Embed Size (px)
Citation preview

SPATIAL APPLICATION EXTENSION ArcGIS 9.x Version Ver 2.0.0, June 2010
User’s Manual
User’s Manual: Spatial Application Extension
TABLE OF CONTENTS 1. INTRODICTION .......................................................................................................... 1 1.1 Introduction ................................................................................................................................1 1.2 What Can You Do With This Extension. ....................................................................................1 1.3 Tips For Learning .......................................................................................................................1 1.4 Getting Help ...............................................................................................................................1 1.5 Installation ..................................................................................................................................1 1.6 First Time Operation ..................................................................................................................1 2. UNDERSANDING MODE OF OPERATION............................................................... 2 2.1 General Operation......................................................................................................................2 2.2 Program Toolbar ........................................................................................................................3 3. UNDERSANDING THE SAExt GEODATABASE STRUCTURE............................... 5 3.1 Parcel Feature Class..................................................................................................................5 3.2 Construction Feature Class .......................................................................................................6 3.3 Segments Feature Class............................................................................................................6 3.4 Parcel History Feature Class .....................................................................................................7 3.5 Vertical Parcel Feature Class ....................................................................................................7 4. CREATING AND IMPORTING GEODATABASE ...................................................... 8 4.1 Creating New Geodatabase.......................................................................................................8 4.2 Opening Geodatabase...............................................................................................................8 4.3 Importing Geodatabase..............................................................................................................8 5. MAINTAINING GEODATABASE ............................................................................... 9 5.1 Validating Parcel Data................................................................................................................9 5.2 Validating Parcel Geometry .......................................................................................................9 5.3 Validating Segment Data .........................................................................................................10 5.4 Validating Construction Data ...................................................................................................10 6. EDITING GEODATABASE....................................................................................... 11 6.1 Parcel Split ...............................................................................................................................11 6.1.1 Select Parcel for Spliting..........................................................................................................11 6.1.2 One Point and Area Method ....................................................................................................12 6.1.3 Move Line and Area Method....................................................................................................13 6.1.4 Offset Method...........................................................................................................................14 6.1.5 Join Point Method ....................................................................................................................15 6.1.6 Merge Polygon Method............................................................................................................16 6.1.7 General Editing Method ...........................................................................................................17 6.1.8 Performing Parcel Split ............................................................................................................18 6.2 Parcel Merge............................................................................................................................19 6.3 Edit Parcel Boundary ...............................................................................................................20 7. QUERY FUNCTIONS ............................................................................................... 21 7.1 Search Geodatabase ...............................................................................................................21 7.2 View Parcel History ..................................................................................................................21 8. MISCELLANEOUS FUNCTIONS ............................................................................. 22 8.1 Using Area Converter...............................................................................................................22 8.2 Printing Geodatabase ..............................................................................................................22 9. GETTING SUPPORT................................................................................................ 23 9.1 Getting Help .............................................................................................................................23 9.2 Contact Information..................................................................................................................23 10. Attribute Coding Standards ................................................................................... 24 10.1 Coded Values For Parcel Type (Parcelty) ...............................................................................24 10.2 Coded Values For Construction Type (Consty) .......................................................................24 10.3 Coded Values For Boundary Type (Boundty)..........................................................................24 10.4 Coded Values For Administrative Boundary Type (Aboundty) ................................................25 10.5 Coded Values For Map Boundary Type (Mboundty) ...............................................................25

User’s Manual: Spatial Application Extension
1
1. INTRODICTION
1.1 Introduction Welcome to the DOLIA’s Spatial Application Extension (SAExt), the parcel data management extension to the ArcGIS. The Spatial Application Extension adds a specialized Tool Bar to the ArcGIS for managing the parcel data. The extension has been specifically written for the Department of Land Information and Archive (DOLIA) and is best suited for the Nepali system of parcel data management at local district survey offices. The SAExt uses Geodatabase as the basic form of data format, which offers greater flexibility in data management. The SAExt operates only on ArcGIS 9.x under the windows XP system.
1.2 What Can You Do With This Extension. • Loading of the Geodatabase.
• Building& Editing of the Segment database of the Parcel for the Boundary Information
• Parcel Search and Reporting Facilities
• Parcel Editing including Parcel Split and Merge. The Split operation with various types of geometry operation is provided within ArcGIS environment.
• Maintenance routines for checking overlapping parcels, overlapping buildings and validating the attribute data
• Printing of the parcel data and map at user specified scale and paper sizes.
1.3 Tips For Learning The learning of the SAExt requires significant experience of using the ArcGIS’s ArcMap as well as general background of the parcel management system in Nepal. This manual is not intended for self learning but for the user’s who have already undergone through the training conducted by the DOLIA. The program comes with a sample data set, which can be used for various exercises. A comprehensive training is provided by DOLIA on application of this software.
1.4 Getting Help This user’s manual is also provided in PDF format. Further help can be obtained from the DOLIA’s Spatial Application Development Group.
1.5 Installation The program comes in a CD-ROM along with the sample files and other accessories. Run the “SETUP.EXE” from the CD-ROM and follow the screen instructions, which create directory ‘LIS_SYSTEM” in the specified root drive. Do not install this system under any other directories. The LIS_SYSTEM directory contains following sub-directories
LIS_Spatial_Applications Contains the Program modules. Do not move or
delete contents of this directory LIS_Spatial_Data Contains the Sample Data Files as well as provide
the location for the other data files LIS_Spatial_Data_Templates Contains the template database files. Do not delete
or move contents of this directory
Other directory may be included in the LIS_SYSTEM directory.
1.6 First Time Operation SAExt is not registered automatically. It can be registered by selecting Tools¬>Customize->Add From File->SAEx.dll (Located in the LIS Spatial Applications ->Programs Directory)

User’s Manual: Spatial Application Extension
2
2. UNDERSANDING MODE OF OPERATION
2.1 General Operation The SAExt is developed especially for the Parcel Management, hence the data capture, processing of the parcel polygons etc are not supported by the system. The editing of the parcels are supported only for parcel merger and split. A topologically clean data is required to be loaded into the SAExt system. Topologically clean data can be generated either using the ESRI’s DAK (Data Automation Kit) or ArcInfo/ArcView or any other third party software. The SAExt is capable to look into the overlapping parcels and construction items but not able to correct them automatically. The operating mode of the SAExt is as follows;
a) Create the New Geodatabase if Geodatabase for the parcels/sheets is not created yet
b) Load topologically clean parcel and construction polygons to the “Parcel” and “Construction” feature class. The minimum required fields while loading shall be; Parcel Feature Class : Parcelno, District, VDC, Wardno, GridS1 & ParcelTy. The ParcelKey is Generated by the SAExt Automatically and the Shape_length, Shape_Area & the ObjectID is maintained by the ArcGIS system.
c) Use Maintenance Toolbar to validate the parcels and construction, which checks for the overlapping entities. If any errors are found at this stage, topology re-building is needed to be carried out through the platform used for topology building. Expert users can correct some of the minor errors using built-in editor of the ArcEditor however this is not recommended for the general use.
d) After Successful loading of the ‘Parcel’ and ‘Construction’ feature classes, next step will be to build the segment feature class which is automatically built by the SAExt system. After building Segment feature class, the entry of the data can be carried out for the various boundary types using the SAExt or other system. The SAExt has built in module to input or edit the boundary types.
e) After entering of all the boundary types, the Geodatabase is READY for the further use. Legend styling etc can be applied and the document can be saved for future uses.

User’s Manual: Spatial Application Extension
3
2.2 Program Toolbar The SAExt is provided with a toolbar to access the functionality of the software. Each of the items of the toolbar also has further tools, which when activated provide access to the individual process screens.
Admin
This provides the access to the software via user login. Users can be created by the super-user and provide appropriate access rights.
File The file menu provides options for creating new geodatabase, open existing geodatabase and importing geodatabase.
Search The Search Menu Included the Parcel Search tool which can be used to locate the parcel and provide the report on it.
Edit The Edit menu provides access to the tools for parcel split, parcel merge and editing of the parcel boundaries.

User’s Manual: Spatial Application Extension
4
View The View Menu includes the tool for retrieving the parcel history. The details of the parcel history are stored in the “Parcel_History” feature class which can be used to prepare details in tabular form using the ArcGIS query functions. The Parcel history tool only display the links of the splitted parcels in chronological order.
Maintenance The Maintenance Menu includes tools Parcel Data Validation, Parcel Geometry Validation, Segment Validation and Validation of the Constuction.
Tools The Tools menu contain a Area Converter to various units of measurement.
Print The Print provides a tool to print the parcel map in user specified scale and paper sizes.
Help The Menu provides access to “About” and “Help”. Help is available in the PDF format in the installed directory

User’s Manual: Spatial Application Extension
5
3. UNDERSANDING THE SAEXT GEODATABASE STRUCTURE
The SAExt Geodatabase schema has been designed to take care of all the needs of the parcel management. Further feature class will be added to improve the system in the future releases as feedbacks from the implementations are received.
3.1 Parcel Feature Class
Field Data Type Holds Remarks OBJECTID Object ID System SHAPE Geometry System Shape_Length Double Perimeter of Parcel System Shape_Area Double Area of Parcel System PARCELKEY Text Unique Parcel Key PARCELNO Short Integer Parcel No DISTRICT Short Integer District Code VDC Short Integer VDC Code WARDNO Text Ward No + Character GRIDS1 Text Grid Sheet Number Parcelty Short Integer Coded Domain for Parcel Type Parcel Note Text Remarks for the new parcels
The PARCELKEY Contains the Unique parcel key of 23 Character which provides the unique identification for parcel such that no IDs are duplicated for the entire parcel data of Nepal. The DOLIA has devised a system for generating Unique Parcel Key based on the GirdSheet No, Parcel No, Wardno, VDC & District;
Unique Parcel Key = GridSheet No( Max 9 Char)+Parcel No (Max 6 Char)+District ( Max 3 Char)+VDC (Max 2 Char)+Ward No( Max 3 char)
e.g. Parcel Key for the Following parcel will be
102134025000196002601104
Grid sheet - 102-1340-25
Parcel No - 1960
District - 26
VDC - 11
Ward – 4
“0” are placed to make up the required character width. In case of the Gridsheet the “0” is added at the end and for rest it is added in front. The ward number contains two numeric and one character such that ward can be represented by “04a” representing “a” part of the ward “04” In case of the Free sheets (Island Maps) the Grid Sheet Number will be 0. For such geodatabase, the wardno plays a important role and the ward no can contain one character at the end of the ward numbers itself. e.g for ward no 1 ka it can be denoted by 01a. It is proposed to use roman characters in place of the Devanagari Characters such that “Ka” is represented by “a” and so on. Hence the free sheet parcelkey will look like 000000000000196002601104a
User’s Manual: Spatial Application Extension
6
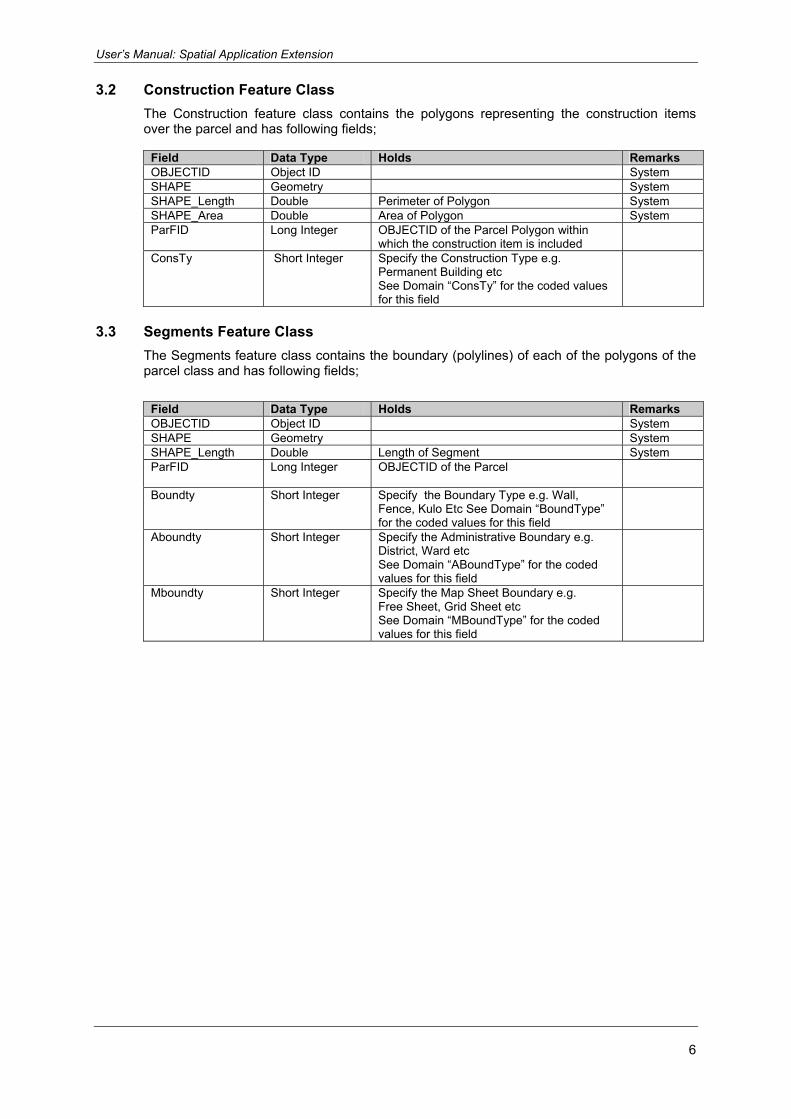
3.2 Construction Feature Class The Construction feature class contains the polygons representing the construction items over the parcel and has following fields;
Field Data Type Holds Remarks OBJECTID Object ID System SHAPE Geometry System SHAPE_Length Double Perimeter of Polygon System SHAPE_Area Double Area of Polygon System ParFID Long Integer OBJECTID of the Parcel Polygon within
which the construction item is included
ConsTy Short Integer Specify the Construction Type e.g. Permanent Building etc See Domain “ConsTy” for the coded values for this field
3.3 Segments Feature Class The Segments feature class contains the boundary (polylines) of each of the polygons of the parcel class and has following fields;
Field Data Type Holds Remarks OBJECTID Object ID System SHAPE Geometry System SHAPE_Length Double Length of Segment System ParFID Long Integer OBJECTID of the Parcel
Boundty Short Integer Specify the Boundary Type e.g. Wall, Fence, Kulo Etc See Domain “BoundType” for the coded values for this field
Aboundty Short Integer Specify the Administrative Boundary e.g. District, Ward etc See Domain “ABoundType” for the coded values for this field
Mboundty Short Integer Specify the Map Sheet Boundary e.g. Free Sheet, Grid Sheet etc See Domain “MBoundType” for the coded values for this field

User’s Manual: Spatial Application Extension
7
3.4 Parcel History Feature Class
The Parcel History feature class contains the parcel polygons which are split along with all the data related to the split parcels as well as the split date and link Ids for tracking the parcel history. The feature class has following fields;
Field Data Type Holds Remarks OBJECTID Object ID System SHAPE Geometry System Shape_Length Double Perimeter of Parcel System Shape_Area Double Area of Parcel System PARCELKEY Text Unique Parcel Key PARCELNO Short Integer Parcel No DISTRICT Short Integer District Code VDC Short Integer VDC Code WARDNO Text Ward No + Character GRIDS1 Text Grid Sheet Number BDate Date Parcel Split System Date LINKFID Long Integer Link to the parent parcel SplitDateNep Text Date in Nepali LINKPARCELNO Short Integer Link to Splitted Parcel Number GivenBY Text Original Owner TakenBy Text New Owner FileMapNo Text File Map Number MapSDate Text Map Serial and Date RegSDate Text Registration Serial and Date SplitBy Text Split Personnel (Login ID) CheckedBy Text Person Checking Split Operation Remarks Text Remarks for the new parcels
3.5 Vertical Parcel Feature Class The Vertical Parcel feature class contains the vertical parcels to the parcel concerned which is provided with height and Owner ID. Further fields will be added in the later version as the system for registering the vertical parcels are made systematic by the Department of Survey. The feature class has following fields;
Field Data Type Holds Remarks OBJECTID Object ID System SHAPE Geometry System Shape_Length Double Perimeter of Parcel System Shape_Area Double Area of Parcel System
ParFID Long Integer OBJECTID of the Parcel
Height Double Height of the Vertical Parcel
OwnerID Short Integer Short Integer Id of owner e.g 1,2 etc for the given parcel

User’s Manual: Spatial Application Extension
8
4. CREATING AND IMPORTING GEODATABASE
4.1 Creating New Geodatabase The SAExt can create a new Geodatabase along with required datasets. The new Geodatabase is created based on the template Geodatabase specially designed for the Spatial application which is located in the LIS_Spatial_Data_Templates sub directory.
1) Click “File” Menu in the SAExt Tool Bar and Select “Create New Geodatabase” menu
2) Type in the Name of the New Geodatabase to be created and Press Proceed.
3) A new Geodatabase is created by the name supplied in the above step in the sub-directory LIS_Spatial_Data. While naming the Geodatabase a systematic approach is required such that the name of the Geodatabase alone can be used to indicate the area it is representing. e.g Free sheets (Island Maps) can be named as 23-11-09a-01 representing 23 as district, 11 as VDC/Municipality, 09a and ward number 9 part “a” (i.e “ka”) and 01 as the sheet number (in case it contain many sheet numbers). Similarly the Geodatabase of ward-wise database may simply be 23-11-09 and Grid-sheet wise Geodatabase may have name representing the grid sheet number e.g. 102-1340-25. Details of the naming convention and other related standards are provided in the Annex to this document.
4) When a new Geodatabase is created following datasets and feature classes are created;
• Dataset containing feature classes of Parcel, Construction & Segments
• Feature Classes for Parcel History and Vertical Parcels.
5) After Creation of the New Geodatabase, loading to the Geodatabase can be performed
4.2 Opening Geodatabase The SAExt can open the Geodatabase with all of its feature classes and apply predefined symbology. The SAExt provides automatic application of the predefined symbology for each of the feature class.
4.3 Importing Geodatabase Geodatabase created by the extension can be imported to merge the geodatabase or to import to new file for further works. The old geodatabases (ArcGIS 8.x) version need to be imported to new geodatabase to work properly in this present release of the software.
1) Click “File” Menu in the SAExt Tool Bar and Select “Import Geodatabase” menu.
2) Select required geodatabase and press “Import”

User’s Manual: Spatial Application Extension
9
5. MAINTAINING GEODATABASE
The SAExt has built in tools for validating the Geodatabase. At present the program is able to validate the Unique Parcel Key, Parcel No, Parcel Geometry, Construction Items and Segment Data. All the Validation Routines are accessed through the “Maintenance” Menu in the SAExt Tool Bar.
5.1 Validating Parcel Data The Validating Parcel Data provides means to build unique Parcel Key and the verify the duplicated parcel numbers per wards.
1) Click “Maintenance” Menu in the SAExt Tool Bar and Select “Validate Parcel Data” menu.
2) Select the options for the parcel data verification. The “Unique Parcel Key” option actually rebuilds the parcelkey rather than verifying and reporting the error. The option “Parcel No” verifies the duplicating parcel no in a given ward in given Geodatabase. A screen is presented with the conflicting Parcel No and user can go through each of the parcel and correct the parcel no.
3) The general mode of the operation is to select the “Parcel No” option at the beginning and correct all the parcel nos. Then run the “Validate Parcel Data” again and this time use only the “Unique Parcel Key”, which will re-build the unique Parcelkey for all the parcels.
5.2 Validating Parcel Geometry The Validating Parcel Geometry provides means to locate the overlapping and hanging parcels. At present only option for verifying the Overlapping Parcels is available.
1) Click “Maintenance” Menu in the SAExt Tool Bar and Select “Validate Parcel Geometry” menu.
2) Select the Options for Validating the Parcel Geometry “Overlapping Parcels” & “Hanging Parcels” At present only the “Overlapping Parcels” is available for validation. Press “Proceed”
3) The SAExt takes few minutes depending on the size of the Geodatabase to validate the requested operation.
4) If no errors are found i.e there is no overlapping parcels then the Program report so and exits.
5) If overlapping parcels are observed, then program reports it and provides the list of the overlapping parcels
6) Select the Overlapping Parcel ID numbers and Press “View”. This will zoom to the selected parcel.
7) The SAExt can only report the Overlapping parcel and do not contain tools for correcting them. Hence if the errors are detected after loading the Geodatabase, immediate measure to correct them should be taken via the software used for building the topology before proceeding to any other works in the SAExt. Expert users can correct some of the minor errors using built-in editor of the ArcEditor however this is not recommended for the general use

User’s Manual: Spatial Application Extension
10
8) If the overlapping parcels are numerous the SAExt stops checking if the number exceeds 100. In event of such massive errors, the re¬building of the topology is only option available to correct the errors.
5.3 Validating Segment Data The Validating Segment Data provides means to maintain the Segments Feature Class up to date with the Parcel Feature Class. This tool will be used seldom unless major manual editing are done or new data are loaded by the user to correct the topology of the parcel feature class or to append the Data. Otherwise the segments feature class is automatically maintained by the SAExt during the split, merge etc operation. Validating segment data can be run once in a while to make sure that Segment Feature Class is up to date. The Tool does not report any errors but if any are found, it corrects it automatically.
5.4 Validating Construction Data The Validating Construction Data provides means to build the construction item relationship to the parcel and also check for the construction items e.g. buildings etc that do not contain within the parcel. The SAExt can only report the construction items not contained (overlapped) within parcels but can not correct them.
1) Click “Maintenance” Menu in the SAExt Tool Bar and Select “Validate Construction Data” menu.
2) Press “Proceed”
3) The SAExt takes few minutes depending on the size of the Geodatabase to validate the requested operation.
4) If no errors are found i.e there are no overlapping construction items then the Program report so and also builds construction feature class database and exits.
5) If overlapping construction items are observed, then program reports it and provides the list of the overlapping construction items. However the construction feature class is built for the correct construction items and for those with error a NULL “ParFID” is provided.
6) Select the Overlapping Parcel ID numbers and Press “View”. This will zoom to the selected parcel.
7) The SAExt can only report the Overlapping Construction Items but do not contain tools for correcting them. Hence if the errors are detected after loading the Geodatabase, immediate measure to correct them should be taken via the software used for building the topology before proceeding to any other works in the SAExt. Expert users can correct some of the minor errors using built-in editor of the ArcEditor however this is not recommended for the general use
8) If the overlapping construction items are numerous the SAExt stops checking if the number exceeds 100. In event of such massive errors, the re-building of the topology is only option available to correct the errors.

User’s Manual: Spatial Application Extension
11
6. EDITING GEODATABASE
The SAExt is provided with editing tools related to Parcel Split, Merge, Segment data and some tools for adding construction items, buildings and tools for modifying and adding parcels. The SAExt do not contain tools for topology building, cleaning etc, which has to be performed before loading data to the SAExt.
6.1 Parcel Split Once the Paper Map are converted to the digital and used in GIS environment, the further editing and maintenance works are to be carried out entirely on the GIS system. The creation of the digital map is a snap shot event such that a particular state of the map is converted to the GIS.
The change of the shape, boundary lines of the rivers, kulo etc do not happen unless a new system of the survey is carried out. Such case can be considered as isolated and does not come under the parcel maintenance works. The major update of the map by new survey works will require to build a new datasets with new attributes, which it shall will be a major project component as the survey works itself.
Splitting of parcel to two or many individual parcel is the most common tasks. Generally parcels are irregular in shape and splitting it to the required areas (which is the most common criteria) requires many iterative procedures. The procedure may include finding splitting polyline from offset from corner, angle and distance, co-ordinates etc. Various methods are provided to operate within the ArcGIS environment. The methods of spliting as well as the tools for performing the splits and finalizing is presented in the toolbar.
6.1.1 Select Parcel for Spliting
Initial step is to select parcel for split operation. Following are the procedure for this operation;
1) Select “Select Parcel” from the parcel split tool bar.
2) Always use “Select In Map” Button to select the parcel. This will avoid selection of non parcel layers.
3) If it is a new operation then select “New Operation”
4) if it is continuation of the previous operation for which parcel split is not finalized yet, select “Edit Existing Operation”
5) For New operation provide the file name (Operation Name) say “Split of 528 Ward 4” etc to record the correct operation. This will be easier to find the operation for editing later on.
6) For “Edit Existing Operation” select the operation file. If the parcel split has taken place the system will notify “Edit session has expired” which indicates the file is no longer usable as the split operation has already been completed. User can delete such files from \LIS_SYSTEM\LIS_Scratch_Data
7) New group layer “Parcel Split Operations” will be temporarily added for the split works.

User’s Manual: Spatial Application Extension
12
6.1.2 One Point and Area Method
The tool provides a means to locate point on any segment and divide the parcel with a given area criteria.
1) Select “Select Polygon” in which operation will be carried out. There may be many polygons resulted from the previous operations. Select the appropriate one.
2) From “Point Location” , select “Select in Map” for selecting the segment of polygon on which point is to be located.
3) After selection of segment, use “Load Selected” to bring the segment in calculation
4) Provide the Length (distance) for location of point and press “Locate Point”
5) From “Area Method” chose either “Clockwise” or “Counter clockwise “ direction and provide area
6) Press “Proceed” to Check the sub-division. If the Area is located in wrong side or area is not correct Press “Undo” after “proceed”.
7) If it is OK then press “Finalize”
Selected Segment Selected Polygon
Point Location & Area
Finalization
User’s Manual: Spatial Application Extension
13
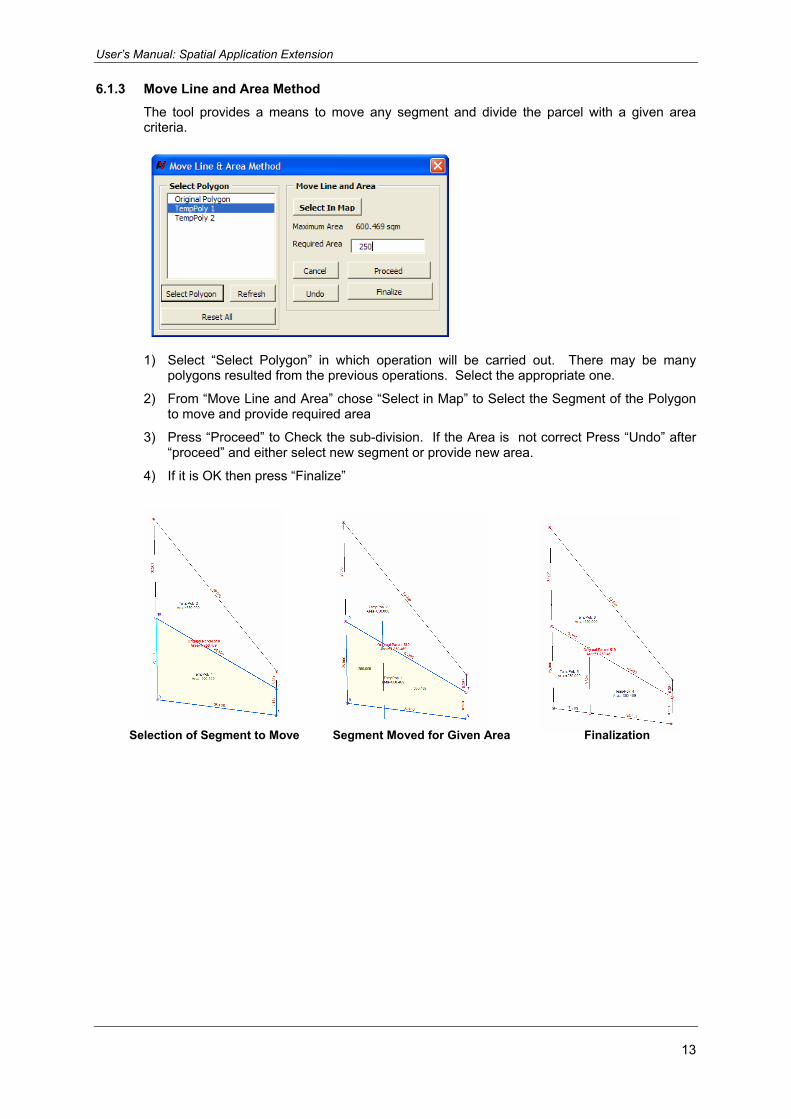
6.1.3 Move Line and Area Method
The tool provides a means to move any segment and divide the parcel with a given area criteria.
1) Select “Select Polygon” in which operation will be carried out. There may be many polygons resulted from the previous operations. Select the appropriate one.
2) From “Move Line and Area” chose “Select in Map” to Select the Segment of the Polygon to move and provide required area
3) Press “Proceed” to Check the sub-division. If the Area is not correct Press “Undo” after “proceed” and either select new segment or provide new area.
4) If it is OK then press “Finalize”
Selection of Segment to Move Segment Moved for Given Area Finalization

User’s Manual: Spatial Application Extension
14
6.1.4 Offset Method
This method does offset of any segment of a parcel and sub-divide the area.
1) Select “Select Polygon” in which operation will be carried out. There may be many polygons resulted from the previous operations. Select the appropriate one.
2) From “Offset Method” chose “Select in Map” to Select the Segment of the Polygon to offset and provide offset distance.
3) Press “Proceed” to Check the sub-division. If the Area is not correct Press “Undo” after “proceed” and either select new segment or provide new area.
4) If it is OK then press “Finalize”
Selection of Segment to offset Offset of Segment togiven Distance
Finalization
Selection of Segment to offset

User’s Manual: Spatial Application Extension
15
6.1.5 Join Point Method
This method provides sub-division by locating points and joining them. Existing points can also be joined to make sub-divisions.
1) Select “Select Polygon” in which operation will be carried out. There may be many
polygons resulted from the previous operations. Select the appropriate one.
2) From “Point Location”, select “Select in Map” for selecting the segment of polygon on which point is to be located.
3) After selection of segment, use “Load Selected” to bring the segment in calculation
4) Provide the Length (distance) for location of point and press “Locate Point”
5) From “Join Points” chose “From Point” & “To Point” .
6) Press “Proceed” to Check the sub-division. If the sub-division is not correct, press “Undo” after “proceed”.
7) If it is OK then press “Finalize”
Selection of point 21 & 22 Finalization
User’s Manual: Spatial Application Extension
16
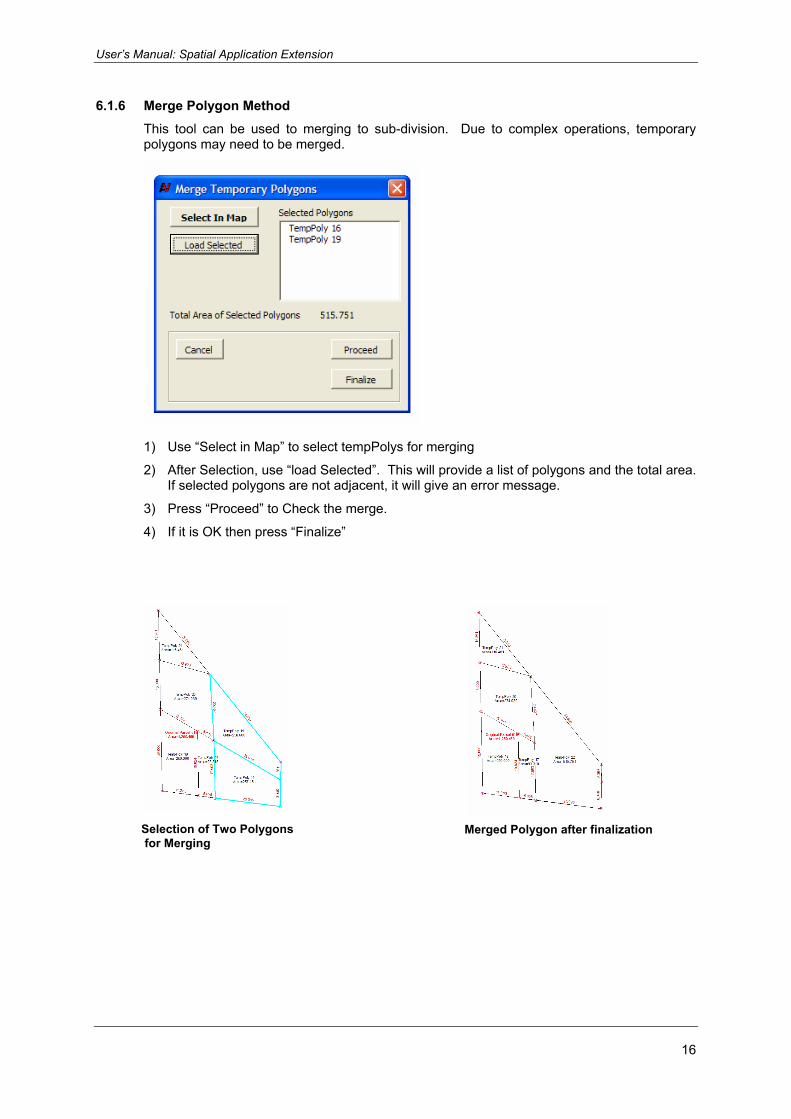
6.1.6 Merge Polygon Method
This tool can be used to merging to sub-division. Due to complex operations, temporary polygons may need to be merged.
1) Use “Select in Map” to select tempPolys for merging
2) After Selection, use “load Selected”. This will provide a list of polygons and the total area. If selected polygons are not adjacent, it will give an error message.
3) Press “Proceed” to Check the merge.
4) If it is OK then press “Finalize”
Selection of Two Polygons for Merging
Merged Polygon after finalization
User’s Manual: Spatial Application Extension
17
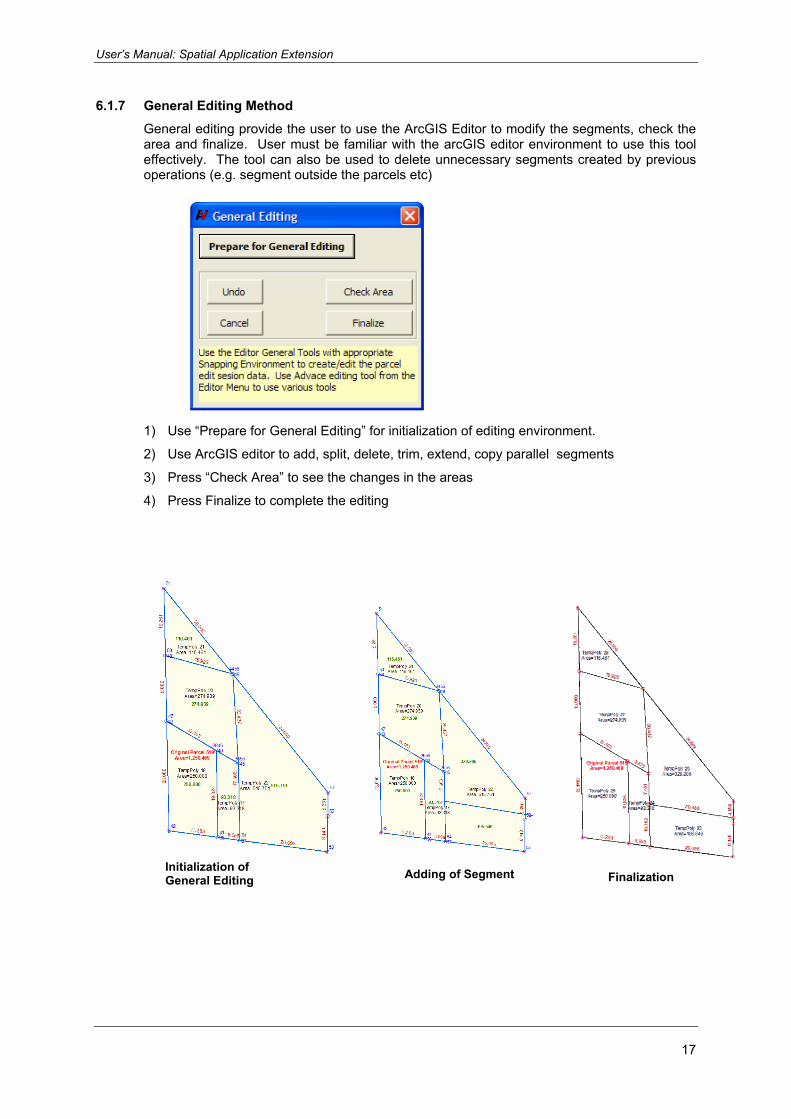
6.1.7 General Editing Method
General editing provide the user to use the ArcGIS Editor to modify the segments, check the area and finalize. User must be familiar with the arcGIS editor environment to use this tool effectively. The tool can also be used to delete unnecessary segments created by previous operations (e.g. segment outside the parcels etc)
1) Use “Prepare for General Editing” for initialization of editing environment.
2) Use ArcGIS editor to add, split, delete, trim, extend, copy parallel segments
3) Press “Check Area” to see the changes in the areas
4) Press Finalize to complete the editing
Initialization of General Editing Adding of Segment Finalization

User’s Manual: Spatial Application Extension
18
6.1.8 Performing Parcel Split
After performing sub-divisions, these are updated into the parcel database. The oepration required various information as per the parcel split rule of the department of survey. The form provides all the necessary inputs.
After providing all the necesssary inputs and new parcel numbers, press “perform Split”. The process is automatic and will include the new sub-division to the parcel database, update the segments (including neighbours), update the parcel history. The data provided in this form is included in the parcel histroy to trace back the split operations.
Completion of Performing Split

User’s Manual: Spatial Application Extension
19
6.2 Parcel Merge
The merging of the parcel takes two or more parcel and makes a single parcel. Conditions are checked for the merger and parcel with following conditions are not merged i) Parcel not neighbours to each other ii) Parcels falling in different wards or VDC iii) Parcels of different types.
1) Click “Edit” Menu in the SAExt Tool Bar and Select “Merge Parcels” menu.
2) Click “Select Parcels” Button to select two or more parcels. Use “SHIFT+CLICK” to add the parcels to the previous selection
3) Click “Perform Merge” button, if the conditions of the parcel merger as described above is met then the program will merge the parcel and ask for conformation.
4) If the conditions are not met, appropriate message will be displayed and the program will exit.
5) After successful merger, the parcel no etc will be updated
6) If there are construction items in the merged parcel these will also be updated automatically.

User’s Manual: Spatial Application Extension
20
6.3 Edit Parcel Boundary Editing of the Parcel Boundary Type can be carried out using the SAExt.
1) Click “Edit” Menu in the SAExt Tool Bar and Select “Parcel Boundary” menu.
2) Click “Select” Button in the Edit Segment Screen and select one parcel. Selection of more than one parcel will result in error.
3) Click “Edit” Button in the Edit Segment Screen the segments and its boundary types will be loaded to the screen.
4) Click at any segment number, which will highlight the selected segment in “Red” and the existing values will be shown in the “Boundary Type” Textbox
5) Input or Edit the Boundary Type value. The coded value of the boundary types are given in the last chapter of this document. Use appropriate coded values. Editing of any segment can be done by clicking the segment numbers which automatically highlights the selected segment in display.
6) After edit or input of all the boundary types click “SAVE” which will result in confirmation dialog and selecting ‘Yes” will permanently record the edits.

User’s Manual: Spatial Application Extension
21
7. QUERY FUNCTIONS
7.1 Search Geodatabase The SAExt has built in tool for searching the parcels and reporting them.. At present only the parcel search with options of highlighting the neighbors etc are provided. Additional search capability will be added in the future releases. Visualize Parcels takes the Unique Parcel ID as Input or Build Unique Parcel ID from supplied information and searches the coverage or Geodatabase and zoom to the selected parcels. It also provides a button for generating the report of the selected parcel. The report button is only enabled if the search is successful i.e if the parcel exists in the database.
1) Click “Search” Menu in the Toolbar and Select “Parcel Search” menu.
2) Provide the search information. Minimum required information are VDC, Ward No and Parcel No. To use the Minimum Option Tic the “Use Only VDC, Ward & Parcel No”. To highlight the neighbours as well Tic “ Highlight the Neighbours”
3) Press Search Button to proceed. If the search is successful the SAExt will zoom to the searched parcel and select it. If “Highlight Neighbours” are requested the searched parcel and Neighbours are highlighted with two different colors. If the search is not successful, an error message will be displayed.
4) The ‘Report” button will be enabled after the successful search operation. The “Report” button provides the access to reporting of the parcel including its area, parcel geometry, neighbours etc. The Content of the report can be copied to the clipboard and placed in any Word Processing Software and Printed.
7.2 View Parcel History Parcel history can be viewed for all the parcels which have been created from split operation in the Geodatabase. A parcel history feature class is automatically maintained by the SAExt system when ever the split operation is carried out. The parcel history feature class can be used for undo purpose in the later release of the SAExt.
1) Click “View” Menu in the SAExt Tool Bar and Select “Parcel History” menu.
2) Select Parcel using selection tool of the ArcGIS for loading parcel history. Select only one parcel, selection of multiple parcel will result in error.
3) Click “Load Parcel History” Button. If there is history record of that parcel the list will appear.
4) Select the history items and click “View” button to view the originating parcel.

User’s Manual: Spatial Application Extension
22
8. MISCELLANEOUS FUNCTIONS
8.1 Using Area Converter The “Area Converter” tools can be used to convert various units of Area e.g. (sqm to Ropani and so on). The tool is completely interactive and self explanatory.
1) Click “Tools” Menu in the SAExt Tool Bar and Select “Area Converter” menu.
2) A separate “Area Converter” screen will appear, which contains all the options for input and output.
3) Select unit of input at the “Convert From” Tab and input the required Area to be converted. Select the required unit in “Convert To” Tab, the area will be automatically converted.
8.2 Printing Geodatabase The “Print” Menu in the SAExt toolbar provides means for printing of the Geodatabase. At present only automatic composition of the parcel printing is available. It has been assumed that the user of the SAExt is familiar with the ArcMAP system, hence the printing of grid-sheet or all of the free-sheets can be done using the ArcMAP layout methods hence such automated tools are not provided in the present release of the SAExt. The “Parcel Print” tool is intended for printing of each individual parcels with details of related information from the parcel feature class. The tool can automatically compose the print for A4/A3 size paper which is best suited for printing the parcel details.
1) Click “Print” Menu in the SAExt Tool Bar and Select “Parcel Print” menu.
2) Enter the scale of printing e.g 500, 2500 etc and paper Size (A4/A3). Click the “Compose” Button, which will switch to the layout mode and compose

User’s Manual: Spatial Application Extension
23
9. GETTING SUPPORT
9.1 Getting Help The SAExt has been developed for the Department of the Land Information and Archive (DOLIA) . The “Help” menu in the SAExt toolbar contains the “About” menu, which displays the “About” screen.

User’s Manual: Spatial Application Extension
24
10. ATTRIBUTE CODING STANDARDS
The SAExt Geodatabase includes the “Domains” for Parcel Types, Construction Types, Boundary Types and for the Administrative Boundary. The Domains includes the coded values for each classification of the fields. When a new Geodatabase is created, the domains are also automatically created such that the display of the coded value is possible during symbology, enquiry as well as printing of the tables.
The user can further expand the domains if new coded value has to be included. In such circumstances, the “Blank.mdb” located in LIS_Spatial_Data_Template subdirectory also need to be upgraded along with the Geodatabase concerned. This way the template Geodatabase will be updated for subsequent creation of new Geodatabase.
10.1 Coded Values For Parcel Type (Parcelty)
Code Description Remarks 0 Private Default Value 20 River 30 Forest 60 Government 70 Institutional
10.2 Coded Values For Construction Type (Consty)
Code Description Remarks 0 Permanent Building Default Value 10 Temporary Building 20 Damaged Building 30 Wall 40 Pond 50 Gate/Entrance 60 Temple
10.3 Coded Values For Boundary Type (Boundty)
Code Description Remarks 0 None Default 10 Building Foot Print 20 Wall 25 Shared Wall 30 Fence 35 Shared Fence 40 Gate 50 Line Kulo 52 Line Kulo & Wall 54 Line Kulo & Fence 58 Line Kulo & Gate

User’s Manual: Spatial Application Extension
25
10.4 Coded Values For Administrative Boundary Type (Aboundty)
Code Description Remarks 0 None Default 10 Ward 20 VDC/Municipality 30 District 40 Zone 50 National
10.5 Coded Values For Map Boundary Type (Mboundty)
Code Description Remarks 0 None Default 10 Grid Sheet 20 Free Sheet