Embed Size (px)
Citation preview

User’s manual
www.euphones.vtech.comCS1300-B

�
1. Important Safety InStrUCtIonSWhen using your telephone equipment, basic safety precautions should always be followed to reduce the risk of fire, electric shock and injury, including the following:
Read and understand all the instructions.Follow all warnings and instructions marked on the product.Unplug this product from the wall outlet before cleaning. Do not use liquid cleaners or aerosol cleaners. Use a damp cloth for cleaning.Do not use this product near water (for example, near a bath tub, kitchen sink, swimming pool).Do not expose the telephone to direct sunlight or extreme cold environment. Do not put the telephone close to heating sources such as radiators, cookers, etc.Do not overload wall outlets and extension cords as this can result in the risk of fire or electric shock.Unplug this product from the wall outlet and refer servicing to VTech/distributor under the following conditions:
When the power supply cord or plug is damaged or frayed.If the product does not operate normally by following the operating instructions.If the product has been dropped and the cabinet has been damaged.If the product exhibits a distinct change in performance.
Avoid using a telephone (other than a cordless type) during an electrical storm. There may be a remote risk of electric shock from lightning.Do not use the telephone to report a gas leak in the vicinity of the leak.Use only the supplied NiMH (Nickel Metal Hydride) batteries! The operation periods for the handsets are only applicable with the default battery capacities.The use of other battery types or non-rechargeable batteries/primary cells can be dangerous. These may cause interference and/or unit damages. The manufacturer will not be held liable for damage arising from such non-compliance.Do not use third party charging bays. The batteries may be damaged.Please note the correct polarity while inserting the batteries.Battery should not be exposed to excessive heat such as bright sunshine or fire and immersed in water.
�.�.3.
4.
5.
6.
7.
••
••
8.
9.�0.
��.
��.�3.�4.

�
DISpoSal warnIngWhen this crossed-out wheeled bin symbol is attached to a product, it means the product is covered by the European Directive �00�/96/EC.All electrical and electronic products/battery should be disposed of separately from the municipal waste stream via designated collection facilities appointed by the government or the local authorities.The correct disposal of your old appliance/battery will help prevent potential negative consequences for the environment and human health.
For more detailed information about disposal of your old appliance/battery, please contact your city office, waste disposal service or the shop where you purchased the product.
If you have questions about this product, or having difficulty with setup or operation, contact our Customer Service Centre.
power aDaptor InformatIon
power adaptor
VTech (Qingyuan) Plastic & Electronics Co. Ltd. - Model: VT04EEU06045, Input: �00-�40V AC 50/60Hz �50mA, Output: 6VDC 450mA (EU plug).Shenzhen Ruijing Industrial Co. Ltd. - Model: RJ-S060450E002, Input: �00-�40V AC 50/60Hz �50mA, Output: 6VDC 450mA (EU plug).
Battery AAAx�, Ni-MH, 300mAh.
For pluggable equipment, the socket outlet shall be installed near the equipment and shall be easily accessible.
�.
�.
3.

3
2.1 package ContentsThe package contains the following items:
� Handset� Base station� Power adaptor for base station� Telephone line cord� AAA NiMH rechargeable batteries� User’s manual
2.2 Connect the Base
••••••
2. Set Up tHe telepHone
NOTE
Use only the supplied power adapter.•
To telephone wall jack
�
To wall power outlet
�

4
2.3 Install and Charge the Handset Battery
NOTESUse only the supplied AAAx�, Ni-MH, 300mAh batteries.If you do not use the handset for a long time, disconnect and remove the battery to prevent possible leakage.
••
3
�
�

5
3.1 overview of the Handset
earpIeCe menU / oK
mUte / Delete / InterCom
Down / Call lISt / VolUme Down
Up / reDIal lISt / VolUme Up talK on / reCall(flaSH) talK off / CanCel / BaCK
alpHanUmerIC KeypaD, (Star), (HaSH) SpeaKerpHone
pHoneBooK reCall
mICropHone
1.2.3.
4.
5.6.
7.8.
9.10.11.
3. get to Know yoUr pHone
��
6
3
�
�
4
5
7
8
9
�0

6
3.2 overview of the Base Station
pagePress to page all registered handset(s). Handset(s) will ring for approximately 60 seconds.Press and hold for 5 seconds to enter the registration mode.
2. CHargIng CraDleFor charging the handset.
1.
�
�

7
3.3 Handset lCD display icons and symbolsThe LCD display gives you information on the current status of the telephone.
Display icons Icons can be Steadily On (visible), Flashing or Off (not visible)
Scroll up / down the menu items / Phonebook list / Redial list / Call List.
Steadily on when the handset is with reception range. Flashes when out of range or not registered to the base.
Steadily on when an intercom is in progress.Flashes when there is an incoming intercom call.
Steadily on when a call is in progress.
Steadily on when the ringer is switched off.
Steadily on when an alarm is set. Flashes when the alarm time set before reaches.
Steadily on when the keypad is locked.
Steadily on when a message is received at the telephone service provider.
Steadily on when the battery is fully charged.Whole icon flashes when the battery is charging.
Flashes when low battery power level is detected and the handset needs charging.
Steadily on when more characters are existed before the text currently displayed.

8
Steadily on when more characters are existed after the text currently displayed.
Press to select more menu options if applicable
Press to confirm the current selection if applicable.
Press to initial an intercom call when idle.
Press to go back to previous menu level or cancel the current action if applicable.
Press to clear a character or stop the alarm if applicable, press to mute / unmute during a call.
Steadily on when when you have received missed calls.
Steadily on when the speakerphone is turned on.

9
3.4 menu navigationIn idle mode:
Press .
p q to scroll to a menu option.Press to select. -or- Press to return to previous screen. -or- press and hold to return to idle mode.
�.�.3.
HS SettIngS regIStratIon DefaUltALARMRING SETUPTONE SETUPLANGUAGERENAME HSHS DISPLAYAUTO ANSWERDATE & TIME
PIN? PIN?
Call lISt pHoneBooK Call BloCKer BS SettIngSReview Call ListUnder a selected Call List entry:ADD TO PBDELETEDELETE ALLDETAILS
Under a selected Phonebook entry:ADDVIEWEDITDELETEDELETE ALLPB STATUS
ONOFF
DELETE HSDIAL MODEFLASH TIMECHANGE PIN

�0
4. USe yoUr pHone4.1 Switch on/off the HandsetPress and hold .
4.2 make a CallEnter phone number. Press / .
4.3 answer an Incoming CallPress / .-or-If aUto anSwer is on:Lift the handset.
4.4 adjust listening Volume During a Callto adjust listening volume during a call:Press p q .
4.5 mute/unmute a Call (microphone off/on)to mute or end mute the microphone during a call:Press .
4.6 end a CallPress .-or-Place the handset on the base.
4.7 turn the Handset ringer on/offPress and hold .
4.8 turn the Keypad lock on/offPress and hold .

��
4.9 redial
4.9.1 redial a number from the redial listPress .
p q → (a desired entry).Press / .
NOTEIf there is no number in the list, the display shows “empty”.
4.9.2 Store a redial number into the phonebookPress .
p q → (a desired entry).Press → p q → aDD to pB.Press → Enter name.Press → Enter number.Press → p q → meloDy 1 - meloDy 10.Press .
4.9.3 Delete a redial numberPress .
p q → (a desired entry).Press → p q → Delete.Press .
4.9.4 Delete all redial numbersPress .Press → p q → Delete all.Press twice.
4.10 find the Handset (pagIng)Press on the base.Press / / on handset, or press on the base to stop paging.
�.�.3.
�.�.3.4.5.6.7.
�.�.3.4.
�.�.3.
�.�.

��
5. pHoneBooK5.1 Store a number entry in the phonebook
Press . -or- Press → p q → pHoneBooK. Press .
NOTEIf there is no entry in the list, the display shows “empty”.�. Press → p q → aDD.3. Press → Enter name.4. Press → Enter number.5. Press → p q → meloDy 1 - meloDy 10.6. Press .
5.2 Dial an entryPress . -or- Press → p q → pHoneBooK. Press p q → (a desired entry).Press / to dial out.
5.3 edit a phonebook entryPress . -or- Press → p q → pHoneBooK. Press p q → (a desired entry).Press → p q → eDIt.Press → Enter name.Press → Enter number.Press → p q → meloDy 1 - meloDy 10.Press .
�.
�.
�.3.
�.
�.3.4.5.6.7.
�3
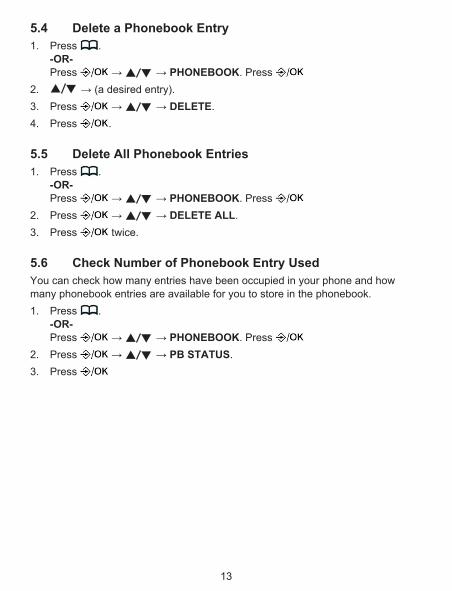
5.4 Delete a phonebook entryPress . -or- Press → p q → pHoneBooK. Press p q → (a desired entry).Press → p q → Delete.Press .
5.5 Delete all phonebook entriesPress . -or- Press → p q → pHoneBooK. Press Press → p q → Delete all.Press twice.
5.6 Check number of phonebook entry UsedYou can check how many entries have been occupied in your phone and how many phonebook entries are available for you to store in the phonebook.
Press . -or- Press → p q → pHoneBooK. Press Press → p q → pB StatUS.Press
�.
�.3.4.
�.
�.3.
�.
�.3.

�4
6.1 Date and time SettingsYou will need to set the correct time and date so that you know when you received answering machine (applicable to model with answering machine) or call list entries.
6.1.1 Set the Date formatPress → p q → HS SettIngS.Press → p q → Date & tIme.Press → p q → Date format.Press → p q → DD-mm-yy / mm-DD-yy.Press .
6.1.2 Set the time formatPress → p q → HS SettIngS.Press → p q → Date & tIme.Press → p q → tIme format.Press → p q → 12 Hr / 24 Hr.Press .
6.1.3 Set the timePress → p q → HS SettIngS.Press → p q → Date & tIme.Press → p q → Set tIme.Press → Enter time.Press → p q → am or pm .
6.1.4 Set the DatePress → p q → HS SettIngS.Press → p q → Date & tIme.Press → p q → Set Date.Press → Enter Date.Press .
�.�.3.4.5.
�.�.3.4.5.
�.�.3.4.5.
�.�.3.4.5.
6. pHone SettIngSYour phone comes with a selection of settings that you can change to personalize your phone the way you like it to work.
�5
6.2 Handset Settings6.2.1 alarm
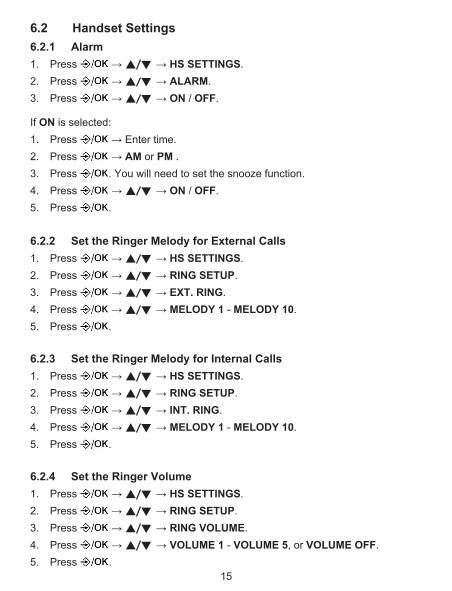
Press → p q → HS SettIngS.Press → p q → alarm.Press → p q → on / off.
If on is selected:Press → Enter time.Press → am or pm .Press . You will need to set the snooze function.Press → p q → on / off.Press .
6.2.2 Set the ringer melody for external CallsPress → p q → HS SettIngS.Press → p q → rIng SetUp.Press → p q → eXt. rIng.Press → p q → meloDy 1 - meloDy 10.Press .
6.2.3 Set the ringer melody for Internal CallsPress → p q → HS SettIngS.Press → p q → rIng SetUp.Press → p q → Int. rIng.Press → p q → meloDy 1 - meloDy 10.Press .
6.2.4 Set the ringer VolumePress → p q → HS SettIngS.Press → p q → rIng SetUp.Press → p q → rIng VolUme.Press → p q → VolUme 1 - VolUme 5, or VolUme off.Press .
�.�.3.
�.�.3.4.5.
�.�.3.4.5.
�.�.3.4.5.
�.�.3.4.5.

�6
6.2.5 Set alert tonesA single beep is emitted when you press a key. You can turn on or off the key tone. You can also turn on the alert tones when low battery and out of range are detected. Low battery tone will be emitted while you are talking with the phone to alert you that you need to charge your battery. Out of range tone will be emitted when the handset is out of range from the base.
Press → p q → HS SettIngS.Press → p q → tone SetUp.Press → p q → Key tone / Battery tone / oUt of range.Press → p q → on / off.Press .
6.2.6 rename the HandsetPress → p q → HS SettIngS.Press → p q → rename HS.Press → p q → Enter name.Press .
6.2.7 Set the Handset languagePress → p q → HS SettIngS.Press → p q → langUage.Press → p q → (The desired language).Press .
6.2.8 Set the Handset Display InformationPress → p q → HS SettIngS.Press → p q → HS DISplay.Press → p q → HanDSet name / tIme.Press .
�.�.3.4.5.
�.�.3.4.
�.�.3.4.
�.�.3.4.

�7
6.2.9 Set the auto answerPress → p q → HS SettIngS.Press → p q → aUto anSwer.Press → p q → on / off.Press .
6.3 Base Settings
6.3.1 Set the Dial modeThe dial mode settings is country dependent. Please contact your local service provider for the correct settings.
Press → p q → BS SettIngS.Press → p q → DIal moDe.Press → p q → tone / pUlSe.Press .
6.3.2 Set the flash timeThe flash time settings is country dependent. Please contact your local service provider for the correct settings.
Press → p q → BS SettIngS.Press → p q → flaSH tIme.Press → p q → SHort / meDIUm / long.Press .
6.3.3 Change the System pIn CodeThe default system PIN code is 0000.
Press → p q → BS SettIngS.Press → p q → CHange pIn.Press .Enter old pIn (Default: 0000).Press → Enter new pIn.Press → Enter new pIn again.Press .
�.�.3.4.
�.�.3.4.
�.�.3.4.
�.�.3.4.5.6.7.

�8
6.4 reset your phoneYou can reset your phone to the default settings. After reset, all settings and entries (except phonebook) will be deleted.
Press → p q → DefaUlt.Press → Enter old pIn (Default: 0000).Press twice.
�.�.3.

�9
7. Caller DISplay 7.1 Call listThis feature is available if you have subscribed to the Caller ID service from your local service provider telephone company.
7.2 Store a Call list number into the phonebookPress .
p q → (a desired entry).Press → p q → aDD to pB.Press → Enter name.Press → Edit number.Press → p q → meloDy 1 - meloDy 10.Press.
7.3 Delete an entry in the Call listPress .
p q → (a desired entry).Press → p q → Delete.Press twice.
7.4 Delete all Call list entriesPress .Press → p q → Delete all.Press twice.
7.5 View the Details of the Call list entryPress .Press → p q → DetaIlS.Press .
�.�.3.4.5.6.7.
�.�.3.4.
�.�.3.
�.�.3.
�0
If you have subscribed to Calling Number Display (Caller ID) service, you can use the call block feature to automatically reject incoming calls without caller number display. These number types are those withheld number, and unavailable number.You will not hear any ring tone from the blocked calls but they would be answered by answering machine (for answering machine model) all the time.
Blocked calls are treated as new call log entries, the name of the call log will be replaced with Blocked call.Call block on is a local individual setting on each handset, you should turn on the feature on handset individual if you purchased more than one handset.
8.1 Block Calls without number Display in the Call listPress → p q → Call BloCK.Press → p q → on / off.
When on is chosen, press ▼ or ▲ to scroll to private (for calls that the caller is blocking the telephone number), Unavailable (for calls that the caller’s number is unavailable), or Both.
3. Press .
•
•
�.�.
•
8. Call BloCKer

��
9. troUBleSHootIngproblem Solutions
my telephone does not work at all.
Make sure the batteries are installed and charged correctly. For optimum daily performance, return the handset to the telephone base after use.Remove and reinstall the batteries, then charge for up to �6 hours. If the problem isn’t solved, purchase new batteries.Make sure the power adapter is securely plugged into an outlet not controlled by a wall switch.Make sure the telephone line cord is plugged firmly into the telephone base and the telephone wall jack.
•
•
•
•
Common cure for electronic equipment.
If the telephone is not responding normally, put the handset in the telephone base. If it does not respond, try the following (in the order listed):
Disconnect the power to the telephone base.Disconnect the batteries on the handset.Wait a few minutes before connecting power to the telephone base.Re-install the batteries and place the handset in the telephone base.Wait for the handset to synchronize with the telephone base. Allow up to one minute for this to take place.
•••
•
•

��
there is interference during a telephone conversation. my calls fade out when I am using the handset.
The handset may be out of range. Move it closer to the telephone base.If you subscribe to high-speed Internet service (digital subscriber line - DSL) through your telephone line, you must install a DSL filter between the telephone base and the telephone wall jack. The filter prevents noise anda caller ID problems caused by DSL interference. Please contact your DSL service provider for more information about DSL filters.Appliances or other cordless telephones plugged into the same circuit as the telephone base can cause interference. Try moving the appliance or telephone base to another outlet.Other electronic products may cause interference to your cordless telephone. Install your telephone as far away as possible from the following electronic devices: wireless routers, radios, radio towers, pager towers, cellular telephones, digital telephones, intercoms, room monitors, televisions, VCRs, personal computers, kitchen appliances, and other cordless telephones.If your telephone is plugged in with a modem or a surge protector, plug the telephone (or modem/surge protector) into a different location. If this doesn’t solve the problem, re-locate your telephone or modem farther apart from each other, or use a different surge protector.The location of your telephone base can impact the performance of your cordless phone. For better reception, install the telephone base in a centralized location within your home or office, away from walls or other obstructions. In many environments, elevating the telephone base improves overall performance.Disconnect the telephone base from the telephone wall jack and plug in a corded telephone. If calls are still not clear, the problem is probably in the wiring or telephone service. Contact your telephone service provider (charges might apply).If the other telephones in your home are having the same problem, the problem is in the wiring or telephone service. Contact your telephone service provider (charges may apply).
•
•
•
•
•
•
•
•

�3
Common cure for electronic equipment.
If the telephone is not responding normally, put the handset in the telephone base. If it does not respond, try the following (in the order listed):
Disconnect the power to the telephone base.Disconnect the batteries on the handset.Wait a few minutes before connecting power to the telephone base.Re-install the batteries and place the handset in the telephone base.Wait for the handset to synchronize with the telephone base. Allow up to one minute for this to take place.
•••
•
•
This telephone is not equipped with a grounding function. Therefore, some of the functions may be limited when used in PBX systems. Please contact the technical support of the network provider for further information.

�4
Vtech product warrantyDear Customer, Thank you for purchasing a VTech telephone. For the product warranty applicable to this product, we refer you to the VTech website www.euphones.vtech.com for on line registration. Your retailer will provide you with a statutory 2-year warranty. If you have a problem within the first 2 years from purchase, call the warranty helpline or email them.
for extended warrantyPlease keep a copy of your proof of purchase; you will need this when presenting the product back to where you bought it from.
If you have a problem after � years of purchase, up to 5 years from purchase: Within 30 days of purchase you need to have registered your device at www.euphones.vtech.com.The following parts to your device are not covered by this extended warranty: Batteries, Cables, Damage caused by pets, Damaged caused from being dropped, Water Damage, Sun Exposure Damage.
Thank You.
�.
�.
10. warranty

�5
This analog telephone DECT complies with the basic requirements contained in the R&TTE Directive �999/5/EC on ratio equipment and telecommunications terminal equipment and is suitable for connection and operation in the member state indicated on the base station and/or packaging.The declaration of conformity may be viewed at www.euphones.vtech.com.The CE symbol confirms the conformity of the telephone and the above directive.
11. approVal anD ConformIty

�6
12. Care anD maIntenanCe InStrUCtIonStake care of your telephone
Your cordless telephone contains sophisticated electronic parts, so you must treat it with care.Avoid rough treatment. Place the handset down gently. Save the original packing materials to protect your telephone if you ever need to ship it.
avoid waterYou can damage your telephone if it gets wet. Do not use the handset in the rain, or handle it with wet hands. Do not install the telephone base near a sink, bathtub or shower.
electrical stormsElectrical storms can sometimes cause power surges harmful to electronic equipment. For your own safety, take caution when using electric appliances during storms.
Cleaning your telephoneYour telephone has a durable plastic casing that should retain its luster for many years. Clean it only with a soft cloth slightly dampened with water or a mild soap.Do not use excess water or cleaning solvents of any kind.
NOTERemember that electrical appliances can cause serious injury if used when you are wet or standing in water. If the telephone base should fall into water, Do not retrIeVe It UntIl yoU UnplUg tHe power CorD anD telepHone lIne CorDS from tHe wall. Then pull the unit out by the unplugged cords.
•
•••
•
•
•
•
CaUtIonrISK of eXploSIon If Battery IS replaCeD
By an InCorreCt type.DISpoSe of USeD Battery aCCorDIng
to tHe InStrUCtIonS.

�7
VteCH teleCommUnICatIonS ltD.a member of tHe VteCH groUp of CompanIeS.© �0�5 VTech Telecommunications Ltd. All Rights Reserved. V�.0. ��/�5.