Embed Size (px)
Citation preview
VMT-2 Valve Maintenance TrailerUser’s Manual
Copyright © 2009 E.H. Wachs Company. All rights reserved. This manual may not be reproduced in whole or in part
without the written consent of E.H. Wachs Company.
E.H. Wachs Company Part No. 77-MAN-31Rev. 0-1109, November 2009
Revision History:Original November 2009
E.H. Wachs Company600 Knightsbridge ParkwayLincolnshire, IL 60069www.wachsco.com

VMT-2 Valve Maintenance Trailer
Part No. 77-MAN-31, Rev. 0-1109 E.H. Wachs Company
This page intentionally left blank.
Table of Contents
Table of ContentsChapter 1: About This Manual . . . . . . . . . . . . . . . . . . . . . . . . . . . . . . . . . . . . . . . . . . . . . . . . . 1Purpose of This Manual . . . . . . . . . . . . . . . . . . . . . . . . . . . . . . . . . . . . . . . . . . . . . . . . . . . . . . . . . 1How to Use The Manual . . . . . . . . . . . . . . . . . . . . . . . . . . . . . . . . . . . . . . . . . . . . . . . . . . . . . . . . 2Symbols and Warnings . . . . . . . . . . . . . . . . . . . . . . . . . . . . . . . . . . . . . . . . . . . . . . . . . . . . . . . . . 2Manual Updates and Revision Tracking . . . . . . . . . . . . . . . . . . . . . . . . . . . . . . . . . . . . . . . . . . . . 3Component Manuals . . . . . . . . . . . . . . . . . . . . . . . . . . . . . . . . . . . . . . . . . . . . . . . . . . . . . . . . . . . 4
Chapter 2: Safety . . . . . . . . . . . . . . . . . . . . . . . . . . . . . . . . . . . . . . . . . . . . . . . . . . . . . . . . . . . . . 5Operator Safety . . . . . . . . . . . . . . . . . . . . . . . . . . . . . . . . . . . . . . . . . . . . . . . . . . . . . . . . . . . . . . . 5
Safety Symbols . . . . . . . . . . . . . . . . . . . . . . . . . . . . . . . . . . . . . . . . . . . . . . . . . . . . . . . . . . . . 6Protective Equipment Requirements . . . . . . . . . . . . . . . . . . . . . . . . . . . . . . . . . . . . . . . . . . . . 7
Safety Labels . . . . . . . . . . . . . . . . . . . . . . . . . . . . . . . . . . . . . . . . . . . . . . . . . . . . . . . . . . . . . . . . . 7
Chapter 3: Introduction to the Equipment . . . . . . . . . . . . . . . . . . . . . . . . . . . . . . . . . . . . . . . 13Standard VMT-2 Equipment . . . . . . . . . . . . . . . . . . . . . . . . . . . . . . . . . . . . . . . . . . . . . . . . . . . . 13
Trailer . . . . . . . . . . . . . . . . . . . . . . . . . . . . . . . . . . . . . . . . . . . . . . . . . . . . . . . . . . . . . . . . . . . 13Engine . . . . . . . . . . . . . . . . . . . . . . . . . . . . . . . . . . . . . . . . . . . . . . . . . . . . . . . . . . . . . . . . . . 18
Gas Engine . . . . . . . . . . . . . . . . . . . . . . . . . . . . . . . . . . . . . . . . . . . . . . . . . . . . . . . . . . . . 18Diesel Engine . . . . . . . . . . . . . . . . . . . . . . . . . . . . . . . . . . . . . . . . . . . . . . . . . . . . . . . . . . 19
Vacuum System . . . . . . . . . . . . . . . . . . . . . . . . . . . . . . . . . . . . . . . . . . . . . . . . . . . . . . . . . . . 20Pressure Washer . . . . . . . . . . . . . . . . . . . . . . . . . . . . . . . . . . . . . . . . . . . . . . . . . . . . . . . . . . . 22
Optional Equipment . . . . . . . . . . . . . . . . . . . . . . . . . . . . . . . . . . . . . . . . . . . . . . . . . . . . . . . . . . . 23Hydraulic System . . . . . . . . . . . . . . . . . . . . . . . . . . . . . . . . . . . . . . . . . . . . . . . . . . . . . . . . . . 23Light Bar . . . . . . . . . . . . . . . . . . . . . . . . . . . . . . . . . . . . . . . . . . . . . . . . . . . . . . . . . . . . . . . . 24Hydraulic Hose Reel . . . . . . . . . . . . . . . . . . . . . . . . . . . . . . . . . . . . . . . . . . . . . . . . . . . . . . . 24Locking Job Box . . . . . . . . . . . . . . . . . . . . . . . . . . . . . . . . . . . . . . . . . . . . . . . . . . . . . . . . . . 25Spare Tire Kit . . . . . . . . . . . . . . . . . . . . . . . . . . . . . . . . . . . . . . . . . . . . . . . . . . . . . . . . . . . . . 25Water Heater . . . . . . . . . . . . . . . . . . . . . . . . . . . . . . . . . . . . . . . . . . . . . . . . . . . . . . . . . . . . . 26ERV-750 Extended Reach Valve Exerciser . . . . . . . . . . . . . . . . . . . . . . . . . . . . . . . . . . . . . 27
Chapter 4: Assembly, Disassembly, and Storage . . . . . . . . . . . . . . . . . . . . . . . . . . . . . . . . . . 29First-Time Use . . . . . . . . . . . . . . . . . . . . . . . . . . . . . . . . . . . . . . . . . . . . . . . . . . . . . . . . . . . . . . . 29Storage Procedures . . . . . . . . . . . . . . . . . . . . . . . . . . . . . . . . . . . . . . . . . . . . . . . . . . . . . . . . . . . 30
Standard Equipment . . . . . . . . . . . . . . . . . . . . . . . . . . . . . . . . . . . . . . . . . . . . . . . . . . . . . 30Optional Equipment . . . . . . . . . . . . . . . . . . . . . . . . . . . . . . . . . . . . . . . . . . . . . . . . . . . . . 30
Taking the Equipment out of Storage . . . . . . . . . . . . . . . . . . . . . . . . . . . . . . . . . . . . . . . . . . . . . 31Standard Equipment . . . . . . . . . . . . . . . . . . . . . . . . . . . . . . . . . . . . . . . . . . . . . . . . . . . . . . . . 31Optional Equipment . . . . . . . . . . . . . . . . . . . . . . . . . . . . . . . . . . . . . . . . . . . . . . . . . . . . . . . . 31Cycling Antifreeze out of the System . . . . . . . . . . . . . . . . . . . . . . . . . . . . . . . . . . . . . . . . . . 32
E.H. Wachs Company Part No. 77-MAN-31, Rev. 0-1109 i
VMT-2 Valve Maintenance Trailer
Cold Weather Storage . . . . . . . . . . . . . . . . . . . . . . . . . . . . . . . . . . . . . . . . . . . . . . . . . . . . . . . . . 34Pressure Washer . . . . . . . . . . . . . . . . . . . . . . . . . . . . . . . . . . . . . . . . . . . . . . . . . . . . . . . . . . 34
Trailer Without Water Heater . . . . . . . . . . . . . . . . . . . . . . . . . . . . . . . . . . . . . . . . . . . . . 34Trailer With Water Heater . . . . . . . . . . . . . . . . . . . . . . . . . . . . . . . . . . . . . . . . . . . . . . . . 37
Chapter 5: Operating Instructions . . . . . . . . . . . . . . . . . . . . . . . . . . . . . . . . . . . . . . . . . . . . . 41Trailer Features . . . . . . . . . . . . . . . . . . . . . . . . . . . . . . . . . . . . . . . . . . . . . . . . . . . . . . . . . . . . . . 41
Towing the Trailer . . . . . . . . . . . . . . . . . . . . . . . . . . . . . . . . . . . . . . . . . . . . . . . . . . . . . . . . . 41Spare Tire Option . . . . . . . . . . . . . . . . . . . . . . . . . . . . . . . . . . . . . . . . . . . . . . . . . . . . . . . . . 42Locking Job Box Option . . . . . . . . . . . . . . . . . . . . . . . . . . . . . . . . . . . . . . . . . . . . . . . . . . . . 43
Starting and Running the Engine . . . . . . . . . . . . . . . . . . . . . . . . . . . . . . . . . . . . . . . . . . . . . . . . . 44Gas Engine . . . . . . . . . . . . . . . . . . . . . . . . . . . . . . . . . . . . . . . . . . . . . . . . . . . . . . . . . . . . . . . 45Diesel Engine . . . . . . . . . . . . . . . . . . . . . . . . . . . . . . . . . . . . . . . . . . . . . . . . . . . . . . . . . . . . . 46
Vacuum System Operation . . . . . . . . . . . . . . . . . . . . . . . . . . . . . . . . . . . . . . . . . . . . . . . . . . . . . 48Selecting a Vacuum Wand . . . . . . . . . . . . . . . . . . . . . . . . . . . . . . . . . . . . . . . . . . . . . . . . . . 48Setup and Operation . . . . . . . . . . . . . . . . . . . . . . . . . . . . . . . . . . . . . . . . . . . . . . . . . . . . . . . 48Emptying the Tank . . . . . . . . . . . . . . . . . . . . . . . . . . . . . . . . . . . . . . . . . . . . . . . . . . . . . . . . 54
Draining Liquid . . . . . . . . . . . . . . . . . . . . . . . . . . . . . . . . . . . . . . . . . . . . . . . . . . . . . . . . 54Dumping Solids . . . . . . . . . . . . . . . . . . . . . . . . . . . . . . . . . . . . . . . . . . . . . . . . . . . . . . . . 57
Unclogging the Vacuum . . . . . . . . . . . . . . . . . . . . . . . . . . . . . . . . . . . . . . . . . . . . . . . . . . . . 61Pressure Washer Operation . . . . . . . . . . . . . . . . . . . . . . . . . . . . . . . . . . . . . . . . . . . . . . . . . . . . . 63
Filling the Water Tank . . . . . . . . . . . . . . . . . . . . . . . . . . . . . . . . . . . . . . . . . . . . . . . . . . . . . . 63Filling the Antifreeze (Primer) Tank . . . . . . . . . . . . . . . . . . . . . . . . . . . . . . . . . . . . . . . . . . . 64Using the Pressure Washer . . . . . . . . . . . . . . . . . . . . . . . . . . . . . . . . . . . . . . . . . . . . . . . . . . 65Priming the Washer Pump . . . . . . . . . . . . . . . . . . . . . . . . . . . . . . . . . . . . . . . . . . . . . . . . . . . 68
Prime Using the VMT-2 Pump Draw . . . . . . . . . . . . . . . . . . . . . . . . . . . . . . . . . . . . . . . 68Light Bar Operation . . . . . . . . . . . . . . . . . . . . . . . . . . . . . . . . . . . . . . . . . . . . . . . . . . . . . . . . . . . 72Hydraulic Hose Reel Operation . . . . . . . . . . . . . . . . . . . . . . . . . . . . . . . . . . . . . . . . . . . . . . . . . . 73Water Heater Operation . . . . . . . . . . . . . . . . . . . . . . . . . . . . . . . . . . . . . . . . . . . . . . . . . . . . . . . . 75
Starting and Running the Water Heater . . . . . . . . . . . . . . . . . . . . . . . . . . . . . . . . . . . . . . . . . 75Spraying Hot Water . . . . . . . . . . . . . . . . . . . . . . . . . . . . . . . . . . . . . . . . . . . . . . . . . . . . . . . . 78Heating the Tank Water . . . . . . . . . . . . . . . . . . . . . . . . . . . . . . . . . . . . . . . . . . . . . . . . . . . . . 79Circulating Hot Water . . . . . . . . . . . . . . . . . . . . . . . . . . . . . . . . . . . . . . . . . . . . . . . . . . . . . . 80
Valve Exerciser . . . . . . . . . . . . . . . . . . . . . . . . . . . . . . . . . . . . . . . . . . . . . . . . . . . . . . . . . . . . . . 82
ii Part No. 77-MAN-31, Rev. 0-1109 E.H. Wachs Company
Table of Contents
Chapter 6: Routine Maintenance . . . . . . . . . . . . . . . . . . . . . . . . . . . . . . . . . . . . . . . . . . . . . . . 85Engine Maintenance . . . . . . . . . . . . . . . . . . . . . . . . . . . . . . . . . . . . . . . . . . . . . . . . . . . . . . . . . . 85Daily Maintenance . . . . . . . . . . . . . . . . . . . . . . . . . . . . . . . . . . . . . . . . . . . . . . . . . . . . . . . . . . . . 86
Cleaning the Vacuum Filter . . . . . . . . . . . . . . . . . . . . . . . . . . . . . . . . . . . . . . . . . . . . . . . . . . 86Lubricating the Blower . . . . . . . . . . . . . . . . . . . . . . . . . . . . . . . . . . . . . . . . . . . . . . . . . . . . . 90
Weekly Maintenance . . . . . . . . . . . . . . . . . . . . . . . . . . . . . . . . . . . . . . . . . . . . . . . . . . . . . . . . . . 93Monthly Maintenance . . . . . . . . . . . . . . . . . . . . . . . . . . . . . . . . . . . . . . . . . . . . . . . . . . . . . . . . . 95Oil Change Schedule . . . . . . . . . . . . . . . . . . . . . . . . . . . . . . . . . . . . . . . . . . . . . . . . . . . . . . . . . . 96
Engine . . . . . . . . . . . . . . . . . . . . . . . . . . . . . . . . . . . . . . . . . . . . . . . . . . . . . . . . . . . . . . . . . . 96Sprayer Pump . . . . . . . . . . . . . . . . . . . . . . . . . . . . . . . . . . . . . . . . . . . . . . . . . . . . . . . . . . . . . 97Blower . . . . . . . . . . . . . . . . . . . . . . . . . . . . . . . . . . . . . . . . . . . . . . . . . . . . . . . . . . . . . . . . . . 98
Chapter 7: Service and Repair . . . . . . . . . . . . . . . . . . . . . . . . . . . . . . . . . . . . . . . . . . . . . . . . . 99Changing a Tire . . . . . . . . . . . . . . . . . . . . . . . . . . . . . . . . . . . . . . . . . . . . . . . . . . . . . . . . . . . . . . 99Replacing Tank Shut-Off Seal . . . . . . . . . . . . . . . . . . . . . . . . . . . . . . . . . . . . . . . . . . . . . . . . . . 101Replacing Control Panel Switches . . . . . . . . . . . . . . . . . . . . . . . . . . . . . . . . . . . . . . . . . . . . . . . 102Replacing Fuses . . . . . . . . . . . . . . . . . . . . . . . . . . . . . . . . . . . . . . . . . . . . . . . . . . . . . . . . . . . . . 107Servicing the Drive Belts . . . . . . . . . . . . . . . . . . . . . . . . . . . . . . . . . . . . . . . . . . . . . . . . . . . . . . 108
Vacuum Blower Belts . . . . . . . . . . . . . . . . . . . . . . . . . . . . . . . . . . . . . . . . . . . . . . . . . . . . . 108Sprayer Pump Belts . . . . . . . . . . . . . . . . . . . . . . . . . . . . . . . . . . . . . . . . . . . . . . . . . . . . . . . 112
Adjusting the Tank Latches . . . . . . . . . . . . . . . . . . . . . . . . . . . . . . . . . . . . . . . . . . . . . . . . . . . . 115Replacing the Battery . . . . . . . . . . . . . . . . . . . . . . . . . . . . . . . . . . . . . . . . . . . . . . . . . . . . . . . . . 118Jump-Starting the Engine . . . . . . . . . . . . . . . . . . . . . . . . . . . . . . . . . . . . . . . . . . . . . . . . . . . . . . 118Replacing Light Bar Bulbs . . . . . . . . . . . . . . . . . . . . . . . . . . . . . . . . . . . . . . . . . . . . . . . . . . . . 120
Light Bar Flashers . . . . . . . . . . . . . . . . . . . . . . . . . . . . . . . . . . . . . . . . . . . . . . . . . . . . . . . . 120Work Lights . . . . . . . . . . . . . . . . . . . . . . . . . . . . . . . . . . . . . . . . . . . . . . . . . . . . . . . . . . . . . 121
Chapter 8: Parts Lists and Drawings . . . . . . . . . . . . . . . . . . . . . . . . . . . . . . . . . . . . . . . . . . . 123
Chapter 9: Accessories and Spare Parts . . . . . . . . . . . . . . . . . . . . . . . . . . . . . . . . . . . . . . . . 137Options . . . . . . . . . . . . . . . . . . . . . . . . . . . . . . . . . . . . . . . . . . . . . . . . . . . . . . . . . . . . . . . . . . . . 137Accessories . . . . . . . . . . . . . . . . . . . . . . . . . . . . . . . . . . . . . . . . . . . . . . . . . . . . . . . . . . . . . . . . 138
Chapter 10: Ordering Information . . . . . . . . . . . . . . . . . . . . . . . . . . . . . . . . . . . . . . . . . . . . 141Ordering Replacement Parts . . . . . . . . . . . . . . . . . . . . . . . . . . . . . . . . . . . . . . . . . . . . . . . . . . . 141Repair Information . . . . . . . . . . . . . . . . . . . . . . . . . . . . . . . . . . . . . . . . . . . . . . . . . . . . . . . . . . . 142Warranty Information . . . . . . . . . . . . . . . . . . . . . . . . . . . . . . . . . . . . . . . . . . . . . . . . . . . . . . . . 142Return Goods Address . . . . . . . . . . . . . . . . . . . . . . . . . . . . . . . . . . . . . . . . . . . . . . . . . . . . . . . . 142
E.H. Wachs Company Part No. 77-MAN-31, Rev. 0-1109 iii

VMT-2 Valve Maintenance Trailer
This page intentionally left blank.
iv Part No. 77-MAN-31, Rev. 0-1109 E.H. Wachs Company
Chapter 1, About This Manual
Chapter 1
About This Manual
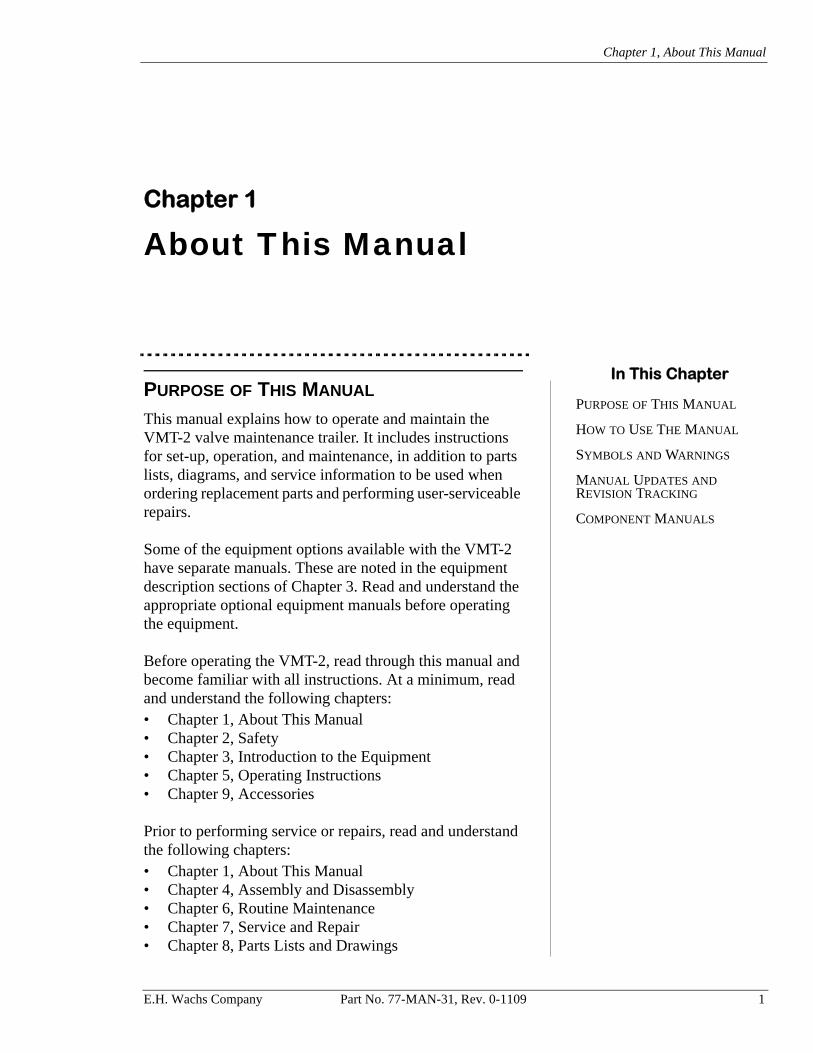
PURPOSE OF THIS MANUAL
This manual explains how to operate and maintain the VMT-2 valve maintenance trailer. It includes instructions for set-up, operation, and maintenance, in addition to parts lists, diagrams, and service information to be used when ordering replacement parts and performing user-serviceable repairs.
Some of the equipment options available with the VMT-2 have separate manuals. These are noted in the equipment description sections of Chapter 3. Read and understand the appropriate optional equipment manuals before operating the equipment.
Before operating the VMT-2, read through this manual and become familiar with all instructions. At a minimum, read and understand the following chapters:• Chapter 1, About This Manual• Chapter 2, Safety• Chapter 3, Introduction to the Equipment• Chapter 5, Operating Instructions• Chapter 9, Accessories
Prior to performing service or repairs, read and understand the following chapters:• Chapter 1, About This Manual• Chapter 4, Assembly and Disassembly• Chapter 6, Routine Maintenance• Chapter 7, Service and Repair• Chapter 8, Parts Lists and Drawings
In This Chapter
PURPOSE OF THIS MANUAL
HOW TO USE THE MANUAL
SYMBOLS AND WARNINGS
MANUAL UPDATES AND REVISION TRACKING
COMPONENT MANUALS
E.H. Wachs Company Part No. 77-MAN-31, Rev. 0-1109 1
VMT-2 Valve Maintenance Trailer
HOW TO USE THE MANUAL
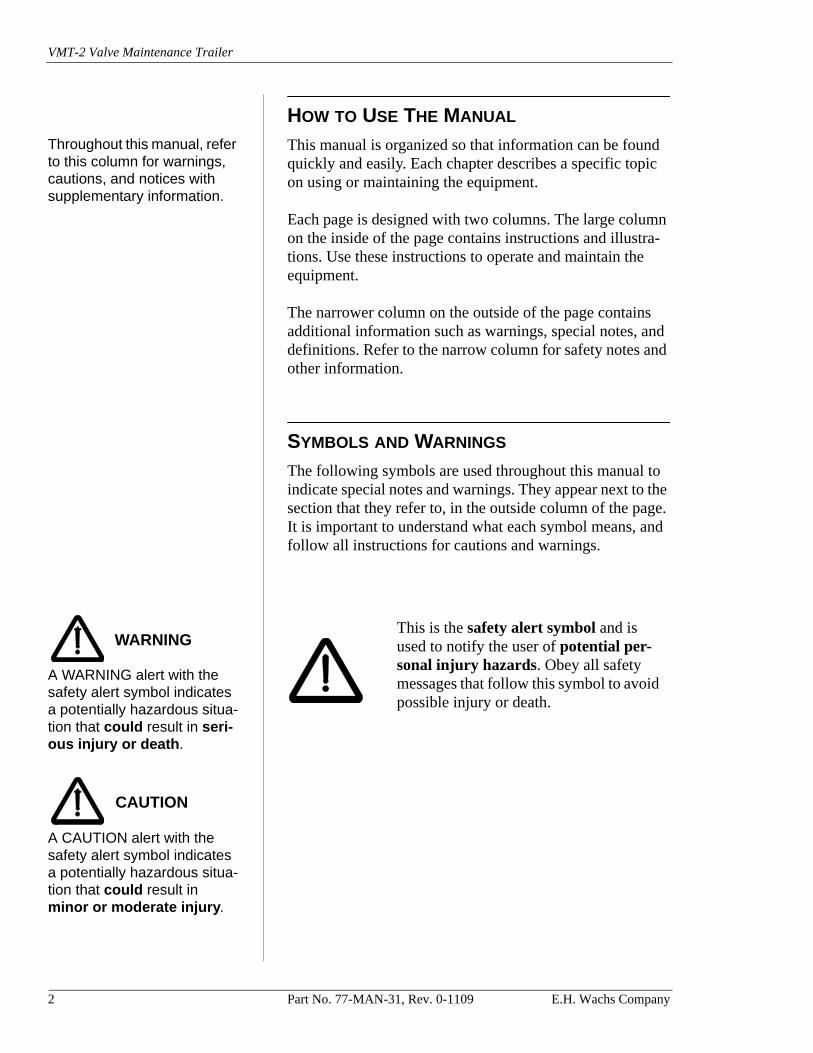
Throughout this manual, refer to this column for warnings, cautions, and notices with supplementary information.
This manual is organized so that information can be found quickly and easily. Each chapter describes a specific topic on using or maintaining the equipment.
Each page is designed with two columns. The large column on the inside of the page contains instructions and illustra-tions. Use these instructions to operate and maintain the equipment.
The narrower column on the outside of the page contains additional information such as warnings, special notes, and definitions. Refer to the narrow column for safety notes and other information.
SYMBOLS AND WARNINGS
The following symbols are used throughout this manual to indicate special notes and warnings. They appear next to the section that they refer to, in the outside column of the page. It is important to understand what each symbol means, and follow all instructions for cautions and warnings.
A WARNING alert with the safety alert symbol indicates a potentially hazardous situa-tion that could result in seri-ous injury or death.
A CAUTION alert with the safety alert symbol indicates a potentially hazardous situa-tion that could result in minor or moderate injury.
WARNINGThis is the safety alert symbol and is used to notify the user of potential per-sonal injury hazards. Obey all safety messages that follow this symbol to avoid possible injury or death.
CAUTION
2 Part No. 77-MAN-31, Rev. 0-1109 E.H. Wachs Company
Chapter 1, About This Manual: Manual Updates and Revision Tracking
A CAUTION alert with the damage alert symbol indi-cates a situation that will result in damage to the equipment.
An IMPORTANT alert with the damage alert symbol indi-cates a situation that may result in damage to the equipment.
A NOTE provides supple-mentary information or oper-ating tips.
MANUAL UPDATES AND REVISION TRACKING
Current versions of E.H. Wachs Company manuals are also available in PDF for-mat. You can request an electronic copy of this manual by emailing customer service at [email protected].
Occasionally, manuals will be updated with improved oper-ation or maintenance procedures, or with corrections if nec-essary. Revised manuals will include an updated revision history on the title page.
If factory service or upgrades are performed on the equip-ment and that service changes any technical data or opera-tion and maintenance procedures on the equipment, a revised manual will be returned with the equipment.
CAUTIONThis is the equipment damage alert symbol and is used to notify the user of potential equipment damage situa-tions. Obey all messages that follow this symbol to avoid damaging the equipment or work piece on which it is operating.
IMPORTANT
NOTENOTEThis symbol indicates a user note. Notes provide additional information to supple-ment the instructions, or tips for easier operation.
E.H. Wachs Company Part No. 77-MAN-31, Rev. 0-1109 3
VMT-2 Valve Maintenance Trailer
COMPONENT MANUALS
The following manufacturers’ manuals are supplied for components of the VMT-2 system:
• Kohler engine Owner’s Manual (for gas engine)• Kohler engine Service Manual (for gas engine)• Briggs & Stratton Vanguard Diesel Operating & Main-
tenance Instructions (for diesel engine)• Water Cannon Hot Water Series Pressure Washer Oper-
ator’s Instruction Manual• Dexter Electric Brakes manual• Dexter Hubs/Drums/Bearings manual• Monarch M Series DC Hydraulic Power Units Informa-
tion and Troubleshooting Guide
4 Part No. 77-MAN-31, Rev. 0-1109 E.H. Wachs Company

Chapter 2, Safety
Chapter 2
Safety
The E.H. Wachs Company takes great pride in designing and manufacturing safe, high-quality products. We make user safety a top priority in the design of all our products.
Read this chapter carefully before operating the VMT-2. It contains important safety instructions and recommenda-tions.
OPERATOR SAFETY
Follow these guidelines for safe operation of the equip-ment.
Look for this sym-bol throughout the manual. It indicates a personal injury hazard.
• READ THE OPERATING MANUAL. Make sure that you understand all setup and operating instructions before you begin.
• INSPECT MACHINE AND ACCESSORIES. Before starting the machine, look for loose bolts or nuts, leaking lubricant, rusted components, and any other physical conditions that may affect operation. Properly maintaining the machine can greatly decrease the chances for injury.
• ALWAYS READ PLACARDS AND LABELS. Make sure all placards, labels, and stickers are clearly legible and in good condition. Replacement labels can be pur-chased from E.H. Wachs Company.
• KEEP CLEAR OF MOVING PARTS. Keep hands, arms, and fingers clear of all rotating or moving parts.
In This Chapter
OPERATOR SAFETY
SAFETY LABELS
E.H. Wachs Company Part No. 77-MAN-31, Rev. 0-1109 5
VMT-2 Valve Maintenance Trailer
Always turn machine off before doing any adjustments or service.
• SECURE LOOSE CLOTHING AND JEWELRY. Secure or remove loose-fitting clothing and jewelry, and securely bind long hair to prevent them from getting caught in moving parts of the machine.
• KEEP WORK AREA CLEAR. Keep all clutter and nonessential materials out of the work area. Only per-sonnel directly involved with the work being performed should have access to the area.
Safety Symbols
This icon is displayed with any safety alert that indicates a personal injury hazard.
WARNINGThis safety alert indicates a potentially hazardous situation that, if not avoided, could result in death or serious injury.
CAUTIONThis safety alert, with the personal injury hazard symbol, indicates a potentially hazardous situation that, if not avoided, could result in minor or moderate injury.
6 Part No. 77-MAN-31, Rev. 0-1109 E.H. Wachs Company
Chapter 2, Safety: Safety Labels
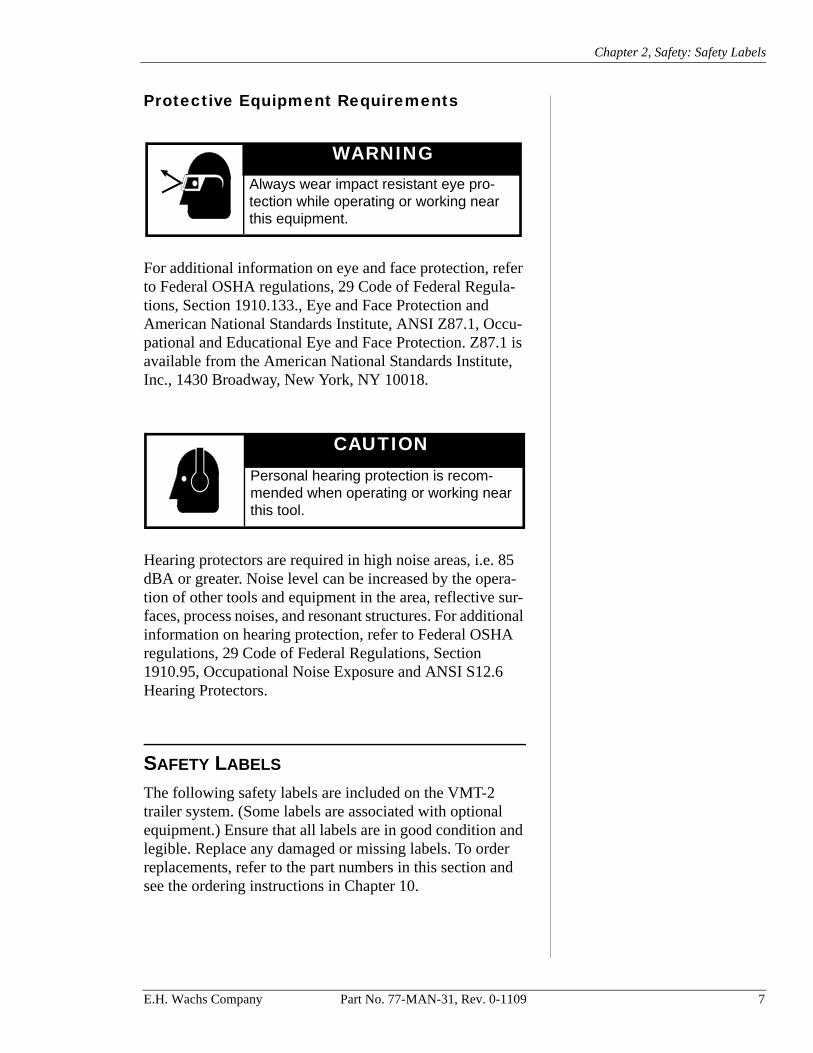
Protective Equipment Requirements
For additional information on eye and face protection, refer to Federal OSHA regulations, 29 Code of Federal Regula-tions, Section 1910.133., Eye and Face Protection and American National Standards Institute, ANSI Z87.1, Occu-pational and Educational Eye and Face Protection. Z87.1 is available from the American National Standards Institute, Inc., 1430 Broadway, New York, NY 10018.
Hearing protectors are required in high noise areas, i.e. 85 dBA or greater. Noise level can be increased by the opera-tion of other tools and equipment in the area, reflective sur-faces, process noises, and resonant structures. For additional information on hearing protection, refer to Federal OSHA regulations, 29 Code of Federal Regulations, Section 1910.95, Occupational Noise Exposure and ANSI S12.6 Hearing Protectors.
SAFETY LABELS
The following safety labels are included on the VMT-2 trailer system. (Some labels are associated with optional equipment.) Ensure that all labels are in good condition and legible. Replace any damaged or missing labels. To order replacements, refer to the part numbers in this section and see the ordering instructions in Chapter 10.
Always wear impact resistant eye pro-tection while operating or working near this equipment.
WARNING
CAUTIONPersonal hearing protection is recom-mended when operating or working near this tool.
E.H. Wachs Company Part No. 77-MAN-31, Rev. 0-1109 7
VMT-2 Valve Maintenance Trailer
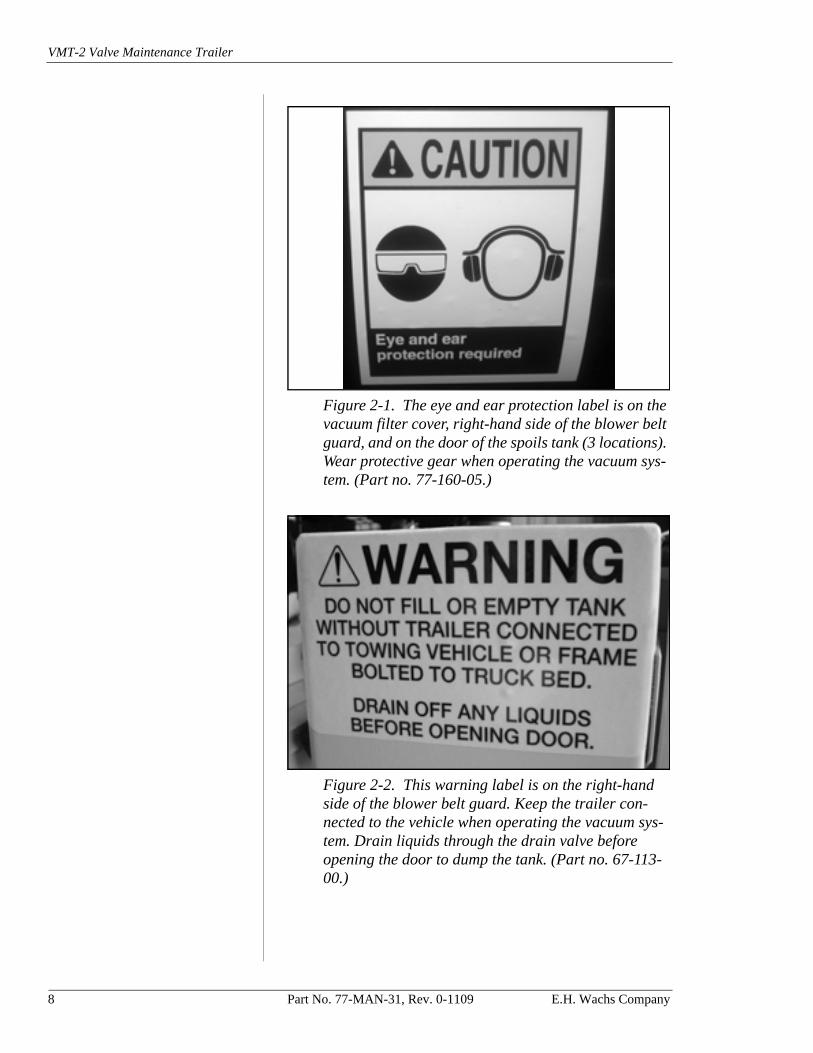
Figure 2-1. The eye and ear protection label is on the vacuum filter cover, right-hand side of the blower belt guard, and on the door of the spoils tank (3 locations). Wear protective gear when operating the vacuum sys-tem. (Part no. 77-160-05.)
Figure 2-2. This warning label is on the right-hand side of the blower belt guard. Keep the trailer con-nected to the vehicle when operating the vacuum sys-tem. Drain liquids through the drain valve before opening the door to dump the tank. (Part no. 67-113-00.)
8 Part No. 77-MAN-31, Rev. 0-1109 E.H. Wachs Company
Chapter 2, Safety: Safety Labels
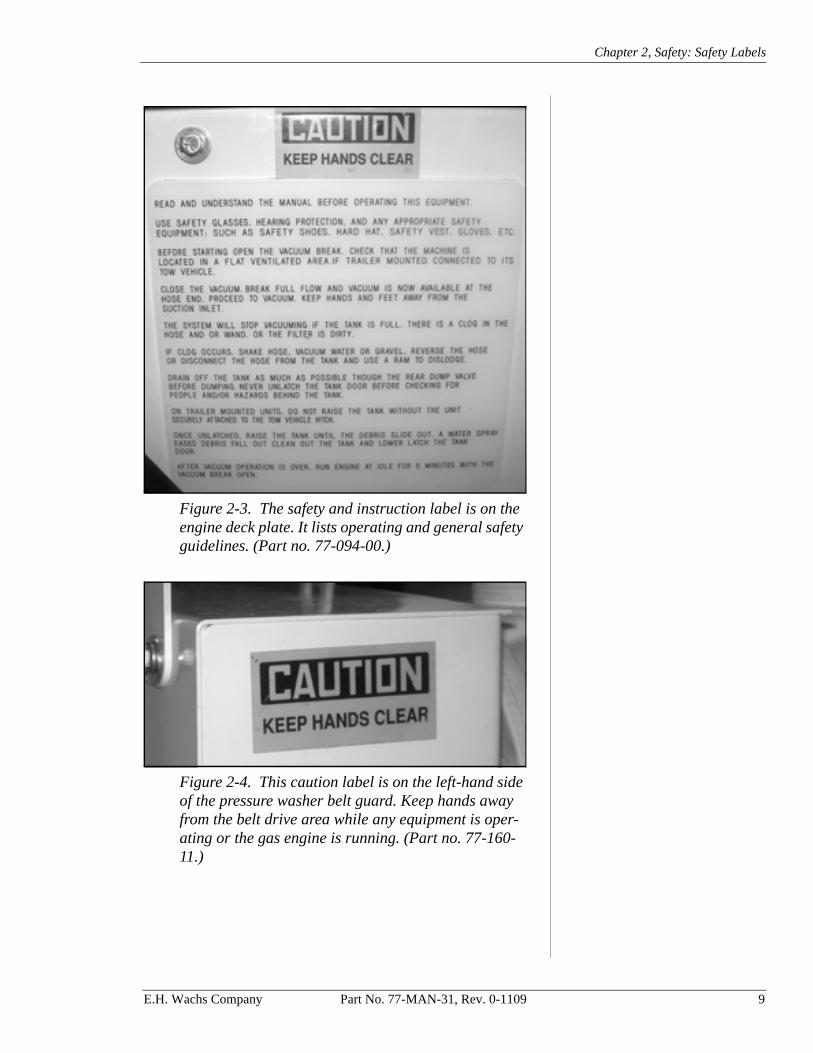
Figure 2-3. The safety and instruction label is on the engine deck plate. It lists operating and general safety guidelines. (Part no. 77-094-00.)
Figure 2-4. This caution label is on the left-hand side of the pressure washer belt guard. Keep hands away from the belt drive area while any equipment is oper-ating or the gas engine is running. (Part no. 77-160-11.)
E.H. Wachs Company Part No. 77-MAN-31, Rev. 0-1109 9
VMT-2 Valve Maintenance Trailer
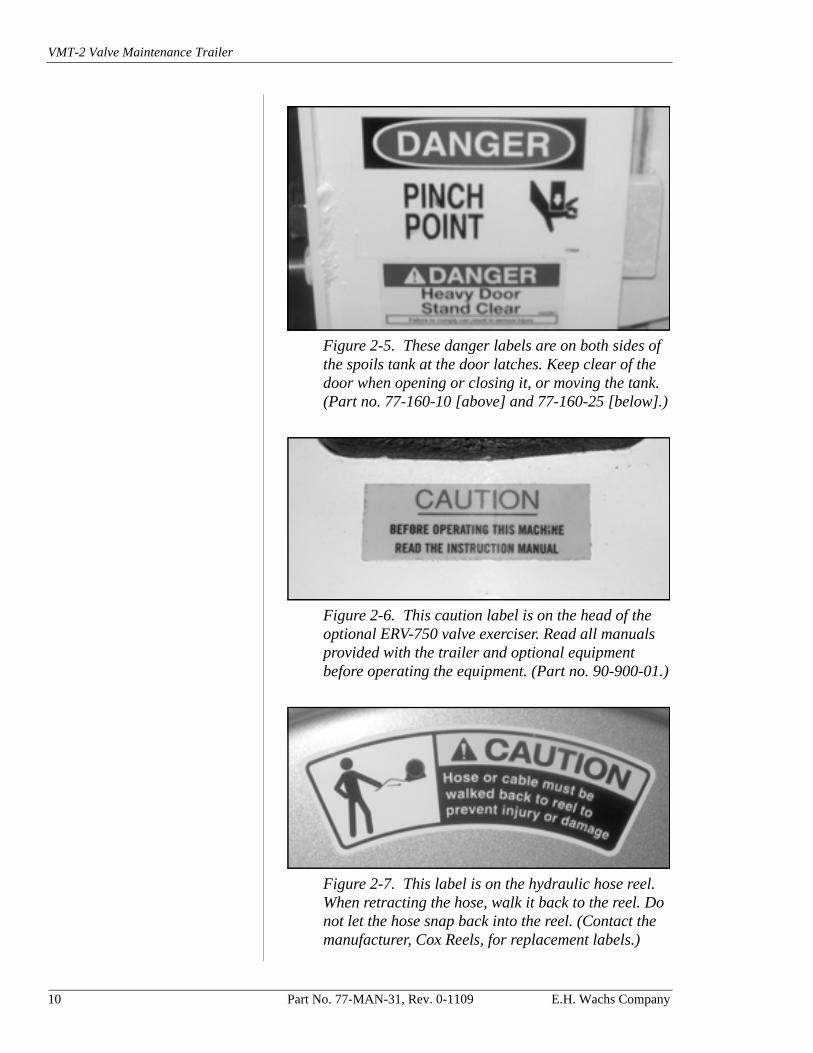
Figure 2-5. These danger labels are on both sides of the spoils tank at the door latches. Keep clear of the door when opening or closing it, or moving the tank. (Part no. 77-160-10 [above] and 77-160-25 [below].)
Figure 2-6. This caution label is on the head of the optional ERV-750 valve exerciser. Read all manuals provided with the trailer and optional equipment before operating the equipment. (Part no. 90-900-01.)
Figure 2-7. This label is on the hydraulic hose reel. When retracting the hose, walk it back to the reel. Do not let the hose snap back into the reel. (Contact the manufacturer, Cox Reels, for replacement labels.)
10 Part No. 77-MAN-31, Rev. 0-1109 E.H. Wachs Company

Chapter 2, Safety: Safety Labels
Figure 2-8. This caution label is on the hydraulic hose reel. Do not disassemble the spring from the reel. (Contact the manufacturer, Cox Reels, for replacement label.)
Figure 2-9. This warning label is on the trailer fender. Prior to each use of the trailer, check tire condition and lug nut tightness. (Part no. 77-160-15.)
Figure 2-10. This warning label is on the blower silencer housing. Shut down the system when servic-ing the blower. (Part no. 67-111-00.)
E.H. Wachs Company Part No. 77-MAN-31, Rev. 0-1109 11
VMT-2 Valve Maintenance Trailer
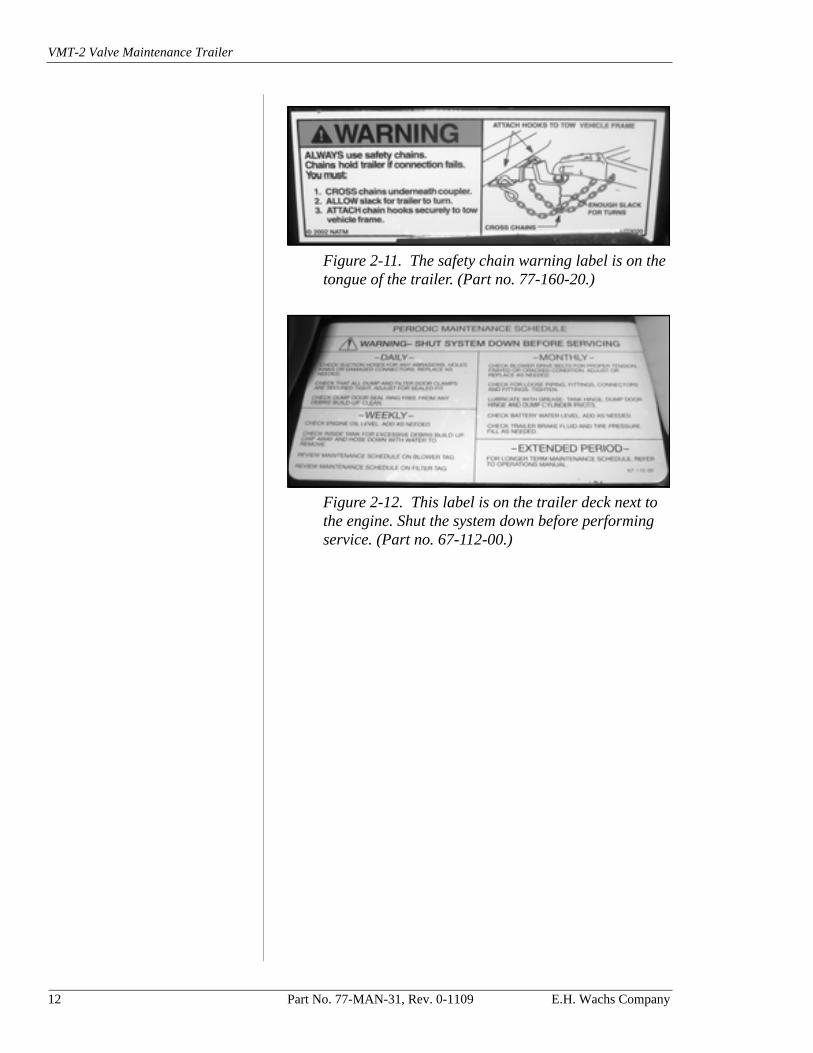
Figure 2-11. The safety chain warning label is on the tongue of the trailer. (Part no. 77-160-20.)
Figure 2-12. This label is on the trailer deck next to the engine. Shut the system down before performing service. (Part no. 67-112-00.)
12 Part No. 77-MAN-31, Rev. 0-1109 E.H. Wachs Company
Chapter 3, Introduction to the Equipment
Chapter 3
Introduction to the Equipment
STANDARD VMT-2 EQUIPMENT
The following standard equipment is provided with the basic 77-000-31 (gas engine) or 77-000-33 (diesel engine) configuration of the VMT-2:
• trailer • 200 gallon spoils tank• gas or diesel engine • pressure washer• vacuum system
The 77-000-32 (gas engine) and 77-000-34 (diesel engine) configurations include a 300 gallon spoils tank in place of the 200 gallon spoils tank.
These components are described in the following sections.
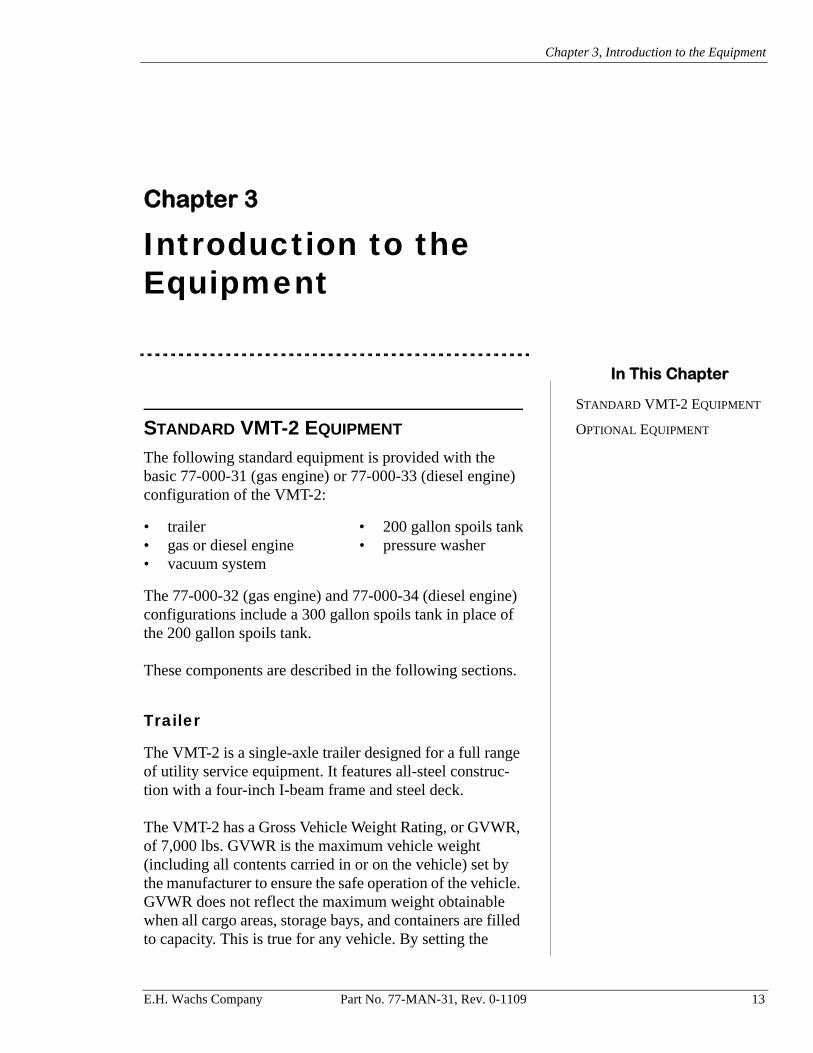
Trailer
The VMT-2 is a single-axle trailer designed for a full range of utility service equipment. It features all-steel construc-tion with a four-inch I-beam frame and steel deck.
The VMT-2 has a Gross Vehicle Weight Rating, or GVWR, of 7,000 lbs. GVWR is the maximum vehicle weight (including all contents carried in or on the vehicle) set by the manufacturer to ensure the safe operation of the vehicle. GVWR does not reflect the maximum weight obtainable when all cargo areas, storage bays, and containers are filled to capacity. This is true for any vehicle. By setting the
In This Chapter
STANDARD VMT-2 EQUIPMENT
OPTIONAL EQUIPMENT
E.H. Wachs Company Part No. 77-MAN-31, Rev. 0-1109 13
VMT-2 Valve Maintenance Trailer
GVWR of the VMT-2 at 7,000 lbs, the E.H. Wachs Com-pany provides a practical balance between intended use and safe operation. The operator must be aware of the vehicle's GVWR and adjust payloads accordingly to ensure that the GVWR limit is not exceeded.
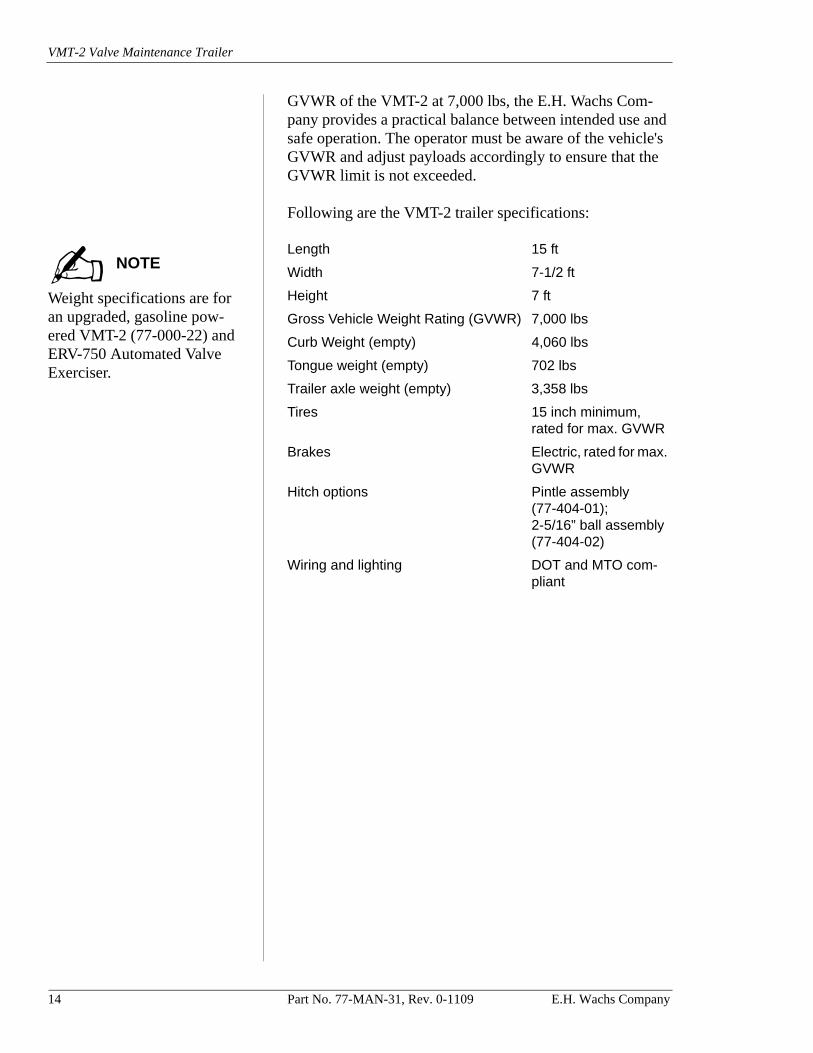
Following are the VMT-2 trailer specifications:
Weight specifications are for an upgraded, gasoline pow-ered VMT-2 (77-000-22) and ERV-750 Automated Valve Exerciser.
Length 15 ft
Width 7-1/2 ft
Height 7 ft
Gross Vehicle Weight Rating (GVWR) 7,000 lbs
Curb Weight (empty) 4,060 lbs
Tongue weight (empty) 702 lbs
Trailer axle weight (empty) 3,358 lbs
Tires 15 inch minimum, rated for max. GVWR
Brakes Electric, rated for max. GVWR
Hitch options Pintle assembly (77-404-01);2-5/16” ball assembly (77-404-02)
Wiring and lighting DOT and MTO com-pliant
NOTE
14 Part No. 77-MAN-31, Rev. 0-1109 E.H. Wachs Company
Chapter 3, Introduction to the Equipment: Standard VMT-2 Equipment
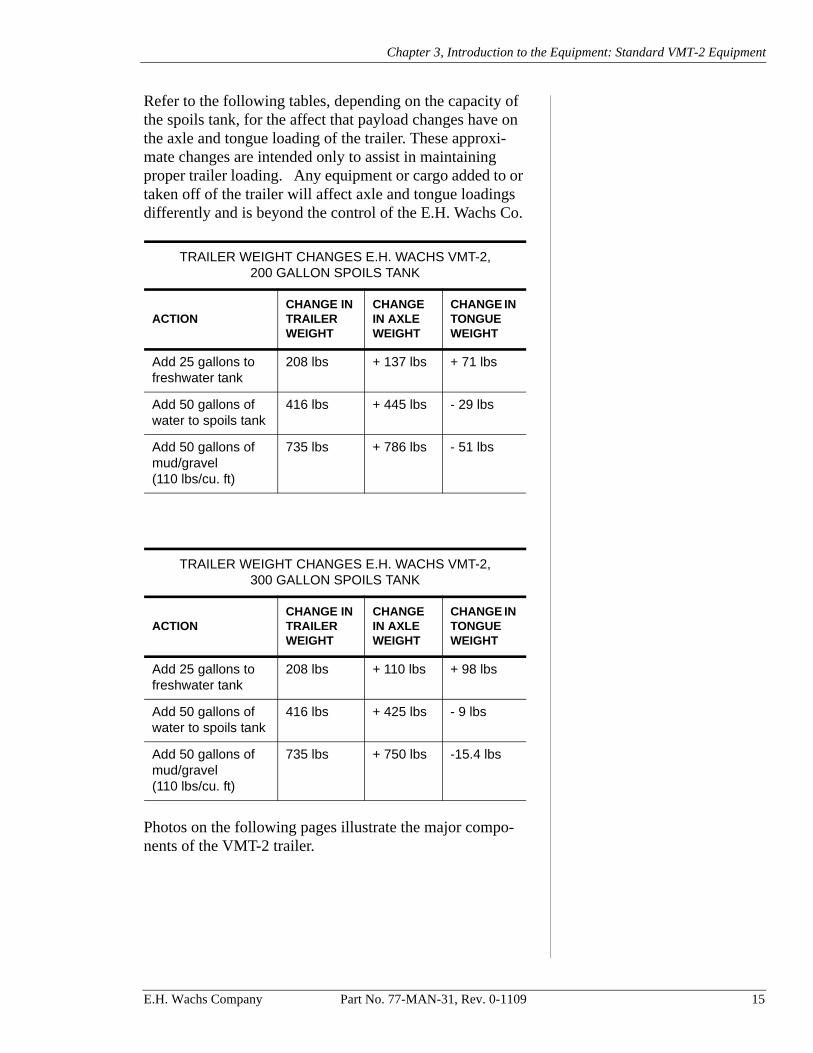
Refer to the following tables, depending on the capacity of the spoils tank, for the affect that payload changes have on the axle and tongue loading of the trailer. These approxi-mate changes are intended only to assist in maintaining proper trailer loading. Any equipment or cargo added to or taken off of the trailer will affect axle and tongue loadings differently and is beyond the control of the E.H. Wachs Co.
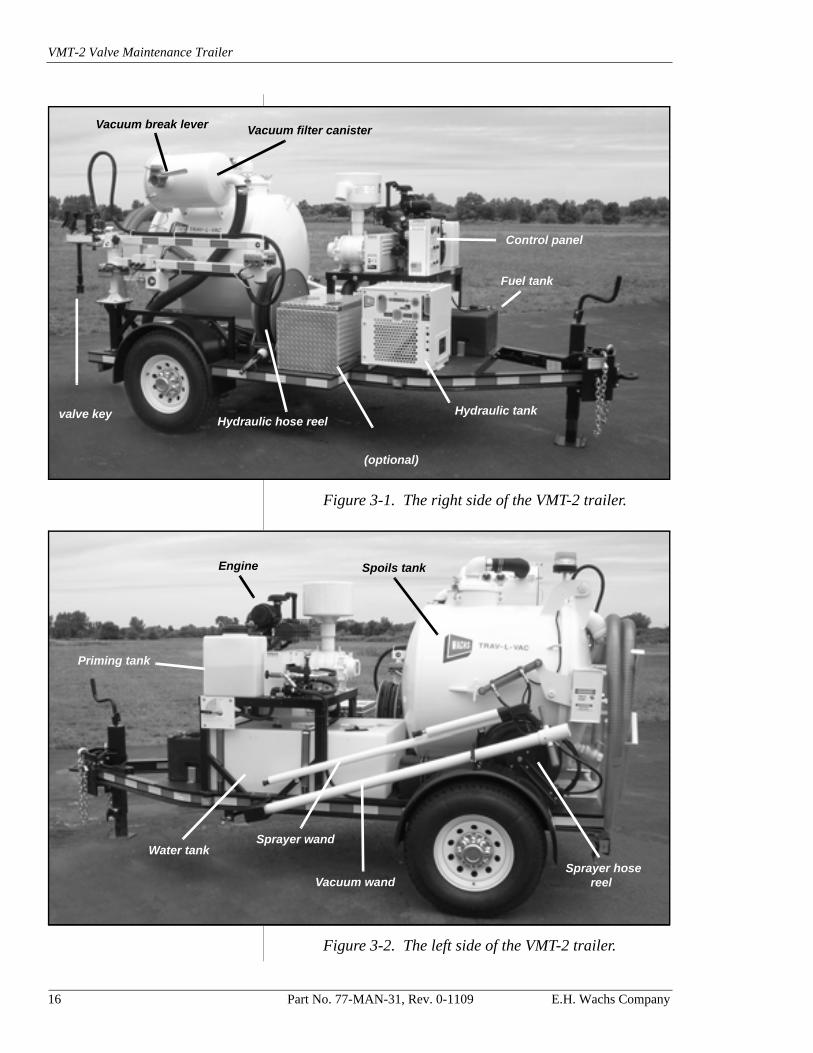
Photos on the following pages illustrate the major compo-nents of the VMT-2 trailer.
TRAILER WEIGHT CHANGES E.H. WACHS VMT-2,200 GALLON SPOILS TANK
ACTIONCHANGE IN TRAILER WEIGHT
CHANGE IN AXLE WEIGHT
CHANGE IN TONGUE WEIGHT
Add 25 gallons to freshwater tank
208 lbs + 137 lbs + 71 lbs
Add 50 gallons of water to spoils tank
416 lbs + 445 lbs - 29 lbs
Add 50 gallons of mud/gravel (110 lbs/cu. ft)
735 lbs + 786 lbs - 51 lbs
TRAILER WEIGHT CHANGES E.H. WACHS VMT-2,300 GALLON SPOILS TANK
ACTIONCHANGE IN TRAILER WEIGHT
CHANGE IN AXLE WEIGHT
CHANGE IN TONGUE WEIGHT
Add 25 gallons to freshwater tank
208 lbs + 110 lbs + 98 lbs
Add 50 gallons of water to spoils tank
416 lbs + 425 lbs - 9 lbs
Add 50 gallons of mud/gravel (110 lbs/cu. ft)
735 lbs + 750 lbs -15.4 lbs
E.H. Wachs Company Part No. 77-MAN-31, Rev. 0-1109 15
VMT-2 Valve Maintenance Trailer
Figure 3-1. The right side of the VMT-2 trailer.
Figure 3-2. The left side of the VMT-2 trailer.
ERV-750
Locking tool boxexerciser
(optional)
Vacuum filter canister
Fuel tank
Hydraulic hose reel
Control panel
Hydraulic tank
Vacuum break lever
valve key
Water tank
Vacuum wandSprayer hose
reel
Priming tank
Engine Spoils tank
Sprayer wand
16 Part No. 77-MAN-31, Rev. 0-1109 E.H. Wachs Company
Chapter 3, Introduction to the Equipment: Standard VMT-2 Equipment
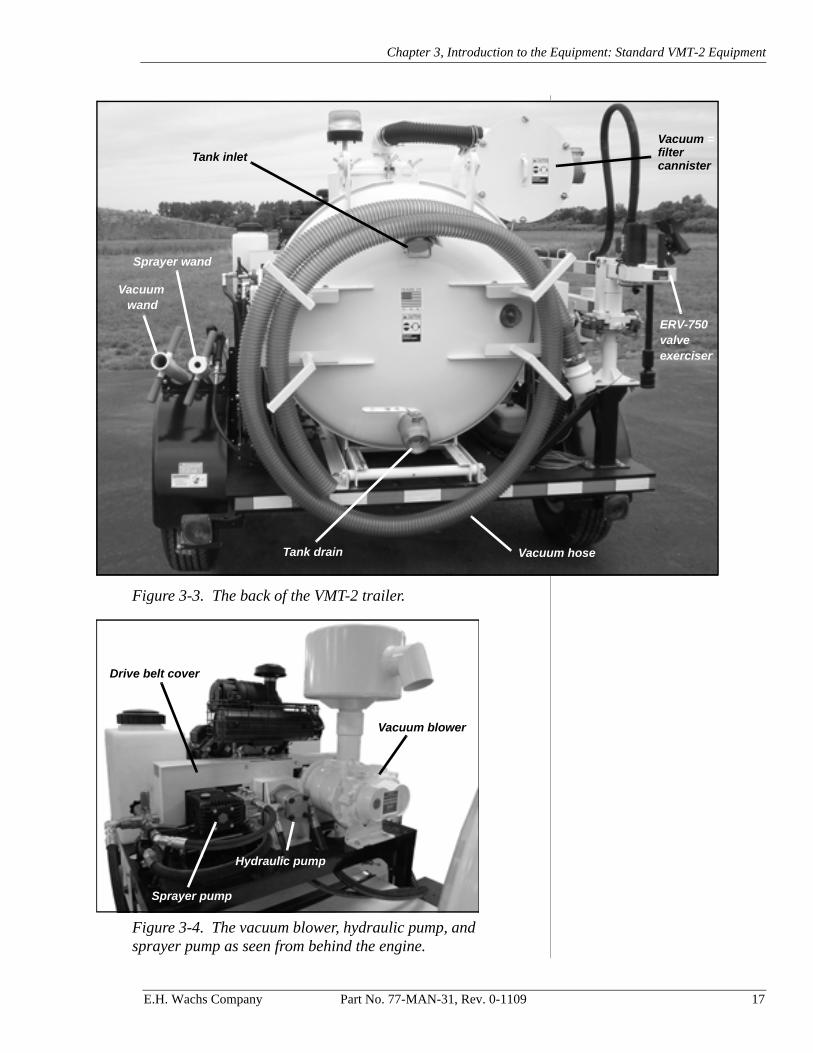
Figure 3-3. The back of the VMT-2 trailer.
Figure 3-4. The vacuum blower, hydraulic pump, and sprayer pump as seen from behind the engine.
Vacuum hose
Tank inlet
Tank drain
ERV-750valveexerciser
Vacuum =filtercannister
Vacuum
Sprayer wand
wand
mp
Drive belt cover
Vacuum blower
Sprayer pump
Hydraulic pump
E.H. Wachs Company Part No. 77-MAN-31, Rev. 0-1109 17
VMT-2 Valve Maintenance Trailer
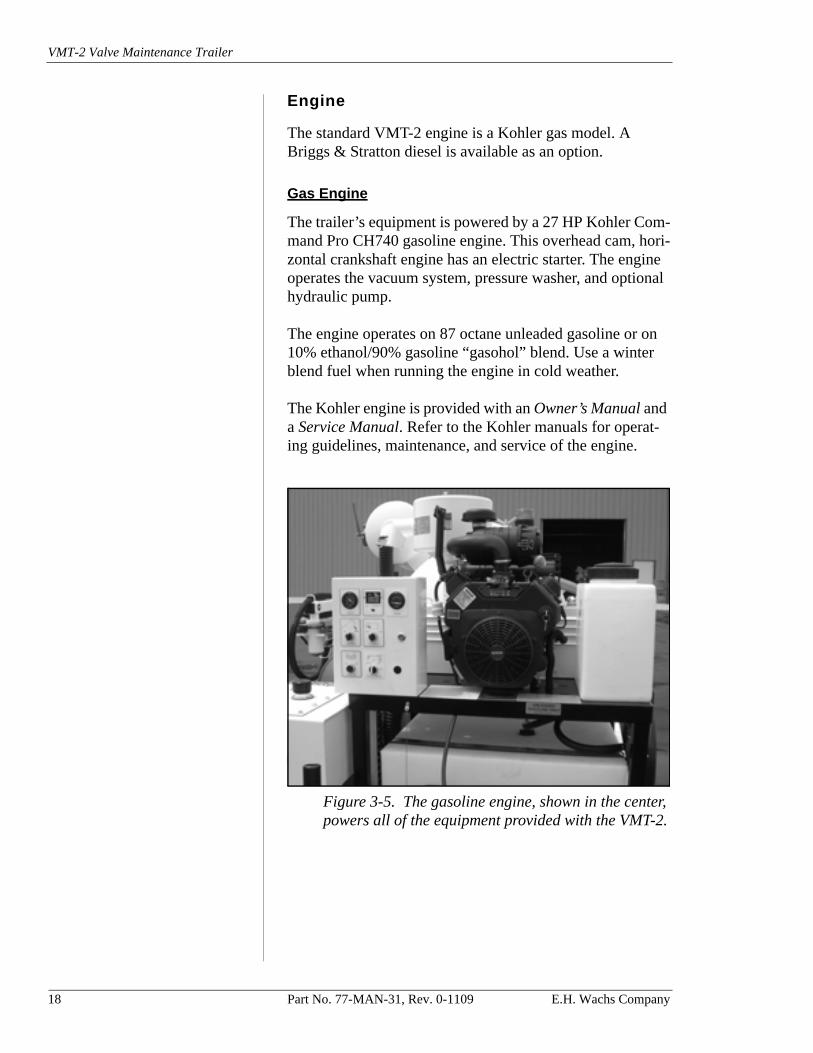
Engine
The standard VMT-2 engine is a Kohler gas model. A Briggs & Stratton diesel is available as an option.
Gas Engine
The trailer’s equipment is powered by a 27 HP Kohler Com-mand Pro CH740 gasoline engine. This overhead cam, hori-zontal crankshaft engine has an electric starter. The engine operates the vacuum system, pressure washer, and optional hydraulic pump.
The engine operates on 87 octane unleaded gasoline or on 10% ethanol/90% gasoline “gasohol” blend. Use a winter blend fuel when running the engine in cold weather.
The Kohler engine is provided with an Owner’s Manual and a Service Manual. Refer to the Kohler manuals for operat-ing guidelines, maintenance, and service of the engine.
Figure 3-5. The gasoline engine, shown in the center, powers all of the equipment provided with the VMT-2.
18 Part No. 77-MAN-31, Rev. 0-1109 E.H. Wachs Company

Chapter 3, Introduction to the Equipment: Standard VMT-2 Equipment
Diesel Engine
An optional diesel engine is available. The Briggs & Strat-ton Vanguard model 582447 is a three-cylinder engine pro-viding 26.5 horsepower. It features an electric starter and is water cooled.
The engine operates on minimum 40 cetane diesel fuel. Do not use kerosene or gasoline in the diesel engine.
The diesel engine is provided with an Operator’s Manual. Refer to the Briggs & Stratton manual for operating guide-lines, maintenance, and service of the engine.
Figure 3-6. The diesel engine is shown. The engine keyswitch and throttle are located remotely.
E.H. Wachs Company Part No. 77-MAN-31, Rev. 0-1109 19
VMT-2 Valve Maintenance Trailer
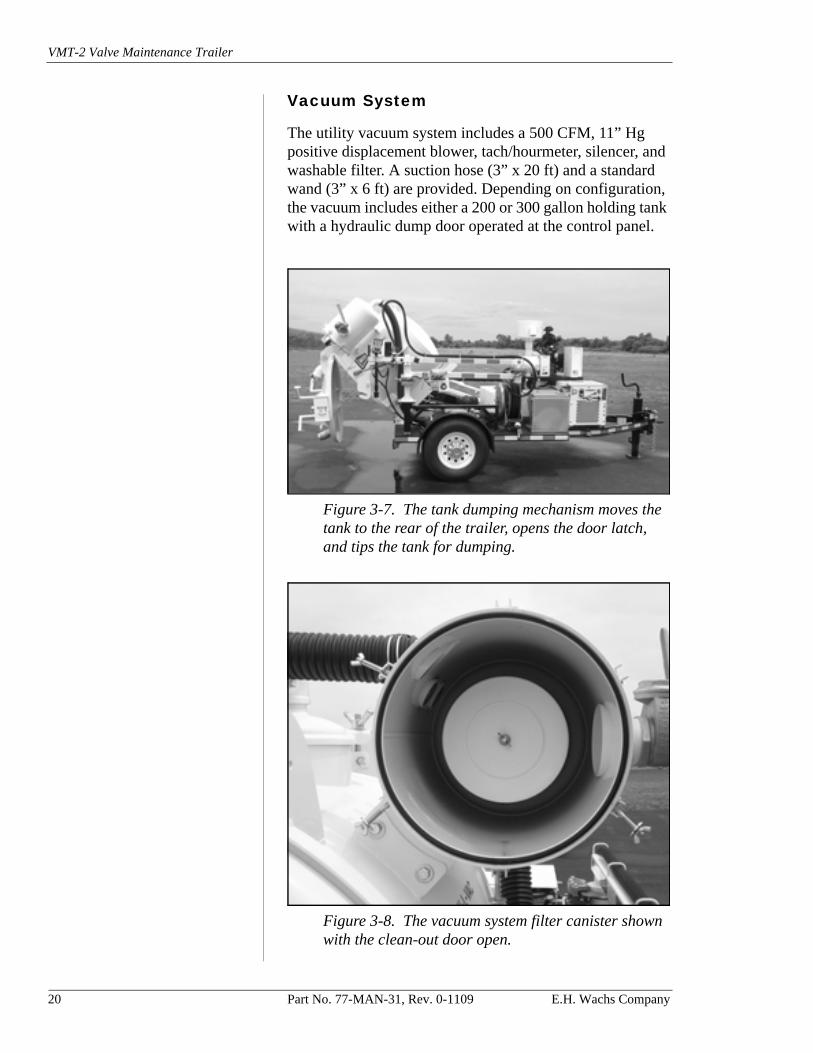
Vacuum System
The utility vacuum system includes a 500 CFM, 11” Hg positive displacement blower, tach/hourmeter, silencer, and washable filter. A suction hose (3” x 20 ft) and a standard wand (3” x 6 ft) are provided. Depending on configuration, the vacuum includes either a 200 or 300 gallon holding tank with a hydraulic dump door operated at the control panel.
Figure 3-7. The tank dumping mechanism moves the tank to the rear of the trailer, opens the door latch, and tips the tank for dumping.
Figure 3-8. The vacuum system filter canister shown with the clean-out door open.
20 Part No. 77-MAN-31, Rev. 0-1109 E.H. Wachs Company
Chapter 3, Introduction to the Equipment: Standard VMT-2 Equipment
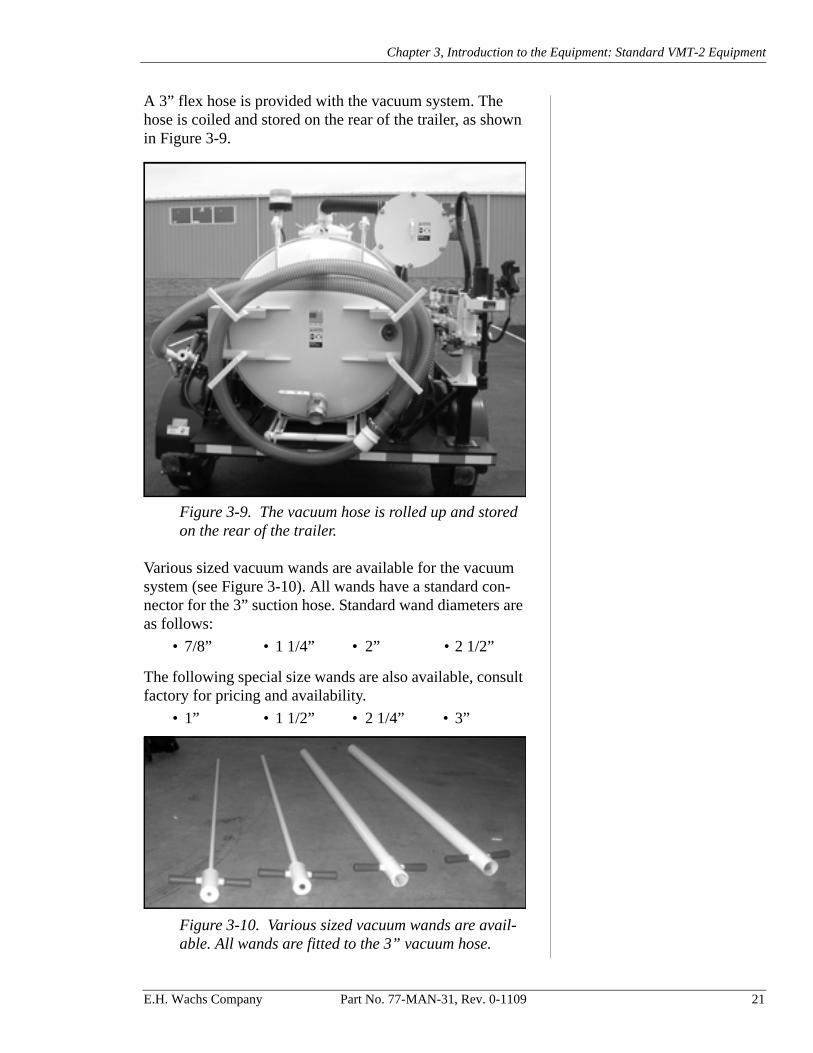
A 3” flex hose is provided with the vacuum system. The hose is coiled and stored on the rear of the trailer, as shown in Figure 3-9.
Figure 3-9. The vacuum hose is rolled up and stored on the rear of the trailer.
Various sized vacuum wands are available for the vacuum system (see Figure 3-10). All wands have a standard con-nector for the 3” suction hose. Standard wand diameters are as follows:
• 7/8” • 1 1/4” • 2” • 2 1/2”
The following special size wands are also available, consult factory for pricing and availability.
• 1” • 1 1/2” • 2 1/4” • 3”
Figure 3-10. Various sized vacuum wands are avail-able. All wands are fitted to the 3” vacuum hose.
E.H. Wachs Company Part No. 77-MAN-31, Rev. 0-1109 21
VMT-2 Valve Maintenance Trailer
Pressure Washer
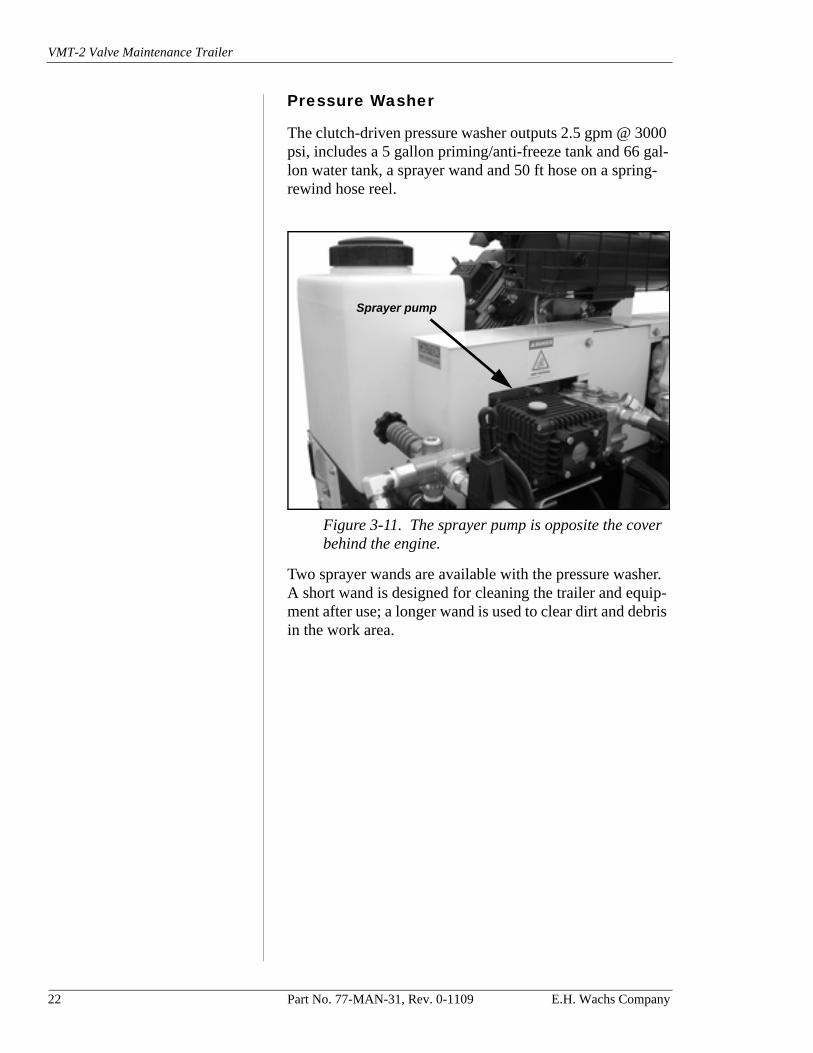
The clutch-driven pressure washer outputs 2.5 gpm @ 3000 psi, includes a 5 gallon priming/anti-freeze tank and 66 gal-lon water tank, a sprayer wand and 50 ft hose on a spring-rewind hose reel.
Figure 3-11. The sprayer pump is opposite the cover behind the engine.
Two sprayer wands are available with the pressure washer. A short wand is designed for cleaning the trailer and equip-ment after use; a longer wand is used to clear dirt and debris in the work area.
Sprayer pump
22 Part No. 77-MAN-31, Rev. 0-1109 E.H. Wachs Company
Chapter 3, Introduction to the Equipment: Optional Equipment
OPTIONAL EQUIPMENT
The following optional equipment can be added to any of the VMT-2 base configurations (Note: not all combinations are possible):
• hydraulic power supply• light bar• hydraulic hose reel• locking job box• spare tire kit• water heater• ERV-750 valve exerciser
The following sections describe these components.
Hydraulic System
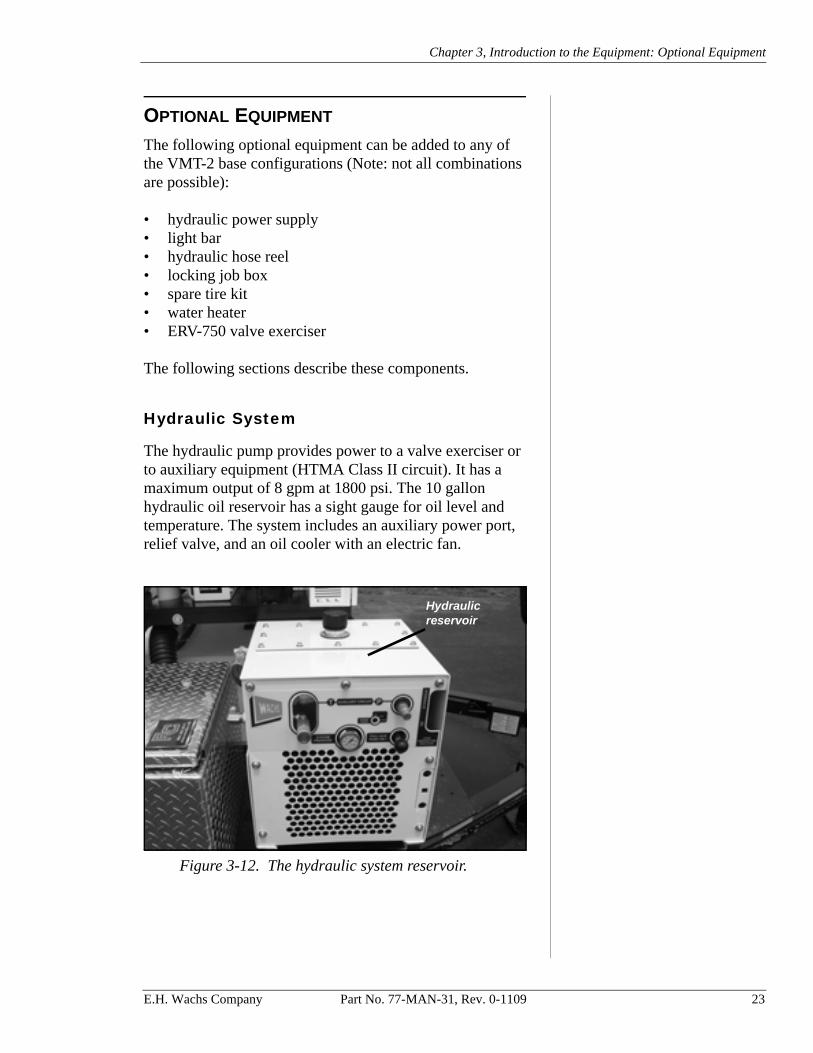
The hydraulic pump provides power to a valve exerciser or to auxiliary equipment (HTMA Class II circuit). It has a maximum output of 8 gpm at 1800 psi. The 10 gallon hydraulic oil reservoir has a sight gauge for oil level and temperature. The system includes an auxiliary power port, relief valve, and an oil cooler with an electric fan.
Figure 3-12. The hydraulic system reservoir.
Hydraulicreservoir
E.H. Wachs Company Part No. 77-MAN-31, Rev. 0-1109 23
VMT-2 Valve Maintenance Trailer
Light Bar
An overhead light bar with work lights and a programmed arrow board is available. The light bar includes an elec-tronic control panel in a watertight enclosure.
Figure 3-13. The light bar included with the upgraded VMT-2.
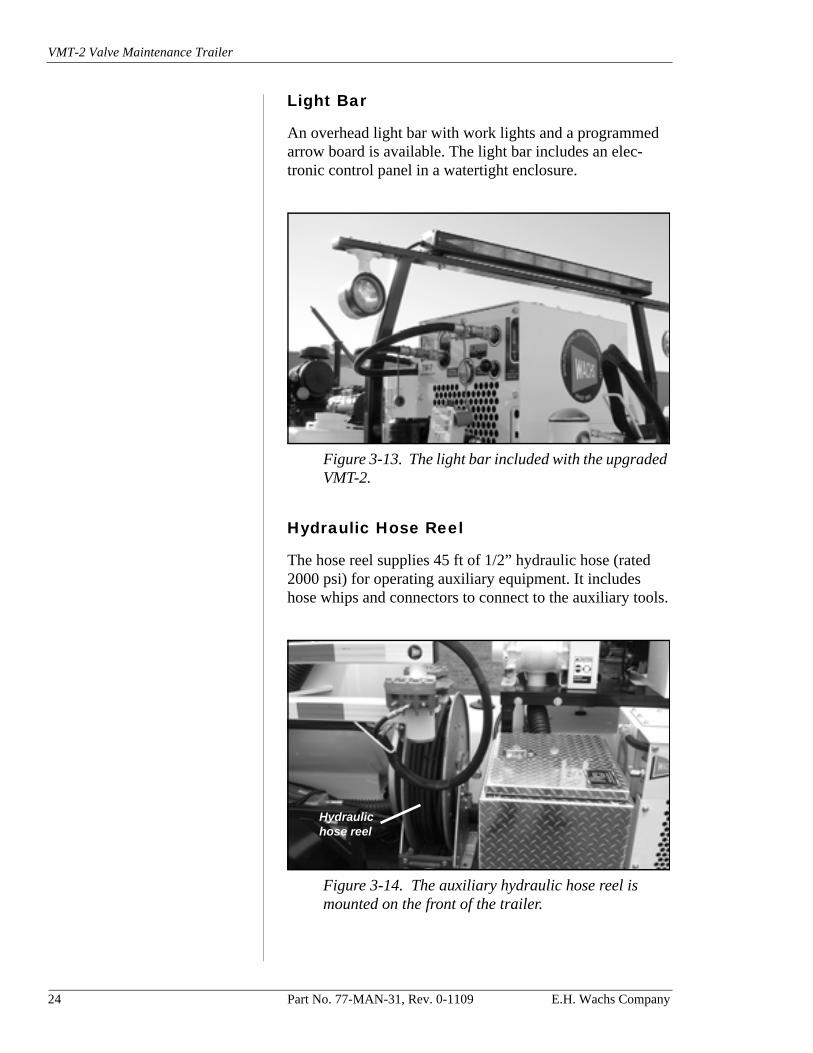
Hydraulic Hose Reel
The hose reel supplies 45 ft of 1/2” hydraulic hose (rated 2000 psi) for operating auxiliary equipment. It includes hose whips and connectors to connect to the auxiliary tools.
Figure 3-14. The auxiliary hydraulic hose reel is mounted on the front of the trailer.
Hydraulic hose reel
24 Part No. 77-MAN-31, Rev. 0-1109 E.H. Wachs Company
Chapter 3, Introduction to the Equipment: Optional Equipment
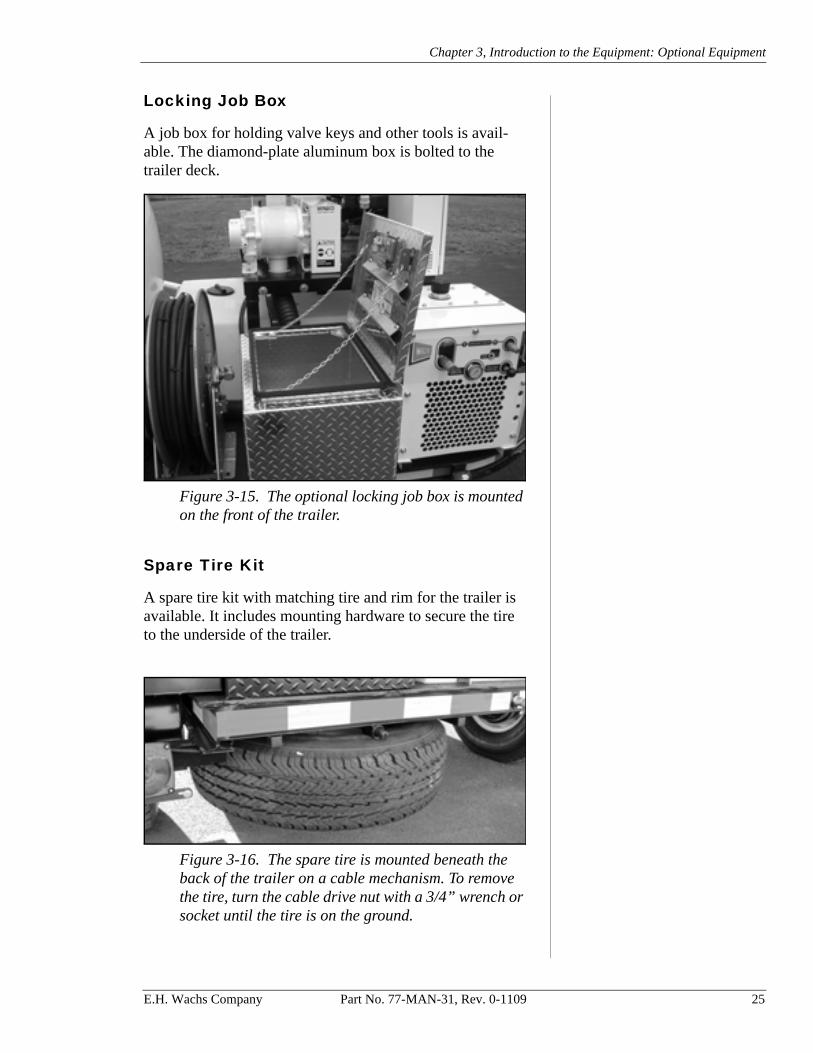
Locking Job Box
A job box for holding valve keys and other tools is avail-able. The diamond-plate aluminum box is bolted to the trailer deck.
Figure 3-15. The optional locking job box is mounted on the front of the trailer.
Spare Tire Kit
A spare tire kit with matching tire and rim for the trailer is available. It includes mounting hardware to secure the tire to the underside of the trailer.
Figure 3-16. The spare tire is mounted beneath the back of the trailer on a cable mechanism. To remove the tire, turn the cable drive nut with a 3/4” wrench or socket until the tire is on the ground.
E.H. Wachs Company Part No. 77-MAN-31, Rev. 0-1109 25
VMT-2 Valve Maintenance Trailer
Water Heater
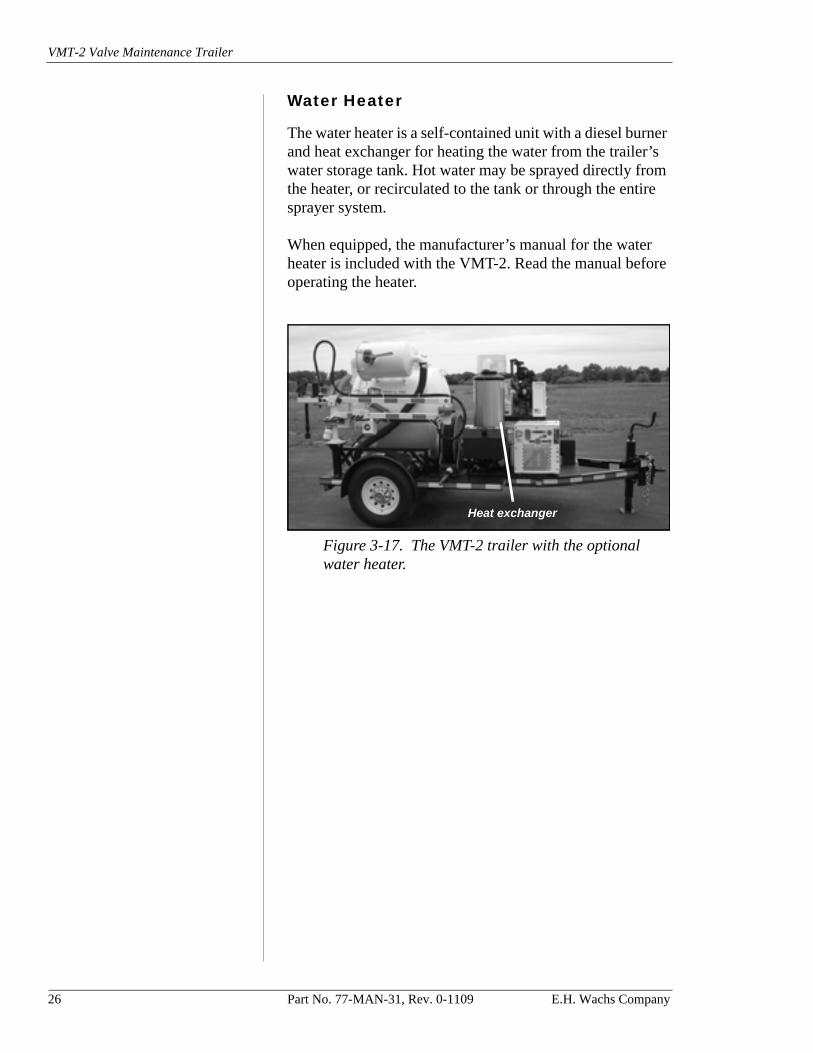
The water heater is a self-contained unit with a diesel burner and heat exchanger for heating the water from the trailer’s water storage tank. Hot water may be sprayed directly from the heater, or recirculated to the tank or through the entire sprayer system.
When equipped, the manufacturer’s manual for the water heater is included with the VMT-2. Read the manual before operating the heater.
Figure 3-17. The VMT-2 trailer with the optional water heater.
Heat exchanger
26 Part No. 77-MAN-31, Rev. 0-1109 E.H. Wachs Company
Chapter 3, Introduction to the Equipment: Optional Equipment
ERV-750 Extended Reach Valve Exerciser
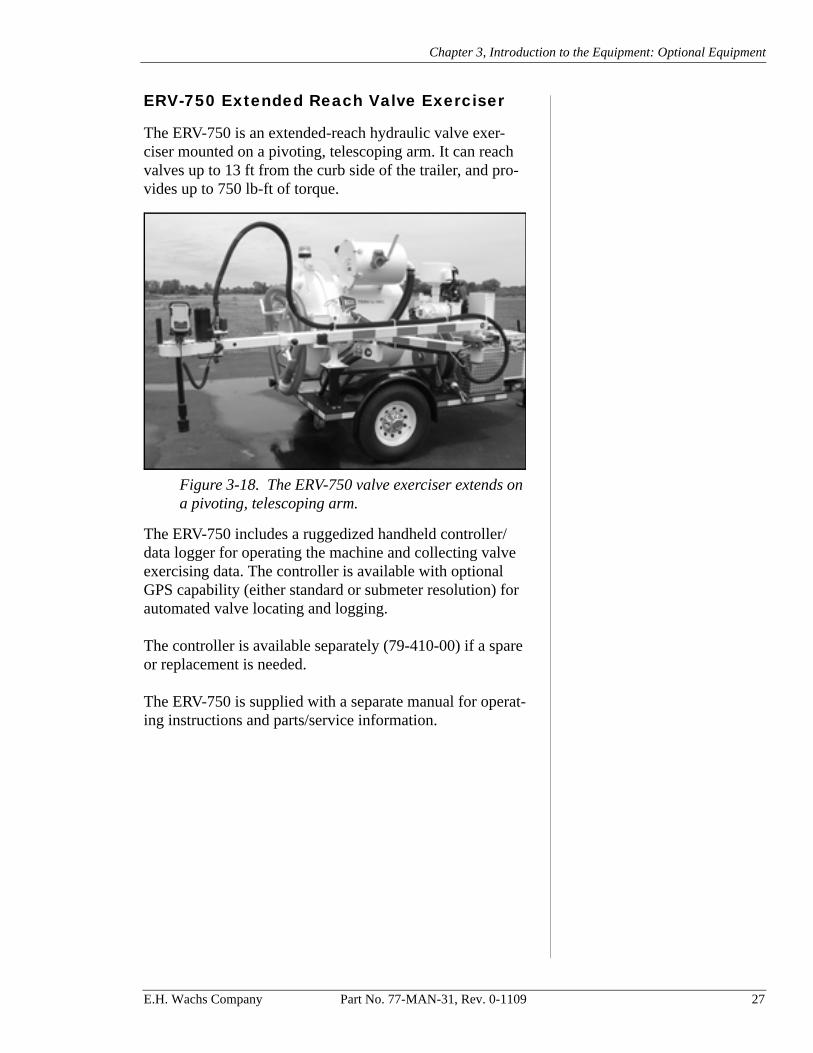
The ERV-750 is an extended-reach hydraulic valve exer-ciser mounted on a pivoting, telescoping arm. It can reach valves up to 13 ft from the curb side of the trailer, and pro-vides up to 750 lb-ft of torque.
Figure 3-18. The ERV-750 valve exerciser extends on a pivoting, telescoping arm.
The ERV-750 includes a ruggedized handheld controller/data logger for operating the machine and collecting valve exercising data. The controller is available with optional GPS capability (either standard or submeter resolution) for automated valve locating and logging.
The controller is available separately (79-410-00) if a spare or replacement is needed.
The ERV-750 is supplied with a separate manual for operat-ing instructions and parts/service information.
E.H. Wachs Company Part No. 77-MAN-31, Rev. 0-1109 27

VMT-2 Valve Maintenance Trailer
This page intentionally left blank.
28 Part No. 77-MAN-31, Rev. 0-1109 E.H. Wachs Company
Chapter 4, Assembly, Disassembly, and Storage
Chapter 4
Assembly, Disassembly, and Storage
The VMT-2 trailer comes with all major components and systems assembled and ready for use. Some assembly of accessories may be required.
This chapter describes how to set up the VMT-2 for initial operation, and how to prepare it for storage and for restora-tion to service.
FIRST-TIME USE
Perform the following checks and procedures before using your VMT-2 trailer for the first time.
• Remove the shrinkwrap and packaging straps.• Fill the engine’s fuel tank.• Fill the water tank.• Fill the priming tank.• Prime the water pump according to the instructions in
Chapter 5.
In This Chapter
FIRST-TIME USE
STORAGE PROCEDURES
TAKING THE EQUIPMENT OUT OF STORAGE
COLD WEATHER STORAGE
E.H. Wachs Company Part No. 77-MAN-31, Rev. 0-1109 29
VMT-2 Valve Maintenance Trailer
STORAGE PROCEDURES
Perform the following procedures before storing the VMT-2 trailer for an extended period of time (at least one week out of service).
Standard Equipment
• Perform the daily maintenance procedure described in Chapter 6.
• Partially release the latches on the tank door so that the door isn’t compressed against the seal. Leave the latches engaged enough to keep the door from swinging open freely.
• Add fuel stabilizer to the engine fuel tank, or drain the tank.
• Drain the water tank.
Optional Equipment
• Add fuel stabilizer to the hot water kit fuel tank, or drain the tank.
• Place the optional cover on the ERV-750 valve exer-ciser.
30 Part No. 77-MAN-31, Rev. 0-1109 E.H. Wachs Company
Chapter 4, Assembly, Disassembly, and Storage: Taking the Equipment out of Storage
TAKING THE EQUIPMENT OUT OF STORAGE
Perform the following checks and procedures when restor-ing the equipment to service after extended storage.
Standard Equipment
Check the following:• Engine oil level• Blower pump oil level• Hydraulic oil level in the tank• Blower and hydraulic pump belts• All gaskets for wear or deterioration• Tank door seal• Condition and air pressure of the tires (including the
optional spare tire)• Trailer lights
On sealed fuel tanks, use the vented fuel tank cap when using the VMT-2 in warm weather.
• Vacuum system filter• Battery, charge if necessary• Trailer break-away system battery, charge if necessary• Once all checks are satisfactorily completed, fill the
engine fuel tank. On sealed fuel tanks, use the vented fuel tank cap when operating the VMT-2 in warm weather.
Optional Equipment
When optional equipment is installed, check the following:• Light bar - check operation• Hot water kit - check burner and controls, fill hot water
kit fuel tank.
NOTE
E.H. Wachs Company Part No. 77-MAN-31, Rev. 0-1109 31
VMT-2 Valve Maintenance Trailer
Cycling Antifreeze out of the System
Propylene glycol (PG) anti-freeze comes in two types, motor vehicle and RV/Marine. These antifreezes are intended for completely differ-ent end uses. Use only RV/Marine antifreeze in the sprayer system. When cycling antifreeze out of the system, do not dump anti-freeze on the ground or into storm water drains. Cycle it back into the priming tank, then remove the priming tank and dispose of the antifreeze in an approved manner.
Use fresh water to cycle antifreeze out of the sprayer system when returning the unit to service or prior to starting the unit after it has been stored during freezing weather. If the optional water heater is installed, heated water may be used.
1. Fill the water tank with fresh water.
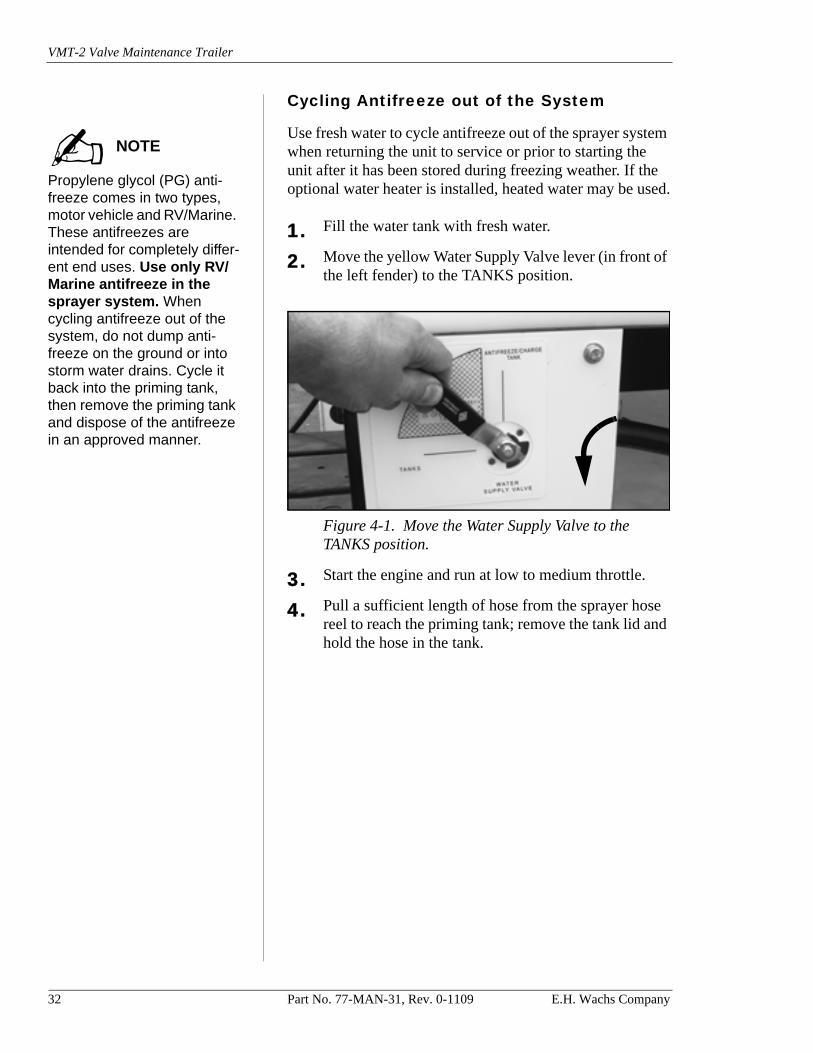
2. Move the yellow Water Supply Valve lever (in front of the left fender) to the TANKS position.
Figure 4-1. Move the Water Supply Valve to the TANKS position.
3. Start the engine and run at low to medium throttle.
4. Pull a sufficient length of hose from the sprayer hose reel to reach the priming tank; remove the tank lid and hold the hose in the tank.
NOTE
32 Part No. 77-MAN-31, Rev. 0-1109 E.H. Wachs Company
Chapter 4, Assembly, Disassembly, and Storage: Taking the Equipment out of Storage
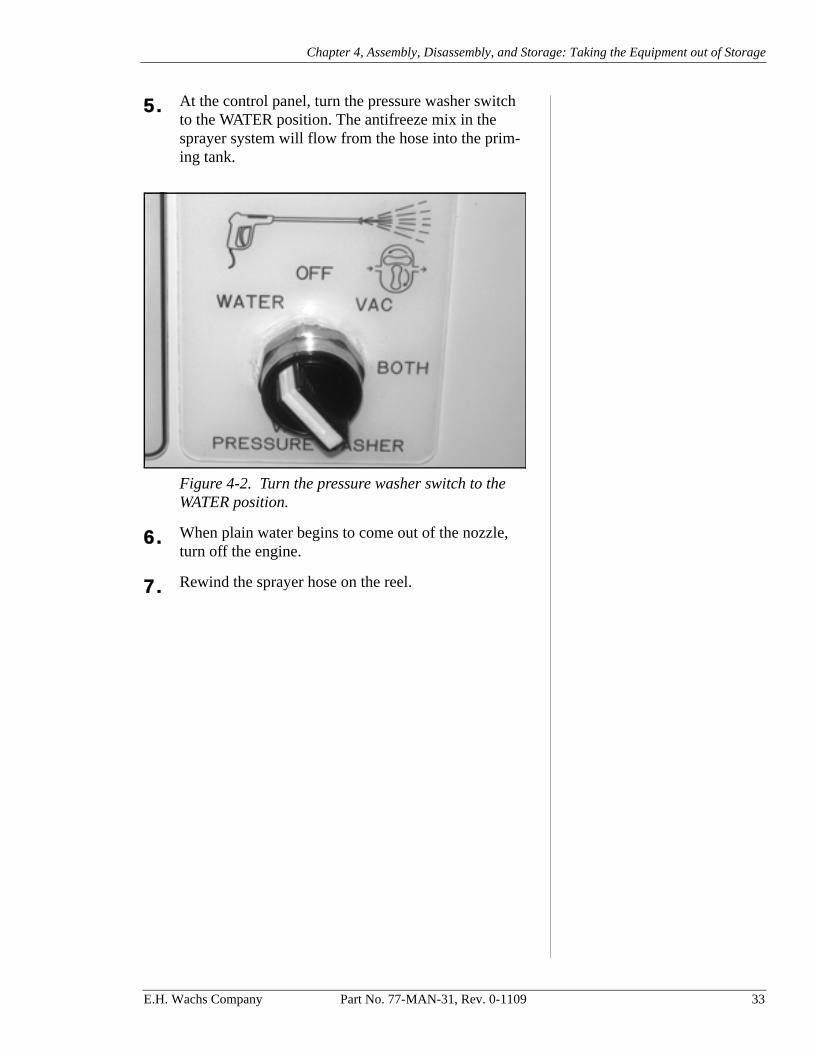
5. At the control panel, turn the pressure washer switch to the WATER position. The antifreeze mix in the sprayer system will flow from the hose into the prim-ing tank.
Figure 4-2. Turn the pressure washer switch to the WATER position.
6. When plain water begins to come out of the nozzle, turn off the engine.
7. Rewind the sprayer hose on the reel.
E.H. Wachs Company Part No. 77-MAN-31, Rev. 0-1109 33
VMT-2 Valve Maintenance Trailer
COLD WEATHER STORAGE
Propylene glycol (PG) anti-freeze comes in two types, motor vehicle and RV/Marine. These antifreezes are intended for completely differ-ent end uses. Use only RV/Marine antifreeze in the sprayer system. When cycling antifreeze out of the system, do not dump anti-freeze on the ground or into storm water drains. Cycle it back into the priming tank, then remove the priming tank and dispose of the antifreeze in an approved manner.
When storing the trailer in sub-freezing weather, even for short periods, perform the following special procedures.
Pressure Washer
Before storing the trailer in sub-freezing weather (32° F/ 0° C), cycle RV/marine antifreeze through the sprayer sys-tem using the following procedure.
Trailer Without Water Heater
1. Ensure that the priming tank is filled with an appropri-ate RV/marine antifreeze mix for the environmental temperature.
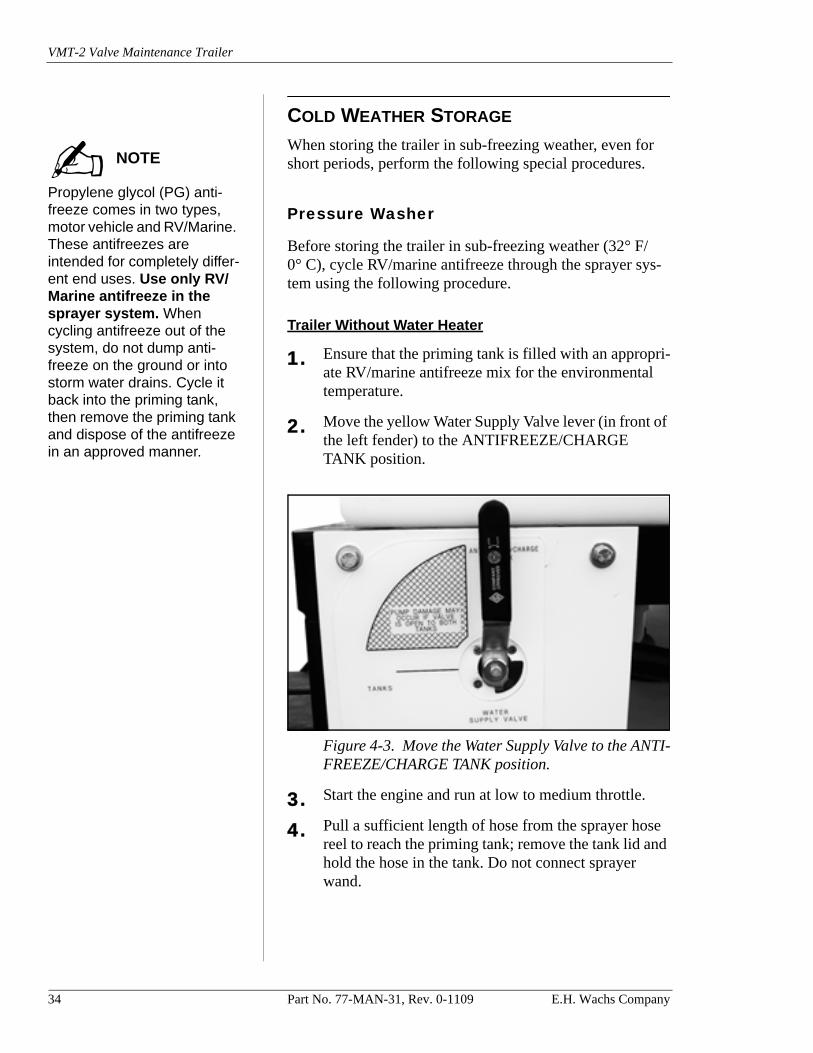
2. Move the yellow Water Supply Valve lever (in front of the left fender) to the ANTIFREEZE/CHARGE TANK position.
Figure 4-3. Move the Water Supply Valve to the ANTI-FREEZE/CHARGE TANK position.
3. Start the engine and run at low to medium throttle.
4. Pull a sufficient length of hose from the sprayer hose reel to reach the priming tank; remove the tank lid and hold the hose in the tank. Do not connect sprayer wand.
NOTE
34 Part No. 77-MAN-31, Rev. 0-1109 E.H. Wachs Company
Chapter 4, Assembly, Disassembly, and Storage: Cold Weather Storage
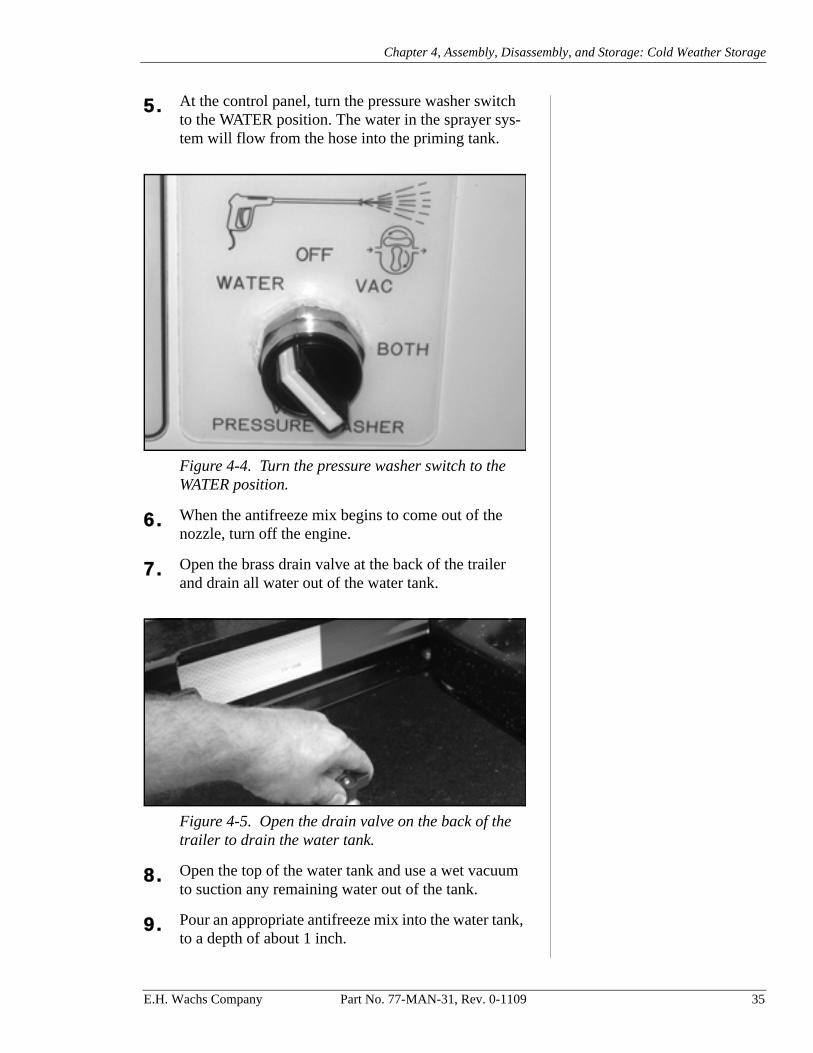
5. At the control panel, turn the pressure washer switch to the WATER position. The water in the sprayer sys-tem will flow from the hose into the priming tank.
Figure 4-4. Turn the pressure washer switch to the WATER position.
6. When the antifreeze mix begins to come out of the nozzle, turn off the engine.
7. Open the brass drain valve at the back of the trailer and drain all water out of the water tank.
Figure 4-5. Open the drain valve on the back of the trailer to drain the water tank.
8. Open the top of the water tank and use a wet vacuum to suction any remaining water out of the tank.
9. Pour an appropriate antifreeze mix into the water tank, to a depth of about 1 inch.
E.H. Wachs Company Part No. 77-MAN-31, Rev. 0-1109 35
VMT-2 Valve Maintenance Trailer
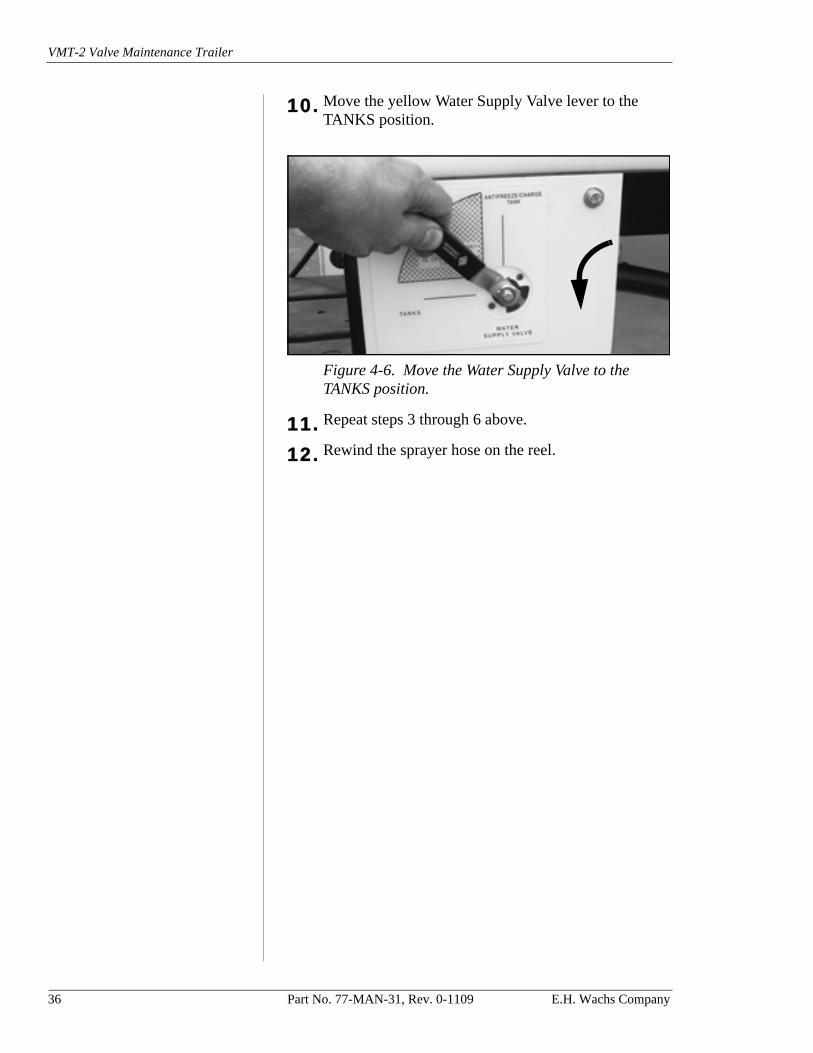
10. Move the yellow Water Supply Valve lever to the TANKS position.
Figure 4-6. Move the Water Supply Valve to the TANKS position.
11. Repeat steps 3 through 6 above.
12. Rewind the sprayer hose on the reel.
36 Part No. 77-MAN-31, Rev. 0-1109 E.H. Wachs Company
Chapter 4, Assembly, Disassembly, and Storage: Cold Weather Storage
Trailer With Water Heater
1. Ensure that the priming tank is filled with an appropri-ate RV/marine antifreeze mix for the environmental temperature.
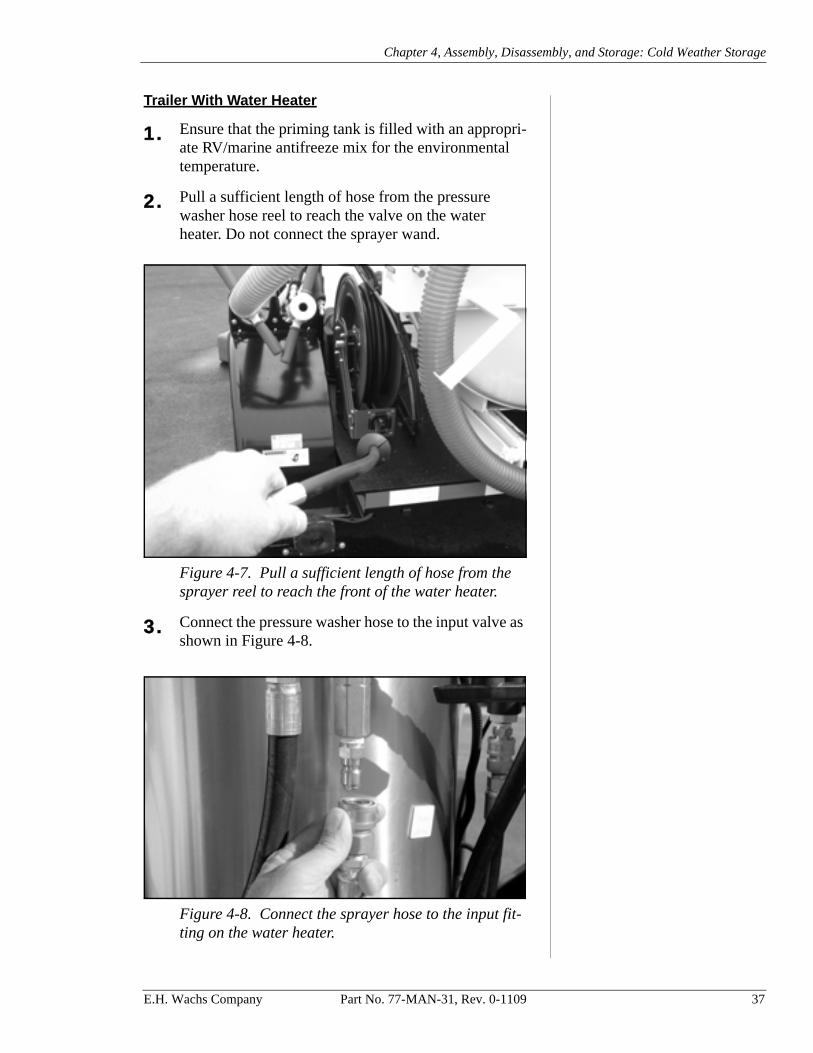
2. Pull a sufficient length of hose from the pressure washer hose reel to reach the valve on the water heater. Do not connect the sprayer wand.
Figure 4-7. Pull a sufficient length of hose from the sprayer reel to reach the front of the water heater.
3. Connect the pressure washer hose to the input valve as shown in Figure 4-8.
Figure 4-8. Connect the sprayer hose to the input fit-ting on the water heater.
E.H. Wachs Company Part No. 77-MAN-31, Rev. 0-1109 37
VMT-2 Valve Maintenance Trailer
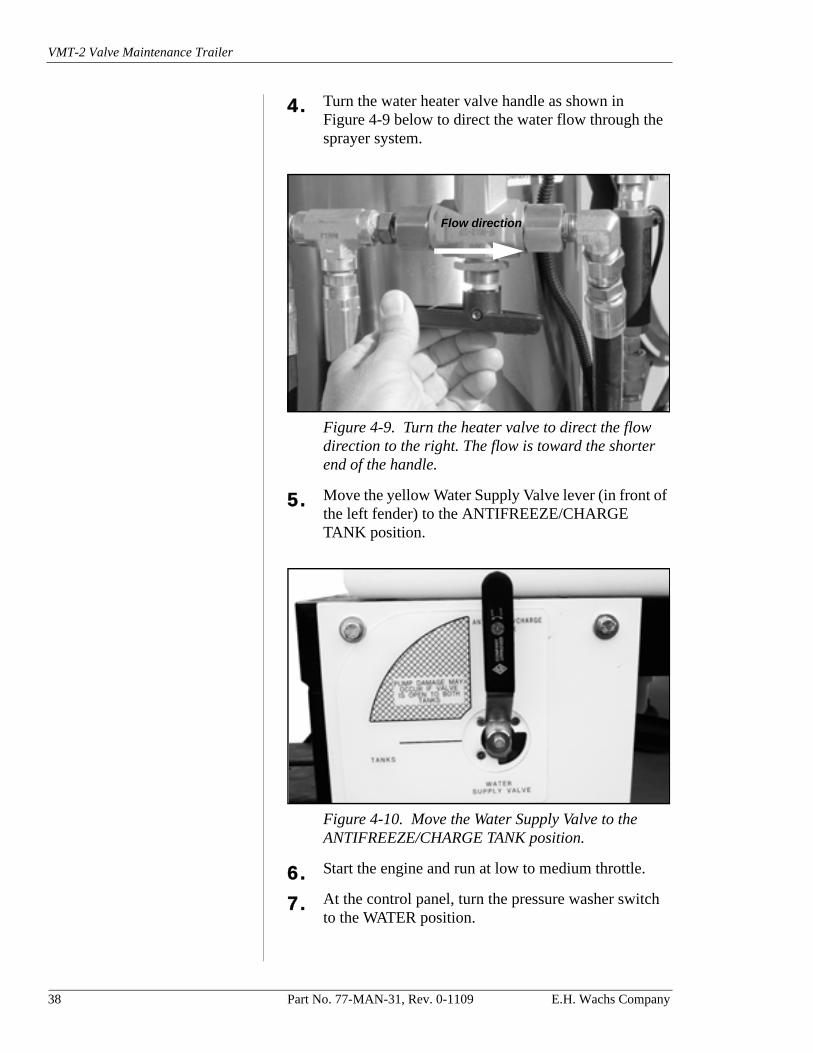
4. Turn the water heater valve handle as shown in Figure 4-9 below to direct the water flow through the sprayer system.
Figure 4-9. Turn the heater valve to direct the flow direction to the right. The flow is toward the shorter end of the handle.
5. Move the yellow Water Supply Valve lever (in front of the left fender) to the ANTIFREEZE/CHARGE TANK position.
Figure 4-10. Move the Water Supply Valve to the ANTIFREEZE/CHARGE TANK position.
6. Start the engine and run at low to medium throttle.
7. At the control panel, turn the pressure washer switch to the WATER position.
Flow direction
38 Part No. 77-MAN-31, Rev. 0-1109 E.H. Wachs Company
Chapter 4, Assembly, Disassembly, and Storage: Cold Weather Storage
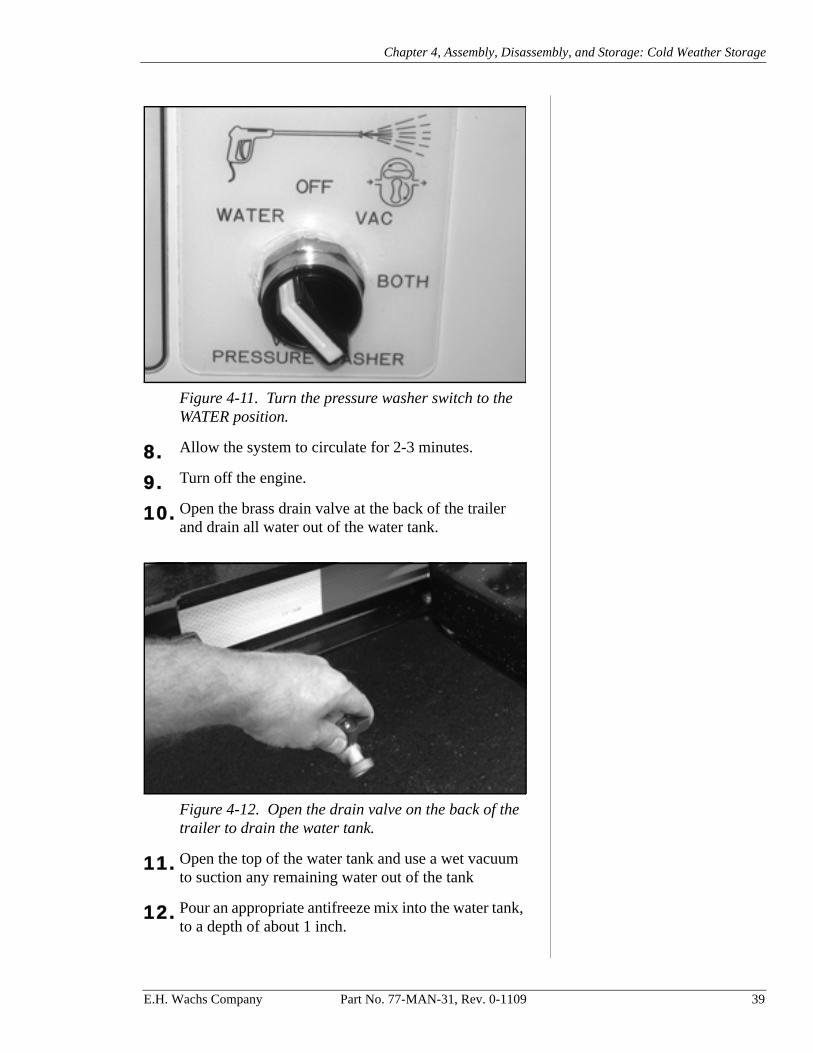
Figure 4-11. Turn the pressure washer switch to the WATER position.
8. Allow the system to circulate for 2-3 minutes.
9. Turn off the engine.
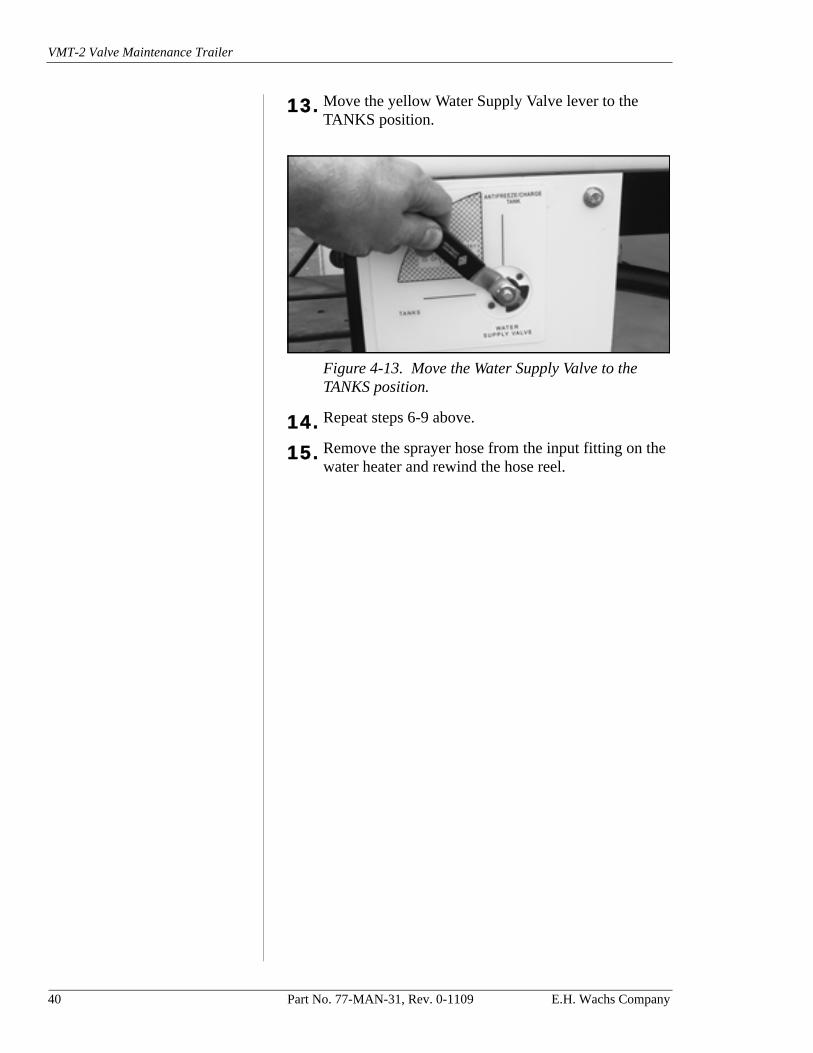
10. Open the brass drain valve at the back of the trailer and drain all water out of the water tank.
Figure 4-12. Open the drain valve on the back of the trailer to drain the water tank.
11. Open the top of the water tank and use a wet vacuum to suction any remaining water out of the tank
12. Pour an appropriate antifreeze mix into the water tank, to a depth of about 1 inch.
E.H. Wachs Company Part No. 77-MAN-31, Rev. 0-1109 39
VMT-2 Valve Maintenance Trailer
13. Move the yellow Water Supply Valve lever to the TANKS position.
Figure 4-13. Move the Water Supply Valve to the TANKS position.
14. Repeat steps 6-9 above.
15. Remove the sprayer hose from the input fitting on the water heater and rewind the hose reel.
40 Part No. 77-MAN-31, Rev. 0-1109 E.H. Wachs Company

Chapter 5, Operating Instructions
Chapter 5
Operating Instructions
This chapter provides instructions for towing the VMT-2 trailer and starting the engine to power the trailer’s equip-ment.
Specific sections of the chapter provide instructions for operating the following standard and optional components of the VMT-2 system:
• vacuum system• pressure washer• light bar• hydraulic hose reel• hot water kit• valve exerciser
TRAILER FEATURES
Towing the Trailer
Before towing the trailer:
• Take the key out of the engine keyswitch.• Ensure that the:
- hitch is properly attached and the safety chains are attached to the vehicle.
- trailer tail lights, brake lights, and turn signals are working.
- jack stand on the trailer hitch is raised.
In This Chapter
TRAILER FEATURES
STARTING AND RUNNING THE ENGINE
VACUUM SYSTEM OPERATION
PRESSURE WASHER OPERATION
LIGHT BAR OPERATION
HYDRAULIC HOSE REEL OPERATION
WATER HEATER OPERATION
VALVE EXERCISER
E.H. Wachs Company Part No. 77-MAN-31, Rev. 0-1109 41
VMT-2 Valve Maintenance Trailer
- tires are properly inflated.- all hoses, wands, and other attachments are securely
stored on the trailer.- the optional locking job box (if installed) is closed.
• If the ERV-750 is installed, ensure that it is secured to the trailer bed with the latches, remove the controller from its cradle and put it in its storage case. Store the case in the vehicle.
Spare Tire Option
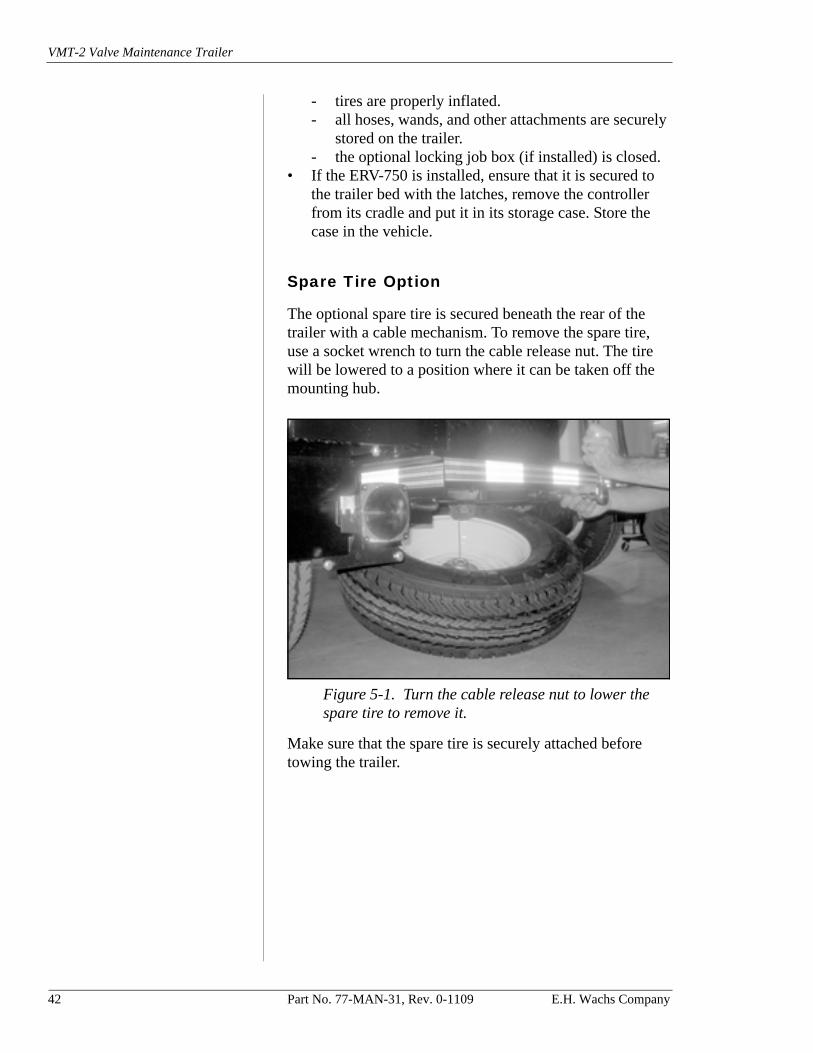
The optional spare tire is secured beneath the rear of the trailer with a cable mechanism. To remove the spare tire, use a socket wrench to turn the cable release nut. The tire will be lowered to a position where it can be taken off the mounting hub.
Figure 5-1. Turn the cable release nut to lower the spare tire to remove it.
Make sure that the spare tire is securely attached before towing the trailer.
42 Part No. 77-MAN-31, Rev. 0-1109 E.H. Wachs Company
Chapter 5, Operating Instructions: Trailer Features
Locking Job Box Option
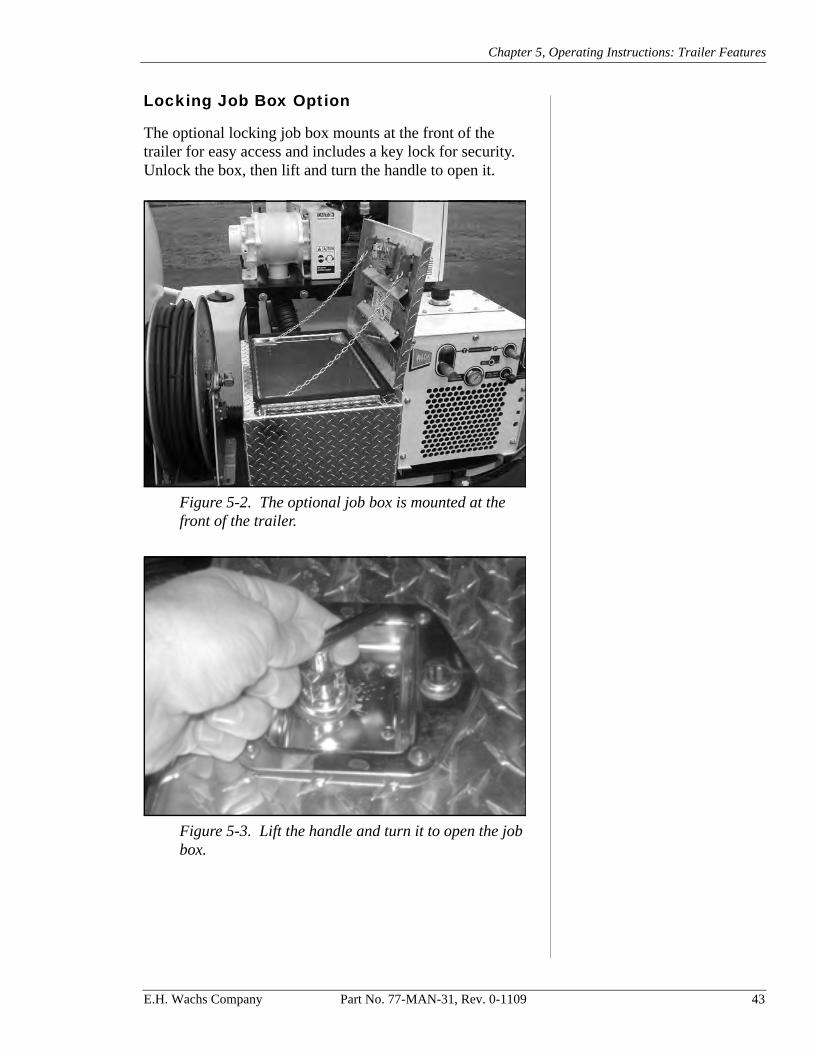
The optional locking job box mounts at the front of the trailer for easy access and includes a key lock for security. Unlock the box, then lift and turn the handle to open it.
Figure 5-2. The optional job box is mounted at the front of the trailer.
Figure 5-3. Lift the handle and turn it to open the job box.
E.H. Wachs Company Part No. 77-MAN-31, Rev. 0-1109 43
VMT-2 Valve Maintenance Trailer
STARTING AND RUNNING THE ENGINE
The engine MUST be running to operate the vacuum, pres-sure washer, valve exerciser, or auxiliary hydraulic equip-ment.
The engine keyswitch must be in the ON position to operate any of the equipment on the VMT-2. Electrical demand from on board equipment can exceed the capacity of the trailer engine's charging circuit. This is especially true when moving and dumping the spoils tank. The supplied deep cycle battery provides sufficient reserve to allow temporary operation of all electrical accessories; however it is strongly recommended to run the engine at a minimum of 2800 rpm when using any electrical accessory. When moving the spoils tank, run the engine at this rpm for a period of 10 times usage to recharge the battery to the state before mov-ing/dumping the tank (for example; if draining, dumping and stowage of the spoils tank takes two minutes, run the engine at 2800 rpm or more for at least 20 minutes). Use of other electrically powered accessories while recharging will lengthen the time required or prevent recharging of the bat-tery. After heavy or long usage it may be necessary to charge the battery overnight to ensure proper charge level. If needed, only replace the trailer battery with a similar sized deep cycle battery.
NOTE
44 Part No. 77-MAN-31, Rev. 0-1109 E.H. Wachs Company

Chapter 5, Operating Instructions: Starting and Running the Engine
Gas Engine
Use 87 octane unleaded gasoline or gasohol (10% ethanol/90% unleaded gas) in the engine. In cold weather, use win-ter blend fuel for easier starting.
Before using the engine, read the operating guidelines and instructions in the Kohler Owner’s Manual.
On sealed fuel tanks, use the vented fuel tank cap when using the VMT-2 in warm weather.
1. Check the gas tank to make sure that it has sufficient fuel for the job.
2. Set the choke lever (top lever) all the way on (to the left), as shown in Figure 5-4.
3. Set the throttle lever (bottom lever) midway between slow and fast, as shown in Figure 5-4.
Figure 5-4. To start the engine, set the choke lever (top) all the way to the left, and the throttle lever (bot-tom) in the middle.
NOTE
E.H. Wachs Company Part No. 77-MAN-31, Rev. 0-1109 45
VMT-2 Valve Maintenance Trailer
Do not crank the engine con-tinuously for more than 10 seconds at a time. If the engine does not start, wait 60 seconds before trying to re-start it.
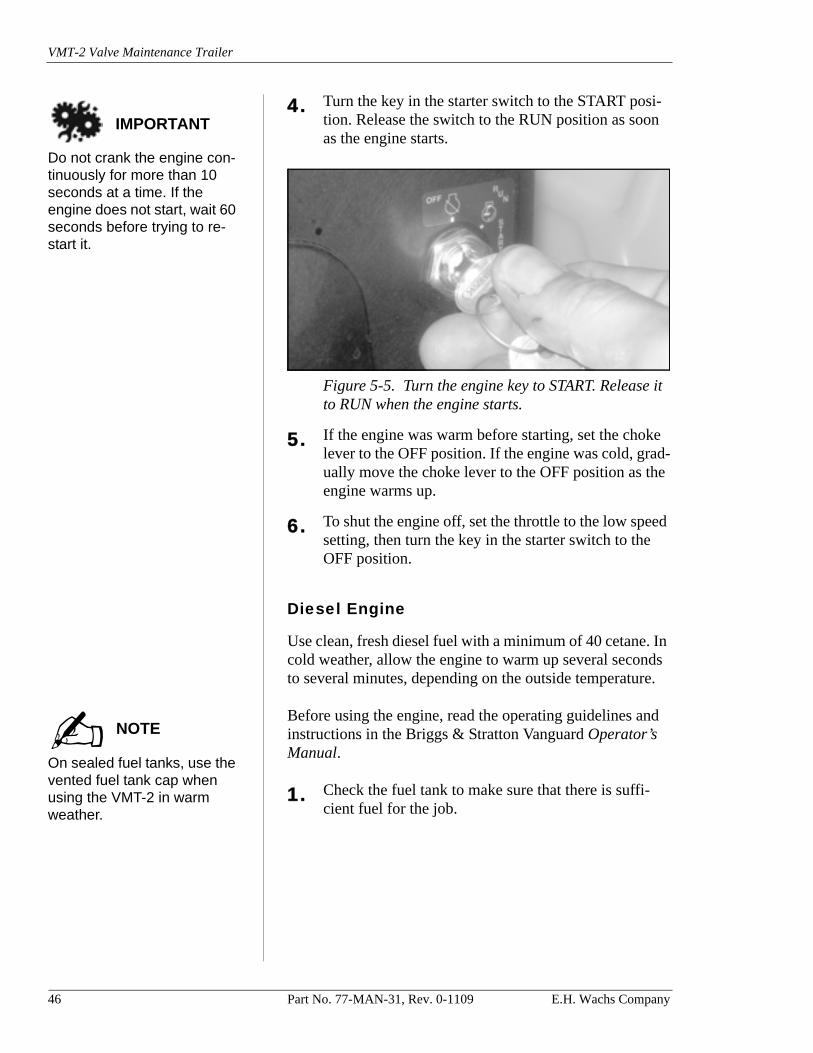
4. Turn the key in the starter switch to the START posi-tion. Release the switch to the RUN position as soon as the engine starts.
Figure 5-5. Turn the engine key to START. Release it to RUN when the engine starts.
5. If the engine was warm before starting, set the choke lever to the OFF position. If the engine was cold, grad-ually move the choke lever to the OFF position as the engine warms up.
6. To shut the engine off, set the throttle to the low speed setting, then turn the key in the starter switch to the OFF position.
Diesel Engine
Use clean, fresh diesel fuel with a minimum of 40 cetane. In cold weather, allow the engine to warm up several seconds to several minutes, depending on the outside temperature.
On sealed fuel tanks, use the vented fuel tank cap when using the VMT-2 in warm weather.
Before using the engine, read the operating guidelines and instructions in the Briggs & Stratton Vanguard Operator’s Manual.
1. Check the fuel tank to make sure that there is suffi-cient fuel for the job.
IMPORTANT
NOTE
46 Part No. 77-MAN-31, Rev. 0-1109 E.H. Wachs Company
Chapter 5, Operating Instructions: Starting and Running the Engine
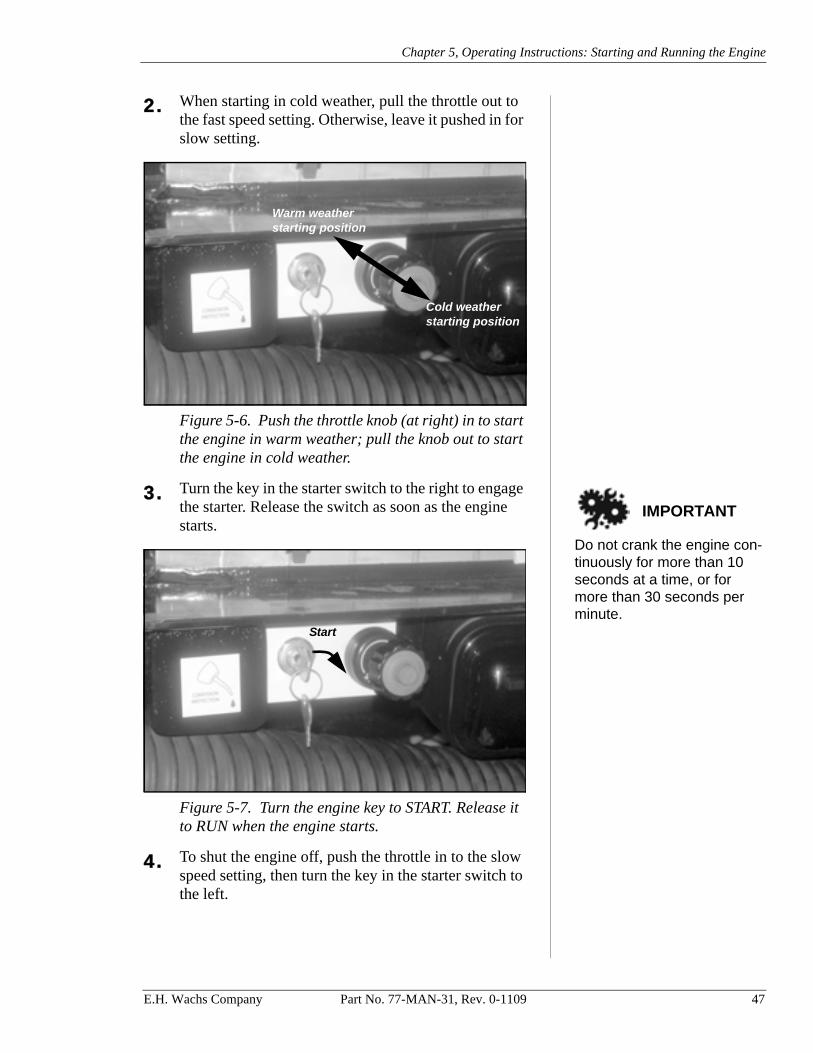
2. When starting in cold weather, pull the throttle out to the fast speed setting. Otherwise, leave it pushed in for slow setting.
Figure 5-6. Push the throttle knob (at right) in to start the engine in warm weather; pull the knob out to start the engine in cold weather.
Do not crank the engine con-tinuously for more than 10 seconds at a time, or for more than 30 seconds per minute.
3. Turn the key in the starter switch to the right to engage the starter. Release the switch as soon as the engine starts.
Figure 5-7. Turn the engine key to START. Release it to RUN when the engine starts.
4. To shut the engine off, push the throttle in to the slow speed setting, then turn the key in the starter switch to the left.
Warm weather starting position
Cold weather starting position
IMPORTANT
Start
E.H. Wachs Company Part No. 77-MAN-31, Rev. 0-1109 47
VMT-2 Valve Maintenance Trailer
VACUUM SYSTEM OPERATION
Selecting a Vacuum Wand
Vacuum wands of different diameters are available. A stan-dard 2-1/2” (inside diameter) wand is provided with the vacuum system. A 1-1/4” wand is the most commonly used optional size. See Chapter 9 for a list of available wand sizes.
In general, use the largest wand possible for the work envi-ronment. Larger wands pick up more debris faster and are less likely to clog. Use a smaller wand when working in tight areas.
Setup and Operation
The standard suction hose is 20 feet long (longer length hoses can be ordered).
Before setting up the vacuum system, position the VMT-2 trailer so that the suction hose reaches the work area.
Ensure that the:• latch on the dump door of the holding tank is fully
engaged.• holding tank drain valve is closed.• vacuum break lever on the back of the trailer is in the
CLOSED position.
Leave the trailer attached to the vehicle when operating the vacuum. A self-standing trailer could move as the vac-uum tank fills, causing opera-tor injury or damage to the equipment.
1. Park the trailer on level ground near the work site so that the suction hose reaches the work area. Keep the trailer attached to the vehicle when operating the vac-uum.
2. Remove the suction hose from its storage location on the rear of the trailer and lay it out on the ground.
NOTE
WARNING
48 Part No. 77-MAN-31, Rev. 0-1109 E.H. Wachs Company
Chapter 5, Operating Instructions: Vacuum System Operation
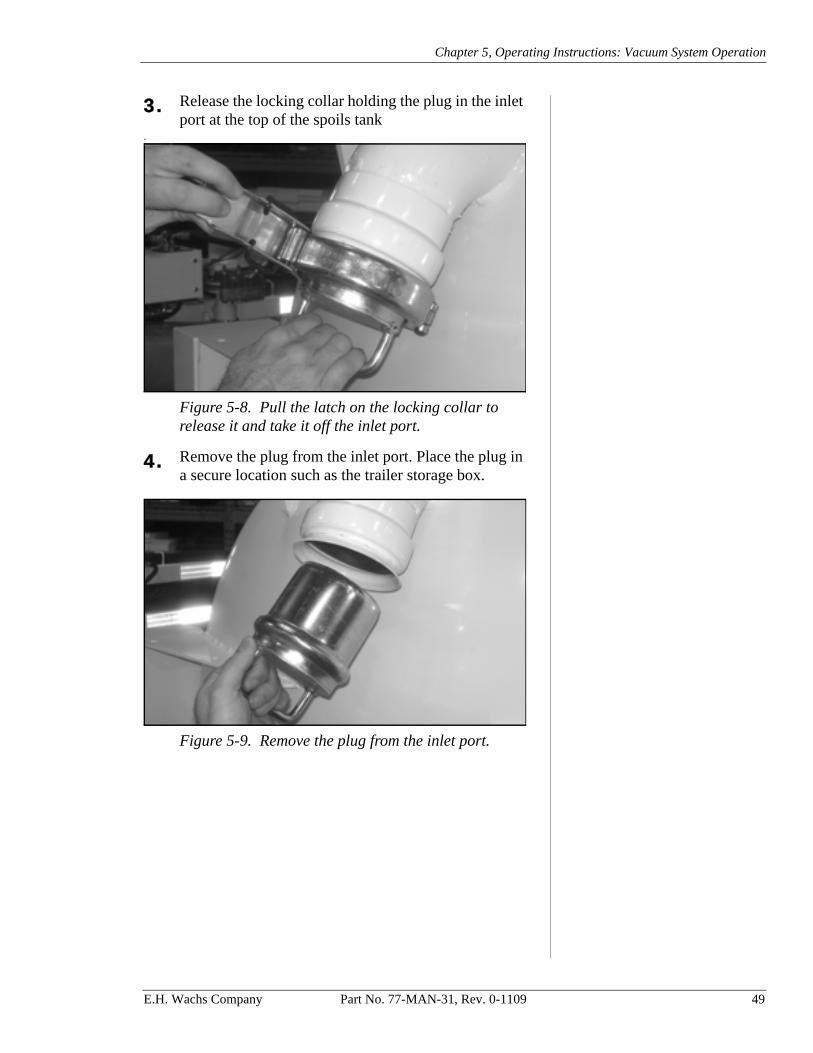
3. Release the locking collar holding the plug in the inlet port at the top of the spoils tank
.
Figure 5-8. Pull the latch on the locking collar to release it and take it off the inlet port.
4. Remove the plug from the inlet port. Place the plug in a secure location such as the trailer storage box.
Figure 5-9. Remove the plug from the inlet port.
E.H. Wachs Company Part No. 77-MAN-31, Rev. 0-1109 49

VMT-2 Valve Maintenance Trailer
5. Insert the port fitting end of the suction hose into the inlet port. Put the locking collar over the fitting and close the latch to secure the hose.
Figure 5-10. Insert the hose fitting into the inlet port and attach it with the locking collar.
6. Slide the other end of the hose over the vacuum wand. The hose will fit tightly. Insert the wand far enough to install the hose clamp.
Figure 5-11. Insert the wand fitting into the end of the vacuum hose.
50 Part No. 77-MAN-31, Rev. 0-1109 E.H. Wachs Company
Chapter 5, Operating Instructions: Vacuum System Operation
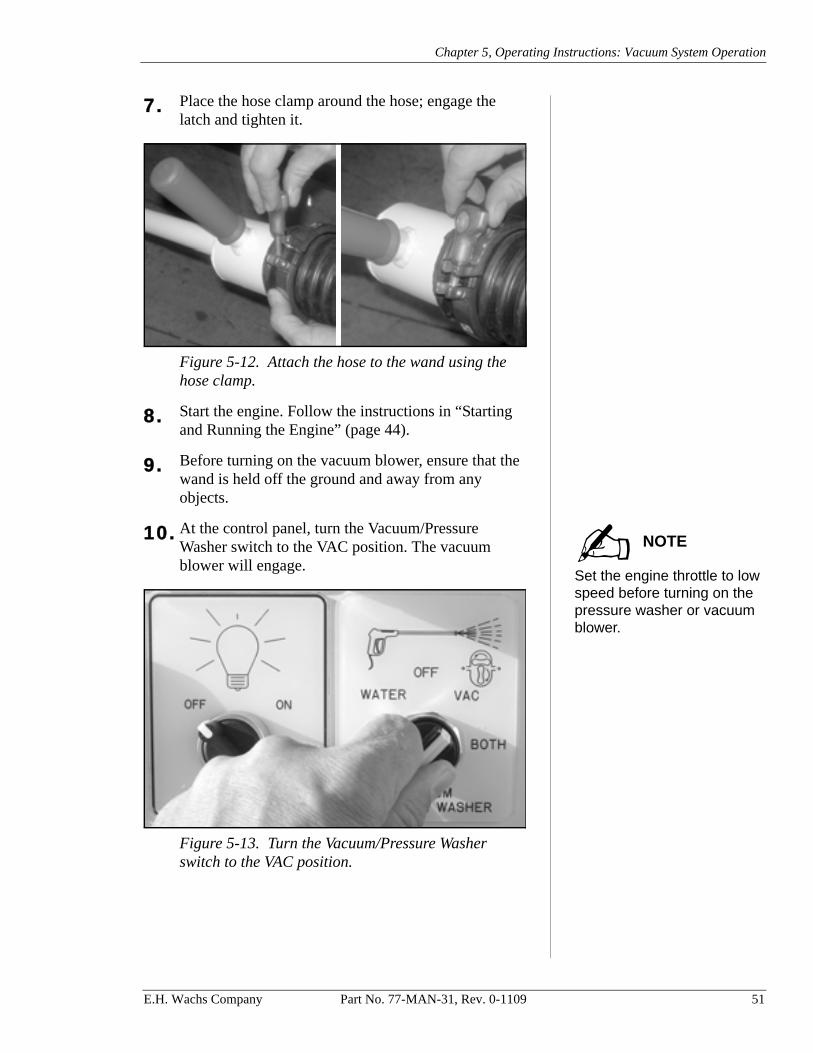
7. Place the hose clamp around the hose; engage the latch and tighten it.
Figure 5-12. Attach the hose to the wand using the hose clamp.
8. Start the engine. Follow the instructions in “Starting and Running the Engine” (page 44).
9. Before turning on the vacuum blower, ensure that the wand is held off the ground and away from any objects.
Set the engine throttle to low speed before turning on the pressure washer or vacuum blower.
10. At the control panel, turn the Vacuum/Pressure Washer switch to the VAC position. The vacuum blower will engage.
Figure 5-13. Turn the Vacuum/Pressure Washer switch to the VAC position.
NOTE
E.H. Wachs Company Part No. 77-MAN-31, Rev. 0-1109 51
VMT-2 Valve Maintenance Trailer
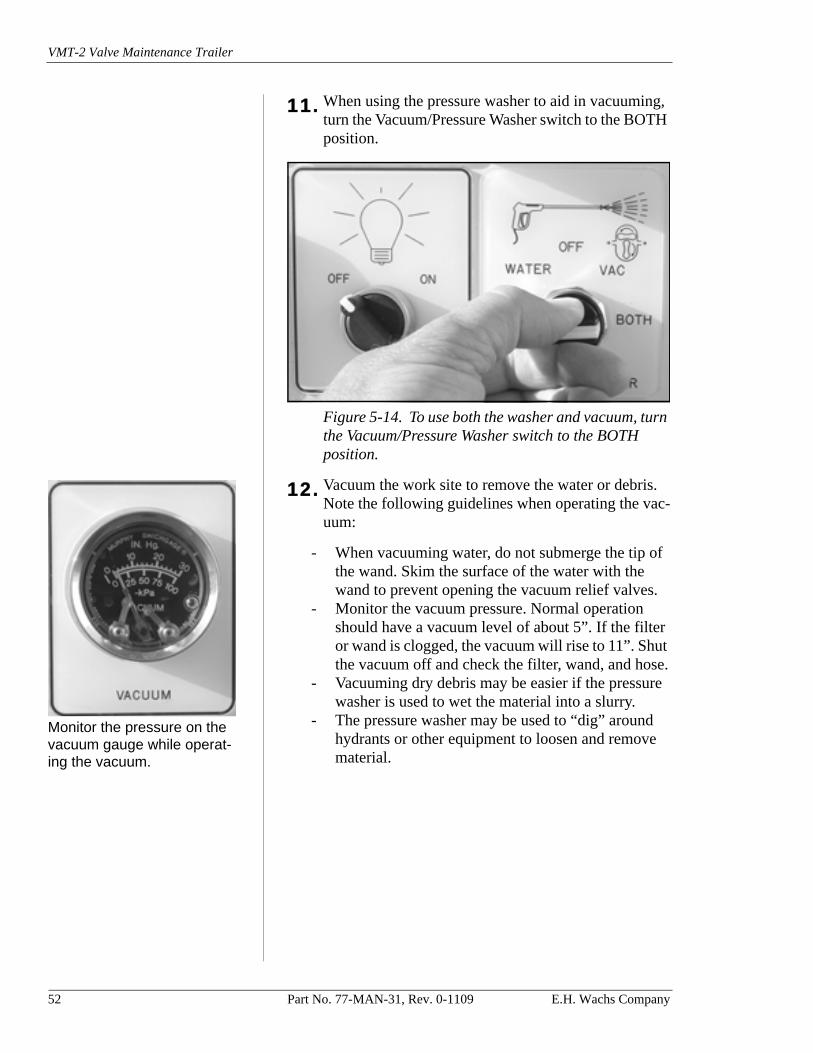
11. When using the pressure washer to aid in vacuuming, turn the Vacuum/Pressure Washer switch to the BOTH position.
Figure 5-14. To use both the washer and vacuum, turn the Vacuum/Pressure Washer switch to the BOTH position.
Monitor the pressure on the vacuum gauge while operat-ing the vacuum.
12. Vacuum the work site to remove the water or debris. Note the following guidelines when operating the vac-uum:
- When vacuuming water, do not submerge the tip of the wand. Skim the surface of the water with the wand to prevent opening the vacuum relief valves.
- Monitor the vacuum pressure. Normal operation should have a vacuum level of about 5”. If the filter or wand is clogged, the vacuum will rise to 11”. Shut the vacuum off and check the filter, wand, and hose.
- Vacuuming dry debris may be easier if the pressure washer is used to wet the material into a slurry.
- The pressure washer may be used to “dig” around hydrants or other equipment to loosen and remove material.
52 Part No. 77-MAN-31, Rev. 0-1109 E.H. Wachs Company
Chapter 5, Operating Instructions: Vacuum System Operation
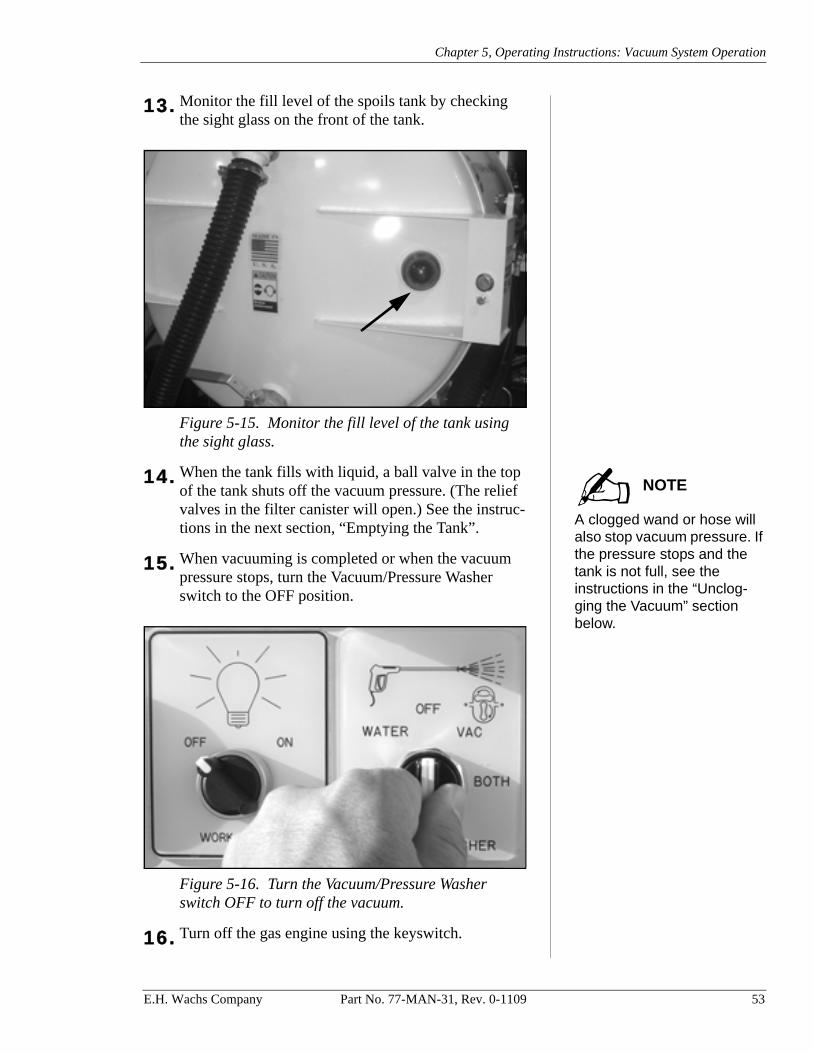
13. Monitor the fill level of the spoils tank by checking the sight glass on the front of the tank.
Figure 5-15. Monitor the fill level of the tank using the sight glass.
A clogged wand or hose will also stop vacuum pressure. If the pressure stops and the tank is not full, see the instructions in the “Unclog-ging the Vacuum” section below.
14. When the tank fills with liquid, a ball valve in the top of the tank shuts off the vacuum pressure. (The relief valves in the filter canister will open.) See the instruc-tions in the next section, “Emptying the Tank”.
15. When vacuuming is completed or when the vacuum pressure stops, turn the Vacuum/Pressure Washer switch to the OFF position.
Figure 5-16. Turn the Vacuum/Pressure Washer switch OFF to turn off the vacuum.
16. Turn off the gas engine using the keyswitch.
NOTE
E.H. Wachs Company Part No. 77-MAN-31, Rev. 0-1109 53
VMT-2 Valve Maintenance Trailer
17. Remove the wand from the suction hose and put it in the trailer’s accessory storage cradle.
18. Remove the hose from the tank inlet port and replace it on the front of the trailer.
19. Re-insert the plug in the inlet port and secure it with the locking collar.
The tank moves out 12” before it tips for dumping, and the door swings out when opened. Allow sufficient clearance behind the trailer.
Emptying the Tank
When emptying the tank, follow the appropriate procedure below for draining liquids or dumping solids from the tank.
Draining Liquid
1. Move the trailer to the dumping location. Ensure that there is clearance around the trailer.
Ensure that no one is near the tank when operating the Dump Switch. Contact with the tank while it is moving could cause serious injury.
2. Start the gas engine. Follow the instructions in “Start-ing and Running the Engine” (page 44).
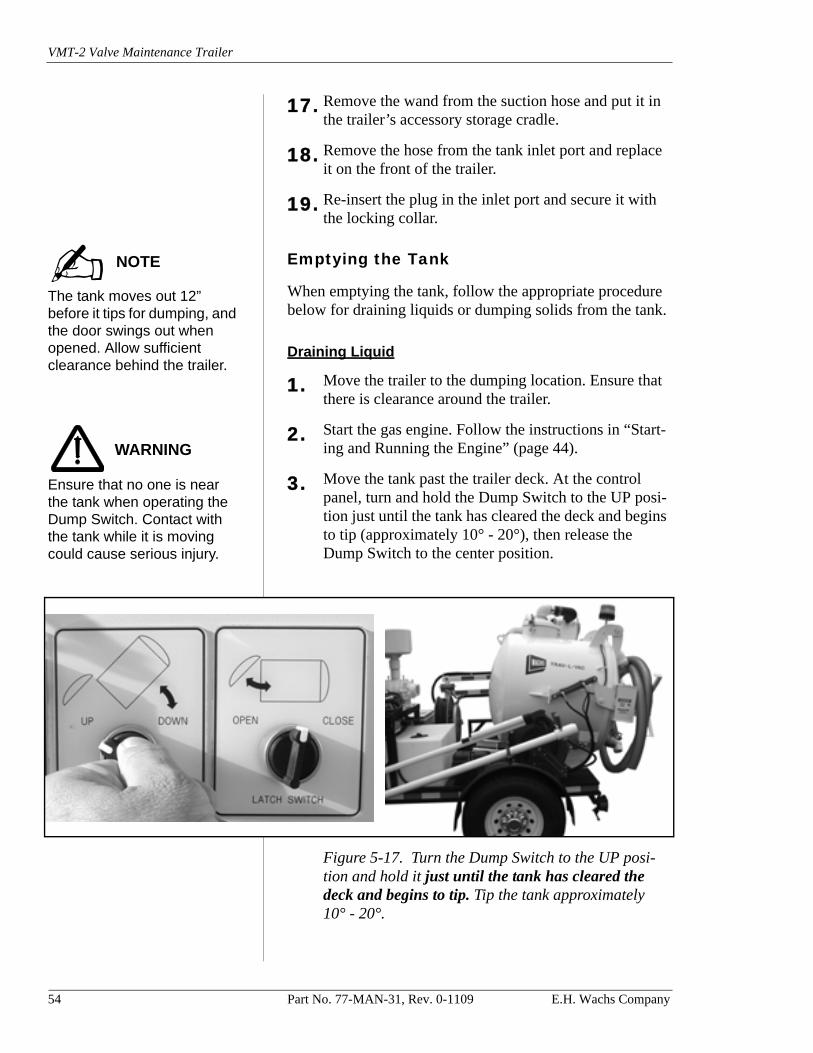
3. Move the tank past the trailer deck. At the control panel, turn and hold the Dump Switch to the UP posi-tion just until the tank has cleared the deck and begins to tip (approximately 10° - 20°), then release the Dump Switch to the center position.
Figure 5-17. Turn the Dump Switch to the UP posi-tion and hold it just until the tank has cleared the deck and begins to tip. Tip the tank approximately x 10° - 20°.
NOTE
WARNING
54 Part No. 77-MAN-31, Rev. 0-1109 E.H. Wachs Company
Chapter 5, Operating Instructions: Vacuum System Operation
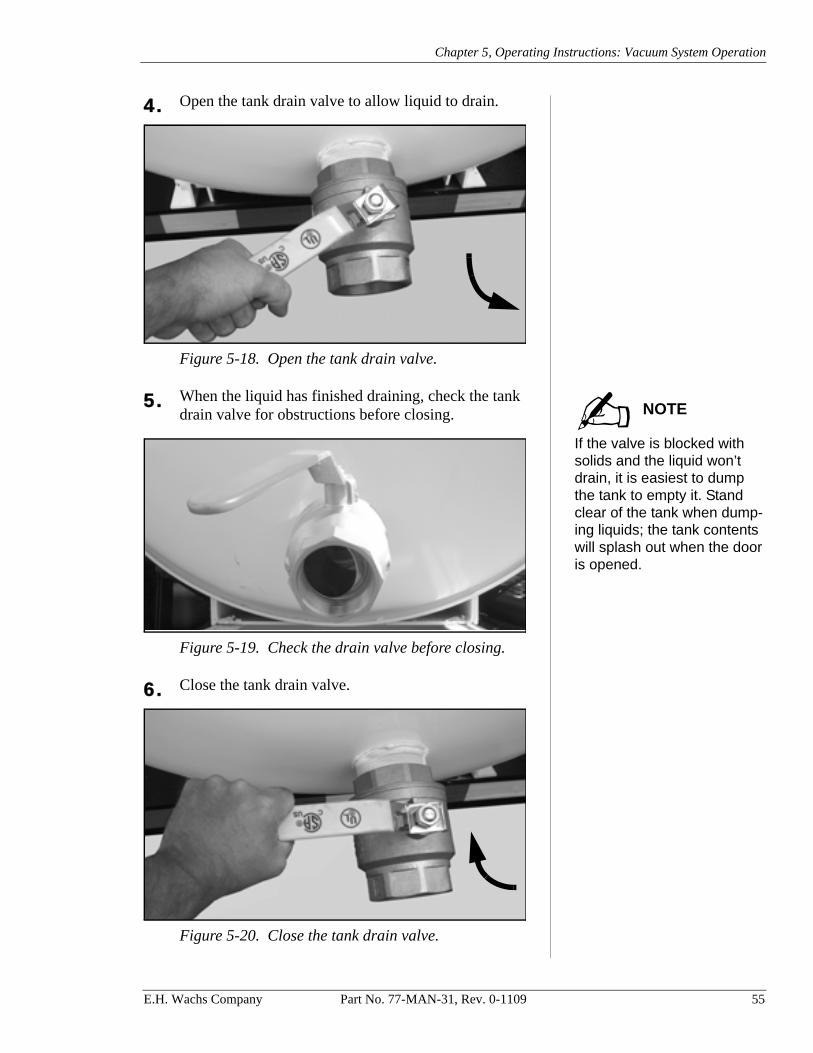
4. Open the tank drain valve to allow liquid to drain.
Figure 5-18. Open the tank drain valve.
If the valve is blocked with solids and the liquid won’t drain, it is easiest to dump the tank to empty it. Stand clear of the tank when dump-ing liquids; the tank contents will splash out when the door is opened.
5. When the liquid has finished draining, check the tank drain valve for obstructions before closing.
Figure 5-19. Check the drain valve before closing.
6. Close the tank drain valve.
Figure 5-20. Close the tank drain valve.
NOTE
E.H. Wachs Company Part No. 77-MAN-31, Rev. 0-1109 55
VMT-2 Valve Maintenance Trailer
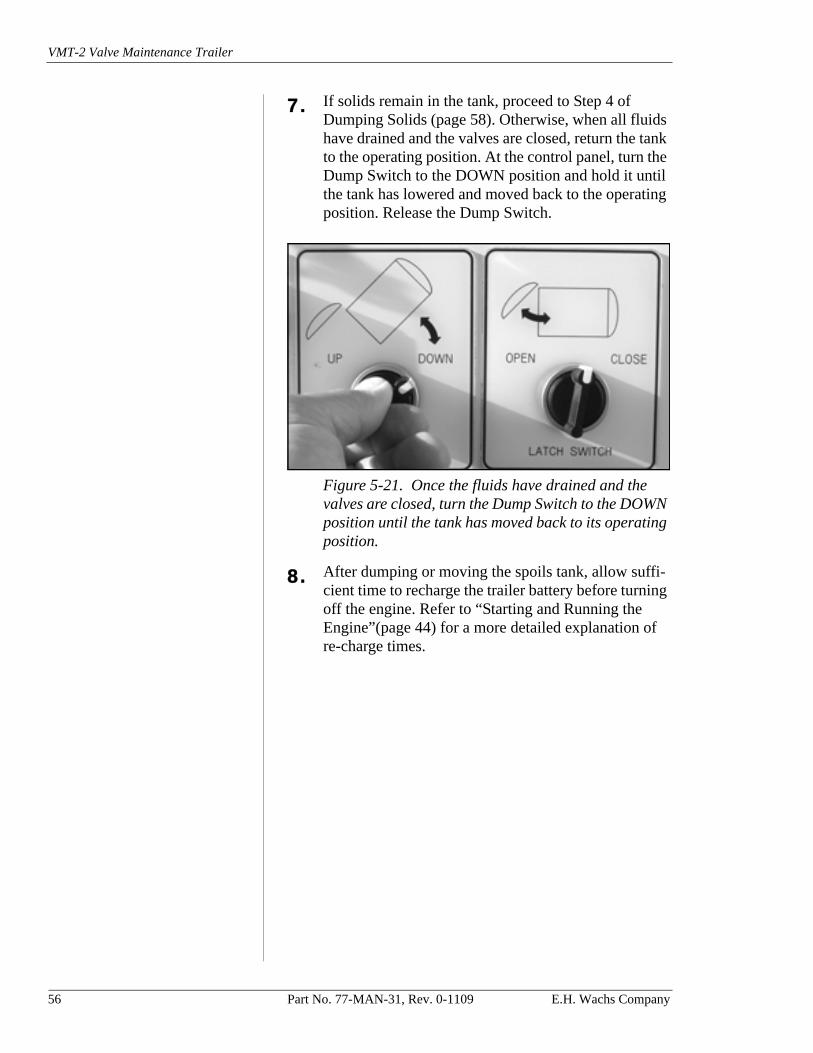
7. If solids remain in the tank, proceed to Step 4 of Dumping Solids (page 58). Otherwise, when all fluids have drained and the valves are closed, return the tank to the operating position. At the control panel, turn the Dump Switch to the DOWN position and hold it until the tank has lowered and moved back to the operating position. Release the Dump Switch.
Figure 5-21. Once the fluids have drained and the valves are closed, turn the Dump Switch to the DOWN position until the tank has moved back to its operating position.
8. After dumping or moving the spoils tank, allow suffi-cient time to recharge the trailer battery before turning off the engine. Refer to “Starting and Running the Engine”(page 44) for a more detailed explanation of re-charge times.
56 Part No. 77-MAN-31, Rev. 0-1109 E.H. Wachs Company
Chapter 5, Operating Instructions: Vacuum System Operation
Dumping Solids
Park the trailer on level ground before dumping. The door may not close if the trailer is not level.
When the tank contains both liquids and solids, it may be appropriate to partially drain the liquid (using the previous procedure) prior to dumping the solids. However, a moder-ate amount of liquid may facilitate dumping the solids.
1. Move the trailer to the dumping location. Ensure that there is clearance around the trailer and sufficient area for the tank to open and dump.
Ensure that no one is near the tank when operating the Dump Switch. Contact with the tank while it is moving could cause serious injury.
2. Start the gas engine. Follow the instructions in “Start-ing and Running the Engine” (page 44).
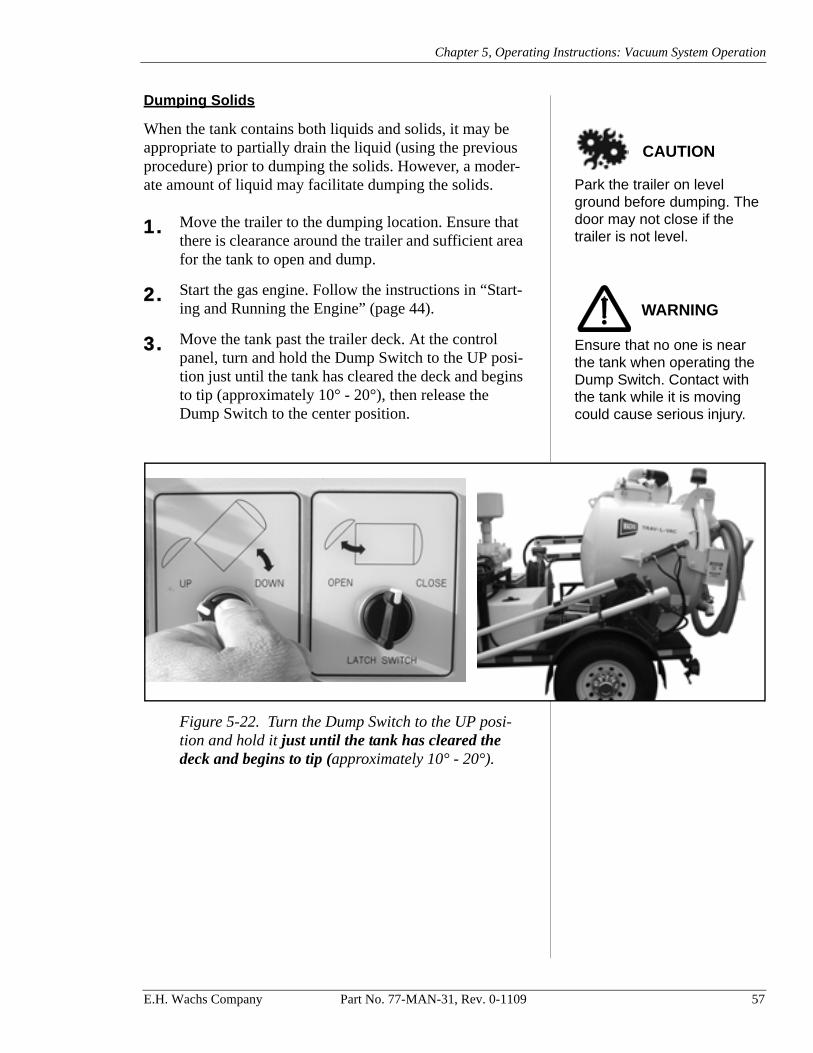
3. Move the tank past the trailer deck. At the control panel, turn and hold the Dump Switch to the UP posi-tion just until the tank has cleared the deck and begins to tip (approximately 10° - 20°), then release the Dump Switch to the center position.
Figure 5-22. Turn the Dump Switch to the UP posi-tion and hold it just until the tank has cleared the deck and begins to tip (approximately 10° - 20°).
CAUTION
WARNING
E.H. Wachs Company Part No. 77-MAN-31, Rev. 0-1109 57
VMT-2 Valve Maintenance Trailer
Make sure no one is near the tank when operating the Latch Switch. Contact with the tank door or contents when the door opens could cause serious injury.
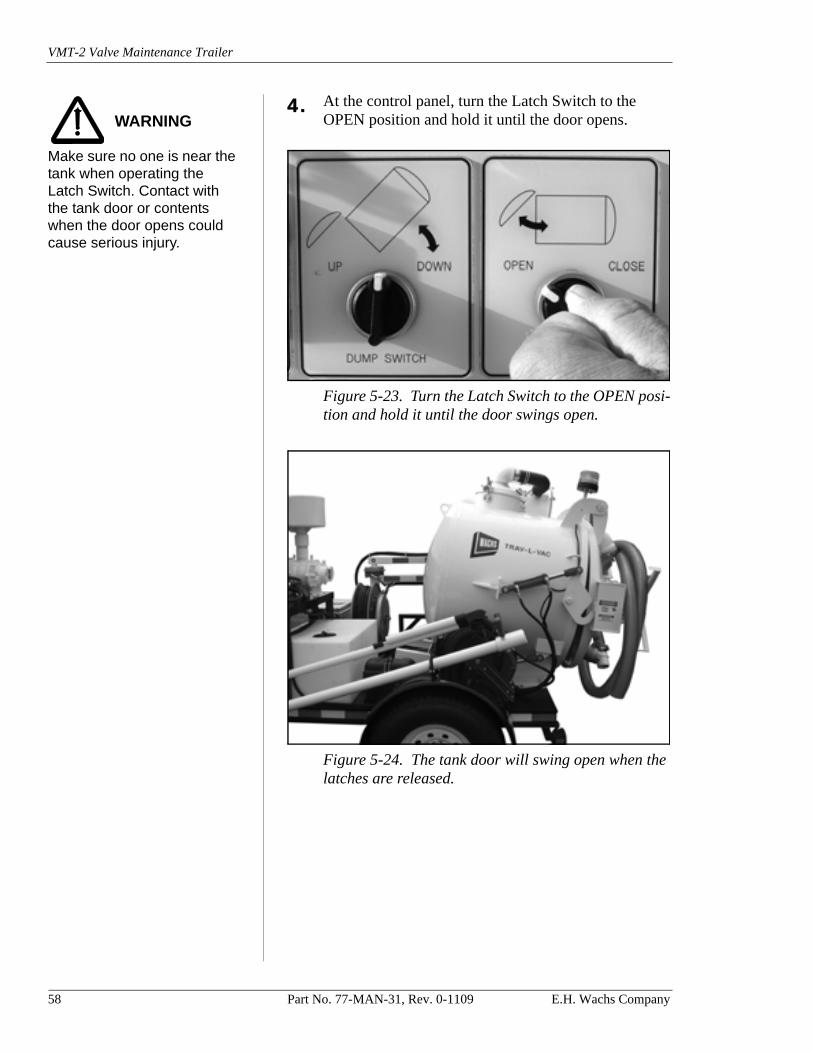
4. At the control panel, turn the Latch Switch to the OPEN position and hold it until the door opens.
Figure 5-23. Turn the Latch Switch to the OPEN posi-tion and hold it until the door swings open.
Figure 5-24. The tank door will swing open when the latches are released.
WARNING
58 Part No. 77-MAN-31, Rev. 0-1109 E.H. Wachs Company
Chapter 5, Operating Instructions: Vacuum System Operation
Monitor the door position when tilting the tank. In cer-tain situations the door may contact the ground which could damage the door.
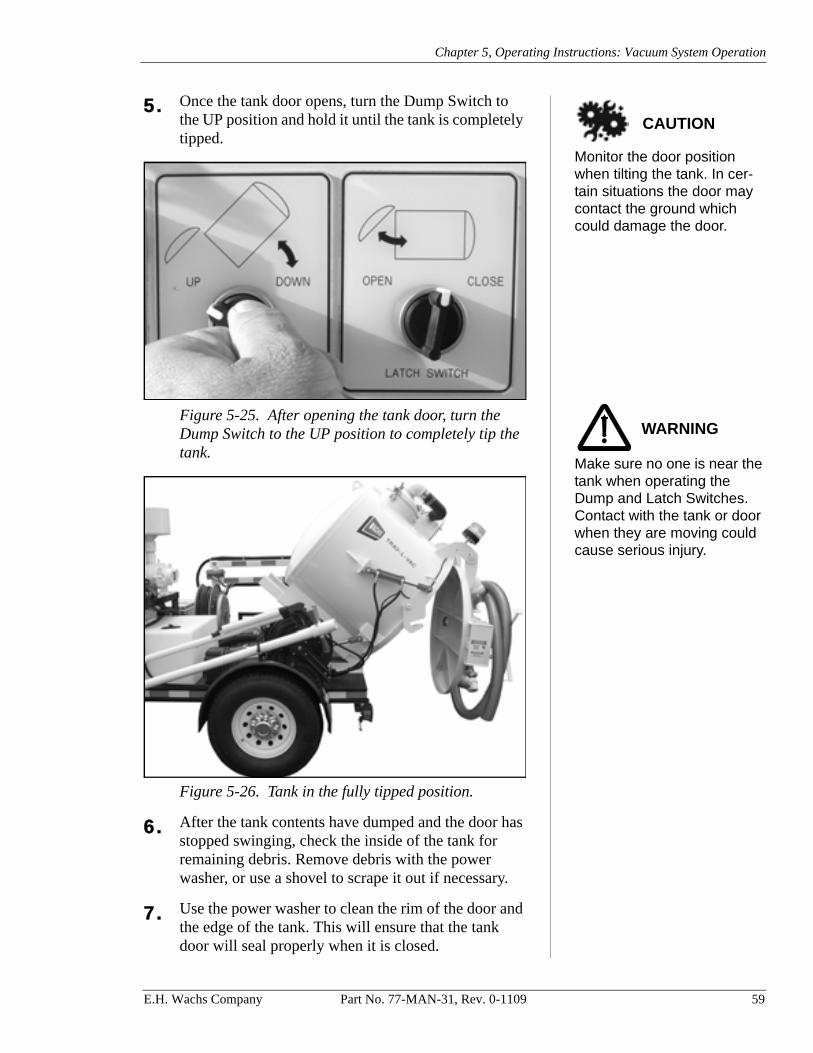
5. Once the tank door opens, turn the Dump Switch to the UP position and hold it until the tank is completely tipped.
Make sure no one is near the tank when operating the Dump and Latch Switches. Contact with the tank or door when they are moving could cause serious injury.
Figure 5-25. After opening the tank door, turn the Dump Switch to the UP position to completely tip the tank.
Figure 5-26. Tank in the fully tipped position.
6. After the tank contents have dumped and the door has stopped swinging, check the inside of the tank for remaining debris. Remove debris with the power washer, or use a shovel to scrape it out if necessary.
7. Use the power washer to clean the rim of the door and the edge of the tank. This will ensure that the tank door will seal properly when it is closed.
CAUTION
WARNING
E.H. Wachs Company Part No. 77-MAN-31, Rev. 0-1109 59
VMT-2 Valve Maintenance Trailer
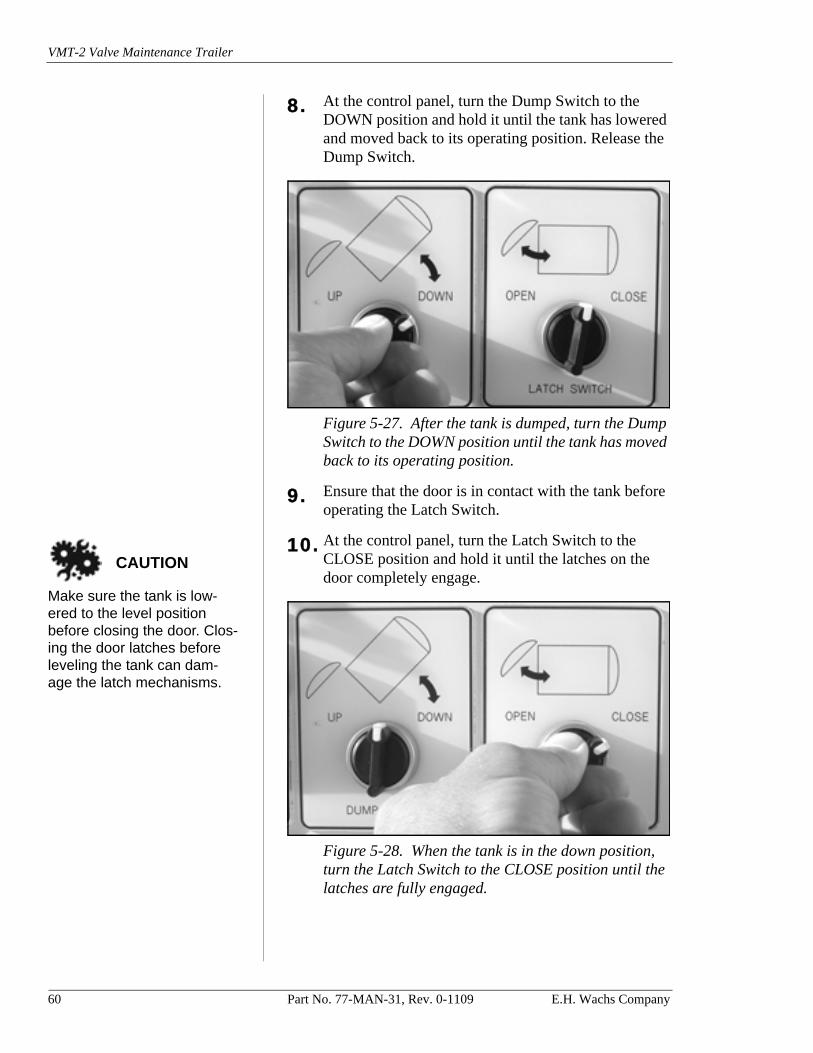
8. At the control panel, turn the Dump Switch to the DOWN position and hold it until the tank has lowered and moved back to its operating position. Release the Dump Switch.
Figure 5-27. After the tank is dumped, turn the Dump Switch to the DOWN position until the tank has moved back to its operating position.
9. Ensure that the door is in contact with the tank before operating the Latch Switch.
Make sure the tank is low-ered to the level position before closing the door. Clos-ing the door latches before leveling the tank can dam-age the latch mechanisms.
10. At the control panel, turn the Latch Switch to the CLOSE position and hold it until the latches on the door completely engage.
Figure 5-28. When the tank is in the down position, turn the Latch Switch to the CLOSE position until the latches are fully engaged.
CAUTION
60 Part No. 77-MAN-31, Rev. 0-1109 E.H. Wachs Company

Chapter 5, Operating Instructions: Vacuum System Operation
11. After dumping or moving the spoils tank, allow suffi-cient time to recharge the trailer battery before turning off the engine. Refer to “Starting and Running the Engine” (page 44) for a more detailed explanation of re-charge times.
Unclogging the Vacuum
Check the filter whenever the vacuum system becomes clogged. Reduced suction caused by a partially clogged filter can cause the hose to clog. Clean the filter if neces-sary.
If the system loses suction and the tank is not full, there is either a clog in the wand or hose, or the filter is plugged. If the suction stops suddenly, a clog is the most likely cause. A gradual decrease of suction is generally caused by a plugged filter.
Use the following procedure to clear the clog. Instructions for cleaning the filter are in Chapter 6.
1. With the vacuum running, turn the Vacuum Break lever to the CLOSED position, then return it to the OPEN position. This may dislodge the clog.
Figure 5-29. Turn the Vacuum Break lever to the CLOSED position.
2. Repeat opening and closing the Vacuum Break lever once or twice to see if the clog dislodges.
NOTE
E.H. Wachs Company Part No. 77-MAN-31, Rev. 0-1109 61
VMT-2 Valve Maintenance Trailer
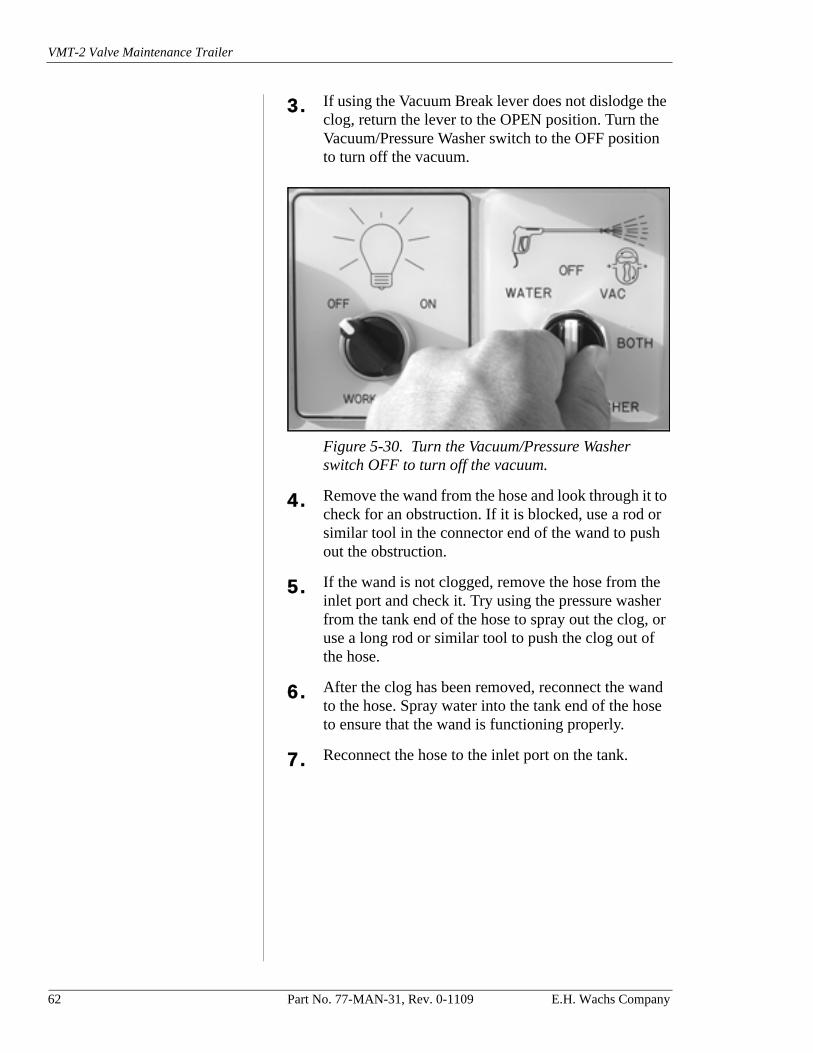
3. If using the Vacuum Break lever does not dislodge the clog, return the lever to the OPEN position. Turn the Vacuum/Pressure Washer switch to the OFF position to turn off the vacuum.
Figure 5-30. Turn the Vacuum/Pressure Washer switch OFF to turn off the vacuum.
4. Remove the wand from the hose and look through it to check for an obstruction. If it is blocked, use a rod or similar tool in the connector end of the wand to push out the obstruction.
5. If the wand is not clogged, remove the hose from the inlet port and check it. Try using the pressure washer from the tank end of the hose to spray out the clog, or use a long rod or similar tool to push the clog out of the hose.
6. After the clog has been removed, reconnect the wand to the hose. Spray water into the tank end of the hose to ensure that the wand is functioning properly.
7. Reconnect the hose to the inlet port on the tank.
62 Part No. 77-MAN-31, Rev. 0-1109 E.H. Wachs Company
Chapter 5, Operating Instructions: Pressure Washer Operation
PRESSURE WASHER OPERATION
Before operating the pressure washer, ensure that:• there is water in the washer reservoir• there is antifreeze in the antifreeze reservoir (if the tem-
perature will be below freezing)• the Water Supply Valve lever is in the TANKS position.
See Chapter 4 for instructions on storing the pressure washer in sub-freezing weather.
Filling the Water Tank
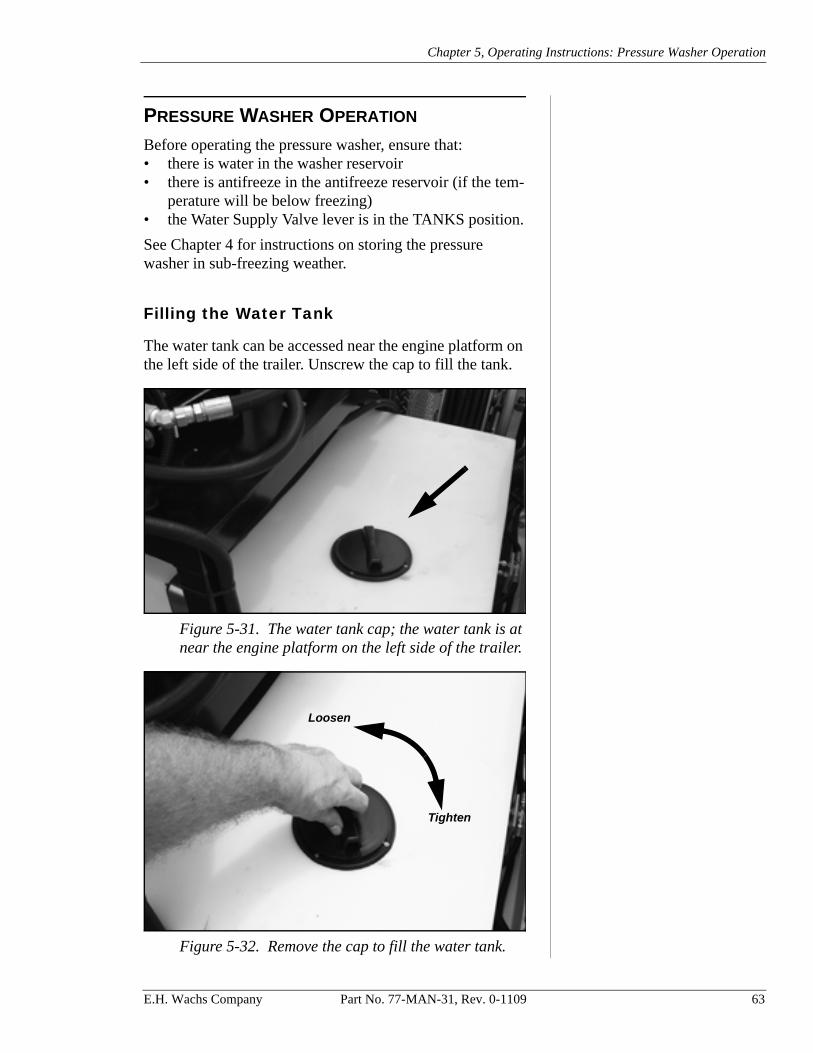
The water tank can be accessed near the engine platform on the left side of the trailer. Unscrew the cap to fill the tank.
Figure 5-31. The water tank cap; the water tank is at near the engine platform on the left side of the trailer.
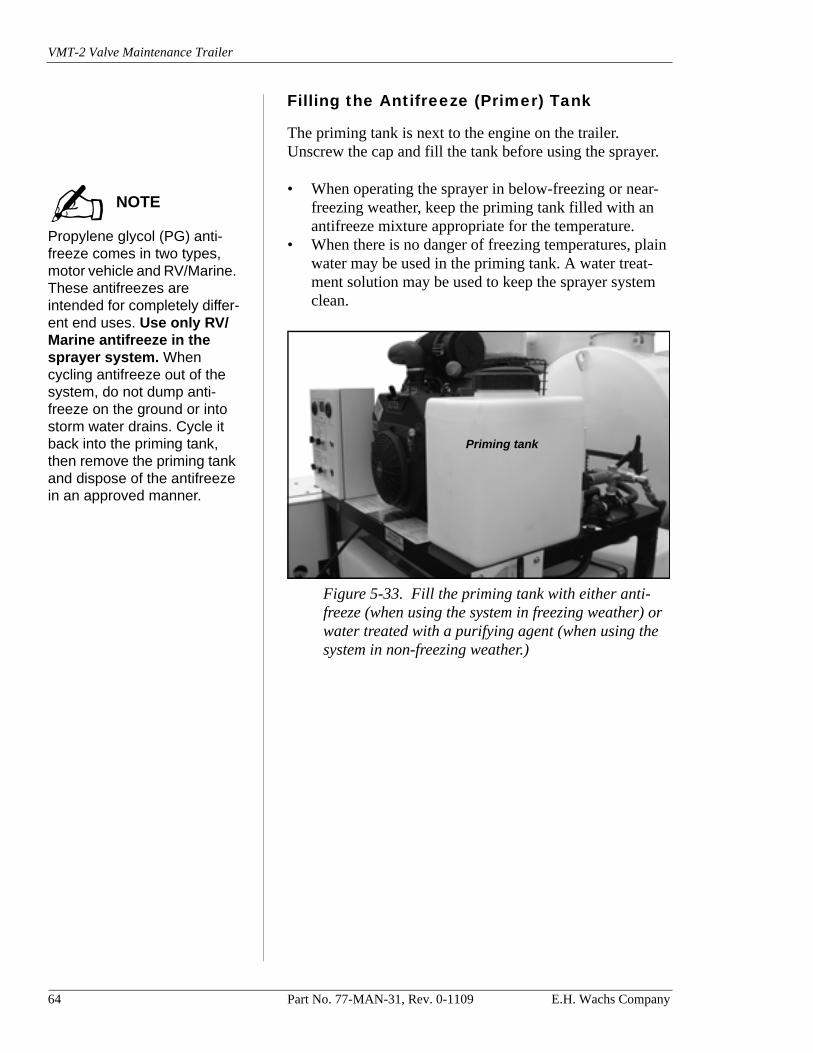
Figure 5-32. Remove the cap to fill the water tank.
Loosen
Tighten
E.H. Wachs Company Part No. 77-MAN-31, Rev. 0-1109 63
VMT-2 Valve Maintenance Trailer
Filling the Antifreeze (Primer) Tank
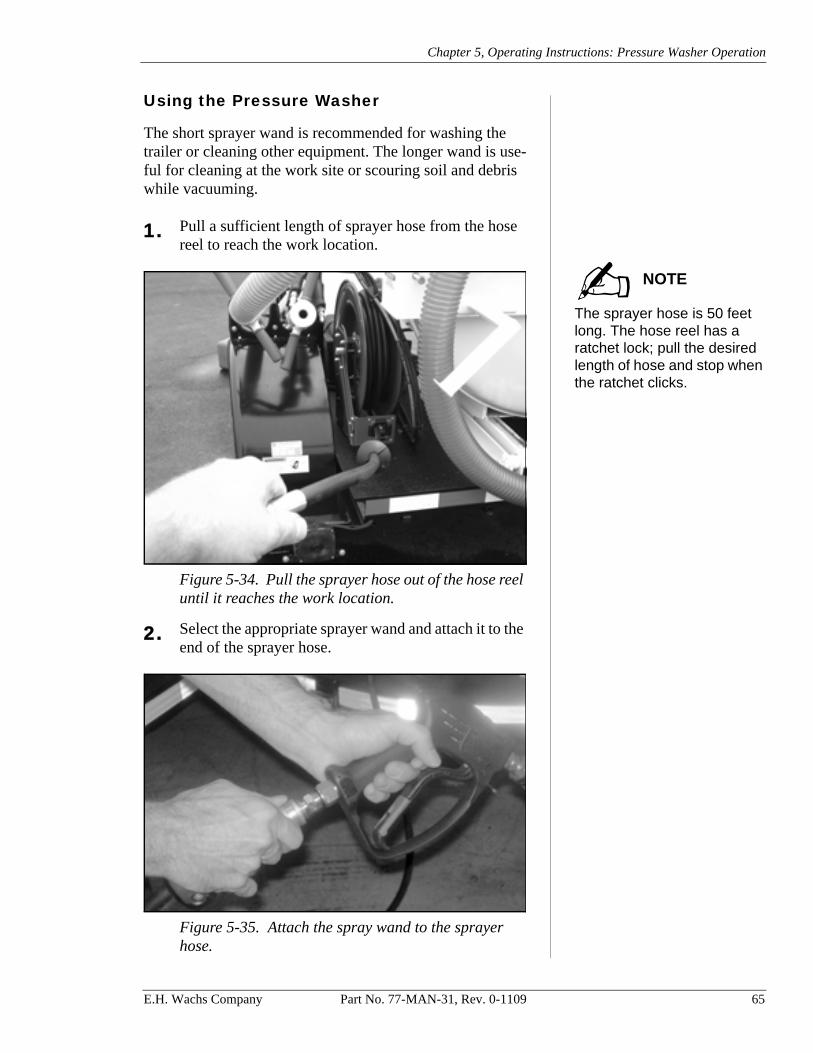
The priming tank is next to the engine on the trailer. Unscrew the cap and fill the tank before using the sprayer.
Propylene glycol (PG) anti-freeze comes in two types, motor vehicle and RV/Marine. These antifreezes are intended for completely differ-ent end uses. Use only RV/Marine antifreeze in the sprayer system. When cycling antifreeze out of the system, do not dump anti-freeze on the ground or into storm water drains. Cycle it back into the priming tank, then remove the priming tank and dispose of the antifreeze in an approved manner.
• When operating the sprayer in below-freezing or near-freezing weather, keep the priming tank filled with an antifreeze mixture appropriate for the temperature.
• When there is no danger of freezing temperatures, plain water may be used in the priming tank. A water treat-ment solution may be used to keep the sprayer system clean.
Figure 5-33. Fill the priming tank with either anti-freeze (when using the system in freezing weather) or water treated with a purifying agent (when using the system in non-freezing weather.)
NOTE
Priming tank
64 Part No. 77-MAN-31, Rev. 0-1109 E.H. Wachs Company
Chapter 5, Operating Instructions: Pressure Washer Operation
Using the Pressure Washer
The short sprayer wand is recommended for washing the trailer or cleaning other equipment. The longer wand is use-ful for cleaning at the work site or scouring soil and debris while vacuuming.
1. Pull a sufficient length of sprayer hose from the hose reel to reach the work location.
The sprayer hose is 50 feet long. The hose reel has a ratchet lock; pull the desired length of hose and stop when the ratchet clicks.
Figure 5-34. Pull the sprayer hose out of the hose reel until it reaches the work location.
2. Select the appropriate sprayer wand and attach it to the end of the sprayer hose.
Figure 5-35. Attach the spray wand to the sprayer hose.
NOTE
E.H. Wachs Company Part No. 77-MAN-31, Rev. 0-1109 65
VMT-2 Valve Maintenance Trailer
3. Start the gas engine and run at low to medium throttle.
Set the engine throttle to low speed before turning on the pressure washer or vacuum blower.
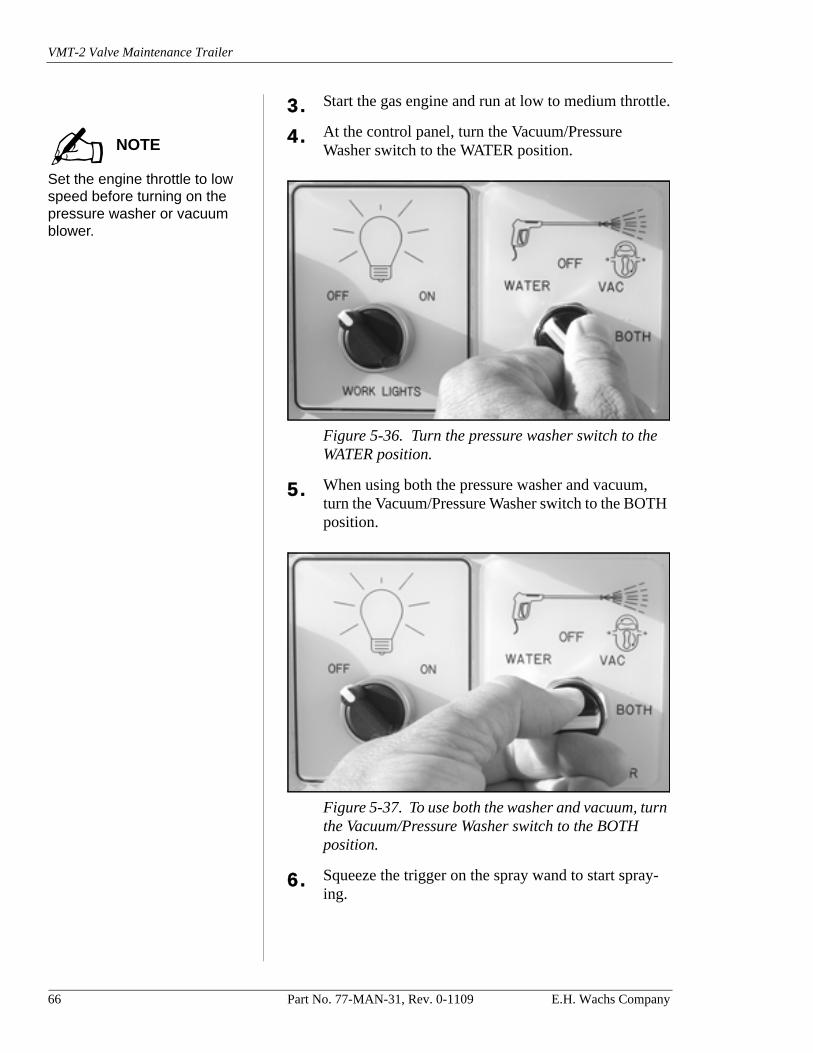
4. At the control panel, turn the Vacuum/Pressure Washer switch to the WATER position.
Figure 5-36. Turn the pressure washer switch to the WATER position.
5. When using both the pressure washer and vacuum, turn the Vacuum/Pressure Washer switch to the BOTH position.
Figure 5-37. To use both the washer and vacuum, turn the Vacuum/Pressure Washer switch to the BOTH position.
6. Squeeze the trigger on the spray wand to start spray-ing.
NOTE
66 Part No. 77-MAN-31, Rev. 0-1109 E.H. Wachs Company
Chapter 5, Operating Instructions: Pressure Washer Operation
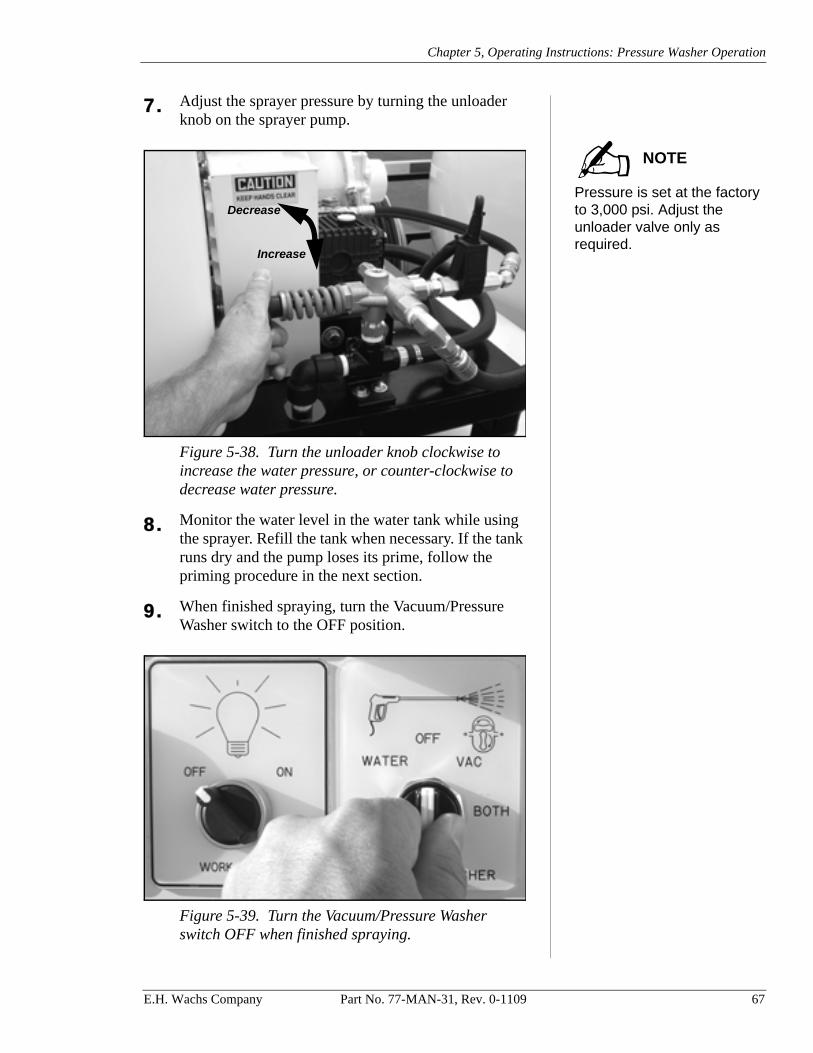
7. Adjust the sprayer pressure by turning the unloader knob on the sprayer pump.
Pressure is set at the factory to 3,000 psi. Adjust the unloader valve only as required.
Figure 5-38. Turn the unloader knob clockwise to increase the water pressure, or counter-clockwise to decrease water pressure.
8. Monitor the water level in the water tank while using the sprayer. Refill the tank when necessary. If the tank runs dry and the pump loses its prime, follow the priming procedure in the next section.
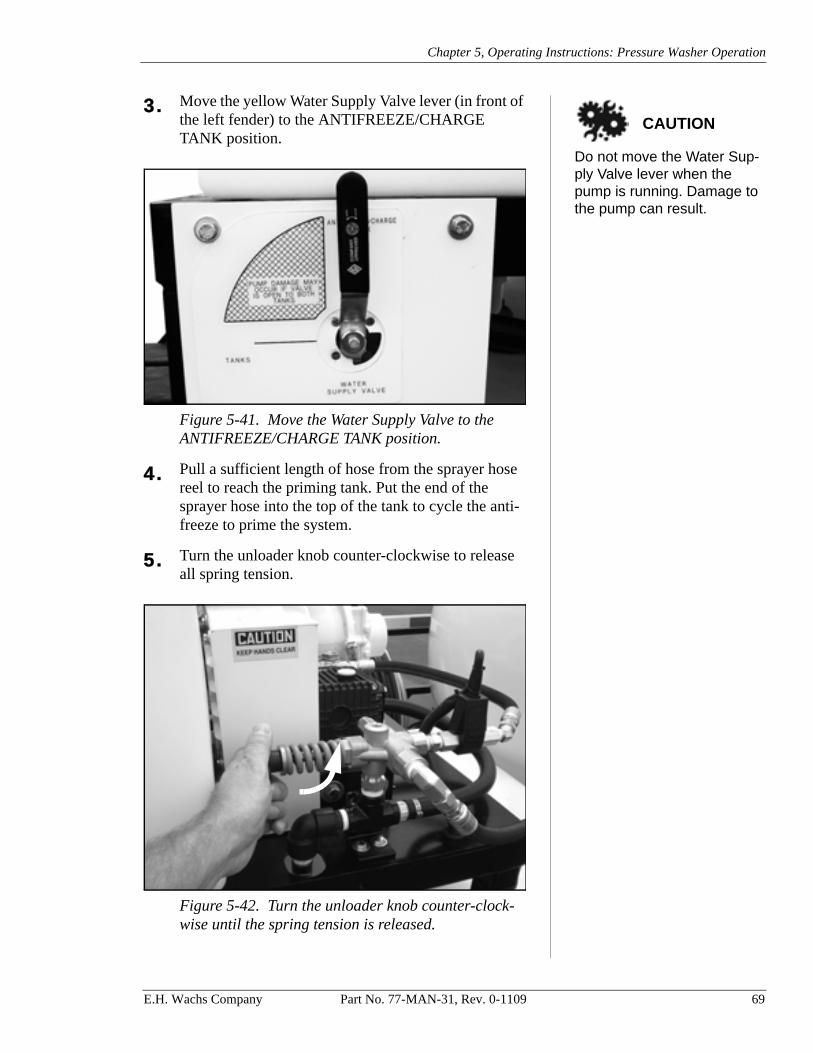
9. When finished spraying, turn the Vacuum/Pressure Washer switch to the OFF position.
Figure 5-39. Turn the Vacuum/Pressure Washer switch OFF when finished spraying.
NOTE
Increase
Decrease
E.H. Wachs Company Part No. 77-MAN-31, Rev. 0-1109 67

VMT-2 Valve Maintenance Trailer
Priming the Washer Pump
Any loose or cracked fittings, or air trapped in the suction line, will prevent the water pump from operating cor-rectly.
The washer pump may requiring priming if the tank runs dry, or if the system is drained because of a leak or service. The pump can be primed by using its own suction or using an external pressurized water source.
Prime Using the VMT-2 Pump Draw
1. Fill the main water tank with water.
2. Fill the priming tank with water. (The fluid level in the priming tank must be higher than the pump.)
Figure 5-40. Fill the priming tank so that the water level is above the pump.
NOTE
Minimum water level
Priming tank
68 Part No. 77-MAN-31, Rev. 0-1109 E.H. Wachs Company
Chapter 5, Operating Instructions: Pressure Washer Operation
Do not move the Water Sup-ply Valve lever when the pump is running. Damage to the pump can result.
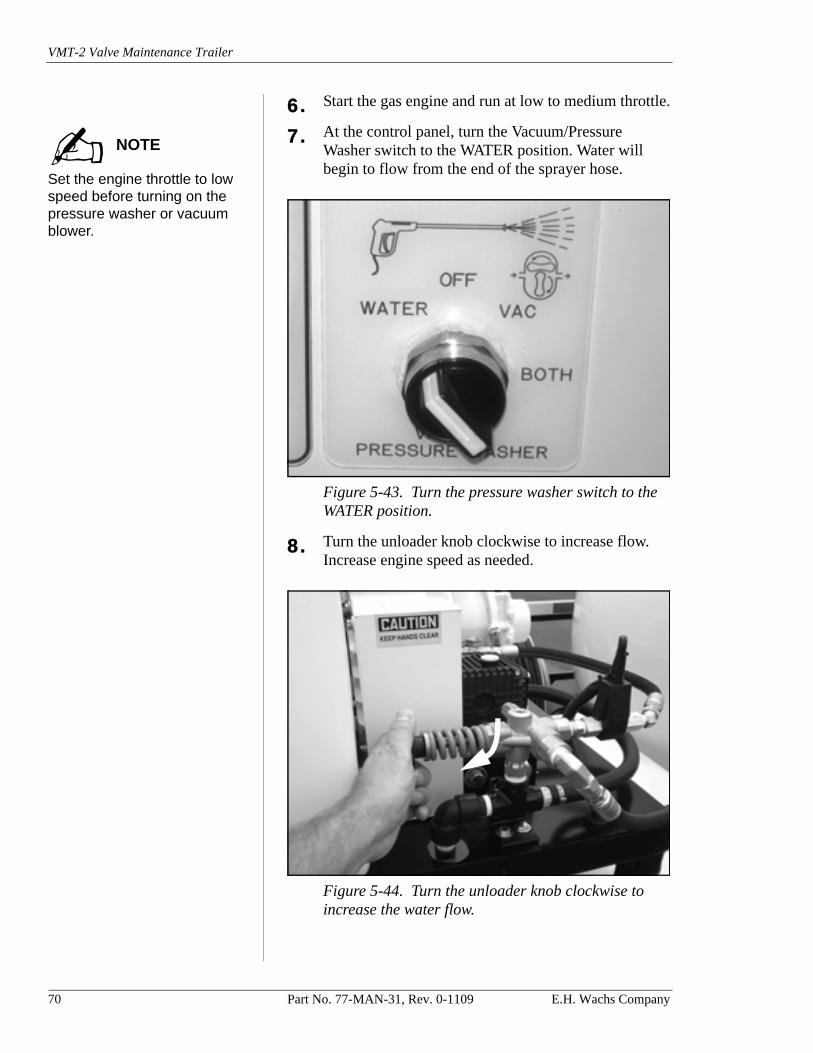
3. Move the yellow Water Supply Valve lever (in front of the left fender) to the ANTIFREEZE/CHARGE TANK position.
Figure 5-41. Move the Water Supply Valve to the ANTIFREEZE/CHARGE TANK position.
4. Pull a sufficient length of hose from the sprayer hose reel to reach the priming tank. Put the end of the sprayer hose into the top of the tank to cycle the anti-freeze to prime the system.
5. Turn the unloader knob counter-clockwise to release all spring tension.
Figure 5-42. Turn the unloader knob counter-clock-wise until the spring tension is released.
CAUTION
E.H. Wachs Company Part No. 77-MAN-31, Rev. 0-1109 69
VMT-2 Valve Maintenance Trailer
6. Start the gas engine and run at low to medium throttle.
Set the engine throttle to low speed before turning on the pressure washer or vacuum blower.
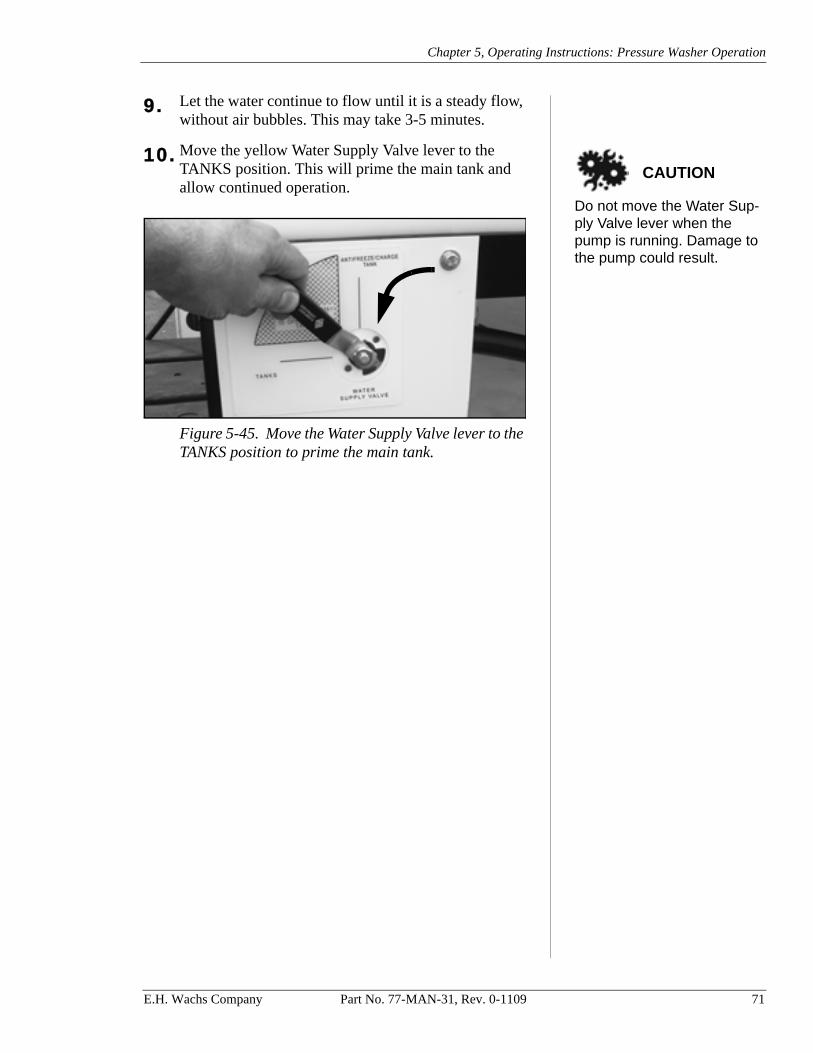
7. At the control panel, turn the Vacuum/Pressure Washer switch to the WATER position. Water will begin to flow from the end of the sprayer hose.
Figure 5-43. Turn the pressure washer switch to the WATER position.
8. Turn the unloader knob clockwise to increase flow. Increase engine speed as needed.
Figure 5-44. Turn the unloader knob clockwise to increase the water flow.
NOTE
70 Part No. 77-MAN-31, Rev. 0-1109 E.H. Wachs Company
Chapter 5, Operating Instructions: Pressure Washer Operation
9. Let the water continue to flow until it is a steady flow, without air bubbles. This may take 3-5 minutes.
Do not move the Water Sup-ply Valve lever when the pump is running. Damage to the pump could result.
10. Move the yellow Water Supply Valve lever to the TANKS position. This will prime the main tank and allow continued operation.
Figure 5-45. Move the Water Supply Valve lever to the TANKS position to prime the main tank.
CAUTION
E.H. Wachs Company Part No. 77-MAN-31, Rev. 0-1109 71
VMT-2 Valve Maintenance Trailer
LIGHT BAR OPERATION
The light bar controller is mounted in a water-tight enclo-sure.
1. To access the controller, open the enclosure.
2. Press the POWER button to turn on the light bar.
3. At night, push in the NIGHT button for low-intensity light mode.
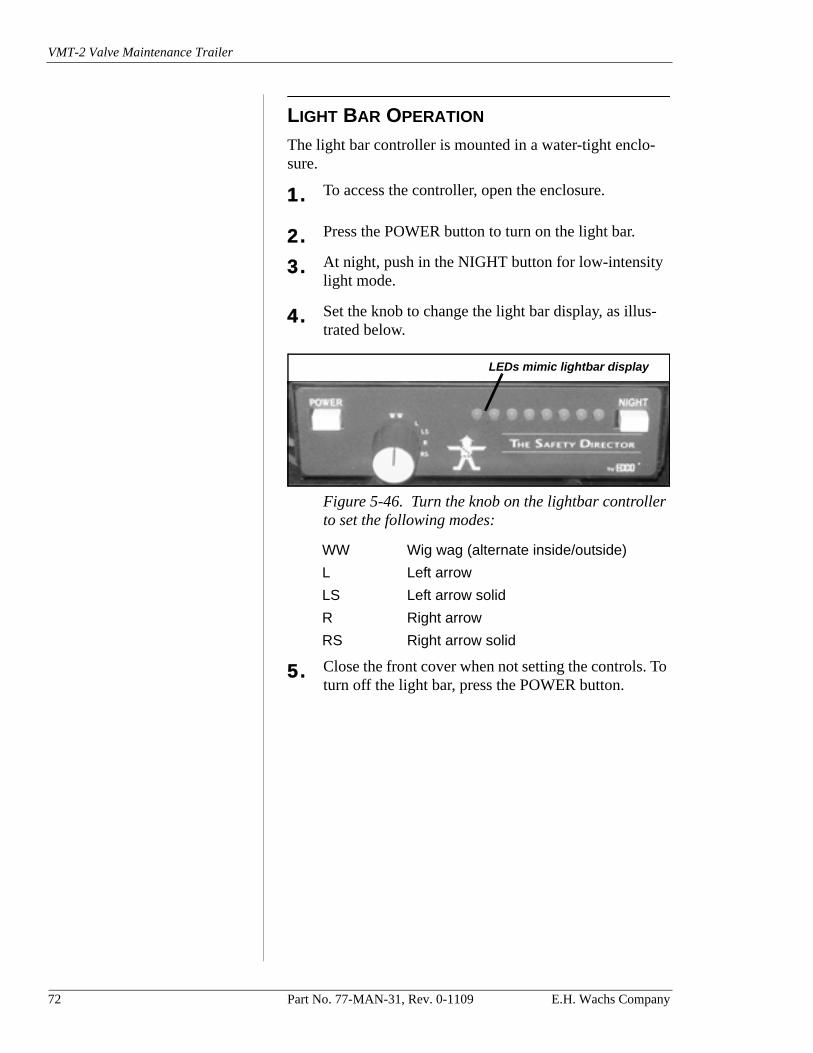
4. Set the knob to change the light bar display, as illus-trated below.
Figure 5-46. Turn the knob on the lightbar controller to set the following modes:
WW Wig wag (alternate inside/outside)
L Left arrow
LS Left arrow solid
R Right arrow
RS Right arrow solid
5. Close the front cover when not setting the controls. To turn off the light bar, press the POWER button.
LEDs mimic lightbar display
72 Part No. 77-MAN-31, Rev. 0-1109 E.H. Wachs Company
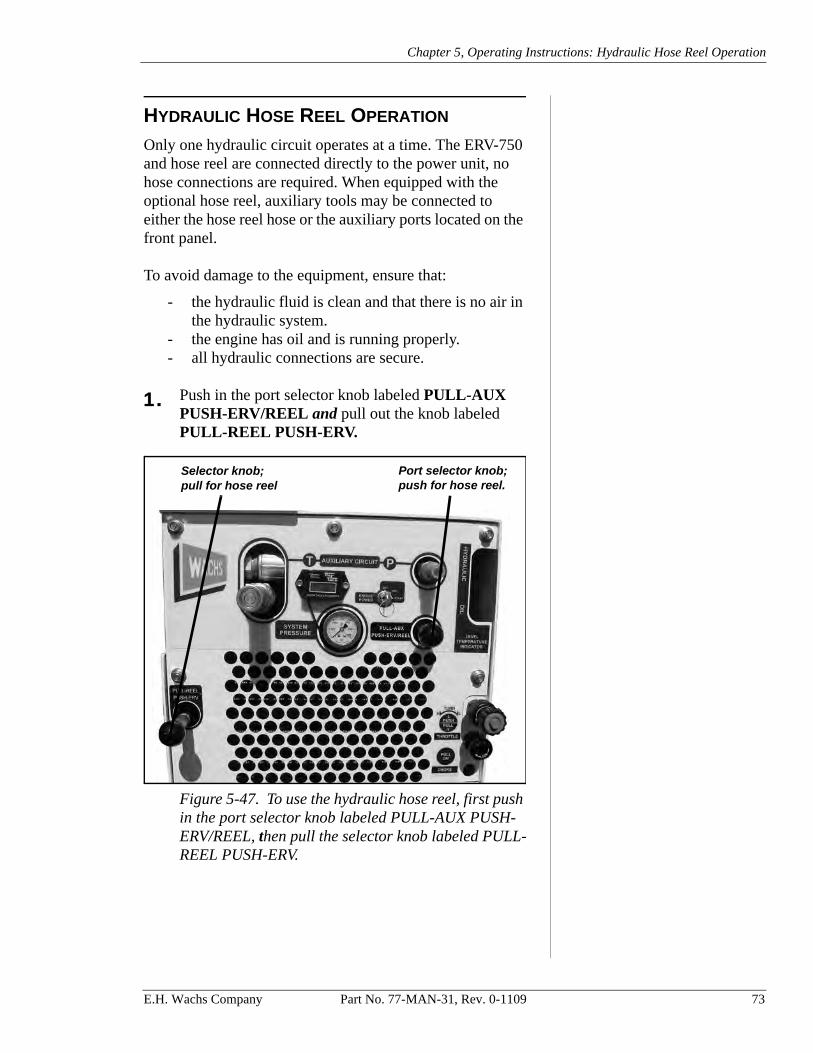
Chapter 5, Operating Instructions: Hydraulic Hose Reel Operation
HYDRAULIC HOSE REEL OPERATION
Only one hydraulic circuit operates at a time. The ERV-750 and hose reel are connected directly to the power unit, no hose connections are required. When equipped with the optional hose reel, auxiliary tools may be connected to either the hose reel hose or the auxiliary ports located on the front panel.
To avoid damage to the equipment, ensure that:
- the hydraulic fluid is clean and that there is no air in the hydraulic system.
- the engine has oil and is running properly. - all hydraulic connections are secure.
1. Push in the port selector knob labeled PULL-AUX PUSH-ERV/REEL and pull out the knob labeled PULL-REEL PUSH-ERV.
Figure 5-47. To use the hydraulic hose reel, first push in the port selector knob labeled PULL-AUX PUSH-ERV/REEL, then pull the selector knob labeled PULL-REEL PUSH-ERV.
Selector knob; pull for hose reel
Port selector knob; push for hose reel.
E.H. Wachs Company Part No. 77-MAN-31, Rev. 0-1109 73
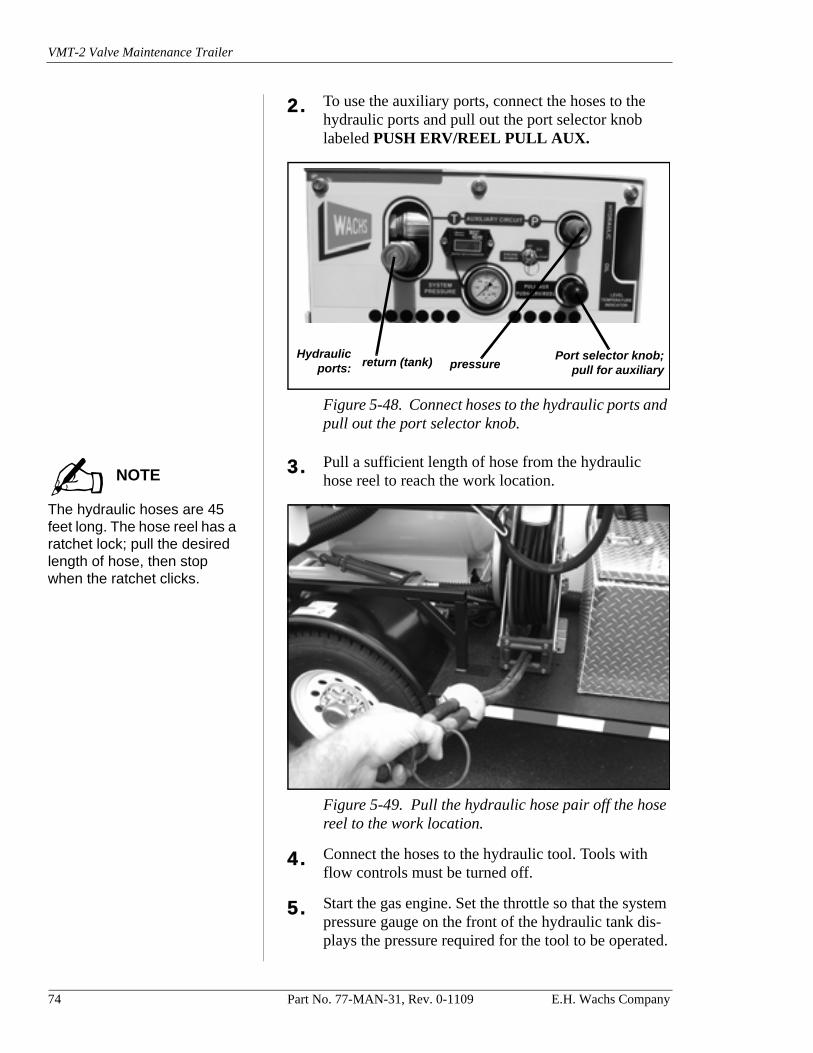
VMT-2 Valve Maintenance Trailer
2. To use the auxiliary ports, connect the hoses to the hydraulic ports and pull out the port selector knob labeled PUSH ERV/REEL PULL AUX.
Figure 5-48. Connect hoses to the hydraulic ports and pull out the port selector knob.
The hydraulic hoses are 45 feet long. The hose reel has a ratchet lock; pull the desired length of hose, then stop when the ratchet clicks.
3. Pull a sufficient length of hose from the hydraulic hose reel to reach the work location.
Figure 5-49. Pull the hydraulic hose pair off the hose reel to the work location.
4. Connect the hoses to the hydraulic tool. Tools with flow controls must be turned off.
5. Start the gas engine. Set the throttle so that the system pressure gauge on the front of the hydraulic tank dis-plays the pressure required for the tool to be operated.
Hydraulicports: return (tank) pressure
Port selector knob;pull for auxiliary
NOTE
74 Part No. 77-MAN-31, Rev. 0-1109 E.H. Wachs Company
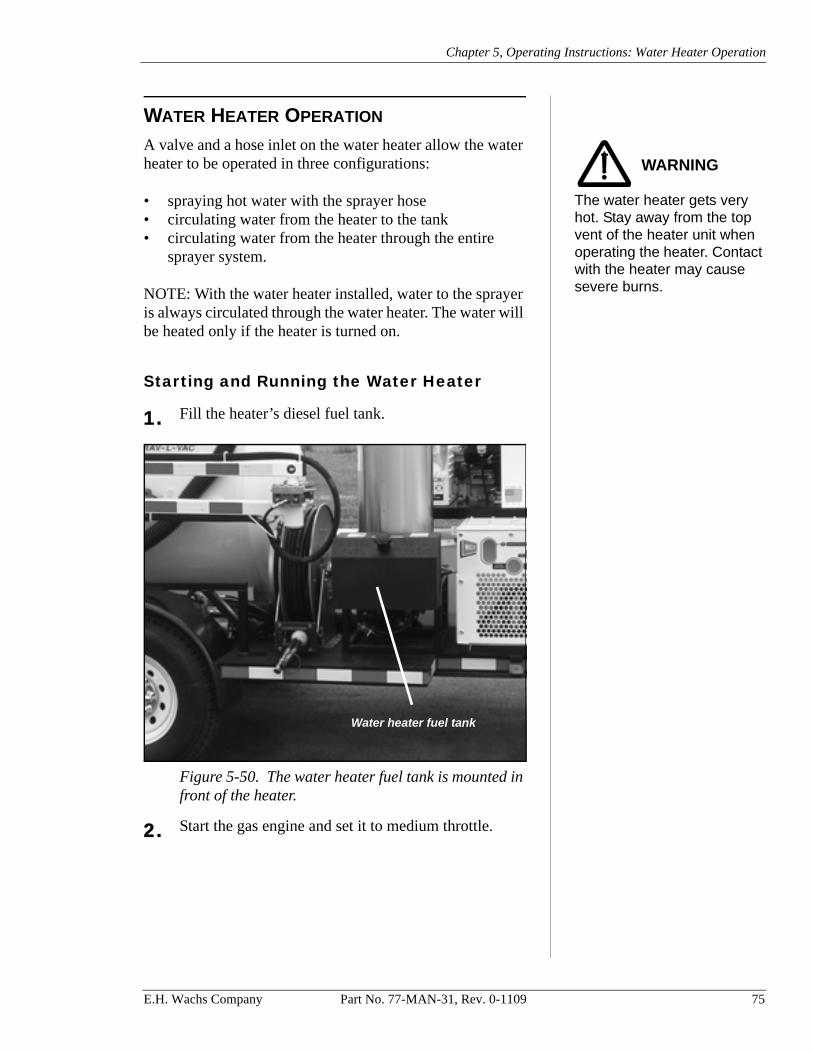
Chapter 5, Operating Instructions: Water Heater Operation
WATER HEATER OPERATION
The water heater gets very hot. Stay away from the top vent of the heater unit when operating the heater. Contact with the heater may cause severe burns.
A valve and a hose inlet on the water heater allow the water heater to be operated in three configurations:
• spraying hot water with the sprayer hose• circulating water from the heater to the tank• circulating water from the heater through the entire
sprayer system.
NOTE: With the water heater installed, water to the sprayer is always circulated through the water heater. The water will be heated only if the heater is turned on.
Starting and Running the Water Heater
1. Fill the heater’s diesel fuel tank.
Figure 5-50. The water heater fuel tank is mounted in front of the heater.
2. Start the gas engine and set it to medium throttle.
WARNING
Water heater fuel tank
E.H. Wachs Company Part No. 77-MAN-31, Rev. 0-1109 75
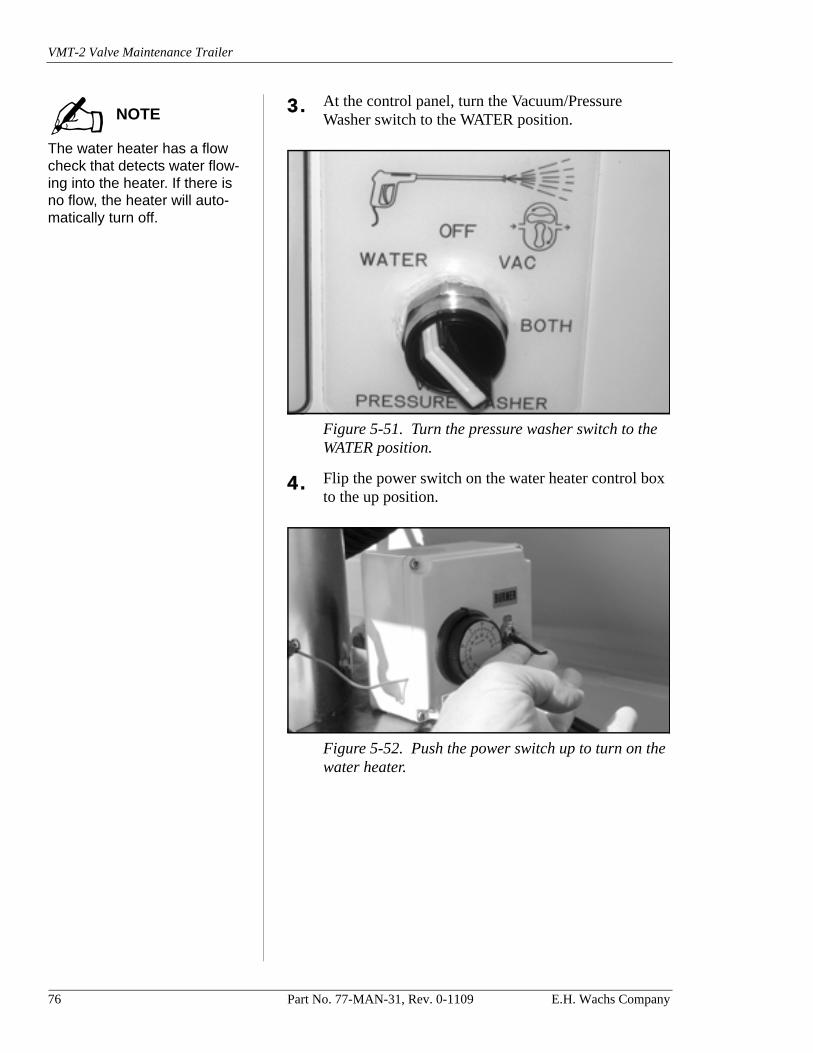
VMT-2 Valve Maintenance Trailer
The water heater has a flow check that detects water flow-ing into the heater. If there is no flow, the heater will auto-matically turn off.
3. At the control panel, turn the Vacuum/Pressure Washer switch to the WATER position.
Figure 5-51. Turn the pressure washer switch to the WATER position.
4. Flip the power switch on the water heater control box to the up position.
Figure 5-52. Push the power switch up to turn on the water heater.
NOTE
76 Part No. 77-MAN-31, Rev. 0-1109 E.H. Wachs Company
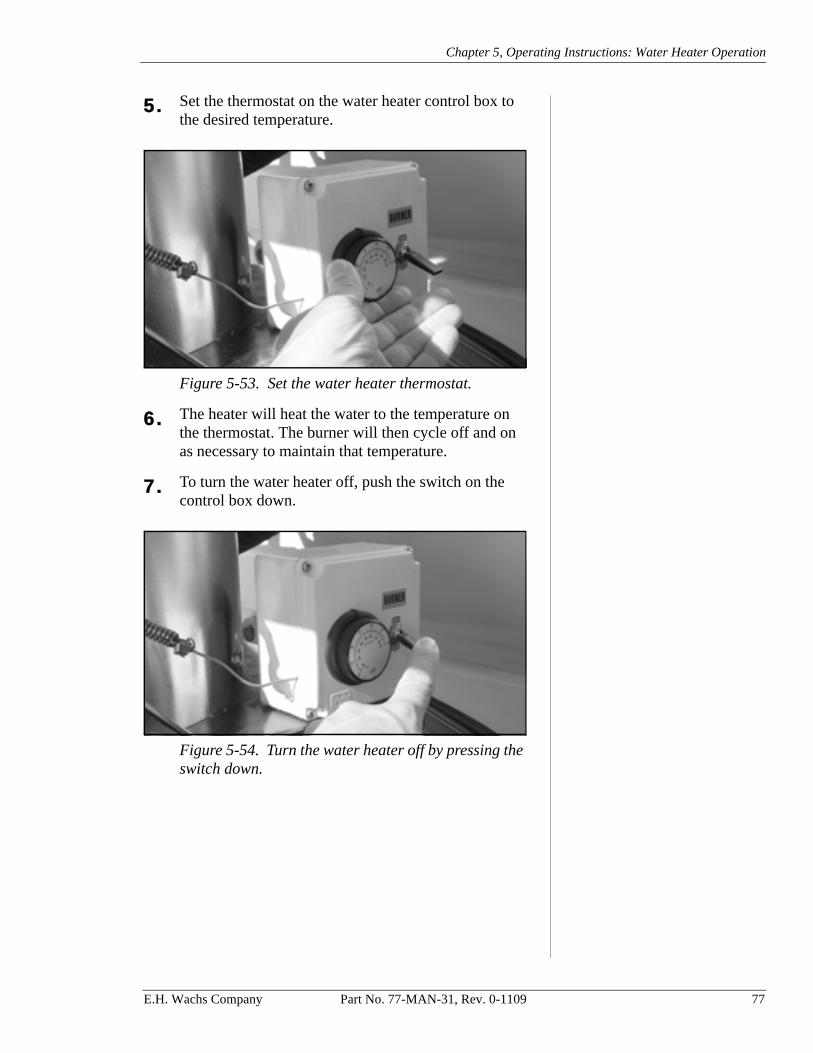
Chapter 5, Operating Instructions: Water Heater Operation
5. Set the thermostat on the water heater control box to the desired temperature.
Figure 5-53. Set the water heater thermostat.
6. The heater will heat the water to the temperature on the thermostat. The burner will then cycle off and on as necessary to maintain that temperature.
7. To turn the water heater off, push the switch on the control box down.
Figure 5-54. Turn the water heater off by pressing the switch down.
E.H. Wachs Company Part No. 77-MAN-31, Rev. 0-1109 77
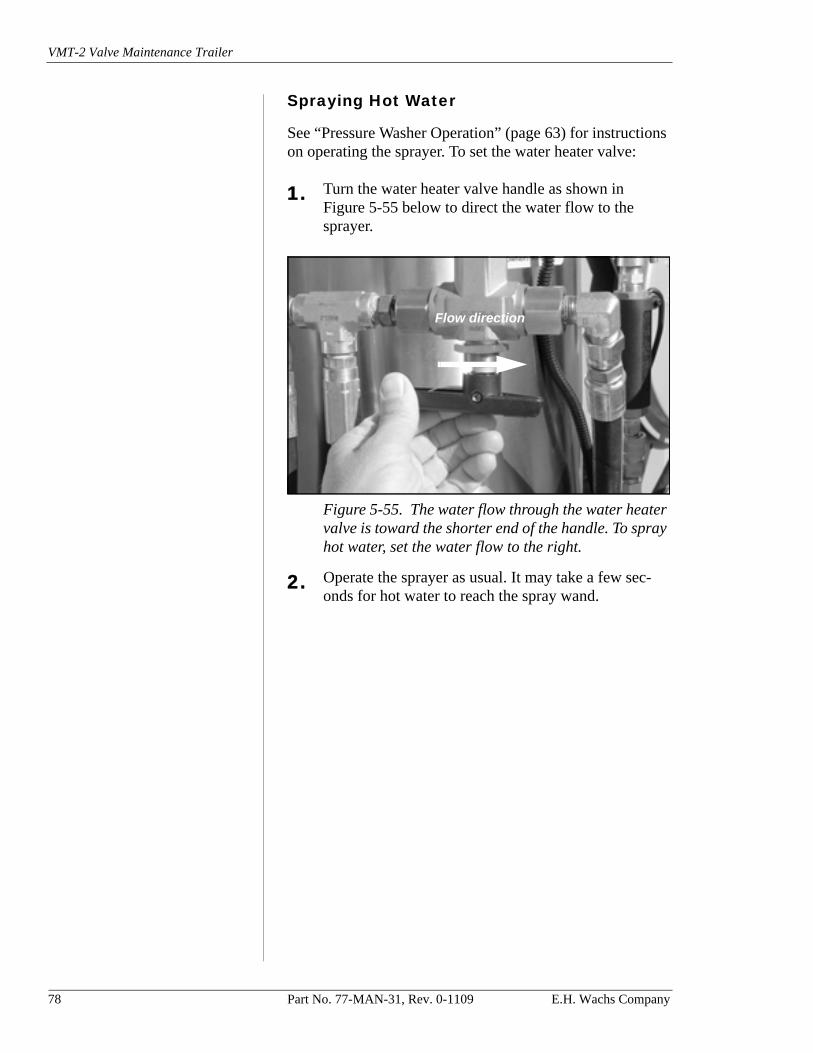
VMT-2 Valve Maintenance Trailer
Spraying Hot Water
See “Pressure Washer Operation” (page 63) for instructions on operating the sprayer. To set the water heater valve:
1. Turn the water heater valve handle as shown in Figure 5-55 below to direct the water flow to the sprayer.
Figure 5-55. The water flow through the water heater valve is toward the shorter end of the handle. To spray hot water, set the water flow to the right.
2. Operate the sprayer as usual. It may take a few sec-onds for hot water to reach the spray wand.
Flow direction
78 Part No. 77-MAN-31, Rev. 0-1109 E.H. Wachs Company
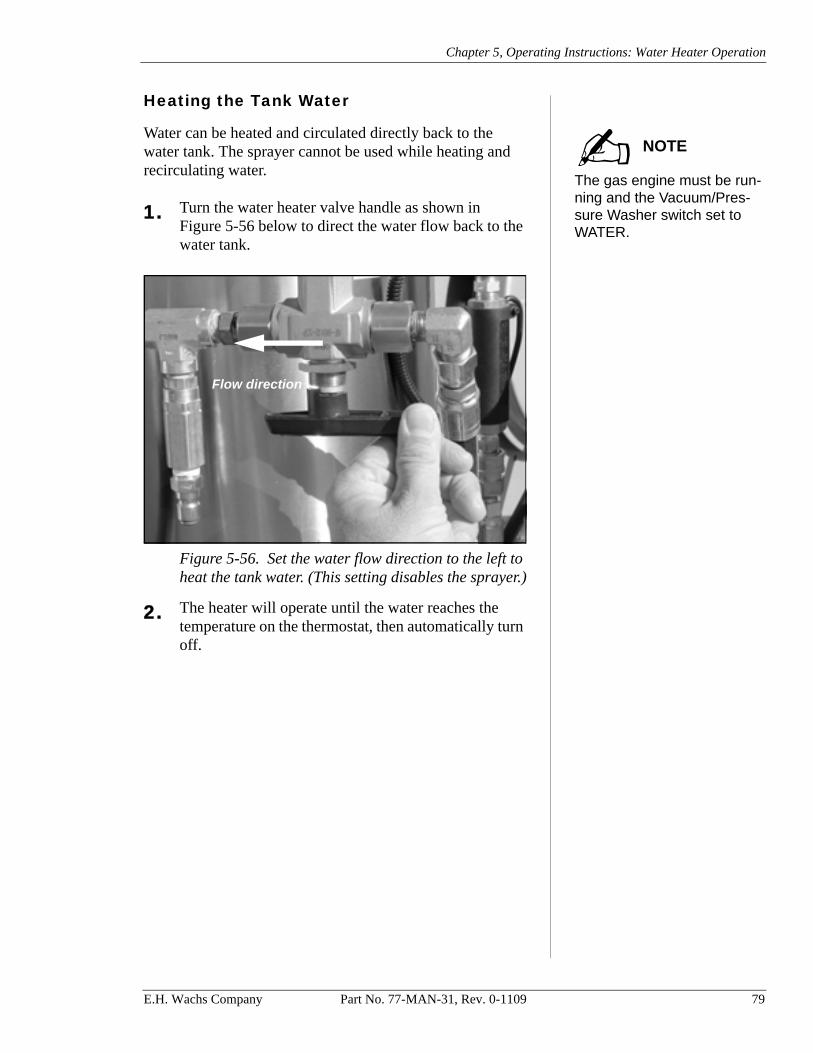
Chapter 5, Operating Instructions: Water Heater Operation
Heating the Tank Water
The gas engine must be run-ning and the Vacuum/Pres-sure Washer switch set to WATER.
Water can be heated and circulated directly back to the water tank. The sprayer cannot be used while heating and recirculating water.
1. Turn the water heater valve handle as shown in Figure 5-56 below to direct the water flow back to the water tank.
Figure 5-56. Set the water flow direction to the left to heat the tank water. (This setting disables the sprayer.)
2. The heater will operate until the water reaches the temperature on the thermostat, then automatically turn off.
NOTE
Flow direction
E.H. Wachs Company Part No. 77-MAN-31, Rev. 0-1109 79
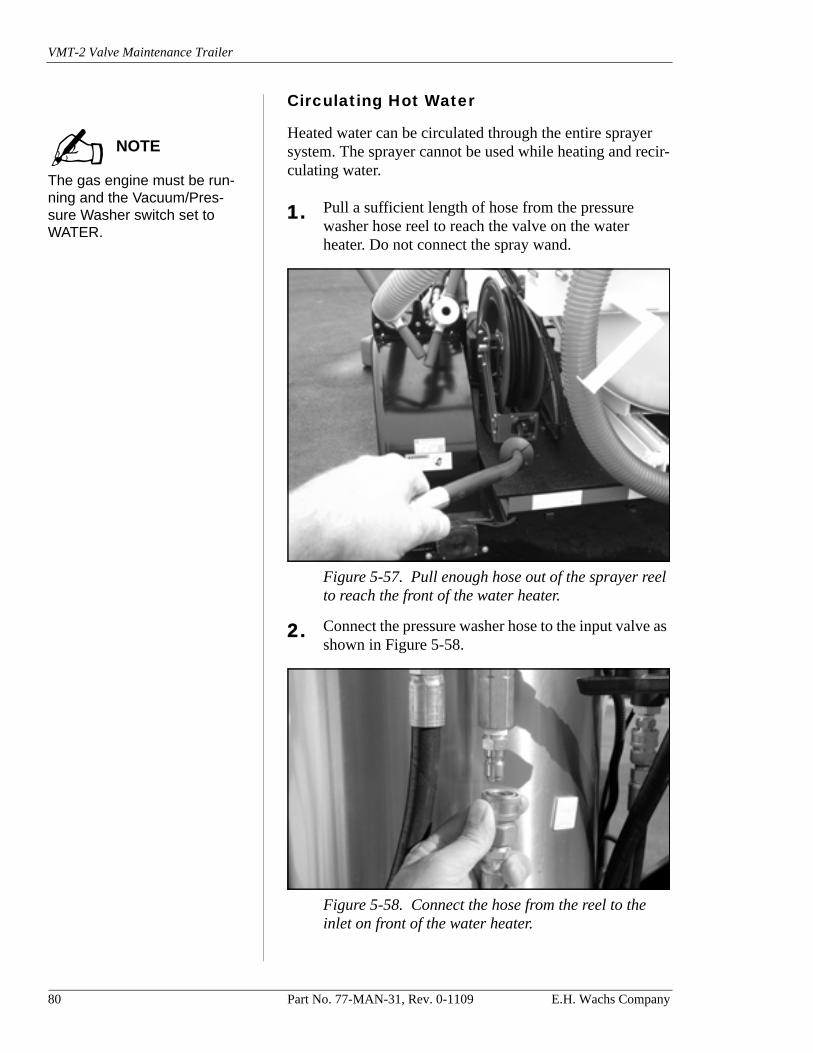
VMT-2 Valve Maintenance Trailer
Circulating Hot Water
The gas engine must be run-ning and the Vacuum/Pres-sure Washer switch set to WATER.
Heated water can be circulated through the entire sprayer system. The sprayer cannot be used while heating and recir-culating water.
1. Pull a sufficient length of hose from the pressure washer hose reel to reach the valve on the water heater. Do not connect the spray wand.
Figure 5-57. Pull enough hose out of the sprayer reel to reach the front of the water heater.
2. Connect the pressure washer hose to the input valve as shown in Figure 5-58.
Figure 5-58. Connect the hose from the reel to the inlet on front of the water heater.
NOTE
80 Part No. 77-MAN-31, Rev. 0-1109 E.H. Wachs Company
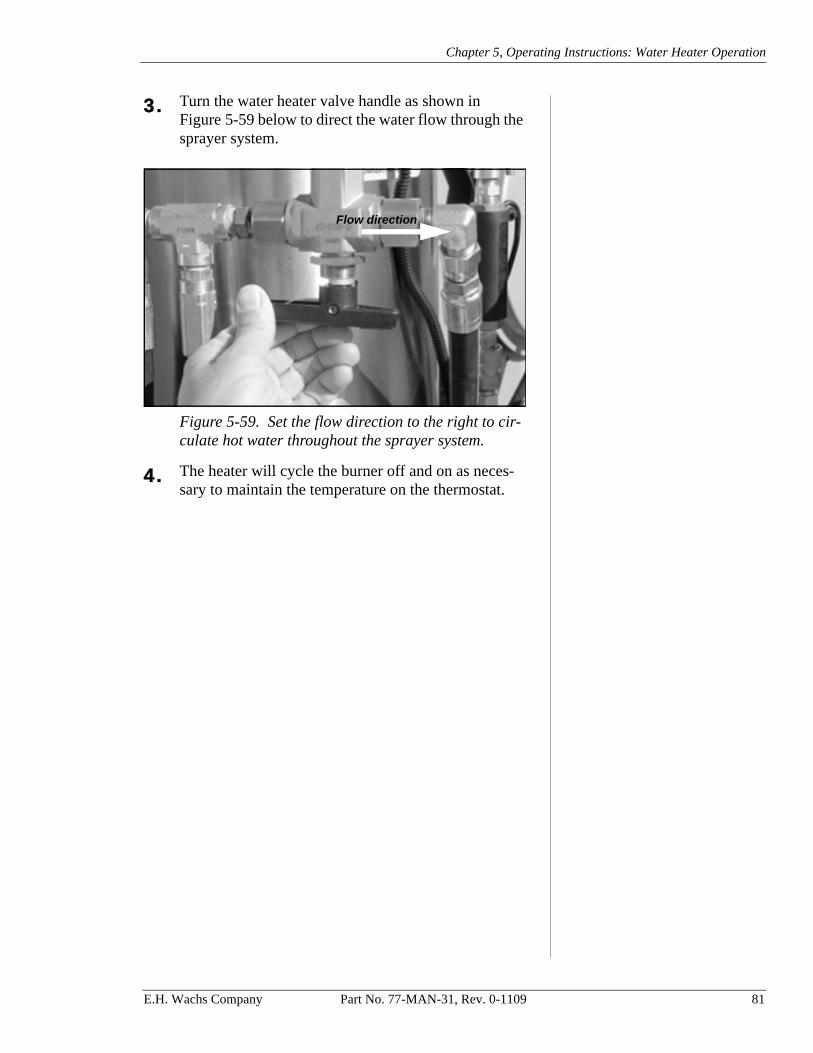
Chapter 5, Operating Instructions: Water Heater Operation
3. Turn the water heater valve handle as shown in Figure 5-59 below to direct the water flow through the sprayer system.
Figure 5-59. Set the flow direction to the right to cir-culate hot water throughout the sprayer system.
4. The heater will cycle the burner off and on as neces-sary to maintain the temperature on the thermostat.
Flow direction
E.H. Wachs Company Part No. 77-MAN-31, Rev. 0-1109 81
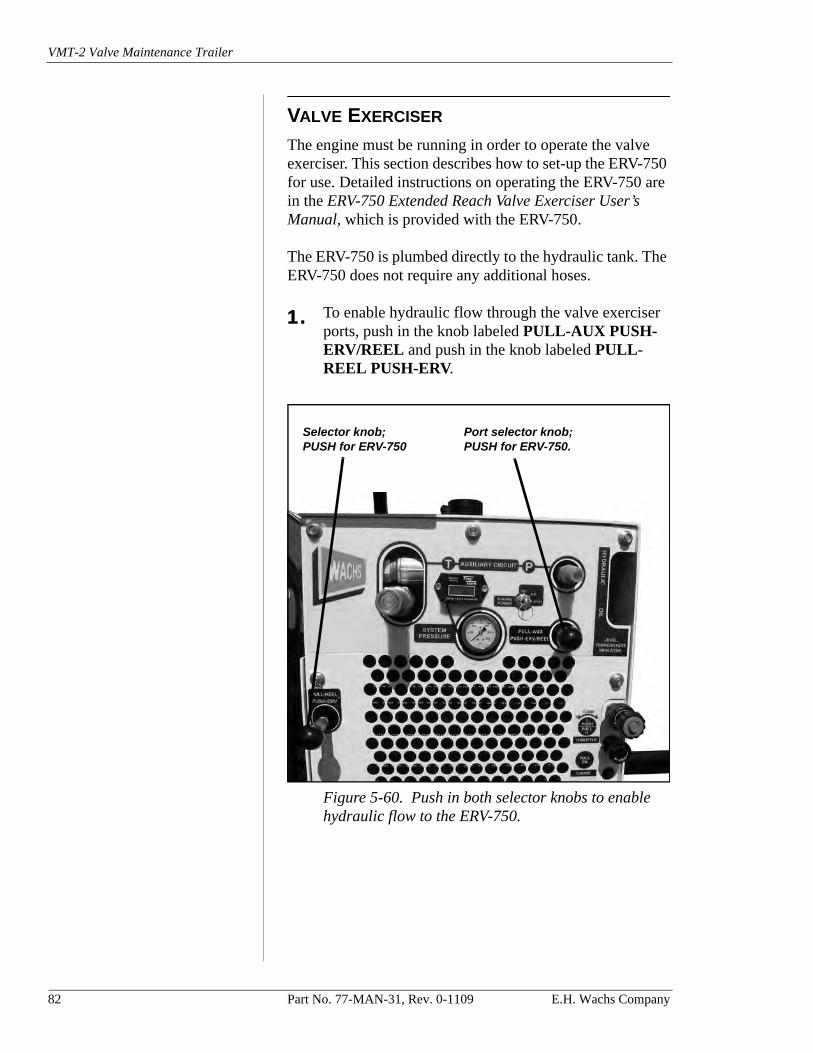
VMT-2 Valve Maintenance Trailer
VALVE EXERCISER
The engine must be running in order to operate the valve exerciser. This section describes how to set-up the ERV-750 for use. Detailed instructions on operating the ERV-750 are in the ERV-750 Extended Reach Valve Exerciser User’s Manual, which is provided with the ERV-750.
The ERV-750 is plumbed directly to the hydraulic tank. The ERV-750 does not require any additional hoses.
1. To enable hydraulic flow through the valve exerciser ports, push in the knob labeled PULL-AUX PUSH-ERV/REEL and push in the knob labeled PULL-REEL PUSH-ERV.
Figure 5-60. Push in both selector knobs to enable hydraulic flow to the ERV-750.
Port selector knob; PUSH for ERV-750.
Selector knob; PUSH for ERV-750
82 Part No. 77-MAN-31, Rev. 0-1109 E.H. Wachs Company
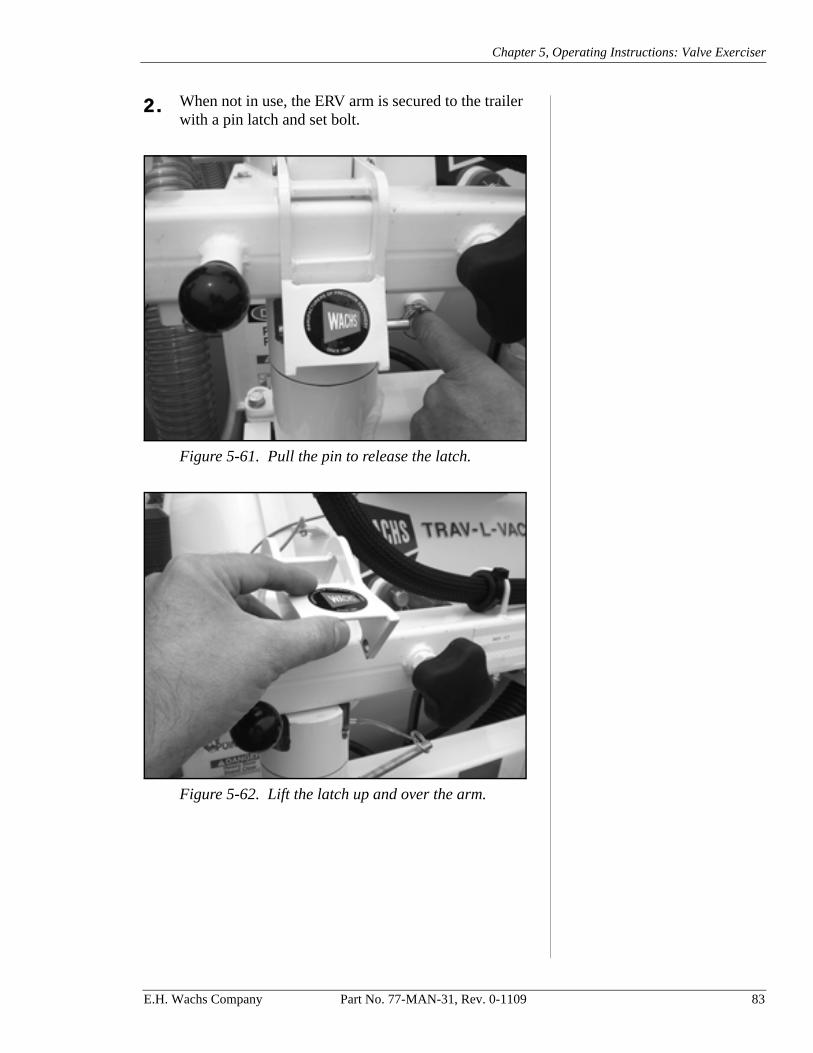
Chapter 5, Operating Instructions: Valve Exerciser
2. When not in use, the ERV arm is secured to the trailer with a pin latch and set bolt.
Figure 5-61. Pull the pin to release the latch.
Figure 5-62. Lift the latch up and over the arm.
E.H. Wachs Company Part No. 77-MAN-31, Rev. 0-1109 83
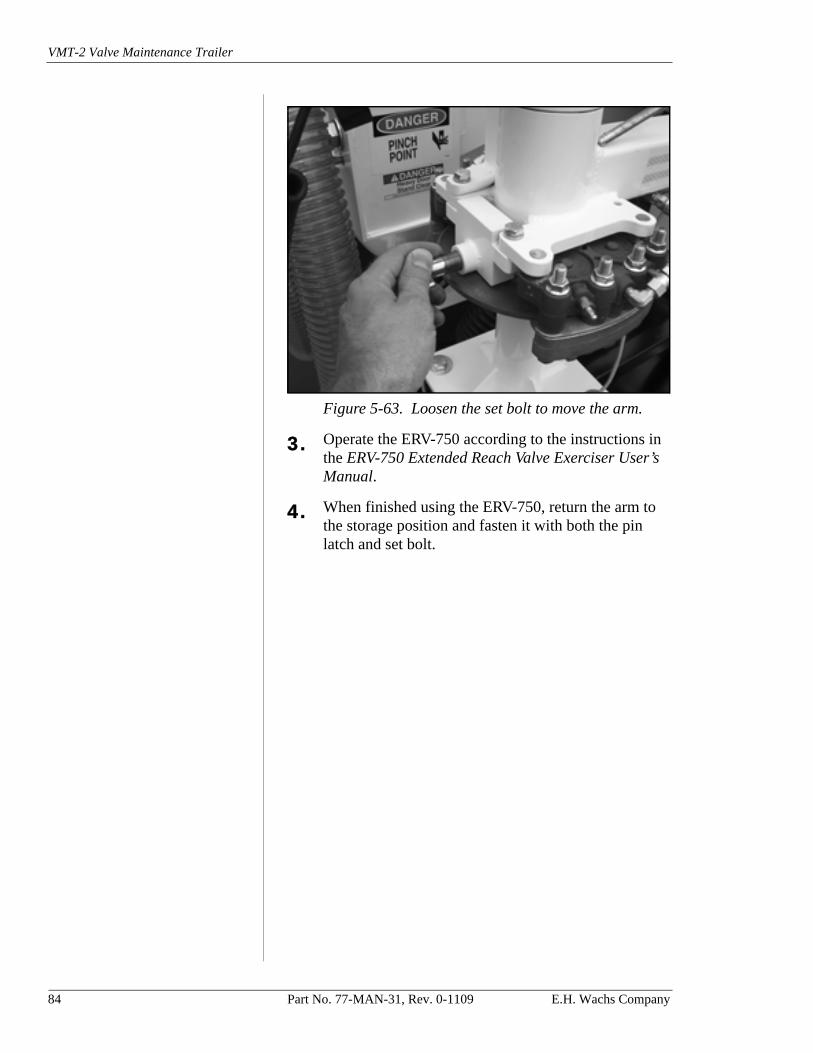
VMT-2 Valve Maintenance Trailer
Figure 5-63. Loosen the set bolt to move the arm.
3. Operate the ERV-750 according to the instructions in the ERV-750 Extended Reach Valve Exerciser User’s Manual.
4. When finished using the ERV-750, return the arm to the storage position and fasten it with both the pin latch and set bolt.
84 Part No. 77-MAN-31, Rev. 0-1109 E.H. Wachs Company
Chapter 6, Routine Maintenance
Chapter 6
Routine Maintenance
For maintenance on the engine, axles, brakes, and any optional equipment such as the water heater or valve exer-cisers refer to the individual manuals supplied with those components. Perform all maintenance procedures recom-mended by the manufacturers.
ENGINE MAINTENANCE
The manual supplied with the VMT-2 engine (either gas or diesel) has a comprehensive maintenance schedule. Per-form all engine maintenance according to the guidelines in the manufacturer’s manual.
This chapter highlights some engine maintenance proce-dures, but does not describe all maintenance. Always fol-low the recommendations in the engine manual.
In This Chapter
ENGINE MAINTENANCE
DAILY MAINTENANCE
WEEKLY MAINTENANCE
MONTHLY MAINTENANCE
OIL CHANGE SCHEDULE
REPLACE THE OIL FILL CAP. WIPE ANY SPILLED OIL OFF OF THE BLOWER HOUSING.
E.H. Wachs Company Part No. 77-MAN-31, Rev. 0-1109 85

VMT-2 Valve Maintenance Trailer
DAILY MAINTENANCE
Perform the following maintenance each day:
• Clean the vacuum system filter (see “Cleaning the Vac-uum Filter” below). Verify that the clamps are secured tightly.
• Lubricate the vacuum blower (see “Lubricating the Blower” below).
• Verify that all trailer and accessory lights are working. • Check suction hoses for abrasions, holes, kinks, or dam-
aged connectors. Replace if necessary.• Clean any debris from the tank door seal.• Verify that the latches on the tank door seal the door
tightly. See “Adjusting the Tank Latches” in Chapter 7.
Cleaning the Vacuum Filter
The filter should be cleaned every day; more frequently when vacuuming dust or water that is very dirty. If the vac-uum begins to lose suction, check the filter and clean it if necessary. Once the filter is cleaned, it must be allowed to dry before reinstallation.
Keep at least one spare filter on hand so that filters can be swapped for cleaning.
1. Shut off the vacuum switch at the control panel.
Figure 6-1. Turn the Vacuum/Pressure Washer switch to the OFF position.
86 Part No. 77-MAN-31, Rev. 0-1109 E.H. Wachs Company
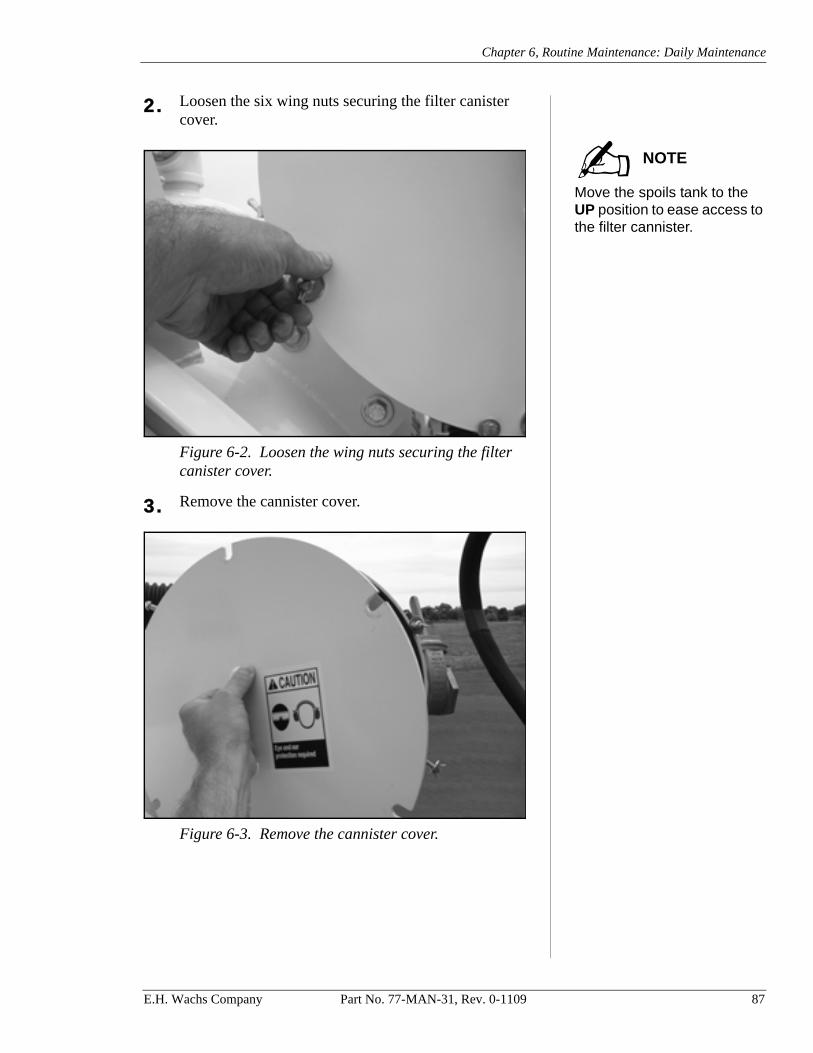
Chapter 6, Routine Maintenance: Daily Maintenance
2. Loosen the six wing nuts securing the filter canister cover.
Move the spoils tank to the UP position to ease access to the filter cannister.
Figure 6-2. Loosen the wing nuts securing the filter canister cover.
3. Remove the cannister cover.
Figure 6-3. Remove the cannister cover.
NOTE
E.H. Wachs Company Part No. 77-MAN-31, Rev. 0-1109 87
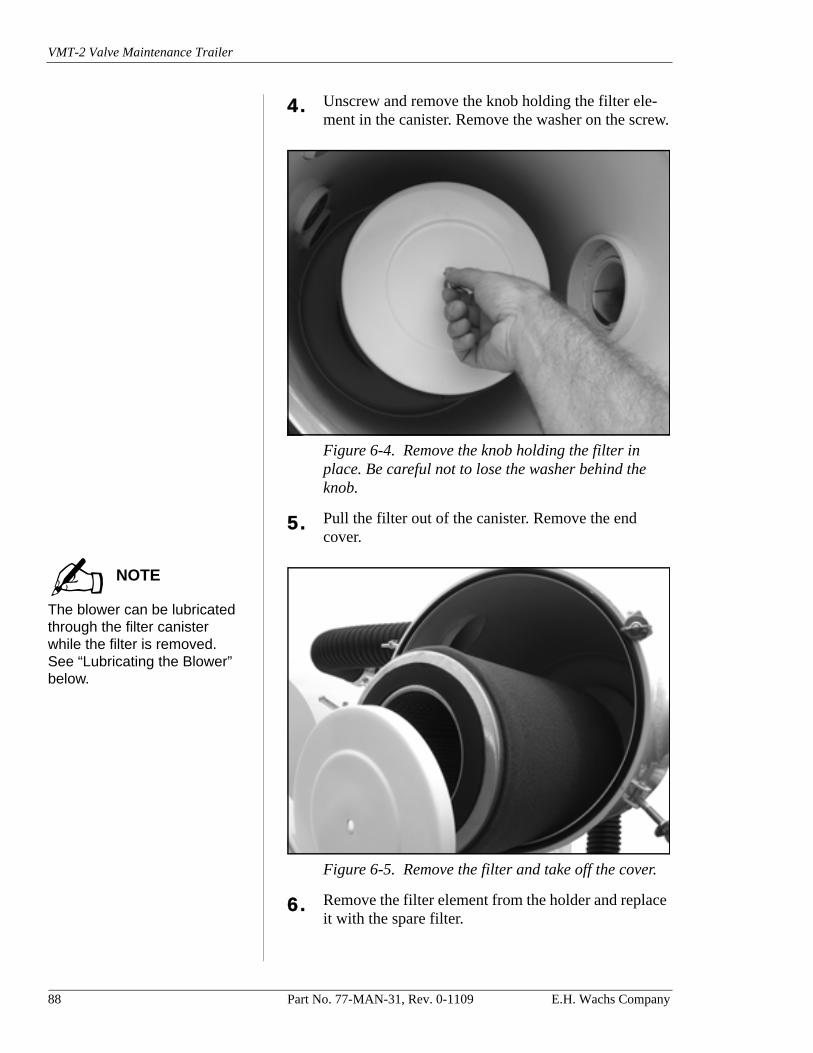
VMT-2 Valve Maintenance Trailer
4. Unscrew and remove the knob holding the filter ele-ment in the canister. Remove the washer on the screw.
Figure 6-4. Remove the knob holding the filter in place. Be careful not to lose the washer behind the knob.
5. Pull the filter out of the canister. Remove the end cover.
The blower can be lubricated through the filter canister while the filter is removed. See “Lubricating the Blower” below.
Figure 6-5. Remove the filter and take off the cover.
6. Remove the filter element from the holder and replace it with the spare filter.
NOTE
88 Part No. 77-MAN-31, Rev. 0-1109 E.H. Wachs Company
Chapter 6, Routine Maintenance: Daily Maintenance
7. Put the filter holder back into the canister.
8. Replace the cover over the end of the filter. Install the washer and the locking knob, securing the knob tightly.
9. Replace the canister cover and fasten it with the swing latches.
Do not spray the filter ele-ment with pressurized water. High-pressure spray may tear the filter.
10. Wash the filter that was removed in clean water, or a water/detergent solution. Rinse the filter and set it where it can dry.
IMPORTANT
E.H. Wachs Company Part No. 77-MAN-31, Rev. 0-1109 89
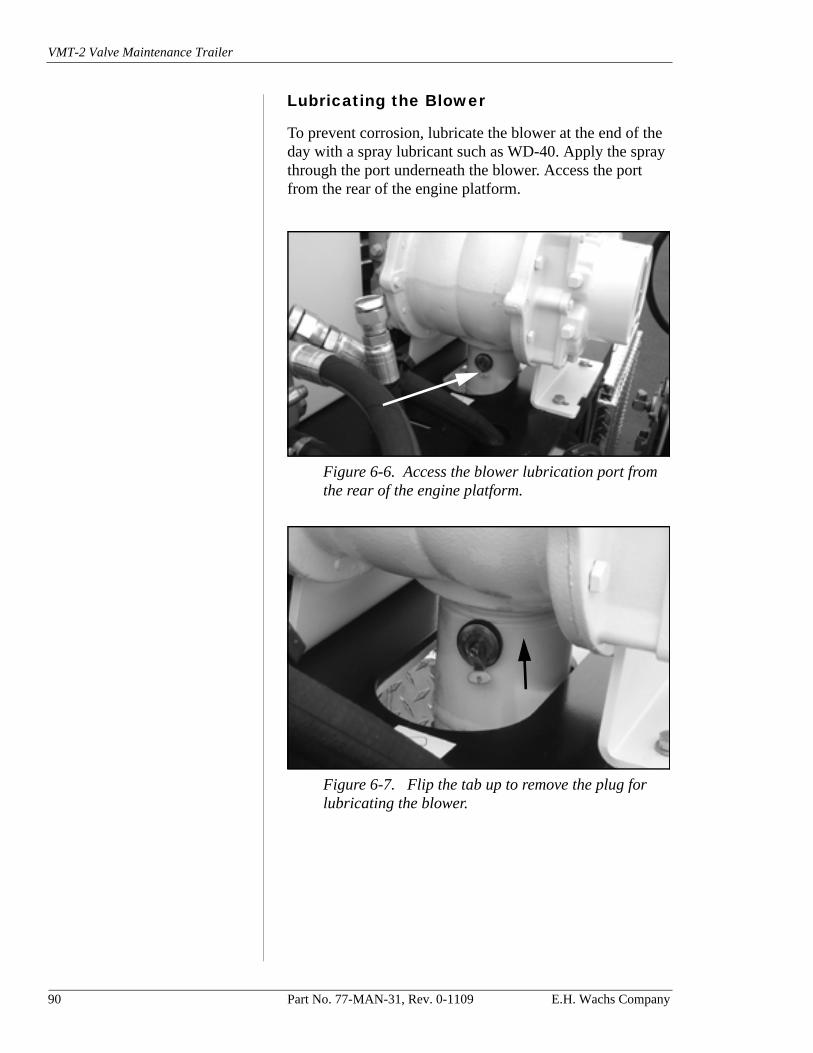
VMT-2 Valve Maintenance Trailer
Lubricating the Blower
To prevent corrosion, lubricate the blower at the end of the day with a spray lubricant such as WD-40. Apply the spray through the port underneath the blower. Access the port from the rear of the engine platform.
Figure 6-6. Access the blower lubrication port from the rear of the engine platform.
Figure 6-7. Flip the tab up to remove the plug for lubricating the blower.
90 Part No. 77-MAN-31, Rev. 0-1109 E.H. Wachs Company
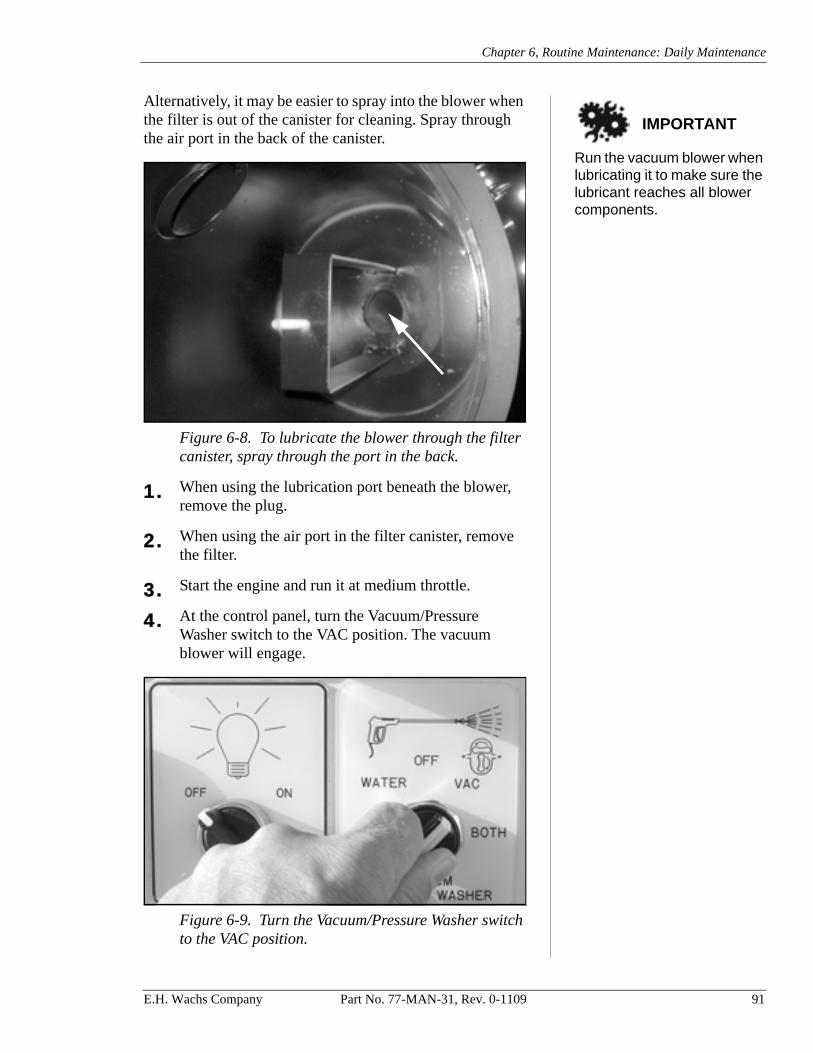
Chapter 6, Routine Maintenance: Daily Maintenance
Run the vacuum blower when lubricating it to make sure the lubricant reaches all blower components.
Alternatively, it may be easier to spray into the blower when the filter is out of the canister for cleaning. Spray through the air port in the back of the canister.
Figure 6-8. To lubricate the blower through the filter canister, spray through the port in the back.
1. When using the lubrication port beneath the blower, remove the plug.
2. When using the air port in the filter canister, remove the filter.
3. Start the engine and run it at medium throttle.
4. At the control panel, turn the Vacuum/Pressure Washer switch to the VAC position. The vacuum blower will engage.
Figure 6-9. Turn the Vacuum/Pressure Washer switch to the VAC position.
IMPORTANT
E.H. Wachs Company Part No. 77-MAN-31, Rev. 0-1109 91
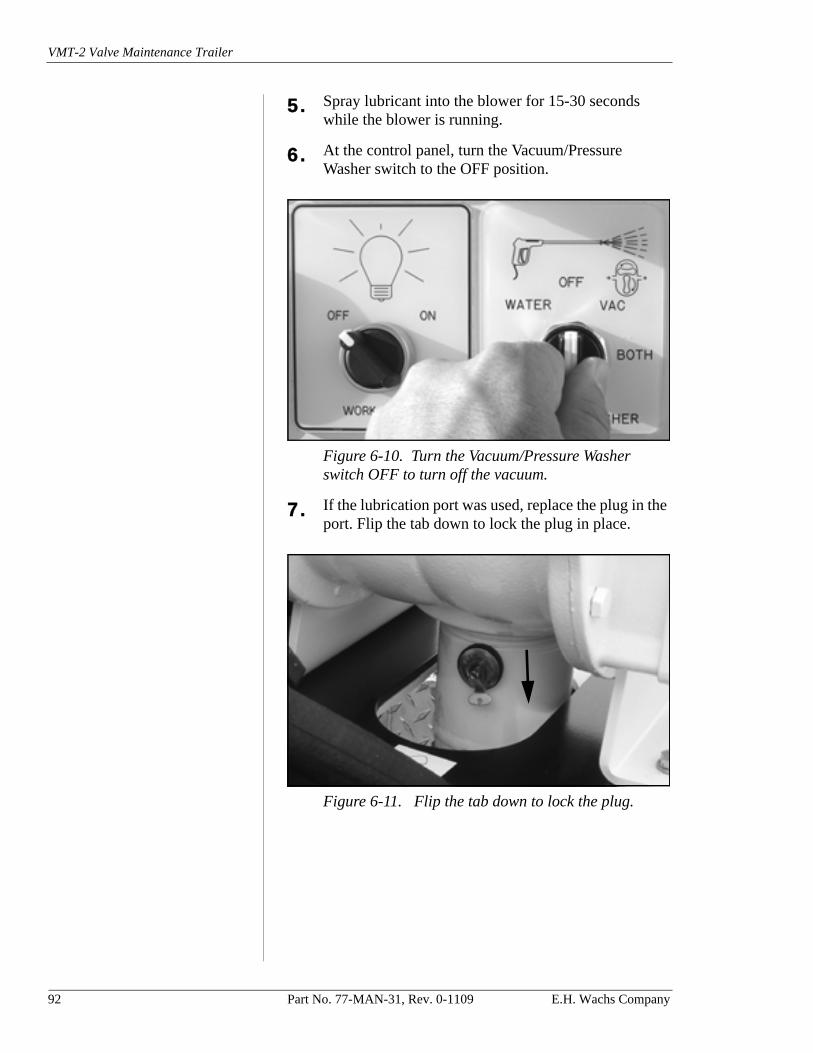
VMT-2 Valve Maintenance Trailer
5. Spray lubricant into the blower for 15-30 seconds while the blower is running.
6. At the control panel, turn the Vacuum/Pressure Washer switch to the OFF position.
Figure 6-10. Turn the Vacuum/Pressure Washer switch OFF to turn off the vacuum.
7. If the lubrication port was used, replace the plug in the port. Flip the tab down to lock the plug in place.
Figure 6-11. Flip the tab down to lock the plug.
92 Part No. 77-MAN-31, Rev. 0-1109 E.H. Wachs Company
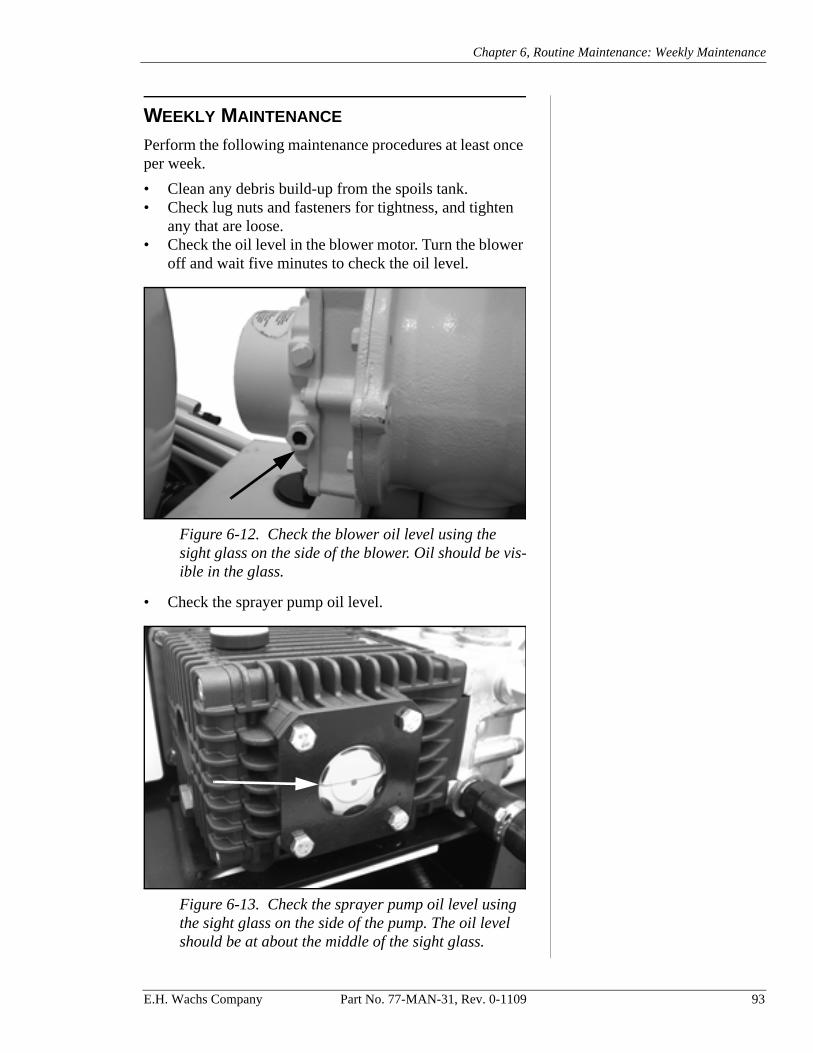
Chapter 6, Routine Maintenance: Weekly Maintenance
WEEKLY MAINTENANCE
Perform the following maintenance procedures at least once per week.
• Clean any debris build-up from the spoils tank.• Check lug nuts and fasteners for tightness, and tighten
any that are loose.• Check the oil level in the blower motor. Turn the blower
off and wait five minutes to check the oil level.
Figure 6-12. Check the blower oil level using the sight glass on the side of the blower. Oil should be vis-ible in the glass.
• Check the sprayer pump oil level.
Figure 6-13. Check the sprayer pump oil level using the sight glass on the side of the pump. The oil level should be at about the middle of the sight glass.
E.H. Wachs Company Part No. 77-MAN-31, Rev. 0-1109 93
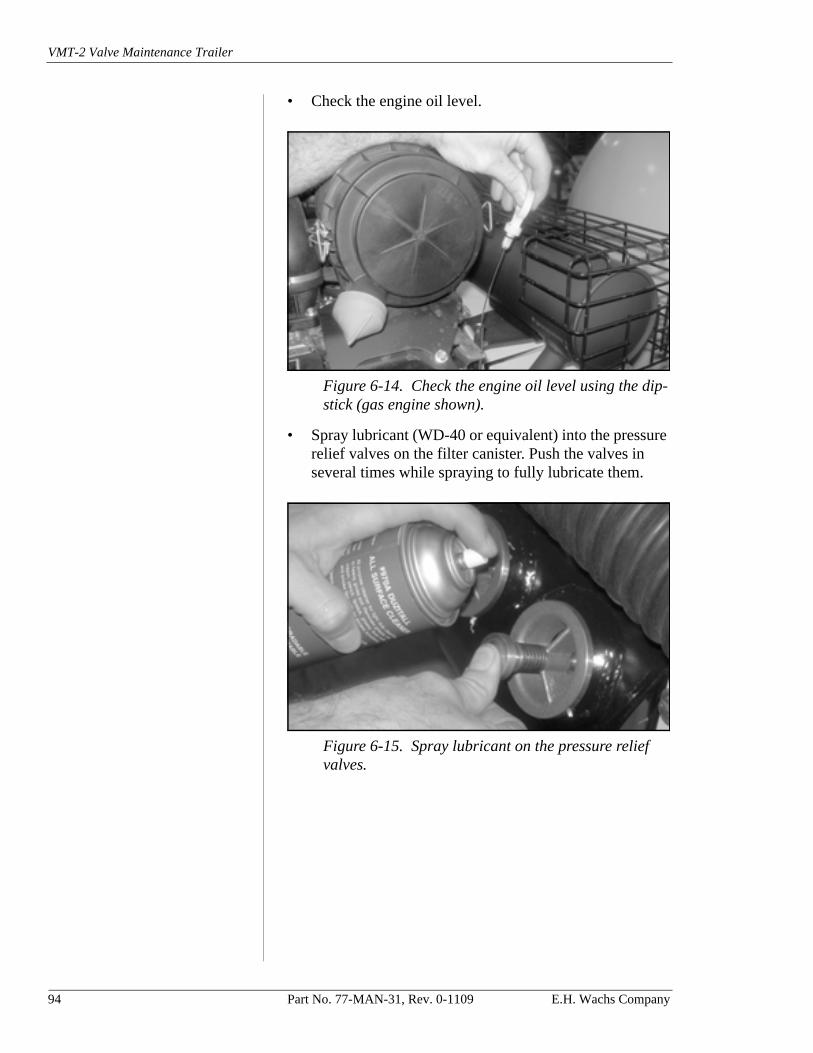
VMT-2 Valve Maintenance Trailer
• Check the engine oil level.
Figure 6-14. Check the engine oil level using the dip-stick (gas engine shown).
• Spray lubricant (WD-40 or equivalent) into the pressure relief valves on the filter canister. Push the valves in several times while spraying to fully lubricate them.
Figure 6-15. Spray lubricant on the pressure relief valves.
94 Part No. 77-MAN-31, Rev. 0-1109 E.H. Wachs Company
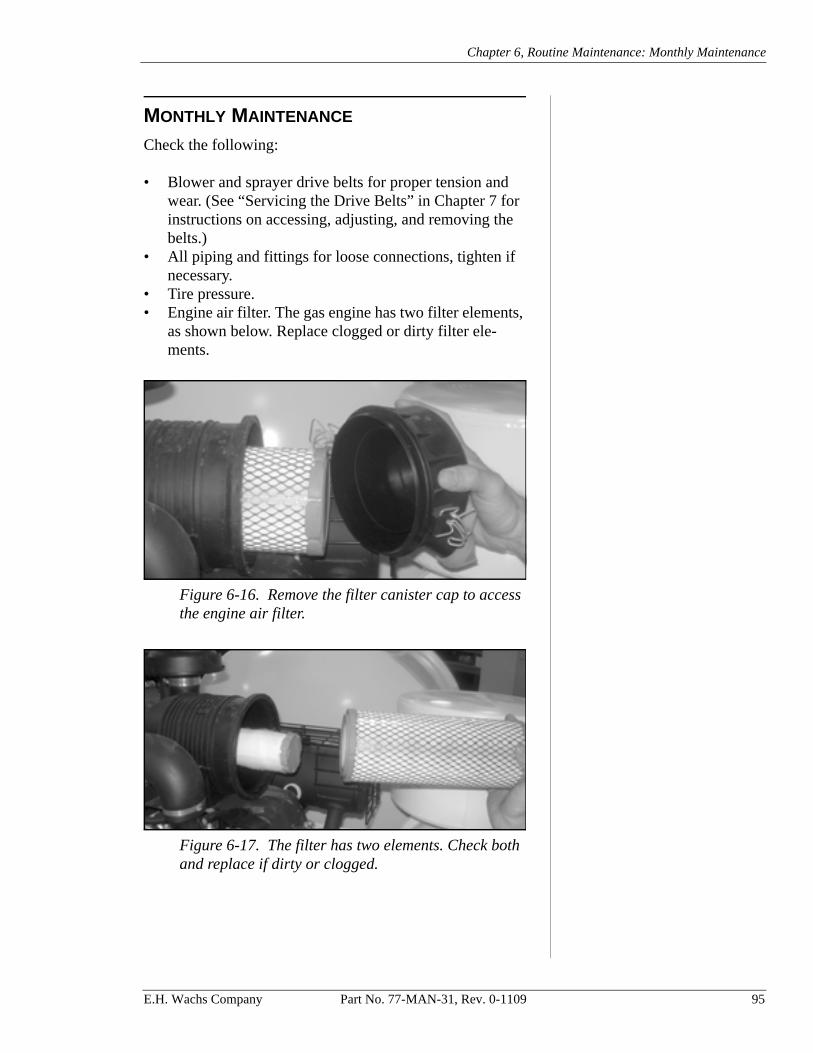
Chapter 6, Routine Maintenance: Monthly Maintenance
MONTHLY MAINTENANCE
Check the following:
• Blower and sprayer drive belts for proper tension and wear. (See “Servicing the Drive Belts” in Chapter 7 for instructions on accessing, adjusting, and removing the belts.)
• All piping and fittings for loose connections, tighten if necessary.
• Tire pressure.• Engine air filter. The gas engine has two filter elements,
as shown below. Replace clogged or dirty filter ele-ments.
Figure 6-16. Remove the filter canister cap to access the engine air filter.
Figure 6-17. The filter has two elements. Check both and replace if dirty or clogged.
E.H. Wachs Company Part No. 77-MAN-31, Rev. 0-1109 95
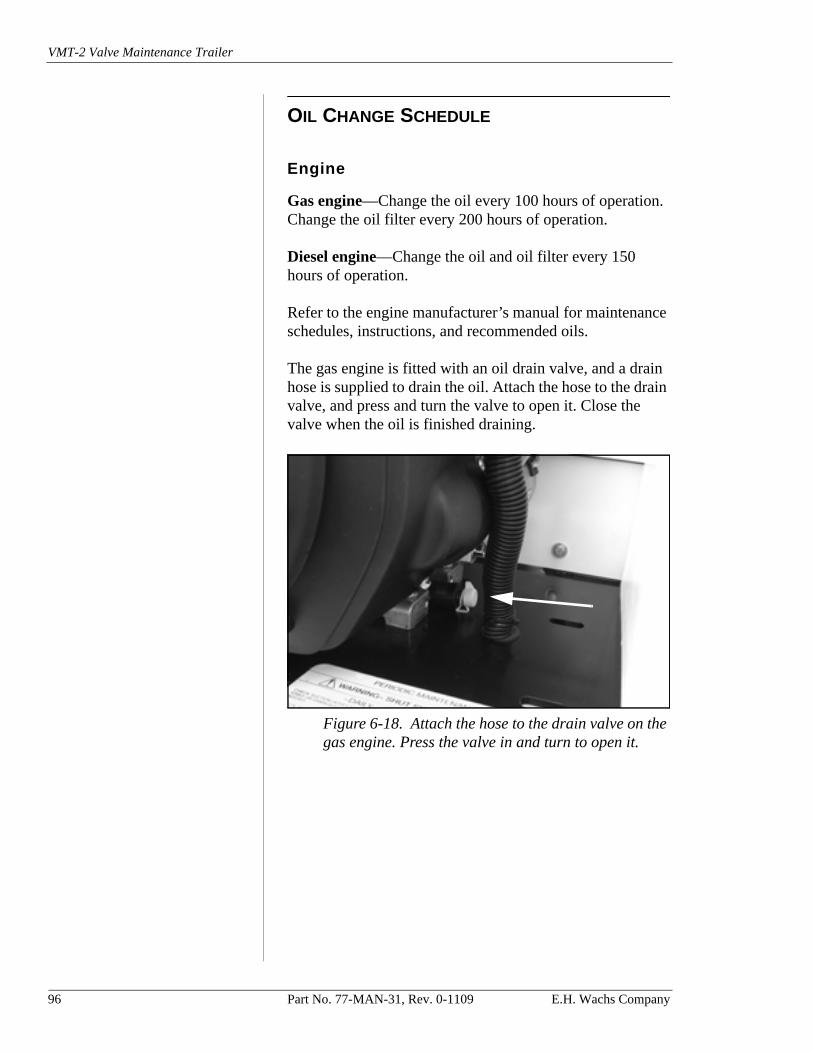
VMT-2 Valve Maintenance Trailer
OIL CHANGE SCHEDULE
Engine
Gas engine—Change the oil every 100 hours of operation. Change the oil filter every 200 hours of operation.
Diesel engine—Change the oil and oil filter every 150 hours of operation.
Refer to the engine manufacturer’s manual for maintenance schedules, instructions, and recommended oils.
The gas engine is fitted with an oil drain valve, and a drain hose is supplied to drain the oil. Attach the hose to the drain valve, and press and turn the valve to open it. Close the valve when the oil is finished draining.
Figure 6-18. Attach the hose to the drain valve on the gas engine. Press the valve in and turn to open it.
96 Part No. 77-MAN-31, Rev. 0-1109 E.H. Wachs Company
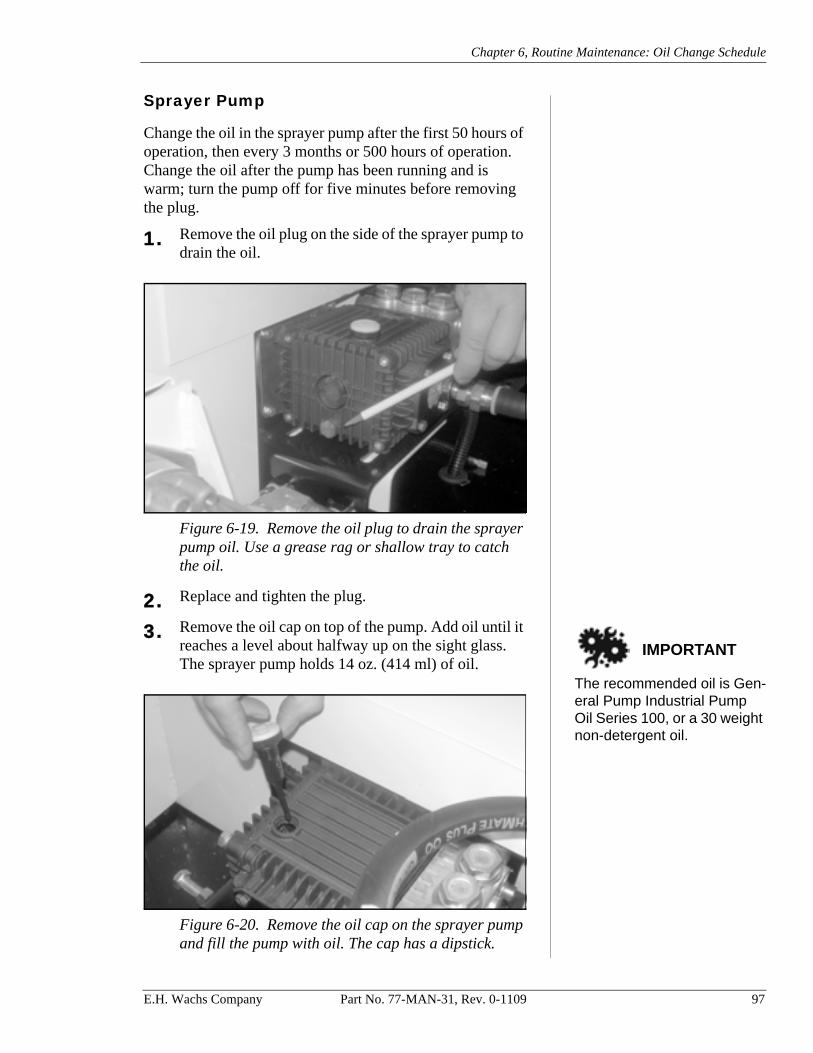
Chapter 6, Routine Maintenance: Oil Change Schedule
Sprayer Pump
Change the oil in the sprayer pump after the first 50 hours of operation, then every 3 months or 500 hours of operation. Change the oil after the pump has been running and is warm; turn the pump off for five minutes before removing the plug.
1. Remove the oil plug on the side of the sprayer pump to drain the oil.
Figure 6-19. Remove the oil plug to drain the sprayer pump oil. Use a grease rag or shallow tray to catch the oil.
2. Replace and tighten the plug.
The recommended oil is Gen-eral Pump Industrial Pump Oil Series 100, or a 30 weight non-detergent oil.
3. Remove the oil cap on top of the pump. Add oil until it reaches a level about halfway up on the sight glass. The sprayer pump holds 14 oz. (414 ml) of oil.
Figure 6-20. Remove the oil cap on the sprayer pump and fill the pump with oil. The cap has a dipstick.
IMPORTANT
E.H. Wachs Company Part No. 77-MAN-31, Rev. 0-1109 97
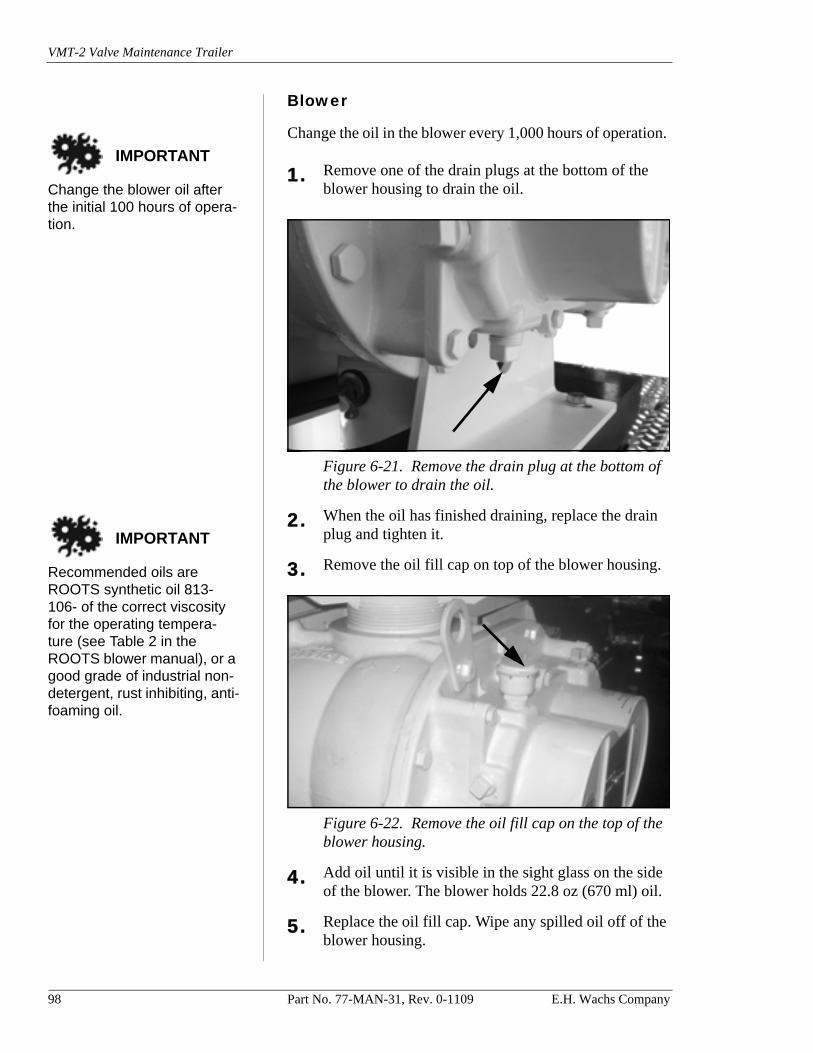
VMT-2 Valve Maintenance Trailer
Blower
Change the blower oil after the initial 100 hours of opera-tion.
Change the oil in the blower every 1,000 hours of operation.
1. Remove one of the drain plugs at the bottom of the blower housing to drain the oil.
Figure 6-21. Remove the drain plug at the bottom of the blower to drain the oil.
Recommended oils are ROOTS synthetic oil 813-106- of the correct viscosity for the operating tempera-ture (see Table 2 in the ROOTS blower manual), or a good grade of industrial non-detergent, rust inhibiting, anti-foaming oil.
2. When the oil has finished draining, replace the drain plug and tighten it.
3. Remove the oil fill cap on top of the blower housing.
Figure 6-22. Remove the oil fill cap on the top of the blower housing.
4. Add oil until it is visible in the sight glass on the side of the blower. The blower holds 22.8 oz (670 ml) oil.
5. Replace the oil fill cap. Wipe any spilled oil off of the blower housing.
IMPORTANT
IMPORTANT
98 Part No. 77-MAN-31, Rev. 0-1109 E.H. Wachs Company
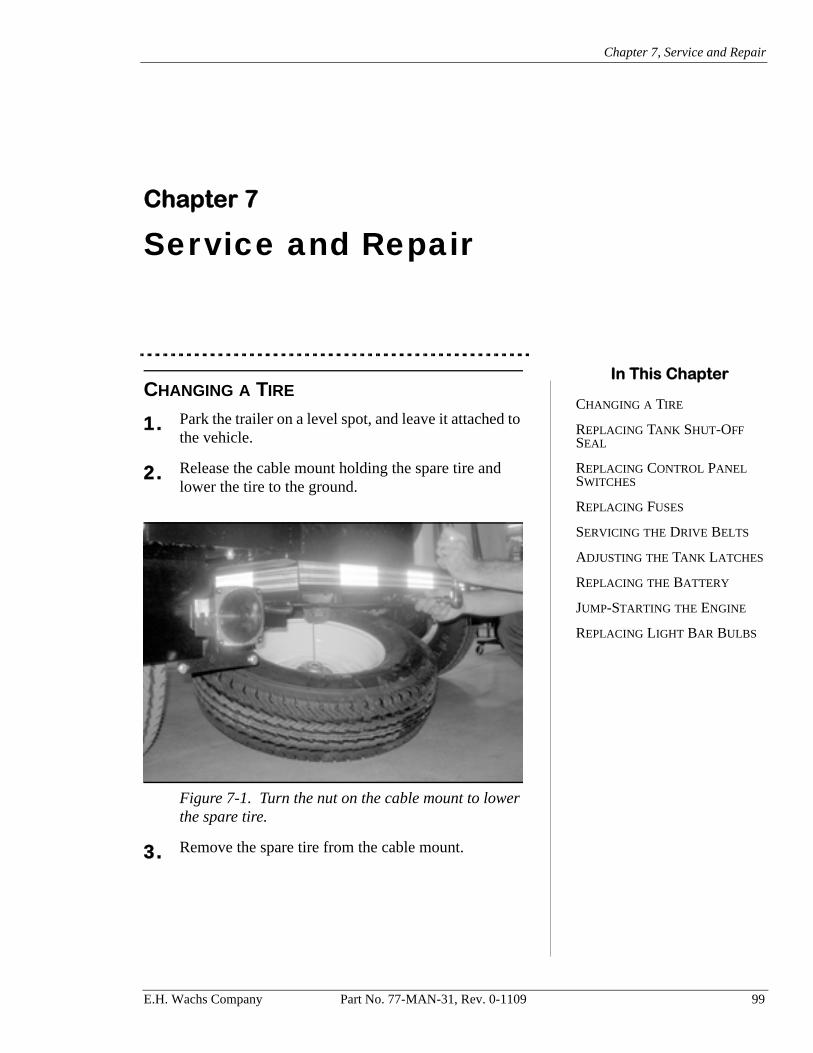
Chapter 7, Service and Repair
Chapter 7
Service and Repair
CHANGING A TIRE
1. Park the trailer on a level spot, and leave it attached to the vehicle.
2. Release the cable mount holding the spare tire and lower the tire to the ground.
Figure 7-1. Turn the nut on the cable mount to lower the spare tire.
3. Remove the spare tire from the cable mount.
In This Chapter
CHANGING A TIRE
REPLACING TANK SHUT-OFF SEAL
REPLACING CONTROL PANEL SWITCHES
REPLACING FUSES
SERVICING THE DRIVE BELTS
ADJUSTING THE TANK LATCHES
REPLACING THE BATTERY
JUMP-STARTING THE ENGINE
REPLACING LIGHT BAR BULBS
E.H. Wachs Company Part No. 77-MAN-31, Rev. 0-1109 99
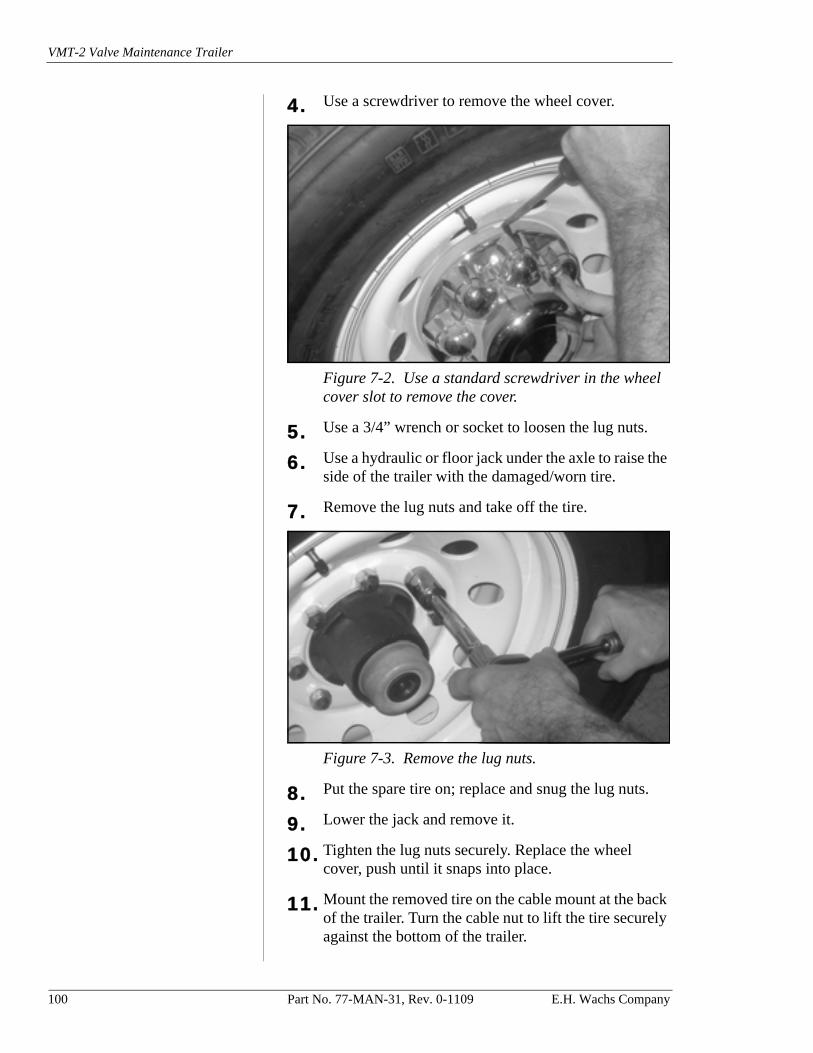
VMT-2 Valve Maintenance Trailer
4. Use a screwdriver to remove the wheel cover.
Figure 7-2. Use a standard screwdriver in the wheel cover slot to remove the cover.
5. Use a 3/4” wrench or socket to loosen the lug nuts.
6. Use a hydraulic or floor jack under the axle to raise the side of the trailer with the damaged/worn tire.
7. Remove the lug nuts and take off the tire.
Figure 7-3. Remove the lug nuts.
8. Put the spare tire on; replace and snug the lug nuts.
9. Lower the jack and remove it.
10. Tighten the lug nuts securely. Replace the wheel cover, push until it snaps into place.
11. Mount the removed tire on the cable mount at the back of the trailer. Turn the cable nut to lift the tire securely against the bottom of the trailer.
100 Part No. 77-MAN-31, Rev. 0-1109 E.H. Wachs Company
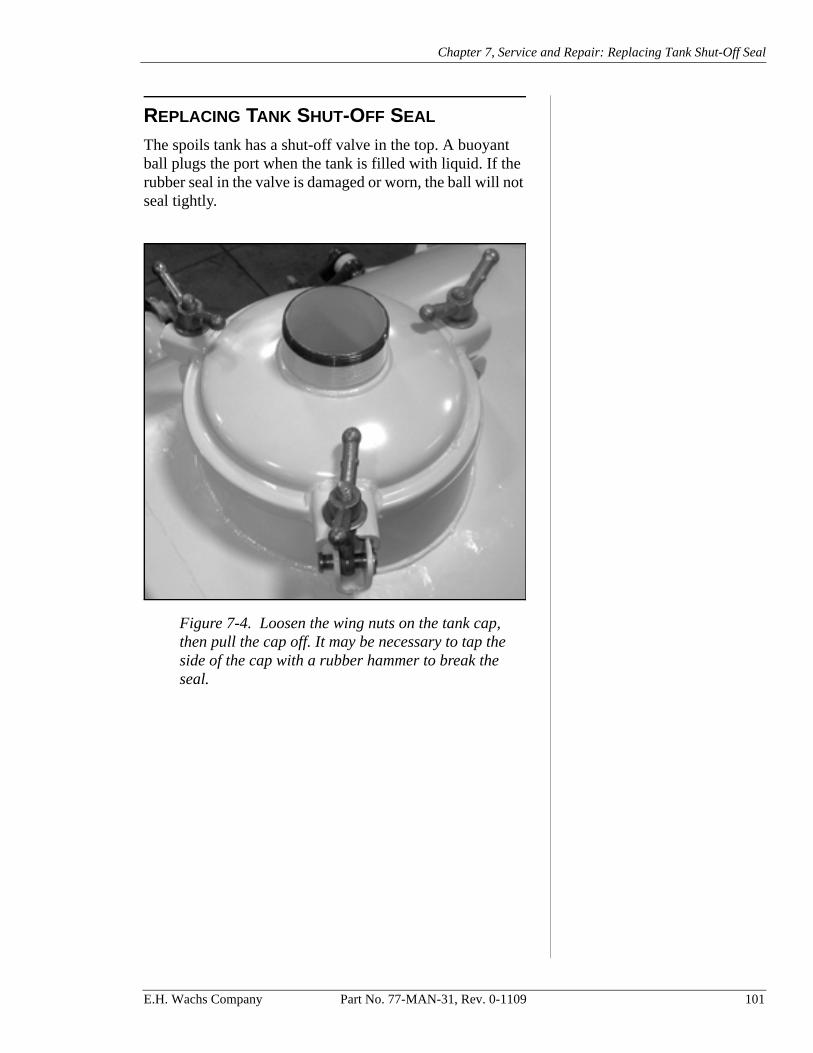
Chapter 7, Service and Repair: Replacing Tank Shut-Off Seal
REPLACING TANK SHUT-OFF SEAL
The spoils tank has a shut-off valve in the top. A buoyant ball plugs the port when the tank is filled with liquid. If the rubber seal in the valve is damaged or worn, the ball will not seal tightly.
Figure 7-4. Loosen the wing nuts on the tank cap, then pull the cap off. It may be necessary to tap the side of the cap with a rubber hammer to break the seal.
E.H. Wachs Company Part No. 77-MAN-31, Rev. 0-1109 101
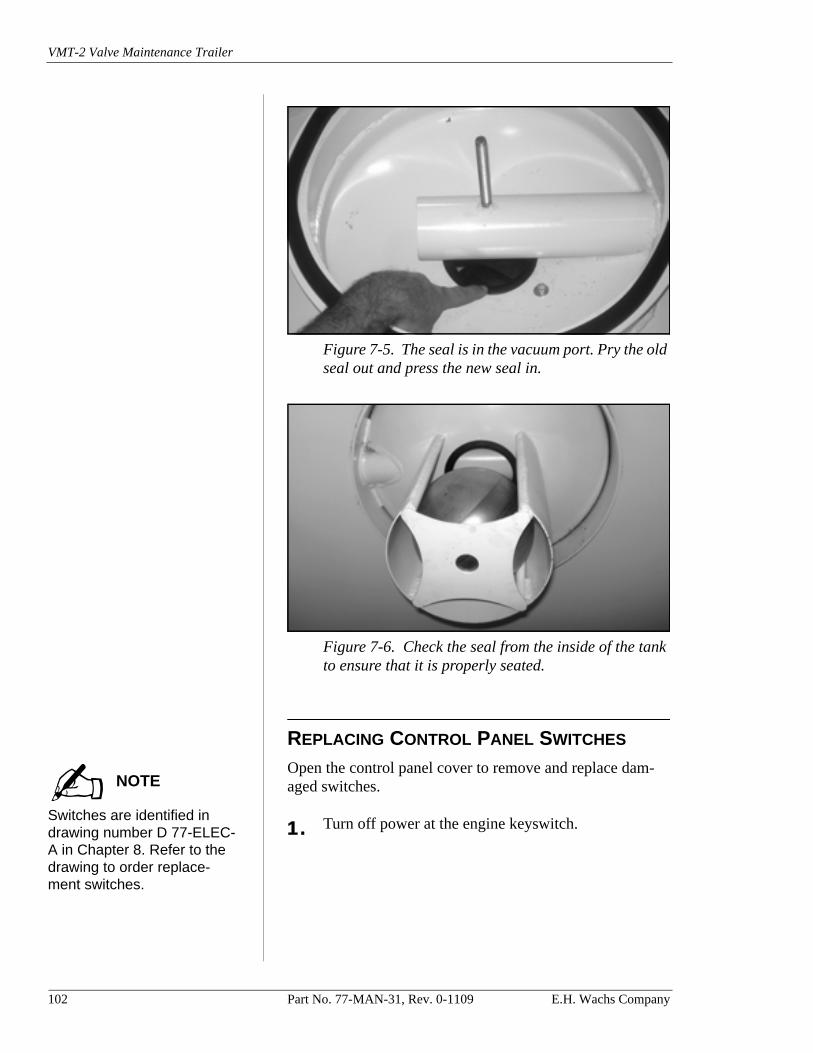
VMT-2 Valve Maintenance Trailer
Figure 7-5. The seal is in the vacuum port. Pry the old seal out and press the new seal in.
Figure 7-6. Check the seal from the inside of the tank to ensure that it is properly seated.
REPLACING CONTROL PANEL SWITCHES
Switches are identified in drawing number D 77-ELEC-A in Chapter 8. Refer to the drawing to order replace-ment switches.
Open the control panel cover to remove and replace dam-aged switches.
1. Turn off power at the engine keyswitch.
NOTE
102 Part No. 77-MAN-31, Rev. 0-1109 E.H. Wachs Company
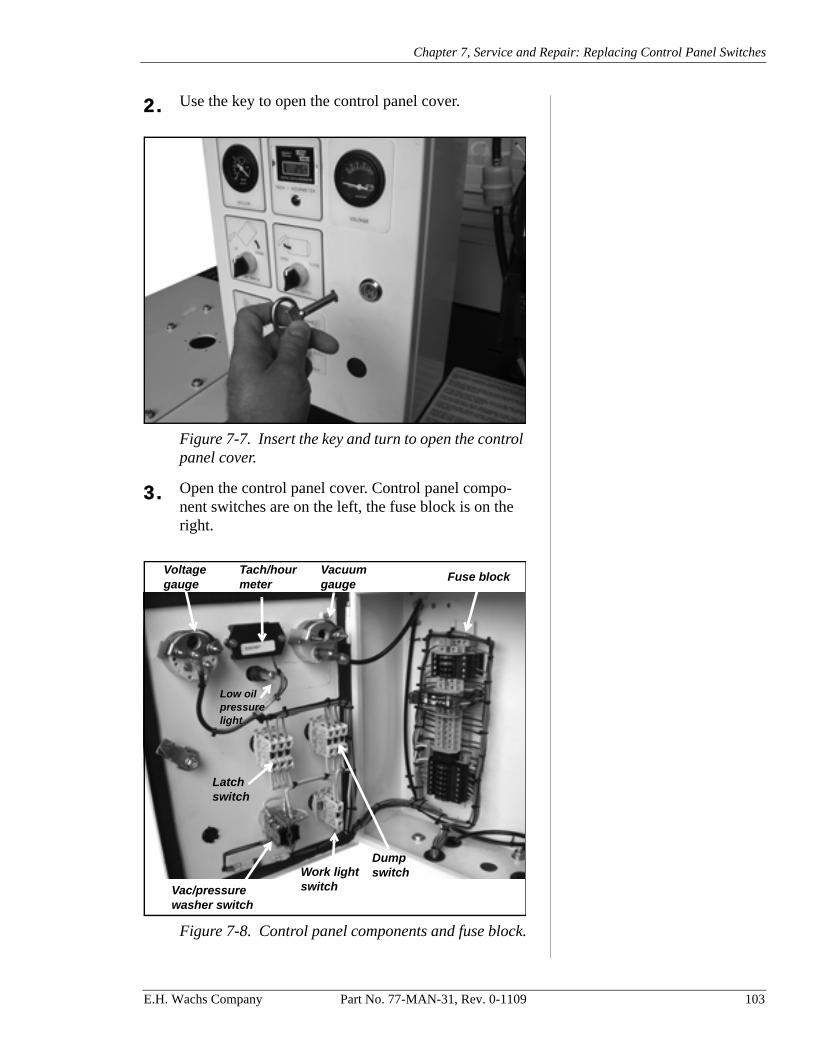
Chapter 7, Service and Repair: Replacing Control Panel Switches
2. Use the key to open the control panel cover.
Figure 7-7. Insert the key and turn to open the control panel cover.
3. Open the control panel cover. Control panel compo-nent switches are on the left, the fuse block is on the right.
Figure 7-8. Control panel components and fuse block.
Dump switch
Latch switch
Vacuum gauge
Work light switchVac/pressure
washer switch
Low oilpressurelight
Fuse blockTach/hour meter
Voltage gauge
E.H. Wachs Company Part No. 77-MAN-31, Rev. 0-1109 103
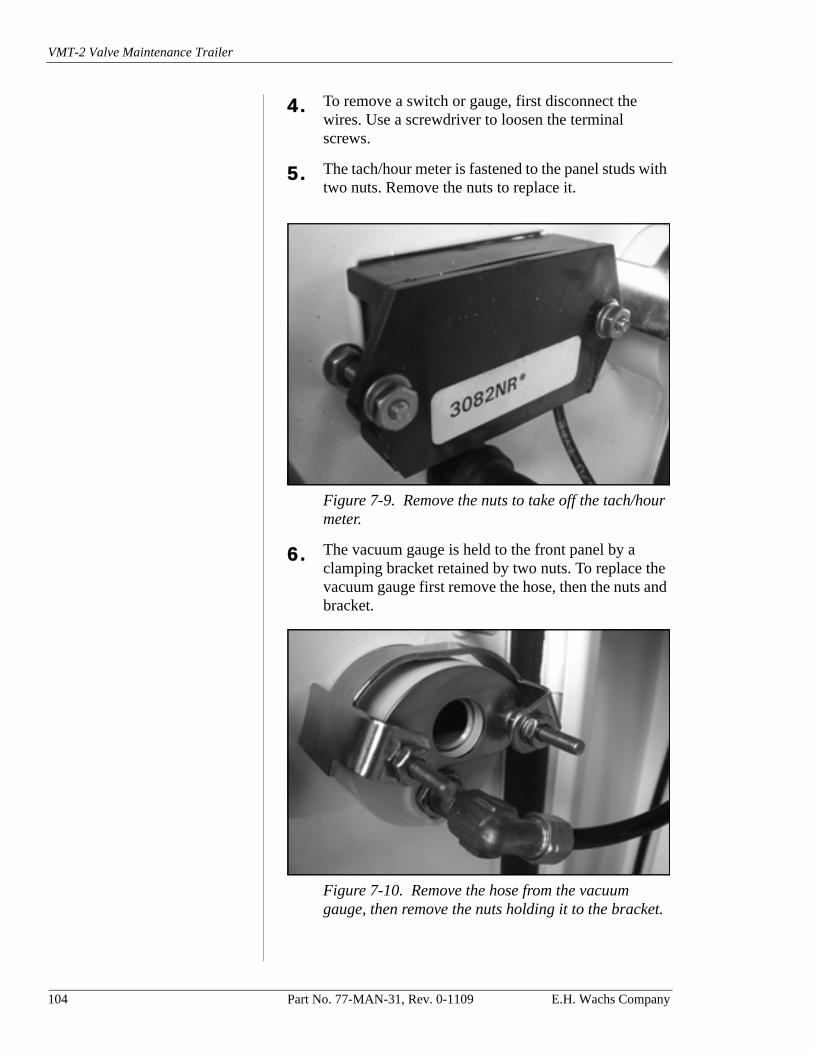
VMT-2 Valve Maintenance Trailer
4. To remove a switch or gauge, first disconnect the wires. Use a screwdriver to loosen the terminal screws.
5. The tach/hour meter is fastened to the panel studs with two nuts. Remove the nuts to replace it.
Figure 7-9. Remove the nuts to take off the tach/hour meter.
6. The vacuum gauge is held to the front panel by a clamping bracket retained by two nuts. To replace the vacuum gauge first remove the hose, then the nuts and bracket.
Figure 7-10. Remove the hose from the vacuum gauge, then remove the nuts holding it to the bracket.
104 Part No. 77-MAN-31, Rev. 0-1109 E.H. Wachs Company
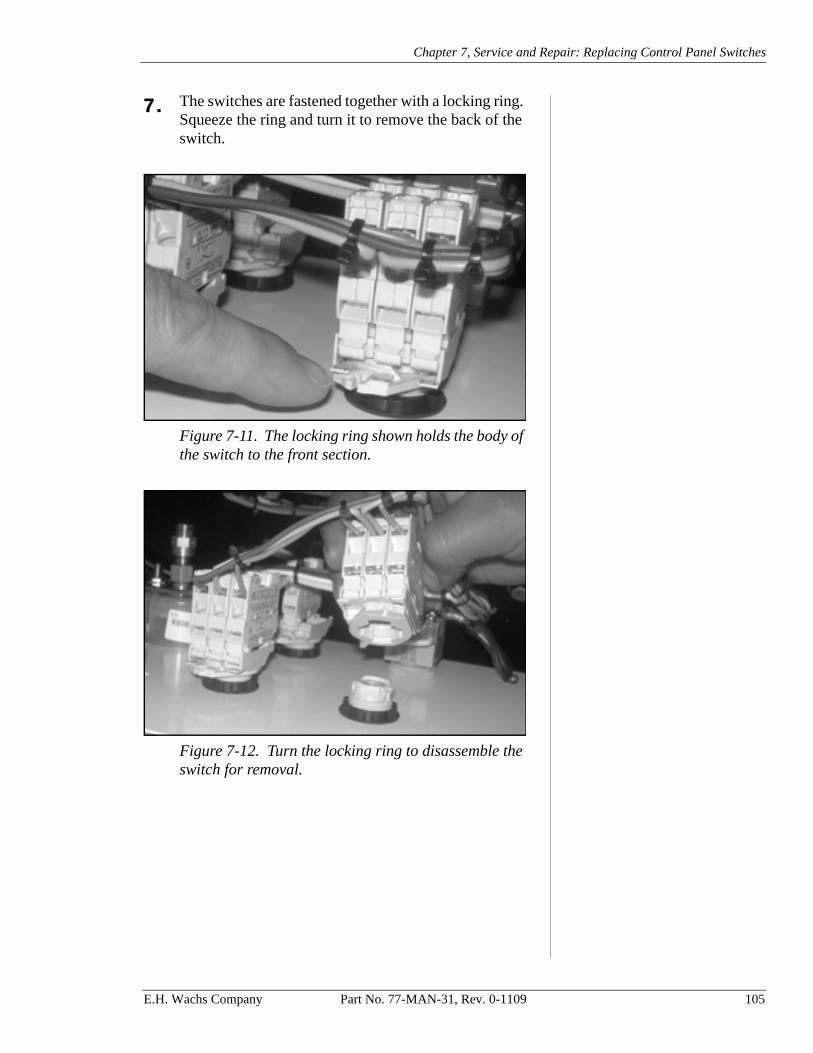
Chapter 7, Service and Repair: Replacing Control Panel Switches
7. The switches are fastened together with a locking ring. Squeeze the ring and turn it to remove the back of the switch.
Figure 7-11. The locking ring shown holds the body of the switch to the front section.
Figure 7-12. Turn the locking ring to disassemble the switch for removal.
E.H. Wachs Company Part No. 77-MAN-31, Rev. 0-1109 105
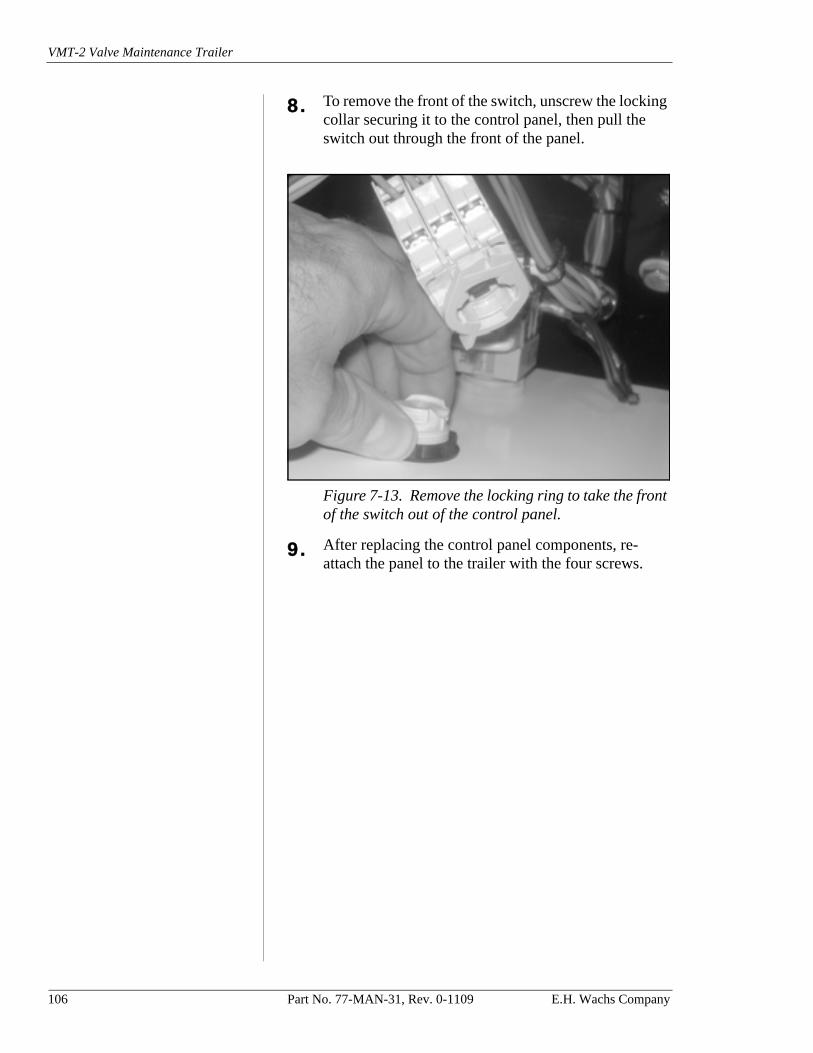
VMT-2 Valve Maintenance Trailer
8. To remove the front of the switch, unscrew the locking collar securing it to the control panel, then pull the switch out through the front of the panel.
Figure 7-13. Remove the locking ring to take the front of the switch out of the control panel.
9. After replacing the control panel components, re-attach the panel to the trailer with the four screws.
106 Part No. 77-MAN-31, Rev. 0-1109 E.H. Wachs Company
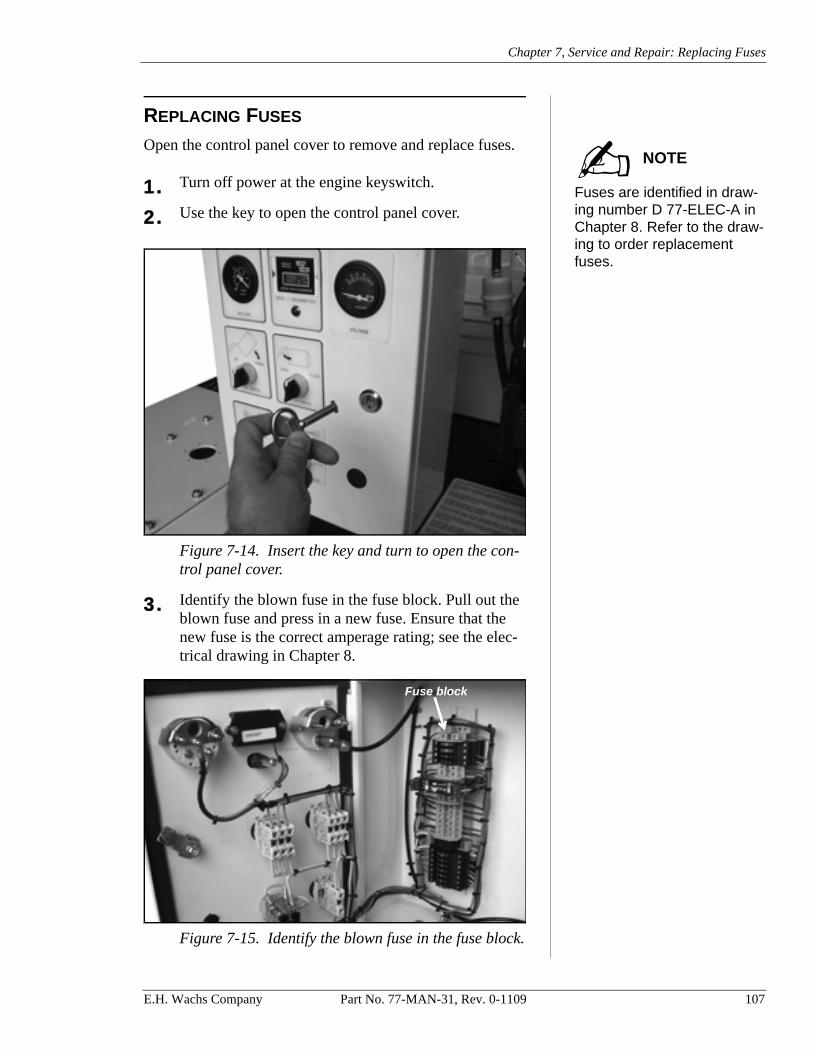
Chapter 7, Service and Repair: Replacing Fuses
REPLACING FUSES
Fuses are identified in draw-ing number D 77-ELEC-A in Chapter 8. Refer to the draw-ing to order replacement fuses.
Open the control panel cover to remove and replace fuses.
1. Turn off power at the engine keyswitch.
2. Use the key to open the control panel cover.
Figure 7-14. Insert the key and turn to open the con-trol panel cover.
3. Identify the blown fuse in the fuse block. Pull out the blown fuse and press in a new fuse. Ensure that the new fuse is the correct amperage rating; see the elec-trical drawing in Chapter 8.
Figure 7-15. Identify the blown fuse in the fuse block.
NOTE
Fuse block
E.H. Wachs Company Part No. 77-MAN-31, Rev. 0-1109 107
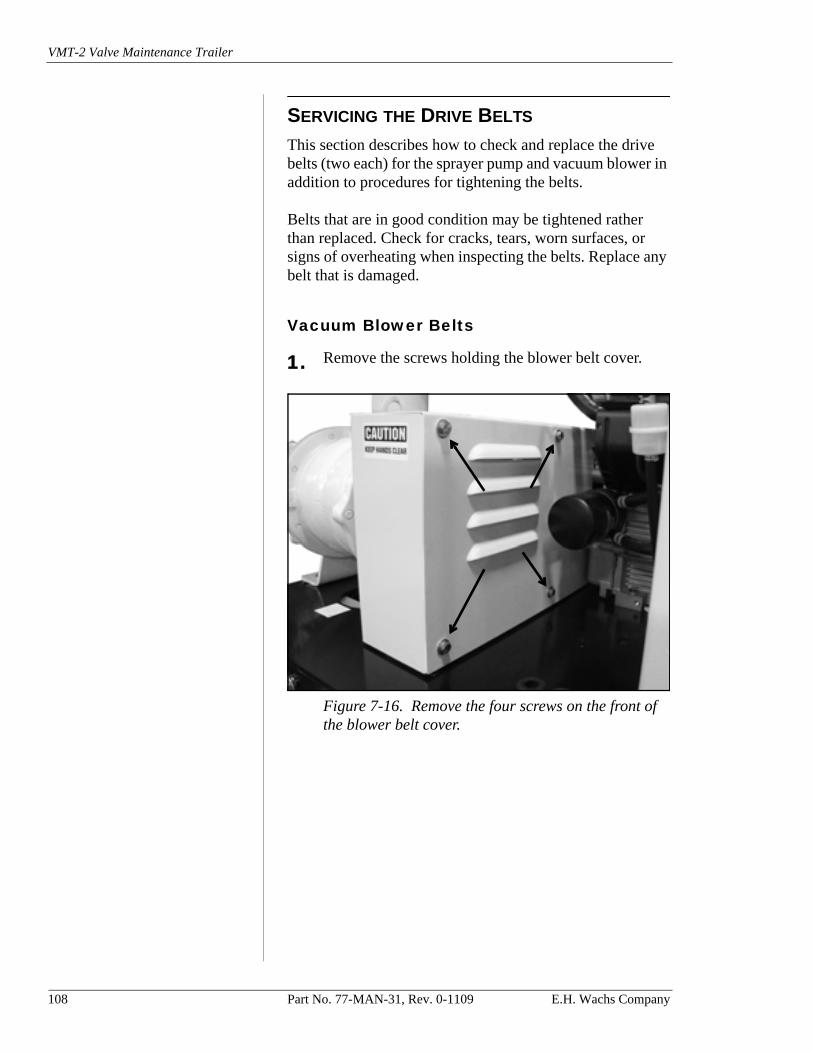
VMT-2 Valve Maintenance Trailer
SERVICING THE DRIVE BELTS
This section describes how to check and replace the drive belts (two each) for the sprayer pump and vacuum blower in addition to procedures for tightening the belts.
Belts that are in good condition may be tightened rather than replaced. Check for cracks, tears, worn surfaces, or signs of overheating when inspecting the belts. Replace any belt that is damaged.
Vacuum Blower Belts
1. Remove the screws holding the blower belt cover.
Figure 7-16. Remove the four screws on the front of the blower belt cover.
108 Part No. 77-MAN-31, Rev. 0-1109 E.H. Wachs Company
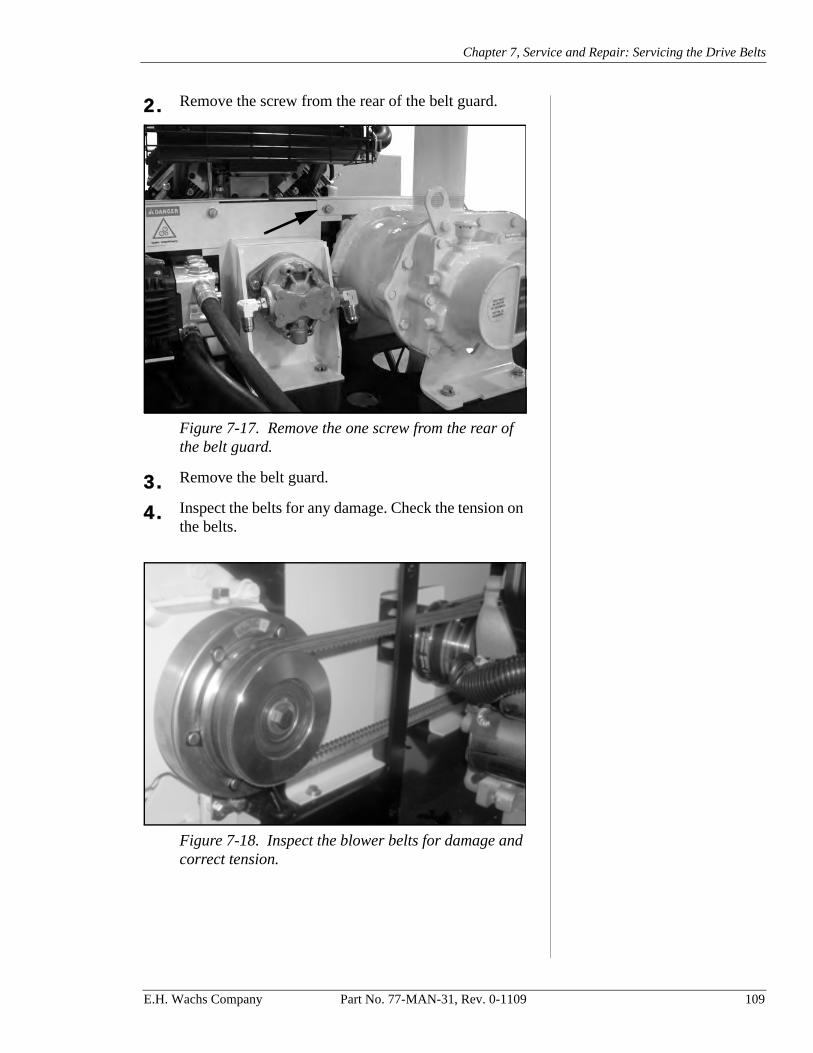
Chapter 7, Service and Repair: Servicing the Drive Belts
2. Remove the screw from the rear of the belt guard.
Figure 7-17. Remove the one screw from the rear of the belt guard.
3. Remove the belt guard.
4. Inspect the belts for any damage. Check the tension on the belts.
Figure 7-18. Inspect the blower belts for damage and correct tension.
E.H. Wachs Company Part No. 77-MAN-31, Rev. 0-1109 109
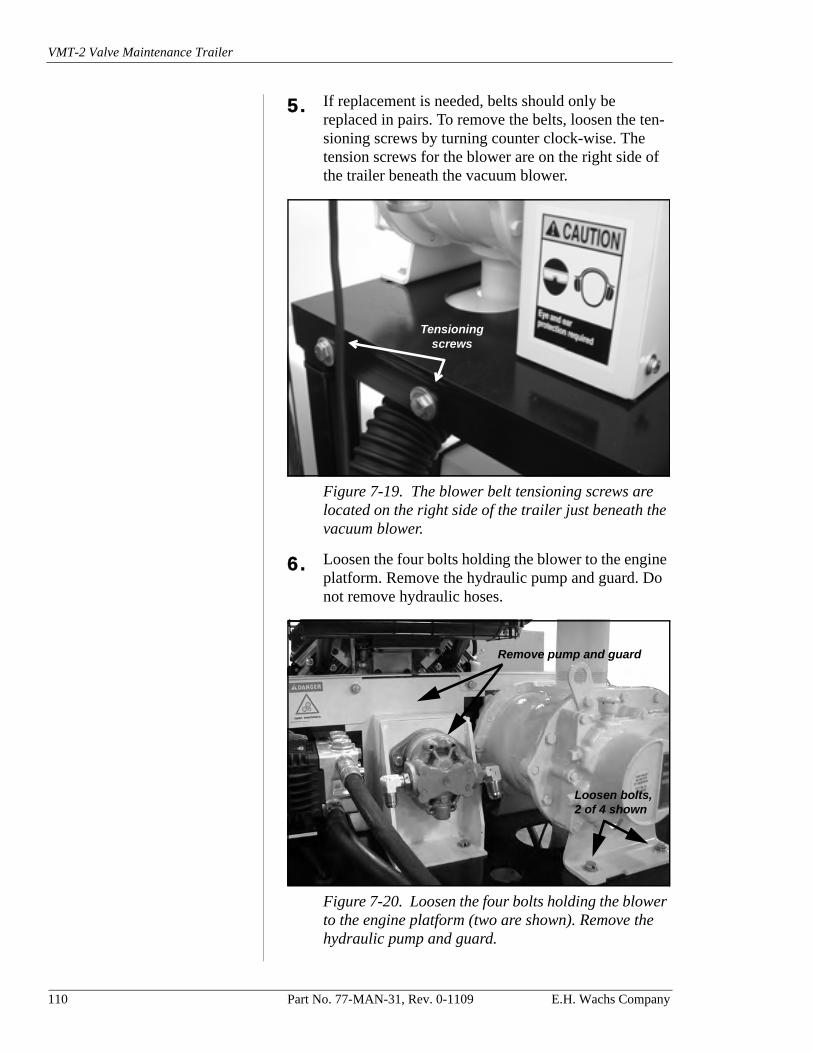
VMT-2 Valve Maintenance Trailer
5. If replacement is needed, belts should only be replaced in pairs. To remove the belts, loosen the ten-sioning screws by turning counter clock-wise. The tension screws for the blower are on the right side of the trailer beneath the vacuum blower.
Figure 7-19. The blower belt tensioning screws are located on the right side of the trailer just beneath the vacuum blower.
6. Loosen the four bolts holding the blower to the engine platform. Remove the hydraulic pump and guard. Do not remove hydraulic hoses.
Figure 7-20. Loosen the four bolts holding the blower to the engine platform (two are shown). Remove the hydraulic pump and guard.
Tensioning screws
Remove pump and guard
Loosen bolts,2 of 4 shown
110 Part No. 77-MAN-31, Rev. 0-1109 E.H. Wachs Company

Chapter 7, Service and Repair: Servicing the Drive Belts
7. Remove the worn or damaged belts, and replace with the new belts.
Turn both tensioning screws the same number of turns to keep the blower square with the drive system.
8. Tighten the blower belt tensioning screws until the belts are tight on the pulleys. To check the tension, place your thumb on the belt halfway between the pul-leys and press down. The belts should deflect no more than 1/2” (13 mm).
9. Tighten the four bolts holding the blower to the engine platform.
10. Mount hydraulic pump and guard, tighten all screws.
11. Replace the blower belt guard, insert and tighten all screws.
NOTE
E.H. Wachs Company Part No. 77-MAN-31, Rev. 0-1109 111

VMT-2 Valve Maintenance Trailer
Sprayer Pump Belts
1. Remove the screw holding the back of the sprayer pump belt cover.
Figure 7-21. Remove the screw on the back of the sprayer pump belt cover.
2. Remove the four screws on the front of the cover.
Figure 7-22. Remove the four screws holding the front of the sprayer pump belt cover (shown with priming tank removed).
3. Lift the cover up and tip it to remove it from behind the engine.
112 Part No. 77-MAN-31, Rev. 0-1109 E.H. Wachs Company
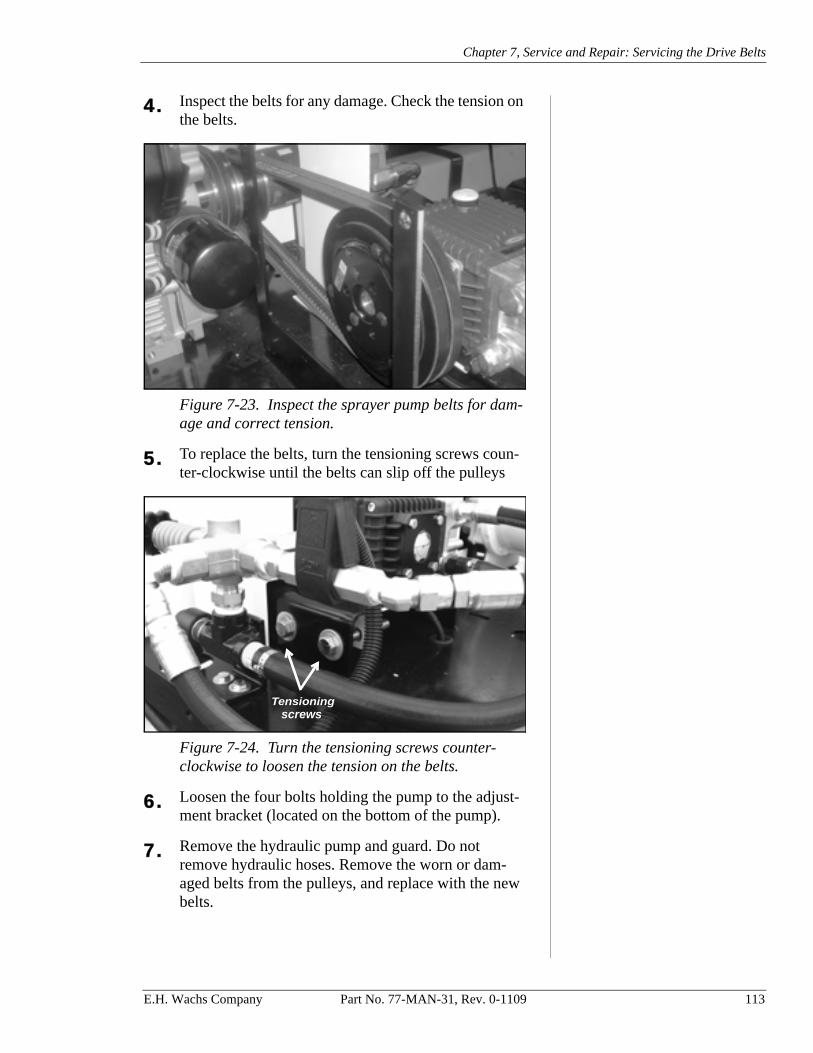
Chapter 7, Service and Repair: Servicing the Drive Belts
4. Inspect the belts for any damage. Check the tension on the belts.
Figure 7-23. Inspect the sprayer pump belts for dam-age and correct tension.
5. To replace the belts, turn the tensioning screws coun-ter-clockwise until the belts can slip off the pulleys
Figure 7-24. Turn the tensioning screws counter-clockwise to loosen the tension on the belts.
6. Loosen the four bolts holding the pump to the adjust-ment bracket (located on the bottom of the pump).
7. Remove the hydraulic pump and guard. Do not remove hydraulic hoses. Remove the worn or dam-aged belts from the pulleys, and replace with the new belts.
Tensioningscrews
E.H. Wachs Company Part No. 77-MAN-31, Rev. 0-1109 113
VMT-2 Valve Maintenance Trailer
Turn both tensioning screws the same number of turns to keep the sprayer pump square with the drive system.
8. Tighten the sprayer pump belt tensioning screws until the belts are tight on the pulleys. To check the tension, place your thumb on the belt halfway between the pul-leys and press down. The belts should deflect no more than 1/2” (13 mm).
9. Replace the sprayer pump belt cover and insert the four screws in the front.
10. Replace the screw in the back of the sprayer pump belt cover.
NOTE
114 Part No. 77-MAN-31, Rev. 0-1109 E.H. Wachs Company
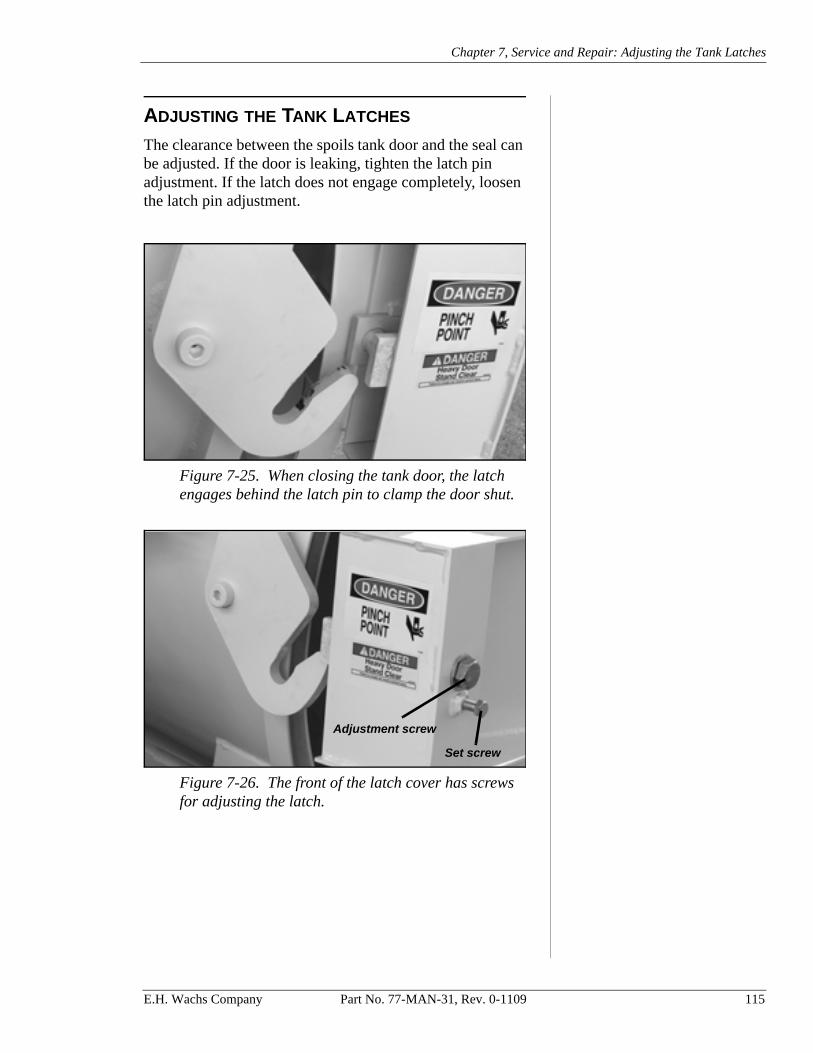
Chapter 7, Service and Repair: Adjusting the Tank Latches
ADJUSTING THE TANK LATCHES
The clearance between the spoils tank door and the seal can be adjusted. If the door is leaking, tighten the latch pin adjustment. If the latch does not engage completely, loosen the latch pin adjustment.
Figure 7-25. When closing the tank door, the latch engages behind the latch pin to clamp the door shut.
Figure 7-26. The front of the latch cover has screws for adjusting the latch.
Adjustment screw
Set screw
E.H. Wachs Company Part No. 77-MAN-31, Rev. 0-1109 115
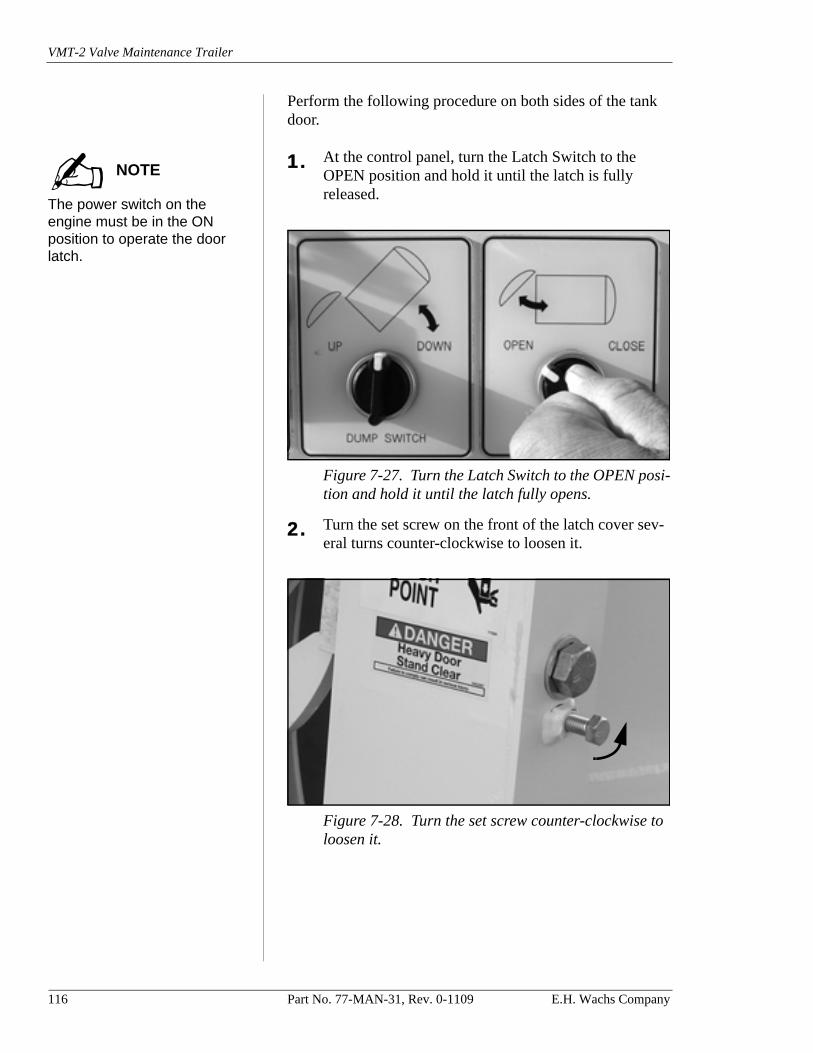
VMT-2 Valve Maintenance Trailer
Perform the following procedure on both sides of the tank door.
The power switch on the engine must be in the ON position to operate the door latch.
1. At the control panel, turn the Latch Switch to the OPEN position and hold it until the latch is fully released.
Figure 7-27. Turn the Latch Switch to the OPEN posi-tion and hold it until the latch fully opens.
2. Turn the set screw on the front of the latch cover sev-eral turns counter-clockwise to loosen it.
Figure 7-28. Turn the set screw counter-clockwise to loosen it.
NOTE
116 Part No. 77-MAN-31, Rev. 0-1109 E.H. Wachs Company
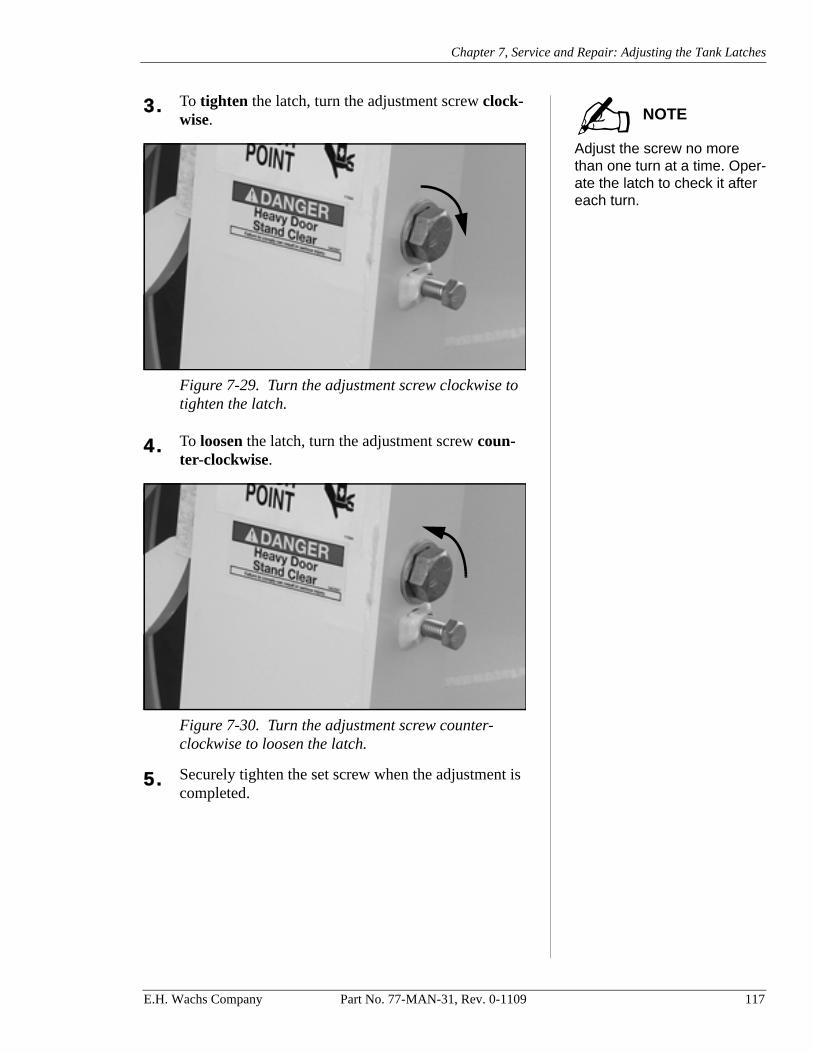
Chapter 7, Service and Repair: Adjusting the Tank Latches
Adjust the screw no more than one turn at a time. Oper-ate the latch to check it after each turn.
3. To tighten the latch, turn the adjustment screw clock-wise.
Figure 7-29. Turn the adjustment screw clockwise to tighten the latch.
4. To loosen the latch, turn the adjustment screw coun-ter-clockwise.
Figure 7-30. Turn the adjustment screw counter-clockwise to loosen the latch.
5. Securely tighten the set screw when the adjustment is completed.
NOTE
E.H. Wachs Company Part No. 77-MAN-31, Rev. 0-1109 117
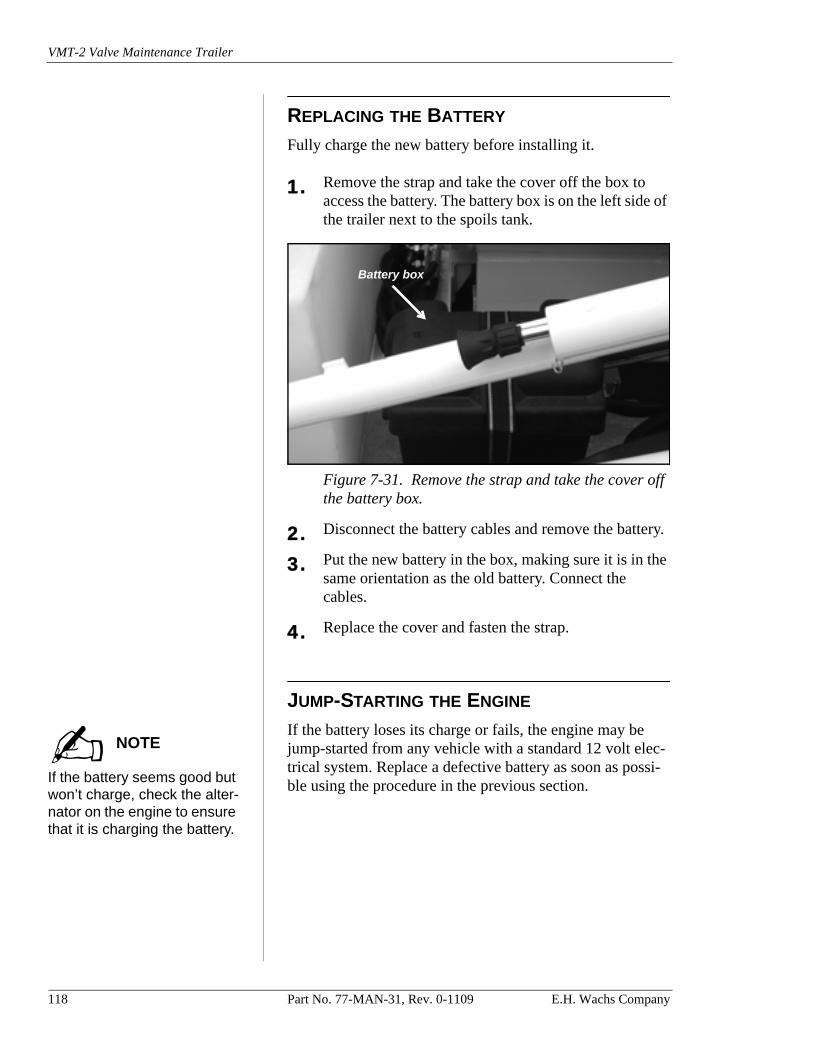
VMT-2 Valve Maintenance Trailer
REPLACING THE BATTERY
Fully charge the new battery before installing it.
1. Remove the strap and take the cover off the box to access the battery. The battery box is on the left side of the trailer next to the spoils tank.
Figure 7-31. Remove the strap and take the cover off the battery box.
2. Disconnect the battery cables and remove the battery.
3. Put the new battery in the box, making sure it is in the same orientation as the old battery. Connect the cables.
4. Replace the cover and fasten the strap.
JUMP-STARTING THE ENGINE
If the battery seems good but won’t charge, check the alter-nator on the engine to ensure that it is charging the battery.
If the battery loses its charge or fails, the engine may be jump-started from any vehicle with a standard 12 volt elec-trical system. Replace a defective battery as soon as possi-ble using the procedure in the previous section.
Battery box
NOTE
118 Part No. 77-MAN-31, Rev. 0-1109 E.H. Wachs Company
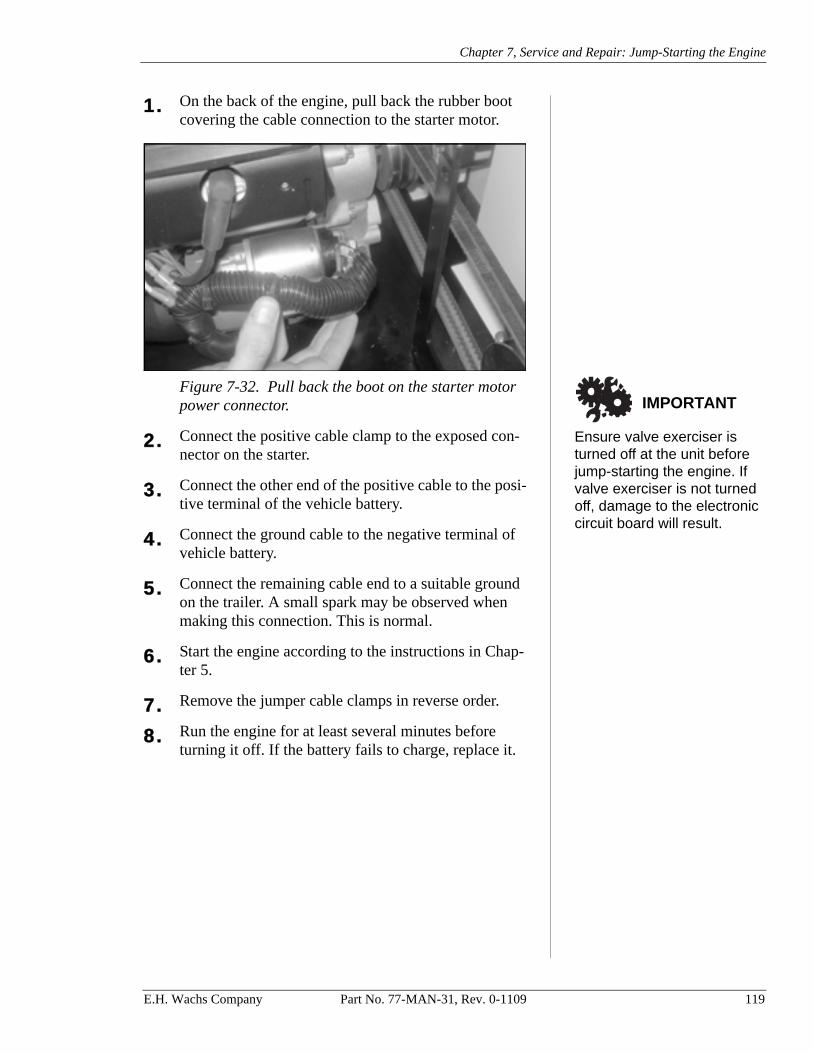
Chapter 7, Service and Repair: Jump-Starting the Engine
1. On the back of the engine, pull back the rubber boot covering the cable connection to the starter motor.
Ensure valve exerciser is turned off at the unit before jump-starting the engine. If valve exerciser is not turned off, damage to the electronic circuit board will result.
Figure 7-32. Pull back the boot on the starter motor power connector.
2. Connect the positive cable clamp to the exposed con-nector on the starter.
3. Connect the other end of the positive cable to the posi-tive terminal of the vehicle battery.
4. Connect the ground cable to the negative terminal of vehicle battery.
5. Connect the remaining cable end to a suitable ground on the trailer. A small spark may be observed when making this connection. This is normal.
6. Start the engine according to the instructions in Chap-ter 5.
7. Remove the jumper cable clamps in reverse order.
8. Run the engine for at least several minutes before turning it off. If the battery fails to charge, replace it.
IMPORTANT
E.H. Wachs Company Part No. 77-MAN-31, Rev. 0-1109 119
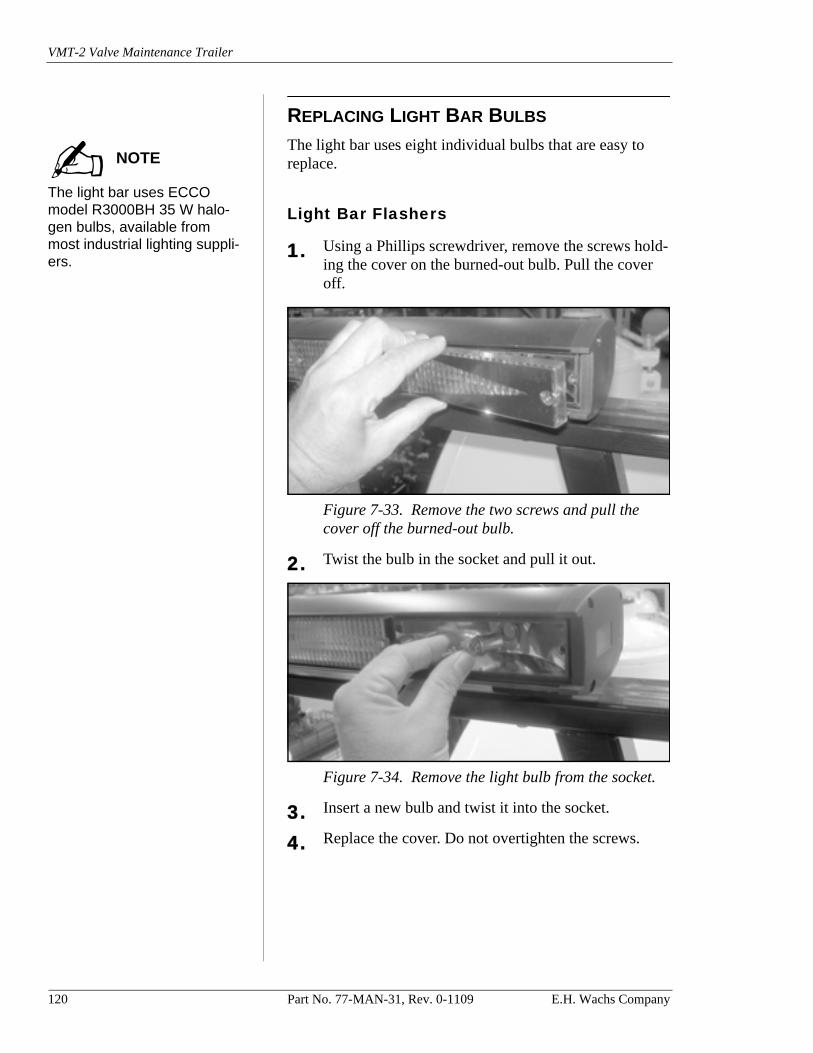
VMT-2 Valve Maintenance Trailer
REPLACING LIGHT BAR BULBS
The light bar uses ECCO model R3000BH 35 W halo-gen bulbs, available from most industrial lighting suppli-ers.
The light bar uses eight individual bulbs that are easy to replace.
Light Bar Flashers
1. Using a Phillips screwdriver, remove the screws hold-ing the cover on the burned-out bulb. Pull the cover off.
Figure 7-33. Remove the two screws and pull the cover off the burned-out bulb.
2. Twist the bulb in the socket and pull it out.
Figure 7-34. Remove the light bulb from the socket.
3. Insert a new bulb and twist it into the socket.
4. Replace the cover. Do not overtighten the screws.
NOTE
120 Part No. 77-MAN-31, Rev. 0-1109 E.H. Wachs Company
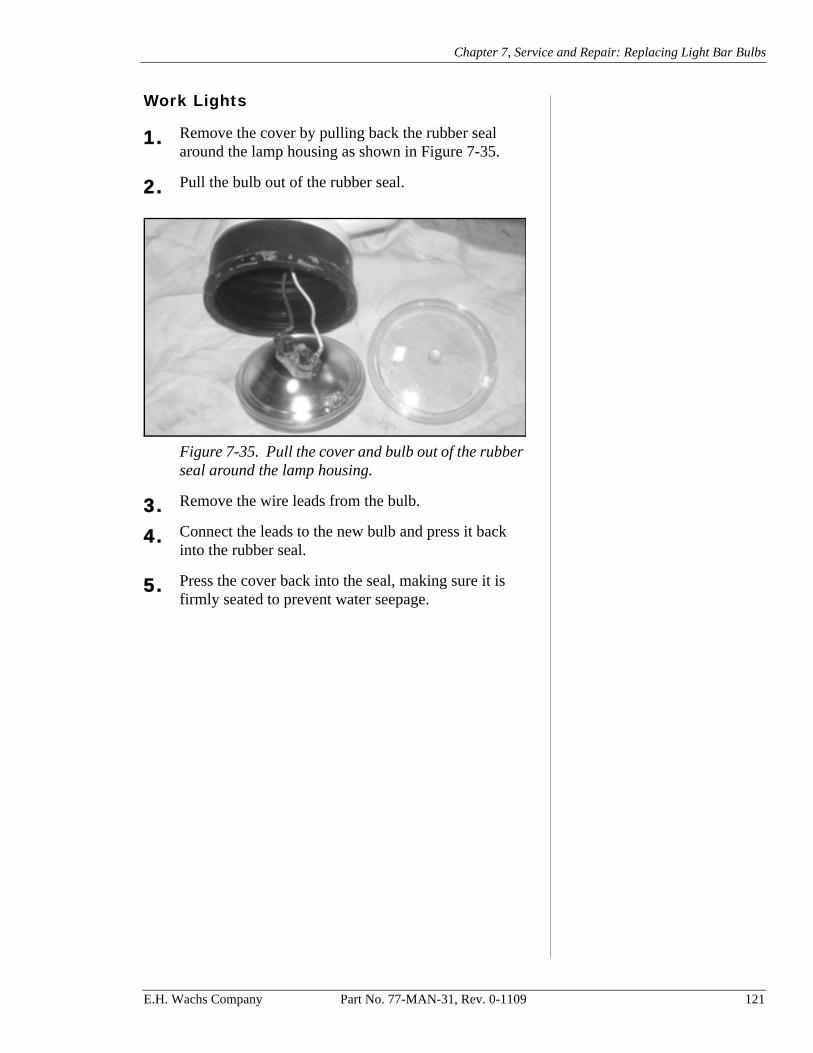
Chapter 7, Service and Repair: Replacing Light Bar Bulbs
Work Lights
1. Remove the cover by pulling back the rubber seal around the lamp housing as shown in Figure 7-35.
2. Pull the bulb out of the rubber seal.
Figure 7-35. Pull the cover and bulb out of the rubber seal around the lamp housing.
3. Remove the wire leads from the bulb.
4. Connect the leads to the new bulb and press it back into the rubber seal.
5. Press the cover back into the seal, making sure it is firmly seated to prevent water seepage.
E.H. Wachs Company Part No. 77-MAN-31, Rev. 0-1109 121

VMT-2 Valve Maintenance Trailer
This page intentionally left blank.
122 Part No. 77-MAN-31, Rev. 0-1109 E.H. Wachs Company
Chapter 8, Parts Lists and Drawings
E.H. Wachs Company Part No. 77-MAN-31, Rev. 0-1109 123
Chapter 8
Parts Lists and Drawings
Refer to the following drawings and component lists to identify part numbers and perform service.
D 77-ELEC-A Electrical schematic (pre-September 2007)
D 77-ELEC-B Electrical schematic (post-September 2007)
D 77-HYD W-DA Hydraulic schematic (pre-September 2007)
D 77-HYD W-DB Hydraulic schematic (post-September 2007)
D 77SWIVEL-PWA Pressure washer schematic (pre-September 2007)
D 77SWIVEL-PWC Pressure washer schematic (post-September 2007)

VMT-2 Valve Maintenance Trailer
124 Part No. 77-MAN-31, Rev. 0-1109 E.H. Wachs Company
This page intentionally left blank.
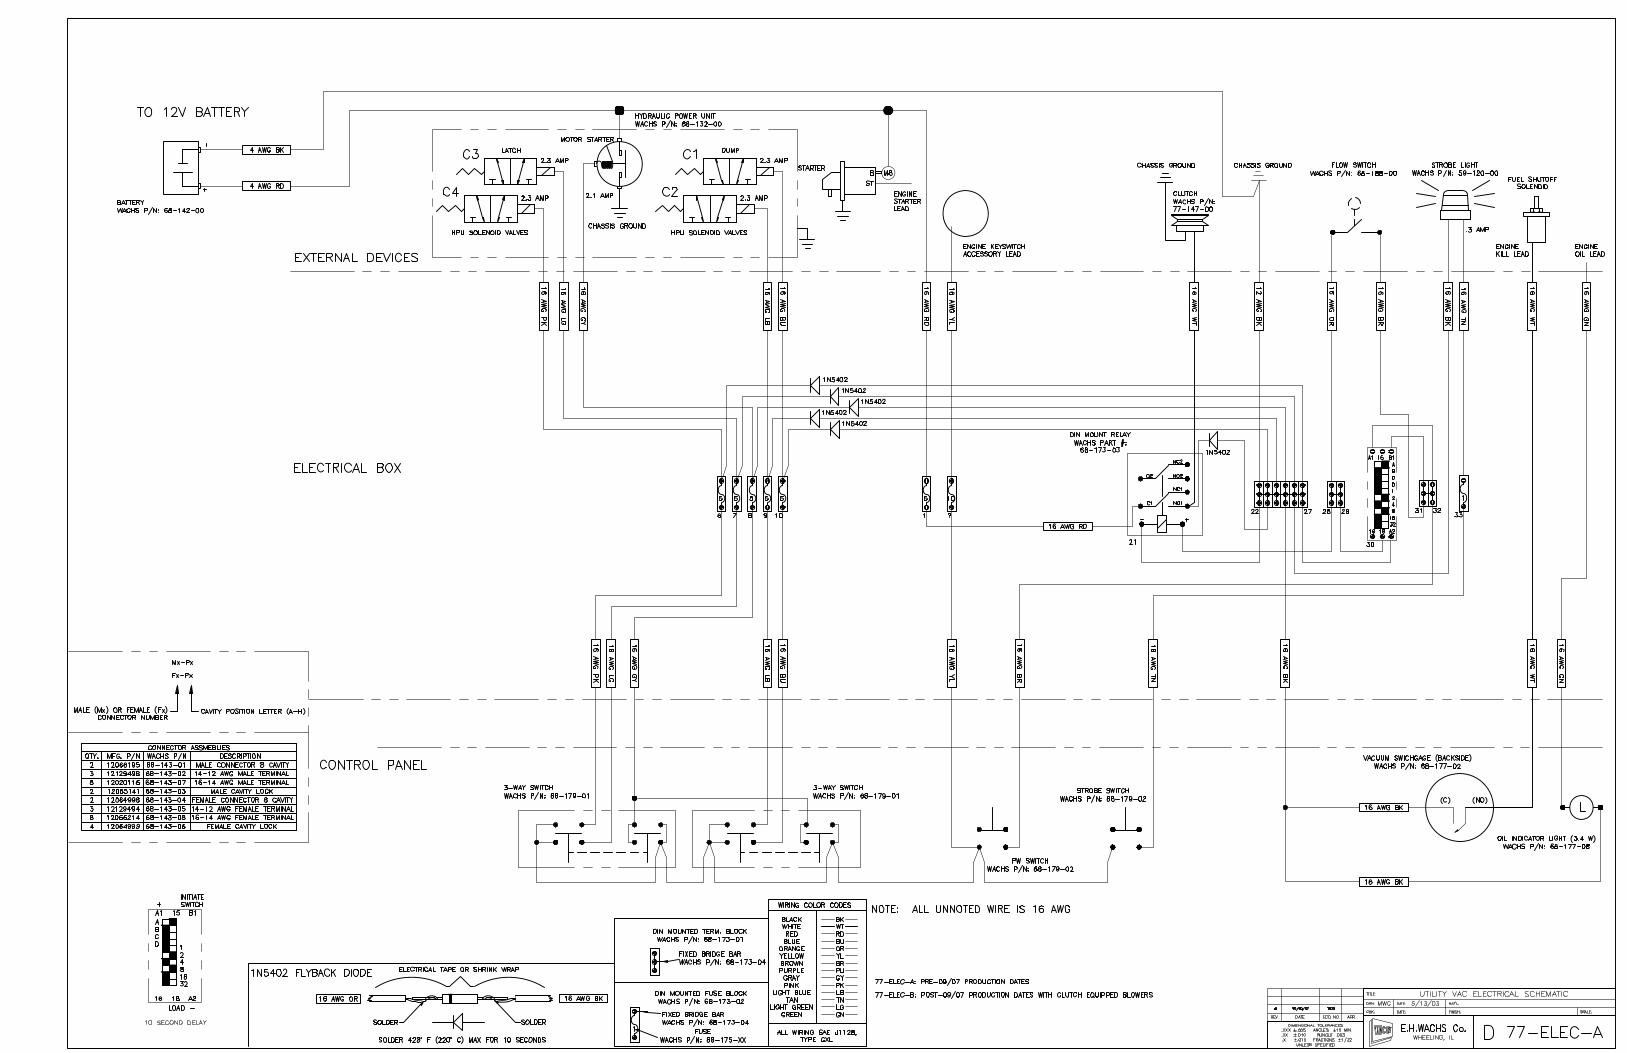

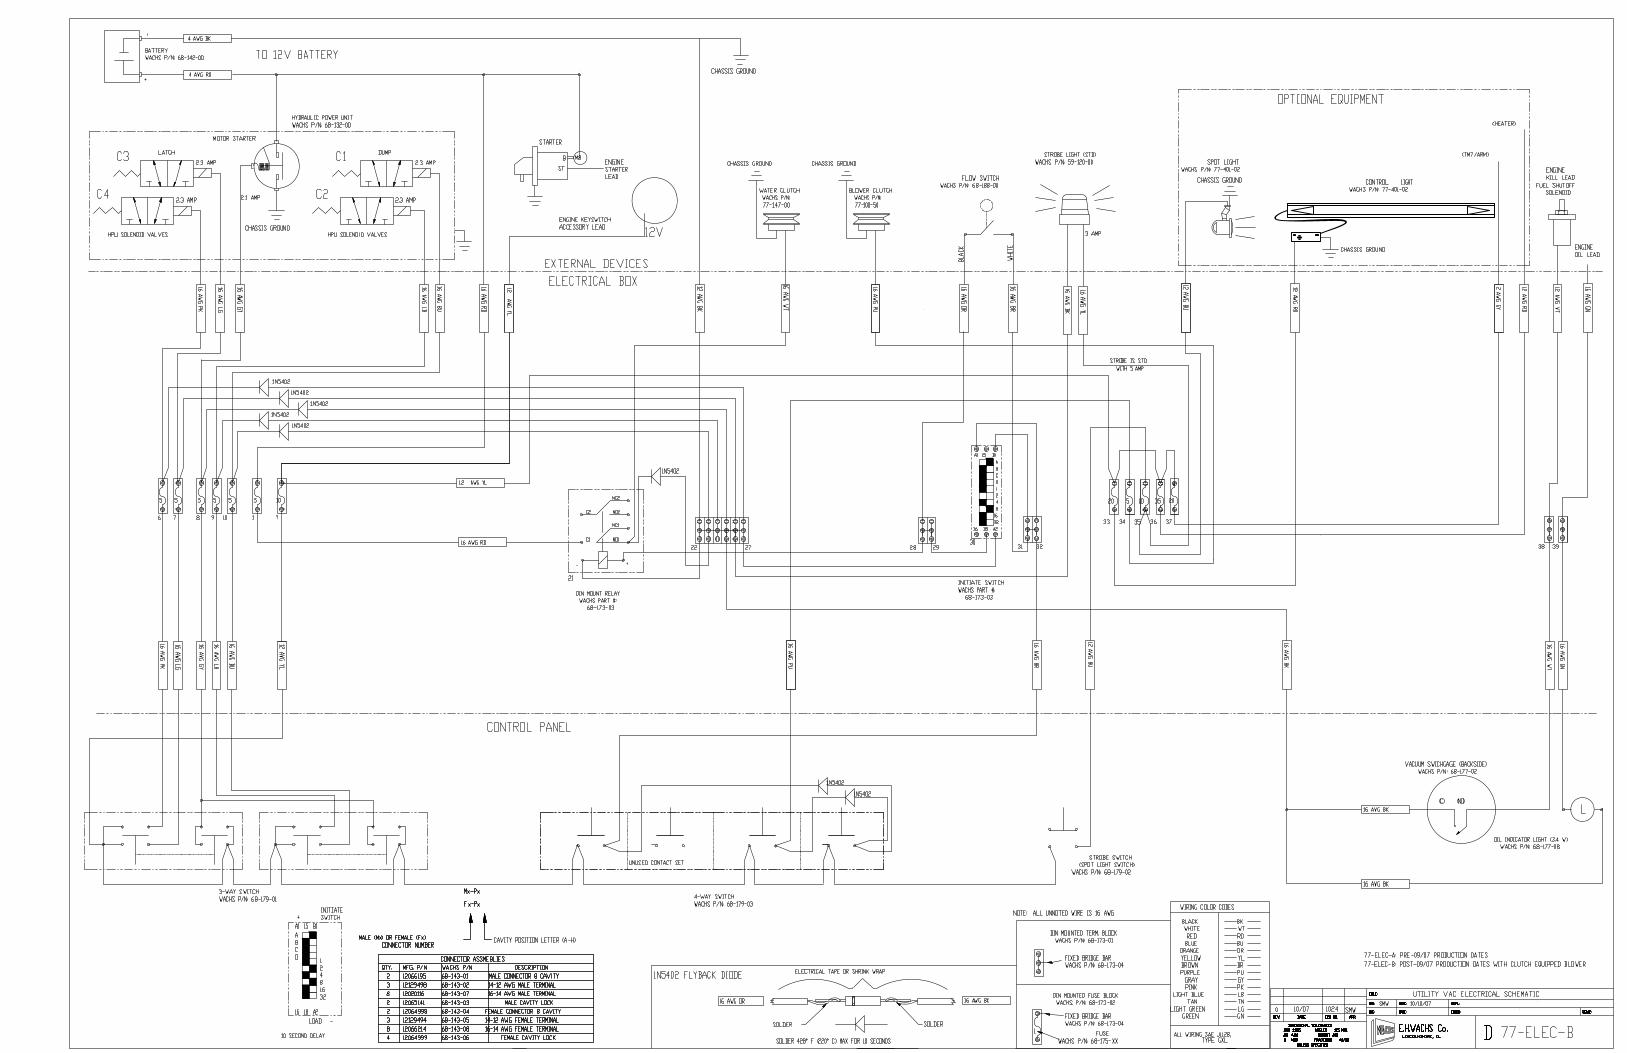


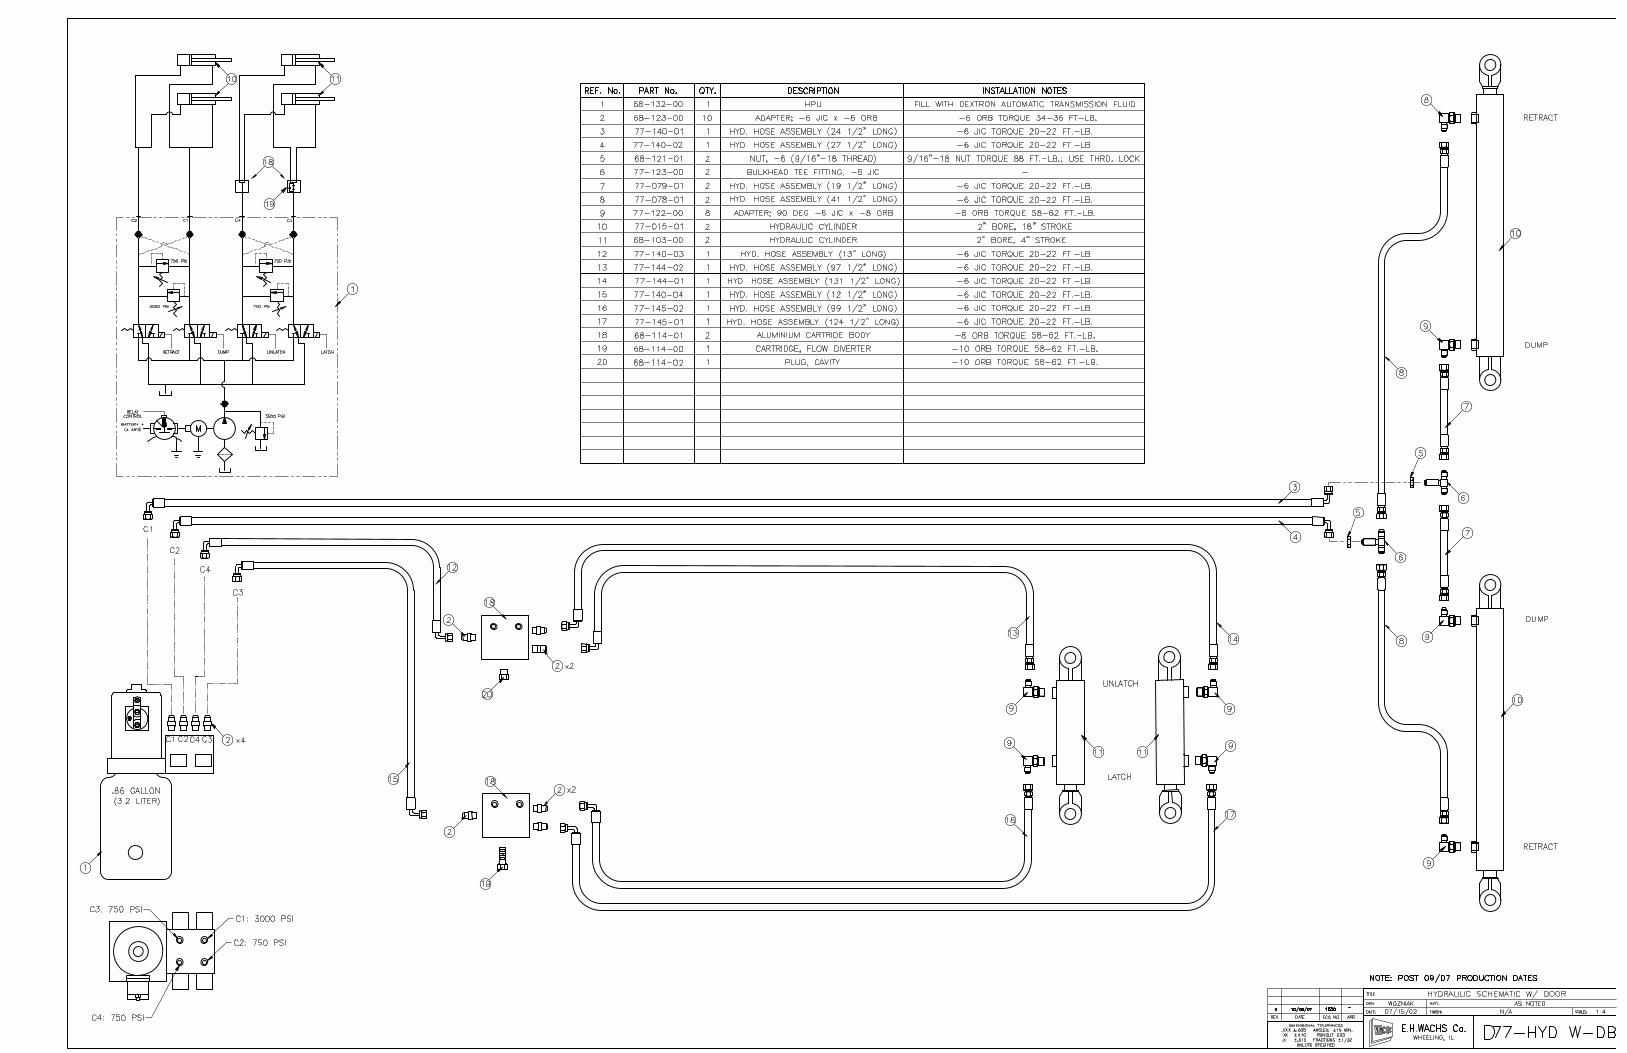

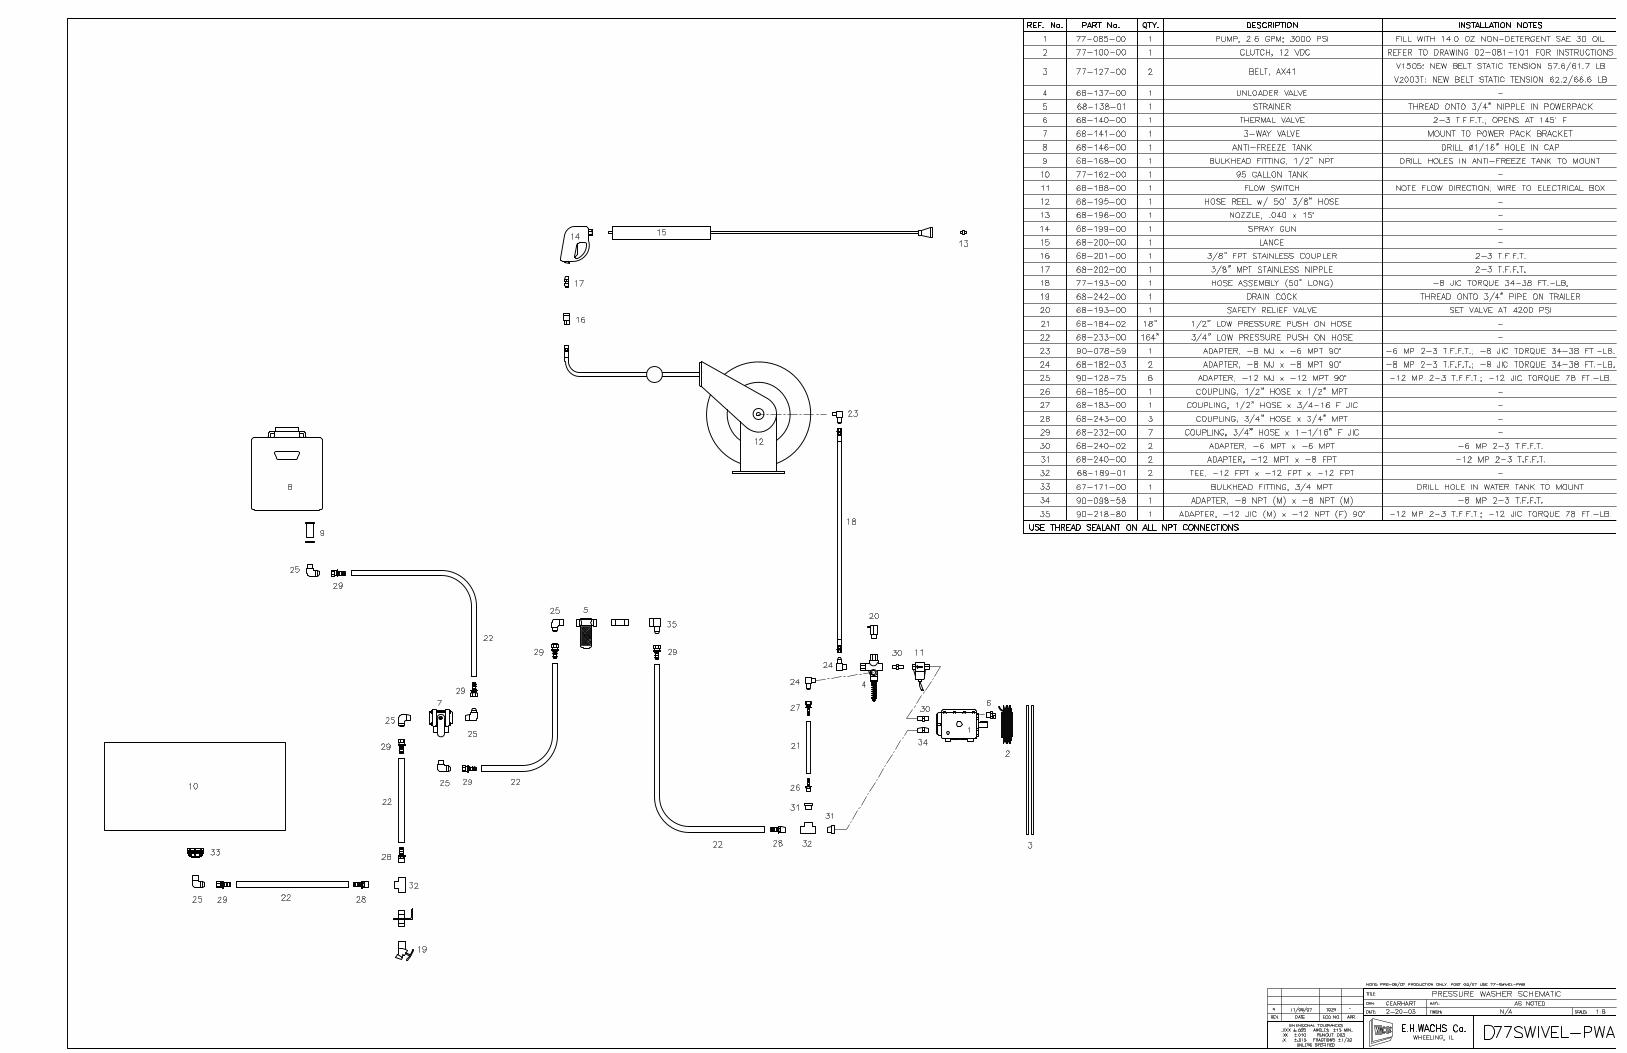

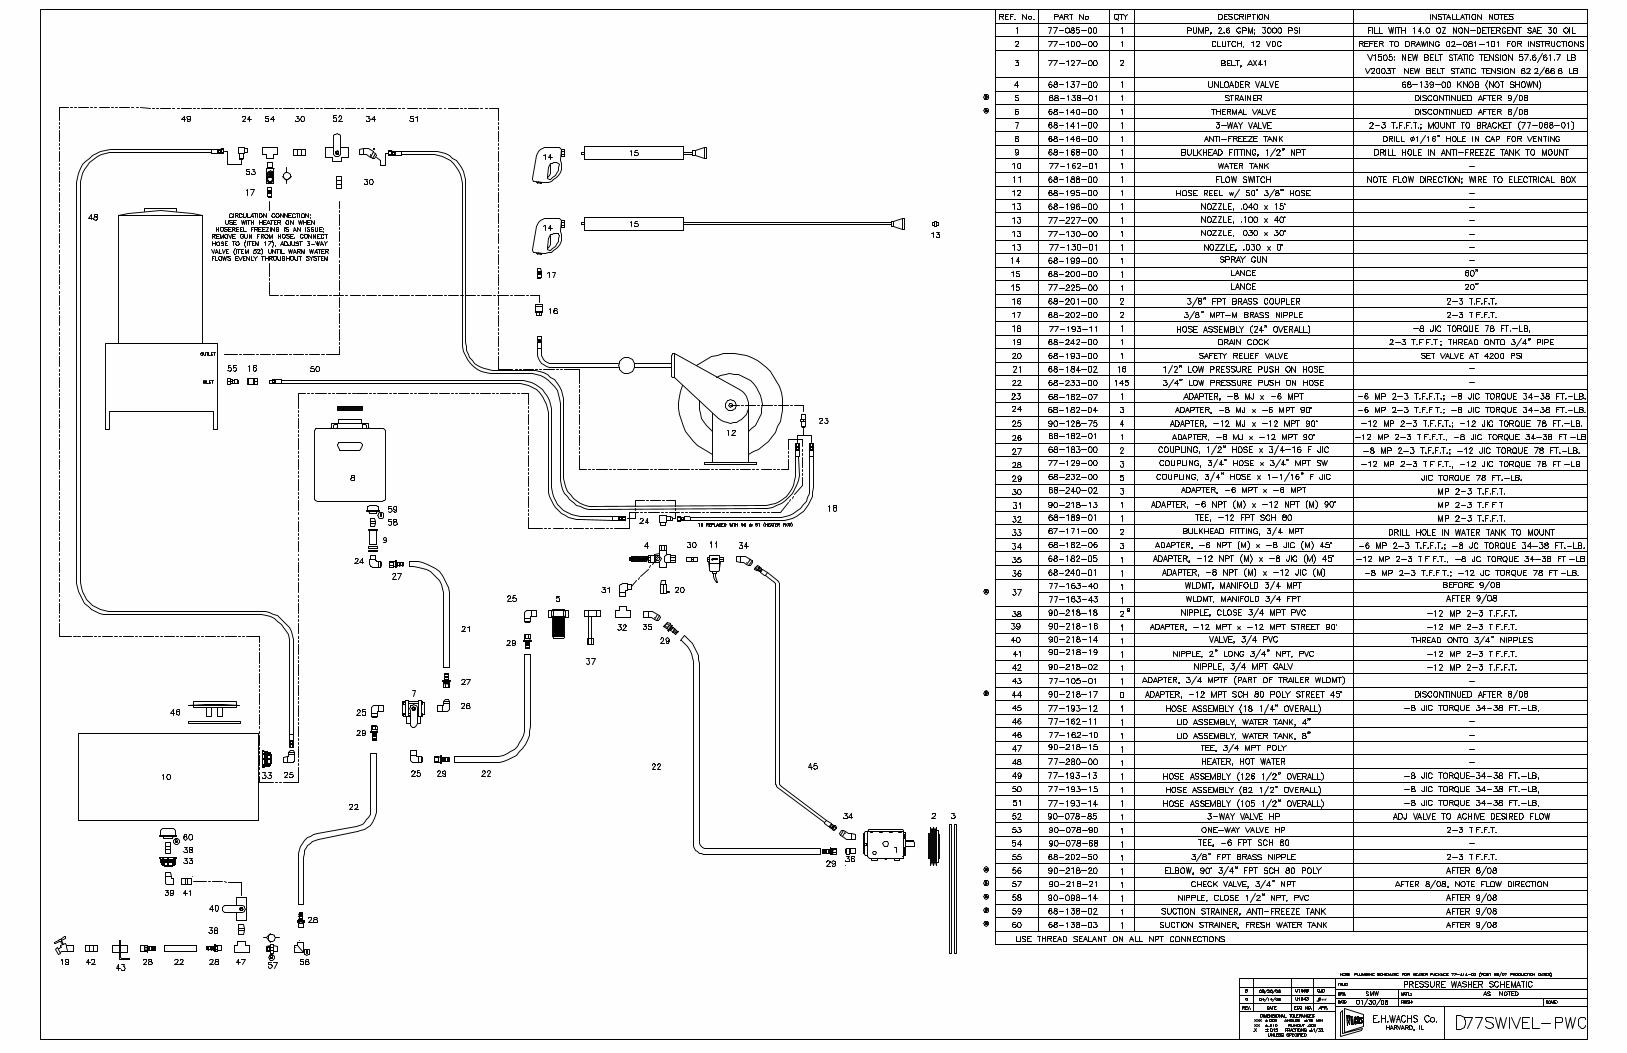

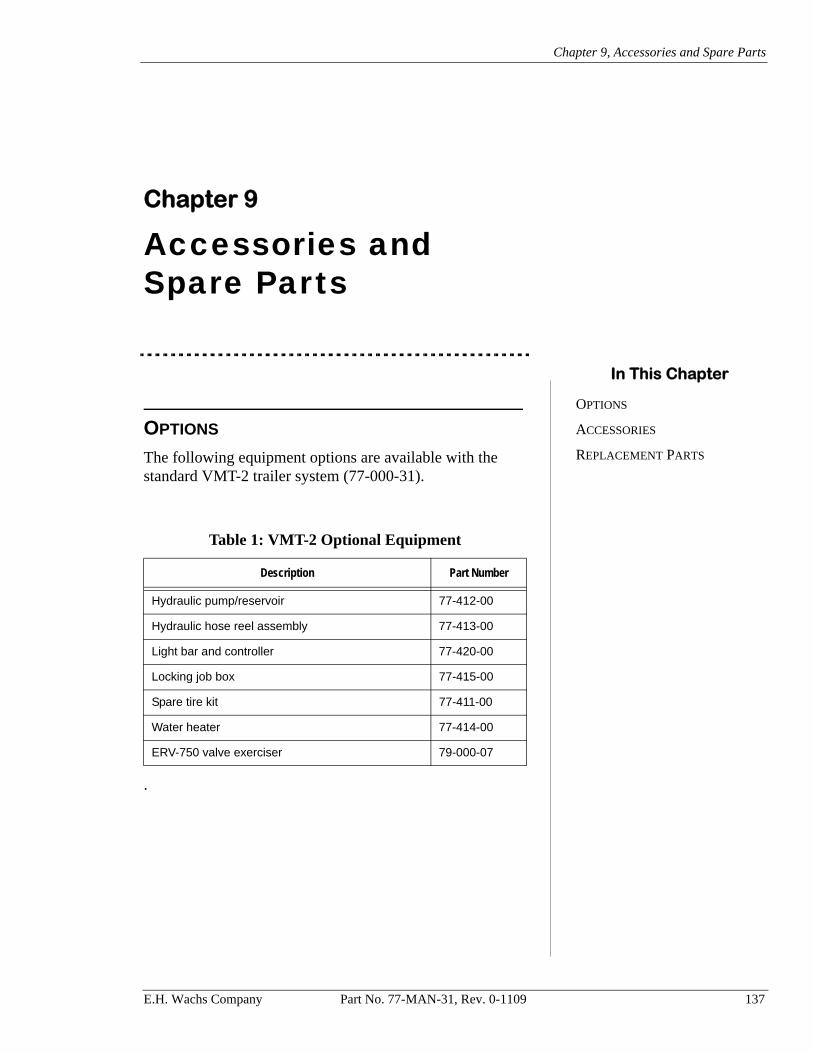
Chapter 9, Accessories and Spare Parts
Chapter 9
Accessories and Spare Parts
OPTIONS
The following equipment options are available with the standard VMT-2 trailer system (77-000-31).
.
Table 1: VMT-2 Optional Equipment
Description Part Number
Hydraulic pump/reservoir 77-412-00
Hydraulic hose reel assembly 77-413-00
Light bar and controller 77-420-00
Locking job box 77-415-00
Spare tire kit 77-411-00
Water heater 77-414-00
ERV-750 valve exerciser 79-000-07
In This Chapter
OPTIONS
ACCESSORIES
REPLACEMENT PARTS
E.H. Wachs Company Part No. 77-MAN-31, Rev. 0-1109 137
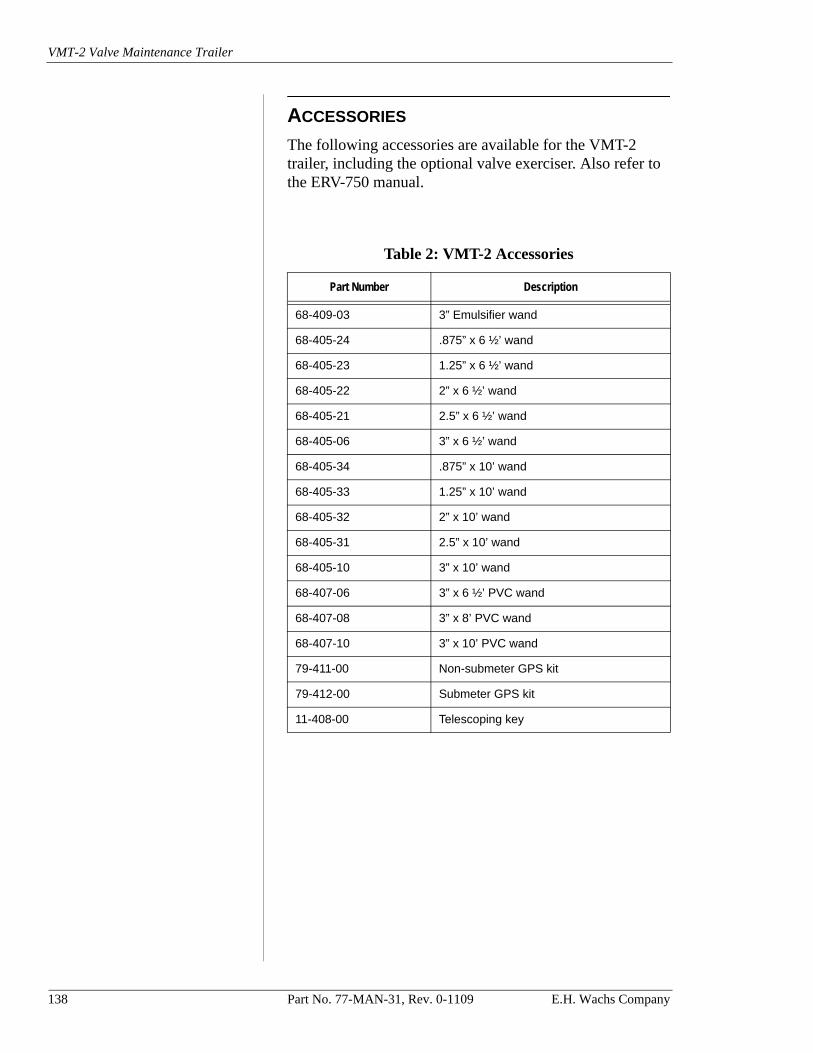
VMT-2 Valve Maintenance Trailer
ACCESSORIES
The following accessories are available for the VMT-2 trailer, including the optional valve exerciser. Also refer to the ERV-750 manual.
Table 2: VMT-2 Accessories
Part Number Description
68-409-03 3” Emulsifier wand
68-405-24 .875” x 6 ½’ wand
68-405-23 1.25” x 6 ½’ wand
68-405-22 2” x 6 ½’ wand
68-405-21 2.5” x 6 ½’ wand
68-405-06 3” x 6 ½’ wand
68-405-34 .875” x 10’ wand
68-405-33 1.25” x 10’ wand
68-405-32 2” x 10’ wand
68-405-31 2.5” x 10’ wand
68-405-10 3” x 10’ wand
68-407-06 3” x 6 ½’ PVC wand
68-407-08 3” x 8’ PVC wand
68-407-10 3” x 10’ PVC wand
79-411-00 Non-submeter GPS kit
79-412-00 Submeter GPS kit
11-408-00 Telescoping key
138 Part No. 77-MAN-31, Rev. 0-1109 E.H. Wachs Company
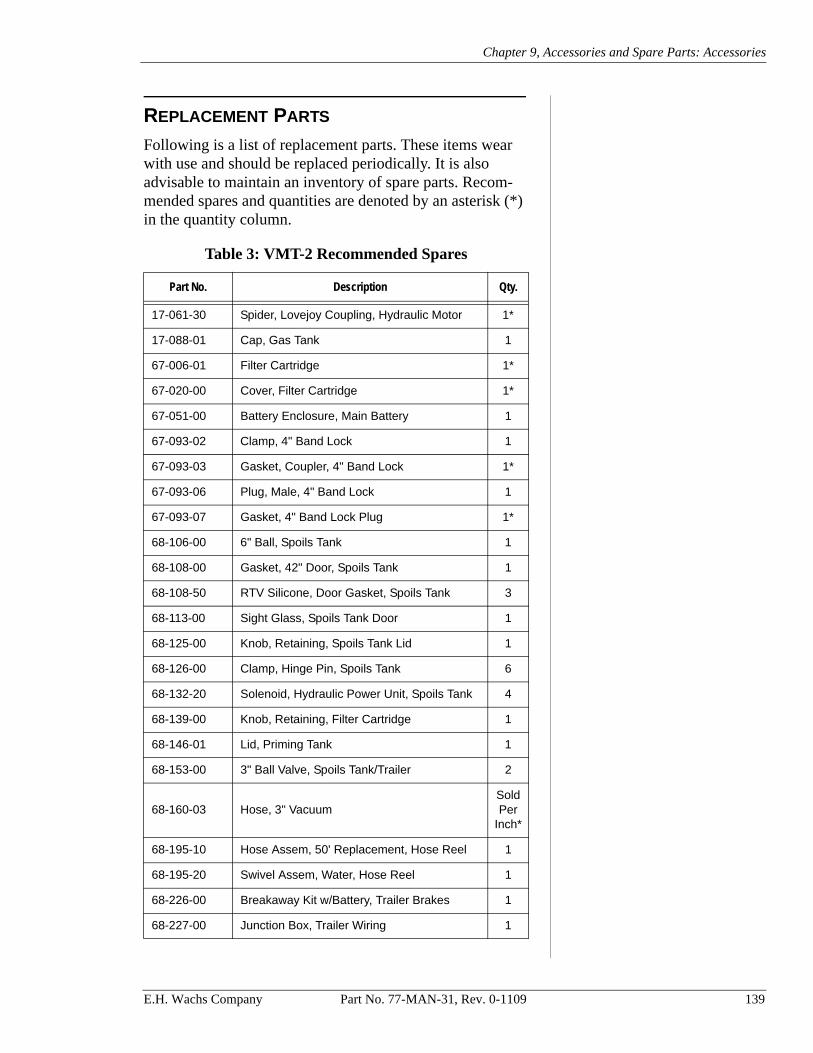
Chapter 9, Accessories and Spare Parts: Accessories
REPLACEMENT PARTS
Following is a list of replacement parts. These items wear with use and should be replaced periodically. It is also advisable to maintain an inventory of spare parts. Recom-mended spares and quantities are denoted by an asterisk (*) in the quantity column.
Table 3: VMT-2 Recommended Spares
Part No. Description Qty.
17-061-30 Spider, Lovejoy Coupling, Hydraulic Motor 1*
17-088-01 Cap, Gas Tank 1
67-006-01 Filter Cartridge 1*
67-020-00 Cover, Filter Cartridge 1*
67-051-00 Battery Enclosure, Main Battery 1
67-093-02 Clamp, 4" Band Lock 1
67-093-03 Gasket, Coupler, 4" Band Lock 1*
67-093-06 Plug, Male, 4" Band Lock 1
67-093-07 Gasket, 4" Band Lock Plug 1*
68-106-00 6" Ball, Spoils Tank 1
68-108-00 Gasket, 42" Door, Spoils Tank 1
68-108-50 RTV Silicone, Door Gasket, Spoils Tank 3
68-113-00 Sight Glass, Spoils Tank Door 1
68-125-00 Knob, Retaining, Spoils Tank Lid 1
68-126-00 Clamp, Hinge Pin, Spoils Tank 6
68-132-20 Solenoid, Hydraulic Power Unit, Spoils Tank 4
68-139-00 Knob, Retaining, Filter Cartridge 1
68-146-01 Lid, Priming Tank 1
68-153-00 3" Ball Valve, Spoils Tank/Trailer 2
68-160-03 Hose, 3" VacuumSold Per
Inch*
68-195-10 Hose Assem, 50' Replacement, Hose Reel 1
68-195-20 Swivel Assem, Water, Hose Reel 1
68-226-00 Breakaway Kit w/Battery, Trailer Brakes 1
68-227-00 Junction Box, Trailer Wiring 1
E.H. Wachs Company Part No. 77-MAN-31, Rev. 0-1109 139
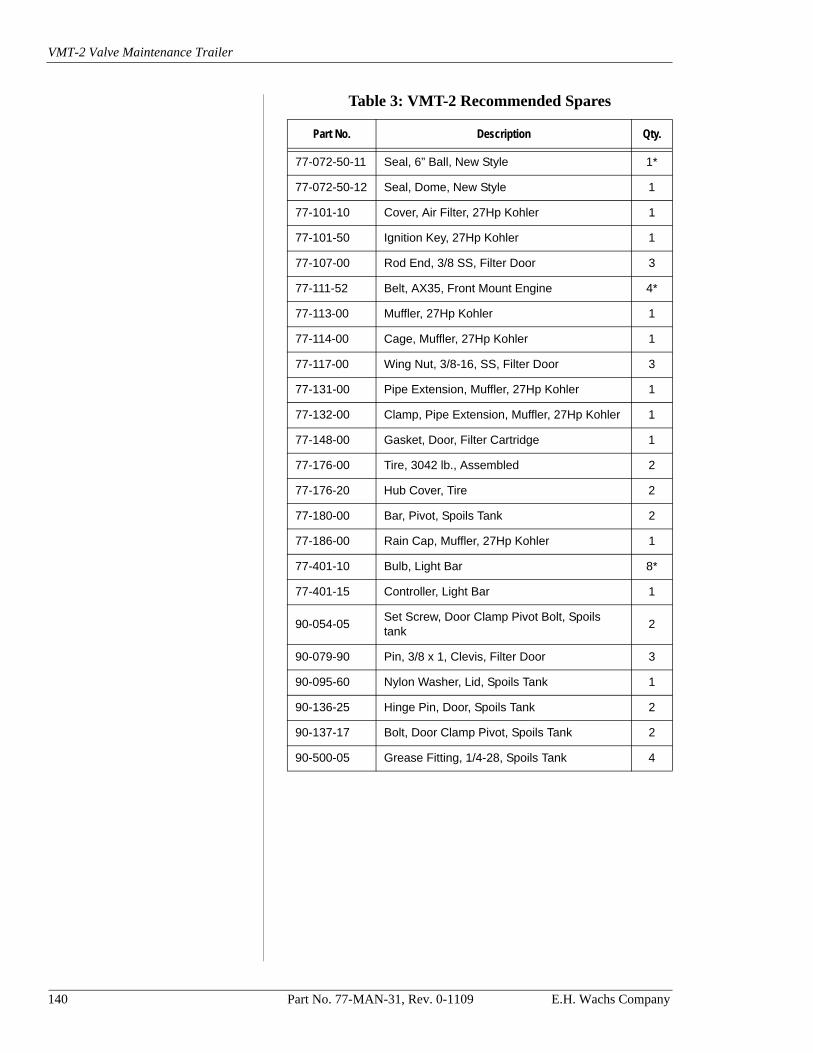
VMT-2 Valve Maintenance Trailer
77-072-50-11 Seal, 6” Ball, New Style 1*
77-072-50-12 Seal, Dome, New Style 1
77-101-10 Cover, Air Filter, 27Hp Kohler 1
77-101-50 Ignition Key, 27Hp Kohler 1
77-107-00 Rod End, 3/8 SS, Filter Door 3
77-111-52 Belt, AX35, Front Mount Engine 4*
77-113-00 Muffler, 27Hp Kohler 1
77-114-00 Cage, Muffler, 27Hp Kohler 1
77-117-00 Wing Nut, 3/8-16, SS, Filter Door 3
77-131-00 Pipe Extension, Muffler, 27Hp Kohler 1
77-132-00 Clamp, Pipe Extension, Muffler, 27Hp Kohler 1
77-148-00 Gasket, Door, Filter Cartridge 1
77-176-00 Tire, 3042 lb., Assembled 2
77-176-20 Hub Cover, Tire 2
77-180-00 Bar, Pivot, Spoils Tank 2
77-186-00 Rain Cap, Muffler, 27Hp Kohler 1
77-401-10 Bulb, Light Bar 8*
77-401-15 Controller, Light Bar 1
90-054-05Set Screw, Door Clamp Pivot Bolt, Spoils tank
2
90-079-90 Pin, 3/8 x 1, Clevis, Filter Door 3
90-095-60 Nylon Washer, Lid, Spoils Tank 1
90-136-25 Hinge Pin, Door, Spoils Tank 2
90-137-17 Bolt, Door Clamp Pivot, Spoils Tank 2
90-500-05 Grease Fitting, 1/4-28, Spoils Tank 4
Table 3: VMT-2 Recommended Spares
Part No. Description Qty.
140 Part No. 77-MAN-31, Rev. 0-1109 E.H. Wachs Company
Chapter 10, Ordering Information
Chapter 10
Ordering Information
To place an order, request service, or get more detailed information on any E.H. Wachs Company product, please contact us at one of the following numbers:
U.S. 800-323-8185International: 847-537-8800
Or visit our Web site at:
www.wachsco.com
ORDERING REPLACEMENT PARTS
When ordering parts, please provide the part description and part number for all parts to be ordered.
In This Chapter
ORDERING REPLACEMENT PARTS
REPAIR INFORMATION
WARRANTY INFORMATION
RETURN GOODS ADDRESS
E.H. Wachs Company Part No. 77-MAN-31, Rev. 0-1109 141
VMT-2 Valve Maintenance Trailer
REPAIR INFORMATION
Please call for an authorization number before returning any equipment for repair or factory service. We will advise you of shipping and handling. Include the following information when returning equipment:• Your name/company name• Your address• Your phone number• A description of the problem or the work to be done.
An estimate of the work to be performed and the associated cost will be provided prior to commencement of service or repairs.
WARRANTY INFORMATION
Enclosed with the manual is a warranty card. Please com-plete the registration card and return it to E.H. Wachs Com-pany. Retain the owner’s registration record and warranty card for your information.
RETURN GOODS ADDRESS
Use the following address to return equipment for repair:
E.H. Wachs Company600 Knightsbridge ParkwayLincolnshire, Illinois 60069 USA
142 Part No. 77-MAN-31, Rev. 0-1109 E.H. Wachs Company