Embed Size (px)
Citation preview
I
MASTER THESIS
TITLE: Manoeuvring Drone (Tello ans Tello EDU) Using Body
Poses or Gestures
MASTER DEGREE: Master's Degree in Applications
and Technologies for Unmanned Aircraft Systems (Drones) (MED)
AUTHOR: Tushar Saini
ACADEMIC ADVISORS: Dr. David Remondo
PROJECT MENTORS: Adrià Arnaste and Narcís Codina
DATE: 28 October 2021

II
Abstract
The project aims to use computer vision and machine learning to control Tello and
Tello Edu Drones.
The main use of this project is for educational and experimental purposes for
upcoming future uses. I got inspired by the developments in the field of computer
vision and pose estimation. As people are doing some much instructing and
innovative things using this Drone and combined it with AI, Computer Vision, and
Machine learning.
This project helps anyone who likes to learn from the beginning even they don’t
have any prior knowledge of programming or Computer Vision. They can able to
build a simple application and also provide the basic knowledge for the
development of a more complex application. As a final objective, the main
application is proposed, are consists of a drone that can be controlled using body
poses or the movement of the body i.e., following the person by maintaining a
constant safety distance and following the commands given by the instructor.
To start programming Tello or Tello EDU drone, it is based on a series of scripts
and functions which is already been developed. So, that SDK is used as a guide to
developing a new tello custom SDK to develop a complex and interactive
application.
By using this custom template, we can develop several basic mission
scripts/programs.
For the main application, different experiments were carried out to check which
method is better in extracting the body key points/Landmarks in real-time in which
low computing power is required or in other words no or less GPU power is
required. As a result, I come across the Google AI open source “MediaPipe
Machine Learning” platform, which provides a cross-platform, customizable ML
solution for live and streaming media. Which is used for advanced application in
this project.

III
CONTENTS
INTRODUCTION ..................................................................................................... 1
CHAPTER 1: STATUS QUO .................................................................................. 3
CHAPTER 2: TELLO DRONE ................................................................................ 6
2.1. Technical Characteristics ............................................................................... 6
2.2. Basic Requirement for programming ............................................................ 9
2.3. SDK 2.0 ............................................................................................................ 9
2.3. Mobile Application ........................................................................................ 10
CHAPTER 3: POSE DETECTION ........................................................................ 12
3.1 Overview ........................................................................................................ 12
3.2 Model Architecture and Pipeline Design ..................................................... 13
3.2.1 Inference pipeline ........................................................................................................... 13 3.2.2 Person detector .............................................................................................................. 13 3.2.3 Topology ......................................................................................................................... 14 3.2.4 Neural network architecture .......................................................................................... 18
CHAPTER 4: DRONE & POSE FUSION .............................................................. 21
4.1. Introduction to Tello Programming............................................................. 21
4.1.1 Simple Maneuver ............................................................................................................ 21 4.1.2 Simple Take Picture ....................................................................................................... 22 4.1.3 Manual Control ............................................................................................................... 23
4.2. Pose Class .................................................................................................... 24
4.2.1 Introduction to Class ..................................................................................................... 24 4.2.2 Introduction to Functions .............................................................................................. 26
4.3. Implementation ............................................................................................. 34
4.3.1 Introduction State Machine Diagram ............................................................................ 34 4.3.2 Explanation of State Machine ....................................................................................... 35
4.4. Main Application: Control the drone with Body Gestures ........................ 40
4.4.1 Material Required ........................................................................................................... 40 4.4.2 Steps Required ............................................................................................................... 40 4.4.3 Run and Play ................................................................................................................... 41
CONCLUSIONS .................................................................................................... 42

IV
ACRONYMS ......................................................................................................... 44
REFERENCES ...................................................................................................... 45
Annexe A: Feature extraction network architecture ........................................ 47
Annexe B: GitHub References ........................................................................... 48
Annexe C: Pose Class and its functions ........................................................... 49
Annexe D: State Class and its functions ........................................................... 52
Annexe E: Main functions................................................................................... 57

INTRODUCTION 1
INTRODUCTION
This project focus on the Tello and Tello EDU Drones. As both are being used for
experimental and educational purposes by several companies, institutes, and
universities. They provide an easy, simple, and reliable platform for beginners to
start learning.
As there are various other drones also available in the market, which are also
dedicated for educational and experimental purposes have been studied and how
the people and organizations used them. During this, it’s found that Tello and Tello
EDU Drones are best for this project. There is various GitHub repository available
online related to both drones. In addition, there is a forum called “Tellopilots” where
many people and different developers share doubts, problems, and progress,
which helps me and many other beginners to learn and to avoid future mistakes.
Besides that, on “YouTube” also there is lots of content and tutorials are available
which help me to learn during this project.
The initial objective of the project is to create a basic platform that allows anyone to
perform basic missions with or without using the Body Poses. These basic
missions consist of simple takeoff, landing, or any serious of movements. As we
proceed further in the project it also explains or elaborates to create more complex
applications. But the main objective of this project is to control the drone
movements through body poses, although it also includes tracking or following the
body/person by maintaining a safe distance. There will be many more applications
that can be developed by using this basic platform.
The drones to carry out this project are provided by the Universitat Politecnica de
Catalunya campus “Castelldefels School of Telecommunications and Aerospace
Engineering (EETAC)” and the “elarco design SL.” a consultancy company with
whom I proceed my Master’s Thesis. Moreover, they also provide the proper space
and controlled area to perform various tests throughout this project along with
proper mentoring.
To start this project, I used Tello SDK. It contains several packages, each with one
or more classes that present the data and methods used to control a Tello drone.
And, MediaPipe BlazePose GHUM & GHUML python API which provide a basic
platform to work on this project. It contains a lightweight convolutional neural
network architecture for human pose estimation that is tailored for real-time
inference on mobile and low-end devices. As MediaPipe also provides the same
API for other platforms like android, iOS, C++, and Java. Along with some other
basic python libraries.
This document is organized in various chapters for a better understanding of the
process of the project and the knowledge for those who want to start their new

INTRODUCTION 2
projects. Chapter 1 is discussed about the various drones which are available in
the market which can be customized and programmed according to the user for
this application. Chapter 2 is focused on the in-depth explanation of Tello Drone
i.e., technical characteristics, a concept before starting programing, accessories,
and more. Chapter 3 is focused on the explanation and the working pipeline of the
MediaPipe BlazePose. Chapter 4, is focused on the programming and integration,
the knowledge that I gained from the previous chapters to develop the main
application. Finally, a conclusion.
All the references and research which provide knowledge and motivation to make
this project are referred to below in references and annexure. Also, the material
related to this project is available online on GitHub [15].
CHAPTER 1: STATUS QUO 3
CHAPTER 1: STATUS QUO
An investigation or a search was carried out before starting this project to know
about the available platforms in the market, which can be adopted easily and have
versatility for an educational project.
Several drones have similar characteristics and specifications which can be
suitable for this project. The most convenient comparisons that have been selected
are discussed below.
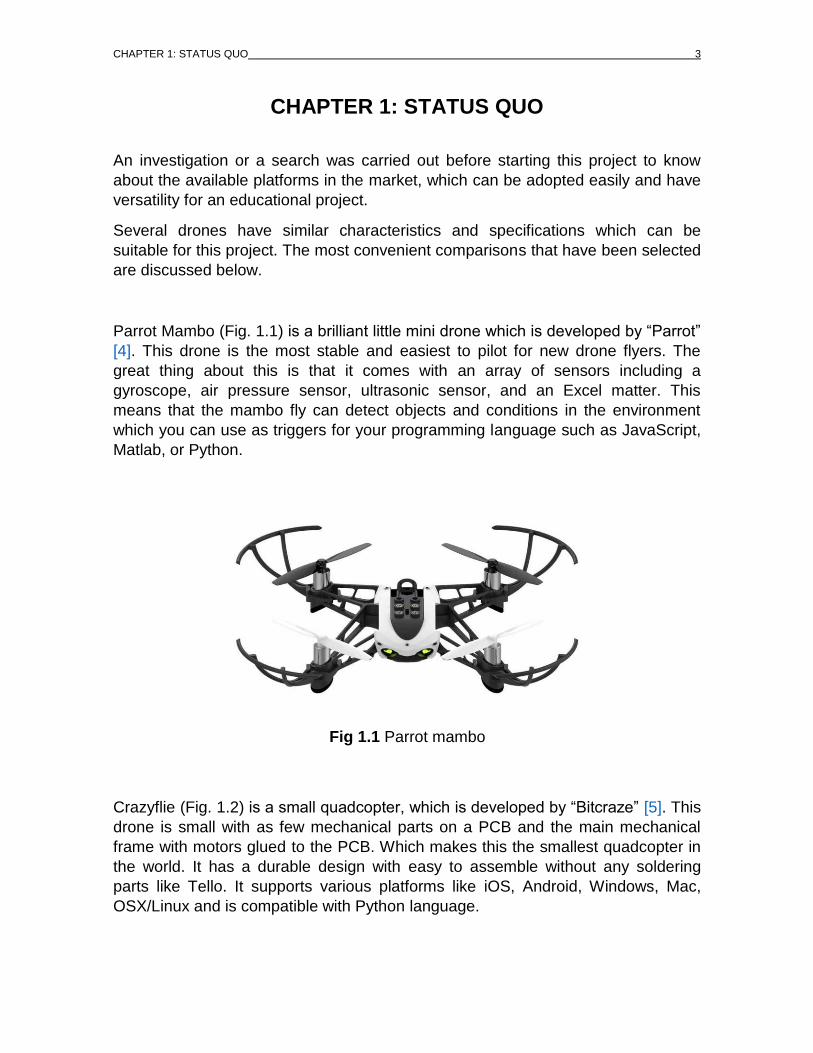
Parrot Mambo (Fig. 1.1) is a brilliant little mini drone which is developed by “Parrot”
[4]. This drone is the most stable and easiest to pilot for new drone flyers. The
great thing about this is that it comes with an array of sensors including a
gyroscope, air pressure sensor, ultrasonic sensor, and an Excel matter. This
means that the mambo fly can detect objects and conditions in the environment
which you can use as triggers for your programming language such as JavaScript,
Matlab, or Python.
Crazyflie (Fig. 1.2) is a small quadcopter, which is developed by “Bitcraze” [5]. This
drone is small with as few mechanical parts on a PCB and the main mechanical
frame with motors glued to the PCB. Which makes this the smallest quadcopter in
the world. It has a durable design with easy to assemble without any soldering
parts like Tello. It supports various platforms like iOS, Android, Windows, Mac,
OSX/Linux and is compatible with Python language.
Fig 1.1 Parrot mambo

CHAPTER 1: STATUS QUO 4
Codrone [Fig. 1.3], is also a small drone developed by “Robolink” [6]. This
programmable drone is specially focused on education purposes with an attractive
look to attract youngsters. It supports two programming platforms Arduino and
Python.
Flybrix [7] (Fig. 1.4), is a Lego Drone. Unlike the drones mentioned above and the
Tello, this drone is buildable, without having to need extra tools, which add a new
set of learning. This drone can be programmed through Arduino.
Fig 1.3 Codrone
Fig 1.2 Crazyflie

CHAPTER 1: STATUS QUO 5
Fig 1.4 Flybrix
Except for this drone, the above-mentioned have the option of block programming,
just like Tello.
The potential of Tello and Tello EDU for education purposes is very large, that’s
why several companies are using them. Among them we can highlight a few:
DrobotsCompany [8]: It is a company that operates in several states of the United
States. It is dedicated to courses for young people. Among its activities, it is worth
mentioning the realization of missions with the Tello and Tello EDU drone, which
makes young people have fun while they learn.
Campuse [9]: It is a company that operates in various parts of the world. They are
specialized in giving courses related to new technologies. Its courses include the
use of the Tello and Tello EDU drone to learn to program in Python and use
OpenCV.
Its easy programming has allowed developers to develop different applications:
DroneBlocks [10]: It is an application that allows programming in a very simple way
with blocks.
Tello FPV [11]: It is an alternative application for drone control but it offers many
more features than the application developed by RYZE. This application is not free.

CHAPTER 2: TELLO DRONE 6
CHAPTER 2: TELLO DRONE
Tello EDU and Tello (Fig. 2.1) is a perfect programmable drone for educational,
DIY, and hobby use. In this section, the drones, their characteristics, and other
information necessary for the development of applications will be known in more
depth.
Both are made by Shenzhen Ryze Technology and incorporate DJI flight control
technology and Intel processors.
Tello is the first drone that they put on the market and Tello EDU is the latest
version with a few more features and which allow swarm programming in a simple
way than the previous version.
This new version also has a new SDK which is more widespread than the previous
one [13] [14].
2.1. Technical Characteristics
The principal components of the drone are the following:
Fig. 2.1 TELLO EDU and TELLO Drone

CHAPTER 2: TELLO DRONE 7
Table 2.1 Description of components of the Tello EDU drone
Its dimensions and characteristics make it very manageable.
Table 2.2 Dimensions and characteristic
Weight 87 g
Dimensions 98×92.5×41 mm
Propeller 3 inches
Telemetric sensor
Integrated Functions Barometer
LED
Vision System
Wi-Fi 2.4 GHz 802.11n
Real-time streaming 720p
Port USB battery charging port
Operating temperature range from 0º to 40º C
Operating frequency range from 2.4 to 2.4835 GHz
20 dBm (FCC)
Transmitter (EIRP) 19 dBm (CE)
19 dBm (SRRC)
1. Propellers 6. Antennas
2. Motors 7. Vision Positioning System
3. Drone Status Indicator 8. Battery
4. Camera 9. Micro USB port
5. Power Button 10. Propeller protectors

CHAPTER 2: TELLO DRONE 8
Being a drone for mainly indoor use, it can be used outdoors but in a controlled
environment like weather, wind speed, etc., that’s why the characteristics that
define its operations are quite limited.
Table 2.3 Detail in operation
Maximum distance of the flight 100 meters
Minimum speed 6.7 mph (10.8 kph)
Maximum speed 17.8 mph (28 kph)
Maximum flight time 13 min (0 wind at a consistent 9mph (15kph))
Maximum flight height 30 meters
It has a very easy battery to change; it can be charged directly with a USB cable
with the battery inside the drone, or with a charging hub.
Table 2.4 Battery details
Removable Yes
Capacity 1100 mAh
Voltage 3.8 V
Type LiPo
Energy 4.18 Wh
Net Weight 25 ± 2 g
Temperature range when charging from 5º to 45º
Maximum Load Power 10 W
The camera allows us to obtain video with a good quality (HD), after the image
processing, it is possible to develop different applications.
Table 2.5 Camera details
Photo 5 MP (2592x1936)
Field of view 82.6°
Video HD: 1280 X 720 30 fps
Format JPG (Photo)
MP4 (Video)
Electronic stabilization Yes

CHAPTER 2: TELLO DRONE 9
Vision Positioning System: Consisting of a camera, which is a grey-only 320x240
IR-sensitive and an infrared 3D module. This system is capable of working in a
range of 0.3 m to 30 m high, but its optimal working conditions are 0.3 m to 6 m
high.
Drone Status Indicator: It is a led that has the drone, and indicates in what state
the drone is in each moment.
Field of view: It is the open observable area that the drone camera can see.
Electronic stabilization: It is an image enhancement technique using electronic
processing.
2.2. Basic Requirement for programming
We can program the Drone by using a different platform, operating system, and
programing language.
The platform like Visual Code, PyCharm, Anaconda, etc.
An operating system like Windows, Linux, MAC, etc.
Programing languages like Java, C++, Python, Scratch, etc.
But in this project windows have been used along with Python programming
language due to easily available python libraries
To run a script, it is necessary to connect the computer with the Drone Wi-Fi. The
name of the Wi-Fi network of the drone is set by default which is written on the
drone where we put the battery, but it is possible to change the name of the
network and also add a password to prevent any stranger from taking control of the
drone in the script.
2.3. SDK 2.0
The Tello drone has a software development kit, which helps to understand the
different commands that are accepted by the drone. This serves as the basic
structure for the development of an application. You can find more detail on the
internet in the user guide and git repository [12].

CHAPTER 2: TELLO DRONE 10
2.3. Mobile Application
Shenzhen RYZE Tech Co. Ltd. Has developed an application for the Tello, which
creates a platform to control the drone over Wi-Fi manually. This application
displays all the necessary information on the display of an Android or iOS mobile
(Fig. 2.2).
Fig. 2.2 Tello App Display
Fig. 2.3 Tello App advance option

CHAPTER 2: TELLO DRONE 11
This application also allows you to Calibrate and update the Firewall of the Tello
(Fig. 2.3).
Moreover, this app has various predefine flight modes which allow you to perform
various tasks and basic missions (Fig. 2.4 and Fig. 2.5).
Fig. 2.4 Flight Mode_1
Fig. 2.5 Flight Mode_2

CHAPTER 3: POSE DETECTION 12
CHAPTER 3: POSE DETECTION
In this chapter, we talk about Person/Pose detection, as we know there are various
2D and 3D open-source pose estimation models or frameworks are available in the
market, like OpenPose, CPN (Cascaded Pyramid Network), AlphaPose, and
HRNet (High-Resolution Net), Deep Pose, Pose Net, Dense Pose. Each model has
its pros and cons, and data output which can be used in various applications. For
this project, I do some research over the internet and also read some research
papers. After doing this intensive research I came across a new 2D & 3D real-time
lightweight pose estimation framework which was purposed by Google in CVPR
Workshop on Computer Vision for Augmented and Virtual Reality at Seattle USA in
June 2020. This framework is named “MediaPipe Pose”. It is also called
BlazePose. This lightweight 3D framework also supports cross-platform (i.e.,
Android, iOS, web, edge devices) compatibility.
In addition, the output of this model match my specification for this project, that’s
the reason I decided to use this Pose mode and we are going to know about this in
more detail as we proceed further in the chapter.
Moreover, MediaPipe also provides several other frameworks and ML models like
Face Detection, Multi-hand Tracking, Hair Segmentation, Object Detection, and
Tracking, Objectron: 3D Object Detection and Tracking, Auto Flip: Automatic video
cropping pipeline, Pose Detection and more.
3.1 BlazePose Overview
Human pose estimation plays a critical role in various applications such as physical
exercises, sign language recognition, and full-body gesture control. For example, it
can form the basis application platform for yoga, dance, and fitness. It can also
enable the overlay of digital content and information on top of the physical world in
augmented reality. That makes it challenging due to the wide variety of poses,
numerous degrees of freedom, and occlusions.
Recent work [18] [19] has shown significant progress on pose estimation. The
common approach in this work is to produce heatmaps for each joint along with
refining offsets for each coordinate. While this choice of heatmaps scales to
multiple people with minimal overhead, it makes the model for a single person
considerably larger than is suitable for real-time inference.
In contrast to heatmap-based techniques, regression-based approaches, while less
computationally demanding and more scalable, attempt to predict the mean
coordinate values, often failing to address the underlying ambiguity. Newell et al.
CHAPTER 3: POSE DETECTION 13
[20] have shown that the stacked hourglass architecture gives a significant boost to
the quality of the prediction, even with a smaller number of parameters.
MediaPipe Pose is the ML solution for high-fidelity body pose tracking, inferring 33
2D and 3D (Dimension) landmarks, and background segmentation mask on the
whole body from RGB video frames by utilizing the BlazePose. The current state-
of-the-art approach for Pose Detection and Tracking relies on powerful desktop
environments for processing, which consist of heavy GPUs and powerful CPUs.
Whereas this Pose Detection method achieves real-time performance on most
modern mobile phones, desktops/laptops, and even on the web only with CPU.
3.2 Model Architecture and Pipeline Design
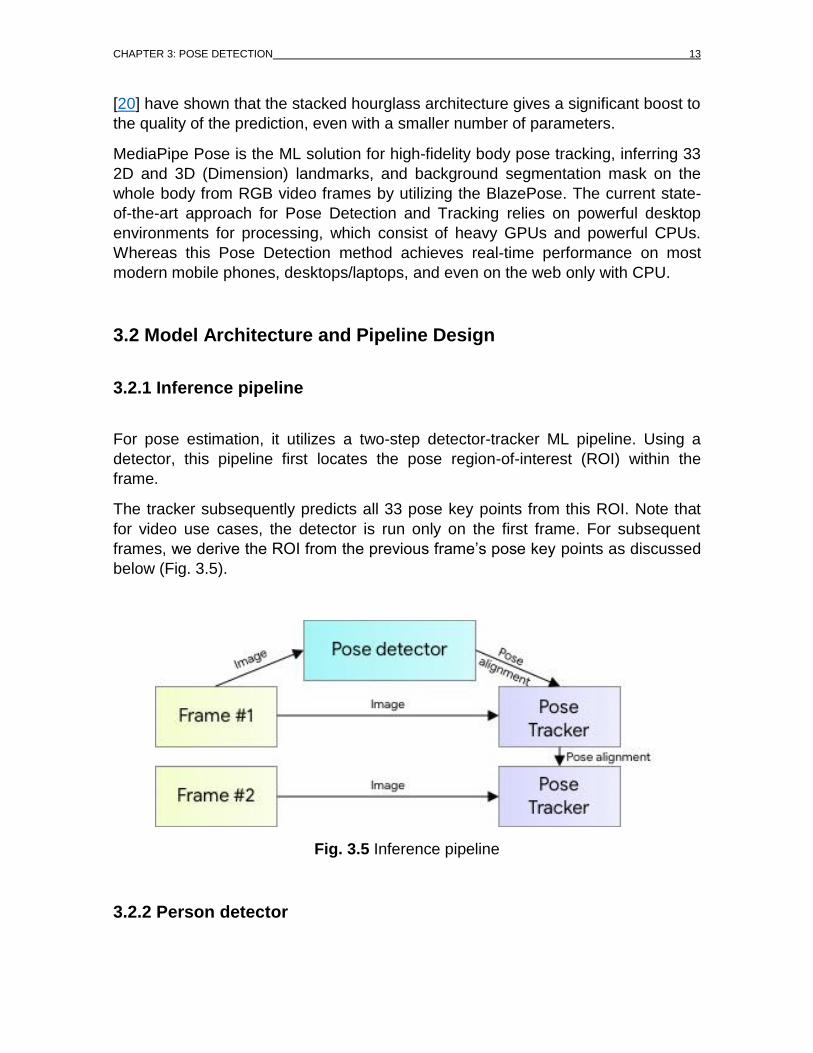
3.2.1 Inference pipeline
For pose estimation, it utilizes a two-step detector-tracker ML pipeline. Using a
detector, this pipeline first locates the pose region-of-interest (ROI) within the
frame.
The tracker subsequently predicts all 33 pose key points from this ROI. Note that
for video use cases, the detector is run only on the first frame. For subsequent
frames, we derive the ROI from the previous frame’s pose key points as discussed
below (Fig. 3.5).
Fig. 3.5 Inference pipeline
3.2.2 Person detector

CHAPTER 3: POSE DETECTION 14
The majority of modern object detection solutions rely on the Non-Maximum
Suppression (NMS) algorithm for their last post-processing step. This works well
for rigid objects with few degrees of freedom. However, this algorithm breaks down
for scenarios that include highly articulated poses like those of humans, e.g. people
waving or hugging. This is because multiple, ambiguous boxes satisfy the
intersection over union (IoU) threshold for the NMS algorithm.
To overcome this problem, the lightweight BlazeFace model, as a proxy for a pose
detector. This model only detests the location of a person within the frame. It
explicitly also predicts two additional virtual key points which then combined with
Leonardo’s Vitruvian man to predict the midpoint of a person’s hips, the radius of a
circle circumscribing the whole person, and the incline angle of the line connecting
the shoulder and hip midpoints as shown below (Fig. 3.6).
Fig. 3.6 Vitruvian man aligned via two virtual keypoints with face bounding box.
3.2.3 Topology
The current standard for human body pose is the COCO topology, which consists of 17 landmarks across the torso, arms, legs, and face. However, the COCO keypoints only localize to the ankle and wrist points, lacking scale and orientation

CHAPTER 3: POSE DETECTION 15
information for hands and feet, which plays a vital role for practical applications like fitness and dance.
The inclusion of more key points is crucial for the subsequent application of domain-specific pose estimation models, like those for hands, face, or feet. With BlazePose, we can get 33 human body keypoints, which is a superset of COCO, BlazeFace, and BlazePalm topologies. This allows us to determine body semantics from pose prediction alone that is consistent with face and hand models (Fig. 3.7).
Fig. 3.7 BlazePose 33 keypoints topology as COCO (coloured with green) superset
In this project, the COCO (Common Object in Context) dataset is used which is
large-scale object detection, segmentation, and captioning dataset available
publically that also includes the dataset of 250,000 people with body Key-points as
shown in Fig(3.1). BlazePose used the COCO dataset as a base for further
development and improvement in pose estimation. In this pose estimation, COCO
is combined other two ML pipelines that are BlazeFace and BlazePalm to extend
its application.

CHAPTER 3: POSE DETECTION 16
BlazeFace
The BlazeFace [17] model architecture is built around four important designs,
which are following:
Enlarging the receptive field size
Feature extractor
Anchor scheme
Post-processing.
Enlarging the receptive field sizes: By modifying the convolutional neural network
architectures tend which favour 3×3 convolution kernels.
Fig. 3.8 BlazeBlock (left) and double BlazeBlock
For example, on an Apple iPhone X with the Metal Performance Shaders
implementation [16], a 3×3 depthwise convolution in 16-bit floating-point arithmetic
takes 0.07 ms for a 56×56×128 tensor, while the subsequent 1×1 convolution from
128 to 128 channels is 4.3 times slower at 0.3 ms. So increasing the kernel size of
the depthwise part is relatively cheap. By employing 5×5 kernels in model
architecture bottlenecks, trading the kernel size increase for the decrease in the
total amount of such bottlenecks required to reach a particular receptive field size
(Fig 3.8).
A MobileNetV2 bottleneck contains subsequent depth-increasing expansion and
depth-decreasing projection pointwise convolutions separated by a non-linearity.
To accommodate for the fewer number of channels in the intermediate tensors, by
swapping these stages so that the residual connections in bottlenecks operate in
the “expanded” (increased) channel resolution. This results in the low overhead of
a depthwise convolution that allows introducing another layer between these two

CHAPTER 3: POSE DETECTION 17
pointwise convolutions, accelerating the receptive field size progression even
further. This forms the essence of a double BlazeBlock that is used as the
bottleneck of choice for the higher abstraction level layers of BlazeFace (see Fig
3.8, right).
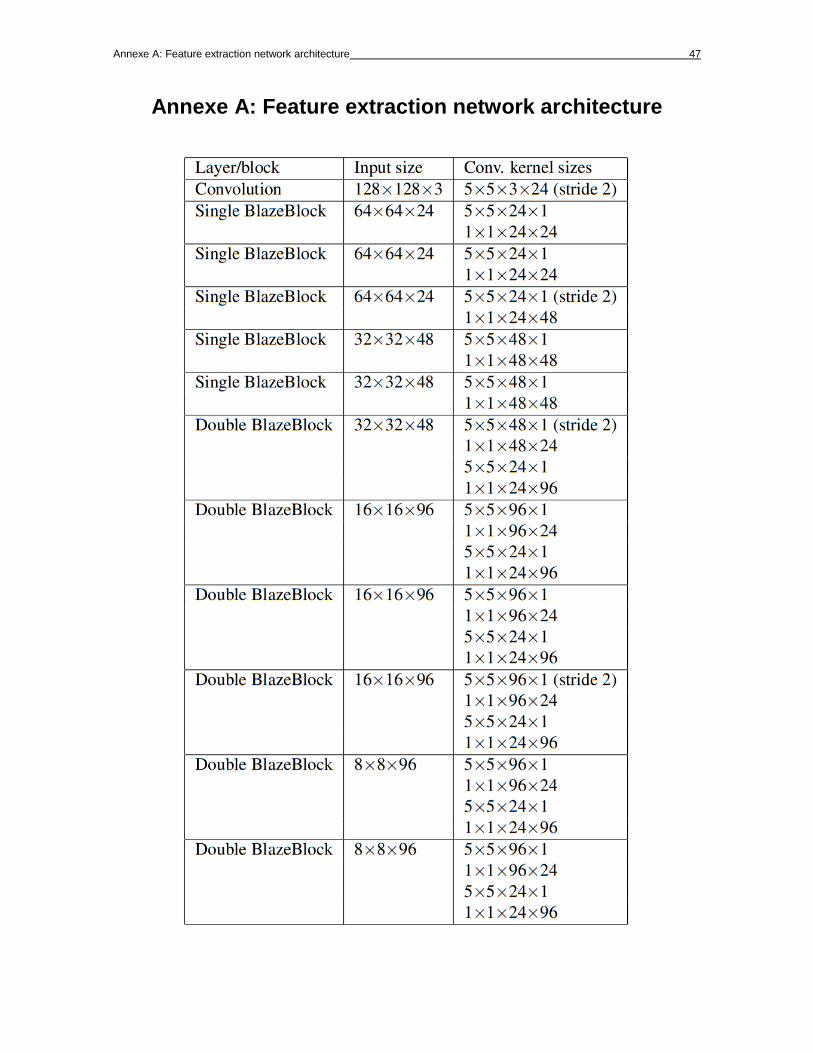
Feature extractor: For example, extracting the feature from the front-facing camera
model. Which contains smaller object scales and therefore has lower
computational demands. The extractor takes an RGB input of 128×128 pixels and
consists of a 2D convolution followed by 5 single BlazeBlocks and 6 double
BlazeBlocks (see Table in Annexer A for the full layout). The highest tensor depth
(channel resolution) is 96, while the lowest spatial resolution is 8×8 (in contrast to
SSD, which reduces the resolution down to 1×1).
Anchor scheme: A typical SSD model uses predictions from 1×1, 2×2, 4×4, 8×8,
and 16×16 feature map sizes (Fig 3.9). However, the success of the Pooling
Pyramid Network (PPN) architecture implies that additional computations could be
redundant after reaching a certain feature map resolution. Taking this into
consideration, by adopting an alternative anchor scheme that stops at the 8×8
feature map dimensions without further downsampling and replaced 2 anchors per
pixel in each of the 8×8, 4×4 and 2×2 resolutions by 6 anchors at 8×8. Due to the
limited variance in human face aspect ratios, limiting the anchors to the 1:1 aspect
ratio is sufficient for accurate face detection.
Fig. 3.9 Anchor computation: SSD (left) vs. BlazeFace
Post-processing: In this process, it increases the model accuracy and reduced the
jittering problems as the feature extractor is not reducing the resolution below 8×8,
the number of anchors overlapping a given object significantly increases with the
object size and When such a model is applied to subsequent video frames, the
predictions tend to fluctuate between different anchors and exhibit temporal jitter
(human perceptible noise).

CHAPTER 3: POSE DETECTION 18
BlazePalm
The hand tracking solution utilizes an ML pipeline consisting of several models
working together ( Fig 3.10):
A palm detector model operates on the full image and returns an oriented hand bounding box. A hand landmark model operates on the cropped image region defined by the palm detector and returns high fidelity 3D hand keypoints.
This architecture is similar to that employed face ML pipeline and that have used
for pose estimation. Providing the accurately cropped palm image to the hand
landmark model drastically reduces the need for data augmentation (e.g. rotations,
translation and scale) and instead allows the network to dedicate most of its
capacity towards coordinate prediction accuracy.
Fig. 3.10 Hand perception pipeline
3.2.4 Neural network architecture
The pose estimation component of the pipeline predicts the location of all 33 key
points of a person with three degrees of freedom each (x, y location and visibility)
plus the two virtual alignment key points described above.

CHAPTER 3: POSE DETECTION 19
Unlike current approaches that employ compute-intensive heatmap prediction to
detect or extract key points from an image or a video frame, whereas this model
uses a regression approach that is supervised by a combined heat map/offset
prediction of all key points, as shown below (Fig. 3.11).
Fig. 3.11 Network architecture: regression with heatmap supervision.
Specifically, during training first, employ a heatmap and offset the loss to train the
centre and left tower of the network. Then remove the heatmap output and train the
regression encoder (right tower), thus, effectively using the heatmap to supervise a
lightweight embedding.
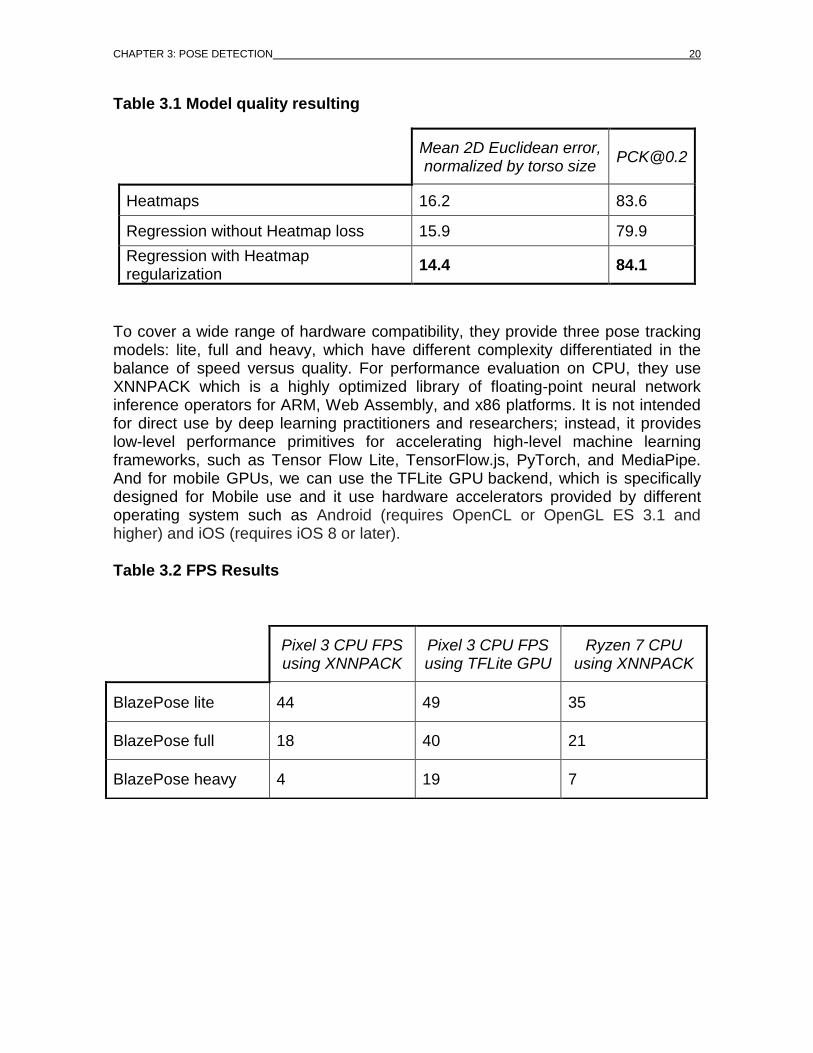
The below table shows the result that is achieved by this process from different training strategies. As an evaluation metric, use the Percent of Correct Points with 20% tolerance ([email protected]) if the 2D Euclidean error is smaller than 20% of the corresponding person’s torso size.
CHAPTER 3: POSE DETECTION 20
Table 3.1 Model quality resulting
To cover a wide range of hardware compatibility, they provide three pose tracking models: lite, full and heavy, which have different complexity differentiated in the balance of speed versus quality. For performance evaluation on CPU, they use XNNPACK which is a highly optimized library of floating-point neural network inference operators for ARM, Web Assembly, and x86 platforms. It is not intended for direct use by deep learning practitioners and researchers; instead, it provides low-level performance primitives for accelerating high-level machine learning frameworks, such as Tensor Flow Lite, TensorFlow.js, PyTorch, and MediaPipe. And for mobile GPUs, we can use the TFLite GPU backend, which is specifically designed for Mobile use and it use hardware accelerators provided by different operating system such as Android (requires OpenCL or OpenGL ES 3.1 and higher) and iOS (requires iOS 8 or later).
Table 3.2 FPS Results
Mean 2D Euclidean error, normalized by torso size
Heatmaps 16.2 83.6
Regression without Heatmap loss 15.9 79.9
Regression with Heatmap regularization
14.4 84.1
Pixel 3 CPU FPS using XNNPACK
Pixel 3 CPU FPS using TFLite GPU
Ryzen 7 CPU using XNNPACK
BlazePose lite 44 49 35
BlazePose full 18 40 21
BlazePose heavy 4 19 7

CHAPTER 4: DRONE & POSE FUSION 21
CHAPTER 4: DRONE & POSE FUSION
In this section, we are going to implement all the knowledge that we gain in the
above chapters to develop the main application. Moreover, this section also helps
or allows anybody who doesn’t have any prior knowledge of the Tello drone, to
perform simple missions by using Python script.
After that, we move further to integrate Pose recognition to control the drone and to
perform various by using body movements.
4.1. Introduction to Tello Programming
Tello Python script which has been used in this project is provided on GitHub [1].
But you can use DjiTellopy [2] SDK also.
4.1.1 Simple Maneuver
The first step is importing all the classes, then connecting the drone Wi-Fi with a
computer to provide commands through a Python script. We will initialize a few
objects and parameters, then commands are sent to the drone. In this simple flight,
first, we take off then move left, rotate clockwise, move forward and land.
Fig. 4.1 Simple Python Script.
In the above script when we create the object of Command class names as
“tello_command”, but you can use any name you want and initialize the command
function. Then we sent takeoff, move and land commands by using their function.

CHAPTER 4: DRONE & POSE FUSION 22
4.1.2 Simple Take Picture
Now, in the second script, we will initialize the Drone cam and capture a picture
and save it in the drive.
Fig. 4.2 Take Picture Python Script.
So, the initialization is the same. But this time we import the cv2 and Stream class
and initialize the steaming address. Then we take off and enable the stream. After,
that we read the frame from the live feed of the drone camera and save the frame
as “frame.jpg” into the drive and land the drone.

CHAPTER 4: DRONE & POSE FUSION 23
4.1.3 Manual Control
This python script is a simple demonstration to control the Tell drone using
Keyboard.
Fig. 4.3 Manual control Python Script.

CHAPTER 4: DRONE & POSE FUSION 24
We use W, S, A, D keys for moving Forward, Backward, Left, Right; E, Q keys for
rotation and R, F keys for moving Up and Down; To stop movement press the
spacebar. When the script starts Tello will take off automatically and for landing
and to terminate the script press ESC (Escape) key. To know more commands
regarding Tello download its SDK [1]. And these and some more examples are
also available in the example folder of Tello SDK [2].
4.2. Pose Class
I have created a custom object-oriented Pose Class for this project in python
language, which include all the necessary functions that we are going to use in this
project. Those who have little knowledge of coding can be able to under the
programming easily as everything is commented on and explained well. In this
section, we will learn in more depth about Pose Detection.
4.2.1 Introduction to Class
The Pose Class contain various function like find_body, find angle, centroid,
distance b/w two points and pose classification which we discuss in brief in this
section one by one.
First of all, we need to import MediaPipe and some other python libraries to start
with like python OpenCV, math etc. Then we create an object-oriented Pose
Detector class, in which we create some Constructors. Constructors are used to
initializing the object's state and the task of constructors is to initialize (assign
values) to the data members of the class when an object of a class is created and
it's run as soon as an object of a class is instantiated.
Fig. 4.4 Pose Detector class constructor.
CHAPTER 4: DRONE & POSE FUSION 25
Here we use the __init__ function as a constructor, or initializer and is
automatically called when we create a new instance of a class. Within that function,
the newly created object is assigned to the parameter ‘self.’ and their default
values (Fig 4.4).
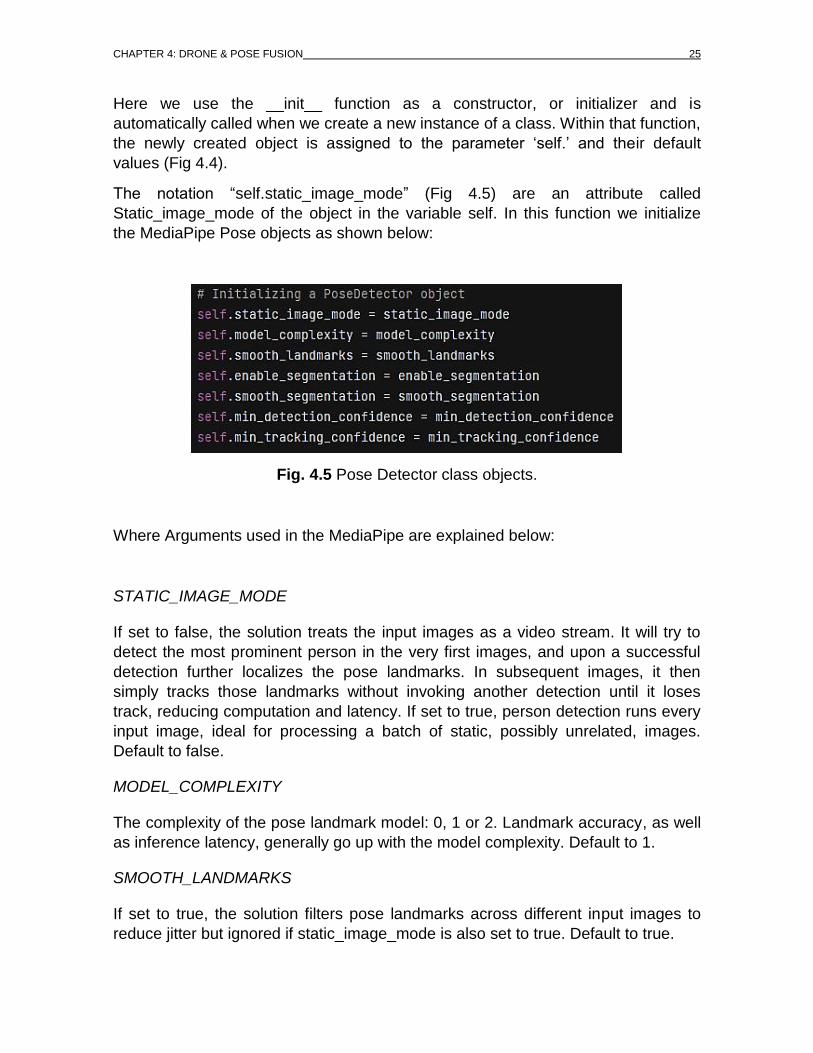
The notation “self.static_image_mode” (Fig 4.5) are an attribute called
Static_image_mode of the object in the variable self. In this function we initialize
the MediaPipe Pose objects as shown below:
Fig. 4.5 Pose Detector class objects.
Where Arguments used in the MediaPipe are explained below:
STATIC_IMAGE_MODE
If set to false, the solution treats the input images as a video stream. It will try to
detect the most prominent person in the very first images, and upon a successful
detection further localizes the pose landmarks. In subsequent images, it then
simply tracks those landmarks without invoking another detection until it loses
track, reducing computation and latency. If set to true, person detection runs every
input image, ideal for processing a batch of static, possibly unrelated, images.
Default to false.
MODEL_COMPLEXITY
The complexity of the pose landmark model: 0, 1 or 2. Landmark accuracy, as well
as inference latency, generally go up with the model complexity. Default to 1.
SMOOTH_LANDMARKS
If set to true, the solution filters pose landmarks across different input images to
reduce jitter but ignored if static_image_mode is also set to true. Default to true.

CHAPTER 4: DRONE & POSE FUSION 26
ENABLE_SEGMENTATION
If set to true, in addition to the pose landmarks the solution also generates the
segmentation mask. Default to false.
SMOOTH_SEGMENTATION
If set to true, the solution filters segmentation masks across different input images
to reduce jitter. Ignored if enable_segmentation is false or static_image_mode is
true. Default to true.
MIN_DETECTION_CONFIDENCE
Minimum confidence value ([0.0, 1.0]) from the person-detection model for the
detection to be considered successful. Default to 0.5.
MIN_TRACKING_CONFIDENCE
Minimum confidence value ([0.0, 1.0]) from the landmark-tracking model for the
pose landmarks to be considered tracked successfully, or otherwise person
detection will be invoked automatically on the next input image. Setting it to a
higher value can increase the robustness of the solution, at the expense of higher
latency. Ignored if static_image_mode is true, where person detection simply runs
on every image. Default to 0.5.
4.2.2 Introduction to Functions
This section is dedicated to various functions in the class and their explanation.
FIND_BODY FUNCTION
This function is the main function that finds the Person/Pose in the frame and
draws the pose. The input for the function is only the image or frames of the video
for which we want to find the pose and you also can enable/disable the draw option
by the Boolean input by setting up the draw True/False.

CHAPTER 4: DRONE & POSE FUSION 27
Fig. 4.6 Find body function.
The outputs or return value of this function are:
Landmarks list:
A list of pose landmarks. Each landmark consists of the following:
x and y: Landmark coordinates normalized to [0.0, 1.0] by the image width
and height respectively.1
1 Converted into Pixel Co-ordinates
CHAPTER 4: DRONE & POSE FUSION 28
z: Represents the landmark depth with the depth at the midpoint of hips
being the origin, and the smaller the value the closer the landmark is to the
camera. The magnitude of z uses roughly the same scale as x.
World landmarks list:
Another list of pose landmarks in world coordinates. Each landmark consists of the following:
x, y and z: Real-world 3D coordinates in centimetres with the origin at the
centre between hips.
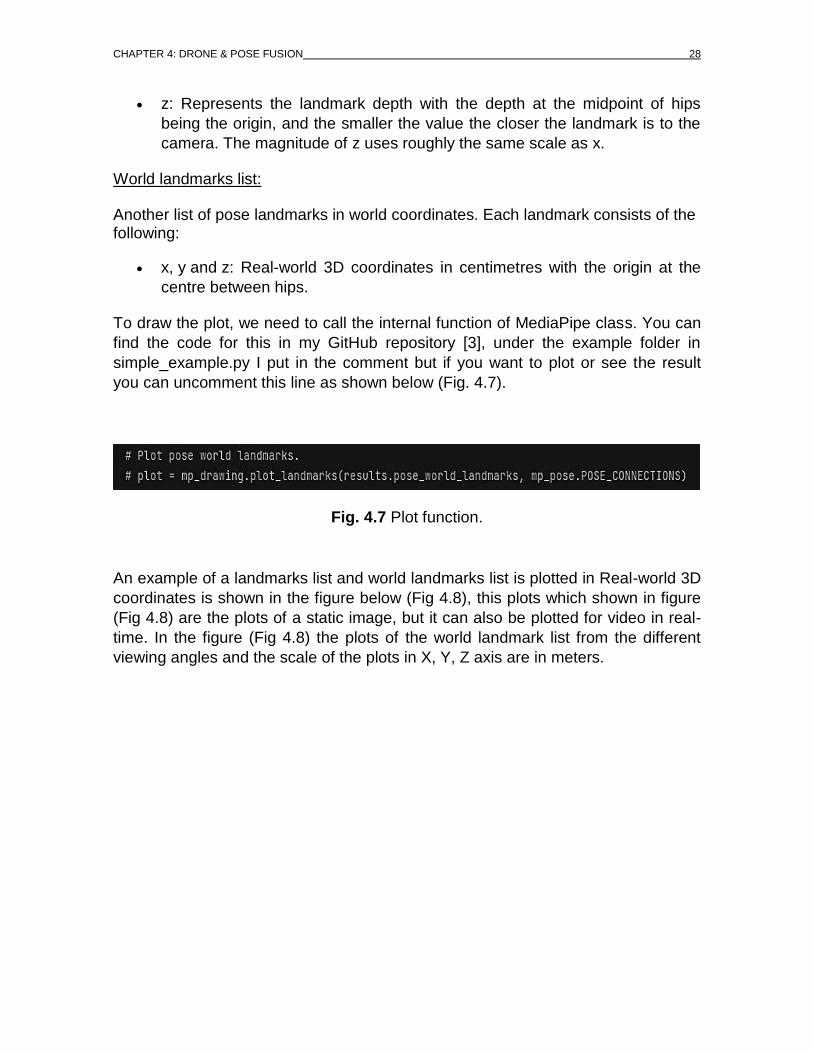
To draw the plot, we need to call the internal function of MediaPipe class. You can
find the code for this in my GitHub repository [3], under the example folder in
simple_example.py I put in the comment but if you want to plot or see the result
you can uncomment this line as shown below (Fig. 4.7).
Fig. 4.7 Plot function.
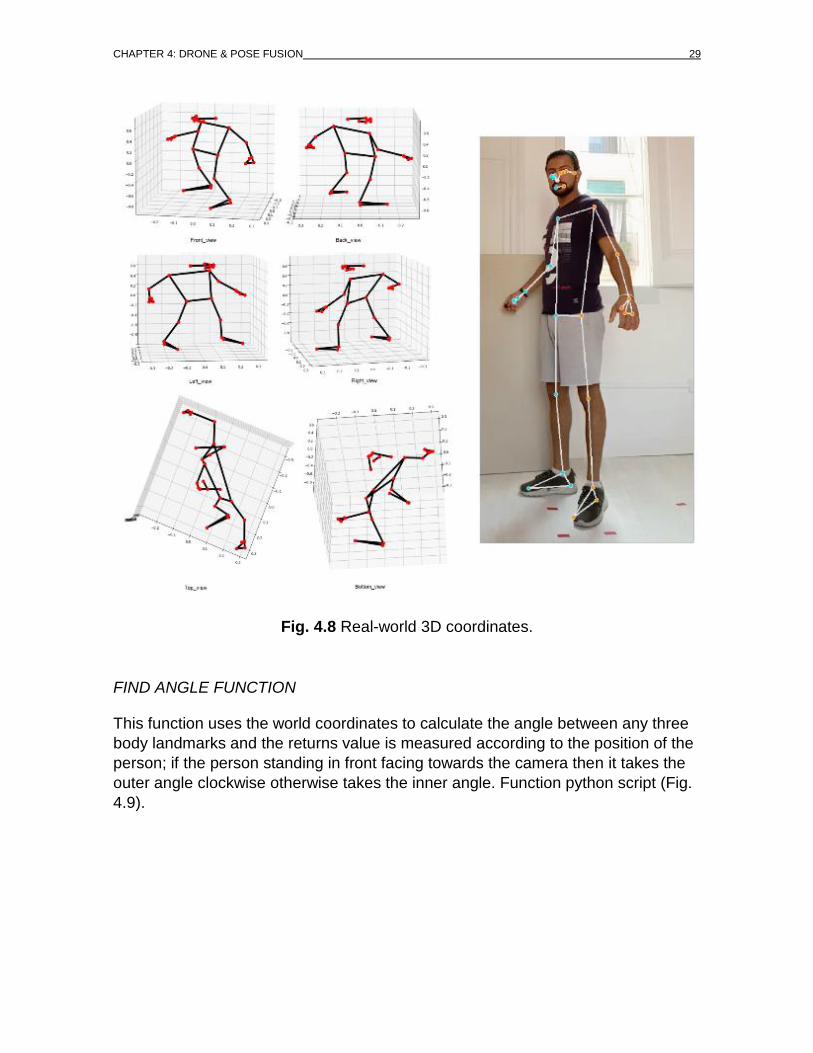
An example of a landmarks list and world landmarks list is plotted in Real-world 3D
coordinates is shown in the figure below (Fig 4.8), this plots which shown in figure
(Fig 4.8) are the plots of a static image, but it can also be plotted for video in real-
time. In the figure (Fig 4.8) the plots of the world landmark list from the different
viewing angles and the scale of the plots in X, Y, Z axis are in meters.
CHAPTER 4: DRONE & POSE FUSION 29
Fig. 4.8 Real-world 3D coordinates.
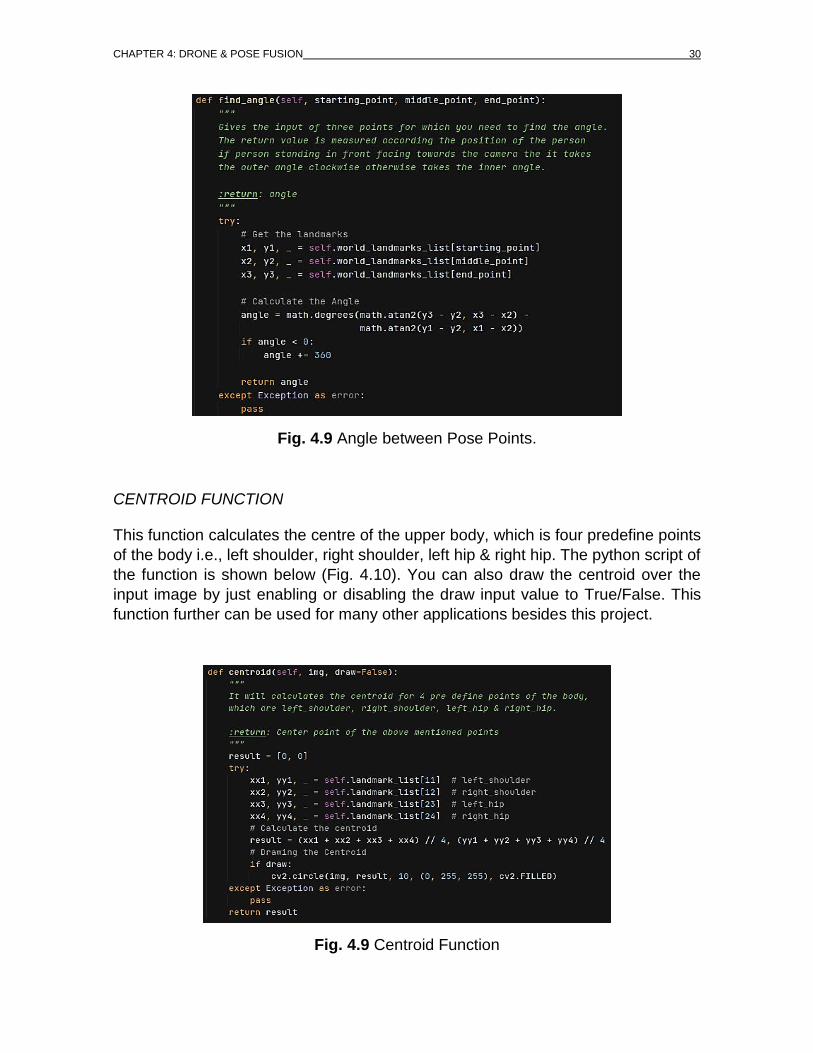
FIND ANGLE FUNCTION
This function uses the world coordinates to calculate the angle between any three
body landmarks and the returns value is measured according to the position of the
person; if the person standing in front facing towards the camera then it takes the
outer angle clockwise otherwise takes the inner angle. Function python script (Fig.
4.9).
CHAPTER 4: DRONE & POSE FUSION 30
Fig. 4.9 Angle between Pose Points.
CENTROID FUNCTION
This function calculates the centre of the upper body, which is four predefine points
of the body i.e., left shoulder, right shoulder, left hip & right hip. The python script of
the function is shown below (Fig. 4.10). You can also draw the centroid over the
input image by just enabling or disabling the draw input value to True/False. This
function further can be used for many other applications besides this project.
Fig. 4.9 Centroid Function

CHAPTER 4: DRONE & POSE FUSION 31
DISTANCE B/W TWO POINTS FUNCTION
This is a simple function that calculates the distance between two landmarks points
and the distance in centimetres (Fig. 4.11).
Fig. 4.11 Distance Function
ANGLE B/W TWO POINTS FUNCTION
This function calculates the angle between two points in which the endpoint can be
a landmark/body/pose point or it can be any manually defined point. This function
allows extending the capability of the function to calculate the angle and increase
the application pose class.
Fig. 4.12 Angle between Pose and World points
CHAPTER 4: DRONE & POSE FUSION 32
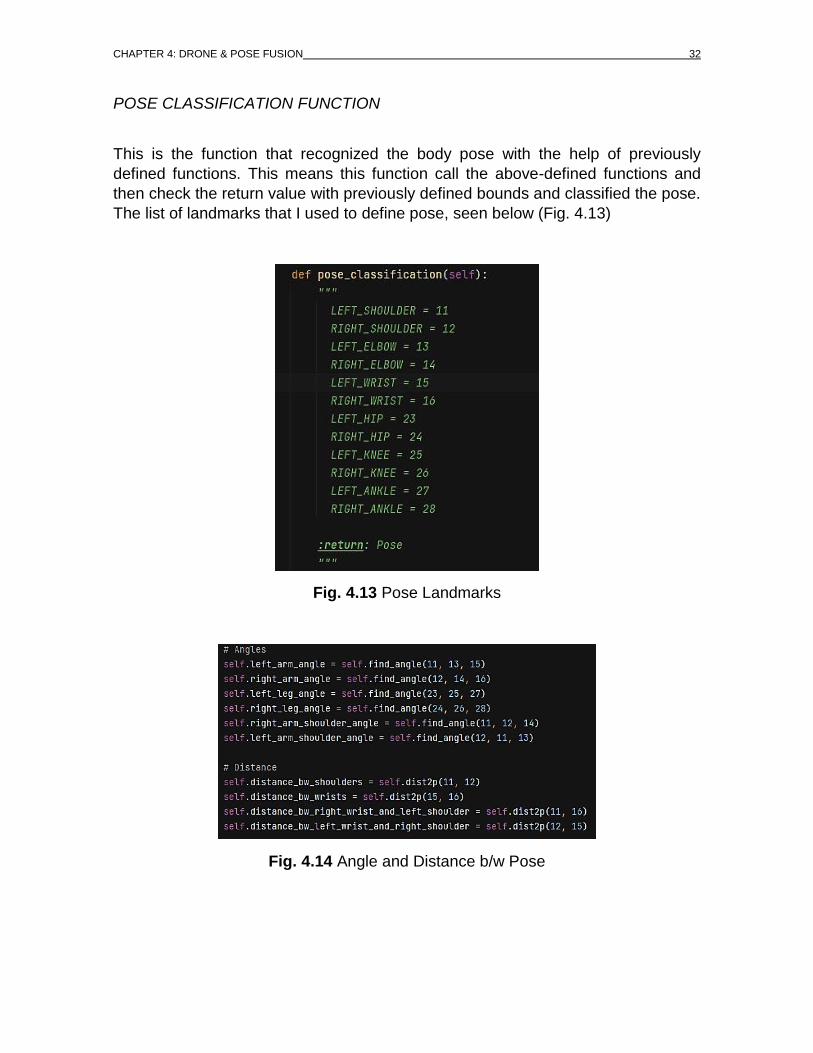
POSE CLASSIFICATION FUNCTION
This is the function that recognized the body pose with the help of previously
defined functions. This means this function call the above-defined functions and
then check the return value with previously defined bounds and classified the pose.
The list of landmarks that I used to define pose, seen below (Fig. 4.13)
Fig. 4.13 Pose Landmarks
Fig. 4.14 Angle and Distance b/w Pose

CHAPTER 4: DRONE & POSE FUSION 33
By using the previously defined function we calculated and define various
parameters, as shown above (Fig. 4.14). Now, by using values from these
variables
We can define various poses as shown below (Table 4.1)
Table 4.1 Poses
CHAPTER 4: DRONE & POSE FUSION 34
4.3. Implementation
In this section, we are going to talk about the merging of our both classes. So, for
merging both the Pose and Tello classes we are going to create a State Machine
program that consists of different state functions and the main program to control
all the processes of the state machine.
4.3.1 Introduction State Machine Diagram
This State machine diagram is typically used to explain our classes work. There
are different states, objects and functions in our classes that act and behave
differently depending on their current state. This state diagram will simply explain
how everything is working in the first place. So, this state machine consists of 7
states with few conditions as shown below (Fig. 4.16).

CHAPTER 4: DRONE & POSE FUSION 35
Fig. 4.15 State Machine
4.3.2 Explanation of State Machine
START
The “Start” state initiates the Tello takeoff command if the Tello system is
connected and enabled. Then move to the next state as shown below (Fig. 4.16).
Fig. 4.16 Start state

CHAPTER 4: DRONE & POSE FUSION 36
IDLE
The “Idle” state fetches the Tello sensor data and displays the output image.
Moreover, it also checks whether Tello is in a safe condition to fly or not by
checking its battery temperature and how much battery percentage is left, as
shown below (Fig. 4.17). If not then, its moves to the “Exit” state and initiate the
landing command for Tello otherwise it moves to the next state “Img_Process”.
Fig. 4.17 Idle state
IMAGE PROCESS
The “Img_Process” state is used to read the video input frame by frame, the input
video source can be streamed directly from a Tello cam or a webcam or
prerecorded video. If the Tello system enables it will automatically read the Tello
feed else the webcam or prerecorded video, and then it will proceed to the next
state as shown below (Fig. 4.18).

CHAPTER 4: DRONE & POSE FUSION 37
Fig. 4.18 Img_Process state
Now, we talk about the Pose Recognition and the Navigation States. These two
states are the most important state of the program, as they do most of the process
and work in the program. The code related to these two state functions is in Annex
B below.
POSE RECOGNITION
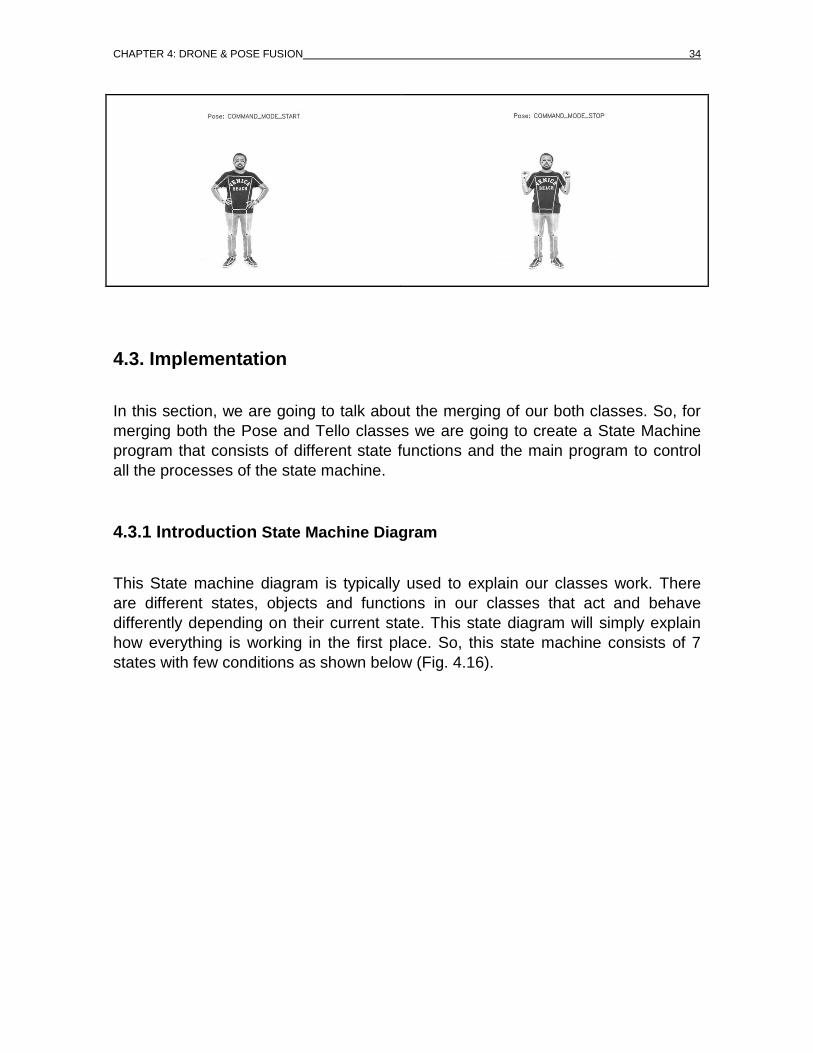
The “pose_recognition” state as it is referred to by name it recognized the pose of
the Human/Person. In this state function, two command modes, that helps to
navigate the drone, depending upon a mode.
The first mode is tracking mode, which is an auto mode. When this mode is
activated drone start tracking the person/human by maintaining a safe distance of
approx. 3.5 meters and its move forward, backward, left and right as the person
moves. It also manoeuvres forward, backward by the movement of the shoulders.
For example, if you rotate/move your shoulder in the X-axis then the drone move
forward and when your shoulder is parallel to the X-axis the drone goes to its
position back.
The second Mode is the Command mode. In mode you can control the drone
manually with the help of body gestures (as shown in Table 4.1), with different
gestures drone can do different manoeuvres like up, down, left, right, forward and
backward. You can also add more pose gestures according to your convenience.
CHAPTER 4: DRONE & POSE FUSION 38
NAVIGATION
The “navigation”, as you know from its name this state function is responsible for
the navigation of the drone in three dimensions space.
In this state function, we navigate the drone by calculating the PID for auto mode
and taking commands for manual mode. But, before that drone is raised directly up
to a certain height so that it can see or detect the whole body or person to
recognize the pose. If it does not detect any for 20 seconds it will automatically
land.
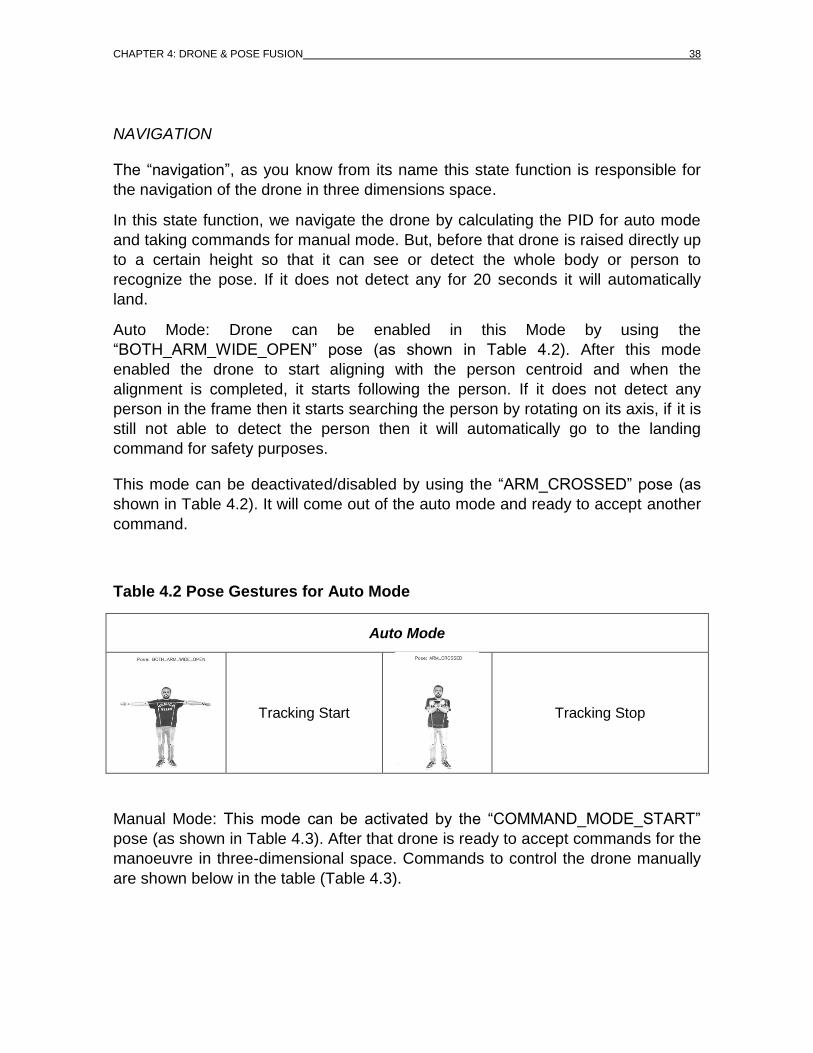
Auto Mode: Drone can be enabled in this Mode by using the
“BOTH_ARM_WIDE_OPEN” pose (as shown in Table 4.2). After this mode
enabled the drone to start aligning with the person centroid and when the
alignment is completed, it starts following the person. If it does not detect any
person in the frame then it starts searching the person by rotating on its axis, if it is
still not able to detect the person then it will automatically go to the landing
command for safety purposes.
This mode can be deactivated/disabled by using the “ARM_CROSSED” pose (as
shown in Table 4.2). It will come out of the auto mode and ready to accept another
command.
Table 4.2 Pose Gestures for Auto Mode
Auto Mode
Tracking Start
Tracking Stop
Manual Mode: This mode can be activated by the “COMMAND_MODE_START”
pose (as shown in Table 4.3). After that drone is ready to accept commands for the
manoeuvre in three-dimensional space. Commands to control the drone manually
are shown below in the table (Table 4.3).

CHAPTER 4: DRONE & POSE FUSION 39
Table 4.3 Different Pose Gestures Manual Mode
Manual Command Mode
Command Mode On
Command Mode Off Landing
Forward
Backwards
Right
Left
Up
Down
Stay at one position
EXIT
This state function is used to come out from the state function for safety purposes
and for landing the drone. This function is called several times during the
programing for safety purposes or to execute the landing command. After this
function, all function is terminated and STOP the code from executing further.

CHAPTER 4: DRONE & POSE FUSION 40
4.4. Main Application: Control the drone with Body Gestures
In this section, we want to continue with the progress made in the above sections,
and import everything step by step.
4.4.1 Material Required
The component is used to perform all the tasks or manoeuvres:
1 X Tello or Tello EDU
1 X Laptop
Wi-Fi Adapter or a Hotspot
4.4.2 Steps Required
1. Get the repository from Github.
i) By cloning for Ubuntu in Terminal (command line)
Syntex:
git clone {repository URL}
ii) By downloading the Zip file

CHAPTER 4: DRONE & POSE FUSION 41
2. Connect the laptop and the Drone to the same Wi-Fi Adapter or a Hotspot,
to perform this application as shown in the figure below (Fig. 4.19).
Fig. 4.19 Environmental Setup
3. Now check all the things are imported properly.
4. Now make the TELLO_SYSTEM_ENABLE = True, in the state.py to test the
real-time application.
OR
Keep it False and test the program before running with the webcam.
4.4.3 Run and Play
After setting up the setup, you can run the program and enjoy the main application of the Body Gestures controlling Drone. All the codes related to this project is available on GitHub, you can access it on the request and the link is below in the annexure.

CONCLUSIONS 42
CONCLUSIONS
The tests related to this project have been performed in an open environment and
a few are in a closed controlled environment, at different locations at the university
campus and Elarco Design laboratory. The machine/laptop/ Notebook is used for
this test is ASUS ROG STRIX, which equipped with a Ryzen processor (Ryzen 7
4800H, 8 core) and 16GB RAM, no GPU is used for the computing process, which
makes it more versatile and adaptable. Because a lot of the pose recognition
frameworks which are available in the market are mostly required a powerful
computer with GPU, but this framework can be used in low-end devices without
GPU power.
First, an investigation was carried out to view what were the other possible drones
available in the market which offers the same functionality as Tello and Tello EDU.
And, by doing that investigation it observed that there were a lot of other drones
present in the market. But Tello played a noticeable role in the field of education,
which is why it was decided to use that in this project along with that it also
provides some base for future developers who wanted to start programming with
the drone for fun and other applications.
Second, another research was carried out regarding the pose estimation, as we
already discussed in our Pose Detection chapter, where I mentioned the different
types of pose recognition models and ML frameworks available and can be used to
create a project, but I choose the one which is more versatility and required only
CPU.
In addition, I go through many content and paperwork which consists of controlling
a drone through body movements or gestures or pose. During the research, I found
a lot of scripts that can also control a drone through body movements, but these
scripts were more complicated and required a lot of processing power for both
CPU & GPU. Although, these scripts were provided me with the basic knowledge
for programming this project.
Third, my objective of this project is to make the script more versatile, easy and
adaptable, so that it can be used on any platform which is capable to run the
python script. In my project, I used Windows 11 OS along with PyCharm as a
Python IDE. The purpose of using PyCharm because it provides smart code
completion, code inspections, on-the-fly error highlighting and quick-fixes, along
with automated code refactoring and rich navigation capabilities and its good for
beginners using Windows OS instead of Linux OS or Mac OS as people are more
familiar with is OS which also motivates new coders to learn more. However, users
can use any other Python IDE and OS according to their convenience.
In the beginning, this project seems to be so simple and easy but as I make
progress and start working on the project to achieve my main application, I faced a

CONCLUSIONS 43
lot of errors and failures while testing the drone flight and the code. However, from
these mistakes and problems, I learned a lot of things and keep me motivated to
pursue further in this project.
In this project, I have also created a few test programs to test the functionality of
every function before applying them to the main application. These test codes can
help others to understand the programming topology and its works. The testing
codes can be used as building blocks for further developments in the application.
You can easily access these testing codes and test them. These codes contain
some basic manoeuvres of the Drone and the testing of Pose class along with
another miscellaneous test like camera working or not, test flight take-off and
landing, and testing other functions of the class.
Finally, this document can provide all the basic and advanced knowledge which
allow for future developers to develop more complicated applications without any
hustle and also save the time to do extensive research on the internet, since this
Pose class is new in the open-source world, so there are only a few
documentations present in this field as this Open Pose class still in the
development phase and people are contributing more and more, and anxious to
learn more in the same field.

ACRONYMS 44
ACRONYMS
GHUM /
GHUML Generative 3D Human Shape and Articulated Pose Models
API Application Programming Interface
SDK Software Development Kit
PCB Printed Circuit Board
LED Light Emitting Diode
EIRP Effective Isotropic Radiated Power
mph/MPH Miles Per Hour
kph/KPH Kilometre Per Hour
mAh Milliamp Hours
LiPo Lithium-Ion Polymer Battery
Wh Watt-hour
W Watt
HD High Definition
MP Mega Pixels
IR Infrared
ML Machine Learning
ROI Region of Interest
PCK Percent of Correct Keypoints
FPS Frame Per Second
GPU Graphics Processing Unit
IDE Integrated Development Environment
OS Operating Software
GB Gigabyte
RAM Random-access memory
REFERENCES 45
REFERENCES
[1] (2021) Tello-Python GitHub. [online] Available: https://github.com/Tushki-
007/tello_sdk.git
[2] DJITelloPy: DJI Tello drone python interface using the official Tello SDK.
Feel free to contribute! (github.com)
[3] (2018) MediaPipe GitHub. [online] Available: Pose - MediaPipe
(google.github.io)
[4] (2021) OpenCV website. [online] Available: https://opencv.org/
[5] (2021) Parrot website. [online] Available: https://www.parrot.com
[6] (2021) Crazyflie. [online] Available: https://www.bitcraze.io/
[7] (2021) Robolink website. [online] Available: https://www.robolink.com
[8] (2021) Flybrix website. [online] Available: https://flybrix.com
[9] (2021) Drobots website. [online] Available: https://drobotscompany.com/
[10] (2021) Campuse website. [online] Available: https://campuse.ro/
[11] (2021) DroneBlocks website. [online] Available:
https://www.droneblocks.io/
[12] (2021) Tello FPV [online] Available:
https://play.google.com/store/apps/details?id=com.volatello.tellofpv&hl=en
&gl=US
[13] (2021) SDK 2.0 User Guide. [online] Available: https://dl-
cdn.ryzerobotics.com/downloads/Tello/Tello%20SDK%202.0%20User%20
Guide.pdf
[14] (2021) Tello spec. [online] Available: Tello (ryzerobotics.com)
[15] (2021) Tello EDU spec. [online] Available: Página Oficial de Tello -
Shenzhen Ryze Technology Co., Ltd (ryzerobotics.com)
[16] (2021) Project Files at GitHub [online] Available: https://github.com/Tushki-
007/Controlling-Tello_drone-using-Pose-Master-s-Project-.git
[17] Metal performance shaders.
https://developer.apple.com/documentation/metalperformanceshaders.
[Online; accessed since April 19, 2019].

REFERENCES 46
[18] [1907.05047] BlazeFace: Sub-millisecond Neural Face Detection on
Mobile GPUs (arxiv.org) 12
[19] Sven Kreiss, Lorenzo Bertoni, and Alexandre Alahi. Pifpaf: Composite
fields for human pose estimation. In Proceedings of the IEEE Conference
on Computer Vision and Pattern Recognition, pages 11977–11986, 2019.
[20] Ke Sun, Bin Xiao, Dong Liu, and Jingdong Wang. Deep high-resolution
representation learning for human pose estimation. In Proceedings of the
IEEE Conference on Computer Vision and Pattern Recognition, pages
5693–5703, 2019.
[21] Alejandro Newell, Kaiyu Yang, and Jia Deng. Stacked hourglass networks
for human pose estimation. In European conference on computer vision,
pages 483–499. Springer, 2016.
Annexe A: Feature extraction network architecture 47
Annexe A: Feature extraction network architecture

Annexe B: GitHub References 48
Annexe B: GitHub References
https://github.com/geaxgx/tello-openpose
https://github.com/hanyazou/TelloPy
https://github.com/CMU-Perceptual-Computing-Lab/openpose
https://github.com/Ubotica/telloCV/
https://github.com/cvzone/cvzone
https://github.com/murtazahassan/Tello-Object-Tracking

Annexe C: Pose Class and its functions 49
Annexe C: Pose Class and its functions

Annexe C: Pose Class and its functions 50

Annexe C: Pose Class and its functions 51

Annexe D: State Class and its functions 52
Annexe D: State Class and its functions

Annexe D: State Class and its functions 53

Annexe D: State Class and its functions 54

Annexe D: State Class and its functions 55

Annexe D: State Class and its functions 56

Annexe E: Main functions 57
Annexe E: Main functions