Embed Size (px)
Citation preview

Using FrontPage 2002 to Create Forms
Academic Computing
Support
Information Technology Services Tennessee Technological University
September 2003
1. Introduction
Using FrontPage 2002 you can create simple web forms and retrieve the information via email or a file. More elaborate forms may require the use of additional methods (ASP, VB Script, etc.) and will not be covered in this class.
2. Opening FrontPage and Creating a New Web
• In the labs from the Start menu: select All Programs Microsoft Office XP Microsoft FrontPage.
• From the Task Pane, under New from template, select Web Site Templates.
• Under Web Sites, select One Page Web. • Type a location and name for your new web.
For example in the labs: U:\FormsWeb. • Click OK. • Note the message that FormsWeb is being created.
3. Creating your page
• Double-click on the file index.htm in the folder list to begin editing it. • Create a borderless table at the top with four rows and two columns. • From the menu, select Table Insert Table..
In the Insert Table dialog box:
♦ Set the number of Rows to 4 and Columns to 2 ♦ Set the width to 90 In percent. ♦ Set the Border size to 0. ♦ Click OK.
• Merge the top row and insert a horizontal line at 90% and purple. • Click in the left cell of the second row. • From the menu, select Insert Picture From File. • Click on the Select file on your computer icon. • Browse to locate the file. For this class, in the dropdown menu, select
Classfiles on Athena ITS FrontPage Forms Images j0078817.gif • Click OK.
Information Technology Services September 2003
Information Technology Services September 2003
FrontPage Forms Page 2
3. Creating your page (cont.)
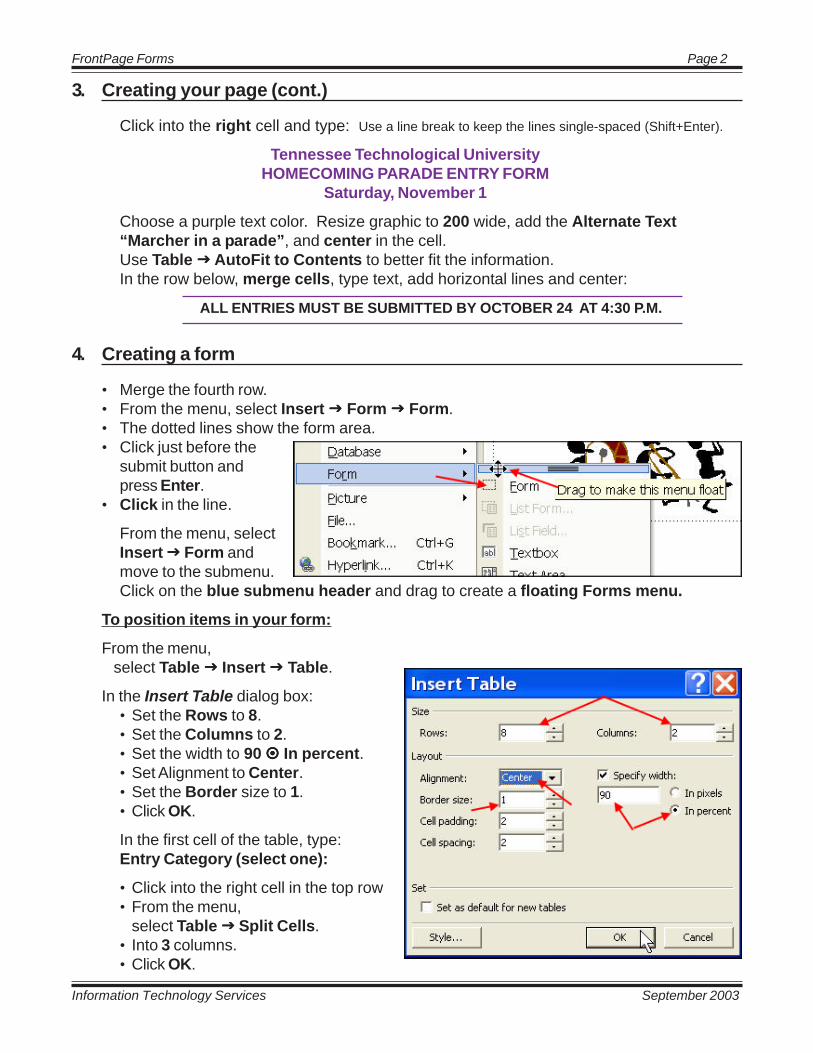
Click into the right cell and type: Use a line break to keep the lines single-spaced (Shift+Enter).
Tennessee Technological University HOMECOMING PARADE ENTRY FORM
Saturday, November 1
Choose a purple text color. Resize graphic to 200 wide, add the Alternate Text “Marcher in a parade”, and center in the cell. Use Table AutoFit to Contents to better fit the information. In the row below, merge cells, type text, add horizontal lines and center:
ALL ENTRIES MUST BE SUBMITTED BY OCTOBER 24 AT 4:30 P.M.
4. Creating a form
• Merge the fourth row. • From the menu, select Insert Form Form. • The dotted lines show the form area. • Click just before the
submit button and press Enter.
• Click in the line.
From the menu, select Insert Form and move to the submenu. Click on the blue submenu header and drag to create a floating Forms menu.
To position items in your form:
From the menu, select Table Insert Table.
In the Insert Table dialog box: • Set the Rows to 8. • Set the Columns to 2. • Set the width to 90 In percent. • Set Alignment to Center. • Set the Border size to 1. • Click OK.
In the first cell of the table, type: Entry Category (select one):
• Click into the right cell in the top row • From the menu,
select Table Split Cells. • Into 3 columns. • Click OK.
Information Technology Services September 2003
FrontPage Forms Page 3
5. Option Buttons
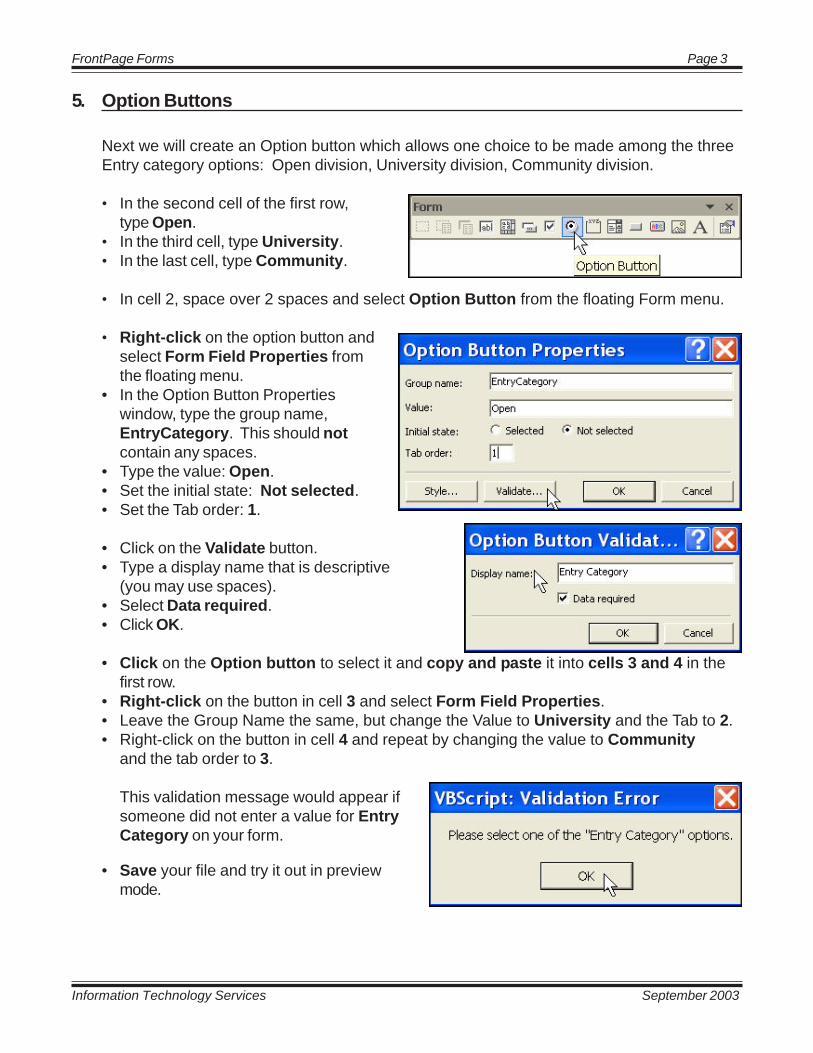
Next we will create an Option button which allows one choice to be made among the three Entry category options: Open division, University division, Community division.
• In the second cell of the first row, type Open.
• In the third cell, type University. • In the last cell, type Community.
• In cell 2, space over 2 spaces and select Option Button from the floating Form menu.
• Right-click on the option button and select Form Field Properties from the floating menu.
• In the Option Button Properties window, type the group name, EntryCategory. This should not contain any spaces.
• Type the value: Open. • Set the initial state: Not selected. • Set the Tab order: 1.
• Click on the Validate button. • Type a display name that is descriptive
(you may use spaces). • Select Data required. • Click OK.
• Click on the Option button to select it and copy and paste it into cells 3 and 4 in the first row.
• Right-click on the button in cell 3 and select Form Field Properties. • Leave the Group Name the same, but change the Value to University and the Tab to 2. • Right-click on the button in cell 4 and repeat by changing the value to Community
and the tab order to 3.
This validation message would appear if someone did not enter a value for Entry Category on your form.
• Save your file and try it out in preview mode.

Information Technology Services September 2003
FrontPage Forms Page 4
6. Text Box
• In the second row left cell, type: Organization’s Complete Name:
• In the second row right cell, select Textbox from the floating Form menu.
• Right-click on the text box and select Form Field Properties.
• In the Text Box Properties window, type the field name: OrgName.
• Set the Width of the field at 55. • Set the Tab order at 4.
• Note: If password field is set to yes, asterisks appear on the screen instead of the characters which are being typed. It only provides a mask at the screen and does not encrypt the information being provided in any way.
• Click on Validate.
• Type a Display Name which will appear when validation fails: Organization’s Name.
• Select Text as the Data type. • Set a minimum length to
ensure that something is entered in this field: 2.
• Set a maximum length to prevent misuse of your form: 55.
• Click OK. • Click OK.
You can resize a form field as needed:
• Click on the text field and use the handle on the right side to make the entry box smaller.
• Right-click on the field and select Form Field Properties from the floating menu. • Note that the Width in characters has decreased. This does not affect the maximum
length set for validation purposes. • Reset width to 55.
Information Technology Services September 2003
FrontPage Forms Page 5
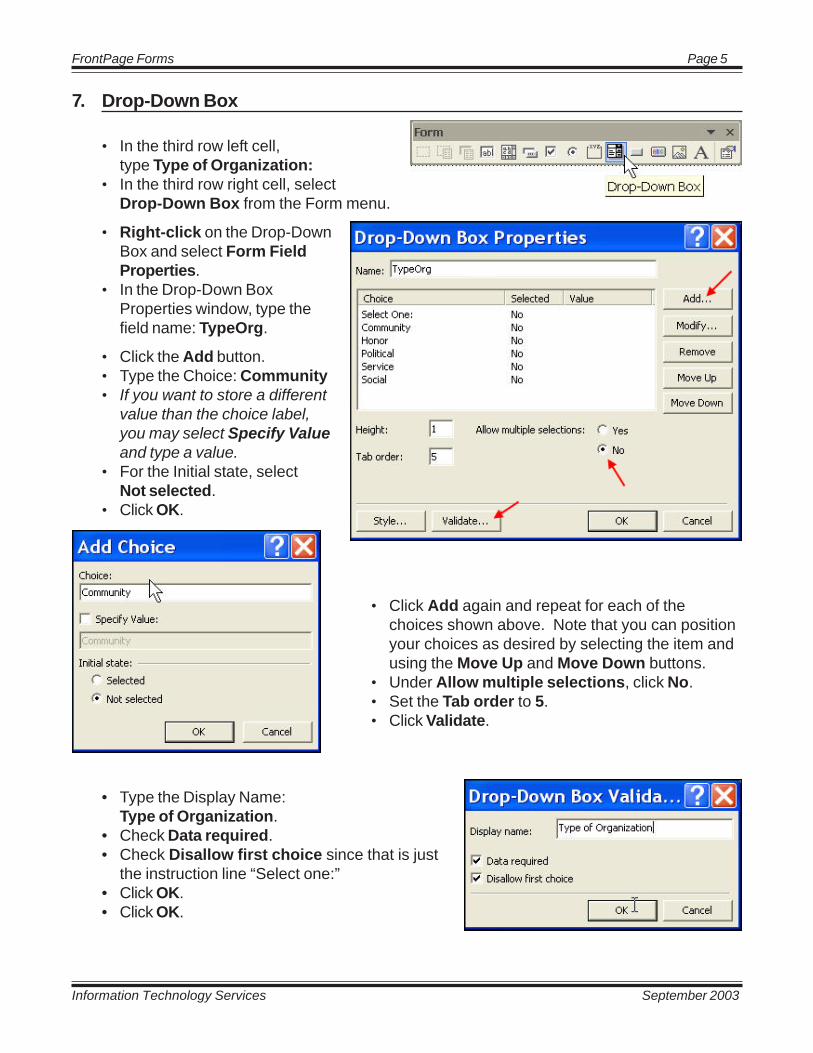
7. Drop-Down Box
• In the third row left cell, type Type of Organization:
• In the third row right cell, select Drop-Down Box from the Form menu.
• Right-click on the Drop-Down Box and select Form Field Properties.
• In the Drop-Down Box Properties window, type the field name: TypeOrg.
• Click the Add button. • Type the Choice: Community • If you want to store a different
value than the choice label, you may select Specify Value and type a value.
• For the Initial state, select Not selected.
• Click OK.
• Click Add again and repeat for each of the choices shown above. Note that you can position your choices as desired by selecting the item and using the Move Up and Move Down buttons.
• Under Allow multiple selections, click No. • Set the Tab order to 5. • Click Validate.
• Type the Display Name: Type of Organization.
• Check Data required. • Check Disallow first choice since that is just
the instruction line “Select one:” • Click OK. • Click OK.

Information Technology Services September 2003
FrontPage Forms Page 6
8. Add Text Boxes
• In the next rows, in the left column, type Person Completing Information: Address or TTU Box No.: Phone: Complete Email Address:
• In the corresponding right cell, select One-Line Text Box from the floating Form menu. • Use the field names: Name, Address, Phone, Email. • Set the field widths and tab order. • Set up validation for each.
9. Text Area Box
• In the last row left cell, type Description of Entry:
• In the right cell, select Text Area from the floating Form menu.
• Right-click on the scrolling text box and select Form Field Properties from the floating menu.
• In the TextArea Box Properties window, type the field name: Description.
• Set the width to 55 characters. • Set the number of lines to 5. • Set the tab order to 10.
• Click on Validate. • Set a display name:
Description of Parade Entry. • Set a min and max entry length. • Click OK. • Click OK.
Browser sometimes differ in how they handle form fields. In the case of scrolling text boxes, earlier versions of Netscape (i.e. 4.78) will not wrap the text in the box unless you make a small change to the HTML.
• Click on the scrolling text box, then click on the HTML tab to edit the code. • Add the word wrap in the textarea tag: <textarea wrap>. • Return to the Normal view. • Click on the Preview tab and view your form, note that some elements will not be active
until your form is published. • If needed return to Normal view and autofit the table, center it, add purple borders.

Information Technology Services September 2003
FrontPage Forms Page 7
10. Setting Form Properties
• Right click in your form and select Form Properties from the floating menu.
• By default your form information is sent to a file in the _private folder on your web site.
• You can also add the option to receive the information via email.
• Type in your email address. • Type in a Form name.
• Click on the Options button.
• Under the File Results tab, select the format in which to save your data: Text database using comma as a separator.
• Under the E-mail Results tab, select the email format.
• Type a subject line. • Type a reply-to line.
(Note this could be a field name, such as Email, if you need to reply to the person who submitted the information.)
• Click OK. • Click OK.

Information Technology Services September 2003
FrontPage Forms Page 8
11. Publishing Your Form
• Save the changes to your file.
• From the file menu, select File Publish Web.
• For this class use the site: http://www.tntech.edu/acs01 (through acs15)
• Click OK.
In the connection window:
For this class, type ttu\trainingxx as given to you by the instructor and password.
• Click OK.
• View your web site in the browser.
• Enter some data and submit it. • Note that FrontPage automatically
creates a confirmation page for you.
• Open another browser window and login to your email account using Webmail.
• Check for messages received.

Information Technology Services September 2003
FrontPage Forms Page 9
12. Accessing Your Data
• Return to FrontPage and close your local copy of the web.
• From the menu, select File Open Web and type the URL of your site. • Click Open. • Give your username and password for this class.
• Look in the folder _private and click on the file form_results.csv to view the data submitted.
• Note that Excel is automatically opened. • Save the file to your U: drive changing the format to an Excel workbook.
Remember that if you republish all pages in your site, the data in the form_results.txt file will be erased. Decide how you will keep track of new data coming in!
Tip: To view hidden folders in your web site, from the menu, select Tools Web Settings, Advanced tab, and check Show hidden files and folders.

Information Technology Services September 2003
FrontPage Forms Page 10
13. Creating Your Own Confirmation Page
• Open the local copy of your web site from the U: drive. • Click on the new page icon in the toolbar. • Save the page as ConfirmPage.htm.
and change the page title to Confirmation. • Create a page similar to that shown here. Use the commands which follow to insert the
field names. Do not type them directly. • You must know the names you assigned to the fields in your form. To check a field
name: return to your form, right-click on a field and select Properties, note the Name.
Thank you [Name] for your TTU Homecoming Parade Application
for the [TypeOrg] Organization: [OrgName]
See you in the parade!
Return to Form
• To insert form fields, from the menu, select Insert Web Component. • Select Advanced Controls and choose Confirmation Field. • Click Finish.
• Type in the form field name exactly.
• Click OK.
IMPORTANT: These are webbots and cannot be typed in simply as they appear.

Information Technology Services September 2003
FrontPage Forms Page 11
13. Creating Your Own Confirmation Page (cont.)
To set this page as the confirmation page:
• Right-click in your form and select Form Properties. • Click on Options. • Under the Confirmation Page tab, type the name of your page or browse to it. • Click OK. • Click OK.
• Save your files. • Publish to your web site.
• Open the browser to your site and refresh if needed. • Submit some data. • Note the new confirmation page which is displayed. • Check your email for another message.

Information Technology Services September 2003
FrontPage Forms Page 12
14. Getting Help
To learn more about HTML and publishing on the world wide web, check out some of these online resources available.
• TTU Guidelines can be found at: http://www.tntech.edu/publicaffairs/web_publish/style_guide2.html
• The home page of the World Wide Web Consortium (W3C®) which oversees the development of Hypertext Markup Language and other topics relating to the web is:
http://www.w3.org/
• You will also want to validate your page to check for any errors in coding by submitting each page's URL to the validator program at the W3C:
http://validator.w3.org/
• Information on making web pages more accessible is also available at the W3C site: http://www.w3.org/WAI/
• To request a web directory for a department, organization, or for instructional materials, please submit an online form available from the ITS Home PageITS Home Page Forms under Web Directories http://www.tntech.edu/its/pubs/forms/ http://www.tntech.edu/its/pubs/forms/
• To learn more about Microsoft FrontPage, from the menu select Help Microsoft FrontPage Help