Embed Size (px)
Citation preview

Using Kiwi to Create Customized PoS Images
Cleber Paiva de Souza / Gabriel Cavalcante
{cleber,gabriel}@ssys.com.br
S-SYS Systems and Solutions

2
S-SYS and SUSE
• S-SYS officially born
Jan/2014
• SUSE partner since
beginning
• Formed by professionals
with experience in SUSE
products, Linux in
general, training and
software development
• Acting together with
SUSE engineers in pre-
sales and project delivery

Scenario
4
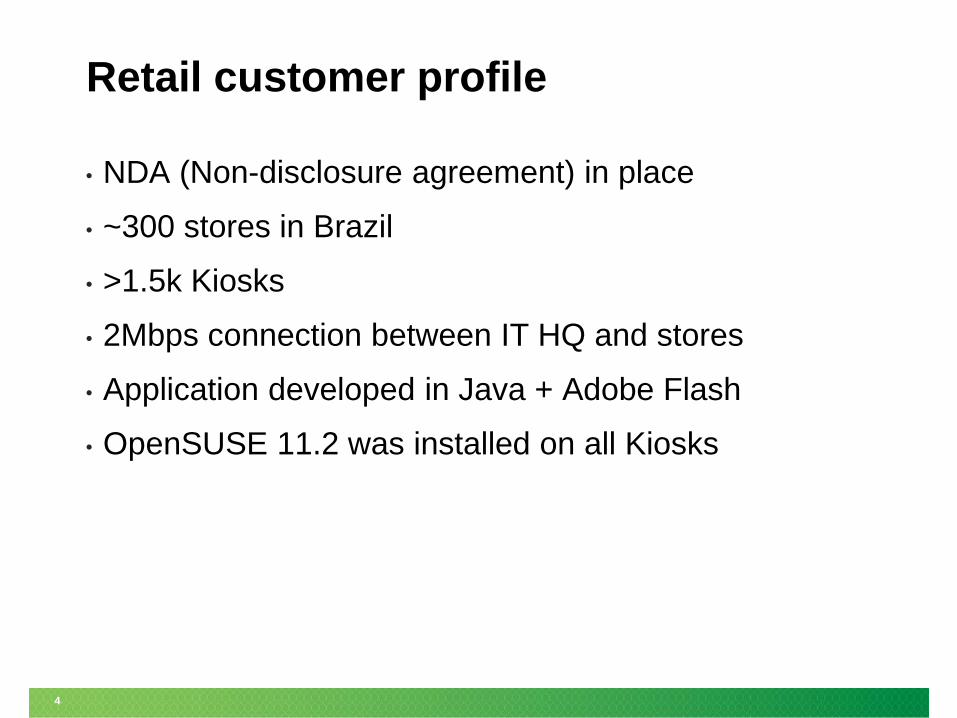
Retail customer profile
• NDA (Non-disclosure agreement) in place
• ~300 stores in Brazil
• >1.5k Kiosks
• 2Mbps connection between IT HQ and stores
• Application developed in Java + Adobe Flash
• OpenSUSE 11.2 was installed on all Kiosks

5
Kiosks
Manufactures:• IBM• Toshiba• Itautec• OKI

6
Brazil size

7
Kiosk hardwares
• Composed of old (>5 years) and new hardware.
– VIA C7-D Processor 2000MHz, 384 MB RAM
• Wifi USB dongle diversity, many unsupported on Suse
Linux 11 by default.
• PinPads
• Barcode scanners
• Printers
• Touchscreen displays

8
Daily problems
• Infeasible to keep one IT staff at each store.
• New kiosk setup requires following a 12 pages manual by store manager with many IFs.
• Store manager should look at the hardware and detect the device combination available.
• A USB keyboard is required to perform installation.
• More steps to configure the kiosk and deploy application.
• Kiosk passwords are written on manual.
• Constant file system corruption. There is only a power on/off switch key.

Plan

10
Improvement plan
• Migrate from OpenSUSE 10.2 to SLES 11 SP4 as the
operating system base.
• Reduce image size (JeOS concept).
• Reduce distribution complexity (number of services,
lighter window manager etc).
• Support legacy hardware.
• Detect and apply changes in the set of supported
hardwares.
• Develop a configuration utility to help non-IT staff in
the deployment process at the store.

11
Desired Process

Solution

13
Kiwi
• Version 7.
• Image build tool
– Command line tool.
– Multiple formats generation (iso, img, oem etc).
– Use configuration files to guide the generation.
– Very flexible workflow.
– Possible to use standard and custom packages.
– Enables the use of a root directory template.

14
Kiwi usage
config.xml
*.rpm
/ template

15
Kiwi – 2-step Image Creation Process
• Create target root directory.
• Install packages.
• Apply the overlay tree.
• Apply archives.
• Execute user defined config.sh script.
• Manage the new root tree.
• Extra:
– Execute user defined images.sh script.
– Create requested image type (Live, CD, DVD, USB stick, Xen,
KVM, Amazon etc).

16
Migration process
• On kiwi migrate from OpenSUSE to SLES 11 required
only setting:
– boot="oemboot/suse-SLES11"
• Required SLES 11 SP4 32 bits image due to legacy
applications.
• Cleanup image:
– Remove unused packages
– Disable unnecessary services
– Remove documentation files
– Remove info and man page files
– Activate and configure essential services (NTP, SSH etc)
17
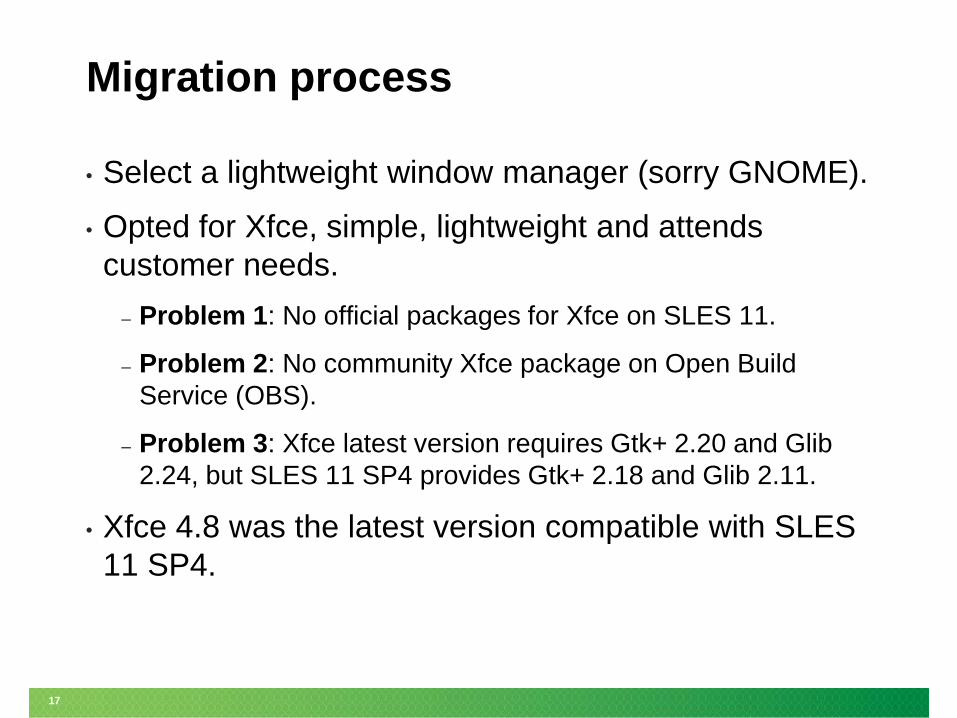
Migration process
• Select a lightweight window manager (sorry GNOME).
• Opted for Xfce, simple, lightweight and attends
customer needs.
– Problem 1: No official packages for Xfce on SLES 11.
– Problem 2: No community Xfce package on Open Build
Service (OBS).
– Problem 3: Xfce latest version requires Gtk+ 2.20 and Glib
2.24, but SLES 11 SP4 provides Gtk+ 2.18 and Glib 2.11.
• Xfce 4.8 was the latest version compatible with SLES
11 SP4.

18
XFCE
• After 3 days working on OpenSUSE RPMs:
– Compiling
– Minor changes on code
– Solving libraries conflicts
• Xfce4 RPMs for Suse 11 SP4 (32 bits only):
– http://www.ssys.com.br/susecon/cas20057
• Warning: Packages deployed with OpenSUSE
trademarks and logomarks.
• Apply customizations for Xfce in /etc/xdg/xfce4
(window manager, session, panel, desktop,
background etc).

19
Wireless
• Suse Kernel support a wide range of wifi devices
– USB and PCI
• However the devices variety keeps increasing. Probably hard to test all models for official releases.
– Usually kiosk assemblers ship cheap wifi devices.
– In our case, 3 out of 4 kiosk wifi devices were not supported by default SuSE kernel driver modules.
– We compiled drivers from manufacturers and from backports.
– To achieve this, we installed a preliminary image version into each kiosk to have a complete compilation environment.
– We shipped all compiled drivers and firmwares in the final image.

20
Touchscreen display
• Each kiosk have a different touchscreen display, each one
with different ways for calibration.
• On EloGraphics touchscreen serial devices, touchcal
calibration utility was able to configure the device correctly.
New to SLES 11 SP4.
• On touchscreen USB devices, it was necessary to load
”usbhid” module to emulate touchscreen as a input device.
• On another touchscreen USB, it was necessary to install
and run a service to control the device.

21
Rules to create /dev shortcuts
• The kiosk application uses devices directly from /dev
for:
– Barcode scanner
– Printer
– Pinpad
• Kiosks had many variations of this set.
• Devices were mapped in udev to provide meaningful
devices:
– /dev/BScanner
– /dev/Printer
– /dev/Ppad

22
Rules to create /dev shortcuts
• For USB devices we could create udev rules:
SUBSYSTEM=="usb",SUBSYSTEMS=="usb",
ATTR{idVendor}=="0dd4", ATTR{idProduct}=="015d",
SYMLINK+="Printer” ,GROUP="users", MODE="0660”
• Serial devices are a little bit harder, but the kiosk manufacturer ships, for example, serial printers always in the same port (/dev/ttyS0, /dev/ttyS1 etc)
• Sometimes manufacters provide tools for testing communication with serial devices.
• Sometimes no, so we try on our own (pyserial).
• Our setup detect the hardware model and hardcode serial device path on application configuration file.

23
Using configuration file templates
• Preparing application
• Devices configuration
• Networking configuration (wireless)
• Display configuration
• Templates for store application
– Store number
– Kiosk number
– Kiosk device configuration to application

24
Using configuration Templates
• atm.printerPortType=usb
atm.printerModel=VKP80II
atm.printerFont=Courier 12 Pitch
atm.printerFontSize=19
scope.modo=2
scope.empresa={{{COMPANY_NAME}}
# four digit stored id
scope.filial={{{STORE_ID}}}
# three digit kiosk id
scope.pdv={{{KIOSK_ID}}}
• scope.dummyMode=false
25
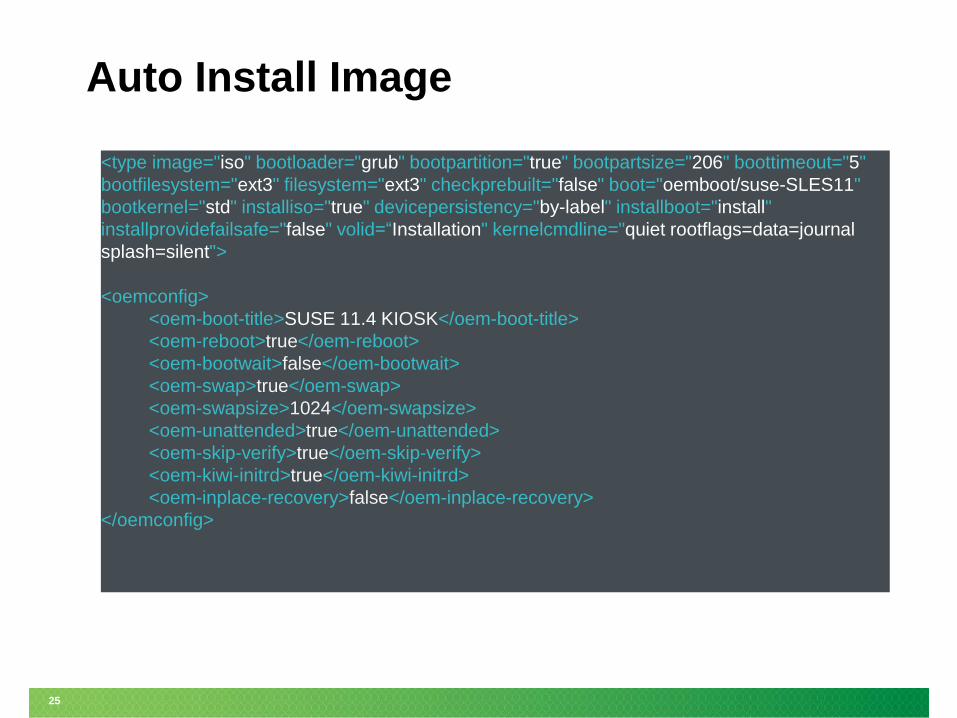
Auto Install Image
<type image="iso" bootloader="grub" bootpartition="true" bootpartsize="206" boottimeout="5"
bootfilesystem="ext3" filesystem="ext3" checkprebuilt="false" boot="oemboot/suse-SLES11"
bootkernel="std" installiso="true" devicepersistency="by-label" installboot="install"
installprovidefailsafe="false" volid=“Installation" kernelcmdline="quiet rootflags=data=journal
splash=silent">
<oemconfig>
<oem-boot-title>SUSE 11.4 KIOSK</oem-boot-title>
<oem-reboot>true</oem-reboot>
<oem-bootwait>false</oem-bootwait>
<oem-swap>true</oem-swap>
<oem-swapsize>1024</oem-swapsize>
<oem-unattended>true</oem-unattended>
<oem-skip-verify>true</oem-skip-verify>
<oem-kiwi-initrd>true</oem-kiwi-initrd>
<oem-inplace-recovery>false</oem-inplace-recovery>
</oemconfig>

26
Creating first boot configuration
• The image is decompressed to the system, with all the templates.
• Template files are filled with store and kiosk information.
• Solution:
– Build a configuration utility that ask some questions to the store manager.
– Minimal information required:
– store and kiosk id.
– kiosk model and it devices (if we are not able to detect it automatically).
– WIFI information.
– *We could do better if network infrastructure helped.

27
Configuration Utility
• Python using pydialog
PROBLEMKIOSK DOESN’T HAVE KBD!!!

28
Add a Virtual KBD and lock windows
• Create a autologin setup user in /etc/inittab.
• Remove all startup code of Xfce.
• Add lines to Xfce xinitrc setup startup:
– /usr/bin/xterm -geometry 142x30+0+0 -uc +l -title "Setup Kiosk"
/usr/bin/setup &
– /usr/bin/xvkbd -compact -geometry 800x150+0-25 -secure -no-repeat
-no-functionkey -window "Setup Company" &

29
Configuring kiosk
• Simple but useful configuration screen:

30
Final reboot
• After the configuration process, the system is ready to
a final reboot.
• Setup switches default user to application user.
• On application user login some remediation are still
necessary:
– echo "079b 0028" > /sys/bus/usb-
serial/drivers/cp210x/new_id
• Start Xfce:
– nohup startxfce4 >/dev/null 2>&1
• Run kiosk application using Xfce autostart.

31
Grub
• By default kiwi add entry to boot from local hard disk:
– Set: bootkernel="std”
• By default kiwi sets --disk-start-sector to 2048.
Does not work on some old hardware:
– Set: --disk-start-sector 32
• Alternatively use syslinux:
– Set: bootloader="grub”
– /boot must be in FAT32.
– No GFX boot menu.
• rootflags=data=journal
32
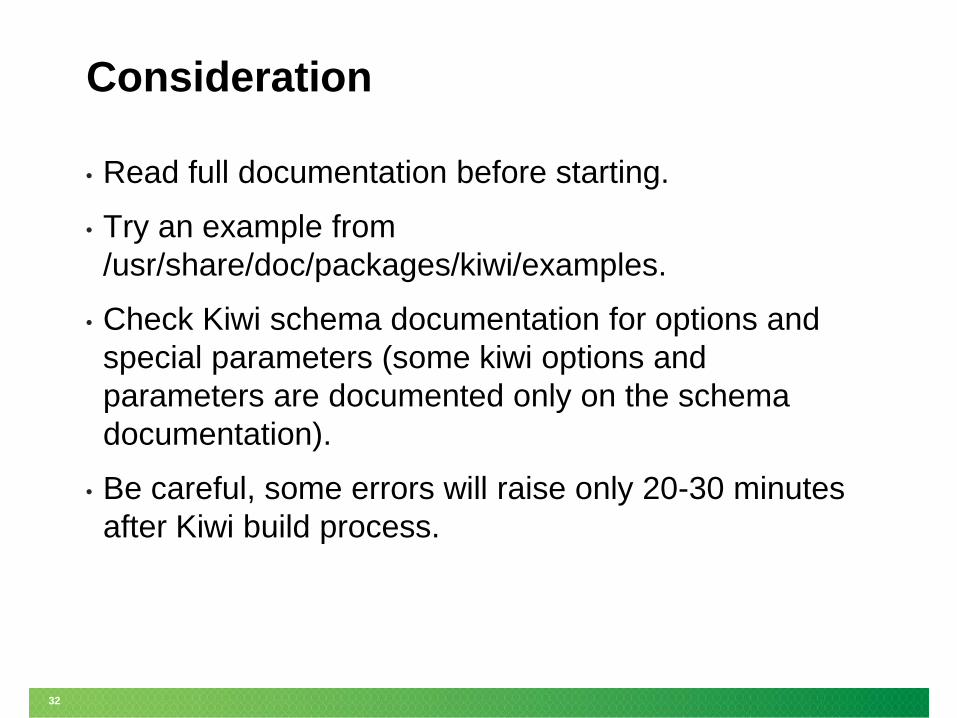
Consideration
• Read full documentation before starting.
• Try an example from
/usr/share/doc/packages/kiwi/examples.
• Check Kiwi schema documentation for options and
special parameters (some kiwi options and
parameters are documented only on the schema
documentation).
• Be careful, some errors will raise only 20-30 minutes
after Kiwi build process.

Can we do more?

34
Possibilities
• Centralize frequent builds and dispatch new images
with PXE in each store (for non-wireless computers)
• Self deploy environments
• Images for store server
• Insert pre-configured services in the image:
– Monitoring
– Configuration Management
– Authentication
– Auditing
– etc

Drawing the process in
Suse Studio Online

36
Select Default Software

37
Upload a zip with custom RPMs
38
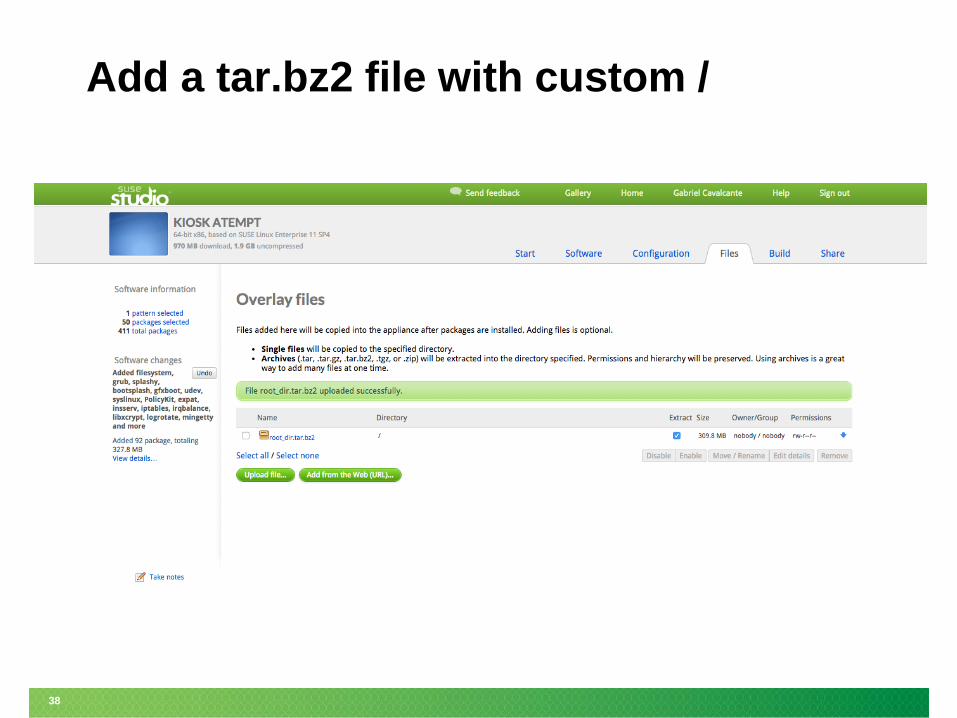
Add a tar.bz2 file with custom /

39
Add custom RPMs

40
Adjust startup parameters (post scripts)
41
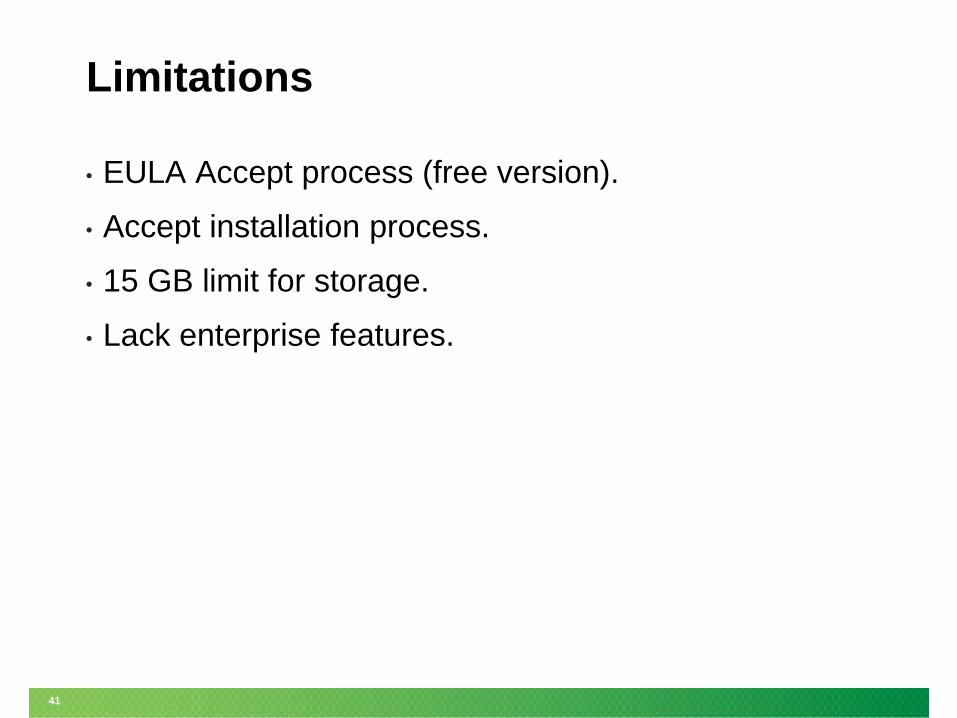
Limitations
• EULA Accept process (free version).
• Accept installation process.
• 15 GB limit for storage.
• Lack enterprise features.

Suse Studio Onsite

43
Working with Suse Studio Onsite

44
Suse Studio Onsite
• Same options as Suse Studio Online.
• Setup internal servers infrastructure for schedulers,
queues, repositories etc.
• Without restrictions imposed by Suse Studio Online.

45
Suse Studio Onsite Advantages
• More build format available.
• Import of kiwi template file available (experimental
feature on Suse Studio Online).
• Update appliance using SUSE Lifecycle Management
Server (SLMS).
• Build images for System Z (additional license
required).
• Suse Manager integration.
• Suse Cloud integration.

46
References
• http://docs.xfce.org/xfce/building
• https://doc.opensuse.org/projects/kiwi/doc/
• https://doc.opensuse.org/projects/kiwi/schema-doc/

47
Thank you.
Going further by breaking things
www.ssys.com.br


49
+49 911 740 53 0 (Worldwide)www.suse.com
Corporate Headquarters
Maxfeldstrasse 590409 NurembergGermany
Join us on:www.opensuse.org

Unpublished Work of SUSE LLC. All Rights Reserved.
This work is an unpublished work and contains confidential, proprietary, and trade secret information of SUSE LLC.
Access to this work is restricted to SUSE employees who have a need to know to perform tasks within the scope of
their assignments. No part of this work may be practiced, performed, copied, distributed, revised, modified, translated,
abridged, condensed, expanded, collected, or adapted without the prior written consent of SUSE.
Any use or exploitation of this work without authorization could subject the perpetrator to criminal and civil liability.
General Disclaimer
This document is not to be construed as a promise by any participating company to develop, deliver, or market a
product. It is not a commitment to deliver any material, code, or functionality, and should not be relied upon in making
purchasing decisions. SUSE makes no representations or warranties with respect to the contents of this document,
and specifically disclaims any express or implied warranties of merchantability or fitness for any particular purpose.
The development, release, and timing of features or functionality described for SUSE products remains at the sole
discretion of SUSE. Further, SUSE reserves the right to revise this document and to make changes to its content, at
any time, without obligation to notify any person or entity of such revisions or changes. All SUSE marks referenced in
this presentation are trademarks or registered trademarks of Novell, Inc. in the United States and other countries. All
third-party trademarks are the property of their respective owners.