Embed Size (px)
Citation preview
1
Using MS-3 Editor/LibrarianThis document explains basic operation of MS-3 Editor/Librarian (subsequently referred to as “EDITOR”).
Getting Ready to Use EDITOR
Important terms in EDITOR
LibraryThis is a storage area inside EDITOR.Patches that you back up from the MS-3 are saved in the library.
LivesetA liveset is a group of multiple patches.Patches that you back up from EDITOR are grouped as a liveset and saved in the library inside EDITOR.You can also collect your favorite patches to create an original liveset.
Installing the USB DriverBefore you use EDITOR, the appropriate USB driver for the product you’re using must be installed on your computer.
1. From the product support page, download the MS-3 Driver.To obtain the latest USB driver, access the following URL, and download and install the appropriate driver for the product you’re using.
https://www.boss.info/support/
2. Double-click the downloaded MS-3 Driver.Installation begins.Proceed with the installation as directed by the installation screens.When the screen indicates “Installation has been completed.” click the [Close] button.The MS-3 Driver has been installed on your computer.
Installing EDITORMEMO
Before you install EDITOR, the USB driver must be installed in your computer as described in “Installing the USB Driver” (p. 1).
Windows users
1. Download “MS-3 Editor/Librarian” from the product support page.
2. Double-click the downloaded file to decompress it.
3. Inside the folder created by decompressing the file, double-click “MS-3 Editor/Librarian.exe.”Installation begins.Proceed with installation as directed by the installation screens.When the screen indicates “Installation has been completed.” click the [Close] button.
Mac OS users
1. Download “MS-3 Editor/Librarian” from the product support page.
2. Double-click the downloaded file to decompress it.
3. Double-click the decompressed file.A “MS-3 Editor/Librarian” icon and “Applications folder” icon appear.
4. Drag and drop the “MS-3 Editor/Librarian” icon onto the “Applications folder” icon.MS-3 Editor/Librarian is added to the applications.Close the folder that you opened in step 3.
Copyright © 2017 ROLAND CORPORATION 01
Using MS-3 Editor/Librarian
2
Starting EDITOR1. Use a USB cable to connect the MS-3 to your computer, and
then turn on the power of the MS-3.
MEMO
You can edit livesets even if the MS-3 is not connected to your computer via a USB cable.However, you can’t save the result of editing a patch. In order to save the edited patch, you’ll need to be connected to your computer.
2. Double-click the EDITOR shortcut icon.
The first time you start up, the dialog box “Choose a device connect with.” appears.
MEMO
On the second and subsequent startups, the device is selected automatically.
Mac OS users
From the Finder, in the application folder, double-click [MS-3 Editor/Librarian].
3. Choose “MS-3,” and click the [OK] button.
EDITOR starts.
MEMO
Since data will be loaded from the MS-3, it may take some time until you can use EDITOR.
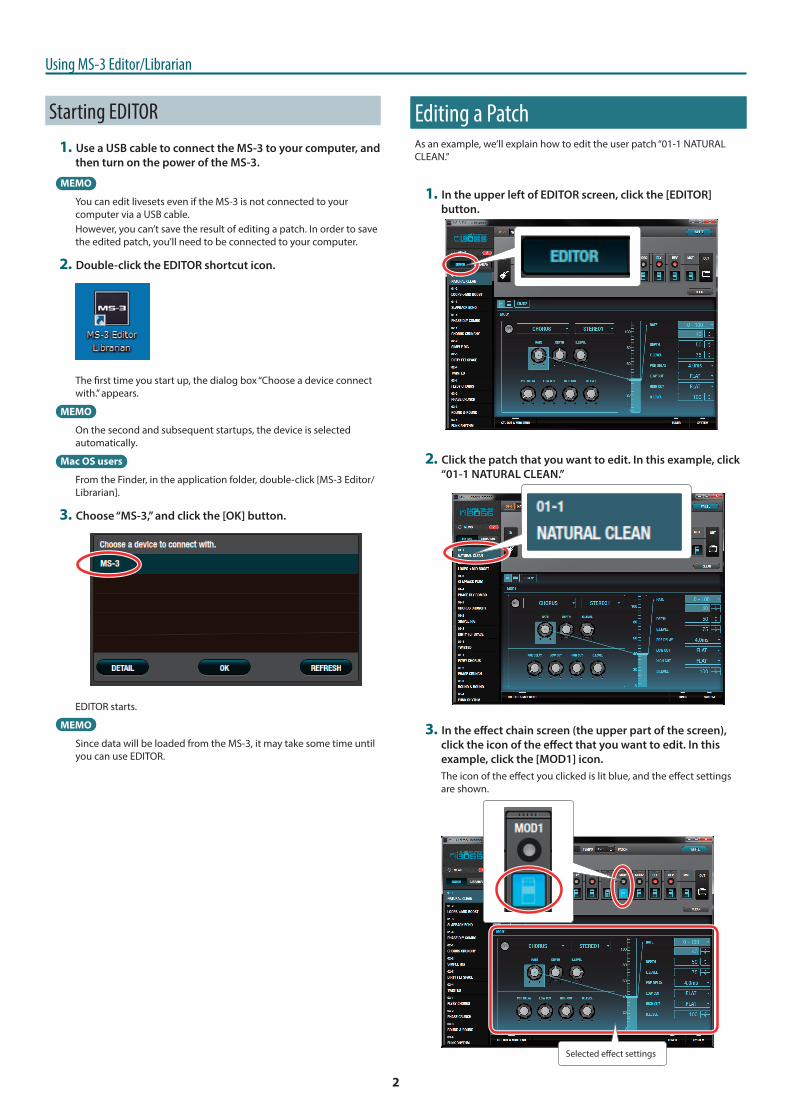
Editing a PatchAs an example, we’ll explain how to edit the user patch “01-1 NATURAL CLEAN.”
1. In the upper left of EDITOR screen, click the [EDITOR] button.
2. Click the patch that you want to edit. In this example, click “01-1 NATURAL CLEAN.”
3. In the effect chain screen (the upper part of the screen), click the icon of the effect that you want to edit. In this example, click the [MOD1] icon.The icon of the effect you clicked is lit blue, and the effect settings are shown.
Selected effect settings
Using MS-3 Editor/Librarian
3
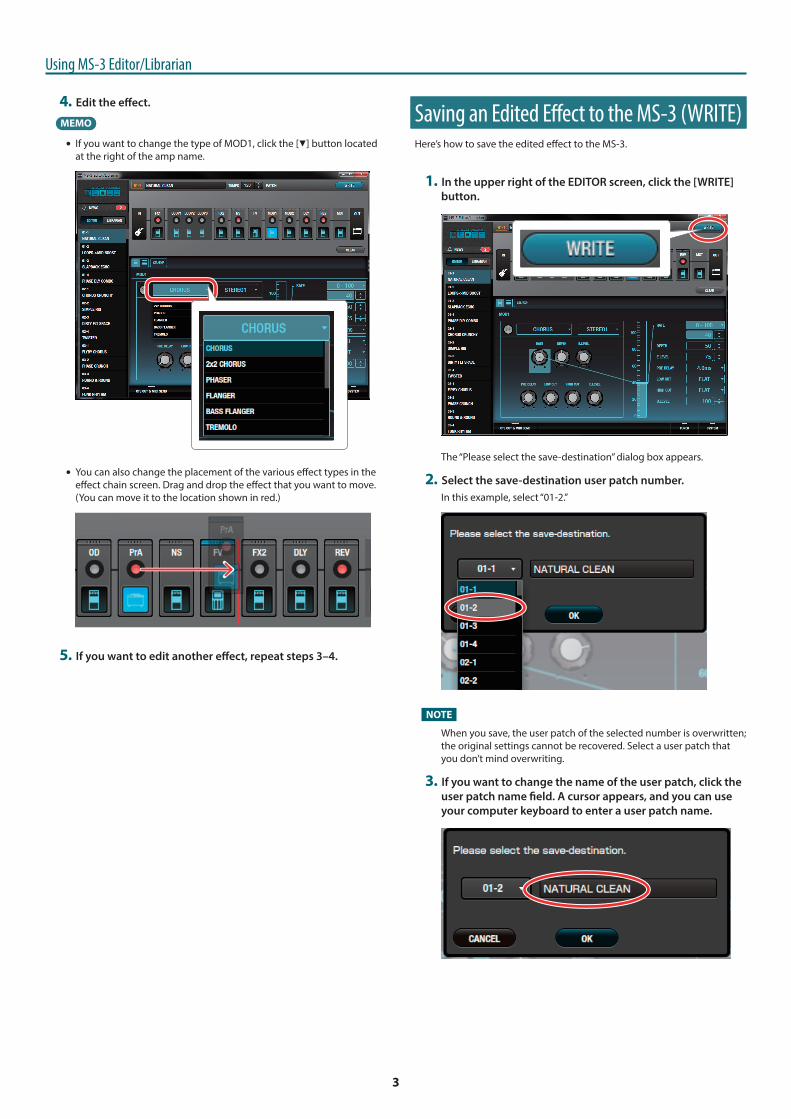
4. Edit the effect.
MEMO
5 If you want to change the type of MOD1, click the [I] button located at the right of the amp name.
5 You can also change the placement of the various effect types in the effect chain screen. Drag and drop the effect that you want to move. (You can move it to the location shown in red.)
5. If you want to edit another effect, repeat steps 3–4.
Saving an Edited Effect to the MS-3 (WRITE)Here’s how to save the edited effect to the MS-3.
1. In the upper right of the EDITOR screen, click the [WRITE] button.
The “Please select the save-destination” dialog box appears.
2. Select the save-destination user patch number.In this example, select “01-2.”
NOTE
When you save, the user patch of the selected number is overwritten; the original settings cannot be recovered. Select a user patch that you don’t mind overwriting.
3. If you want to change the name of the user patch, click the user patch name field. A cursor appears, and you can use your computer keyboard to enter a user patch name.
Using MS-3 Editor/Librarian
4
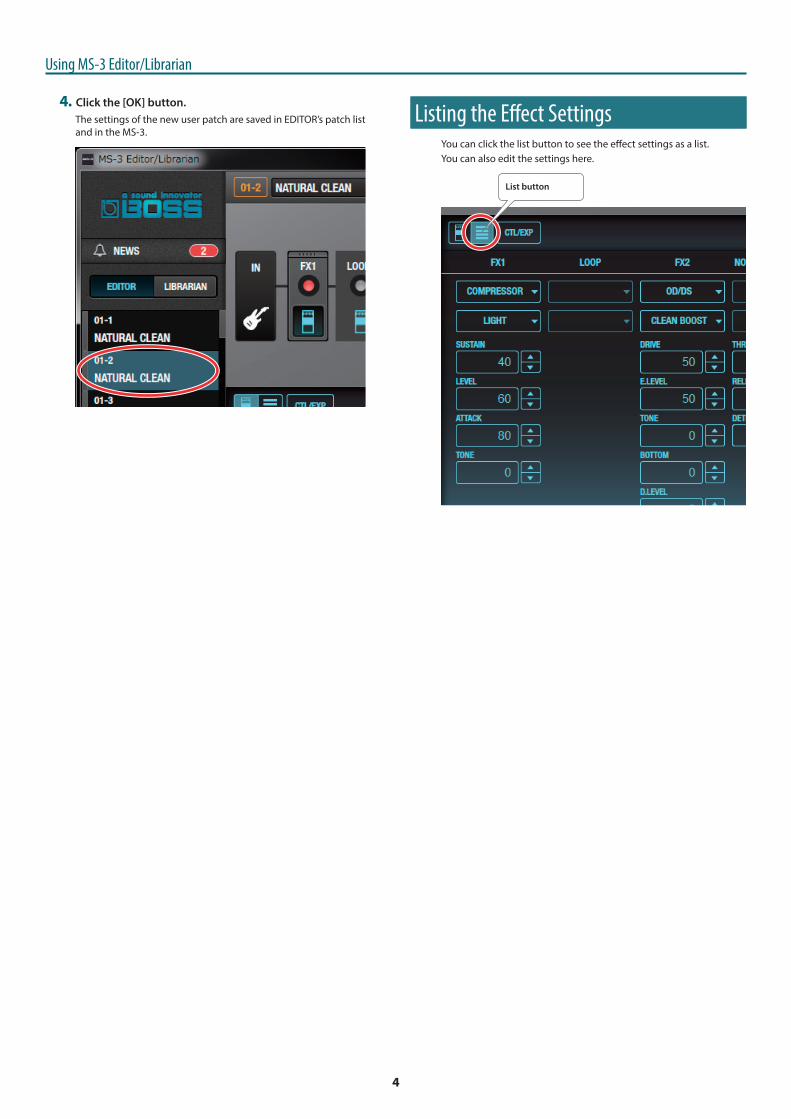
4. Click the [OK] button.The settings of the new user patch are saved in EDITOR’s patch list and in the MS-3.
Listing the Effect SettingsYou can click the list button to see the effect settings as a list.You can also edit the settings here.
List button
Using MS-3 Editor/Librarian
5
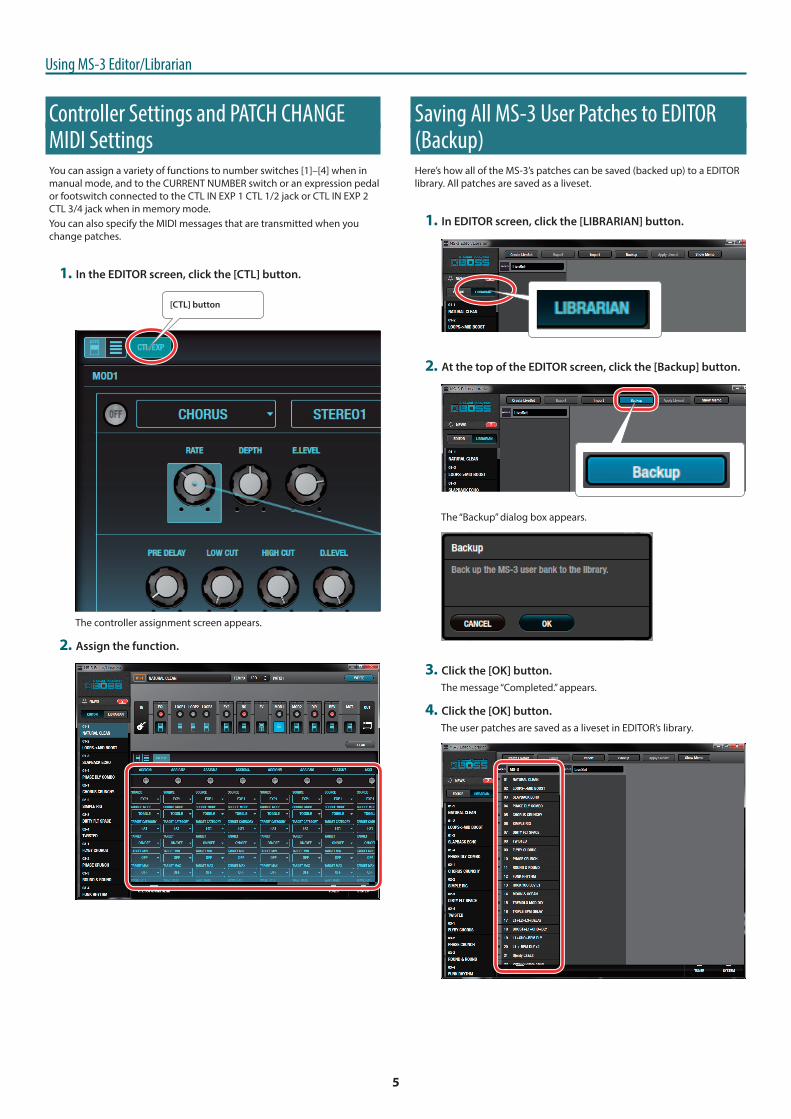
Controller Settings and PATCH CHANGE MIDI SettingsYou can assign a variety of functions to number switches [1]–[4] when in manual mode, and to the CURRENT NUMBER switch or an expression pedal or footswitch connected to the CTL IN EXP 1 CTL 1/2 jack or CTL IN EXP 2 CTL 3/4 jack when in memory mode. You can also specify the MIDI messages that are transmitted when you change patches.
1. In the EDITOR screen, click the [CTL] button.
[CTL] button
The controller assignment screen appears.
2. Assign the function.
Saving All MS-3 User Patches to EDITOR (Backup)Here’s how all of the MS-3’s patches can be saved (backed up) to a EDITOR library. All patches are saved as a liveset.
1. In EDITOR screen, click the [LIBRARIAN] button.
2. At the top of the EDITOR screen, click the [Backup] button.
The “Backup” dialog box appears.
3. Click the [OK] button.The message “Completed.” appears.
4. Click the [OK] button.The user patches are saved as a liveset in EDITOR’s library.
Using MS-3 Editor/Librarian
6
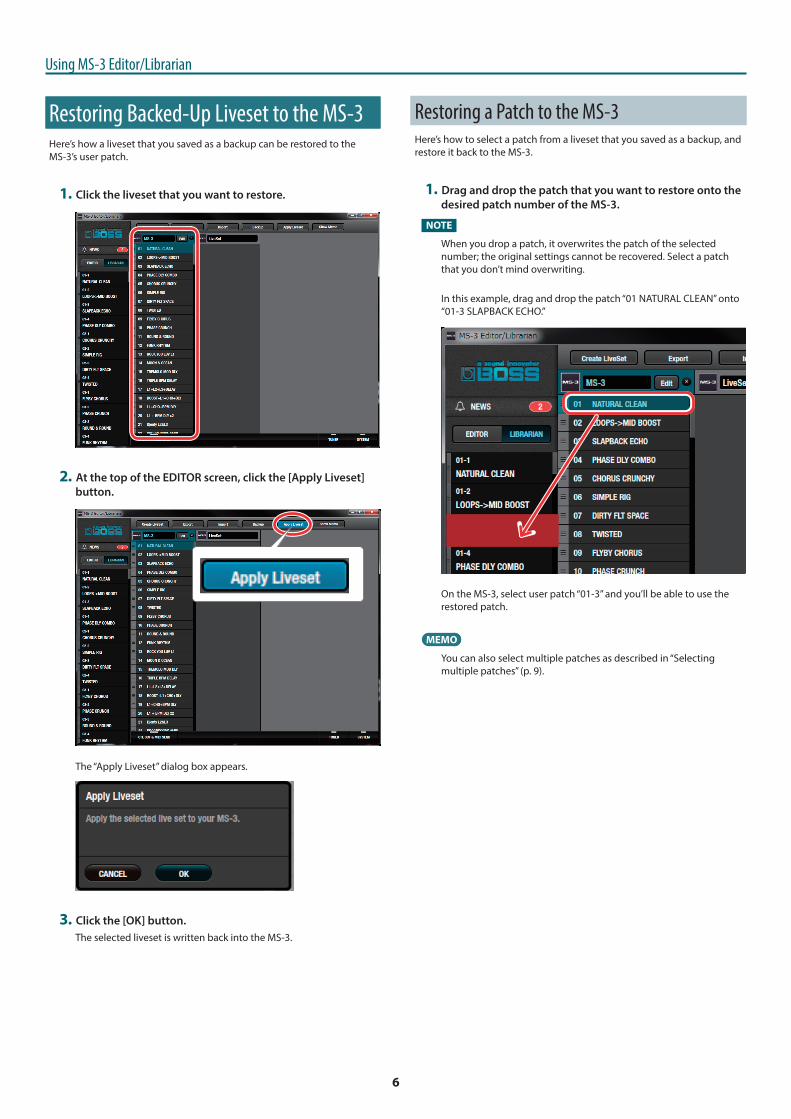
Restoring Backed-Up Liveset to the MS-3Here’s how a liveset that you saved as a backup can be restored to the MS-3’s user patch.
1. Click the liveset that you want to restore.
2. At the top of the EDITOR screen, click the [Apply Liveset] button.
The “Apply Liveset” dialog box appears.
3. Click the [OK] button.The selected liveset is written back into the MS-3.
Restoring a Patch to the MS-3Here’s how to select a patch from a liveset that you saved as a backup, and restore it back to the MS-3.
1. Drag and drop the patch that you want to restore onto the desired patch number of the MS-3.
NOTE
When you drop a patch, it overwrites the patch of the selected number; the original settings cannot be recovered. Select a patch that you don’t mind overwriting.
In this example, drag and drop the patch “01 NATURAL CLEAN” onto “01-3 SLAPBACK ECHO.”
On the MS-3, select user patch “01-3” and you’ll be able to use the restored patch.
MEMO
You can also select multiple patches as described in “Selecting multiple patches” (p. 9).
Using MS-3 Editor/Librarian
7
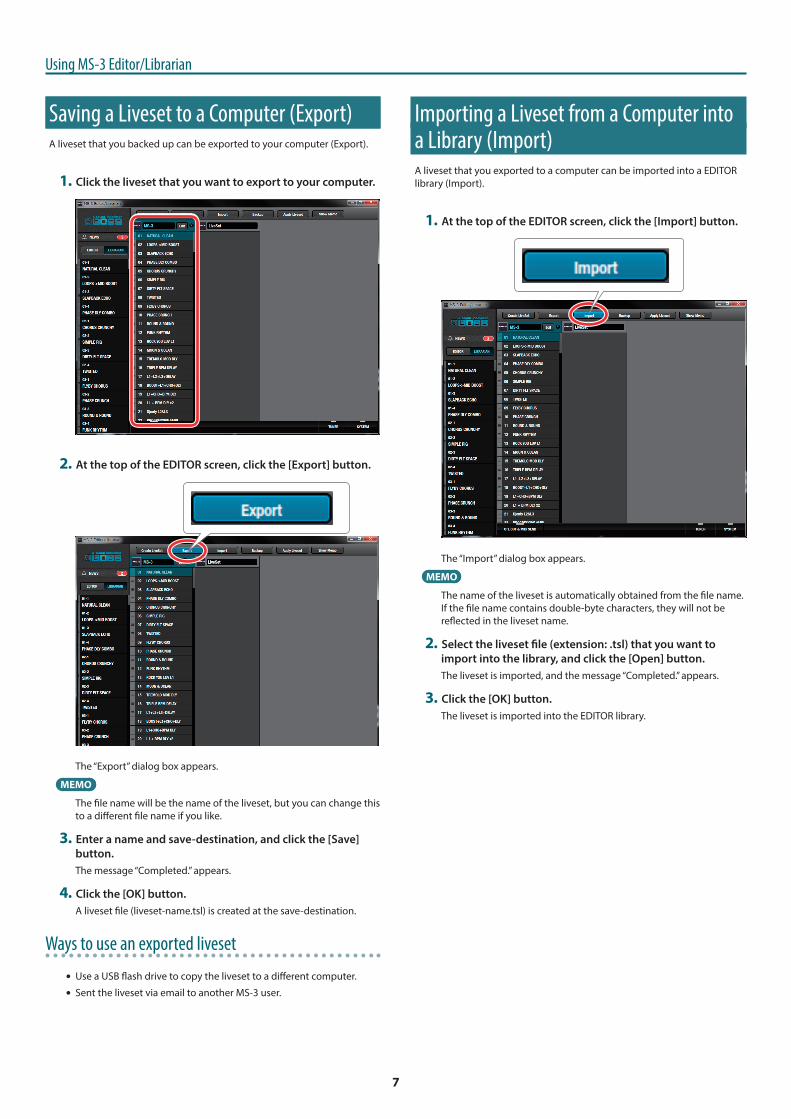
Saving a Liveset to a Computer (Export)A liveset that you backed up can be exported to your computer (Export).
1. Click the liveset that you want to export to your computer.
2. At the top of the EDITOR screen, click the [Export] button.
The “Export” dialog box appears.
MEMO
The file name will be the name of the liveset, but you can change this to a different file name if you like.
3. Enter a name and save-destination, and click the [Save] button.The message “Completed.” appears.
4. Click the [OK] button.A liveset file (liveset-name.tsl) is created at the save-destination.
Ways to use an exported liveset
5 Use a USB flash drive to copy the liveset to a different computer.
5 Sent the liveset via email to another MS-3 user.
Importing a Liveset from a Computer into a Library (Import)A liveset that you exported to a computer can be imported into a EDITOR library (Import).
1. At the top of the EDITOR screen, click the [Import] button.
The “Import” dialog box appears.
MEMO
The name of the liveset is automatically obtained from the file name. If the file name contains double-byte characters, they will not be reflected in the liveset name.
2. Select the liveset file (extension: .tsl) that you want to import into the library, and click the [Open] button.The liveset is imported, and the message “Completed.” appears.
3. Click the [OK] button.The liveset is imported into the EDITOR library.
Using MS-3 Editor/Librarian
8
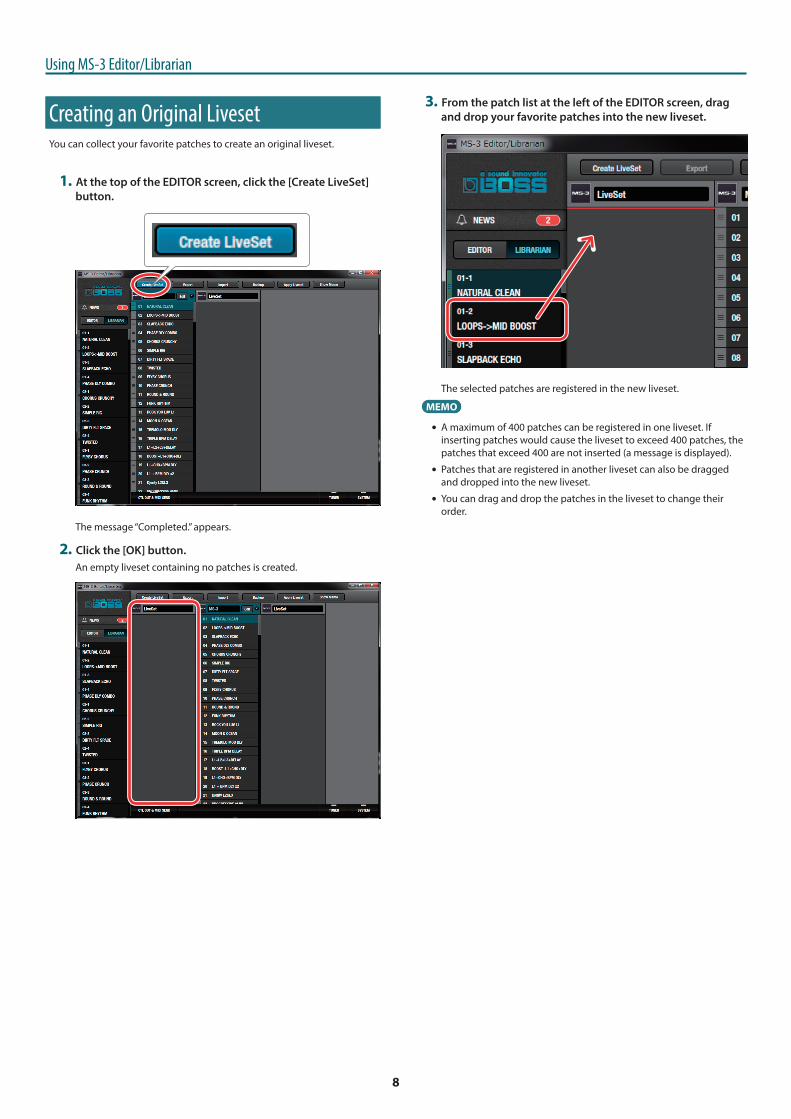
Creating an Original LivesetYou can collect your favorite patches to create an original liveset.
1. At the top of the EDITOR screen, click the [Create LiveSet] button.
The message “Completed.” appears.
2. Click the [OK] button.An empty liveset containing no patches is created.
3. From the patch list at the left of the EDITOR screen, drag and drop your favorite patches into the new liveset.
The selected patches are registered in the new liveset.
MEMO
5 A maximum of 400 patches can be registered in one liveset. If inserting patches would cause the liveset to exceed 400 patches, the patches that exceed 400 are not inserted (a message is displayed).
5 Patches that are registered in another liveset can also be dragged and dropped into the new liveset.
5 You can drag and drop the patches in the liveset to change their order.
Using MS-3 Editor/Librarian
9
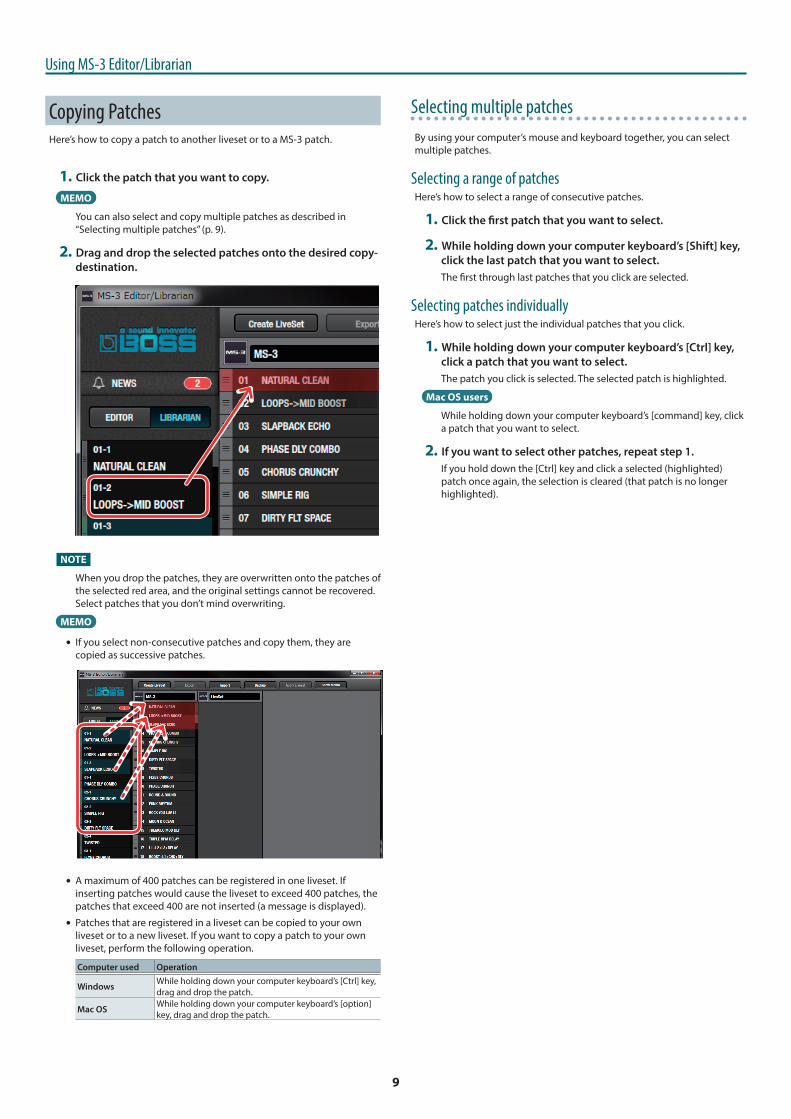
Copying PatchesHere’s how to copy a patch to another liveset or to a MS-3 patch.
1. Click the patch that you want to copy.
MEMO
You can also select and copy multiple patches as described in “Selecting multiple patches” (p. 9).
2. Drag and drop the selected patches onto the desired copy-destination.
NOTE
When you drop the patches, they are overwritten onto the patches of the selected red area, and the original settings cannot be recovered. Select patches that you don’t mind overwriting.
MEMO
5 If you select non-consecutive patches and copy them, they are copied as successive patches.
5 A maximum of 400 patches can be registered in one liveset. If inserting patches would cause the liveset to exceed 400 patches, the patches that exceed 400 are not inserted (a message is displayed).
5 Patches that are registered in a liveset can be copied to your own liveset or to a new liveset. If you want to copy a patch to your own liveset, perform the following operation.
Computer used Operation
Windows While holding down your computer keyboard’s [Ctrl] key, drag and drop the patch.
Mac OS While holding down your computer keyboard’s [option] key, drag and drop the patch.
Selecting multiple patchesBy using your computer’s mouse and keyboard together, you can select multiple patches.
Selecting a range of patchesHere’s how to select a range of consecutive patches.
1. Click the first patch that you want to select.
2. While holding down your computer keyboard’s [Shift] key, click the last patch that you want to select.The first through last patches that you click are selected.
Selecting patches individuallyHere’s how to select just the individual patches that you click.
1. While holding down your computer keyboard’s [Ctrl] key, click a patch that you want to select.The patch you click is selected. The selected patch is highlighted.
Mac OS users
While holding down your computer keyboard’s [command] key, click a patch that you want to select.
2. If you want to select other patches, repeat step 1.If you hold down the [Ctrl] key and click a selected (highlighted) patch once again, the selection is cleared (that patch is no longer highlighted).
Using MS-3 Editor/Librarian
10
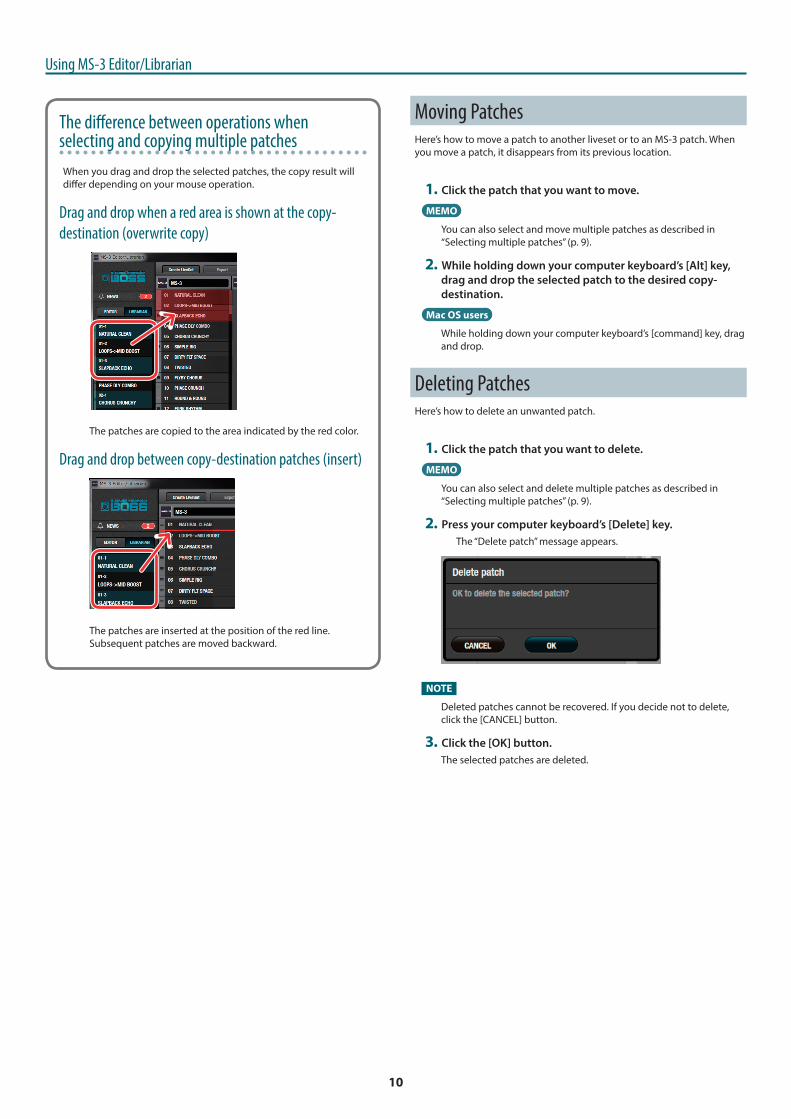
The difference between operations when selecting and copying multiple patchesWhen you drag and drop the selected patches, the copy result will differ depending on your mouse operation.
Drag and drop when a red area is shown at the copy-destination (overwrite copy)
The patches are copied to the area indicated by the red color.
Drag and drop between copy-destination patches (insert)
The patches are inserted at the position of the red line. Subsequent patches are moved backward.
Moving PatchesHere’s how to move a patch to another liveset or to an MS-3 patch. When you move a patch, it disappears from its previous location.
1. Click the patch that you want to move.
MEMO
You can also select and move multiple patches as described in “Selecting multiple patches” (p. 9).
2. While holding down your computer keyboard’s [Alt] key, drag and drop the selected patch to the desired copy-destination.
Mac OS users
While holding down your computer keyboard’s [command] key, drag and drop.
Deleting PatchesHere’s how to delete an unwanted patch.
1. Click the patch that you want to delete.
MEMO
You can also select and delete multiple patches as described in “Selecting multiple patches” (p. 9).
2. Press your computer keyboard’s [Delete] key.The “Delete patch” message appears.
NOTE
Deleted patches cannot be recovered. If you decide not to delete, click the [CANCEL] button.
3. Click the [OK] button.The selected patches are deleted.
Using MS-3 Editor/Librarian
11
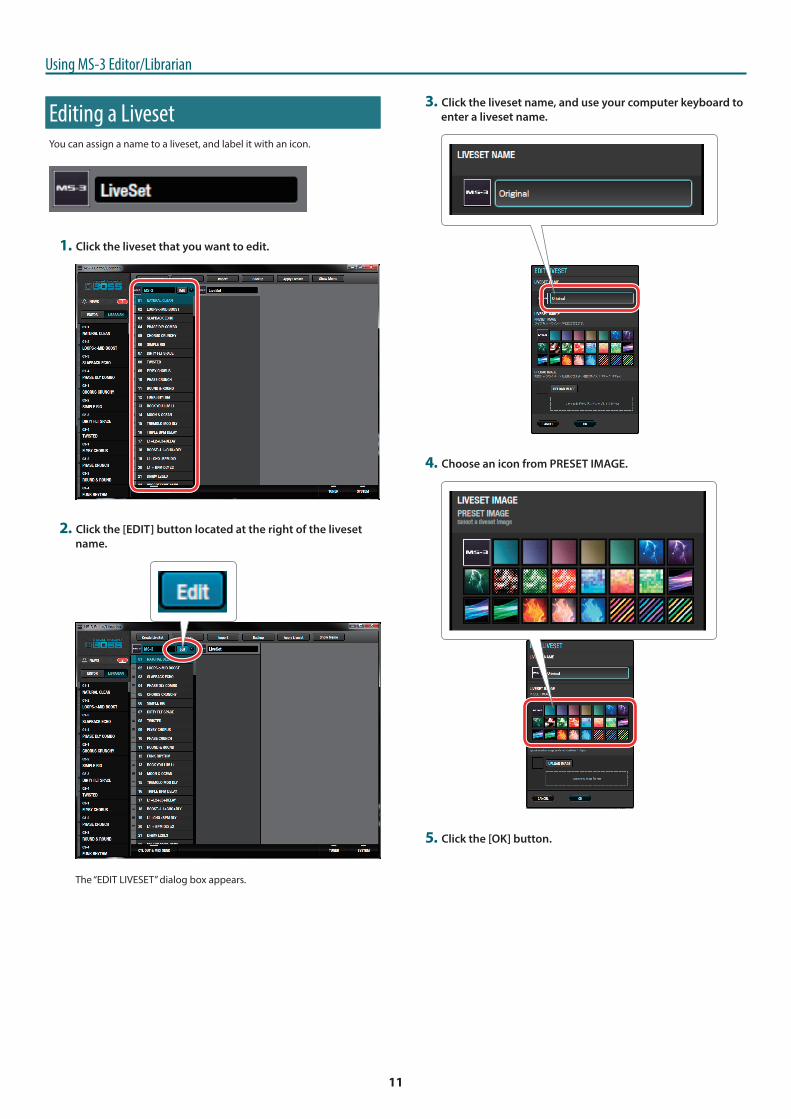
Editing a LivesetYou can assign a name to a liveset, and label it with an icon.
1. Click the liveset that you want to edit.
2. Click the [EDIT] button located at the right of the liveset name.
The “EDIT LIVESET” dialog box appears.
3. Click the liveset name, and use your computer keyboard to enter a liveset name.
4. Choose an icon from PRESET IMAGE.
5. Click the [OK] button.
Using MS-3 Editor/Librarian
12
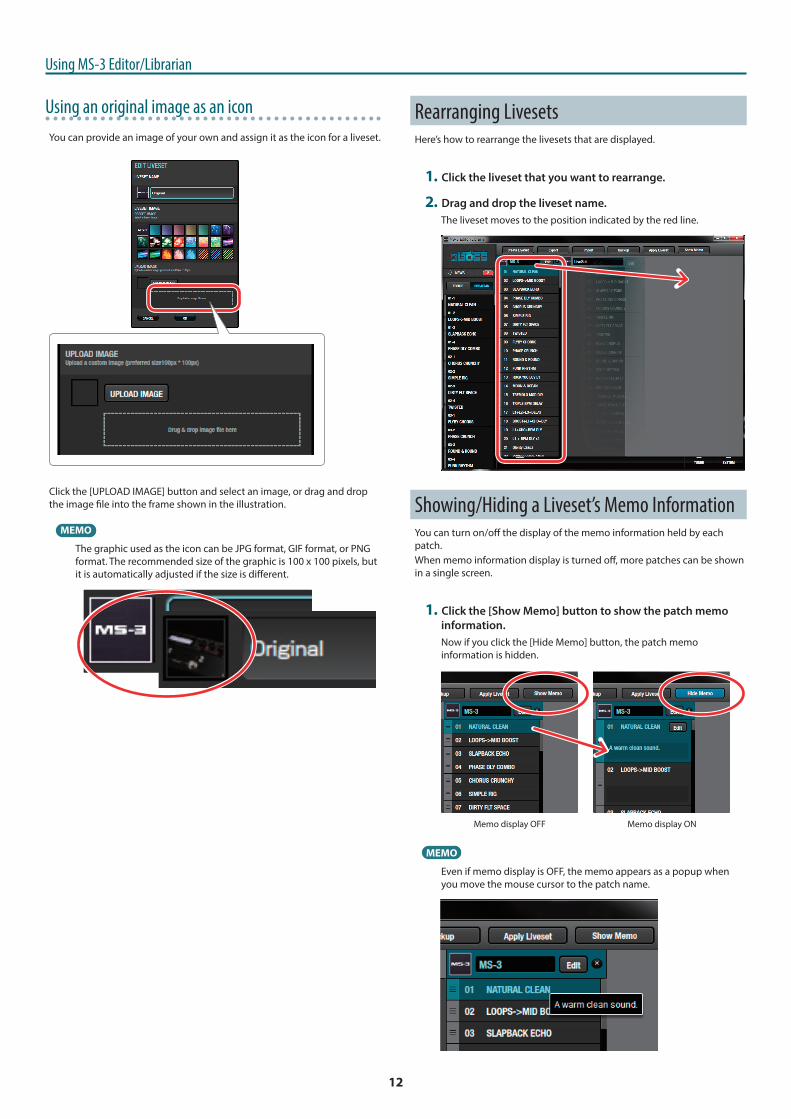
Using an original image as an iconYou can provide an image of your own and assign it as the icon for a liveset.
Click the [UPLOAD IMAGE] button and select an image, or drag and drop the image file into the frame shown in the illustration.
MEMO
The graphic used as the icon can be JPG format, GIF format, or PNG format. The recommended size of the graphic is 100 x 100 pixels, but it is automatically adjusted if the size is different.
Rearranging LivesetsHere’s how to rearrange the livesets that are displayed.
1. Click the liveset that you want to rearrange.
2. Drag and drop the liveset name.The liveset moves to the position indicated by the red line.
Showing/Hiding a Liveset’s Memo InformationYou can turn on/off the display of the memo information held by each patch.When memo information display is turned off, more patches can be shown in a single screen.
1. Click the [Show Memo] button to show the patch memo information.Now if you click the [Hide Memo] button, the patch memo information is hidden.
Memo display ONMemo display OFF
MEMO
Even if memo display is OFF, the memo appears as a popup when you move the mouse cursor to the patch name.

Using MS-3 Editor/Librarian
13
Deleting a LivesetHere’s how to delete a liveset that you no longer need.
1. Click the liveset that you want to delete.
2. Click the [X] button.
The “Delete liveset” message appears.
NOTE
The deleted liveset cannot be recovered. If you decide to cancel without deleting, click the [CANCEL] button.
3. Click the [OK] button.The selected liveset is deleted.
Selecting the Device Controlled by EDITORHere’s how to select the device controlled by EDITOR.
1. In the lower right of the EDITOR screen, click the [SYSTEM] button.The “SYSTEM” screen appears.
2. Click the [Device] button.The “Device” screen appears.
3. In the list of displayed devices, click [MS-3].
4. Click the [OK] button.
Using MS-3 Editor/Librarian
14
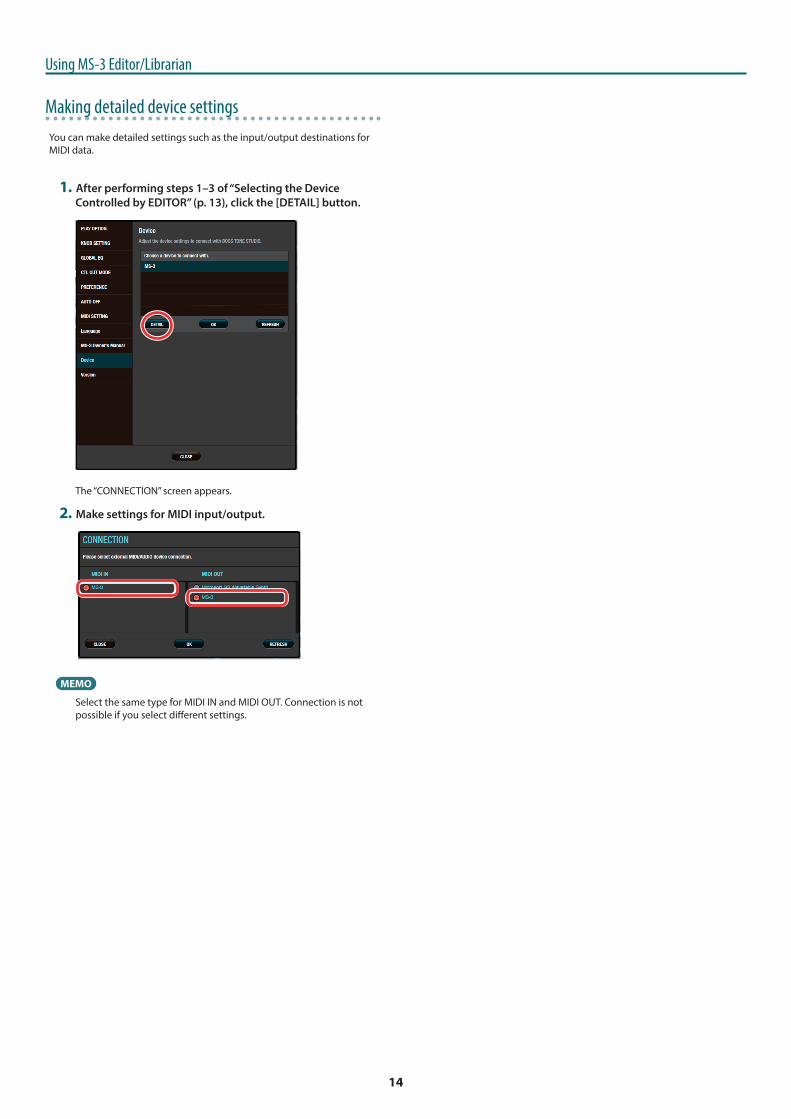
Making detailed device settingsYou can make detailed settings such as the input/output destinations for MIDI data.
1. After performing steps 1–3 of “Selecting the Device Controlled by EDITOR” (p. 13), click the [DETAIL] button.
The “CONNECTION” screen appears.
2. Make settings for MIDI input/output.
MEMO
Select the same type for MIDI IN and MIDI OUT. Connection is not possible if you select different settings.


![[MS-PWEDPS]: PowerPoint Web Editor Data Protocol...Release: June 18, 2019 [MS-PWEDPS]: PowerPoint Web Editor Data Protocol Intellectual Property Rights Notice for Open Specifications](https://img.pdfslide.net/doc/110x75/6105ee4806c9bf1f005bcbdf/ms-pwedps-powerpoint-web-editor-data-protocol-release-june-18-2019-ms-pwedps.jpg)


![MS-3 Editor/Librarianの使いかた MS-3 Editor/Librarianの使いかた 4. エフェクトをエディットします。メモ 5 MOD1の種類を変更したいときは、タイプ名の右側にある[?]](https://img.pdfslide.net/doc/110x75/5ae95a597f8b9a8b2b911d61/ms-3-editorlibrarian-ms-3-editorlibrarian-4-.jpg)