Embed Size (px)
Citation preview
Using the Intel® RealSense™ SDK to Create “Hello World” Project in C#/WPF Abstract This paper presents the basic steps required to develop a C# Windows* Presentation Foundation
(WPF) app from scratch that incorporates the Intel® RealSense™ SDK for Windows. The project
described in this walkthrough can be built using Microsoft Visual Studio* Express 2013 for Windows
Desktop or the professional versions of Visual Studio 2013.
The example outlined in this paper results in a “Hello World” app that demonstrates color camera
streaming and gesture recognition (Figure 1). While not all of the capabilities of the user-facing 3D
depth camera are explored in this article, the resulting application framework will support many of the
other natural interaction modalities offered in the Intel RealSense SDK.
Figure 1. Hello World App Responds to Hand Waving
Introduction The Intel RealSense SDK contains a number of feature-rich sample apps developed in C# and C++ that
demonstrate the advanced capabilities of the 3D camera. Developers can use the source code that
accompanies these samples as a launching point for developing their own apps; however, in many
cases a developer will want to create a brand new project that integrates the Intel RealSense SDK.
At the time of this writing, most of the C# sample apps in the SDK are based on the Windows Forms
user interface model. In this article we explore an alternative approach to user interface development

using WPF. Since the main objective here is to present the essentials of creating an Intel RealSense
app, we won’t be covering exception handling and advanced UI details found in a full-featured app.
Prerequisites You should have some knowledge of C# and know some of the basic operations in Visual Studio like
building an executable, etc. Your system needs a front-facing 3D depth camera compatible with the
Intel RealSense SDK for the example code to work correctly.
Create the Project
Figure 2. Hello World Skeleton Project in Visual Studio*
Figure 2 shows a new C# WPF project in Visual Studio. Perform the following steps to create this
project:
Launch Visual Studio 2013. (Note: if you are using the free Express version, make sure it is
Visual Studio Express 2013 for Windows Desktop.)
Select File, New Project… from the menu bar.
In the New Project screen, expand Templates and select Visual C#.
Select WPF Application.
Specify the location for the new project and its name. For this example, our location is
C:\MyRealSenseProjects and we’ll name it HelloWorld.
Click OK to create the new project.

Add References to the Intel® RealSense™ SDK Libraries Two dynamic-link libraries (DLL) are required for creating Intel RealSense apps in C#:
libpxcclr.cs.dll – the managed C# interface DLL
libpxccpp2c.dll – the unmanaged C++ P/Invoke DLL
Two approaches are available for adding the required Intel RealSense SDK library (DLL) support to your
project:
Create references to the required DLLs located outside of the project, typically as part of a
system-wide install of the Intel RealSense SDK.
Add the required DLLs to the project and create local references.
In the following sections we will explore both techniques for adding the required libraries for Intel
RealSense technology.
Reference Libraries Outside of the Project Referencing libraries outside of the project has the benefit of keeping your project updated with new
versions of the DLLs when the SDK is upgraded to new versions. The downside is that you may need to
explicitly modify the references if the SDK installation path changes or when building to a different
target platform.
If you want to reference the libraries externally, start by right-clicking the HelloWorld project in
Solution Explorer, and then select Properties.
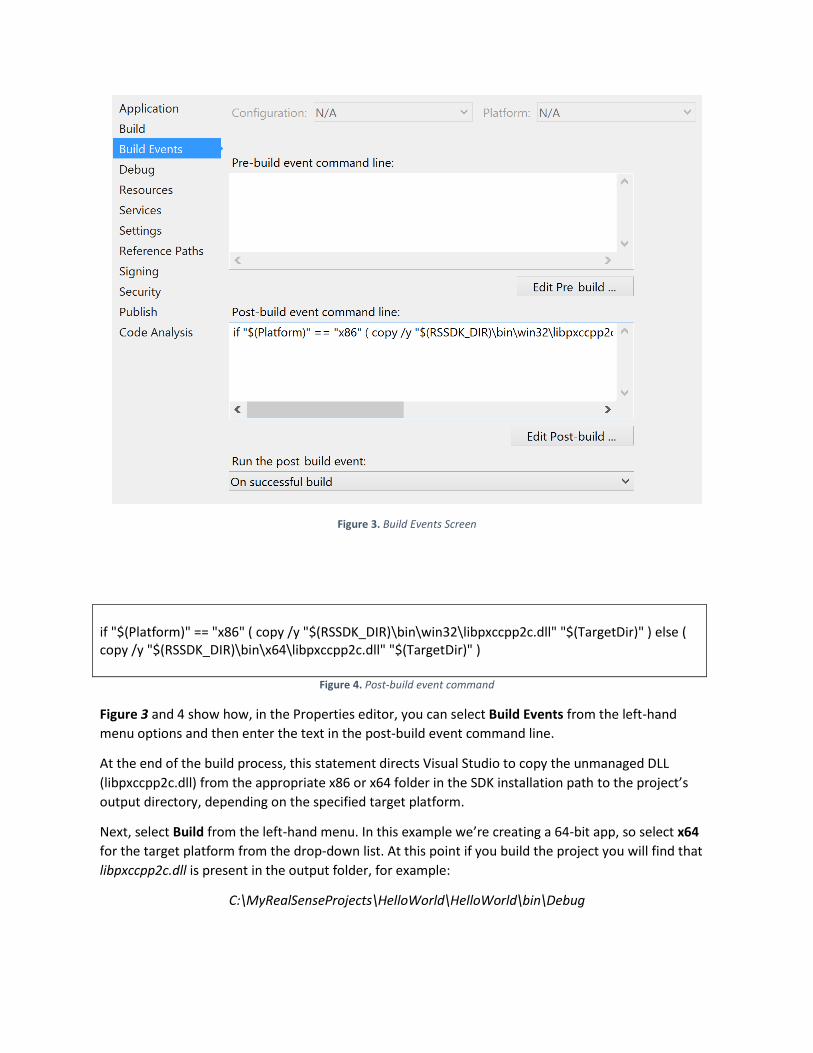
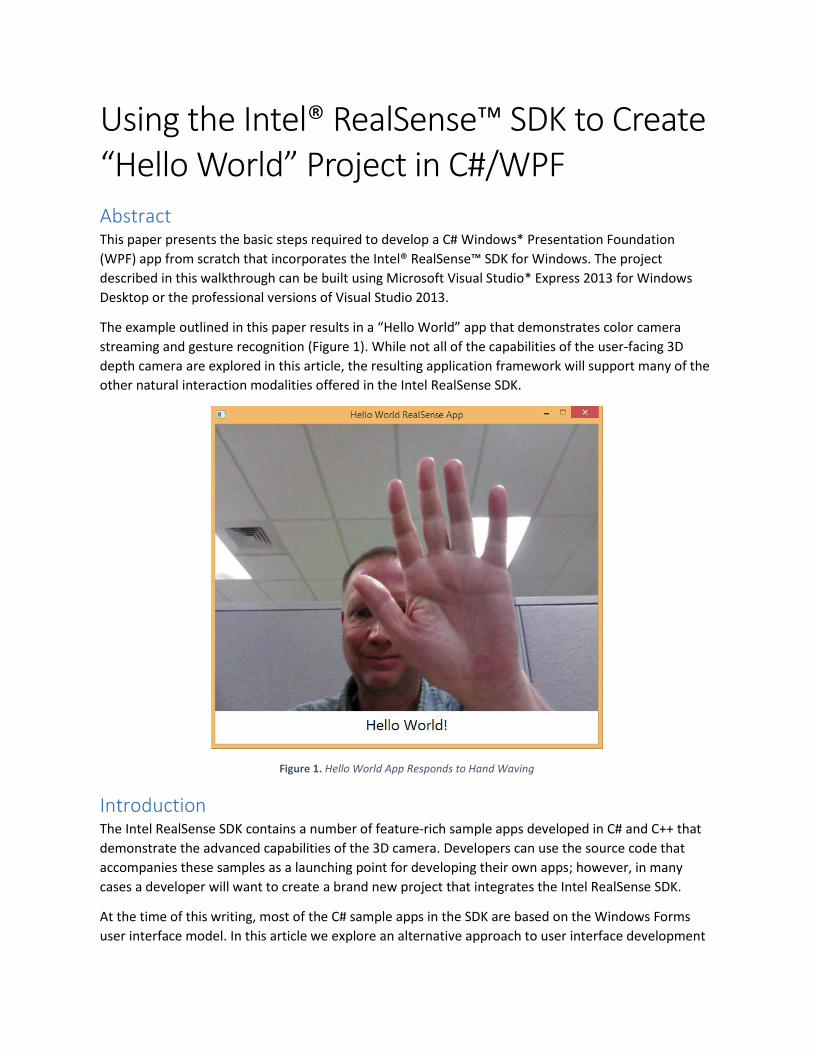
Figure 3. Build Events Screen
if "$(Platform)" == "x86" ( copy /y "$(RSSDK_DIR)\bin\win32\libpxccpp2c.dll" "$(TargetDir)" ) else ( copy /y "$(RSSDK_DIR)\bin\x64\libpxccpp2c.dll" "$(TargetDir)" )
Figure 4. Post-build event command
Figure 3 and 4 show how, in the Properties editor, you can select Build Events from the left-hand
menu options and then enter the text in the post-build event command line.
At the end of the build process, this statement directs Visual Studio to copy the unmanaged DLL
(libpxccpp2c.dll) from the appropriate x86 or x64 folder in the SDK installation path to the project’s
output directory, depending on the specified target platform.
Next, select Build from the left-hand menu. In this example we’re creating a 64-bit app, so select x64
for the target platform from the drop-down list. At this point if you build the project you will find that
libpxccpp2c.dll is present in the output folder, for example:
C:\MyRealSenseProjects\HelloWorld\HelloWorld\bin\Debug
The next step is to add a reference to the managed DLL (libpxcclr.cs.dll). As stated in the Intel
RealSense SDK Developer Guide, it is a known limitation that Visual Studio cannot handle 32-bit and 64-
bit references at the same time; so the application must explicitly modify the reference before building
a different target.
Figure 5. Reference Manager Screen
Error! Reference source not found. shows how to create an explicit reference to the 64-bit DLL:
In Solution Explorer, expand the list under HelloWorld and then right-click References.
Select Add References… and then click the Browse… button.
Navigate to the folder containing the 64-bit DLL, which will depend on the destination of the
RSSDK folder selected during installation. Figure 5 shows the installation path to the x64 build
of libpxcclr.cs.dll used in our particular example.
Click the OK button to add the reference to the project.
Manually Add Libraries to the Project An alternative approach is to add the libraries for Intel RealSense technology directly to the project.
This approach has the benefit of keeping the DLLs bundled closely with the other project files, thus
reducing the chance of broken references in the project. The downside is that the DLLs may need to be
manually updated and aligned with the project as new versions of the SDK are released.
Note: Do not use both approaches to reference the libraries for Intel RealSense technology. If you
decide to add the DLLs directly, either create a new project or remove the previously added reference
and post-build command.
First, locate both DLLs (libpxcclr.cs.dll and libpxccpp2c.dll) in the SDK installation folder and copy them
to the project folder. In this example, we are specifying the following source and destination folders:
Source: C:\Program Files (x86)\Intel\RSSDK\bin\x64
Destination: C:\MyRealSenseProjects\HelloWorld\HelloWorld
Note: In this simple example we are copying the DLLs directly to the project folder. In many cases,
particularly those in which the solution contains more than one project, it is preferable to organize
DLLs in a common folder named lib at the solution level.
Back in the Visual Studio environment, follow these steps to add the libraries to the project:
In Solution Explorer, right-click HelloWorld and then select Add, Existing Items… from the
menu options.
Navigate to the local project folder (C:\MyRealSenseProjects\HelloWorld\HelloWorld) and
select Executable Files (*.exe; *.dll; *.ocx) from the drop-down list.
Highlight both DLLs (libpxcclr.cs.dll and libpxccpp2c.dll) and then click the Add button. The
DLLs should now show up in the Solution Explorer window.
Right-click References in Solution Explorer and select Add References… to open the Reference
Manager window.
Click the Browse button and navigate to the local copy of the managed DLL (e.g.,
C:\MyRealSenseProjects\HelloWorld\HelloWorld).
Highlight libpxcclr.cs.dll and click the Add button.
Back in the Reference Manager screen, ensure the local copy of libpxcclr.cs.dll is selected and
click the OK button.
In Solution Explorer, click the unmanaged DLL (libpxccpp2c.dll) to select it.
The Properties screen will now be showing the file properties for libpxccpp2c.dll. Locate the
“Copy to Output Directory” field and use the drop-down list to select Copy Always. This
ensures the unmanaged DLL gets copied to the project output folder when you build the
application.
Right-click the HelloWorld project in Solution Explorer, and then select Properties. Next, select
Build from the left-hand menu. In this example we’re creating a 64-bit app, so select x64 for
the target platform from the drop-down list.
At this point the Hello World project is Intel RealSense SDK-ready, so let’s build the application!
Create the User Interface Our simple Hello World app demonstrates streaming video from the color camera and gesture
recognition. It uses three WPF controls:
An Image control for hosting the video stream
A Label for printing “Hello World!” on the screen when the user waves a hand at the camera
A StackPanel container to hold the other controls
Start by dragging StackPanel, Image, and Label controls from the Toolbox over to the main window in
the Design view. Don’t worry about how the controls are placed on the main window for now. The
main thing to ensure is that the names of the Image and Label controls match the following:
Image Control: imgColorStream
Label Control: lblMessage
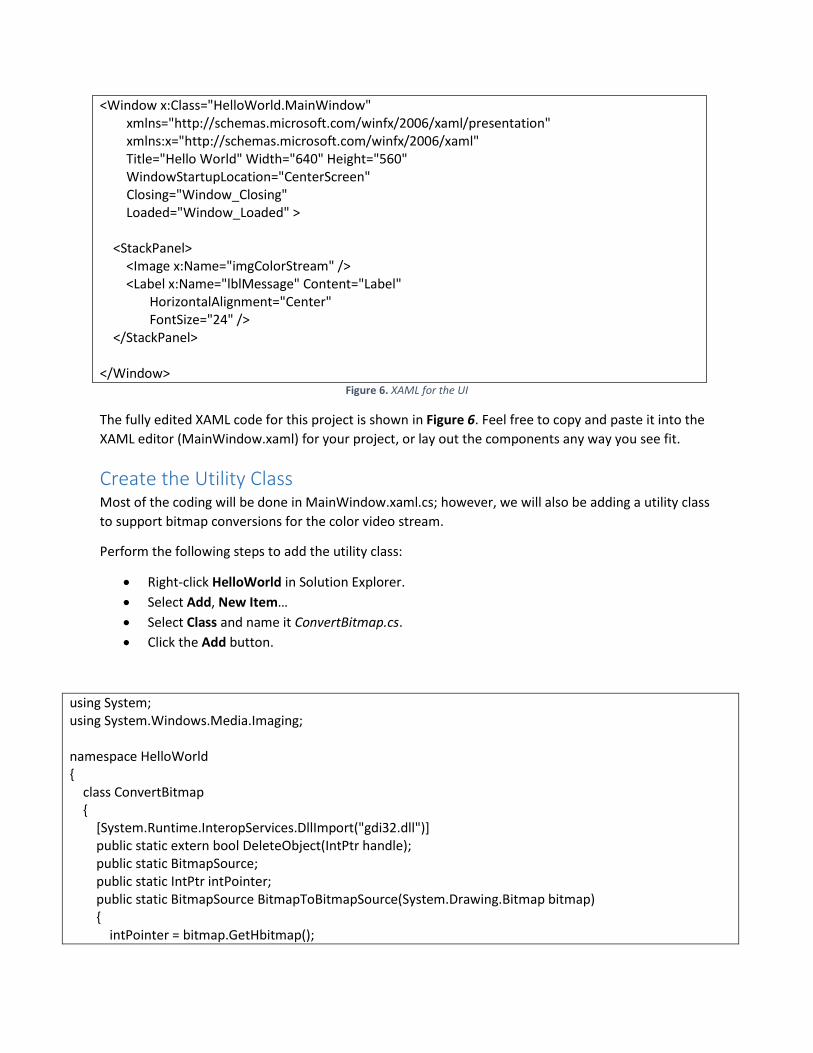
<Window x:Class="HelloWorld.MainWindow" xmlns="http://schemas.microsoft.com/winfx/2006/xaml/presentation" xmlns:x="http://schemas.microsoft.com/winfx/2006/xaml" Title="Hello World" Width="640" Height="560" WindowStartupLocation="CenterScreen" Closing="Window_Closing" Loaded="Window_Loaded" > <StackPanel> <Image x:Name="imgColorStream" /> <Label x:Name="lblMessage" Content="Label" HorizontalAlignment="Center" FontSize="24" /> </StackPanel> </Window>
Figure 6. XAML for the UI
The fully edited XAML code for this project is shown in Figure 6. Feel free to copy and paste it into the
XAML editor (MainWindow.xaml) for your project, or lay out the components any way you see fit.
Create the Utility Class Most of the coding will be done in MainWindow.xaml.cs; however, we will also be adding a utility class
to support bitmap conversions for the color video stream.
Perform the following steps to add the utility class:
Right-click HelloWorld in Solution Explorer.
Select Add, New Item…
Select Class and name it ConvertBitmap.cs.
Click the Add button.
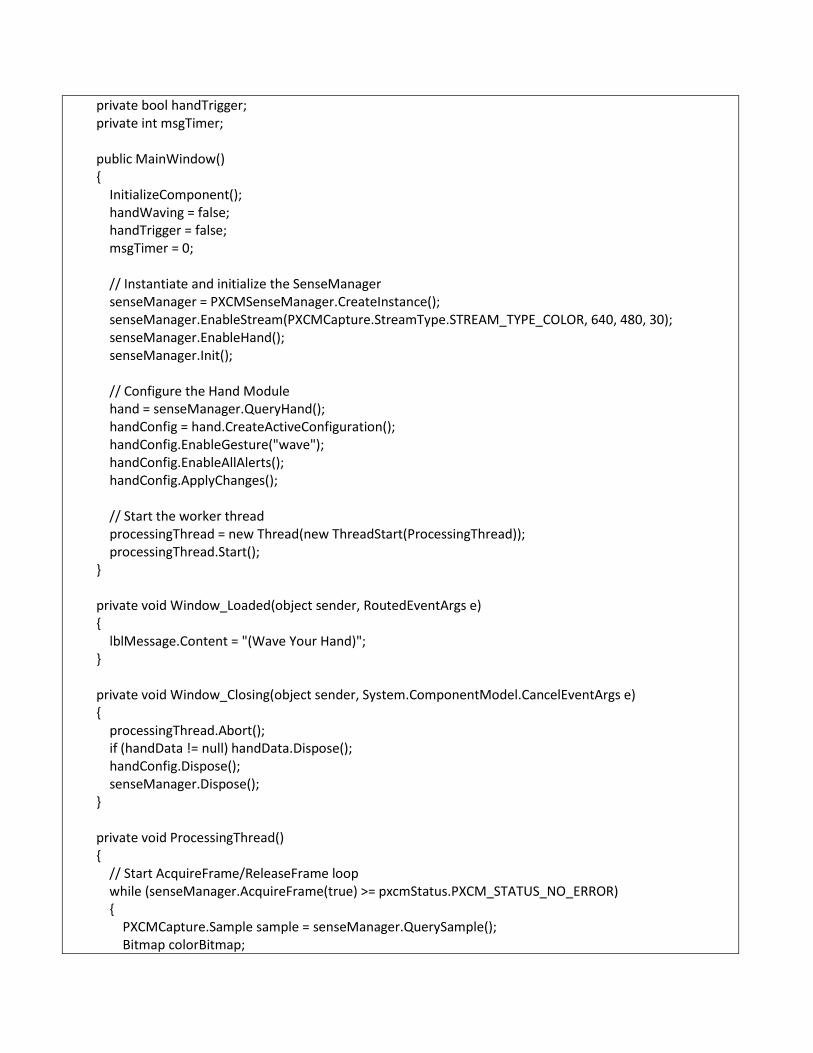
using System; using System.Windows.Media.Imaging; namespace HelloWorld { class ConvertBitmap { [System.Runtime.InteropServices.DllImport("gdi32.dll")] public static extern bool DeleteObject(IntPtr handle); public static BitmapSource; public static IntPtr intPointer; public static BitmapSource BitmapToBitmapSource(System.Drawing.Bitmap bitmap) { intPointer = bitmap.GetHbitmap();

bitmapSource = System.Windows.Interop.Imaging.CreateBitmapSourceFromHBitmap(intPointer, IntPtr.Zero, System.Windows.Int32Rect.Empty, System.Windows.Media.Imaging.BitmapSizeOptions.FromEmptyOptions()); DeleteObject(intPointer); return bitmapSource; } } }
Figure 7. Code for the ConvertBitmap.cs class
Add the code in Figure 7 to the new ConvertBitmap.cs class. Note that the System.Drawing.Imaging
namespace we are attempting to use is flagged as a missing assembly reference by the compiler. To
remedy this, add it to the project by following these steps:
Right-click References in Solution Explorer and select Add References… to open the Reference
Manager window.
Click Framework and then search the list for System.Drawing. Highlight the checkbox and then
click the OK button.
At this point the project should build without any errors.
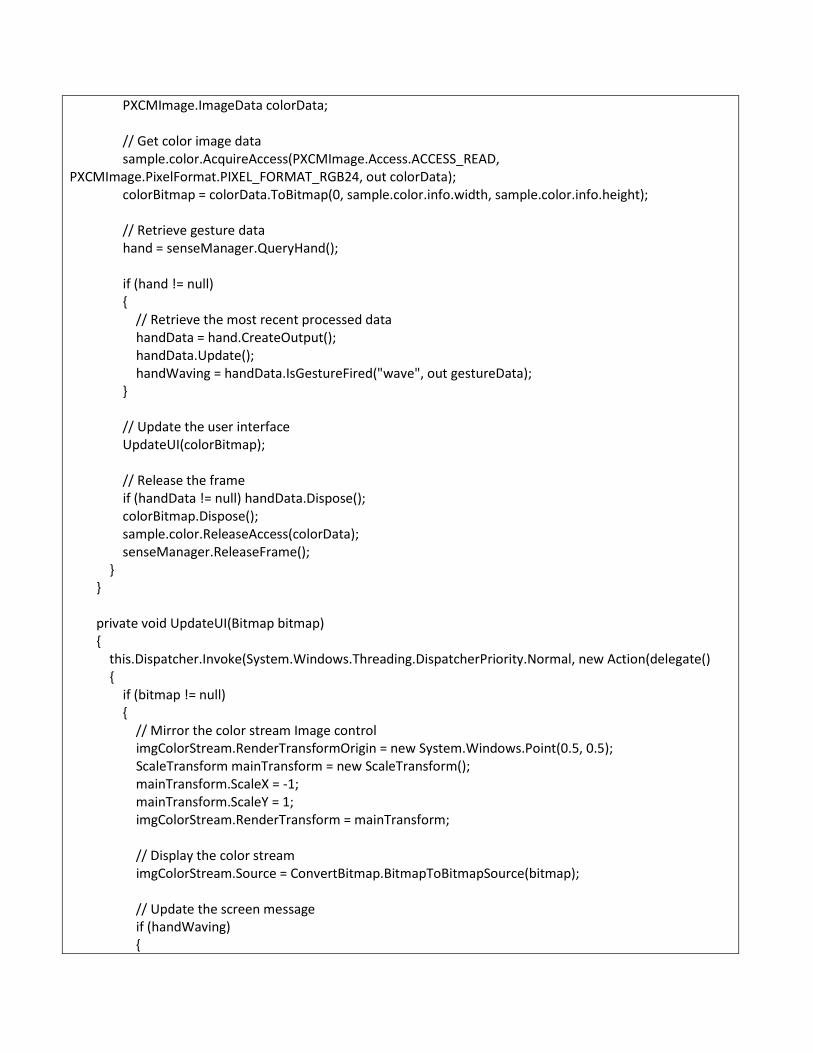
Listing for MainWindow.xaml.cs Figure 8 provides a complete listing of the code in MainWindow.xaml.cs.
using System; using System.Windows; using System.Windows.Media; using System.Threading; using System.Drawing; namespace HelloWorld { /// <summary> /// Interaction logic for MainWindow.xaml /// </summary> public partial class MainWindow : Window { private Thread processingThread; private PXCMSenseManager senseManager; private PXCMHandModule hand; private PXCMHandConfiguration handConfig; private PXCMHandData handData; private PXCMHandData.GestureData gestureData; private bool handWaving;
private bool handTrigger; private int msgTimer; public MainWindow() { InitializeComponent(); handWaving = false; handTrigger = false; msgTimer = 0; // Instantiate and initialize the SenseManager senseManager = PXCMSenseManager.CreateInstance(); senseManager.EnableStream(PXCMCapture.StreamType.STREAM_TYPE_COLOR, 640, 480, 30); senseManager.EnableHand(); senseManager.Init(); // Configure the Hand Module hand = senseManager.QueryHand(); handConfig = hand.CreateActiveConfiguration(); handConfig.EnableGesture("wave"); handConfig.EnableAllAlerts(); handConfig.ApplyChanges(); // Start the worker thread processingThread = new Thread(new ThreadStart(ProcessingThread)); processingThread.Start(); } private void Window_Loaded(object sender, RoutedEventArgs e) { lblMessage.Content = "(Wave Your Hand)"; } private void Window_Closing(object sender, System.ComponentModel.CancelEventArgs e) { processingThread.Abort(); if (handData != null) handData.Dispose(); handConfig.Dispose(); senseManager.Dispose(); } private void ProcessingThread() { // Start AcquireFrame/ReleaseFrame loop while (senseManager.AcquireFrame(true) >= pxcmStatus.PXCM_STATUS_NO_ERROR) { PXCMCapture.Sample sample = senseManager.QuerySample(); Bitmap colorBitmap;
PXCMImage.ImageData colorData; // Get color image data sample.color.AcquireAccess(PXCMImage.Access.ACCESS_READ, PXCMImage.PixelFormat.PIXEL_FORMAT_RGB24, out colorData); colorBitmap = colorData.ToBitmap(0, sample.color.info.width, sample.color.info.height); // Retrieve gesture data hand = senseManager.QueryHand(); if (hand != null) { // Retrieve the most recent processed data handData = hand.CreateOutput(); handData.Update(); handWaving = handData.IsGestureFired("wave", out gestureData); } // Update the user interface UpdateUI(colorBitmap); // Release the frame if (handData != null) handData.Dispose(); colorBitmap.Dispose(); sample.color.ReleaseAccess(colorData); senseManager.ReleaseFrame(); } } private void UpdateUI(Bitmap bitmap) { this.Dispatcher.Invoke(System.Windows.Threading.DispatcherPriority.Normal, new Action(delegate() { if (bitmap != null) { // Mirror the color stream Image control imgColorStream.RenderTransformOrigin = new System.Windows.Point(0.5, 0.5); ScaleTransform mainTransform = new ScaleTransform(); mainTransform.ScaleX = -1; mainTransform.ScaleY = 1; imgColorStream.RenderTransform = mainTransform; // Display the color stream imgColorStream.Source = ConvertBitmap.BitmapToBitmapSource(bitmap); // Update the screen message if (handWaving) {
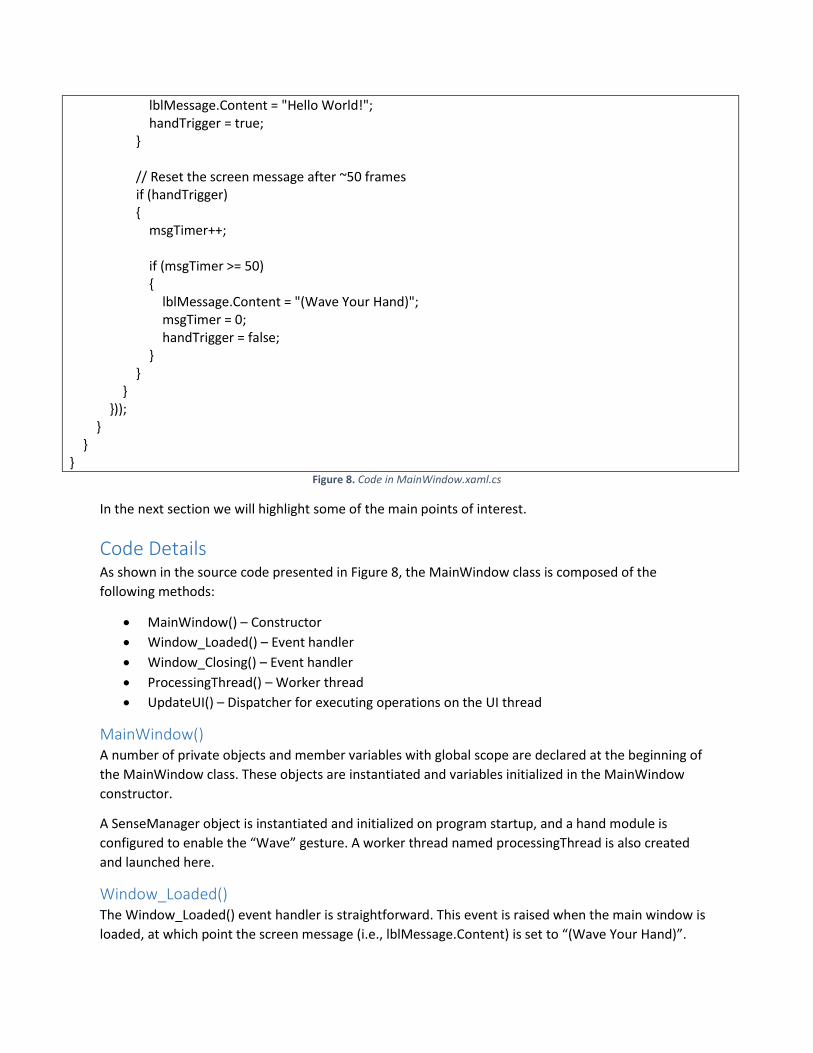
lblMessage.Content = "Hello World!"; handTrigger = true; } // Reset the screen message after ~50 frames if (handTrigger) { msgTimer++; if (msgTimer >= 50) { lblMessage.Content = "(Wave Your Hand)"; msgTimer = 0; handTrigger = false; } } } })); } } }
Figure 8. Code in MainWindow.xaml.cs
In the next section we will highlight some of the main points of interest.
Code Details As shown in the source code presented in Figure 8, the MainWindow class is composed of the
following methods:
MainWindow() – Constructor
Window_Loaded() – Event handler
Window_Closing() – Event handler
ProcessingThread() – Worker thread
UpdateUI() – Dispatcher for executing operations on the UI thread
MainWindow() A number of private objects and member variables with global scope are declared at the beginning of
the MainWindow class. These objects are instantiated and variables initialized in the MainWindow
constructor.
A SenseManager object is instantiated and initialized on program startup, and a hand module is
configured to enable the “Wave” gesture. A worker thread named processingThread is also created
and launched here.
Window_Loaded() The Window_Loaded() event handler is straightforward. This event is raised when the main window is
loaded, at which point the screen message (i.e., lblMessage.Content) is set to “(Wave Your Hand)”.
Window_Closing() The Window_Closing() event handler is raised when the user closes the application. The Dispose
methods for the HandData, HandConfiguration, and SenseManager are called to ensure any
unmanaged memory objects are released when the application closes. The processing thread is also
aborted when this event is raised.
ProcessingThread() As described in the Intel RealSense SDK Reference Manual, the SenseManager interface can be used in
one of two ways: either by procedural calls or by event callbacks. In our Hello World application we are
using procedural calls as the chosen interfacing technique.
The acquire/release frame loop runs in its own thread, independent of the main UI thread. If you
examine the code, you can see that it is here that we access the Intel RealSense SDK APIs to acquire
color image data, retrieve hand gesture data, call the UpdateUI() method, and then release the frame.
Updates to the UI are synchronized with the acquire/release frame loop through method calls to
UpdateUI().
UpdateUI() Update() uses the Dispatcher.Invoke method to perform operations that will be executed on the UI
thread. These operations include displaying the color stream via a WPF Image control and displaying
“Hello World!” in a Label control. This method also contains a simple counter that is used to reset the
message from “Hello World!” back to “(Wave Your Hand)” within 50 frames if the waving gesture is no
longer detected.
Summary In this article we provided a simple walkthrough describing how to create an Intel RealSense SDK-
enabled C#/WPF app from scratch using Microsoft Visual Studio Express 2013 for Windows Desktop or
the professional versions of Visual Studio 2013. The article also provided code listings for the XAML
defining the user interface, along with all of the classes that make up the Hello World app. Give it a try
and see what you think!
About Intel® RealSense™ Technology To get started and learn more about the Intel RealSense SDK for Windows, go to
https://software.intel.com/en-us/intel-realsense-sdk
About the Author Bryan Brown is a software applications engineer in the Developer Relations Division at Intel.
Notices INFORMATION IN THIS DOCUMENT IS PROVIDED IN CONNECTION WITH INTEL PRODUCTS. NO LICENSE,
EXPRESS OR IMPLIED, BY ESTOPPEL OR OTHERWISE, TO ANY INTELLECTUAL PROPERTY RIGHTS IS
GRANTED BY THIS DOCUMENT. EXCEPT AS PROVIDED IN INTEL'S TERMS AND CONDITIONS OF SALE
FOR SUCH PRODUCTS, INTEL ASSUMES NO LIABILITY WHATSOEVER AND INTEL DISCLAIMS ANY
EXPRESS OR IMPLIED WARRANTY, RELATING TO SALE AND/OR USE OF INTEL PRODUCTS INCLUDING
LIABILITY OR WARRANTIES RELATING TO FITNESS FOR A PARTICULAR PURPOSE, MERCHANTABILITY, OR
INFRINGEMENT OF ANY PATENT, COPYRIGHT OR OTHER INTELLECTUAL PROPERTY RIGHT.
UNLESS OTHERWISE AGREED IN WRITING BY INTEL, THE INTEL PRODUCTS ARE NOT DESIGNED NOR
INTENDED FOR ANY APPLICATION IN WHICH THE FAILURE OF THE INTEL PRODUCT COULD CREATE A
SITUATION WHERE PERSONAL INJURY OR DEATH MAY OCCUR.
Intel may make changes to specifications and product descriptions at any time, without notice.
Designers must not rely on the absence or characteristics of any features or instructions marked
"reserved" or "undefined." Intel reserves these for future definition and shall have no responsibility
whatsoever for conflicts or incompatibilities arising from future changes to them. The information here
is subject to change without notice. Do not finalize a design with this information.
The products described in this document may contain design defects or errors known as errata which
may cause the product to deviate from published specifications. Current characterized errata are
available on request.
Contact your local Intel sales office or your distributor to obtain the latest specifications and before
placing your product order.
Copies of documents which have an order number and are referenced in this document, or other Intel
literature, may be obtained by calling 1-800-548-4725, or go to:
http://www.intel.com/design/literature.htm
Software and workloads used in performance tests may have been optimized for performance only on
Intel microprocessors. Performance tests, such as SYSmark* and MobileMark*, are measured using
specific computer systems, components, software, operations, and functions. Any change to any of
those factors may cause the results to vary. You should consult other information and performance
tests to assist you in fully evaluating your contemplated purchases, including the performance of that
product when combined with other products.
Any software source code reprinted in this document is furnished under a software license and may
only be used or copied in accordance with the terms of that license.
Intel, the Intel logo, and Intel RealSense are trademarks of Intel Corporation in the U.S. and/or other
countries.
Copyright © 2015 Intel Corporation. All rights reserved.
*Other names and brands may be claimed as the property of others.