Embed Size (px)
Citation preview

Using the Laser with Rhinoceros 4.0
1. Open file Turn on the computer, laser, and the vacuum filter and log onto the computer using your cougarnet account. Open the Document you wish to cut with the laser. Make sure an employee of the shop has focused the laser to your specific material. The laser needs to be refocused for every material of different thickness.
2. Line Weight
Set all your line weights to Hairline or else the laser will not read the lines. To set line weights in Rhino, select your entire drawing (all that you are going to cut) and click on the Properties Icon [1]. Under Print Width [2], select Hairline [3].
Note: Make sure the print color (diamond) matches the layer color (square) [4] or else the laser will NOT print/cut correctly. However, they should be automatically the same unless the print color has been changed.
1 2
3
4

3. Print Setup Go to File, Print and choose the X-660 from the Printer drop down box [5]. The print page size should change to 32in with by 18in height.
4. View In the View and Output Scale section [6]. Choose the view port your drawing is in from the drop down list [7]. Your drawing should appear in the display Window [8]. Note: Your drawing must be in 2D no matter what viewport you drew it in because the laser will only recognize 2D lines.
5
6 7 8

5. Output Window Placement If your drawing does not fit inside the window to the right of the Print Setup Window, you have to either move the window or change the scale. When you select Move [9], you will be able to select where you want your drawing to sit in the window.
The Light Grey box [10] represents the 32in x 18in cutting area of the laser and should be placed so that the drawing is in the lower left corner of the box. Click on the box to move, and click again when finished.
9
10

6. Scale To change the scale, click on the arrow for the drop down menu [10]. If you drew your drawings to the size you need them in real life, then choose 1:1. If you drew them to the size of a building, then choose the scale of your model. If you can’t find the scale you need in the list, you will need to do the conversion yourself and input a custom scale.
7. Properties Once you have done the previous settings correctly, click the Properties button [11].
10
11
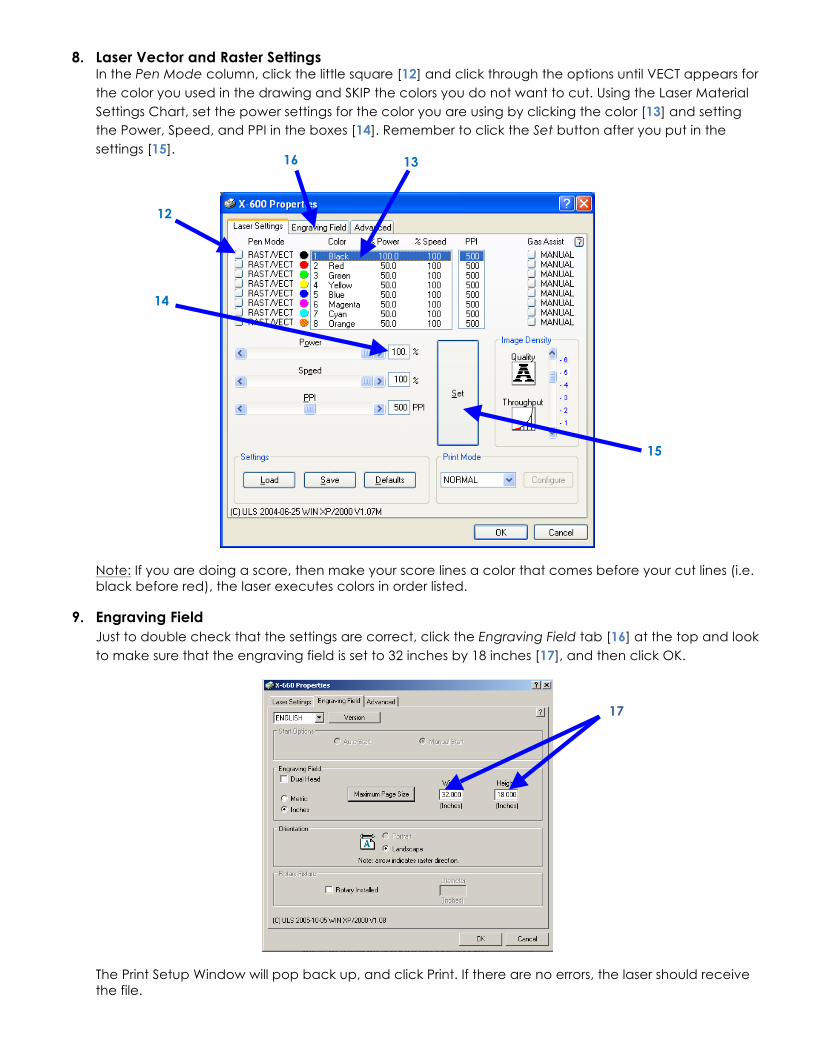
8. Laser Vector and Raster Settings In the Pen Mode column, click the little square [12] and click through the options until VECT appears for the color you used in the drawing and SKIP the colors you do not want to cut. Using the Laser Material Settings Chart, set the power settings for the color you are using by clicking the color [13] and setting the Power, Speed, and PPI in the boxes [14]. Remember to click the Set button after you put in the settings [15].
Note: If you are doing a score, then make your score lines a color that comes before your cut lines (i.e. black before red), the laser executes colors in order listed.
9. Engraving Field Just to double check that the settings are correct, click the Engraving Field tab [16] at the top and look to make sure that the engraving field is set to 32 inches by 18 inches [17], and then click OK.
The Print Setup Window will pop back up, and click Print. If there are no errors, the laser should receive the file.
13
12
14
15
16
17
10. Material Placement Your material should be placed in the lower left corner of the laser. The lower left corner of the laser bed corresponds with the lower left corner of the light grey box you put your drawing in.
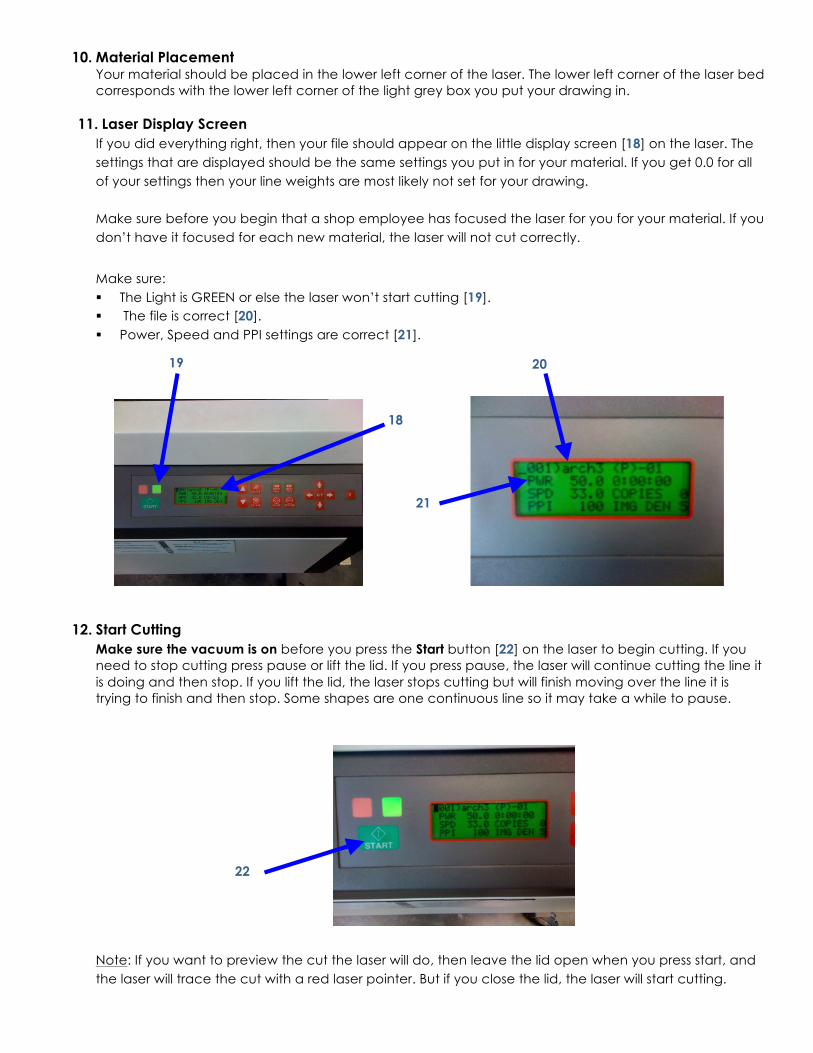
11. Laser Display Screen If you did everything right, then your file should appear on the little display screen [18] on the laser. The settings that are displayed should be the same settings you put in for your material. If you get 0.0 for all of your settings then your line weights are most likely not set for your drawing. Make sure before you begin that a shop employee has focused the laser for you for your material. If you don’t have it focused for each new material, the laser will not cut correctly.
Make sure: The Light is GREEN or else the laser won’t start cutting [19]. The file is correct [20]. Power, Speed and PPI settings are correct [21].
12. Start Cutting
Make sure the vacuum is on before you press the Start button [22] on the laser to begin cutting. If you need to stop cutting press pause or lift the lid. If you press pause, the laser will continue cutting the line it is doing and then stop. If you lift the lid, the laser stops cutting but will finish moving over the line it is trying to finish and then stop. Some shapes are one continuous line so it may take a while to pause.
Note: If you want to preview the cut the laser will do, then leave the lid open when you press start, and the laser will trace the cut with a red laser pointer. But if you close the lid, the laser will start cutting.
18
19 20
21
22