Embed Size (px)
Citation preview
www.logtagrecorders.com
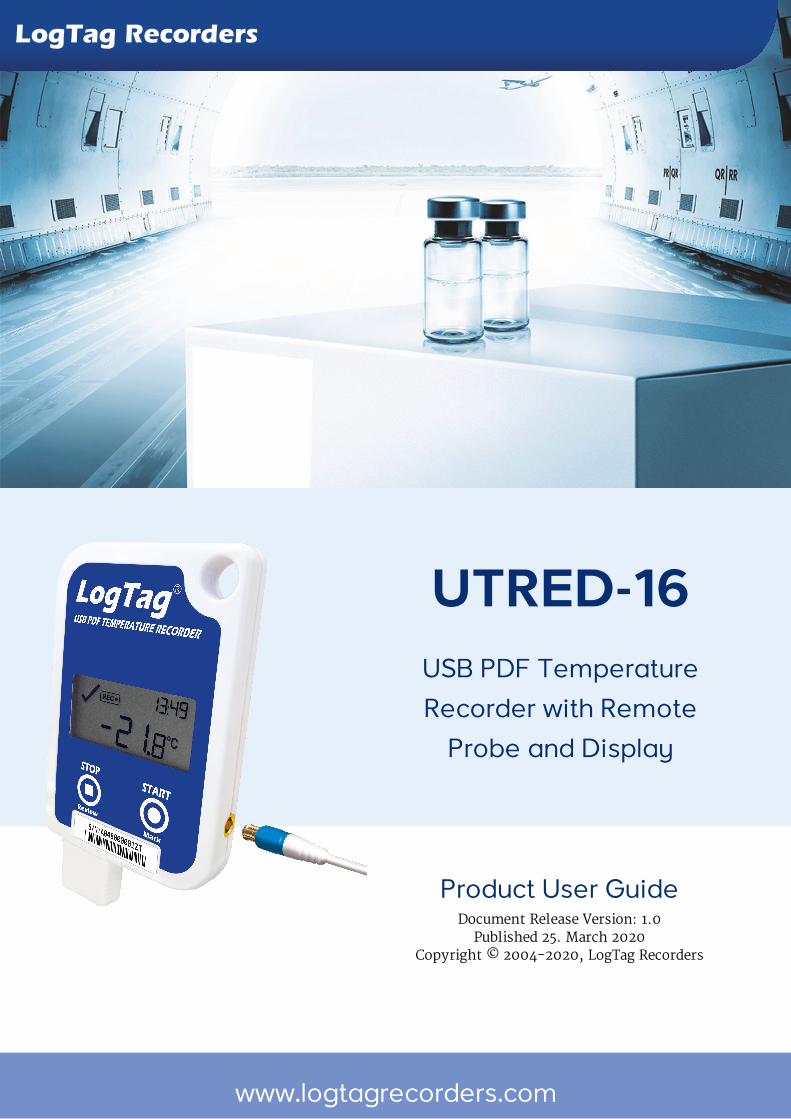
UTRED-16USB PDF Temperature Recorder with Remote
Probe and Display
LogTag Recorders
Product User GuideDocument Release Version: 1.0
Published 25. March 2020Copyright © 2004-2020, LogTag Recorders
UTRED-16 User Guide 2
Contents
Introduction 5
Features 5Case 5Buttons 6Display 6Probes 6PDF 6
What You Need 7Required Items 7Optional Items 7Software Requirements 7
Getting Started 9
Configuring the UTRED-16 for logging 10Preparing the logger 11Standard Configuration Options 11UTRED-16 Start Options 12File Settings 13Advanced Configuration Settings 13Alarm Configuration Options 14Finalizing the configuration 16
Display Overview 17
Operating the Logger 19After the Logger is configured 19Adding the Probe 20Starting the Logger 20During Recording 22Stopping the UTRED-16 33Plugging the UTRED-16 into a USB port 35Accessing the files 36
Interpreting the Data 37Data Evaluation - Report with multiple alarms 37Data Evaluation - Data List 40
Technical Specifications 42
Appendix 1 - Accuracy and Resolution 44Temperature Accuracy 44Temperature Resolution 44
UTRED-16 User Guide 3
Safety InformationThe UTRED-16 USB temperature logger contains a non-replaceable Lithium Battery. When the battery indicates “LOW”, the logger should be replaced, and the battery recycled or disposed of according to your local regulations.
Do not expose the logger to extreme temperatures as it may lead to the destruction of the battery and may cause injuries.
Keep out of the reach of children.
LiabilityLogTag Recorders’ standard warranty terms apply. A copy can be requested by emailing [email protected]. In addition, LogTag Recorders shall not be held liable:
l if the device was used beyond LogTag Recorders’ stated limitations l for any claims due to the improper storage and use of the device l for any problems with refrigeration units l for the bad quality of the monitored goods, if any l for incorrect readings if the device was used with a low battery l for consequential loss
Battery LifeThe main battery in the UTRED-16 is designed to power the device for up to 24 months of operation, provided
l the device was not stored for more than 2 years prior to activation; l the device is not downloaded excessively to a PC (more than once a week); l the recording interval is not shorter than 15 minutes; l the device is stored and operated according to LogTag Recorders’ recommendations.
The UTRED-16 is unable to record readings when connected to USB. You cannot use a USB power supply to power the device!
DisclaimerThe UTRED-16 monitors temperature exposure and not the quality of the goods it accompanies. Its purpose is to signal if product quality evaluation/testing is required.
UTRED-16 User Guide 4
Typographical ConventionsText in this font refers to buttons on the UTRED-16.
Text in this font refers to option settings, dialogue boxes or actions to be taken in LogTag® Analyzer.
Text in this font describes features of the product.
This text describes certain aspects of the product, where incorrect use of a feature may lead to inadvertent loss of data.
This text contains important information for the correct operation ofyour UTRED-16.
This text contains information that explains some aspects of a feature in more detail.
This text contains tips that help you get the best out of your UTRED-16 logger

Introduction UTRED-16 User Guide 5
IntroductionLogTag’s UTRED-16 is a fully configurable, multi-use USB PDF temperature logger with an external temperature probe and a built-in display, that can create temperature reports without the need to install proprietary software or hardware at the destination. Select statistical data can be reviewed directly on the display without the need for a PC. The logger can be configured using LogTag® Analyzer, and is then placed with the goods to be monitored. At the destination the UTRED-16 can be plugged straight into a computer’s USB port and generates a PDF file, which can be accessed using PDF software such as Acrobat Reader.
FeaturesThe UTRED-16 USB PDF temperature logger features the familiar LogTag case layout with an additional USB plug at the bottom.
Case
l Mounting lug for secure fastening of logger to fixtures l USB plug with protective cap - shields USB connector from moisture and dirt l Gold-plated, high-quality MCX socket for external temperature probe l Durable polycarbonate case, IP61

Features UTRED-16 User Guide 6
Buttons
l START/Mark button; used to start the unit, clear alarms or place an inspection mark in the data
l STOP/Review button; used to stop the unit or to review data recorded during the trip
Display
l Shows last recorded temperature and information about alerts l Allows reviewing statistical data
Probes
The UTRED-16 will accept any probe from the ST100 product range.
The UTRED-16 will generate a detailed PDF report when plugged into a USB port of a PC. The PDF report shows a summary of the trip, presents the data in chart and list format. A CSV file of the data list is also available.
The PDF can be shown in several different languages:
l English l French l German l Russian l Spanish
The default ex-factory language is English. You can select which language to use during configuration in the File Settings tab.
You can only change the language during configuration, but not when viewing the PDF.

What You Need UTRED-16 User Guide 7
What You Need
Required Items
In addition to your LogTag® UTRED-16 USB PDF Temperature Recorder with Remote Probe and Display you will need the following:
l an external probe of the ST100 series l a PC running Windows 7 or later and LogTag® Analyzer 3 installed if you wish to
configure and download the logger l a PC with PDF reader software installed for viewing the generated PDF files
Optional Items
In addition to the above, following items are useful accessories:
l a glycol buffer, which simulates environmental behaviour of a vaccine vial
Software Requirements
Software requirements vary depending on the type of file you want the UTRED-16 to generate when plugged into a USB port.
If you wish to configure UTRED-16 products you will need to download the LogTag® Analyzer software from LogTag®’s web site at https://logtagrecorders.com/software/lta3/download/. Follow the instructions to install and start the software.
If you only plan to view a report, plug the UTRED-16 into a computer’s USB port. Depending on the settings made during configuration, a number of on-board files will be generated1 and made available to you in a new drive:
l a PDF file
you can open the file directly from the logger‘s USB memory storage with Acrobat Reader 4.0 or later, or any other compatible PDF reader software of your choice2
1 Depending on the configuration, the UTRED-16 may produce all, some or none of the files.2 PDF files generated by any USB logger can be opened directly in LogTag® Analyzer.

What You Need UTRED-16 User Guide 8
l a CSV file
this file can be imported into a spreadsheet program such as Microsoft Excel l an LTD file
LTD files are LogTag® Analyzer's native, encrypted data files. You can open this file in LogTag® Analyzer, where you can analyze data in detail, generate report files or combine data from multiple recorders for comparison
You can also download data directly into LogTag® Analyzer without accessing the logger‘s on-board files.

Getting Started UTRED-16 User Guide 9
Getting Started
Figure 1: LogTag® recording cycle
Your LogTag® data logger is typically configured, placed with goods that require monitoring and then downloaded once the goods reach their intended destination. Other applications may involve stationary loggers placed in warehouses or to monitor fridges.
Each application requires several steps so you can deploy your data logger and retrieve the recorded measurements. You may be able to skip some of the steps, depending on the way the logger was prepared when it was delivered to you and how you wish to analyze the data.
Things to do before you start logging
1. Download and install the latest version of LogTag® Analyzer 3.You can do this from the LogTag Recorders Software Download page.
2. Configure the unit using LogTag® Analyzer. 3. Connect a probe and place the unit in the monitoring location. 4. Start the logger.
Things to do while recording data
5. Clear an active alarm. 6. Review Minimum and Maximum values during the trip, as well as alarm threshold
violations. 7. Reset Minimum and Maximum values. 8. Place a mark in the recorded readings. 9. Stop the logger recording data.
Things to do when you have finished
10. Plug the unit into a USB port. 11. View the PDF report generated by the UTRED-16. 12. Download the unit to LogTag® Analyzer for analysis. 13. Re-configure or reset the logger, ready for a new trip.

Configuring the UTRED-16 for logging UTRED-16 User Guide 10
Configuring the UTRED-16 for loggingBefore a UTRED-16 logger can be deployed, it must be configured with the parameters required for starting and recording temperature values.
Loggers can be purchased unconfigured, or pre-configured, ready to be started, using one of a number of different profiles that are available.
You can check if your logger is already configured or not by briefly pressing the STOP/Review button.
The logger is already configured to start
If your logger is configured to start it will show either
if the logger was pre-configured for a push-button start, or
if the logger was pre-configured for a Date/Time start.
If your logger shows one of these screens you may skip the configuration process.
The logger is unconfigured
An unconfigured UTRED-16 logger is delivered to you hibernated (i.e. in a state of low power consumption), and pressing the STOP/Review shows:
followed by and then
If your logger is unconfigured you must set it up with the parameters required for:
l starting and recording temperature values l triggering alarms l printing the PDF
Configuring the UTRED-16 for logging UTRED-16 User Guide 11
This is done using LogTag® Analyzer software, which can also be used for downloading and analyzing data.
Preparing the logger
l Start the LogTag® Analyzer software.
l Remove the protective cap and insert the UTRED-16 into a USB port.
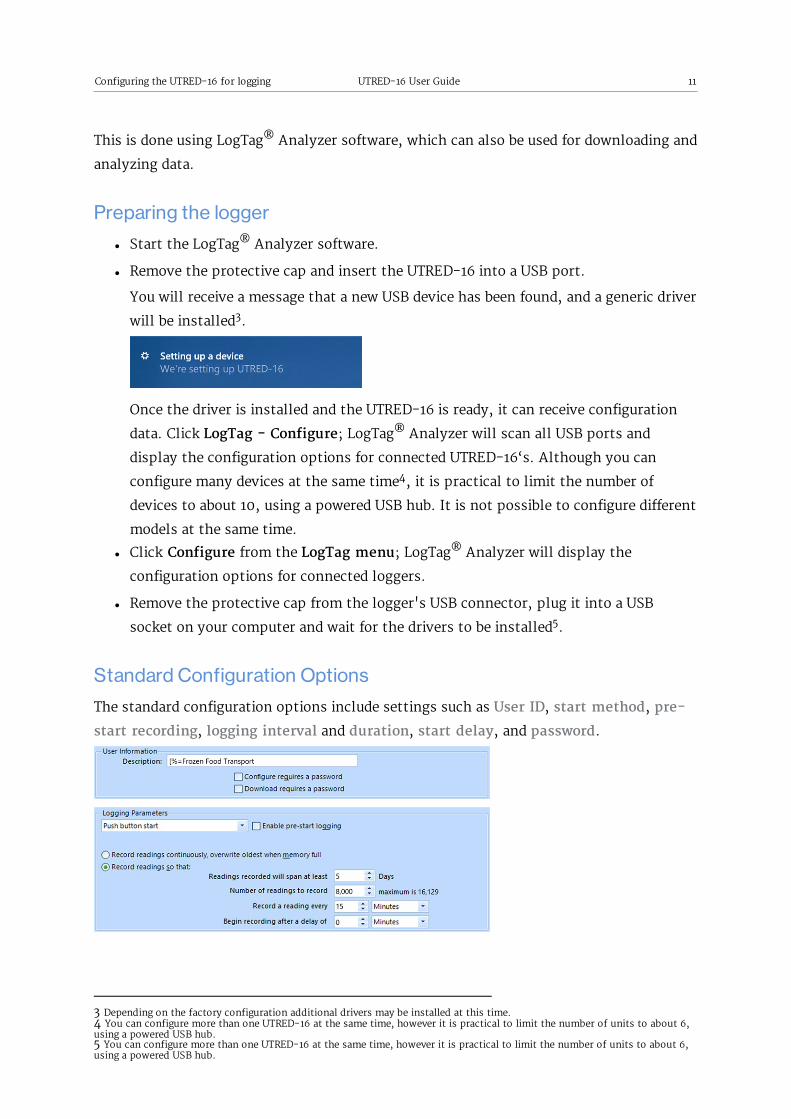
You will receive a message that a new USB device has been found, and a generic driver will be installed3.
Once the driver is installed and the UTRED-16 is ready, it can receive configuration data. Click LogTag - Configure; LogTag® Analyzer will scan all USB ports and display the configuration options for connected UTRED-16‘s. Although you can configure many devices at the same time4, it is practical to limit the number of devices to about 10, using a powered USB hub. It is not possible to configure different models at the same time.
l Click Configure from the LogTag menu; LogTag® Analyzer will display the configuration options for connected loggers.
l Remove the protective cap from the logger's USB connector, plug it into a USB socket on your computer and wait for the drivers to be installed5.
Standard Configuration Options
The standard configuration options include settings such as User ID, start method, pre-start recording, logging interval and duration, start delay, and password.
3 Depending on the factory configuration additional drivers may be installed at this time.4 You can configure more than one UTRED-16 at the same time, however it is practical to limit the number of units to about 6, using a powered USB hub.5 You can configure more than one UTRED-16 at the same time, however it is practical to limit the number of units to about 6, using a powered USB hub.

Configuring the UTRED-16 for logging UTRED-16 User Guide 12
For detailed information about each parameter please read the section about Configuring a LogTag® for logging in LogTag® Analyzer’s User Guide or press F1 for help.
UTRED-16 Start Options
During configuration with LogTag® Analyzer you can decide when the UTRED-16 starts taking temperature readings:
Push button start
The logger will start taking temperature readings as soon as you have pressed the START/Mark button (see Starting the Logger on page 20).
When you choose the push button start option, you can Enable pre-start logging (or disable it) and also Begin recording after a delay.
Pre-start readings
If you enable pre-start readings, the UTRED-16 starts recording as soon as it is unplugged from the USB port6 and will continue to do so until you start the unit. No alarms are processed while pre-start readings are being taken, pre-start readings will not appear in the PDF file after the logger was started, and no PDF file will be generated if only pre-start readings are present in the logger. Using pre-start readings is a good way to avoid data loss if you forget to start the unit, as you can still access the data using LogTag® Analyzer.
Start delay
If you configure the UTRED-16 to start after a delay period, the logger will not immediately record temperature readings after you have pressed START/Mark, but start a countdown timer instead, and record readings only after the timer has ended. The value for the timer is set during configuration. If pre-start readings are enabled, these will continue to be recorded during the delay period.
Date/Time start
The logger will start taking temperature readings at the date and time you specified during configuration (local time). You cannot combine a date/time start with pre-start readings or the start delay function.
6 The first pre-start reading is taken one log interval after you unplug the unit from the USB port.
Configuring the UTRED-16 for logging UTRED-16 User Guide 13
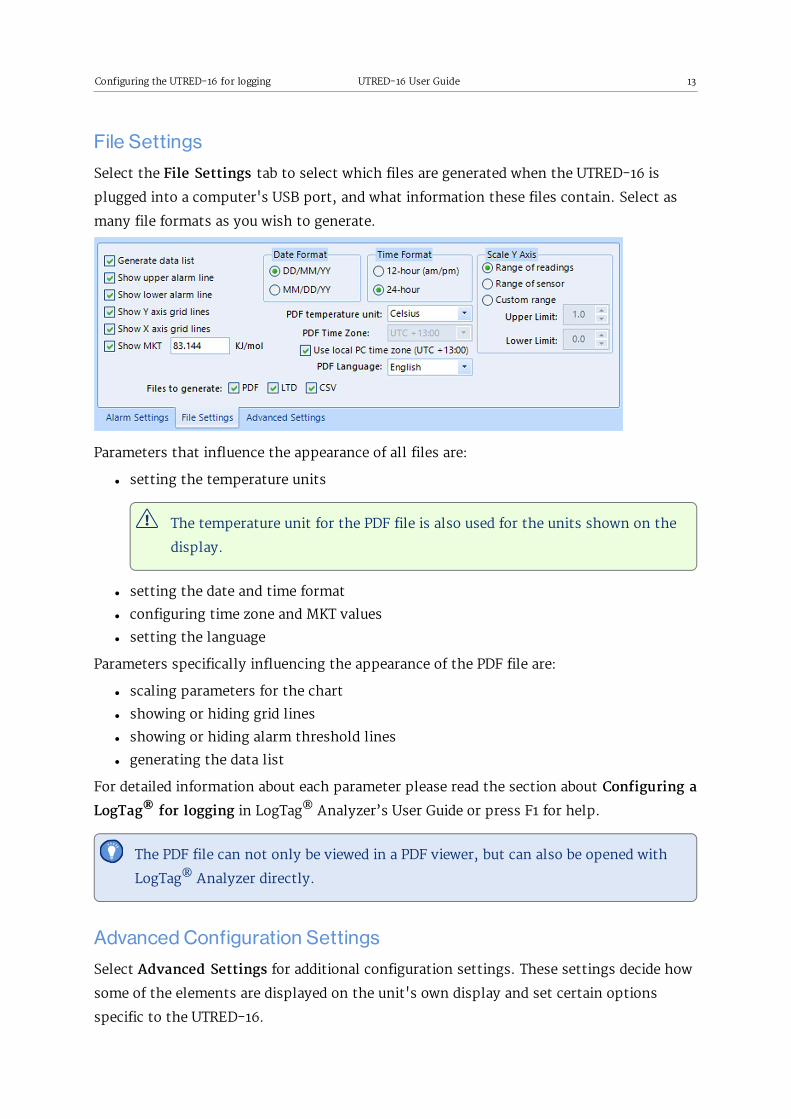
File Settings
Select the File Settings tab to select which files are generated when the UTRED-16 is plugged into a computer's USB port, and what information these files contain. Select as many file formats as you wish to generate.
Parameters that influence the appearance of all files are:
l setting the temperature units
The temperature unit for the PDF file is also used for the units shown on the display.
l setting the date and time format l configuring time zone and MKT values l setting the language
Parameters specifically influencing the appearance of the PDF file are:
l scaling parameters for the chart l showing or hiding grid lines l showing or hiding alarm threshold lines l generating the data list
For detailed information about each parameter please read the section about Configuring a LogTag® for logging in LogTag® Analyzer’s User Guide or press F1 for help.
The PDF file can not only be viewed in a PDF viewer, but can also be opened with LogTag® Analyzer directly.
Advanced Configuration Settings
Select Advanced Settings for additional configuration settings. These settings decide how some of the elements are displayed on the unit's own display and set certain options specific to the UTRED-16.

Configuring the UTRED-16 for logging UTRED-16 User Guide 14
Figure 2: UTRED-16 advanced configuration screen in LogTag® Analyzer 3
Parameters that influence the appearance of the display are:
l Pause alarm/statistics processing (see Paused Readings on page 31) l Switch off display after 30 seconds (Power save, see Power Save on page 31) l allowing a user to reset the trip's minimum and maximum values on the display
during recording l showing the alarm screens during review (Reviewing Alarms on page 24)
Parameters influencing specific behavior of the UTRED-16 are:
l clearing and resetting alarms when the START/Mark button is pressed l leaving the alarm turned on, even if readings return to the normal temperature range
again l allowing the user to stop the logger with the STOP/Review button l allowing the user to reset the logger with the START/Mark button
For detailed information about each parameter please read the section about Configuring a LogTag® for logging in LogTag® Analyzer’s User Guide or press F1 for help.
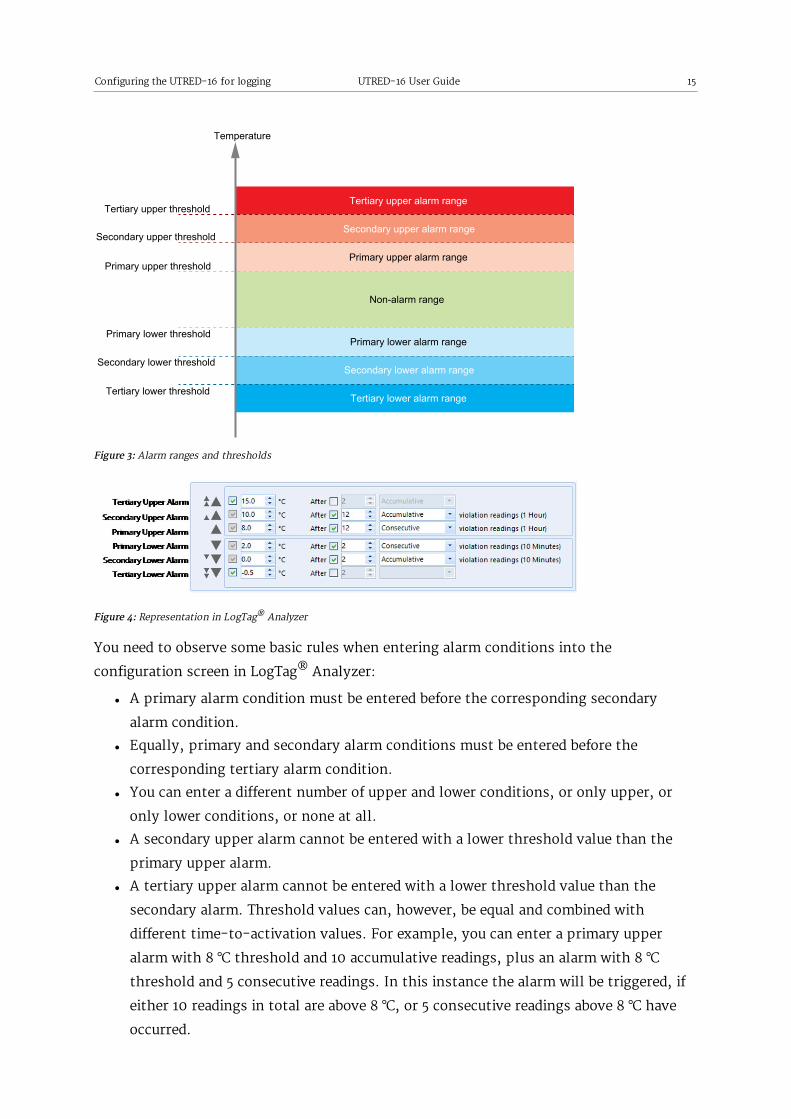
Alarm Configuration Options
LogTag® Analyzer allows up to 6 different alarm trigger conditions for temperature when configuring a UTRED-16 for recording, depending on the model. Each alarm trigger condition consists of a threshold temperature value, an activation type (which can be instant, consecutive or accumulative) and a delay time, if it is not an instant alarm.If an alarm trigger condition requires readings to exceed an upper threshold temperature it is called an upper alarm. If an alarm trigger condition requires readings to go below lower thresholds it is called a lower alarm.
An alarm event is generated, when either of the entered alarm conditions is triggered.The UTRED-16 can have up to three upper alarms, and up to three lower alarms.
Configuring the UTRED-16 for logging UTRED-16 User Guide 15
Figure 3: Alarm ranges and thresholds
Figure 4: Representation in LogTag® Analyzer
You need to observe some basic rules when entering alarm conditions into the configuration screen in LogTag® Analyzer:
l A primary alarm condition must be entered before the corresponding secondary alarm condition.
l Equally, primary and secondary alarm conditions must be entered before the corresponding tertiary alarm condition.
l You can enter a different number of upper and lower conditions, or only upper, or only lower conditions, or none at all.
l A secondary upper alarm cannot be entered with a lower threshold value than the primary upper alarm.
l A tertiary upper alarm cannot be entered with a lower threshold value than the secondary alarm. Threshold values can, however, be equal and combined with different time-to-activation values. For example, you can enter a primary upper alarm with 8 °C threshold and 10 accumulative readings, plus an alarm with 8 °C threshold and 5 consecutive readings. In this instance the alarm will be triggered, if either 10 readings in total are above 8 °C, or 5 consecutive readings above 8 °C have occurred.

Configuring the UTRED-16 for logging UTRED-16 User Guide 16
Any alarm condition that is activated will be shown on the PDF, in the software and on the display.
The section about Reviewing Alarms on page 24 shows examples of how this is represented and reviewed on the display.
Finalizing the configuration
Click Configure to upload the configuration data to the UTRED-16.
When the configuration is complete, unplug the UTRED-16 from the USB socket and replace the protective cap.
If you wish to configure more UTRED-16 units with the same configuration, insert the next loggers into USB sockets, wait until they are ready for configuration and click Repeat Configure. Alternatively, you can use the Profile function to configure multiple units with the same settings.
You can upload the configuration to a UTRED-16 logger as often as required.

Display Overview UTRED-16 User Guide 17
Display Overview
ALARM/OK indicator The symbol is shown as soon as the UTRED-16 has registered an alarm event. While there are no alarms, the symbol is shown.
Recording indicators The recording indicators show what the UTRED-16 is currently recording.
l If READY is shown, the UTRED-16 is ready to be started with the START/Mark button. Depending on the configuration it may already record pre-start readings.
l If STARTING is shown, the logger has been started, and a start delay is active. The word DELAY is also shown, together with the time in hours and minutes until the start.
l If is shown, the UTRED-16 is recording temperature at the sample interval defined during configuration.
l If is shown together with the word PAUSED, the product is also recording, but the recorded values are not taken into account when calculating alarm events and durations.
l If the word STOPPED is shown, the UTRED-16 has finished recording temperature data.
Mark indicator The word MARK is shown when the next temperature reading is identified with an inspection mark in the recorded data.
MIN/MAX indicator
The word MAX is shown when the temperature on the display represents the maximum recorded temperature for the current trip. The word MIN is shown when the temperature on the display represents the minimum recorded temperature for the current trip7.
Temperature Units Depending on the selected PDF temperature units, this shows either °F or °C.
7 If MIN/MAX data were reset during the trip, these temperatures reflect only the period since the reset took place.
Display Overview UTRED-16 User Guide 18
Temperature ValueThis shows the most recently recorded temperature while the UTRED-16 is recording. Once the logger has stopped, nothing will be displayed. During review, this will show minimum or maximum temperatures.
Time Value and Time IndicatorsThe time value display is used to show one of the following:
l the current time l the time remaining until the logger starts recording (for a delayed start) l a duration, for example of an alarm
The time indicators identify which of those is displayed as follows:
l If TIME is shown, the time value represents the current time in hours and minutes (24- hour format).
l If DELAY is shown, the time value represents a start delay, or the time remaining until a date/time start will occur.
l If DURATION is shown, the time value represents the duration, for example the time above the upper alarm limit.
The word boot appears in place of the clock if new firmware is being uploaded to the UTRED-16.
The word USb appears when the unit is plugged into a USB port.
Above/Below Threshold Arrows The up-arrow is shown when the temperature displayed (i.e. last recorded) is above the specified upper temperature threshold. The down-arrow is shown when the temperature displayed is below the specified lower temperature threshold.
The four smaller up/down-arrows are secondary and tertiary alarm symbols. They are used when more than one upper or more than one lower alarm is defined and are shown then the current temperature is above or below the corresponding alarm levels.
Alarm Threshold Markers The upper alarm threshold marker ( ) is shown if one of the upper temperature limits triggered an alarm event. It is also displayed when the review screen shows one of the upper threshold values.
The lower alarm threshold marker ( ) is shown if an alarm event occurred at one of the lower temperature limits. It is also displayed when the review screen shows one of the lower threshold values.
The four smaller up/down-arrows are secondary and tertiary alarm symbols. They are displayed when more than one upper or more than one lower alarm is defined and the current temperature is above or below the corresponding alarm levels.
Battery Low The battery low symbol will appear if the UTRED-16's battery is low. If the symbol is not shown while the display is turned on, the battery is still OK.
Operating the Logger UTRED-16 User Guide 19
Operating the LoggerThe following sections show how to operate the product, and what information you can expect to see on the display.
After the Logger is configured
Push Button Start
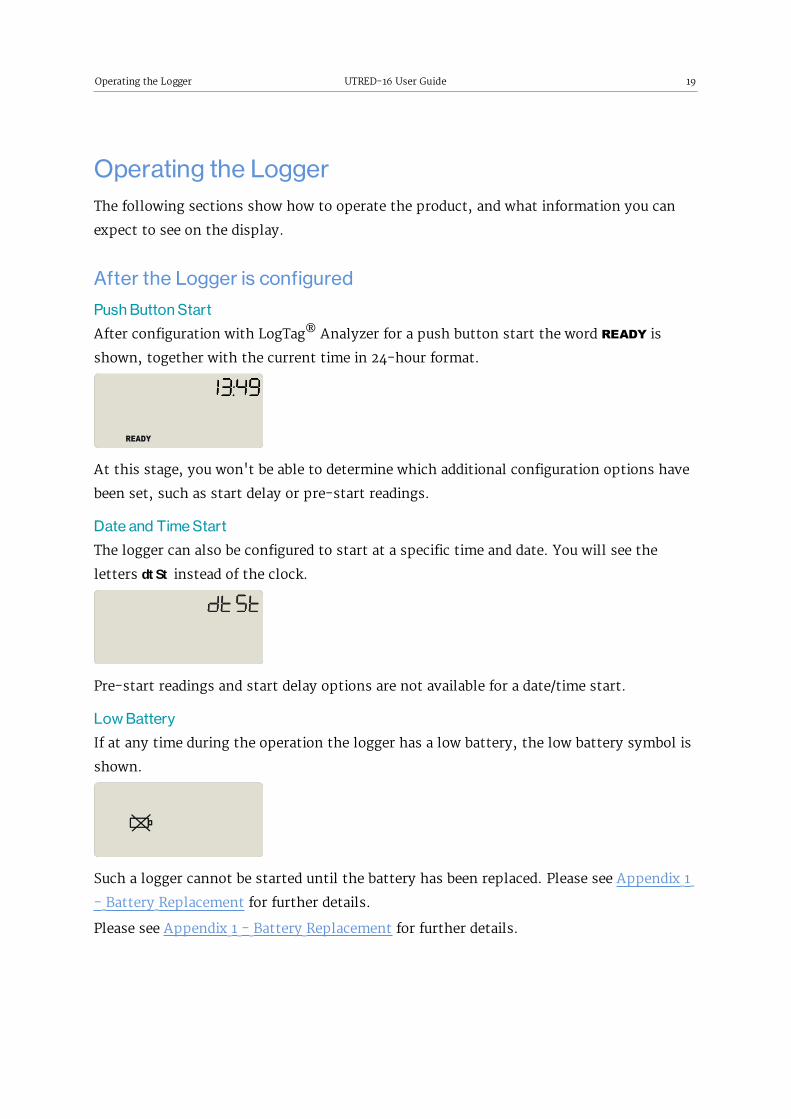
After configuration with LogTag® Analyzer for a push button start the word READY is shown, together with the current time in 24-hour format.
At this stage, you won't be able to determine which additional configuration options have been set, such as start delay or pre-start readings.
Date and Time Start
The logger can also be configured to start at a specific time and date. You will see the letters dt St instead of the clock.
Pre-start readings and start delay options are not available for a date/time start.
Low Battery
If at any time during the operation the logger has a low battery, the low battery symbol is shown.
Such a logger cannot be started until the battery has been replaced. Please see Appendix 1 - Battery Replacement for further details.
Please see Appendix 1 - Battery Replacement for further details.

Operating the Logger UTRED-16 User Guide 20
Adding the Probe
Before the UTRED-16 can record temperature data you will need to connect an external probe.
The UTRED-16 accepts any ST100 probe. Plug the sensor into the socket located on the side of the device, as shown.
Starting the Logger
Before you carry out the following start procedure, please ensure you have plugged the external probe firmly into the socket on the side of the logger.
Push button start, quickstart enabled
Press and hold the START/Mark button until READY disappears and the symbolSTARTING is shown. The UTRED-16 now records temperature data. This start option works very similar to other LogTag® LED products.
Push button start, quickstart disabled
Press and hold the START/Mark button. READY immediately disappears, and the symbol blinks for 4 seconds. The symbol then shows permanently for 2 seconds. If you release the button during this time, the logger starts taking temperature readings. The
symbol remains shown. If the button is released earlier than 4 seconds or later than 6 seconds, the display shows READY again, and the logger does not start.
Push Button Start with Start Delay
If the logger was configured for push button start with a start delay (regardless of quickstart settings), the word DELAY is shown instead of the symbol, once you have started the logger.
The delay time is shown in hours and minutes, if it is less than 24:00 hours, and the word

Operating the Logger UTRED-16 User Guide 21
HOURS is shown.
The time counts down and the UTRED-16 starts recording when it reaches 0: 00.
If the start delay is greater than 24 hours the word DAYS is shown along with the number of full days remaining.
Each time a user presses the START/Mark button during the start delay phase, the start delay value is reset to its originally configured value.
Automatic date/time start
If you configured the UTRED-16 for a date/time start, dtSt will be displayed instead of the clock.
The logger will record temperature values as soon as the configured date and time have passed.
If the logger is still plugged into a USB port when the start time passes, the recorded readings will show USB Paused on the PDF and in the software's reports.
Operating the Logger UTRED-16 User Guide 22
During Recording
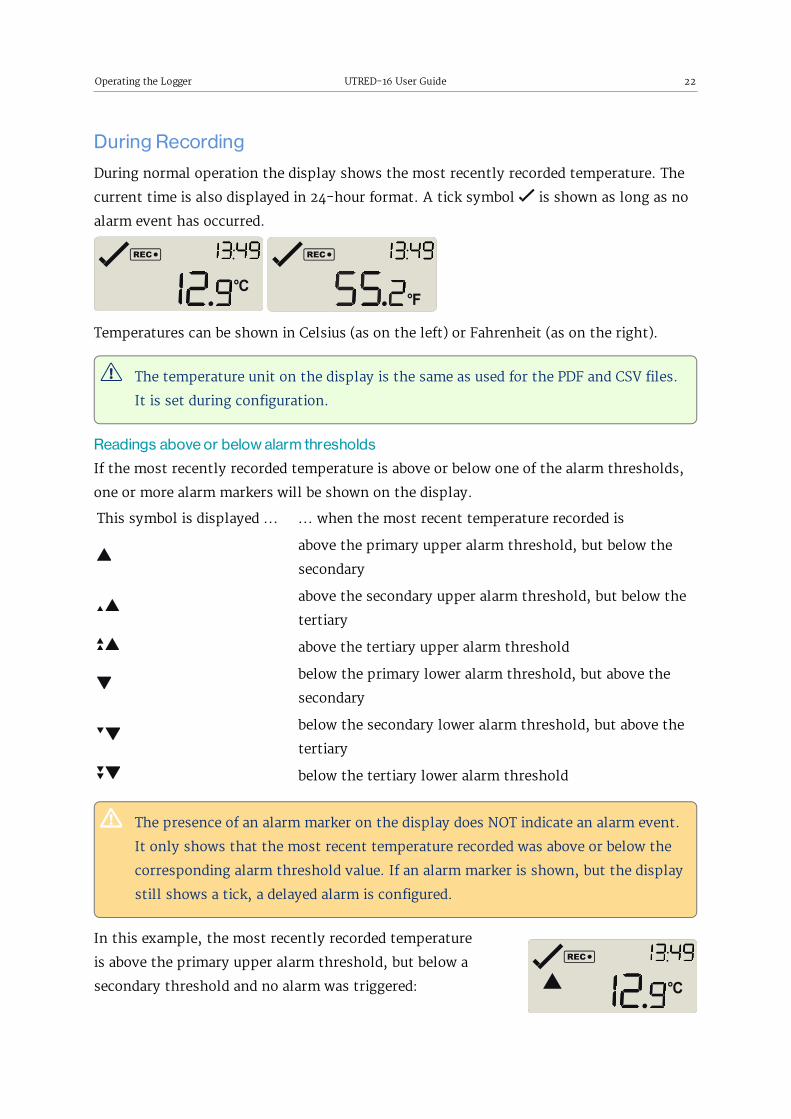
During normal operation the display shows the most recently recorded temperature. The current time is also displayed in 24-hour format. A tick symbol is shown as long as no alarm event has occurred.
Temperatures can be shown in Celsius (as on the left) or Fahrenheit (as on the right).
The temperature unit on the display is the same as used for the PDF and CSV files. It is set during configuration.
Readings above or below alarm thresholds
If the most recently recorded temperature is above or below one of the alarm thresholds, one or more alarm markers will be shown on the display.
This symbol is displayed ... ... when the most recent temperature recorded is
above the primary upper alarm threshold, but below the secondary
above the secondary upper alarm threshold, but below the tertiary
above the tertiary upper alarm threshold
below the primary lower alarm threshold, but above the secondary
below the secondary lower alarm threshold, but above the tertiary
below the tertiary lower alarm threshold
The presence of an alarm marker on the display does NOT indicate an alarm event. It only shows that the most recent temperature recorded was above or below the corresponding alarm threshold value. If an alarm marker is shown, but the display still shows a tick, a delayed alarm is configured.
In this example, the most recently recorded temperature is above the primary upper alarm threshold, but below a secondary threshold and no alarm was triggered:
Operating the Logger UTRED-16 User Guide 23
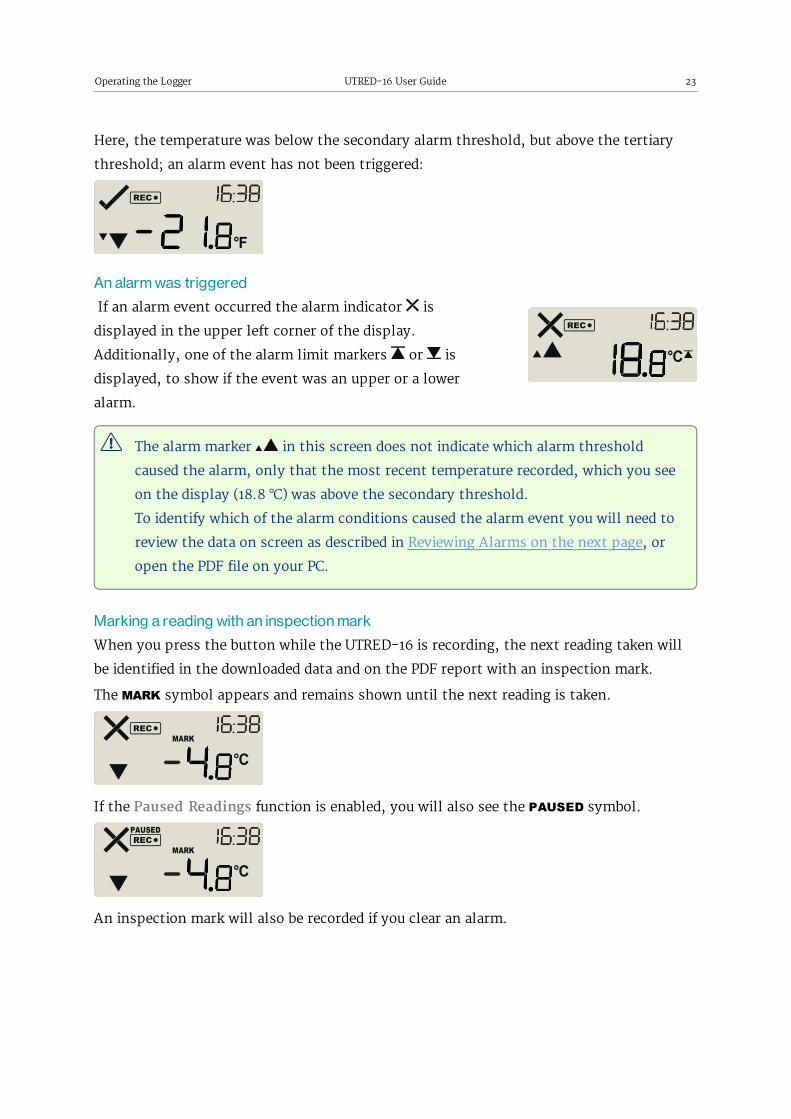
Here, the temperature was below the secondary alarm threshold, but above the tertiary threshold; an alarm event has not been triggered:
An alarm was triggered
If an alarm event occurred the alarm indicator is displayed in the upper left corner of the display. Additionally, one of the alarm limit markers or is displayed, to show if the event was an upper or a lower alarm.
The alarm marker in this screen does not indicate which alarm threshold caused the alarm, only that the most recent temperature recorded, which you see on the display (18.8 °C) was above the secondary threshold.To identify which of the alarm conditions caused the alarm event you will need to review the data on screen as described in Reviewing Alarms on the next page, or open the PDF file on your PC.
Marking a reading with an inspection mark
When you press the button while the UTRED-16 is recording, the next reading taken will be identified in the downloaded data and on the PDF report with an inspection mark.
The MARK symbol appears and remains shown until the next reading is taken.
If the Paused Readings function is enabled, you will also see the PAUSED symbol.
An inspection mark will also be recorded if you clear an alarm.

Operating the Logger UTRED-16 User Guide 24
Reviewing Alarms
At any time you can review the recorded statistics by briefly pressing the STOP/Review button. You can do this while the logger is still taking temperature readings, or when it has already stopped, but not when it is plugged into a USB port.
After each subsequent press of STOP/Review the next review screen is shown. The number of screens available for review depends on the number of configured alarms, and whether or not the alarm review screens have been enabled. If no alarms are configured, or the alarm review screens are disabled, only the MIN and MAX screens appear.
Figure 5: Review cycle with threshold screens disabled

Operating the Logger UTRED-16 User Guide 25
If 6 alarms are configured and the alarm review screens are enabled (which is the maximum), 8 screens will appear.
Figure 6: Review cycle with all alarms enabled
You can terminate the review at any time by pressing START/Mark, or by waiting 30 seconds without pressing any button.
Operating the Logger UTRED-16 User Guide 26
In the example following alarm settings are used:
Figure 7: Alarm configuration settings in LogTag® Analyzer
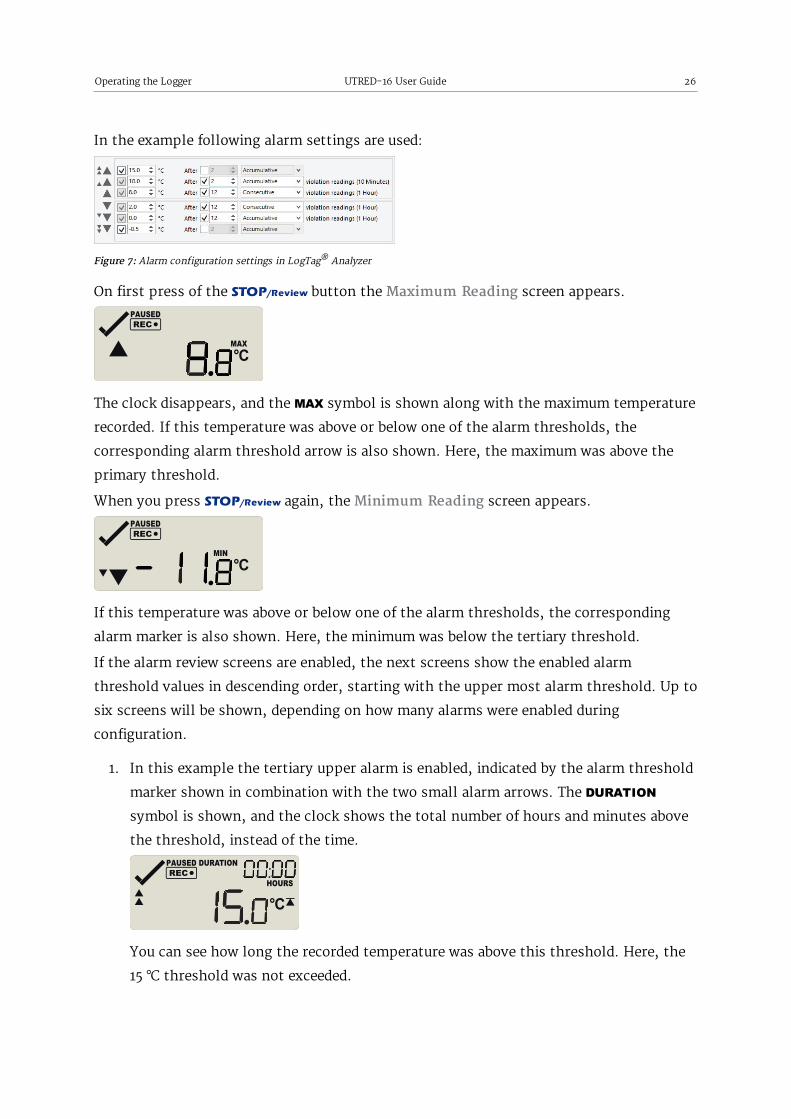
On first press of the STOP/Review button the Maximum Reading screen appears.
The clock disappears, and the MAX symbol is shown along with the maximum temperature recorded. If this temperature was above or below one of the alarm thresholds, the corresponding alarm threshold arrow is also shown. Here, the maximum was above the primary threshold.
When you press STOP/Review again, the Minimum Reading screen appears.
If this temperature was above or below one of the alarm thresholds, the corresponding alarm marker is also shown. Here, the minimum was below the tertiary threshold.
If the alarm review screens are enabled, the next screens show the enabled alarm threshold values in descending order, starting with the upper most alarm threshold. Up to six screens will be shown, depending on how many alarms were enabled during configuration.
1. In this example the tertiary upper alarm is enabled, indicated by the alarm threshold marker shown in combination with the two small alarm arrows. The DURATION symbol is shown, and the clock shows the total number of hours and minutes above the threshold, instead of the time.
You can see how long the recorded temperature was above this threshold. Here, the 15 °C threshold was not exceeded.

Operating the Logger UTRED-16 User Guide 27
2. The secondary upper alarm is shown next, indicated by the alarm threshold marker shown in combination with a single small alarm arrow.
As with the previous alarm the 10 °C threshold was not exceeded.
3. The primary upper alarm is shown next, indicated by the alarm threshold marker shown without any small alarm arrows.
In this example the temperature was above 8 °C for 1 day, 8 hours and 35 minutes. If the duration is longer than 24 hours, the display will alternate between showing days and hours.
4. The primary lower alarm is shown next, indicated by the alarm threshold marker shown without any small alarm arrows.
In this example, the temperature was lower than the primary threshold for 1 hour and 20 minutes.
5. The secondary lower alarm is shown next, indicated by the alarm threshold marker shown without one small alarm arrow.
In this example, the temperature was lower than the secondary threshold for 35 minutes.

Operating the Logger UTRED-16 User Guide 28
6. The tertiary lower alarm is shown next, indicated by the alarm threshold marker shown with two small alarm arrows.
In this example, the temperature was not lower than the tertiary threshold.

Operating the Logger UTRED-16 User Guide 29
Resetting the Trip Minimum/Maximum Temperatures
The currently stored Min/Max temperature values can be reset at any time while the unit is recording, but not once the unit has been stopped.
To reset the values, follow this procedure:
l Press STOP/Review to display the trip maximum temperature value.
l Press STOP/Review again to display the trip minimum temperature value.
You can only complete the next steps if you are viewing the Minimum temperature screen!
l Press and hold STOP/Review. After 1 second the following screen sequence will show, and then repeat once:
l After approx. seconds, following screen will show:
Release the STOP/Review button when the screens no longer alternate. The values will be reset, and the normal recording screen will be shown.
l If you keep holding the STOP/Review button, the currently stored min/max values will be retained.

Operating the Logger UTRED-16 User Guide 30
l Releasing the button within the 6-second period after the initial press switches to the first review screen.
A min/max reset mark will be recorded in the logged data. The logger will now track new min/max values, with the first update shown as soon as the next reading is taken.
You will be able to see in the chart in LogTag® Analyzer and in the PDF report when the min/max values were cleared, but you will not be able to review previous min/max values on screen once they have been cleared.
Clearing an Alarm
A UTRED-16 can be configured so you can clear an alarm from the display. To do this, press and hold the STOP/Review button.
After 2 seconds the alarm will be cleared and the will change to a . If you keep holding the button for a further 2 seconds, the will show again and the alarm will not be cleared.
An inspection mark will be recorded against the next temperature reading taken, whether you clear the alarm or not.
An alarm cannot be cleared once the UTRED-16 has stopped recording. Alarms resulting from an accumulation of readings can also not be cleared.

Operating the Logger UTRED-16 User Guide 31
Paused Readings
During configuration of the UTRED-16 you can set the option to ignore up to 15 readings for alarm and statistics calculations after either button is pressed. The readings are still shown on the graph and in the data listing, but they are labelled as paused, and their value is ignored when determining alarm trigger conditions, minimum/maximum values and other statistical calculations.
Pausing readings is useful, for example, when you need to temporarily remove the probe from the monitored location to inspect goods, but you do not wish to trigger an alarm as a result of you handling the probe.
It allows the logger to acclimatize to the environment again, before further readings are processed.
After a button press the display shows PAUSED next to the symbol. PAUSED will turn off as soon as the last ignored reading has been recorded.
The option is set in the Advanced Settings tab during configuration with LogTag® Analyzer and is expressed in number of readings after the last button press.
Paused readings are specially marked in the graph and data listings.
How long PAUSED is displayed depends on when between readings you press the button. It will show longer, if the button is pressed just after the logger takes a reading, but shorter if you press the button just before. For example, if you configure a logging interval of 10 minutes and 2 paused readings, the time PAUSED is shown could be as short as 10 minutes, but as long as 20 minutes.
Power Save
When Power Save is enabled, the display will automatically switch off if none of the buttons have been pressed for 30 seconds.
This function is appropriate in applications where you don't need to look at the display frequently, such as in transit monitoring applications, as the logger uses less battery power when the display is not turned on.
Pressing any button will re-activate the display.
Power save is enabled or disabled when configuring the UTRED-16 via LogTag® Analyzer in the Advanced Settings tab.

Operating the Logger UTRED-16 User Guide 32
Battery Low while recording
If the battery is low while the UTRED-16 is still recording, the battery low symbol is shown in addition to any other currently displayed information.
The product has reached the end of its life.
If you continue to use the UTRED-16 despite a low battery warning you may lose readings, or the readings recorded may be inaccurate.
Probe is disconnected
The display shows instead of a temperature value if the logger's external temperature probe is disconnected.
Any values recorded during this time will not be taken into account when calculating statistics values or alarms.
If, for example, the temperature was above 10 °C for 12 hours (which would normally trigger an alarm event), but the probe was disconnected for 3 hours during this time, no alarm would be generated.
When evaluating data, any readings taken while the probe is disconnected are shown as -- . - in the data list. The chart in LogTag® Analyzer will show a gap during this period.

Operating the Logger UTRED-16 User Guide 33
Stopping the UTRED-16
Automatically
The UTRED-16 automatically stops recording temperature when the maximum number of readings specified during configuration has been reached. Your unit can also be set up to stop when it is inserted into a USB socket. This option needs to be set up at the factory and cannot be changed during configuration with LogTag® Analyzer. Your distributor can supply more information about this option.
Manually
You can configure a UTRED-16 so it can be stopped with the button. This feature is useful when you take the logger out of a shipment and don’t want to falsify the statistics with readings taken after the shipment completion. The stop function is enabled in the Advanced Options dialogue during configuration.
Press and hold the button. The STOPPED symbol shows in addition to for 2 seconds.
The symbol turns off after 2 seconds. Release the button and the logger stops taking temperature readings.
If the button is released while is still on, or you wait until STOPPED disappears, the display shows again, and the logger continues to record data. In this case, an inspection mark will be recorded in the data against the next temperature reading. The MARK symbol will show, and the PAUSED symbol also shows if this feature is enabled.
Unlike many other LogTag® products with display, the alarm does not have to be cleared before the logger can be stopped.
Logger has stopped
Once the logger has stopped, the display will show:
l the STOPPED symbol l the OK indicator ( ) if no alarm was recorded l the alarm indicator ( ) and one or both alarm threshold( ) indicators if an alarm
was recorded during the trip that has not been cleared l the current time l the battery low symbol ( ) if the battery is low
The logger does not show a temperature reading.

Operating the Logger UTRED-16 User Guide 34
The logger has stopped, and no alarms were recorded during the trip.
Here, the logger has stopped, and an upper alarm was recorded during the trip.
Resetting the Logger
You can reset a UTRED-16 back to its original READY state. Once reset, recording can be started again.
When performing this procedure all recordings and statistics stored in the logger are deleted and cannot be recovered. Please ensure your data has been saved!
All settings in the logger are retained.
For this process to work, the logger must be STOPPED.
Press and hold the START/Mark button. The READY
symbol will turn on.
When the STOPPED symbol turns off, release the button within 2 seconds. The logger is now ready to be started again.
If the button is released while STOPPED is still on, or you wait until the READY symbol disappears, the display shows STOPPED again, and the logger remains stopped. This means, the data from the previous trip is still accessible.
The ability to reset a logger is enabled or disabled in the Advanced Settings tab when configuring the UTRED-16 via LogTag® Analyzer.

Operating the Logger UTRED-16 User Guide 35
Plugging the UTRED-16 into a USB port
As soon as you plug the UTRED-16 into a USB port, the word USb appears.
If you have configured the logger to generate files, USb remains turned on until all files have been generated.
During the file generation a small animation will play on the display.
As soon as the file generation is finished, USb will blink every second to indicate these files can now be accessed.
These files are generated each time you plug the logger into the USB port, regardless of whether the logger is still recording readings or not.
What happens on your computer depends on the operating system of the computer, the settings made during configuration and whether or not LogTag® Analyzer is running.
Microsoft Windows
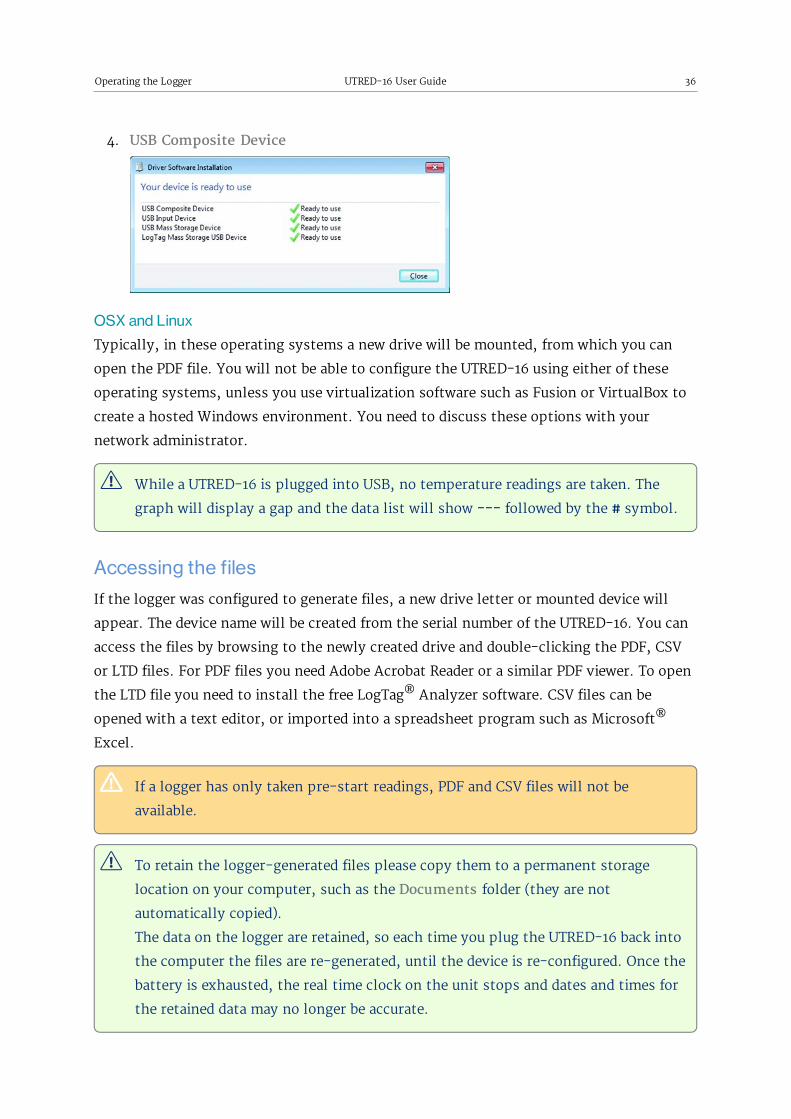
Up to four drivers will now be installed, depending on the UTRED-16's configuration.
All drivers are part of the operating system and will typically not require administrator privileges for your computer.
1. Mass Storage Device
2. LogTag Mass Storage USB Device
These two devices are required so you can access the data files in the same way as a USB memory stick. These drivers will not be installed if the UTRED-16 does not generate files.
3. USB Input Device (HID)
This device is used for communication to LogTag® Analyzer and its driver will always be installed, even if LogTag® Analyzer is not present on the computer.
Operating the Logger UTRED-16 User Guide 36
4. USB Composite Device
OSX and Linux
Typically, in these operating systems a new drive will be mounted, from which you can open the PDF file. You will not be able to configure the UTRED-16 using either of these operating systems, unless you use virtualization software such as Fusion or VirtualBox to create a hosted Windows environment. You need to discuss these options with your network administrator.
While a UTRED-16 is plugged into USB, no temperature readings are taken. The graph will display a gap and the data list will show --- followed by the # symbol.
Accessing the files
If the logger was configured to generate files, a new drive letter or mounted device will appear. The device name will be created from the serial number of the UTRED-16. You can access the files by browsing to the newly created drive and double-clicking the PDF, CSV or LTD files. For PDF files you need Adobe Acrobat Reader or a similar PDF viewer. To open the LTD file you need to install the free LogTag® Analyzer software. CSV files can be opened with a text editor, or imported into a spreadsheet program such as Microsoft® Excel.
If a logger has only taken pre-start readings, PDF and CSV files will not be available.
To retain the logger-generated files please copy them to a permanent storage location on your computer, such as the Documents folder (they are not automatically copied).The data on the logger are retained, so each time you plug the UTRED-16 back into the computer the files are re-generated, until the device is re-configured. Once the battery is exhausted, the real time clock on the unit stops and dates and times for the retained data may no longer be accurate.

Interpreting the Data UTRED-16 User Guide 37
Interpreting the Data
Figure 8: Sample report page with Multiple Alarm Thresholds
Data Evaluation - Report with multiple alarms
Alarm Status
This shows at a glance if the UTRED-16 recorded alarm conditions during the trip (showing a red ) or if no alarms were recorded (showing a green ).
Recorded Data Overview
This section shows at what time the logger started to record data, when it finished, how many readings were recorded and how long that took.

Interpreting the Data UTRED-16 User Guide 38
Temperature Scale
A temperature scale is shown, which adjusts dynamically depending on the settings made during configuration of the logger with LogTag® Analyzer.
Markers The chart will show marks where the UTRED-16 has been downloaded (º) or where an
inspection mark has been placed with the START/Mark or STOP/Review button (•). It also
shows Paused marks (•) where a button press has prevented readings from being used for statistics and alarm calculations.
USB Paused Readings
USB loggers cannot take a reading while plugged into a USB port. A gap is shown in the graph where the UTRED-16 was plugged in at the time it would otherwise have taken a reading. The list shows instead of the reading.
Recorded Data Chart
The chart shows a graphical representation of the data during the trip. As part of the UTRED-16 configuration process you set the parameters that influence how the chart is presented.
Legend
Shows the symbols for download marks, inspections marks and paused marks if they appear in the readings.
File Information
This section shows general information about the PDF file, such as generation time, date and time formats used in the chart and the data list as well as the file name, which is compiled from information about the data it contains: LogTag_[serial_number]_[trip number]_[file creation date]_file creation time]_[OK or ALM].pdfOther files that may be generated have the extensions *.csv and *.ltd.
Logger Information and Configuration
This section shows general information such as serial and model numbers, trip number, battery status and description. It shows how the logger was started, if a start delay was active and the interval used for taking readings.
Logger Statistics Overview
This section gives a brief overview of the temperature data collected during the trip. It shows minimum and maximum values, when these occurred and also shows average, standard deviation and MKT values.

Interpreting the Data UTRED-16 User Guide 39
Upper and Lower Alarm Information
These two sections summarize the alarm trigger conditions and occurrences during the trip, including:
l alarm threshold temperature value l any delay value for consecutive or accumulative alarms l the total time above or below a threshold l how often an alarm occurred l whether or not an alarm was generated for this alarm trigger
You may see up to three alarms for each direction, depending on the logger's configuration.
Upper Threshold Lines
Upper alarm thresholds are shown with red dashed lines --- so you can see at a glance where temperatures went above set limits. You may see up to three lines depending on configuration and zoom settings.
Lower Threshold Lines
Lower alarm thresholds are shown with blue dashed lines --- so you can see at a glance where temperatures went below set limits. You may see up to three lines depending on configuration and zoom settings.
Page information
The current page number and the total number of pages appear on every page.
Interpreting the Data UTRED-16 User Guide 40
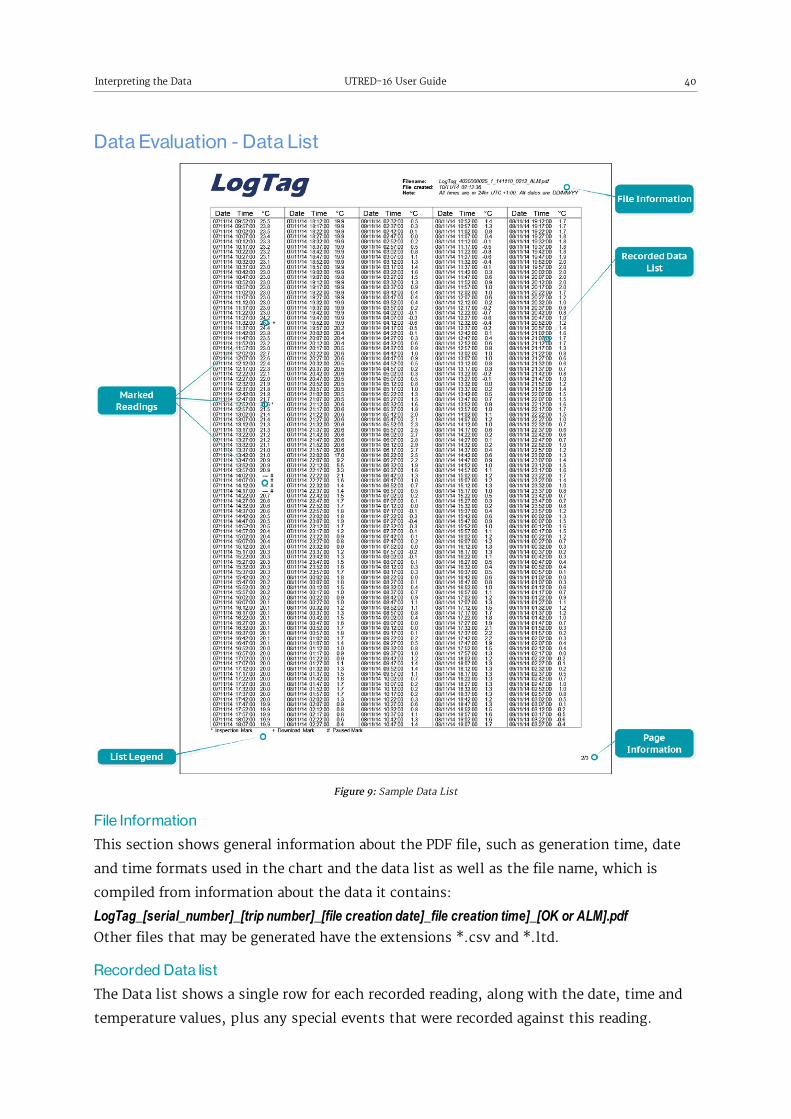
Data Evaluation - Data List
Figure 9: Sample Data List
File Information
This section shows general information about the PDF file, such as generation time, date and time formats used in the chart and the data list as well as the file name, which is compiled from information about the data it contains: LogTag_[serial_number]_[trip number]_[file creation date]_file creation time]_[OK or ALM].pdfOther files that may be generated have the extensions *.csv and *.ltd.
Recorded Data list
The Data list shows a single row for each recorded reading, along with the date, time and temperature values, plus any special events that were recorded against this reading.

Interpreting the Data UTRED-16 User Guide 41
Page information
The current page number and the total number of pages appear on every page.
Marked readings
In the data list, each entry may be marked with one or more of the following symbols, depending on which event occurred when the reading was taken:
l A + symbol will be shown, if the UTRED-16 was downloaded with LogTag® Analyzer just prior to the reading being taken.
l A * symbol will be shown where an inspection mark has been placed. l A $ symbol will be shown where readings were paused as a result of a button press. l A # symbol will be shown where the logger was plugged into a USB port at the time
it would otherwise have taken a reading. l A % symbol will be shown when the min/max readings were reset.
USB Paused Readings
USB loggers cannot take a reading while plugged into a USB port. A gap is shown in the graph where the UTRED-16 was plugged in at the time it would otherwise have taken a reading. The list shows instead of the reading.
Probe Disconnected
A gap is shown in the graph where the UTRED-16's probe was not plugged in at the time it took a reading. The list shows instead of the reading.
Legend
Shows the symbols for download marks, inspections marks and paused marks if they appear in the readings.

Technical Specifications UTRED-16 User Guide 42
Technical SpecificationsModel Number UTRED-16
Sensor Measurement Range -40 °C to +99 °C (-40 °F to +210 °F)
Operating Temperature Range -30 °C to +70 °C (-22 °F to +158 °F)
Storage Temperature Range 0 °C to +40 °C (32 °F to +104 °F)
Ambient humidity range during transport and use
0 to 95%RH
Rated Temperature Accuracy
Better than ±0.5 °C (±0.9 °F) for -20 °C to +40 °C (-4 °F to +104 °F), typically ±0.3 °C (0.6 °F)Better than ±0.8 °C (±1.4 °F) for -40 °C to -20 °C (-40 °F to -4 °F), typically ±0.5 °C (0.9 °F)Better than ±0.8 °C (±1.4 °F) for +40 °C to +70 °C (104 °F to 158 °F), typically ±0.7 °C (1.3 °F)Better than ±1.2 °C (±2.2 °F) for +70 °C to +99 °C (158 °F to 210 °F), typically ±1 °C (1.8 °F)Please see resolution chart in Accuracy and Resolution
Rated Temperature Resolution
Better than 0.1 °C (0.2 °F) for -30 °C to +60 °C (-22 °F to +140 °F)Better than 0.2 °C (0.4 °F) for -40 °C to -30 °C (-40 °F to -22 °F)Better than 0.5 °C (0.9 °F) for +60 °C to +99 °C (+140 °F to +210 °F)Please see accuracy chart in Accuracy and Resolution
Probe Compatibility Any external probe from the ST100 series
Sensor Reaction Time According to probe
Clock accuracy Quartz crystal-locked real time clock, rated accuracy ±25ppm @ 25 °C (equiv to 2.5 seconds/day)Rated temperature coefficient is -0.034±0.006ppm/°C (i.e. typically +/-0.00294seconds/day/°C)
Recording Capacity
16,129 real time temperature values, giving
l 112 days @ 10min logging or l 168 days @ 15min logging.
Statistics memory For displaying statistics on LCD
l Max/Min values l Alarm duration values
Memory type Non volatile
Sampling Interval Configurable from 30 seconds to 18 hours
Start options l Push button start with optional configurable start delay from 1 minute to 72 hours l Date/time start
Alarm functions l three configurable upper alarms l three configurable lower alarms l OK tick and Alarm cross on display, linked to alarms
Vibration Withstands vibration specification as detailed in EN12830:2018
Shock l Withstands shock specification as detailed in EN12830:2018 l Withstands 5 drops from 1m onto smooth concrete floor without loss of function or calibration
EMC compliance l EC EMC directives (EN 61000-6-1:2005 & EN 61000-6-3:2006) l Includes electrostatic discharge as prescribed in EN 61000-4-2 l Complies with FCC Part 15 Subparts A and B
Environmental IEC 60529: IP61 with USB cap fitted and vertically hung
Case Material Polycarbonate
Power source CR2450 3V Li-MnO2 non-replaceable, non-rechargeable coin cell battery
Battery life Typically 24 months of operation with normal use (15 minute logging, statistics reviewed on the display no more than once daily for no longer than 30 seconds each time, download data monthly) provided recorder is kept within the storage temperature range when not in use.
Size 93mm(H) x 54.5mm (W) x 8.6mm (T) including USB cap (excluding probe)
Weight 39g (excluding probe)
Calibration Factory calibration using instruments traceable to an ISO/IEC 17025 accredited testing laboratory
PDF features l compliant with standard 1.6 and later l Single page report with trip and alarm summary l Multi page report with list of readings including date/time

Technical Specifications UTRED-16 User Guide 43
Download time l Typically with full memory (16,129 readings) less than 30 seconds from time of insertion to availability of PDF report.
l Typically less than 10 seconds from time of insertion to availability of LTD file in LogTag® Analyzer (if configured)
Software requirements l LogTag® Analyzer version 3.1r9 or later to configure and download l PDF reader software to access on-board PDF files
USB compatibility USB 2.0, type A plug
Accessories l Glycol Bottle l Replacement protective cap 200-000425 l Probe extension lead STX-50

Appendix 1 - Accuracy and Resolution UTRED-16 User Guide 44
Appendix 1 - Accuracy and Resolution
Temperature Accuracy
The following graph shows the typical rated temperature accuracy of a UTRED-16:
Figure 10: Rated Temperature Accuracy Chart
Temperature Resolution
The following graph shows the typical rated native temperature resolution of a UTRED-16:
Figure 11: Rated Temperature Resolution Chart