Embed Size (px)
Citation preview
Page 1 of 17
V12 Table Guide By ShoryukenToTheChin
2
7
4
8
5
3
1
10
6
11
9
Page 2 of 17
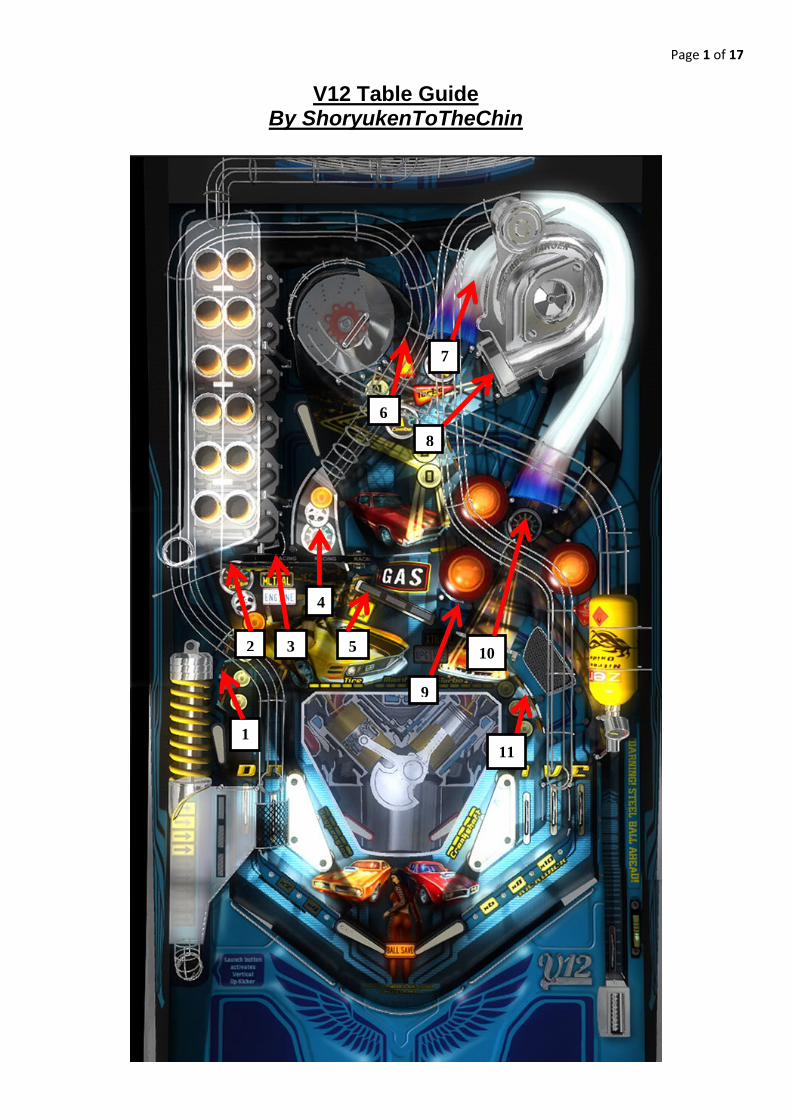
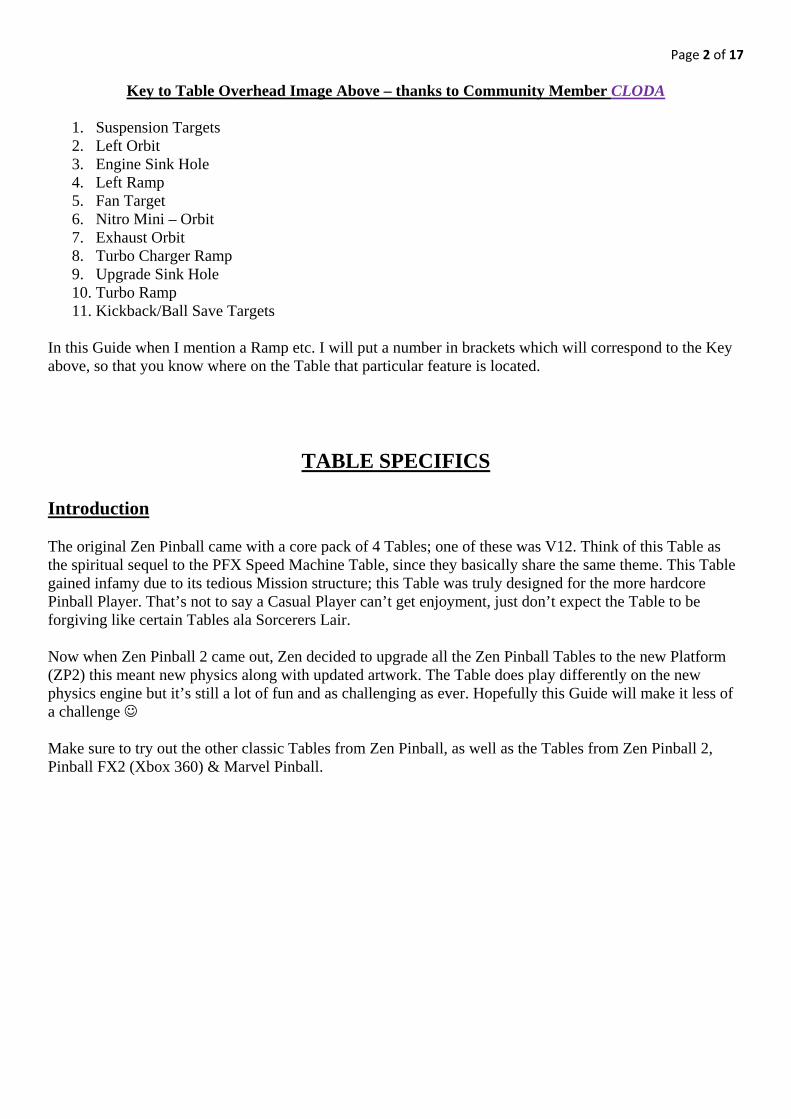
Key to Table Overhead Image Above – thanks to Community Member CLODA
1. Suspension Targets 2. Left Orbit 3. Engine Sink Hole 4. Left Ramp 5. Fan Target 6. Nitro Mini – Orbit 7. Exhaust Orbit 8. Turbo Charger Ramp 9. Upgrade Sink Hole 10. Turbo Ramp 11. Kickback/Ball Save Targets
In this Guide when I mention a Ramp etc. I will put a number in brackets which will correspond to the Key above, so that you know where on the Table that particular feature is located.
TABLE SPECIFICS
Introduction The original Zen Pinball came with a core pack of 4 Tables; one of these was V12. Think of this Table as the spiritual sequel to the PFX Speed Machine Table, since they basically share the same theme. This Table gained infamy due to its tedious Mission structure; this Table was truly designed for the more hardcore Pinball Player. That’s not to say a Casual Player can’t get enjoyment, just don’t expect the Table to be forgiving like certain Tables ala Sorcerers Lair. Now when Zen Pinball 2 came out, Zen decided to upgrade all the Zen Pinball Tables to the new Platform (ZP2) this meant new physics along with updated artwork. The Table does play differently on the new physics engine but it’s still a lot of fun and as challenging as ever. Hopefully this Guide will make it less of a challenge Make sure to try out the other classic Tables from Zen Pinball, as well as the Tables from Zen Pinball 2, Pinball FX2 (Xbox 360) & Marvel Pinball.

Page 3 of 17 Skill Shot – 100,000 Points Launch the Ball with enough power so the Ball goes into a hidden Sink Hole just inside the Tables Playfield (to the left of the Bumpers) this earns you 100,000 Points.
Gas Targets - *Activated at the start of any new Ball*
First thing you should do is hit these 3 Gas Targets because it’s important to remove them as early as possible, since you need access to the upper level of the Tables Playfield.
Power Bar/Plunger – As you pull back the Plunger (Analogue
Stick on your Controller controls this) The Spring will
get smaller. Pull the Plunger back about 1/4 of the way (Shown in the Image
to the Left) and release.
3 Gas Targets
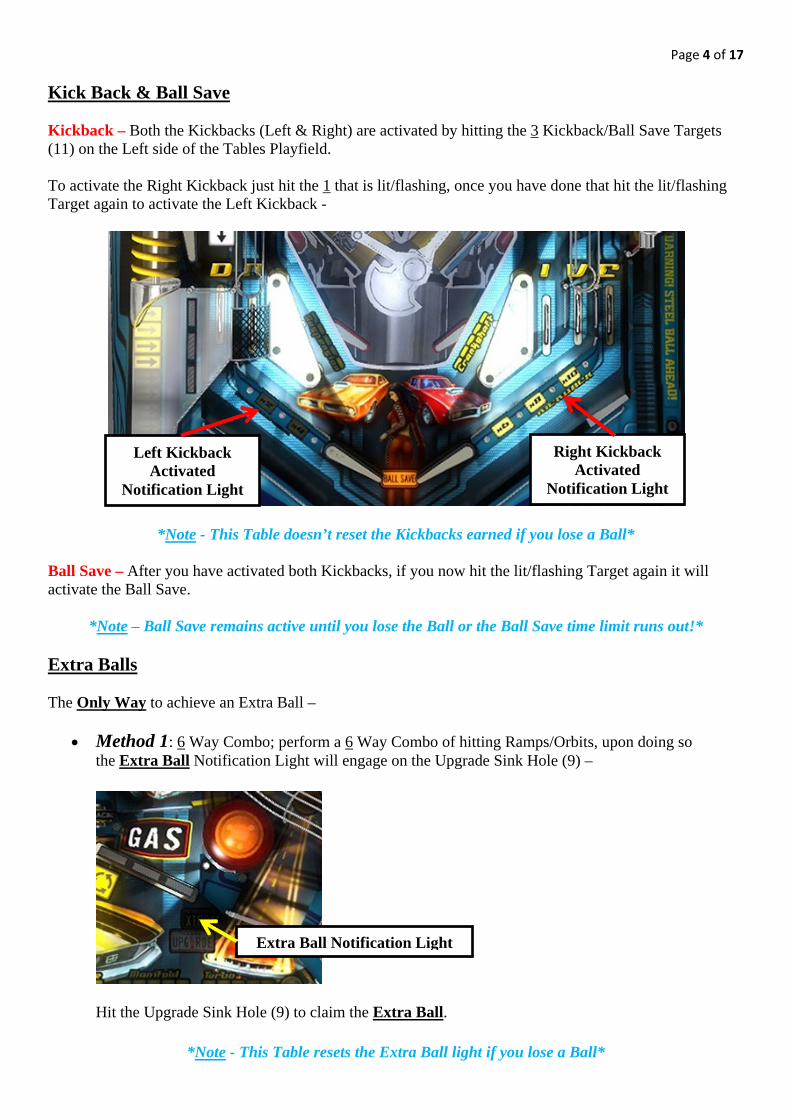
Page 4 of 17 Kick Back & Ball Save Kickback – Both the Kickbacks (Left & Right) are activated by hitting the 3 Kickback/Ball Save Targets (11) on the Left side of the Tables Playfield. To activate the Right Kickback just hit the 1 that is lit/flashing, once you have done that hit the lit/flashing Target again to activate the Left Kickback -
*Note - This Table doesn’t reset the Kickbacks earned if you lose a Ball* Ball Save – After you have activated both Kickbacks, if you now hit the lit/flashing Target again it will activate the Ball Save.
*Note – Ball Save remains active until you lose the Ball or the Ball Save time limit runs out!* Extra Balls The Only Way to achieve an Extra Ball –
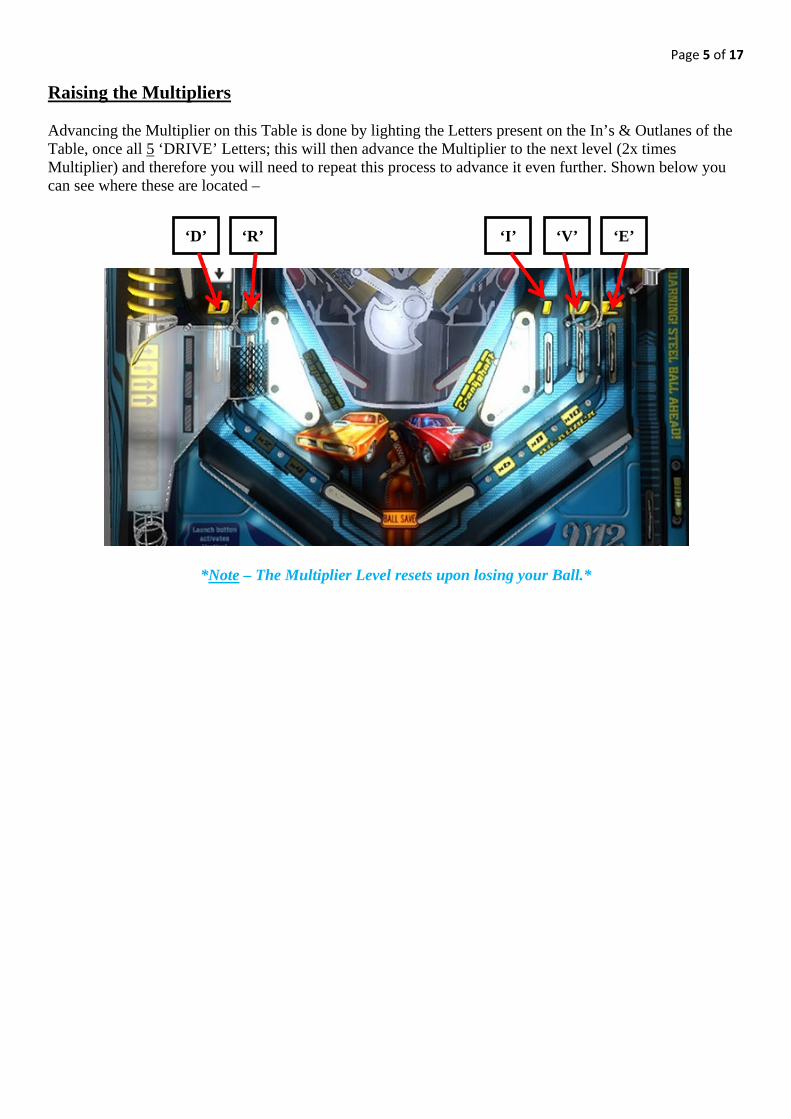
• Method 1: 6 Way Combo; perform a 6 Way Combo of hitting Ramps/Orbits, upon doing so the Extra Ball Notification Light will engage on the Upgrade Sink Hole (9) –
Hit the Upgrade Sink Hole (9) to claim the Extra Ball.
*Note - This Table resets the Extra Ball light if you lose a Ball*
Extra Ball Notification Light
Right Kickback Activated
Notification Light
Left Kickback Activated
Notification Light
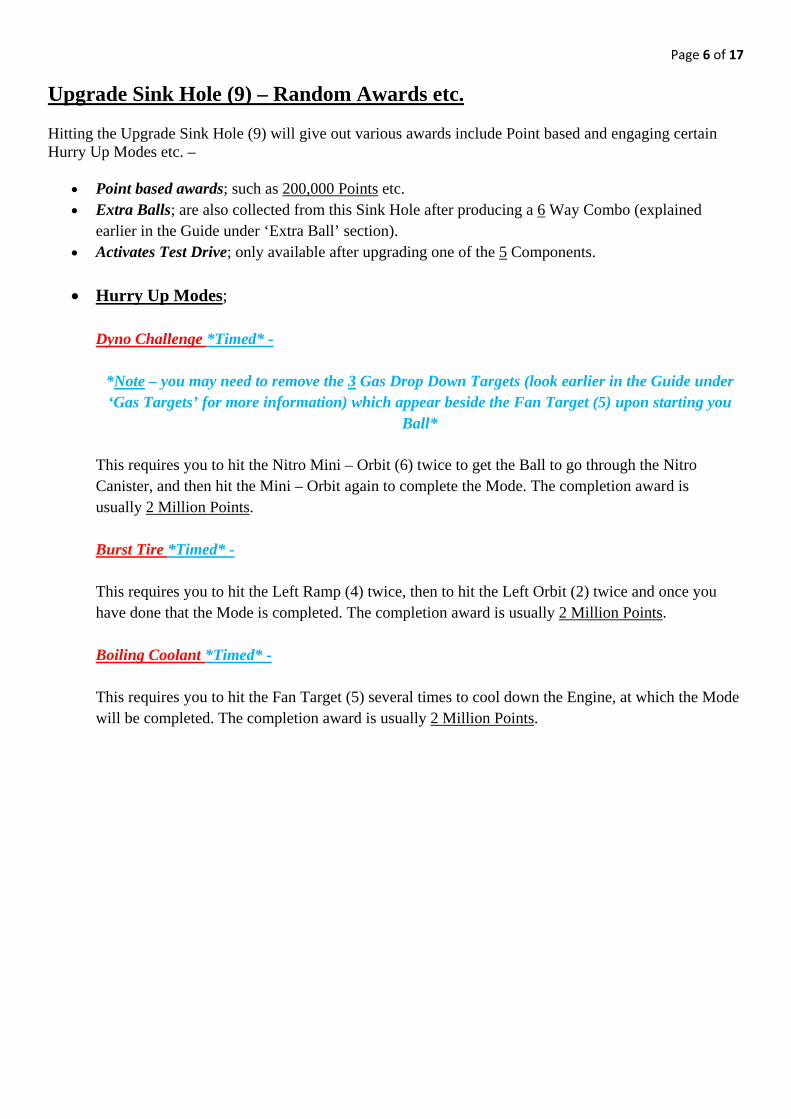
Page 5 of 17 Raising the Multipliers Advancing the Multiplier on this Table is done by lighting the Letters present on the In’s & Outlanes of the Table, once all 5 ‘DRIVE’ Letters; this will then advance the Multiplier to the next level (2x times Multiplier) and therefore you will need to repeat this process to advance it even further. Shown below you can see where these are located –
*Note – The Multiplier Level resets upon losing your Ball.*
‘D’ ‘R’ ‘V’ ‘E’ ‘I’
Page 6 of 17
Upgrade Sink Hole (9) – Random Awards etc. Hitting the Upgrade Sink Hole (9) will give out various awards include Point based and engaging certain Hurry Up Modes etc. –
• Point based awards; such as 200,000 Points etc. • Extra Balls; are also collected from this Sink Hole after producing a 6 Way Combo (explained
earlier in the Guide under ‘Extra Ball’ section). • Activates Test Drive; only available after upgrading one of the 5 Components.
• Hurry Up Modes; Dyno Challenge *Timed* -
*Note – you may need to remove the 3 Gas Drop Down Targets (look earlier in the Guide under ‘Gas Targets’ for more information) which appear beside the Fan Target (5) upon starting you
Ball* This requires you to hit the Nitro Mini – Orbit (6) twice to get the Ball to go through the Nitro Canister, and then hit the Mini – Orbit again to complete the Mode. The completion award is usually 2 Million Points. Burst Tire *Timed* - This requires you to hit the Left Ramp (4) twice, then to hit the Left Orbit (2) twice and once you have done that the Mode is completed. The completion award is usually 2 Million Points. Boiling Coolant *Timed* - This requires you to hit the Fan Target (5) several times to cool down the Engine, at which the Mode will be completed. The completion award is usually 2 Million Points.
Page 7 of 17
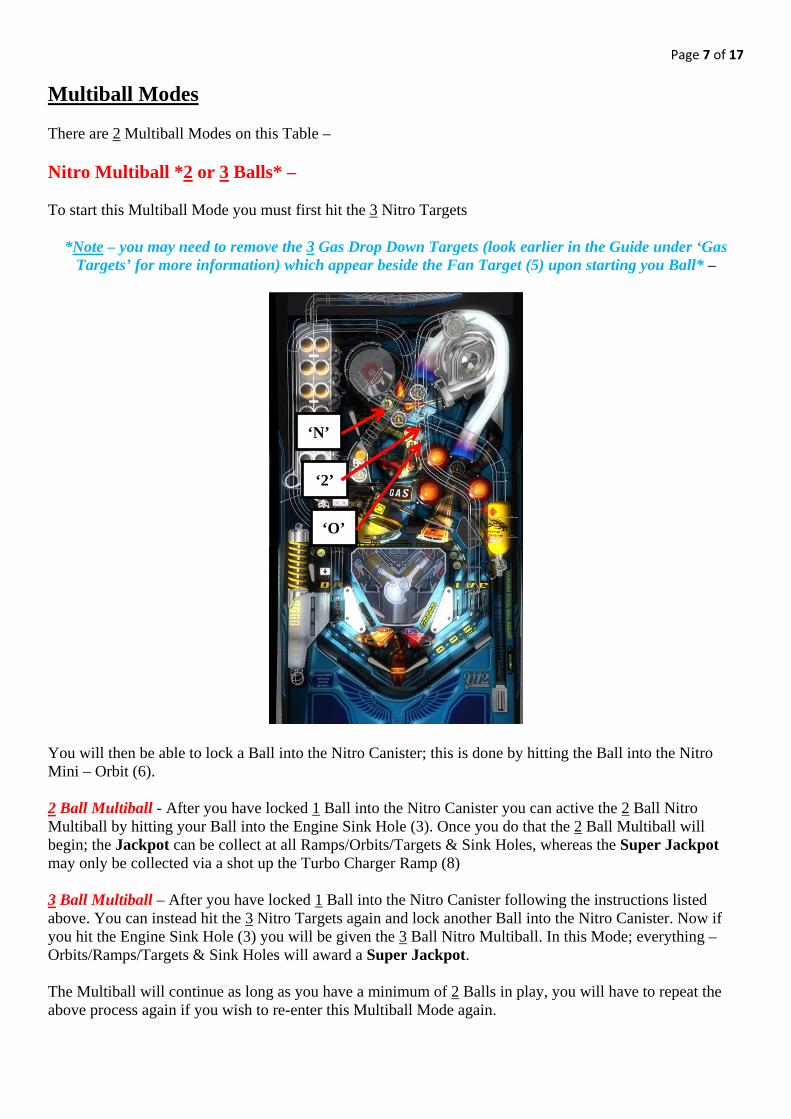
Multiball Modes There are 2 Multiball Modes on this Table – Nitro Multiball *2 or 3 Balls* – To start this Multiball Mode you must first hit the 3 Nitro Targets
*Note – you may need to remove the 3 Gas Drop Down Targets (look earlier in the Guide under ‘Gas
Targets’ for more information) which appear beside the Fan Target (5) upon starting you Ball* –
You will then be able to lock a Ball into the Nitro Canister; this is done by hitting the Ball into the Nitro Mini – Orbit (6). 2 Ball Multiball - After you have locked 1 Ball into the Nitro Canister you can active the 2 Ball Nitro Multiball by hitting your Ball into the Engine Sink Hole (3). Once you do that the 2 Ball Multiball will begin; the Jackpot can be collect at all Ramps/Orbits/Targets & Sink Holes, whereas the Super Jackpot may only be collected via a shot up the Turbo Charger Ramp (8) 3 Ball Multiball – After you have locked 1 Ball into the Nitro Canister following the instructions listed above. You can instead hit the 3 Nitro Targets again and lock another Ball into the Nitro Canister. Now if you hit the Engine Sink Hole (3) you will be given the 3 Ball Nitro Multiball. In this Mode; everything – Orbits/Ramps/Targets & Sink Holes will award a Super Jackpot. The Multiball will continue as long as you have a minimum of 2 Balls in play, you will have to repeat the above process again if you wish to re-enter this Multiball Mode again.
‘O’
‘2’
‘N’
Page 8 of 17 Component Upgrade Test Drive *3 Balls*– This Multiball becomes available when you successfully update one of the 5 Components; Manifold, Crankshaft, Tires, Turbo or Suspension. The Upgrade Notification Light will be lit under the Upgrade Sink Hole (9). Hit the Ball into that to begin the Test Drive Multiball. Once this Multiball begins everything will be lit up and the Balls will have a motion blur trail when they are moving, it’s a crazy cool effect. Dependent what upgrade Level of the Component that you are activating this Mode; the Jackpot values awarded for hitting everything from Orbits to Sink Holes will defer –
• Component Upgrade Level 1; worth 100,000 Points. • Component Upgrade Level 2; worth 200,000 Points. • Component Upgrade Level 3; worth 300,000 Points. • Component Upgrade Level 4; worth 400,000 Points. • Component Upgrade Level 5; worth 500,000 Points.
The Multiball will continue as long as you have a minimum of 2 Balls in play, you will have to repeat the above process again if you wish to re-enter this Multiball Mode again.
Page 9 of 17
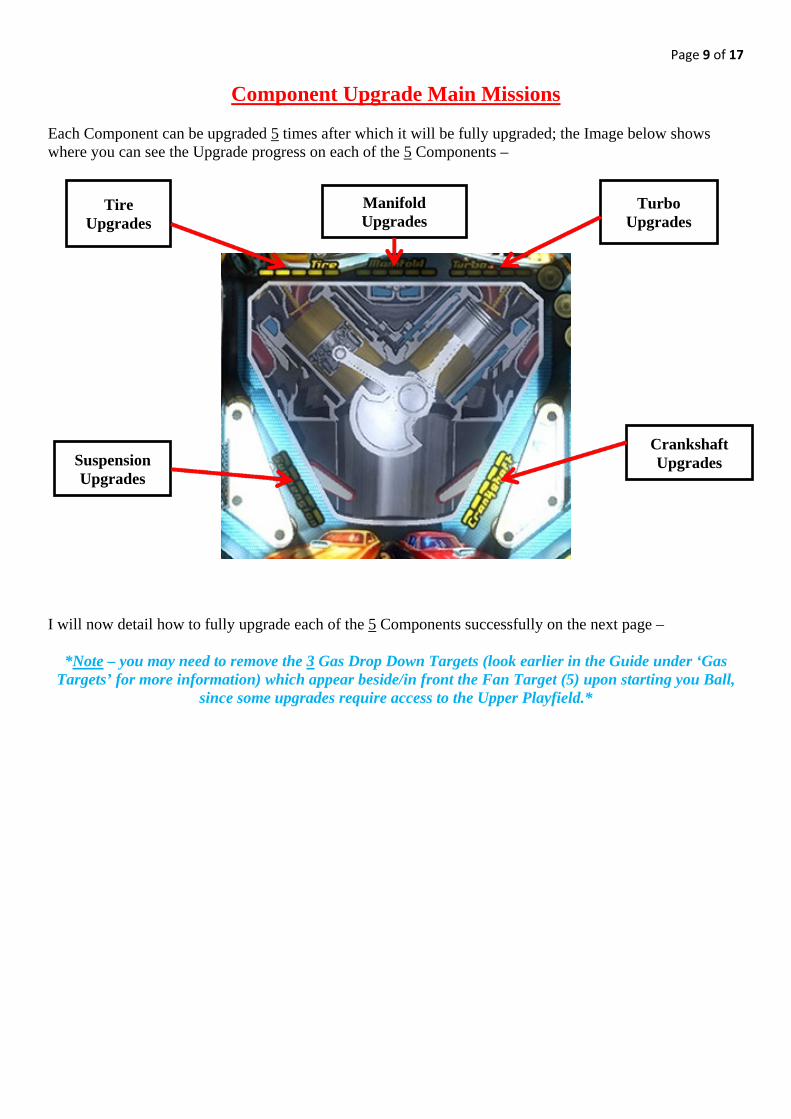
Component Upgrade Main Missions Each Component can be upgraded 5 times after which it will be fully upgraded; the Image below shows where you can see the Upgrade progress on each of the 5 Components –
I will now detail how to fully upgrade each of the 5 Components successfully on the next page –
*Note – you may need to remove the 3 Gas Drop Down Targets (look earlier in the Guide under ‘Gas Targets’ for more information) which appear beside/in front the Fan Target (5) upon starting you Ball,
since some upgrades require access to the Upper Playfield.*
Manifold Upgrades
Turbo Upgrades
Crankshaft Upgrades
Tire Upgrades
Suspension Upgrades
Page 10 of 17 Tire Upgrades
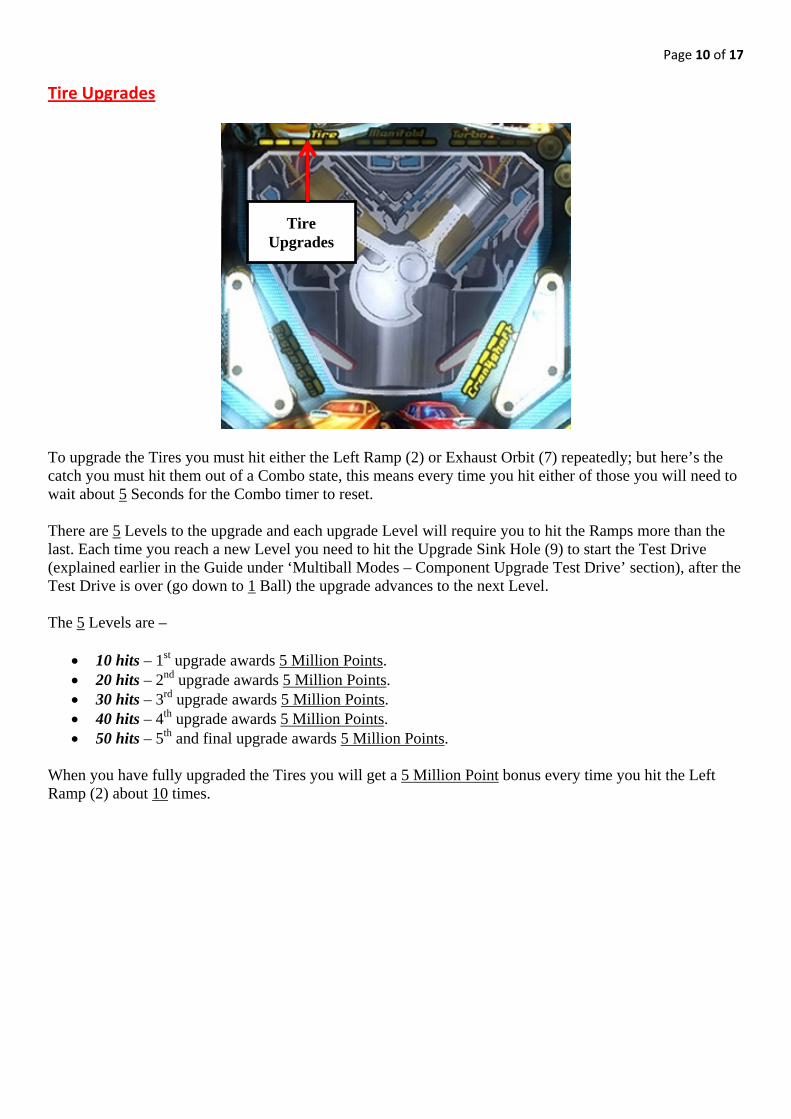
To upgrade the Tires you must hit either the Left Ramp (2) or Exhaust Orbit (7) repeatedly; but here’s the catch you must hit them out of a Combo state, this means every time you hit either of those you will need to wait about 5 Seconds for the Combo timer to reset. There are 5 Levels to the upgrade and each upgrade Level will require you to hit the Ramps more than the last. Each time you reach a new Level you need to hit the Upgrade Sink Hole (9) to start the Test Drive (explained earlier in the Guide under ‘Multiball Modes – Component Upgrade Test Drive’ section), after the Test Drive is over (go down to 1 Ball) the upgrade advances to the next Level. The 5 Levels are –
• 10 hits – 1st upgrade awards 5 Million Points. • 20 hits – 2nd upgrade awards 5 Million Points. • 30 hits – 3rd upgrade awards 5 Million Points. • 40 hits – 4th upgrade awards 5 Million Points. • 50 hits – 5th and final upgrade awards 5 Million Points.
When you have fully upgraded the Tires you will get a 5 Million Point bonus every time you hit the Left Ramp (2) about 10 times.
Tire Upgrades
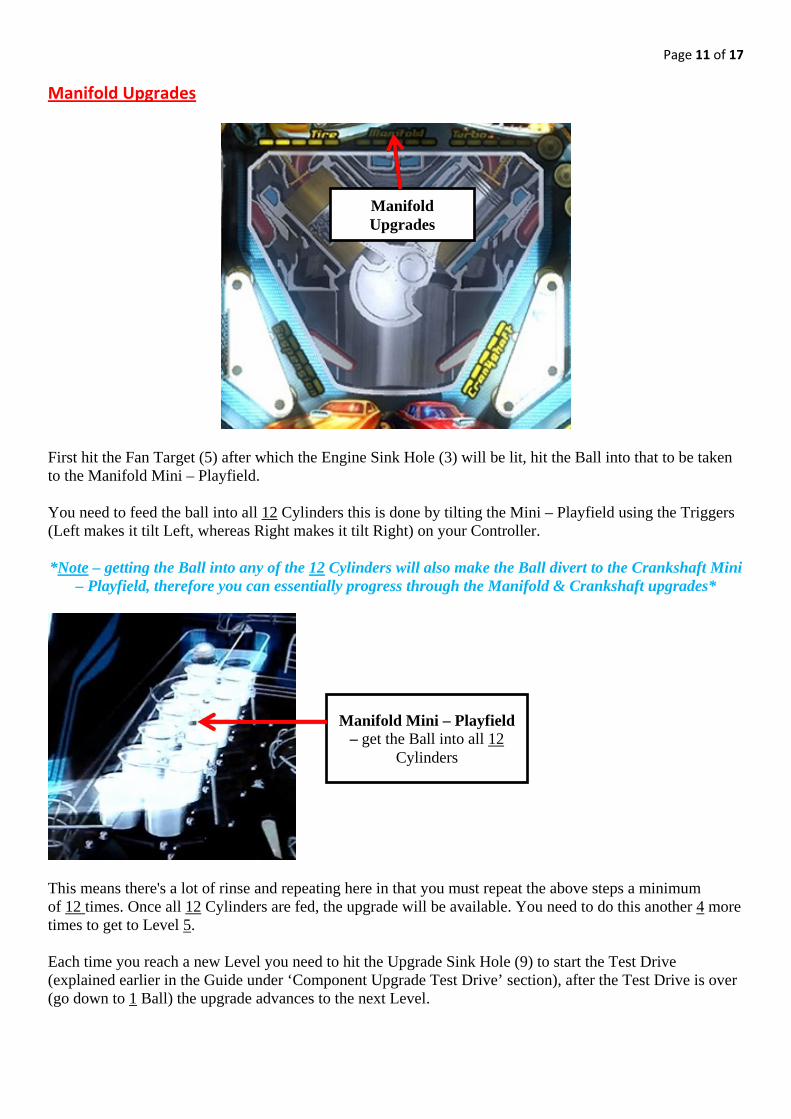
Page 11 of 17 Manifold Upgrades
First hit the Fan Target (5) after which the Engine Sink Hole (3) will be lit, hit the Ball into that to be taken to the Manifold Mini – Playfield. You need to feed the ball into all 12 Cylinders this is done by tilting the Mini – Playfield using the Triggers (Left makes it tilt Left, whereas Right makes it tilt Right) on your Controller. *Note – getting the Ball into any of the 12 Cylinders will also make the Ball divert to the Crankshaft Mini
– Playfield, therefore you can essentially progress through the Manifold & Crankshaft upgrades*
This means there's a lot of rinse and repeating here in that you must repeat the above steps a minimum of 12 times. Once all 12 Cylinders are fed, the upgrade will be available. You need to do this another 4 more times to get to Level 5. Each time you reach a new Level you need to hit the Upgrade Sink Hole (9) to start the Test Drive (explained earlier in the Guide under ‘Component Upgrade Test Drive’ section), after the Test Drive is over (go down to 1 Ball) the upgrade advances to the next Level.
Manifold Upgrades
Manifold Mini – Playfield – get the Ball into all 12
Cylinders
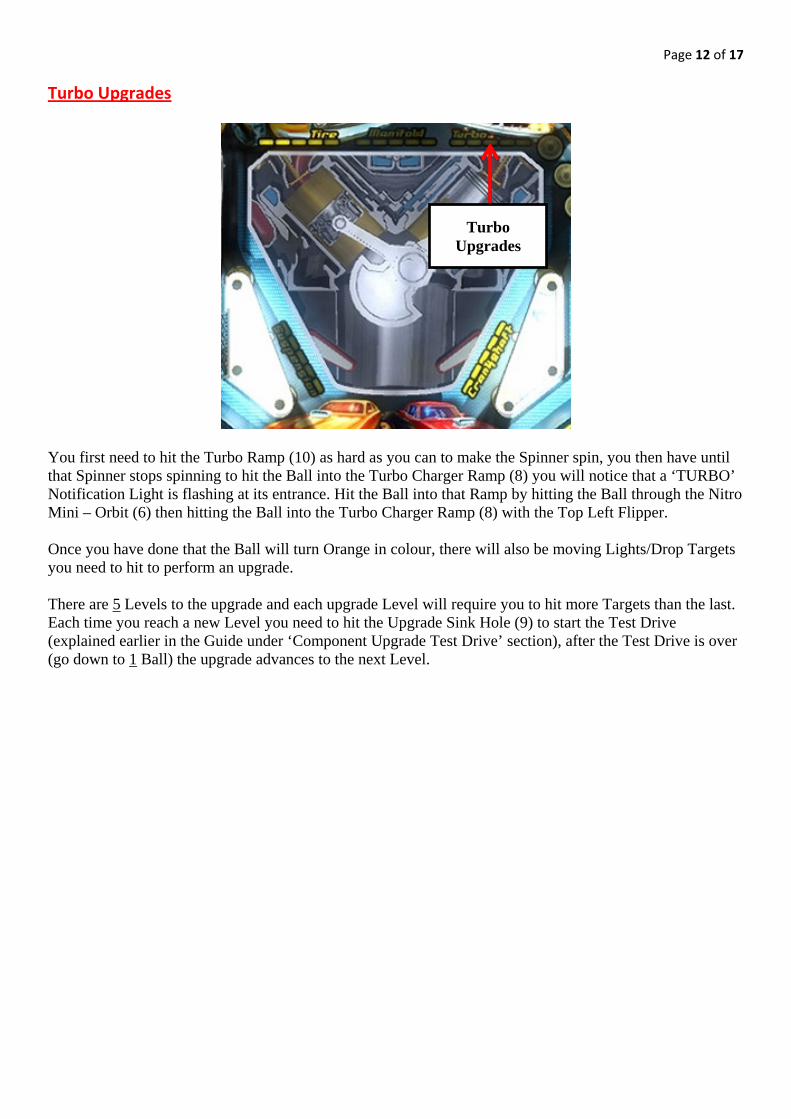
Page 12 of 17 Turbo Upgrades
You first need to hit the Turbo Ramp (10) as hard as you can to make the Spinner spin, you then have until that Spinner stops spinning to hit the Ball into the Turbo Charger Ramp (8) you will notice that a ‘TURBO’ Notification Light is flashing at its entrance. Hit the Ball into that Ramp by hitting the Ball through the Nitro Mini – Orbit (6) then hitting the Ball into the Turbo Charger Ramp (8) with the Top Left Flipper. Once you have done that the Ball will turn Orange in colour, there will also be moving Lights/Drop Targets you need to hit to perform an upgrade. There are 5 Levels to the upgrade and each upgrade Level will require you to hit more Targets than the last. Each time you reach a new Level you need to hit the Upgrade Sink Hole (9) to start the Test Drive (explained earlier in the Guide under ‘Component Upgrade Test Drive’ section), after the Test Drive is over (go down to 1 Ball) the upgrade advances to the next Level.
Turbo Upgrades

Page 13 of 17 Crankshaft Upgrades
First you need to get into the Crankshaft Mini – Playfield by hitting the Fan Target (5) after which the Engine Sink Hole (3) will be lit, hit the Ball into that to be taken to the Manifold Mini – Playfield. You then need to feed the ball into one of the 12 Cylinders this is done by tilting the Mini – Playfield using the Triggers (Left makes it tilt Left, whereas Right makes it tilt Right) on your Controller.
Crankshaft Upgrades
Manifold Mini – Playfield – get the Ball into one of 12
Cylinders
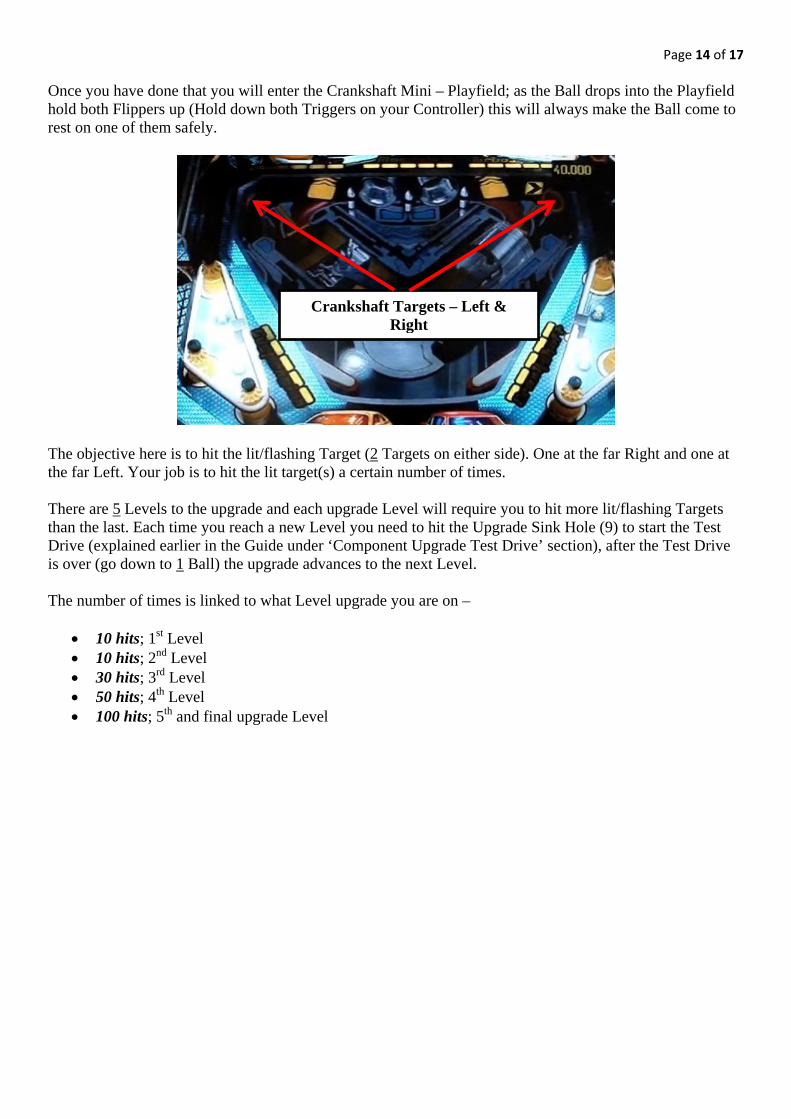
Page 14 of 17 Once you have done that you will enter the Crankshaft Mini – Playfield; as the Ball drops into the Playfield hold both Flippers up (Hold down both Triggers on your Controller) this will always make the Ball come to rest on one of them safely.
The objective here is to hit the lit/flashing Target (2 Targets on either side). One at the far Right and one at the far Left. Your job is to hit the lit target(s) a certain number of times. There are 5 Levels to the upgrade and each upgrade Level will require you to hit more lit/flashing Targets than the last. Each time you reach a new Level you need to hit the Upgrade Sink Hole (9) to start the Test Drive (explained earlier in the Guide under ‘Component Upgrade Test Drive’ section), after the Test Drive is over (go down to 1 Ball) the upgrade advances to the next Level. The number of times is linked to what Level upgrade you are on –
• 10 hits; 1st Level • 10 hits; 2nd Level • 30 hits; 3rd Level • 50 hits; 4th Level • 100 hits; 5th and final upgrade Level
Crankshaft Targets – Left & Right
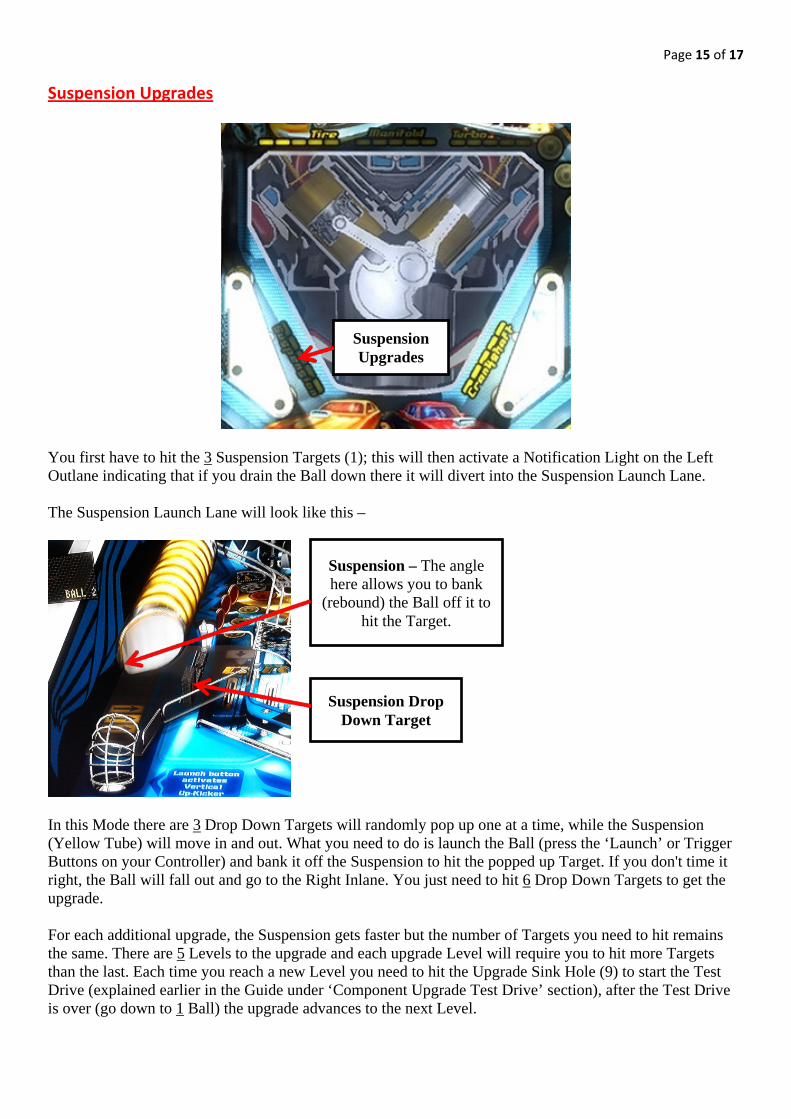
Page 15 of 17 Suspension Upgrades
You first have to hit the 3 Suspension Targets (1); this will then activate a Notification Light on the Left Outlane indicating that if you drain the Ball down there it will divert into the Suspension Launch Lane. The Suspension Launch Lane will look like this –
In this Mode there are 3 Drop Down Targets will randomly pop up one at a time, while the Suspension (Yellow Tube) will move in and out. What you need to do is launch the Ball (press the ‘Launch’ or Trigger Buttons on your Controller) and bank it off the Suspension to hit the popped up Target. If you don't time it right, the Ball will fall out and go to the Right Inlane. You just need to hit 6 Drop Down Targets to get the upgrade. For each additional upgrade, the Suspension gets faster but the number of Targets you need to hit remains the same. There are 5 Levels to the upgrade and each upgrade Level will require you to hit more Targets than the last. Each time you reach a new Level you need to hit the Upgrade Sink Hole (9) to start the Test Drive (explained earlier in the Guide under ‘Component Upgrade Test Drive’ section), after the Test Drive is over (go down to 1 Ball) the upgrade advances to the next Level.
Suspension Upgrades
Suspension – The angle here allows you to bank
(rebound) the Ball off it to hit the Target.
Suspension Drop Down Target
Page 16 of 17
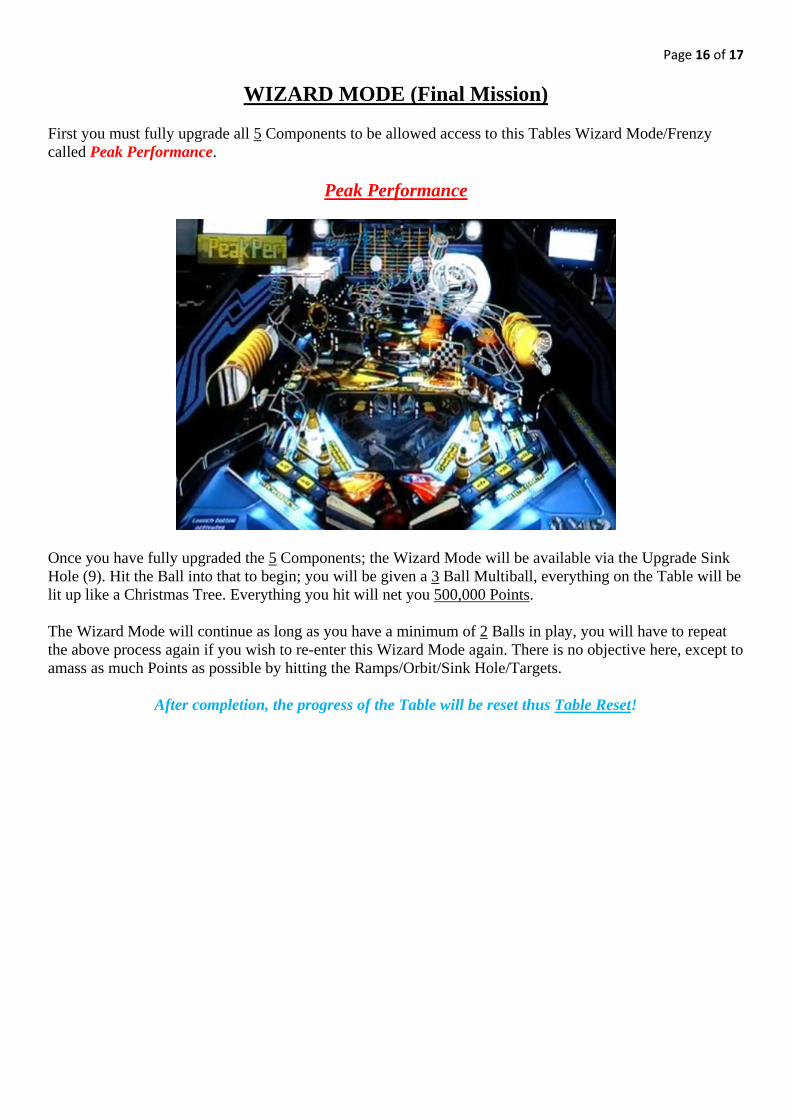
WIZARD MODE (Final Mission) First you must fully upgrade all 5 Components to be allowed access to this Tables Wizard Mode/Frenzy called Peak Performance.
Peak Performance
Once you have fully upgraded the 5 Components; the Wizard Mode will be available via the Upgrade Sink Hole (9). Hit the Ball into that to begin; you will be given a 3 Ball Multiball, everything on the Table will be lit up like a Christmas Tree. Everything you hit will net you 500,000 Points. The Wizard Mode will continue as long as you have a minimum of 2 Balls in play, you will have to repeat the above process again if you wish to re-enter this Wizard Mode again. There is no objective here, except to amass as much Points as possible by hitting the Ramps/Orbit/Sink Hole/Targets.
After completion, the progress of the Table will be reset thus Table Reset!
Page 17 of 17 Special Thanks to all the Zen Studios Forum Community! Members such as Cloda, shogun00, skippycue & YouTube Member - caperUnderscore26 I couldn’t have completed the Guide without your help either directly or indirectly - you are all awesome!!!
In closing I hope you enjoyed this Table, I certainly have and I hope by using this Guide it increases that Fun factor for you and everyone else who plays with you etc.
Check out the other Tables available, they are all available to download on the Xbox Live Marketplace in Add-Ons section or download it straight from the PFX2 Platform itself. Zen Pinball 2 on PlayStation Network, Zen Pinball on the Apple AppStore, Zen Pinball 3D on Nintendo 3DS and Zen Pinball THD on Android Marketplace. Thanks for viewing my Guide, “Engine Ignited!”
Yours
ShoryukenToTheChin