Embed Size (px)
Citation preview
QAM.V409V2.0217.5
V409v2 Fingertip Pulse Oximeter
Operating Manual

3
1. About this Manual 4
2. Safety Information 4
3. Introduction 5
4. Appearance and Display 6
5 Setting Up the Device 7
6. Operation 8
7. SpO2 Measurement 9
8. Maintenance 11
9. Disposal 13
10. Troubleshooting 13
11. Specifications 13
12. Warranty 14
12.1 Returns Policy 14
12.2 Warranty Details 15
Tel: 0800 878 9864 Fax: 0333 321 0973
email: [email protected] url: www.daray.co.uk

4
1. About this manual This manual provides the instructions necessary to operate the V409 fingertip pulse oximeter (from here on referred to as ‘the device’) in accordance with its function and intended use. Observance of this manual is a prerequisite for proper performance and correct operation, and ensures patient and operator safety. This manual is an integral part of and should always be kept close to the device, so that it can be obtained conveniently when necessary. Content of this manual is subject to change without prior notice.
2. Safety Information The safety statements presented in this chapter refer to the basic safety information that the operator of the device shall pay attention to and abide by. There are additional safety statements in other chapters or sections, which may be the same as or similar to the followings, or specific to the operations. The following safety terms warning and caution are used throughout this manual to point out hazards and to designate a degree or level or seriousness: WARNING Indicates a potential hazard situation or unsafe practice that, if not avoided, could result in death or serious injury. CAUTION Indicates a potential hazard or unsafe practice that, if not avoided, could result in minor personal injury or product/property damage. NOTE Provides application tips or other useful information to ensure that you get the most from your product. WARNING
The device is intended only as an adjunct in patient assessment. It must be used in conjunction with clinical signs and symptoms. It is not intended as a device used for treatment purposes.
To ensure patient safety, verify this device can function safely and normally before use.
When using the device together with the electrical surgery equipment, the user should pay attention to and guarantee safety of the patient being measured.
EXPLOSION HAZARD: Do not use the device in the presence of flammable anaesthetics, explosive substances, vapours or liquids.
It is not recommended to hang the device when transporting patients. Safety hazards may arise from the large amplitude swing during the transportation.
Do not use the device during MRl (magnetic resonance imaging) scanning because induced current could potentially cause burns. The device is capable of interfering with the proper performance of MRI, and MRI is capable of interfering with the measurement accuracy of the
The device may be contaminated by microorganism during transporting, use and storage. Use the recommended methods to sterilize and disinfect the device when the packing material is damaged, or it has not been used for a long time.
The light (the red light and the infrared light which is invisible) emitted from the device is harmful to the eyes, so the user and the maintenance personnel can not stare at the light.

5
CAUTION
The device is a commonly sealed device. Keep its surface dry and clean, and prevent any liquid from infiltrating it.
The device is precision and fragile. Avoid pressure, knocks, strong vibration or other mechanical damage. Hold it carefully and lightly. If it is not in use, it should be appropriately stored in a dry place and away from direct sunlight.
Don't use mobile phones around when the device is in operation. Mobile phones may emit electromagnetic radiation which is capable of interfering with the proper performance of the device. NOTE
Important! Before use, carefully read this manual, all safety information and specifications.
3. Introduction The device is a non-invasive fingertip pulse oximeter. It operates only on common 1.5V AAA alkaline or rechargeable battery power. It is compact, tiny, light, low power consumption, and easy for learning and handling. It is suitable for monitoring adult and paediatric patients. It is widely used in the hospital's operation room, ICU, clinic section office, out-patient department, sickroom, emergency treatment, and in the process of transporting patients. It can also be used in the recovery and health care organizations, the community medical treatments, the oxygen bars, the family nursing, the physical care in sports (you can use the device before or after the sport, but it is not recommended to use it during the sport) and so on. The device has the following functions:
Measuring: The device measures arterial oxygen saturation (SpO2), pulse rate (PR) and pulse strength through its sensor and displays them on the OLED screen.
Prompting: Indication of remaining battery capacity and low battery power.
Power saving: Automatic shutdown when no monitoring for 8 seconds.

6
4. Appearance and display
Figure 4-1 Front panel
Key:
No. Description Remarks
1 Power and rotation button Press this button to power on the device. After 6 seconds, press the button for 3 seconds to change the direction of display. Wait 6 seconds between each change as the device may not respond. Direction changes may not respond if the battery is low.
2 Colour OLED screen Displays SpO2, pulse rate, pulse bar graph and waveform.
3 SpO2 waveform Waveform shown in real-time.
4 Pulse bar graph Has 6 levels. Indicates the pulse strength of SpO2 measurement.
5 Clip press Press here to open the clip.
6 Low battery power indicator Prompts that the batteries need to be replaced with new ones, otherwise the device will soon shut down.
7 PR measurement Displays pulse rate value and is refreshed every pulse. Displayed unit is BPM.
8 SpO2 measurement Displays SpO2 value and is refreshed every pulse. Displayed unit is %.
9 Lanyard hole Insert the lanyard here.
10 Battery compartment Press/push here to open battery compartment.
1
3
4 8
10 7
2
9
2
6 5

7
5. Setting Up the Device Unpacking and Inspection Open the package and remove the device and accessories carefully. Check all materials against the packing list. Check the device for any mechanical or aesthetic damage. Contact DARAY immediately in case of any problem. Installing Batteries The device is powered by two batteries. Follow the steps below to install the batteries before first use:
Hold the device in one hand with the front panel facing the palm.
Using the thumb on your other hand, push on the battery cabinet lid's press sign, and slide the lid open at the same time. The battery cabinet is opened as shown in figure 5-1.
Install batteries into the slots, observing the correct polarity as per the plus and minus symbols within the compartment - as shown in figure 5-2.
Push the lid onto the cabinet and slide upwards to ensure it is fully closed.
Figure 5-1 Battery Cabinet Figure 5-2 Installing Batteries
CAUTION
Use AAA alkaline batteries or rechargeable batteries. Do not use carbon or poor quality batteries.
Remove the batteries if the device is not to be used for a long time.
During use, replace batteries of insufficient energy in time with good ones; abnormal power supply may lead to product damages or even personnel injuries.
Please take care when you insert the batteries for the improper insertion may damage the device.
NOTE To dispose of the batteries, follow local laws for proper disposal. See ‘Disposal – section 9’ in this manual.
8
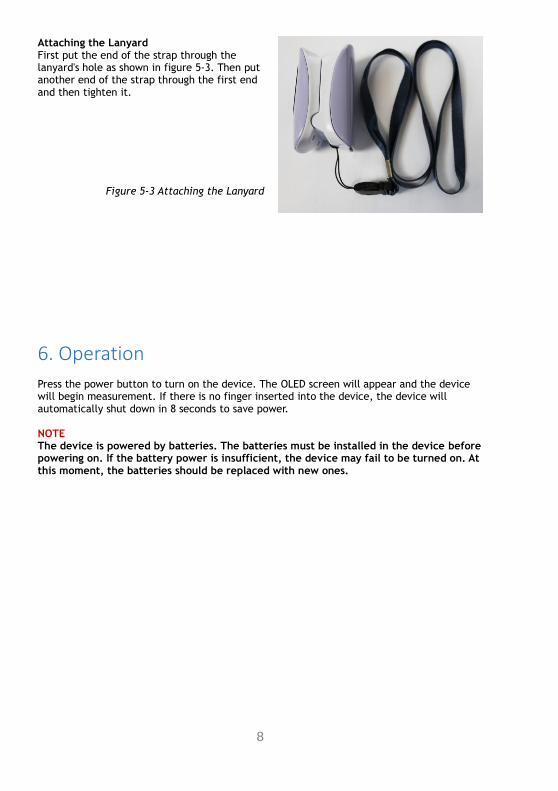
Attaching the Lanyard First put the end of the strap through the lanyard's hole as shown in figure 5-3. Then put another end of the strap through the first end and then tighten it.
Figure 5-3 Attaching the Lanyard
6. Operation Press the power button to turn on the device. The OLED screen will appear and the device will begin measurement. If there is no finger inserted into the device, the device will automatically shut down in 8 seconds to save power. NOTE The device is powered by batteries. The batteries must be installed in the device before powering on. If the battery power is insufficient, the device may fail to be turned on. At this moment, the batteries should be replaced with new ones.

9
7. SpO2 Measurement Measurement principle SpO2 plethysmogram measurement is employed to determine the oxygen saturation of hemoglobin in the arterial blood. The SpO2/PLETH parameter can also provide a pulse rate signal, pulse strength and a plethysmogram wave. How the SpO2/PLETH Parameter Works:
Arterial oxygen saturation is measured by a method called pulse oximetry. It is a continuous, non-invasive method based on the different spectra absorption of hemoglobin and oxyhemogiobin (called spectrophotometer principle). It measures how much light, sent from light sources on one side of the sensor, is transmitted through patient tissue (such as a finger or a toe), to a receiver on the other side.
The sensor measurement wavelengths are nominally 660nm for the Red
LED and 940nm for Infrared LED. Maximum optical power output for LED is 4 mW.
The amount of light transmitted depends on many factors, most of which are constant. However, one of these factors, the blood flow in the arteries, varies with time, because it is pulsating. By measuring the light absorption during a pulsation, it is possible to derive the oxygen saturation of the arterial blood. Detecting the pulsation gives a PLETH waveform, pulse rate signal and pulse strength.
The SpO2 value, PR value and pulse strength can be displayed on the screen.
SpO2 is a non-invasive measurement of the functional oxygen saturation.
The light sources and the receiver of the sensor are laid in the two rubber cushions of the device respectively.
Measurement steps
Press the clip open device to open the clip.
Insert the patient's finger into the rubber cushions of the clip, making sure the finger is in the right position as shown in figure 6-1, and then clip the f.
Press the power button on the front panel to turn on the device.
It is recommended to use the index finger, middle finger or ring finger when testing.
Do not shake the device and keep the patient at ease during the process.
The readings will be displayed on the OLED screen momentarily.
Figure 7-1 Put Finger Into the correct position

10
NOTE
Make sure to place the device on the finger in a correct direction. The LED part of the sensor should be at the backside of the patient hand and the photodetector part at the inside. Make sure to insert the finger to a suitable depth into the sensor so that the fingernail is just opposite to the light emitted from the sensor.
To acquire accurate results, please read data until the device is steadily placed. Measurement Limitations If the accuracy of any measurement does not seem reasonable, first check the patient's vital signs by an alternate method. Then check the instrument for proper function. Inaccurate measurements may be caused by:
High-frequency electrical noise, such as noise from electrosurgical apparatus connected to the system;
Significant levels of dysfunctional hemoglobins (e.g., carboxyhemoglobin or methemoglobin);
Significant concentrations of dysfunctional hemoglobin, such as carboxyhemoglobin and methemoglobin; itravascular dyes such as indocyanine green or methylene blue;
Exposure to excessive illumination, such as surgical lamps (especially ones with a xenon light source), bilirubin lamps, fluorescent lights, infrared heating lamps, or direct sunlight (exposure to excessive illumination can be corrected by covering the device with a dark material);
Excessive patient motion;
Venous pulsations;
SpO2 is too low;
Improper position of the finger inserted into the device;
Placement of the device on the same extremity with a blood pressure cuff, arterial catheter, or intravascular line.
Loss of pulse signal can occur in the following situation:
The device clip is too tight;
There is excessive illumination from light sources such as a surgical lamp, a bilirubin lamp, or sunlight;
A blood pressure cuff is inflated on the same extremity as the one with the device attached:
The patient has hypotension, severe vasoconstriction, severe anaemia. or hypothermia;
There is arterial occlusion proximal to the device;
The patient is in cardiac arrest or in shock. Precautions WARNING
Check if the device is in normal condition before monitoring. Do not use the device once it is found damage.
Remove the device from the patient after measurement.
Do not put the device on extremities with arterial catheter or venous syringe.
The device can not be clipped on the oedema and tender tissue.
If no pulse is found or the reading is unreasonable, first check the patient 's condition, and then check the device placement on the finger, finally consult a qualified engineer to check the device for correct function.
Don't use the device to measure patients whose pulse rate is lower than 30bpm, which may cause incorrect results.
The device is not appropriate for the ceaseless monitoring of the patients. Prolonged and continuous monitoring may increase jeopardy of unexpected change of dermal condition such as abnormal sensitivity, ruhescence, vesicle, repressive putrescence, and so on. The uncomfortable or painful feeling may appear if using the device

11
ceaselessly, especially for child and patient of poor perfusion or immature dermographia by light collimation. Iris recommended that the device should not be applied to the same finger for over 2 hours.
Make sure no contamination or scar exists in the site where the device is placed. Otherwise, the measured result may be incorrect because the signal received by the sensor is affected.
When used on different patients, the device is prone to crossed contamination, which should be prevented and controlled by the user. Disinfection is recommended before using the device on other patients.
NOTE
Do not perform SpO2 monitoring and NIBP measurements on the same arm simultaneously. Obstruction of blood flow during NIBP measurements may adversely affect the reading of the SpO2 value.
The patient's fingernail should not be too long, otherwise the finger cannot be inserted into the sensor to a suitable depth and the SpO2 measurements may be inaccurate.
8. Maintenance System Check Before using the device, perform the following steps:
Check if there is any mechanical damage;
Check if all the functions of the device can work normally so as to make sure that the device is in proper working condition;
Check if the battery energy is sufficient. If the device can not be powered on, or when powering on, the battery capacity bar is 0 level or the low battery power indicator is red and flashes, replace the batteries with good ones.
In case of any damage, abnormal function, hidden safety danger or exception, do not use the device on patient. Contact the technician in your hospital or the manufacture immediately. Make sure the qualified service personnel have implemented a complete inspection, including the functional safety check, after the device has been used for 6-12 consecutive months, or after device servicing or system upgrading. This is to ensure the normal operation of the system. CAUTION Take out the batteries if the device is not in used for a long time. General Cleaning The device should be cleaned on a regular basis. When it is polluted by dust, oil, sweat or blood etc., it should be cleaned at once. If there is heavy pollution or lots of dust and sand in your place, the device should be cleaned more frequently. Before cleaning the device, consult your hospital's regulations for cleaning, disinfecting and sterilizing equipment. The exterior surfaces of the device may be cleaned gently with a clean and soft cloth, sponge or cotton swap, dampened with a non-erosive cleaning solution. Drying off excess cleaning solution before cleaning the device is recommended. WARNING
Power off the device before cleaning. Examples of suitable cleaning solutions are as follows:
Diluted soap water
12
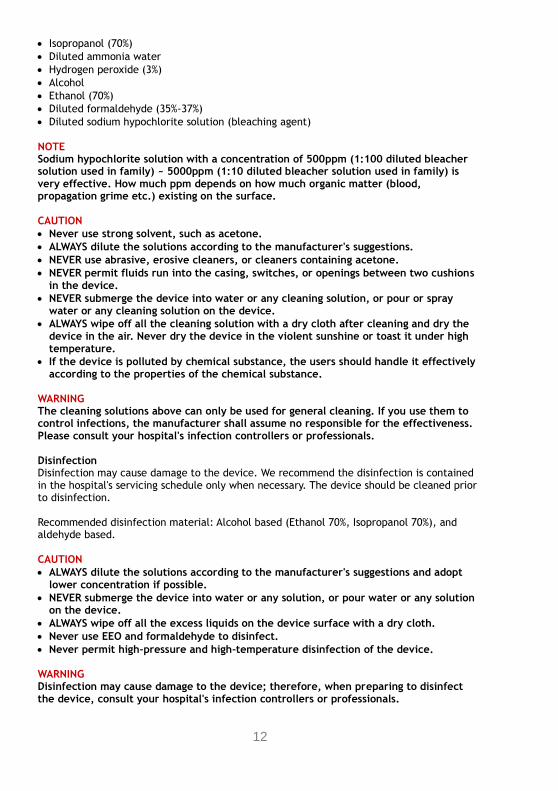
Isopropanol (70%)
Diluted ammonia water
Hydrogen peroxide (3%)
Alcohol
Ethanol (70%)
Diluted formaldehyde (35%-37%)
Diluted sodium hypochlorite solution (bleaching agent) NOTE Sodium hypochlorite solution with a concentration of 500ppm (1:100 diluted bleacher solution used in family) ~ 5000ppm (1:10 diluted bleacher solution used in family) is very effective. How much ppm depends on how much organic matter (blood, propagation grime etc.) existing on the surface. CAUTION
Never use strong solvent, such as acetone.
ALWAYS dilute the solutions according to the manufacturer's suggestions.
NEVER use abrasive, erosive cleaners, or cleaners containing acetone.
NEVER permit fluids run into the casing, switches, or openings between two cushions in the device.
NEVER submerge the device into water or any cleaning solution, or pour or spray water or any cleaning solution on the device.
ALWAYS wipe off all the cleaning solution with a dry cloth after cleaning and dry the device in the air. Never dry the device in the violent sunshine or toast it under high temperature.
If the device is polluted by chemical substance, the users should handle it effectively according to the properties of the chemical substance.
WARNING The cleaning solutions above can only be used for general cleaning. If you use them to control infections, the manufacturer shall assume no responsible for the effectiveness. Please consult your hospital's infection controllers or professionals. Disinfection Disinfection may cause damage to the device. We recommend the disinfection is contained in the hospital's servicing schedule only when necessary. The device should be cleaned prior to disinfection. Recommended disinfection material: Alcohol based (Ethanol 70%, Isopropanol 70%), and aldehyde based. CAUTION
ALWAYS dilute the solutions according to the manufacturer's suggestions and adopt lower concentration if possible.
NEVER submerge the device into water or any solution, or pour water or any solution on the device.
ALWAYS wipe off all the excess liquids on the device surface with a dry cloth.
Never use EEO and formaldehyde to disinfect.
Never permit high-pressure and high-temperature disinfection of the device. WARNING Disinfection may cause damage to the device; therefore, when preparing to disinfect the device, consult your hospital's infection controllers or professionals.
13
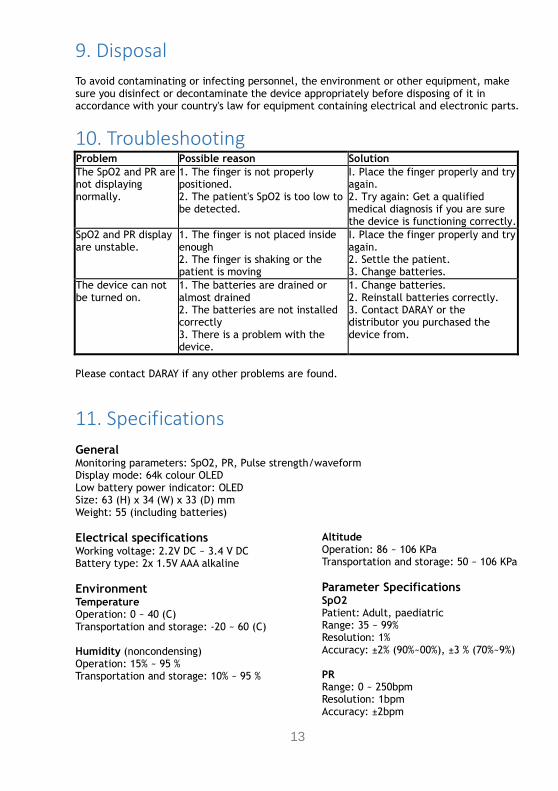
9. Disposal To avoid contaminating or infecting personnel, the environment or other equipment, make sure you disinfect or decontaminate the device appropriately before disposing of it in accordance with your country's law for equipment containing electrical and electronic parts.
10. Troubleshooting Problem Possible reason Solution
The SpO2 and PR are not displaying normally.
1. The finger is not properly positioned. 2. The patient's SpO2 is too low to be detected.
I. Place the finger properly and try again. 2. Try again: Get a qualified medical diagnosis if you are sure the device is functioning correctly.
SpO2 and PR display are unstable.
1. The finger is not placed inside enough 2. The finger is shaking or the patient is moving
I. Place the finger properly and try again. 2. Settle the patient. 3. Change batteries.
The device can not be turned on.
1. The batteries are drained or almost drained 2. The batteries are not installed correctly 3. There is a problem with the device.
1. Change batteries. 2. Reinstall batteries correctly. 3. Contact DARAY or the distributor you purchased the device from.
Please contact DARAY if any other problems are found.
11. Specifications
General Monitoring parameters: SpO2, PR, Pulse strength/waveform Display mode: 64k colour OLED Low battery power indicator: OLED Size: 63 (H) x 34 (W) x 33 (D) mm Weight: 55 (including batteries)
Electrical specifications Working voltage: 2.2V DC ~ 3.4 V DC Battery type: 2x 1.5V AAA alkaline
Environment Temperature Operation: 0 ~ 40 (C) Transportation and storage: -20 ~ 60 (C) Humidity (noncondensing) Operation: 15% ~ 95 % Transportation and storage: 10% ~ 95 %
Altitude Operation: 86 ~ 106 KPa Transportation and storage: 50 ~ 106 KPa
Parameter Specifications SpO2 Patient: Adult, paediatric Range: 35 ~ 99% Resolution: 1% Accuracy: ±2% (90%~00%), ±3 % (70%~9%) PR Range: 0 ~ 250bpm Resolution: 1bpm Accuracy: ±2bpm
14
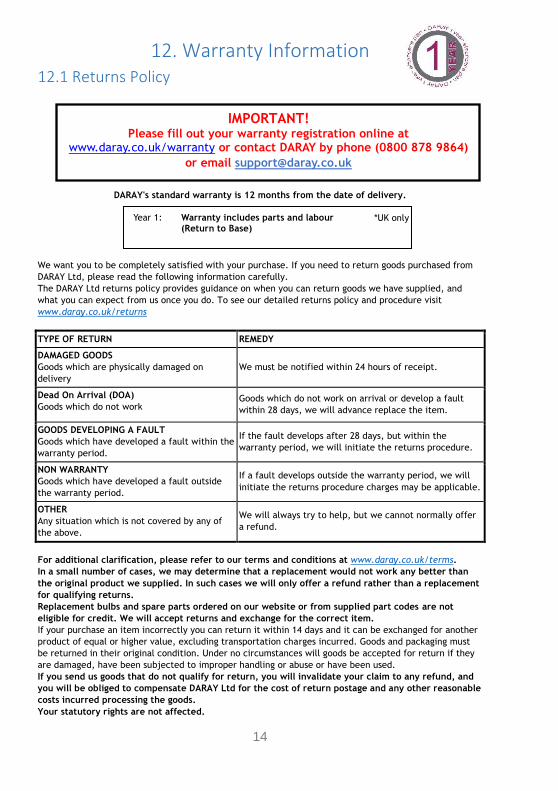
12. Warranty Information
12.1 Returns Policy
DARAY's standard warranty is 12 months from the date of delivery.
We want you to be completely satisfied with your purchase. If you need to return goods purchased from
DARAY Ltd, please read the following information carefully.
The DARAY Ltd returns policy provides guidance on when you can return goods we have supplied, and
what you can expect from us once you do. To see our detailed returns policy and procedure visit
www.daray.co.uk/returns
TYPE OF RETURN REMEDY
DAMAGED GOODS
Goods which are physically damaged on
delivery
We must be notified within 24 hours of receipt.
Dead On Arrival (DOA)
Goods which do not work Goods which do not work on arrival or develop a fault
within 28 days, we will advance replace the item.
GOODS DEVELOPING A FAULT
Goods which have developed a fault within the
warranty period.
If the fault develops after 28 days, but within the
warranty period, we will initiate the returns procedure.
NON WARRANTY
Goods which have developed a fault outside
the warranty period.
If a fault develops outside the warranty period, we will
initiate the returns procedure charges may be applicable.
OTHER
Any situation which is not covered by any of
the above.
We will always try to help, but we cannot normally offer
a refund.
For additional clarification, please refer to our terms and conditions at www.daray.co.uk/terms.
In a small number of cases, we may determine that a replacement would not work any better than
the original product we supplied. In such cases we will only offer a refund rather than a replacement
for qualifying returns.
Replacement bulbs and spare parts ordered on our website or from supplied part codes are not
eligible for credit. We will accept returns and exchange for the correct item.
If your purchase an item incorrectly you can return it within 14 days and it can be exchanged for another
product of equal or higher value, excluding transportation charges incurred. Goods and packaging must
be returned in their original condition. Under no circumstances will goods be accepted for return if they
are damaged, have been subjected to improper handling or abuse or have been used.
If you send us goods that do not qualify for return, you will invalidate your claim to any refund, and
you will be obliged to compensate DARAY Ltd for the cost of return postage and any other reasonable
costs incurred processing the goods.
Your statutory rights are not affected.
IMPORTANT! Please fill out your warranty registration online at
www.daray.co.uk/warranty or contact DARAY by phone (0800 878 9864)
or email [email protected]
Year 1: Warranty includes parts and labour (Return to Base)
*UK only
15
12.2 Warranty Details
TERMS AND CONDITIONS OF WARRANTY 1. To qualify for this warranty you must register on www.daray.co.uk or return to Daray Ltd
(Daray) the duly completed warranty-registration form accompanying the product. 2. Daray warrants this product (excluding lamp) against faulty material and workmanship during
the period of the warranty. The period of warranty is the period stated on your warranty card and commences on the date of purchase of the product. In the event that the product is not in good working order Daray will provide, during the warranty period, a free repair service within the United Kingdom. The warranty is subject to proof of purchase being provided; therefore, you should retain your original receipt. 2.1 The repair service consists of the provision of spare parts and/or replacement products (at
Daray’s discretion) which will be provided on an exchange basis and will either be new, equivalent to new or reconditioned. All replaced spare parts and products shall become the property of Daray.
2.2 Daray’s only obligation under this warranty is the provision of the service as set out above. 2.3 All products are returned to Daray at the customer’s cost and risk. Products to be returned
should be adequately packed. For the address to send returns to please visit www.daray.co.uk
3. Daray’s arrangements for providing service provided under this warranty may include the use of sub-contractors.
4. This warranty does not cover damage or defects in the Product caused by or resulting from:
Wilful neglect or negligence by anyone other than Daray;
Improper use, storage or handling of the product;
Use of non-Daray approved parts (such as replacement lamps) not compatible with the Product;
Fire, accident or disaster;
Use of non-Daray modifications other than in accordance with Daray’s instructions; Attachment of fittings and accessories not approved by Daray; Repairs, modifications carried out by service personnel not approved by Daray;
Damage caused by chemical corrosion from cleaning agents not approved by Daray.
Failure to use or install the product in accordance with the manufacturer’s instructions. 5. Nothing in this warranty shall have the effect of restricting or excluding the liability of Daray in respect of:
a) Death and personal injury caused by the negligence of Daray, or for fraud; b) Under the Consumer Protection Act 1987 to a person who has suffered damage caused by
a defective product or to a dependant or relative of such a person; c) Direct damage to your property caused by the proven negligence of Daray.
6. This agreement does not give any rights other than those expressly set out above and in particular, Daray will not be responsible for any loss of income, profits or contracts or any direct or indirect consequential loss, damage caused to or suffered by the purchaser as a direct result of this agreement.
7. This warranty is offered (subject to these terms and conditions) in addition to, and does not affect your statutory rights.
8. Daray may disclose your details and other personal information to companies within the Daray group including any subsidiary company or sub-contractor of Daray for the purposes of performing our obligations hereunder.
9. You must not resell outside the UK any products supplied by Daray and covered by the Export of Goods (Control) Order 1992 (or any law that replaces it) without obtaining all necessary licences. You also agree not to sell the product in the UK if you know or think that the person buying the product intends to export it without getting the necessary licences. You agree to impose similar conditions to these on anyone you sell the product to.
10. These conditions shall in all respect be governed and construed in accordance with English law and the exclusive jurisdiction of the English courts.
Product:
Serial No:

DARAY Ltd.
Unit 1 Marquis Drive
Moira
Derbyshire
United Kingdom
DE12 6EJ
+44 (0)800 878 9864
+44 (0)333 321 0973 [email protected] www.daray.co.uk