Embed Size (px)
Citation preview
YASKAWA
Varispeed SERIES OPTION CARDDeviceNet COMMUNICATION INTERFACE CARD USER'S MANUAL
YASKAWA MANUAL NO. SIBP C730600 01B
Model: SI-N1

Copyright © 2004 YASKAWA ELECTRIC CORPORATION All rights reserved. No part of this publication may be reproduced, stored in a retrieval system, or transmitted, in any form, or by any means, mechanical, electronic, photocopying, recording, or otherwise, without the prior written permission of Yaskawa. No patent liability is assumed with respect to the use of the information contained herein. Moreover, because Yaskawa is constantly striving to improve its high-quality products, the information contained in this manual is subject to change without notice. Every precaution has been taken in the preparation of this manual. Nevertheless, Yaskawa assumes no responsibility for errors or omissions. Neither is any liability assumed for damages resulting from the use of the information contained in this publication.

1
INTRODUCTION
This User’s Manual describes the operations and specifications of the DeviceNet Communication Interface Card (hereafter called the SI-N1 card). The SI-N1 card transfers the data between the Varispeed series Current Vector Control General-purpose Inverter and the Open Field Network DeviceNet (hereafter called the DeviceNet). Read this manual carefully and be sure you understand the information provided before attempting any operations.
For the operation of the Inverter, refer to the Varispeed Instruction Manual
F7 series: TOE-S616-55.1 G7 series: TOE-S616-60.1 F7S series: EZZ009387
General Precautions
• Some drawings in this manual are shown with the protective cover or shields removed, in order to describe the detail with more clarity. Make sure all covers and shields are replaced before operating this product, and operate it in accordance with the instructions in this manual.
• This manual may be modified when necessary because of improvement of the product, modification, or changes in specifications.
• A new version of the manual will be released under a revised manual number when any changes are made.
• Contact your Yaskawa representative or a Yaskawa office listed on the back of this manual to order a new manual if this manual is damaged or lost. Please provide the document number listed on the front cover of this manual when ordering.
• Yaskawa cannot guarantee the quality of any products which have been modified. Yaskawa assumes no responsibility for any injury or damage caused by a modified product.
2
Safety Information
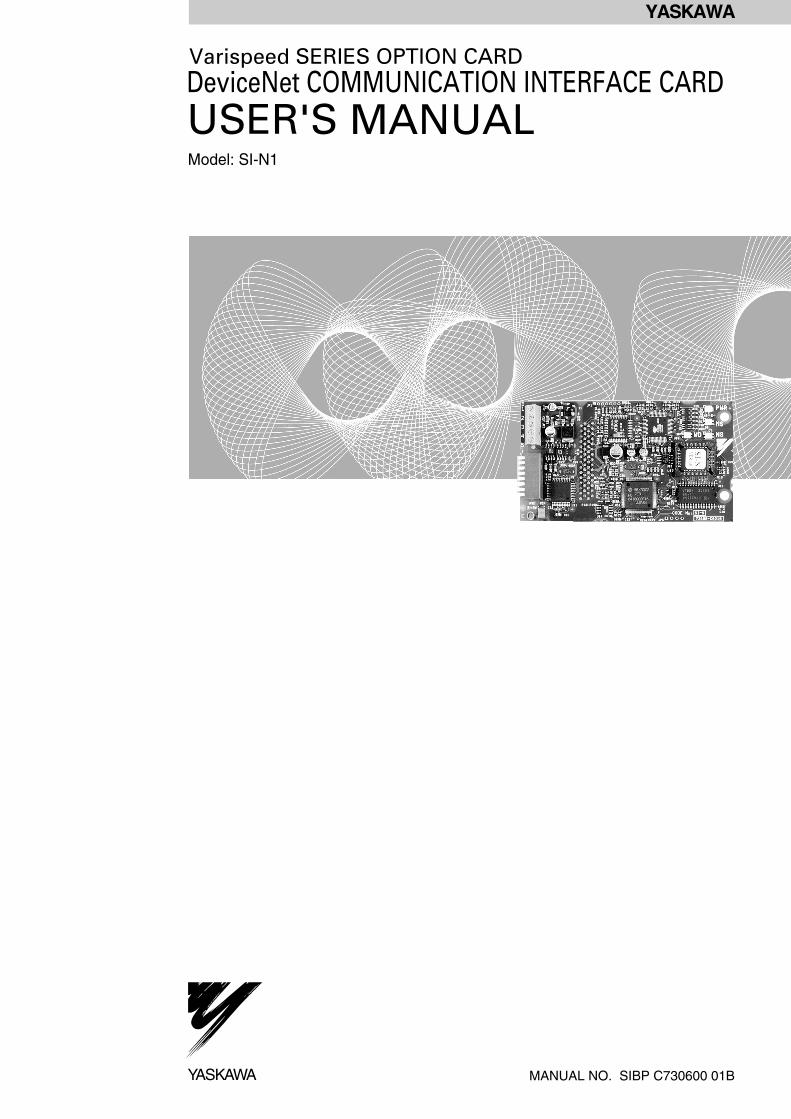
The following conventions are used to indicate precautions in this manual. Failure to heed precautions provided in this manual can result in serious or possibly even fatal injury or damage to the products or to related equipment and systems.
Indicates a potentially hazardous situation which, if not avoided, could result in death or serious injury to personnel.
Indicates a potentially hazardous situation which, if not avoided, may result in minor or moderate injury to personnel and damage to equipment.
Even items described in may result in a vital acccident in some situations. In either case, follow these important notes.
Indicates important information that should be memorized.
CAUTION
NOTE
CAUTION
WARNING

3
Safety Pracautions
Read this instruction manual thoroughly before installation, operation, maintenance or inspection of the DeviceNet Communication Interface Card SI-N1. In this manual, NOTES FOR SAFE OPERATION are classified as “WARNING” and “CAUTION.”
Receiving
CAUTION • Do not use any option card which is damaged or has missing parts.
Failure to observe this caution may result in injury.
Installation and Wiring
WARNING • Never touch the inside of the Inverter.
Failure to observe this warning may result in electric shock.
• Disconnect all power before mounting or removing the option card or wiring. Then wait at least the specified time (specified on the front cover) after the power supply is disconnected and all LEDs and CHARGE LED are extinguished. Failure to observe this warning may result in electric shock.
• Do not damage or apply excessive stress to the cables. Do not place heavy objects on the cables or place the cables between other objects. Failure to observe this warning may result in electric shock, malfunction or damage of the equipment.
CAUTION • Do not touch the elements of the option card with bare hands.
Failure to observe this caution may result in equipment damage caused by static electricity. • Insert the connectors firmly.
Failure to observe this caution may result in malfunction or damage of the equipment.
Setting
CAUTION • Be careful when changing Inverter settings. The Inverter is factory set to suitable settings.
Failure to observe this caution may result in damage of the equipment.
4
Contents INTRODUCTION································································································· 1 Safety Information ······························································································· 2 Safety Pracautions ······························································································ 3
1 OUTLINE................................................................................... 6
2 RECEIVING .............................................................................. 7
2.1 Model and Code Number......................................................................7
3 NOMENCLATURE AND SETTING........................................... 8
3.1 Components..........................................................................................8
3.2 Terminal Block ......................................................................................8
3.3 LED.......................................................................................................9
3.4 DIP Switch ..........................................................................................10 3.4.1 Baud Rate Setting Switch ................................................................................... 10 3.4.2 MAC ID Setting Switch........................................................................................ 10
4 INSTALLATION AND WIRING................................................ 11
4.1 Installing the SI-N1 Card.....................................................................11
4.2 Wiring of the Communications Cable..................................................12
5 FUNCTIONS ........................................................................... 13
5.1 EDS Files ............................................................................................13
5.2 Initial Settings......................................................................................13
5.3 I/O Message Communications............................................................15 5.3.1 Basic I/O Instances ............................................................................................. 16 5.3.2 Extended I/O Instance (Factory Setting) ............................................................. 18 5.3.3 MEMOBUS I/O Instances ................................................................................... 20 5.3.4 Control I/O Instances .......................................................................................... 22
5.4 Explicit Message Communications .....................................................26 5.4.1 Identity Object (Class 01 Hex) ............................................................................ 26 5.4.2 Message Router Object (Class 02 Hex).............................................................. 27 5.4.3 DeviceNet Object (Class 03 Hex) ....................................................................... 28 5.4.4 Assembly Object (Class 04 Hex) ........................................................................ 29 5.4.5 DeviceNet Connection Object (Class 05 Hex) .................................................... 30 5.4.6 Motor Data Object (Class 28 Hex) ...................................................................... 33 5.4.7 Control Supervisor Object (Class 29 Hex) .......................................................... 34 5.4.8 AC/DC Drive Object (Class 2A Hex) ................................................................... 38
5
5.4.9 Inverter Parameter Object (Class 64 Hex) .......................................................... 42
6 TROUBLESHOOTING ............................................................43
6.1 Inverter Errors .................................................................................... 43
6.2 Errors Indicated by the DeviceNet Communications Indicators............................................................................................ 44
6.3 Error Code Table................................................................................ 46
6.4 MEMOBUS I/O Instance Error Table.................................................. 47
7 SPECIFICATIONS...................................................................48
1 OUTLINE
6
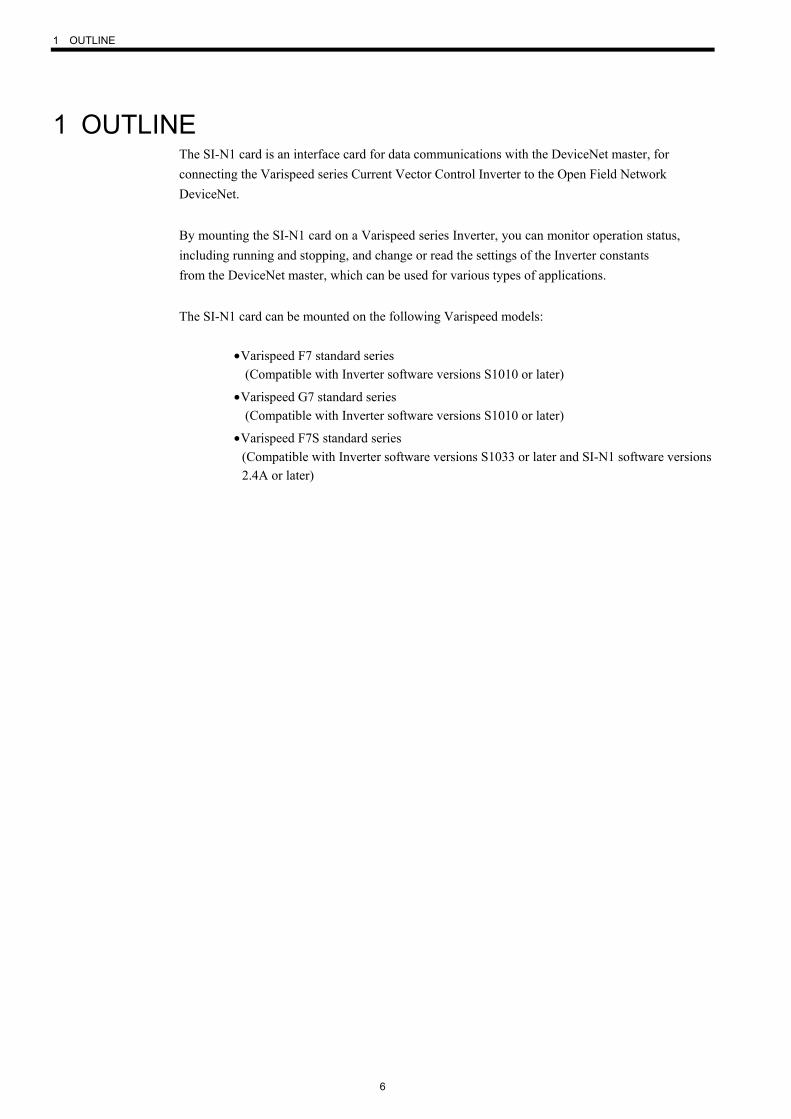
1 OUTLINE The SI-N1 card is an interface card for data communications with the DeviceNet master, for connecting the Varispeed series Current Vector Control Inverter to the Open Field Network DeviceNet.
By mounting the SI-N1 card on a Varispeed series Inverter, you can monitor operation status, including running and stopping, and change or read the settings of the Inverter constants from the DeviceNet master, which can be used for various types of applications.
The SI-N1 card can be mounted on the following Varispeed models:
• Varispeed F7 standard series (Compatible with Inverter software versions S1010 or later)
• Varispeed G7 standard series (Compatible with Inverter software versions S1010 or later)
• Varispeed F7S standard series (Compatible with Inverter software versions S1033 or later and SI-N1 software versions 2.4A or later)

2.1 Model and Code Number
7
2 RECEIVING Check the following items as soon as the product is delivered.
Item Method
Has the correct model of the SI-N1 card been delivered?
Confirm the model code number in the lower right of the SI-N1 card. (Refer to 2.1.)
Is the SI-N1 card damaged in any way?
Inspect the entire exterior of the SI-N1 card to see if there are any scratches or any other damage resulting from shipping.
If you find any irregularities, contact the agency from which you purchased the Inverter or your Yaskawa representative immediately.
2.1 Model and Code Number
The model and code numbers in the lower right of the SI-N1 card are as follows. The 11 digits of the code number are also the product’s revision number.
The SI-N1 card of version 73600-C0211-01 or later is compatible with the Varispeed series.
SI-N1
VER X.XA
SI-N1 software version number
Note: F7S-series Inverters support SI-N1 software versions 2.4A or later.
Code Number
DeviceNet Communications Interface SI-N1 Card Model

3 NOMENCLATURE AND SETTING
8
3 NOMENCLATURE AND SETTING 3.1 Components
The names of components on the SI-N1 card are shown in the following figure.
3.2 Terminal Block
This terminal block connects the SI-N1 card to the DeviceNet communications line.
Terminal
No. Terminal
Color Name
Wiring Color
Meaning
1 Black V- Black Communications power supply 2 Blue CAN_L Blue Low side communications data 3 - Shield (Shield) Shielded wire 4 White CAN_H White High side communications data 5 Red V+ Red Communications DC+24 V
1 2 3 4 5
Black Blue White Red
Terminal Block
DIP Switches
LED
Grounding Cable
Option Connector (60 pin)

3.3 LED
9
3.3 LED
These LED indicator lamps indicate the status of the DeviceNet or the SI-N1 card.
Indication Name
Color Status Operating Status Remarks
Green ON Power supply ON Power is supplied to the SI-N1 card from the Inverter. PWR
− OFF Power supply OFF Power is not being supplied to the Inverter. Incorrect connection of the SI-N1 card does not supply power to the SI-N1 card.
Green ON SI-N1 card operating The SI-N1 card is operating normally.
Green Flashing SI-N1 card initializing There is an incorrect baud rate setting or there is a MAC ID duplication.
Red ON Fatal error occurred A fatal (irrecoverable) error occurred in the SI-N1 card.
Red Flashing Non-fatal error occurred A non-fatal (recoverable) error occurred.
MS
− OFF Power supply OFF Power is not being supplied to the Inverter. Incorrect connection of the SI-N1 card does not supply power to the SI-N1 card.
Green ON Online communications established.
DeviceNet communications are operating normally.
Green Flashing Online communications not established.
DeviceNet communications are operating normally, but communications have not been established with the Master.
Red ON Communications error An error occurred that disables DeviceNet communications. • MAC ID duplication • Bus Off detected
Red Flashing Communications timeout A communications timeout occurred with the Master.
NS
− OFF Offline or Power supply OFF
DeviceNet communications are not online. Power is not being supplied to the SI-N1 card. The baud rate settings do not agree.
Green Flashing CPU operating The CPU of the SI-N1 card is operating normally.
Red ON CPU error The CPU of the SI-N1 card is initializing or error.
WD
− OFF Power supply OFF Power is not being sipplied to the Inverter. Incorrect connection of the SI-N1 card does not supply power to the SI-N1 card.
∗ Both MS and NS will be ON when the baud rate setting (DIP switch: DR1, DR0) is ON.
PWR
MS
NSWD
3 NOMENCLATURE AND SETTING 3.4.1 Baud Rate Setting Switch
10
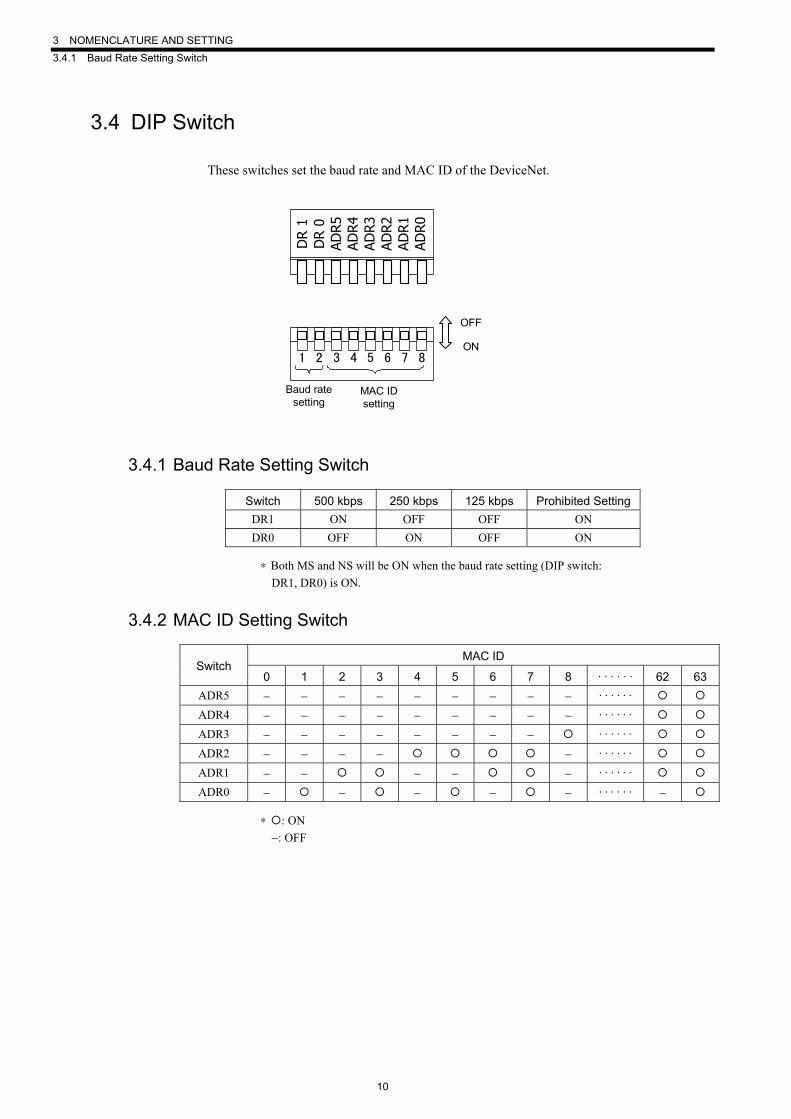
3.4 DIP Switch
These switches set the baud rate and MAC ID of the DeviceNet.
DR
1D
R 0
ADR5
ADR4
ADR3
ADR2
ADR1
ADR0
1 2 3 4 85 6 7
Baud ratesetting
MAC IDsetting
OFF
ON
3.4.1 Baud Rate Setting Switch
Switch 500 kbps 250 kbps 125 kbps Prohibited Setting DR1 ON OFF OFF ON DR0 OFF ON OFF ON
∗ Both MS and NS will be ON when the baud rate setting (DIP switch: DR1, DR0) is ON.
3.4.2 MAC ID Setting Switch
MAC ID Switch
0 1 2 3 4 5 6 7 8 · · · · · · 62 63ADR5 − − − − − − − − − · · · · · · ADR4 − − − − − − − − − · · · · · · ADR3 − − − − − − − − · · · · · · ADR2 − − − − − · · · · · · ADR1 − − − − − · · · · · · ADR0 − − − − − · · · · · · −
∗ : ON −: OFF

4.1 Installing the SI-N1 Card
11
4 INSTALLATION AND WIRING 4.1 Installing the SI-N1 Card
The SI-N1 card must be installed on the control board inside the Inverter. Remove the Digital Operator and the front cover of the Inverter.
Use the following procedure to install the SI-N1 card.
1. Turn off the Inverter's power supply. Wait the specified time, as shown on the front cover of the Inverter, and then remove the Digital Operator and the front cover of the Inverter. Confirm that the CHARGE indicator is turned off.
2. Remove the option clip that prevents option cards C and D from rising.
3. Connect the SI-N1 card to the 60-pin 2CN connector on the Inverter's control board. Insert two spacers (marked as A in the diagram) into the spacer holes on the SI-N1 card. Press it firmly until you hear it snap into place.
4. Reattach the clip in its original position.
5. Connect the grounding cable of the SI-N1 card to terminal E(G) for the control circuit on the Inverter's control board.
6. Connect the communications cable, and set the DIP switch to the correct setting.
7. Reattach the Digital Operator and the front cover of the Inverter.
How to Install the SI-N1 card
Option A
4CN Option Card A Connector
2CN Option Card C Connector
Option Clip (To hold Option Cards C and D)
3CN Option Card D Connector
Control Terminal
Option C
Option D
SI-N1
A
4 INSTALLATION AND WIRING
12
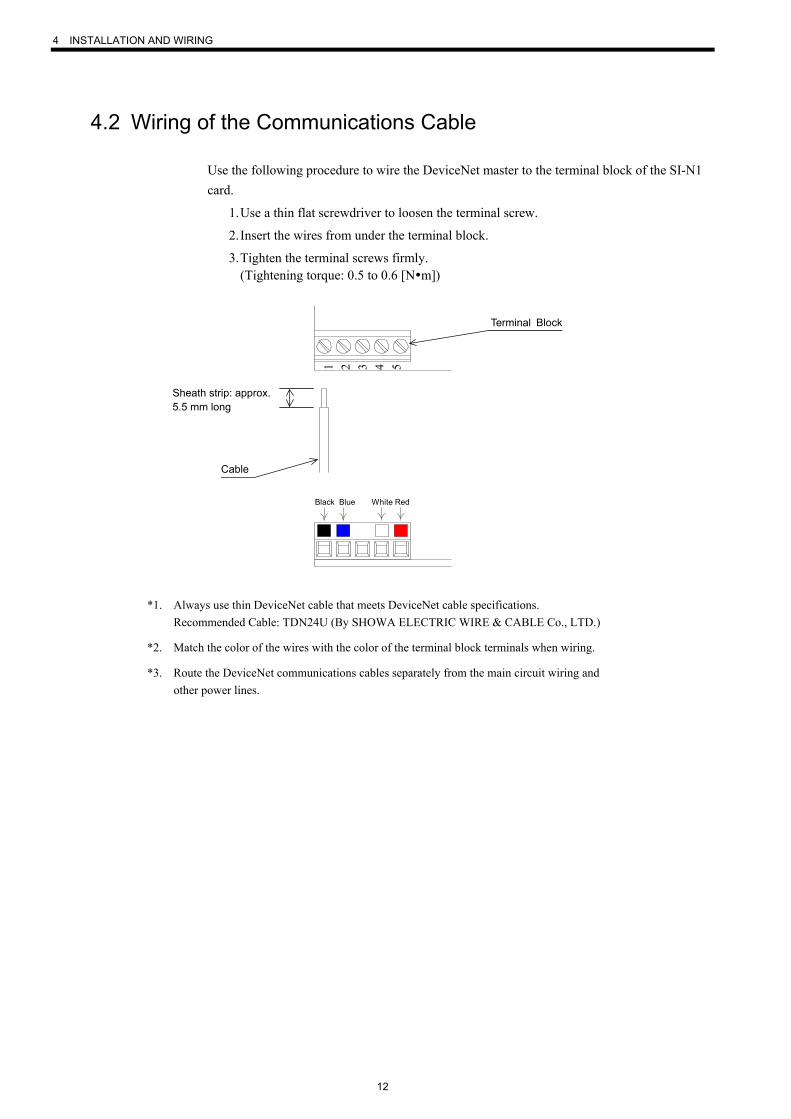
4.2 Wiring of the Communications Cable
Use the following procedure to wire the DeviceNet master to the terminal block of the SI-N1 card.
1. Use a thin flat screwdriver to loosen the terminal screw.
2. Insert the wires from under the terminal block.
3. Tighten the terminal screws firmly. (Tightening torque: 0.5 to 0.6 [N m])
1 2 3 4 5
Black Blue White Red
*1. Always use thin DeviceNet cable that meets DeviceNet cable specifications. Recommended Cable: TDN24U (By SHOWA ELECTRIC WIRE & CABLE Co., LTD.)
*2. Match the color of the wires with the color of the terminal block terminals when wiring.
*3. Route the DeviceNet communications cables separately from the main circuit wiring and other power lines.
Cable
Terminal Block
Sheath strip: approx. 5.5 mm long

5.1 EDS Files
13
5 FUNCTIONS The SI-N1 card supports the AC Drive Profile defined in DeviceNet specifications. No special settings are needed to operate, adjust, and monitor the Inverters from any DeviceNet master.
The SI-N1 card operates as Group 2 Only servers (DeviceNet slaves) in the DeviceNet network. Two kinds of communications are possible with the master: I/O messages and explicit messages.
5.1 EDS Files
An EDS file is needed for setting and monitoring the SI-N1 card with the DeviceNet setting tool (configurator). By writing an EDS file into the setting tool, you enable the setting and reading of the Inverter constants from the setting tool. EDS file depends on the type and capacity of the Inverter. Contact your Yaskawa representative for more information how to get a EDS file.
5.2 Initial Settings
Always set the following Inverter constants before using DeviceNet communications.
Name Inverter Constant
No. Display ∗1 Description
Factory Setting F7 G7
Frequency units of reference setting and monitor
o1-03
Display Scaling
Always set the number of motor poles (2 to 39). In DeviceNet standards, the motor speed is expressed in units of min-1. The SI-N1 uses this constant (o1-03) setting to convert the frequency to min-1.
0
Reference selection ∗2 b1-01
Reference Source
Set the inputting method for frequency reference. 0: Digital Operator 1: Control circuit terminals (analog inputs) 2: MEMOBUS transmission (Uses SI-K2) 3: Option Card 4: Pulse train input Set to 3 (Option Card) to validate the frequency reference from the SI-N1 card.
1
Operation method selection ∗2 b1-02
Run Source
Set the operation method. 0: Digital Operator 1: Control circuit terminals (sequence inputs) 2: MEMOBUS communication (Uses SI-K2) 3: Option Card Set to 3 (Option Card) to validate the run command from the SI-N1 card.
1
5 FUNCTIONS
14
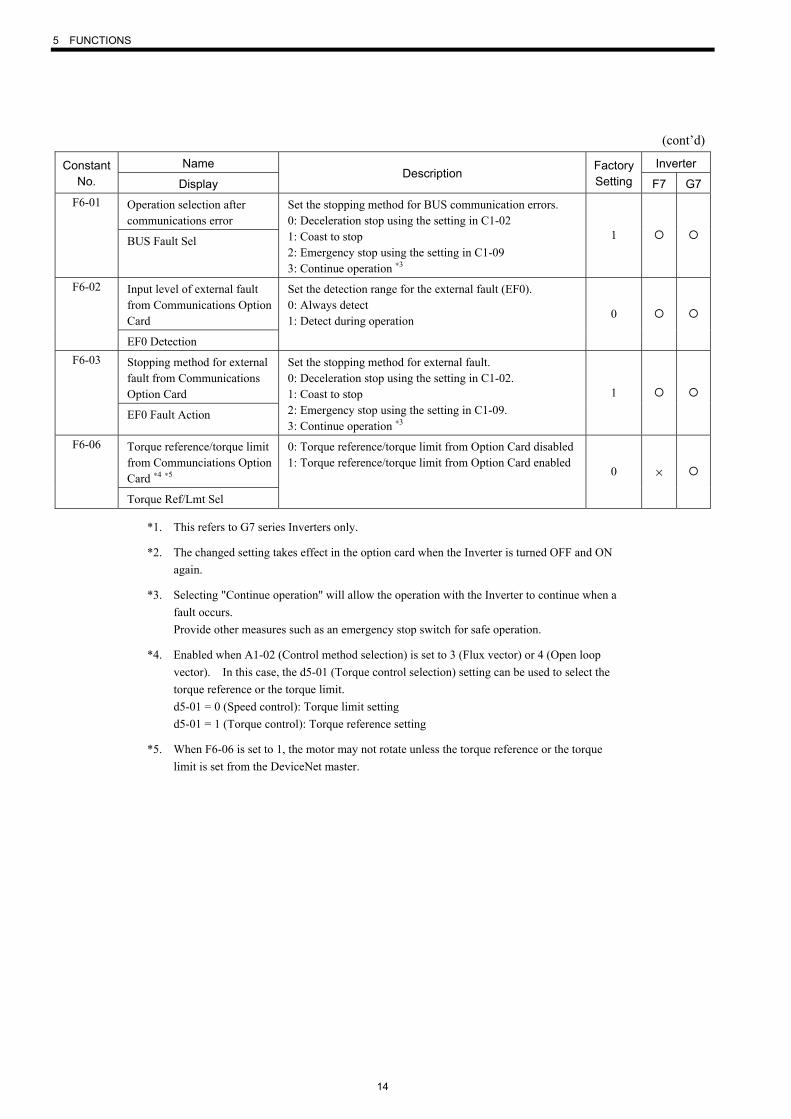
(cont’d)
Name Inverter Constant No. Display
Description Factory Setting F7 G7
Operation selection after communications error
F6-01
BUS Fault Sel
Set the stopping method for BUS communication errors. 0: Deceleration stop using the setting in C1-02 1: Coast to stop 2: Emergency stop using the setting in C1-09 3: Continue operation ∗3
1
Input level of external fault from Communications Option Card
F6-02
EF0 Detection
Set the detection range for the external fault (EF0). 0: Always detect 1: Detect during operation 0
Stopping method for external fault from Communications Option Card
F6-03
EF0 Fault Action
Set the stopping method for external fault. 0: Deceleration stop using the setting in C1-02. 1: Coast to stop 2: Emergency stop using the setting in C1-09. 3: Continue operation ∗3
1
Torque reference/torque limit from Communciations Option Card ∗4 ∗5
F6-06
Torque Ref/Lmt Sel
0: Torque reference/torque limit from Option Card disabled 1: Torque reference/torque limit from Option Card enabled
0 ×
*1. This refers to G7 series Inverters only.
*2. The changed setting takes effect in the option card when the Inverter is turned OFF and ON again.
*3. Selecting "Continue operation" will allow the operation with the Inverter to continue when a fault occurs. Provide other measures such as an emergency stop switch for safe operation.
*4. Enabled when A1-02 (Control method selection) is set to 3 (Flux vector) or 4 (Open loop vector). In this case, the d5-01 (Torque control selection) setting can be used to select the torque reference or the torque limit. d5-01 = 0 (Speed control): Torque limit setting d5-01 = 1 (Torque control): Torque reference setting
*5. When F6-06 is set to 1, the motor may not rotate unless the torque reference or the torque limit is set from the DeviceNet master.
5.3 I/O Message Communications
15
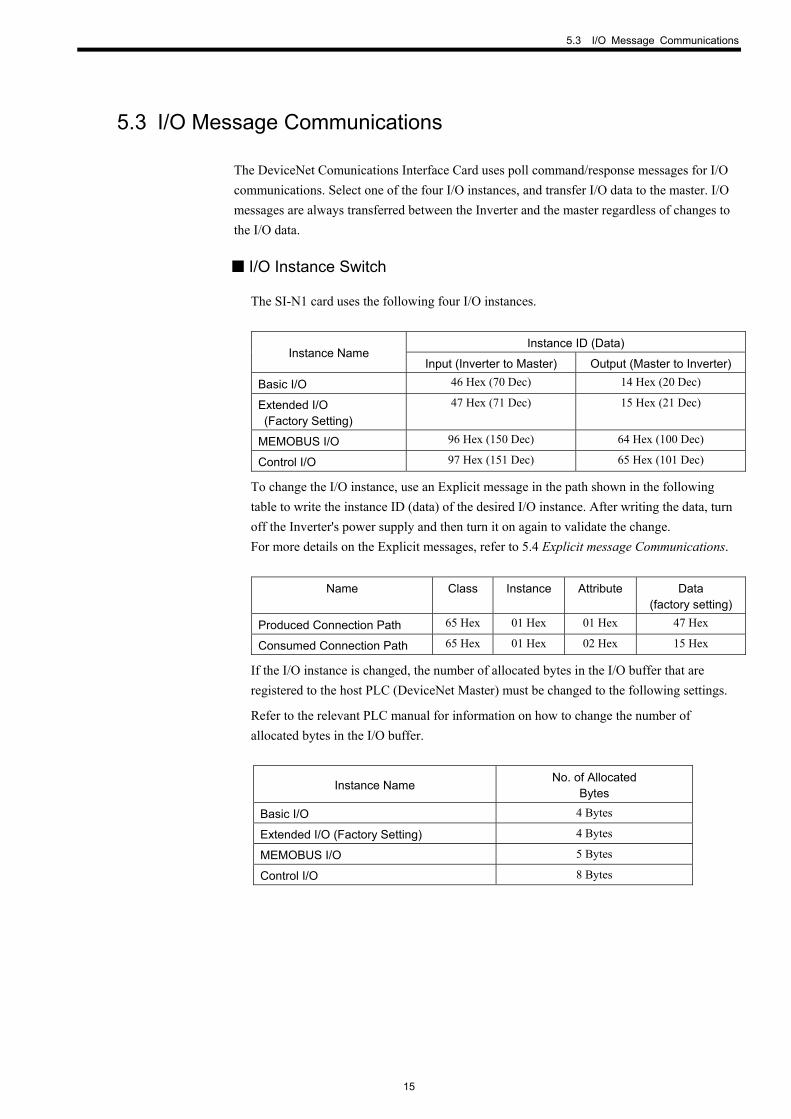
5.3 I/O Message Communications
The DeviceNet Comunications Interface Card uses poll command/response messages for I/O communications. Select one of the four I/O instances, and transfer I/O data to the master. I/O messages are always transferred between the Inverter and the master regardless of changes to the I/O data.
■ I/O Instance Switch
The SI-N1 card uses the following four I/O instances.
Instance ID (Data)
Instance Name Input (Inverter to Master) Output (Master to Inverter)
Basic I/O 46 Hex (70 Dec) 14 Hex (20 Dec)
Extended I/O (Factory Setting)
47 Hex (71 Dec) 15 Hex (21 Dec)
MEMOBUS I/O 96 Hex (150 Dec) 64 Hex (100 Dec)
Control I/O 97 Hex (151 Dec) 65 Hex (101 Dec)
To change the I/O instance, use an Explicit message in the path shown in the following table to write the instance ID (data) of the desired I/O instance. After writing the data, turn off the Inverter's power supply and then turn it on again to validate the change. For more details on the Explicit messages, refer to 5.4 Explicit message Communications.
Name Class Instance Attribute Data
(factory setting)
Produced Connection Path 65 Hex 01 Hex 01 Hex 47 Hex
Consumed Connection Path 65 Hex 01 Hex 02 Hex 15 Hex
If the I/O instance is changed, the number of allocated bytes in the I/O buffer that are registered to the host PLC (DeviceNet Master) must be changed to the following settings.
Refer to the relevant PLC manual for information on how to change the number of allocated bytes in the I/O buffer.
Instance Name No. of Allocated
Bytes
Basic I/O 4 Bytes
Extended I/O (Factory Setting) 4 Bytes
MEMOBUS I/O 5 Bytes
Control I/O 8 Bytes

5 FUNCTIONS 5.3.1 Basic I/O Instances
16
5.3.1 Basic I/O Instances
This is a standard I/O instance type defined in DeviceNet’s AC Drive Profile. Four bytes are used for input data and four bytes are used for output data.
■ Input (Master to SI-N1) Instance 20 (14 Hex)
Byte Bit 7 Bit 6 Bit 5 Bit 4 Bit 3 Bit 2 Bit 1 Bit 0 0 − − − − − Fault
Reset − Run Fwd
1 − − − − − − − − 2 Speed Reference (Low Byte) 3 Speed Reference (High Byte)
Data Name Contents
Byte 0, bit 0 Run Fwd Runs the Inverter forward. 0: Stop. 1: Run forward.
Byte 0, bit 2 Fault Reset Resets the Inverter from fault status. 0: − 1: Reset fault.
Bytes 2 and 3 Speed Reference∗3 Sets the Inverter’s speed reference. Speed reference data: Frequency reference (min-1) × 2SS (SS: Speed scale∗1) Setting range: 0 to FFFF Hex∗2 For example, when setting a reference of 1,800 min-1 with a speed scale of 0: Speed reference data = 1,800 × 20 = 1,800 = 0708 Hex
*1. The speed scale can be set with AC/DC Drive object attribute 16 through explicit message communications.
*2. If the speed is set to a value greater than that of the Inverter 's Maximum Output Frequency setting in E1-04, the setting of E1-04 will be the maximum output frequency.
*3. When using the speed reference, always set the Number of Motor Poles (2 to 39) in Inverter constant o1-03 (Selecting Setting/Display Units of Frequency Reference). When changing the setting, be sure to turn the Inverter power supply OFF and turn ON again after the display of the Digital Operator is OFF.

5.3 I/O Message Communications
17
■ Output (SI-N1 to Master) Instance 70 (46 Hex)
Byte Bit 7 Bit 6 Bit 5 Bit 4 Bit 3 Bit 2 Bit 1 Bit 0 0 − − − − − Running 1
(Fwd) − Faulted
1 − − − − − − − − 2 Speed Actual (Low Byte) 3 Speed Actual (High Byte)
Data Name Contents
Byte 0, bit 0 Faulted Indicates that the Inverter detected a fault. 0: Normal 1: Fault detected.
Byte 0, bit 2 Running 1 (Fwd) Indicates the Inverter’s operating status. 0: Stopped or operating in reverse. 1: Operating forward or applying DC injection braking.
Bytes 2 and 3 Speed Actual Indicates the Inverter’s speed. Monitored speed data: Monitored frequency (min-1) × 2SS (SS: Speed scale∗1) For example, when the monitored speed data is 03E8 Hex and the speed scale is 0: Monitored frequency = 03E8 Hex/ 20 = 1,000/ 20 = 1,000 min-1
*1. The speed scale can be set with AC/DC Drive object attribute 16 through explicit message communications.
*2. When using the Speed Actual monitor, always set the Number of Motor Poles (2 to 39) in Inverter constant o1-03 (Selecting Setting/Display Units of Frequency Reference). When changing the setting, be sure to turn the Inverter power supply OFF and turn ON again after the display of the Digital Operator is OFF.
*3. The frequency monitor value depends on the setting of the Inverter constant A1-02 (Control method selection) as shown in the table below.
Control Method Selection (A1-02)
Frequency Monitor Value
0 U1-02 (Output frequency) 1 U1-05 (Motor speed) 2 U1-02 (Output frequency) 3 U1-05 (Motor speed) 4 U1-02 (Output frequency) 5 U1-02 (Output frequency) 6 U1-05 (Motor speed) 7 U1-02 (Output frequency)

5 FUNCTIONS 5.3.2 Extended I/O Instance (Factory Setting)
18
5.3.2 Extended I/O Instance (Factory Setting)
This is a standard I/O instance type defined in DeviceNet’s AC Drive Profile and it is the initial factory setting for I/O instances. Four bytes are used for input data and four bytes are used for output data.
■ Input (Master to SI-N1) Instance 21 (15 Hex)
Byte Bit 7 Bit 6 Bit 5 Bit 4 Bit 3 Bit 2 Bit 1 Bit 0 0 − NetRef NetCtrl − − Fault
Reset Run Rev Run Fwd
1 − − − − − − − − 2 Speed Reference (Low Byte) 3 Speed Reference (High Byte)
Data Name Contents
Byte 0, bit 0 Run Fwd Runs the Inverter forward. 0: Stop. 1: Run forward.
Byte 0, bit 1 Run Rev Runs the Inverter in reverse. 0: Stop. 1: Run in reverse.
Byte 0, bit 2 Fault Reset Resets the Inverter from fault status. 0: − 1: Reset fault.
Byte 0, bit 5 NetCtrl Sets the RUN command right. 0: Use the RUN Command Input Method set in constant b1-02
(RUN Command Selection). 1: Enables the RUN command from DeviceNet
(byte 0, bits 0 and 1). Byte 0, bit 6 NetRef Sets the Frequency Reference right.
0: Use the Frequency Reference Input Method set in constant b1-01 (Frequency Reference Selection).
1: Enables the Frequency Reference from DeviceNet (bytes 2 and 3).
Bytes 2 and 3 Speed Reference Sets the Inverter’s speed reference. The speed reference is exactly the same as it is in a Basic I/O Instances.
5.3 I/O Message Communications
19
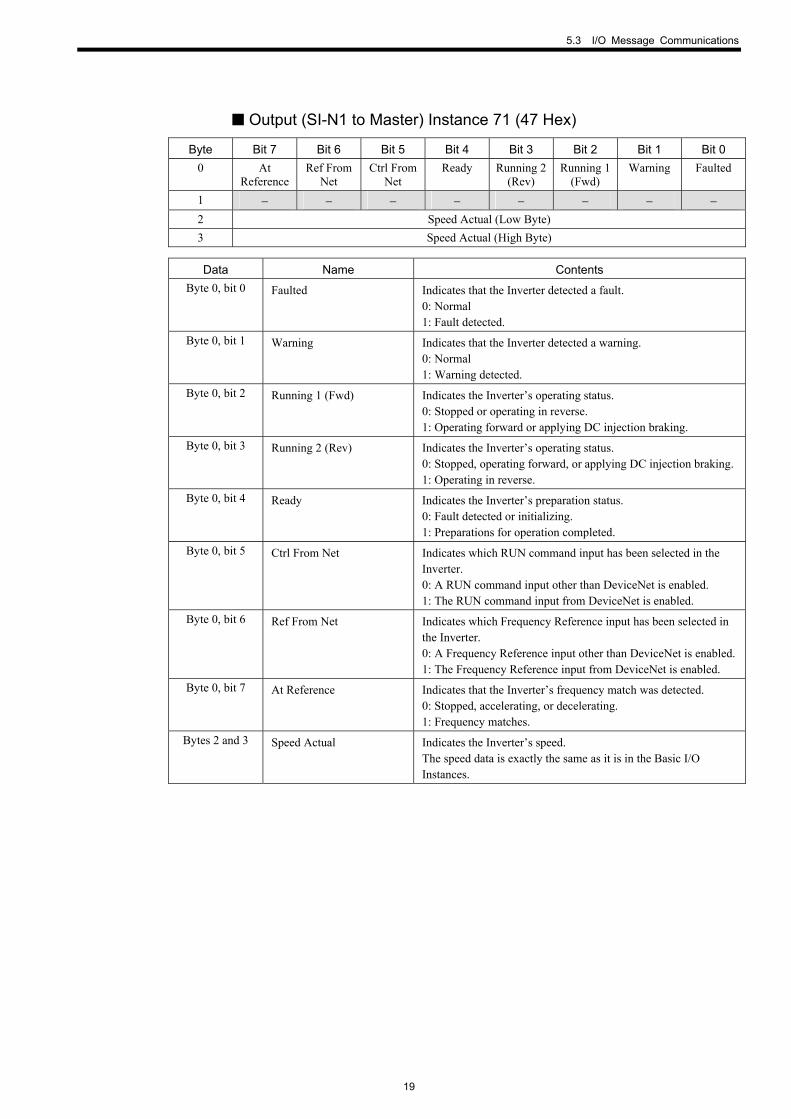
■ Output (SI-N1 to Master) Instance 71 (47 Hex)
Byte Bit 7 Bit 6 Bit 5 Bit 4 Bit 3 Bit 2 Bit 1 Bit 0 0 At
Reference Ref From
Net Ctrl From
Net Ready Running 2
(Rev) Running 1
(Fwd) Warning Faulted
1 − − − − − − − − 2 Speed Actual (Low Byte) 3 Speed Actual (High Byte)
Data Name Contents
Byte 0, bit 0 Faulted Indicates that the Inverter detected a fault. 0: Normal 1: Fault detected.
Byte 0, bit 1 Warning Indicates that the Inverter detected a warning. 0: Normal 1: Warning detected.
Byte 0, bit 2 Running 1 (Fwd) Indicates the Inverter’s operating status. 0: Stopped or operating in reverse. 1: Operating forward or applying DC injection braking.
Byte 0, bit 3 Running 2 (Rev) Indicates the Inverter’s operating status. 0: Stopped, operating forward, or applying DC injection braking.1: Operating in reverse.
Byte 0, bit 4 Ready Indicates the Inverter’s preparation status. 0: Fault detected or initializing. 1: Preparations for operation completed.
Byte 0, bit 5 Ctrl From Net Indicates which RUN command input has been selected in the Inverter. 0: A RUN command input other than DeviceNet is enabled. 1: The RUN command input from DeviceNet is enabled.
Byte 0, bit 6 Ref From Net Indicates which Frequency Reference input has been selected in the Inverter. 0: A Frequency Reference input other than DeviceNet is enabled.1: The Frequency Reference input from DeviceNet is enabled.
Byte 0, bit 7 At Reference Indicates that the Inverter’s frequency match was detected. 0: Stopped, accelerating, or decelerating. 1: Frequency matches.
Bytes 2 and 3 Speed Actual Indicates the Inverter’s speed. The speed data is exactly the same as it is in the Basic I/O Instances.

5 FUNCTIONS 5.3.3 MEMOBUS I/O Instances
20
5.3.3 MEMOBUS I/O Instances
All of the Inverter’s constants can be referenced and set with a MEMOBUS I/O instance. MEMOBUS I/O instances can be used with Yaskawa Inverters only. They cannot be used with other companies’ DeviceNet-compatible Inverters.
Five bytes are used for input data and five bytes are used for output data.
■ Input (Master to SI-N1) Instance 100 (64 Hex)
Byte Bit 7 Bit 6 Bit 5 Bit 4 Bit 3 Bit 2 Bit 1 Bit 0 0 Function Code 1 Register Number (High Byte) 2 Register Number (Low Byte) 3 Register Data (High Byte) 4 Register Data (Low Byte)
Data Name Contents
Byte 0 Function Code Set the MEMOBUS (command message) function code. 03 Hex: Read 10 Hex: Write 00 Hex: Do not execute.
Bytes 1 and 2 Register Number Set the Inverter’s MEMOBUS register number ∗. Bytes 3 and 4 Register Data Set the write data when executing a MEMOBUS WRITE
command.
■ Output (SI-N1 to Master) Instance 150 (96 Hex)
Byte Bit 7 Bit 6 Bit 5 Bit 4 Bit 3 Bit 2 Bit 1 Bit 0 0 Function Code 1 Register Number (High Byte) 2 Register Number (Low Byte) 3 Register Data (High Byte) 4 Register Data (Low Byte)
Data Name Contents
Byte 0 Function Code Indicates the MEMOBUS (response message) function code. 03 Hex: Normal read 10 Hex: Normal write 83 Hex: Read error 90 Hex: Write error
Bytes 1 and 2 Register Number Indicates the MEMOBUS register number ∗ in the executed process. These bytes will contain the MEMOBUS error code if a read or write error occurred.
Bytes 3 and 4 Register Data Indicates the read data when executing a MEMOBUS READ command.
∗ Refer to the Varispeed series INSTRUCTIONS (F7 series: TOE-S616-55.1, G7 series: TOE-S616-60.1, F7S series: EZZ009387) for the MEMOBUS register number.

5.3 I/O Message Communications
21
■ ENTER Command (Write-only Register)
Register Number
Name Contents Setting Range
Initial Setting
0900H ENTER Command Writes constant data to non-volatile memory (EEPROM).
0000H −
0910H ENTER Command Do not write constant data to non-volitile memory (EEPROM).
0000H −
When writing a constant from the master through communications, always execute the ENTER command after changing the constant. When a constant is changed, the new value is written to the constant data area in the Inverter’s RAM. The ENTER command that writes to the non-volatile memory writes the constant data from RAM to the non-volatile memory in the Inverter. As this ENTER command writes the constant data to the non-volatile memory, the data will be retained after the power is turned off. Since the Inverter’s EEPROM can be overwritten a limited number of times (100,000 times), do not execute the ENTER command too frequently. Because the ENTER command that does not write to the non-volatile memory does not write the constant data to the non-volatile memory, the data is lost if the power is turned off. When changing the constant temporarily, use this command. When two or more constants are being changed, execute the ENTER command once after changing all of the constants. The register numbers of the ENTER command (0900H and 0910H) are for writing only. If reading this register, the error code 02H occurs.
5 FUNCTIONS 5.3.4 Control I/O Instances
22
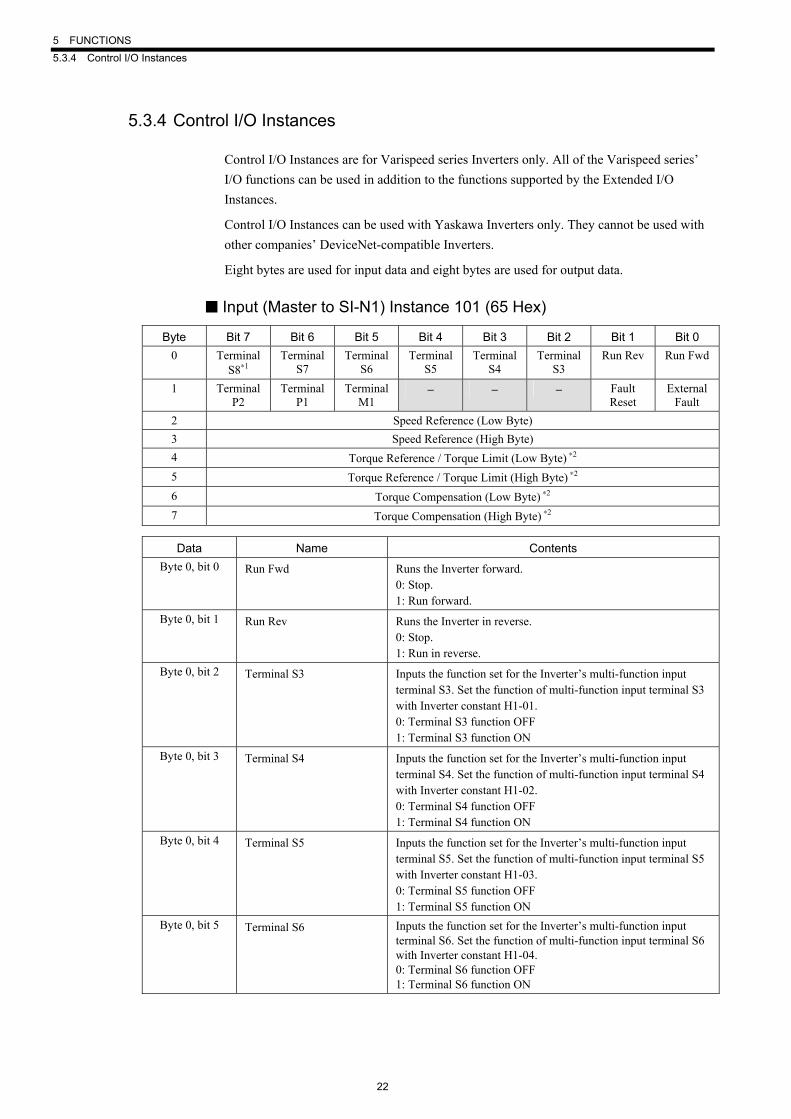
5.3.4 Control I/O Instances
Control I/O Instances are for Varispeed series Inverters only. All of the Varispeed series’ I/O functions can be used in addition to the functions supported by the Extended I/O Instances.
Control I/O Instances can be used with Yaskawa Inverters only. They cannot be used with other companies’ DeviceNet-compatible Inverters.
Eight bytes are used for input data and eight bytes are used for output data.
■ Input (Master to SI-N1) Instance 101 (65 Hex)
Byte Bit 7 Bit 6 Bit 5 Bit 4 Bit 3 Bit 2 Bit 1 Bit 0 0 Terminal
S8∗1 Terminal
S7 Terminal
S6 Terminal
S5 Terminal
S4 Terminal
S3 Run Rev Run Fwd
1 Terminal P2
Terminal P1
Terminal M1
− − − Fault Reset
External Fault
2 Speed Reference (Low Byte) 3 Speed Reference (High Byte) 4 Torque Reference / Torque Limit (Low Byte) ∗2 5 Torque Reference / Torque Limit (High Byte) ∗2 6 Torque Compensation (Low Byte) ∗2 7 Torque Compensation (High Byte) ∗2
Data Name Contents
Byte 0, bit 0 Run Fwd Runs the Inverter forward. 0: Stop. 1: Run forward.
Byte 0, bit 1 Run Rev Runs the Inverter in reverse. 0: Stop. 1: Run in reverse.
Byte 0, bit 2 Terminal S3 Inputs the function set for the Inverter’s multi-function input terminal S3. Set the function of multi-function input terminal S3 with Inverter constant H1-01. 0: Terminal S3 function OFF 1: Terminal S3 function ON
Byte 0, bit 3 Terminal S4 Inputs the function set for the Inverter’s multi-function input terminal S4. Set the function of multi-function input terminal S4 with Inverter constant H1-02. 0: Terminal S4 function OFF 1: Terminal S4 function ON
Byte 0, bit 4 Terminal S5 Inputs the function set for the Inverter’s multi-function input terminal S5. Set the function of multi-function input terminal S5 with Inverter constant H1-03. 0: Terminal S5 function OFF 1: Terminal S5 function ON
Byte 0, bit 5 Terminal S6 Inputs the function set for the Inverter’s multi-function input terminal S6. Set the function of multi-function input terminal S6 with Inverter constant H1-04. 0: Terminal S6 function OFF 1: Terminal S6 function ON

5.3 I/O Message Communications
23
(cont’d)
Data Name Contents Byte 0, bit 6 Terminal S7 Inputs the function set for the Inverter’s multi-function input
terminal S7. Set the function of multi-function input terminal S7 with Inverter constant H1-05. 0: Terminal S7 function OFF 1: Terminal S7 function ON
Byte 0, bit 7 Terminal S8∗1 Inputs the function set for the Inverter’s multi-function input terminal S8. Set the function of multi-function input terminal S8 with Inverter constant H1-05. 0: Terminal S8 function OFF 1: Terminal S8 function ON
Byte 1, bit 0 External Fault External fault (EF0) input from option. 0: − 1: External fault (EF0)
Byte 1, bit 1 Fault Reset Resets the Inverter from fault status. 0: − 1: Reset fault.
Byte 1, bit 5 Terminal M1 Operates the Inverter’s multi-function output terminal M1-M2. This function is enabled only when Inverter constant H2-01 is set to F. 0: Terminal M1-M2 OFF 1: Terminal M1-M2 ON
Byte 1, bit 6 Terminal P1 Operates the Inverter’s multi-function output terminal P1. This function is enabled only when Inverter constant H2-02 is set to F.0: Terminal P1 OFF 1: Terminal P1 ON
Byte 1, bit 7 Terminal P2 Operates the Inverter’s multi-function output terminal P2. This function is enabled only when Inverter constant H2-03 is set to F.0: Terminal P2 OFF 1: Terminal P2 ON
Bytes 2 and 3 Speed Reference Sets the Inverter’s speed reference. The units are not affected by the speed scale (SS) setting.
Bytes 4 and 5 Torque Reference Torque Limit∗2
Sets the Inverter’s torque reference/torque limit. The units are fixed at 0.1%. Operates as the torque reference when the Inverter is torque control (d5-01=1) and as the torque limit when speed control (d5-01=0). Disabled when the constant F6-06 is 0.
Bytes 6 and 7 Torque Compensation∗2 Sets the Inverter’s torque compensation. The units are fixed at 0.1%.
*1. This terminal can be used only when the Inverter is G7 series. Do not use with F7 and F7S series.
*2. These terminals can be used only when the Inverter is designed for torque control.

5 FUNCTIONS 5.3.4 Control I/O Instances
24
■ Output (SI-N1 to Master) Instance 151 (97 Hex)
Byte Bit 7 Bit 6 Bit 5 Bit 4 Bit 3 Bit 2 Bit 1 Bit 0 0 Faulted Warning Ready At
ReferenceReset Rev
Running ZSP Running
1 − − Terminal P2
Terminal P1
Terminal M1
Local/ Remote
UV OPE
2 Speed Actual (Low Byte) 3 Speed Actual (High Byte) 4 Torque Reference Monitor (Low Byte) ∗ 5 Torque Reference Monitor (High Byte) ∗ 6 Output Current (Low Byte) 7 Output Current (High Byte)
Data Name Contents
Byte 0, bit 0 Running Indicates the Inverter’s operating status. 0: Operating forward or stopped. 1: Operating forward, operating in reverse, or applying DC
injection braking. Byte 0, bit 1 ZSP Indicates the Inverter’s operating status.
0: Operating forward or in reverse. 1: Stopped or applying DC injection braking.
Byte 0, bit 2 Rev Running Indicates the Inverter’s operating status. 0: Operating forward or stopped. 1: Operating in reverse or inputting reverse RUN command.
Byte 0, bit 3 Reset Indicates the input status of the Inverter’s RESET signal. 0: − 1: RESET signal being input.
Byte 0, bit 4 At Reference Indicates that the Inverter’s frequency match was detected. 0: Stopped, accelerating, or decelerating. 1: Frequency matches.
Byte 0, bit 5 Ready Indicates the Inverter’s preparation status. 0: Fault detected or initializing. 1: Preparations for operation completed.
Byte 0, bit 6 Warning Indicates that the Inverter detected a warning. 0: Normal 1: Warning detected.
Byte 0, bit 7 Faulted Indicates that the Inverter detected a fault. 0: Normal 1: Fault detected.
Byte 1, bit 0 oPE Indicates that the Inverter detected a MEMOBUS constant setting error (oPE). 0: Normal 1: oPE (oPE01 to oPE11) detected.
Byte 1, bit 1 UV Indicates that the Inverter detected an undervoltage error. 0: Normal 1: UV detected.
Byte 1, bit 2 Local/Remote Indicates which RUN command input has been selected in the Inverter. 0: A RUN command input other than DeviceNet is enabled. 1: The RUN command input from DeviceNet is enabled.
5.3 I/O Message Communications
25
(cont’d)
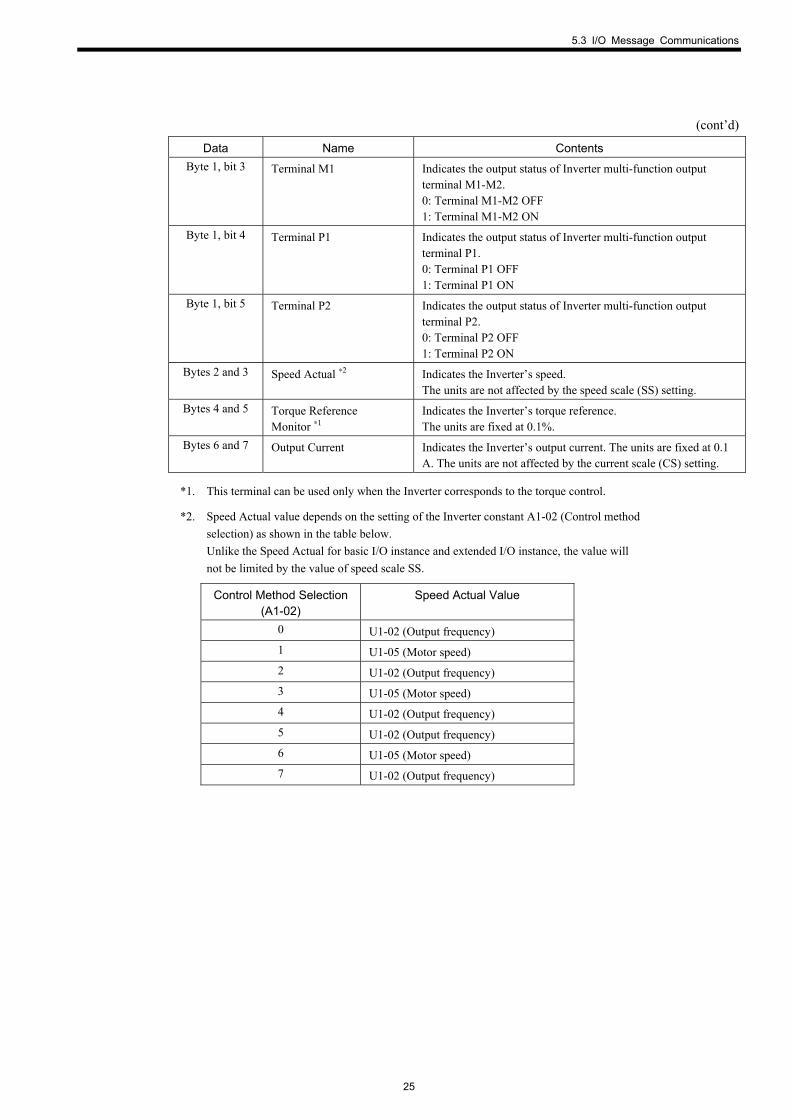
Data Name Contents Byte 1, bit 3 Terminal M1 Indicates the output status of Inverter multi-function output
terminal M1-M2. 0: Terminal M1-M2 OFF 1: Terminal M1-M2 ON
Byte 1, bit 4 Terminal P1 Indicates the output status of Inverter multi-function output terminal P1. 0: Terminal P1 OFF 1: Terminal P1 ON
Byte 1, bit 5 Terminal P2 Indicates the output status of Inverter multi-function output terminal P2. 0: Terminal P2 OFF 1: Terminal P2 ON
Bytes 2 and 3 Speed Actual ∗2 Indicates the Inverter’s speed. The units are not affected by the speed scale (SS) setting.
Bytes 4 and 5 Torque Reference Monitor ∗1
Indicates the Inverter’s torque reference. The units are fixed at 0.1%.
Bytes 6 and 7 Output Current Indicates the Inverter’s output current. The units are fixed at 0.1 A. The units are not affected by the current scale (CS) setting.
*1. This terminal can be used only when the Inverter corresponds to the torque control.
*2. Speed Actual value depends on the setting of the Inverter constant A1-02 (Control method selection) as shown in the table below. Unlike the Speed Actual for basic I/O instance and extended I/O instance, the value will not be limited by the value of speed scale SS.
Control Method Selection (A1-02)
Speed Actual Value
0 U1-02 (Output frequency) 1 U1-05 (Motor speed) 2 U1-02 (Output frequency) 3 U1-05 (Motor speed) 4 U1-02 (Output frequency) 5 U1-02 (Output frequency) 6 U1-05 (Motor speed) 7 U1-02 (Output frequency)

5 FUNCTIONS 5.4.1 Identity Object (Class 01 Hex)
26
5.4 Explicit Message Communications
The SI-N1 card can be used to transfer explicit messages (defined in DeviceNet specifications) to and from a DeviceNet master. Various kinds of data can be set and referenced from the master, ranging from DeviceNet-related settings to the Inverter’s control data. Unlike I/O message that are transmitted in a fixed cycle, explicit messages can be sent from the master at any time and corresponding responses will be returned.
■ Format of Explicit Messages Header MAC ID Service
Code Class Instance Attribute Data Footer
Item Description
Header This value is set automatically, so there is no need to check it. MAC ID Contains the MAC ID of the master or slave that is the other node
involved in the data transfer. Service Code In a request message, the service code specifies the requested
operation such as reading or writing data. In a normal response, bit 15 (the most significant bit) of the request service code will be turned ON in the response. If an error occurred, the code 94 will be returned. Examples: ・0E: Read request ・8E: Normal read response ・10: Write request ・90: Normal write response ・94: Error response
Class Instance Attribute
Each DeviceNet function is divided into these 3 codes. When specifying data, specify it with these 3 codes.
Data Request: Contains the write data. Response: Contains the read data or error code.
Footer This value is set automatically, so there is no need to check it.
5.4.1 Identity Object (Class 01 Hex)
The Identity object stores the DeviceNet product information. All of the attributes are read-only.
■ Supported Services
Service Code (Hex) Service Name Description 0E Get_Attribute_Single Returns the contents of the specified
attribute. 05 Reset Resets (initializes) the SI-N1 card’s
status.

5.4 Explicit Message Communications
27
■ Object Contents
Instance Attribute Name Contents Setting Range
Initial Setting (Hex)
Read Write Size
00 01 Object Software Revision
Indicates the Identity object’s software revision.
--- 0001 OK --- Word
01 Vendor ID Indicates the manufacturer’s code. ・44 (2C Hex): Yaskawa Electric
--- 002C OK --- Word
02 Device Type Indicates the DeviceNet device profile. This product implements the AC Drive profile. ・2: AC Drive
--- 0002 OK --- Word
03 Product Code Indicates the product code assigned by the manufacturer.
--- ∗1 OK --- Word
04 Revision Indicates the SI-N1 card’s software revision.
--- ∗2 OK --- Byte×2
05 Status Indicates the SI-N1 card’s communications status.
--- 0000 OK --- Word
06 Serial Number Indicates the serial number of the SI-N1 card’s communications.
--- Depends on product.
OK --- Long
07 Product Name Indicates the model number. ・F7 SI-N ・G7 SI-N ・F7S SI-N
--- Capacity. ・F7 SI-N ・G7 SI-N ・F7S SI-N
OK --- String
01
08 State Indicates the Inverter’s status. ・3: Inverter ready.
--- 03 OK --- Byte
*1. The Product Code depends on the Inverter type and capacity.
*2. The Revision depends on the option card software. If the software version is 2.4A, the revision is “02, 04”.
5.4.2 Message Router Object (Class 02 Hex)
The Message Router object has a function that separates the DeviceNet communications information. Both explicit messages and I/O messages are always allocated to each function through this object. The Message Router object itself performs only internal processes and it does not have data that is exchanged externally.
■ Supported Services
Service Code (Hex) Service Name Description 0E Get_Attribute_Single Returns the contents of the specified
attribute.
5 FUNCTIONS 5.4.3 DeviceNet Object (Class 03 Hex)
28
■ Object Contents
Instance Attribute Name Contents Setting Range
Initial Setting (Hex)
Read Write Size
00 01 Object Software Revision
Indicates the Message Router object’s software revision.
--- 0001 OK --- Word
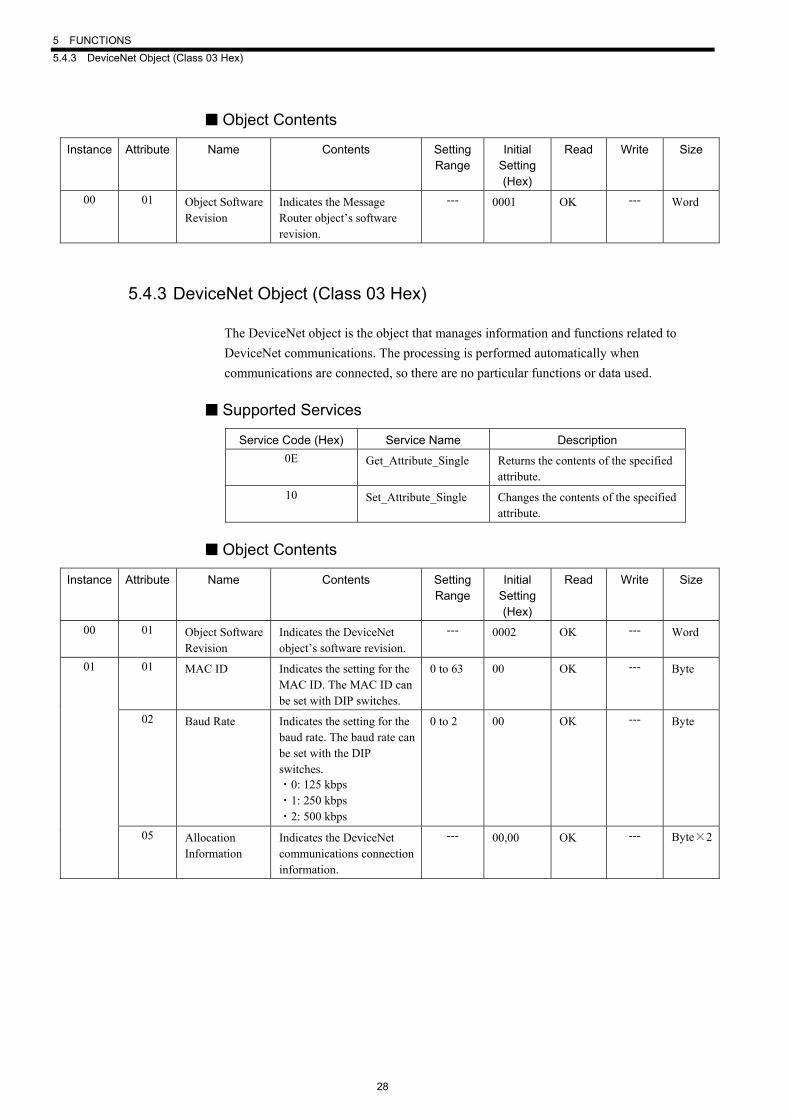
5.4.3 DeviceNet Object (Class 03 Hex)
The DeviceNet object is the object that manages information and functions related to DeviceNet communications. The processing is performed automatically when communications are connected, so there are no particular functions or data used.
■ Supported Services
Service Code (Hex) Service Name Description 0E Get_Attribute_Single Returns the contents of the specified
attribute. 10 Set_Attribute_Single Changes the contents of the specified
attribute.
■ Object Contents
Instance Attribute Name Contents Setting Range
Initial Setting (Hex)
Read Write Size
00 01 Object Software Revision
Indicates the DeviceNet object’s software revision.
--- 0002 OK --- Word
01 MAC ID Indicates the setting for the MAC ID. The MAC ID can be set with DIP switches.
0 to 63 00 OK --- Byte
02 Baud Rate Indicates the setting for the baud rate. The baud rate can be set with the DIP switches. ・0: 125 kbps ・1: 250 kbps ・2: 500 kbps
0 to 2 00 OK --- Byte
01
05 Allocation Information
Indicates the DeviceNet communications connection information.
--- 00,00 OK --- Byte×2
5.4 Explicit Message Communications
29
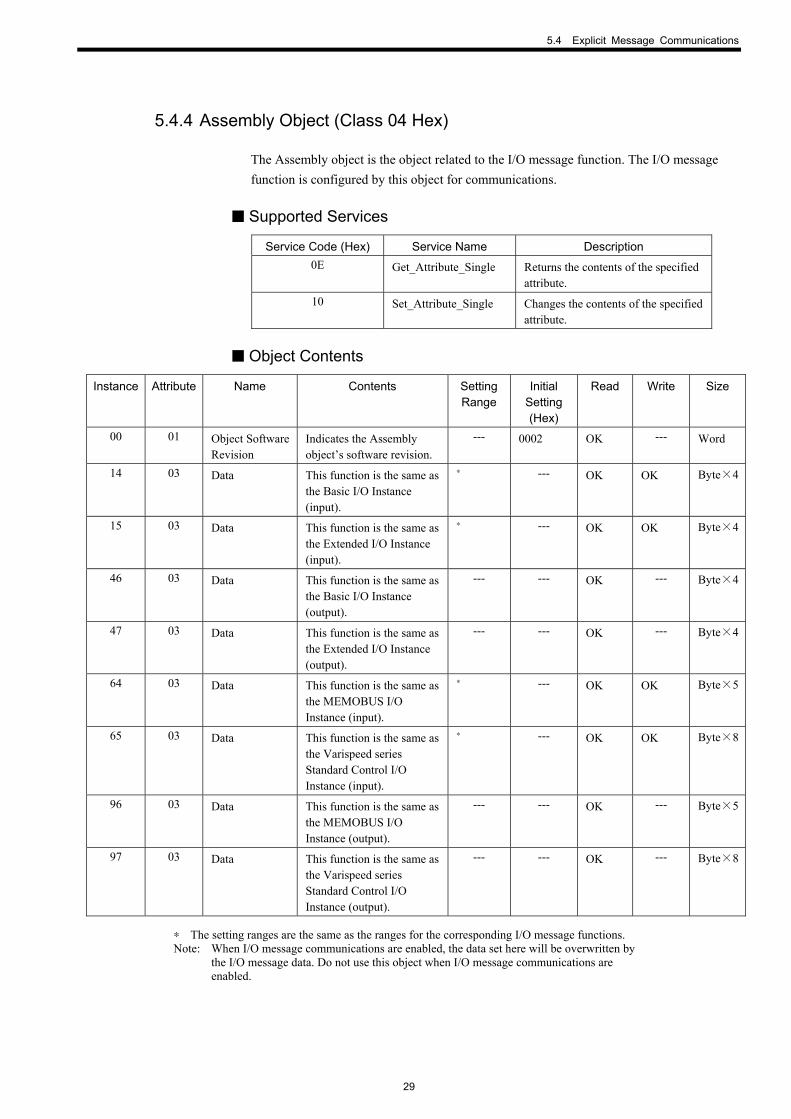
5.4.4 Assembly Object (Class 04 Hex)
The Assembly object is the object related to the I/O message function. The I/O message function is configured by this object for communications.
■ Supported Services
Service Code (Hex) Service Name Description 0E Get_Attribute_Single Returns the contents of the specified
attribute. 10 Set_Attribute_Single Changes the contents of the specified
attribute.
■ Object Contents
Instance Attribute Name Contents Setting Range
Initial Setting (Hex)
Read Write Size
00 01 Object Software Revision
Indicates the Assembly object’s software revision.
--- 0002 OK --- Word
14 03 Data This function is the same as the Basic I/O Instance (input).
∗ --- OK OK Byte×4
15 03 Data This function is the same as the Extended I/O Instance (input).
∗ --- OK OK Byte×4
46 03 Data This function is the same as the Basic I/O Instance (output).
--- --- OK --- Byte×4
47 03 Data This function is the same as the Extended I/O Instance (output).
--- --- OK --- Byte×4
64 03 Data This function is the same as the MEMOBUS I/O Instance (input).
∗ --- OK OK Byte×5
65 03 Data This function is the same as the Varispeed series Standard Control I/O Instance (input).
∗ --- OK OK Byte×8
96 03 Data This function is the same as the MEMOBUS I/O Instance (output).
--- --- OK --- Byte×5
97 03 Data This function is the same as the Varispeed series Standard Control I/O Instance (output).
--- --- OK --- Byte×8
∗ The setting ranges are the same as the ranges for the corresponding I/O message functions. Note: When I/O message communications are enabled, the data set here will be overwritten by
the I/O message data. Do not use this object when I/O message communications are enabled.
5 FUNCTIONS 5.4.5 DeviceNet Connection Object (Class 05 Hex)
30
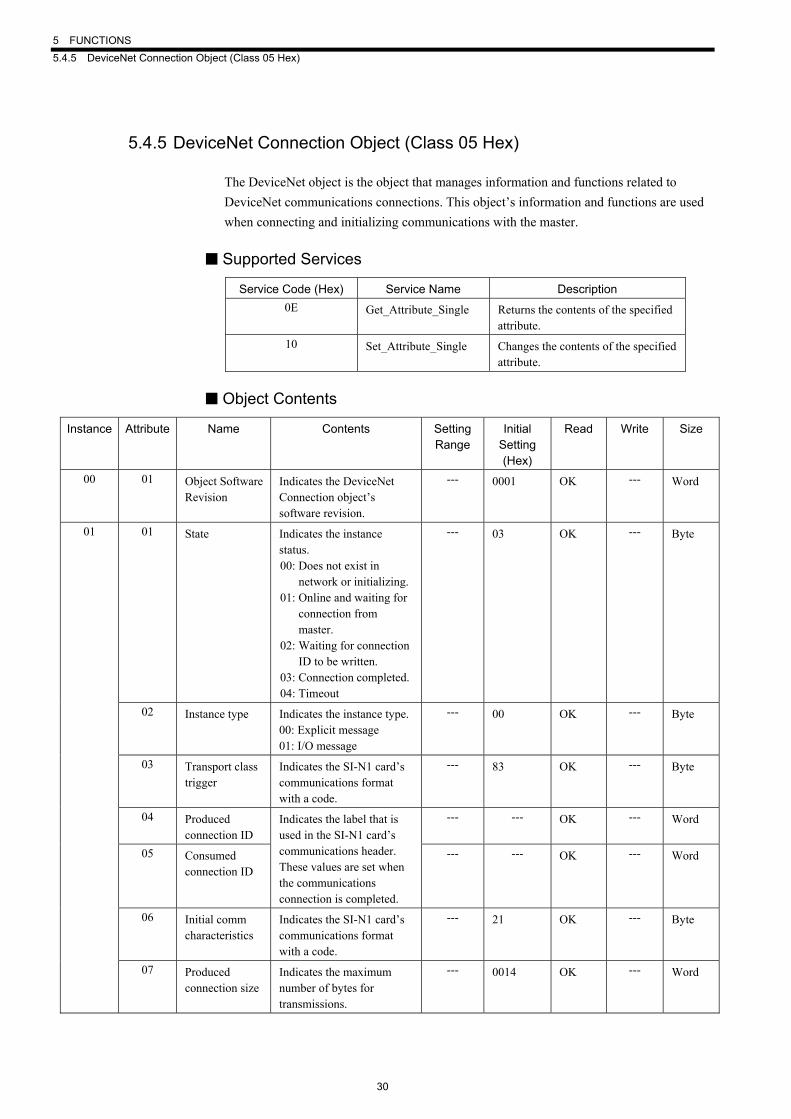
5.4.5 DeviceNet Connection Object (Class 05 Hex)
The DeviceNet object is the object that manages information and functions related to DeviceNet communications connections. This object’s information and functions are used when connecting and initializing communications with the master.
■ Supported Services
Service Code (Hex) Service Name Description 0E Get_Attribute_Single Returns the contents of the specified
attribute. 10 Set_Attribute_Single Changes the contents of the specified
attribute.
■ Object Contents
Instance Attribute Name Contents Setting Range
Initial Setting (Hex)
Read Write Size
00 01 Object Software Revision
Indicates the DeviceNet Connection object’s software revision.
--- 0001 OK --- Word
01 State Indicates the instance status. 00: Does not exist in
network or initializing. 01: Online and waiting for
connection from master.
02: Waiting for connection ID to be written.
03: Connection completed.04: Timeout
--- 03 OK --- Byte
02 Instance type Indicates the instance type. 00: Explicit message 01: I/O message
--- 00 OK --- Byte
03 Transport class trigger
Indicates the SI-N1 card’s communications format with a code.
--- 83 OK --- Byte
04 Produced connection ID
--- --- OK --- Word
05 Consumed connection ID
Indicates the label that is used in the SI-N1 card’s communications header. These values are set when the communications connection is completed.
--- --- OK --- Word
06 Initial comm characteristics
Indicates the SI-N1 card’s communications format with a code.
--- 21 OK --- Byte
01
07 Produced connection size
Indicates the maximum number of bytes for transmissions.
--- 0014 OK --- Word

5.4 Explicit Message Communications
31
(cont’d)
Instance Attribute Name Contents Setting Range
Initial Setting (Hex)
Read Write Size
08 Consumed connection size
Indicates the maximum number of bytes for receptions.
--- 0014 OK --- Word
09 Expected packet rate
Indicates the timeout time for internal processing after a communications request was received. (Set in multiples of 10 ms.)
0 to 65,535 ms
09C4 (2, 500 ms)
OK OK Word
0C Watchdog timeout action
Indicates the action to take when a timeout occurred during internal processing related to communications. 00: Maintain until reset or
disconnected. 01: Disconnect
automatically. 02: Perform the operation
again while connected
--- 01 OK --- Byte
0D Produced connection path length
Indicates the transmission connection path’s number of bytes.
--- 0000 OK --- Word
0E Produced connection path
Indicates the application object that transmits data from the instance.
--- --- OK --- Array
0F Consumed connection path length
Indicates the reception connection path’s number of bytes.
--- 0000 OK --- Word
01
10 Consumed connection path
Indicates the application object that receives data from the instance.
--- --- OK --- Array
01 State Indicates the instance status. 00: Does not exist in
network or initializing. 01: Online and waiting for
connection from master.
02: Waiting for connection ID to be written.
03: Connection completed.04: Timeout
--- 03 OK --- Byte
02 Instance type Indicates the instance type. 00: Explicit message 01: I/O message
--- 01 OK --- Byte
02
03 Transport class trigger
Indicates the SI-N1 card’s communications format with a code.
--- 83 OK --- Byte

5 FUNCTIONS 5.4.5 DeviceNet Connection Object (Class 05 Hex)
32
(cont’d)
Instance Attribute Name Contents Setting Range
Initial Setting (Hex)
Read Write Size
04 Produced connection ID
--- --- OK --- Word
05 Consumed connection ID
Indicates the label that is used in the SI-N1 card’s communications header. These values are set when the communications connection is completed.
--- --- OK --- Word
06 Initial comm characteristics
Indicates the SI-N1 card’s communications format with a code.
--- 01 OK --- Byte
07 Produced connection size
Indicates the maximum number of bytes for transmissions.
--- 0004 OK --- Word
08 Consumed connection size
Indicates the maximum number of bytes for receptions.
--- 0004 OK --- Word
09 Expected packet rate
Indicates the timeout time for internal processing after a communications request was received. (Set in multiples of 10 ms.)
0 to 65, 535 ms
0000 (0 ms)
OK OK Word
0C Watchdog timeout action
Indicates the action to take when a timeout occurred during internal processing related to communications. 00: Maintain until reset or
disconnected. 01: Disconnect
automatically. 02: Perform the operation
again while connected.
--- 00 OK --- Byte
0D Produced connection path length
Indicates the transmission connection path’s number of bytes.
--- 0003 OK --- Word
0E Produced connection path
Indicates the application object that transmits data from the instance.
--- 62, 34, 37 OK --- Array
0F Consumed connection path length
Indicates the reception connection path’s number of bytes.
--- 0003 OK --- Word
02
10 Consumed connection path
Indicates the application object that receives data from the instance.
--- 62, 31, 35 OK --- Array

5.4 Explicit Message Communications
33
5.4.6 Motor Data Object (Class 28 Hex)
The Motor Data object is the object that manages information and functions related to the motor connected to the Inverter. The motor’s rated current and rated voltage can be set or referenced with this object.
■ Supported Services
Service Code (Hex) Service Name Description 0E Get_Attribute_Single Returns the contents of the specified
attribute. 10 Set_Attribute_Single Changes the contents of the specified
attribute.
■ Object Contents
Instance Attribute Name Contents Setting Range
Initial Setting (Hex)
Read Write Size
00 01 Object Software Revision
Indicates the Motor Data object’s software revision.
--- 0001 OK --- Word
03 Motor Type Indicates the type of motor being used.
3: Permanent magnet motor7: Squirrel-cage induction
motor
--- 07 OK --- Byte
06 Rated Current This attribute can be used to set/reference the motor’s rated current.
Setting units: 0.1 A∗3
10 to 200% of the Inverter’s rated current
∗1 OK OK Word
01
07 Rated Voltage This attribute can be used to set/reference the motor’s rated voltage.
Setting units: 1V
0 to 255 V∗2
00C8∗2 OK OK Word
*1. The initial setting of the motor rated current depends on the Inverter’s capacity.
*2. The table shows the setting range and initial setting for a 200 V Class Inverter. Double these values when using a 400 V Class Inverter.
*3. When the Maximum applicable servomotor capacity of the Inverter is 7.5 kW or less, the units are 0.01A.

5 FUNCTIONS 5.4.7 Control Supervisor Object (Class 29 Hex)
34
5.4.7 Control Supervisor Object (Class 29 Hex)
The Control Supervisor object is the object that manages information and functions related to the Inverter’s control I/O. Basic control I/O functions are assigned to this object, such as the Inverter’s Run, Stop, and Fault Detect controls.
The Control Supervisor object’s functions are shared with the I/O message communications functions. When an I/O message communications connection is established, the values set with this object will be overwritten by the values set by I/O messages.
■ Supported Services
Service Code (Hex) Service Name Description 0E Get_Attribute_Single Returns the contents of the specified
attribute. 10 Set_Attribute_Single Changes the contents of the specified
attribute. 05 Reset Resets the Inverter.
■ Object Contents
Instance Attribute Name Contents Setting Range
Initial Setting (Hex)
Read Write Size
00 01 Object Software Revision
Indicates the Control Supervisor object’s software revision.
--- 0001 OK --- Word
03 Run1 Runs the Inverter forward. 00: Stop. 01: Run forward.
00, 01 00 OK OK Byte
04 Run Rev Runs the Inverter in reverse. 00: Stop. 01: Run in reverse.
00, 01 00 OK OK Byte
01
05 NetCtrl Sets the RUN command right. 00: Use the RUN command
input method set in constant b1-02 (RUN Command Selection).
01: Enables the RUN command from DeviceNet (byte 0, bits 0 and 1).
00, 01 00 OK OK Byte
5.4 Explicit Message Communications
35
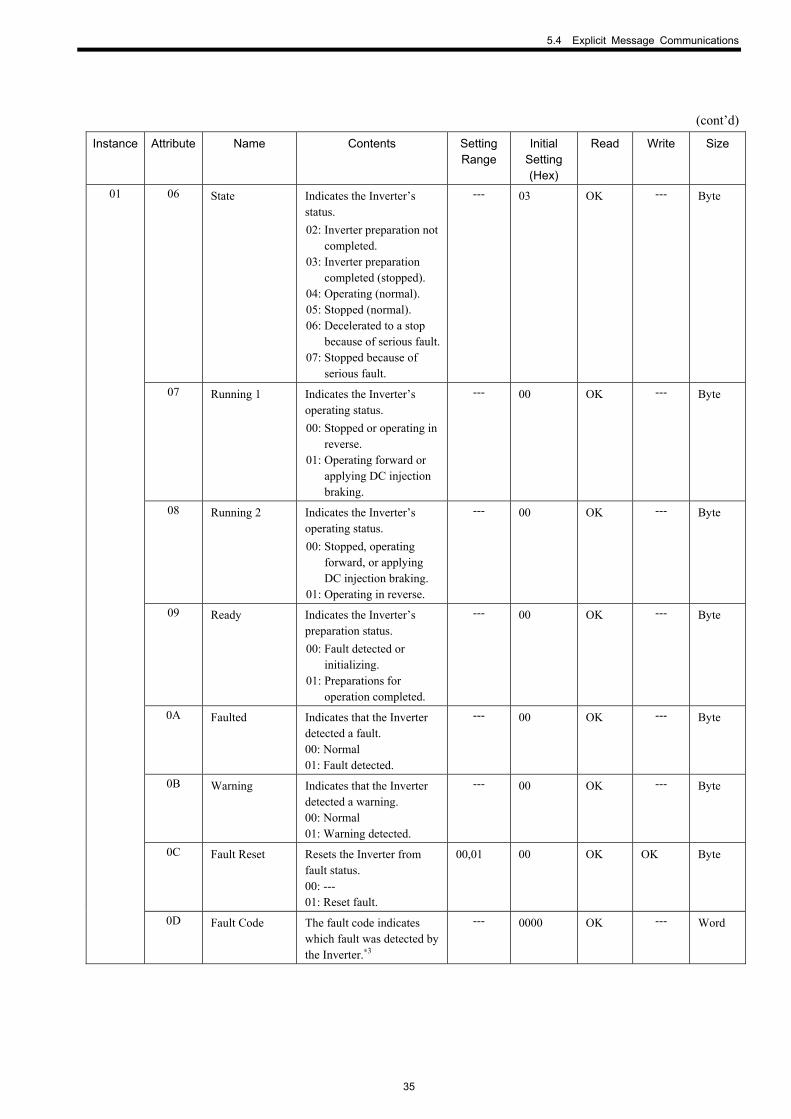
(cont’d)
Instance Attribute Name Contents Setting Range
Initial Setting (Hex)
Read Write Size
06 State Indicates the Inverter’s status. 02: Inverter preparation not
completed. 03: Inverter preparation
completed (stopped). 04: Operating (normal). 05: Stopped (normal). 06: Decelerated to a stop
because of serious fault.07: Stopped because of
serious fault.
--- 03 OK --- Byte
07 Running 1 Indicates the Inverter’s operating status. 00: Stopped or operating in
reverse. 01: Operating forward or
applying DC injection braking.
--- 00 OK --- Byte
08 Running 2 Indicates the Inverter’s operating status. 00: Stopped, operating
forward, or applying DC injection braking.
01: Operating in reverse.
--- 00 OK --- Byte
09 Ready Indicates the Inverter’s preparation status. 00: Fault detected or
initializing. 01: Preparations for
operation completed.
--- 00 OK --- Byte
0A Faulted Indicates that the Inverter detected a fault. 00: Normal 01: Fault detected.
--- 00 OK --- Byte
0B Warning Indicates that the Inverter detected a warning. 00: Normal 01: Warning detected.
--- 00 OK --- Byte
0C Fault Reset Resets the Inverter from fault status. 00: --- 01: Reset fault.
00,01 00 OK OK Byte
01
0D Fault Code The fault code indicates which fault was detected by the Inverter.∗3
--- 0000 OK --- Word
5 FUNCTIONS 5.4.7 Control Supervisor Object (Class 29 Hex)
36
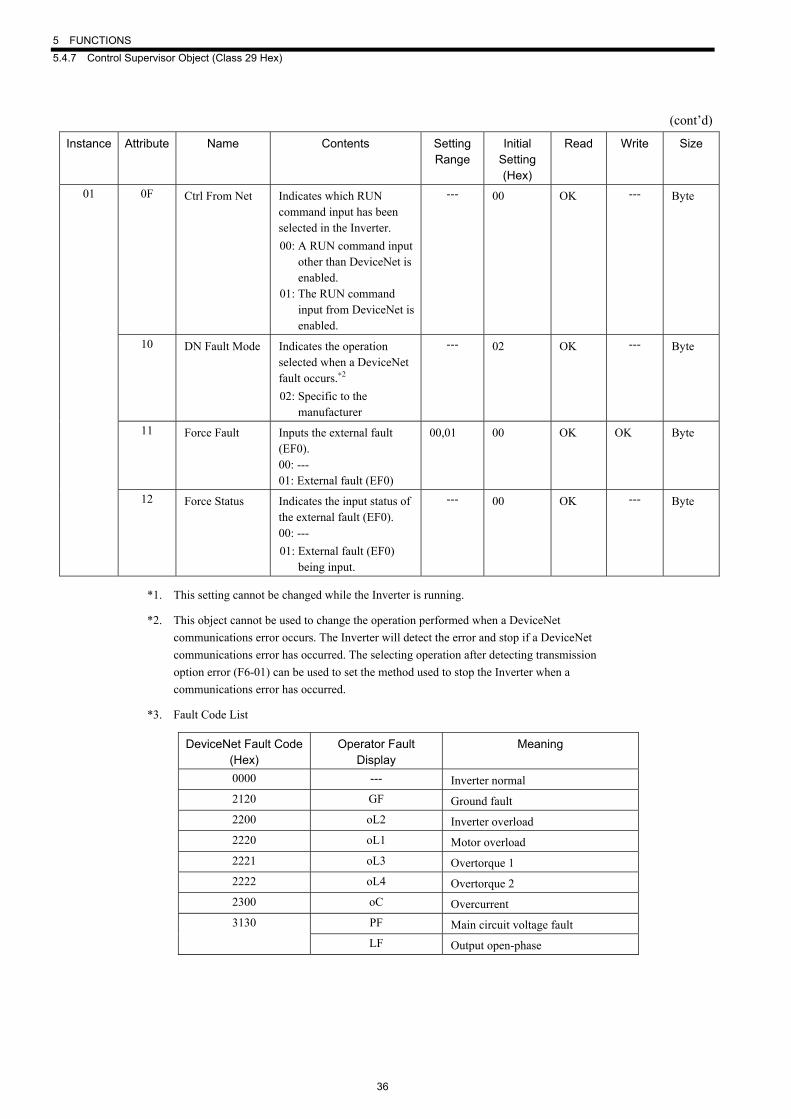
(cont’d)
Instance Attribute Name Contents Setting Range
Initial Setting (Hex)
Read Write Size
0F Ctrl From Net Indicates which RUN command input has been selected in the Inverter. 00: A RUN command input
other than DeviceNet is enabled.
01: The RUN command input from DeviceNet is enabled.
--- 00 OK --- Byte
10 DN Fault Mode Indicates the operation selected when a DeviceNet fault occurs.∗2 02: Specific to the
manufacturer
--- 02 OK --- Byte
11 Force Fault Inputs the external fault (EF0). 00: --- 01: External fault (EF0)
00,01 00 OK OK Byte
01
12 Force Status Indicates the input status of the external fault (EF0). 00: --- 01: External fault (EF0)
being input.
--- 00 OK --- Byte
*1. This setting cannot be changed while the Inverter is running.
*2. This object cannot be used to change the operation performed when a DeviceNet communications error occurs. The Inverter will detect the error and stop if a DeviceNet communications error has occurred. The selecting operation after detecting transmission option error (F6-01) can be used to set the method used to stop the Inverter when a communications error has occurred.
*3. Fault Code List
DeviceNet Fault Code (Hex)
Operator Fault Display
Meaning
0000 --- Inverter normal 2120 GF Ground fault 2200 oL2 Inverter overload 2220 oL1 Motor overload 2221 oL3 Overtorque 1 2222 oL4 Overtorque 2 2300 oC Overcurrent
PF Main circuit voltage fault 3130
LF Output open-phase

5.4 Explicit Message Communications
37
(cont’d)
DeviceNet Fault Code (Hex)
Operator Fault Display
Meaning
3210 oV Main circuit overvoltage 3220 Uv1 Main circuit undervoltage 3222 Uv3 Inrush prevention circuit fault 4200 oH Heatsink overheating 4210 oH1 Heatsink overheating 5110 Uv2 Control power supply error 5120 PUF Fuse blown 5300 oPr Operator not connected 6320 Err EEPROM write error 7110 rr Internal braking transistor fault 7112 rH Installed braking resistor overheating7301 PGo PG disconnection detected
oS Overspeed 7310
dEv Excessive speed deviation 7500 bUS Inverter communications error
EF3 External fault (input terminal S3) EF4 External fault (input terminal S4) EF5 External fault (input terminal S5) EF6 External fault (input terminal S6) EF7 External fault (input terminal S7)
9000
EF0 Option External fault
5 FUNCTIONS 5.4.8 AC/DC Drive Object (Class 2A Hex)
38
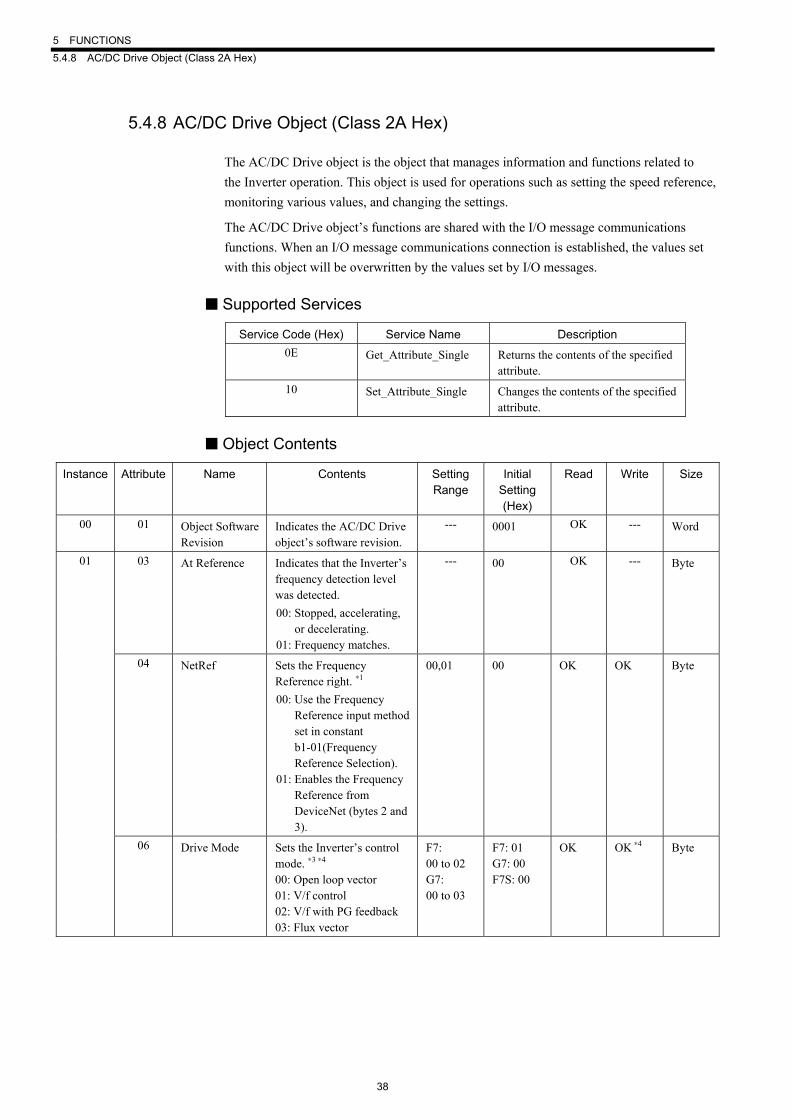
5.4.8 AC/DC Drive Object (Class 2A Hex)
The AC/DC Drive object is the object that manages information and functions related to the Inverter operation. This object is used for operations such as setting the speed reference, monitoring various values, and changing the settings.
The AC/DC Drive object’s functions are shared with the I/O message communications functions. When an I/O message communications connection is established, the values set with this object will be overwritten by the values set by I/O messages.
■ Supported Services
Service Code (Hex) Service Name Description 0E Get_Attribute_Single Returns the contents of the specified
attribute. 10 Set_Attribute_Single Changes the contents of the specified
attribute.
■ Object Contents
Instance Attribute Name Contents Setting Range
Initial Setting (Hex)
Read Write Size
00 01 Object Software Revision
Indicates the AC/DC Drive object’s software revision.
--- 0001 OK --- Word
03 At Reference Indicates that the Inverter’s frequency detection level was detected. 00: Stopped, accelerating,
or decelerating. 01: Frequency matches.
--- 00 OK --- Byte
04 NetRef Sets the Frequency Reference right. ∗1 00: Use the Frequency
Reference input method set in constant b1-01(Frequency Reference Selection).
01: Enables the Frequency Reference from DeviceNet (bytes 2 and 3).
00,01 00 OK OK Byte
01
06 Drive Mode Sets the Inverter’s control mode. ∗3 ∗4 00: Open loop vector 01: V/f control 02: V/f with PG feedback 03: Flux vector
F7: 00 to 02 G7: 00 to 03
F7: 01 G7: 00 F7S: 00
OK OK ∗4 Byte

5.4 Explicit Message Communications
39
(cont’d)
Instance Attribute Name Contents Setting Range
Initial Setting (Hex)
Read Write Size
07 Speed Actual Indicates the Inverter’s speed. ∗2 Minimum units: min-1/2SS SS: Speed scale (attribute
16)
--- 0000 OK --- Word
08 Speed Ref Sets or references the Inverter’s speed reference. ∗2 Minimum units: min-1/2 SS SS: Speed scale (attribute
16)
0 to max. frequency
0000 OK OK Word
09 Current Actual Indicates the Inverter’s output current. Minimum units: 0.1 A/2 CS CS: Current scale (attribute
17)
--- 0000 OK --- Word
0F Power Actual Indicates the Inverter’s output power. Minimum units: W/2PS PS: Power scale (attribute
1A)
--- 0000 OK --- Word
10 Input Voltage Indicates the Inverter’s input voltage. Minimum units: V/2VS VS: Voltage scale (attribute
1B)
--- 0000 OK --- Word
11 Output Voltage Indicates the Inverter’s output voltage. Minimum units: V/2 VS VS : Voltage scale (attribute
1B)
--- 0000 OK --- Word
12 Acceleration Time
Sets or references the Inverter’s Acceleration Time 1. Minimum units: ms/2TS TS: Time scale (attribute
1C)
0 to 6,000 s
2710 (10.0 s)
OK OK Word
01
13 Deceleration Time
Sets or references the Inverter’s Deceleration Time 1. Minimum units: ms/2 TS TS: Time scale (attribute
1C)
0 to 6,000 s
2710 (10.0 s)
OK OK Word

5 FUNCTIONS 5.4.8 AC/DC Drive Object (Class 2A Hex)
40
(cont’d)
Instance Attribute Name Contents Setting Range
Initial Setting (Hex)
Read Write Size
14 Low Spd Limit Sets or references the Inverter’s Frequency Reference Lower Limit. ∗2 ∗3 Minimum units: min-1/2SS SS: Speed scale (attribute
16)
0 to 110% of the max. frequency
0000 OK OK Word
15 High Spd Limit Sets or references the Inverter’s Frequency Reference Upper Limit. ∗2 ∗3 Minimum units: min-1/2 SS SS: Speed scale (attribute
16)
0 to 110% of the max. frequency
0708 (1,800 r/m)
OK OK Word
16 Speed Scale Sets or references the unit coefficient for speed-related data. Speed units: 1 (min-1) x 1/2 SS SS: Speed scale setting
-15 to 15
(F1 to 0F)
00 OK OK Byte
17 Current Scale Sets or references the unit coefficient for current-related data. Current units: 0.1 (A) x 1/2CS CS: Current scale setting
-15 to 15
(F1 to 0F)
00 OK OK Byte
1A Power Scale Sets or references the unit Coefficient (n155) for power-related data. Power units: 1 (W) x 1/2PS PS: Power scale setting
-15 to 15
(F1 to 0F)
00 OK OK Byte
1B Voltage Scale Sets or references the unit coefficient for voltage-related data. Voltage units: 1 (V) x 1/2VS
VS: Voltage scale setting
-15 to 15
(F1 to 0F)
00 OK OK Byte
01
1C Time Scale Sets or references the unit coefficient for time-related data. Time units: 1 (ms) x 1/2TS TS: Time scale setting
-15 to 15
(F1 to 0F)
00 OK OK Byte

5.4 Explicit Message Communications
41
(cont’d)
Instance Attribute Name Contents Setting Range
Initial Setting (Hex)
Read Write Size
01 1D Ref From Net Indicates which Frequency Reference input has been selected in the Inverter. ∗1 00: A Frequency Reference
input other than DeviceNet is enabled.
01: The Frequency Reference input from DeviceNet is enabled.
--- 00 OK --- Byte
*1. These settings cannot be changed while the Inverter is running.
*2. Always set the Number of Motor Poles (2 to 39) in Inverter constant o1-03 when using the Speed Ref, Speed Actual, Low Spd Limit, or High Spd Limit settings. When changing the setting, be sure to turn the Inverter power supply OFF and turn ON again after the display of the Digital Operator is OFF. The Speed Actual (2A/1/7) value depends on the setting of the Inverter constant A1-02 (Control method selection) in the same way as for I/O message communications (basic I/O instance and extended I/O instance). When A1-02 is set to 0, 2, 4, 5, or 7 (without PG), U1-02 (Output frequency) will be read, and when A1-02 is set to 1, 3, or 6 (with PG), U1-05 (Motor speed) will be read.
*3. The Drive Mode, Low Spd Limit, and High Spd Limit settings cannot be changed while the Inverter is running.
*4. The Drive Mode (2A/1/6) is read out as shown in the table below, depending on the setting of the Inverter constant A1-02. Note that settings 4 through 7 of A1-02 cannot be written by DeviceNet master. Use the Digital Operator to change the setting of A1-02 to 4, 5, 6, or 7. After the setting of A1-02 (Control method selection) is changed, be sure to initialize the constants with the constant A1-03 (Initialize).
Control Method Selection(A1-02)
2A/1/6 Read Value 2A/1/6 Write Value
0 1: V/f control 1: V/f control 1 2: V/f control with PG feedback 2: V/f control with PG feedback 2 0: Open loop vector control 0: Open loop vector control 3 3: Flux vector control 3: Flux vector control
4 0: Open loop vector control Impossible to write 5 0: Open loop vector control Impossible to write 6 3: Flux vector control Impossible to write 7 0: Open loop vector control Impossible to write
5 FUNCTIONS 5.4.9 Inverter Parameter Object (Class 64 Hex)
42
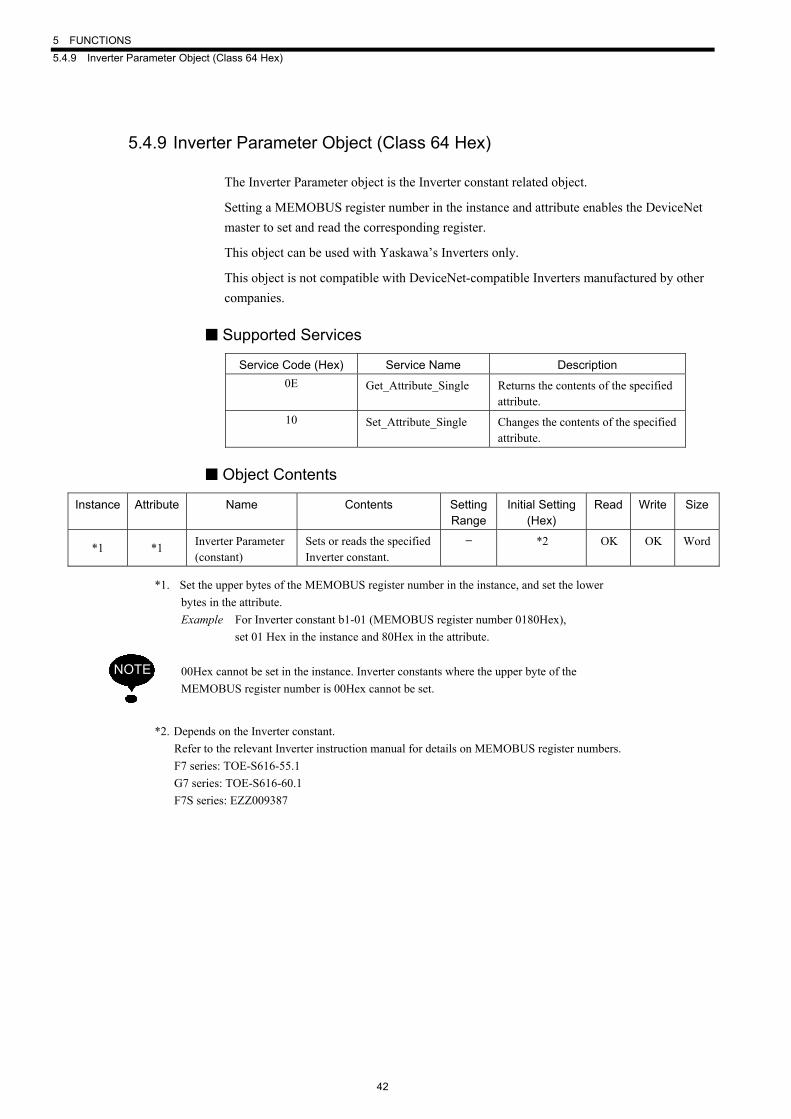
5.4.9 Inverter Parameter Object (Class 64 Hex)
The Inverter Parameter object is the Inverter constant related object.
Setting a MEMOBUS register number in the instance and attribute enables the DeviceNet master to set and read the corresponding register.
This object can be used with Yaskawa’s Inverters only.
This object is not compatible with DeviceNet-compatible Inverters manufactured by other companies.
■ Supported Services
Service Code (Hex) Service Name Description 0E Get_Attribute_Single Returns the contents of the specified
attribute. 10 Set_Attribute_Single Changes the contents of the specified
attribute.
■ Object Contents
Instance Attribute Name Contents Setting Range
Initial Setting (Hex)
Read Write Size
*1 *1 Inverter Parameter (constant)
Sets or reads the specified Inverter constant.
− *2 OK OK Word
*1. Set the upper bytes of the MEMOBUS register number in the instance, and set the lower bytes in the attribute. Example For Inverter constant b1-01 (MEMOBUS register number 0180Hex), set 01 Hex in the instance and 80Hex in the attribute. 00Hex cannot be set in the instance. Inverter constants where the upper byte of the MEMOBUS register number is 00Hex cannot be set.
*2. Depends on the Inverter constant. Refer to the relevant Inverter instruction manual for details on MEMOBUS register numbers. F7 series: TOE-S616-55.1 G7 series: TOE-S616-60.1 F7S series: EZZ009387
NOTE
6.1 Inverter Errors
43
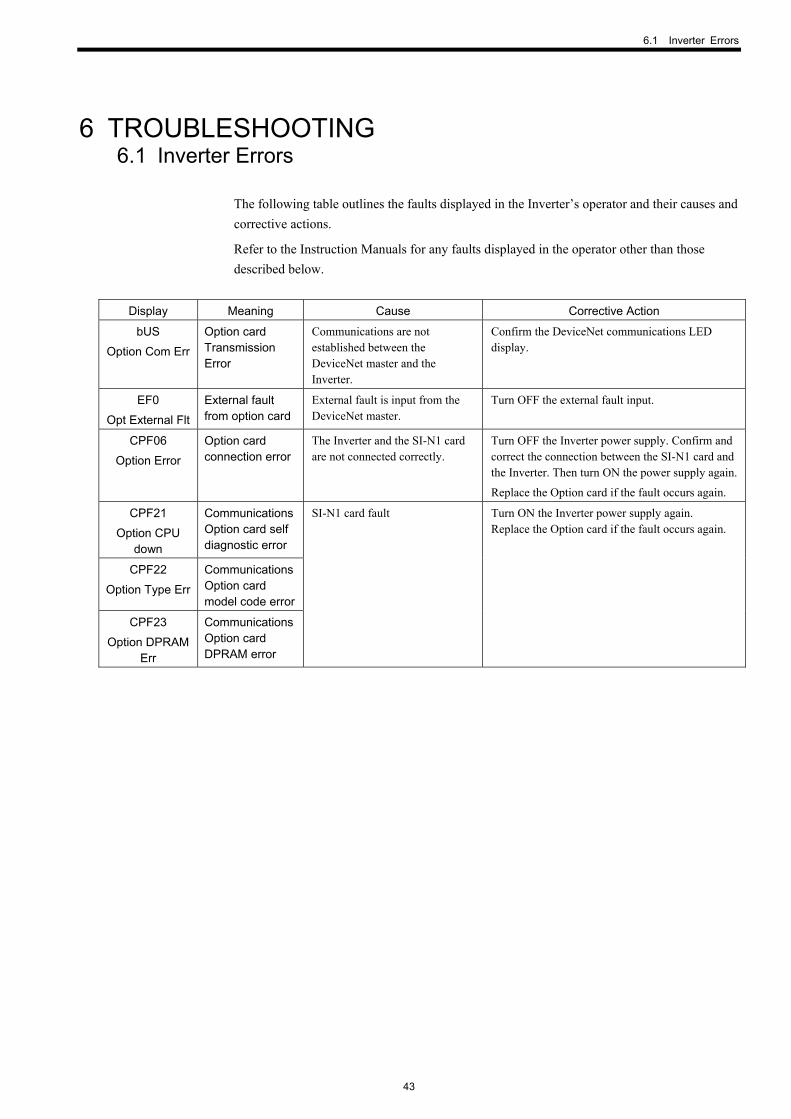
6 TROUBLESHOOTING 6.1 Inverter Errors
The following table outlines the faults displayed in the Inverter’s operator and their causes and corrective actions.
Refer to the Instruction Manuals for any faults displayed in the operator other than those described below.
Display Meaning Cause Corrective Action
bUS
Option Com Err
Option card Transmission Error
Communications are not established between the DeviceNet master and the Inverter.
Confirm the DeviceNet communications LED display.
EF0
Opt External Flt
External fault from option card
External fault is input from the DeviceNet master.
Turn OFF the external fault input.
CPF06
Option Error
Option card connection error
The Inverter and the SI-N1 card are not connected correctly.
Turn OFF the Inverter power supply. Confirm and correct the connection between the SI-N1 card and the Inverter. Then turn ON the power supply again.
Replace the Option card if the fault occurs again.
CPF21
Option CPU down
Communications Option card self diagnostic error
CPF22
Option Type Err
Communications Option card model code error
CPF23
Option DPRAM Err
Communications Option card DPRAM error
SI-N1 card fault Turn ON the Inverter power supply again. Replace the Option card if the fault occurs again.
6 TROUBLESHOOTING
44
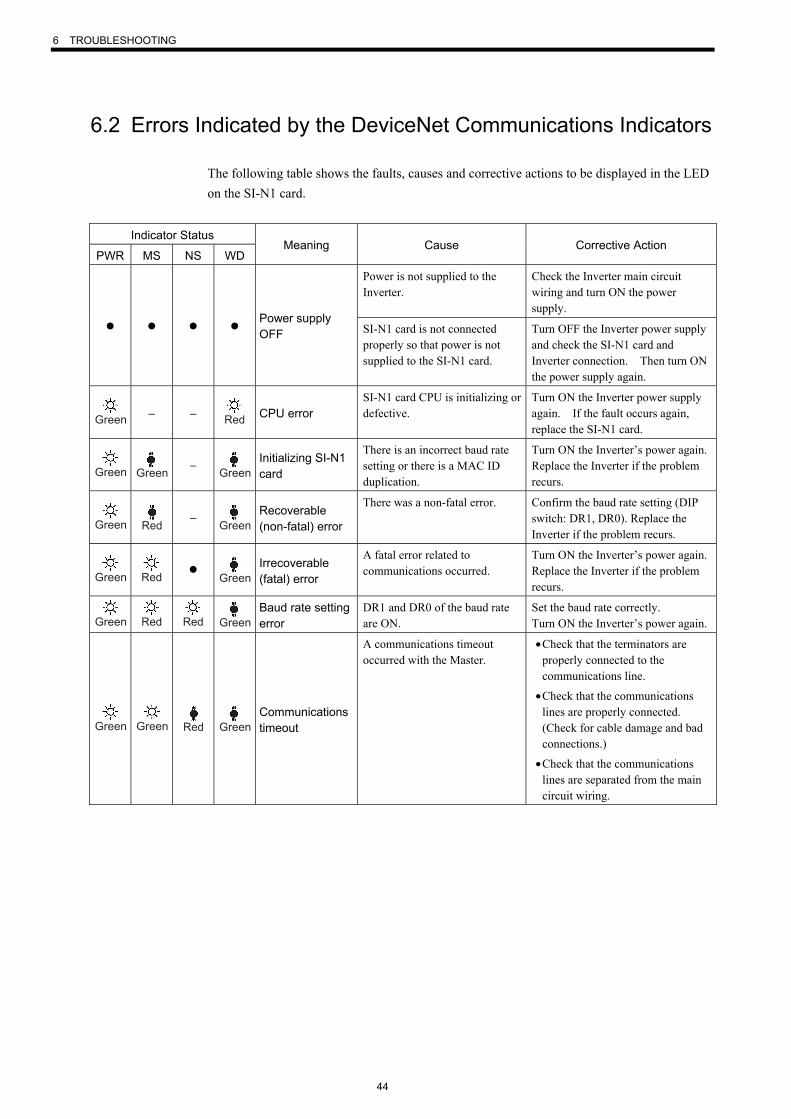
6.2 Errors Indicated by the DeviceNet Communications Indicators
The following table shows the faults, causes and corrective actions to be displayed in the LED on the SI-N1 card.
Indicator Status
PWR MS NS WDMeaning Cause Corrective Action
Power is not supplied to the Inverter.
Check the Inverter main circuit wiring and turn ON the power supply.
Power supply OFF SI-N1 card is not connected
properly so that power is not supplied to the SI-N1 card.
Turn OFF the Inverter power supply and check the SI-N1 card and Inverter connection. Then turn ON the power supply again.
Green − − Red
CPU error SI-N1 card CPU is initializing or defective.
Turn ON the Inverter power supply again. If the fault occurs again, replace the SI-N1 card.
Green Green −
Green Initializing SI-N1 card
There is an incorrect baud rate setting or there is a MAC ID duplication.
Turn ON the Inverter’s power again. Replace the Inverter if the problem recurs.
Green Red −
Green Recoverable (non-fatal) error
There was a non-fatal error. Confirm the baud rate setting (DIP switch: DR1, DR0). Replace the Inverter if the problem recurs.
Green Red
Green Irrecoverable (fatal) error
A fatal error related to communications occurred.
Turn ON the Inverter’s power again. Replace the Inverter if the problem recurs.
Green Red Red Green Baud rate setting error
DR1 and DR0 of the baud rate are ON.
Set the baud rate correctly. Turn ON the Inverter’s power again.
Green Green Red Green Communications timeout
A communications timeout occurred with the Master.
• Check that the terminators are properly connected to the communications line.
• Check that the communications lines are properly connected. (Check for cable damage and bad connections.)
• Check that the communications lines are separated from the main circuit wiring.
6.2 Errors Indicated by the DeviceNet Communications Indicators
45
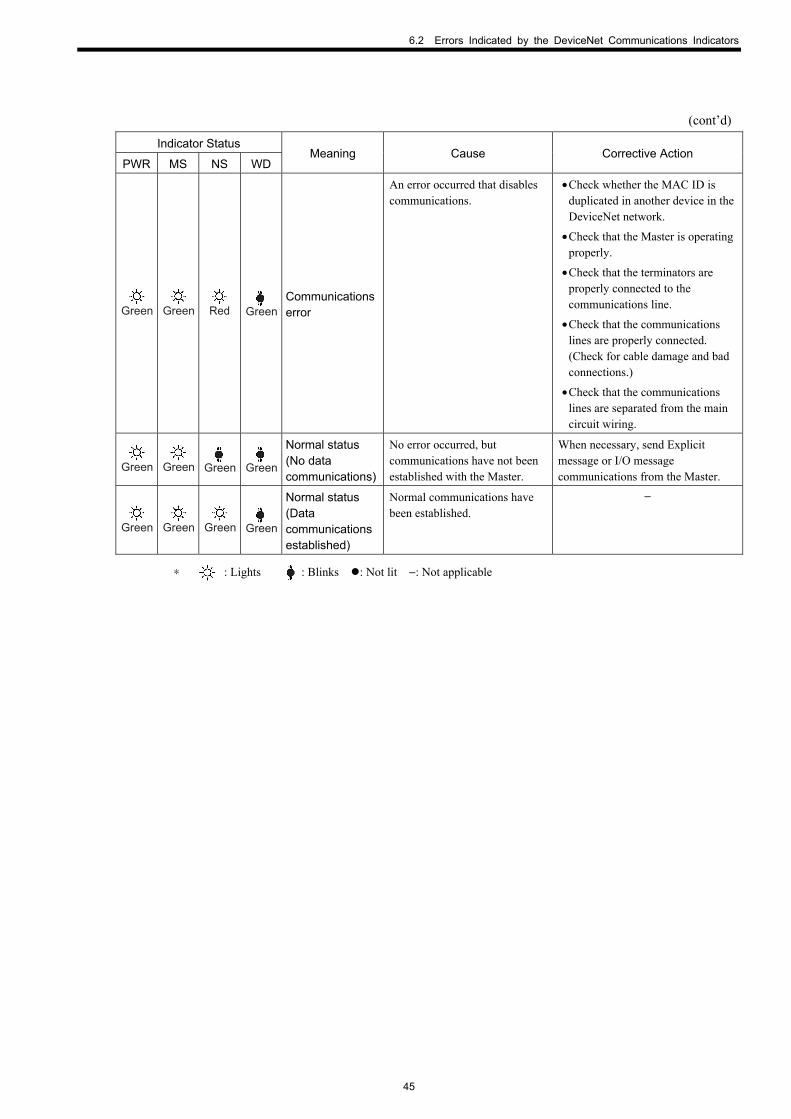
(cont’d)
Indicator Status
PWR MS NS WD Meaning Cause Corrective Action
Green Green Red Green Communications error
An error occurred that disables communications.
• Check whether the MAC ID is duplicated in another device in the DeviceNet network.
• Check that the Master is operating properly.
• Check that the terminators are properly connected to the communications line.
• Check that the communications lines are properly connected. (Check for cable damage and bad connections.)
• Check that the communications lines are separated from the main circuit wiring.
Green Green Green Green
Normal status (No data communications)
No error occurred, but communications have not been established with the Master.
When necessary, send Explicit message or I/O message communications from the Master.
Green Green Green Green
Normal status (Data communications established)
Normal communications have been established.
−
∗ : Lights : Blinks : Not lit −: Not applicable
6 TROUBLESHOOTING
46
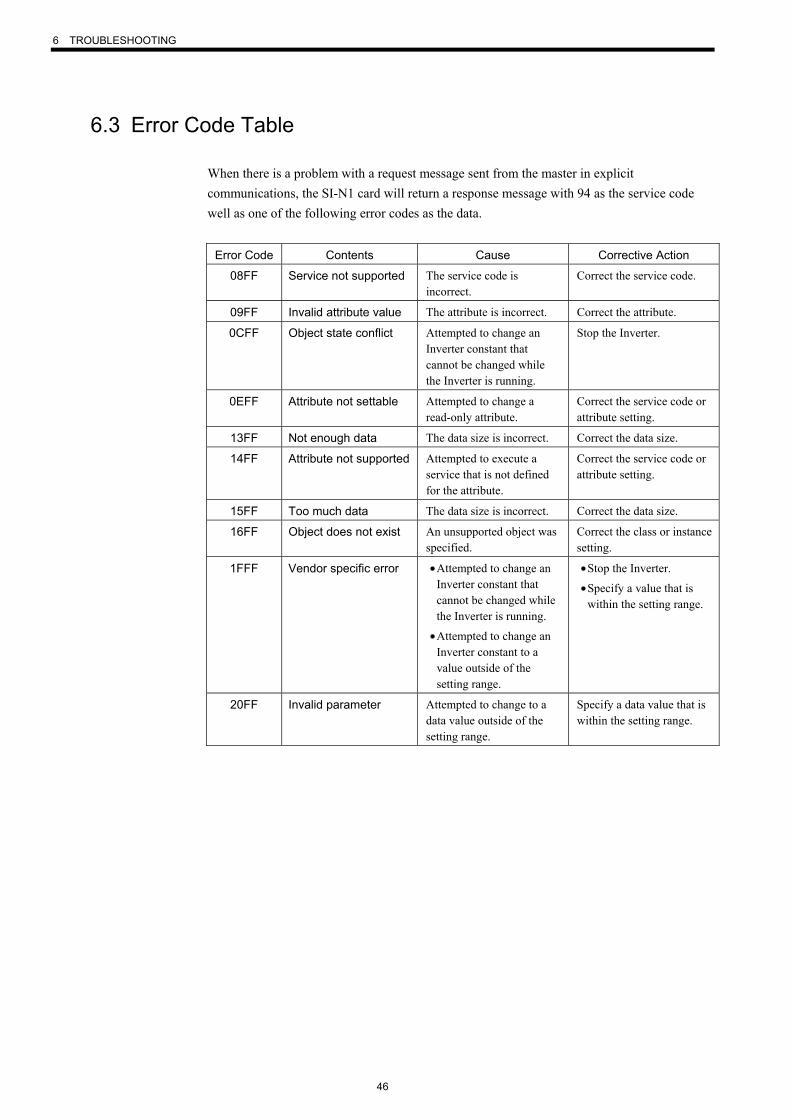
6.3 Error Code Table
When there is a problem with a request message sent from the master in explicit communications, the SI-N1 card will return a response message with 94 as the service code well as one of the following error codes as the data.
Error Code Contents Cause Corrective Action
08FF Service not supported The service code is incorrect.
Correct the service code.
09FF Invalid attribute value The attribute is incorrect. Correct the attribute.
0CFF Object state conflict Attempted to change an Inverter constant that cannot be changed while the Inverter is running.
Stop the Inverter.
0EFF Attribute not settable Attempted to change a read-only attribute.
Correct the service code or attribute setting.
13FF Not enough data The data size is incorrect. Correct the data size.
14FF Attribute not supported Attempted to execute a service that is not defined for the attribute.
Correct the service code or attribute setting.
15FF Too much data The data size is incorrect. Correct the data size.
16FF Object does not exist An unsupported object was specified.
Correct the class or instance setting.
1FFF Vendor specific error • Attempted to change an Inverter constant that cannot be changed while the Inverter is running.
• Attempted to change an Inverter constant to a value outside of the setting range.
• Stop the Inverter.
• Specify a value that is within the setting range.
20FF Invalid parameter Attempted to change to a data value outside of the setting range.
Specify a data value that is within the setting range.

6.4 MEMOBUS I/O Instance Error Table
47
6.4 MEMOBUS I/O Instance Error Table
The following errors can occur when using the MEMOBUS I/O Instance to set or reference Inverter constants.
Error Code Contents Cause
01 Hex Function code error A function code other than 00 Hex, 03 Hex, or 10 Hex was sent from the master.
02 Hex Invalid register number error
• No register number has been registered to specify the register to be accessed.
• ENTER command 0900H was executed for a write-only register.
21 Hex Data setting error • A simple upper/lower limit error occurred with control data or constant write operation.
• A constant setting error occurred when a constant was written.
22 Hex Write mode error • Attempted to write a constant from the master while Inverter was running.
• Attempted to write a constant from the master with the ENTER command while Inverter was running.
• Attempted to write a constant other than A1-00 to -05, E1-03, o2-04 from the master during an CPF03 occurrence.
• Attempted to write data from the master but the data was read-only.
23 Hex Writing during main circuit undervoltage (UV) error
• Attempted to write a constant from the master during a UV (undervoltage) occurrence.
• Attempted to write a constant from the master with the ENTER command during a UV (undervoltage) occurrence.
24 Hex Writing error during constants processing
• Attempted to write a constant from the master while data was being stored.

7 SPECIFICATIONS
48
7 SPECIFICATIONS
Item Specifications
Model SI-N1
I/O Message Communications Four kinds of I/O instances are supported:
1. Basic I/O instances (4 input bytes, 4 output bytes)
2. Extended I/O instances (4 input bytes, 4 output bytes)
3. MEMOBUS I/O instances (5 input bytes, 5 output bytes)
4. Control I/O instances (8 input bytes, 8 output bytes)
Explicit Message Communications
Up to 32 bytes of data can be transferred in conformance with the DeviceNet AC/DC drive profile.
Communications Speed 125/250/500 (kbps)
Communications Speed Max. wiring length 125 kpbs 500 m (1,640 ft) 250 kpbs 250 m (820 ft)
Communications Distance
500 kpbs 100 m (328 ft)
Max. Number of Communications Nodes
64
Communications Power Supply External power supply DC 11 V to 25 V (20 mA or less)
Operation Power Supply DC 4.75 V to 5.25 V (from the Inverter)
Ambient Temperature -10°C to + 45°C (14°F to 113°F)
Humidity 90%RH or less (non-condensing)
Storage Temperature -20°C to + 60°C (-4°F to 140°F)
Location Indoor (free from corrosive gases or dust)
Altitude 1000 m (3,280 ft) or less

YASKAWA ELECTRIC CORPORATION
In the event that the end user of this product is to be the military and said product is to be employed in any weapons systems or the manufacture thereof, the export will fall under the relevant regulations as stipulated in the Foreign Exchange and Foreign Trade Regulations. Therefore, be sure to follow all procedures and submit all relevant documentation according to any and all rules, regulations and laws that may apply.
Specifications are subject to change without notice for ongoing product modifications and improvements.
© 2004-2006 YASKAWA ELECTRIC CORPORATION. All rights reserved.
IRUMA BUSINESS CENTER (SOLUTION CENTER)480, Kamifujisawa, Iruma, Saitama 358-8555, JapanPhone 81-4-2962-5696 Fax 81-4-2962-6138
YASKAWA ELECTRIC AMERICA, INC.2121 Norman Drive South, Waukegan, IL 60085, U.S.A.Phone 1-847-887-7000 Fax 1-847-887-7370
YASKAWA ELETRICO DO BRASIL COMERCIO LTD.A.Avenida Fagundes Filho, 620 Bairro Saude-Sao Paulo-SP, Brazil CEP: 04304-000Phone 55-11-5071-2552 Fax 55-11-5581-8795
YASKAWA ELECTRIC EUROPE GmbHAm Kronberger Hang 2, 65824 Schwalbach, GermanyPhone 49-6196-569-300 Fax 49-6196-569-312
YASKAWA ELECTRIC UK LTD.1 Hunt Hill Orchardton Woods Cumbernauld, G68 9LF, United KingdomPhone 44-1236-735000 Fax 44-1236-458182
YASKAWA ELECTRIC KOREA CORPORATION7F, Doore Bldg. 24, Yeoido-dong, Youngdungpo-Ku, Seoul 150-877, KoreaPhone 82-2-784-7844 Fax 82-2-784-8495
YASKAWA ELECTRIC (SINGAPORE) PTE. LTD.151 Lorong Chuan, #04-01, New Tech Park 556741, SingaporePhone 65-6282-3003 Fax 65-6289-3003
YASKAWA ELECTRIC (SHANGHAI) CO., LTD.No.18 Xizang Zhong Road. Room 1702-1707, Harbour Ring Plaza Shanghai 200001, ChinaPhone 86-21-5385-2200 Fax 86-21-5385-3299
YASKAWA ELECTRIC (SHANGHAI) CO., LTD. BEIJING OFFICERoom 1011A, Tower W3 Oriental Plaza, No.1 East Chang An Ave.,Dong Cheng District, Beijing 100738, ChinaPhone 86-10-8518-4086 Fax 86-10-8518-4082
YASKAWA ELECTRIC TAIWAN CORPORATION9F, 16, Nanking E. Rd., Sec. 3, Taipei, TaiwanPhone 886-2-2502-5003 Fax 886-2-2505-1280
YASKAWA
Varispeed SERIES OPTION CARDDeviceNet COMMUNICATION INTERFACE CARD USER'S MANUAL
05-7⑦ 00-71013
Printed in Japan September 2006 04-2
MANUAL NO. SIBP C730600 01B
1