Embed Size (px)
Citation preview

c h a p t e r 2
Your creative armament
I’ve been creating vector artwork and wrangling with Bézier
curves going on 18 years now. For 14 years, I was a die-hard
Macromedia Freehand user. along the way, I’d use adobe Illus-
trator from time to time—you know, if I had to. But when adobe
bought Freehand, I saw the writing on the wall and committed
myself to an exclusive relationship with Illustrator. We haven’t
always gotten along, Illustrator and me, but our marriage contin-
ues to deepen and improve with each passing software release.
Excerpted from Vector Basic Training: A Systematic Creative Process for Building Precision Vector Artwork by Von Glitschka. Copyright © 2011. Used with permission of Pearson Education, Inc. and New Riders.

16 c h a p t e r 2
A Love-Hate RelationshipIt’s hard to use something day in and day out—especially something so closely tied to my personal passion for design and creativity—without becoming somewhat fanatical about it. Let me start by saying that I love how Adobe Illustrator makes it so easy for me to turn my designs into precise, well-built vector illustrations.
However, as much as I appreciate Illustrator’s many, many fine qualities, there are times when it drives me absolutely nuts. (Some of you may be nodding your heads in agreement.) Years ago, I wrote a blog post about my “switcher” frustrations and in the process coined the phrase “Adobe Frustrator.” (You can see the post at http://snipurl.com/vonsterswitch.) Adobe’s lead marketing director for Illustrator saw my post, agreed with many of my criticisms, and invited me to be on the Illustrator beta team. I’ve been part of that team since the release of Illustrator CS3 and have consulted on a handful of potential tools. So, as you can see, I’ve been watching the software’s development for a long time.
After several years working with Illustrator and contributing to its devel-opment as a beta tester, I still have some big gripes about several of Illus-trator’s shortcomings, and I’ll touch on these throughout this chapter. That said, the program has much improved since I first started using it and I have to admit that Adobe Illustrator is the best professional appli-cation for creating precise vector graphics in our industry. Hands down.
As a former die-hard FreeHand user for 14 years, you can be sure that I do not say these words lightly.
That said, whether you use Adobe Illustrator, CorelDraw, Inkscape—or any other app from an ever-growing list of open source vector drawing programs—before you can control Bézier curves and build vector art successfully, you must become familiar with your core building tools. All of these programs use Bézier curves for vector building. Every vector drawing program gives you the ability to build shapes via anchor points and paths. The difference among programs lies in the additional propri-etary tools provided to manipulate points and paths.
Excerpted from Vector Basic Training: A Systematic Creative Process for Building Precision Vector Artwork by Von Glitschka. Copyright © 2011. Used with permission of Pearson Education, Inc. and New Riders.

Y o u r c r e a t i v e a r m a m e n t 17
For ease of communication, this book uses Adobe Illustrator to show-case the creative process. In this chapter, I’ll tell you about the 12 core Illustrator tools you’ll need to use to build precise vector graphics. If you don’t have Illustrator, 11 of these tools have equivalents in the other vec-tor drawing programs. The few exceptions are the Xtream Path plug-in (www.cvalley.com) and the BetterHandles plug-in (http://www.nineblock.com), which were created specifically for Illustrator.
Vector building can be accomplished in any vector drawing program. The tools may have different names and might not work exactly the same way, but they should all enable you to arrive at the same precise solution. The key to success as an illustrative designer is to get back to basics. A sound and systematic creative process that includes analog drawing at its core will improve any designer’s ability to execute digital art at a higher level.
Core Tools for Vector BuildingIllustrator is replete with an array of tools that grows with each new soft-ware release. Whole books are dedicated to documenting these new tools and how to use them. This book, however, is dedicated to “basic training,” so we’ll only cover the 12 core tools needed to create precise vector shapes within any given drawing program.
The 12 Disciples of DesignEach of the 12 tools listed here serves a specific function in the build process. Keep in mind that some of these tools lend themselves to spe-cific build methods, which we’ll go over in more detail in Chapter 6.
The 12 core tools you’ll use to create precise vector shapes are:
1. Pen tool (P): Simply put, precise vector building wouldn’t be pos-sible without the Pen tool. You’ll use it to lay down all of your anchor points, one by one, forming a path that makes the vector shape you need (Figure 2.1).
Excerpted from Vector Basic Training: A Systematic Creative Process for Building Precision Vector Artwork by Von Glitschka. Copyright © 2011. Used with permission of Pearson Education, Inc. and New Riders.

18 c h a p t e r 2
2. Add Anchor Point tool (+): This tool allows you to add an additional anchor point to any path you have created (Figure 2.2).
3. Delete Anchor Point tool (–): This tool will remove any anchor point from any path you’ve created without breaking the path (Figure 2.3). I have a beef with this tool. You really shouldn’t need it. This is a case of Illustrator making my life harder than it needs to be. We can only hope that the next version of Illustrator will allow you to simply highlight an anchor point and hit Delete—no special tool required to make it happen.
You can also select your anchor points and click “Remove selected anchor points” from the Control panel menu at the top of your screen. The results are the same.
FIgure 2.1 Pen tool. FIgure 2.2 Add Anchor Point tool.
FIgure 2.3 Delete Anchor Point tool.
Excerpted from Vector Basic Training: A Systematic Creative Process for Building Precision Vector Artwork by Von Glitschka. Copyright © 2011. Used with permission of Pearson Education, Inc. and New Riders.

Y o u r c r e a t i v e a r m a m e n t 19
4. Convert Anchor Point tool (Shift-C): This tool converts smooth points to corner points. It can also reveal, isolate, manipulate, and/or retract handlebars independently to adjust a Bézier curve (Figure 2.4).
5. Selection tool (V): Use this tool to scale objects larger or smaller. It also allows you to click or drag to select shapes as individual objects, and you can use it to manipulate handlebars to adjust a Bézier curve (Figure 2.5).
6. Direct Selection tool (A): This tool lets you directly click or drag to select a specific segment of a path or individual anchor points. It can also reveal, isolate, and manipulate handlebars to adjust a Bézier curve (Figure 2.6).
FIgure 2.4 Convert Anchor Point tool.
FIgure 2.5 Selection tool. FIgure 2.6 Direct Selection tool.
Excerpted from Vector Basic Training: A Systematic Creative Process for Building Precision Vector Artwork by Von Glitschka. Copyright © 2011. Used with permission of Pearson Education, Inc. and New Riders.

20 c h a p t e r 2
7. rectangle tool (M): This tool will create complete shapes with 90-degree angles (Figure 2.7). For more information, see “Shape Building Method” in Chapter 6.
8. ellipse tool (L): This tool will create complete circular or elliptical shapes (Figure 2.8). For more information, see “Shape Building Method” in Chapter 6.
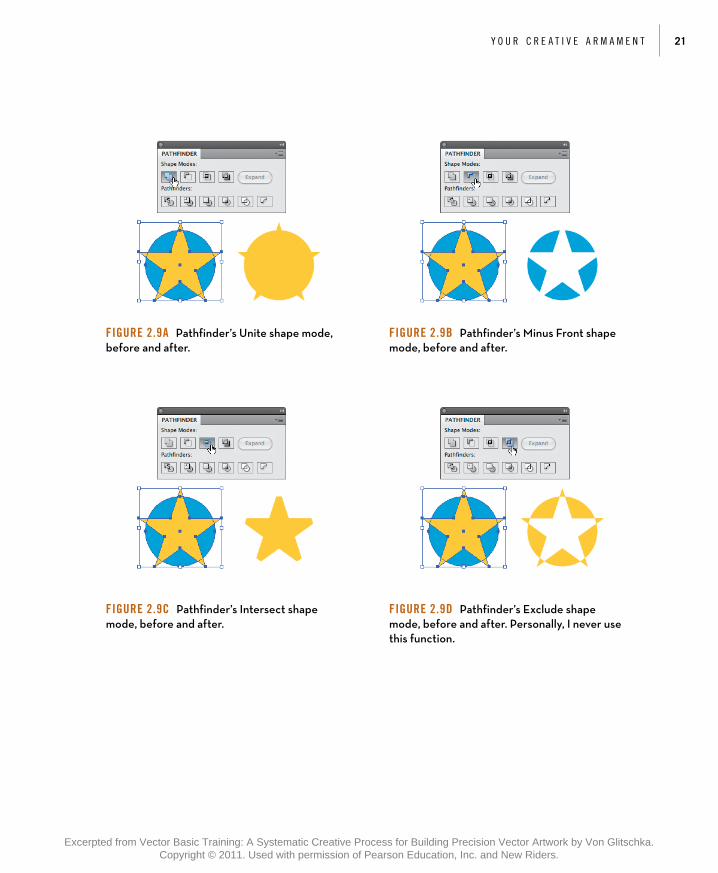
9. Pathfinder tool (Shift-Command-F9 or Shift-Control-F9): This tool enables you to create using shape-building techniques (think cookie cutters) using the tool’s Unite, Minus Front, Intersect, and Exclude modes (FigureS 2.9A–2.9D). There are other functions within the tool, but we’ll only focus on these four shape modes.
FIgure 2.7 Rectangle tool. FIgure 2.8 Ellipse tool.
Excerpted from Vector Basic Training: A Systematic Creative Process for Building Precision Vector Artwork by Von Glitschka. Copyright © 2011. Used with permission of Pearson Education, Inc. and New Riders.
Y o u r c r e a t i v e a r m a m e n t 21
FIgure 2.9a Pathfinder’s Unite shape mode, before and after.
FIgure 2.9B Pathfinder’s Minus Front shape mode, before and after.
FIgure 2.9c Pathfinder’s Intersect shape mode, before and after.
FIgure 2.9d Pathfinder’s Exclude shape mode, before and after. Personally, I never use this function.
Excerpted from Vector Basic Training: A Systematic Creative Process for Building Precision Vector Artwork by Von Glitschka. Copyright © 2011. Used with permission of Pearson Education, Inc. and New Riders.

22 c h a p t e r 2
10. rotate tool (R): This tool allows you to define the rotat-ing axis of any selected object and rotate it on the fly or via a specific numerical amount (Figure 2.10).
11. reflect tool (O): With this tool, flip a selected object either horizontally or vertically. You’ll use it mainly for creating symmetrical designs (Figure 2.11). For more information, see “Symmetry Is Your Friend” in Chapter 6.
12. Xtream Path plug-in (CValley Software): This plug-in makes editing and forming your final vector shapes far easier and more precise than Adobe’s own tools (Warp tool, Shift-R). The plug-in comes with many useful tools, but we’ll focus specifically on the Segment Direct Edit tool, Symmetric Edit tool, Round Fillet tool, and a drop-down menu object filter it adds called Smart Rounding (Figure 2.12).
FIgure 2.11 Reflect tool. FIgure 2.12 Xtream Path plug-in’s Segment Direct Edit tool, Symmetric Edit tool, Round Fillet tool, and the Smart Rounding filter.
FIgure 2.10 Rotate tool.
Excerpted from Vector Basic Training: A Systematic Creative Process for Building Precision Vector Artwork by Von Glitschka. Copyright © 2011. Used with permission of Pearson Education, Inc. and New Riders.

Y o u r c r e a t i v e a r m a m e n t 23
Xtream Path Plug-inWhen I first discovered the Xtream Path plug-in, I knew I had found the Holy Grail of vector building. It has not only made creating vector art within Illustrator easier and more precise, but it’s also proven to be a far superior build method to anything I used to know and love in FreeHand.
FreeHand made editing anchor points and paths easier than Adobe Illustrator did, with fewer tools, less hassle, and in less time. When I switched to Adobe Illustrator, my build time slowed down. The Xtream Path plug-in simplified the Illustrator process with one tool, no hassle, and resulted in a faster build time than either FreeHand or Illustrator provided. Should you use the Xtream Path plug-in? It’s a no-brainer.
The Xtream Path plug-in is a superior tool for editing and shaping vector graphics. The plug-in is well worth the investment (about $140) because the time you’ll save in frustration-free building will more than cover the cost.
The Three Amigos, Plus OneThe Xtream Path plug-in is made up of 33 individual tools, but we will use three of these and one drop-down menu in this book. They are:
1. Segment Direct edit tool: This tool allows you to literally grab a vector path anywhere (between two anchor points) and bend it into any freeform shape (Figure 2.13).
FIgure 2.13 Grab a vector path anywhere between two anchor points and bend the Bézier curve into the specific shape needed to match your drawing. You’ll simply push and pull your paths to form them into your final art (like vector clay, if you will). The functionality is simple, intuitive, and, most importantly, leads to precise vector building.
Excerpted from Vector Basic Training: A Systematic Creative Process for Building Precision Vector Artwork by Von Glitschka. Copyright © 2011. Used with permission of Pearson Education, Inc. and New Riders.

24 c h a p t e r 2
2. Symmetric edit tool: With this tool, you can grab a path (between two anchor points) and symmetrically distort it evenly in the direc-tion in which you are moving the path (Figure 2.14).
3. round Fillet tool: This tool allows you to drag over independent anchor points and visually round them off on the fly, or you can round off points to an exact specification that you set in the Control panel. It only works on corner anchor points that have no Bézier curves pulled out (Figure 2.15).
FIgure 2.14 Evenly distort a path with mathematical precision using the Symmetric Edit tool.
FIgure 2.15 Simple, on-the-fly rounding of vector shapes using the Round Fillet tool.
Excerpted from Vector Basic Training: A Systematic Creative Process for Building Precision Vector Artwork by Von Glitschka. Copyright © 2011. Used with permission of Pearson Education, Inc. and New Riders.

Y o u r c r e a t i v e a r m a m e n t 25
FIgure 2.16 Round off any type of path with the Smart Rounding filter.
4. Smart rounding filter: This useful filter allows you to select a whole object or just an individual anchor point and round it off—regardless if the path has a Bézier curve on it or not. To access the Smart Rounding filter, select Object > Filters > Xtream Path > Smart Rounding (Figure 2.16). You can also use the Smart Rounding filter to round off any type of path regardless of anchor point types. Either select the whole shape or individual anchor points.
Excerpted from Vector Basic Training: A Systematic Creative Process for Building Precision Vector Artwork by Von Glitschka. Copyright © 2011. Used with permission of Pearson Education, Inc. and New Riders.