Embed Size (px)
Citation preview

MICROSOFT PROCEDURE : Purchase Ordering Process SCOPE : This covers the order processing of Microsoft Open License Programs,
Volume Purchase, FPP (Retail Packs) and Media Kits VENDOR LINK: https://moet.microsoft.com/
Microsoft licenses, Retail Packs (FPP) and Media Kit orders are processed via MOET (Microsoft Order Entry Tool) --- an online option for submitting purchase orders to Microsoft.
Figure 1 MOET Main Menu
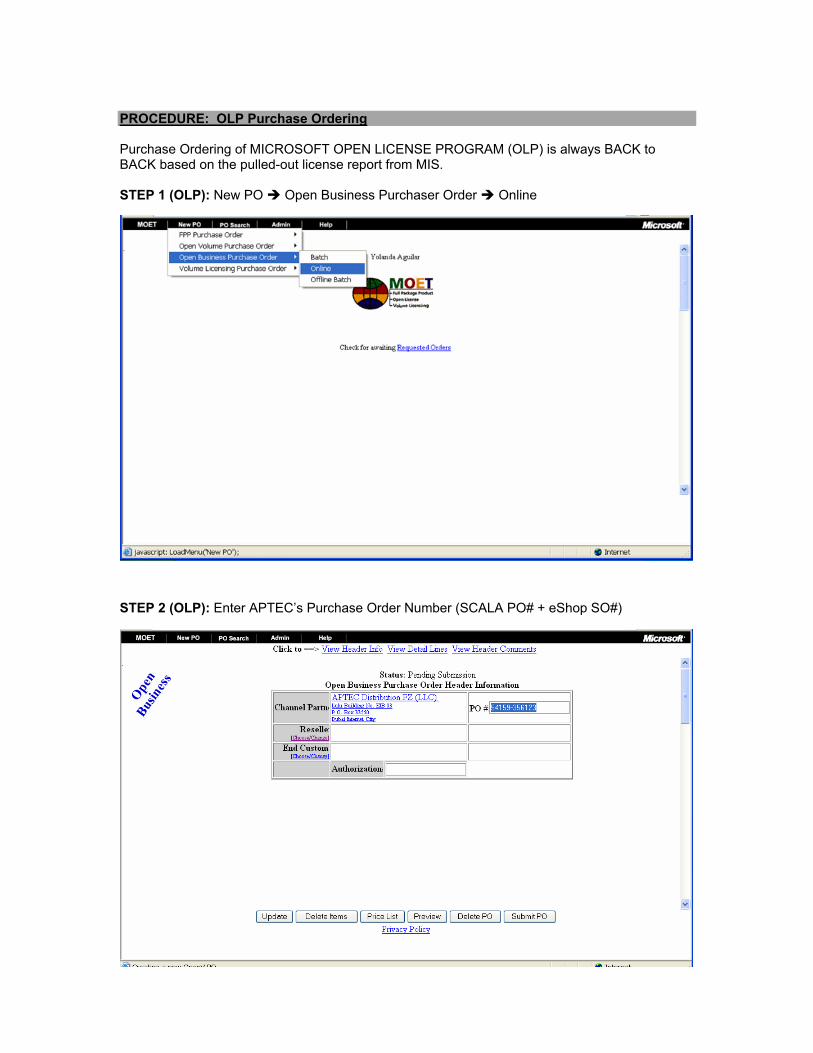
PROCEDURE: OLP Purchase Ordering Purchase Ordering of MICROSOFT OPEN LICENSE PROGRAM (OLP) is always BACK to BACK based on the pulled-out license report from MIS. STEP 1 (OLP): New PO Open Business Purchaser Order Online STEP 2 (OLP): Enter APTEC’s Purchase Order Number (SCALA PO# + eShop SO#)
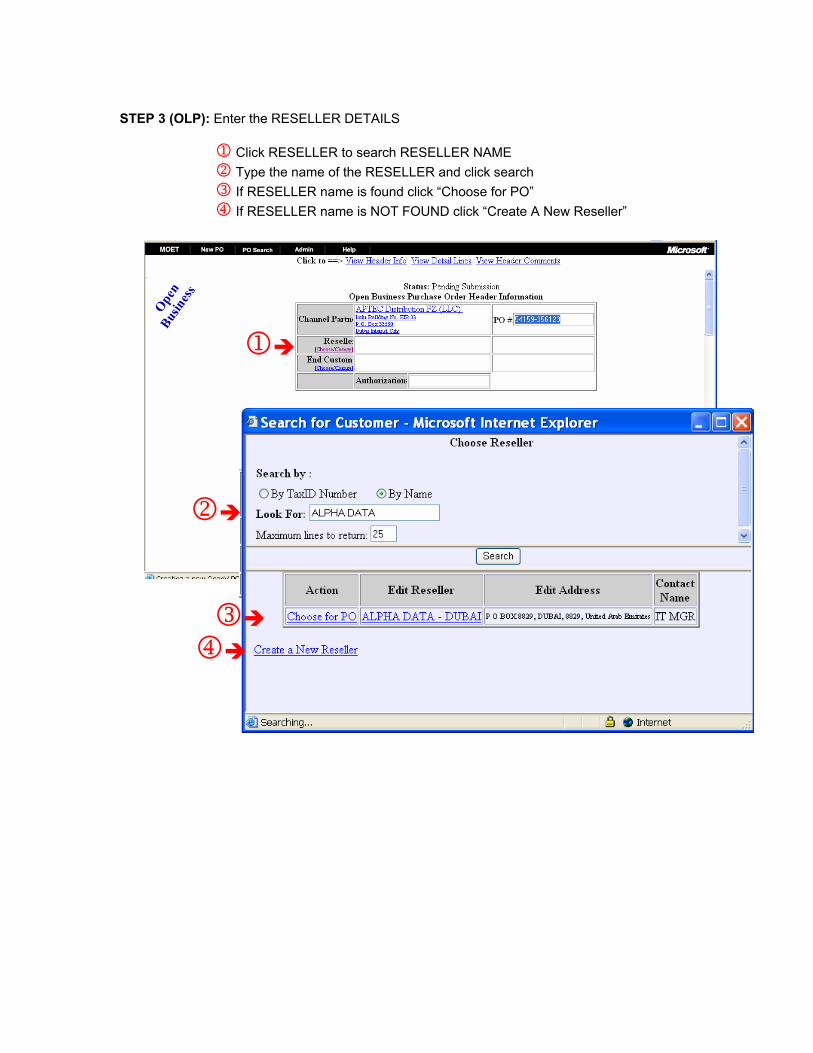
STEP 3 (OLP): Enter the RESELLER DETAILS
1 Click RESELLER to search RESELLER NAME 2 Type the name of the RESELLER and click search 3 If RESELLER name is found click “Choose for PO” 4 If RESELLER name is NOT FOUND click “Create A New Reseller”
3 4
2
1
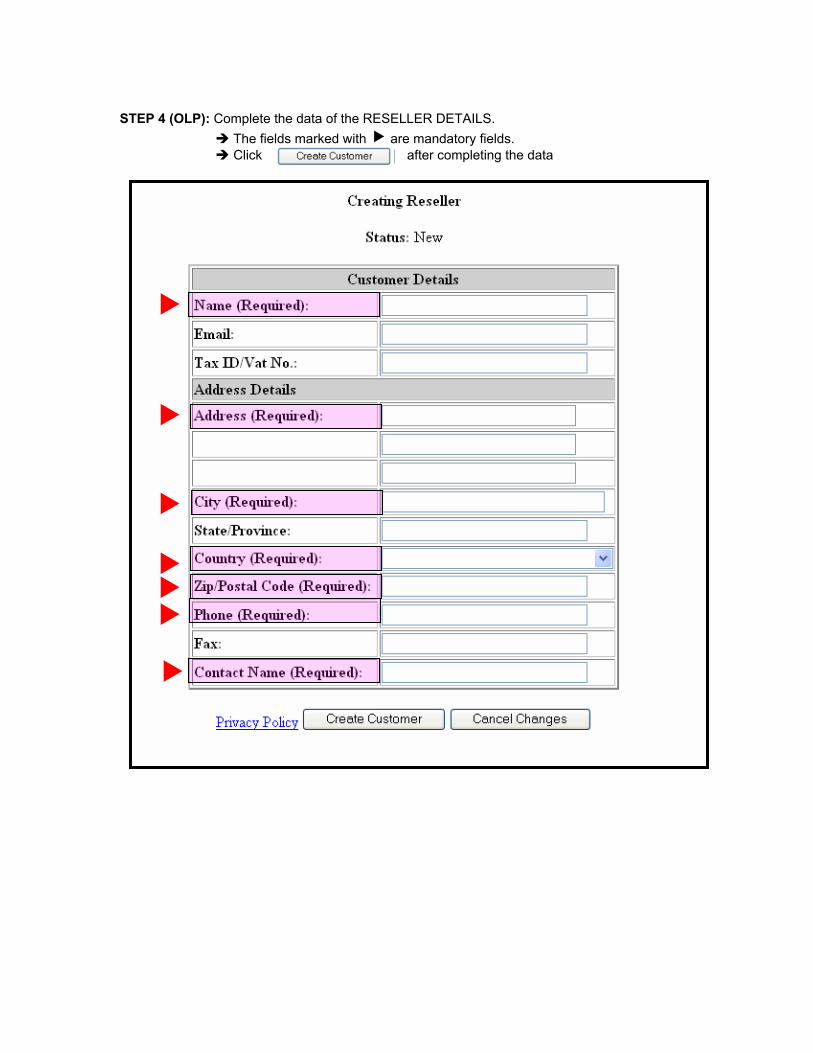
STEP 4 (OLP): Complete the data of the RESELLER DETAILS.
The fields marked with are mandatory fields. Click after completing the data
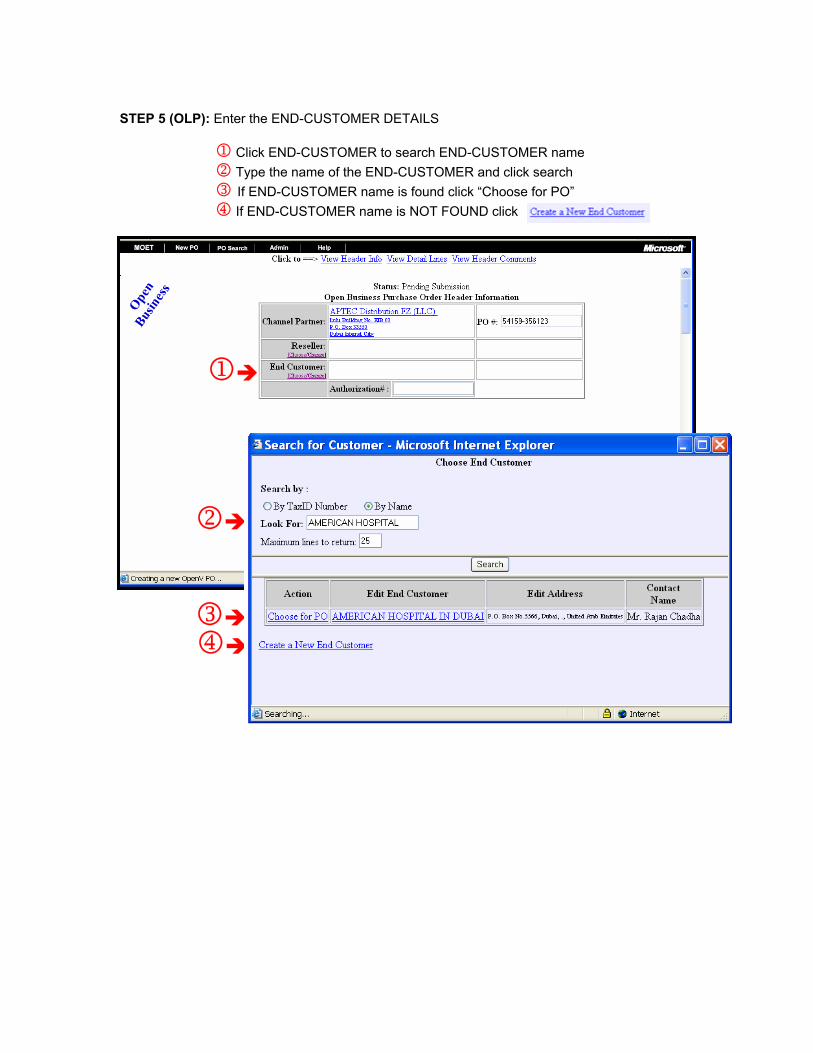
STEP 5 (OLP): Enter the END-CUSTOMER DETAILS
1 Click END-CUSTOMER to search END-CUSTOMER name 2 Type the name of the END-CUSTOMER and click search 3 If END-CUSTOMER name is found click “Choose for PO” 4 If END-CUSTOMER name is NOT FOUND click
2
3 4
1
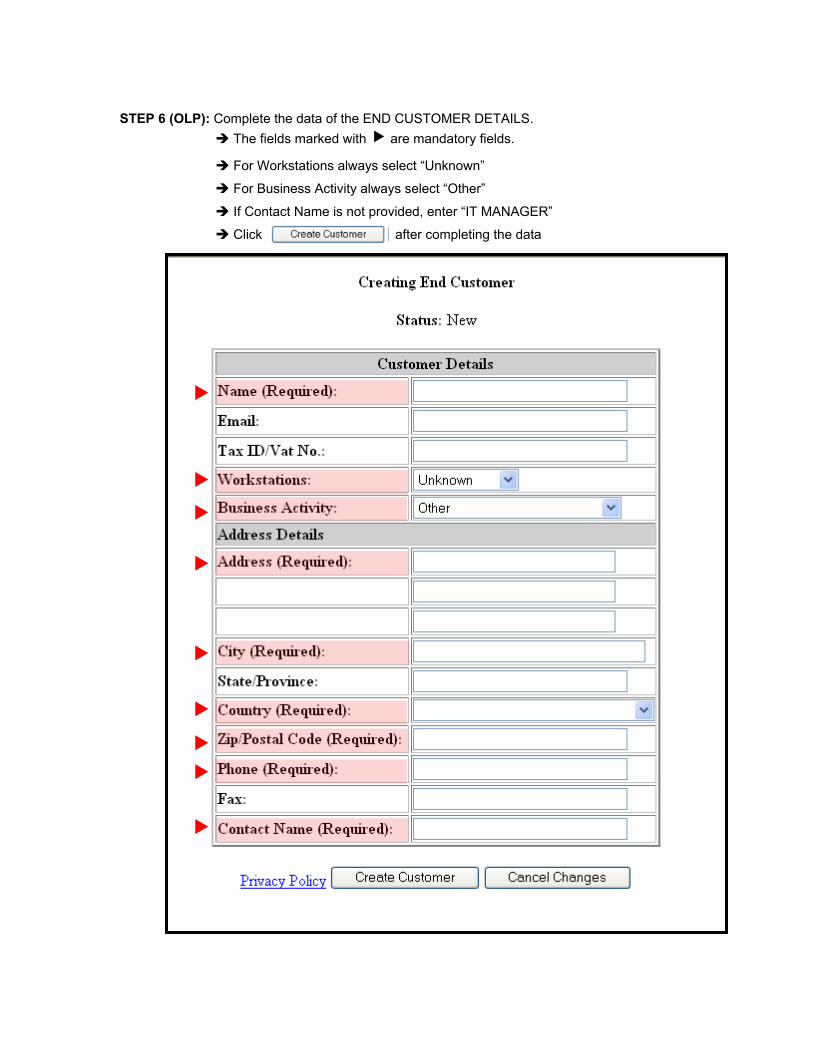
STEP 6 (OLP): Complete the data of the END CUSTOMER DETAILS.
The fields marked with are mandatory fields.
For Workstations always select “Unknown”
For Business Activity always select “Other”
If Contact Name is not provided, enter “IT MANAGER”
Click after completing the data
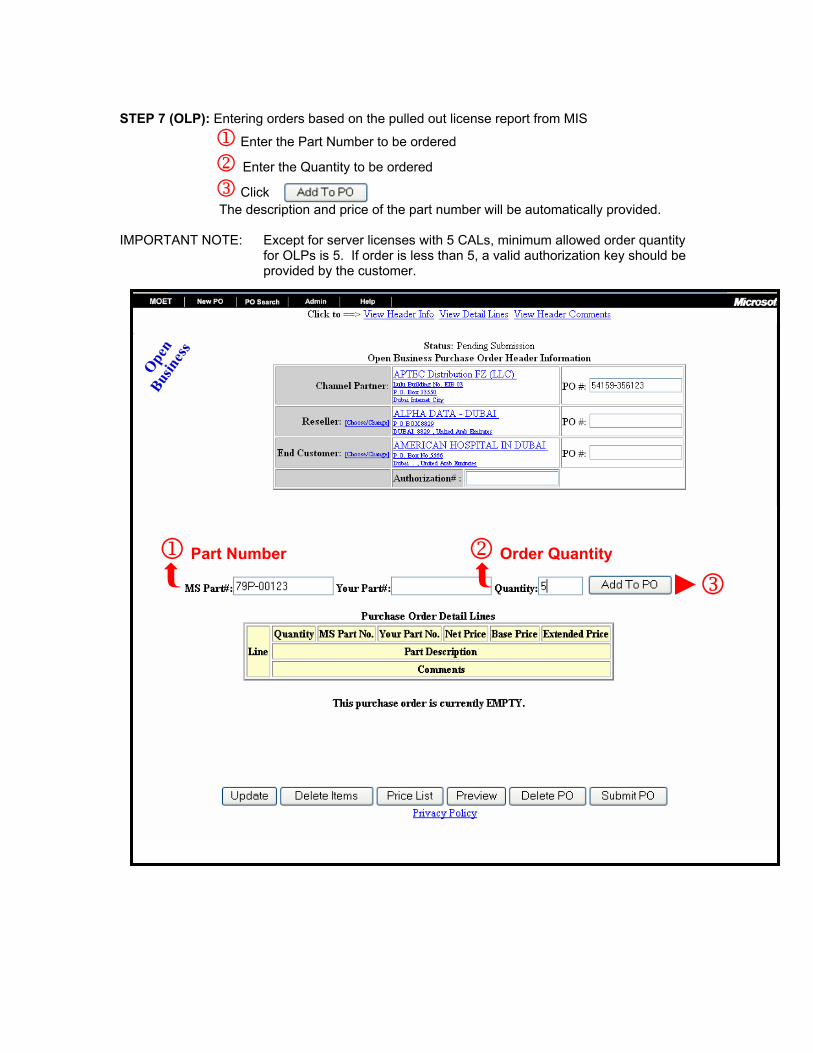
STEP 7 (OLP): Entering orders based on the pulled out license report from MIS
1 Enter the Part Number to be ordered
2 Enter the Quantity to be ordered
3 Click The description and price of the part number will be automatically provided.
IMPORTANT NOTE: Except for server licenses with 5 CALs, minimum allowed order quantity
for OLPs is 5. If order is less than 5, a valid authorization key should be provided by the customer.
►32 rder Quantity O
1 Part Number

STEP 7 (OLP): Submitting the ORDER After entering all part numbers, click The order is completed.
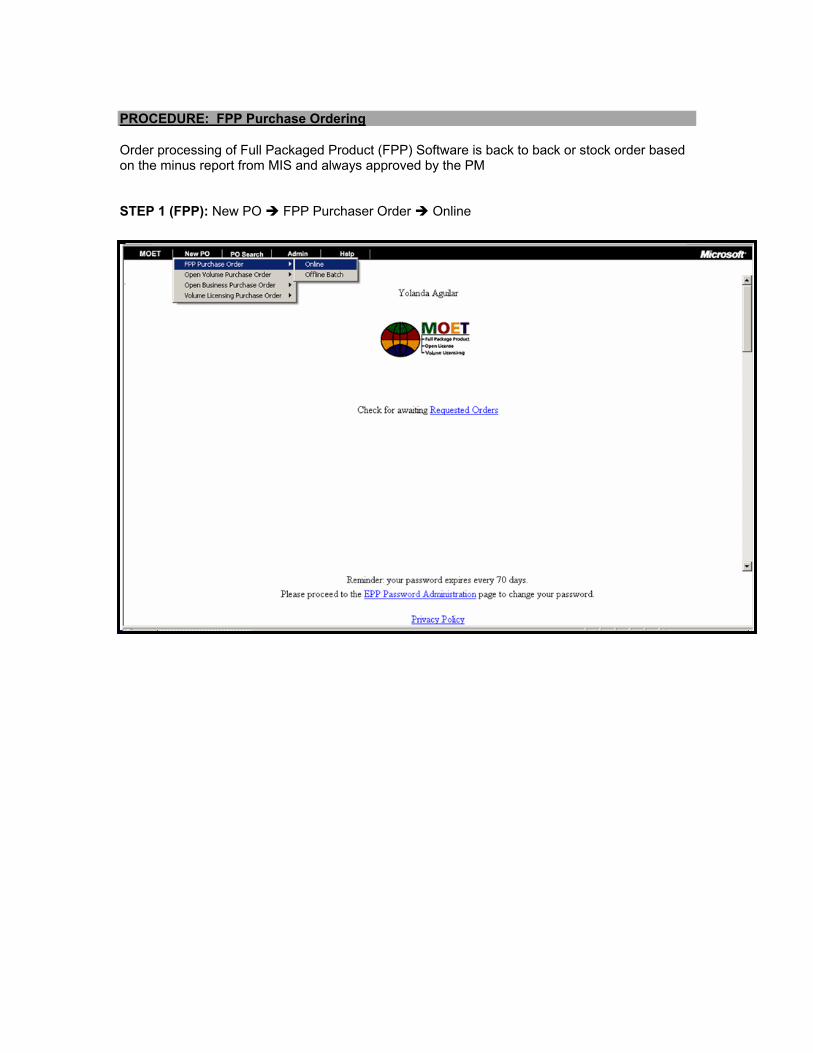
PROCEDURE: FPP Purchase Ordering Order processing of Full Packaged Product (FPP) Software is back to back or stock order based on the minus report from MIS and always approved by the PM STEP 1 (FPP): New PO FPP Purchaser Order Online
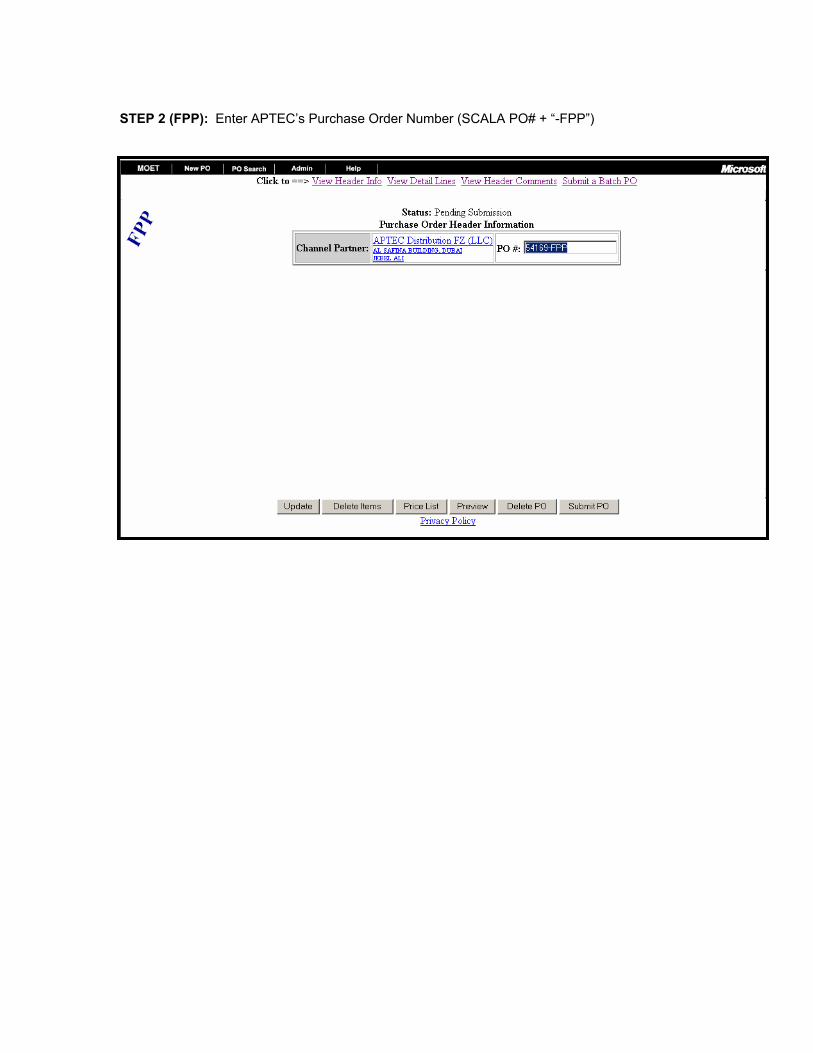
STEP 2 (FPP): Enter APTEC’s Purchase Order Number (SCALA PO# + “-FPP”)
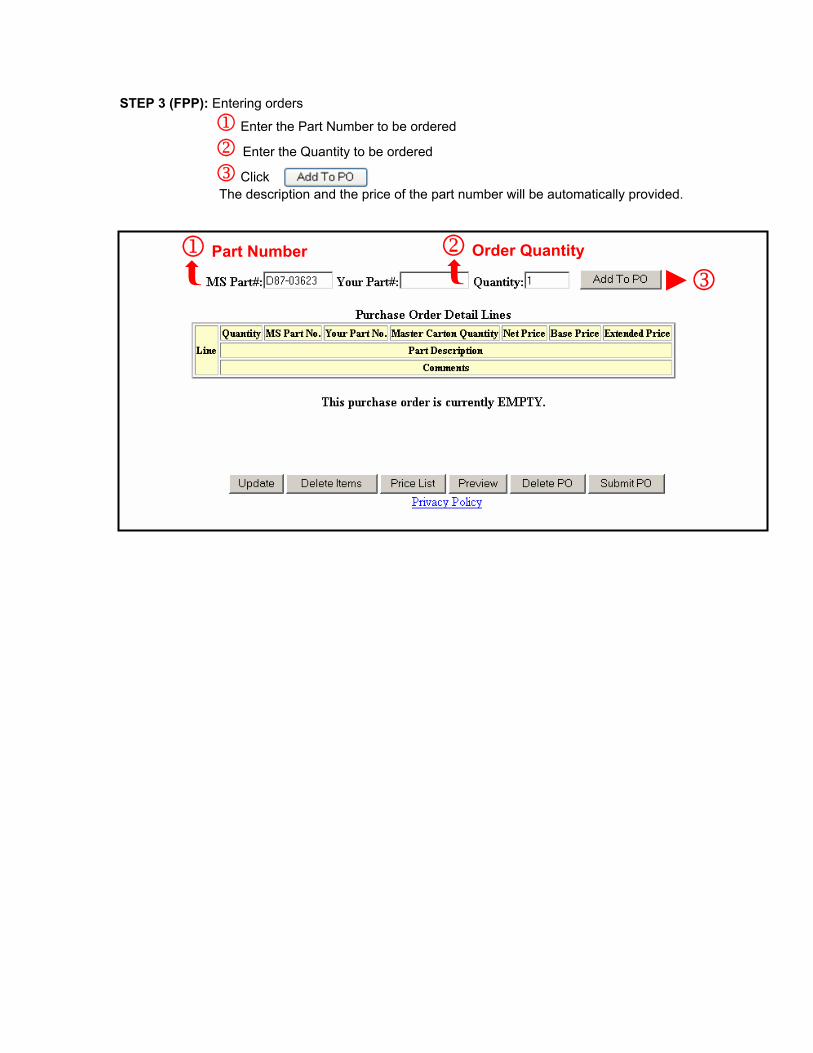
STEP 3 (FPP): Entering orders
1 Enter the Part Number to be ordered
2 Enter the Quantity to be ordered
3 Click The description and the price of the part number will be automatically provided.
►3
2 rder Quantity O
1 Part Number
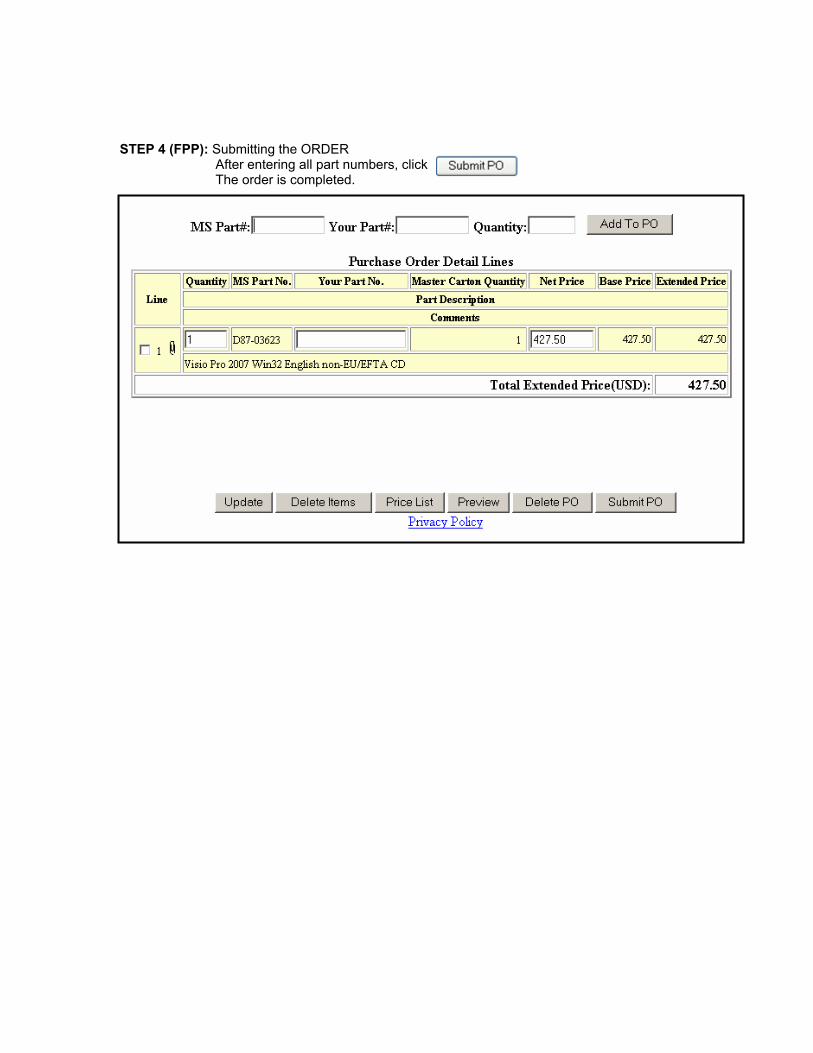
STEP 4 (FPP): Submitting the ORDER
After entering all part numbers, click The order is completed.

PROCEDURE: Media Kits Purchase Ordering Order processing of Media Kit is back to back or stock order based on the minus report from MIS and always approved by the PM STEP 1 (WWF): Volume Licensing Purchase Order Online
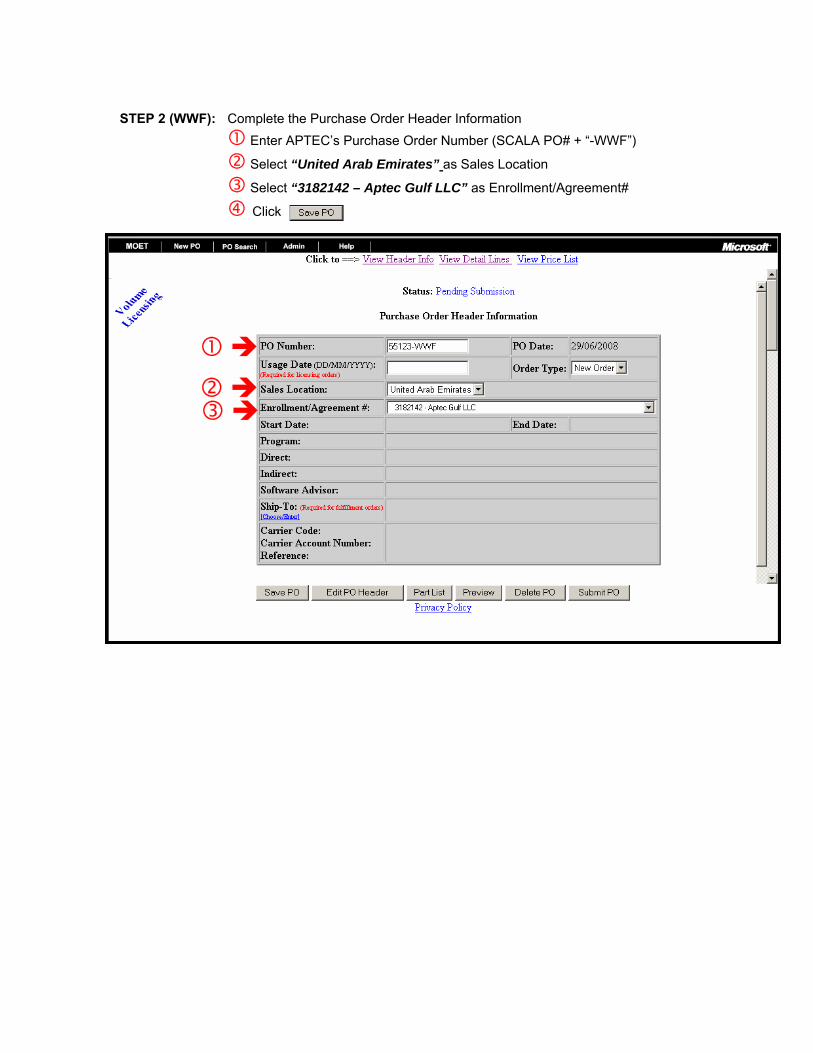
STEP 2 (WWF): Complete the Purchase Order Header Information Enter APTEC’s Purchase Order Number (SCALA PO# + “-WWF”)
Select “United Arab Emirates” as Sales Location
Select “3182142 – Aptec Gulf LLC” as Enrollment/Agreement#
Click
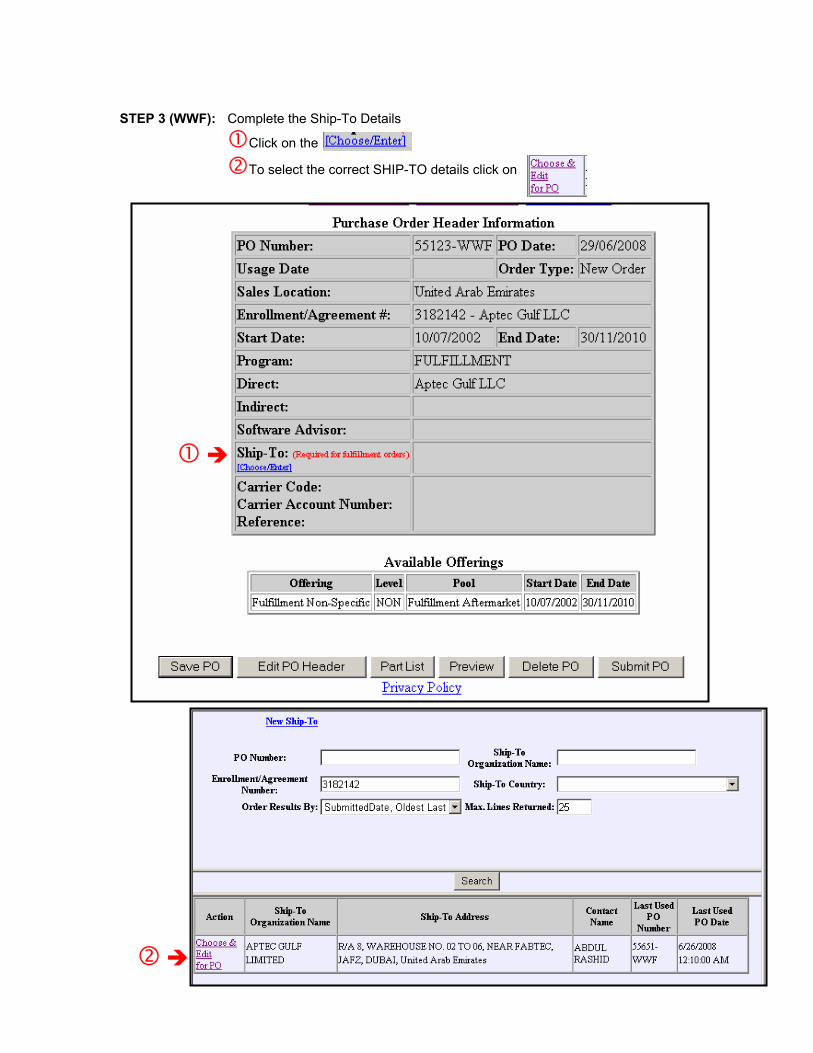
STEP 3 (WWF): Complete the Ship-To Details
Click on the
To select the correct SHIP-TO details click on
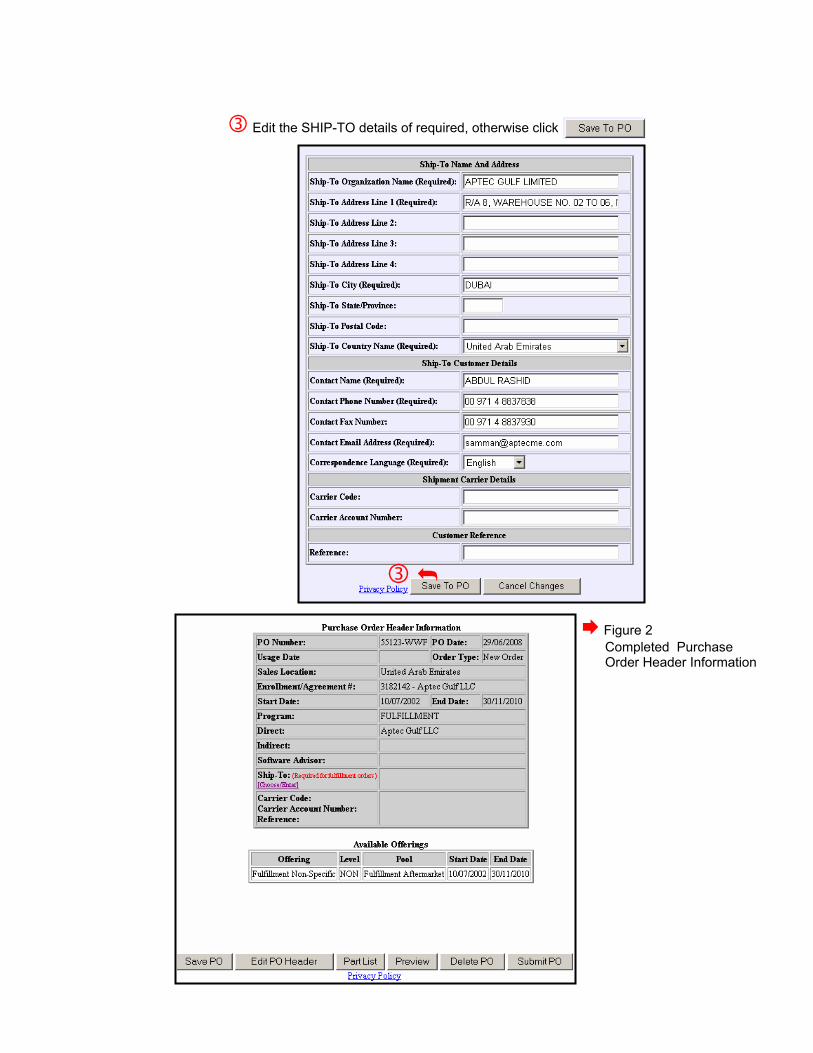
Edit the SHIP-TO details of required, otherwise click
↖
Figure 2 Completed Purchase Order Header Information
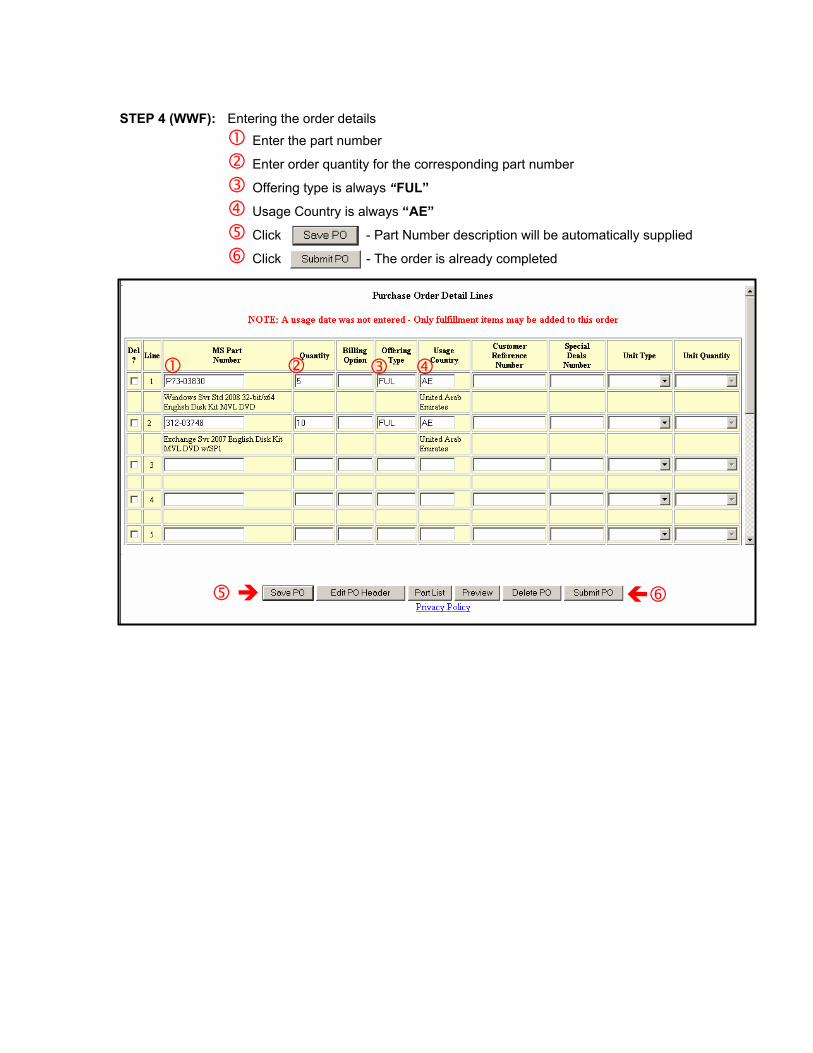
STEP 4 (WWF): Entering the order details Enter the part number
Enter order quantity for the corresponding part number
Offering type is always “FUL”
Usage Country is always “AE”
Click - Part Number description will be automatically supplied
Click - The order is already completed
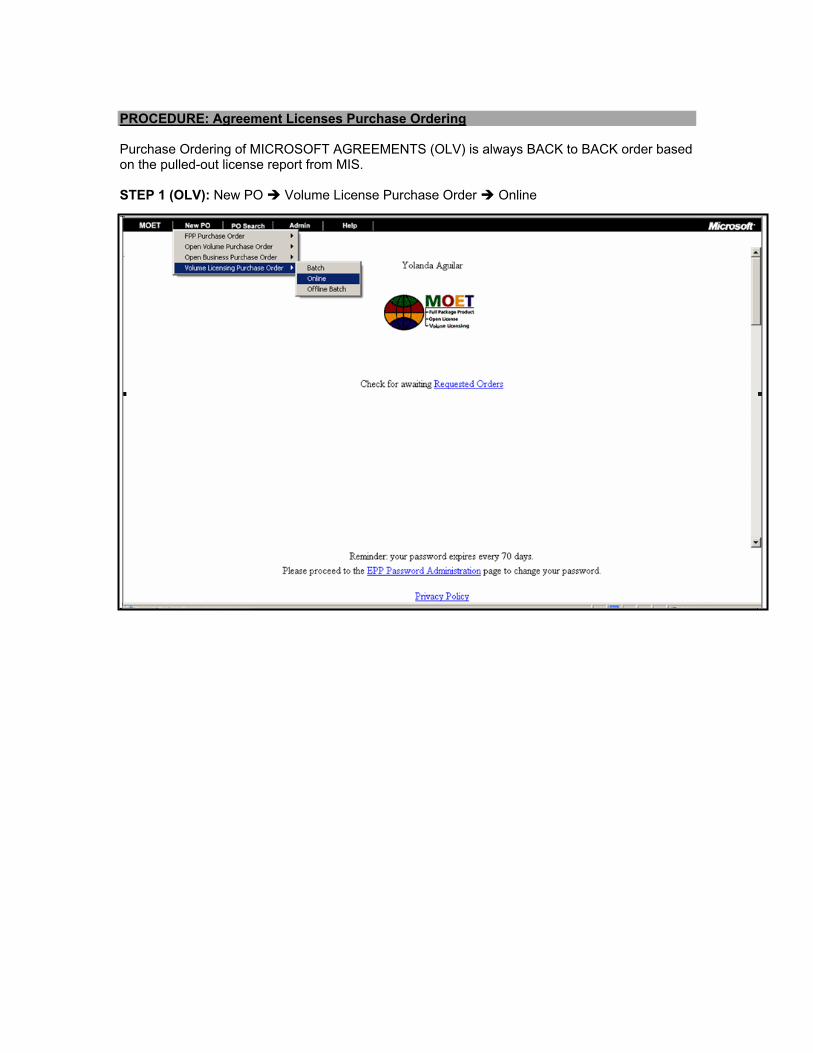
PROCEDURE: Agreement Licenses Purchase Ordering Purchase Ordering of MICROSOFT AGREEMENTS (OLV) is always BACK to BACK order based on the pulled-out license report from MIS. STEP 1 (OLV): New PO Volume License Purchase Order Online

STEP 2 (OLV): Complete the Purchase Order Header Information Enter APTEC’s Purchase Order Number (SCALA PO# + Agreement Type) Agreement Types: OLV – Open Value SCH – School Agreement OVS – Open Value Subscription Enter the correct usage date based on start and end date of the agreement
as shown on the agreement details in EXPLORE Select the correct sales location based on the agreement details
Select the correct agreement number Click to complete the purchase order header information. The agreement details will be automatically supplied (See Figure 3)
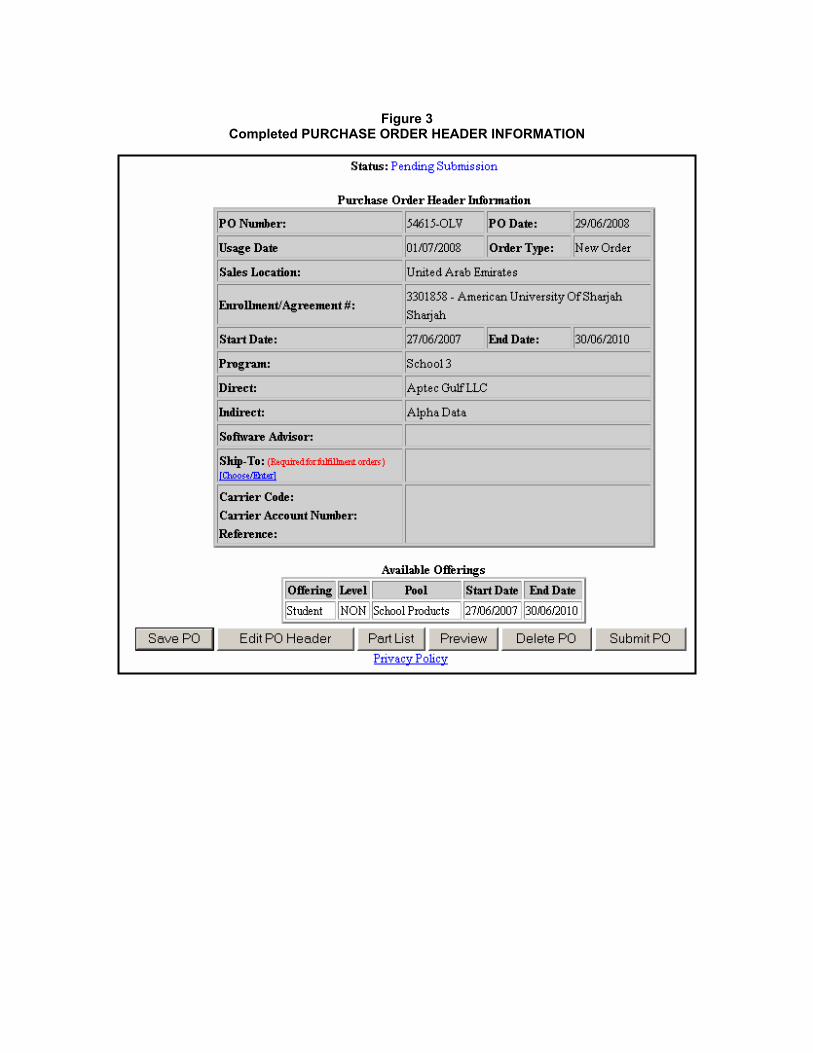
Figure 3
Completed PURCHASE ORDER HEADER INFORMATION
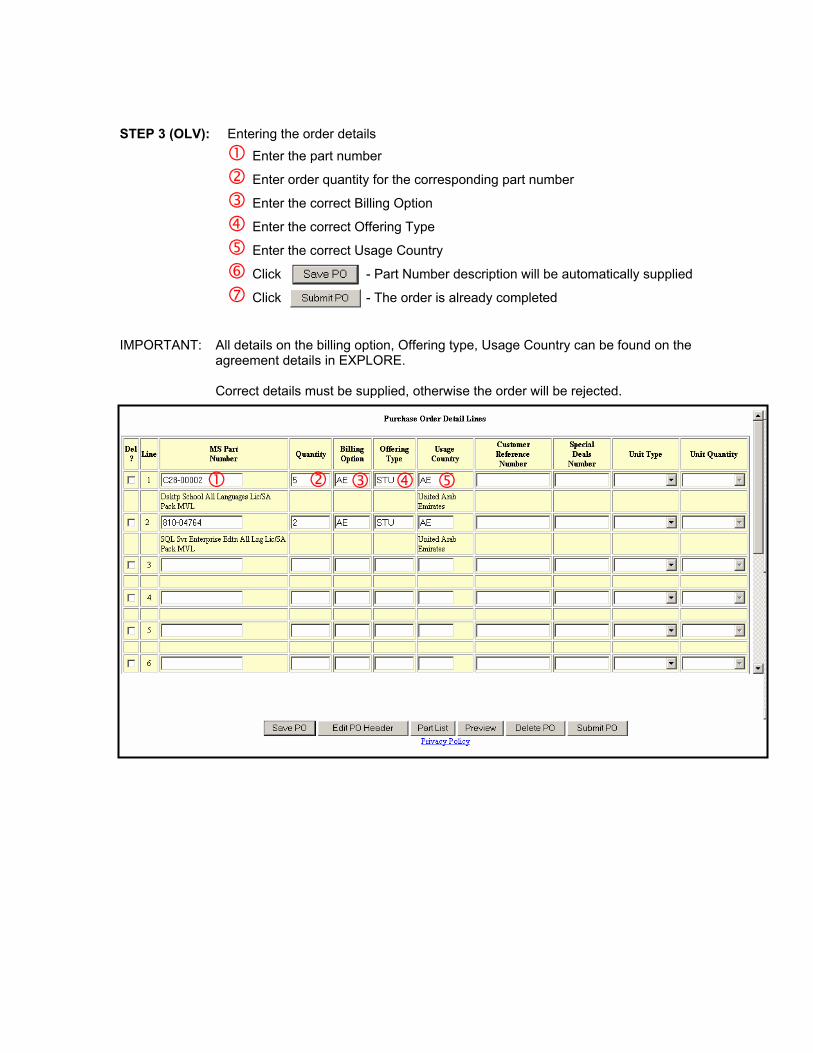
STEP 3 (OLV): Entering the order details Enter the part number
Enter order quantity for the corresponding part number
Enter the correct Billing Option
Enter the correct Offering Type
Enter the correct Usage Country
Click - Part Number description will be automatically supplied
Click - The order is already completed IMPORTANT: All details on the billing option, Offering type, Usage Country can be found on the agreement details in EXPLORE. Correct details must be supplied, otherwise the order will be rejected.
VENDOR : MICROSOFT PROCEDURE : VENDOR REPORTING SCOPE : This covers the procedure of generating the reports submitted to the
vendor REPORT LIST :
1. Retail Pack and Media Kit Inventory 2. OEM SalesOut Report 3. Retail Pack and Media Kit Sales Out Report
FREQUENCY : Reports are submitted on a weekly basis and must be submitted on-line
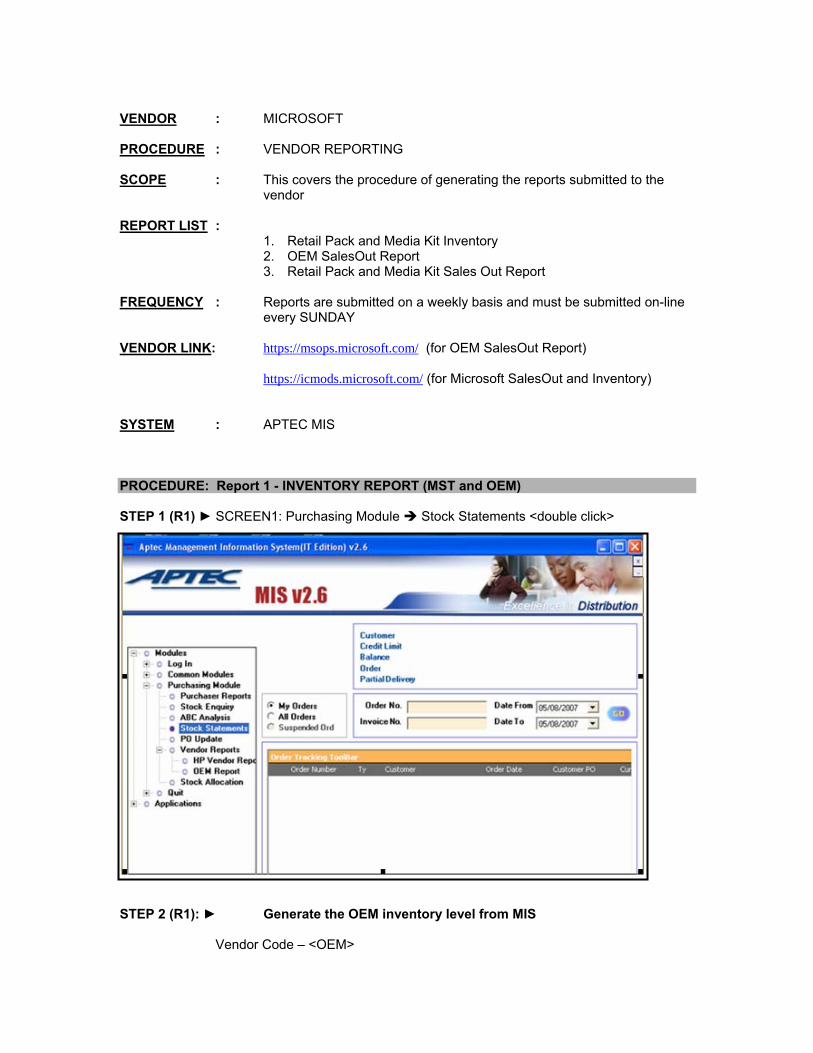
every SUNDAY VENDOR LINK: https://msops.microsoft.com/ (for OEM SalesOut Report) https://icmods.microsoft.com/ (for Microsoft SalesOut and Inventory) SYSTEM : APTEC MIS PROCEDURE: Report 1 - INVENTORY REPORT (MST and OEM) STEP 1 (R1) ► SCREEN1: Purchasing Module Stock Statements <double click> STEP 2 (R1): ► Generate the OEM inventory level from MIS Vendor Code – <OEM>
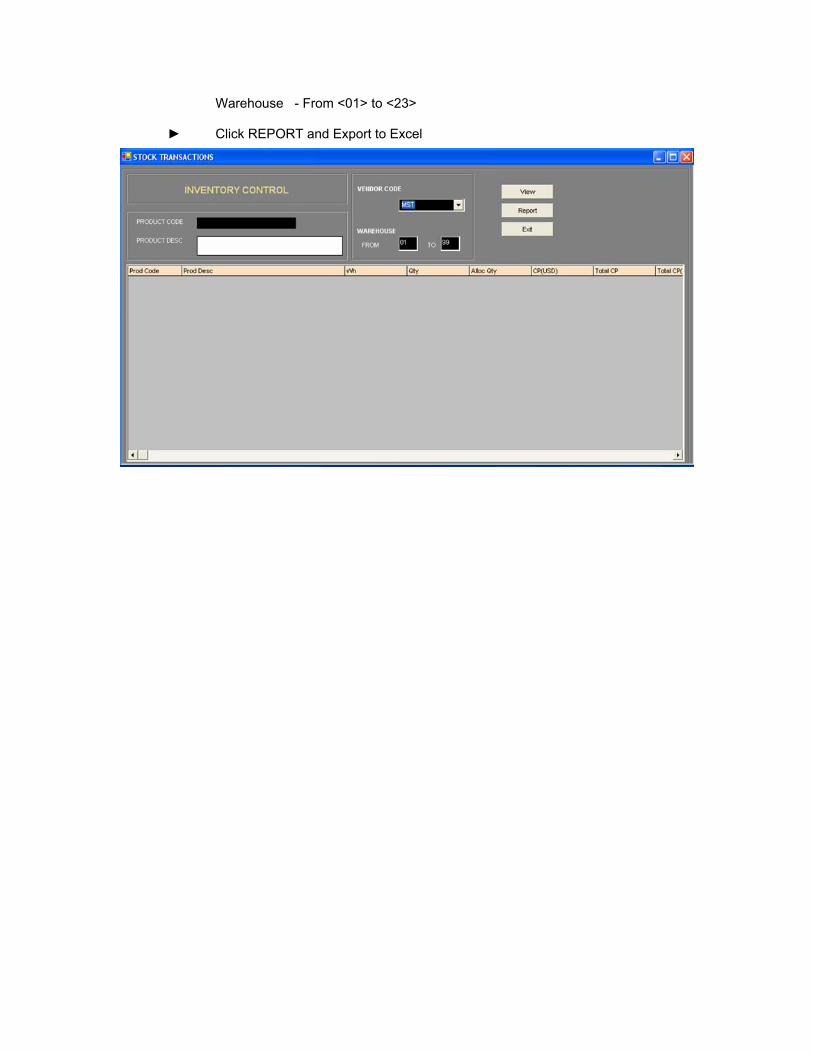
Warehouse - From <01> to <23> ► Click REPORT and Export to Excel
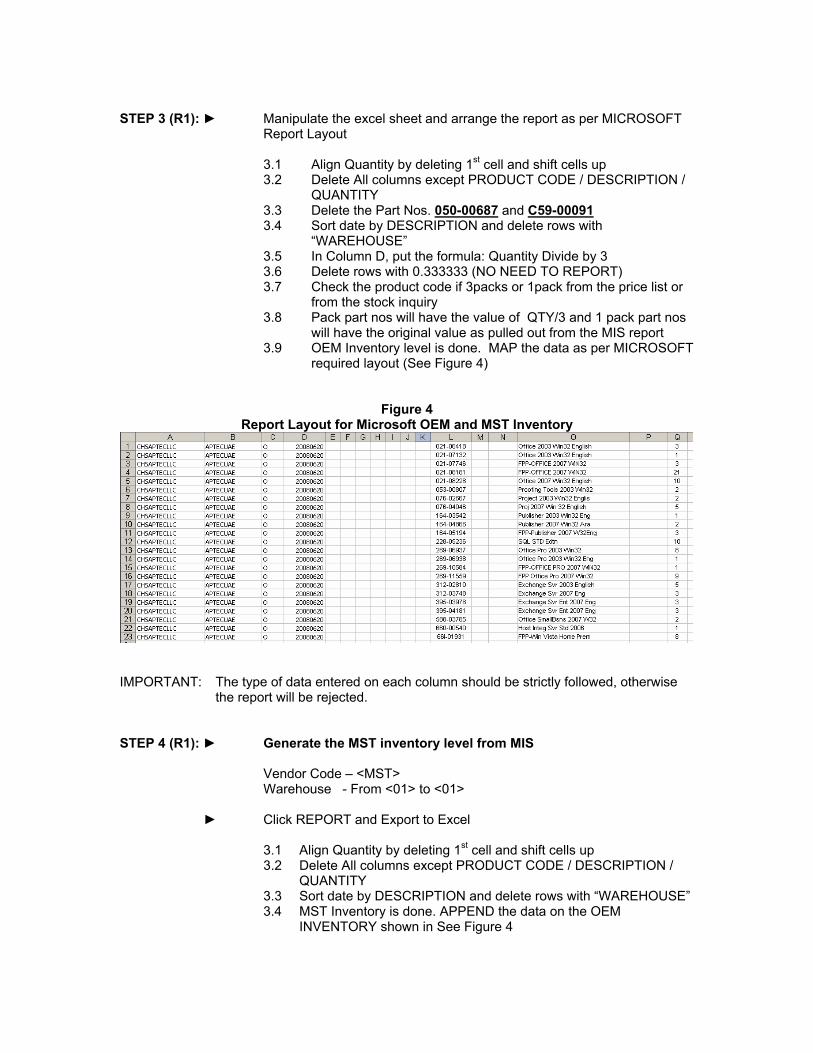
STEP 3 (R1): ► Manipulate the excel sheet and arrange the report as per MICROSOFT
Report Layout
3.1 Align Quantity by deleting 1st cell and shift cells up 3.2 Delete All columns except PRODUCT CODE / DESCRIPTION /
QUANTITY 3.3 Delete the Part Nos. 050-00687 and C59-00091 3.4 Sort date by DESCRIPTION and delete rows with
“WAREHOUSE” 3.5 In Column D, put the formula: Quantity Divide by 3 3.6 Delete rows with 0.333333 (NO NEED TO REPORT) 3.7 Check the product code if 3packs or 1pack from the price list or
from the stock inquiry 3.8 Pack part nos will have the value of QTY/3 and 1 pack part nos
will have the original value as pulled out from the MIS report 3.9 OEM Inventory level is done. MAP the data as per MICROSOFT
required layout (See Figure 4)
Figure 4 Report Layout for Microsoft OEM and MST Inventory
IMPORTANT: The type of data entered on each column should be strictly followed, otherwise
the report will be rejected. STEP 4 (R1): ► Generate the MST inventory level from MIS Vendor Code – <MST> Warehouse - From <01> to <01> ► Click REPORT and Export to Excel
3.1 Align Quantity by deleting 1st cell and shift cells up 3.2 Delete All columns except PRODUCT CODE / DESCRIPTION /
QUANTITY 3.3 Sort date by DESCRIPTION and delete rows with “WAREHOUSE” 3.4 MST Inventory is done. APPEND the data on the OEM
INVENTORY shown in See Figure 4

STEP 5 (R1): ► Uploading the INVENTORY REPORT
5.1 Log-in to ICMODS https://icmods.microsoft.com/ 5.2 Click Send File then browse to attach the INVENTORY REPORT 5.3 Select Inventory 5.4 Click Submit
Figure 5 ICMODS Uploading Screen
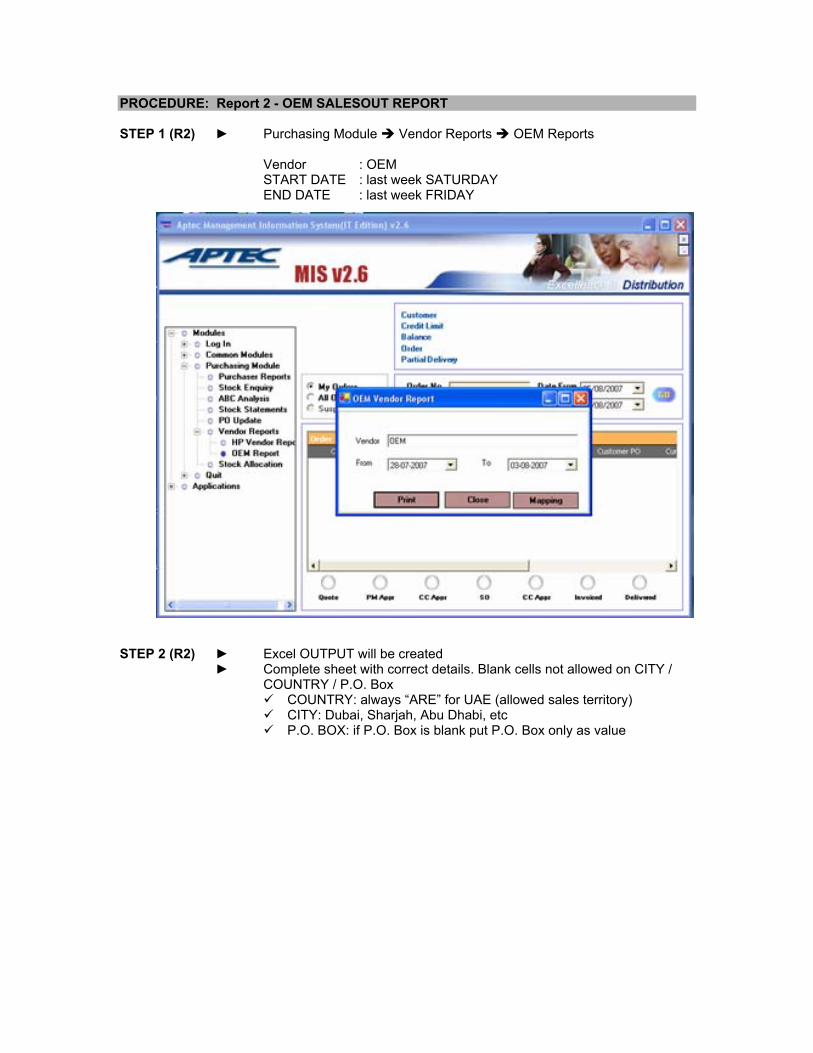
PROCEDURE: Report 2 - OEM SALESOUT REPORT STEP 1 (R2) ► Purchasing Module Vendor Reports OEM Reports
Vendor : OEM START DATE : last week SATURDAY END DATE : last week FRIDAY
STEP 2 (R2) ► Excel OUTPUT will be created
► Complete sheet with correct details. Blank cells not allowed on CITY / COUNTRY / P.O. Box
COUNTRY: always “ARE” for UAE (allowed sales territory) CITY: Dubai, Sharjah, Abu Dhabi, etc P.O. BOX: if P.O. Box is blank put P.O. Box only as value
STEP 3 (R2) ► Check for correct MAPPING of 3pack OEM
OEM MAPPING for 3 Pack SKUs:
E85-05101 - E85-05153 N09-02018 - N09-01943 E85-05892 - E85-05862 N09-02426 - N09-02430
SAMPLE MAPPING DECLARATION:
SCALA CODE
MS CODE Scala units
MS units
E85-05101 E85-05101 3 1 E85-05101 E85-05153 1 1
Type “A” to ADD new mapping
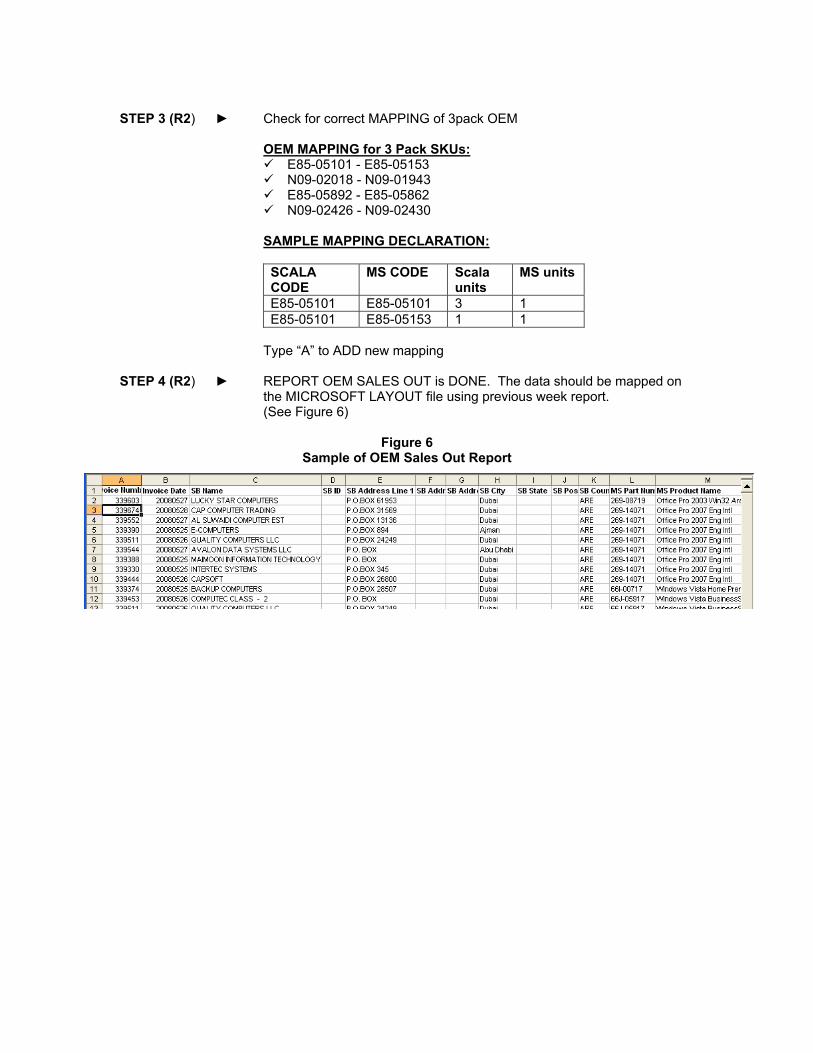
STEP 4 (R2) ► REPORT OEM SALES OUT is DONE. The data should be mapped on
the MICROSOFT LAYOUT file using previous week report. (See Figure 6)
Figure 6
Sample of OEM Sales Out Report
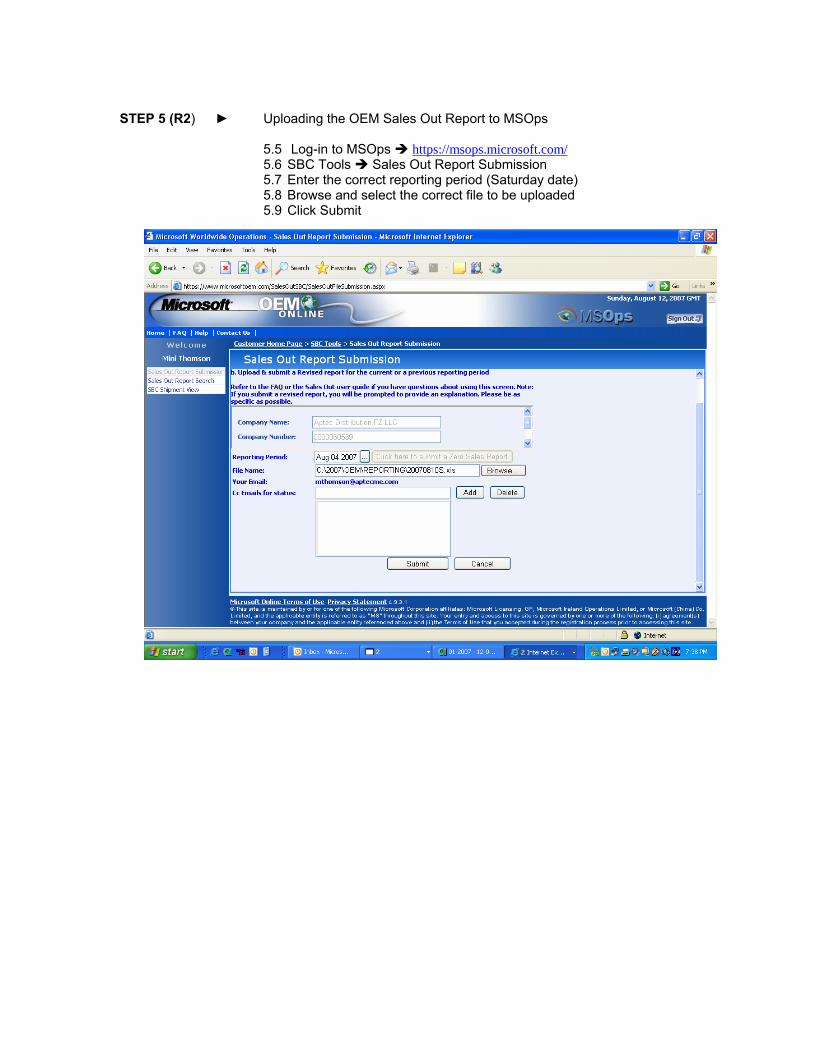
STEP 5 (R2) ► Uploading the OEM Sales Out Report to MSOps
5.5 Log-in to MSOps https://msops.microsoft.com/ 5.6 SBC Tools Sales Out Report Submission 5.7 Enter the correct reporting period (Saturday date) 5.8 Browse and select the correct file to be uploaded 5.9 Click Submit
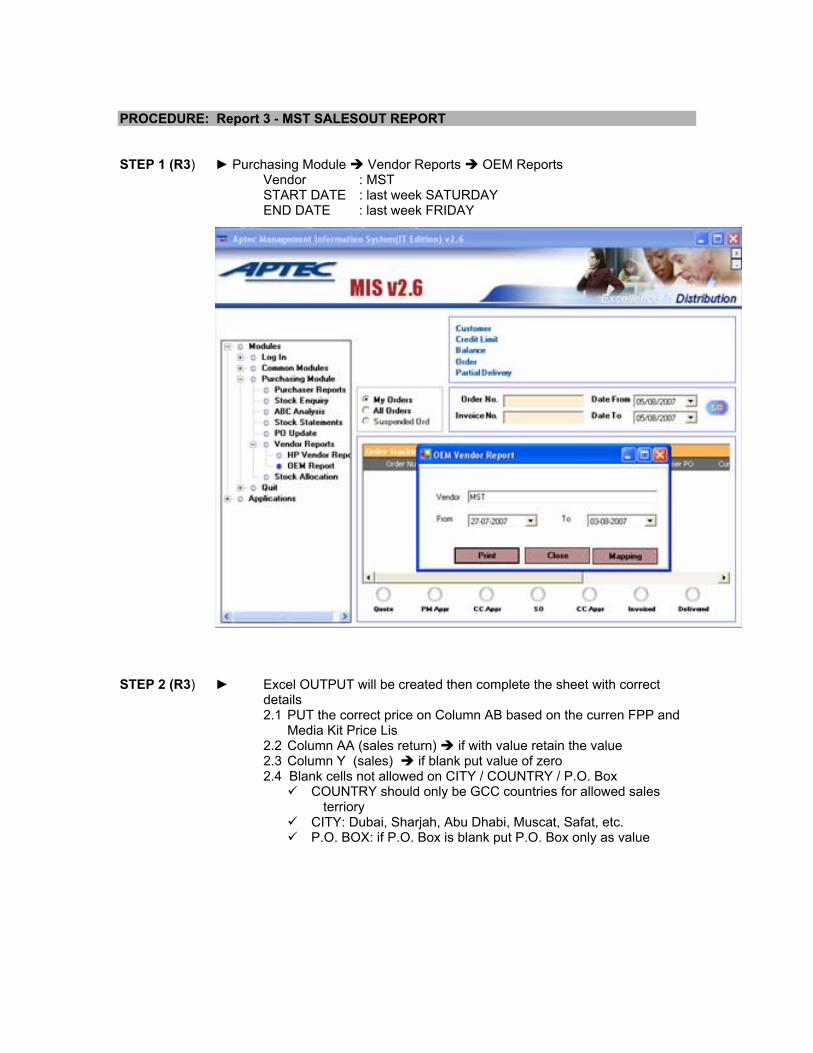
PROCEDURE: Report 3 - MST SALESOUT REPORT STEP 1 (R3) ► Purchasing Module Vendor Reports OEM Reports
Vendor : MST START DATE : last week SATURDAY END DATE : last week FRIDAY
STEP 2 (R3) ► Excel OUTPUT will be created then complete the sheet with correct
details 2.1 PUT the correct price on Column AB based on the curren FPP and
Media Kit Price Lis 2.2 Column AA (sales return) if with value retain the value 2.3 Column Y (sales) if blank put value of zero 2.4 Blank cells not allowed on CITY / COUNTRY / P.O. Box
COUNTRY should only be GCC countries for allowed sales terriory
CITY: Dubai, Sharjah, Abu Dhabi, Muscat, Safat, etc. P.O. BOX: if P.O. Box is blank put P.O. Box only as value

STEP 3 (R3) ► Uploading the MST Sales Out Report
3.1 Log-in to ICMODS https://icmods.microsoft.com/ 3.2 Click Send File then browse to attach the MST Sales Out Report 3.3 Select Sales 3.4 Click Submit
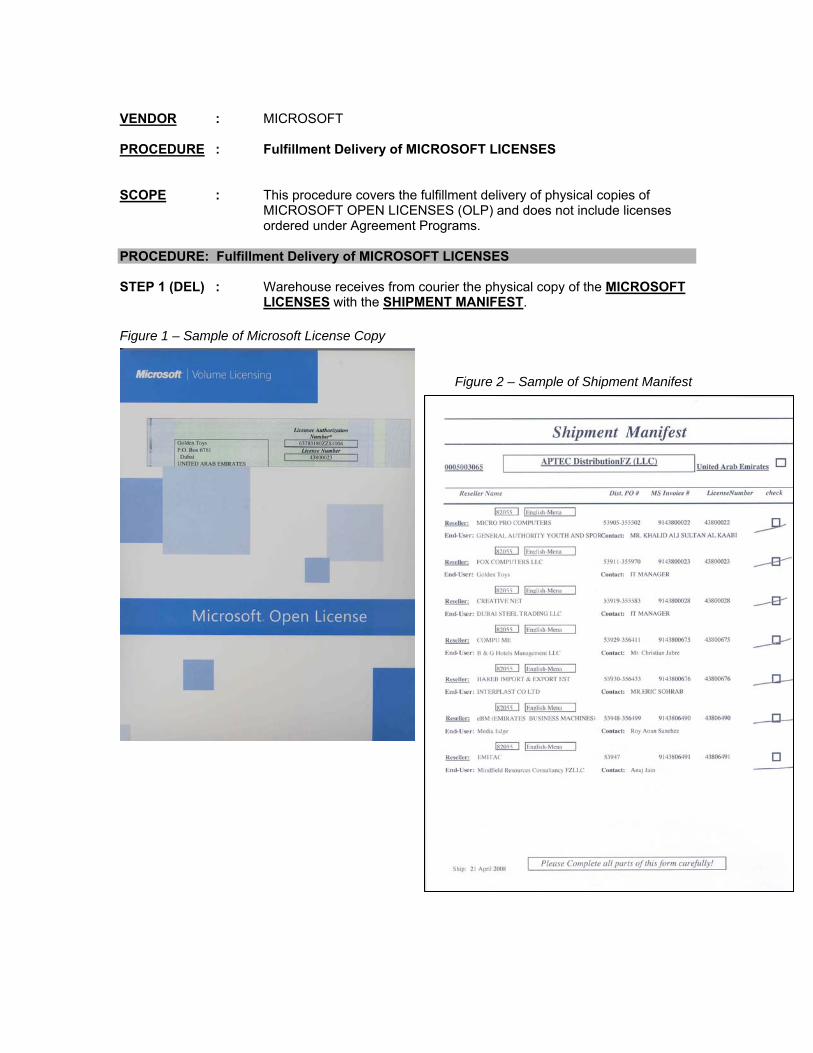
VENDOR : MICROSOFT PROCEDURE : Fulfillment Delivery of MICROSOFT LICENSES SCOPE : This procedure covers the fulfillment delivery of physical copies of
MICROSOFT OPEN LICENSES (OLP) and does not include licenses ordered under Agreement Programs.
PROCEDURE: Fulfillment Delivery of MICROSOFT LICENSES STEP 1 (DEL) : Warehouse receives from courier the physical copy of the MICROSOFT
LICENSES with the SHIPMENT MANIFEST. Figure 1 – Sample of Microsoft License Copy Figure 2 – Sample of Shipment Manifest
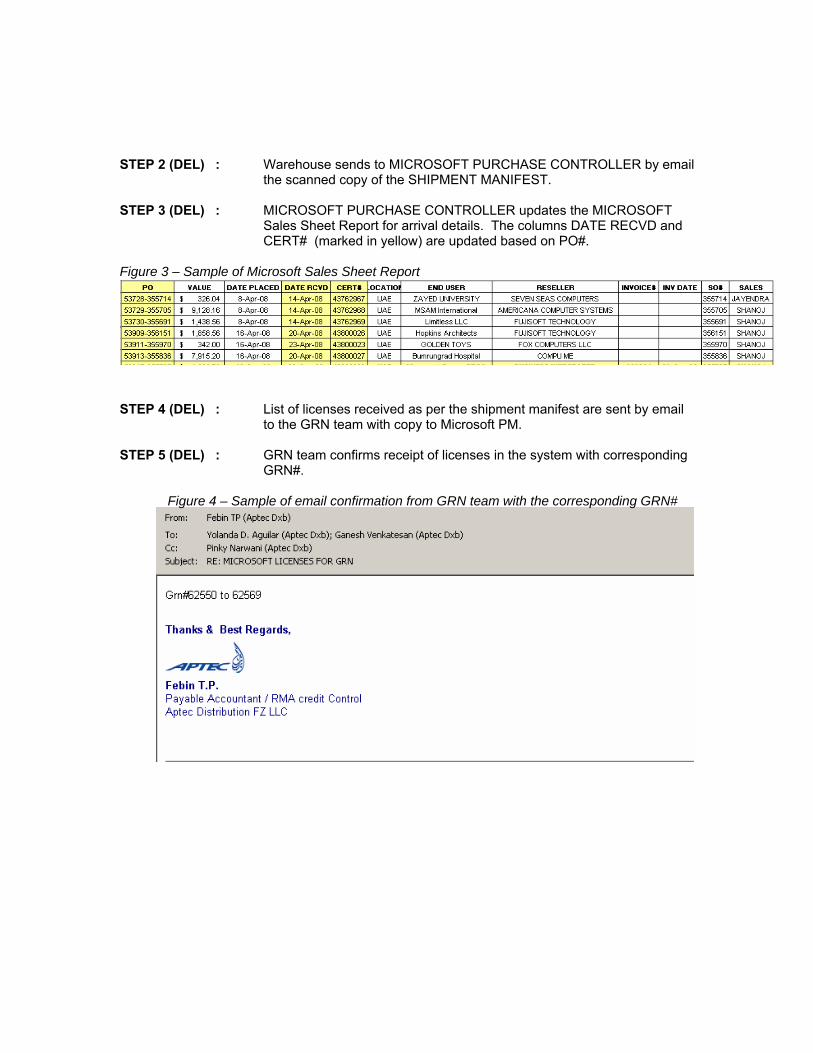
STEP 2 (DEL) : Warehouse sends to MICROSOFT PURCHASE CONTROLLER by email
the scanned copy of the SHIPMENT MANIFEST. STEP 3 (DEL) : MICROSOFT PURCHASE CONTROLLER updates the MICROSOFT
Sales Sheet Report for arrival details. The columns DATE RECVD and CERT# (marked in yellow) are updated based on PO#.
Figure 3 – Sample of Microsoft Sales Sheet Report STEP 4 (DEL) : List of licenses received as per the shipment manifest are sent by email
to the GRN team with copy to Microsoft PM. STEP 5 (DEL) : GRN team confirms receipt of licenses in the system with corresponding
GRN#.
Figure 4 – Sample of email confirmation from GRN team with the corresponding GRN#
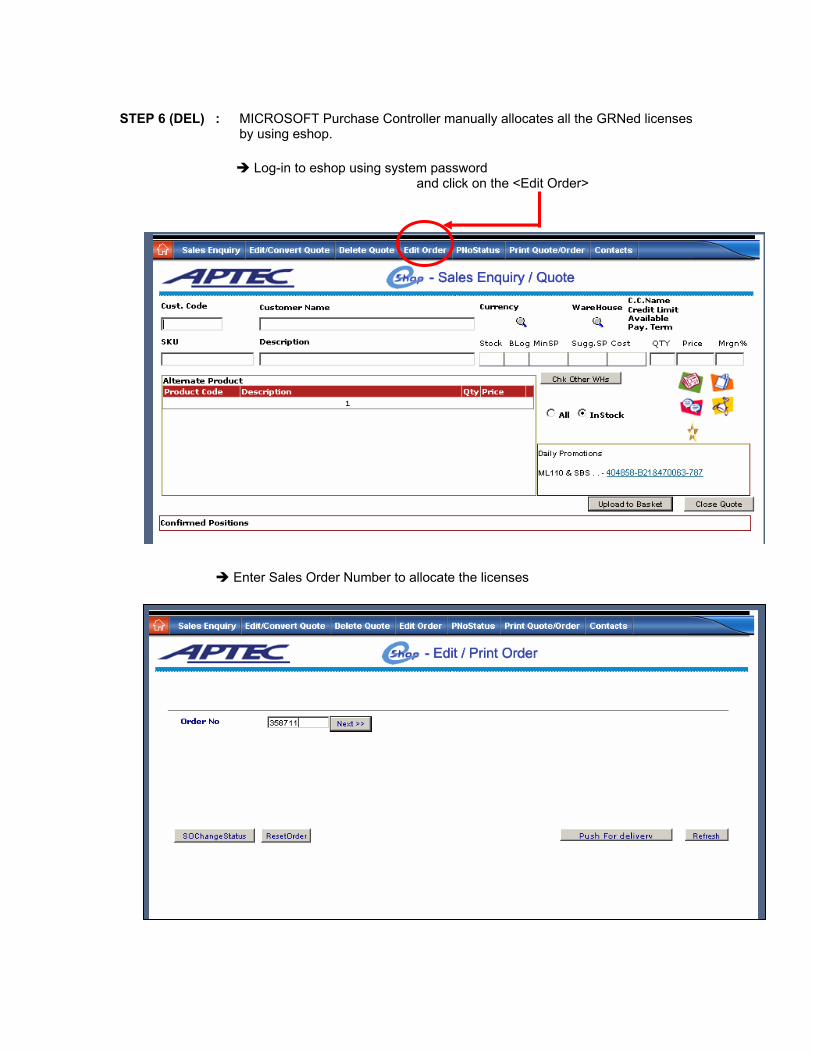
STEP 6 (DEL) : MICROSOFT Purchase Controller manually allocates all the GRNed licenses
by using eshop.
Log-in to eshop using system password and click on the <Edit Order>
Enter Sales Order Number to allocate the licenses
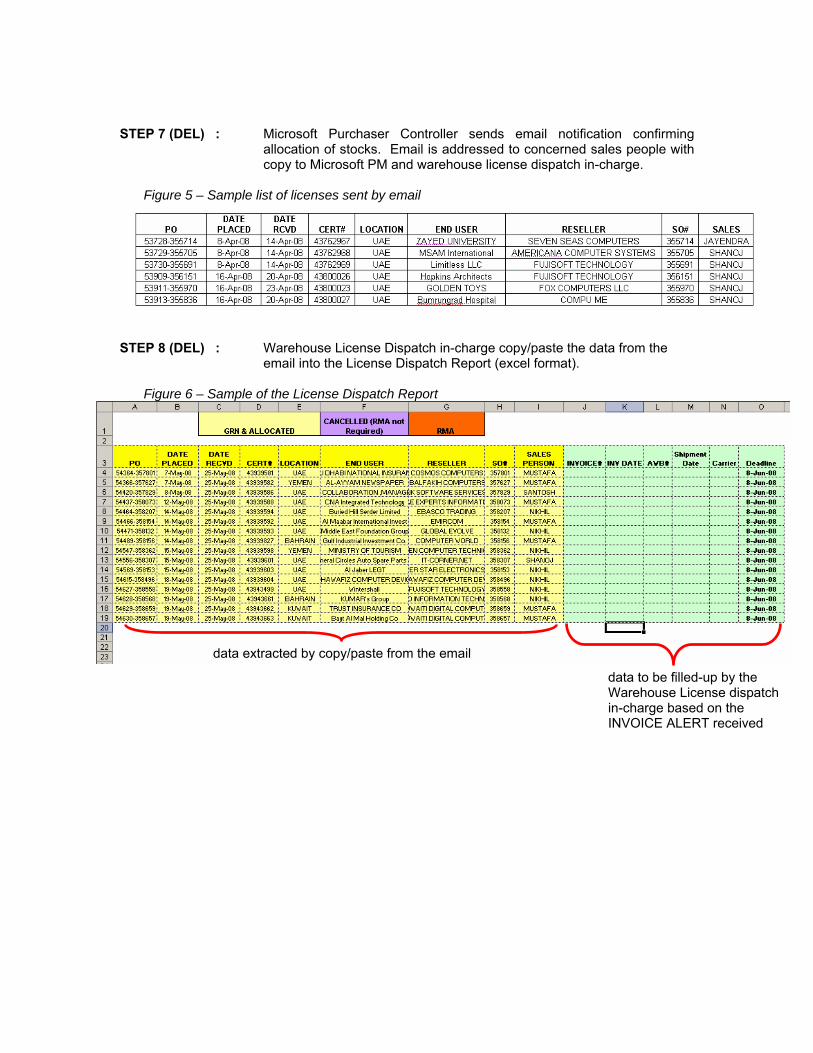
STEP 7 (DEL) : Microsoft Purchaser Controller sends email notification confirming
allocation of stocks. Email is addressed to concerned sales people with copy to Microsoft PM and warehouse license dispatch in-charge.
Figure 5 – Sample list of licenses sent by email
STEP 8 (DEL) : Warehouse License Dispatch in-charge copy/paste the data from the
email into the License Dispatch Report (excel format).
Figure 6 – Sample of the License Dispatch Report
data to be filled-up by the Warehouse License dispatch in-charge based on the INVOICE ALERT received
data extracted by copy/paste from the email
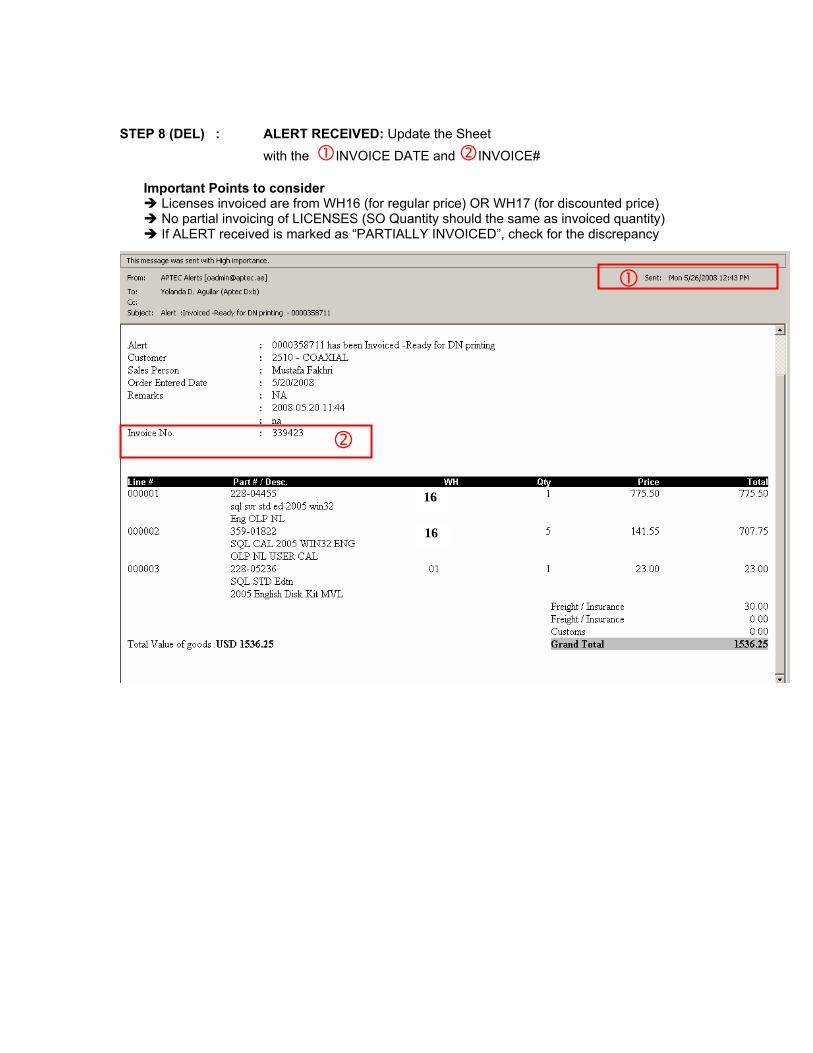
STEP 8 (DEL) : ALERT RECEIVED: Update the Sheet
with the INVOICE DATE and INVOICE#
Important Points to consider Licenses invoiced are from WH16 (for regular price) OR WH17 (for discounted price) No partial invoicing of LICENSES (SO Quantity should the same as invoiced quantity) If ALERT received is marked as “PARTIALLY INVOICED”, check for the discrepancy
16
16
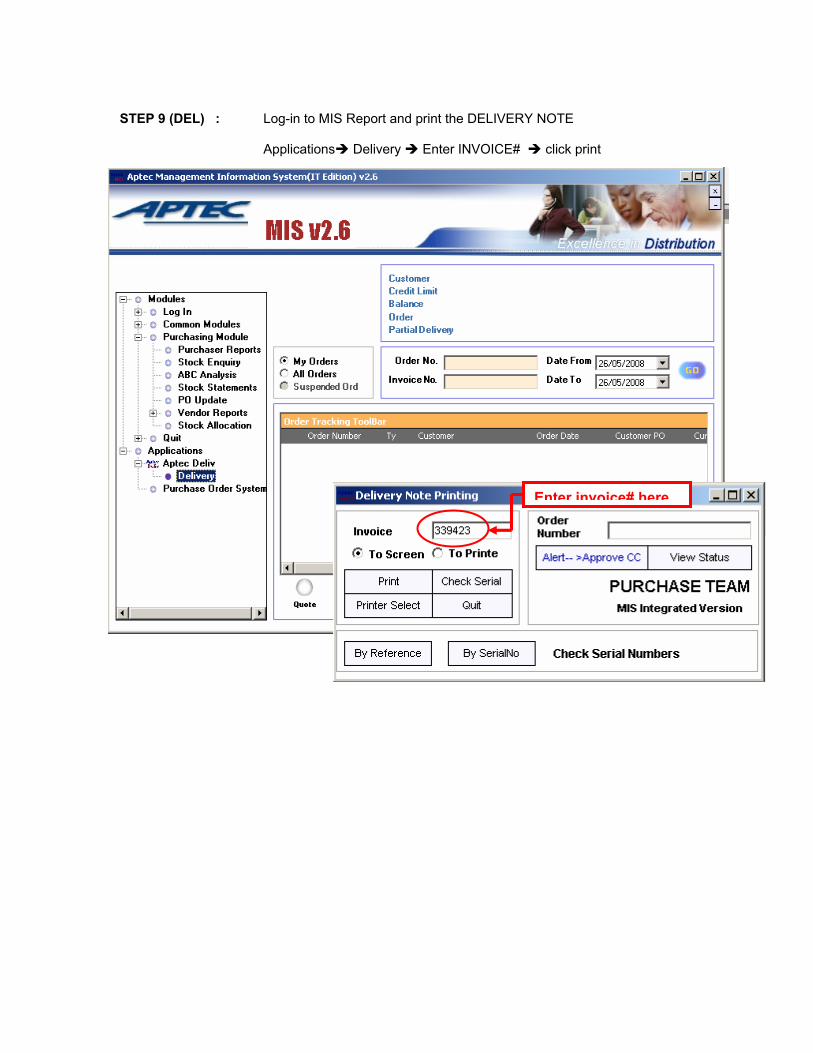
STEP 9 (DEL) : Log-in to MIS Report and print the DELIVERY NOTE
Applications Delivery Enter INVOICE# click print
Enter invoice# here
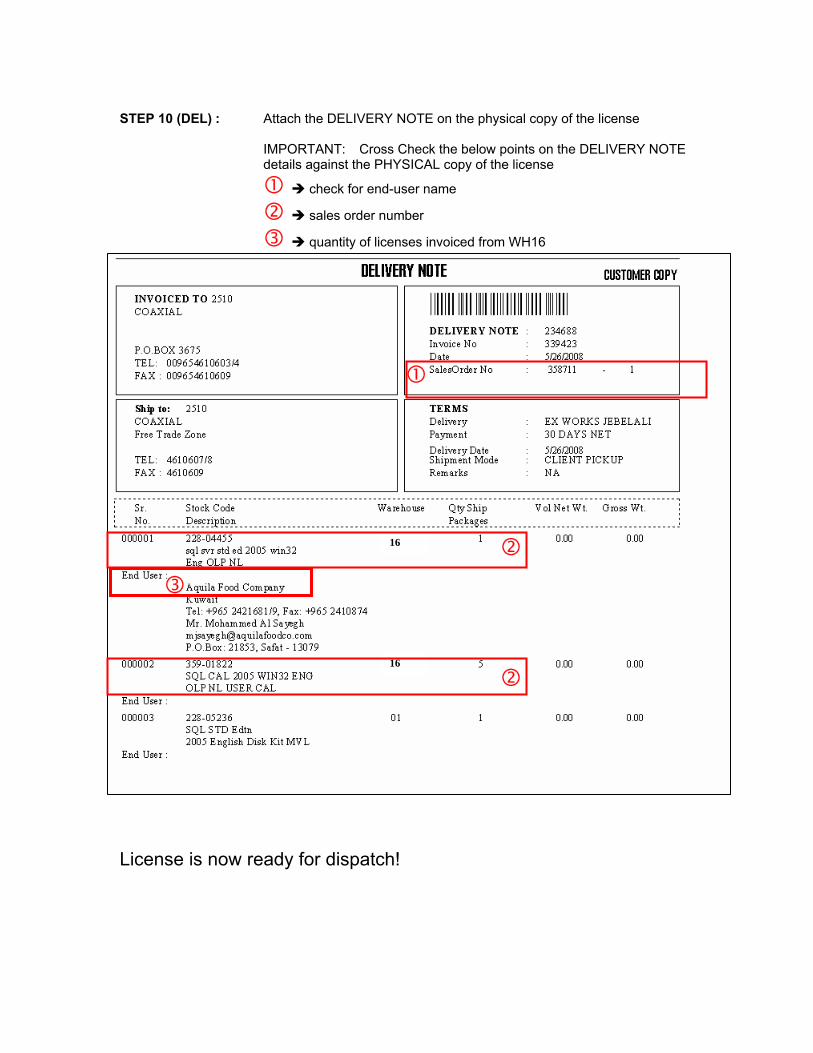
STEP 10 (DEL) : Attach the DELIVERY NOTE on the physical copy of the license
IMPORTANT: Cross Check the below points on the DELIVERY NOTE details against the PHYSICAL copy of the license
check for end-user name
sales order number
quantity of licenses invoiced from WH16
16
16
License is now ready for dispatch!
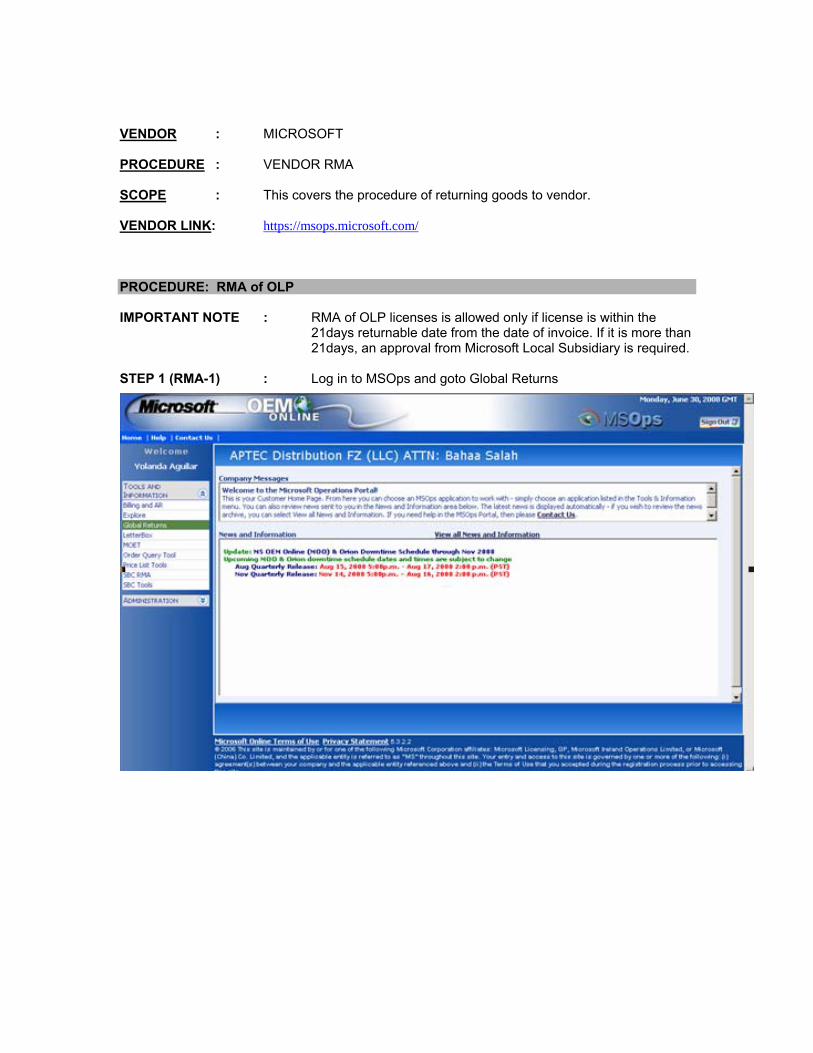
VENDOR : MICROSOFT PROCEDURE : VENDOR RMA SCOPE : This covers the procedure of returning goods to vendor. VENDOR LINK: https://msops.microsoft.com/ PROCEDURE: RMA of OLP IMPORTANT NOTE : RMA of OLP licenses is allowed only if license is within the
21days returnable date from the date of invoice. If it is more than 21days, an approval from Microsoft Local Subsidiary is required.
STEP 1 (RMA-1) : Log in to MSOps and goto Global Returns
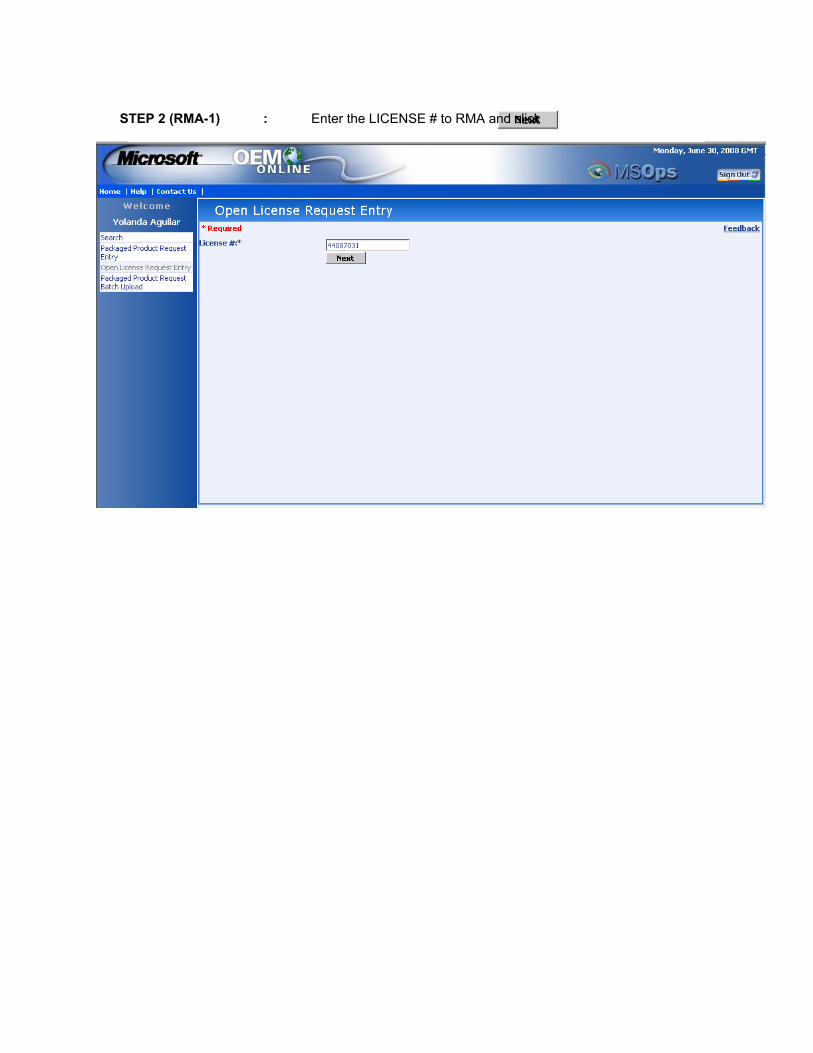
STEP 2 (RMA-1) : Enter the LICENSE # to RMA and click
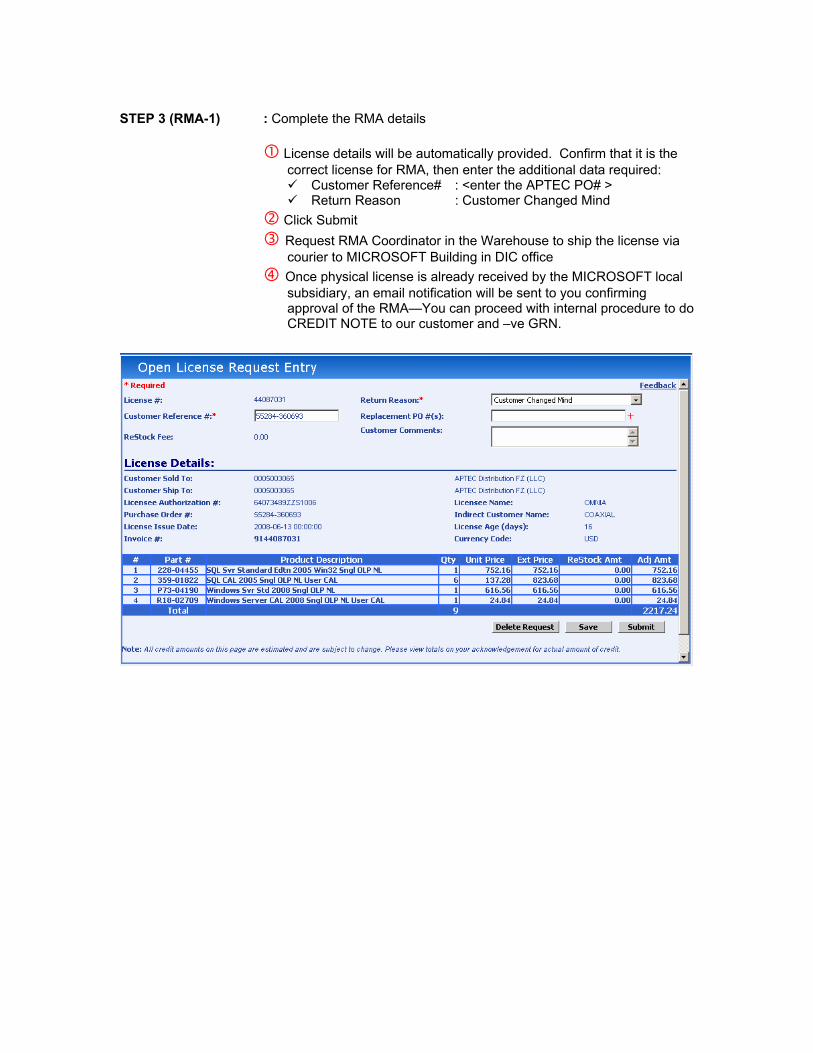
STEP 3 (RMA-1) : Complete the RMA details
License details will be automatically provided. Confirm that it is the correct license for RMA, then enter the additional data required:
Customer Reference# : <enter the APTEC PO# > Return Reason : Customer Changed Mind
Click Submit Request RMA Coordinator in the Warehouse to ship the license via courier to MICROSOFT Building in DIC office
Once physical license is already received by the MICROSOFT local subsidiary, an email notification will be sent to you confirming approval of the RMA—You can proceed with internal procedure to do CREDIT NOTE to our customer and –ve GRN.
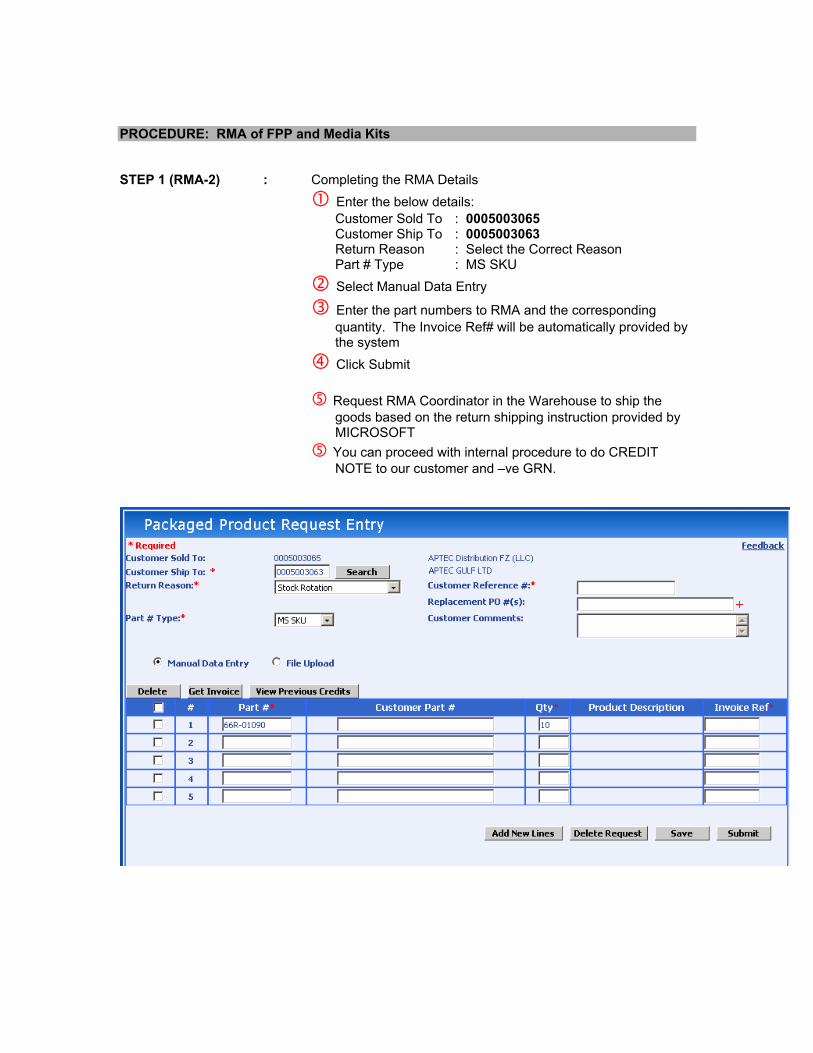
PROCEDURE: RMA of FPP and Media Kits STEP 1 (RMA-2) : Completing the RMA Details Enter the below details:
Customer Sold To : 0005003065 Customer Ship To : 0005003063
Return Reason : Select the Correct Reason Part # Type : MS SKU
Select Manual Data Entry
Enter the part numbers to RMA and the corresponding quantity. The Invoice Ref# will be automatically provided by the system Click Submit
Request RMA Coordinator in the Warehouse to ship the goods based on the return shipping instruction provided by MICROSOFT
You can proceed with internal procedure to do CREDIT NOTE to our customer and –ve GRN.


![fpp [Autoguardado]](https://img.pdfslide.net/doc/110x75/577c811c1a28abe054ab83c1/fpp-autoguardado.jpg)