Embed Size (px)
Citation preview
60
30
1545
5
10
Insert leader end of brush through lumen being tested and advance it until leader end of brush appears, continuing to pull it through until entire brush exits the lumen.
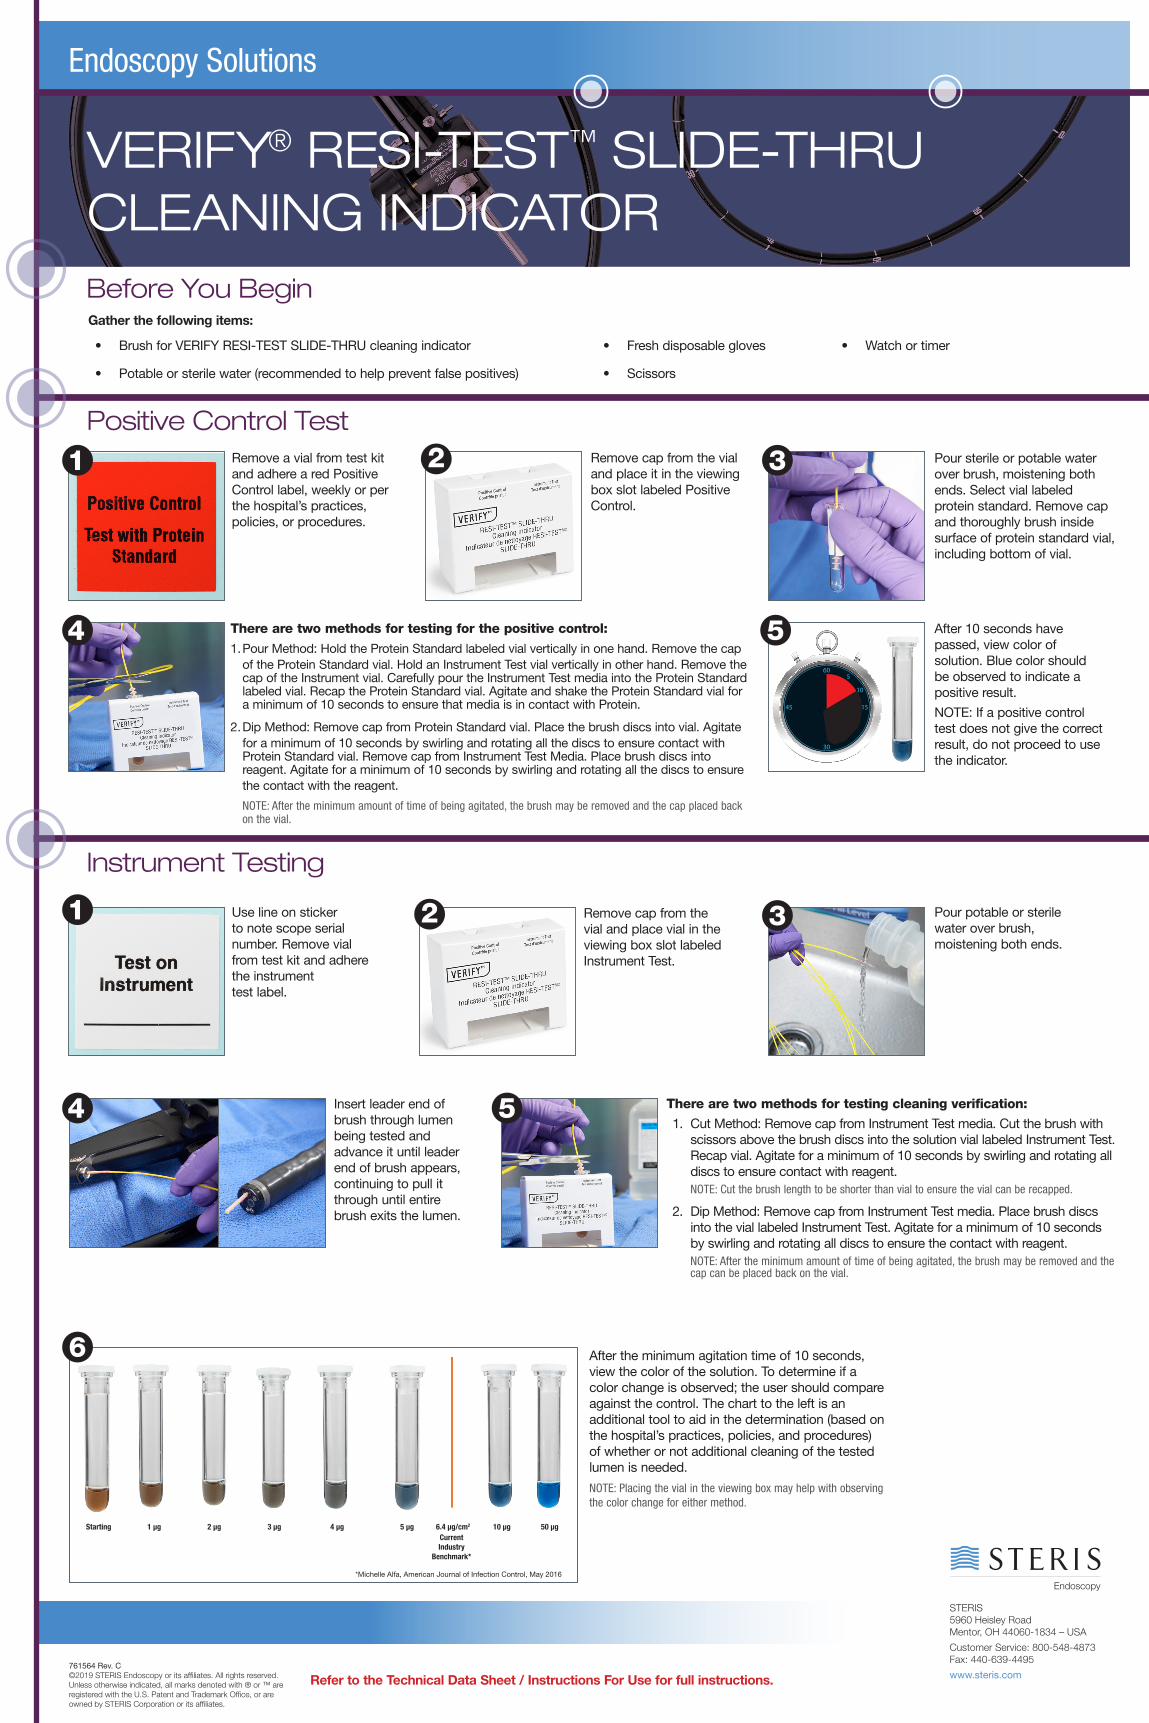
Endoscopy Solutions
Pour potable or sterile water over brush, moistening both ends.
Before You Begin
Positive Control Test
Instrument Testing
Gather the following items:
Use line on sticker to note scope serial number. Remove vial from test kit and adhere the instrument test label.
Remove a vial from test kit and adhere a red Positive Control label, weekly or per the hospital’s practices, policies, or procedures.
Remove cap from the vial and place vial in the viewing box slot labeled Instrument Test.
Remove cap from the vial and place it in the viewing box slot labeled Positive Control.
VERIFY® RESI-TEST™ SLIDE-THRU CLEANING INDICATOR
• Brush for VERIFY RESI-TEST SLIDE-THRU cleaning indicator
• Potable or sterile water (recommended to help prevent false positives)
*Michelle Alfa, American Journal of Infection Control, May 2016
2
2
Pour sterile or potable water over brush, moistening both ends. Select vial labeled protein standard. Remove cap and thoroughly brush inside surface of protein standard vial, including bottom of vial.
3
3
After 10 seconds have passed, view color of solution. Blue color should be observed to indicate a positive result.
NOTE: If a positive control test does not give the correct result, do not proceed to use the indicator.
There are two methods for testing for the positive control:
1. Pour Method: Hold the Protein Standard labeled vial vertically in one hand. Remove the cap of the Protein Standard vial. Hold an Instrument Test vial vertically in other hand. Remove the cap of the Instrument vial. Carefully pour the Instrument Test media into the Protein Standard labeled vial. Recap the Protein Standard vial. Agitate and shake the Protein Standard vial for a minimum of 10 seconds to ensure that media is in contact with Protein.
2. Dip Method: Remove cap from Protein Standard vial. Place the brush discs into vial. Agitate for a minimum of 10 seconds by swirling and rotating all the discs to ensure contact with Protein Standard vial. Remove cap from Instrument Test Media. Place brush discs into reagent. Agitate for a minimum of 10 seconds by swirling and rotating all the discs to ensure the contact with the reagent.
NOTE: After the minimum amount of time of being agitated, the brush may be removed and the cap placed back on the vial.
There are two methods for testing cleaning verification:
1. Cut Method: Remove cap from Instrument Test media. Cut the brush with scissors above the brush discs into the solution vial labeled Instrument Test. Recap vial. Agitate for a minimum of 10 seconds by swirling and rotating all discs to ensure contact with reagent.NOTE: Cut the brush length to be shorter than vial to ensure the vial can be recapped.
2. Dip Method: Remove cap from Instrument Test media. Place brush discs into the vial labeled Instrument Test. Agitate for a minimum of 10 seconds by swirling and rotating all discs to ensure the contact with reagent.NOTE: After the minimum amount of time of being agitated, the brush may be removed and the cap can be placed back on the vial.
After the minimum agitation time of 10 seconds, view the color of the solution. To determine if a color change is observed; the user should compare against the control. The chart to the left is an additional tool to aid in the determination (based on the hospital’s practices, policies, and procedures) of whether or not additional cleaning of the tested lumen is needed.
1
4
4
6
1
5
5
761564 Rev. C©2019 STERIS Endoscopy or its affiliates. All rights reserved.Unless otherwise indicated, all marks denoted with ® or ™ are registered with the U.S. Patent and Trademark Office, or are owned by STERIS Corporation or its affiliates.
Refer to the Technical Data Sheet / Instructions For Use for full instructions.
• Fresh disposable gloves
• Scissors
• Watch or timer
STERIS 5960 Heisley RoadMentor, OH 44060-1834 – USA
Customer Service: 800-548-4873Fax: 440-639-4495
www.steris.com
NOTE: Placing the vial in the viewing box may help with observing the color change for either method.
6.4 µg/cm2 10 µgCurrent Industry
Benchmark*
50 µg5 µg4 µg3 µg2 µg1 µgStarting
![Untitled-1 [samaygroup.in]samaygroup.in/Userfiles/PdfFiles/636782751384411705.pdf · Rudraksh Resi. Aditya Resi. Poojan Resi. IOC. IOC Circle Hotel o Siddharth Tirupatl laza Tirupati](https://img.pdfslide.net/doc/110x75/5f9ebb498aca803cc45d12fd/untitled-1-rudraksh-resi-aditya-resi-poojan-resi-ioc-ioc-circle-hotel-o.jpg)