Embed Size (px)
Citation preview
Veritas InfoScale™Operations Manager 7.2Installation andConfiguration Guide
June 2017
Veritas InfoScale™ Operations Manager 7.2Installation and Configuration Guide
Last updated: 2017-06-06
Document version: 7.2 Rev 0
Legal NoticeCopyright © 2017 Veritas Technologies LLC. All rights reserved.
Veritas, the Veritas Logo, Veritas InfoScale, and NetBackup are trademarks or registeredtrademarks of Veritas Technologies LLC or its affiliates in the U.S. and other countries. Othernames may be trademarks of their respective owners.
This product may contain third party software for which Veritas is required to provide attributionto the third party (“Third Party Programs”). Some of the Third Party Programs are availableunder open source or free software licenses. The License Agreement accompanying theSoftware does not alter any rights or obligations you may have under those open source orfree software licenses. Refer to the third party legal notices document accompanying thisVeritas product or available at:
https://www.veritas.com/about/legal/license-agreements
The product described in this document is distributed under licenses restricting its use, copying,distribution, and decompilation/reverse engineering. No part of this document may bereproduced in any form by any means without prior written authorization of Veritas TechnologiesLLC and its licensors, if any.
THE DOCUMENTATION IS PROVIDED "AS IS" AND ALL EXPRESS OR IMPLIEDCONDITIONS, REPRESENTATIONS AND WARRANTIES, INCLUDING ANY IMPLIEDWARRANTY OF MERCHANTABILITY, FITNESS FOR A PARTICULAR PURPOSE ORNON-INFRINGEMENT, ARE DISCLAIMED, EXCEPT TO THE EXTENT THAT SUCHDISCLAIMERS ARE HELD TO BE LEGALLY INVALID. VERITAS TECHNOLOGIES LLCSHALL NOT BE LIABLE FOR INCIDENTAL OR CONSEQUENTIAL DAMAGES INCONNECTION WITH THE FURNISHING, PERFORMANCE, OR USE OF THISDOCUMENTATION. THE INFORMATION CONTAINED IN THIS DOCUMENTATION ISSUBJECT TO CHANGE WITHOUT NOTICE.
The Licensed Software and Documentation are deemed to be commercial computer softwareas defined in FAR 12.212 and subject to restricted rights as defined in FAR Section 52.227-19"Commercial Computer Software - Restricted Rights" and DFARS 227.7202, et seq."Commercial Computer Software and Commercial Computer Software Documentation," asapplicable, and any successor regulations, whether delivered by Veritas as on premises orhosted services. Any use, modification, reproduction release, performance, display or disclosureof the Licensed Software and Documentation by the U.S. Government shall be solely inaccordance with the terms of this Agreement.
Veritas Technologies LLC
500 E Middlefield RoadMountain View, CA 94043
http://www.veritas.com
Technical SupportTechnical Support maintains support centers globally. All support services will be deliveredin accordance with your support agreement and the then-current enterprise technical supportpolicies. For information about our support offerings and how to contact Technical Support,visit our website:
https://www.veritas.com/support
You can manage your Veritas account information at the following URL:
https://my.veritas.com
If you have questions regarding an existing support agreement, please email the supportagreement administration team for your region as follows:
[email protected] (except Japan)
DocumentationMake sure that you have the current version of the documentation. Each document displaysthe date of the last update on page 2. The document version appears on page 2 of eachguide. The latest documentation is available on the Veritas website:
https://sort.veritas.com/documents
Documentation feedbackYour feedback is important to us. Suggest improvements or report errors or omissions to thedocumentation. Include the document title, document version, chapter title, and section titleof the text on which you are reporting. Send feedback to:
You can also see documentation information or ask a question on the Veritas community site:
http://www.veritas.com/community/
Veritas Services and Operations Readiness Tools (SORT)Veritas Services and Operations Readiness Tools (SORT) is a website that provides informationand tools to automate and simplify certain time-consuming administrative tasks. Dependingon the product, SORT helps you prepare for installations and upgrades, identify risks in yourdatacenters, and improve operational efficiency. To see what services and tools SORT providesfor your product, see the data sheet:
https://sort.veritas.com/data/support/SORT_Data_Sheet.pdf
Section 1 Installing and configuring VeritasInfoScale Operations Manager .................. 14
Chapter 1 Planning your Veritas InfoScale OperationsManager installation ................................................... 15
About Veritas InfoScale Operations Manager ..................................... 15Downloading Veritas InfoScale Operations Manager 7.2 ....................... 16
Downloading Management Server files ....................................... 16Downloading managed host files ............................................... 17
Using the product documentation ..................................................... 18Host considerations for installing Veritas InfoScale Operations Manager
........................................................................................... 20Typical Veritas InfoScale Operations Manager deployment configuration
........................................................................................... 20Centralized management of Storage Foundation High Availability
hosts ............................................................................. 21Veritas InfoScale Operations Manager 7.2 installation overview ............ 21Choosing a Management Server host ............................................... 22Choosing the managed hosts ......................................................... 22
Chapter 2 System requirements ....................................................... 24
Operating system requirements ....................................................... 24Third-party required libraries ........................................................... 24
32-bit SNIA Common HBA API required on Windows hosts ............. 25System resource requirements ........................................................ 25
About space estimation for data logs .......................................... 26About the frequency of managed host, enclosure and switch
information discovery ........................................................ 29Supported hardware ..................................................................... 32Web browser requirements ............................................................. 33Network and firewall requirements ................................................... 33
Internet Protocol version requirements ........................................ 35Proxy server requirements ............................................................. 36
Contents
Chapter 3 Installing, upgrading, and uninstalling VeritasInfoScale Operations Manager ............................... 38
Packages included in Veritas InfoScale Operations Manager ................. 39About installing Management Server ................................................ 39
Installing Management Server on Linux ....................................... 39Installing Management Server on Windows .................................. 43
Verifying Management Server installation on Linux .............................. 42Verifying Management Server installation on Windows ......................... 43Configuring Veritas InfoScale Operations Manager on Linux and
Windows .............................................................................. 43About installing managed host ........................................................ 45
Installing managed host on UNIX/Linux ....................................... 46Installing managed host on Windows .......................................... 47Installing managed host through Solaris JumpStart ....................... 48About cloning virtual machines .................................................. 48About migrating virtual machines ............................................... 49
Verifying managed host installation on UNIX ...................................... 49Verifying managed host installation on Windows ................................. 50About upgrading Management Server .............................................. 50
Upgrading Management Server on Linux .................................... 51Upgrading Management Server on Windows ................................ 53Migrating the managed hosts to 2048-bit certificate ....................... 55
About backing up and restoring Veritas InfoScale Operations Managerdata ..................................................................................... 57Taking regular backups of Veritas InfoScale Operations Manager
data on Linux .................................................................. 59Backing up Veritas InfoScale Operations Manager data on Linux
before upgrading to version 7.2 ........................................... 59Restoring backed up data on Linux ............................................ 60Taking regular backups of Veritas InfoScale Operations Manager
data on Windows .............................................................. 61Backing up Veritas InfoScale Operations Manager data on
Windows before upgrading to version 7.2 .............................. 62Restoring backed up data on Windows ....................................... 63
About upgrading managed hosts to Veritas InfoScale OperationsManager 7.2 .......................................................................... 64Upgrading managed host using the console ................................. 65Upgrading managed host on UNIX/Linux using operating system
commands ...................................................................... 66Upgrading managed host on Windows using the installer package
..................................................................................... 67Verifying the version of Management Server in the console ................... 68
5Contents
Verifying the version of a managed host in the console ......................... 68Uninstalling Management Server on Linux ......................................... 69Uninstalling Management Server on Windows .................................... 69Uninstalling managed host on UNIX ................................................. 70Uninstalling managed host on Windows ............................................ 70
Chapter 4 Configuring Veritas InfoScale OperationsManager in a high availability and disasterrecovery environment ................................................ 72
Configuring the high availability feature in Veritas InfoScale OperationsManager ............................................................................... 72Configuring a new Veritas InfoScale Operations Manager
installation in high availability environment ............................. 73Configuring an existing Veritas InfoScale Operations Manager
installation in high availability environment ............................. 79Configuring Management Server in one-to-one DR environment ............ 81
Prerequisites for configuring a Management Server in DRenvironment .................................................................... 83
Performing initial configuration of Management Server installationin DR environment ............................................................ 84
Creating the base service groups for DR configuration ................... 84Enabling DR configuration ........................................................ 87
Configuring Veritas InfoScale Operations Manager in high availabilityand disaster recovery environment ............................................. 87Prerequisites for configuring a Management Server in HA-DR
environment .................................................................... 87Performing initial configuration of Management Server installation
in DR environment ............................................................ 89Creating the base service groups for DR configuration ................... 89Enabling DR configuration ........................................................ 92
About upgrading the high availability configurations ............................. 92Upgrading Management Server in high availability environment
..................................................................................... 93About upgrading the high availability and disaster recovery
configurations ........................................................................ 94Upgrading Management Server in high availability and disaster
recovery environment ........................................................ 94Removing the high availability configuration ....................................... 95
6Contents
Chapter 5 Installing and uninstalling Veritas InfoScaleOperations Manager add-ons .................................. 97
About deploying Veritas InfoScale Operations Manager add-ons ............ 98Downloading a Veritas InfoScale Operations Manager add-on ............... 99Uploading a Veritas InfoScale Operations Manager add-on to the
repository ............................................................................ 100Upload Solutions to Repository panel options ............................. 100
Installing a Veritas InfoScale Operations Manager add-on ................... 101Install - Download Add-on panel options .................................... 102Install - Select hosts panel options for add-ons ........................... 102
Uninstalling a Veritas InfoScale Operations Manager add-on ............... 103Uninstall panel options ........................................................... 104
Removing a Veritas InfoScale Operations Manager add-on from therepository ............................................................................ 105Remove panel options ........................................................... 105
Canceling deployment request for a Veritas InfoScale OperationsManager add-on ................................................................... 105Cancel Deployment Request panel options ................................ 106
Installing a Veritas InfoScale Operations Manager add-on on a specificmanaged host ...................................................................... 107Install panel options .............................................................. 107
Uninstalling a Veritas InfoScale Operations Manager add-on from aspecific managed host ........................................................... 108Uninstall panel options ........................................................... 108
Enabling a Veritas InfoScale Operations Manager add-on on a specificmanaged host ...................................................................... 109
Disabling a Veritas InfoScale Operations Manager add-on from aspecific managed host ........................................................... 110
Refreshing the repository ............................................................. 111Restarting the web server ............................................................. 111
Section 2 Setting up the Management Serverenvironment ........................................................... 112
Chapter 6 Basic Veritas InfoScale Operations Managertasks .............................................................................. 113
About the communication between the managed hosts andManagement Server .............................................................. 113
Connecting to Veritas InfoScale Operations Manager ManagementServer ................................................................................ 114
7Contents
Stopping and starting the Web application ....................................... 115About the Management Server perspective ...................................... 116
Chapter 7 Adding and managing hosts ......................................... 117
Overview of host discovery ........................................................... 117How Veritas InfoScale Operations Manager discovers hosts .......... 117Supported features for host discovery options ............................. 121
Overview of agentless discovery .................................................... 123About agentless discovery using the Control Host ....................... 124About agentless discovery of remote hosts ................................ 124Prerequisites for agentless configuration ................................... 125How agentless discovery of a UNIX or Linux host works ............... 125How agentless discovery of a Windows host works ...................... 126Requirements for agentless discovery of UNIX hosts ................... 127Requirements for agentless discovery of Windows hosts .............. 129Requirements for deep array discovery for agentless hosts ........... 130Commands that require the root access for agentless discovery
of UNIX hosts ................................................................ 131Using the privilege control software with agentless discovery of
UNIX hosts .................................................................... 133SSH configuration requirements for agentless discovery ............... 134About installing OpenSSH on a UNIX host ................................. 136
Adding the managed hosts to Management Server using an agentconfiguration ........................................................................ 139Add agent hosts panel options ................................................ 140
Adding the managed hosts to Management Server using an agentlessconfiguration ........................................................................ 143Add agentless hosts panel options ........................................... 145
Adding managed hosts to Management Server using the AutoConfigure (gendeploy.pl) script ................................................ 146
Editing the agentless host configuration ........................................... 148Edit agentless host panel options ............................................. 149
Refreshing the details of the managed host ...................................... 150Removing managed hosts from the Management Server domain .......... 151
Chapter 8 Setting up user access ................................................... 152
About managing authentication brokers and authentication domainsin the Veritas InfoScale Operations Manager domain ................... 153
Adding Lightweight Directory Access Protocol or Active Directory-basedauthentication on Management Server ...................................... 154Add LDAP/AD panel options ................................................... 155Add LDAP/AD panel options to specify the domain name .............. 157
8Contents
Unconfiguring Lightweight Directory Access Protocol or Active Directoryconfiguration from the authentication broker ............................... 159
Enabling the authentication domain ................................................ 159Disabling the authentication domain ............................................... 160About predefined roles in Veritas InfoScale Operations Manager .......... 161About Organizations, objects, and roles in Veritas InfoScale Operations
Manager ............................................................................. 161Assigning permissions to user groups for a perspective ...................... 163Modifying permissions assigned to user groups for a perspective ......... 164Deleting permissions assigned to user groups on a perspective ........... 164Restricting users or user groups from accessing the Veritas InfoScale
Operations Manager console .................................................. 165Example: Managing user access in Veritas InfoScale Operations
Manager using Organizations and existing user groups ................ 166
Chapter 9 Setting up fault monitoring ............................................ 171
About alerts and rules .................................................................. 171Creating rules in the Management Server perspective ........................ 173
Create Rule - Select the type of fault conditions to trigger this rulepanel options ................................................................ 174
Create Rule - Select one or more fault topics which will trigger thisrule panel options ........................................................... 175
Create Rule - Setup notifications panel options ........................... 175Create Rule - Enter name and description panel options ............... 176
Editing rules in the Management Server perspective .......................... 177Edit Rule - Select the type of fault condition to trigger this rule
panel options ................................................................ 178Edit Rule - Select one or more fault topics which will trigger this
rule panel options ........................................................... 179Edit Rule - Setup notifications panel options ............................... 179Edit Rule - Enter name and description panel options ................... 180
Deleting rules in the Management Server perspective ........................ 181Delete Rule panel options ...................................................... 181
Enabling rules in the Management Server perspective ........................ 182Enable Rule panel options ...................................................... 182
Disabling rules in the Management Server perspective ....................... 182Disable Rule panel options ..................................................... 183
About faults and risks .................................................................. 183Suppressing faults in the Management Server perspective .................. 184
Suppress Faults panel options ................................................. 184Restoring a suppressed fault in the Management Server perspective
.......................................................................................... 185
9Contents
Suppressing a fault definition in the Management Server perspective.......................................................................................... 186Suppress the fault definition panel options ................................. 187
Restoring a suppressed fault definition in the Management Serverperspective ......................................................................... 187
Chapter 10 Setting up virtualization environment discovery.......................................................................................... 189
About the virtualization technologies supported ................................. 190About Control Hosts in Veritas InfoScale Operations Manager ............. 191Requirements for discovering vCenter and ESX servers using Veritas
InfoScale Operations Manager ................................................ 192About near real-time discovery of VMware events ............................. 193Setting up near real-time discovery of VMware events ........................ 194
Configuring the VMware vCenter Server to generate SNMP traps.................................................................................... 196
Configuration settings for VMware vCenter discovery ......................... 198Requirements for discovering the Solaris zones ................................ 199
Requirements for the zlogin utility on non-Global Zones ................ 200Requirements for devices exported to non-Global Zones .............. 200Requirements for file systems exported to non-Global Zones ......... 200
Requirements for discovering Solaris Logical domains ....................... 201Requirements for discovering logical partitions .................................. 201Requirements for Microsoft Hyper-V virtualization discovery ................ 202Requirements for Kernel-based Virtual Machine (KVM) virtualization
discovery ............................................................................ 202Adding a virtualization server ........................................................ 203
Add Virtualization Server panel options ..................................... 204Add Virtualization Server panel options ..................................... 205
Editing a virtualization discovery configuration .................................. 206Edit Configuration panel options .............................................. 206Edit Configuration panel options for method selection .................. 207
Refreshing a virtualization discovery configuration ............................. 208Refreshing an ESX Server discovery ........................................ 208
Removing a virtualization discovery configuration .............................. 209Configuring performance metering for a VMware vCenter server .......... 210Disable performance metering for a VMware vCenter server ................ 210
Chapter 11 Deploying hot fixes, packages, and patches ........... 212
About deploying Veritas InfoScale Operations Manager hot fixes .......... 213About deploying maintenance release packages and patches .............. 214About deploying base release packages .......................................... 214
10Contents
Downloading a hot fix, package, or patch ......................................... 215Uploading a Veritas InfoScale Operations Manager hot fix or package
to the repository ................................................................... 215Installing a Veritas InfoScale Operations Manager hot fix, package, or
patch ................................................................................. 216Install - Download hot fix, package, or patch panel options ............ 217Install - Select hosts panel options ........................................... 217
Uninstalling a Veritas InfoScale Operations Manager hot fix ................. 219Removing a hot fix, package, or patch from the repository ................... 219Canceling deployment request for a hot fix, package, or patch ............. 220Installing a Veritas InfoScale Operations Manager hot fix on a specific
managed host ...................................................................... 221Uninstalling a Veritas InfoScale Operations Manager hot fix from a
specific managed host ........................................................... 221
Chapter 12 Configuring Management Server settings ................ 223
Configuring the Management Server settings ................................... 223Configuring SMTP settings for email notifications .............................. 225Configuring SNMP trap settings for alert notifications ......................... 227Configuring the proxy server settings .............................................. 227Enabling the analytics gathering on Management Server .................... 228Setting the period for retaining the alert and the task logs in the
database ............................................................................ 229Configuring Web server settings .................................................... 229Setting the generation time for subscribed reports ............................. 230Configuring advance authorization settings ...................................... 231Enabling or disabling policy signatures for the data center ................... 231
Chapter 13 Setting up extended attributes ..................................... 233
About using extended attributes ..................................................... 233Adding an extended attribute ......................................................... 234Modifying an extended attribute ..................................................... 235Deleting an extended attribute ....................................................... 235
Chapter 14 Downloading price tier information from SORT.......................................................................................... 237
About assigning price tiers to hosts ................................................ 237About updating the price tier information on Management Server .......... 238Updating the price tier information automatically on Management Server
.......................................................................................... 239
11Contents
Updating the price tier information manually on Management Server.......................................................................................... 239
Chapter 15 Managing SFHA updates .............................................. 241
About managing the SFHA update information on Management Server.......................................................................................... 241
Downloading information on SFHA updates automatically from SORT.......................................................................................... 242
Viewing available SFHA updates ................................................... 243Viewing details about SFHA updates .............................................. 244Viewing a list of hosts that are missing critical SFHA hot fixes .............. 245Viewing the product updates for a host ............................................ 245Downloading SFHA updates ......................................................... 246
Chapter 16 Viewing information on the Management Serverenvironment ................................................................. 248
Viewing the details of an add-on, hot fix, package, or patch on SORTwebsite ............................................................................... 249
Viewing the hosts configured in the Management Server domain .......... 249Viewing the details of the authentication broker and the domains
associated with the broker ...................................................... 250Viewing faults in the Management Server perspective ....................... 251Viewing the faults definitions ......................................................... 251Viewing details of alert logs ........................................................... 252Viewing the details of rules ........................................................... 253Viewing the details of active users logged in to Management Server
.......................................................................................... 254Viewing the Management Server settings ........................................ 254Viewing the list of extended attributes ............................................. 255Viewing audit information for Management Server ............................. 255Viewing task information for the data center ..................................... 256Viewing or exporting a list of available policy signatures ...................... 257
Appendix A Troubleshooting ................................................................ 258
Management Server (MS) ............................................................ 258Veritas InfoScale Operations Manager processes running on
Management Server for Linux ........................................... 258Veritas InfoScale Operations Manager services running on
Management Server for Windows ...................................... 258Commands to start and stop the Veritas InfoScale Operations
Manager processes on Management Server on Linux ............ 259
12Contents

Commands to start and stop the Veritas InfoScale OperationsManager processes on Management Server on Windows.................................................................................... 259
Management Server log file locations on Linux ........................... 259Management Server log file locations on Windows ...................... 259
Managed host (MH) .................................................................... 260Veritas InfoScale Operations Manager processes running on
managed host on Unix/Linux ............................................. 260Veritas InfoScale Operations Manager services running on
managed host on Windows ............................................... 260Commands to start and stop Veritas InfoScale Operations Manager
processes on managed host on UNIX/Linux ........................ 260Managed host log files ........................................................... 260Agentless driver log files ........................................................ 260Gathering information for troubleshooting .................................. 261
Index .................................................................................................................. 262
13Contents
Installing and configuringVeritas InfoScaleOperations Manager
■ Chapter 1. Planning your Veritas InfoScale Operations Manager installation
■ Chapter 2. System requirements
■ Chapter 3. Installing, upgrading, and uninstalling Veritas InfoScale OperationsManager
■ Chapter 4. Configuring Veritas InfoScale Operations Manager in a high availabilityand disaster recovery environment
■ Chapter 5. Installing and uninstalling Veritas InfoScale Operations Manageradd-ons
1Section
Planning your VeritasInfoScale OperationsManager installation
This chapter includes the following topics:
■ About Veritas InfoScale Operations Manager
■ Downloading Veritas InfoScale Operations Manager 7.2
■ Using the product documentation
■ Host considerations for installing Veritas InfoScale Operations Manager
■ Typical Veritas InfoScale Operations Manager deployment configuration
■ Veritas InfoScale Operations Manager 7.2 installation overview
■ Choosing a Management Server host
■ Choosing the managed hosts
About Veritas InfoScale Operations ManagerVeritas InfoScale Operations Manager by Veritas gives you a single, centralizedmanagement console for the Storage Foundation High Availability products. Youcan use it to monitor, visualize, and manage storage and cluster resources, andgenerate reports about these components in the Management Server domain.Veritas InfoScale Operations Manager helps administrators centrally manage diversedata center environments.
1Chapter
You can also use Veritas InfoScale Operations Manager to visualize and reportabout the hosts which do not have Storage Foundation High Availability productsinstalled on them.
In Veritas InfoScale Operations Manager, you can establish user credentials suchthat authorized users can access the product to perform sensitive managementtasks. Other users can perform only a basic set of operations, or can only viewinformation.
A typical Veritas InfoScale Operations Manager deployment consists of the following:
■ Management Server
■ Managed hosts
A Veritas InfoScale Operations Manager deployment may also discover the following:
■ Virtualization environment
■ SAN/NAS or Unified storage
■ SAN fabrics
Downloading Veritas InfoScale OperationsManager 7.2
You can download Veritas InfoScale Operations Manager 7.2 packages from thefollowing URL:
https://sort.veritas.com/vom
Note: You can download any latest patches available for the release from theVeritas Services and Operations Readiness Tools (SORT) website athttps://sort.veritas.com/patch/matrix.
See “Downloading Management Server files” on page 16.
See “Downloading managed host files” on page 17.
Downloading Management Server filesTo install or upgrade Veritas InfoScale Operations Manager Management Server,you need to download a .zip file. The .zip file contains the file that you can runto install Management Server.
Veritas InfoScale Operations Manager 7.2 provides you two options for installingManagement Server. You can either install only Management Server or install
16Planning your Veritas InfoScale Operations Manager installationDownloading Veritas InfoScale Operations Manager 7.2
Management Server along with all the add-ons, except the Veritas InfoScaleOperations Manager Help Add-on.
The names of the .zip file and the installer file for each platform are as follows:
■ Linux:
■ Download file name:
■ For Management Server -Veritas_Operations_Manager_Management_Server_7.2.0_Linux.zip
■ For Management server along with the add-ons-Veritas_Operations_Manager_Management_Server_7.2.0_Linux_Full.zip
■ Installer file name:
■ For Management Server -Veritas_Operations_Manager_MS_7.2_Linux.bin
■ For Management server along with the add-ons-Veritas_Operations_Manager_MS_7.2_Linux_Full.bin
■ Windows:
■ Download file name:
■ For Management Server -Veritas_Operations_Manager_Management_Server_7.2.0_Win.zip
■ For Management server along with the add-ons-Veritas_Operations_Manager_Management_Server_7.2.0_Win_Full.zip
■ Installer file name:
■ For Management Server -Veritas_Operations_Manager_MS_7.2_Win.exe
■ For Management server along with the add-ons-Veritas_Operations_Manager_MS_7.2_Win_Full.exe
See “About installing Management Server” on page 39.
See “About upgrading Management Server” on page 50.
Downloading managed host filesTo install or upgrade host management, you need to download theVeritas_Operations_Manager_Managed_Host_Bundle_7.2.0.zip file that containsthe packages for all the supported operating systems for managed hosts. You canunzip the file and install the package on the host for its corresponding operatingsystem.
17Planning your Veritas InfoScale Operations Manager installationDownloading Veritas InfoScale Operations Manager 7.2
To upgrade a managed host to Veritas InfoScale Operations Manager 7.2, you canchoose to use the Deployment Management feature.
See “About deploying maintenance release packages and patches” on page 214.
Table 1-1 provides the information on the file that you use to install the managedhost for each operating system.
Table 1-1 Managed host installation and upgrade files
Installer file nameOperatingsystem
VRTSsfmh_7.2.0.0_AIX.bff.ZAIX
VRTSsfmh_7.2.0.0_Linux.rpmLinux
VRTSsfmh_7.2.0.0_SunOS_arch_sparc.pkgSolarisversionsbeforeversion 11on SPARC
VRTSsfmh_7.2.0.0_SunOS_arch_sparc_osr_5.11.p5pSolaris 11on SPARC
VRTSsfmh_7.2.0.0_SunOS_arch_i386.pkgSolaris 10on x86
VRTSsfmh_7.2.0.0_SunOS_arch_i386_osr_5.11.p5pSolaris 11on x86
VRTSsfmh_7.2.0.0_Windows_arch_x64.msiWindows64-bit
See “About installing managed host” on page 45.
See “About upgrading managed hosts to Veritas InfoScale Operations Manager7.2” on page 64.
Using the product documentationTable 1-2 lists the Veritas InfoScale Operations Manager guides and Table 1-3 liststhe URLs for Veritas InfoScale Operations Manager documentation:
18Planning your Veritas InfoScale Operations Manager installationUsing the product documentation
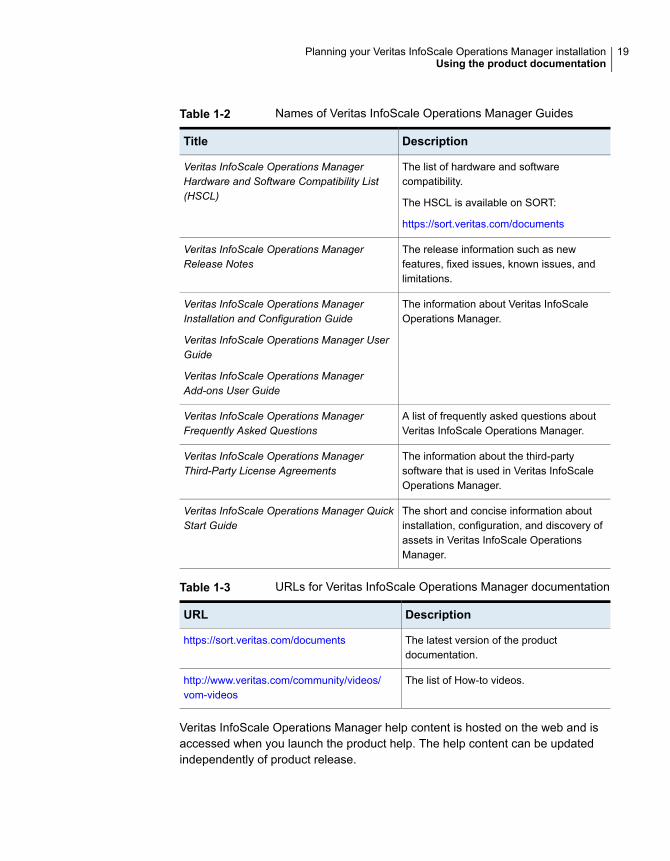
Table 1-2 Names of Veritas InfoScale Operations Manager Guides
DescriptionTitle
The list of hardware and softwarecompatibility.
The HSCL is available on SORT:
https://sort.veritas.com/documents
Veritas InfoScale Operations ManagerHardware and Software Compatibility List(HSCL)
The release information such as newfeatures, fixed issues, known issues, andlimitations.
Veritas InfoScale Operations ManagerRelease Notes
The information about Veritas InfoScaleOperations Manager.
Veritas InfoScale Operations ManagerInstallation and Configuration Guide
Veritas InfoScale Operations Manager UserGuide
Veritas InfoScale Operations ManagerAdd-ons User Guide
A list of frequently asked questions aboutVeritas InfoScale Operations Manager.
Veritas InfoScale Operations ManagerFrequently Asked Questions
The information about the third-partysoftware that is used in Veritas InfoScaleOperations Manager.
Veritas InfoScale Operations ManagerThird-Party License Agreements
The short and concise information aboutinstallation, configuration, and discovery ofassets in Veritas InfoScale OperationsManager.
Veritas InfoScale Operations Manager QuickStart Guide
Table 1-3 URLs for Veritas InfoScale Operations Manager documentation
DescriptionURL
The latest version of the productdocumentation.
https://sort.veritas.com/documents
The list of How-to videos.http://www.veritas.com/community/videos/vom-videos
Veritas InfoScale Operations Manager help content is hosted on the web and isaccessed when you launch the product help. The help content can be updatedindependently of product release.
19Planning your Veritas InfoScale Operations Manager installationUsing the product documentation
Host considerations for installing VeritasInfoScale Operations Manager
Host considerations for installing and configuring Veritas InfoScale OperationsManager include the following:
■ Before you begin the Veritas InfoScale Operations Manager installation, ensurethat you have the following information:
■ Administrator accounts and passwords for all target hosts
■ A diagram of your storage network (suggested for your reference)
■ The managed hosts within a Management Server domain must reportsynchronized universal time clock time (UC/UTC).
■ You must have at least one valid support contract for Storage Foundation HighAvailability to be entitled to use Veritas InfoScale Operations Manager.
See “About installing Management Server” on page 39.
See “About installing managed host” on page 45.
Typical Veritas InfoScale Operations Managerdeployment configuration
If you implement centralized management, a typical full installation of VeritasInfoScale Operations Manager consists of a single Management Server, multiplemanaged hosts, and a Web console. We recommend this deployment becausecentralized management offers you the flexibility of performing operations on multipleStorage Foundation High Availability hosts.
Advantages also include the following:
■ Aggregated information for reporting
■ Performance management across the data center
■ Monitoring storage utilization across the data center
■ Administration and analysis of all clusters in an enterprise
See “Downloading Veritas InfoScale Operations Manager 7.2” on page 16.
20Planning your Veritas InfoScale Operations Manager installationHost considerations for installing Veritas InfoScale Operations Manager
Centralized management of Storage Foundation High Availabilityhosts
In this deployment scenario, you can centrally manage the Storage FoundationHigh Availability hosts. We recommend this deployment because centralizedmanagement offers you the flexibility of performing operations on multiple StorageFoundation High Availability hosts.
Advantages also include the following:
■ Aggregated information for reporting
■ Performance management across the data center
■ Monitoring storage utilization across the data center
■ Administration and analysis of all clusters in an enterprise
See “Typical Veritas InfoScale Operations Manager deployment configuration”on page 20.
Veritas InfoScale Operations Manager 7.2installation overview
Installing Veritas InfoScale Operations Manager involves the following:
■ Reviewing the Veritas InfoScale Operations Manager architecture and typicaldeployment configurationsSee “Typical Veritas InfoScale Operations Manager deployment configuration”on page 20.
■ Verifying that you have met system requirementsSee “Operating system requirements” on page 24.See “System resource requirements” on page 25.See “Supported hardware” on page 32.See “Web browser requirements” on page 33.See “Network and firewall requirements” on page 33.
■ Installing and configuring the Veritas InfoScale Operations Manager ManagementServerSee “About installing Management Server” on page 39.See “Configuring Veritas InfoScale Operations Manager on Linux and Windows”on page 43.
■ Installing Veritas InfoScale Operations Manager host management on the hoststhat will be centrally managedSee “About installing managed host” on page 45.
21Planning your Veritas InfoScale Operations Manager installationVeritas InfoScale Operations Manager 7.2 installation overview
Choosing a Management Server hostManagement Server is the central piece of the Veritas InfoScale Operations Managerarchitecture. Management Server is responsible for displaying and managing theinformation that is reported from the managed hosts, storage, SAN fabrics andVirtualization environment.
To identify a host that is appropriate as Management Server, use the followingcriteria:
■ The host should meet or exceed recommended system requirements.See “Operating system requirements” on page 24.See “32-bit SNIA Common HBA API required on Windows hosts” on page 25.See “System resource requirements” on page 25.See “Web browser requirements” on page 33.See “Network and firewall requirements” on page 33.
■ The host should provide data security and space for a growing database asManagement Server discovers new managed hosts and monitors network events.Ideally, the host should have RAID-protected storage and the capacity to growits file systems.
■ Clients that connect to Management Server using the Veritas InfoScaleOperations Manager console (Web browser) must be able to access the host.For more information on choosing a Management Server host, refer to theVeritasInfoScale OperationsManager Hardware and Software Compatibility List (HSCL).
Choosing the managed hostsA typical Veritas InfoScale Operations Manager deployment consists of aManagement Server and multiple managed hosts. A managed host is a server thatis configured either with or without an agent to become a part of the Veritas InfoScaleOperations Manager infrastructure. A managed host may be configured to discoverthe information about servers, storage, Storage Area Network (SAN), andvirtualization infrastructure. Once a managed host is configured, it collects theinformation and transmits this information to Management Server.
For the managed hosts that do not have Storage Foundation or Storage FoundationHigh Availability, the server information can be discovered in two ways:
■ By installing an agent on the managed hosts
■ By agentless discovery using SSH (for UNIX/Linux hosts) or WMI (for Windowshosts)
22Planning your Veritas InfoScale Operations Manager installationChoosing a Management Server host
Note: Agentless discovery is not supported on the hosts that have any of the StorageFoundation High Availability products installed on them.
For more information on agent and agentless hosts, see the Veritas InfoScaleOperations Manager User Guide.
Before you install a managed host, make sure that it meets or exceeds therecommended system requirements.
For more information on choosing a Management Server host, refer to the VeritasInfoScale Operations Manager Hardware and Software Compatibility List (HSCL).
See “Operating system requirements” on page 24.
23Planning your Veritas InfoScale Operations Manager installationChoosing the managed hosts
System requirementsThis chapter includes the following topics:
■ Operating system requirements
■ Third-party required libraries
■ System resource requirements
■ Supported hardware
■ Web browser requirements
■ Network and firewall requirements
■ Proxy server requirements
Operating system requirementsFor information on Operating system requirements for Veritas InfoScale OperationsManager 7.2, refer to the Veritas InfoScale Operations Manager Hardware andSoftware Compatibility List (HSCL).
See “System resource requirements” on page 25.
Third-party required librariesThis section lists third-party libraries required to run Veritas InfoScale OperationsManager:
■ 32-bit SNIA Common HBA API required on Windows hosts
2Chapter
32-bit SNIA Common HBA API required on Windows hostsFor proper discovery of Fibre Channel attached devices—including discovery ofHBA and its target ports—Veritas InfoScale Operations Manager requires installationof the 32-bit SNIA Common HBA API on all Windows managed hosts running HBAcontrollers.
The Common HBA API is typically available as part of your HBA vendor’s driverkit, or you can download it from your HBA vendor’s site.
Follow these steps to determine if the SNIA Common HBA API is already presenton your Windows host.
To verify that the 32-bit SNIA Common HBA API is installed on a Windowshost
1 Open the registry editor on the managed host using the regedit command.
2 Check the following location to get the SNIA library information:
HKEY_LOCAL_MACHINE\SOFTWARE\SNIA\HBA\hba_model
On 64-bit platforms, Veritas InfoScale Operations Manager requires 32-bit librariesinstalled as a pre-requisite. For more information, see your HBA vendordocumentation.
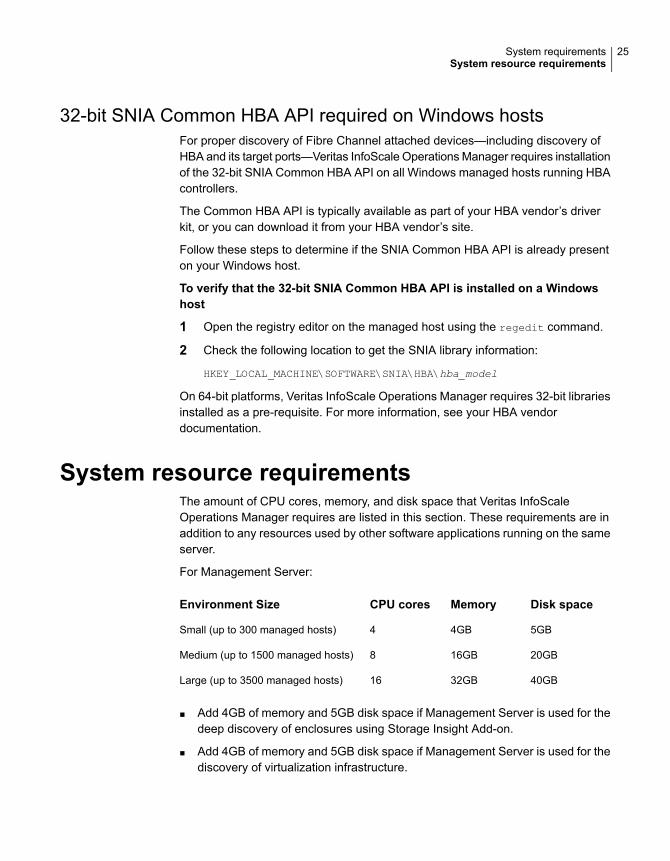
System resource requirementsThe amount of CPU cores, memory, and disk space that Veritas InfoScaleOperations Manager requires are listed in this section. These requirements are inaddition to any resources used by other software applications running on the sameserver.
For Management Server:
Disk spaceMemoryCPU coresEnvironment Size
5GB4GB4Small (up to 300 managed hosts)
20GB16GB8Medium (up to 1500 managed hosts)
40GB32GB16Large (up to 3500 managed hosts)
■ Add 4GB of memory and 5GB disk space if Management Server is used for thedeep discovery of enclosures using Storage Insight Add-on.
■ Add 4GB of memory and 5GB disk space if Management Server is used for thediscovery of virtualization infrastructure.
25System requirementsSystem resource requirements
Additional considerations for system resource requirements for Veritas InfoScaleOperations Manager:
■ It is recommended to have a swap space that is at least twice the size of RAM.
■ It is recommended to upgrade the managed hosts to the latest version for thebest performance of the product.
■ The system resource requirements may vary based on the actual environmentin which the product is deployed.
For a managed host:
■ CPU cores: 1
■ Memory: 1GB
■ Disk space: 2GB
■ Add 4GB of memory and 5GB disk space if being used as discovery host forthe deep discovery of enclosures using Storage Insight Add-on.
For Control Host (host that has Control Host Add-on):
■ CPU: Dual processor for agentless discovery of every 1000 managed hosts.
■ Memory: 4GB for agentless discovery of every 1000 managed hosts. Add 4GBof memory if Control Host is used for the discovery of virtualization infrastructure.
■ Disk space: 15GB of disk space for agentless discovery of every 1000 managedhosts.
Note: If any of the above is running on a virtual environment, it is recommendedto have resources such as CPU cores and memory dedicated to the virtual machinefor the best performance of the product.
Read the Late Breaking News tech note for the latest information on updates,patches, and software issues regarding this release, here:
https://www.veritas.com/support/en_US/article.000108276
About space estimation for data logsIn Veritas InfoScale Operations Manager, historical performance data of variousresources is collected in a fixed-size binary file. The older data is overwritten asnew data arrives in a circular round robin array. The number of metrics, frequencyof data insertion, number of objects, and the roll-up databases affect the size ofbinary file. The higher resolution data is compressed to a lower resolution data.
26System requirementsSystem resource requirements
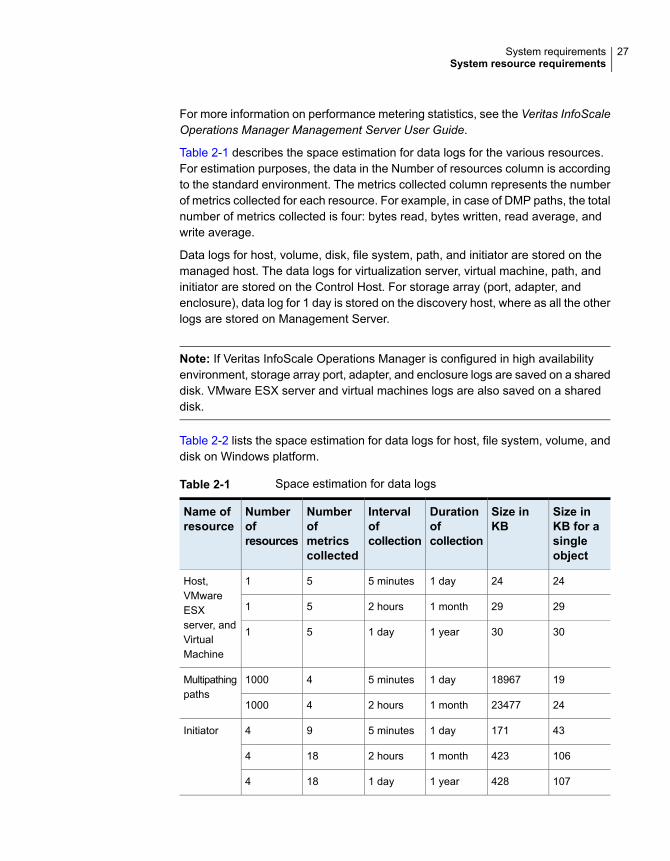
For more information on performance metering statistics, see the Veritas InfoScaleOperations Manager Management Server User Guide.
Table 2-1 describes the space estimation for data logs for the various resources.For estimation purposes, the data in the Number of resources column is accordingto the standard environment. The metrics collected column represents the numberof metrics collected for each resource. For example, in case of DMP paths, the totalnumber of metrics collected is four: bytes read, bytes written, read average, andwrite average.
Data logs for host, volume, disk, file system, path, and initiator are stored on themanaged host. The data logs for virtualization server, virtual machine, path, andinitiator are stored on the Control Host. For storage array (port, adapter, andenclosure), data log for 1 day is stored on the discovery host, where as all the otherlogs are stored on Management Server.
Note: If Veritas InfoScale Operations Manager is configured in high availabilityenvironment, storage array port, adapter, and enclosure logs are saved on a shareddisk. VMware ESX server and virtual machines logs are also saved on a shareddisk.
Table 2-2 lists the space estimation for data logs for host, file system, volume, anddisk on Windows platform.
Table 2-1 Space estimation for data logs
Size inKB for asingleobject
Size inKB
Durationofcollection
Intervalofcollection
Numberofmetricscollected
Numberofresources
Name ofresource
24241 day5 minutes51Host,VMwareESXserver, andVirtualMachine
29291 month2 hours51
30301 year1 day51
19189671 day5 minutes41000Multipathingpaths
24234771 month2 hours41000
431711 day5 minutes94Initiator
1064231 month2 hours184
1074281 year1 day184
27System requirementsSystem resource requirements
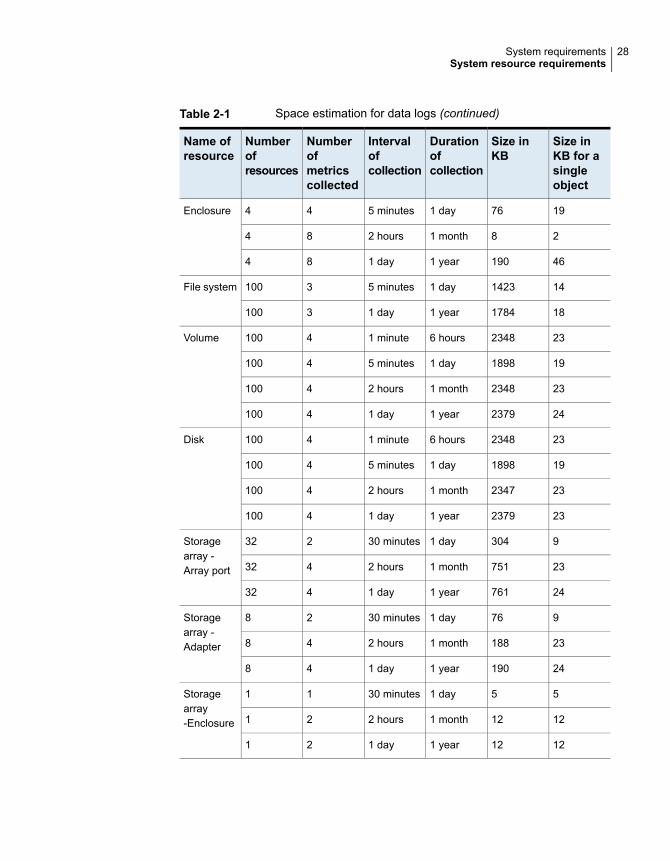
Table 2-1 Space estimation for data logs (continued)
Size inKB for asingleobject
Size inKB
Durationofcollection
Intervalofcollection
Numberofmetricscollected
Numberofresources
Name ofresource
19761 day5 minutes44Enclosure
281 month2 hours84
461901 year1 day84
1414231 day5 minutes3100File system
1817841 year1 day3100
2323486 hours1 minute4100Volume
1918981 day5 minutes4100
2323481 month2 hours4100
2423791 year1 day4100
2323486 hours1 minute4100Disk
1918981 day5 minutes4100
2323471 month2 hours4100
2323791 year1 day4100
93041 day30 minutes232Storagearray -Array port 237511 month2 hours432
247611 year1 day432
9761 day30 minutes28Storagearray -Adapter 231881 month2 hours48
241901 year1 day48
551 day30 minutes11Storagearray-Enclosure 12121 month2 hours21
12121 year1 day21
28System requirementsSystem resource requirements
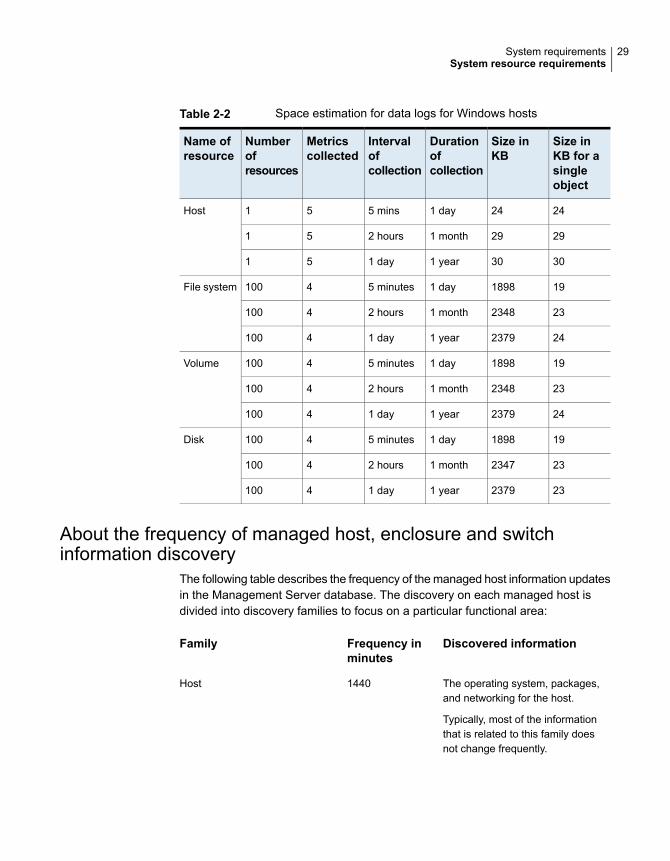
Table 2-2 Space estimation for data logs for Windows hosts
Size inKB for asingleobject
Size inKB
Durationofcollection
Intervalofcollection
Metricscollected
Numberofresources
Name ofresource
24241 day5 mins51Host
29291 month2 hours51
30301 year1 day51
1918981 day5 minutes4100File system
2323481 month2 hours4100
2423791 year1 day4100
1918981 day5 minutes4100Volume
2323481 month2 hours4100
2423791 year1 day4100
1918981 day5 minutes4100Disk
2323471 month2 hours4100
2323791 year1 day4100
About the frequency of managed host, enclosure and switchinformation discovery
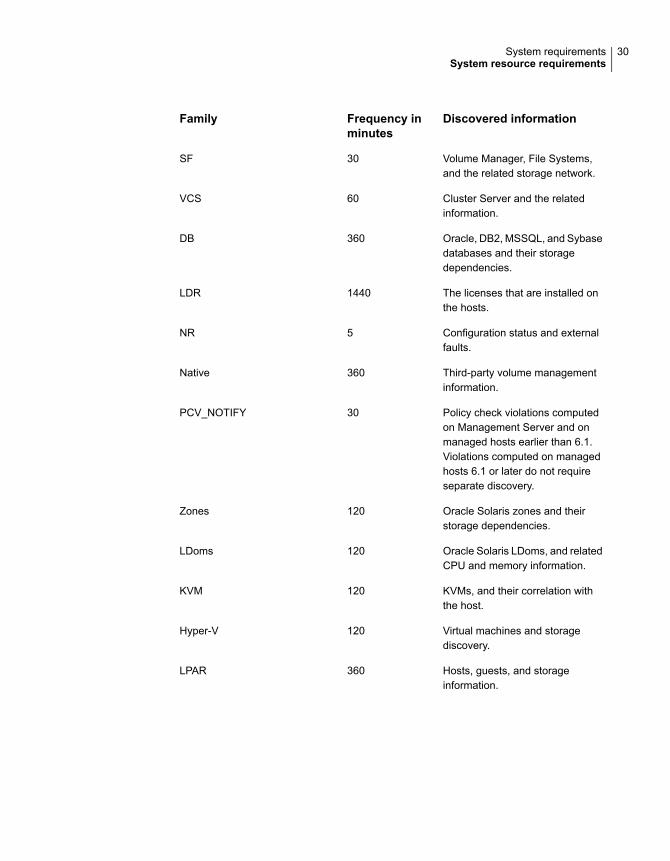
The following table describes the frequency of the managed host information updatesin the Management Server database. The discovery on each managed host isdivided into discovery families to focus on a particular functional area:
Discovered informationFrequency inminutes
Family
The operating system, packages,and networking for the host.
Typically, most of the informationthat is related to this family doesnot change frequently.
1440Host
29System requirementsSystem resource requirements
Discovered informationFrequency inminutes
Family
Volume Manager, File Systems,and the related storage network.
30SF
Cluster Server and the relatedinformation.
60VCS
Oracle, DB2, MSSQL, and Sybasedatabases and their storagedependencies.
360DB
The licenses that are installed onthe hosts.
1440LDR
Configuration status and externalfaults.
5NR
Third-party volume managementinformation.
360Native
Policy check violations computedon Management Server and onmanaged hosts earlier than 6.1.Violations computed on managedhosts 6.1 or later do not requireseparate discovery.
30PCV_NOTIFY
Oracle Solaris zones and theirstorage dependencies.
120Zones
Oracle Solaris LDoms, and relatedCPU and memory information.
120LDoms
KVMs, and their correlation withthe host.
120KVM
Virtual machines and storagediscovery.
120Hyper-V
Hosts, guests, and storageinformation.
360LPAR
30System requirementsSystem resource requirements
Discovered informationFrequency inminutes
Family
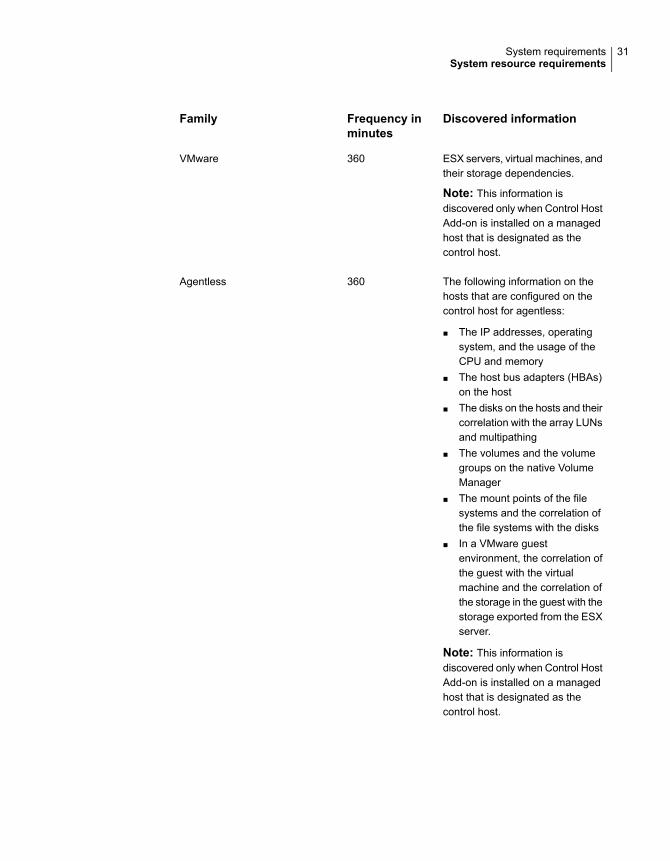
ESX servers, virtual machines, andtheir storage dependencies.
Note: This information isdiscovered only when Control HostAdd-on is installed on a managedhost that is designated as thecontrol host.
360VMware
The following information on thehosts that are configured on thecontrol host for agentless:
■ The IP addresses, operatingsystem, and the usage of theCPU and memory
■ The host bus adapters (HBAs)on the host
■ The disks on the hosts and theircorrelation with the array LUNsand multipathing
■ The volumes and the volumegroups on the native VolumeManager
■ The mount points of the filesystems and the correlation ofthe file systems with the disks
■ In a VMware guestenvironment, the correlation ofthe guest with the virtualmachine and the correlation ofthe storage in the guest with thestorage exported from the ESXserver.
Note: This information isdiscovered only when Control HostAdd-on is installed on a managedhost that is designated as thecontrol host.
360Agentless
31System requirementsSystem resource requirements
Discovered informationFrequency inminutes
Family
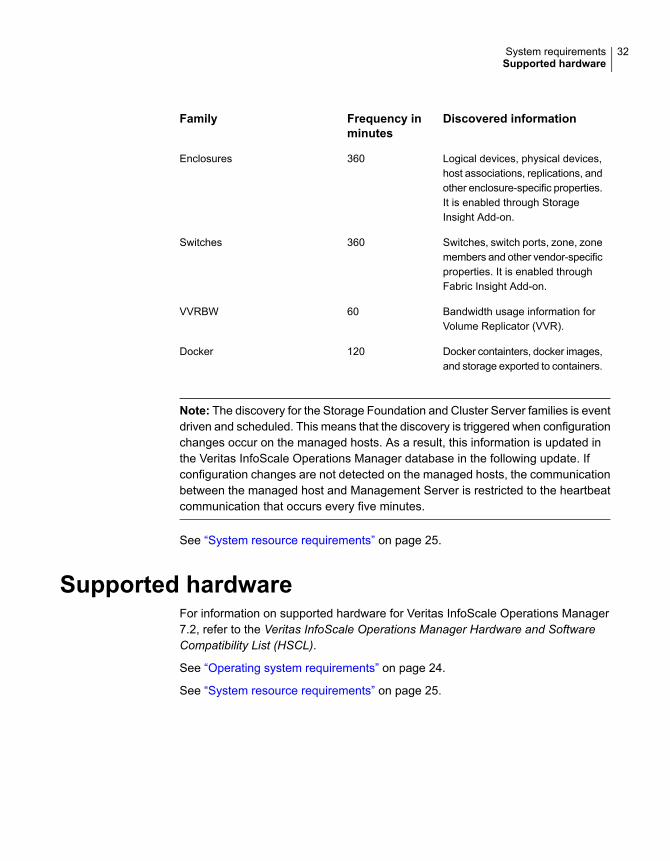
Logical devices, physical devices,host associations, replications, andother enclosure-specific properties.It is enabled through StorageInsight Add-on.
360Enclosures
Switches, switch ports, zone, zonemembers and other vendor-specificproperties. It is enabled throughFabric Insight Add-on.
360Switches
Bandwidth usage information forVolume Replicator (VVR).
60VVRBW
Docker containters, docker images,and storage exported to containers.
120Docker
Note: The discovery for the Storage Foundation and Cluster Server families is eventdriven and scheduled. This means that the discovery is triggered when configurationchanges occur on the managed hosts. As a result, this information is updated inthe Veritas InfoScale Operations Manager database in the following update. Ifconfiguration changes are not detected on the managed hosts, the communicationbetween the managed host and Management Server is restricted to the heartbeatcommunication that occurs every five minutes.
See “System resource requirements” on page 25.
Supported hardwareFor information on supported hardware for Veritas InfoScale Operations Manager7.2, refer to the Veritas InfoScale Operations Manager Hardware and SoftwareCompatibility List (HSCL).
See “Operating system requirements” on page 24.
See “System resource requirements” on page 25.
32System requirementsSupported hardware
Web browser requirementsFor information on Web browser requirements for Veritas InfoScale OperationsManager 7.2, refer to the Veritas InfoScale Operations Manager Hardware andSoftware Compatibility List (HSCL).
Network and firewall requirementsIf you plan to manage hosts within multiple domains, update the network settingsto resolve the host from all domains.
You need to ensure that the localhost can be resolved from the host.
If localhost cannot be resolved from the host, update your network settings to enableit.
For Veritas InfoScale Operations Manager Management Server in High Availability,you need to configure firewall settings for both the virtual and the physical IP of allcluster nodes.
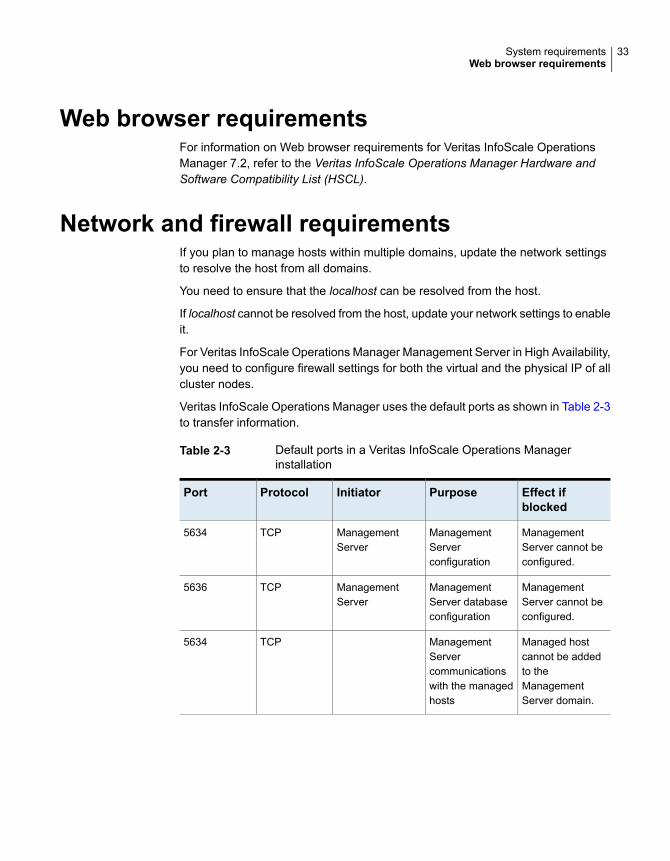
Veritas InfoScale Operations Manager uses the default ports as shown in Table 2-3to transfer information.
Table 2-3 Default ports in a Veritas InfoScale Operations Managerinstallation
Effect ifblocked
PurposeInitiatorProtocolPort
ManagementServer cannot beconfigured.
ManagementServerconfiguration
ManagementServer
TCP5634
ManagementServer cannot beconfigured.
ManagementServer databaseconfiguration
ManagementServer
TCP5636
Managed hostcannot be addedto theManagementServer domain.
ManagementServercommunicationswith the managedhosts
TCP5634
33System requirementsWeb browser requirements
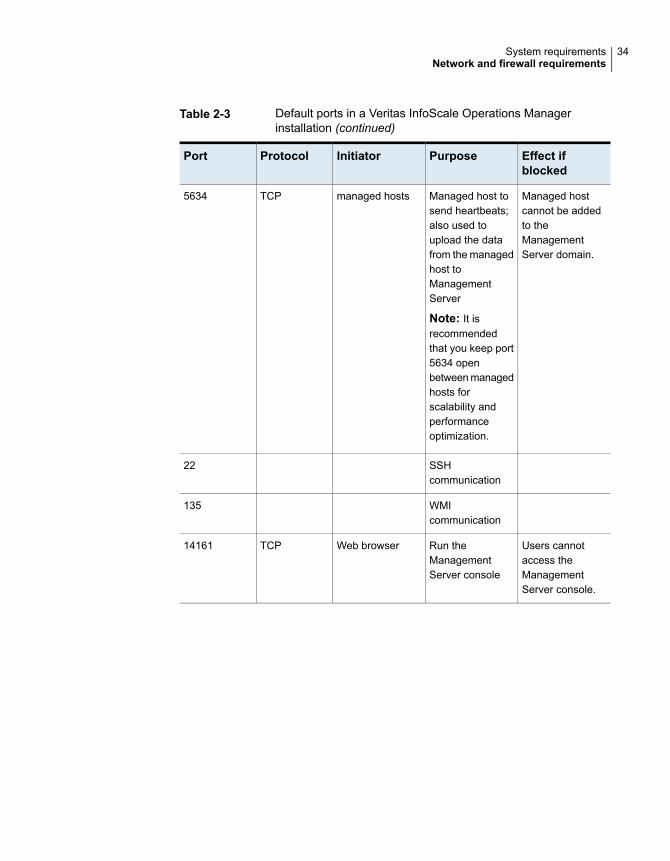
Table 2-3 Default ports in a Veritas InfoScale Operations Managerinstallation (continued)
Effect ifblocked
PurposeInitiatorProtocolPort
Managed hostcannot be addedto theManagementServer domain.
Managed host tosend heartbeats;also used toupload the datafrom the managedhost toManagementServer
Note: It isrecommendedthat you keep port5634 openbetween managedhosts forscalability andperformanceoptimization.
managed hostsTCP5634
SSHcommunication
22
WMIcommunication
135
Users cannotaccess theManagementServer console.
Run theManagementServer console
Web browserTCP14161
34System requirementsNetwork and firewall requirements
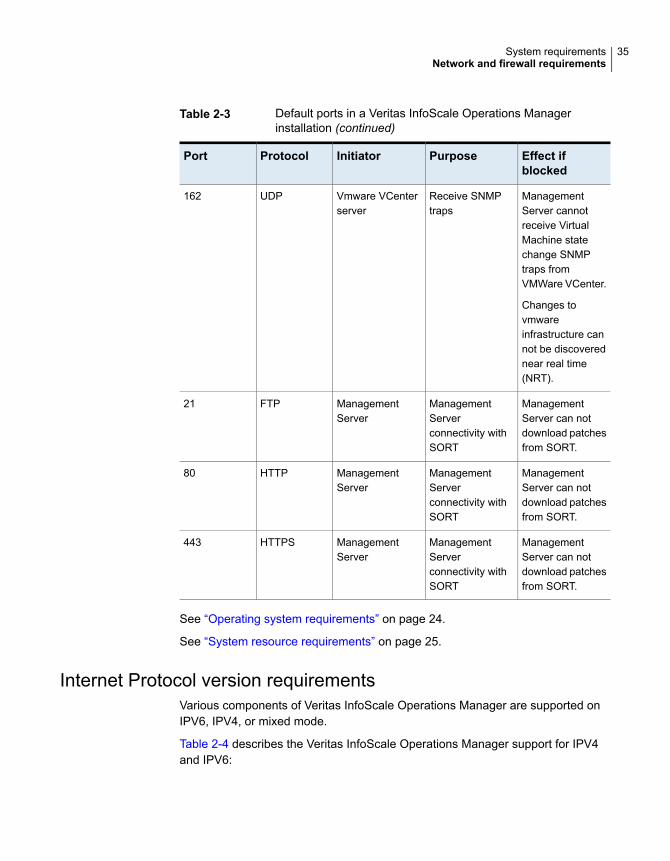
Table 2-3 Default ports in a Veritas InfoScale Operations Managerinstallation (continued)
Effect ifblocked
PurposeInitiatorProtocolPort
ManagementServer cannotreceive VirtualMachine statechange SNMPtraps fromVMWare VCenter.
Changes tovmwareinfrastructure cannot be discoverednear real time(NRT).
Receive SNMPtraps
Vmware VCenterserver
UDP162
ManagementServer can notdownload patchesfrom SORT.
ManagementServerconnectivity withSORT
ManagementServer
FTP21
ManagementServer can notdownload patchesfrom SORT.
ManagementServerconnectivity withSORT
ManagementServer
HTTP80
ManagementServer can notdownload patchesfrom SORT.
ManagementServerconnectivity withSORT
ManagementServer
HTTPS443
See “Operating system requirements” on page 24.
See “System resource requirements” on page 25.
Internet Protocol version requirementsVarious components of Veritas InfoScale Operations Manager are supported onIPV6, IPV4, or mixed mode.
Table 2-4 describes the Veritas InfoScale Operations Manager support for IPV4and IPV6:
35System requirementsNetwork and firewall requirements
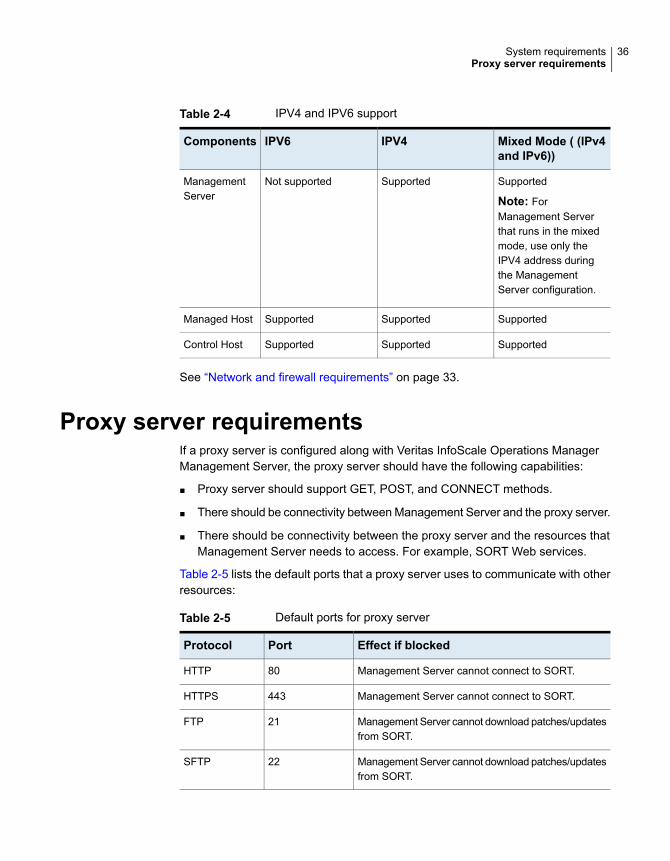
Table 2-4 IPV4 and IPV6 support
Mixed Mode ( (IPv4and IPv6))
IPV4IPV6Components
Supported
Note: ForManagement Serverthat runs in the mixedmode, use only theIPV4 address duringthe ManagementServer configuration.
SupportedNot supportedManagementServer
SupportedSupportedSupportedManaged Host
SupportedSupportedSupportedControl Host
See “Network and firewall requirements” on page 33.
Proxy server requirementsIf a proxy server is configured along with Veritas InfoScale Operations ManagerManagement Server, the proxy server should have the following capabilities:
■ Proxy server should support GET, POST, and CONNECT methods.
■ There should be connectivity between Management Server and the proxy server.
■ There should be connectivity between the proxy server and the resources thatManagement Server needs to access. For example, SORT Web services.
Table 2-5 lists the default ports that a proxy server uses to communicate with otherresources:
Table 2-5 Default ports for proxy server
Effect if blockedPortProtocol
Management Server cannot connect to SORT.80HTTP
Management Server cannot connect to SORT.443HTTPS
Management Server cannot download patches/updatesfrom SORT.
21FTP
Management Server cannot download patches/updatesfrom SORT.
22SFTP
36System requirementsProxy server requirements

See “System resource requirements” on page 25.
37System requirementsProxy server requirements
Installing, upgrading, anduninstalling VeritasInfoScale OperationsManager
This chapter includes the following topics:
■ Packages included in Veritas InfoScale Operations Manager
■ About installing Management Server
■ Verifying Management Server installation on Linux
■ Verifying Management Server installation on Windows
■ Configuring Veritas InfoScale Operations Manager on Linux and Windows
■ About installing managed host
■ Verifying managed host installation on UNIX
■ Verifying managed host installation on Windows
■ About upgrading Management Server
■ About backing up and restoring Veritas InfoScale Operations Manager data
■ About upgrading managed hosts to Veritas InfoScale Operations Manager 7.2
■ Verifying the version of Management Server in the console
■ Verifying the version of a managed host in the console
3Chapter
■ Uninstalling Management Server on Linux
■ Uninstalling Management Server on Windows
■ Uninstalling managed host on UNIX
■ Uninstalling managed host on Windows
Packages included in Veritas InfoScaleOperationsManager
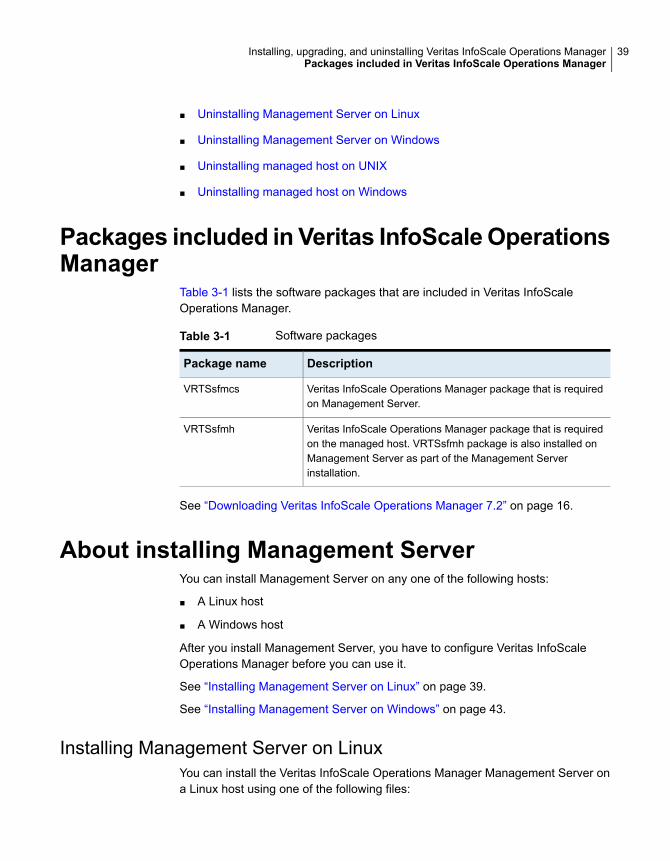
Table 3-1 lists the software packages that are included in Veritas InfoScaleOperations Manager.
Table 3-1 Software packages
DescriptionPackage name
Veritas InfoScale Operations Manager package that is requiredon Management Server.
VRTSsfmcs
Veritas InfoScale Operations Manager package that is requiredon the managed host. VRTSsfmh package is also installed onManagement Server as part of the Management Serverinstallation.
VRTSsfmh
See “Downloading Veritas InfoScale Operations Manager 7.2” on page 16.
About installing Management ServerYou can install Management Server on any one of the following hosts:
■ A Linux host
■ A Windows host
After you install Management Server, you have to configure Veritas InfoScaleOperations Manager before you can use it.
See “Installing Management Server on Linux” on page 39.
See “Installing Management Server on Windows” on page 43.
Installing Management Server on LinuxYou can install the Veritas InfoScale Operations Manager Management Server ona Linux host using one of the following files:
39Installing, upgrading, and uninstalling Veritas InfoScale Operations ManagerPackages included in Veritas InfoScale Operations Manager

■ For Management server:Veritas_Operations_Manager_MS_7.2_Linux.bin
■ For Management server along with the add-ons:Veritas_Operations_Manager_MS_7.2_Linux_Full.bin
The .bin file installs the VRTSsfmcs and the VRTSsfmh packages on the target host.
Note: By default, the VRTSsfmcs and the VRTSsfmh packages are installed in the/opt directory. You cannot specify a different location to install the packages.
To install Veritas InfoScale OperationsManagerManagement Server on Linux
1 Make sure that the host where you plan to install Management Server meetsor exceeds system and operating system requirements.
2 Download and unzip the installation file.
See “Downloading Management Server files” on page 16.
3 Open an operating system console.
4 On the host where you plan to install Management Server, log on as root.
5 Change directory to the location where you unzipped the .bin file.
6 At the command prompt, enter one of the following:
■ ./Veritas_Operations_Manager_MS_7.2_Linux.bin
■ ./Veritas_Operations_Manager_MS_7.2_Linux_Full.bin
If you see the Permission Denied error, change the permissions for the .bin
file. To change the permission, run the appropriate command:
■ chmod +x Veritas_Operations_Manager_MS_7.2_Linux.bin
■ chmod +x Veritas_Operations_Manager_MS_7.2_Linux_Full.bin
40Installing, upgrading, and uninstalling Veritas InfoScale Operations ManagerAbout installing Management Server
7 To accept the End User License Agreement and proceed with installation, typey.
The installation is complete when you see messages similar to the following:
Installation is complete. You will need to configure Veritas
Veritas InfoScale Operations Manager Management Server.
Please open your browser and type the following URL to configure:
https://myhost.example.com:5634/
Please skip this step if you intend to use this host as a standby
node for Veritas InfoScale Operations Manager Management Server
HA.
8 Verify that the packages are installed and the processes are started.
See “Verifying Management Server installation on Linux” on page 42.
9 Configure Veritas InfoScale Operations Manager.
See “Configuring Veritas InfoScale Operations Manager on Linux and Windows”on page 43.
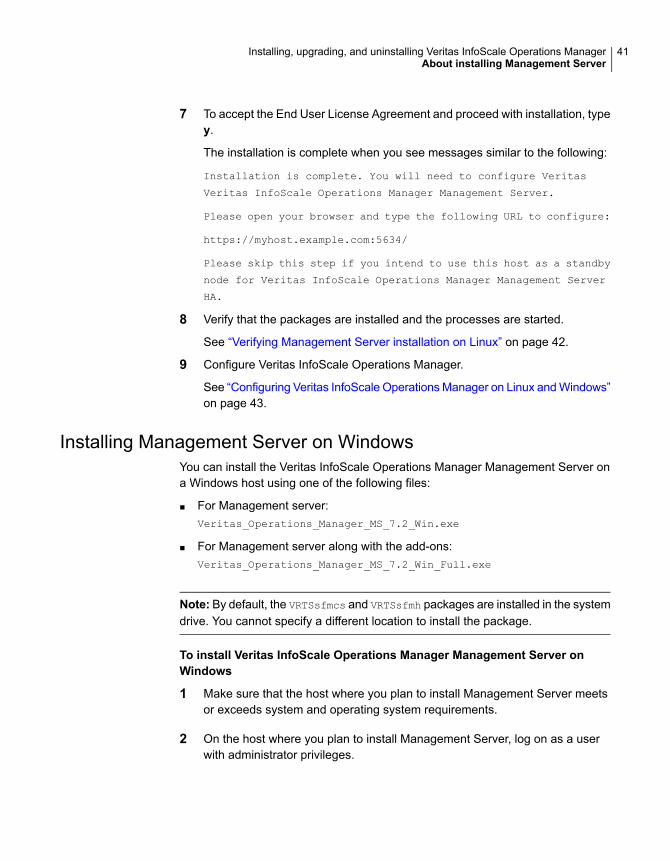
Installing Management Server on WindowsYou can install the Veritas InfoScale Operations Manager Management Server ona Windows host using one of the following files:
■ For Management server:Veritas_Operations_Manager_MS_7.2_Win.exe
■ For Management server along with the add-ons:Veritas_Operations_Manager_MS_7.2_Win_Full.exe
Note: By default, the VRTSsfmcs and VRTSsfmh packages are installed in the systemdrive. You cannot specify a different location to install the package.
To install Veritas InfoScale Operations Manager Management Server onWindows
1 Make sure that the host where you plan to install Management Server meetsor exceeds system and operating system requirements.
2 On the host where you plan to install Management Server, log on as a userwith administrator privileges.
41Installing, upgrading, and uninstalling Veritas InfoScale Operations ManagerAbout installing Management Server
3 Download and unzip the installation file.
See “Downloading Veritas InfoScale Operations Manager 7.2” on page 16.
4 Turn off the Windows firewall, or, open ports 5634 and 14161 for TCP/IPcommunication.
5 Ensure that there is no restart pending from Windows Update. If there is, restartthe host before launching the installer.
6 Make sure that the value for environment variable PATHEXT on the target hostincludes the extensions .exe, .bat, and .vbs.
7 To launch the installer, run the Veritas_Operations_Manager_MS_7.2_Win.exe
or Veritas_Operations_Manager_MS_7.2_Win_Full.exe file.
8 To proceed with the Management Server installation, accept the End UserLicense Agreement.
9 Click Next and follow through the installation process.
10 After the installation is complete, select Launch Veritas InfoScale OperationsManager configuration to configure Veritas InfoScale Operations Manager.
You can choose to configure Veritas InfoScale Operations Manager later usingthe https://hostname:5634/ URL.
Where, hostname is the fully qualified name of the host.
11 Click Finish.
12 Configure Veritas InfoScale Operations Manager.
See “Configuring Veritas InfoScale Operations Manager on Linux and Windows”on page 43.
13 Verify that Management Server is installed and the required services are started.
See “Verifying Management Server installation on Windows” on page 43.
VerifyingManagement Server installation on LinuxYou can verify the Management Server installation by making sure that the packagesare installed and the required processes are started.
42Installing, upgrading, and uninstalling Veritas InfoScale Operations ManagerVerifying Management Server installation on Linux
To verify Management Server installation on Linux
1 On the host where you installed Management Server, check whether theVRTSsfmcs package is installed. Run the following command:
rpm -q VRTSsfmcs
2 Check whether the VRTSsfmh package is installed. Run the following command:
rpm -q VRTSsfmh
3 Check whether the xprtld process is started. Run the following command:
ps -ef | grep xprtld
See “Installing Management Server on Linux” on page 39.
Verifying Management Server installation onWindows
You can verify the Management Server installation by making sure that the VeritasInfoScale Operations Manager for Windows program is installed, and the VeritasStorage Foundation Messaging Service is started.
To verify Management Server installation on Windows
1 On the host where you installed host management, on the Windows ControlPanel, click Add or Remove Programs.
2 Check whetherVeritas InfoScale OperationsManager forWindows appearsin the list of installed programs.
3 On the Windows Services panel, check whether the Veritas InfoScaleOperations Manager Messaging Service has started.
See “Verifying the version of Management Server in the console” on page 68.
See “Installing Management Server on Windows” on page 43.
ConfiguringVeritas InfoScaleOperationsManageron Linux and Windows
After you successfully install Management Server, a message is displayed with theURL that you can use to configure Veritas InfoScale Operations Manager. OnWindows, if you chose to launch the configuration, the Web browser is automaticallylaunched with the URL.
43Installing, upgrading, and uninstalling Veritas InfoScale Operations ManagerVerifying Management Server installation on Windows
For Internet Explorer 7.0, or later, on Windows Server 2008, or Firefox 3.0, or later,if the webpage does not get displayed, you have to set up the Web browser.
Note: You may configure the networking on Management Server in either the IPv4mode, or in the mixed mode (IPv4 and IPv6). For Management Server that runs inthe mixed mode, use only the IPv4 address during the installation and configurationprocess and not the IPv6 address.
For Management Server configuration with IPv6 address, the localhost, 127.0.0.1,::1 should be bound to a network interface that is up and running. For example, lo0on Linux.
To configure Veritas InfoScale Operations Manager on Linux and Windows
1 Launch the Web browser. On Windows, if you chose to launch the configurationafter installation, the Web browser is automatically launched.
■ On a host that has a network connection to the Management Server host,open a Web browser.
■ Launch the following URL:https://hostname:5634/Where, hostname is the Management Server's host name or fully-qualifiedhost name. For a IPv4 configuration, you can alternatively specify the IPaddress instead of the host name.For the dual-mode configuration of Management Server, the IPv6 addressand the host name entries of the managed hosts should be present in the/etc/hosts file on Management Server. Also, all the managed hosts shouldhave an entry of the IPv6 address and the host name of Management Serverin their respective /etc/hosts file.
2 In the Authentication Required dialog, enter Management Server host's rootor administrator user name and password.
3 In the Server Setting panel, check and modify the Server Name, if required.
4 Check and modify the Server Address, if required.
5 In the Database Setting panel, you can accept the default location or specifyyour own location. To modify the default location, clearUse Default and specifyanother location. On Windows, if you modify the default, you must have Fullcontrol permission on the drive that you specify.
The default database directory is /var/opt/VRTSsfmcs/db on Linux and%ALLUSERSPROFILE%\Symantec\VRTSsfmcs\db on Windows.
6 Click Next.
44Installing, upgrading, and uninstalling Veritas InfoScale Operations ManagerConfiguring Veritas InfoScale Operations Manager on Linux and Windows
7 In the Analytics Setting panel, select Enable Analytics Gathering to allowVeritas to gather data on your Veritas InfoScale Operations Manager usage.
8 Do one of the following:
■ To change settings, click Back,
■ To start the configuration, click Finish.
At the end of the Veritas InfoScale Operations Manager configuration, messagessimilar to the following are displayed:
Configuration successful.
Click the Launch Web Console button to login.
9 Click LaunchWeb Console to log on to Veritas InfoScale Operations Manageron the configured Management Server host.
See “Installing Management Server on Linux” on page 39.
See “Installing Management Server on Windows” on page 43.
About installing managed hostYou must install the VRTSsfmh package on a host so you can manage it using VeritasInfoScale Operations Manager Management Server. By default, a compatible versionof VRTSsfmh package is packaged with Storage Foundation High Availability 5.1,or later versions. It is recommended that you upgrade the VRTSsfmh package tothe same version as the Management Server. Some of the new features added inVeritas InfoScale Operations Manager may not be available with older versions ofVRTSsfmh package.
After you install the VRTSsfmh package on the host, you need to add the host to theManagement Server domain. You can add the host using the Management Serverconsole, or the gendeploy.pl script.
For more information on adding hosts to a Management Server domain, see theVeritas InfoScale Operations Manager Management Server User Guide.
See “Adding the managed hosts to Management Server using an agentconfiguration” on page 139.
See “Adding the managed hosts to Management Server using an agentlessconfiguration” on page 143.
See “Adding managed hosts to Management Server using the Auto Configure(gendeploy.pl) script” on page 146.
See “Operating system requirements” on page 24.
45Installing, upgrading, and uninstalling Veritas InfoScale Operations ManagerAbout installing managed host
See “About cloning virtual machines” on page 48.
See “About migrating virtual machines” on page 49.
Installing managed host on UNIX/LinuxYou can install Veritas InfoScale Operations Manager managed host on aUNIX/Linux host by installing the VRTSsfmh package on it.
Note: By default, the VRTSsfmh package is installed in the /opt directory. Youcannot specify a different location to install the package.
To install Veritas InfoScaleOperationsManagermanaged host on aUNIX/Linuxhost
1 Make sure that the host where you plan to install managed host meets orexceeds system and operating system requirements.
See “Operating system requirements” on page 24.
2 Download the managed host installation files bundle, and unzip it.
See “Downloading managed host files” on page 17.
3 Open an operating system console.
4 On the host where you plan to install managed host, log on as root.
5 Change directory to the location where you unzipped the installation files bundle.
On AIX hosts, decompress the downloaded file.
6 At the command prompt, enter one of the following commands to install thepackage:
■ For AIX, enter the following:installp -ac -d VRTSsfmh_7.2.0.0_AIX.bff VRTSsfmh
■ For Linux, enter the following:rpm -ivh VRTSsfmh_7.2.0.0_Linux.rpm
■ For Solaris versions before version 11 on SPARC, enter the following:pkgadd -d VRTSsfmh_7.2.0.0_SunOS_arch_sparc.pkg
■ For Solaris 10 on x86, enter the following:pkgadd -d VRTSsfmh_7.2.0.0_SunOS_arch_i386.pkg
■ For Solaris 11 on SPARC, enter the following:pkg install --accept -g
VRTSsfmh_7.2.0.0_SunOS_arch_sparc_osr_5.11.p5p VRTSsfmh
46Installing, upgrading, and uninstalling Veritas InfoScale Operations ManagerAbout installing managed host
■ For Solaris 11 on x86, enter the following:pkg install --accept -g
VRTSsfmh_7.2.0.0_SunOS_arch_i386_osr_5.11.p5p VRTSsfmh
7 Verify that the VRTSsfmh package is installed and the required processes havestarted.
See “Verifying managed host installation on UNIX” on page 49.
See “About installing managed host” on page 45.
Installing managed host on WindowsYou can install Veritas InfoScale Operations Manager managed host on a Windowshost by running a .msi file on it.
Note: By default, the VRTSsfmh package is installed in the system drive. You cannotspecify a different location to install the package.
To install Veritas InfoScale Operations Manager managed host on aWindowshost
1 Log on to the target host as a user with administrator privileges.
2 Make sure that the value for environment variable PATHEXT on the target hostincludes the extensions .exe, .bat, and .vbs.
3 Make sure that the host where you plan to install managed host meets orexceeds system and operating system requirements.
4 Download the managed host installation files bundle, and unzip it.
See “Downloading managed host files” on page 17.
5 From the directory to which you unzipped the installation files bundle, do thefollowing:
■ On a 64-bit host, run VRTSsfmh_7.2.0.0_Windows_arch_x64.msi
6 On the welcome screen of the Installation Wizard, click Next.
7 On the Ready to Install the Program screen, click Install to start theinstallation.
8 Click Finish to exit the Installation Wizard.
9 Verify that the managed host program is installed and the required serviceshave started.
See “Verifying managed host installation on Windows” on page 50.
47Installing, upgrading, and uninstalling Veritas InfoScale Operations ManagerAbout installing managed host
See “About installing managed host” on page 45.
Installing managed host through Solaris JumpStartYou can add the managed host to the domain through Solaris JumpStart installationwithout any user interaction. You can use the gendeploy.pl script to create a scriptthat adds the host to the Management Server domain. You can also download thescript from the Management Server console under Settings > Host and clickAutoConfigure.The script that is generated by gendeploy.pl can be included inthe final stages of the Solaris JumpStart installation process.
The following are the highlights of installing Veritas InfoScale Operations Managermanaged host as a part of the Solaris JumpStart installation:
■ A script which will install VRTSsfmh pkg needs to be included at the time ofinstalling operating system using jumpstart.
■ Use the gendeploy.pl script to create a script that adds the host to theManagement Server domain.
■ In the finalized stages of the Solaris JumpStart installation, run the script thatis created through gendeploy.pl.
To create the script to be used for adding the hosts in Solaris JumpStartinstallation
1 Log on as root on Management Server.
2 Run gendeploy.pl to create the script file:
/opt/VRTSsfmh/bin/gendeploy.pl --out scriptfilename
where, scriptfilename is the name of the script file that has to be copied to themanaged host, and then run to add the host to the Management Server domain.
See “Adding the managed hosts to Management Server using an agentconfiguration” on page 139.
See “Adding the managed hosts to Management Server using an agentlessconfiguration” on page 143.
See “Adding managed hosts to Management Server using the Auto Configure(gendeploy.pl) script” on page 146.
About cloning virtual machinesVRTSsfmh package generates a globally unique identifier for the host usingparameters such as host id and MAC address of the host. Veritas InfoScaleOperations Manager Management Server identifies a managed host using thisidentifier.
48Installing, upgrading, and uninstalling Veritas InfoScale Operations ManagerAbout installing managed host
Some virtualization technologies such as VMware create a new BIOS UUID for aVirtual Machine when it is cloned. The Veritas InfoScale Operations Manager Agent(VRTSsfmh package) uses this UUID to know if the host has been cloned.
On other virtualization technologies, you need to reset the host id of the clone isreset. If host id is not reset, both the clone and the cloned hosts are recognized asthe same, which can cause data corruption in the Veritas InfoScale OperationsManager database. After you reset the host id of the clone, Veritas InfoScaleOperations Manager removes any managed host-related configuration from theclone that gets copied over from the cloned host. The clone is treated as a newhost and has to be added as a managed host to the Management Server domain.
See “About installing managed host” on page 45.
About migrating virtual machinesWhen the VRTSsfmh package is installed on a host, it generates a globally uniqueidentifier for the host. Veritas InfoScale Operations Manager Management Serveridentifies a managed host using this identifier. Veritas InfoScale Operations Managergenerates this unique identifier using parameters such as host id and Media AccessControl (MAC) address of the host.
Veritas InfoScale Operations Manager tries to maintain the same identifier for thehost in case the host is migrated.
On some virtualization technologies such as LPAR or LDOM, the MAC address ofthe host changes when it is migrated. You need to ensure that Veritas InfoScaleOperations Manager uses the same identifier for a managed host even when it ismigrated. For this purpose, you need to ensure that the host id of the virtual machinedoes not change after migration. In most of the virtualization technologies, host idof the virtual machine remains the same after migration.
Exception to this is LDOM, where, if host id is not explicitly set for an LDOM guest(using the command ldm set-domain), then the host id changes after migration ofthe Virtual Machine. It causes VRTSsfmh package to regenerate the unique hostidentifier and the current configuration of the managed host is lost. In such cases,the managed host can no longer actively report data to the Veritas InfoScaleOperations Manager Management Server.
See “About installing managed host” on page 45.
Verifying managed host installation on UNIXYou can verify host management installation on UNIX by making sure that theVRTSsfmh package is installed, and the required processes have started.
49Installing, upgrading, and uninstalling Veritas InfoScale Operations ManagerVerifying managed host installation on UNIX
To verify the managed host installation on UNIX
◆ On the host where you installed managed host package, enter one of thefollowing at the command prompt to verify that the package is installed:
■ On AIX, enter the following:lslpp -l VRTSsfmh
■ On Linux, enter the following:rpm -q VRTSsfmh
■ On Solaris, enter the following:pkginfo -l VRTSsfmh
For Solaris 11, use the following command:pkg info VRTSsfmh
See “Verifying the version of a managed host in the console” on page 68.
See “Installing managed host on UNIX/Linux” on page 46.
Verifying managed host installation on WindowsYou can verify the managed host installation on Windows by making sure that theVeritas InfoScale Operations Manager (Host Component) program is installed, andthe required services have started.
To verify the managed host installation on Windows
1 On the host where you installed the managed host, launch the WindowsControl Panel, and click Programs and Features.
2 Check whether Veritas InfoScale Operations Manager (Host Component)appears in the list of installed programs.
3 On the Windows Services panel, check whether the Veritas InfoScaleOperations Manager Messaging Service has started.
See “Verifying the version of a managed host in the console” on page 68.
See “Installing managed host on Windows” on page 47.
About upgrading Management ServerYou can upgrade your Veritas InfoScale Operations Manager Management Serverinstallation to 7.2 only from version 7.0 and 7.1. To upgrade, you have to downloadand install the required packages. You can upgrade Management Server on Linuxand Windows hosts.
50Installing, upgrading, and uninstalling Veritas InfoScale Operations ManagerVerifying managed host installation on Windows
Note: To upgrade to Veritas InfoScale Operations Manager 7.2 from versions before7.0, you first need to upgrade to Veritas InfoScale Operations Manager version 7.0.Then, you can upgrade to version 7.2.
From version 7.0 onwards, Veritas InfoScale Operations Manager supports 2048-bitcertificates for communication between Management Server and the managedhosts. In case of an upgrade to Veritas InfoScale Operations Manager 7.0 or later,you need to migrate the Management server domain to 2048-bit certificates afteryou upgrade your Management Server.
See “Migrating the managed hosts to 2048-bit certificate” on page 55.
See “Downloading Veritas InfoScale Operations Manager 7.2” on page 16.
See “Upgrading Management Server on Linux” on page 51.
See “Upgrading Management Server on Windows” on page 53.
See “Backing up Veritas InfoScale Operations Manager data on Linux beforeupgrading to version 7.2” on page 59.
See “Backing up Veritas InfoScale Operations Manager data on Windows beforeupgrading to version 7.2” on page 62.
Upgrading Management Server on LinuxYou can upgrade an existing 7.0 and 7.1 Management Server on a Linux host toVeritas InfoScale Operations Manager 7.2 usingVeritas_Operations_Manager_MS_7.2_Linux.bin orVeritas_Operations_Manager_MS_7.2_Linux_Full.bin file. When you run the.bin file, the installer first attempts to upgrade the Veritas InfoScale OperationsManager database to a temporary location. If the database upgrade is successful,the remaining steps in the upgrade process are carried out. If the database upgradefails, the previous version of Veritas InfoScale Operations Manager is restored.
Before you upgrade Management Server, Veritas recommends that you take abackup of the Management Server data.
See “Backing up Veritas InfoScale Operations Manager data on Linux beforeupgrading to version 7.2” on page 59.
Note: If the existing Management server has its database at a non-default location,the installer gives read and execute permission to other users for the non-defaultlocation as a part of the upgrade process.
51Installing, upgrading, and uninstalling Veritas InfoScale Operations ManagerAbout upgrading Management Server
To upgrade Management Server to Veritas InfoScale Operations Manager 7.2on Linux
1 Make sure that the host where you plan to upgrade Management Server meetsor exceeds system and operating system requirements.
See “Operating system requirements” on page 24.
See “System resource requirements” on page 25.
2 On the host where you plan to upgrade Management Server, log on as root.
3 Download and unzip the installation file.
See “Downloading Veritas InfoScale Operations Manager 7.2” on page 16.
4 Change directory to the location where you unzipped the .bin file.
5 At the command prompt, run one of the following commands:
■ For Management Server -./Veritas_Operations_Manager_MS_7.2_Linux.bin
■ For Management Server along with the add-ons-./Veritas_Operations_Manager_MS_7.2_Linux_Full.bin
If you see the Permission Denied error, change the permissions for the .bin
file. Run the appropriate command to change the permission:
■ For Management Server -chmod +x Veritas_Operations_Manager_MS_7.2_Linux.bin
■ For Management Server along with the add-ons-chmod +x Veritas_Operations_Manager_MS_7.2_Linux_Full.bin
6 To accept the End User License Agreement and proceed with the upgrade,type y.
7 In response to the message that confirms if you want to upgrade to VeritasInfoScale Operations Manager 7.2, type y.
8 If you do not have sufficient disk space in your current database directory tocreate the temporary files, you are prompted to provide the path for a temporaryworking area having enough disk space. Provide the complete path of atemporary working area.
You can calculate the disk space requirements for the temporary files as follows:
(2 * DB size) + (10% of DB size) + 150 MB
where DB size is the size of your database. The size of the database is actuallythe size of the /var/opt/VRTSsfmcs/db/ database directory.
52Installing, upgrading, and uninstalling Veritas InfoScale Operations ManagerAbout upgrading Management Server
9 The upgrade is complete when you see message similar to the following:
Veritas InfoScale Operations Manager upgrade is complete.
10 To verify the upgrade, run the following command:
rpm -q VRTSsfmcs
Verify that the version for the VRTSsfmcs package is displayed as 7.2.
See “Verifying Management Server installation on Linux” on page 42.
11 After a successful upgrade to Veritas InfoScale Operations Manager 7.2, youcan log on to Management Server using the following link:
https://HOST_NAME:14161/vom
where, HOST_NAME is the name of the Management Server.
12 To check whether the Veritas InfoScale Operations Manager services arerunning, run the following command:
/opt/VRTSsfmh/bin/vomadm service --status
See “About upgrading Management Server” on page 50.
Upgrading Management Server on WindowsYou can upgrade an existing 7.0 and 7.1 Management Server on a Windows hostto Veritas InfoScale Operations Manager 7.2 using theVeritas_Operations_Manager_MS_7.2_Win.exe orVeritas_Operations_Manager_MS_7.2_Win_Full.exe file. When you run the .exe
file, the installer first attempts to upgrade the Veritas InfoScale Operations Managerdatabase to a temporary location. If the database upgrade is successful, theremaining steps in the upgrade process are carried out. If the database upgradefails, the previous version of Veritas InfoScale Operations Manager is restored.
Before you upgrade Management Server, Veritas recommends that you take abackup of the Management Server data.
See “Backing up Veritas InfoScale Operations Manager data on Windows beforeupgrading to version 7.2” on page 62.
53Installing, upgrading, and uninstalling Veritas InfoScale Operations ManagerAbout upgrading Management Server
To upgrade Management Server to Veritas InfoScale Operations Manager 7.2on Windows
1 Make sure that the host where you plan to upgrade Management Server meetsor exceeds system and operating system requirements.
See “Operating system requirements” on page 24.
See “System resource requirements” on page 25.
2 On the host where you plan to upgrade Management Server, log on as a userwith administrator privileges.
3 Download and unzip the installation file.
See “Downloading Veritas InfoScale Operations Manager 7.2” on page 16.
4 Turn off the Windows firewall, or, open ports 5634 and 14161 for TCP/IPcommunication.
5 Ensure that there is no restart pending from Windows Update. If there is, restartthe host before launching the installer.
6 To launch the installer, run one of the following files:
■ For Management Server -Veritas_Operations_Manager_MS_7.2_Win.exe
■ For Management Server along with the add-ons-Veritas_Operations_Manager_MS_7.2_Win_Full.exe
7 In the message window that confirms if you wish to upgrade to Veritas InfoScaleOperations Manager 7.2, click Yes to continue with the upgrade.
8 In the Veritas InfoScale Operations Manager 7.2 setup wizard, click Next.
9 To accept the End User License Agreement and proceed with the upgrade,select I accept the terms of the License Agreement, and click Next.
10 If the disk space in your current database directory is insufficient for creatingthe temporary files, provide the path to a temporary work area that has therequired disk space.
You can calculate the disk space requirements for the temporary files as follows:
(2 * DB size) + (10% of DB size) + 350 MB
where, DB size is the size of your database. The size of the database is actuallythe size of the C:\ProgramData\Symantec\VRTSsfmcs\db database directory.
11 The upgrade is complete when you see message similar to the following:
Completed the Veritas InfoScale Operations Manager 7.2 Setup
12 Click Finish to close the installer.
54Installing, upgrading, and uninstalling Veritas InfoScale Operations ManagerAbout upgrading Management Server
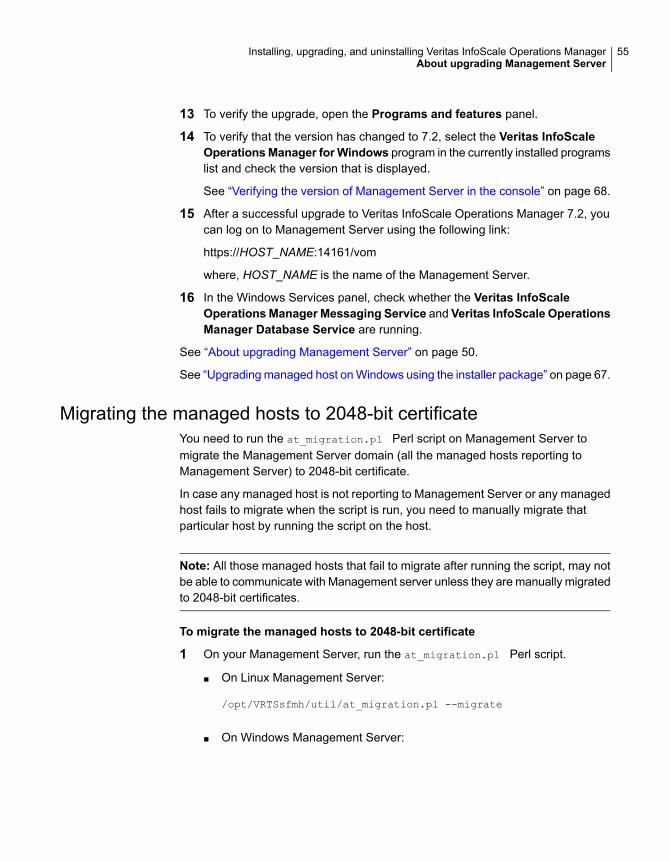
13 To verify the upgrade, open the Programs and features panel.
14 To verify that the version has changed to 7.2, select the Veritas InfoScaleOperationsManager forWindows program in the currently installed programslist and check the version that is displayed.
See “Verifying the version of Management Server in the console” on page 68.
15 After a successful upgrade to Veritas InfoScale Operations Manager 7.2, youcan log on to Management Server using the following link:
https://HOST_NAME:14161/vom
where, HOST_NAME is the name of the Management Server.
16 In the Windows Services panel, check whether the Veritas InfoScaleOperationsManager Messaging Service and Veritas InfoScale OperationsManager Database Service are running.
See “About upgrading Management Server” on page 50.
See “Upgrading managed host on Windows using the installer package” on page 67.
Migrating the managed hosts to 2048-bit certificateYou need to run the at_migration.pl Perl script on Management Server tomigrate the Management Server domain (all the managed hosts reporting toManagement Server) to 2048-bit certificate.
In case any managed host is not reporting to Management Server or any managedhost fails to migrate when the script is run, you need to manually migrate thatparticular host by running the script on the host.
Note: All those managed hosts that fail to migrate after running the script, may notbe able to communicate with Management server unless they are manually migratedto 2048-bit certificates.
To migrate the managed hosts to 2048-bit certificate
1 On your Management Server, run the at_migration.pl Perl script.
■ On Linux Management Server:
/opt/VRTSsfmh/util/at_migration.pl --migrate
■ On Windows Management Server:
55Installing, upgrading, and uninstalling Veritas InfoScale Operations ManagerAbout upgrading Management Server
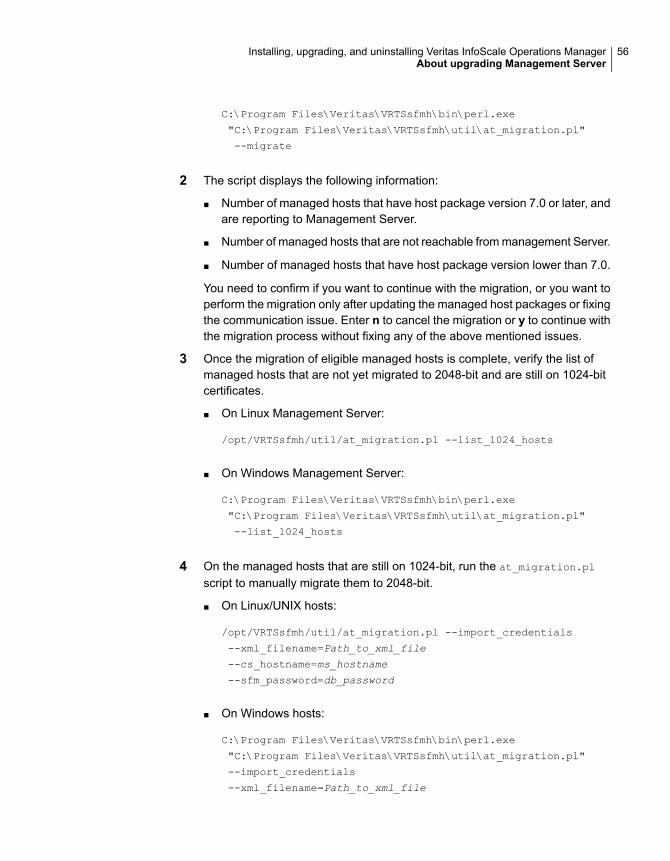
C:\Program Files\Veritas\VRTSsfmh\bin\perl.exe
"C:\Program Files\Veritas\VRTSsfmh\util\at_migration.pl"
--migrate
2 The script displays the following information:
■ Number of managed hosts that have host package version 7.0 or later, andare reporting to Management Server.
■ Number of managed hosts that are not reachable from management Server.
■ Number of managed hosts that have host package version lower than 7.0.
You need to confirm if you want to continue with the migration, or you want toperform the migration only after updating the managed host packages or fixingthe communication issue. Enter n to cancel the migration or y to continue withthe migration process without fixing any of the above mentioned issues.
3 Once the migration of eligible managed hosts is complete, verify the list ofmanaged hosts that are not yet migrated to 2048-bit and are still on 1024-bitcertificates.
■ On Linux Management Server:
/opt/VRTSsfmh/util/at_migration.pl --list_1024_hosts
■ On Windows Management Server:
C:\Program Files\Veritas\VRTSsfmh\bin\perl.exe
"C:\Program Files\Veritas\VRTSsfmh\util\at_migration.pl"
--list_1024_hosts
4 On the managed hosts that are still on 1024-bit, run the at_migration.pl
script to manually migrate them to 2048-bit.
■ On Linux/UNIX hosts:
/opt/VRTSsfmh/util/at_migration.pl --import_credentials
--xml_filename=Path_to_xml_file
--cs_hostname=ms_hostname
--sfm_password=db_password
■ On Windows hosts:
C:\Program Files\Veritas\VRTSsfmh\bin\perl.exe
"C:\Program Files\Veritas\VRTSsfmh\util\at_migration.pl"
--import_credentials
--xml_filename=Path_to_xml_file
56Installing, upgrading, and uninstalling Veritas InfoScale Operations ManagerAbout upgrading Management Server
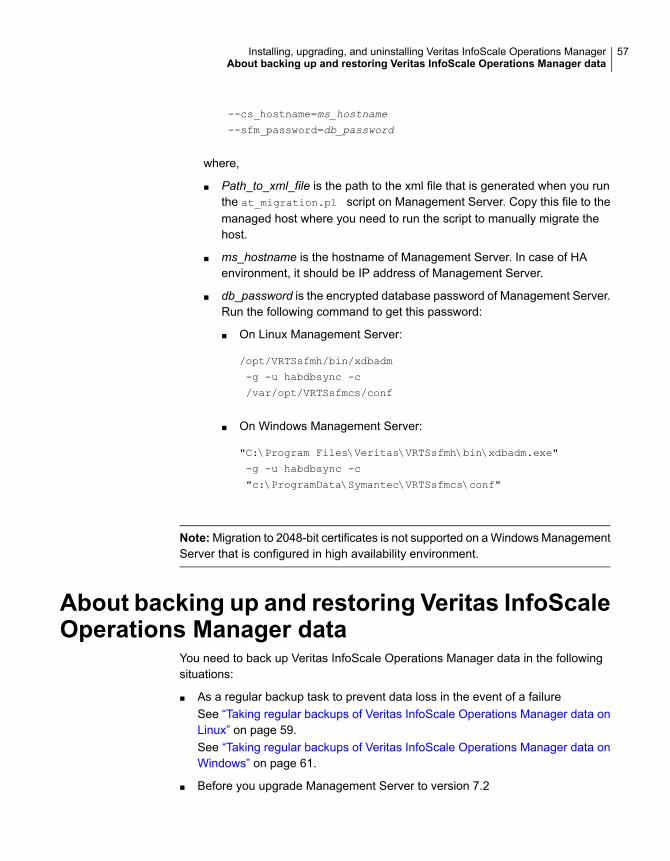
--cs_hostname=ms_hostname
--sfm_password=db_password
where,
■ Path_to_xml_file is the path to the xml file that is generated when you runthe at_migration.pl script on Management Server. Copy this file to themanaged host where you need to run the script to manually migrate thehost.
■ ms_hostname is the hostname of Management Server. In case of HAenvironment, it should be IP address of Management Server.
■ db_password is the encrypted database password of Management Server.Run the following command to get this password:
■ On Linux Management Server:
/opt/VRTSsfmh/bin/xdbadm
-g -u habdbsync -c
/var/opt/VRTSsfmcs/conf
■ On Windows Management Server:
"C:\Program Files\Veritas\VRTSsfmh\bin\xdbadm.exe"
-g -u habdbsync -c
"c:\ProgramData\Symantec\VRTSsfmcs\conf"
Note:Migration to 2048-bit certificates is not supported on a Windows ManagementServer that is configured in high availability environment.
About backing up and restoring Veritas InfoScaleOperations Manager data
You need to back up Veritas InfoScale Operations Manager data in the followingsituations:
■ As a regular backup task to prevent data loss in the event of a failureSee “Taking regular backups of Veritas InfoScale Operations Manager data onLinux” on page 59.See “Taking regular backups of Veritas InfoScale Operations Manager data onWindows” on page 61.
■ Before you upgrade Management Server to version 7.2
57Installing, upgrading, and uninstalling Veritas InfoScale Operations ManagerAbout backing up and restoring Veritas InfoScale Operations Manager data
See “Backing up Veritas InfoScale Operations Manager data on Linux beforeupgrading to version 7.2” on page 59.See “Backing up Veritas InfoScale Operations Manager data on Windows beforeupgrading to version 7.2” on page 62.
Similarly, you need to restore Veritas InfoScale Operations Manager data in thefollowing situations:
■ To restore the Management Server to the last backed up state, when the VeritasInfoScale Operations Manager 7.2 application fails.
■ To restore the Management Server for the previous version, when theManagement Server upgrade to version 7.2 fails.
See “Restoring backed up data on Linux” on page 60.
See “Restoring backed up data on Windows” on page 63.
Points to remember when you back up or restore Veritas InfoScale OperationsManager data:
■ You must use the script (vom_bkup.pl) of the same version for the backup andrestore tasks for that version. For example, use the version 7.2 script to backup data, and use the same script when you need to restore the data.
■ You can restore data to a particular version only if the backup was taken for thatversion. For example, if you back up data for version 4.1, you cannot restorethe backup to a version 5.0 Management Server. You can restore a version 4.1backup only to a version 4.1 Management Server.
■ On Linux, you can use the script to back up or restore Management Server datain either the standard configuration, or in the high-availability configuration.
■ On Windows, you can use the script to back up Management Server data ineither the standard configuration, or in the high-availability configuration.However, you can restore the backup only for a standard configuration. Torestore the backed-up data for a high-availability configuration, contact VeritasTechnical Support.
Note: Veritas InfoScale Operations Manager data is also backed up as a part offile system level data backup on the Management Server. In such cases, you needto stop all the Veritas InfoScale Operations Manager processes before backing upthe data.
58Installing, upgrading, and uninstalling Veritas InfoScale Operations ManagerAbout backing up and restoring Veritas InfoScale Operations Manager data
Taking regular backups of Veritas InfoScale Operations Managerdata on Linux
You can regularly back up the Management Server data to prevent data loss in theevent of a failure. Veritas InfoScale Operations Manager provides the vom_bkup.pl
script that you can use to back up and restore data.
Before you take the backup, review information on what is supported, and thelimitations.
See “About backing up and restoring Veritas InfoScale Operations Manager data”on page 57.
To take regular backups of Veritas InfoScale Operations Manager data onLinux
1 On the host where you plan to back up Management Server, log on as a rootuser.
2 Locate the vom_bkup.pl perl script at the following location:
/opt/VRTSsfmcs/config/adm/
3 To take the backup, run the script at the command prompt:
./vom_bkup.pl --backup dir
where, dir is the location that you specify for creating the backup. You canspecify any location except /var/opt/VRTSsfmh, /opt/VRTSsfmh,/var/opt/VRTSsfmcs, or /opt/VRTSsfmcs.
See “Restoring backed up data on Linux” on page 60.
Backing up Veritas InfoScale Operations Manager data on Linuxbefore upgrading to version 7.2
We recommend that you back up data before you upgrade Management Server toa newer version. If the upgrade fails, you can reinstall the previous version andrestore the backed up data for that version.
To take the backup, use the vom_bkup.pl script that is available on the ManagementServer host.
Before you take the backup, review information on what is supported, and thelimitations.
See “About backing up and restoring Veritas InfoScale Operations Manager data”on page 57.
59Installing, upgrading, and uninstalling Veritas InfoScale Operations ManagerAbout backing up and restoring Veritas InfoScale Operations Manager data
To back up Veritas InfoScale Operations Manager data on Linux beforeupgrade to version 7.2
1 On the host where you plan to back up Management Server, log on as a rootuser.
2 To take the backup, run the script at the command prompt:
/opt/VRTSsfmcs/config/adm/vom_bkup.pl --backup dir
where, dir is the location that you specify for creating the backup. You canspecify any location except /var/opt/VRTSsfmh, /opt/VRTSsfmh,/var/opt/VRTSsfmcs, or /opt/VRTSsfmcs.
See “Restoring backed up data on Linux” on page 60.
See “Upgrading Management Server on Linux” on page 51.
Restoring backed up data on LinuxAfter you have backed up the Veritas InfoScale Operations Manager data, you canuse the vom_bkup.pl backup script to restore the data as and when required.
Note: To restore data after the upgrade to Veritas InfoScale Operations Manager7.2 failed, use the same script that you used to take the backup. For moreinformation on restoring the data, refer to the Veritas InfoScale Operations ManagerInstallation and Configuration Guide of that release.
You can restore the data to the same host on which the data was backed up, or toa different host. To restore the data to a different host, you need to do the followingtasks on the new host before you perform the restore operation:
■ Change the physical host name and the IP address to match the system onwhich the backup was taken.
■ Install Veritas InfoScale Operations Manager Management Server. The VeritasInfoScale Operations Manager version should be the same as the version onthe system that was used to back up the data.
■ Configure Veritas InfoScale Operations Manager using the same databasedirectory.
■ Restore the data.
■ Install all the add-ons that were installed on Management Server at the time ofbacking up the data.
Before you restore the data, review information on what is supported, and thelimitations.
60Installing, upgrading, and uninstalling Veritas InfoScale Operations ManagerAbout backing up and restoring Veritas InfoScale Operations Manager data
See “About backing up and restoring Veritas InfoScale Operations Manager data”on page 57.
To restore the Veritas InfoScale Operations Manager data on Linux
1 Run the following command to restore the data:
/opt/VRTSsfmcs/config/adm/vom_bkup.pl --restore dir
where, dir is the location that you specified for creating the backup.
2 Run the following command on Management Server to force the batch rescanof all the managed hosts:
/opt/VRTSsfmh/bin/xdistc --run -- mh_ctl.pl --rescan
See “Taking regular backups of Veritas InfoScale Operations Manager data onLinux” on page 59.
See “About installing Management Server” on page 39.
Taking regular backups of Veritas InfoScale Operations Managerdata on Windows
You can regularly back up the Management Server data to prevent data loss in theevent of a failure. Veritas InfoScale Operations Manager provides the vom_bkup.pl
script that you can use to back up and restore data.
Before you take the backup, review information on what is supported, and thelimitations.
See “About backing up and restoring Veritas InfoScale Operations Manager data”on page 57.
To take regular backups of Veritas InfoScale Operations Manager data onWindows
1 On the host where you plan to back up Management Server, log on as a userwith administrator privileges.
2 Locate the vom_bkup.pl script at the following location:
installdir\VRTSsfmcs\config\adm
3 To take the backup, run the script at the command prompt:
"installdir\VRTSsfmh\bin\perl.exe"
"installdir\VRTSsfmcs\config\adm\vom_bkup.pl" --backup "dir"
where, installdir is the installation directory and dir is the location that youspecify for creating the backup. Make sure that the location that you specify
61Installing, upgrading, and uninstalling Veritas InfoScale Operations ManagerAbout backing up and restoring Veritas InfoScale Operations Manager data
has adequate disk space to store the backup. You can specify any locationexcept the following:
■ %ALLUSERPROFILE%\Veritas\VRTSsfmcs
■ %ALLUSERPROFILE%\Veritas\VRTSsfmh
■ %APPDATA%\Symantec\VRTSsfmcs
■ %APPDATA%\Symantec\VRTSsfmh
See “Restoring backed up data on Windows” on page 63.
Backing up Veritas InfoScale Operations Manager data on Windowsbefore upgrading to version 7.2
We recommend that you back up data before you upgrade Management Server toa newer version. If the upgrade fails, you can reinstall the previous version andrestore the backed up data for that version.
To take the backup, use the vom_bkup.pl script that is available on the ManagementServer host.
Before you take the backup, review information on what is supported, and thelimitations.
See “About backing up and restoring Veritas InfoScale Operations Manager data”on page 57.
To back up Veritas InfoScale Operations Manager data on Windows beforeupgrade to version 7.2
1 On the host where you plan to back up Management Server, log on as a userwith administrator privileges.
2 To take the backup, run the following command at the command prompt:
"installdir\VRTSsfmh\bin\perl.exe"
"installdir\VRTSsfmcs\config\adm\vom_bkup.pl" --backup "dir"
where, installdir is the installation directory and dir is the location that youspecify for creating the backup. Make sure that the location that you specifyhas adequate disk space to store the backup. You can specify any locationexcept the following:
■ C:\Program Files\Veritas\VRTSsfmcs
■ C:\Program Files\Veritas\VRTSsfmh
■ C:\Documents and Settings\All Users\Application
Data\Symantec\VRTSsfmcs
62Installing, upgrading, and uninstalling Veritas InfoScale Operations ManagerAbout backing up and restoring Veritas InfoScale Operations Manager data

■ C:\Documents and Settings\All Users\Application
Data\Symantec\VRTSsfmh
See “Restoring backed up data on Windows” on page 63.
See “Upgrading Management Server on Windows” on page 53.
Restoring backed up data on WindowsAfter you have backed up the Veritas InfoScale Operations Manager data, you canuse the vom_bkup.pl backup script to restore the data as and when required.
Note: To restore data because the upgrade to Veritas InfoScale Operations Manager7.2 failed, use the same script that you used to take the backup. For moreinformation on restoring the data, refer to the Veritas InfoScale Operations ManagerInstallation and Configuration Guide for that release.
You can restore the data to the same host on which the data was backed up, or toa different host. To restore the data to a different host, you need to do the followingtasks on the new host before you perform the restore operation:
■ Change the physical host name and the IP address to match that of the systemthat you backed up the data on.
■ Install Veritas InfoScale Operations Manager Management Server. The VeritasInfoScale Operations Manager version should be the same as the version onthe system that was used to back up the data.
■ Configure Veritas InfoScale Operations Manager using the same databasedirectory.
■ Restore the data.
■ Install all the add-ons, that were installed on Management Server at the time ofbacking up the data.
Before you restore the data, review information on what is supported, and thelimitations.
See “About backing up and restoring Veritas InfoScale Operations Manager data”on page 57.
63Installing, upgrading, and uninstalling Veritas InfoScale Operations ManagerAbout backing up and restoring Veritas InfoScale Operations Manager data
To restore the Veritas InfoScale Operations Manager data on Windows
1 Run the following command to restore the data:
"installdir\VRTSsfmh\bin\perl.exe"
"installdir\VRTSsfmcs\config\adm\vom_bkup.pl" --restore dir
where, installdir is the installation directory and dir is the location that youspecified for creating the backup.
2 Run the following command on Management Server to force the batch rescanof all the managed hosts:
"installdir\VRTSsfmh\bin\perl.exe" "installdir\VRTSsfmh\bin\xdistc
--run -- mh_ctl.pl --rescan
See “Taking regular backups of Veritas InfoScale Operations Manager data onWindows” on page 61.
See “About installing Management Server” on page 39.
About upgrading managed hosts to VeritasInfoScale Operations Manager 7.2
You can upgrade managed hosts in your Management Server domain to VeritasInfoScale Operations Manager 7.2 to make them compatible with the 7.2Management Server. You can upgrade both the UNIX-based and theWindows-based managed hosts. You can upgrade to Veritas InfoScale OperationsManager 7.2 from the following:
■ SF Manager 2.x managed host
■ Veritas InfoScale Operations Manager 3.x managed host
■ Veritas InfoScale Operations Manager 4.x managed host
■ Veritas InfoScale Operations Manager 5.x managed host
■ Veritas InfoScale Operations Manager 6.x managed host
■ Veritas InfoScale Operations Manager 7.0 managed host
Note: You must upgrade Management Server to 7.2 before you upgrade themanaged hosts in its domain to 7.2.
You can choose one of the following methods to upgrade a managed host to VeritasInfoScale Operations Manager 7.2:
64Installing, upgrading, and uninstalling Veritas InfoScale Operations ManagerAbout upgrading managed hosts to Veritas InfoScale Operations Manager 7.2
■ Upgrade the managed host using Settings > Deployment in the VeritasInfoScale Operations Manager console.See “Upgrading managed host using the console” on page 65.For more information on deploying packages, see the Veritas InfoScaleOperations Manager Management Server User Guide.
■ Upgrade the managed host using the console or operating system commands.See “Upgrading managed host using the console” on page 65.See “Upgrading managed host on Windows using the installer package”on page 67.See “Upgrading managed host on UNIX/Linux using operating systemcommands” on page 66.
Note: If you upgrade a managed host that has Control Host add-on installed on itto 7.2, you need to upgrade the Control Host add-on to a compatible version. Forcompatibility matrix of managed host version and control Host add-on, see VeritasInfoScale Operations Manager Hardware and software Compatibility List (HSCL).
Upgrading managed host using the consoleYou can upgrade multiple managed hosts using the Management Server console.This method is an efficient method to upgrade the VRTSsfmh package remotely onthe managed hosts, instead of upgrading it individually. To upgrade the managedhosts, ensure that the VRTSsfmh package is uploaded to the repository. You neednot remove any hot fix that is installed on the host for the VRTSsfmh package beforethe upgrade.
To perform this task, your user group must be assigned the Admin role on theManagement Server perspective. The root user can also perform this task.
To upgrade managed hosts using the Veritas InfoScale Operations Managerconsole
1 In the Home page on the Management Server console, click Settings.
2 Select Deployment, and then select Base Releases.
3 Right-click the vom-7.2.0.0-mh package, and select Install.
4 In the Install Download wizard panel, select a download option, and clickNext.
See “Install - Download hot fix, package, or patch panel options” on page 217.
65Installing, upgrading, and uninstalling Veritas InfoScale Operations ManagerAbout upgrading managed hosts to Veritas InfoScale Operations Manager 7.2
5 In the Install Select hosts panel, click Hosts option, and select the desiredmanaged hosts. To upgrade all the managed hosts that use a specific platform,use the Platforms option. Click Finish.
See “Install - Select hosts panel options” on page 217.
6 In the Result panel, click Close.
See “Adding the managed hosts to Management Server using an agentconfiguration” on page 139.
See “Adding the managed hosts to Management Server using an agentlessconfiguration” on page 143.
Upgrading managed host on UNIX/Linux using operating systemcommands
You can upgrade an existing managed host on UNIX to Veritas InfoScale OperationsManager 7.2 by upgrading the VRTSsfmh package on it.
To upgrade managed host to Veritas InfoScale Operations Manager 7.2 onUNIX
1 Make sure that the host where you plan to upgrade host management meetsor exceeds system and operating system requirements.
See “Operating system requirements” on page 24.
See “System resource requirements” on page 25.
2 Download the managed host installation files bundle, and unzip it.
See “Downloading Veritas InfoScale Operations Manager 7.2” on page 16.
3 Open an operating system console.
4 On the host where you plan to upgrade host management, log on as root.
5 Change directory to the location where you unzipped the installation files bundle.
If the host is an AIX host, decompress the downloaded file.
See “Downloading managed host files” on page 17.
6 If you are upgrading a Solaris 11 host, run the following commands to stop theservices:
■ /opt/VRTSsfmh/adm/xprtldctrl stop
■ /opt/VRTSsfmh/adm/vxvmdiscovery-ctrl.sh stop
7 At the command prompt, enter one of the following commands to upgrade thepackage:
66Installing, upgrading, and uninstalling Veritas InfoScale Operations ManagerAbout upgrading managed hosts to Veritas InfoScale Operations Manager 7.2
■ For AIX, enter the following:installp -ad VRTSsfmh_7.2.0_AIX.bff VRTSsfmh
■ For Linux, enter the following:rpm -U VRTSsfmh_7.2.0_Linux.rpm
■ For Solaris on SPARC versions before version 11, enter the following:pkgadd -d VRTSsfmh_7.2.0_SunOS_arch_sparc.pkg -a
/opt/VRTSsfmh/etc/VRTSsfmhadmin VRTSsfmh
■ For Solaris on SPARC versions 11 or later, enter the following:pkg update --accept -g
VRTSsfmh_7.2.0_SunOS_arch_sparc_osr_5.11.p5p package_path
VRTSsfmh
8 To verify that the package has been upgraded and the version has changedto 7.2, enter one of the following at the command prompt:
■ On AIX, enter the following:lslpp -l VRTSsfmh
■ On Linux, enter the following:rpm -q VRTSsfmh
■ On Solaris, enter the following:pkginfo -l VRTSsfmh
See “Verifying the version of a managed host in the console” on page 68.
Upgrading managed host on Windows using the installer packageYou can upgrade an existing managed host on Windows to Veritas InfoScaleOperations Manager 7.2 by upgrading the .msi package on it.
To upgrade managed host to Veritas InfoScale Operations Manager 7.2 onWindows
1 Log on to the target host as a user with administrator privileges.
2 Download the managed host installation files bundle, and unzip it.
See “Downloading Veritas InfoScale Operations Manager 7.2” on page 16.
3 From the directory to which you unzipped the installation files bundle, runVRTSsfmh_7.2_Windows_arch_x64.msi.
See “Downloading managed host files” on page 17.
4 On the Welcome screen of the InstallShield Wizard, click Next.
5 On the Ready to Install the Program screen, click Install to start the upgrade.
67Installing, upgrading, and uninstalling Veritas InfoScale Operations ManagerAbout upgrading managed hosts to Veritas InfoScale Operations Manager 7.2

6 Click Finish to exit the InstallShield Wizard.
7 To verify the upgrade, go to the Windows Control Panel and open thePrograms and Features panel.
8 In the list of currently installed programs, verify that the version for the VeritasInfoScale Operations Manager for Windows (Host Component) programhas changed to 7.2.
See “Verifying the version of a managed host in the console” on page 68.
Verifying the version of Management Server inthe console
After you have installed or upgraded Management Server, you can verify its versionin the Management Server console.
To verify the version of Management Server in the console
1 In the Home page of the Management Server console, click Help > About.
The Management Server version is displayed.
2 To close the window, click OK.
See “Verifying Management Server installation on Linux” on page 42.
See “Verifying Management Server installation on Windows” on page 43.
Verifying the version of a managed host in theconsole
After you have installed or upgraded a managed host, you can verify its version inthe Management Server console.
To verify the version of a managed host in the console
1 In the Management Server console, go to the Server perspective and selectManage in the left pane.
2 Select Data Center in the navigation tree.
3 Select the Hosts tab.
4 In the hosts list that is displayed, verify the managed host version under MHVersion.
See “Verifying managed host installation on UNIX” on page 49.
See “Verifying managed host installation on Windows” on page 50.
68Installing, upgrading, and uninstalling Veritas InfoScale Operations ManagerVerifying the version of Management Server in the console
Uninstalling Management Server on LinuxYou can uninstall Veritas InfoScale Operations Manager Management Server byremoving the VRTSsfmcs and VRTSsfmh packages from the Management Serverhost. When you uninstall Management Server, all data on managed hosts is alsoremoved. If you reinstall Management Server on the host, you have to add the hostsagain to the Management Server domain.
Note: You must remove the VRTSsfmcs package before you remove the VRTSsfmh
package.
To uninstall Veritas InfoScale Operations Manager Management Server onLinux
1 Open an operating system console.
2 On the Management Server host, log on as root.
3 To remove the VRTSsfmcs package, run the following command:
rpm -e VRTSsfmcs
4 To remove the VRTSsfmh package, run the following command:
rpm -e VRTSsfmh
See “About installing Management Server” on page 39.
Uninstalling Management Server on WindowsYou can uninstall Veritas InfoScale Operations Manager Management Server froma Windows host. When you uninstall Management Server, all data on managedhosts is also removed. If you reinstall Management Server on the host, you haveto add the hosts again to the Management Server domain.
To uninstall Veritas InfoScale Operations Manager Management Server onWindows
1 Log on to the target host as a user with administrator privileges.
2 In the Windows Control Panel, click Program and Features.
3 From the list of installed programs, select Veritas InfoScale OperationsManager for Windows.
4 Click Uninstall/Change.
5 In the dialog box, do one of the following:
69Installing, upgrading, and uninstalling Veritas InfoScale Operations ManagerUninstalling Management Server on Linux
■ To confirm that you want to uninstall Management Server, click Yes.
■ To exit without uninstalling Management Server, click No and skip step 6.
6 On the message window that indicates that the uninstall was successful, clickOK.
See “About installing Management Server” on page 39.
Uninstalling managed host on UNIXYou can use an operating system command to remove the VRTSsfmh package froma UNIX managed host. When you remove the package, Veritas InfoScale OperationsManager managed host is uninstalled from the managed host.
Note: Before you uninstall the host, remove it from the Management Server domain.
To uninstall Veritas InfoScale Operations Manager managed host onUNIX/Linux
1 Open an operating system console.
2 On the managed host where you plan to uninstall managed host, log on asroot.
3 At the command prompt, enter one of the following commands to uninstall thepackage:
■ On AIX, enter the following:installp -u VRTSsfmh
■ On Linux, enter the following:rpm -e VRTSsfmh
■ On Solaris 10, enter the following:pkgrm VRTSsfmh
■ On Solaris 11, enter the following:pkg uninstall VRTSsfmh
See “About installing managed host” on page 45.
Uninstalling managed host on WindowsYou can uninstall Veritas InfoScale Operations Manager managed host on aWindows managed host.
70Installing, upgrading, and uninstalling Veritas InfoScale Operations ManagerUninstalling managed host on UNIX
Note: Before you uninstall the host, remove it from the Management Server domain.
To uninstall Veritas InfoScale OperationsManagermanaged host onWindows
1 Log on to the target host as a user with administrator privileges.
2 Go to the Windows Control Panel, and click Programs and Features.
3 From the list of installed programs, select Veritas InfoScale OperationsManager (Host Component).
4 Do one of the following:
■ Select Uninstall at the top of the list.
■ Right click and select Uninstall.
5 In the dialog box, do one of the following:
■ To confirm that you want to uninstall managed host, click Yes.
■ To exit without uninstalling managed host, click No.
See “About installing managed host” on page 45.
71Installing, upgrading, and uninstalling Veritas InfoScale Operations ManagerUninstalling managed host on Windows
Configuring VeritasInfoScale OperationsManager in a highavailability and disasterrecovery environment
This chapter includes the following topics:
■ Configuring the high availability feature in Veritas InfoScale Operations Manager
■ Configuring Management Server in one-to-one DR environment
■ Configuring Veritas InfoScale Operations Manager in high availability and disasterrecovery environment
■ About upgrading the high availability configurations
■ About upgrading the high availability and disaster recovery configurations
■ Removing the high availability configuration
Configuring the high availability feature in VeritasInfoScale Operations Manager
you can configure the high availability (HA) feature in Veritas InfoScale OperationsManager to improve the availability of the Management Server. This configurationalso improves the availability of the applications and the services that Veritas
4Chapter

InfoScale Operations Manager provides. You can configure the HA feature on aLinux or a Windows based Management Server.
A Veritas InfoScale Operations Manager installation with HA feature typically consistsof:
■ Veritas InfoScale Operations Manager.
■ Two nodes (Node1 and Node2) in the same data centre.
■ Storage Foundation Enterprise version for cluster and storage software orStorage Foundation 7.0 or later versions.
In the event of a failure or a planned maintenance, Veritas InfoScale OperationsManager in HA can failover from Node1 to Node2, which are in the same datacentre and are part of the same cluster.
You can configure the high availability (HA) feature on a new Management serverthat is being configured as well as on an existing Management Server. You needto follow different set of procedures for a new and an existing Management Server:
■ See “Configuring a new Veritas InfoScale Operations Manager installation inhigh availability environment” on page 73.
■ See “Configuring an existing Veritas InfoScale Operations Manager installationin high availability environment” on page 79.
Configuring a new Veritas InfoScale Operations Manager installationin high availability environment
You can configure Veritas InfoScale Operations Manager in high availabilityenvironment immediately after the initial configuration of Management Server. Inthis method, you do not have to change the host name and the IP address of thehost.
Note: To avoid losing the data, do not use this method to configure high availabilityenvironment on an existing Management Server. Follow the process of configuringan existing Veritas InfoScale Operations Manager installation in high availabilityenvironment.
Configuring a new Veritas InfoScale Operations Manager installation in highavailability environment involves the following steps:
73Configuring Veritas InfoScale Operations Manager in a high availability and disaster recovery environmentConfiguring the high availability feature in Veritas InfoScale Operations Manager
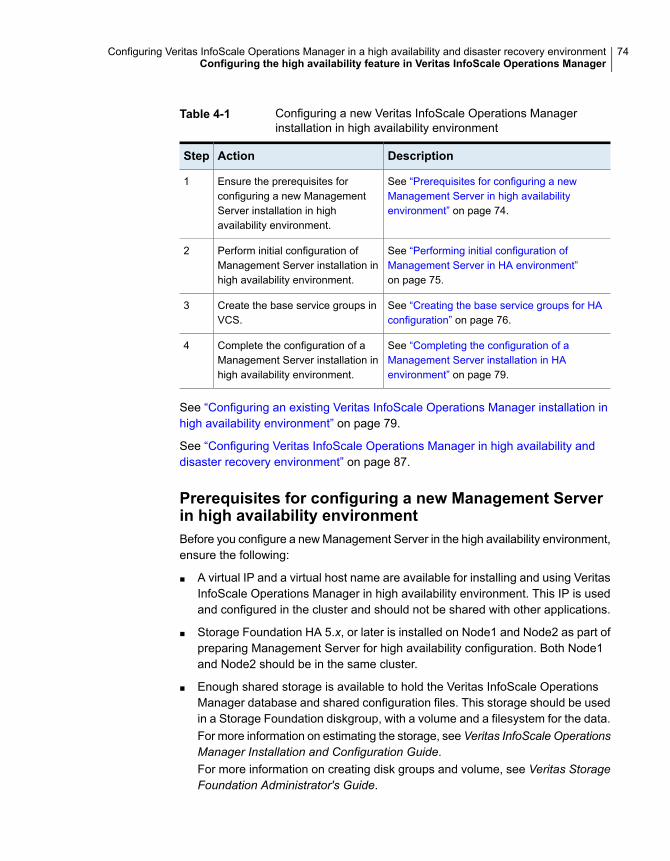
Table 4-1 Configuring a new Veritas InfoScale Operations Managerinstallation in high availability environment
DescriptionActionStep
See “Prerequisites for configuring a newManagement Server in high availabilityenvironment” on page 74.
Ensure the prerequisites forconfiguring a new ManagementServer installation in highavailability environment.
1
See “Performing initial configuration ofManagement Server in HA environment”on page 75.
Perform initial configuration ofManagement Server installation inhigh availability environment.
2
See “Creating the base service groups for HAconfiguration” on page 76.
Create the base service groups inVCS.
3
See “Completing the configuration of aManagement Server installation in HAenvironment” on page 79.
Complete the configuration of aManagement Server installation inhigh availability environment.
4
See “Configuring an existing Veritas InfoScale Operations Manager installation inhigh availability environment” on page 79.
See “Configuring Veritas InfoScale Operations Manager in high availability anddisaster recovery environment” on page 87.
Prerequisites for configuring a new Management Serverin high availability environmentBefore you configure a new Management Server in the high availability environment,ensure the following:
■ A virtual IP and a virtual host name are available for installing and using VeritasInfoScale Operations Manager in high availability environment. This IP is usedand configured in the cluster and should not be shared with other applications.
■ Storage Foundation HA 5.x, or later is installed on Node1 and Node2 as part ofpreparing Management Server for high availability configuration. Both Node1and Node2 should be in the same cluster.
■ Enough shared storage is available to hold the Veritas InfoScale OperationsManager database and shared configuration files. This storage should be usedin a Storage Foundation diskgroup, with a volume and a filesystem for the data.For more information on estimating the storage, see Veritas InfoScale OperationsManager Installation and Configuration Guide.For more information on creating disk groups and volume, see Veritas StorageFoundation Administrator's Guide.
74Configuring Veritas InfoScale Operations Manager in a high availability and disaster recovery environmentConfiguring the high availability feature in Veritas InfoScale Operations Manager
■ Node1 and Node2 must have their clocks synchronized in Universal Time Clock(UTC/UC) format.
See “Configuring a new Veritas InfoScale Operations Manager installation in highavailability environment” on page 73.
Performing initial configuration of Management Server inHA environmentPerforming the initial configuration involves the following high-level steps:
■ Install Management Server on both the nodes (Node1 and Node2).
■ configure Management Server only on Node1.
■ Add Node2 as a managed host to the Management server that is configured onNode1.
For information on installing and configuring Management Server, see VeritasInfoScale Operations Manager Installation and configuration Guide.
To configure Management Server on Node1
1 You need to configure Node1 as Management Server in standalone mode.
To configure a new Management Server, click the following URL that displaysafter you install the Management Server on Node1:
https://My_host_1:5634
Where, My_host_1 is the host name of Node1. Alternatively, you can use theIP address of Node1.
You must ensure that you have appropriate privileges to log on to this host.
2 In the Server Setting page, do the following:
■ In the Server Name field, enter the virtual host name of Node1.
■ In the Server Address field, enter the virtual IP address of Node1.
3 In the Database Setting page, specify the database location.
This field displays the default database path. If required, you can modify it. Ifyou specify a database path other than the default path, ensure the availabilityof sufficient disk space.
If you specify a location other than the default database location, you mustmake sure that it is not part of the shared storage that is used for failover. Lateron during the configuration process, the database is moved to the sharedstorage.
75Configuring Veritas InfoScale Operations Manager in a high availability and disaster recovery environmentConfiguring the high availability feature in Veritas InfoScale Operations Manager
4 In the Analytics Setting page, select Enable Analytics Gathering to allowVeritas to gather data on your Veritas InfoScale Operations Manager usage.Click Finish.
5 In the next panel, view the status of the tasks that are performed. Click LaunchWeb Console to log on to Management Server on Node1.
To add Node2 as a managed host to the configured Management Server
◆ Use the Veritas InfoScale Operations Manager Web console to add Node2 asa managed host to the Management Server that is configured on Node1.
See “Configuring a new Veritas InfoScale Operations Manager installation in highavailability environment” on page 73.
See “Configuring an existing Veritas InfoScale Operations Manager installation inhigh availability environment” on page 79.
See “Configuring Management Server in one-to-one DR environment” on page 81.
See “Configuring Veritas InfoScale Operations Manager in high availability anddisaster recovery environment” on page 87.
Creating the base service groups for HA configurationFor HA configuration, you need to create some base service groups and resources,and add some dependencies between the resources.
To perform this task, your user group must be assigned the Admin role on thecluster or the Availability perspective. The permission on the cluster may be explicitlyassigned or inherited from a parent Organization.
You need to create following service groups with their respective resources:
Table 4-2
ResourceService group
■ SFM_SStore_DGSFM_SStore
■ SFM_Services_IP■ SFM_Services_NIC■ SFM_Services_Mount
SFM_Services
Note: You need to use the service group names and resource names as suggested.Failure to do so will result in configuration failure.
■ For the resources that you can create on the SFM_SStore service group forWindows cluster, refer to the following table:
76Configuring Veritas InfoScale Operations Manager in a high availability and disaster recovery environmentConfiguring the high availability feature in Veritas InfoScale Operations Manager
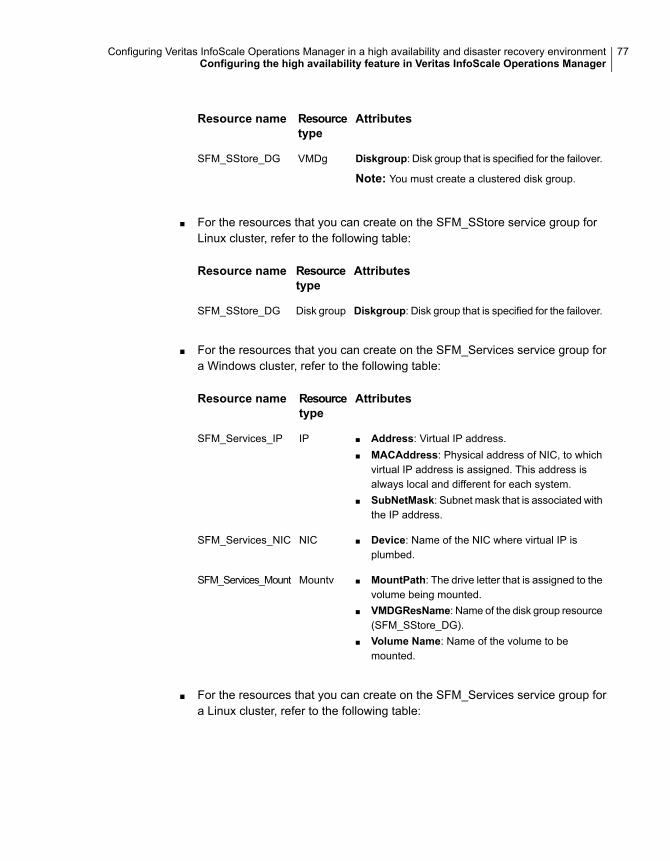
AttributesResourcetype
Resource name
Diskgroup: Disk group that is specified for the failover.
Note: You must create a clustered disk group.
VMDgSFM_SStore_DG
■ For the resources that you can create on the SFM_SStore service group forLinux cluster, refer to the following table:
AttributesResourcetype
Resource name
Diskgroup: Disk group that is specified for the failover.Disk groupSFM_SStore_DG
■ For the resources that you can create on the SFM_Services service group fora Windows cluster, refer to the following table:
AttributesResourcetype
Resource name
■ Address: Virtual IP address.■ MACAddress: Physical address of NIC, to which
virtual IP address is assigned. This address isalways local and different for each system.
■ SubNetMask: Subnet mask that is associated withthe IP address.
IPSFM_Services_IP
■ Device: Name of the NIC where virtual IP isplumbed.
NICSFM_Services_NIC
■ MountPath: The drive letter that is assigned to thevolume being mounted.
■ VMDGResName: Name of the disk group resource(SFM_SStore_DG).
■ Volume Name: Name of the volume to bemounted.
MountvSFM_Services_Mount
■ For the resources that you can create on the SFM_Services service group fora Linux cluster, refer to the following table:
77Configuring Veritas InfoScale Operations Manager in a high availability and disaster recovery environmentConfiguring the high availability feature in Veritas InfoScale Operations Manager
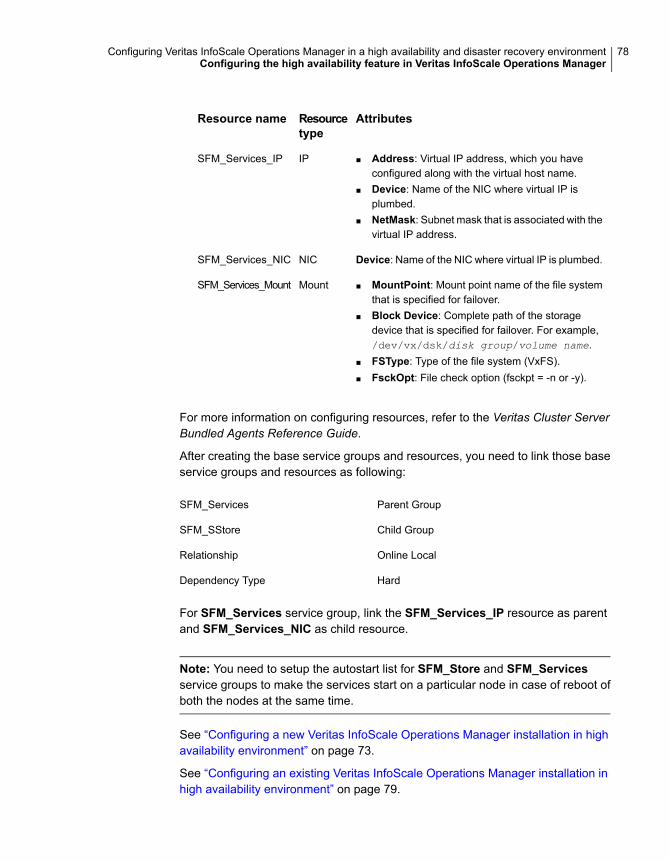
AttributesResourcetype
Resource name
■ Address: Virtual IP address, which you haveconfigured along with the virtual host name.
■ Device: Name of the NIC where virtual IP isplumbed.
■ NetMask: Subnet mask that is associated with thevirtual IP address.
IPSFM_Services_IP
Device: Name of the NIC where virtual IP is plumbed.NICSFM_Services_NIC
■ MountPoint: Mount point name of the file systemthat is specified for failover.
■ Block Device: Complete path of the storagedevice that is specified for failover. For example,/dev/vx/dsk/disk group/volume name.
■ FSType: Type of the file system (VxFS).■ FsckOpt: File check option (fsckpt = -n or -y).
MountSFM_Services_Mount
For more information on configuring resources, refer to the Veritas Cluster ServerBundled Agents Reference Guide.
After creating the base service groups and resources, you need to link those baseservice groups and resources as following:
Parent GroupSFM_Services
Child GroupSFM_SStore
Online LocalRelationship
HardDependency Type
For SFM_Services service group, link the SFM_Services_IP resource as parentand SFM_Services_NIC as child resource.
Note: You need to setup the autostart list for SFM_Store and SFM_Servicesservice groups to make the services start on a particular node in case of reboot ofboth the nodes at the same time.
See “Configuring a new Veritas InfoScale Operations Manager installation in highavailability environment” on page 73.
See “Configuring an existing Veritas InfoScale Operations Manager installation inhigh availability environment” on page 79.
78Configuring Veritas InfoScale Operations Manager in a high availability and disaster recovery environmentConfiguring the high availability feature in Veritas InfoScale Operations Manager
Completing the configuration of a Management Serverinstallation in HA environmentAfter you create the base service groups and resources and add dependenciesbetween resources, you need to perform certain steps to complete the configurationin high availability environment.
To complete the configuration of a new Veritas InfoScale OperationsManagerinstallation in high availability environment
1 Open a Web browser, and launch the following URL:
https://My_virtual-host:5634
where, My_virtual-host is the virtual host name of Node1.
You must ensure that you have appropriate privileges to log on to this host.
2 In the panel that displays the message Click Next to configure MS as aCluster Node, click Next.
3 In the next panel, which displays the steps that you must do to configureManagement Server as a cluster node, click Start.
4 In the panel, that displays the steps that you must do to configure ManagementServer in high availability environment, click Next.
5 In the panel, that displays the details of the service group for the HAconfiguration for your review, click Next.
6 View the status of the tasks that are performed as part of Veritas InfoScaleOperations Manager HA configuration and do one of the following:
■ Click the link that is displayed on the panel to log on to Veritas InfoScaleOperations Manager that is configured in high availability environment.
■ Click Quit to quit the configuration dialog.
See “Configuring a new Veritas InfoScale Operations Manager installation in highavailability environment” on page 73.
See “Configuring an existing Veritas InfoScale Operations Manager installation inhigh availability environment” on page 79.
Configuring an existing Veritas InfoScale Operations Managerinstallation in high availability environment
To perform this task, you must have a root user account and your user group mustbe assigned the Admin role on the Management Server perspective.
Configuring an existing Veritas InfoScale Operations Manager installation in highavailability environment involves the following steps:
79Configuring Veritas InfoScale Operations Manager in a high availability and disaster recovery environmentConfiguring the high availability feature in Veritas InfoScale Operations Manager
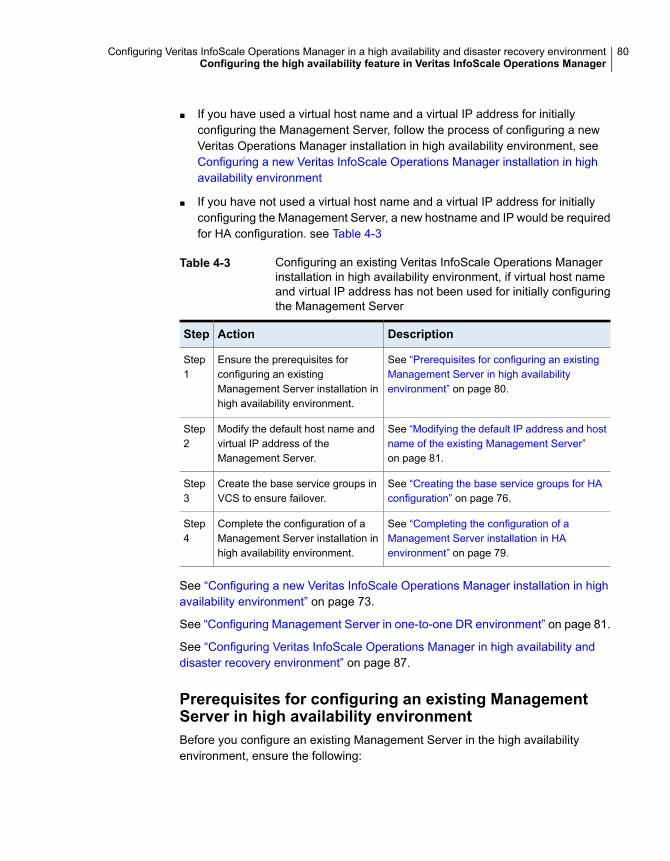
■ If you have used a virtual host name and a virtual IP address for initiallyconfiguring the Management Server, follow the process of configuring a newVeritas Operations Manager installation in high availability environment, seeConfiguring a new Veritas InfoScale Operations Manager installation in highavailability environment
■ If you have not used a virtual host name and a virtual IP address for initiallyconfiguring the Management Server, a new hostname and IP would be requiredfor HA configuration. see Table 4-3
Table 4-3 Configuring an existing Veritas InfoScale Operations Managerinstallation in high availability environment, if virtual host nameand virtual IP address has not been used for initially configuringthe Management Server
DescriptionActionStep
See “Prerequisites for configuring an existingManagement Server in high availabilityenvironment” on page 80.
Ensure the prerequisites forconfiguring an existingManagement Server installation inhigh availability environment.
Step1
See “Modifying the default IP address and hostname of the existing Management Server”on page 81.
Modify the default host name andvirtual IP address of theManagement Server.
Step2
See “Creating the base service groups for HAconfiguration” on page 76.
Create the base service groups inVCS to ensure failover.
Step3
See “Completing the configuration of aManagement Server installation in HAenvironment” on page 79.
Complete the configuration of aManagement Server installation inhigh availability environment.
Step4
See “Configuring a new Veritas InfoScale Operations Manager installation in highavailability environment” on page 73.
See “Configuring Management Server in one-to-one DR environment” on page 81.
See “Configuring Veritas InfoScale Operations Manager in high availability anddisaster recovery environment” on page 87.
Prerequisites for configuring an existing ManagementServer in high availability environmentBefore you configure an existing Management Server in the high availabilityenvironment, ensure the following:
80Configuring Veritas InfoScale Operations Manager in a high availability and disaster recovery environmentConfiguring the high availability feature in Veritas InfoScale Operations Manager
■ Storage Foundation HA 5.x, or later is installed on Node1 and Node2 as part ofpreparing Management Server for high availability configuration. Both Node1and Node2 should be in the same cluster.
■ A Storage Foundation disk group, volume and a file system for the data is createdwith identical names on all the nodes. Use VxVM and VxFS to create the diskgroup, volume and a file system. The disk group, volume and a file system areused to configure the Veritas InfoScale Operations Manager database in highavailability environment.For more information on creating disk groups and volume, see Veritas StorageFoundation Administrator's Guide.
■ Node2 is added as a managed host to the Management Server that is configuredon Node1.
See “Configuring an existing Veritas InfoScale Operations Manager installation inhigh availability environment” on page 79.
Modifying the default IP address and host name of theexisting Management ServerIf you have not used a virtual host name and IP during the configuration of theManagement Server, you need to change the default IP address and host name toa new IP address and a new host name. Based on the operating system of yourManagement Server, you need to follow the recommended methods to change thedefault IP address and host name to a new IP address and a new host name.
The old default IP address and host name gets released in this case and can beused as a virtual IP and virtual host name for configuring the Management Serverin HA environment.
See “Configuring an existing Veritas InfoScale Operations Manager installation inhigh availability environment” on page 79.
Configuring Management Server in one-to-oneDR environment
Following is an overview of the process of configuring Management Server inone-to-one symmetrical DR environment:
■ Install Management Server on the local cluster (Node1) and the remote cluster(Node2).
■ Configure Management Server on Node1 only.
81Configuring Veritas InfoScale Operations Manager in a high availability and disaster recovery environmentConfiguring Management Server in one-to-one DR environment
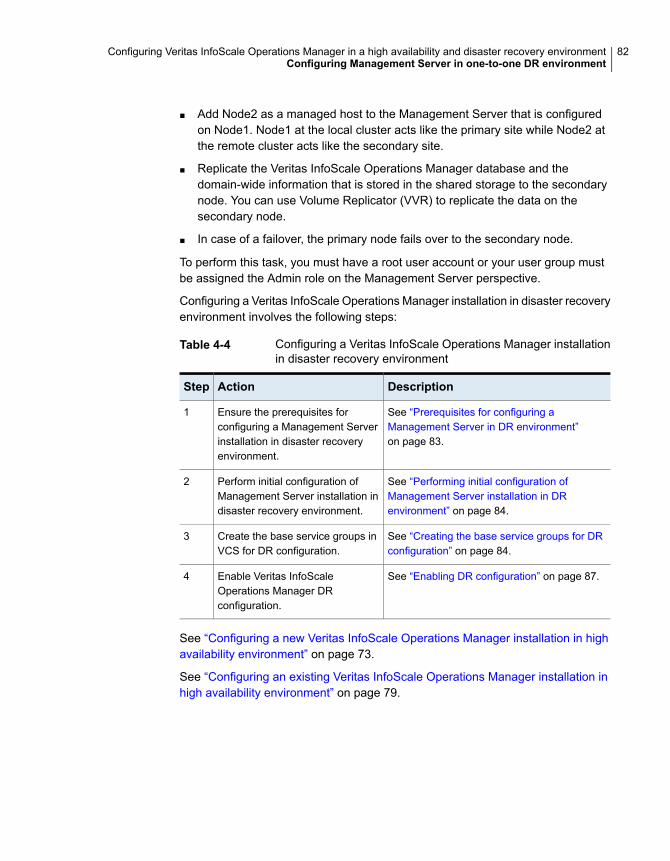
■ Add Node2 as a managed host to the Management Server that is configuredon Node1. Node1 at the local cluster acts like the primary site while Node2 atthe remote cluster acts like the secondary site.
■ Replicate the Veritas InfoScale Operations Manager database and thedomain-wide information that is stored in the shared storage to the secondarynode. You can use Volume Replicator (VVR) to replicate the data on thesecondary node.
■ In case of a failover, the primary node fails over to the secondary node.
To perform this task, you must have a root user account or your user group mustbe assigned the Admin role on the Management Server perspective.
Configuring a Veritas InfoScale Operations Manager installation in disaster recoveryenvironment involves the following steps:
Table 4-4 Configuring a Veritas InfoScale Operations Manager installationin disaster recovery environment
DescriptionActionStep
See “Prerequisites for configuring aManagement Server in DR environment”on page 83.
Ensure the prerequisites forconfiguring a Management Serverinstallation in disaster recoveryenvironment.
1
See “Performing initial configuration ofManagement Server installation in DRenvironment” on page 84.
Perform initial configuration ofManagement Server installation indisaster recovery environment.
2
See “Creating the base service groups for DRconfiguration” on page 84.
Create the base service groups inVCS for DR configuration.
3
See “Enabling DR configuration” on page 87.Enable Veritas InfoScaleOperations Manager DRconfiguration.
4
See “Configuring a new Veritas InfoScale Operations Manager installation in highavailability environment” on page 73.
See “Configuring an existing Veritas InfoScale Operations Manager installation inhigh availability environment” on page 79.
82Configuring Veritas InfoScale Operations Manager in a high availability and disaster recovery environmentConfiguring Management Server in one-to-one DR environment
Prerequisites for configuring a Management Server in DRenvironment
Before you configure Veritas InfoScale Operations Manager in the high availabilityand disaster recovery environment, ensure the following:
■ A Storage Foundation disk group, volume and a file system for the data iscreated. Use VxVM and VxFS to create the disk group, volume and a file system.The disk group, volume and a file system are used to configure the VeritasInfoScale Operations Manager database in high availability environment.
■ A virtual IP and a virtual host name are available for installing and using VeritasInfoScale Operations Manager in disaster recovery environment. This IP is laterused for configuring SFM_Services_IP resource and it should not be sharedwith other applications.
■ If you are using VVR for replication, ensure that Storage Foundation HA 5.x, orlater, and VCS cluster are installed on the hosts that you want to designate asNode1 in local site (Site A) and Node2 in remote site (Site B).
■ If you are using VVR for replication, ensure that Global Cluster Option (GCO)is enabled in VCS in Site A and Site B. For more information on enabling GCO,see Cluster Server Administrator’s Guide.
■ If you are using VVR for replication, ensure that Volume Replicator (VVR) shouldbe configured in Site A and Site B at VxVM level. For more information onconfiguring VVR, see Volume Replicator Administrator's Guide.
■ Both the nodes on which you want to configure Veritas InfoScale OperationsManager in the disaster recovery environment must report synchronizedUniversal Time Clock (UTC/UC) time.
■ You must specify the database location. You can either use the default databaselocation /var/opt/VRTSsfmcs/db or specify another location. If you specify thelocation other than the default database location, you must make sure that it isnot part of the shared file system that is used for failover. Later, the VeritasInfoScale Operations Manager DR script moves the database to the shared filesystem.
■ If you do not use DNS Agent, you must add the host names to the /etc/hosts
file.
■ The SFM_Services and the SFM_SStore base service groups that are createdon Site A and Site B should have similar attributes and values.
■ Use different virtual IP addresses for GCO IP, SFM_Services_IP, and for theVVR rlinks.
83Configuring Veritas InfoScale Operations Manager in a high availability and disaster recovery environmentConfiguring Management Server in one-to-one DR environment
■ The virtual host name corresponding to the virtual IP configured inSFM_Services_IP must be the same in Site A and Site B.
■ The SFM_Services base service group must be configured as Global Servicegroup between the two clusters.
■ SFM_SStore service is online on any of the nodes before you execute thedisaster recovery script.
■ For more information on creating disk groups and volume, see Veritas StorageFoundation Administrator's Guide.
See “Configuring Management Server in one-to-one DR environment” on page 81.
Performing initial configuration of Management Server installation inDR environment
Before you configure a Linux-based Management Server in disaster recoveryenvironment, you need to perform the following steps:
To perform initial configuration of Management Server installation in disasterrecovery environment
1 Install Management Server on Node1 in Site A and Node2 in Site B.
2 Configure Node1 as Management Server in high availability environment usingthe virtual host and virtual IP. Follow the steps only for configuring Managementserver on Node1, described in the procedure.
See “Performing initial configuration of Management Server in HA environment”on page 75.
3 Use VCS DNS resource to update the host name and IP mapping. If you donot use DNS Agent, you must add the host names to the /etc/hosts file.
See “Configuring Management Server in one-to-one DR environment” on page 81.
Creating the base service groups for DR configurationYou need to create the base service groups in Cluster Server and link those baseservice groups and resource types for DR configuration.
You need to create at least the following service groups with their respectiveresources on Node1 and Node2:
ResourceService group
■ SFM_SStore_DG■ SFM_SStore_RVG
SFM_SStore
84Configuring Veritas InfoScale Operations Manager in a high availability and disaster recovery environmentConfiguring Management Server in one-to-one DR environment
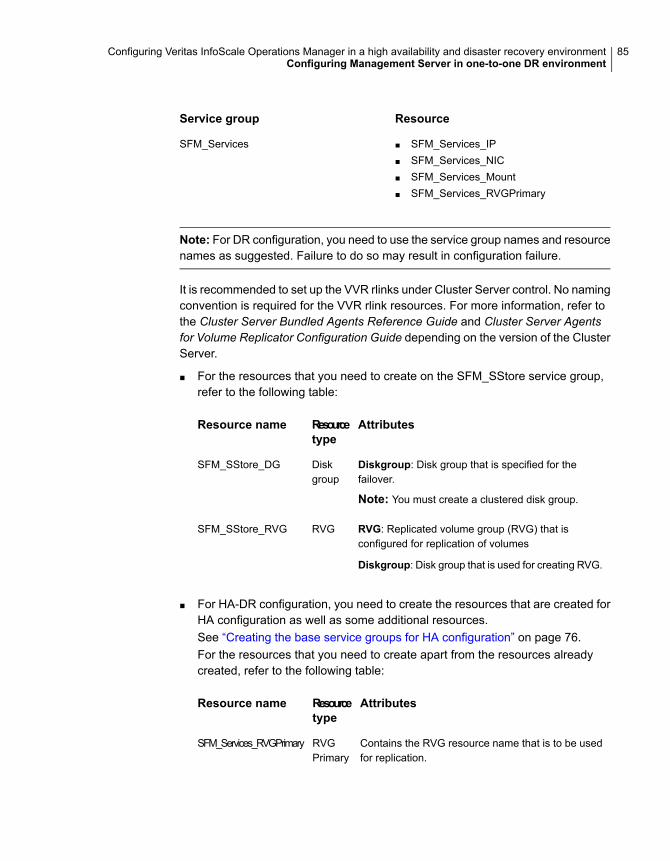
ResourceService group
■ SFM_Services_IP■ SFM_Services_NIC■ SFM_Services_Mount■ SFM_Services_RVGPrimary
SFM_Services
Note: For DR configuration, you need to use the service group names and resourcenames as suggested. Failure to do so may result in configuration failure.
It is recommended to set up the VVR rlinks under Cluster Server control. No namingconvention is required for the VVR rlink resources. For more information, refer tothe Cluster Server Bundled Agents Reference Guide and Cluster Server Agentsfor Volume Replicator Configuration Guide depending on the version of the ClusterServer.
■ For the resources that you need to create on the SFM_SStore service group,refer to the following table:
AttributesResourcetype
Resource name
Diskgroup: Disk group that is specified for thefailover.
Note: You must create a clustered disk group.
Diskgroup
SFM_SStore_DG
RVG: Replicated volume group (RVG) that isconfigured for replication of volumes
Diskgroup: Disk group that is used for creating RVG.
RVGSFM_SStore_RVG
■ For HA-DR configuration, you need to create the resources that are created forHA configuration as well as some additional resources.See “Creating the base service groups for HA configuration” on page 76.For the resources that you need to create apart from the resources alreadycreated, refer to the following table:
AttributesResourcetype
Resource name
Contains the RVG resource name that is to be usedfor replication.
RVGPrimary
SFM_Services_RVGPrimary
85Configuring Veritas InfoScale Operations Manager in a high availability and disaster recovery environmentConfiguring Management Server in one-to-one DR environment
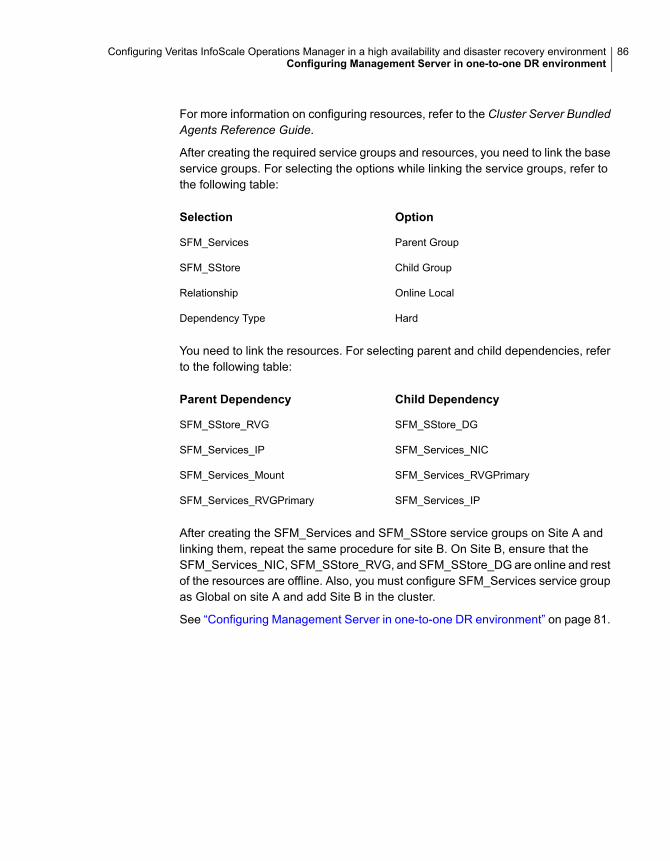
For more information on configuring resources, refer to the Cluster Server BundledAgents Reference Guide.
After creating the required service groups and resources, you need to link the baseservice groups. For selecting the options while linking the service groups, refer tothe following table:
OptionSelection
Parent GroupSFM_Services
Child GroupSFM_SStore
Online LocalRelationship
HardDependency Type
You need to link the resources. For selecting parent and child dependencies, referto the following table:
Child DependencyParent Dependency
SFM_SStore_DGSFM_SStore_RVG
SFM_Services_NICSFM_Services_IP
SFM_Services_RVGPrimarySFM_Services_Mount
SFM_Services_IPSFM_Services_RVGPrimary
After creating the SFM_Services and SFM_SStore service groups on Site A andlinking them, repeat the same procedure for site B. On Site B, ensure that theSFM_Services_NIC, SFM_SStore_RVG, and SFM_SStore_DG are online and restof the resources are offline. Also, you must configure SFM_Services service groupas Global on site A and add Site B in the cluster.
See “Configuring Management Server in one-to-one DR environment” on page 81.
86Configuring Veritas InfoScale Operations Manager in a high availability and disaster recovery environmentConfiguring Management Server in one-to-one DR environment
Enabling DR configurationTo enable Veritas InfoScale Operations Manager DR configuration
◆ Run the following script on Site A to configure Site B as part of the VeritasInfoScale Operations Manager DR configuration:
/opt/VRTSsfmh/bin/xprtlc
-u vxss://virtual_hostname:14545/sfm_admin/sfm_domain/vx
-d debug=1
-d setup=1
-d mh=Node_2
-l https://virtual_hostname:5634/admin/cgi-bin/cs_hadr_config.pl
where, virtual_hostname is the virtual host name of Site A and Node_2 is thename of Node at Site B.
See “Configuring Management Server in one-to-one DR environment” on page 81.
ConfiguringVeritas InfoScaleOperationsManagerin high availability and disaster recoveryenvironment
You can configure the high availability and disaster recovery feature only on aVeritas InfoScale Operations Manager Linux-based Management Server that isconfigured in high availability environment. In your globally distributed data center,the Veritas InfoScale Operations Manager HADR setup that is enabled with disasterrecovery enhances the failover support.
You can configure Veritas InfoScale Operations Manager in high availability anddisaster recovery environment in the following two ways:
■ Using symmetrical nodes
■ Using asymmetrical nodes
Prerequisites for configuring a Management Server in HA-DRenvironment
Before you configure Veritas InfoScale Operations Manager in the high availabilityand disaster recovery environment, ensure the following:
■ A virtual IP and a virtual host name are available for installing and using VeritasInfoScale Operations Manager in high availability and disaster recovery
87Configuring Veritas InfoScale Operations Manager in a high availability and disaster recovery environmentConfiguring Veritas InfoScale Operations Manager in high availability and disaster recovery environment
environment. This IP is used and configured in VCS for SFM_Services_IP andshould not be shared with other applications.
■ Storage Foundation HA 5.x, or later, and VCS cluster are installed on the hoststhat you want to designate as Node1 and Node2 in local site (Site A) and Node3and Node4 in remote site (Site B). Also, Node1 in Site A and Node3 in Site Bare considered as primary nodes. In case of HADR configuration usingasymmetrical nodes, only one node is configured on the remote site (Node3 ).
■ Global Cluster Option (GCO) is enabled in VCS in Site A and Site B. For moreinformation on enabling GCO, see Cluster Server Administrator’s Guide.
■ Volume Replicator (VVR) is configured in Site A and Site B at VxVM level. Formore information on configuring VVR, refer to the Veritas Volume ReplicatorAdministrator's Guide.
■ All the nodes on which you want to configure Veritas InfoScale OperationsManager in the high availability environment must report synchronized UniversalTime Clock (UTC/UC) time.
■ You must specify the database location. You can either use the default databaselocation /var/opt/VTRSsfmcs/db or specify another location. If you specify thelocation other than the default database location, you must make sure that it isnot part of the shared file system that is used for failover. Later, the VeritasInfoScale Operations Manager DR script moves the database to the shared filesystem.
■ If you do not use DNS Agent, you must add the host names to the /etc/hosts
file.
■ The SFM_Services and the SFM_SStore base service groups that are createdon Site A and Site B should have similar attributes and values, except forSFM_SStore_IP.
■ Use different virtual IP addresses for GCO IP and SFM_Services_IP.
■ The virtual host name that is used on all domains in Site A and Site B are thesame.
■ The SFM_Services base service group must be configured as Global Servicegroup between the two clusters.
■ SFM_SStore service is online on any of the nodes before you execute thedisaster recovery script.
■ You need to create a Storage Foundation disk group, file system, and a volumefor the data with identical names on all the nodes. Use VxVM and VxFS to createthe file system and volume. The disk group, file system, and volume are usedto configure the Veritas InfoScale Operations Manager database in highavailability environment.
88Configuring Veritas InfoScale Operations Manager in a high availability and disaster recovery environmentConfiguring Veritas InfoScale Operations Manager in high availability and disaster recovery environment
For more information on creating disk groups and volume, see Veritas StorageFoundation Administrator's Guide.
See “Configuring Veritas InfoScale Operations Manager in high availability anddisaster recovery environment” on page 87.
Performing initial configuration of Management Server installation inDR environment
Before you configure a Linux-based Management Server in high availability anddisaster recovery environment, you need to perform the following steps:
To perform initial configuration of Management Server installation in highavailability and disaster recovery environment
1 In case of HADR configuration using symmetrical nodes, install ManagementServer on Node1 and Node2 in Site A and Node3 and Node4 in Site B. In caseof HADR configuration using asymmetrical nodes, install Management serveron Node1 and Node2 in Site A and Node3 in Site B.
2 Configure Node1 as Management Server in high availability environment usingthe virtual host and virtual IP. Follow the steps only for configuring Managementserver on Node1, described in the procedure.
See “Performing initial configuration of Management Server in HA environment”on page 75.
3 In case of HADR configuration using symmetrical nodes, add Node3 and Node4as managed hosts to the Management Server that is configured on Node1. Incase of HADR configuration using asymmetrical nodes, add Node3 as managedhost to the Management Server.
4 Use VCS DNS resource to update the host name and IP mapping. If you donot use DNS Agent, you must add the host names to the /etc/hosts file.
See “Configuring Veritas InfoScale Operations Manager in high availability anddisaster recovery environment” on page 87.
Creating the base service groups for DR configurationYou need to create the base service groups in Cluster Server and link those baseservice groups and resource types for DR configuration.
You need to create at least the following service groups with their respectiveresources on the cluster that contains Node1 and Node2 on site A:
89Configuring Veritas InfoScale Operations Manager in a high availability and disaster recovery environmentConfiguring Veritas InfoScale Operations Manager in high availability and disaster recovery environment
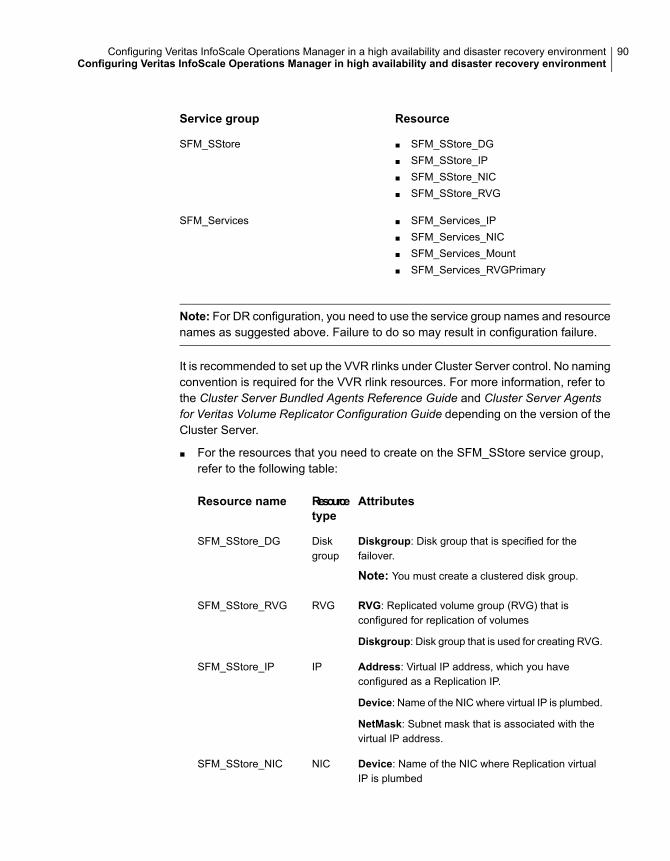
ResourceService group
■ SFM_SStore_DG■ SFM_SStore_IP■ SFM_SStore_NIC■ SFM_SStore_RVG
SFM_SStore
■ SFM_Services_IP■ SFM_Services_NIC■ SFM_Services_Mount■ SFM_Services_RVGPrimary
SFM_Services
Note: For DR configuration, you need to use the service group names and resourcenames as suggested above. Failure to do so may result in configuration failure.
It is recommended to set up the VVR rlinks under Cluster Server control. No namingconvention is required for the VVR rlink resources. For more information, refer tothe Cluster Server Bundled Agents Reference Guide and Cluster Server Agentsfor Veritas Volume Replicator Configuration Guide depending on the version of theCluster Server.
■ For the resources that you need to create on the SFM_SStore service group,refer to the following table:
AttributesResourcetype
Resource name
Diskgroup: Disk group that is specified for thefailover.
Note: You must create a clustered disk group.
Diskgroup
SFM_SStore_DG
RVG: Replicated volume group (RVG) that isconfigured for replication of volumes
Diskgroup: Disk group that is used for creating RVG.
RVGSFM_SStore_RVG
Address: Virtual IP address, which you haveconfigured as a Replication IP.
Device: Name of the NIC where virtual IP is plumbed.
NetMask: Subnet mask that is associated with thevirtual IP address.
IPSFM_SStore_IP
Device: Name of the NIC where Replication virtualIP is plumbed
NICSFM_SStore_NIC
90Configuring Veritas InfoScale Operations Manager in a high availability and disaster recovery environmentConfiguring Veritas InfoScale Operations Manager in high availability and disaster recovery environment
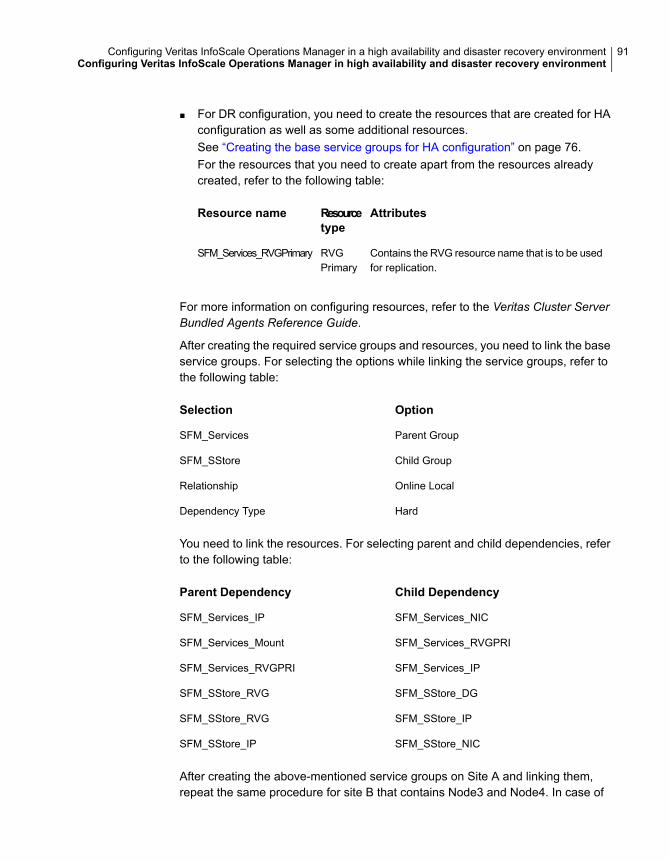
■ For DR configuration, you need to create the resources that are created for HAconfiguration as well as some additional resources.See “Creating the base service groups for HA configuration” on page 76.For the resources that you need to create apart from the resources alreadycreated, refer to the following table:
AttributesResourcetype
Resource name
Contains the RVG resource name that is to be usedfor replication.
RVGPrimary
SFM_Services_RVGPrimary
For more information on configuring resources, refer to the Veritas Cluster ServerBundled Agents Reference Guide.
After creating the required service groups and resources, you need to link the baseservice groups. For selecting the options while linking the service groups, refer tothe following table:
OptionSelection
Parent GroupSFM_Services
Child GroupSFM_SStore
Online LocalRelationship
HardDependency Type
You need to link the resources. For selecting parent and child dependencies, referto the following table:
Child DependencyParent Dependency
SFM_Services_NICSFM_Services_IP
SFM_Services_RVGPRISFM_Services_Mount
SFM_Services_IPSFM_Services_RVGPRI
SFM_SStore_DGSFM_SStore_RVG
SFM_SStore_IPSFM_SStore_RVG
SFM_SStore_NICSFM_SStore_IP
After creating the above-mentioned service groups on Site A and linking them,repeat the same procedure for site B that contains Node3 and Node4. In case of
91Configuring Veritas InfoScale Operations Manager in a high availability and disaster recovery environmentConfiguring Veritas InfoScale Operations Manager in high availability and disaster recovery environment
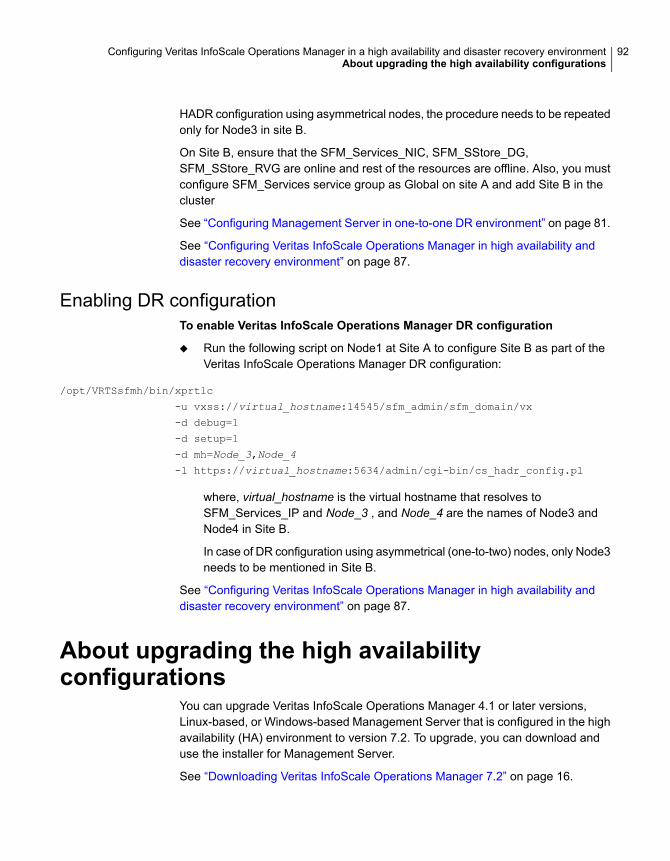
HADR configuration using asymmetrical nodes, the procedure needs to be repeatedonly for Node3 in site B.
On Site B, ensure that the SFM_Services_NIC, SFM_SStore_DG,SFM_SStore_RVG are online and rest of the resources are offline. Also, you mustconfigure SFM_Services service group as Global on site A and add Site B in thecluster
See “Configuring Management Server in one-to-one DR environment” on page 81.
See “Configuring Veritas InfoScale Operations Manager in high availability anddisaster recovery environment” on page 87.
Enabling DR configurationTo enable Veritas InfoScale Operations Manager DR configuration
◆ Run the following script on Node1 at Site A to configure Site B as part of theVeritas InfoScale Operations Manager DR configuration:
/opt/VRTSsfmh/bin/xprtlc
-u vxss://virtual_hostname:14545/sfm_admin/sfm_domain/vx
-d debug=1
-d setup=1
-d mh=Node_3,Node_4
-l https://virtual_hostname:5634/admin/cgi-bin/cs_hadr_config.pl
where, virtual_hostname is the virtual hostname that resolves toSFM_Services_IP and Node_3 , and Node_4 are the names of Node3 andNode4 in Site B.
In case of DR configuration using asymmetrical (one-to-two) nodes, only Node3needs to be mentioned in Site B.
See “Configuring Veritas InfoScale Operations Manager in high availability anddisaster recovery environment” on page 87.
About upgrading the high availabilityconfigurations
You can upgrade Veritas InfoScale Operations Manager 4.1 or later versions,Linux-based, or Windows-based Management Server that is configured in the highavailability (HA) environment to version 7.2. To upgrade, you can download anduse the installer for Management Server.
See “Downloading Veritas InfoScale Operations Manager 7.2” on page 16.
92Configuring Veritas InfoScale Operations Manager in a high availability and disaster recovery environmentAbout upgrading the high availability configurations
After the upgrade, you can use the HA environment on the upgraded VeritasInfoScale Operations Manager 7.2 Management Server.
Note: In the HA configuration for the Windows environment, it is mandatory to useCluster Server (VCS ) private NT domain to log on to Veritas InfoScale OperationsManager.
See “Upgrading Management Server in high availability environment” on page 93.
Upgrading Management Server in high availability environmentBefore you upgrade Veritas InfoScale Operations Manager in the high availabilityenvironment, keep in mind the following:
■ The SFM_Services, the SFM_SStore, and the SFM_Xprtld service groups shouldbe online on one of the nodes of Veritas InfoScale Operations Manager in thehigh availability environment, which is the active node.
■ Veritas recommends that you take a backup of the Management Server data.See “Backing up Veritas InfoScale Operations Manager data on Linux beforeupgrading to version 7.2” on page 59.See “Backing up Veritas InfoScale Operations Manager data on Windows beforeupgrading to version 7.2” on page 62.
Note: You must upgrade the active node before you upgrade the slave nodes.
To upgrade Management Server in high availability environment to 7.2
1 Follow the steps to upgrade Management Server on the active node, and then,on the slave nodes.
See “Upgrading Management Server on Linux” on page 51.
See “Upgrading Management Server on Windows” on page 53.
After the upgrade on the active node, the SFM_Services service group, andthe SFM_SStore service group, are in a frozen state.
You must upgrade all the slave nodes before you unfreeze the service groupson the active node to prevent issues during failover.
2 To unfreeze the service groups on the active node, run the following command:
■ On a UNIX host:/opt/VRTSsfmcs/config/vcs/sfmha start
■ On a Windows host:
93Configuring Veritas InfoScale Operations Manager in a high availability and disaster recovery environmentAbout upgrading the high availability configurations
"installdir\VRTSsfmh\bin\perl.exe"
"installdir\VRTSsfmcs\config\vcs\sfmha" start
where, installdir is the installation directory of Management Server.
3 In the console, verify that the SFM_Services, the SFM_SStore, and theSFM_Xprtld service groups are online on the active node.
See “About upgrading the high availability configurations” on page 92.
See “Upgrading Management Server in high availability and disaster recoveryenvironment” on page 94.
About upgrading the high availability and disasterrecovery configurations
You can upgrade Veritas InfoScale Operations Manager 4.1, or later versions,UNIX-based Management Server that is configured in the high availability anddisaster recovery (HA-DR) environment to version 7.2. To upgrade, you candownload and use the installer for Management Server.
See “Downloading Veritas InfoScale Operations Manager 7.2” on page 16.
After the upgrade, you can use the HA-DR environments on the upgraded VeritasInfoScale Operations Manager 7.2 Management Server.
See “Upgrading Management Server in high availability and disaster recoveryenvironment” on page 94.
Upgrading Management Server in high availability and disasterrecovery environment
Before you upgrade Veritas InfoScale Operations Manager in the high availabilityand disaster recovery environment, keep in mind the following:
■ The SFM_Services, the SFM_SStore, and the SFM_Xprtld service groups shouldbe online on one of the nodes of Veritas InfoScale Operations Manager in thehigh availability environment, which is the active node.
Note: You must upgrade the active node before you upgrade the slave nodes.
94Configuring Veritas InfoScale Operations Manager in a high availability and disaster recovery environmentAbout upgrading the high availability and disaster recovery configurations
To upgrade Management Server in high availability environment to 7.2
1 Follow the steps to upgrade Management Server on the active node, and then,on the slave nodes.
See “Upgrading Management Server on Linux” on page 51.
After the upgrade on the active node, the SFM_Services service group, andthe SFM_SStore service group, are in a frozen state.
You must upgrade all the slave nodes before you unfreeze the service groupson the active node to prevent issues during failover.
2 To unfreeze the service groups on the active node, run the following command:
/opt/VRTSsfmcs/config/vcs/sfmha start
where, installdir is the installation directory.
3 You must upgrade all the slave nodes before you unfreeze the service groupson the active node to prevent issues during failover.
4 In the console, verify that the SFM_Services, the SFM_SStore, and theSFM_Xprtld service groups are online on the active node.
See “About upgrading the high availability and disaster recovery configurations”on page 94.
See “Upgrading Management Server in high availability environment” on page 93.
Removing the high availability configurationYou can remove the high availability configuration only from a Veritas InfoScaleOperations Manager Linux-based Management Server. To remove the highavailability configuration from Veritas InfoScale Operations Manager, you need tolaunch the https://hostname:5634 URL.
Note: In Veritas InfoScale Operations Manager 7.2, you cannot remove the VeritasInfoScale Operations Manager HA-DR environment that is configured in the remotesite.
The procedure uses the following host names:
My_virtual-host_1Name of the Management Server host that is configured ina high availability environment
95Configuring Veritas InfoScale Operations Manager in a high availability and disaster recovery environmentRemoving the high availability configuration
To remove the high availability configuration fromVeritas InfoScaleOperationsManager
1 Launch the following URL from a Web browser:
https://My_Virtual-host_1:5634
where, My_Virtual-host_1 is the virtual host name of the Management Serverhost that is configured in a high availability environment.
2 In the configuration dialog, select Reconfigure as a NON HA CMS and clickNext.
3 In the panel that lists the tasks that are to be performed to remove the VeritasInfoScale Operations Manager HA configuration, click Rollover.
You must perform the rollover task on Node1 when you remove the highavailability configuration from Veritas InfoScale Operations Manager.
After the rollover task, you remove the high availability configuration fromVeritas InfoScale Operations Manager and move back to standalone mode.After you perform the rollover task, you do the following:
■ On Node1and Node2, remove the sfm_ha directory from the mount locationof the file system.
■ On both the nodes, check for the VRTSsfmcs.pre_clus file on the locationvar/opt/.VRTSsfmcs.pre_clus/. If the VRTSsfmcs.pre_clus file exist on anyof the nodes, remove the file.
4 In the next panel, view the status of the tasks that are performed as part ofremoving the Veritas InfoScale Operations Manager HA configuration and dothe following:
■ Click the link that is displayed on the panel to log on to Management Serverfrom which the HA configuration is removed.
■ Click Quit to quit the configuration dialog.
96Configuring Veritas InfoScale Operations Manager in a high availability and disaster recovery environmentRemoving the high availability configuration
Installing and uninstallingVeritas InfoScaleOperations Manageradd-ons
This chapter includes the following topics:
■ About deploying Veritas InfoScale Operations Manager add-ons
■ Downloading a Veritas InfoScale Operations Manager add-on
■ Uploading a Veritas InfoScale Operations Manager add-on to the repository
■ Installing a Veritas InfoScale Operations Manager add-on
■ Uninstalling a Veritas InfoScale Operations Manager add-on
■ Removing a Veritas InfoScale Operations Manager add-on from the repository
■ Canceling deployment request for a Veritas InfoScale Operations Manageradd-on
■ Installing a Veritas InfoScale Operations Manager add-on on a specific managedhost
■ Uninstalling a Veritas InfoScale Operations Manager add-on from a specificmanaged host
■ Enabling a Veritas InfoScale Operations Manager add-on on a specific managedhost
5Chapter
■ Disabling a Veritas InfoScale Operations Manager add-on from a specificmanaged host
■ Refreshing the repository
■ Restarting the web server
About deploying Veritas InfoScale OperationsManager add-ons
Veritas InfoScale Operations Manager add-ons are independent optional featurepacks that you can deploy on managed hosts. Add-ons are independent of eachother, and they can be installed or uninstalled based on your business requirements.
Using the Management Server console, you can view the details of those VeritasInfoScale Operations Manager add-ons for which there is at least one applicablehost in the domain.
You can download and install the add-ons in one of the following ways:
■ Download from Veritas Services and Operations Readiness Tools (SORT)website. In the Management Server console, upload the add-on to the repositoryusing Upload Solutions, and then install.
■ Use the Management Server console to download and install the add-on.
Note: If you have installed the Management Server package with the add-ons, thenyou can view the add-ons in the Repository view and directly install them.
The Help add-on is not a part of the package. You need to separately downloadand install it.
For more information on the Veritas InfoScale Operations Manager add-ons andtheir supported versions, refer to the Veritas InfoScale Operations ManagerHardware and Software Compatibility List (HSCL).
Add-on are of the following types:
■ Install on Management Server only.
■ Install on managed host only.
■ Install on Management Server and managed host.
98Installing and uninstalling Veritas InfoScale Operations Manager add-onsAbout deploying Veritas InfoScale Operations Manager add-ons
Note: When you install the add-on in high availability and high availability-disasterrecovery (HA-DR) environment, you need to install the add-ons manually on all thenodes of high availability and high availability-disaster recovery cluster before usingthem for the configuration. Avoiding this step might result into configuration losswhen the Management Server failovers to other nodes in the high availability andhigh availability-disaster recovery cluster.
If you have upgraded to Veritas InfoScale Operations Manager Management Server7.2 from a previous version of Veritas InfoScale Operations Manager, you mayneed to upgrade the add-ons. The previous version of the add-on may not besupported with Veritas InfoScale Operations Manager 7.2.
When you upgrade an add-on which is installed on Management Server, the newversion overwrites the old version. When you upgrade an add-on which is installedon the managed host, the old version is retained.
See “About deploying maintenance release packages and patches” on page 214.
See “Downloading a Veritas InfoScale Operations Manager add-on” on page 99.
See “Uploading a Veritas InfoScale Operations Manager add-on to the repository”on page 100.
See “Downloading Management Server files” on page 16.
Downloading a Veritas InfoScale OperationsManager add-on
Using the Management Server console, you can do one of the following:
■ Download individual Veritas InfoScale Operations Manager add-ons using theManagement Server console.
■ Download the zip file which contains all the Veritas InfoScale Operations Manageradd-ons from SORT website. The zip file or compressed file for a version containsall the add-ons applicable for that particular version.
To perform this task, your user group must be assigned the Admin role on theManagement Server perspective.
To download a Veritas InfoScale Operations Manager add-on
1 In the Home page on the Management Server console, click Settings.
2 Click Deployment.
99Installing and uninstalling Veritas InfoScale Operations Manager add-onsDownloading a Veritas InfoScale Operations Manager add-on
3 Expand Add-ons to locate the add-on which you want to download.
4 Right-click the add-on and select Download to download on your localcomputer.
See “Uploading a Veritas InfoScale Operations Manager add-on to the repository”on page 100.
See “Installing a Veritas InfoScale Operations Manager add-on” on page 101.
Uploading a Veritas InfoScaleOperationsManageradd-on to the repository
You need to download the zip file containing the add-ons bundle from SORT website.You can also download individual add-ons using the Management Server console.
After you download the add-ons, you can upload them to the Management Serverindividually or as a zip file.
To perform this task, your user group must be assigned the Admin role on theManagement Server perspective.
To upload a Veritas InfoScale Operations Manager add-on to the repository
1 In the Home page on the Management Server console, click Settings.
2 Do one of the following:
■ Click Upload Solutions.
■ Click Deployment, and then click Upload Solutions.
3 In the Upload Solutions to Repository wizard panel, click Browse to selectthe add-on that you want to upload.
4 Click Upload to upload the add-on to the repository.
5 Click Close.
See “Installing a Veritas InfoScale Operations Manager add-on” on page 101.
See “Removing a Veritas InfoScale Operations Manager add-on from the repository”on page 105.
See “About deploying Veritas InfoScale Operations Manager add-ons” on page 98.
Upload Solutions to Repository panel optionsUse this wizard panel to select the Veritas InfoScale Operations Manager add-on,hot fix, or package, and upload the same to the repository.
100Installing and uninstalling Veritas InfoScale Operations Manager add-onsUploading a Veritas InfoScale Operations Manager add-on to the repository
Storage Foundation High Availability hot fixes cannot be uploaded to the repository.
To upload Storage Foundation High Availability hot fixes to the repository, you needto install the Patch Installer Add-on.
For more information on Patch Installer Add-on, refer to the Veritas InfoScaleOperations Manager Add-ons User Guide.
See “Uploading a Veritas InfoScale Operations Manager add-on to the repository”on page 100.
See “Uploading a Veritas InfoScale Operations Manager hot fix or package to therepository” on page 215.
Installing a Veritas InfoScale OperationsManageradd-on
Before you install an add-on, you need to download it either from SORT websiteor using the Management Server console. Add-ons are of the following types:
■ Install on Management Server only.
■ Install on managed host only.
■ Install on Management Server and managed host.
If you select to install an add-on that is applicable to Management Server andmanaged hosts, then the add-on first installs on Management Server and then onthe managed hosts.
Depending on the add-on that you install, you may need to restart the web server.
To perform this task, your user group must be assigned the Admin role on theManagement Server perspective.
To install a Veritas InfoScale Operations Manager add-on
1 In the Home page on the Management Server console, click Settings.
2 Click Deployment.
3 Expand Add-ons to select the add-on.
4 In the Add-ons tab, right-click the add-on, and select Install.
5 In the Install -Download Add-on wizard panel, select a download option, andclick Next.
See “Install - Download Add-on panel options” on page 102.
6 In the Install - Selects hosts wizard panel, select the hosts, and click Finish.
See “Install - Select hosts panel options for add-ons” on page 102.
101Installing and uninstalling Veritas InfoScale Operations Manager add-onsInstalling a Veritas InfoScale Operations Manager add-on
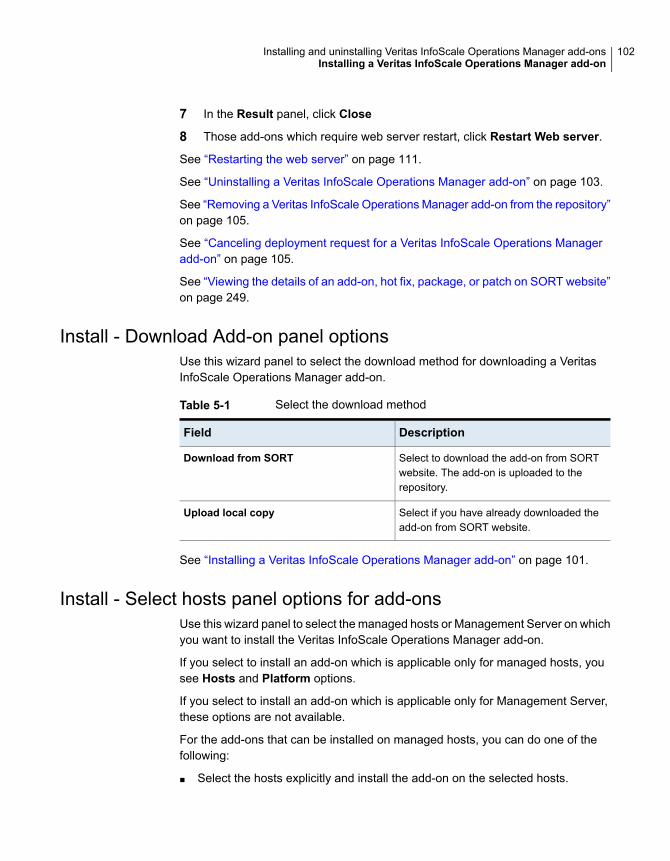
7 In the Result panel, click Close
8 Those add-ons which require web server restart, click Restart Web server.
See “Restarting the web server” on page 111.
See “Uninstalling a Veritas InfoScale Operations Manager add-on” on page 103.
See “Removing a Veritas InfoScale Operations Manager add-on from the repository”on page 105.
See “Canceling deployment request for a Veritas InfoScale Operations Manageradd-on” on page 105.
See “Viewing the details of an add-on, hot fix, package, or patch on SORT website”on page 249.
Install - Download Add-on panel optionsUse this wizard panel to select the download method for downloading a VeritasInfoScale Operations Manager add-on.
Table 5-1 Select the download method
DescriptionField
Select to download the add-on from SORTwebsite. The add-on is uploaded to therepository.
Download from SORT
Select if you have already downloaded theadd-on from SORT website.
Upload local copy
See “Installing a Veritas InfoScale Operations Manager add-on” on page 101.
Install - Select hosts panel options for add-onsUse this wizard panel to select the managed hosts or Management Server on whichyou want to install the Veritas InfoScale Operations Manager add-on.
If you select to install an add-on which is applicable only for managed hosts, yousee Hosts and Platform options.
If you select to install an add-on which is applicable only for Management Server,these options are not available.
For the add-ons that can be installed on managed hosts, you can do one of thefollowing:
■ Select the hosts explicitly and install the add-on on the selected hosts.
102Installing and uninstalling Veritas InfoScale Operations Manager add-onsInstalling a Veritas InfoScale Operations Manager add-on
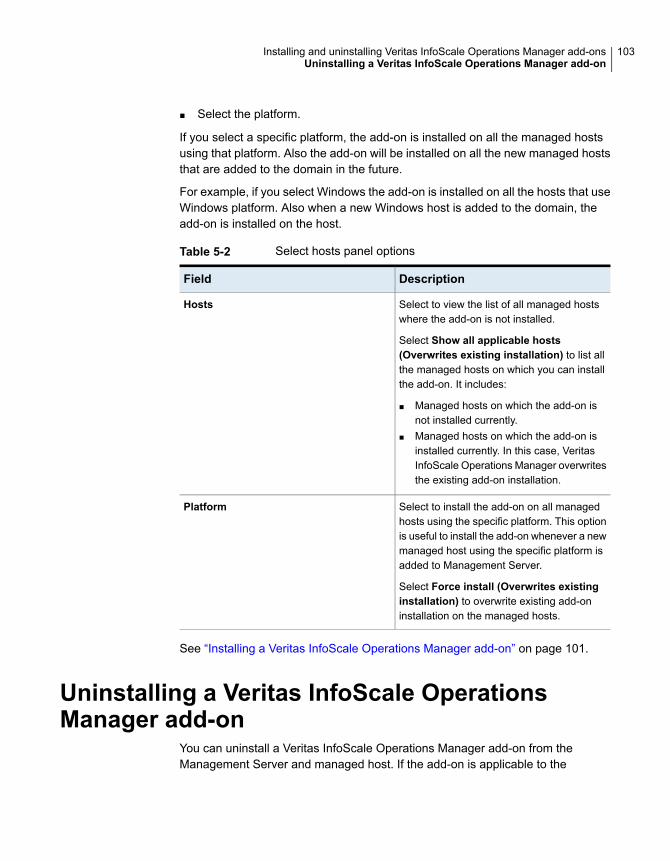
■ Select the platform.
If you select a specific platform, the add-on is installed on all the managed hostsusing that platform. Also the add-on will be installed on all the new managed hoststhat are added to the domain in the future.
For example, if you select Windows the add-on is installed on all the hosts that useWindows platform. Also when a new Windows host is added to the domain, theadd-on is installed on the host.
Table 5-2 Select hosts panel options
DescriptionField
Select to view the list of all managed hostswhere the add-on is not installed.
Select Show all applicable hosts(Overwrites existing installation) to list allthe managed hosts on which you can installthe add-on. It includes:
■ Managed hosts on which the add-on isnot installed currently.
■ Managed hosts on which the add-on isinstalled currently. In this case, VeritasInfoScale Operations Manager overwritesthe existing add-on installation.
Hosts
Select to install the add-on on all managedhosts using the specific platform. This optionis useful to install the add-on whenever a newmanaged host using the specific platform isadded to Management Server.
Select Force install (Overwrites existinginstallation) to overwrite existing add-oninstallation on the managed hosts.
Platform
See “Installing a Veritas InfoScale Operations Manager add-on” on page 101.
Uninstalling a Veritas InfoScale OperationsManager add-on
You can uninstall a Veritas InfoScale Operations Manager add-on from theManagement Server and managed host. If the add-on is applicable to the
103Installing and uninstalling Veritas InfoScale Operations Manager add-onsUninstalling a Veritas InfoScale Operations Manager add-on
Management Server, you need to restart the web server depending on the add-onafter you uninstall the add-on successfully.
To perform this task, your user group must be assigned the Admin role on theManagement Server perspective.
To uninstall a Veritas InfoScale Operations Manager add-on
1 In the Home page on the Management Server console, click Settings.
2 Click Deployment.
3 Expand Add-ons to locate the add-on.
4 In the Add-ons tab, right-click the add-on that you want to uninstall, selectUninstall.
5 In the Uninstall panel, review the information, and click Yes.
See “Uninstall panel options” on page 104.
6 Those add-ons which require web server restart, click Restart Web server.
See “Restarting the web server” on page 111.
See “Installing a Veritas InfoScale Operations Manager add-on” on page 101.
See “Removing a Veritas InfoScale Operations Manager add-on from the repository”on page 105.
Uninstall panel optionsUse this wizard panel to uninstall the Veritas InfoScale Operations Manager add-onor hot fix.
Use this wizard panel to confirm the action of uninstalling the add-on or hot fix fromall the hosts.
Select Ignore checks (if any) before uninstalling to ignore the checks beforeuninstalling.
Veritas InfoScale Operations Manager packages and patches cannot be uninstalled.
See “Uninstalling a Veritas InfoScale Operations Manager add-on” on page 103.
See “Uninstalling a Veritas InfoScale Operations Manager hot fix” on page 219.
104Installing and uninstalling Veritas InfoScale Operations Manager add-onsUninstalling a Veritas InfoScale Operations Manager add-on
Removing a Veritas InfoScaleOperationsManageradd-on from the repository
You can remove a Veritas InfoScale Operations Manager add-on from the repositoryand Management Server. Detailed information of the add-on will not be displayedin the Repository view within Deployment.
To perform this task, your user group must be assigned the Admin role on theManagement Server perspective.
To remove a Veritas InfoScale OperationsManager add-on from the repository
1 In the Home page on the Management Server console, click Settings.
2 Click Deployment.
3 Expand Add-ons to locate the add-on.
4 InAdd-ons tab, right-click the add-on that you want to remove, selectRemove.
5 In the Remove panel, click Yes.
See “Remove panel options” on page 105.
See “Refreshing the repository” on page 111.
See “Installing a Veritas InfoScale Operations Manager add-on” on page 101.
See “Installing a Veritas InfoScale Operations Manager hot fix, package, or patch”on page 216.
See “Uninstalling a Veritas InfoScale Operations Manager add-on” on page 103.
Remove panel optionsUse this wizard panel to confirm the action of removing the add-on, hot fix, package,or patch for Veritas InfoScale Operations Manager or Storage Foundation HighAvailability from the repository.
See “Removing a Veritas InfoScale Operations Manager add-on from the repository”on page 105.
See “Removing a hot fix, package, or patch from the repository” on page 219.
Canceling deployment request for a VeritasInfoScale Operations Manager add-on
Using the Management Server console, you can cancel the deployment requestfor a Veritas InfoScale Operations Manager add-on.
105Installing and uninstalling Veritas InfoScale Operations Manager add-onsRemoving a Veritas InfoScale Operations Manager add-on from the repository
Deployment requests are of two types, Deploy by host and Deploy by platform.Deploy by host type lets you select the hosts on which you want to deploy theadd-on. If you select Deploy by platform, then the add-on is deployed on all thehosts having the selected platform.
Request of the type Deploy by host cannot be canceled.
If you initiate an install request of Deploy by platform type, then the request isapplicable for all the existing hosts as well as the new hosts that are added to theManagement Server domain on a later date. In case ofDeploy by platform request,if you cancel the deployment request, the add-on installation on all the existinghosts is completed. But the add-on is not installed on the hosts that are added tothe domain after cancellation of the deployment request.
To perform this task, your user group must be assigned the Admin role on theManagement Server perspective.
To cancel deployment request for a Veritas InfoScale Operations Manageradd-on
1 In the Home page on the Management Server console, click Settings.
2 Click Deployment.
3 Expand Add-ons to locate the add-on whose deployment request you wantto cancel.
4 Select the Requests tab.
5 Right-click the request and select Cancel Request.
6 In the Cancel Deployment Request wizard panel, click OK.
See “Cancel Deployment Request panel options” on page 106.
See “Installing a Veritas InfoScale Operations Manager add-on” on page 101.
See “Installing a Veritas InfoScale Operations Manager hot fix, package, or patch”on page 216.
See “Uninstalling a Veritas InfoScale Operations Manager add-on” on page 103.
Cancel Deployment Request panel optionsUse this wizard panel to cancel deployment request for add-on, hot fix, package,or patch for Veritas InfoScale Operations Manager or Storage Foundation HighAvailability.
See “Canceling deployment request for a Veritas InfoScale Operations Manageradd-on” on page 105.
See “Canceling deployment request for a hot fix, package, or patch” on page 220.
106Installing and uninstalling Veritas InfoScale Operations Manager add-onsCanceling deployment request for a Veritas InfoScale Operations Manager add-on
Installing a Veritas InfoScale OperationsManageradd-on on a specific managed host
Using the Management Server console, you can install the Veritas InfoScaleOperations Manager add-on on the selected managed host. If the add-on is alreadyinstalled on the selected host, then Veritas InfoScale Operations Manager overwritesthe existing installation. It is referred to as a force installation.
To perform this task, your user group must be assigned the Admin role on theManagement Server perspective.
To install a Veritas InfoScale Operations Manager add-on on a specificmanaged host
1 In the Home page on the Management Server console, click Settings.
2 Click Deployment.
3 Expand Add-ons to select an add-on.
4 In the Applicable Hosts tab, right-click the host, and select Install.
5 In the Install wizard panel, review the information, and click OK.
See “Install panel options” on page 107.
6 In the Install - Result panel, clickOK. If the add-on requires web server restart,click the Restart Web Server button on the toolbar.
See “Restarting the web server” on page 111.
See “About deploying Veritas InfoScale Operations Manager add-ons” on page 98.
Install panel optionsUse this wizard panel to install the Veritas InfoScale Operations Manager add-onor hot fix on a selected host.
Table 5-3 lists the options for Veritas InfoScale Operations Manager add-on andhot fixes.
Table 5-3 Install panel options for installing an add-on or hot fix on aselected host
DescriptionField
Displays the name of the selected host.Name
Displays the status of the selected add-on orhot fix on the selected host.
Status
107Installing and uninstalling Veritas InfoScale Operations Manager add-onsInstalling a Veritas InfoScale Operations Manager add-on on a specific managed host
Table 5-3 Install panel options for installing an add-on or hot fix on aselected host (continued)
DescriptionField
Select to ignore checks before installing.Ignore checks (if any) before installing
See “Installing a Veritas InfoScale Operations Manager add-on on a specificmanaged host” on page 107.
See “Installing a Veritas InfoScale Operations Manager hot fix on a specific managedhost” on page 221.
Uninstalling a Veritas InfoScale OperationsManager add-on from a specific managed host
Using the Management Server console, you can uninstall the Veritas InfoScaleOperations Manager add-on from the selected managed host. You can uninstallthe add-on irrespective of its state (enabled or disabled).
To perform this task, your user group must be assigned the Admin role on theManagement Server perspective.
To uninstall a Veritas InfoScale Operations Manager add-on from a specificmanaged host
1 In the Home page on the Management Server console, click Settings.
2 Click Deployment.
3 Expand Add-ons to select an add-on.
4 In the Applicable Hosts tab, right-click the host, and select Uninstall.
5 In the Uninstall wizard panel, review the information, and click OK.
See “Uninstall panel options” on page 108.
6 In the Uninstall - Result panel, click OK.
7 Those add-ons which require web server restart, click Restart Web server.
See “Restarting the web server” on page 111.
See “About deploying Veritas InfoScale Operations Manager add-ons” on page 98.
Uninstall panel optionsUse this wizard panel to uninstall the Veritas InfoScale Operations Manager add-onor hot fix from the selected host.
108Installing and uninstalling Veritas InfoScale Operations Manager add-onsUninstalling a Veritas InfoScale Operations Manager add-on from a specific managed host
Table 5-4 lists the uninstall options for Veritas InfoScale Operations Manager add-onand hot fixes.
Table 5-4 Uninstall panel options for uninstalling an add-on or hot fix froma selected host
DescriptionField
Displays the name of the selected host.Name
Displays the status of the selected add-on orhot fix on the selected host.
Status
Select to ignore checks before installing.Ignore checks (if any) before installing
See “Uninstalling a Veritas InfoScale Operations Manager add-on from a specificmanaged host” on page 108.
See “Uninstalling a Veritas InfoScale Operations Manager hot fix from a specificmanaged host” on page 221.
Enabling a Veritas InfoScale Operations Manageradd-on on a specific managed host
Using the Management Server console, you can enable a Veritas InfoScaleOperations Manager add-on on a selected managed host. Depending on the add-on,you may need to restart the web server.
To perform this task, your user group must be assigned the Admin role on theManagement Server perspective.
To enable a Veritas InfoScale Operations Manager add-on on a specificmanaged host
1 In the Home page on the Management Server console, click Settings.
2 Click Deployment.
3 Expand Add-ons to select the add-on.
4 In the Applicable Hosts tab, right-click the host, and select Enable.
5 In the Enable wizard panel, review the information, and click OK.
6 In the Enable - Result panel, click OK.
7 Those add-ons which require web server restart, click Restart Web server.
See “Restarting the web server” on page 111.
109Installing and uninstalling Veritas InfoScale Operations Manager add-onsEnabling a Veritas InfoScale Operations Manager add-on on a specific managed host
See “Installing a Veritas InfoScale Operations Manager add-on on a specificmanaged host” on page 107.
See “Uninstalling a Veritas InfoScale Operations Manager add-on from a specificmanaged host” on page 108.
See “Disabling a Veritas InfoScale Operations Manager add-on from a specificmanaged host” on page 110.
Disabling a Veritas InfoScale OperationsManageradd-on from a specific managed host
Using the Management Server console, you can disable a Veritas InfoScaleOperations Manager add-on from a selected managed host. Depending on theadd-on, you may need to restart the web server.
To perform this task, your user group must be assigned the Admin role on theManagement Server perspective.
To disable a Veritas InfoScale Operations Manager add-on from a specificmanaged host
1 In the Home page on the Management Server console, click Settings.
2 Click Deployment.
3 Expand Add-ons to select the add-on.
4 In the Applicable Hosts tab, right-click the host, and select Disable.
5 In the Disable wizard panel, review the information, and click OK.
6 In the Disable - Result panel, click OK.
7 Those add-ons which require web server restart, click Restart Web server.
See “Restarting the web server” on page 111.
See “Installing a Veritas InfoScale Operations Manager add-on on a specificmanaged host” on page 107.
See “Uninstalling a Veritas InfoScale Operations Manager add-on from a specificmanaged host” on page 108.
See “Enabling a Veritas InfoScale Operations Manager add-on on a specificmanaged host” on page 109.
110Installing and uninstalling Veritas InfoScale Operations Manager add-onsDisabling a Veritas InfoScale Operations Manager add-on from a specific managed host
Refreshing the repositoryIf you remove an add-on, hot fix, package, or patch from the repository andManagement Server, detailed information of the same is not displayed in theRepository view within Deployment. Using the Management Server console, youcan refresh the repository to view the information again.
Latest information about add-ons, hot fixes, packages, and patches that is availableon SORT is also synchronized and displayed in the Repository view.
To perform this task, your user group must be assigned the Admin role on theManagement Server perspective.
To refresh the repository
1 In the Home page on the Management Server console, click Settings.
2 Click Deployment.
3 Right-click Repository and select Refresh Repository.
4 In the Refresh Repository panel, to include the previously removed updates,select Include removed updates.
5 Select the updates from the list and click Yes.
6 In the Result panel, click OK.
See “Removing a Veritas InfoScale Operations Manager add-on from the repository”on page 105.
See “About deploying Veritas InfoScale Operations Manager add-ons” on page 98.
Restarting the web serverDepending on the Veritas InfoScale Operations Manager add-on that you install,uninstall, enable, or disable on a host, you may need to restart the web server.
The Restart Web server button is displayed only if restart is required. You canalso restart using the CLI command: vomsc --restart web.
When you restart the web server, all the logged in users are logged out.
To perform this task, your user group must be assigned the Admin role on theManagement Server perspective.
To restart the web server
1 In the Home page on the Management Server console, click Settings.
2 Click Deployment, and click Restart Web Server.
See “Installing a Veritas InfoScale Operations Manager add-on” on page 101.
111Installing and uninstalling Veritas InfoScale Operations Manager add-onsRefreshing the repository
Setting up the ManagementServer environment
■ Chapter 6. Basic Veritas InfoScale Operations Manager tasks
■ Chapter 7. Adding and managing hosts
■ Chapter 8. Setting up user access
■ Chapter 9. Setting up fault monitoring
■ Chapter 10. Setting up virtualization environment discovery
■ Chapter 11. Deploying hot fixes, packages, and patches
■ Chapter 12. Configuring Management Server settings
■ Chapter 13. Setting up extended attributes
■ Chapter 14. Downloading price tier information from SORT
■ Chapter 15. Managing SFHA updates
■ Chapter 16. Viewing information on the Management Server environment
2Section
Basic Veritas InfoScaleOperations Manager tasks
This chapter includes the following topics:
■ About the communication between the managed hosts and Management Server
■ Connecting to Veritas InfoScale Operations Manager Management Server
■ Stopping and starting the Web application
■ About the Management Server perspective
About the communication between the managedhosts and Management Server
Veritas InfoScale Operations Manager provides you a single, centralizedmanagement console for the Storage Foundation and High Availability products.You can use it to monitor, visualize, and manage storage resources and generatereports about them. Veritas InfoScale Operations Manager lets administratorscentrally manage diverse data center environments.
A typical Veritas InfoScale Operations Manager deployment consists of aManagement Server and the managed hosts. The managed host can run on anyplatform that Veritas InfoScale Operations Manager supports. In a centrally manageddeployment, you must configure one host as Management Server. ManagementServer receives information about all the resources in its domain. When you log onto Management Server, you can gain access to the resources on different hostswithin the centrally-managed deployment.
The installer installs the VRTSsfmcs (Management Server) and the VRTSsfmh(managed host) packages on the host that is designated as Management Server.
6Chapter
The VRTSsfmh package contains the XPRTL component that facilitates thecommunication between the managed hosts and Management Server. TheVRTSsfmh package is installed on the managed host and Management Server.
The XPRTL component consists of the following:
■ The XPRTLD component, which is a light weight and full-featured Web server.
■ The XPRTLC component, which is an HTTP client that is based on commandlines. The XPRTLC component can send information to Web servers .
The XPRTLD and the XPRTLC components are integrated with VeritasAuthentication Services for secure SSL communication over HTTP.
The communication between the managed host and Management Server occursthrough the HTTPS protocol. The XPRTLD Web server running on both the managedhost and Management Server supports the Common Gateway Interface (CGI)standards. The managed hosts use XPRTLC and invoke CGI through the XPRTLDon Management Server to perform several actions such as the Veritas InfoScaleOperations Manager database update. Management Server uses XPRTLC andinvokes CGI through the XPRTLD on the managed hosts to perform various actionsthat include Storage Foundation and high availability operations.
See “Connecting to Veritas InfoScale Operations Manager Management Server”on page 114.
Connecting to Veritas InfoScale OperationsManager Management Server
After downloading the installation files, you must install and configure VeritasInfoScale Operations Manager Management Server.
See “Installing Management Server on Linux” on page 39.
See “Installing Management Server on Windows” on page 43.
You can use any supported Web browser to connect to Management Server.
114Basic Veritas InfoScale Operations Manager tasksConnecting to Veritas InfoScale Operations Manager Management Server
To connect to Veritas InfoScale Operations Manager Management Server
1 On a client system that has a network connection to the host, open a Webbrowser.
Your browser must be configured to accept cookies. If you are using pop-upblockers, either disable them or configure them to accept pop-ups from thehost.
2 In the browser’s address field, type the following URL and press Enter:
https://hostname:14161/
where hostname is the host name, fully-qualified host name, or IP address ofManagement Server.
Example: https://myhost.example.com:14161/
For Internet Explorer 7.0 on Windows Server 2008, or Firefox 3.0, if the Webpage does not get displayed, you have to set up the browser.
3 In the username and password fields, type credentials for a valid operatingsystem network domain account.
The Authentication Service automatically recognizes users in the domain—forexample, unixpwd or NT—on which the Authentication Broker host is a member.
4 Click Login.
You can view the Veritas InfoScale Operations Manager dashboard.
See “About installing managed host” on page 45.
Stopping and starting the Web applicationYou can stop and restart Veritas InfoScale Operations Manager Web UI framework.
To stop and restart Veritas InfoScale Operations Manager Web UI framework
1 Open an operating system console and log on as root to Management Server.
2 Depending on the platform of Management Server, use one of the following torestart Veritas InfoScale Operations Manager Web UI framework:
■ Red Hat Linux: Execute the /opt/VRTSsfmcs/cweb/sfmw restart
command.
■ Windows: Under Service Control Manager (services.msc), restart theStorage Manager Service service.
See “Connecting to Veritas InfoScale Operations Manager Management Server”on page 114.
115Basic Veritas InfoScale Operations Manager tasksStopping and starting the Web application
About the Management Server perspectiveThe Veritas InfoScale Operations Manager administrator uses the Settings pageon the Management Server console to set up the Management Server environment.
The Settings page is also known as the Management Server perspective.
To view information or perform operations on the Management Server perspectiverequires root user access or assignment of the Admin role on the ManagementServer perspective.
See “Connecting to Veritas InfoScale Operations Manager Management Server”on page 114.
116Basic Veritas InfoScale Operations Manager tasksAbout the Management Server perspective
Adding and managinghosts
This chapter includes the following topics:
■ Overview of host discovery
■ Overview of agentless discovery
■ Adding the managed hosts to Management Server using an agent configuration
■ Adding the managed hosts to Management Server using an agentlessconfiguration
■ Adding managed hosts to Management Server using the Auto Configure(gendeploy.pl) script
■ Editing the agentless host configuration
■ Refreshing the details of the managed host
■ Removing managed hosts from the Management Server domain
Overview of host discoveryFor an overview of host discovery, refer to the following topics:
See “Supported features for host discovery options” on page 121.
How Veritas InfoScale Operations Manager discovers hostsVeritas InfoScale Operations Manager provides several ways to discover the hostsand their associations to storage resources and network devices. To discover the
7Chapter
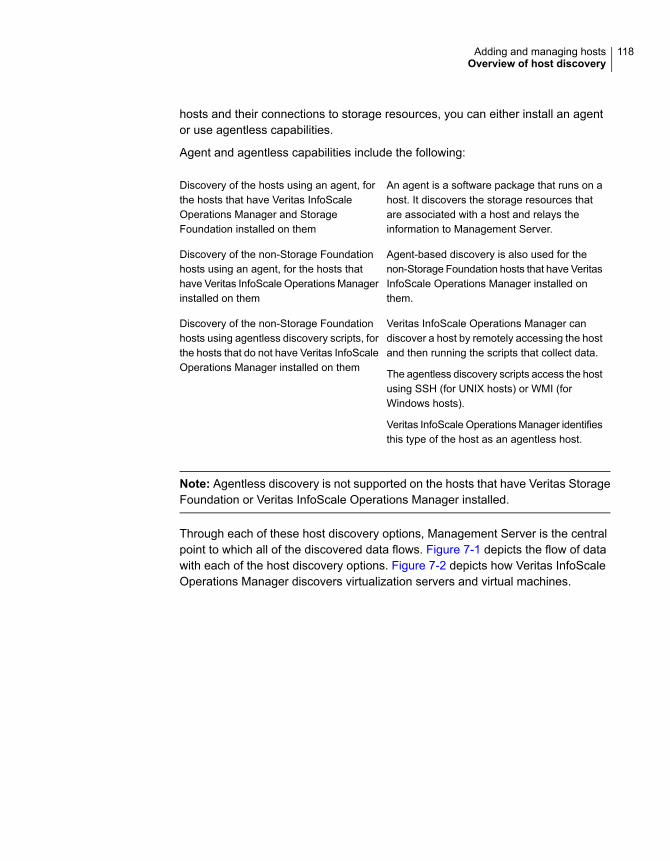
hosts and their connections to storage resources, you can either install an agentor use agentless capabilities.
Agent and agentless capabilities include the following:
An agent is a software package that runs on ahost. It discovers the storage resources thatare associated with a host and relays theinformation to Management Server.
Discovery of the hosts using an agent, forthe hosts that have Veritas InfoScaleOperations Manager and StorageFoundation installed on them
Agent-based discovery is also used for thenon-Storage Foundation hosts that have VeritasInfoScale Operations Manager installed onthem.
Discovery of the non-Storage Foundationhosts using an agent, for the hosts thathave Veritas InfoScale Operations Managerinstalled on them
Veritas InfoScale Operations Manager candiscover a host by remotely accessing the hostand then running the scripts that collect data.
The agentless discovery scripts access the hostusing SSH (for UNIX hosts) or WMI (forWindows hosts).
Veritas InfoScale Operations Manager identifiesthis type of the host as an agentless host.
Discovery of the non-Storage Foundationhosts using agentless discovery scripts, forthe hosts that do not have Veritas InfoScaleOperations Manager installed on them
Note: Agentless discovery is not supported on the hosts that have Veritas StorageFoundation or Veritas InfoScale Operations Manager installed.
Through each of these host discovery options, Management Server is the centralpoint to which all of the discovered data flows. Figure 7-1 depicts the flow of datawith each of the host discovery options. Figure 7-2 depicts how Veritas InfoScaleOperations Manager discovers virtualization servers and virtual machines.
118Adding and managing hostsOverview of host discovery
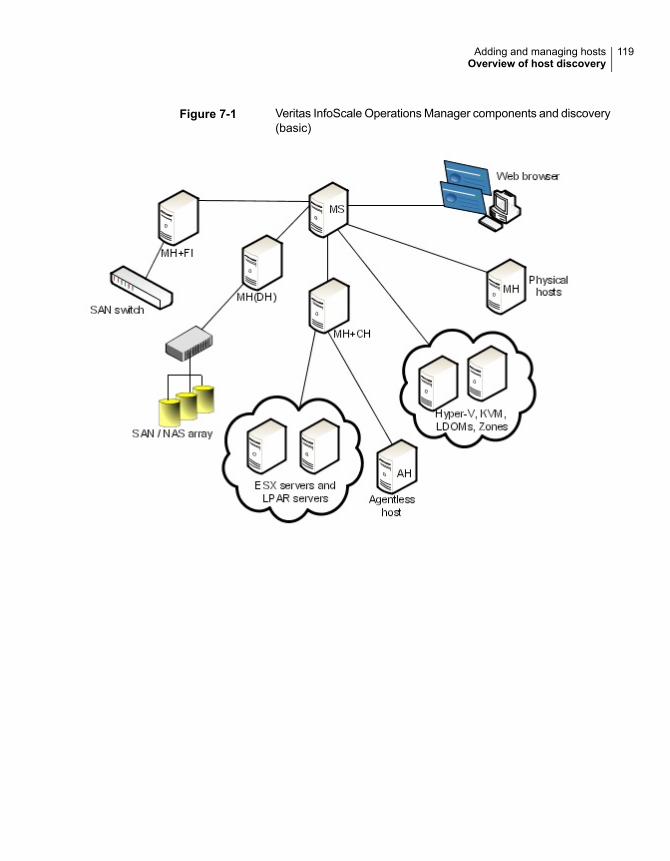
Figure 7-1 Veritas InfoScale Operations Manager components and discovery(basic)
119Adding and managing hostsOverview of host discovery
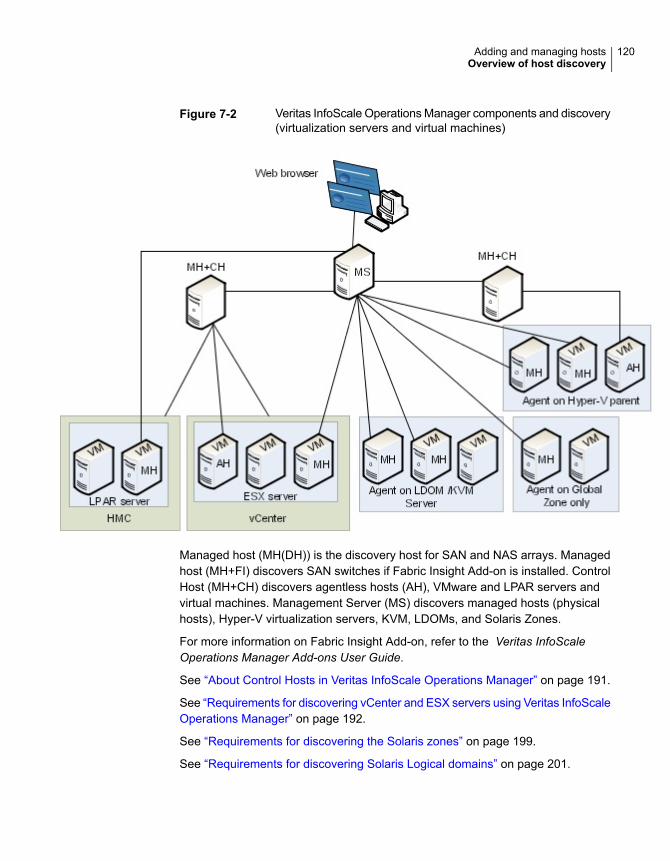
Figure 7-2 Veritas InfoScale Operations Manager components and discovery(virtualization servers and virtual machines)
Managed host (MH(DH)) is the discovery host for SAN and NAS arrays. Managedhost (MH+FI) discovers SAN switches if Fabric Insight Add-on is installed. ControlHost (MH+CH) discovers agentless hosts (AH), VMware and LPAR servers andvirtual machines. Management Server (MS) discovers managed hosts (physicalhosts), Hyper-V virtualization servers, KVM, LDOMs, and Solaris Zones.
For more information on Fabric Insight Add-on, refer to the Veritas InfoScaleOperations Manager Add-ons User Guide.
See “About Control Hosts in Veritas InfoScale Operations Manager” on page 191.
See “Requirements for discovering vCenter and ESX servers using Veritas InfoScaleOperations Manager” on page 192.
See “Requirements for discovering the Solaris zones” on page 199.
See “Requirements for discovering Solaris Logical domains” on page 201.
120Adding and managing hostsOverview of host discovery
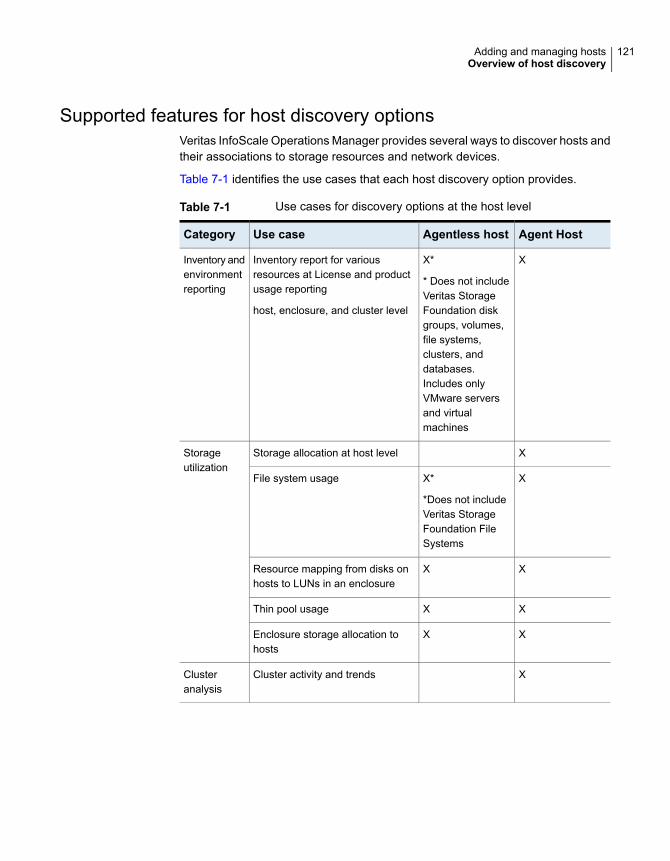
Supported features for host discovery optionsVeritas InfoScale Operations Manager provides several ways to discover hosts andtheir associations to storage resources and network devices.
Table 7-1 identifies the use cases that each host discovery option provides.
Table 7-1 Use cases for discovery options at the host level
Agent HostAgentless hostUse caseCategory
XX*
* Does not includeVeritas StorageFoundation diskgroups, volumes,file systems,clusters, anddatabases.Includes onlyVMware serversand virtualmachines
Inventory report for variousresources at License and productusage reporting
host, enclosure, and cluster level
Inventory andenvironmentreporting
XStorage allocation at host levelStorageutilization
XX*
*Does not includeVeritas StorageFoundation FileSystems
File system usage
XXResource mapping from disks onhosts to LUNs in an enclosure
XXThin pool usage
XXEnclosure storage allocation tohosts
XCluster activity and trendsClusteranalysis
121Adding and managing hostsOverview of host discovery
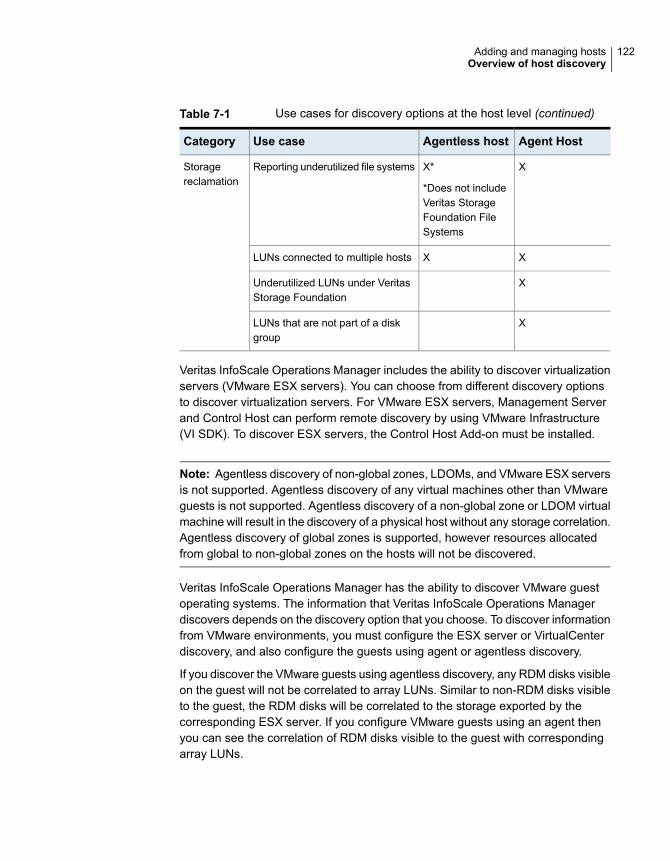
Table 7-1 Use cases for discovery options at the host level (continued)
Agent HostAgentless hostUse caseCategory
XX*
*Does not includeVeritas StorageFoundation FileSystems
Reporting underutilized file systemsStoragereclamation
XXLUNs connected to multiple hosts
XUnderutilized LUNs under VeritasStorage Foundation
XLUNs that are not part of a diskgroup
Veritas InfoScale Operations Manager includes the ability to discover virtualizationservers (VMware ESX servers). You can choose from different discovery optionsto discover virtualization servers. For VMware ESX servers, Management Serverand Control Host can perform remote discovery by using VMware Infrastructure(VI SDK). To discover ESX servers, the Control Host Add-on must be installed.
Note: Agentless discovery of non-global zones, LDOMs, and VMware ESX serversis not supported. Agentless discovery of any virtual machines other than VMwareguests is not supported. Agentless discovery of a non-global zone or LDOM virtualmachine will result in the discovery of a physical host without any storage correlation.Agentless discovery of global zones is supported, however resources allocatedfrom global to non-global zones on the hosts will not be discovered.
Veritas InfoScale Operations Manager has the ability to discover VMware guestoperating systems. The information that Veritas InfoScale Operations Managerdiscovers depends on the discovery option that you choose. To discover informationfrom VMware environments, you must configure the ESX server or VirtualCenterdiscovery, and also configure the guests using agent or agentless discovery.
If you discover the VMware guests using agentless discovery, any RDM disks visibleon the guest will not be correlated to array LUNs. Similar to non-RDM disks visibleto the guest, the RDM disks will be correlated to the storage exported by thecorresponding ESX server. If you configure VMware guests using an agent thenyou can see the correlation of RDM disks visible to the guest with correspondingarray LUNs.
122Adding and managing hostsOverview of host discovery
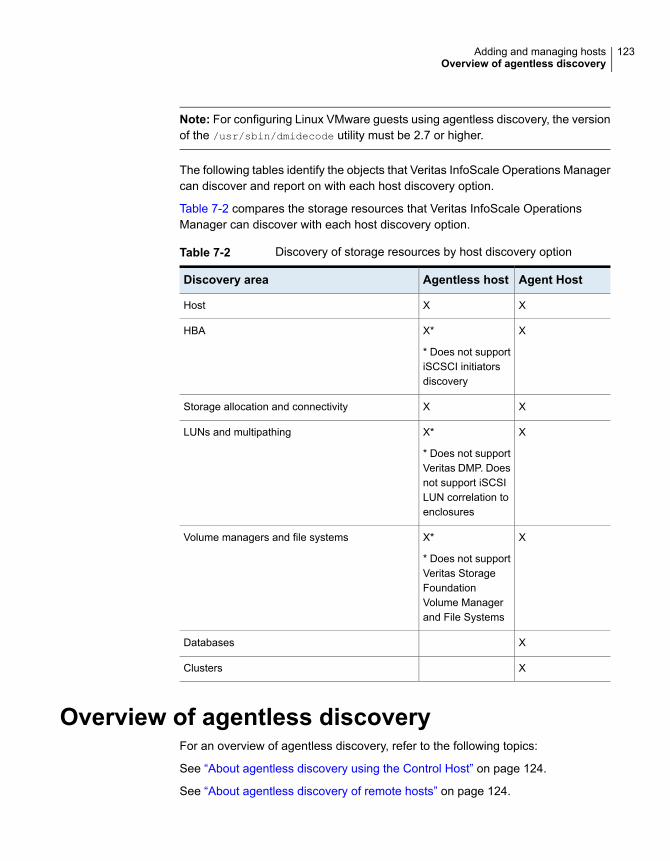
Note: For configuring Linux VMware guests using agentless discovery, the versionof the /usr/sbin/dmidecode utility must be 2.7 or higher.
The following tables identify the objects that Veritas InfoScale Operations Managercan discover and report on with each host discovery option.
Table 7-2 compares the storage resources that Veritas InfoScale OperationsManager can discover with each host discovery option.
Table 7-2 Discovery of storage resources by host discovery option
Agent HostAgentless hostDiscovery area
XXHost
XX*
* Does not supportiSCSCI initiatorsdiscovery
HBA
XXStorage allocation and connectivity
XX*
* Does not supportVeritas DMP. Doesnot support iSCSILUN correlation toenclosures
LUNs and multipathing
XX*
* Does not supportVeritas StorageFoundationVolume Managerand File Systems
Volume managers and file systems
XDatabases
XClusters
Overview of agentless discoveryFor an overview of agentless discovery, refer to the following topics:
See “About agentless discovery using the Control Host” on page 124.
See “About agentless discovery of remote hosts” on page 124.
123Adding and managing hostsOverview of agentless discovery
See “How agentless discovery of a UNIX or Linux host works” on page 125.
See “How agentless discovery of a Windows host works” on page 126.
See “Prerequisites for agentless configuration” on page 125.
See “Requirements for agentless discovery of UNIX hosts” on page 127.
See “Requirements for agentless discovery of Windows hosts” on page 129.
See “Requirements for deep array discovery for agentless hosts” on page 130.
See “Commands that require the root access for agentless discovery of UNIX hosts”on page 131.
See “Using the privilege control software with agentless discovery of UNIX hosts”on page 133.
See “SSH configuration requirements for agentless discovery” on page 134.
See “About installing OpenSSH on a UNIX host” on page 136.
About agentless discovery using the Control HostVeritas InfoScale Operations Manager uses Control Hosts as a discoverymechanism. A Control Host can be used to perform agentless discovery of a remotehost. To perform agentless discovery, you must install the Control Host Add-on onone of the managed hosts. You can install the Control Host Add-on on ManagementServer, however it is not recommended as it puts extra load on Management Server.
Platform support for a host that can act as a Control Host is the same as that ofManagement Server.
Note: A Linux Control Host can only discover UNIX or Linux agentless hosts usingSSH. A Windows Control Host can discover Windows agentless hosts using WMIor UNIX/Linux agentless hosts using SSH. Ensure that you install one or moreControl Hosts on the appropriate platform depending on the operating system ofthe remote hosts you want to discover agentless method.
See “About Control Hosts in Veritas InfoScale Operations Manager” on page 191.
About agentless discovery of remote hostsAgentless discovery lets you discover hosts without installing an agent on the host.The discovery provides end-to-end visibility from the file system to the spindle.Because an agent is not required, agentless discovery eliminates agent deploymentand maintenance and minimizes CPU and memory consumption.
124Adding and managing hostsOverview of agentless discovery
To perform agentless discovery, Veritas InfoScale Operations Manager remotelyaccesses the host and runs discovery scripts that collect data from a host.
See “How agentless discovery of a UNIX or Linux host works” on page 125.
See “How agentless discovery of a Windows host works” on page 126.
Prerequisites for agentless configurationThe following list provides prerequisites required for agentless configuration:
■ You must install the Control Host Add-on on one or more managed hosts and/orManagement Server.Veritas InfoScale Operations Manager lets you discover a host through theControl Host. The Control Host helps you manage discovery data from agentlesshosts and can discover HBAs, OSHandles on the host, multipathing, Linux LVM,and file systems (including native options like ZFS). Agentless discovery doesnot support the discovery of databases and applications.
■ A UNIX Control Host cannot be used to agentlessly discover Windows hosts. Ifyou plan to agentlessly discover Windows hosts, you will need to plan yourControl Host deployment accordingly.
■ You must install Storage Insight Add-on and configure arrays for deep discovery.Storage Insight Add-on must be deployed to enable correlation of OSHandleson the agentless hosts to array LUNs.If you make any configuration changes, for example creating new LUNs andmaking them visible to the host, on storage arrays, then the agentless discoverythat occurs after a subsequent SI deep array discovery will reflect the changeson the agentless hosts. After making changes to the array, one SI deep discoveryneeds to occur and only then a subsequent agentless discovery will pick up thechanges on the host.
See “About agentless discovery using the Control Host” on page 124.
How agentless discovery of a UNIX or Linux host worksTo perform agentless discovery of a remote UNIX or Linux host, Veritas InfoScaleOperations Manager does the following:
■ Uses Secure Shell (SSH) to send the discovery script to the remote host.
■ Runs the discovery script on the remote host.
■ Saves the output of the script to a data file on the remote host in the /var/tmp
directory.
■ Uses SSH to get the output on to the Control Host.
125Adding and managing hostsOverview of agentless discovery
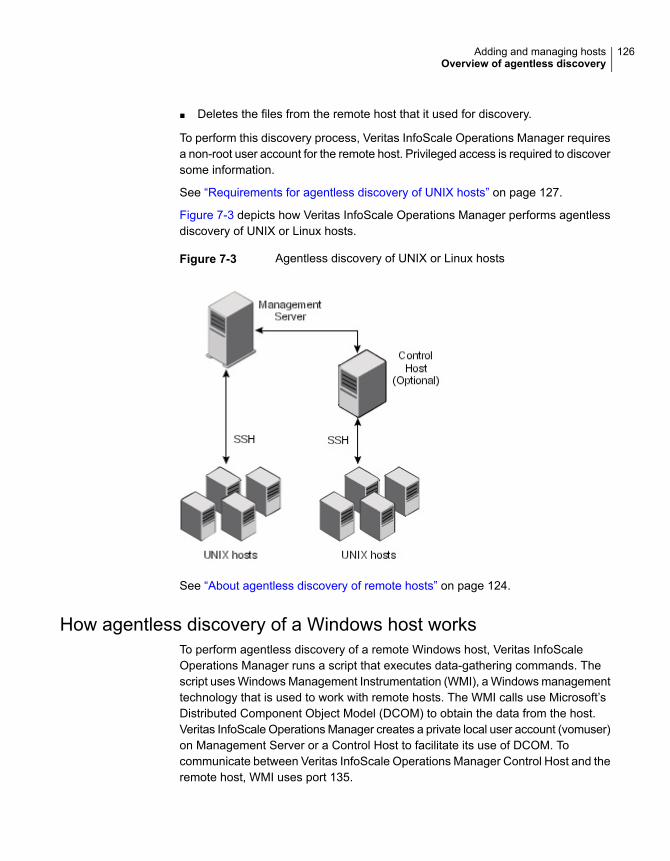
■ Deletes the files from the remote host that it used for discovery.
To perform this discovery process, Veritas InfoScale Operations Manager requiresa non-root user account for the remote host. Privileged access is required to discoversome information.
See “Requirements for agentless discovery of UNIX hosts” on page 127.
Figure 7-3 depicts how Veritas InfoScale Operations Manager performs agentlessdiscovery of UNIX or Linux hosts.
Figure 7-3 Agentless discovery of UNIX or Linux hosts
See “About agentless discovery of remote hosts” on page 124.
How agentless discovery of a Windows host worksTo perform agentless discovery of a remote Windows host, Veritas InfoScaleOperations Manager runs a script that executes data-gathering commands. Thescript uses Windows Management Instrumentation (WMI), a Windows managementtechnology that is used to work with remote hosts. The WMI calls use Microsoft’sDistributed Component Object Model (DCOM) to obtain the data from the host.Veritas InfoScale Operations Manager creates a private local user account (vomuser)on Management Server or a Control Host to facilitate its use of DCOM. Tocommunicate between Veritas InfoScale Operations Manager Control Host and theremote host, WMI uses port 135.
126Adding and managing hostsOverview of agentless discovery
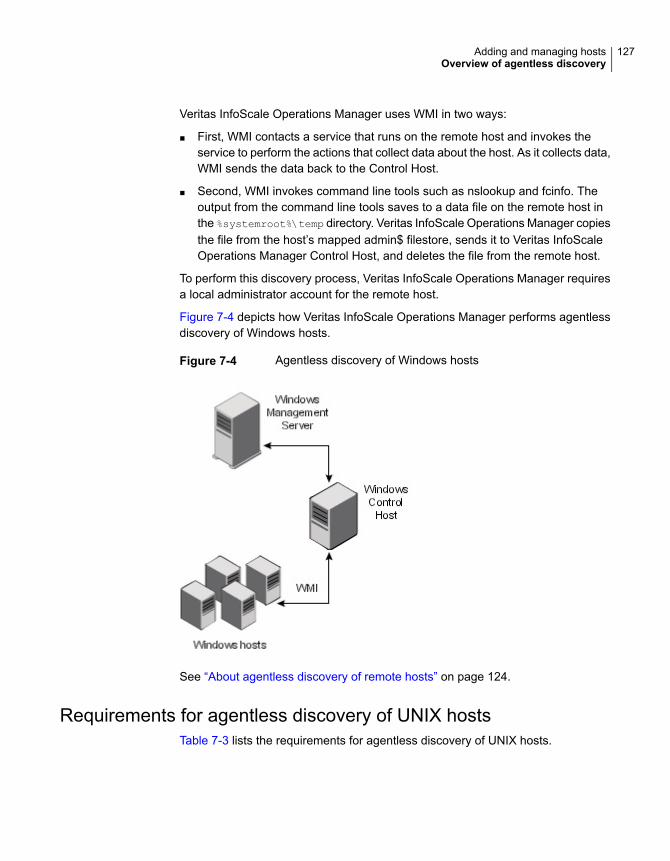
Veritas InfoScale Operations Manager uses WMI in two ways:
■ First, WMI contacts a service that runs on the remote host and invokes theservice to perform the actions that collect data about the host. As it collects data,WMI sends the data back to the Control Host.
■ Second, WMI invokes command line tools such as nslookup and fcinfo. Theoutput from the command line tools saves to a data file on the remote host inthe %systemroot%\temp directory. Veritas InfoScale Operations Manager copiesthe file from the host’s mapped admin$ filestore, sends it to Veritas InfoScaleOperations Manager Control Host, and deletes the file from the remote host.
To perform this discovery process, Veritas InfoScale Operations Manager requiresa local administrator account for the remote host.
Figure 7-4 depicts how Veritas InfoScale Operations Manager performs agentlessdiscovery of Windows hosts.
Figure 7-4 Agentless discovery of Windows hosts
See “About agentless discovery of remote hosts” on page 124.
Requirements for agentless discovery of UNIX hostsTable 7-3 lists the requirements for agentless discovery of UNIX hosts.
127Adding and managing hostsOverview of agentless discovery
Table 7-3 Requirements for agentless discovery of UNIX hosts
DescriptionRequirement
■ The minimum requirement is a non-root user account.■ Veritas requires privileged access to discover some
information. You can use privilege control software todesignate privileged access to a specific user for specificcommands.See “Commands that require the root access for agentlessdiscovery of UNIX hosts” on page 131.See “Using the privilege control software with agentlessdiscovery of UNIX hosts” on page 133.
A user account
Ensure there is network access between the host that youwant to discover and Veritas InfoScale Operations ManagerControl Host that performs discovery.
UNIX agentless discovery requires contacting SSH runningon TCP port 22 on the remote host. TCP port 22 should beopen in both directions between the Control Host and theremote host.
Network access betweenhosts
Enable persistent binding if you want Veritas InfoScaleOperations Manager to discover the storage that is allocatedto a Solaris 9 host.
Persistent binding for Solaris9 hosts
Veritas InfoScale Operations Manager requires a shell onthe remote host (sh, ksh, or bash) that accepts sh fileredirection.
A shell on the remote host
128Adding and managing hostsOverview of agentless discovery
Table 7-3 Requirements for agentless discovery of UNIX hosts (continued)
DescriptionRequirement
To communicate between the Veritas InfoScale OperationsManager host and remote UNIX hosts, Veritas InfoScaleOperations Manager uses the non-keyboard interactive,password-based authentication of SSH.
Ensure that:
■ SSH is installed.The SSH package is typically installed by default;however, it may not be present if a minimal operatingsystem installation was performed. If the SSH packageis not present, use the operating system installer to installSSH, or download and install OpenSSH.See “About installing OpenSSH on a UNIX host”on page 136.
■ SSH is set up properly.See “SSH configuration requirements for agentlessdiscovery” on page 134.
■ SunSSH is version 1.1 (Sun_SSH_1.1) or higher onSolaris 9 hosts. If a Solaris 9 host runs version 1.0(Sun_SSH_1_0), network communication between VeritasInfoScale Operations Manager and the Solaris 9 host mayterminate during agentless configuration and discovery.
■ OpenSSH is not version 0.9.8e or 0.9.7e on AIX, Linux,and Solaris hosts. These versions have known AESencryption issues, which can cause a warning.
Secure Shell (SSH) on theremote host
See “How agentless discovery of a UNIX or Linux host works” on page 125.
Requirements for agentless discovery of Windows hostsTable 7-4 lists the requirements for agentless discovery of Windows hosts
Table 7-4 Requirements for agentless discovery of Windows hosts
DescriptionRequirement
Veritas InfoScale Operations Manager requires a localadministrator account for the remote host.
A user account
Ensure there is network access between the host that youwant to discover and Veritas InfoScale Operations ManagerControl Host that performs discovery.
Network access betweenhosts
129Adding and managing hostsOverview of agentless discovery
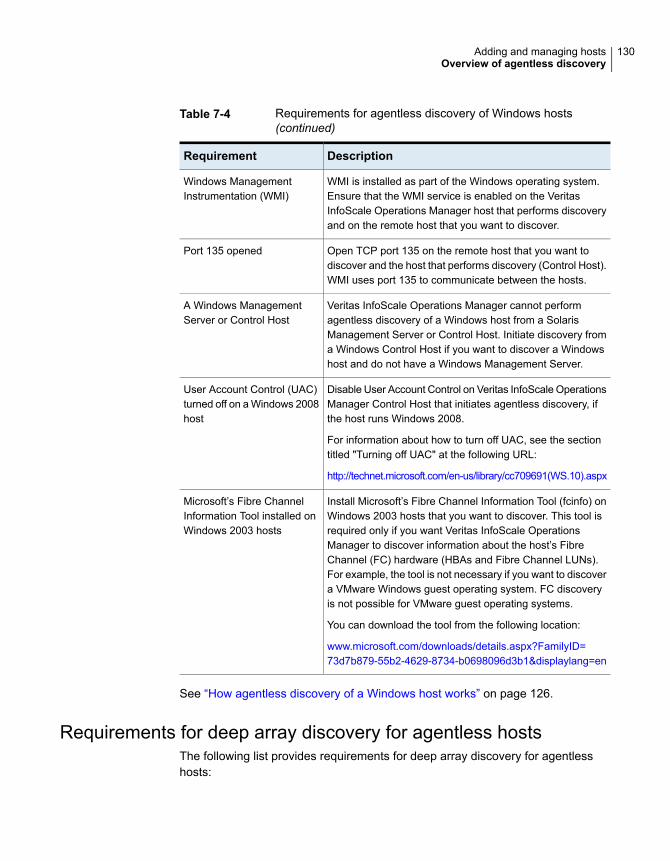
Table 7-4 Requirements for agentless discovery of Windows hosts(continued)
DescriptionRequirement
WMI is installed as part of the Windows operating system.Ensure that the WMI service is enabled on the VeritasInfoScale Operations Manager host that performs discoveryand on the remote host that you want to discover.
Windows ManagementInstrumentation (WMI)
Open TCP port 135 on the remote host that you want todiscover and the host that performs discovery (Control Host).WMI uses port 135 to communicate between the hosts.
Port 135 opened
Veritas InfoScale Operations Manager cannot performagentless discovery of a Windows host from a SolarisManagement Server or Control Host. Initiate discovery froma Windows Control Host if you want to discover a Windowshost and do not have a Windows Management Server.
A Windows ManagementServer or Control Host
Disable User Account Control on Veritas InfoScale OperationsManager Control Host that initiates agentless discovery, ifthe host runs Windows 2008.
For information about how to turn off UAC, see the sectiontitled "Turning off UAC" at the following URL:
http://technet.microsoft.com/en-us/library/cc709691(WS.10).aspx
User Account Control (UAC)turned off on a Windows 2008host
Install Microsoft’s Fibre Channel Information Tool (fcinfo) onWindows 2003 hosts that you want to discover. This tool isrequired only if you want Veritas InfoScale OperationsManager to discover information about the host’s FibreChannel (FC) hardware (HBAs and Fibre Channel LUNs).For example, the tool is not necessary if you want to discovera VMware Windows guest operating system. FC discoveryis not possible for VMware guest operating systems.
You can download the tool from the following location:
www.microsoft.com/downloads/details.aspx?FamilyID=73d7b879-55b2-4629-8734-b0698096d3b1&displaylang=en
Microsoft’s Fibre ChannelInformation Tool installed onWindows 2003 hosts
See “How agentless discovery of a Windows host works” on page 126.
Requirements for deep array discovery for agentless hostsThe following list provides requirements for deep array discovery for agentlesshosts:
130Adding and managing hostsOverview of agentless discovery
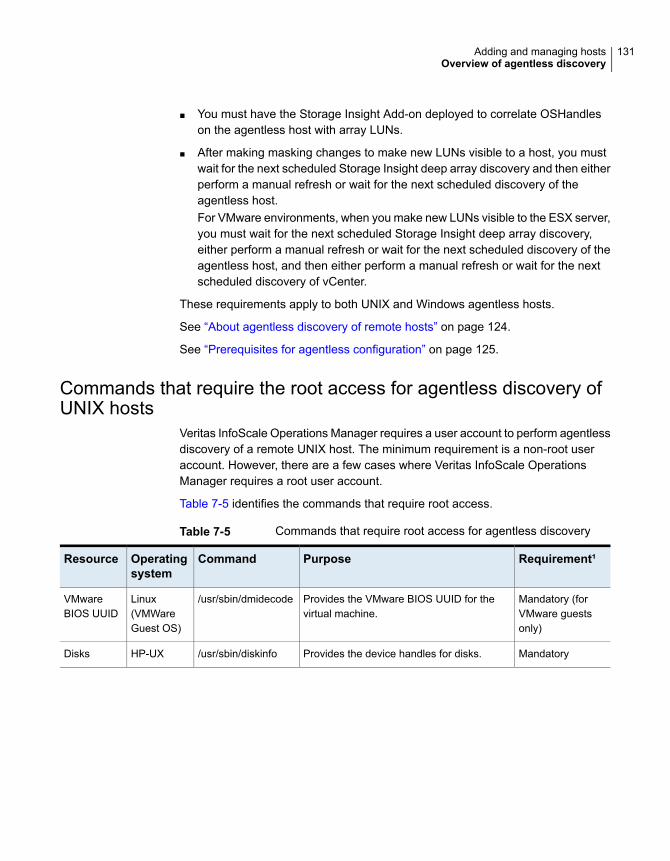
■ You must have the Storage Insight Add-on deployed to correlate OSHandleson the agentless host with array LUNs.
■ After making masking changes to make new LUNs visible to a host, you mustwait for the next scheduled Storage Insight deep array discovery and then eitherperform a manual refresh or wait for the next scheduled discovery of theagentless host.For VMware environments, when you make new LUNs visible to the ESX server,you must wait for the next scheduled Storage Insight deep array discovery,either perform a manual refresh or wait for the next scheduled discovery of theagentless host, and then either perform a manual refresh or wait for the nextscheduled discovery of vCenter.
These requirements apply to both UNIX and Windows agentless hosts.
See “About agentless discovery of remote hosts” on page 124.
See “Prerequisites for agentless configuration” on page 125.
Commands that require the root access for agentless discovery ofUNIX hosts
Veritas InfoScale Operations Manager requires a user account to perform agentlessdiscovery of a remote UNIX host. The minimum requirement is a non-root useraccount. However, there are a few cases where Veritas InfoScale OperationsManager requires a root user account.
Table 7-5 identifies the commands that require root access.
Table 7-5 Commands that require root access for agentless discovery
Requirement¹PurposeCommandOperatingsystem
Resource
Mandatory (forVMware guestsonly)
Provides the VMware BIOS UUID for thevirtual machine.
/usr/sbin/dmidecodeLinux(VMWareGuest OS)
VMwareBIOS UUID
MandatoryProvides the device handles for disks./usr/sbin/diskinfoHP-UXDisks
131Adding and managing hostsOverview of agentless discovery
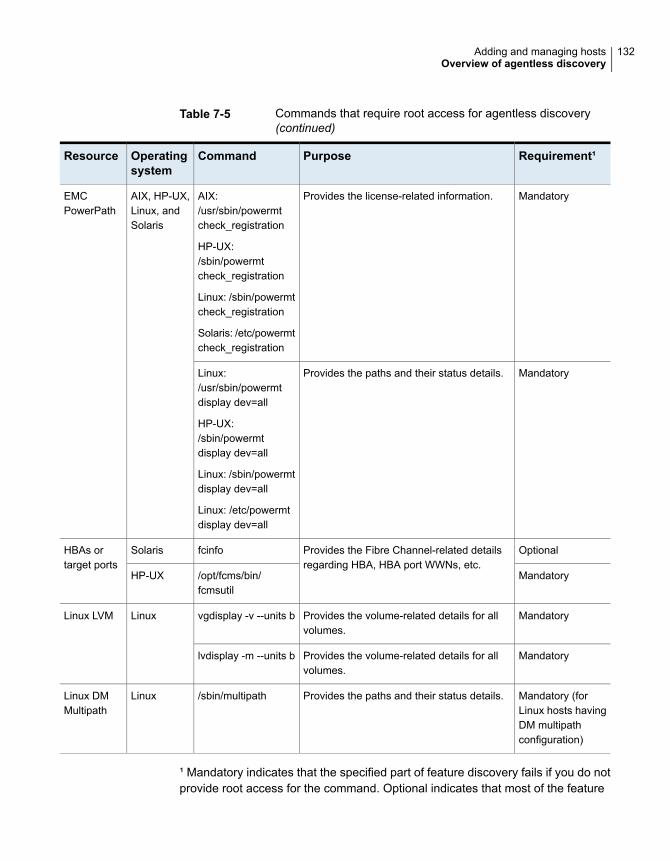
Table 7-5 Commands that require root access for agentless discovery(continued)
Requirement¹PurposeCommandOperatingsystem
Resource
MandatoryProvides the license-related information.AIX:/usr/sbin/powermtcheck_registration
HP-UX:/sbin/powermtcheck_registration
Linux: /sbin/powermtcheck_registration
Solaris: /etc/powermtcheck_registration
AIX, HP-UX,Linux, andSolaris
EMCPowerPath
MandatoryProvides the paths and their status details.Linux:/usr/sbin/powermtdisplay dev=all
HP-UX:/sbin/powermtdisplay dev=all
Linux: /sbin/powermtdisplay dev=all
Linux: /etc/powermtdisplay dev=all
OptionalProvides the Fibre Channel-related detailsregarding HBA, HBA port WWNs, etc.
fcinfoSolarisHBAs ortarget ports
Mandatory/opt/fcms/bin/fcmsutil
HP-UX
MandatoryProvides the volume-related details for allvolumes.
vgdisplay -v --units bLinuxLinux LVM
MandatoryProvides the volume-related details for allvolumes.
lvdisplay -m --units b
Mandatory (forLinux hosts havingDM multipathconfiguration)
Provides the paths and their status details./sbin/multipathLinuxLinux DMMultipath
¹ Mandatory indicates that the specified part of feature discovery fails if you do notprovide root access for the command. Optional indicates that most of the feature
132Adding and managing hostsOverview of agentless discovery
discovery works even if you do not provide root access for the command. Themandatory commands for a given OS platform need not be enabled in the privilegecontrol software if the host does not have the utilities installed on it
See “How agentless discovery of a UNIX or Linux host works” on page 125.
See “Requirements for agentless discovery of UNIX hosts” on page 127.
Using the privilege control software with agentless discovery of UNIXhosts
Veritas InfoScale Operations Manager requires a user account to perform agentlessdiscovery of a remote UNIX host. The minimum requirement is a non-root useraccount. However, there are a few instances where Veritas InfoScale OperationsManager requires a root user account.
See “Commands that require the root access for agentless discovery of UNIX hosts”on page 131.
To discover that information, you can configure Veritas InfoScale OperationsManager to use one of the following:
■ A root user account.
■ A non-root user account and use privilege control software to grant that userthe ability to run specific commands.
Veritas InfoScale Operations Manager supports the following privilege controlsoftware with agentless discovery:
■ PowerBroker
■ Privilege Manager for UNIX
■ Sudo
Table 7-6 identifies how you can use privilege control software with agentlessdiscovery.
Table 7-6 Using privilege control software with agentless discovery of UNIXhosts
ActionStep
Install the privilege control software on the remote host thatyou want to discover.
1
133Adding and managing hostsOverview of agentless discovery
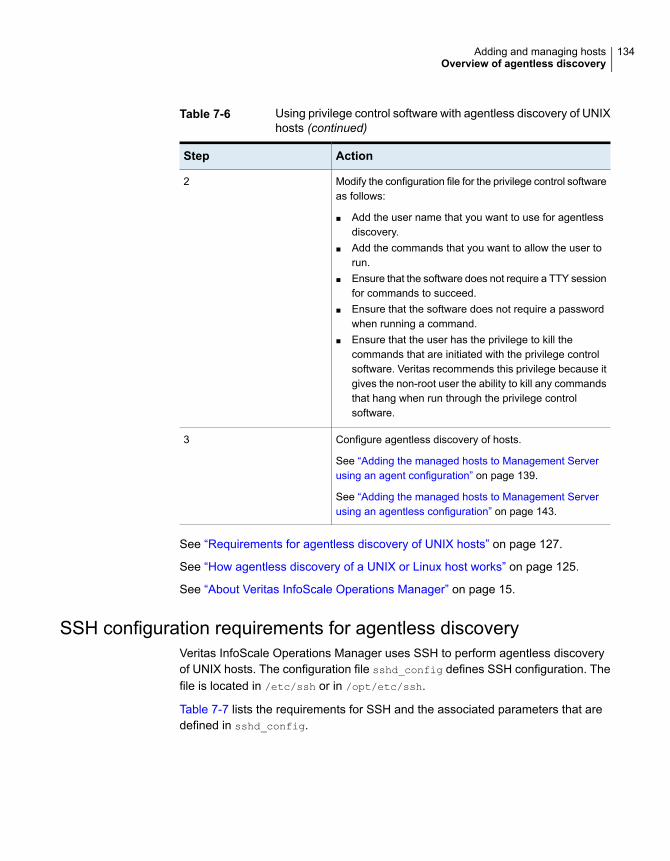
Table 7-6 Using privilege control software with agentless discovery of UNIXhosts (continued)
ActionStep
Modify the configuration file for the privilege control softwareas follows:
■ Add the user name that you want to use for agentlessdiscovery.
■ Add the commands that you want to allow the user torun.
■ Ensure that the software does not require a TTY sessionfor commands to succeed.
■ Ensure that the software does not require a passwordwhen running a command.
■ Ensure that the user has the privilege to kill thecommands that are initiated with the privilege controlsoftware. Veritas recommends this privilege because itgives the non-root user the ability to kill any commandsthat hang when run through the privilege controlsoftware.
2
Configure agentless discovery of hosts.
See “Adding the managed hosts to Management Serverusing an agent configuration” on page 139.
See “Adding the managed hosts to Management Serverusing an agentless configuration” on page 143.
3
See “Requirements for agentless discovery of UNIX hosts” on page 127.
See “How agentless discovery of a UNIX or Linux host works” on page 125.
See “About Veritas InfoScale Operations Manager” on page 15.
SSH configuration requirements for agentless discoveryVeritas InfoScale Operations Manager uses SSH to perform agentless discoveryof UNIX hosts. The configuration file sshd_config defines SSH configuration. Thefile is located in /etc/ssh or in /opt/etc/ssh.
Table 7-7 lists the requirements for SSH and the associated parameters that aredefined in sshd_config.
134Adding and managing hostsOverview of agentless discovery
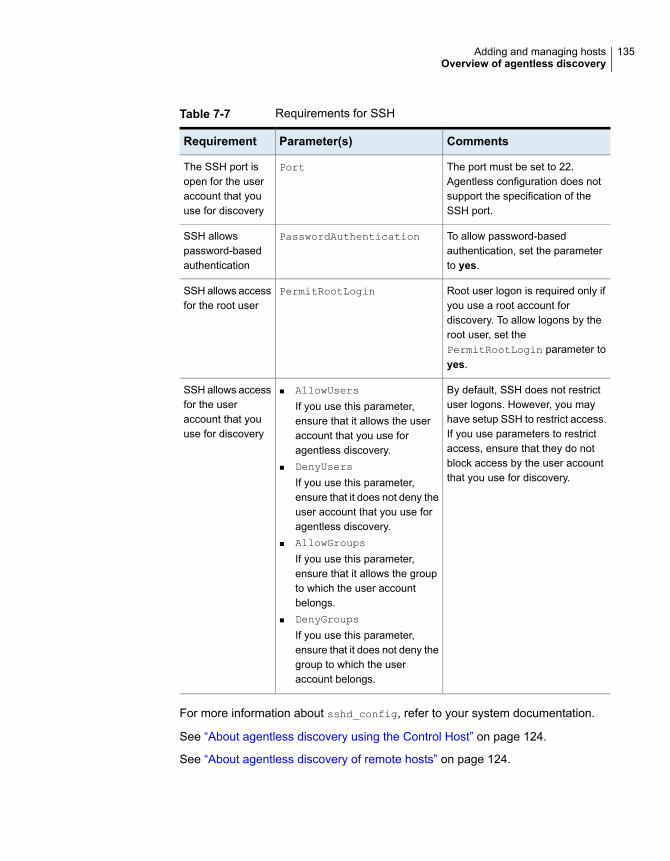
Table 7-7 Requirements for SSH
CommentsParameter(s)Requirement
The port must be set to 22.Agentless configuration does notsupport the specification of theSSH port.
PortThe SSH port isopen for the useraccount that youuse for discovery
To allow password-basedauthentication, set the parameterto yes.
PasswordAuthenticationSSH allowspassword-basedauthentication
Root user logon is required only ifyou use a root account fordiscovery. To allow logons by theroot user, set thePermitRootLogin parameter toyes.
PermitRootLoginSSH allows accessfor the root user
By default, SSH does not restrictuser logons. However, you mayhave setup SSH to restrict access.If you use parameters to restrictaccess, ensure that they do notblock access by the user accountthat you use for discovery.
■ AllowUsers
If you use this parameter,ensure that it allows the useraccount that you use foragentless discovery.
■ DenyUsers
If you use this parameter,ensure that it does not deny theuser account that you use foragentless discovery.
■ AllowGroups
If you use this parameter,ensure that it allows the groupto which the user accountbelongs.
■ DenyGroups
If you use this parameter,ensure that it does not deny thegroup to which the useraccount belongs.
SSH allows accessfor the useraccount that youuse for discovery
For more information about sshd_config, refer to your system documentation.
See “About agentless discovery using the Control Host” on page 124.
See “About agentless discovery of remote hosts” on page 124.
135Adding and managing hostsOverview of agentless discovery
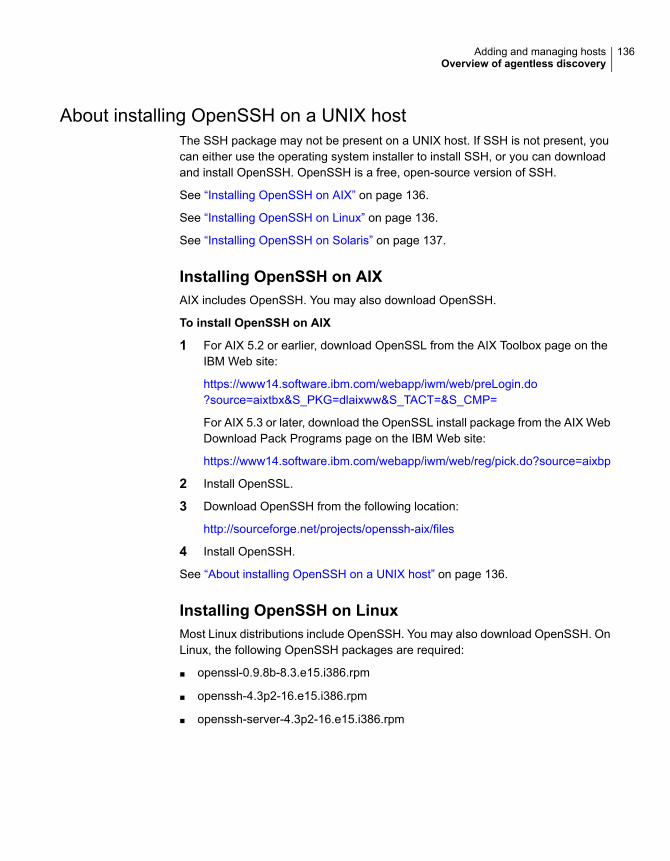
About installing OpenSSH on a UNIX hostThe SSH package may not be present on a UNIX host. If SSH is not present, youcan either use the operating system installer to install SSH, or you can downloadand install OpenSSH. OpenSSH is a free, open-source version of SSH.
See “Installing OpenSSH on AIX” on page 136.
See “Installing OpenSSH on Linux” on page 136.
See “Installing OpenSSH on Solaris” on page 137.
Installing OpenSSH on AIXAIX includes OpenSSH. You may also download OpenSSH.
To install OpenSSH on AIX
1 For AIX 5.2 or earlier, download OpenSSL from the AIX Toolbox page on theIBM Web site:
https://www14.software.ibm.com/webapp/iwm/web/preLogin.do?source=aixtbx&S_PKG=dlaixww&S_TACT=&S_CMP=
For AIX 5.3 or later, download the OpenSSL install package from the AIX WebDownload Pack Programs page on the IBM Web site:
https://www14.software.ibm.com/webapp/iwm/web/reg/pick.do?source=aixbp
2 Install OpenSSL.
3 Download OpenSSH from the following location:
http://sourceforge.net/projects/openssh-aix/files
4 Install OpenSSH.
See “About installing OpenSSH on a UNIX host” on page 136.
Installing OpenSSH on LinuxMost Linux distributions include OpenSSH. You may also download OpenSSH. OnLinux, the following OpenSSH packages are required:
■ openssl-0.9.8b-8.3.e15.i386.rpm
■ openssh-4.3p2-16.e15.i386.rpm
■ openssh-server-4.3p2-16.e15.i386.rpm
136Adding and managing hostsOverview of agentless discovery
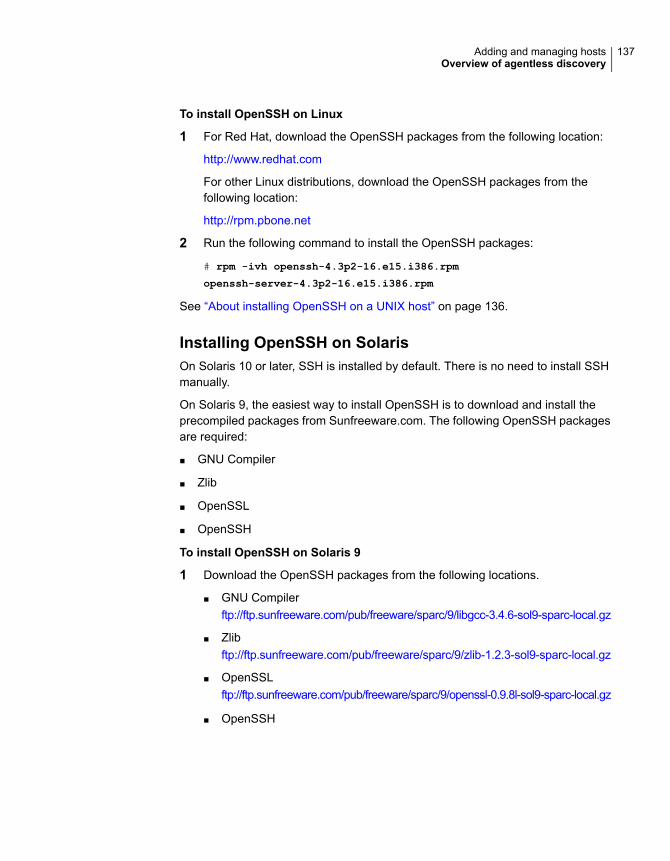
To install OpenSSH on Linux
1 For Red Hat, download the OpenSSH packages from the following location:
http://www.redhat.com
For other Linux distributions, download the OpenSSH packages from thefollowing location:
http://rpm.pbone.net
2 Run the following command to install the OpenSSH packages:
# rpm -ivh openssh-4.3p2-16.e15.i386.rpm
openssh-server-4.3p2-16.e15.i386.rpm
See “About installing OpenSSH on a UNIX host” on page 136.
Installing OpenSSH on SolarisOn Solaris 10 or later, SSH is installed by default. There is no need to install SSHmanually.
On Solaris 9, the easiest way to install OpenSSH is to download and install theprecompiled packages from Sunfreeware.com. The following OpenSSH packagesare required:
■ GNU Compiler
■ Zlib
■ OpenSSL
■ OpenSSH
To install OpenSSH on Solaris 9
1 Download the OpenSSH packages from the following locations.
■ GNU Compilerftp://ftp.sunfreeware.com/pub/freeware/sparc/9/libgcc-3.4.6-sol9-sparc-local.gz
■ Zlibftp://ftp.sunfreeware.com/pub/freeware/sparc/9/zlib-1.2.3-sol9-sparc-local.gz
■ OpenSSLftp://ftp.sunfreeware.com/pub/freeware/sparc/9/openssl-0.9.8l-sol9-sparc-local.gz
■ OpenSSH
137Adding and managing hostsOverview of agentless discovery
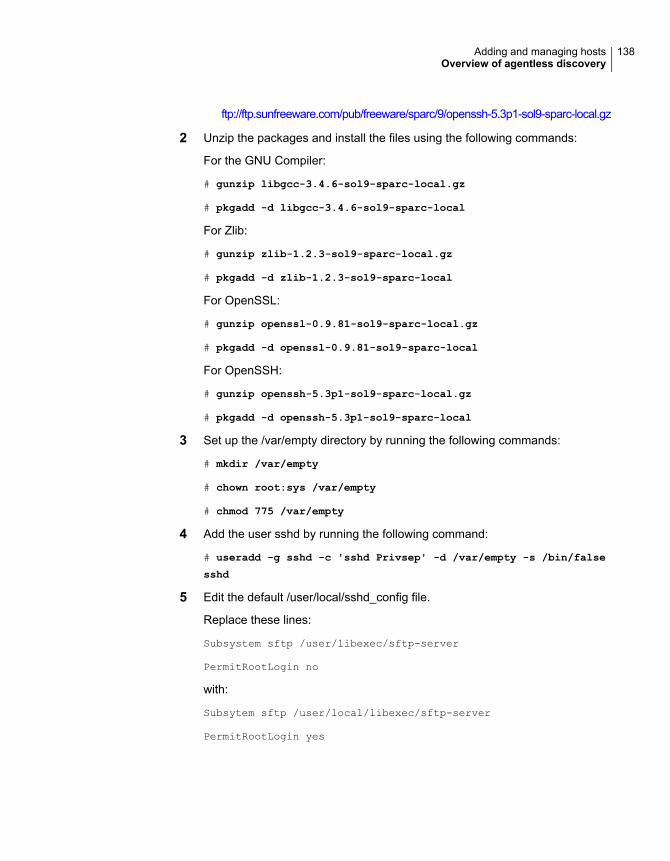
ftp://ftp.sunfreeware.com/pub/freeware/sparc/9/openssh-5.3p1-sol9-sparc-local.gz
2 Unzip the packages and install the files using the following commands:
For the GNU Compiler:
# gunzip libgcc-3.4.6-sol9-sparc-local.gz
# pkgadd -d libgcc-3.4.6-sol9-sparc-local
For Zlib:
# gunzip zlib-1.2.3-sol9-sparc-local.gz
# pkgadd -d zlib-1.2.3-sol9-sparc-local
For OpenSSL:
# gunzip openssl-0.9.81-sol9-sparc-local.gz
# pkgadd -d openssl-0.9.81-sol9-sparc-local
For OpenSSH:
# gunzip openssh-5.3p1-sol9-sparc-local.gz
# pkgadd -d openssh-5.3p1-sol9-sparc-local
3 Set up the /var/empty directory by running the following commands:
# mkdir /var/empty
# chown root:sys /var/empty
# chmod 775 /var/empty
4 Add the user sshd by running the following command:
# useradd -g sshd -c 'sshd Privsep' -d /var/empty -s /bin/false
sshd
5 Edit the default /user/local/sshd_config file.
Replace these lines:
Subsystem sftp /user/libexec/sftp-server
PermitRootLogin no
with:
Subsytem sftp /user/local/libexec/sftp-server
PermitRootLogin yes
138Adding and managing hostsOverview of agentless discovery
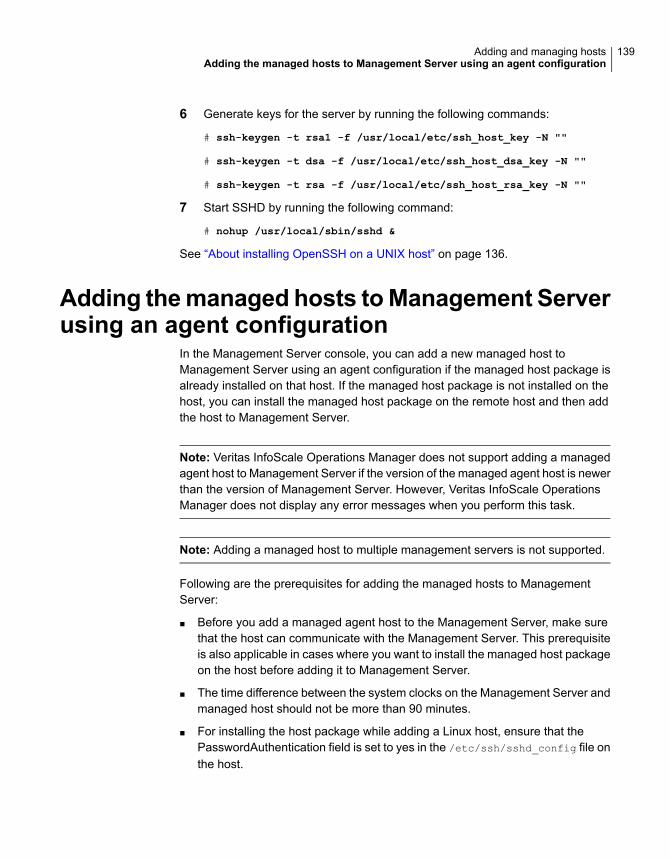
6 Generate keys for the server by running the following commands:
# ssh-keygen -t rsa1 -f /usr/local/etc/ssh_host_key -N ""
# ssh-keygen -t dsa -f /usr/local/etc/ssh_host_dsa_key -N ""
# ssh-keygen -t rsa -f /usr/local/etc/ssh_host_rsa_key -N ""
7 Start SSHD by running the following command:
# nohup /usr/local/sbin/sshd &
See “About installing OpenSSH on a UNIX host” on page 136.
Adding themanaged hosts toManagement Serverusing an agent configuration
In the Management Server console, you can add a new managed host toManagement Server using an agent configuration if the managed host package isalready installed on that host. If the managed host package is not installed on thehost, you can install the managed host package on the remote host and then addthe host to Management Server.
Note: Veritas InfoScale Operations Manager does not support adding a managedagent host to Management Server if the version of the managed agent host is newerthan the version of Management Server. However, Veritas InfoScale OperationsManager does not display any error messages when you perform this task.
Note: Adding a managed host to multiple management servers is not supported.
Following are the prerequisites for adding the managed hosts to ManagementServer:
■ Before you add a managed agent host to the Management Server, make surethat the host can communicate with the Management Server. This prerequisiteis also applicable in cases where you want to install the managed host packageon the host before adding it to Management Server.
■ The time difference between the system clocks on the Management Server andmanaged host should not be more than 90 minutes.
■ For installing the host package while adding a Linux host, ensure that thePasswordAuthentication field is set to yes in the /etc/ssh/sshd_config file onthe host.
139Adding and managing hostsAdding the managed hosts to Management Server using an agent configuration
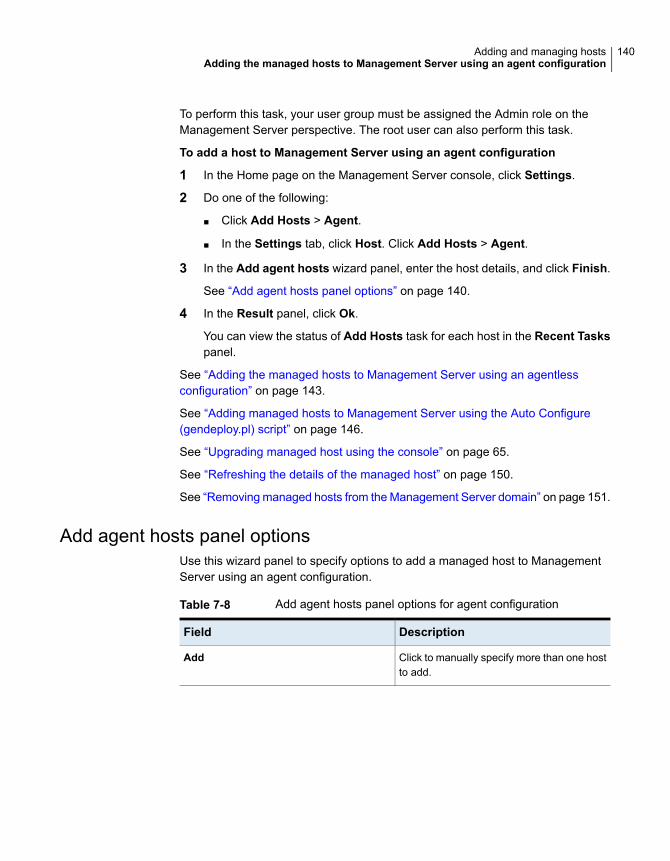
To perform this task, your user group must be assigned the Admin role on theManagement Server perspective. The root user can also perform this task.
To add a host to Management Server using an agent configuration
1 In the Home page on the Management Server console, click Settings.
2 Do one of the following:
■ Click Add Hosts > Agent.
■ In the Settings tab, click Host. Click Add Hosts > Agent.
3 In the Add agent hosts wizard panel, enter the host details, and click Finish.
See “Add agent hosts panel options” on page 140.
4 In the Result panel, click Ok.
You can view the status of Add Hosts task for each host in the Recent Taskspanel.
See “Adding the managed hosts to Management Server using an agentlessconfiguration” on page 143.
See “Adding managed hosts to Management Server using the Auto Configure(gendeploy.pl) script” on page 146.
See “Upgrading managed host using the console” on page 65.
See “Refreshing the details of the managed host” on page 150.
See “Removing managed hosts from the Management Server domain” on page 151.
Add agent hosts panel optionsUse this wizard panel to specify options to add a managed host to ManagementServer using an agent configuration.
Table 7-8 Add agent hosts panel options for agent configuration
DescriptionField
Click to manually specify more than one hostto add.
Add
140Adding and managing hostsAdding the managed hosts to Management Server using an agent configuration
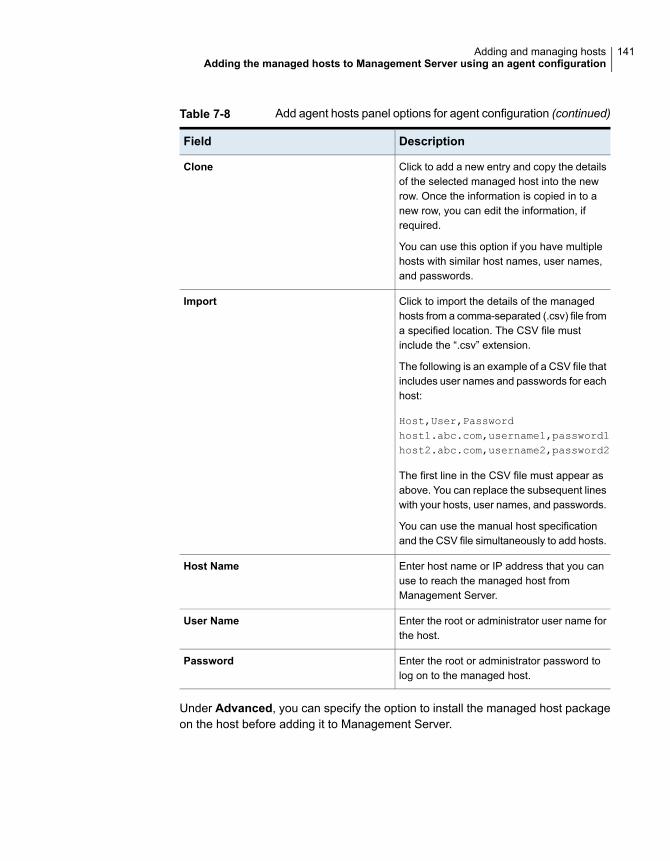
Table 7-8 Add agent hosts panel options for agent configuration (continued)
DescriptionField
Click to add a new entry and copy the detailsof the selected managed host into the newrow. Once the information is copied in to anew row, you can edit the information, ifrequired.
You can use this option if you have multiplehosts with similar host names, user names,and passwords.
Clone
Click to import the details of the managedhosts from a comma-separated (.csv) file froma specified location. The CSV file mustinclude the “.csv” extension.
The following is an example of a CSV file thatincludes user names and passwords for eachhost:
Host,User,Passwordhost1.abc.com,username1,password1host2.abc.com,username2,password2
The first line in the CSV file must appear asabove. You can replace the subsequent lineswith your hosts, user names, and passwords.
You can use the manual host specificationand the CSV file simultaneously to add hosts.
Import
Enter host name or IP address that you canuse to reach the managed host fromManagement Server.
Host Name
Enter the root or administrator user name forthe host.
User Name
Enter the root or administrator password tolog on to the managed host.
Password
Under Advanced, you can specify the option to install the managed host packageon the host before adding it to Management Server.
141Adding and managing hostsAdding the managed hosts to Management Server using an agent configuration
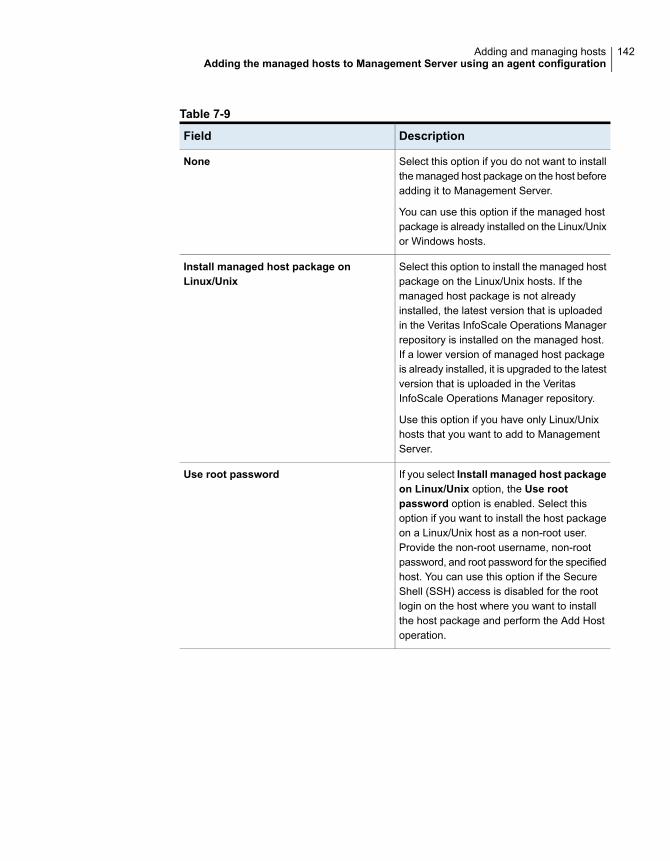
Table 7-9
DescriptionField
Select this option if you do not want to installthe managed host package on the host beforeadding it to Management Server.
You can use this option if the managed hostpackage is already installed on the Linux/Unixor Windows hosts.
None
Select this option to install the managed hostpackage on the Linux/Unix hosts. If themanaged host package is not alreadyinstalled, the latest version that is uploadedin the Veritas InfoScale Operations Managerrepository is installed on the managed host.If a lower version of managed host packageis already installed, it is upgraded to the latestversion that is uploaded in the VeritasInfoScale Operations Manager repository.
Use this option if you have only Linux/Unixhosts that you want to add to ManagementServer.
Install managed host package onLinux/Unix
If you select Install managed host packageon Linux/Unix option, the Use rootpassword option is enabled. Select thisoption if you want to install the host packageon a Linux/Unix host as a non-root user.Provide the non-root username, non-rootpassword, and root password for the specifiedhost. You can use this option if the SecureShell (SSH) access is disabled for the rootlogin on the host where you want to installthe host package and perform the Add Hostoperation.
Use root password
142Adding and managing hostsAdding the managed hosts to Management Server using an agent configuration
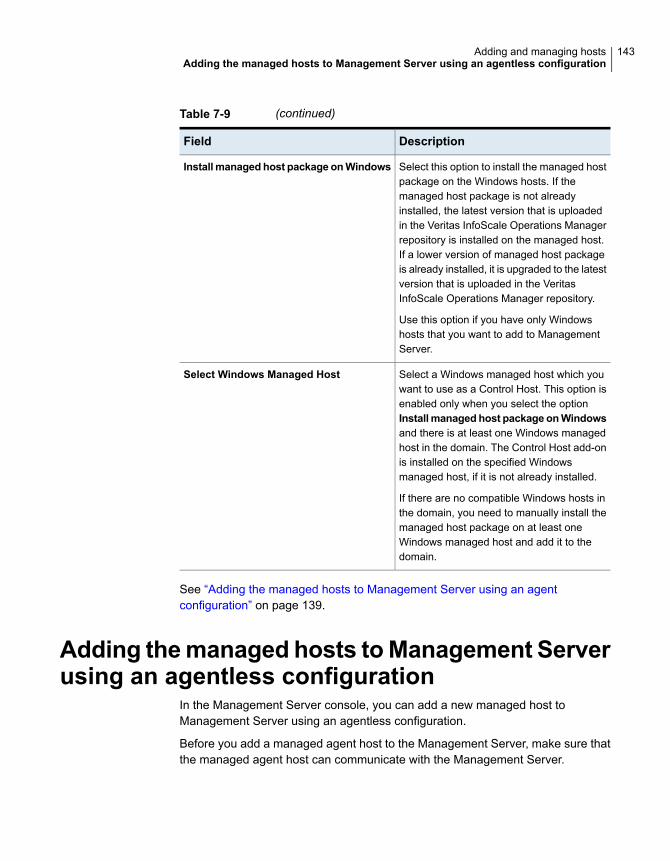
Table 7-9 (continued)
DescriptionField
Select this option to install the managed hostpackage on the Windows hosts. If themanaged host package is not alreadyinstalled, the latest version that is uploadedin the Veritas InfoScale Operations Managerrepository is installed on the managed host.If a lower version of managed host packageis already installed, it is upgraded to the latestversion that is uploaded in the VeritasInfoScale Operations Manager repository.
Use this option if you have only Windowshosts that you want to add to ManagementServer.
Installmanaged host package onWindows
Select a Windows managed host which youwant to use as a Control Host. This option isenabled only when you select the optionInstallmanaged host package onWindowsand there is at least one Windows managedhost in the domain. The Control Host add-onis installed on the specified Windowsmanaged host, if it is not already installed.
If there are no compatible Windows hosts inthe domain, you need to manually install themanaged host package on at least oneWindows managed host and add it to thedomain.
Select Windows Managed Host
See “Adding the managed hosts to Management Server using an agentconfiguration” on page 139.
Adding themanaged hosts toManagement Serverusing an agentless configuration
In the Management Server console, you can add a new managed host toManagement Server using an agentless configuration.
Before you add a managed agent host to the Management Server, make sure thatthe managed agent host can communicate with the Management Server.
143Adding and managing hostsAdding the managed hosts to Management Server using an agentless configuration
You can convert an agentless host to an agent host by installing the Veritas InfoScaleOperations Manager agent on the host and then add the host using the Add agenthost wizard. You do not need to remove the host from the Management Serverdomain.
Note: Adding a managed host to multiple management servers is not supported.
To perform this task, your user group must be assigned the Admin role on theManagement Server perspective. The root user can also perform this task.
To add a managed host to Management Server using an agentlessconfiguration
1 In the Home page on the Management Server console, click Settings.
2 Do one of the following:
■ Click Add Hosts > Agentless.
■ In the Settings tab click Host. Click Add Hosts > Agentless.
3 In the Add agentless hosts wizard panel, enter the host details, and clickFinish.
See “Add agentless hosts panel options” on page 145.
4 In the Result panel, verify that the host has been added successfully. ClickOK.
To add multiple managed agentless hosts to Management Server using theCSV file
1 In the Home page on the Management Server console, click Settings.
2 Do one of the following:
■ Click Add Hosts > Agents.
■ In the Settings tab click Host. Click Add Hosts > Agentless.
3 In the Add agentless host wizard panel, under Advance, click Browse toselect the .csv file.
4 Click Import selected file and click Finish.
5 In the Result panel, verify that the host has been added successfully. ClickOK.
See “Adding the managed hosts to Management Server using an agentconfiguration” on page 139.
See “Adding managed hosts to Management Server using the Auto Configure(gendeploy.pl) script” on page 146.
144Adding and managing hostsAdding the managed hosts to Management Server using an agentless configuration
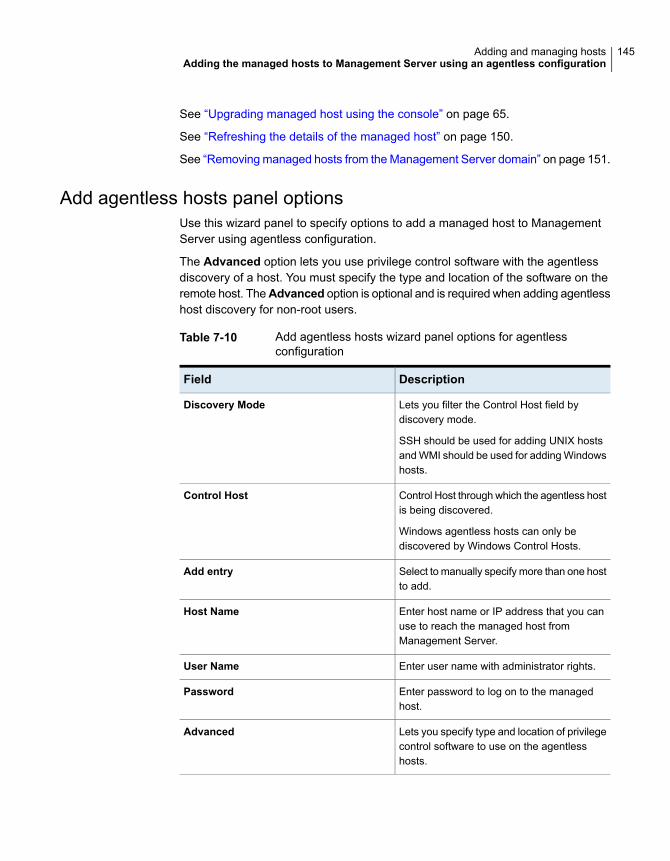
See “Upgrading managed host using the console” on page 65.
See “Refreshing the details of the managed host” on page 150.
See “Removing managed hosts from the Management Server domain” on page 151.
Add agentless hosts panel optionsUse this wizard panel to specify options to add a managed host to ManagementServer using agentless configuration.
The Advanced option lets you use privilege control software with the agentlessdiscovery of a host. You must specify the type and location of the software on theremote host. TheAdvanced option is optional and is required when adding agentlesshost discovery for non-root users.
Table 7-10 Add agentless hosts wizard panel options for agentlessconfiguration
DescriptionField
Lets you filter the Control Host field bydiscovery mode.
SSH should be used for adding UNIX hostsand WMI should be used for adding Windowshosts.
Discovery Mode
Control Host through which the agentless hostis being discovered.
Windows agentless hosts can only bediscovered by Windows Control Hosts.
Control Host
Select to manually specify more than one hostto add.
Add entry
Enter host name or IP address that you canuse to reach the managed host fromManagement Server.
Host Name
Enter user name with administrator rights.User Name
Enter password to log on to the managedhost.
Password
Lets you specify type and location of privilegecontrol software to use on the agentlesshosts.
Advanced
145Adding and managing hostsAdding the managed hosts to Management Server using an agentless configuration
Under Advanced you can add multiple hosts by importing the information from acomma-separated (.csv) file from a specified location. The CSV file must includethe “.csv” extension. You can use the manual host specification and the CSV filesimultaneously to add hosts.
The following is an example of a CSV file that includes user names and passwordsfor each host:
Host,User,Password
host1.abc.com,username1,password1
host2.abc.com,username2,password2
The first line in the CSV file must appear as above. You can replace the subsequentlines with your hosts, user names, and passwords.
For agentless configuration, the CSV file cannot contain both UNIX and Windowshosts.
Note: The discovery mode (SSH or WMI) must be consistent with the types of hostsyou specify in the CSV file. You must specify SSH for UNIX hosts and WMI forWindows hosts.
Adding managed hosts to Management Serverusing the Auto Configure (gendeploy.pl) script
You can add an agent host to the Management Server domain with minimal userinteraction. The Auto Configure (gendeploy.pl) script available on ManagementServer can be used to create a script that is run on the host to add the host to thedomain. You can create the script either at the command prompt, or in the VeritasInfoScale Operations Manager Management Server console.
Note: You can only add an agent host using the Auto Configure (gendeploy.pl)script. This feature is not applicable for adding agentless hosts.
You need to copy the script that is created using gendeploy.pl to all the hosts thatyou want to add to the domain. After you copy the script, you have to run it on eachhost. A host on which you run the script must have the VRTSsfmh package installedon it.
Adding many hosts to Management Server at the same time using the AutoConfigure (gendeploy.pl) script can affect the performance of Management Server.It is recommended that you add no more than 50 agent hosts at a time.
146Adding and managing hostsAdding managed hosts to Management Server using the Auto Configure (gendeploy.pl) script
Note: Adding a managed host to multiple management servers is not supported.
To perform this task, your user group must be assigned the Admin role on theManagement Server perspective. The root user can also perform this task.
To add an agent host to Management Server using the Auto Configure(gendeploy.pl) script
1 Create the script to add an agent host using either the command prompt, orthe console. Do one of the following:
■ In the Home page on the Management Server console, click Settings. ClickAuto Configure. In the Auto Configure wizard, click Download. In theFile Download dialog, click Save to save the script to the required location.
■ Create the script using command prompt.
■ On Linux Management Server, log on as root.Run the following command:/opt/VRTSsfmh/bin/gendeploy.pl --out filename [--domain
sfm:domainname:port]
where, filename is the name of the script that you specify. Thedomainname is the Management Server host name.For example,/opt/VRTSsfmh/bin/gendeploy.pl --out test.pl --domain
sfm://Managementserver.domain.com:5634
In this example, the domain name is the Management Server name, orthe domain that is hosted by Management Server.
■ On Windows Management Server, log on as a user with the administratorprivileges.To change the directory, run the following command at the commandprompt:cd "C:\Program Files\Veritas\VRTSsfmh\bin"
To create the script to add an agent host, run the following command:perl.exe gendeploy.pl --out <filename> [--domain
<sfm:domainname:port>]
where, filename is the name of the script that you specify. The domain
name is the Management Server host name.For example, perl.exe gendeploy.pl --out test.pl[--domain
sfm://Managementserver.domain.com:5634]
In this example, the domain name is the Management Server name, orthe domain that is hosted by the Management Server.
2 Copy the script to the agent host.
147Adding and managing hostsAdding managed hosts to Management Server using the Auto Configure (gendeploy.pl) script

3 On the agent host, change the directory to the location where you copied thescript.
4 Do one of the following:
■ On UNIX-based hosts, run the following command to make the scriptexecutable:chmod +x filename
where, filename is the name of the script.Run the script:./filename
■ On Windows-based hosts, run the following command:"C:\Program Files\Veritas\VRTSsfmh\bin\perl.exe" filename
where, filename is the name of the script.For the above script, the optional hostname parameter is the host as seenby the Management Server. The host is discovered by this name or IPaddress in Veritas InfoScale Operations Manager.
5 In the console, verify that the agent host has been added to the ManagementServer domain.
See “Adding the managed hosts to Management Server using an agentconfiguration” on page 139.
See “Adding the managed hosts to Management Server using an agentlessconfiguration” on page 143.
See “Upgrading managed host using the console” on page 65.
See “Refreshing the details of the managed host” on page 150.
See “Removing managed hosts from the Management Server domain” on page 151.
Editing the agentless host configurationTo edit the details of an agentless host, you can use the Edit agentlessconfiguration option.
The Advanced option lets you use privilege control software with the agentlessdiscovery of a host. You must specify the type and location of the software. TheAdvanced option is optional and is required while configuring agentless hostdiscovery for non-root users.
The edit operation for agentless hosts is asynchronous. The wizard displays thatthe operation has triggered the edit, but the discovery operation for the agentlesshost is actually in progress in the background. You must wait for the actual discoveryto complete.
148Adding and managing hostsEditing the agentless host configuration
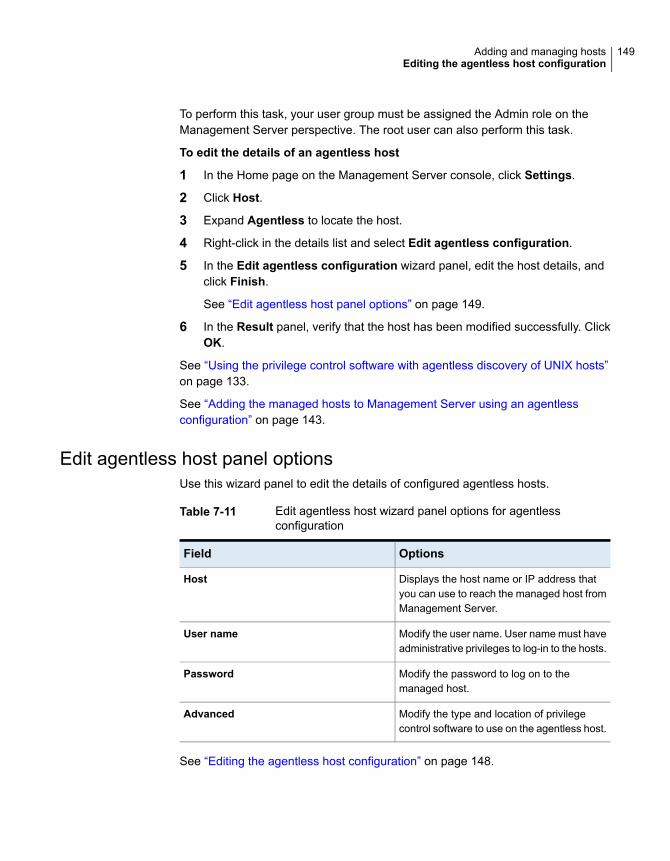
To perform this task, your user group must be assigned the Admin role on theManagement Server perspective. The root user can also perform this task.
To edit the details of an agentless host
1 In the Home page on the Management Server console, click Settings.
2 Click Host.
3 Expand Agentless to locate the host.
4 Right-click in the details list and select Edit agentless configuration.
5 In the Edit agentless configuration wizard panel, edit the host details, andclick Finish.
See “Edit agentless host panel options” on page 149.
6 In the Result panel, verify that the host has been modified successfully. ClickOK.
See “Using the privilege control software with agentless discovery of UNIX hosts”on page 133.
See “Adding the managed hosts to Management Server using an agentlessconfiguration” on page 143.
Edit agentless host panel optionsUse this wizard panel to edit the details of configured agentless hosts.
Table 7-11 Edit agentless host wizard panel options for agentlessconfiguration
OptionsField
Displays the host name or IP address thatyou can use to reach the managed host fromManagement Server.
Host
Modify the user name. User name must haveadministrative privileges to log-in to the hosts.
User name
Modify the password to log on to themanaged host.
Password
Modify the type and location of privilegecontrol software to use on the agentless host.
Advanced
See “Editing the agentless host configuration” on page 148.
149Adding and managing hostsEditing the agentless host configuration
See “Adding managed hosts to Management Server using the Auto Configure(gendeploy.pl) script” on page 146.
Refreshing the details of the managed hostYou can use the Management Server console to refresh the discovery of the agentfamilies on both managed agent and agentless hosts. You can also perform thistask in the Hosts details view in the Server perspective.
To refresh more than one managed host, press Ctrl as you select hosts from thelist.
The refresh operation for agentless hosts is asynchronous. The wizard displaysthat the operation has triggered the refresh, but the discovery operation for theagentless host is actually in progress in the background. You must wait for theactual discovery to complete. When it is complete, you can view the status reflectedin the State column if you are in the Server perspective. If you are in theManagement Server perspective, click Host and view the status in the DiscoveryState column.
To perform this task in the Server perspective, your user group must be assignedthe Admin role on the host or the Server perspective. The permission on the hostmay be explicitly assigned or inherited from a parent Organization.
To perform this task, your user group must be assigned the Admin role on theManagement Server perspective.
To refresh the details of a managed host
1 In the Home page on the Management Server console, do one of the following:
■ Go to the Server perspective and select Manage in the left pane. Expandthe Organization or Uncategorized Hosts to locate the host.
■ Click Settings. Click Host to locate the host.
2 Right-click the managed host and select Refresh.
3 In the Refresh Hosts wizard panel review the managed host and click Yes.
4 In the Result panel click OK.
See “Adding the managed hosts to Management Server using an agentconfiguration” on page ?.
See “Adding the managed hosts to Management Server using an agentlessconfiguration” on page 143.
See “Adding managed hosts to Management Server using the Auto Configure(gendeploy.pl) script” on page 146.
150Adding and managing hostsRefreshing the details of the managed host
See “Removing managed hosts from the Management Server domain” on page 151.
See “Verifying the version of a managed host in the console” on page 68.
Removing managed hosts from the ManagementServer domain
You can dissociate the managed hosts from Management Server and remove themanaged hosts from the data center using the Management Server console. Toremove more than one managed host, press Ctrl as you select hosts from the list.
To perform this task, your user group must be assigned the Admin role on theManagement Server perspective. The root user can also perform this task.
To remove managed hosts from the Management Server domain
1 In the Home page on the Management Server console, click Settings.
2 Click Host.
3 Right-click the managed host and select Remove.
4 In the Remove Hosts wizard panel review the managed host and click Yes.
5 In the Result panel click OK.
See “Adding the managed hosts to Management Server using an agentconfiguration” on page 139.
See “Adding the managed hosts to Management Server using an agentlessconfiguration” on page 143.
See “Adding managed hosts to Management Server using the Auto Configure(gendeploy.pl) script” on page 146.
See “Refreshing the details of the managed host” on page 150.
151Adding and managing hostsRemoving managed hosts from the Management Server domain
Setting up user accessThis chapter includes the following topics:
■ About managing authentication brokers and authentication domains in the VeritasInfoScale Operations Manager domain
■ Adding Lightweight Directory Access Protocol or Active Directory-basedauthentication on Management Server
■ Unconfiguring Lightweight Directory Access Protocol or Active Directoryconfiguration from the authentication broker
■ Enabling the authentication domain
■ Disabling the authentication domain
■ About predefined roles in Veritas InfoScale Operations Manager
■ About Organizations, objects, and roles in Veritas InfoScale Operations Manager
■ Assigning permissions to user groups for a perspective
■ Modifying permissions assigned to user groups for a perspective
■ Deleting permissions assigned to user groups on a perspective
■ Restricting users or user groups from accessing the Veritas InfoScale OperationsManager console
■ Example: Managing user access in Veritas InfoScale Operations Manager usingOrganizations and existing user groups
8Chapter
About managing authentication brokers andauthentication domains in the Veritas InfoScaleOperations Manager domain
An authentication broker is an intermediate registration and certification authoritythat can authenticate clients including users or services.
In Veritas InfoScale Operations Manager there is a primary authentication brokerwhich is associated with one or more authentication domains that authenticateusers. The primary authentication broker is installed on Management Server. Theauthentication broker is configured automatically during the Management Serverconfiguration. You cannot add more than one authentication broker.
You can also manage the authentication domains that are associated withauthentication brokers in Veritas InfoScale Operations Manager.
Veritas InfoScale Operations Manager supports the authentication mechanism thatis configured in the operating system, including Pluggable Authentication Modules(PAM), Network Information Service (NIS), or NIS+. In addition to the nativeoperating system authentication, Veritas InfoScale Operations Manager supportsLightweight Directory Access Protocol (LDAP) and Active Directory (AD).
Veritas InfoScale Operations Manager authentication has no ability to interact withRSA or other secondary authentication interfaces like proxy, VPN, Kerberos, (wherethe subscriber must request and receive an encrypted security token that can beused to access a particular service), Remote Authentication Dial-In User Service(RADIUS), Terminal Access Controller Access Control System Plus (TACACS+),DS3, smartcard, or other multifactor authentication methods.
You can view the following authentication domain types on the Veritas InfoScaleOperations Manager log in page:
■ Unixpwd
■ Network (NT) Domain
■ LDAP
■ AD
To assign permissions to user groups within perspectives, you need to configureLDAP or AD domain.
If you unconfigure the LDAP or AD domain, the permissions that are assigned touser groups on the perspectives are deleted.
To manage the authentication domains, your user group must be assigned theAdmin role on the Management Server perspective.
153Setting up user accessAbout managing authentication brokers and authentication domains in the Veritas InfoScale Operations
Manager domain
See “Adding Lightweight Directory Access Protocol or Active Directory-basedauthentication on Management Server” on page 154.
See “Unconfiguring Lightweight Directory Access Protocol or Active Directoryconfiguration from the authentication broker” on page 159.
See “Assigning permissions to user groups for a perspective” on page 163.
Adding Lightweight Directory Access Protocol orActive Directory-based authentication onManagement Server
You can add Lightweight Directory Access Protocol (LDAP) or Active Directory(AD)-based authentication on the primary authentication broker.
By default, the LDAP or AD-based authentication domain that you add is in theenabled state.
To perform this task, your user group must be assigned the Admin role on theManagement Server perspective.
To add LDAP or AD-based authentication
1 In the Home page on the Management Server console, click Settings.
2 Do one of the following:
■ Click Add LDAP/AD.
■ Click Security. In the Brokers & Domains tab, click Add LDAP/AD.
3 In the Add LDAP/AD wizard panel, enter the details, and click Next.
See “Add LDAP/AD panel options” on page 155.
4 In the Add LDAP/AD wizard panel, enter a domain name, specify the searchbase, and click Finish.
See “Add LDAP/AD panel options to specify the domain name” on page 157.
5 In the Add LDAP/AD panel that confirms that you have added the LDAP orAD-based authentication, click OK.
See “About managing authentication brokers and authentication domains in theVeritas InfoScale Operations Manager domain” on page 153.
See “Unconfiguring Lightweight Directory Access Protocol or Active Directoryconfiguration from the authentication broker” on page 159.
154Setting up user accessAdding Lightweight Directory Access Protocol or Active Directory-based authentication on Management
Server
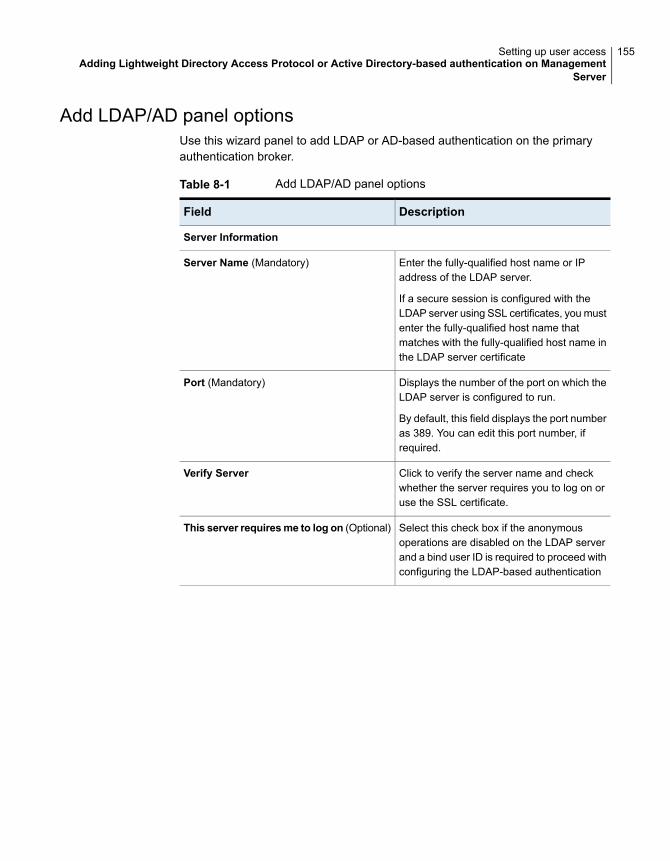
Add LDAP/AD panel optionsUse this wizard panel to add LDAP or AD-based authentication on the primaryauthentication broker.
Table 8-1 Add LDAP/AD panel options
DescriptionField
Server Information
Enter the fully-qualified host name or IPaddress of the LDAP server.
If a secure session is configured with theLDAP server using SSL certificates, you mustenter the fully-qualified host name thatmatches with the fully-qualified host name inthe LDAP server certificate
Server Name (Mandatory)
Displays the number of the port on which theLDAP server is configured to run.
By default, this field displays the port numberas 389. You can edit this port number, ifrequired.
Port (Mandatory)
Click to verify the server name and checkwhether the server requires you to log on oruse the SSL certificate.
Verify Server
Select this check box if the anonymousoperations are disabled on the LDAP serverand a bind user ID is required to proceed withconfiguring the LDAP-based authentication
This server requiresme to log on (Optional)
155Setting up user accessAdding Lightweight Directory Access Protocol or Active Directory-based authentication on Management
Server
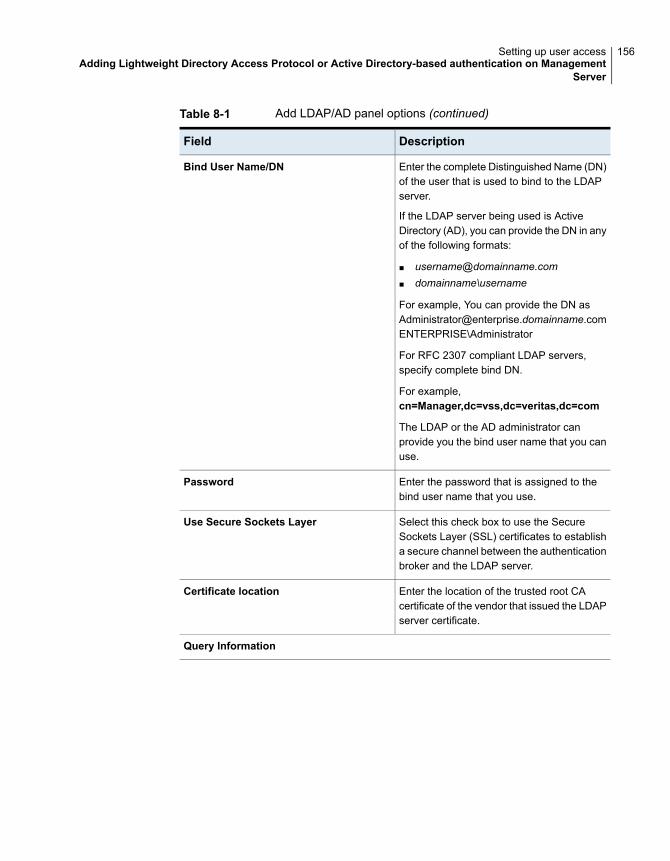
Table 8-1 Add LDAP/AD panel options (continued)
DescriptionField
Enter the complete Distinguished Name (DN)of the user that is used to bind to the LDAPserver.
If the LDAP server being used is ActiveDirectory (AD), you can provide the DN in anyof the following formats:
■ [email protected]■ domainname\username
For example, You can provide the DN [email protected]\Administrator
For RFC 2307 compliant LDAP servers,specify complete bind DN.
For example,cn=Manager,dc=vss,dc=veritas,dc=com
The LDAP or the AD administrator canprovide you the bind user name that you canuse.
Bind User Name/DN
Enter the password that is assigned to thebind user name that you use.
Password
Select this check box to use the SecureSockets Layer (SSL) certificates to establisha secure channel between the authenticationbroker and the LDAP server.
Use Secure Sockets Layer
Enter the location of the trusted root CAcertificate of the vendor that issued the LDAPserver certificate.
Certificate location
Query Information
156Setting up user accessAdding Lightweight Directory Access Protocol or Active Directory-based authentication on Management
Server
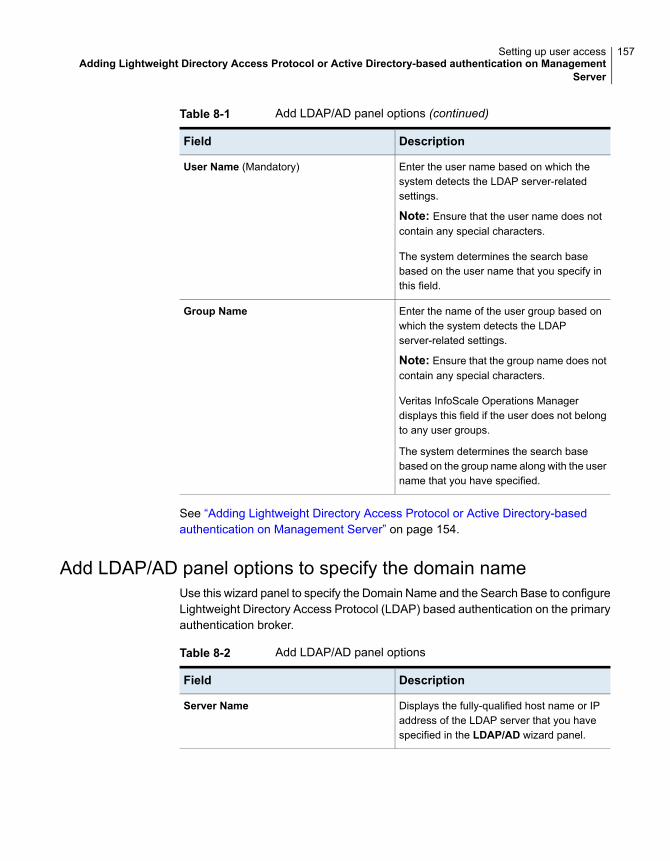
Table 8-1 Add LDAP/AD panel options (continued)
DescriptionField
Enter the user name based on which thesystem detects the LDAP server-relatedsettings.
Note: Ensure that the user name does notcontain any special characters.
The system determines the search basebased on the user name that you specify inthis field.
User Name (Mandatory)
Enter the name of the user group based onwhich the system detects the LDAPserver-related settings.
Note: Ensure that the group name does notcontain any special characters.
Veritas InfoScale Operations Managerdisplays this field if the user does not belongto any user groups.
The system determines the search basebased on the group name along with the username that you have specified.
Group Name
See “Adding Lightweight Directory Access Protocol or Active Directory-basedauthentication on Management Server” on page 154.
Add LDAP/AD panel options to specify the domain nameUse this wizard panel to specify the Domain Name and the Search Base to configureLightweight Directory Access Protocol (LDAP) based authentication on the primaryauthentication broker.
Table 8-2 Add LDAP/AD panel options
DescriptionField
Displays the fully-qualified host name or IPaddress of the LDAP server that you havespecified in the LDAP/AD wizard panel.
Server Name
157Setting up user accessAdding Lightweight Directory Access Protocol or Active Directory-based authentication on Management
Server

Table 8-2 Add LDAP/AD panel options (continued)
DescriptionField
Enter a unique name to identify theLDAP-based authentication that you configureon the primary authentication broker. You canenter up to 32 characters.
Domain Name
Search Base
Select this option if you want to use thedefault search base that the system hasdetected using the information that you havespecified on the LDAP/AD wizard panel.
Use Default
Select this option to specify the search baseother than the default search base.
For example, you can customize the searchbase as follows to authenticate the user(sampleuser) who belongs to the organization(ou=HR), which is an organization unit underou=user
The organization structure is given below:
ou=HR,ou=People,dc=veritas,dc=com
|-sampleuser
ou=Engg,ou=People,dc=veritas,dc=com
|-Eng1
The default search base isou=HR,ou=People,dc=veritas,dc=com
To authenticate users under ou=HR andou=Engg, set custom search base to a levelup:
ou=People,dc=veritas,dc=com
Custom
See “Adding Lightweight Directory Access Protocol or Active Directory-basedauthentication on Management Server” on page 154.
158Setting up user accessAdding Lightweight Directory Access Protocol or Active Directory-based authentication on Management
Server
Unconfiguring Lightweight Directory AccessProtocol or Active Directory configuration fromthe authentication broker
You can remove or unconfigure Lightweight Directory Access Protocol (LDAP) orActive Directory (AD) configuration from the primary authentication broker usingthe Management Server console.
The permissions assigned to user groups within perspectives are deleted whenyou remove LDAP or AD configuration.
To perform this task, your user group must be assigned the Admin role on theManagement Server perspective.
To unconfigure LDAP or AD configuration from the primary authenticationbroker
1 In the Home page on the Management Server console, click Settings.
2 Click Security.
3 In the Brokers & Domains tab, right-click the authentication domain that youhave configured as LDAP or AD, and select Unconfigure.
4 In the Unconfigure panel review the information, and click OK.
See “About managing authentication brokers and authentication domains in theVeritas InfoScale Operations Manager domain” on page 153.
See “Viewing the details of the authentication broker and the domains associatedwith the broker” on page 250.
See “Adding Lightweight Directory Access Protocol or Active Directory-basedauthentication on Management Server” on page 154.
Enabling the authentication domainUsing the Management Server console, you can enable the authentication domainsthat are associated with an authentication broker, LDAP, or AD. You must enablean authentication domain to do the following:
■ Display the authentication domain on the Veritas InfoScale Operations Managerlogin page.
■ To assign permissions to the user groups for the perspectives.
159Setting up user accessUnconfiguring Lightweight Directory Access Protocol or Active Directory configuration from the authentication
broker
To enable the authentication domain
1 In the Management Server console, click Settings.
2 Click Security.
3 In the Brokers & Domains tab, right-click the domain and select Enable.
4 In the Enable Domains wizard panel, review the domain name and type, andclick OK.
See “About managing authentication brokers and authentication domains in theVeritas InfoScale Operations Manager domain” on page 153.
See “Viewing the details of the authentication broker and the domains associatedwith the broker” on page 250.
See “Adding Lightweight Directory Access Protocol or Active Directory-basedauthentication on Management Server” on page 154.
See “Unconfiguring Lightweight Directory Access Protocol or Active Directoryconfiguration from the authentication broker” on page 159.
See “Disabling the authentication domain” on page 160.
Disabling the authentication domainUsing the Management Server console, you can disable the authentication domainthat is associated with an authentication broker, AD, or LDAP. When you disablea domain, it is not displayed on the Veritas InfoScale Operations Manager loginpage and you cannot assign permissions to the user groups for the perspectives.
To disable the authentication domain
1 In the Management Server console, click Settings.
2 Click Security.
3 In the Brokers & Domains tab, right-click the domain and select Disable.
4 In the Disable Domains wizard panel, review the domain name and type, andclick OK.
See “About managing authentication brokers and authentication domains in theVeritas InfoScale Operations Manager domain” on page 153.
See “Viewing the details of the authentication broker and the domains associatedwith the broker” on page 250.
See “Adding Lightweight Directory Access Protocol or Active Directory-basedauthentication on Management Server” on page 154.
160Setting up user accessDisabling the authentication domain
See “Unconfiguring Lightweight Directory Access Protocol or Active Directoryconfiguration from the authentication broker” on page 159.
See “Enabling the authentication domain” on page 159.
About predefined roles in Veritas InfoScaleOperations Manager
Veritas InfoScale Operations Manager has three predefined roles: Admin, Operator,and Guest. Veritas InfoScale Operations Manager makes use of the existing usergroups within the Active Directory or in the native operating system such as Windowsor UNIX. A user group is assigned a role on the perspective or an Organizationwithin a perspective.
A user group with Admin role on a perspective can perform tasks such as creatingand assigning permissions to an Organization, along with other tasks that arerelevant in the perspective. A user group with Guest role can only view theinformation displayed in the perspective. Only Admin role can be assigned to a usergroup in the Management Server perspective.
Operator role is available only in the Availability perspective. A user group withoperator role can perform operations such as taking a service group online or offline,freezing or unfreezing service groups, or running the high availability and disasterrecovery fire drill.
See “Assigning permissions to user groups for a perspective” on page 163.
About Organizations, objects, and roles in VeritasInfoScale Operations Manager
Organization is a collection of objects in a perspective that can be secured andmanaged as a group. Organizations can be created in all perspectives except inthe Management Server perspective. To create an Organization, your user groupmust have the Admin role on the perspective. The objects within the Organizationmay or may not represent the physical organization of the objects in the actual datacenter.
Multiple Organizations can be created in a perspective and user permissions canbe assigned to each Organization. For example, a group of users can have Adminrole on an Organization having Windows hosts, and Guest role for an Organizationhaving Linux hosts.
You can also create unlimited number of nested Organizations. An Organizationdefined in one perspective is not available in another perspective.
161Setting up user accessAbout predefined roles in Veritas InfoScale Operations Manager
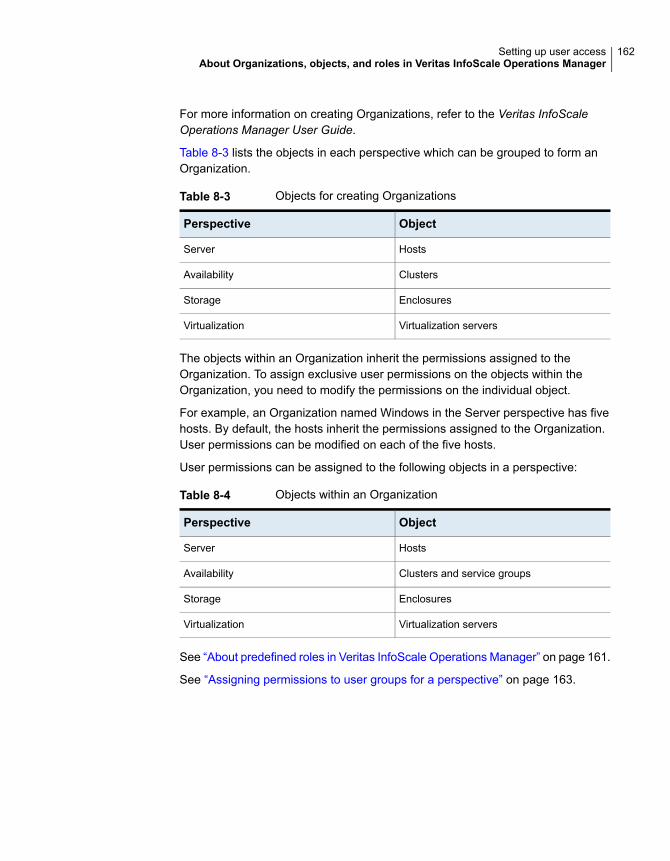
For more information on creating Organizations, refer to the Veritas InfoScaleOperations Manager User Guide.
Table 8-3 lists the objects in each perspective which can be grouped to form anOrganization.
Table 8-3 Objects for creating Organizations
ObjectPerspective
HostsServer
ClustersAvailability
EnclosuresStorage
Virtualization serversVirtualization
The objects within an Organization inherit the permissions assigned to theOrganization. To assign exclusive user permissions on the objects within theOrganization, you need to modify the permissions on the individual object.
For example, an Organization named Windows in the Server perspective has fivehosts. By default, the hosts inherit the permissions assigned to the Organization.User permissions can be modified on each of the five hosts.
User permissions can be assigned to the following objects in a perspective:
Table 8-4 Objects within an Organization
ObjectPerspective
HostsServer
Clusters and service groupsAvailability
EnclosuresStorage
Virtualization serversVirtualization
See “About predefined roles in Veritas InfoScale Operations Manager” on page 161.
See “Assigning permissions to user groups for a perspective” on page 163.
162Setting up user accessAbout Organizations, objects, and roles in Veritas InfoScale Operations Manager
Assigning permissions to user groups for aperspective
Veritas InfoScale Operations Manager makes use the existing user groups whichare present in the Active Directory or in the native operating system such asWindows or UNIX. The root user can assign permissions such as Admin or Guestto the user groups for a perspective.
For the Availability perspective, the root user can also assign the Operator role.The user groups having the Operator role can perform operations such as takinga service group online or offline, freezing or unfreezing a service group, or runningthe high availability and disaster recovery fire drill.
To assign permissions to user groups for a perspective, your user group must havethe Admin role assigned on the Management Server perspective. The root usercan also perform this task.
To assign permissions to user groups for a perspective
1 In the Home page on the Management Server console, do one of the following:.
■ Click Settings. Skip to 2.
■ Click on a perspective and expand Manage in the left pane. Right-clickData Center and select Properties. Skip to 4.
2 Click Security, and click the Permissions tab.
3 Select a perspective from the drop-down list.
4 Under Add Permission, click Select user group.
5 In the Select user group panel, select the domain, and enter the name of theuser group.
The user group name is case-sensitive.
6 Click Verify user group and click OK.
7 Under Add Permission, select a role from the drop-down list. Click Add.
See “About predefined roles in Veritas InfoScale Operations Manager”on page 161.
8 In the Success panel click OK.
See “Modifying permissions assigned to user groups for a perspective” on page 164.
See “Deleting permissions assigned to user groups on a perspective” on page 164.
163Setting up user accessAssigning permissions to user groups for a perspective
Modifying permissions assigned to user groupsfor a perspective
Veritas InfoScale Operations Manager makes use the existing user groups whichare present in the Active Directory or in the native operating system such asWindows or UNIX. The root user can modify permissions assigned to the usergroups for a perspective. In case of Availability perspective, the root user can alsoassign the Operator role.
To modify permissions assigned to user groups for a perspective, your user groupmust have the Admin role assigned on the Management Server perspective. Theroot user can also perform this task.
To modify permissions assigned to user groups for a perspective
1 In the Home page on the Management Server console, do one of the following:
■ Click Settings. Skip to 2.
■ Click on a perspective and expand Manage in the left pane. Right-click DataCenter and select Properties. Skip to 3.
2 Click Security and click the Permissions tab.
3 Right-click the user group and select Modify Role.
4 In the Modify Role panel, select a role from the drop-down list, and click OK.
5 In the Modify Role panel click Close.
See “About predefined roles in Veritas InfoScale Operations Manager” on page 161.
See “Deleting permissions assigned to user groups on a perspective” on page 164.
Deleting permissions assigned to user groups ona perspective
Using the Management Server console, you can delete the permissions assignedto user groups on a perspective.
To delete permissions assigned to user groups on a perspective, your user groupmust have the Admin role assigned on the Management Server perspective. Theroot user can also perform this task.
To delete permissions assigned to user groups on a perspective
1 In the Home page on the Management Server console, do one of the following:
■ Click Settings. Skip to 2.
164Setting up user accessModifying permissions assigned to user groups for a perspective
■ Click on a perspective and expand Manage in the left pane. Right-clickData Center and select Properties. Skip to 3.
2 Click Security, and click the Permissions tab.
3 Right-click the user group and select Delete.
4 In the Delete panel click OK.
5 In the Delete - Result panel click Close.
See “About predefined roles in Veritas InfoScale Operations Manager” on page 161.
See “Modifying permissions assigned to user groups for a perspective” on page 164.
Restricting users or user groups from accessingthe Veritas InfoScale OperationsManager console
You can restrict a user or a user group from accessing the Management Serverconsole.
Create a file named .esmwebdeny and enter the name of the user or the user groupwhom you want to restrict in the following format.
■ For user: user name@domain name:user
■ For user group: user group name@domain name:group
User and user group names are case-sensitive only for unixpwd domains, for LDAP,AD, and NT domains they are case insensitive.
Web server restart is not required when the file is created or modified. If the useror the user group is already logged in to the Management Server console, therestrictions will be applicable in the subsequent login session.
Following is an example of a .esmwebdeny file that includes the names of usersand user groups who are restricted from accessing the Management Server console.
[email protected]:user
[email protected]:user
[email protected]:group
[email protected]:group
Place the file at the following location:
■ For Linux-based Management Server: /var/opt/VRTSsfmcs/conf/
■ For Windows-based Management Server (2008/2008 R2):C:\ProgramData\Symantec\VRTSsfmcs\conf\
Precede a comment in the .esmwebdeny file with "#".
165Setting up user accessRestricting users or user groups from accessing the Veritas InfoScale Operations Manager console

See “Adding Lightweight Directory Access Protocol or Active Directory-basedauthentication on Management Server” on page 154.
See “Assigning permissions to user groups for a perspective” on page 163.
See “Deleting permissions assigned to user groups on a perspective” on page 164.
Example: Managing user access in VeritasInfoScale Operations Manager usingOrganizations and existing user groups
As an Administrator you may need to restrict user groups from performing certaintasks on specific objects. Using the Management Server console, you can assignroles to existing user groups on a perspective. Alternately you can also createOrganizations in a perspective, and assign roles to user groups on theseOrganizations. Organizations can be created using hosts, clusters, virtualizationservers, and enclosures in Server, Availability, Virtualization, and Storageperspective respectively.
You can create an Organization in one of the following ways:
■ Create an empty Organization.
■ Create an Organization by manually selecting the objects.
■ Create an Organization by selecting objects based on a rule.
This example explains how you can restrict user groups from performing certaintasks on objects.
You can do any one of the following to restrict access:
■ Provide access only to the selected perspective.
■ Create an Organization in a perspective, and provide access to the same.
■ Provide access to an object within the Organization.
For more information on creating Organizations within a perspective and assigningpredefined roles, refer to the Veritas InfoScale Operations Manager ManagementServer User Guide.
In this example, we use the following names:
alpha.veritasdomain.comDomain
UserGroup_AUser group 1
UserGroup_BUser group 2
166Setting up user accessExample: Managing user access in Veritas InfoScale Operations Manager using Organizations and existing
user groups
Operations_teamUser group 3
Windows_clusterOrganization 1
Linux_clusterOrganization 2
Beta_SGService group
Provide access to user groups on a perspectiveAs an Administrator, you can provide access to user groups on a perspective.Veritas InfoScale Operations Manager makes use of the existing user groups whichare present in Lightweight Directory Access Protocol (LDAP) or Active Directory(AD), or the authentication mechanism in the native operating system of Windowsand UNIX. Before you assign permissions to user groups, you need to create usergroups in LDAP or AD. Create user groups called UserGroup_A, UserGroup_B,and Operations_team. User group names are case-sensitive.
User groups with Admin role on a perspective can perform all the tasks in thatperspective. In addition to the Admin role, Operator role is available only in theAvailability perspective. User group with Operator role can perform certain taskssuch as onlining and offlining service groups, freezing or unfreezing service groups,clearing faults on service groups or, running the disaster recover fire drill.
A user group having the Guest role on any perspective can only view the informationand not perform any task.
Consider the Operations_team user group which is responsible for tasks such asfreezing or unfreezing service groups, clearing faults on service groups, runningthe high availability or disaster recover fire drill. These tasks are performed on theservices groups in the Availability perspective. A user group having either Adminor Operator role can perform these tasks. As an Administrator, you can assign theOperator role to Operations_team, thereby restricting them from performing othertasks which require Admin role.
Using the Management Server console, you can assign the Operator role on theAvailability perspective to the Operations_team user group.
To assign Operator role to Operations_team on the Availability perspective
1 In the Home page on the Management Server console, click Settings.
2 Click Security.
3 Click the Permissions tab.
4 Select Availability perspective.
5 Under Add Permission, click Select user group.
167Setting up user accessExample: Managing user access in Veritas InfoScale Operations Manager using Organizations and existing
user groups
6 In the Select user group panel, select alpha.veritasdomain.com, and enterOperations_team.
7 Verify the user group, and click OK.
8 Under Add Permission, select Operator role from the list, and click Add.
Create an Organization in a perspective, and provideaccess to the sameAssigning the Admin role to user groups on a perspective, allows the user groupsto perform all tasks on all the objects within the perspective. As an Administrator,you may want to restrict the access to certain objects within the perspective. To dothis, you need to create an Organization by grouping the objects. You can thenprovide appropriate roles to user groups on these Organizations.
For example, in the Availability perspective, you can create an Organization calledWindows_cluster which consists of all Windows cluster nodes and another calledLinux_cluster having all Linux cluster nodes. You can assign the clusters to theOrganization based on a rule.
To create a Windows_cluster Organization
1 In the Home page on the Management Server console, go to Availabilityperspective and select Manage in the left pane.
2 Right-click Data Center and select Create Organization.
3 In theCreate Organizationwizard panel, enterWindows_cluster in the namefield.
4 Select Assign Clusters to Organization Based on Rule, and click Next.
5 In the Create Organization - Based on a rule wizard panel, do the following:
■ In the Attribute list, select Platform.
■ In the Condition list, select Is One-of.
■ In the Values list, select Windows.
6 Click Finish.
The rule is applied and all the cluster nodes having Windows platform are movedfrom Uncategorized Clusters into the Organization named Windows_cluster. Whena new Windows cluster node is added to the Management Server domain, it isautomatically moved into Windows_cluster Organization.
Similarly you can create another Organization called Linux_cluster for all clusternodes on Linux platform.
168Setting up user accessExample: Managing user access in Veritas InfoScale Operations Manager using Organizations and existing
user groups
You can now restrict access to these Organizations. You can provide Admin roleto UserGroup_A on the Windows_cluster Organization, and UserGroup_B onLinux_cluster.
To assign Admin role to UserGroup_A on Windows_cluster
1 In the Home page on the Management Server console, go to Availabilityperspective and select Manage in the left pane.
2 Right-click Windows_cluster, and select Properties.
3 Under Add Permission, click Select user group.
4 In the Select user group panel, select alpha.veritasdomain.com, and enterUserGroup_A.
5 Verify the user group, and click OK.
6 Under Add Permission, select Admin role from the list, and click Add.
The UserGroup_A is now assigned the Admin role on Windows_cluster. This teamcan now perform all the tasks on the cluster.
Similarly you can assign Admin role to UserGroup_B on Linux_cluster. If required,you can also assign Guest role to UserGroup_A on Linux_cluster, and Guest roleto UserGroup_B on Windows_cluster.
Provide access to an object within the Organization.Since UserGroup_A is assigned Guest role on Linux_cluster, all the service groupswithin Linux_cluster inherit the Guest role for UserGroup_A.
Consider a service group, Beta_SG, which belongs to the Linux_cluster Organization.You want to assign Admin role to UserGroup_A on this service group. To do thisyou need to modify the role.
To modify role on Beta_SG to Admin for UserGroup_A
1 In the Home page on the Management Server console, go to Availabilityperspective and select Manage in the left pane.
2 Expand Linux_cluster, expand Service Groups, and select Beta_SG.
3 Right-click Beta_SG, and select Properties.
4 Click the Permissions tab.
5 Right-click UserGroup_A, select Modify Role.
6 Select Admin role and click OK.
UserGroup_A now has Admin role on Beta_SG, and Guest role on the remainingservice groups in the Linux_cluster Organization.
169Setting up user accessExample: Managing user access in Veritas InfoScale Operations Manager using Organizations and existing
user groups

See “Adding Lightweight Directory Access Protocol or Active Directory-basedauthentication on Management Server” on page 154.
See “About predefined roles in Veritas InfoScale Operations Manager” on page 161.
See “Assigning permissions to user groups for a perspective” on page 163.
170Setting up user accessExample: Managing user access in Veritas InfoScale Operations Manager using Organizations and existing
user groups
Setting up fault monitoringThis chapter includes the following topics:
■ About alerts and rules
■ Creating rules in the Management Server perspective
■ Editing rules in the Management Server perspective
■ Deleting rules in the Management Server perspective
■ Enabling rules in the Management Server perspective
■ Disabling rules in the Management Server perspective
■ About faults and risks
■ Suppressing faults in the Management Server perspective
■ Restoring a suppressed fault in the Management Server perspective
■ Suppressing a fault definition in the Management Server perspective
■ Restoring a suppressed fault definition in the Management Server perspective
About alerts and rulesData center administrators need to manage the condition of the resources in thedata center. Administrators typically define the custom rules that specify whatconditions generate an alert, what actions should occur if an alert is detected, andwhich actions generate which type of alert severity. Using the Management Serverconsole, you can create and maintain rules pertaining to alerts.
You can monitor the faulty status and performance information of your data centerby reviewing the alert log on the Management Server console.
You can view the following information on alerts in the data center:
9Chapter
■ Information about the alert.
■ The source of the alert.
■ The time when the alert occurred.
The alert severity levels are:
■ Critical
■ Warning
■ Information
You can create alert rules to receive warnings about events and conditions, suchas stopped replication or storage capacity, enabled or disabled I/O paths, faultedclusters and so on.
Using the Management Server console, you can specify to initiate one of thefollowing actions when an alert condition is met:
■ Send an email message. For some alert conditions, operators may want to sendemails notifying key personnel about the condition. You can specify one or moreemail addresses to which the alert notification is sent.
Note: You must provide the details for the SMTP settings before setting theemail notification for an alert.
■ Send an SNMP trap notification. Some objects are not polled. When events takeplace, these objects send traps or unsolicited asynchronous SNMP messagesto the Server. Some of the rules that Veritas InfoScale Operations Manageruses to monitor objects in the environment rely on SNMP trap-based messages.
Note: You must configure SNMP trap settings for receiving alert notifications.
■ Run a custom script. You can upload a custom script that runs when the alertconditions that are specified by the rule occur.
See “Viewing the details of rules” on page 253.
See “Configuring SMTP settings for email notifications” on page 225.
See “Configuring SNMP trap settings for alert notifications” on page 227.
172Setting up fault monitoringAbout alerts and rules
Creating rules in the Management Serverperspective
In the Management Server console, you can create rules to trigger various actionsbased on alert conditions.
To perform this task, your user group must be assigned the Admin role on theManagement Server perspective.
For more information on applying rules to specific Organizations, see VeritasInfoScale Operations Manager User Guide.
To create a rule in the Management Server perspective
1 In the Home page on the Management Server console, click Settings.
2 Click Alert & Rules.
3 Click Create Rule.
4 In the Create Rule wizard panel, do one of the following:
■ Select This rule will be triggered for all faults of type:, click Next andskip to 6.
■ Select Enter the fault topics that will trigger the actions for this rule:,enter the fault definitions separated by a comma (,) or a semicolon (;), andclick Next. Skip to 6.
■ Select Choose from a list of fault topics, click Next, and skip to 5.
See “Create Rule - Select the type of fault conditions to trigger this rule paneloptions ” on page 174.
5 In the Create Rule - Select one or more fault topics which will trigger thisrule wizard panel, select the fault topics, and click Next.
See “Create Rule - Select one or more fault topics which will trigger this rulepanel options” on page 175.
6 In the Create Rule - Setup notifications wizard panel, enter the requiredinformation and click Next.
See “Create Rule - Setup notifications panel options” on page 175.
7 In the Create Rule - Enter name and description wizard panel, enter therequired information and click Finish.
See “Create Rule - Enter name and description panel options” on page 176.
8 In the Create Rule - Result panel, verify that the rule has been successfullycreated, and click OK.
173Setting up fault monitoringCreating rules in the Management Server perspective
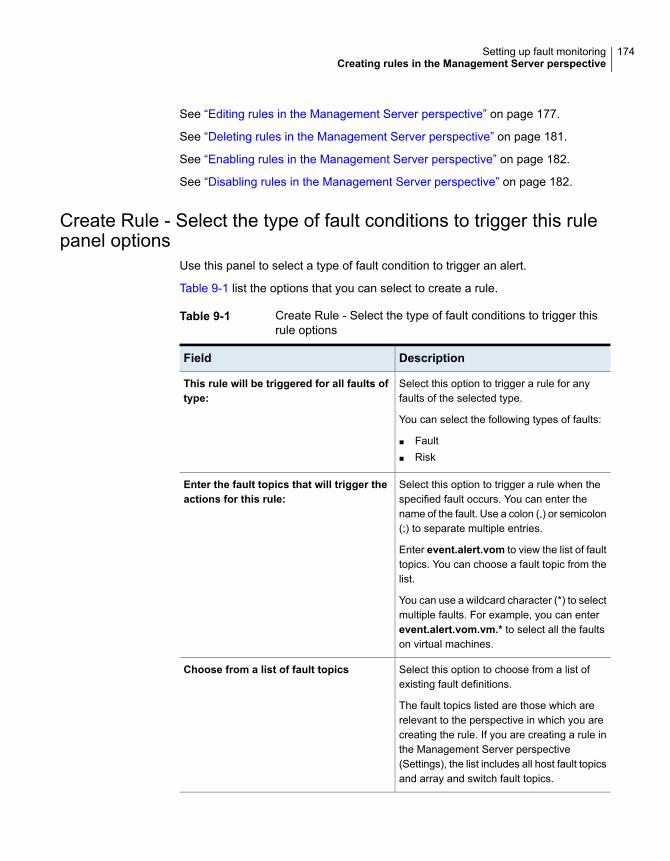
See “Editing rules in the Management Server perspective” on page 177.
See “Deleting rules in the Management Server perspective” on page 181.
See “Enabling rules in the Management Server perspective” on page 182.
See “Disabling rules in the Management Server perspective” on page 182.
Create Rule - Select the type of fault conditions to trigger this rulepanel options
Use this panel to select a type of fault condition to trigger an alert.
Table 9-1 list the options that you can select to create a rule.
Table 9-1 Create Rule - Select the type of fault conditions to trigger thisrule options
DescriptionField
Select this option to trigger a rule for anyfaults of the selected type.
You can select the following types of faults:
■ Fault■ Risk
This rule will be triggered for all faults oftype:
Select this option to trigger a rule when thespecified fault occurs. You can enter thename of the fault. Use a colon (,) or semicolon(;) to separate multiple entries.
Enter event.alert.vom to view the list of faulttopics. You can choose a fault topic from thelist.
You can use a wildcard character (*) to selectmultiple faults. For example, you can enterevent.alert.vom.vm.* to select all the faultson virtual machines.
Enter the fault topics that will trigger theactions for this rule:
Select this option to choose from a list ofexisting fault definitions.
The fault topics listed are those which arerelevant to the perspective in which you arecreating the rule. If you are creating a rule inthe Management Server perspective(Settings), the list includes all host fault topicsand array and switch fault topics.
Choose from a list of fault topics
174Setting up fault monitoringCreating rules in the Management Server perspective
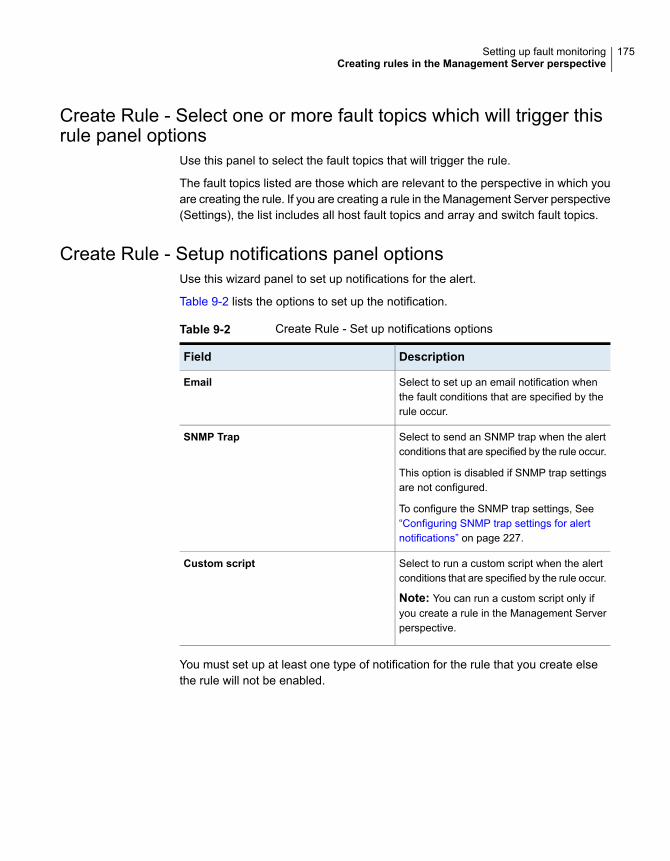
Create Rule - Select one or more fault topics which will trigger thisrule panel options
Use this panel to select the fault topics that will trigger the rule.
The fault topics listed are those which are relevant to the perspective in which youare creating the rule. If you are creating a rule in the Management Server perspective(Settings), the list includes all host fault topics and array and switch fault topics.
Create Rule - Setup notifications panel optionsUse this wizard panel to set up notifications for the alert.
Table 9-2 lists the options to set up the notification.
Table 9-2 Create Rule - Set up notifications options
DescriptionField
Select to set up an email notification whenthe fault conditions that are specified by therule occur.
Select to send an SNMP trap when the alertconditions that are specified by the rule occur.
This option is disabled if SNMP trap settingsare not configured.
To configure the SNMP trap settings, See“Configuring SNMP trap settings for alertnotifications” on page 227.
SNMP Trap
Select to run a custom script when the alertconditions that are specified by the rule occur.
Note: You can run a custom script only ifyou create a rule in the Management Serverperspective.
Custom script
You must set up at least one type of notification for the rule that you create elsethe rule will not be enabled.
175Setting up fault monitoringCreating rules in the Management Server perspective
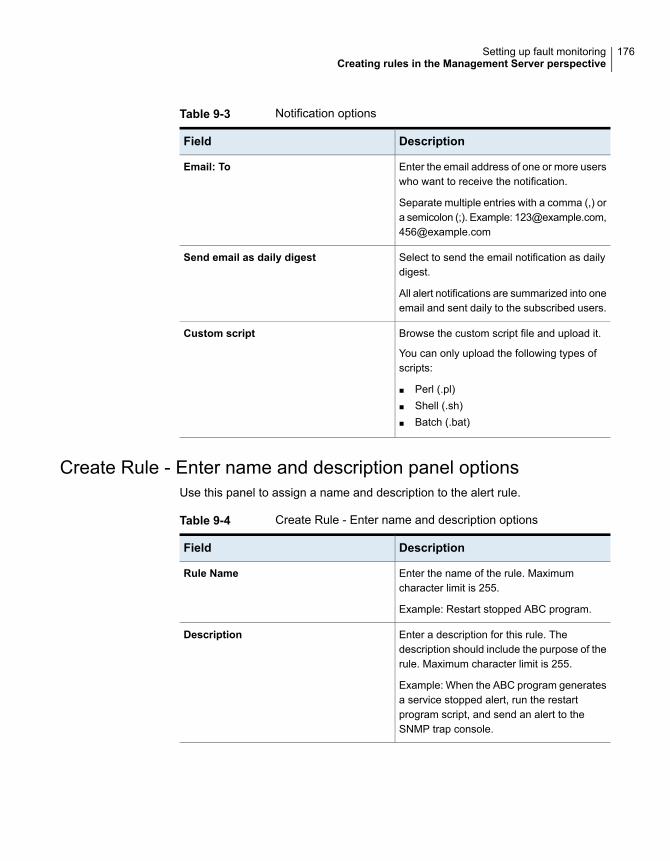
Table 9-3 Notification options
DescriptionField
Enter the email address of one or more userswho want to receive the notification.
Separate multiple entries with a comma (,) ora semicolon (;). Example: [email protected],[email protected]
Email: To
Select to send the email notification as dailydigest.
All alert notifications are summarized into oneemail and sent daily to the subscribed users.
Send email as daily digest
Browse the custom script file and upload it.
You can only upload the following types ofscripts:
■ Perl (.pl)■ Shell (.sh)■ Batch (.bat)
Custom script
Create Rule - Enter name and description panel optionsUse this panel to assign a name and description to the alert rule.
Table 9-4 Create Rule - Enter name and description options
DescriptionField
Enter the name of the rule. Maximumcharacter limit is 255.
Example: Restart stopped ABC program.
Rule Name
Enter a description for this rule. Thedescription should include the purpose of therule. Maximum character limit is 255.
Example: When the ABC program generatesa service stopped alert, run the restartprogram script, and send an alert to theSNMP trap console.
Description
176Setting up fault monitoringCreating rules in the Management Server perspective
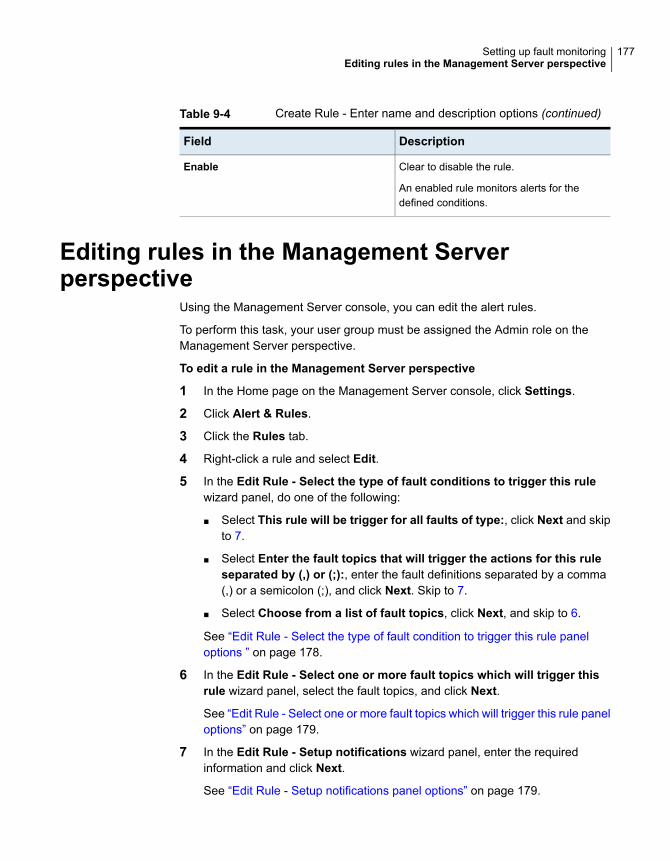
Table 9-4 Create Rule - Enter name and description options (continued)
DescriptionField
Clear to disable the rule.
An enabled rule monitors alerts for thedefined conditions.
Enable
Editing rules in the Management Serverperspective
Using the Management Server console, you can edit the alert rules.
To perform this task, your user group must be assigned the Admin role on theManagement Server perspective.
To edit a rule in the Management Server perspective
1 In the Home page on the Management Server console, click Settings.
2 Click Alert & Rules.
3 Click the Rules tab.
4 Right-click a rule and select Edit.
5 In the Edit Rule - Select the type of fault conditions to trigger this rulewizard panel, do one of the following:
■ Select This rule will be trigger for all faults of type:, click Next and skipto 7.
■ Select Enter the fault topics that will trigger the actions for this ruleseparated by (,) or (;):, enter the fault definitions separated by a comma(,) or a semicolon (;), and click Next. Skip to 7.
■ Select Choose from a list of fault topics, click Next, and skip to 6.
See “Edit Rule - Select the type of fault condition to trigger this rule paneloptions ” on page 178.
6 In the Edit Rule - Select one or more fault topics which will trigger thisrule wizard panel, select the fault topics, and click Next.
See “Edit Rule - Select one or more fault topics which will trigger this rule paneloptions” on page 179.
7 In the Edit Rule - Setup notifications wizard panel, enter the requiredinformation and click Next.
See “Edit Rule - Setup notifications panel options” on page 179.
177Setting up fault monitoringEditing rules in the Management Server perspective
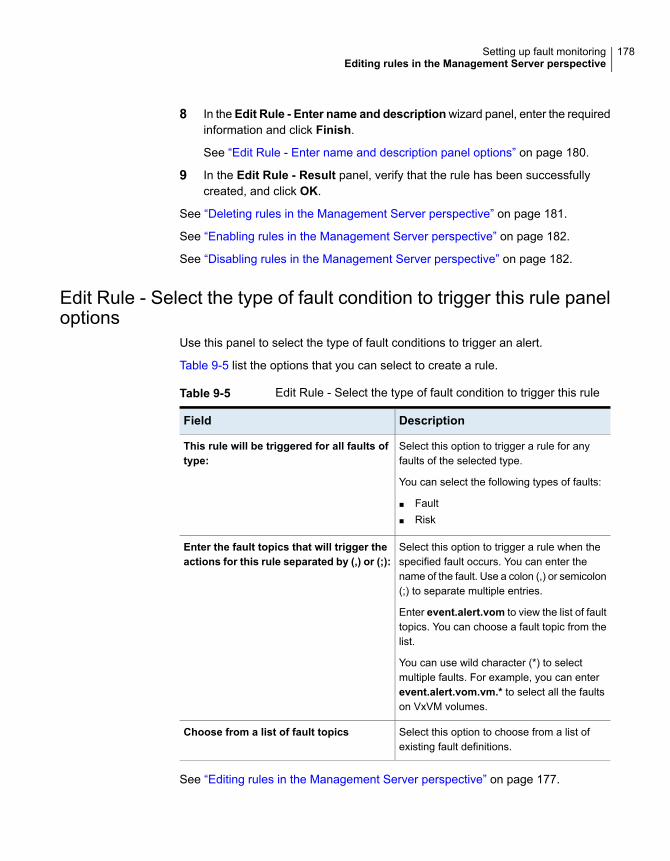
8 In the Edit Rule - Enter name and descriptionwizard panel, enter the requiredinformation and click Finish.
See “Edit Rule - Enter name and description panel options” on page 180.
9 In the Edit Rule - Result panel, verify that the rule has been successfullycreated, and click OK.
See “Deleting rules in the Management Server perspective” on page 181.
See “Enabling rules in the Management Server perspective” on page 182.
See “Disabling rules in the Management Server perspective” on page 182.
Edit Rule - Select the type of fault condition to trigger this rule paneloptions
Use this panel to select the type of fault conditions to trigger an alert.
Table 9-5 list the options that you can select to create a rule.
Table 9-5 Edit Rule - Select the type of fault condition to trigger this rule
DescriptionField
Select this option to trigger a rule for anyfaults of the selected type.
You can select the following types of faults:
■ Fault■ Risk
This rule will be triggered for all faults oftype:
Select this option to trigger a rule when thespecified fault occurs. You can enter thename of the fault. Use a colon (,) or semicolon(;) to separate multiple entries.
Enter event.alert.vom to view the list of faulttopics. You can choose a fault topic from thelist.
You can use wild character (*) to selectmultiple faults. For example, you can enterevent.alert.vom.vm.* to select all the faultson VxVM volumes.
Enter the fault topics that will trigger theactions for this rule separated by (,) or (;):
Select this option to choose from a list ofexisting fault definitions.
Choose from a list of fault topics
See “Editing rules in the Management Server perspective” on page 177.
178Setting up fault monitoringEditing rules in the Management Server perspective
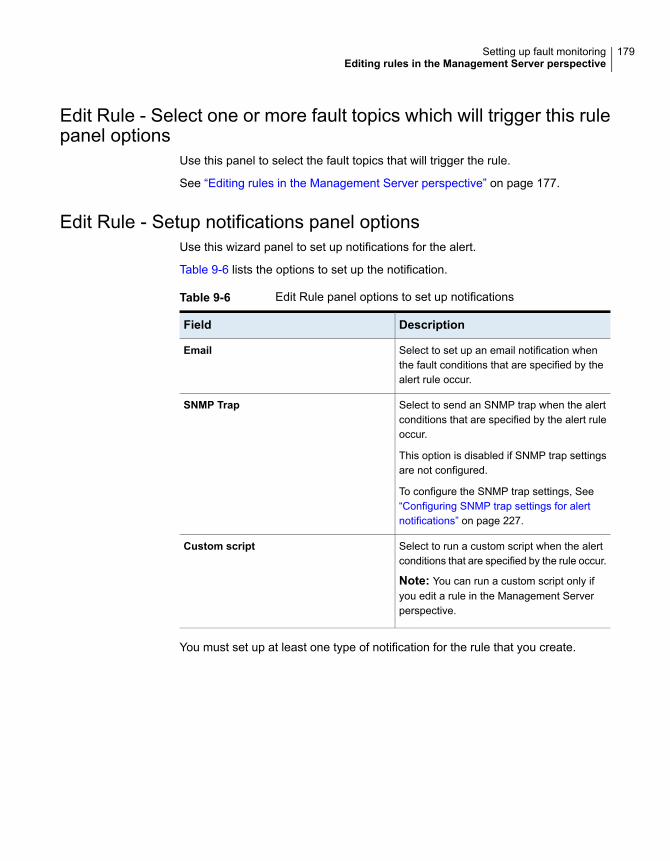
Edit Rule - Select one or more fault topics which will trigger this rulepanel options
Use this panel to select the fault topics that will trigger the rule.
See “Editing rules in the Management Server perspective” on page 177.
Edit Rule - Setup notifications panel optionsUse this wizard panel to set up notifications for the alert.
Table 9-6 lists the options to set up the notification.
Table 9-6 Edit Rule panel options to set up notifications
DescriptionField
Select to set up an email notification whenthe fault conditions that are specified by thealert rule occur.
Select to send an SNMP trap when the alertconditions that are specified by the alert ruleoccur.
This option is disabled if SNMP trap settingsare not configured.
To configure the SNMP trap settings, See“Configuring SNMP trap settings for alertnotifications” on page 227.
SNMP Trap
Select to run a custom script when the alertconditions that are specified by the rule occur.
Note: You can run a custom script only ifyou edit a rule in the Management Serverperspective.
Custom script
You must set up at least one type of notification for the rule that you create.
179Setting up fault monitoringEditing rules in the Management Server perspective
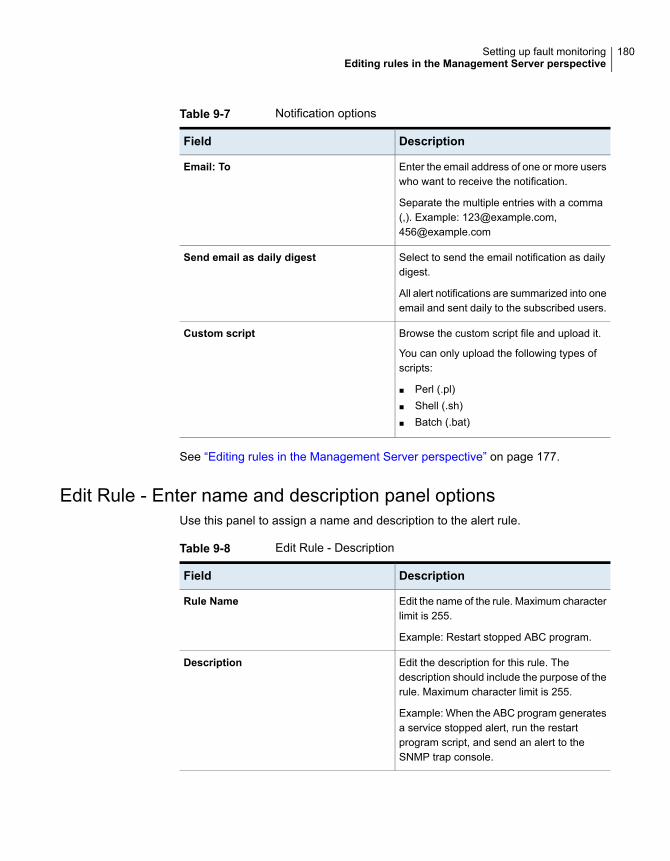
Table 9-7 Notification options
DescriptionField
Enter the email address of one or more userswho want to receive the notification.
Separate the multiple entries with a comma(,). Example: [email protected],[email protected]
Email: To
Select to send the email notification as dailydigest.
All alert notifications are summarized into oneemail and sent daily to the subscribed users.
Send email as daily digest
Browse the custom script file and upload it.
You can only upload the following types ofscripts:
■ Perl (.pl)■ Shell (.sh)■ Batch (.bat)
Custom script
See “Editing rules in the Management Server perspective” on page 177.
Edit Rule - Enter name and description panel optionsUse this panel to assign a name and description to the alert rule.
Table 9-8 Edit Rule - Description
DescriptionField
Edit the name of the rule. Maximum characterlimit is 255.
Example: Restart stopped ABC program.
Rule Name
Edit the description for this rule. Thedescription should include the purpose of therule. Maximum character limit is 255.
Example: When the ABC program generatesa service stopped alert, run the restartprogram script, and send an alert to theSNMP trap console.
Description
180Setting up fault monitoringEditing rules in the Management Server perspective
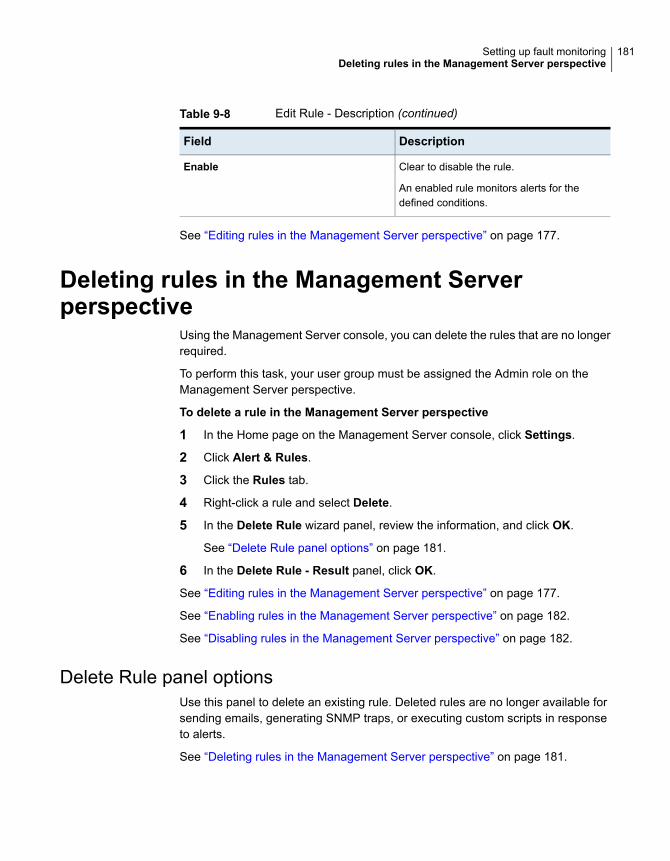
Table 9-8 Edit Rule - Description (continued)
DescriptionField
Clear to disable the rule.
An enabled rule monitors alerts for thedefined conditions.
Enable
See “Editing rules in the Management Server perspective” on page 177.
Deleting rules in the Management Serverperspective
Using the Management Server console, you can delete the rules that are no longerrequired.
To perform this task, your user group must be assigned the Admin role on theManagement Server perspective.
To delete a rule in the Management Server perspective
1 In the Home page on the Management Server console, click Settings.
2 Click Alert & Rules.
3 Click the Rules tab.
4 Right-click a rule and select Delete.
5 In the Delete Rule wizard panel, review the information, and click OK.
See “Delete Rule panel options” on page 181.
6 In the Delete Rule - Result panel, click OK.
See “Editing rules in the Management Server perspective” on page 177.
See “Enabling rules in the Management Server perspective” on page 182.
See “Disabling rules in the Management Server perspective” on page 182.
Delete Rule panel optionsUse this panel to delete an existing rule. Deleted rules are no longer available forsending emails, generating SNMP traps, or executing custom scripts in responseto alerts.
See “Deleting rules in the Management Server perspective” on page 181.
181Setting up fault monitoringDeleting rules in the Management Server perspective
Enabling rules in the Management Serverperspective
Using the Management Server console, you can enable the rules that are in thedisabled state.
To perform this task, your user group must be assigned the Admin role on theManagement Server perspective.
To enable rules in the Management Server perspective
1 In the Home page on the Management Server console, click Settings.
2 Click Alert & Rules.
3 Click the Rules tab.
4 Right-click a rule, and select Enable.
5 In the Enable Rule wizard panel, review the information, and click OK.
See “Enable Rule panel options” on page 182.
6 In the Enable Rule - Result panel, click OK.
See “Disabling rules in the Management Server perspective” on page 182.
See “Editing rules in the Management Server perspective” on page 177.
See “Deleting rules in the Management Server perspective” on page 181.
Enable Rule panel optionsUse this panel to enable the rule that is in disable state.
See “Enabling rules in the Management Server perspective” on page 182.
Disabling rules in the Management Serverperspective
Using the Management Server console, you can disable the rules that are in theenabled state.
To perform this task, your user group must be assigned the Admin role on theManagement Server perspective.
To disable rules in the Management Server perspective
1 In the Home page on the Management Server console, click Settings.
2 Click Alert & Rules.
182Setting up fault monitoringEnabling rules in the Management Server perspective
3 Click the Rules tab.
4 Right-click a rule, and select Disable.
5 In the Disable Rule wizard panel, review the information, and click OK.
See “Disable Rule panel options” on page 183.
6 In the Disable Rule - Result panel, click OK.
See “Enabling rules in the Management Server perspective” on page 182.
See “Editing rules in the Management Server perspective” on page 177.
See “Deleting rules in the Management Server perspective” on page 181.
Disable Rule panel optionsUse this panel to disable the rule that is in enabled state.
See “Disabling rules in the Management Server perspective” on page 182.
About faults and risksVeritas InfoScale Operations Manager enables you to view all possible problemsin the data center that it manages at several levels in the user interface. You canmonitor the faulty status and possible risks to the managed resources.
You can view the system identified fault conditions along with their correspondingentities and the affected sources. You can automate error handling by developingthe rules that trigger specific actions in response to alert conditions. You can alsosuppress a fault for a specific duration.
You can view the following information on faults in the data center:
■ Conditions of the managed objects (applications, storage enclosures, hosts,clusters and so on) in the data center.
■ The source of the fault.
■ The time when the fault occurred.
See “Viewing the faults definitions” on page 251.
See “Viewing faults in the Management Server perspective ” on page 251.
See “Suppressing a fault definition in the Management Server perspective”on page 186.
See “Restoring a suppressed fault definition in the Management Server perspective”on page 187.
See “Suppressing faults in the Management Server perspective” on page 184.
183Setting up fault monitoringAbout faults and risks
See “Restoring a suppressed fault in the Management Server perspective”on page 185.
Suppressing faults in the Management Serverperspective
Using the Management Server console, you can suppress one or more faults inVeritas InfoScale Operations Manager. To suppress a fault, you can choose oneof the following:
■ Temporarily hide the fault.
■ Disable the fault for the affected fault sources.
■ Disable all the faults for the affected fault sources.
For all the options, you can either specify the date and time to keep the faults inthe suppressed state, or you can suppress the faults forever.
To perform this task, your user group must be assigned the Admin role on theManagement Server perspective.
To suppress a fault
1 In the Home page on the Management Server console, click Settings.
2 Click Faults & Risks.
3 Click the Faults tab.
4 Right-click a fault and select Suppress Faults.
5 In the Suppress Faults wizard panel, enter the required information, and clickOK.
See “Suppress Faults panel options” on page 184.
See “Viewing faults in the Management Server perspective ” on page 251.
See “Restoring a suppressed fault in the Management Server perspective”on page 185.
Suppress Faults panel optionsUse this panel to suppress the faults in Veritas InfoScale Operations Manager. Youcan hide or disable the faults either temporarily or permanently. You can disable afault for a specific object; however, the fault definition is still considered as activefor other objects.
184Setting up fault monitoringSuppressing faults in the Management Server perspective
For all these options, you can either specify the date and time to keep the faults inthe suppressed state, or suppress the faults forever.
Table 9-9 Suppress Faults panel options
DescriptionField
Select this option to temporarily hide theselected fault. It is essentially hiding thecurrent instance of the fault. The fault isdisplayed again when it is detected.
Hide the selected fault(s). Show again ifthe problem reoccurs.
Select this option to disable the fault for theaffected fault source.
Disable the selected fault(s) for theaffected fault sources
Select this option to disable all faults for theaffected fault source.
Disable all fault(s) for the affected faultsources
Select this option to hide the fault withoutspecifying any time interval.
Hide or disable forever
You can specify the date until which the faultremains suppressed. After this date, the faultis again considered as active in VeritasInfoScale Operations Manager.
Hide or disable until
Provide the reason why the fault wassuppressed. You can enter up to 254characters for the description.
Reason for hiding or disabling
See “Suppressing faults in the Management Server perspective” on page 184.
Restoring a suppressed fault in the ManagementServer perspective
You can restore the fault that is suppressed in Veritas InfoScale OperationsManager.
When you suppress a fault, you set a date until which the fault is suppressed. Afterthe specified date, the fault is again considered as active in the system. However,Veritas InfoScale Operations Manager also provides you with the option to activatethe fault before that set date.
To perform this task, your user group must be assigned the Admin role on theManagement Server perspective.
185Setting up fault monitoringRestoring a suppressed fault in the Management Server perspective

To restore a suppressed fault in the Management Server perspective
1 In the Home page on the Management Server console, click Settings.
2 Click Faults & Risks.
3 Click the Faults tab.
4 Right-click the suppressed fault, and select Restore Faults.
5 In the Restore Faults panel, click OK.
See “Suppressing faults in the Management Server perspective” on page 184.
See “Viewing faults in the Management Server perspective ” on page 251.
Suppressing a fault definition in the ManagementServer perspective
You can suppress the fault definitions for the faults that you want to disablepermanently. After the definition itself is suppressed, Veritas InfoScale OperationsManager treats the corresponding faults as non-existing. You can specify a periodto keep the selected fault definition in the suppressed state.
Note: Though the option to forever disable a fault definition is provided, you canagain activate the fault definition using the Unsuppress Faults option.
To perform this task, your user group must be assigned the Admin role on theManagement Server perspective.
To suppress a fault definition
1 In the Home page on the Management Server console, click Settings.
2 Click Faults & Risks.
3 Click the Fault Definition tab.
4 Right-click a fault definition and select Suppress Faults.
5 In the Suppress Faults wizard panel, enter the required information, and clickOK.
See “Suppress the fault definition panel options” on page 187.
See “Viewing the faults definitions” on page 251.
See “Restoring a suppressed fault definition in the Management Server perspective”on page 187.
186Setting up fault monitoringSuppressing a fault definition in the Management Server perspective
Suppress the fault definition panel optionsUse this panel to suppress the selected fault definition. After the fault definition issuppressed, it is no longer displayed on Veritas InfoScale Operations Manageruser interface. You can suppress one or more fault definitions simultaneously.
Table 9-10 Suppress Faults panel options
DescriptionField
Select this option to disable the fault definitionwithout specifying any time period.
Note: Though the fault definition issuppressed forever, you can still activate it.This option provides additional flexibility tothe users who want to be able to suppressthe definition without specifying the date alongwith the ability to re-activate the definition.
Hide or disable forever
You can specify the date until which the faultdefinition remains suppressed. After this date,the fault definition is again considered asactive in Veritas InfoScale OperationsManager.
Hide or disable until
Provide the reason to suppress this faultdefinition. You can enter up to 254 charactersfor the description.
Reason for hiding or disabling
See “Suppressing a fault definition in the Management Server perspective”on page 186.
Restoring a suppressed fault definition in theManagement Server perspective
You can restore a suppressed fault definition using the Management Server console.After re-activation, Veritas InfoScale Operations Manager starts using the faultdefinition for subsequent fault detections.
To perform this task, your user group must be assigned the Admin role on theManagement Server perspective.
To restore a suppressed fault definition
1 In the Home page on the Management Server console, click Settings.
2 Click Faults & Risks.
187Setting up fault monitoringRestoring a suppressed fault definition in the Management Server perspective
3 Click the Fault Definition tab.
4 Right-click a suppressed fault, and select Restore Faults.
5 In the Restore Faults panel, click OK.
See “Suppressing a fault definition in the Management Server perspective”on page 186.
See “Viewing the faults definitions” on page 251.
188Setting up fault monitoringRestoring a suppressed fault definition in the Management Server perspective
Setting up virtualizationenvironment discovery
This chapter includes the following topics:
■ About the virtualization technologies supported
■ About Control Hosts in Veritas InfoScale Operations Manager
■ Requirements for discovering vCenter and ESX servers using Veritas InfoScaleOperations Manager
■ About near real-time discovery of VMware events
■ Setting up near real-time discovery of VMware events
■ Configuration settings for VMware vCenter discovery
■ Requirements for discovering the Solaris zones
■ Requirements for discovering Solaris Logical domains
■ Requirements for discovering logical partitions
■ Requirements for Microsoft Hyper-V virtualization discovery
■ Requirements for Kernel-based Virtual Machine (KVM) virtualization discovery
■ Adding a virtualization server
■ Editing a virtualization discovery configuration
■ Refreshing a virtualization discovery configuration
■ Removing a virtualization discovery configuration
■ Configuring performance metering for a VMware vCenter server
10Chapter
■ Disable performance metering for a VMware vCenter server
About the virtualization technologies supportedVeritas InfoScale Operations Manager supports the following virtualizationtechnologies:
■ VMware ESX
■ Solaris Zones
■ Oracle VM Server for SPARC (previously called Sun Logical Domains - LDoms)
■ Logical partition (LPAR)
■ Microsoft Hyper-V
■ Kernel-based Virtual Machine (KVM): Red Hat Enterprise Linux as the KVMServer
For VMware ESX discovery, a designated Control Host discovers the VMwarevCenter Server in the data center. This discovery displays those ESX servers thatVMware vCenter Server manages and the virtual machines that are configured onthe ESX servers.
For Solaris Zones discovery, the zone agentlet that is present in the VRTSsfmh
package, which is installed on a Solaris managed host, discovers the Global zonesthat are configured on the host. This discovery displays the non-Global zones thatare configured on the Global Zone.
For Sun LDoms discovery, the LDom agentlet that is present in the VRTSsfmh
package, which is installed on a Solaris managed host, discovers the LDom Serverthat is configured on the host. This discovery displays the LDom clients that areconfigured on the LDom Server.
For logical partition (LPAR) discovery, Veritas InfoScale Operations Manager canuse Hardware Management Console (HMC), a VRTSsfmh package that is installedon the LPAR client, or a VRTSsfmh package installed as a part of DMP on the VIOserver. Control Host is required for the HMC discovery.
For Microsoft Hyper-V discovery, Veritas InfoScale Operations Manager discoversHyper-V server (with VRTSsfmh package on it), and its correlation with the Hyper-Vvirtual machines. It also discovers the storage that is provisioned to the guests andits correlation with the virtual machine and the Hyper-V server. The Hyper-V guest,when added (using agent or agentless option) to Veritas InfoScale OperationsManager Management Server domain, provides storage mapping discovery.
For Kernel-based Virtual Machine (KVM) discovery, Veritas InfoScale OperationsManager discovers KVM virtual machines on the Linux host if the KVM modules
190Setting up virtualization environment discoveryAbout the virtualization technologies supported
are installed, and configured on the virtualization server (KVM Server). VeritasInfoScale Operations Manager discovers basic information about KVM virtualmachines. For example, virtual machine name, CPU, and so on.
See “Requirements for discovering the Solaris zones” on page 199.
See “Requirements for discovering logical partitions” on page 201.
See “Requirements for Microsoft Hyper-V virtualization discovery” on page 202.
See “Requirements for Kernel-based Virtual Machine (KVM) virtualization discovery”on page 202.
About Control Hosts in Veritas InfoScaleOperations Manager
Veritas InfoScale Operations Manager uses Control Hosts as a discoverymechanism. In Veritas InfoScale Operations Manager, the Control Hosts discoverthe following:
■ Information on VMware Virtualization infrastructure (vSphere) and HardwareManagement Console (HMC) server.
■ Agentless hosts.
To configure the Control Host on a managed host, install the Control Host Add-onon the Veritas InfoScale Operations Manager Management Server or a managedhost that reports to Management Server.
Information on VMware Virtualization Infrastructure (vSphere)
In Veritas InfoScale Operations Manager, you can configure Veritas InfoScaleOperations Manager Management Server or a managed host that reports toManagement Server as Control Host to discover the information on the VMwarevirtualization infrastructure. For this configuration, you must install the Control HostAdd-on on the physical or virtual hosts that you want to designate as Control Host.In Veritas InfoScale Operations Manager, you must download the Control HostAdd-on from the Veritas Web site, upload to the Deployment ManagementRepository, and install it on the relevant physical or virtual hosts.
In your data center, Control Hosts help Management Server in discovering thefollowing information on VMware virtualization infrastructure:
■ VMware vCenter servers that are configured in your data center.
■ VMware ESX servers that vCenter Servers manage.
■ VMware Virtual Machines that are configured on the VMware ESX servers.
■ VMware HA Clusters.
191Setting up virtualization environment discoveryAbout Control Hosts in Veritas InfoScale Operations Manager
Note: To administer a Control Host on the Windows platform, Veritas InfoScaleOperations Manager creates a user named 'vomuser' with the administrativeprivileges.
Ensure that the Control Hosts can communicate with the vCenter servers fromwhich they can discover the information on VMware Infrastructure.
You can designate a managed host that reports to Management Server as ControlHost to address the following situations:
■ To discover the vCenter server that is behind a firewall and you do not want toinstall Management Server inside the firewall.
■ To except Management Server from the discovery of VMware infrastructure toreduce the load on Management Server.
Agentless discovery of a remote host
You can use Control Hosts to perform agentless discovery of VMware virtualmachines. Add the vCenter server that hosts the virtual machine as an AgentlessHost to the Management Server.
To perform agentless discovery of hosts, you must install the Control Host Add-onon one of the managed hosts. You can install the Control Host Add-on onManagement Server, however it is not recommended as it puts extra load onManagement Server.
A Linux Control Host can only discover UNIX or Linux agentless hosts using SSH.A Windows Control Host can discover Windows agentless hosts using WMI orUNIX/Linux agentless hosts using SSH. Ensure that you install one or more ControlHosts on the appropriate platform depending on the operating system of the remotehosts you want to discover using agentless method.
See “About agentless discovery using the Control Host” on page 124.
See “About the virtualization technologies supported” on page 190.
See “Requirements for discovering vCenter and ESX servers using Veritas InfoScaleOperations Manager” on page 192.
Requirements for discovering vCenter and ESXservers using Veritas InfoScale OperationsManager
The following are the requirements for discovering VMware Infrastructure usingVeritas InfoScale Operations Manager:
192Setting up virtualization environment discoveryRequirements for discovering vCenter and ESX servers using Veritas InfoScale Operations Manager
■ Install the VRTSsfmh package on the virtual or physical hosts on which you wantto install the Control Host Add-on.
■ Ensure that the Control Hosts can ping the vCenter servers or the ESX serversfrom which they can discover the information on VMware Infrastructure.
■ Ensure that you have appropriate privileges to log on to the vCenter server orthe ESX server.
■ Ensure that you have the Browse Datastore privileges on the vCenter or theESX server that you want Veritas InfoScale Operations Manager to discover.
About near real-time discovery of VMware eventsWith near real-time discovery of VMware events, any change in the state of a virtualmachine (for example, VM powered on) and changes occurring at the vCenterServer infrastructure-level (for example, VM created) in the Management Serverdomain are updated in the Veritas InfoScale Operations Manager database in nearreal-time.
The near real-time discovery of VMware infrastructure enables the partial discoveryof ESX servers managed under a vCenter Server. For example, if an SNMP trapis received for a virtual machine (VM1) hosted on ESX1, Veritas InfoScaleOperations Manager runs the discovery cycle only for ESX1. Other ESX serversunder that vCenter Server are not re-discovered. This discovery is triggered by theevent notification from the VMware vCenter Server to the Management Server usingSNMP traps. :
For near real-time discovery, ensure to configure the VMware vCenter Server andthe Management Server in the same domain. This discovery is supported for thefollowing events occurring at a VMware vCenter Server-level:
Table 10-1 Supported events for near-real time discovery
Applicable with theManagement Serverversion
Event as shown inVMware vCenter Server
Discovered state
6.0, or laterVM powered onVirtual machine powered on
6.0, or laterVM powered offVirtual machine powered off
6.0, or laterDRS VM powered onVirtual machine DistributedResource Scheduler (DRS)powered on
6.0, or laterVM suspendedVirtual machine suspended
193Setting up virtualization environment discoveryAbout near real-time discovery of VMware events
Table 10-1 Supported events for near-real time discovery (continued)
Applicable with theManagement Serverversion
Event as shown inVMware vCenter Server
Discovered state
6.1, or laterVM createdVirtual machine created
6.1, or laterVM migratedVirtual machine migrated
Hot migration: A powered-onvirtual machine is migratedfrom one ESX server toanother ESX server.
6.1, or laterVM relocatingVirtual machine relocatedfrom one ESX server toanother
Cold migration: A powered-offvirtual machine is migratedfrom one ESX server toanother ESX server.
6.1, or laterVM renamedVirtual machine renamed
6.1, or laterDRS VM migratedVirtual machine migrated toanother host by VMware DRS(Distributed ResourceScheduler)
Note: The near real-time update of virtual machines is supported on VMwarevCenter Server 4.x, 5.x and 6.0.
See “Setting up near real-time discovery of VMware events” on page 194.
See “Configuring the VMware vCenter Server to generate SNMP traps” on page 196.
Setting up near real-time discovery of VMwareevents
To set up near real-time discovery of VMware events, configure the VMware vCenterServer SNMP settings with the Management Server address as the receiver URL.The Management Server receives the updates when you add the VMware vCenterServer to the Management Server.
The VMware vCenter Server generates SNMP traps for the following events:
194Setting up virtualization environment discoverySetting up near real-time discovery of VMware events

■ When a virtual machine's state changes - powered on, powered off, andsuspended.
■ When any other virtual infrastructure-related changes are detected. For example,when a virtual machine is created, migrated, or renamed.
The vCenter Server sends the SNMP trap to the Management Server. The SNMPtrap contains the information of the virtual machine state, and it is used to updatethe Management Server database.
Note: SNMP version 1 (SNMPv1) and version 2 (SNMPv2) are supported.
The Veritas InfoScale Operations Manager component of near real-time discoveryis xtrapd. It runs as a daemon on Linux and as a service on Windows operatingsystem. xtrapd detects the SNMP trap that is sent from the VMware vCenter Server,updates the virtual machine records in the Veritas InfoScale Operations Managerdatabase, and subsequently the Management Server console is updated with thelatest state of the virtual machine.
To set up the near real-time discovery of VMware events, complete the followingsteps:
Table 10-2 Setting up near real-time (NRT) discovery of VMware events
DescriptionActionStep
Using VMware vCenter Server console:
Provide information to configure ManagementServer as the SNMP trap receiver. Also configurethe alarm to send the SNMP traps when the stateof the virtual machine changes.
See “Configuring the VMware vCenter Server togenerate SNMP traps” on page 196.
Provide ManagementServer details in theVMware vCenter Serverconsole.
Step 1
Using the Management Server console:
195Setting up virtualization environment discoverySetting up near real-time discovery of VMware events
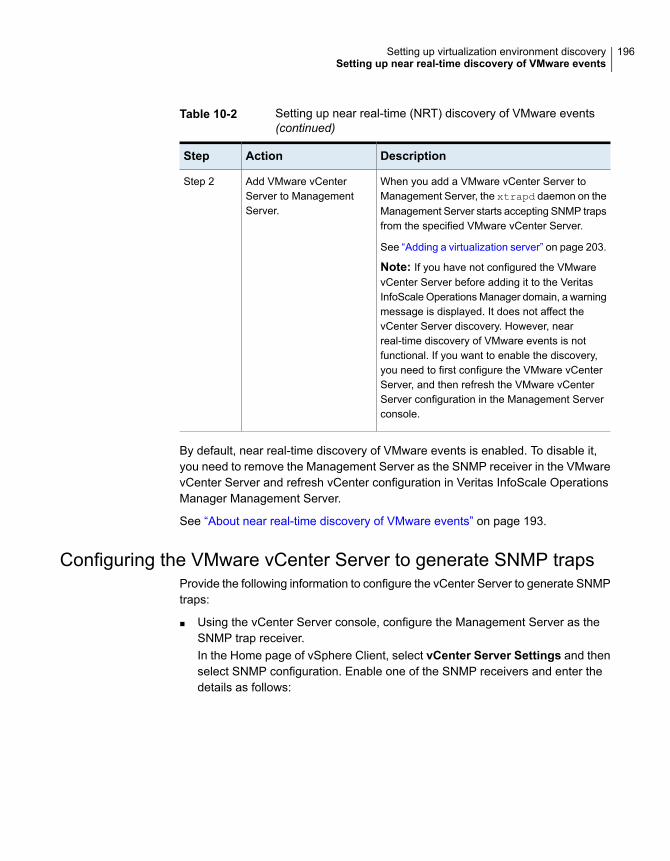
Table 10-2 Setting up near real-time (NRT) discovery of VMware events(continued)
DescriptionActionStep
When you add a VMware vCenter Server toManagement Server, the xtrapd daemon on theManagement Server starts accepting SNMP trapsfrom the specified VMware vCenter Server.
See “Adding a virtualization server” on page 203.
Note: If you have not configured the VMwarevCenter Server before adding it to the VeritasInfoScale Operations Manager domain, a warningmessage is displayed. It does not affect thevCenter Server discovery. However, nearreal-time discovery of VMware events is notfunctional. If you want to enable the discovery,you need to first configure the VMware vCenterServer, and then refresh the VMware vCenterServer configuration in the Management Serverconsole.
Add VMware vCenterServer to ManagementServer.
Step 2
By default, near real-time discovery of VMware events is enabled. To disable it,you need to remove the Management Server as the SNMP receiver in the VMwarevCenter Server and refresh vCenter configuration in Veritas InfoScale OperationsManager Management Server.
See “About near real-time discovery of VMware events” on page 193.
Configuring the VMware vCenter Server to generate SNMP trapsProvide the following information to configure the vCenter Server to generate SNMPtraps:
■ Using the vCenter Server console, configure the Management Server as theSNMP trap receiver.In the Home page of vSphere Client, select vCenter Server Settings and thenselect SNMP configuration. Enable one of the SNMP receivers and enter thedetails as follows:
196Setting up virtualization environment discoverySetting up near real-time discovery of VMware events
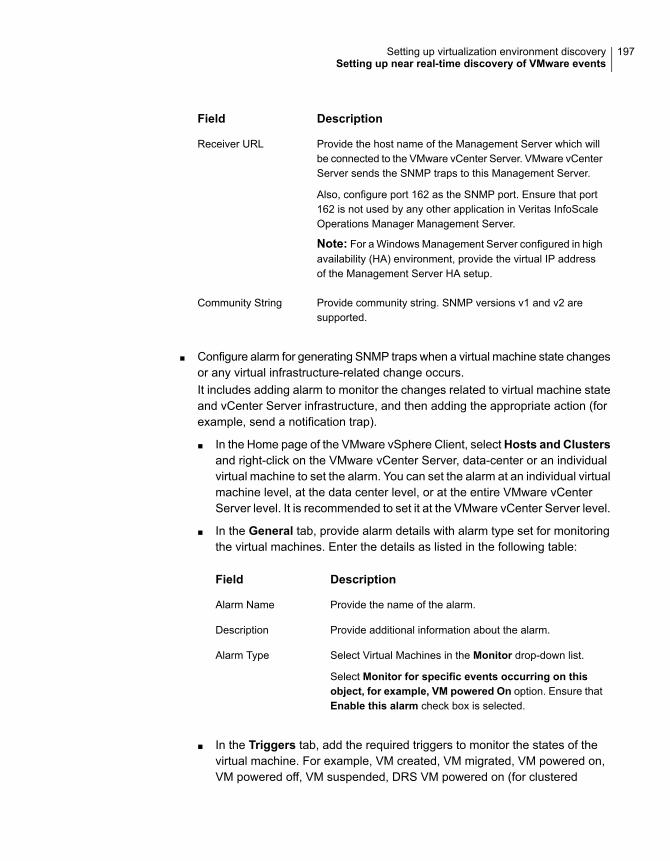
DescriptionField
Provide the host name of the Management Server which willbe connected to the VMware vCenter Server. VMware vCenterServer sends the SNMP traps to this Management Server.
Also, configure port 162 as the SNMP port. Ensure that port162 is not used by any other application in Veritas InfoScaleOperations Manager Management Server.
Note: For a Windows Management Server configured in highavailability (HA) environment, provide the virtual IP addressof the Management Server HA setup.
Receiver URL
Provide community string. SNMP versions v1 and v2 aresupported.
Community String
■ Configure alarm for generating SNMP traps when a virtual machine state changesor any virtual infrastructure-related change occurs.It includes adding alarm to monitor the changes related to virtual machine stateand vCenter Server infrastructure, and then adding the appropriate action (forexample, send a notification trap).
■ In the Home page of the VMware vSphere Client, selectHosts and Clustersand right-click on the VMware vCenter Server, data-center or an individualvirtual machine to set the alarm. You can set the alarm at an individual virtualmachine level, at the data center level, or at the entire VMware vCenterServer level. It is recommended to set it at the VMware vCenter Server level.
■ In the General tab, provide alarm details with alarm type set for monitoringthe virtual machines. Enter the details as listed in the following table:
DescriptionField
Provide the name of the alarm.Alarm Name
Provide additional information about the alarm.Description
Select Virtual Machines in the Monitor drop-down list.
Select Monitor for specific events occurring on thisobject, for example, VM powered On option. Ensure thatEnable this alarm check box is selected.
Alarm Type
■ In the Triggers tab, add the required triggers to monitor the states of thevirtual machine. For example, VM created, VM migrated, VM powered on,VM powered off, VM suspended, DRS VM powered on (for clustered
197Setting up virtualization environment discoverySetting up near real-time discovery of VMware events
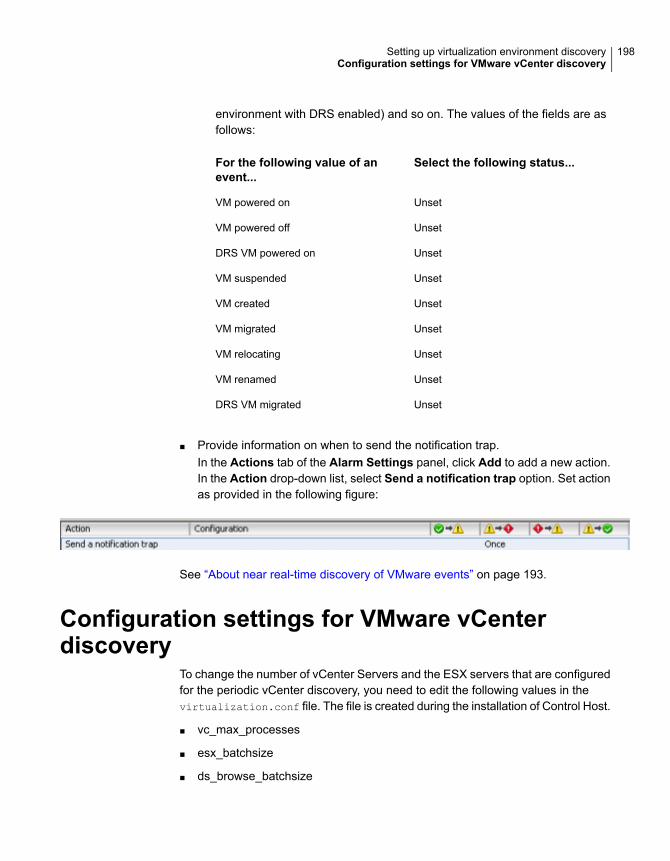
environment with DRS enabled) and so on. The values of the fields are asfollows:
Select the following status...For the following value of anevent...
UnsetVM powered on
UnsetVM powered off
UnsetDRS VM powered on
UnsetVM suspended
UnsetVM created
UnsetVM migrated
UnsetVM relocating
UnsetVM renamed
UnsetDRS VM migrated
■ Provide information on when to send the notification trap.In the Actions tab of the Alarm Settings panel, click Add to add a new action.In the Action drop-down list, select Send a notification trap option. Set actionas provided in the following figure:
See “About near real-time discovery of VMware events” on page 193.
Configuration settings for VMware vCenterdiscovery
To change the number of vCenter Servers and the ESX servers that are configuredfor the periodic vCenter discovery, you need to edit the following values in thevirtualization.conf file. The file is created during the installation of Control Host.
■ vc_max_processes
■ esx_batchsize
■ ds_browse_batchsize
198Setting up virtualization environment discoveryConfiguration settings for VMware vCenter discovery
■ datastore_browse
Where:
vc_max_processes: The number of processes that are created for the discovery ofthe vCenter Servers. One process per vCenter Server is created for the discovery.
esx_batchsize: The maximum number of ESX/ESXi servers that gets discoveredin a batch. Default value of this parameter is 300. If there are more than 300ESX/ESXi servers in a vCenter, discovery of such vCenter creates batches ofESX/ESXi servers and discovers them.
ds_browse_batchsize: The number of datastores that gets discovered on a vCenterin parallel. Default value of this configuration parameter is 25. This configurationparameter works only if datastore_browse is set to 1.
datastore_browse: This flag indicates if datastores need to be browsed fordiscovering the details of virtual disks. Default value of this configuration parameteris 0 which means datastore browse is skipped. In case datastore browse is required,set this parameter to 1.
The virtualization.conf file is located at:
■ On Linux Control Host: /var/opt/VRTSsfmh
■ On Windows Control Host: %ALLUSERSPROFILE%\Symantec\VRTSsfmh\
See “About near real-time discovery of VMware events” on page 193.
See “Setting up near real-time discovery of VMware events” on page 194.
See “Configuring the VMware vCenter Server to generate SNMP traps” on page 196.
Requirements for discovering the Solaris zonesThe following are the requirements for discovering Solaris zones in Veritas InfoScaleOperations Manager:
■ Install the VRTSsfmh package on one or more traditional hosts that containsGlobal Zones. This helps Veritas InfoScale Operations Manager discovernon-global-zones that are configured on the Global Zones.
■ Ensure that the managed hosts with the Solaris 10 or 11 operating systemcontain non-Global Zones.
■ Ensure that the managed hosts with the Solaris 10 or 11 operating system donot contain any LDoms.
■ Enable the zlogin command if it is disabled on the non-Global Zones.
■ Ensure that using the zlogin command, you can log on to the non-Global Zones.
199Setting up virtualization environment discoveryRequirements for discovering the Solaris zones
■ Ensure that the non-Global Zones can access the devices that are exportedfrom the Global Zone.
■ Ensure that the file systems that are exported from the Global Zone to thenon-Global Zones are mounted in the non-Global Zones.
See “About the virtualization technologies supported” on page 190.
See “Requirements for the zlogin utility on non-Global Zones” on page 200.
See “Requirements for devices exported to non-Global Zones” on page 200.
See “Requirements for file systems exported to non-Global Zones” on page 200.
Requirements for the zlogin utility on non-Global ZonesVeritas InfoScale Operations Manager uses the zlogin utility to discover non-GlobalZones. By default, the zlogin utility is enabled on non-Global Zones. If you havedisabled the zlogin utility on non-Global Zones, you need to enable it. You canuse the following command to verify:
global# zlogin my-zone zonename
See “Requirements for discovering the Solaris zones” on page 199.
Requirements for devices exported to non-Global ZonesVeritas InfoScale Operations Manager can discover the devices that are exportedfrom the Global Zone to non-Global Zones. However, if the storage is not accessibleto the non-Global Zone, Veritas InfoScale Operations Manager cannot discoverthat storage as exported from the Global Zone. For example, the storage may notbe accessible to the non-Global Zone because the non-Global Zone is not yetrestarted. Ensure that the non-Global Zones can access the devices that areexported from the Global Zone.
See “Requirements for discovering the Solaris zones” on page 199.
Requirements for file systems exported to non-Global ZonesVeritas InfoScale Operations Manager can discover the file systems that areexported from the Global Zone to non-Global Zones. However, if a file system isnot mounted in a non-Global Zone, Veritas InfoScale Operations Manager doesnot discover that file system as exported from the Global Zone. Ensure that the filesystems that are exported from the Global Zone to the non-Global Zones aremounted in the non-Global Zones.
See “Requirements for discovering the Solaris zones” on page 199.
200Setting up virtualization environment discoveryRequirements for discovering the Solaris zones

Requirements for discovering Solaris Logicaldomains
The following are the requirements for discovering Solaris LDoms using VeritasInfoScale Operations Manager:
■ Install the VRTSsfmh package on one or more traditional hosts with the Solarisoperating system on which you want Veritas InfoScale Operations Manager todiscover Solaris LDoms.
■ Ensure that the managed hosts with the Solaris operating system contain LDoms.
See “About the virtualization technologies supported” on page 190.
Requirements for discovering logical partitionsLogical partition (LPAR) virtualization discovery pre-requisites are as follows:
For basic LPAR discovery you need to:
■ Add Hardware Management Console (HMC) to Veritas InfoScale OperationsManager domain by control host.
■ Configure the required storage arrays (providing storage to the LPAR servers)using the Storage Insight Add-on. This is required to discover the correlation ofstorage inside the VIO server with the storage arrays.
■ For VIO servers with Veritas dynamic multi-pathing installed: Install the VRTSsfmh
package on the VIO servers and configure them in Veritas InfoScale OperationsManager as agents.
■ You must have at least hmcoperator role in HMC to perform these tasks.
Note: The Veritas InfoScale Operations Manager supports only legitimatefilename characters in an LPAR profile name. The special characters reservedfor Operating System usage (for example space, “\”, “$”, “!”, “&”) are notsupported. It is recommended to use upper and lower case alphabets, numericvalues (0-9), “_” and “-“ for the LPAR profile name.
For storage correlation discovery, in addition to the above mentioned pre-requisites,ensure that:
■ You configure LPAR guests with VRTSsfmh package. It provides the discoveryof correlation of storage inside LPAR guests with that exported from the VIOservers.
201Setting up virtualization environment discoveryRequirements for discovering Solaris Logical domains
See “About the virtualization technologies supported” on page 190.
Requirements for Microsoft Hyper-V virtualizationdiscovery
The requirements for the discovery of Microsoft Hyper-V virtualization discoveryare listed below:
Virtual machine discovery■ VRTSsfmh package should be installed on the Hyper-V server (parent partition).
■ Hyper-V role should be enabled.
■ Windows Management Instrumentation (WMI) service should be running.
Exported storage discovery■ The Hyper-V server must be running Microsoft Windows 2008 R2, or later
operating system.
■ Windows Management Instrumentation (WMI) should be running on the guest.See “About the virtualization technologies supported” on page 190.
Requirements for Kernel-based Virtual Machine(KVM) virtualization discovery
Kernel-based Virtual Machine (KVM) discovery pre-requisites are as follows:
■ VRTSsfmh package must be present on the Linux host.
■ KVM modules must be installed and configured on the virtualization server.
To verify if the KVM modules are installed and configured, run the followingcommand:
■ file /dev/kvm
The output should be /dev/kvm: character special.
See “About the virtualization technologies supported” on page 190.
202Setting up virtualization environment discoveryRequirements for Microsoft Hyper-V virtualization discovery
Adding a virtualization serverIn Veritas InfoScale Operations Manager, you must add the virtualization serversto let a Control Host discover the virtual servers. You can add the virtualizationservers for VMware discovery, or HMC discovery.
The VMware discovery provides the following information:
■ Information on VirtualCenter servers
■ Information on the ESX servers that the VirtualCenter server manages
■ Information on the virtual machines that are configured on the ESX servers
The HMC discovery provides the following information:
■ Information on HMC servers
■ Information on the LPAR servers that the HMC server manages
■ Information on the virtual machines that are configured on the LPAR servers
After you add a virtualization server, to view all ESX servers that the VirtualCenterserver manages, click vCenter under Data Center. Similarly to view all the LPARservers that the HMC server manages click HMC under Data Center.
To perform this task, your user group must be assigned the Admin role on theManagement Server perspective. The root user can also perform this task.
To add a virtualization server in Veritas InfoScale Operations Manager
1 In the Home page on the Management Server console, click Settings.
2 Do one of the following:
■ Click Add Virtualization Server
■ Click Virtualization, and then click Add Virtualization Server.
■ Click Virtualization, right-click Data Center and select Add VirtualizationServer.
3 In the Add Virtualization Server wizard panel, enter the details, and clickNext.
See “Add Virtualization Server panel options” on page 204.
4 In the Select optionwizard panel, select the method for virtualization discoveryof the servers, and click Finish.
See “Add Virtualization Server panel options” on page 205.
5 In the Result panel, view the progress of the configuration. After theconfiguration is complete, click OK.
203Setting up virtualization environment discoveryAdding a virtualization server
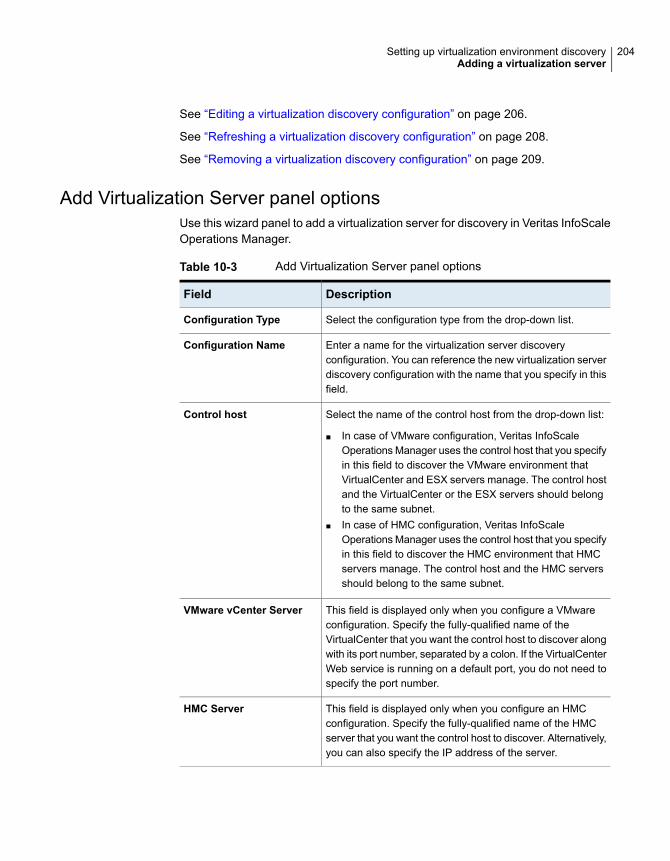
See “Editing a virtualization discovery configuration” on page 206.
See “Refreshing a virtualization discovery configuration” on page 208.
See “Removing a virtualization discovery configuration” on page 209.
Add Virtualization Server panel optionsUse this wizard panel to add a virtualization server for discovery in Veritas InfoScaleOperations Manager.
Table 10-3 Add Virtualization Server panel options
DescriptionField
Select the configuration type from the drop-down list.Configuration Type
Enter a name for the virtualization server discoveryconfiguration. You can reference the new virtualization serverdiscovery configuration with the name that you specify in thisfield.
Configuration Name
Select the name of the control host from the drop-down list:
■ In case of VMware configuration, Veritas InfoScaleOperations Manager uses the control host that you specifyin this field to discover the VMware environment thatVirtualCenter and ESX servers manage. The control hostand the VirtualCenter or the ESX servers should belongto the same subnet.
■ In case of HMC configuration, Veritas InfoScaleOperations Manager uses the control host that you specifyin this field to discover the HMC environment that HMCservers manage. The control host and the HMC serversshould belong to the same subnet.
Control host
This field is displayed only when you configure a VMwareconfiguration. Specify the fully-qualified name of theVirtualCenter that you want the control host to discover alongwith its port number, separated by a colon. If the VirtualCenterWeb service is running on a default port, you do not need tospecify the port number.
VMware vCenter Server
This field is displayed only when you configure an HMCconfiguration. Specify the fully-qualified name of the HMCserver that you want the control host to discover. Alternatively,you can also specify the IP address of the server.
HMC Server
204Setting up virtualization environment discoveryAdding a virtualization server
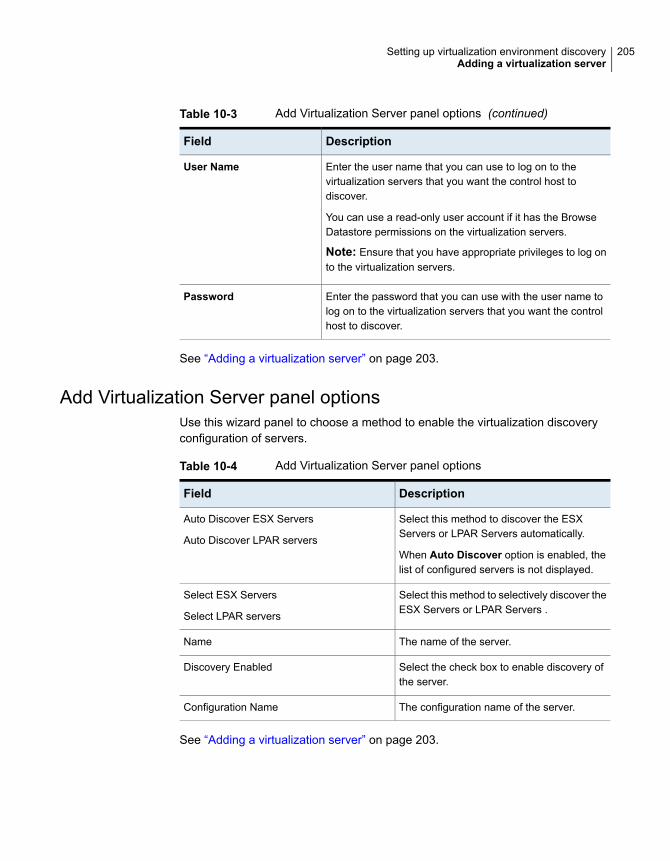
Table 10-3 Add Virtualization Server panel options (continued)
DescriptionField
Enter the user name that you can use to log on to thevirtualization servers that you want the control host todiscover.
You can use a read-only user account if it has the BrowseDatastore permissions on the virtualization servers.
Note: Ensure that you have appropriate privileges to log onto the virtualization servers.
User Name
Enter the password that you can use with the user name tolog on to the virtualization servers that you want the controlhost to discover.
Password
See “Adding a virtualization server” on page 203.
Add Virtualization Server panel optionsUse this wizard panel to choose a method to enable the virtualization discoveryconfiguration of servers.
Table 10-4 Add Virtualization Server panel options
DescriptionField
Select this method to discover the ESXServers or LPAR Servers automatically.
When Auto Discover option is enabled, thelist of configured servers is not displayed.
Auto Discover ESX Servers
Auto Discover LPAR servers
Select this method to selectively discover theESX Servers or LPAR Servers .
Select ESX Servers
Select LPAR servers
The name of the server.Name
Select the check box to enable discovery ofthe server.
Discovery Enabled
The configuration name of the server.Configuration Name
See “Adding a virtualization server” on page 203.
205Setting up virtualization environment discoveryAdding a virtualization server
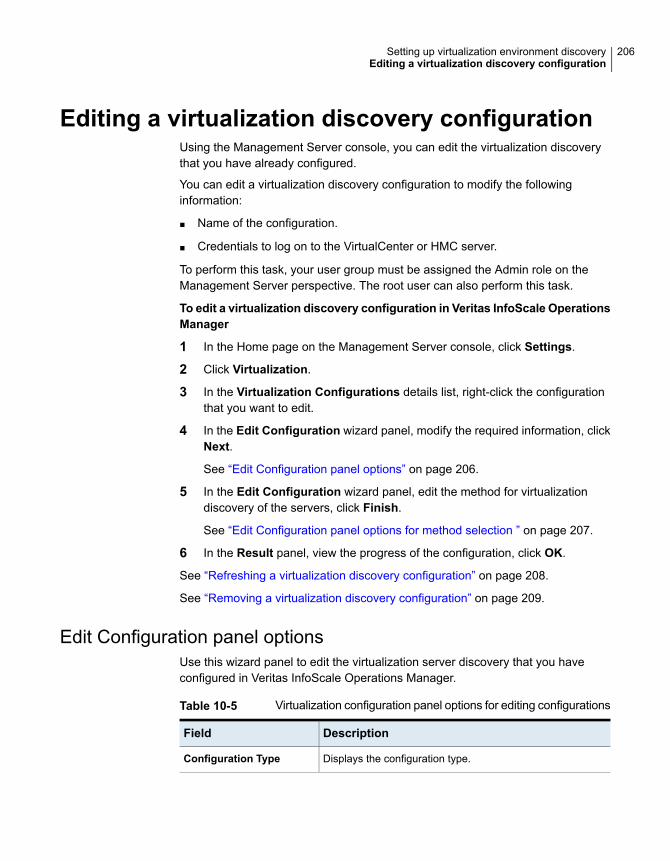
Editing a virtualization discovery configurationUsing the Management Server console, you can edit the virtualization discoverythat you have already configured.
You can edit a virtualization discovery configuration to modify the followinginformation:
■ Name of the configuration.
■ Credentials to log on to the VirtualCenter or HMC server.
To perform this task, your user group must be assigned the Admin role on theManagement Server perspective. The root user can also perform this task.
To edit a virtualization discovery configuration in Veritas InfoScale OperationsManager
1 In the Home page on the Management Server console, click Settings.
2 Click Virtualization.
3 In the Virtualization Configurations details list, right-click the configurationthat you want to edit.
4 In the Edit Configuration wizard panel, modify the required information, clickNext.
See “Edit Configuration panel options” on page 206.
5 In the Edit Configuration wizard panel, edit the method for virtualizationdiscovery of the servers, click Finish.
See “Edit Configuration panel options for method selection ” on page 207.
6 In the Result panel, view the progress of the configuration, click OK.
See “Refreshing a virtualization discovery configuration” on page 208.
See “Removing a virtualization discovery configuration” on page 209.
Edit Configuration panel optionsUse this wizard panel to edit the virtualization server discovery that you haveconfigured in Veritas InfoScale Operations Manager.
Table 10-5 Virtualization configuration panel options for editing configurations
DescriptionField
Displays the configuration type.Configuration Type
206Setting up virtualization environment discoveryEditing a virtualization discovery configuration
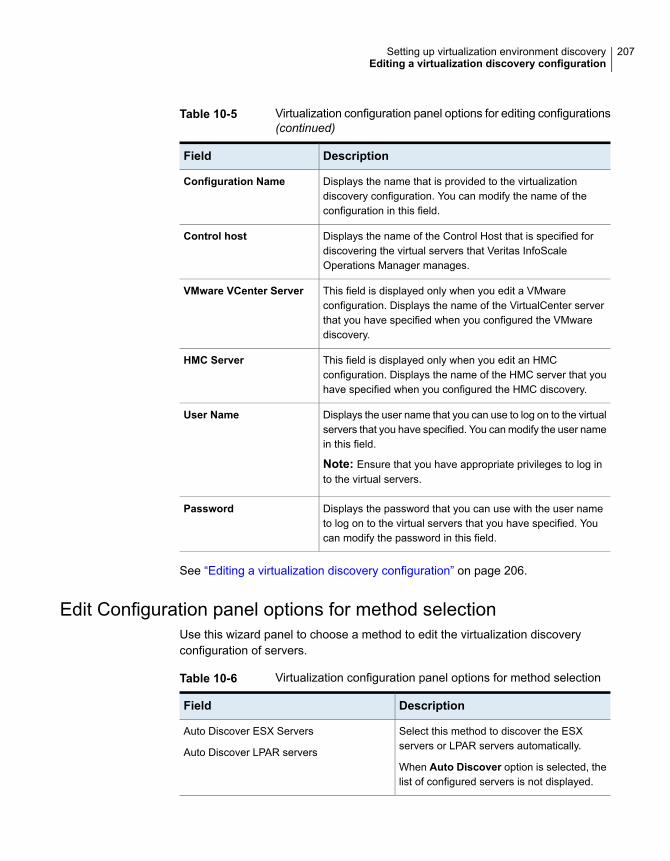
Table 10-5 Virtualization configuration panel options for editing configurations(continued)
DescriptionField
Displays the name that is provided to the virtualizationdiscovery configuration. You can modify the name of theconfiguration in this field.
Configuration Name
Displays the name of the Control Host that is specified fordiscovering the virtual servers that Veritas InfoScaleOperations Manager manages.
Control host
This field is displayed only when you edit a VMwareconfiguration. Displays the name of the VirtualCenter serverthat you have specified when you configured the VMwarediscovery.
VMware VCenter Server
This field is displayed only when you edit an HMCconfiguration. Displays the name of the HMC server that youhave specified when you configured the HMC discovery.
HMC Server
Displays the user name that you can use to log on to the virtualservers that you have specified. You can modify the user namein this field.
Note: Ensure that you have appropriate privileges to log into the virtual servers.
User Name
Displays the password that you can use with the user nameto log on to the virtual servers that you have specified. Youcan modify the password in this field.
Password
See “Editing a virtualization discovery configuration” on page 206.
Edit Configuration panel options for method selectionUse this wizard panel to choose a method to edit the virtualization discoveryconfiguration of servers.
Table 10-6 Virtualization configuration panel options for method selection
DescriptionField
Select this method to discover the ESXservers or LPAR servers automatically.
When Auto Discover option is selected, thelist of configured servers is not displayed.
Auto Discover ESX Servers
Auto Discover LPAR servers
207Setting up virtualization environment discoveryEditing a virtualization discovery configuration
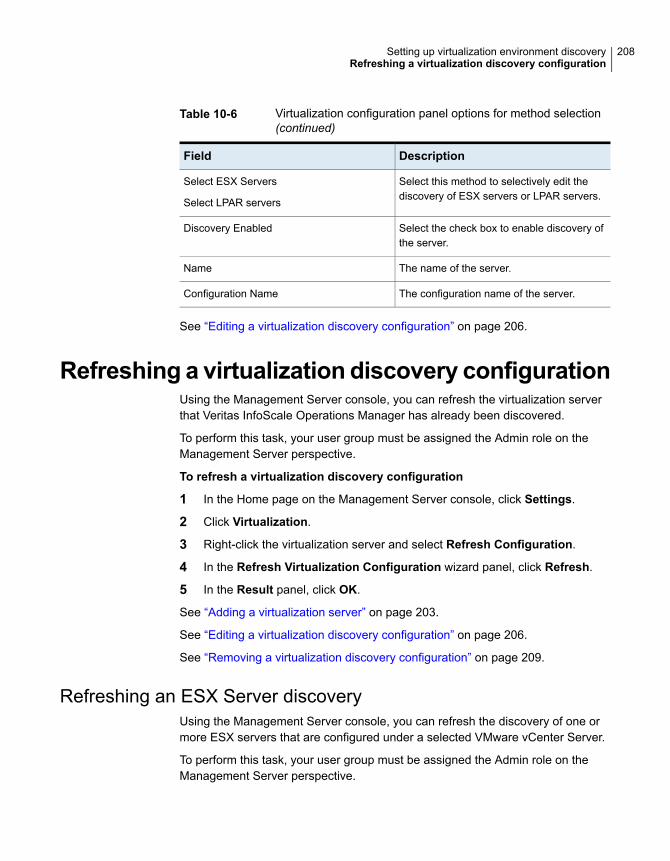
Table 10-6 Virtualization configuration panel options for method selection(continued)
DescriptionField
Select this method to selectively edit thediscovery of ESX servers or LPAR servers.
Select ESX Servers
Select LPAR servers
Select the check box to enable discovery ofthe server.
Discovery Enabled
The name of the server.Name
The configuration name of the server.Configuration Name
See “Editing a virtualization discovery configuration” on page 206.
Refreshing a virtualization discovery configurationUsing the Management Server console, you can refresh the virtualization serverthat Veritas InfoScale Operations Manager has already been discovered.
To perform this task, your user group must be assigned the Admin role on theManagement Server perspective.
To refresh a virtualization discovery configuration
1 In the Home page on the Management Server console, click Settings.
2 Click Virtualization.
3 Right-click the virtualization server and select Refresh Configuration.
4 In the Refresh Virtualization Configuration wizard panel, click Refresh.
5 In the Result panel, click OK.
See “Adding a virtualization server” on page 203.
See “Editing a virtualization discovery configuration” on page 206.
See “Removing a virtualization discovery configuration” on page 209.
Refreshing an ESX Server discoveryUsing the Management Server console, you can refresh the discovery of one ormore ESX servers that are configured under a selected VMware vCenter Server.
To perform this task, your user group must be assigned the Admin role on theManagement Server perspective.
208Setting up virtualization environment discoveryRefreshing a virtualization discovery configuration
To refresh the discovery of an ESX server
1 In the Home page on the Management Server console, click Settings.
2 Click Virtualization.
3 Under the Virtualization Configurations tab, you can view the details ofvirtualization configuration. For example, the name of the virtualization server(vCenter Server) used in the configuration, its type, associated control hostand other parameters. Select the desired virtualization configuration.
4 The Configured Virtualization Servers tab lists the ESX servers managedunder the vCenter Server that is part of the selected virtualization configuration.
5 Right-click the required ESX server and click Refresh. Press Ctrl or Shift forthe selection of multiple ESX servers.
6 In the Refresh Virtualization Server wizard panel, click Refresh.
7 In the Result panel, click OK.
See “Adding a virtualization server” on page 203.
See “About the virtualization technologies supported” on page 190.
Removing a virtualization discovery configurationUsing the Management Server console, you can remove a virtualization discoveryconfiguration.
To perform this task, your user group must be assigned the Admin role on theManagement Server perspective. The root user can also perform this task.
To remove a virtualization discovery configuration
1 In the Home page on the Management Server console, click Settings.
2 Click Virtualization.
3 Right-click the virtualization server and select Remove Configuration.
4 In the Remove Virtualization Configuration wizard panel, click Remove.
5 In the Result panel, click OK.
See “Editing a virtualization discovery configuration” on page 206.
See “Refreshing a virtualization discovery configuration” on page 208.
209Setting up virtualization environment discoveryRemoving a virtualization discovery configuration
Configuring performance metering for a VMwarevCenter server
Using the Management Server console, you can enable or disable performancemetering for a VMware vCenter server and its configured ESX servers.
Performance metering is enabled by default. To disable performance metering,clear the Enable performance metering check box.
You can enter an interval period for which you want the performance data to becollected. The interval period should be between 5 minutes and 1440 minutes andin the multiples of five. The default interval period is five minutes.
For more information on performance metering, refer to the Veritas InfoScaleOperations Manager User Guide.
To perform this task, your user group must be assigned the Admin role on theManagement Server perspective.
Note: To perform this operation you must have Control Host Add-on 7.2.
To configure performance metering for a VMware vCenter server
1 In the Home page on the Management Server console, click Settings.
2 Click Virtualization.
3 Right-click a VMware vCenter server and select Configure metering.
4 In the Configure performance metering panel, and enter an interval periodfor which you want the performance data to be collected, and click Finish.
Disable performance metering for a VMwarevCenter server
Use this option to disable performance metering for a VMware vCenter server andthe configured ESX servers.
For more information on performance metering, refer to the Veritas InfoScaleOperations Manager User Guide.
To perform this task, your user group must be assigned the Admin role on theManagement Server perspective.
210Setting up virtualization environment discoveryConfiguring performance metering for a VMware vCenter server
To disable performance metering for a VMware vCenter server
1 In the Home page on the Management Server console, click Settings.
2 Click Virtualization.
3 Right-click a VMware vCenter server and select Configure metering.
4 In theConfigure performancemetering panel, clear theEnable performancemetering check box, and click Finish.
211Setting up virtualization environment discoveryDisable performance metering for a VMware vCenter server
Deploying hot fixes,packages, and patches
This chapter includes the following topics:
■ About deploying Veritas InfoScale Operations Manager hot fixes
■ About deploying maintenance release packages and patches
■ About deploying base release packages
■ Downloading a hot fix, package, or patch
■ Uploading a Veritas InfoScale Operations Manager hot fix or package to therepository
■ Installing a Veritas InfoScale Operations Manager hot fix, package, or patch
■ Uninstalling a Veritas InfoScale Operations Manager hot fix
■ Removing a hot fix, package, or patch from the repository
■ Canceling deployment request for a hot fix, package, or patch
■ Installing a Veritas InfoScale Operations Manager hot fix on a specific managedhost
■ Uninstalling a Veritas InfoScale Operations Manager hot fix from a specificmanaged host
11Chapter
About deploying Veritas InfoScale OperationsManager hot fixes
You can download and install hot fixes for Veritas InfoScale Operations Managerin one of the following ways:
■ Download from Veritas Services and Operations Readiness Tools (SORT)website. In the Management Server console, upload the hot fix to the repositoryusing Upload Solutions, and then install.
■ Use the Management Server console to download and install the hot fix.
You can upload multiple hot fixes to the repository.
Hot fixes are of the following types:
■ Install on Management Server only.
■ Install on managed host only.
■ Install on Management Server and managed host.
In case of hot fixes that can be installed on Management Server and managed host,you need to first install the hot fix on Management Server, and then on the managedhost.
Note: For deploying Storage Foundation High Availability hot fixes, you need toinstall the Patch Installer add-on. For more information on deploying StorageFoundation High Availability hot fixes using the Patch Installer add-on, refer toVeritas InfoScale Operations Manager Add-ons User Guide.
See “About deploying Veritas InfoScale Operations Manager add-ons” on page 98.
See “About deploying maintenance release packages and patches” on page 214.
See “Downloading a Veritas InfoScale Operations Manager add-on” on page 99.
See “Uploading a Veritas InfoScale Operations Manager hot fix or package to therepository” on page 215.
See “Installing a Veritas InfoScale Operations Manager hot fix, package, or patch”on page 216.
213Deploying hot fixes, packages, and patchesAbout deploying Veritas InfoScale Operations Manager hot fixes
About deploying maintenance release packagesand patches
You can download and install the maintenance release packages and patches forVeritas InfoScale Operations Manager that are VOM Deployable in one of thefollowing ways.
■ Download from Veritas Services and Operations Readiness Tools (SORT)website. In the Management Server console, upload the package or patch tothe repository using Upload Solutions, and then install.
■ Use the Management Server console to download and install the package orpatch.
Packages or patches for Veritas InfoScale Operations Manager are available intape archive (tar.gz) format, Storage Foundation archive (.sfa) format, or compress(.zip) format.
See “About deploying Veritas InfoScale Operations Manager add-ons” on page 98.
See “Downloading a Veritas InfoScale Operations Manager add-on” on page 99.
See “Uploading a Veritas InfoScale Operations Manager hot fix or package to therepository” on page 215.
See “Installing a Veritas InfoScale Operations Manager hot fix, package, or patch”on page 216.
About deploying base release packagesYou can download and install the base release packages for Veritas InfoScaleOperations Manager that are VOM Deployable in one of the following ways.
■ Download from Veritas Services and Operations Readiness Tools (SORT)website. In the Management Server console, upload the package to the repositoryusing Upload Solutions, and then install.
■ Use the Management Server console to download and install the package.
See “About deploying Veritas InfoScale Operations Manager add-ons” on page 98.
See “Downloading a Veritas InfoScale Operations Manager add-on” on page 99.
See “Uploading a Veritas InfoScale Operations Manager hot fix or package to therepository” on page 215.
See “Installing a Veritas InfoScale Operations Manager hot fix, package, or patch”on page 216.
214Deploying hot fixes, packages, and patchesAbout deploying maintenance release packages and patches
Downloading a hot fix, package, or patchUsing the Management Server console, you can download a hot fix, package, orpatch on your local computer. You can download the hot fixes, packages, andpatches for Veritas InfoScale Operations Manager, Storage Foundation, and StorageFoundation High Availability products.
To perform this task, your user group must be assigned the Admin role on theManagement Server perspective.
To download a hot fix, package, or patch
1 In the Home page on the Management Server console, click Settings.
2 Click Deployment.
3 Locate the hot fix, package, or patch which you want to download.
4 Right-click the hot fix, package, or patch, and select Download to downloadon your local computer.
See “Uploading a Veritas InfoScale Operations Manager hot fix or package to therepository” on page 215.
See “Installing a Veritas InfoScale Operations Manager hot fix, package, or patch”on page 216.
Uploading a Veritas InfoScaleOperationsManagerhot fix or package to the repository
You need to download the hot fix or the package from the SORT website or usingthe Management Server console. After you upload the hot fix or package using theManagement Server console, you need to install it, and then you can start using it.
You can upload a single package to the repository or upload all the packagestogether as a zip file.
To perform this task, your user group must be assigned the Admin role on theManagement Server perspective.
To upload a Veritas InfoScale Operations Manager hot fix or package to therepository
1 In the Home page on the Management Server console, click Settings.
2 Do one of the following:
■ Click Upload Solutions.
■ Click Deployment, and then click Upload Solutions.
215Deploying hot fixes, packages, and patchesDownloading a hot fix, package, or patch

3 In the Upload Solutions to Repository wizard panel, click Browse to selectthe hot fix or package that you want to upload.
4 Click Upload to upload to the repository.
5 Click Close.
See “Installing a Veritas InfoScale Operations Manager hot fix, package, or patch”on page 216.
See “Removing a Veritas InfoScale Operations Manager add-on from the repository”on page 105.
See “Uninstalling a Veritas InfoScale Operations Manager add-on” on page 103.
Installing a Veritas InfoScale OperationsManagerhot fix, package, or patch
Using the Management Server console, you can install a Veritas InfoScaleOperations Manager hot fix, package, or patch on the Management Server.
In case of hot fixes that can be installed on Management Server and managed host,you need to first install the hot fix on Management Server, and then on the managedhost.
To perform this task, your user group must be assigned the Admin role on theManagement Server perspective.
To install a Veritas InfoScale Operations Manager hot fix, package, or patch
1 In the Home page on the Management Server console, click Settings.
2 Click Deployment.
3 Expand Hot Fixes, Maintenance Release, or Base Release to select the hotfix, package, or patch.
4 Right-click the hot fix, package, or patch, click Install.
5 In the Install -Download Add-on wizard panel, select a download option andclick Next.
See “Install - Download hot fix, package, or patch panel options” on page 217.
6 In the Install Select hosts wizard panel, select the managed hosts on whichyou want to install the hot fix, package, or patch, and click Finish.
See “Install - Select hosts panel options” on page 217.
7 In the Result panel, click OK
See “Uninstalling a Veritas InfoScale Operations Manager add-on” on page 103.
216Deploying hot fixes, packages, and patchesInstalling a Veritas InfoScale Operations Manager hot fix, package, or patch
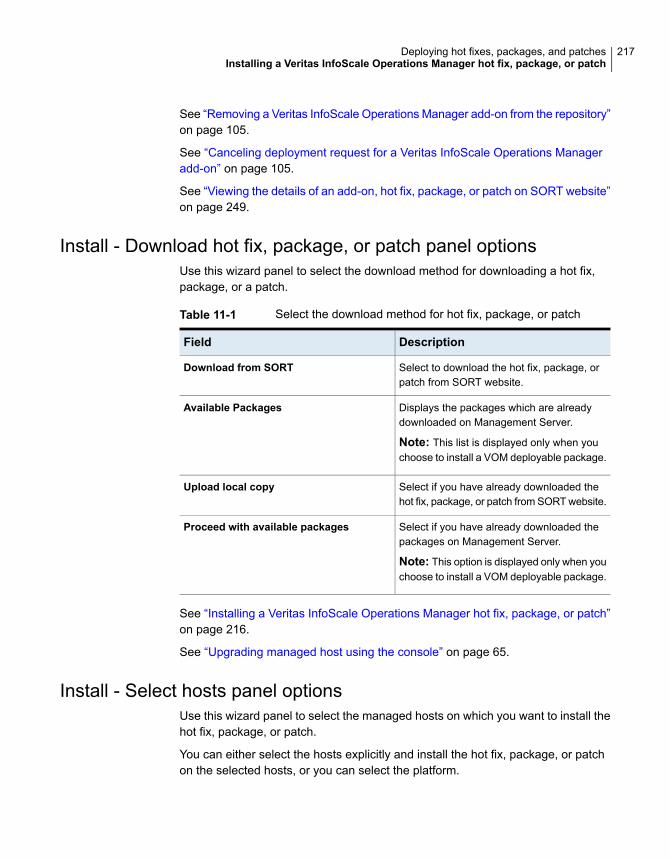
See “Removing a Veritas InfoScale Operations Manager add-on from the repository”on page 105.
See “Canceling deployment request for a Veritas InfoScale Operations Manageradd-on” on page 105.
See “Viewing the details of an add-on, hot fix, package, or patch on SORT website”on page 249.
Install - Download hot fix, package, or patch panel optionsUse this wizard panel to select the download method for downloading a hot fix,package, or a patch.
Table 11-1 Select the download method for hot fix, package, or patch
DescriptionField
Select to download the hot fix, package, orpatch from SORT website.
Download from SORT
Displays the packages which are alreadydownloaded on Management Server.
Note: This list is displayed only when youchoose to install a VOM deployable package.
Available Packages
Select if you have already downloaded thehot fix, package, or patch from SORT website.
Upload local copy
Select if you have already downloaded thepackages on Management Server.
Note: This option is displayed only when youchoose to install a VOM deployable package.
Proceed with available packages
See “Installing a Veritas InfoScale Operations Manager hot fix, package, or patch”on page 216.
See “Upgrading managed host using the console” on page 65.
Install - Select hosts panel optionsUse this wizard panel to select the managed hosts on which you want to install thehot fix, package, or patch.
You can either select the hosts explicitly and install the hot fix, package, or patchon the selected hosts, or you can select the platform.
217Deploying hot fixes, packages, and patchesInstalling a Veritas InfoScale Operations Manager hot fix, package, or patch
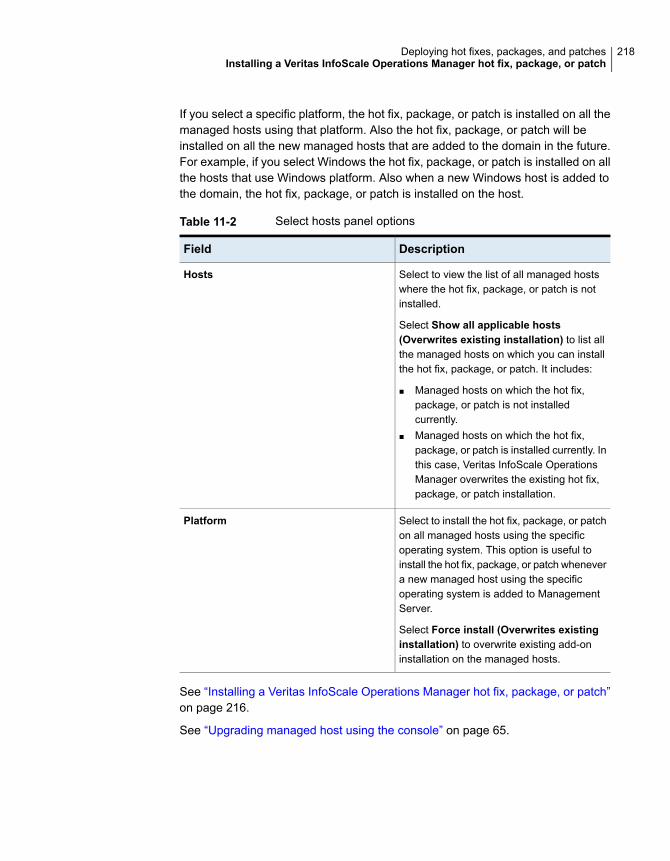
If you select a specific platform, the hot fix, package, or patch is installed on all themanaged hosts using that platform. Also the hot fix, package, or patch will beinstalled on all the new managed hosts that are added to the domain in the future.For example, if you select Windows the hot fix, package, or patch is installed on allthe hosts that use Windows platform. Also when a new Windows host is added tothe domain, the hot fix, package, or patch is installed on the host.
Table 11-2 Select hosts panel options
DescriptionField
Select to view the list of all managed hostswhere the hot fix, package, or patch is notinstalled.
Select Show all applicable hosts(Overwrites existing installation) to list allthe managed hosts on which you can installthe hot fix, package, or patch. It includes:
■ Managed hosts on which the hot fix,package, or patch is not installedcurrently.
■ Managed hosts on which the hot fix,package, or patch is installed currently. Inthis case, Veritas InfoScale OperationsManager overwrites the existing hot fix,package, or patch installation.
Hosts
Select to install the hot fix, package, or patchon all managed hosts using the specificoperating system. This option is useful toinstall the hot fix, package, or patch whenevera new managed host using the specificoperating system is added to ManagementServer.
Select Force install (Overwrites existinginstallation) to overwrite existing add-oninstallation on the managed hosts.
Platform
See “Installing a Veritas InfoScale Operations Manager hot fix, package, or patch”on page 216.
See “Upgrading managed host using the console” on page 65.
218Deploying hot fixes, packages, and patchesInstalling a Veritas InfoScale Operations Manager hot fix, package, or patch
Uninstalling a Veritas InfoScale OperationsManager hot fix
You can uninstall only Veritas InfoScale Operations Manager hot fixes from theManagement Server and managed host.
To perform this task, your user group must be assigned the Admin role on theManagement Server perspective.
To uninstall a Veritas InfoScale Operations Manager hot fix
1 In the Home page on the Management Server console, click on Settings.
2 Click Deployment.
3 Expand Hot Fixes to locate the hot fix.
4 In the Hot Fixes tab, right-click the hot fix that you want to uninstall, selectUninstall.
5 In the Uninstall panel, review the information, and click Yes.
See “Uninstall panel options” on page 104.
See “Installing a Veritas InfoScale Operations Manager add-on” on page 101.
See “Installing a Veritas InfoScale Operations Manager hot fix, package, or patch”on page 216.
See “Removing a Veritas InfoScale Operations Manager add-on from the repository”on page 105.
Removing a hot fix, package, or patch from therepository
You can remove a hot fix, package, or patch from the repository. Detailed informationabout the hot fix, package, or patch is not displayed in the Repository view withinDeployment.
To perform this task, your user group must be assigned the Admin role on theManagement Server perspective.
To remove a hot fix, package, or patch from the repository
1 In the Home page on the Management Server console, click Settings.
2 Click Deployment.
219Deploying hot fixes, packages, and patchesUninstalling a Veritas InfoScale Operations Manager hot fix
3 Right-click the add-on, hot fix, package, or patch that you want to remove,select Remove.
4 In the Remove panel, click Yes.
See “Remove panel options” on page 105.
See “Refreshing the repository” on page 111.
See “Installing a Veritas InfoScale Operations Manager add-on” on page 101.
See “Installing a Veritas InfoScale Operations Manager hot fix, package, or patch”on page 216.
See “Uninstalling a Veritas InfoScale Operations Manager add-on” on page 103.
Canceling deployment request for a hot fix,package, or patch
Using the Management Server console, you can cancel the deployment requestfor a Veritas InfoScale Operations Manager hot fix, package, or patch.
Deployment requests are of two types, Deploy by host and Deploy by platform.Deploy by host type lets you select the hosts on which you want to deploy the hotfix, package, or patch. If you select Deploy by platform, then the hot fix, package,or patch is deployed on all the hosts having the selected platform.
Request of the type Deploy by host cannot be canceled.
If you initiate an install request of Deploy by platform type, then the request isapplicable for all the existing hosts as well as the new hosts that are added to theManagement Server domain on a later date. In case ofDeploy by platform request,if you cancel the deployment request, the hot fix, package, or patch installation onall the existing hosts is completed. But the hot fix, package, or patch is not installedon the hosts that are added to the domain after cancellation of the deploymentrequest.
To perform this task, your user group must be assigned the Admin role on theManagement Server perspective.
To cancel deployment request for a hot fix, package, or patch
1 In the Home page on the Management Server console, click Settings.
2 Click Deployment.
3 Expand Hot Fixes to locate the hot fix, package, or patch whose deploymentrequest you want to cancel.
4 Select the Requests tab.
220Deploying hot fixes, packages, and patchesCanceling deployment request for a hot fix, package, or patch
5 Right-click the request and select Cancel Request.
6 In the Cancel Deployment Request wizard panel, click OK.
See “Cancel Deployment Request panel options” on page 106.
See “Installing a Veritas InfoScale Operations Manager add-on” on page 101.
See “Installing a Veritas InfoScale Operations Manager hot fix, package, or patch”on page 216.
See “Uninstalling a Veritas InfoScale Operations Manager add-on” on page 103.
Installing a Veritas InfoScale OperationsManagerhot fix on a specific managed host
Using the Management Server console, you can install the Veritas InfoScaleOperations Manager hot fix on the selected managed host. If the hot fix is alreadyinstalled on the selected host, then Veritas InfoScale Operations Manager overwritesthe existing installation. It is referred to as a force installation.
To perform this task, your user group must be assigned the Admin role on theManagement Server perspective.
To install a Veritas InfoScale OperationsManager hot fix on a specificmanagedhost
1 In the Home page on the Management Server console, click Settings.
2 Click Deployment.
3 Expand Hot Fixes to select a hot fix.
4 In the Applicable Hosts tab, right-click the host, and select Install.
5 In the Install wizard panel, review the information, and click OK
See “Install panel options” on page 107.
6 In the Install - Result panel, click OK.
See “About deploying Veritas InfoScale Operations Manager add-ons” on page 98.
Uninstalling a Veritas InfoScale OperationsManager hot fix from a specific managed host
Using the Management Server console, you can uninstall the Veritas InfoScaleOperations Manager hot fix from the selected managed host. You can uninstall theadd-on irrespective of its state (enabled or disabled).
221Deploying hot fixes, packages, and patchesInstalling a Veritas InfoScale Operations Manager hot fix on a specific managed host
To perform this task, your user group must be assigned the Admin role on theManagement Server perspective.
To uninstall a Veritas InfoScale Operations Manager hot fix from a specificmanaged host
1 In the Home page on the Management Server console, click Settings.
2 Click Deployment.
3 Expand Hot Fixes to select a hot fix.
4 In the Applicable Hosts tab, right-click the host, and select Uninstall.
5 In the Uninstall wizard panel, review the information, and click OK
See “Uninstall panel options” on page 108.
6 In the Uninstall - Result panel, click OK.
See “About deploying Veritas InfoScale Operations Manager add-ons” on page 98.
222Deploying hot fixes, packages, and patchesUninstalling a Veritas InfoScale Operations Manager hot fix from a specific managed host
Configuring ManagementServer settings
This chapter includes the following topics:
■ Configuring the Management Server settings
■ Configuring SMTP settings for email notifications
■ Configuring SNMP trap settings for alert notifications
■ Configuring the proxy server settings
■ Enabling the analytics gathering on Management Server
■ Setting the period for retaining the alert and the task logs in the database
■ Configuring Web server settings
■ Setting the generation time for subscribed reports
■ Configuring advance authorization settings
■ Enabling or disabling policy signatures for the data center
Configuring the Management Server settingsYou can perform the following tasks in the Server settings tab in ManagementServer:
12Chapter
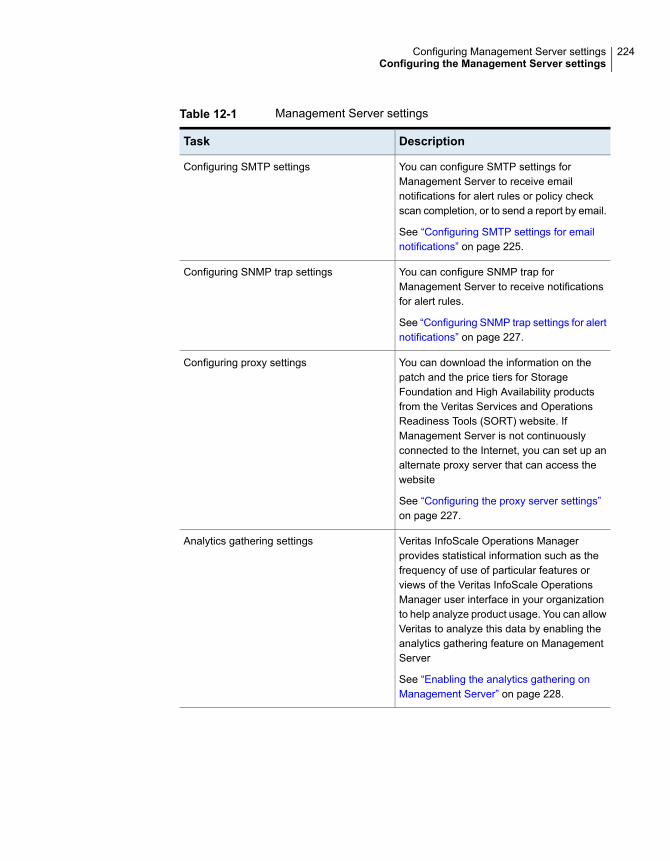
Table 12-1 Management Server settings
DescriptionTask
You can configure SMTP settings forManagement Server to receive emailnotifications for alert rules or policy checkscan completion, or to send a report by email.
See “Configuring SMTP settings for emailnotifications” on page 225.
Configuring SMTP settings
You can configure SNMP trap forManagement Server to receive notificationsfor alert rules.
See “Configuring SNMP trap settings for alertnotifications” on page 227.
Configuring SNMP trap settings
You can download the information on thepatch and the price tiers for StorageFoundation and High Availability productsfrom the Veritas Services and OperationsReadiness Tools (SORT) website. IfManagement Server is not continuouslyconnected to the Internet, you can set up analternate proxy server that can access thewebsite
See “Configuring the proxy server settings”on page 227.
Configuring proxy settings
Veritas InfoScale Operations Managerprovides statistical information such as thefrequency of use of particular features orviews of the Veritas InfoScale OperationsManager user interface in your organizationto help analyze product usage. You can allowVeritas to analyze this data by enabling theanalytics gathering feature on ManagementServer
See “Enabling the analytics gathering onManagement Server” on page 228.
Analytics gathering settings
224Configuring Management Server settingsConfiguring the Management Server settings
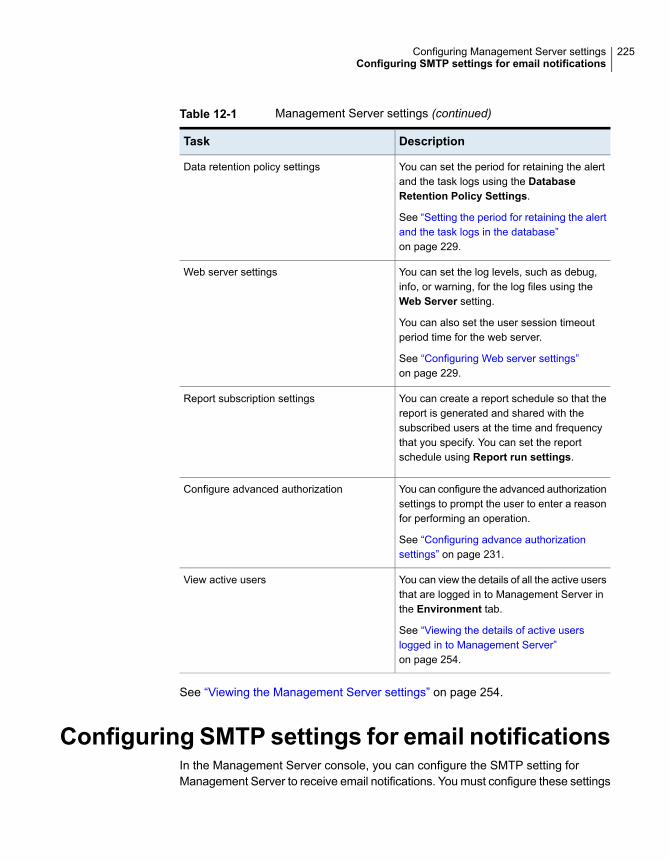
Table 12-1 Management Server settings (continued)
DescriptionTask
You can set the period for retaining the alertand the task logs using the DatabaseRetention Policy Settings.
See “Setting the period for retaining the alertand the task logs in the database”on page 229.
Data retention policy settings
You can set the log levels, such as debug,info, or warning, for the log files using theWeb Server setting.
You can also set the user session timeoutperiod time for the web server.
See “Configuring Web server settings”on page 229.
Web server settings
You can create a report schedule so that thereport is generated and shared with thesubscribed users at the time and frequencythat you specify. You can set the reportschedule using Report run settings.
Report subscription settings
You can configure the advanced authorizationsettings to prompt the user to enter a reasonfor performing an operation.
See “Configuring advance authorizationsettings” on page 231.
Configure advanced authorization
You can view the details of all the active usersthat are logged in to Management Server inthe Environment tab.
See “Viewing the details of active userslogged in to Management Server”on page 254.
View active users
See “Viewing the Management Server settings” on page 254.
Configuring SMTP settings for email notificationsIn the Management Server console, you can configure the SMTP setting forManagement Server to receive email notifications. You must configure these settings
225Configuring Management Server settingsConfiguring SMTP settings for email notifications
to receive email notifications for alert rules or policy check scan completion, or tosend a report by email.
You can also send a test email to the recipient's account to verify the SMTP settingsthat you have configured.
Enter the following details to configure the SMTP settings:
Valid formats for SMTP server include: FullyQualified Domain Name (FQDN), IP address,or, if the network handles DNS resolution forhost names, a shortened host name.Examples: Host123, Host123.example.com,xxx.yyy.zzz.aaa.
SMTP server
The email address that is entered in theSender account appears as the sender ofall the emails that a rule sends out.
Sender account
Enter the SMTP mail server port number.SMTP port
To perform this task, your user group must be assigned the Admin role on theManagement Server perspective.
To configure the SMTP settings for email notifications
1 In the Home page on the Management Server console, click Settings.
2 In the Settings tab, click Management Server.
3 In the Server settings tab, under SMTP settings, do the following:
■ Enter the SMTP mail server host name in SMTP server.
■ Enter a valid email address in Sender account.
■ Enter the SMTP mail server port number in SMTP port.
4 Click Save Settings.
To verify the SMTP settings
1 In SMTP Settings, under Test SMTP, do the following:
■ Enter a valid email address of the recipient in Recipient Account.
■ Enter the test email message that you want to send to the recipient in TestMessage.
2 Click Send test mail.
See “Configuring the Management Server settings” on page 223.
See “Viewing the Management Server settings” on page 254.
226Configuring Management Server settingsConfiguring SMTP settings for email notifications
Configuring SNMP trap settings for alertnotifications
Using the Management Server console, you can configure the SNMP trap settings.
When an event takes place, some objects that are not polled, send traps orunsolicited asynchronous SNMP messages to the server. Some of the rules thatVeritas InfoScale Operations Manager uses to monitor objects in the environmentrely on SNMP trap-based messages.
Enter the following details to configure the SNMP trap settings:
Enter the IP Address or name of the hostwhere the SNMP trap console is located.Visible only when SNMP Trap is selected.Example: Host123.example.com
SNMP server
Enter the SNMP port number. The defaultport for the trap is 162.
You can edit the port number, if required.
SNMP port
To perform this task, your user group must be assigned the Admin role on theManagement Server perspective.
To configure the SNMP trap settings for alert notifications
1 In the Home page on the Management Server console, click Settings.
2 In the Settings tab, click Management Server.
3 In the Server settings tab, under SNMP Trap settings, do the following:
■ Enter the SNMP server host name in SNMP server.
■ Enter the SNMP server port number in SNMP port.
4 Click Save Settings.
See “Configuring the Management Server settings” on page 223.
See “Viewing the Management Server settings” on page 254.
Configuring the proxy server settingsIn the Management Server console, when Management Server is not continuouslyconnected to the Internet, you can use a proxy server to connect to SORT.
To perform this task, your user group must be assigned the Admin role on theManagement Server perspective.
227Configuring Management Server settingsConfiguring SNMP trap settings for alert notifications
To configure the proxy server settings
1 In the Home page on the Management Server console, click Settings.
2 In the Settings tab, click Management Server.
3 In the Server settings tab, under Proxy settings, do the following:
■ Enter the name or IP address of the proxy server in Proxy server.
■ Enter the port number of the proxy server in Proxy server port.
■ Enter the user name that you use to access the proxy server in Proxy user.
■ Enter the password that you use to access the proxy server in Proxypassword.
4 Click Test SORT connectivity to check the connectivity to SORT.
5 Click Save Settings.
See “Configuring the Management Server settings” on page 223.
See “Viewing the Management Server settings” on page 254.
Enabling the analytics gathering on ManagementServer
Veritas InfoScale Operations Manager uses Web beacons (also known as singlepixel or clear GIFS) to provide statistical information such as the frequency of useof particular features or views of the Veritas InfoScale Operations Manager userinterface in your organization to help analyze product usage. The information doesnot identify the users. Veritas analyzes this data to understand the information thatis of most interest to the customers and the features that the customers use most.
In the Management Server, Server settings view, you can enable analyticsgathering on Management Server.
If the Enable Analytics Gathering check box is enabled while you configureManagement Server, the Enable Analytics Gathering check box appears selected.Clear the Enable Analytics Gathering check box to disable analytics gatheringon Management Server.
To perform this task, your user group must be assigned the Admin role on theManagement Server perspective.
228Configuring Management Server settingsEnabling the analytics gathering on Management Server

To enable analytics gathering on Management Server
1 In the Home page on the Management Server console, click Settings.
2 In the Settings tab, click Management Server.
3 In the Server settings tab, underAnalytics gathering settings, select EnableAnalytics Gathering, and click Save Settings.
See “Configuring the Management Server settings” on page 223.
See “Viewing the Management Server settings” on page 254.
Setting the period for retaining the alert and thetask logs in the database
In theManagement Server,Server setting view, you can set the period for retainingthe alert and the task logs. After this period, the alert and the task logs are removedfrom the Veritas InfoScale Operations Manager database.
To perform this task, your user group must be assigned the Admin role on theManagement Server perspective.
To set the period for retaining the alert and the task logs in the database
1 In the Home page on the Management Server console, click Settings.
2 In the Settings tab, click Management Server.
3 In the Server settings tab, underDatabase Retention Policy Settings, selectthe number of days from the drop-down list in the following:
■ Alert Log (Days)
■ Task Log (Days)
4 Click Save Settings.
See “Configuring the Management Server settings” on page 223.
See “Viewing the Management Server settings” on page 254.
Configuring Web server settingsIn the Management Server console, you can configure the following:
■ Log level for the log files in the web server.
■ User session timeout period for the web server.
You can select the following options for log level:
229Configuring Management Server settingsSetting the period for retaining the alert and the task logs in the database
■ Debug.
■ Info
■ Warning
By default, Veritas InfoScale Operations Manager sets the log level as Info.
You can manage the user session timeout period for the web server. By default,the user session timeout period is 30 minutes. If you want to disable the user sessiontimeout period for the web server, you must enter -1 in the Timeout field.
Although the default timeout period is set at 30 minutes, technically the sessiontimeout happens after 60 minutes. In the first 30 minutes of inactivity or no mouseclicks, the browser session continues to poll the Management Server intermittently.After exactly 30 minutes a pop-up window appears. Click Continue in the pop-upwindow to continue the web server session without having to enter the usercredentials. If the pop-up window is not acknowledged, then the 30-minutes timeoutperiod of the Tomcat web server starts. After 30 minutes of inactivity, the sessionis terminated. If you now click OK in the pop-up window, you are asked to enteryour user credentials.
To perform this task, your user group must be assigned the Admin role on theManagement Server perspective.
To configure the web server settings
1 In the Home page on the Management Server console, click Settings.
2 In the Settings tab, click Management Server.
3 In the Server settings tab, under Web Server Settings, select the log level,and set the timeout period.
4 Click Save Settings
See “Configuring the Management Server settings” on page 223.
See “Viewing the Management Server settings” on page 254.
Setting the generation time for subscribed reportsYou can use the Management Server console to create a report schedule forsubscribed reports. You can specify the time of the day when the reports are to begenerated and shared with the subscribers. The default time of the day is 1.00 AM.
For more information on reports, refer to the Veritas InfoScale Operations ManagerUser Guide.
To perform this task, your user group must be assigned the Admin role on theManagement Server perspective.
230Configuring Management Server settingsSetting the generation time for subscribed reports
To set the generation time for subscribed reports
1 In the Home page on the Management Server console, click Settings.
2 In the Setting tab, click Management Server.
3 In the Server settings tab, under Report subscription settings, select thetime of the day.
4 Click Save Settings.
See “Configuring the Management Server settings” on page 223.
See “Viewing the Management Server settings” on page 254.
Configuring advance authorization settingsYou can use the Management Server console to configure advance authorizationsettings. These settings are applicable for all operations that are performed on theManagement Server console. The Reason panel appears after an operation isperformed and the user is asked to enter a reason for performing the operation.
To perform this task, your user group must be assigned the Admin role on theManagement Server perspective.
To configure advance authorization settings
1 In the Home page on the Management Server console, click Settings.
2 In the Setting tab, click Management Server.
3 In the Server settings tab, underAdvanced authorization, selectAsk reasonfor all operations.
4 Click Save Settings.
See “Configuring the Management Server settings” on page 223.
See “Viewing the Management Server settings” on page 254.
See “Viewing audit information for Management Server” on page 255.
Enabling or disabling policy signatures for thedata center
In the Management Server console, you can enable or disable policy signaturesfor the data center. In the data center view, signatures are enabled by default.
To perform this task, your user group must be assigned the Admin role on theManagement Server perspective.
231Configuring Management Server settingsConfiguring advance authorization settings
Note:Registered signatures can also be enabled or disabled from the perspectiveswhere they are registered: for hosts on the Server perspective or for clusters onthe Availability perspective. The most recent enable or disable operation takesprecedence.
See the Veritas InfoScale Operations Manager Management Server User Guide.
To enable or disable policy signatures for the data center
1 In the Home page, click Settings.
2 Click Policy Signatures.
3 Select one or more signatures to enable or disable.
4 Right-click and choose the appropriate menu option for the operation you wantto perform.
■ Enable Signatures
■ Disable Signatures
5 Confirm to perform the operation on all hosts registered for that signature.
See “Configuring the Management Server settings” on page 223.
232Configuring Management Server settingsEnabling or disabling policy signatures for the data center
Setting up extendedattributes
This chapter includes the following topics:
■ About using extended attributes
■ Adding an extended attribute
■ Modifying an extended attribute
■ Deleting an extended attribute
About using extended attributesAn extended attribute is an additional user-defined attribute that provides additionaldetails about an object in Veritas InfoScale Operations Manager. This informationabout an object is in addition to the details that Veritas InfoScale Operations Managerdiscovers for that object. You can define multiple extended attributes on the objectsusing the Management Server console. You can use the extended attributes tosearch, filter, and sort the objects in the Management Server console. You can alsomanage the extended attributes using the Veritas InfoScale Operations ManagerWeb services API.
You can define an extended attribute and associate it with the relevant objects. Youneed to set the value for the extended attribute when you associate it with the object.
Table 13-1 lists the object types supporting extended attributes and the perspectiveto which these objects belong to.
13Chapter
Table 13-1 Object types supporting extended attributes
PerspectiveObjects
ServerHost, disk, disk group, volume, snapshot,exchange server, database
AvailabilityCluster, service group
StorageEnclosure, switch, fabric, fabric zone
VirtualizationVirtualization server, virtual machine
You can set the value for the extended attribute on the objects in one of the followingways:
■ By selecting an object in a perspective
■ By searching and filtering the objects in the data center in a perspective
Note: For more information on setting the extended attribute value and Web servicesAPI, refer to the Veritas InfoScale Operations Manager User Guide.
See “Viewing the list of extended attributes” on page 255.
See “Adding an extended attribute” on page 234.
Adding an extended attributeUsing the Management Server console, you can add one or more extended attributesfor multiple object types. You can add up to 20 extended attributes on an objecttype. An extended attribute is displayed in the Properties column in the perspectiveview. You can right-click the attribute and select Show as column to display theattribute as a column in the table.
The extended attribute name can be same as the default attribute name of an objecttype. You cannot have two extended attributes having the same name.
For example, in the Server perspective, Veritas InfoScale Operations Managerdiscovers the condition of a disk which is displayed in the Condition column. Youcan create an extended attribute namedCondition onDisk. This extended attributeis displayed in the Properties panel. You cannot create two extended attributeswith the same name for example Condition on Disk.
The maximum length of the extended attribute name can be 256 characters. It cancontain alphanumeric characters, hyphen (-), and space.
234Setting up extended attributesAdding an extended attribute
To perform this task, your user group must be assigned the Admin role on theManagement Server perspective.
To add an extended attribute
1 In the Home page on the Management Server console, click Settings.
2 Click Extended Attributes.
3 In the Extended Attribute view, click Add.
4 In the Add panel, enter a name for the extended attribute, and select one ormore object types. Click Finish.
5 In the Add- Result panel, click Close.
See “Modifying an extended attribute” on page 235.
See “Viewing the list of extended attributes” on page 255.
Modifying an extended attributeUsing the Management Server console, you can modify the name of an extendedattribute. The name of the extended attribute should be unique.
To perform this task, your user group must be assigned the Admin role on theManagement Server perspective.
To modify an extended attribute
1 In the Home page on the Management Server console, click Settings.
2 Click Extended Attributes.
3 In the Extended Attribute view, right-click an extended attribute, and selectModify.
4 In the Updated Name field, enter a new name for the extended attribute, andclick OK.
5 In the Modify - Result panel, click Close.
See “Adding an extended attribute” on page 234.
See “Viewing the list of extended attributes” on page 255.
Deleting an extended attributeUsing the Management Server console, you can delete an extended attribute. Whenyou delete an extended attribute, the association with the objects is also deleted,and the extended attribute is not visible in the properties of the object.
235Setting up extended attributesModifying an extended attribute
To perform this task, your user group must be assigned the Admin role on theManagement Server perspective.
To delete an extended attribute
1 In the Home page on the Management Server console, click Settings.
2 Click Extended Attributes.
3 In the Extended Attribute view, right-click the extended attribute, and selectDelete.
4 In the Delete panel, click OK.
5 In the Delete - Result panel, click Close.
See “Adding an extended attribute” on page 234.
See “Modifying an extended attribute” on page 235.
See “Viewing the list of extended attributes” on page 255.
236Setting up extended attributesDeleting an extended attribute
Downloading price tierinformation from SORT
This chapter includes the following topics:
■ About assigning price tiers to hosts
■ About updating the price tier information on Management Server
■ Updating the price tier information automatically on Management Server
■ Updating the price tier information manually on Management Server
About assigning price tiers to hostsYou can use operating system-specific commands to find host characteristics. Thisincludes the make and model of the host, processor type, and processor count.However, although you can discover hardware information for most hosts, you maynot have all the characteristics of a host. In that case, it is called an "unknown tier".
The assign price tier feature lets you assign price tiers to an unknown host. Iteliminates the need to find host characteristics manually.
You can assign a price tier to a host by selecting the server price tier, processorsprice tier, operating system price tier, or the Symantec Performance Value Unit(SPVU) price tier.
See “About updating the price tier information on Management Server” on page 238.
See “Updating the price tier information automatically on Management Server”on page 239.
See “Updating the price tier information manually on Management Server”on page 239.
14Chapter
About updating the price tier information onManagement Server
To find the appropriate price tier or the Symantec Performance Value Unit (SPVU)for the licenses of the Storage Foundation and high availability products that areinstalled on the managed hosts, Veritas InfoScale Operations Manager requiresthe latest information on the price tiers for these products. Veritas updates the latestinformation of the price tiers on the Veritas Services and Operations ReadinessTools (SORT) website. Management Server requires HTTPS connectivity with theSORT server for downloading this information.
The Veritas InfoScale Operations Manager console provides you with variousmethods to update the price tier information on Management Server. You can useany one of the following methods to update the price tier information on ManagementServer:
■ Configure Management Server to update the latest price tier informationautomatically when Management Server is continuously connected to theInternet.
■ Set up a proxy server to update the latest price tier information automaticallywhen Management Server is not connected to the Internet.
■ Download a script file manually from Management Server when ManagementServer is not continuously connected to the Internet, or you cannot set up aproxy server. You must run the file on a Windows system that is connected tothe Internet to extract a text file that contains the latest information on the pricetiers, and upload the extracted text file to Management Server
The price tiers assigned to the managed hosts do not change automatically whenyou upload a new price tier file to Management Server. You need to manually assignthe price tier to the host using the Veritas InfoScale Operations Manager console.
The automatic update of the price tier information on a Management Server occursaccording to the schedule set by you. By default, the price tier information is updatedon Management Server on the first day of every month.
Note: Veritas InfoScale Operations Manager downloads the price tier informationfrom the SORT website only if a newer version is available on the website.
See “About assigning price tiers to hosts” on page 237.
See “Updating the price tier information automatically on Management Server”on page 239.
238Downloading price tier information from SORTAbout updating the price tier information on Management Server
See “About managing the SFHA update information on Management Server”on page 241.
Updating the price tier information automaticallyon Management Server
You can configure Management Server to connect to the Veritas Services andOperations Readiness Tools (SORT) website and update the price tier informationautomatically when Management Server is continuously connected to the Internet.When Management Server is not connected to Internet, you can use a proxy serverto update the price tier information automatically. By default, the automatic downloadof the price tier information occurs on the first day of every month at 00.00 hours.
To perform this task, your user group must be assigned the Admin role on theManagement Server perspective.
To update the price tier information automatically on Management Server
1 In the Home page on the Management Server console, click Settings.
2 Click SORT.
3 In the Price Tier Download Settings tab, under Price Tier AutomaticDownload do the following:
■ Select the day of the month from the drop-down list in Day of month.
■ Select the time of the day from the drop-down list in Time of day.
4 Click Save.
5 In the Success panel click OK, and click Close.
See “About updating the price tier information on Management Server” on page 238.
See “Updating the price tier information manually on Management Server”on page 239.
See “Configuring the proxy server settings” on page 227.
Updating the price tier information manually onManagement Server
You can update the price tier information manually when Management Server isnot connected to the Internet, or you cannot set up a proxy server to access theVeritas Services and Operations Readiness Tools (SORT) website
239Downloading price tier information from SORTUpdating the price tier information automatically on Management Server
To do this, you must download the pricetier.vbs script file from ManagementServer and run it on a Windows system that has Internet connectivity. Extract thetext file that contains the latest information on the price tiers. You must copy thistext file to the system where Management Server is running and manually uploadthis text file.
Note: You must use a Windows system to perform this operation.
To perform this task, your user group must be assigned the Admin role on theManagement Server perspective.
To update the price tier information manually on Management Server
1 In the Home page on the Management Server console, click Settings.
2 Click SORT.
3 In the Price Tier Download Settings tab, under Price Tier Manual Downloaddo the following:
■ Click Download to download the pricetier.vbs script.
■ Copy the pricetier.vbs file to a Windows system that has Internetconnectivity.
■ Run the following command to extract the pricetier.txt file that containsthe information on the price tiers:cscript/NoLogo pricetier.vbs
Alternatively, you can double-click the script file to extract the text file. Thepricetier.txt file is generated in the folder where you have downloadedthe pricetier.vbs script file.
■ Copy the pricetier.txt file to the system where Management Server isrunning.
4 Click Browse to select the pricetier.txt file.
5 Click Upload.
6 Click Close.
See “About updating the price tier information on Management Server” on page 238.
See “Updating the price tier information automatically on Management Server”on page 239.
240Downloading price tier information from SORTUpdating the price tier information manually on Management Server
Managing SFHA updatesThis chapter includes the following topics:
■ About managing the SFHA update information on Management Server
■ Downloading information on SFHA updates automatically from SORT
■ Viewing available SFHA updates
■ Viewing details about SFHA updates
■ Viewing a list of hosts that are missing critical SFHA hot fixes
■ Viewing the product updates for a host
■ Downloading SFHA updates
Aboutmanaging the SFHA update information onManagement Server
Veritas InfoScale Operations Manager helps you ensure that your hosts are up todate with respect to updates for Storage Foundation High Availability (SFHA)products that are installed on the managed hosts.
In the Management Server console, you can view new updates available for StorageFoundation High Availability (SFHA) products that are installed on the managedhosts. Updates can include hot fixes, maintenance releases, and base releases.
To generate the correct update report for the managed hosts, Veritas InfoScaleOperations Manager requires the latest information on the updates for theseproducts. Veritas updates the latest information on the product updates on theVeritas Services and Operations Readiness Tools (SORT) website as a script file.Management Server requires HTTPS connectivity with the SORT server fordownloading this information.
15Chapter
You can configure Management Server to download the product update informationfrom SORT automatically when Management Server is continuously connected tothe Internet. You can set a schedule for the automatic download. The default isevery Sunday at noon. If Management Server does not have connectivity with theSORT server, you can set up a proxy server.
See “Configuring the proxy server settings” on page 227.
See “Viewing available SFHA updates” on page 243.
Downloading information on SFHA updatesautomatically from SORT
Veritas InfoScale Operations Manager Management Server can download theinformation about hot fixes and other product updates for SFHA products fromVeritas Services and Operations Readiness Tools (SORT). In the ManagementServer console, you can set an automatic download schedule to update the productinformation on Management Server. Automatic download requires connectivity tothe SORT website from Management Server or from a proxy server. By default,the automatic download of information occurs every Sunday at noon.
Click Run Now to download the SFHA updates information immediately.
See “Configuring the proxy server settings” on page 227.
To perform this task, your user group must be assigned the Admin role on theManagement Server perspective.
To download information on SFHA updates automatically from SORT
1 In the Home page on the Management Server console, click Settings.
2 Click the Settings tab, and click SORT.
3 In the SFHA Updates Download Settings tab, under Automatic SFHAUpdates Download, select theDownload SFHAUpdates Information checkbox.
4 To change the default schedule (every Sunday at noon), select a daily, weekly,or monthly frequency and specify the schedule.
5 Click Save.
6 In the Success panel click OK, and click Close.
242Managing SFHA updatesDownloading information on SFHA updates automatically from SORT
Viewing available SFHA updatesIn the Management Server console, you can view information about StorageFoundation High Availability (SFHA) hot fixes and other updates that are availablefrom the Veritas Services and Operations Readiness Tools (SORT) website.
The Deployment window under Settings lists available update information for allhosts in the data center. The information includes details such as the type of patch,the product version, criticality, size, and whether deployable from Veritas InfoScaleOperations Manager. You can select an update and view related information onthe following tabs:
■ Overview: Shows a distribution chart of hosts requiring the update.
■ Applicable Hosts: Shows information about the hosts that require the update.
You can view this information, if your user group has Admin role assigned on theManagement Server perspective.
To view available operations, right-click an update. The available operations dependon the type of update and the information available for it on SORT. Operations caninclude viewing details about an update on the SORT website, downloading anupdate, and removing the update information from the repository.
You can use the Management Server console to install SFHA hot fixes; however,this requires Patch Installer Add-on.
Note: In the Server perspective, you can right-click a host and select Propertiesto view information on available SFHA updates for that host only.
See “Viewing the product updates for a host” on page 245.
To view available SFHA updates
1 In the Home page on the Management Server console, click Settings.
2 Click the Settings tab and click Deployment.
3 Choose one of the following:
■ To view hot fixes for all SFHA products, click Hot Fixes and click the HotFixes tab.
■ To view hot fixes for one product only, expand Hot Fixes and click one ofthe products, then click the Hot Fixes tab.
■ To view maintenance releases for all SFHA products, click MaintenanceReleases and click the Maintenance Releases tab.
243Managing SFHA updatesViewing available SFHA updates
■ To view maintenance releases for one product only, expand MaintenanceReleases and click one of the products, then click the MaintenanceReleases tab.
■ To view base releases for all SFHA products, click Base Releases andclick the Base Releases tab.
■ To view base releases for one product only, expand Base Releases andclick one of the products, then click the Base Releases tab.
4 Optionally, select one or more of the following:
Filter the list to only updates that can be deployedusing the Management Server console. SomeSFHA hot fixes are deployable. Deployment ofSFHA hot fixes requires Patch Installer Add-on.
VOM deployable
Filter the list to critical updates only.Critical
Filter out any obsolete updates.Non obsolete
5 To view which hosts require an update, select the update and click theApplicable Hosts tab.
You can double-click on a host to view more information about the host in theServer perspective, if you have the required permissions for that perspectiveand host.
6 If you want to view more information about an update, right-click it and selectDetails to connect to SORT.
See “Viewing details about SFHA updates” on page 244.
Viewing details about SFHA updatesIn the Management Server console, you can view details about updates for StorageFoundation High Availability (SFHA) products.
Viewing details requires connectivity to the Veritas Services and OperationsReadiness Tools (SORT) website. If no connection is available to SORT from theManagement Server, you can configure a proxy server from the console.
See “Configuring the proxy server settings” on page 227.
You can view this information, if your user group has Admin role assigned on theManagement Server perspective.
244Managing SFHA updatesViewing details about SFHA updates
To view details about SFHA updates
1 In the Home page on the Management Server console, click Settings.
2 Click the Settings tab and click Deployment.
3 Locate the update that you want to view details about.
See “Viewing available SFHA updates” on page 243.
4 Right-click the update and select Details.
Viewing a list of hosts that are missing criticalSFHA hot fixes
You can view a faults table that lists managed hosts that are missing critical StorageFoundation High Availability (SFHA) hot fixes.
You can view this information, if your user group has Admin role assigned on theManagement Server perspective.
To view a list of hosts that are missing critical SFHA hot fixes
1 In the Home page on the Management Server console, click Settings.
2 Click the Settings tab and click Deployment.
3 In the tree, click Hot Fixes.
4 Click the Faults tab.
See “Viewing available SFHA updates” on page 243.
Viewing the product updates for a hostVeritas InfoScale Operations Manager Management Server can connect to VeritasServices and Operations Readiness Tools (SORT) to retrieve information on theproduct updates that Veritas has released. In the host Properties dialog box, youcan view information on Storage Foundation High Availability (SFHA) updates thatare installed on the host or available and not yet installed.
Product and update information includes release type, date, and criticality of availableupdates. For installed updates, the information includes whether an installed updateis obsolete or superseded by another release of the same type, for example, if ahot fix has been superseded by a more recent hot fix.
You can view this information related to the hosts for which your user group has atleast Guest role explicitly assigned or inherited from a parent Organization. You
245Managing SFHA updatesViewing a list of hosts that are missing critical SFHA hot fixes
can also view the information if your user group has a Guest role assigned on theServer perspective.
To view the product updates for a host
1 In the Management Server console, go to the Server perspective and expandManage in the left pane.
2 Expand the Organization or Uncategorized Hosts to locate the host.
3 Right-click the host and click Properties.
4 Click the Products tab.
5 Select a product and click the Installed updates or Available updates tabsbelow.
6 For more information on an available update, double-click the update. TheDeployments window lists all information that has been retrieved from SORT.From that window you can select an update and view more details on the SORTwebsite.
See “Viewing available SFHA updates” on page 243.
Downloading SFHA updatesIn the Management Server console, you can download updates for StorageFoundation High Availability (SFHA) products. The updates are downloaded fromVeritas Services and Operations Readiness Tools (SORT) to the system whereyour browser is running.
Downloading SFHA updates requires connectivity to the SORT website. If noconnection is available to SORT from Management Server, you can configure aproxy server from the console.
See “Configuring the proxy server settings” on page 227.
To perform this task, your user group must be assigned the Admin role on theManagement Server perspective.
Note: To use Management Server to deploy supported SFHA hot fixes requiresPatch Installer Add-on.
To download SFHA updates
1 In the Home page on the Management Server console, click Settings.
2 Click the Settings tab and click Deployment.
246Managing SFHA updatesDownloading SFHA updates

3 In the tree, locate the update that you want to download.
4 Right-click the update and select Download.
If the Download option is not available, this indicates the download locationfor this SFHA update is not available on SORT.
247Managing SFHA updatesDownloading SFHA updates
Viewing information on theManagement Serverenvironment
This chapter includes the following topics:
■ Viewing the details of an add-on, hot fix, package, or patch on SORT website
■ Viewing the hosts configured in the Management Server domain
■ Viewing the details of the authentication broker and the domains associatedwith the broker
■ Viewing faults in the Management Server perspective
■ Viewing the faults definitions
■ Viewing details of alert logs
■ Viewing the details of rules
■ Viewing the details of active users logged in to Management Server
■ Viewing the Management Server settings
■ Viewing the list of extended attributes
■ Viewing audit information for Management Server
■ Viewing task information for the data center
■ Viewing or exporting a list of available policy signatures
16Chapter
Viewing the details of an add-on, hot fix, package,or patch on SORT website
Using the Management Server console, you can view the details of an add-on, hotfix, package, or patch on the SORT website.
You can view this information, if your user group has Admin role assigned on theManagement Server perspective.
To view the details of an add-on, hot fix, package, or patch on the SORTwebsite
1 In the Home page on the Management Server console, click Settings.
2 Click Deployment.
3 Expand Repository to locate the add-on, hot fix, package, or patch whosedetails you want to view.
4 Right-click the add-on, hot fix, package, or patch, and select Details to viewthe details on the SORT website.
See “Installing a Veritas InfoScale Operations Manager add-on” on page 101.
See “Installing a Veritas InfoScale Operations Manager hot fix, package, or patch”on page 216.
Viewing the hosts configured in the ManagementServer domain
You can use the Management Server console to view the details of the hosts thatare configured in the Management Server domain. You can view the details of hostssuch as name, configuration type, status, platform, OS version, MH version, andthe discovery state.
In this view you can perform the refresh and remove host tasks.
You can view this information, if your user group has Admin role assigned on theManagement Server perspective. The root user can also view this information.
To view the hosts configured in the Management Server domain
1 In the Home page on the Management Server console, click Settings.
2 Click Host.
3 Do one of the following to view the details of the configured hosts:
■ Select Data Center to view all the configured hosts.
249Viewing information on the Management Server environmentViewing the details of an add-on, hot fix, package, or patch on SORT website
■ Select Agent to view all the agent hosts.
■ Select Agentless to view all the agentless hosts.
See “Refreshing the details of the managed host” on page 150.
See “Removing managed hosts from the Management Server domain” on page 151.
Viewing the details of the authentication brokerand the domains associated with the broker
Using the Management Server console, you can view the name of the authenticationbroker and the details of the domains that are associated with the broker.
In Broker, you can view the name of the authentication broker and the port numberon which the authentication broker is configured to run.
You can view the following details for each authentication domain.
■ Name of the authentication domain
■ Type of the authentication domain
■ Whether the authentication domain is enabled or disabled
You can perform the following tasks in this view:
■ Configure LDAP/AD.
■ Unconfigure the LDAP configuration.
You can view this information, if your user group has Admin role assigned on theManagement Server perspective. The root user can also view this information.
To view the details of the authentication broker and the domains associatedwith the broker
1 In the Home page on the Management Server console, click Settings.
2 Click Security to view the Brokers & Domain tab.
See “About managing authentication brokers and authentication domains in theVeritas InfoScale Operations Manager domain” on page 153.
See “Adding Lightweight Directory Access Protocol or Active Directory-basedauthentication on Management Server” on page 154.
See “Unconfiguring Lightweight Directory Access Protocol or Active Directoryconfiguration from the authentication broker” on page 159.
250Viewing information on the Management Server environmentViewing the details of the authentication broker and the domains associated with the broker
Viewing faults in the Management Serverperspective
Using the Management Server console, you can view the system identified faultconditions. You can view the fault condition, the source of the fault, and the timewhen the fault occurred.
You can perform the following tasks in this view:
■ Suppress the fault.
■ Restore the suppress fault.
■ Create a rule that determines the action that Management Server performswhen it receives the alert that is related to a faulty entity.
You can view this information, if your user group has Admin role assigned on theManagement Server perspective.
To view faults in the Management Server perspective
1 In the Home page on the Management Server console, click Settings.
2 Click Faults & Risks.
3 Click the Faults tab.
See “About faults and risks” on page 183.
See “Suppressing faults in the Management Server perspective” on page 184.
See “Restoring a suppressed fault in the Management Server perspective”on page 185.
Viewing the faults definitionsYou can view a comprehensive list of all the fault definitions that Veritas InfoScaleOperations Manager uses to generate all faults. You can use this list to view thedefinitions of the faults that are already generated and yet to generate. Some ofthe information that you can obtain from this view:
■ Message: Displays information about the fault.
■ Entity Type: Displays the source object on which the fault occurs.
■ Affected Types: Displays all the object types that are affected by the fault onthe source object. For example, if a service group is faulted, it is listed underthe Entity Type column. Since a service group is associated with managedhosts, clusters, and other objects, Veritas InfoScale Operations Manager
251Viewing information on the Management Server environmentViewing faults in the Management Server perspective
generates derived faults for these objects. All such associated objects are listedin this column.
You can perform the following tasks in this view:
■ Suppress a fault.
■ Restore a fault.
You can disable a fault definition by suppressing the fault. After the fault definitionis disabled, all associated faults are automatically suppressed. You can suppressthe fault definition until a specific date, or disable it forever.
Though the option to forever disable a fault definition is provided, you can againactivate the fault definition using the Restore Faults option.
You can view this information, if your user group has Admin role assigned on theManagement Server perspective.
To view the faults definitions
1 In the Home page on the Management Server console, click Settings.
2 Click Faults & Risks.
3 Click the Fault Definition tab.
See “About faults and risks” on page 183.
See “Suppressing a fault definition in the Management Server perspective”on page 186.
See “Restoring a suppressed fault definition in the Management Server perspective”on page 187.
Viewing details of alert logsUsing the Management Server console, you can quickly ascertain the condition ofall resources in the Veritas InfoScale Operations Manager domain. The Alert Logdisplays alerts from all hosts that the Management Server manages. Alert logs areretained for 30 days.
You can view the following information:
■ Topic: Displays the fault definition name.
■ Message: Displays the message which is a part of the alert. You can view thename of the host on which the alert condition occurred.
■ Classification: Displays the classification of the alert, for example, volume alert,subdisk alert, and path enabled.
■ Source Host: Displays the host on which the alert condition occurred.
252Viewing information on the Management Server environmentViewing details of alert logs
■ Time: Displays the date and time when the alert was generated.
You can view this information, if your user group has Admin role assigned on theManagement Server perspective.
To view details of alert logs
1 In the Home page on the Management Server console, click Settings.
2 Click Alert & Rules.
3 Click the Alert Log tab.
See “About alerts and rules” on page 171.
Viewing the details of rulesYou can view the details of alert rules in the Management Server console. You canview the name and description of the rule. The owner of the rule, last updated time,and whether the rule is enabled or disabled.
You can perform the following tasks in this view:
■ Create a rule.
■ Edit a rule.
■ Enable a rule.
■ Disable a rule.
■ Delete a rule.
You can view this information, if your user group has Admin role assigned on theManagement Server perspective.
To view the details of alert rules
1 In the Home page on the Management Server console, click Settings.
2 Click Alert & Rules.
3 Click the Rules tab.
See “Editing rules in the Management Server perspective” on page 177.
See “Enabling rules in the Management Server perspective” on page 182.
See “Disabling rules in the Management Server perspective” on page 182.
See “Deleting rules in the Management Server perspective” on page 181.
253Viewing information on the Management Server environmentViewing the details of rules
Viewing the details of active users logged in toManagement Server
In the Management Server console, you can view the following details of the activeusers who are logged in to Management Server.
■ User name with which the active user has logged in to Management Server.
■ Date and time at which the user has logged in to Management Server.
■ The time for which the user was idle.
■ Host name or IP address of the host from which the user logs in.
You can view this information, if your user group has Admin role assigned on theManagement Server perspective.
To view the details of active users logged in to Management Server
1 In the Home page on the Management Server console, click Settings.
2 Click Management Server.
3 Click the Environment tab to view the details.
See “Configuring the Management Server settings” on page 223.
See “Viewing the Management Server settings” on page 254.
Viewing the Management Server settingsYou can perform the following tasks in the Management Server settings view:
■ Configure the SMTP settings for Management Server.
■ Configure the SNMP trap settings for Management Server.
■ Configure proxy server settings.
■ Enable the analytics gathering on Management Server.
■ Set the Database Retention policy.
■ Set log levels for log files in the web server.
■ Set report subscription settings.
■ Set advance authorization settings.
You can view this information, if your user group has Admin role assigned on theManagement Server perspective.
254Viewing information on the Management Server environmentViewing the details of active users logged in to Management Server
To view the Management Server settings
1 In the Home page on the Management Server console, click Settings.
2 Click Management Server and click the Server Settings tab to view thesettings.
See “Configuring the Management Server settings” on page 223.
Viewing the list of extended attributesUsing the Management Server console, you can view the list of all the extendedattributes that are defined.
You can view the following details:
■ Unique name of the extended attribute.
■ Object type that is associated with the extended attribute.
You can perform the following tasks in this view:
■ Add an extended attribute.
■ Modify an existing extended attribute.
■ Delete an extended attribute.
You can view this information, if your user group has Admin role assigned on theManagement Server perspective.
To view the list of extended attributes
1 In the Home page on the Management Server console, click Settings.
2 Click Extended Attribute.
See “Adding an extended attribute” on page 234.
See “Modifying an extended attribute” on page 235.
See “Deleting an extended attribute” on page 235.
Viewing audit information for Management ServerYou can use the Management Server console to view audit information collectedby Management Server. For audit purposes, Management Server collects informationon all activities initiated using the Management Server console. This audit trackingalso includes activities which were prevented from being carried out because theywere not authorized.
Management Server collects the following audit information:
255Viewing information on the Management Server environmentViewing the list of extended attributes
■ The date and time of the activity.
■ The activity, for example, configuring an enclosure.
■ The location where the activity occurred.
■ The target on which the activity was performed.
■ The user.
■ Whether the activity was authorized.
■ The reason for the operation.For a reason to be collected, the advanced authorization settings for ManagementServer must be enabled. If enabled, the Reason panel appears after an operationis performed and the user is asked to enter a reason for performing the operation.See “Configuring advance authorization settings” on page 231.
You can view this information, if your user group has Admin role assigned on theManagement Server perspective.
You can also export the information to a file.
To view audit information for Management Server
1 In the Home page on the Management Server console, click Settings andselect Audit & Tasks.
2 Click the Audit tab.
If you want to export the audit information, click the Save icon in the upperright of the tab.
Viewing task information for the data centerIn the Management Server console, you can view information such as the followingabout all tasks performed in the data center:
■ Task name
■ State (completed, failed, and so on)
■ The source, for example, a host or cluster
■ The object
■ The user
■ Start and end time
You can view this information, if your user group has Admin role assigned on theManagement Server perspective.
256Viewing information on the Management Server environmentViewing task information for the data center

To view task information for the data center
1 In the Home page on the Management Server console, click Settings andselect Audit & Tasks.
2 Click the Tasks tab.
3 To view more details about a task, right-click it and select Properties.
See “Setting the period for retaining the alert and the task logs in the database”on page 229.
Viewing or exporting a list of available policysignatures
In the Management Server console, you can view all policy signatures and exportthem to a file. You must have the appropriate permissions for the Veritas InfoScaleOperations Manager Settings perspective.
You can view this information, if your user group has Admin role assigned on theManagement Server perspective.
To view or export a list of available policy signatures
1 In the Home page on the Management Server console, click Settings.
2 Click Policy Signatures.
3 If you want to export the signatures to a file, click the Save icon in the upperright of the window.
257Viewing information on the Management Server environmentViewing or exporting a list of available policy signatures
TroubleshootingThis appendix includes the following topics:
■ Management Server (MS)
■ Managed host (MH)
Management Server (MS)
Veritas InfoScale Operations Manager processes running onManagement Server for Linux
■ /opt/VRTSsfmcs/pgsql/bin/postgres
■ /opt/VRTSsfmh/bin/xprtld
■ /opt/VRTSsfmcs/webgui/jre/bin/java
■ /opt/VRTSsfmcs/sec/bin/sfmsecd
■ /opt/VRTSsfmh/bin/xtrapd
Veritas InfoScale Operations Manager services running onManagement Server for Windows
■ Veritas InfoScale Operations Manager Authentication Service
■ Veritas InfoScale Operations Manager Service
■ Veritas Storage Foundation Messaging Service
■ Veritas InfoScale Operations Manager Database Service
■ Veritas InfoScale Operations Manager SNMP Trap Service
AAppendix
Commands to start and stop the Veritas InfoScale OperationsManager processes on Management Server on Linux
service option of vomadm command can be used to start/stop the individual servicesand is the recommended method especially when the Management Server isconfigured for HA.
/opt/VRTSsfmh/bin/vomadm service {--start | --stop | --restart |
--status | --version | --help}
Commands to start and stop the Veritas InfoScale OperationsManager processes on Management Server on Windows
service option of vomadm command can be used to start/stop the individual servicesand is the recommended method especially when the Management Server isconfigured for HA.
C:\Program Files\Veritas\VRTSsfmh\bin>perl.exe vomadm service {--start
| --stop | --restart | --status | --version | --help}
Management Server log file locations on Linux■ General: /var/opt/VRTSsfmcs/logs
■ Database installation and upgrade logs:/var/VRTSsfmcs/config_db
■ Installer log file:/var/opt/VRTSsfmh/logs/install_sfm.log
■ DB engine log: var/opt/VRTSsfmcs/db/data/SFMdb3.dblog
Management Server log file locations on Windows■ General: C:\ProgramData\Symantec\VRTSsfmcs\logs
■ General: C:\ProgramData\Symantec\VRTSsfmh\logs
■ Database configuration and upgradelogs:C:\ProgramData\Symantec\VRTSsfmcs\config_db
■ Installer log file: C:\Program Files\Veritas\VRTSsfmcs\install.log
■ DB engine log: C:\ProgramData\Symantec\VRTSsfmcs\logs\SFMdb3.dblog
259TroubleshootingManagement Server (MS)
Managed host (MH)
Veritas InfoScale Operations Manager processes running onmanaged host on Unix/Linux
■ /opt/VRTSsfmh/bin/xprtld
■ /opt/VRTSsfmh/bin/sfmh-discovery.pl
■ /opt/VRTSsfmh/bin/vxdclid
Veritas InfoScale Operations Manager services running on managedhost on Windows
Veritas Storage Foundation Messaging Service
Note: sfmh-discovery and dcli processes do not run on a Windows managed host.
Commands to start and stop Veritas InfoScale Operations Managerprocesses on managed host on UNIX/Linux
■ xprtld: /opt/VRTSsfmh/adm/xprtldctrl <start | stop>
■ sfmh-discovery: /opt/VRTSsfmh/adm/vxvmdiscovery-ctrl.sh <start |
stop>
■ vxdclid: /opt/VRTSsfmh/etc/vxdcli.sh <start | stop | restart>
Managed host log files■ UNIX/Linux: /var/opt/VRTSsfmh/logs
■ Windows: C:\ProgramData\Symantec\VRTSsfmh\logs
Agentless driver log filesThe agentless driver log files are stored at the Control Host at the following location:
■ UNIX/Linux : /var/opt/VRTSsfmh/hostname/log
■ Windows: C:\ProgramData\Symantec\VRTSsfmh\AGENTLESS\hostname\log
where, hostname is the name of the agentless host.
260TroubleshootingManaged host (MH)
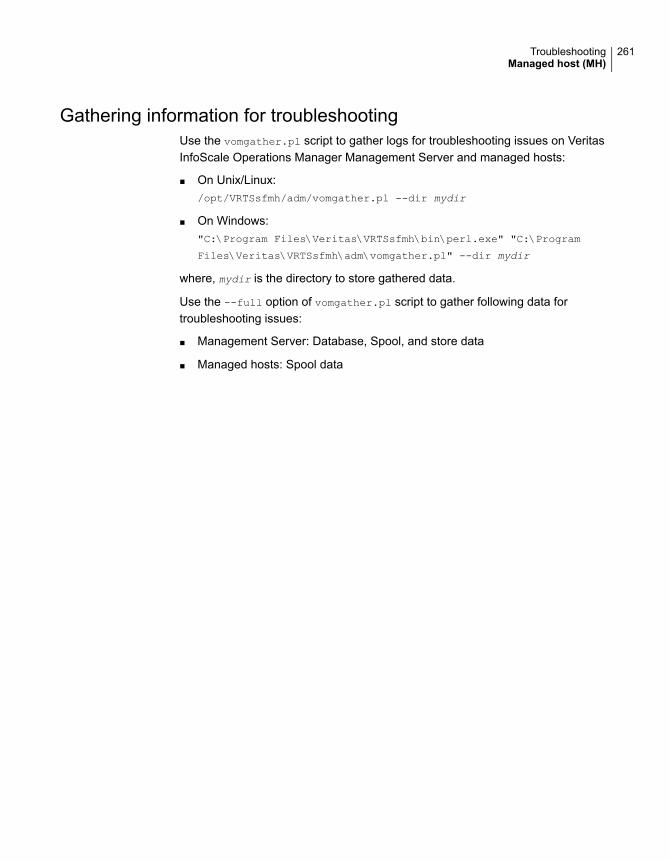
Gathering information for troubleshootingUse the vomgather.pl script to gather logs for troubleshooting issues on VeritasInfoScale Operations Manager Management Server and managed hosts:
■ On Unix/Linux:/opt/VRTSsfmh/adm/vomgather.pl --dir mydir
■ On Windows:"C:\Program Files\Veritas\VRTSsfmh\bin\perl.exe" "C:\Program
Files\Veritas\VRTSsfmh\adm\vomgather.pl" --dir mydir
where, mydir is the directory to store gathered data.
Use the --full option of vomgather.pl script to gather following data fortroubleshooting issues:
■ Management Server: Database, Spool, and store data
■ Managed hosts: Spool data
261TroubleshootingManaged host (MH)
Aabout
communication between managed host andManagement Server 113
Active Directory removing 159ActiveX 33add-on
canceling deployment request 105disabling 110downloading 99enabling 109installing 101removing 105uninstalling 103
addingvirtualization server 203
advance authorization settings 231agentless discovery
about 117Commands that require the root access 131control hosts 124Linux 125prerequisites 125privilege control software for UNIX hosts 133remote hosts 124requirements for deep array discovery 130requirements for UNIX hosts 127requirements for Windows hosts 129SSH configuration requirements 134supported features 121UNIX 125Windows 126
alert log retention period 229alerts and rules 171array management capabilities 124assigning price tier
processor price tier 237server price tier 237
audit information 255authentication broker
managing 153
authentication broker (continued)viewing 250
authentication domainsenabling 159managing 153viewing 250
Bbacking up Veritas InfoScale Operations Manager
on Linux 59on Windows 61–62
browsers 33
Cconfiguring
Control Host 191existing Management Server in HA
environment 79Management Server 43Management Server HA 72Management Server in HADR environment 87new Management Server installation in HA
environment 73Configuring Management Server settings
advance authorization 231report scheduling 230
Control Host 124discover VMware Virtualization Infrastructure 191
Ddeep array discovery 130deploying
add-ons 98hot fixes 213package 214packages or patches 214Veritas InfoScale Operations Manager 20
disable performance meteringVMware vCenter server 210
disabling authentication domains 160
Index
domains 33downloading
managed host files 17Management Server files 16Veritas InfoScale Operations Manager 16
DRone-to-one 81
DR configurationcreating base service groups 84, 89enabling configuration 87, 92performing initial configuration 84, 89prerequisites 83
Eenabling analytics gathering 228enabling authentication domains 159extended attribute
adding 234deleting 235modifying 235using 233
Ffault definition
restoring 187suppressing 186
faultsrestoring 185suppressing 184viewing 251
faults and risks 183fibre channel switch capabilities 124firewalls ports
ports 33
Ggendeploy.pl 48
HHA configuration 72
completing the configuration 79creating base service groups 76modify default IP address and host name 81performing initial configuration 75prerequisites for existing MS 80prerequisites for new MS 74
HA-DR configurationprerequisites 87
HADR configuration 87host discovery 117
See also agentless discovery of hostsabout 117supported features 121
hostsavailable patches 245missing SFHA hot fixes 245view patches 245
hot fixcancel deployment request 220deploying 213install on specific host 221installing 216removing 219uninstall from specific host 221uninstalling 219uploading 215
Iinstallation resources 20installing
host management through Solaris JumpStart 48managed host 45managed host on UNIX 46managed host on Windows 47Management Server 39Management Server on Linux 39Management Server on Windows 41
Intranet zone security level 33IPV 35
JJavaScript 33JScript 33
LLDAP
adding authentication 154removing 159
LDom discoveryprerequisites 201requirements 201
Mmanaged host
add using gendeploy.pl 146installation files for UNIX 46
263Index
managed host (continued)installation files for Windows 47installing 45installing on UNIX 46installing on Windows 47installing through Solaris JumpStart 48package 39removing 151uninstalling on UNIX 70uninstalling on Windows 70upgrading 64upgrading on UNIX 66upgrading on Windows 67verifying installation on UNIX 49verifying installation on Windows 50
managed hostsrefresh host details 150upgrade using console 65verifying version using the console 68
Management Serveradvance authorization settings 254alert log retention period settings 229analytics gathering 254configuring 43configuring a new installation in HA
environment 73configuring an existing installation in HA
environment 79configuring HA 72configuring HADR 87configuring proxy server 227configuring settings 223configuring SNMP trap 227database retention policy 254editing agentless hosts 148enabling analytics gathering 228installation files for Linux 39installation files for Windows 41installing 39installing on Linux 39installing on Windows 41LDAP based authentication 154package 39proxy settings 254remove managed host 151report subscription settings 254SMTP settings 254SMTP settings for email 225SNMP trap settings 254
Management Server (continued)task log retention period settings 229uninstalling on Linux 69uninstalling on Windows 69upgrading 50upgrading in HA DR environment 94upgrading in HA environment 93upgrading on Linux 51upgrading on Windows 53verifying installation on Linux 42verifying installation on Windows 43verifying version using the console 68Web server settings 229web server settings 254
Nnetwork requirements 33
OOpenSSH
about 136installing on AIX 136installing on Linux 136installing on Solaris 137
operating system requirements 24organization 161
Ppackage
base release 214cancel deployment request 220deploying 214installing 216removing 219uploading 215
packages or patchesdeploying 214maintenance release 214
patchcancel deployment request 220installing 216removing 219uploading 215
patch informationupdating from SORT 242
performance meteringdisable for VMware vCenter server 210
264Index
permissionsassigning for perspective 163deleting on perspective 164modifying for perspective 164
perspectiveassigning permissions 163deleting permissions 164modifying permissions 164
policy checksenabling or disabling signatures for data
center 231exporting signatures 257
pop-up blockers 33price tier information
update automatically 239update manually 239
Proxy server requirements 36proxy server settings 227
Rremoving
Active Directory 159LDAP 159
report scheduling 230resolv.conf 33restoring Veritas InfoScale Operations Manager
on Linux 60on Windows 63
roles 161rules
about 171creating 173deleting 181disabling 182editing 177enabling 182
Ssecurity level 33SFHA updates
downloading from SORT 246managing 241updating information from SORT 242view 243view details 244
signaturesexporting 257
signatures for data centerenabling or disabling 231
SNMP trap settings 227Solaris JumpStart installation 48solaris zones discovery
prerequisites 199requirements 199
SORTdownloading information on SFHA updates 242downloading SFHA updates 246
space estimation data logs 26SSL 33system resource requirements 25
Ttask information for the data center 256task log retention period 229TCP 33toolbars 33
UUC 20UDP 33uninstalling
add-on 103managed host on UNIX 70managed host on Windows 70Management Server on Linux 69Management Server on Windows 69
upgradingHA 92HA-DR 94managed host 64managed host on UNIX 66managed host on Windows 67managed host using installer package 67managed host using operating system
commands 66managed hosts using console 65Management Server 50Management Server in HA DR environment 94Management Server in HA environment 93Management Server on Linux 51Management Server on Windows 53
uploadadd-on 100
userrestricting 165
265Index
user group permissionsassigning for perspective 163deleting on perspective 164modifying for perspective 164restricting 165
UTC 20
Vverifying
managed host installation on UNIX 49managed host installation on Windows 50managed host version using the console 68Management Server installation on Linux 42Management Server installation on Windows 43Management Server version using the console 68
Veritas InfoScale Operations Managerabout 15backing up on Linux 59backing up on Windows 61–62choosing managed hosts 22choosing Management Server hosts 22choosing Web console hosts 33configuring HA 72configuring HADR 87configuring Management Server 43deployment configuration 20downloading 16downloading managed host files 17downloading Management Server files 16installation resources 20installing managed host on UNIX 46installing managed host on Windows 47installing Management Server on Linux 39installing Management Server on Windows 41IPV requirements 35network requirements 33operating systems 24organization 161packages 39proxy server requirements 36restoring on Linux 60restoring on Windows 63supported hardware 32system resource requirements 25uninstalling UNIX managed host 70upgrading managed host on UNIX 66upgrading managed host on Windows 67upgrading Management Server in HA DR
environment 94
Veritas InfoScale Operations Manager (continued)upgrading Management Server in HA
environment 93upgrading Management Server on Linux 51upgrading Management Server on Windows 53URL 16using product documentation 18
Veritas InfoScale Operations Manager deploymentcentralized management 21
Veritas InfoScale Operations Manager HAconfiguring a new installation 73configuring an existing installation 79removing configuration 95upgrading 92
Veritas InfoScale Operations Manager HA-DRupgrading 94
viewingalert log 252authentication broker 250authentication domains 250extended attributes 255
virtual machinescloning 48migrating 49
virtualization discoveryediting configuration 206refreshing configuration 208refreshing ESX Server 208removing configuration 209
virtualization serveradding 203
virtualization technologykernel-based virtual machine 190LPAR 190Microsoft Hyper-V 190Solaris LDom 190Solaris zones 190VMware 190
VMware discoverynear real-time update of virtual machine
states 193prerequisites 192requirements 192
VRTSsfmcs package 39VRTSsfmh package 39, 45–46, 66
WWeb browsers requirements 33Web console 33
266Index
Web serversettings 229
web serverCLI command 111restart 111
Web UI frameworkstarting and stopping 115
267Index