Embed Size (px)
Citation preview

Version 4 User Guide
ALSI USER GUIDE
Version 4.5 August 2015 Page 1
Contents Facilitator Screen overview ................................................................................................................................... 4
Monitor Screen overview ...................................................................................................................................... 5
Defibrillator Screen Overview .............................................................................................................................. 6
Basic Screen with Waveform Overview ............................................................................................................ 7
Basic Screen Overview ............................................................................................................................................ 8
AED Screen Overview ............................................................................................................................................. 9
Introduction............................................................................................................................................................. 10
Overview .............................................................................................................................................................. 10
System Organisation ....................................................................................................................................... 10
1. Quick Start ................................................................................................................................................. 10
2. Quick Picks ................................................................................................................................................. 10
3. Scenario Building ..................................................................................................................................... 10
The ALSi System .................................................................................................................................................... 11
Key features ........................................................................................................................................................ 11
Installing ALSi ..................................................................................................................................................... 12
Updating the system ....................................................................................................................................... 13
Exiting ALSi.......................................................................................................................................................... 13
Passwords ............................................................................................................................................................ 13
User Guides ......................................................................................................................................................... 14
Specifications (iPad Air 2) .............................................................................................................................. 14
iPad Operations ................................................................................................................................................. 14
Connecting your iPads to the network. ........................................................................................................ 15
Setting up your network ................................................................................................................................ 16
Connecting with Bluetooth ........................................................................................................................... 17
Quick Start ............................................................................................................................................................... 19
Facilitator iPad ................................................................................................................................................... 19
Monitor iPad ....................................................................................................................................................... 21
Quick Picks ............................................................................................................................................................... 24
What is a Quick Pick? ...................................................................................................................................... 24
Changing contents in the Quick Pick box ............................................................................................... 24
ALSI USER GUIDE
Version 4.5 August 2015 Page 2
Examples of how to use Quick Picks ......................................................................................................... 25
Changing Quick Pick parameters on the fly ........................................................................................... 25
Adding new Quick Picks or Investigations on the fly ......................................................................... 26
Reordering Quick Picks .................................................................................................................................. 27
Editing Investigations ...................................................................................................................................... 28
Building scenarios ................................................................................................................................................. 29
Activating Parameters ..................................................................................................................................... 33
Tools Menu ......................................................................................................................................................... 41
Scenario Functions ................................................................................................................................................ 42
Synchronising scenarios ..................................................................................................................................... 43
Editing Scenarios .............................................................................................................................................. 44
Duplicating Scenarios ..................................................................................................................................... 44
Emailing Scenarios ........................................................................................................................................... 44
Importing Scenarios and Terms .................................................................................................................. 44
Sounds .................................................................................................................................................................. 45
Changing Waveforms ..................................................................................................................................... 46
The PEA Button .................................................................................................................................................. 46
The Cardio-Pulmonary Resuscitation (CPR) Button ............................................................................. 46
Trending Function ............................................................................................................................................ 46
Virtual Time ......................................................................................................................................................... 47
Pacing & Shock Default ................................................................................................................................. 47
AED Mode - Pads Confirm ............................................................................................................................ 48
Measurement options..................................................................................................................................... 48
Custom Values ................................................................................................................................................... 48
Learner Screen Functions ................................................................................................................................... 50
Monitor Screen .................................................................................................................................................. 50
Basic Screen with Waveform ........................................................................................................................ 51
The Basic Screen ............................................................................................................................................... 52
Sounds ............................................................................................................................................................. 52
Alarms .............................................................................................................................................................. 52
Freeze screen ................................................................................................................................................. 52
Contrast ........................................................................................................................................................... 53
ALSI USER GUIDE
Version 4.5 August 2015 Page 3
NIBP................................................................................................................................................................... 53
Arterial Blood Pressure .............................................................................................................................. 53
Waveforms ...................................................................................................................................................... 53
Parameter values .......................................................................................................................................... 53
Recall investigations or other information ......................................................................................... 53
Defibrillator Screen .......................................................................................................................................... 53
Pacing Screen ..................................................................................................................................................... 55
Sync Screen ......................................................................................................................................................... 55
AED Screen .......................................................................................................................................................... 55
General Settings .................................................................................................................................................... 57
To change the colours of the values and waveforms ......................................................................... 57
To change other settings ............................................................................................................................... 58
To change language or terms used ........................................................................................................... 58
Tips and Tricks ........................................................................................................................................................ 59
Four-finger Swipe ............................................................................................................................................. 59
Apple TV ............................................................................................................................................................... 59
Connection .......................................................................................................................................................... 59
Bluetooth Speaker ............................................................................................................................................ 60
Trusting iSimulate and the ALSi app ......................................................................................................... 60
Troubleshooting .................................................................................................................................................... 61
Reference tables .................................................................................................................................................... 62
Facilitator Screen Quick Reference ................................................................................................................. 67
Learners Screen Quick Reference .................................................................................................................... 69
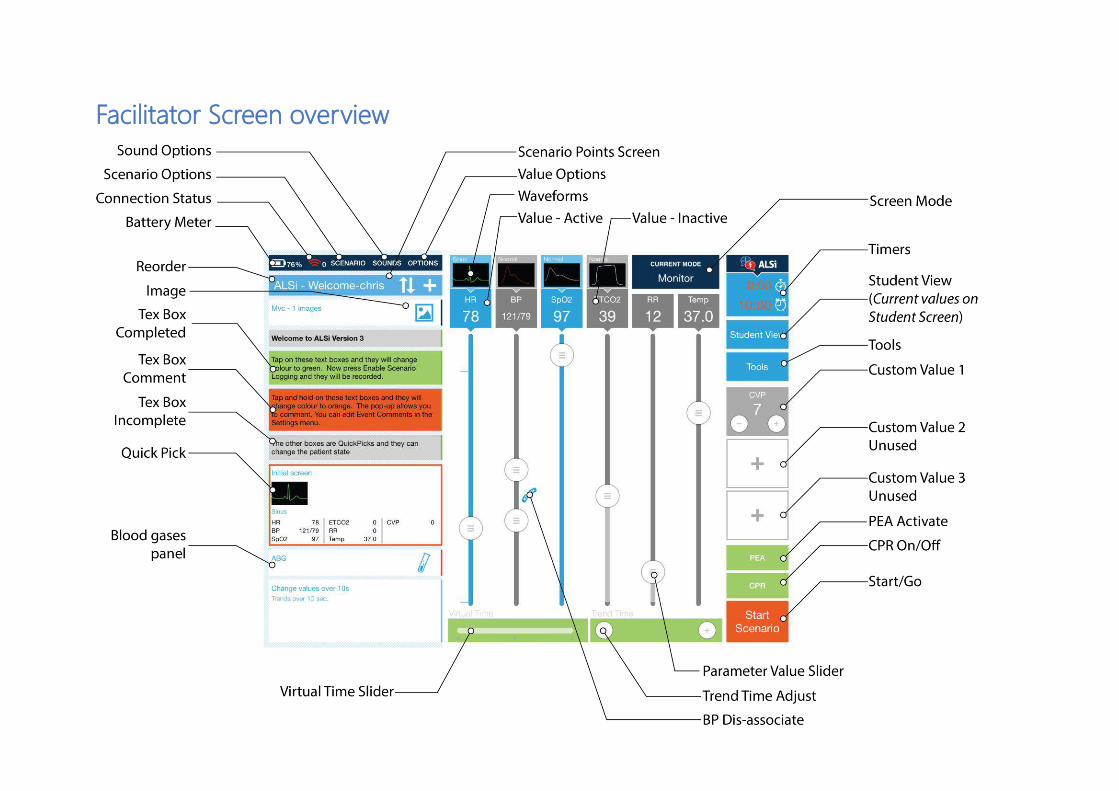
Facilitator Screen overview

ALSI USER GUIDE
Version 4.5 August 2015 Page 5
Monitor Screen overview
ALSI USER GUIDE
Version 4.5 August 2015 Page 6
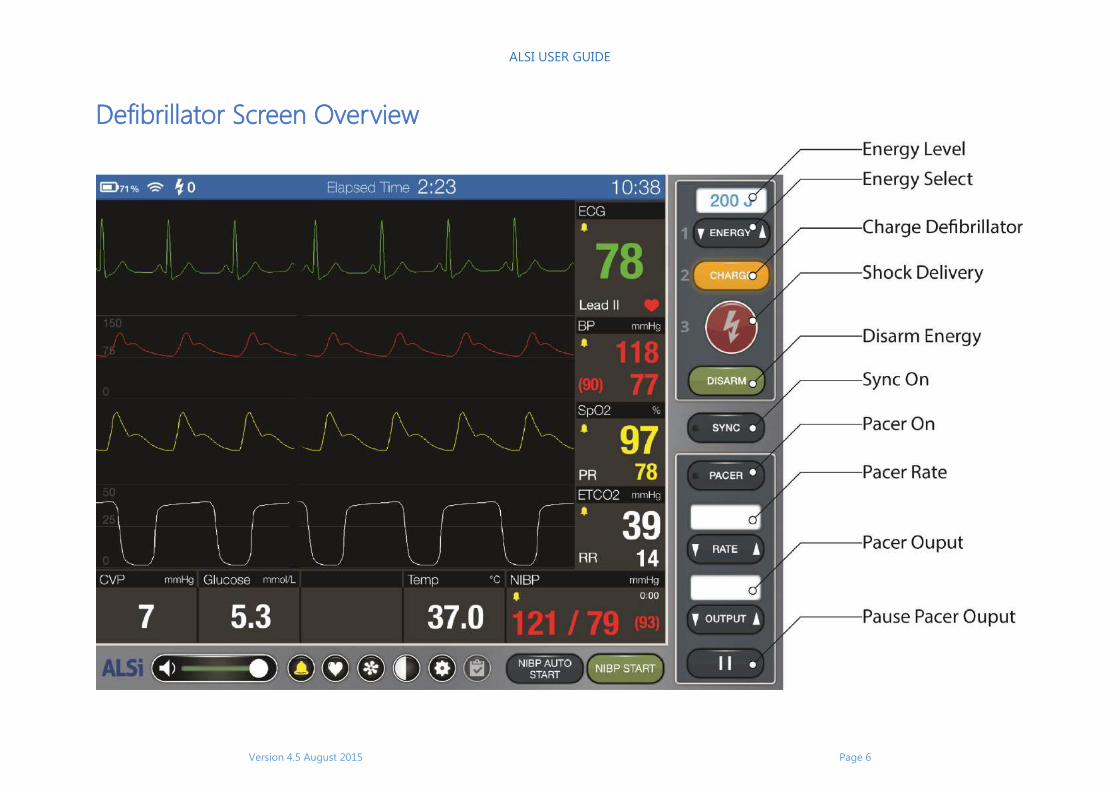
Defibrillator Screen Overview
ALSI USER GUIDE
Version 4.5 August 2015 Page 7
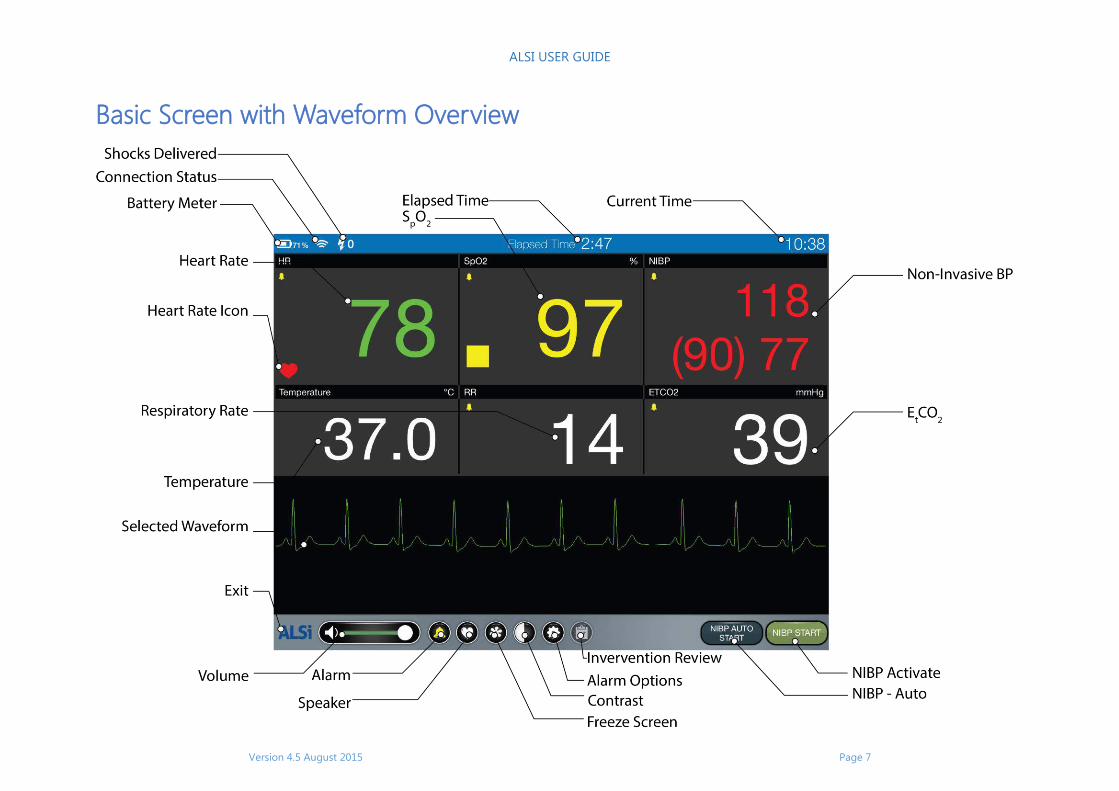
Basic Screen with Waveform Overview
ALSI USER GUIDE
Version 4.5 August 2015 Page 8
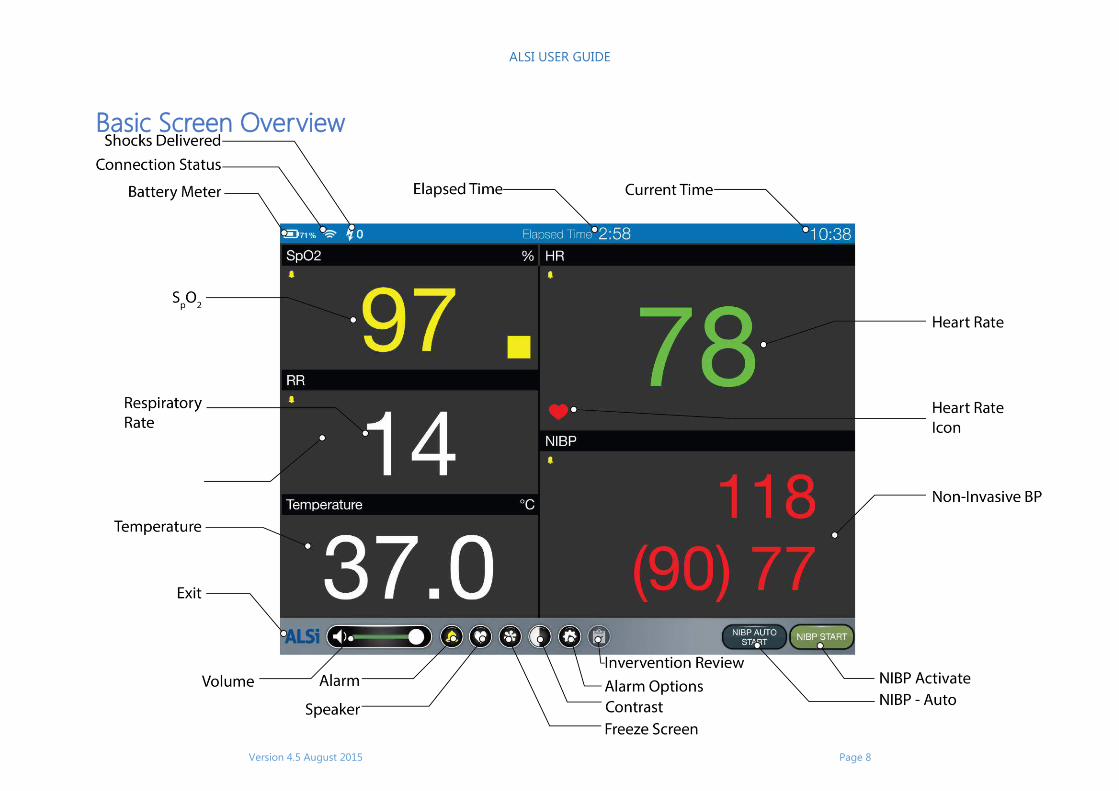
Basic Screen Overview
ALSI USER GUIDE
Version 4.5 August 2015 Page 9
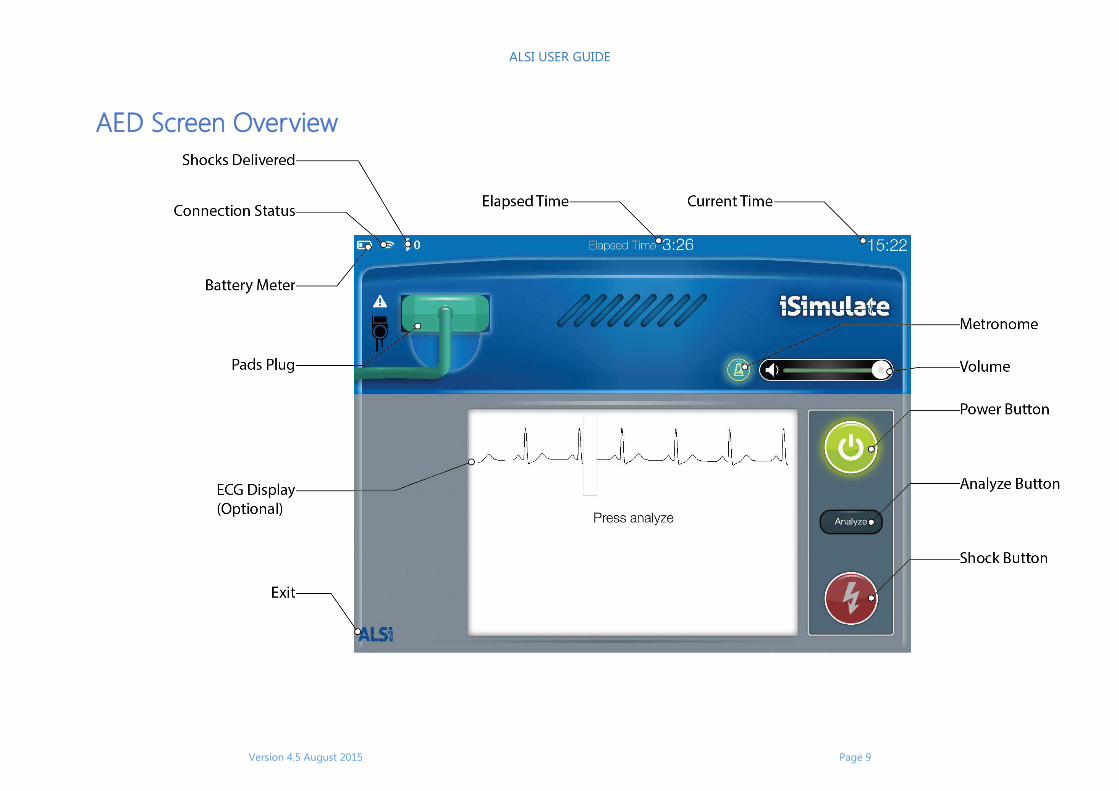
AED Screen Overview
Introduction
Overview
Welcome to the 4th generation of ALSi, the best in simulation technology.
ALSi allows simulation and scenario based education to be delivered quickly, easily and
intuitively. It is a hyper-flexible patient monitor simulator which uses 2 iPads connected
wirelessly. The system includes 5 modes which can be simulated using the touch screen of
an iPad:
1. Automated External Defibrillator (AED)
2. Basic Screen with waveform
3. Basic Screen without waveform
4. Multi-parameter patient monitor
5. Multi-parameter defibrillator
ALSi can be connected to any manikin and it can be used with standardized patients. It is
intrinsically safe, as it does not deliver any energy.
System Organisation
ALSi uses 2 iPads connected by Wi-Fi or Bluetooth to communicate. Wi-Fi can
be provided using the supplied Apple Airport Express, Mobile Wi-Fi (Mi-Fi) or
using the Personal Hotspot if one of the iPads has 3/4G capability. Bluetooth
is set within ALSi settings.
1. Quick Start
You will find a Quick Start section to get you up and running quickly.
2. Quick Picks
Read this section as it explain the importance of Quick Picks and will give you a great
understanding of how these work.
A Quick Pick is a box that contains all the information that you want to show on the
Learner Screen when selected. It can be a parameter, investigation, image, video or
simply turns something on. Quick picks are very powerful, but also simple to use. There is
no limit to the number of Quicks Picks you can create or use in a scenario.
3. Scenario Building
Building Scenarios is explained in detail.
ALSI USER GUIDE
Version 4.5 August 2015 Page 11
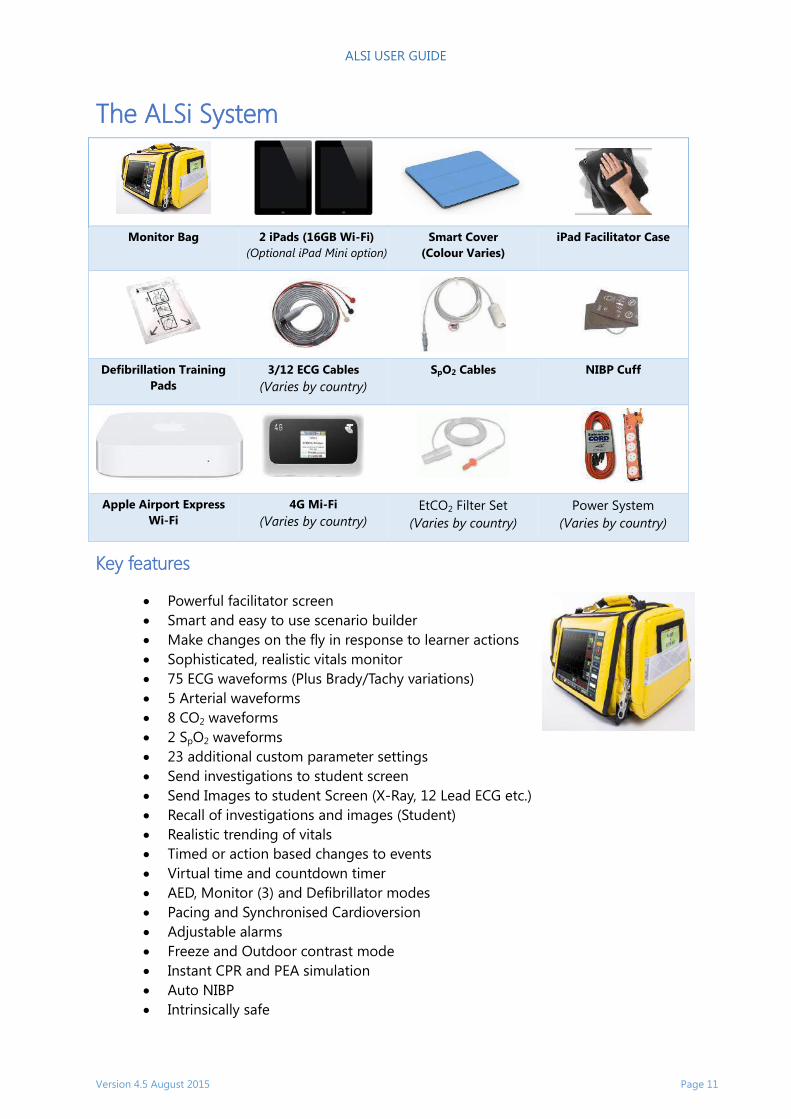
The ALSi System
Monitor Bag 2 iPads (16GB Wi-Fi)
(Optional iPad Mini option)
Smart Cover
(Colour Varies)
iPad Facilitator Case
Defibrillation Training
Pads
3/12 ECG Cables
(Varies by country)
SpO2 Cables NIBP Cuff
Apple Airport Express
Wi-Fi
4G Mi-Fi
(Varies by country)
EtCO2 Filter Set
(Varies by country)
Power System
(Varies by country)
Key features
Powerful facilitator screen
Smart and easy to use scenario builder
Make changes on the fly in response to learner actions
Sophisticated, realistic vitals monitor
75 ECG waveforms (Plus Brady/Tachy variations)
5 Arterial waveforms
8 CO2 waveforms
2 SpO2 waveforms
23 additional custom parameter settings
Send investigations to student screen
Send Images to student Screen (X-Ray, 12 Lead ECG etc.)
Recall of investigations and images (Student)
Realistic trending of vitals
Timed or action based changes to events
Virtual time and countdown timer
AED, Monitor (3) and Defibrillator modes
Pacing and Synchronised Cardioversion
Adjustable alarms
Freeze and Outdoor contrast mode
Instant CPR and PEA simulation
Auto NIBP
Intrinsically safe
ALSI USER GUIDE
Version 4.5 August 2015 Page 12
Installing ALSi
ALSi comes pre-installed on systems that are supplied. For users with their own iPads, these
instructions will assist with installing ALSi.
Monitor iPad
1. Connect to the internet on your Monitor
iPad
2. Go to
http://www.isimulateonline.com/update on
the iPad.
3. Login using the supplied details if required
4. Go to Downloads
a. Download ALSi Full on to your Monitor
iPad
5. Accept Install and installation will occur
6. Provide ‘trust’ permissions for ALSi (Pg. 51)
7. Enter Your Device Name. This is a unique
name that identifies the device if support is
needed. You can name it after your work
area, location or any other name that
ensures you know which unit we are
managing if you need support.
8. Enter Product ID (Licence Key) exactly as
provided
9. Press Submit
10. You will receive a Welcome to ALSi message
11. Disconnect iPad from internet and connect
to selected Wi-Fi
Facilitator iPad
1. Connect to the internet on your Facilitator
iPad
2. Go to http://www.isimulateonline.com/update
on the iPad.
3. Login using the supplied details if required
4. Go to Downloads
5. Download ALSi Facilitator on to your
Facilitator iPad
6. Accept Install and installation will occur
7. Provide ‘trust’ permissions for ALSi (Pg. 51)
8. Disconnect iPad from internet and connect to
selected Wi-Fi
ALSI USER GUIDE
Version 4.5 August 2015 Page 13
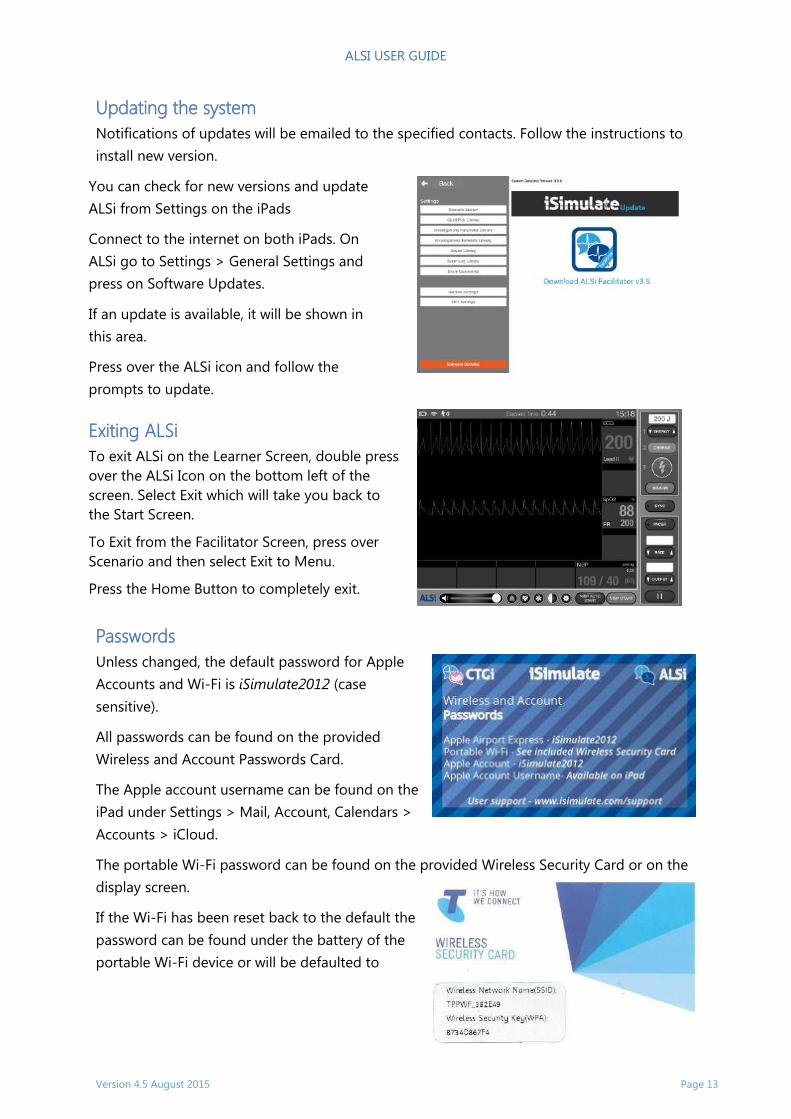
Updating the system
Notifications of updates will be emailed to the specified contacts. Follow the instructions to
install new version.
You can check for new versions and update
ALSi from Settings on the iPads
Connect to the internet on both iPads. On
ALSi go to Settings > General Settings and
press on Software Updates.
If an update is available, it will be shown in
this area.
Press over the ALSi icon and follow the
prompts to update.
Exiting ALSi
To exit ALSi on the Learner Screen, double press
over the ALSi Icon on the bottom left of the
screen. Select Exit which will take you back to
the Start Screen.
To Exit from the Facilitator Screen, press over
Scenario and then select Exit to Menu.
Press the Home Button to completely exit.
Passwords
Unless changed, the default password for Apple
Accounts and Wi-Fi is iSimulate2012 (case
sensitive).
All passwords can be found on the provided
Wireless and Account Passwords Card.
The Apple account username can be found on the
iPad under Settings > Mail, Account, Calendars >
Accounts > iCloud.
The portable Wi-Fi password can be found on the provided Wireless Security Card or on the
display screen.
If the Wi-Fi has been reset back to the default the
password can be found under the battery of the
portable Wi-Fi device or will be defaulted to
ALSI USER GUIDE
Version 4.5 August 2015 Page 14
password. The login to Wi-Fi mobile devices is normally admin.
You may have one off the following Wi-Fi units:
Apple Airport Express
NetComm Mobile 3G - 3G24W
Telstra M60
Telstra M65
Telstra MF90
User Guides
User guides for all iPads and devices can be found on the website, under Resources.
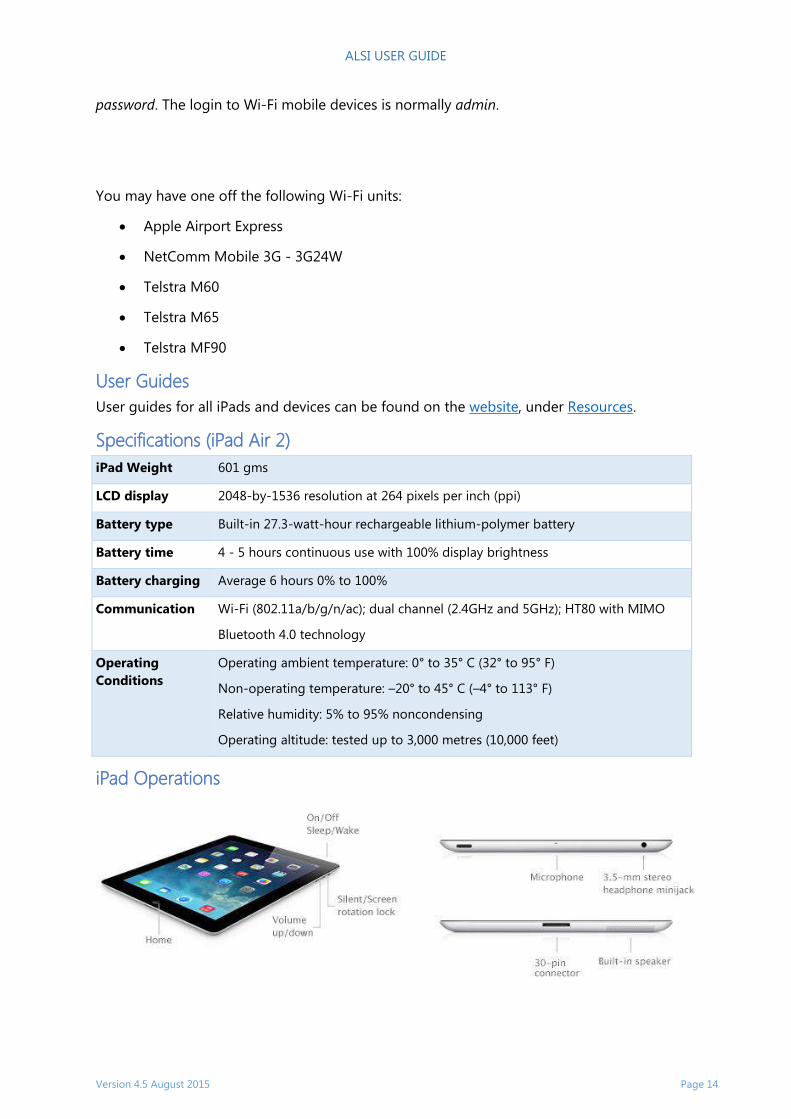
Specifications (iPad Air 2)
iPad Weight 601 gms
LCD display 2048-by-1536 resolution at 264 pixels per inch (ppi)
Battery type Built-in 27.3-watt-hour rechargeable lithium-polymer battery
Battery time 4 - 5 hours continuous use with 100% display brightness
Battery charging Average 6 hours 0% to 100%
Communication Wi-Fi (802.11a/b/g/n/ac); dual channel (2.4GHz and 5GHz); HT80 with MIMO
Bluetooth 4.0 technology
Operating
Conditions
Operating ambient temperature: 0° to 35° C (32° to 95° F)
Non-operating temperature: –20° to 45° C (–4° to 113° F)
Relative humidity: 5% to 95% noncondensing
Operating altitude: tested up to 3,000 metres (10,000 feet)
iPad Operations
ALSI USER GUIDE
Version 4.5 August 2015 Page 15
Connecting your iPads to the network. The supplied system has been preconfigured to connect automatically once you have
powered the system up.
Our systems use 2 iPads connected by primarily by Wi-Fi to communicate. If Wi-Fi is not
available you can use the in-built Bluetooth. Connectivity can be provided using the
following systems, in order of preference:
1. Apple Airport Express
2. Mobile Wi-Fi (Mi-Fi)
3. Personal Hotspot if one of the iPads has 3G/4G capability and subject to carrier
conditions.
4. Bluetooth using the in-built system within ALSi and CTGi
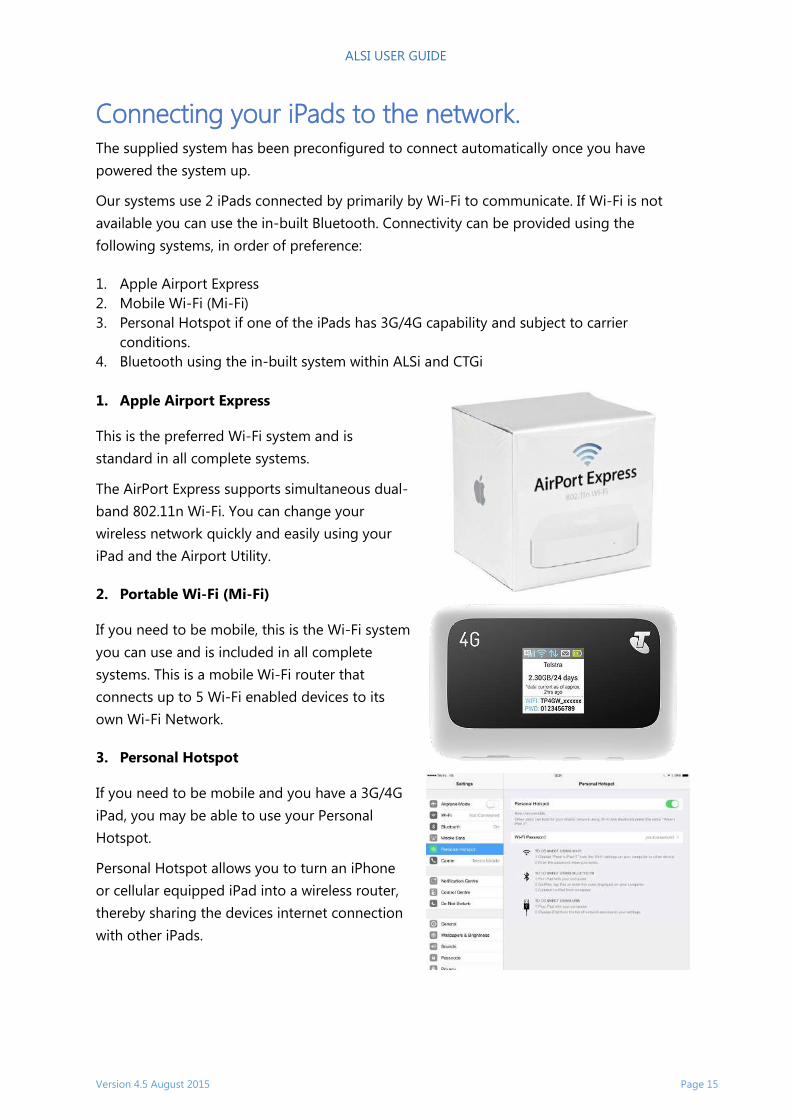
1. Apple Airport Express
This is the preferred Wi-Fi system and is
standard in all complete systems.
The AirPort Express supports simultaneous dual-
band 802.11n Wi-Fi. You can change your
wireless network quickly and easily using your
iPad and the Airport Utility.
2. Portable Wi-Fi (Mi-Fi)
If you need to be mobile, this is the Wi-Fi system
you can use and is included in all complete
systems. This is a mobile Wi-Fi router that
connects up to 5 Wi-Fi enabled devices to its
own Wi-Fi Network.
3. Personal Hotspot
If you need to be mobile and you have a 3G/4G
iPad, you may be able to use your Personal
Hotspot.
Personal Hotspot allows you to turn an iPhone
or cellular equipped iPad into a wireless router,
thereby sharing the devices internet connection
with other iPads.

ALSI USER GUIDE
Version 4.5 August 2015 Page 16
4. Bluetooth
Bluetooth connectivity is included within ALSi
and CTGi in the Settings >General area.
Bluetooth is a short-range wireless technology
that lets you connect iPads to each other.
Bluetooth technology eliminates the need for
the cables that connect devices together.
Bluetooth-enabled devices connect wirelessly
within a 10 m range.
Setting up your network
If you have not purchased a complete system, or are having connectivity issues you may
need to reset the network.
Follow these steps to connect to your chosen Wi-Fi network.
From the iPad's Homescreen, tap Settings.
(This assumes you didn't rearrange your apps.
If you did, find the Settings icon wherever you
put it.)
To start the iPad scanning for available wireless
networks, tap the Wi-Fi button and then slide
the slider to "on". In a few seconds, you'll see a
list of all the networks near you, whether
they're public or private (if you don’t see the
list, there may not be any within range).
The list of Wi-Fi networks you'll see will include
two kinds: public and private. Private networks
have a lock icon next to them; Public don’t. The
bars next to each network indicate the strength
of the connection – more bars means a faster
connection.
The supplied systems will have a network
called iSimulate.
ALSI USER GUIDE
Version 4.5 August 2015 Page 17
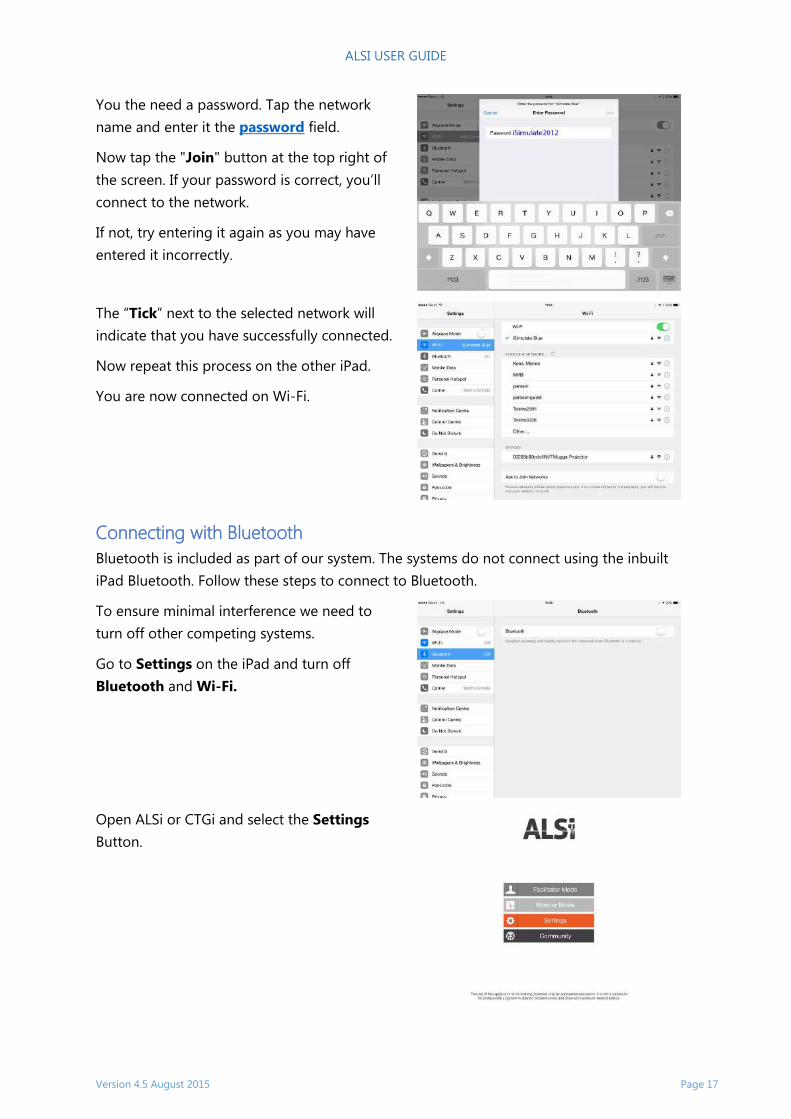
You the need a password. Tap the network
name and enter it the password field.
Now tap the "Join" button at the top right of
the screen. If your password is correct, you’ll
connect to the network.
If not, try entering it again as you may have
entered it incorrectly.
The “Tick” next to the selected network will
indicate that you have successfully connected.
Now repeat this process on the other iPad.
You are now connected on Wi-Fi.
Connecting with Bluetooth
Bluetooth is included as part of our system. The systems do not connect using the inbuilt
iPad Bluetooth. Follow these steps to connect to Bluetooth.
To ensure minimal interference we need to
turn off other competing systems.
Go to Settings on the iPad and turn off
Bluetooth and Wi-Fi.
Open ALSi or CTGi and select the Settings
Button.
ALSI USER GUIDE
Version 4.5 August 2015 Page 18
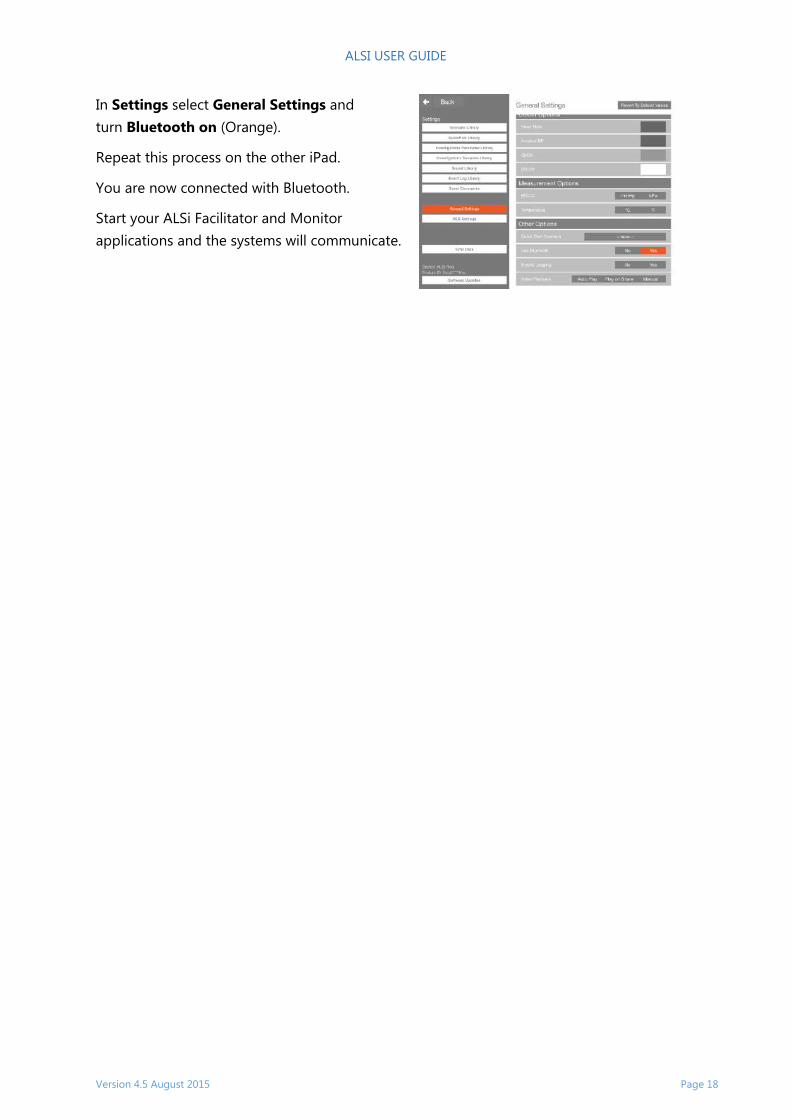
In Settings select General Settings and
turn Bluetooth on (Orange).
Repeat this process on the other iPad.
You are now connected with Bluetooth.
Start your ALSi Facilitator and Monitor
applications and the systems will communicate.
ALSI USER GUIDE
Version 4.5 August 2015 Page 19
Quick Start This section will show you how to start the system so you are ready to run a scenario.
Connect you iPads on the same network. If you instructions on how to connect the iPads on
a network, Click Here.
Facilitator iPad
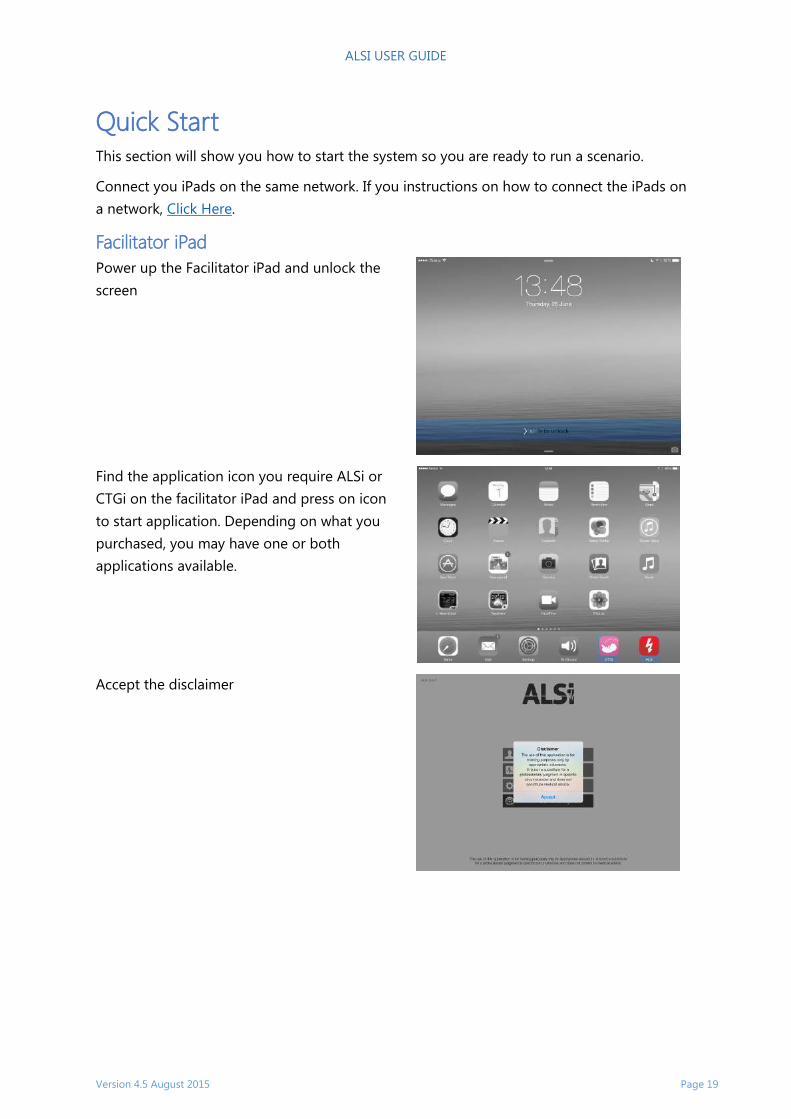
Power up the Facilitator iPad and unlock the
screen
Find the application icon you require ALSi or
CTGi on the facilitator iPad and press on icon
to start application. Depending on what you
purchased, you may have one or both
applications available.
Accept the disclaimer
ALSI USER GUIDE
Version 4.5 August 2015 Page 20
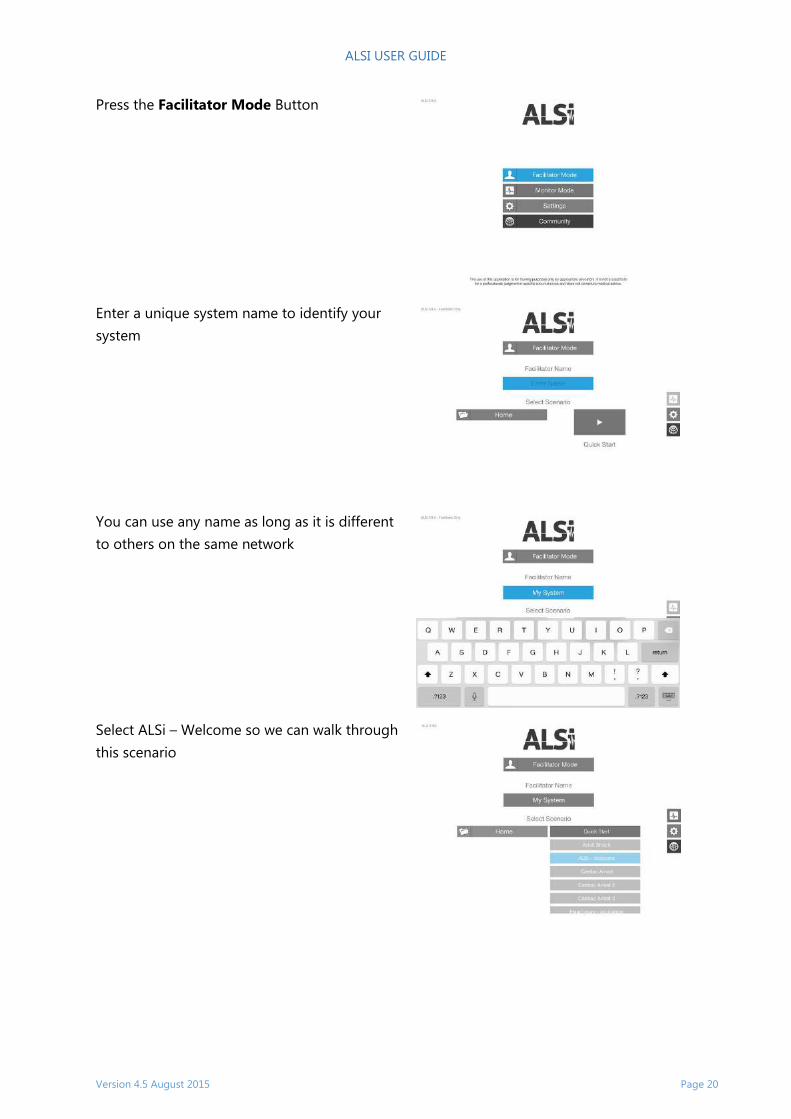
Press the Facilitator Mode Button
Enter a unique system name to identify your
system
You can use any name as long as it is different
to others on the same network
Select ALSi – Welcome so we can walk through
this scenario
ALSI USER GUIDE
Version 4.5 August 2015 Page 21
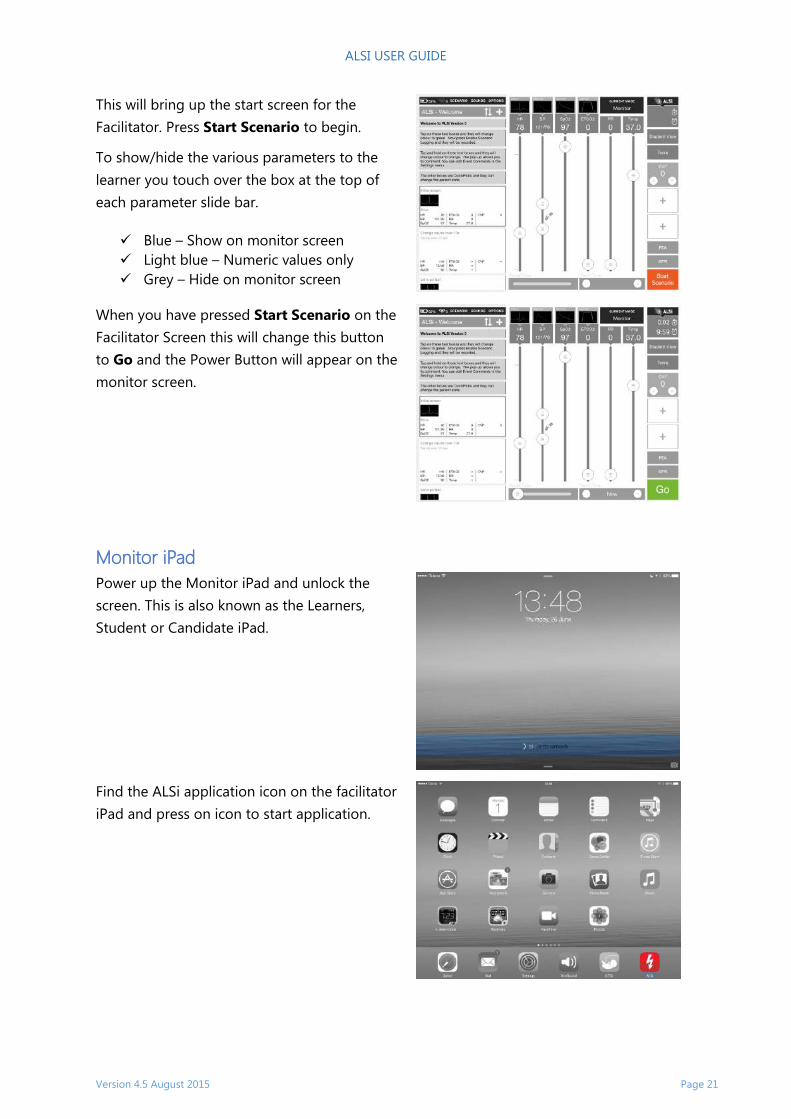
This will bring up the start screen for the
Facilitator. Press Start Scenario to begin.
To show/hide the various parameters to the
learner you touch over the box at the top of
each parameter slide bar.
Blue – Show on monitor screen
Light blue – Numeric values only
Grey – Hide on monitor screen
When you have pressed Start Scenario on the
Facilitator Screen this will change this button
to Go and the Power Button will appear on the
monitor screen.
Monitor iPad
Power up the Monitor iPad and unlock the
screen. This is also known as the Learners,
Student or Candidate iPad.
Find the ALSi application icon on the facilitator
iPad and press on icon to start application.
ALSI USER GUIDE
Version 4.5 August 2015 Page 22
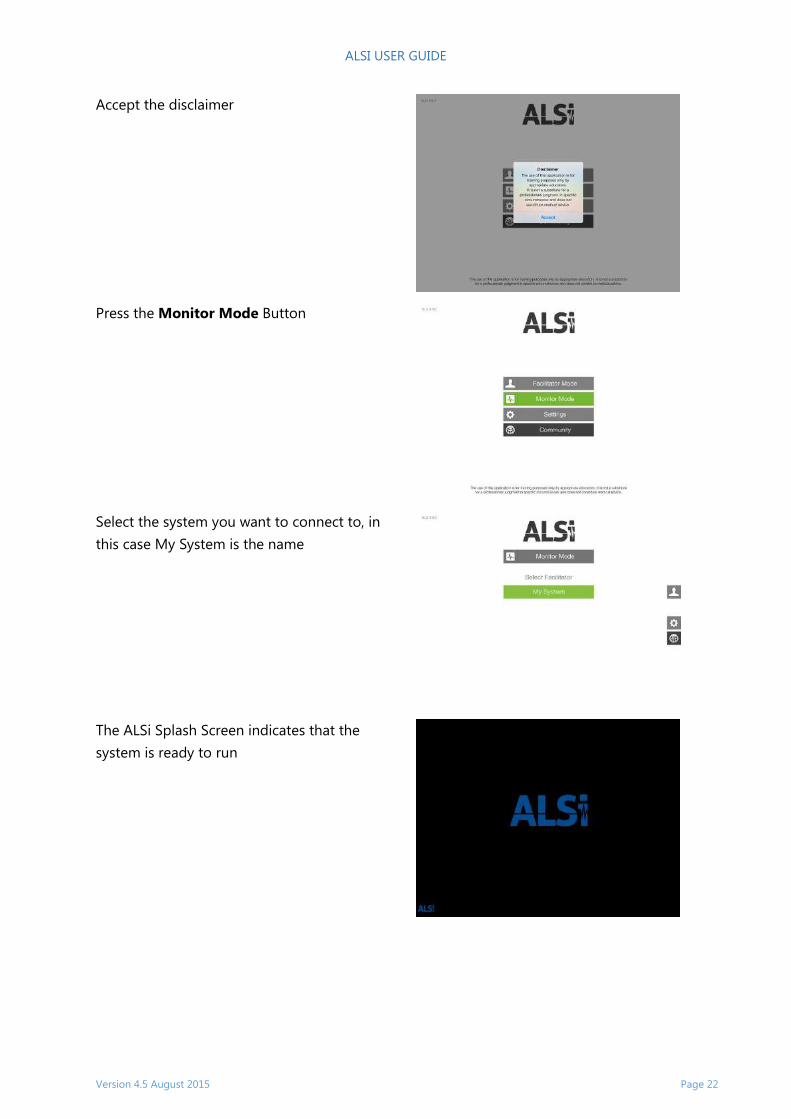
Accept the disclaimer
Press the Monitor Mode Button
Select the system you want to connect to, in
this case My System is the name
The ALSi Splash Screen indicates that the
system is ready to run
ALSI USER GUIDE
Version 4.5 August 2015 Page 23
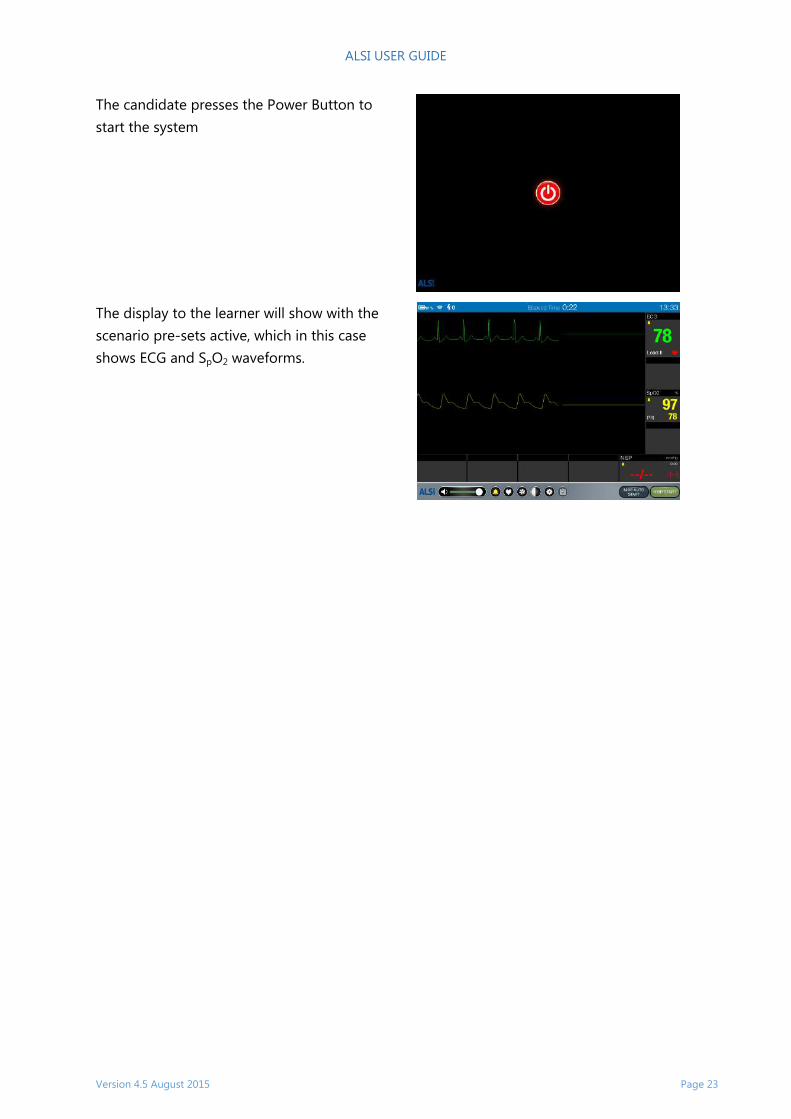
The candidate presses the Power Button to
start the system
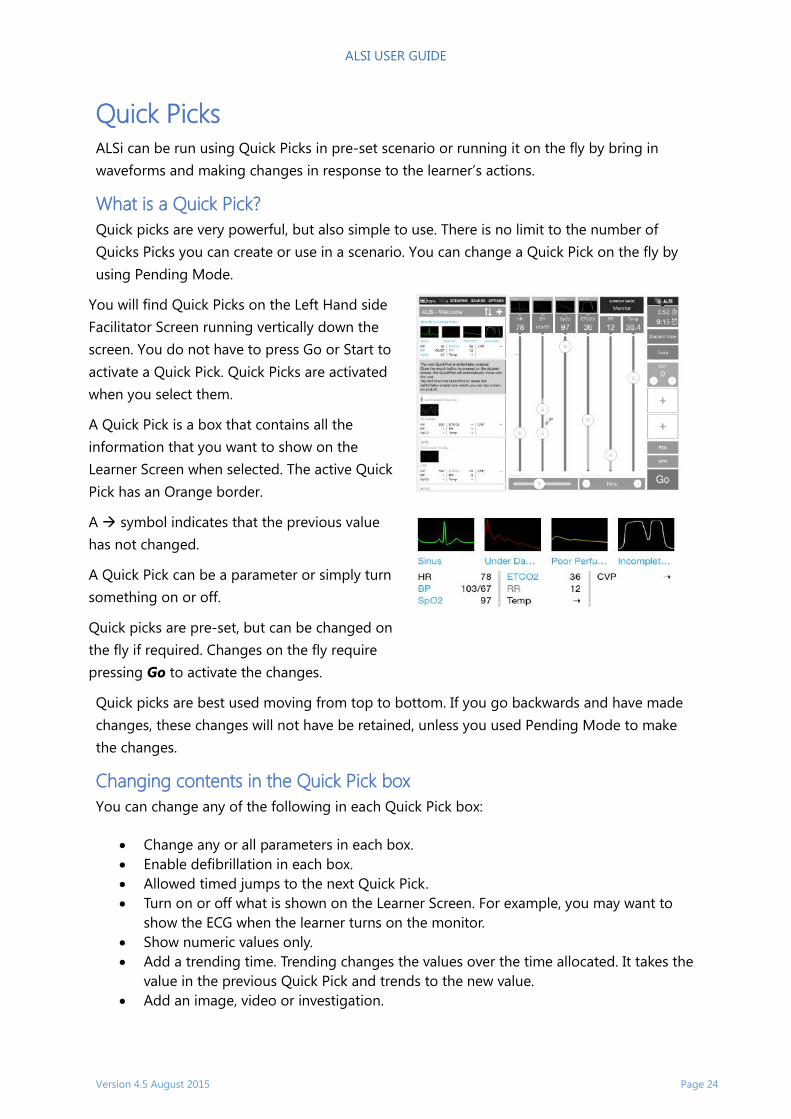
The display to the learner will show with the
scenario pre-sets active, which in this case
shows ECG and SpO2 waveforms.
ALSI USER GUIDE
Version 4.5 August 2015 Page 24
Quick Picks ALSi can be run using Quick Picks in pre-set scenario or running it on the fly by bring in
waveforms and making changes in response to the learner’s actions.
What is a Quick Pick?
Quick picks are very powerful, but also simple to use. There is no limit to the number of
Quicks Picks you can create or use in a scenario. You can change a Quick Pick on the fly by
using Pending Mode.
You will find Quick Picks on the Left Hand side
Facilitator Screen running vertically down the
screen. You do not have to press Go or Start to
activate a Quick Pick. Quick Picks are activated
when you select them.
A Quick Pick is a box that contains all the
information that you want to show on the
Learner Screen when selected. The active Quick
Pick has an Orange border.
A symbol indicates that the previous value
has not changed.
A Quick Pick can be a parameter or simply turn
something on or off.
Quick picks are pre-set, but can be changed on
the fly if required. Changes on the fly require
pressing Go to activate the changes.
Quick picks are best used moving from top to bottom. If you go backwards and have made
changes, these changes will not have be retained, unless you used Pending Mode to make
the changes.
Changing contents in the Quick Pick box
You can change any of the following in each Quick Pick box:
Change any or all parameters in each box.
Enable defibrillation in each box.
Allowed timed jumps to the next Quick Pick.
Turn on or off what is shown on the Learner Screen. For example, you may want to
show the ECG when the learner turns on the monitor.
Show numeric values only.
Add a trending time. Trending changes the values over the time allocated. It takes the
value in the previous Quick Pick and trends to the new value.
Add an image, video or investigation.
ALSI USER GUIDE
Version 4.5 August 2015 Page 25
Examples of how to use Quick Picks
Change from a perfusing rhythm to a non-perfusing rhythm.
Create an event that is linked to a treatment.
Create a series that has a patient deteriorating using trends.
Create a pre-defined scenario with shockable and not shockable parameters.
Add or change a waveform
Turn a parameter on or off.
Introduce a custom parameter, such as glucose.
Build Quicks Picks to respond to positive and negative actions.
Changing Quick Pick parameters on the fly
In the event that the learner does something unexpected you can change all the parameters
in a Quick Pick as required.
1. Press on the Quick Pick Box for 1 second to
put the Quick Pick in to Pending Mode.
2. Make all the changes you require, including
Waveforms.
3. Close the Grey box once you have made all
the changes by press on the X. All changes
will be made.
4. To activate the changes, press again on the
Quick Pick box.
Use this technique to change investigations on
the fly as well.
You can also now save these changes as a new
scenario when exiting the scenario.
ALSI USER GUIDE
Version 4.5 August 2015 Page 26
Adding new Quick Picks or Investigations on the fly
You can add additional Quick Picks or investigations into your scenario at any time.
1. Click on + next to the Scenario Name.
2. This will display a number of you can
select from:
Quick Picks
Investigations
Images
3. Select the option that you want to add.
4. The new option will appear at the
bottom of the Quick Picks ready for
activation.
5. You can add images to existing gallery
that you have in the scenario, or add a
completely new gallery of images.
Select “Add Image Gallery”
Name your image gallery
Add images to the gallery
6. These will appear at the bottom of your
Quick Picks list.
7. Reordering Quick Picks is covered in
the Reordering Quick Picks section.
ALSI USER GUIDE
Version 4.5 August 2015 Page 27
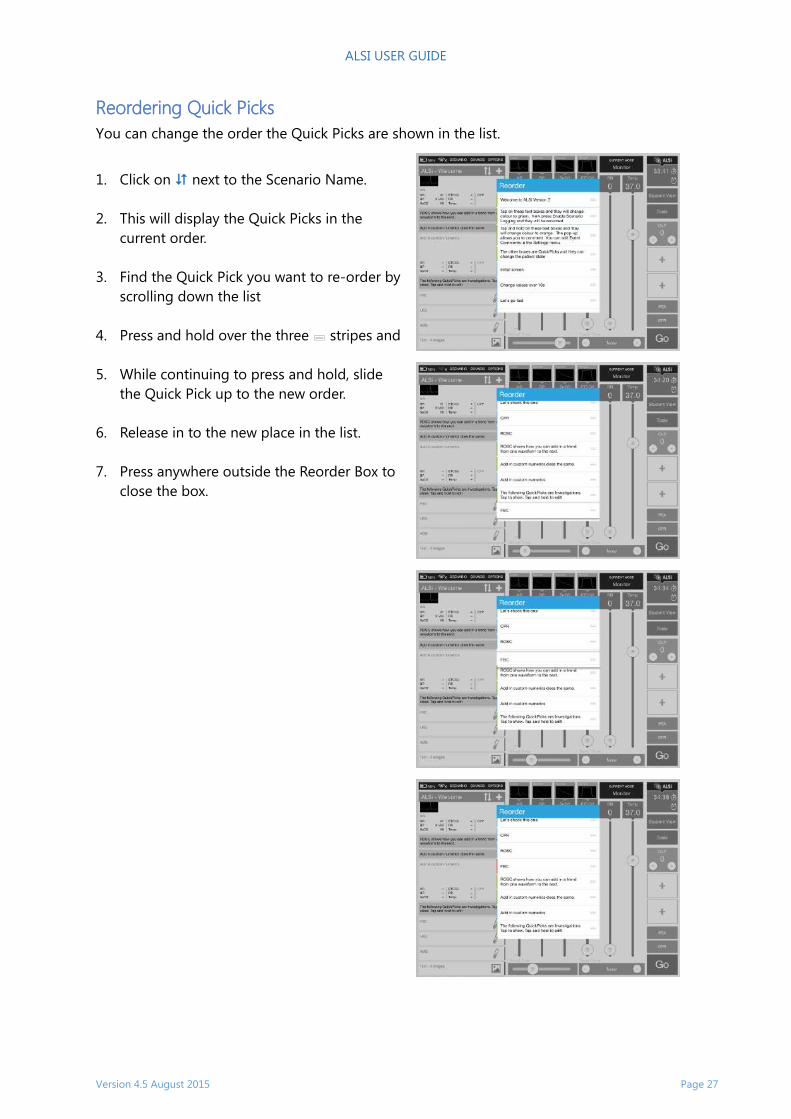
Reordering Quick Picks
You can change the order the Quick Picks are shown in the list.
1. Click on next to the Scenario Name.
2. This will display the Quick Picks in the
current order.
3. Find the Quick Pick you want to re-order by
scrolling down the list
4. Press and hold over the three stripes and
5. While continuing to press and hold, slide
the Quick Pick up to the new order.
6. Release in to the new place in the list.
7. Press anywhere outside the Reorder Box to
close the box.
ALSI USER GUIDE
Version 4.5 August 2015 Page 28
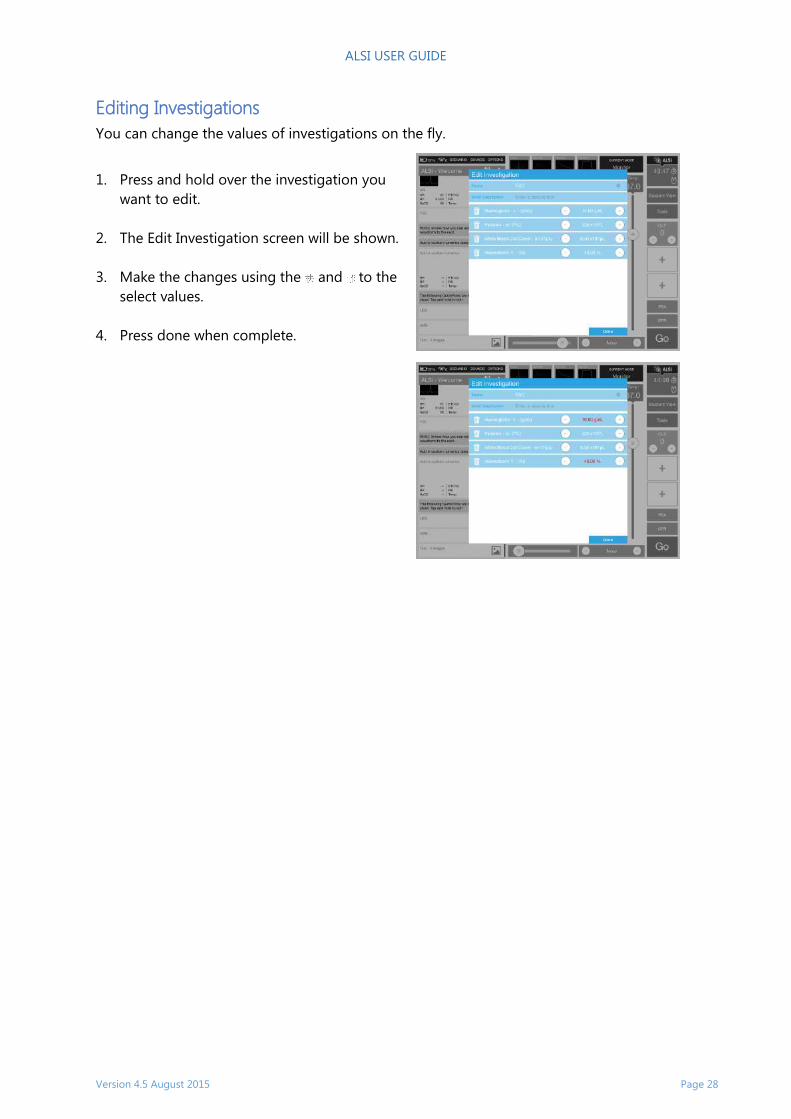
Editing Investigations
You can change the values of investigations on the fly.
1. Press and hold over the investigation you
want to edit.
2. The Edit Investigation screen will be shown.
3. Make the changes using the and to the
select values.
4. Press done when complete.
ALSI USER GUIDE
Version 4.5 August 2015 Page 29
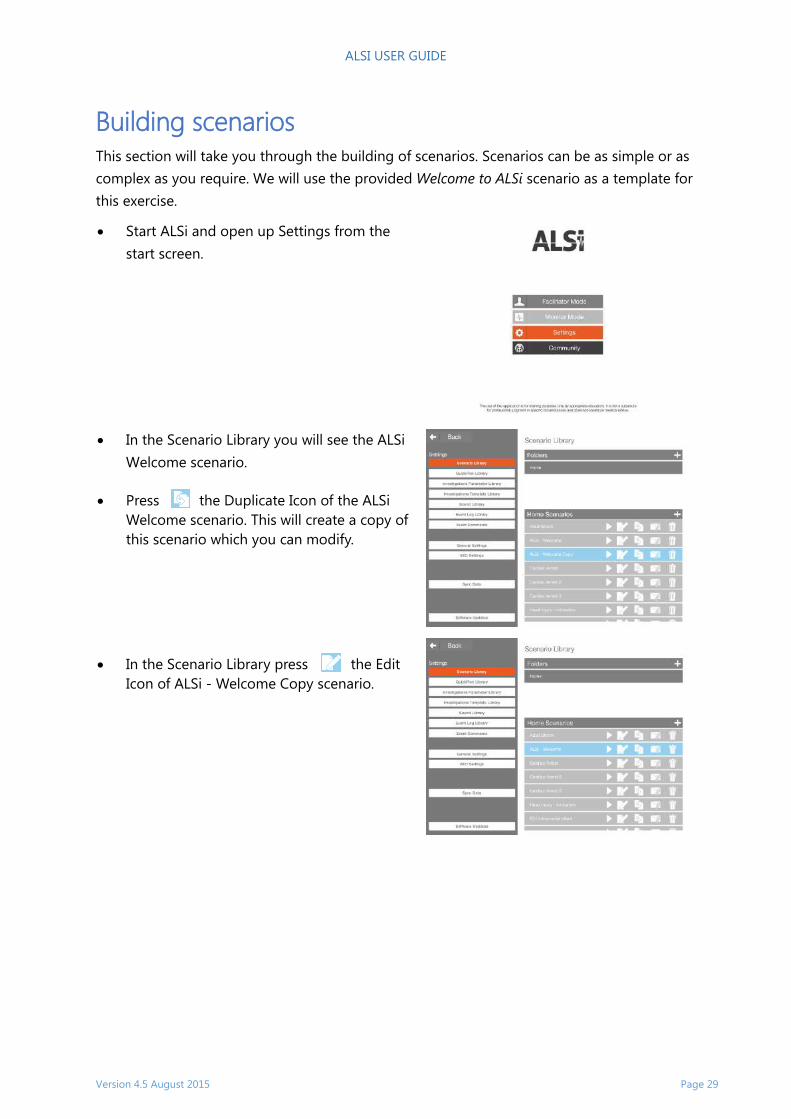
Building scenarios This section will take you through the building of scenarios. Scenarios can be as simple or as
complex as you require. We will use the provided Welcome to ALSi scenario as a template for
this exercise.
Start ALSi and open up Settings from the
start screen.
In the Scenario Library you will see the ALSi
Welcome scenario.
Press the Duplicate Icon of the ALSi
Welcome scenario. This will create a copy of
this scenario which you can modify.
In the Scenario Library press the Edit
Icon of ALSi - Welcome Copy scenario.
ALSI USER GUIDE
Version 4.5 August 2015 Page 30
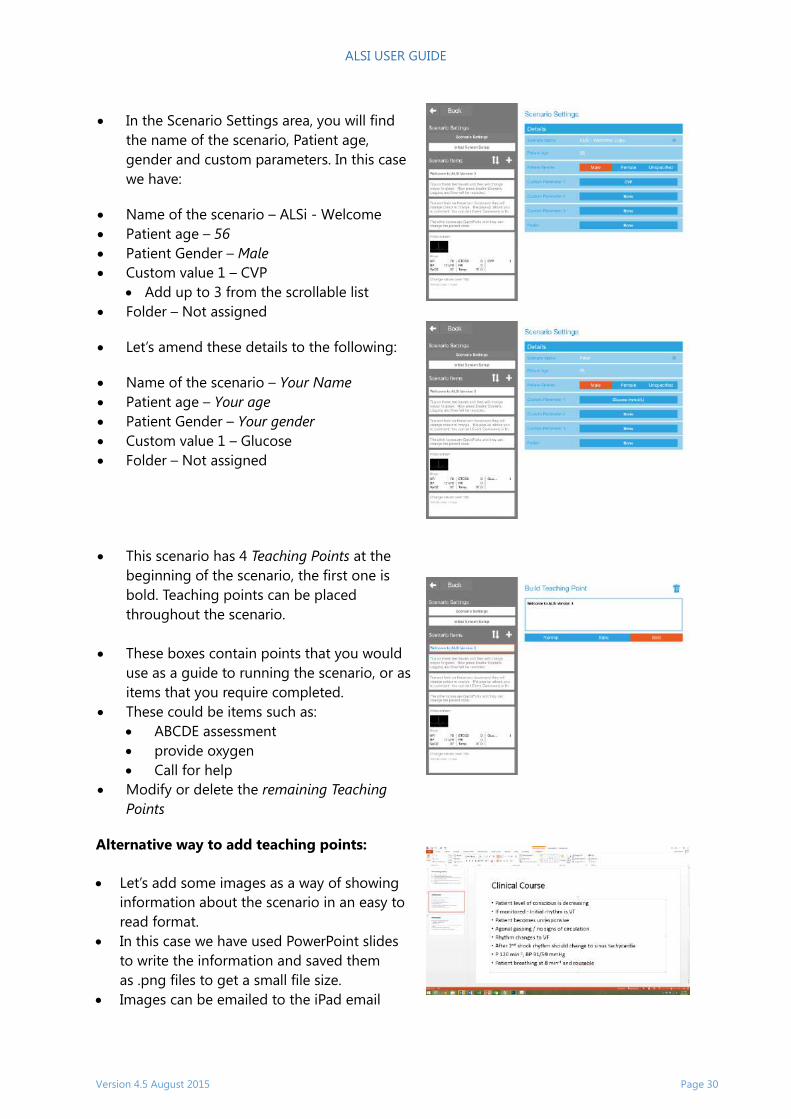
In the Scenario Settings area, you will find
the name of the scenario, Patient age,
gender and custom parameters. In this case
we have:
Name of the scenario – ALSi - Welcome
Patient age – 56
Patient Gender – Male
Custom value 1 – CVP
Add up to 3 from the scrollable list
Folder – Not assigned
Let’s amend these details to the following:
Name of the scenario – Your Name
Patient age – Your age
Patient Gender – Your gender
Custom value 1 – Glucose
Folder – Not assigned
This scenario has 4 Teaching Points at the
beginning of the scenario, the first one is
bold. Teaching points can be placed
throughout the scenario.
These boxes contain points that you would
use as a guide to running the scenario, or as
items that you require completed.
These could be items such as:
ABCDE assessment
provide oxygen
Call for help
Modify or delete the remaining Teaching
Points
Alternative way to add teaching points:
Let’s add some images as a way of showing
information about the scenario in an easy to
read format.
In this case we have used PowerPoint slides
to write the information and saved them
as .png files to get a small file size.
Images can be emailed to the iPad email
ALSI USER GUIDE
Version 4.5 August 2015 Page 31
account or placed in a Dropbox folder. The
images are added to your Photos on the
Facilitator iPad.
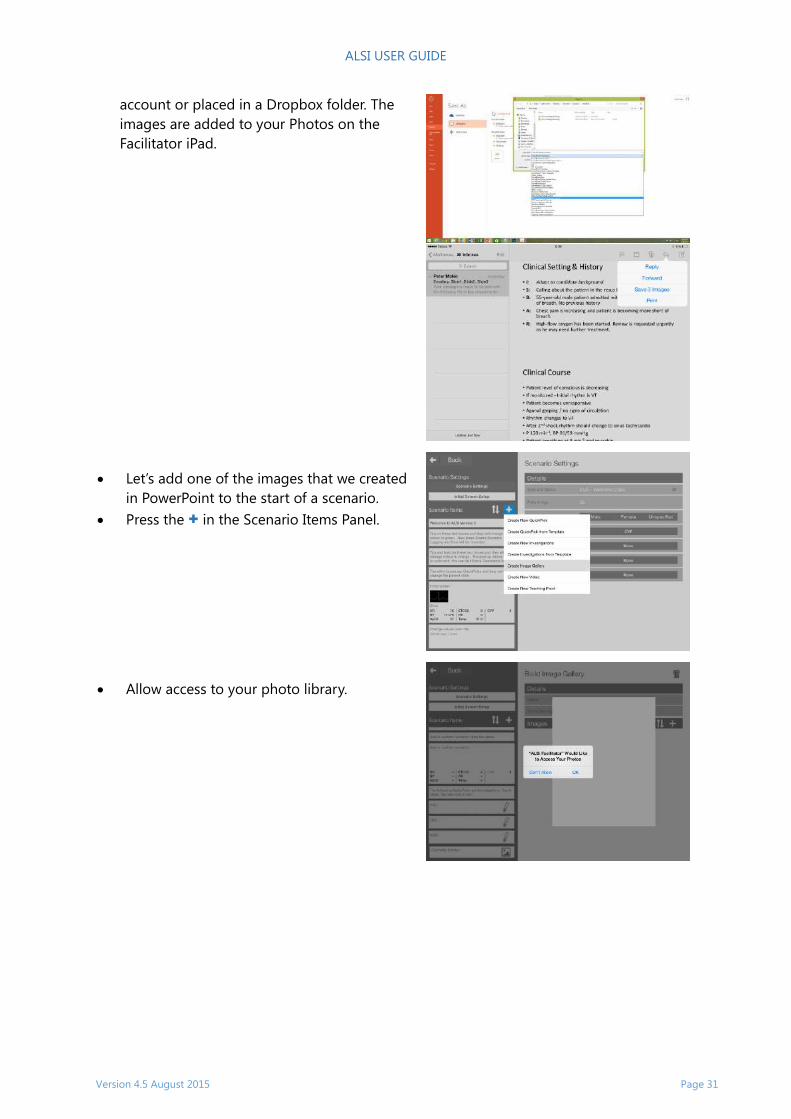
Let’s add one of the images that we created
in PowerPoint to the start of a scenario.
Press the + in the Scenario Items Panel.
Allow access to your photo library.
ALSI USER GUIDE
Version 4.5 August 2015 Page 32
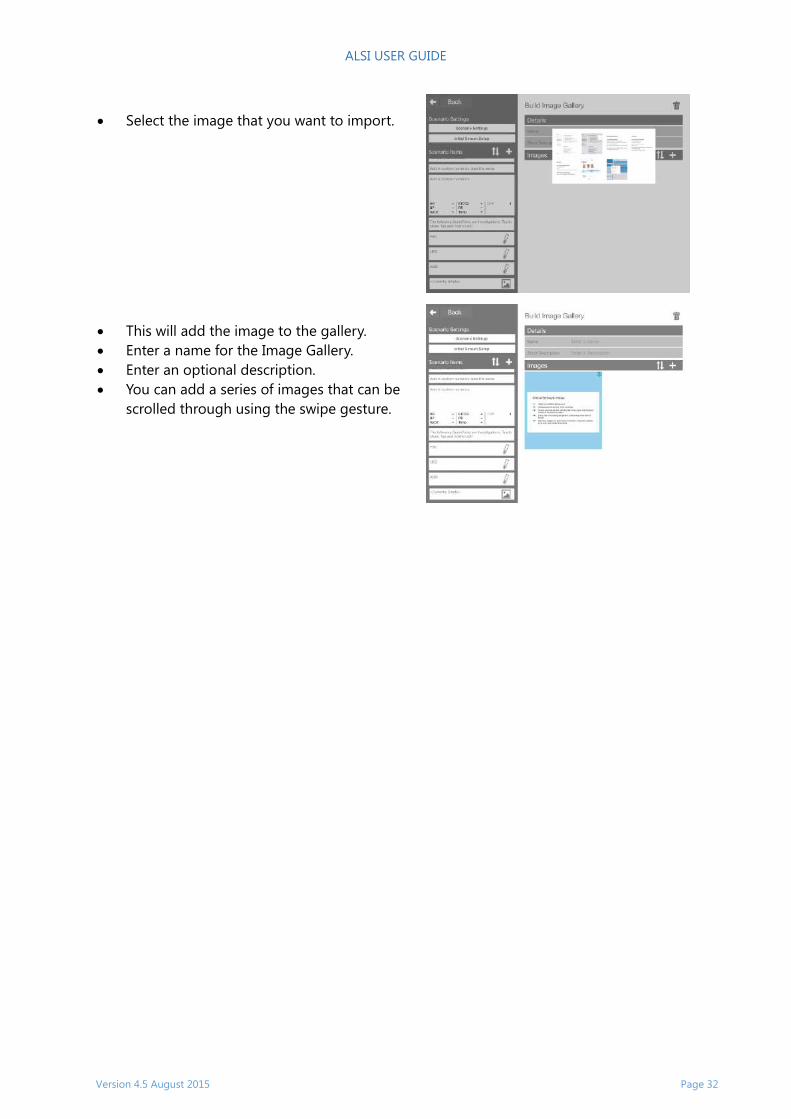
Select the image that you want to import.
This will add the image to the gallery.
Enter a name for the Image Gallery.
Enter an optional description.
You can add a series of images that can be
scrolled through using the swipe gesture.
ALSI USER GUIDE
Version 4.5 August 2015 Page 33
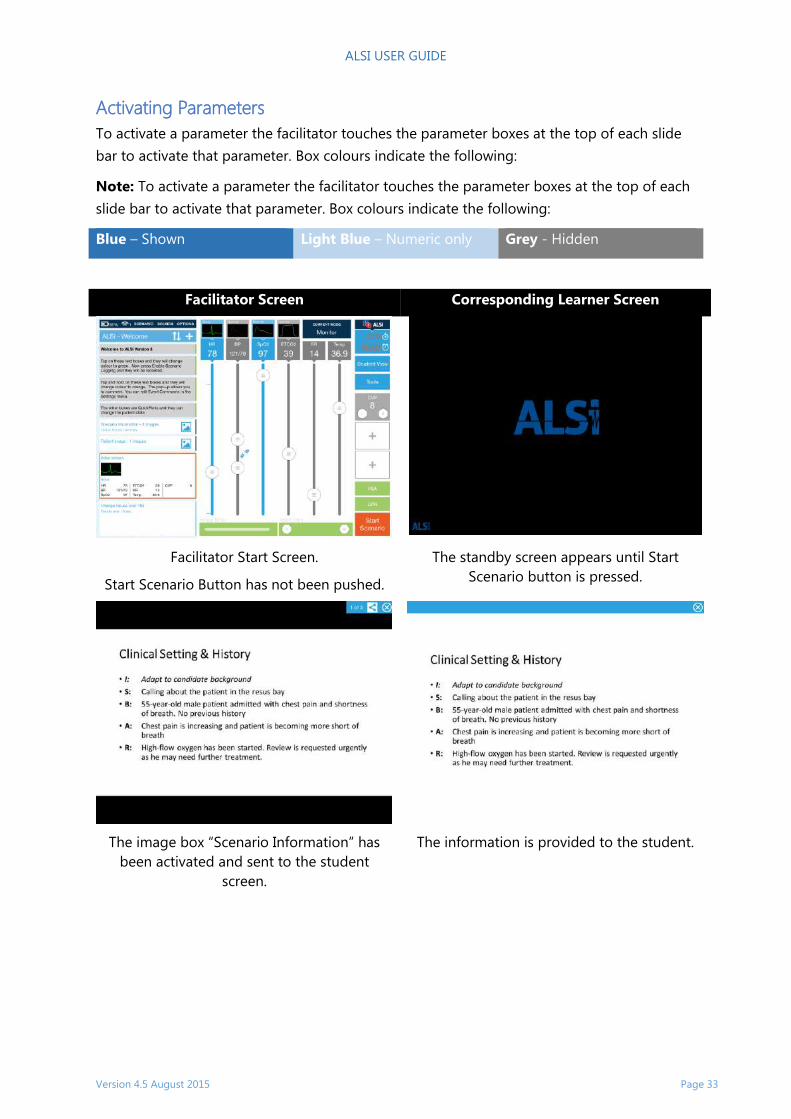
Activating Parameters
To activate a parameter the facilitator touches the parameter boxes at the top of each slide
bar to activate that parameter. Box colours indicate the following:
Note: To activate a parameter the facilitator touches the parameter boxes at the top of each
slide bar to activate that parameter. Box colours indicate the following:
Blue – Shown Light Blue – Numeric only Grey - Hidden
Facilitator Screen Corresponding Learner Screen
Facilitator Start Screen.
Start Scenario Button has not been pushed.
The standby screen appears until Start
Scenario button is pressed.
The image box “Scenario Information” has
been activated and sent to the student
screen.
The information is provided to the student.
ALSI USER GUIDE
Version 4.5 August 2015 Page 34
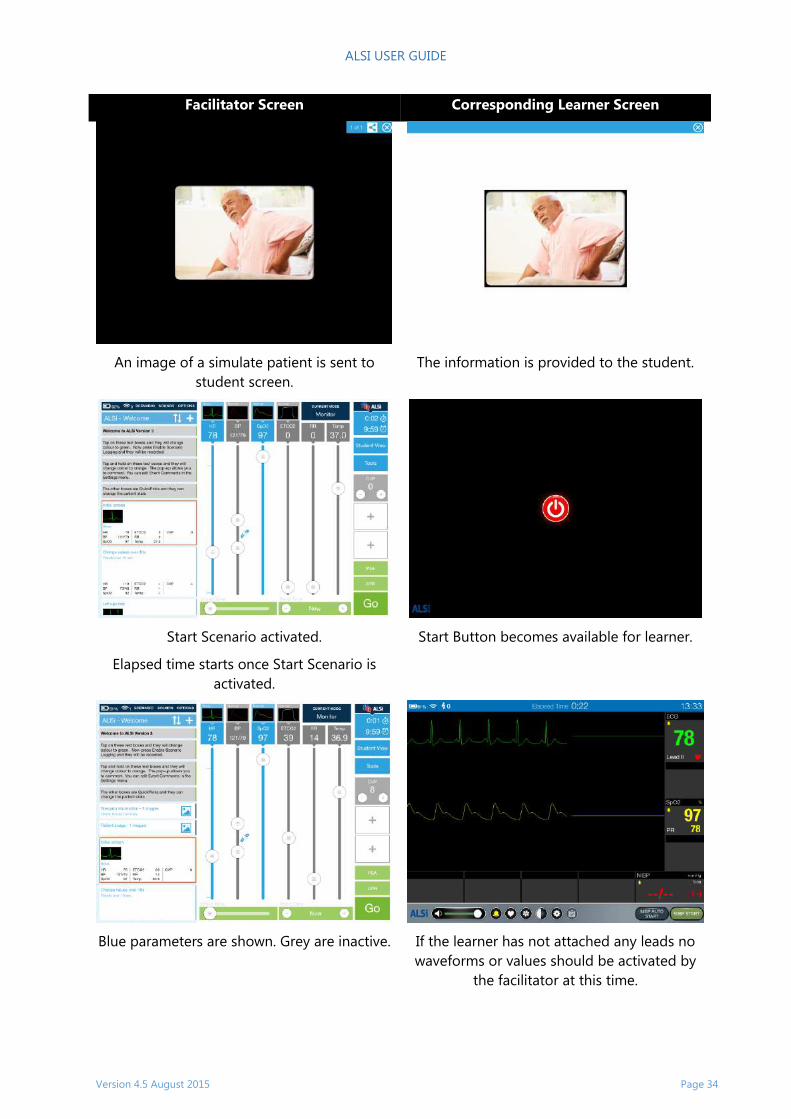
Facilitator Screen Corresponding Learner Screen
An image of a simulate patient is sent to
student screen.
The information is provided to the student.
Start Scenario activated.
Elapsed time starts once Start Scenario is
activated.
Start Button becomes available for learner.
Blue parameters are shown. Grey are inactive. If the learner has not attached any leads no
waveforms or values should be activated by
the facilitator at this time.
ALSI USER GUIDE
Version 4.5 August 2015 Page 35
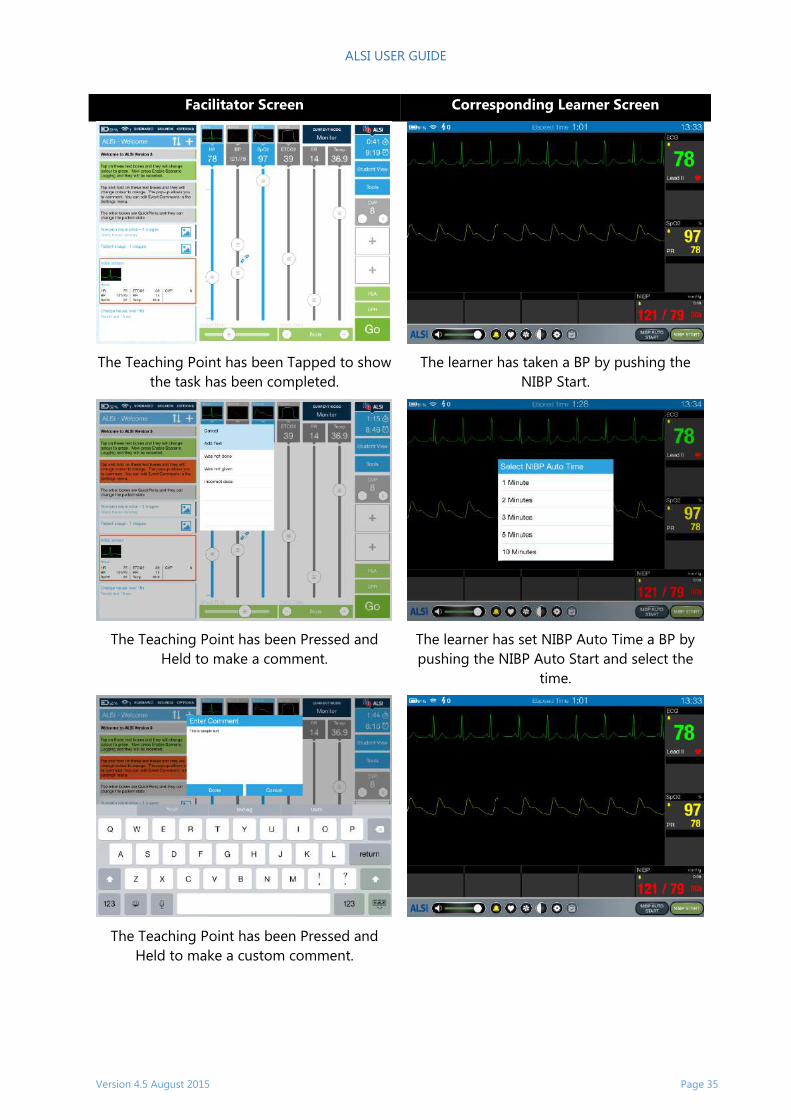
Facilitator Screen Corresponding Learner Screen
The Teaching Point has been Tapped to show
the task has been completed.
The learner has taken a BP by pushing the
NIBP Start.
The Teaching Point has been Pressed and
Held to make a comment.
The learner has set NIBP Auto Time a BP by
pushing the NIBP Auto Start and select the
time.
The Teaching Point has been Pressed and
Held to make a custom comment.
ALSI USER GUIDE
Version 4.5 August 2015 Page 36
Facilitator Screen Corresponding Learner Screen
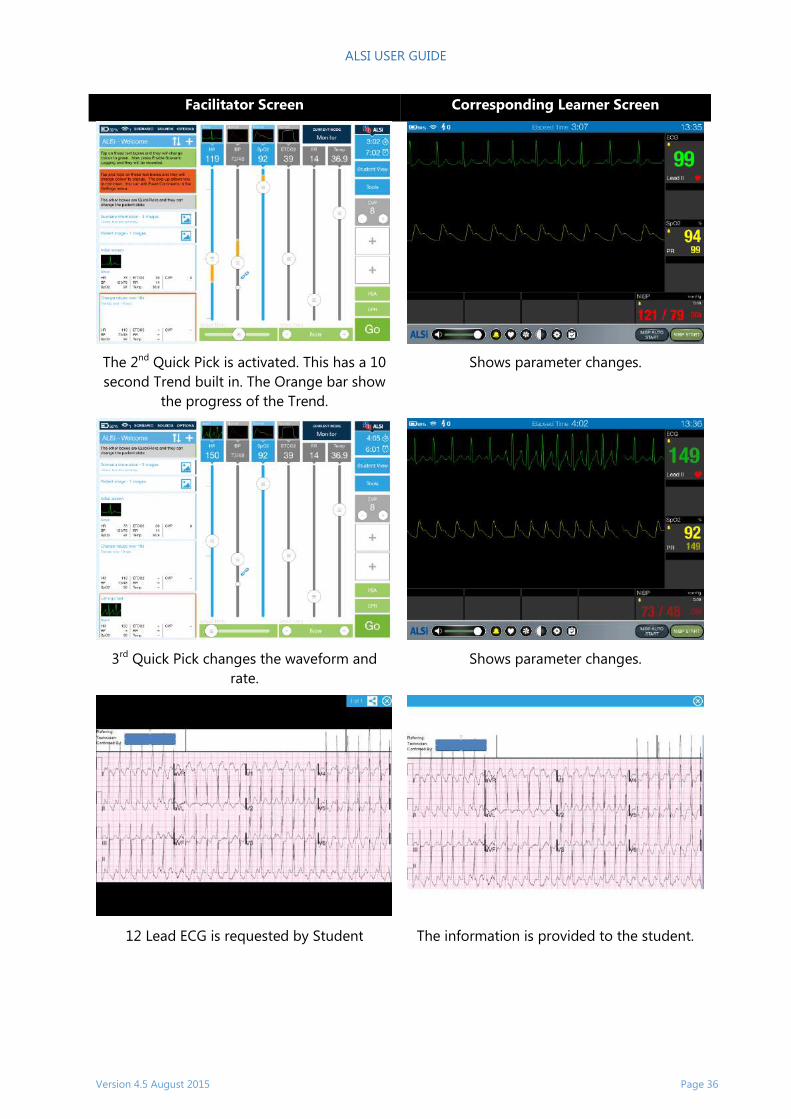
The 2nd Quick Pick is activated. This has a 10
second Trend built in. The Orange bar show
the progress of the Trend.
Shows parameter changes.
3rd Quick Pick changes the waveform and
rate.
Shows parameter changes.
12 Lead ECG is requested by Student The information is provided to the student.
ALSI USER GUIDE
Version 4.5 August 2015 Page 37
Facilitator Screen Corresponding Learner Screen
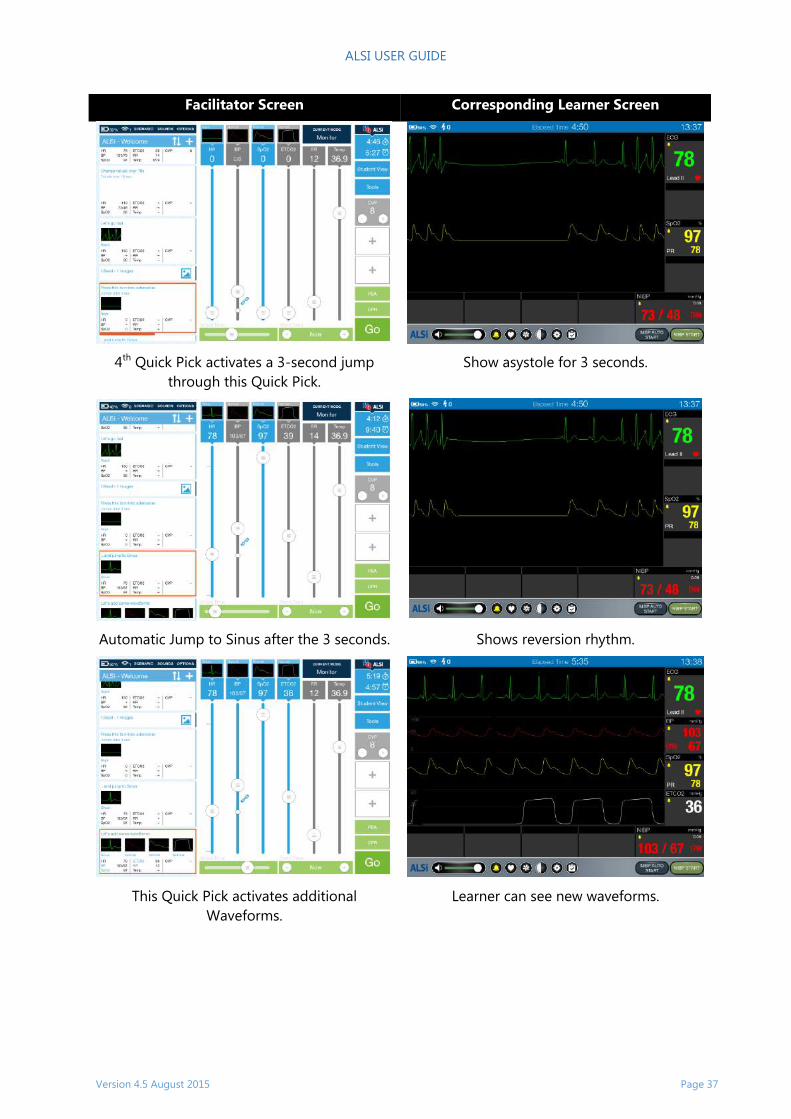
4th Quick Pick activates a 3-second jump
through this Quick Pick.
Show asystole for 3 seconds.
Automatic Jump to Sinus after the 3 seconds. Shows reversion rhythm.
This Quick Pick activates additional
Waveforms.
Learner can see new waveforms.
ALSI USER GUIDE
Version 4.5 August 2015 Page 38
Facilitator Screen Corresponding Learner Screen
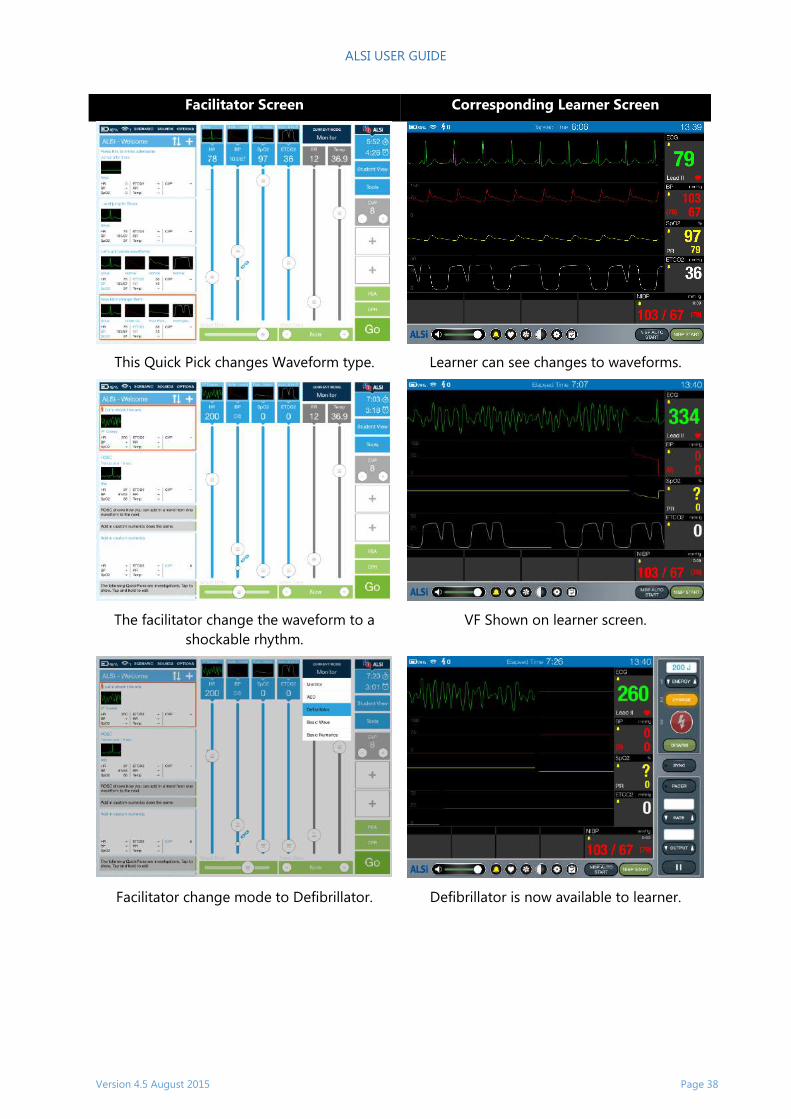
This Quick Pick changes Waveform type. Learner can see changes to waveforms.
The facilitator change the waveform to a
shockable rhythm.
VF Shown on learner screen.
Facilitator change mode to Defibrillator. Defibrillator is now available to learner.
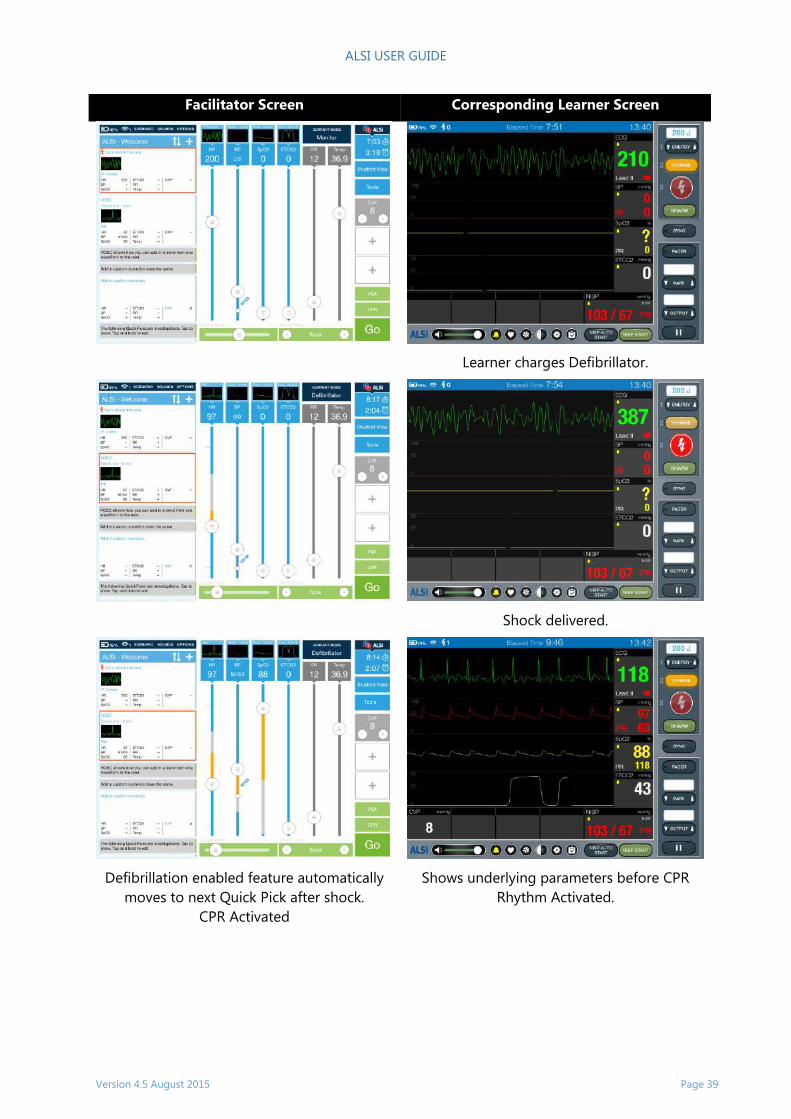
ALSI USER GUIDE
Version 4.5 August 2015 Page 39
Facilitator Screen Corresponding Learner Screen
Learner charges Defibrillator.
Shock delivered.
Defibrillation enabled feature automatically
moves to next Quick Pick after shock.
CPR Activated
Shows underlying parameters before CPR
Rhythm Activated.
ALSI USER GUIDE
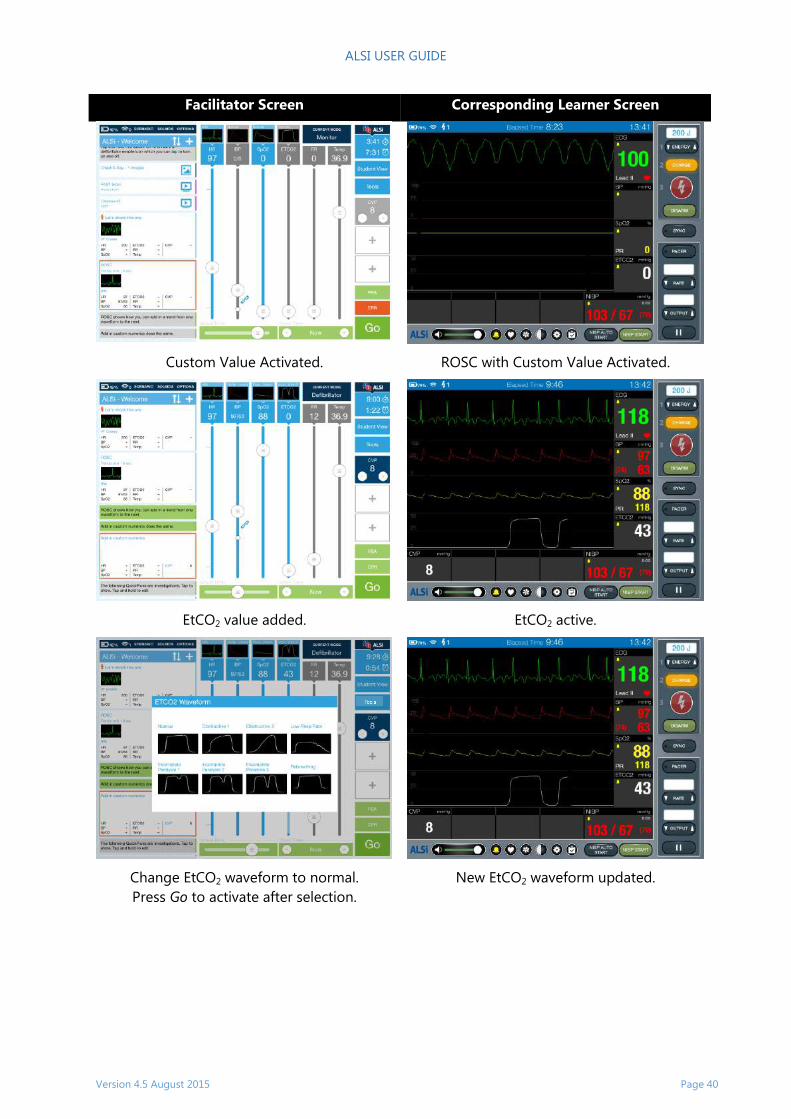
Version 4.5 August 2015 Page 40
Facilitator Screen Corresponding Learner Screen
Custom Value Activated. ROSC with Custom Value Activated.
EtCO2 value added. EtCO2 active.
Change EtCO2 waveform to normal.
Press Go to activate after selection.
New EtCO2 waveform updated.
ALSI USER GUIDE
Version 4.5 August 2015 Page 41
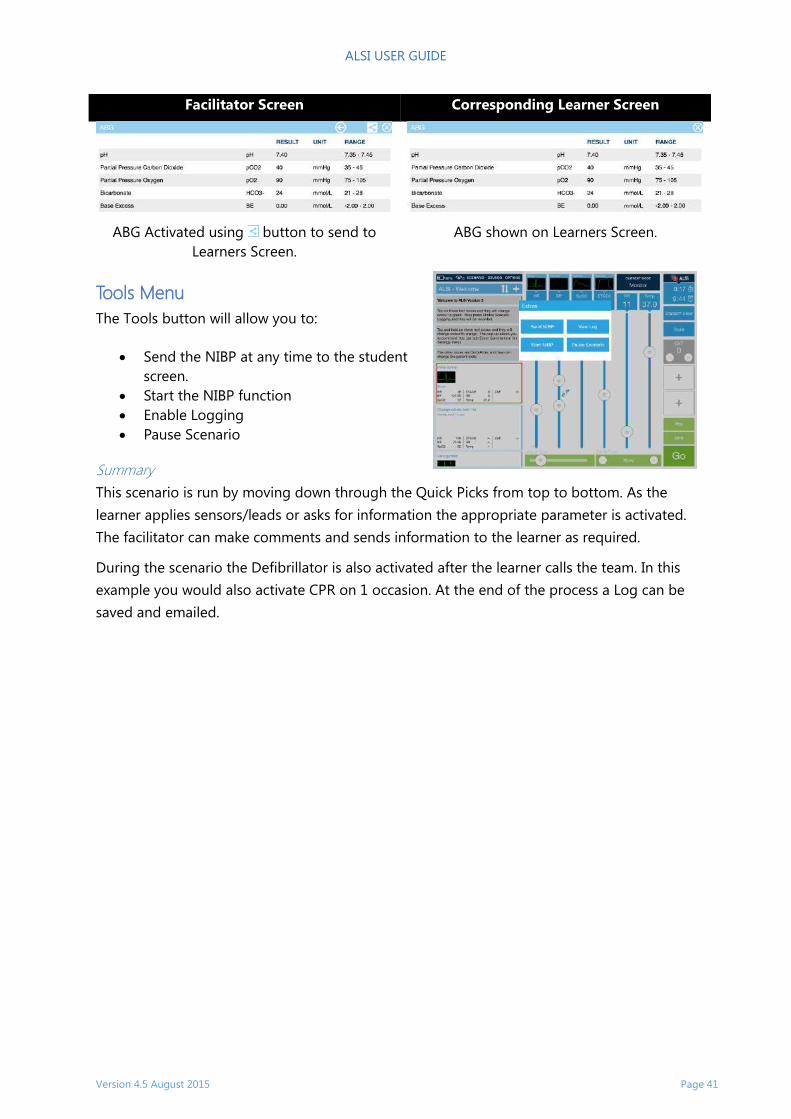
Facilitator Screen Corresponding Learner Screen
ABG Activated using button to send to
Learners Screen.
ABG shown on Learners Screen.
Tools Menu
The Tools button will allow you to:
Send the NIBP at any time to the student
screen.
Start the NIBP function
Enable Logging
Pause Scenario
Summary
This scenario is run by moving down through the Quick Picks from top to bottom. As the
learner applies sensors/leads or asks for information the appropriate parameter is activated.
The facilitator can make comments and sends information to the learner as required.
During the scenario the Defibrillator is also activated after the learner calls the team. In this
example you would also activate CPR on 1 occasion. At the end of the process a Log can be
saved and emailed.
ALSI USER GUIDE
Version 4.5 August 2015 Page 42
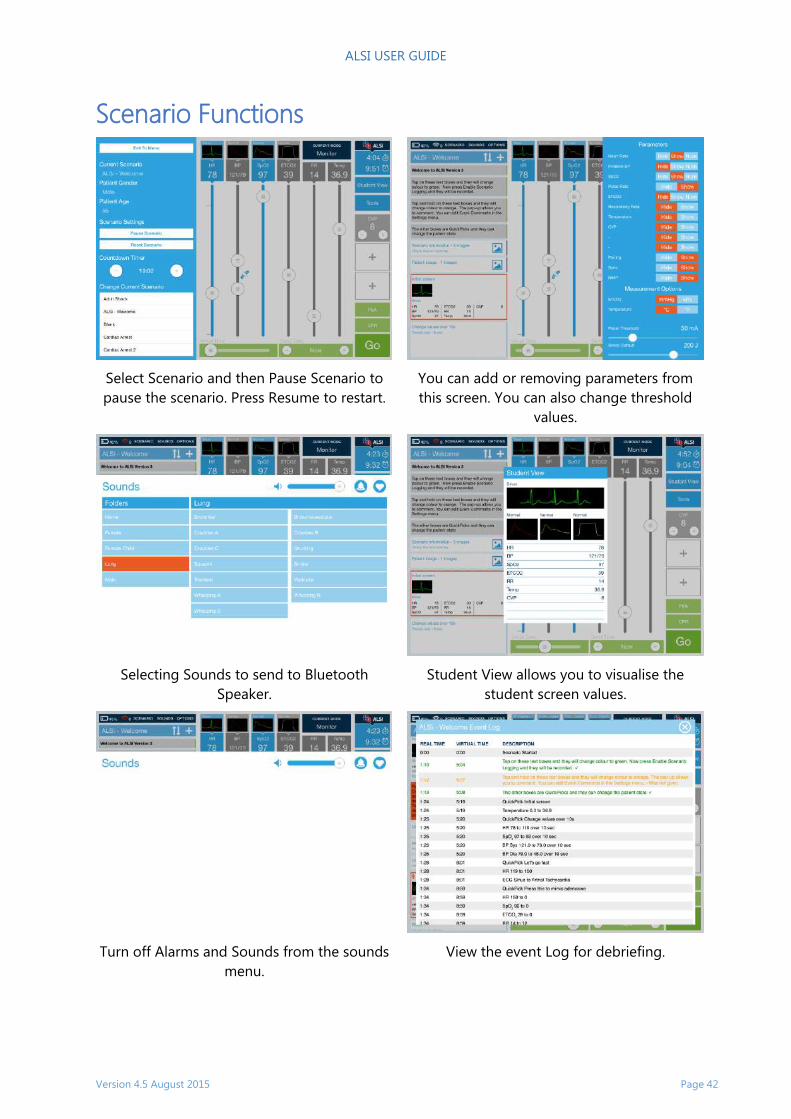
Scenario Functions
Select Scenario and then Pause Scenario to
pause the scenario. Press Resume to restart.
You can add or removing parameters from
this screen. You can also change threshold
values.
Selecting Sounds to send to Bluetooth
Speaker.
Student View allows you to visualise the
student screen values.
Turn off Alarms and Sounds from the sounds
menu.
View the event Log for debriefing.
ALSI USER GUIDE
Version 4.5 August 2015 Page 43
Synchronising scenarios This section will take you through the Synchronising of scenarios. You can make your
scenarios with images and videos run faster by Synchronising Scenarios to the student iPad,
this will eliminate any delay in showing the media on the student iPad by storing the images
and videos on both iPads. You will need to re-sync all scenarios that contain media if you
change the iPad to a new one.
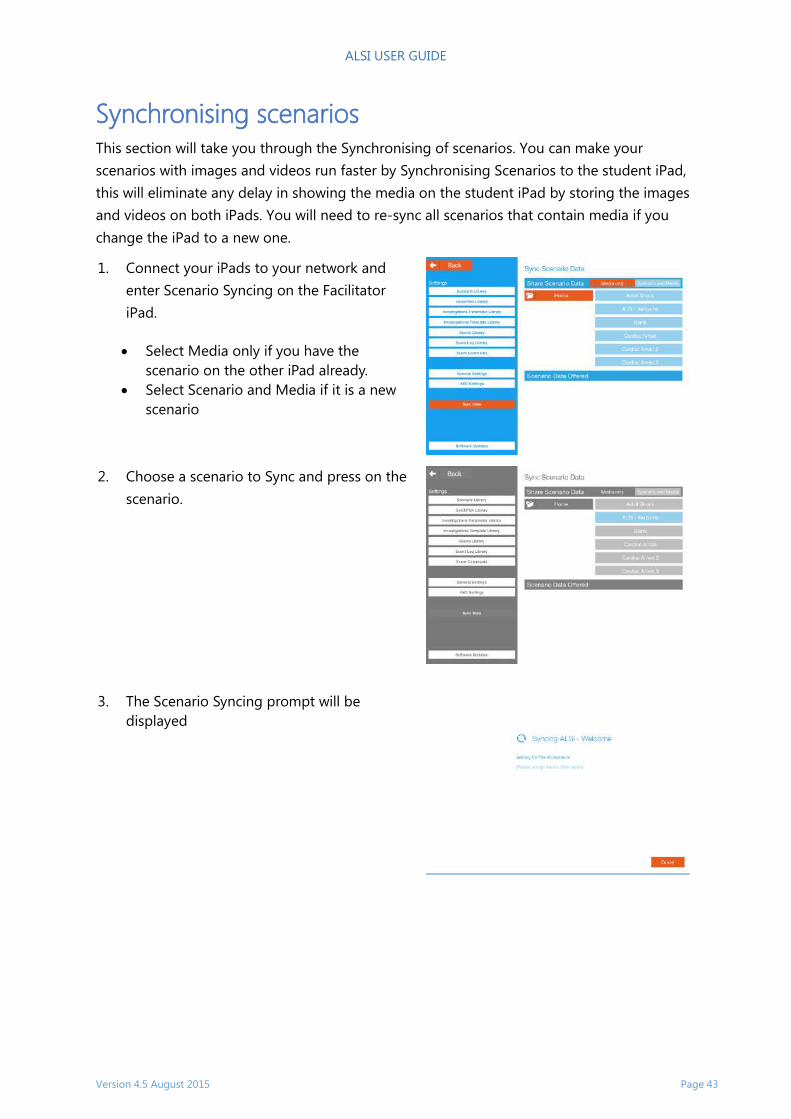
1. Connect your iPads to your network and
enter Scenario Syncing on the Facilitator
iPad.
Select Media only if you have the
scenario on the other iPad already.
Select Scenario and Media if it is a new
scenario
2. Choose a scenario to Sync and press on the
scenario.
3. The Scenario Syncing prompt will be
displayed
ALSI USER GUIDE
Version 4.5 August 2015 Page 44
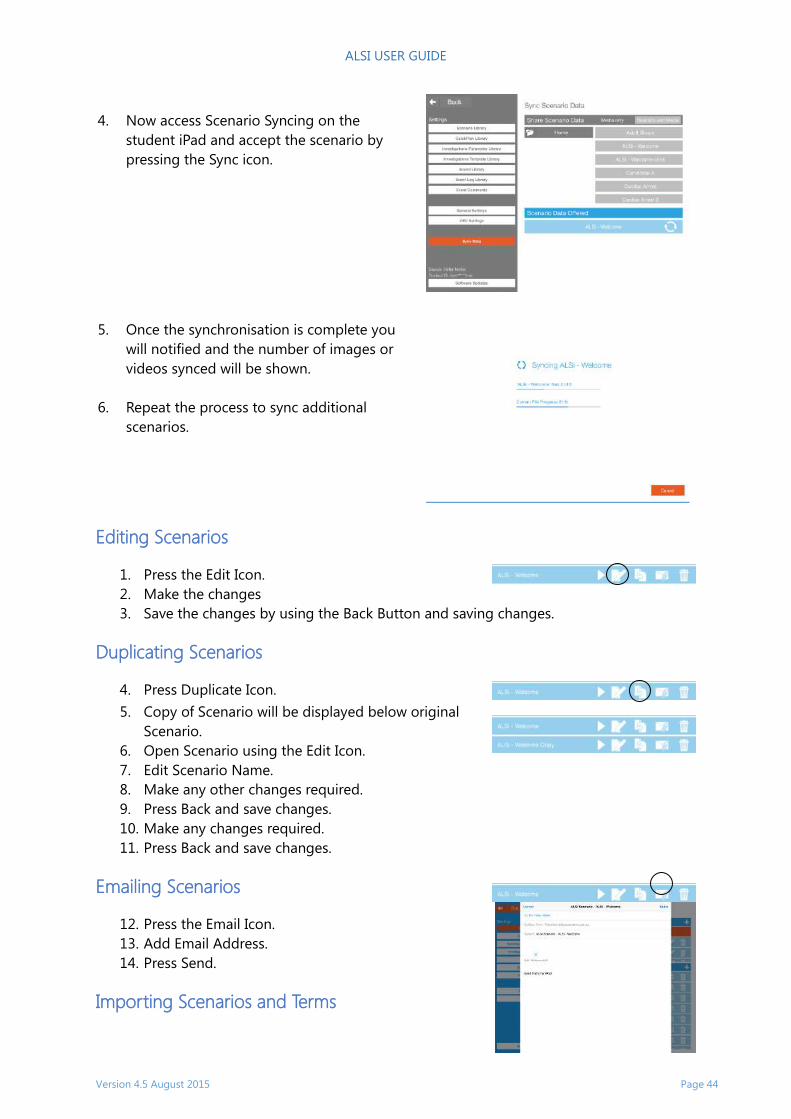
4. Now access Scenario Syncing on the
student iPad and accept the scenario by
pressing the Sync icon.
5. Once the synchronisation is complete you
will notified and the number of images or
videos synced will be shown.
6. Repeat the process to sync additional
scenarios.
Editing Scenarios
1. Press the Edit Icon.
2. Make the changes
3. Save the changes by using the Back Button and saving changes.
Duplicating Scenarios
4. Press Duplicate Icon.
5. Copy of Scenario will be displayed below original
Scenario.
6. Open Scenario using the Edit Icon.
7. Edit Scenario Name.
8. Make any other changes required.
9. Press Back and save changes.
10. Make any changes required.
11. Press Back and save changes.
Emailing Scenarios
12. Press the Email Icon.
13. Add Email Address.
14. Press Send.
Importing Scenarios and Terms
ALSI USER GUIDE
Version 4.5 August 2015 Page 45
Scenarios and Terms can be imported from emails or cloud services like Dropbox. Items that
are imported must have been generated by ALSi and exported and emailed to be used.
To Export use the Export feature in the scenario and terms sections.
To import follow these steps:
From email
1. Open Email
2. Press and hold over ALSi attachment
3. Select Open in ALSi
4. Import will occur
5. Success message will appear
From Dropbox
1. Open Dropbox folder on iPad
2. Select ALSi scenario file
3. Press Open icon
4. Select Open in ALSi
5. Import will occur
6. Success message will appear.
Sounds
Sounds on the facilitator iPad are designed to be
sent to a Bluetooth speaker placed in or under a
manikin. You have lung, and voice sounds that you
can pick from different age and gender. The
default sound is a 50 year old male.
You can record your own sounds on the iPad in
the sounds setting area, or import using the same
method as scenarios.
ALSI USER GUIDE
Version 4.5 August 2015 Page 46
Changing Waveforms
ECG, SpO2, EtCO2 and Invasive Blood Pressure (IBP) waveforms can be change by pressing
over the allocated boxes.
ECG – 50+ available see ECG Waveform List.
SaO2 – Normal and poor perfusion.
EtCO2 – Normal, Obstructive 1, Obstructive 2, Low Respiration Rate, Incomplete
Paralysis 1, Incomplete Paralysis 2, Incomplete Paralysis 3 and Rebreathing.
IBP – Normal, poor perfusion, under damped, over damped, poor perfusion and CPR.
The PEA Button
The PEA (Pulseless Electrical Activity) button immediately drops all parameter values to zero,
but leaves the ECG waveform as set.
To return to the previous values you can select the same Quick Pick or change to a new
Quick Pick. You can also manually adjust each parameter and then press Go to activate the
new values.
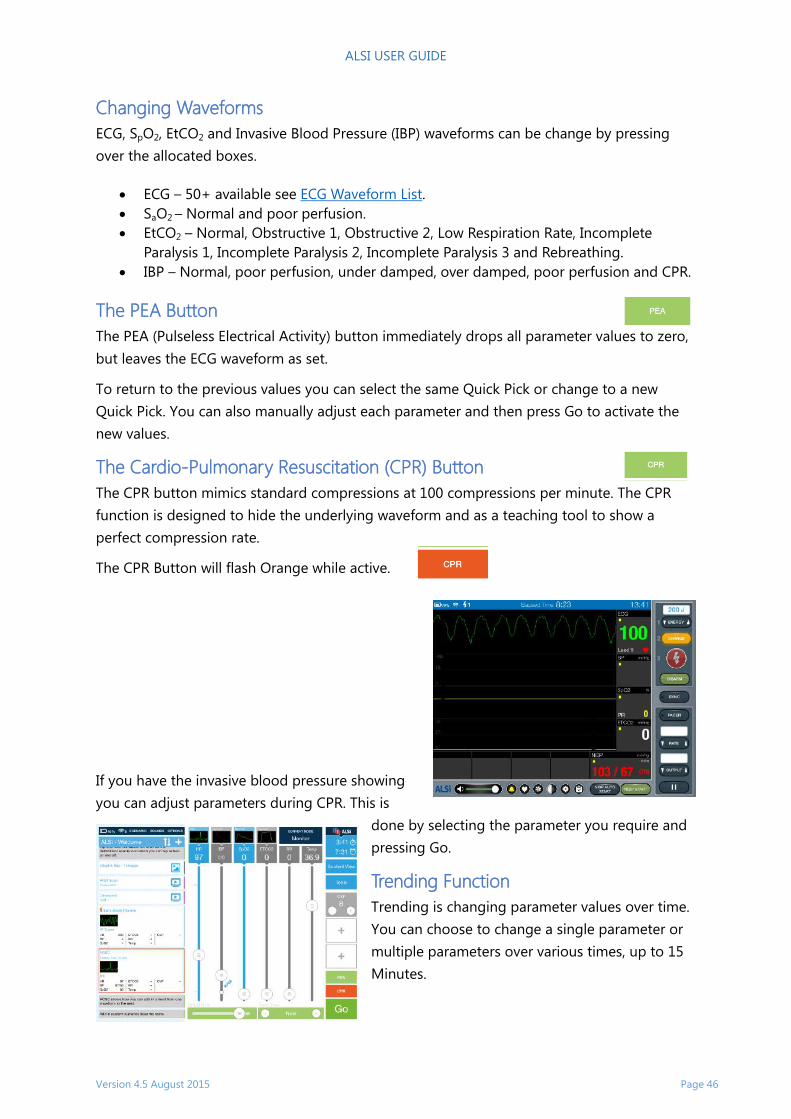
The Cardio-Pulmonary Resuscitation (CPR) Button
The CPR button mimics standard compressions at 100 compressions per minute. The CPR
function is designed to hide the underlying waveform and as a teaching tool to show a
perfect compression rate.
The CPR Button will flash Orange while active.
If you have the invasive blood pressure showing
you can adjust parameters during CPR. This is
done by selecting the parameter you require and
pressing Go.
Trending Function
Trending is changing parameter values over time.
You can choose to change a single parameter or
multiple parameters over various times, up to 15
Minutes.
ALSI USER GUIDE
Version 4.5 August 2015 Page 47
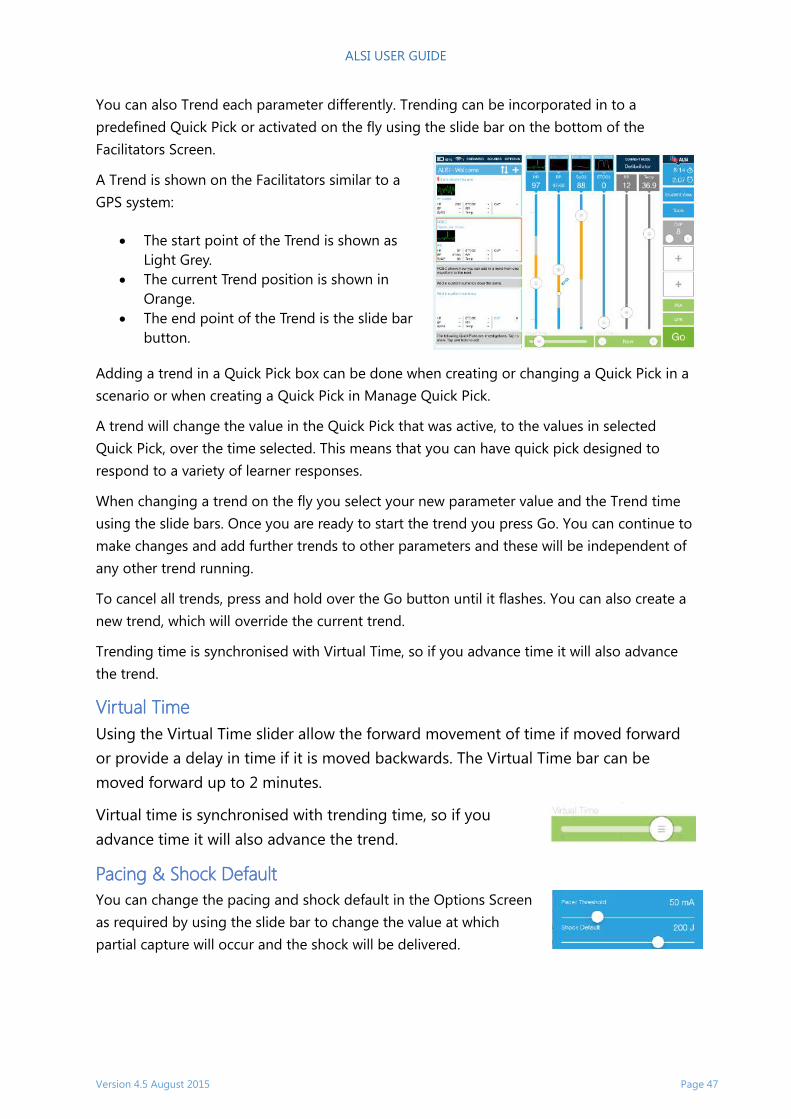
You can also Trend each parameter differently. Trending can be incorporated in to a
predefined Quick Pick or activated on the fly using the slide bar on the bottom of the
Facilitators Screen.
A Trend is shown on the Facilitators similar to a
GPS system:
The start point of the Trend is shown as
Light Grey.
The current Trend position is shown in
Orange.
The end point of the Trend is the slide bar
button.
Adding a trend in a Quick Pick box can be done when creating or changing a Quick Pick in a
scenario or when creating a Quick Pick in Manage Quick Pick.
A trend will change the value in the Quick Pick that was active, to the values in selected
Quick Pick, over the time selected. This means that you can have quick pick designed to
respond to a variety of learner responses.
When changing a trend on the fly you select your new parameter value and the Trend time
using the slide bars. Once you are ready to start the trend you press Go. You can continue to
make changes and add further trends to other parameters and these will be independent of
any other trend running.
To cancel all trends, press and hold over the Go button until it flashes. You can also create a
new trend, which will override the current trend.
Trending time is synchronised with Virtual Time, so if you advance time it will also advance
the trend.
Virtual Time
Using the Virtual Time slider allow the forward movement of time if moved forward
or provide a delay in time if it is moved backwards. The Virtual Time bar can be
moved forward up to 2 minutes.
Virtual time is synchronised with trending time, so if you
advance time it will also advance the trend.
Pacing & Shock Default
You can change the pacing and shock default in the Options Screen
as required by using the slide bar to change the value at which
partial capture will occur and the shock will be delivered.
ALSI USER GUIDE
Version 4.5 August 2015 Page 48
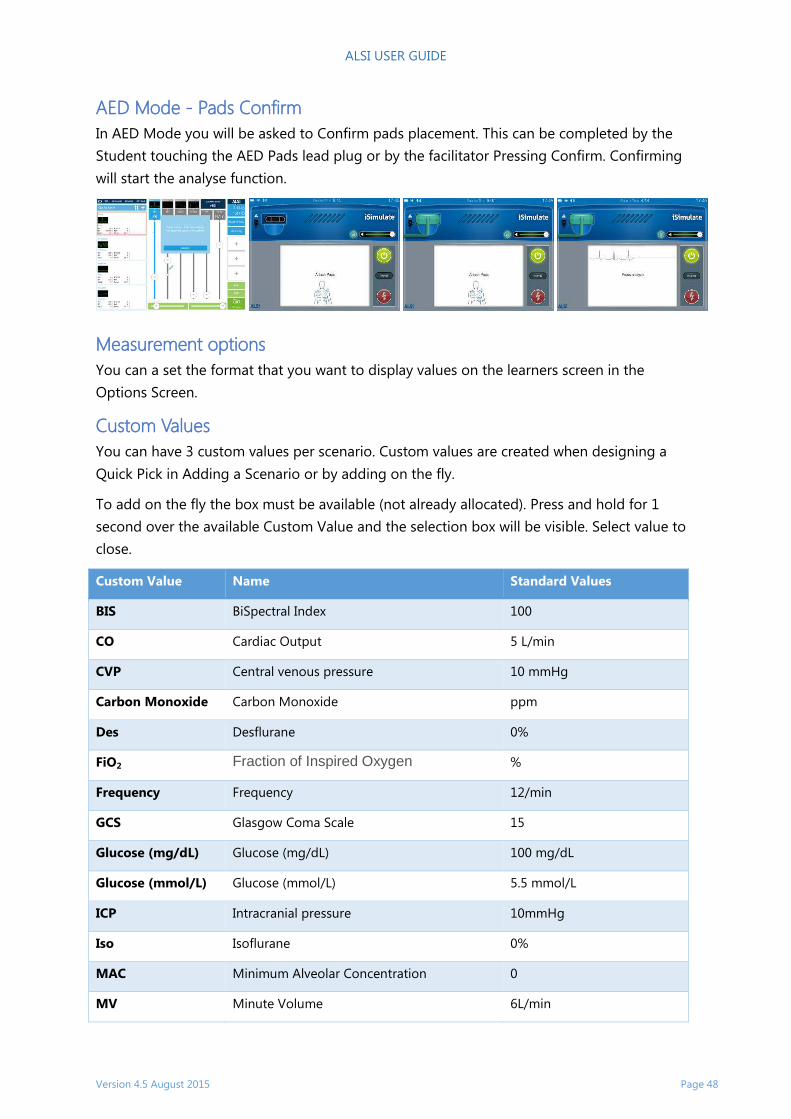
AED Mode - Pads Confirm
In AED Mode you will be asked to Confirm pads placement. This can be completed by the
Student touching the AED Pads lead plug or by the facilitator Pressing Confirm. Confirming
will start the analyse function.
Measurement options
You can a set the format that you want to display values on the learners screen in the
Options Screen.
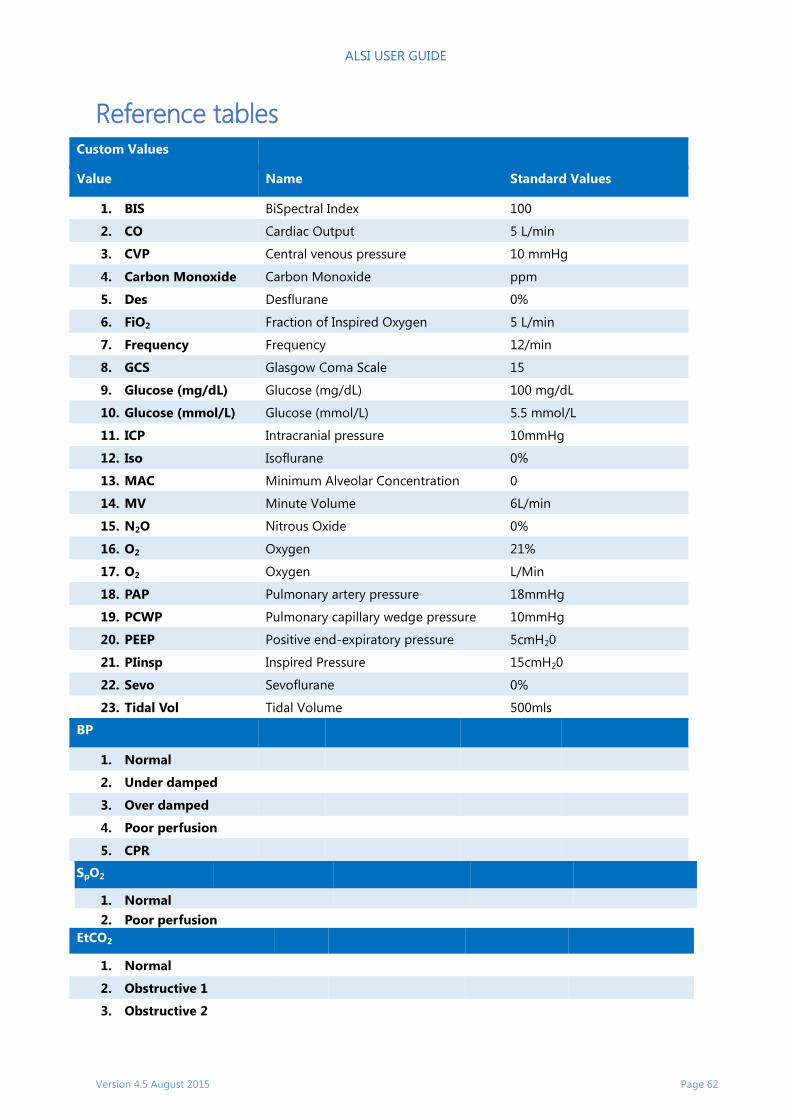
Custom Values
You can have 3 custom values per scenario. Custom values are created when designing a
Quick Pick in Adding a Scenario or by adding on the fly.
To add on the fly the box must be available (not already allocated). Press and hold for 1
second over the available Custom Value and the selection box will be visible. Select value to
close.
Custom Value Name Standard Values
BIS BiSpectral Index 100
CO Cardiac Output 5 L/min
CVP Central venous pressure 10 mmHg
Carbon Monoxide Carbon Monoxide ppm
Des Desflurane 0%
FiO2 Fraction of Inspired Oxygen %
Frequency Frequency 12/min
GCS Glasgow Coma Scale 15
Glucose (mg/dL) Glucose (mg/dL) 100 mg/dL
Glucose (mmol/L) Glucose (mmol/L) 5.5 mmol/L
ICP Intracranial pressure 10mmHg
Iso Isoflurane 0%
MAC Minimum Alveolar Concentration 0
MV Minute Volume 6L/min
ALSI USER GUIDE
Version 4.5 August 2015 Page 49
N2O Nitrous Oxide 0%
O2 Oxygen 21%
O2 Oxygen 5 L/min
PAP Pulmonary artery pressure 18mmHg
PCWP Pulmonary capillary wedge pressure 10mmHg
PEEP Positive end-expiratory pressure 5cmH20
PIinsp Inspired Pressure 15cmH20
Sevo Sevoflurane 0%
Tidal Vol Tidal Volume 500mls
ALSI USER GUIDE
Version 4.5 August 2015 Page 50
Learner Screen Functions While not required to function, the Learner should attach the appropriate sensors or leads to
the Patient simulator before the facilitator activates the waveforms and numbered
parameters on the monitor.
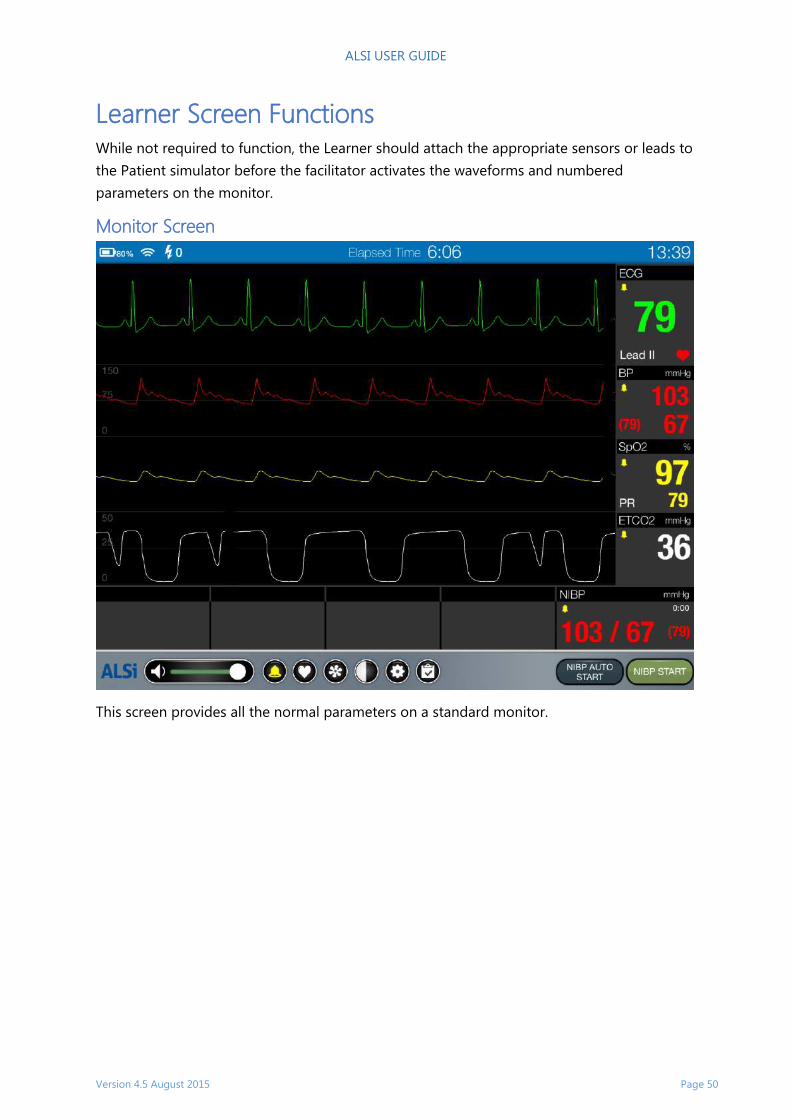
Monitor Screen
This screen provides all the normal parameters on a standard monitor.
ALSI USER GUIDE
Version 4.5 August 2015 Page 51
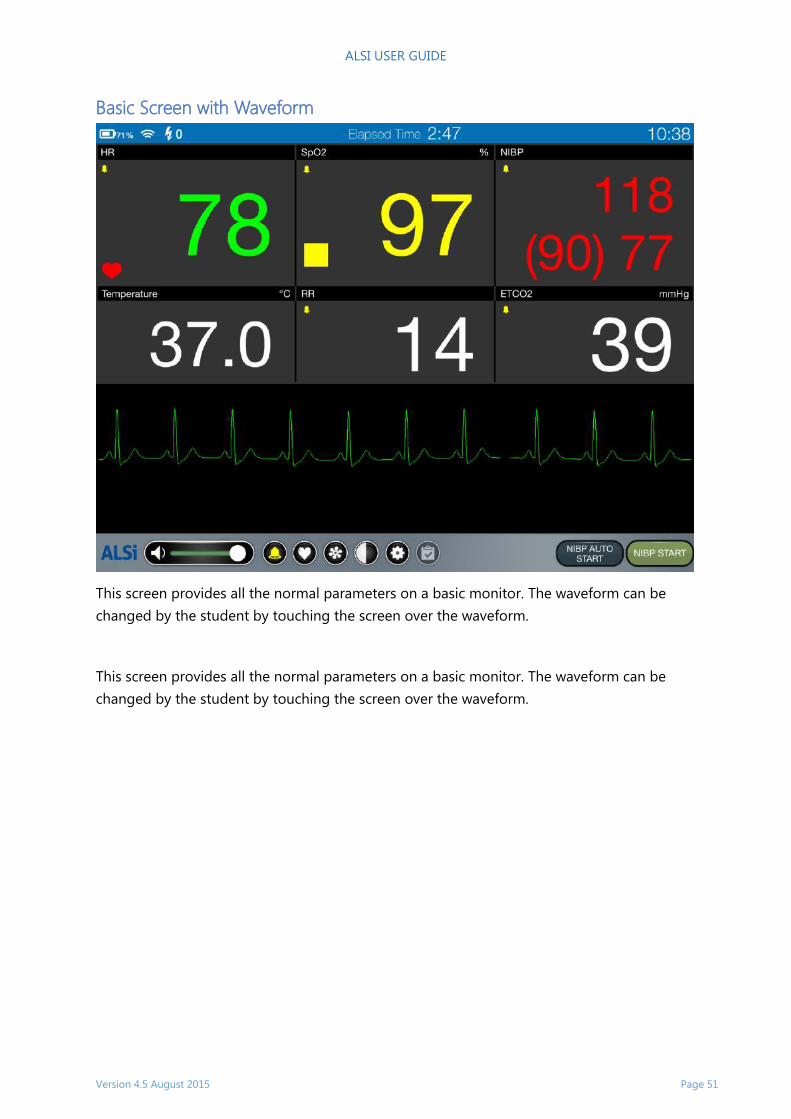
Basic Screen with Waveform
This screen provides all the normal parameters on a basic monitor. The waveform can be
changed by the student by touching the screen over the waveform.
This screen provides all the normal parameters on a basic monitor. The waveform can be
changed by the student by touching the screen over the waveform.
ALSI USER GUIDE
Version 4.5 August 2015 Page 52
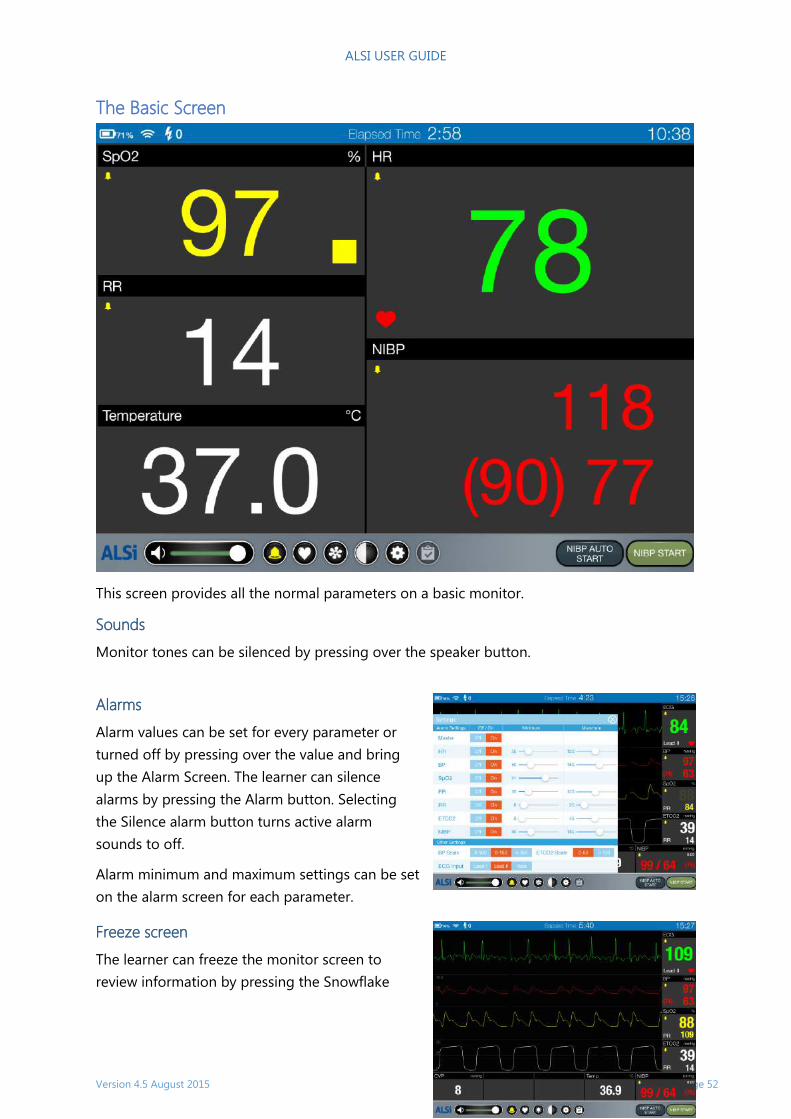
The Basic Screen
This screen provides all the normal parameters on a basic monitor.
Sounds
Monitor tones can be silenced by pressing over the speaker button.
Alarms
Alarm values can be set for every parameter or
turned off by pressing over the value and bring
up the Alarm Screen. The learner can silence
alarms by pressing the Alarm button. Selecting
the Silence alarm button turns active alarm
sounds to off.
Alarm minimum and maximum settings can be set
on the alarm screen for each parameter.
Freeze screen
The learner can freeze the monitor screen to
review information by pressing the Snowflake
ALSI USER GUIDE
Version 4.5 August 2015 Page 53
button. The freeze screen button will flash when active, Press the Sun button to unfreeze.
Contrast
The Contrast function is used where the bright lighting may make seeing the screen difficult.
This will change the values and waveforms to a black and white format.
NIBP
Selecting the NBP Start button starts a simulated inflation of the blood pressure cuff. The
NBP details will be shown in the NBP section of the Monitor. The blood pressure cuff does
not have to be connected to the patient for this function to be available on the Monitor.
The NIBP reading is updated either manually when the NIBP Start button is pushed or when
the NIBP Auto Start is selected.
The NIBP can also be set to run automatically as set in the Setup NBP menu. To set the Auto
time the learner presses over the NIBP reading and selects the Auto time.
Arterial Blood Pressure
Arterial Blood Pressure and NIBP share the same values, but Arterial Blood Pressure changes
are immediately shown, whereas NIBP require the learner to take a new reading.
Waveforms
The waveform is displayed when the sensor or leads are registered as attached in the
simulation. Waveforms can be turned off to display the parameter value only.
Parameter values
The parameter value is displayed when the sensor
or leads are registered as attached in the
simulation.
Recall investigations or other information
The learner can recall any previously supplied
investigation or image by pressing the Checked
Note Icon.
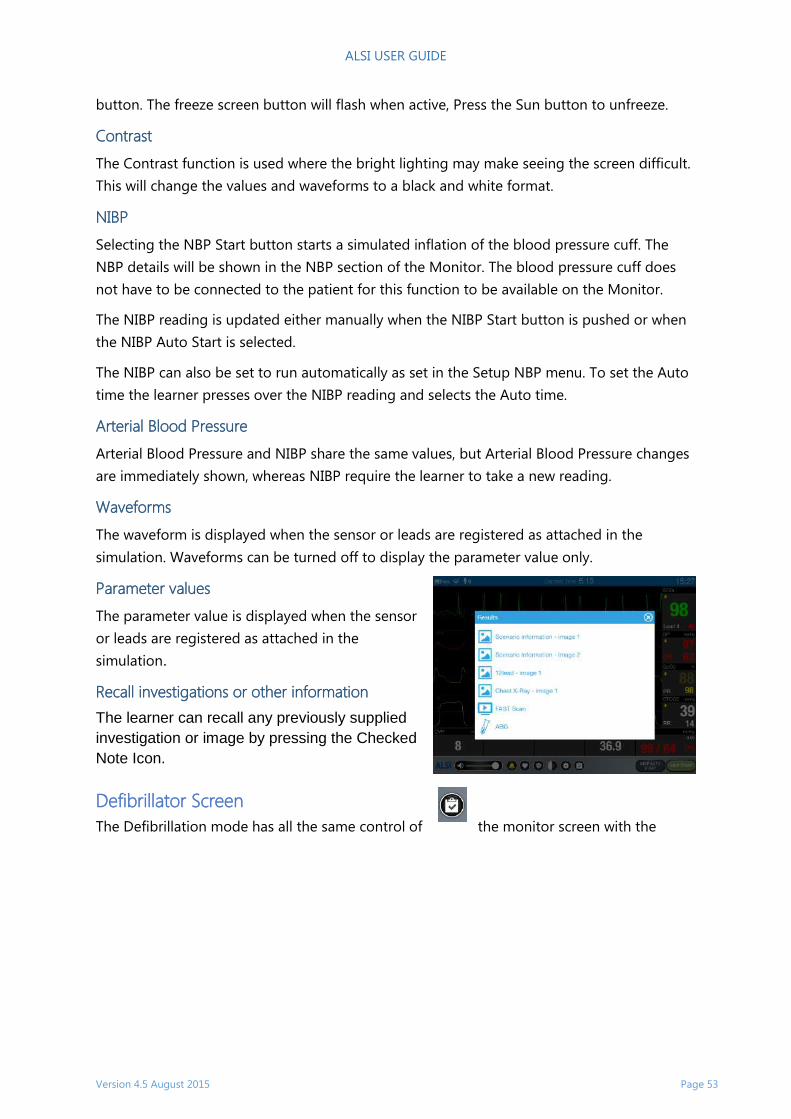
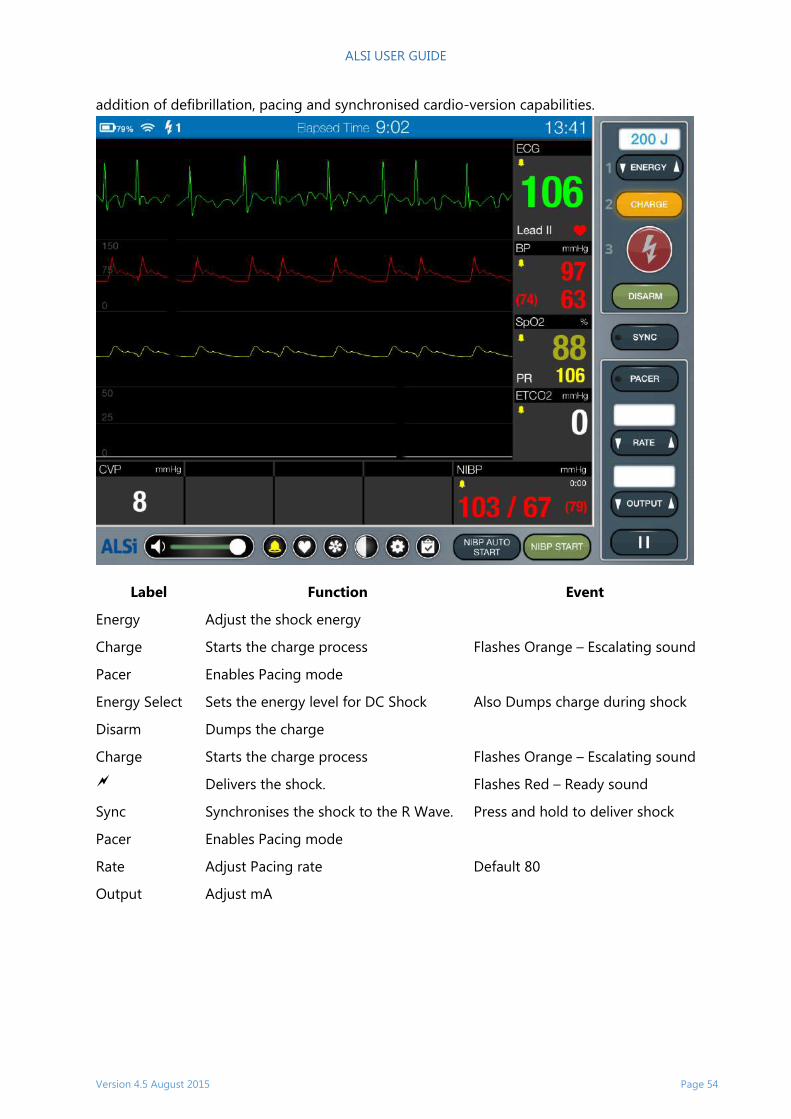
Defibrillator Screen
The Defibrillation mode has all the same control of the monitor screen with the
ALSI USER GUIDE
Version 4.5 August 2015 Page 54
addition of defibrillation, pacing and synchronised cardio-version capabilities.
Label Function Event
Energy Adjust the shock energy
Charge Starts the charge process Flashes Orange – Escalating sound
Pacer Enables Pacing mode
Energy Select Sets the energy level for DC Shock Also Dumps charge during shock
Disarm Dumps the charge
Charge Starts the charge process Flashes Orange – Escalating sound
Delivers the shock. Flashes Red – Ready sound
Sync Synchronises the shock to the R Wave. Press and hold to deliver shock
Pacer Enables Pacing mode
Rate Adjust Pacing rate Default 80
Output Adjust mA
ALSI USER GUIDE
Version 4.5 August 2015 Page 55
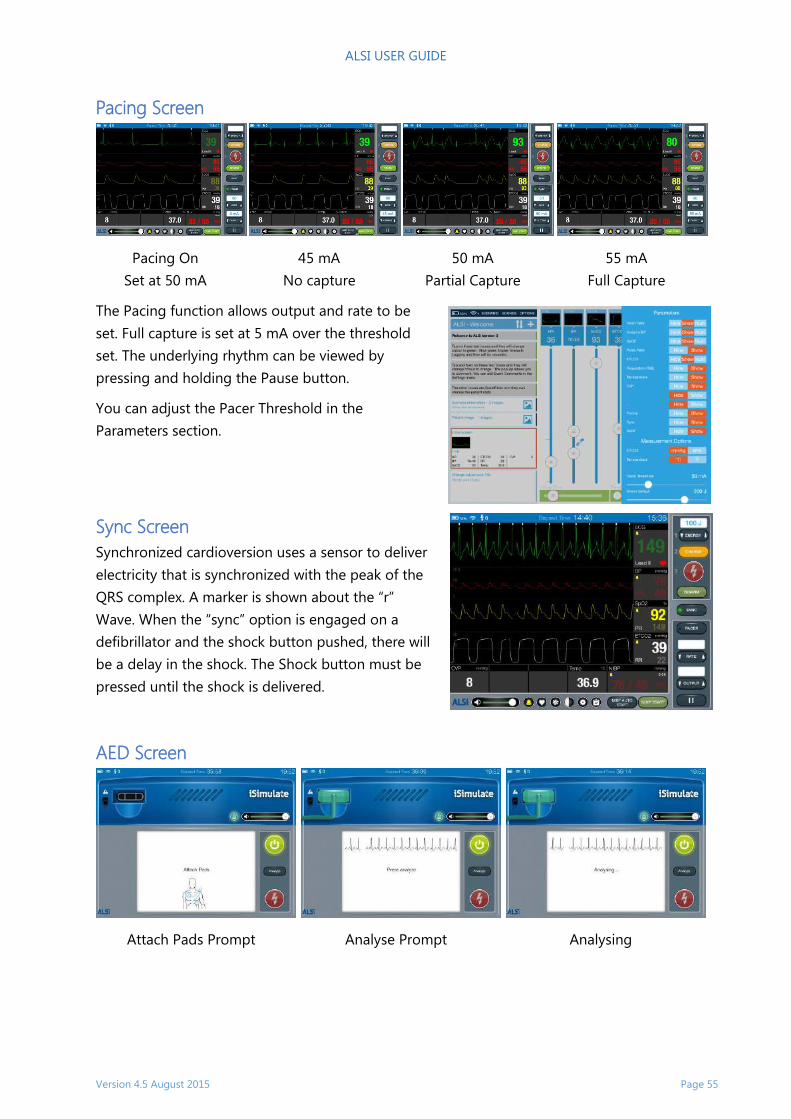
Pacing Screen
Pacing On
Set at 50 mA
45 mA
No capture
50 mA
Partial Capture
55 mA
Full Capture
The Pacing function allows output and rate to be
set. Full capture is set at 5 mA over the threshold
set. The underlying rhythm can be viewed by
pressing and holding the Pause button.
You can adjust the Pacer Threshold in the
Parameters section.
Sync Screen
Synchronized cardioversion uses a sensor to deliver
electricity that is synchronized with the peak of the
QRS complex. A marker is shown about the “r”
Wave. When the “sync” option is engaged on a
defibrillator and the shock button pushed, there will
be a delay in the shock. The Shock button must be
pressed until the shock is delivered.
AED Screen
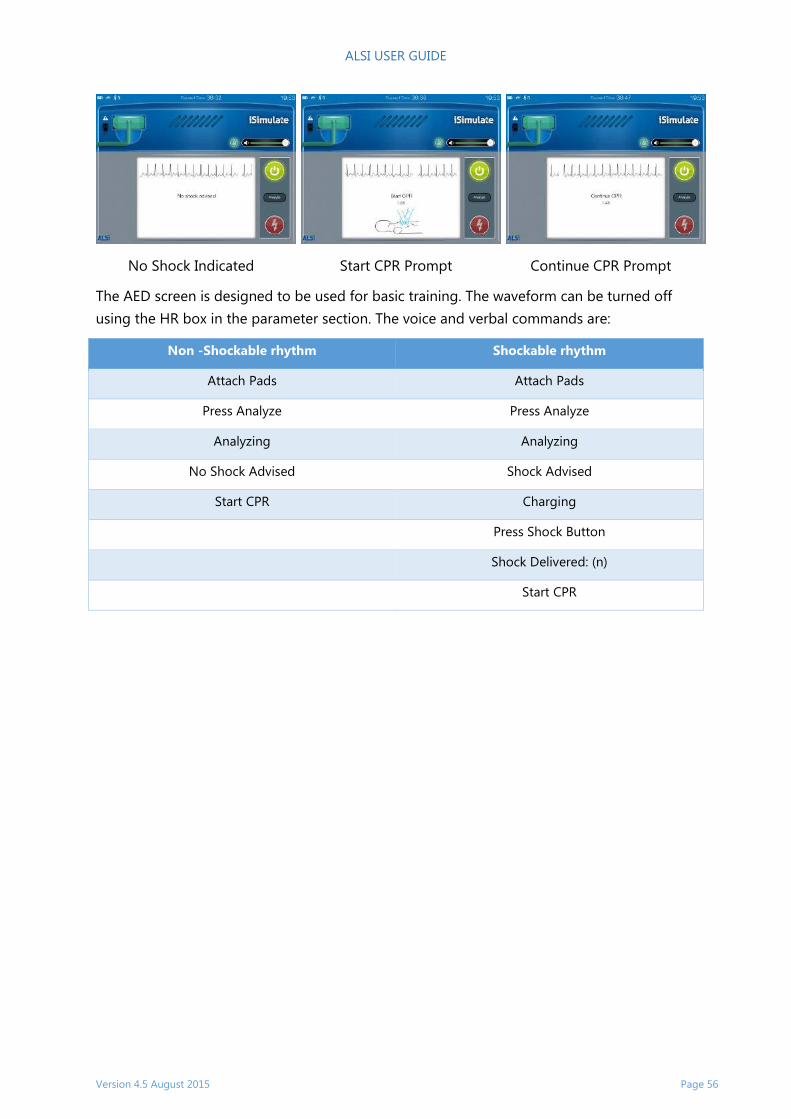
Attach Pads Prompt Analyse Prompt Analysing
ALSI USER GUIDE
Version 4.5 August 2015 Page 56
No Shock Indicated Start CPR Prompt Continue CPR Prompt
The AED screen is designed to be used for basic training. The waveform can be turned off
using the HR box in the parameter section. The voice and verbal commands are:
Non -Shockable rhythm Shockable rhythm
Attach Pads Attach Pads
Press Analyze Press Analyze
Analyzing Analyzing
No Shock Advised Shock Advised
Start CPR Charging
Press Shock Button
Shock Delivered: (n)
Start CPR

ALSI USER GUIDE
Version 4.5 August 2015 Page 57
General Settings The General Settings allows you to change the colour of waveforms and also the language of
ALSi.
To change the colours of the values and waveforms
1. From the selection screen select
Settings
2. Select General Settings
3. Press over colour boxes to bring up
colour picker
4. Using colour picker select the new
colour
5. The new colour is displayed
ALSI USER GUIDE
Version 4.5 August 2015 Page 58
To change other settings
This section is used to change the following:
Measurement options
Quick Start Scenario – This will be
displayed as the Default Scenario
To change language or terms used
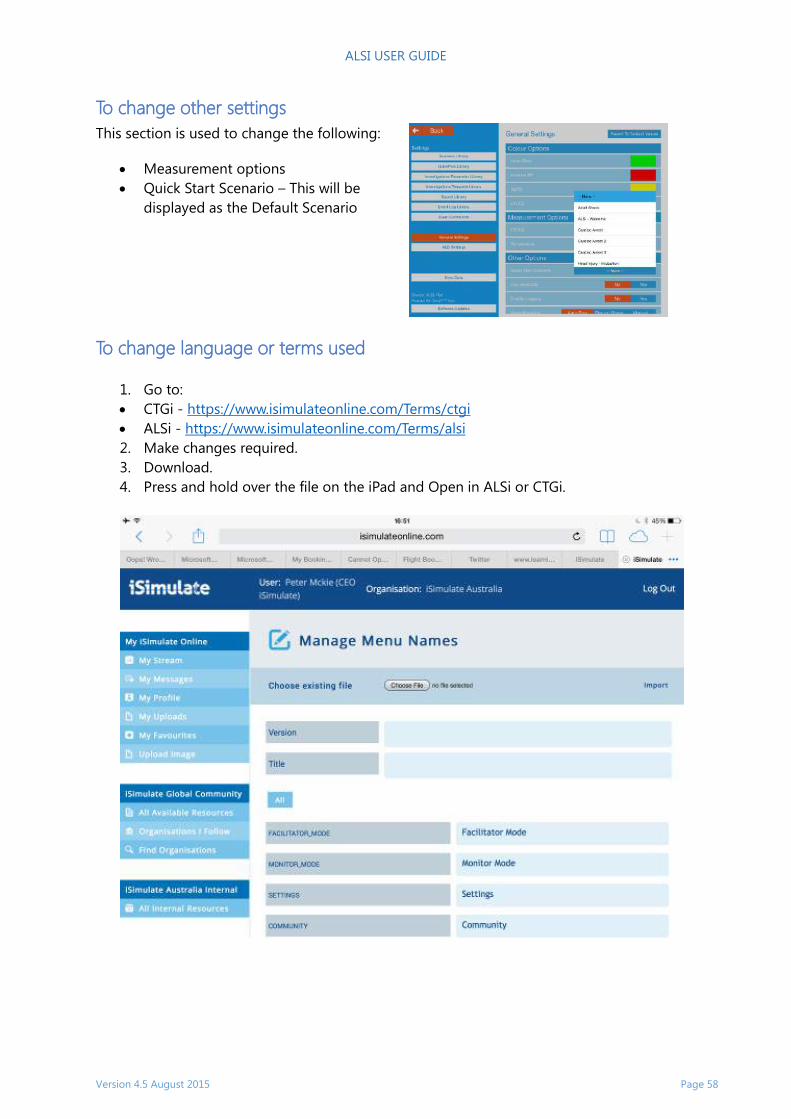
1. Go to:
CTGi - https://www.isimulateonline.com/Terms/ctgi
ALSi - https://www.isimulateonline.com/Terms/alsi
2. Make changes required.
3. Download.
4. Press and hold over the file on the iPad and Open in ALSi or CTGi.

ALSI USER GUIDE
Version 4.5 August 2015 Page 59
Tips and Tricks
Four-finger Swipe
Four-finger swipe left/right: Thanks to this gesture, you can have
relevant images and videos ready to go and swipe them in while
running ALSi. For example you would use a matching 12 lead ECG
and open it up in Photos first and then open ALSi Facilitator.
When you are ready to show the 12 Lead, you use the four-finger
swipe right to show the image and then use the four-finger swipe
left to return to ALSi Facilitator.
You can use this to show any image or video.
It is best that you remove any other non-required apps that are running so that you only
have ALSi and Photos active. To reveal the multitasking bar at the bottom of your iPad
screen, swipe up with four (or five) fingers at once, from the bottom of the iPad screen to the
top. This is the equivalent to double clicking the Home button.
You have to make sure that gestures are turned on for your iPad. Look in Settings, General,
Multitasking Gestures to set the slider to On if needed.
Apple TV
Apple TV and AirPlay Mirroring lets you show exactly what’s on
your iPad screen to everyone in the same room or a another
location. Show web pages, photos, videos, course material and
more on your HDTV via Apple TV. Zoom in and out and rotate
from portrait to landscape and your audience sees that too.
AirPlay does it all wirelessly, so you can work the room or sit
comfortably among the crowd.
If you see it, so can they, which is excellent for ECG tutorial or for other to follow the monitor
live in another room.
Connection
Turn off your iPads Cellular and Bluetooth function if not being used. iPads will default to the
strongest signal and this may occasionally cause the iPad to switch connections.
Use your Airport Express for a static environment and only use your Mobile Mi-Fi where you
have no power. In crowded environments, you may find a lag with Mi-Fi and connection
dropouts.

ALSI USER GUIDE
Version 4.5 August 2015 Page 60
Bluetooth Speaker
Use a small Bluetooth speaker to send sounds to the manikin. The
best place for the speaker is inside the manikin as shown in the
image. This will make the sound like it coming out of the mouth.
Trusting iSimulate and the ALSi app
Changes in iOS 9 have seen a change in the way an app developer is
trusted. Previously a popup message would be shown when first
opening ALSi to provide the trust permissions. Users must now
follow the steps below on each iPad running ALSi:
1. Open Settings
2. On the “General” section, scroll down to “Profile”
3. Tap on iSimulate Pty Ltd
4. Tap on ALSi or ALSi Facilitator
5. Tap on Trust
ALSI USER GUIDE
Version 4.5 August 2015 Page 61
Troubleshooting The main error will be caused by loss of Wi-Fi connectivity.
1. Generally to problem is caused by each iPad being connected to a different network.
a. Ensure that both iPads are connected to the same named network.
2. A firewall exists in the network that does not allow the iPads to see each other.
a. Use the Apple Airport Express WiFi device if supplied
b. Contact your IT Department
ALSi has been designed with a re-connection function that will constantly try to reconnect in
the event of loss on connectivity.
Both iPads must be on the same Wi-Fi network to connect to each other. Connection
between the iPads is completed using the bonjour service on port 5353. From there it creates
a TCP connection on a port which is assigned on a kernel level.
To assist with Wi-Fi connectivity we recommend the following:
1. Avoid using the 2.4Ghz band. Use high quality Wi-Fi system with 5GHz capabilities.
2.4GHz is the most widely used band in wireless networking and is crowded. Using
the 5GHz band means that if the interference is significant, you can switch to another
band and avoid all interference that 2.4GHz might have.
2. Reduce the number of mobile phones turned on in the training area.
3. Test your environment prior to use to minimise any issues that may occur. If you
continue to have wireless interference, you may wish to try moving your router closer
to the area where you will use your wireless devices the most.
4. Change channels. One of the easiest ways that you can help alleviate some of the
issues with Wi-Fi interference is by changing your router’s broadcast channel to one
not being used by surrounding routers.
5. Turn off the cellular function on the iPads as it may switch to that connection on the
iPad with cellular meaning that the iPads would be on different connections.
6. If not using Bluetooth, turn this function off to avoid any potential conflict.
ALSI USER GUIDE
Version 4.5 August 2015 Page 62
Reference tables Custom Values
Value Name Standard Values
1. BIS BiSpectral Index 100
2. CO Cardiac Output 5 L/min
3. CVP Central venous pressure 10 mmHg
4. Carbon Monoxide Carbon Monoxide ppm
5. Des Desflurane 0%
6. FiO2 Fraction of Inspired Oxygen 5 L/min
7. Frequency Frequency 12/min
8. GCS Glasgow Coma Scale 15
9. Glucose (mg/dL) Glucose (mg/dL) 100 mg/dL
10. Glucose (mmol/L) Glucose (mmol/L) 5.5 mmol/L
11. ICP Intracranial pressure 10mmHg
12. Iso Isoflurane 0%
13. MAC Minimum Alveolar Concentration 0
14. MV Minute Volume 6L/min
15. N2O Nitrous Oxide 0%
16. O2 Oxygen 21%
17. O2 Oxygen L/Min
18. PAP Pulmonary artery pressure 18mmHg
19. PCWP Pulmonary capillary wedge pressure 10mmHg
20. PEEP Positive end-expiratory pressure 5cmH20
21. PIinsp Inspired Pressure 15cmH20
22. Sevo Sevoflurane 0%
23. Tidal Vol Tidal Volume 500mls
BP
1. Normal
2. Under damped
3. Over damped
4. Poor perfusion
5. CPR
SpO2
1. Normal
2. Poor perfusion
EtCO2
1. Normal
2. Obstructive 1
3. Obstructive 2
ALSI USER GUIDE
Version 4.5 August 2015 Page 63
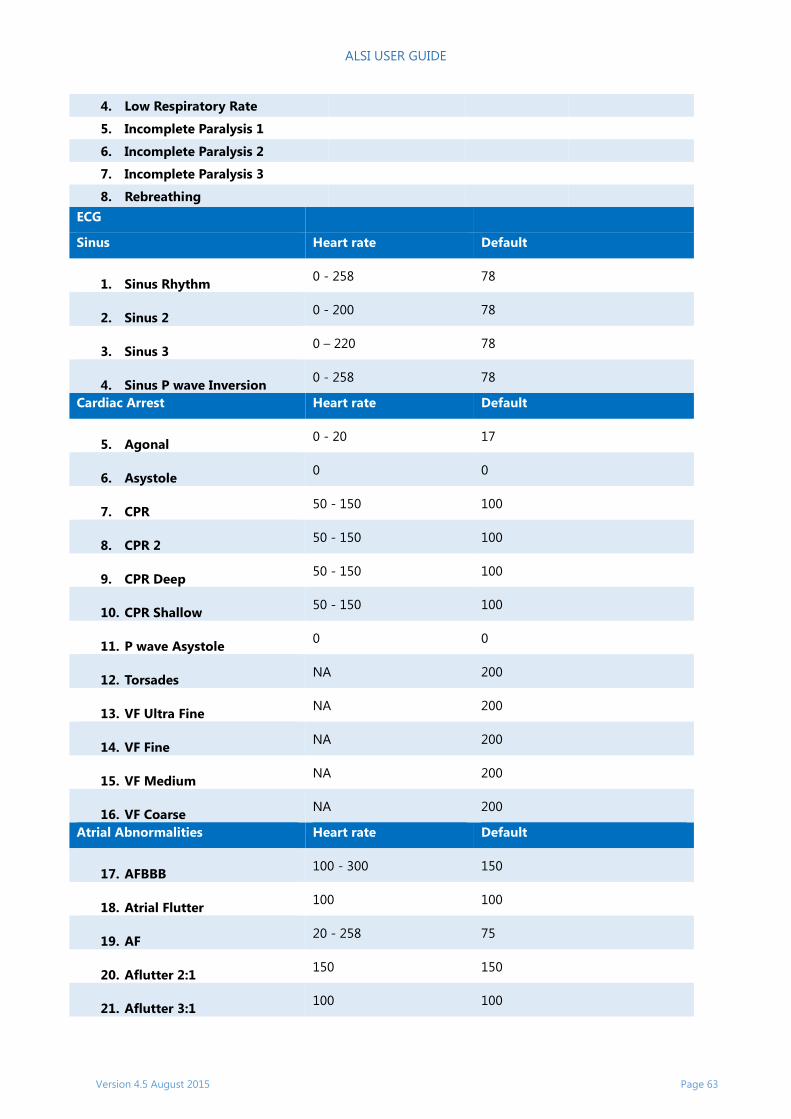
4. Low Respiratory Rate
5. Incomplete Paralysis 1
6. Incomplete Paralysis 2
7. Incomplete Paralysis 3
8. Rebreathing
ECG
Sinus Heart rate Default
1. Sinus Rhythm 0 - 258 78
2. Sinus 2 0 - 200 78
3. Sinus 3 0 – 220 78
4. Sinus P wave Inversion 0 - 258 78
Cardiac Arrest Heart rate Default
5. Agonal 0 - 20 17
6. Asystole 0 0
7. CPR 50 - 150 100
8. CPR 2 50 - 150 100
9. CPR Deep 50 - 150 100
10. CPR Shallow 50 - 150 100
11. P wave Asystole 0 0
12. Torsades NA 200
13. VF Ultra Fine NA 200
14. VF Fine NA 200
15. VF Medium NA 200
16. VF Coarse NA 200
Atrial Abnormalities Heart rate Default
17. AFBBB 100 - 300 150
18. Atrial Flutter 100 100
19. AF 20 - 258 75
20. Aflutter 2:1 150 150
21. Aflutter 3:1 100 100
ALSI USER GUIDE
Version 4.5 August 2015 Page 64
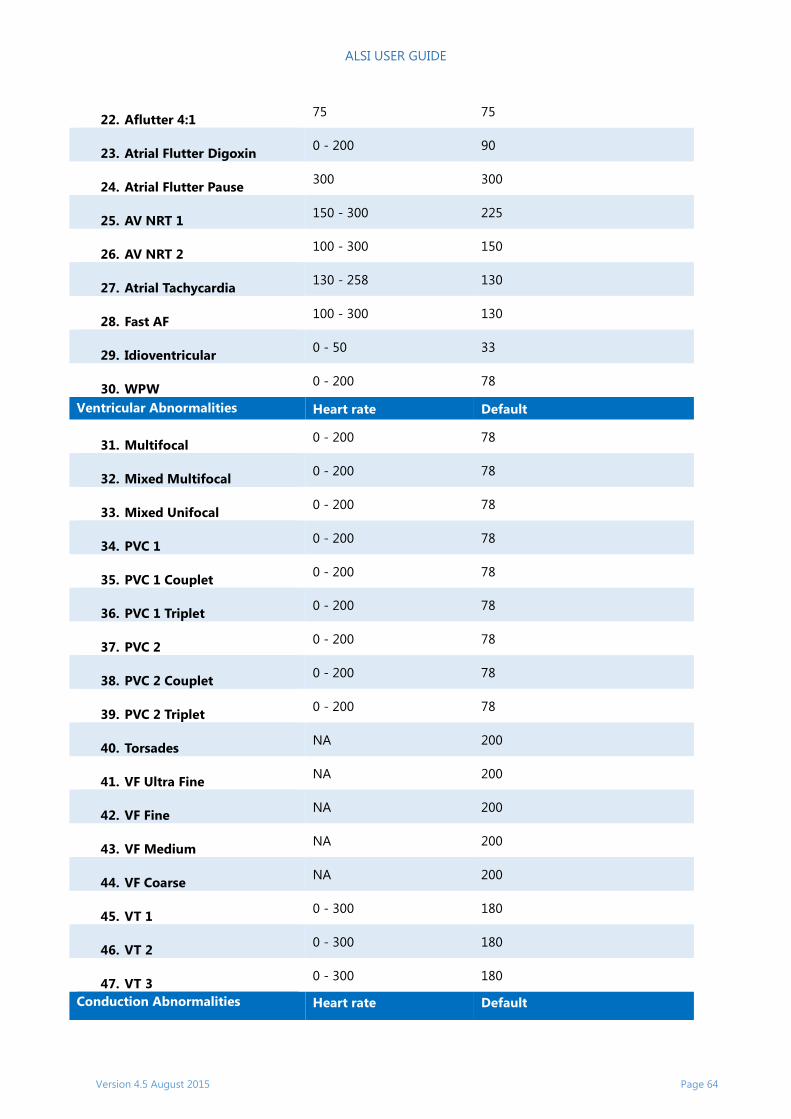
22. Aflutter 4:1 75 75
23. Atrial Flutter Digoxin 0 - 200 90
24. Atrial Flutter Pause 300 300
25. AV NRT 1 150 - 300 225
26. AV NRT 2 100 - 300 150
27. Atrial Tachycardia 130 - 258 130
28. Fast AF 100 - 300 130
29. Idioventricular 0 - 50 33
30. WPW 0 - 200 78
Ventricular Abnormalities Heart rate Default
31. Multifocal 0 - 200 78
32. Mixed Multifocal 0 - 200 78
33. Mixed Unifocal 0 - 200 78
34. PVC 1 0 - 200 78
35. PVC 1 Couplet 0 - 200 78
36. PVC 1 Triplet 0 - 200 78
37. PVC 2 0 - 200 78
38. PVC 2 Couplet 0 - 200 78
39. PVC 2 Triplet 0 - 200 78
40. Torsades NA 200
41. VF Ultra Fine NA 200
42. VF Fine NA 200
43. VF Medium NA 200
44. VF Coarse NA 200
45. VT 1 0 - 300 180
46. VT 2 0 - 300 180
47. VT 3 0 - 300 180
Conduction Abnormalities Heart rate Default

ALSI USER GUIDE
Version 4.5 August 2015 Page 65
48. 1o HB
0 - 258 78
49. 2o HB T1
10 - 120 60
50. 2o HB T2
10 - 120 60
51. 2o HB T2 2:1
0 - 150 52
52. 2o HB T2 3:1
0 - 150 50
53. 2o HB T2 4:1
0 - 150 50
54. 2o HB T2 3:2
0 - 150 50
55. 2o HB T2 4:3
0 - 150 50
56. 2o HB T2 V 1
0 - 150 40
57. 2o HB T2 V 2
0 - 150 20
58. 3o HB
0 - 80 40
59. Junctional 0 - 200 78
60. LBBB 0 - 200 78
61. RBBB 0 - 200 78
Ischaemia Heart rate Default
62. Inferior Infarct MI 0 - 200 78
63. Sinus with ST ↓ 0 – 258 78
64. Sinus with ST ↑ 0 - 258 78
65. Miscellaneous Heart rate Default
66. Electrical Alternans 0 - 200 150
67. Hypokalaemia 0 - 200 78
68. Hyperkalaemia Mild 0 - 200 78
69. Hyperkalaemia Severe 0 - 100 56
70. Hypothermia 0 - 100 39
71. Long QT 0 - 200 78
72. Low Voltage 0 - 200 78
73. Pericarditis 0 - 258 78

ALSI USER GUIDE
Version 4.5 August 2015 Page 66
74. Dual Chamber Pacemaker 0 - 258 150
75. Single Chamber Pacemaker 0 - 258 150
76. Paediatric Heart rate Default
77. Neonatal 50 - 300 150
78. Young Child SR 0 - 200 125
ALSI USER GUIDE
Version 4.5 August 2015 Page 67
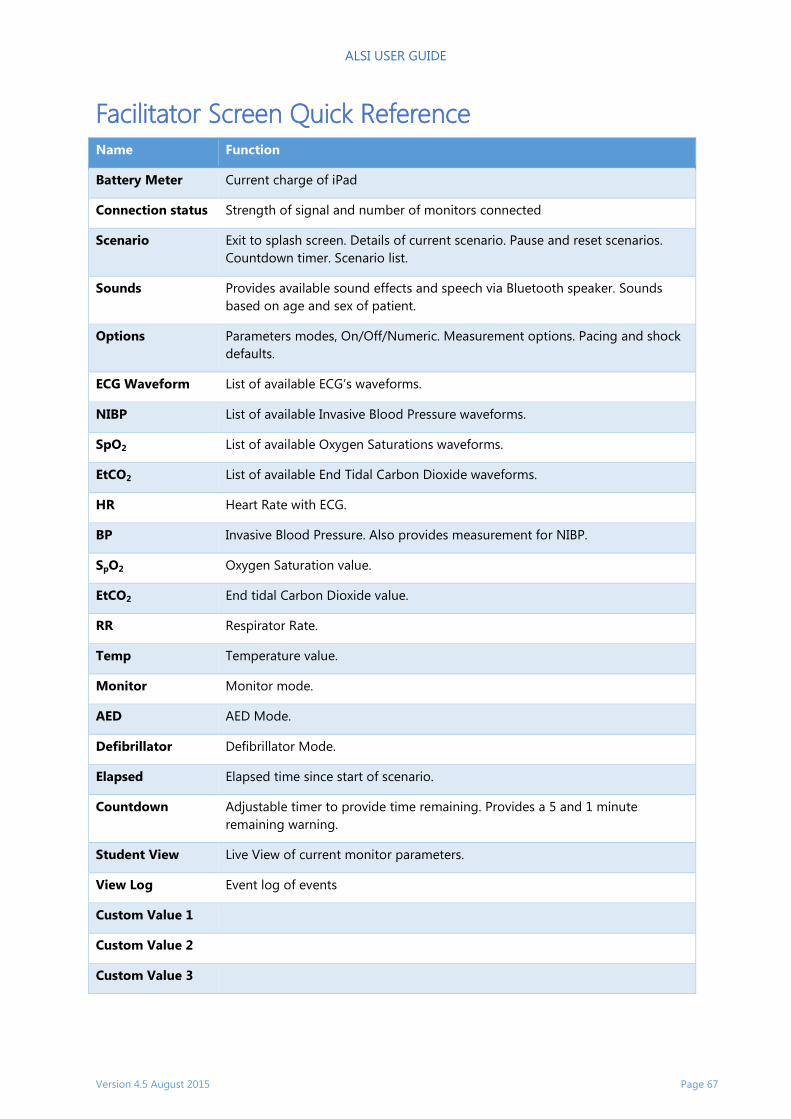
Facilitator Screen Quick Reference
Name Function
Battery Meter Current charge of iPad
Connection status Strength of signal and number of monitors connected
Scenario Exit to splash screen. Details of current scenario. Pause and reset scenarios.
Countdown timer. Scenario list.
Sounds Provides available sound effects and speech via Bluetooth speaker. Sounds
based on age and sex of patient.
Options Parameters modes, On/Off/Numeric. Measurement options. Pacing and shock
defaults.
ECG Waveform List of available ECG’s waveforms.
NIBP List of available Invasive Blood Pressure waveforms.
SpO2 List of available Oxygen Saturations waveforms.
EtCO2 List of available End Tidal Carbon Dioxide waveforms.
HR Heart Rate with ECG.
BP Invasive Blood Pressure. Also provides measurement for NIBP.
SpO2 Oxygen Saturation value.
EtCO2 End tidal Carbon Dioxide value.
RR Respirator Rate.
Temp Temperature value.
Monitor Monitor mode.
AED AED Mode.
Defibrillator Defibrillator Mode.
Elapsed Elapsed time since start of scenario.
Countdown Adjustable timer to provide time remaining. Provides a 5 and 1 minute
remaining warning.
Student View Live View of current monitor parameters.
View Log Event log of events
Custom Value 1
Custom Value 2
Custom Value 3
ALSI USER GUIDE
Version 4.5 August 2015 Page 68
PEA Pulseless Electrical Activity. Sets all value to zero.
CPR Mimics a CPR waveform.
Start/Go Starts scenario or activates a change in parameters.
Virtual Time Allows time to be moved forward or provides a temporary pause in elapsed
time.
Trend Time Adjust the amount of time that changes occur.
Quick Picks List of available pre-set events or actions.
Scenario Points Provide text of scenario objectives and events. Each point can be selected to
show which points where completed.
ALSI USER GUIDE
Version 4.5 August 2015 Page 69
Learners Screen Quick Reference
Name Function
Battery Meter Current charge of iPad
Connection status Strength of signal and number of monitors connected
Shocks Number of shocks delivered
Elapsed Time Elapsed time since start of scenario.
Countdown Adjustable timer to provide time remaining. Provides a 5 and 1 minute
remaining warning.
Alarm Options Press and hold over each parameter value to set alarms.
Contrast Mode Changes the screen to Black & White for outside environment.
Freeze Screen Snowflake symbol () freezes the screen to allow for evaluation of waveforms.
Select Sun symbol () to unfreeze.
Recall Symbol recalls any supplied investigations or images
Speaker Turn sound on/off.
Alarms Silence alarm for 2 minutes, unless another alarm is activated.
ALSis Double press to exit Learner Screen.
HR Heart Rate.
BP Invasive Blood Pressure. Also provides measurement for NIBP.
SpO2 Oxygen Saturation value.
EtCo2 End tidal Carbon Dioxide value.
RR Respirator Rate.
Temp Temperature value.
ECG Waveform Current waveform.
Blood Pressure Blood Pressure waveform.
SpO2 SpO2 waveform.
Custom Values 3 customs values.
NIBP Auto Start Pre-set time to activate NIBP function.
NIBP Start Manually start NIBP.
Energy Set energy level for cardioversion (Default 200).
Charge Charge defibrillator.
Deliver shock.
Disarm Dump shock.
Sync Turn on Synchronized Cardioversion feature.

ALSI USER GUIDE
Version 4.5 August 2015 Page 70
Pacer Turn on Pacer Function.
Rate Set pacer rate (Default 80).
Output Set pacer threshold (Default 50mA).
II Pause Pacing (Shows underlying rhythm)

ALSI USER GUIDE
Version 4.5 August 2015 Page 71
Unit 17 Molonglo Mall
Fyshwick ACT 2609
Australia
Phone: +61 2 6129 8200 ~ Fax: +61 2 6129 8220
Web: www.isimulate.com Email: [email protected]