Embed Size (px)
Citation preview

Applicant Tracking System’s Training Dean/Vice President/Delegate Guide Version Final, July 7, 2017
Page 2 of 19 Dean/Vice President/Delegate QRG Final, July 7, 2017
Applicant Tracking System’s Training
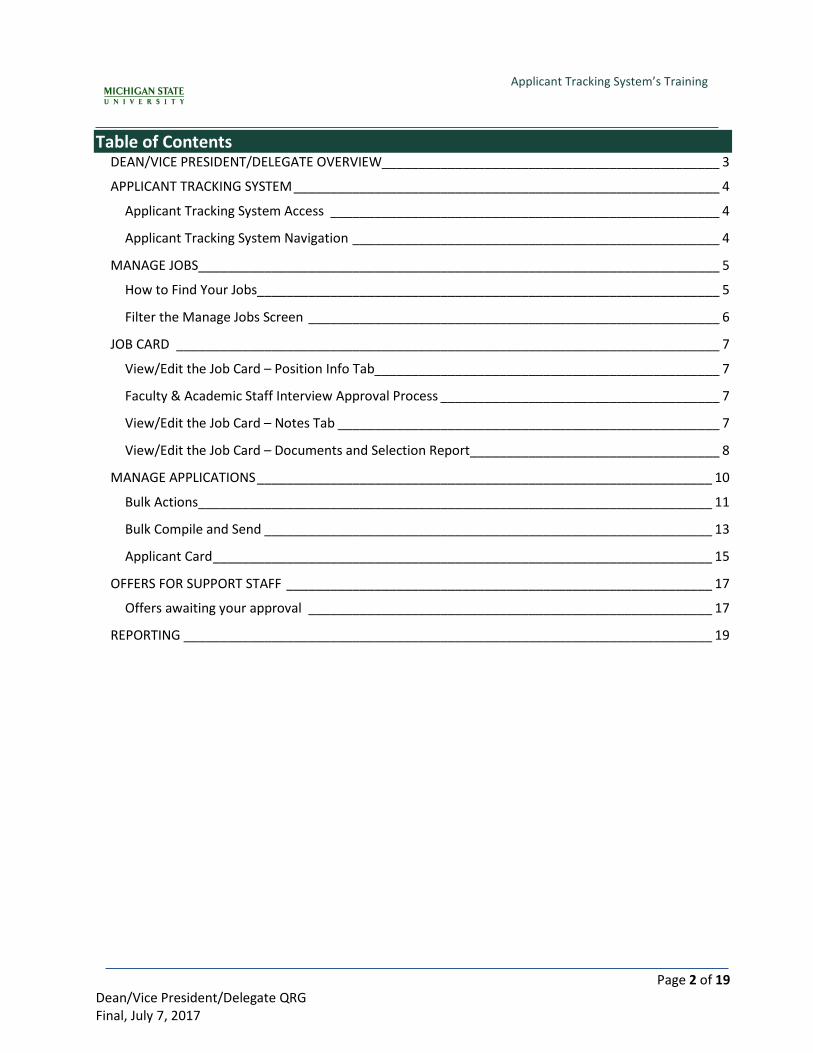
Table of Contents DEAN/VICE PRESIDENT/DELEGATE OVERVIEW______________________________________________ 3
APPLICANT TRACKING SYSTEM __________________________________________________________ 4
Applicant Tracking System Access _____________________________________________________ 4
Applicant Tracking System Navigation __________________________________________________ 4
MANAGE JOBS _______________________________________________________________________ 5
How to Find Your Jobs_______________________________________________________________ 5
Filter the Manage Jobs Screen ________________________________________________________ 6
JOB CARD __________________________________________________________________________ 7
View/Edit the Job Card – Position Info Tab_______________________________________________ 7
Faculty & Academic Staff Interview Approval Process ______________________________________ 7
View/Edit the Job Card – Notes Tab ____________________________________________________ 7
View/Edit the Job Card – Documents and Selection Report __________________________________ 8
MANAGE APPLICATIONS ______________________________________________________________ 10
Bulk Actions ______________________________________________________________________ 11
Bulk Compile and Send _____________________________________________________________ 13
Applicant Card ____________________________________________________________________ 15
OFFERS FOR SUPPORT STAFF __________________________________________________________ 17
Offers awaiting your approval _______________________________________________________ 17
REPORTING ________________________________________________________________________ 19
Page 3 of 19 Dean/Vice President/Delegate QRG Final, July 7, 2017
Applicant Tracking System’s Training
DEAN/VICE PRESIDENT/DELEGATE OVERVIEW The Applicant Tracking System provides a set of tools for managing and organizing job postings and applicants. It provides oversight into the numerous organizational units in each area, and empowers teams to organize and monitor a large volume of postings and applicants. It allows Deans/Vice Presidents/Delegates an opportunity to manage progress being made in their departments and colleges. For consistency within MSU, we will use the term Applicant Tracking System (ATS) as the name of our new system for recruiting and hiring. The software being implemented is called PageUp. These terms may be used interchangeably; however, all training materials will reference the Applicant Tracking System (ATS). Deans/Vice Presidents/Delegates can complete the following tasks within the ATS:
• Use Manage Jobs to oversee job postings and their statuses • Use Manage Applicants to oversee applicants and their statuses • Perform approvals
Page 4 of 19 Dean/Vice President/Delegate QRG Final, July 7, 2017
Applicant Tracking System’s Training
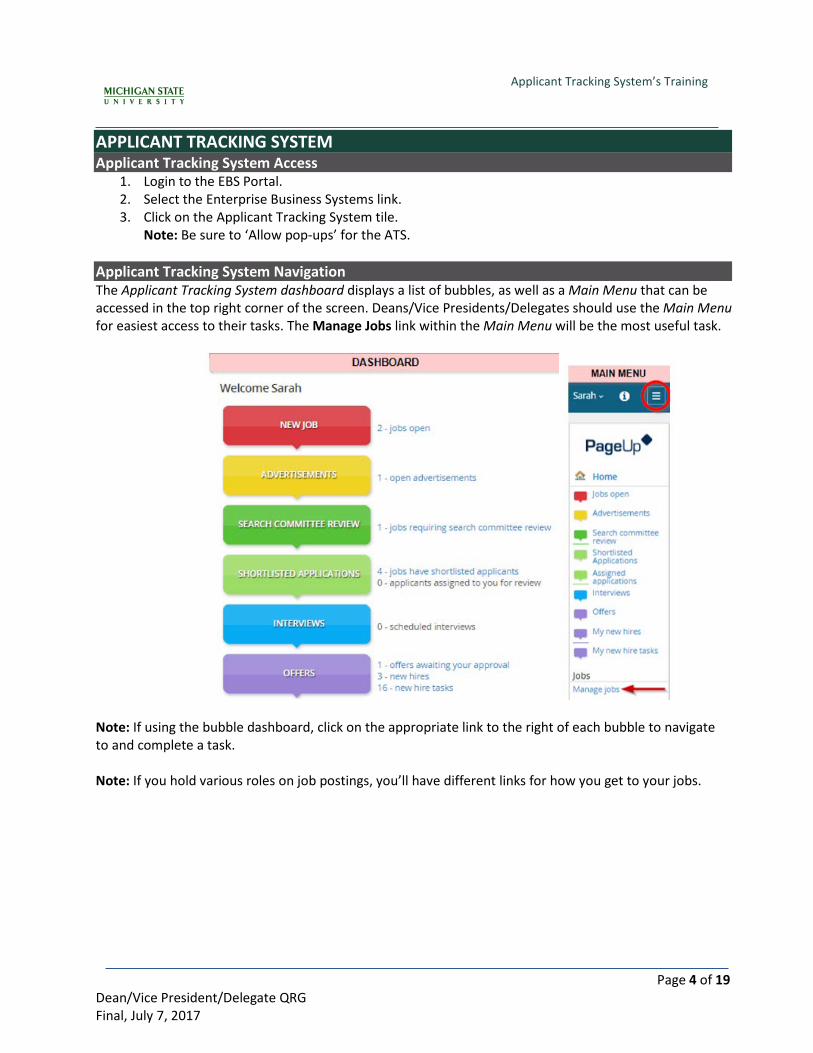
APPLICANT TRACKING SYSTEM Applicant Tracking System Access
1. Login to the EBS Portal. 2. Select the Enterprise Business Systems link. 3. Click on the Applicant Tracking System tile.
Note: Be sure to ‘Allow pop-ups’ for the ATS. Applicant Tracking System Navigation The Applicant Tracking System dashboard displays a list of bubbles, as well as a Main Menu that can be accessed in the top right corner of the screen. Deans/Vice Presidents/Delegates should use the Main Menu for easiest access to their tasks. The Manage Jobs link within the Main Menu will be the most useful task.
Note: If using the bubble dashboard, click on the appropriate link to the right of each bubble to navigate to and complete a task. Note: If you hold various roles on job postings, you’ll have different links for how you get to your jobs.
Page 5 of 19 Dean/Vice President/Delegate QRG Final, July 7, 2017
Applicant Tracking System’s Training
MANAGE JOBS How to Find Your Jobs
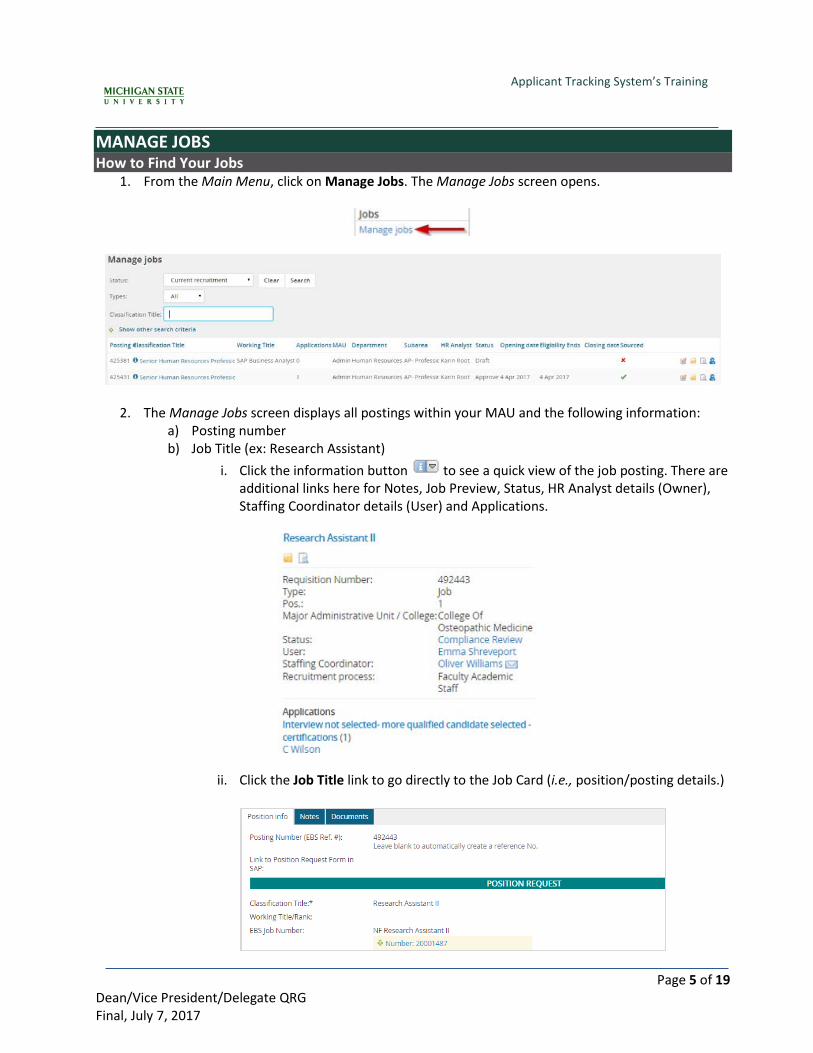
1. From the Main Menu, click on Manage Jobs. The Manage Jobs screen opens.
2. The Manage Jobs screen displays all postings within your MAU and the following information: a) Posting number b) Job Title (ex: Research Assistant)
i. Click the information button to see a quick view of the job posting. There are additional links here for Notes, Job Preview, Status, HR Analyst details (Owner), Staffing Coordinator details (User) and Applications.
ii. Click the Job Title link to go directly to the Job Card (i.e., position/posting details.)
Page 6 of 19 Dean/Vice President/Delegate QRG Final, July 7, 2017
Applicant Tracking System’s Training
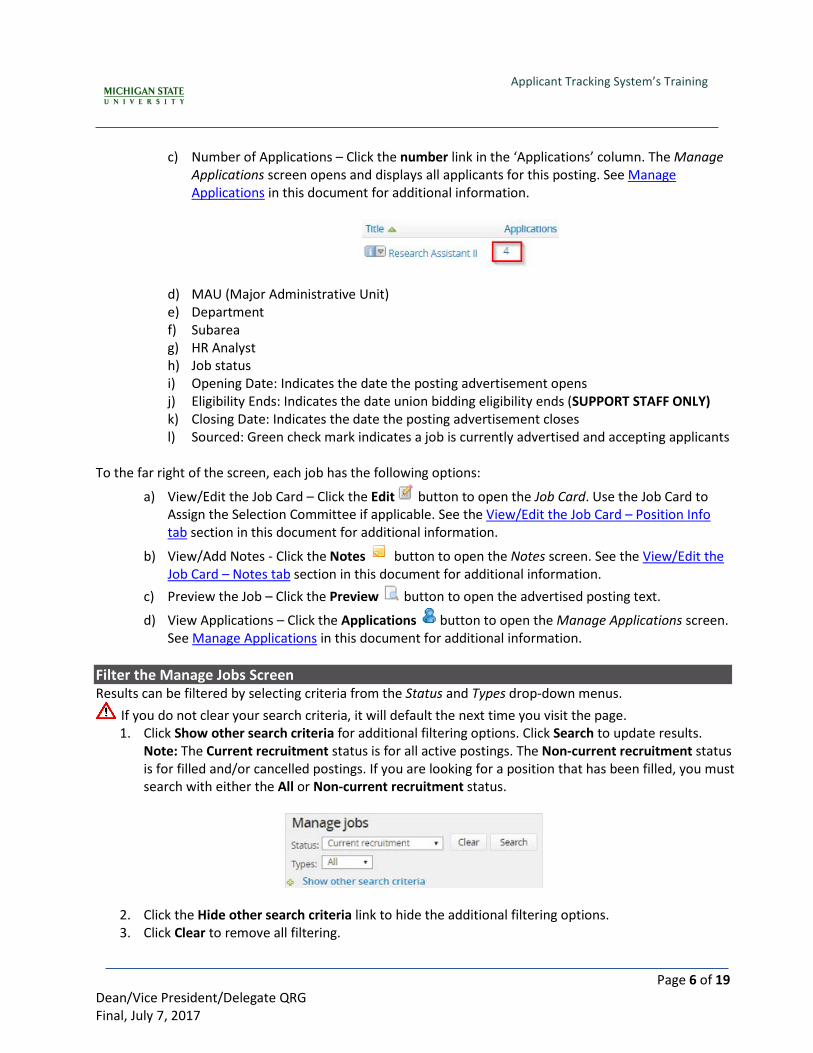
c) Number of Applications – Click the number link in the ‘Applications’ column. The Manage
Applications screen opens and displays all applicants for this posting. See Manage Applications in this document for additional information.
d) MAU (Major Administrative Unit) e) Department f) Subarea g) HR Analyst h) Job status i) Opening Date: Indicates the date the posting advertisement opens j) Eligibility Ends: Indicates the date union bidding eligibility ends (SUPPORT STAFF ONLY) k) Closing Date: Indicates the date the posting advertisement closes l) Sourced: Green check mark indicates a job is currently advertised and accepting applicants
To the far right of the screen, each job has the following options:
a) View/Edit the Job Card – Click the Edit button to open the Job Card. Use the Job Card to Assign the Selection Committee if applicable. See the View/Edit the Job Card – Position Info tab section in this document for additional information.
b) View/Add Notes - Click the Notes button to open the Notes screen. See the View/Edit the Job Card – Notes tab section in this document for additional information.
c) Preview the Job – Click the Preview button to open the advertised posting text.
d) View Applications – Click the Applications button to open the Manage Applications screen. See Manage Applications in this document for additional information.
Filter the Manage Jobs Screen Results can be filtered by selecting criteria from the Status and Types drop-down menus.
If you do not clear your search criteria, it will default the next time you visit the page. 1. Click Show other search criteria for additional filtering options. Click Search to update results.
Note: The Current recruitment status is for all active postings. The Non-current recruitment status is for filled and/or cancelled postings. If you are looking for a position that has been filled, you must search with either the All or Non-current recruitment status.
2. Click the Hide other search criteria link to hide the additional filtering options. 3. Click Clear to remove all filtering.
Page 7 of 19 Dean/Vice President/Delegate QRG Final, July 7, 2017
Applicant Tracking System’s Training
JOB CARD View/Edit the Job Card – Position Info Tab
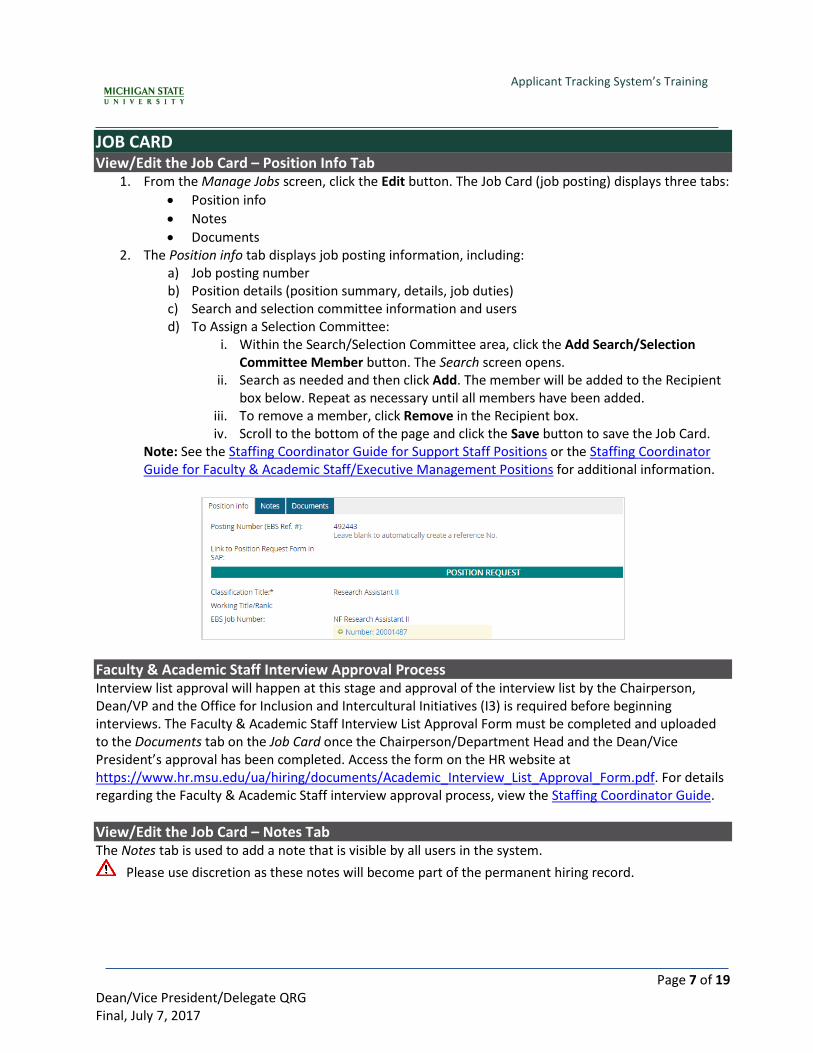
1. From the Manage Jobs screen, click the Edit button. The Job Card (job posting) displays three tabs: • Position info • Notes • Documents
2. The Position info tab displays job posting information, including: a) Job posting number b) Position details (position summary, details, job duties) c) Search and selection committee information and users d) To Assign a Selection Committee:
i. Within the Search/Selection Committee area, click the Add Search/Selection Committee Member button. The Search screen opens.
ii. Search as needed and then click Add. The member will be added to the Recipient box below. Repeat as necessary until all members have been added.
iii. To remove a member, click Remove in the Recipient box. iv. Scroll to the bottom of the page and click the Save button to save the Job Card.
Note: See the Staffing Coordinator Guide for Support Staff Positions or the Staffing Coordinator Guide for Faculty & Academic Staff/Executive Management Positions for additional information.
Faculty & Academic Staff Interview Approval Process Interview list approval will happen at this stage and approval of the interview list by the Chairperson, Dean/VP and the Office for Inclusion and Intercultural Initiatives (I3) is required before beginning interviews. The Faculty & Academic Staff Interview List Approval Form must be completed and uploaded to the Documents tab on the Job Card once the Chairperson/Department Head and the Dean/Vice President’s approval has been completed. Access the form on the HR website at https://www.hr.msu.edu/ua/hiring/documents/Academic_Interview_List_Approval_Form.pdf. For details regarding the Faculty & Academic Staff interview approval process, view the Staffing Coordinator Guide. View/Edit the Job Card – Notes Tab The Notes tab is used to add a note that is visible by all users in the system.
Please use discretion as these notes will become part of the permanent hiring record.
Page 8 of 19 Dean/Vice President/Delegate QRG Final, July 7, 2017
Applicant Tracking System’s Training
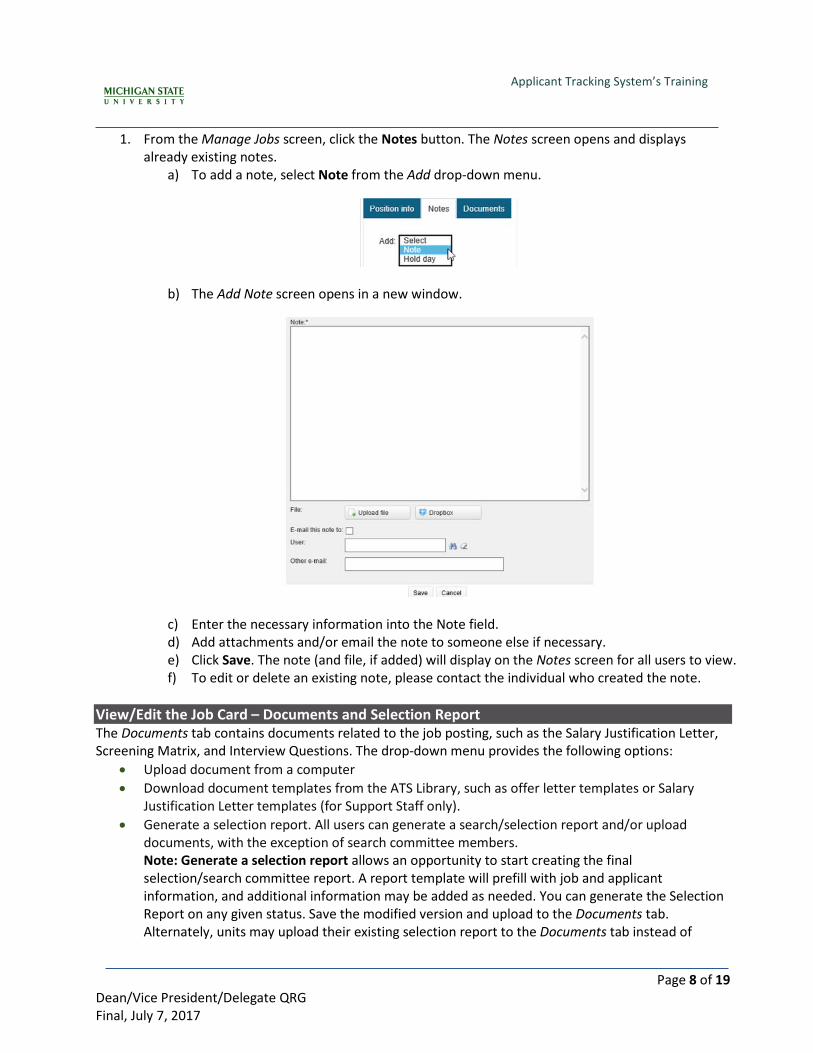
1. From the Manage Jobs screen, click the Notes button. The Notes screen opens and displays already existing notes.
a) To add a note, select Note from the Add drop-down menu.
b) The Add Note screen opens in a new window.
c) Enter the necessary information into the Note field. d) Add attachments and/or email the note to someone else if necessary. e) Click Save. The note (and file, if added) will display on the Notes screen for all users to view. f) To edit or delete an existing note, please contact the individual who created the note.
View/Edit the Job Card – Documents and Selection Report The Documents tab contains documents related to the job posting, such as the Salary Justification Letter, Screening Matrix, and Interview Questions. The drop-down menu provides the following options:
• Upload document from a computer • Download document templates from the ATS Library, such as offer letter templates or Salary
Justification Letter templates (for Support Staff only). • Generate a selection report. All users can generate a search/selection report and/or upload
documents, with the exception of search committee members. Note: Generate a selection report allows an opportunity to start creating the final selection/search committee report. A report template will prefill with job and applicant information, and additional information may be added as needed. You can generate the Selection Report on any given status. Save the modified version and upload to the Documents tab. Alternately, units may upload their existing selection report to the Documents tab instead of
Page 9 of 19 Dean/Vice President/Delegate QRG Final, July 7, 2017
Applicant Tracking System’s Training
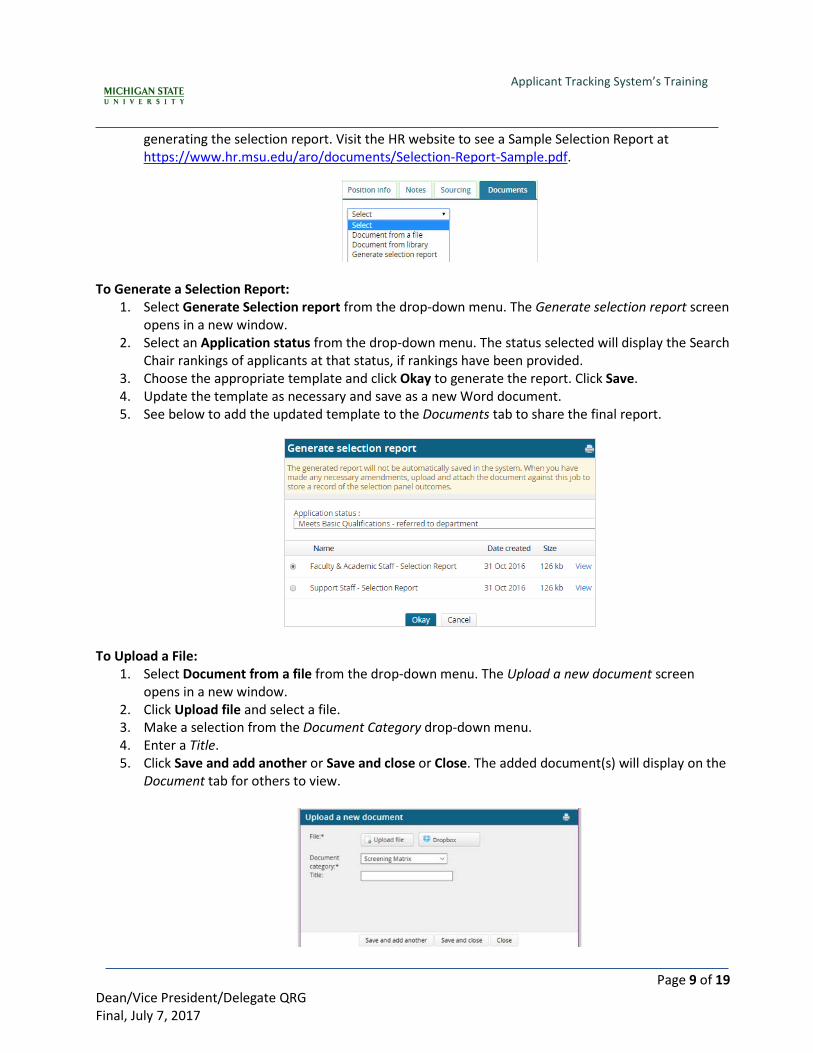
generating the selection report. Visit the HR website to see a Sample Selection Report at https://www.hr.msu.edu/aro/documents/Selection-Report-Sample.pdf.
To Generate a Selection Report: 1. Select Generate Selection report from the drop-down menu. The Generate selection report screen
opens in a new window. 2. Select an Application status from the drop-down menu. The status selected will display the Search
Chair rankings of applicants at that status, if rankings have been provided. 3. Choose the appropriate template and click Okay to generate the report. Click Save. 4. Update the template as necessary and save as a new Word document. 5. See below to add the updated template to the Documents tab to share the final report.
To Upload a File:
1. Select Document from a file from the drop-down menu. The Upload a new document screen opens in a new window.
2. Click Upload file and select a file. 3. Make a selection from the Document Category drop-down menu. 4. Enter a Title. 5. Click Save and add another or Save and close or Close. The added document(s) will display on the
Document tab for others to view.
Page 10 of 19 Dean/Vice President/Delegate QRG Final, July 7, 2017
Applicant Tracking System’s Training
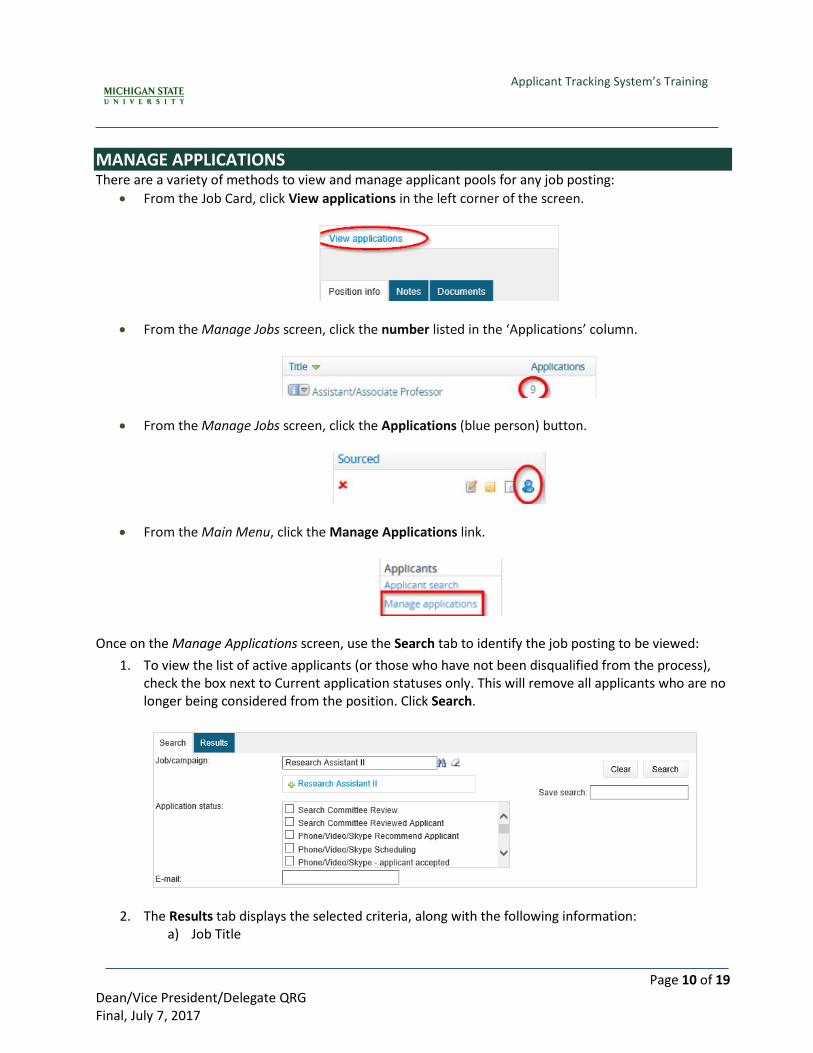
MANAGE APPLICATIONS There are a variety of methods to view and manage applicant pools for any job posting:
• From the Job Card, click View applications in the left corner of the screen.
• From the Manage Jobs screen, click the number listed in the ‘Applications’ column.
• From the Manage Jobs screen, click the Applications (blue person) button.
• From the Main Menu, click the Manage Applications link.
Once on the Manage Applications screen, use the Search tab to identify the job posting to be viewed: 1. To view the list of active applicants (or those who have not been disqualified from the process),
check the box next to Current application statuses only. This will remove all applicants who are no longer being considered from the position. Click Search.
2. The Results tab displays the selected criteria, along with the following information: a) Job Title
Page 11 of 19 Dean/Vice President/Delegate QRG Final, July 7, 2017
Applicant Tracking System’s Training
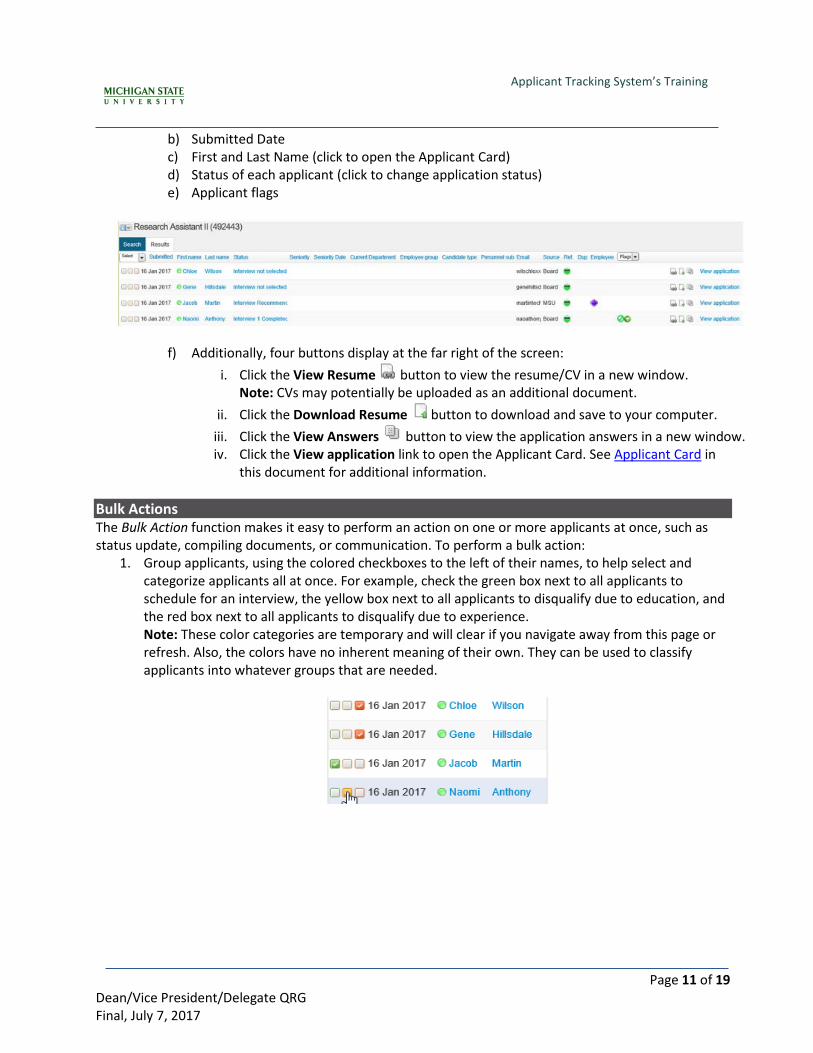
b) Submitted Date c) First and Last Name (click to open the Applicant Card) d) Status of each applicant (click to change application status) e) Applicant flags
f) Additionally, four buttons display at the far right of the screen: i. Click the View Resume button to view the resume/CV in a new window.
Note: CVs may potentially be uploaded as an additional document. ii. Click the Download Resume button to download and save to your computer.
iii. Click the View Answers button to view the application answers in a new window. iv. Click the View application link to open the Applicant Card. See Applicant Card in
this document for additional information. Bulk Actions The Bulk Action function makes it easy to perform an action on one or more applicants at once, such as status update, compiling documents, or communication. To perform a bulk action:
1. Group applicants, using the colored checkboxes to the left of their names, to help select and categorize applicants all at once. For example, check the green box next to all applicants to schedule for an interview, the yellow box next to all applicants to disqualify due to education, and the red box next to all applicants to disqualify due to experience. Note: These color categories are temporary and will clear if you navigate away from this page or refresh. Also, the colors have no inherent meaning of their own. They can be used to classify applicants into whatever groups that are needed.
Page 12 of 19 Dean/Vice President/Delegate QRG Final, July 7, 2017
Applicant Tracking System’s Training
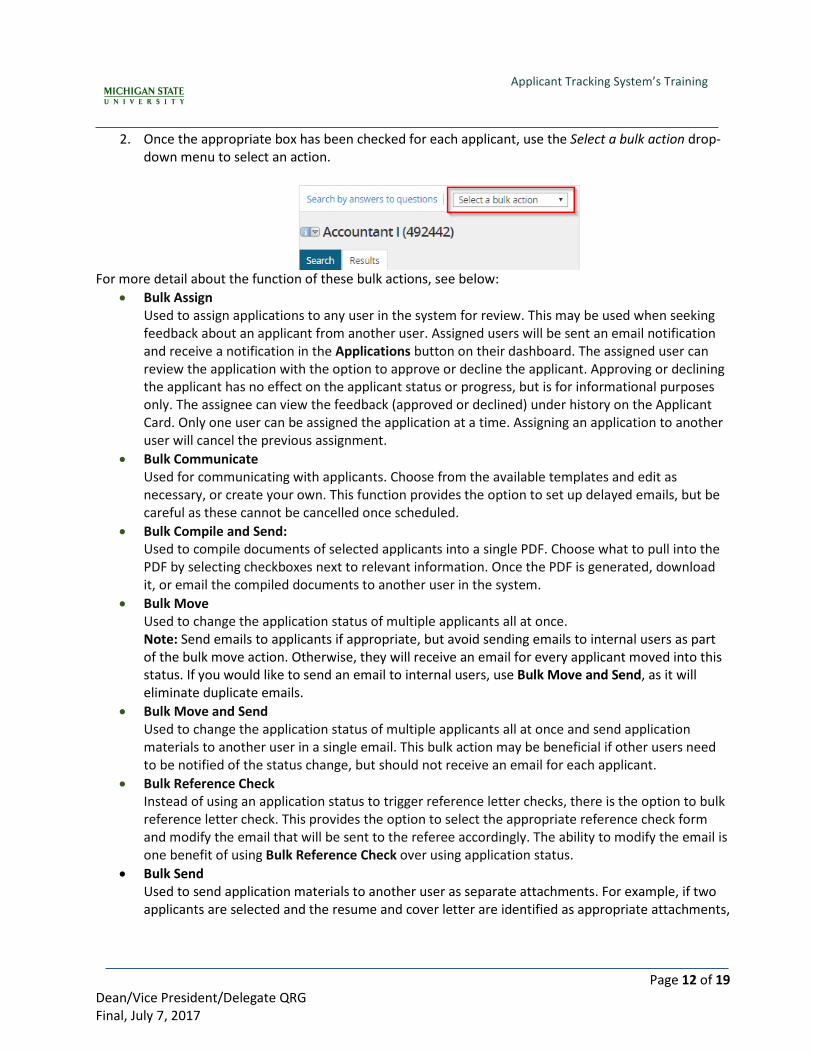
2. Once the appropriate box has been checked for each applicant, use the Select a bulk action drop-down menu to select an action.
For more detail about the function of these bulk actions, see below:
• Bulk Assign Used to assign applications to any user in the system for review. This may be used when seeking feedback about an applicant from another user. Assigned users will be sent an email notification and receive a notification in the Applications button on their dashboard. The assigned user can review the application with the option to approve or decline the applicant. Approving or declining the applicant has no effect on the applicant status or progress, but is for informational purposes only. The assignee can view the feedback (approved or declined) under history on the Applicant Card. Only one user can be assigned the application at a time. Assigning an application to another user will cancel the previous assignment.
• Bulk Communicate Used for communicating with applicants. Choose from the available templates and edit as necessary, or create your own. This function provides the option to set up delayed emails, but be careful as these cannot be cancelled once scheduled.
• Bulk Compile and Send: Used to compile documents of selected applicants into a single PDF. Choose what to pull into the PDF by selecting checkboxes next to relevant information. Once the PDF is generated, download it, or email the compiled documents to another user in the system.
• Bulk Move Used to change the application status of multiple applicants all at once. Note: Send emails to applicants if appropriate, but avoid sending emails to internal users as part of the bulk move action. Otherwise, they will receive an email for every applicant moved into this status. If you would like to send an email to internal users, use Bulk Move and Send, as it will eliminate duplicate emails.
• Bulk Move and Send Used to change the application status of multiple applicants all at once and send application materials to another user in a single email. This bulk action may be beneficial if other users need to be notified of the status change, but should not receive an email for each applicant.
• Bulk Reference Check Instead of using an application status to trigger reference letter checks, there is the option to bulk reference letter check. This provides the option to select the appropriate reference check form and modify the email that will be sent to the referee accordingly. The ability to modify the email is one benefit of using Bulk Reference Check over using application status.
• Bulk Send Used to send application materials to another user as separate attachments. For example, if two applicants are selected and the resume and cover letter are identified as appropriate attachments,

Page 13 of 19 Dean/Vice President/Delegate QRG Final, July 7, 2017
Applicant Tracking System’s Training
the user will receive four individual attachments. For most purposes, Bulk Compile and Send is a much better way to send materials as it compiles all the documents into one attachment.
3. Once the bulk action is selected, a new window will open with instructions for that specific task. The system allows action to be taken on applicants starting first with the green category, then yellow, then red. The bar at the top shows which color group you are working with.
a) Enter information or choose criteria for the green applicants. b) Enter information or choose criteria for the yellow applicants.
c) Enter information or choose criteria for the red applicants.
4. Regroup the applicants as necessary and repeat additional Bulk Actions as needed.
Bulk Compile and Send From the Manage Applications screen, view and download all applicant documents in one PDF using the Bulk Compile and Send function.
1. Check the box next to the names of applicants to be included in the PDF.
2. Click Bulk Compile and Send from the drop-down. Note: Bulk Compile and Send does not send the document automatically, but does provide the option to send via email once generated.
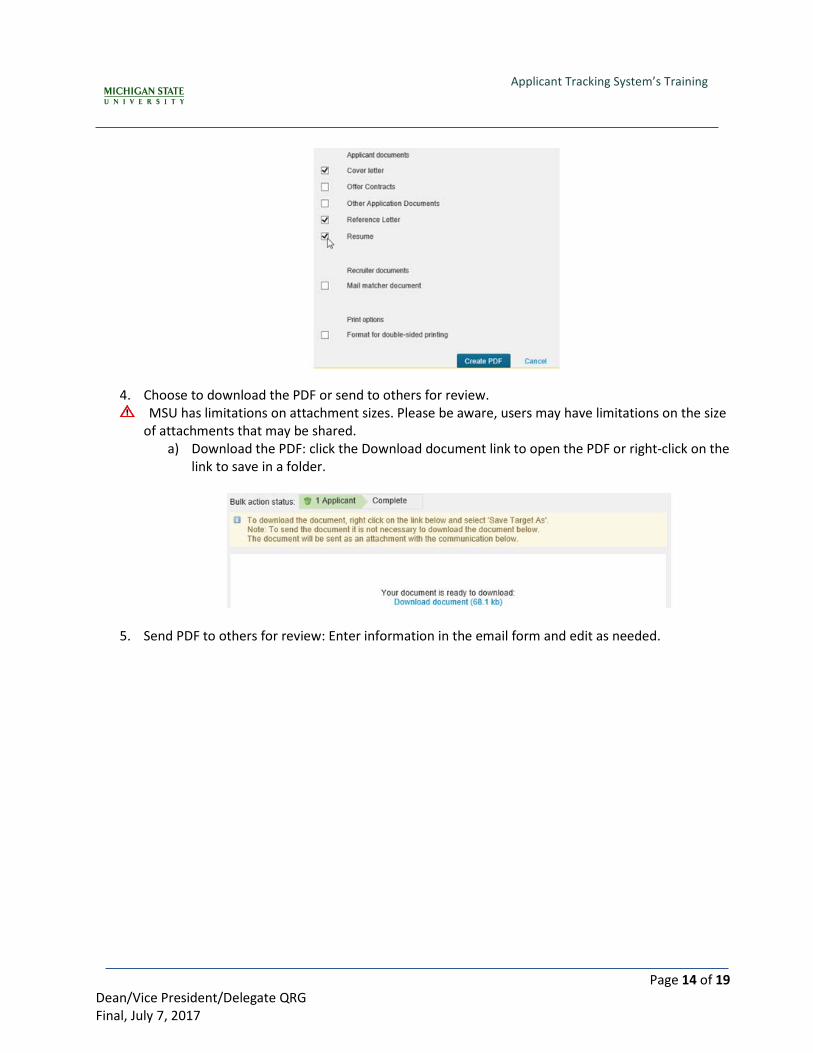
3. Select all documents to include and click Create PDF.
Page 14 of 19 Dean/Vice President/Delegate QRG Final, July 7, 2017
Applicant Tracking System’s Training
4. Choose to download the PDF or send to others for review. MSU has limitations on attachment sizes. Please be aware, users may have limitations on the size
of attachments that may be shared. a) Download the PDF: click the Download document link to open the PDF or right-click on the
link to save in a folder.
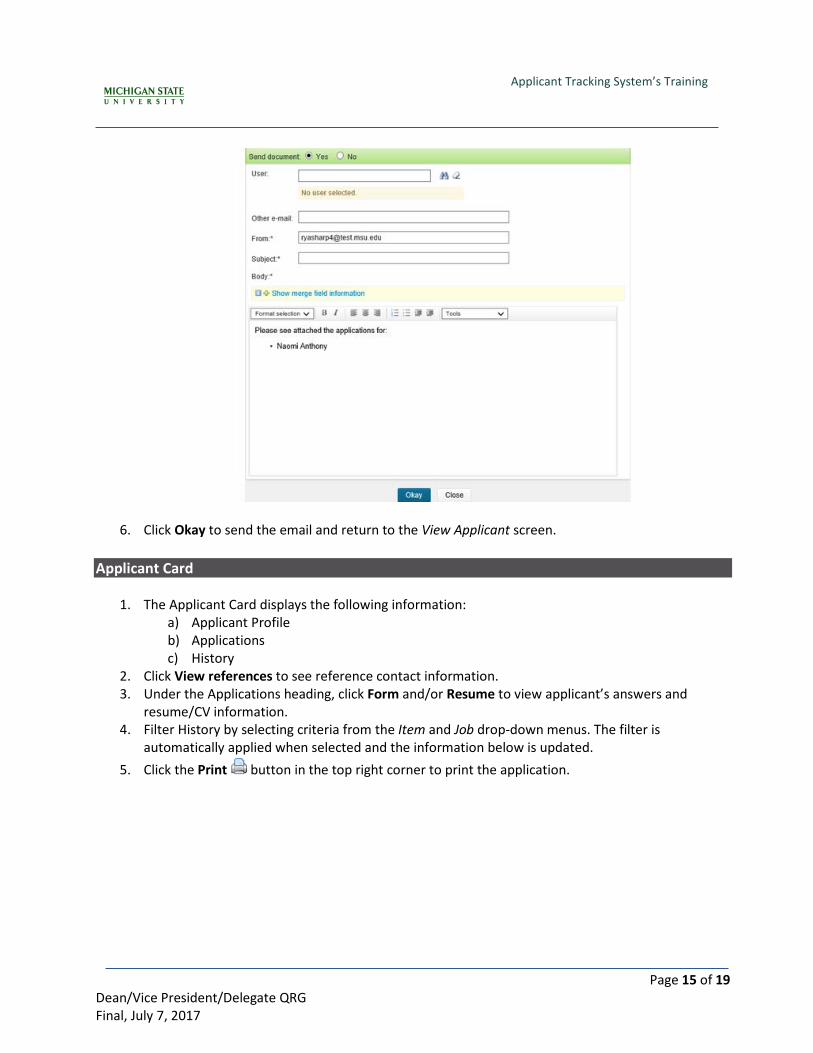
5. Send PDF to others for review: Enter information in the email form and edit as needed.
Page 15 of 19 Dean/Vice President/Delegate QRG Final, July 7, 2017
Applicant Tracking System’s Training
6. Click Okay to send the email and return to the View Applicant screen. Applicant Card
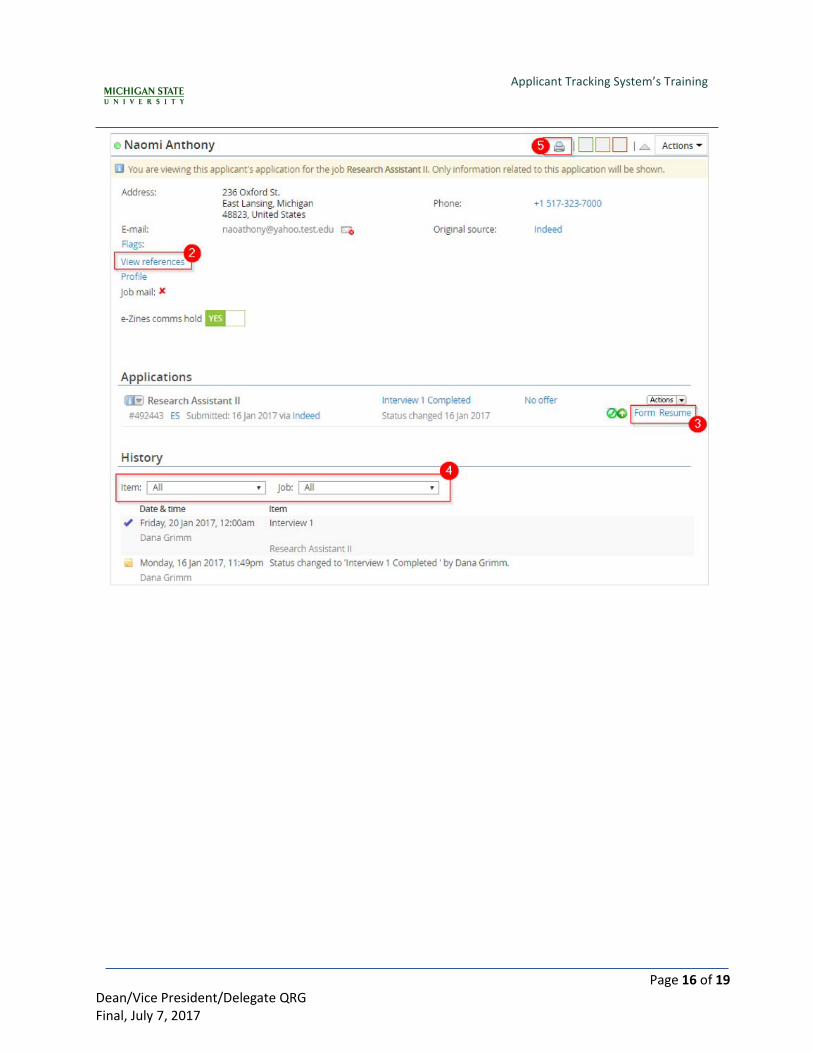
1. The Applicant Card displays the following information: a) Applicant Profile b) Applications c) History
2. Click View references to see reference contact information. 3. Under the Applications heading, click Form and/or Resume to view applicant’s answers and
resume/CV information. 4. Filter History by selecting criteria from the Item and Job drop-down menus. The filter is
automatically applied when selected and the information below is updated. 5. Click the Print button in the top right corner to print the application.
Page 16 of 19 Dean/Vice President/Delegate QRG Final, July 7, 2017
Applicant Tracking System’s Training
Page 17 of 19 Dean/Vice President/Delegate QRG Final, July 7, 2017
Applicant Tracking System’s Training
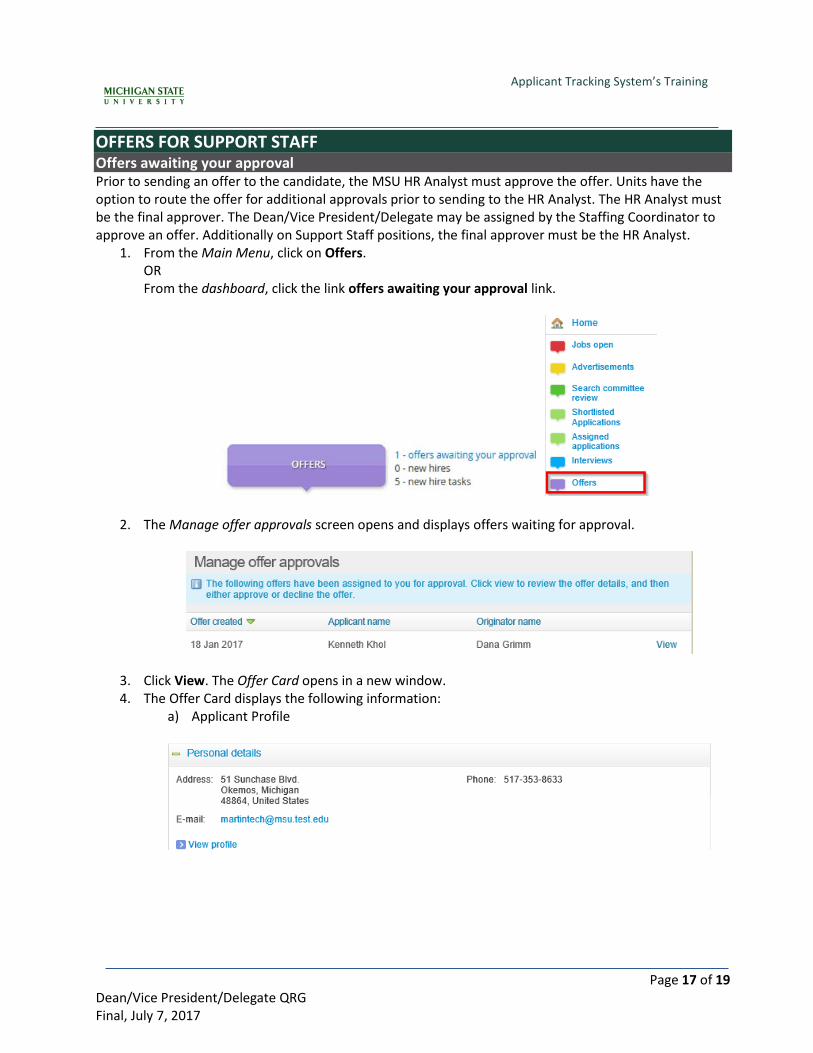
OFFERS FOR SUPPORT STAFF Offers awaiting your approval Prior to sending an offer to the candidate, the MSU HR Analyst must approve the offer. Units have the option to route the offer for additional approvals prior to sending to the HR Analyst. The HR Analyst must be the final approver. The Dean/Vice President/Delegate may be assigned by the Staffing Coordinator to approve an offer. Additionally on Support Staff positions, the final approver must be the HR Analyst.
1. From the Main Menu, click on Offers. OR From the dashboard, click the link offers awaiting your approval link.
2. The Manage offer approvals screen opens and displays offers waiting for approval.
3. Click View. The Offer Card opens in a new window. 4. The Offer Card displays the following information:
a) Applicant Profile
Page 18 of 19 Dean/Vice President/Delegate QRG Final, July 7, 2017
Applicant Tracking System’s Training
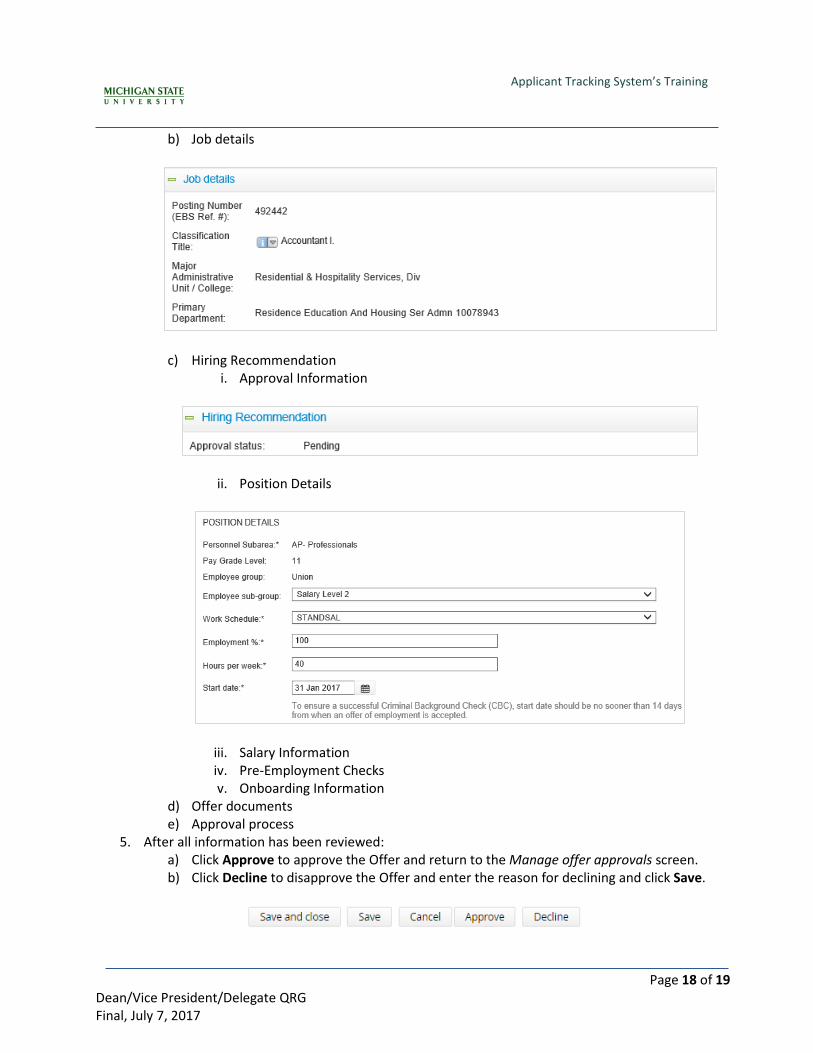
b) Job details
c) Hiring Recommendation i. Approval Information
ii. Position Details
iii. Salary Information iv. Pre-Employment Checks v. Onboarding Information
d) Offer documents e) Approval process
5. After all information has been reviewed: a) Click Approve to approve the Offer and return to the Manage offer approvals screen. b) Click Decline to disapprove the Offer and enter the reason for declining and click Save.
Page 19 of 19 Dean/Vice President/Delegate QRG Final, July 7, 2017
Applicant Tracking System’s Training
REPORTING Reports are contained in one central location in the ATS, making it easy to access information about multiple postings at once. You can run the following reports for all active postings within your MAU:
• Applicant List • Faculty & Academic Staff EEO Summary • Support Staff EEO Summary
For further details on using reporting in the ATS, view the Reporting Guide on the HR website at https://hr.msu.edu/aro/documents/reporting-guide.pdf.