Embed Size (px)
Citation preview
Veterans Health Gateway
Tutorial 2.0
Triage and Health Information Solution
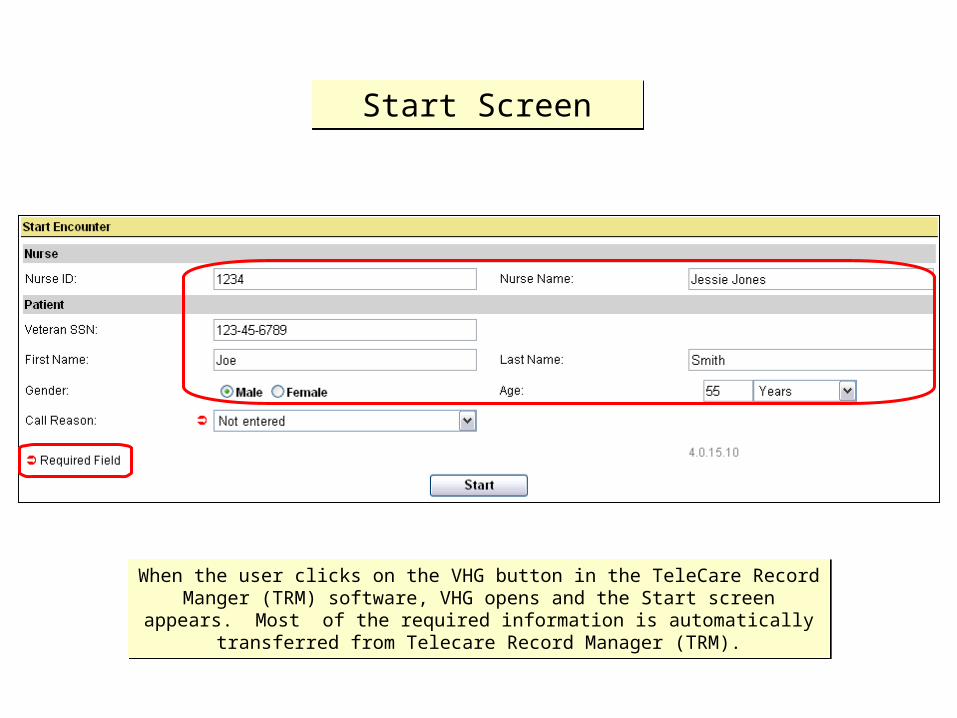
When the user clicks on the VHG button in the TeleCare Record Manger (TRM) software, VHG opens and the Start screen appears. Most of the required
information is automatically transferred from Telecare Record Manager (TRM).
When the user clicks on the VHG button in the TeleCare Record Manger (TRM) software, VHG opens and the Start screen appears. Most of the required
information is automatically transferred from Telecare Record Manager (TRM).
Start ScreenStart Screen
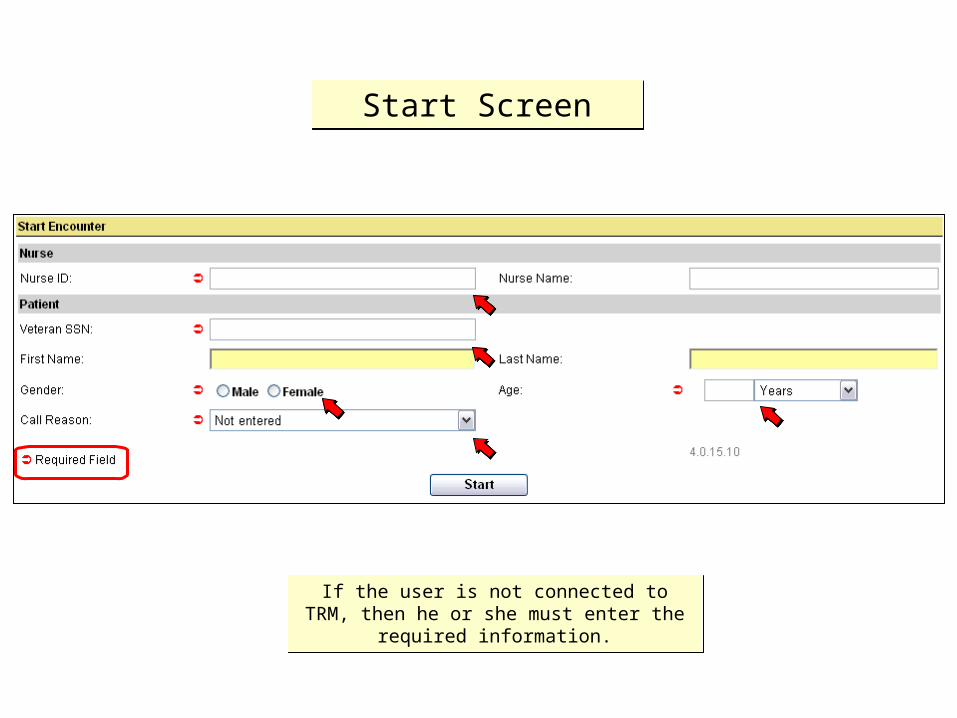
If the user is not connected to TRM, then he or she must enter the required information.
If the user is not connected to TRM, then he or she must enter the required information.
Start ScreenStart Screen
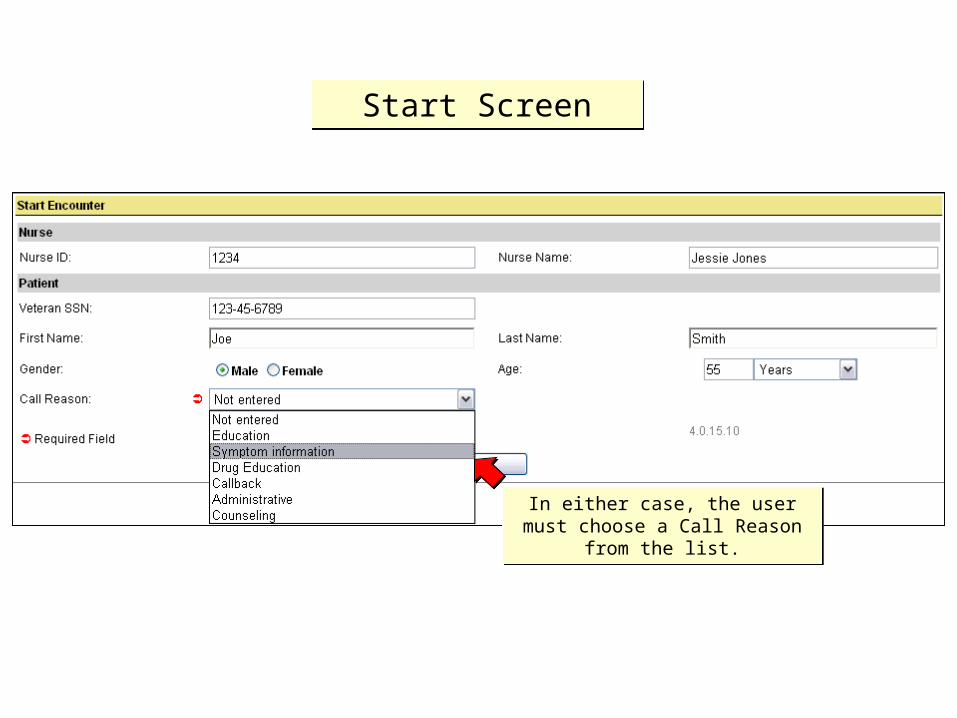
In either case, the user must choose a Call Reason from the list.
In either case, the user must choose a Call Reason from the list.
Start ScreenStart Screen

Then the user clicks on Start.Then the user clicks on Start.
Note: the format of the Encounter: Start screen may vary, depending on which version of VHG is used.
Note: the format of the Encounter: Start screen may vary, depending on which version of VHG is used.
Start ScreenStart Screen
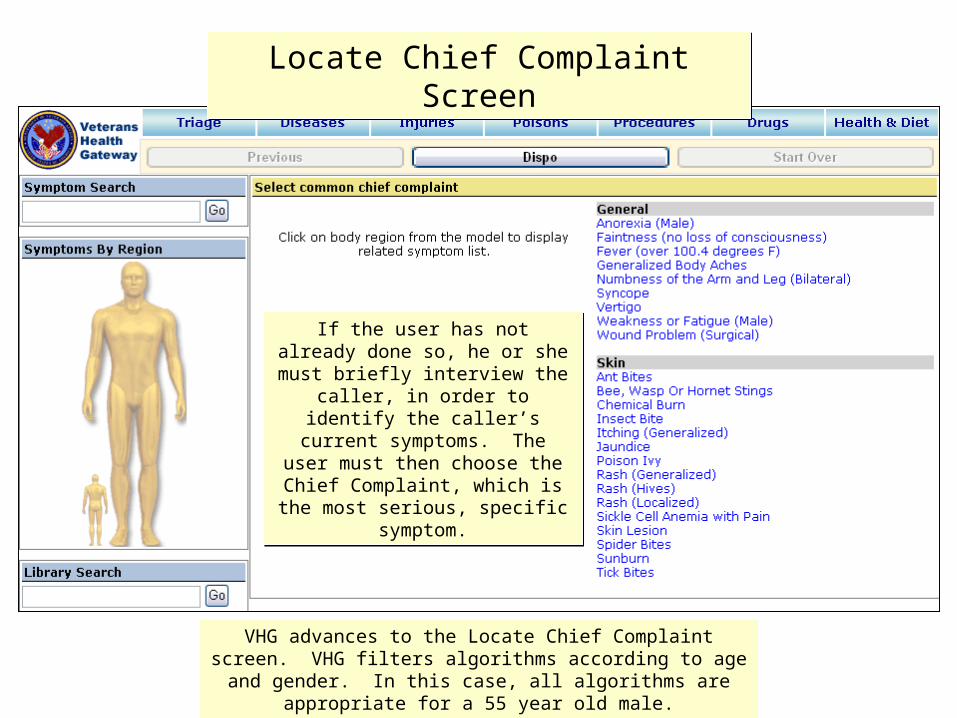
Locate Chief Complaint ScreenLocate Chief Complaint Screen
VHG advances to the Locate Chief Complaint screen. VHG filters algorithms according to age and gender. In this case, all
algorithms are appropriate for a 55 year old male.
VHG advances to the Locate Chief Complaint screen. VHG filters algorithms according to age and gender. In this case, all
algorithms are appropriate for a 55 year old male.
If the user has not already done so, he or she must briefly interview the caller, in order to identify the caller’s current symptoms. The user must then choose the Chief Complaint, which is the most serious, specific
symptom.
If the user has not already done so, he or she must briefly interview the caller, in order to identify the caller’s current symptoms. The user must then choose the Chief Complaint, which is the most serious, specific
symptom.
Locate Chief Complaint ScreenLocate Chief Complaint Screen
1
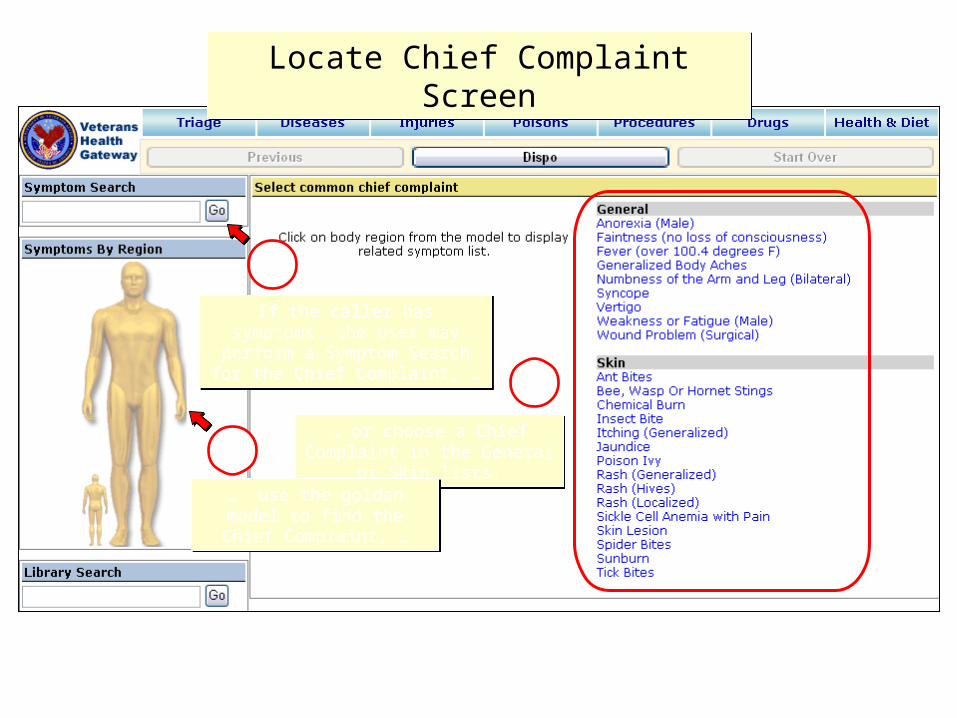
If the caller has symptoms, the user may perform a Symptom Search for
the Chief Complaint, …
If the caller has symptoms, the user may perform a Symptom Search for
the Chief Complaint, …
3
… or choose a Chief Complaint in the General or Skin lists.
… or choose a Chief Complaint in the General or Skin lists.2
… use the golden model to find the Chief Complaint, …… use the golden model to find the Chief Complaint, …
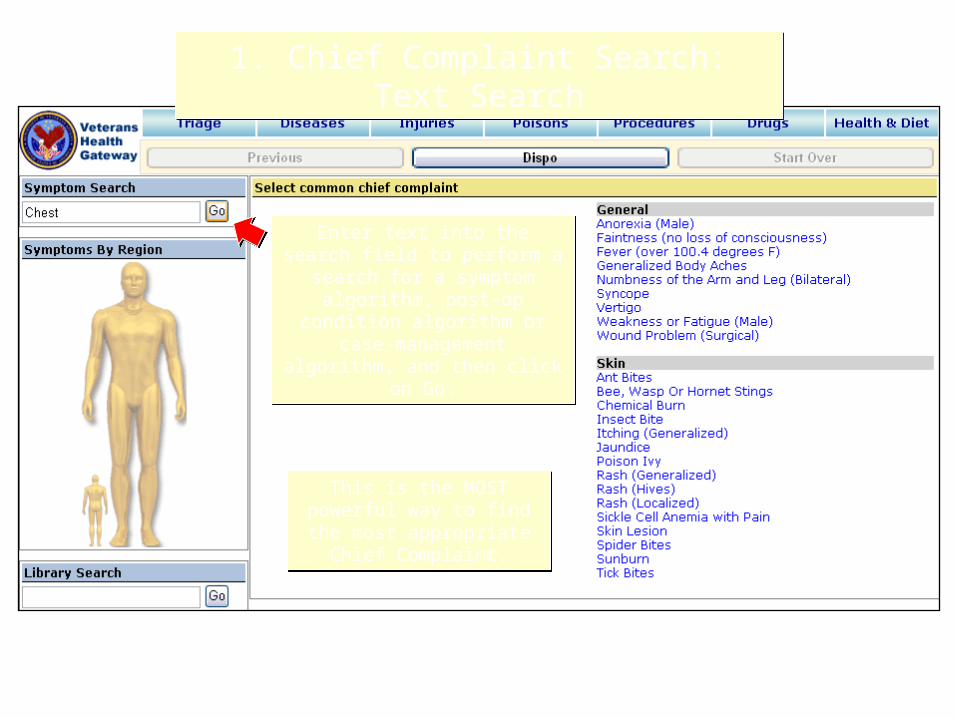
Enter text into the search field to perform a search for a symptom
algorithm, post-op condition algorithm or case-management algorithm, and then click on Go.
Enter text into the search field to perform a search for a symptom
algorithm, post-op condition algorithm or case-management algorithm, and then click on Go.
1. Chief Complaint Search: Text Search1. Chief Complaint Search: Text Search
This is the MOST powerful way to find the most
appropriate Chief Complaint.
This is the MOST powerful way to find the most
appropriate Chief Complaint.
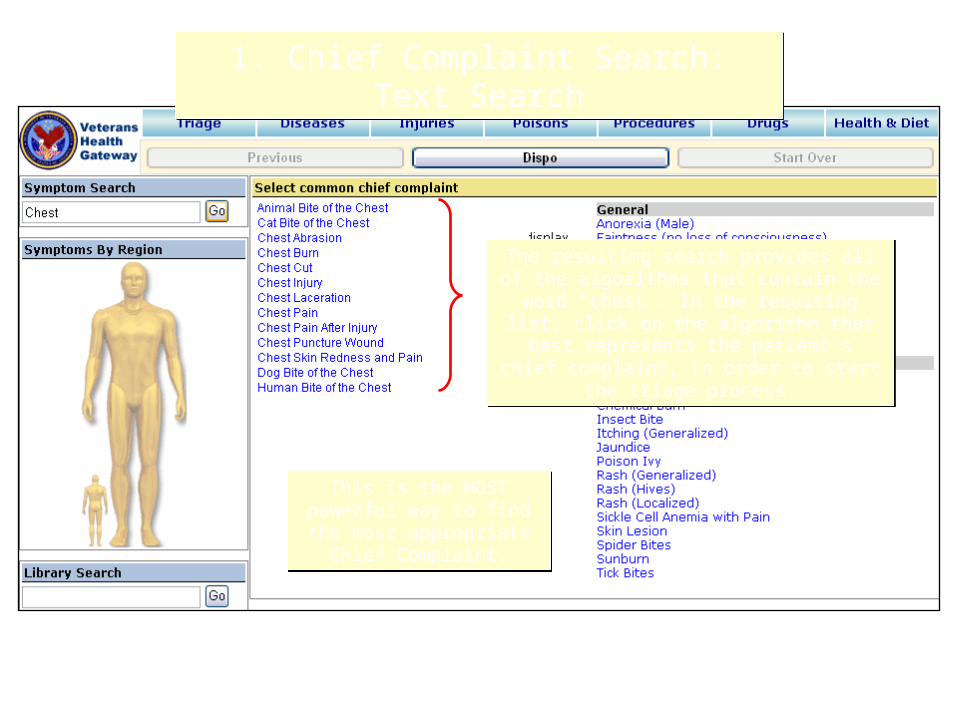
The resulting search provides all of the algorithms that contain the word “chest”. In the
resulting list, click on the algorithm that best represents the patient’s chief complaint, in
order to start the triage process.
The resulting search provides all of the algorithms that contain the word “chest”. In the
resulting list, click on the algorithm that best represents the patient’s chief complaint, in
order to start the triage process.
1. Chief Complaint Search: Text Search1. Chief Complaint Search: Text Search
This is the MOST powerful way to find the most
appropriate Chief Complaint.
This is the MOST powerful way to find the most
appropriate Chief Complaint.
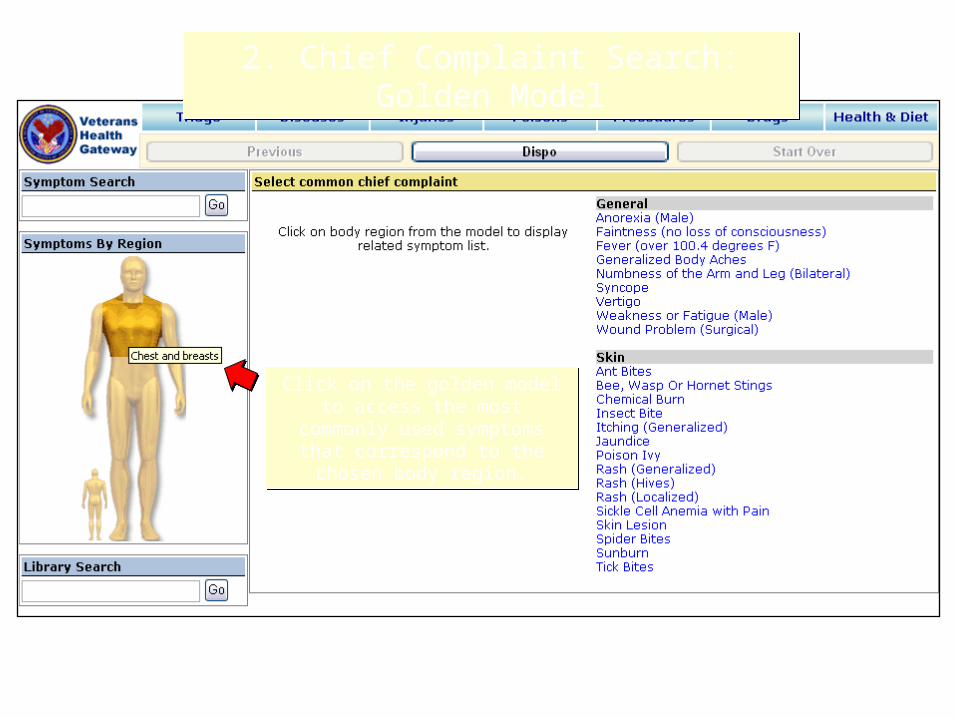
Click on the golden model to access the most commonly used symptoms that correspond to the
chosen body region.
Click on the golden model to access the most commonly used symptoms that correspond to the
chosen body region.
2. Chief Complaint Search: Golden Model2. Chief Complaint Search: Golden Model
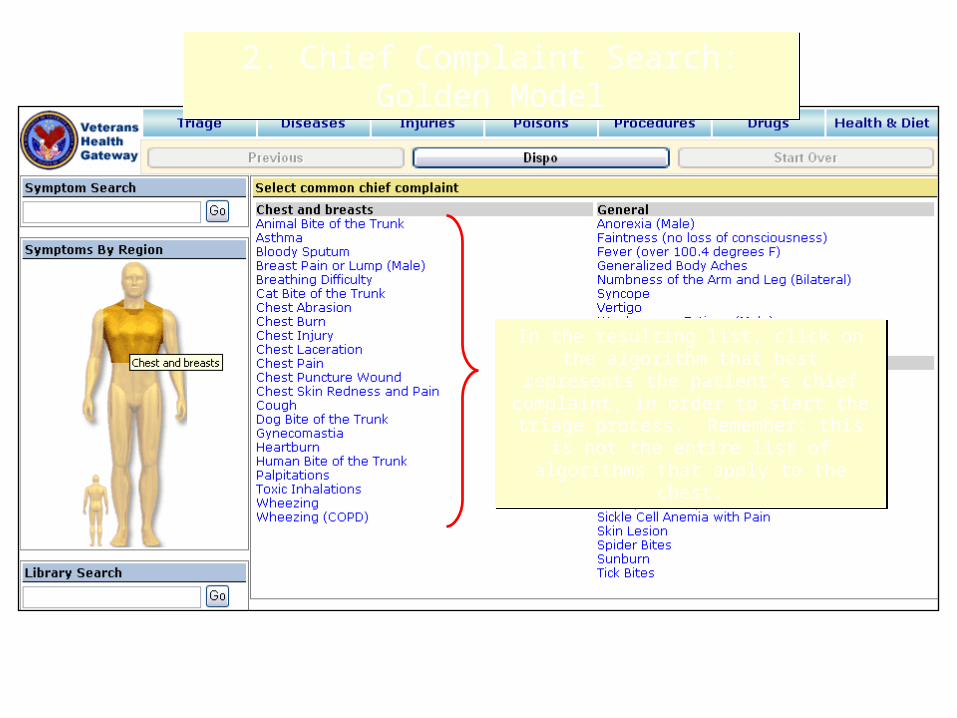
In the resulting list, click on the algorithm that best represents the patient’s chief complaint, in order to start the triage
process. Remember: this is not the entire list of algorithms that apply to the chest.
In the resulting list, click on the algorithm that best represents the patient’s chief complaint, in order to start the triage
process. Remember: this is not the entire list of algorithms that apply to the chest.
2. Chief Complaint Search: Golden Model2. Chief Complaint Search: Golden Model
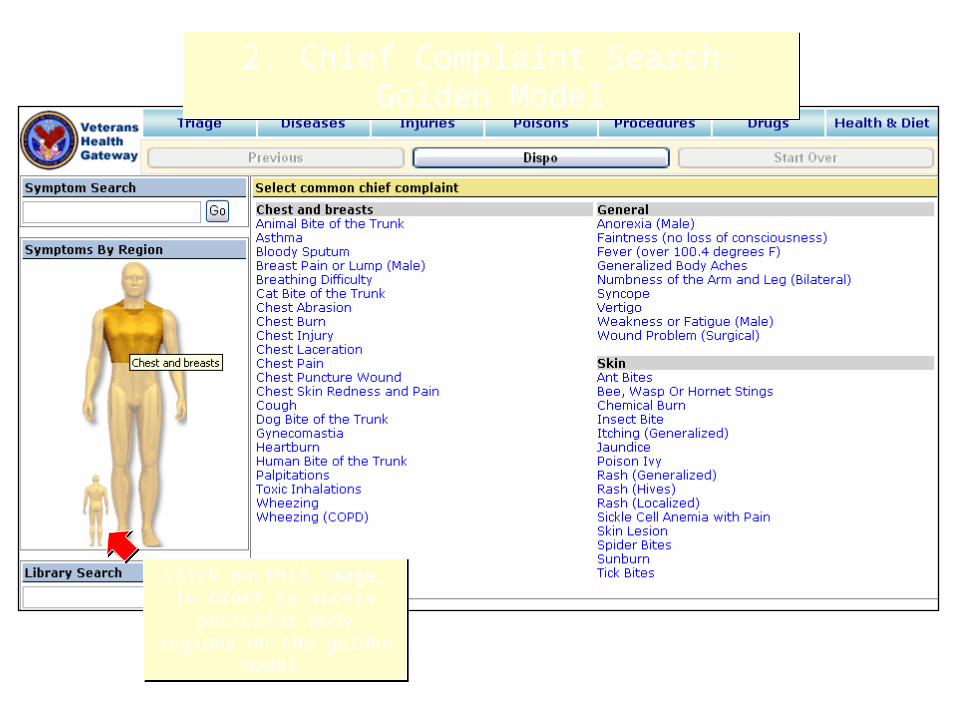
Click on this image, in order to access posterior body
regions on the golden model.
Click on this image, in order to access posterior body
regions on the golden model.
2. Chief Complaint Search: Golden Model2. Chief Complaint Search: Golden Model
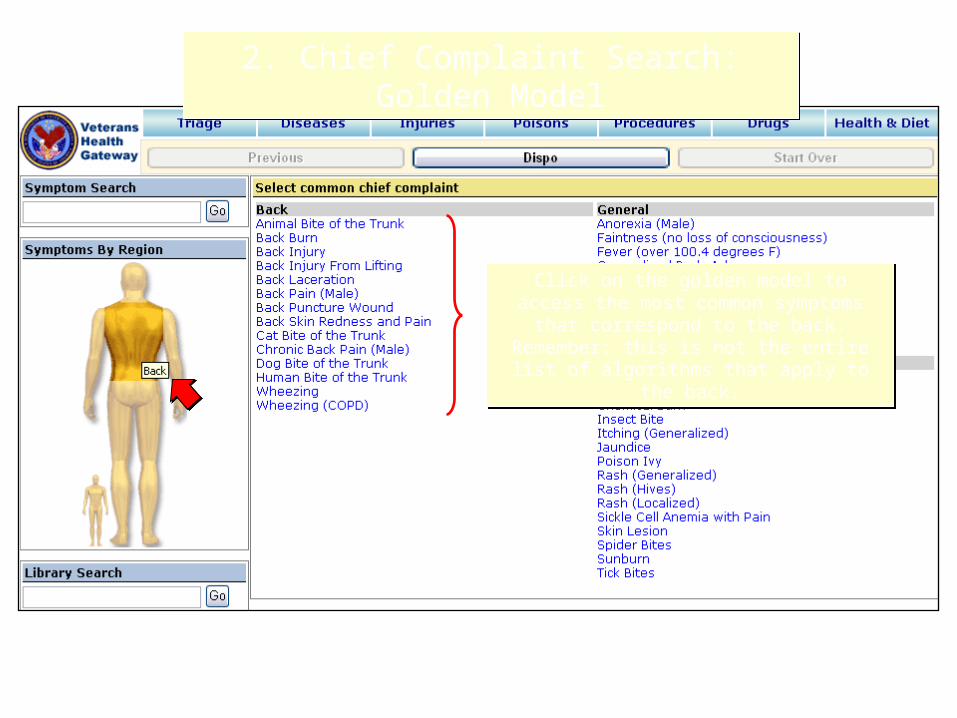
Click on the golden model to access the most common symptoms that correspond to the
back. Remember: this is not the entire list of algorithms that apply to the back.
Click on the golden model to access the most common symptoms that correspond to the
back. Remember: this is not the entire list of algorithms that apply to the back.
2. Chief Complaint Search: Golden Model2. Chief Complaint Search: Golden Model
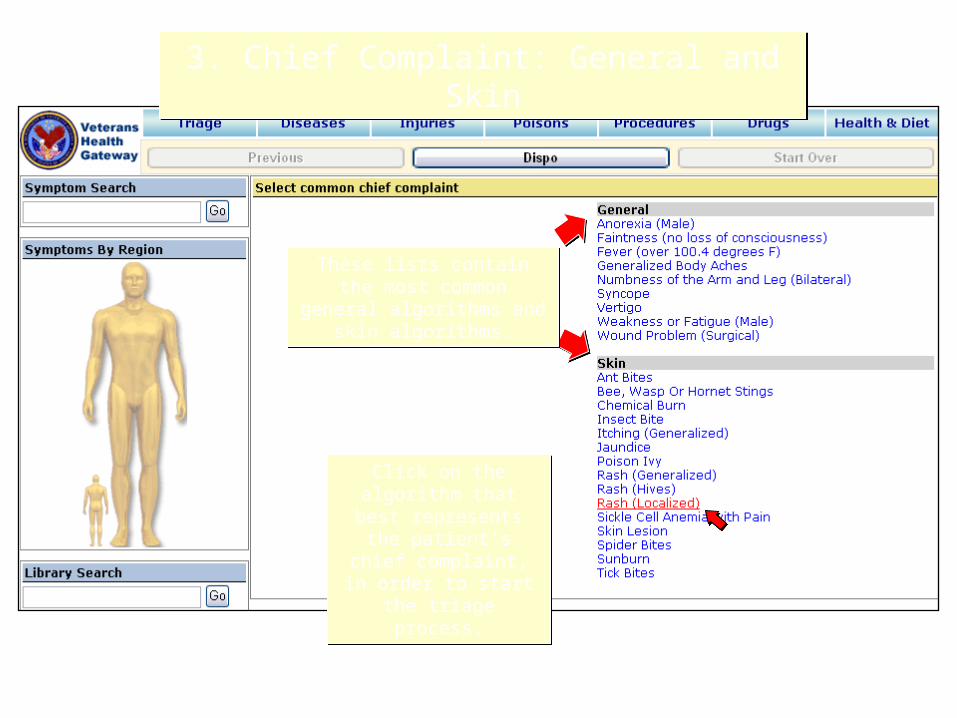
3. Chief Complaint: General and Skin3. Chief Complaint: General and Skin
Click on the algorithm that best represents the
patient’s chief complaint, in order to
start the triage process.
Click on the algorithm that best represents the
patient’s chief complaint, in order to
start the triage process.
These lists contain the most common general algorithms
and skin algorithms.
These lists contain the most common general algorithms
and skin algorithms.
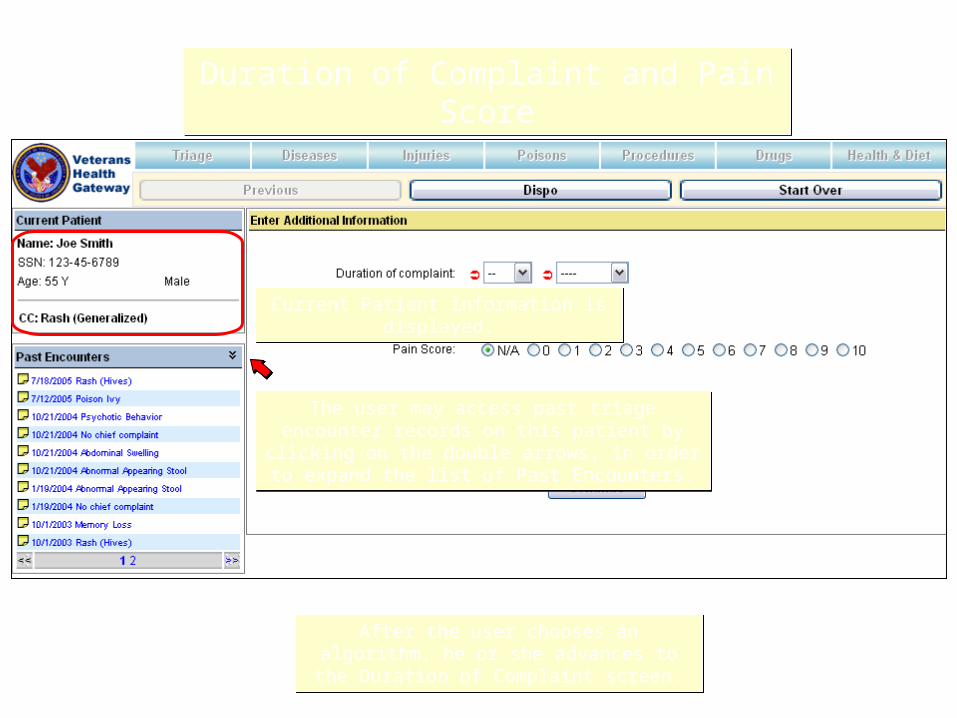
Duration of Complaint and Pain ScoreDuration of Complaint and Pain Score
After the user chooses an algorithm, he or she advances to the Duration of Complaint screen.After the user chooses an algorithm, he or she advances to the Duration of Complaint screen.
The user may access past triage encounter records on this patient by clicking on the double arrows, in
order to expand the list of Past Encounters.
The user may access past triage encounter records on this patient by clicking on the double arrows, in
order to expand the list of Past Encounters.
Current Patient information is displayed.Current Patient information is displayed.
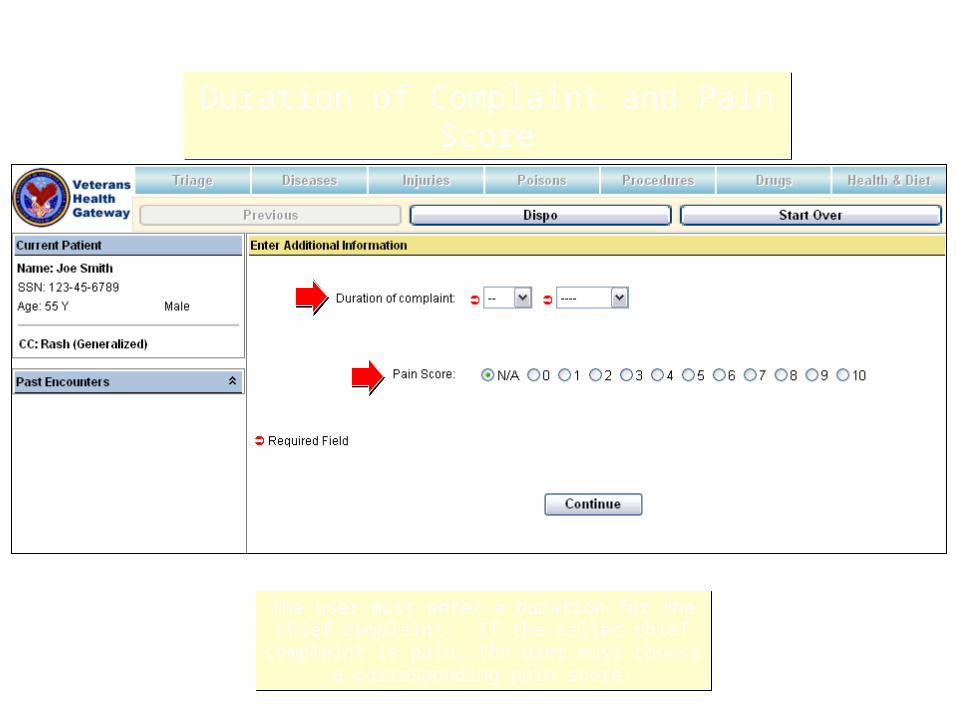
Duration of Complaint and Pain ScoreDuration of Complaint and Pain Score
The user must enter a duration for the chief complaint. If the caller chief complaint is pain, the
user must choose a corresponding pain score.
The user must enter a duration for the chief complaint. If the caller chief complaint is pain, the
user must choose a corresponding pain score.
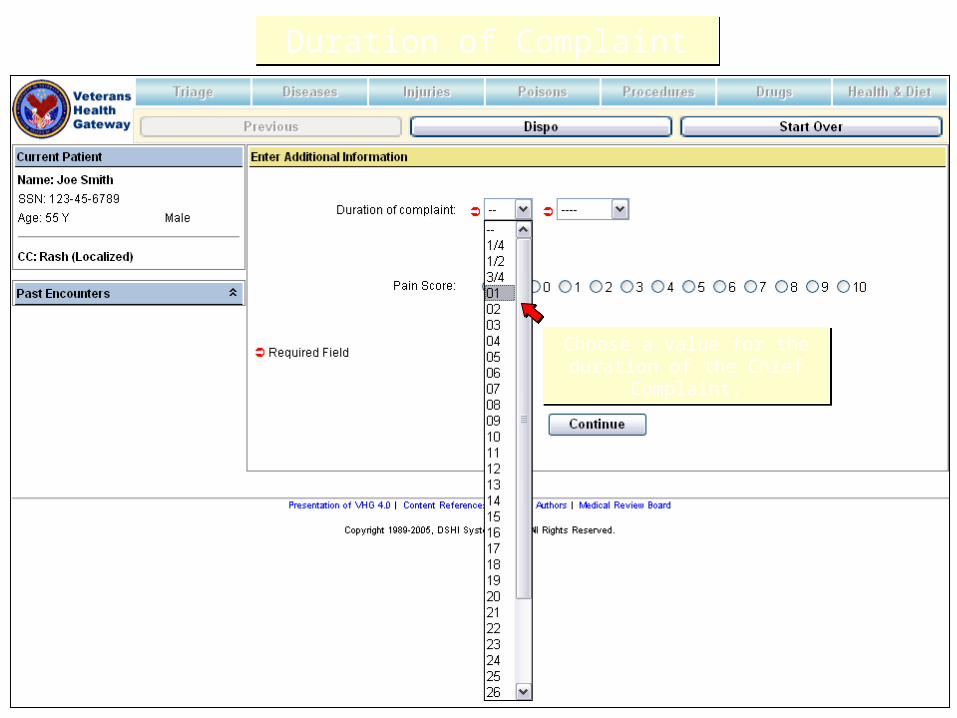
Duration of ComplaintDuration of Complaint
Choose a value for the duration of the Chief Complaint.
Choose a value for the duration of the Chief Complaint.
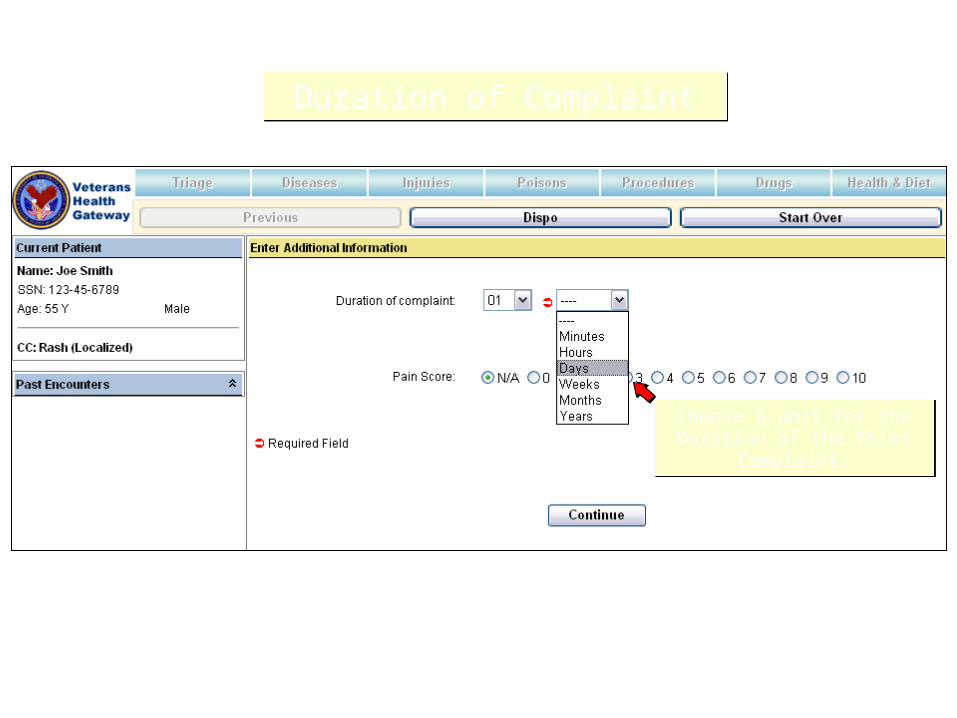
Duration of ComplaintDuration of Complaint
Choose a unit for the Duration of the Chief Complaint.
Choose a unit for the Duration of the Chief Complaint.
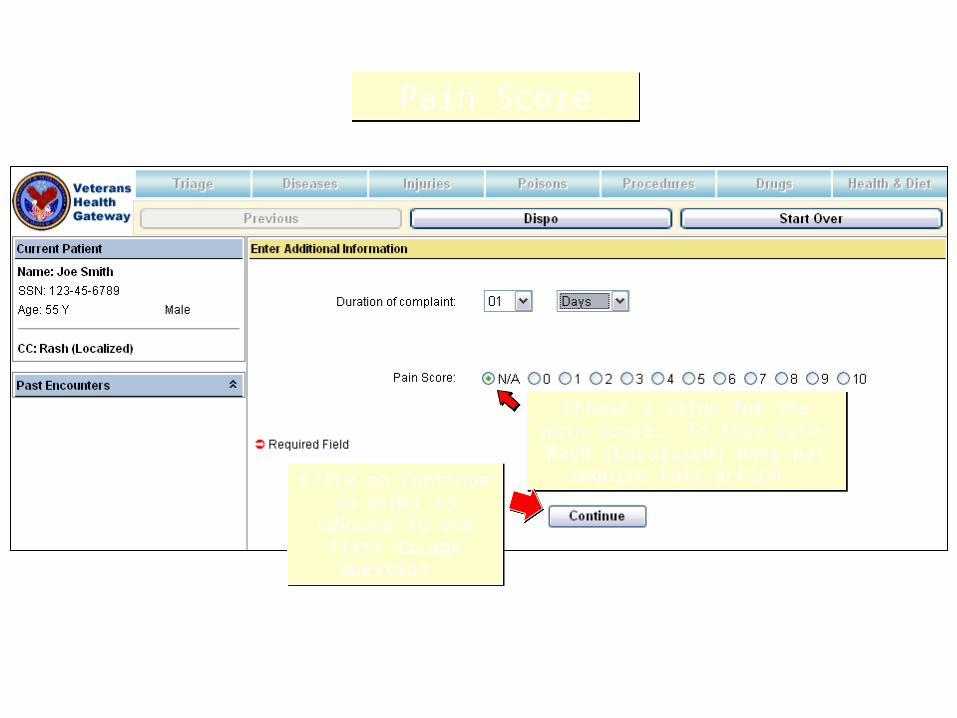
Pain ScorePain Score
Choose a value for the pain score. In this case, Rash (Localized) does
not require this action.
Choose a value for the pain score. In this case, Rash (Localized) does
not require this action.
Click on Continue in order to advance to the
first triage question.
Click on Continue in order to advance to the
first triage question.
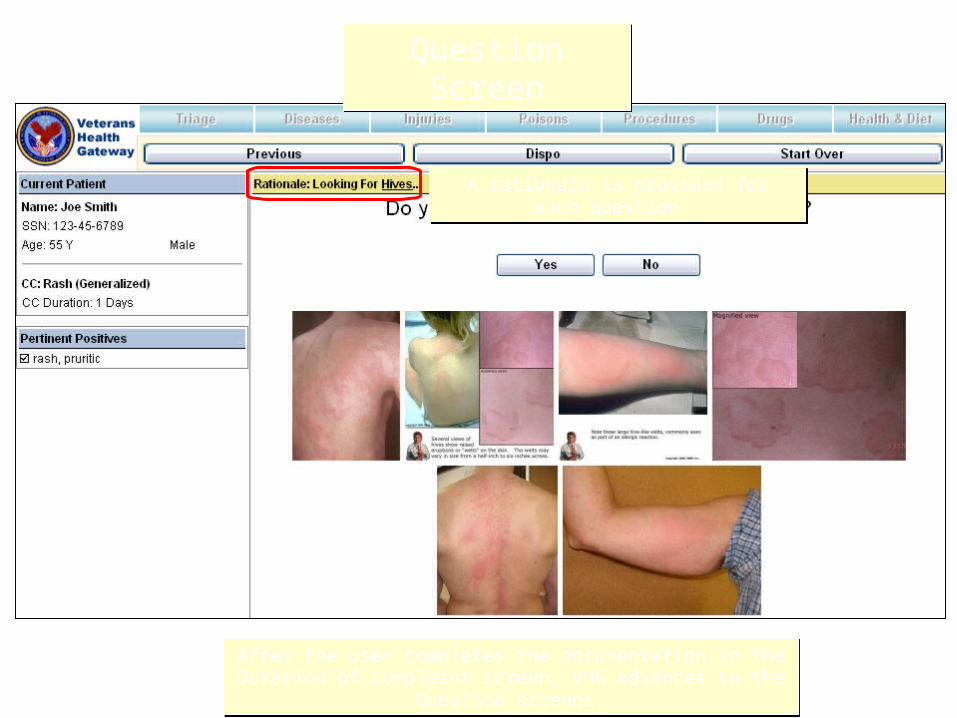
Question ScreenQuestion Screen
A rationale is provided for each question. A rationale is provided for each question.
After the user completes the documentation in the Duration of Complaint screen, VHG advances to the Question screens.
After the user completes the documentation in the Duration of Complaint screen, VHG advances to the Question screens.
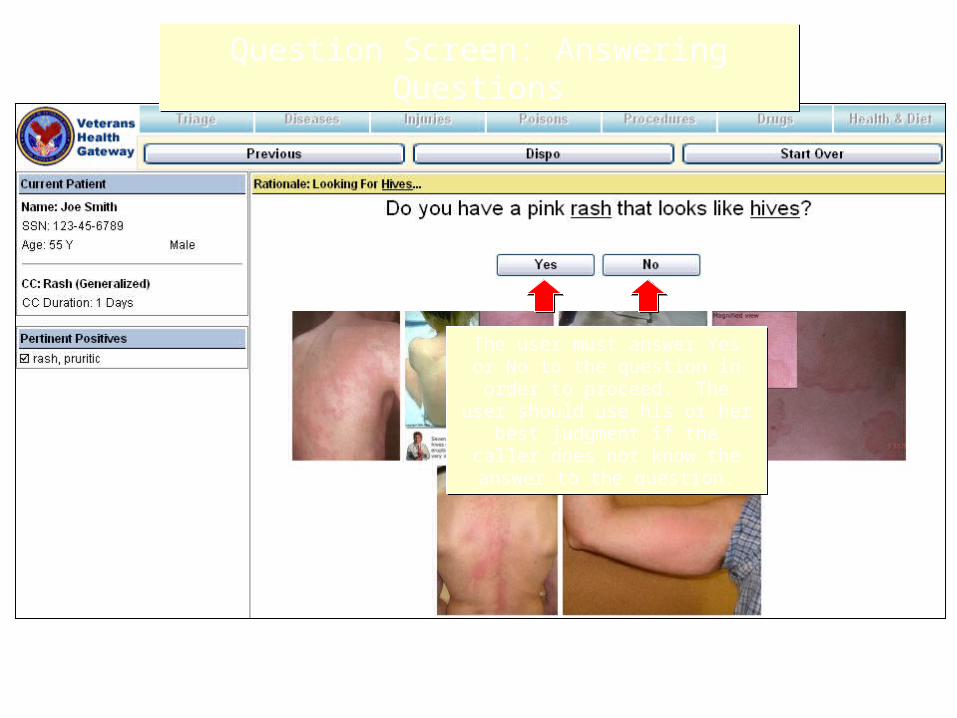
Question Screen: Answering QuestionsQuestion Screen: Answering Questions
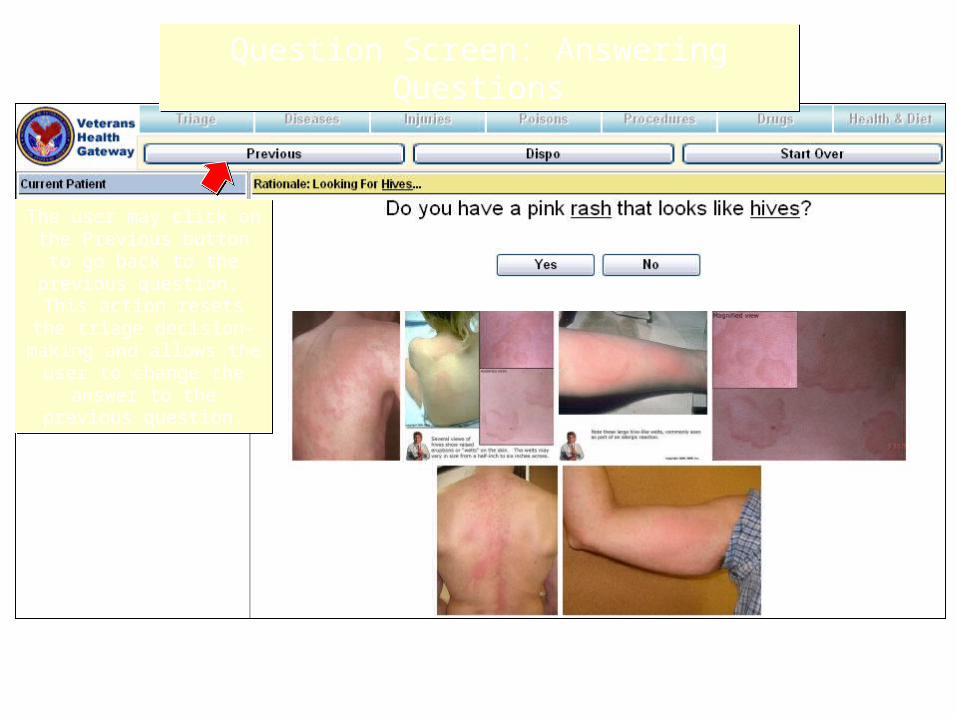
The user may click on the Previous button to go back to the previous question.
This action resets the triage decision–making and allows
the user to change the answer to the previous
question.
The user may click on the Previous button to go back to the previous question.
This action resets the triage decision–making and allows
the user to change the answer to the previous
question.
Question Screen: Answering QuestionsQuestion Screen: Answering Questions
The user must answer Yes or No to the question in order to proceed.
The user should use his or her best judgment if the caller does not know
the answer to the question.
The user must answer Yes or No to the question in order to proceed.
The user should use his or her best judgment if the caller does not know
the answer to the question.
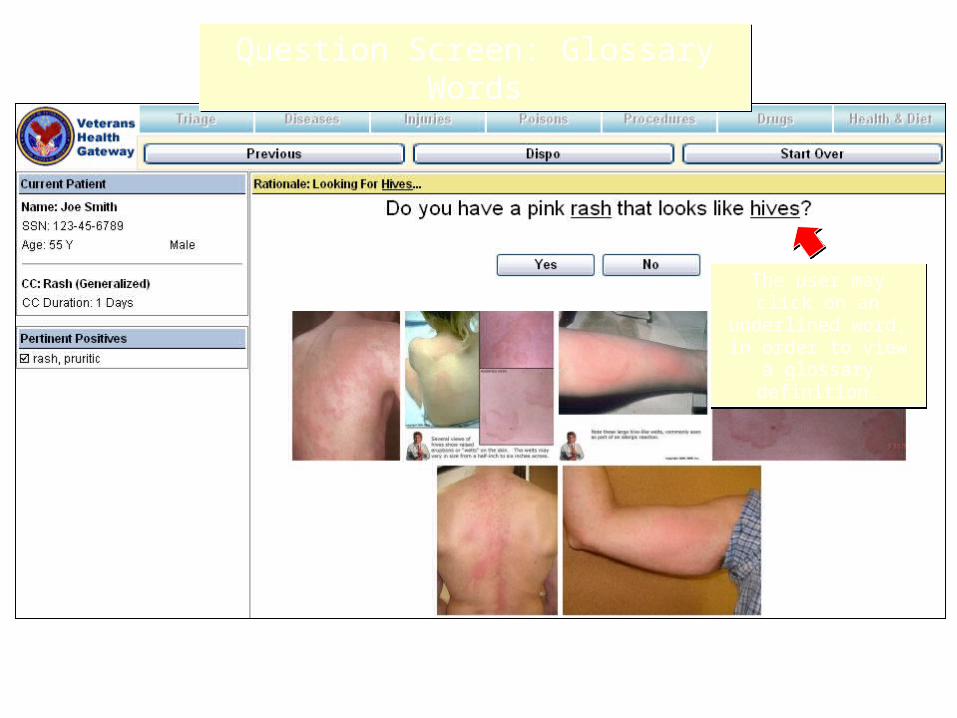
Question Screen: Glossary WordsQuestion Screen: Glossary Words
The user may click on an underlined word, in
order to view a glossary definition.
The user may click on an underlined word, in
order to view a glossary definition.
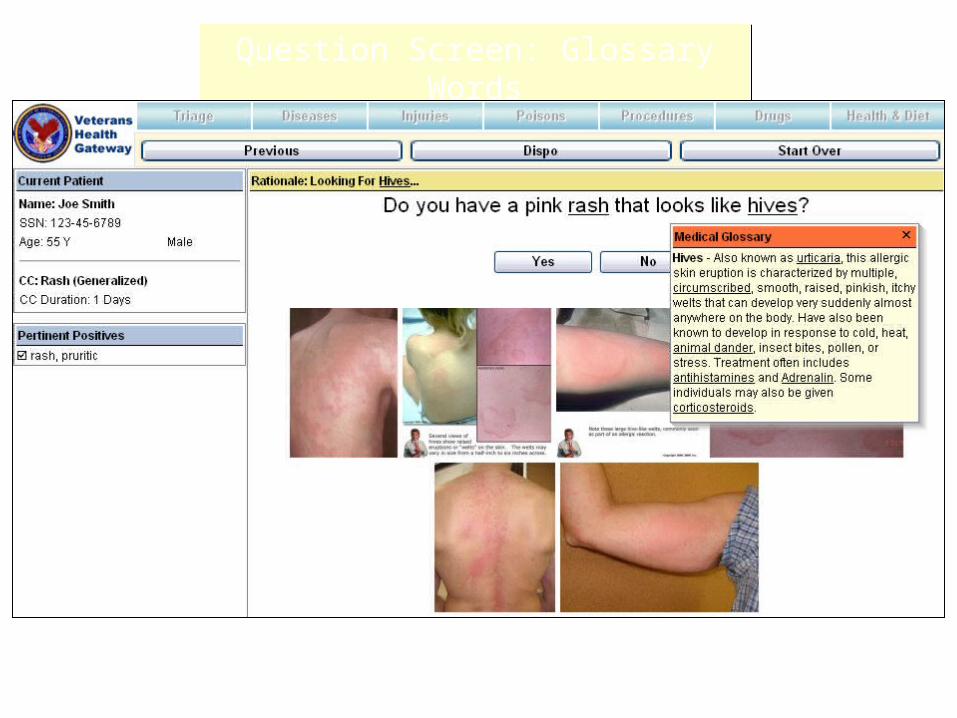
Question Screen: Glossary WordsQuestion Screen: Glossary Words
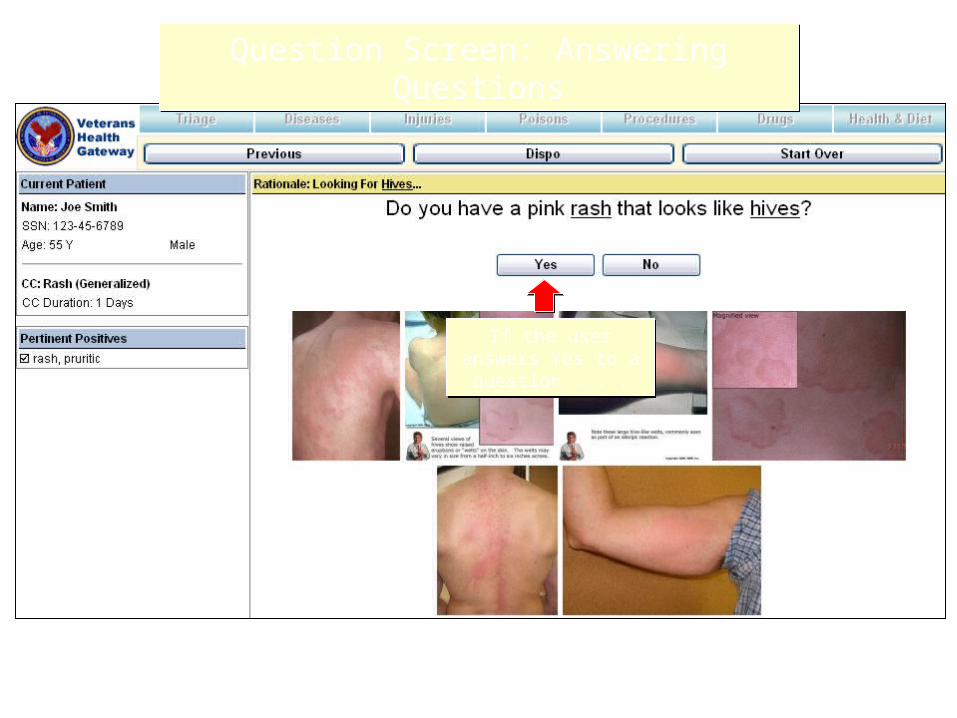
Question Screen: Answering QuestionsQuestion Screen: Answering Questions
If the user answers Yes to a question . . .If the user answers
Yes to a question . . .
Question Screen: Answering QuestionsQuestion Screen: Answering Questions
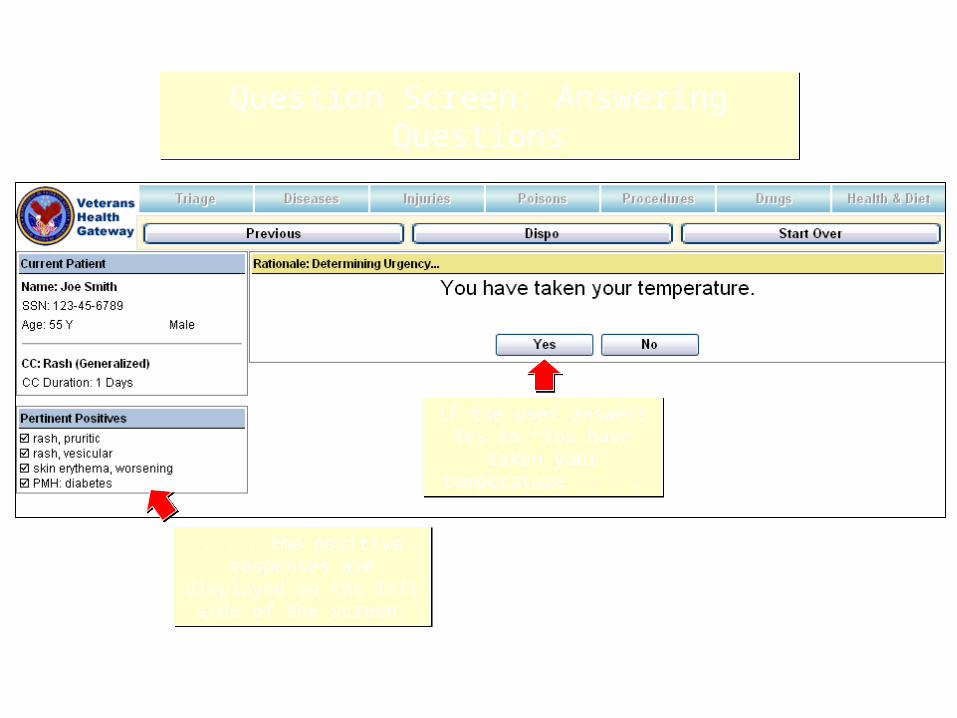
If the user answers Yes to “You have taken your
temperature” . . .
If the user answers Yes to “You have taken your
temperature” . . .
. . . the positive responses are displayed on the left
side of the screen.
. . . the positive responses are displayed on the left
side of the screen.
Question Screen: Answering QuestionsQuestion Screen: Answering Questions
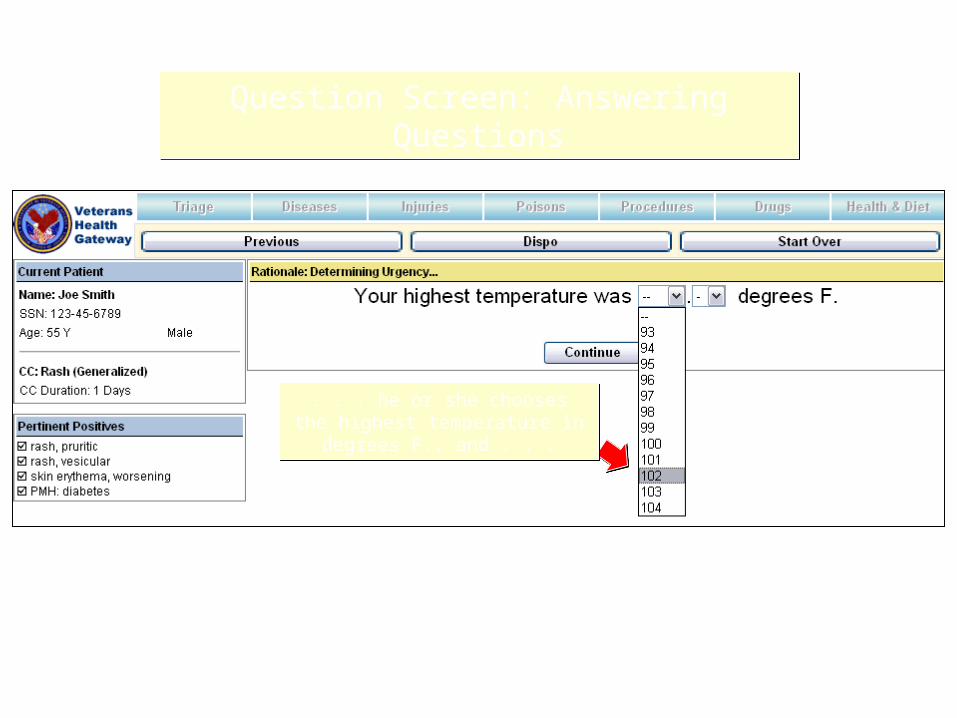
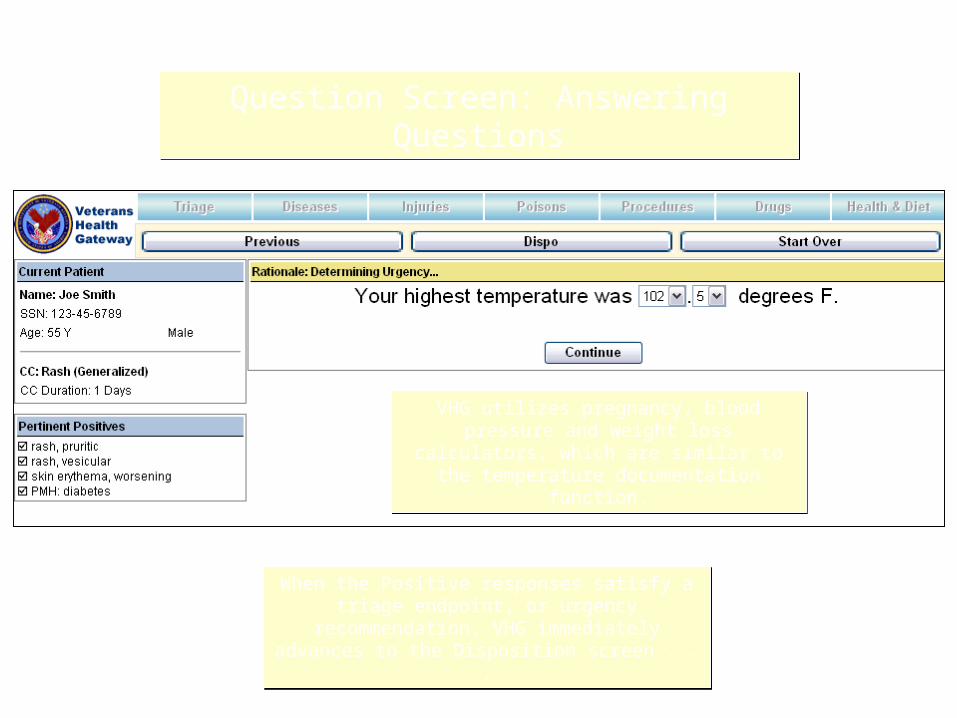
. . . he or she chooses the highest temperature in degrees F., and . . .. . . he or she chooses the highest temperature in degrees F., and . . .
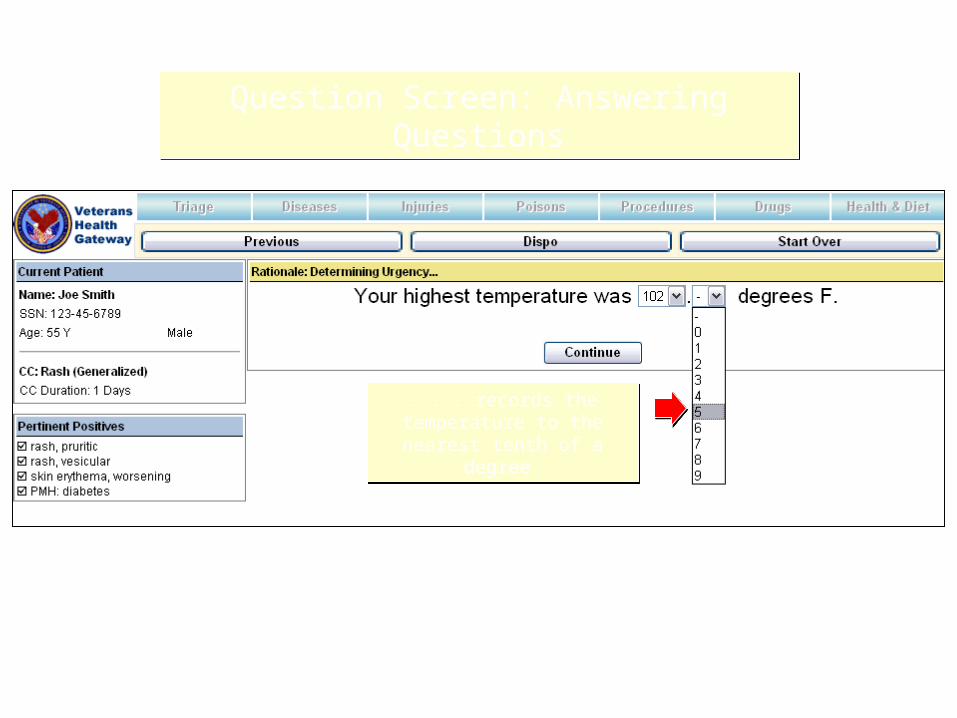
. . . records the temperature to the nearest tenth of a degree.. . . records the temperature to the nearest tenth of a degree.
Question Screen: Answering QuestionsQuestion Screen: Answering Questions
Question Screen: Answering QuestionsQuestion Screen: Answering Questions
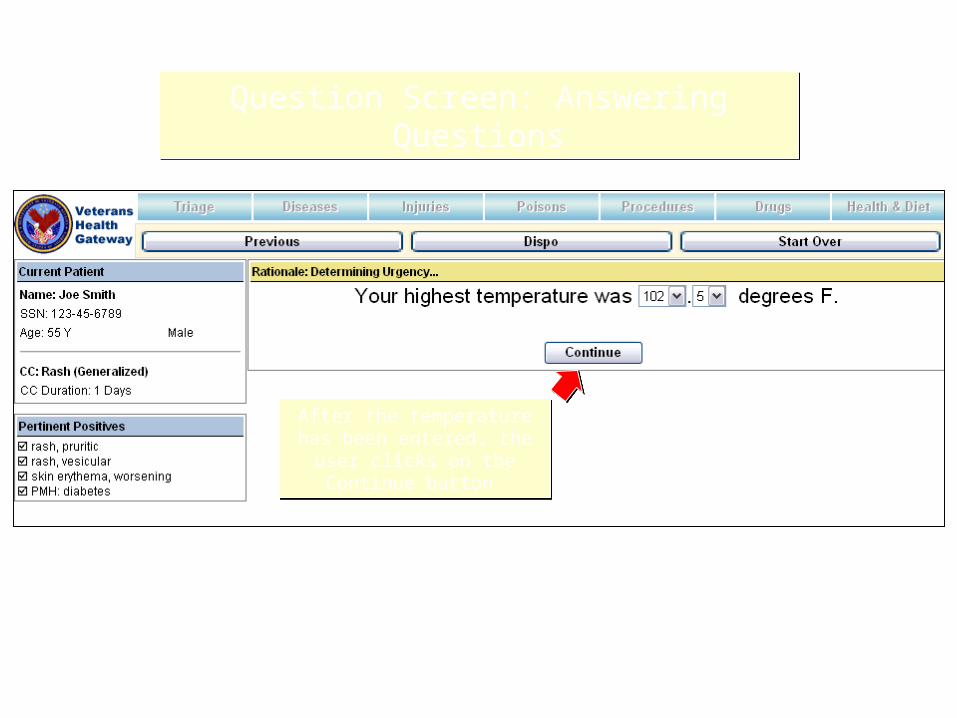
After the temperature has been entered, the user clicks
on the Continue button.
After the temperature has been entered, the user clicks
on the Continue button.
Question Screen: Answering QuestionsQuestion Screen: Answering Questions
When the Positive responses satisfy a triage endpoint, or urgency recommendation, VHG
immediately advances to the Disposition screen . . .
When the Positive responses satisfy a triage endpoint, or urgency recommendation, VHG
immediately advances to the Disposition screen . . .
VHG utilizes pregnancy, blood pressure and weight loss calculators, which are similar to the
temperature documentation function.
VHG utilizes pregnancy, blood pressure and weight loss calculators, which are similar to the
temperature documentation function.

On the Disposition Screen, VHG provides a System Recommendation.
This is the follow-up interval, within which the patient should receive care
from a health care provider.
On the Disposition Screen, VHG provides a System Recommendation.
This is the follow-up interval, within which the patient should receive care
from a health care provider.
Disposition Screen: VHG RecommendationDisposition Screen: VHG Recommendation
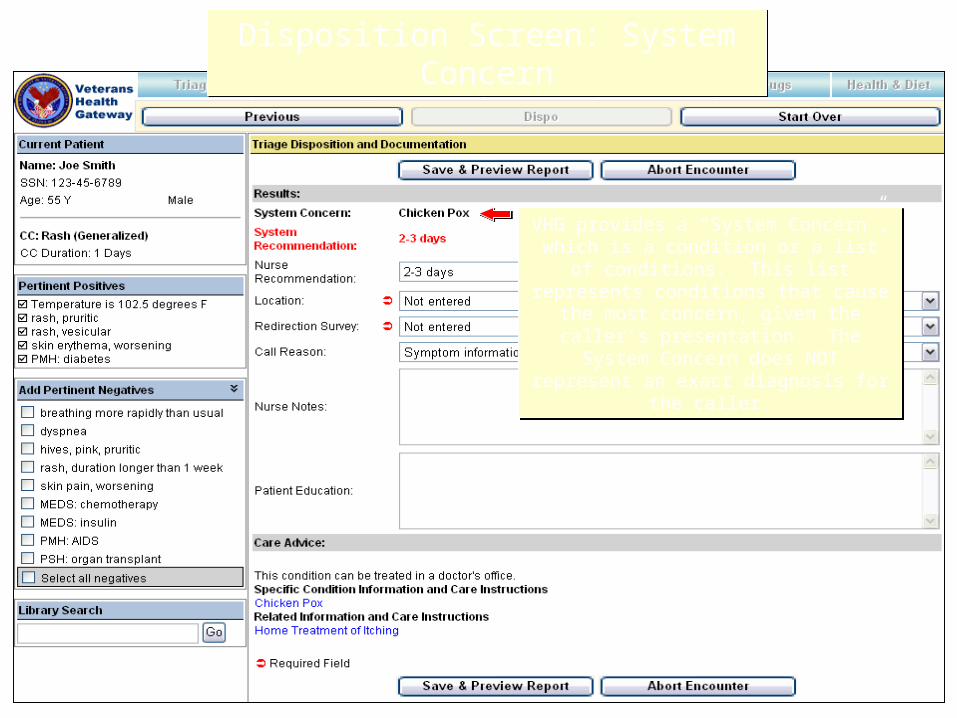
VHG provides a “System Concern”, which is a condition or a list of conditions. This list represents conditions that cause the
most concern, given the caller’s presentation. The System Concern does NOT represent an exact diagnosis for the
caller.
VHG provides a “System Concern”, which is a condition or a list of conditions. This list represents conditions that cause the
most concern, given the caller’s presentation. The System Concern does NOT represent an exact diagnosis for the
caller.
Disposition Screen: System ConcernDisposition Screen: System Concern
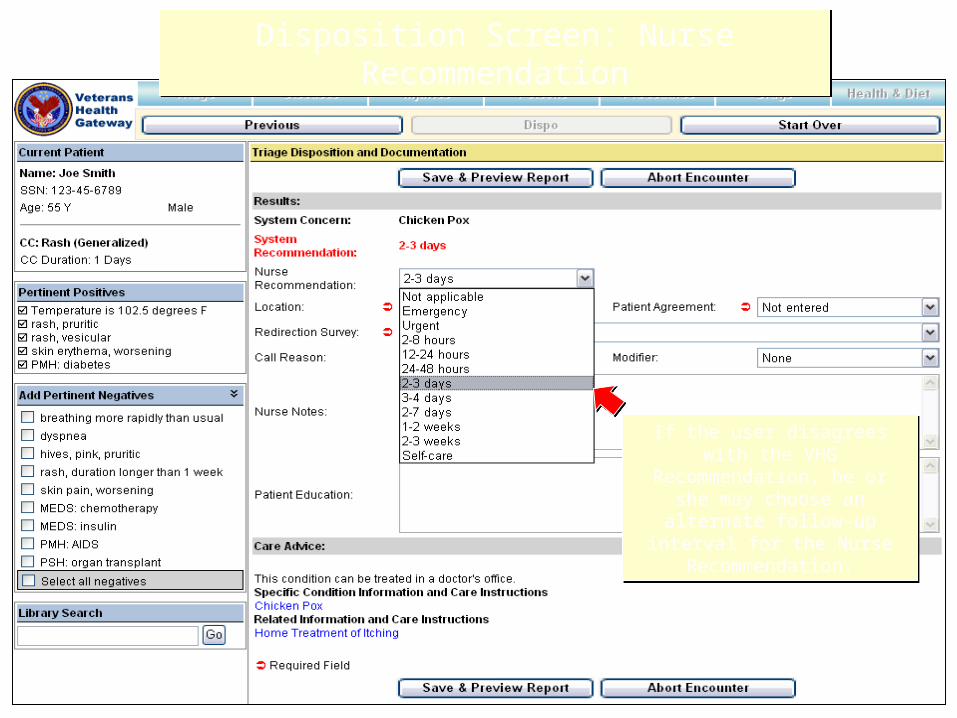
If the user disagrees with the VHG Recommendation, he or she may choose an alternate
follow-up interval for the Nurse Recommendation.
If the user disagrees with the VHG Recommendation, he or she may choose an alternate
follow-up interval for the Nurse Recommendation.
Disposition Screen: Nurse RecommendationDisposition Screen: Nurse Recommendation
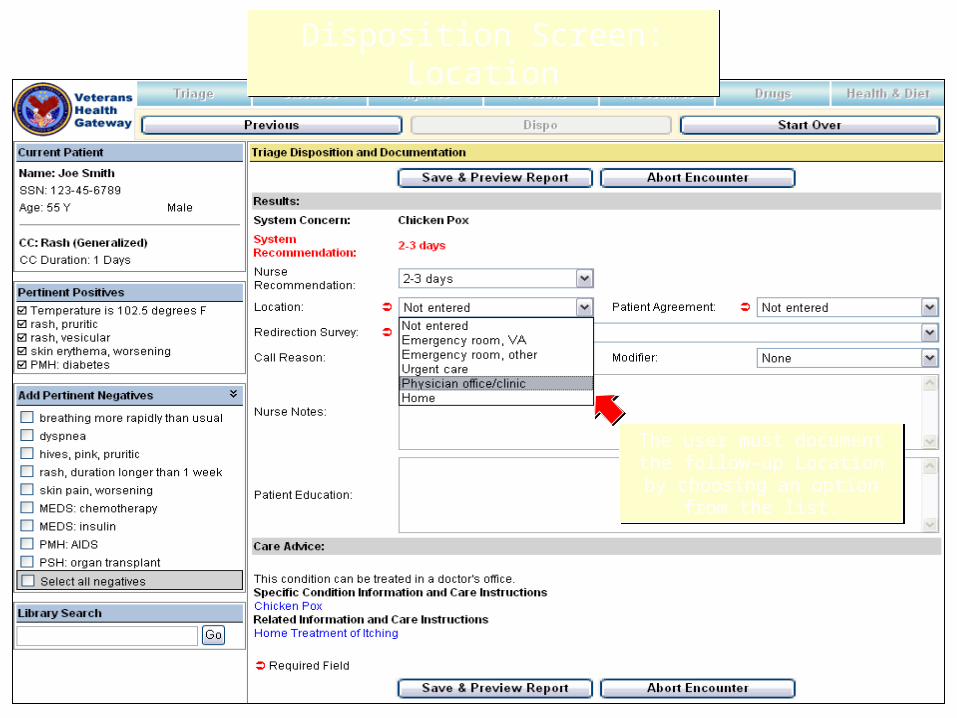
The user must document the follow-up Location by choosing
an option from the list.
The user must document the follow-up Location by choosing
an option from the list.
Disposition Screen: LocationDisposition Screen: Location
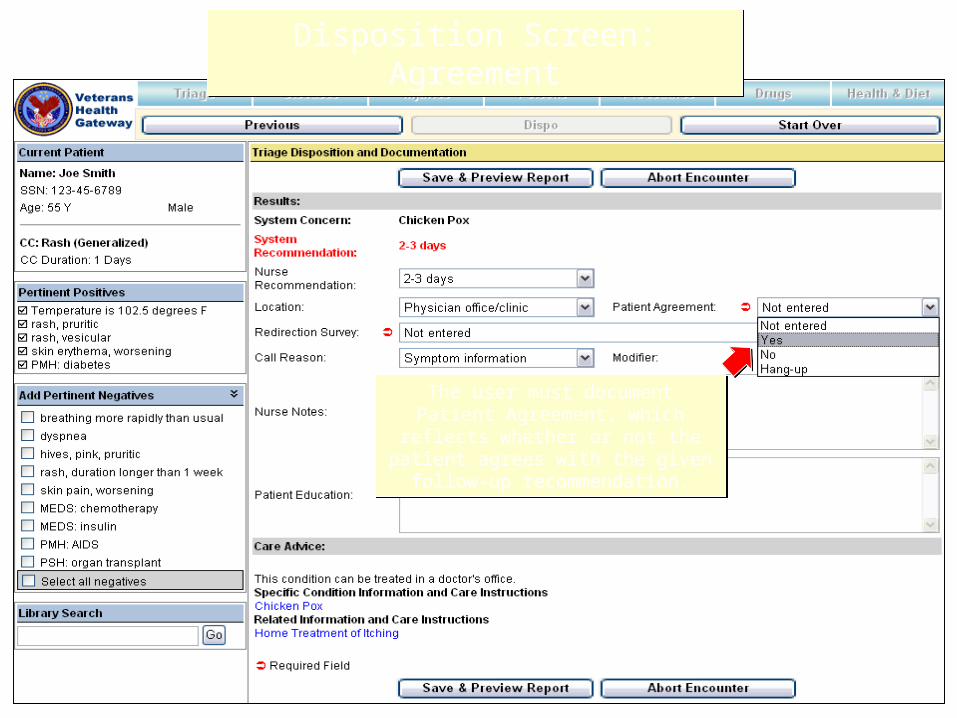
The user must document Patient Agreement, which reflects whether or not the patient agrees with the given
follow-up recommendation.
The user must document Patient Agreement, which reflects whether or not the patient agrees with the given
follow-up recommendation.
Disposition Screen: AgreementDisposition Screen: Agreement
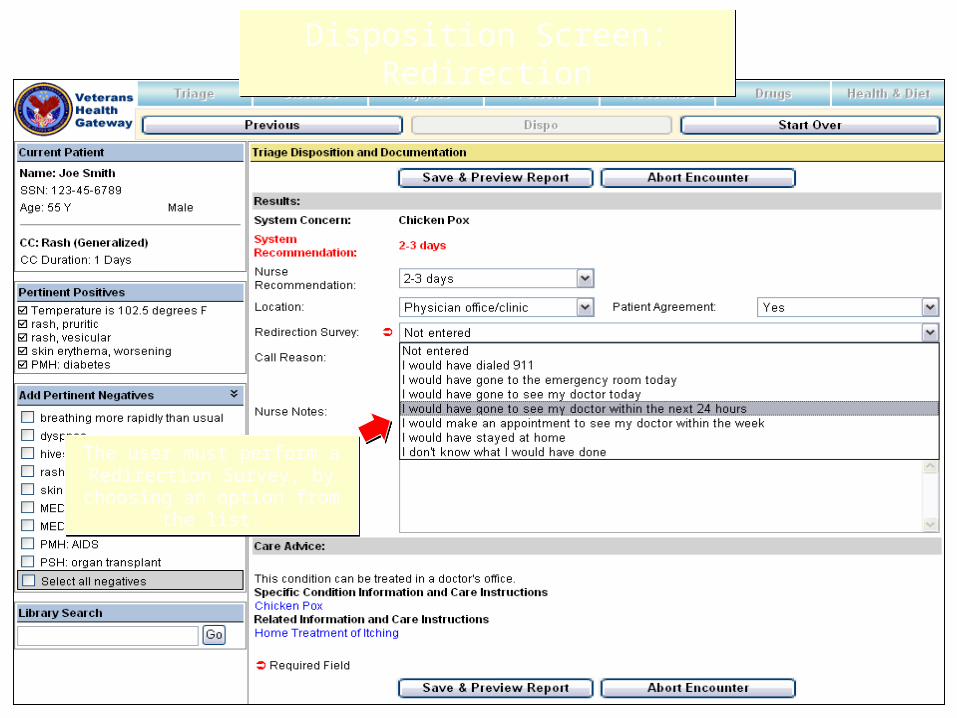
Disposition Screen: RedirectionDisposition Screen: Redirection
The user must perform a Redirection Survey, by choosing
an option from the list.
The user must perform a Redirection Survey, by choosing
an option from the list.
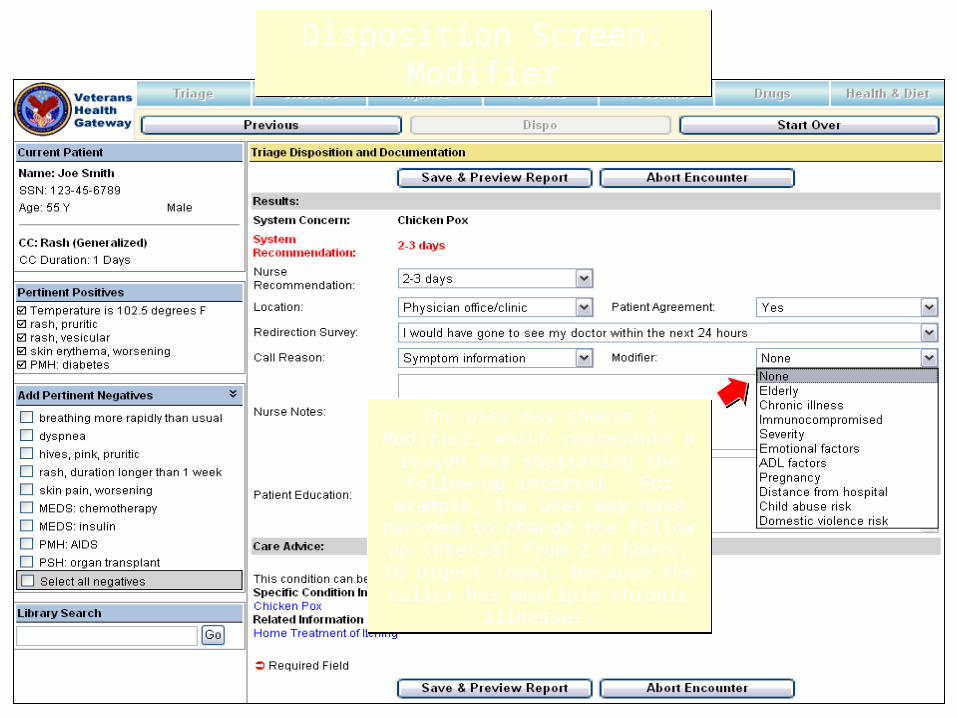
Disposition Screen: ModifierDisposition Screen: Modifier
The user may choose a Modifier, which represents a reason for
shortening the follow-up interval. For example, the user may have decided
to change the follow up interval from 2-8 hours, to Urgent (now), because the caller has multiple chronic illnesses.
The user may choose a Modifier, which represents a reason for
shortening the follow-up interval. For example, the user may have decided
to change the follow up interval from 2-8 hours, to Urgent (now), because the caller has multiple chronic illnesses.
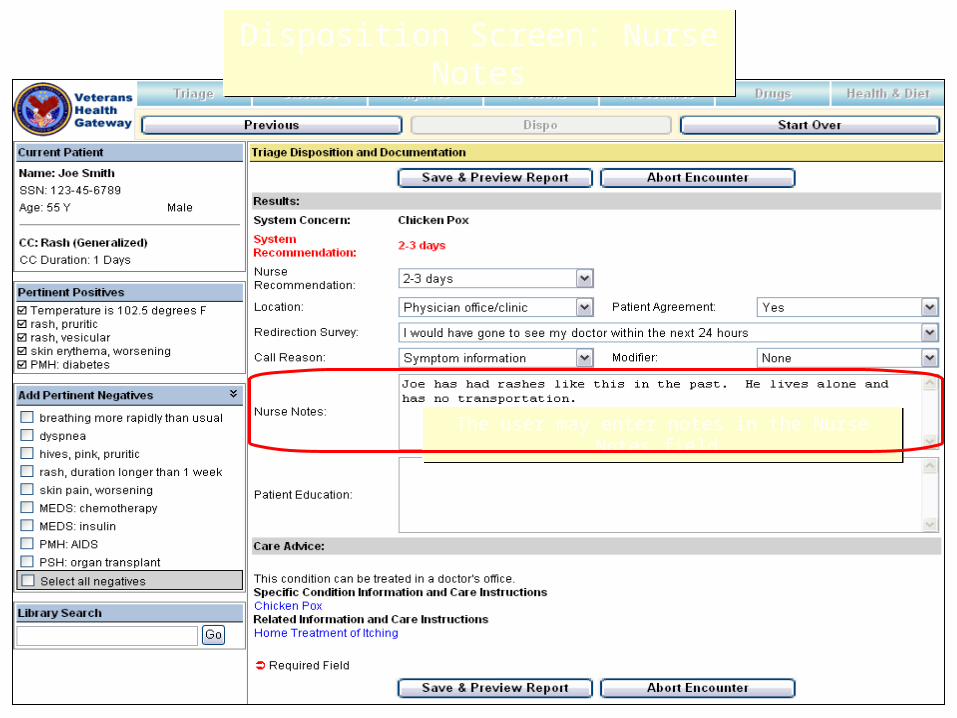
Disposition Screen: Nurse NotesDisposition Screen: Nurse Notes
The user may enter notes in the Nurse Notes field.The user may enter notes in the Nurse Notes field.
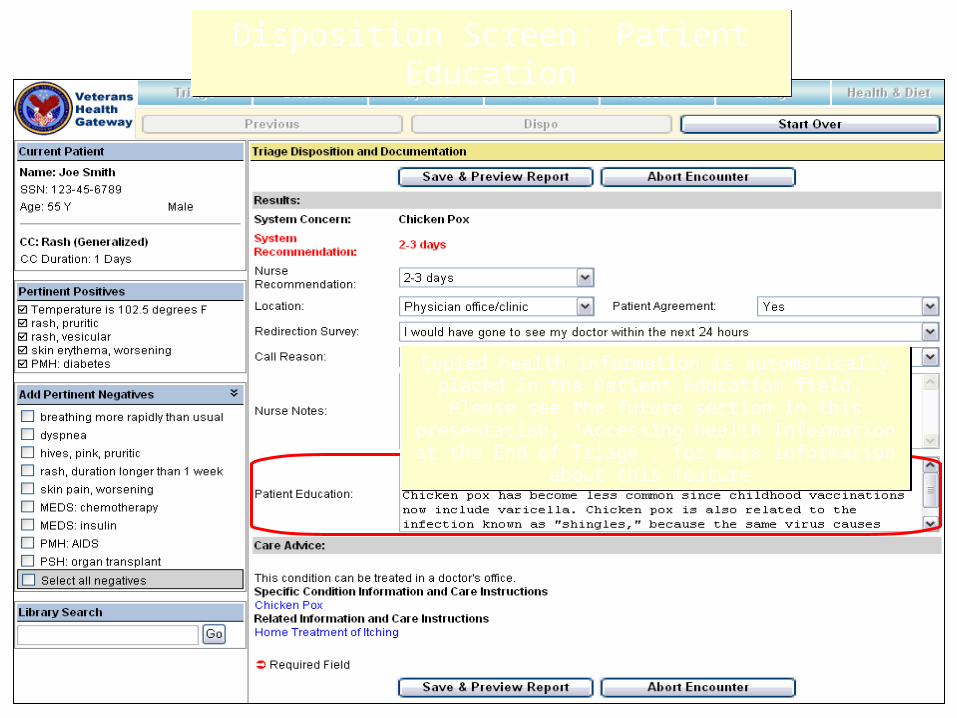
Disposition Screen: Patient EducationDisposition Screen: Patient Education
Copied health information is automatically placed in the Patient Education field. Please see the future section in
this presentation, “Accessing Health Information at the End of Triage”, for more information about this feature.
Copied health information is automatically placed in the Patient Education field. Please see the future section in
this presentation, “Accessing Health Information at the End of Triage”, for more information about this feature.
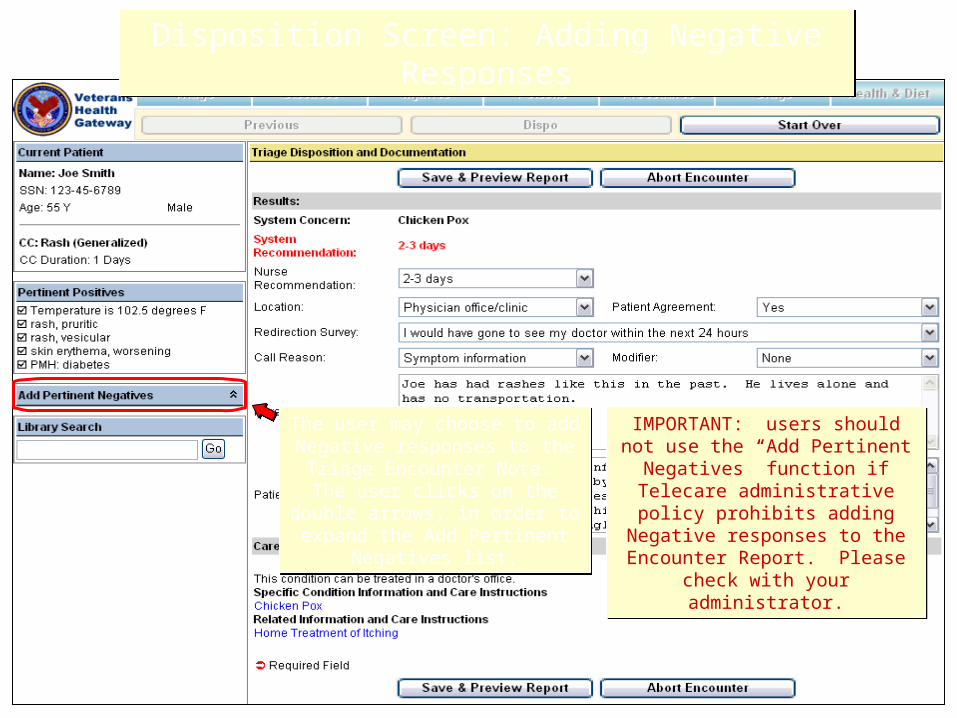
Disposition Screen: Adding Negative ResponsesDisposition Screen: Adding Negative Responses
The user may choose to add Negative responses to the Triage Encounter Note. The user clicks on the double arrows, in order to
expand the Add Pertinent Negatives list.
The user may choose to add Negative responses to the Triage Encounter Note. The user clicks on the double arrows, in order to
expand the Add Pertinent Negatives list.
IMPORTANT: users should not use the “Add Pertinent Negatives”
function if Telecare administrative policy prohibits adding Negative
responses to the Encounter Report. Please check with your
administrator.
IMPORTANT: users should not use the “Add Pertinent Negatives”
function if Telecare administrative policy prohibits adding Negative
responses to the Encounter Report. Please check with your
administrator.
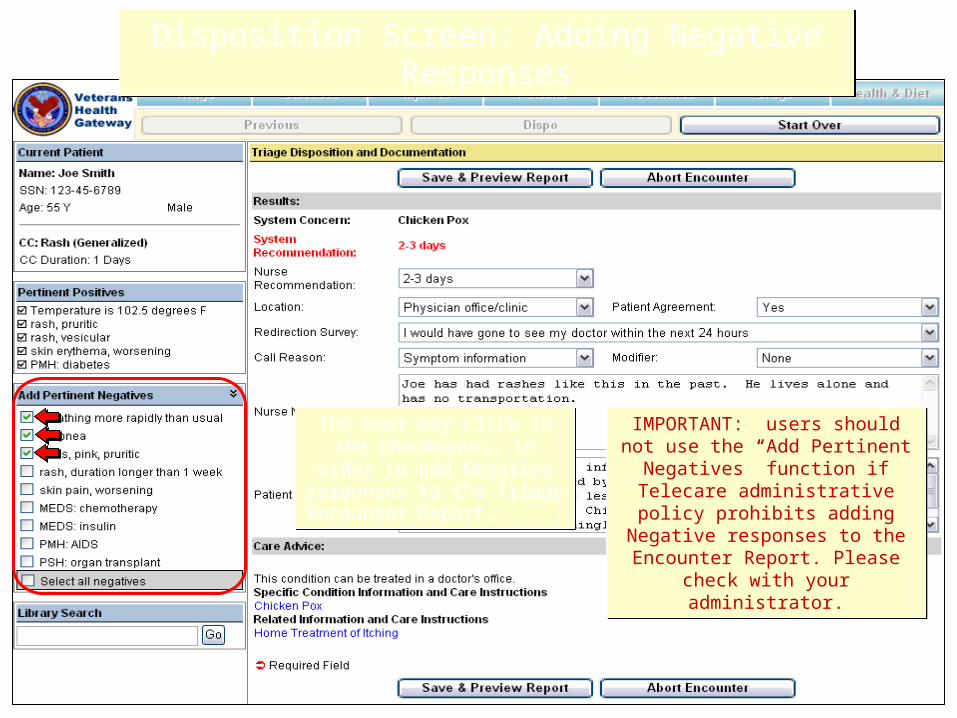
The user may click in the checkboxes, in order to add Negative responses to the
Triage Encounter Report, . . .
The user may click in the checkboxes, in order to add Negative responses to the
Triage Encounter Report, . . .
Disposition Screen: Adding Negative ResponsesDisposition Screen: Adding Negative Responses
IMPORTANT: users should not use the “Add Pertinent Negatives”
function if Telecare administrative policy prohibits adding Negative
responses to the Encounter Report. Please check with your
administrator.
IMPORTANT: users should not use the “Add Pertinent Negatives”
function if Telecare administrative policy prohibits adding Negative
responses to the Encounter Report. Please check with your
administrator.
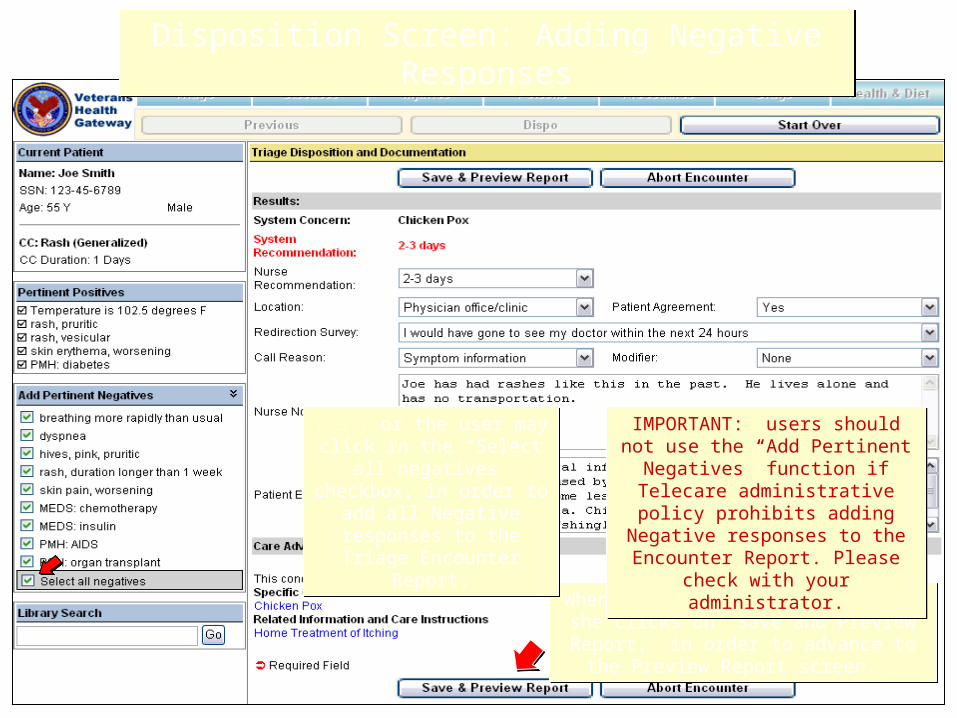
When the user is finished, he or she clicks on “Save and Preview Report,” in order to advance to the Preview Report screen.
When the user is finished, he or she clicks on “Save and Preview Report,” in order to advance to the Preview Report screen.
. . . or the user may click in the “Select all negatives”
checkbox, in order to add all Negative responses to the Triage Encounter Report.
. . . or the user may click in the “Select all negatives”
checkbox, in order to add all Negative responses to the Triage Encounter Report.
Disposition Screen: Adding Negative ResponsesDisposition Screen: Adding Negative Responses
IMPORTANT: users should not use the “Add Pertinent Negatives”
function if Telecare administrative policy prohibits adding Negative
responses to the Encounter Report. Please check with your
administrator.
IMPORTANT: users should not use the “Add Pertinent Negatives”
function if Telecare administrative policy prohibits adding Negative
responses to the Encounter Report. Please check with your
administrator.
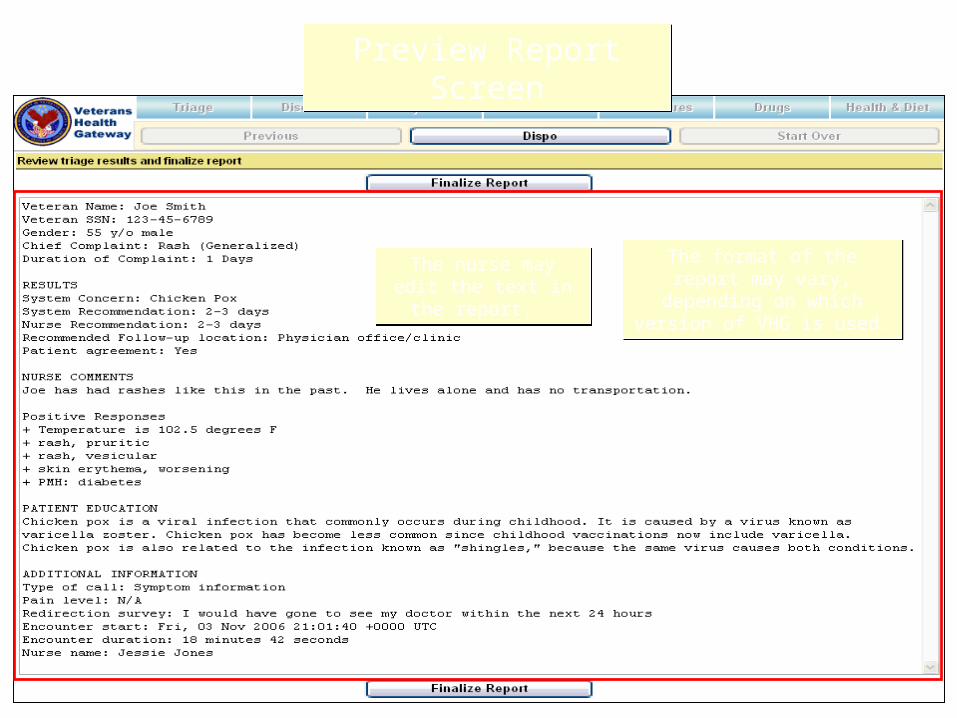
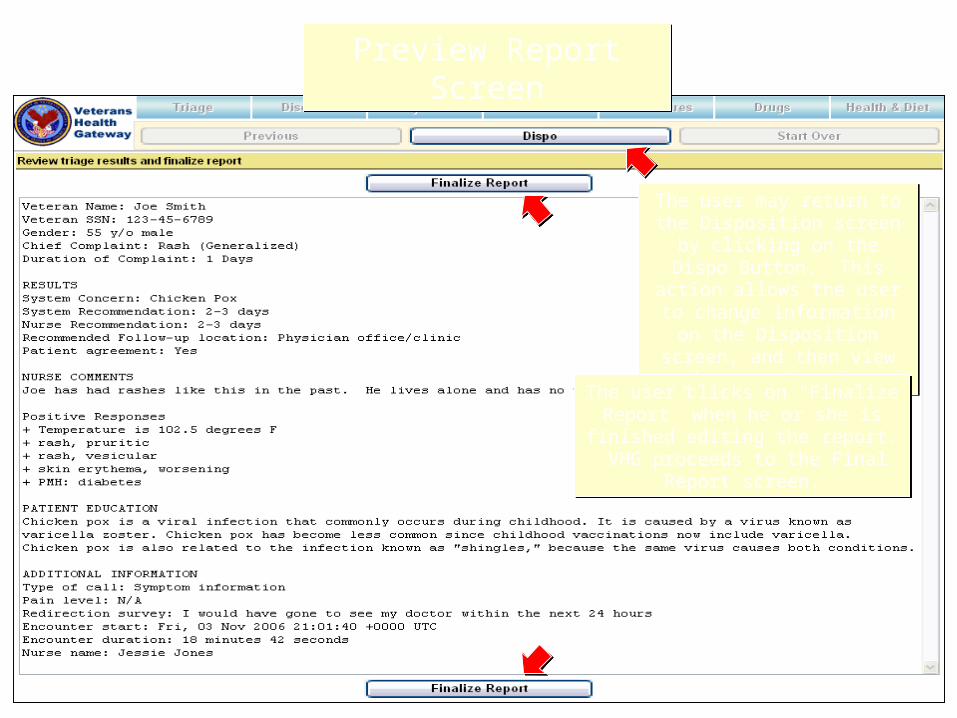
Preview Report ScreenPreview Report Screen
The nurse may edit the text in the report.
The nurse may edit the text in the report.
The format of the report may vary, depending on which version of VHG is used.
The format of the report may vary, depending on which version of VHG is used.
Preview Report ScreenPreview Report Screen
The user may return to the Disposition screen by clicking
on the Dispo Button. This action allows the user to
change information on the Disposition screen, and then
view the report again.
The user may return to the Disposition screen by clicking
on the Dispo Button. This action allows the user to
change information on the Disposition screen, and then
view the report again.
The user clicks on “Finalize Report” when he or she is finished editing the
report. VHG proceeds to the Final Report screen.
The user clicks on “Finalize Report” when he or she is finished editing the
report. VHG proceeds to the Final Report screen.
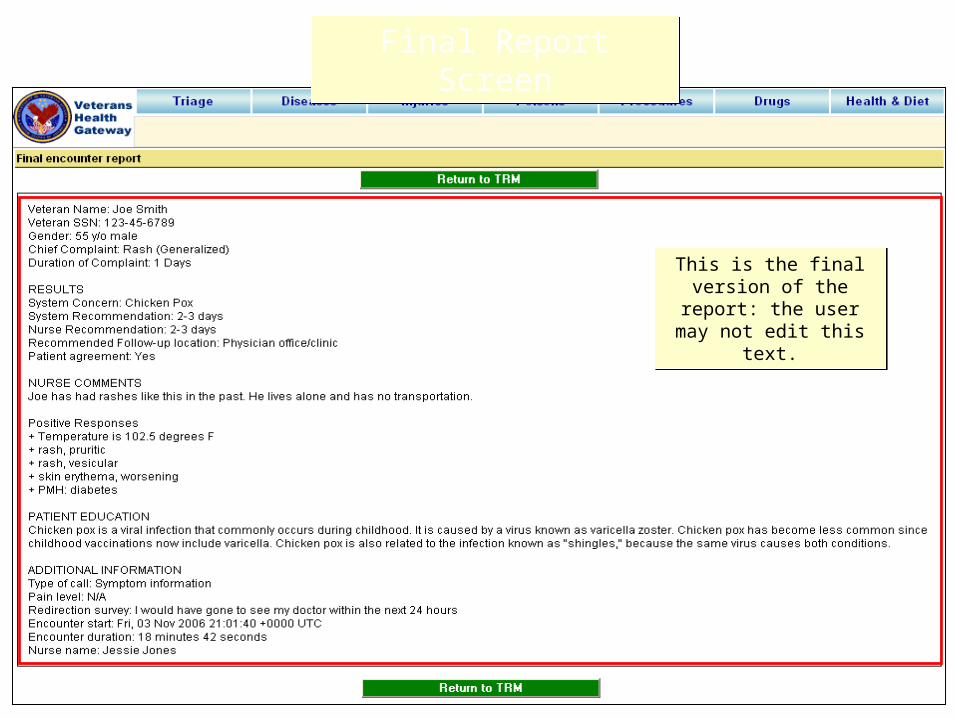
This is the final version of the report: the user may
not edit this text.
This is the final version of the report: the user may
not edit this text.
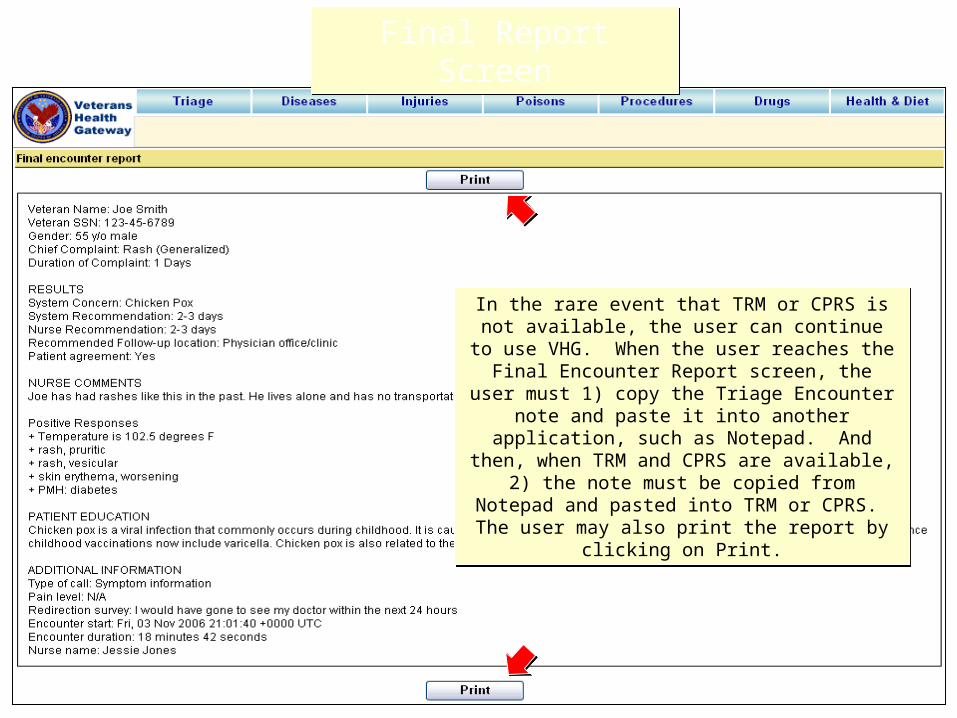
Final Report ScreenFinal Report Screen
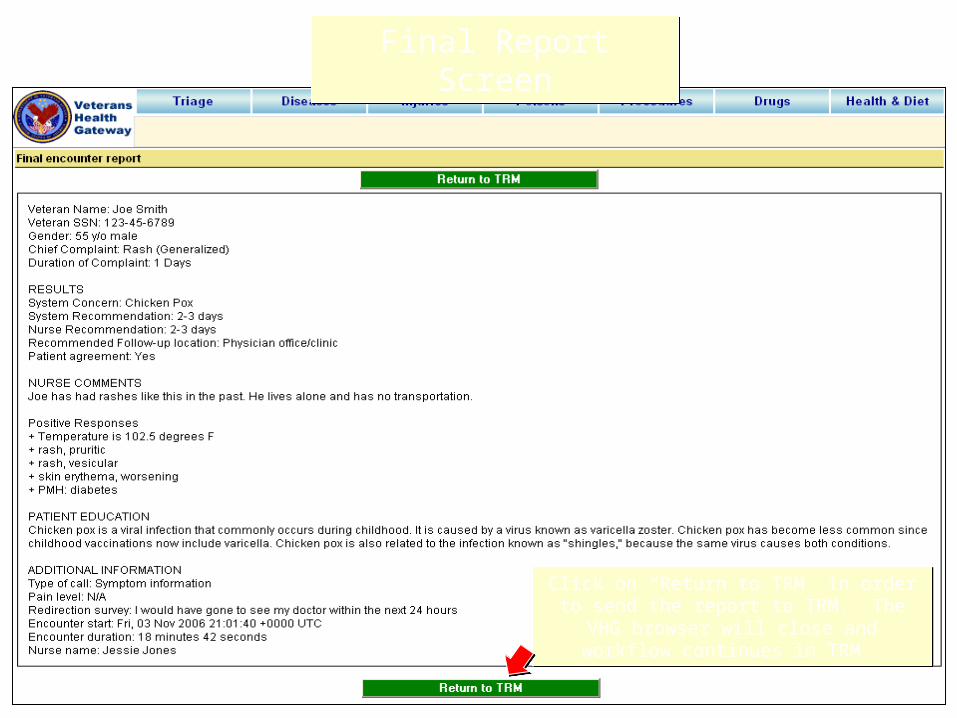
Final Report ScreenFinal Report Screen
Click on “Return to TRM” in order to send the report to TRM. The VHG browser will close
and workflow continues in TRM.
Click on “Return to TRM” in order to send the report to TRM. The VHG browser will close
and workflow continues in TRM.
Final Report ScreenFinal Report Screen
In the rare event that TRM or CPRS is not available, the user can continue to use VHG. When the user
reaches the Final Encounter Report screen, the user must 1) copy the Triage Encounter note and paste it
into another application, such as Notepad. And then, when TRM and CPRS are available, 2) the
note must be copied from Notepad and pasted into TRM or CPRS. The user may also print the report
by clicking on Print.
Accessing Health Information at the End of Triage
Related health information and care instructions
Accessing Patient Education InformationAccessing Patient Education Information
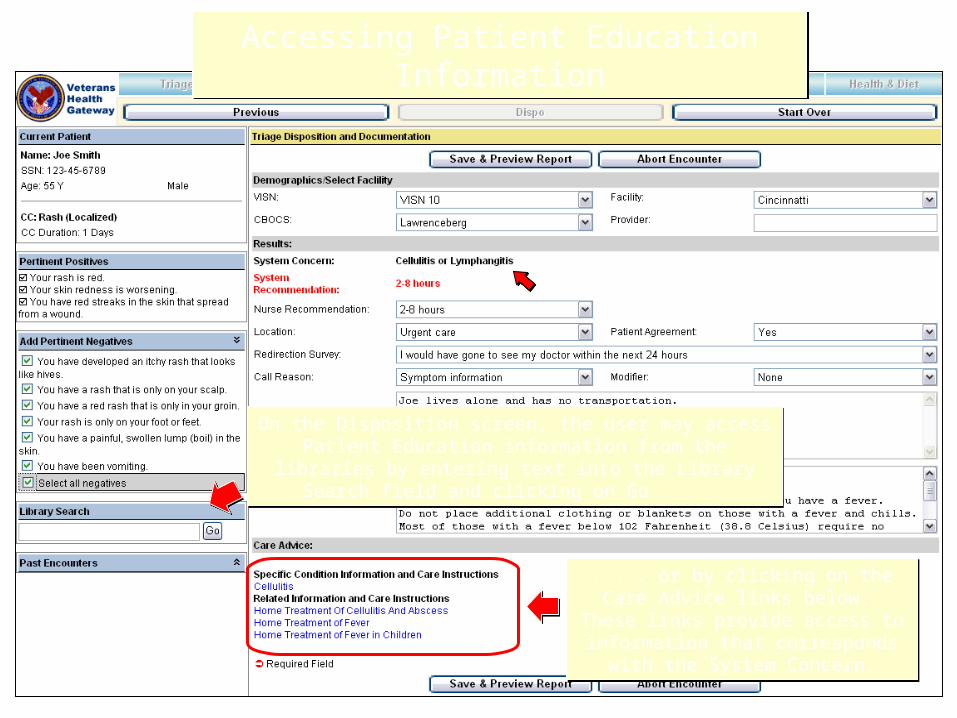
On the Disposition screen, the user may access Patient Education information from the libraries by entering text into
the Library Search field and clicking on Go . . .
On the Disposition screen, the user may access Patient Education information from the libraries by entering text into
the Library Search field and clicking on Go . . .
. . . or by clicking on the Care Advice links below. These links provide access to information that corresponds with the
System Concern.
. . . or by clicking on the Care Advice links below. These links provide access to information that corresponds with the
System Concern.
Accessing Patient Education InformationAccessing Patient Education Information
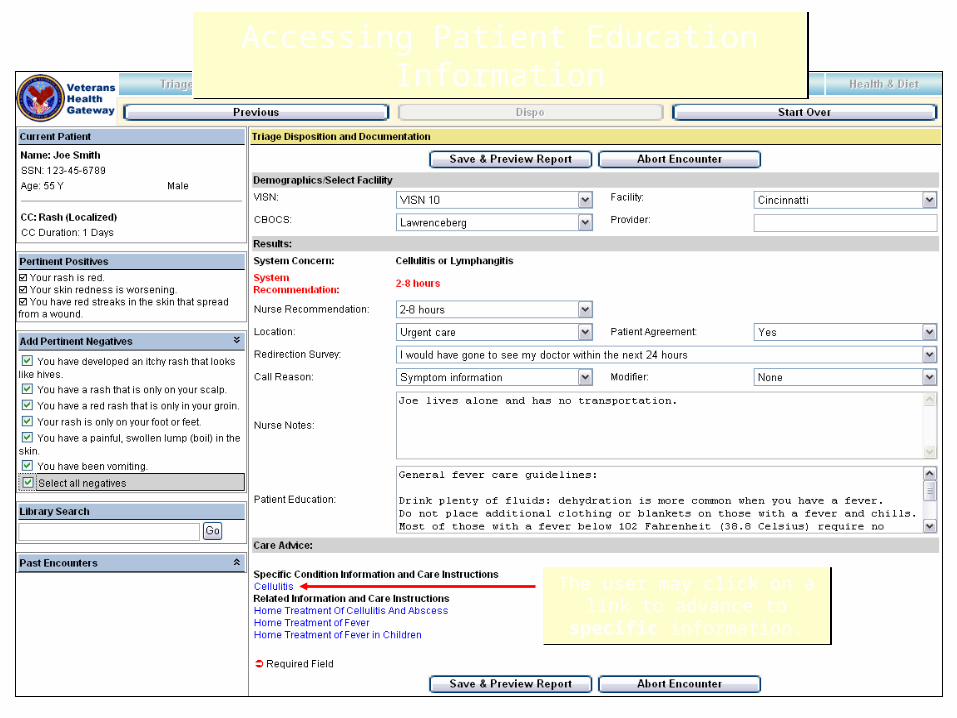
The user may click on a link to advance to specific
information.
The user may click on a link to advance to specific
information.
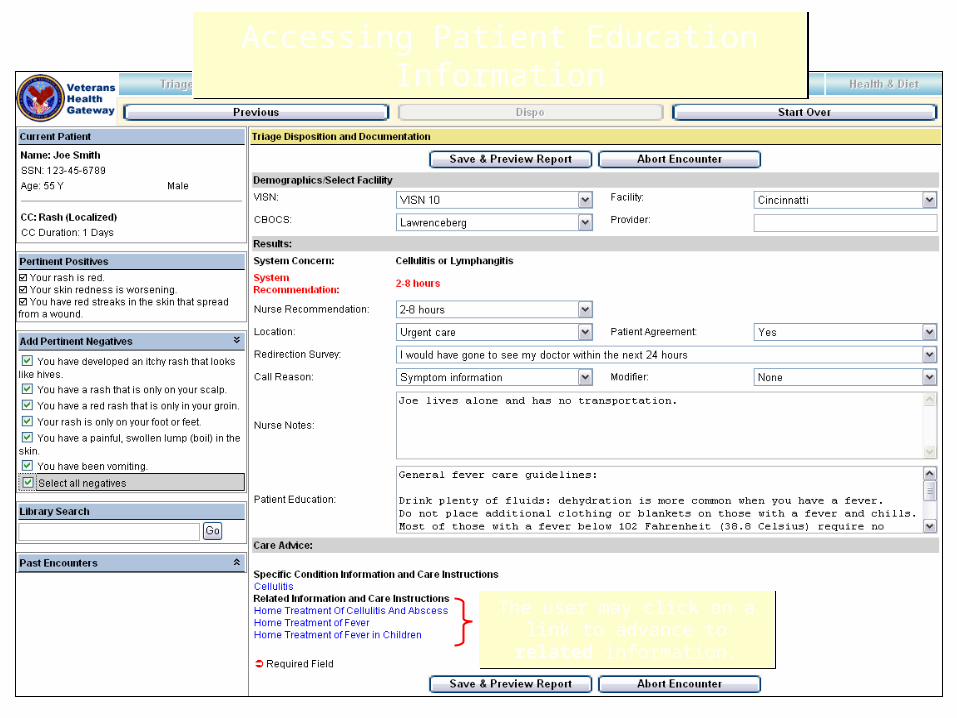
The user may click on a link to advance to related information.The user may click on a link to advance to related information.
Accessing Patient Education InformationAccessing Patient Education Information
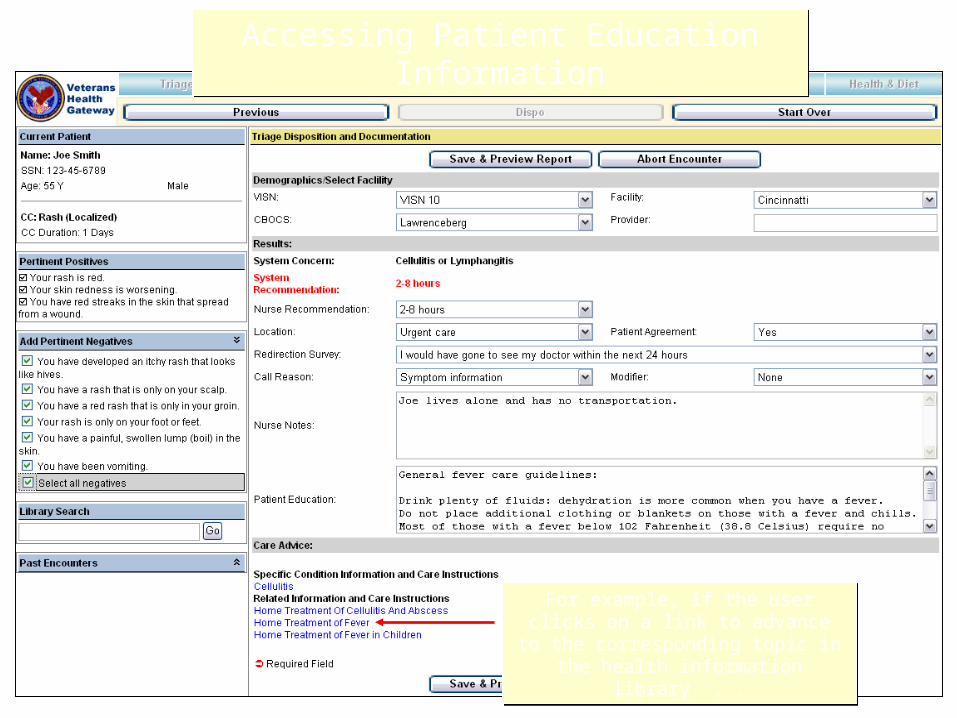
For example, if the user clicks on a link to advance to the corresponding topic in
the health information library. . .
For example, if the user clicks on a link to advance to the corresponding topic in
the health information library. . .
Accessing Patient Education InformationAccessing Patient Education Information
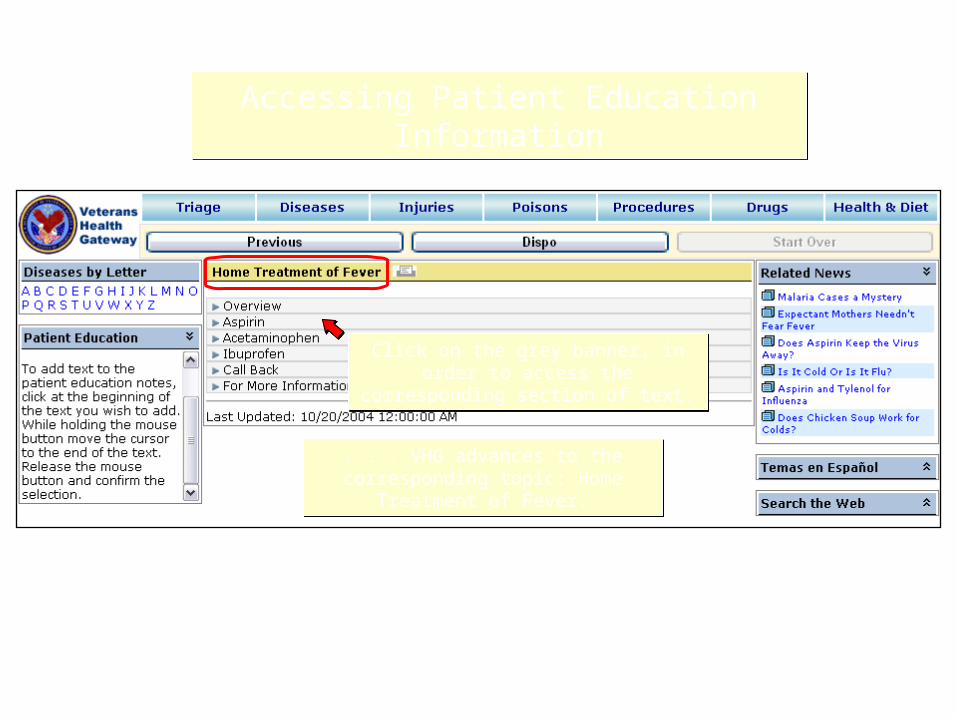
. . . VHG advances to the corresponding topic: Home Treatment of Fever.
. . . VHG advances to the corresponding topic: Home Treatment of Fever.
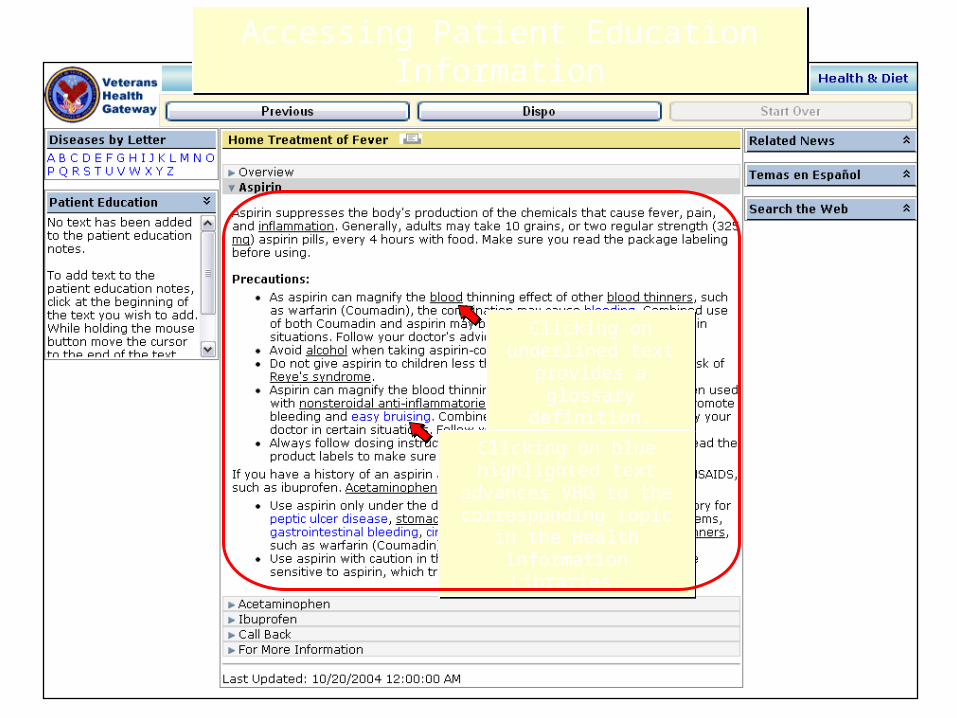
Click on the grey banner, in order to access the corresponding section of text.
Click on the grey banner, in order to access the corresponding section of text.
Accessing Patient Education InformationAccessing Patient Education Information
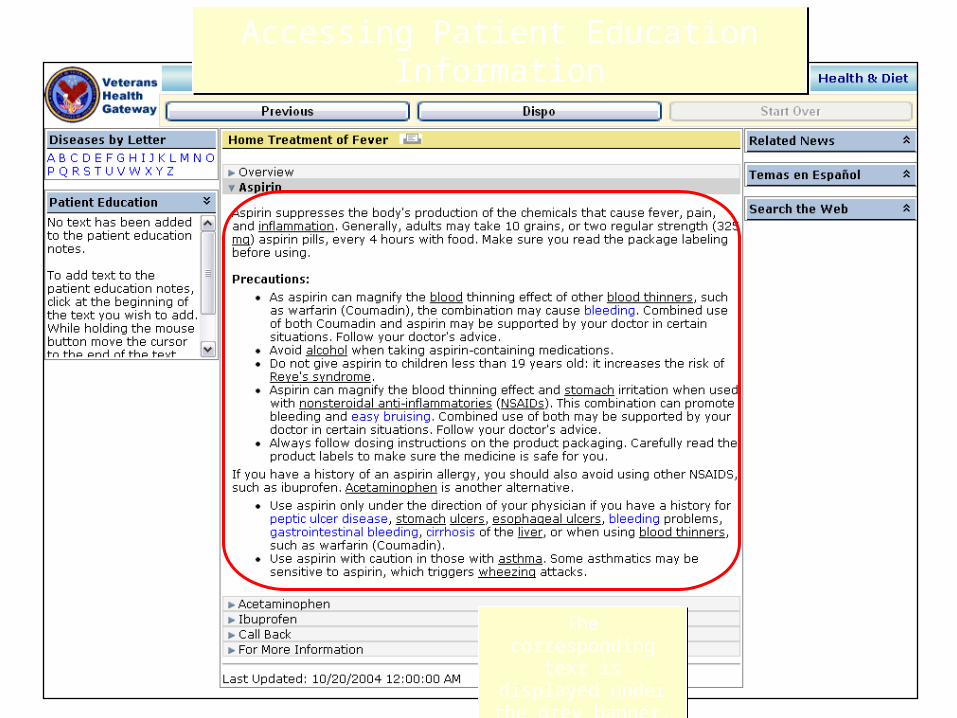
The corresponding text is displayed under
the grey banner.
The corresponding text is displayed under
the grey banner.
Accessing Patient Education InformationAccessing Patient Education Information
Accessing Patient Education InformationAccessing Patient Education Information
Clicking on underlined text provides a
glossary definition.
Clicking on underlined text provides a
glossary definition.
Clicking on blue highlighted text advances VHG to the corresponding topic in the
Health Information Libraries.
Clicking on blue highlighted text advances VHG to the corresponding topic in the
Health Information Libraries.
Accessing Patient Education Information to the RecordAccessing Patient Education Information to the Record
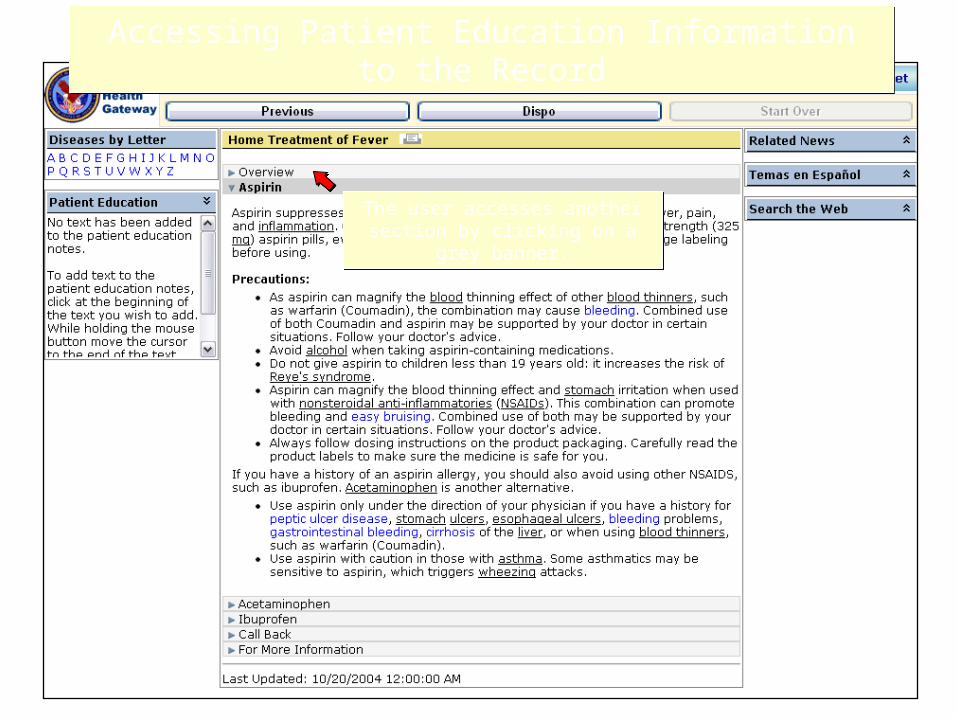
The user accesses another section by clicking on a grey banner.
The user accesses another section by clicking on a grey banner.
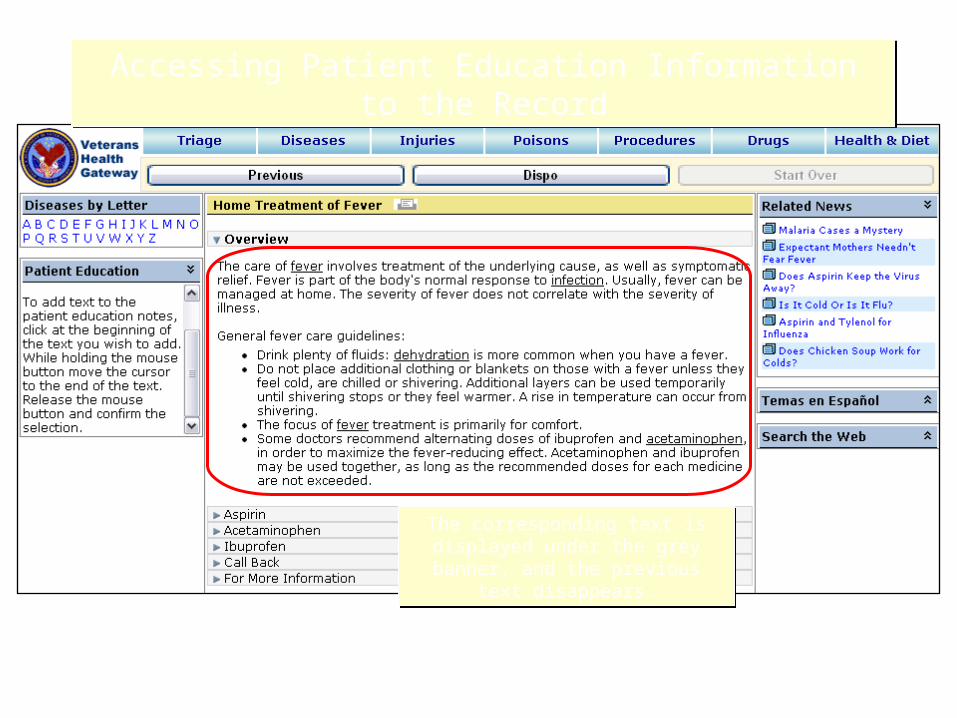
The corresponding text is displayed under the grey banner, and the
previous text disappears.
The corresponding text is displayed under the grey banner, and the
previous text disappears.
Accessing Patient Education Information to the RecordAccessing Patient Education Information to the Record
Adding Patient Education Information to the RecordAdding Patient Education Information to the Record
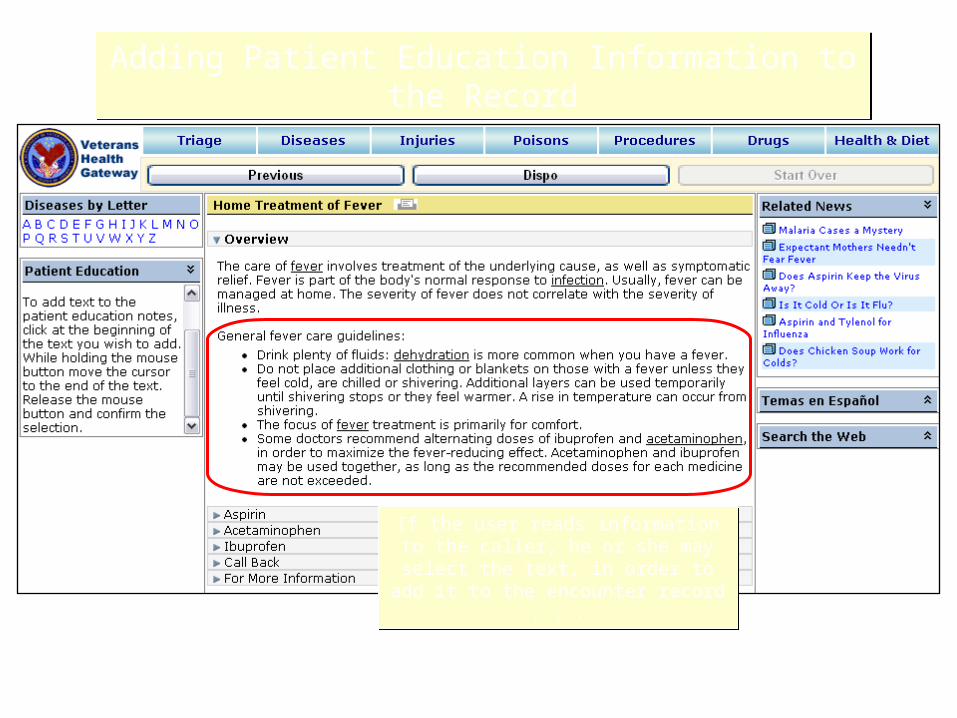
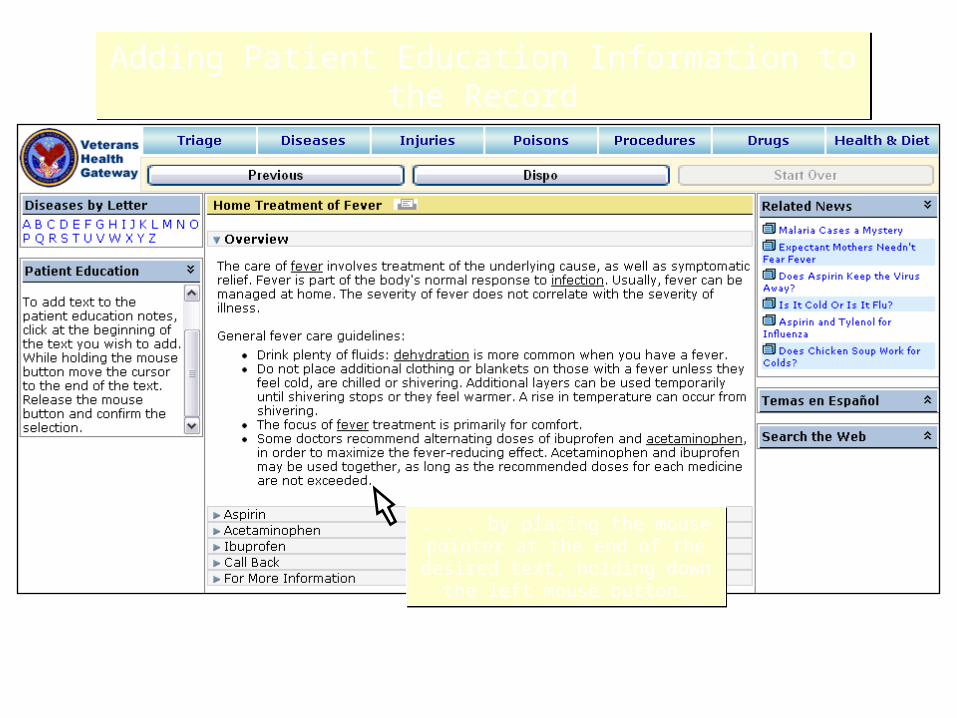
If the user reads information to the caller, he or she may select the text, in
order to add it to the encounter record . . .
If the user reads information to the caller, he or she may select the text, in
order to add it to the encounter record . . .
Adding Patient Education Information to the RecordAdding Patient Education Information to the Record
. . . by placing the mouse pointer at the end of the desired text, holding
down the left mouse button…
. . . by placing the mouse pointer at the end of the desired text, holding
down the left mouse button…
Adding Patient Education Information to the RecordAdding Patient Education Information to the Record
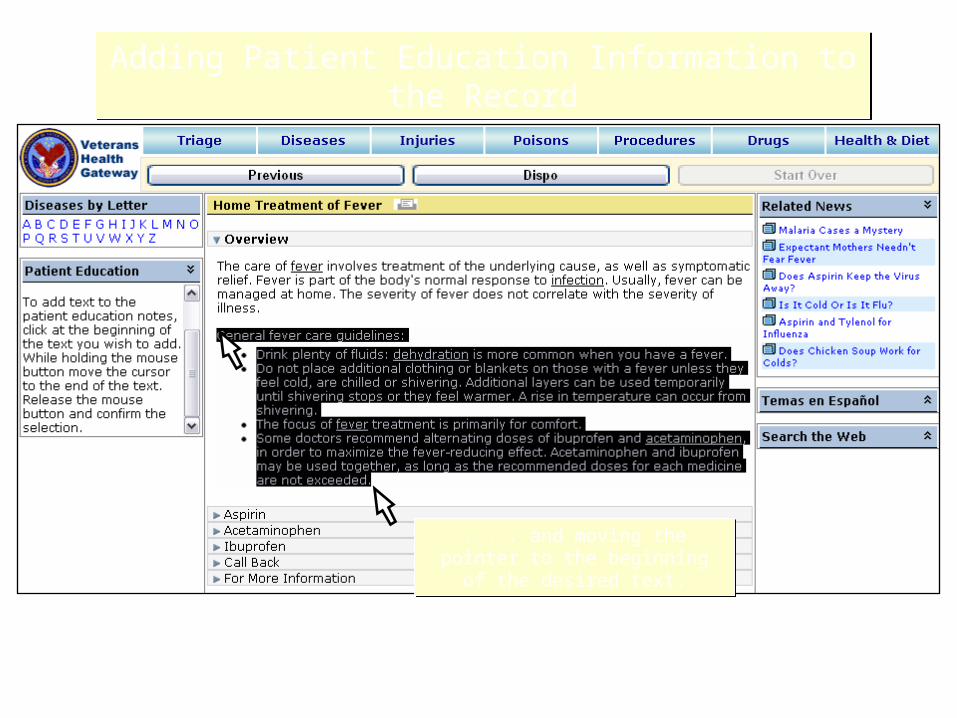
. . . and moving the pointer to the beginning of the desired text.
. . . and moving the pointer to the beginning of the desired text.
Adding Patient Education Information to the RecordAdding Patient Education Information to the Record
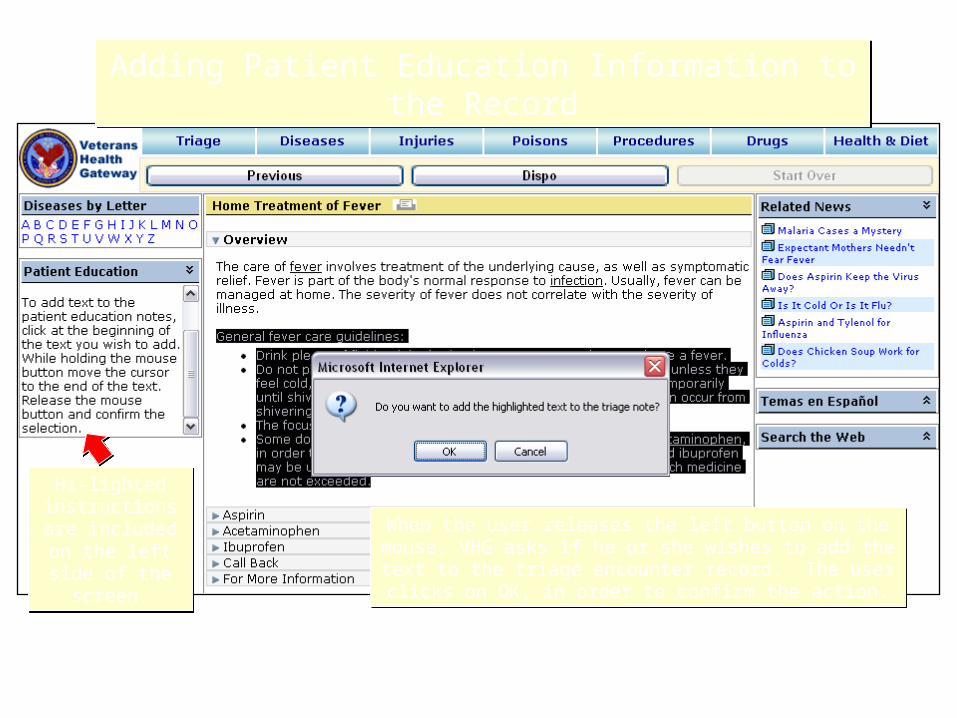
When the user releases the left button on the mouse, VHG asks if he or she wishes to add the text to the triage encounter record. The user clicks on OK, in order to confirm the action.
When the user releases the left button on the mouse, VHG asks if he or she wishes to add the text to the triage encounter record. The user clicks on OK, in order to confirm the action.
Hi-lighted instructions are included on the left side of the
screen.
Hi-lighted instructions are included on the left side of the
screen.
Adding Patient Education Information to the RecordAdding Patient Education Information to the Record
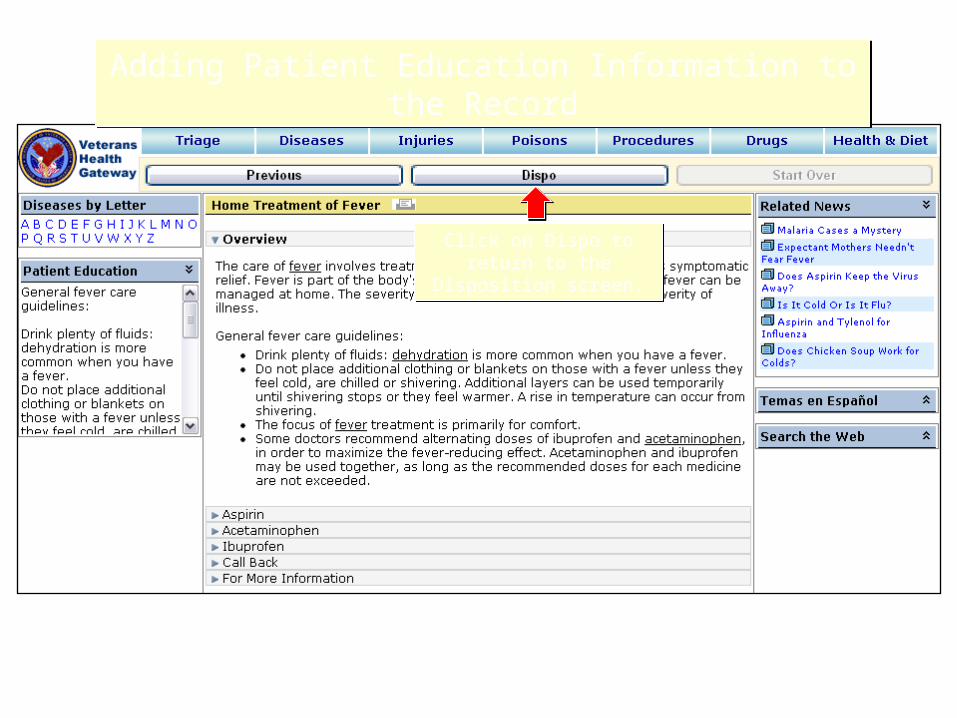
Click on Dispo to return to the Disposition screen.
Click on Dispo to return to the Disposition screen.
Disposition ScreenDisposition Screen
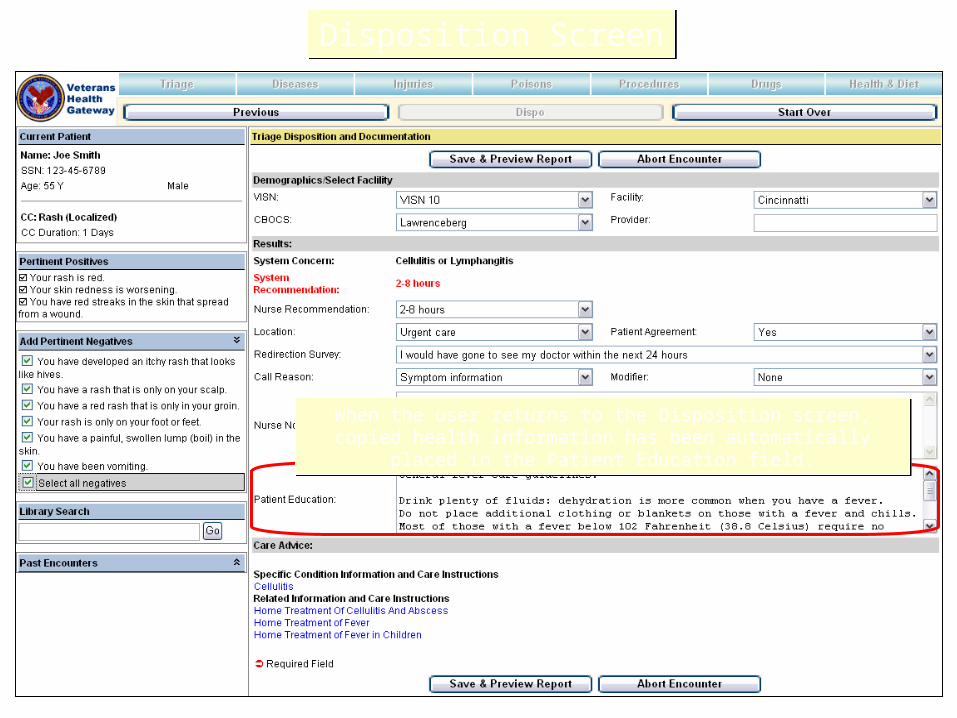
When the user returns to the Disposition screen, copied health information has been automatically placed in the Patient Education
field.
When the user returns to the Disposition screen, copied health information has been automatically placed in the Patient Education
field.
Providing Health Information to Callers
When a caller does not require triage
Completing an Education CallCompleting an Education Call
. . . or 2) click on one of the health information library tabs.
. . . or 2) click on one of the health information library tabs.
2
1
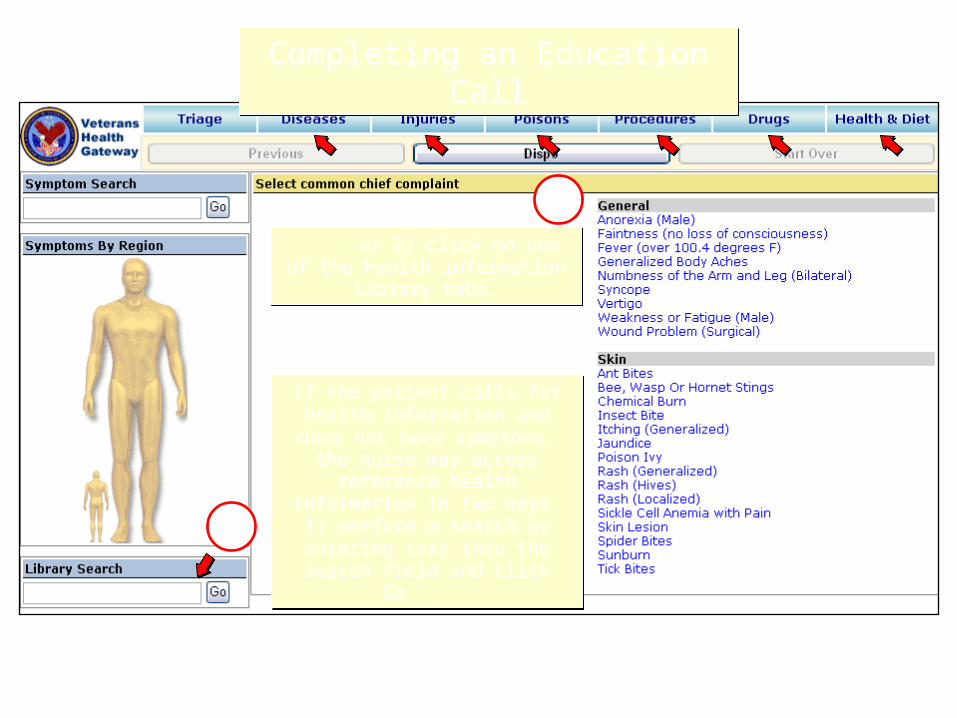
If the patient calls for health information and does not have
symptoms, the nurse may access reference health information in two
ways: 1) perform a search by entering text into the search field
and click Go . . .
If the patient calls for health information and does not have
symptoms, the nurse may access reference health information in two
ways: 1) perform a search by entering text into the search field
and click Go . . .
Completing an Education CallCompleting an Education Call
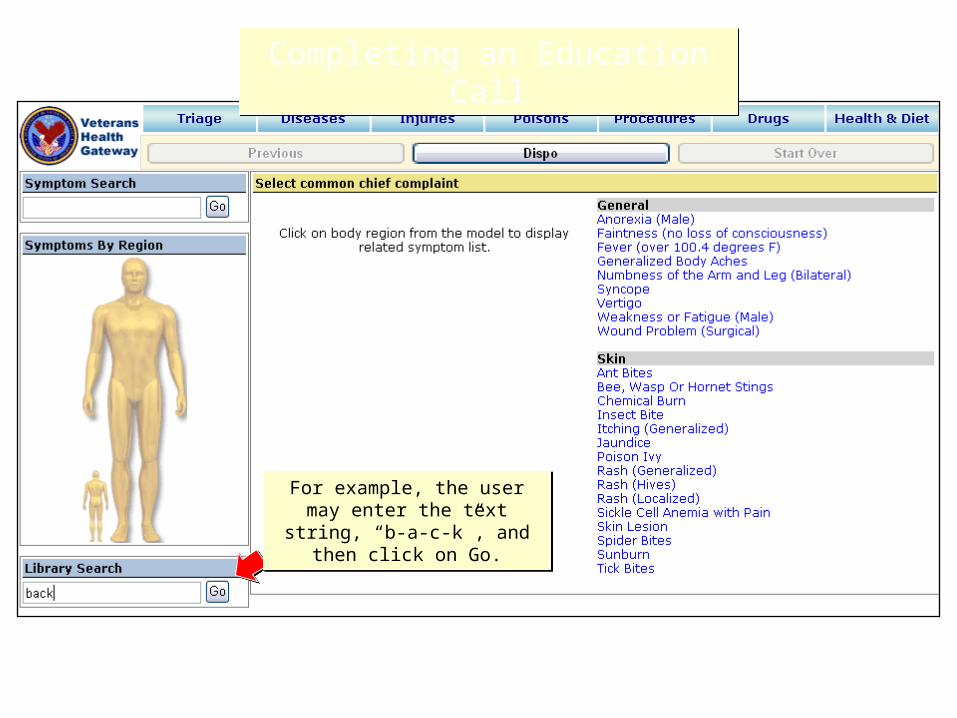
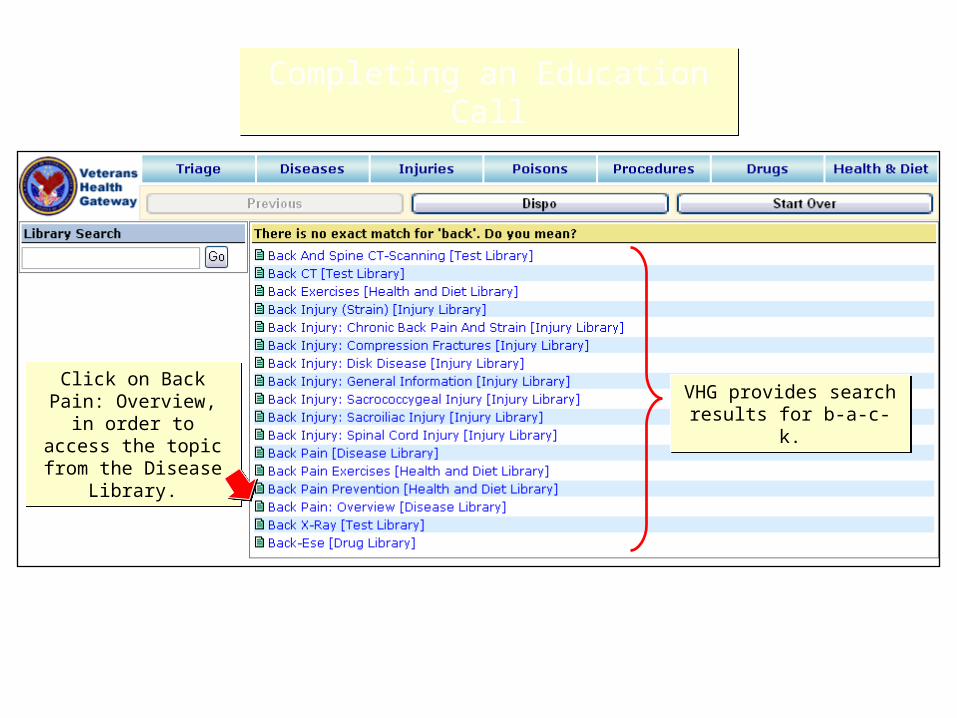
For example, the user may enter the text string, “b-a-c-k”,
and then click on Go.
For example, the user may enter the text string, “b-a-c-k”,
and then click on Go.
Completing an Education CallCompleting an Education Call
Click on Back Pain: Overview, in order to access the topic from the Disease Library.
Click on Back Pain: Overview, in order to access the topic from the Disease Library.
VHG provides search results for b-a-c-k.
VHG provides search results for b-a-c-k.
Completing an Education CallCompleting an Education Call
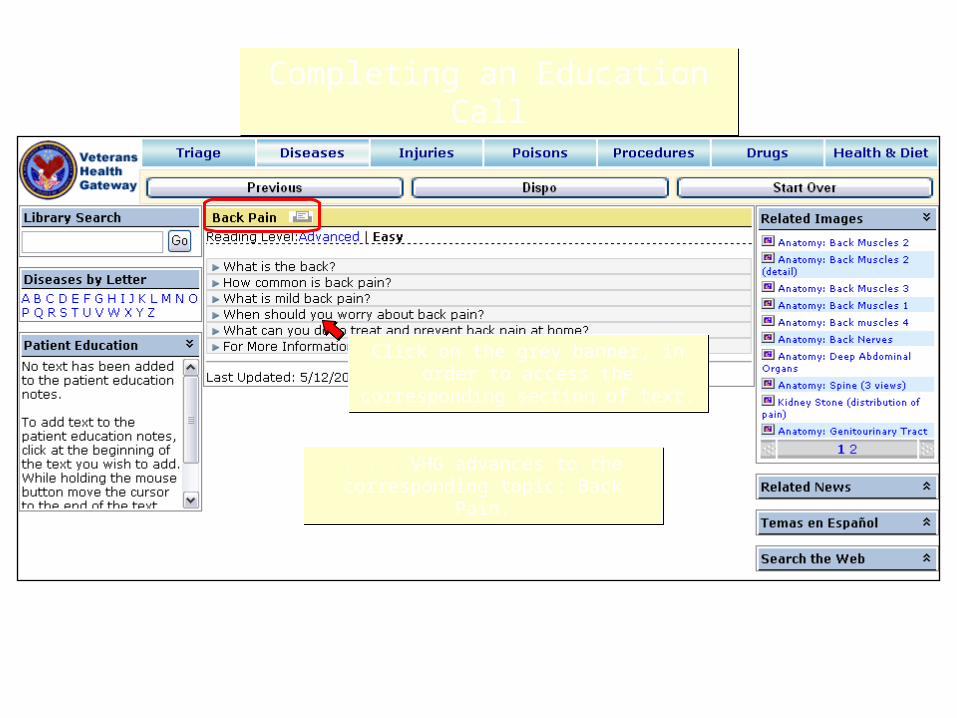
. . . VHG advances to the corresponding topic: Back Pain.
. . . VHG advances to the corresponding topic: Back Pain.
Click on the grey banner, in order to access the corresponding section of text.
Click on the grey banner, in order to access the corresponding section of text.
Completing an Education CallCompleting an Education Call
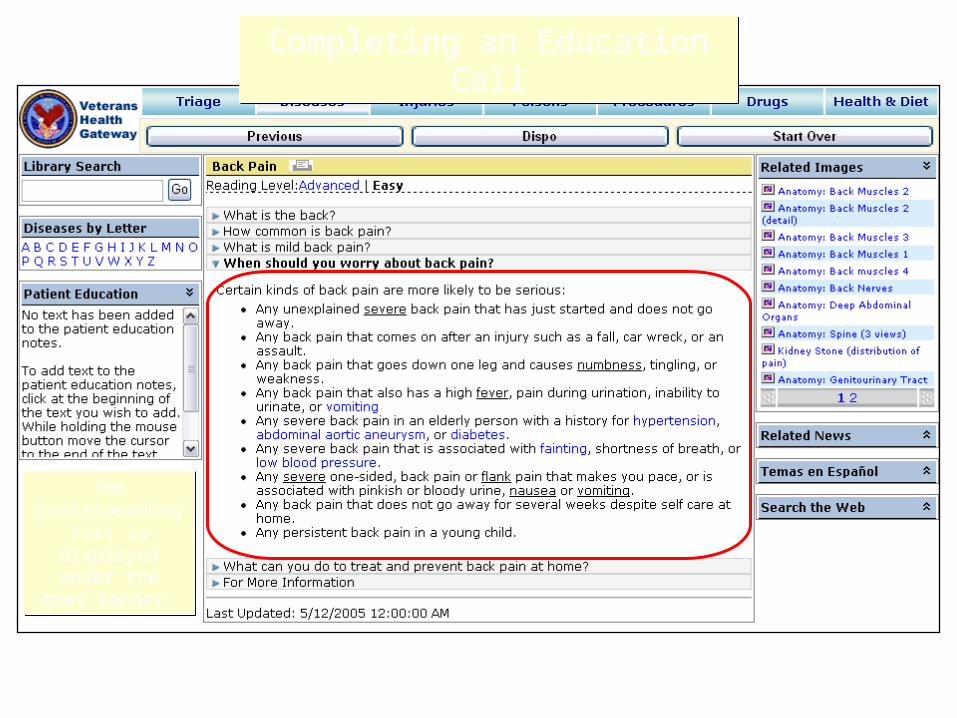
The corresponding
text is displayed under the grey
banner.
The corresponding
text is displayed under the grey
banner.
Completing an Education CallCompleting an Education Call
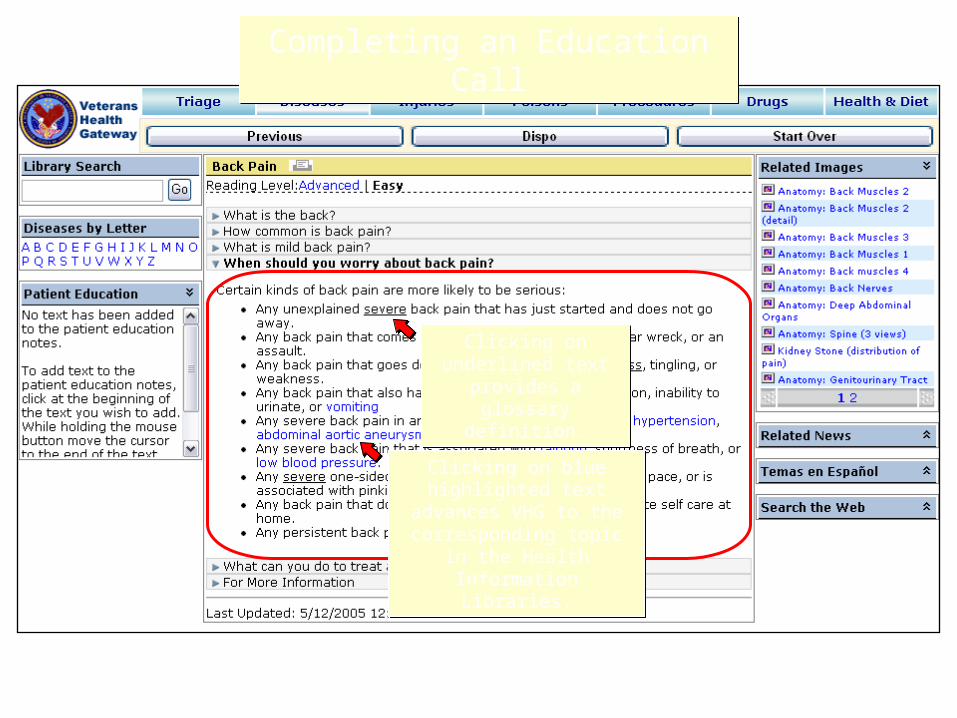
Clicking on underlined text provides a
glossary definition.
Clicking on underlined text provides a
glossary definition.
Clicking on blue highlighted text advances VHG to the corresponding topic in the
Health Information Libraries.
Clicking on blue highlighted text advances VHG to the corresponding topic in the
Health Information Libraries.
Completing an Education CallCompleting an Education Call
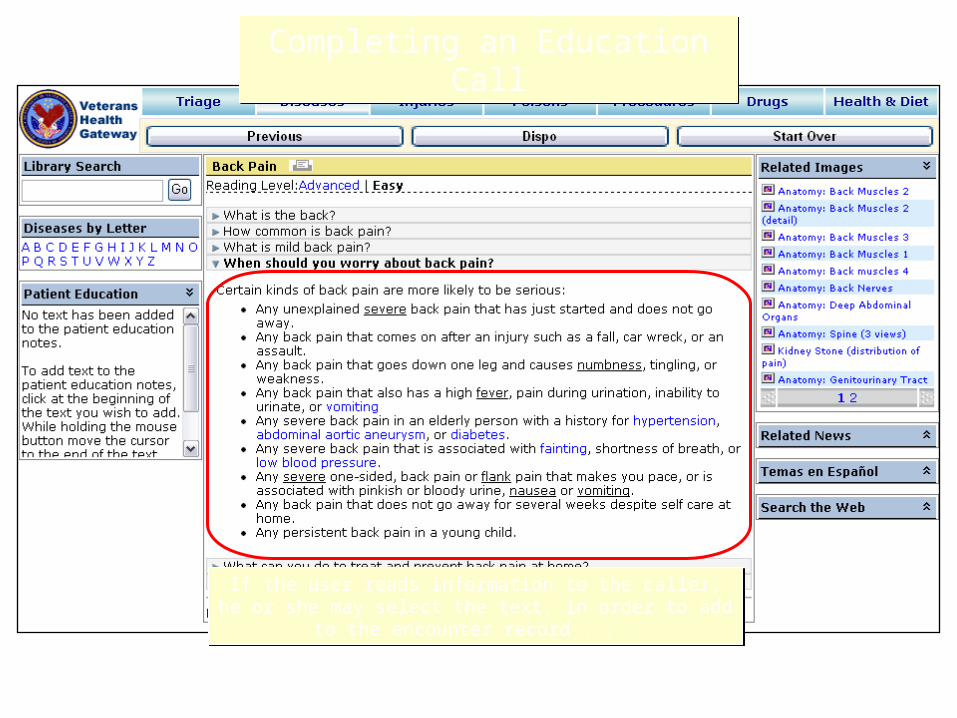
If the user reads information to the caller, he or she may select the text, in order to add to the encounter record . . .If the user reads information to the caller, he or she may
select the text, in order to add to the encounter record . . .
Completing an Education CallCompleting an Education Call
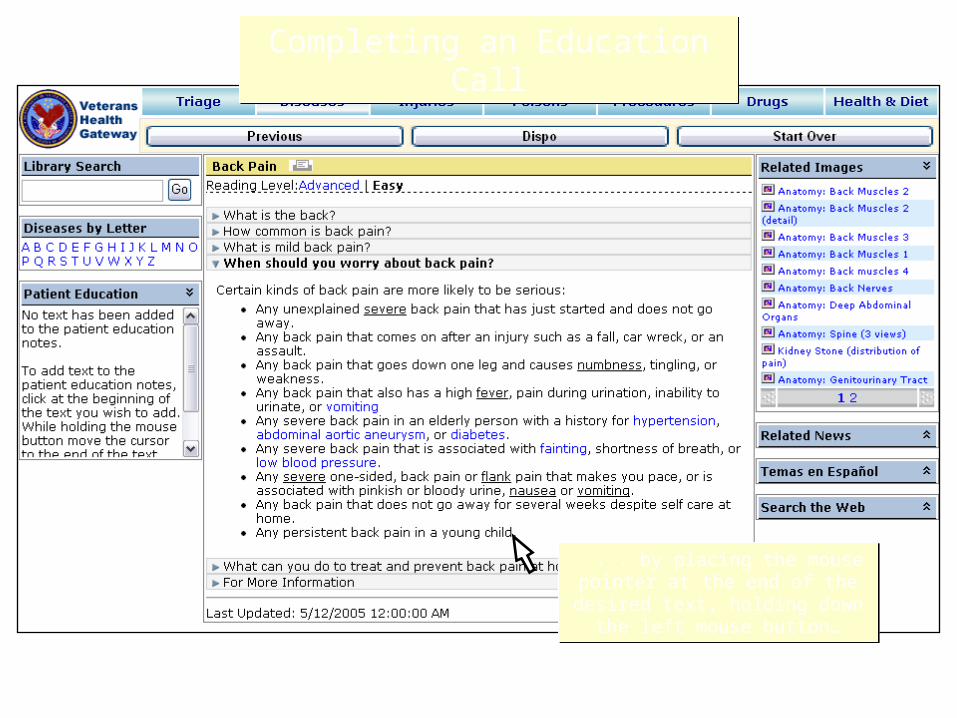
. . . by placing the mouse pointer at the end of the desired text, holding
down the left mouse button…
. . . by placing the mouse pointer at the end of the desired text, holding
down the left mouse button…
Completing an Education CallCompleting an Education Call
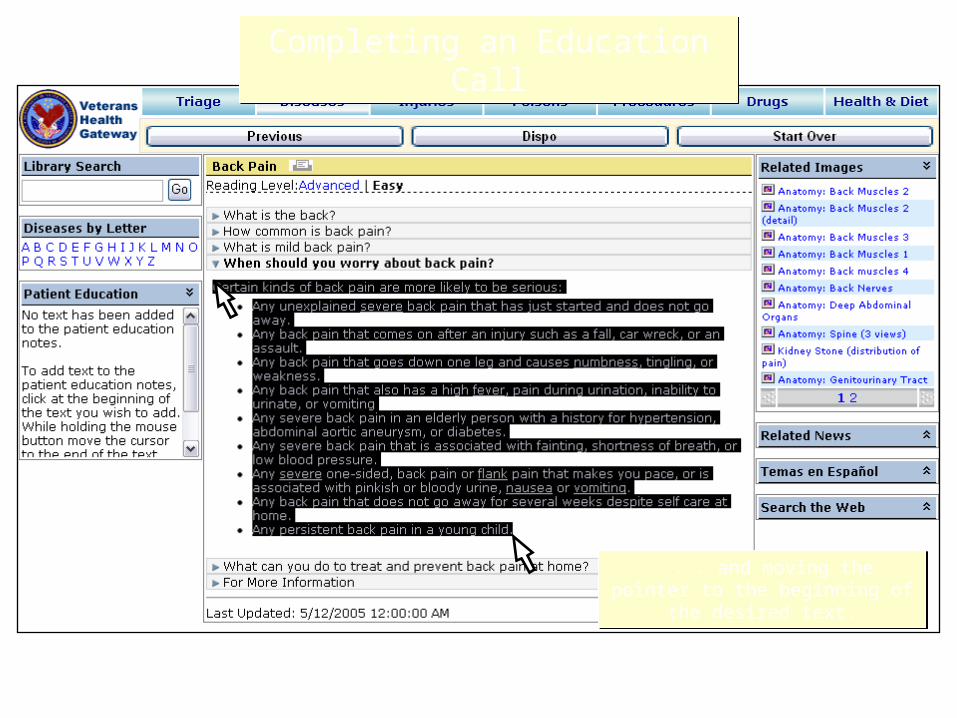
. . . and moving the pointer to the beginning of the desired text.
. . . and moving the pointer to the beginning of the desired text.

Completing an Education CallCompleting an Education Call
When the user releases the left button on the mouse, VHG asks if he or she wishes to add the text to the encounter
record. The user clicks on OK, in order to confirm the action.
When the user releases the left button on the mouse, VHG asks if he or she wishes to add the text to the encounter
record. The user clicks on OK, in order to confirm the action.
Hi-lighted instructions are included on the left side of the
screen.
Hi-lighted instructions are included on the left side of the
screen.
Completing an Education CallCompleting an Education Call
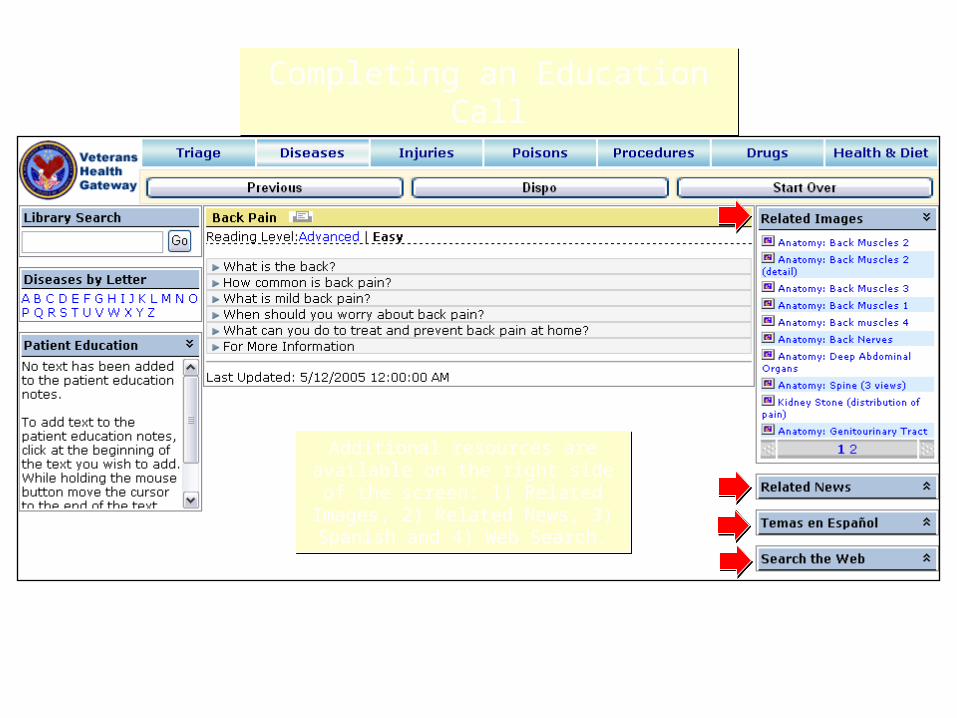
Additional resources are available on the right side of the screen: 1)
Related Images, 2) Related News, 3) Spanish and 4) Web Search.
Additional resources are available on the right side of the screen: 1)
Related Images, 2) Related News, 3) Spanish and 4) Web Search.
Completing an Education CallCompleting an Education Call
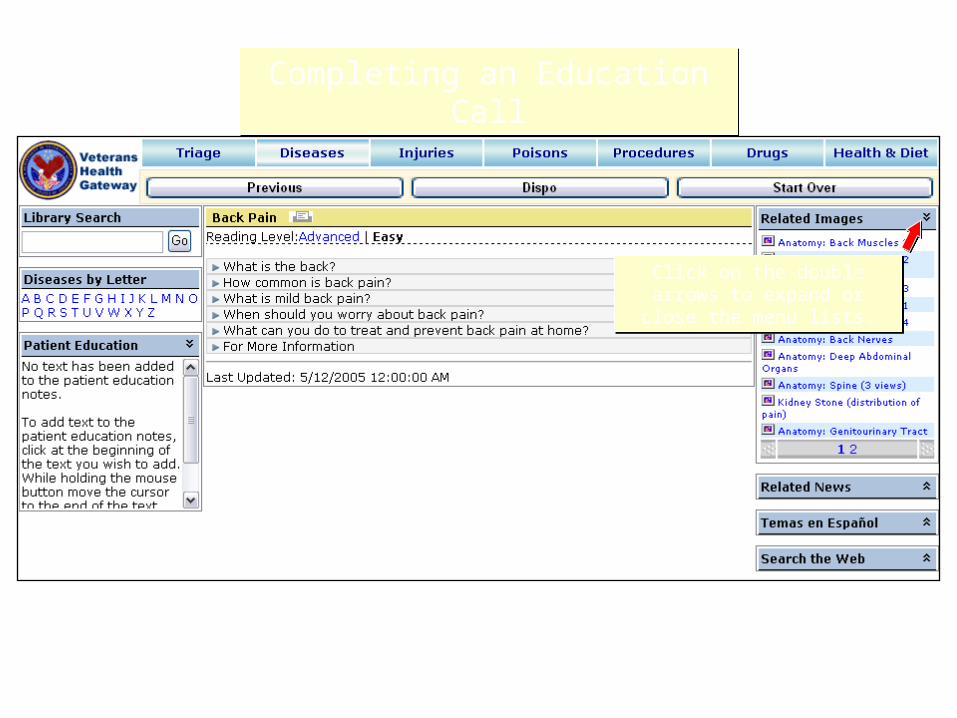
Click on the double arrows to expand or close the menu lists.Click on the double arrows to
expand or close the menu lists.
Completing an Education CallCompleting an Education Call
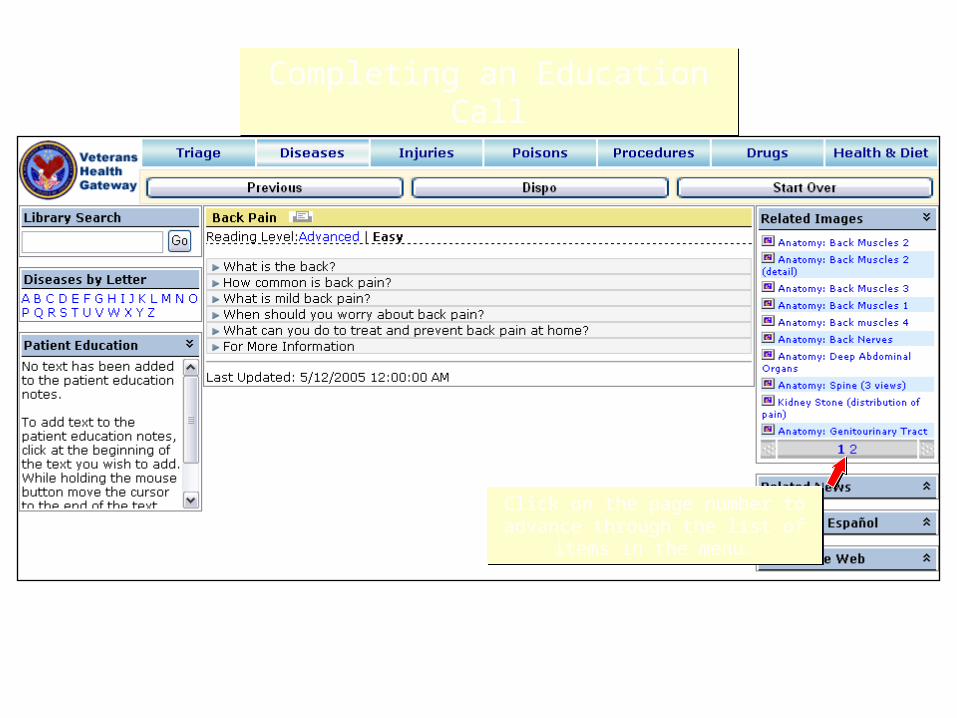
Click on the page number to advance through the list of items in the menu.
Click on the page number to advance through the list of items in the menu.
Completing an Education CallCompleting an Education Call
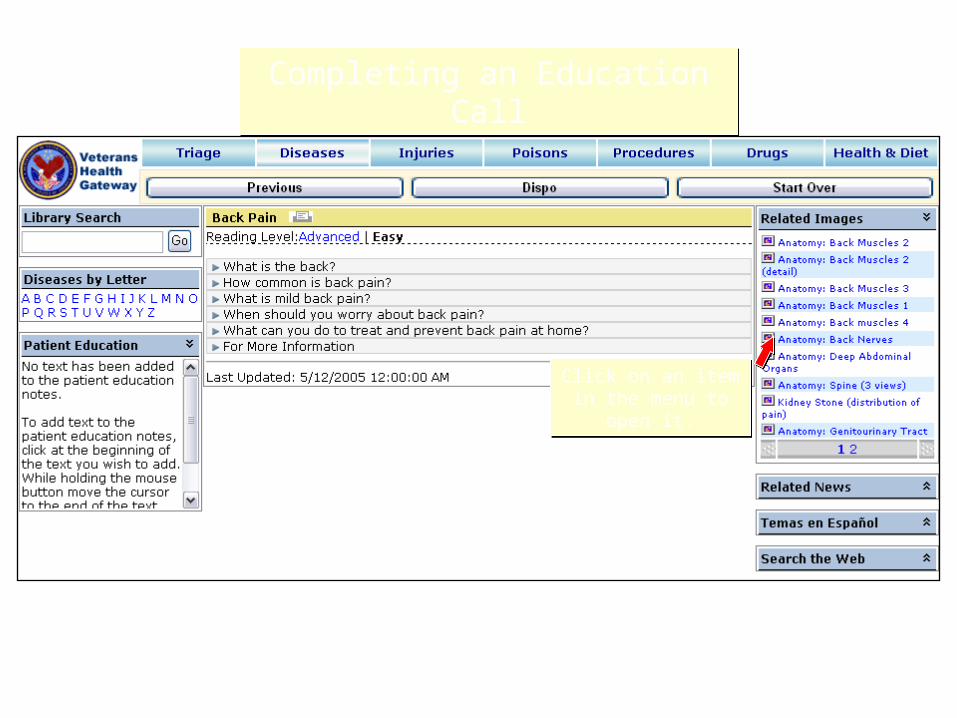
Click on an item in the menu to open it.Click on an item in
the menu to open it.

Completing an Education CallCompleting an Education Call
Click on Dispo to proceed to the Disposition screen.Click on Dispo to proceed to the Disposition screen.
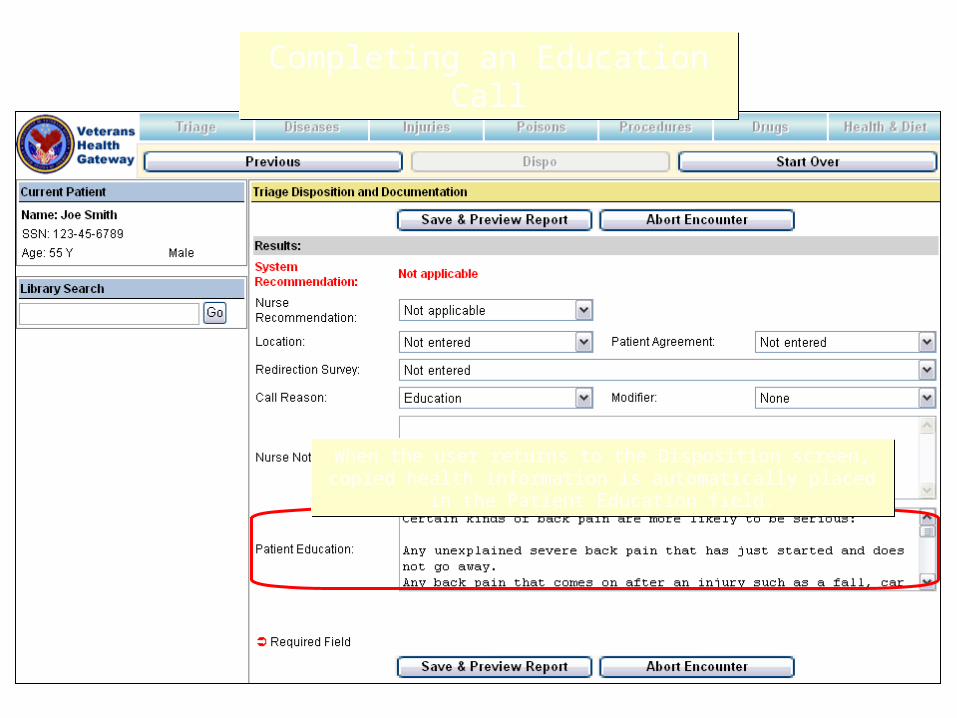
When the user returns to the Disposition screen, copied health information is automatically placed in the Patient Education field.When the user returns to the Disposition screen, copied health
information is automatically placed in the Patient Education field.
Completing an Education CallCompleting an Education Call
Completing an Education CallCompleting an Education Call
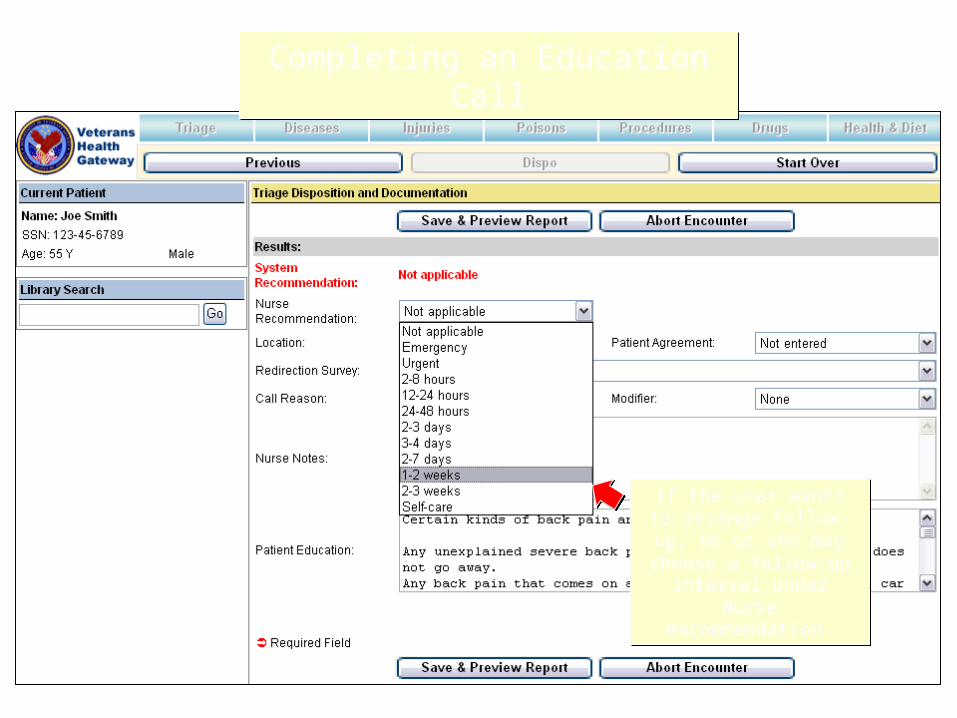
If the user wants to arrange follow-up, he or
she may choose a follow-up interval under Nurse
Recommendation.
If the user wants to arrange follow-up, he or
she may choose a follow-up interval under Nurse
Recommendation.
Completing an Education CallCompleting an Education Call
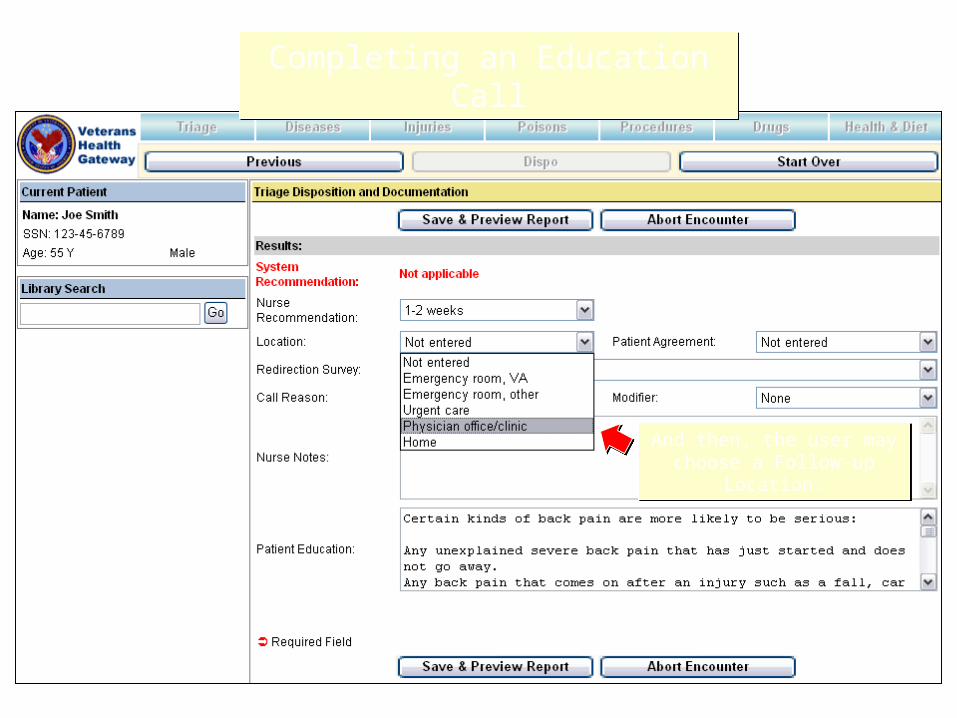
And then, the user may choose a Follow-up Location.
And then, the user may choose a Follow-up Location.
Completing an Education CallCompleting an Education Call
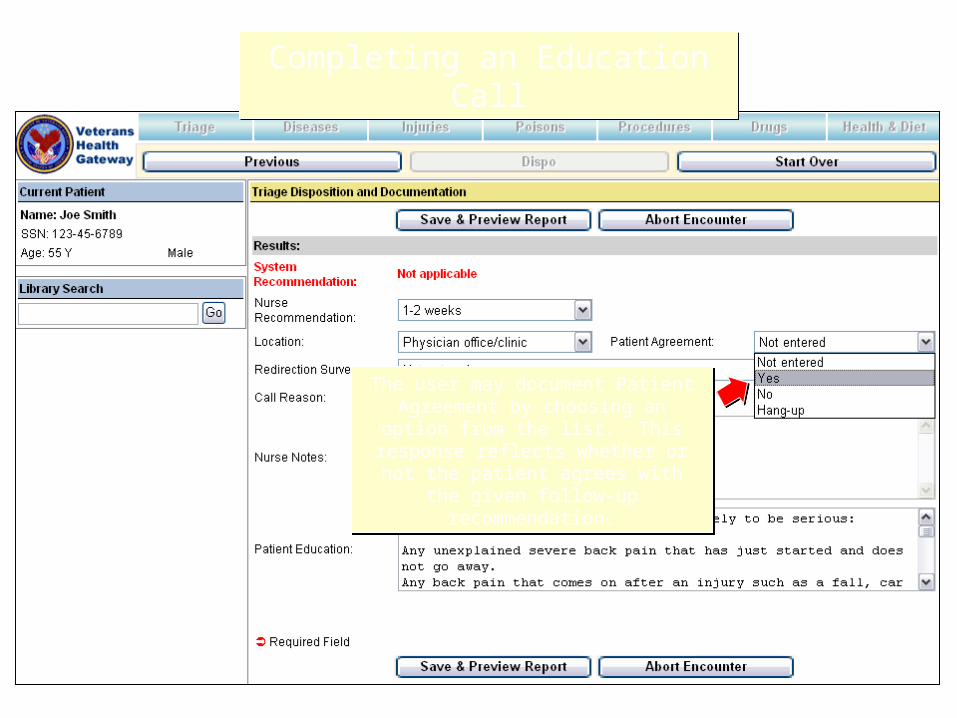
The user may document Patient Agreement by choosing an option from the list. This response reflects whether or not the patient agrees with the given
follow-up recommendation.
The user may document Patient Agreement by choosing an option from the list. This response reflects whether or not the patient agrees with the given
follow-up recommendation.
Completing an Education CallCompleting an Education Call
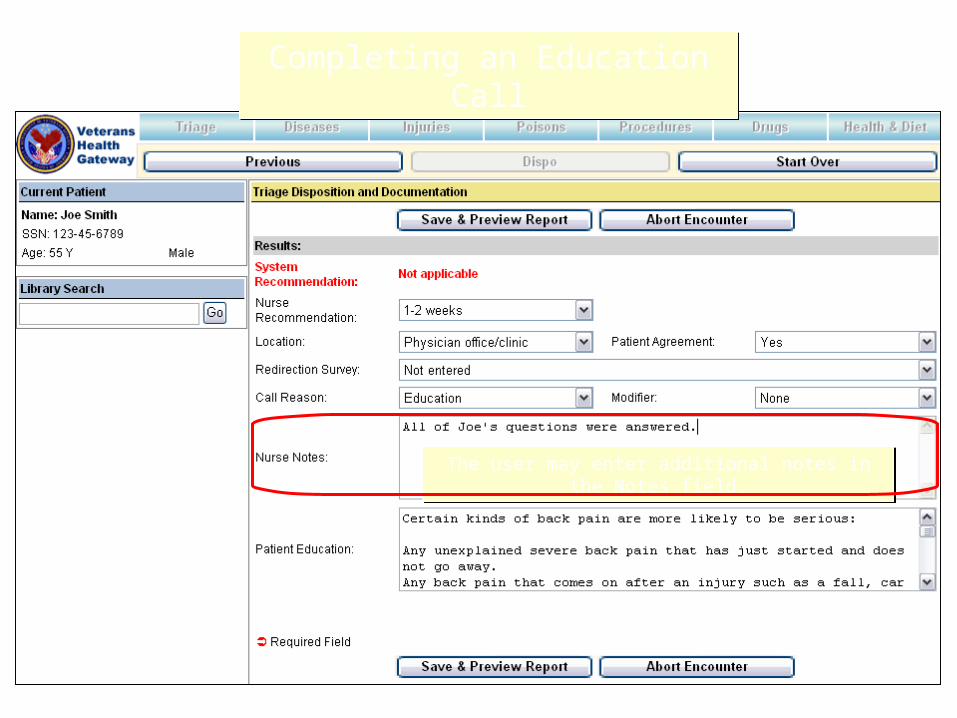
The user may enter additional notes in the Notes field.The user may enter additional notes in the Notes field.
Completing an Education CallCompleting an Education Call
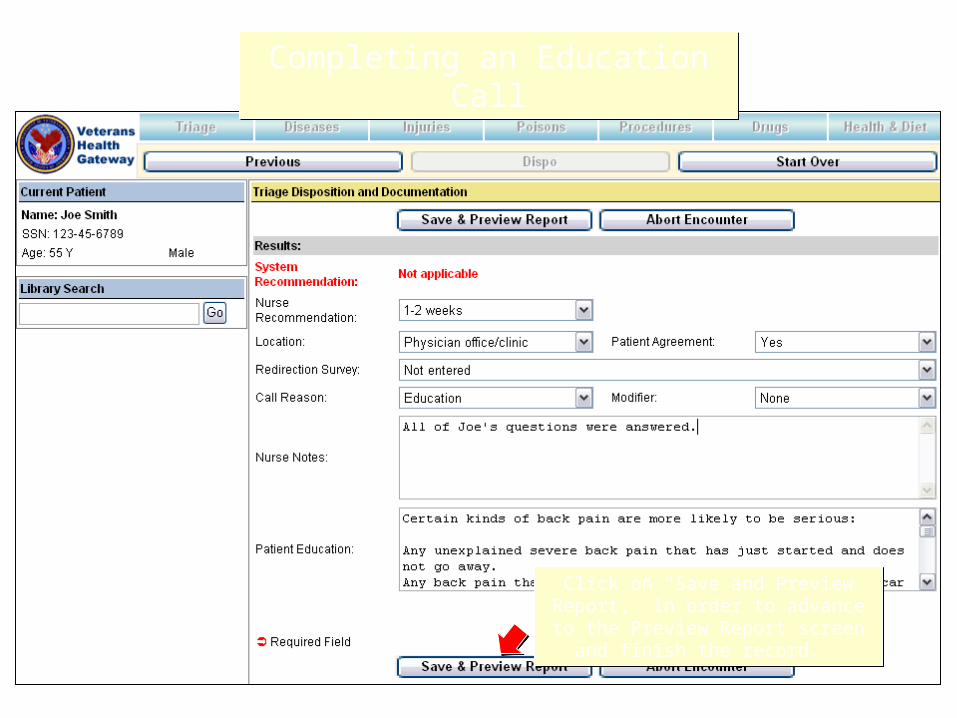
Click on “Save and Preview Report,” in order to advance to the Preview Report
screen and finish the record.
Click on “Save and Preview Report,” in order to advance to the Preview Report
screen and finish the record.
Navigation Buttons
Veterans Health Gateway
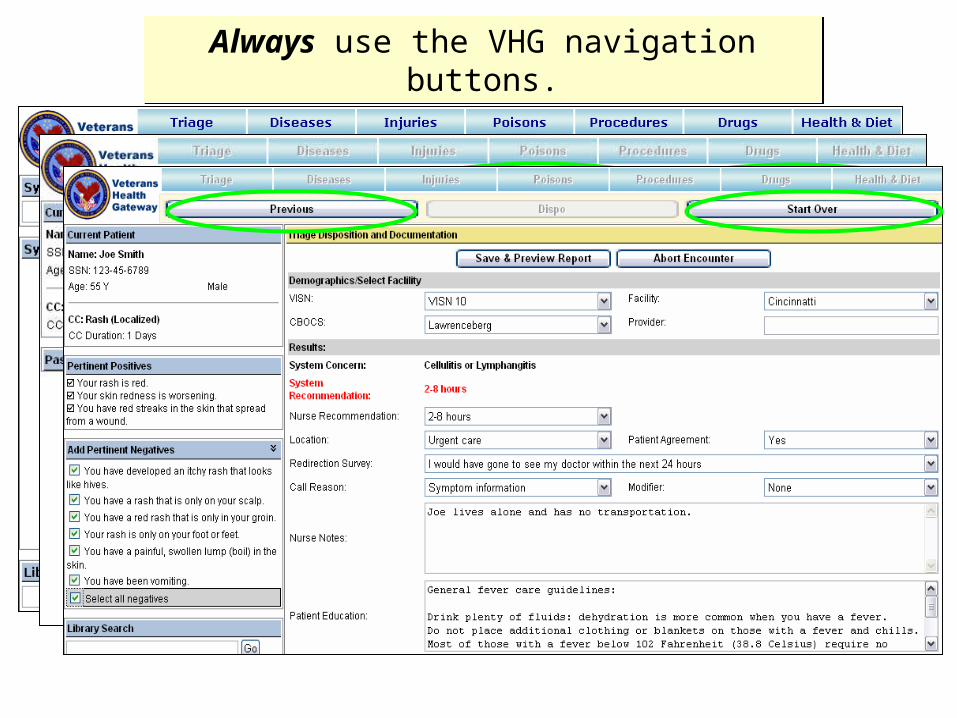
Always use the VHG navigation buttons.Always use the VHG navigation buttons.

Never use the browser navigation buttons.Never use the browser navigation buttons.
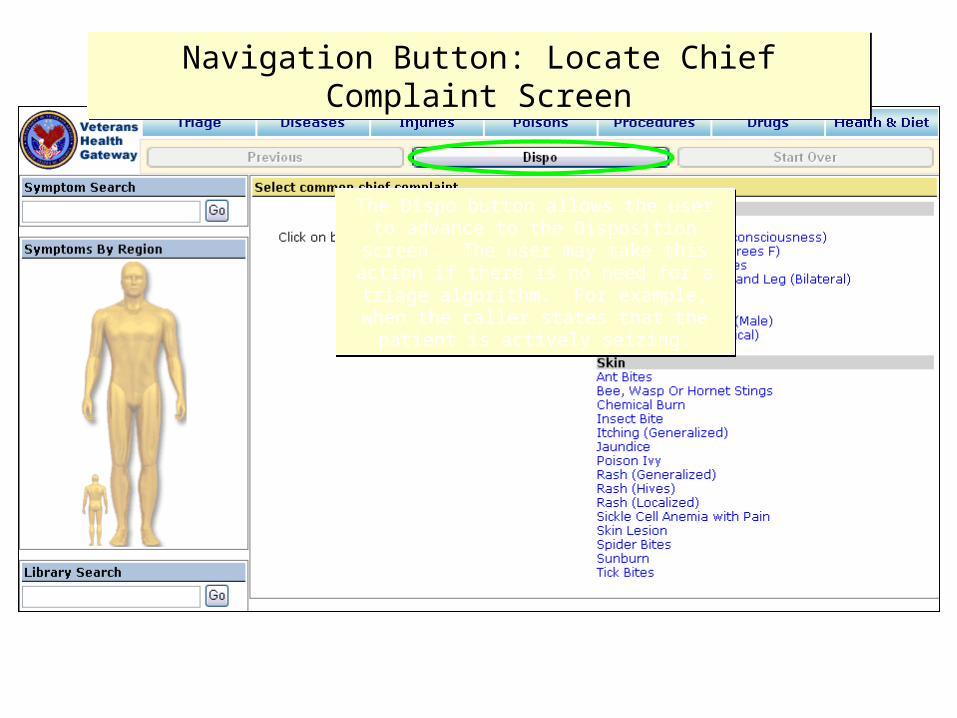
Navigation Button: Locate Chief Complaint ScreenNavigation Button: Locate Chief Complaint Screen
The Dispo button allows the user to advance to the Disposition screen. The user may take
this action if there is no need for a triage algorithm. For example, when the caller states that the patient is actively seizing.
The Dispo button allows the user to advance to the Disposition screen. The user may take
this action if there is no need for a triage algorithm. For example, when the caller states that the patient is actively seizing.
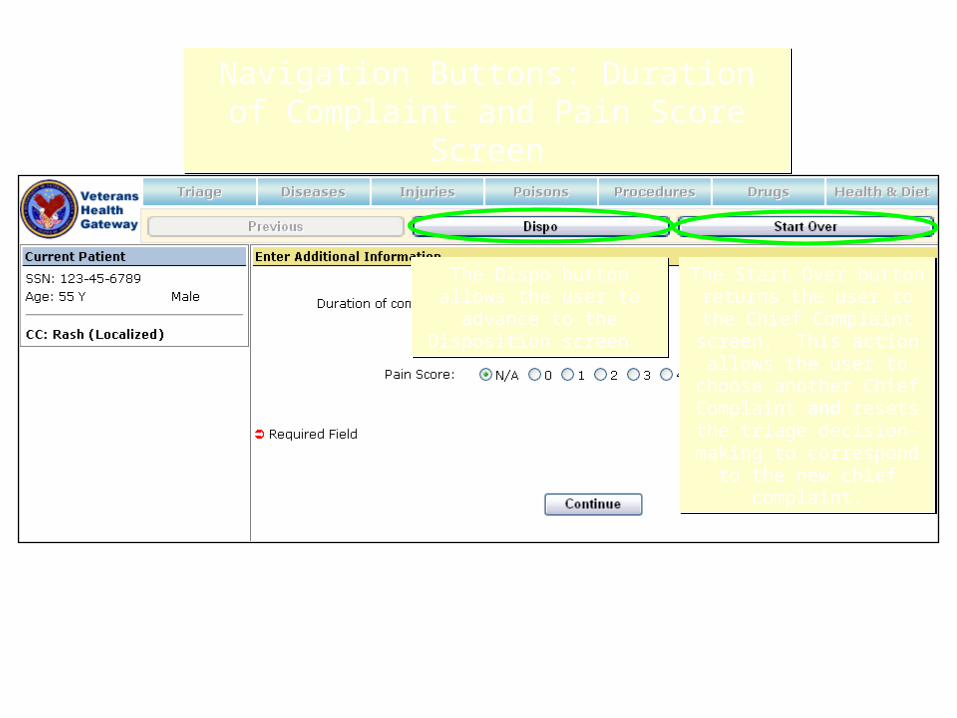
Navigation Buttons: Duration of Complaint and Pain Score Screen
Navigation Buttons: Duration of Complaint and Pain Score Screen
The Start Over button returns the user to the Chief
Complaint screen. This action allows the user to
choose another Chief Complaint and resets the triage decision-making to
correspond to the new chief complaint.
The Start Over button returns the user to the Chief
Complaint screen. This action allows the user to
choose another Chief Complaint and resets the triage decision-making to
correspond to the new chief complaint.
The Dispo button allows the user to advance to the
Disposition screen.
The Dispo button allows the user to advance to the
Disposition screen.
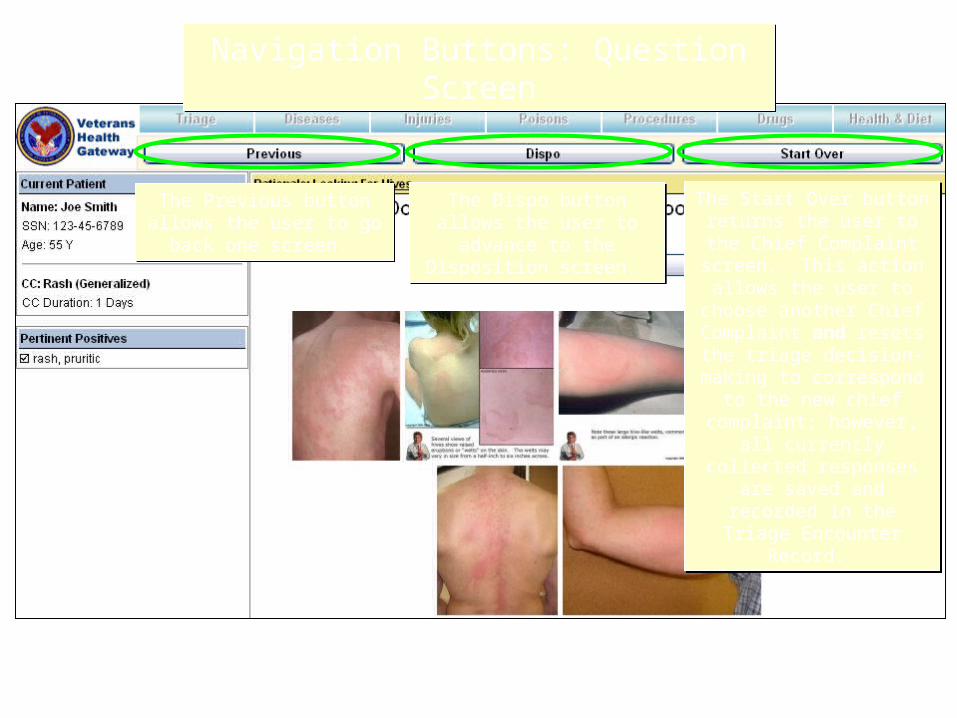
The Previous button allows the user to go back one
screen.
The Previous button allows the user to go back one
screen.
The Start Over button returns the user to the Chief
Complaint screen. This action allows the user to
choose another Chief Complaint and resets the triage decision-making to
correspond to the new chief complaint; however, all
currently collected responses are saved and
recorded in the Triage Encounter Record.
The Dispo button allows the user to advance to the
Disposition screen.
The Dispo button allows the user to advance to the
Disposition screen.
Navigation Buttons: Question ScreenNavigation Buttons: Question Screen
Navigation Buttons: Disposition Screen Navigation Buttons: Disposition Screen
The Previous button allows the user to go back one
screen.
The Previous button allows the user to go back one
screen.
The Start Over button returns the user to the Chief
Complaint screen. This action allows the user to
choose another Chief Complaint and resets the triage decision-making to
correspond to the new chief complaint; however, all
currently collected responses are saved and
recorded in the Triage Encounter Record.

Navigation Buttons: Information LibrariesNavigation Buttons: Information Libraries
The Previous button allows the user to go back one
screen.
The Previous button allows the user to go back one
screen.
The Dispo button allows the user to advance to the
Disposition screen.
The Dispo button allows the user to advance to the
Disposition screen.
Accessing Images
Valuable assistance for the user
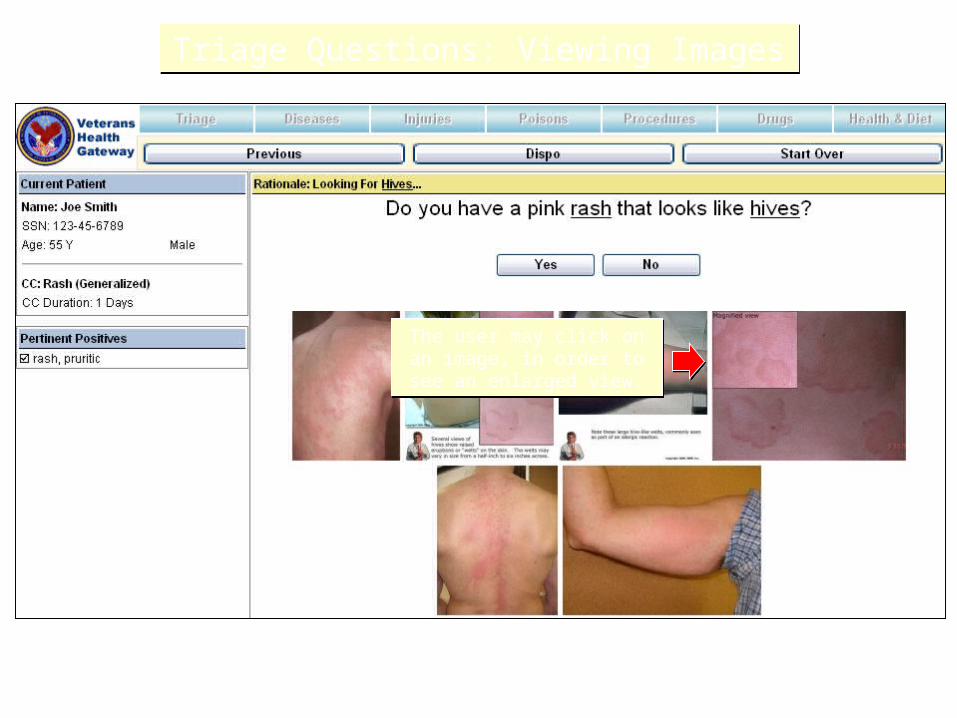
Triage Questions: Viewing ImagesTriage Questions: Viewing Images
The user may click on an image, in order to see an
enlarged view.
The user may click on an image, in order to see an
enlarged view.
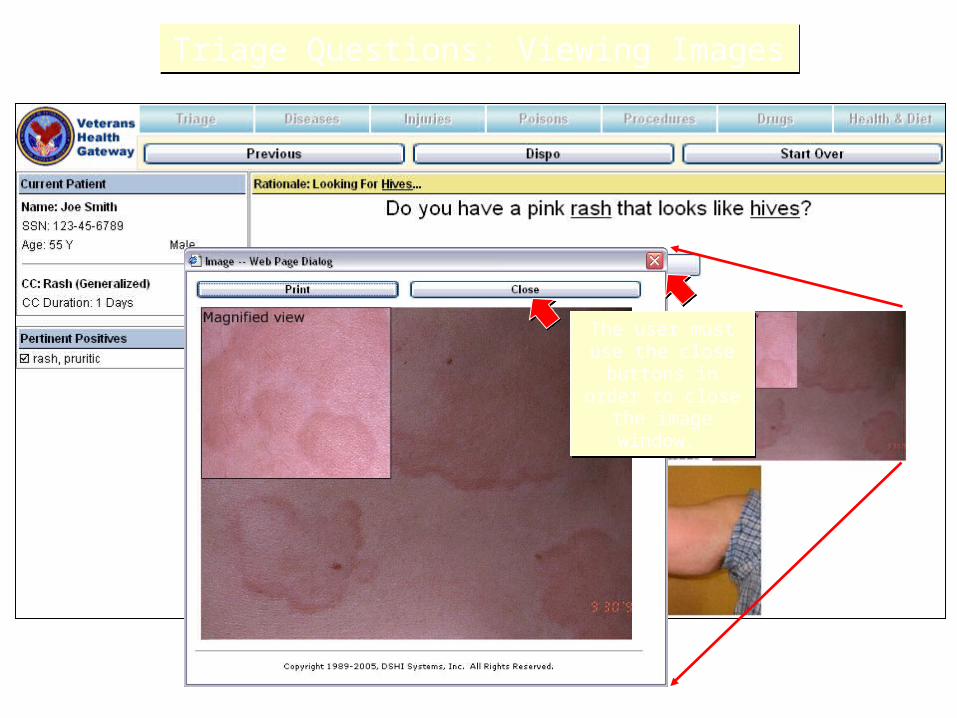
Triage Questions: Viewing ImagesTriage Questions: Viewing Images
The user must use the close buttons in order to close the image window.
The user must use the close buttons in order to close the image window.
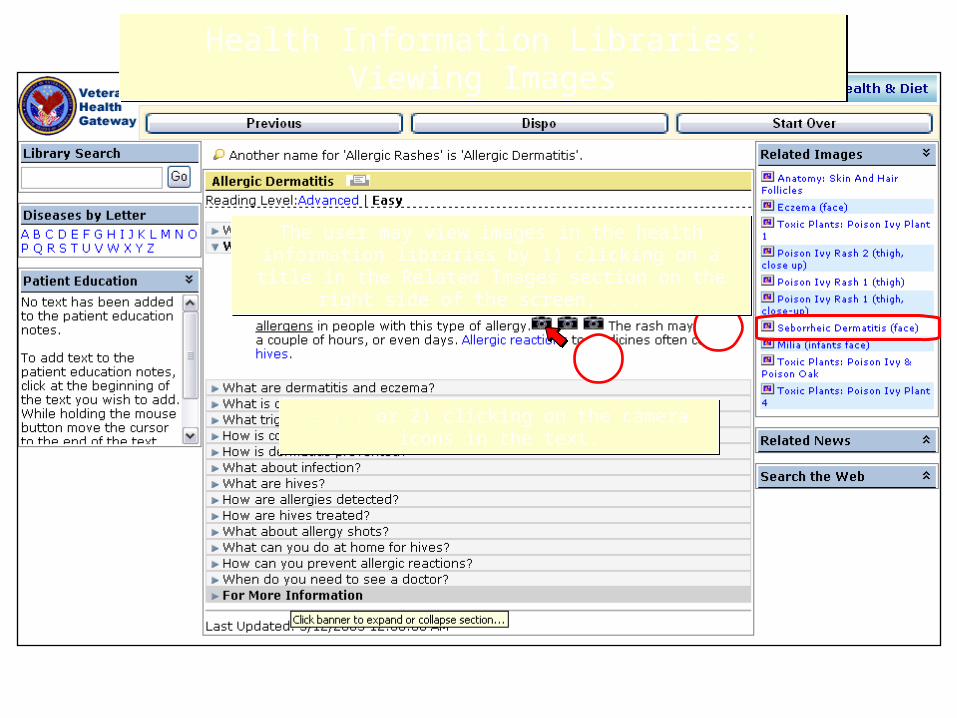
Health Information Libraries: Viewing ImagesHealth Information Libraries: Viewing Images
. . . or 2) clicking on the camera icons in the text.. . . or 2) clicking on the camera icons in the text.
21
The user may view images in the health information libraries by 1) clicking on a title in the Related Images section on the
right side of the screen, . . .
The user may view images in the health information libraries by 1) clicking on a title in the Related Images section on the
right side of the screen, . . .
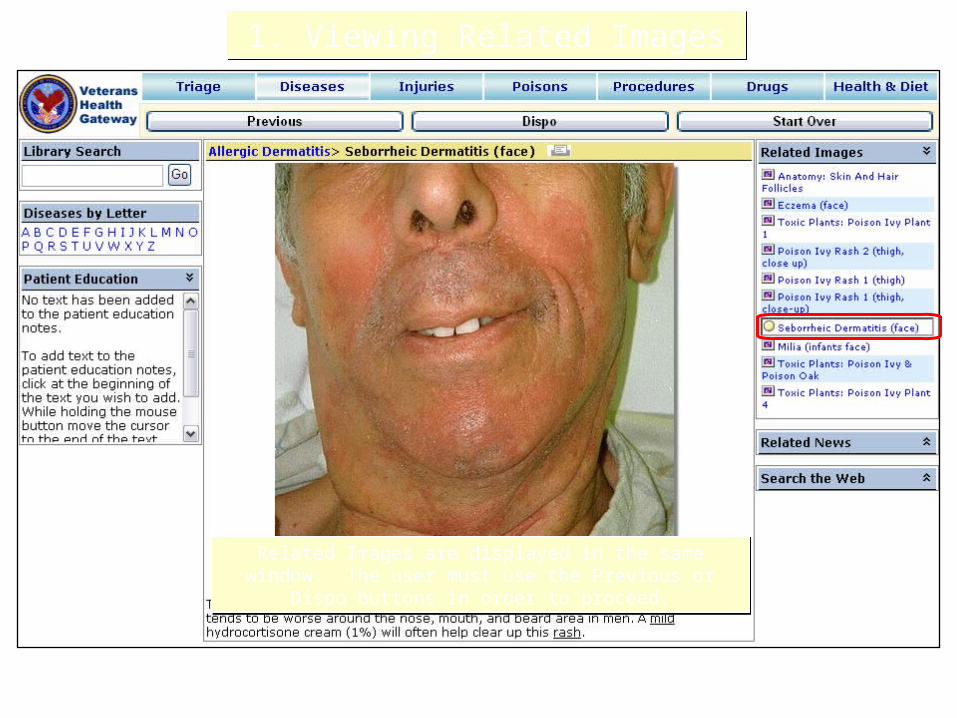
1. Viewing Related Images1. Viewing Related Images
Related Images are displayed in the same window. The user must use the Previous or Dispo buttons in order to proceed.
Related Images are displayed in the same window. The user must use the Previous or Dispo buttons in order to proceed.
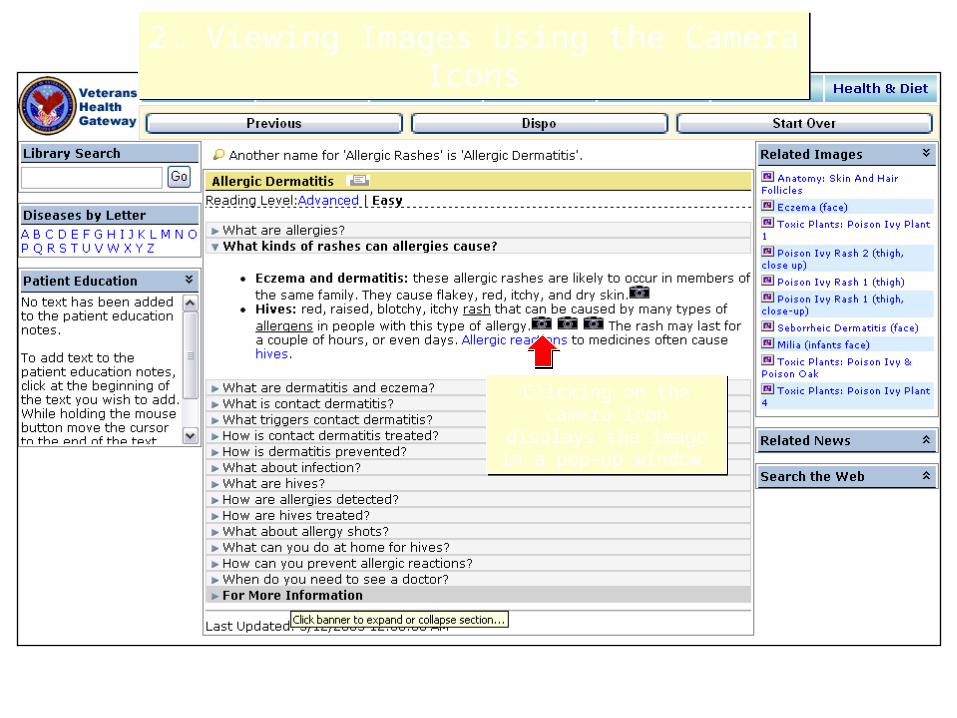
2. Viewing Images Using the Camera Icons2. Viewing Images Using the Camera Icons
Clicking on the camera icon displays the image in
a pop-up window.
Clicking on the camera icon displays the image in
a pop-up window.

2. Viewing Images Using the Camera Icons2. Viewing Images Using the Camera Icons
The user must use the close buttons in order to close the image window.
The user must use the close buttons in order to close the image window.
Aborting the Clinical Encounter
Providing an alternative for infrequent mistakes
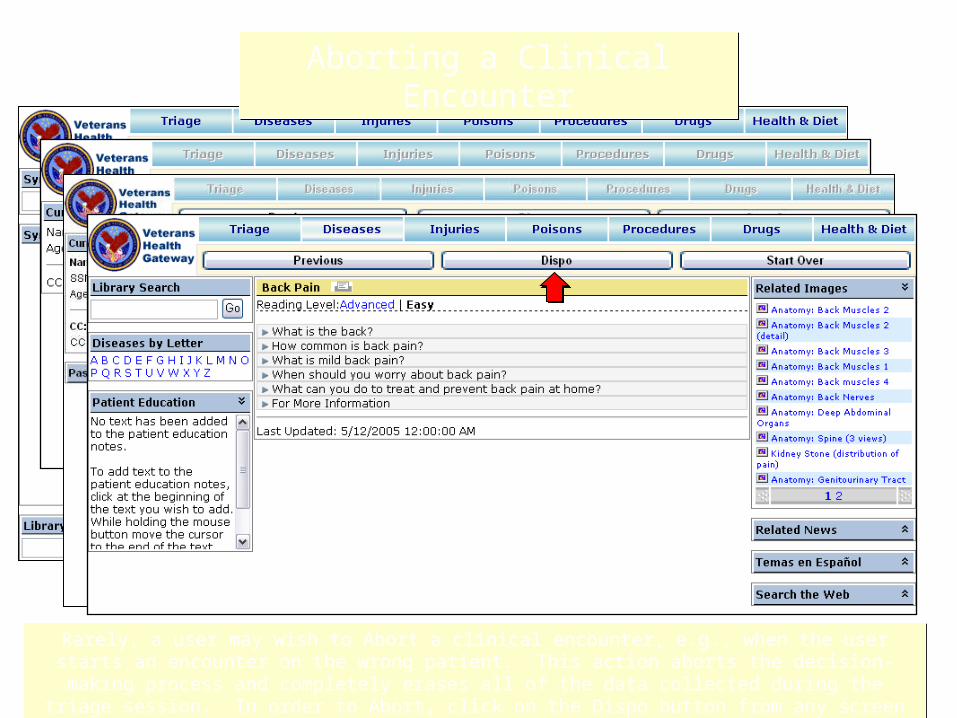
Aborting a Clinical EncounterAborting a Clinical Encounter
Rarely, a user may wish to Abort a clinical encounter, e.g., when the user starts an encounter on the wrong patient. This action aborts the decision-making process and completely erases all of the data collected during the triage session. In order to Abort, click on the Dispo button from any screen in
VHG . . .
Aborting a Clinical EncounterAborting a Clinical Encounter
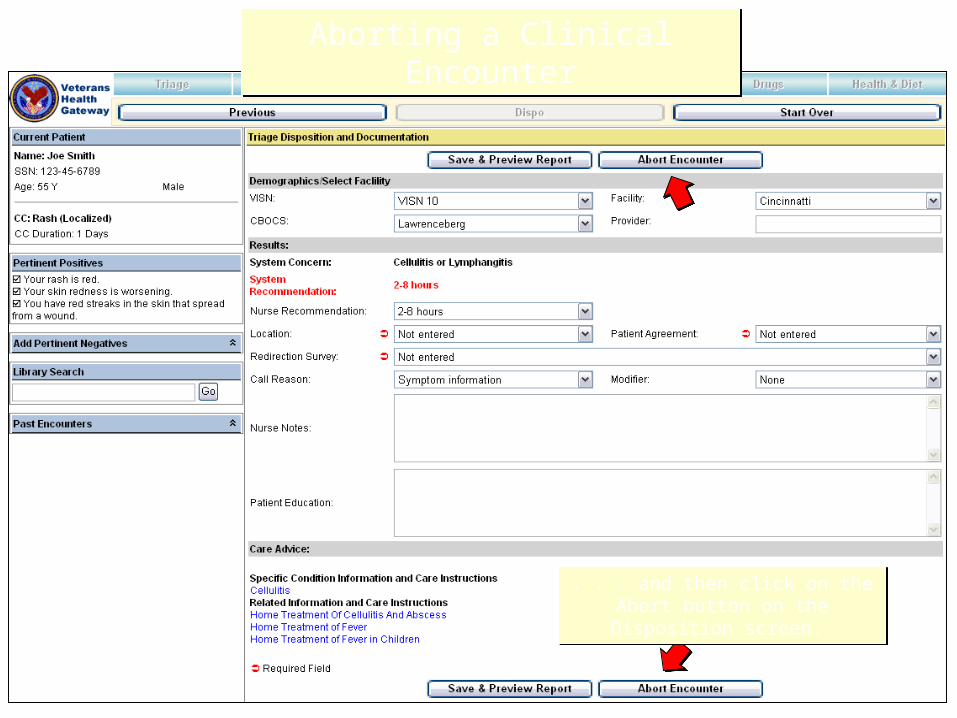
. . . and then click on the Abort button on the Disposition screen.
. . . and then click on the Abort button on the Disposition screen.
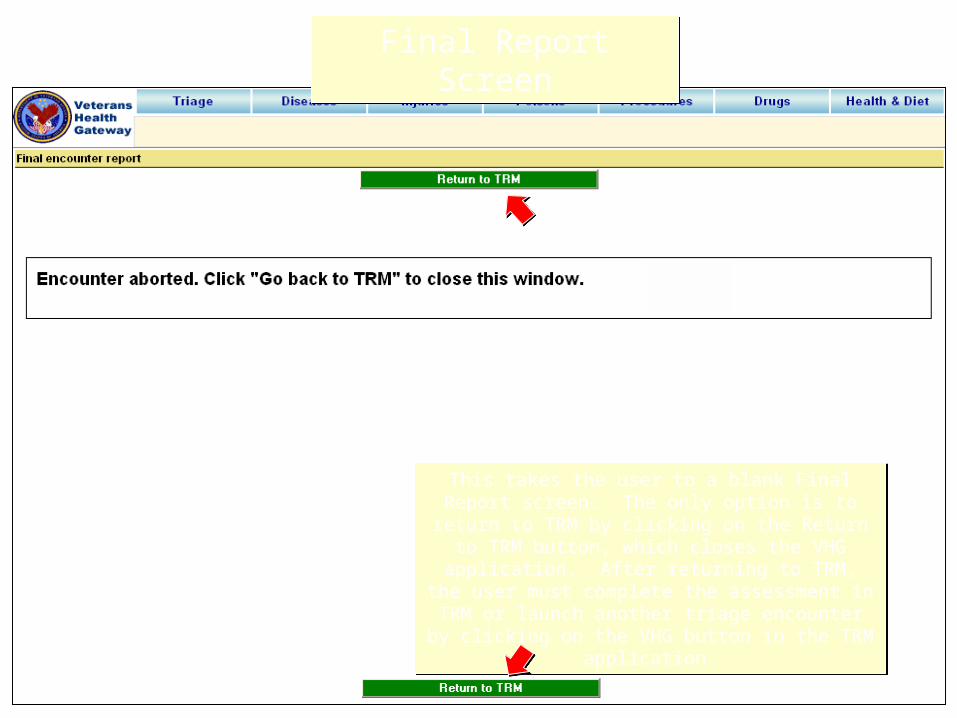
Final Report ScreenFinal Report Screen
This takes the user to a blank Final Report screen. The only option is to return to TRM by clicking on the
Return to TRM button, which closes the VHG application. After returning to TRM, the user must
complete the assessment in TRM or launch another triage encounter by clicking on the VHG button in the
TRM application.
Thank You
DSHI Systems