Embed Size (px)
Citation preview
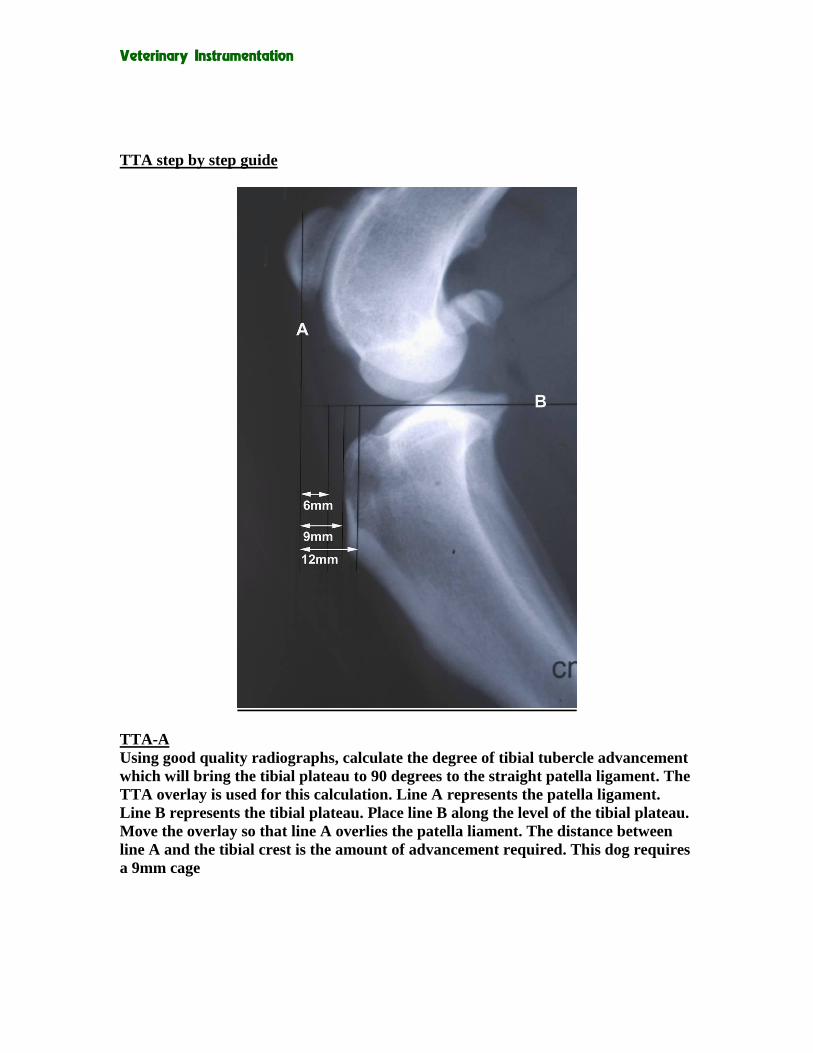
Veterinary Instrumentation
TTA step by step guide
TTA-A
Using good quality radiographs, calculate the degree of tibial tubercle advancement
which will bring the tibial plateau to 90 degrees to the straight patella ligament. The
TTA overlay is used for this calculation. Line A represents the patella ligament.
Line B represents the tibial plateau. Place line B along the level of the tibial plateau.
Move the overlay so that line A overlies the patella liament. The distance between
line A and the tibial crest is the amount of advancement required. This dog requires
a 9mm cage
Veterinary Instrumentation
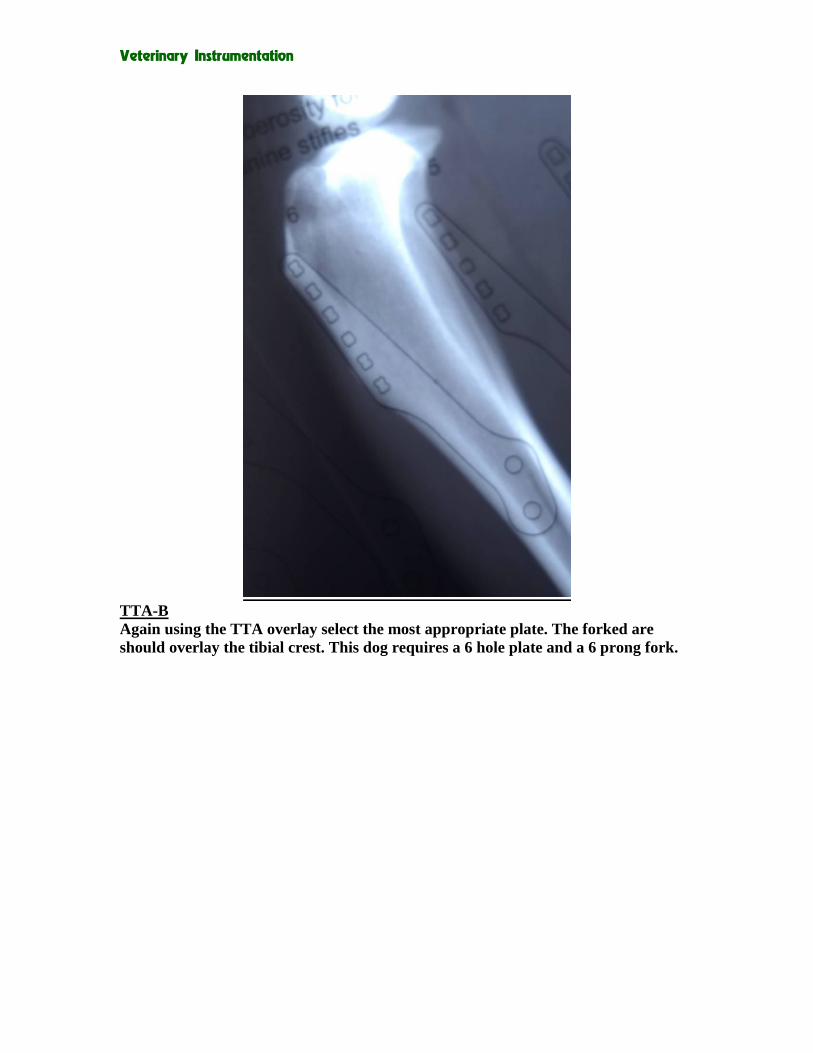
TTA-B
Again using the TTA overlay select the most appropriate plate. The forked are
should overlay the tibial crest. This dog requires a 6 hole plate and a 6 prong fork.
Veterinary Instrumentation
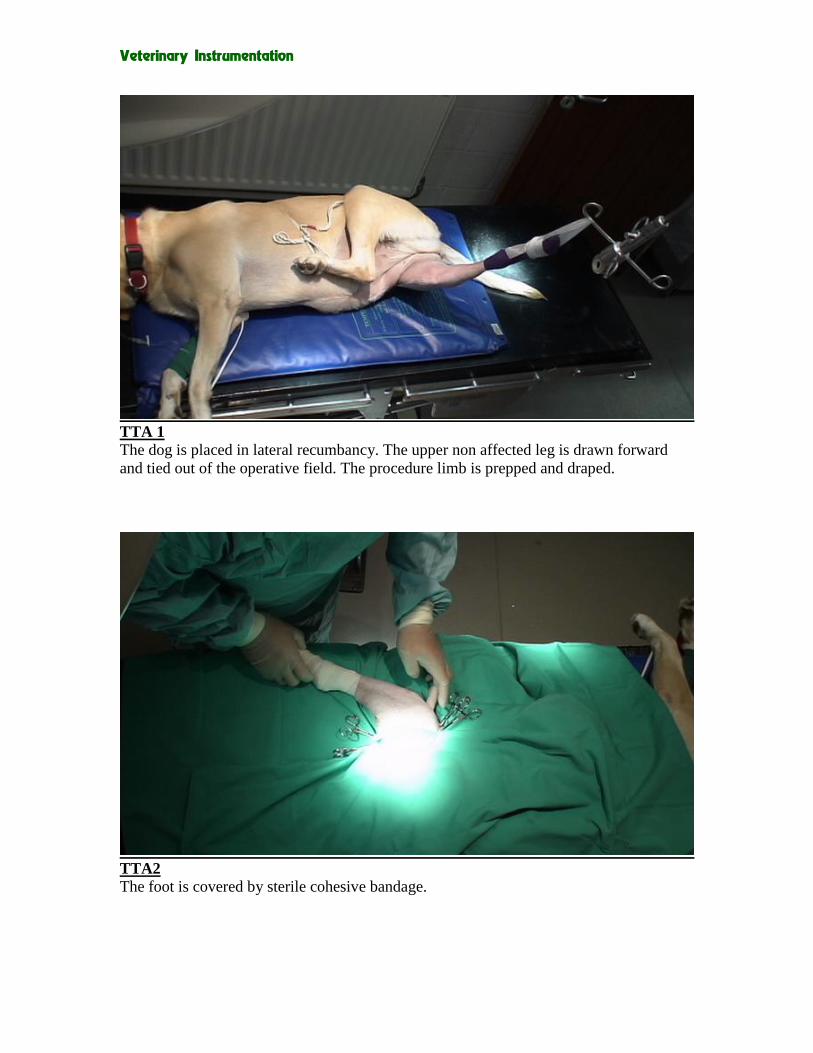
TTA 1
The dog is placed in lateral recumbancy. The upper non affected leg is drawn forward
and tied out of the operative field. The procedure limb is prepped and draped.
TTA2
The foot is covered by sterile cohesive bandage.
Veterinary Instrumentation
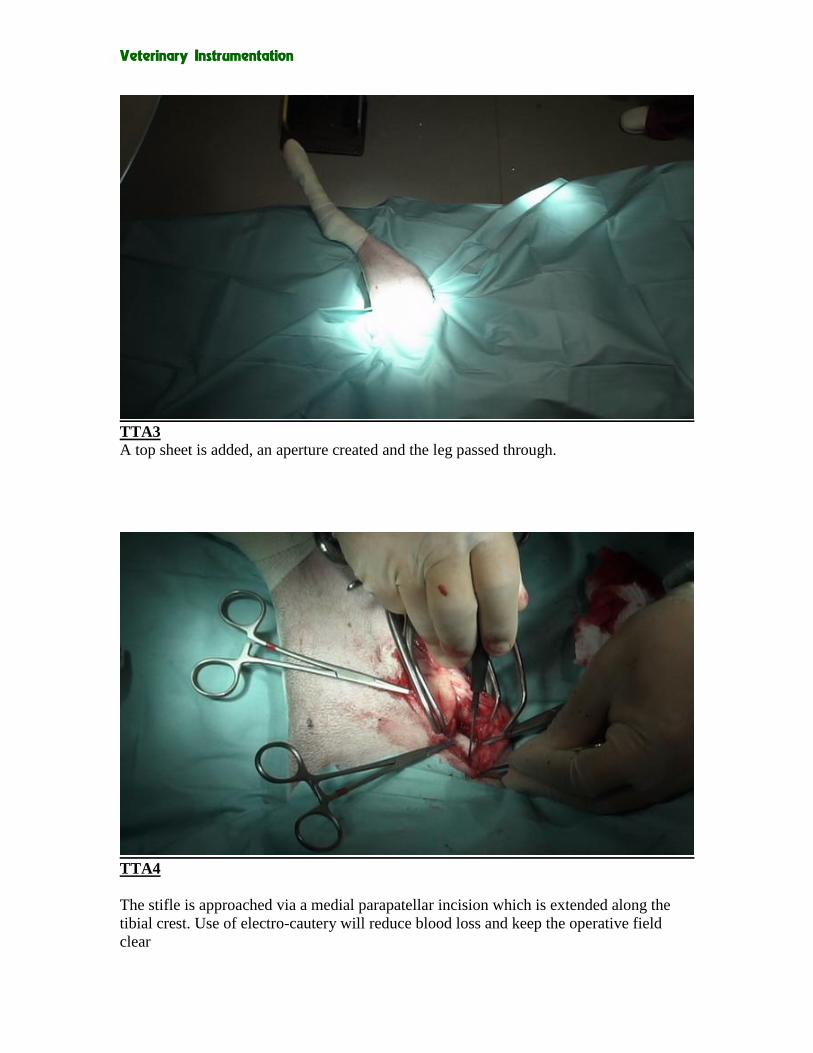
TTA3
A top sheet is added, an aperture created and the leg passed through.
TTA4
The stifle is approached via a medial parapatellar incision which is extended along the
tibial crest. Use of electro-cautery will reduce blood loss and keep the operative field
clear

Veterinary Instrumentation
TTA5
The stifle is examined for meniscal injuries which will need to treated. If desired a
meniscal release is performed at this time. The joint capsule is then closed.
TTA6
A pair of artery forceps are pushed through caudal to the straight patella ligament. Sitting
between the patella ligament and the articular surface of the tibia the forceps act as a
landmark for the tibial crest osteotomy.
Veterinary Instrumentation
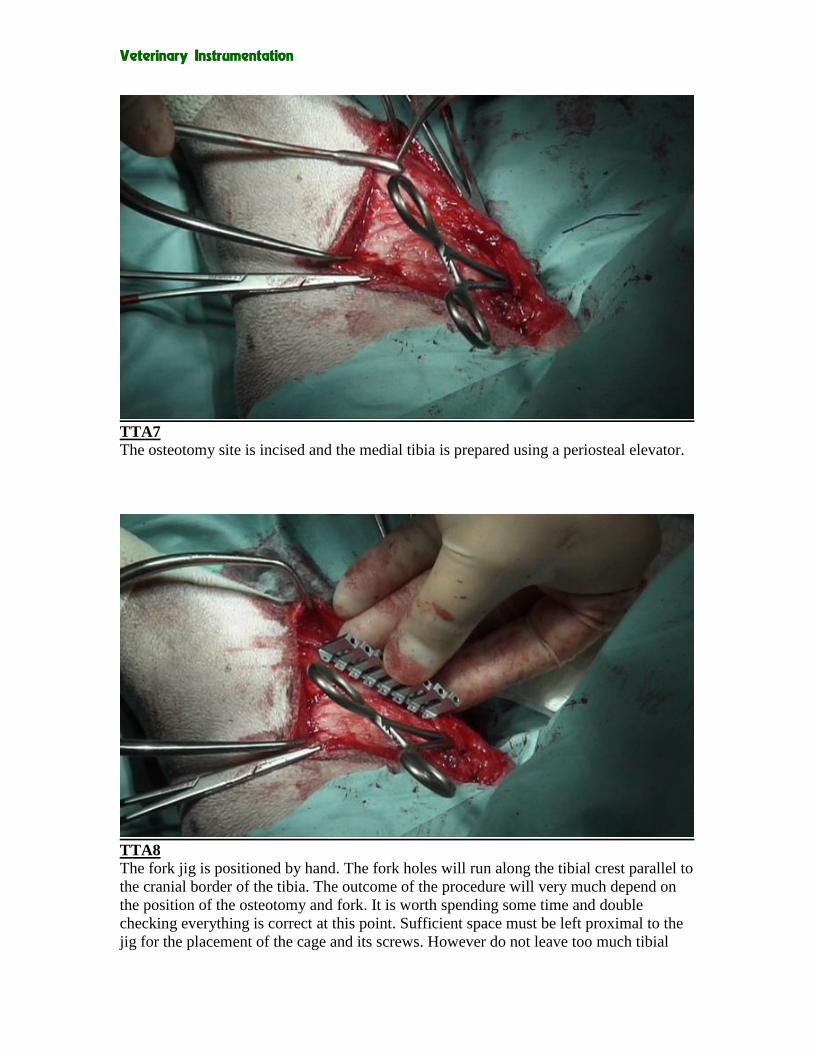
TTA7
The osteotomy site is incised and the medial tibia is prepared using a periosteal elevator.
TTA8
The fork jig is positioned by hand. The fork holes will run along the tibial crest parallel to
the cranial border of the tibia. The outcome of the procedure will very much depend on
the position of the osteotomy and fork. It is worth spending some time and double
checking everything is correct at this point. Sufficient space must be left proximal to the
jig for the placement of the cage and its screws. However do not leave too much tibial
Veterinary Instrumentation
crest exposed. Please skip to the final photograph which shows the post operative
radiograph for a clearer picture of what is required.
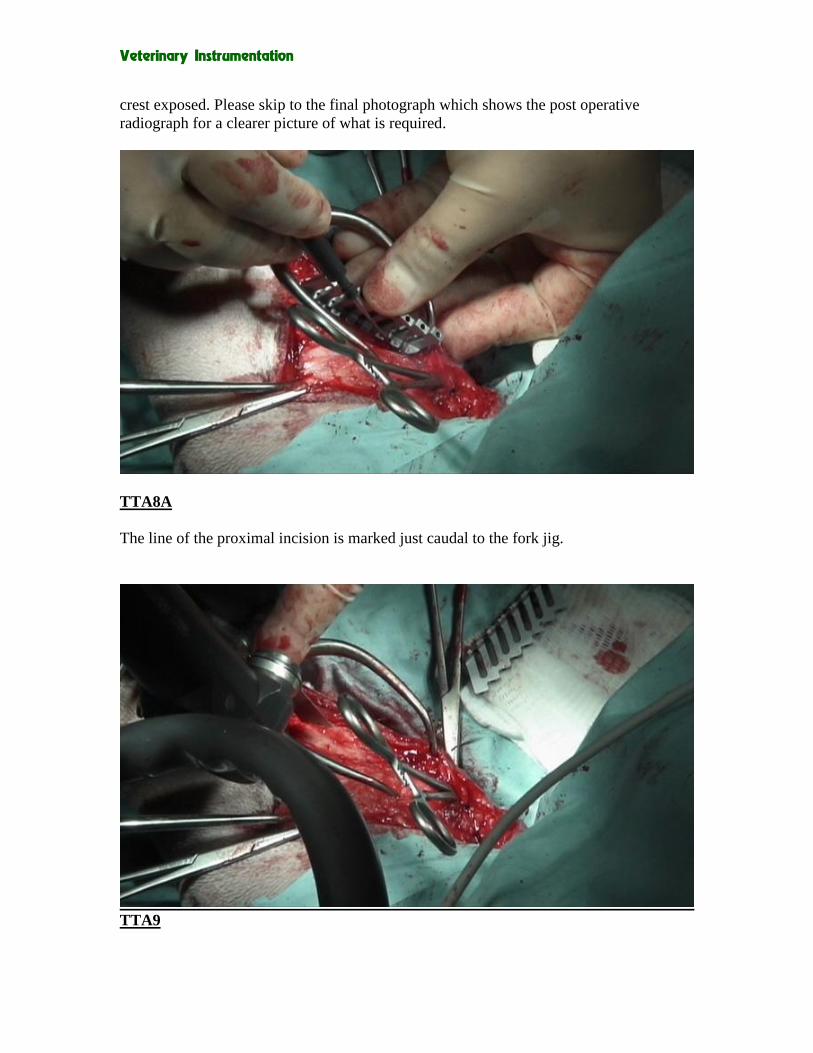
TTA8A
The line of the proximal incision is marked just caudal to the fork jig.
TTA9
Veterinary Instrumentation
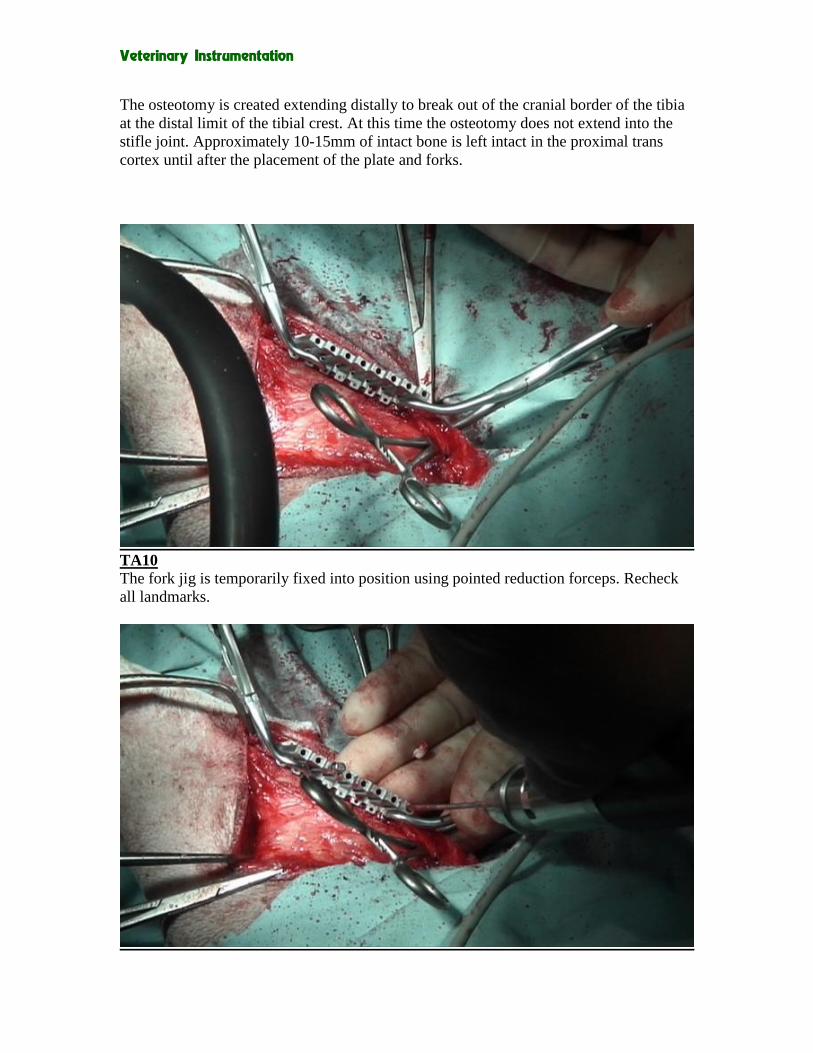
The osteotomy is created extending distally to break out of the cranial border of the tibia
at the distal limit of the tibial crest. At this time the osteotomy does not extend into the
stifle joint. Approximately 10-15mm of intact bone is left intact in the proximal trans
cortex until after the placement of the plate and forks.
TA10
The fork jig is temporarily fixed into position using pointed reduction forceps. Recheck
all landmarks.

Veterinary Instrumentation
TTA11
The most distal hole required for the fork (in this case a six prong fork) is drilled. To
prevent movement of the jig a peg is placed into this hole. The most proximal hole
(always hole number 1) is then drilled and pegged. The remaining holes are drilled.
TTA12
The plate is contoured. This is done to ensure that the implant does not induce a lateral or
torsional force on the osteotomised tibial tuberosity following reduction and fixation.
Veterinary Instrumentation
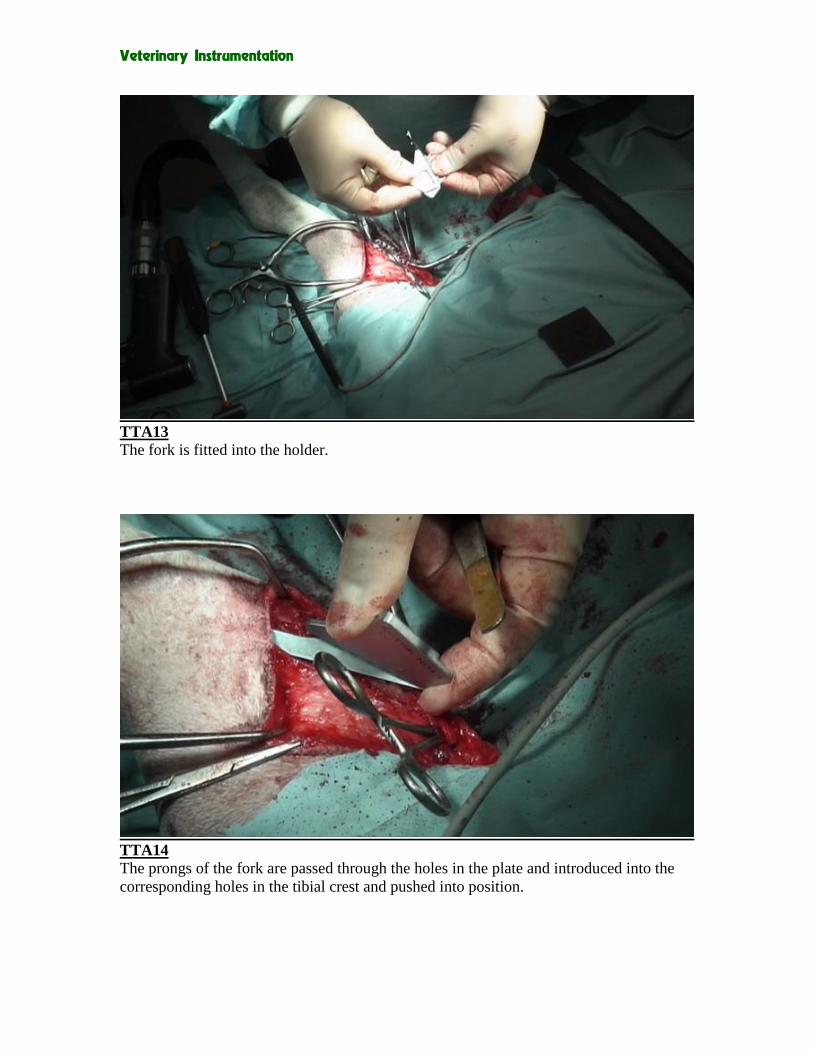
TTA13
The fork is fitted into the holder.
TTA14
The prongs of the fork are passed through the holes in the plate and introduced into the
corresponding holes in the tibial crest and pushed into position.

Veterinary Instrumentation
TTA15
A mallet is used to tap home the fork. The fork holder is removed and the fork is checked
and finally seated with the mallet if necessary.
TTA16
The fork and proximal portion of the plate in situ.
Veterinary Instrumentation
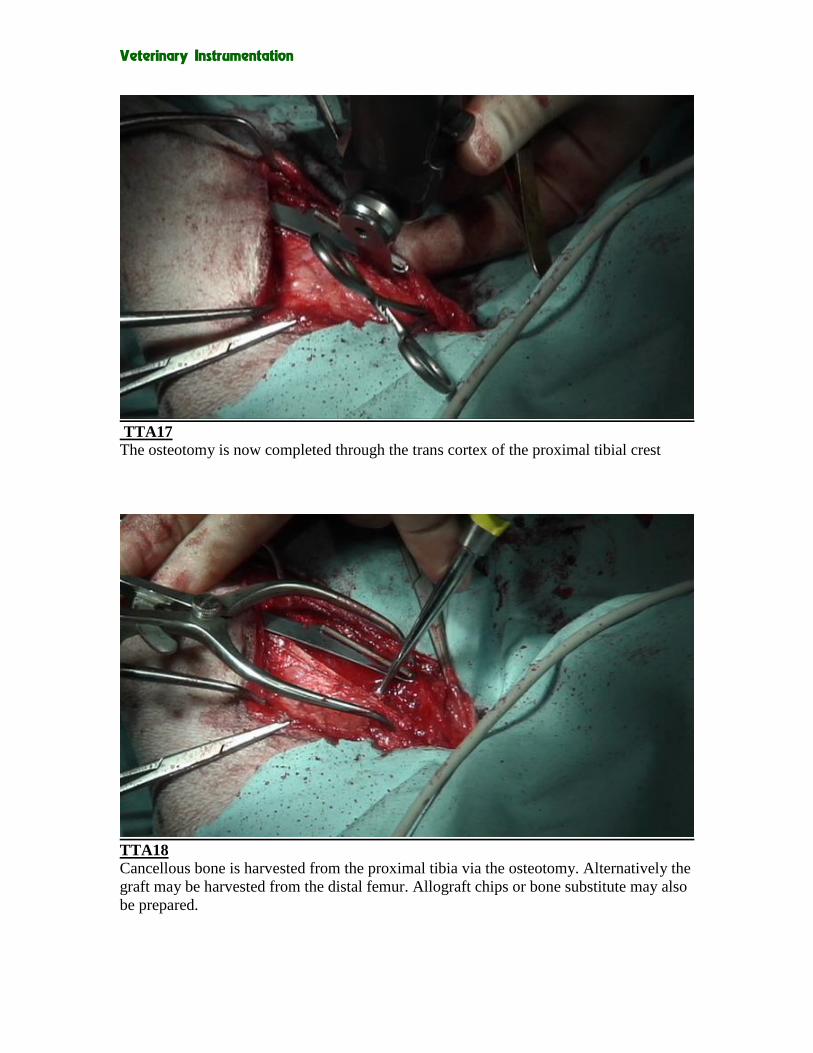
TTA17
The osteotomy is now completed through the trans cortex of the proximal tibial crest
TTA18
Cancellous bone is harvested from the proximal tibia via the osteotomy. Alternatively the
graft may be harvested from the distal femur. Allograft chips or bone substitute may also
be prepared.
Veterinary Instrumentation
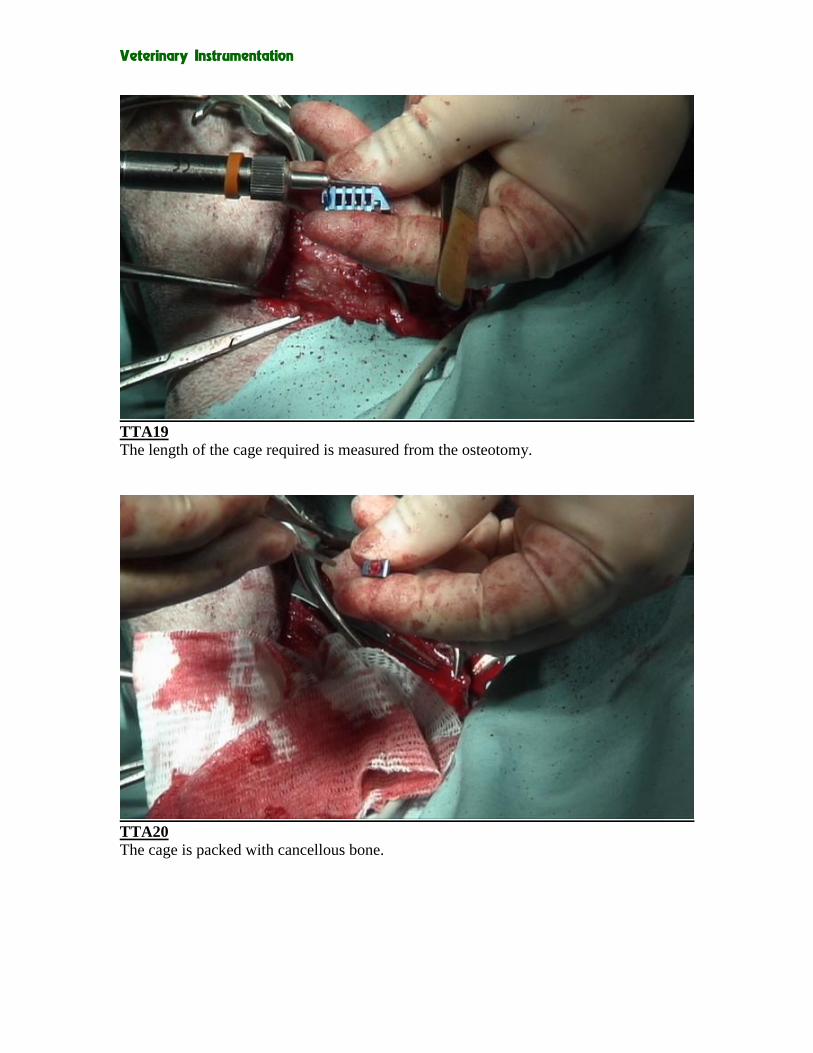
TTA19
The length of the cage required is measured from the osteotomy.
TTA20
The cage is packed with cancellous bone.

Veterinary Instrumentation
TTA21
Using the appropriate lever the osteotomy is levered open distal to the insertion site of the
cage. Once again it may be useful to check the post op radiograph for the correct position.
TTA22
The ears on the cage are contoured and the cage inserted into position. There is a right
way and a wrong way so double check.
Veterinary Instrumentation
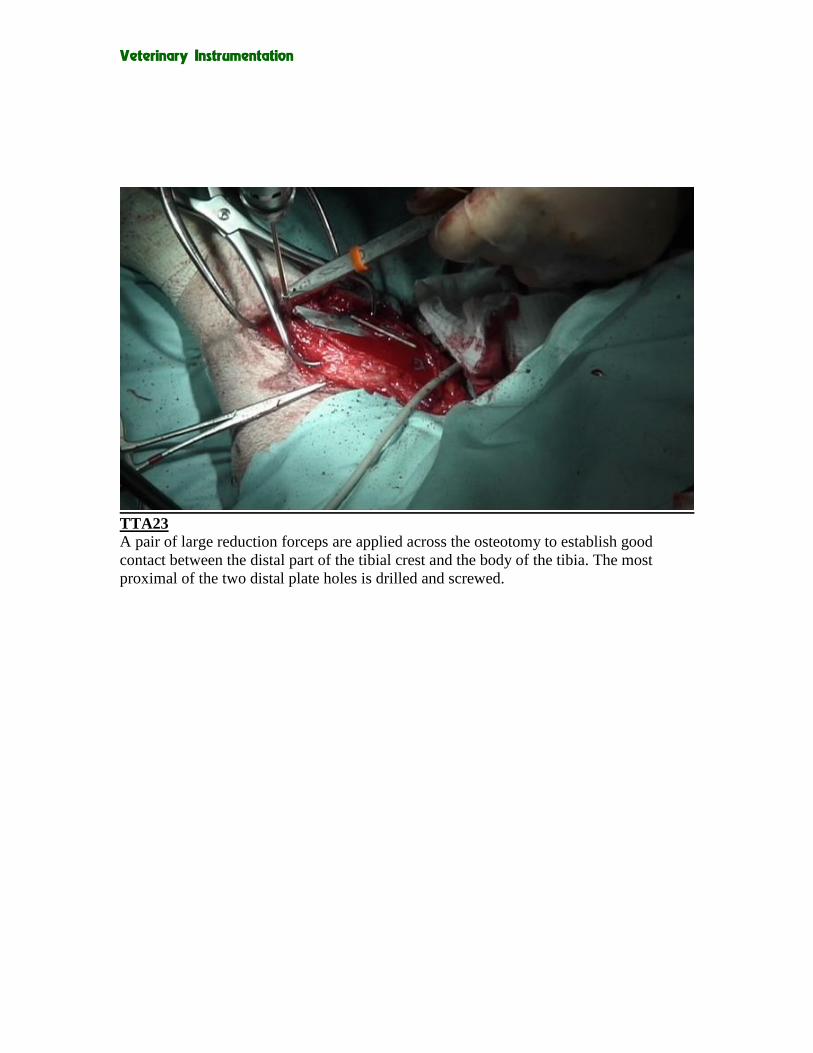
TTA23
A pair of large reduction forceps are applied across the osteotomy to establish good
contact between the distal part of the tibial crest and the body of the tibia. The most
proximal of the two distal plate holes is drilled and screwed.
Veterinary Instrumentation
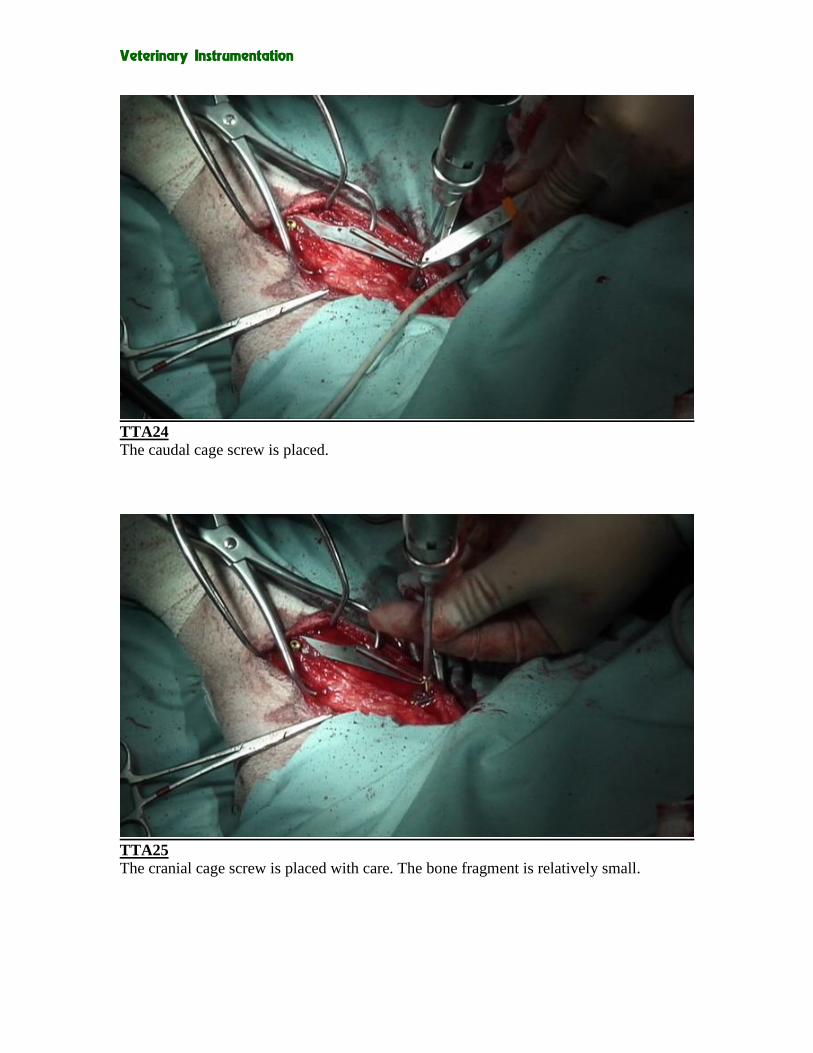
TTA24
The caudal cage screw is placed.
TTA25
The cranial cage screw is placed with care. The bone fragment is relatively small.
Veterinary Instrumentation
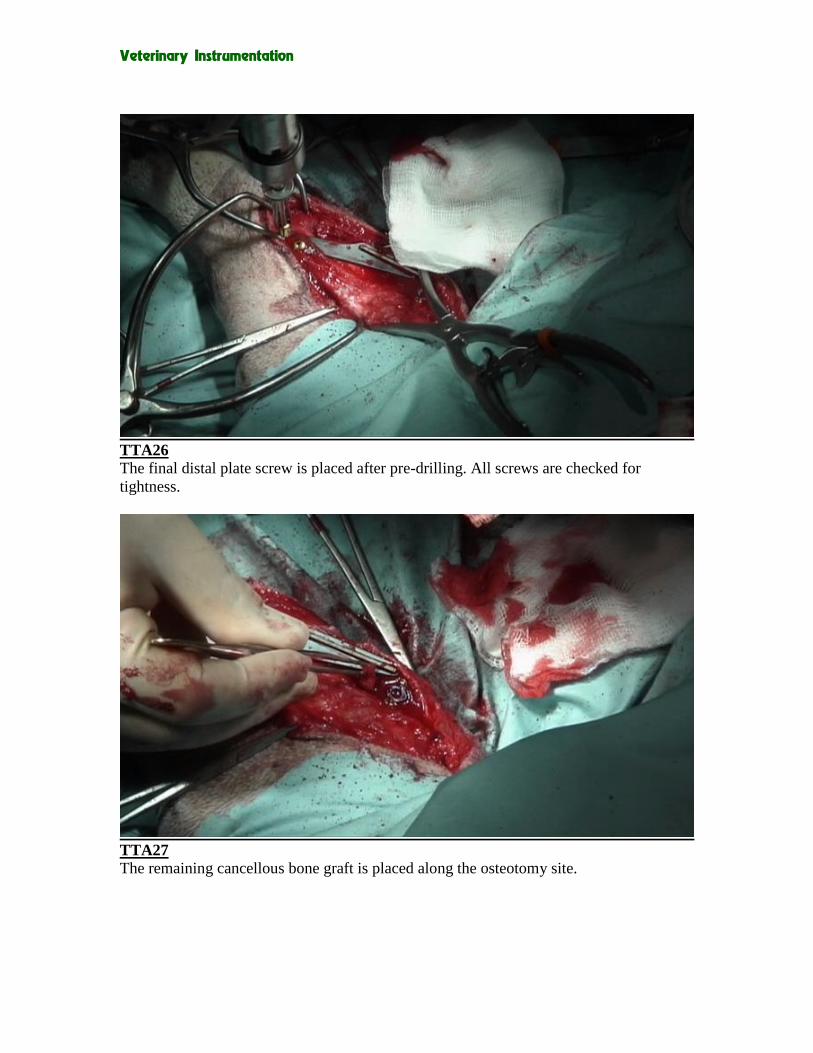
TTA26
The final distal plate screw is placed after pre-drilling. All screws are checked for
tightness.
TTA27
The remaining cancellous bone graft is placed along the osteotomy site.

Veterinary Instrumentation
TTA28 The incision is closed in layers. The deep layer picks up the periosteum.
TTA29 A simple adhesive dressing similar to Hypofix or Primapore is applied.

Veterinary Instrumentation
TTA30 The post operative radiograph. Note the position of the cage leaving only a short tip of
tibial crest exposed. Note also the contact between osteotomised tibial crest and the body
of the tibia distally.
The tibial plateau now sits at 90 degrees to the straight patella ligament.