Embed Size (px)
Citation preview
Appendix 16.5
Bureau of Reclamation Visual Identity Project Specifications for Web Pages
and Instructions for Utilizing the Reclamation Web Template
(Version 3/1/16)
The Visual Identity Program (VIP) is designed to present a clear and consistent identity for Reclamation, and to effectively communicate our mission of managing water in the west. Reclamation Web sites are viewed millions of times each year, and represent an integral element in the agency’s overall communication strategy. By using the VIP, Reclamation Web sites become easier for the public to navigate, and the use of templates will greatly assist Web content authors with the management and maintenance of their sites.
Please note that these specifications are to be used in conjunction with the Reclamation Web Publishing Manual.
The Visual Identity Project Specifications for Web Pages are mandatory for all Reclamation Internet Web sites. They also apply to all Web sites on the corporate level under http://intra.usbr.gov. (The intranet version of the template has a different header and footer .lbi library file and the word INTRANET is included before the page office name over the banner image. Until further notice, Regions will set their own policies regarding the implementation of the VIP on their internal Intranet pages.
The following information includes detailed guidance to assist Web content managers in implementing the VIP, and examples are provided that illustrate the guidelines needed for successful implementation of the VIP template. Contact your Reclamation Web Team representative or the Reclamation Web Manager for assistance with general Visual Identity design questions related to the Web and obtaining solutions for design problems not addressed in the Visual Identity Project Specifications for Web Pages or the Reclamation Web Publishing Manual.
The VIP html templates may be edited with Dreamweaver. However, it is anticipated that Reclamation will migrate to the Drupal Content Management System at some point in the future.
The standard font and color for the content is Arial and black. The left navigation and other components should utilize the color, font and formatting provided in the template to give the Reclamation website a consistent look and feel. Note that the blue and sand colors used in the web template are not an exact match to those colors in the VI color template. Those colors were designed primarily for print media and a slightly different version was used for the web template to provide better contrast for accessibility compliance.
Template folders/files
The files supplied for the html page templates include the following folders, html files and a banner Photoshop psd file. Folders HTML Files components library
components.html (contains examples of some standard components) region.html (which can also be used for an office homepage) facility,html interactives.html region.html single-column.html (page with just the sample left navigation and blank content area) two-column.html three-column.html mapped-image.html
Reclamation Web Publishing Manual and Appendices
Page 2
NOTE: Three folders linked in the template will be maintained on the www.usbr.gov site (css, img, js). Therefore you must be online when editing or viewing web pages for stylesheets, javascripts and icon images to function. The “img” folder contains the seal, logotype and icon images included for the web pages. The “css” folder contains the cascading style sheet and the “js” folder contains the javascripts. These are maintained on the sever level at the root level for all sites on www.usbr.gov and on the WO/DO intranet pages. You can continue to use a separate “images” folder at the local site level for all the images added to the pages by the site owners and for the your specific office banner image (bg-banner.jpg), just change the link in your template page if you want to use a local image rather than the main banner – which will be changed periodically in the main img directory. Rather than using Dreamweaver dwt template files, the new design will use html files (example pages) that can be edited and used as html templates for sites. Any content input must conform to the requirements of the responsive design. You can use the Dreamweaver “find and replace” function to change items site-wide. The library and components folders are described below.
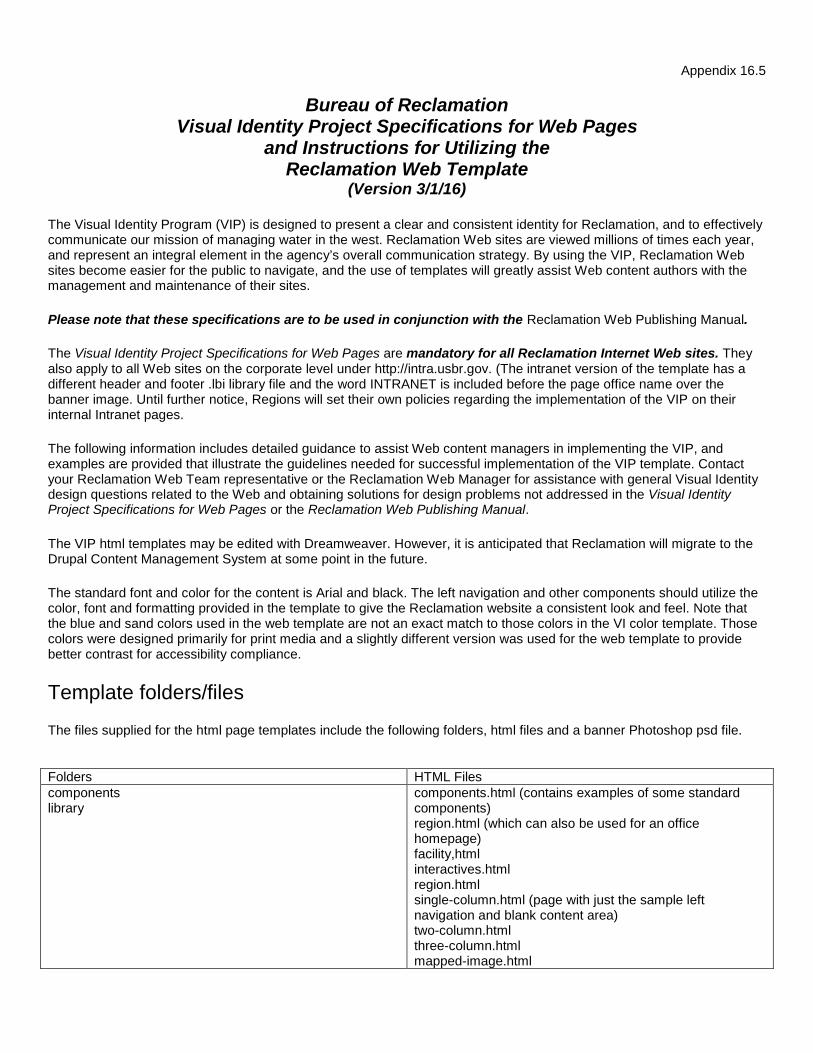
Components The directory named “components” in the standard template zip file is comprised of html pages containing code snippets for each page component which corresponds to the files’ name. Each document corresponds to the related web part within the html template demo pages. This code can be copied and inserted into new pages as needed. The components folder should not be uploaded to the server.
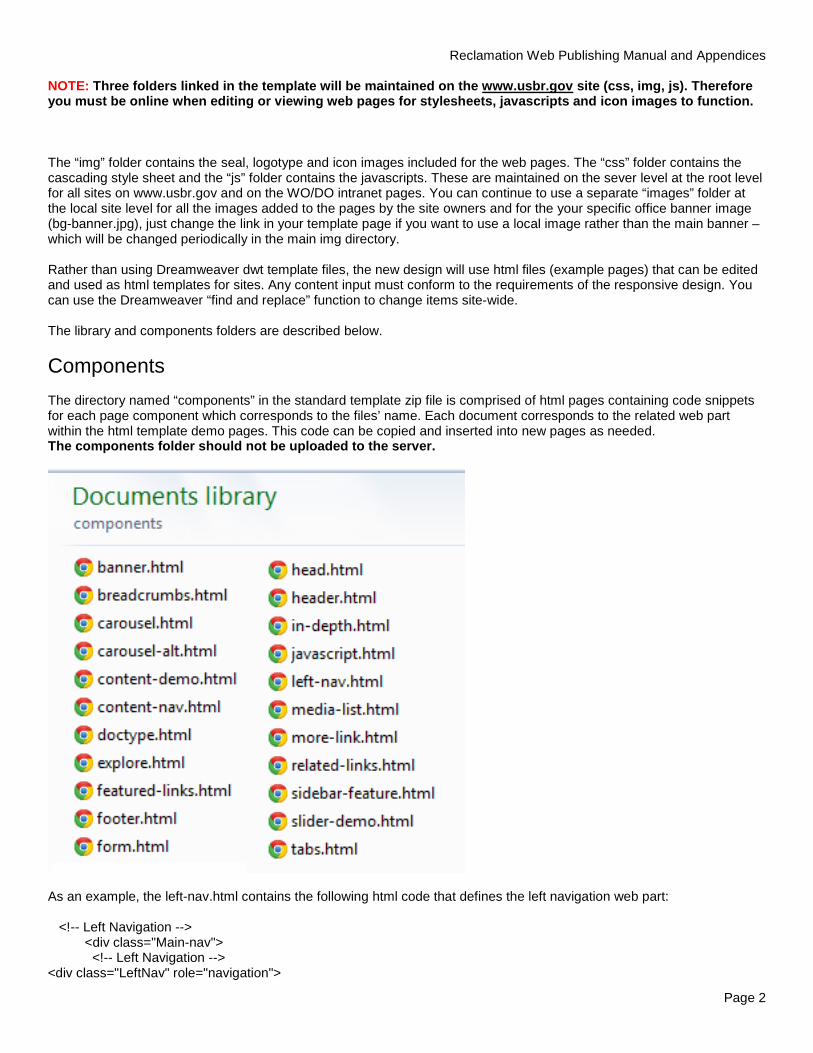
As an example, the left-nav.html contains the following html code that defines the left navigation web part: <!-- Left Navigation --> <div class="Main-nav"> <!-- Left Navigation --> <div class="LeftNav" role="navigation">
Reclamation Web Publishing Manual and Appendices
Page 3
<span class="LeftNav-title">OFFICE NAME</span> <ul class="LeftNav-list"> <li><a href="#">Office Home</a></li> <li><a href="#">Top level items</a></li> <li><a href="#">About Us</a></li> <li class="-active"><a href="#">Programs and Activities</a> <ul> <li><a href="#">Submenu item</a></li> <li><a href="#">Submenu item</a></li> <li><a href="#">Submenu item</a></li> <li><a href="#">Submenu item</a> <ul><li><a href="#">Third level item</a></li></ul></li> <li><a href="#">Submenu item</a></li> <li><a href="#">Submenu item</a></li> <li><a href="#">Submenu item</a></li> </ul> </li> <li><a href="#">Resources Management</a></li> </ul> </div>
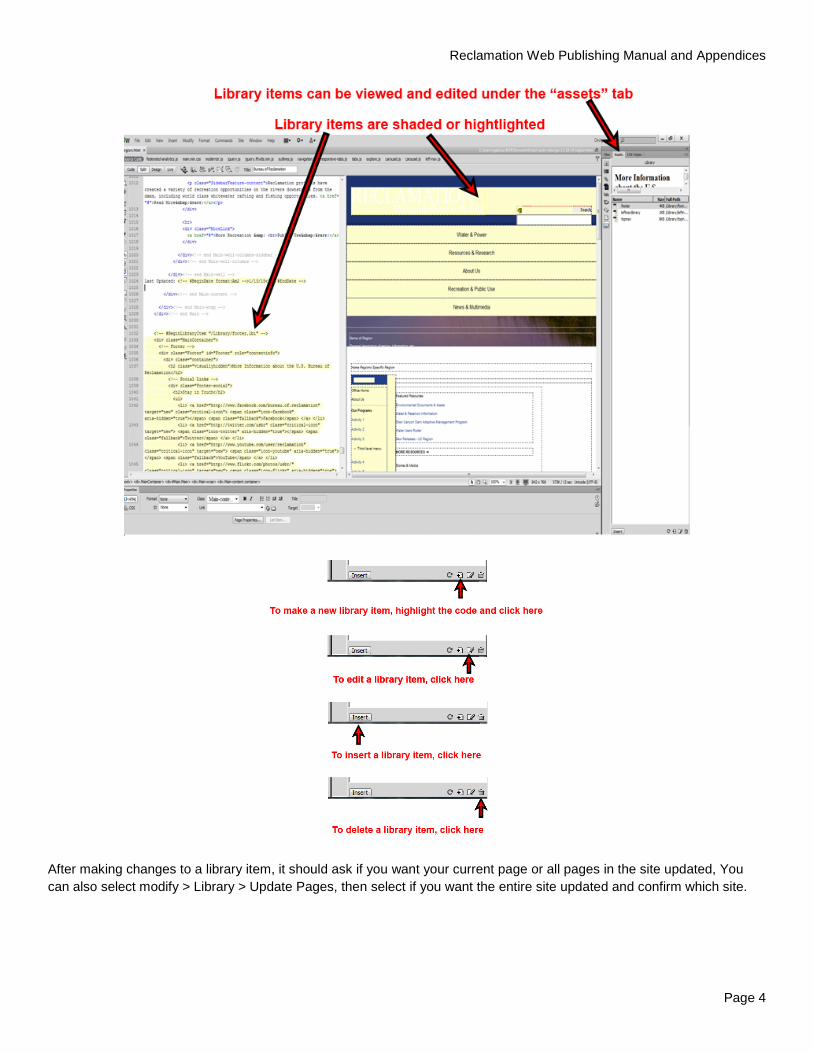
Library items (Reminder: Do not edit the topnav.lbi , footer.lbi or explore.lbi files.)
Note: If you have a submenu that you only want to show up when that primary menu item is selected, you will have to make a separate library item for that submenu to use on those pages.
Reclamation Web Publishing Manual and Appendices
Page 4
After making changes to a library item, it should ask if you want your current page or all pages in the site updated, You can also select modify > Library > Update Pages, then select if you want the entire site updated and confirm which site.

Reclamation Web Publishing Manual and Appendices
Page 5
Reclamation Web Publishing Manual and Appendices
Page 6
Metadata, title, breadcrumbs
Make sure you change the title tag for each page, as appropriate (i.e. About Us | Bureau of Reclamation)
Meta descriptions are commonly used on search engine result pages (SERPs) to display preview snippets for a given page. Meta description tags, while not important to search engine rankings, are extremely important in gaining user click-through from SERPs. These short paragraphs are a webmaster’s opportunity to advertise content to searchers and to let them know exactly whether the given page contains the information they're looking for. The meta description should employ the keywords intelligently, but also create a compelling description that a searcher will want to click. Direct relevance to the page and uniqueness between each page’s meta description is key. The description should optimally be between 150-160 characters.
Make sure to update the breadcrumbs as appropriate for each page. (i.e., Reclamation / Upper Colorado Region / About Us). The <div class="Breadcrumbs"> will automatically format the names (small and italic) and place the slash between them. Make sure you include the link for each item.
Header banner and navigation
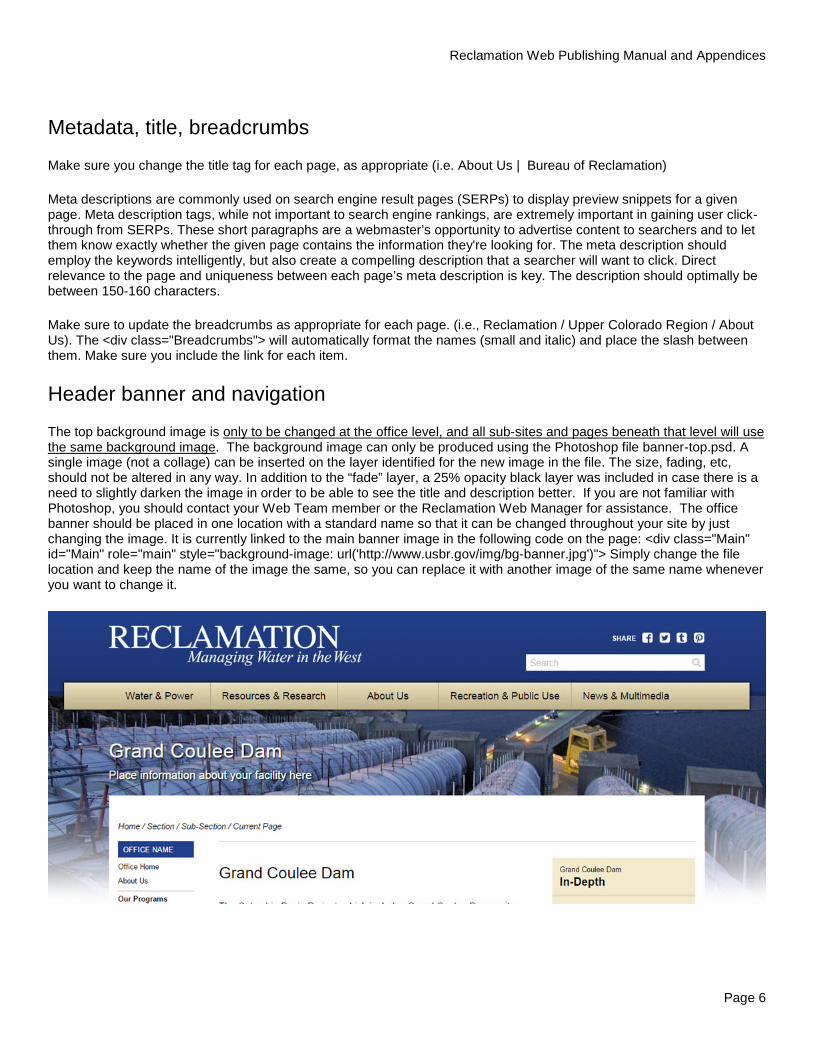
The top background image is only to be changed at the office level, and all sub-sites and pages beneath that level will use the same background image. The background image can only be produced using the Photoshop file banner-top.psd. A single image (not a collage) can be inserted on the layer identified for the new image in the file. The size, fading, etc, should not be altered in any way. In addition to the “fade” layer, a 25% opacity black layer was included in case there is a need to slightly darken the image in order to be able to see the title and description better. If you are not familiar with Photoshop, you should contact your Web Team member or the Reclamation Web Manager for assistance. The office banner should be placed in one location with a standard name so that it can be changed throughout your site by just changing the image. It is currently linked to the main banner image in the following code on the page: <div class="Main" id="Main" role="main" style="background-image: url('http://www.usbr.gov/img/bg-banner.jpg')"> Simply change the file location and keep the name of the image the same, so you can replace it with another image of the same name whenever you want to change it.
Reclamation Web Publishing Manual and Appendices
Page 7
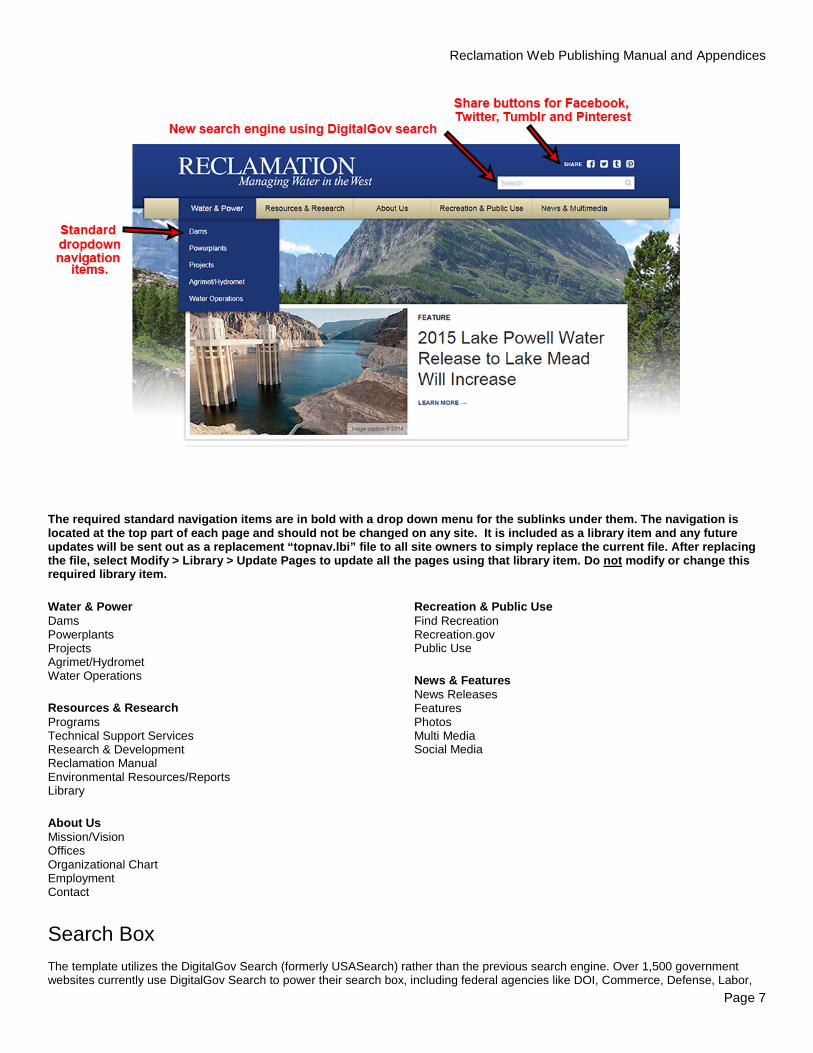
The required standard navigation items are in bold with a drop down menu for the sublinks under them. The navigation is located at the top part of each page and should not be changed on any site. It is included as a library item and any future updates will be sent out as a replacement “topnav.lbi” file to all site owners to simply replace the current file. After replacing the file, select Modify > Library > Update Pages to update all the pages using that library item. Do not modify or change this required library item.
Water & Power Dams Powerplants Projects Agrimet/Hydromet Water Operations
Resources & Research Programs Technical Support Services Research & Development Reclamation Manual Environmental Resources/Reports Library
About Us Mission/Vision Offices Organizational Chart Employment Contact
Recreation & Public Use Find Recreation Recreation.gov Public Use
News & Features News Releases Features Photos Multi Media Social Media
Search Box The template utilizes the DigitalGov Search (formerly USASearch) rather than the previous search engine. Over 1,500 government websites currently use DigitalGov Search to power their search box, including federal agencies like DOI, Commerce, Defense, Labor,
Reclamation Web Publishing Manual and Appendices
Page 8
Homeland Security, HUD, Education, Agriculture, Transportation and many others. DigitalGov Search utilizes primarily Bing and Google to power the searches, but will also incorporate their own search to supplement those search engines. The intranet template site utilizes a different search engine designed to search our internal intranet files.
Footer
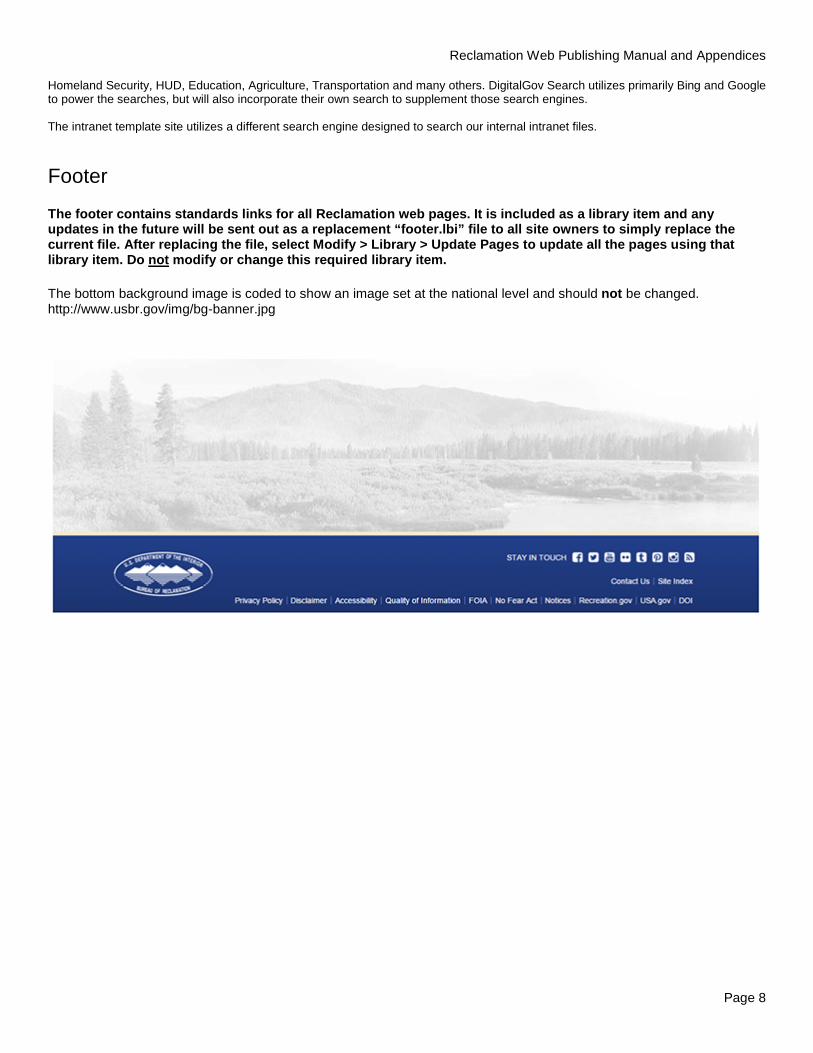
The footer contains standards links for all Reclamation web pages. It is included as a library item and any updates in the future will be sent out as a replacement “footer.lbi” file to all site owners to simply replace the current file. After replacing the file, select Modify > Library > Update Pages to update all the pages using that library item. Do not modify or change this required library item.
The bottom background image is coded to show an image set at the national level and should not be changed. http://www.usbr.gov/img/bg-banner.jpg
Reclamation Web Publishing Manual and Appendices
Page 9
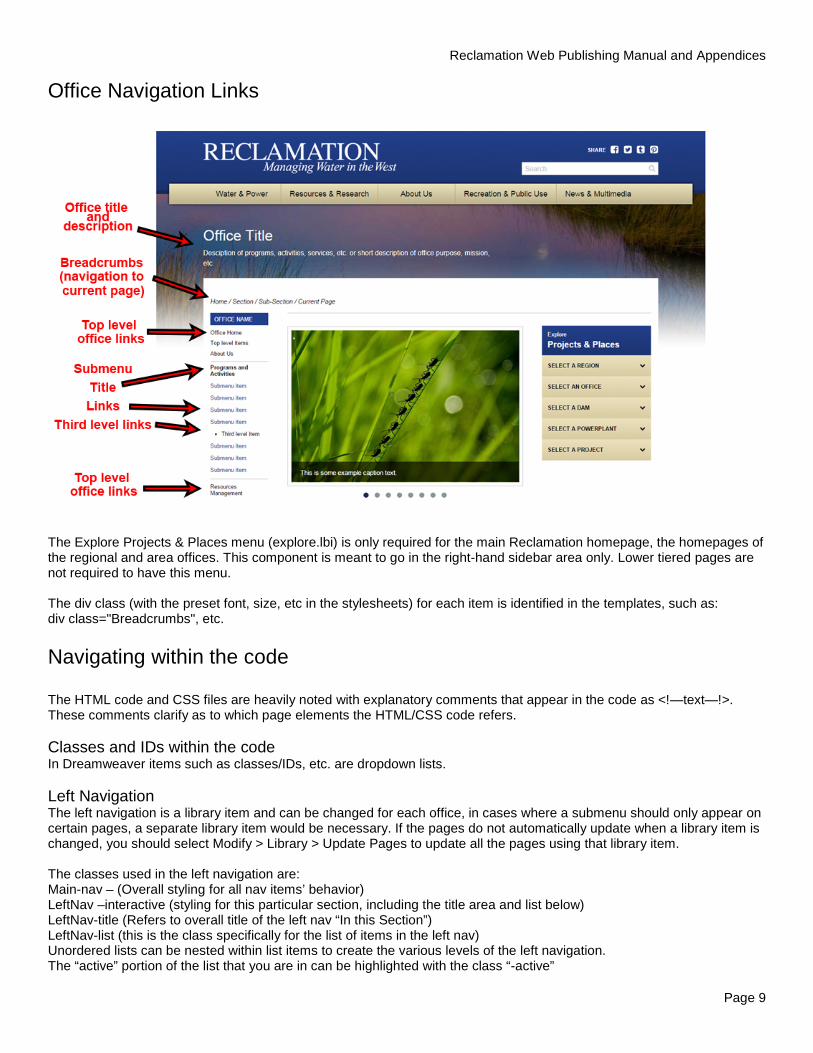
Office Navigation Links
The Explore Projects & Places menu (explore.lbi) is only required for the main Reclamation homepage, the homepages of the regional and area offices. This component is meant to go in the right-hand sidebar area only. Lower tiered pages are not required to have this menu. The div class (with the preset font, size, etc in the stylesheets) for each item is identified in the templates, such as: div class="Breadcrumbs", etc. Navigating within the code The HTML code and CSS files are heavily noted with explanatory comments that appear in the code as <!—text—!>. These comments clarify as to which page elements the HTML/CSS code refers. Classes and IDs within the code In Dreamweaver items such as classes/IDs, etc. are dropdown lists. Left Navigation The left navigation is a library item and can be changed for each office, in cases where a submenu should only appear on certain pages, a separate library item would be necessary. If the pages do not automatically update when a library item is changed, you should select Modify > Library > Update Pages to update all the pages using that library item. The classes used in the left navigation are: Main-nav – (Overall styling for all nav items’ behavior) LeftNav –interactive (styling for this particular section, including the title area and list below) LeftNav-title (Refers to overall title of the left nav “In this Section”) LeftNav-list (this is the class specifically for the list of items in the left nav) Unordered lists can be nested within list items to create the various levels of the left navigation. The “active” portion of the list that you are in can be highlighted with the class “-active”
Reclamation Web Publishing Manual and Appendices
Page 10
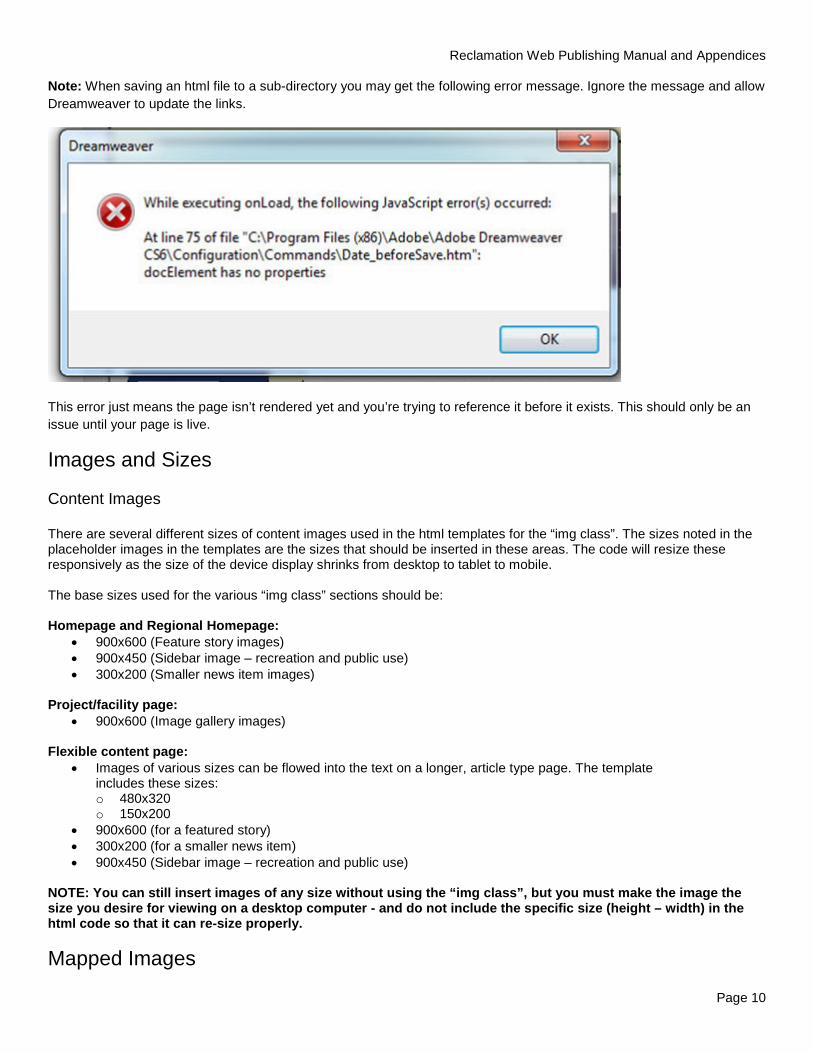
Note: When saving an html file to a sub-directory you may get the following error message. Ignore the message and allow Dreamweaver to update the links.
This error just means the page isn’t rendered yet and you’re trying to reference it before it exists. This should only be an issue until your page is live.
Images and Sizes Content Images There are several different sizes of content images used in the html templates for the “img class”. The sizes noted in the placeholder images in the templates are the sizes that should be inserted in these areas. The code will resize these responsively as the size of the device display shrinks from desktop to tablet to mobile. The base sizes used for the various “img class” sections should be: Homepage and Regional Homepage:
• 900x600 (Feature story images) • 900x450 (Sidebar image – recreation and public use) • 300x200 (Smaller news item images)
Project/facility page:
• 900x600 (Image gallery images)
Flexible content page: • Images of various sizes can be flowed into the text on a longer, article type page. The template
includes these sizes: o 480x320 o 150x200
• 900x600 (for a featured story) • 300x200 (for a smaller news item) • 900x450 (Sidebar image – recreation and public use)
NOTE: You can still insert images of any size without using the “img class”, but you must make the image the size you desire for viewing on a desktop computer - and do not include the specific size (height – width) in the html code so that it can re-size properly. Mapped Images
Reclamation Web Publishing Manual and Appendices
Page 11
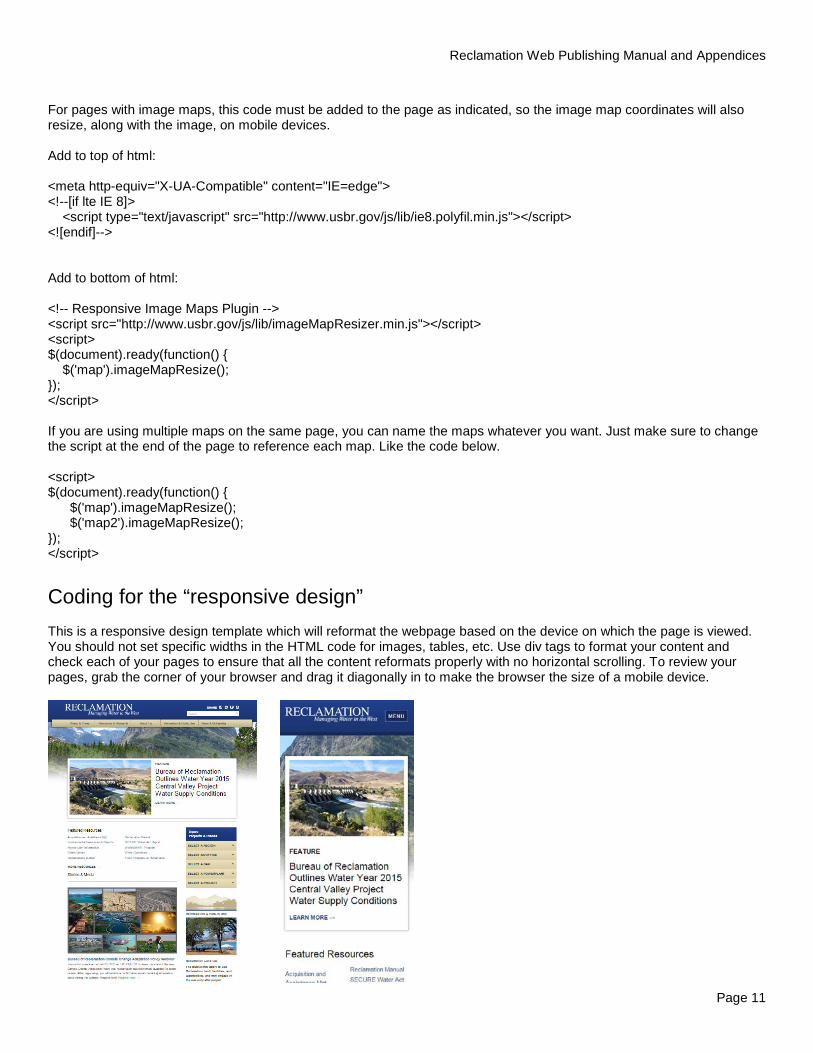
For pages with image maps, this code must be added to the page as indicated, so the image map coordinates will also resize, along with the image, on mobile devices. Add to top of html: <meta http-equiv="X-UA-Compatible" content="IE=edge"> <!--[if lte IE 8]> <script type="text/javascript" src="http://www.usbr.gov/js/lib/ie8.polyfil.min.js"></script> <![endif]--> Add to bottom of html: <!-- Responsive Image Maps Plugin --> <script src="http://www.usbr.gov/js/lib/imageMapResizer.min.js"></script> <script> $(document).ready(function() { $('map').imageMapResize(); }); </script> If you are using multiple maps on the same page, you can name the maps whatever you want. Just make sure to change the script at the end of the page to reference each map. Like the code below. <script> $(document).ready(function() { $('map').imageMapResize(); $('map2').imageMapResize(); }); </script> Coding for the “responsive design” This is a responsive design template which will reformat the webpage based on the device on which the page is viewed. You should not set specific widths in the HTML code for images, tables, etc. Use div tags to format your content and check each of your pages to ensure that all the content reformats properly with no horizontal scrolling. To review your pages, grab the corner of your browser and drag it diagonally in to make the browser the size of a mobile device.
Reclamation Web Publishing Manual and Appendices
Page 12
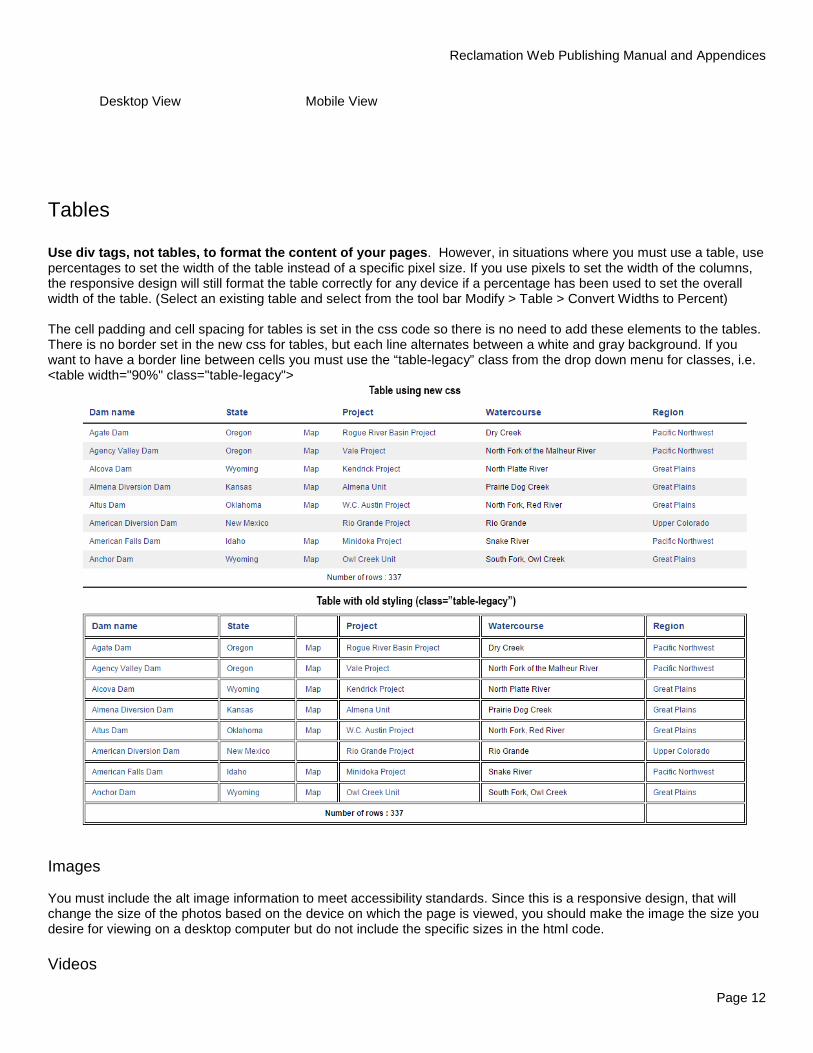
Desktop View Mobile View Tables Use div tags, not tables, to format the content of your pages. However, in situations where you must use a table, use percentages to set the width of the table instead of a specific pixel size. If you use pixels to set the width of the columns, the responsive design will still format the table correctly for any device if a percentage has been used to set the overall width of the table. (Select an existing table and select from the tool bar Modify > Table > Convert Widths to Percent) The cell padding and cell spacing for tables is set in the css code so there is no need to add these elements to the tables. There is no border set in the new css for tables, but each line alternates between a white and gray background. If you want to have a border line between cells you must use the “table-legacy” class from the drop down menu for classes, i.e. <table width="90%" class="table-legacy">
Images You must include the alt image information to meet accessibility standards. Since this is a responsive design, that will change the size of the photos based on the device on which the page is viewed, you should make the image the size you desire for viewing on a desktop computer but do not include the specific sizes in the html code. Videos
Reclamation Web Publishing Manual and Appendices
Page 13
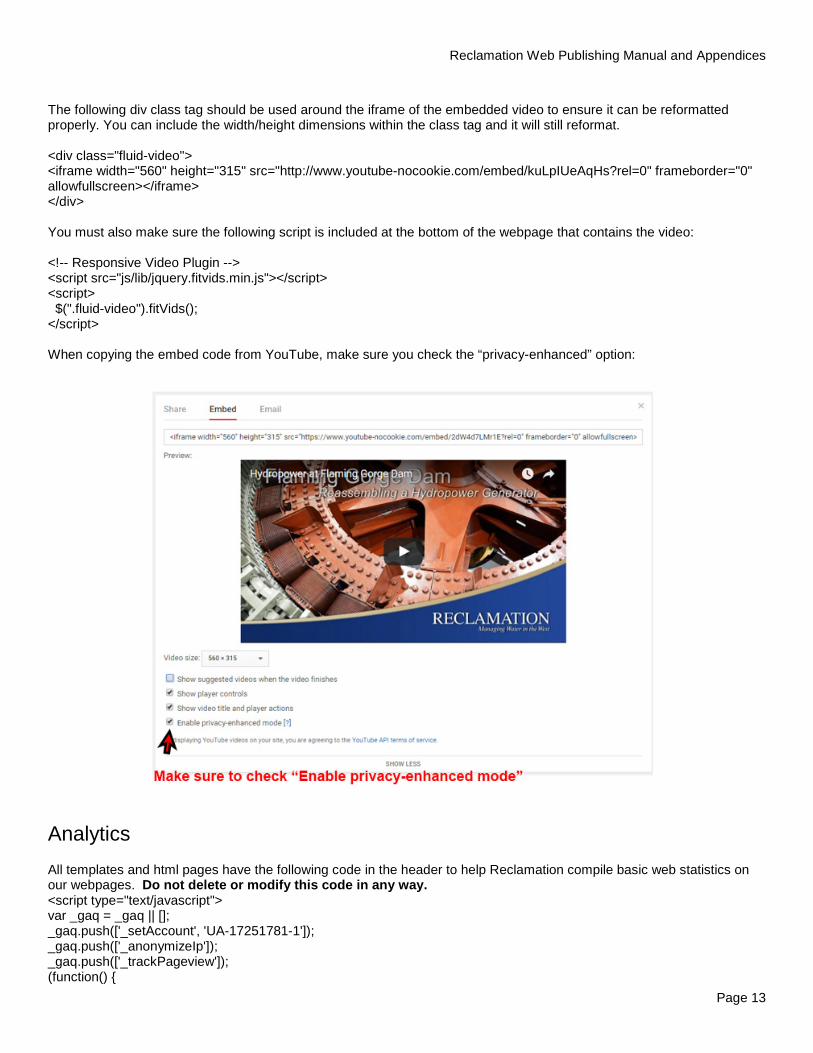
The following div class tag should be used around the iframe of the embedded video to ensure it can be reformatted properly. You can include the width/height dimensions within the class tag and it will still reformat. <div class="fluid-video"> <iframe width="560" height="315" src="http://www.youtube-nocookie.com/embed/kuLpIUeAqHs?rel=0" frameborder="0" allowfullscreen></iframe> </div> You must also make sure the following script is included at the bottom of the webpage that contains the video: <!-- Responsive Video Plugin --> <script src="js/lib/jquery.fitvids.min.js"></script> <script> $(".fluid-video").fitVids(); </script> When copying the embed code from YouTube, make sure you check the “privacy-enhanced” option:
Analytics All templates and html pages have the following code in the header to help Reclamation compile basic web statistics on our webpages. Do not delete or modify this code in any way. <script type="text/javascript"> var _gaq = _gaq || []; _gaq.push(['_setAccount', 'UA-17251781-1']); _gaq.push(['_anonymizeIp']); _gaq.push(['_trackPageview']); (function() {
Reclamation Web Publishing Manual and Appendices
Page 14
var ga = document.createElement('script'); ga.type = 'text/javascript'; ga.async = true; ga.src = ('https:' == document.location.protocol ? 'https://ssl' : 'http://www') + '.google-analytics.com/ga.js'; var s = document.getElementsByTagName('script')[0]; s.parentNode.insertBefore(ga, s); })(); </script> <script type="text/javascript" src="http://www.usbr.gov/js/federated-analytics.js"></script>
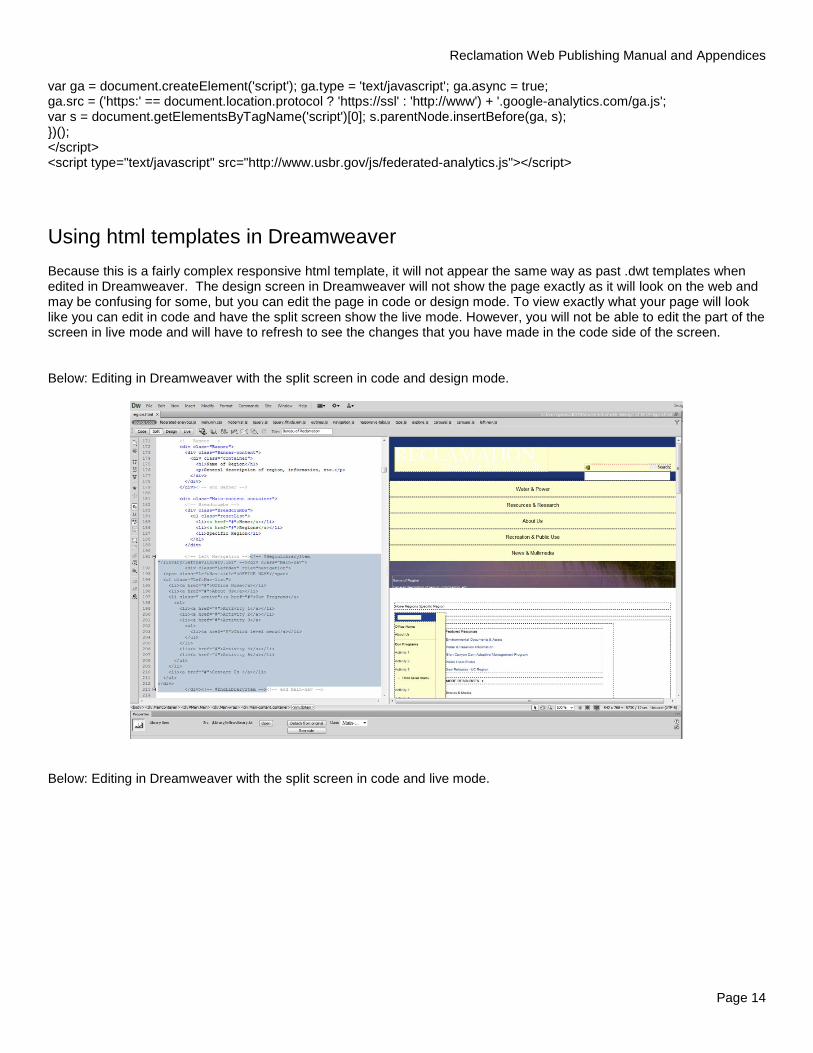
Using html templates in Dreamweaver Because this is a fairly complex responsive html template, it will not appear the same way as past .dwt templates when edited in Dreamweaver. The design screen in Dreamweaver will not show the page exactly as it will look on the web and may be confusing for some, but you can edit the page in code or design mode. To view exactly what your page will look like you can edit in code and have the split screen show the live mode. However, you will not be able to edit the part of the screen in live mode and will have to refresh to see the changes that you have made in the code side of the screen. Below: Editing in Dreamweaver with the split screen in code and design mode.
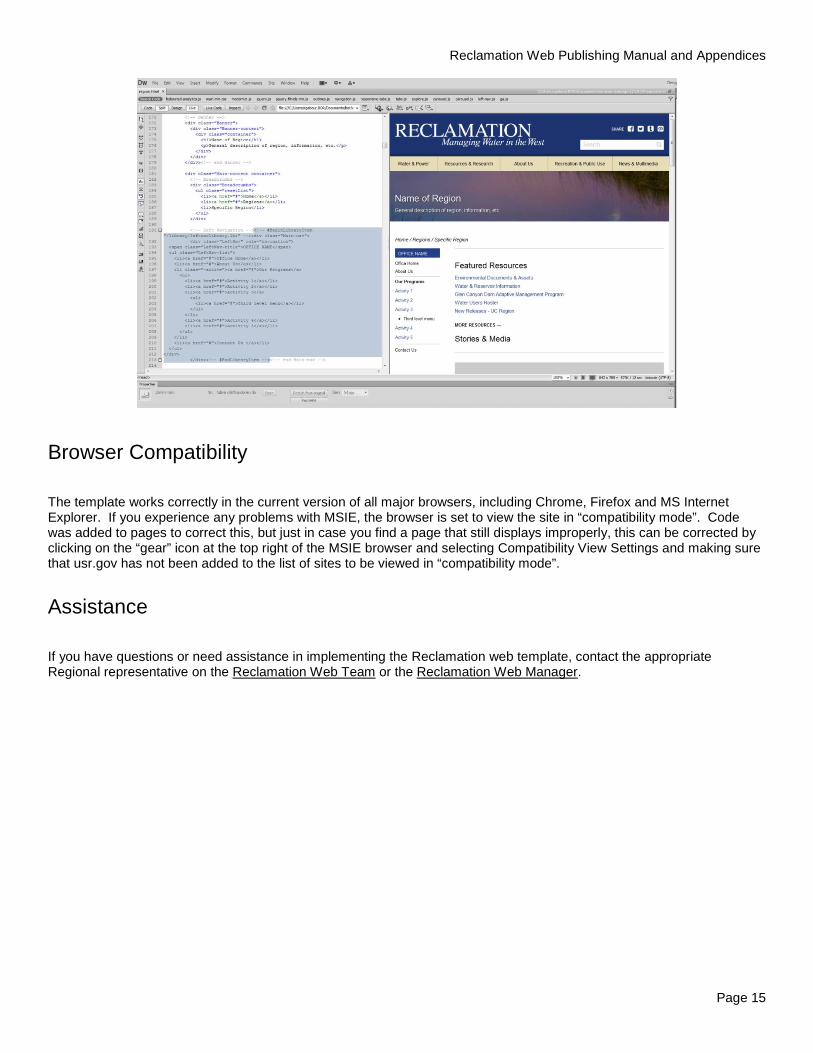
Below: Editing in Dreamweaver with the split screen in code and live mode.
Reclamation Web Publishing Manual and Appendices
Page 15
Browser Compatibility The template works correctly in the current version of all major browsers, including Chrome, Firefox and MS Internet Explorer. If you experience any problems with MSIE, the browser is set to view the site in “compatibility mode”. Code was added to pages to correct this, but just in case you find a page that still displays improperly, this can be corrected by clicking on the “gear” icon at the top right of the MSIE browser and selecting Compatibility View Settings and making sure that usr.gov has not been added to the list of sites to be viewed in “compatibility mode”.
Assistance If you have questions or need assistance in implementing the Reclamation web template, contact the appropriate Regional representative on the Reclamation Web Team or the Reclamation Web Manager.