Embed Size (px)
Citation preview
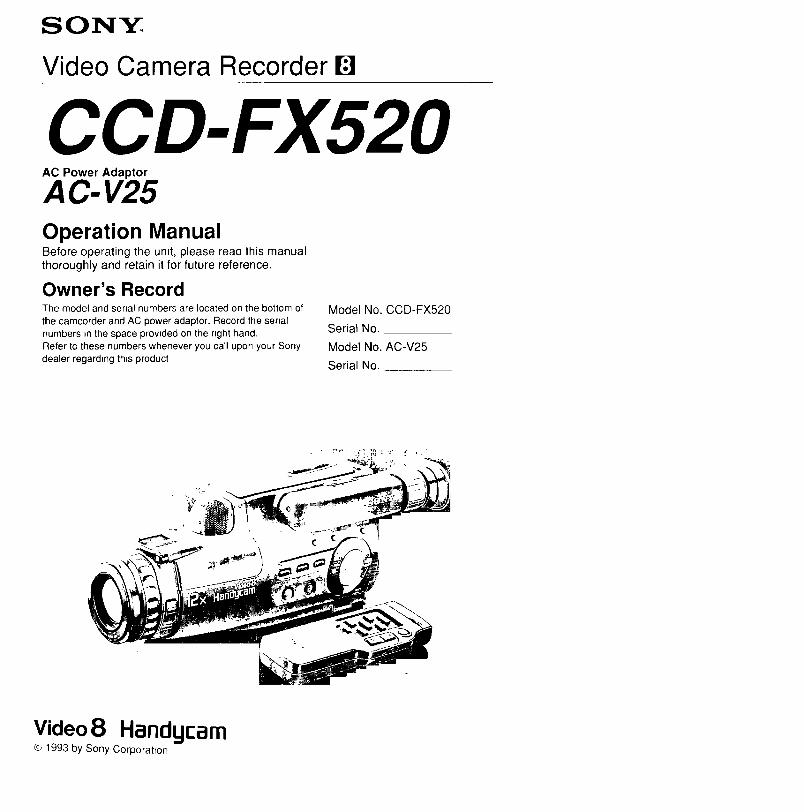
SONY
Video Camera Recorder
CCD-FX520AC Power Adaptor
AC-V25Operation ManualBefore operating the untt, please read this manualthoroughly and retain it for future reference.
Owner's RecordThe model and senal numbers are located on the bottom of
the camcorder and AC power adaptor. Record the serial
numbers m the space provided on the nght hand.
Refer to these numbers whenever you call upon your Sony
dealer regarding this product
Model No. CCD-FX520
Serial No.
Model No. AC-V25
Serial No.
?
Video8 Handgcam_, 1993 by Sony Corporatton
2
To prevent fire or shockhazard, do not expose the unitto rain or moisture.
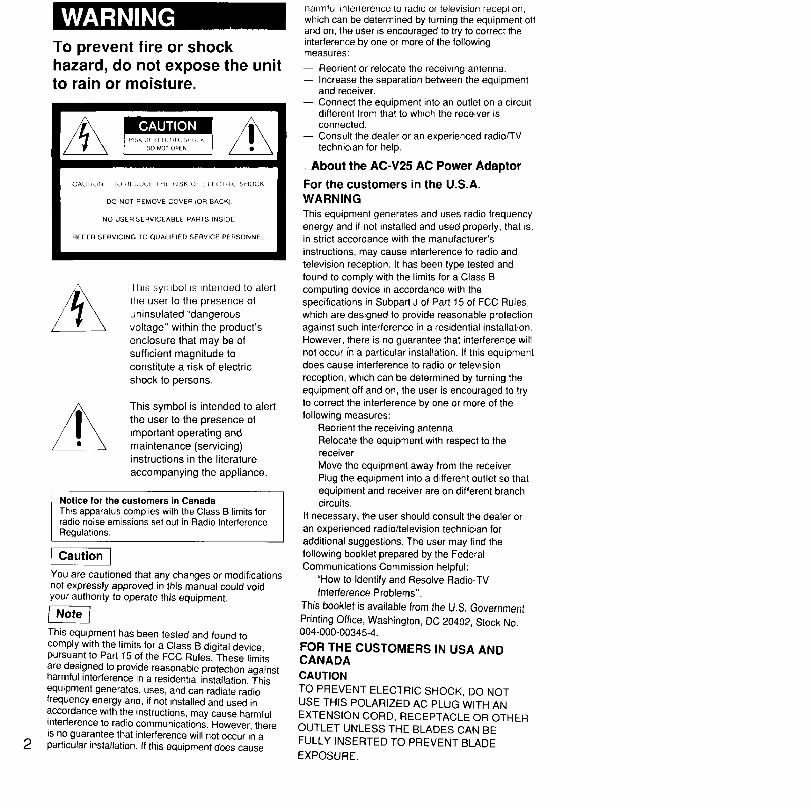
] his symbol is intended to alertthe user to the presence ofuninsulated "dangerousvoltage" within the product'senclosure that may be ofsufficient magnitude toconstitute a risk of electric
shock to persons.
This symbol is intended to alert
the user to the presence ofimportant operating andmaintenance (servicing)instructions in the literature
accompanying the appliance.
Notice for the customers in CanadaThis apparatus complies with the Class B limits forradio noise emissions set out in Radio InterferenceRegulations.
Caution 1
You are cautioned that any changes or modifications
not expressly approved in this manual could voidyour authority to operate this equipment.
This equipment has been tested and found to
comply with the limits for a Class B digital device,pursuant to Part 15 of the FCC Rules. These limits
are designed to provide reasonable protection againstharmful interference in a residential installation. Thisequipment generates, uses, and can radiate radiofrequency energy and, if not installed and used in
accordance with the instructions, may cause harmful
interference to radio communications. However, thereis no guarantee that interference will not occur in a
particular installation. If this equipment does cause
harmful interference to radio or television reception,
which can be determined by turning the equipment offand on, the user is encouraged to try to correct theinterference by one or more of the followingmeasures:
-- Reorient or relocate the receiving antenna.
-- Increase the separation between the equipmentand receiver.
-- Connect the equipment into an outlet on a circuitdifferent from that to which the receiver isconnected.
-- Consult the dealer or an experienced radiofTVtechnician for help.
About the AC-V25 AC Power AdaptorFor the customers in the U.S.A.
WARNING
This equipment generates and uses radio frequency
energy and if not installed and used properly, that is,
in strict accordance with the manufacturer's
instructions, may cause interference to radio and
television reception. It has been type tested and
found to comply with the limits for a Class B
computing device in accordance with the
specifications in Subpart J of Part 15 of FCC Rules,
which are designed to provide reasonable protection
against such interference in a residential installation.
However, there is no guarantee that interference will
not occur (n a particular installation. If this equipmentdoes cause interference to radio or television
reception, which can be determined by turning the
equipment off and on, the user is encouraged to try
to correct the interference by one or more of the
following measures:
Reorient the receiving antenna
Relocate the equipment with respect to thereceiver
Move the equipment away from the receiver
Plug the equipment into a different outlet so that
equipment and receiver are on different branchcircuits.
If necessary, the user should consult the dealer or
an experienced radio/television technician for
additional suggestions. The user may find the
following booklet prepared by the Federal
Communications Commission helpful:
"How to Identify and Resolve Radio-TV
Interference Problems".
This booklet is available from the U.S. Government
Printing Office, Washington, DC 20402, Stock No.004-000-00345-4.
FOR THE CUSTOMERS IN USA ANDCANADA
CAUTION
TO PREVENT ELECTRIC SHOCK, DO NOT
USE THIS POLARIZED AC PLUG WITH AN
EXTENSION CORD, RECEPTACLE OR OTHER
OUTLET UNLESS THE BLADES CAN BE
FULLY INSERTED TO PREVENT BLADE
EXPOSURE.
Before You BeginAbout This manual 4
Checking Supplied AccessoNes 5
Getting StartedCharging and Instalhng the Battery Pack 6
T_ps for Using the Battery Pack 8
Instalhng the Lithium Battery 10Adjusting the Viewfinder Lens 11BEEP Feature 11
Setting the Date and T_me 12
Stormg a Birth Date m Your Camcorder 13Inserting a Cassette 15
Hmts for Better Shooting 16
Basic OperationsCamera Recording 17
Using the Zoom Feature 19Recording the Date or T_me 19
Recording an Age 20Checking the Recorded Picture in the V_ewl_nder 21
Connectqons for Playback 22
Connect=ng to a TV or VCR w_thout Vtdeo/Aud=o Input Jacks 22
Connecting to a TV or VCR w=th V_deo/Aud_o Input Jacks 22Play=ng Back a Tape 23
Various Playback Modes 24
Preparing the Remote Commander 24
Advanced OperationsUsmg Alternative Power Sources 25Focus=ng Manually 26
Using the PROGRAM AE Funcbon 28
Compensahng for Backl=ght_ng 30Fade-_n and Fade-out 31
Using the Tape Counter 32Insert a Scene m the M_ddle of a Recorded Tape 33
Ed=t=ng onto Another Tape 34Recording from a TV or VCR 35
Additional InformationMaintenance Informat=on and Precaut=ons 37
Using Your Camcorder Abroad 41
Identifying the Parts 42Specff=catlons 47Trouble Check 48
Indicators In the V=ewfinder 50
Index (Back cover)
1Welcome to Video [] )Congratulations on your purchase of th_s Sony Handycam Camcorder. W_th your Handycam, you can
capture hfe's precious moments w=th superior p_cture and sound quahty. Your Handycam is loaded wrthadvanced features, but at the same bme =t is very easy to use You will soon be producing home vtdeo thatyou can enjoy for years to come
3
Before You Begin
If you want to shoot as soon as possible, read tile chapters "Getting Started' and "Bastc Operations" first As
you read through th_s manual, buttons and settings on the camcorder are shown in capital letterse g. Set the POWER sw_tch to CAMERA
Note on TV Color System
TV color systems ddfer from country to country.To wew your record{ngs on a TV, you need an NTSC system based TV. When you want to use a PAL-Msystem based TV, you w_ll need an NTSC/PAL-M transcoder (as this is an NTSC based camcorder) Pleasecheck the hston page 41 to see the TV color system of your country
Note on the Supplied RFU Adaptor
Stnce each country has _ts own electricity and TV color system, you may not be able to use the RFU adaptor
when you use the camcorder abroad
Precaution on Copyright
Television programs, films, wdeo tapes, and other materials may be copyrighted Unauthorized recording of
such matenal may be contrary to the prowstons of the copynght laws.
4
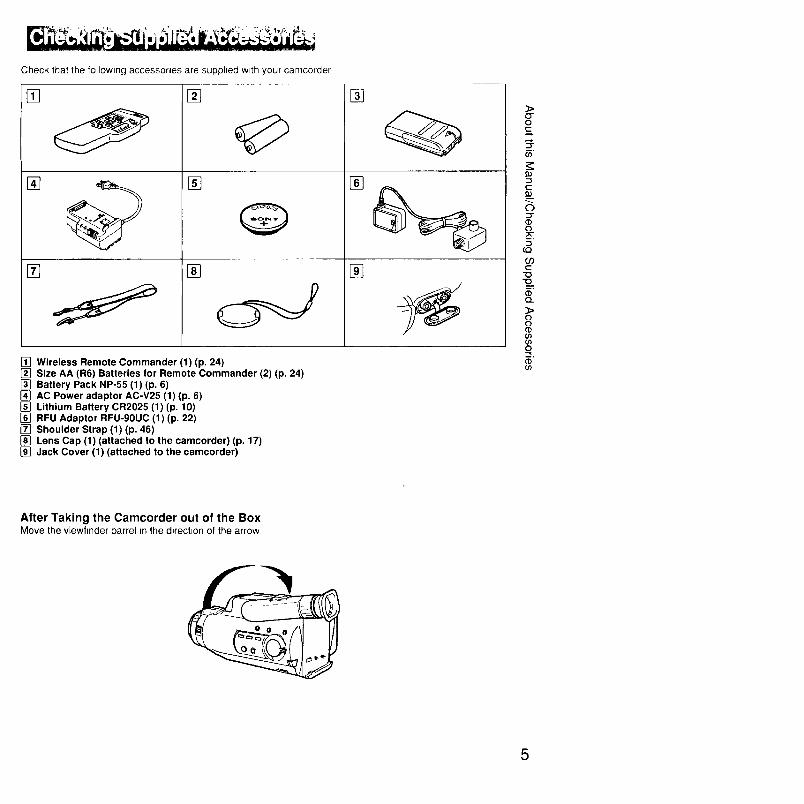
Check that the following accessories are supphed wtth your camcorder
[] []
[]
[]
[]
[]
%
[]
[]
[] Wireless Remote Commander (1) (p. 24)
[] Size AA (R6) Batteries for Remote Commander (2) (p. 24)[] Battery Pack NP-55 (1) (p. 6)
[] AC Power adaptor AC-V25 (1) (p. 6)[] Lithium Battery CR2025 (1) (p, 10)[] RFU Adaptor RFU-90UC (1) (p, 22)
[] Shoulder Strap (1) (p. 46)
[] Lens Cap (1) (attached to the camcorder) (p. 17)[] Jack Cover (1) (attached to the camcorder)
_>o-oC
B,
"-1t-
r.QU)1.-
"o-o
o_
_>(3o(1)
C.qo
CD
After Taking the Camcorder out of the BoxMove the viewfinder barrel _nthe dtrect_on of the arrow
Getting Started
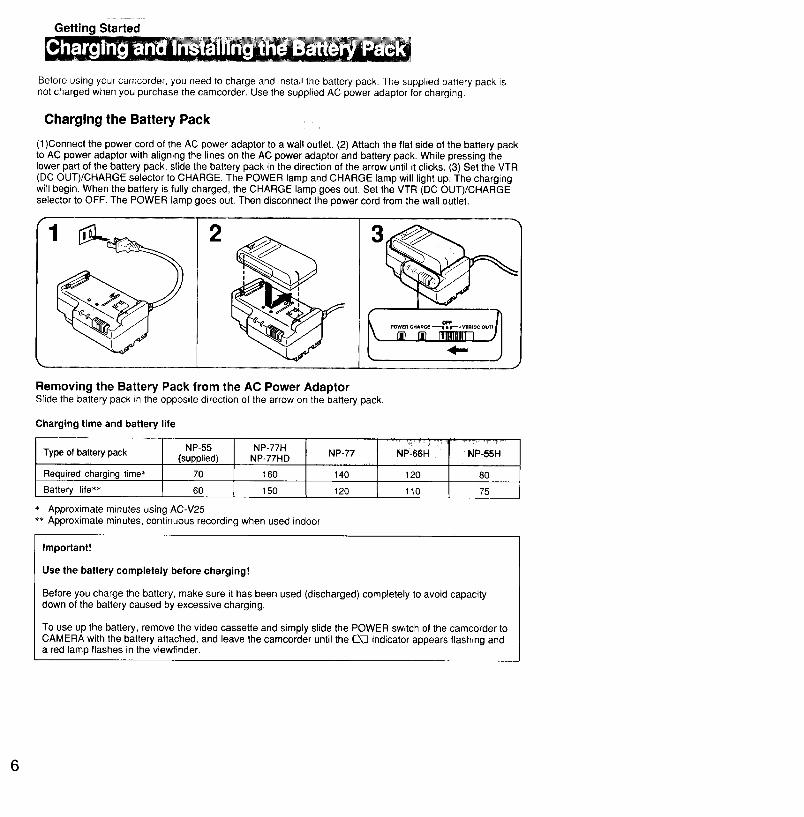
Before using your camcorder, you need to charge and install the battery pack. The supplied battery pack isnot charged when you purchase the camcorder. Use the supplied AC power adaptor for charging.
Charging the Battery Pack
(1)Connect the power cord of the AC power adaptor to a wall outlet. (2) Attach the flat side of the battery packto AC power adaptor with aligning the lines on the AC power adaptor and battery pack. While pressing thelower part of the battery pack, slide the battery pack in the direction of the arrow until it clicks. (3) Set the VTR(DC OUT)/CHARGE selector to CHARGE. The POWER lamp and CHARGE lamp will light up. The chargingwill begin. When the battery is fully charged, the CHARGE lamp goes out. Set the VTR (DC OUT)/CHARGEselector to OFF. The POWER lamp goes out. Then disconnect the power cord from the wall outlet.
1 2
Removing the Battery Pack from the AC Power AdaptorSlide the battery pack in the opposite direction of the arrow on the battery pack.
Charging time and battery life
• o,, .:, .
NP-55 NP-77H NP-77 NP-66H NP-55HType of battery pack (supplied) NP-77HD
Required charging time'* 70 160 140 120 80
Battery life '_'_ 60 150 120 110 75
Approximate minutes using AC-V25'_" Approximate minutes, continuous recording when used indoor
Important!
Use the battery completely before charging!
Before you charge the battery, make sure it has been used (discharged) completely to avoid capacitydown of the battery caused by excessive charging.
To use up the battery, remove the video cassette and simply slide the POWER switch of the camcorder toCAMERA with the battery attached, and leave the camcorder until the ,f_\_ indicator appears flashing anda red lamp flashes in the viewfinder.
Notes on the AC power adaptor
• The camcorder cannot be operated while charging the battery pack.
• The POWER lamp will remain lit for a while even if the battery pack is detached and the power cord isdisconnected after charging the battery pack. This is normal.
• If the POWER lamp does not light, set the VTR(DC OUT)/CHARGE selector to OFF and disconnect thepower cord. in about one minute, reconnect the power cord and set the VTR(DC OUT)/CHARGE selector to
CHARGE again.
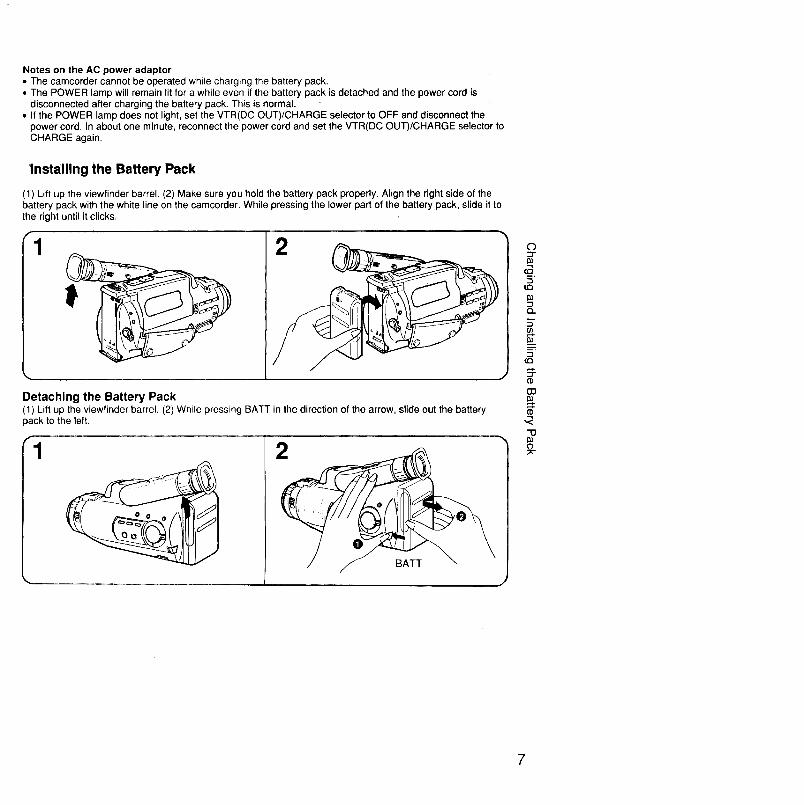
Installing the Battery Pack
(1) Lift up the viewfinder barrel. (2) Make sure you hold the battery pack properly. Align the right side of thebattery pack with the white line on the camcorder. While pressing the lower part of the battery pack, slide it to
the right until it clicks.
f
1 2
Detaching the Battery Pack(1) Lift up the viewfinder barrel. (2) While pressing BATT in the direction of the arrow, slide out the battery
pack to the left.
f
1 2
BATT
O=T
Q..
5
(c}
oo
,2"13
(3;x-
7
Tips for Using the Battery Pack
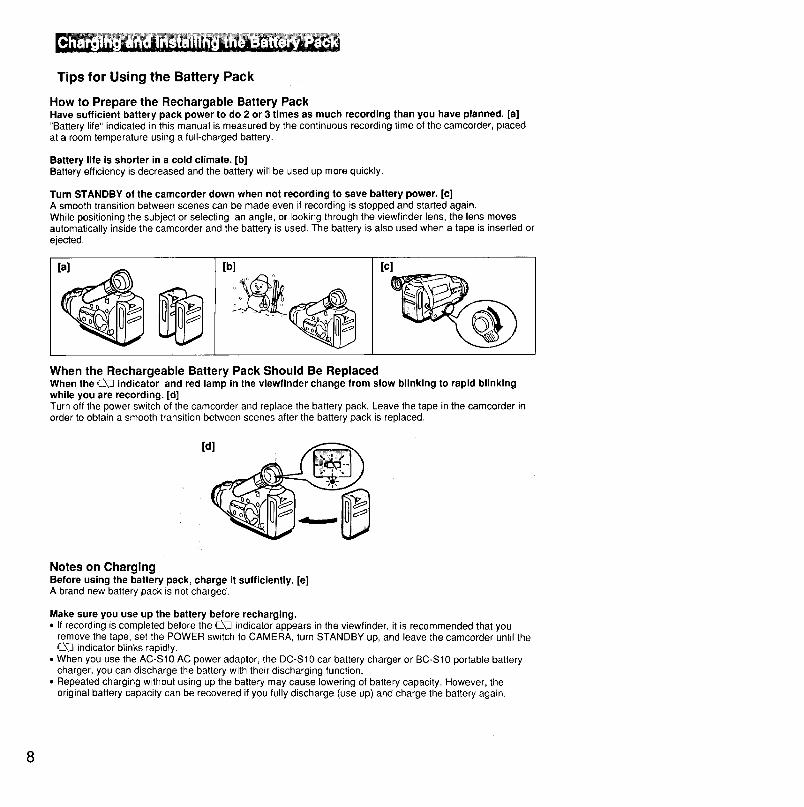
How to Prepare the Rechargable Battery PackHave sufficient battery pack power to do 2 or 3 times as much recording than you have planned. [a]"Battery life" indicated in this manual is measured by the continuous recording time of the camcorder, placed
at a room temperature using a full-charged battery.
Battery life is shorter in a cold climate. [b]
Battery efficiency is decreased and the battery will be used up more quickly.
Turn STANDBY of the camcorder down when not recording to save battery power. [c]A smooth transition between scenes can be made even if recording is stopped and started again.While positioning the subject or selecting an angle, or looking through the viewfinder lens, the lens movesautomatically inside the camcorder and the battery is used. The battery is also used when a tape is inserted orejected.
[a] [b] [c]
When the Rechargeable Battery Pack Should Be ReplacedWhen the #-.\_ indicator and red lamp in the viewfinder change from slow blinking to rapid blinking
while you are recording. [d]Turn off the power switch of the camcorder and replace the battery pack. Leave the tape in the camcorder in
order to obtain a smooth transition between scenes after the battery pack is replaced.
Notes on ChargingBefore using the battery pack, charge it sufficiently. [e]
A brand new battery pack is not charged.
Make sure you use up the battery before recharging.
• If recording is completed before the L_\_ indicator appears in the viewfinder, it is recommended that youremove the tape, set the POWER switch to CAMERA, turn STANDBY up, and leave the camcorder until the_\-3 indicator blinks rapidly.
• When you use the AC-SIO AC power adaptor, the DC-S10 car battery charger or BC-S10 portable batterycharger, you can discharge the battery with their discharging function.
• Repeated charging without using up the battery may cause lowering of battery capacity. However, theoriginal battery capacity can be recovered if you fully discharge (use up) and charge the battery again.
8
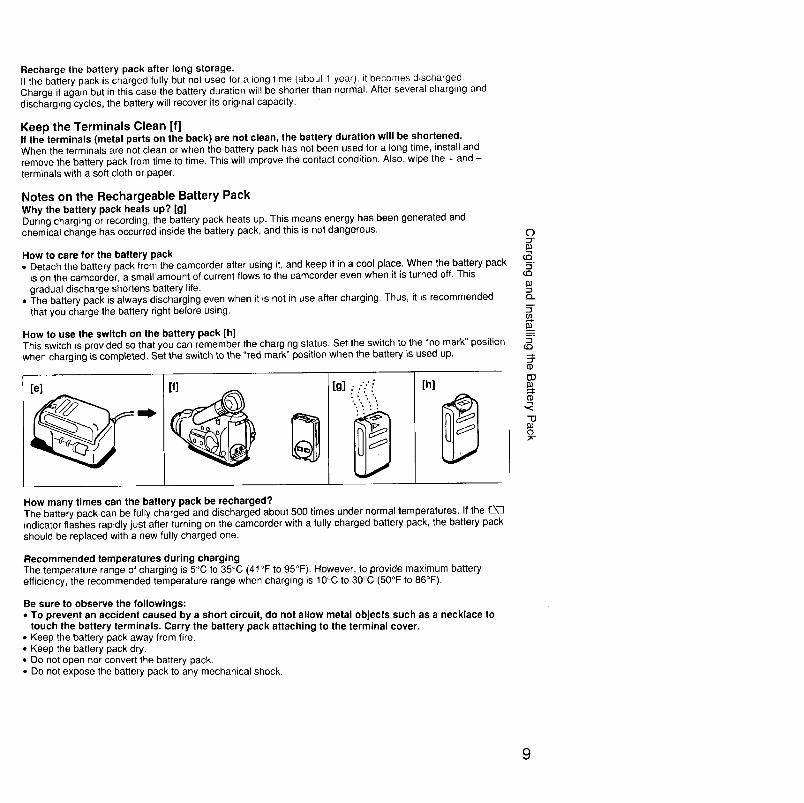
Recharge the battery pack after long storage.
If the battery pack is charged fully but not used for a long time (about 1 year), it becomes discharged.Charge it again but in this case the battery duration will be shorter than normal. After several charging and
discharging cycles, the battery will recover its original capacity.
Keep the Terminals Clean [f]If the terminals (metal parts on the back) are not clean, the battery duration will be shortened,When the terminals are not clean or when the battery pack has not been used for a long time, install and
remove the battery pack from time to time. This will improve the contact condition. Also, wipe the + and -terminals with a soft cloth or paper.
Notes on the Rechargeable Battery PackWhy the battery pack heats up? [g]During charging or recording, the battery pack heats up. This means energy has been generated and
chemical change has occurred inside the battery pack, and this is not dangerous.
How to care for the battery pack• Detach the battery pack from the camcorder after using it, and keep it in a cool place. When the battery pack
is on the camcorder, a small amount of current flows to the camcorder even when it is turned off, This
gradual discharge shortens battery life,
• The battery pack is always discharging even when it is not in use after charging. Thus, it is recommended
that you charge the battery right before using.
How to use the switch on the battery pack [h]This switch is provided so that you can remember the charging status. Set the switch to the "no mark" positionwhen charging is completed. Set the switch to the "red mark" position when the battery is used up.
[e]
I[g] i_
[h]
How many times can the battery pack be recharged?The battery pack can be fully charged and discharged about 500 times under normal temperatures. If the __\_indicator flashes rapidly just after turning on the camcorder with a fully charged battery pack, the battery packshould be replaced with a new fully charged one,
Recommended temperatures during charging
The temperature range of charging is 5°C to 35°C (41°F to 95°F). However, to provide maximum batteryefficiency, the recommended temperature range when charging is 10°C to 30°C (50°F to 86°F).
Be sure to observe the followings:
• To prevent an accident caused by a short circuit, do not allow metal objects such as a necklace totouch the battery terminals. Carry the battery pack attaching to the terminal cover.
• Keep the battery pack away from fire.• Keep the battery pack dry,
• Do not open nor convert the battery pack.• Do not expose the battery pack to any mechanical shock,
(b
5"t.Q
cL
5"
"-1r,.Q
(1)
'13
O
9

lhe pos=l.we s_de of the hth_urn battery _smarked +. Negattve s_de has no polartty s_gn
Installing the Lithium Battery
To activate the clock and store bbrthdates _nthe camcorder's memory, you must first installa lithium battery.Be sure to install the Itthium battery wtth the correct polarity. (1) Remove the hthium battery holder locatedbelow the grip strap of the camcorder (2) Install the supphed CR2025 lithiumbattery with the +stde facingdown. (3)Put the hthium battery holder into the camcorder
1
Lithium Battery Life
2
O3
The battery will last for approximately 1 year under normal conditions. When the hthium battery becomesweak, the ,_, indicator will flash in the vtewfinder screen for about 5 seconds when you turn STANDBY upwh_te the POWER switch _s set to CAMERA. In th_s case, replace the battery with a Sony 0R2025 or
Duracell DL-2025. Use of any other battery may present a risk of fire or explosion.
"l
When replacing the lithium battery, keep the battery pack or other power source attached. Otherwise, input
data will be cleared and you will have to store the data again.
WarningBattery may explode ff m_streated Do not recharge, d_sassemble or dispose of in fire.
CautionKeep the hth_um battery out of the reach of children Should the battery be swallowed, consult a doctorimmediately
10
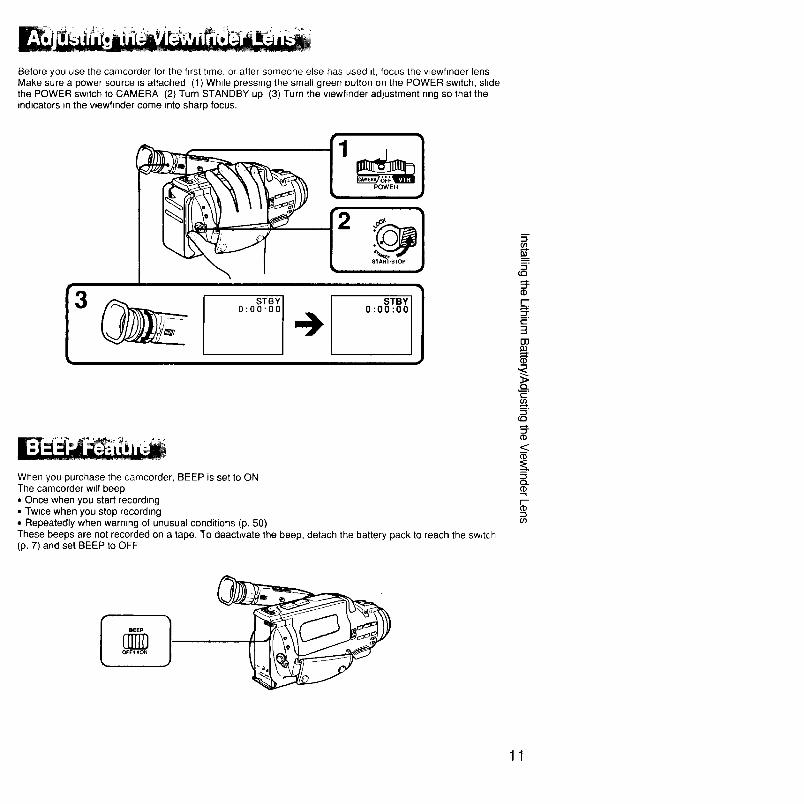
Before you use the camcorder for the first t_me, or after someone else has used _t, focus the wewfinder lensMake sure a power source ts attached (1) While presstng the small green button on the POWER switch, slide
the POWER sw_tch to CAMERA (2) Turn STANDBY up (3) Turn the vtewf_nder adjustment ring so that theindicators in the vlewfinder come into sharp focus.
When you purchase the camcorder, BEEP is set to ON
The camcorder wdl beep• Once when you start recording
•Twtce when you stop recording• Repeatedly when warning of unusual conditions (p. 50)
These beeps are not recorded on a tape. To deachvate the beep, detach the battery pack to reach the sw_tch(p. 7) and set BEEP to OFF
5"
=
"-i
I--
¢-
3aa
¢-
::3
:)..-('b<
-io..('D
r--(I:)
tj3
11

Before setting the clock, make sure a power source and lithium battery are installed and adjust the viewfinderlens (p. 11). The indicators appear in the viewfinder screen. (1) While pressing the small green button on thePOWER switch, slide the POWER switch to CAMERA. (2) Turn STANDBY up. (3) Press DATE (+) and
TIME (NEXT) simultaneously for a few seconds until the year indicator flashes in the viewfinder. (4) Adjust the
flashing digits for the year, month, day, hour and minute by using DATE (+) and TIME(NEXT). The clock startsfrom "00" second after you press TIME (NEXT) following the adjustment of the minutes, if you press
TIME (NEXT) again, the time indicator wilt disappear.
[1POWER START/STOP ,_
3DATE(+) TIME(NEXT)
JAN. "I'-1 9i9
i i i ii _
40 JA -.1.,- ,,_x_
D_ I TI_T)•,,t/ --)
--J U L.-:- 1 1993
-:_.'.-oo:_>i_
e o_ _T,
12
To advance the digits the fasterHold down DATE (+).
To correct the date and time setting
Repeat steps 3 to 4.
To check the preset dale and lime
Press DATE (+) to display the date indicator in the viewfinder. Press TIME (NEXT) to display the timeindicator. When you press the same button again, the indicator goes out.
The year indicator changes as follows:
1993 --> 1994 - - ---> 2020
T INote on the time indicator
The internal clock of the camcorder operates on a 12-hour cycle.
12:00:00 AM stands for midnight. 12:00:00 PM stands for noon.
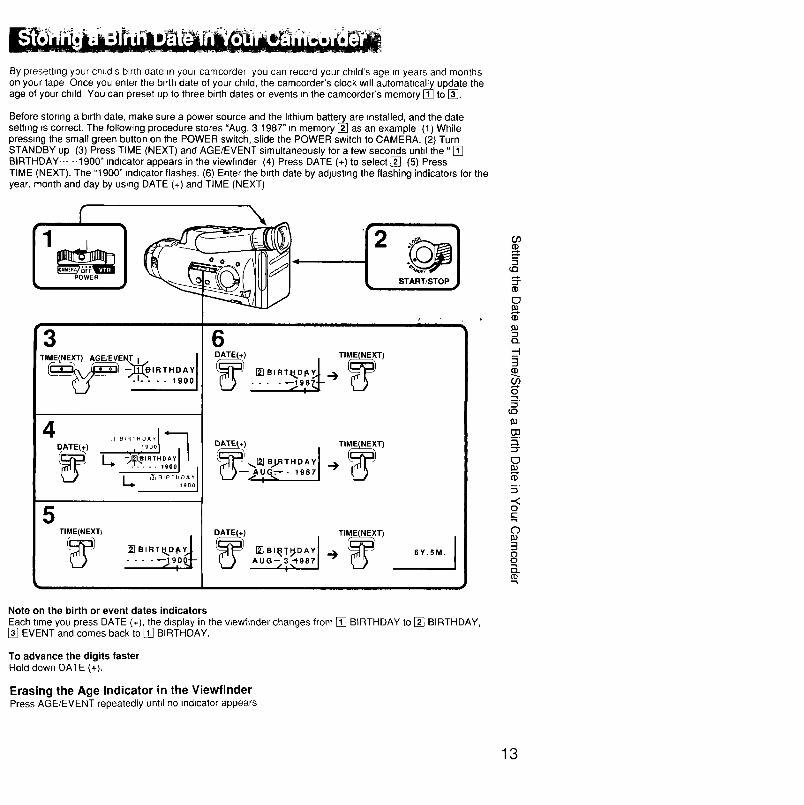
Bypresettingyourchildsbirthdateinyourcamcorder,youcanrecordyourchild'sagetn years and months
on your tape Once you enter the b_rth date of your chtld, the camcorder's clock will automatmcaH_ update theage of your child You can preset up to three birth dates or events in the camcorder's memory Ill to 13].
Before stonng a b_rth date, make sure a power source and the hthium battery are _nstalled, and the datesetting is correct. The following procedure stores "Aug. 3 1987" m memory 121 as an example (1) Whilepressing the small green button on the POWER switch, slide the POWER switch to CAMERA. (2) TurnSTANDBY up (3) Press TIME (NEXT) and AGE/EVENT simultaneously for a few seconds until the "[]
BIRTHDAY ..... 1900" tndlcator appears in the viewfinder (4) Press DATE (+) to select [] (5) PressTIME (NEXT). The "1900" indicator flashes. (6) Enter the birth date by adjustmg the flashing indicators for the
year, month and day by ustng DATE (+) and TIME (NEXT)
f \i ii n ii i
POWER € S
3 6TIME,NEXT) AGE/EVENT t .
...... 1,o01
4_) , :9oo
L._ /T_, m..... t900 I
_IBIRThD_y1900
5TIME(NEXT)
_ r_ BI RT'D_Y LL".... ---_9,oQ:
OA'TE_+) TII_T)_ ,_[_ B_THDAY
TTT' Ir_ BI_'[_DAY ,_ 6Y.5M.AUG-- 3 "I"987
Note on the birth or event dates indicators
Each time you press DATE (+), the d_splay in the wewf)nder changes from [] BtRTI-IDAY to [] BIRTHDAY,[] EVENT and comes back to [] BIRTHDAY.
To advance the digits fasterHold down DATE (+).
Erasing the Age Indicator in the ViewfinderPress AGE/EVENT repeatedly until no indicator appears
09(b
C_
G}"-tCL
O"L'-"l
_c_
.<ot--
('b
3oa_CD
13
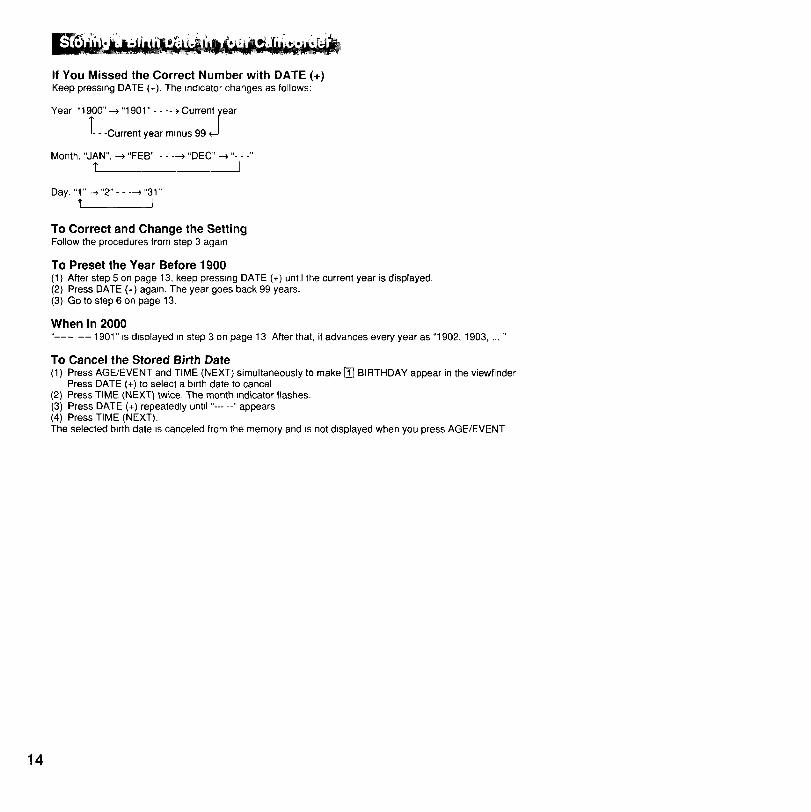
If You Missed the Correct Number with DATE (+)Keep pressing DATE (+). The indicator changes as follows:
Year "1900" --) "1901" - - ----) Current IearI'.. -Current year minus 99 _J
Month. "JAN". --) "FEB" - - ---) "DEC" --) "- - -"
t I
Day. "1" --) "2" - - ---)'31"1" I
To Correct and Change the SettingFollow the procedures from step 3 again
To Preset the Year Before 1900(1) After step 5 on page 13, keep pressing DATE (+) until the current year is displayed.
(2) Press DATE (+) again. The year goes back 99 years.(3) Goto step 6 on page 13.
When in 2000..... 1901 "'=sdisplayed m step 3 on page 13 After that, it advances every year as "1902, 1903 .... "
To Cancel the Stored Birth Date(1) Press AGE/EVENT and TiME (NEXT) simultaneously to make [] BIRTHDAY appear in the viewfinder
Press DATE (+) to select a birth date to cancel(2) Press TIME (NEXT) twice. The month indicator flashes.
(3) Press DATE (+) repeatedly until "- .... "appears(4) Press TIME (NEXT).
The selected birth date =scanceled from the memory and =s not dtsplayed when you press AGE/EVENT
14

Make sure a power source is attached. (1) While pressing the small blue button on EJECT, slide EJECT
down. The cassette holder automatically moves up and opens. (2) Insert a cassette (not supplied) with thewindow facing out. (3) Press the PUSH mark on the cassette holder until it clicks to close it. The cassetteholder will automatically slide down.
1 2 3
Ejecting the CassetteWhile pressing the blue button on EJECT, slide EJECT down.
o__.
co
o
..<ot,--
3oS_o
5-
__.
0
ffl
15

For hand-held shots, you will get better result holding the camcorder according to the following suggestions
[a]
tl i
[b]
• Hold the camcorder firmly and secure it wnth the grip strap so that you can easily manipulate the controls
with your thumb. [a]• Place your right elbow against your snde
• Place your left hand under the camcorder to support _t.• Place the vlewfinder eyecup firmly against your eye
• Use the vuewfinder frame as a guide to determine the horizontal plane
• You can also record nn a low posntnon to get an interesting recording angle. Turn the viewfinder up forrecording from a low position (It can be turned up to 180 degrees ) [b]
Place the camcorder on a flat surface or use a tripod
Try placing the camcorder on a table or any other flat surface of suutable heught if you have a tnpod for a stnllcamera, you can also use _tw_th the camcorder(p 44), Make sure the tripod screw _sshorter than 6 5 mm (9/32 m).
Using the Viewfinder as a Sports Finder
What is a Sports Finder?It usa function that enables you to monttor the p_cture while your eyes are at a d_stance from the eyecup It nsconvement when mowng around to shoot scenes
Setting the Viewfinder to the Sports Finder Position [c]Turn the v_ewfunder adjustment nng clockwnse completely
Returning to the Normal Viewfinder PositionTurn the adjustment nng counterclockwise untd _nd_cators that appear nnthe vnewfinder come nnto sharp focus
When Storing Your Camcorder [d]Turn the wewflnder barrel to the front
[c] [d]
16

Basic Operation
Make sure a power source is attached and a cassette =sinserted Before you record one-ttme events, you maywant to make a thai recording to make sure you are using the camcorder correctly (1) By pressing thereleases on the lens cap, remove the lens cap and attach it to the gnp belt. (2) While press=ng the small green
button on the POWER switch, slide the POWER switch to CAMERA (3) Set PROGRAM AE to the greenposition. (4) Set FOCUS to AUTO (5) Turn STANDBY up (6) Press START/STOP (red button) The
camcorder starts recording and the "REC" indicator w=ll appear m the wewfinder The camera recording/batterylamp on the vtewfinder barrel wtll also Itght
POWER
STBY
START/STOP
To Stop Recording MomentarilyPress START/STOP again. The "STBY" tndlcator appears in the viewfinder (Standby mode).
To Finish RecordingTurn STANDBY down and shde the POWER switch to OFF. Eject the cassette (p. 15) To protect the lens,attach the lens cap to the lens by pressing the releases on the cap
Note on Standby modeIf you leave the camcorder for more than 5 minutes with a cassette inserted in Standby mode, the camcordergoes off automatically. This _sto prevent the battery from being expended unnecessarily and is to protect thetape from wearing out To resume Standby mode, turn STANDBY down once and up again To start recording,press START/STOP.
Note on recordingWhen you record from the begmmng of the tape, run the tape for about 15 seconds before actual recordingTh_sis to prevent the camcorder from missing any start-up scenes when you play back the cassette.You can record in SP (standard play) mode only
Note on the tape counter (p. 32)
The tape counter mdrcates the elapsed recording or playback time. Use _t as a gurde. There mpght be adrscrepancy of several seconds from the actual tfme. To set the counter to zero, press COUNTER RESETunder the vlewflnder barrel.
'-1-"-1
$-
EJ
8-0o::3oo"-1
C)
3
33(D00S_
See next page {or further mfo 1 7
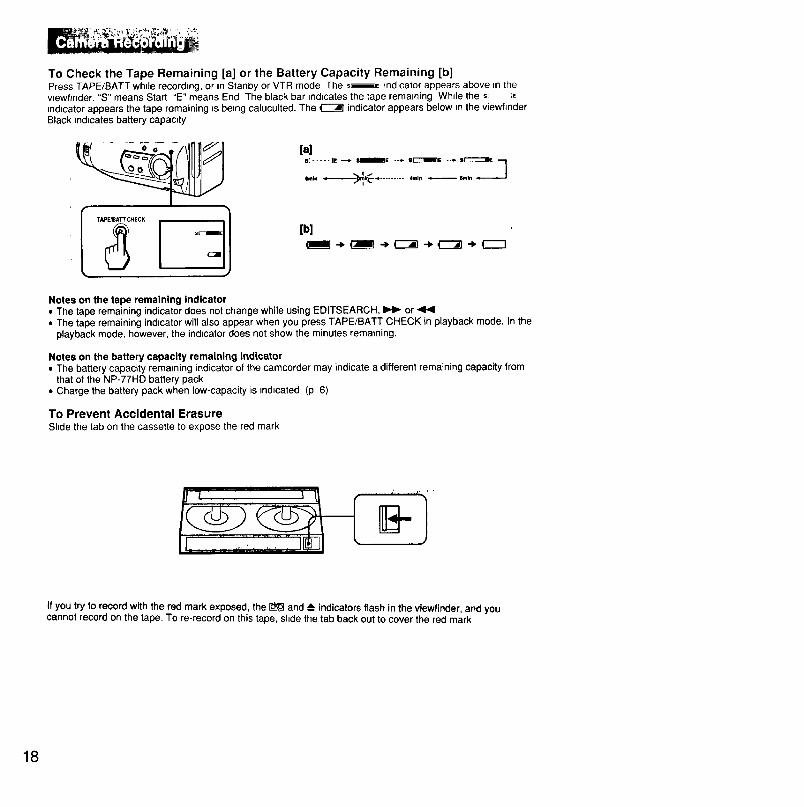
To Check the Tape Remaining [a] or the Battery Capacity Remaining [b]Press TAPE/BATT while recording, or in Stanby or VTR mode The s_E indicator appears above m thevlewfinder. "S" means Start "E" means End The black bar indicates the tape remaining Whde the sE..... _Emd=catorappears the tape remaining is betng caluculted. The _ indicator appears below m the viewhnderBlack md=catesbattery capacity
I TAPEtBATTCHECK
[a]
=..... ,._ .--..=,...... ._ .... _,,_==_
[b]
Notes on the tape remaining Indicator• The tape remaining indicatordoes not change while using EDITSEARCH, _ or• The tape remaining indtcator will also appear when you press TAPE/BATT CHECK in playback mode. In the
playback mode, however, the ind=catordoes not show the minutes remaining.
Notes on the battery capacity remaining indicator• The battery capacity remaining indicator of the camcorder may indicate a different remaining capacity from
that of the NP-77HD battery pack• Charge the battery pack when low-capacity is tnd=cated (p 6)
To Prevent Accidental ErasureShdethetabonthecassetteto exposetheredmark
If you try to record with the red mark exposed, the _ and -_ indicators flash in the viewfinder, and youcannot record on the tape. To re-record on this tape, shde the tab back out to cover the red mark
18
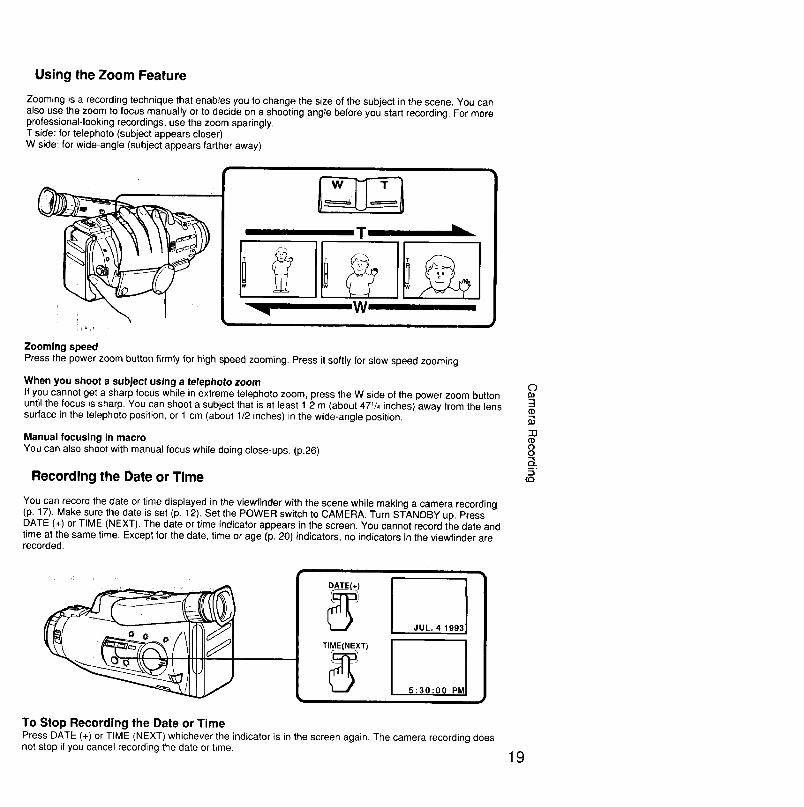
Using the Zoom Feature
Zooming is a recording technique that enables you to change the size of the subject in the scene. You canalso use the zoom to focus manually or to decide on a shooting angle before you start recording. For moreprofessional-looking recordings, use the zoom sparingly.T side: for telephoto (subject appears closer)
W side: for wide-angle (subject appears farther away)
Zooming speed
IH
Press the power zoom button firmly for high speed zooming. Press it softly for slow speed zooming.
When you shoot a subject using a telephoto zoom
If you cannot get a sharp focus while in extreme telephoto zoom, press the W side of the power zoom button
until the focus is sharp. You can shoot a subject that is at least 1.2 m (about 47V4 inches) away from the lenssurface in the telephoto position, or 1 cm (about 1/2 inches) in the wide-angle position.
Manual focusing in macroYou can also shoot with manual focus while doing close-ups. (p.26)
Recording the Date or Time
You can record the date or time displayed in the viewfinder with the scene while making a camera recording(p. 17). Make sure the date is set (p. 12). Set the POWER switch to CAMERA. Turn STANDBY up. PressDATE (+) or TIME (NEXT). The date or time indicator appears in the screen. You cannot record the date andtime at the same time. Except for the date, time or age (p. 20) indicators, no indicators in the viewfinder arerecorded.
O
3
33
(.-)oS_
TI_XT)
JUL. 41993
5:30:00 PM
To Stop Recording the Date or TimePress DATE (+) or TIME (NEXT) whichever the indicator is in the screen again. The camera recording doesnot stop if you cancel recording the date or time.
19
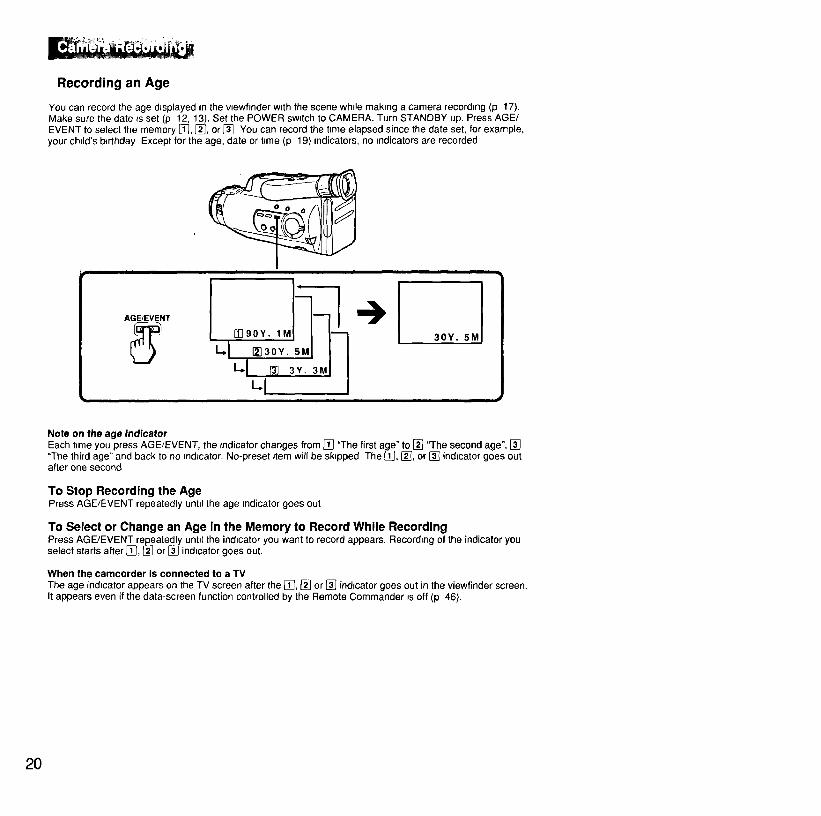
Recording an Age
You can record the age displayed m the vlewhnder wpth the scene while making a camera recordrng (p 17).Make sure the date is set (p 12, 13). Set the POWER switch to CAMERA. Turn STANDBY up. Press AGE/EVENT to select the memory [], [], or [] You can record the time elapsed since the date set, for example,
your chrld's b_rthday Except for the age, date or t_me (p 19) mdicators, no indicators are recorded
AGE/EVENT
i t i i
30Y. 5M I
Note on the age indicatorEach time you press AGE/EVENT, the indicator changes from [] "The firstage" to [] "The second age", []"The third age" and back to no indicator.No-preset item will be skipped The {_, [], or [] indtcator goes outafter one second
To Stop Recording the AgePress AGE/EVENT repeatedly unttl the age pndicator goes out
To Select or Change an Age in the Memory to Record While RecordingPress AGE/EVENT repeatedly unttl the indicator you want to record appears. Recording of the indicator youselect starts after [], _-] or [] indicator goes out.
When the camcorder is connected to a TVThe age indicator appears on the TV screen after the [], [] or [] indicator goes out in the viewfinder screen.It appears even if the data-screen function controlled by the Remote Commander psoff (p 46).
2O
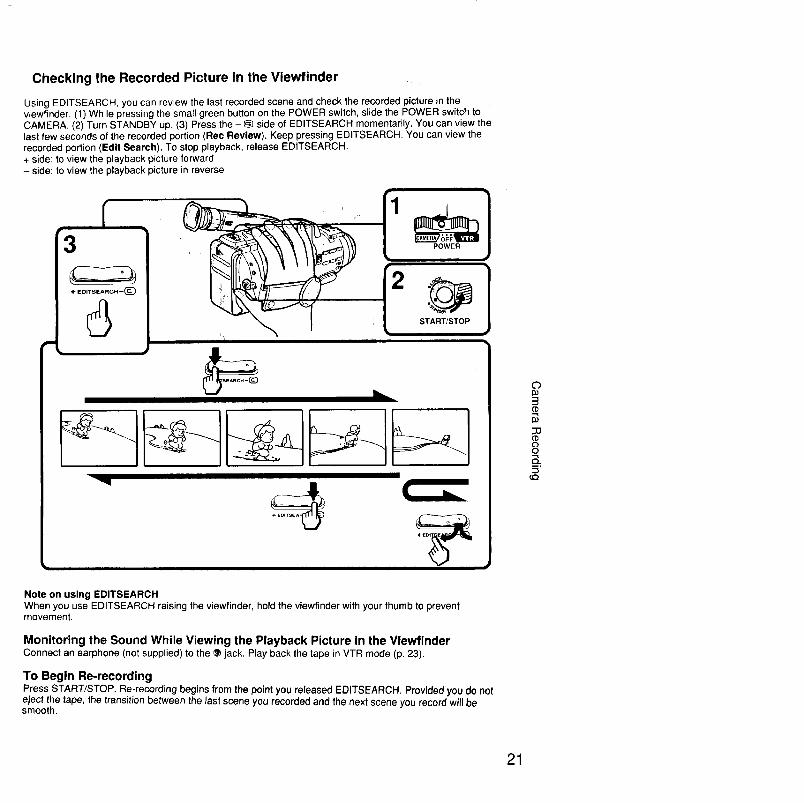
Checking the Recorded Picture in the Viewfinder
Using EDITSEARCH, you can review the last recorded scene and check the recorded picture in theviewfinder. (1) While pressing the small green button on the POWER switch, slide the POWER switch to
CAMERA. (2) Turn STANDBY up. (3) Press the - g side of EDITSEARCH momentarily. You can view thelast few seconds of the recorded portion (Rec Review). Keep pressing EDITSEARCH. You can view the
recorded portion (Edit Search). To stop playback, release EDITSEARCH.+ side: to view the playback picture forward
- side: to view the playback picture in reverse
f3
4- EDITSEARCH-(_
d START/STOP
i
Note on using EDITSEARCHWhen you use EDITSEARCH raising the viewfinder, hold the viewfinder with your thumb to preventmovement.
Monitoring the Sound While Viewing the Playback Picture in the ViewfinderConnect anearphone(not supplied)to the • jack. Play backthe tape in VTRmode(p.23).
To Begin Re-recordingPress START/STOP. Re-recording begins from the point you released EDITSEARCH. Provided you do noteject the tape, the transition between the last scene you recorded and the next scene you record wi(I besmooth.
(b
3CD
3O('D
0
21
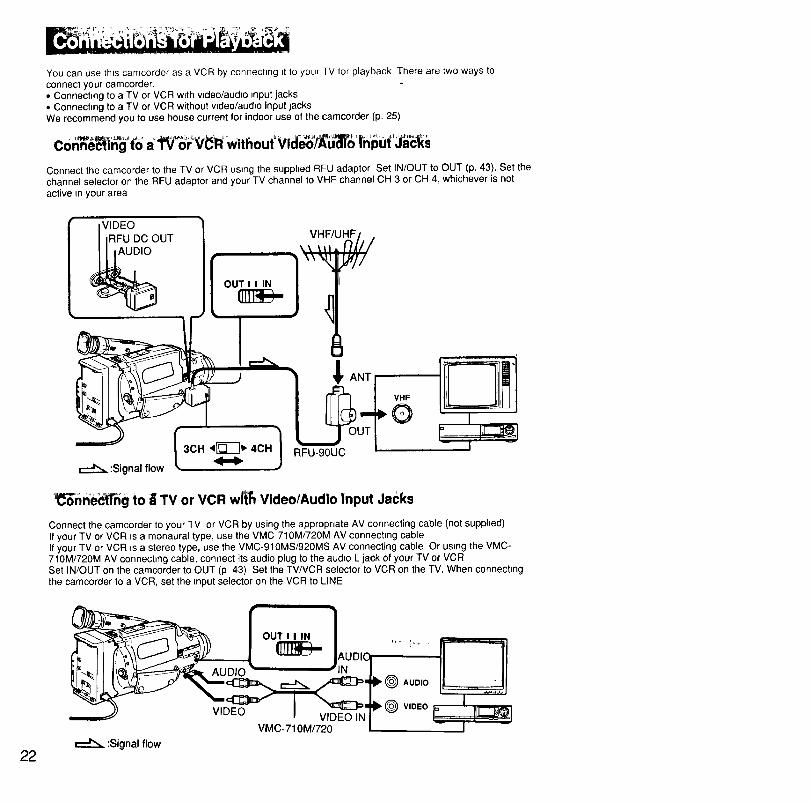
You can use th_s camcorder as a VCR by connecting Jtto you_ TV for playback There are two ways to
connect your camcorder.
• Connecting to a TV or VCR w_th video/audio tnput jacks• Connecting to a TV or VCR without wdeo/audto input jacksWe recommend you to use house current for indoor use of the camcorder (p. 25)
Conne_t|ng to a 't_ or_/_FI without Vi_eo_'_u_(_ _lipU_,Ja_s
Connect the camcorder to the TV or VCR using the supphed RFU adaptor Set IN/OUT to OUT (p. 43). Set thechannel selector on the RFU adaptor and your TV channel to VHF channel CH 3 or CH 4, whichever is not
active in your area
VHF/UHF
3CH _'O--_v 4OH 1 RFU-90UC:Signal flow
_ANT
VHF
OJ
• :_i_neb_[_'rlgto ii Tv or VCR wl_ VldeolAudio Input Jacks
Connect the camcorder to your TV or VCR by using the appropriate AV connecting cable (not supphed)If your TV or VCR _sa monaural type, use the VMC-710M/720M AV connecting cableIf your TV or VCR is a stereo type, use the VMC-910MS/920MS AV connecting cable Or using the VMC-710M/720M AV connecUng cable, connect its audio plug to the audio L jack of your TV or VCRSet IN/OUT on the camcorder to OUT (p 43) Set the TV/VCR selector to VCR on the TV. When connectingthe camcorder to a VCR, set the input selector on the VCR to LINE
22:Signal flow
VIDEOVIDEO IN
VMC-710M/720
AUDIO o
VIDEO _
1
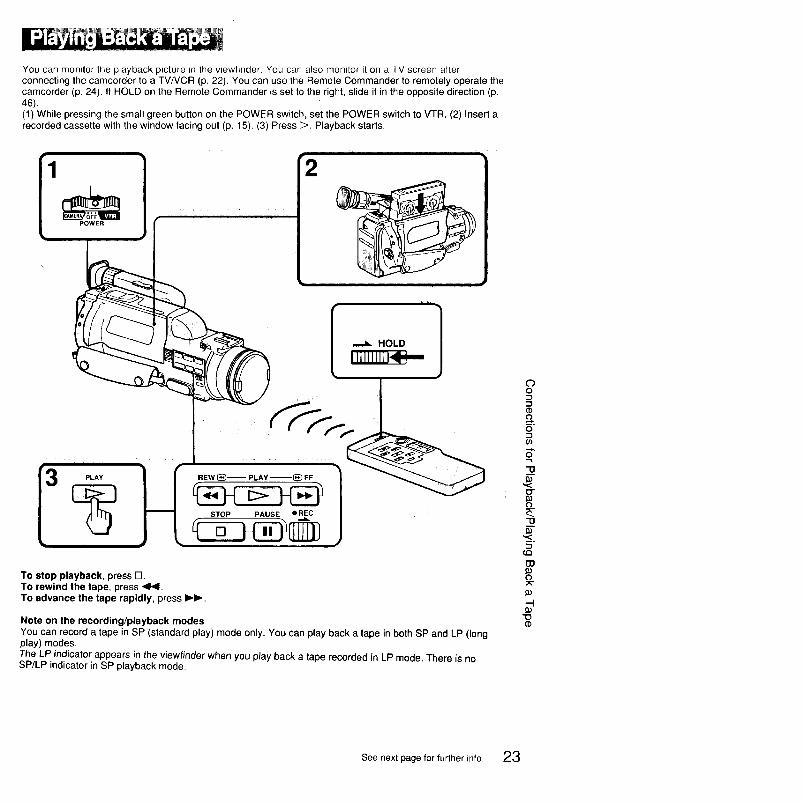
You can monitor the playback picture in the viewfinder. You can also monitor it on a TV screen after
connecting the camcorder to a TV/VCR (p. 22). You can use the Remote Commander to remotely operate thecamcorder (p. 24). It HOLD on the Remote Commander is set to the right, slide it in the opposite direction (p.46).
(1) While pressing the small green button on the POWER switch, set the POWER switch to VTR. (2) Insert arecorded cassette with the window facing out (p. 15). (3) Press _. Playback starts.
J i i ill
2
I PLAY
I11111t111_-_
To stop playback, press El.To rewind the tape, press 41<1.To advance the tape rapidly, press I_lW.
Note on the recording/playback modes
You can record a tape in SP (standard play) mode only. You can play back a tape in both SP and LP (longplay) modes.
The LP indicator appears in the viewfinder when you play back a tape recorded in LP mode. There is noSP/LP indicator in SP playback mode.
0o
(D£
u)
o-
o
--1
o3
o
--If_
"1ocb
See next page for further info. 23
Various Playback Modes
To View a Still Picture (Playback Pause)Press II during playback. To resume playback, press II or D.
To Locate a Scene (Picture Search)Keep pressing -41<1or I_ during playback. To resume normal playback, release the button.
To Monitor the High-speed Picture During Fast-forward or Rewind (Skip Scan)Keep pressing <!,4 while rewinding, or _ while advancing the tape. To resume normal playback, press D.
To View the Picture in a Sequence of Stop-motion ImagesPress EDITSEARCH repeatedly in playback pause mode. If you keep pressing EDITSEARCH, you can viewthe playback picture forward (+) or in reverse (-).
To View the Picture at 1/5 Speed (Slow Playback) (Only With the Commander)Press I1_ of the Remote Commander (p.46) during playback. To resume normal playback, press E>. Whenslow playback lasts for about 1 minute, it shifts to the normal playback speed automatically.
Notes on playback• Streaks may appear and the sound may be muted depending on playback mode.• When still picture mode lasts for about 5 minutes, the camcorder automatically stops.
To display the viewfinder screen indicators on a TVPress DATA SCREEN on the Remote Commander.
To erase the indicators, press DATA SCREEN again.
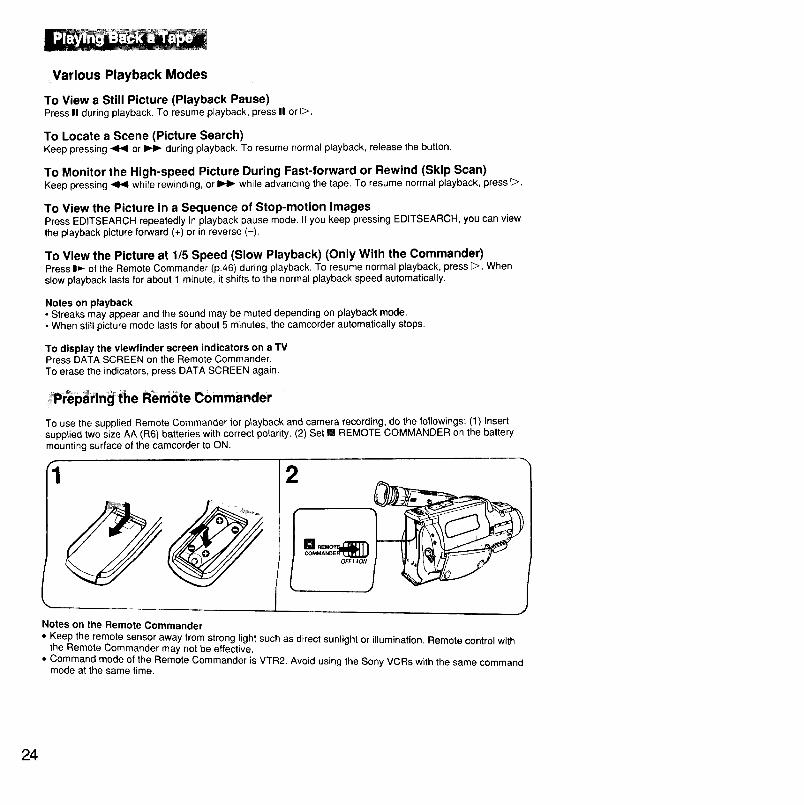
To use the supplied Remote Commander tor p_ayback and camera recording, do the followings: (1) Insert
supplied two size AA (R6) batteries with correct polarity. (2) Set [] REMOTE COMMANDER on the batterymounting surface of the camcorder to ON.
2
OFF! ION
Notes on the Remote Commander
• Keep the remote sensor away from strong light such as direct sunlight or illumination, Remote control withthe Remote Commander may not be effective.
• Command mode of the Remote Commander is VTR2. Avoid using the Sony VCRs with the same commandmode at the same time.
24
You can choose any of the following power sources for your camcorder: Battery pack (P.6), house current,
and 12/24 V car battery.The appropriate power source for you to choose depends on where you want to use your camcorder.
I PlaCe Power source Accessory to be used ,i iBattery pack NP-55 (supplied), NP-77H/77HD, NP-77,Outdoors Battery pack NP-66H or NP-55H
Indoors House current AC power adaptor AC-V25 (supplied), AC-V30 or AC-S10
In the car 12 V or 24 V car battery DC pack DCP-77
Note on power sourcesDisconnecting the power source or removing the battery pack during recording or playback may damage the
inserted tape. If this happens, supply the power again immediately.
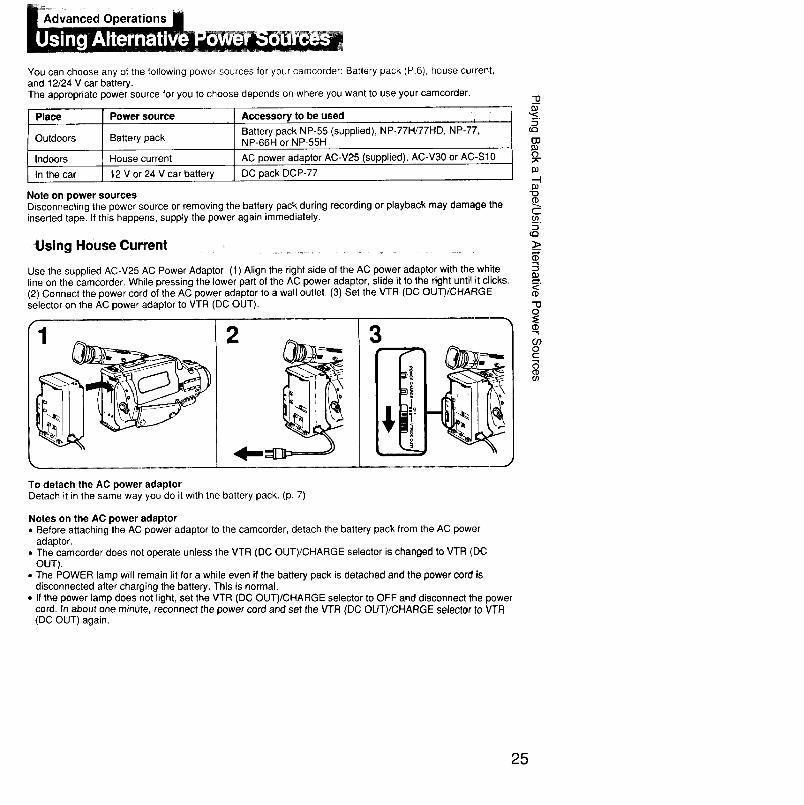
Using House Current
Use the supplied AC-V25 AC Power Adaptor. (1) Align the right side of the AC power adaptor with the whiteline on the camcorder. While pressing the lower part of the AC power adaptor, slide it to the right until it clicks.(2) Connect the power cord of the AC power adaptor to a wall outlet. (3) Set the VTR (DC OUT)/CHARGEselector on the AC power adaptor to VTR (DC OUT).
2 3
To detach the AC power adaptorDetach it in the same way you do it with the battery pack. (p. 7)
Notes on the AC power adaptor• Before attaching the AC power adaptor to the camcorder, detach the battery pack from the AC power
adaptor.• The camcorder does not operate unless the VTR (DC OUT)/CHARGE selector is changed to VTR (DC
OUT).• The POWER lamp will remain lit for a while even if the battery pack is detached and the power cord is
disconnected after charging the battery. This is normal.• If the power lamp does not light, set the VTR (DC OUT)/CHARGE selector to OFF and disconnect the power
cord. In about one minute, reconnect the power cord and set the VTR (DC OUT)/CHARGE selector to VTR(DC OUT) again.
73
_.7-(.c}
O3Cb
.-I
cf./).
"7
3
0
-0o
0
0C
0
25
Using a Car Battery
When you want to use a car battery as a power source for your camcorder, use the DCP-77 DC Pack (notsupplied). By attaching the DCP-77 DC Pack to your camcorder and connecting the power cord of the DCpack to the cigarette lighter socket of a car (12 V or 24 V), the car battery supplies power to your camcorder.
1"o detach the DO pack from the camcorder
Detach it the same way you do the battery pack. (P. 7)
AC-S10 AC Power AdaptorCompletely discharge a battery pack before recharging it to its full capacity.
B0-77, BC-S10 Portable Battery Charger
Charge a battery pack on 100 - 240 V AC. BC-S10 has a discharging function.
DC-SlO Car Battery ChargerCharge a battery pack throughthe cigarette lighter socket. It has a discharging function.
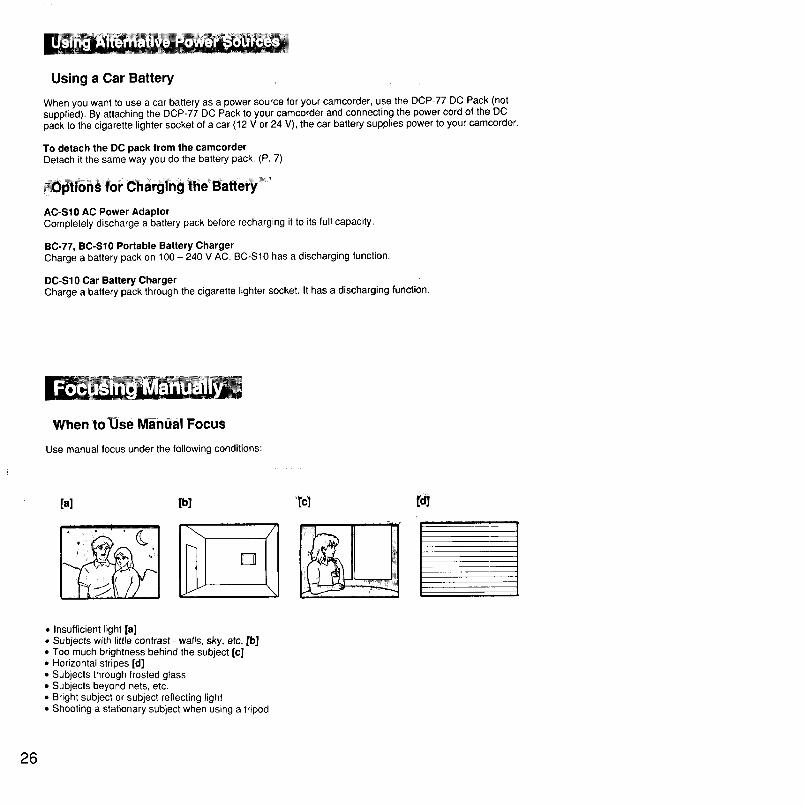
When toUse Ma-nt_al Focus
Use manual focus under the following conditions:
[a] [H
[] I• Insufficient light [a]• Subjects with little contrast - wails, sky, etc. [b,]• Too much brightness behind the subject [c]• Horizontal stripes [d]• Subjects through frosted glass• Subjects beyond nets, etc.• Bright subject or subject reflecting light• Shooting a stationary subject when using a tripod
26
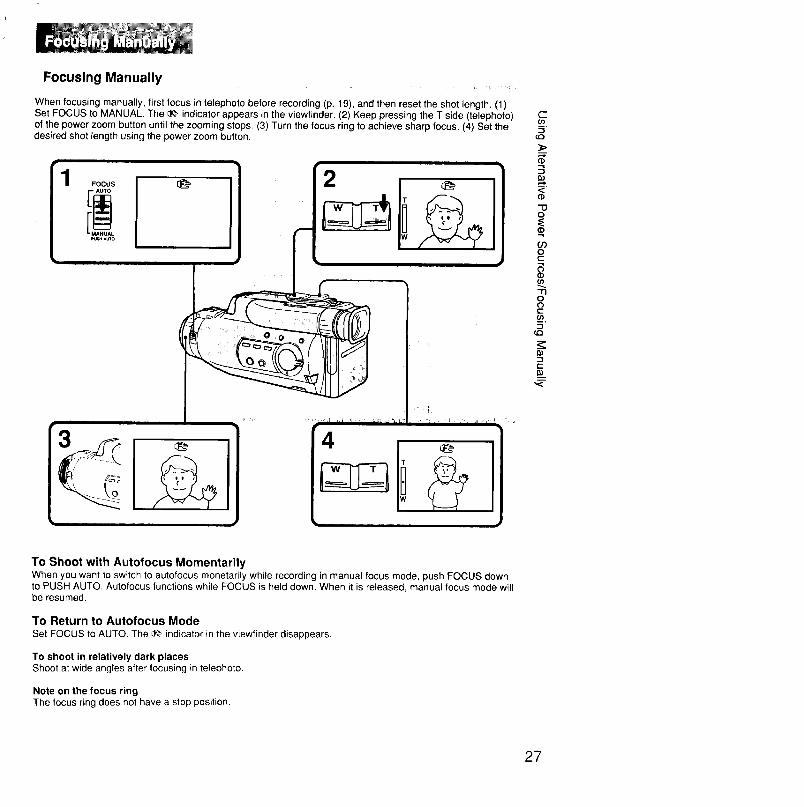
Focusing Manually
When focusing manually, first focus in telephoto before recording (p. 19), and then reset the shot length. (1)Set FOCUS to MANUAL. The _ indicator appears in the viewfinder. (2) Keep pressing the T side (telephoto)of the power zoom button until the zooming stops. (3) Turn the focus ring to achieve sharp focus. (4) Set thedesired shot length using the power zoom button.
C
o-q
<o"13O
Or)ot-'-SP."1"1oo
__.
c
To Shoot with Autofocus MomentarilyWhen you want to switch to autofocus monetarily while recording in manual focus mode, push FOCUS downto PUSH AUTO. Autofocus functions while FOCUS is held down. When it is released, manual focus mode willbe resumed.
To Return to Autofocus Mode
Set FOCUS to AUTO. The _ indicator in the viewfinder disappears.
To shoot in relatively dark placesShoot at wide angles after focusing in telephoto.
Note on the focus ringThe focus ring does not have a stop position.
27

You can select the suitable mode among three PROGRAM AE (Auto Exposure) modes depending on the
shooting situation. When you use PROGRAM AE, you can get a Portrait effect (the subject is in focus and thebackground is out of focus) or capture high-speed action with Sports mode or High-Speed Shutter mode.
SeleCting the Best Mode
Select the best mode by referring to the examples below.
p] [b] [€]
_'_ Portrait mode [a]
• A still subject such as a person or flower
• Subject behind an obstacle such as a net• Zooming in on a subject in telehpoto
_ Sports mode [b]
• Outdoor sports scenes such as football, tennis, golf or skiing
• A landscape in a moving car
'J_" High-speed Shutter mode [c]
• A golf swing or a tennis match in fine weather with the ball captured clearly• Playing back certain scenes with high-speed movements in clear, sharp picture
28

Using the PROGRAM AE Function
Set PRGGRAM AE to the desrred mode _, _k. or _ One of these marks appears m the viewfinder
correspond=ng to the swatch posJtuon
q H
Note on shutter speed
The shutter speed in each PROGRAM AE mode _sas foliows.Portrait mode - between 1/60 and 1/2000
Sports mode - between 1/60 and 1/500High-speed Shutter mode - 1/4000
29
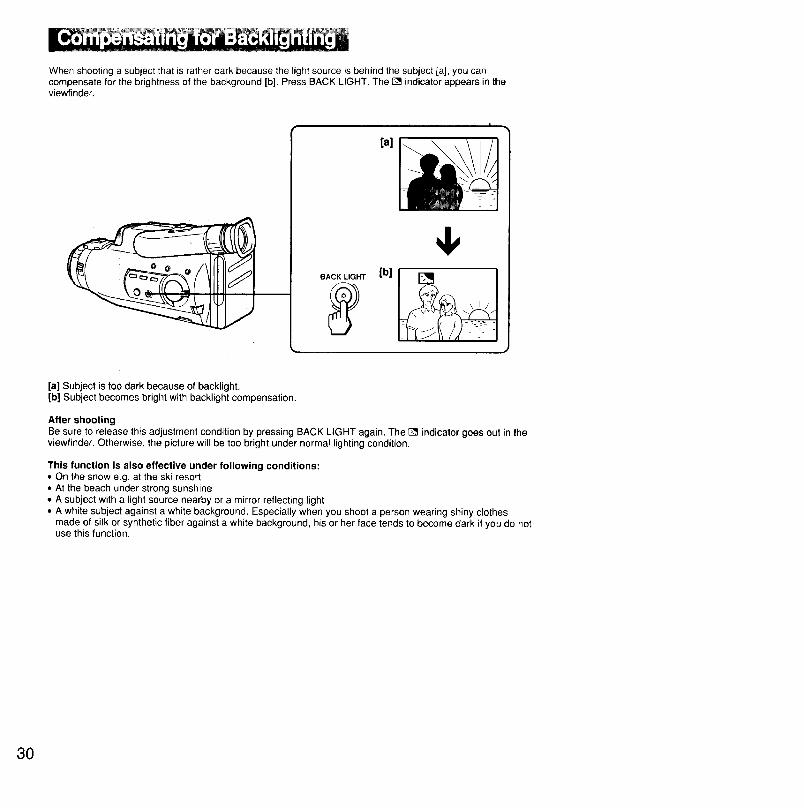
When shooting a subject that is rather dark because the light source is behind the subject [a], you can
compensate for the brightness of the background [b]. Press BACK LIGHT. The [] indicator appears in theviewfinder.
[a]
4,
BACK_LIGHT [b] ___
[a] Subject is too dark because of backlight.[b] Subject becomes bright with backlight compensation.
After shootingBe sure to release this adjustment condition by pressing BACK LIGHT again. The [] indicator goes out in theviewfinder. Otherwise, the picture will be too bright under normal lighting condition.
This function is also effective under following conditions:
• On the snow e.g. at the ski resort• At the beach under strong sunshine
• A subject with a light source nearby or a mirror reflecting light
• A white subject against a white background. Especially when you shoot a person wearing shiny clothes
made of silk or synthetic fiber against a white background, his or her face tends to become dark if you do notuse this function.
30
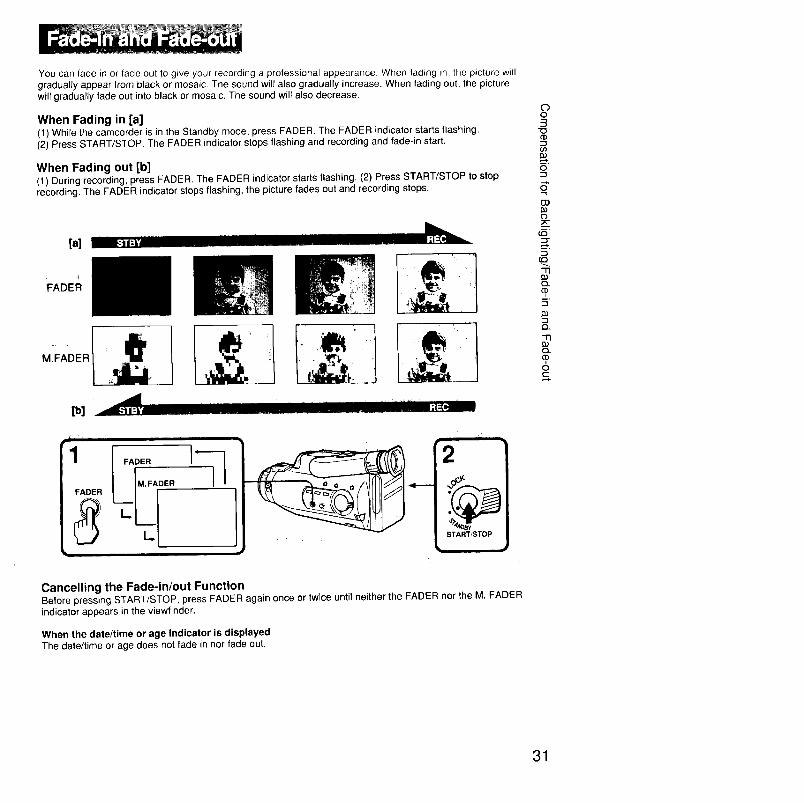
You can fade in or fade out to give your recording a professional appearance. When fading in, the picture willgradually appear from black or mosaic, The sound will also graduaJly increase. When fading out, the picturewill gradually fade out into black or mosaic. The sound will also decrease.
When Fading in [a](1) While the camcorder is in the Standby mode, press FADER. The FADER indicator starts flashing.
(2) Press START/STOP. The FADER indicator stops flashing and recording and fade-in start.
When Fading out [b](t) During recording, press FADER. The FADER indicator starts flashing. (2) Press START/STOP to stoprecording. The FADER indicator stops flashing, the picture fades out and recording stops.
[a]
FADEi_
M.FADER
[b]
iii i
2
START/STOP
Cancelling the Fade-in/out FunctionBefore pressing START/STOP, press FADER again once Or twice until neither the FADER nor the M. FADERindicator appears in the viewfinder.
When the date/time or age indicator is displayed
The date/time or age does not fade in nor fade out.
Oo
rD
"-1
_O
O
(.Q
-n
o..
-1"1
Q.
6£
31
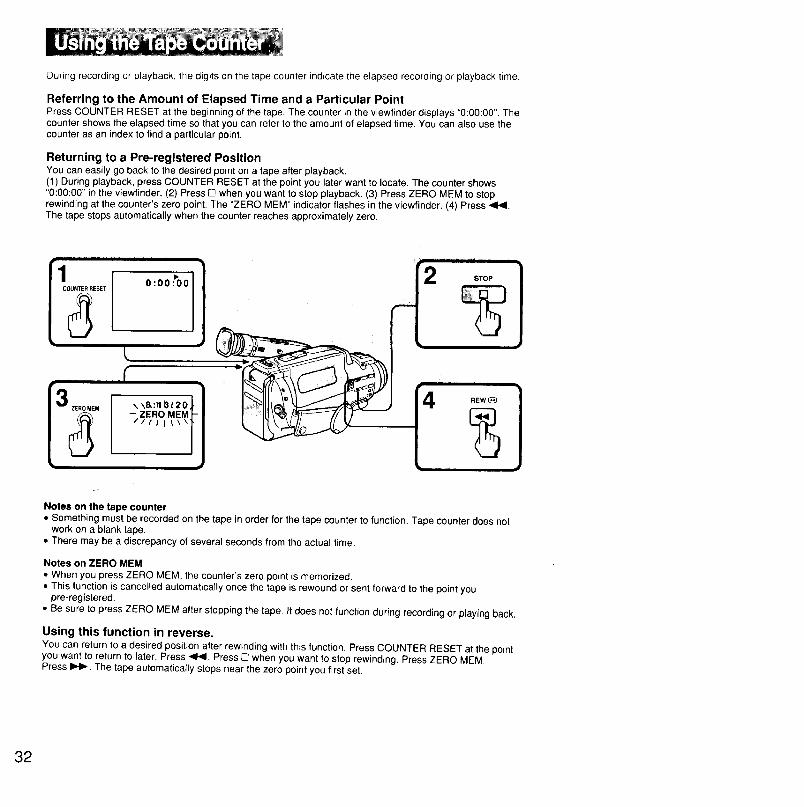
During recording or playback, the digits on the tape counter indicate the elapsed recording or playback time.
Referring to the Amount of Elapsed Time and a Particular PointPress COUNTER RESET at the beginning of the tape. The counter in the viewfinder displays "0:00:00". Thecounter shows the elapsed time so that you can refer to the amount of elapsed time. You can also use thecounter as an index to find a particular point.
Returning to a Pre-registered PositionYou can easily go back to the desired point on a tape after playback.(1) During playback, press COUNTER RESET at the point you later want to locate. The counter shows"0:00:00" in the viewfinder. (2) Press [] when you want to stop playback. (3) Press ZERO MEM to stoprewinding at the counter's zero point. The "ZERO MEM" indicator flashes in the viewfinder. (4) Press .<1<1.The tape stops automatically when the counter reaches approximately zero.
ii f
/1111\\\ 1 41 REW[_ 1LNotes on the tape counter
• Something must be recorded on the tape in order for the tape counter to function. Tape counter does notwork on a blank tape.
• There may be a discrepancy of several seconds from the actual time.
Notes on ZERO MEM
• When you press ZERO MEM, the counter's zero point is memorized.• This function is cancelled automatically once the tape is rewound or sent forward to the point you
pre-registered.
• Be sure to press ZERO MEM after stopping the tape. It does not function during recording or playing back.
Using this function in reverse.
You can return to a desired position after rewinding with this function. Press COUNTER RESET at the pointyou want to return to later. Press <1<1. Press C_when you want to stop rewinding. Press ZERO MEM.Press D,,-I_.The tape automatically stops near the zero point you first set.
32
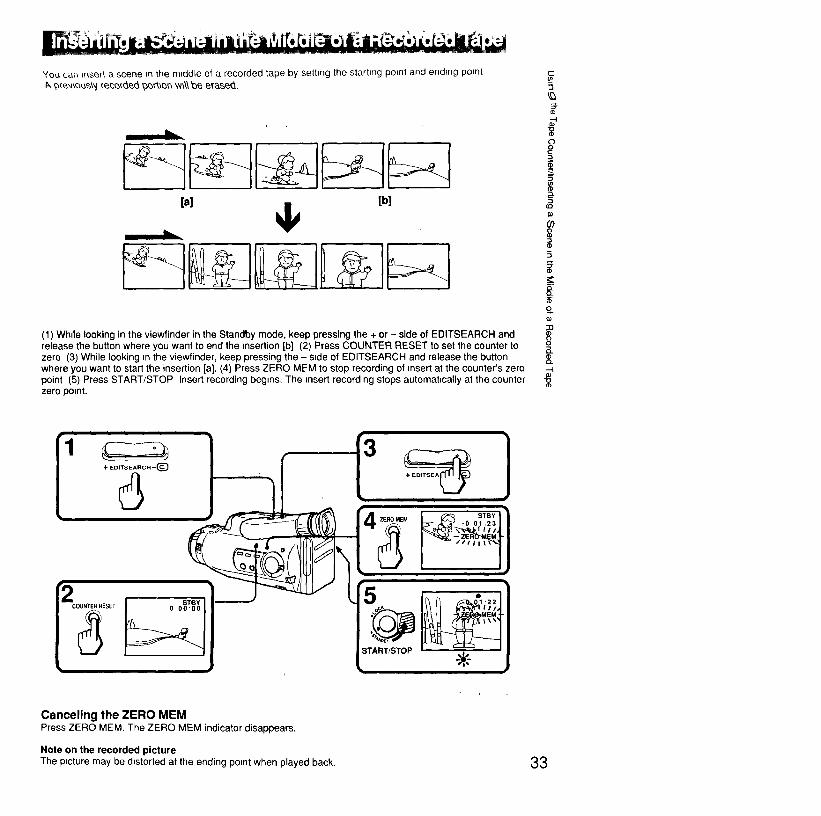
"1o_ c_,r__nsert a scene m the mLddle of a recorded tape by setting the starting point and endrng point
L
[a] [b]
(1) Wh_le looking in the viewfinder in the Standby mode, keep pressing the + or - side of EDiTSEARCH andrelease the button where you want to end the insertion [b] (2) Press COUNTER RESET to set the counter tozero (3) While looking _nthe viewfinder, keep pressing the - s_deof EDITSEARCH and release the buttonwhere you want to start the insertion [a]. (4) Press ZERO MEM to stop recording of insert at the counter's zeropoint (5) Press START/STOP Insert recording begins. The _nsertrecording stops automatically at the counterzero point.
t5
--I
o,22
_;3
f_
¢
R-o._
°.9.
o_oB_
Canceling the ZERO MEMPress ZERO MEM. The ZERO MEM indicator disappears.
Note on the recorded pictureThe p_cturemay be d_stortedat the ending point when played back. 33
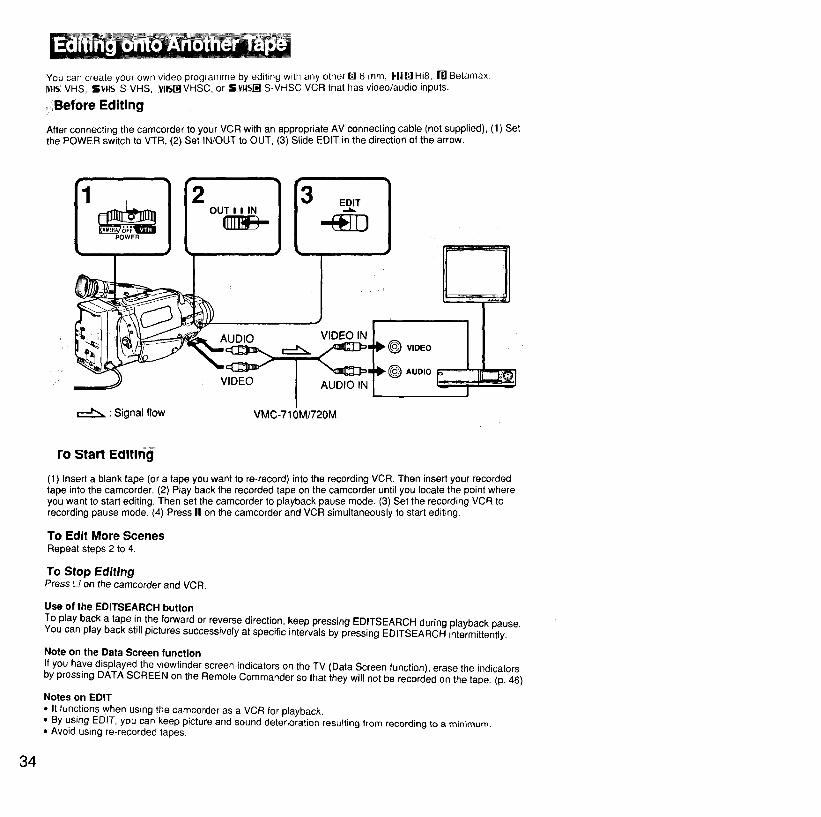
You can create your own video programme by editing with any other _ 8 mm, Hi[:] Hi8, r_ Betamax.IfUS:VHS, SVIIS S-VHS, [VlIS[]VHSC, or S[¥1tSI'_IS-VHSC VCR that has video/audio inputs.
i Before Editing
After connecting the camcorder to your VCR with an appropriate AV connecting cable (not supplied), (1) Setthe POWER switch to VTR, (2) Set IN/OUT to OUT, (3) Slide EDIT in the direction of the arrow,
: Signal flow
VIDEO AUDIO IN
VMC-710M/720M
VIDEO ,_AUDIO
ro start Editing
(1) Insert a blank tape (or a tape you want to re-record) into the recording VCR. Then insert your recordedtape into the camcorder. (2) Play back the recorded tape on the camcorder until you locate the point whereyou want to start editing. Then set the camcorder to playback pause mode, (3) Set the recording VCR torecording pause mode. (4) Press II on the camcorder and VCR simultaneously to start editing.
To Edit More ScenesRepeat steps 2 to 4.
To Stop EditingPress_ on the camcorder and VCR.
Use of the EDITSEARCH button
To play back a tape in the forward or reverse direction, keep pressing EDITSEARCH during playback pause.You can play back still pictures successively at specific intervals by pressing EDITSEARCH intermittently.
Note on the Data Screen function
If you have displayed the viewfinder screen indicators on the TV (Data Screen function), erase the indicatorsby pressing DATA SCREEN on the Remote Commander so that they will not be recorded on the tape. (p. 46)
Notes on EDIT
• It functions when using the camcorder as a VCR for playback.• By using EDIT, you can keep picture and sound deterioration resulting from recording to a minimum.• Avoid using re-recorded tapes.
34
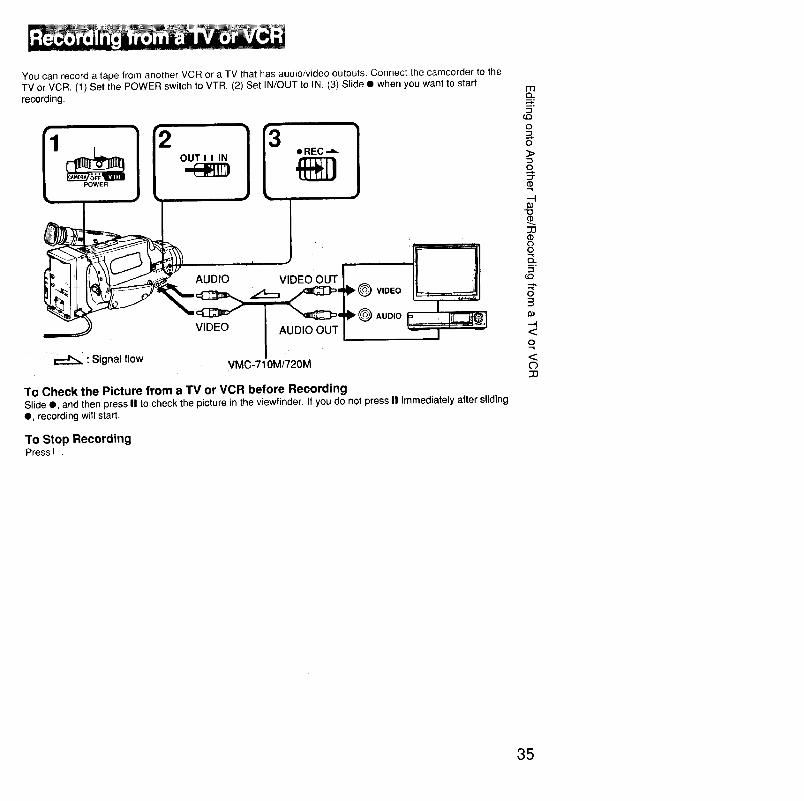
You can record a tape from another VCR or a TV that has audio/video outputs. Connect the camcorder to the
TV or VCR. (1) Set the POWER switch to VTR. (2) Set IN/OUT to IN. (3) Slide • when you want to start
recording.
,._ : Signal flow
VIDEO
VMC-71 OM/720M
VIDEOAUDIO
To Check the Picture from a TV or VCR before RecordingSlide •, and then press II to check the picture in the viewfinder. If you do not press II immediately after sliding
• , recording will start.
To Stop RecordingPress El.
mCL
5"CQO
O
o
--4
3O
ooS_5
_D
0B
--4
o
C)33
35
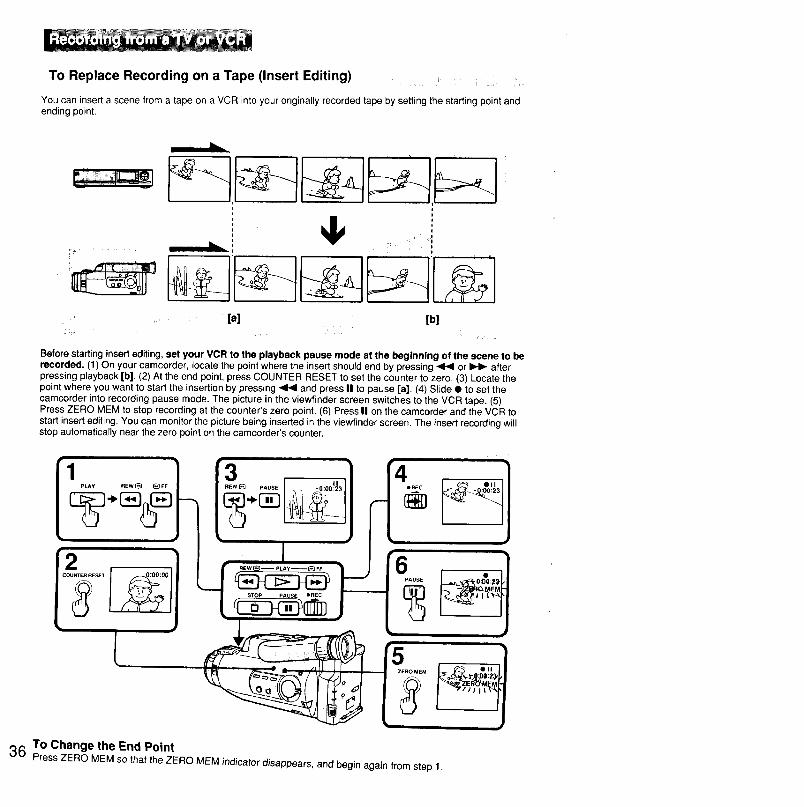
To Replace Recording on a Tape (Insert Editing)
You can insert a scene from a tape on a VCR into your originally recorded tape by setting the starting point andending point•
in
4,aa
[a] [b]
Beforestarting insertediting, set your VCR to the playback pause mode at the beginning of the scene to berecorded. (1) On yourcamcorder, locate the pointwhere the insert should end by pressing<1<1or _ afterpressingplayback [b]. (2) At the end point,press COUNTER RESET to set the counter to zero. (3) Locate thepointwhere you want to start the insertionby pressing_ and press II to pause [a]. (4) Slide • to set thecamcorder into recordingpause mode. The picture in the viewfinder screen switches to the VCR tape. (5)PressZERO MEM to stop recordingat the counter's zero point. (6) Press II on the camcorder and the VCR tostart insert editing. You can monitor the picture being inserted in the viewfinder screen. The insert recording willstop automatically near the zero 3oint on the camcorder's counter.
PLAY REW[_ _FF
3REW [_ PAUSE
RE W (_)-- PLAY--_ FF
STOP PAUS_ eREC
011
_- :00:2_
To Change the End Point36Press ZERO MEM so that the ZERO MEM indicatordisappears, and begin again from step 1.
Additional Information
: Moisture Condensation
If the camcorder is brought directly from a cold place to a warm place, moisture may condense inside thecamcorder, on the surface of the tape, or on the lens. If this happens, the tape may stick to the head drum and
be damaged or the carncorder may not operate correctly. To prevent possible damage under thesecircumstances, the camcorder is furnished with moisture sensor. However, take the following precautions.
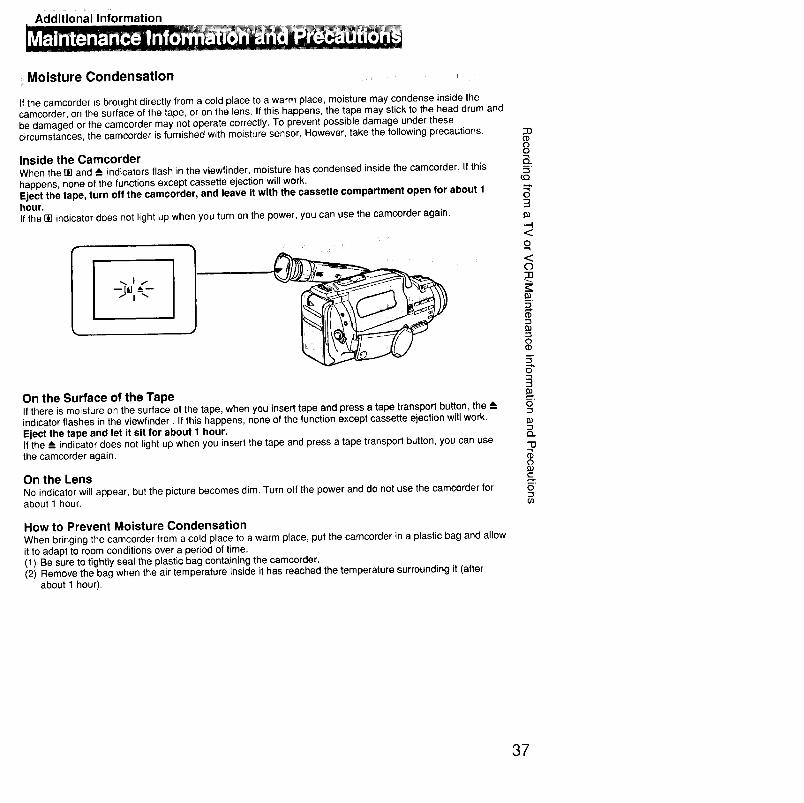
Inside the CamcorderWhen the [] and _- indicatorsflash in the viewfinder, moisturehas condensed inside the camcorder. If thishappens, none of the functions except cassette ejection willwork.Eject the tape, turn off the camcorder, and leave It with the cassette compartment open for about 1hour.If the [] indicatordoes not light up when youturn on the power, you can use the camcorder again.
On the Surface of the TapeIf there is moisture on the surface of the tape, when you insert tape and press a tape transport button, the _-indicator flashes in the viewfinder. If this happens, none of the function except cassette ejection will work.Eject the tape and let it sit for about 1 hour.If the _--indicator does not light up when you insert the tape and press a tape transport button, you can usethe camcorder again.
On the Lens
No indicatorwill appear, but the picture becomes dim. Turn off the power and do not use the carncorderforabout 1 hour.
How to Prevent Moisture Condensation
When bringing the camcorder from a cold place to a warm place, put the camcorder in a plastic bag and allowit to adapt to room conditionsover a period of time.(1) Be sure to tightly seal the plastic bag containingthe camcorder.(2) Remove the bag when the air temperature inside it has reached the temperature surrounding it (after
about 1 hour).
_0CD00
&'-3
a3
<£<o
"7
"3o0
5-
0"-1
"-1(3_
"13
0
c_,-_-.0
37

Video Head Cleaning
To ensure clear pictures, clean the video heads periodically, When playback pictures are "noisy", or hardly
visible, the video heads may be contaminated.
[e] [b]
[a] Slight contamination[b] Critical contaminationIf this happens, clean the video heads with the Sony VS-25CLH cleaning cassette (not supplied). Afterchecking the picture, if it is still "noisy", repeat the cleaning. (Do not repeat cleaning more than 5 times.)
CautionDo not use a commercially available wet-type cleaning cassette. It may damage the video heads.
Note
If the V8-25CLH cleaning cassette is not available in your area, consult your Sony service facility.
Removing Dust from ln_i_e the vlewt'lnder
(1) While holding down the switch on the viewfinder barrel, turn the eyecup in the direction of the arrow andpull it up to detach it. (2) Remove the small lens from inside of the viewfinder. (3) Clean the surface of thescreen with a commercially available blower.
1 2 3
38
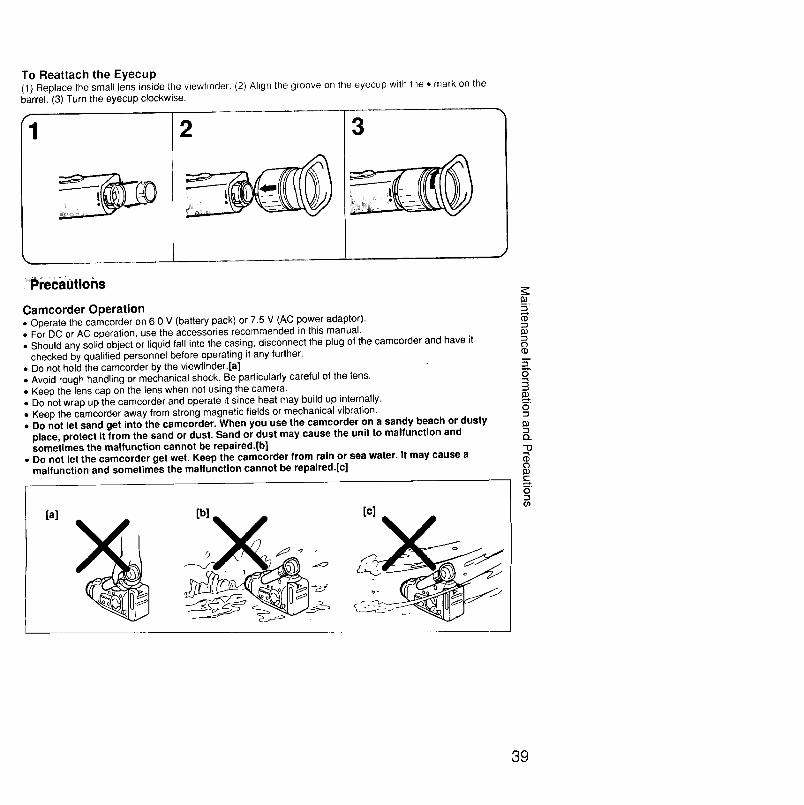
To Reattach the Eyecup(1) Replace the small lens inside the viewfinder. (2) Align the groove on the eyecup with tile • mark on thebarrel. (3) Turn the eyecup clockwise.
1 2 3
_recautions
Camcorder Operation• Operate the camcerder on &O V (battery pack) or 7.5 V (AC power adaptor).
• For DC or AC operation, use the accessories recommended in this manual.
• Should any solid object or liquid fall into the casing, disconnect the plug of the camcorder and have itchecked by qualified personnel before operating it any further.
• Do not hold the camcorder by the viewfinder.[a]• Avoid rough handling or mechanical shock. Be particularly careful of the lens.
• Keep the lens cap on the lens when not using the camera.• Do not wrap up the camcorder and operate it since heat may build up internally.
• Keep the camcorder away from strong magnetic fields or mechanical vibration.
• Do not let sand get into the camcorder. When you use the camcorder on a sandy beach or dustyplace, protect it from the sand or dust. Sand or dust may cause the unit to malfunction and
sometimes the malfunction cannot be repaired.[b]• Do not let the camcorder get wet. Keep the camcorder from rain or sea water. It may cause a
malfunction and sometimes the malfunction cannot be repalred.[c]
[a] [b] [c]
o
o
(3_
"13
o
£5
39
Camcorder Care• Never leave the camcorder under temperatures above 60'C (140' F), such as in a car parked in the sun or
under direct sunlight.
• When the camcorder is not to be used for a long time, disconnect the power source and remove the tape.
Periodically turn on the power, operate the camera and VTR sections and play back a tape for about 3minutes.
• Clean the lens with a soft brush to remove dust. If there are fingerprints on the lens, remove them with a softcloth.
• Clean the camcorder body with a soft dry cloth, or a soft cloth lightly moistened with a mild detergentsolution. Do not use any type of solvent which may damage the finish.
Handling Tapes• Do not insert anything into the small holes on the rear of the cassette. These holes are used to sense the
type, thickness of the tape, or if the tab is out or in.
AC Power Adaptor CareCharging
• Repeated charging while some capacity remains causes a lowering of battery capacity. However, the
original battery capacity can be recovered if you use the battery completely and charge it fully again.• Charge the battery on a flat place without vibration.
• The battery will get hot during charging. But it is normal.
• Do not continuously recharge a charged battery pack as that will cause the battery pack efficiency todeteriorate.
Charging temperature
The temperature range for charging is 5°C to 35°C (41 °F to 95°F). However, to prevent maximum batteryefficiency, the recommended temperature range is 10°C to 30°C (50°F to 86°F).
Others
• The model for USA or Canada: One blade of the plug is wider than the other for the purpose of safety andwill fit into the power outlet only one way. If you are unable to insert the plug fully into the outlet, contact yourdealer.
• Disconnect the plug of the unit from the wall outlet when not in use for a long time. To disconnect the ACpower cord, pull it out by the plug. Never pull the cord itself.
• Do not operate the unit with a damaged cord or if it has been dropped or damaged.• Do not bend the AC power cord forcibly, or put a heavy object on it. This will damage the cord and may
cause a fire or an electrical shock.• Be sure that nothing metallic comes into contact with the metal parts of the connecting surface. If it does, a
short may occur and the unit may be damaged.• Always keep the metal contacts clean.• Do not disassemble the unit.• Do not apply mechanical shock or drop the unit.• While the unit is in use, particularlyduring charging, keep it away from any AM receivers andvideo
equipment because itwill disturb AM reception and video operation.• Do not place the unit in locations where it is:
--Extremely hot or cold--:Dusty or dirty--Very humid--Vibrating
• If any difficulty should arise, disconnect the plug of the unit and contact the nearest Sony dealer.
40
Each country has its own electricity and TV color systems, Before using your camcorder abroad, check thefollowing points:
Power Sources
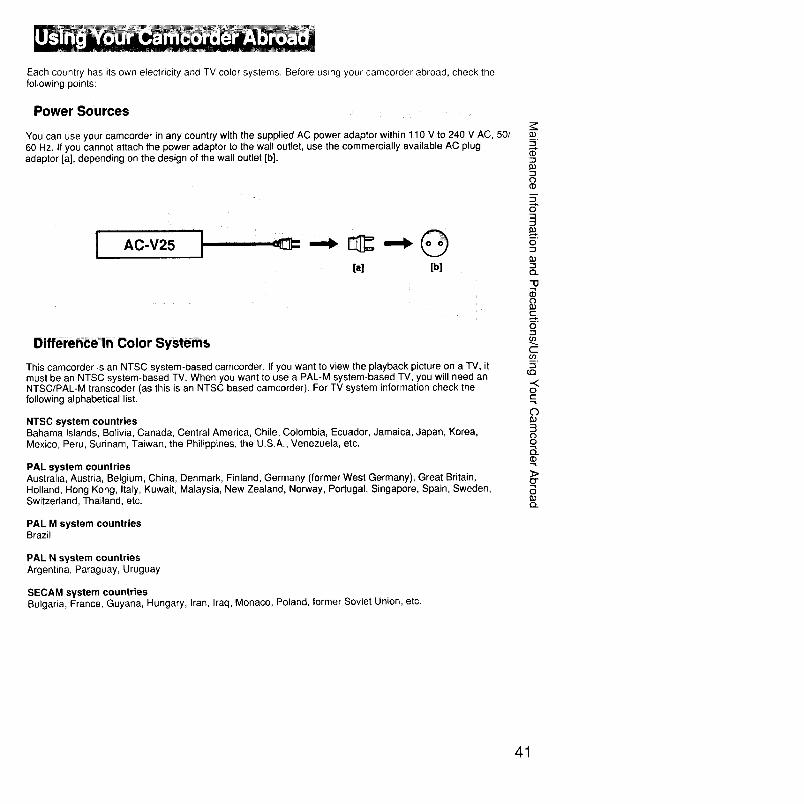
You can use your camcorder in any country with the supplied AC power adaptor within 1 10 V to 240 V AC, 50/60 Hz. If you cannot attach the power adaptor to the wall outlet, use the commercially available AC plug
adaptor [a], depending on the design of the wall outlet [b].
[a] [b]
Diffe_h_eln Color Systems
This camcorder is an NTSC system-based camcorder. If you want to view the playback picture on a TV, itmust be an NTSC system-based TV. When you want to use a PAL-M system-based TV, you will need anNTSC/PAL-M transcoder (as this is an NTSC based camcorder). For TV system information check thefollowing alphabetical list.
NTSC system countriesBahama Islands, Bolivia, Canada, Central America, Chile, Colombia, Ecuador, Jamaica, Japan, Korea,Mexico, Peru, Surinam, Taiwan, the Philippines, the U.S.A., Venezuela, etc.
PAL system countriesAustralia, Austria, Belgium, China, Denmark, Finland, Germany (former West Germany), Great Britain,Holland, Hong Kong, Italy, Kuwait, Malaysia, New Zealand, Norway, Portugal, Singapore, Spain, Sweden,Switzerland, Thailand, etc.
PAL M system countriesBrazil
PAL N system countriesArgentina, Paraguay, Uruguay
SECAM system countriesBulgaria, France, Guyana, Hungary, Iran, Iraq, Monaco, Poland, former Soviet Union, etc.
"-i
('D
"-1o('D
6"
6"
93
o..
-o
o93
5
c
.m
..<ot.-
C)933(bOB_tD
>CF893C)..
41

%rfl
%
[]
[]
®
[]
POWER switch (p. 11)
CAMERA: for camera recordingVTR: for playing back or editing tape
OFF: power off
REMOTE @ (LANC) control jack
Connect the LANC _t connecting cable of awired remote control unit such as an editingcontroller, in this case, set the [] REMOTE
COMMANDER switch to OFF.(p. 24)
_' (LANC) stands for Local ApplicationControl Bus System. The ¢ control jack is
used for controlling the tape transport ofvideo equipment and peripherals connectedto it. This jack has the same function as theconnectors indicated as CONTROL L orREMOTE,
(earphone) jack (minijack) (p. 21)Connect an earphone (not supplied) to monitorthe sound while viewing the playback or therecording picture.
START/STOP button (p. 17)To start recording, press it after setting the
POWER switch to CAMERA and turningSTANDBY up.To stop recording momentarily, press it again.
STANDBY switch (p. 11)
To set the camcorder to Standby mode(recording standby mode), set it up. To stop
recording or to prevent from accidentallyrecording and wearing down the battery, set i.tdown.
[]
[]
£DITSEARCH (and _) recording review)
button (p. 21)Press it to check the recorded scene in the
viewfinder in Standby mode.+ side: to view the playback picture forward
- side: to view the playback picture in reverse
Power zoom button (p. 19)Press it to change the size of the subject in thescene.T side: for telephoto (subject appears closer)W side: for wide-angle (subject appears furtheraway)
Built-in microphone
EJECT (cassette eject) button (p. 15)While pressing the blue button, slide it to insertor eject a cassette.
Cassette holder (p. 15)
[_ Lithium battery holder (p. 10)
Insert a lithium battery here to activate the clock,
Grip strap (p. 16)Put your hand thorugh the grip strap to hold thecamcorder, Adjust the length of the strap so thatyour thumb can easily touch START/STOP.
42
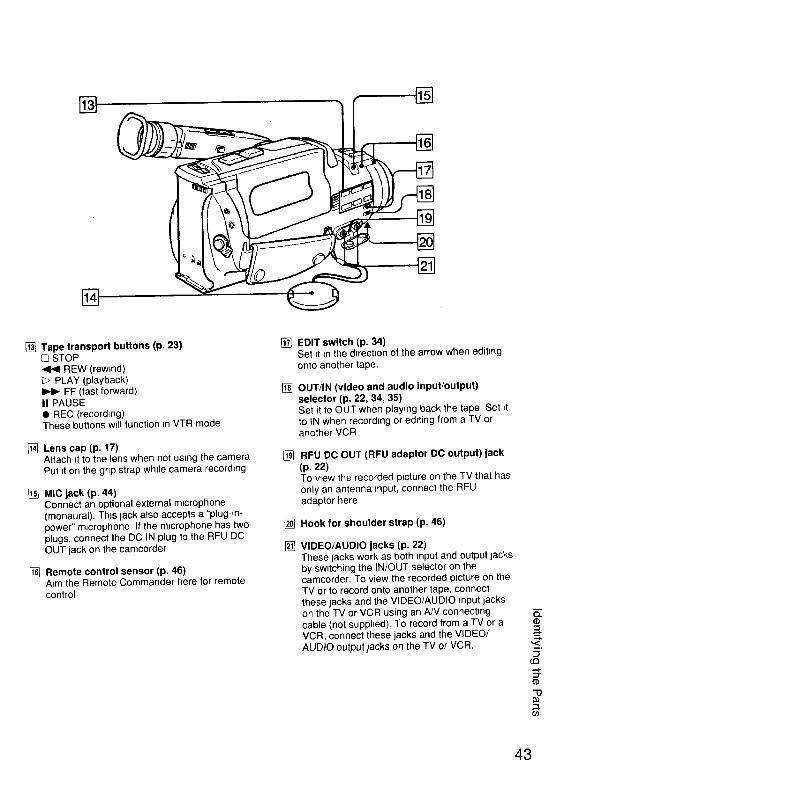
%
[] Tape transport buttons (p. 23)STOP
REW (rewLnd)PLAY (playback)
FF (fast forward)II PAUSE• REC (recording)These buttons wtll function m VTR mode
[] Lens cap (p. 17)Attach =tto the lens when not using the cameraPut =ton the grtp strap wh_lecamera recording
[] MIC jack (P- 44)Connect an optional external m=crophone
(monaural), This jack atso accepts a "plug-m-
power" m_crophone If the m=crophone has twoplugs, connect the DC IN plug to the RFU DC
OUT jack on the camcorder
[] Remote control sensor (p. 46)A_m the Remote Commander here for remotecontrol
[]
[]
[]
[]
[]
EDIT switch (p. 34)Set =tm the d=rect=onof the arrow when editingontoanother tape.
OUT/IN (video and audio input/output)selector (p. 22, 34, 35)Set it to OUT when playing back the tape Set itto IN when recording or ed=ting from a TV oranother VCR
RFU DC OUT (RFU adaptor De output) jack
(p. 22)To v_ew the recorded p_cture on the TV that has
only an antenna tnput, connect the RFUadaptor here
Hook for shoulder strap (p. 46)
VIDEO/AUDIO jacks (p. 22)These lacks work as both inputand output jacksby switching the IN/OUT selector on thecamcorder. To view the recorded p_ctureon theTV or to record onto another tape, connectthese jacks and the VIDEO/AUDIO input jackson the TV or VCR using an A/V connectingcable (not supplted). To record from a TV or aVCR, connect these jacks and the VIDEO/AUDIO output jacks on the TV or VCR.
(3L
m.
(Q
"O
r./)
43

[][]
[][]
[] Accessory shoe (p. 43)Attach the external microphone (not supplied)here.
[]
[]
[]
Remote control sensor (p. 46)Aim the Remote Commander here for remote
control.
Focus ring (p. 27)Turn it to adjust the focus manually and to
achieve a sharp focus in manual focus mode.
FOCUS switch (p. 27)AUTO: for autofocusingMANUAL: for manual focusing
PUSH AUTO: for temporary autofocusingwhile in manual focusing mode
Tripod receptacle (bottom) (p. 16)Attach a tripod (not supplied) here. When
attaching a non-Sony tripod, make sure that thelength of the camera mounting screw is shorterthan 6.5 mm (9/32 inches). Otherwise, the screw
might damage the inner part of the camcorder.
FADER button (p. 31)
When starting a recording by fading in, press thebutton and then start recording. When youconclude a recording by fading out, press the
button and then press START/STOP to stoprecording.
You can select black fader by pressing FADERonce or mosaic fader by pressing it twice.
[]
[]
[]
[]
BACK LIGHT button (p. 30)
Press it when a recording subject is too darkbecause of excessively bright background.
DATE(+) and TIME(NEXT) buttons (p. 12, 19)Each button has two functions. One is to displaythe date or time indicator in the viewfinder. The
other is to set the date and time. Pressing
DATE (+) advances digits and pressing TIME
(NEXT) sets the next element while setting dateand time.
AGE/EVENT button (p. 13, 20)
Press when setting the birth date (or event)indicator, or when displaying and turning off the
age indicator in the viewfinder.
PROGRAM AE selector (p. 28)Set the desired PROGRAM AE mode (Portrait/Sports/High-Speed Shutter mode) to fit theshooting situation,
BATT (battery eject) knob (p. 7)Keep pressing to remove the battery pack.
Hook for shoulder strap (p, 46)
44
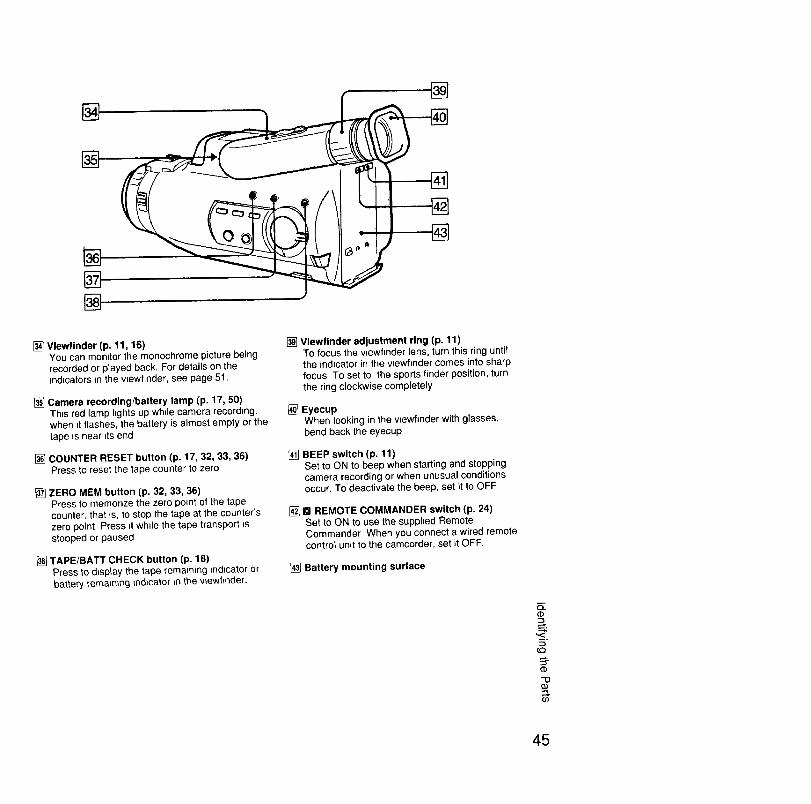
[]
[]
[] Viewfinder (p. 11, 16)You can monftor the monochrome picture beingrecorded or played back. For details on themdtcators in the wewfinder, see page 51.
[] Camera recording/battery lamp (p. 17, 50)This red lamp hghts up whde camera recording.when ft flashes, the battery is almost empty or thetape =snear _tsend
[_ COUNTER RESET button (p. 17, 32, 33, 36)Press to reset the tape counter to zero
[] ZERO MEM button (p. 32, 33, 36)Press to memorize the zero point of the tapecounter, that _s, to stop the tape at the counter's
zero point Press it while the tape transport =sstopped or paused
[] TAPE/BATT CHECK button (p. 18)Press to d_splay the tape remaining mdLcator or
battery remam;ng _nd_cator _n the wewt_nder.
[] Viewflnder adjustment ring (p. 11)To focus the vzewfmder lens, turn this ring until
the indicator in the wewfinder comes into sharpfocus To set to the sports finder position, turn
the ring clockwise completely
_]Eyecup
Whenlookinginthe wewfmder with glasses,bend back the eyecup
BEEP switch (p. 11)Set to ON to beep when starting and stoppingcamera recordingor when unusual conditionsoccur. To deactivate the beep, set it to OFF
[] [] REMOTE COMMANDER switch (p. 24)Set to ON to use the supplied RemoteCommander When you connect a wired remotecontrol unqtto the camcorder, set it OFF.
[] Battery mounting surface
(b
_<_.
(I)
"O
o_
45
Wireless Remote Commanoer
[]
i ............. L;L
%@
_,_ 2Rem(c6.__t_ns°r
(Approximatemaximumdista--30n_
angles for remote control)
[]
[]
[]
TransmitterPoint toward the remote sensor on the camcorder
to remotely controt the camcorder. Actrvate thecamcorder before you use the RemoteCommander.
Tape transport buttons (P. 23)
DATA SCREEN BUTTONPress to d_splay the vJewfinder screen tnd_catorson a TV when you connect the camcorder to a TVTo erase the indpcators, press it agarn.
[] HOLD switch (P. 23)
Shde _nthe direction of the arrow to prevent thebuttons from being accidentally pressed Before
using this Remote Commander, slide m theopposite direction of the arrow
___ START/STOP button (p. 17)
Power zoom button (p. 19)
Attaching the Shoulder Strap
Attach the supphed shoulder strap to the hooks
46
rI 2 3
i
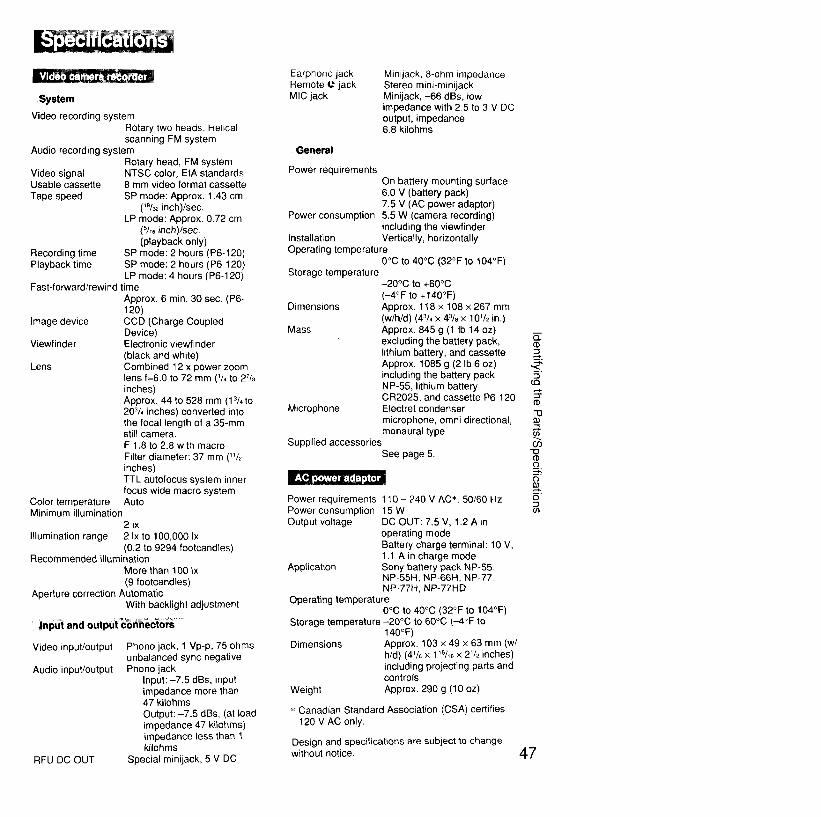
System
Video recording system
Rotary two heads, Helical
scanning FM systemAudio recording system
Rotary head, FM system
Video signal NTSC color, EIA standardsUsable cassette 8 mm video format cassette
Tape speed SP mode: Approx. 1.43 cm(_9/32inch)/sec.
LP mode: Approx. 0.72 cm(5/,6 inch)Isec.
(playback only)
Recording time SP mode: 2 hours (P6o120)Playback time SP mode: 2 hours (P6-120)
LP mode: 4 hours (P6-120)Fast-forward/rewind time
Approx. 6 min. 30 sec, (P6-120)
Image device CCD (Charge CoupledDevice)
Viewfinder Electronic viewfinder
(black and white)
Lens Combined 12 x power zoomlens f=6.0 to 72 mm (V, to 27/8
inches)Approx. 44 to 528 mm (13/4to
203/, inches) converted intothe focal length of a 35-mmstill camera.
F 1.8 to 2.8 with macro
Filter diameter: 37 mm ('/2inches)
TTL autofocus system innerfocus wide macro system
Color temperature AutoMinimum illumination
2 Ix
Illumination range 2 Ix to 100,000 Ix(0.2 to 9294 footcandles)
Recommended illuminationMore than 100 Ix
(9 footcandles)
Aperture correction AutomaticWith backlight adjustment
|nput end output _nnector_= "
Video input/output
Audio input/output
RFU DC OUT
Phono jack, 1 Vp-p, 75 ohms
unbalanced sync negativePhono jack
Input: -7.5 dBs, inputimpedance more than47 kilohms
Output: -7.5 dBs, (at load
impedance 47 kilohms)impedance less than 1kilohms
Special minijack, 5 V DC
Earphone jack
Remote @ jackMIC jack
Minijack, 8-ohm impedanceStereo mini-minijackMinijack, -66 dBs, low
impedance with 2.5 to 3 V DCoutput, impedance6.8 kilohms
General
Power requirements
On battery mounting surface6.0 V (battery pack)
7.5 V (AC power adaptor)Power consumption 5.5 W (camera recording)
including the viewfinderInstallation Vertically, horizontally
Operating temperature
0°C to 40°C (32°F to 104°F)Storage temperature
-20°C to +60°C
(-4°F to +140°F)
Dimensions Approx. 118 x 108 x 267 mm
(w/h/d) (43/, x 43/8 x 10V2 in.)Mass Approx. 845 g (1 Ib 14 oz)
excluding the battery pack,lithium battery, and cassette
Approx. 1085 g (2 Ib 6 oz)including the battery pack
NP-55, lithium batteryCR2025, and cassette P6-120
Microphone Electret condenser
microphone, omni directional,
monaural typeSupplied accessories
See page 5.
Power requirements 110 - 240 V AC _. 50/60 HzPower consumption 15 W
Output voltage DC OUT: 7.5 V, 1.2 A in
operating modeBattery charge terminal: 10 V,
1.1 A in charge modeApplication Sony battery pack NP-55,
NP-55H, NP-66H, NP-77,NP-77H, NP-77HD
Operating temperature0°C to 40°C (32°F to 104°F)
Storage temperature -20°C to 60°C (-4°F to140°F)
Dimensions Approx. 103 x 49 x 63 mm (w/
h/d) (4% x 1_5/_ x 2V2 inches)including projecting parts andcontrols
Weight Approx. 290 g (10 oz)
" Canadian Standard Association (CSA) certifies120 V AC only.
Design and specifications are subject to changewithout notice. 47
(b
-.h
{,Q
('1)"13
0O"Od)_o..-h
5'

Ifyourunintoanyproblemsusingthecamcorder,usethefollowingtabletotroubleshoottheproblem.
3=no
Symptom IThe power does notgo on.
The power goes off.
The battery pack isquickly discharged.
START/STOP doesnot operate.
The cassette cannotbe removed from the
'_ compartment._. No function except for
O cassette ejction works.
The tape does notmove when a tapetransport button ispressed.
The autofocusfunction does not
work.
Cause
The battery is not attached.
The battery is empty.
The AC power adaptor isnot connected to a walloutlet.
While being operated inCAMERA mode, thecamcorder has been in thepause mode for more than 5minutes.
The battery is empty.
The ambient temperature istoo low.
The battery pack has not
been charged fully.
The battery pack iscompletely dead, and
cannot be recharged.
The tape is stuck to thedrum.
Corrective Actions
Attach the battery.
Use a charged battery.
Connect the adaptor to a walloutlet.
Turn STANDBY down at onceand turn it up again.
Use a charged battery.
Charge the battery packagain.
Use another battery pack.
Eject the tape.
The tape has run out. Rewind the tape or use a newone.
Set it to CAMERA.The POWER switch is set toVTR.
The tab on the cassette is
out (red).
The battery is exhausted.
Moisture condensation hasoccurred.
The POWER switch is set toCAMERA or OFF.
The tape has run out.
Focus is set to MANUAL.
Shooting conditions are notsuitable for autofocusoperation.
Use a new tape or slide thered tab.
Use a charged battery or theAC power adaptor.
Remove the cassette and donot use the camcorder for atleast an hour.
Set it to VTR.
Rewind the tape or use a newone.
Set it to AUTO.
Set Focus to MANUAL toadjust the focus manually.
page
7,25
6
25
17
6
8
6
15
18, 23
17
18
6, 25
37
23
18, 23
26
26
(Continued)
48
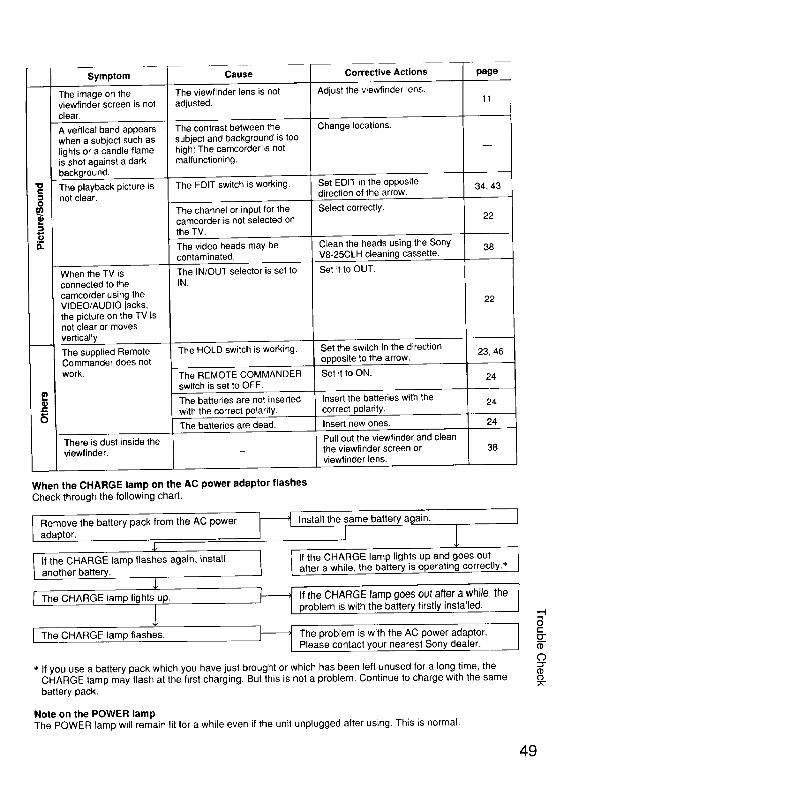
Symptom Cause Corrective Actions
The image on the The viewfinder lens is not Adjust the viewfinder lens.viewfinder screen is not adjusted. 11clear,
A vertical band appears The contrast between the Change locations.when a subject such as subject and background is too
lights or a candle flame high: The camcorder is notis shot against a clark malfunctioning.background.
The playback picture is The EDIT switch is working. Set EDIT in the opposite"_ not clear, direction of the arrow.
34, 43
The channel or input for the Select correctly.camcorder is not selected on 22
the TV.
E The video heads may be Clean the heads using the Sony 38contaminated. V8-25CLH cleaning cassette.
The IN/OUT selector is set to Set it to OUT.IN.
G)J=
When the TV isconnected to the
camcorder using theVIDEO/AUDIO jacks,
the picture on the TV isnot clear or movesvertically.
The supplied RemoteCommander does notwork.
There is dust inside theviewfinder.
The HOLD switch is working.
The REMOTE COMMANDERswitch is set to OFF.
The batteries are not inserted
with the correct polarity.
The batteries are dead.
Set the switch in the direction
opposite to the arrow.
Set it to ON.
Insert the batteries with the
correct polarity.
Insert new ones.
Pull out the viewfinder and cleanthe viewfinder screen orviewfinder lens.
22
23,46
24
24
24
38
When the CHARGE lamp on the AC power adaptor flashesCheck through the following chart.
Remove the battery pack from the AC poweradaptor.
1| the CHARGE lamp flashes again, installanother battery.
I The CHARGE lamp lights up.
1The CHARGE lamp flashes.
install the same battery again.
I If the CHARGE lamp lights up and goes outafter a wh e, the battery s operat ng correct y._
_--_ If the CHARGE ramp goes out after a while, theproblem is with the battery firstlyinstalled.
_,',_ The problem is with the AC power adaptor.Please contact your nearest Sony dealer.
_' If you use a battery pack which you have just brought or which has been left unused for a long time, theCHARGE tamp may flash at the first charging. But this is not a problem. Continue to charge with the samebattery pack.
Note on the POWER lamp
The POWER lamp will remain lit for a while even if the unit unplugged after using. This is normal.
8¢..o-
C)ZTCDO
49
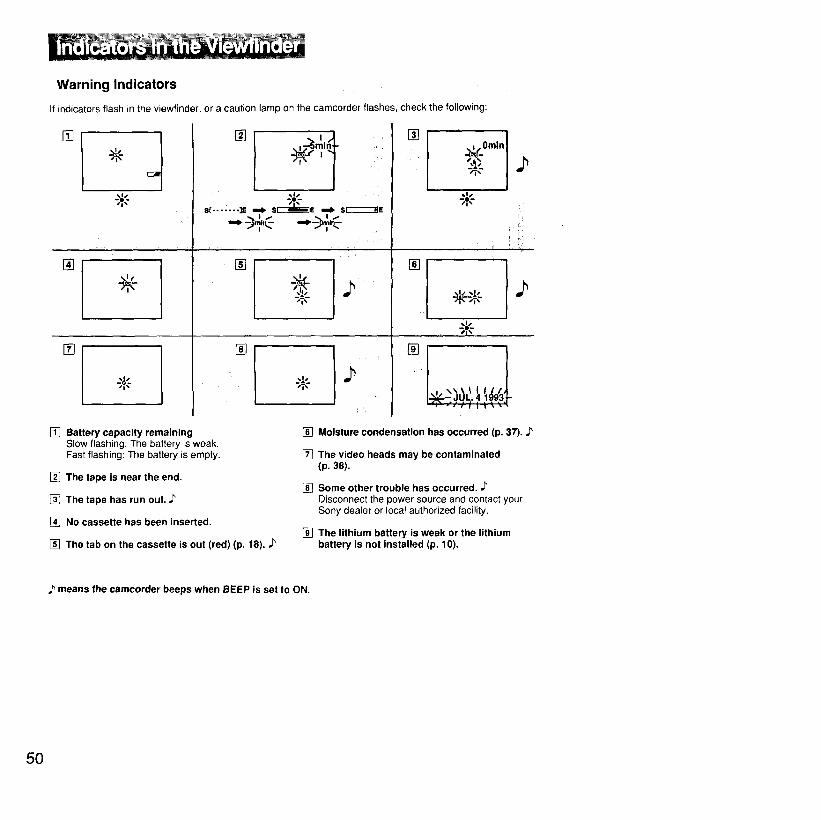
Warning Indicators
If indicators flash in the viewfinder, or a caution lamp on the camcorder flashes, check the following:
÷
[]
÷
..,_-_11 -
[]
,Ij
St ....... ]E m=lk SI_E _ S[_E
__)-,<_
[]
Pl \
[]
,i
"7
[] I-_ 0 rain I
[]
€i _.
.-_-- L...4 1 9311|11
h4
[] Battery capacity remainingSlow flashing: The battery is weak.Fast flashing: The battery is empty.
[] The tape is near the end.
[] The tape has run out. ,_
[] No cassette has been inserted.
[] The tab on the cassette is out (red) (p. 18). ,,_
[] Moisture condensation has occurred (p. 37).._
[] The video heads may be contaminated(p. 38).
[] Some other trouble has occurred,
Disconnect the power source and contact your
Sony dealer or local authorized facility.
[] The lithium battery is weak or the lithium
battery is not installed (p. 10).
J_means the camcorder beeps when BEEP is set to ON.
50
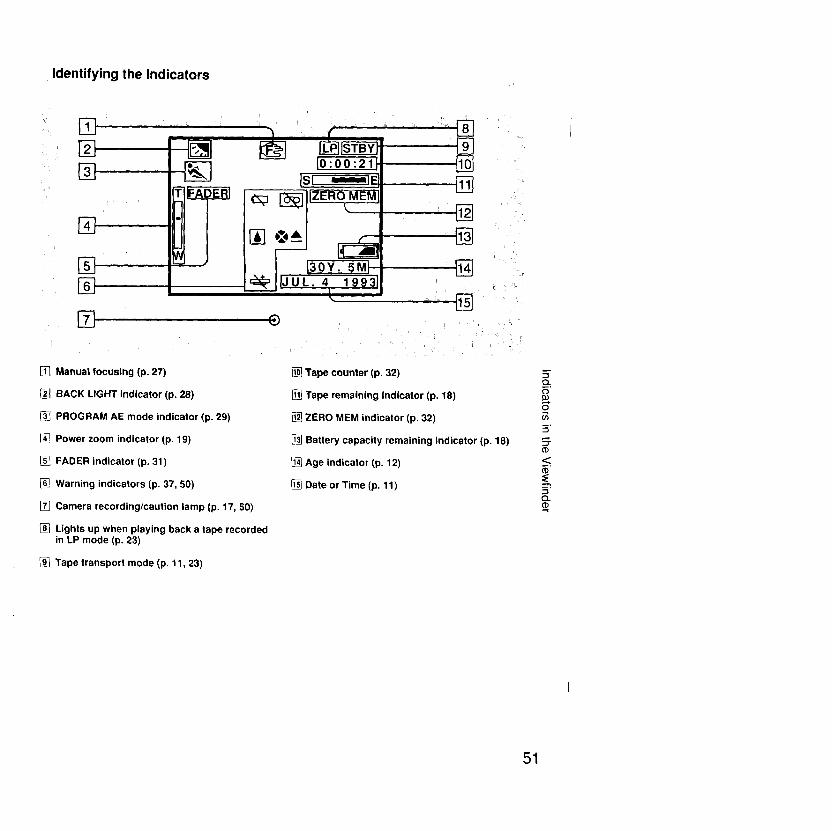
Identifying the Indicators
[]
[]
[0:00:21
Ls[ "-'-'-'IE
[_llZEROL MEM
k
©
%
@
[] Manual focusing (p. 27)
BACK LIGHT indicator (p. 28)
[] PROGRAM AE mode indicator (p. 29)
_] Power zoom indicator (p. 19)
FADER indicator (p. 31)
[] Warning indicators (p. 37, 50)
Camera recording/caution lamp (p. 17, 50)
Lights up when playing back a tape recordedin LP mode (p. 23)
Tape transport mode (p. 11, 23)
[] Tape counter (p. 32)
[] Tape remaining indicator (p. 18)
[] ZERO MEM indicator (p. 32)
[_ Battery capacity remaining indicator (p. 18)
Age indicator (p. 12)
Date or Time (p. 11)
cL
o
(i)<
cLcb
51

Index
AAC power adaptor ............... 6, 25Accessory shoe ....................... 44
Adjusting viewfinder ................ 16AGE/EVENT button ................. 12AUDIO ..................................... 22Audio/Video cable ................... 22
Autofocus ................................ 17
BBACK LIGHT ........................... 28
Battery ............................. 5, 6, 10Battery lamp ............................ 45
Battery pack .............................. 6BEEP ....................................... 16
CCAMERA mode ....................... 11
Camera recording lamp ........... 45
Car battery operation .............. 26
Charging battery .................... 5, 6Cleaning video head ............... 38Clock set ................................. 11
Close-up .................................. 19Connection ........................ 22, 34COUNTER RESET ................. 32
D,EDATA SCREEN ....................... 46
DATE/TIME ............................. 11
Dew indicator .......................... 37
Earphone jack ......................... 21EDIT switch ............................. 39
Editing ..................................... 34EDITSEARCH ......................... 21
EJECT ..................................... 14
Exposure ................................. 29External microphone jack ........ 43
Eyecup .................................... 45
F,G,HFade-in/fade-out ..................... 31FADER ................................... 31
FF (fast foward) ...................... 23FOCUS ............................. 17, 26
High-speed shutter ................. 29HOLD switch ........................... 23
I,J,K,LIndoor ..................................... 25
Insert ........................... t0, 14, 33LANC ...................................... 42
Lens cap ............................. 5, 17LOCK ...................................... 11
Lithium battery .................... 5, 10
M,N,O,PManual focus .......................... 26
(MACRO) ................................ 19
MIC (PLUG IN POWER) ......... 43OUT/IN ................. 22, 34, 35, 43PAUSE button ........................ 24PLAY ...................................... 23
Playback on TV ...................... 22Portrait mode .......................... 28
Power sources .................... 6, 25Power zoom ............................ 19PROGRAM AE ....................... 28
PUSH AUTO ........................... 27
RRec review .............................. 21
REC (record)/PAUSE ....... 17, 24Remote Commander
.......................... 5, 23, 24, 34, 46
REMOTE control jack ............. 42
REW (rewind) ......................... 23RFU adaptor ........................... 22RFU DC OUT ......................... 22
SShoulder strap ................... 5, 46
Skip-scan ............................... 24Slow ........................................ 24
Specifications .......................... 47
Sports tinder ............................ 16
Sports mode ............................ 28START/STOP .................... 17, 42STANDBY ............................... 11
Still picture ............................... 24STOP ................................ t 7, 23
Supplied accessories ................ 5
T,U,VTAPE/BATT CHECK ............... 18
Tape counter ........................... 32
TIME (NEXT) ............... 12, 13, 19Tripod mounting ................ 16, 44Troubles .................................. 48
VTR mode ............................... 23VHF/UHF antenna ................... 22
VIDEO ............................... 22, 34
Video cassette tapes ......... 15, 18Viewfinder indicators ............... 50
W,X,Y,ZWarning ............................... 2, 50Wireless Remote Commander
.................................... 23, 24, 46ZERO MEM ........... 32, 33, 36, 45Zoo m ....................................... 19
Sony Corporation Printed in Japan
If you have any question about thisproducL call:Sony Customer Infomatien CenterEast Coast: 201-930-7669 (SONY) NJCentral: 708-250-7669 (SONY) ILWest Coast: 714-821-7669 (SONY) CA
or write to:
Sony Customer Infomation CenterSony Drive, Mail Drop #T-11,Park Ridge, NJ 07656