Embed Size (px)
Citation preview

VIDEO TOOLS
www.pace.edu/digitaltoolkit
914 773-3333 (ITS Help Desk)
914 773-3664 (Office)
D I G I T A L
T O O L K I T
C L I C K
H E R E !
Last updated: 04/01/15
H o w t o M a k e a D i g i t a l S t o r y U s i n g
i M o v i e 1 0 . 0
1. The best way to start an iMovie project is to collect all the elements you plan to use beforehand
(images, videos and music) and putting them into a folder.
This tutorial describes how to upload a video in YouTube and make it private.
VIDEO TOOLS
www.pace.edu/digitaltoolkit
914 773-3333 (ITS Help Desk)
914 773-3664 (Office)
D I G I T A L
T O O L K I T
C L I C K
H E R E !
Last updated: 04/01/15
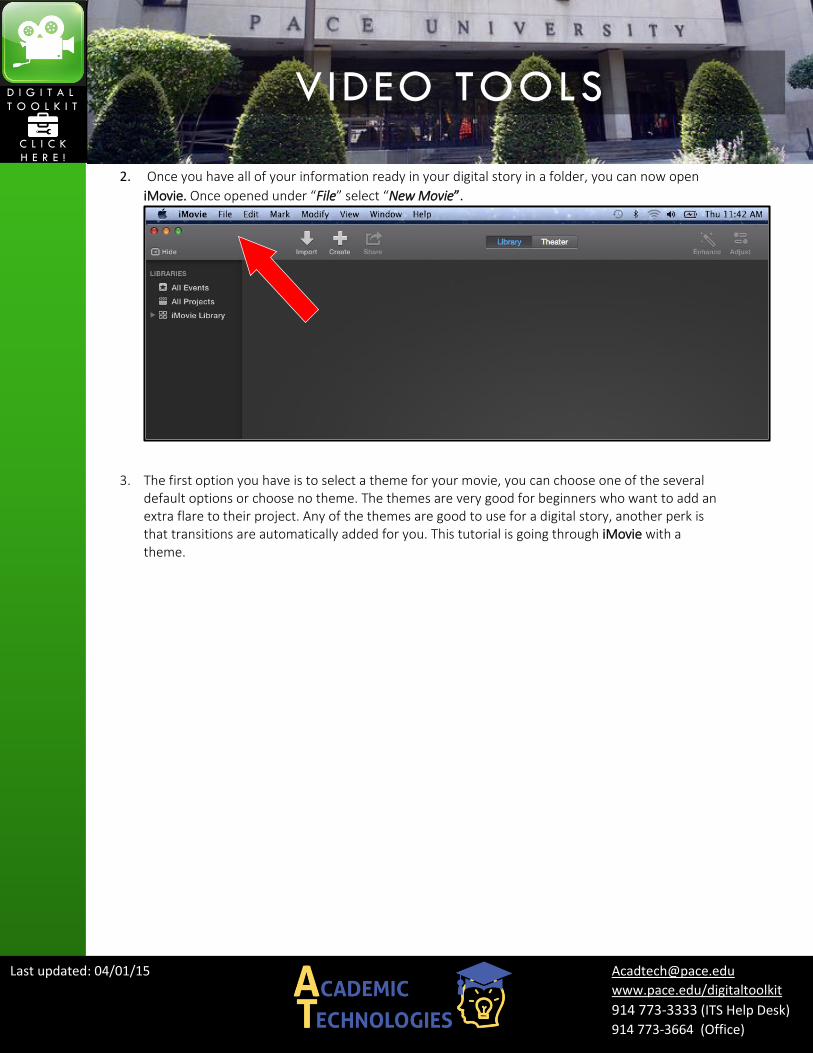
2. Once you have all of your information ready in your digital story in a folder, you can now open
iMovie. Once opened under “File” select “New Movie”.
3. The first option you have is to select a theme for your movie, you can choose one of the several
default options or choose no theme. The themes are very good for beginners who want to add an extra flare to their project. Any of the themes are good to use for a digital story, another perk is that transitions are automatically added for you. This tutorial is going through iMovie with a theme.

VIDEO TOOLS
www.pace.edu/digitaltoolkit
914 773-3333 (ITS Help Desk)
914 773-3664 (Office)
D I G I T A L
T O O L K I T
C L I C K
H E R E !
Last updated: 04/01/15
4. After you’ve created your theme, you will be asked to name your project.
5. After you name your project, a movie timeline is created. This is when you will import all of your
information for the digital story by selecting “Import Media”

VIDEO TOOLS
www.pace.edu/digitaltoolkit
914 773-3333 (ITS Help Desk)
914 773-3664 (Office)
D I G I T A L
T O O L K I T
C L I C K
H E R E !
Last updated: 04/01/15
6. After selecting “Import Media” you will browse your computer for the digital story folder. Once the folder is located, select it and press “Import Selected”.

VIDEO TOOLS
www.pace.edu/digitaltoolkit
914 773-3333 (ITS Help Desk)
914 773-3664 (Office)
D I G I T A L
T O O L K I T
C L I C K
H E R E !
Last updated: 04/01/15
7. Once imported, you can see all of your media for the story on the left hand side in the “Library”
8. Now you are ready to begin dragging and dropping your media onto the timeline to create a
digital story. To start choose the photo you would like for your title screen and drag it to the
storyboard. A title will already be created for you based on what you named your project. If you
want to change it, click the text on the preview of your movie.

VIDEO TOOLS
www.pace.edu/digitaltoolkit
914 773-3333 (ITS Help Desk)
914 773-3664 (Office)
D I G I T A L
T O O L K I T
C L I C K
H E R E !
Last updated: 04/01/15
9. Continue to drag and drop the images you want in your digital story. Automatic transitions from
the theme will appear. Drag the photos and videos in the order you want them to appear, then
worry about personalizing the transitions later.
Note: if you want to see how your video looks so far simply press the space button on your keyboard.

VIDEO TOOLS
www.pace.edu/digitaltoolkit
914 773-3333 (ITS Help Desk)
914 773-3664 (Office)
D I G I T A L
T O O L K I T
C L I C K
H E R E !
Last updated: 04/01/15
10. After you’ve finished previewing your movie, you can work on customizing and enhancing the
photos. If you want to work on one specific photo, hover over the photo on your time and press
the adjust button on the top right hand side. A menu will show allowing you to crop, enhance
and even add filters to your photos

VIDEO TOOLS
www.pace.edu/digitaltoolkit
914 773-3333 (ITS Help Desk)
914 773-3664 (Office)
D I G I T A L
T O O L K I T
C L I C K
H E R E !
Last updated: 04/01/15
11. When you are finished with personalizing each picture, you can now customize the transitions.
Click the “Transitions” block on the bottom left hand side. This will allow you to explore all of the
transition options and those specific to the current theme being used.
Note: to preview the transition, simply drag your cursor over the icon

VIDEO TOOLS
www.pace.edu/digitaltoolkit
914 773-3333 (ITS Help Desk)
914 773-3664 (Office)
D I G I T A L
T O O L K I T
C L I C K
H E R E !
Last updated: 04/01/15
12. To change a transition on your timeline with another, simply drag the transition you like directly
over the old one you want to replace.
13. To add text, select the “Title” block on the bottom right hand side under “Transitions” To preview text styles, simply hover your cursor over them. Just like transitions there are titles for specific themes as well as general designs.
14. Once you choose a text you like, drag it to the clip you want it to correspond to. To edit the text,
click on the preview on the right side and delete the “TEXT HERE” to put your own text.

VIDEO TOOLS
www.pace.edu/digitaltoolkit
914 773-3333 (ITS Help Desk)
914 773-3664 (Office)
D I G I T A L
T O O L K I T
C L I C K
H E R E !
Last updated: 04/01/15
15. There are several ways to add music, on the bottom left hand side you can select either iTunes or
Garageband and your music files within those programs will be available. (Hint- use the search
bar on the bottom to easily search for the song you want). Once you choose a song simply drag
onto the timeline
Note: **If you use a song from iTunes you must only use it for school projects not to be publicized
elsewhere AND you must cite the song and artist**

VIDEO TOOLS
www.pace.edu/digitaltoolkit
914 773-3333 (ITS Help Desk)
914 773-3664 (Office)
D I G I T A L
T O O L K I T
C L I C K
H E R E !
Last updated: 04/01/15
You can also add music directly from your folder, in the library where all of your files are
located. Simply drag the music file onto the timeline.
VIDEO TOOLS
www.pace.edu/digitaltoolkit
914 773-3333 (ITS Help Desk)
914 773-3664 (Office)
D I G I T A L
T O O L K I T
C L I C K
H E R E !
Last updated: 04/01/15
**Note: You can manually drag where you want the music to begin and stop by simply extending the sides
or moving the song block from side to side. **
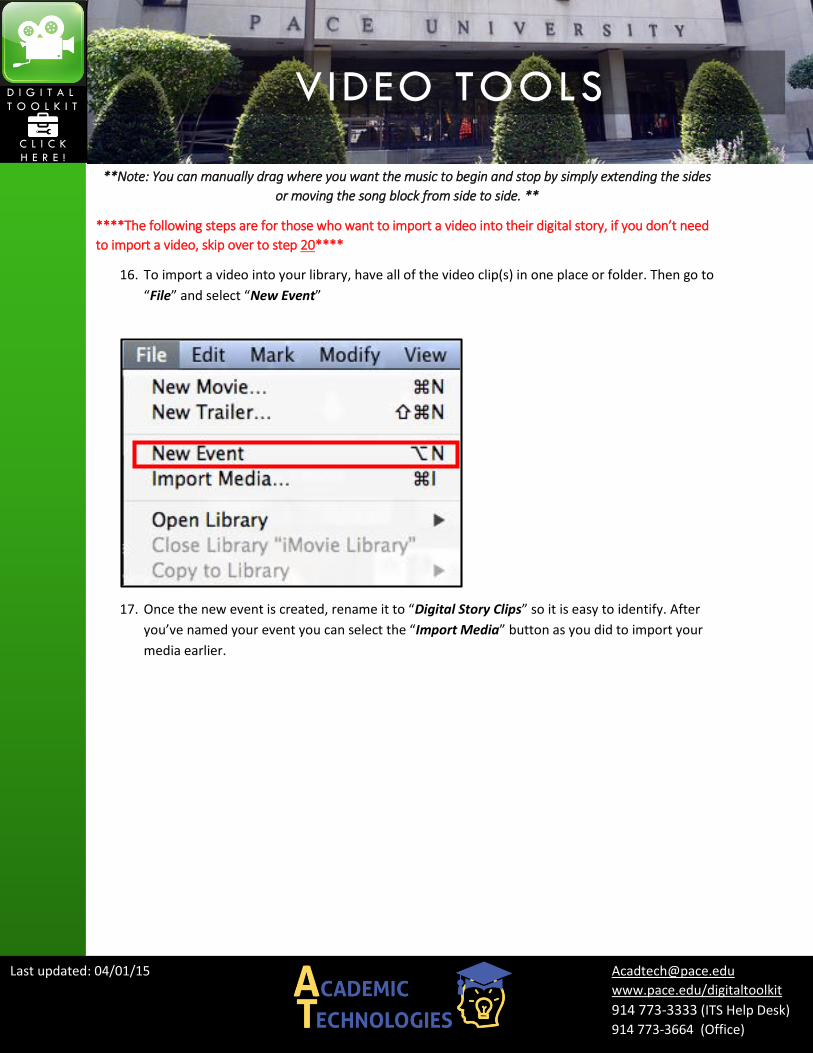
****The following steps are for those who want to import a video into their digital story, if you don’t need
to import a video, skip over to step 20****
16. To import a video into your library, have all of the video clip(s) in one place or folder. Then go to
“File” and select “New Event”
17. Once the new event is created, rename it to “Digital Story Clips” so it is easy to identify. After
you’ve named your event you can select the “Import Media” button as you did to import your
media earlier.

VIDEO TOOLS
www.pace.edu/digitaltoolkit
914 773-3333 (ITS Help Desk)
914 773-3664 (Office)
D I G I T A L
T O O L K I T
C L I C K
H E R E !
Last updated: 04/01/15
18. If you already uploaded your videos with the other media in the folder, simply drag the video
from the library onto the timeline like you did for the other photos and music.

VIDEO TOOLS
www.pace.edu/digitaltoolkit
914 773-3333 (ITS Help Desk)
914 773-3664 (Office)
D I G I T A L
T O O L K I T
C L I C K
H E R E !
Last updated: 04/01/15
**Note: The clip will show up in your event, or library and you will be able to choose the part of the clip
you want to use. (You can explore the clip simple by hovering your mouse over it). Once you find the part
you want to use, drag and select it, and move it to your storyboard. **
19. You can customize a video, the same way you customized a photo by selecting the adjust button
on the top right hand side. When you click “Video Effect” you can change the color scheme of
the clip (black and white, sepia, etc.). You can adjust the “Speed”, if you go towards the turtle
the clip will go in slow motion, if you go towards the rabbit the clip will speed up. If you check
“Reverse” the clip will go backwards (i.e. if the clip is someone running or swimming they will be
doing it backwards).
To add text and transitions to your video clip, review steps 11-14.
20. To add credits (or a bibliography) go back to the text browser, and find the type of credits you
would like to use. Note: for bibliographies or long credits the “Scrolling Credits” is the best
choice. Once you drag it to the end of your project, you will be able to choose the background
theme for your credits (preview them by hovering your mouse over them). To edit the text, click
on the text bubble above the credit block or the preview on the right side.

VIDEO TOOLS
www.pace.edu/digitaltoolkit
914 773-3333 (ITS Help Desk)
914 773-3664 (Office)
D I G I T A L
T O O L K I T
C L I C K
H E R E !
Last updated: 04/01/15
Note: You can easily copy and paste your bibliography from Word.
21. When you finish your digital story, you must export it using the “Share” button on the top right.

VIDEO TOOLS
www.pace.edu/digitaltoolkit
914 773-3333 (ITS Help Desk)
914 773-3664 (Office)
D I G I T A L
T O O L K I T
C L I C K
H E R E !
Last updated: 04/01/15
You can export it to iTunes, and it will show up in your iTunes library, if you click YouTube, it will
export the video automatically to YouTube, if you click File it will export it as a file to your finder.
You must choose one of these options in order to finalize your project and make it into a file.
GOOD LUCK
My Notes:
^ Delete this filler text in the real tutorial so there is space to write ^