Embed Size (px)
Citation preview
ViewBoard 2.1 SoftwareUser Guide
Thank you for choosing ViewSonic
With over 25 years as a world leading provider of visual solutions, ViewSonic is dedicated to exceeding the world’s expectations for technological evolution, innovation, and simplicity. At ViewSonic, we believe that our products have the potential to make a positive impact in the world, and we are confident that the ViewSonic product you have chosen will serve you well.
Once again, thank you for choosing ViewSonic !
i
Contents1. Introduction
2. Installation Instructions2.1 Operating Environment ................................................................ 22.2 Software Installation ..................................................................... 2
3. Using ViewBoard 2.1 Software3.1 Screen Layout .............................................................................. 53.1.1 Toolbar ...................................................................................... 5
3.1.1.1 Menu ...............................................................................................63.1.1.2 Switch to Desktop Mode ...............................................................123.1.1.3 Tools .............................................................................................123.1.1.4 Resource Bank .............................................................................263.1.1.5 Selection .......................................................................................293.1.1.6 Writing ...........................................................................................383.1.1.7 Eraser ...........................................................................................383.1.1.8 Shap ..............................................................................................393.1.1.9 Handwriting Recognition ...............................................................393.1.1.10 Roaming ......................................................................................403.1.1.11 Undo ...........................................................................................413.1.1.12 Redo ...........................................................................................413.1.1.13 Add Page ....................................................................................413.1.1.14 Previous Page .............................................................................413.1.1.15 Page Management ......................................................................413.1.1.16 Next Page ...................................................................................46
3.1.2 Desktop Mode ......................................................................... 473.2 Subject Mode Function Chemistry ............................................. 483.2.1 English Mode ........................................................................... 483.2.2 Math Mode .............................................................................. 50
3.2.2.1 Basic Function ..............................................................................503.2.2.2 Math Tools ....................................................................................51
3.2.3 Chemistry Mode ...................................................................... 573.2.3.1 Basic Function ..............................................................................573.2.3.2 Chemistry Tools ............................................................................58
3.2.4 Physics Mode .......................................................................... 633.2.4.1 Basic Function ..............................................................................633.2.4.2 Physics Tools ................................................................................64

ii
Other InformationCustomer Support ............................................................................ 65
1
1. IntroductionViewBoard 2.1 is an interactive whiteboard software which is based on interactive touch operation. The software is suitable for smart panel classroom teaching, which provides whiteboard functions such as writing, erasing, notation, drawing and roaming. It also fully integrates smart panel interactive multimedia functions, providing powerful interactive teaching and displaying experiences such as sub-subject teaching tools and multimedia demonstration.
Friendly user interface, convenient operating experience, and various subjects’ scenes are all outstanding parts of ViewBoard 2.1 software.
• Convenient operation experience. Navigation map is convenient for user positioning page, toolbar mobile with gestures convenient for user demonstration operation.
• Various subject scenes. Different subject is set with different subject scenarios, including English, Math, Chemistry, Physics, and etc. Different subjects provide different teaching tools, and user can apply different subject scenes for teaching according to the current subject.
• Convenient and practical presentation tools. Functions such as screen cover, spotlight, screen zooming, and annotation and etc., which enhances practicality and convenience of the software while inheriting traditional operation habit.
• Actual simulation of soft pen. Soft pen function provides feeling of simulating soft pen, and during writing process, user can present handwriting effect of different degree of thickness according to user's writing speed, to provide users better writing experience.
• Personalized custom settings. Users can customize settings for brush, eraser and canvas background according to need, fully meeting demonstration need from each detail.
2
2. Installation Instructions2.1 Operating Environment• Windows 7 / 8 / 8.1 / 10 system
• Flash Player 10 or above
• .Net Framework 4.0 and later versions
• Microsoft Media 10.0 or above
• Microsoft Office 2007 and later versions
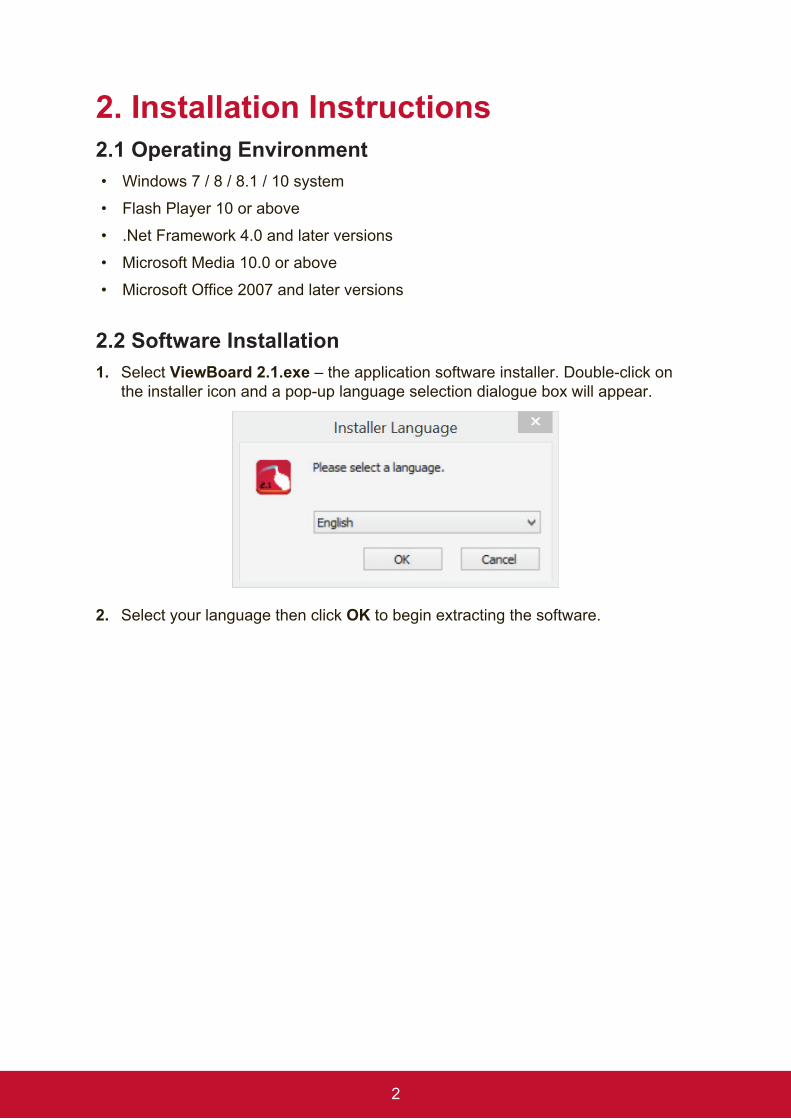
2.2 Software Installation1. Select ViewBoard 2.1.exe – the application software installer. Double-click on
the installer icon and a pop-up language selection dialogue box will appear.
2. Select your language then click OK to begin extracting the software.
3
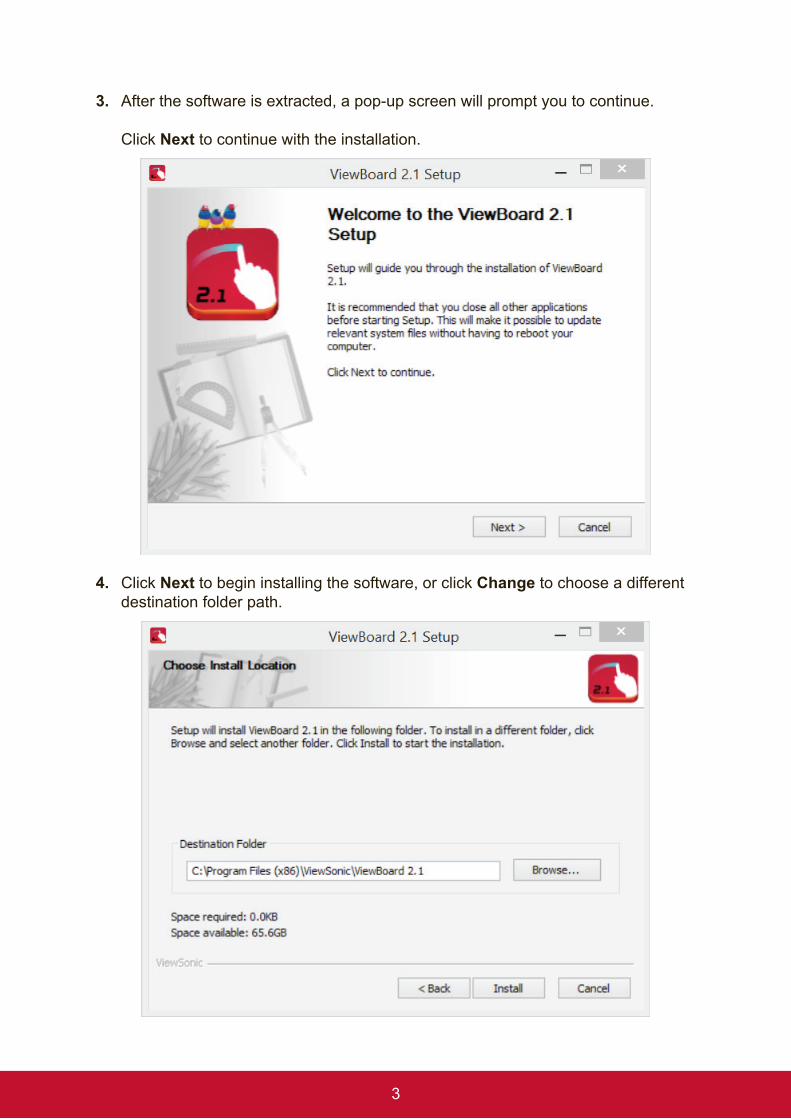
3. After the software is extracted, a pop-up screen will prompt you to continue.
Click Next to continue with the installation.
4. Click Next to begin installing the software, or click Change to choose a different destination folder path.
4
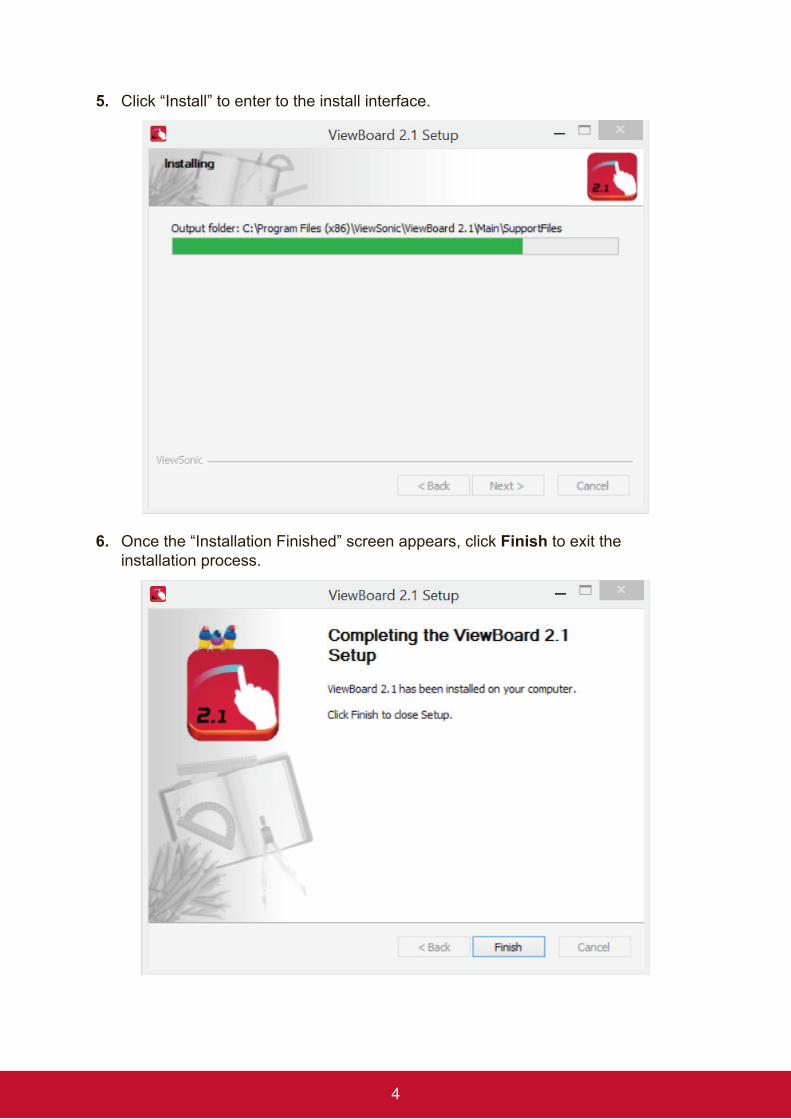
5. Click “Install” to enter to the install interface.
6. Once the “Installation Finished” screen appears, click Finish to exit the installation process.
5
3. Using ViewBoard 2.1 SoftwareTo start up the application, double-click the icon on the desktop screen or selecting ViewBoard 2.1 from the Programs drop-down list in the Start menu.
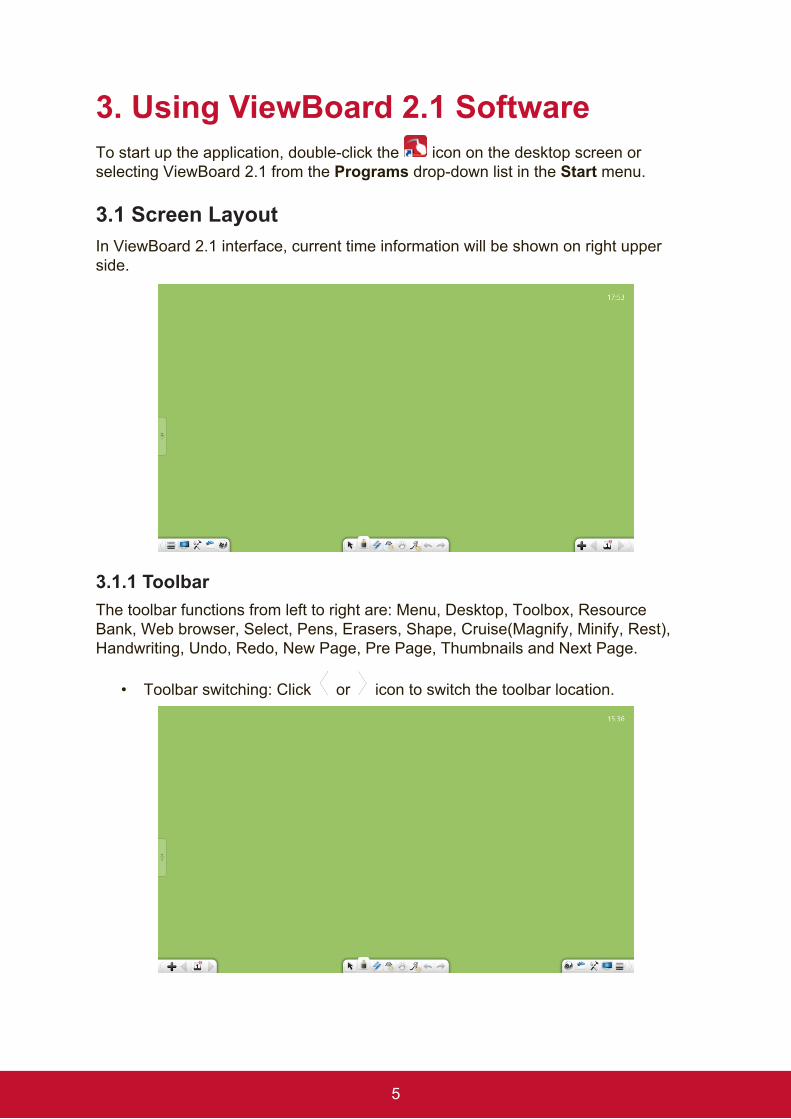
3.1 Screen LayoutIn ViewBoard 2.1 interface, current time information will be shown on right upper side.
3.1.1 ToolbarThe toolbar functions from left to right are: Menu, Desktop, Toolbox, Resource Bank, Web browser, Select, Pens, Erasers, Shape, Cruise(Magnify, Minify, Rest), Handwriting, Undo, Redo, New Page, Pre Page, Thumbnails and Next Page.
• Toolbar switching: Click or icon to switch the toolbar location.
6
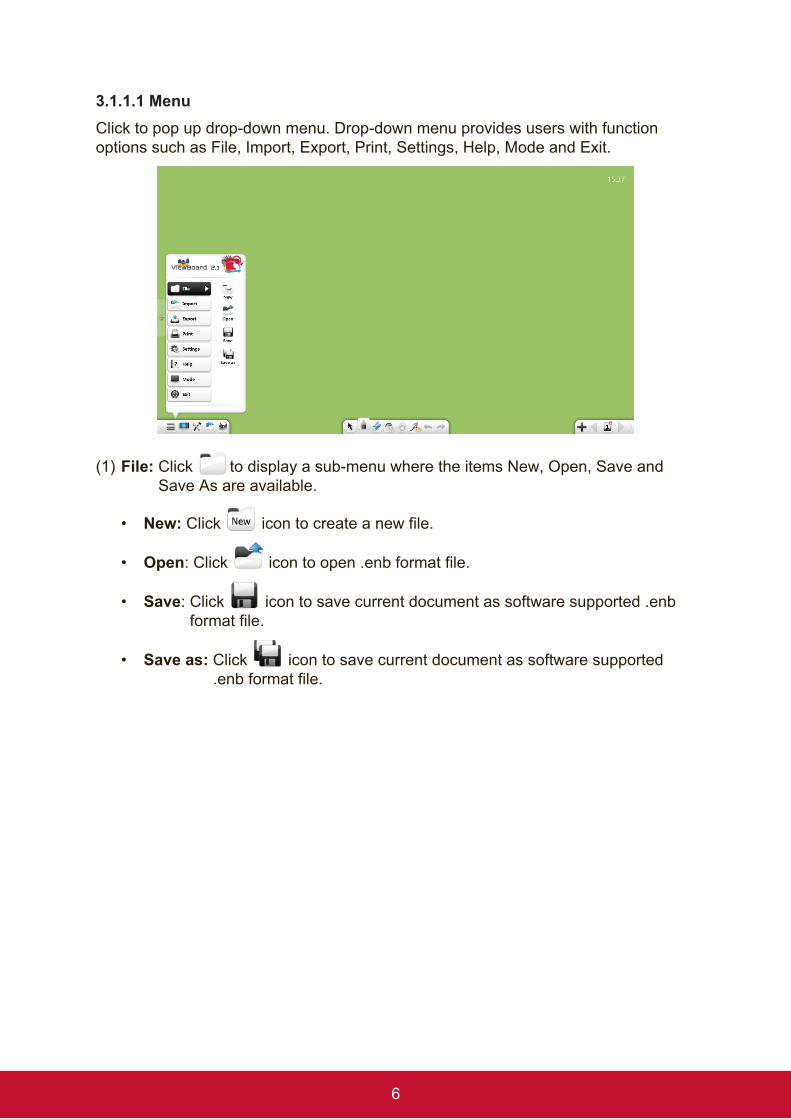
3.1.1.1 MenuClick to pop up drop-down menu. Drop-down menu provides users with function options such as File, Import, Export, Print, Settings, Help, Mode and Exit.
(1) File: Click to display a sub-menu where the items New, Open, Save and Save As are available.
• New: Click icon to create a new file.
• Open: Click icon to open .enb format file.
• Save: Click icon to save current document as software supported .enb format file.
• Save as: Click icon to save current document as software supported .enb format file.
7
(2) Import: Click to display a sub-menu, where you can import file, text, handwriting, clipboard and general material to the current page.
• File: Click to display the file selection window. You can select an image, video, audio, flash, PDF document, TXT document, Office document, or Note courseware. In preparation mode, you can drag images, videos, audios, flashes, and PDF, TXT, Office, or ViewBoard files to the software interface.
i. File types: a Image files: *.bpm, *.jpg, *.jpeg, *.png, *.ico, *.cur, and *.gif.b Video files: *.wmv, *.avi, *.mp4, *.rmvb, *.rm, *.mov, *.flv, *.f4v, *.asf,
*.mpg, *.3gp, *.mkv, *.mpeg, *.ts, and *.vob.c Audio files: *.wav, *.wma, *.mp3, and *.mid.d Flashes: *.swf.e PDF files: *.pdf.f TXT files: *.txt.g Office files: *.ppt, *.pptx.h Note files: *.enb.
ii. Import PPT file: When you import a PPT file, the original PPT will open a separate window. If the option Enable the PPT presentation tool is selected, the presentation tool bar will be shown lower center side.
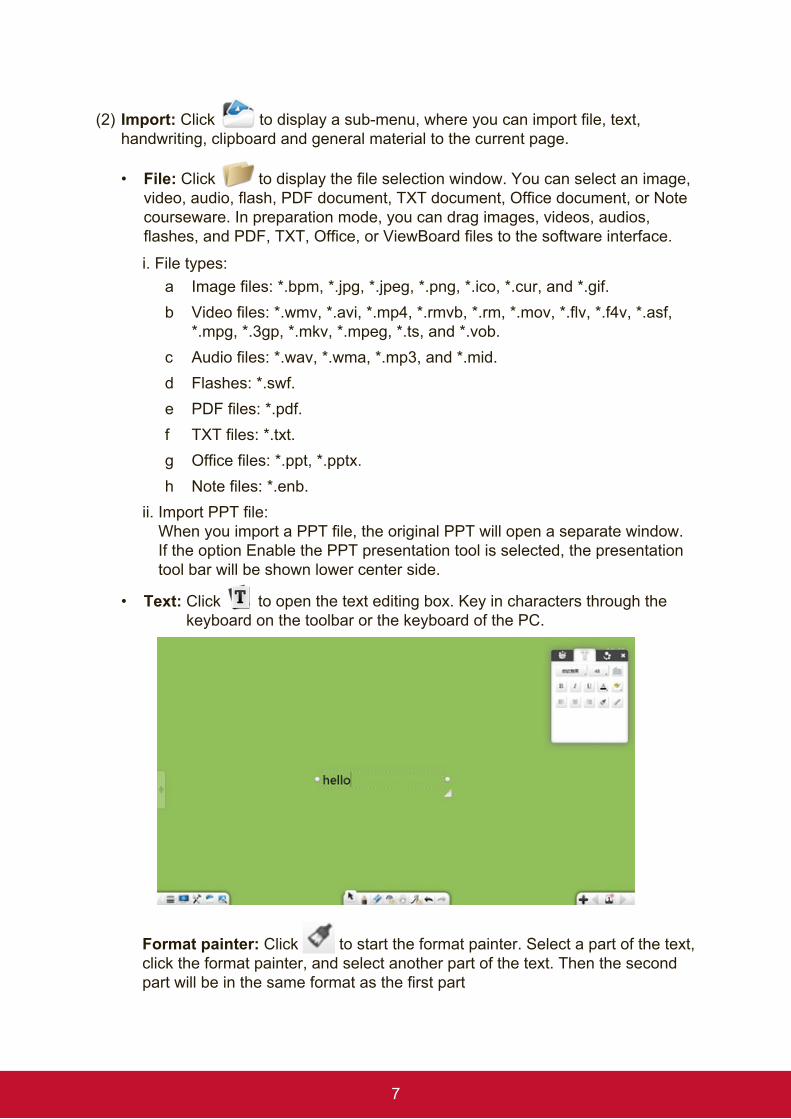
• Text: Click to open the text editing box. Key in characters through the keyboard on the toolbar or the keyboard of the PC.
Format painter: Click to start the format painter. Select a part of the text, click the format painter, and select another part of the text. Then the second part will be in the same format as the first part
8
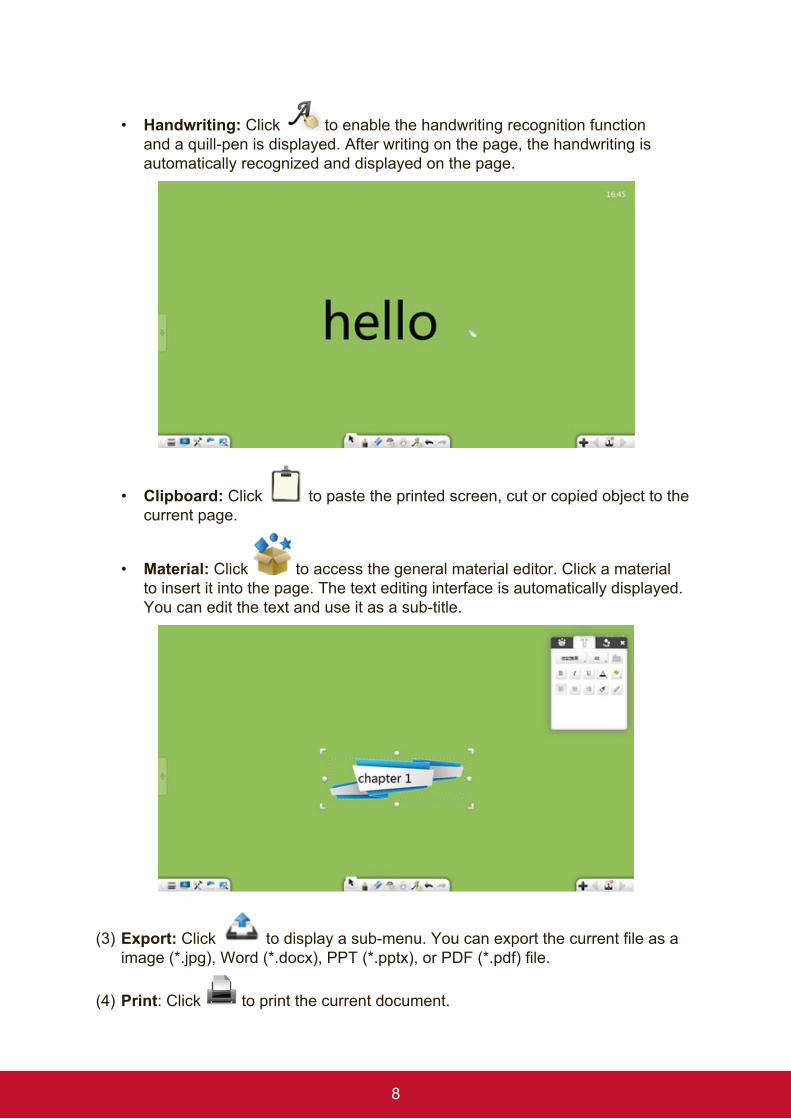
• Handwriting: Click to enable the handwriting recognition function and a quill-pen is displayed. After writing on the page, the handwriting is automatically recognized and displayed on the page.
• Clipboard: Click to paste the printed screen, cut or copied object to the current page.
• Material: Click to access the general material editor. Click a material to insert it into the page. The text editing interface is automatically displayed. You can edit the text and use it as a sub-title.
(3) Export: Click to display a sub-menu. You can export the current file as a image (*.jpg), Word (*.docx), PPT (*.pptx), or PDF (*.pdf) file.
(4) Print: Click to print the current document.
9
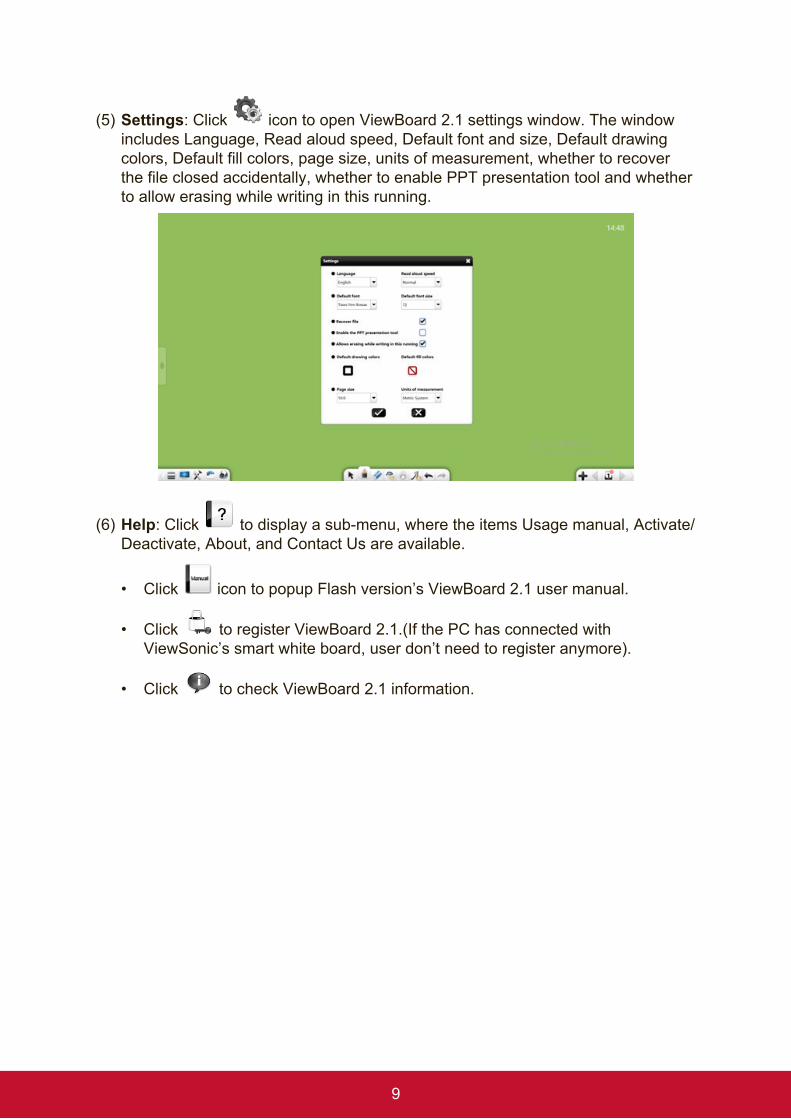
(5) Settings: Click icon to open ViewBoard 2.1 settings window. The window includes Language, Read aloud speed, Default font and size, Default drawing colors, Default fill colors, page size, units of measurement, whether to recover the file closed accidentally, whether to enable PPT presentation tool and whether to allow erasing while writing in this running.
(6) Help: Click to display a sub-menu, where the items Usage manual, Activate/Deactivate, About, and Contact Us are available.
• Click icon to popup Flash version’s ViewBoard 2.1 user manual.
• Click to register ViewBoard 2.1.(If the PC has connected with ViewSonic’s smart white board, user don’t need to register anymore).
• Click to check ViewBoard 2.1 information.
10
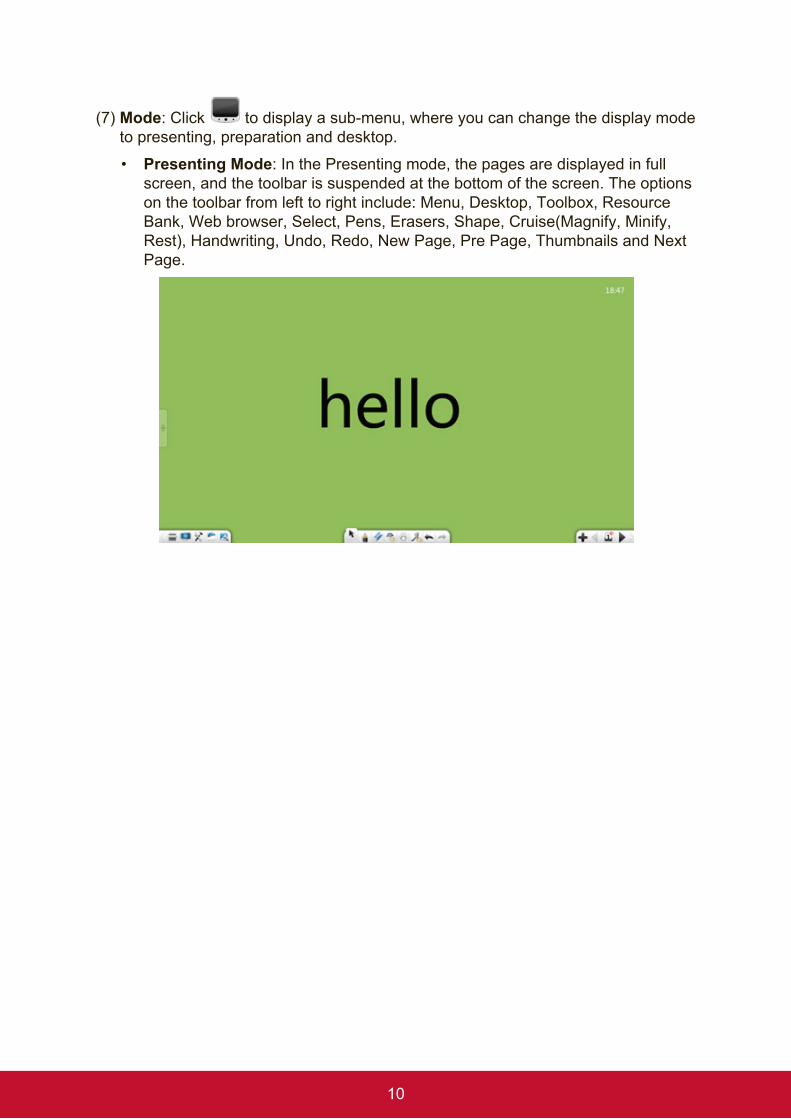
(7) Mode: Click to display a sub-menu, where you can change the display mode to presenting, preparation and desktop.
• Presenting Mode: In the Presenting mode, the pages are displayed in full screen, and the toolbar is suspended at the bottom of the screen. The options on the toolbar from left to right include: Menu, Desktop, Toolbox, Resource Bank, Web browser, Select, Pens, Erasers, Shape, Cruise(Magnify, Minify, Rest), Handwriting, Undo, Redo, New Page, Pre Page, Thumbnails and Next Page.
11
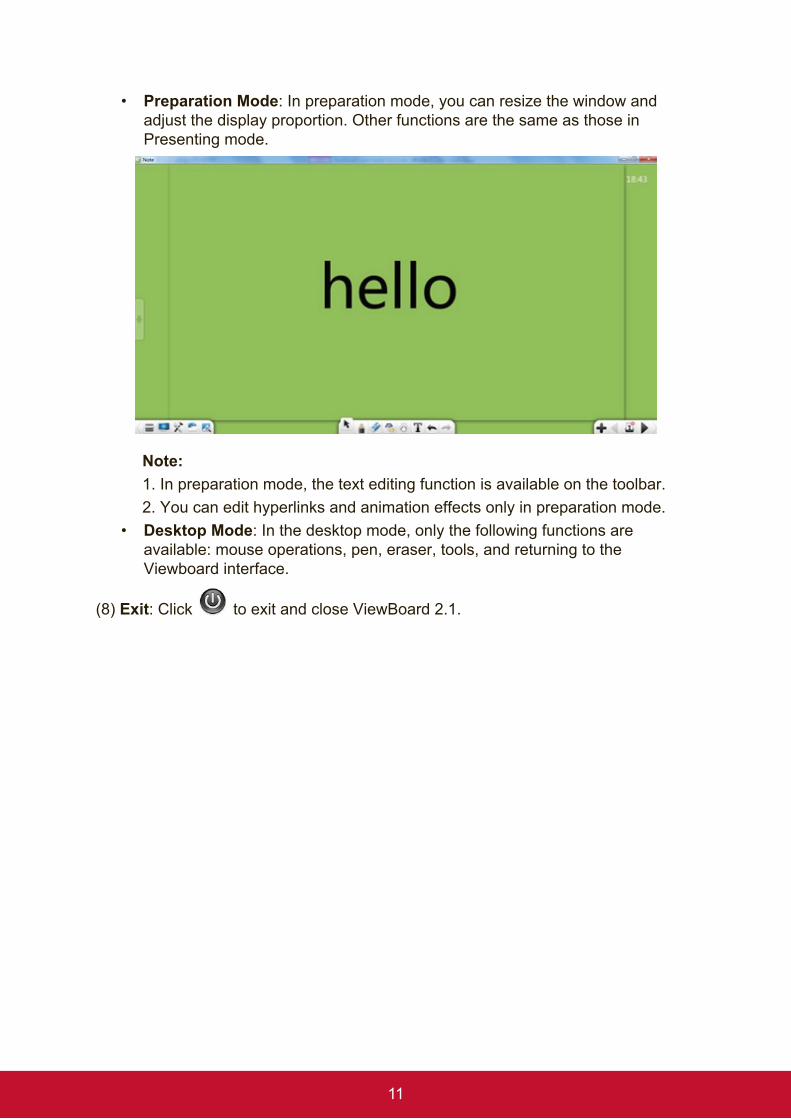
• Preparation Mode: In preparation mode, you can resize the window and adjust the display proportion. Other functions are the same as those in Presenting mode.
Note:1. In preparation mode, the text editing function is available on the toolbar.2. You can edit hyperlinks and animation effects only in preparation mode.
• Desktop Mode: In the desktop mode, only the following functions are available: mouse operations, pen, eraser, tools, and returning to the Viewboard interface.
(8) Exit: Click to exit and close ViewBoard 2.1.
12
3.1.1.2 Switch to Desktop Mode
Click to switch to desktop mode, see 3.1.2 Desktop Mode for details.
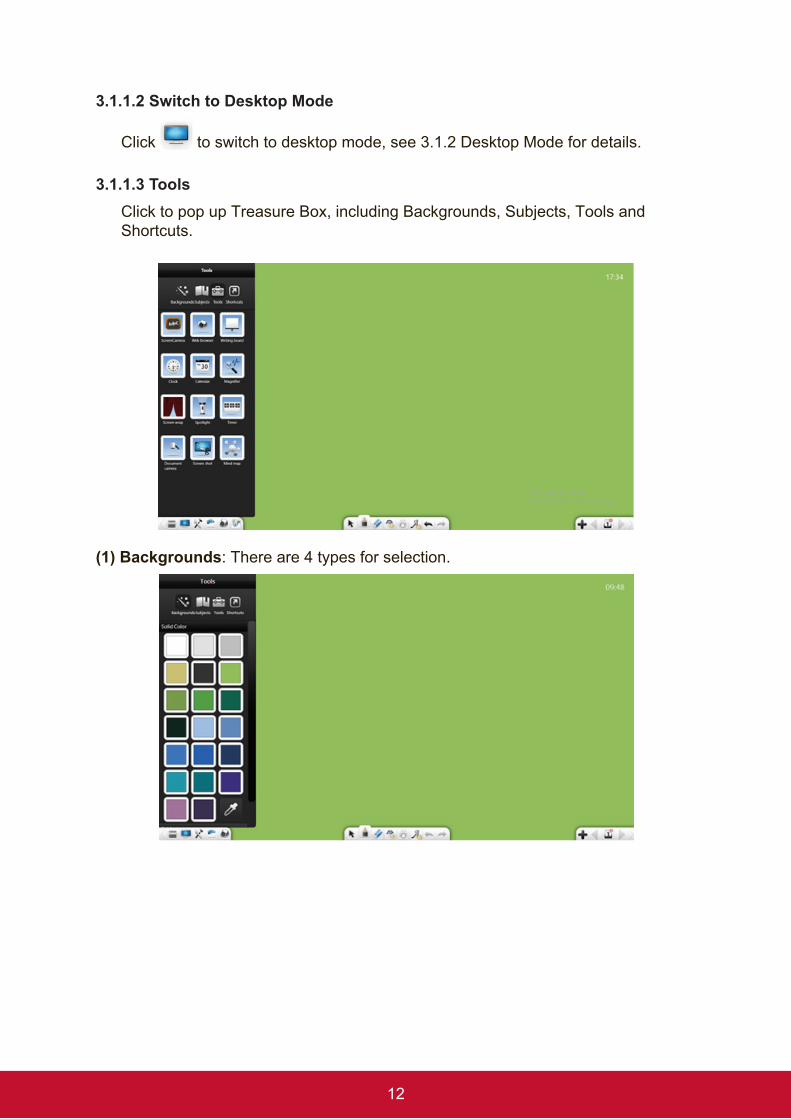
3.1.1.3 ToolsClick to pop up Treasure Box, including Backgrounds, Subjects, Tools and Shortcuts.
(1) Backgrounds: There are 4 types for selection.
13
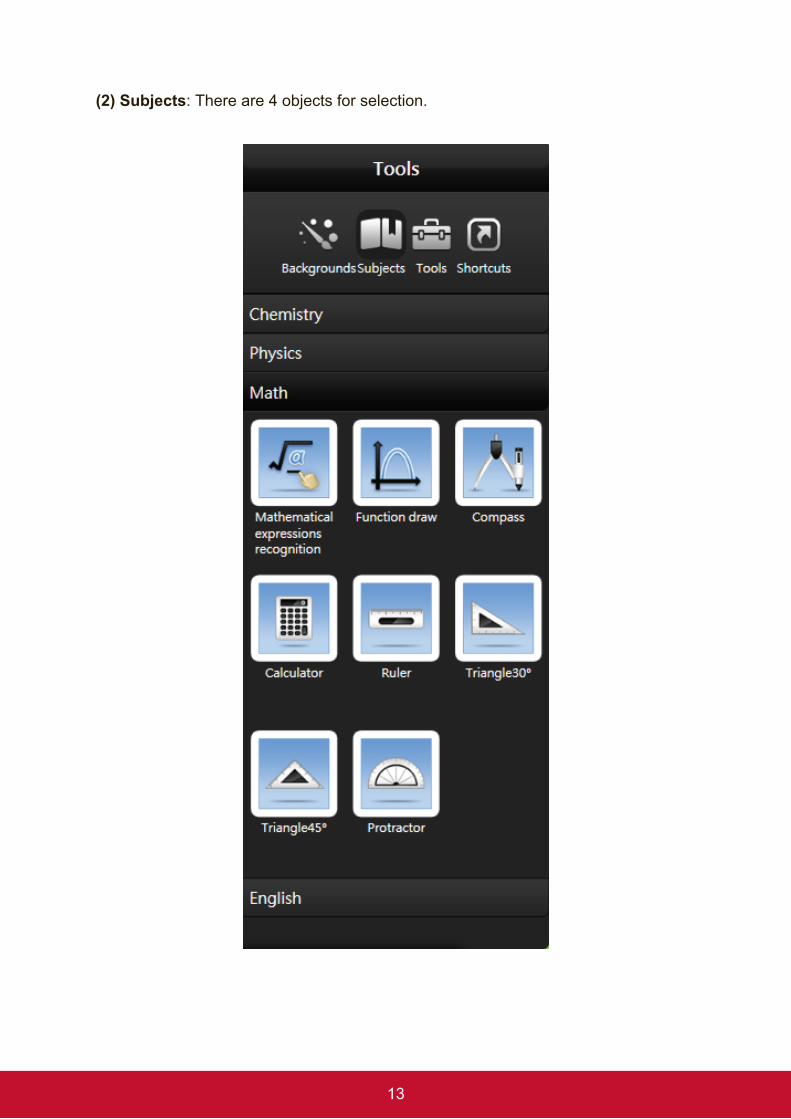
(2) Subjects: There are 4 objects for selection.
14
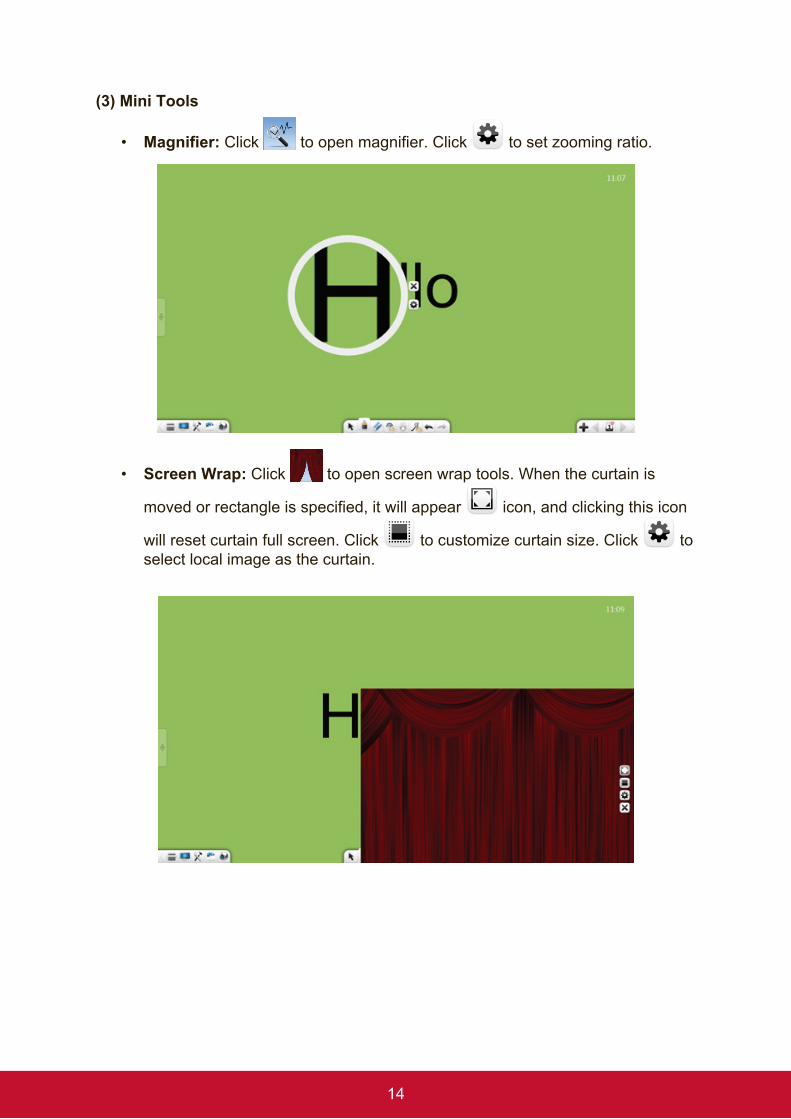
(3) Mini Tools
• Magnifier: Click to open magnifier. Click to set zooming ratio.
• Screen Wrap: Click to open screen wrap tools. When the curtain is
moved or rectangle is specified, it will appear icon, and clicking this icon
will reset curtain full screen. Click to customize curtain size. Click to select local image as the curtain.
15
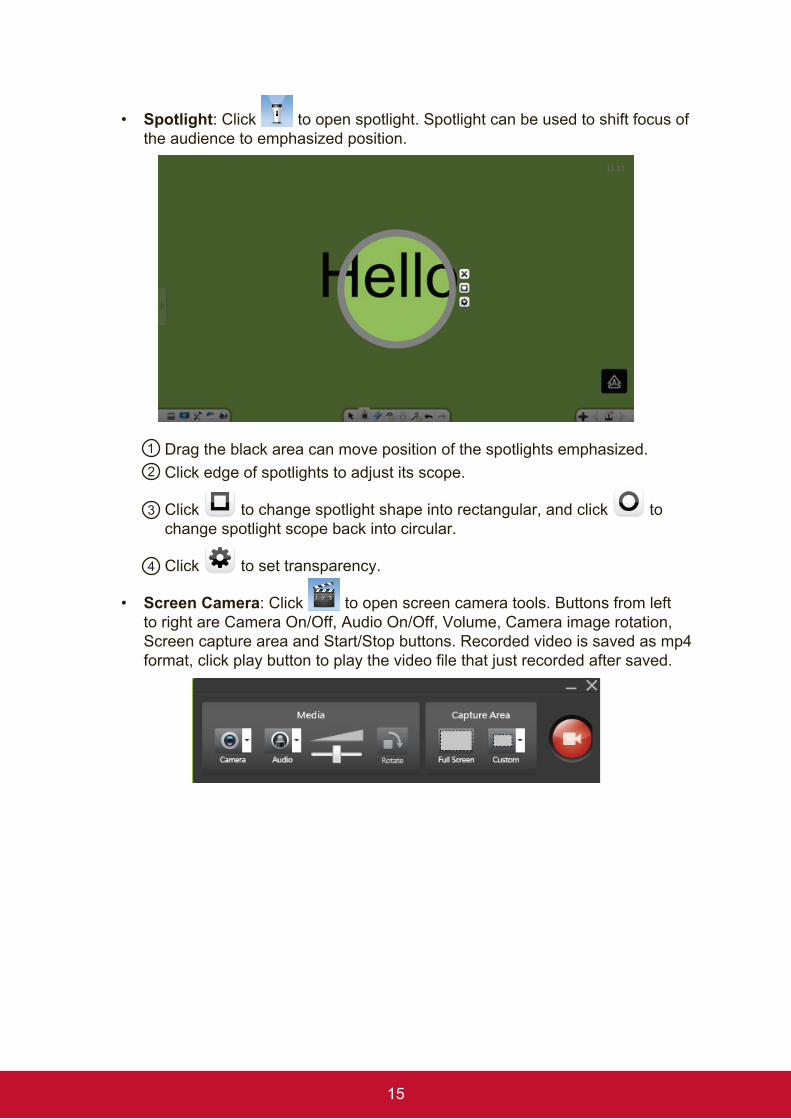
• Spotlight: Click to open spotlight. Spotlight can be used to shift focus of the audience to emphasized position.
1 Drag the black area can move position of the spotlights emphasized.2 Click edge of spotlights to adjust its scope.
3 Click to change spotlight shape into rectangular, and click to change spotlight scope back into circular.
4 Click to set transparency.
• Screen Camera: Click to open screen camera tools. Buttons from left to right are Camera On/Off, Audio On/Off, Volume, Camera image rotation, Screen capture area and Start/Stop buttons. Recorded video is saved as mp4 format, click play button to play the video file that just recorded after saved.
16
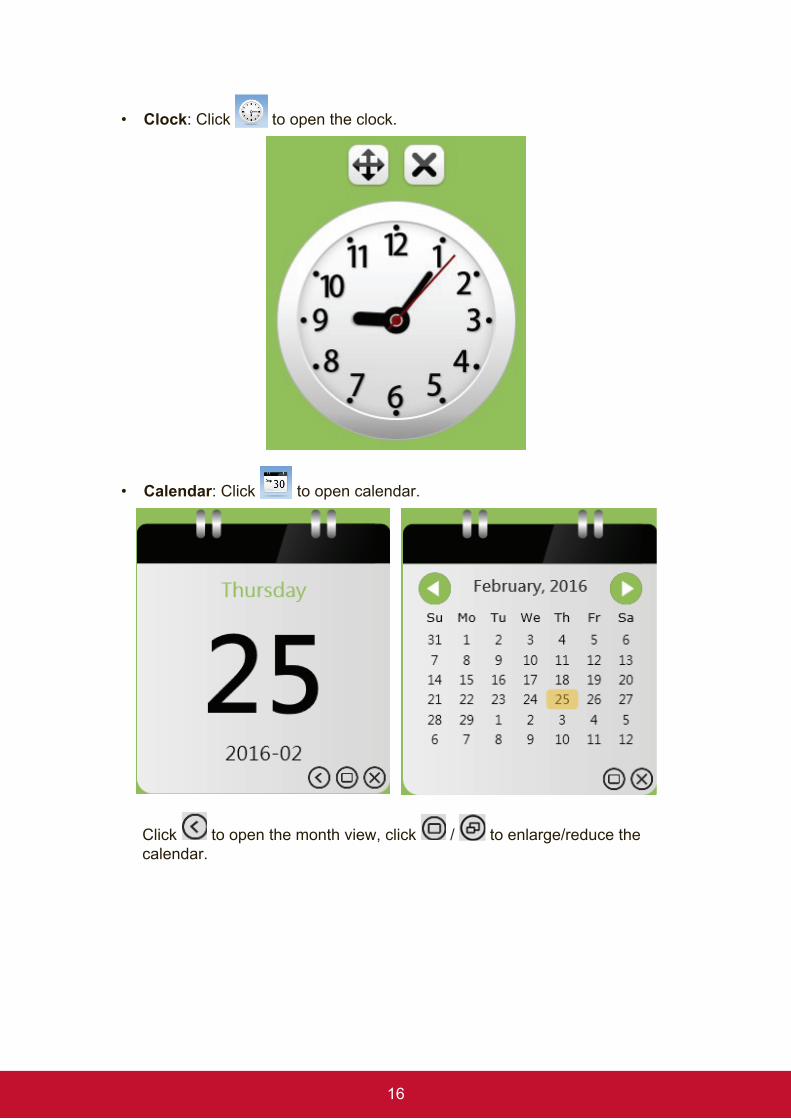
• Clock: Click to open the clock.
• Calendar: Click to open calendar.
Click to open the month view, click / to enlarge/reduce the calendar.
17
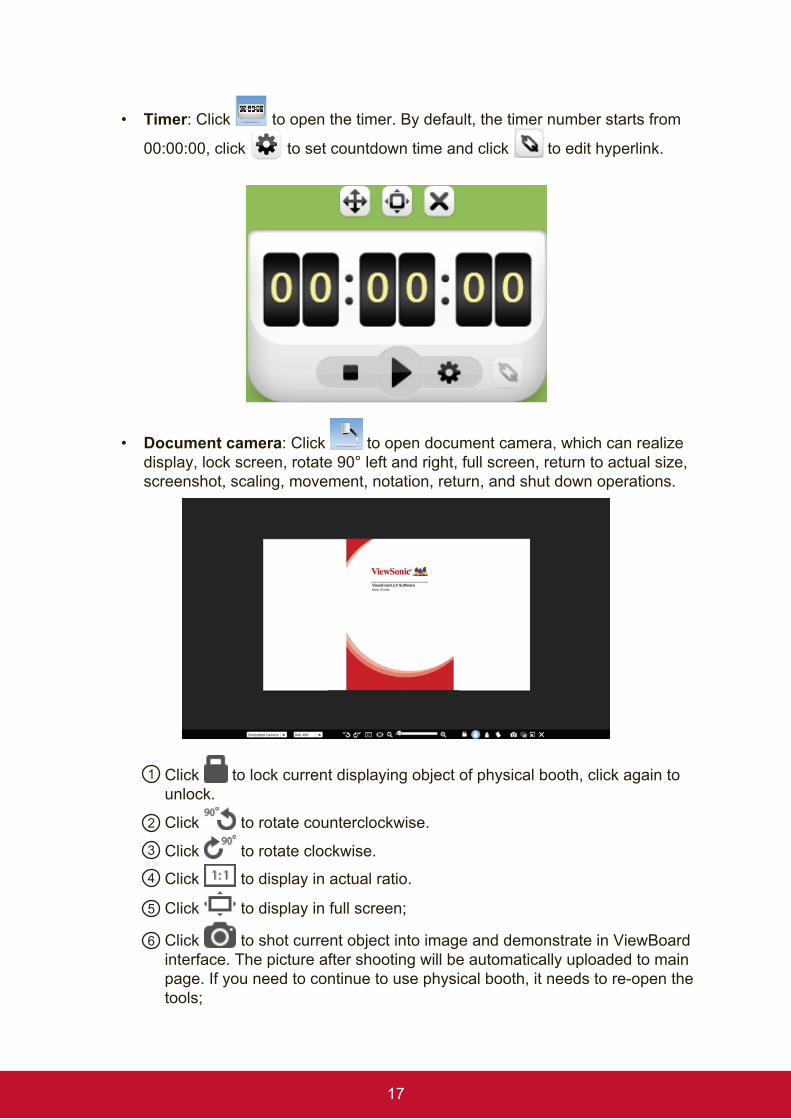
• Timer: Click to open the timer. By default, the timer number starts from
00:00:00, click to set countdown time and click to edit hyperlink.
• Document camera: Click to open document camera, which can realize display, lock screen, rotate 90° left and right, full screen, return to actual size, screenshot, scaling, movement, notation, return, and shut down operations.
1 Click to lock current displaying object of physical booth, click again to unlock.
2 Click to rotate counterclockwise.
3 Click to rotate clockwise.4 Click to display in actual ratio.
5 Click to display in full screen;
6 Click to shot current object into image and demonstrate in ViewBoard interface. The picture after shooting will be automatically uploaded to main page. If you need to continue to use physical booth, it needs to re-open the tools;
18
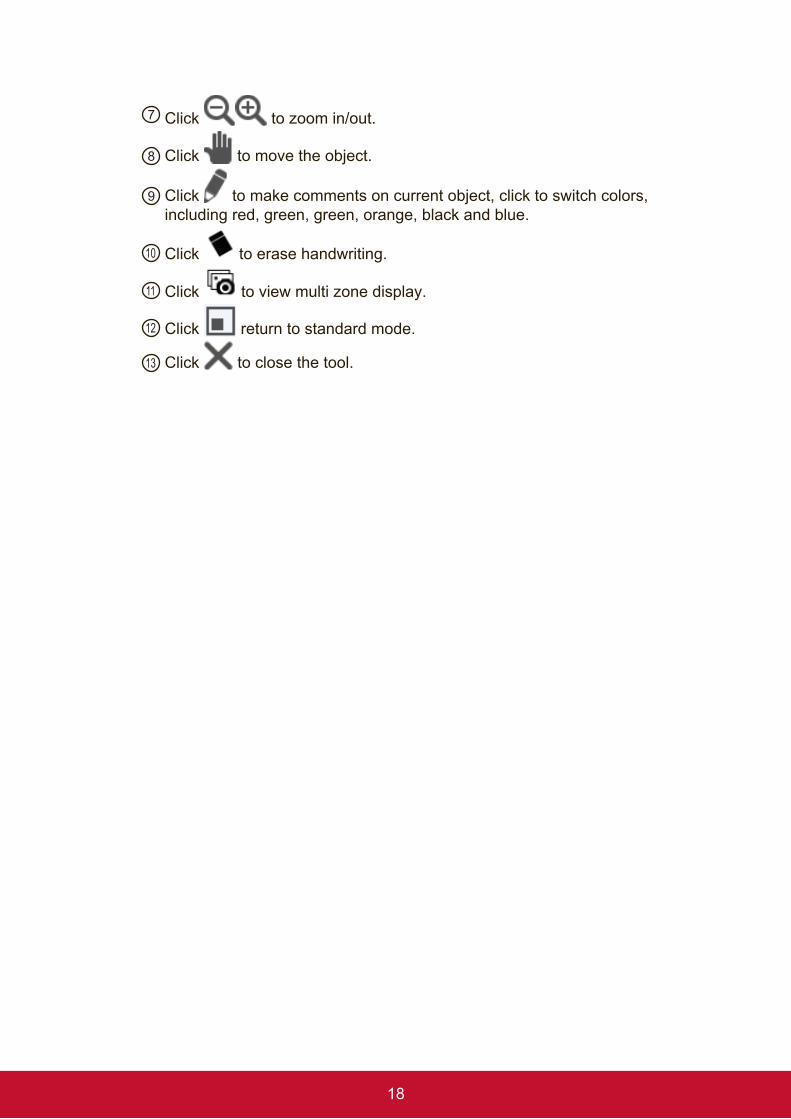
7 Click to zoom in/out.
8 Click to move the object.
9 Click to make comments on current object, click to switch colors, including red, green, green, orange, black and blue.
10 Click to erase handwriting.
11 Click to view multi zone display.
12 Click return to standard mode.
13 Click to close the tool.
19
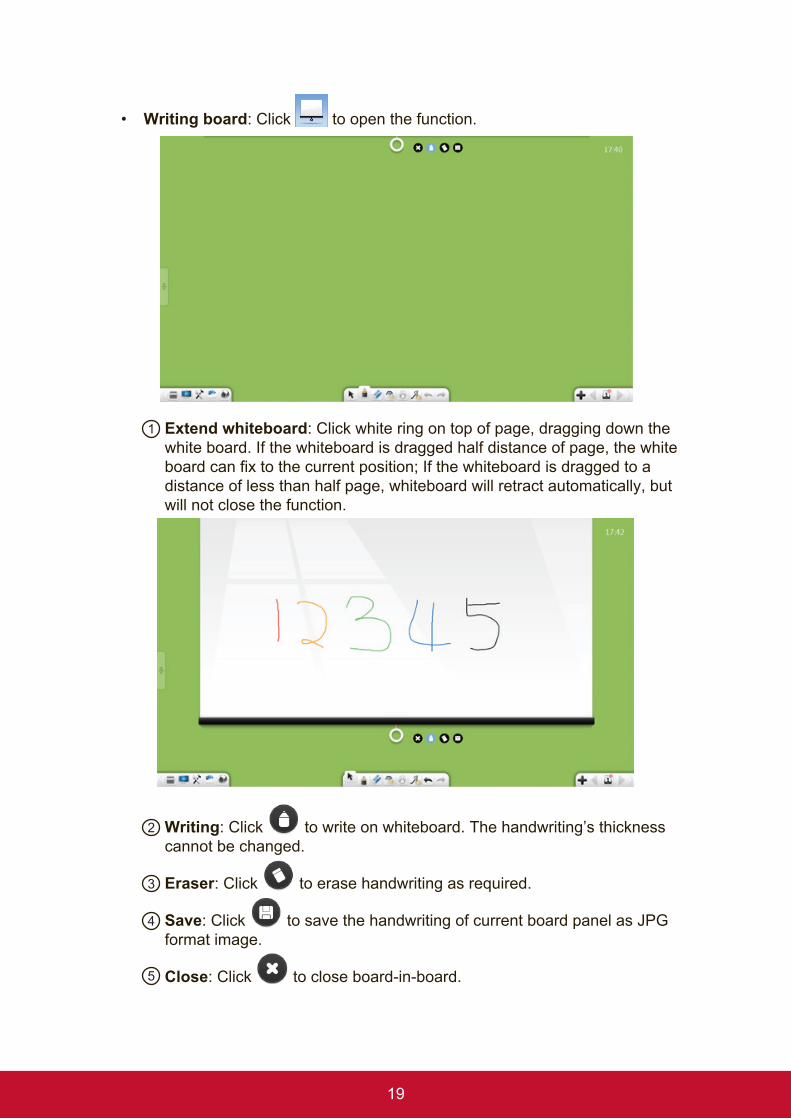
• Writing board: Click to open the function.
1 Extend whiteboard: Click white ring on top of page, dragging down the white board. If the whiteboard is dragged half distance of page, the white board can fix to the current position; If the whiteboard is dragged to a distance of less than half page, whiteboard will retract automatically, but will not close the function.
2 Writing: Click to write on whiteboard. The handwriting’s thickness cannot be changed.
3 Eraser: Click to erase handwriting as required.
4 Save: Click to save the handwriting of current board panel as JPG format image.
5 Close: Click to close board-in-board.
20
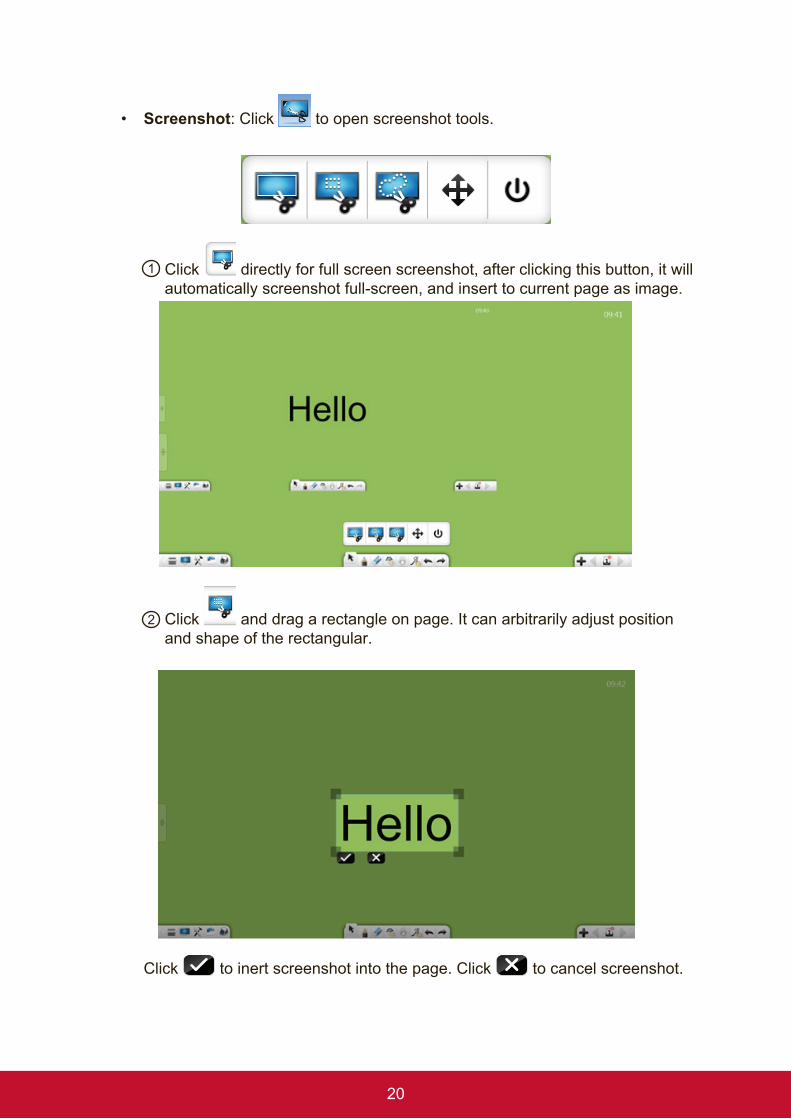
• Screenshot: Click to open screenshot tools.
1 Click directly for full screen screenshot, after clicking this button, it will automatically screenshot full-screen, and insert to current page as image.
2 Click and drag a rectangle on page. It can arbitrarily adjust position and shape of the rectangular.
Click to inert screenshot into the page. Click to cancel screenshot.
21
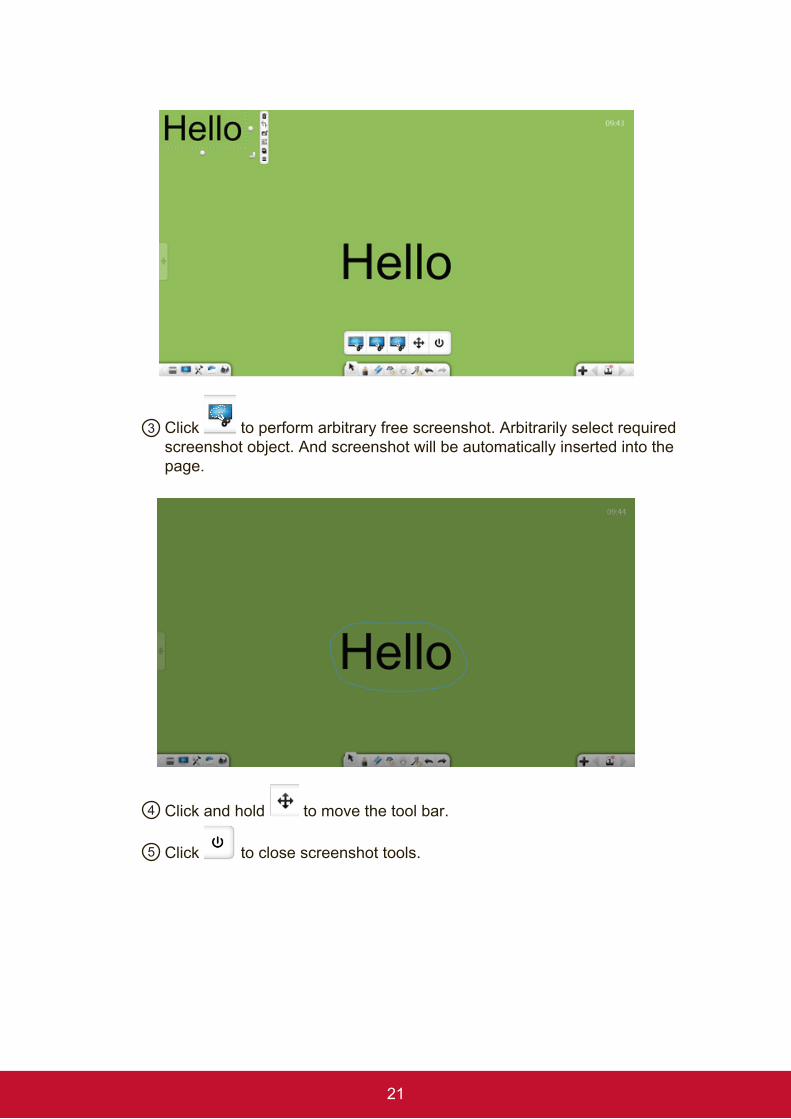
3 Click to perform arbitrary free screenshot. Arbitrarily select required screenshot object. And screenshot will be automatically inserted into the page.
4 Click and hold to move the tool bar.
5 Click to close screenshot tools.
22
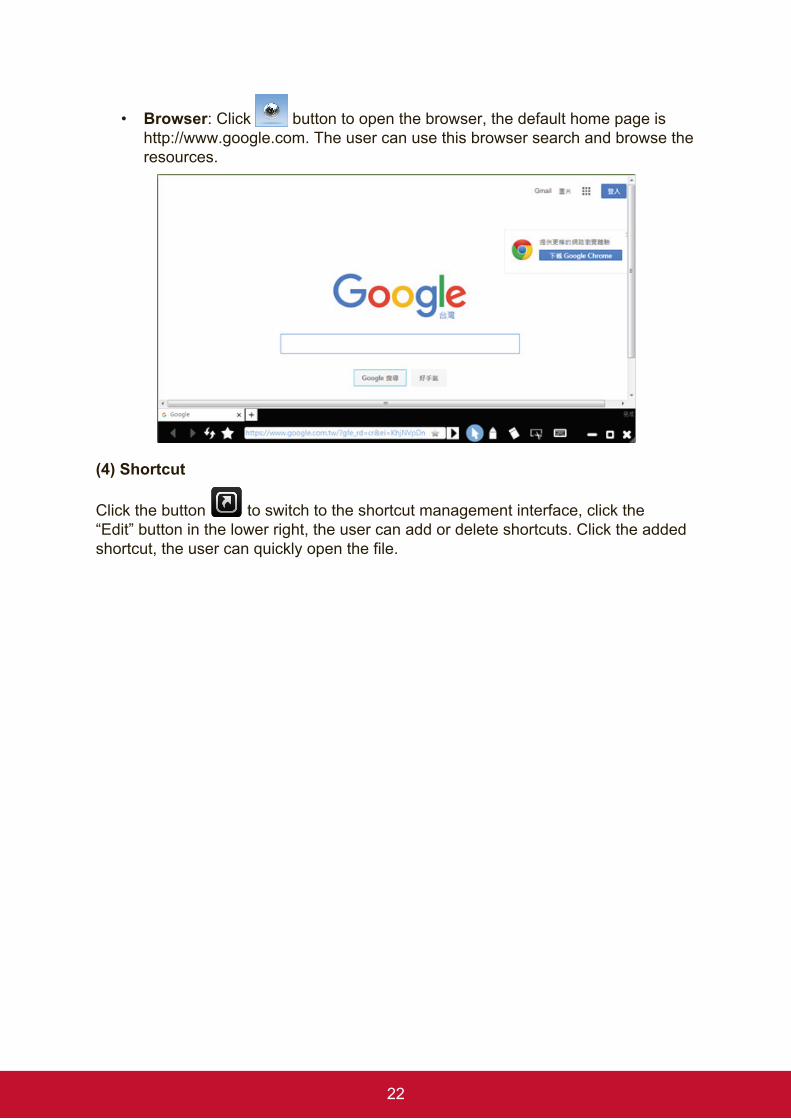
• Browser: Click button to open the browser, the default home page is http://www.google.com. The user can use this browser search and browse the resources.
(4) Shortcut
Click the button to switch to the shortcut management interface, click the “Edit” button in the lower right, the user can add or delete shortcuts. Click the added shortcut, the user can quickly open the file.
23
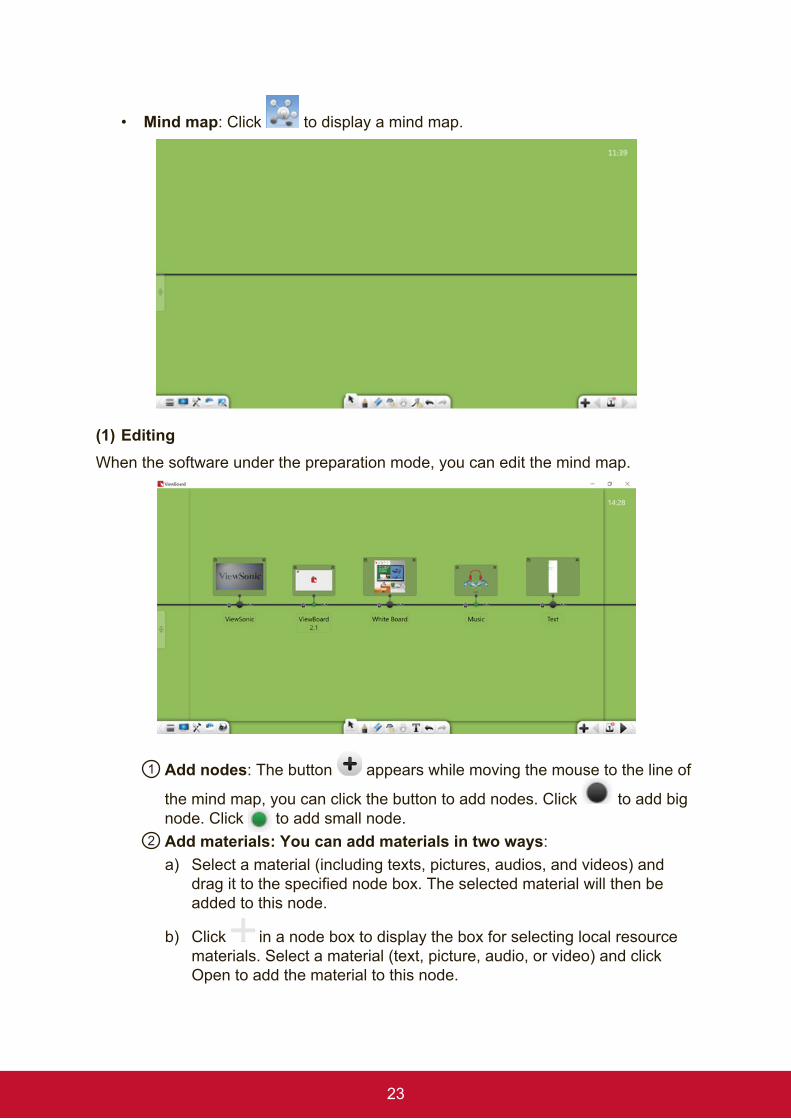
• Mind map: Click to display a mind map.
(1) EditingWhen the software under the preparation mode, you can edit the mind map.
1 Add nodes: The button appears while moving the mouse to the line of
the mind map, you can click the button to add nodes. Click to add big node. Click to add small node.
2 Add materials: You can add materials in two ways: a) Select a material (including texts, pictures, audios, and videos) and
drag it to the specified node box. The selected material will then be added to this node.
b) Click in a node box to display the box for selecting local resource materials. Select a material (text, picture, audio, or video) and click Open to add the material to this node.
24
3 Export materials: Click in the upper left corner of the node box to export the materials of this node to the page.
4 Delete materials: Click in the upper right corner of the node box to delete the materials of this node.
5 Delete nodes: Click on the left of a node to delete the node.
6 Move nodes: Click and drag or to move the corresponding node leftwards or rightwards.
7 Move nodes partially: Click and drag on the right of a node to move this node and all nodes on its right side.
8 Move nodes wholly: Click and drag the guide axis to move all nodes on the axis leftwards or rightwards.
9 Name nodes: Enter characters in the text box below a node to name this node.
10 Preview: Click the material of a node to display the preview interface. The hyperlink function in editing mode is different from that in play mode. Other functions are the same. For details, see the description below. Hyperlink: If you preview materials in editing mode, click to set a hyperlink for the node.
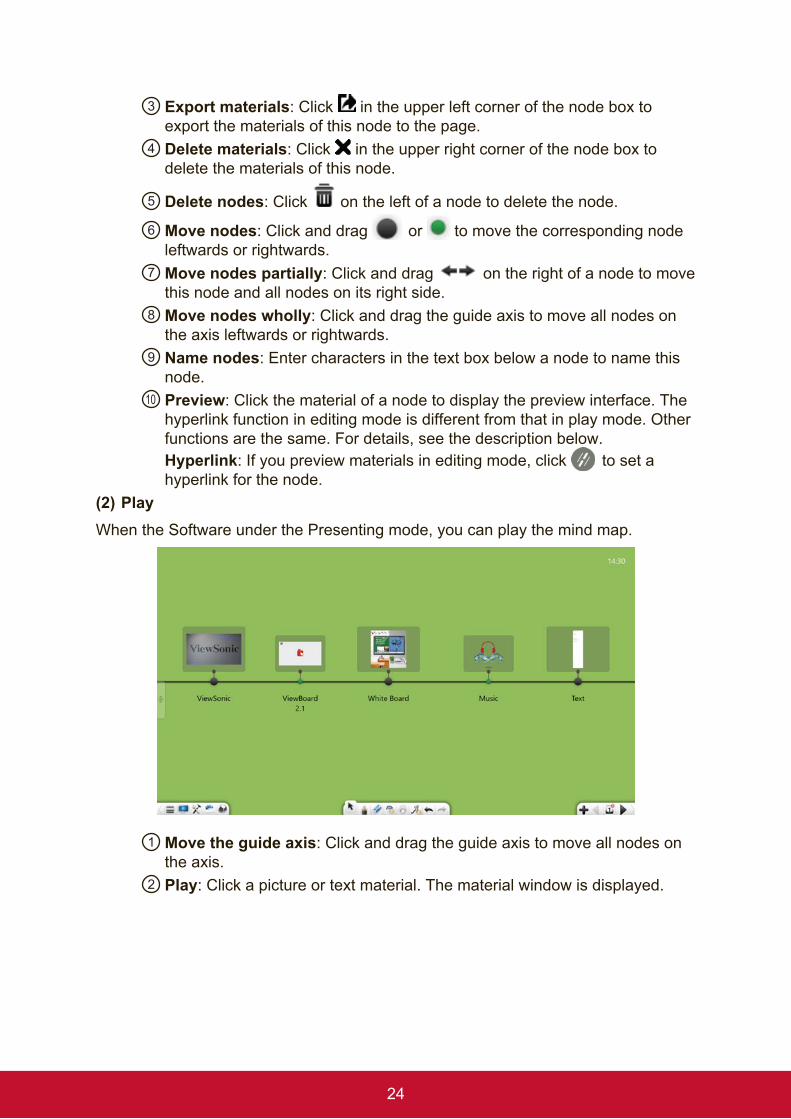
(2) PlayWhen the Software under the Presenting mode, you can play the mind map.
1 Move the guide axis: Click and drag the guide axis to move all nodes on the axis.
2 Play: Click a picture or text material. The material window is displayed.
25
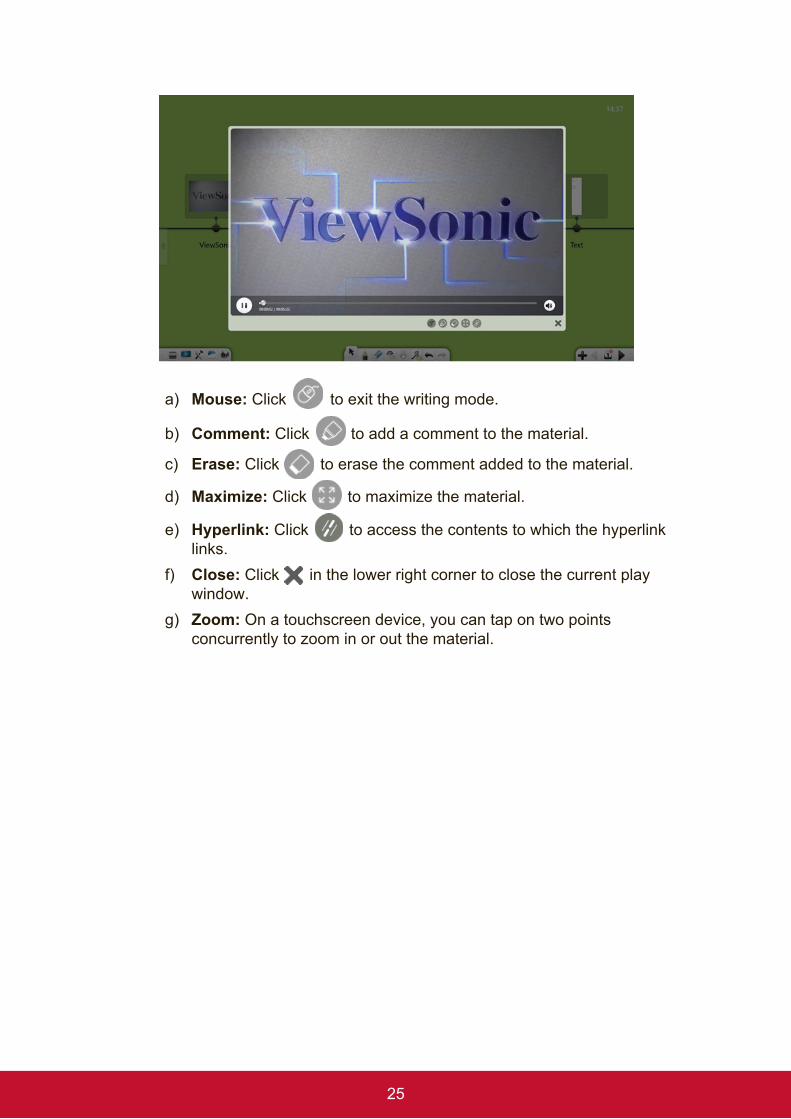
a) Mouse: Click to exit the writing mode.
b) Comment: Click to add a comment to the material.
c) Erase: Click to erase the comment added to the material.
d) Maximize: Click to maximize the material.
e) Hyperlink: Click to access the contents to which the hyperlink links.
f) Close: Click in the lower right corner to close the current play window.
g) Zoom: On a touchscreen device, you can tap on two points concurrently to zoom in or out the material.
26
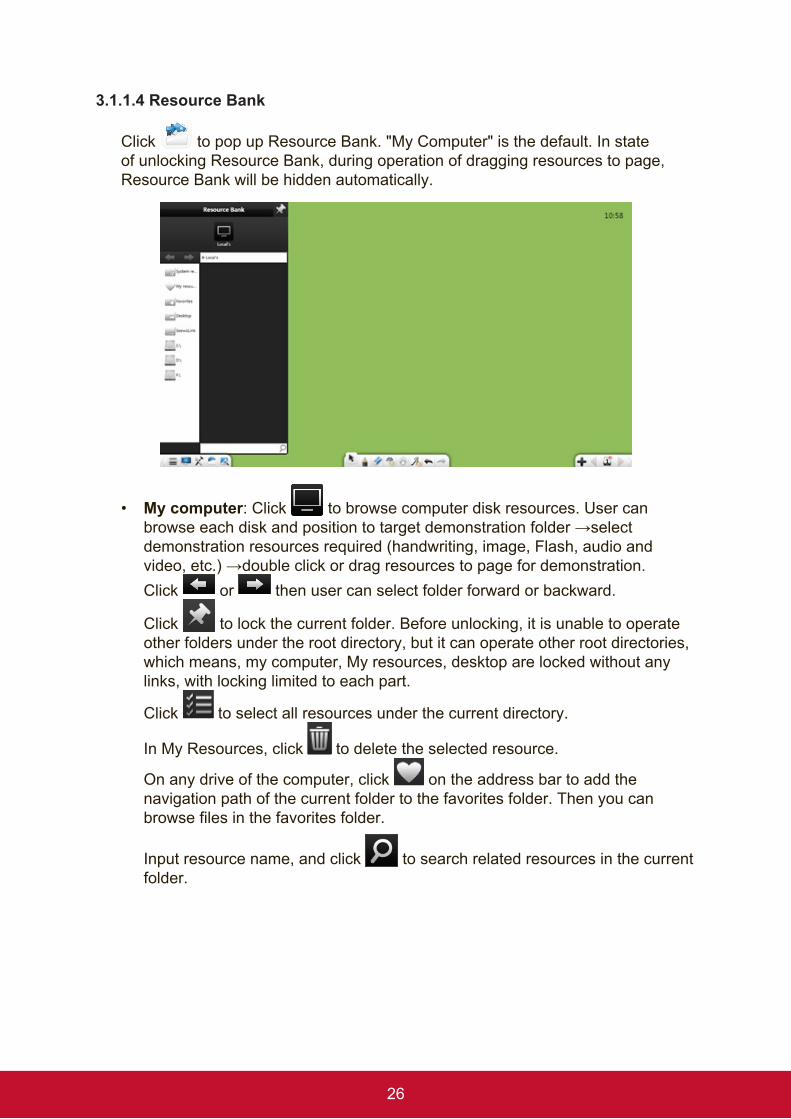
3.1.1.4 Resource Bank
Click to pop up Resource Bank. "My Computer" is the default. In state of unlocking Resource Bank, during operation of dragging resources to page, Resource Bank will be hidden automatically.
• My computer: Click to browse computer disk resources. User can browseeachdiskandpositiontotargetdemonstrationfolder→selectdemonstration resources required (handwriting, image, Flash, audio and video,etc.)→doubleclickordragresourcestopagefordemonstration. Click or then user can select folder forward or backward.
Click to lock the current folder. Before unlocking, it is unable to operate other folders under the root directory, but it can operate other root directories, which means, my computer, My resources, desktop are locked without any links, with locking limited to each part.
Click to select all resources under the current directory.
In My Resources, click to delete the selected resource.
On any drive of the computer, click on the address bar to add the navigation path of the current folder to the favorites folder. Then you can browse files in the favorites folder.
Input resource name, and click to search related resources in the current folder.
27
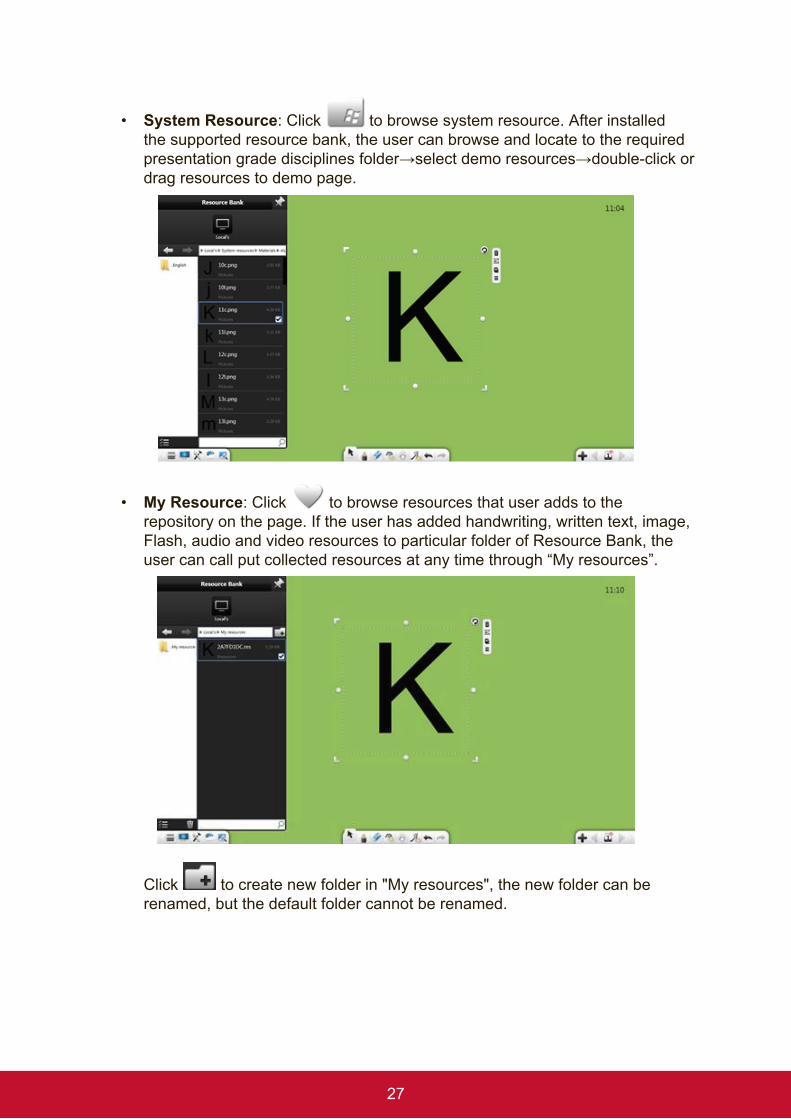
• System Resource: Click to browse system resource. After installed the supported resource bank, the user can browse and locate to the required presentationgradedisciplinesfolder→selectdemoresources→double-clickordrag resources to demo page.
• My Resource: Click to browse resources that user adds to the repository on the page. If the user has added handwriting, written text, image, Flash, audio and video resources to particular folder of Resource Bank, the user can call put collected resources at any time through “My resources”.
Click to create new folder in "My resources", the new folder can be renamed, but the default folder cannot be renamed.
28
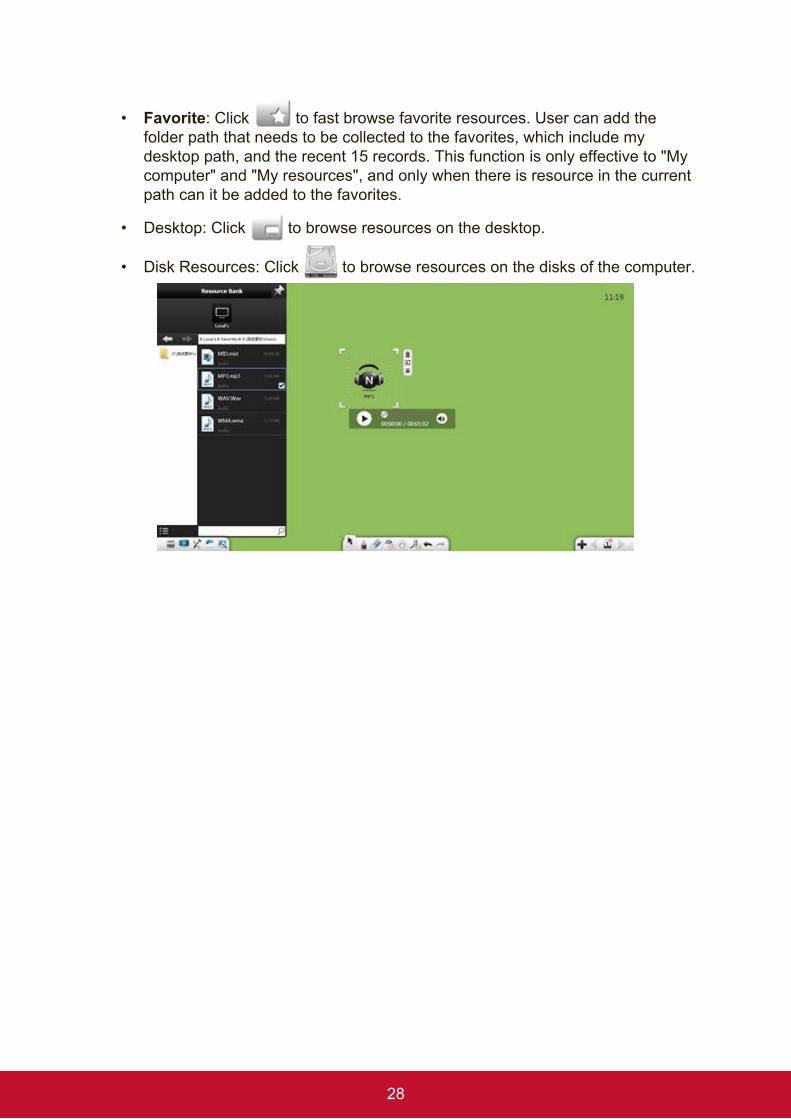
• Favorite: Click to fast browse favorite resources. User can add the folder path that needs to be collected to the favorites, which include my desktop path, and the recent 15 records. This function is only effective to "My computer" and "My resources", and only when there is resource in the current path can it be added to the favorites.
• Desktop: Click to browse resources on the desktop.
• Disk Resources: Click to browse resources on the disks of the computer.
29
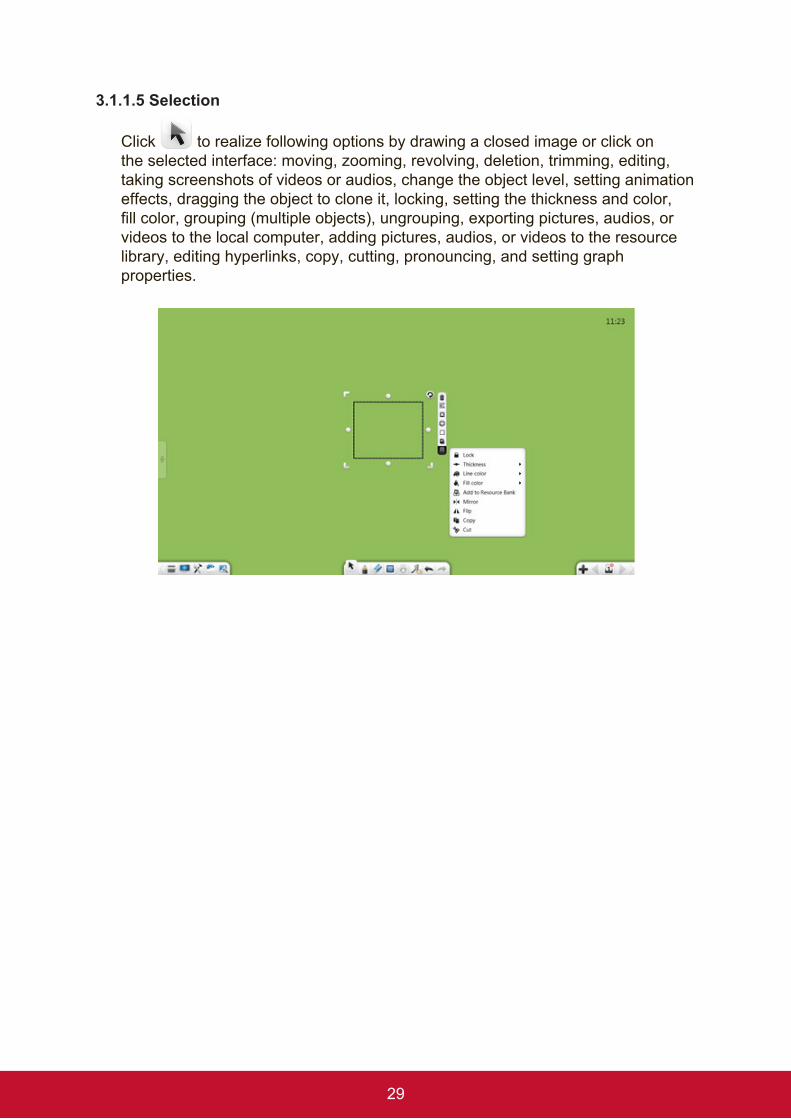
3.1.1.5 Selection
Click to realize following options by drawing a closed image or click on the selected interface: moving, zooming, revolving, deletion, trimming, editing, taking screenshots of videos or audios, change the object level, setting animation effects, dragging the object to clone it, locking, setting the thickness and color, fill color, grouping (multiple objects), ungrouping, exporting pictures, audios, or videos to the local computer, adding pictures, audios, or videos to the resource library, editing hyperlinks, copy, cutting, pronouncing, and setting graph properties.
30
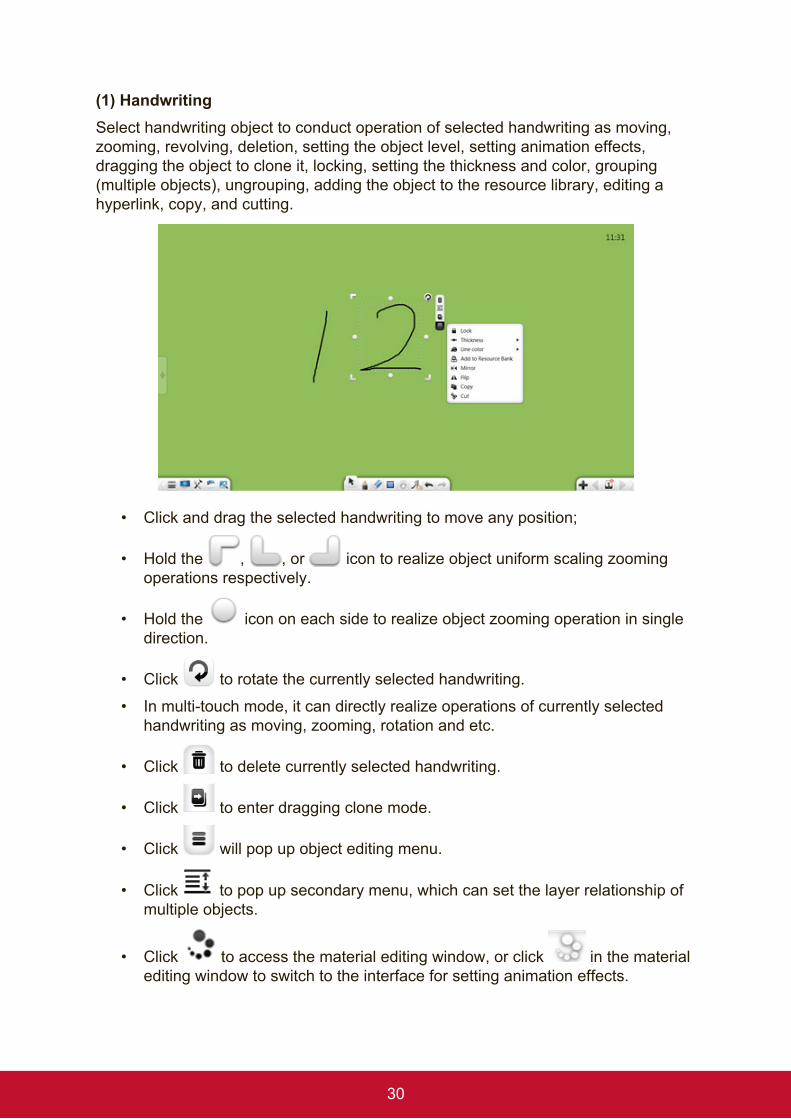
(1) HandwritingSelect handwriting object to conduct operation of selected handwriting as moving, zooming, revolving, deletion, setting the object level, setting animation effects, dragging the object to clone it, locking, setting the thickness and color, grouping (multiple objects), ungrouping, adding the object to the resource library, editing a hyperlink, copy, and cutting.
• Click and drag the selected handwriting to move any position;
• Hold the , , or icon to realize object uniform scaling zooming operations respectively.
• Hold the icon on each side to realize object zooming operation in single direction.
• Click to rotate the currently selected handwriting.
• In multi-touch mode, it can directly realize operations of currently selected handwriting as moving, zooming, rotation and etc.
• Click to delete currently selected handwriting.
• Click to enter dragging clone mode.
• Click will pop up object editing menu.
• Click to pop up secondary menu, which can set the layer relationship of multiple objects.
• Click to access the material editing window, or click in the material editing window to switch to the interface for setting animation effects.
31
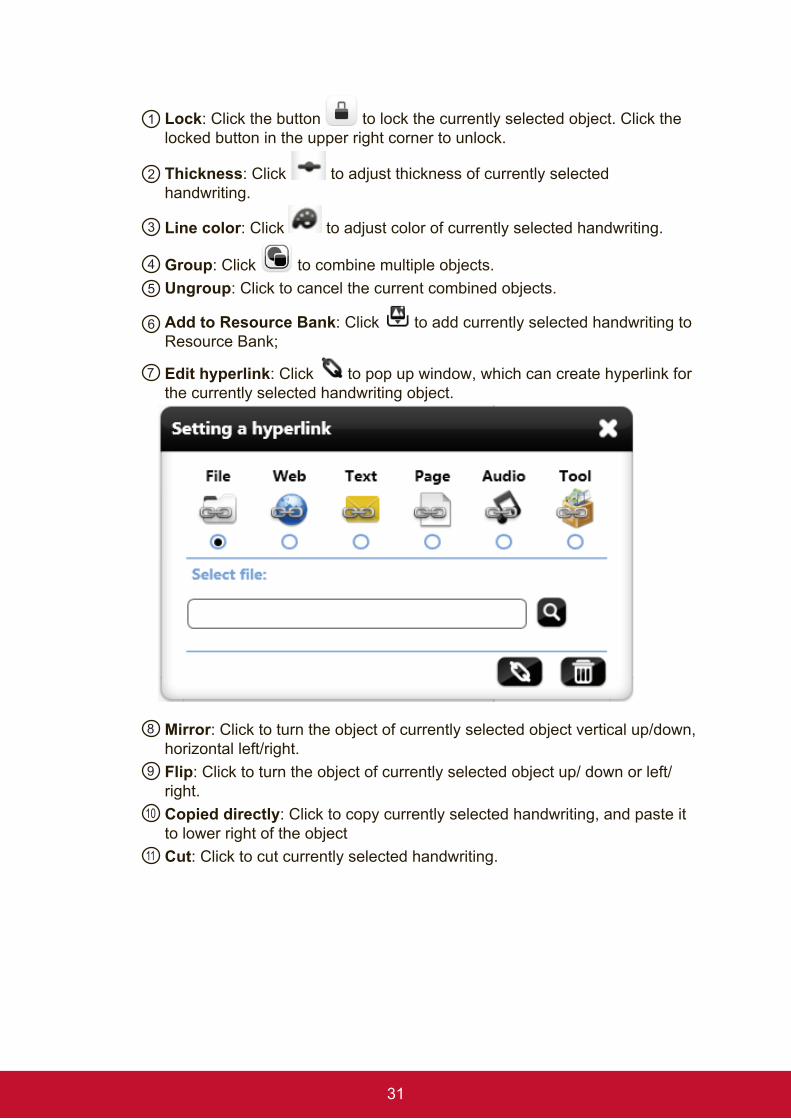
1 Lock: Click the button to lock the currently selected object. Click the locked button in the upper right corner to unlock.
2 Thickness: Click to adjust thickness of currently selected handwriting.
3 Line color: Click to adjust color of currently selected handwriting.
4 Group: Click to combine multiple objects.5 Ungroup: Click to cancel the current combined objects.
6 Add to Resource Bank: Click to add currently selected handwriting to Resource Bank;
7 Edit hyperlink: Click to pop up window, which can create hyperlink for the currently selected handwriting object.
8 Mirror: Click to turn the object of currently selected object vertical up/down, horizontal left/right.
9 Flip: Click to turn the object of currently selected object up/ down or left/right.
10 Copied directly: Click to copy currently selected handwriting, and paste it to lower right of the object
11 Cut: Click to cut currently selected handwriting.
32
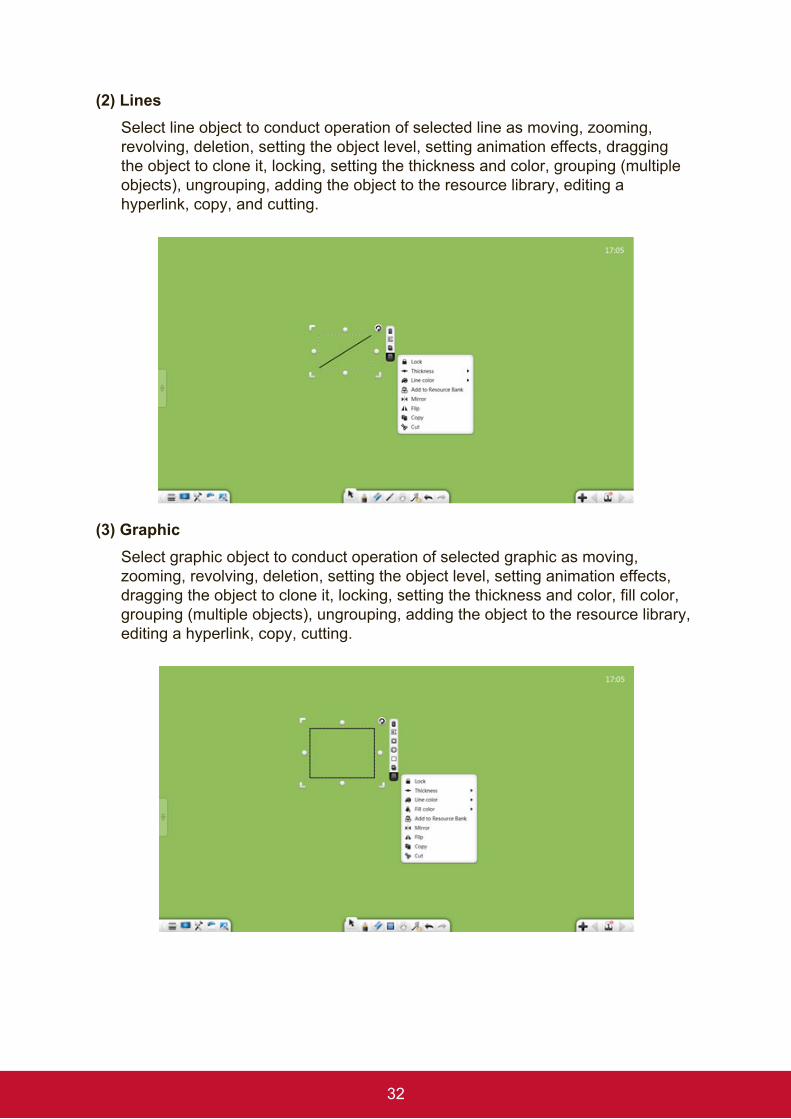
(2) LinesSelect line object to conduct operation of selected line as moving, zooming, revolving, deletion, setting the object level, setting animation effects, dragging the object to clone it, locking, setting the thickness and color, grouping (multiple objects), ungrouping, adding the object to the resource library, editing a hyperlink, copy, and cutting.
(3) GraphicSelect graphic object to conduct operation of selected graphic as moving, zooming, revolving, deletion, setting the object level, setting animation effects, dragging the object to clone it, locking, setting the thickness and color, fill color, grouping (multiple objects), ungrouping, adding the object to the resource library, editing a hyperlink, copy, cutting.
33
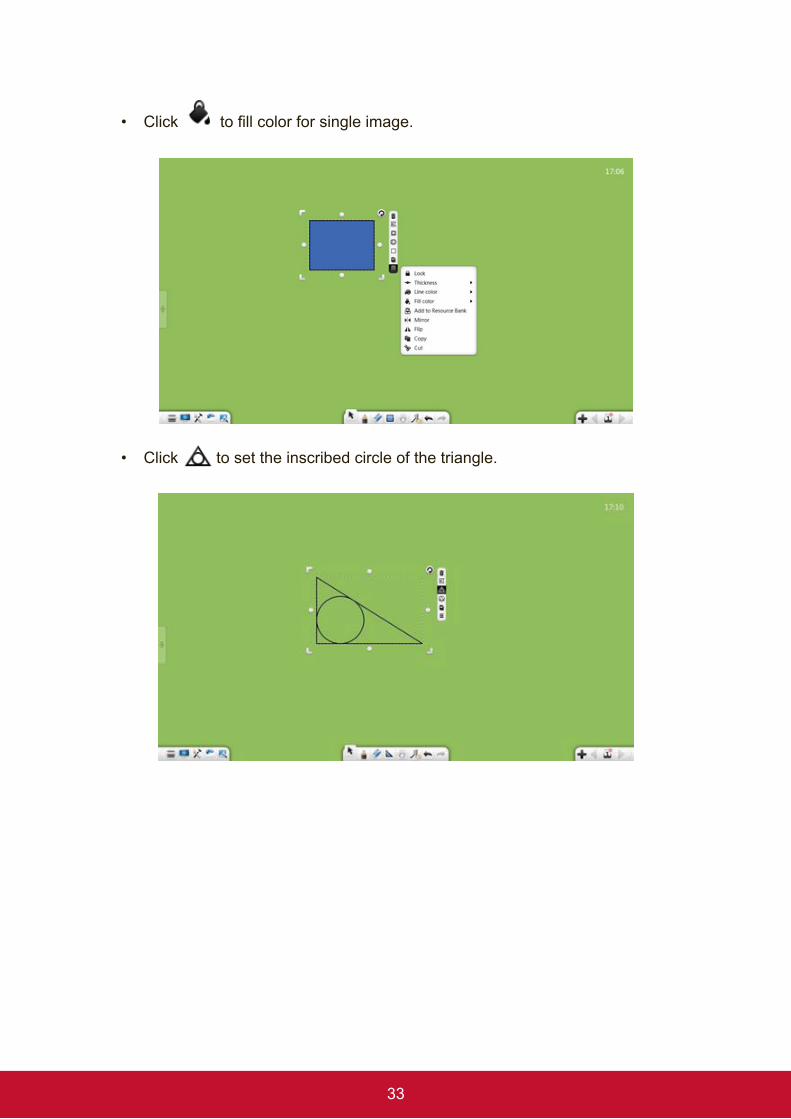
• Click to fill color for single image.
• Click to set the inscribed circle of the triangle.
34
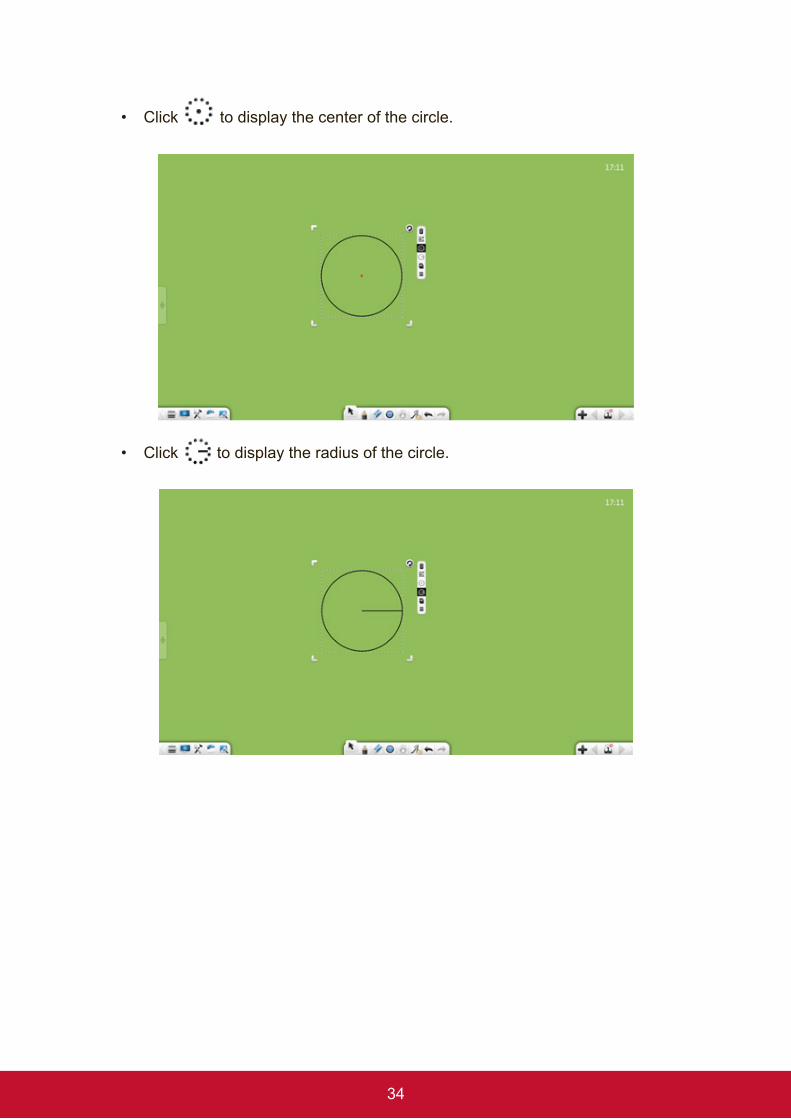
• Click to display the center of the circle.
• Click to display the radius of the circle.
35
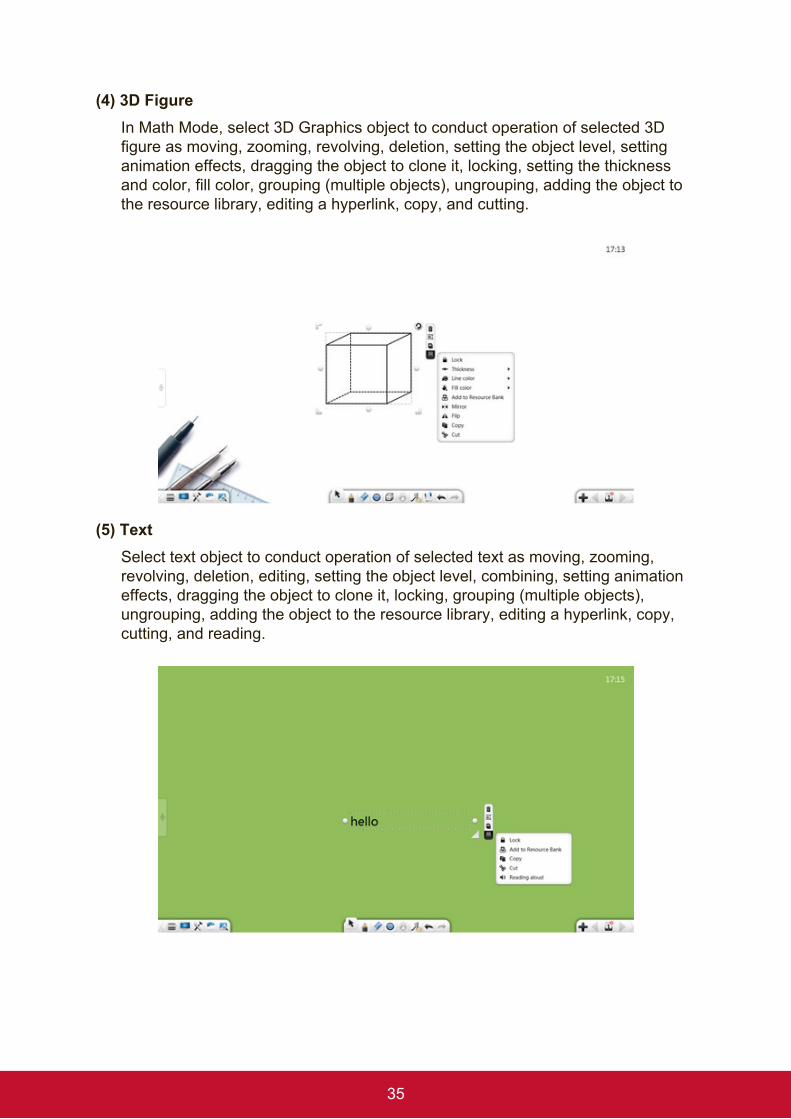
(4) 3D FigureIn Math Mode, select 3D Graphics object to conduct operation of selected 3D figure as moving, zooming, revolving, deletion, setting the object level, setting animation effects, dragging the object to clone it, locking, setting the thickness and color, fill color, grouping (multiple objects), ungrouping, adding the object to the resource library, editing a hyperlink, copy, and cutting.
(5) TextSelect text object to conduct operation of selected text as moving, zooming, revolving, deletion, editing, setting the object level, combining, setting animation effects, dragging the object to clone it, locking, grouping (multiple objects), ungrouping, adding the object to the resource library, editing a hyperlink, copy, cutting, and reading.
36
• Edit text: Select and click the text to enter the text editing state. You can edit the selected text.
• Read Aloud: Click to read the currently selected text. Under XP, there is no reading function.
• Merger: Click to combine the currently selected two groups (or more than two sets of texts), with the selected text automatic typesetting to the end of the first set of text.
1 Keep Source Formatting: Click to keep their original text format.
2 Combine Formatting: Click button, the text formats such as font, size, and color are the same as the first set of text.
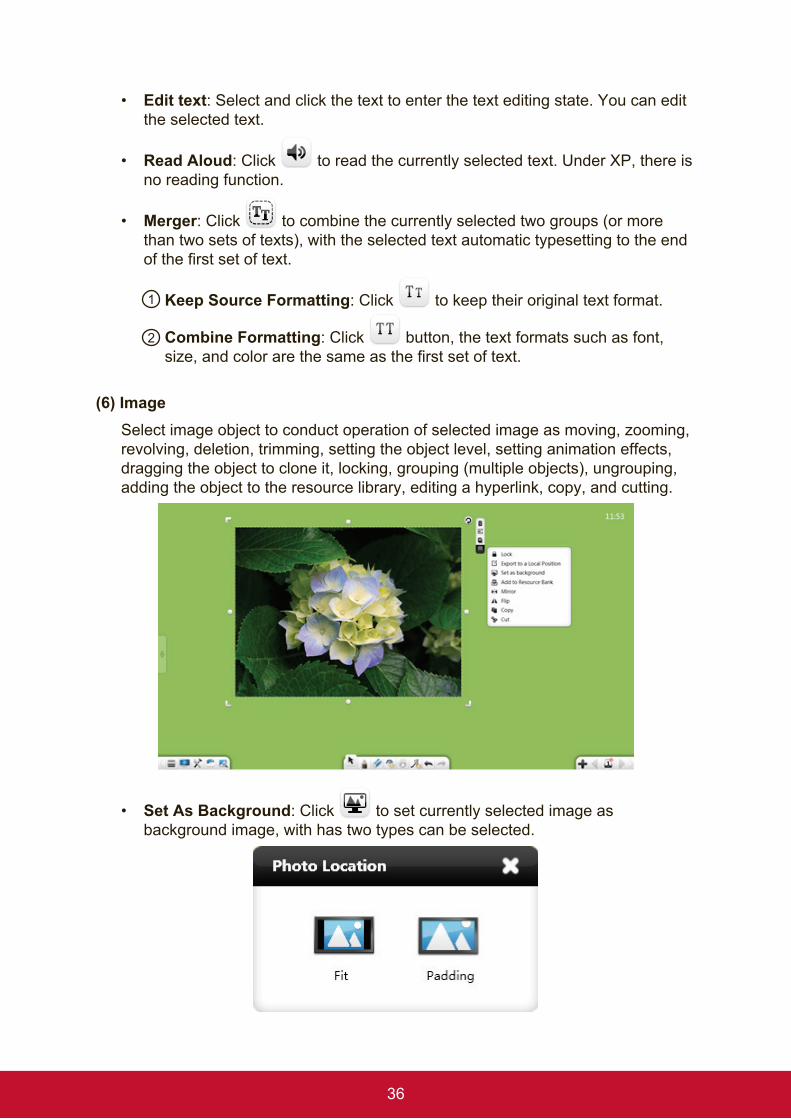
(6) ImageSelect image object to conduct operation of selected image as moving, zooming, revolving, deletion, trimming, setting the object level, setting animation effects, dragging the object to clone it, locking, grouping (multiple objects), ungrouping, adding the object to the resource library, editing a hyperlink, copy, and cutting.
• Set As Background: Click to set currently selected image as background image, with has two types can be selected.
37
• Export: Click to export the currently selected picture in its original format.
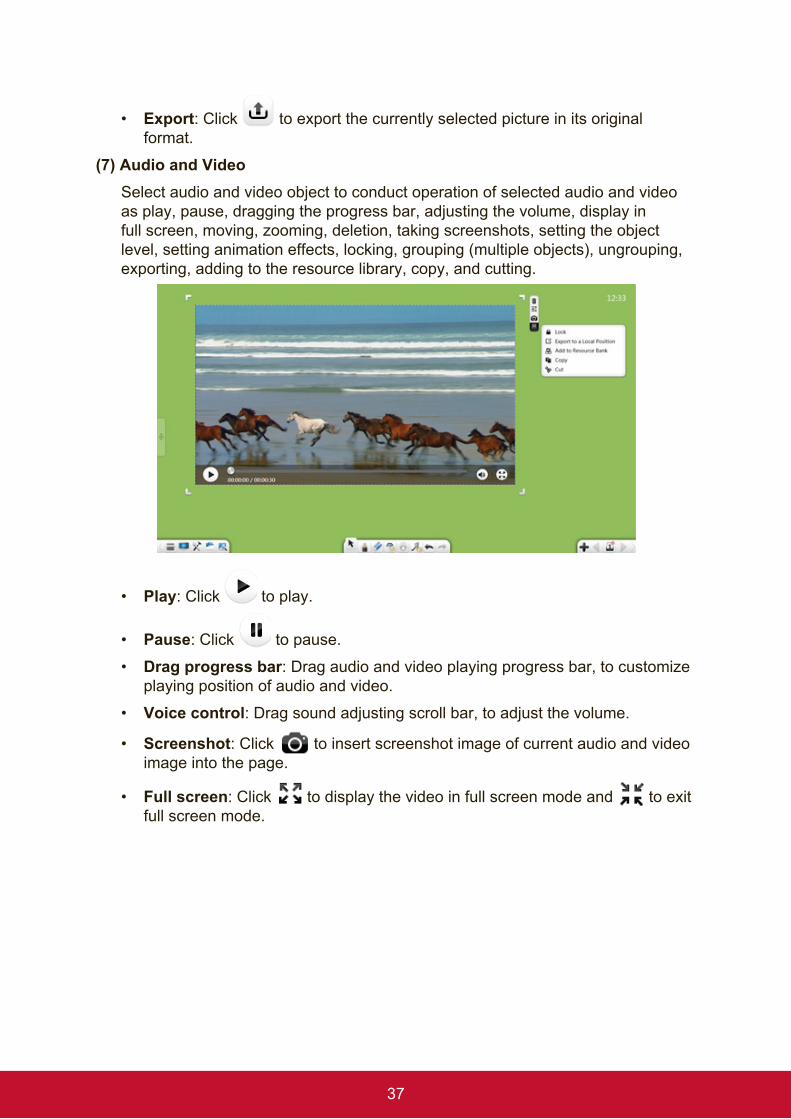
(7) Audio and VideoSelect audio and video object to conduct operation of selected audio and video as play, pause, dragging the progress bar, adjusting the volume, display in full screen, moving, zooming, deletion, taking screenshots, setting the object level, setting animation effects, locking, grouping (multiple objects), ungrouping, exporting, adding to the resource library, copy, and cutting.
• Play: Click to play.
• Pause: Click to pause.
• Drag progress bar: Drag audio and video playing progress bar, to customize playing position of audio and video.
• Voice control: Drag sound adjusting scroll bar, to adjust the volume.
• Screenshot: Click to insert screenshot image of current audio and video image into the page.
• Full screen: Click to display the video in full screen mode and to exit full screen mode.
38
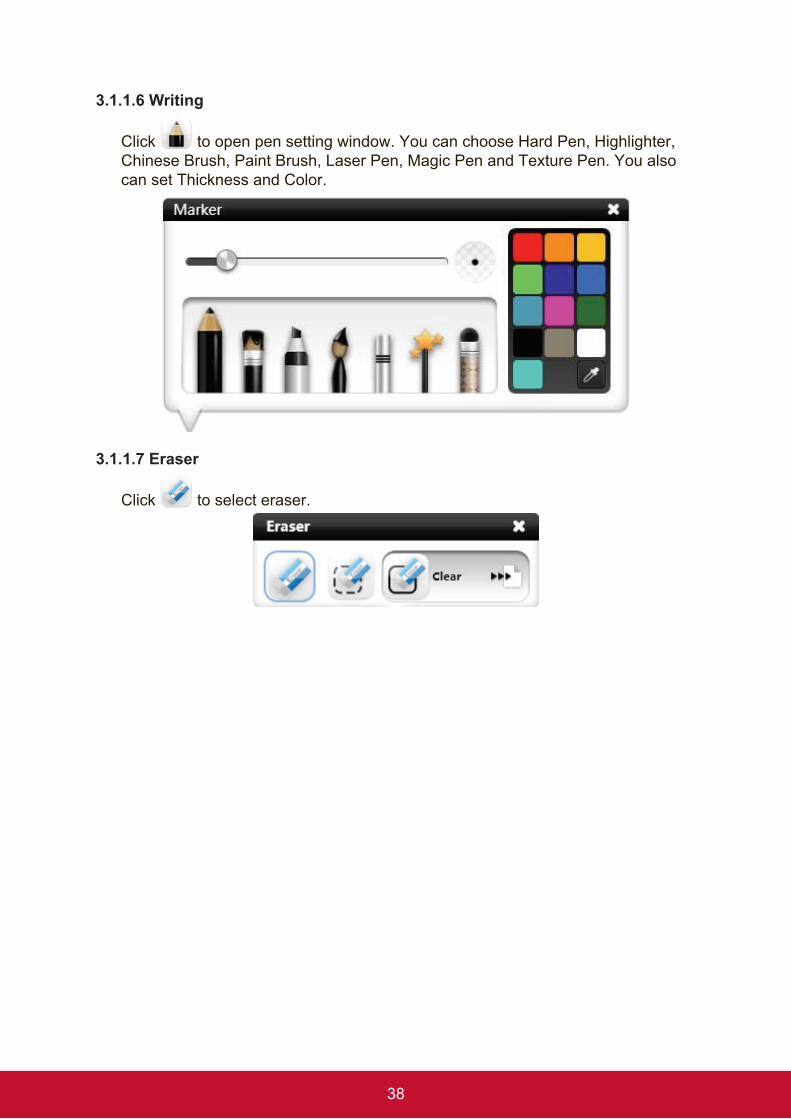
3.1.1.6 Writing
Click to open pen setting window. You can choose Hard Pen, Highlighter, Chinese Brush, Paint Brush, Laser Pen, Magic Pen and Texture Pen. You also can set Thickness and Color.
3.1.1.7 Eraser
Click to select eraser.

39
3.1.1.8 Shap
Click to display the shape screen. By default, the Shape Recognizer mode is selected, Line Weight is set to Thin, and Line Color is set to Black. You can set the shape type, frame/line thickness, frame/line color, and filled geometric figures. The figure types include Shape Recognizer, Circle, Ellipse, Parallelogram, Right Triangle, Trapezoid, Isosceles Triangle, Rectangle, Rubber Band, Dotted Rubber Band, Dotted Line, Wave Line, Arrow, and Line Segment.
3.1.1.9 Handwriting Recognition
Click to enable the handwriting recognition function and a quill-pen is displayed. After writing on the page, the handwriting is automatically recognized and displayed on the page.
40
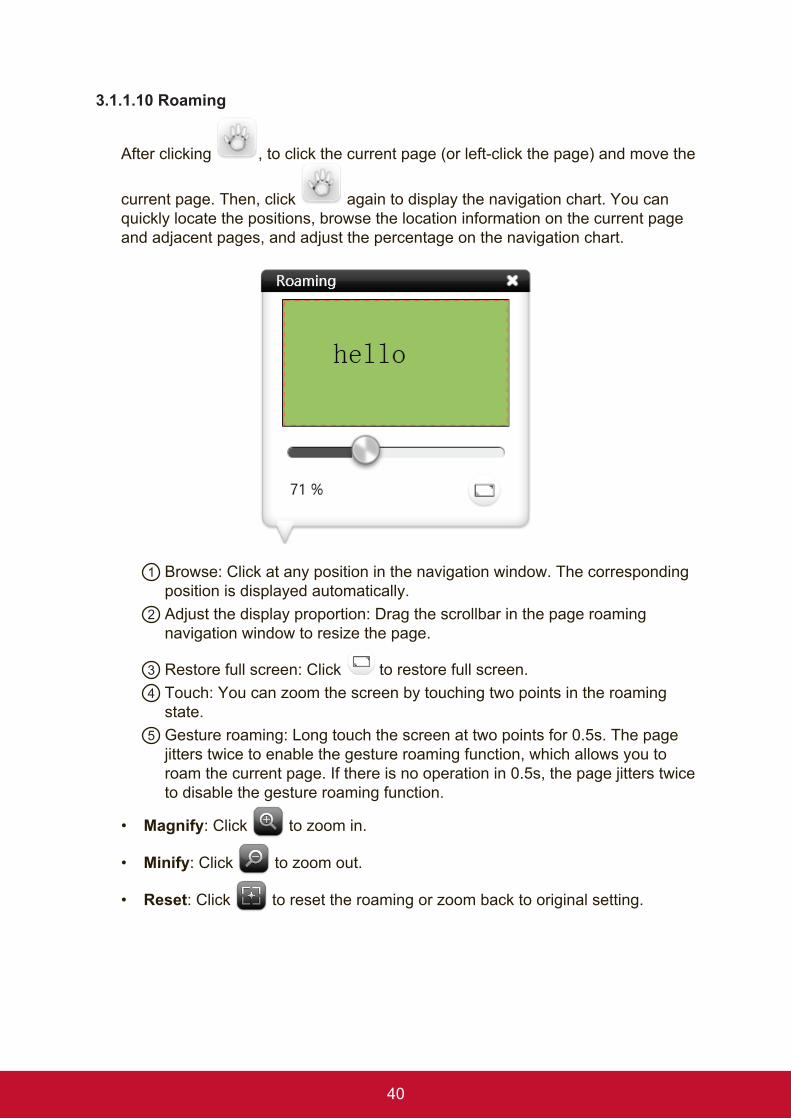
3.1.1.10 Roaming
After clicking , to click the current page (or left-click the page) and move the
current page. Then, click again to display the navigation chart. You can quickly locate the positions, browse the location information on the current page and adjacent pages, and adjust the percentage on the navigation chart.
1 Browse: Click at any position in the navigation window. The corresponding position is displayed automatically.
2 Adjust the display proportion: Drag the scrollbar in the page roaming navigation window to resize the page.
3 Restore full screen: Click to restore full screen. 4 Touch: You can zoom the screen by touching two points in the roaming
state.5 Gesture roaming: Long touch the screen at two points for 0.5s. The page
jitters twice to enable the gesture roaming function, which allows you to roam the current page. If there is no operation in 0.5s, the page jitters twice to disable the gesture roaming function.
• Magnify: Click to zoom in.
• Minify: Click to zoom out.
• Reset: Click to reset the roaming or zoom back to original setting.
41
3.1.1.11 Undo
Click to undo previous operation.
3.1.1.12 Redo
Click to restore previous operation.
3.1.1.13 Add Page
If the current page is the last page, click to add a new page.
3.1.1.14 Previous Page
If current page is not the first page, click to switch to previous page.
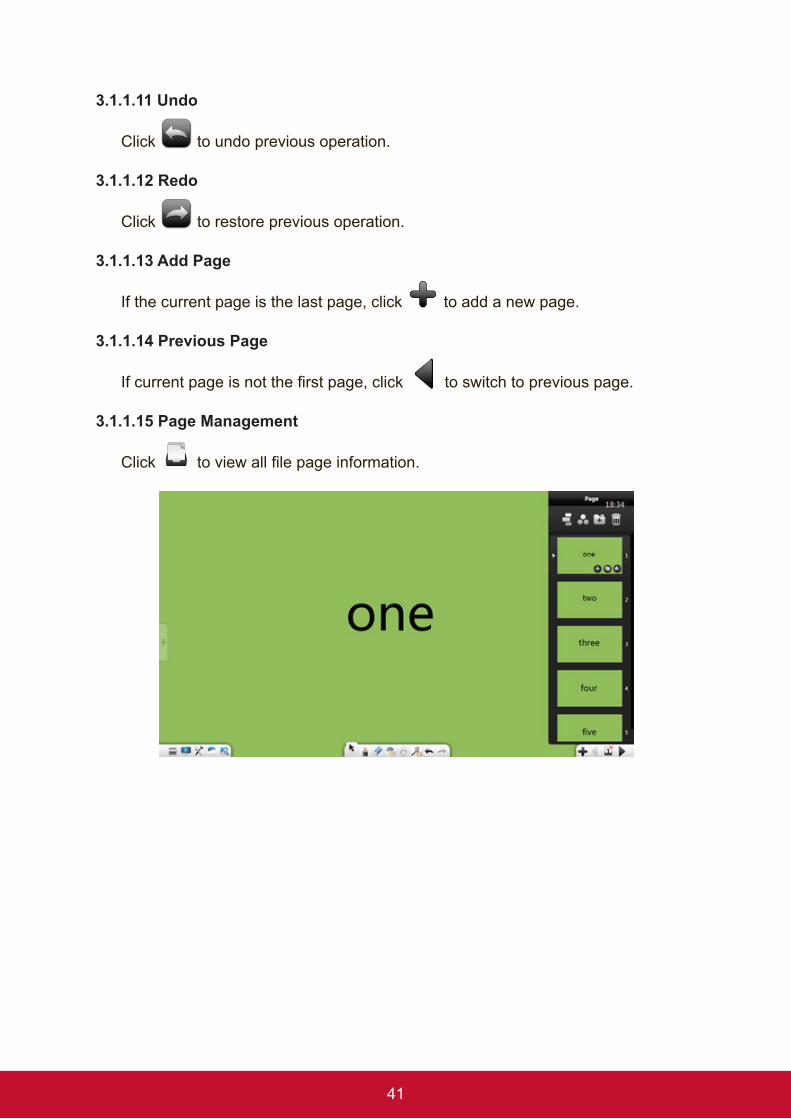
3.1.1.15 Page Management
Click to view all file page information.
42
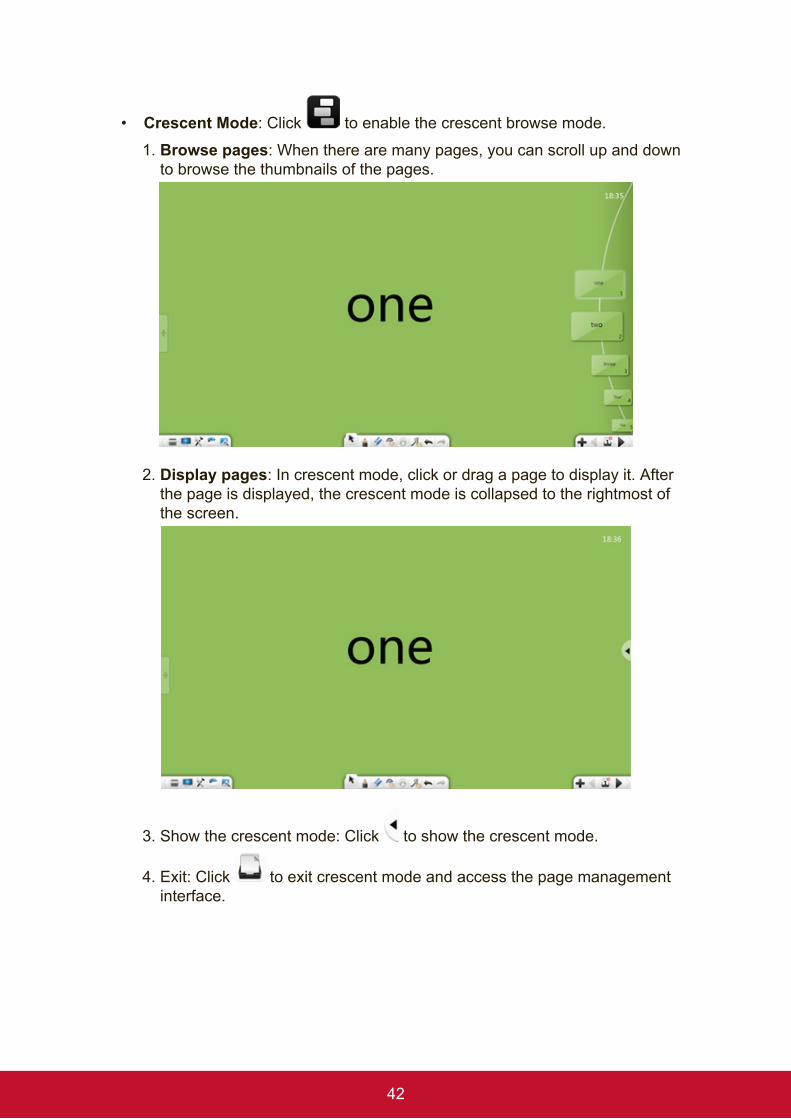
• Crescent Mode: Click to enable the crescent browse mode.
1. Browse pages: When there are many pages, you can scroll up and down to browse the thumbnails of the pages.
2. Display pages: In crescent mode, click or drag a page to display it. After the page is displayed, the crescent mode is collapsed to the rightmost of the screen.
3. Show the crescent mode: Click to show the crescent mode.
4. Exit: Click to exit crescent mode and access the page management interface.
43
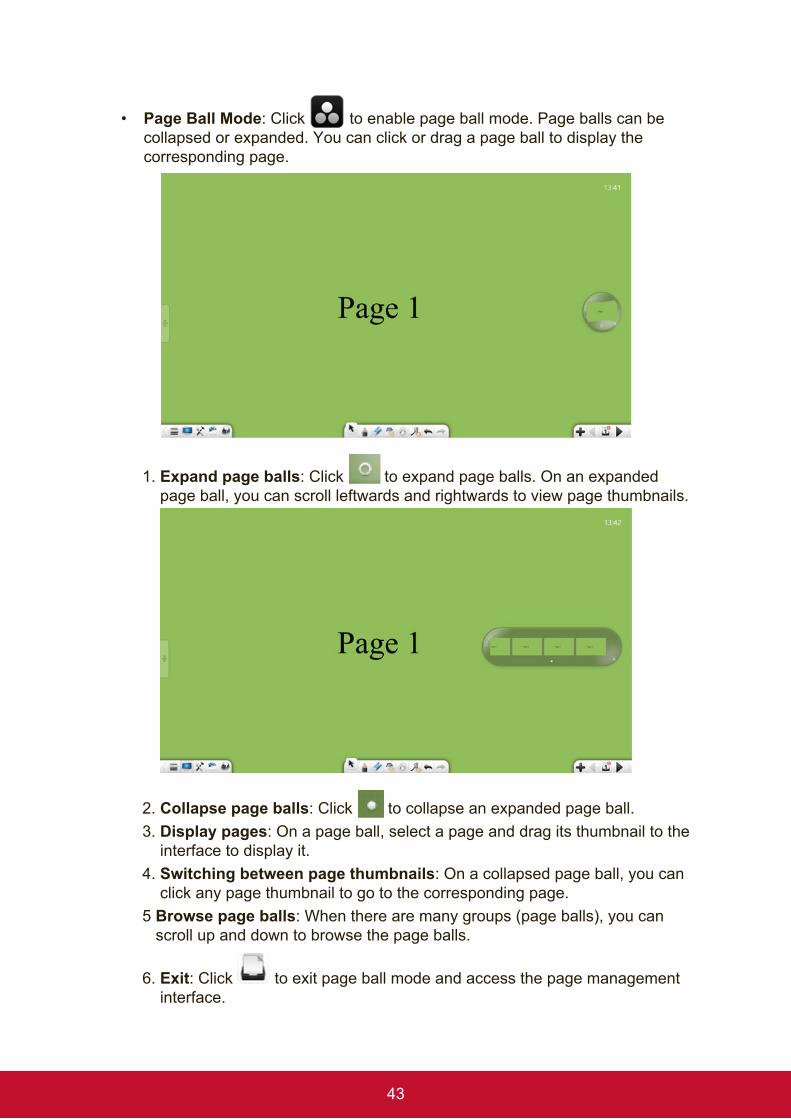
• Page Ball Mode: Click to enable page ball mode. Page balls can be collapsed or expanded. You can click or drag a page ball to display the corresponding page.
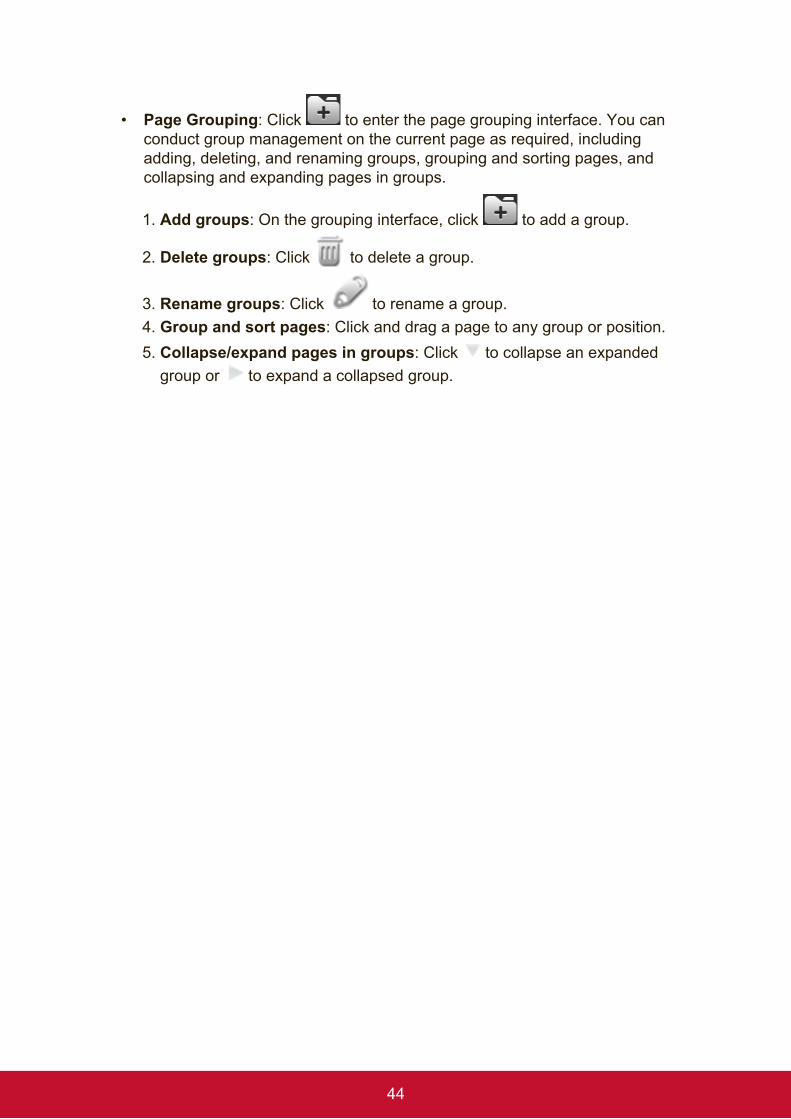
1. Expand page balls: Click to expand page balls. On an expanded page ball, you can scroll leftwards and rightwards to view page thumbnails.
2. Collapse page balls: Click to collapse an expanded page ball.3. Display pages: On a page ball, select a page and drag its thumbnail to the
interface to display it.4. Switching between page thumbnails: On a collapsed page ball, you can
click any page thumbnail to go to the corresponding page.5 Browse page balls: When there are many groups (page balls), you can
scroll up and down to browse the page balls.
6. Exit: Click to exit page ball mode and access the page management interface.
44
• Page Grouping: Click to enter the page grouping interface. You can conduct group management on the current page as required, including adding, deleting, and renaming groups, grouping and sorting pages, and collapsing and expanding pages in groups.
1. Add groups: On the grouping interface, click to add a group.
2. Delete groups: Click to delete a group.
3. Rename groups: Click to rename a group. 4. Group and sort pages: Click and drag a page to any group or position. 5. Collapse/expand pages in groups: Click to collapse an expanded
group or to expand a collapsed group.

45
• Delete page: Click to delete page.
• Add page: Click to add a new page.
• Copy page: Click to copy current page to next page.
• Move page: Click and drag the page, the user can drag the currently selected page to another location.

46
• Special effect in page flipping: Click to set a flipping special effect for the current page, including audio and animation effects.
• Browse pages: Scroll the scroll wheel up and down to browse the pages.
• Multiplex pages: In lection preparation mode, you can drag a page to another opened program.
3.1.1.16 Next Page
If the current page is not the last page, click to switch to next page.
47
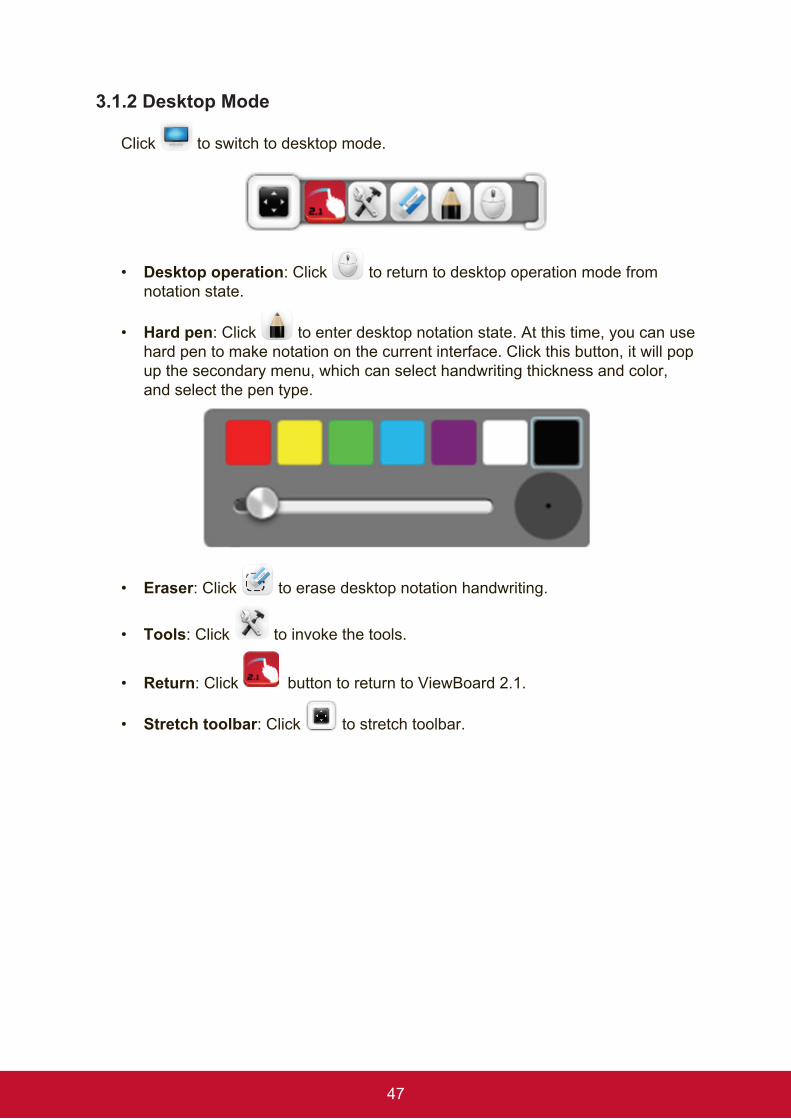
3.1.2 Desktop Mode
Click to switch to desktop mode.
• Desktop operation: Click to return to desktop operation mode from notation state.
• Hard pen: Click to enter desktop notation state. At this time, you can use hard pen to make notation on the current interface. Click this button, it will pop up the secondary menu, which can select handwriting thickness and color, and select the pen type.
• Eraser: Click to erase desktop notation handwriting.
• Tools: Click to invoke the tools.
• Return: Click button to return to ViewBoard 2.1.
• Stretch toolbar: Click to stretch toolbar.
48
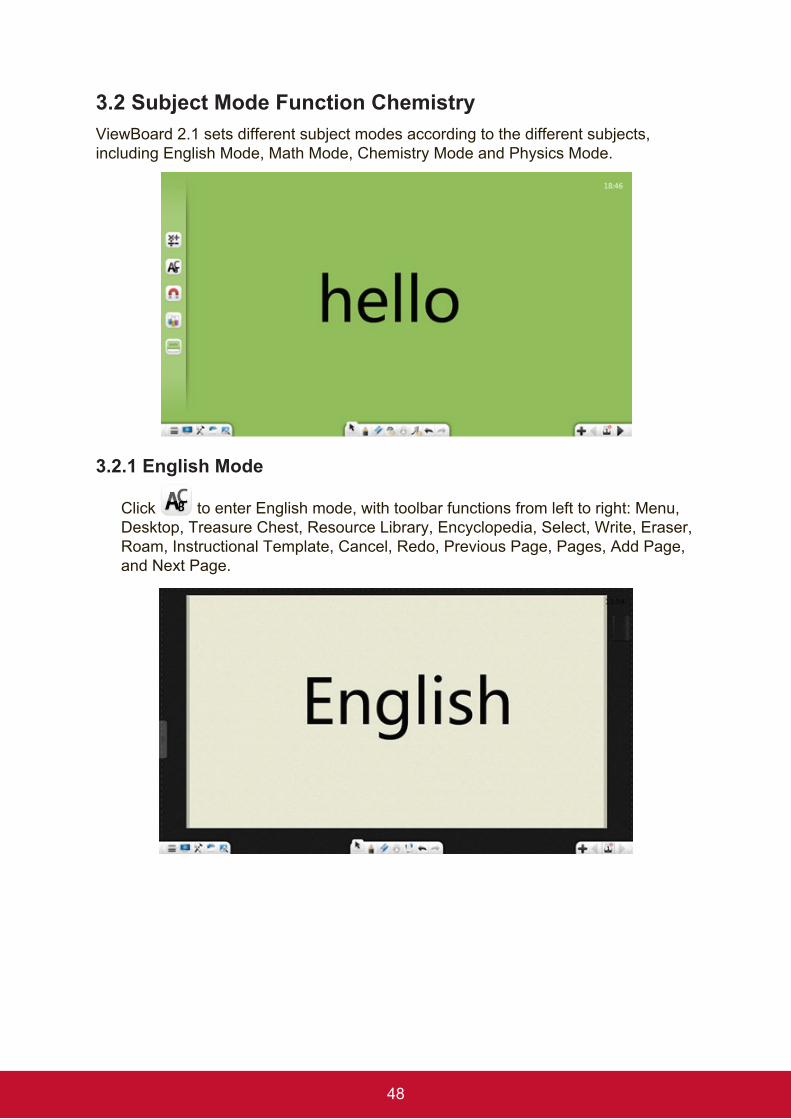
3.2 Subject Mode Function ChemistryViewBoard 2.1 sets different subject modes according to the different subjects, including English Mode, Math Mode, Chemistry Mode and Physics Mode.
3.2.1 English Mode
Click to enter English mode, with toolbar functions from left to right: Menu, Desktop, Treasure Chest, Resource Library, Encyclopedia, Select, Write, Eraser, Roam, Instructional Template, Cancel, Redo, Previous Page, Pages, Add Page, and Next Page.
49
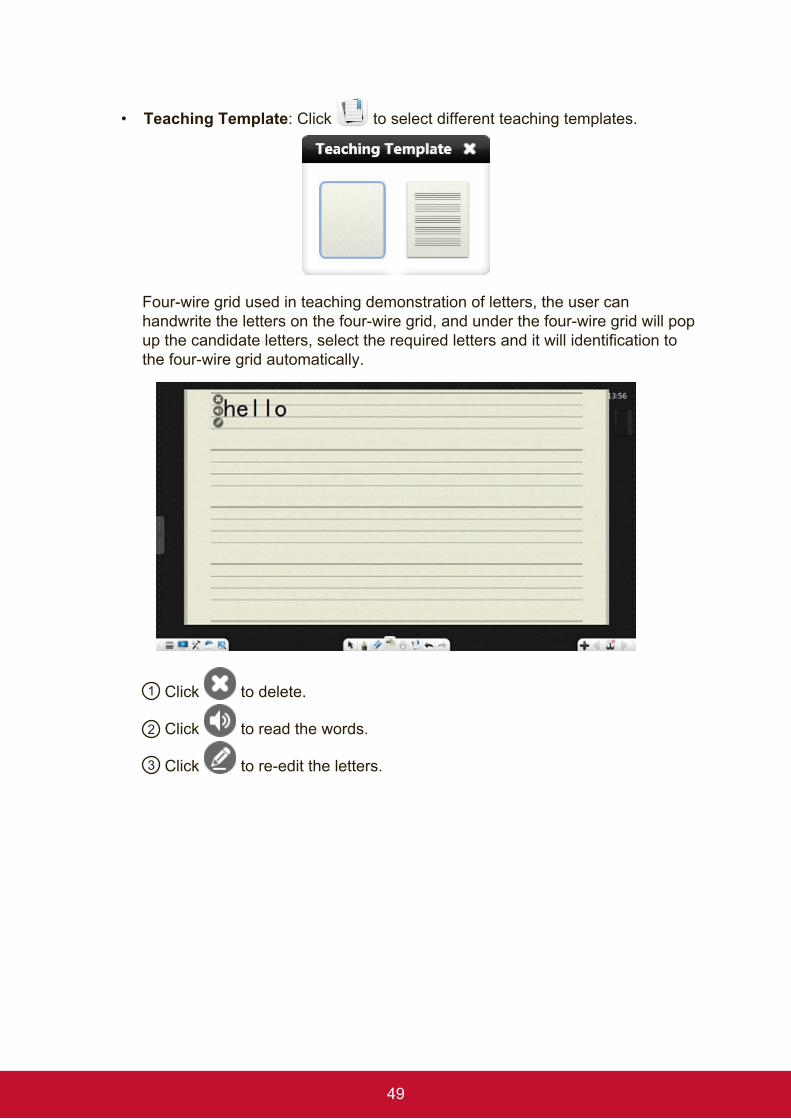
• Teaching Template: Click to select different teaching templates.
Four-wire grid used in teaching demonstration of letters, the user can handwrite the letters on the four-wire grid, and under the four-wire grid will pop up the candidate letters, select the required letters and it will identification to the four-wire grid automatically.
1 Click to delete.
2 Click to read the words.
3 Click to re-edit the letters.
50
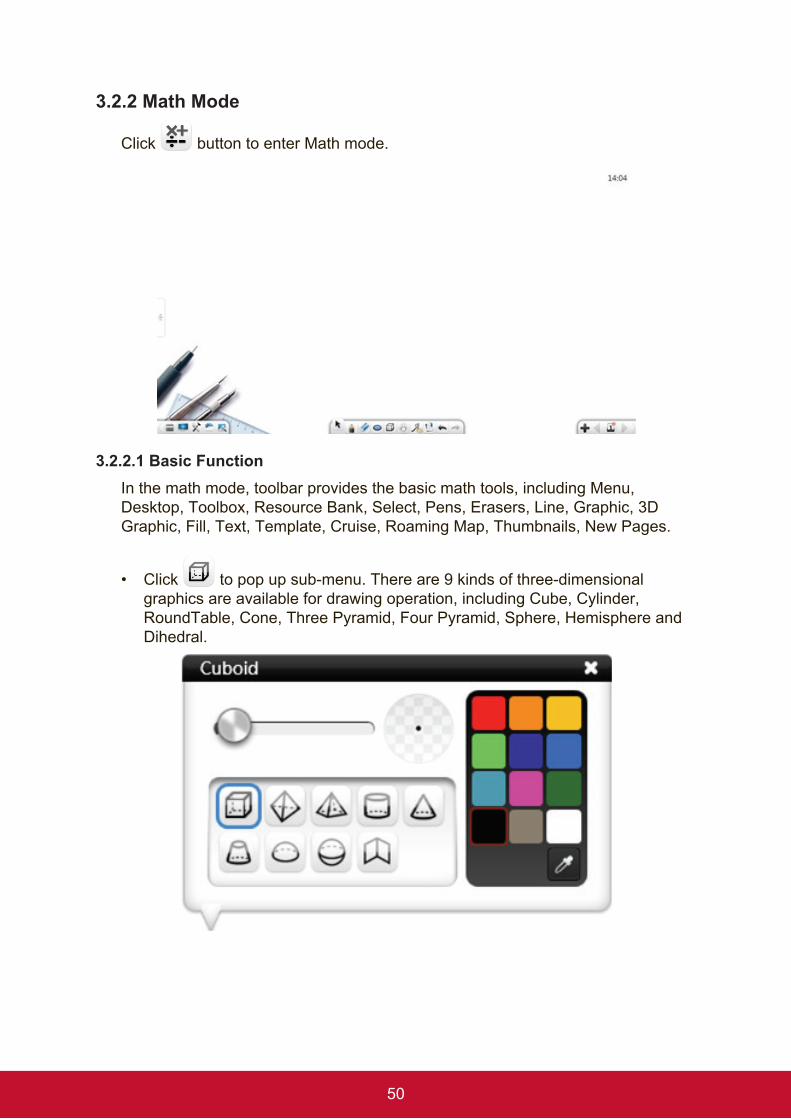
3.2.2 Math Mode
Click button to enter Math mode.
3.2.2.1 Basic FunctionIn the math mode, toolbar provides the basic math tools, including Menu, Desktop, Toolbox, Resource Bank, Select, Pens, Erasers, Line, Graphic, 3D Graphic, Fill, Text, Template, Cruise, Roaming Map, Thumbnails, New Pages.
• Click to pop up sub-menu. There are 9 kinds of three-dimensional graphics are available for drawing operation, including Cube, Cylinder, RoundTable, Cone, Three Pyramid, Four Pyramid, Sphere, Hemisphere and Dihedral.
51
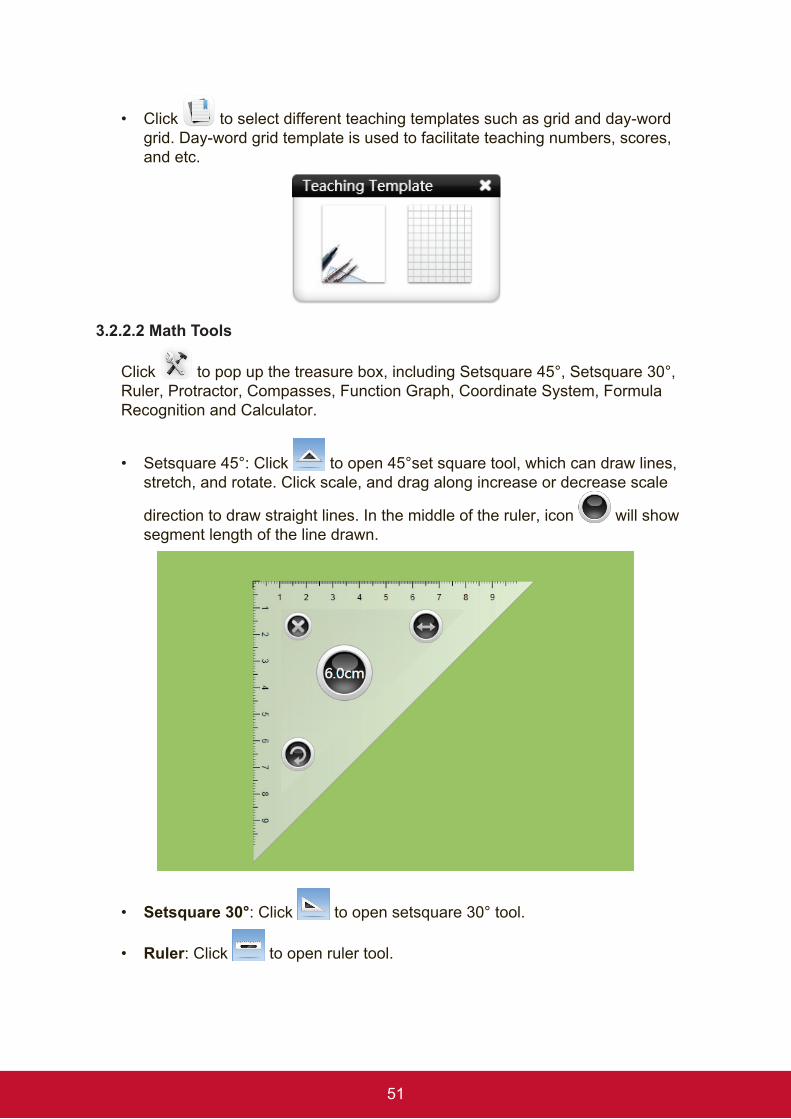
• Click to select different teaching templates such as grid and day-word grid. Day-word grid template is used to facilitate teaching numbers, scores, and etc.
3.2.2.2 Math Tools
Click to pop up the treasure box, including Setsquare 45°, Setsquare 30°, Ruler, Protractor, Compasses, Function Graph, Coordinate System, Formula Recognition and Calculator.
• Setsquare 45°: Click to open 45°set square tool, which can draw lines, stretch, and rotate. Click scale, and drag along increase or decrease scale
direction to draw straight lines. In the middle of the ruler, icon will show segment length of the line drawn.
• Setsquare 30°: Click to open setsquare 30° tool.
• Ruler: Click to open ruler tool.
52
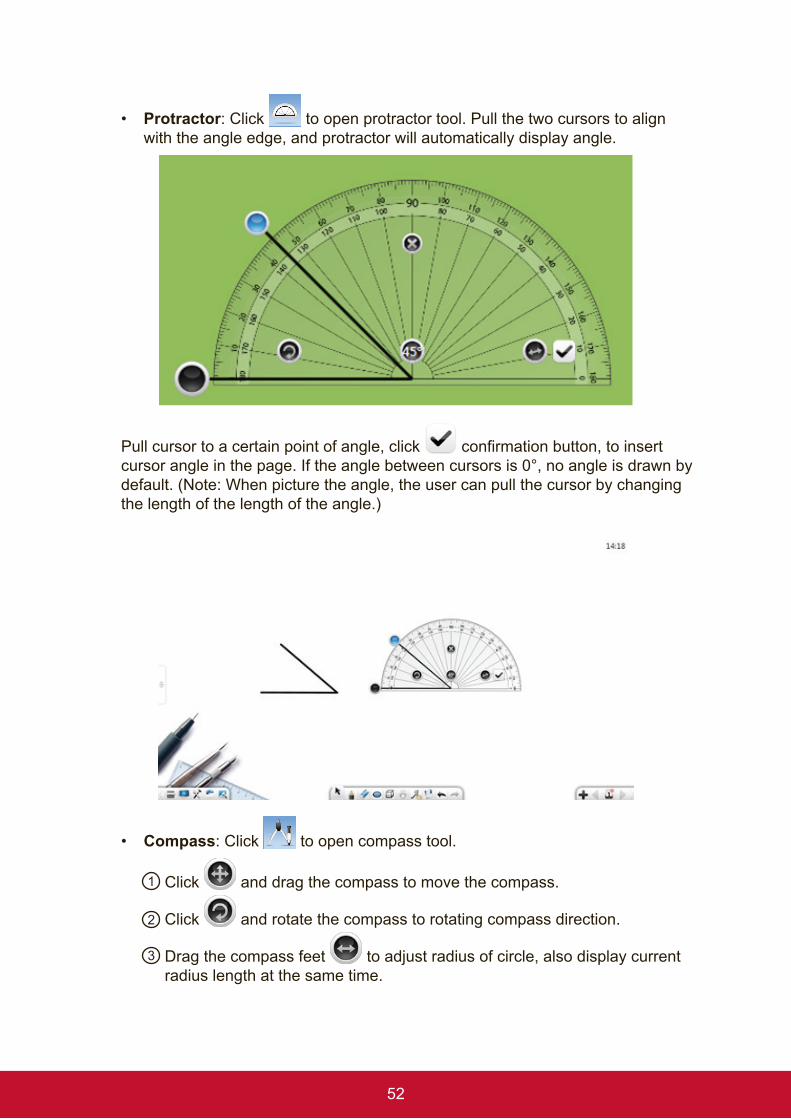
• Protractor: Click to open protractor tool. Pull the two cursors to align with the angle edge, and protractor will automatically display angle.
Pull cursor to a certain point of angle, click confirmation button, to insert cursor angle in the page. If the angle between cursors is 0°, no angle is drawn by default. (Note: When picture the angle, the user can pull the cursor by changing the length of the length of the angle.)
• Compass: Click to open compass tool.
1 Click and drag the compass to move the compass.
2 Click and rotate the compass to rotating compass direction.
3 Drag the compass feet to adjust radius of circle, also display current radius length at the same time.
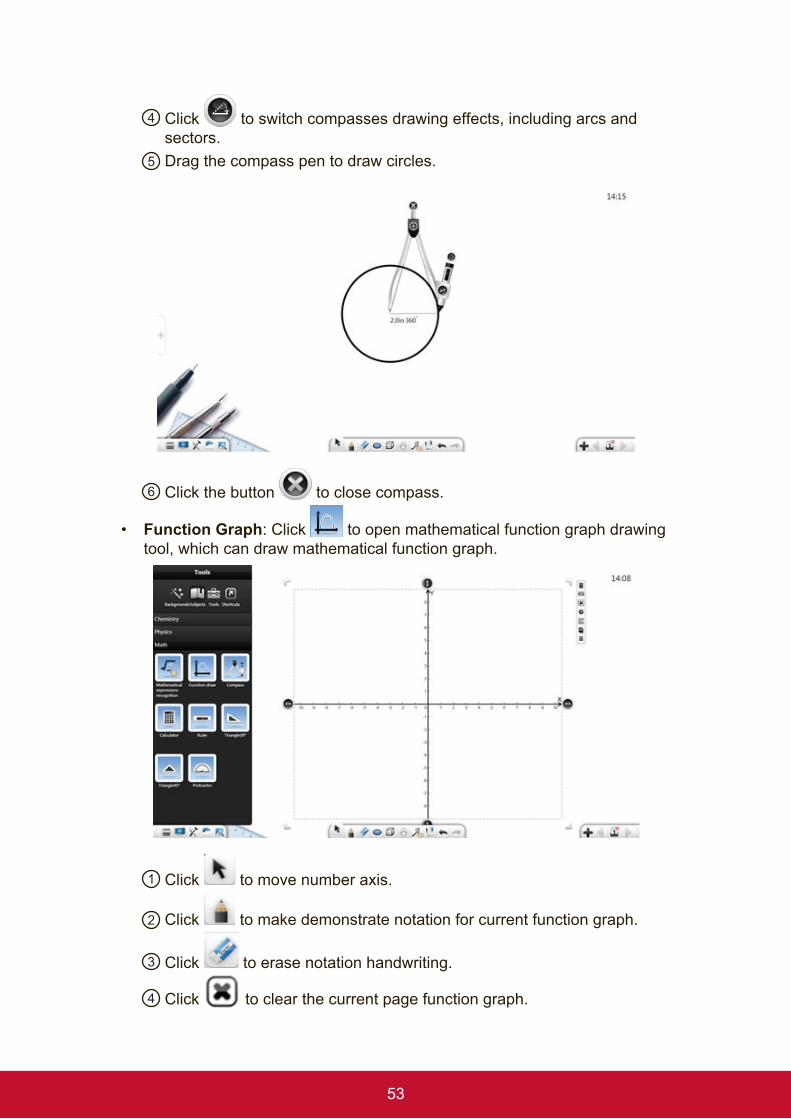
53
4 Click to switch compasses drawing effects, including arcs and sectors.
5 Drag the compass pen to draw circles.
6 Click the button to close compass.
• Function Graph: Click to open mathematical function graph drawing tool, which can draw mathematical function graph.
1 Click to move number axis.
2 Click to make demonstrate notation for current function graph.
3 Click to erase notation handwriting.
4 Click to clear the current page function graph.
54
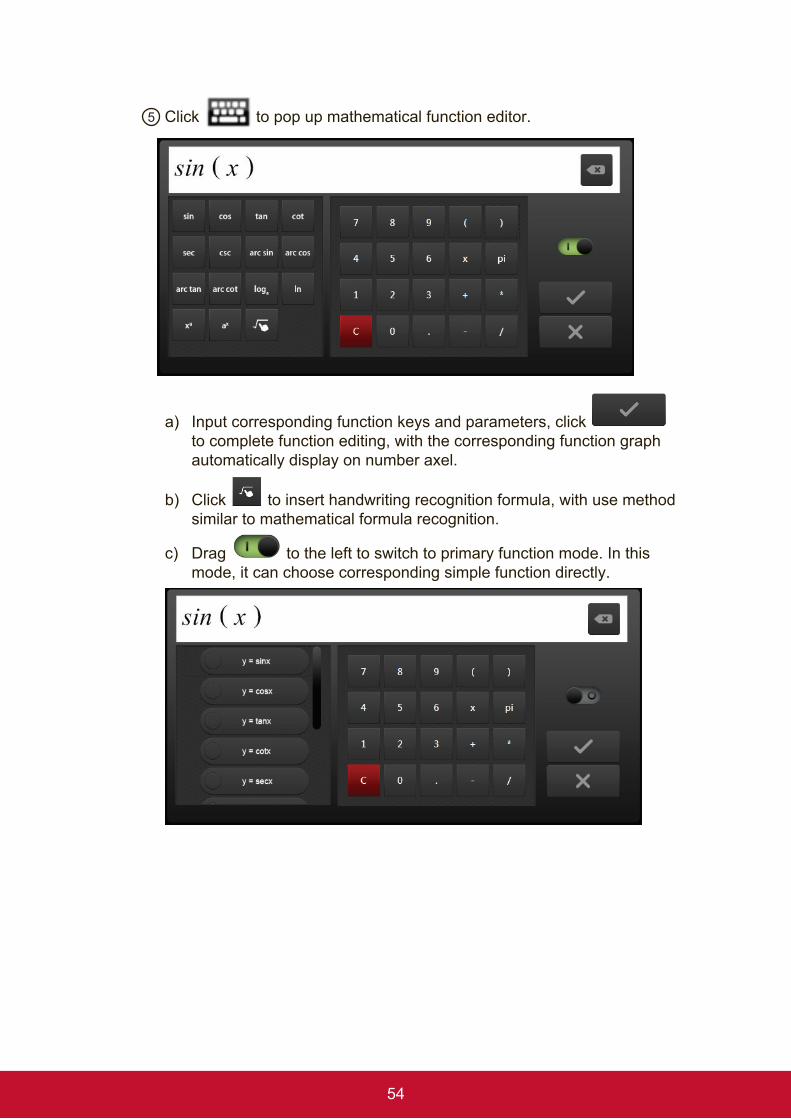
5 Click to pop up mathematical function editor.
a) Input corresponding function keys and parameters, click to complete function editing, with the corresponding function graph automatically display on number axel.
b) Click to insert handwriting recognition formula, with use method similar to mathematical formula recognition.
c) Drag to the left to switch to primary function mode. In this mode, it can choose corresponding simple function directly.
55
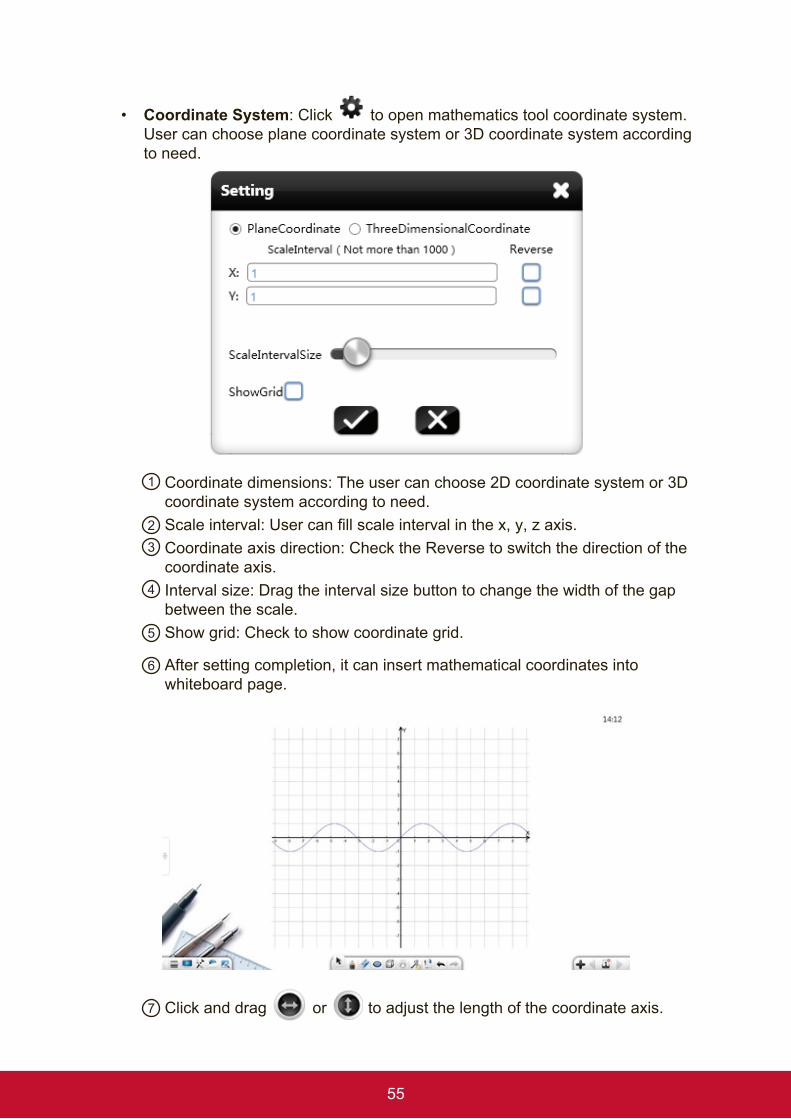
• Coordinate System: Click to open mathematics tool coordinate system. User can choose plane coordinate system or 3D coordinate system according to need.
1 Coordinate dimensions: The user can choose 2D coordinate system or 3D coordinate system according to need.
2 Scale interval: User can fill scale interval in the x, y, z axis.3 Coordinate axis direction: Check the Reverse to switch the direction of the
coordinate axis.4 Interval size: Drag the interval size button to change the width of the gap
between the scale.5 Show grid: Check to show coordinate grid.
6 After setting completion, it can insert mathematical coordinates into whiteboard page.
7 Click and drag or to adjust the length of the coordinate axis.
56
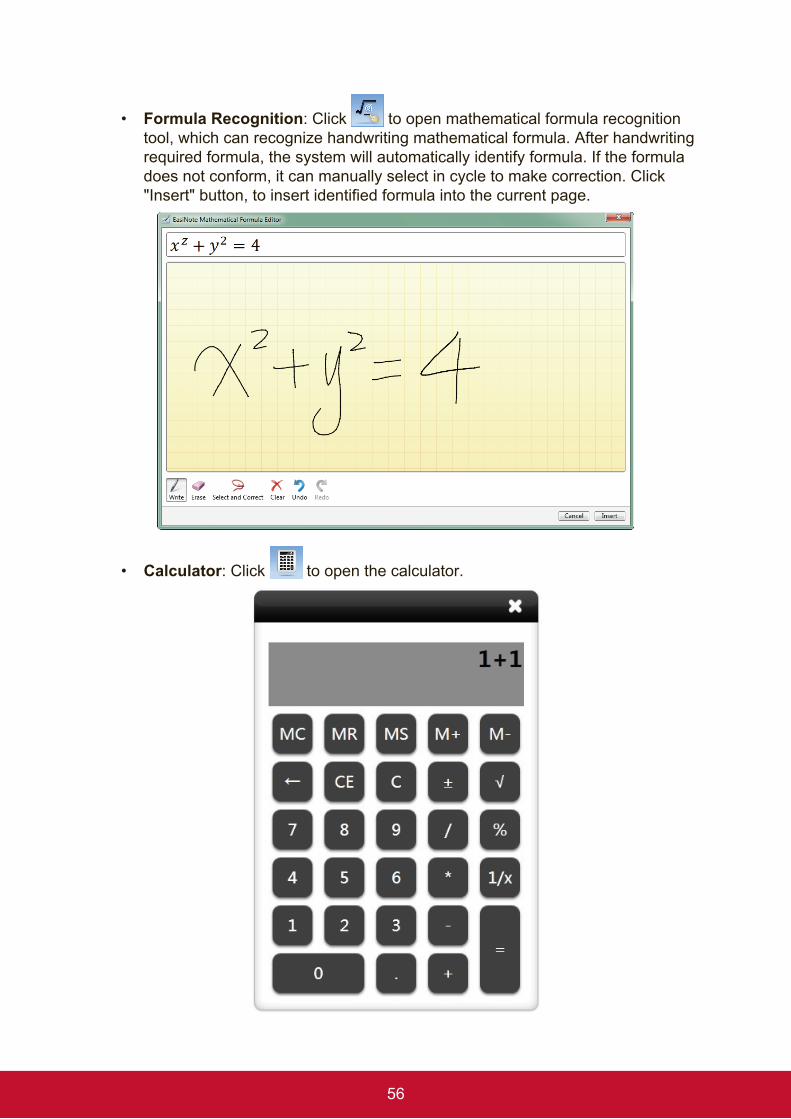
• Formula Recognition: Click to open mathematical formula recognition tool, which can recognize handwriting mathematical formula. After handwriting required formula, the system will automatically identify formula. If the formula does not conform, it can manually select in cycle to make correction. Click "Insert" button, to insert identified formula into the current page.
• Calculator: Click to open the calculator.
57
3.2.3 Chemistry Mode
Click to enter Chemistry mode.
3.2.3.1 Basic FunctionIn the chemistry mode, toolbar provides the basic math tools, including Menu, Desktop, Treasure Chest, Resource Library, Encyclopedia, Select, Write, Eraser, Roam, Handwriting Recognition, Chemical Formula, Atomic Structure Diagram, Cancel, Redo, Previous Page, Pages, Add Page, and Next Page.
58
3.2.3.2 Chemistry Tools
Click to pop up the treasure box. Click the disciplines and select the chemistry to pop up the interface of chemistry tools, including Periodic Table, Atomic structure diagram and chemistry lab instruments.
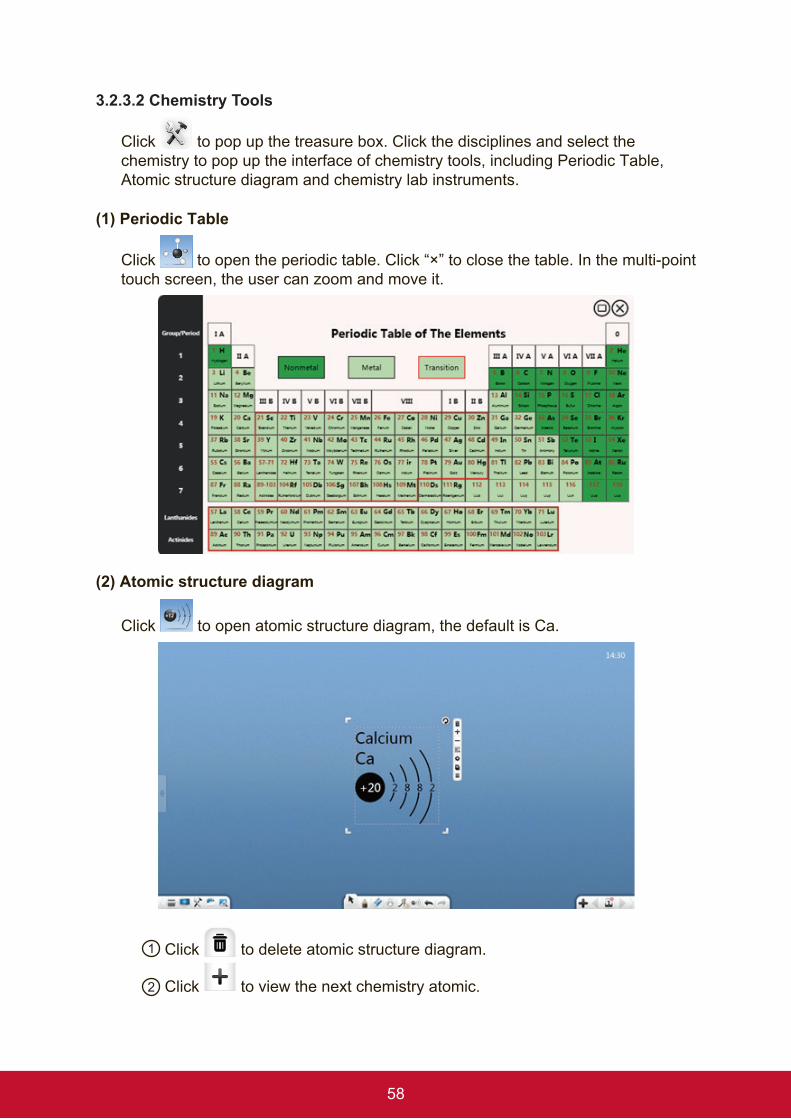
(1) Periodic Table
Click to open the periodic table. Click “×” to close the table. In the multi-point touch screen, the user can zoom and move it.
(2) Atomic structure diagram
Click to open atomic structure diagram, the default is Ca.
1 Click to delete atomic structure diagram.
2 Click to view the next chemistry atomic.
59
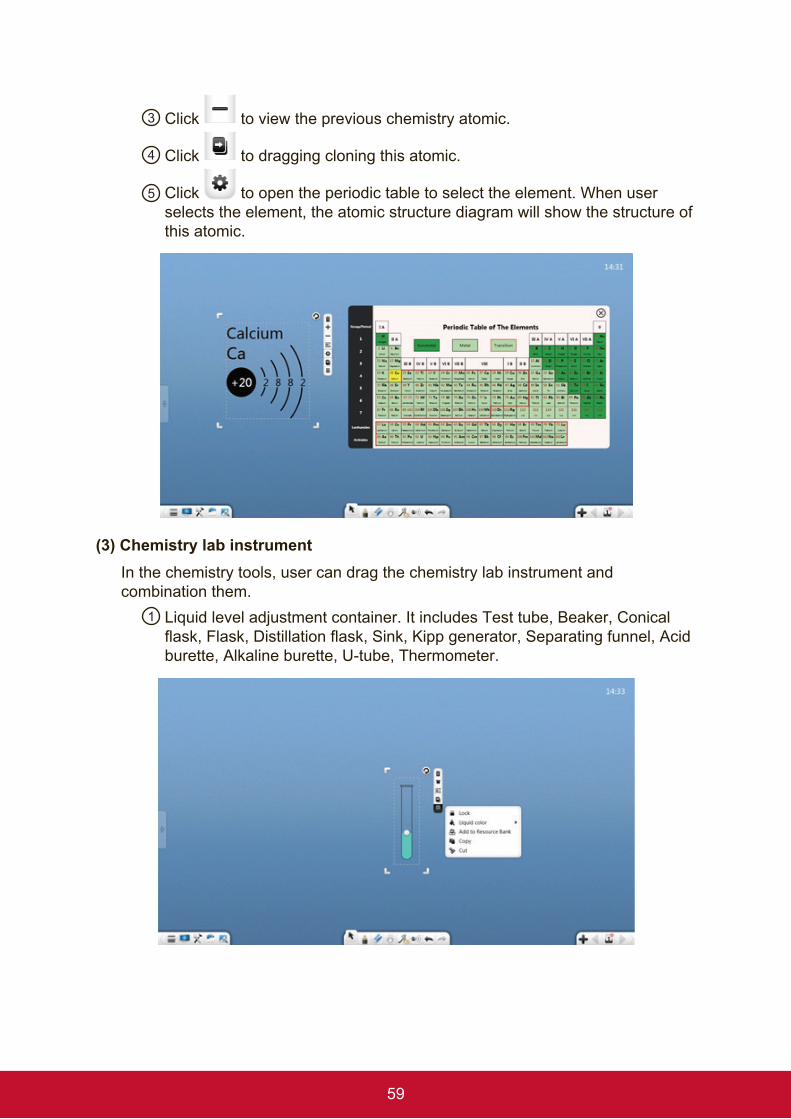
3 Click to view the previous chemistry atomic.
4 Click to dragging cloning this atomic.
5 Click to open the periodic table to select the element. When user selects the element, the atomic structure diagram will show the structure of this atomic.
(3) Chemistry lab instrumentIn the chemistry tools, user can drag the chemistry lab instrument and combination them.
1 Liquid level adjustment container. It includes Test tube, Beaker, Conical flask, Flask, Distillation flask, Sink, Kipp generator, Separating funnel, Acid burette, Alkaline burette, U-tube, Thermometer.
60
a) The operation of container as moving, select and non-uniform zooming, deletion, setting the object level, setting animation effects, dragging the object to clone it, locking, grouping (multiple objects), ungrouping, adding the object to the resource library, editing a hyperlink, copy, and cutting are similar to those in the handwriting operations.
b) Liquid level: Click and drag the button on the liquid surface, moving it up and down to change the liquid level.
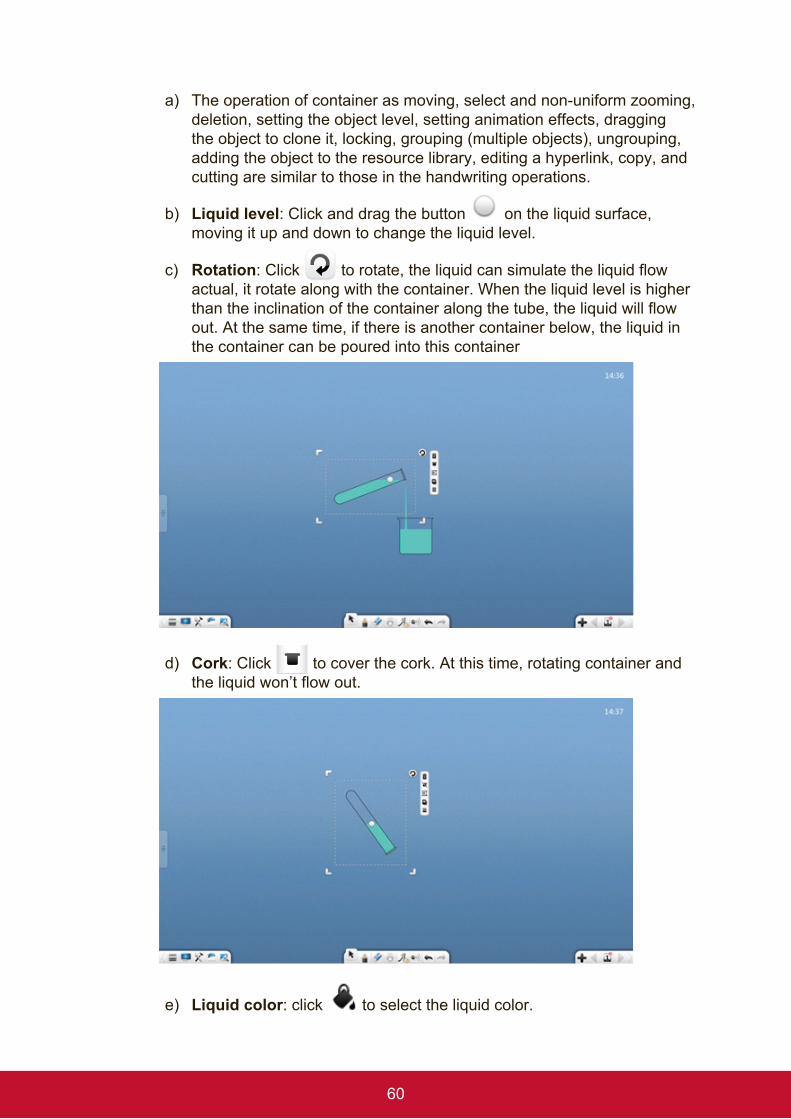
c) Rotation: Click to rotate, the liquid can simulate the liquid flow actual, it rotate along with the container. When the liquid level is higher than the inclination of the container along the tube, the liquid will flow out. At the same time, if there is another container below, the liquid in the container can be poured into this container
d) Cork: Click to cover the cork. At this time, rotating container and the liquid won’t flow out.
e) Liquid color: click to select the liquid color.
61
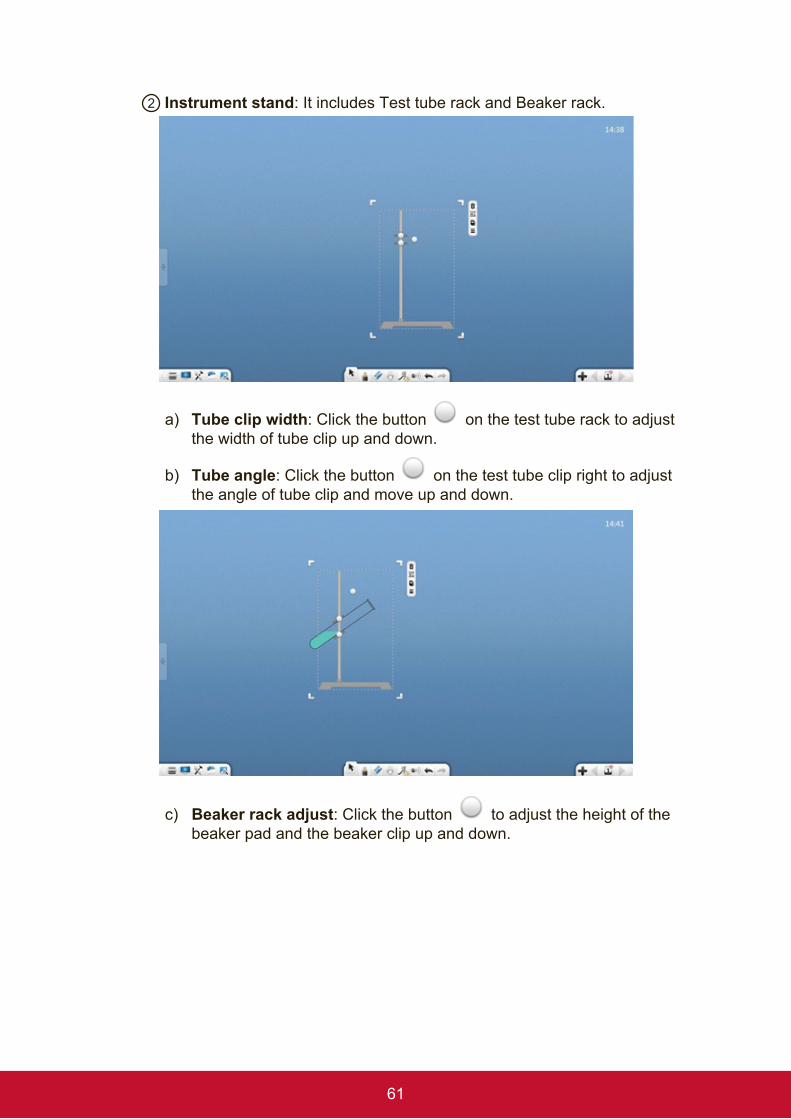
2 Instrument stand: It includes Test tube rack and Beaker rack.
a) Tube clip width: Click the button on the test tube rack to adjust the width of tube clip up and down.
b) Tube angle: Click the button on the test tube clip right to adjust the angle of tube clip and move up and down.
c) Beaker rack adjust: Click the button to adjust the height of the beaker pad and the beaker clip up and down.
62
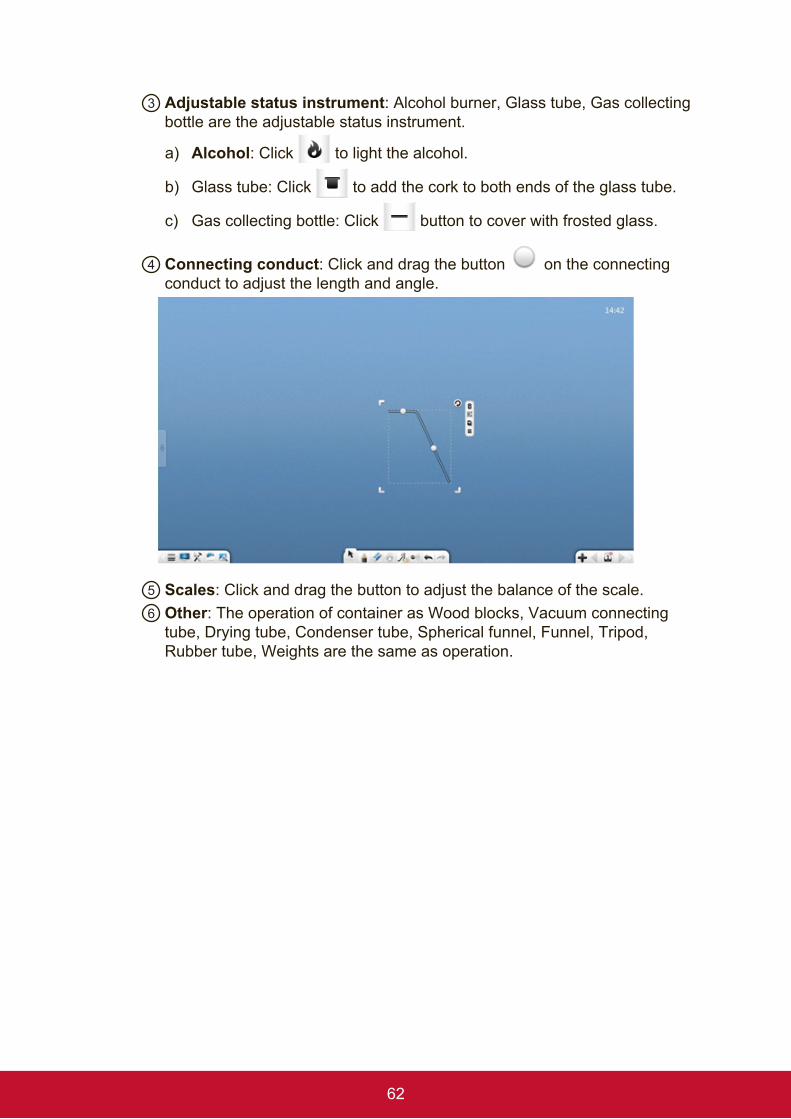
3 Adjustable status instrument: Alcohol burner, Glass tube, Gas collecting bottle are the adjustable status instrument.
a) Alcohol: Click to light the alcohol.
b) Glass tube: Click to add the cork to both ends of the glass tube.
c) Gas collecting bottle: Click button to cover with frosted glass.
4 Connecting conduct: Click and drag the button on the connecting conduct to adjust the length and angle.
5 Scales: Click and drag the button to adjust the balance of the scale. 6 Other: The operation of container as Wood blocks, Vacuum connecting
tube, Drying tube, Condenser tube, Spherical funnel, Funnel, Tripod, Rubber tube, Weights are the same as operation.
63
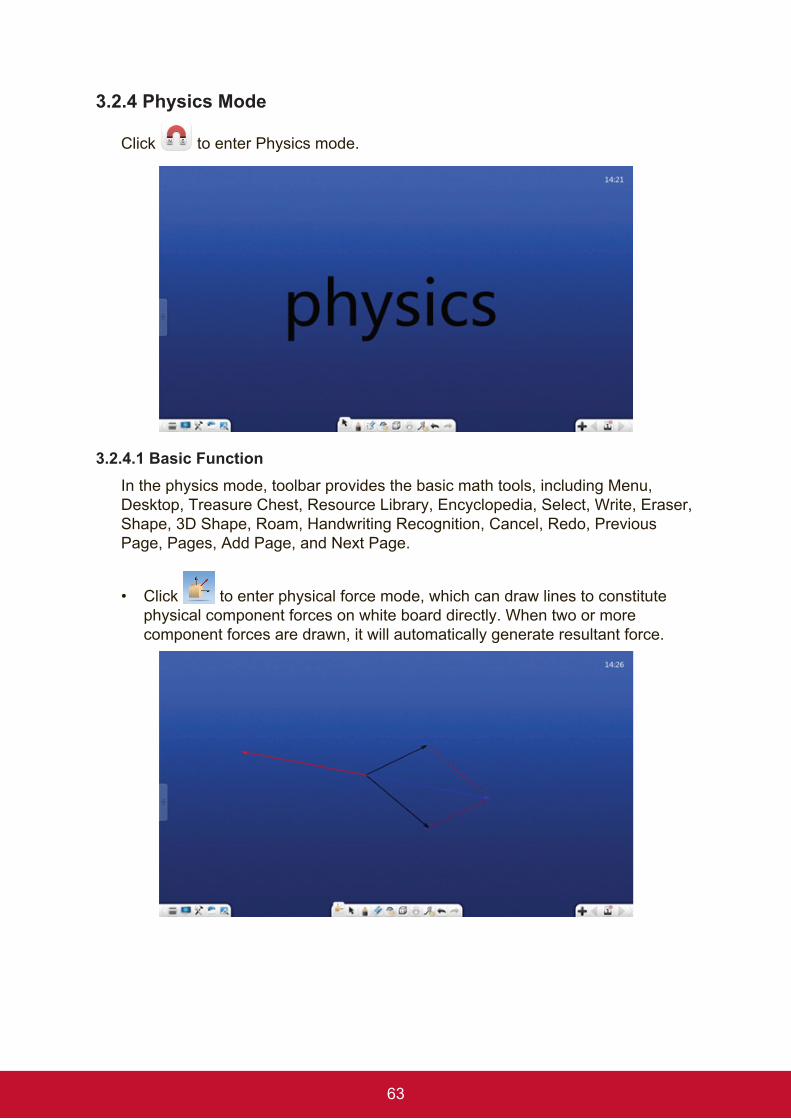
3.2.4 Physics Mode
Click to enter Physics mode.
3.2.4.1 Basic FunctionIn the physics mode, toolbar provides the basic math tools, including Menu, Desktop, Treasure Chest, Resource Library, Encyclopedia, Select, Write, Eraser, Shape, 3D Shape, Roam, Handwriting Recognition, Cancel, Redo, Previous Page, Pages, Add Page, and Next Page.
• Click to enter physical force mode, which can draw lines to constitute physical component forces on white board directly. When two or more component forces are drawn, it will automatically generate resultant force.
64
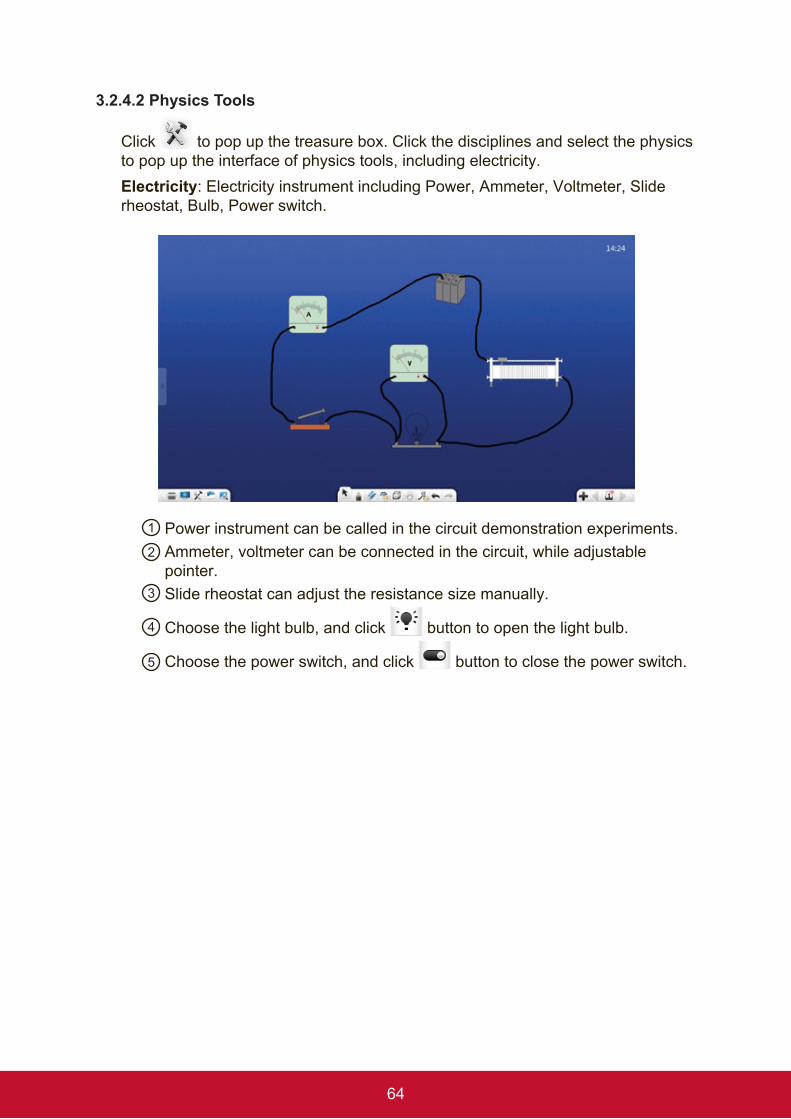
3.2.4.2 Physics Tools
Click to pop up the treasure box. Click the disciplines and select the physics to pop up the interface of physics tools, including electricity.Electricity: Electricity instrument including Power, Ammeter, Voltmeter, Slide rheostat, Bulb, Power switch.
1 Power instrument can be called in the circuit demonstration experiments.2 Ammeter, voltmeter can be connected in the circuit, while adjustable
pointer.3 Slide rheostat can adjust the resistance size manually.
4 Choose the light bulb, and click button to open the light bulb.
5 Choose the power switch, and click button to close the power switch.
65
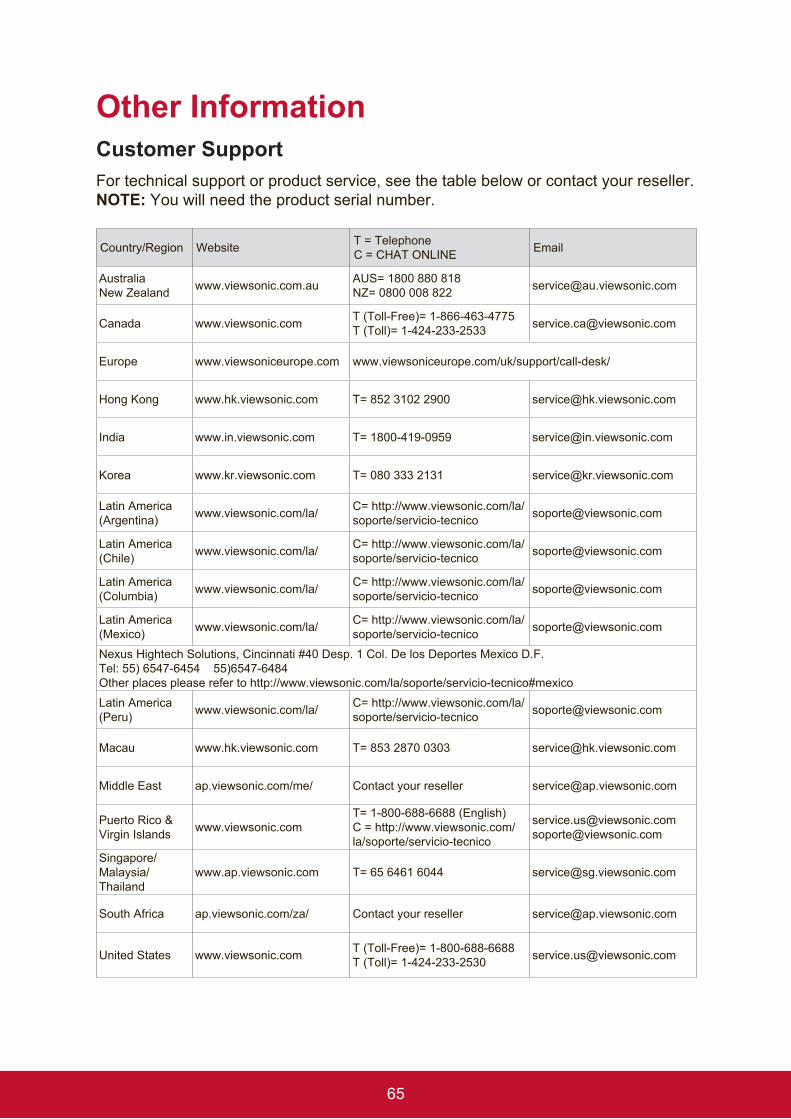
Other InformationCustomer SupportFor technical support or product service, see the table below or contact your reseller.NOTE: You will need the product serial number.
Country/Region Website T = TelephoneC = CHAT ONLINE Email
Australia New Zealand www.viewsonic.com.au AUS= 1800 880 818
NZ= 0800 008 822 [email protected]
Canada www.viewsonic.com T (Toll-Free)= 1-866-463-4775T (Toll)= 1-424-233-2533 [email protected]
Europe www.viewsoniceurope.com www.viewsoniceurope.com/uk/support/call-desk/
Hong Kong www.hk.viewsonic.com T= 852 3102 2900 [email protected]
India www.in.viewsonic.com T= 1800-419-0959 [email protected]
Korea www.kr.viewsonic.com T= 080 333 2131 [email protected]
Latin America(Argentina) www.viewsonic.com/la/ C= http://www.viewsonic.com/la/
soporte/servicio-tecnico [email protected]
Latin America (Chile) www.viewsonic.com/la/ C= http://www.viewsonic.com/la/
soporte/servicio-tecnico [email protected]
Latin America(Columbia) www.viewsonic.com/la/ C= http://www.viewsonic.com/la/
soporte/servicio-tecnico [email protected]
Latin America (Mexico) www.viewsonic.com/la/ C= http://www.viewsonic.com/la/
soporte/servicio-tecnico [email protected]
Nexus Hightech Solutions, Cincinnati #40 Desp. 1 Col. De los Deportes Mexico D.F. Tel: 55) 6547-6454 55)6547-6484Other places please refer to http://www.viewsonic.com/la/soporte/servicio-tecnico#mexico
Latin America (Peru) www.viewsonic.com/la/ C= http://www.viewsonic.com/la/
soporte/servicio-tecnico [email protected]
Macau www.hk.viewsonic.com T= 853 2870 0303 [email protected]
Middle East ap.viewsonic.com/me/ Contact your reseller [email protected]
Puerto Rico & Virgin Islands www.viewsonic.com
T= 1-800-688-6688 (English)C = http://www.viewsonic.com/la/soporte/servicio-tecnico
[email protected]@viewsonic.com
Singapore/ Malaysia/ Thailand
www.ap.viewsonic.com T= 65 6461 6044 [email protected]
South Africa ap.viewsonic.com/za/ Contact your reseller [email protected]
United States www.viewsonic.com T (Toll-Free)= 1-800-688-6688T (Toll)= 1-424-233-2530 [email protected]

66