Embed Size (px)
Citation preview
VINCHIN BACKUP & RECOVERY
V4.0
Quick Installation Guide
Install on Physical Server | 2018/09
1
CONTENTS
Record iSO File ................................................................................................................... 2
Record to USB Disk Guide ......................................................................................... 2
Record to CD Guide .................................................................................................. 4
Install Backup Server ......................................................................................................... 7
Install Backup Plug-in ...................................................................................................... 13
Install Backup Node (Optional) ..................................................................................... 15
2
Record iSO File
Installing Vinchin backup server can be done via USB disk or CD. In this installation guide we use
UltralSO record tool to record the ISO file.
Record to USB Disk Guide
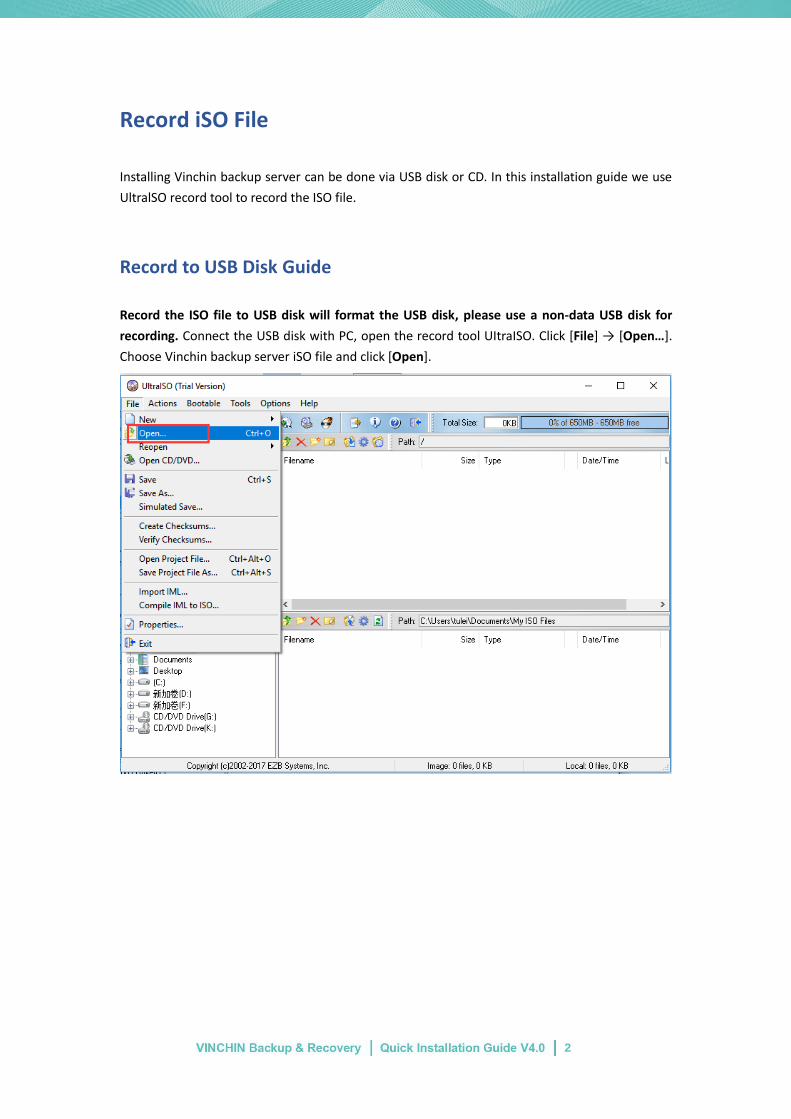
Record the ISO file to USB disk will format the USB disk, please use a non-data USB disk for
recording. Connect the USB disk with PC, open the record tool UItraISO. Click [File] → [Open…].
Choose Vinchin backup server iSO file and click [Open].
3
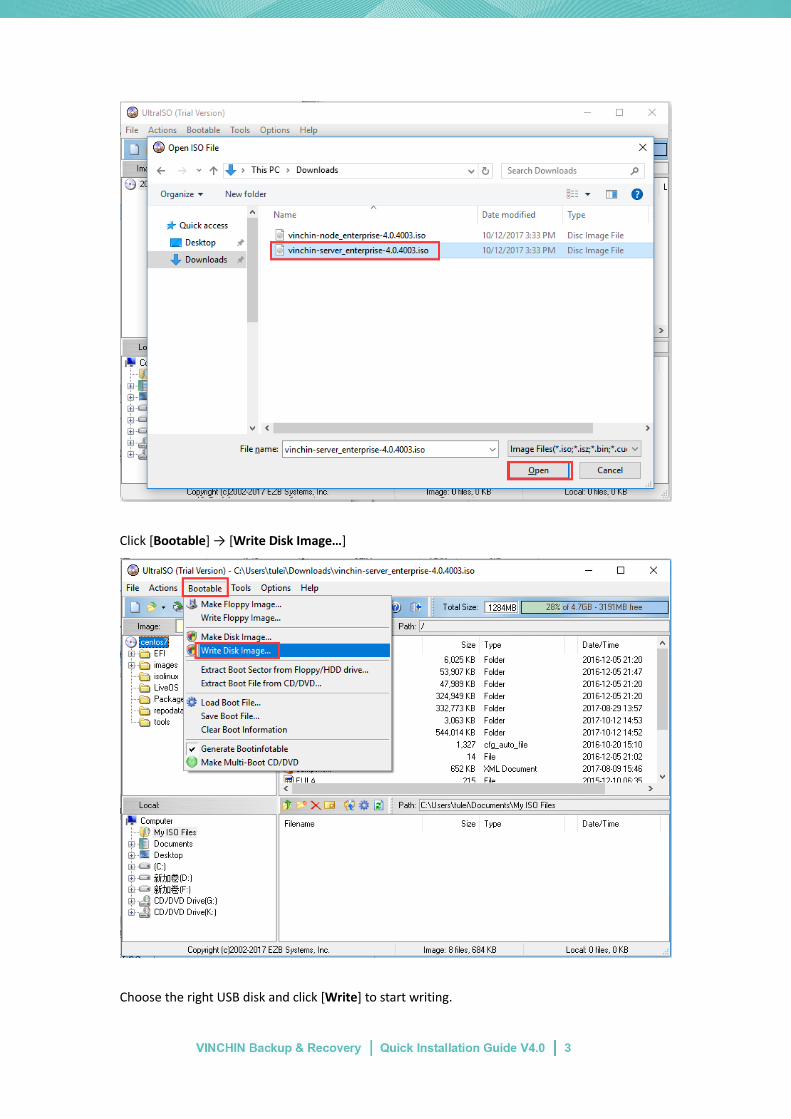
Click [Bootable] → [Write Disk Image…]
Choose the right USB disk and click [Write] to start writing.
4
Note:
Some of the servers may not identify the installed USB disk, if installation via USB disk is failed,
please change to install via CD.
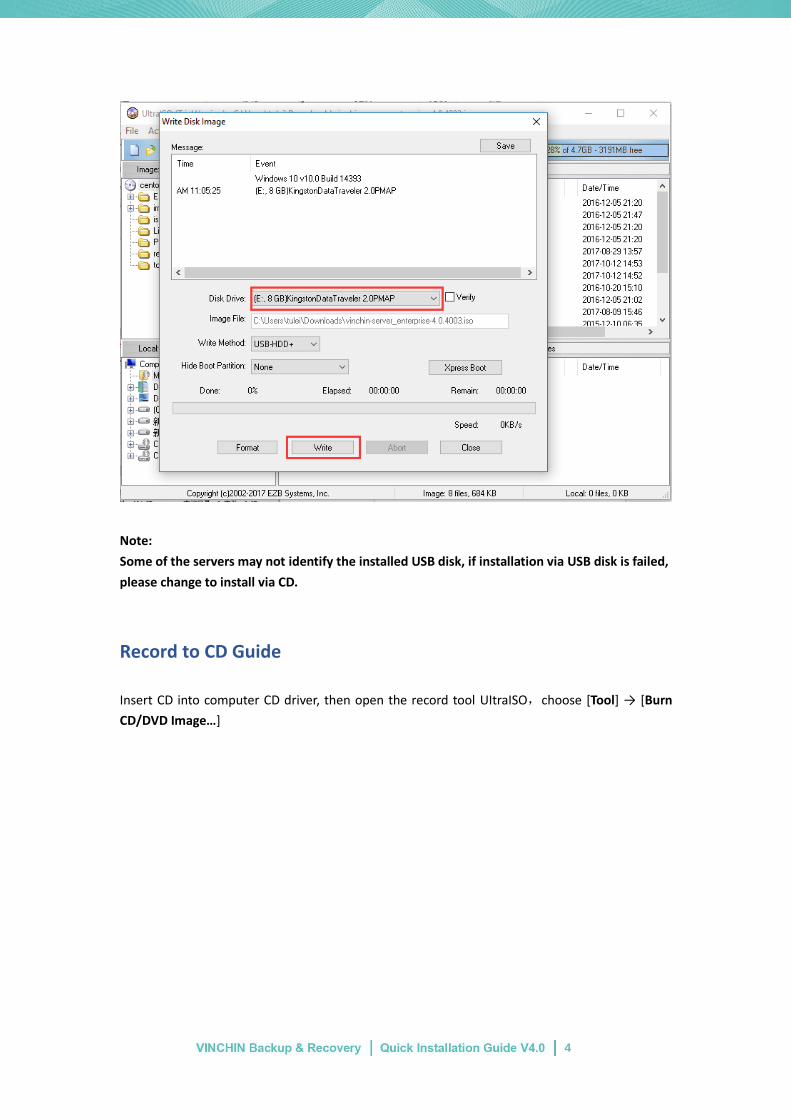
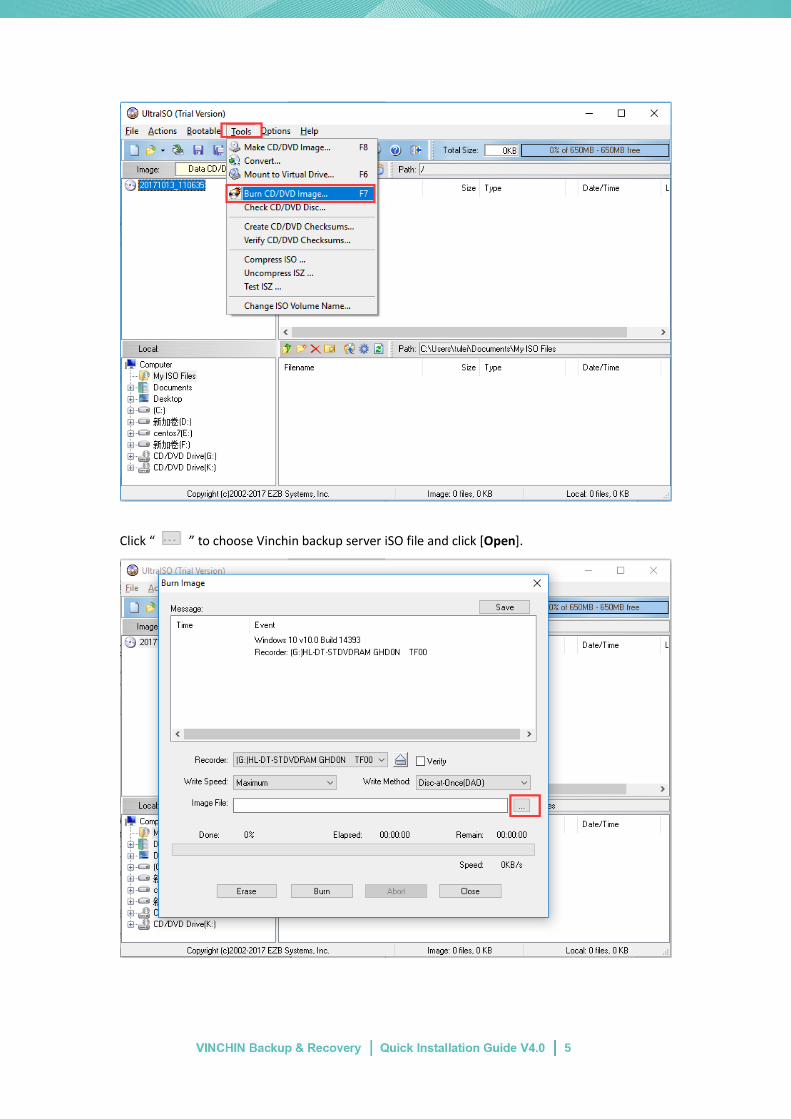
Record to CD Guide
Insert CD into computer CD driver, then open the record tool UItraISO,choose [Tool] → [Burn
CD/DVD Image…]
5
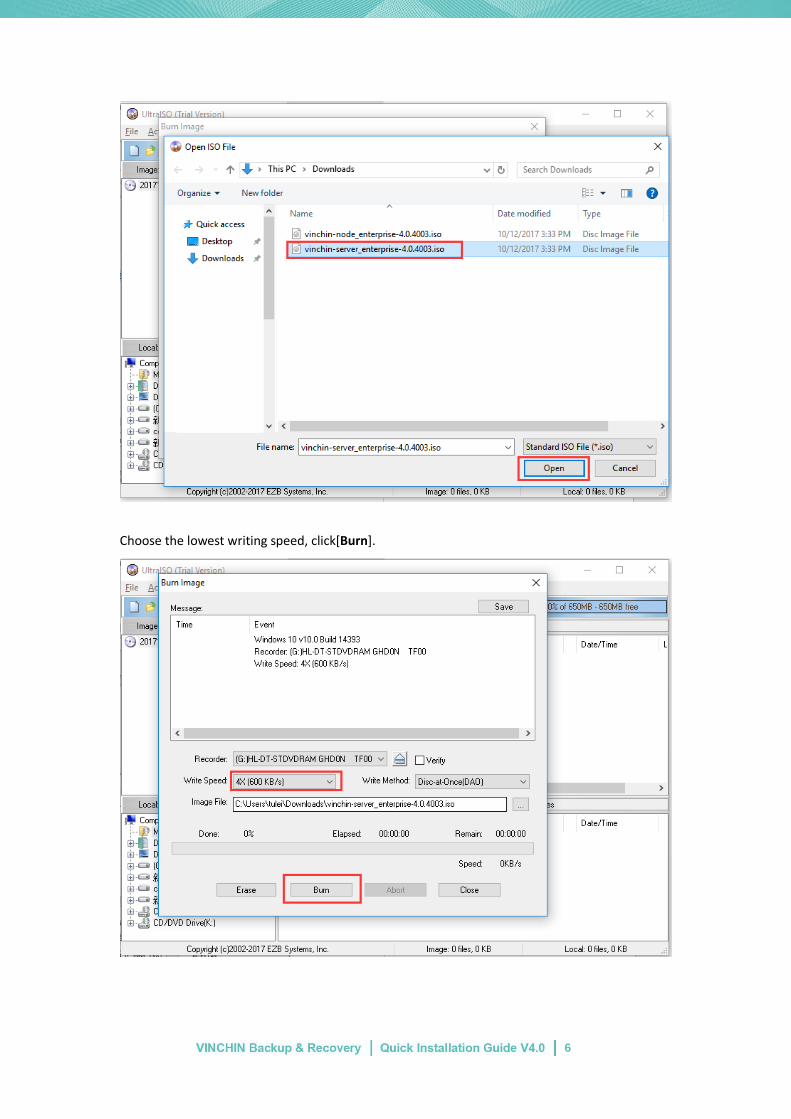
Click “ ” to choose Vinchin backup server iSO file and click [Open].
6
Choose the lowest writing speed, click[Burn].
7
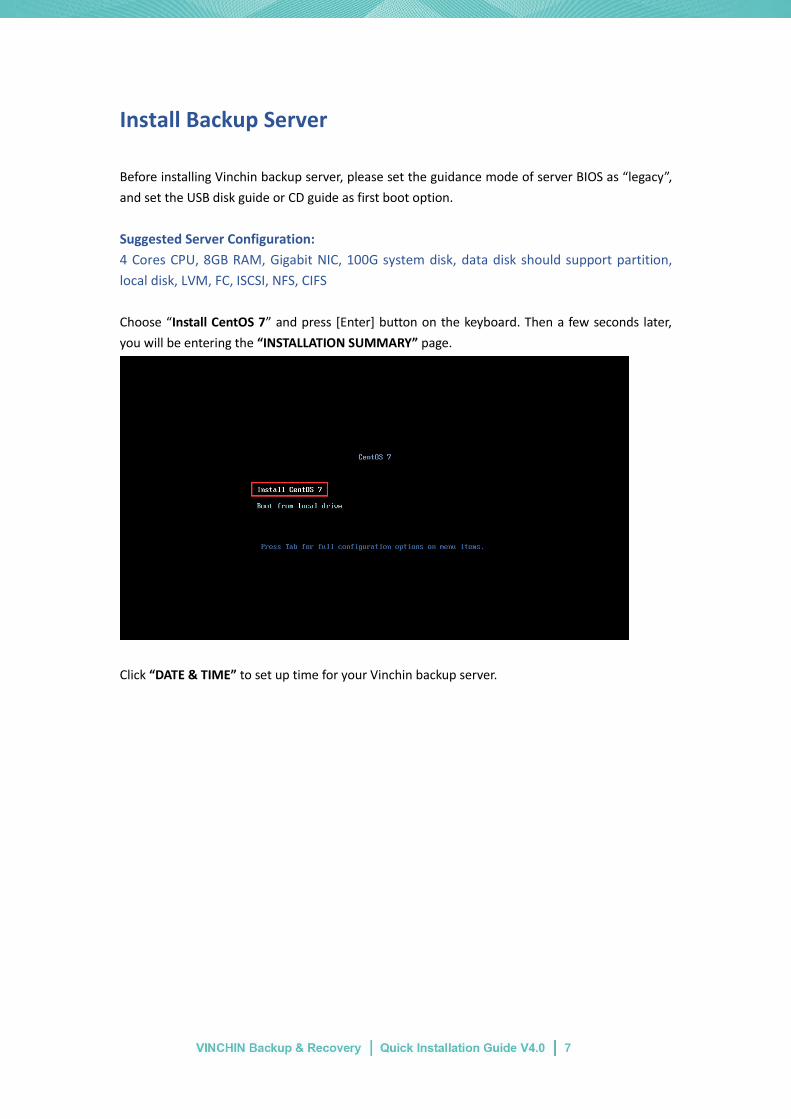
Install Backup Server
Before installing Vinchin backup server, please set the guidance mode of server BIOS as “legacy”,
and set the USB disk guide or CD guide as first boot option.
Suggested Server Configuration:
4 Cores CPU, 8GB RAM, Gigabit NIC, 100G system disk, data disk should support partition,
local disk, LVM, FC, ISCSI, NFS, CIFS
Choose “Install CentOS 7” and press [Enter] button on the keyboard. Then a few seconds later,
you will be entering the “INSTALLATION SUMMARY” page.
Click “DATE & TIME” to set up time for your Vinchin backup server.
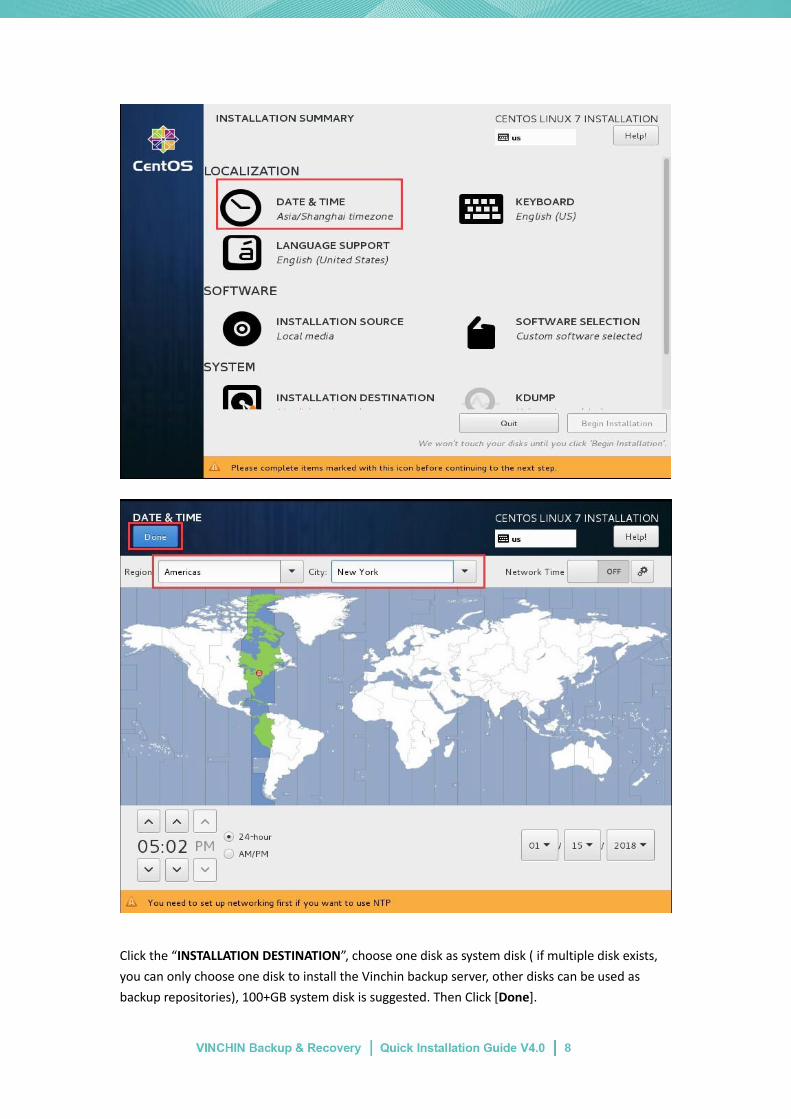
8
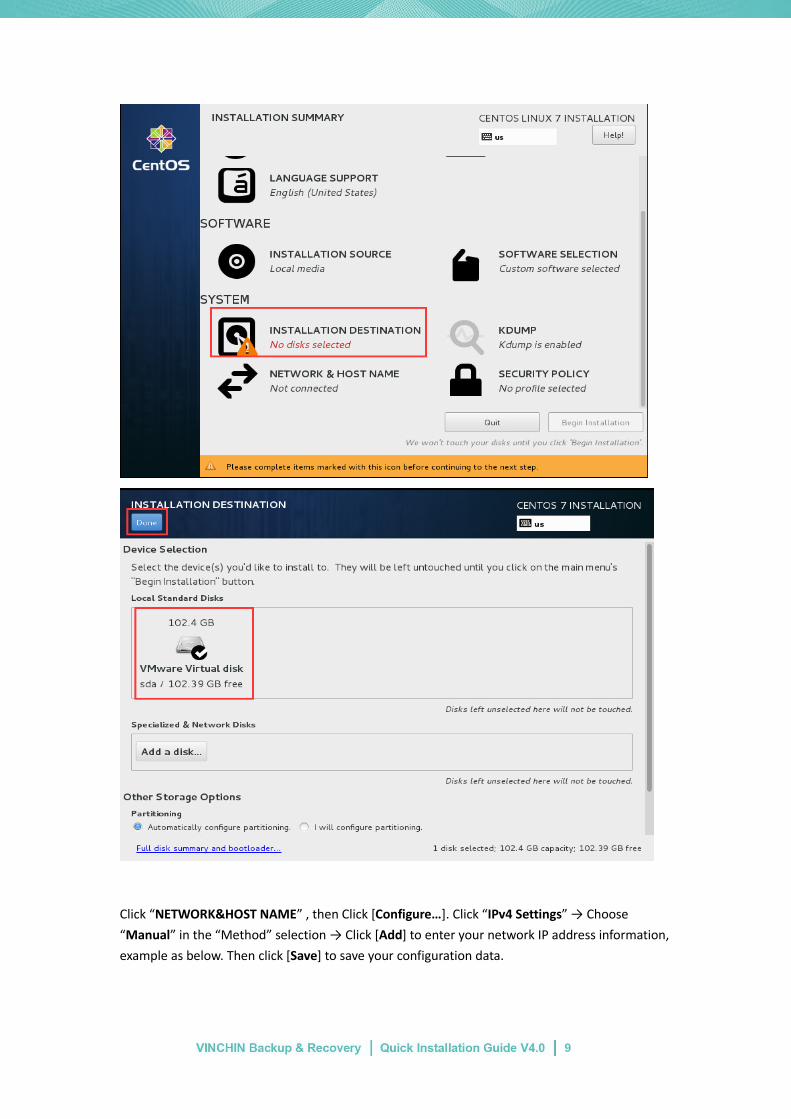
Click the “INSTALLATION DESTINATION”, choose one disk as system disk ( if multiple disk exists,
you can only choose one disk to install the Vinchin backup server, other disks can be used as
backup repositories), 100+GB system disk is suggested. Then Click [Done].
9
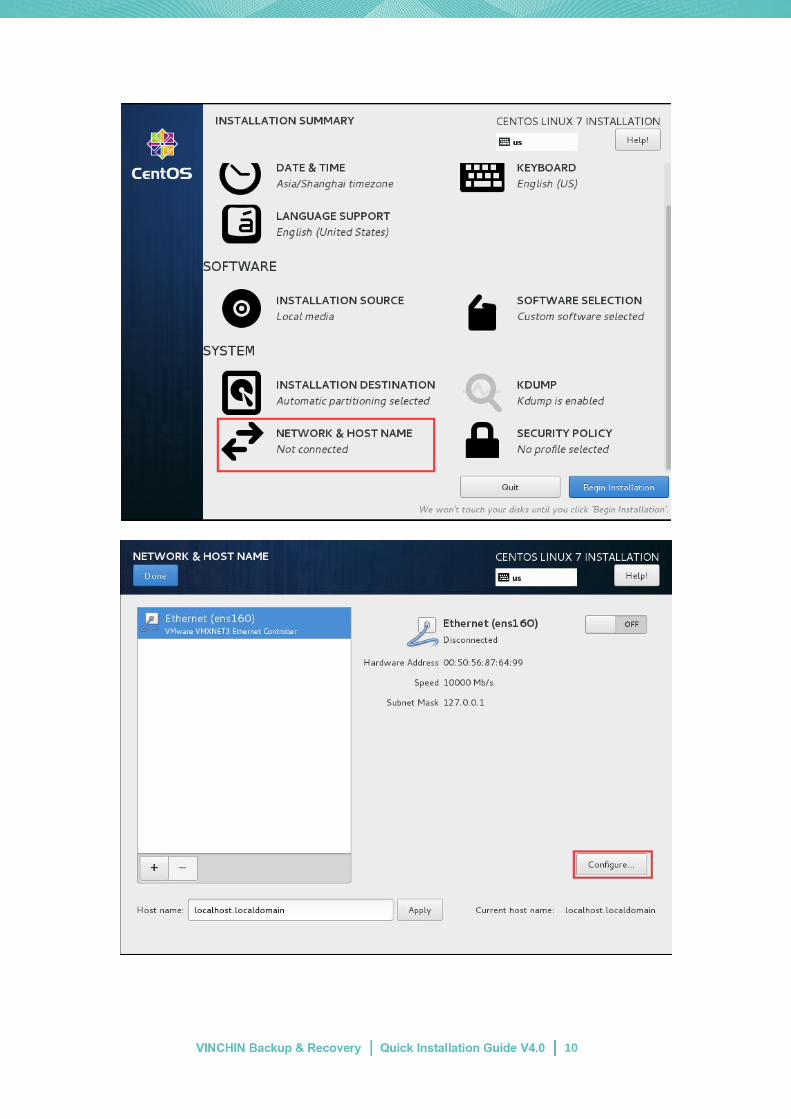
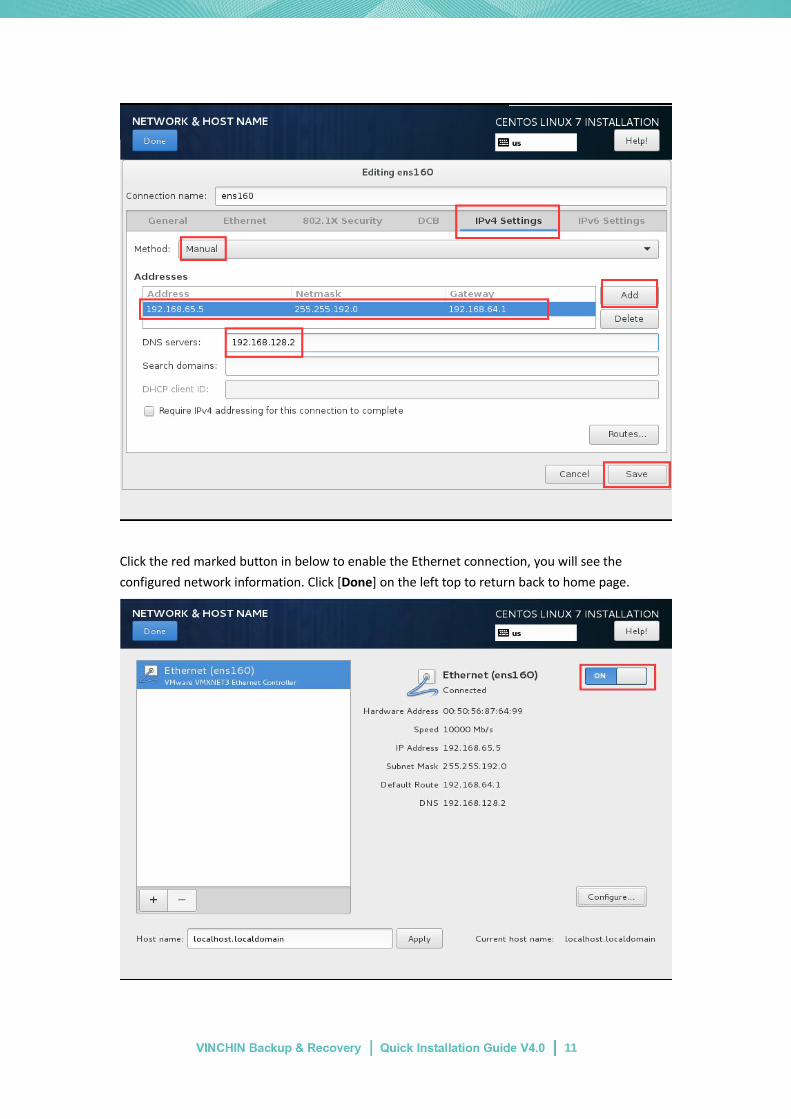
Click “NETWORK&HOST NAME” , then Click [Configure…]. Click “IPv4 Settings” → Choose
“Manual” in the “Method” selection → Click [Add] to enter your network IP address information,
example as below. Then click [Save] to save your configuration data.
10
11
Click the red marked button in below to enable the Ethernet connection, you will see the
configured network information. Click [Done] on the left top to return back to home page.
12
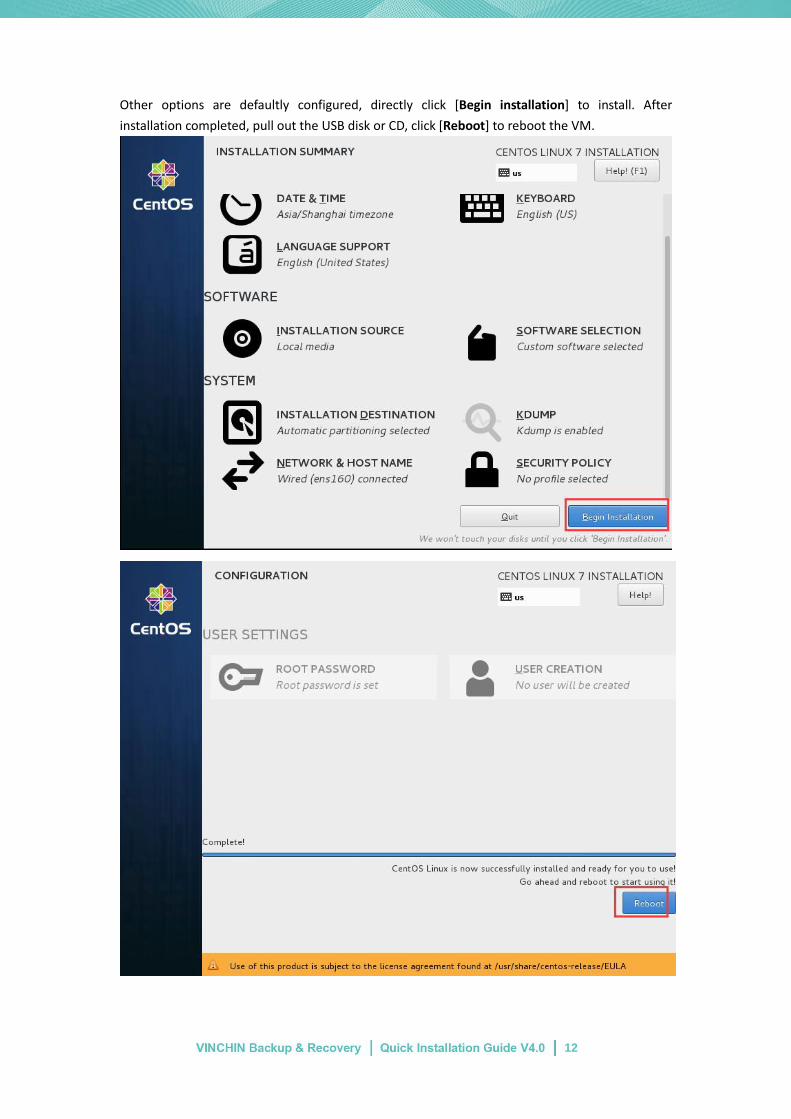
Other options are defaultly configured, directly click [Begin installation] to install. After
installation completed, pull out the USB disk or CD, click [Reboot] to reboot the VM.
13
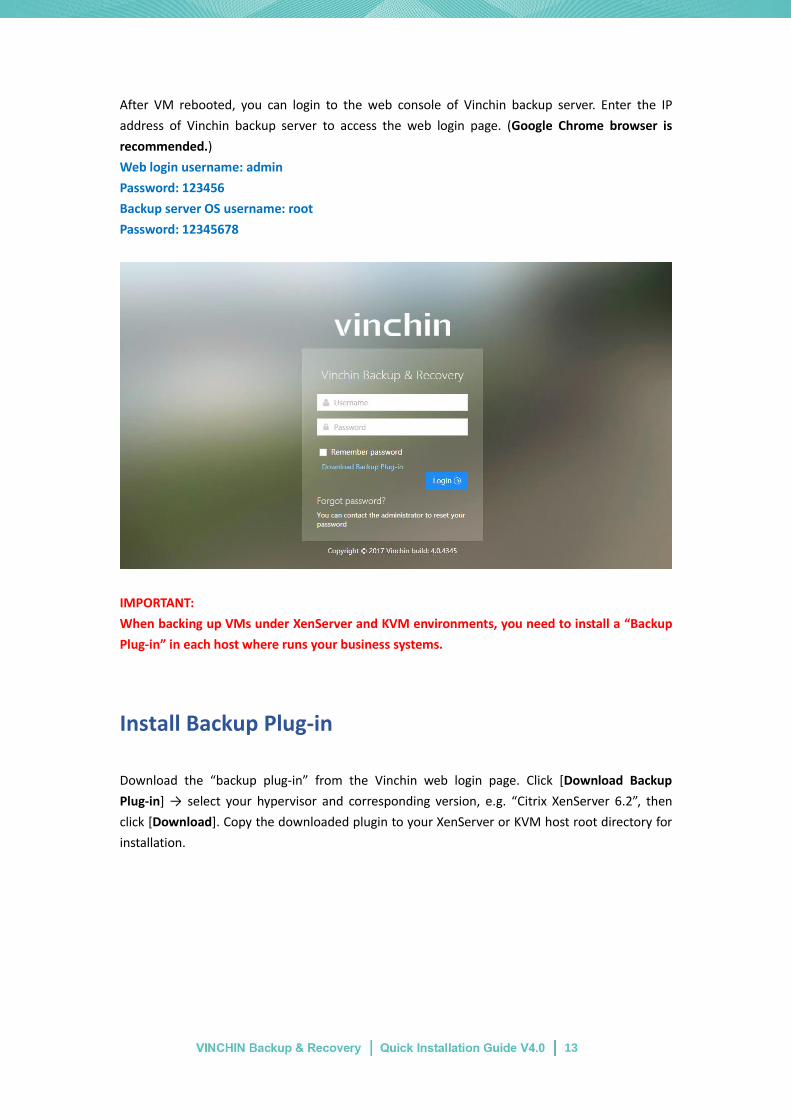
After VM rebooted, you can login to the web console of Vinchin backup server. Enter the IP
address of Vinchin backup server to access the web login page. (Google Chrome browser is
recommended.)
Web login username: admin
Password: 123456
Backup server OS username: root
Password: 12345678
IMPORTANT:
When backing up VMs under XenServer and KVM environments, you need to install a “Backup
Plug-in” in each host where runs your business systems.
Install Backup Plug-in
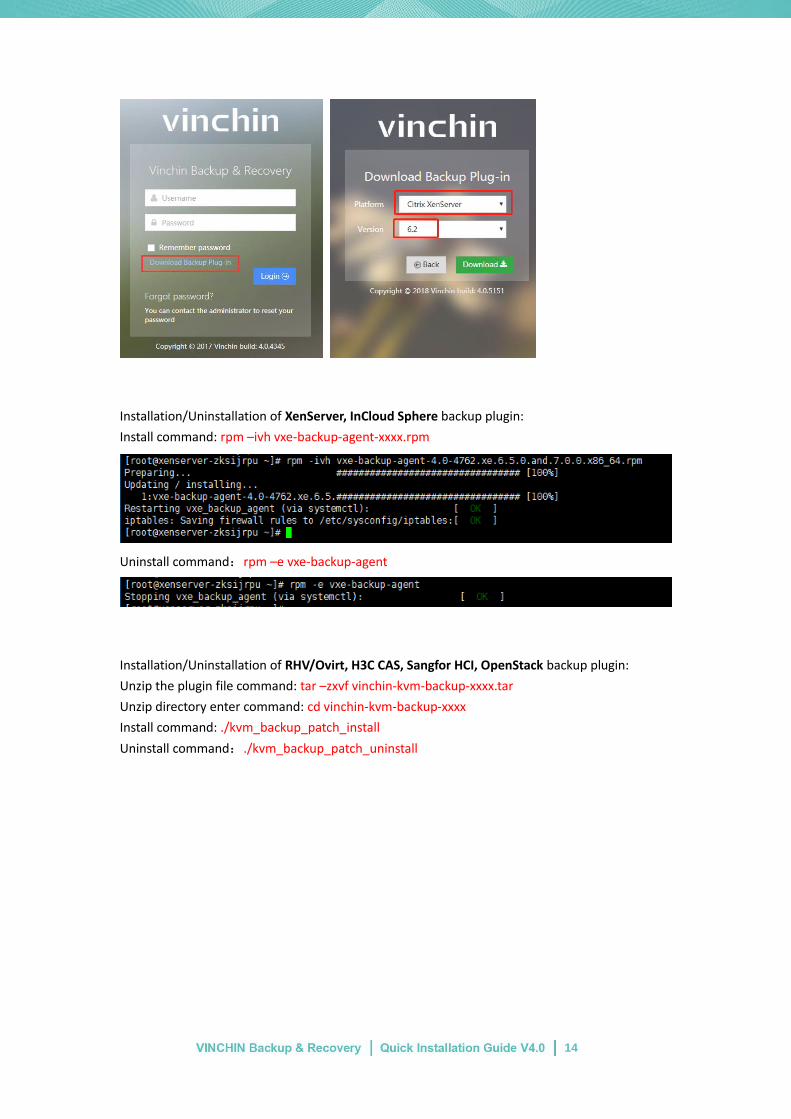
Download the “backup plug-in” from the Vinchin web login page. Click [Download Backup
Plug-in] → select your hypervisor and corresponding version, e.g. “Citrix XenServer 6.2”, then
click [Download]. Copy the downloaded plugin to your XenServer or KVM host root directory for
installation.
14
Installation/Uninstallation of XenServer, InCloud Sphere backup plugin:
Install command: rpm –ivh vxe-backup-agent-xxxx.rpm
Uninstall command:rpm –e vxe-backup-agent
Installation/Uninstallation of RHV/Ovirt, H3C CAS, Sangfor HCI, OpenStack backup plugin:
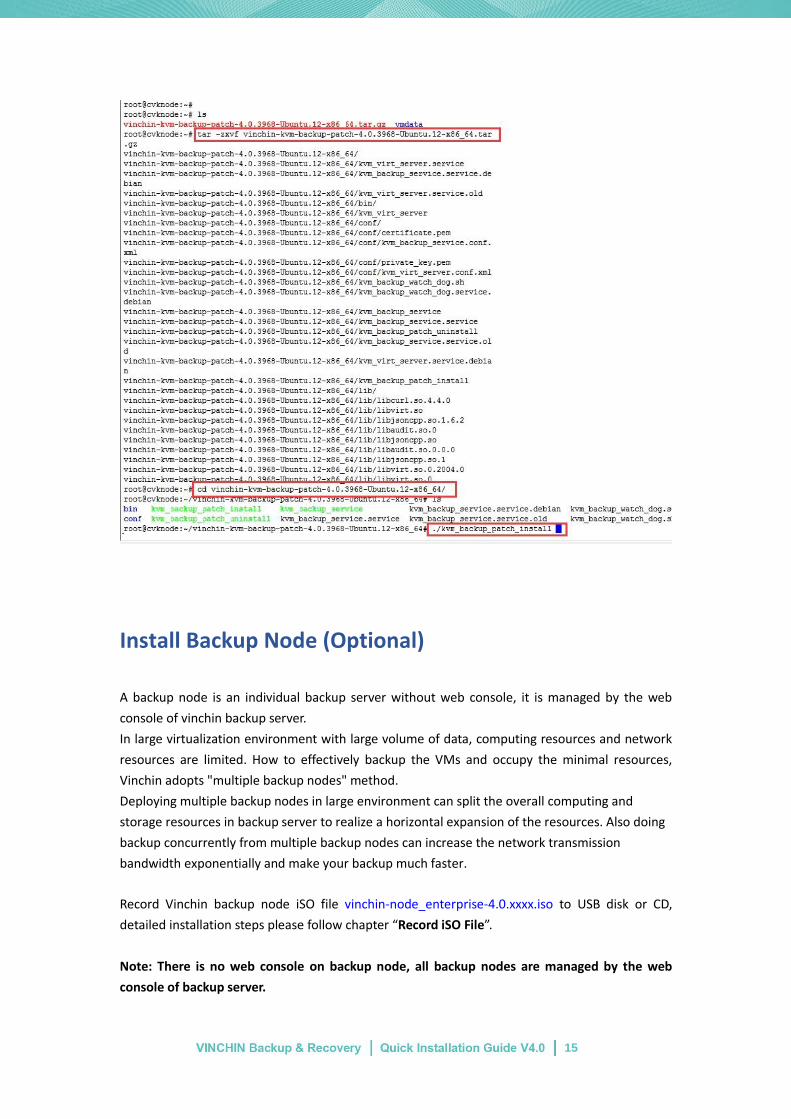
Unzip the plugin file command: tar –zxvf vinchin-kvm-backup-xxxx.tar
Unzip directory enter command: cd vinchin-kvm-backup-xxxx
Install command: ./kvm_backup_patch_install
Uninstall command:./kvm_backup_patch_uninstall
15
Install Backup Node (Optional)
A backup node is an individual backup server without web console, it is managed by the web
console of vinchin backup server.
In large virtualization environment with large volume of data, computing resources and network
resources are limited. How to effectively backup the VMs and occupy the minimal resources,
Vinchin adopts "multiple backup nodes" method.
Deploying multiple backup nodes in large environment can split the overall computing and
storage resources in backup server to realize a horizontal expansion of the resources. Also doing
backup concurrently from multiple backup nodes can increase the network transmission
bandwidth exponentially and make your backup much faster.
Record Vinchin backup node iSO file vinchin-node_enterprise-4.0.xxxx.iso to USB disk or CD,
detailed installation steps please follow chapter “Record iSO File”.
Note: There is no web console on backup node, all backup nodes are managed by the web
console of backup server.

16
The backup node’s IP address shall be different from the backup server, but make sure they are
connected with each other.
After the backup node is installed successfully, you can login the backup node’s OS to modify
config files.
Backup node OS username: root Password:12345678
Edit config file: vi /etc/common_server.conf.xml
Modify the server_ip and database_ip to Backup Server’s IP address.
Enclose:vi editor often-used command
i Insert
esc Exit the editor
:wq Save & exit
Please reboot the backup node OS after you modify its config files: reboot
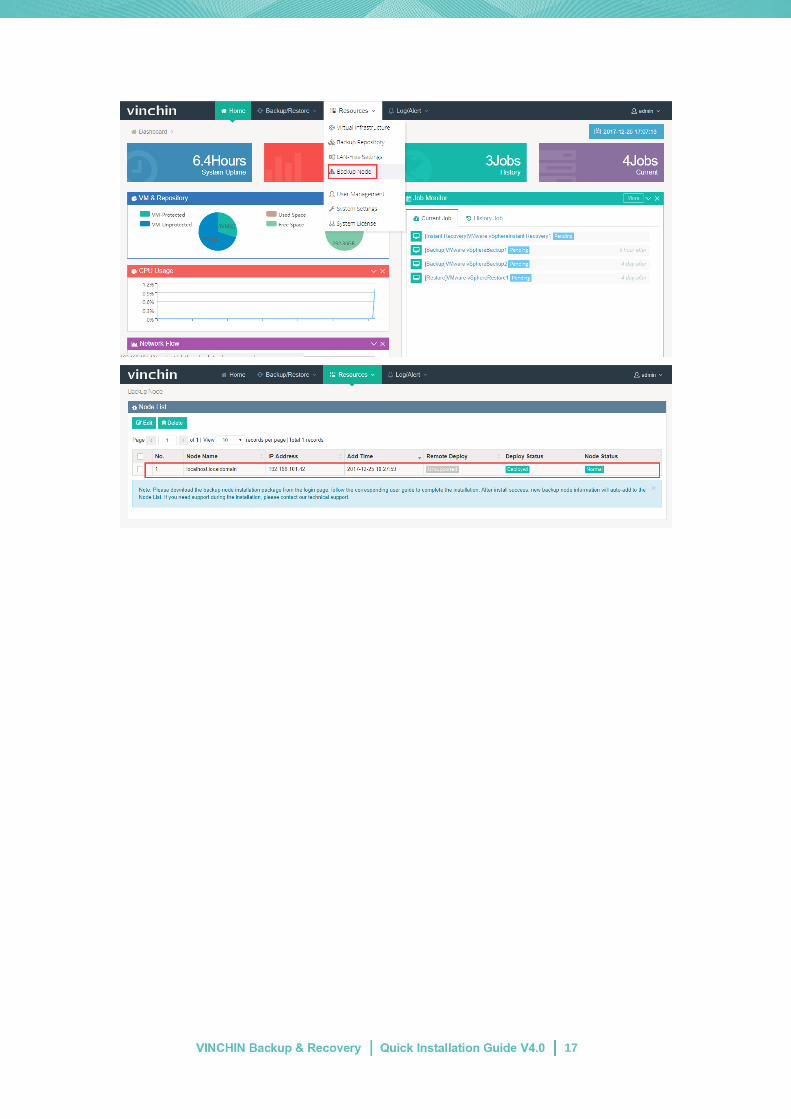
After rebooting the backup node OS, log in the backup server’s web console with default
username : admin , password:123456. You can view the installed backup node information in
the [Resources] → [Backup Node].
17
18
Head Office
F14,No.19,3rd Tianfu Street,
Hi-Tech Zone,Chengdu,China.
P.C.610041
Sales
Tel:+86-28-85530156
Email:[email protected]
Support
Tel:+86-400-9955-698
Email:[email protected]
Website
www.vinchin.com/en