Embed Size (px)
Citation preview

Slate Digital - Virtual Buss Compressors
Virtual Microphone System User Guide
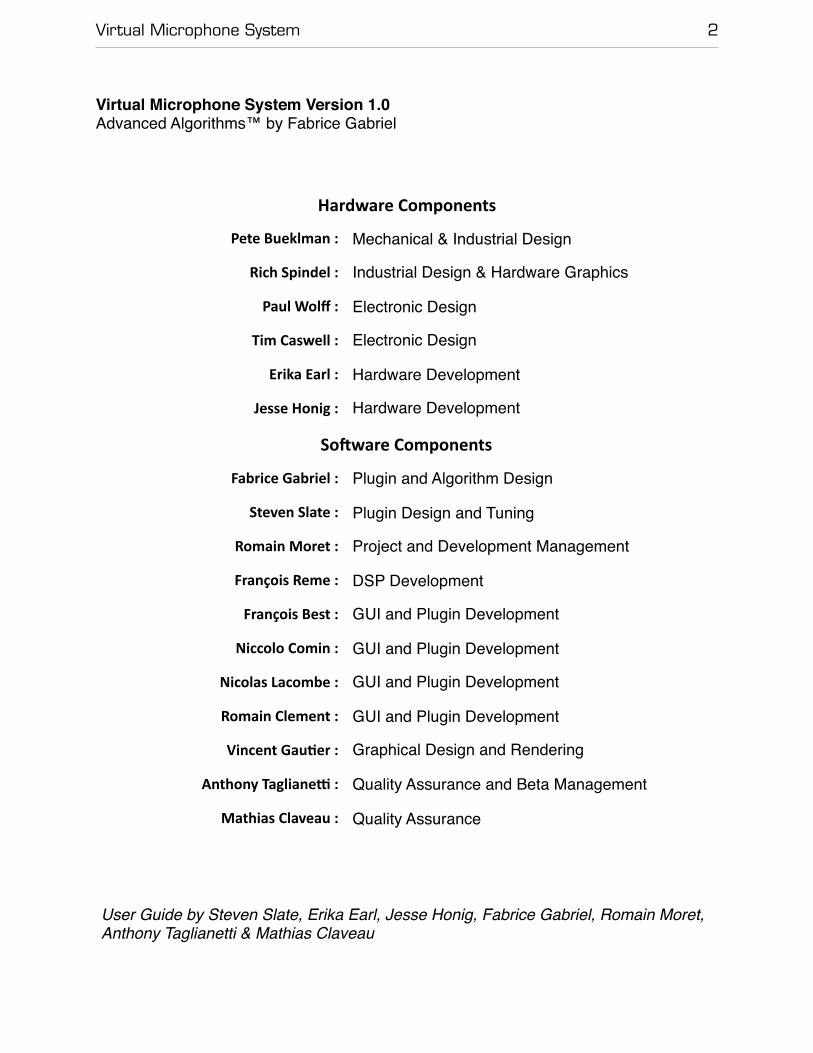
Virtual Microphone System 2
Virtual Microphone System Version 1.0Advanced Algorithms™ by Fabrice Gabriel
Hardware'Components
Pete'Bueklman': Mechanical & Industrial Design
Rich'Spindel': Industrial Design & Hardware Graphics
Paul'Wolff': Electronic Design
Tim'Caswell': Electronic Design
Erika'Earl': Hardware Development
Jesse'Honig': Hardware Development
So@ware'Components
Fabrice'Gabriel': Plugin and Algorithm Design
Steven'Slate':' Plugin Design and Tuning
Romain'Moret': Project and Development Management
François'Reme': DSP Development
François'Best': GUI and Plugin Development
Niccolo'Comin': GUI and Plugin Development
Nicolas'Lacombe': GUI and Plugin Development
Romain'Clement': GUI and Plugin Development
Vincent'GauJer':' Graphical Design and Rendering
Anthony'TaglianeM': Quality Assurance and Beta Management
Mathias'Claveau':' Quality Assurance
User Guide by Steven Slate, Erika Earl, Jesse Honig, Fabrice Gabriel, Romain Moret, Anthony Taglianetti & Mathias Claveau
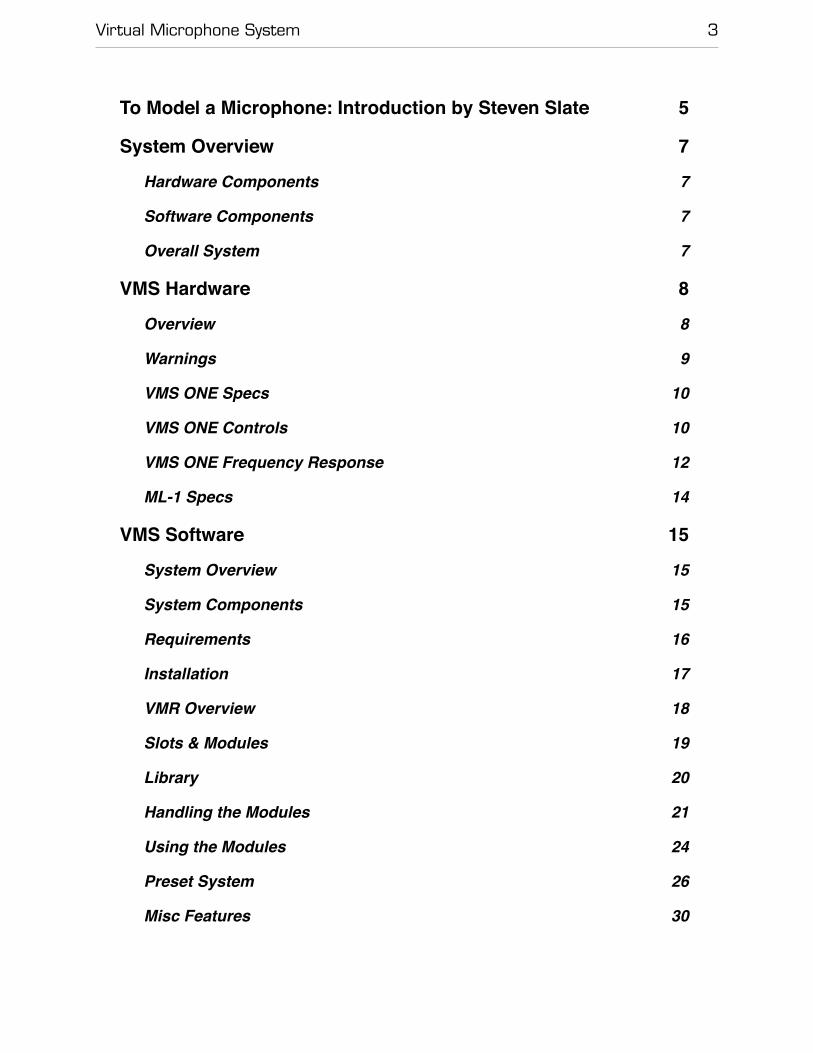
Virtual Microphone System 3
To Model a Microphone: Introduction by Steven Slate 5
System Overview 7
Hardware Components 7
Software Components 7
Overall System 7
VMS Hardware 8
Overview 8
Warnings 9
VMS ONE Specs 10
VMS ONE Controls 10
VMS ONE Frequency Response 12
ML-1 Specs 14
VMS Software 15
System Overview 15
System Components 15
Requirements 16
Installation 17
VMR Overview 18
Slots & Modules 19
Library 20
Handling the Modules 21
Using the Modules 24
Preset System 26
Misc Features 30
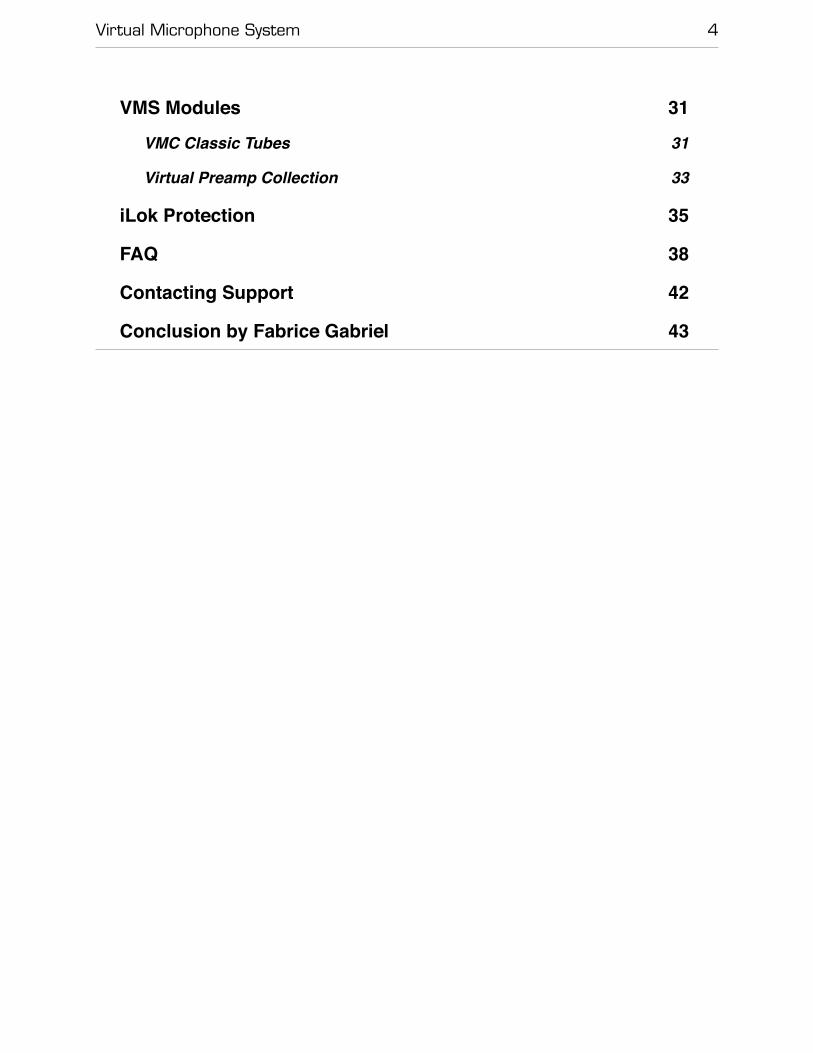
Virtual Microphone System 4
VMS Modules 31
VMC Classic Tubes 31
Virtual Preamp Collection 33
iLok Protection 35
FAQ 38
Contacting Support 42
Conclusion by Fabrice Gabriel 43
Virtual Microphone System 5
To Model a Microphone: Introduction by Steven Slate
The first time I heard a U47, I was seventeen years old. The year was 1997, and I was interning at a small commercial recording facility near my home in New Jersey.
“Be extremely careful with this microphone, it’s forty years old and irreplaceable”, I was told by my boss as we went through the mic locker.
This old grey microphone became so intriguing to me. Why on earth would anyone want to use this old mic? I mean, we had a lot of new microphones. Surely they had to be better than this ancient thing from the 60’s. And to make matters worse, the mic smelled bad.
“So what do you use this U47 on?” I remember asking my boss.
“You’ll know”, he replied, adding to the mystery.
About a week later, a band came in with a bluesy rock singer who had an incredible voice that was a mixture of David Clayton Thomas and Paul Rogers. I went to put up the U87 that I had been instructed to use on the last two vocalists, but my boss stopped me and said “We’re gonna use the 47 on this guy”. He set up the 47 in the vocal booth, then patched it to a Neve preamp, then to a Pultec EQ for some top end, and finally to an 1176 compressor. The singer stepped up, and from the control room I could hear him warming up. The sound coming out of the speakers was rich, warm, present, and just sounded incredible. All of a sudden that weird old mic with the musty smell became magical.
It wasn’t until I was in Boston, assisting at another recording studio, when I got to experience another U47. This time it was on a female singer for a poppy rock tune. But as I listened with the producer to the sound of her voice through the U47, it didn’t seem to sound quite right. Then the head engineer switched the mic to a vintage C12. The vocalist started belting out the chorus and my jaw dropped to the floor, because she sounded so perfect. Midway through she stopped and looked at us through the glass and said “I sound awesome through this mic, it’s definitely the one!” And we tracked the rest of the record with the C12. It was an important lesson for me, because I realized that despite how magical the 47 sounds, it’s not going to fit every source. The second lesson I learned is that the sound of a microphone could greatly influence a performance, since a performer has to be inspired to perform at his or her peak level. If they are not hearing the right sound coming from the mic in their headphones, that’s not going to happen.
Fast forward to 2013. By this time, I was fortunate enough to own my own U47 which I had used on dozens of recordings over the years. One day I was doing a mic shootout on a male vocalist for a friend’s band, and the U47 was by far the clear winner.
Virtual Microphone System 6
But I remember that after the session, I pulled up the vocal takes that were sung through the various mics, and I began to wonder… “What was it about the U47 that was so much better?” Oddly enough, I had never really analyzed it. I had always just accepted the fact that the U47 was a ‘magical’ sounding mic. But now that I wasn’t just an audio engineer but an audio developer, I began to see and hear things differently.
What I realized that day, was that the 47’s magic sound was not due to it being clean, clear, and hifi. No, it was the mic’s unique character. It’s mid forward frequency response, subtle harmonics, and slightly gritty tube saturation helped create its magic tone. At Slate Digital, we had given the term “Dynamic Nonlinear Artifacts” to these anomalies. And more importantly, we knew a lot about them since digitally recreating them had become our core business model.
Three long years later, I am so proud to finally release the Virtual Microphone System to the professional audio industry. Our whole team has worked tirelessly to ensure that the sound of these gorgeous mics and preamps have been recreated with extreme detail. From the fat FG-47 to the airy FG-800, you’re always going to find the virtual mic that works just right for your source. And if it doesn’t, you can change it…. in the mix.
Wishing you beautiful music,
Steven Slate
Virtual Microphone System 7
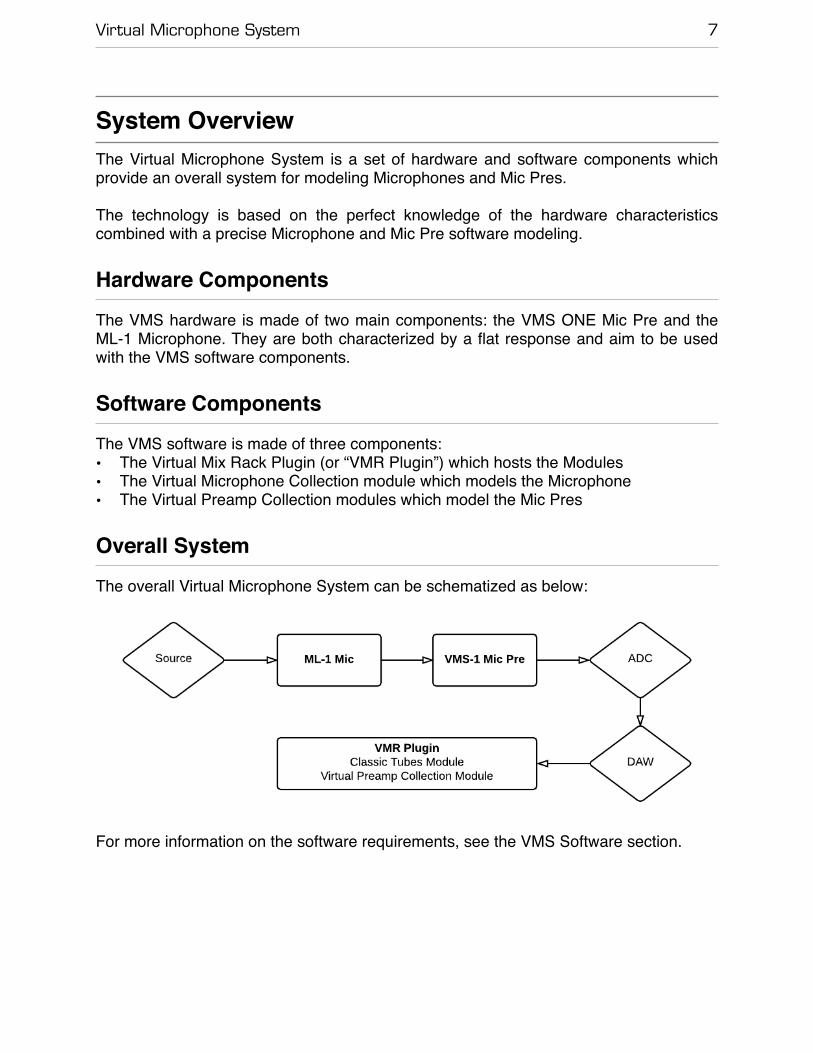
System OverviewThe Virtual Microphone System is a set of hardware and software components which provide an overall system for modeling Microphones and Mic Pres.
The technology is based on the perfect knowledge of the hardware characteristics combined with a precise Microphone and Mic Pre software modeling.
Hardware ComponentsThe VMS hardware is made of two main components: the VMS ONE Mic Pre and the ML-1 Microphone. They are both characterized by a flat response and aim to be used with the VMS software components.
Software ComponentsThe VMS software is made of three components:• The Virtual Mix Rack Plugin (or “VMR Plugin”) which hosts the Modules• The Virtual Microphone Collection module which models the Microphone• The Virtual Preamp Collection modules which model the Mic Pres
Overall SystemThe overall Virtual Microphone System can be schematized as below:
�For more information on the software requirements, see the VMS Software section.
VMS Hardware 8
VMS Hardware
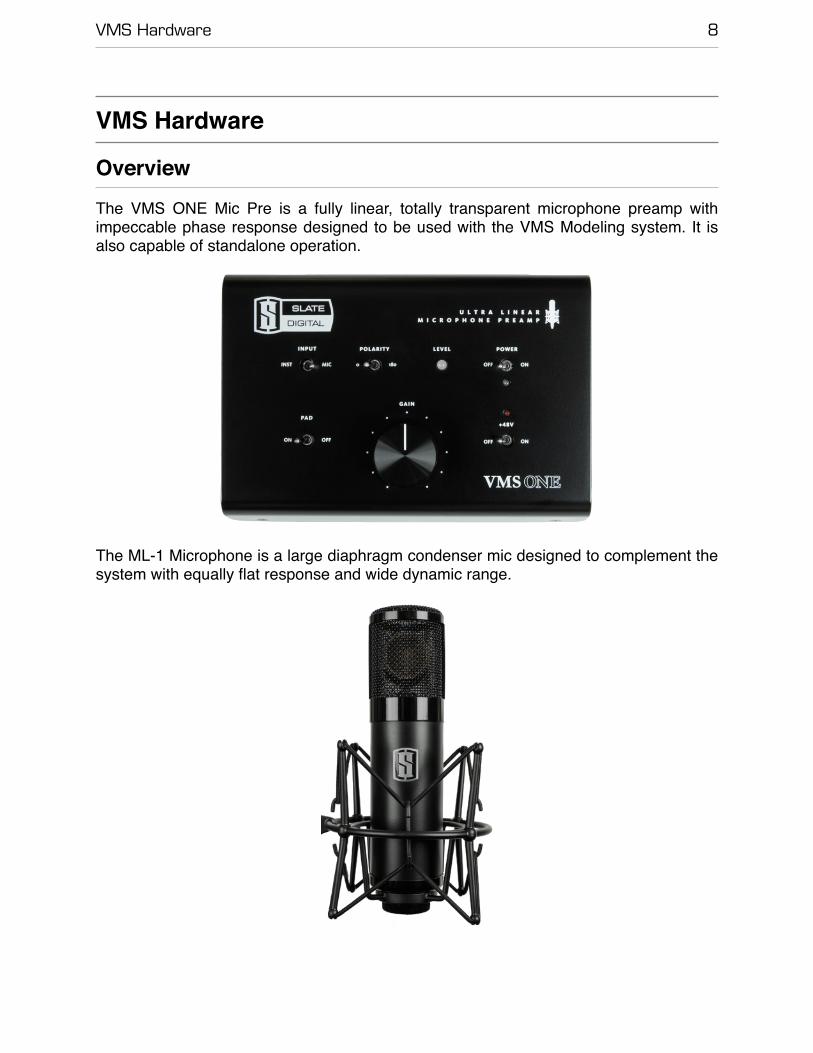
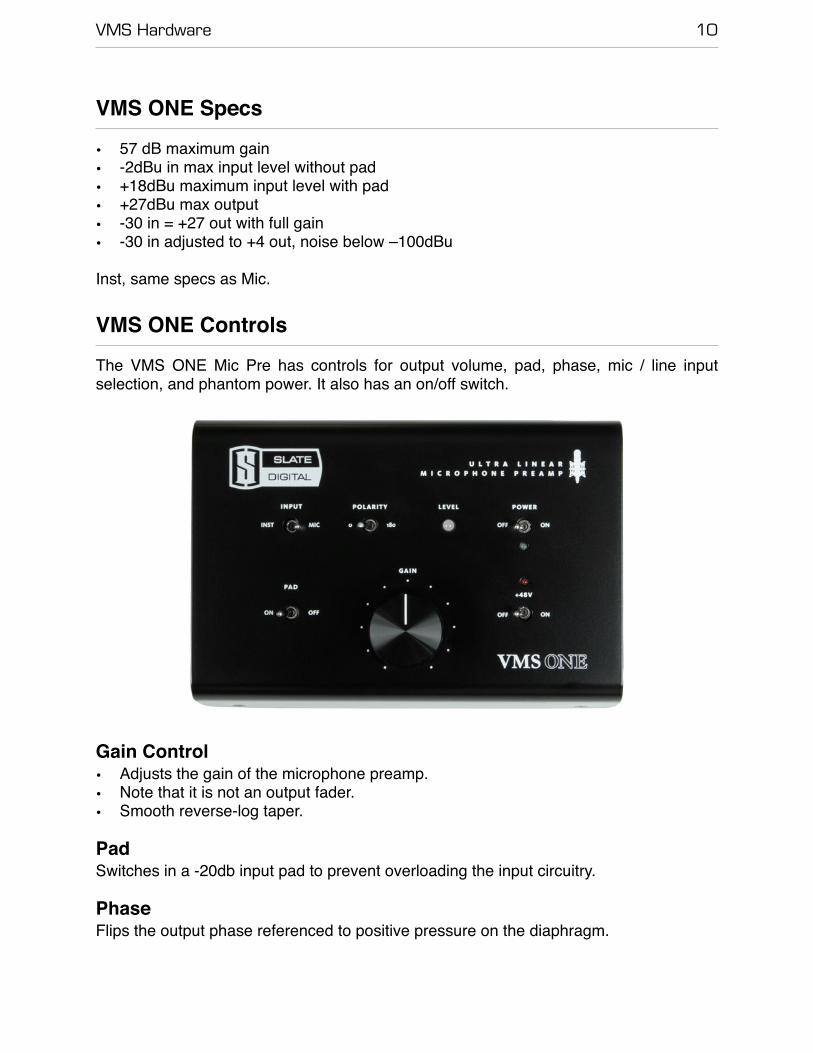
OverviewThe VMS ONE Mic Pre is a fully linear, totally transparent microphone preamp with impeccable phase response designed to be used with the VMS Modeling system. It is also capable of standalone operation.
�The ML-1 Microphone is a large diaphragm condenser mic designed to complement the system with equally flat response and wide dynamic range.
�
VMS Hardware 9
Warnings
• Remember to switch off or mute any and all power amps, including those on powered monitors and in headphone amps before turning the Mic Pre on or off. Damage may occur if you do not!
• Please do not electrocute yourself while installing the unit. Mains voltage can be very, very dangerous and is not a thing to trifle with.
• Please do not connect or disconnect microphone cables while phantom power is switched on. It can create dangerous conditions in your equipment and personal life.
• Confirm the pinouts of any and all cabling before connecting it to the system.
• Monitoring at loud volumes can be very damaging to your ears and the ears of others, even for short durations. The CDC and many other institutions have researched what constitutes a safe listening environment and it is advisable to familiarize yourself with their findings before working long, late hours listening too loud.
• From time to time voltages higher than those of normal audio signals are present on audio cabling, such as phantom power. Be very careful not to apply this voltage where it is not intended, as it may hurt the tiny hamster that powers the unit.
VMS Hardware 10
VMS ONE Specs
• 57 dB maximum gain • -2dBu in max input level without pad • +18dBu maximum input level with pad • +27dBu max output • -30 in = +27 out with full gain • -30 in adjusted to +4 out, noise below –100dBu
Inst, same specs as Mic.
VMS ONE ControlsThe VMS ONE Mic Pre has controls for output volume, pad, phase, mic / line input selection, and phantom power. It also has an on/off switch.
Gain Control • Adjusts the gain of the microphone preamp. • Note that it is not an output fader. • Smooth reverse-log taper.
Pad Switches in a -20db input pad to prevent overloading the input circuitry.
PhaseFlips the output phase referenced to positive pressure on the diaphragm.
VMS Hardware 11
Mic / Inst SelectorSelects either the mic input (XLR) or the instrument input (TRS) to the mic pre.Both connectors are available on the back panel via a combo jack.
Phantom Power Provides +48v for powering condenser microphones or other equipment.
On / Off switch Applies power (or doesn’t) to the mic pre circuit.
VMS Hardware 12
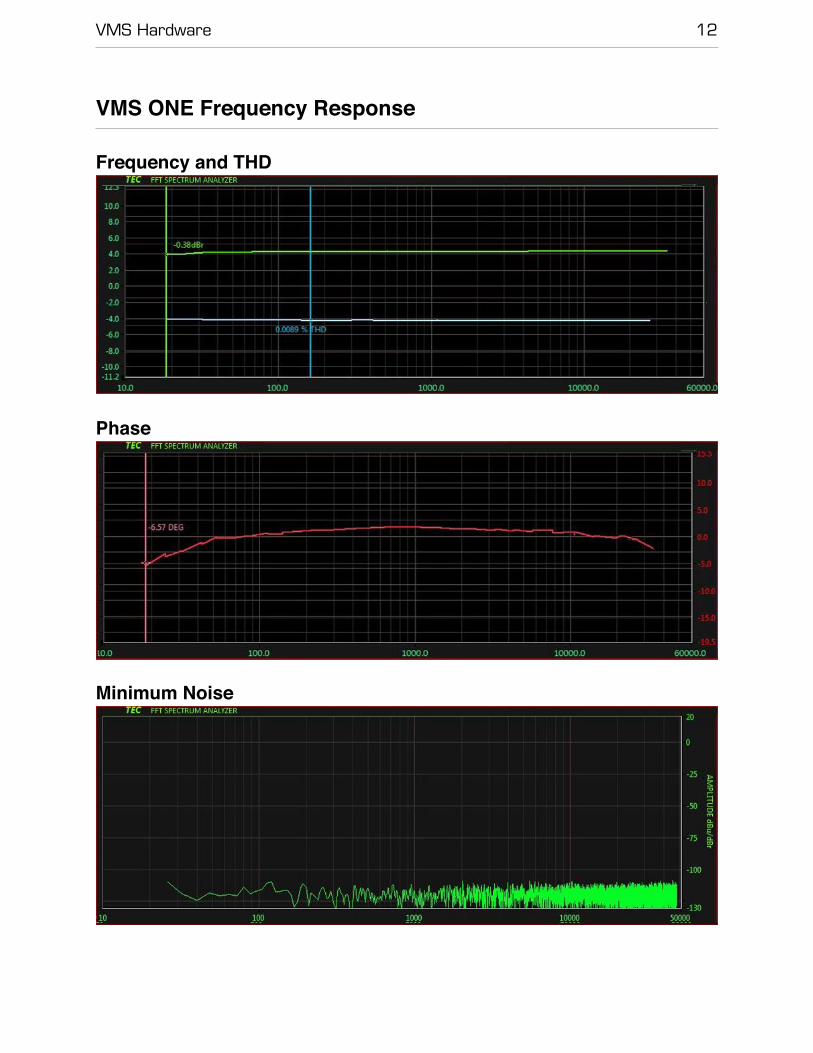
VMS ONE Frequency Response
Frequency and THD
!
Phase
!
Minimum Noise
!

VMS Hardware 13
Maximum Noise
!
VMS Hardware 14
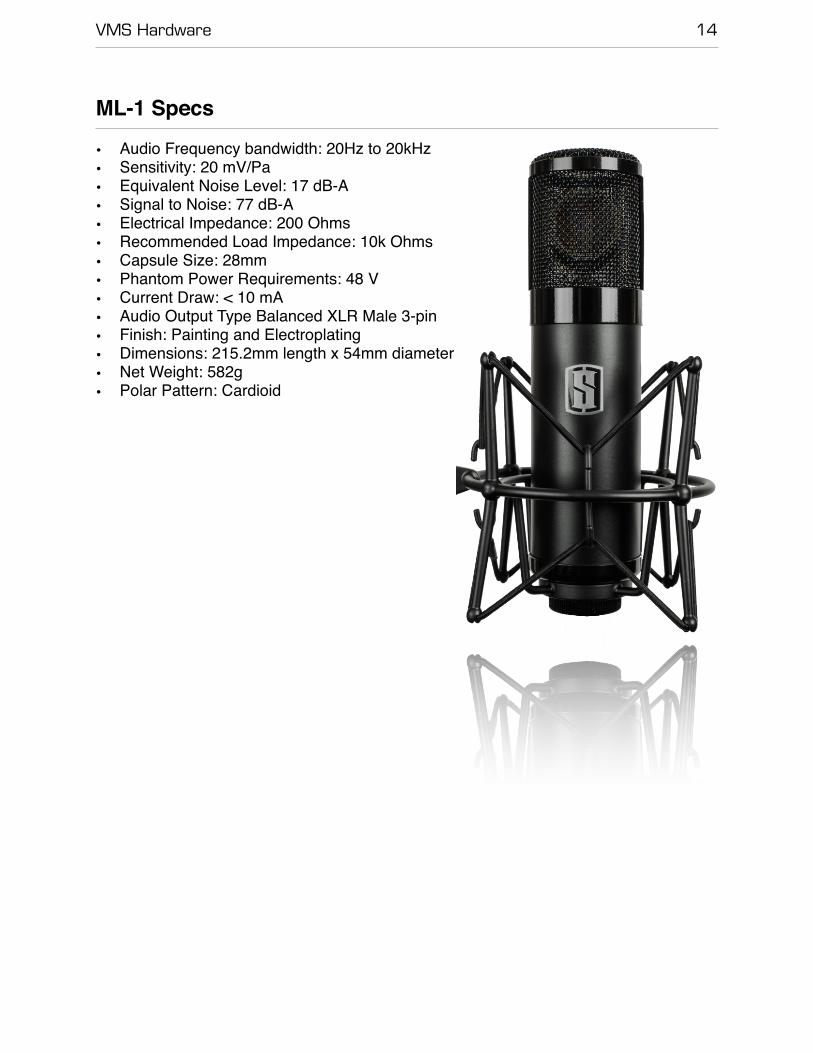
ML-1 Specs
• Audio Frequency bandwidth: 20Hz to 20kHz • Sensitivity: 20 mV/Pa • Equivalent Noise Level: 17 dB-A • Signal to Noise: 77 dB-A • Electrical Impedance: 200 Ohms • Recommended Load Impedance: 10k Ohms • Capsule Size: 28mm • Phantom Power Requirements: 48 V • Current Draw: < 10 mA • Audio Output Type Balanced XLR Male 3-pin • Finish: Painting and Electroplating • Dimensions: 215.2mm length x 54mm diameter • Net Weight: 582g • Polar Pattern: Cardioid
VMS Software 15
VMS Software
System OverviewThe Virtual Mix Rack System is a modular architecture that allows the use of processing units, the Modules, within a Rack Platform, the Virtual Mix Rack Plugin.
In the VMR System architecture, the Rack and the Modules are independent. They both reside on the system as two separate binary sets. This offers a more flexible way of adding new modules in the Virtual Mix Rack ecosystem, without having to systematically update the entire set of existing modules.
This separation also allows an easier and more powerful way to deal with iLok licenses. Each Module could have it’s own license, gathered into a licensed bundle, or even use the same license as the Virtual Mix Rack itself.
System ComponentsThe VMR Platform is made of two components: the Virtual Mix Rack Plugin and the Virtual Mix Rack Modules.
VMR PluginThe Virtual Mix Rack Plugin is the corner stone of the VMR System. It is the actual plugin you insert in the host. Within this plugin, you can load, use, move and remove VMR Modules.
VMR ModulesVMR Modules are like small plugins. In fact, they are plugins, except that they exist as a plugin format that only the VMR Rack can interpret and use.
From the VMR System perspective, the Virtual Mix Rack Plugin is the host, and the VMR Modules are the modular processing units.
Modules can be of any kind, dynamic processing, EQs, delay, reverbs, mixing utilities, mastering units, metering, etc.
VMS Software 16
Requirements
Supported Architectures
Macintosh๏ Mac OS X 10.7 or later (32 and 64-bit) ๏ Mac Quad Core i5 Intel Processor, 4GB RAM ๏ Plugin Formats: VST2, VST3, AudioUnit, AAX
Windows๏ Windows 7 or later (32 and 64-bit) ๏ Quad Core i5, 4GB RAM ๏ Plugin Formats: VST2, VST3, AAX
Rack and Module LicensesDue to the Modular architecture of the Virtual Mix Rack plugin, you will need multiple licenses to get the VMR System up and running:
• The VMR Rack license, which activates the VMR Rack and free Modules like Revival and Trimmer.
• Module/Modules Bundles licenses: for instance, the VMR Mix Bundle license contains licenses for the FG-116, FG-401, FG-N and FG-S modules. Bundled licenses cannot be separated.*
Rack and Module VersionsIt’s important to understand that the VMR Rack and Modules must always share the same version number. For instance a Module under version X will only work within a Rack that is also under version X, and vice-versa.
Click the Slate Digital logo in the toolbar to open the About Panel, which will display the version number for the Rack and Modules.†
See the iLok Protection section for more information.*
See the About Panel section for more information.†
VMS Software 17
Installation
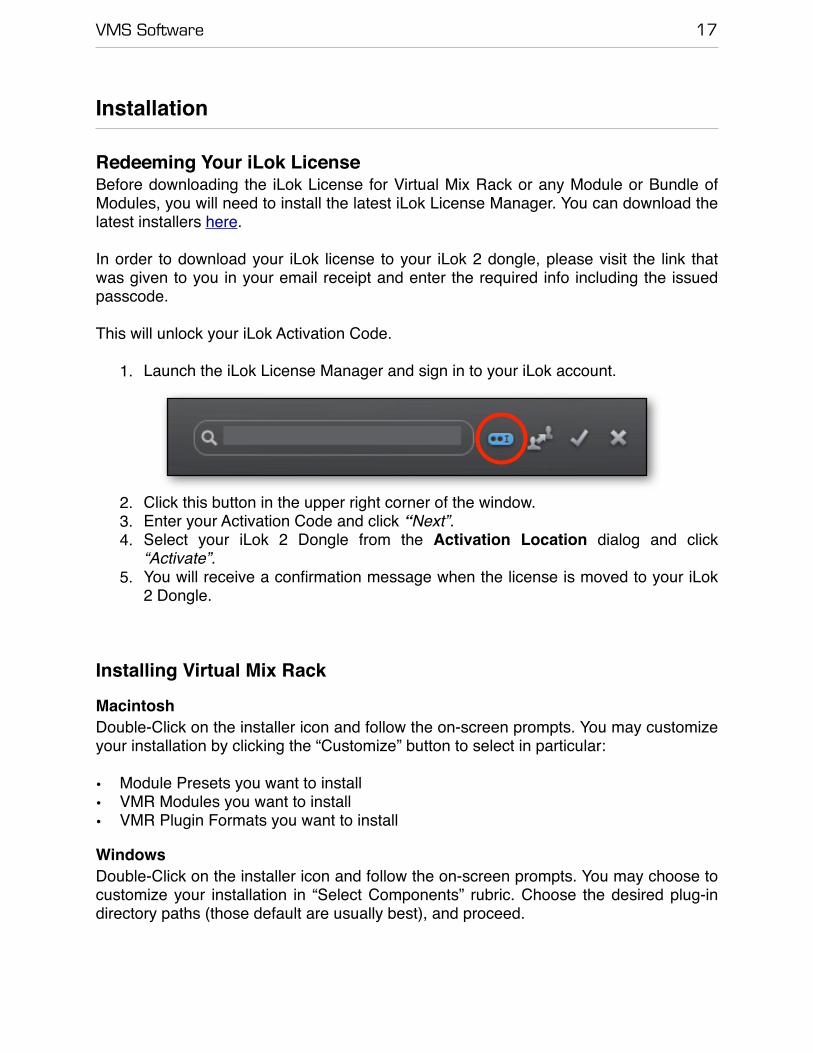
Redeeming Your iLok LicenseBefore downloading the iLok License for Virtual Mix Rack or any Module or Bundle of Modules, you will need to install the latest iLok License Manager. You can download the latest installers here.
In order to download your iLok license to your iLok 2 dongle, please visit the link that was given to you in your email receipt and enter the required info including the issued passcode.
This will unlock your iLok Activation Code.
1. Launch the iLok License Manager and sign in to your iLok account.
2. Click this button in the upper right corner of the window.3. Enter your Activation Code and click “Next”.4. Select your iLok 2 Dongle from the Activation Location dialog and click
“Activate”.5. You will receive a confirmation message when the license is moved to your iLok
2 Dongle.
Installing Virtual Mix Rack
MacintoshDouble-Click on the installer icon and follow the on-screen prompts. You may customize your installation by clicking the “Customize” button to select in particular:
• Module Presets you want to install• VMR Modules you want to install• VMR Plugin Formats you want to install
WindowsDouble-Click on the installer icon and follow the on-screen prompts. You may choose to customize your installation in “Select Components” rubric. Choose the desired plug-in directory paths (those default are usually best), and proceed.
VMS Software 18
VMR Overview
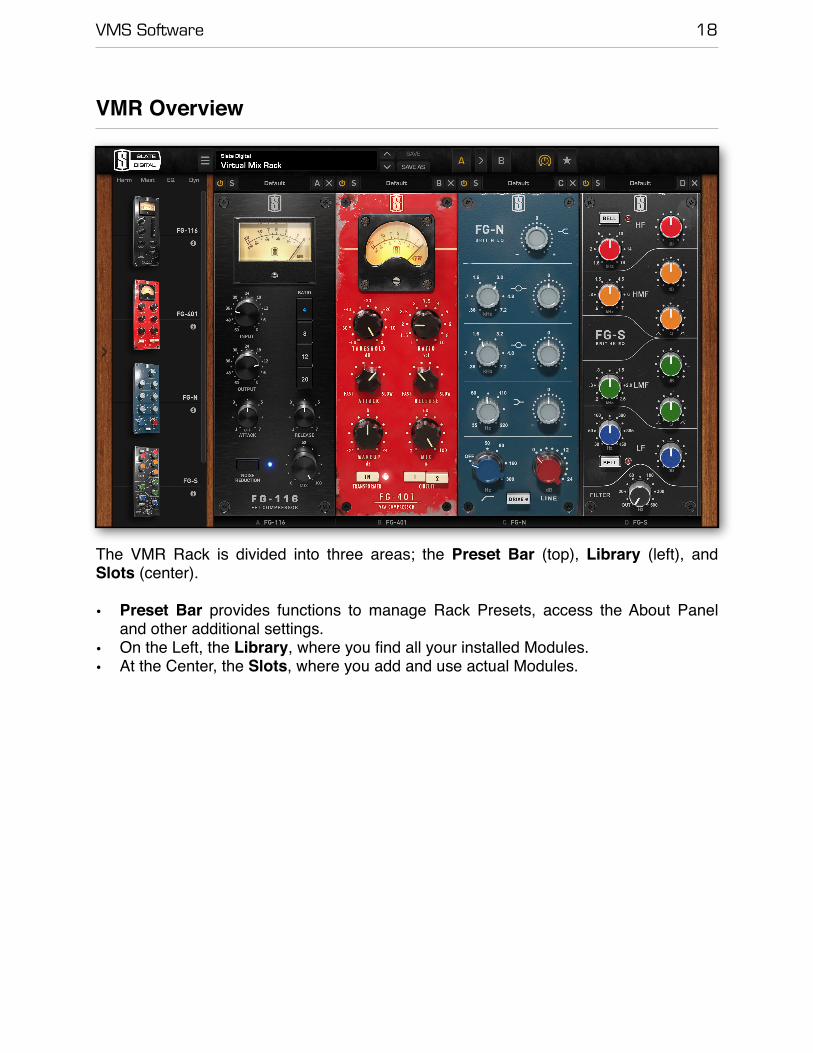
The VMR Rack is divided into three areas; the Preset Bar (top), Library (left), and Slots (center).
• Preset Bar provides functions to manage Rack Presets, access the About Panel and other additional settings.
• On the Left, the Library, where you find all your installed Modules.• At the Center, the Slots, where you add and use actual Modules.
VMS Software 19
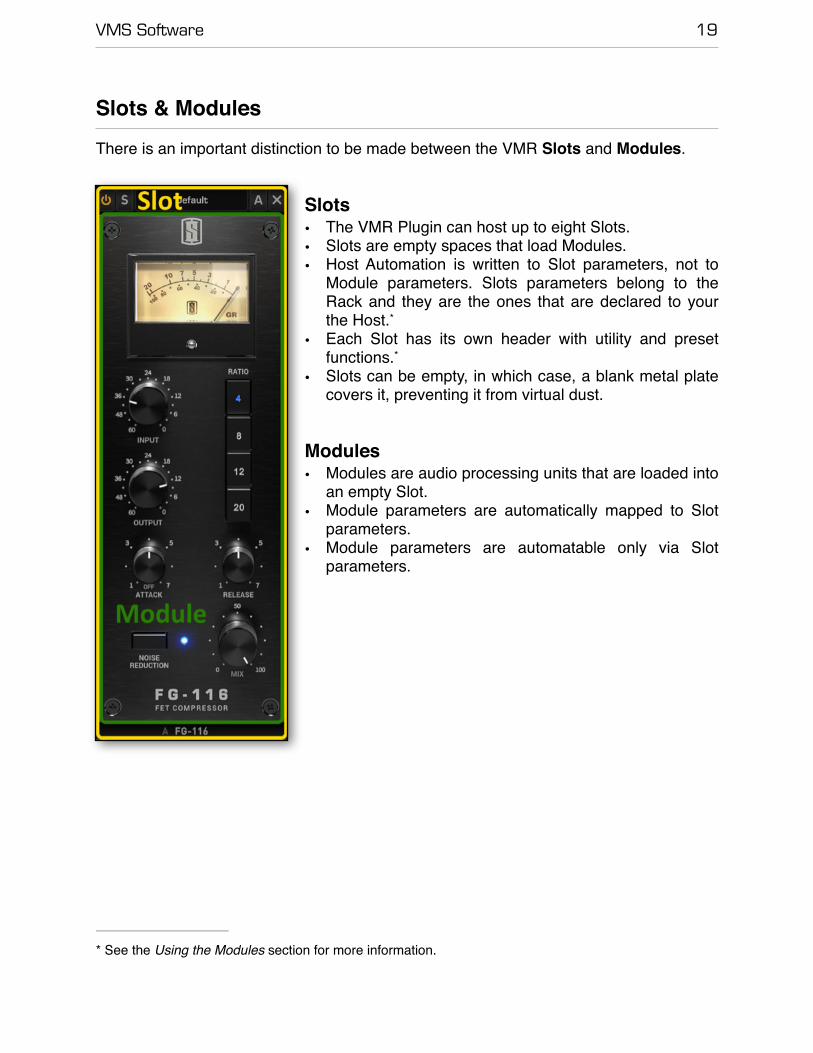
Slots & ModulesThere is an important distinction to be made between the VMR Slots and Modules.
Slots• The VMR Plugin can host up to eight Slots.• Slots are empty spaces that load Modules.• Host Automation is written to Slot parameters, not to
Module parameters. Slots parameters belong to the Rack and they are the ones that are declared to your the Host.*
• Each Slot has its own header with utility and preset functions.*
• Slots can be empty, in which case, a blank metal plate covers it, preventing it from virtual dust.
Modules• Modules are audio processing units that are loaded into
an empty Slot.• Module parameters are automatically mapped to Slot
parameters.• Module parameters are automatable only via Slot
parameters.
� See the Using the Modules section for more information.*
VMS Software 20
Library
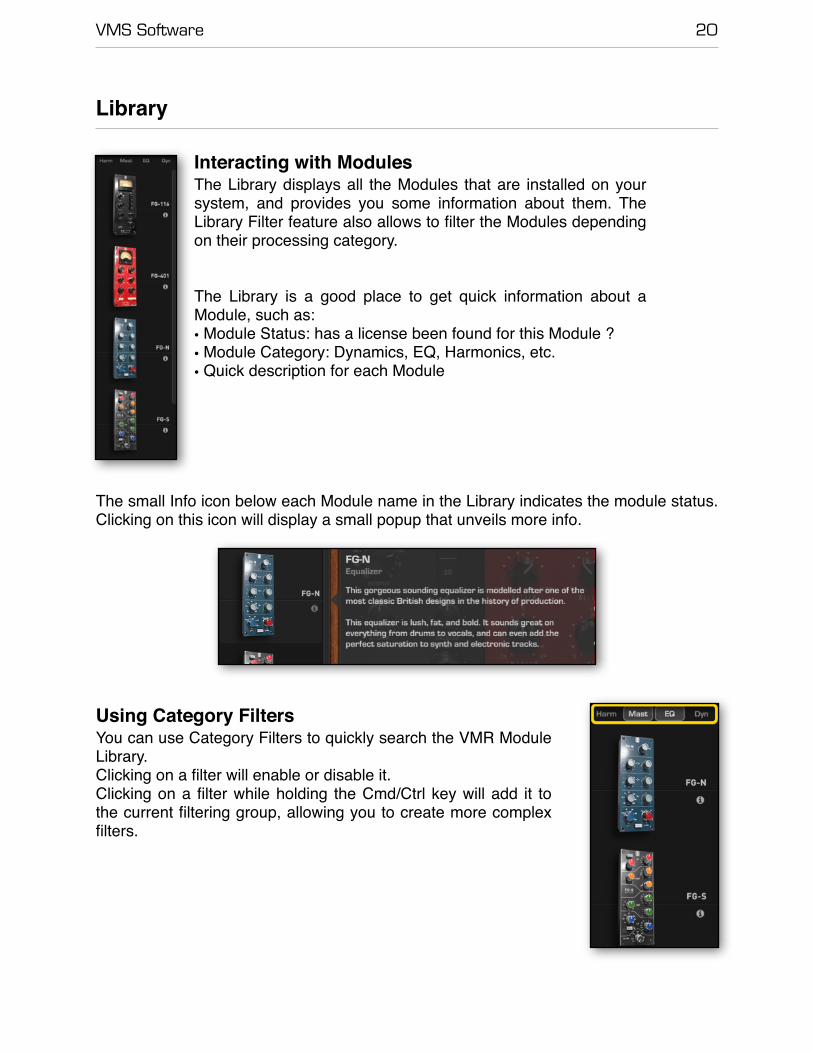
Interacting with ModulesThe Library displays all the Modules that are installed on your system, and provides you some information about them. The Library Filter feature also allows to filter the Modules depending on their processing category.
The Library is a good place to get quick information about a Module, such as:• Module Status: has a license been found for this Module ?• Module Category: Dynamics, EQ, Harmonics, etc.• Quick description for each Module
The small Info icon below each Module name in the Library indicates the module status. Clicking on this icon will display a small popup that unveils more info.
�
Using Category FiltersYou can use Category Filters to quickly search the VMR Module Library.Clicking on a filter will enable or disable it.Clicking on a filter while holding the Cmd/Ctrl key will add it to the current filtering group, allowing you to create more complex filters.
VMS Software 21
Handling the Modules
Adding ModulesThere are two ways of adding Modules:
1. By double clicking on the Module’s Thumbnail in the Library.
2. By Dragging the Module’s Thumbnail from the Library and dropping it into a Rack Slot.
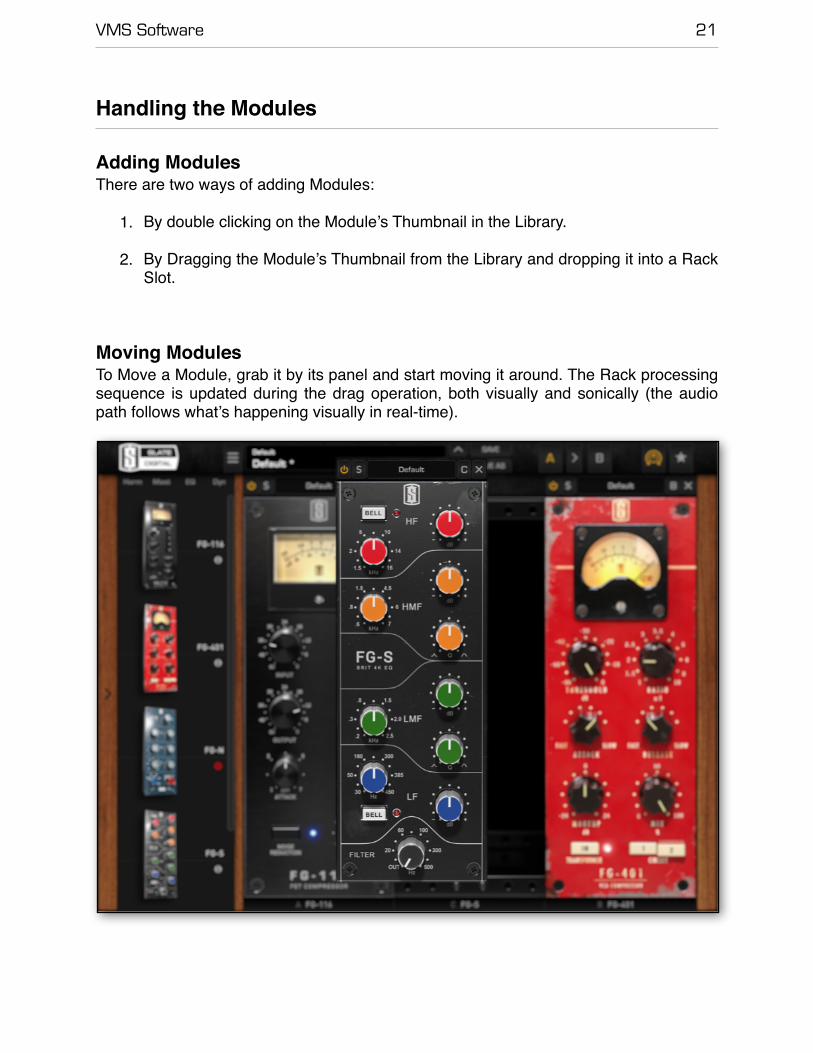
Moving ModulesTo Move a Module, grab it by its panel and start moving it around. The Rack processing sequence is updated during the drag operation, both visually and sonically (the audio path follows what’s happening visually in real-time).
�
VMS Software 22
Duplicating ModulesTo duplicate a Module, Drag’n Drop it while holding the Opt/Alt key. More generally, as long as the Opt/Alt key is pressed during a Drag’n Drop operation, then the dragged Module will be a clone of the original one.
Removing ModulesThere are two ways of removing Modules and Slots:
1. By clicking on the X icon in the Slot Header: this will remove the entire Slot, with the Module that is inside (note: the Rack will always have a minimum number of visible Slots, so when removing a Module, you can potentially end up with an empty Slot).
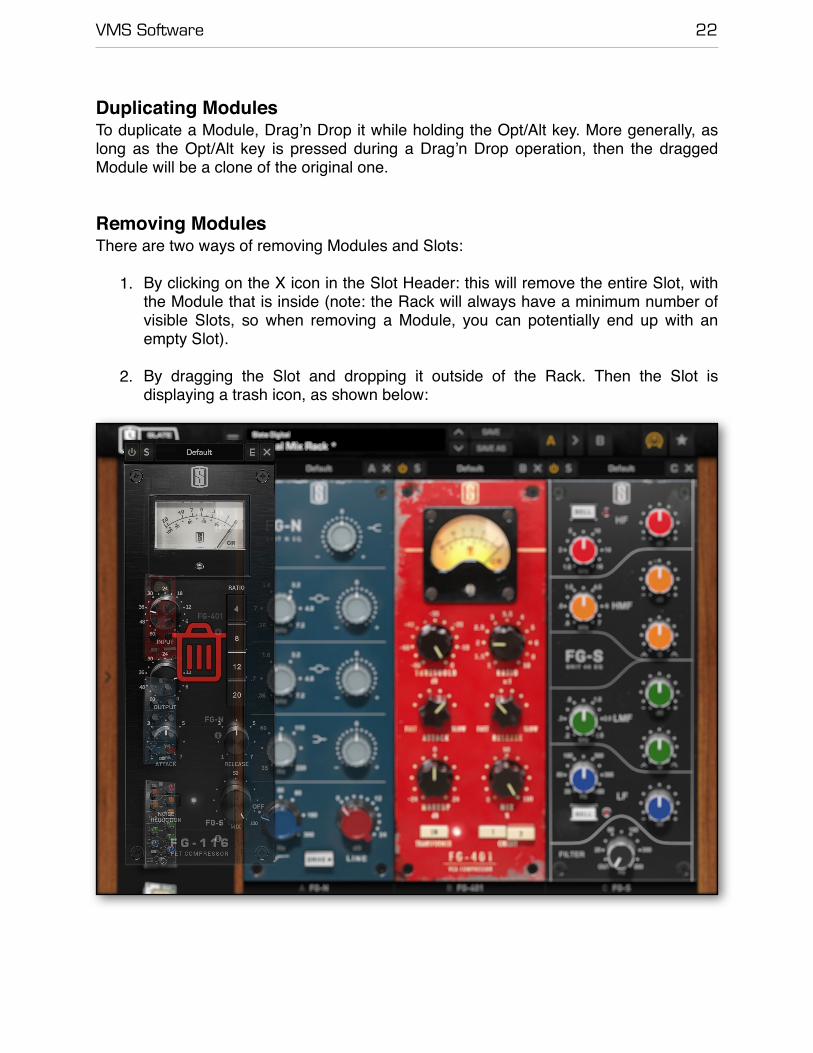
2. By dragging the Slot and dropping it outside of the Rack. Then the Slot is displaying a trash icon, as shown below:
�
VMS Software 23
Moving / Cloning Modules between Rack InstancesThis is one of the nice feature of the VMR from a workflow perspective: you can add, move and duplicate Modules between two Rack Instances.
To Move / Clone a Module from an instance to another, just drag the Module from the first Rack view to the second. Holding Opt/Alt during the Drag operation will duplicate the Module instead of moving it.This also works with the Library, you can grab a Module from any Rack instance’s Library, and drop into any other Rack instance’s Slot.
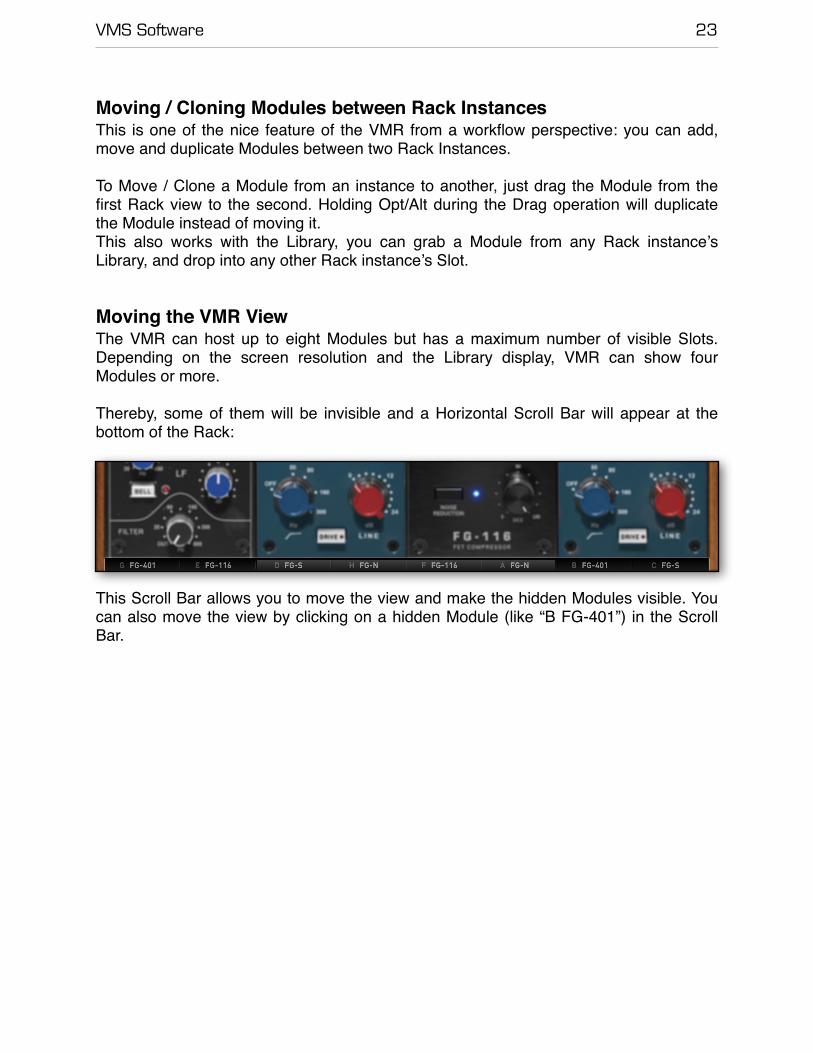
Moving the VMR ViewThe VMR can host up to eight Modules but has a maximum number of visible Slots. Depending on the screen resolution and the Library display, VMR can show four Modules or more.
Thereby, some of them will be invisible and a Horizontal Scroll Bar will appear at the bottom of the Rack:
This Scroll Bar allows you to move the view and make the hidden Modules visible. You can also move the view by clicking on a hidden Module (like “B FG-401”) in the Scroll Bar.
VMS Software 24
Using the Modules
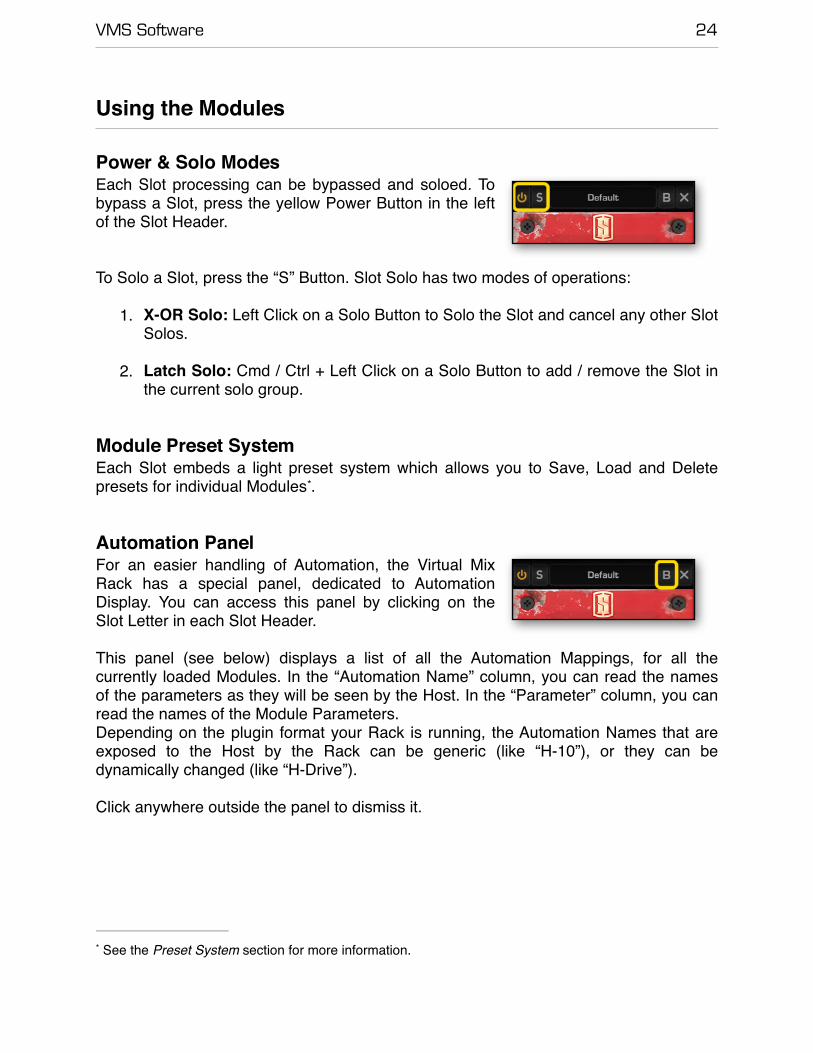
Power & Solo ModesEach Slot processing can be bypassed and soloed. To bypass a Slot, press the yellow Power Button in the left of the Slot Header.
To Solo a Slot, press the “S” Button. Slot Solo has two modes of operations:
1. X-OR Solo: Left Click on a Solo Button to Solo the Slot and cancel any other Slot Solos.
2. Latch Solo: Cmd / Ctrl + Left Click on a Solo Button to add / remove the Slot in the current solo group.
Module Preset SystemEach Slot embeds a light preset system which allows you to Save, Load and Delete presets for individual Modules .*
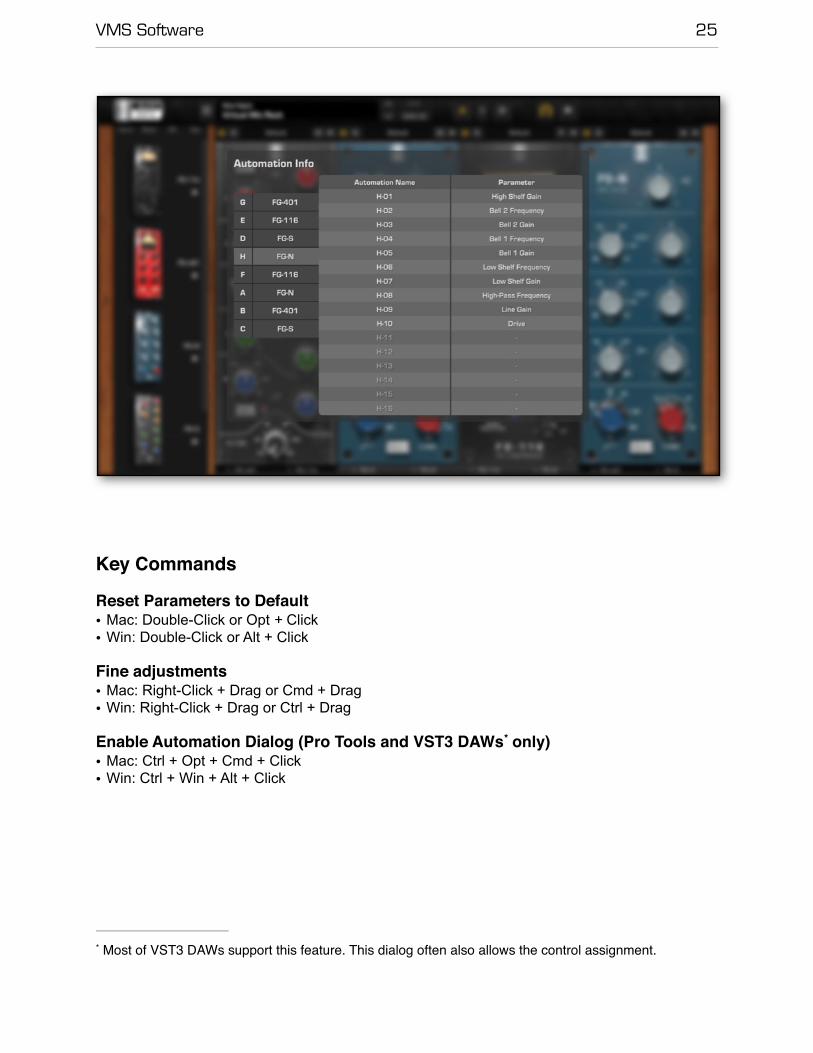
Automation PanelFor an easier handling of Automation, the Virtual Mix Rack has a special panel, dedicated to Automation Display. You can access this panel by clicking on the Slot Letter in each Slot Header.
This panel (see below) displays a list of all the Automation Mappings, for all the currently loaded Modules. In the “Automation Name” column, you can read the names of the parameters as they will be seen by the Host. In the “Parameter” column, you can read the names of the Module Parameters. Depending on the plugin format your Rack is running, the Automation Names that are exposed to the Host by the Rack can be generic (like “H-10”), or they can be dynamically changed (like “H-Drive”).
Click anywhere outside the panel to dismiss it.
See the Preset System section for more information.*
VMS Software 25
�
Key Commands
Reset Parameters to Default• Mac: Double-Click or Opt + Click • Win: Double-Click or Alt + Click
Fine adjustments• Mac: Right-Click + Drag or Cmd + Drag • Win: Right-Click + Drag or Ctrl + Drag
Enable Automation Dialog (Pro Tools and VST3 DAWs only)*
• Mac: Ctrl + Opt + Cmd + Click • Win: Ctrl + Win + Alt + Click
Most of VST3 DAWs support this feature. This dialog often also allows the control assignment. *
VMS Software 26
Preset System
VMR Preset SystemThe Preset System allows you to fasten your workflow by using predefined configuration. If you consider the VMR System not just as a channel-strip, but as a complete Processing ToolBox, then Presets could easily become the starting point of any of your Virtual Mix Rack Plugin instance usage.Presets are divided in two Layers:
1. Rack Presets: handled through the top Preset Bar2. Module Presets: handled through the Preset Label within each Slot
Rack and Module Preset Systems are independent. A Rack Preset contains all the Slots and Modules configuration, but it doesn’t store which Module Preset has been used in which Slot, to avoid unnecessary synchronization mismatches. It just stores the Module Preset Names which have been used.
Rack Presets
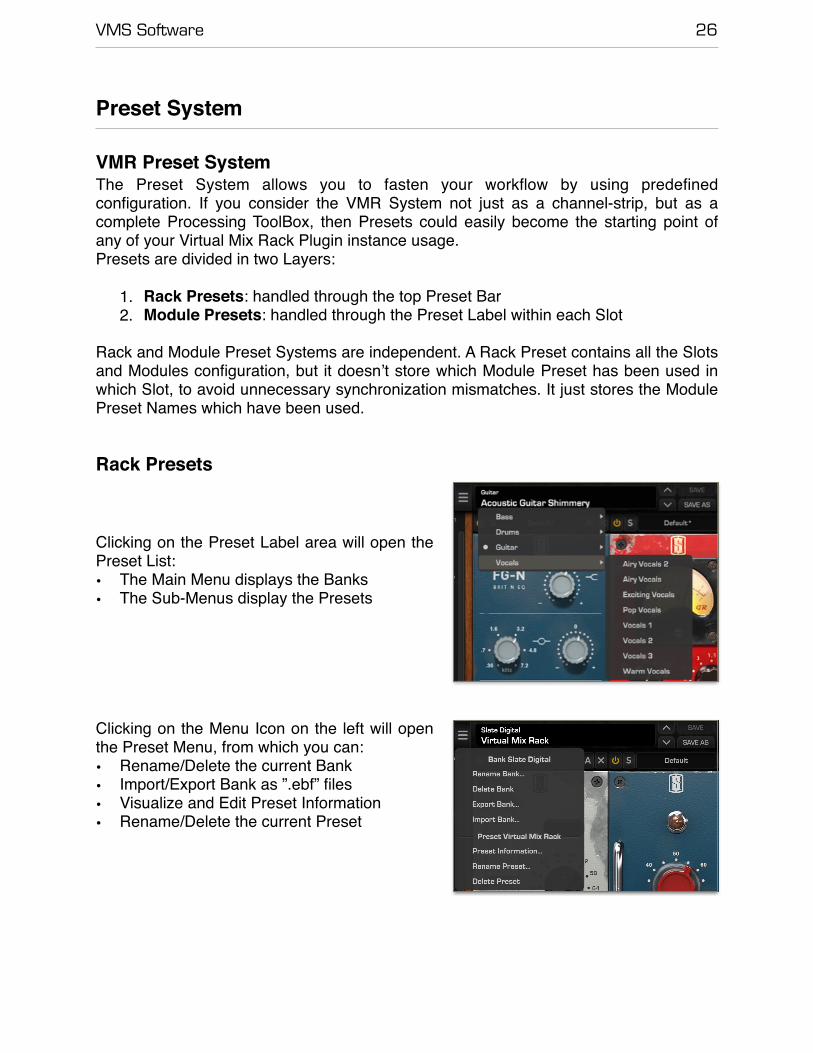
Clicking on the Preset Label area will open the Preset List:• The Main Menu displays the Banks• The Sub-Menus display the Presets
Clicking on the Menu Icon on the left will open the Preset Menu, from which you can:• Rename/Delete the current Bank• Import/Export Bank as ”.ebf” files• Visualize and Edit Preset Information• Rename/Delete the current Preset
VMS Software 27
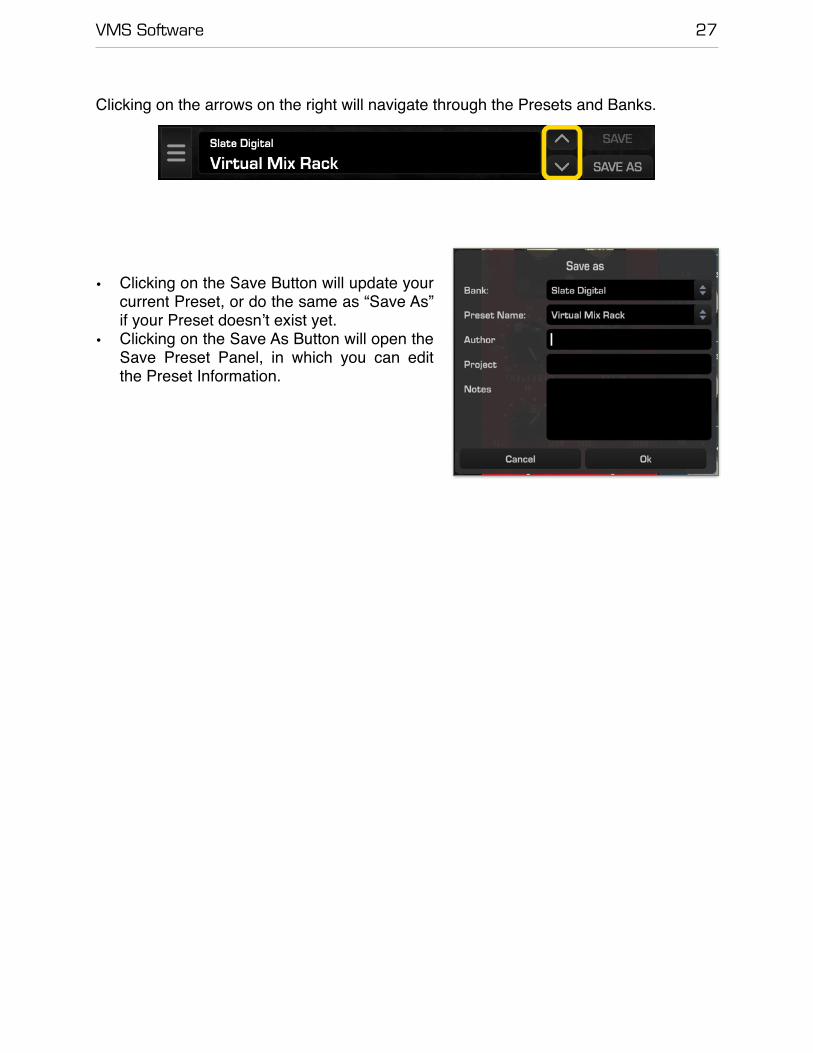
Clicking on the arrows on the right will navigate through the Presets and Banks.
• Clicking on the Save Button will update your current Preset, or do the same as “Save As” if your Preset doesn’t exist yet.
• Clicking on the Save As Button will open the Save Preset Panel, in which you can edit the Preset Information.

VMS Software 28
Module Presets
Clicking on the Preset Label area will open the Preset List, from which you can:• Save/Save As the current Preset• Delete the current Preset• Reset the Module to its Default State• Load a Module Preset
Clicking on the Save As Button will open the “Save Preset As…” Panel.
Modified Preset Status
When you modify a Preset (both Rack and Module), a star exponent appears next to the Preset Name in order to inform you that the Preset is in a Modified Status. Saving the Preset will update it and then the star exponent will disappear.
If this updated Preset is used in an other instance (or an other session), the star exponent will be displayed in this instance. Recalling the Preset will update it and then the star exponent will disappear.
VMS Software 29
A/B Preset Snapshots
�
The Virtual Mix Rack offers a simple A/B System to quickly compare two Racks configurations.A/B Snapshots can be controlled and switched from the dedicated A/B buttons.The Plugin is always operating on one of the two Snapshots, A or B, the current Snapshot being highlighted in yellow.Clicking on a Snapshot letter will switch your Rack to this Snapshot.Clicking on the arrow between the two buttons will copy the current Snapshot to the other.
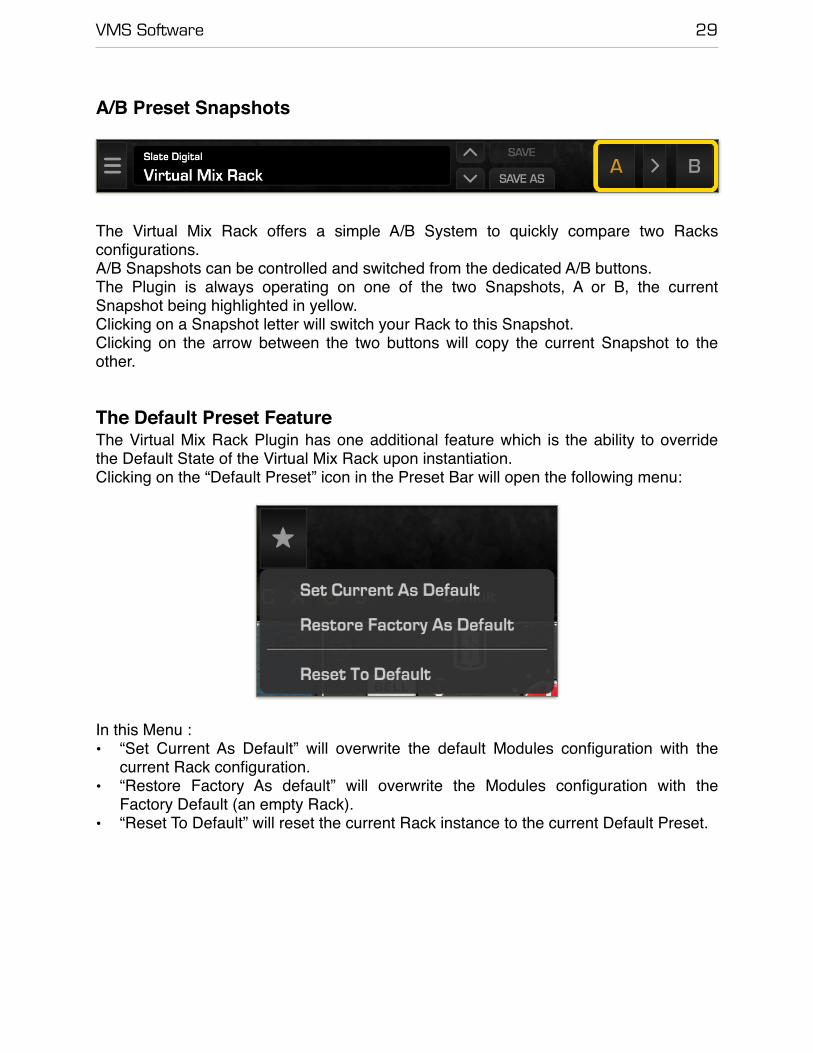
The Default Preset FeatureThe Virtual Mix Rack Plugin has one additional feature which is the ability to override the Default State of the Virtual Mix Rack upon instantiation.Clicking on the “Default Preset” icon in the Preset Bar will open the following menu:
�
In this Menu :• “Set Current As Default” will overwrite the default Modules configuration with the
current Rack configuration.• “Restore Factory As default” will overwrite the Modules configuration with the
Factory Default (an empty Rack).• “Reset To Default” will reset the current Rack instance to the current Default Preset.
VMS Software 30
Misc Features
Rotary Knob Mode
�Clicking on the “Rotary Knob Mode” icon in the Preset Bar toggles the Knob Mode between Linear and Rotary.
In Linear Mode, the Knobs follow horizontal and vertical mouse moves. In Rotary Mode, the Knobs follow circular mouse moves (pretty useful on touch devices).
The icon is highlighted in yellow when the Knobs are in Rotary Mode.Note: fine adjustments (Cmd/Ctrl+Drag) are also available in Rotary Knob Mode.
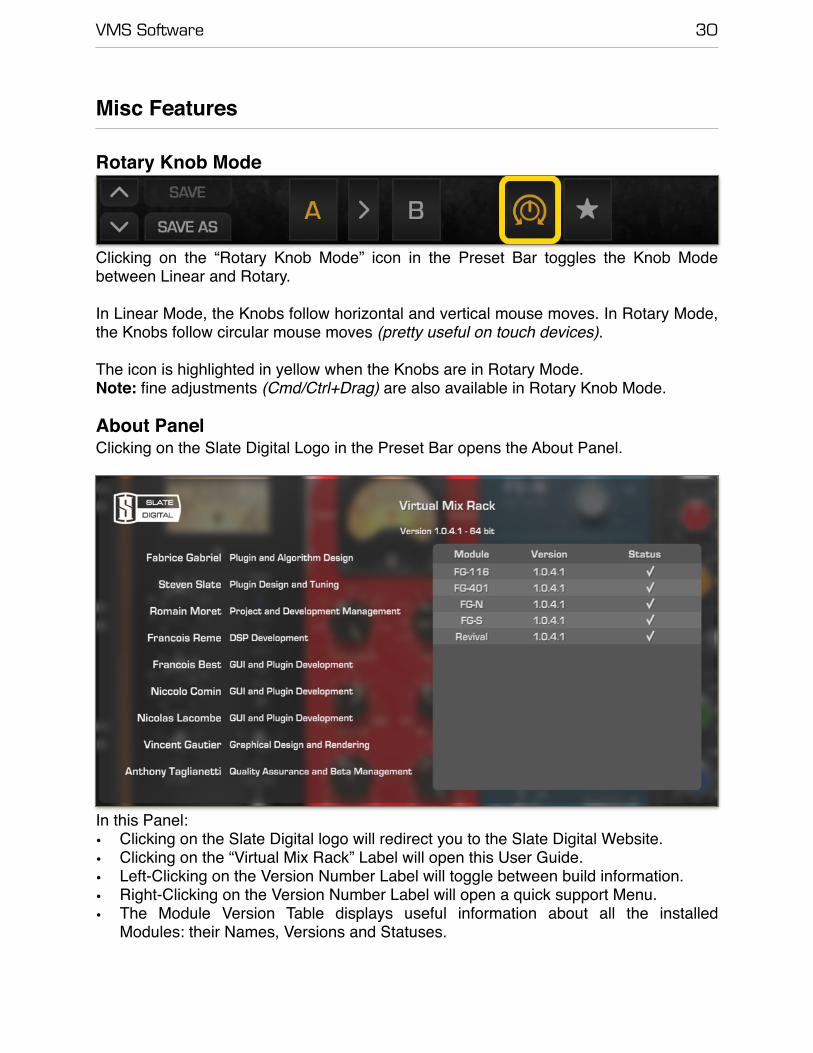
About PanelClicking on the Slate Digital Logo in the Preset Bar opens the About Panel.
�In this Panel:• Clicking on the Slate Digital logo will redirect you to the Slate Digital Website.• Clicking on the “Virtual Mix Rack” Label will open this User Guide.• Left-Clicking on the Version Number Label will toggle between build information.• Right-Clicking on the Version Number Label will open a quick support Menu.• The Module Version Table displays useful information about all the installed
Modules: their Names, Versions and Statuses.
VMS Software 31
VMS Modules
VMC Classic TubesThe VMC Classic Tubes Module emulates the precise characteristics of eight famous tube microphones, and is to be used in conjunction with the ML-1 Hardware Microphone and the VMS ONE Hardware Mic Pre.
FG-47The FG-47 recreates the sound of one of the most famous vintage tube microphones in the history of audio. It has a thick and full-bodied low end, rich and present midrange, and smooth top end. This microphone sounds great on thick lead vocals, but also sounds incredible as a kick drum mic, room mic, guitar mic, and on horns and strings.
FG-800The FG-800 recreates the sound of one of the most popular modern tube mics, known for being the go-to choice for pop and hip hop vocalists. It’s extremely bright and airy, but with a warm bottom end. Using this mic on vocals will give you an instant polished ‘pop’ sound. However, this mic also sounds great on overheads and acoustic guitar.
FG-251 The FG-251 recreates the sound of one of the most sought-after vintage tube mics in the industry. It’s one of the most in-demand lead vocal mics on the planet, known for being crisp, warm and flattering on a variety of voices. The FG-251 also sounds great on drums, guitars, acoustics, and just about anything else you put it on!
FG-67The FG-67 emulates a vintage German classic known for being slightly dark, bold and thick. This mic is amazing on vocals, rooms, horns and piano, and it’s one of Steven’s favorite on toms.
FG-269The FG-269 emulates an extremely rare German classic that shares much of the same circuit as the 67, but with a different tube that makes it more open and clear. This is one of the best-sounding vocal mics we’ve ever heard.
FG-M7The FG-M7 takes one of the most famous dynamic vocal mics used in the studio by artists like Michael Jackson and adds the tube stage of the classic 47, making it extremely punchy and crisp, with incredible mids that cut through the mix. Definitely gonna be a favorite!
VMS Software 32
FG-800MThe FG-800M emulates an older Japanese tube mic, and is slightly fatter and darker than the stock FG-800. If you love the FG-800 but wish it was a tad less sibilant and bright, you’re gonna love this.
FG-12The FG-12 emulates an Austrian classic known for being incredibly smooth and rich-sounding. We chose an absolutely incredible version of this mic to model – it’s the perfect representation of this famous tone.
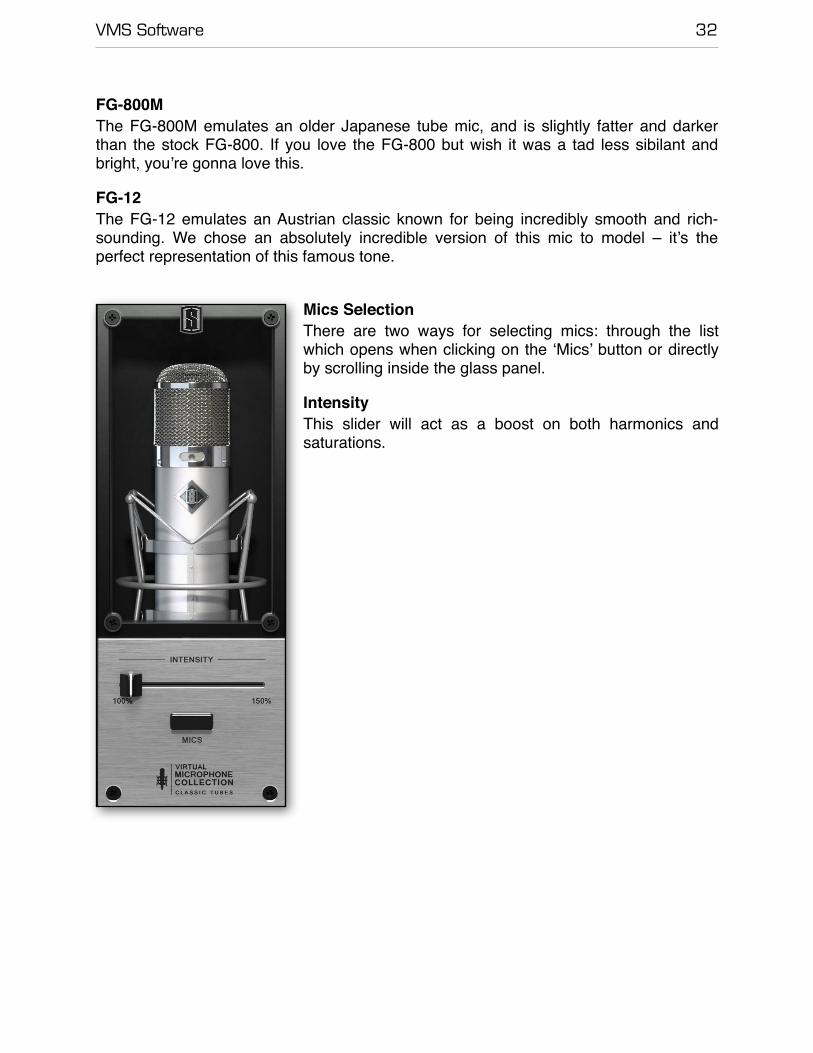
Mics SelectionThere are two ways for selecting mics: through the list which opens when clicking on the ‘Mics’ button or directly by scrolling inside the glass panel.
IntensityThis slider will act as a boost on both harmonics and saturations.
VMS Software 33
Virtual Preamp CollectionThe Virtual Preamp Collection brings the authentic tone of two of the audio industry’s most classic microphone preamplifiers to your digital audio workstation. Each preamp uses state of the art analog modeling technology to recreate every aspect of the preamp circuit from mild coloration to full on saturation and distortion.
The Virtual Preamp Collection or “VPC” was originally designed to be used with the VMS ONE Hardware Mic Pre, but it can be used with any clean sounding preamp to add extra vibe. VPC can also add real analog preamp tone to any track or mix, and even create rich sounding distortion effects.
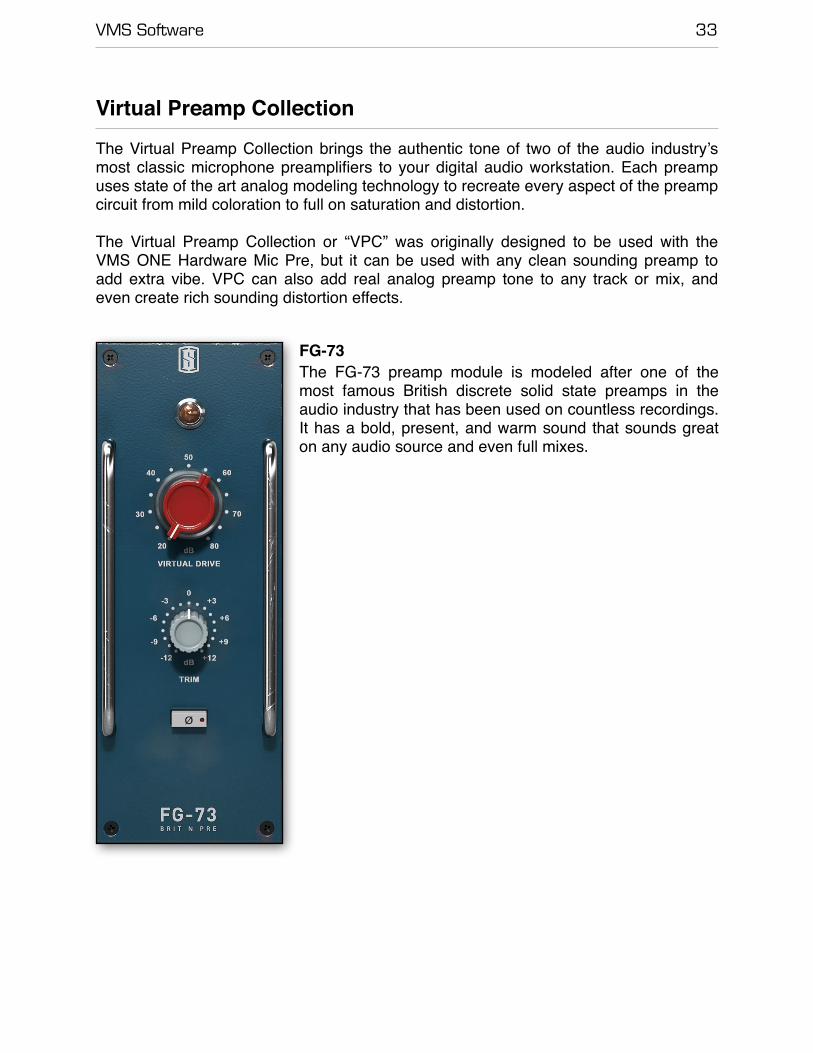
FG-73The FG-73 preamp module is modeled after one of the most famous British discrete solid state preamps in the audio industry that has been used on countless recordings. It has a bold, present, and warm sound that sounds great on any audio source and even full mixes.
VMS Software 34
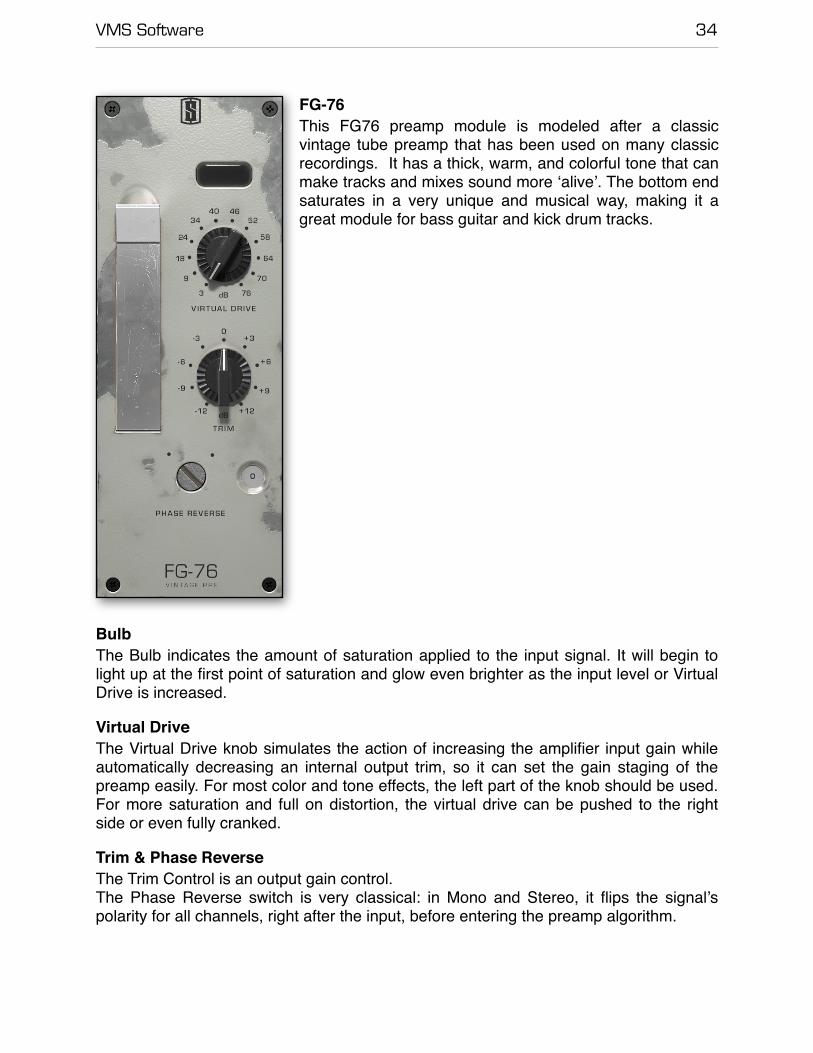
FG-76This FG76 preamp module is modeled after a classic vintage tube preamp that has been used on many classic recordings. It has a thick, warm, and colorful tone that can make tracks and mixes sound more ‘alive’. The bottom end saturates in a very unique and musical way, making it a great module for bass guitar and kick drum tracks.
BulbThe Bulb indicates the amount of saturation applied to the input signal. It will begin to light up at the first point of saturation and glow even brighter as the input level or Virtual Drive is increased.
Virtual DriveThe Virtual Drive knob simulates the action of increasing the amplifier input gain while automatically decreasing an internal output trim, so it can set the gain staging of the preamp easily. For most color and tone effects, the left part of the knob should be used. For more saturation and full on distortion, the virtual drive can be pushed to the right side or even fully cranked.
Trim & Phase ReverseThe Trim Control is an output gain control.The Phase Reverse switch is very classical: in Mono and Stereo, it flips the signal’s polarity for all channels, right after the input, before entering the preamp algorithm.
VMS Software 35
iLok Protection
3rd Party iLok License Transfer FeeWhen reselling any Slate software product, there will be a $10 License Transfer Fee in order for us to process the new customer into our user database. It is the responsibility of the seller to inform the buyer of this fee at the time of sale.
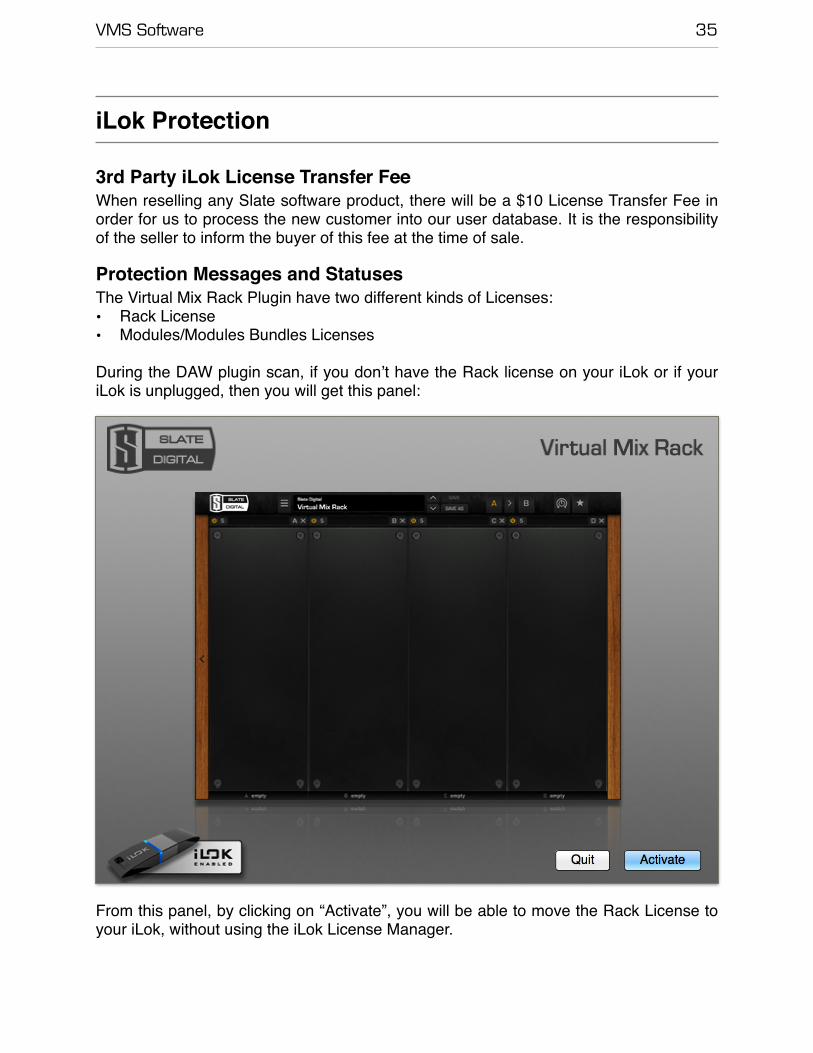
Protection Messages and StatusesThe Virtual Mix Rack Plugin have two different kinds of Licenses:• Rack License• Modules/Modules Bundles Licenses
During the DAW plugin scan, if you don’t have the Rack license on your iLok or if your iLok is unplugged, then you will get this panel:
From this panel, by clicking on “Activate”, you will be able to move the Rack License to your iLok, without using the iLok License Manager.
VMS Software 36
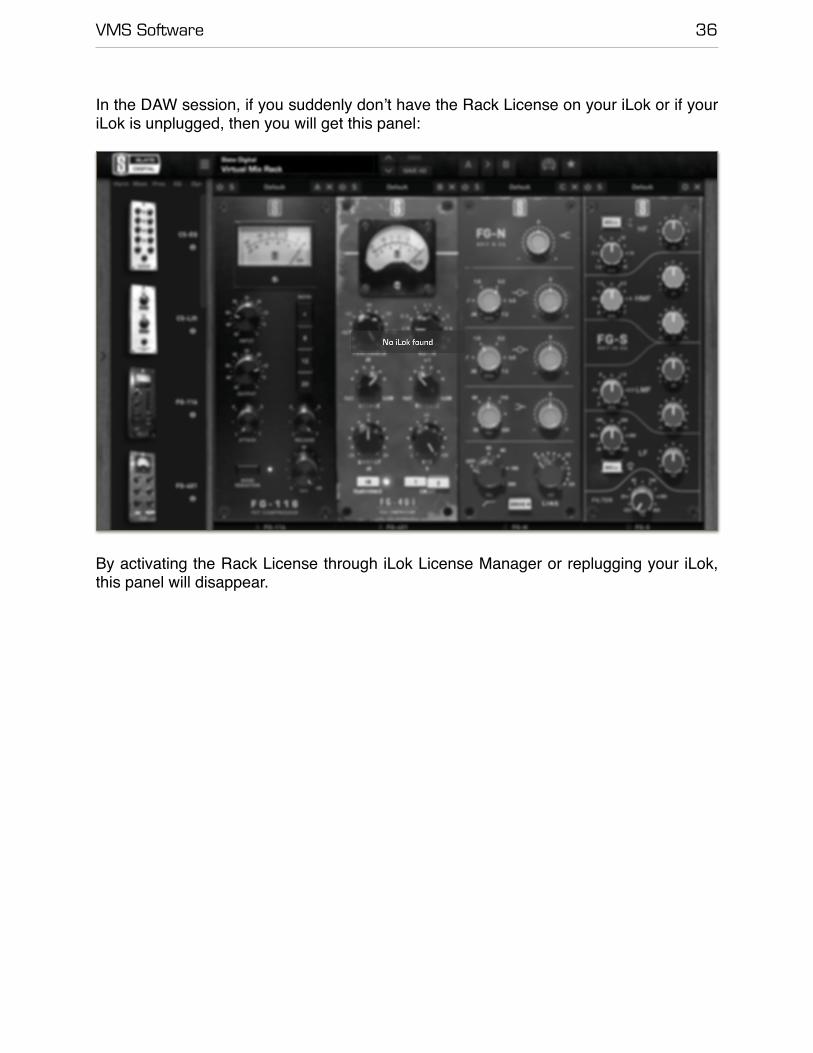
In the DAW session, if you suddenly don’t have the Rack License on your iLok or if your iLok is unplugged, then you will get this panel:
�
By activating the Rack License through iLok License Manager or replugging your iLok, this panel will disappear.
VMS Software 37
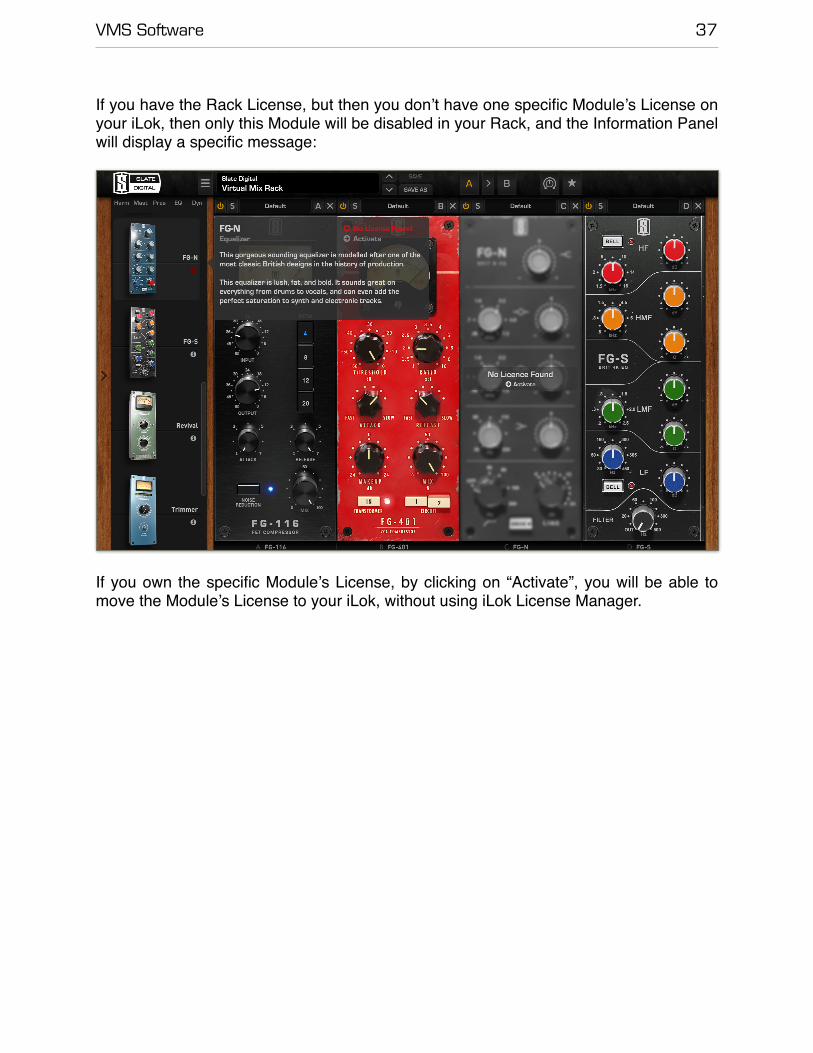
If you have the Rack License, but then you don’t have one specific Module’s License on your iLok, then only this Module will be disabled in your Rack, and the Information Panel will display a specific message:
�
If you own the specific Module’s License, by clicking on “Activate”, you will be able to move the Module’s License to your iLok, without using iLok License Manager.
VMS Software 38
FAQ
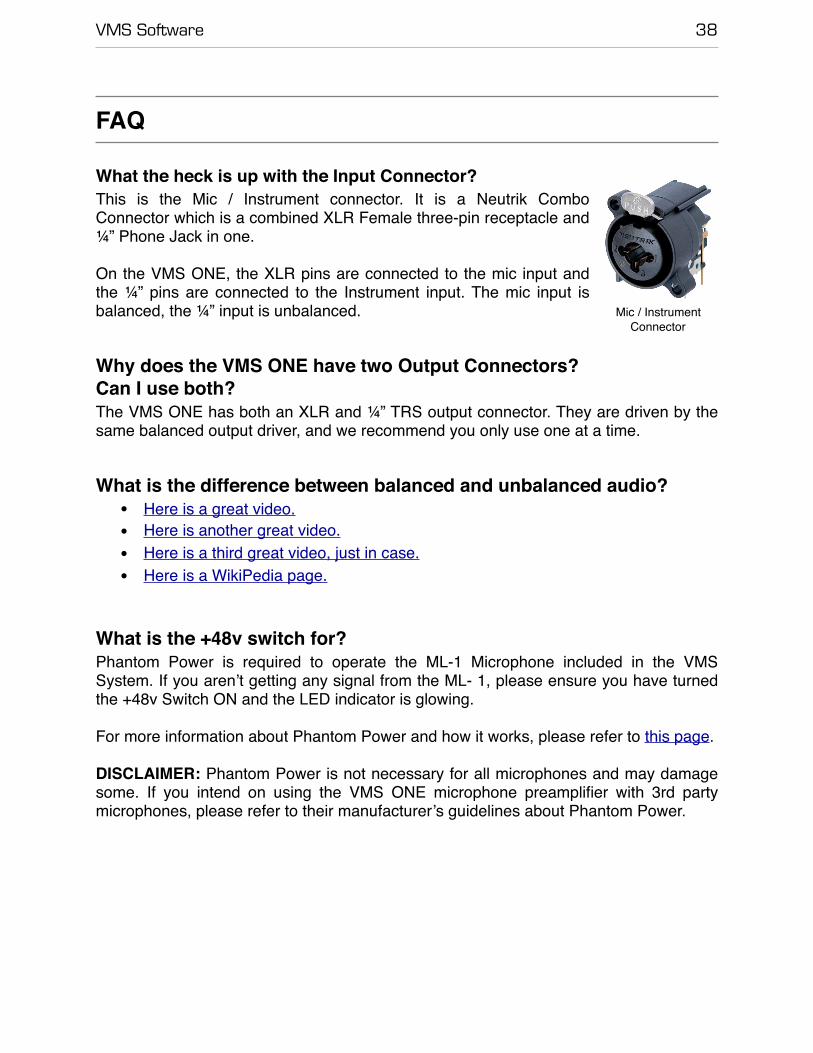
What the heck is up with the Input Connector?This is the Mic / Instrument connector. It is a Neutrik Combo Connector which is a combined XLR Female three-pin receptacle and ¼” Phone Jack in one.
On the VMS ONE, the XLR pins are connected to the mic input and the ¼” pins are connected to the Instrument input. The mic input is balanced, the ¼” input is unbalanced.
Why does the VMS ONE have two Output Connectors? Can I use both?The VMS ONE has both an XLR and ¼” TRS output connector. They are driven by the same balanced output driver, and we recommend you only use one at a time.
What is the difference between balanced and unbalanced audio?• Here is a great video.• Here is another great video.• Here is a third great video, just in case.• Here is a WikiPedia page.
What is the +48v switch for?Phantom Power is required to operate the ML-1 Microphone included in the VMS System. If you aren’t getting any signal from the ML- 1, please ensure you have turned the +48v Switch ON and the LED indicator is glowing.
For more information about Phantom Power and how it works, please refer to this page.
DISCLAIMER: Phantom Power is not necessary for all microphones and may damage some. If you intend on using the VMS ONE microphone preamplifier with 3rd party microphones, please refer to their manufacturer’s guidelines about Phantom Power.
Mic / Instrument Connector
VMS Software 39
Can I use the microphone or preamplifier separately?Yes! The hardware components of the Virtual Microphone System are fully analog! You may use the ML-1 with another microphone preamplifier and you may use another microphone with the VMS ONE.
However, the Virtual Microphone System is a set of hardware and software components which provide an overall system for modeling Microphones and Mic Preamps. The technology is based on the perfect knowledge of the hardware characteristics combined with precise Microphone and Mic Preamp software modeling. When accurate modeling is required, we highly recommend you use the complete system as intended.
What is the Pad for?The Pre Attenuation Device (or PAD) is a fixed attenuation before the first stage of the input amplifier. This is provided to reduce the input signal on loud sources and prevent overloading the input of the VMS ONE.
On the VMS ONE, the pad is fixed at -20dB. You may want to use this on drums, guitar amps, or very loud singers.
I have the gain knob all the way down and the signal is still too loud and distorting!!Try the Pad!
Which side of the microphone should I sing into?Sing into the side that has the Slate Digital logo engraved.
How do I connect this thing?Please refer to the Quick Start Guide.
How does the VMS handle proximity effect?Proximity effect is largely created in the physical world. The physical dimensions of the microphone capsule and the sound source’s proximity to it are what create proximity effect, not the mic’s capsule or electronics. The ML-1 1-inch capsule accurately reflects the proximity effect created in other microphones and does not require additional modeling to do so.
VMS Software 40
I have really expensive, super hi-fidelity cabling. How does this affect the VMS system?
While some cables may sound better than others, or transmit more or less perfectly, almost every piece of equipment you will encounter in the balanced, pro-audio world assumes lossless and noiseless "perfect" cabling. It would be a very rare piece of equipment that calibrated itself for a certain type of cabling. Designers will measure and account for voltage drop on power rails when using long cable runs, but the balanced cabling and differential signaling method which is used in almost all professional audio reduces *signal* voltage loss to the point that it is ignored except in extreme cases. The small amount of difference in expensive, esoteric cables is noticeable to only some users, but their use will not in any way *negatively* affect anything. This is compounded by the balanced, low-impedance nature of professional audio equipment. Unbalanced, high-impedance signals like those from electric guitar pickups are affected by cabling to a *much* larger extent.
Can I use a hardware compressor after the VMS-1?
This is not recommended during the recording process with VMS. The VMR modules that relate to the ML-1 and VMS-1, namely VMC and VPC, are expecting a flat, uncompressed signal. Imagine if you will trying to compress the signal before it had hit the preamp (or even the mic!). The recommended practice in this case would be to use the hardware compressor as a hardware insert after the VMR processing. You can then commit this to tape / disk by the usual methods.
I feel like the level is too low in my DAW.
There are a lot of factors that contribute to the level one sees at the DAW. The input source to the mic, the mic itself, the mic pre, the interface and any of it's related settings, all of the cabling, and the type of metering selected. Since the VMS is a very wide-dynamic range device, and doesn't at all compress the input signal as many mics and pres inadvertently do, the averaging algorithm of the meter may not register an average (RMS) level that looks as "hot" as some users may expect. This is perfectly normal. Many loud singers will be towards the lower end of the gain adjustment, and many quieter singers and soft acoustic instruments may be near the top. Considering all of these factors, trying to say what should "feel" right on the meter/gain knob is very squirrely. Additionally, there are many different ways of reading the information at the meter and deciding what is correct. In the digital world, hotter is not always better, and the dynamic range is easily compressed if one is not careful. Many engineers leave as much as 15dB headroom at the converter stage to ensure nothing is clipped. This is especially important when recording uncompressed signals like the VMS. The VMS preamp makes about 15dB of gain at the minimum setting and 60dB of gain at maximum. This can be measured with fairly simple tools if a user feels that there is a problem, and we are always here to assist with that.
VMS Software 41
I need more details about the power supply and it’s connections.
The SLA-PSU which ships with both the VMS kit and Slate Control is a "Universal-Input." It will accept 100-250 AC volts input and has a removable IEC cable. The PSU end is the very common IEC C14 type which most people would just refer to as an "IEC inlet." Cables from this connector to local connectors (North America is NEMA 5-15 for example) are easily found. IEC C14 mates with IEC C13. The PSU ships with a NEMA 5-15 to IEC C13. A person in England, for example, would want a BS-1363 to IEC C13. The two linked Wikipedia pages above should provide all the info for a person to get the right cable, and if adapters are used it is important to use only physical adapters and not voltage transformers.The output is the standard API Lunchbox pinout and voltages.
It is a 5-Pin XLR connection and the pinout is as follows:• Pin 1: Chassis Ground• Pin 2: Electrical Ground• Pin 3: +15 Volts DC @ 2.5A• Pin 4: -15 Volts DC @ 2.5A• Pin 5: +48 Volts DC @ 250mA
VMS Software 42
Contacting SupportAll technical support inquiries must be logged through our help desk for attention.
Please login to your help desk account at Slate Digital Support. Click “Contact Support" and choose the respective category relevant to your product/query. And, be sure to include the information log within the ticket comments or as an attachment…
User System and Hardware Information Log• Open the About panel.• Right click on the version number to open a menu "Copy plug-in info to clipboard”,
click it.• Open a text editor, an e-mail or a support ticket, and paste.
Example(of(informa.on(displayed:(
Plugin'&'Host'Informa2on:'44444444444444444444444444444444444444444444444444444'Version:' ' <version'number>'4'64'bit'Build:'' ' <build'number>'<date>'<2me>''Format:'' ' <VST2,'VST3,'AudioUnit,'AAX>'Host:'' ' <DAW'name>'
OS'Informa2on:'4444444444444444444444444444444444444444444444444444444444444444'Name:''' <opera2ng'system'name'and'version>'64'bit:' ' yes'
Hardware'Informa2on:'4444444444444444444444444444444444444444444444444444444444'CPU:'' ' ' Unknown'Num'cores'(per'cpu):' 4'Num'cores'(total):' 16'Speed:''' ' 2400'MHz'Max'Cache:'' ' 12582912'bytes'CPU'Flags:'' ' <mmx,'sse,'sse2,'sse3,'ssse3,'sse4.1,'sse4.2,'etc...>''RAM'(MB):' ' 8192'Page'size:'' ' 4096'
Language'Informa2on:'4444444444444444444444444444444444444444444444444444444444'User'Lang:'' <FR,'ENG,'GER,'etc...>'Region:'' ' <FR,'ENG,'GER,'etc...>'Display'Lang:'' <FR,'ENG,'GER,'etc...>
VMS Software 43
Conclusion by Fabrice Gabriel
Every single Slate Digital new project to date has been a real challenge, technically and artistically. But the Virtual Microphone System is really special because for the first time, we’re dealing with original audio signals that are seen first as “real life” audio signals, not only as digital signals within a DAW or electrical analog signals.
Most attempts to reproduce the sonic characteristics of vintage microphones have been more or less successful because the signal has always been considered like it was from another occurrence of an analog gear, but in the case of a microphone, this is more complex.
First, the source signal is recorded in a real environment, so we had to make sure that the source microphone would capture all the details that would be needed to replicate the sound of a vintage microphone. The source microphone could not have deviations or steep peaks and dips in its frequency response, because it would have produce unpredictable final results. Indeed our commitment is to provide the precise response of vintage microphones, not an approximate tone.
Second, we were amazed to realize, when performing listening tests, on how a pure scientific approach would not be sufficient. Of course, standard analysis tools and routines that we’ve been using successfully and refined for all our analog modeling software until now was a required starting point, but this time the critical listening part happened to be more important than ever.
We even had to develop some special innovative tools for those listening experiences so we could push the boundaries even further. This allowed us to provide perfect, ear-matching results, where standard measurement procedures would have failed.
The design of the source microphone ML-1 was an essential part of the whole process, as well as the VMS-ONE preamp, as it was absolutely crucial to get the most neutral signal out the ML-1.
From that very neutral signal, we can recreate all the characteristics of the same sound that would be captured by a vintage microphone in the same conditions. That of course is only possible if we have a very consistent source to work with!
Finally, I can say that we achieved something that we could only dream of a few years ago: being able to get the sound of many legendary microphones, easily accessible and that you can pick even after recording your track. This opens up a new field of creativity and flexibility for vocal and instrument recording, with the most faithful digital processing available to date.