Embed Size (px)
Citation preview
P R O D U C T G U I D E
V E R S I O N 4 . 2 4 . 0
VirusScan Command-Line

COPYRIGHT
© 2003 Networks Associates Technology, Inc. All Rights Reserved. No part of this publication may be reproduced, transmitted, transcribed, stored in a retrieval system, or translated into any language in any form or by any means without the written permission of Networks Associates Technology, Inc., or its suppliers or affiliate companies. To obtain this permission, write to the attention of the Network Associates legal department at: 3965 Freedom Circle, Santa Clara, California 95054, or call +1-972-308-9960.
TRADEMARK ATTRIBUTIONS
Active Firewall, Active Security, Active Security (in Katakana), ActiveHelp, ActiveShield, AntiVirus Anyware and design, Bomb Shelter, Certified Network Expert, Clean-Up, CleanUp Wizard, CNX, CNX Certification Certified Network Expert and design, Design (stylized N), Disk Minder, Distributed Sniffer System, Distributed Sniffer System (in Katakana), Dr Solomon’s, Dr Solomon’s label, Enterprise SecureCast, Enterprise SecureCast (in Katakana), Event Orchestrator, EZ SetUp, First Aid, ForceField, GMT, GroupShield, GroupShield (in Katakana), Guard Dog, HelpDesk, HomeGuard, Hunter, LANGuru, LANGuru (in Katakana), M and design, Magic Solutions, Magic Solutions (in Katakana), Magic University, MagicSpy, MagicTree, McAfee, McAfee (in Katakana), McAfee and design, McAfee.com, MultiMedia Cloaking, Net Tools, Net Tools (in Katakana), NetCrypto, NetScan, NetShield, NetStalker, Network Associates, NetXray, NotesGuard, Nuts & Bolts, Oil Change, PC Medic, PCNotary, PrimeSupport, Recoverkey, Recoverkey – International, Registry Wizard, ReportMagic, Router PM, Safe & Sound, SalesMagic, SecureCast, Service Level Manager, ServiceMagic, SmartDesk, Sniffer, Sniffer (in Hangul), Stalker, SupportMagic, TIS, TMEG, Total Network Security, Total Network Visibility, Total Network Visibility (in Katakana), Total Service Desk, Total Virus Defense, Trusted Mail, UnInstaller, Virex, Virus Forum, ViruScan, VirusScan, WebScan, WebShield, WebShield (in Katakana), WebSniffer, WebStalker, WebWall, Who’s Watching Your Network, WinGauge, Your E-Business Defender, ZAC 2000, Zip Manager are registered trademarks of Network Associates, Inc. and/or its affiliates in the US and/or other countries. All other registered and unregistered trademarks in this document are the sole property of their respective owners.
This product includes or may include software developed by the OpenSSL Project for use in the OpenSSL Toolkit. (http://www.openssl.org/)
This product includes or may include cryptographic software written by Eric Young. ([email protected])
LICENSE AGREEMENTNOTICE TO ALL USERS: CAREFULLY READ THE APPROPRIATE LEGAL AGREEMENT CORRESPONDING TO THE LICENSE
YOU PURCHASED, WHICH SETS FORTH THE GENERAL TERMS AND CONDITIONS FOR THE USE OF THE LICENSED
SOFTWARE. IF YOU DO NOT KNOW WHICH TYPE OF LICENSE YOU HAVE ACQUIRED, PLEASE CONSULT THE SALES AND
OTHER RELATED LICENSE GRANT OR PURCHASE ORDER DOCUMENTS THAT ACCOMPANIES YOUR SOFTWARE
PACKAGING OR THAT YOU HAVE RECEIVED SEPARATELY AS PART OF THE PURCHASE (AS A BOOKLET, A FILE ON THE
PRODUCT CD, OR A FILE AVAILABLE ON THE WEB SITE FROM WHICH YOU DOWNLOADED THE SOFTWARE PACKAGE). IF
YOU DO NOT AGREE TO ALL OF THE TERMS SET FORTH IN THE AGREEMENT, DO NOT INSTALL THE SOFTWARE. IF
APPLICABLE, YOU MAY RETURN THE PRODUCT TO NETWORK ASSOCIATES OR THE PLACE OF PURCHASE FOR A FULL
REFUND.
Issued January 2003 / VirusScan Command-Line version 4.24.0

Contents
Preface . . . . . . . . . . . . . . . . . . . . . . . . . . . . . . . . . . . . . . . . . . . . . . . 5
Audience . . . . . . . . . . . . . . . . . . . . . . . . . . . . . . . . . . . . . . . . . . . . . . . . . . . . . . . . . . . . . . . 5
Getting more information . . . . . . . . . . . . . . . . . . . . . . . . . . . . . . . . . . . . . . . . . . . . . . . . . . . 6
Contacting McAfee and Network Associates . . . . . . . . . . . . . . . . . . . . . . . . . . . . . . . . . . . . 7
1 Introduction . . . . . . . . . . . . . . . . . . . . . . . . . . . . . . . . . . . . . . . . . . . 9
What’s new in this release . . . . . . . . . . . . . . . . . . . . . . . . . . . . . . . . . . . . . . . . . . . . . . . . . . 9
Allocating cache for file reading . . . . . . . . . . . . . . . . . . . . . . . . . . . . . . . . . . . . . . . . . 9
Scanning files in remote storage . . . . . . . . . . . . . . . . . . . . . . . . . . . . . . . . . . . . . . . . 10
Scanning protected files . . . . . . . . . . . . . . . . . . . . . . . . . . . . . . . . . . . . . . . . . . . . . . 10
Support for plain-text mailboxes . . . . . . . . . . . . . . . . . . . . . . . . . . . . . . . . . . . . . . . . 10
2 Installing the Command-Line Software . . . . . . . . . . . . . . . . . . . . 11
System requirements . . . . . . . . . . . . . . . . . . . . . . . . . . . . . . . . . . . . . . . . . . . . . . . . . . . . . 11
Installing the software . . . . . . . . . . . . . . . . . . . . . . . . . . . . . . . . . . . . . . . . . . . . . . . . . . . . 11
Validating your files . . . . . . . . . . . . . . . . . . . . . . . . . . . . . . . . . . . . . . . . . . . . . . . . . . . . . . 12
Testing your installation . . . . . . . . . . . . . . . . . . . . . . . . . . . . . . . . . . . . . . . . . . . . . . . . . . . 14
Removing the software . . . . . . . . . . . . . . . . . . . . . . . . . . . . . . . . . . . . . . . . . . . . . . . . . . . 14
3 Using the Command-Line Scanner . . . . . . . . . . . . . . . . . . . . . . . 15
What can you scan? . . . . . . . . . . . . . . . . . . . . . . . . . . . . . . . . . . . . . . . . . . . . . . . . . . . . . 15
What is heuristic analysis? . . . . . . . . . . . . . . . . . . . . . . . . . . . . . . . . . . . . . . . . . . . . . . . . 16
Scanning NTFS streams . . . . . . . . . . . . . . . . . . . . . . . . . . . . . . . . . . . . . . . . . . . . . . . . . . 16
Using memory caches . . . . . . . . . . . . . . . . . . . . . . . . . . . . . . . . . . . . . . . . . . . . . . . . . . . . 17
Scanning files in remote storage . . . . . . . . . . . . . . . . . . . . . . . . . . . . . . . . . . . . . . . . . . . . 19
Scanning protected files . . . . . . . . . . . . . . . . . . . . . . . . . . . . . . . . . . . . . . . . . . . . . . . . . . 19
Examples of on-demand scans . . . . . . . . . . . . . . . . . . . . . . . . . . . . . . . . . . . . . . . . . . . . . 19
Example 1: Running a full scan . . . . . . . . . . . . . . . . . . . . . . . . . . . . . . . . . . . . . . . . . 19
Example 2: Creating a report . . . . . . . . . . . . . . . . . . . . . . . . . . . . . . . . . . . . . . . . . . 20
Example 3: Saving the report to a file . . . . . . . . . . . . . . . . . . . . . . . . . . . . . . . . . . . . 20
Example 4: Creating a scanning profile . . . . . . . . . . . . . . . . . . . . . . . . . . . . . . . . . . . 21
Configuring a scan to run at startup . . . . . . . . . . . . . . . . . . . . . . . . . . . . . . . . . . . . . . . . . . 21
Product Guide iii
Contents
Creating a list of infected files . . . . . . . . . . . . . . . . . . . . . . . . . . . . . . . . . . . . . . . . . . . . . . 22
Scanning options . . . . . . . . . . . . . . . . . . . . . . . . . . . . . . . . . . . . . . . . . . . . . . . . . . . . . . . . 23
General options . . . . . . . . . . . . . . . . . . . . . . . . . . . . . . . . . . . . . . . . . . . . . . . . . . . . . 23
Target options . . . . . . . . . . . . . . . . . . . . . . . . . . . . . . . . . . . . . . . . . . . . . . . . . . . . . . 26
Response and notification options . . . . . . . . . . . . . . . . . . . . . . . . . . . . . . . . . . . . . . . 30
Report options . . . . . . . . . . . . . . . . . . . . . . . . . . . . . . . . . . . . . . . . . . . . . . . . . . . . . . 33
Alphabetic list of options . . . . . . . . . . . . . . . . . . . . . . . . . . . . . . . . . . . . . . . . . . . . . . 35
Scanning your diskettes . . . . . . . . . . . . . . . . . . . . . . . . . . . . . . . . . . . . . . . . . . . . . . . . . . 39
Preparing your computer . . . . . . . . . . . . . . . . . . . . . . . . . . . . . . . . . . . . . . . . . . . . . . 39
Scanning a diskette . . . . . . . . . . . . . . . . . . . . . . . . . . . . . . . . . . . . . . . . . . . . . . . . . . 39
Error levels . . . . . . . . . . . . . . . . . . . . . . . . . . . . . . . . . . . . . . . . . . . . . . . . . . . . . . . . . . . . 40
Handling error messages . . . . . . . . . . . . . . . . . . . . . . . . . . . . . . . . . . . . . . . . . . . . . . . . . . 41
4 Removing Infections . . . . . . . . . . . . . . . . . . . . . . . . . . . . . . . . . . . 43
If the scanner detects a virus . . . . . . . . . . . . . . . . . . . . . . . . . . . . . . . . . . . . . . . . . . . . . . . 44
Removing a virus found in a file . . . . . . . . . . . . . . . . . . . . . . . . . . . . . . . . . . . . . . . . 45
Running additional virus-cleaning tasks . . . . . . . . . . . . . . . . . . . . . . . . . . . . . . . . . . 46
Cleaning macro viruses from password-protected files . . . . . . . . . . . . . . . . . . . 46
Cleaning Windows NT hard disks . . . . . . . . . . . . . . . . . . . . . . . . . . . . . . . . . . . 46
Creating an emergency diskette . . . . . . . . . . . . . . . . . . . . . . . . . . . . . . . . . . . . . . . . . . . . 47
5 Updating Your Anti-Virus Protection . . . . . . . . . . . . . . . . . . . . . . 51
Index . . . . . . . . . . . . . . . . . . . . . . . . . . . . . . . . . . . . . . . . . . . . . . . . 53
iv VirusScan Command-Line version 4.24.0
Preface
This Product Guide introduces McAfee VirusScan Command-Line version 4.24.0, and provides the following information:
� Detailed instructions for installing the software.
� Descriptions of all new features in this release of the software.
� Descriptions of all product features.
� Detailed instructions for configuring and deploying the software.
� Procedures for performing tasks.
AudienceThis information is intended primarily for two audiences:
� Network administrators who are responsible for the company’s anti-virus program.
� Users who are responsible for updating virus definition (DAT) files on their workstation, or configuring the software’s detection options.
Product Guide 5

Preface
Getting more information
Help Product information in the Help system that is accessed from within the application.
The Help system provides brief descriptions of the most common options.
Release Notes README file. Product information, system requirements, resolved issues, any known issues, and last-minute additions or changes to the product or its documentation.
Available as a .TXT file from either the product CD or the McAfee download site.
Contact A list of phone numbers, street addresses, web addresses, and fax numbers for Network Associates offices in the United States and around the world. Also provides contact information for services and resources, including:
� Technical Support
� Customer Service
� Download Support
� AVERT Anti-Virus Research Site
� McAfee Beta Site
� On-Site Training
� Network Associates Offices Worldwide
6 VirusScan Command-Line version 4.24.0
Preface
Contacting McAfee and Network Associates
Technical Support http://knowledge.nai.com
McAfee Beta Site www.mcafeeb2b.com/beta/
AVERT Anti-Virus Emergency Response Team
www.mcafeeb2b.com/naicommon/avert/default.asp
Download Site www.mcafeeb2b.com/naicommon/download/
DAT File Updates www.mcafeeb2b.com/naicommon/download/dats/find.asp
ftp://ftp.nai.com/pub/antivirus/datfiles/4.x
Product Upgrades www.mcafeeb2b.com/naicommon/download/upgrade/login.asp
Valid grant number required. Contact Network Associates Customer Service.
On-Site Training www.mcafeeb2b.com/services/mcafee-training/default.asp
Network Associates Customer Service:
E-mail [email protected]
Web www.nai.com
www.mcafeeb2b.com
US, Canada, and Latin America toll-free:
Phone +1-888-VIRUS NO or +1-888-847-8766
Monday – Friday, 8 a.m. – 8 p.m., Central Time
Product Guide 7

Preface
8 VirusScan Command-Line version 4.24.0
1
IntroductionThe command-line scanner is a program that you can run from a command-line prompt. It provides an alternative to scanners that use a graphical user interface (GUI). Both types of scanner use the same virus-scanning engine.
The command-line scanner enables you to search for viruses in any drive, folder, or file in your computer “on demand” — in other words, at any time. The command-line scanner also features options that can alert you when they detect a virus or take a variety of automatic actions.
When kept up-to-date with the latest virus definition (DAT) files, the scanner is an important part of your network security. We recommend that you set up an anti-virus security policy for your network that incorporates as many protective measures as possible.
The scanner acts as an interface to the powerful virus-scanning engine — the engine common to all McAfee anti-virus products.
What’s new in this releaseThis release introduces the following new features:
� Allocating cache for file reading.
� Scanning files in remote storage on page 10.
� Scanning protected files on page 10.
� Support for plain-text mailboxes on page 10.
Allocating cache for file reading
Previous release When making file reads, the engine normally allocated a small amount of memory (or ‘cache’) as determined by the operating system.
Current release A larger amount of cache can be specified.
Benefits Files, especially large archives can be scanned faster.
For more information See the descriptions of the new options, /AFC, /OCRS and /OCMAX in Using memory caches on page 17.
Product Guide 9
Introduction
Scanning files in remote storage
Scanning protected files
Support for plain-text mailboxes
Previous release When using the /DOHSM option, the engine can scan files in a remote storage system, such as Hierarchical Storage Management (HSM). However, the scan returned the files to local storage.
Current release A new option, /NORECALL option can be used with /DOHSM.
Benefits The scanned files remain in remote storage. They are not transported to local storage.
For more information See the description of the new option, /NORECALL in Scanning files in remote storage on page 19.
Previous release The scanner normally examined files which the system protects from access, such as other users’ profiles and their recycle bins.
Current release Access to such files can be restricted.
Benefits Faster overall scanning.
For more information See the description of the new option, /NOBKSEM in Scanning protected files on page 19.
Previous release Plain-text mailboxes were not scanned.
Current release Scanning of plain text mailboxes is now supported.
Benefits Scanning is now available for Eudora, PINE, and Netscape.
Where to find This feature is enabled by the option /MAILBOX.
For more information See page 27.
10 VirusScan Command-Line version 4.24.0
2
Installing the Command-LineSoftwareTo prevent the spread of viruses that might already be on your computer before you install the anti-virus software:
1 Review the system requirements below.
2 Ensure that your computer is virus-free.
3 Confirm that your date and time settings are accurate.
System requirements� An IBM-compatible personal computer with an Intel 80386 processor or an
equivalent, running MS-DOS version 6.22 or later.
� For best results, we recommend at least 4MB of memory and 4MB of free hard disk space.
Installing the softwareIf you suspect your computer is already infected, see page 43 before you install the scanner software.
1 Create a directory for the software on your hard disk.
2 Depending on the source of your command-line program files, do one of the following:
� CDInsert the compact disc into your CD drive, then copy the files from the CD to that directory.
� DiskettesInsert the first diskette into your A drive, change to the A drive, then copy the files from your diskette drive to that directory.
� Files downloaded from a web siteDecompress the zipped files into that directory.
NOTEWe recommend that you use the -d option to extract command-line files and preserve their directory structure. Type CD to change to the directory to which you extracted the program files.
Product Guide 11
Installing the Command-Line Software
3 Add the directory you created to the PATH statement in your AUTOEXEC.BAT file.
4 Make a clean start-up disk. See Creating an emergency diskette on page 47 for more information.
To run the scanner from a Novell NetWare login script without running out of memory:
Follow these steps immediately after installation.
1 Rename LOGIN.EXE to LOGIN1.EXE, then remove any references to the anti-virus software from the file.
2 Create a batch file named LOGIN.BAT.
3 At the first line of the batch file, add a call to the scanner, with the options you want to include.
4 Add a call to the file LOGIN1.EXE to the second line of the batch file.
These steps prevent LOGIN.EXE and SCAN.EXE from loading into memory at the same time. This allows the scanner to run before your computer tries to get access to the network. Your login script should then run without complications.
Validating your filesWhen you download or copy files from any outside source, your computer is at risk of virus infection — even if the risk is small. Downloading anti-virus software is no exception. It is important to verify that the software is authentic, unaltered, and not infected. Strict, extensive security measures ensure that the products you purchase and download from our web site and other electronic services are safe, reliable, and free from virus infections. However, anti-virus software attracts the attention of virus writers and Trojan-horse writers, and some find it amusing to post infected copies of commercial software, or use the same file names to camouflage their own work.
Download your files from the McAfee or Network Associates web site. If you download a file from any other source, it is important to verify that it is authentic, unaltered, and not infected. The software package includes a utility program called VALIDATE that you can use to ensure that your version of the software is authentic. When you receive a new version of this software, you can run VALIDATE on all of its program files and DAT files.
To ensure that you have exactly the same files as the original software, you need to compare the validation codes that VALIDATE.EXE generates against the packing list supplied with your copy of the software. The packing list is a text file that contains the validation codes that were generated from a cyclical redundancy check (CRC) when the software was packaged for delivery.
12 VirusScan Command-Line version 4.24.0

Installing the Command-Line Software
To validate your files:
1 Install the software as described in page 11.
2 In the Microsoft Windows taskbar, click Start, point to Programs, then choose Command Prompt.
3 In the window that appears, change your command prompt to point to the directory that contains the VirusScan files.
4 At the command prompt, enter VALIDATE *.*
The program examines all of the files in the program directory, then generates a file list that includes the following information:
� The name of each file.
� The size of each file, in bytes.
� The creation date and time of each file.
� Two validation codes in separate columns for each file.
For example:
NAMES DAT 242681 03-26-03 4:24a 35B2 4690
5 Print this output so that you can review it easily. Do one of the following:
� If your printer is set to capture output from MS-DOS programs, type VALIDATE *.* >PRN at the command prompt. To learn how to set your printer, consult your Windows documentation.
� Direct the output to a file, and print the file directly from any text editor, such as Microsoft Notepad. At the command prompt, enter: VALIDATE *.* > <filename>
6 Print the packing list, so that you can review it easily. At the command prompt, enter: PACKING.LST >PRN.
7 Compare the output from VALIDATE.EXE and PACKING.LST.
The sizes, creation dates and times, and validation codes for each file name must match exactly. If they do not, delete the file immediately. Do not open the file or examine it with any other utility; this may cause virus infection.
Checking your installation with VALIDATE.EXE does not guarantee that your copy is free from defects, copying errors, virus infections or tampering, but the program’s security features make it extremely unlikely that anyone has tampered with files that have correct validation codes.
Product Guide 13
Installing the Command-Line Software
Testing your installationAfter you install it, the anti-virus software is ready to scan your computer for infected files. You can verify that the software has installed correctly and that it can properly scan for viruses with a test. This was developed by the European Institute of Computer Anti-virus Research (EICAR), a coalition of anti-virus vendors, as a method for their customers to test any anti-virus software installation.
To test your installation:
1 Open a standard MS-DOS or Windows text editor, then type the following character string as one line, with no spaces or line breaks:
X5O!P%@AP[4\PZX54(P^)7CC)7}$EICAR-STANDARD-ANTIVIRUS-TEST-FILE!$H+H*
NOTEThe line shown above should appear as one line in your text editor window, so be sure to maximize your text editor window and delete any carriage returns. Also, be sure to type the letter O, not the number 0, in the “X5O...” that begins the test message.
If you are reading this manual on your computer, you can copy the line directly from the Acrobat PDF file and paste it into Notepad. You can also copy this text string directly from the “Testing your installation” section of the README.TXT file, which is in your anti-virus program directory. If you copy the line from either of these sources, be sure to delete any carriage returns or spaces.
2 Save the file with the name EICAR.COM. The file size will be 68 or 70 bytes.
3 Start your anti-virus software and allow it to scan the directory that contains EICAR.COM. When the software examines this file, it reports “Found EICAR test file NOT a virus.”
NOTEThis file is not a virus — it cannot spread or infect other files, or otherwise harm your computer. Delete the file when you have finished testing your installation to avoid alarming other users. Please note that products that operate through a graphical user interface do not return this same EICAR identification message.
Removing the software1 Change your command prompt to point to the directory that contains the
VirusScan files (as set up in Step 1 under Installing the software on page 11).
2 Delete all files in the directory.
14 VirusScan Command-Line version 4.24.0

3
Using the Command-Line ScannerThe command-line scanner is a program that you can run from a command prompt. To run a scan, type scan at the command prompt with the options you want. For a complete list of options, see page 23 onwards.
You should scan any file that is new to your computer, especially any newly downloaded or installed files. If your computers are susceptible to virus infection, you should scan as often as once a day.
The scanner operates with minimal use of system resources. The program also includes options for administrators that help to ensure that the scanner is being used most efficiently. For example, the FREQUENCY option sets a mandatory period between scans, which helps to minimize resources when the network is most busy.
What can you scan? � File types scanned by default.
These file types as well as many other common file types are scanned by default: .BIN, .COM, .DLL, .DOC, .DOT, .EXE, .HTM, .INI, .OVL, .RTF, .SYS, .VBS, .VXD, .XLA, .XLS, and .XLT.
� Archived and compressed files recognized by the scanner.
You can scan compressed and archive file formats which include .ARC, .ARJ, .CAB, Diet, .GZIP, LZEXE, .LZH, PKLite, .RAR, .TAR, and .ZIP files.
The scanner detects and reports any infections found in any compressed or archive file. The scanner can also clean files in .ZIP archive format. If you have access to Windows, you can clean certain infections from compressed files using VirusScan for Windows software.
You can use the options /UNZIP and /NOCOMP to configure the scanner to handle compressed files. These and other scan options are described in the tables from page 26 to page 30.
Product Guide 15
Using the Command-Line Scanner
What is heuristic analysis? An anti-virus scanner uses two techniques to detect viruses — signature matching and heuristic analysis.
A virus signature is simply a binary pattern that is found in a virus-infected file. Using information in the DAT files, the scanner searches for those patterns. However, this approach cannot detect a new virus because its signature is not yet known, therefore the scanner use another technique — heuristic analysis.
Programs, documents or e-mail messages that carry a virus often have distinctive features. They might attempt unprompted modification of files, invoke mail clients, or use other means to replicate themselves. The scanner analyzes the program code to detect these kinds of computer instructions. The scanner also searches for “legitimate,” non-virus-like behavior, such as prompting the user before taking action, and thereby avoids raising false alarms.
In an attempt to avoid detection, some viruses are encrypted. Each computer instruction is simply a binary number, but the computer does not use all the possible numbers. By searching for unexpected numbers inside a program file, the scanner can detect an encrypted virus.
By using these techniques, the scanner can detect both known viruses and many new viruses and variants.
Scanning NTFS streamsSome known methods of file infection add the virus body at the beginning or the end of a host file. However, a "Stream" virus exploits the NTFS feature in Windows NT/2000 that allows multiple data streams. For example, a Windows 95/98 FAT file has only one data stream — the program code or data itself. In NTFS, users can create any number of data streams within the file — independent executable program modules, as well as various service streams such as file access rights, encryption data, and processing time.
Unfortunately, some streams might contain viruses. The scanner can detect a stream virus in one of two ways; you can specify the full stream name, or you can include /STREAMS and specify either no stream name, or a part of a stream name using the wildcard characters ? and *.
Currently no known viruses hide themselves in NTFS streams. One virus — W2K/Stream — uses streams to save a clean copy of its host. Stream viruses are a potential risk, but not a current risk.
16 VirusScan Command-Line version 4.24.0

Using the Command-Line Scanner
Table 3-1 shows the effect of different commands on a stream called file:stream that contains a virus.
Using memory caches When scanning a file for viruses and other malicious software, the virus-scanning engine reads the file into computer memory in amounts determined by the operating system. Although changes are not normally necessary, you can improve the scanning speed by increasing the amount of memory that the engine uses. This can be controlled by the following options:
� /OCRS
� /OCMAX
� /AFC
Options /OCRS and /OCMAX are intended for use with offline or remote storage, such as Hierarchical Storage Management (HSM). The /AFC option is intended for use with archive and compressed files, such as .ZIP files.
Table 3-1. Scanning streams
Command Action
SCAN /ALL /STREAMS FILE All streams were scanned.
The virus is detected.
SCAN /ALL FILE:STREAM The exact stream name was specified.
The virus is detected.
SCAN /ALL /STREAMS FILE:STREAM The exact stream name was specified.
The virus is detected.
SCAN /ALL FILE:STR* An exact stream name was not specified.
The virus is not detected.
SCAN /ALL /STREAMS FILE:STR* All streams beginning with “str” are scanned.
The virus is detected.
SCAN /ALL FILE No streams were named.
The virus is not detected.
Product Guide 17

Using the Command-Line Scanner
OCRS
Typically the scanner reads only a few kilobytes of a file at a time, therefore a large number of reads might be required per file. The /OCRS option causes the engine to use a large internal ‘cache’ for each file read instead. The size of reads for this cache is determined by a value in the range 0 through 4, as follows:
/OCRS=0 — 128 KB
/OCRS=1 — 256 KB
/OCRS=2 — 512 KB
/OCRS=3 — 1 MB
/OCRS=4 — 2 MB
OCMAX
The /OCMAX option determines the maximum size of the internal cache for file reads. By default, the engine typically caches up to eight reads per file, and uses a cache of 128 KB. So, if you set /OCRS=2 (for 256 KB), the value for OCMAX defaults to 2 MB. If you set the /OCRS=4, the value for OCMAX defaults to 16 MB.
When setting the maximum size explicitly, you must specify the value of OCMAX as a number of Megabytes. For example, to specify a 2 MB limit for the internal cache, use the following: /OCMAX=2.
AFC
The /AFC option is intended for use with archive and compressed files, such as .ZIP files. When the engine encounters the file, it first decompresses the contents into computer memory (or ‘cache’) before scanning them. This option allows you to vary the amount of cache that the scanner uses. A larger cache can improve the speed of scanning archive files.
The cache is allocated ‘per file’, so the engine uses a large amount of cache if there are many nested files. This option normally improves scanning speeds unless the computer has very low memory.
Table 3-2 shows the range of cache sizes that are permitted. If you specify a value outside this range, the minimum or maximum value is assumed as appropriate. If you do not use this option, the scanner uses the default value.
Table 3-2. Cache sizes
Platform Minimum Default Maximum
Microsoft 16-bit DOS client or server 2 MB 8 MB 16 MB
Clients on other platforms 8 MB 24 MB 512 MB
Servers on other platforms 8 MB 64 MB 512 MB
18 VirusScan Command-Line version 4.24.0

Using the Command-Line Scanner
Scanning files in remote storage Under some Microsoft Windows system, files that are not in frequent use can be stored in a remote storage system, such as the Hierarchical Storage Management (HSM) system. However, when the files are scanned using the /DOHSM option, those files become ‘in use’ again. To prevent this effect, you can include the /NORECALL option. In combination, these options request the stored file for scanning, but the file continues to reside in remote storage. The file is not transported back to local storage.
Scanning protected filesThe scanner normally examines files such as other users’ profiles and recycle bins for viruses. If you want to prevent this type of scanning in a Windows NT, Windows 2000 or Windows XP system, use the /NOBKSEM option.
Examples of on-demand scans The examples in the following sections describe how to run typical on-demand scans. In the example on page 21, you can learn how to save the details of scans that you find useful as scanning profiles. Profiles provide an efficient means of handling multiple or repetitive scans, and you can also use profiles as templates for new scans as needed.
Example 1: Running a full scanThe first step in building a scan command is to determine which files or directories you want to examine. You can easily scan one file or folder at a time, but many scan options make targeting specific directories or drives easy. See page 26 for a list of these options. To run a full scan, you can use the /adn option.
To run a full scan:
1 If you do not already have the VirusScan program directory listed in your path statement, change to the directory where you stored your VirusScan program files.
2 At the command prompt, enter:
SCAN /ADN
The scanner scans all network drives and displays its results on-screen.
Product Guide 19

Using the Command-Line Scanner
Example 2: Creating a reportThe scanner can report its results in a log file you create and name. In this example, the scanner create its report in a log file called WEEK40.TXT, which appears in your current working directory.
To create a report:
1 If you do not already have the VirusScan program directory listed in your path statement, change to the directory where you stored your VirusScan program files.
2 At the command prompt, enter:
SCAN /ADN /REPORT WEEK40.TXT
The scanner scans all network drives and generates a text file of the results. The contents of the report are identical to the text you see on-screen as the scanner is running.
Example 3: Saving the report to a file To create a running report of the scanner’s actions, use the /APPEND option to add any results of the scan to a file.
To create a running report:
1 If you do not already have the VirusScan program directory listed in your path statement, change to the directory where your VirusScan program files are stored.
2 At the command prompt, enter:
SCAN /ADN /APPEND /REPORT WEEK40.TXT
The scanner scans all network drives, and appends the results of the scan to an existing file called WEEK40.TXT.
20 VirusScan Command-Line version 4.24.0

Using the Command-Line Scanner
Example 4: Creating a scanning profileInstead of typing all of the options for a scan at the command prompt each time you want to run the task, you can save the options in a text file as a scanning profile. You can then tell the scanner to load the options from that file.
To create a scanning profile:
1 Using any text editor, open a new file.
2 Add the options to configure your scan task in the same way that you type them at the command prompt. Save the file to the VirusScan program directory as SAMPLE.TXT.
3 To start a scan with these options, enter:
SCAN /LOAD SAMPLE.TXT
Configuring a scan to run at startupBy using a scanning profile in the AUTOEXEC.BAT file, a computer can scan for viruses each time it starts.
To configure a virus scan at startup:
1 Change to the root directory by entering C:, then CD \ at the command prompt.
2 To start the MS-DOS text editor, enter:
EDIT AUTOEXEC.BAT
3 Locate the first line that has a reference to SCAN.EXE. Insert one space after the reference, then enter:
/LOAD <filename>
where <filename> is the name of the scanning profile you want to run at startup. You can add a series of such files, each separated with a space, to load multiple scan profiles.
4 When you finish editing your AUTOEXEC.BAT file, save your changes, then quit your text editor.
5 Restart your computer to have the software run and load the command-line options you chose.
Product Guide 21

Using the Command-Line Scanner
Creating a list of infected filesAlthough a summary report can be useful, you can also create a simple list that contains only the names of the infected files. You can create and control this list using the options, BADLIST, APPENDBAD, and CHECKLIST.
For example, the following command scans the directory DIR1 and all its subdirectories, and produces information on-screen:
SCAN C:\DIR1\*.* /SUB
To produce a simple list of infected files, you can add the BADLIST option:
SCAN C:\DIR1\*.* /SUB /BADLIST BAD1.TXT
The contents of BAD1.TXT might look like this list:
C:\DIR1\Games\hotGame.exe ... Found Acid.674 virus!
C:\DIR1\SCANTEST\virtest.com ... Found: EICAR test file NOT a virus.
You can add to the list of infected files by using the APPENDBAD option. For example, the following command scans the directory DIR2, and any infected files found here are added to the existing list:
SCAN C:\DIR2\*.* /SUB /BADLIST BAD1.TXT /APPENDBAD
Then, the contents of BAD1.TXT might look like this:
C:\DIR1\Games\hotGame.exe ... Found Acid.674 virus!
C:\DIR1\SCANTEST\virtest.com ... Found: EICAR test file NOT a virus.
C:\DIR2\prices.doc ... Found: virus or variant W97M/Concept!
C:\DIR2\Costs\may2003.doc ... Found the W97M/Ethan virus!
Using the CHECKLIST option, you can refer to that list, and scan the same files again later:
SCAN /CHECKLIST BAD1.TXT
22 VirusScan Command-Line version 4.24.0

Using the Command-Line Scanner
Scanning optionsThe scanning options are organized into several functional groups:
� General options.
� Target options on page 26.
� Response and notification options on page 30.
� Report options on page 33.
The options are also listed alphabetically with brief descriptions on page 35.
General options The following table lists the general scanning options.
Table 3-3. General options
General option Limitations Description
/? None. Display a list of command-line options, each with a brief description.
You can add a list of scanning options to a report file. To do this, type at the command prompt:
SCAN /? /REPORT <filename>
The report is appended with the full set of options available for that scan task.
/AFC=<size> Use with /UNZIP.
Use a memory cache of specified size when decompressing files.
The size must be specified in megabytes. For example, to specify a 64 MB cache, use /AFC=64. See page 18 for more information.
/ANALYZE Extended memory is required.
Scan for possible new viruses in programs and macros.
See What is heuristic analysis? on page 16 for details.
You can type /ANALYSE instead.
For macro viruses only, use /MANALYZE. For program viruses only, use /PANALYZE.
/APPENDBAD Use with /BADLIST.
Append names of infected files to an existing file, as specified by /BADLIST.
See Creating a list of infected files on page 22 for details.
Product Guide 23
Using the Command-Line Scanner
/BADLIST <filename> None. Create a list of infected files.
See Creating a list of infected files on page 22 for details.
/BEEP None. Issue a tone when an infected file is found.
By default, a tone is only issued when the scan ends.
/BPRESTORE None. Restore sectors from backup after cleaning.
/EXTLIST None. Display names of file extensions that are scanned by default.
/EXTRA <filename> None. Specify the location on any EXTRA.DAT file.
An EXTRA.DAT is a small, supplemental virus-definition file that is released between regular DAT updates.
/FREQUENCY <hours> None. Do not scan before the specified number of hours after the previous scan.
In environments where the risk of virus infection is very low, this option prevents unnecessary scans.
Remember, frequent scanning provides greater protection against viruses.
/HELP None. Display a list of command-line options, each with a brief description.
See “/?” on page 23 for more details.
/HTML <filename> None. Display the results in HTML format.
/LOAD <filename> None. Load scanning options from the named file, or scanning profile.
You can call scanning profiles from any local directory.
You can use this option to perform a scan you have already configured by loading custom settings already saved in an ASCII-formatted file.
/MANALYZE Extended memory is required.
Scan for possible new viruses in macros.
You can type /MANALYSE instead.
For program viruses only, use /PANALYZE. For program and macro viruses, use /ANALYZE.
/NOBKSEM Windows NT, Windows 2000, and Windows XP only.
Prevent scanning of files that are normally protected.
Such files can normally be accessed by the operating system’s FILE_FLAG_BACKUP_SEMANTICS flag.
See Scanning protected files on page 19 for details.
Table 3-3. General options (Continued)
General option Limitations Description
24 VirusScan Command-Line version 4.24.0

Using the Command-Line Scanner
/NOEXPIRE None. Disable the “expiration date” message if the scanner’s DAT files are out of date.
For more details, see Updating Your Anti-Virus Protection on page 51.
/OCRS=<value> None.
Use with Microsoft Windows only.
Specify a value that represents the size of the internal cache size for each file read.
The value may be specified as a digit that represents sizes between 128KB and 2MB. See Using memory caches on page 17 for details.
/OCMAX=<size> None.
Use with Microsoft Windows only.
Specify the maximum size of the internal cache for file reads.
The size must be specified in megabytes. See Using memory caches on page 17 for details.
/PANALYZE Extended memory is required.
Scan for possible new viruses in programs.
You can type /PANALYSE instead.
For macro viruses only, use /MANALYZE. For program and macro viruses, use /ANALYZE.
/PROGRAM None. Scan for malicious applications.
Some widely available applications such as “password crackers” can be used maliciously or can pose a security threat.
/SILENT None. Do not display any information on-screen.
/STREAMS NTFS only, run from within Windows NT.
Scan all streams within a file if it is in an NTFS partition on a Windows NT system.
See Scanning NTFS streams on page 16 for more information.
/TIMEOUT <seconds> None. Set the maximum time to spend scanning any one file.
Table 3-3. General options (Continued)
General option Limitations Description
Product Guide 25

Using the Command-Line Scanner
Target options The following table lists scanning options that define the type of object or area to be scanned.
NOTETo configure a scan, you must specify a target location for the scan, such as C:\, A:\, /ADL, /ADN.
Table 3-4. Target options
Target option Limitations Description
/AD None. Same as /ALLDRIVES.
/ADL None. Scan all local drives for viruses, including compressed and PC drives, in addition to any other drives specified on the command line. Do not scan diskette drives.
/ADN None. Scan all network drives for viruses, in addition to any other drives specified on the command line.
/ALL See note on page 29.
Scan all files regardless of extension.
By default, only executable files are scanned. Using this option substantially increases the scanning time. Use it only if you find a virus or suspect you have one.
/ALLDRIVES None. Scan all drives. Scan all network drives and local drives, but not removable drives; these include diskette drives, CD drives, and Zip drives.
This is a combination of /ADN and /ADL.
/ALLOLE None. Treat all files as compound/OLE files regardless of file extension.
/BOOT Do not use with /NODDA.
Scan boot sector and master boot record only.
/CHECKLIST <filename> None. Scan the files listed in the specified file.
See Creating a list of infected files on page 22 for details.
/DOHSM On Windows NT, 2000 and XP only.
Scan files that are offline.
These are files that Hierarchical Storage Management (HSM) has archived because they have not been accessed for some time. See also /NORECALL.
/EXCLUDE <filename> None. Do not scan the files listed in the specified file.
Use this option to exclude specific files from a scan. List the complete path to each file on its own line. You may use wildcards, * and ?.
26 VirusScan Command-Line version 4.24.0
Using the Command-Line Scanner
/MAILBOX Use with /MIME Scan plain-text mailboxes.
These include Eudora, PINE, and Netscape. Most mailboxes will be in MIME format, and therefore the /MIME option is also required.
/MANY None. Scan multiple diskettes consecutively in a single drive.
The program prompts you for each disk. You can use this option to check several diskettes quickly. If one disk is found to be infected, the scanning stops.
You cannot use this option if you run the scanner from a boot disk and you have only one diskette drive.
/MAXFILESIZE <size> None. Scan only files that are not larger than the specified number of megabytes.
/MIME None. Scan inside MIME files.
/NOBACKUP None. Do not prompt for backup of sectors before attempting to clean.
/NOBOOT None. Do not scan the boot sector.
/NOBREAK None. Disable CTRL-C and CTRL-BREAK during scans.
Users cannot halt scans in progress if this option is set.
/NOCOMP None. Do not check compressed executables created with the LZEXE or PkLite file-compression programs.
This reduces scanning time when a full scan is not needed. Otherwise, by default, the scanner checks inside executable, or self-decompressing files by decompressing each file in memory and checking for viruses.
/NOD None. Use with /CLEAN. Do not scan all files regardless of extension.
By default, /CLEAN scans and tries to clean viruses in all file types. When you include the /NOD option, the scanning and cleaning are limited to the susceptible file types only, as recognized by their file extensions.
/NODDA Do not use with /BOOT.
Do not access disk directly. This prevents the scanner from accessing the boot record.
This feature allows the scanner to run under Windows NT.
You might need to use this option on some device- driven drives.
Table 3-4. Target options (Continued)
Target option Limitations Description
Product Guide 27

Using the Command-Line Scanner
/NODOC See note on page 29.
Do not scan document files.
This includes Microsoft Office documents, OLE2, PowerPoint, CorelDraw, WordPerfect, RTF, Visio, Autodesk Autocad 2000, Adobe PDF 5, and Corel PhotoPaint 9 files.
/NODECRYPT None. Do not decrypt Microsoft Office compound documents that are password-protected.
By default, macros inside password-protected compound documents are scanned by employing “password cracking” techniques. If, for reasons of security, you do not require these techniques, use this option. Password cracking does not render the file readable.
/NOJOKES None. Do not report any jokes.
/NOMEM None. Do not scan memory for viruses.
Use this option only when you are certain that your computer is virus-free.
/NORECALL Use with /DOHSM Do not move files from remote storage into local storage after scanning.
/NOSCRIPT None. Do not scan these types of file: HTML, JavaScript, Visual Basic, and Script Component Type Libraries.
Stand-alone JavaScript and Visual Basic Script files will still be scanned.
/SECURE None. Scan inside all files including compressed files regardless of file extension, and use heuristic analysis.
This is a combination of /ALL, /ANALYZE, and /UNZIP.
Table 3-4. Target options (Continued)
Target option Limitations Description
28 VirusScan Command-Line version 4.24.0

Using the Command-Line Scanner
NOTEThe /ALL option overrides the /NODOC option, such that all files are scanned, but Microsoft Office files are not scanned for macros.
/SUB None. Scan any subdirectories inside a directory.
By default, when you specify a directory to scan rather than a drive, the scanner examines only the files it contains, not its subdirectories.
Use this option to scan all subdirectories within the specified directories. This option is not necessary if you specify an entire drive as a target.
/UNZIP None. Scan inside archive files, such as those saved in ZIP, LHA, PKarc, ARJ, WinACE, CAB, and CHM formats.
If used with /CLEAN, this option attempts to clean non-compressed files inside ZIP files only. No other archive formats can be cleaned.
The /CLEAN option does not delete or rename infected files within ZIP files. It does not rename the ZIP file itself.
The program cannot cleaned infected files found within any other archive format; you must first extract them from the archive file.
Table 3-4. Target options (Continued)
Target option Limitations Description
Product Guide 29
Using the Command-Line Scanner
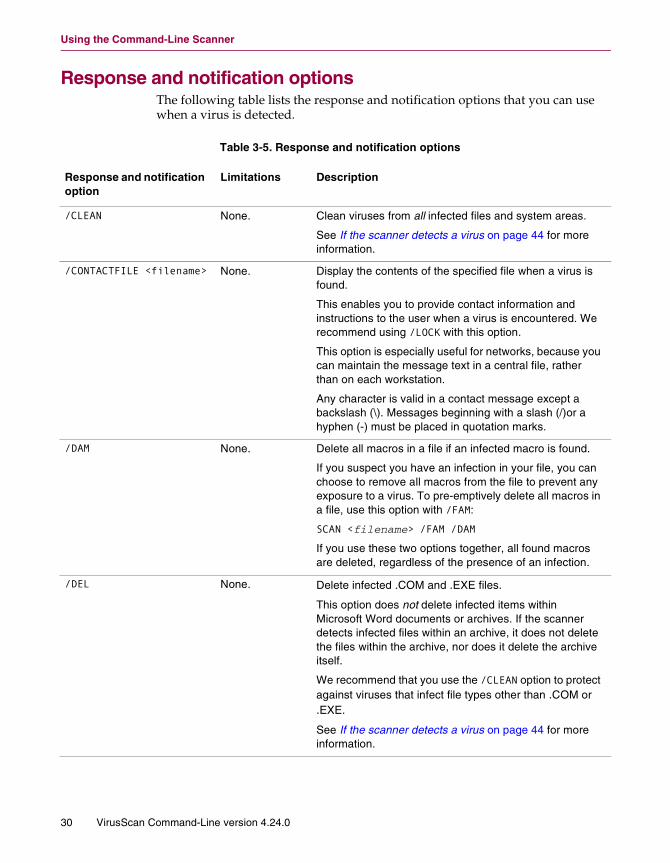
Response and notification options The following table lists the response and notification options that you can use when a virus is detected.
Table 3-5. Response and notification options
Response and notification option
Limitations Description
/CLEAN None. Clean viruses from all infected files and system areas.
See If the scanner detects a virus on page 44 for more information.
/CONTACTFILE <filename> None. Display the contents of the specified file when a virus is found.
This enables you to provide contact information and instructions to the user when a virus is encountered. We recommend using /LOCK with this option.
This option is especially useful for networks, because you can maintain the message text in a central file, rather than on each workstation.
Any character is valid in a contact message except a backslash (\). Messages beginning with a slash (/)or a hyphen (-) must be placed in quotation marks.
/DAM None. Delete all macros in a file if an infected macro is found.
If you suspect you have an infection in your file, you can choose to remove all macros from the file to prevent any exposure to a virus. To pre-emptively delete all macros in a file, use this option with /FAM:
SCAN <filename> /FAM /DAM
If you use these two options together, all found macros are deleted, regardless of the presence of an infection.
/DEL None. Delete infected .COM and .EXE files.
This option does not delete infected items within Microsoft Word documents or archives. If the scanner detects infected files within an archive, it does not delete the files within the archive, nor does it delete the archive itself.
We recommend that you use the /CLEAN option to protect against viruses that infect file types other than .COM or .EXE.
See If the scanner detects a virus on page 44 for more information.
30 VirusScan Command-Line version 4.24.0

Using the Command-Line Scanner
/EVLOG On Windows NT only.
Use NT Event Logging.
Any detections are recorded in the Application Log of the Event Viewer.
/FAM None. Find all macros, not just macros suspected of being infected.
The scanner treats any macro as a possible virus and reports that the file “contains one or more macros.” However, the macros are not removed.
If you suspect you have an infection in a file, you can remove all macros from the file by using the /FAM and /DAM options together. For example:
SCAN <filename> /FAM /DAM
/LOCK In MS-DOS systems only, not Windows NT.
Halt and lock the computer if a virus is found.
This option is appropriate in vulnerable network environments, such as open-use computer laboratories.
We recommend that you use this option with the /CONTACTFILE <filename> option to tell users what to do or whom to contact if the scanner locks their computer.
/MOVE <dir> None. Move all infected files found during a scan to the specified directory, preserving the drive letter and directory structure.
This option has no effect if the Master Boot Record or boot sector is infected, because these are not files.
See If the scanner detects a virus on page 44 for more information.
/NOBEEP None. Do not issue a tone when the scan ends.
By default, a tone is issued at the end of a scan if an infection is found.
Table 3-5. Response and notification options (Continued)
Response and notification option
Limitations Description
Product Guide 31

Using the Command-Line Scanner
/NORENAME None. Do not rename an infected file that cannot be cleaned.
For information about renaming, see Table 4-1 on page 44.
See If the scanner detects a virus on page 44 for more information.
/PLAD On NetWare volumes only.
Preserve the last-accessed time and date for files that are scanned.
Some software (such as used for creating backups or archives) relies on a file’s last-accessed time and date to work correctly. If you set this option, the engine resets that time and date to their original values after scanning the file.
Table 3-5. Response and notification options (Continued)
Response and notification option
Limitations Description
32 VirusScan Command-Line version 4.24.0

Using the Command-Line Scanner
Report options By default, the results of a scan appear on-screen. The following table lists the options for displaying the results elsewhere. To capture a scanner report to a text file, use /REPORT with any additional options as needed. For examples of using reporting options, see page 20.
Table 3-6. Report options
Report option Limitations Description
/APPEND None. Append information to the specified report file instead of overwriting it.
Use this option with /REPORT.
/PAUSE Do not use with report options.
Enable a screen pause.
When the screen is full of messages, the prompt “Press any key to continue“ appears. Otherwise, by default, the screen fills and scrolls continuously without stopping. This allows the scanner to run without stopping on PCs with multiple drives or that have severe infections.
We recommend you do not use this option with the report options, REPORT, /RPTALL, /RPTCOR, and /RPTERR.
/REPORT <filename> Do not use with /PAUSE.
Create a report of infected files and system errors, and save the data to the specified file in ASCII text file format.
If that file already exists, /REPORT overwrites it. To avoid overwriting, use the /APPEND option with /REPORT. The scanner then adds report information to the end of the file, instead of overwriting it.
You can also use /RPTALL, /RPTCOR and /RPTERR to add the names of scanned files, corrupted files, modified files, and system errors to the report.
You can include the destination drive and directory (such as D:\VSREPRT\ALL.TXT), but if the destination is a network drive, you must have rights to create and delete files on that drive.
You may find it helpful to add a list of scanning options to the report files. To do this, type at the command prompt:
SCAN /HELP /REPORT <filename>
The results of your scanning report are appended with the full set of options available for that scan task.
We recommend you do not use /PAUSE when using any report option.
/RPTALL Use with /REPORT.
Include the names of all scanned files in the report file.
Product Guide 33
Using the Command-Line Scanner
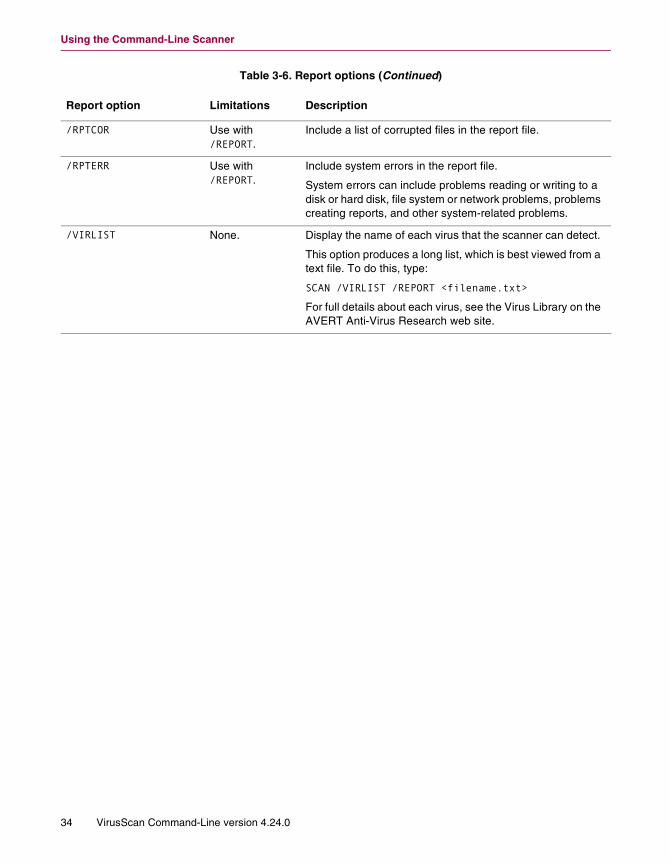
/RPTCOR Use with /REPORT.
Include a list of corrupted files in the report file.
/RPTERR Use with /REPORT.
Include system errors in the report file.
System errors can include problems reading or writing to a disk or hard disk, file system or network problems, problems creating reports, and other system-related problems.
/VIRLIST None. Display the name of each virus that the scanner can detect.
This option produces a long list, which is best viewed from a text file. To do this, type:
SCAN /VIRLIST /REPORT <filename.txt>
For full details about each virus, see the Virus Library on the AVERT Anti-Virus Research web site.
Table 3-6. Report options (Continued)
Report option Limitations Description
34 VirusScan Command-Line version 4.24.0

Using the Command-Line Scanner
Alphabetic list of options For convenience, the options are repeated in this section with a brief description. For full descriptions, see the previous sections.
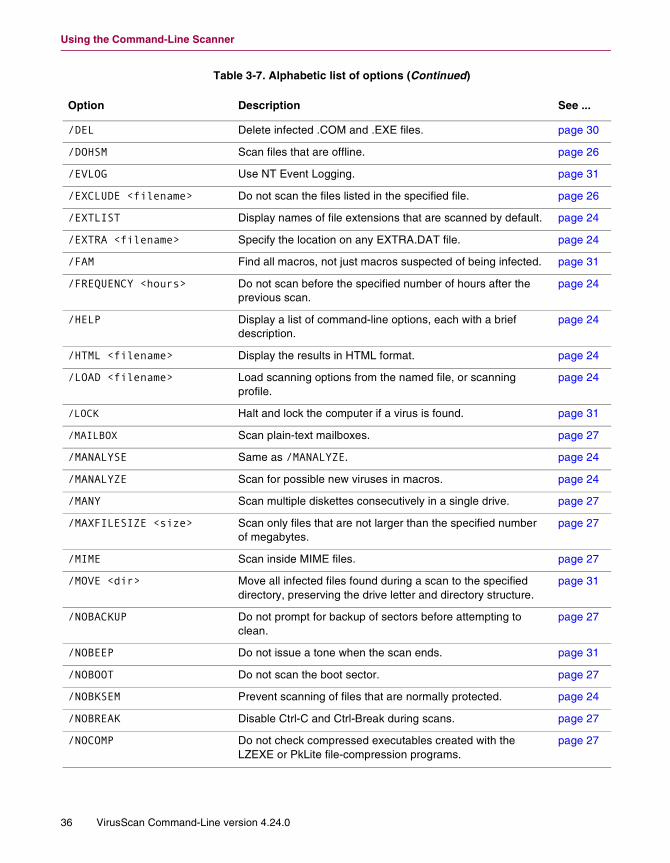
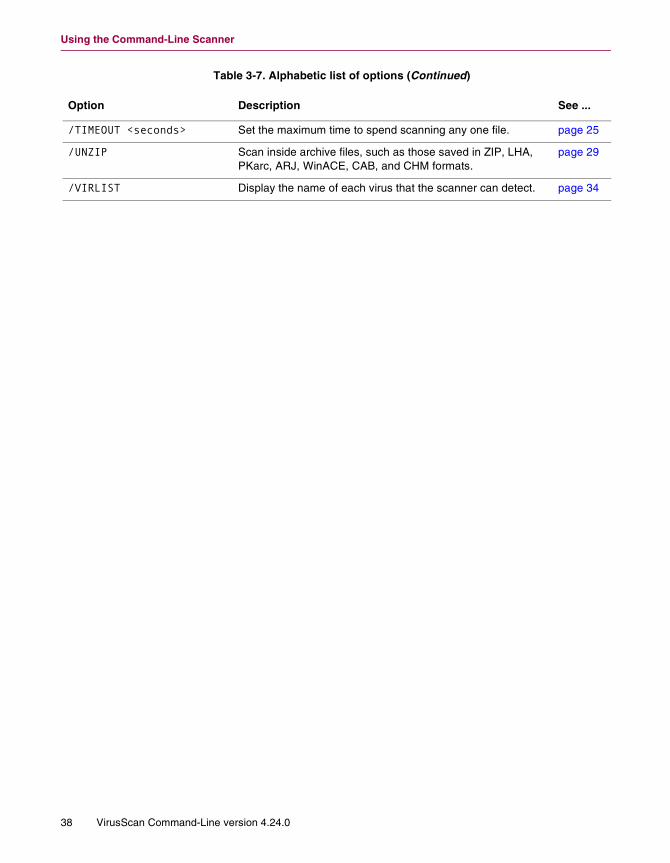
Table 3-7. Alphabetic list of options
Option Description See ...
/? Display a list of command-line options, each with a brief description.
page 23
/AD Same as /ALLDRIVES. page 26
/ADL Scan all local drives for viruses, including compressed and PC drives, in addition to any other drives specified on the command line. Do not scan diskette drives.
page 26
/ADN Scan all network drives for viruses, in addition to any other drives specified on the command line.
page 26
/AFC=<size> Use a memory cache of specified size when decompressing files.
page 23
/ALL Scan all files regardless of extension. page 26
/ALLDRIVES Scan all drives. Scan all network drives and local drives, but not removable drives; these include diskette drives, CD drives, and Zip drives.
page 26
/ALLOLE Treat all files as compound/OLE files regardless of file extension.
page 26
/ANALYSE Same as /ANALYZE. page 23
/ANALYZE Scan for possible new viruses in programs and macros. page 23
/APPEND Append information to the specified report file instead of overwriting it.
page 33
/APPENDBAD Append names of infected files to an existing file, as specified by /BADLIST.
page 23
/BADLIST <filename> Create a list of infected files. page 24
/BEEP Issue a tone when an infected file is found. page 24
/BOOT Scan boot sector and master boot record only. page 26
/BPRESTORE Restore sectors from backup after cleaning. page 24
/CHECKLIST <filename> Scan the files listed in the specified file. page 26
/CLEAN Clean viruses from all infected files and system areas. page 30
/CONTACTFILE <filename> Display the contents of the specified file when a virus is found.
page 30
/DAM Delete all macros in a file if an infected macro is found. page 30
Product Guide 35
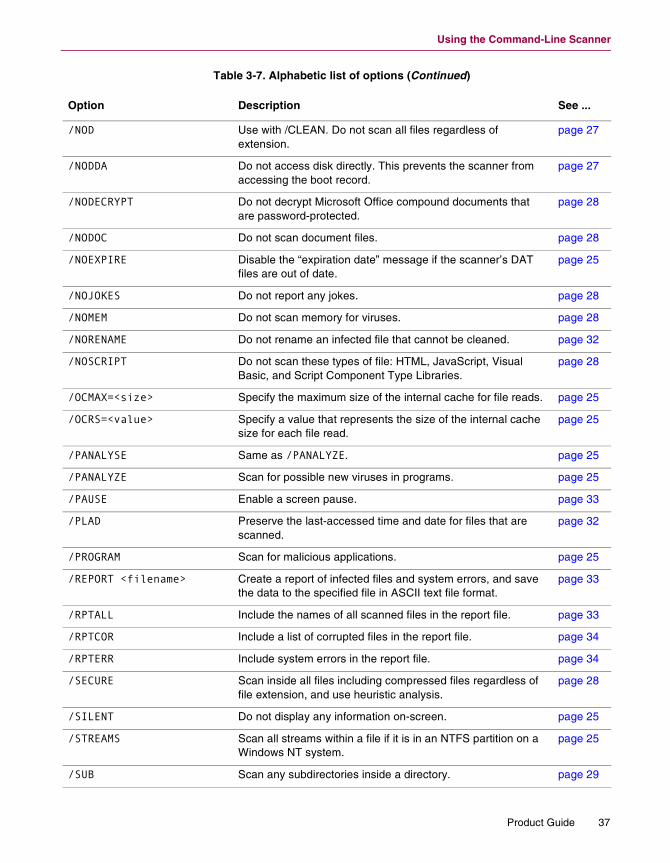
Using the Command-Line Scanner
/DEL Delete infected .COM and .EXE files. page 30
/DOHSM Scan files that are offline. page 26
/EVLOG Use NT Event Logging. page 31
/EXCLUDE <filename> Do not scan the files listed in the specified file. page 26
/EXTLIST Display names of file extensions that are scanned by default. page 24
/EXTRA <filename> Specify the location on any EXTRA.DAT file. page 24
/FAM Find all macros, not just macros suspected of being infected. page 31
/FREQUENCY <hours> Do not scan before the specified number of hours after the previous scan.
page 24
/HELP Display a list of command-line options, each with a brief description.
page 24
/HTML <filename> Display the results in HTML format. page 24
/LOAD <filename> Load scanning options from the named file, or scanning profile.
page 24
/LOCK Halt and lock the computer if a virus is found. page 31
/MAILBOX Scan plain-text mailboxes. page 27
/MANALYSE Same as /MANALYZE. page 24
/MANALYZE Scan for possible new viruses in macros. page 24
/MANY Scan multiple diskettes consecutively in a single drive. page 27
/MAXFILESIZE <size> Scan only files that are not larger than the specified number of megabytes.
page 27
/MIME Scan inside MIME files. page 27
/MOVE <dir> Move all infected files found during a scan to the specified directory, preserving the drive letter and directory structure.
page 31
/NOBACKUP Do not prompt for backup of sectors before attempting to clean.
page 27
/NOBEEP Do not issue a tone when the scan ends. page 31
/NOBOOT Do not scan the boot sector. page 27
/NOBKSEM Prevent scanning of files that are normally protected. page 24
/NOBREAK Disable Ctrl-C and Ctrl-Break during scans. page 27
/NOCOMP Do not check compressed executables created with the LZEXE or PkLite file-compression programs.
page 27
Table 3-7. Alphabetic list of options (Continued)
Option Description See ...
36 VirusScan Command-Line version 4.24.0
Using the Command-Line Scanner
/NOD Use with /CLEAN. Do not scan all files regardless of extension.
page 27
/NODDA Do not access disk directly. This prevents the scanner from accessing the boot record.
page 27
/NODECRYPT Do not decrypt Microsoft Office compound documents that are password-protected.
page 28
/NODOC Do not scan document files. page 28
/NOEXPIRE Disable the “expiration date” message if the scanner’s DAT files are out of date.
page 25
/NOJOKES Do not report any jokes. page 28
/NOMEM Do not scan memory for viruses. page 28
/NORENAME Do not rename an infected file that cannot be cleaned. page 32
/NOSCRIPT Do not scan these types of file: HTML, JavaScript, Visual Basic, and Script Component Type Libraries.
page 28
/OCMAX=<size> Specify the maximum size of the internal cache for file reads. page 25
/OCRS=<value> Specify a value that represents the size of the internal cache size for each file read.
page 25
/PANALYSE Same as /PANALYZE. page 25
/PANALYZE Scan for possible new viruses in programs. page 25
/PAUSE Enable a screen pause. page 33
/PLAD Preserve the last-accessed time and date for files that are scanned.
page 32
/PROGRAM Scan for malicious applications. page 25
/REPORT <filename> Create a report of infected files and system errors, and save the data to the specified file in ASCII text file format.
page 33
/RPTALL Include the names of all scanned files in the report file. page 33
/RPTCOR Include a list of corrupted files in the report file. page 34
/RPTERR Include system errors in the report file. page 34
/SECURE Scan inside all files including compressed files regardless of file extension, and use heuristic analysis.
page 28
/SILENT Do not display any information on-screen. page 25
/STREAMS Scan all streams within a file if it is in an NTFS partition on a Windows NT system.
page 25
/SUB Scan any subdirectories inside a directory. page 29
Table 3-7. Alphabetic list of options (Continued)
Option Description See ...
Product Guide 37
Using the Command-Line Scanner
/TIMEOUT <seconds> Set the maximum time to spend scanning any one file. page 25
/UNZIP Scan inside archive files, such as those saved in ZIP, LHA, PKarc, ARJ, WinACE, CAB, and CHM formats.
page 29
/VIRLIST Display the name of each virus that the scanner can detect. page 34
Table 3-7. Alphabetic list of options (Continued)
Option Description See ...
38 VirusScan Command-Line version 4.24.0
Using the Command-Line Scanner
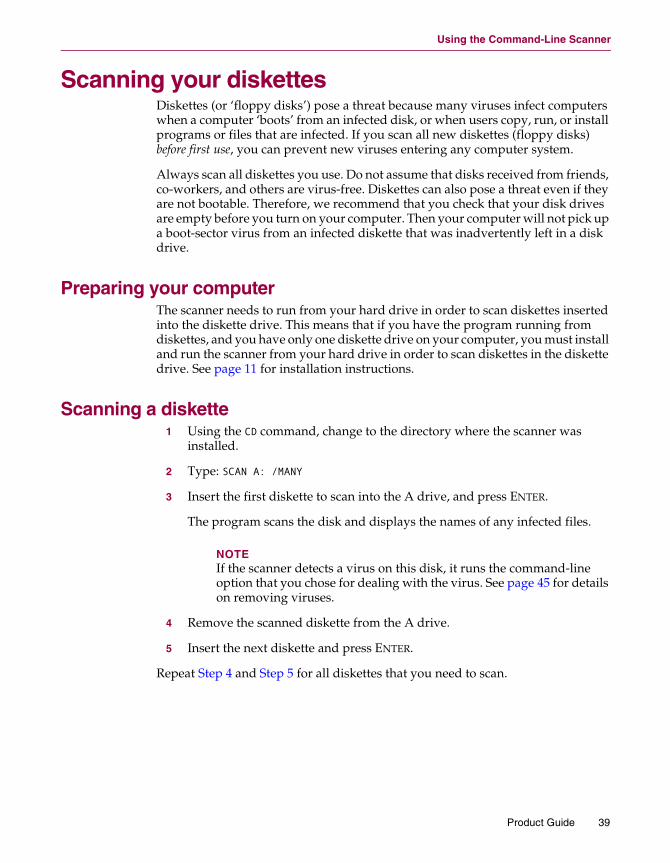
Scanning your diskettesDiskettes (or ‘floppy disks’) pose a threat because many viruses infect computers when a computer ‘boots’ from an infected disk, or when users copy, run, or install programs or files that are infected. If you scan all new diskettes (floppy disks) before first use, you can prevent new viruses entering any computer system.
Always scan all diskettes you use. Do not assume that disks received from friends, co-workers, and others are virus-free. Diskettes can also pose a threat even if they are not bootable. Therefore, we recommend that you check that your disk drives are empty before you turn on your computer. Then your computer will not pick up a boot-sector virus from an infected diskette that was inadvertently left in a disk drive.
Preparing your computerThe scanner needs to run from your hard drive in order to scan diskettes inserted into the diskette drive. This means that if you have the program running from diskettes, and you have only one diskette drive on your computer, you must install and run the scanner from your hard drive in order to scan diskettes in the diskette drive. See page 11 for installation instructions.
Scanning a diskette1 Using the CD command, change to the directory where the scanner was
installed.
2 Type: SCAN A: /MANY
3 Insert the first diskette to scan into the A drive, and press ENTER.
The program scans the disk and displays the names of any infected files.
NOTEIf the scanner detects a virus on this disk, it runs the command-line option that you chose for dealing with the virus. See page 45 for details on removing viruses.
4 Remove the scanned diskette from the A drive.
5 Insert the next diskette and press ENTER.
Repeat Step 4 and Step 5 for all diskettes that you need to scan.
Product Guide 39

Using the Command-Line Scanner
Error levelsWhen you run the on-demand scanner in the MS-DOS environment, an error level is set. You can use the ERRORLEVEL value in batch files to take actions based on the results of the scan. See your MS-DOS operating-system documentation for more information.
The on-demand scanner can return the following error levels:
Table 3-8. Error Levels
Error Level
Description
0 No errors occurred; no viruses were found.
2 Data file integrity check failed.
6 A general problem.
8 Scanner was unable to find a DAT file.
10 A virus was found in memory.
12 Cleaning failed.
The scanner tried to clean a file, but has failed for some reason, and the file is still infected.
13 One or more viruses or hostile objects were found.
15 Self-check failed; the scanner may be infected or damaged.
19 The scanner succeeded in cleaning all infected files.
20 Scanning was prevented because of the /FREQUENCY option.
See page 24 for more information.
21 Computer requires a reboot to clean the infection.
102 The user quit via Esc-X, ^C or Exit button.
This feature can be disabled with the /NOBREAK option.
40 VirusScan Command-Line version 4.24.0
Using the Command-Line Scanner
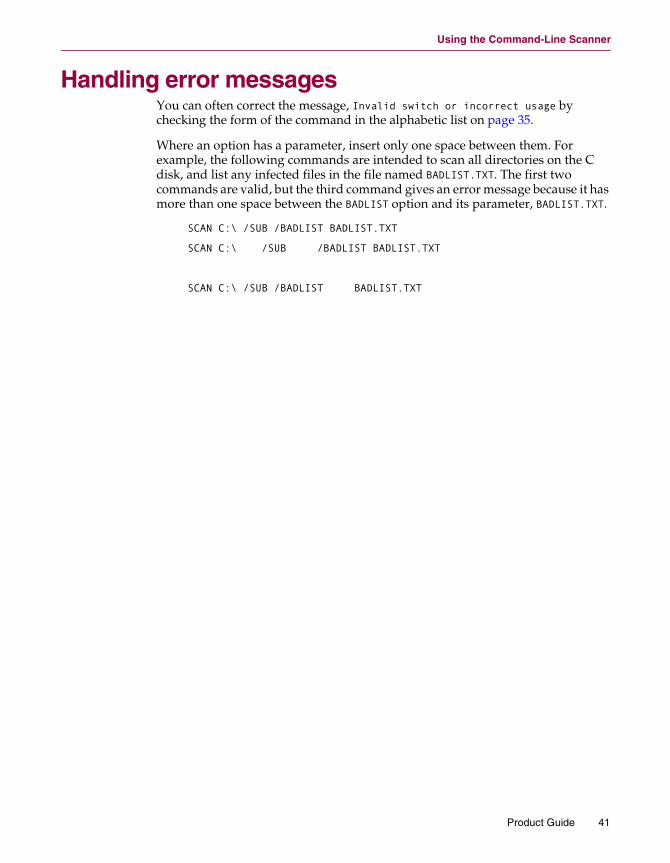
Handling error messagesYou can often correct the message, Invalid switch or incorrect usage by checking the form of the command in the alphabetic list on page 35.
Where an option has a parameter, insert only one space between them. For example, the following commands are intended to scan all directories on the C disk, and list any infected files in the file named BADLIST.TXT. The first two commands are valid, but the third command gives an error message because it has more than one space between the BADLIST option and its parameter, BADLIST.TXT.
SCAN C:\ /SUB /BADLIST BADLIST.TXT
SCAN C:\ /SUB /BADLIST BADLIST.TXT
SCAN C:\ /SUB /BADLIST BADLIST.TXT
Product Guide 41
Using the Command-Line Scanner
42 VirusScan Command-Line version 4.24.0
4
Removing InfectionsIf you suspect you have a virus, don’t panic! Although they are far from harmless, most viruses that infect your computer do not destroy data, play pranks, or render your computer unusable. Even the rare viruses that carry a destructive payload usually produce their nasty effects in response to a trigger event. In most cases, unless you know that a payload has activated, you have time to deal with the infection properly. However, this unwanted computer code can interfere with your computer’s normal operation, consume system resources and have other undesirable effects, so take viruses seriously and remove them when you encounter them.
Unusual computer behavior, unexplained crashes, or other unpredictable events might not be caused by a virus. If you believe you have a virus on your computer because of occurrences such as these, a scan might not produce the results you expect, but it helps eliminate one potential cause of your computer problems.
To clean your computer:
If you have a virus or you suspect that you have a virus, and you have not yet installed the on-demand scanner, follow these steps:
1 Turn off your computer.
WARNINGDo not reboot using the reset button or CTRL + ALT + DELETE. If you do, some viruses might remain intact or drop destructive payloads.
2 Place a clean start-up diskette into the diskette drive. If you do not have this diskette, see Creating an emergency diskette on page 47.
3 Turn on your computer.
4 At the command prompt, type: SCAN /ADL /ALL /CLEAN.
5 If viruses were removed:
Shut down your computer and remove the diskette. Begin the installation procedure described on page 11.
To find and remove the source of infection, scan your diskettes immediately after installation. For information, see Scanning your diskettes on page 39.
Product Guide 43

Removing Infections
If viruses were not removed:
If the scanner cannot remove a virus, you see one of the following messages:
Virus could not be removed.
There is no remover currently available for the virus.
If the scanner finds a virus in a file and cannot remove it, you must delete the infected file and restore a copy from backups. If the virus was found in the Master Boot Record, refer to the AVERT Anti-Virus Research Site for information about manually removing viruses.
If the scanner detects a virusViruses attack computer systems by infecting files — usually executable program files or macros inside documents and templates. The scanner can safely remove most common viruses from infected files.
However, some viruses are designed to damage your files beyond repair. The scanner can move these irreparably damaged or corrupted files to a quarantine directory or delete them permanently to prevent further infection.
If the scanner cannot clean an infected file, it renames the file to prevent its use. When a file is renamed, only the file extension (typically three letters) is changed. The following table shows the methods of renaming.
For example, if an infected file called BAD.COM is found, the scanner attempts to rename the file to BAD.VOM. However, if a file of that name already exists in the directory, the scanner attempts to rename the file to BAD.VIR, BAD.V01, or BAD.V02, and so on.
For file extensions with more than three letters, the name is usually not truncated. For example, NOTEPAD.CLASS becomes NOTEPAD.VLASS. However, an infected file called WATER.VAPOR becomes WATER.VIR.
Table 4-1. Renaming infected files
Original Renamed Description
Not V?? V?? File extensions that do not start with v are renamed with v as the initial letter of the file extension. For example, MYFILE.DOC becomes MYFILE.VOC.
V?? VIR File extensions that start with v are renamed as .VIR. For example, MYFILE.VBs becomes MYFILE.VIR.
VIR, V01-V99
These files are recognized as already infected, and are not renamed again.
<blank> VIR Files with no extensions are given the extension, .VIR.
44 VirusScan Command-Line version 4.24.0
Removing Infections
Removing a virus found in a fileIf the scanner detects a virus in a file, it displays the path names of infected files and takes the action specified in either the loaded scanning profile or command-line options. See Using the Command-Line Scanner on page 15 for information about creating scanning profiles. For example:
� If you selected /MOVE, the scanner automatically moves the infected files to the specified quarantine directory.
� If you selected /CLEAN, the scanner attempts to clean the file.
� If you selected /DEL and this is a .EXE or .COM file, the scanner deletes the infected file.
� If you selected /NORENAME, the scanner does not rename the infected file.
NOTETake care if you are using more than one of these options in combination. For example, if you specify /MOVE and /CLEAN together, the scanner creates a copy of an infected file in the specified quarantine directory before attempting to clean the file. If you want to keep an infected copy for investigation, this is useful, but if you intend only to remove any virus that might be present on the computer, it is more beneficial and more secure to use /CLEAN on its own. Generally speaking, simply specifying more command-line options does not necessarily increase the benefit of the scanning.
Product Guide 45
Removing Infections
Running additional virus-cleaning tasksThese tasks include:
� Cleaning macro viruses from password-protected files.
� Cleaning Windows NT hard disks.
Cleaning macro viruses from password-protected files The scanner respects users’ passwords and usually leaves them intact. For example, in password-protected Microsoft Excel 95 files, the scanner removes macro viruses without disturbing users’ passwords.
However, macro viruses that infect Microsoft Word files sometimes plant their own passwords. Depending on the capabilities of the virus, the scanner takes one of the following actions when trying to clean a password-protected file:
� If the macro virus can plant its own password: The scanner cleans the file, removes the planted password, and removes the virus.
� If the macro virus cannot plant its own password: The scanner notes the infection but does not remove the password.
Cleaning Windows NT hard disksTo clean the Master Boot Record (MBR) on a hard disk formatted with the Microsoft Windows NT file system (NTFS):
1 Start the computer that has the NTFS file system partition from a virus-free MS-DOS boot disk.
2 Run the scanner, using SCAN /BOOT /CLEAN. Be sure to run the scanner from a diskette that you know is free from viruses.
This cleans the NTFS file system Master Boot Record, but the scanner cannot read the rest of the NTFS file system partition when you boot into a MS-DOS environment. To scan the rest of the NTFS file system partition, reboot into Windows NT, then run the scanner again.
46 VirusScan Command-Line version 4.24.0

Removing Infections
Creating an emergency diskette In case your computer becomes infected, you need a clean start-up, also called boot, or emergency diskette. This section describes how to create that emergency diskette. Any virus in your system might be transferred to your emergency diskette and infect your computer again, so your computer must be virus-free to create it. If your computer is infected, go to another computer and scan it. If it is virus-free, create your boot diskette at that computer.
This emergency diskette is for scanning the boot sector and system files only; it is not intended for normal scanning.
NOTEBecause Windows NT cannot boot from a diskette, you can format this boot diskette from within a Windows NT environment.
To create a boot diskette:
1 Exit from Windows or any applications to get the command prompt (C:\>).
2 Insert a blank, unformatted diskette into the A drive.
3 Format the diskette by typing the following command at the command prompt:
FORMAT A: /S /U
This overwrites any information already on the diskette.
4 When you are prompted for a volume label, enter an appropriate name for your start-up diskette.
5 Locate HIMEM.SYS on your hard drive.
� MS-DOS users: By default, this file is in the \DOS directory.
� Windows users: By default, this file is in the \WINDOWS\COMMAND directory.
6 Copy HIMEM.SYS to your A drive by typing the following at the command prompt:
COPY HIMEM.SYS A:\
Product Guide 47
Removing Infections
7 Create a file called CONFIG.SYS.
You can do this from within MS-DOS, or by using Notepad or any other text editor.
NOTEA true text editor, such as Edit (in MS-DOS) or Notepad, saves characters to a file without additional formatting. However, most word-processing programs add extra information that can render a file unusable as a TXT file. If you use a program such as Word or Wordpad to create text files, save them in .TXT format.
To create CONFIG.SYS at the command prompt:
a Type EDIT to start the MS-DOS editing program.
b Type the following lines:
DEVICE=HIMEM.SYSDOS=HIGH
c Select File, Save As and type the name CONFIG.SYS.
d Click OK to save the file.
e Select File, Exit to close Edit and return to the command prompt.
To create CONFIG.SYS using Notepad or any other text editor:
a Launch the editing program, and open a new file.
b Complete Step b through Step e above.
8 Change to the scanner’s program directory (as set up in Step 1 on page 11).
9 Copy the command-line version of the scanner software to the diskette by entering the following commands at the command prompt:
COPY BOOTSCAN.EXE A:\
COPY EMSCAN.DAT A:\SCAN.DAT
COPY EMCLEAN.DAT A:\CLEAN.DAT
COPY EMNAMES.DAT A:\NAMES.DAT
COPY LICENSE.DAT A:\
COPY MESSAGES.DAT A:\
You have now copied, and renamed where necessary all the files that the scanner needs to scan the boot sector of an infected computer.
48 VirusScan Command-Line version 4.24.0
Removing Infections
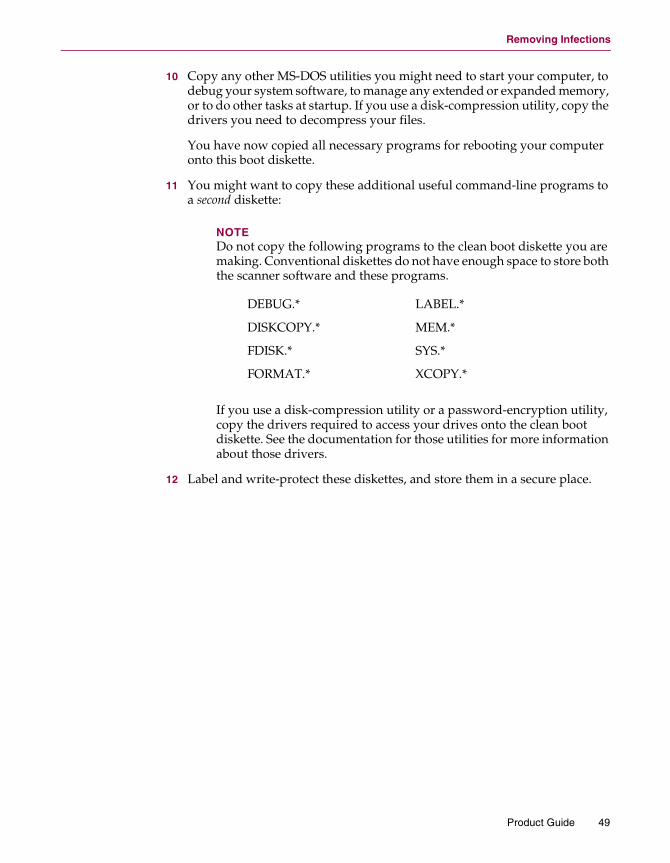
10 Copy any other MS-DOS utilities you might need to start your computer, to debug your system software, to manage any extended or expanded memory, or to do other tasks at startup. If you use a disk-compression utility, copy the drivers you need to decompress your files.
You have now copied all necessary programs for rebooting your computer onto this boot diskette.
11 You might want to copy these additional useful command-line programs to a second diskette:
NOTEDo not copy the following programs to the clean boot diskette you are making. Conventional diskettes do not have enough space to store both the scanner software and these programs.
If you use a disk-compression utility or a password-encryption utility, copy the drivers required to access your drives onto the clean boot diskette. See the documentation for those utilities for more information about those drivers.
12 Label and write-protect these diskettes, and store them in a secure place.
DEBUG.* LABEL.*
DISKCOPY.* MEM.*
FDISK.* SYS.*
FORMAT.* XCOPY.*
Product Guide 49
Removing Infections
50 VirusScan Command-Line version 4.24.0

5
Updating Your Anti-Virus ProtectionHundreds of new viruses are discovered every month. To offer you the best protection possible, we continually update the virus definition (DAT) files that the scanner uses to detect viruses. Although your software has technology that allows it to detect previously unknown strains of viruses or malicious code, new virus types and other agents appear frequently.
The DAT files that came with your original copy of the anti-virus scanner might not be able to help the software detect a virus that was discovered months later. For maximum protection, we strongly recommend that you update your files regularly.
The command-line scanner uses the same virus definition files as our other anti-virus products that might be installed in your network, so you can be sure that with current DAT files in place, a command-line scanner offers the same protection as our other anti-virus software.
To update DAT files for the command-line software:
1 Download the DAT file, for example, dat-4220.zip, from any of these sources:
� McAfee web site, at http://www.mcafeeb2b.com/naicommon/download/
� McAfee FTP site, at ftp://ftp.nai.com/pub/antivirus/datfiles/4.x.
NOTEWhen you are selecting the latest DAT files, ignore any references to SuperDAT (a self-installing DAT file). You cannot use this type of file with the command-line scanner.
2 Create a temporary directory on your hard disk.
3 Copy the downloaded DAT file to the temporary directory.
4 Locate the directories on your hard drive where the command-line scanner is currently loaded (as set up in Step 1 on page 11).
5 The downloaded DAT file is in a compressed .ZIP format. Use a compression utility such as WinZip or PKZip to extract the files from the ZIP file into that directory. Be sure to extract all the files. If using WinZip, select the Use Folder Names and the All Files options.
Product Guide 51

Updating Your Anti-Virus Protection
6 Allow the updated files to overwrite the existing DAT files.
NOTEIf other Virus Scan products are loaded on your computer, or if you chose custom installation options, some DAT files might be located in more than one directory. If so, save these updated DAT files to each directory.
52 VirusScan Command-Line version 4.24.0

Index
Aalarm, see beep/ALL option, warning with /NODOC, 29alphabetic options, 35archive file cache, default value of, 18archive files, 17 to 18
setting cache size, 18arguments, see options, 23audience for this manual, 5AVERT Anti-Virus Research Site, contacting, 7
BBACKUP_SEMANTICS flag, 24beep, not wanted, 31beta program, contacting, 7boot diskette, 47boot record, preventing scanner from accessing, 27boot sector
limiting scan to, 26warning about /NODDA, 26
Ccache, 17 to 18clean
all infected files, 30diskette, 47
/CLEAN option, 30, 45colon, delimiter in stream naming, 17command-line options, see options, 23compressed files, 17 to 18
scanning inside, 29skipping during virus scans, 27types recognized by the scanner, 15
computer problems, attributing to viruses, 43contacting McAfee
CONTACT file, 6list of resources, 7
corrupted files, 34, 44crashes attributed to viruses, 43CTRL+BREAK, disabling during scans, 27CTRL+C, disabling during scans, 27customer service, contacting, 7cyclical redundancy check (CRC), 12
Ddamaged files, 44DAT file updates, web site, 7date, see expiration date message, 25defaults, archive file cache, 18/DEL option, 30, 45direct drive access, disabling with scanner, 27directories, scanning, 29diskettes
scanning, 39scanning multiple, 27
displaying list of detected viruses, 34download web site, 7drives
scanning local, 26scanning network, 26
EEdit program (in MS-DOS), 48EICAR "virus" for testing installation, 14emergency disk, making a, 47error levels, 40error messages, 41Eudora, 27event log, 31excluding files, from virus scan, 26exit codes, see error levelsexpiration date message, disabling, 25
Product Guide 53

Ffile types
list of scanned, 24scanning all, 26
FILE_FLAG_BACKUP_SEMANTICS flag, 24files
compressed, 29corrupted, 34, 44damaged, 44deleting infected files, 30do not scan compressed files, 27excluding from scan, 26jokes, 28last -access date, 32moving infected files, 31scanning all, 28scanning under specified size, 27
floppy disks, see diskettesfrequency
error level for prevented scanning, 40setting for scan, 24
Ggeneral options, 23getting more information, 6
HHELP application, 6help, displaying, 23heuristic analysis, 28
enabling full capabilities, 23macro viruses only, 24program viruses only, 25
Hierarchical Storage Management (HSM), 10, 17
Iinfected files
creating a list of, 22deleting permanently, 30do not rename, 32moving, 31not renaming, 45removing viruses from, 43
installation, testing effectiveness of, 14internal cache, 18Invalid switch or incorrect usage, message, 41
Jjokes, 28
KKnowledgeCenter, 7
Llist of detected viruses, 34local drives, scanning, 26locking the computer, if a virus is found, 31locking, on DOS systems only, 31LZEXE, 27
Mmacro viruses
cleaning, 46heuristic analysis for, 24
mailboxesplain text, 27with /MIME, 27
master boot record (MBR), how to clean on NTFS, 46
memorycache, 17omitting from scans, 28virus infections in, error level for, 40
messagesdisplaying when a virus is found, 30Invalid switch or incorrect usage, 41pausing when displaying, 33
Microsoft Officefiles not scanned for macros, warning, 29omitting files from scans, 28
Microsoft Word, for creating .TXT files, 48MIME, 27/MOVE option, 31, 45moving infected files, 31
54 VirusScan Command-Line version 4.24.0
NNetscape, 27network drives, scanning, 26new features, 9NODDA, do not use with BOOT, 27/NODOC option, warning with /ALL, 29/NORENAME option, 32, 45Notepad, tips on using, 48Novell NetWare, run scanner from login script, 12NTFS streams, 16NTFS, cleaning, 46
OOffice, see Microsoft Officeoffline storage, 17options, 23 to 34
alphabetic, 35general, 23report, 33response and notification, 30target, 26
Ppanic, avoiding when your computer is infected, 43password-protected files, 46/PAUSE, do not use with report options, 33/PAUSE, not with /REPORT, 33pausing, when displaying scanner messages, 33PINE, 27PKLITE, 27plain-text mailboxes, 27product training, contacting, 7profile, see scanning profileprotected files, 19
Qquarantine, 44 to 45
RREADME file, 6recycle bins, 19remote storage, 17
/DOHSM and /NORECALL, 28
report options, 33reports
adding names of scanned files to, 33adding system errors to, 34do not use options with /PAUSE, 33generating with scanner, 33
requirements, system, 11response and notification options, 30responses, default when infected by viruses, 43
SSCAN.EXE, 15scanning disks, 39scanning profile, 21scanning speed, improvement, 18script, 28security threat, 25self-check, error level if fails, 40server, size of archive cache for, 18sound, see beepstreams, 16subdirectories, scanning, 29switches, see options, 23system
performance, 15requirements, 11
Ttarget options, 26technical support, contacting, 7testing your installation, 14text (.TXT) files, tips on creating, 48tone, see beeptraining web site, 7
Uupgrade web site, 7user profiles, 19users halting scans, how to prevent, 27
Product Guide 55

Vvirus library, 34virus scanning
displaying message when virus is found, 30preventing users from halting, 27
virusesdetected, error level for, 40displaying list of detected, 34effects of, 43locking the computer if found, 31removing from infected files, 43
VirusScan software, 40
WW2K/Stream, 16Windows NT File System (NTFS), cleaning MBR, 46
56 VirusScan Command-Line version 4.24.0