Embed Size (px)
Citation preview

2 VISIT www.edvotek.com for complete experiment details & free student protocols.
EDVOTEK® WORKSHOPTransformation Tips and Tricks
IntroductionAre transformations giving you trouble? Then this is the workshop for you!
In this workshop, you will transform E. coli with plasmids that express brightly colored rainbow proteins. They can even glow fl uorescent green with GFP! We’ll share tips and tricks along the way to ensure experimental success. Receive a fl ash drive/ entry in a T-shirt drawing.
Table of Contents Page
Background Information 3
Experimental Procedure 5
Experiment Results and Analysis 7
Troubleshooting Guide 9
Related Products 10

3CONTACT US? CALL 1.800.EDVOTEK • Fax 202-370 -1501 • email info@edvotek .com
EDVOTEK® WORKSHOP Transformation Tips and Tricks
Background Information
DNA CAN BE TRANSFERRED BETWEEN BACTERIA
In nature, DNA is transferred between bacteria using two main methods— transformation and conjugation. In transformation, a bacterium takes up exogenous DNA from the surrounding environ-ment (Figure 1). In contrast, conjugation relies upon direct contact between two bacterial cells. A piece of DNA is copied in one cell (the donor) and then is transferred into the other (recipient) cell. In both cases, the bacteria have acquired new genetic information that is both stable and heritable.
Frederick Griffi th fi rst discovered transformation in 1928 when he observed that living cultures of a normally non-pathogenic strain of Streptococcus pneumonia were able to kill mice, but only after being mixed with a heat-killed pathogenic strain. Because the non-patho-genic strain had been “transformed” into a pathogenic strain, he named this transfer of virulence “transformation”. In 1944, Oswald Avery and his colleagues purifi ed DNA, RNA and protein from a viru-lent strain of S. pneumonia to determine which was responsible for transformation. Each component was mixed each with a non-pathogenic strain of bacteria. Only those recipient cells exposed to DNA became pathogenic. These transfor-mation experiments not only revealed how this virulence is transferred but also led to the recognition of DNA as the genetic material.
The exact mode of transformation can differ between bacteria species. For example, Haemophilus infl uenzae uses membrane-bound vesicles to capture double-stranded DNA from the environment. In contrast, S. pneumoniae expresses competency factors that allow the cells to take in single-stranded DNA molecules. In the laboratory, scientists can induce cells—even those that are not naturally competent—to take up DNA and become transformed. To accomplish this, DNA is added to the cells in the presence of specifi c chemicals (like calcium, rubidium, or magnesium chloride), and the suspension is “heat shocked”—moved quickly between widely different temperatures. It is believed that a combination of chemical ions and the rapid change in tem-perature alters the permeability of the cell wall and membrane, allowing the DNA molecules to enter the cell. Today, many molecular biologists use transformation of Escherichia coli in their experiments, even though it is not normally capable of transforming in nature.
GENETIC ENGINEERING USING RECOMBINANT DNA TECHNOLOGY
Many bacteria possess extra, non-essential genes on small circular pieces of double-stranded DNA in addition to their chromosomal DNA. These pieces of DNA, called plasmids, allow bacteria to exchange benefi cial genes. For example, the gene that codes for ß-lactamase, an enzyme that provides antibiotic resistance, can be carried between bacteria on plasmids. Transformed cells secrete ß-lactamase into the surrounding medium, where it degrades the antibiotic ampicillin, which inhibits cell growth by interfering with cell wall synthesis. Thus, bacteria expressing this gene can grow in the presence of ampicillin. Furthermore, small “satellite” colonies of untrans-formed cells may also grow around transformed colonies because they are indirectly protected by ß-lactamase activity.
Recombinant DNA technology has allowed scientists to link genes from different sources to bacterial plasmids (Figure 2). These specialized plasmids, called vectors, contain the following features:
1. Origin of Replication: a DNA sequence from which bacteria can initiate the copying of the plasmid.
2. Multiple Cloning Site: a short DNA sequence that contains many unique restriction enzyme sites and allows scientists to control the introduction of specifi c genes into the plasmid.
3. Promoter: a DNA sequence that is typically located just before (“upstream” of) the coding sequence of a gene. The promoter recruits RNA polymerase to the beginning of the gene sequence, where it can begin transcription.
Figure 1: Bacterial Transformation
Plasmid Bacterial Cell
Transformed Cell
4 VISIT www.edvotek.com for complete experiment details & free student protocols.
EDVOTEK® WORKSHOPTransformation Tips and Tricks
Background Information
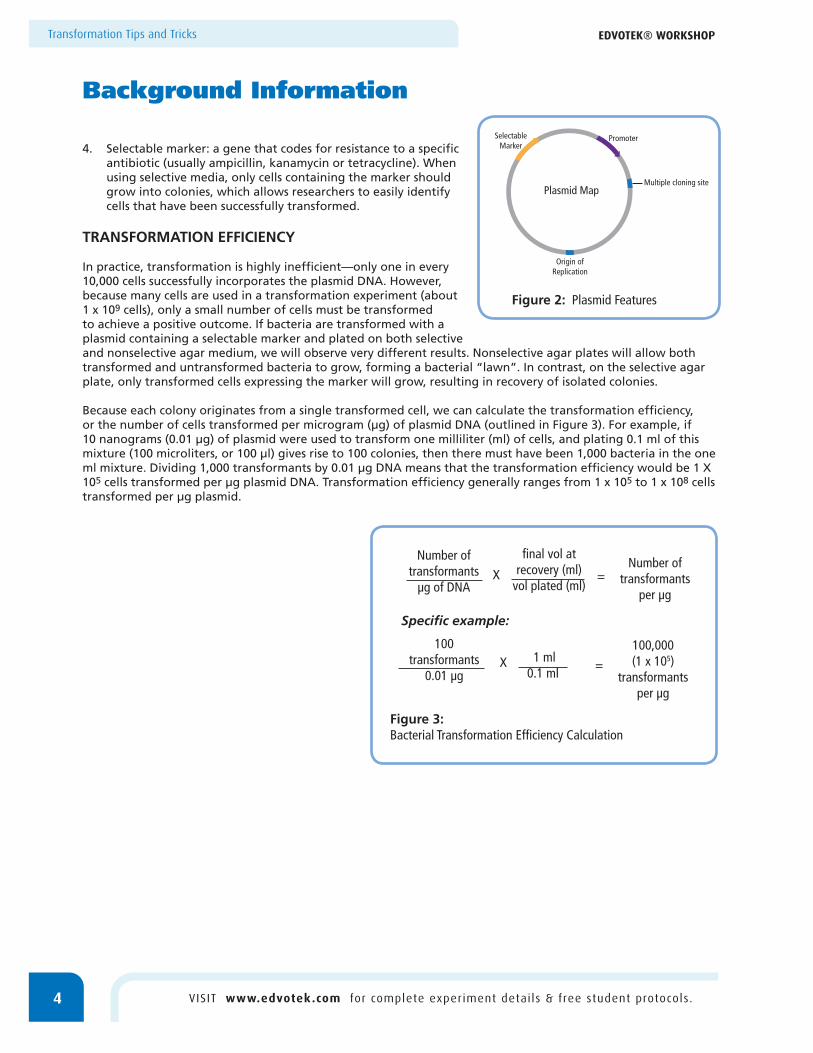
4. Selectable marker: a gene that codes for resistance to a specifi c antibiotic (usually ampicillin, kanamycin or tetracycline). When using selective media, only cells containing the marker should grow into colonies, which allows researchers to easily identify cells that have been successfully transformed.
TRANSFORMATION EFFICIENCY
In practice, transformation is highly ineffi cient—only one in every 10,000 cells successfully incorporates the plasmid DNA. However, because many cells are used in a transformation experiment (about 1 x 10⁹ cells), only a small number of cells must be transformed to achieve a positive outcome. If bacteria are transformed with a plasmid containing a selectable marker and plated on both selective and nonselective agar medium, we will observe very different results. Nonselective agar plates will allow both transformed and untransformed bacteria to grow, forming a bacterial “lawn”. In contrast, on the selective agar plate, only transformed cells expressing the marker will grow, resulting in recovery of isolated colonies.
Because each colony originates from a single transformed cell, we can calculate the transformation effi ciency, or the number of cells transformed per microgram (µg) of plasmid DNA (outlined in Figure 3). For example, if 10 nanograms (0.01 µg) of plasmid were used to transform one milliliter (ml) of cells, and plating 0.1 ml of this mixture (100 microliters, or 100 µl) gives rise to 100 colonies, then there must have been 1,000 bacteria in the one ml mixture. Dividing 1,000 transformants by 0.01 µg DNA means that the transformation effi ciency would be 1 X 10⁵ cells transformed per µg plasmid DNA. Transformation effi ciency generally ranges from 1 x 10⁵ to 1 x 10⁸ cells transformed per µg plasmid.
Figure 2: Plasmid Features
Plasmid Map
SelectableMarker
Promoter
Origin ofReplication
Multiple cloning site
Number oftransformants
per µg =
100 transformants
0.01 µg
Specifi c example:
X
fi nal vol at recovery (ml)
vol plated (ml)X
1 ml0.1 ml
=
100,000 (1 x 10⁵)
transformants per µg
Number of transformants
µg of DNA
Figure 3:Bacterial Transformation Effi ciency Calculation

5CONTACT US? CALL 1.800.EDVOTEK • Fax 202-370 -1501 • email info@edvotek .com
EDVOTEK® WORKSHOP Transformation Tips and Tricks
Experiment Procedure
1. LABEL one microcentrifuge tube with “+DNA” and a second microcentrifuge tube with “-DNA”.2. TRANSFER 500 µL ice-cold CaCl2 solution into the ”– DNA” tube using a sterile 1 ml pipet. 3. Using a toothpick, TRANSFER 5 well-isolated colonies (each colony should be approx. 1-1.5 mm in size)
from the E. coli source plate to the “-DNA” tube. 4. RESUSPEND the bacterial cells in the CaCl2 solution by pipetting up and down until no clumps of cells are visible and
the cell suspension looks cloudy.5. TRANSFER 250 µl of the cell suspension to the tube labeled “+ DNA”. PLACE tubes on ice.6. ADD 10 µl of the Plasmid DNA to the tube labeled “+ DNA”. DO NOT add the plasmid to the “-DNA” tube.7. Gently MIX the samples by fl icking the tubes. INCUBATE the tubes on ice for 10 minutes.8. PLACE the transformation tubes in a 42° C water bath for 90 seconds. 9. Immediately RETURN the tubes to the ice bucket and INCUBATE for two minutes.10. TRANSFER 250 µL of Recovery Broth to each tube using a sterile 1 ml pipet. Gently MIX by fl icking the tube.11. INCUBATE the cells for 30 minutes in a 37° C water bath.12. While the cells are recovering, LABEL the bottom of four agar plates as indicated below. • -DNA (plate with no stripe) • -DNA/+Amp (plate with one stripe) • +DNA/+Amp (plate with one stripe) +DNA/+Amp/+IPTG (plate with two stripes)
1. 2. 3.
6.5.
999
42° C
+D
NA
E.coli source plate
—D
NA
—D
NA
—D
NA
4.+
DN
A
—D
NA
250 µl
+D
NAADD:
10 µl Plasmid DNADO NOT ADD TO THE “-DNA” TUBE!
500 µlCaCl2
Transfer5
colonies
7.10min.
8.
90sec.
+D
NA
—D
NA
9.2
min.
+D
NA
—D
NA
10.250 µl
RecoveryBroth
—D
NA
+ DN
A
99
37° C11.
30min.
12.-DNA
-DNA+Amp
+DNA+Amp
+DNA+Amp+IPTG
For best results, make sure that the cells are completely resuspended.
Make sure tokeep the actual labels small!
Transformation of E. coli with Blue, Pink, Purple Chromogenic Proteins

6 VISIT www.edvotek.com for complete experiment details & free student protocols.
EDVOTEK® WORKSHOPTransformation Tips and Tricks
13. After the recovery period, REMOVE the tubes from the water bath and place them on the lab bench.
14. Using a sterile 1 ml pipet, TRANSFER 250 µL recovered cells from the tube labeled “ –DNA “ to the middle of the -DNA and
-DNA/+Amp plates.15. Using a new sterile 1 ml pipet, TRANSFER 250 µL recovered cells
from the tube labeled “ +DNA “ to the middle of the +DNA/+Amp and +DNA/+Amp/+IPTG plates.
16. SPREAD the cells over the entire plate using an inoculating loop. Use one sterile loop to spread both -DNA samples. Change to a fresh loop before spreading the +DNA samples. Make sure the cells have been spread over the entire surface of the plates. COVER the plates and WAIT fi ve minutes for the cell suspension to be absorbed by the agar.
17. STACK the plates on top of one another and TAPE them together. LABEL the plates with your initials or group number. PLACE the plates in the inverted position (agar side on top) in a 37° C bacte-rial incubation oven for overnight incubation (24 hours). If you do not have an incubator, colonies will form at room temperature in approximately 24 - 48 hours.
18. VISUALIZE the transformation and control plates and RECORD the following:
• The number of colonies on the plate. • The color of the bacteria.
Transformation of E. coli with Blue, Pink, Purple Chromogenic Proteins
Experiment Summary:
E. coli from the source plate are resus-pended in an ice-cold CaCl2 solution. Plasmid DNA is added to half of the cells before they are “heat shocked” in a 42°C water bath. The heat shock step facilitates the entry of DNA into the bacterial cells. Recovery Broth is added to the cell suspension, and the bacteria are allowed to recover for 30 minutes at 37°C. This recovery period allows the bacteria to repair their cell walls and to express the antibiotic re-sistance gene. Lastly, the transformed E. coli are plated on LB plates and allowed to grow at 37°C overnight.
13. 14.
16. 37° C
-DNA
—D
NA
Cover & Wait
250 µl
17. 18.
- D
NA
+ D
NA
-DNA/+Amp
250 µl 15.
+DNA/+Amp
+D
NA 250 µl
+DNA/+Amp/+IPTG
250 µl
5min. 24
hours
NOTE for Step 17:It may take longer for the cells to absorb into the medium. Do not invert plates if cells have not completely been absorbed.

7CONTACT US? CALL 1.800.EDVOTEK • Fax 202-370 -1501 • email info@edvotek .com
EDVOTEK® WORKSHOP Transformation Tips and Tricks
DETERMINATION OF TRANSFORMATION EFFICIENCY
Transformation effi ciency is a quantitative determination of the number of cells transformed per 1 µg of plasmid DNA. In essence, it is an indicator of the success of the transformation experiment.
You will calculate the transformation effi ciency using the data collected from your experi-ment.
1. Count the number of colonies on the plate that is labeled: +DNA/+Amp/+IPTG
A convenient method to keep track of counted colonies is to mark each colony with a lab marking pen on the outside of the plate.
2. Determine the transformation effi ciency using the following formula:
DATA COLLECTION
1. Observe the results you obtained on your transformation and control plates.
Control Plates: (-) DNA • -DNA • -DNA/+Amp
Transformation Plates: (+) DNA • +DNA/+Amp • +DNA/+Amp/+IPTG
2 Draw and describe what you observe. For each of the plates, record the following:
• How much bacterial growth do you observe? Determine a count. • What color are the bacteria? • Why do different members of your class have different transformation effi ciencies? • If you did not get any results, what factors could be attributed to this fact?
x =
fi nal vol at recovery (ml)
vol plated (ml)
Number of transformants
per µg
Number of transformants
µg of DNA
Example:Assume you observed 40 colonies:
40transformants
0.05 µg
1600(1.6 x 10³)
transformants per µg
x0.5 ml
0.25 ml=
Quick Reference:
50 ng (0.05 µg) of DNA is used.The fi nal volume at recovery is 0.50 ml The volume plated is 0.25 ml
Experimental Results and Analysis
8 VISIT www.edvotek.com for complete experiment details & free student protocols.
EDVOTEK® WORKSHOPTransformation Tips and Tricks
Experimental Results and Analysis
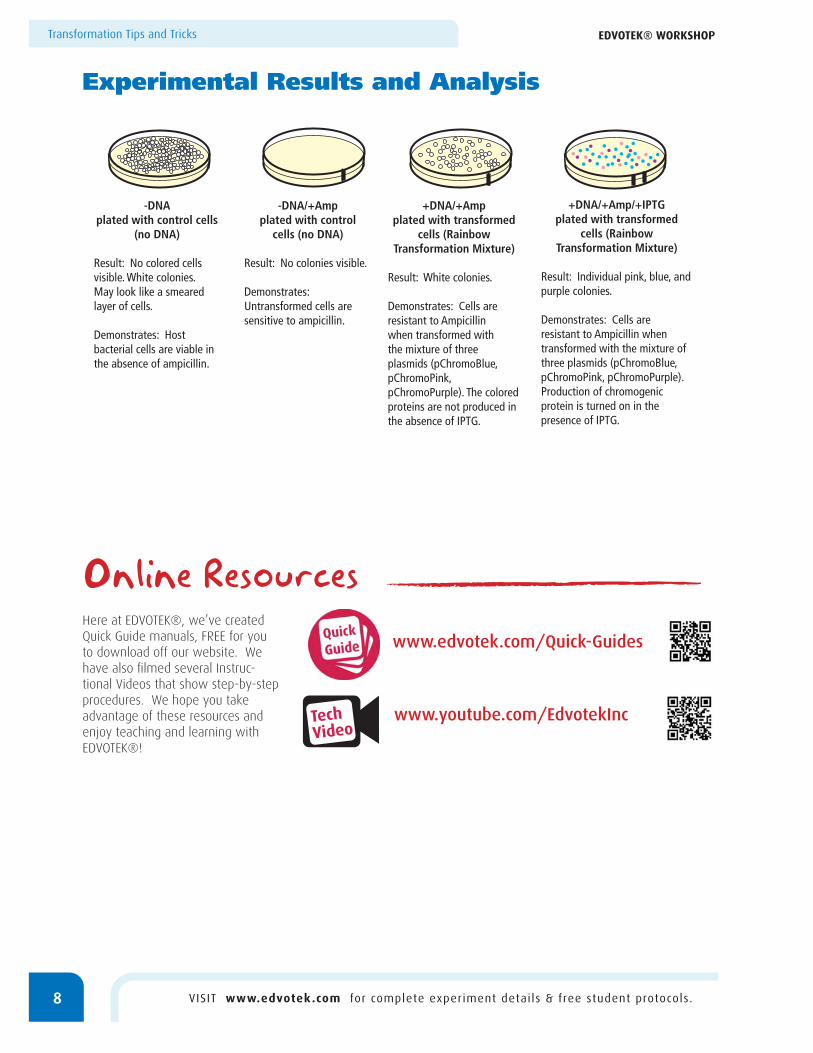
+DNA/+Amp/+IPTGplated with transformed
cells (Rainbow Transformation Mixture)
Result: Individual pink, blue, and purple colonies.
Demonstrates: Cells are resistant to Ampicillin when transformed with the mixture of three plasmids (pChromoBlue, pChromoPink, pChromoPurple). Production of chromogenic protein is turned on in the presence of IPTG.
+DNA/+Ampplated with transformed
cells (Rainbow Transformation Mixture)
Result: White colonies.
Demonstrates: Cells are resistant to Ampicillin when transformed with the mixture of three plasmids (pChromoBlue, pChromoPink, pChromoPurple). The colored proteins are not produced in the absence of IPTG.
-DNA/+Ampplated with control
cells (no DNA)
Result: No colonies visible.
Demonstrates: Untransformed cells are sensitive to ampicillin.
-DNAplated with control cells
(no DNA)
Result: No colored cells visible. White colonies.May look like a smeared layer of cells.
Demonstrates: Host bacterial cells are viable in the absence of ampicillin.
Online ResourcesHere at EDVOTEK®, we’ve created Quick Guide manuals, FREE for you to download off our website. We have also fi lmed several Instruc-tional Videos that show step-by-step procedures. We hope you take advantage of these resources and enjoy teaching and learning with EDVOTEK®!
www.edvotek.com/Quick-Guides
TechVideo
www.youtube.com/EdvotekInc

9CONTACT US? CALL 1.800.EDVOTEK • Fax 202-370 -1501 • email info@edvotek .com
EDVOTEK® WORKSHOP Transformation Tips and Tricks
Transformation Troubleshooting Guide
PROBLEM: CAUSE: ANSWER:
Poor cell growth on source plate
Incubation time too short Continue to incubate source plate at 37ºC for a total of 16-20 hours.
Antibiotic added to source plate When pouring plates, be sure to add antibiotics & additives at the correct step.
Colonies appeared smeary on transformation plate
Plates containing transformants were inverted too soon
Allow cell suspension to fully absorbed into the medium before inverting plates.
Experimental plates too moistAfter pouring plates, allow them dry overnight at room temp.Alternatively, warm plates at 37°C for 30 min. before plating cells
Incorrect host cells used for transformation
Confirm that correct bacterial strain was used for transformation
Cells were not properly heat shocked Ensure that temp. was 42ºC & heat shock step took place for no more than 90 seconds.
No colonies seen on transformation plates
Plasmid DNA not added to transformation mix
Ensure plasmid DNA was added to transformation tube.
Incorrect incubation temperature Use a thermometer to check incubator temperature. Adjust temp. to 37°C if necessary.
Make sure that pipets are used properly. If using micropipets, make sure students practice using pipets
Satellite colonies seen on transformation plate
Incorrect concentration of antibioticsin plates
Antibiotic is degraded
Ensure the correct concentration of antibiotic was added to plates - Make sure ReadyPour is cooled to 60°C before adding antibiotic.
Make sure ReadyPour is cooled to 60°C before adding antibiotic.
Incubate the plates overnight at 37ºC (24 hours).
Incorrect antibiotics Be certain that the correct antibiotic was used.
Cells not well resuspended in CaCl2Completely resuspend the cells in the CaCl2, leaving no cell clumps (vortex or mix vigorously to fully resuspend cells). Cell suspension should be cloudy.
Low transformation efficiency
Not enough cells used for transformation
Source plates were incubated for more than 20 hours
Experimental plates too old
Cells not well resuspended in CaCl2
CaCl2 solution not cold enough
Cell solution not cold enough
Too much or too little plasmid DNA added to cell suspension
Cells were not properly heat shocked
Antibiotics were degraded prior to pouring plates
Incorrect concentration of antibiotics in plates
Pick more colonies from source plate (1-2 colonies @ 1-2 mm width per 500µl CaCl2)
Important that source cells grow no longer than 20 hrs. Refrigerate plates after 20 hrs if necessary. Do not use source plates that have been incubatedlonger than 24 hours, refrigerated or not).
Prepare transformation plate and use shortly after preparation
Completely resuspend the cells in the CaCl2, leaving no cell clumps (vortex or mix vigorously to fully resuspend cells). Cell suspension should be cloudy.
Pre-chill CaCl2 before adding cells to the CaCl2
Extend incubation of celll suspension on ice 10-15 min. (should not exceed 30 min. total). This increases the transformation efficiency.
Ensure that correct volume of plasmid was added to the transformation tube. If using micropipets, make sure students practice using pipets.
Ensure that temperature was 42ºC and that heat shock step took place for no more than 90 seconds.
Make sure ReadyPour is cooled to 60°C before adding antibiotic.
Ensure that the correct concentration of antibiotic was used
Plates were incubated too long

10 VISIT www.edvotek.com for complete experiment details & free student protocols.
EDVOTEK® WORKSHOPTransformation Tips and Tricks
To order or for more information, visit our website: www.edvotek.com
Related Experiments
In this experiment, your students can see a blue color change in transformed cells due to the switching on of a gene. The pGAL™ plasmid gives them a blue color due to the production of the ß-galactosi-dase protein by the lacZ gene. IPTG is not required in this experiment since pGAL™ contains the complete lacZ gene.
For 10 Lab Groups
Complete in 50 min.and grow overnight
Cat. #221
Transformation of E.coli with pGAL™(Blue Colony)
Green Fluorescent Protein (GFP), which is responsible for bioluminescence in the jellyfi sh Aequorea victo-ria, is used extensively in all areas of science. Many organisms have been transformed with the GFP gene. It has proven to be so useful that scientists have mutated it to produce Blue Fluorescent Protein (BFP). In this simple experiment, your students will transform bacteria either with GFP, BFP or both!
For 10 Lab Groups
Complete in 50 min.and grow overnight
Cat. #222
Transformation of E.coli with Blue and Green Fluorescent Proteins
Transformed cells take up a plasmid containing the GFP gene. The GFP gene was isolated from the jellyfi sh Aequorea victoria. Transformed colonies expressing the GFP protein are visibly green in nor-mal light but will fl uoresce brightly when exposed to long wave UV light.
For 10 Lab Groups
Set Up & Plating 50 min.Incubation overnightTransformation effi ciency 15 min.
Cat. #223
Transformation of E.coli with Green Fluorescent Proteins (GFP)

11CONTACT US? CALL 1.800.EDVOTEK • Fax 202-370 -1501 • email info@edvotek .com
EDVOTEK® WORKSHOP Transformation Tips and Tricks
Related Experiments
To order or for more information, visit our website: www.edvotek.com
Rainbow Transformation
Transformation is of central importance in molecu-lar cloning since it allows for the selection, propa-gation, expression and purifi cation of a gene. Posi-tive selection for cells containing plasmid DNA is accomplished by antibiotic growth selection. In this experiment, your students will transform bac-teria with a new set of rainbow color plasmids that transform non-pathogenic bacterial cells into bright, colorful cells.
For 10 Lab Groups
Set Up & Plating 50 min.Incubation overnightTransformation effi ciency 15 min.
Cat. #224
When DNA is subcloned in the pUC polylinker region, ß-galacto-sidase production is interrupted, resulting in the inability of cells to hydrolyze X-Gal. This results in the production of white colonies amongst a background of blue colonies. This experiment provides a DNA fragment, linearized plasmid, and T4 DNA Ligase. Follow-ing the ligation to synthesize the recombinant plasmid, competent E.coli cells are transformed and the number of recombinant antibi-otic resistant white and blue colonies are counted. ß-galactosidase activity is assayed from blue and white bacterial cells. This experi-ment can be broken down into three modules: ligation, transfor-mation, and assay of ß-galactosidase.
For 5 Lab Groups
Module I: Ligation - 70 min.Module II: Transformation and Selection - 60 min.Module III: Assay of ß-galactosidase - 60 min.
Cat. #300
Cloning is frequently performed to study gene structure, function, and to enhance gene expression. This experiment is divided into fi ve modules. Clones are constructed by ligation of a vector and a fragment insert. The constructs are then transformed into competent cells and the cells are grown and selected for resistance. Plasmid DNA is then isolated from the transformants, cleaved with restric-tion enzymes, and analyzed by agarose gel electrophore-sis. Recommended for college level courses.
For 5 Plasmid Constructs & Analyses
Module I: 70 min.Module II: 70 min.Module III: 15 min.Module IV: 65-80 min.Module V: 70 min.Electrophoresis 45 min.
Cat. #301
Blue/White Cloning of a DNA Fragment & Assay of ß-galactosidase
Construction & Cloning of a DNA Recombinant

12 VISIT www.edvotek.com for complete experiment details & free student protocols.
EDVOTEK® WORKSHOPTransformation Tips and Tricks
Related Equipment
1.8 L Waterbath5.5 x 6 x 4” chamberIncludes one coverCat. #539
EDVOTEK® 1.8 L Digital Waterbath
10 L Waterbath12 x 9.5 x 6” chamberIncludes one coverCat. #538
EDVOTEK® 10 L Digital Waterbath
This economical bacterial incubator features a digital temperature control with a range from Ambient +1° C to 60° C. Ideal for growing bacteria on agar plates at 37° C or for Southern and Western Blot analysis at 60° C. Includes two adjustable/removable shelves for increased capacity. Accepts bottles and fl asks up to 2 L. Internal dimensions are: 10.3 x 9.3 x 12.8”. External dimensions are: 13.2 x 14.5 x 18.7”.
Cat. #546
Incubation Oven
This classic Edvotek® waterbath has been improved to now include digital temperature control! We’ve also added a low-water sensor to prevent burn-outs and deepened the chamber to hold more bottles and fl asks. The stainless steel chamber is corrosion resis-tant and temperature controlled from ambient to 95°C with cover (now included).
The all-new Edvotek® 10 L waterbath incorporates digital temperature control and an optional shaking capability! We’ve also added a low-water sensor to prevent burn-outs and the deep chamber holds virtually any bottle or fl ask. The stainless steel chamber is corrosion resistant and temperature controlled from ambient to 95°C with cover (now included).
Robust, accurate, easy to use, color coded, fun & cost effec-tive micropipets which use standard micropipet tips. No need to calibrate and impossible to measure the wrong volume!
Uses Standard 1-200 μl tips.Cat. # 588 40 μl MiniPipet
SEVERAL SIZES AVAILABLE! SEE OUR WEBSITE FOR MORE INFORMATION!
Fixed Volume MiniPipets™
Our newly designed Variable Micropipets feature volumes ranging from 0.1 to 5000 μl. They are easy to use, sturdy, highly accurate and use standard micropipet tips. The volume is easily selected by twisting the top. The lightweight design and tip ejector makes operation fast & easy. A tool and instructions are included for self-calibration.
• New & Improved• Better Quality, Same Price• More Durable• More Ergonomic
EDVOTEK® Variable Micropipets
SEVERAL SIZES AVAILABLE! SEE OUR WEBSITE FOR MORE INFORMATION!
Cat. # 590 5 - 50 μl Micropipet