Embed Size (px)
Citation preview

VitalPBX Reference Guide Ver. 2.4.0

VitalPBX Reference Guide Ver. 2.4.0, December 2019
Copyright © 2019 VitalPBX. All rights reserved. Page 2 of 248
CONTENTS Contents
1. INTRODUCTION ...................................................................................................................................... 6
2. MENU OVERVIEW ................................................................................................................................... 7
3. CONFIGURATION CONSIDERATIONS ................................................................................................... 12
3.1 SECURITY ....................................................................................................................................................... 12 3.2 NUMBERING SYSTEM ....................................................................................................................................... 12
4. PBX ........................................................................................................................................................ 13
4.1 EXTENSIONS ................................................................................................................................................... 13 4.1.1 Extensions ............................................................................................................................................ 13 4.1.2 Hot Desking ......................................................................................................................................... 24 4.1.3 Import Extensions ................................................................................................................................ 28 4.1.4 Export Extensions ................................................................................................................................ 29 4.1.5 Bulk Modification ................................................................................................................................ 30 4.1.6 Bulk Extensions .................................................................................................................................... 31 4.1.7 Extensions Status ................................................................................................................................. 33
4.2 APPLICATIONS ................................................................................................................................................. 36 4.2.1 Conferences ......................................................................................................................................... 36 4.2.2 Custom Applications ............................................................................................................................ 39 4.2.3 Custom Destinations ............................................................................................................................ 40 4.2.4 Custom Context ................................................................................................................................... 41 4.2.5 Feature Codes ...................................................................................................................................... 42 4.2.6 Paging & Intercom ............................................................................................................................... 48 4.2.7 Pickup Groups ...................................................................................................................................... 51 4.2.8 Parking ................................................................................................................................................ 52 4.2.9 Speed Dialing ....................................................................................................................................... 53 4.2.10 Import/Export Speed Dialing ............................................................................................................. 54 4.2.11 Voicemail Broadcast Group ............................................................................................................... 55 4.2.12 Call Back ............................................................................................................................................ 56 4.2.13 DISA ................................................................................................................................................... 58 4.2.14 PIN List ............................................................................................................................................... 59
4.3 CLASS OF SERVICE ............................................................................................................................................ 60 4.3.1 Class of Service .................................................................................................................................... 60 4.3.2 Feature Category ................................................................................................................................. 61 4.3.3 Dialing Restriction Rules ...................................................................................................................... 62 4.3.4 Customer Code .................................................................................................................................... 63 4.3.5 Authorization Code .............................................................................................................................. 64 4.3.6 Route Selections .................................................................................................................................. 65
4.4 CALL CENTER .................................................................................................................................................. 66 4.4.1 Ring Groups ......................................................................................................................................... 66 4.4.2 Queues ................................................................................................................................................. 67 4.4.3 Queues Priorities ................................................................................................................................. 72 4.4.4 Queues VIPs ......................................................................................................................................... 73 4.4.5 Queues CallBack .................................................................................................................................. 74
4.5 EXTERNAL ...................................................................................................................................................... 77 4.5.1 Trunks .................................................................................................................................................. 77 4.5.2 Outbound Routes ................................................................................................................................. 84 4.5.3 Emergency Numbers ........................................................................................................................... 86

VitalPBX Reference Guide Ver. 2.4.0, December 2019
Copyright © 2019 VitalPBX. All rights reserved. Page 3 of 248
4.5.4 Inbound Routes (DID) .......................................................................................................................... 87 4.5.5 Dynamic Routing (AutoCLIP Routes) .................................................................................................... 89
4.6 INCOMING CALLS ............................................................................................................................................. 91 4.6.1 IVR ....................................................................................................................................................... 91 4.6.2 Time Groups & Time Conditions .......................................................................................................... 94 4.6.3 Announcements ................................................................................................................................... 97 4.6.4 Languages ........................................................................................................................................... 98 4.6.5 Night Mode.......................................................................................................................................... 99 4.6.6 CID Modifiers ..................................................................................................................................... 100 4.6.7 CID Lookup ......................................................................................................................................... 101
4.7 TOOLS ......................................................................................................................................................... 102 4.7.1 Asterisk CLI ........................................................................................................................................ 102 4.7.2 Black List ............................................................................................................................................ 103 4.7.3 Dashboard ......................................................................................................................................... 104 4.7.4 Log File Viewer .................................................................................................................................. 105 4.7.5 Cron Profiles ...................................................................................................................................... 106 4.7.6 Phone Books ...................................................................................................................................... 107 4.7.7 Task Manager .................................................................................................................................... 108
4.8 EXTRAS ........................................................................................................................................................ 109 4.8.1 Video Conference ............................................................................................................................... 109
4.9 VIRTUAL FAXES ............................................................................................................................................. 110 4.9.1 Fax Devices ........................................................................................................................................ 110 4.9.2 Global Fax Settings ............................................................................................................................ 111 4.9.3 Fax Sending ....................................................................................................................................... 112 4.9.4 Fax Viewer ......................................................................................................................................... 113
4.10 COMMUNICATOR ......................................................................................................................................... 114 4.10.1 Softkey Profiles ................................................................................................................................ 114 4.10.2 Pause Profiles .................................................................................................................................. 116 4.10.3 Campaigns Result Profiles ............................................................................................................... 117 4.10.4 Campaigns ....................................................................................................................................... 118
5. REPORTS .............................................................................................................................................. 119
5.1 CDR REPORTS .............................................................................................................................................. 119 5.1.1 CDR Filters ......................................................................................................................................... 119 5.1.2 View CDR Reports .............................................................................................................................. 120
5.2 PBX REPORTS ............................................................................................................................................... 121 5.2.1 Status ................................................................................................................................................. 121
5.3 IVR STATS .................................................................................................................................................... 122 5.3.1 IVR Stats ............................................................................................................................................ 122
6. SETTINGS ............................................................................................................................................. 123
6.1 TECHNOLOGY SETTINGS .................................................................................................................................. 123 6.1.1 SIP Settings ........................................................................................................................................ 123 6.1.2 IAX2 Settings...................................................................................................................................... 131 6.1.3 PJSIP Settings ..................................................................................................................................... 135 6.1.4 Profiles ............................................................................................................................................... 136 6.1.5 Telephony Settings ............................................................................................................................ 138 6.1.6 Dial Profiles ........................................................................................................................................ 138
6.2 VOICEMAIL SETTINGS ..................................................................................................................................... 140 6.2.1 Voicemail Settings ............................................................................................................................. 140 6.2.2 Voicemail Time Zones ........................................................................................................................ 142
6.3 PBX SETTINGS .............................................................................................................................................. 144 6.3.1 System General .................................................................................................................................. 144 6.3.2 Asterisk Manager Users..................................................................................................................... 147 6.3.3 Music on Hold .................................................................................................................................... 148 6.3.4 Recording Managements .................................................................................................................. 149 6.3.5 Log File............................................................................................................................................... 150

VitalPBX Reference Guide Ver. 2.4.0, December 2019
Copyright © 2019 VitalPBX. All rights reserved. Page 4 of 248
6.3.6 RTP Settings ....................................................................................................................................... 151 6.3.7 Mini HTTP Server ............................................................................................................................... 152 6.3.8 Asterisk Sounds .................................................................................................................................. 153
6.4 TELEPHONY .................................................................................................................................................. 154 6.4.1 Interface ............................................................................................................................................ 154 6.4.2 Clock Sources ..................................................................................................................................... 154 6.4.3 Channel Group ................................................................................................................................... 155 6.4.4 Profile Assignments ........................................................................................................................... 156
6.5 END POINT MANAGER .................................................................................................................................... 157 6.5.1 Host Settings...................................................................................................................................... 158 6.5.2 Creating Template ............................................................................................................................. 159 6.5.3 Device Buttons ................................................................................................................................... 160 6.5.4 Expansion Modules ............................................................................................................................ 161 6.5.5 Advanced Settings ............................................................................................................................. 161 6.5.6 Device Mapping ................................................................................................................................. 162
7. ADMIN ................................................................................................................................................. 164
7.1 ADMIN ........................................................................................................................................................ 164 7.1.1 Users .................................................................................................................................................. 164 7.1.2 Users Profiles ..................................................................................................................................... 166 7.1.3 Application Access ............................................................................................................................. 167 7.1.4 Backup & Restore .............................................................................................................................. 168 7.1.5 Tenants .............................................................................................................................................. 169 7.1.6 Branding ............................................................................................................................................ 172
7.2. SYSTEM SETTINGS ......................................................................................................................................... 174 7.2.1 System Miscellaneous ....................................................................................................................... 174 7.2.2 Network Settings ............................................................................................................................... 177 7.2.3 Email Settings .................................................................................................................................... 179 7.2.4 DHCP Settings .................................................................................................................................... 181 7.2.5 Certificates......................................................................................................................................... 183 7.2.6 HTTP server ........................................................................................................................................ 184 7.2.7 Maintenance ..................................................................................................................................... 185
7.3 SECURITY ..................................................................................................................................................... 186 7.3.1 Firewall .............................................................................................................................................. 186 7.3.2 Intrusion Detection ............................................................................................................................ 191 7.3.3 Weak Passwords................................................................................................................................ 194 7.3.4 OpenVPN Server ................................................................................................................................ 195 7.3.5 Open Client ........................................................................................................................................ 206 7.3.6 GEO Firewall ...................................................................................................................................... 207
7.4 ADD-ONS ..................................................................................................................................................... 208 7.4.1 Add-ons ............................................................................................................................................. 208
8. APPENDIX ............................................................................................................................................ 209
8.1 HOW TO INSTALL VITALPBX IN CENTOS 7 .......................................................................................................... 209 8.2 HIGH AVAILABILITY ........................................................................................................................................ 210 8.3 FEATURE CODES ............................................................................................................................................ 219 8.4 BLF (HINTS) ................................................................................................................................................. 226
8.4.1 Grandstream Phone Management .................................................................................................... 227 8.4.2 Yealink Management ........................................................................................................................ 228 8.4.3 Xorcom Management ........................................................................................................................ 228
8.5 VITALPBX VOICE PROMPTS ............................................................................................................................. 229 8.6 VITALPBX CALL FLOW .................................................................................................................................... 233 8.7 RECOMMENDATIONS ...................................................................................................................................... 234 8.8 ADDITIONAL MODULES ................................................................................................................................... 235
8.8.1 Domotic Module ................................................................................................................................ 235 8.8.2 Sonata Suite (Recording Management) ............................................................................................ 241 8.8.3 Sonata Suite (Billing System) ............................................................................................................. 242

VitalPBX Reference Guide Ver. 2.4.0, December 2019
Copyright © 2019 VitalPBX. All rights reserved. Page 5 of 248
8.8.4 Sonata Suite (SwitchBoard) ............................................................................................................... 243 8.8.5 Operator Panel .................................................................................................................................. 244
8.9 COMMAND TOOL .......................................................................................................................................... 248 8.10 CREDITS ..................................................................................................................................................... 248
8.10.1 Sources of Information .................................................................................................................... 248

VitalPBX Reference Guide Ver. 2.4.0, December 2019
6
1. INTRODUCTION VitalPBX is a highly responsive graphic user-interface that facilitates the management of Asterisk servers, in a fast, intuitive, and secure manner.
VitalPBX provides an intuitive 3-level menu that makes it very easy to locate the item that you want to configure.
Some of the usability feature of VitalPBX you should be aware of are:
1. You can use VitalPBX from any device and with any browser. VitalPBX transparently adapts to all devices, whether it be a smartphone, tablet, PC, MAC or Linux.
2. In the top right corner of each dialog you will find a magnifier ( ). Touching the icon activates the system-wide global search option, allowing you to easily search extensions, call queues, conferences, DISA, trunks, modules, etc.
3. When you navigate to a module, you will notice that most of them have an icon list ( ) at the top right corner. When you press on the icon, it will show you a list of all the objects that have been created by that module. At the top the list you will also notice a magnifier ( ) which you can use as filter. Type in any part of the name of the object that you are looking, and all objects that match your filter will be displayed.
4. VitalPBX has been designed so that all the information is always visible on a single page without having to scroll down and lose sight of the rest of the content. For this reason, you will see that most dialogs are divided into multiple tabs that enable you to see all the data for the current object.
5. VitalPBX is multi-tab, which means you can work on any tab in any dialog without closing the previous tab, allowing you to work on different tabs of the dialog, or even different dialogs. You don’t have to save data in one tab before opening another tab, so can work simultaneously on multiple tabs or dialogs. For example, if you are defining a ring group, and realize that you have not defined an extension that will be a destination in the ring group, you can simply go the Extensions dialog, create and save the missing extension, and then complete the ring group using the newly created extension.
6. The Save and Delete buttons will always be visible at the bottom of the page, no matter the size of the page that you are using.
7. You can get more screen space by hiding the left-hand navigation menu. You can do this by touching the ( ) button located in the upper left of each dialog.
8. All fields have tooltips for help. In the case of mobile devices and tablets, you will need to press on the help balloon to access the help text.
9. Mandatory fields are indicated by an asterisk following the field name, e.g. Name * indicates that the Name field is mandatory.

VitalPBX Reference Guide Ver. 2.4.0, December 2019
7
2. MENU OVERVIEW The VitalPBX user menu is divided into four main sections, PBX, Reports, Settings, and Admin as outlined below.
▪ PBX, where you can find all about the PBX settings:
• Extensions
o Extensions, management of extensions and devices
o Hot Desking, device management
o Import Extensions, import extensions from CSV format
o Export Extensions, export extensions in CSV format
o Bulk Modification, bulk extension modification
o Bulk Extensions, create a range of extensions in a single action
o Extension Status, status of extensions, with possibility to changing the state
• Applications

VitalPBX Reference Guide Ver. 2.4.0, December 2019
8
o Conferences, conference room management
o Custom Applications, custom application management
o Custom Destinations, custom destination management
o Custom Context, custom context management
o Feature Codes, management of telephone feature codes
o Paging & Intercom, paging & intercom management
o Pickup Groups, management of pickup groups
o Parking, parking management
o Speed Dialing, speed dial management
o Import/Export Speed Dialing, Import/Export speed Dialing from/to CSV format
o Voicemail Broadcast Group, voicemail broadcast group management
o Call Back, management of call back functionality
o DISA, Direct Inward System Access (DISA) management
o PIN List, group of pins that will be used to access outgoing routes
• Class of Service
o Class of Service, group of settings that define the dial plan to which each extension has
access
o Features Category, telephone feature groups that are associated with a Class of Service
o Dialing Restriction Rules, dial-up restrictions that are associated with a Class of Service
o Customer Codes, customer account codes that can be dynamically associated to a call in
order to categorize the call in the CDR
o Authorization Code, code that authorizes privileges to make a call
o Route Selections, Automatic Route selection management
• Call Center
o Ring Groups, groups of extensions that do not handle statistics. Ring Groups allow you
to create a single extension number (the Ring Group number) that will ring on multiple
extensions.
o Queues, call queues that handle statistics through a log file
o Queues Priorities, it gives priority to a queue call on another, very useful when an agent
serves multiple queues simultaneously
o Queues VIPs, list of phones that will give priority in the call queue
• External
o Trunks, SIP, IAX, DAHDI trunks management
o Outbound Routes, management prefixes for outgoing routes
o Emergency Numbers, create groups of emergency numbers to give them priority
o Inbound Routes, DID management for incoming routes
o Dynamic Routing, AutoCLIP Routes
• Incoming Calls
o IVR, IVR and Automatic Attendant management
o Time Groups, time group management
o Time Conditions, time conditions management

VitalPBX Reference Guide Ver. 2.4.0, December 2019
9
o Announcement, pre-announcement management
o Languages, languages management
o Night Mode, night mode management
o CID Modifiers, Modifies the CID in incoming calls
o CID Lookup, Search caller information in a database or url
• Tools
o Asterisk CLI, Asterisk command line management interface
o Blacklist, black list management number
o Dashboard, see system status in real time
o Log File Viewer, displays the contents of log files
o Cron Profiles, create profiles for periodic execution of certain routines
o Phonebooks, create Phonebook to be accessed from phones
o Task Manager, the task manager add-on is a powerful and fully free tool that allows you
to schedule any script created by the user as a task from the GUI.
• Extras
o Video Conference, create video conferences using WebRTC
▪ Reports, where you can find everything about the CDR generated by phone calls
• CDR Reports
o CDR Filters, management of filters to apply in reports
o CDR, display call records (CDR)
• PBX Reports
o Status, displays the status of the PBX:
▪ Channels
▪ Registrations
▪ Peers
▪ Hints
▪ Voicemail
▪ Queues
• IVR Reports, create reports of IVR use
▪ Settings, where you can find everything about the parameters of different technologies (such as SIP and IAX), voice mail settings, the PBX overall event files, configuration of analog and digital interfaces (DAHDi), auto-provisioning of phones (End Point Manager), and managing Digium phone (DPMA)
• Technology Settings
o SIP Settings, general SIP settings management
o IAX2 Settings, general IAX settings management
o PJSIP Settings, general PJSIP settings management
o Profiles, profile management
o Telephony Settings, select Tone Zone
o Dial Profiles, dial profile management

VitalPBX Reference Guide Ver. 2.4.0, December 2019
10
• Voicemail Settings
o Voicemail Settings, general voice mail settings management
o Voicemail Timezones, time zone management for voicemail
• PBX Settings
o System General, general system settings such as directories, dial-plan settings, etc
o Asterisk Manager Users, to create users of Asterisk Manager
o Music on Hold, to create and upload music on hold
o Recordings Management, to upload recordings
o Log File, create log files related to Asterisk
o RTP Settings, general RTP settings management
o Mini HTTP Server, Asterisk provides a basic HTTP/HTTPS server
o Asterisk Sounds, manages the voice guides of the system in different languages
• Telephony
o Interfaces, detects and configures new analog and digital interfaces
o Clock Sources, source of the clock in digital line
o Channel Groups, grouping external interfaces such as E1, FXO, etc
o Profile Assignments, assignments profile to the channels
• End Point Manager
o Host Setting, creates networks for devices search
o Create Template, create templates for different devices
o Device Mapping, search for devices connected to the network and configure
▪ Admin, allows you to create system users and manage system settings
• Admin
o Users, management of system users
o User Profiles, management of user profiles
o Application Access, gives permission to access certain applications such as FOP2
o Backup & Restore, Backup and Restore the entire PBX configuration.
• System Settings
o System Misc, management of system notifications and date and time settings.
o Network Settings, network management.
o Email Settings, email server configuration
o DHCP Settings, DHCP server configuration
o Certificates, create certificates of type Self Signed and Let's Encrypt
o HTTP Server, assign ports to access the interface and enable the HTTPS server
o OpenVPN, manages OpenVPN Server and Client
• Security
o Firewall, firewall management system
o Intrusion Detection, management detect and block attacks System

VitalPBX Reference Guide Ver. 2.4.0, December 2019
11
o Weak Password, weak password detection
• Add-ons
o Add-ons, management add-ons modules and software.
VitalPBX Reference Guide Ver. 2.4.0, December 2019
12
3. CONFIGURATION CONSIDERATIONS
3.1 Security Just like any other computer on your network that is connected to the Internet, VitalPBX can be
targeted by hackers for the purpose of making cheap telephone calls. During the entire process of setting up VitalPBX, you should be constantly aware of the potential security implications of each step and make sure that your system is well protected.
3.2 Numbering System You need to decide how many digits to use for extensions – do you want to use 3, 4, or more? You should take into account that most feature codes are 2 digits, so setting a system with 2-digit extensions is not really practical. It will help you to navigate your system if you group similar functions together, for example, by using the following ranges:
• 7000 - 7999 for extensions
• 9100 - 9199 for ring groups
• 9200 - 9299 for queues
• 9300 - 9399 for conferences
VitalPBX Reference Guide Ver. 2.4.0, December 2019
13
4. PBX
4.1 Extensions
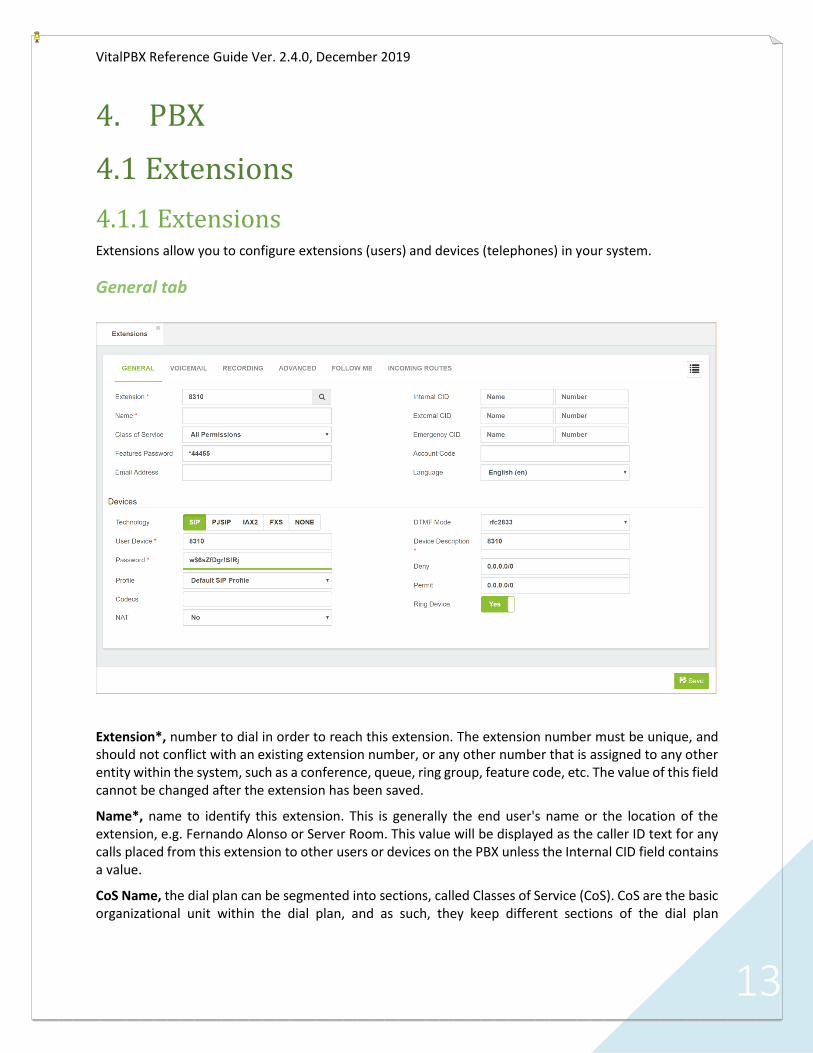
4.1.1 Extensions Extensions allow you to configure extensions (users) and devices (telephones) in your system.
General tab
Extension*, number to dial in order to reach this extension. The extension number must be unique, and should not conflict with an existing extension number, or any other number that is assigned to any other entity within the system, such as a conference, queue, ring group, feature code, etc. The value of this field cannot be changed after the extension has been saved.
Name*, name to identify this extension. This is generally the end user's name or the location of the extension, e.g. Fernando Alonso or Server Room. This value will be displayed as the caller ID text for any calls placed from this extension to other users or devices on the PBX unless the Internal CID field contains a value.
CoS Name, the dial plan can be segmented into sections, called Classes of Service (CoS). CoS are the basic organizational unit within the dial plan, and as such, they keep different sections of the dial plan

VitalPBX Reference Guide Ver. 2.4.0, December 2019
14
independent of each other. VitalPBX uses CoS to enforce security boundaries between the various parts of the dial plan, as well as to provide different classes of service to different groups of users.
Features Password, password to access certain system features and the control panel of the phone.
Email Address, email address to where the services messages will be sent.
Internal CID, internal Caller ID for the extension, consisting of two parts: the CID Name and the CID Number. This will define the caller ID text that is displayed when this user calls other (internal) users on the same PBX. This could be used when a user is part of a department in which callbacks should be directed to the department rather than directly to the user (such as a technical support department). This field is not mandatory. If the field is left blank, the user's extension will be used to set the Outbound Caller ID text.
External CID, external Caller ID for the extension, consisting of two parts: the CID Name and the CID Number. This will define the caller ID text that is displayed when this user makes calls outside of the PBX. This could be used when a user is part of a department in which callbacks should be directed to the department rather than directly to the user (such as a technical support department). Setting the caller ID must be supported by the trunk service provider. This field is not mandatory, but if the field is left blank, the default caller ID name for the trunk placing the call will be used to set the caller ID name text.
Emergency CID, it allows to define the caller id that will be used in case of calling an emergency number.
Account Code, this field is used to populate the Account Code field of the Call Detail Record (CDR). If the field is left blank, the Account Code field of the CDR record will also be blank.
Language, specifies the language setting to be used for this extension. This will force all prompts specific to the user to be played in the selected language, provided that the language is installed and voice prompts for the specified language exist on your server. This field is not required. If left blank, prompts will be played in the default language of the VitalPBX server.
Devices section This section allows you to configure the device that is linked to the extension.
▪ Technology, type of technology used by this device. The technology options are:
• PJSIP, PJSIP device
• SIP, SIP device
• IAX2, IAX device
• FXS, analog device
• NONE, extension without device.
PJSIP
User Device*, username to be used when registering this device.
Password, password (secret) associated with this device. Passwords can be the weakest link on any externally accessible PBX system, as malicious users will attempt to locate extensions having weak passwords. Extensions that authenticate by using simple passwords such as "1234" stand a good chance of being compromised, allowing an attacker to place calls through your PBX. Pick strong passwords carefully and ensure that passwords are not given to anyone who does not need to know them. Passwords should be at least 8 characters long and should include a random mixture of letters (both upper- and lower-case), numbers, and special characters.

VitalPBX Reference Guide Ver. 2.4.0, December 2019
15
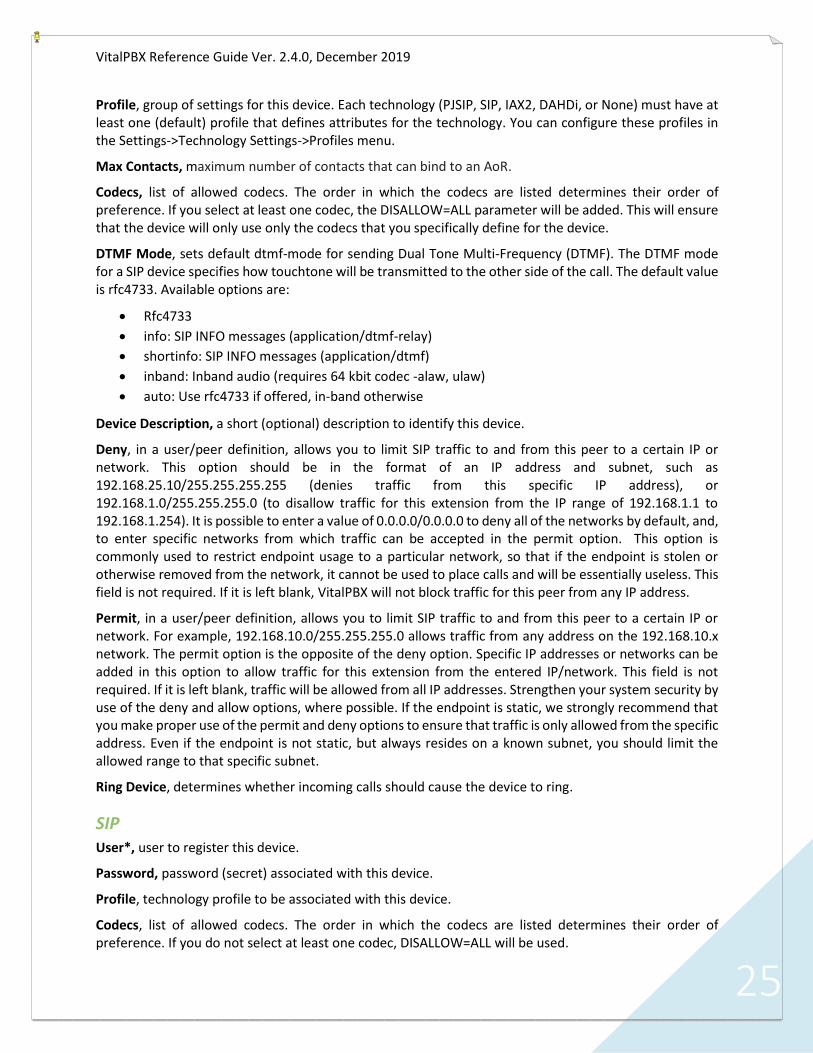
Profile, group of settings for this device. Each technology (PJSIP, SIP, IAX2, DAHDi, or None) must have at least one (default) profile that defines attributes for the technology. You can configure these profiles in the Settings->Technology Settings->Profiles menu.
Max Contacts, maximum number of contacts that can bind to an AoR.
Codecs, list of allowed codecs. The order in which the codecs are listed determines their order of preference. If you select at least one codec, the DISALLOW=ALL parameter will be added. This will ensure that the device will only use only the codecs that you specifically define for the device.
DTMF Mode, sets default dtmf-mode for sending Dual Tone Multi-Frequency (DTMF). The DTMF mode for a SIP device specifies how touchtone will be transmitted to the other side of the call. The default value is rfc4733. Available options are:
• Rfc4733
• info: SIP INFO messages (application/dtmf-relay)
• shortinfo: SIP INFO messages (application/dtmf)
• inband: Inband audio (requires 64 kbit codec -alaw, ulaw)
• auto: Use rfc4733 if offered, in-band otherwise
Device Description, a short (optional) description to identify this device.
Deny, in a user/peer definition, allows you to limit SIP traffic to and from this peer to a certain IP or network. This option should be in the format of an IP address and subnet, such as 192.168.25.10/255.255.255.255 (denies traffic from this specific IP address), or 192.168.1.0/255.255.255.0 (to disallow traffic for this extension from the IP range of 192.168.1.1 to 192.168.1.254). It is possible to enter a value of 0.0.0.0/0.0.0.0 to deny all of the networks by default, and, to enter specific networks from which traffic can be accepted in the permit option. This option is commonly used to restrict endpoint usage to a particular network, so that if the endpoint is stolen or otherwise removed from the network, it cannot be used to place calls and will be essentially useless. This field is not required. If it is left blank, VitalPBX will not block traffic for this peer from any IP address.
Permit, in a user/peer definition, allows you to limit SIP traffic to and from this peer to a certain IP or network. For example, 192.168.10.0/255.255.255.0 allows traffic from any address on the 192.168.10.x network. The permit option is the opposite of the deny option. Specific IP addresses or networks can be added in this option to allow traffic for this extension from the entered IP/network. This field is not required. If it is left blank, traffic will be allowed from all IP addresses. Strengthen your system security by use of the deny and allow options, where possible. If the endpoint is static, we strongly recommend that you make proper use of the permit and deny options to ensure that traffic is only allowed from the specific address. Even if the endpoint is not static, but always resides on a known subnet, you should limit the allowed range to that specific subnet.
Ring Device, determines whether incoming calls should cause the device to ring.
SIP
User Device*, username to be used when registering this device.
Password, password (secret) associated with this device. Passwords can be the weakest link on any externally accessible PBX system, as malicious users will attempt to locate extensions having weak passwords. Extensions that authenticate by using simple passwords such as "1234" stand a good chance of being compromised, allowing an attacker to place calls through your PBX. Pick strong passwords carefully and ensure that passwords are not given to anyone who does not need to know them. Passwords

VitalPBX Reference Guide Ver. 2.4.0, December 2019
16
should be at least 8 characters long and should include a random mixture of letters (both upper- and lower-case), numbers, and special characters.
Profile, group of settings for this device. Each technology (SIP, IAX2, DAHDi) must have at least one (default) profile that defines attributes for the technology. You can configure these profiles in the Settings->Technology Settings->Profiles menu.
Codecs, list of allowed codecs. The order in which the codecs are listed determines their order of preference. If you select at least one codec, the DISALLOW=ALL parameter will be added. This will ensure that the device will only use only the codecs that you specifically define for the device.
NAT, (Network Address Translation) is a technology commonly used by firewalls and routers to allow multiple devices on a LAN with 'private' IP addresses to share a single public IP address. A private IP address is an address, which can only be addressed from within the LAN, but not from the Internet outside the LAN Options:
• No: No special NAT handling other than RFC3581
• Force: Pretend there was an rport parameter even if there wasn't
• Comedia: Send media to the port Asterisk received it from regardless of where the SDP says to
send it.
• Auto Force: Set the force rport option if Asterisk detects NAT
• Auto Comedia: Set the comedia option if Asterisk detects NAT
DTMF Mode, sets default dtmf-mode for sending Dual Tone Multi-Frequency (DTMF). The DTMF mode for a SIP device specifies how touchtone will be transmitted to the other side of the call. The default value is rfc2833. Available options are:
• info: SIP INFO messages (application/dtmf-relay)
• shortinfo: SIP INFO messages (application/dtmf)
• inband: Inband audio (requires 64 kbit codec -alaw, ulaw)
• auto: Use rfc2833 if offered, in-band otherwise
Device Description, a short (optional) description to identify this device.
Deny, in a user/peer definition, allows you to limit SIP traffic to and from this peer to a certain IP or network. This option should be in the format of an IP address and subnet, such as 192.168.25.10/255.255.255.255 (denies traffic from this specific IP address), or 192.168.1.0/255.255.255.0 (to disallow traffic for this extension from the IP range of 192.168.1.1 to 192.168.1.254). It is possible to enter a value of 0.0.0.0/0.0.0.0 to deny all of the networks by default, and, to enter specific networks from which traffic can be accepted in the permit option. This option is commonly used to restrict endpoint usage to a particular network, so that if the endpoint is stolen or otherwise removed from the network, it cannot be used to place calls and will be essentially useless. This field is not required. If it is left blank, VitalPBX will not block traffic for this peer from any IP address.
Permit, in a user/peer definition, allows you to limit SIP traffic to and from this peer to a certain IP or network. For example, 192.168.10.0/255.255.255.0 allows traffic from any address on the 192.168.10.x network. The permit option is the opposite of the deny option. Specific IP addresses or networks can be added in this option to allow traffic for this extension from the entered IP/network. This field is not required. If it is left blank, traffic will be allowed from all IP addresses. Strengthen your system security by use of the deny and allow options, where possible. If the endpoint is static, we strongly recommend that you make proper use of the permit and deny options to ensure that traffic is only allowed from the specific

VitalPBX Reference Guide Ver. 2.4.0, December 2019
17
address. Even if the endpoint is not static, but always resides on a known subnet, you should limit the allowed range to that specific subnet.
Ring Device, determines whether incoming calls should cause the device to ring.
IAX2 User Device*, username to be used when registering this device.
Password, password (secret) associated with this device. Passwords can be the weakest link on any externally accessible PBX system, as malicious users will attempt to locate extensions having weak passwords. Extensions that authenticate by using simple passwords such as "1234" stand a good chance of being compromised, allowing an attacker to place calls through your PBX. Pick strong passwords carefully and ensure that passwords are not given to anyone who does not need to know them. Passwords should be at least 8 characters long and should include a random mixture of letters (both upper- and lower-case), numbers, and special characters.
Profile, group of settings for this device. Each technology (SIP, IAX2, Telephony, or None) must have at least one (default) profile that defines attributes for the technology. You can configure these profiles in the Settings->Technology Settings->Profiles menu.
Codecs, list of allowed codecs. The order in which the codecs are listed determines their order of preference. If you select at least one codec, the DISALLOW=ALL parameter will be added. This will ensure that the device will only use only the codecs that you specifically define for the device.
Device Description, a short (optional) description to identify this device.
Deny, in a user/peer definition, allows you to limit SIP traffic to and from this peer to a certain IP or network. This option should be in the format of an IP address and subnet, such as 192.168.25.10/255.255.255.255 (denies traffic from this specific IP address), or 192.168.1.0/255.255.255.0 (to disallow traffic for this extension from the IP range of 192.168.1.1 to 192.168.1.254). It is possible to enter a value of 0.0.0.0/0.0.0.0 to deny all of the networks by default, and, to enter specific networks from which traffic can be accepted in the permit option. This option is commonly used to restrict endpoint usage to a particular network, so that if the endpoint is stolen or otherwise removed from the network, it cannot be used to place calls and will be essentially useless. This field is not required. If it is left blank, VitalPBX will not block traffic for this peer from any IP address.
Permit, in a user/peer definition, allows you to limit SIP traffic to and from this peer to a certain IP or network. For example, 192.168.10.0/255.255.255.0 allows traffic from any address on the 192.168.10.x network. The permit option is the opposite of the deny option. Specific IP addresses or networks can be added in this option to allow traffic for this extension from the entered IP/network. This field is not required. If it is left blank, traffic will be allowed from all IP addresses. Strengthen your system security by use of the deny and allow options, where possible. If the endpoint is static, we strongly recommend that you make proper use of the permit and deny options to ensure that traffic is only allowed from the specific address. Even if the endpoint is not static, but always resides on a known subnet, you should limit the allowed range to that specific subnet.
Ring Device, determines whether incoming calls should cause the device to ring.
FXS Channel*, the Telephony (DHADi) channel, selected from the drop-down list, that should be associated with this device.
VitalPBX Reference Guide Ver. 2.4.0, December 2019
18
Profile, group of settings for this device. Each technology (SIP, IAX2, Telephony, or None) must have at least one (default) profile that defines attributes for the technology. You can configure these profiles in the Settings->Technology Settings->Profiles menu.
Device Description, a short (optional) description to identify this device.
Ring Device, determines whether incoming calls should cause the device to ring.
NONE Extensions that do not have device, such as the Hot Desking.
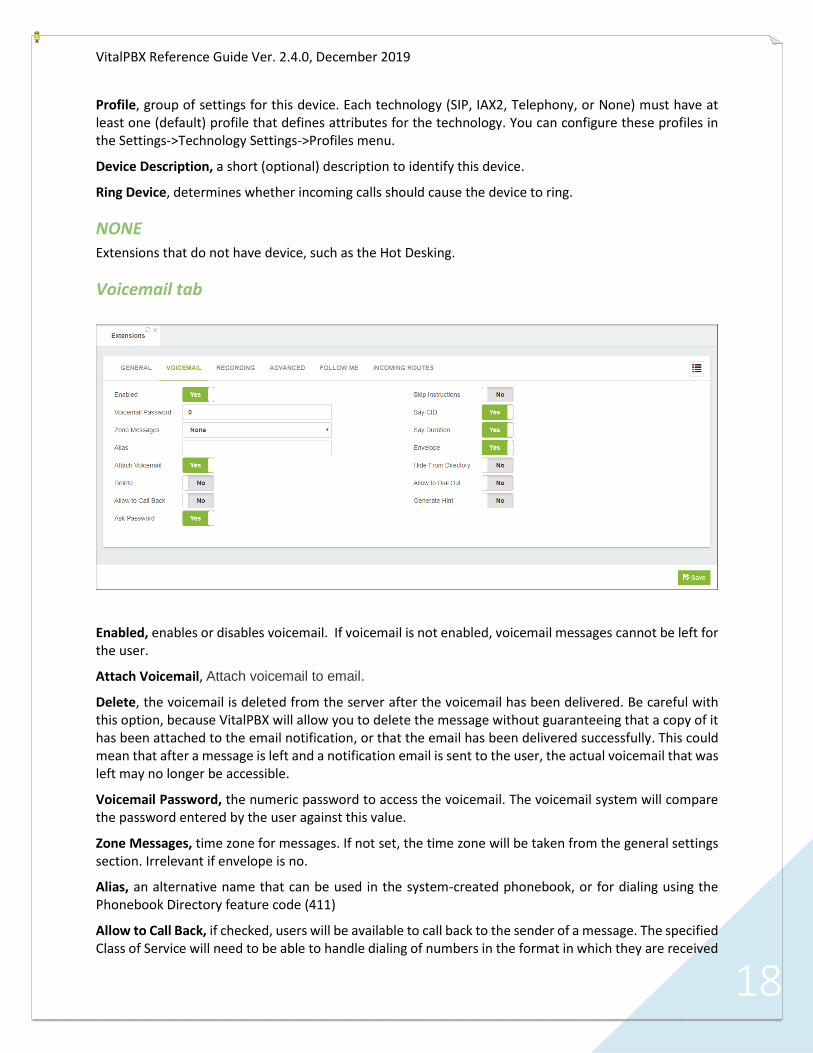
Voicemail tab
Enabled, enables or disables voicemail. If voicemail is not enabled, voicemail messages cannot be left for the user.
Attach Voicemail, Attach voicemail to email.
Delete, the voicemail is deleted from the server after the voicemail has been delivered. Be careful with this option, because VitalPBX will allow you to delete the message without guaranteeing that a copy of it has been attached to the email notification, or that the email has been delivered successfully. This could mean that after a message is left and a notification email is sent to the user, the actual voicemail that was left may no longer be accessible.
Voicemail Password, the numeric password to access the voicemail. The voicemail system will compare the password entered by the user against this value.
Zone Messages, time zone for messages. If not set, the time zone will be taken from the general settings section. Irrelevant if envelope is no.
Alias, an alternative name that can be used in the system-created phonebook, or for dialing using the Phonebook Directory feature code (411)
Allow to Call Back, if checked, users will be available to call back to the sender of a message. The specified Class of Service will need to be able to handle dialing of numbers in the format in which they are received

VitalPBX Reference Guide Ver. 2.4.0, December 2019
19
(for example, the country code may not be received with the caller ID, but might be required for the outgoing call).
Ask Password, it allows to define if the users who dials *97 to access to their own voicemail will be prompted to enter its voicemail password or not. This doesn’t apply for the “Remote Voicemail (*98)” feature.
Skip Instructions, if set to yes, it will skip the playback of instructions for leaving a message to the
calling party.
Say CID, system will play back the caller ID number of the person who left the message prior to the message being played.
Say Duration, turn on/off the duration information before playing the voicemail message.
Envelope, determine whether the user will hear the date and time that the message was left prior to hearing the voicemail message being played.
Hide From Directory, hide If set to yes, this name of this user will not be visible to the system-created phonebook, and you cannot dial to this user using the Phonebook Directory feature code (411).
Allow to Dial Out, if allowed, users can dial out from their mailboxes (option 4 from mailbox’s advanced menu). This is considered a very dangerous feature in a phone system (mainly because many voicemail users like to use 1234 as their password) and is therefore not recommended.
Generate Hint, if enabled, it will be possible to remotely monitor the voicemail status of this extension through a BLF key. To configure the BLF you must to use the following format: vm_1234, where 1234 is the extension that will be monitored.
Recording tab
In this tab you will find the information about the recording telephone calls and dictation recording.

VitalPBX Reference Guide Ver. 2.4.0, December 2019
20
This group of fields allows a user to control the recording of incoming or outgoing calls. The user can either dial a feature code (*3) to selectively enable recording for the current call, never record calls, or always record calls.
Outgoing, record external outgoing calls.
Incoming, record external incoming calls.
Internal, record internal calls.
On Demand Recording, record calls on demand.
Dictation section Enabled, activates the dictation service when set to Yes.
Format, recording audio format:
• Ogg Vorbis
• GSM
• WAV
Auto-Send Email, recording will be sent automatically once completed.
Advanced tab

VitalPBX Reference Guide Ver. 2.4.0, December 2019
21
Ring Time, the number of seconds to ring the device before giving up and moving on to the next priority for the extension.
Call Limit, maximum number of simultaneous calls that can be received by this device.
Dial Profile, there are many options that you can set on the outbound call, including call screening, distinctive ringing, and more. Goto Settings/Technology/Dial Profile for more information.
Internal Auto Answer, automatic call answering can be requested from within the incoming call by using the SIP Alert-Info header. This can only be utilized when automatic call answering is allowed on the phone.
Music on Hold Class, this option specifies which music on hold class to suggest to the peer channel
when this channel places the peer on hold.
Secretary Extension, functionality is used to re-route all incoming calls for this extension to the secretary’s extension. Only the secretary is allowed to make direct calls to this extension.
Dynamic Routing, allows you to enable or not the dynamic routing for this extension. If enabled, when an outside party (who previously was called by this extension) calls back, his call will be routed directly to this extension.
Fax Enabled, Enable/Disable fax.
Diversions Hints, generate hints regarding status of the extension. For example, hints could be generated for diversions (DND, Call Forwarding, Personal Assistant and Boss/Secretary). Do not activate this option unless your phone has a console or keys for Hints. Activating this option can slow down the “Apply Changes” in the PBX and overload.
Block Spy Me, do not let other users to spy on this extension.
Send CallerID, send, or hide, the Caller ID for this extension.
Call Waiting, if you uncheck this option, only one incoming call will be allowed to this extension.
Pinless, if enabled, the user of this extension will not be prompted to enter pin on outbound routes that have assigned a pin set.
Call Center Settings This section contains two fields (Dynamic Queues, Static Queues) that allows you to assign or remove massively an extension to any queue or group of queues
Dynamic Queues, are the agents who will be allowed to log in the call queue.
Static Queues, are agents that will always be in the queue, these agents do not need to log in.
User Portal Enable Portal, allow users to login to Portal to configure their own extension.
Portal User, user for login as portal user.
Portal Password, password for access to portal area.

VitalPBX Reference Guide Ver. 2.4.0, December 2019
22
User Image section Allows the user to select any image and associate it with the extension. It may be the photo of the owner of the extension, an avatar, or any other graphic; in png, jpg, or jpeg format. The size of the file must be less 20 MB
Follow Me tab
Follow Me List, list of extensions and/or external numbers to be accessed by follow me.
Initial Ring Time, time in seconds to ring the primary extension before calling to the members on the follow-me list.
Ring Time, is the time that the phone will be allowed to ring, without being answered, before continuing to an alternative destination.
Ring Strategy, Define the strategy to ring this.
Options:
» One by One: ring all available number in the Follow List One by One.
» Ring All: ring all available number in the Follow List at the same time.
Music On Hold, the Music on Hold class that should be used for the caller while they are waiting to be connected.
Call-from Prompt, you can select the default option to use the “Incoming call from” message prompt or use your own custom prompt.
No Recording Prompt, you can select to use the standard “You have an incoming call” message prompt when the caller elects not to leave their name or the option isn't set for them to do so, or use your own custom prompt.

VitalPBX Reference Guide Ver. 2.4.0, December 2019
23
Please Hold Prompt, you can select to use the standard “Please hold while we try and connect your call” message prompt or use your own custom prompt.
Status Prompt, you can select to use the standard “The party you're calling isn't at their desk” message prompt or use your own custom prompt.
Sorry Prompt, you can select to use the standard “I'm sorry, but we were unable to locate your party” message prompt or use your own custom prompt.
Enabled, it allows you to enable/disable the follow-me feature on this extension.
Follow Me Options section Record Caller’s Name, record the caller's name so it can be announced to the callee at each step.
Prompt Called, called party will be asked whether they wish to accept the incoming call.
Incoming Routes The DID number for incoming calls, i.e. the inbound route that should be associated with this
extension.
Description, a short description to identify the route.
DID Pattern, the DID number for incoming calls, i.e. the inbound route that should be associated with this extension.
CID Pattern, optional CID number to make route more specific.
Actions, go to Inbound Route module.

VitalPBX Reference Guide Ver. 2.4.0, December 2019
24
4.1.2 Hot Desking The Hot Desking module is where the accounts are created for devices without the need of having
an extension number. A Hot Desking device is associated with an extension that previously had to be created in the module extensions with technology option "None", i.e. without being associated with any device. A Hot Desking device can be associated with an extension by dialing the hot desking feature code (*80), the extension number, and the extension password. To remove the association, you only need to dial the hot desking feature code (*80).
General tab Technology, type of technology for this device. There are four options:
• PJSIP, PJSIP device
• SIP, sip device
• IAX2, iax device
• FXS, analog/digital device
PJSIP
User Device*, username to be used when registering this device.
Password, password (secret) associated with this device. Passwords can be the weakest link on any externally accessible PBX system, as malicious users will attempt to locate extensions having weak passwords. Extensions that authenticate by using simple passwords such as "1234" stand a good chance of being compromised, allowing an attacker to place calls through your PBX. Pick strong passwords carefully and ensure that passwords are not given to anyone who does not need to know them. Passwords should be at least 8 characters long and should include a random mixture of letters (both upper- and lower-case), numbers, and special characters.
VitalPBX Reference Guide Ver. 2.4.0, December 2019
25
Profile, group of settings for this device. Each technology (PJSIP, SIP, IAX2, DAHDi, or None) must have at least one (default) profile that defines attributes for the technology. You can configure these profiles in the Settings->Technology Settings->Profiles menu.
Max Contacts, maximum number of contacts that can bind to an AoR.
Codecs, list of allowed codecs. The order in which the codecs are listed determines their order of preference. If you select at least one codec, the DISALLOW=ALL parameter will be added. This will ensure that the device will only use only the codecs that you specifically define for the device.
DTMF Mode, sets default dtmf-mode for sending Dual Tone Multi-Frequency (DTMF). The DTMF mode for a SIP device specifies how touchtone will be transmitted to the other side of the call. The default value is rfc4733. Available options are:
• Rfc4733
• info: SIP INFO messages (application/dtmf-relay)
• shortinfo: SIP INFO messages (application/dtmf)
• inband: Inband audio (requires 64 kbit codec -alaw, ulaw)
• auto: Use rfc4733 if offered, in-band otherwise
Device Description, a short (optional) description to identify this device.
Deny, in a user/peer definition, allows you to limit SIP traffic to and from this peer to a certain IP or network. This option should be in the format of an IP address and subnet, such as 192.168.25.10/255.255.255.255 (denies traffic from this specific IP address), or 192.168.1.0/255.255.255.0 (to disallow traffic for this extension from the IP range of 192.168.1.1 to 192.168.1.254). It is possible to enter a value of 0.0.0.0/0.0.0.0 to deny all of the networks by default, and, to enter specific networks from which traffic can be accepted in the permit option. This option is commonly used to restrict endpoint usage to a particular network, so that if the endpoint is stolen or otherwise removed from the network, it cannot be used to place calls and will be essentially useless. This field is not required. If it is left blank, VitalPBX will not block traffic for this peer from any IP address.
Permit, in a user/peer definition, allows you to limit SIP traffic to and from this peer to a certain IP or network. For example, 192.168.10.0/255.255.255.0 allows traffic from any address on the 192.168.10.x network. The permit option is the opposite of the deny option. Specific IP addresses or networks can be added in this option to allow traffic for this extension from the entered IP/network. This field is not required. If it is left blank, traffic will be allowed from all IP addresses. Strengthen your system security by use of the deny and allow options, where possible. If the endpoint is static, we strongly recommend that you make proper use of the permit and deny options to ensure that traffic is only allowed from the specific address. Even if the endpoint is not static, but always resides on a known subnet, you should limit the allowed range to that specific subnet.
Ring Device, determines whether incoming calls should cause the device to ring.
SIP User*, user to register this device.
Password, password (secret) associated with this device.
Profile, technology profile to be associated with this device.
Codecs, list of allowed codecs. The order in which the codecs are listed determines their order of preference. If you do not select at least one codec, DISALLOW=ALL will be used.

VitalPBX Reference Guide Ver. 2.4.0, December 2019
26
DTMF Mode, sets default dtmf-mode for sending Dual Tone Multi-Frequency (DTMF). The DTMF mode for a SIP device specifies how touchtones will be transmitted to the other side of the call. The default value is rfc2833. Available options are:
• info: SIP INFO messages (application/dtmf-relay)
• shortinfo: SIP INFO messages (application/dtmf)
• inband: Inband audio (requires 64 kbit codec -alaw, ulaw)
• auto: Use rfc2833 if offered, in-band otherwise
Device Description*, a short description to identify this device.
Deny, in a user/peer definition, allows you to limit SIP traffic to and from this peer to a certain IP or network. This option should be in the format of an IP address and subnet, such as 192.168.25.10/255.255.255.255 (denies traffic from this specific IP address), or 192.168.1.0/255.255.255.0 (to disallow traffic for this extension from the IP range of 192.168.1.1 to 192.168.1.254). It is possible to enter a value of 0.0.0.0/0.0.0.0 to deny all of the networks by default, and, to enter specific networks from which traffic can be accepted in the permit option. This option is commonly used to restrict endpoint usage to a particular network, so that if the endpoint is stolen or otherwise removed from the network, it cannot be used to place calls and will be essentially useless. This field is not required. If it is left blank, VitalPBX will not block traffic for this peer from any IP address.
Permit, in a user/peer definition, allows you to limit SIP traffic to and from this peer to a certain IP or network. For example, 192.168.10.0/255.255.255.0 allows traffic from any address on the 192.168.10.x network. The permit option is the opposite of the deny option. Specific IP addresses or networks can be added in this option to allow traffic for this extension from the entered IP/network. This field is not required. If it is left blank, traffic will be allowed from all IP addresses. Strengthen your system security by use of the deny and allow options, where possible. If the endpoint is static, we strongly recommend that you make proper use of the permit and deny options to ensure that traffic is only allowed from the specific address. Even if the endpoint is not static, but always resides on a known subnet, you should limit the allowed range to that specific subnet.
NAT, (Network Address Translation) is a technology commonly used by firewalls and routers to allow multiple devices on a LAN with 'private' IP addresses to share a single public IP address. A private IP address is an address, which can only be addressed from within the LAN, but not from the Internet outside the LAN Options:
• No: No special NAT handling other than RFC3581
• Force: Pretend there was an rport parameter even if there wasn't
• Comedia: Send media to the port Asterisk received it from regardless of where the SDP says to
send it.
• Auto Force: Set the force_rport option if Asterisk detects NAT
• Auto Comedia: Set the comedia option if Asterisk detects NAT
Ring Device, determines whether incoming calls should cause this device to ring.
IAX2 User*, user to register this device.
Password, password (secret) associated with this device.
Profile, technology profile to be associated with this device.

VitalPBX Reference Guide Ver. 2.4.0, December 2019
27
Codecs, list of allowed codecs. The order in which the codecs are listed determines their order of preference. If you do not select at least one codec, DISALLOW=ALL will be used.
Device Description*, a short description to identify this device.
Deny, in a user/peer definition, allows you to limit SIP traffic to and from this peer to a certain IP or network. This option should be in the format of an IP address and subnet, such as 192.168.25.10/255.255.255.255 (denies traffic from this specific IP address), or 192.168.1.0/255.255.255.0 (to disallow traffic for this extension from the IP range of 192.168.1.1 to 192.168.1.254). It is possible to enter a value of 0.0.0.0/0.0.0.0 to deny all of the networks by default, and, to enter specific networks from which traffic can be accepted in the permit option. This option is commonly used to restrict endpoint usage to a particular network, so that if the endpoint is stolen or otherwise removed from the network, it cannot be used to place calls and will be essentially useless. This field is not required. If it is left blank, VitalPBX will not block traffic for this peer from any IP address.
Permit, in a user/peer definition, allows you to limit SIP traffic to and from this peer to a certain IP or network. For example, 192.168.10.0/255.255.255.0 allows traffic from any address on the 192.168.10.x network. The permit option is the opposite of the deny option. Specific IP addresses or networks can be added in this option to allow traffic for this extension from the entered IP/network. This field is not required. If it is left blank, traffic will be allowed from all IP addresses. Strengthen your system security by use of the deny and allow options, where possible. If the endpoint is static, we strongly recommend that you make proper use of the permit and deny options to ensure that traffic is only allowed from the specific address. Even if the endpoint is not static, but always resides on a known subnet, you should limit the allowed range to that specific subnet.
Ring Device, determines whether incoming calls should cause this device to ring.
FXS Channel*, the Telephony (DAHDi) channels, selected from the drop-down list, to be associated with this device.
Profile, technology profile to be associated with this device.
Device Description*, a short description to identify this device.
Ring Device, determines whether incoming calls should cause this device to ring.

VitalPBX Reference Guide Ver. 2.4.0, December 2019
28
4.1.3 Import Extensions Import Extensions is an easy way to create extensions in a large system. You can create a csv file from a template that can be downloaded from this same module. This template can be edited in Excel and then imported into VitalPBX.
General tab
CSV File, CSV File with details of the extension/s to process.
An example of the file format can be download by press the “Download Import Format” button at the bottom of the screen. In the first line of this file there is a complete description of each field.

VitalPBX Reference Guide Ver. 2.4.0, December 2019
29
4.1.4 Export Extensions Export all Extensions in CSV format.
CSV Fotmat

VitalPBX Reference Guide Ver. 2.4.0, December 2019
30
4.1.5 Bulk Modification In this module, you can make changes to a group of extensions very easily and quickly. For example, you could change the language of all the extensions at once.
General tab
Click on the Add Extensions button to select the extensions that you wish to modify.
Field, manage the following fields:
• Class of Service
• Ring Time
• Language
• Account Code
• Dial Options
• Music on Hold
• Call Recordings
• Diversion Hints

VitalPBX Reference Guide Ver. 2.4.0, December 2019
31
4.1.6 Bulk Extensions In this module it is possible to create extensions in a range defined by the user.
General tab
Extension Range, defines the range of extensions that you want to create, eg.: from 1000 to 1400. If any
of the extensions in the range already exists will be skipped.
Name prefix, allows you to define a prefix to use as part of the extension name, eg.: if you set the prefix
value to Agent and the extension is 200, the extension name will be Agent 200. If blank, the word
Extension will be used as prefix.
Class of Service, the dial plan can be segmented into sections, called Classes of Service (CoS). CoS are the basic organizational unit within the dial plan, and as such, they keep different sections of the dial plan independent of each other. VitalPBX uses CoS to enforce security boundaries between the various parts of the dial plan, as well as to provide different classes of service to different groups of users.
Language, specifies the language setting to be used for this extension. This will force all prompts specific to the user to be played in the selected language, provided that the language is installed and voice prompts for the specified language exist on your server. This field is not required. If left blank, prompts will be played in the default language of the VitalPBX server.
Devices Technology, type of technology used by this device. The technology options are:
• PJSIP, PJSIP device
• SIP, SIP device
• IAX2, IAX device
• FXS, analog device
• NONE, extension without device.

VitalPBX Reference Guide Ver. 2.4.0, December 2019
32
Devices Password, password (secret) associated with this device. Passwords can be the weakest link on any externally accessible PBX system, as malicious users will attempt to locate extensions having weak passwords. Extensions that authenticate by using simple passwords such as "1234" stand a good chance of being compromised, allowing an attacker to place calls through your PBX. Pick strong passwords carefully and ensure that passwords are not given to anyone who does not need to know them. Passwords should be at least 8 characters long and should include a random mixture of letters (both upper- and lower-case), numbers, and special characters.
Dial Profile, there are many options that you can set on the outbound call, including call screening, distinctive ringing, and more. Goto Settings/Technology/Dial Profile for more information.
Codecs, list of allowed codecs. The order in which the codecs are listed determines their order of preference. If you select at least one codec, the DISALLOW=ALL parameter will be added. This will ensure that the device will only use only the codecs that you specifically define for the device.
Music on Hold Class, this option specifies which music on hold class to suggest to the peer channel
when this channel places the peer on hold.
Recording calls, this group of fields allows a user to control the recording of incoming or outgoing calls. The user can either dial a feature code (*3) to selectively enable recording for the current call, never record calls, or always record calls.
• Outgoing, record external outgoing calls.
• Incoming, record external incoming calls.
• Internal, record internal calls.
• On Demand Recording, record calls on demand.
Voicemail Enabled, enables or disables voicemail. If voicemail is not enabled, voicemail messages cannot be left for the user.
Voicemail Password, the numeric password to access the voicemail. The voicemail system will compare the password entered by the user against this value. Allows you to define the voicemail password for each extension, if left blank, the password will be the extension number. You may use the reserved word {RANDOM} to generate a random password.
Account Code, this field is used to populate the Account Code field of the Call Detail Record (CDR). If the field is left blank, the Account Code field of the CDR record will also be blank. Allows you to define the account code for each extension. You may use the reserved word {EXTENSION} to use the extension as account code.
Features Password, password to access certain system features and the control panel of the phone. Allows you to define the features password for each extension, if left blank, a random password will be generated. You may use the reserved word {EXTENSION} to use the extension as features password.
Ring Time, the number of seconds to ring the device before giving up and moving on to the next priority for the extension.
NAT, (Network Address Translation) is a technology commonly used by firewalls and routers to allow multiple devices on a LAN with 'private' IP addresses to share a single public IP address. A private IP address is an address, which can only be addressed from within the LAN, but not from the Internet outside the LAN Options:
• No: No special NAT handling other than RFC3581
• Force: Pretend there was an rport parameter even if there wasn't

VitalPBX Reference Guide Ver. 2.4.0, December 2019
33
• Comedia: Send media to the port Asterisk received it from regardless of where the SDP says to
send it.
• Auto Force: Set the force rport option if Asterisk detects NAT
• Auto Comedia: Set the comedia option if Asterisk detects NAT
Call Waiting, if you uncheck this option, only one incoming call will be allowed to this extension.
4.1.7 Extensions Status This module shows the status of all extensions with the option to change any status by simply pressing the ( ) button that is located at the end of each line.
General tab

VitalPBX Reference Guide Ver. 2.4.0, December 2019
34
The dialog displays the following fields:
• Extension (number)
• Boss/Secretary (status)
• Secretary Extension (number)
• Personal Assistant (status)
• Follow-me (status)
• DND (Do Not Disturb status)
• Call Forward Immediately (CFI status)
• Call Forward Busy (CFB status)
• Call Forward No Answer (CFN status)
• Call Forward Unavailable (CFU status)
Use the ( ) button that is located at the end of each line to modify the status of an extension. You can modify the Personal Assistant and Diversion settings of the extension. The status can be in effect either unconditionally (by NOT selecting a time group from the time dropdown), or for a specific during the time period as defined by the time group that you select from the dropdown list, or can be effect unconditionally if no time group is selected. In addition, you can change the status by click the circle in each option.

VitalPBX Reference Guide Ver. 2.4.0, December 2019
35
Use the ( ) button see the status of the devices associate at the extension.
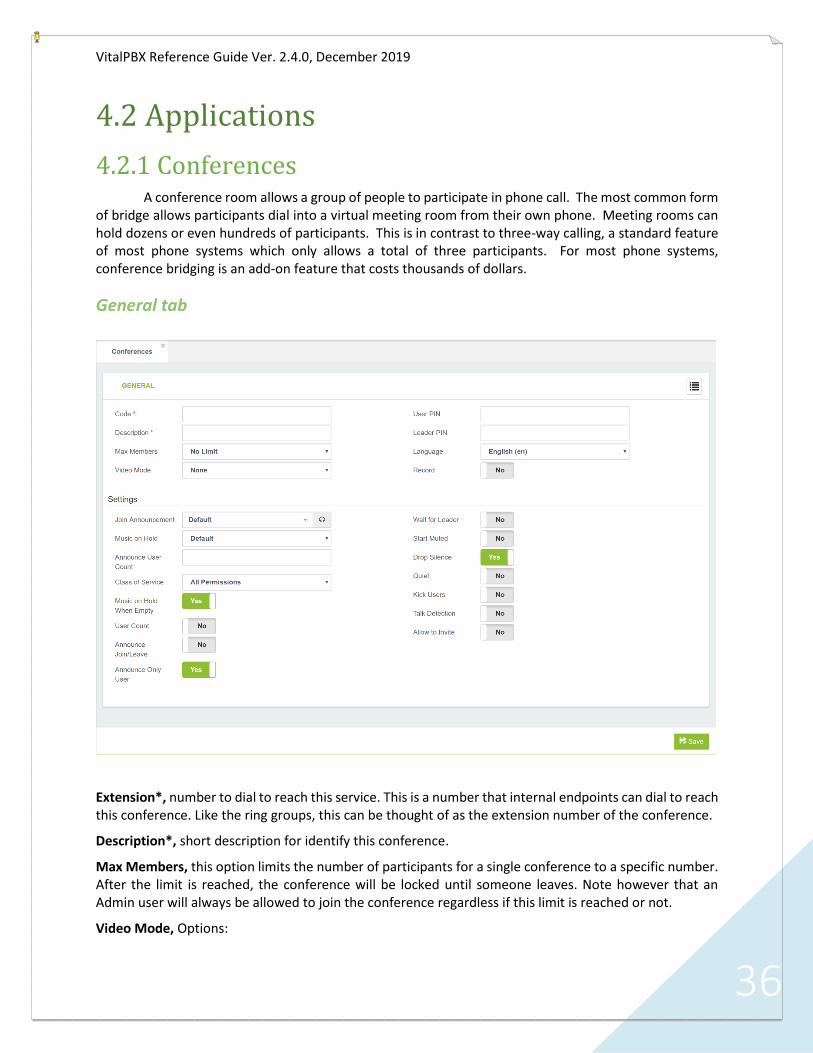
VitalPBX Reference Guide Ver. 2.4.0, December 2019
36
4.2 Applications
4.2.1 Conferences A conference room allows a group of people to participate in phone call. The most common form
of bridge allows participants dial into a virtual meeting room from their own phone. Meeting rooms can hold dozens or even hundreds of participants. This is in contrast to three-way calling, a standard feature of most phone systems which only allows a total of three participants. For most phone systems, conference bridging is an add-on feature that costs thousands of dollars.
General tab
Extension*, number to dial to reach this service. This is a number that internal endpoints can dial to reach this conference. Like the ring groups, this can be thought of as the extension number of the conference.
Description*, short description for identify this conference.
Max Members, this option limits the number of participants for a single conference to a specific number. After the limit is reached, the conference will be locked until someone leaves. Note however that an Admin user will always be allowed to join the conference regardless if this limit is reached or not.
Video Mode, Options:

VitalPBX Reference Guide Ver. 2.4.0, December 2019
37
• None: No video sources are set by default in the conference. It is still possible for a user to be
set as a video source via AMI or DTMF action at any time.
• Follow Talker: The video feed will follow whoever is talking and providing video.
• Admin: The first administrator who joins the conference with video capability is the only source
of video distribution to all participants. If the administrator leaves, the next administrator to join
after them becomes the source.
User PIN*, is a numeric passcode that is used to enter the conference room. If a PIN is entered in this field, no one is able to join the conference room without entering the PIN.
Admin PIN, functions in the same way as the User PIN. The Admin PIN and User PIN should not be set to the same value. The Admin PIN is used in conjunction with the Wait Admin option explained further in this chapter, in order to identify the administrator or leader of the conference.
Language, set the language used for announcements to the conference.
Record Conference, when set to yes, records the conference call starting when the first user enters the room, and ending when the last user exits the room.
Conference Settings section Music on Hold, the music on hold class to use for this conference.
Announce User Count, used for announcing the participant count to all members of the conference. If set to a number, then the announcement is only played when the number of participants is above the set number. Available options are yes, no, or a whole number. Default is no.
Music on Hold When Empty, when this option is enabled on-hold music will be played if there is only one caller in the conference room or if the conference has not started yet (because the leader has not arrived). If this option is disabled, no sound will be played during these situations.
User Count, when this option is enabled, the number of users currently in the conference room will be announced to each caller before they are bridged into the conference.
Announce Join/Leave, when enabled, this option will prompt the user for a name when entering the conference. After the name is recorded, it will be played when the user enters or exits the conference.
Announce Only User, sets if the only user announcement should be played when a user enters a empty conference.
Wait for Leader, if this option is enabled, the conference will not begin until the conference administrator joins the conference room. The administrator is identified by the Admin PIN. If other callers join the conference room before the leader does, they will hear on-hold music or silence until the conference begins (what they hear depends on the MoH When Empty setting explained earlier in this section). If this option is set to "No", the callers will be bridged into the conference as soon as they call the conference room number.
Start Muted, when this option is enabled, all users joining the conference are initially muted.
Drop Silence, this option drops what Asterisk detects as silence from entering into the bridge. Enabling this option will drastically improve performance and help remove the buildup of background noise from the conference. Highly recommended for large conferences due to its performance enhancements.

VitalPBX Reference Guide Ver. 2.4.0, December 2019
38
Quiet, when this option is enabled, user introductions, enter prompts, and exit prompts are not played. There are some prompts, such as the prompt to enter a PIN number that will still be played regardless of how this option is set.
Kick Users, enabling this option will kick out all remaining users of the conference, after the last admin user leaves the conference.
Talk Detection, this option sets whether or not notifications of when a user begins and ends talking should be sent out as events over AMI.
The following codes can be entered by all conference participants:
• *1 – toggles mute for the user. When enabled, anything the user says is not transmitted to the
rest of conference members. If the conference is being recorded, anything said by a muted user
is not part of the recording.
• *4 - decreases receive volume. The user can tap this option to decrease the volume of what they
are hearing. This does not affect what any other conference member hears. If a user is finding
other conference members too loud, they can press *4 a few times to make the conference
quieter for themselves.
• *5 - increases receive volume. The user can tap this option to increase the volume of what they
are hearing. This does not affect what any other conference member hears. If a user is having
trouble hearing other members of the conference, they can press *5 a few times to make the
conference louder for themselves.
• *6 - decreases transmit volume. The user can tap this option to decrease the volume of what
they are transmitting to the rest of the conference members. When this option is used, the user
will sound quieter to all other conference members. If a user is much louder than the other
members of a conference room, they can tap *6 few times to make their transmit volume
quieter.
• *7 - increases transmit volume. The user can tap this option to increase the volume of what they
are transmitting to the rest of the conference members. When this option is used, the user will
sound louder to all other conference members. If the conference members are having trouble
hearing a particular user, that user can tap *7 a few times to make their transmit volume louder.
• *8 – user can tap this code to leave the conference.
In addition, the admin has access to additional codes:
• *2 - toggles the conference lock. When a conference is locked, no more callers may join. A locked
conference must be unlocked for any new users to join. This option is only available to a
conference administrator. If the conference does not have an admin PIN configured or the user
has joined the conference as a user instead of an admin, this option is not available.
• *3 - ejects the last user who joined the conference from the conference room. The user will hear
a message informing them that they have been ejected from the conference and that their call
will be terminated. Note that if a conference is unlocked, the user may rejoin. The best way to
remove an abusive conference user is to eject them and then immediately lock the conference.
This option is only available to a conference administrator. If the conference does not have an
admin PIN configured, or the user has joined the conference as a user.
Allow to Invite, if enabled, all the participants could press “**” or “0” to invite other people to this
conference.

VitalPBX Reference Guide Ver. 2.4.0, December 2019
39
4.2.2 Custom Applications This module allows you to call modules that have no extension number, such as pre-
announcement, Time Condition, IVR, etc. A custom application is a custom feature code. A custom application allows a custom extension or star code to be defined, which will direct the caller to any call target when dialed. For example, if we have a ring group that calls the cell phones of all staff members, we might create a custom application that calls that ring group when *CELL (*2355) is dialed.
General tab
Code *, number to dial to reach this service.
Name*, short description to identify this custom application.
Enabled, enable or disable this custom application. If disabled, then users will be informed that the extension they dialed is not valid if they attempt to use the custom application. This field allows a custom application to be quickly disabled without having to remove the application entirely.
Destination* section Select Module, allows to choose from a drop-down list of available modules, which module should be activated.
Select Destination, is the call target to which the module should be routed. Any call target that has been previously configured is a valid destination for a custom application.
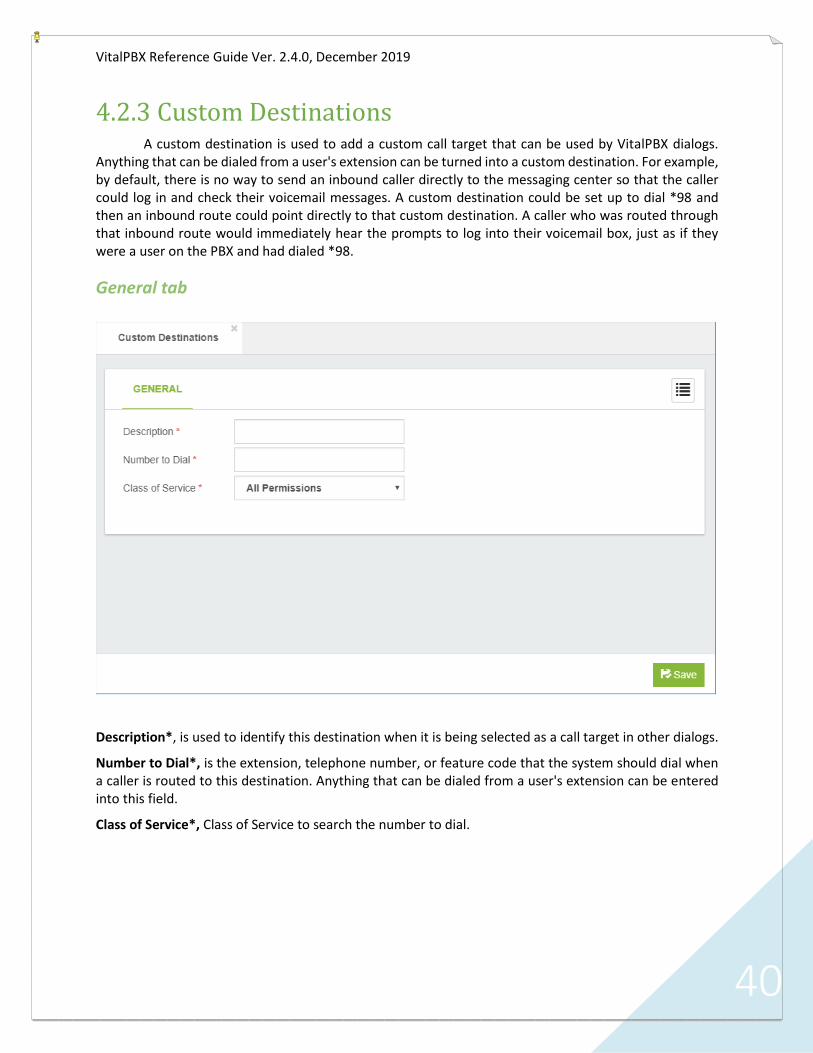
VitalPBX Reference Guide Ver. 2.4.0, December 2019
40
4.2.3 Custom Destinations A custom destination is used to add a custom call target that can be used by VitalPBX dialogs.
Anything that can be dialed from a user's extension can be turned into a custom destination. For example, by default, there is no way to send an inbound caller directly to the messaging center so that the caller could log in and check their voicemail messages. A custom destination could be set up to dial *98 and then an inbound route could point directly to that custom destination. A caller who was routed through that inbound route would immediately hear the prompts to log into their voicemail box, just as if they were a user on the PBX and had dialed *98.
General tab
Description*, is used to identify this destination when it is being selected as a call target in other dialogs.
Number to Dial*, is the extension, telephone number, or feature code that the system should dial when a caller is routed to this destination. Anything that can be dialed from a user's extension can be entered into this field.
Class of Service*, Class of Service to search the number to dial.

VitalPBX Reference Guide Ver. 2.4.0, December 2019
41
4.2.4 Custom Context Allows the integration of personalized contexts, very useful for advanced users.
Description*, a short description to identify this custom context.
Context*, name of the custom context created by yourself.
Extension, the extension defined in your custom context.
Priority, the priority defined in your custom context.
Destination, destination after having executed the custom context.

VitalPBX Reference Guide Ver. 2.4.0, December 2019
42
4.2.5 Feature Codes VitalPBX includes all the telephony features currently available in all Asterisk distributions plus
features than until now were only available in expensive, commercial PBX systems.
Black List section Prompts the user to enter a telephone number. The entered number is then added to the user's blacklist. Inbound calls will not ring an extension if they are on that extension's blacklist. Blacklisted callers will be told that the number they dialed is no longer in service. This option is very popular as it allows users to block unwanted numbers.
• *30 Add Number to Blacklist, prompts the user to enter a telephone number. The entered
number is then added to the user's blacklist. Inbound calls will not ring an extension if they are on
that extension's blacklist. Blacklisted callers will be told that the number they dialed is no longer
in service.
• *31 Remove Number from Blacklist, prompts the user to enter a telephone number. The entered
number is removed from the user's blacklist.
• *32 Add Last Caller to Blacklist, adds the last number that called the user to the blacklist.
Business Services section Here we can find the following feature codes:
• *34 Wakeup Call, set up a reminder or wakeup call for the current extension.
• *35 Remote Wakeup Call, create a reminder or wakeup call for another extension.
• *36 Boss/Secretary, this functionality is used to re-route all incoming calls for the boss phone to
the secretary phone. Only the secretary is allowed to call the boss phone directly.

VitalPBX Reference Guide Ver. 2.4.0, December 2019
43
• *37 Speak Last Number, says the last number that called the current extension, with the
possibility to press a button to call back to the original caller.
• *38 Remind Me, records a message. You can configure in how many minutes you want to hear
the recording. When the set time expires, you will receive a call in your extension and the
recording will be played.
Call Completion section Call Completion Supplementary Services (often abbreviated "CCSS" or simply "CC") allows a caller
to let VitalPBX automatically alert him when a called party has become available, given that a previous call to that party failed for some reason. The two services offered are Call Completion on Busy Subscriber (CCBS) and Call Completion on No Response (CCNR). To illustrate, let's say that Alice attempts to call Bob. Bob is currently on a phone call with Carol, though, so Alice hears a busy signal. In this situation, assuming that Asterisk has been configured to allow for such activity, Alice would be able to request CCBS. Once Bob has finished his phone call, Alice will be alerted. Alice can then attempt to call Bob again.
• *40 Call Completion, to activate a call to a previously unresponsive extension when that extension
become reachable.
• *41 Cancel Call Completion
Call Center section Call centers are special offices that are purpose-built to handle a large volume of phone calls. Call
centers typically handle customer service, support, telemarketing, telesales and collection functions. The employees who staff call centers are referred to as “agents” or “customer service representatives”. Call centers range from very small informal operations to quite large, highly optimized sites with hundreds of agents. This group of feature codes allows us to interact with options from the telephone:

VitalPBX Reference Guide Ver. 2.4.0, December 2019
44
• *50 Add/Remove Queue Agent, Add/Remove an Agent to a specific queue.
• *51 Pause/Unpause Queue Agent, Pause/Unpause an Agent to a specific queue.
• *52 Queues Login/Logout, Add/Remove an Agent to all queue that agent belong to.
• *53 Queues Pause/Unpause, Pause/Unpause an Agent to all queue that agent belong to.
• *55 Spy on Extension, spy on a specified extension.
• *56 Spy on Extension in Whisper Mode, spy on a specified extension in whisper mode.
• *57 Spy Random Channels, spy on random channels.
Call Forward section
The group of call forwarding provides the following options:
• *36 Boss/Secretary – Toggle, enable or disable call forwarding from the boss to the secretary.
• *58 Call Forward Immediately, enable or disable call forwarding.
• *59 Set CF Immediately Number, set the number to which diverted calls should be sent.
• *60 Call Forward Unavailable, enable or disable call forwarding.
• *61 Set CF Unavailable Number, set the number to which diverted calls should be sent.
• *62 Call Forward Busy, enable or disable call forwarding when your extension is busy.
• *63 Set CF Busy Number, set the number to which diverted calls should be sent.
• *64 Call Forward On No Answer, enable or disable call forwarding when your extension does not
answer incoming calls.
• *65 Set CF On No Answer Number, set the number to which diverted calls should be sent.
• *66 Do Not Disturb, enable or disable Do Not Disturb.
• *67 Follow Me, enable or disable Follow Me.
• *69 Clear all Diversions, disable all diversions.

VitalPBX Reference Guide Ver. 2.4.0, December 2019
45
On Call Features section
These facilities are used when you are on a call:
• *0 Disconnect Call, disconnect the current call.
• *07 Direct Pickup, remotely capture a call that is ringing at another extension.
• *08 Pickup Group, captures any call that is ringing the group that belongs to the extension if it
has the right permission. To use this facility is necessary to create a pickup.
• *2 Attended Transfer, transfer the current call with notifying the extension to which the call will
be transferred.
• *3 One Touch Recording, forces the call to be recorded.
• *4 Park Call, call parking.
• #1 Blind Transfer, transfer the current call without notifying the extension to which the call will
be transferred.
Phonebook Directory section This directory is completely linked to extensions that have voice mail, with which they create a name and the full name of the person is recorded to listen when there is a match when the user will type the first few letters of the name or last name.
• 411 Dial by Name Directory

VitalPBX Reference Guide Ver. 2.4.0, December 2019
46
Test Services section
These are a group of features in order to test the system.
• *70 Speak Date and Time
• *71 Speak Your Extension Number, you can hear your extension number.
• *72 Echo Test, an echo test system to measure the response time.
• *73 Simulate Incoming Call, simulation of an incoming call to test ringing of the phone.
Special Features section
This is a group of features which are described below:
• *75 Lock/Unlock Phone, lock and unlock the current extension.
• *76 Change Features Password, change the password to access to certain telephone facilities.
• *77 Remote Substitution, makes it possible for a remote phone to make calls as if you are on your
own phone.
• *78 Account Code, CDR assigned to an account code, very useful for call accounting.
• *79 Authorization Code, from any phone you can make a call using a code that is associated with
unrestricted dial plan.
• *80 Hot Desking, assign an extension number to a hot desking device type.
• *81 Night Mode All, change the state of all night mode.

VitalPBX Reference Guide Ver. 2.4.0, December 2019
47
Recording & Announcements This group of feature codes allows you to interact with your voice mail and other similar
applications.
• *92 Custom Recording, records a message.
• *93 Dictation Services, records a message with the option of sending it by email.
• *94 Record Msg for Personal Assistant, records a message that callers will hear when they are
served by the personal assistant.
• *97 Direct Voicemail, direct entry to the voicemail system – requires password.
• *98 Remote Voicemail, remote entry to the voicemail – requires both extension number and
password.
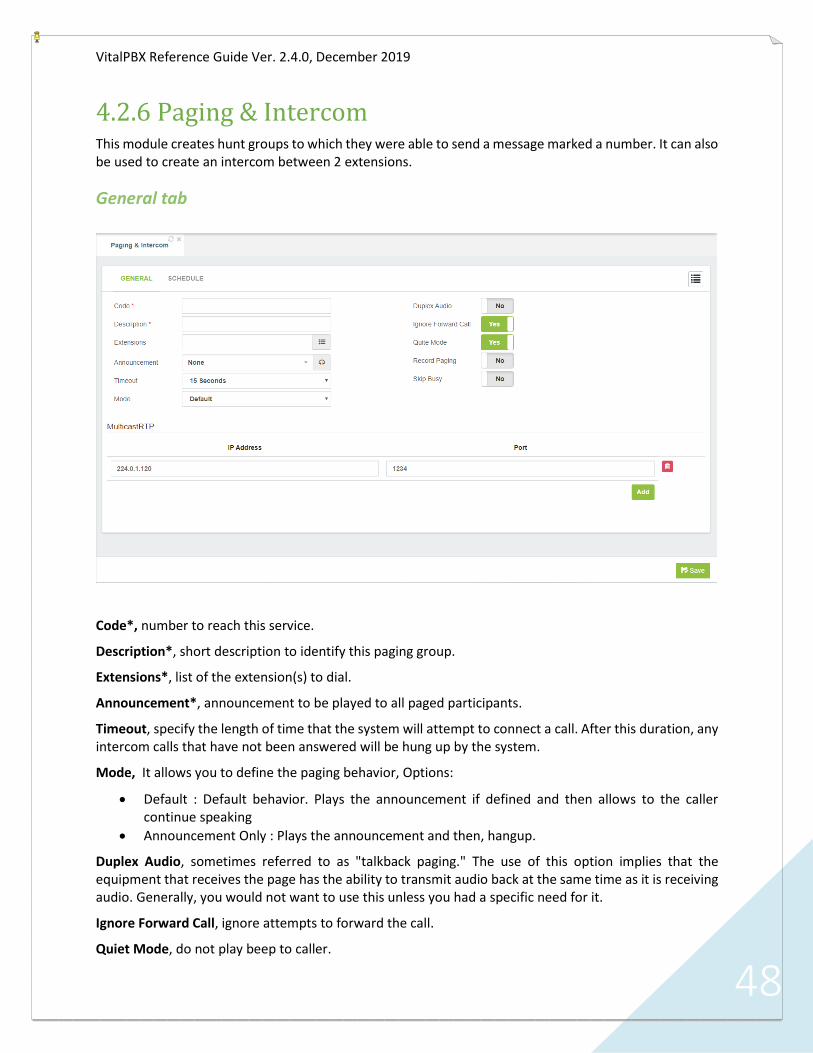
VitalPBX Reference Guide Ver. 2.4.0, December 2019
48
4.2.6 Paging & Intercom This module creates hunt groups to which they were able to send a message marked a number. It can also be used to create an intercom between 2 extensions.
General tab
Code*, number to reach this service.
Description*, short description to identify this paging group.
Extensions*, list of the extension(s) to dial.
Announcement*, announcement to be played to all paged participants.
Timeout, specify the length of time that the system will attempt to connect a call. After this duration, any intercom calls that have not been answered will be hung up by the system.
Mode, It allows you to define the paging behavior, Options:
• Default : Default behavior. Plays the announcement if defined and then allows to the caller continue speaking
• Announcement Only : Plays the announcement and then, hangup.
Duplex Audio, sometimes referred to as "talkback paging." The use of this option implies that the equipment that receives the page has the ability to transmit audio back at the same time as it is receiving audio. Generally, you would not want to use this unless you had a specific need for it.
Ignore Forward Call, ignore attempts to forward the call.
Quiet Mode, do not play beep to caller.

VitalPBX Reference Guide Ver. 2.4.0, December 2019
49
Record Paging, record the page message into a file.
Skip Busy, dials a channel only if the device state is NOT_INUSE. This option is likely only useful (and reliable) on SIP-bound channels, and even so may not work if a single line is allowed multiple calls on it.
Schedule It is possible to schedule paging actions and play an announcement. This is quite useful for schools (bell system), automation announcements on the office, airports, train stations, etc.
The capability to schedule paging items has been added. This new feature comes as an add-on.
The options to configure are the following:
Enabled, enable or disable the execution of the scheduled payment
Time, time to execute paging
Start Day, initial day to execute the paging
End Day, final day to execute the paging
Excluded Dates, the dates listed are excluded from the paging execution schedule
• Month, month to exclude
• Day of Month, day of the month to exclude
• Description, brief description to remember why that date is being excluded.

VitalPBX Reference Guide Ver. 2.4.0, December 2019
50
MulticastRTP Section Multicast Paging allows you to send pages to groups of phones directly, without the PBX being
involved in the page. With multicast paging, phones are programmed to listen to a broadcast address. The advantage to this method is that the multicast page is a single SIP call instead of a multiple-party conference call. This greatly reduces the workload placed on the PBX, especially when a large number of devices are involved.
All phones that you want to include in the multicast paging group need to be on the same network, since a network broadcast protocol is used.
IP Address, the multicast IP address that the station shall listen to, e.g. 224.0.1.120. Multicast IP addresses are in the range from 224.0.0.0 to 239.255.255.255.
Port, the multicast Port number that the station shall listen to.
MulticastRTP Phone Configuration
Yealink
Grandstream

VitalPBX Reference Guide Ver. 2.4.0, December 2019
51
4.2.7 Pickup Groups Pickup Group specifies to which pickup groups an extension belongs. An extension can belong to
multiple pickup groups. The call group and pickup group options allow users to pick up calls that are not directed to them by dialing a feature code (*08). Calls directed to any phone in a particular call group can be answered by any user who is a member of the corresponding pickup group. For example, a user in pickup group Support will be able to pick up any call directed to any phone in the Support call group. This can be useful for small office or home setups, where it is easier to simply pick up a call from another phone rather than forward that call to another extension. Note that a user can be part of a pickup group without being a member of the associated call group. For example, a senior staff member may be able to pick up any call directed to anyone in his department, but his department should not be able to pick up calls directed to the senior staff member.
General tab
Description*, a description to identify the pickup group, can consist of numbers and names.
Extension section Extension, any extension that you want to add to this group.
Member, when enabled, indicates that the extension is a member of the pickup group.
Allow Pickup, when enabled, indicates that this extension can pick up calls that are directed to this group.

VitalPBX Reference Guide Ver. 2.4.0, December 2019
52
4.2.8 Parking The Call Parking feature allows you to place a caller on hold and then retrieve them from any phone, anywhere on the system.
General tab
Code*, number to reach this service.
Description*, short Description to identify this parking.
Parking Positions, number of parking spaces to use.
Parking TimeOut*, number of seconds a call can be parked before being returned.
Comeback DialTime*, when a parked call times out, this is the number of seconds to dial the device that originally parked the call.
Courtesy Tone, to whom to play the courtesy tone while waiting for someone to pick up the parked call. Options are:
• No one
• Caller
• Callee
• Both
Music on Hold, this is the MoH class to use for the parked channel.
Call Transfer, enables or disables DTMF based transfers when picking up a parked call.
Call Reparking, enables or disables DTMF based parking when picking up a parked call.
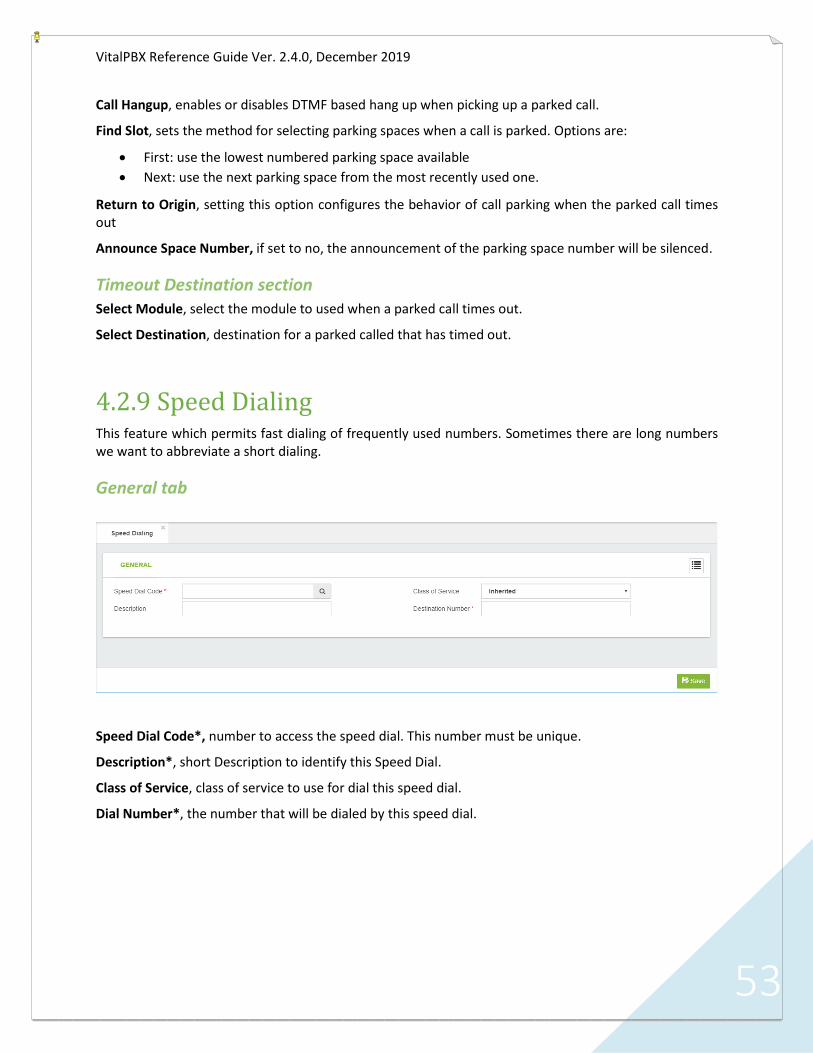
VitalPBX Reference Guide Ver. 2.4.0, December 2019
53
Call Hangup, enables or disables DTMF based hang up when picking up a parked call.
Find Slot, sets the method for selecting parking spaces when a call is parked. Options are:
• First: use the lowest numbered parking space available
• Next: use the next parking space from the most recently used one.
Return to Origin, setting this option configures the behavior of call parking when the parked call times out
Announce Space Number, if set to no, the announcement of the parking space number will be silenced.
Timeout Destination section Select Module, select the module to used when a parked call times out.
Select Destination, destination for a parked called that has timed out.
4.2.9 Speed Dialing This feature which permits fast dialing of frequently used numbers. Sometimes there are long numbers we want to abbreviate a short dialing.
General tab
Speed Dial Code*, number to access the speed dial. This number must be unique.
Description*, short Description to identify this Speed Dial.
Class of Service, class of service to use for dial this speed dial.
Dial Number*, the number that will be dialed by this speed dial.

VitalPBX Reference Guide Ver. 2.4.0, December 2019
54
4.2.10 Import/Export Speed Dialing Import/Export Speed Dialing to/from CSV file.
An example of the file format can be download by press the “Download Import Format” button at the bottom of the screen. The first line is for the header.

VitalPBX Reference Guide Ver. 2.4.0, December 2019
55
4.2.11 Voicemail Broadcast Group Extension Group to which voicemail can be sent.
General tab
Code*, number to dial to send broadcast voicemail
Description*, short Description to identify this Voicemail Broadcast Group
Extensions*, list of extensions for mass-mailing voicemail. Note that you can only see the extensions that have active voicemail.
Password*, password to protect this Voicemail Broadcast Group
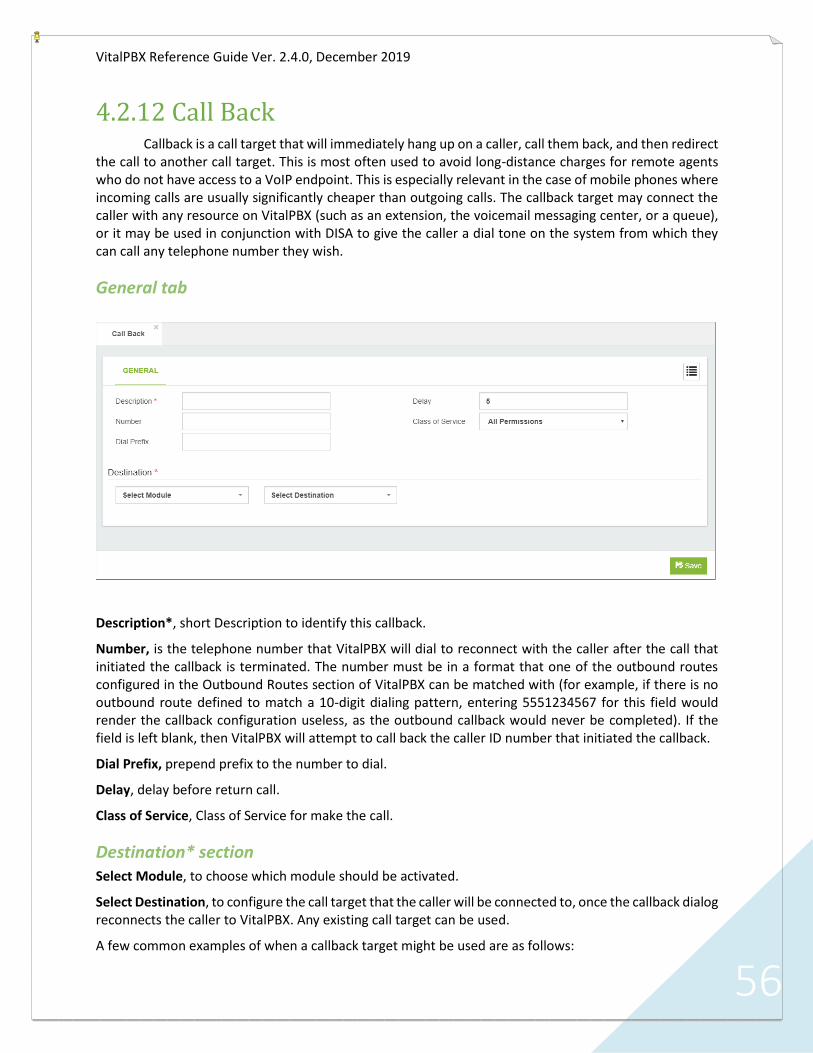
VitalPBX Reference Guide Ver. 2.4.0, December 2019
56
4.2.12 Call Back Callback is a call target that will immediately hang up on a caller, call them back, and then redirect
the call to another call target. This is most often used to avoid long-distance charges for remote agents who do not have access to a VoIP endpoint. This is especially relevant in the case of mobile phones where incoming calls are usually significantly cheaper than outgoing calls. The callback target may connect the caller with any resource on VitalPBX (such as an extension, the voicemail messaging center, or a queue), or it may be used in conjunction with DISA to give the caller a dial tone on the system from which they can call any telephone number they wish.
General tab
Description*, short Description to identify this callback.
Number, is the telephone number that VitalPBX will dial to reconnect with the caller after the call that initiated the callback is terminated. The number must be in a format that one of the outbound routes configured in the Outbound Routes section of VitalPBX can be matched with (for example, if there is no outbound route defined to match a 10-digit dialing pattern, entering 5551234567 for this field would render the callback configuration useless, as the outbound callback would never be completed). If the field is left blank, then VitalPBX will attempt to call back the caller ID number that initiated the callback.
Dial Prefix, prepend prefix to the number to dial.
Delay, delay before return call.
Class of Service, Class of Service for make the call.
Destination* section Select Module, to choose which module should be activated.
Select Destination, to configure the call target that the caller will be connected to, once the callback dialog reconnects the caller to VitalPBX. Any existing call target can be used.
A few common examples of when a callback target might be used are as follows:

VitalPBX Reference Guide Ver. 2.4.0, December 2019
57
• A company where employees need the ability to check their voicemail from anywhere. Calling
the toll-free company phone number costs the company too much money. A callback target
could be set up to call back the incoming caller ID, and be directed to the miscellaneous
destination of *98. Callers would receive a call on the number they called from, would be
prompted for their extension and their password, and would then have access to their voicemail
messages.
• A company receives better per-minute rates on calls made through its VoIP trunks than calls
made through employees' mobile phones. Employees' mobile phones have free incoming calls.
A callback target could be set up for each employee with a mobile phone to call back the
employee's mobile number. The callback would be directed to a DISA destination to give the
employee a dial tone on the PBX (allowing them to dial out using the company's VoIP trunks
without using any outgoing mobile minutes).
• A company that receives collect calls from anywhere in the world (such as a credit card company
that needs to receive calls if a customer's card is lost or stolen). The company reduces their costs
if they use a VoIP trunk local to the country that the customer is in, rather than paying for the
entire collect call at hefty international rates. A callback target could be set up to call back the
incoming caller ID of the customer and be directed to a queue. The customer would receive a
call to the number they called from and would be connected with a company representative as
soon as one is available.

VitalPBX Reference Guide Ver. 2.4.0, December 2019
58
4.2.13 DISA DISA allows you to create a destination that allows people to call in to from an outside line and
reach the system dial tone. This is useful if you want people to be able to take advantage of the low rate for international calls that you have available on your system, or to allow outside callers to be able to use the paging or intercom features of the system. Always protect this feature with a strong password.
A DISA call target will provide a caller with a dial tone on VitalPBX. Once the caller has a dial tone, they can utilize the same set of functions that are utilized by a user with VoIP endpoint attached to VitalPBX. This means that a person who is remotely located could be given access to dial any extension directly, check their voicemail messages, or even place calls to external telephone numbers through VitalPBX.
General tab
Description*, short description for identify this DISA when it is being selected as a call target in other parts of the VitalPBX interface.
Password, used to authenticate a caller when they want to activate DISA feature. If the password field contains a value, then the caller will be prompted to enter the password. The password that the user enters must match the value of the password field, otherwise the call will be disconnected, and the caller will not be able to access the DISA feature.
Class of Service, specifies the dial plan context in which the user-entered extension will be matched.
Caller ID, is used to set the outbound caller ID, consisting of two parts: the CID Name and the CID Number. This will define the caller ID text that is displayed when this user calls other. This is an optional field. If this field is left blank, then the caller ID of the person placing the call will be used.
Response Timeout, specifies how long VitalPBX will wait for valid input before disconnecting the call. This not only applies when a caller has not entered any digit yet, but also if a caller has partially entered a number to call without finishing the entry. The default value for this field is 10 seconds.
Digit Timeout, specifies how long VitalPBX will wait between digits before dialing the call. If a caller begins entering digits and then stops, VitalPBX will wait for the number of seconds specified in this field, before

VitalPBX Reference Guide Ver. 2.4.0, December 2019
59
sending the entered digits to VitalPBX for dialing. The default value for this field is five seconds. This is usually sufficient as most people do not take more than five seconds between button pushes on their phone once they have started dialing.
4.2.14 PIN List List of PIN that is associated with an outgoing trunk. Any extension that want to make a call you will be asked for a PIN number.
General tab
Description*, short description for this PIN List.
Pin List*, set the PIN List for this record (If you want to add more of a pin do it in a new line) only can introduce numbers and characters *#.

VitalPBX Reference Guide Ver. 2.4.0, December 2019
60
4.3 Class of Service
4.3.1 Class of Service Group of settings that define the dial plan that has access to the extension.
General tab
Class of Service, Class of Service Name (Must be Unique). Alphanumeric values with dash and underscore are allowed.
Name, short Description for identify this Class of Service.
Feature Category, features allowed for this Class of Service.
Dial Restrictions, dial restriction rules set for this Class of Service.
Route Selection, routes to use for this Class of Service.
Prepaid Billing, it allows you to select a billing app to rate calls made by extensions with this CoS.
Allowed Calls By, it defines the list of CoS to be allowed to call to this CoS when Private field is checked.
Private, it defines if extensions with this CoS may be called by others with different CoS. If is checked only calls with the same CoS or calls coming from CoS selected on Allowed Calls By field will be allowed. It applies only for internal calls.
Last Destination section Select Module, allows the user to choose from a drop-down list of available modules, which module should be activated.
Select Destination, is the call target to which the module should be routed.

VitalPBX Reference Guide Ver. 2.4.0, December 2019
61
Bad Destination section Select Module, allows the user to choose from a drop-down list of available modules, which module should be activated.
Select Destination, is the call target to which the module should be routed.
4.3.2 Feature Category In this module you can create groups of feature codes. This allows you to prevent some users from having access to some of the more sensitive feature codes.
General tab In this tab you will find the information about Feature Category.
Description*, short description to identify this feature category - must be unique.
Available Features, list of available feature codes.
Enabled Features, list of feature codes that have been included.

VitalPBX Reference Guide Ver. 2.4.0, December 2019
62
4.3.3 Dialing Restriction Rules Here you can create dial restrictions rules. These can be associated with a class of services.
General tab
Description*, short description to identify this "Dialing Restriction" - must be unique.
Rules section Rules (Pattern), allows you to create extension patterns in your dial plan that match one or more possible dialed numbers. The pattern options are:
• The letter X or x represents a single digit from 0 to 9.
• The letter Z or z represents a single digit from 1 to 9.
• The letter N or n represents a single digit from 2 to 9.
• The period (.) character is a wildcard that matches one or more characters.
• The exclamation mark (!) is a wildcard that matches zero or more characters.
• [1237-9] matches any digit or letter in the brackets (in this example, 1,2,3,7,8,9)
• [a-z] matches any lower-case letter
• [A-Z] matches any UPPER-case letter
Allowed, allow/disallow this pattern.
Announcement, choose an announcement associated with this pattern.
Play Max Duration, play max duration only if max duration is greater than 0 or not in blank.
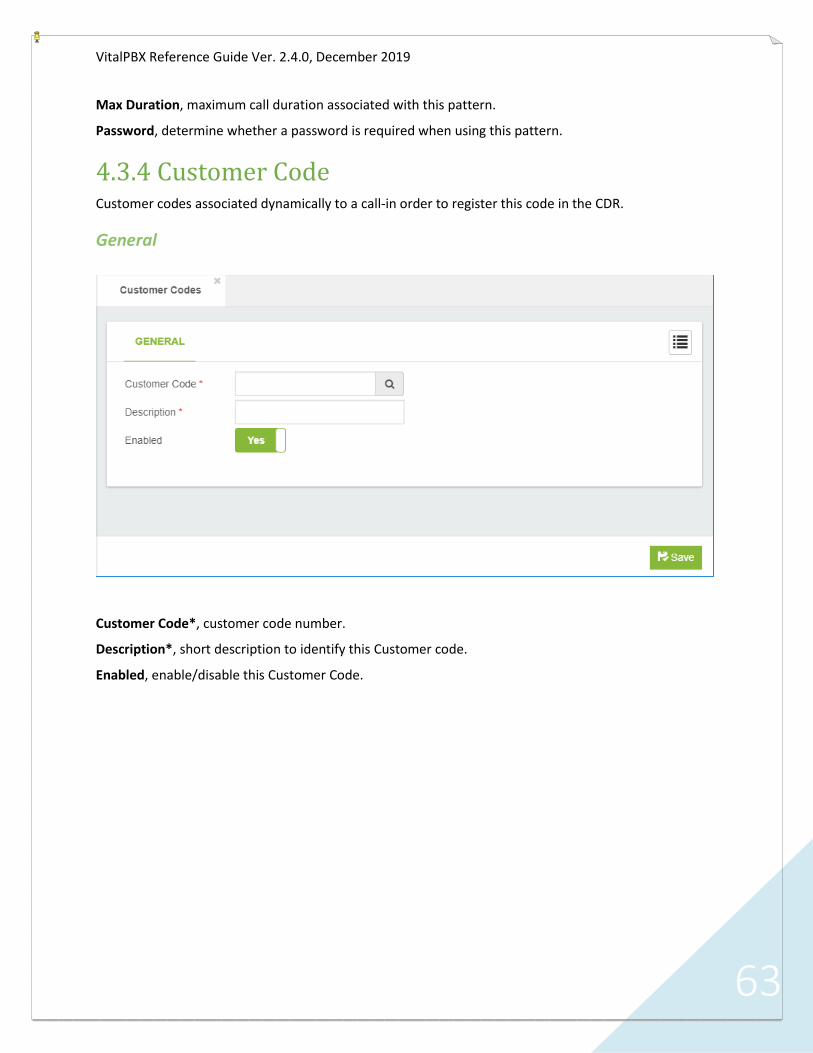
VitalPBX Reference Guide Ver. 2.4.0, December 2019
63
Max Duration, maximum call duration associated with this pattern.
Password, determine whether a password is required when using this pattern.
4.3.4 Customer Code Customer codes associated dynamically to a call-in order to register this code in the CDR.
General
Customer Code*, customer code number.
Description*, short description to identify this Customer code.
Enabled, enable/disable this Customer Code.

VitalPBX Reference Guide Ver. 2.4.0, December 2019
64
4.3.5 Authorization Code Code that gives privileges to make a call from any extension.
General tab
Authorization Code*, authorization code number.
Authorization Alias*, Alias to identify this authorization code. For security reasons this will appear on CDR reports instead of the authorization code.
Description*, Short description to identify this "Authorization Code".
Class of Service, Class of Service is used to route the call.
Enabled, enable/disable this Authorization Code.

VitalPBX Reference Guide Ver. 2.4.0, December 2019
65
4.3.6 Route Selections Route selection is a private branch exchange (PBX) feature that allows a system to route a telephone call over the most appropriate carrier and service offering based on factors such as the type of call (i.e., local, local long distance, etc.), the user's class of service (CoS), the time of day, and the day of the week (e.g., workday, weekend, or holiday).
General tab
Description*, a short description for identify this Route Selection
Route Selection Members section Outbound Route, select outbound route.
Time Group, select time group.
Enabled, enable or disable this route.

VitalPBX Reference Guide Ver. 2.4.0, December 2019
66
4.4 Call Center
4.4.1 Ring Groups Ring Groups offer the possibility that a call to be received by more than one internal extensions. The option is used most often for picking up calls received on a certain line (Inbound Routes) and sending them to a certain destination (Welcome prompt, IVR and ring groups). Also, the group can be accessed internally, calling the number assigned to it.
General tab
Code*, number to dial to reach this service.
Description*, short description to identify this ring group.
Extensions, list of extension for this ring group.
External Numbers, list of external number for this ring group.
Ring Strategy, ring strategy of extension group.
Ring Time, ring time in seconds, MAX 160 seconds.
Class of Service, Class of Service to use for dial the external numbers listed in this ring group.
Music On Hold, music on hold to play.
CID Name Prefix, prefix to append to this ring group.
Allow Diversions, allows you to define if the diversions defined for the different extensions members will be applied or not.
Mark Cancelled Calls as Answered, with this option enabled prevents the other phones record a missed call when the call has been answered on a phone

VitalPBX Reference Guide Ver. 2.4.0, December 2019
67
listed on this ring group. This is a very useful setting when the ring strategy is set to “Ring All”
Destination section Select Module, allows the user to choose from a drop-down list of available modules, which module should be activated.
Select Destination, is the call target to which the module should be routed.
4.4.2 Queues ACD (Automatic Call Distributor) distributes incoming calls in the order of arrival to the first available agent. The system answers each call immediately and, if necessary, holds it in a queue until it can be directed to the next available call center agent. Balancing the workload among agents ensures that each caller receives prompt and professional service.
General tab
Code*, number to reach this service.
Description*, short Description to identify this queue.
Strategy, defines the strategy to ring this queue. Options are:
• Ring All: Ring all available channels until one answers
VitalPBX Reference Guide Ver. 2.4.0, December 2019
68
• Least Recent: Ring interface which was least recently hung up by this queue
• Fewest Calls: Ring the one with fewest completed calls from this queue
• Random: Ring random interface
• Round Robin Memory: Round robin with memory, remember where we left off last ring pass
• Round Robin Ordered: Same as Round Robin Memory, except the queue member order from
config file is preserved
• Linear: Rings interfaces in the order specified in this queue. If you use dynamic members, the
members will be rung in the order in which they were added
• Weight Random: Rings random interface but uses the member's penalty as a weight when
calculating their metric.
CID Name Prefix, prefix to append to this queue, typically indicate to the agents from which queue the
call comes.
Join Announcement, allowing you to define an announcement to be played to the caller immediately as
they reach the queue.
Agent Announcement, an announcement may be specified which is played for the member as soon as they answer a call, typically to indicate to them which queue this call should be answered as, so that agents or members who are listening to more than one queue can differentiated how they should engage the customer.
Service Level, the idea is to define the maximum acceptable time for a caller to wait before being answered. You then note how many calls are answered within that threshold, and they go toward your service level. So, for example, if your service level is 60 seconds, and 4 out of 5 calls are answered in 60 seconds or less, your service level is 80%.
Join Empty, controls whether a caller is added to the queue when no members are available.
Leave When Empty, used to control whether callers are kicked out of the queue when members are no longer available to take calls.
Timeout Priority, used to control the priority of the two possible timeout options specified for a queue. The Queue() application has a timeout value that can be specified to control the absolute time a caller can be in the queue. The timeout value controls the amount of time (along with retry) to ring a member for. Sometime these values conflict, so you can control which value takes precedence.
Queue Timeout, will cause the queue to fail out after a specified number of seconds.
Member Timeout, specifies the number of seconds to ring a member's device.
Retry, specifies the number of seconds to wait before attempting the next member in the queue if the timeout value is exhausted while attempting to ring a member of the queue.
Wrap-up time, the number of seconds to keep a member unavailable in a queue after completing a call. This time allows an agent to finish any post call processing they may need to handle before they are presented with the next call.
Music on Hold, set the class of music for this queue.
Ring Busy Agent, used to avoid sending calls to members whose status is In Use.
Record, record the calls in this queue.

VitalPBX Reference Guide Ver. 2.4.0, December 2019
69
Members section Extension, extension number.
Penalty, within a queue, we can penalize members in order to lower their preference for being called when there are people waiting in a particular queue. For example, we may penalize queue members when we want them to be a member of a queue, but to be used only when the queue gets full enough that all our preferred agents are unavailable. This means we can have three queues (say, support, sales, and billing), each containing the same three queue members: James Shaw, Kay Madsen, and Danielle Roberts.
Suppose, however, that we want James Shaw to be the preferred contact in the support queue, Kay Madsen preferred in sales, and Danielle Roberts preferred in billing. By penalizing Kay Madsen and Danielle Roberts in support, we ensure that James Shaw will be the preferred queue member called. Similarly, we can penalize James Shaw and Danielle Roberts in the sales queue so Kay Madsen is preferred, and penalize James Shaw and Kay Madsen in the billing queue so Danielle Roberts is preferred.
Member Type, decide if the member will be: dynamic or static.
Allow Diversion, decide if the member executed or not the diversions when called.
Last Destination* section Select Module, allows the user to choose from a drop-down list of available modules, which module should be activated.
Select Destination, is the call target to which the module should be routed.
After Hangup Destination* section Select Module, allows the user to choose from a drop-down list of available modules, which module should be activated.
Select Destination, is the call target to which the module should be routed.

VitalPBX Reference Guide Ver. 2.4.0, December 2019
70
Announcement Settings tab
Periodic Announcement, periodic announcement to provide to the caller. The system default message is "All representatives are currently busy assisting other callers. Please wait for the next available representative.
Periodic Announcement Frequency, indicates how often we should make periodic announcements to the caller. Bear in mind that playing a message to callers on a regular basis will tend to upset them. Pleasant music will keep your callers far happier than endlessly repeated apologies or advertising, so give some thought to:
• keeping this message short
• Not playing it too frequently.
Announce First User, if enabled, play announcements to the first user waiting in the Queue. This may mean that announcements are played when an agent attempts to connect to the waiting user, which may delay the time before the agent and the user can communicate.
Relative Periodic Announcement, if set to yes, the Periodic Announce Frequency timer will start from when the end of the file being played back is reached, instead of from the beginning.
Announce Hold Time, defines whether the estimated hold time should be played along with the periodic announcements.
Announce Position, defines whether the caller's position in the queue should be announced. If you have any logic in your system that can promote callers in rank (i.e., high-priority calls get moved to the front of the queue), it is best not to use this option. Very few things upset a caller more than hearing that they’ve been moved toward the back of the line. Options are:
• No: The position will never be announced
• Yes: The caller's position will always be announced

VitalPBX Reference Guide Ver. 2.4.0, December 2019
71
• Limit: The caller will hear her position in the queue only if it is within the limit defined by
Announce Position Limit.
• More: The caller will hear her position if it is beyond the number defined by Announce Position
Limit.
Announce Position Limit, used if you've defined Announce Position as either limit or more
Announce Frequency, defines how often we should announce the caller's position and/or estimated hold time in the queue. Set this value to zero to disable. In a small call center, it is unlikely that the system will be able to make accurate estimates, and thus callers are more likely to find this information frustrating.
Min Announce Frequency, specifies the minimum amount of time that must pass before we announce the caller's position in the queue again. This is used when the caller's position may change frequently, to prevent the caller hearing multiple updates in a short period of time.
Announce Round Seconds, if this value is nonzero, the number of seconds is announced and rounded to the value defined.
Others tab
Members Settings Autopause, enables/disables the automatic pausing of agents who fail to answer a call. A value of All causes this agent to be paused in all queues that they are a member of. This parameter can be tricky in a live environment, because if the agent doesn't know they've been paused, you could end up with agents waiting for calls, not knowing they've been paused. Never use this unless you have a way to indicate to the members that they've been paused or have a supervisor who is watching the status of the queue in real time.
Penalty Members Limit, a limit can be set to disregard penalty settings when the queue has too few members. No penalty will be weighed in if there are only X or fewer queue members.
Member Delay, used if you want a delay prior to the caller and queue member being connected to each other.

VitalPBX Reference Guide Ver. 2.4.0, December 2019
72
Timeout Restart, if set to yes, resets the timeout for an agent to answer if either a BUSY or CONGESTION status is received from the channel. This can be useful if the agent is allowed to reject or cancel a call.
Other Queue Settings section Queue Weight, defines the weight of a queue. A queue with a higher weight defined will get first priority when members are associated with multiple queues. Keep in mind that if you have a very busy queue with a high weight, callers in a lower-weigh queue might never get answered (or have to wait for a long time).
Queue Max Length, specifies the maximum number of callers allowed to be waiting in a queue. A value of zero means an unlimited number of callers are allowed in the queue.
Reset Stats, it allows you to select a cron profile to reset the queue stats periodically.
IVR, a IVR may be specified, in which if the user types a SINGLE digit extension while they are in the queue, they will be taken out of the queue and sent to that extension in this IVR.
VIP Customer, List of VIP Customers, these customers have more priority in this queue.
Autofill, the old behavior of the queue (autofill=no) is to have a serial type behavior in that the queue will make all waiting callers wait in the queue even if there is more than one available member ready to take calls until the head caller is connected with the member they were trying to get to.
4.4.3 Queues Priorities Change the weight of a queue dynamically, in order to prioritize calls that incoming for this way. Usually the destination is a queue.
General tab

VitalPBX Reference Guide Ver. 2.4.0, December 2019
73
Description*, short Description to identify this queue priority
Priority, the Queue Priority to set.
Destination section Select Module, allows the user to choose from a drop-down list of available modules, which module should be activated.
Select Destination, is the call target to which the module should be routed.
4.4.4 Queues VIPs They are the customers who have priority when calling.
General tab
Description*, short description to identify this.
VIP List*, insert the list of numbers separated by a carriage return.
VitalPBX Reference Guide Ver. 2.4.0, December 2019
74
4.4.5 Queues CallBack With the Queues CallBack module, you can reduce customer frustration by minimizing the time
spent on hold. This feature provides callers with the option to request a callback from the next available agent instead of waiting on hold, allowing them to disconnect from the call and tend to other things.
How it Works? When someone calls your company and there are no available agents, after the customers have
waited for a predefined length of time, an automated message can offer to call them back. If the customer decides to request the callback service, their number will be saved and queued. When an agent becomes available, VitalPBX will then automatically call the person who left the callback request. If that person answers the call, they will be connected to the agent.
Why Use It? There are many reasons this module can be effective for you, but between those reasons you can find:
• Increased customer satisfaction and retention: providing this feature to your customer, you let them know that you value their time. It is a courtesy that boosts the customers’ impression of your service and results in higher satisfaction with the customer experience.
• Reduce call abandonment rate: When your customers have the option to request a callback, they will no longer be tempted to hang up and move on from your services. Instead, they can request a callback and go about their day while they wait for an agent to return their call.
• Manage high volumes: Whether you regularly experience peak periods at your call center or occasionally have spikes in call volume, callbacks can defer calls until volumes are more manageable. “Smoothing out” peak periods makes more efficient use of agents, improving call center productivity and reducing the need to hire additional resources.
• Lowering Telco costs: When you keep a caller in a queue, a PSTN line is occupied the whole time. Often, a toll-free DID at a premium per-minute rate. The callback feature eliminates the need to keep lines open, removing the telco costs associated with the queue waiting time.
• Boost employee morale: Your customers don’t like waiting in queues, and your agents don’t like dealing with customers who have been kept waiting. When your customers haven’t had to wait on hold for a long time to reach an agent, they are more likely to be in a better mood when speaking with your agents. That reduces stress on your agents and helps them improve their productivity.

VitalPBX Reference Guide Ver. 2.4.0, December 2019
75
In the Queues CallBack module, you need to configure the following options:
• Description, brief description
• CallBack Queue, it allows you to define the queue where callers who request a callback will be sent.
• Class of Service, it allows you to define what Class of Service will be used to perform the callback. Remember that the class of service
• contains the permissions to allow outgoing calls through specific trunks or outbound routes.
• Dial Prefix, if defined, it will be prepended to the requested callback number.
• Time Group, it allows you to configure a time group to define the allowed times to perform callbacks.
• Maximum Tries, amount of allowed tries to perform before marking the call back as failed.
• Caller ID, Caller ID info to use during the callback. This information could be modified during the call process by the trunks or outbound routes settings.
• Instructions Message, message to be played with the instructions for requesting a callback. o Default Message: “All of our representatives are currently busy. Please stay on the line
and your call will be answered by the next available representative, or press one to be called back when a representative is available”
• Invalid Message, message to be played when the provided number by caller doesn’t match with the defined number rules.
o Default Message: “I’m sorry, that is not a recognized phone number”
• Number Prompt Message, instructions message for asking to enter the callback number. o Default Message: “Please enter your telephone number”
• Ring Time, it allows you to define the time that the callback numbers will ring before marking the call as not answered.
VitalPBX Reference Guide Ver. 2.4.0, December 2019
76
• Ask CallBack Number, if enabled, the caller will be prompted to enter its callback number. If set to no, the caller id number it will be used as callback number, as long as the number match with the allowed number rules.
• Allowed Number Rules, they are the numbers allowed to return the call, Patterns can be used.
o Pattern, It allows to define rules of what type of numbers can be used when requesting
a call back options:
▪ X: The letter X or x represents a single digit from 0 to 9.
▪ Z: The letter Z or z represents any digit from 1 to 9.
▪ N: The letter N or n represents a single digit from 2 to 9.
▪ .: wildcard, matches one or more characters.
▪ !: wildcard, matches zero or more characters immediately.
▪ [1237-9]: matches any digit or letter in the brackets (in this example, 1,2,3,7,8,9)
▪ [a-z]: matches any lower-case letter
▪ [A-Z]: matches any UPPER-case letter
o Enabled, It allows you to Enable/Disable pattern rules.

VitalPBX Reference Guide Ver. 2.4.0, December 2019
77
4.5 External
4.5.1 Trunks In the simplest of terms, a trunk is a pathway into or out of a telephone system. A trunk connects
VitalPBX to outside resources, such as PSTN telephone lines or additional PBX systems to perform inter-system transfers. Trunks can be physical, such as a PRI or PSTN line, or they can be virtual by routing calls to another endpoint using Internet Protocol (IP) links.
Trunks are the PBX equivalent of an external phone line. They are the links that allow your system to make calls to the outside world, and to receive calls from the outside world. Without a trunk, you cannot call anyone, and no one can call you. You can configure a trunk to connect with:
• Any VoIP service provider
• Any PSTN/Media Gateway, which allows you to make and receive calls over standard telephone
lines from your local telephone company
• Connect directly to another PBX.
General tab

VitalPBX Reference Guide Ver. 2.4.0, December 2019
78
Technology
• SIP
• PJSIP
• IAX2
• TELEPHONY
• TENANT
• CUSTOM
SIP, PJSIP, IAX2, TELEPHONY, TENANT and CUSTOM trunks utilize the technologies of their namesakes. These trunks have the same highlights and pitfalls that extensions and devices using the same technology do. Telephony trunks require physical hardware cards for incoming lines to plug into. SIP trunks are the most widely adopted and compatible, but have difficulties traversing firewalls. IAX2 trunks are able to traverse most firewalls easily but are limited to Asterisk-based systems.
Setting up a trunk is very similar to setting up an extension. All of the trunks share common setup fields, followed by fields that are specific to the technology of the trunk.
Description, a description to help identify this trunk
Class of Service, class of service to be used by this trunk.
Ring Timer, time to ring the trunk before determining that the call cannot be completed.
Dial Profile, there are many options that you can set on the outbound call, including call screening, distinctive ringing, and more. Goto Settings/Technology/Dial Profile for more information.
Profile, profile with common parameters for the technology selected.
Music on Hold, default music on hold for this trunk.
Codecs, list of allowed codecs for SIP trunks, in order of preference. Codecs that are not list will not be allowed for this trunk.Port, the port number we want to connect to on the remote side.
NAT, (Network Address Translation) is a technology most commonly used by firewalls and routers to allow multiple devices on a LAN with “private” IP addresses to share a single public IP address. A private IP address is an address, which can only be addressed from within the LAN, but not from the Internet outside the LAN. The Options are:
• No: Do no special NAT handling other than RFC3581
• Force: Pretend there was an rport parameter even if there was
• Comedia: Send media to the port Asterisk received it from regardless of where the SDP says to send it.
• Auto Force: Set the force_rport option if Asterisk detects NAT.
• Auto Comedia: Set the comedia option if Asterisk detects NAT.
Get DID From, it allows you to define from which SIP header will be extracted the DID number.
Get CID From, it allows you to define from which SIP header will be extracted the caller ID info.
Trunk CID, sets the default caller ID name and number that will be displayed to the called party. The Trunk CID will only be used if Overwrite CID field is set to Yes. Note that setting the outbound caller ID only works on digital lines (T1/E1/J1/PRI/BRI/SIP/IAX2), not POTS lines. The ability to set outbound caller ID must also be supported by your provider.

VitalPBX Reference Guide Ver. 2.4.0, December 2019
79
• Name, a string that can be used to identify calls on this trunk. If this field is left blank, only the
Trunk CID number will be sent.
• Number, the telephone number that will be displayed by calls on this trunk.
DTMF Mode, set default dtmf-mode for sending DTMF. Default rfc2833|rfc4733, Options:
• info : SIP INFO messages (application/dtmf-relay)
• shortinfo : SIP INFO messages (application/dtmf)
• inband : Inband audio (requires 64 kbit codec -alaw, ulaw)
• auto : Use rfc2833|rfc4733 if offered, in-band otherwise
Overwrite CID, overwrite Caller ID.
Disable Trunk, this allows you to disable this trunk to be inaccessible.
Continue on Busy, it forces to continue the call to the next configured trunk when this trunk being busy.
Note:
The call will also continue to the next trunk if any error happens, even if this checkbox is not checked.
SIP/PJSIP/IAX settings Outgoing for Settings Calls (Peer)
Outgoing Username, Username the remote server should use to contact this PBX. It is also the device name that will be created.
Host, is the IP address or DNS hostname of the SIP provider. This is the destination server or network that VitalPBX will send calls to when using this trunk.
Port, sets the default port to be accessed on the remote endpoint device. Only required for SIP trunks.
Local Secret, secret to be used for authentication requests from remote server.
Insecure, Allows relaxing authentication of incoming SIP requests. Options:
• Port: Allow matching of peer by IP address without matching port number
• Invite: Do not require authentication of incoming INVITES'
• Port, Invite: The combination is the minimum security since no checking or port check or authentication to the INVITE message type.
Allow Inbound Calls, if checked, this device will be allowed also to accept calls.
Remote Username, authentication username for remote server
Remote Secret, the password credential used to authenticate this trunk against the provider
From User, the user credential used to authenticate this trunk against the provider
From Domain, as your provider knows your domain
Qualify, causes VitalPBX to regularly send a SIP OPTIONS command to check that the peer is still online. If the peer does not answer within the configured period, VitalPBX will consider the device to be off-line and not available for future calls.
IAX Trunking, allows sending voice of several calls in one IAX packet. It can significantly reduce the required network bandwidth.
VitalPBX Reference Guide Ver. 2.4.0, December 2019
80
Incoming for Settings Calls (User) Username, the username credential used to contact this trunk
Host, the host they use to contact us (We could specify the "dynamic" option and leave open the possibility that any device connected to your machine without an IP in particular.)
Local Secret, secret to be used for authentication requests from remote server.
Insecure, Sets the level of authentication and verification established between machines when performing communication. Options are:
• Port: Allow matching of peer by IP address without matching port number
• Invite: Do not require authentication of incoming INVITEs
• Port, Invite: The combination is the minimum security since no checking or port check or
authentication to the INVITE message type.
IP Authentication, if checked, allows the incoming requests authentication by IP address in addition to the username authentication.
Qualify, make periodic checks to make sure that the user is alive.
IAX Trunking, allows sending voice of several calls in one IAX packet. It can significantly reduce the required network bandwidth.
Register String, the register line includes a host name (mydomain.com) which tells Asterisk where to send the registration request; the account number and password, for example: account:[email protected]:5060
General Configurations (PJSIP) Transport, explicit transport configuration to use.
Match, the value is a comma-delimited list of IP addresses or hostnames. IP addresses may have a subnet mask appended. The subnet mask may be written in either CIDR or dotted-decimal notation. Separate the IP address and subnet mask with a slash (“/”).
Contacts, Permanent contacts assigned to an AoR. You can define multiple contact addresses in SIP URI format. e.g.: sip:198.51.100.1:5060.
Outbound Registration Settings (PJSIP) Require Registration, it defines, if is required to register against the remote server or VoIP provider.
Permanent Auth Rejection, if this option is enabled and an authentication challenge fails, registration will not be attempted again until the configuration is reloaded.
Max Retries, maximum number of registration attempts.
Expiration, expiration time for registrations in seconds.
Retry Interval, interval in seconds between retries if outbound registration is unsuccessful.
Forbidden Retry Interval, it defines the time to wait before attempting registration again, after receiving a 403 Forbidden response. If 0 is specified, no retry will be made after receiving a 403 Forbidden response.
Client URI, this is the address-of-record for the outbound registration (i.e. the URI in the to header of the REGISTER). For registration with an ITSP, the client SIP URI may need to consist of an account name or

VitalPBX Reference Guide Ver. 2.4.0, December 2019
81
number and the provider hostname for their registrar, e.g. [email protected]. This may differ between providers.
For registration to generic registrars, the client SIP URI will depend on networking specifics and configuration of the registrar.
Server URI, this is the URI at which to find the registrar to send the outbound REGISTER. This URI is used as the request URI of the outbound REGISTER request from Asterisk.
For registration with an ITSP, the setting may often be just the domain of the registrar, e.g. sip:sip.example.com.
Telephony Settings
Telephony Trunk Parameters Channel Group, the channel group used by this trunk.
Mode, selection mode for available channels.

VitalPBX Reference Guide Ver. 2.4.0, December 2019
82
Advanced tab In custom setting you can add any valid value in the account settings of the trunk
Type, Friend, User or Peer.
Parameter, any valid variable of Asterisk.
Value, any value for the Asterisk variable.
Enabled, enable or disable the custom settings.
Dial Manipulation Rules tab
Dialing Manipulation Rules, that allows you to manipulate the dialed number depending of the trunk. e.g.: Suppose you have two providers, both have emergency calls service, but the number to dial is different for each one, for the first provider you must to dial 933 and for the second one you must to dial 944. So, you can configure in your outbound route the 911 and replace this number depending on the trunk on which the call is dialed through.

VitalPBX Reference Guide Ver. 2.4.0, December 2019
83
Switch to Text Mode Due to many requests about configuring trunks in text mode like in other Asterisk distros, we have
decided to allow you to create trunks just by writing or pasting the configuration of your provider in a text box. This is to help the customers who come from other distros to have a very easy transition.
Tenant If it is configured in the main tenant it is to be used as a gateway for the other Tenant, if it is configured in the secondary Teneants it is to allow calls between Tenants.
Custom They are used to support protocols type H323 or any other protocol that is not defined.
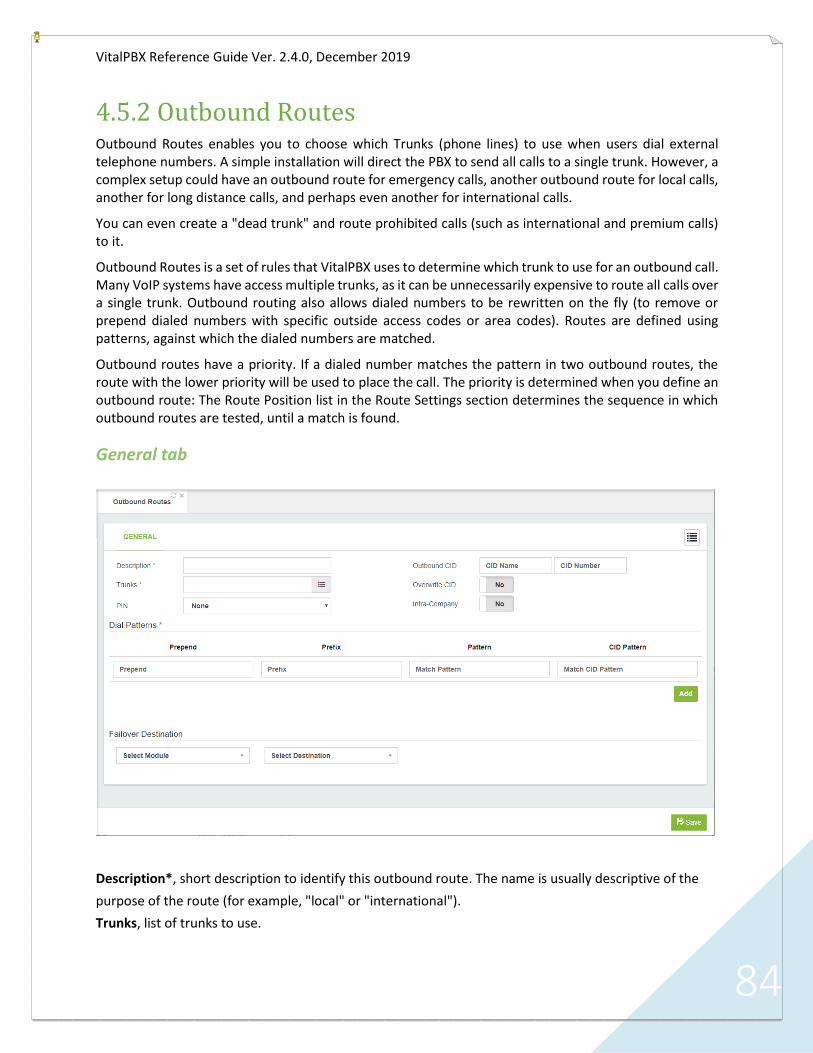
VitalPBX Reference Guide Ver. 2.4.0, December 2019
84
4.5.2 Outbound Routes Outbound Routes enables you to choose which Trunks (phone lines) to use when users dial external telephone numbers. A simple installation will direct the PBX to send all calls to a single trunk. However, a complex setup could have an outbound route for emergency calls, another outbound route for local calls, another for long distance calls, and perhaps even another for international calls.
You can even create a "dead trunk" and route prohibited calls (such as international and premium calls) to it.
Outbound Routes is a set of rules that VitalPBX uses to determine which trunk to use for an outbound call. Many VoIP systems have access multiple trunks, as it can be unnecessarily expensive to route all calls over a single trunk. Outbound routing also allows dialed numbers to be rewritten on the fly (to remove or prepend dialed numbers with specific outside access codes or area codes). Routes are defined using patterns, against which the dialed numbers are matched.
Outbound routes have a priority. If a dialed number matches the pattern in two outbound routes, the route with the lower priority will be used to place the call. The priority is determined when you define an outbound route: The Route Position list in the Route Settings section determines the sequence in which outbound routes are tested, until a match is found.
General tab
Description*, short description to identify this outbound route. The name is usually descriptive of the
purpose of the route (for example, "local" or "international").
Trunks, list of trunks to use.

VitalPBX Reference Guide Ver. 2.4.0, December 2019
85
PIN, list of PINs, using previously created password sets (if any), to authenticate access to this route. PIN sets can be configured in the VitalPBX PIN dialog.
Outbound CID, it allows you to define a specific Caller ID Number/Name that will be using on this outbound route when the “Overwrite CID” setting is enabled.
Overwrite CID, if enable, the extension’s outbound CID will be overwritten with the CID parameters defined on this Outbound Route.
Intra-Company, if checked, the internal caller id will be sent through this outbound route, instead of the external caller id of the calling extension.
Dial Patterns:
• Prepend, digits to add to a successful match.
• Prefix, prefix to remove to a successful match.
• Pattern, Pattern matching allows us to create extension patterns in our dial plan that match
more than one possible dialed number Options:
o X: The letter X or x represents a single digit from 0 to 9.
o Z: The letter Z or z represents any digit from 1 to 9.
o N: The letter N or n represents a single digit from 2 to 9.
o .: wildcard, matches one or more characters.
o !: wildcard, matches zero or more characters immediately.
o [1237-9]: matches any digit or letter in the brackets (in this example, 1,2,3,7,8,9)
o [a-z]: matches any lower-case letter
o [A-Z]: matches any UPPER-case letter
Be sure that the outbound routes you create allow you to dial the following types of calls:
• Emergency: Dedicate a route just for this purpose. Calls for emergency services should never be
mangled by another dial pattern.
• Local: Calls to local numbers (usually NXXXXXXXXX).
• Toll-free: Calls to toll-free numbers (such as 1-888 or 1-800 numbers)
• Mobiles: Ensure that your outbound routes have been configured to handle calls to all mobile
phone providers.
• International: Calls outside of the country, if permitted (usually 011)
• Special: Calls that do not fit any other category. This includes calls such as calls to the operator
(0) and directory assistance (411)
• Long distance: Calls outside of the local calling area, if permitted (usually 1NXXXXXXXXX). Make
sure that your outbound routes are designed to properly handle calls if you are using a
dedicated provider for international calls.

VitalPBX Reference Guide Ver. 2.4.0, December 2019
86
4.5.3 Emergency Numbers This module defines the external numbers that cannot be restricted, these numbers can be dialed from any extension, either a Hotdesking that is not registered or any extension that has completely restricted outgoing calls.
Description, a short description to easy recognize this list of emergency numbers.
Trunks, list of trunks than can be used in case of an emergency call.
List of Emergency Numbers, telephone number to contact local emergency services for assistance and
name of the service that represents this telephone number. eg.: Police, Firefighters, Ambulance, etc.

VitalPBX Reference Guide Ver. 2.4.0, December 2019
87
4.5.4 Inbound Routes (DID) The Inbound Routes module is where you define how the PBX handles incoming calls. Typically, you determine the phone number that outside callers have called (DID Number) and then indicate which extension, Ring Group, Voicemail, or other destination to which the call should be directed.
General tab
Routing Method, can either be the Telephony channel for an analog port (FXO), or default for all other inbound routes like E1, T2, Sip or IAX trunk. From version 2.3.8 it is possible to route a DID range to an extension number. For example, if I have the DID range from 1 (305) 6724 7100 to 1 (305) 6724 7200, it is possible to get the last four digits of the DID and route it to the corresponding extension.
Description*, short description to identify this DID. This field is used to hold a description to help you remember what this particular inbound route is for. This field is not parsed by VitalPBX.
DID Pattern*, expected number or pattern. This field is used when DID-based routing is desired. The phone number of the DID to be matched should be entered in this field. The DID number must match the format in which the provider is sending the DID. Many providers will send the DID information with the call as +15555555555, while others will leave out the country code information and simply send 5555555555. If the DID entered in this field does not exactly match the number sent by the provider, then the inbound route will not be used. This field can be left blank to match calls from all DIDs (this will also match calls that have no DID information).
This field also allows patterns to match a range of numbers. Patterns must begin with an underscore (_) to signify that they are patterns. Within patterns, X will match the numbers 0 through 9, and specific

VitalPBX Reference Guide Ver. 2.4.0, December 2019
88
numbers can be matched if they are placed between square parentheses. For example, to match both 555-555-1234 and 555-555-1235, the pattern would be _555555123[45].
CID Pattern, CID number or CID pattern to match. This can be used when CID-based routing is preferred. As with the DID Number field, the CID entered in this field must exactly match the format in which the provider is sending the CID. Providers may send 7, 10, or 11 digits; they may include a country code and the plus symbol. Check with your provider to see the format in which the CID is sent, in order to ensure that this field is entered correctly.
The Caller ID Number field can be left blank to match with all CIDs (this will also match calls that have no CID information sent with them). The field allows Private, Blocked, Unknown, Restricted, Anonymous, and Unavailable values to be entered, as many providers will send these in the CID number data.
Leaving both the DID Number and Caller ID Number fields blank will create a route that matches all calls.
Caller ID Modifier, allows you to modify the caller id name/number.
CID Lookup, it allows you to select a CID Lookup item to search the incoming caller number into a directory of a CRM or a cloud directory, or other and set the correct CID Name.
Language, specifies the language setting to be used for this route. This will force all prompts specific to the route to be played in the selected language, provided that the language is installed and voice prompts for the specified language exist on your server. This field is not required. If left blank, prompts will be played in the default language of the VitalPBX server.
Music On Hold, this drop-down menu allows you to select the music-on-hold class for this route. Whenever a caller accessing this route is placed on hold, they will hear the music on hold defined in the class selected here. This is often used for companies that use their music on hold to advertise services, or that accept calls in multiple different languages. Calls to a French DID might play a music-on-hold class with French advertisements, while an English DID would play a class with English advertisements.
Alert Info, to set a distinctive ring for this inbound route. There does not yet seem to be a standard for how to tell a SIP phone that you want it to ring with a distinctive ring. On SIP handsets that do support distinctive ringing, the exact method of specifying distinctive ring varies from one model to another. In many cases this is done by sending a SIP_ALERT_INFO header, but the usage of this header is not consistent. This is often used for SIP endpoints that can ring differently, or auto-answer calls based on the SIP_ALERT_INFO text that is received. Any inbound call that matches this route will send the text in this field to any SIP device that receives the call.
Enable Recording, enable call recording on this route.
Privacy Manager section Privacy Manager, this drop-down menu is used to enable or disable the VitalPBX privacy manager functionality. When enabled, incoming calls that arrive without an associated caller ID number will be prompted to enter their telephone number. Callers will be given a number of attempts (as defined in the Max attempts field, below) to enter this information before their call is disconnected.
Fax Settings Fax Detection, determines whether faxes should be detected on this route. If fax detection is enabled, additional parameters can be configured, and a dropdown will appear which is used to select the extension to which the inbound faxes will be directed. Typically, this extension is a DAHDI extension that

VitalPBX Reference Guide Ver. 2.4.0, December 2019
89
has a physical fax machine plugged into it. However, it may also be a virtual extension that will be answered by VitalPBX. The program will accept faxes and turn them into digital documents for review.
If fax detection is disabled, fax detection will not be used for calls on this route. Any fax calls will be handled just like voice calls.
Destination* section Select Module, allows the user to choose from a drop-down list of available modules, which module should be activated.
Select Destination, is the call target to which the module should be routed.
4.5.5 Dynamic Routing (AutoCLIP Routes) This feature allows you to route missed or not completed outgoing calls to the original caller. When extension user makes an outgoing call, the called party can call back extension user directly, no pass through the Inbound route setting.
General tab
Expiration Time, it allows to define how long the records of the dynamic routing list will be conserved, before they are automatically deleted.
Digits Match, it allows to define the number of digits to be extracted from the caller’s number (from right to left), to later search for matches in the dynamic routing list. If left blank, the entire caller’s number will be used to search for matches.
Delete Used Records, if checked, the record will be deleted from the dynamic routing list when the callback is answered.
Only Keep Missed Calls, if checked, only calls (outgoing) that are missed by the called party will be saved in the dynamic routing list.

VitalPBX Reference Guide Ver. 2.4.0, December 2019
90
List tab
Displays the complete list of calls that are pending completion of the Dynamic Route action. The action could be canceled through the options of the Actions button.
Note:
In order for the Dynamic Route to work, the option in the Extension configuration in the Advanced TAB must be activated.

VitalPBX Reference Guide Ver. 2.4.0, December 2019
91
4.6 Incoming Calls
4.6.1 IVR IVR (Interactive Voice Response) allows you configure an auto attendant to answer calls and redirect the call-in response to input from the caller. An IVR system is often referred to as a digital receptionist. An IVR plays a pre-recorded message to the caller that asks them to press various buttons on their telephone depending on which department or person they would like to speak with. The IVR system will then route the call accordingly.
VitalPBX’s IVR allows any digits to be defined for routing purposes. For example, pressing “1” could route the caller to the sales ring group. Destinations can be defined to receive the call if the IVR times out or does not receive valid input.
It is important that you carefully plan the call flow and branching options for IVRs, while considering the user experience. IVRs use customized Announcements, so you will need to make sure that they are clear and meaningful, and configured to optimize the caller experience. Factors that you should consider include:
• Handling the timeout when there is no input from the caller
• Controlling the action to take if caller provides invalid user input
• Allowing the caller to backtrack if s/he has made a mistake or gets lost
• Allowing the caller to return to the IVR if voicemail is encountered
• Whether or not to take advantage of time-based branching, by defining Time Groups, for normal
office hours, that include start and end times, start and end days of the week, and much more
• Defining a Time Condition, and setting one destination if the time matches and a different
destination if the time does not match

VitalPBX Reference Guide Ver. 2.4.0, December 2019
92
General tab
Description*, short description to identify this IVR. This field is not parsed by VitalPBX.
Class of Service, choose a Class of Service for this IVR.
Invalid Tries, number of invalid attempts allowed.
Welcome Message, welcome message, selected from a drop-down menu of pre-recorded messages that will be played to the caller when they enter the IVR.
Instructions Message, Message to be played after the welcome message. This message is useful for avoid repeating the welcome message on invalid/timeout event.
Invalid Retry Message, message, selected from a drop-down menu of pre-recorded messages, to be played when the IVR receives an invalid option.
Invalid Message, message, selected from a drop-down menu of pre-recorded messages, to be played when user exceeds the maximum number of attempts.
Timeout, is the maximum time, in seconds, that the system will wait for input from the caller. If this time passes without input, the call will fail over to the Timeout Destination that the user has defined.
Timeout Tries, is used to determine the number of times the IVR will repeat itself when no valid input is received. After the specified number of tries, the caller will be send to the Timeout Destination. The maximum number of loops allowed is five.

VitalPBX Reference Guide Ver. 2.4.0, December 2019
93
Timeout Retry Message, message, selected from a drop-down menu of pre-recorded messages, to be played when input has not been received within the period defined by Timeout. If the number of Timeout Tries has not yet been reached, then the user will be prompted to try again.
Timeout Message, message selected from a drop-down menu of pre-recorded messages, to be played when reaching the timeout.
Welcome after Timeout, when enabled, will return the user to the main IVR Welcome Message after playing the Timeout Retry Message.
Welcome after Retry, when enabled, will return the user to the main IVR Welcome Message after playing the Invalid Retry Message.
Direct Dial, enables the caller to dial an extension directly from the IVR. If this option is not enabled, the caller will receive a message that they have provided invalid input when they enter an extension, even if the extension is valid.
Generate Stats, if is set on yes, it will be saved stats for each option marked. These statistics can be consulted in the IVR Stats module.
Invalid Destination* section Select Module, allows the user to choose from a drop-down list of available modules, which module should be activated.
Select Destination, is the call target to which the module should be routed.
Timeout Destination* section Select Module, allows the user to choose from a drop-down list of available modules, which module should be activated.
Select Destination, is the call target to which the module should be routed.
IVR Entries tab In this tab defines how to handle the user’s input.

VitalPBX Reference Guide Ver. 2.4.0, December 2019
94
Entries* section Digit, digit to press.
Module, module to activate when the caller presses the appropriate digit.
Destination, destination to call when the caller presses the appropriate digit.
Enabled, enabled or disable this option.
It is good practice to ensure that the user has an easy way of getting back to the previous menu. One simple way to do this would be to allow the user to press “*” and link that keypress to the parent IVR.
4.6.2 Time Groups & Time Conditions Time conditions are a set of rules for hours, dates, or days of the week. A condition has two call targets each time. Calls sent to a time condition will be sent to one target if the time of the call matches one of the conditions, or to the other target if none of the conditions match. Each time condition can have multiple time definitions (known as time groups). Time conditions are often used to control how a phone system responds to callers inside and outside of business hours, and during holidays.
Before we can set up a time condition call target, we need to define a set of time groups. Time groups are a list of rules against which incoming calls are checked. The rules specify a specific date or time, and a call can be routed differently if the time it comes in matches with one of the rules in a time group. Each time group can have an unlimited number of rules defined. It is useful to group similar sets of time rules together. For example, there may be one-time group for business hours in which the time that the business will be open will be defined. Another popular time group is for holidays, in which each holiday that falls on a business day is defined.

VitalPBX Reference Guide Ver. 2.4.0, December 2019
95
Time Groups
General tab
Description*, used to identify the time group, when selecting it during the setup of a time condition. This value is not parsed by VitalPBX.
Schedules section Time to Start, time, in hours and minutes, that the time group should start.
Week Day Start, day of the week that the time group should start.
Month Day Start, day of the month that the time group should start.
Month Start, month of the year that the time group should start.
Time to finish, time, in hours and minutes, that the time group should end.
Week Day Finish, day of the week that the time group should end.
Month Day Finish, day of the month that the time group should end.
Month Finish, month of the year that the time group should end.
Time Conditions Once a time group has been defined, a time condition can be set up as a call target.
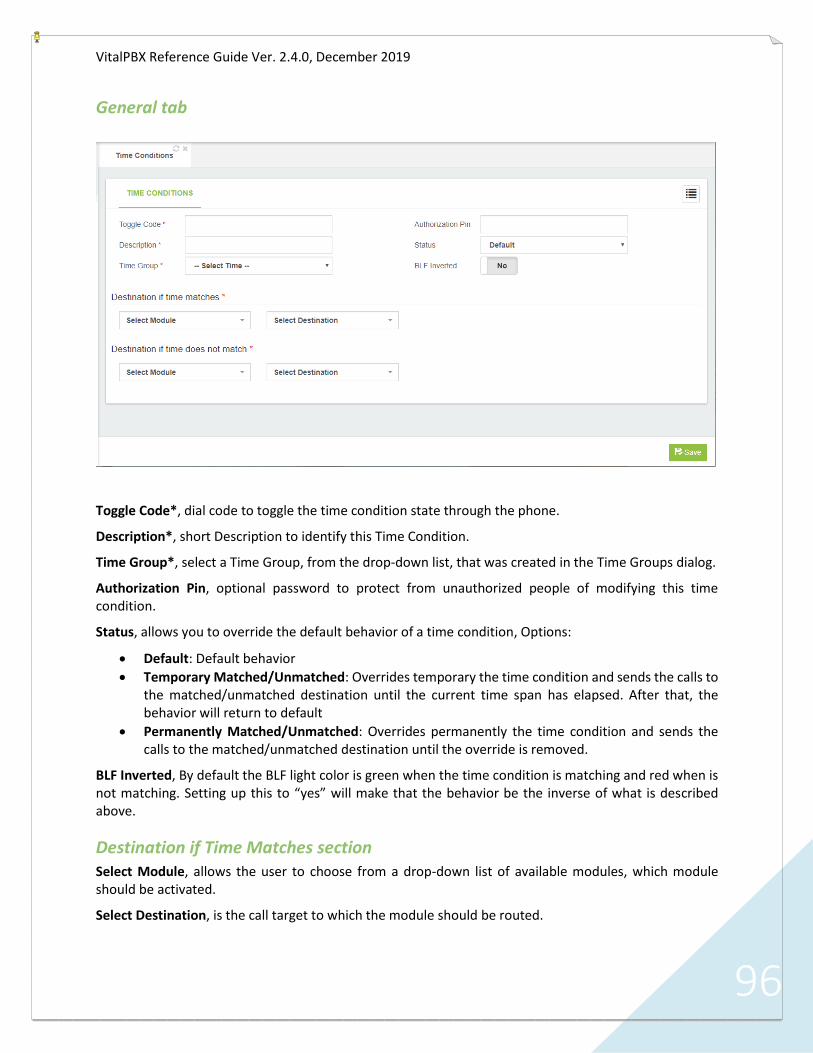
VitalPBX Reference Guide Ver. 2.4.0, December 2019
96
General tab
Toggle Code*, dial code to toggle the time condition state through the phone.
Description*, short Description to identify this Time Condition.
Time Group*, select a Time Group, from the drop-down list, that was created in the Time Groups dialog.
Authorization Pin, optional password to protect from unauthorized people of modifying this time condition.
Status, allows you to override the default behavior of a time condition, Options:
• Default: Default behavior
• Temporary Matched/Unmatched: Overrides temporary the time condition and sends the calls to the matched/unmatched destination until the current time span has elapsed. After that, the behavior will return to default
• Permanently Matched/Unmatched: Overrides permanently the time condition and sends the calls to the matched/unmatched destination until the override is removed.
BLF Inverted, By default the BLF light color is green when the time condition is matching and red when is not matching. Setting up this to “yes” will make that the behavior be the inverse of what is described above.
Destination if Time Matches section Select Module, allows the user to choose from a drop-down list of available modules, which module should be activated.
Select Destination, is the call target to which the module should be routed.

VitalPBX Reference Guide Ver. 2.4.0, December 2019
97
Destination if Time does not Match section Select Module, allows the user to choose from a drop-down list of available modules, which module should be activated.
Select Destination, is the call target to which the module should be routed.
4.6.3 Announcements This module is used for when you want the caller to hear a message, before being automatically transferred to a fixed destination.
General tab
Description*, short description to identify this Announcement.
Custom Recording, select a recording, from the drop-down list, to play in this Announcement.
Destination after playing announcement* section Select Module, allows the user to choose from a drop-down list of available modules, which module should be activated.
Select Destination, is the call target to which the module should be routed.

VitalPBX Reference Guide Ver. 2.4.0, December 2019
98
4.6.4 Languages This module is used for when you want to change the language of the voice guide in the course of a call, such as when an IVR is used and the user selects a language.
General tab
Name*, short name, must be unique.
Description, short description to identify this language.
Language, channel language to use from drop-down list.
Destination section Select Module, allows the user to choose from a drop-down list of available modules, which module should be activated.
Select Destination, is the call target to which the module should be routed.

VitalPBX Reference Guide Ver. 2.4.0, December 2019
99
4.6.5 Night Mode Night mode is used to change the conditions of an incoming route depending on whether he is active or not.
General tab
Toggle Code*, code to dial to change the night mode state via phone.
Description, short description to identify this Night Mode
Optional Password, optional password to protect this Night Mode
State, indicates whether this Night Mode is currently active.
Ignore global mode, this means that it will not be affected by the state of global night mode.
Generate Hint (indicator), generates hint for this night mode to be seen from a console or monitoring key.
Destination on Destination when Disabled* section Select Module, allows the user to choose from a drop-down list of available modules, which module should be activated.
Select Destination, is the call target to which the module should be routed.
Destination on Destination when Enabled* section Select Module, allows the user to choose from a drop-down list of available modules, which module should be activated.
Select Destination, is the call target to which the module should be routed.
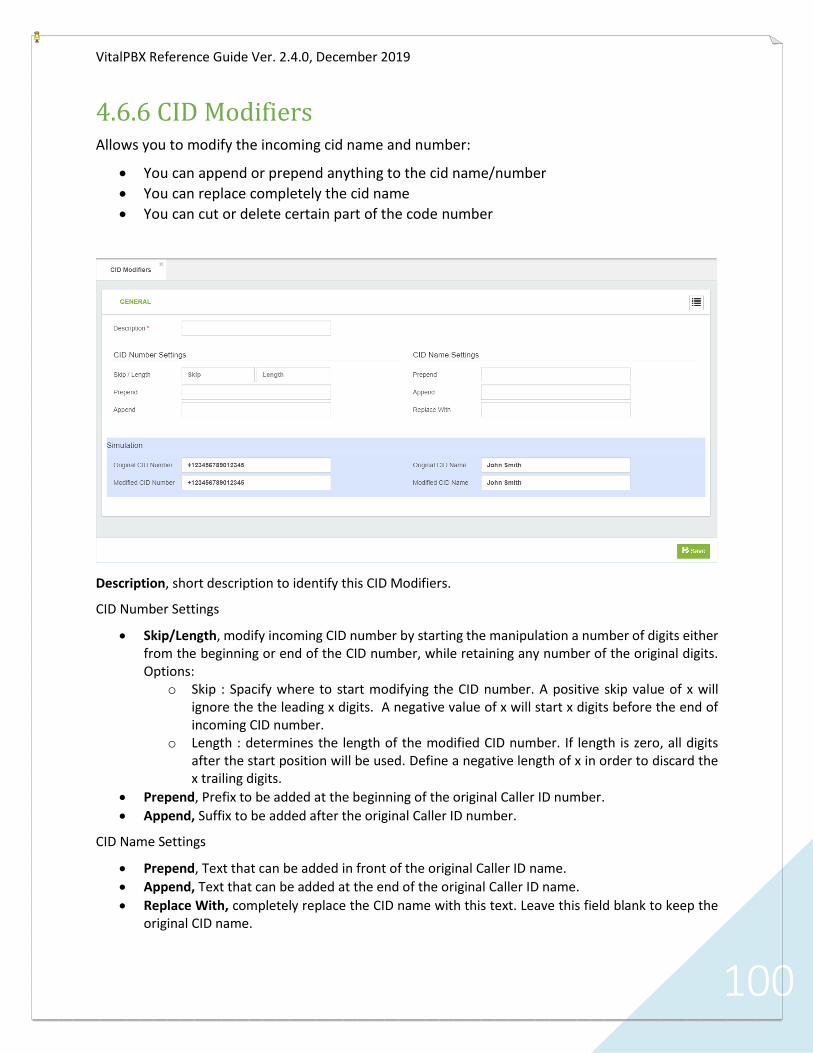
VitalPBX Reference Guide Ver. 2.4.0, December 2019
100
4.6.6 CID Modifiers Allows you to modify the incoming cid name and number:
• You can append or prepend anything to the cid name/number
• You can replace completely the cid name
• You can cut or delete certain part of the code number
Description, short description to identify this CID Modifiers.
CID Number Settings
• Skip/Length, modify incoming CID number by starting the manipulation a number of digits either from the beginning or end of the CID number, while retaining any number of the original digits. Options:
o Skip : Spacify where to start modifying the CID number. A positive skip value of x will ignore the the leading x digits. A negative value of x will start x digits before the end of incoming CID number.
o Length : determines the length of the modified CID number. If length is zero, all digits after the start position will be used. Define a negative length of x in order to discard the x trailing digits.
• Prepend, Prefix to be added at the beginning of the original Caller ID number.
• Append, Suffix to be added after the original Caller ID number.
CID Name Settings
• Prepend, Text that can be added in front of the original Caller ID name.
• Append, Text that can be added at the end of the original Caller ID name.
• Replace With, completely replace the CID name with this text. Leave this field blank to keep the original CID name.

VitalPBX Reference Guide Ver. 2.4.0, December 2019
101
4.6.7 CID Lookup With this module it is possible to consult a database or a URL with a telephone number in order
to document the call with the name of the telephone number owner.
Description, short description to identify this CID Lookup.
Source, it defines the method to get the CID name of an incoming caller.
Host, it defines the API host to make the request.
Port, it defines the port to make the request. By default, 80 for HTTP request and 443 for HTTPS request.
Auth User, it defines the user to authenticate the HTTP/HTTPS request.
Auth Password, it defines the password to authenticate the HTTP/HTTPS request
Path, it defines the script file name to execute on request. Example: cid_lookup.php
Query String, it defines the arguments needed for execute the script. The special argument value [CIDNUM] it will be replaced by caller cid number. Example: caller_num=[CIDNUM]&ctype=vip.
Secure, if is checked, the request will be through HTTPS, in other way it will be through HTTP.
VitalPBX Reference Guide Ver. 2.4.0, December 2019
102
4.7 Tools
4.7.1 Asterisk CLI
General tab From this tab you are able to access the CLI Interface.
In this dialog, you can type any valid Asterisk command. As soon as you start typing, a drop-down list of available Asterisk commands will be displayed.

VitalPBX Reference Guide Ver. 2.4.0, December 2019
103
4.7.2 Black List Is possible to define a blacklist number with a pattern and define a destination for it. Also, it is
possible to disable/enable a blacklist item through the GUI. If no destination is defined for the blacklisted item a message will be played to the caller.
General tab
CID Number, the number that you want to blacklist.
Description, a description of the number that you want to blacklist.
Enabled, Enable/Disable this CID number from the blacklist.
Destination, optional destination. If set, the caller with a CID Number that match with the configured above, will be redirected to the configured destination. If not set, a message will be played instead.

VitalPBX Reference Guide Ver. 2.4.0, December 2019
104
4.7.3 Dashboard

VitalPBX Reference Guide Ver. 2.4.0, December 2019
105
4.7.4 Log File Viewer
General In this tab you will find a tool to view log files.
• Log File, select the log file to see.
• Lines, last lines to read from the log file.

VitalPBX Reference Guide Ver. 2.4.0, December 2019
106
4.7.5 Cron Profiles In this module the profiles of the tasks to be executed are created.
General
• Description, a brief description to identify this profile of Cron.
• Template, predefined templates to configure your CRON profile settings easy and faster.
Settings
• Minute, this controls what minute of the hour the command will run on, and is between 0 and 59.
• Hour, this controls what hour the command will run on, and is specified in the 24 hour clock, values must be between 0 and 23 (0 is midnight).
• Day of Month, this is the Day of Month, that you want the command run on, e.g. to run a command on the 19th of each month, the day would be 19.
• Month, this is the month a specified command will run on, it may be specified numerically (0-12), or as the name of the month (e.g. May).
• Day of Week, this is the Day of Week that you want a command to be run on, it can also be numeric (0-7) or as the name of the day (e.g. sun).

VitalPBX Reference Guide Ver. 2.4.0, December 2019
107
4.7.6 Phone Books This module creates Phone Book that can be viewed from the Device.
• Description, brief description to identify this phone book configuration.
• Extensions, it allows you to select which extensions will be available on this Phone Book.
• Features Codes, it allows you to select which feature codes will be available on this Phone Book.
• Ring Groups, it allows you to select which ring groups will be available on this Phone Book.
• Conferences, it allows you to select which conferences will be available on this Phone Book.
• Queues, it allows you to select which queues will be available on this Phone Book.
• Phone Book URL, copy and paste this URL into your device.
Below we will show a couple of examples of how to configure the Phone Book on your device.
1.- Grandstream
• Goto PHONEBOOK
• In Phonebook Management o Enable Phonebook XML Download, Enable, use HTTP or HTTPS. o Phonebook XML Path, copy the URL.
2.- Yealink
• Goto Contacts
• In Remote Phone Book o Phone Book URL, copy the URL. o Name, descriptive name of this phonebook.

VitalPBX Reference Guide Ver. 2.4.0, December 2019
108
4.7.7 Task Manager The task manager add-on is a powerful and fully free tool that allows you to schedule any script
created by the user as a task from the GUI. The user must to place first the scripts under the
following path /var/lib/ombutel/scripts/ and give to its scripts the right permissions, those scripts
will be listed automatically in task manager module, allowing to the user associated a cron profile
to schedule the execution of its scripts. After save the task the user must to apply changes to make
effective its configurations.

VitalPBX Reference Guide Ver. 2.4.0, December 2019
109
4.8 Extras
4.8.1 Video Conference Through WebRTC technology VitalPBX includes a module which can make your video conferences, which have the following options:
• Simple to use, no downloads required. VitalPBX Meet works directly within your browser. Simply share your conference URL with others to get started.
• Low Bandwidth, multi-party video conferences work with as little as 128Kbps. Screen-sharing and audio-only conferences are possible with far less.
• Unlimited Users, there are no artificial restrictions on the number of users or conference participants. Server power and bandwidth are the only limiting factors.
• Screen Sharing, it’s easy to share your screen with others. VitalPBX Meet is ideal for on-line presentations, lectures, and tech support sessions.
• Secure Rooms, need some privacy? VitalPBX Meet conference rooms can be secured with a password in order to exclude unwanted guests and prevent interruptions.
• Share Notes, VitalPBX Meet features Etherpad, a real-time collaborative text editor that’s great for meeting minutes, writing articles, and more.
• Server, select the server where conference will be hosted.
• Room Name, a room name to join or start a new conference.
• URL, share this URL with the other participants of the video conference.
Note:
Remember to download our plugins in the Chrome web store, look for them with the word VitalPBX.

VitalPBX Reference Guide Ver. 2.4.0, December 2019
110
4.9 Virtual Faxes With this module it is possible to send faxes from the VitalPBX interface, as well as to receive faxes
in our PBX so that they can be read in the VitalPBX interface.
4.9.1 Fax Devices In this screen where fax devices are created which can be associated with an extension
Description, Short description to identify this fax device.
Associated Email, Email to receive notifications and faxes.
Class of Service, Class of service to use for routing outbound faxes.
CID Name, CID Name to use when a fax is sent.
CID Number, CID Number to use when a fax is sent.
Country Code, country code.
Area Code, area code.

VitalPBX Reference Guide Ver. 2.4.0, December 2019
111
4.9.2 Global Fax Settings
Notifications Email, Email address who will receive notifications of received messages, errors and activity summary of the Fax Server.
Device Port, the port that fax devices listen.
Country Code, country code.
Area Code, area code.
Long Distance Prefix, long distance dialing prefix (1 in US).
International Prefix, international dialing prefix (011 in US).
Allow Hosts, specifies the hosts that are allowed to send faxes.
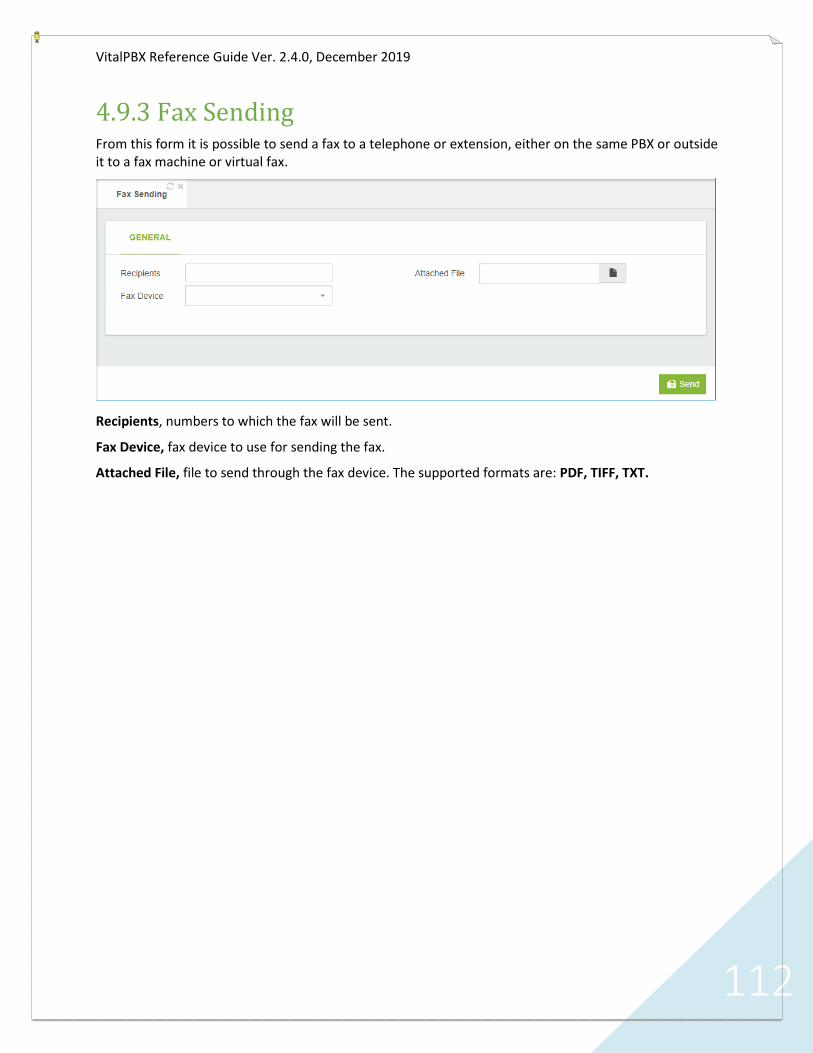
VitalPBX Reference Guide Ver. 2.4.0, December 2019
112
4.9.3 Fax Sending From this form it is possible to send a fax to a telephone or extension, either on the same PBX or outside it to a fax machine or virtual fax.
Recipients, numbers to which the fax will be sent.
Fax Device, fax device to use for sending the fax.
Attached File, file to send through the fax device. The supported formats are: PDF, TIFF, TXT.

VitalPBX Reference Guide Ver. 2.4.0, December 2019
113
4.9.4 Fax Viewer In this screen we can see the list of faxes received by a specific device with a specific date range.
Fax Device, allows you to filter the fax list per device.
Type, allows you to filter the fax list by type.
Start Date, allows you to filter the fax list by date.
End date, allows you to filter the fax list by date.
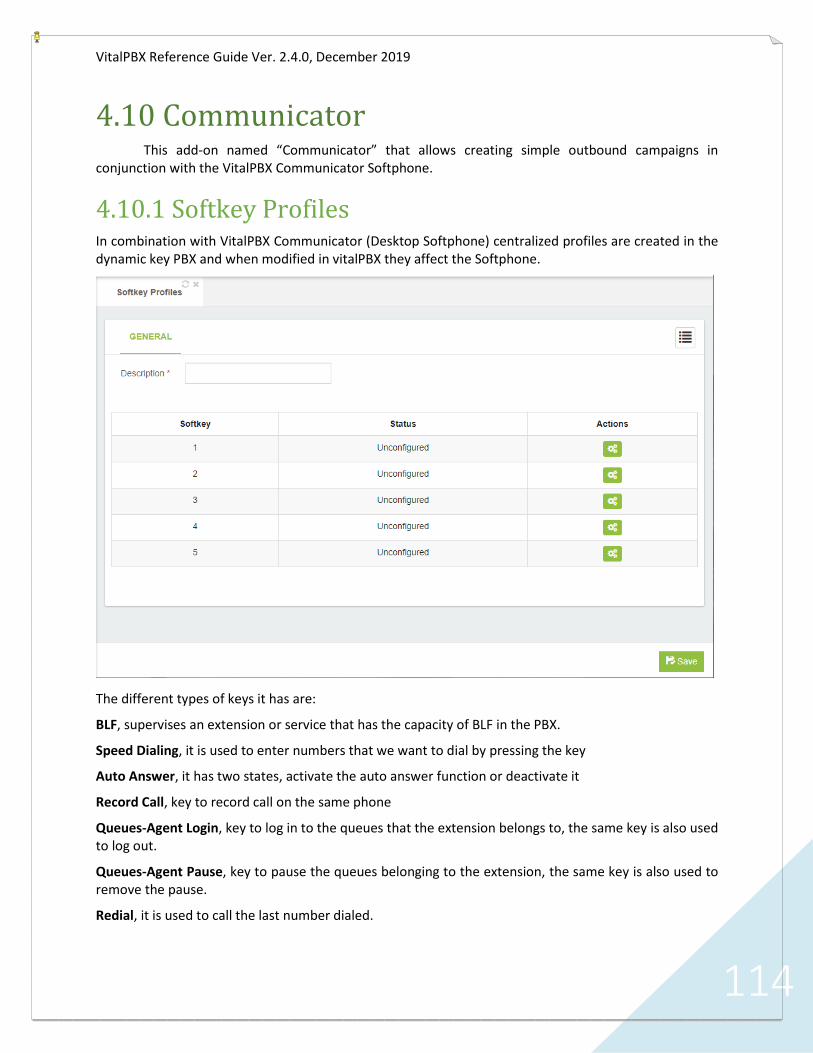
VitalPBX Reference Guide Ver. 2.4.0, December 2019
114
4.10 Communicator This add-on named “Communicator” that allows creating simple outbound campaigns in
conjunction with the VitalPBX Communicator Softphone.
4.10.1 Softkey Profiles In combination with VitalPBX Communicator (Desktop Softphone) centralized profiles are created in the dynamic key PBX and when modified in vitalPBX they affect the Softphone.
The different types of keys it has are:
BLF, supervises an extension or service that has the capacity of BLF in the PBX.
Speed Dialing, it is used to enter numbers that we want to dial by pressing the key
Auto Answer, it has two states, activate the auto answer function or deactivate it
Record Call, key to record call on the same phone
Queues-Agent Login, key to log in to the queues that the extension belongs to, the same key is also used to log out.
Queues-Agent Pause, key to pause the queues belonging to the extension, the same key is also used to remove the pause.
Redial, it is used to call the last number dialed.

VitalPBX Reference Guide Ver. 2.4.0, December 2019
115
Account, it is used to change the softphone registration account, very useful for sharing the same computer with several agents.
Dialer, it is used to activate / deactivate the Dialer campaign.
Description, main key description.
Idle Value, value that is executed when the key is pressed for the first time. If it were a BLF, for example for the do not disturb action, this value would be DND_EXT (EXT -> Extension). In the cases of Account, Redial, Dialer Record Call and Auto Answer it is left blank
Active value, value that is executed when the key has already been pressed. If it were a BLF, for example for the do not disturb action, this value would be DND_EXT (EXT -> Extension). In the cases of Account, Redial, Dialer Record Call and Auto Answer it is left blank
Idle Label, short text to show in normal state. Maximum 7 characters.
Active Label, short text to show in active state. Maximum 7 characters.
Idle Title, description to show in normal state.
Active Title, description to show in active state.

VitalPBX Reference Guide Ver. 2.4.0, December 2019
116
4.10.2 Pause Profiles For statistics, the cause of pause of the agents is often necessary, so it is necessary to create pause cause profiles that can be synchronized with VitalPBX Communicator.
The options to consider are the following,
• Description, brief profile description.
• Causes, allows you to setup different cause of pauses separated by comma.
• Pause Profile URL, URL to retrieve the pause profile settings, this URL is configured in VitalPBX Communicator.

VitalPBX Reference Guide Ver. 2.4.0, December 2019
117
4.10.3 Campaigns Result Profiles To be able to quantify the result of the campaign it is necessary that each call be assigned a result of it, this is where the results profiles are created.
The options to configure are the following:
• Description*, brief description to identify this profile.
• Results o Result, brief description of the result of the call. o Type
▪ Positive End, it means that the management was successful and that the desired person was contacted.
▪ Negative End, it means that the management was not successful and that the desired person could not be reached.
▪ Rescheduled, the call is scheduled to call later or another day.

VitalPBX Reference Guide Ver. 2.4.0, December 2019
118
4.10.4 Campaigns Now we are going to create the marketing campaign for which it is necessary to fill in the following information.
Description, Short campaign description.
Result Profile, it allows you to select a profile with the available results during a campaign.
Contacts List, a CSV file with the list of contacts to be added on this campaign.
Wrap-up Time, represents the time spent by an agent doing After Call Work (ACW) once they have concluded an interaction.
Enable, if set to no, this campaign will be not listed on communicator softphones.
Download CSV Format, if we want to have a sample of the format of the list to upload in Contacts List press this button.

VitalPBX Reference Guide Ver. 2.4.0, December 2019
119
5. Reports
5.1 CDR Reports
5.1.1 CDR Filters
General tab
Description*, short description for this filter.
Duration, call duration range in seconds.
Talk Time, talk time range in seconds.
Add Search Condition section Clicking on the Add button allows you add additional search conditions.
Condition, determines whether the condition is enabled or not. AND → it means that this value has to be met in conjunction with the previous one and so on, OR → means that this value or the previous one must be met.
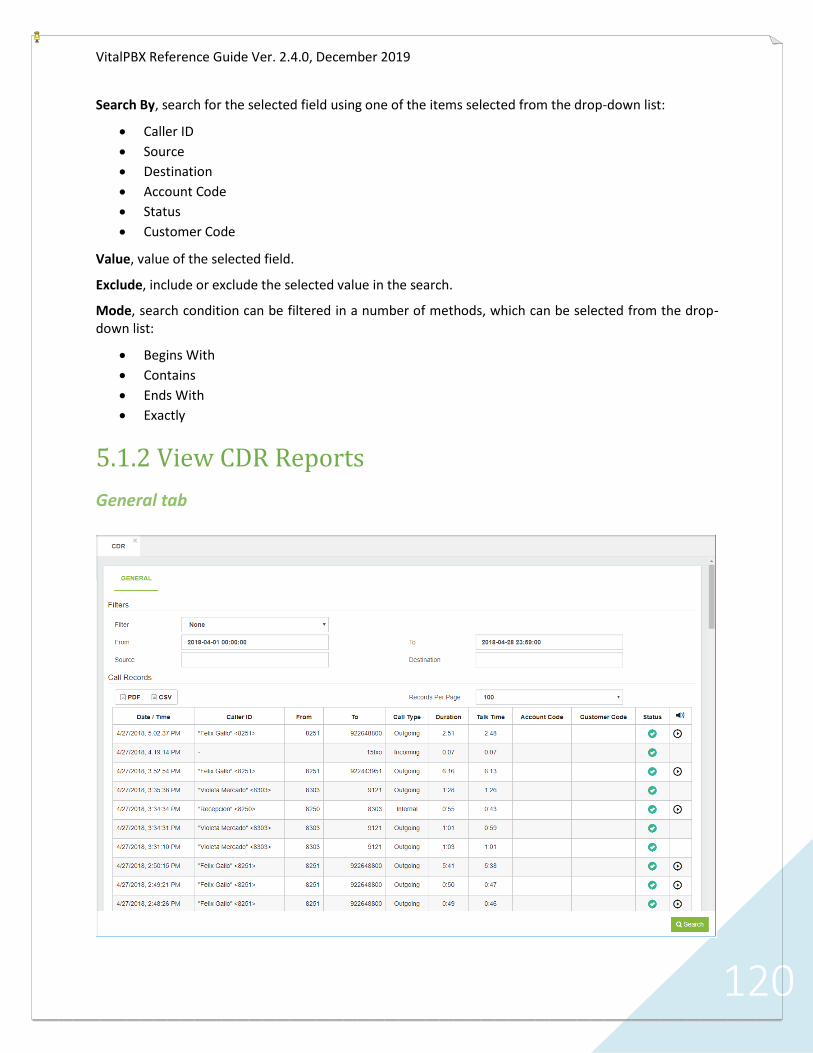
VitalPBX Reference Guide Ver. 2.4.0, December 2019
120
Search By, search for the selected field using one of the items selected from the drop-down list:
• Caller ID
• Source
• Destination
• Account Code
• Status
• Customer Code
Value, value of the selected field.
Exclude, include or exclude the selected value in the search.
Mode, search condition can be filtered in a number of methods, which can be selected from the drop-down list:
• Begins With
• Contains
• Ends With
• Exactly
5.1.2 View CDR Reports
General tab

VitalPBX Reference Guide Ver. 2.4.0, December 2019
121
Filters section Filter, filter, defined in Report Filters dialog, to be used in the report.
From, include records starting from this date and time.
To, include records ending by this date and time.
Source, call source.
Destination, dialed number.
Reports section Record Per Page, set the number of records that should be displayed on each page.
PDF, CSV, export the report in PDF or CSV.
5.2 PBX Reports
5.2.1 Status Show the status of:
• Channels, currently busy channels
• Registrations, trunks currently registered
• Peers, Extensions currently registered
• Hints, Hints currently created
• Voicemail, Voicemail currently created with their number of messages in the mailbox
• Queues, Queues currently created with their members.
General tab

VitalPBX Reference Guide Ver. 2.4.0, December 2019
122
5.3 IVR Stats
5.3.1 IVR Stats Show the statistics of a specific IVR:
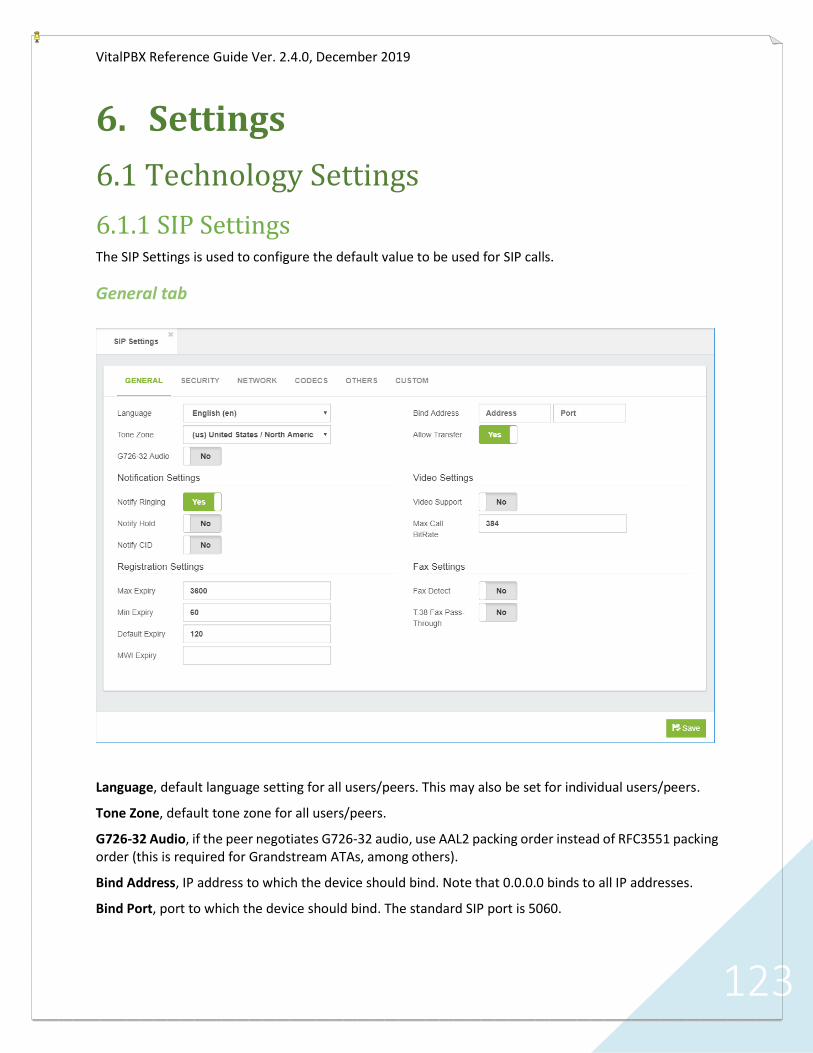
VitalPBX Reference Guide Ver. 2.4.0, December 2019
123
6. Settings
6.1 Technology Settings
6.1.1 SIP Settings The SIP Settings is used to configure the default value to be used for SIP calls.
General tab
Language, default language setting for all users/peers. This may also be set for individual users/peers.
Tone Zone, default tone zone for all users/peers.
G726-32 Audio, if the peer negotiates G726-32 audio, use AAL2 packing order instead of RFC3551 packing order (this is required for Grandstream ATAs, among others).
Bind Address, IP address to which the device should bind. Note that 0.0.0.0 binds to all IP addresses.
Bind Port, port to which the device should bind. The standard SIP port is 5060.

VitalPBX Reference Guide Ver. 2.4.0, December 2019
124
Allow Transfer, disables all transfers (unless specifically enabled in peers or users). Default setting is enabled. Note that the dial options 't' and 'T' are not related as to whether SIP transfers are allowed or not.
Notification Settings section Notify Ringing, controls whether busy subscribers get sent a RINGING message when another call is sent.
Notify Hold, notify subscribers that are in HOLD state.
Notify CID, controls whether caller ID information is sent together with dialog-info+xml notifications (supported by Snom phones).
Video section Video Support, turns on or off support for SIP video. You need to turn this on to get any video support at all.
Max Call Bitrate, maximum bitrate for video calls (default 384 kb/s)
Registration Settings section Max Expiry, maximum allowed time, in seconds, for incoming registrations.
Min Expiry, minimum time, in seconds, for registrations.
Default Expiry, default length of incoming/outgoing registration.
MWI Expiry, expiry time for outgoing MWI subscriptions.
Fax Settings section Fax Detect, When active, enables (both CNG and T.38) detection of inbound faxes.
T.38 Fax Pass-Through, enables T.38 with FEC error correction. Overrides the other values provided for the endpoint, so we can send 400 byte T.38 FAX packets to it.

VitalPBX Reference Guide Ver. 2.4.0, December 2019
125
Security tab
Allow Guest, allow or reject guest calls. Do not activate this option unless you are sure what you are doing. By activating this option, you are allowing anyone to make a call to your PBX without having to register in it
Failure Events, generate manager peer-status events when peer cannot authenticate with Asterisk. Peer-status will be rejected.
Always Reject, when rejecting an incoming INVITE or REGISTER call, for any reason, always reject with an identical response. This reduces the ability of an attacker to scan for valid SIP usernames.
Allow Msg Request, disable this option to reject all MESSAGE requests outside of a call. By default, this option is enabled, enabling MESSAGE requests to be passed to the dial-plan.
Disallow Dynamic Hosts, disallow all dynamic hosts from registering with any IP address used for statically defined hosts. This helps avoid the configuration error of allowing users to register with the same address as a SIP provider.
Auto Domain, this is an important setting with respect to SIP domains. When it is set to "no", Asterisk will only recognise domains that were explicitly defined or will simply not support SIP domains at all (if there were no explicitly defined domains). If you set it to “yes” please be aware that Asterisk will create a domain based on the external IP address of your firewall as specified in the “externip” parameter. This might represent a compromise on your SIP security. If you don’t want a domain to be created based on “externip”, then set to “no” and explicitly add domains for your local (internal) IP address and for any other domains you require.
Allow External Domains, tells Asterisk whether or not to allow SIP-to-SIP calls to non-local domains.
SIP Domains, when used, they provide enhanced security because registrations will only be accepted when they come from an IP phone (or other SIP client) that is using one of the recognised domains. When

VitalPBX Reference Guide Ver. 2.4.0, December 2019
126
Asterisk knows the identity of all its local SIP domains, this allows a higher level of security in the routing of SIP-to-SIP calls too.
NETWORK tab
General section TCP Ennable, use TCP.
TCP Bind Address, IP address and optional port to bind for this transport.
Enabled TLS, enable TLS
TLS Bind Address, IP address and optional port to bind for this transport.
TLS Do Not Verify, if set to yes, don’t verify the servers certificate when acting as a client.
TLS Certificate, the server’s certificate file.
NAT section NAT, NAT (Network Address Translation) is a technology most commonly used by firewalls and routers to allow multiple devices on a LAN with “private” IP addresses to share a single public IP address. A private IP address is an address, which can only be addressed from within the LAN, but not from the Internet outside the LAN.

VitalPBX Reference Guide Ver. 2.4.0, December 2019
127
Options:
• No : Do no special NAT handling other than RFC3581
• Force : Pretend there was an rport parameter even if there wasn’t.
• Comedia : Send media to the port Asterisk received it from regardless of where the SDP says to send it.
• Auto Force : Set the force_rport option if Asterisk detects NAT.
• Auto Comedia : Set the comedia option if Asterisk detects NAT.
External Address, specifies a static address, or address[:port] combination, to be used in SIP and SDP messages.
External Host, alternatively you can specify an external host, and Asterisk will perform DNS queries periodically. Not recommended for production environments, Use "External Address" instead.
External Refresh, how often, in seconds, to refresh the "External Host," if used.
Local Networks section IP Address, valid IP address to be used.
Network Mask, network mask to use.
Codecs tab
Preferred Codec Only, respond to a SIP invite with the single most preferred codec rather than advertising all codec capabilities. This limits the choice of codec by the remote side to exactly the codec that we prefer.
Auto Framing, set packetization based on the remote endpoint's (ptime) preferences.

VitalPBX Reference Guide Ver. 2.4.0, December 2019
128
Available Codecs, list of available codecs.
Selected Codecs, list of selected codecs.
Note:
Click on + icons to move available codecs to list of selected codecs. Click on the x icon to remove codecs from the list of selected codecs. You can also select or remove all codecs by clicking on either the Add All or Remove All buttons.
Others tab
General section SRV Lookups, enables or disables DNS SRV lookups on outbound calls
Qualify Frequency, determines how often, in seconds, to check that the host is alive, as reported, in milliseconds, with sip show settings command.
RPT Timers section RPT Timeout, sets the time, in seconds, to terminate the call if there is no RTP or RTCP activity on the audio channel.
RPT Hold Timeout, sets the time, in seconds, to terminate the call if there is no RTP or RTCP activity on the audio channel.

VitalPBX Reference Guide Ver. 2.4.0, December 2019
129
SIP Debugging section SIP Debug, toggle SIP debugging, from the moment the channel loads this configuration.
Record History, toggles recording of SIP history.
Dump History, toggles dump SIP history at end of a SIP dialogue. SIP history is output to the DEBUG logging channel.
Jitter Buffer section Enabled, enables or disables the use of a jitter-buffer on the receiving side of a SIP channel.
Force, forces the use of a jitter-buffer on the receiving side of a SIP channel.
Max Size, maximum length, in milliseconds, of the jitter-buffer.
Resynchronized, gap in the frame timestamps, in milliseconds, beyond which the jitter-buffer will be resynchronized.
Jitterbuffer Implementation, used on the receiving side of a SIP channel. There is a choice of two options:
• Fixed: size always equals to jb-max-size
• Adaptive: variable size, actually the new jb of IAX2.
Target Extra, sets the time, in milliseconds, the new jitter buffer will pad its size. This option only affects the jb when 'jbimpl = adaptive' is set.
SIP QoS section SIP TOS, sets the TOS for SIP packets.
Audio TOS, sets the TOS for RTP audio packets.
Video TOS, Sets the TOS for RTP video packets.
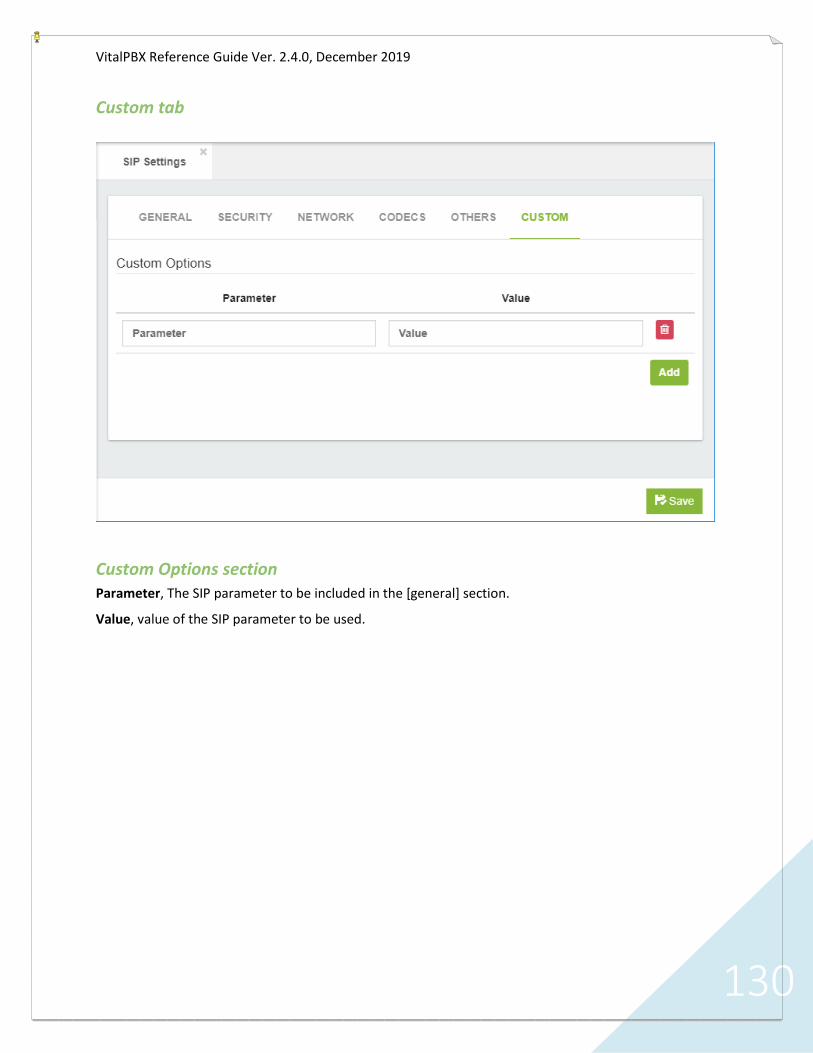
VitalPBX Reference Guide Ver. 2.4.0, December 2019
130
Custom tab
Custom Options section Parameter, The SIP parameter to be included in the [general] section.
Value, value of the SIP parameter to be used.
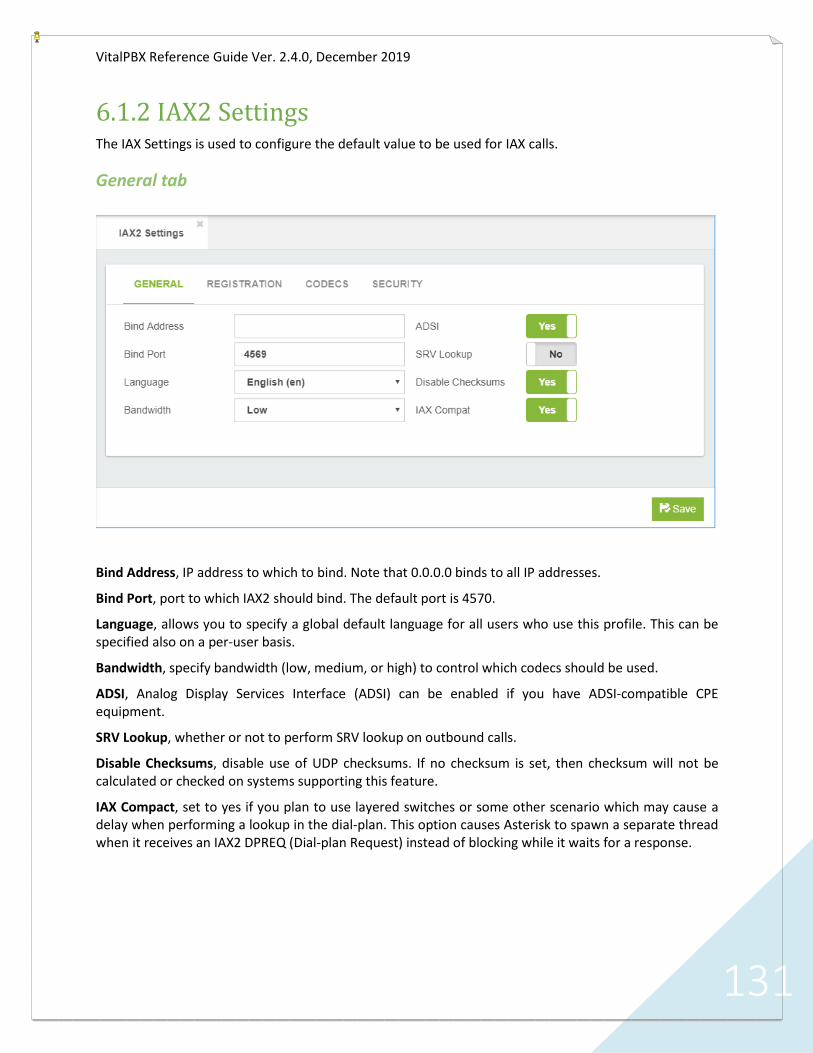
VitalPBX Reference Guide Ver. 2.4.0, December 2019
131
6.1.2 IAX2 Settings The IAX Settings is used to configure the default value to be used for IAX calls.
General tab
Bind Address, IP address to which to bind. Note that 0.0.0.0 binds to all IP addresses.
Bind Port, port to which IAX2 should bind. The default port is 4570.
Language, allows you to specify a global default language for all users who use this profile. This can be specified also on a per-user basis.
Bandwidth, specify bandwidth (low, medium, or high) to control which codecs should be used.
ADSI, Analog Display Services Interface (ADSI) can be enabled if you have ADSI-compatible CPE equipment.
SRV Lookup, whether or not to perform SRV lookup on outbound calls.
Disable Checksums, disable use of UDP checksums. If no checksum is set, then checksum will not be calculated or checked on systems supporting this feature.
IAX Compact, set to yes if you plan to use layered switches or some other scenario which may cause a delay when performing a lookup in the dial-plan. This option causes Asterisk to spawn a separate thread when it receives an IAX2 DPREQ (Dial-plan Request) instead of blocking while it waits for a response.
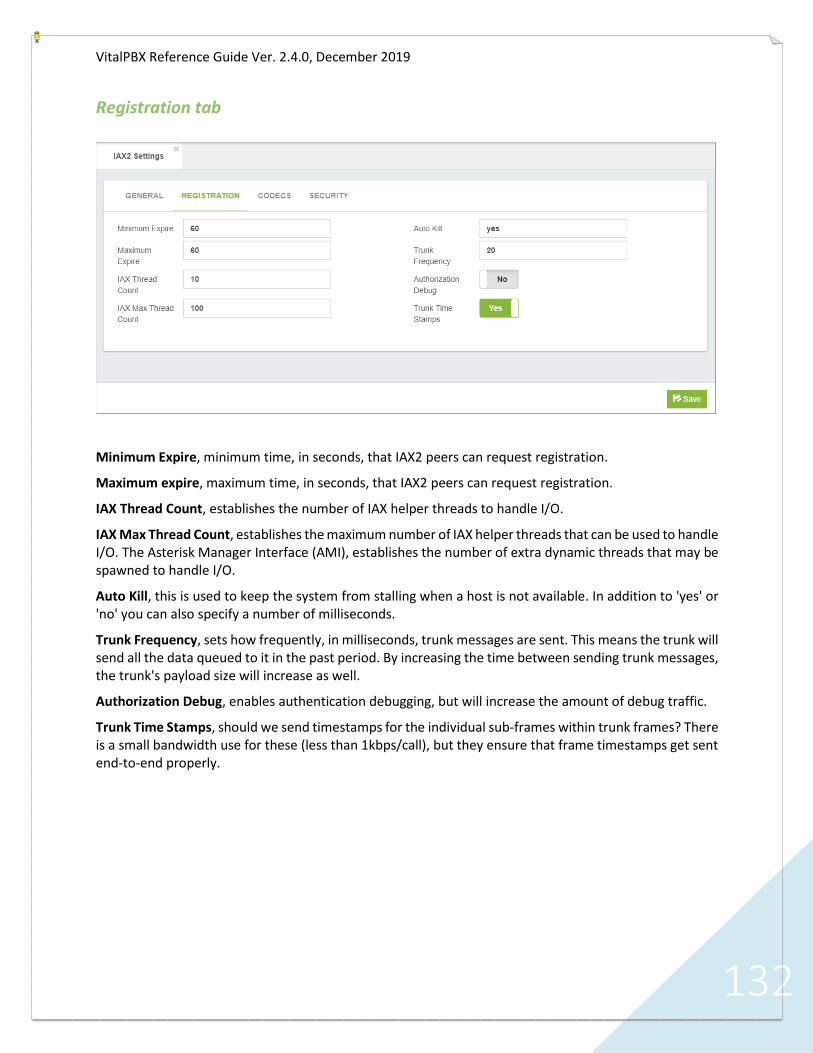
VitalPBX Reference Guide Ver. 2.4.0, December 2019
132
Registration tab
Minimum Expire, minimum time, in seconds, that IAX2 peers can request registration.
Maximum expire, maximum time, in seconds, that IAX2 peers can request registration.
IAX Thread Count, establishes the number of IAX helper threads to handle I/O.
IAX Max Thread Count, establishes the maximum number of IAX helper threads that can be used to handle I/O. The Asterisk Manager Interface (AMI), establishes the number of extra dynamic threads that may be spawned to handle I/O.
Auto Kill, this is used to keep the system from stalling when a host is not available. In addition to 'yes' or 'no' you can also specify a number of milliseconds.
Trunk Frequency, sets how frequently, in milliseconds, trunk messages are sent. This means the trunk will send all the data queued to it in the past period. By increasing the time between sending trunk messages, the trunk's payload size will increase as well.
Authorization Debug, enables authentication debugging, but will increase the amount of debug traffic.
Trunk Time Stamps, should we send timestamps for the individual sub-frames within trunk frames? There is a small bandwidth use for these (less than 1kbps/call), but they ensure that frame timestamps get sent end-to-end properly.

VitalPBX Reference Guide Ver. 2.4.0, December 2019
133
Codecs tab
Codec Priority, controls the codec negotiation of an inbound IAX2 call. There are a number of options:
• Caller: consider the preferred order of the caller before considering the preferred order of the
host.
• Host: consider the preferred order of the host before considering the preferred order of the
caller.
• Disabled: disable the consideration of codec preference altogether.
• Reqonly: Behaves in a similar manner as the disabled option. The call will only be accepted if the
requested format is available.
Codecs Selection section Available Codecs, list of available codecs.
Selected Codecs, list of selected codecs.
Note: Click on + icons to move available codecs to list of selected codecs. Click on the x icon to remove codecs from the list of selected codecs. You can also select or remove all codecs by clicking on either the Add All or Remove All buttons.

VitalPBX Reference Guide Ver. 2.4.0, December 2019
134
Security tab
Call Token Optional, call token validation can be set as optional for a single IP address or a IP address range by enabling this option. This is a global option.
Max Call Numbers, this option limits the number of call numbers allowed for each individual remote IP address. Once an IP address reaches its call number limit, no more new connections are allowed until an existing connection is closed. This option can be used in a peer definition as well, but only takes effect for the IP of a dynamic peer after it completes registration
Max Non-validated Call Nos, they parameter is used to set the combined number of call numbers that can be allocated for connections where call token validation has been disabled. Unlike the Max Call Numbers option, this limit is not separate for each individual IP address. Any connection resulting in a non-call token validated call number being allocated contributes to this limit.
Call Number Limits section
• IP Address, valid IP address to be used.
• Mask, network mask to use.
• Limit, limits the number of call numbers allowed for this group of IP addresses. Once an IP
address group reaches its call number limit, no more new connections are allowed until an
existing connection is closed.

VitalPBX Reference Guide Ver. 2.4.0, December 2019
135
6.1.3 PJSIP Settings The PJSIP Settings is used to configure the default value to be used for PJSIP calls.
General tab
Debug, Enable/Disable SIP debug logging.
Bind, IP Address and optional port to bind to for this transport.
TLS Bind, IP Address and optional port over TLS protocol to bind to for this transport.
Certificate, path to certificate file to present to peer.
SSL Method, method of SSL transport (TLS ONLY).
Timer T1, timer T1 is the base for determining how long to wait before retransmitting requests that receive no response when using an unreliable transport (e.g. UDP).
Timer B, timer B determines the maximum amount of time to wait after sending an INVITE request before terminating the transaction.
Automatic Switching, disable automatic switching from UDP to TCP transports if outgoing request is too large.
Verify Client, require verification of client certificate (TLS ONLY).
Verify Server, require verification of server certificate (TLS ONLY).
Nat Settings Local Net, network to consider local (used for NAT purposes).

VitalPBX Reference Guide Ver. 2.4.0, December 2019
136
External Media Address, external IP address to use in RTP handling.
External Signal Address, external address for SIP signaling.
6.1.4 Profiles Profiles are sets of characteristics that are generally repeated when creating extensions and / or devices. Instead of repeating in the forms and dial-plan these data we create profiles that group this data.
General tab There are four profile type options:
• SIP
• PJSIP
• IAX2
• Telephony (BRI, E1 PRI, E1 R2, FXO, FXS, T1 CAS, T1 PRI)
Name, user-defined name for the profile.
Description, short description to identify this profile.
Network section Host, the host parameter specifies the hostname or IP address of a SIP peer or user. It is used to make both outbound calls and to find the peer when an inbound call is received. Host can take the following formats:

VitalPBX Reference Guide Ver. 2.4.0, December 2019
137
• Domain Name / Hostname e.g. sip.zxv.com
• IP Address e.g. 234.23.42.103
• Dynamic, which means the phones must register.
Type, determines their roles within Asterisk. The type options are:
• Peer: Peers handle both inbound and outbound calls and are matched by IP/port. When there
are incoming calls from the peer, the IP address must match in order for the invitation to be
accepted.
• User: Asterisk users handle inbound calls only, which means that that they can call Asterisk, but
Asterisk can't call them. The callers must be authenticated by their authorization information
(username and secret).
• Friend: Asterisk will create the entity as both a friend and a peer. Asterisk will accept calls from
friends just as it would for users, requiring only that the authorization matches, rather than the
IP address.
Qualify Frequency, how often to check for the host to be up in seconds and reported in milliseconds with sip show settings.
Qualify Timeout, setting to yes (equivalent to 2000 msec) will send an OPTIONS packet to the endpoint periodically (default every minute). Used to monitor the health of the endpoint. If delays are longer then the qualify time, the endpoint will be taken offline and considered unreachable. Can be set to a value which is the msec threshold. Setting to no will turn this off. Can also be helpful to keep NAT pinholes open.
Transport, set the default transports. The order determines the primary default transport.
ICE, whether to Enable ICE Support. Defaults to no. ICE (Interactive Connectivity Establishment) is a protocol for Network Address Translator (NAT) traversal for UDP-based multimedia sessions established with the offer/answer model. This option is commonly enabled in WebRTC setups.
RTP Encryption, enables sRTP voice encryption.
AVPF, enable inter-operability with media streams using the AVPF RTP profile.
Direct RTP, enables direct sending of RTP between call participants
Caller ID section Send Remote Party ID, add remote party ID header to SIP INVITEs.
Trust Remote Party ID, assume that the remote party ID header is correct.

VitalPBX Reference Guide Ver. 2.4.0, December 2019
138
6.1.5 Telephony Settings
General Tab
Tone Zone, default tone zone for all users/peers.
6.1.6 Dial Profiles All dialing options are grouped in a Dial Profile.
General tab
Name, name to identify this profile.
Allow Transfer By, allow the called/calling party to transfer the calling party by sending the DTMF sequence defined in feature codes.
Allow Park By, allow the called/calling party to enable parking of the call by sending the DTMF sequence defined for “Park Call” in feature codes.
MoH Class, provide hold music to the calling party until a requested channel answers.
VitalPBX Reference Guide Ver. 2.4.0, December 2019
139
Call Screening, before ringing your extension, the caller is asked to supply an introduction. The application asks them: “After the tone, say your name”. They are allowed 4 seconds of introduction.
Ringing Tone, indicate ringing to the calling party, even if the called party isn’t actually ringing. Pass no audio to the calling party until the called channel has answered.
Custom Options, allows you to define custom dial parameters that have not been included. Examples of some common dial options:
• D (called:calling) - send the specified digits after the called party has answered, but before the
call gets bridged. The 'called' digits are sent to the called party, and the 'calling' digits are sent to
the calling party. Both arguments can be used alone.
• H - allow the called party to hang up by using the In-Call Asterisk Disconnect code (default value
is **)
• i - any forwarding requests that may be received on this dial attempt will be ignored.
• I - any connected line update requests or any redirecting party update requests that may be
received on this dial attempt will be ignored.
• r - generate ringing to the calling party, even if the called party is not actually ringing. Pass no
audio to the calling party until the called channel has answered.
• S(x) - hang up the call x seconds after the called party has answered the call.
• t - allow the called party to transfer the calling party by using the In-Call Asterisk Blind Transfer
code (default value is ##)
• T - allow the calling party to transfer the called party by using the In-Call Asterisk Blind Transfer
code (default value is ##)
• w - allow the called party to enable recording of the call by using the In-Call Asterisk Toggle Call
Recording code (default value is *1)
• W - allow the calling party to enable recording of the call by using the In-Call Asterisk Toggle Call
Recording code (default value is *1)
Warning! Enabling transfer by caller may allow an outside caller to exploit the PBX by transferring their calls to another external destination when a too permissive Class of Service is defined for the trunk.

VitalPBX Reference Guide Ver. 2.4.0, December 2019
140
6.2 Voicemail Settings
6.2.1 Voicemail Settings
General In this tab you will find the information about Voicemail Settings.
Max Message Length, maximum length of a voicemail message in seconds. Leave empty for No Limit.
Min Message Length, minimum length of a voicemail message in seconds for the message to be kept. Leave empty for No Minimum.
Greetings Length, maximum length of greetings in seconds.
Max Silence, how many seconds of silence before we end the recording.
Max Login Attempts, max number of failed login attempts.
Backup Deleted, maximum number of messages allowed in the Deleted folder.
Max Messages, maximum number of messages per folder. If set to 0, a mailbox will be greetings-only.
Operator Number, Extension to dial on pressing 0 while listening a voicemail.
Move Heard Msg, move heard messages to the Old folder automagically.
Force Name, forces a new user to record their name. A new user is determined by the password being the same as the mailbox number.
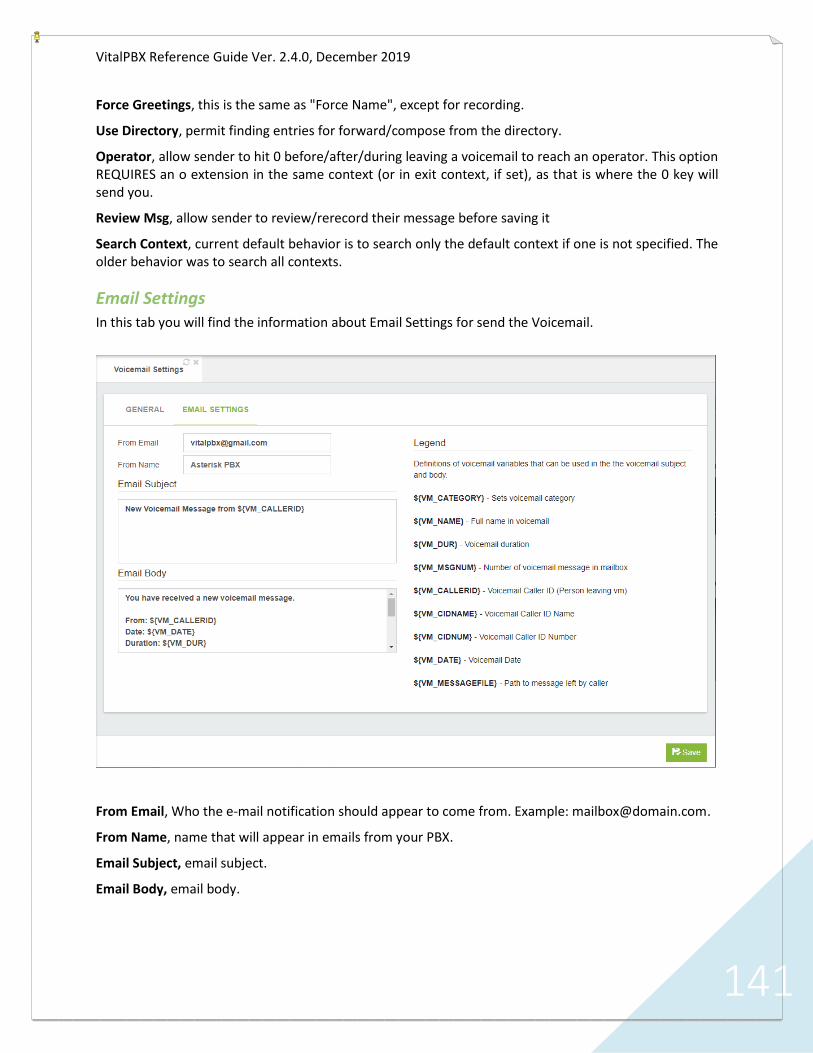
VitalPBX Reference Guide Ver. 2.4.0, December 2019
141
Force Greetings, this is the same as "Force Name", except for recording.
Use Directory, permit finding entries for forward/compose from the directory.
Operator, allow sender to hit 0 before/after/during leaving a voicemail to reach an operator. This option REQUIRES an o extension in the same context (or in exit context, if set), as that is where the 0 key will send you.
Review Msg, allow sender to review/rerecord their message before saving it
Search Context, current default behavior is to search only the default context if one is not specified. The older behavior was to search all contexts.
Email Settings In this tab you will find the information about Email Settings for send the Voicemail.
From Email, Who the e-mail notification should appear to come from. Example: [email protected].
From Name, name that will appear in emails from your PBX.
Email Subject, email subject.
Email Body, email body.
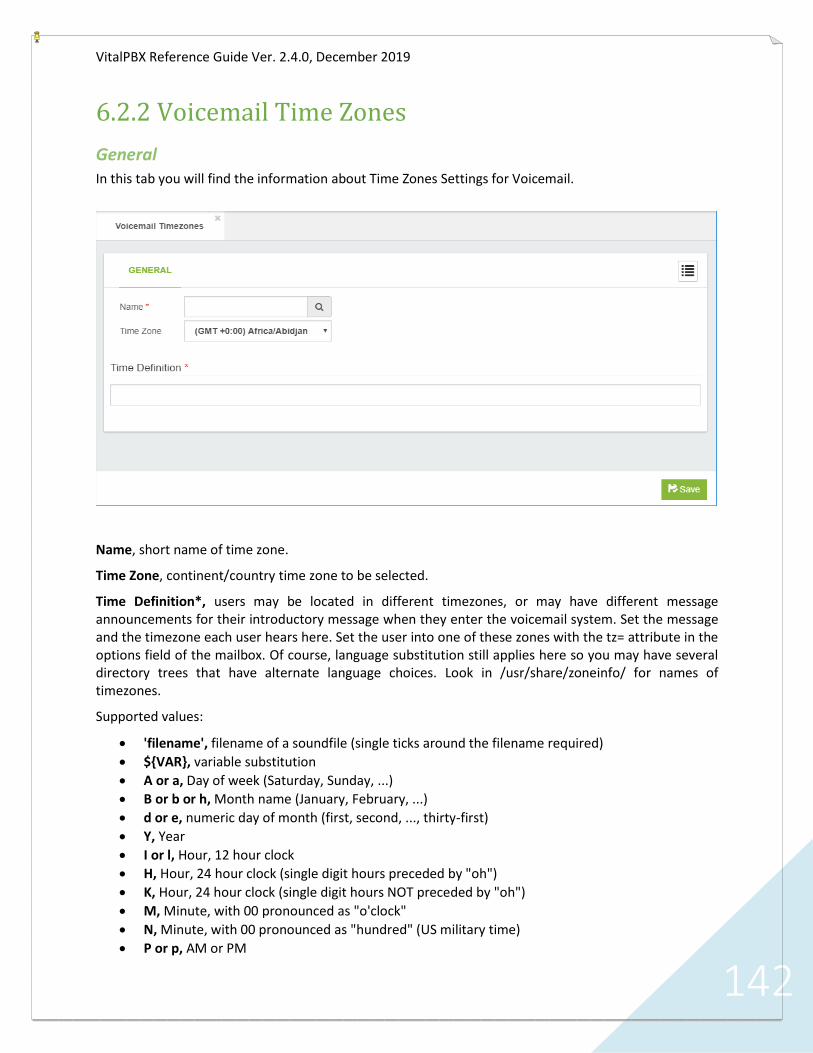
VitalPBX Reference Guide Ver. 2.4.0, December 2019
142
6.2.2 Voicemail Time Zones
General In this tab you will find the information about Time Zones Settings for Voicemail.
Name, short name of time zone.
Time Zone, continent/country time zone to be selected.
Time Definition*, users may be located in different timezones, or may have different message announcements for their introductory message when they enter the voicemail system. Set the message and the timezone each user hears here. Set the user into one of these zones with the tz= attribute in the options field of the mailbox. Of course, language substitution still applies here so you may have several directory trees that have alternate language choices. Look in /usr/share/zoneinfo/ for names of timezones.
Supported values:
• 'filename', filename of a soundfile (single ticks around the filename required)
• ${VAR}, variable substitution
• A or a, Day of week (Saturday, Sunday, ...)
• B or b or h, Month name (January, February, ...)
• d or e, numeric day of month (first, second, ..., thirty-first)
• Y, Year
• I or l, Hour, 12 hour clock
• H, Hour, 24 hour clock (single digit hours preceded by "oh")
• K, Hour, 24 hour clock (single digit hours NOT preceded by "oh")
• M, Minute, with 00 pronounced as "o'clock"
• N, Minute, with 00 pronounced as "hundred" (US military time)
• P or p, AM or PM

VitalPBX Reference Guide Ver. 2.4.0, December 2019
143
• Q, "today", "yesterday" or ABdY (*note: not standard strftime value)
• Q, "" (for today), "yesterday", weekday, or ABdY (*note: not standard strftime value)
• R, 24 hour time, including minute
Examples:
eastern=America/New_York|'vm-received' Q 'digits/at' IMp
central=America/Chicago|'vm-received' Q 'digits/at' IMp
central24=America/Chicago|'vm-received' q 'digits/at' H N 'hours'
military=Zulu|'vm-received' q 'digits/at' H N 'hours' 'phonetic/z_p'
european=Europe/Copenhagen|'vm-received' a d b 'digits/at' HM

VitalPBX Reference Guide Ver. 2.4.0, December 2019
144
6.3 PBX Settings
6.3.1 System General
General Tab In this tab you will find the information about PBX Settings.
Extension Settings
• Default Language, language to select by default when a new extension is being created.
• Device Prefix, prefix to append by default to devices name.
• Enable Voicemail, if enabled, the voicemail will be enabled automatically each time you create
an extension.
• Enable Portal, if enabled, the portal will be enabled automatically each time you create an
extension.
• Create Hints, if enabled, the hints will be enabled automatically each time you create an
extension.
Dial-Plan Settings
• Default Ring Timer, time extensions by default ringing.
• Transfer Digit Timeout, number of seconds to wait between digits when transferring a call
(default is 3 seconds).
• Features Digit Timeout, max time (ms) between digits for feature activation (default is 1000
ms).

VitalPBX Reference Guide Ver. 2.4.0, December 2019
145
• Recording Format, file format for calls recording.
• Recording Script, Script to be executed when the recording is over. The script parameters can be
defined as space separated sequence of strings like ^{name}, where name can be any channel or
MixMonitor variable. For example, ^{UNIQUEID} - channel ID, ^{MIXMONITOR_FILENAME} -
recording file name.
GUI Settings
• Show Login Panel, if set to yes, it shows a panel with the sonata add-ons when these are installed.
System Prompts It allows to customize certain voice guides of the system, at the moment only a couple of options are possible.
• DND, allows you to define a custom prompt that will be reproduced when an extension has active the DND.
• Blacklisted, allows you to define a custom prompt that will be reproduced to callers who are blacklisted.

VitalPBX Reference Guide Ver. 2.4.0, December 2019
146
System Directories Tab
Asterisk Directories
• Asterisk AGI Directory, Asterisk AGI directory.
• Asterisk Directory, home Asterisk directory.
• Asterisk Modules Directory, Asterisk modules directory.
• Asterisk Libraries Directory, Asterisk libraries directory.
• Asterisk Log Directory, Asterisk log directory.
• Asterisk Sound Directory, Asterisk sound directory.
• Asterisk Spool Directory, Asterisk spool (recording) directory

VitalPBX Reference Guide Ver. 2.4.0, December 2019
147
6.3.2 Asterisk Manager Users
General In this tab you will find the information about Asterisk Manager Users.
AMI User*, user name for connect to AMI (must be unique)
AMI Secret, secret for login to Asterisk Management Interface (AMI)
Description, short description.
Read Permissions, AMI read permissions.
Write Permissions, AMI write permissions.
Deny, if you want to deny many hosts or networks, use & char as separator. Example: 192.168.1.0/255.255.255.0&10.0.0.0/255.0.0.0
Permit, if you want to permit many hosts or networks, use & char as separator.

VitalPBX Reference Guide Ver. 2.4.0, December 2019
148
6.3.3 Music on Hold
General In this tab you will find the information about Music on Hold.
Name, short description for identify this MoH Category.
Sort, Sort the files to play.
Sound File, upload a wav or mp3 file.

VitalPBX Reference Guide Ver. 2.4.0, December 2019
149
6.3.4 Recording Managements
General In this tab you will find the information about Record Management.
Sound File, upload a wav or mp3 file.
Name, short description for identify this recording.
Recording List
• Recording, name of the sound file.
• Name, description of the sound file.
• Duration, duration of the recording.
• Action
o , edit description.
o , listen recording.
o , record by phone.
o , delete recording.

VitalPBX Reference Guide Ver. 2.4.0, December 2019
150
6.3.5 Log File
General In this tab you will find the information about create new log file.
Date Format, customize the display of debug message time stamps. See strftime(3) Linux manual for format specifiers. Note that there is also a fractional second parameter which may be used in this field. Use %1q for tenths, %2q for hundredths, etc. Leave blank for default: ISO 8601 date format yyyy-mm-dd HH:MM:SS (%F %T).
Log Rotation
• Sequential: Rename archived logs in order, such that the newest has the highest sequence
number.
• Rotate: Rotate all the old files, such that the oldest has the highest sequence number (expected
behavior for Unix administrators).
• Timestamp: Rename the log files using a timestamp instead of a sequence number when "logger
rotate" is executed.
Append Hostname, appends the hostname to the name of the log files.
Log Queues, log queue events to a file.
Log Files
• File Name, name of log file.

VitalPBX Reference Guide Ver. 2.4.0, December 2019
151
• Debug, debugging is only useful if you are troubleshooting a problem with the Asterisk code
itself. You would not use debug to troubleshoot your dial-plan, but you would use it if the
Asterisk developers asked you to provide logs for a problem you were reporting. Do not use
debug in production, as the amount of detail stored can fill up a hard drive in a matter of days.
• DTMF, logging DTMF can be helpful if you are getting complaints that calls are not routing from
the auto attendant correctly.
• Error, errors represent significant problems in the system that must be addressed immediately.
• Fax, this type of logging causes fax-related messages from the fax technology backend
(res_fax_spandsp or res_fax_digium) to be logged to the fax logger.
• Notice, you will see a lot of these during a reload, but they will also happen during normal call
flow. A notice is simply any event that Asterisk wishes to inform you of.
• Verbose, this is one of the most useful of the logging types, but it is also one of the riskier to
leave unattended, due to the possibility of the output filling your hard drive.
• Warning, a warning represents a problem that could be severe enough to affect a call (including
disconnecting a call because call flow cannot continue). Warnings need to be addressed.
• Security, output security messages.
6.3.6 RTP Settings
General In this tab you will find the information about RTP Settings.
RTP Start, indicates where the port start.
RTP End, indicates the end of the port.
Strict RTP, enable strict RTP protection. This will drop RTP packets that do not come from the source of
the RTP stream, whether to enable or disable UDP checksums on RTP traffic.
RTP Checksums, whether to enable or disable UDP checksums on RTP traffic.
ICE Support, whether to enable or disable ICE support. This option is disabled by default.

VitalPBX Reference Guide Ver. 2.4.0, December 2019
152
Stun Server, hostname or address for the STUN server used when determining the external IP address
and port an RTP session can be reached at. The port number is optional.
Turn Server, hostname or address for the TURN server to be used as a relay. The port number is
optional.
Turn Server Name, username used to authenticate with TURN relay server.
Turn Server Password, password used to authenticate with TURN relay server.
6.3.7 Mini HTTP Server The core of Asterisk provides a basic HTTP/HTTPS server.
Certain Asterisk modules may make use of the HTTP service, such as the Asterisk Manager Interface over HTTP, the Asterisk Restful Interface or WebSocket transports for modules that support that, like chan_sip or chan_pjsip.
General In this tab you will find the information about Mini HTTP Server.
HTTP Bind Address, address and optional port to bind to, both for HTTP and HTTPS.
TLS Bind Address, address and port to bind to this transport.
Certificate, certificate for TLS connections.
Enable HTTP, whether HTTP/HTTPS interface is enabled or not.
TLS Enable, HTTPS support. In addition to enabled, you need to explicitly enable TLS, define the port to
use, and have a certificate somewhere.
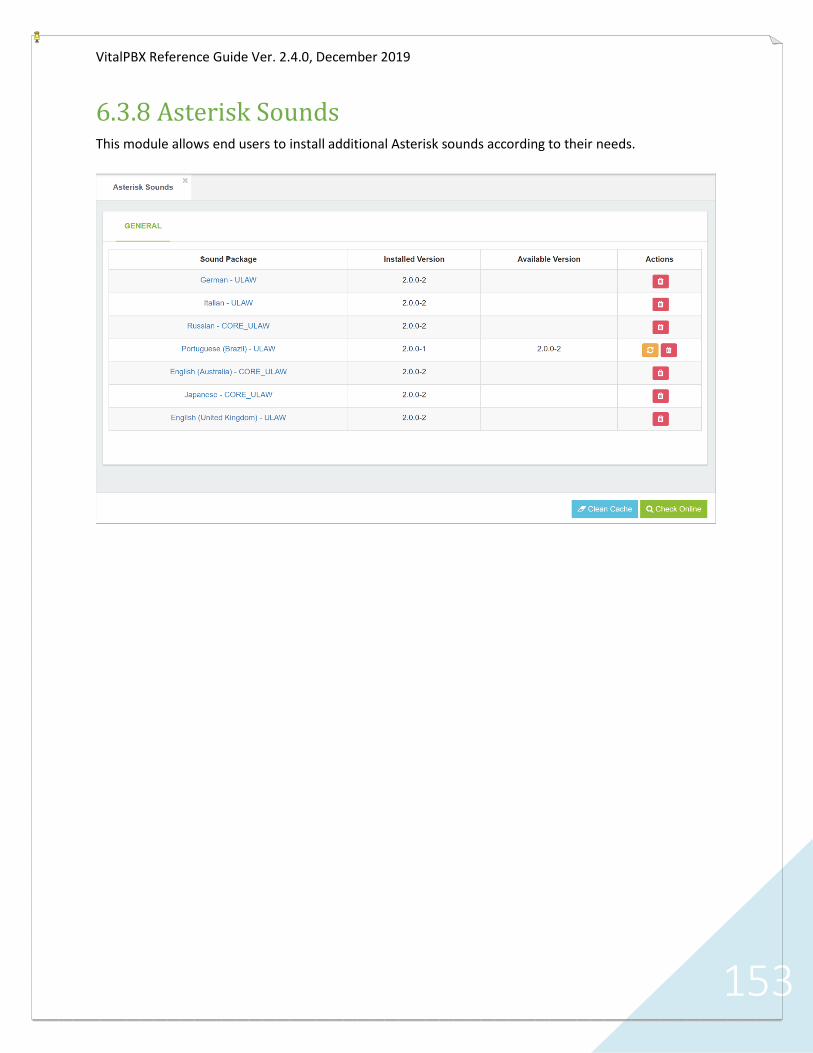
VitalPBX Reference Guide Ver. 2.4.0, December 2019
153
6.3.8 Asterisk Sounds This module allows end users to install additional Asterisk sounds according to their needs.

VitalPBX Reference Guide Ver. 2.4.0, December 2019
154
6.4 Telephony
6.4.1 Interface Telephony Interface detect any new hardware that is connected to our system, either a Hardware connected by USB or directly to a PCI port of our PC or server. Do not worry about pressing the button Detect Hardware you will not lose any previous settings related to the existing hardware.
6.4.2 Clock Sources Select the clock source and its priority for digital interfaces.

VitalPBX Reference Guide Ver. 2.4.0, December 2019
155
6.4.3 Channel Group Grouped the analog and digital interfaces into groups to be used separately on outgoing routes,
very useful when a company share external trunks.
Name*, name of the channel group

VitalPBX Reference Guide Ver. 2.4.0, December 2019
156
6.4.4 Profile Assignments Assign to each channel a profile previously created in Settings/Technology/Profile

VitalPBX Reference Guide Ver. 2.4.0, December 2019
157
6.5 End Point Manager The Endpoint Manager allows you to centrally manage the configuration settings for all IP devices that can be accessed on the network.
It is important to note that IP phones are identified in the Endpoint Manager by their MAC address. This provides you with a powerful tool to pre-provision IP phones before the phones are even connected to the network. This can be done without even opening the box containing the phone, as phone manufacturers typically print the MAC address on the outside of the packaging.
There are a small number of simple tasks that you will need to complete in order to make the Endpoint Manager fully operational:
1. Ensure that your DHCP server is correctly configured to support Option 66, and that the format of Option 66 address is compatible with the Endpoint Manager.
2. Create an entry in the Host Settings dialog to define:
3. Host address of your PBX server
4. Ports used by SIP, IAX2, HTTP, and HTTPS protocols
5. Addresses of DNS and NTP server/s
6. Create a Template for each group of phone models that you want to manage, and link it to a set of Host Settings. (You do not need to create a template for every IP phone in the system, only for groups of phones. For example, if you are supporting two different models of Xorcom phones, you would need to create two templates – one for each model.
7. Use the Device Mapping dialog to scan your network for available phone devices. You can also manually add devices that the network discovery cannot find.
8. Link each device that you want to manage to a template and to one (or more) PBX extensions

VitalPBX Reference Guide Ver. 2.4.0, December 2019
158
6.5.1 Host Settings The Host Settings dialog allows you to configure one or more sets of parameters that can be used when configuring phones. This provides Endpoint Manager with information about the environment to which the phones belong. For example, you may have one template for IP phones that reside on the same network segment as your PBX server, and another template for phones that are located on a different segment. Why would you want to do this? For example, you may use port forwarding for external SIP connections so that external SIP phones can be forwarded from port 6050 to port 5060, whereas internal phones (that reside on the same network as the PBX server) directly access port 5060.
Host Settings
• Name, helps to simplify maintenance: each host setting should be identified with a unique label.
• Hostname/IP Address, is the address of your PBX server. Note that the IP address used by phones
that reside on the same network as PBX may be different from the address used by phones that
are outside the network. Phones that are on the same network can use the physical address of
PBX, even if it is a private IP address. Phones that are outside the network will need to use a
publicly-accessible IP address or hostname.
• SIP Port, typically 5060, is the port that IP phones will access when using SIP protocol. Phones that
are on the same network as your PBX typically use the default port, while phones that are outside
the local network may utilize port-forwarding to use a different port. There is no default value if
this field is left blank: if you do not type a value for this field, SIP phones will not work.
• IAX2 Port, typically 4569, is the port that IP phones will access when using IAX2 protocol. Phones
that are on the same network as your PBX typically use the default port, while phones that are
outside the local network may utilize port-forwarding to use a different port. There is no default
value if this field is left blank: if you do not type a value for this field, IAX2 phones will not work.

VitalPBX Reference Guide Ver. 2.4.0, December 2019
159
• HTTP Port, typically 80, is the port that IP phones will use for HTTP access. Phones that are on the
same network as your PBX typically use the default port, while phones that are outside the local
network may utilize port-forwarding to use a different port. There is no default value if this field
is left blank.
• HTTPS Port, typically 443, is the port that IP phones will use for HTTPS access. Phones that are on
the same network as your PBX typically use the default port, while phones that are outside the
local network may utilize port-forwarding to use a different port. There is no default value if this
field is left blank.
6.5.2 Creating Template You need to create at least one template for every model of IP phone that you want to manage. If you have phone models that use different host settings, you will need to create a template for each combination of phone model/host settings. You will need to create multiple templates, for example, when you want to use a different set of host settings (for the same model phone), or when you have phone models in different time zones.
Template Name*, helps to simplify maintenance: each template should be identified with a unique name.
Brand*, select a Brand from the dropdown list of brands that are supported by Endpoint Manager. If you require a brand that does not appear in the dropdown list, you can contact support, by clicking on the Add new model support menu (on the right-hand side of the dialog).
Model*, select a Model from the dropdown list of models that are supported by Endpoint Manager. If you require a model that does not appear in the dropdown list, you can contact support, by clicking on the Add new model support menu (on the right-hand side of the dialog).

VitalPBX Reference Guide Ver. 2.4.0, December 2019
160
Configuration Layout*, indicates what layout of configuration file you want to use. A very small number of phones may use more than one style of configuration file, depending on the firmware version that is installed.
Host Settings*, allows you to select the name of the Host Settings (described above) that you want to use in this template.
Time zone*, allows you to select the time zone offset to be used by all phones that use this template.
Administrator Password*, is the password that can be used by users to manually access the configuration interface of IP phones based on this template. You should be aware of the limitation imposed by your IP Phone. For example, some IP phones will only accept the password as numeric digits. The Endpoint Manager does not validate whether the password will be acceptable by the phone: you must refer to the documentation for your specific phone.
6.5.3 Device Buttons Allows you to configure the DSS (direct station select) buttons for IP phones that use this template.
The button types, which depend on the brand and model of IP phone that you are using, can include such types as:
• ACD
• BLF
• Call Park
• Call Pickup
• Call Return
• Conference
• DND
• DTMF
• Forward
• Hold
• Intercom
• Line
• Local Directory
• N/A
• Record
• Redial
• Remote Directory
• Speed Dial
• Transfer
• Voice Mail
Some phones do not support device buttons at all. In such cases, a suitable message will be displayed.
For some phones, such as Fanvil, the type has no significance (and will be ignored), as the type is included as a parameter in the Value field

VitalPBX Reference Guide Ver. 2.4.0, December 2019
161
6.5.4 Expansion Modules Allows you to configure the DSS (direct station select) buttons on the expansion module for IP phones that have this hardware and use this template.
Note that each user can use My Extensions to define settings and overwrite the template definitions. This is a useful feature to allow users to personalize some buttons on their phone.
The number of buttons that are displayed are specific to each expansion module.
For some phones, such as Fanvil, the type has no significance (and will be ignored), as the type is included as a parameter in the Value field.
6.5.5 Advanced Settings Advanced Settings allows you to manage the configuration file for phones that belong to this template. Advanced Settings provides access to parameters that are not directly managed by the Endpoint Manager. Codec settings would be an example of such a parameter. Manufacturers’ default values, where applicable, are already defined in the file. You would only need to modify values in the configuration file if you want to define some non-standard behavior.

VitalPBX Reference Guide Ver. 2.4.0, December 2019
162
6.5.6 Device Mapping This dialog manages your devices. The devices that you want to manage can be automatically discovered. Type in a target network segment and mask, such as 192.168.25.0./24, and click on Scan subnet for devices. The discovery will take some time, depending on the number of addresses that can potentially exist on the subnet. Be careful not to use a mask that is too big, as this will impact the time required to complete the discovery process. If devices cannot be discovered by scanning the network, you can manually enter the MAC address of any phones that you want to manage.
Checking on Only show recognized devices will filter out any devices having a MAC address that is not defined in the Endpoint Manager database as an endpoint device.

VitalPBX Reference Guide Ver. 2.4.0, December 2019
163

VitalPBX Reference Guide Ver. 2.4.0, December 2019
164
7. Admin
7.1 Admin
7.1.1 Users
General In this tab you will find the information about management users.
Login Name*, user as you will be login (Nick name).
Password*, your secure password for login
Profile*, profile for this user.
Startup Menu*, set the module for startup.
Full Name*, full real name user.
Department, user department (Example: Admin)
Select Image, image with which the user is associated, it can be a photo of the user.

VitalPBX Reference Guide Ver. 2.4.0, December 2019
165
Settings
GUI Theme, appearance of the interface.
Language, interface language.
Timezone, local Time Zone for this user.
Multi-tab, enable if you want multiple tabs in the interface.

VitalPBX Reference Guide Ver. 2.4.0, December 2019
166
7.1.2 Users Profiles
General In this tab you will find the information about management user’s profiles.
Profile Name, name for this profile.
Modules Access
• Grand Privileges, allow access to all modules.

VitalPBX Reference Guide Ver. 2.4.0, December 2019
167
7.1.3 Application Access Gives extensions permission to certain modules such as FOP2.
General
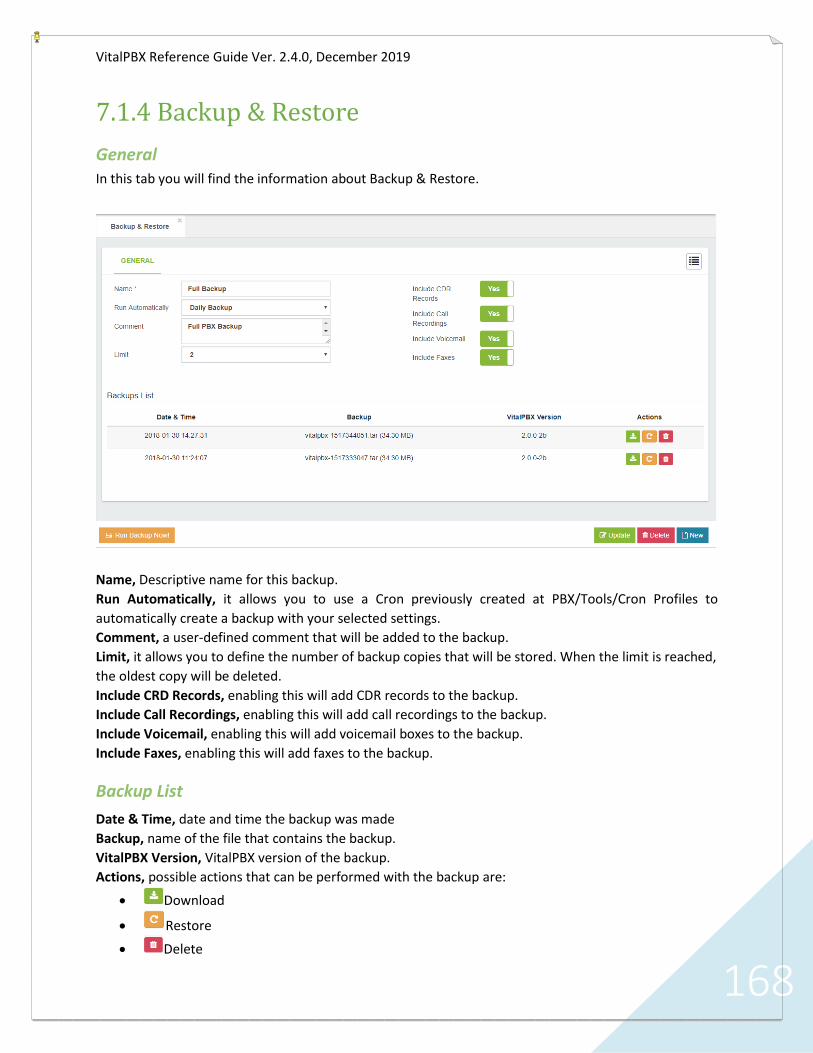
VitalPBX Reference Guide Ver. 2.4.0, December 2019
168
7.1.4 Backup & Restore
General In this tab you will find the information about Backup & Restore.
Name, Descriptive name for this backup.
Run Automatically, it allows you to use a Cron previously created at PBX/Tools/Cron Profiles to
automatically create a backup with your selected settings.
Comment, a user-defined comment that will be added to the backup.
Limit, it allows you to define the number of backup copies that will be stored. When the limit is reached,
the oldest copy will be deleted.
Include CRD Records, enabling this will add CDR records to the backup.
Include Call Recordings, enabling this will add call recordings to the backup.
Include Voicemail, enabling this will add voicemail boxes to the backup.
Include Faxes, enabling this will add faxes to the backup.
Backup List
Date & Time, date and time the backup was made
Backup, name of the file that contains the backup.
VitalPBX Version, VitalPBX version of the backup.
Actions, possible actions that can be performed with the backup are:
• Download
• Restore
• Delete

VitalPBX Reference Guide Ver. 2.4.0, December 2019
169
7.1.5 Tenants The term "software multitenancy" refers to a software architecture in which a single instance of software runs on a server and serves multiple tenants. A tenant is a group of users who share a common access with specific privileges to the software instance. With a multitenant architecture, a software application is designed to provide every tenant a dedicated share of the instance - including its data, configuration, user management, tenant individual functionality and non-functional properties.
As of version 2.2 of VitalPBX, the Multitenant module is added with which, for free, you can have the main Tenant plus an additional one to test all the functions.
General In this tab you will set the information about Tenants.
Name, a unique name for this tenant. This name will be used to create folders, linking cdr info, etc.
Description, short Description to identify this tenant.
Prefix, allows you to define a prefix to be used for extensions devices and others. If left blank an automatic
prefix will be used.
Enabled, it allows you to enable/disable a tenant. If the tenant is disabled, the users who belongs to it
will not be able to login to it nor perform any action.
Tenant Administrator
Assign to Existing User, if checked, instead of creating a new user for the tenant, you may assign
it a existing one.
Admin Email, the email address of the user who will manage this Tenant.

VitalPBX Reference Guide Ver. 2.4.0, December 2019
170
Admin Password, password to authenticate the default admin user of this tenant.
Full Name, administrator’s full name, if not defined, the tenant description will be used instead.
Profile, role profile for the administrator of this tenant. Be careful not to assign a too permissive
role, which may affect other tenants.
Startup Dialog, which dialog to be displayed when logging into the system.
Limitations
Extension, it allows you to define the maximum number of extensions for this tenant.
Trunks, it allows you to define the maximum number of trunks for this tenant.
Queues, it allows you to define the maximum number of queues for this tenant.
IVRs, it allows you to define the maximum number of ivrs for this tenant.
Conferences, it allows you to define the maximum number of conferences for this tenant.
Parking Lots, it allows you to define the maximum number of parking lots for this tenant.
Softphone Devices, it allows you to define how many Sonata Communicator/VitalPBX
Communicator Devices could be activated on this tenant.
Allow Recordings, it allows you to define if this tenant will be able to record or not calls.
Recordings Maintenance Settings
Clear Oldest Recordings, allows you to defined the maximum number of days that
recordings should be retained. The recordings with more age than the days defined here
will be deleted.
Schedule, it allows you to define the schedule in which the maintenance of the PBX will
be executed (Conversion of Recordings, cleaning of Recordings and CDR, etc). If no
schedule is selected, all the maintenance options will be disabled.
Convert Recordings, Enabled/Disable call recordings conversion to MP3.

VitalPBX Reference Guide Ver. 2.4.0, December 2019
171
Call Routing It is possible to share the route selections items as outbound profiles for other tenants, this way
you will not need to create tenant trunks for using main tenant as a gateway, and not need to re-define outbound routes per tenant.
Allow Tenant Trunks, it allows you to define which tenants could be used as tenant trunks.
Allow Outbound Routes, routes that will be used when this tenant make calls through a tenant
trunk pointing to the main tenant. Calls made to any other tenant than the main tenant will be
sent through Inbound Routes definitions.
Outbound Profiles, allows you to define what route selection items can be used as an outbound
profile on this tenant.
Inbound DIDs, list of numbers/patterns belonging to this tenant. Calls that match with these
numbers will be forward automatically to these tenant inbound routes. The configuration of
these numbers takes precedence over the inbound routes definitions on the main tenant.
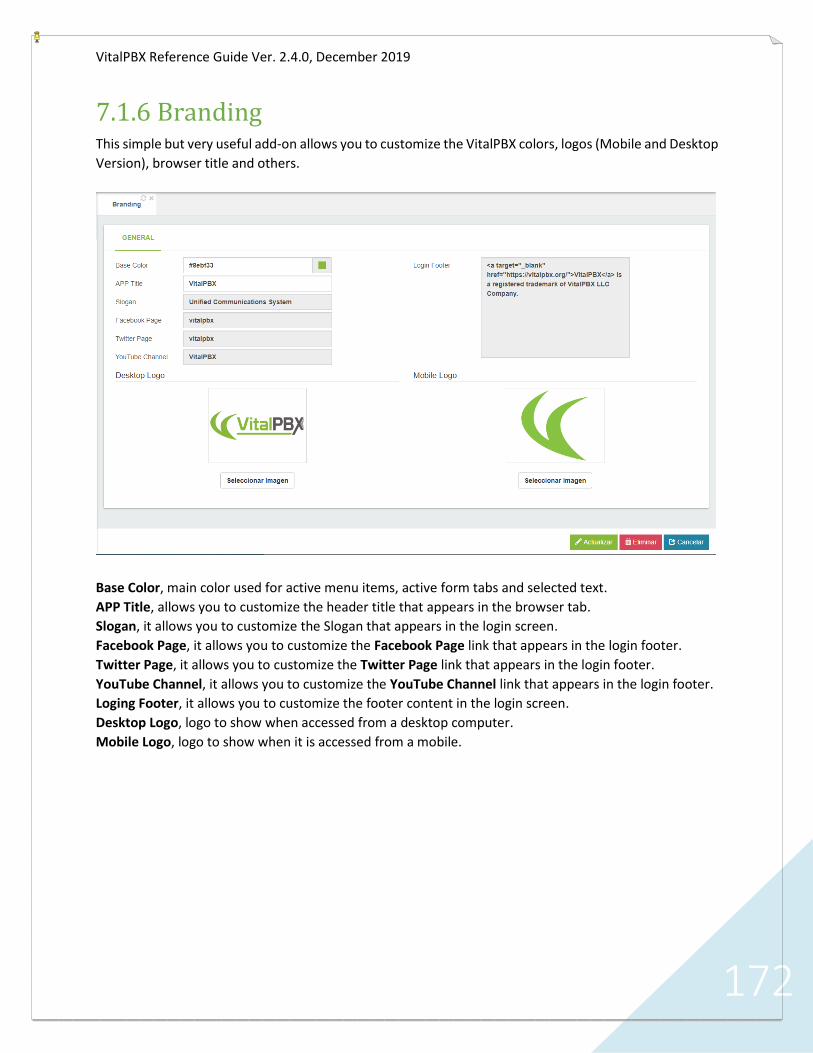
VitalPBX Reference Guide Ver. 2.4.0, December 2019
172
7.1.6 Branding This simple but very useful add-on allows you to customize the VitalPBX colors, logos (Mobile and Desktop
Version), browser title and others.
Base Color, main color used for active menu items, active form tabs and selected text.
APP Title, allows you to customize the header title that appears in the browser tab.
Slogan, it allows you to customize the Slogan that appears in the login screen.
Facebook Page, it allows you to customize the Facebook Page link that appears in the login footer.
Twitter Page, it allows you to customize the Twitter Page link that appears in the login footer.
YouTube Channel, it allows you to customize the YouTube Channel link that appears in the login footer.
Loging Footer, it allows you to customize the footer content in the login screen.
Desktop Logo, logo to show when accessed from a desktop computer.
Mobile Logo, logo to show when it is accessed from a mobile.

VitalPBX Reference Guide Ver. 2.4.0, December 2019
173
If you wish to also change the Welcome message when you access SSH, you must follow the following
procedure
1.- Go to the /etc/profile.d folder and modify the vitalwelcome.sh file
2.- Replaces the Text that is between $ {green} and $ {txtrst}, line 23
3.- To create your new ASCII text we recommend the following web page.
http://patorjk.com/software/taag

VitalPBX Reference Guide Ver. 2.4.0, December 2019
174
7.2. System Settings
7.2.1 System Miscellaneous
General In this tab you will find the information about System Miscellaneous Settings.
, server power off (be careful).
, restart Asterisk.

VitalPBX Reference Guide Ver. 2.4.0, December 2019
175
Time
Time Zone, sets the server timezone.
Date, set date of the system.
Time, set time of the system.
NTP, Enable/Disable NTP.
Server1, NTP server.
Server2, NTP server.
Server3, NTP server.
Server4, NTP server.
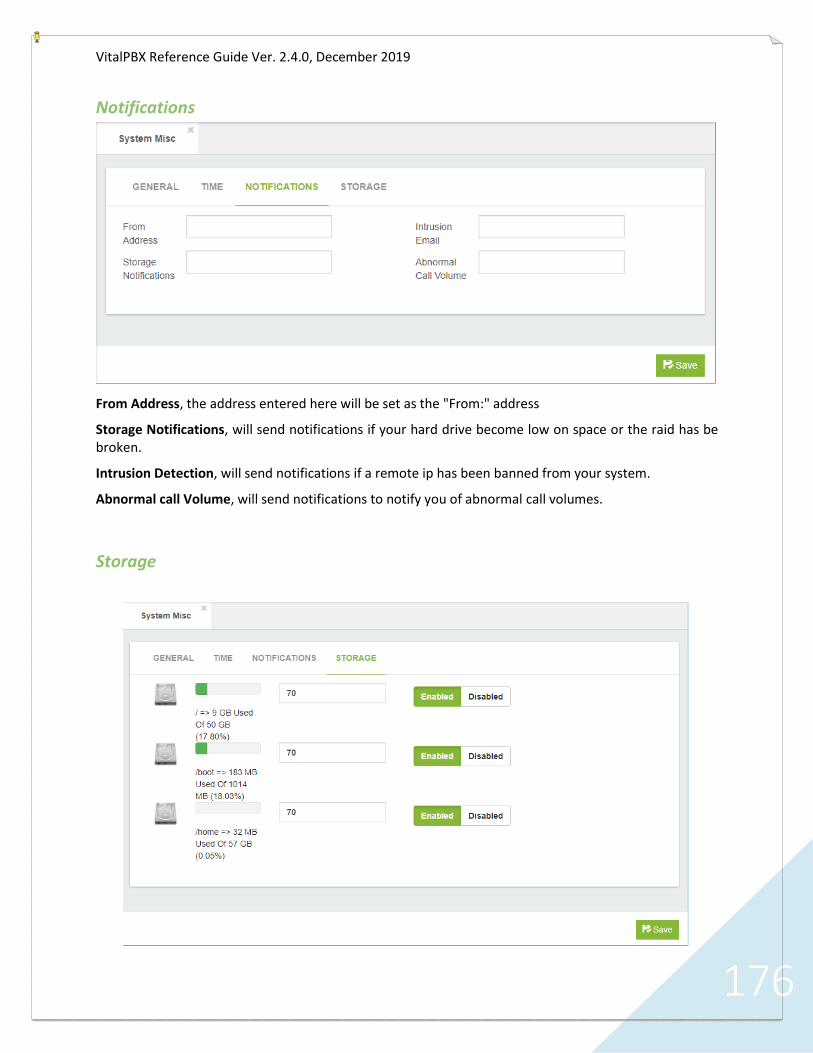
VitalPBX Reference Guide Ver. 2.4.0, December 2019
176
Notifications
From Address, the address entered here will be set as the "From:" address
Storage Notifications, will send notifications if your hard drive become low on space or the raid has be broken.
Intrusion Detection, will send notifications if a remote ip has been banned from your system.
Abnormal call Volume, will send notifications to notify you of abnormal call volumes.
Storage

VitalPBX Reference Guide Ver. 2.4.0, December 2019
177
7.2.2 Network Settings The Network Settings dialog allows you to configure the network environment of the PBX server.
General In this tab you will find the information about Network Settings.
Hostname, hostname of the system.
Device, the physical device to use for this connection.
Name, name of the connection.
DHCP, whether to use DHCP on this connection for obtaining network configuration automatically.
IP Address, IP address to assign to this connection.
Netmask, network mask or prefix.
Gateway, gateway IP address to use.
Search Domain, restrict DNS searches to the specified domain.
Primary DNS, primary DNS IP address.
Secondary DNS, secondary DNS IP address.
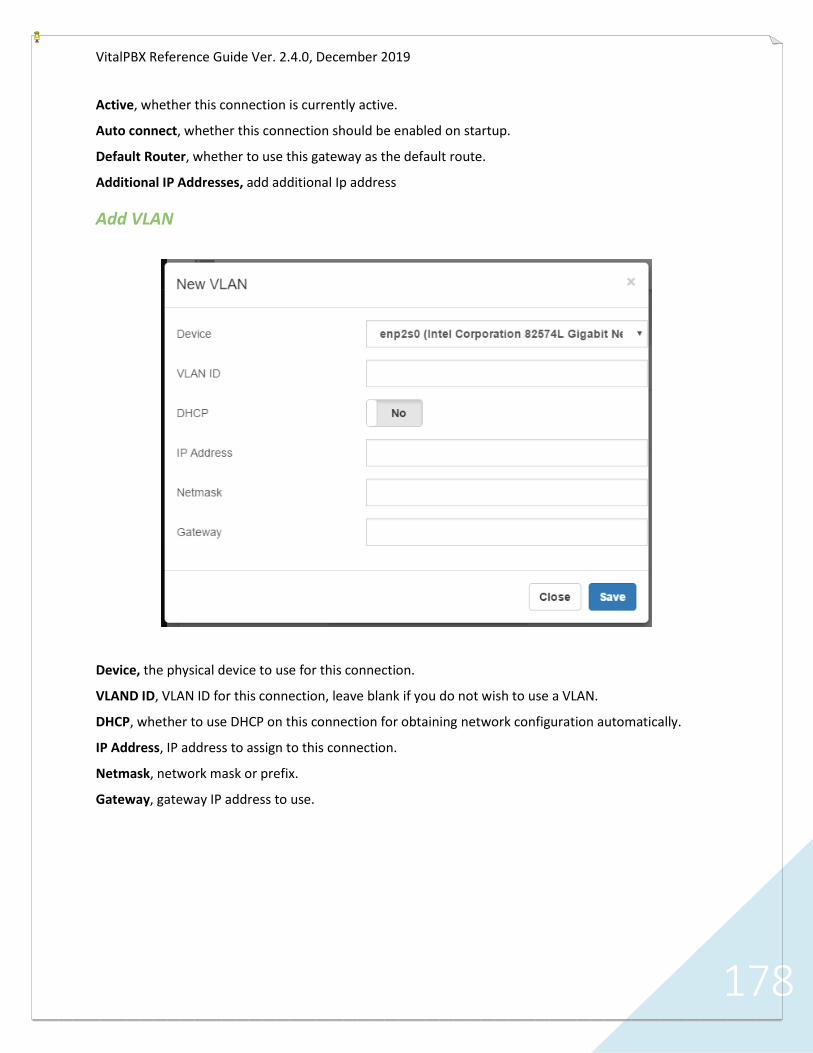
VitalPBX Reference Guide Ver. 2.4.0, December 2019
178
Active, whether this connection is currently active.
Auto connect, whether this connection should be enabled on startup.
Default Router, whether to use this gateway as the default route.
Additional IP Addresses, add additional Ip address
Add VLAN
Device, the physical device to use for this connection.
VLAND ID, VLAN ID for this connection, leave blank if you do not wish to use a VLAN.
DHCP, whether to use DHCP on this connection for obtaining network configuration automatically.
IP Address, IP address to assign to this connection.
Netmask, network mask or prefix.
Gateway, gateway IP address to use.

VitalPBX Reference Guide Ver. 2.4.0, December 2019
179
7.2.3 Email Settings Server allows you the option to send outbound email messages either by using the built-in mail server (such as Postfix) that is active on the PBX server, or by using a network-accessible relay server that is hosted on another machine. Click on Use Built-in Mail Server to use the built-in mail server that is active on PBX or Use External Mail Server to use a network-accessible relay server.
General In this tab you will find the information about email settings.
Server, you can relay outbound email messages either by using a built-in mail server (such as Postfix) that is active on the VitalPBX server, or by using a network-accessible relay server that is hosted on another machine.
From Address, the address entered here will be set as the “From:” address.
Provider, provider can be Gmail, or any other provider. The only additional information required for Gmail is Username and Password.
SMTP Server, the address that your provider has given you to enable you to send outgoing emails.
Port, SMTP server IP port number. By default, port 25 is used.
VitalPBX Reference Guide Ver. 2.4.0, December 2019
180
Origen, specifies the origin domain for all mail posted by the PBX. By default, origin is configured to use your server hostname (e.g.,pbx.mycompany.com)
TLS, Transport Layer Security (TLS) is a protocol that ensures privacy between communicating applications and their users on the Internet. When a server and client communicate, TLS ensures that no third party may eavesdrop or tamper with any message. TLS is the successor to the Secure Sockets Layer (SSL).
Authentication, select the Use Authentication button if your email provider requires authentication (Username and Password) to send outgoing email.
Unser Name, username that your email service provider has given you to allow you to access your email account. Typically, this would be something like [email protected].
Password, the password that you use to log into your email account.
Testing Email Settings, testing the email settings.
Email Log, display email event log.

VitalPBX Reference Guide Ver. 2.4.0, December 2019
181
7.2.4 DHCP Settings Dynamic Host Configuration Protocol (DHCP) is the mechanism that dynamically allocates physical IP addresses to machines and devices on the network. You can choose to use an existing DHCP server on your network, or to use PBX as your DHCP server. If you want to use PBX as your DHCP server, check on the Enable button.
Be careful!
You can only have one active DHCP server on your network.
General In this tab you will find the information about DHCP settings.
DHCP, set to enable if you want VitalPBX to act as a DHCP server for this network, or Disable if you already have a DHCP server on this network.

VitalPBX Reference Guide Ver. 2.4.0, December 2019
182
Disables Interface, you can disable DHCP on one or more interfaces. If you wish to specify multiple interfaces, separate them with commas. For example: eth0, eth0.201
Start Address*, the first address on your network that can be allocated as a dynamic IP address.
End Address*, the last address on your network that can be allocated as a dynamic IP address.
Lease Time*, period that the DHCP server grants an IP address to a device. The device must renew its IP address before the end of the period.
Gateway, the default IP gateway address.
Primary DNS, domain Name System (DNS) translates Internet domain and host names to physical IP addresses in numerical notation, i.e. from mypbx.mydomain.com to 67.67.222.220.
Secondary DNS, define a Secondary DNS to be used if your primary DNS fails to respond.
NTP Server, network Time Protocol (NTP) is a networking protocol to synchronize clocks between computer systems over the Internet.
Option 66, option 66 provides IP phones with an URL for configuration provisioning. VitalPBX Endpoint Manager provides the IP phones with configuration information in response to a HTTP request. The format of the request URL in this case looks like http://[pbx-ip-address]/xepm-provision/. If you define the PBX IP address or host name in the Option 66 field and check the 'Use for Endpoint Manager' check-box then the correct format of the URL will be built automatically. If you have already-prepared IP phone configuration files located in the /tftpboot directory then you should put the PBX IP address or host name in the Option 66 field and uncheck the 'Use for Endpoint Manager' check-box.
Use for End Point Manager, automatically format the Option 66 address for Endpoint Manager based on the address provided for Option 66 above. This will be done by prefixing http:// to the Option 66 address above and appending /xepm-provision/. In order for this to work correctly, the IP address provided above for Option 66 should only consist of the IP address or hostname of the server.
WINS, windows Internet Name Service (WINS) is a name resolution service that maps NetBIOS names to an IP address on the network that uses NetBIOS over TCP/IP (NetBT). The primary purpose of WINS is to support clients that run older versions of Windows and applications that use NetBIOS.
Static Leases
• MAC Address, device MAC address.
• IP Address, device IP address.
• Host Name (optional), host name.

VitalPBX Reference Guide Ver. 2.4.0, December 2019
183
7.2.5 Certificates
General In this tab you will find the information about Certificates.
Type, certificate type, Self Signed, Let’s Encrypt or Custom Description, short description to identify this certificate. Hostname, name of hostname Owner Email, Owners Email (Let’s Encrypt only). Country, Country (Let’s Encrypt only). State, State (Let’s Encrypt only). Certificate, should be the content of certificate file (e.g.: certificate.crt) (Custom only). Key, should be the content of key file (e.g.: private.key) (Custom only). Chain, should be the content intermediate certificate file (e.g.: ca_bundle.crt) (Custom only).

VitalPBX Reference Guide Ver. 2.4.0, December 2019
184
7.2.6 HTTP server
General In this tab you will find the information about HTTP Server settings.
HTTP Port, it defines from which port will be accessible the GUI through HTTP protocol.
HTTPS Port, it defines from which port will be accessible the GUI through HTTPS protocol.
Certificate, it defines the certificate to use when the GUI be accessed through HTTPS. By default, the
pre-build certificate is used, if you want to use another go to Certificates module to generate one.
HTTPS Enable, if checked the GUI will be accessible through HTTPS. Enable by default.
Force HTTPS, if checked all the traffic to HTTP protocol it will be redirected to HTTPS protocol.
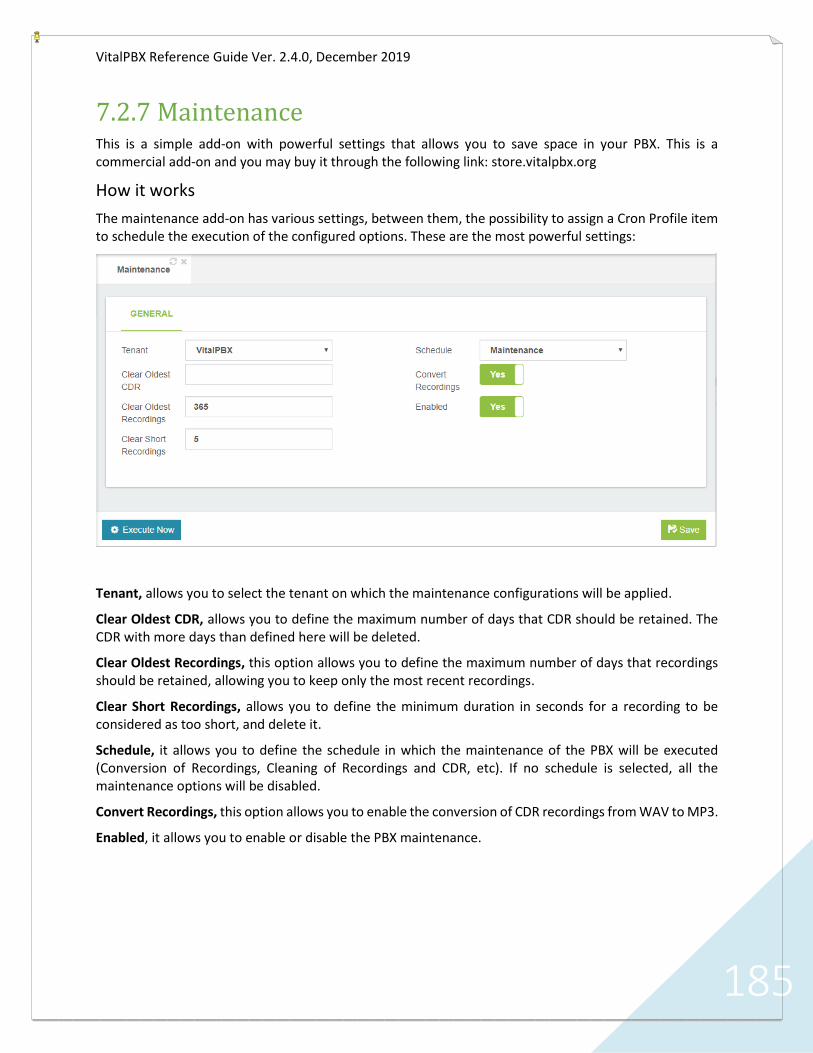
VitalPBX Reference Guide Ver. 2.4.0, December 2019
185
7.2.7 Maintenance This is a simple add-on with powerful settings that allows you to save space in your PBX. This is a commercial add-on and you may buy it through the following link: store.vitalpbx.org
How it works
The maintenance add-on has various settings, between them, the possibility to assign a Cron Profile item to schedule the execution of the configured options. These are the most powerful settings:
Tenant, allows you to select the tenant on which the maintenance configurations will be applied.
Clear Oldest CDR, allows you to define the maximum number of days that CDR should be retained. The CDR with more days than defined here will be deleted.
Clear Oldest Recordings, this option allows you to define the maximum number of days that recordings should be retained, allowing you to keep only the most recent recordings.
Clear Short Recordings, allows you to define the minimum duration in seconds for a recording to be considered as too short, and delete it.
Schedule, it allows you to define the schedule in which the maintenance of the PBX will be executed (Conversion of Recordings, Cleaning of Recordings and CDR, etc). If no schedule is selected, all the maintenance options will be disabled.
Convert Recordings, this option allows you to enable the conversion of CDR recordings from WAV to MP3.
Enabled, it allows you to enable or disable the PBX maintenance.

VitalPBX Reference Guide Ver. 2.4.0, December 2019
186
7.3 Security
7.3.1 Firewall VitalPBX is preconfigured with a built-in firewall. You can choose to disable this built-in firewall by pressing Disable, followed by the Apply button.
General In this tab you will find the information about Firewall status.
▪ Enabled, enable or disable the firewall.

VitalPBX Reference Guide Ver. 2.4.0, December 2019
187
Rules If the firewall is enabled, you can define multiple Applications, on which you can base rules. VitalPBX is preconfigured with a number of standard applications. You may want to add additional applications that are specific to your installation. To add an application, click on the Add Application button at the bottom of the list of applications.
Service, name of the services to use.
Source, is used if you want the rule to be restricted to messages that are sent from a specific IP address or subnet only. Use any to allow all IP addresses. If you want to restrict the rule to a specific IP address then you have to define the IP address with 32 as the subnet mask. If you use IPv6 then the subnet mask must be 128. In most cases you will define IP address as any.
Destination, follow the same conventions as for Source above.
Action, configures whether this rule should Allow, Deny, or Reject access.
• ACCEPT, allow will pass all messages regardless of any rules that may be defined.
• REJECT, reject means that the packet is not allowed to pass, and a response is given to the
originator of the request.
• DROP, deny means that the packet is discarded, but no response is given to the originator of the
request.

VitalPBX Reference Guide Ver. 2.4.0, December 2019
188
Services Management different services.
Name, give the application a meaningful name to help you to easily recognize it. This name will be used to refer to the application in the Rules table.
Protocol, determines the protocol that will be used by the application. Can be any one of TCP, UDP, or Both.
Port, the IP ports that are used by the application. This can be defined as a single port (e.g. 80), a range of ports (e.g. 10000:20000), or a list of ports separated by commas (e.g. 80, 10000:20000, 5060).
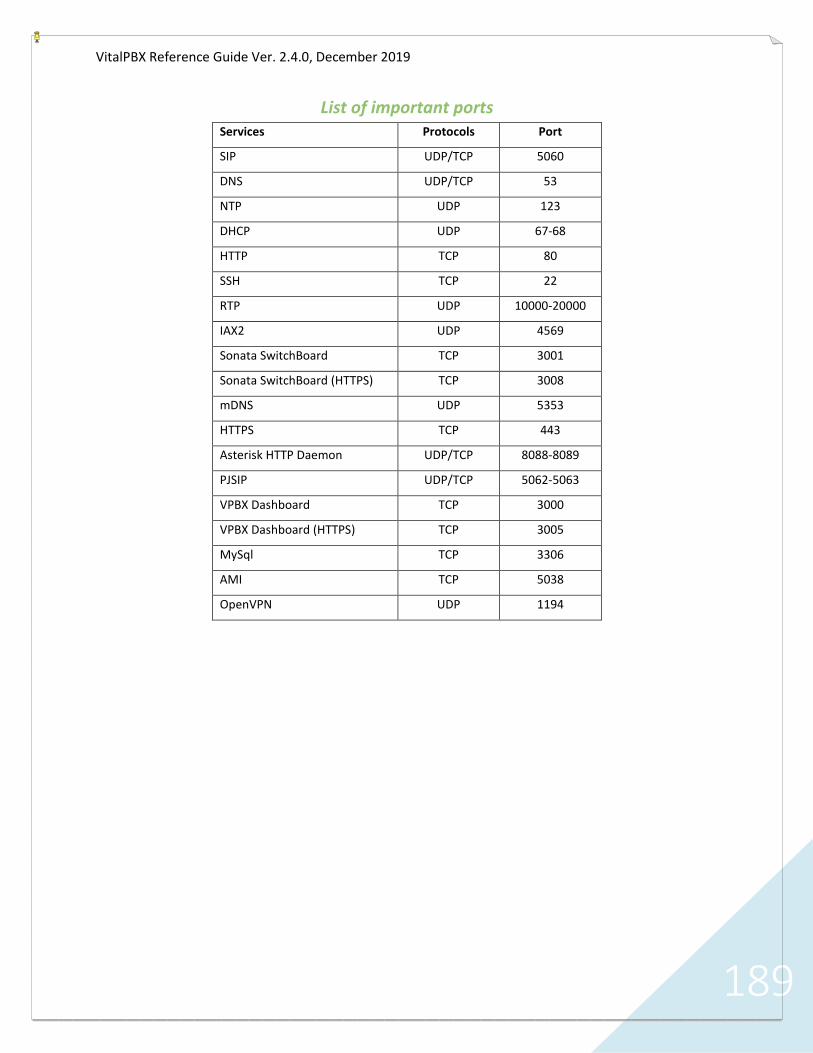
VitalPBX Reference Guide Ver. 2.4.0, December 2019
189
List of important ports Services Protocols Port
SIP UDP/TCP 5060
DNS UDP/TCP 53
NTP UDP 123
DHCP UDP 67-68
HTTP TCP 80
SSH TCP 22
RTP UDP 10000-20000
IAX2 UDP 4569
Sonata SwitchBoard TCP 3001
Sonata SwitchBoard (HTTPS) TCP 3008
mDNS UDP 5353
HTTPS TCP 443
Asterisk HTTP Daemon UDP/TCP 8088-8089
PJSIP UDP/TCP 5062-5063
VPBX Dashboard TCP 3000
VPBX Dashboard (HTTPS) TCP 3005
MySql TCP 3306
AMI TCP 5038
OpenVPN UDP 1194

VitalPBX Reference Guide Ver. 2.4.0, December 2019
190
Whitelist IP list that will not be blocked by the firewall.
Host, IP o Subnetwork.
Description, short description.

VitalPBX Reference Guide Ver. 2.4.0, December 2019
191
7.3.2 Intrusion Detection Intrusion Detection configures the fail2ban application, which detects unauthorized attempts to access the system. After a potential intruder has been detected, the intruder’s IP address will be blocked from further access to the system for the ban period (defined in seconds).
A potential intrusion is defined as a user-defined number of unsuccessful attempts to access the system within a user-defined period of time (defined in seconds).
An email alert will be emailed to the defined email address after a potential intruder is detected.
You can create a whitelist of addresses that will be ignored by this dialog. Typically, you should include the PBX itself in the whitelist, by adding 127.0.0.1 to the whitelist.
Enabled, enable or disable the intrusion detection,
Number of Failed Attempts Allowed, number of attempts that will trigger a ban.
Over a Period of (In Seconds), time period in seconds, over which the number of attempts will trigger a ban.
Will Ban the Host for (In Seconds), number of seconds that a host is banned. -1 means permanent.
And Send a Notification Email To, email address to send notifications to.

VitalPBX Reference Guide Ver. 2.4.0, December 2019
192
Banlist Any IP address that is banned will be shown in the table of banned hosts. The table will show the IP address of the banned host, as well as the fail2ban rule that detected the intrusion. If a host appears incorrectly in the list of banned hosts, you can click on the Unban button to remove it from the list.
Host, banned IP.
Jail, type of action that tried to run the banned IP.
, unban button.

VitalPBX Reference Guide Ver. 2.4.0, December 2019
193
Whitelist IP list that will not be blocked by the instruction detection.
Host, IP address.

VitalPBX Reference Guide Ver. 2.4.0, December 2019
194
7.3.3 Weak Passwords Creates a report of any user accounts, extensions, or trunks that have weak registration passwords.
Accounts with weak passwords represent a security hole and should be updated as soon as possible.
General In this tab you will find a list of all weak password in your system.

VitalPBX Reference Guide Ver. 2.4.0, December 2019
195
7.3.4 OpenVPN Server OpenVPN Access Server is a full featured secure network tunneling VPN software solution that
integrates OpenVPN server capabilities, enterprise management capabilities, simplified OpenVPN Connect UI, and OpenVPN Client software packages that accommodate Windows, MAC, Linux, Android, and iOS environments. OpenVPN Access Server supports a wide range of configurations, including secure and granular remote access to internal network and/ or private cloud network resources and applications with fine-grained access control.
To install the OpenVPN module you must go to the Admin/Add-ons/Add-ons menu. Press Check-Online and install VitalPBX Openvpn. The free version is limited only to the creation of two VPN Clients.
Server In this tab you will find the information about OpenVPN Server.
Enabled, it shows the current status of the OpenVPN Server service.
Port, the port that OpenVPN should listen on.
Server Range, defines the virtual IP range to be used in the VPN tunnel network. e.g.: if you use as range
the IP address 10.8.0.0, the server IP will be 10.8.0.1 and the first client will be assigned the IP 10.8.0.2.
Public Host, remote host or IP address on the client, which specifies the OpenVPN server.
Keep-Alive, the keepalive directive causes ping-like messages to be sent back and forth over the link so
that each side knows when the other side has gone down. All values in seconds.
Redirect Gateway, if enabled, this directive will configure all clients to redirect their default network
gateway through the VPN, causing all IP traffic such as web browsing and DNS lookups to go through the
VPN (The OpenVPN server machine may need to NAT or bridge the TUN/TAP interface to the internet in
order for this to work properly).
Primary DNS, Primary DNS to use when the “Redirect Gateway” option is enabled.
Secondary DNS, Secondary DNS to use when the “Redirect Gateway” option is enabled.
Max Clients, the maximum number of concurrently connected clients we want to allow.
Cipher method, encrypt data channel packets with cipher algorithm alg.
Compression, allows you to define the type of compression to use between server & clients traffic.
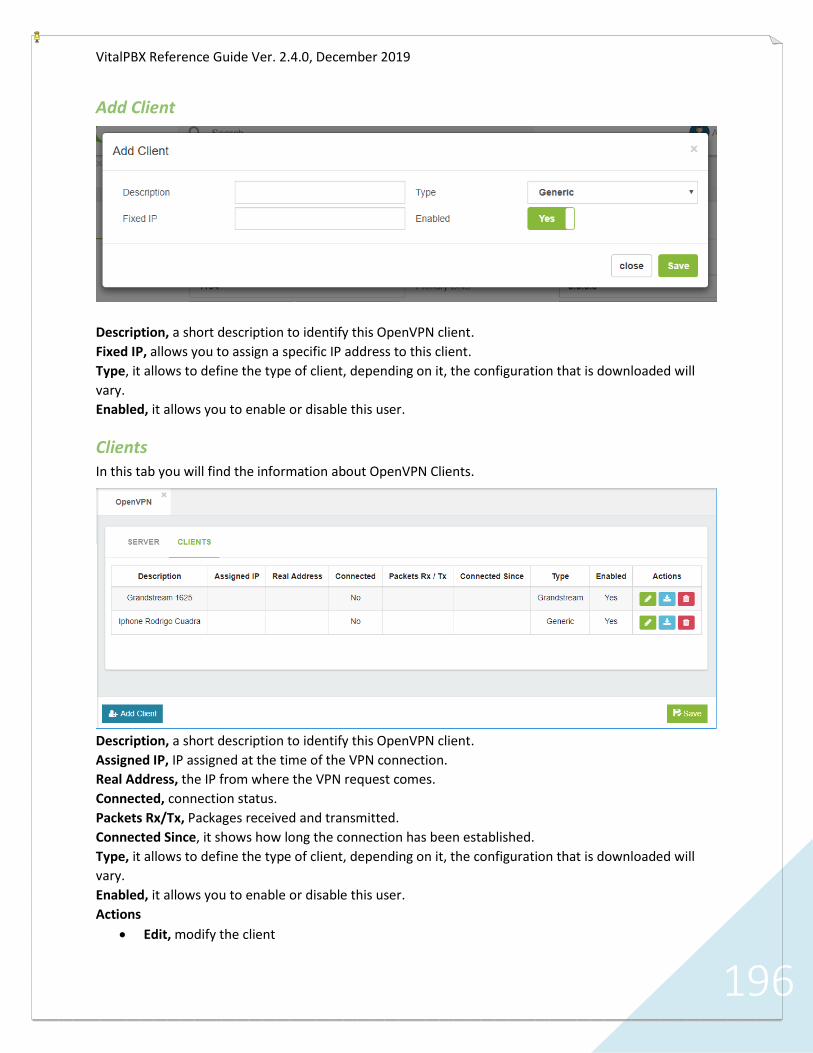
VitalPBX Reference Guide Ver. 2.4.0, December 2019
196
Add Client
Description, a short description to identify this OpenVPN client.
Fixed IP, allows you to assign a specific IP address to this client.
Type, it allows to define the type of client, depending on it, the configuration that is downloaded will
vary.
Enabled, it allows you to enable or disable this user.
Clients In this tab you will find the information about OpenVPN Clients.
Description, a short description to identify this OpenVPN client.
Assigned IP, IP assigned at the time of the VPN connection.
Real Address, the IP from where the VPN request comes.
Connected, connection status.
Packets Rx/Tx, Packages received and transmitted.
Connected Since, it shows how long the connection has been established.
Type, it allows to define the type of client, depending on it, the configuration that is downloaded will
vary.
Enabled, it allows you to enable or disable this user.
Actions
• Edit, modify the client

VitalPBX Reference Guide Ver. 2.4.0, December 2019
197
• Download, download the config file to be installed on the client.
• Delete, delete the client.
Notes:
1.- When you create the SIP extension to connect remember that to have audio it is necessary in the
configuration NAT must be Force, Comedy.
2.- If for some reason an IP range was configured for security in Settings/Technology/SIP Settings Network
tab, Local Network section, remember to add the new IP range that was configured in OpenVPN Server.
By default, VitalPBX does not bring any restriction.

VitalPBX Reference Guide Ver. 2.4.0, December 2019
198
OpenVPN Desktop Client Setup [ Windows ]
Step 1: Download and Install the OpenVPN Desktop Client
https://openvpn.net/index.php/open-source/downloads.html
Step 2: Create OpenVPN Client and Download Config File
Download the OpenVPN Config file from your VitalPBX Server.
Step 3: Add OpenVPN Configuration File to the Desktop Client
Run the OpenVPN Client. Go to Tray Bar, select OpenVPN Icon + Right-Click. Then Import File.
Locate and unzip your OpenVPN configuration file (client_full.ovpn) and import it.
Step 4: Connect to OpenVPN
Step 5:
It was assigned an IP corresponding to the range programmed in the Server section. Remember that the
IP to reach VitalPBX is the first in that range, that is, if we have the range 10.8.0.0, the IP of the PBX is
10.8.0.1.

VitalPBX Reference Guide Ver. 2.4.0, December 2019
199
OpenVPN Grandstream Client Setup
VitalPBX includes a new OpenVPN module that together with the current Grandstream firmware
includes support (server/client mode) which allows you to tunnel the whole SIP/RTP traffic over an
encrypted channel. This is also the best solution to avoid any kind of NAT/routing issues because all
devices are directly accessible within the virtual ip subnet.
Next we will show how to configure a Grandstream phone.
1.- First make sure that the compression is of the “comp-lzo” type in the Server configuration.
2.- We create a client as Grandstream Type and download the configuration.
3.- In the compressed file that we download there are 3 files:
• ca.crt
• clientX.crt
• clientX.key
4.- Now we go to the phone and in Network/OpenVPN® Settings
OpenVPN® Server Address, we configure the IP/Domain of our server.
OpenVPN® Port, here we configure the port to access the server.
OpenVPN® CA, we load ca.crt file.
OpenVPN® Certificate, we load clientX.crt file.
OpenVPN® Client key, we load clientX.key file.
5.- After establishing the tunnel, it is necessary to configure the SIP account of the telephone. Remember
that the IP to reach VitalPBX is the first in that range, that is, if we have the range 10.8.0.0, the IP of the
PBX is 10.8.0.1.

VitalPBX Reference Guide Ver. 2.4.0, December 2019
200
OpenVPN Yealink Client Setup
VitalPBX includes a new OpenVPN module that together with the current Yealink firmware
includes support (server/client mode) which allows you to tunnel the whole SIP/RTP traffic over an
encrypted channel. This is also the best solution to avoid any kind of NAT/routing issues because all
devices are directly accessible within the virtual ip subnet.
Next we will show how to configure a Yealink phone.
1.- First make sure that the compression is of the “comp-lzo” type in the Server configuration.
2.- We create a client as Yealink Type and download the configuration.
3.- Now we are going to configure a Yealink phone, uploading the tar file in Network/Advanced VPN
Section.
Active, enable the VPN option.
Upload VPN Config, upload the previously downloaded tar file.
4.- After establishing the tunnel, it is necessary to configure the SIP account of the telephone. Remember
that the IP to reach VitalPBX is the first in that range, that is, if we have the range 10.8.0.0, the IP of the
PBX is 10.8.0.1.

VitalPBX Reference Guide Ver. 2.4.0, December 2019
201
Iphone VoIP over OpenVPN in VitalPBX
The OpenVPN protocol is not one that is built into the Apple iOS operating system for iPhones, iPads, and iPods. Therefore, a client program is required that can handle capturing the traffic you wish to send through the OpenVPN tunnel and encrypting it and passing it to the OpenVPN server. And of course, the reverse, to decrypt the return traffic. So, a client program is required, and there is only one client available that works on standard Apple iOS devices.
Official OpenVPN Connect app
On the official Apple App Store, the client you can download and install for free there is called OpenVPN Connect. This program supports only one active VPN tunnel at a time. Trying to connect to two different servers at the same time is a function that is not build into the official application OpenVPN Connect app, and it is also not possible because the underlying operating system does not allow this. The OpenVPN Connect app is able to remember multiple different servers, but only one can be active at a time.
To obtain the OpenVPN Connect app, go to the Apple App Store on your Apple iOS device. Look for the words "openvpn connect" and the application will show up in the search results. You can install it from there. Once installed an icon will be placed on your home screen where you can find the app.
Next, we will show how to configure a Iphone OpenVPN phone.
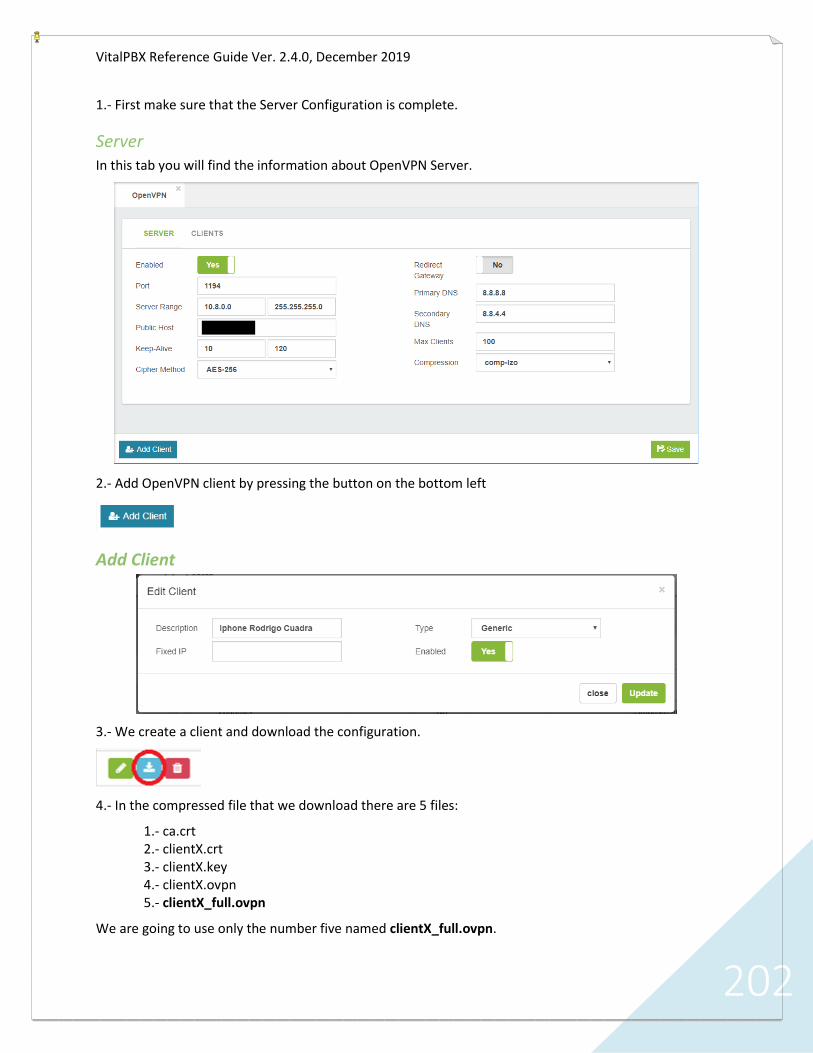
VitalPBX Reference Guide Ver. 2.4.0, December 2019
202
1.- First make sure that the Server Configuration is complete.
Server In this tab you will find the information about OpenVPN Server.
2.- Add OpenVPN client by pressing the button on the bottom left
Add Client
3.- We create a client and download the configuration.
4.- In the compressed file that we download there are 5 files:
1.- ca.crt 2.- clientX.crt 3.- clientX.key 4.- clientX.ovpn 5.- clientX_full.ovpn
We are going to use only the number five named clientX_full.ovpn.

VitalPBX Reference Guide Ver. 2.4.0, December 2019
203
5.- Now we send an email to our account with the attachment to be read on our Iphone. When receiving the e-mail, we press on the attachment and in this way our OpneVPN will be configured. Please follow the next steps:
a.- Open the email
b.- Click the attach file and use Copy to OpenVPN App.

VitalPBX Reference Guide Ver. 2.4.0, December 2019
204
c.- Now add the profile.
d.- Then Allow the profile.

VitalPBX Reference Guide Ver. 2.4.0, December 2019
205
e.- Now that everything is configured just press the connect button
f.- If everything is OK, the connect button will turn green and you will see activity in the sending/receiving of packages.
6.- After establishing the tunnel, it is necessary to configure the account of the SIP or IAX Mobile App. Remember that the IP to reach VitalPBX is the first in that range, that is, if we have the range 10.8.0.0, the IP of the PBX is 10.8.0.1.

VitalPBX Reference Guide Ver. 2.4.0, December 2019
206
7.3.5 Open Client It is also possible for VitalPBX to connect as an OpenVPN Client to another PBX, this facilitates the interconnection between two VitalPBX.
First create a Client for VitalPBX as you created it in the previous step.
Then upload the certificate in this form and your two VitalPBX will be interconnected.

VitalPBX Reference Guide Ver. 2.4.0, December 2019
207
7.3.6 GEO Firewall
Increased security With today’s accessibility to the internet, the world has become even smaller and we are able to
communicate with anyone around the globe. We now have voice over IP connections established through the internet, and that makes our connections to our business and homes more reachable. But sometimes, people from places we do not intend to give access to our means of communication, in this case, our PBX systems, try to connect and use it for their own benefit.
At VitalPBX we want to make it easier to control who can connect or not to our PBX system. That is why we have created this brand-new commercial module called “Geo Firewall”. With the Geo Firewall add-on, you can choose specific countries that can and cannot connect to your PBX system. And we have made it as easy as it gets.
How does it work? To use the Geo Firewall add-on, you simply select the countries you wish to block access to your PBX, and then click “Save”. It is as simple as that. The add-on will make sure to block any requests incoming from the blocked countries selected, and only allow from those that are allowed.
How to get it? To get the Geo Firewall Add-On, make sure that you are running the latest version of VitalPBX, 2.3.6-1 or Higher. You can update by clicking “Check for Updates” on the Admin Menu on the Web UI.

VitalPBX Reference Guide Ver. 2.4.0, December 2019
208
7.4 Add-ons
7.4.1 Add-ons
General
Addon, Name of the Module or Application.
Installed Version, Currently installed version.
Available Update, Currently available version.
Status, state of the Module or Application.
Info, Brief description of the application or module.
Clean Cache, if you have any problems with the installations or updates maybe you need to clean the cache, please use this button.
Check Online, please use this button to check the latest updates.

VitalPBX Reference Guide Ver. 2.4.0, December 2019
209
8. Appendix
8.1 How to Install VitalPBX in Centos 7 To install VitalPBX in Centos 7 you need to do the following steps
1.- If you don't have installed wget command, install it in the following way:
[root@server ~]# yum install wget -y
2.- Download the script:
[root@server ~]# wget https://raw.githubusercontent.com/VitalPBX/VPS/master/vps.sh
3.- Set correct permissions to script:
[root@server ~]# chmod +x vps.sh
4.- Excute the script to install VitalPBX on VPS:
[root@server ~]# ./vps.sh
Troubleshooting
1.- When apply changes appears the following message: sudo: unable to open audit system,
This message appears when the SELINUX is enabled, for disabled execute the following command and then reboot your system:
[root@server ~]# sed -i 's/^SELINUX=.*/SELINUX=disabled/g' /etc/selinux/config
[root@server ~]# reboot
Important Note
VitalPBX is not working with OpenVZ based VPS, please, use KVM based VPS.
Due OpenVZ share the kernel and system files with the other users on the node and the host it's self, you are not able to modify the Kernel in any possible way, so, some applications like fail2ban does will not work as expected.

VitalPBX Reference Guide Ver. 2.4.0, December 2019
210
8.2 High Availability High availability is a characteristic of a system which aims to ensure an agreed level of operational performance, usually uptime, for a higher than normal period.
Make a high-availability cluster out of any pair of VitalPBX servers. VitalPBX can detect a range of failures on one VitalPBX server and automatically transfer control to the other server, resulting in a telephony environment with minimal down time.
Prerequisites
In order to install VitalPBX in high availability you need the following:
a.- 3 IP addresses.
b.- Install VitalPBX on two servers with similar characteristics.
c.- At the time of installation leave the largest amount of space on the hard drive to store the variable data on both servers.

VitalPBX Reference Guide Ver. 2.4.0, December 2019
211
Installation
We are going to start by installing VitalPBX on two servers
a.- When starting the installation go to:
INSTALLATION DESTINATION (Custom partitioning selected)
b.- Select:
I will configure partitioning
And press the button
Done

VitalPBX Reference Guide Ver. 2.4.0, December 2019
212
c.- Select the root partition:
/
Change the capacity to:
Desired Capacity: 20GB
We need enough space for the operating system and its applications in the future; then click
Modify button
Select disk and press the buttons
Select

VitalPBX Reference Guide Ver. 2.4.0, December 2019
213
Update Settings
d.- Finally, we press the button:
Done
And press the button
Accept Changes
Configurations
Configuración de IP y Hostname.
We will configure in each server the IP address and the host name.
Go to the web interface to:
Admin>System Settinngs>Network Settings
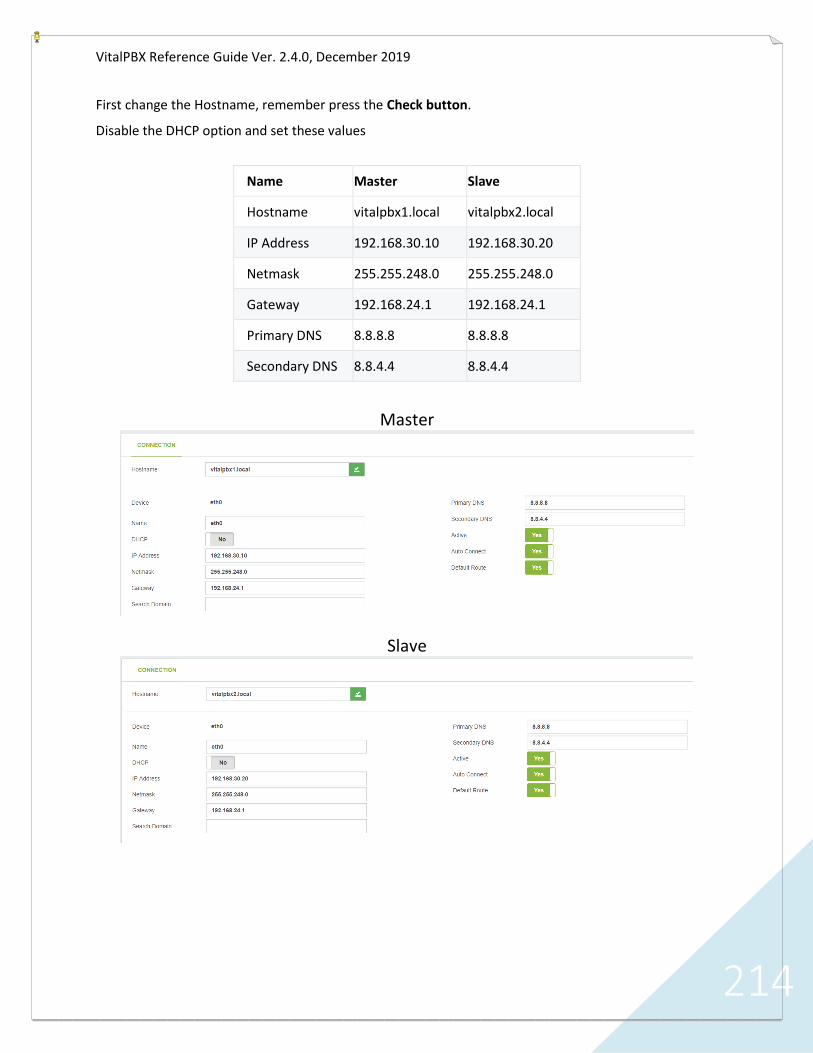
VitalPBX Reference Guide Ver. 2.4.0, December 2019
214
First change the Hostname, remember press the Check button.
Disable the DHCP option and set these values
Name Master Slave
Hostname vitalpbx1.local vitalpbx2.local
IP Address 192.168.30.10 192.168.30.20
Netmask 255.255.248.0 255.255.248.0
Gateway 192.168.24.1 192.168.24.1
Primary DNS 8.8.8.8 8.8.8.8
Secondary DNS 8.8.4.4 8.8.4.4
Master
Slave

VitalPBX Reference Guide Ver. 2.4.0, December 2019
215
Create Disk
Now we connect through ssh to each of the servers.
a.- Initialize the partition to allocate the available space on the hard disk. Do these on both servers.
[root@vitalpbx1-2 ~]# fdisk /dev/sda
Command (m for help): n
Select (default e): p
Selected partition x (take note of the assigned partition number as we will need it later)
[Enter]
[Enter]
Command (m for help): t
Partition number (1-4, default 4): 4
Hex code (type L to list all codes): 8e
Changed type of partition 'Linux' to 'Linux LVM'
Command (m for help): w
[root@vitalpbx-master ~]#
Now restart the servers so that the new table is available. [root@vitalpbx1-2 ~]# reboot
Install Dependencies
Install the necessary dependencies on both servers
[root@vitalpbx1-2 ~]# yum -y install drbd90-utils kmod-drbd90 corosync pacemaker pcs
Script
Now copy and run the following script in server1
[root@vitalpbx1 ~]# cd /
[root@vitalpbx1 ~]# wget
https://raw.githubusercontent.com/VitalPBX/vitalpbx_ha/master/vital_ha.sh
[root@vitalpbx1 ~]# chmod +x vital_ha.sh
[root@vitalpbx1 ~]# ./vital_ha.sh
Set these values, remember the Floating IP Mask must be 2 digit format (SIDR) and the Disk is that you created in the step “Create Disk”:
IP Master.......... > 192.168.30.10
IP Slave........... > 192.168.30.20
Floating IP........ > 192.168.30.30
Floating IP Mask... > 21
Disk (sdax)........ > sda4
hacluster password. > mypassword
Are you sure to continue with these settings? (yes,no) > yes
Are you sure you want to continue connecting (yes/no)? yes
[email protected]'s password: The root password from Slave Server

VitalPBX Reference Guide Ver. 2.4.0, December 2019
216
At the end of the installation you have to see the following message
************************************************************
* VitalPBX Cluster OK *
************************************************************
virtual_ip (ocf::heartbeat:IPaddr2): Started vitalpbx-master.local
Master/Slave Set: DrbdDataClone [DrbdData]
Masters: [ vitalpbx-master.local ]
Slaves: [ vitalpbx-slave.local ]
DrbdFS (ocf::heartbeat:Filesystem): Started vitalpbx-master.local
mysql (ocf::heartbeat:mysql): Started vitalpbx-master.local
dahdi (service:dahdi): Started vitalpbx-master.local
asterisk (service:asterisk): Started vitalpbx-master.local
vpbx-monitor (service:vpbx-monitor): Started vitalpbx-master.local
fail2ban (service:fail2ban): Started vitalpbx-master.local
drbd0 role:Primary
disk:UpToDate
vitalpbx-slave.local role:Secondary
peer-disk:UpToDate
************************************************************
* Before restarting the servers wait for drbd *
* to finish synchronizing the disks *
* Use the *drbdadm status* command to see its status *
************************************************************
*** Done ***
Now check if drbd has finished synchronizing the discs
[root@vitalpbx1 ~]# drbdadm status
drbd0 role:Primary
disk:UpToDate
vitalpbx2.local role:Secondary
peer-disk:UpToDate
[root@vitalpbx-master ~]#
If it shows the previous message it means that everything is fine and we can continue, otherwise we have to wait for it to finish synchronizing.
Now, reboot the vitalpbx1 and wait for status change in vitalpbx2.
[root@vitalpbx1 ~]# reboot
[root@vitalpbx2 ~]# pcs status
Then reboot the vitalpbx2, connect to vitalpbx1 and wait for status change in server1.
[root@vitalpbx2 ~]# reboot
[root@vitalpbx1 ~]# pcs status
Test To execute the process of changing the role, we recommend using the following command: [root@vitalpbx1-2 /]# bascul
************************************************************
* Change the roles of servers in high availability *
* WARNING-WARNING-WARNING-WARNING-WARNING-WARNING-WARNING *
*All calls in progress will be lost and the system will be *
* be in an unavailable state for a few seconds. *
************************************************************
Are you sure to switch from vitalpbx1.local to vitalpbx2.local? (yes,no) > yes
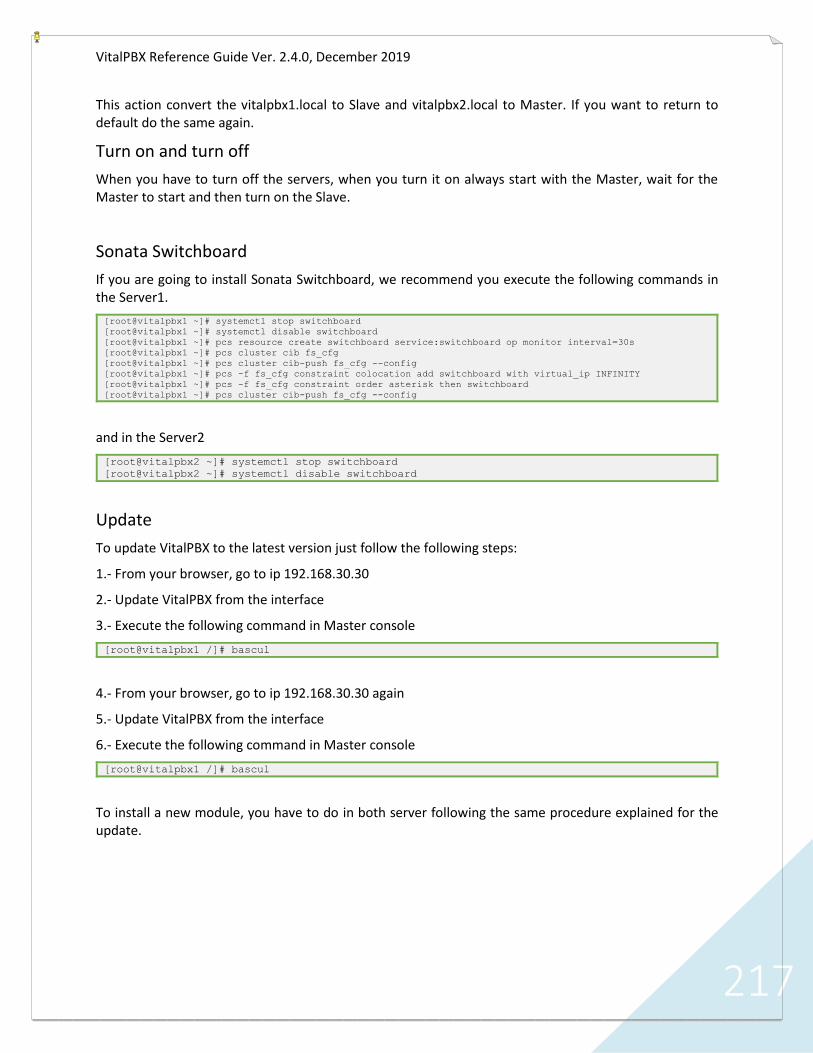
VitalPBX Reference Guide Ver. 2.4.0, December 2019
217
This action convert the vitalpbx1.local to Slave and vitalpbx2.local to Master. If you want to return to default do the same again.
Turn on and turn off
When you have to turn off the servers, when you turn it on always start with the Master, wait for the Master to start and then turn on the Slave.
Sonata Switchboard
If you are going to install Sonata Switchboard, we recommend you execute the following commands in the Server1.
[root@vitalpbx1 ~]# systemctl stop switchboard
[root@vitalpbx1 ~]# systemctl disable switchboard
[root@vitalpbx1 ~]# pcs resource create switchboard service:switchboard op monitor interval=30s
[root@vitalpbx1 ~]# pcs cluster cib fs_cfg
[root@vitalpbx1 ~]# pcs cluster cib-push fs_cfg --config
[root@vitalpbx1 ~]# pcs -f fs_cfg constraint colocation add switchboard with virtual_ip INFINITY
[root@vitalpbx1 ~]# pcs -f fs_cfg constraint order asterisk then switchboard
[root@vitalpbx1 ~]# pcs cluster cib-push fs_cfg --config
and in the Server2
[root@vitalpbx2 ~]# systemctl stop switchboard
[root@vitalpbx2 ~]# systemctl disable switchboard
Update
To update VitalPBX to the latest version just follow the following steps:
1.- From your browser, go to ip 192.168.30.30
2.- Update VitalPBX from the interface
3.- Execute the following command in Master console
[root@vitalpbx1 /]# bascul
4.- From your browser, go to ip 192.168.30.30 again
5.- Update VitalPBX from the interface
6.- Execute the following command in Master console
[root@vitalpbx1 /]# bascul
To install a new module, you have to do in both server following the same procedure explained for the update.

VitalPBX Reference Guide Ver. 2.4.0, December 2019
218
Some Useful Commands
• bascul, is used to change roles between high availability servers. If all is well, a confirmation question should appear if we wish to execute the action.
• role, shows the status of the current server. If all is well you should return Masters or Slaves.
• pcs resource refresh --full, to poll all resources even if the status is unknown, enter the following command.
• pcs cluster unstandby host, in some cases the bascul command does not finish tilting, which causes one of the servers to be in standby (stop), with this command the state is restored to normal.
• drbdadm status, shows the integrity status of the disks that are being shared between both servers in high availability. If for some reason the status of Connecting or Standalone returns to us, wait a while and if the state remains it is because there are synchronization problems between both servers and you should execute the drbdsplit command.
• drbdsplit, solves DRBD split brain recovery.
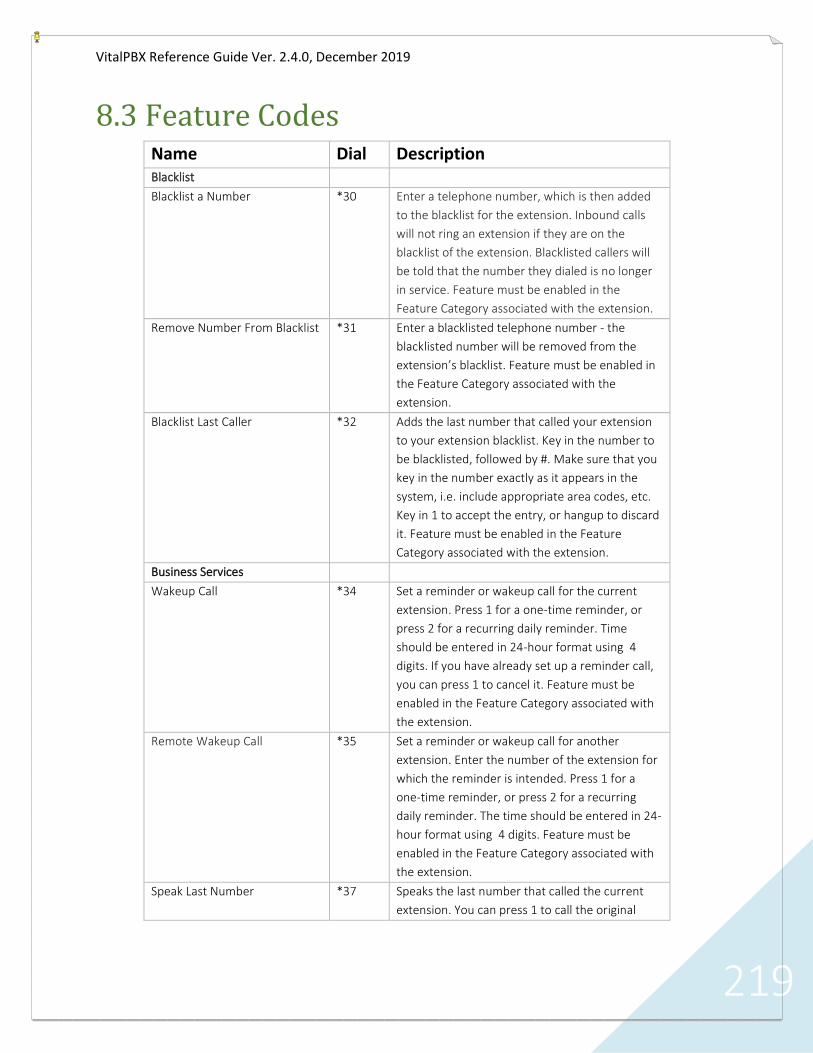
VitalPBX Reference Guide Ver. 2.4.0, December 2019
219
8.3 Feature Codes Name Dial Description Blacklist
Blacklist a Number *30 Enter a telephone number, which is then added
to the blacklist for the extension. Inbound calls
will not ring an extension if they are on the
blacklist of the extension. Blacklisted callers will
be told that the number they dialed is no longer
in service. Feature must be enabled in the
Feature Category associated with the extension.
Remove Number From Blacklist *31 Enter a blacklisted telephone number - the
blacklisted number will be removed from the
extension’s blacklist. Feature must be enabled in
the Feature Category associated with the
extension.
Blacklist Last Caller *32 Adds the last number that called your extension
to your extension blacklist. Key in the number to
be blacklisted, followed by #. Make sure that you
key in the number exactly as it appears in the
system, i.e. include appropriate area codes, etc.
Key in 1 to accept the entry, or hangup to discard
it. Feature must be enabled in the Feature
Category associated with the extension.
Business Services
Wakeup Call *34 Set a reminder or wakeup call for the current
extension. Press 1 for a one-time reminder, or
press 2 for a recurring daily reminder. Time
should be entered in 24-hour format using 4
digits. If you have already set up a reminder call,
you can press 1 to cancel it. Feature must be
enabled in the Feature Category associated with
the extension.
Remote Wakeup Call *35 Set a reminder or wakeup call for another
extension. Enter the number of the extension for
which the reminder is intended. Press 1 for a
one-time reminder, or press 2 for a recurring
daily reminder. The time should be entered in 24-
hour format using 4 digits. Feature must be
enabled in the Feature Category associated with
the extension.
Speak Last Number *37 Speaks the last number that called the current
extension. You can press 1 to call the original

VitalPBX Reference Guide Ver. 2.4.0, December 2019
220
caller. Feature must be enabled in the Feature
Category associated with the extension. <br>
Reminder *38 Records a message. You can configure in how
many minutes you want to hear the recording.
When the set time expires, you will receive a call
on the current extension and the recording will
be played. Feature must be enabled in the
Feature Category associated with the extension.
Call Completation (CCSS)
Enable/Disable Call Completion *40 When enabled, callers will be allowed to request
a call completion for your extension, this means
that when you finish to talk asterisk automatically
will generate a call from who requested the call
completion to your extension.
Cancel Call Completation *41 It allows you to cancel any call completion
request made from your extension.
Call Center
Add/Remove Queue Agent *50 Toggle to add an agent to a specific queue, or
remove the agent from the queue. You can either
follow the prompts, or (in expert mode) enter the
feature code immediately followed by * (asterisk)
and the number of the queue. Feature must be
enabled in the Feature Category associated with
the extension.
Pause/Unpause Queue Agent *51 Toggle to pause, or unpause, an agent for a
specific queue. You can either follow the
prompts, or (in expert mode) enter the feature
code immediately followed by * (asterisk) and the
number of the queue. Feature must be enabled
in the Feature Category associated with the
extension.
Queues Login/Logout *52 Add/Remove an Agent to all queue that agent
belong to
Queues Pause/Unpause *53 Pause/Unpause an Agent to all queue that agent
belong to.
Spy on Extension in Barge
Mode
*54 Instead of whispering on a single channel barge in
on both channels involved in the call.
Spy on Extension *55 Spy on a specific extension. Feature must be
enabled in the Feature Category associated with
the extension.
Spy on Extension In Whisper
Mode
*56 Spy on a specific extension in whisper mode.
Feature must be enabled in the Feature Category
associated with the extension.

VitalPBX Reference Guide Ver. 2.4.0, December 2019
221
Spy Random Channels *57 Spy on random channels. Feature must be
enabled in the Feature Category associated with
the extension.
Call Forward
Boss/Secretary *36 Toggle that enables or disables the routing all
incoming calls for the current extension to the
extension that is defined as the “secretary”
phone. Once this function has been enabled, only
the “secretary” phone will be able to make direct
calls to the “boss” phone – all other calls will be
routed directly to the “secretary” phone. Feature
must be enabled in the Feature Category
associated with the extension, and is only
available after a “secretary” extension has been
defined for the “boss” extension. The “secretary”
extension can dial this feature code to stop
receiving calls.
Call Forward Immediately *58 Toggles immediate call forwarding. Feature must
be enabled in the Feature Category associated
with the extension.
Set CF Immediately Number *59 Sets the number to which calls should be sent
when immediate call forwarding is activated. You
can either follow the prompts, or (in expert
mode) enter the feature code immediately
followed by * (asterisk) and the number to which
calls should be forwarded. Feature must be
enabled in the Feature Category associated with
the extension.
Call Forward Unavailable *60 Toggle to enable or disable call forwarding. Calls
will be forwarded to the extension defined by
default feature code *61. Feature must be
enabled in the Feature Category associated with
the extension.
Set CF Unavailable Number *61 Set the number to which calls should be sent
when unconditional call forwarding is activated.
Feature must be enabled in the Feature Category
associated with the extension.
Call Forward Busy *62 Toggle to enable or disable call forwarding when
your extension is busy. Calls will be forwarded to
the extension defined by default feature code
*63. Feature must be enabled in the Feature
Category associated with the extension.
Set CF Busy Number *63 Sets the number to which calls should be sent
when call forward busy is activated and your

VitalPBX Reference Guide Ver. 2.4.0, December 2019
222
extension is busy. Feature must be enabled in the
Feature Category associated with the extension.
Call Forward On No Answer *64 Toggle to enable or disable call forwarding when
your extension is unable to answer incoming
calls. Calls will be forwarded to the extension
defined by default feature code *65. Feature
must be enabled in the Feature Category
associated with the extension.
Set CF On No Answer Number *65 Sets the number to which calls should be
forwarded when your extension is unable to
answer. Feature must be enabled in the Feature
Category associated with the extension.
Do Not Disturb *66 Toggle to enable or disable the Do Not Disturb
feature. Feature must be enabled in the Feature
Category associated with the extension.
Follow Me *67 Toggle to enable or disable the Follow Me
feature. Feature must be enabled in the Feature
Category associated with the extension.
Clear all Diversions *69 Disables all call diversions, including the Do Not
Disturb feature. Feature must be enabled in the
Feature Category associated with the extension.
Personal Assistant - Toggle *96 Toggle to enable/disable the personal assistant
for your extension.
On Call Features
Disconnect Call *0 When you are on a call, disconnect the current
call. Feature must be enabled in the Feature
Category associated with the extension.
Direct Pickup *07 When you are on a call, capture a call that is
ringing at another extension in your pickup
group. You will need to dial the feature code
followed by the extension number that you want
to answer. Feature must be enabled in the
Feature Category associated with the extension.
Pickup Group *08 When you are on a call, capture a call that is
ringing at any other extension in your pickup
group. To use this facility is necessary to create
call group and pickup group in the extensions
dialog. Feature must be enabled in the Feature
Category associated with the extension.
Attended Transfer *2 When you are on a call, transfer the current call
to the operator. Feature must be enabled in the
Feature Category associated with the extension.
One Touch Recording *3 When you are on a call, force the current call to
be recorded. Feature must be enabled in the
Feature Category associated with the extension.

VitalPBX Reference Guide Ver. 2.4.0, December 2019
223
Park Call *4 When you are on a call, place the current call in
the call park. Feature must be enabled in the
Feature Category associated with the extension.
Blind Transfer #1 When you are on a call, transfer the current call
without notifying the extension to which the call
is transferred. This feature must be allowed by
both the Feature Category and the Dial Profile
associated with the extension.
Phonebook Directory
Dial By Name Directory 411 Use your numerical keypad to dial a user name.
For example, the extension for internal support
may be called HELP, so you dial 411 (to activate
this feature) and then 4357 to reach support.
Feature must be enabled in the Feature Category
associated with the extension.
Test Services
Speak Date and Time *70 Speak the current system date and time. Feature
must be enabled in the Feature Category
associated with the extension.
Speak Your Extension Number *71 Speak the extension number that you are calling
from. Feature must be enabled in the Feature
Category associated with the extension.
Echo Test *72 Echo test to measure the response time. Feature
must be enabled in the Feature Category
associated with the extension.
Simulate Incoming Call *73 Simulate an incoming call to test ringing of the
phone. Feature must be enabled in the Feature
Category associated with the extension.
Special Features
Lock/Unlock Phone *75 Toggle to lock or unlock the current extension.
No outbound calls can be made from a phone
that has been locked. In order to unlock the
phone, you will be prompted to enter the
Features Password for the extension. Feature
must be enabled in the Feature Category
associated with the extension.
Change Features Password *76 Change the password for the current extension in
order to access password-protect telephone
features. Feature must be enabled in the Feature
Category associated with the extension.
Remote Substitution *77 Makes it possible for the current phone to make
calls as if you are calling from different phone
extension. Feature must be enabled in the
Feature Category associated with the extension.

VitalPBX Reference Guide Ver. 2.4.0, December 2019
224
Customer Code *78 Creates a customer code to be used by the CDR
system - very useful for call accounting. Feature
must be enabled in the Feature Category
associated with the extension. <br>
Autorization Code *79 Allows you to make a call from any phone by
using an authorization code that is associated
with an unrestricted dial plan. Feature must be
enabled in the Feature Category associated with
the extension.
Hot Desking *80 This feature enables the ability to possess
multiple extensions using one device, depending
on who is using it. Very useful for Call Centers. To
use this option you need to create several
extensions without device
PBX/Extensions/Extension (Technology: None).
Then you must create a Hot Desking device
PBX/Extensions/Hot Desking
Night Mode All *81 Toggle to enable/disable all defined night modes.
Feature must be enabled in the Feature Category
associated with the extension.
Recordings & Announcements
Custom Recording *92 Used to record a message. Feature must be
enabled in the Feature Category associated with
the extension.
Dictation *93 Used to record a message with the option of
sending it by email. Only available for extensions
where Dictation has been enabled in the
Recording tab.
Record Msg For Personal
Assistant
*94 Record a message that callers will hear when they
are served by your personal assistant. Only
available for extensions where Has Personal
Assistant has been enabled in the Advanced tab.
Send Voicemail Message *95 Allows you to dial any extension and leave a
voicemail message. For example, dialing
*95*2492 will allow you to leave a voicemail
message for extension 2492. Feature must be
enabled in the Feature Category associated with
the extension.
Direct Voicemail *97 Direct entry to the voicemail system to listen to
voicemail for the current extension – only
requires the user to input the voicemail
password. This option is only available for
extensions where voicemail has been enabled in
the Voicemail tab.

VitalPBX Reference Guide Ver. 2.4.0, December 2019
225
Remote Voicemail *98 Remote entry to the voicemail system to listen to
voicemail for any extension – requires the user to
input both an extension number and the
voicemail password for that extension. Feature
must be enabled in the Feature Category
associated with the extension.

VitalPBX Reference Guide Ver. 2.4.0, December 2019
226
8.4 BLF (Hints) Name Dial Description
DND_EXT *66 DND
LOK_EXT *75 Lock Phone
CFN_EXT *64 Call Forwarding No Answer
CFU_EXT *60 Call Forwarding Unavailable
CFI_EXT *58 Call Forwarding Immediately
CFB_EXT *62 Call Forwarding Busy
FWM_EXT *67 Call Follow me
PEA_EXT *96 Personal Assistance
BOSS_EXT *36 Boss/Secretary
QAL_EXT *50 Login/Logout Agent (All dynamic queues to which it belongs)
QAP_EXT *51 Pause/Unpause Agent (All dynamic queues to which it belongs)
QAL_EXT_QUEUE *52 Login/Logout Agent in a specific queue
QAP_EXT_QUEUE *53 Pause/Unpause Agent in a specific queue
vm_EXT Voice Mail
*69 Clear all
701-710 Default Parking
Notes: EXT → Extension, QUEUE→ Queue Number
In VitalPBX activate in each extension Generate Hints. Settings/PBX Settings/System General/

VitalPBX Reference Guide Ver. 2.4.0, December 2019
227
8.4.1 Grandstream Phone Management
Go to Settings/Extension Boards

VitalPBX Reference Guide Ver. 2.4.0, December 2019
228
8.4.2 Yealink Management
Go to DSS Key
8.4.3 Xorcom Management
Go to DSS Key

VitalPBX Reference Guide Ver. 2.4.0, December 2019
229
8.5 VitalPBX Voice Prompts There is a list of the VitalPBX specific voice prompts.
Description Prompt Name Message (En) Mensaje (Es)
Simulate Incoming Call(Read DID)
vital-sim-incoming-call-did Enter the DID number to simulate an incoming call, followed by the pound key.
Por favor digite el D-I-D para simular la llamada entrante, seguido de la tecla numeral
Wake up Call(Welcome Message)
vital-welcome-wake-up-call Welcome to the wake-up call service! Bienvenido al servicio de despertador
Wake up Call Remote(Ask for remote extension)
vital-remote-wake-up-call-number
Enter the extension number of the person who should receive this wake-up call.
Por favor digite el número de extensión de la persona que recibirá el servicio de despertador
Voicemail Direct/Remote(Voicemail Disable)
vital-vm-no-avaliable Voicemail service is disabled for this extension.
El servicio de correo de voz está deshabilitado para esta extensión
Add/Remove Queue Agent(not member)
vital-queue-no-dyn-member You are not a dynamic member of this queue.
Usted no es un miembro dinámico de esta cola.
Spy Extension
vital-spy-extension-number Enter the extension number to be monitored.
Por favor digite el número de extensión a ser monitoreada
Announcement about follow-me activation/deactivation
vital-follow-me Follow-me is ... Sigueme está.....
Announcement that agent is already log on
vital-agent-already-login Agent is already logged in. Este agente está actualmente logueado
Announcement that agent is in pause
vital-agent-pause Agent is now paused. Agente está ahora en pausa
Announcement that queue number
vital-agent-queue-number Queue number ... Numero de cola
Announcement that agent is unpause
vital-agent-unpause Agent is now available. Agente está ahora disponible

VitalPBX Reference Guide Ver. 2.4.0, December 2019
230
Announcement about Call completion activated/deactivated
vital-call-completion Call-completion is ... Completado de llamada está ….
Ask if you have to request the call completion for the current call
vital-call-completion-request
For call-completion, please dial ... Para completar la llamada marque …..
Announcement about Personal assistant activated/deactivated
vital-personal-assistant Personal assistant is …. Asistente personal está...
Announcement personal assistant
destination number
vital-pls-enter-pa-dest-number
Enter the number you wish to call. Por favor, introduzca el número al que desea llamar
Announcement personal assistant recording message
vital-pls-rcrd-personal-assistant
Record your personal assistant message. When done, press the pound key.
Por favor grabe su mensaje del asistente personal, cuando termine presione la Tecla numeral.
Announcement the extension number
vital-your-extension-number-is
Your extension number is ... Su número de extensión es….
Announcement snooze for wake-up call
vital-snooze-for Snooze for ... Posponer por …….
Announcement about diversions activated/deactivated
vital-all-diversions-are Call diversions are ….. Todos los Desvíos están …….
Announcement Caller ID
vital-callerid Caller ID Identificador de Llamada
Announcement Inbound Number
vital-inbound-number <to be deleted>
Inbound number Numero Entrante
Announcement about night mode activated/deactivated
vital-night-mode Night-mode is ….. Modo nocturno esta …..
Announcement about night mode all activated/deactivated
vital-night-mode-all all night-modes are ……. Modo nocturno general esta …...

VitalPBX Reference Guide Ver. 2.4.0, December 2019
231
Ask about the Customer Account Number
vital-customer-account-number
enter customer account number, followed by the pound key
Por favor ingrese el número de cuenta del cliente seguido de la tecla numeral
Custom recording greeting message (*92)
vital-custom-recording
Say your message, and then press the pound key.
Diga su mensaje y luego presiona la tecla numeral.
Ask for authorization code (*79)
vital-authorization-code Enter your authorization code, followed by the pound key
Ingrese su código de autorización, seguido de la Tecla numeral
Login/Logout hot desking device (*80)
vital-hotdesking-login please enter the extension number followed by the pound key
por favor ingrese el número de extensión seguido de la tecla numeral
vital-hotdesking-login-confirm
the extension was successfully added La extensión fue agregada satisfactoriamente
Vital-hotdesking-logout your extension is added, to remove press 1, to cancel press 2
su extensión está agregada, para eliminar presione 1, para cancelar presione 2
vital-hotdesking-logout-remove
the extension was successfully removed la extensión fue eliminada con éxito
vital-hotdesking-logout-cancel
extension remains associated with this device
la extensión sigue asociado a este dispositivo
Phone Unlock vital-phone-unlock your extension has been unlocked Su extensión ha sido desbloqueada
Phone Lock Vital-phone-lock your extension has been locked Su extensión ha sido bloqueada
Not a dynamic member of any Queue (*52)
vital-no-dyn-member
you are not a dynamic member of any Queue
Usted no es un miembro dinámico de ninguna Cola
vital-agent-login-logout Press 1 for agent login or press 2 for agent logoff
Presione 1 para iniciar sesión como agente o presione 2 para cerrar sesión como agente
vital-agent-login Agent logged in Agente agregado a las colas
vital-agent-logoff Agent logged off Agente removido de las colas
Private Class Of Service vital-cos-private You are not allowed to call this extension Usted no tiene permisos para llamar a esta extensión
Hot Desking extension (*80)
vital-no-hotdesking-extension
Sorry, but the provided extension is not hot-desking
Lo siento, pero la extensión proporcionada no es hot-desking
Hot Desking device (*80)
vital-no-hotdesking-device Sorry, but your device is not hot-desking Lo siento, pero su dispositivo no es hot-desking

VitalPBX Reference Guide Ver. 2.4.0, December 2019
232
vital-max-tries You have reached the maximum number of attempts
Ha alcanzado el máximo número de intentos
Authorization Code (*79)
vital-auth-code-invalid You have provided an invalid authorization code
Ha proveído un código de autorización inválido.
Authorization Code (*79)
vital-auth-code-disabled The authorization code you have provided is disabled
El código de autorización que ha proveído está deshabilitado
Customer Code (*78) vital-customer-account-number-invalid
You have provided an invalid customer account number
Ha proveído un número de cuenta de cliente inválido
Customer Code (*78) vital-customer-account-number-disabled
The customer account number you have provided is disabled
El número de cuenta de cliente que ha proveído está deshabilitado.
Record Msg For Personal Assistant (*94)
vital-personal-assistant-no-recording
You have not recorded the personal assistant message, please record it and try again
No ha grabado el mensaje del asistente personal, por favor, grábelo e intente de nuevo
Record Msg For Personal Assistant (*94)
vital-personal-assistant-rec-message
After the tone, please record your personal assistant message
Después del tono grabe el mensaje de su asistente personal
vital-invalid-option You have dialed an invalid option Ha marcado una opción invalida
Cancel Call Completion (*41)
vital-call-completion-cancelled
The call completion service has been canceled
El servicio de completado de llamada ha sido cancelado
Reminder (*38) vital-reminder Please enter the extension number to which you wish to send the message
Por favor introduzca el número de extensión a la cual desea enviar el mensaje
vital-feature-disabled The feature you have dialed is disabled for this extension
La opción que ha marcado esta deshabilitada para esta extensión
Simulate Incoming Call (*73)
vital-sim-incoming-cid Please dial the C.I.D. number to simulate an incoming call, followed by the pound key.
Por favor digite el C-I-D para simular la llamada entrante, seguido de la tecla numeral
Queues Pause/Unpause (*53)
vital-queues-pause To pause all queues… Para ponerse en pausa en todas las colas….
Queues Pause/Unpause (*53)
vital-queues-unpause To un-pause all queues… Para ponerse disponible en todas las colas…
Boss/Secretary – Toggle (*36)
vital-boss-secretary Secretary mode… Modo secretaria…
vital-no-queues There are no available queues No hay colas disponibles
vital-timeout-reached You have depleted the waiting time Ha agotado el tiempo de espera

VitalPBX Reference Guide Ver. 2.4.0, December 2019
233
8.6 VitalPBX Call Flow

VitalPBX Reference Guide Ver. 2.4.0, December 2019
234
8.7 Recommendations
Servers often fail due to lack of space on your hard disk. If you want to keep your server in optimum conditions, we recommend the following: 1.- Remove unnecessary and old recording periodically. If you want to make this automatically, we recommend that you include this cron in cron.daily #!/bin/sh cd /var/spool/asterisk/monitor/ /usr/bin/find . -type f -name "*.mp3" -mtime +180 | /usr/bin/xargs /bin/rm -f >/dev/null 2>&1 /usr/bin/find . -type f -name "*.wav" -mtime +180 | /usr/bin/xargs /bin/rm -f >/dev/null 2>&1 exit 0 Where +180 means the number of days of recording. You can change. Remember to change the permission to 755. 2.- Convert the recording from .wav to .mp3 periodically. If you want to make this automatically, we recommend that you include this cron in cron.daily #!/bin/sh cd /var/spool/asterisk/monitor/ /usr/bin/find . -type f -name "*.wav" -size -200k | /usr/bin/xargs /bin/rm -f >/dev/null 2>&1 /usr/bin/find . -type f -name "*.wav" | /usr/bin/xargs -i lame -r {} /usr/bin/find . -type f -name "*.wav" | /usr/bin/xargs /bin/rm -f >/dev/null 2>&1 exit 0 The third line deleted unnecessary recordings of less than 200k, the four line converts from .wav to .mp3 and the five line deleted all .wav file that was converted to mp3. Remember to change the permission to 755. 3.- Remember to remove periodically the log files, this file is located in: /var/log/ /var/log/asterisk You can remove the log file that finished in .0, .1, etc.

VitalPBX Reference Guide Ver. 2.4.0, December 2019
235
8.8 Additional Modules
8.8.1 Domotic Module The Domotic module facilitates the integration of VitalPBX with home or office automation systems. For now, this module is compatible with the Vera Gateway, in the future we plan to integrate more Gateway.
This module has 4 configuration forms, Units, Device, Scenes and Notifications
• Units, the gateways are configured, it is possible to connect more than one gateway to VitalPBX.
• Device, the devices that are connected to the Gateway are configured, these are automatically detected when the Gateway is configured.
• Scenes, these Scenes are obtained from the Gateway. A Scenes is a group of devices that execute an action in conjunction with just running the Scene
• Notifications, notify when a Devices executes an action, in the case of Devices that possess this characteristic, these can be the movements or magnetic sensors.

VitalPBX Reference Guide Ver. 2.4.0, December 2019
236
8.8.1.1 Units The gateways are configured, it is possible to connect more than one gateway to VitalPBX.
Model, The brand and model of the gateway to be configured. Description, A brief description to identify the Gateway. IP Address, Gateway IP address. Port, Gateway IP port Synchronize, If you make any changes in the Gateway it is necessary to Synchronize again, with this button you can do it.

VitalPBX Reference Guide Ver. 2.4.0, December 2019
237
8.8.1.2 Devices The devices that are connected to the Gateway are configured, these are automatically detected when the Gateway is configured
Number to Dial, Is the number to dial to change the status of the Device. Description, A brief description to identify the Device. Unit, Select the Gateway that we want to configure the Device. Device, select the Device to be configured. Welcome Message, Message to listen when the Device is called (optional). Class of Services, Class of Service to which the Device is associated. PIN List, Pin List associated with the Device, the person must know at least one PIN to change the status of the Device. White List, List of Telephone Numbers or extensions. All that are in this list can change the status of the Device without having to enter PIN. If a number is added to this list automatically the remaining extensions and numbers are blocked. Toggle Mode, If this option is in Yes, the Device status will be changed automatically without asking any questions. Generate Hint, Generates Hint to be accessed from the console of an IP phone. BLF Hint, Is the Hint that must be configured in the console of the IP phone.

VitalPBX Reference Guide Ver. 2.4.0, December 2019
238
8.8.1.3 Scenes Scenes are obtained from the Gateway. A Scenes is a group of devices that execute an action in conjunction with just running the Scene
Number to Dial, Is the number to dial to execute the Scene. Description, A brief description to identify the Scene. Unit, Select the Gateway that we want to configure the Scene. Scene, select the scene to execute. Welcome Message, Message to listen when the Scene is called (optional). Class of Services, Class of Service to which the Scene is associated. PIN List, Pin List associated with the Scene, the person must know at least one PIN to execute the Scene. White List, List of Telephone Numbers or extensions. All that are in this list can execute the Scene without having to enter PIN. If a number is added to this list automatically the remaining extensions and numbers are blocked. Skip Instructions, If this option is in Yes, instructions are ignored and only the scene is executed.

VitalPBX Reference Guide Ver. 2.4.0, December 2019
239
8.8.1.4 Notifications Notify when a Devices executes an action, in the case of Devices that possess this characteristic, these can be the movements or magnetic sensors.
Unit, Select the Gateway that we want to configure the Notification. Device, select the Device to be configured. Welcome Message, Message to listen when the Scene is called (optional). Enabled, enable or disable the notification. Destination, the action to take when the device changes state

VitalPBX Reference Guide Ver. 2.4.0, December 2019
240
8.8.1.5 Some Console Picture Touch Phone
Traditional Console
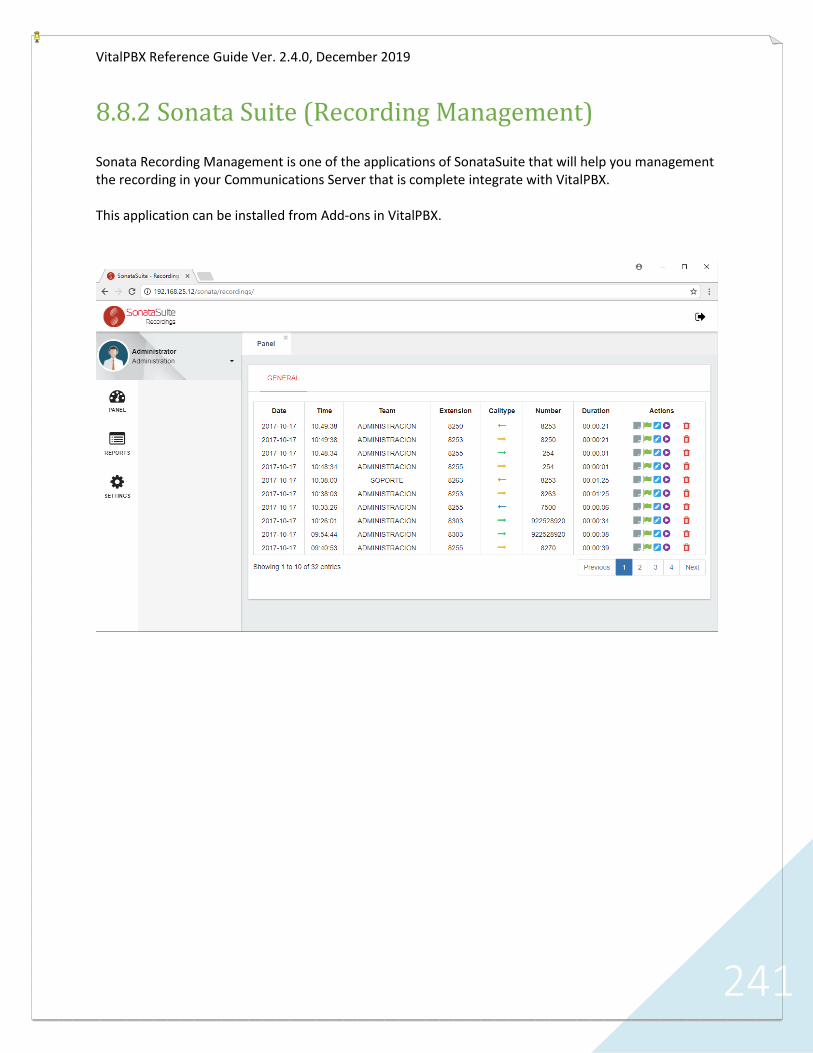
VitalPBX Reference Guide Ver. 2.4.0, December 2019
241
8.8.2 Sonata Suite (Recording Management) Sonata Recording Management is one of the applications of SonataSuite that will help you management the recording in your Communications Server that is complete integrate with VitalPBX. This application can be installed from Add-ons in VitalPBX.

VitalPBX Reference Guide Ver. 2.4.0, December 2019
242
8.8.3 Sonata Suite (Billing System) Sonata Billing System is one of the applications of SonataSuite that will help you management the CDR in your Communications Server that is complete integrate with VitalPBX. This application can be installed from Add-ons in VitalPBX.

VitalPBX Reference Guide Ver. 2.4.0, December 2019
243
8.8.4 Sonata Suite (SwitchBoard) Sonata SwitchBoard is one of the applications of SonataSuite that will help you to visualize in a clear and simple way what is happening with your Communications Server in real time. This application can be installed from Add-ons in VitalPBX.

VitalPBX Reference Guide Ver. 2.4.0, December 2019
244
8.8.5 Operator Panel The panel lets you see detailed PBX activity, like who is talking and to whom, call durations, held calls, queued calls, etc. It lets you control your phone and perform transfers, launch call spying and whisper, monitor queue activity and more. All from your web browser, without the need to install anything on the client side. It can show any number of lines per phone and held call status, so you can see exactly what is going on.
For install and configure FOP2 in VitalPBX following this steps. 1.- Install FOP2, in the console execute the following command # yum install fop2 2.- Then enter VitalPBX and you will see in the Settings section a new option called FOP2 Manager

VitalPBX Reference Guide Ver. 2.4.0, December 2019
245
3.- Enter and create the users with their respective profiles, this user has to be the same as the one that we are going to create to enter the Portal in Extensions Module. For more information on creating users and profiles in FOP2, go to the manufacturer's website.
4.- Go to Admin, Application Access, and select FOP2 Manager. Here add users who will have access to the FOP2 Manager.
5.- Now select FOP2 Switchboard. Here add users who will have access to the Switchboard

VitalPBX Reference Guide Ver. 2.4.0, December 2019
246
6.- Now go to Extensions and select the extensions that we want to access the Switchboard, in the section Advanced, in User Portal enable access and create the user and password. This is the user and password to use to access the Switchboard

VitalPBX Reference Guide Ver. 2.4.0, December 2019
247
7.- Finally, go to the VitalPBX url and add /fop2 and enter the user and password created in the previous step.

VitalPBX Reference Guide Ver. 2.4.0, December 2019
248
8.9 Command Tool
This tool contains a series of commands to easily give maintenance to the VitalPBX installation. To invoke this tool you must use the following syntax: “vitalpbx COMMAND [command-options]“. In the future, we expect to add new functionalities, by now, the available commands are:
vitalpbx reset-pwd [username]: Reset password for any user. If not, user is specified, it resets the password for admin user (Main Tenant Only)
vitalpbx build-db: Execute a series of scripts to build VitalPBX database (apply_patches)
vitalpbx dump-conf: Dump Asterisk Configurations and re-build Asterisk DB (Main Tenant Only)
vitalpbx check-integrity: The command to check the environment integrity now verifies the integrity of each tenant and set the right permissions and owner/group for the folders
8.10 Credits
8.10.1 Sources of Information ▪ VitalPBX Tooltips
▪ Digium web page & wiki
▪ Asterisk files
▪ Google Search (Various)
▪ Voip-info.org
▪ dictionary.com
▪ openvpn.net
▪ http://www.asteriskdocs.org