Embed Size (px)
Citation preview

Warnings & DisclaimersOverclocking/overvoltaging your EVGA 980 Ti KINGPIN graphics card on air, water, andLN2 temperatures can be fun and most of all pretty safe for the hardware, as long as it’sdone correctly. This includes not only card PCB preparation for extreme conditions, buthaving the right software tools + capable supporting hardware(PSU) and a stable platformto test on. Taking the time and effort to prepare the VGA properly for more extreme formsof cooling and knowing some of the basics of overclocking, can go a long way to give abetter understanding of exactly what is going on when you overclock your VGA at anytemperature. Consider everything given below as “self-educational” and provided to assistin getting the most out of your shiny new KP card. Not only EVGA, but I think mostvendors won’t warranty any hardware if it shows signs of being used and abused.Proceed with caution and at your own risk. Having patience and doing things in smallsteps can work wonders in providing the best user experience while keeping yourhardware safe and benching over and over again.
Maxwell overclocking guidelinesOverclocking VGA’s today is made easy through a design like EVGA 980 Ti KINGPIN orother similar custom card. The voltage regulation components on the card and overalldesign/layout are much more capable than reference designs. There are also manydifferent software tools available for adjusting voltages, fan limits, and clock speeds.Anyone can do it with a little basic knowledge of some key terms and practice. First, let’stalk about some of the major components of NVIDIA VGA overclocking software controls.Then some basic terminology/behavior of what’s going on with the GPU when you usethose tools to overclock and overvolt the graphics card.
Power target and OC settings
This is main item limiting performance usually, as every NVIDIA card since the Kepler erahas a power limit and circuitry on the PCB to measure input power. This control does notgive you any amps or Watts value, but instead provides a percentage over designspecification (which varies depending on card SKU/vendor!).
980 Ti KP has three different BIOS modes, which all have different maximum powertargets keeping nominal power spec the same. If you want maximum OC headroom onair/water, you can just max this setting out and it will be enough.
Next up are the usual controls we use in EVGA Precision for adjusting everything on thecard in windows:
GPU Clock offset – This is GPU core clock adjustment setting.MEM Clock offset – This is memory clock adjustment setting.Voltage – for increasing the power to the core (1.212V limit in Precision X) or useclassified voltage controller/EVBot for higher.Fan speed – Always max these when pushing the card on airKBoost – This is critical for getting the best scores when pushing the limits. It forcesthe driver to P0 state on a SW level and can prevent the card from sticking low at 2Dclocks in between game tests while running benches. This can hurt the overall FPSin a benchmark a lot, and usually results in slightly lower score. On LN2, its mostnecessary.
Always use K-boost when doing any kind of benching!

Also if you benching with VGA cable (some cards might have no display issue on digitalinterfaces, such as DVI, HDMI, DP when running very low temperatures), you will needuse secret menu in EVGA Precision X to make KBoost working. To access secret menuopen Precision X, press Ctrl+Shift+Middle wheel on mouse and extra window withexperimental features will pop up.
Disable voltage control – this feature prevent Precision X to control any voltagesettings.Turn off KBOOST limitation – this feature allow you to still enable KBoost even ifusing VGA output (normally it’s disabled, due rare compatibility issues)
Overclocking methodology for Big Maxwell (GM200)
EVGA 980 Ti KINGPIN as well as all other 980 Ti, 980 and Titan-X cards use a GPUfeaturing the NVIDIA Maxwell architecture. Given what we already know about ithighlighted here before, we know that Maxwell GPUs don’t really benefit from muchovervoltage on air and water cooling temps. If you give it some thought, it’s due to factthat power-efficient Maxwell is already close to pushing frequency boundaries whenrunning at ambient temperatures. So then it seems Maxwell doesn’t seem to like muchapplied voltage at ambient temperatures. Well, how does applied GPU voltage normallywork on other GPUs normally? There are two ways:
Voltage relation to chip operation
As your card clocks go up, it’s harder for the electrical gates in the GPU to switch due tomore noise generated and the increased demand for current from the power supply.There is also an overall increase of temperatures inside the chip structures internally onthe GPU. At some point, the applied voltage is just not enough to keep the internal gatesswitching reliably and this creates errors/artifacts. The result is the GPU will crash.

Raising voltage will provide that extra power the GPU needs, but it will also skyrocketGPUs temperatures internally. If you are still below “maximum” temperatures for a specificfrequency, the GPU will remain stable and continue working well. There are safe typicaltemperature ranges for different voltages. These are like “sweet spots” with regards tovoltage/frequency/temperature.
Voltage in relation to power consumption and temperature
Increasing voltages and improving the cooling to reach max clocks, this is basicoverclocking. Keep in mind increasing voltages always brings an increase in powerconsumption and internal GPU temperatures. This is not a linear relationship, but morelike an exponential one. When you increase voltage 10%, your power usage andtemperatures will not increase just 10%, but more like 25-30%. This is very different tofrequency gains, which are more linear (10% faster clock gives close to same 10% powerincrease). Even at extreme cooling temperatures, this rule still applies because -100 °C atdie contact surface is still not enough to cool down heavily overvolted chip logic structuresburied deep in the silicon. It will still overheat at one point no matter how cold temperatureis, if voltage and power consumption is too high. This behavior is important to know, as itis the basis for all overclocking, extreme or not.
Maxwell is designed and optimized very well to run at high frequencies. This means thatwhile keeping voltages and temperatures at normal default levels, you can get amazingclocks. Most of the GM200 GPUs on Titan X and 980 Ti cards can run 1450+ MHz, whichis already considered very high clocks given the chip complexity and size. There is someheadroom left for scaling at ambient temps, but not much.
Overclocking at frequencies beyond 1450 MHz really depends on quality of silicon andhow high it can scale. Another important thing is whether the GPU is taking more or lesspower at default spec.
BIOS & Tools

BIOSes in this section compatible only with EVGAGeForce GTX 980 Ti KINGPIN, and will not work onregular 980 Ti CLASSIFIED or any other card.
Card is shipped with three different BIOSes:
Normal BIOS – This BIOS is stock baseline, +130% Power target limitOC BIOS – This BIOS similar to Normal but with 7096MHz memory, +150% Power targetlimitLN2 BIOS – This BIOS have similar to OC, but with 170% Power target limit
Custom BIOS
OC BIOS
This OC BIOS have next features
Unlocked maxed-out power limit100% unlocked fan speed3591 MHz memory clock as baseDisable protection for subzero
If you plan to run LN2 temps (below -60°C) should use LN2 switch position (Red LEDBIOS), to disable hardware thermal protection mechanism.
Watercooling compatibility
Bitspower 980 KINGPIN waterblocks are compatible with GTX980Ti KPE as well, withminor limitation:Due to different memory chip layout – few memory chips will not be in direct contact withblock. That’s not big issue from performance, as memory is not power hungry device anddoes not need direct active cooling. You can add thermal pad between extra chips andblock, so nothing to worry about there.
Here’s example with BP 980KPE block installed on 980 Ti KPE:
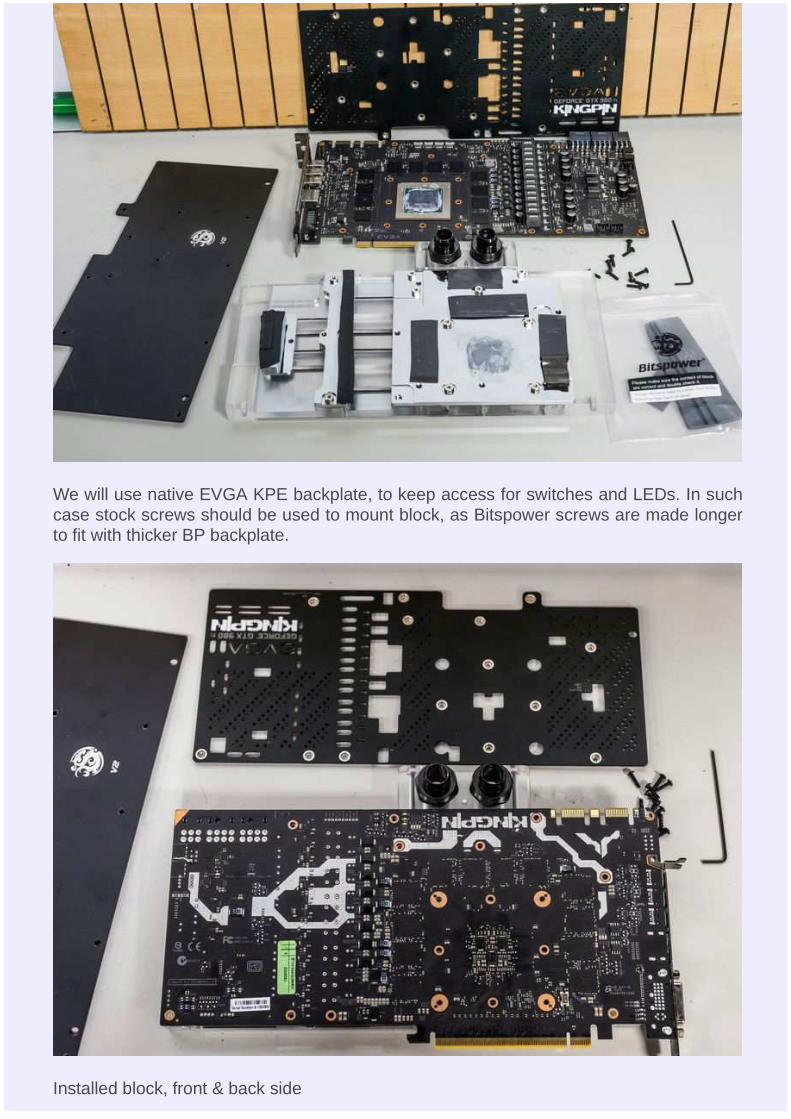
We will use native EVGA KPE backplate, to keep access for switches and LEDs. In suchcase stock screws should be used to mount block, as Bitspower screws are made longerto fit with thicker BP backplate.
Installed block, front & back side

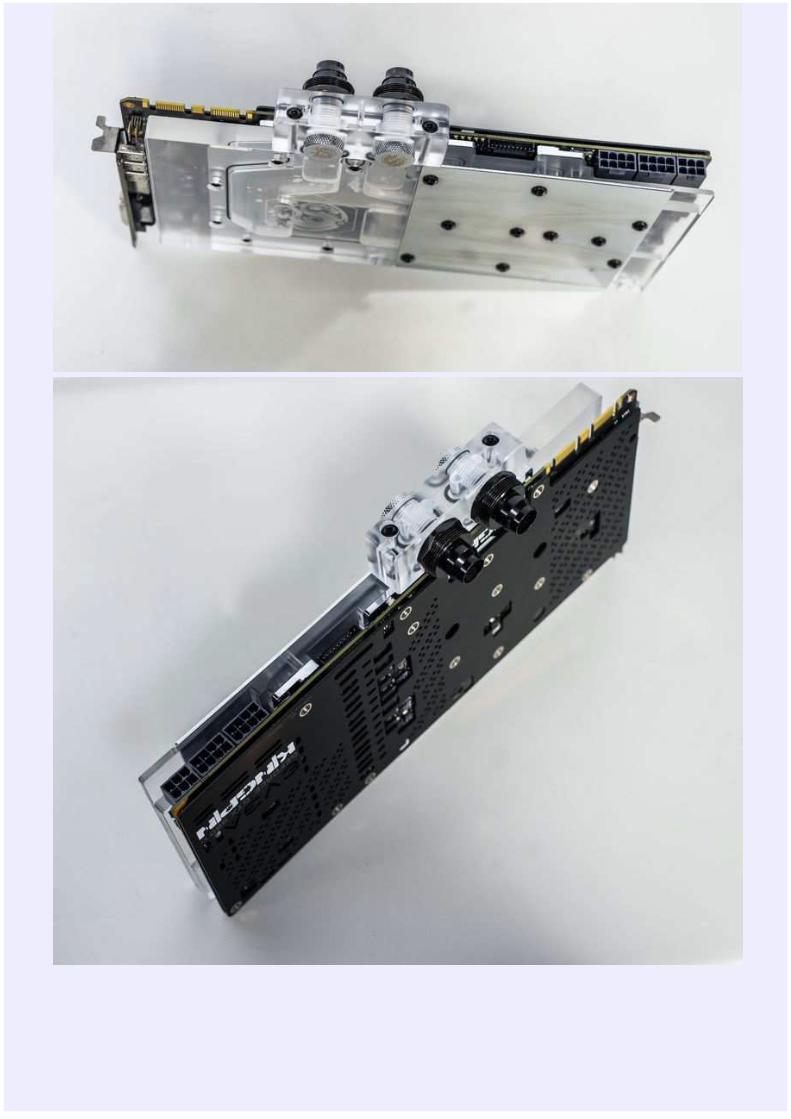
BP block is not exactly single-slot, like EK, but still much thinner than stock fansinksolution.

Overclocking
Clockspeeds, voltages, and temperatures. All these variables work together and must bedialed in correctly for the best results. The following are the normal overclocking rangesyou can expect for the majority of cards, however every card is not exactly the same.More fine tuning will always get the best results on your card. Some cards will usemore/less voltage and for sure some cards will go colder than others on top end. Assuggested earlier, overclocking in small steps helps to learn exactly what your particularGPU needs for every MHz upward.
Air/water cooling clock/voltage/temperature range
The cards clock range on AIR cooling using the default 980 Ti KINGPIN cooler will varyand these are only guidelines of what the average card will do. ASIC level and ambienttemps can have an impact on how high the card clocks on air. Every card will be differentand ASIC is NOT a guarantee of anything, especially at air cooling. It is just a indicator asmentioned before. Generally, most cards with an ASIC of 70% or more should hit 1500and up on air using DEFAULT CORE VOLTAGE. Cards with ASIC ranges up to 74% canhit the low 1500-1530’s, and cards with ASIC of 76% and higher have the greatest chanceusually to hit 1550 MHz+.Because of Maxwell voltage scaling as discussed before, in most cases adding only asmall amount of voltage can help. 1.21-1.22v under load at DMM is about the most youcan go on air before you will get artifacts on screen. I find 1.19-1.2 V to be nice sweetspot on most GPUs. Adding voltage in most cases just results in more artifacts andinstability. Find the limit of your GPU by using default voltage first, then see if addingvoltage helps at all.
LN2 cooling clock/voltage/temperature range
The card scales Maxwell GPUs to the limit and is capable to hit 2 GHz and beyond corefrequency with the right amounts of voltage and temperature. Fully maxing out theseGPUs on LN2 usually requires around -125 to -135c on the GPU container, and roughly1.72v-176v under load at DMM with the correct Vdroop to balance the GPU switchingfrom idle/load. The higher the current usage, the more the Vdroop can help withsmoothing out the cards power usage from idle to load. Core and memory voltage droopsettings will be covered more specifically later on in this guide. The thermal grease youuse and the mounting accuracy/pressure also has a big impact on max clocks. It’s criticalthat the contact surface areas of the pot and the GPU are aligned and mounted correctly,or you can lose 150 MHz+ on top end. I’ve gotten 2000 MHz on cards that previouslycould only do 1850 MHz due to only bad mounting on previous runs. Bad mountingcauses a poor temperature delta between the GPU pot temp and the die temp on theGPU itself. With 980 Ti KINGPIN, there is an internal monitor so you can actually checkthe delta of the card to see the contact accuracy and grease viability (frozen or not).These two aspects are CRUCIAL to top end extreme overclocking. Both are covered laterin the guide.
This guide doesn’t cover insulation and condensation preparation of the card itself, asthere are different ways to do this and everyone has a preferred method. I figured maybeit’s best to let some guys post their own methods here that work well. This lets you decidehow you want to insulate your card your own individual way. Check around KPC or theusual internet forums for insulation guides for your graphics cards. Once the 980 Ti KP isprepped, container is mounted, and card installed into the system, you’re ready. Do aquick post/boot before putting ANY LN2 into the container just to be sure everything is still100% functional on the card after you mounted it. Check that the drivers are stillworking/installed, check for artifacts on the screen, even run a 3Dmark at default settings.If the container warms to 30-40 °C under load, just splash it with some LN2, don’t let itoverheat is all you need to worry about. If it can’t pass this, it will never overclock. Thatmeans it’s time to break down the rig, see what the problem is, and start over.
If everything is OK, then let’s move on. Word to the wise, you can NEVER just pull thecard down to min temp (-125 °C), set max voltage(1.65v+) and think it will run alright. Thisis NEVER recommended and something I’ve always preached against since thebeginning. Impatience will lead to bad extreme overclocking sessions. The proper way tooverclock a VGA to the max clocks it can run is to go in steps, working your way up involtage and down in temperature, like the following. Adjustable on the fly Vdroop changescan help when tuning in max clocks. Voltages shown are measurements taken at theprobe it reading point for core voltage:

1st boot/check Ambient Default voltage
-50 to -60 °C 1650 MHz 1.55 V,droop disable
-80 to -90 °C 1750 MHz 1.65 V,droop disable
-90 to -115 °C 1850 MHz – 1900 MHz 1.7 V, mild droop
-115 °C and beyond 2000 MHz+ 1.75+ V, med-most droop
Again these are typical LN2 scaling numbers of what most cards can achieve. While allKP980Ti PCB ‘s are capable to push Maxwell 980 Ti GPU to well beyond the limits, allGPUs are different. Factors such as ASIC, leakage, and container mounting can have abig impact on the end result.
Memory overclocking
In modern benchmarks like 3Dmark Firestrike or Heaven, graphics memory overclockingis just as important as the GPU.Much thought was given on 980 Ti KINGPIN with regards to memory during the carddesign to optimize memory performance to its fullest.
To start, all 980 Ti KPE cards are equipped with SAMSUNG 7Gbps memory chips.Currently, this is the only 980 Ti card available which features Samsung memory. Why thebuzz about it?
Two main reasons:
1. Samsung is faster clock-per-clock against Hynix due to some tighter latencies and theability to run higher voltage. This improves the performance a bit over that of thereference 980Ti.
2. Samsung memory can scale nicely with memory voltage. This means that if youprovide more voltage to memory than stock 1.60V, you will very likely get higheroverclocking on memory. Hynix memory fails at this as most IC’s are usually unable tocope with elevated voltages. 3D apps will crash on cards using Hynix memory even atstock 7Gbps clock if you raise the memory voltage. Usually over 1.7v is enough to make itunstable. Because of this, Samsung memory is THE BEST choice for a high endoverclocking card and why 980 Ti KINGPIN is built only with Samsung IC’s. When you areoverclocking on LN2, you want to match the highest core speed + highest memory speed.This is what gives the best score and Maxwell GPU cores actually need higher memoryvoltage to keep the memory controller portion of the GPU from bugging on cold andlimiting max memory OC. Hynix memory can’t scale with voltage, so a lot of Ti’s and

Titan-X GPUs end up NOT being able to hit their max core clock due to this. We saw thisbehavior over and over again in the lab on many Titan-X and reference 980ti as well assome ES experimental 980 Ti KINGPIN cards with Hynix memory.
When pushing your card hard on LN2, always raise the memory voltage about 1.80 V TOSTART, and the GPU will require more like around 1.85 V or higher depending on theGPU to keep the memory clocks high on LN2 and scoring correctly. This is critical for 980Ti overclocking and getting the best results.You may find that your card can do ++700 on air even using default voltage. This sameGPU on LN2 will require more memory voltage to keep the same memory overclockstable when GPU is being pushed 1850+. That’s how it works.
Keep in mind that the cards memory is calibrated when it initializes and the bootswindows. Sometimes when raising memory voltage for example to 1.8v at idle desktop, itcan cause the GPU to lock and artifact. This is normal and happens because the memoryhas already been calibrated at lower voltage, long before you got into windows. A simplereboot after desired voltage is set, and everything will be working 100% fine on next bootinto windows with raised memory voltage. Running very high voltages on your cardsmemory for extended periods of time may degrade the IC’s slightly, so be careful not toovervolt when not necessary. Spend some time finding out exactly what memory voltageyour cards needs to run at different temperatures, so it’s not set too high for the clock andall should be good. I run 1.82-1.85 V on cards on LN2 temps always. For air cooling,usually I don’t go over 1.8 V and it seems to be able to handle it so far. The memory canscale very high on some card using higher than 1.90+ V, but please do so carefully. I haveseen some cards IC’s degrade at voltage over 1.94 V/air and running extremely highfrequencies (750+ offset on memory, = 2250+)
Power limit & requirements
This was already covered many times on web , so we will link it in this guide too. HoweverKP980Ti does not need a power limit mod or any thermal limiting mods. It can overcomethe power limit or any thermal limit with a simple BIOS flash. It is 100% designed to notneed any additional modding at all to run @full speed.
Card overclocked with LN2 and running 1800+MHz can take some serious power, soensure your PSU is adequate for the job. We highly recommend running system (CPU,peripherals, fans, motherboard) from one PSU, and VGA card from separate secondPSU, with at least 1200W of power on +12V rail.
To show what card is capable of, here are measurement results of +12V currentconsumption at 8+8+6pin plugs during 3Dmark FireStrike Ultra runs:
Idle power during benchmark loading screen, ~30A taken, near 400W, 1800MHz 1.65V

Running GT1 test, ~71A taken (850W), max peak is 125A (1500W), 1800MHz 1.65V
Running GT1 test with higher clocks&voltage, ~92A (1100W), max peak is 135A(1625W!), 1950MHz 1.74V

Running GT2 test with same settings as above, ~77A (927W), max peak is 133A(1603W).
All results were captured with GPU cooled to -100°C, using Tektronix TDS5034B scopeand TCPA303 current probe.

Alternative functions
If you are a first timer to the extreme world, you might not have lot of experience aboutwhat hardware mods to do on your card, or what traces you need to cut to disableovertemperature/overcurrent protections.
No worries, you can use KPE just as it is for the ALL your LN2 sessions. You only needvoltage control tools, which could be either EVBOT, SW tool such as classified voltagecontroller, or even fancy Raspberry Pi. As already mentioned, 980 Ti KINGPIN isdesigned so there are no hardware modifications or soldering required to reach maximumclocks with your GPU and VMEM, just like all other Kingpin edition cards.
However, If you want a little more fun than just max clocks and performance, we haveincluded a few extra tricks/mods to help you out and get even more from the card withsome easy soldering.
Card PCB surface heater
One common enemy of extreme LN2 overclocking is condensation and water. Water getseverywhere when LN2 overclocking. It gets between tiny components, it can run into thePCIe slot. When it does this it can short power circuits and cause all kinds of problemsand possible disasters. It’s not good to have card wet during operation, and condensationis an age old common problem when running GPU subzero.
The point of LN2 overclocking on a GPU is to freeze the GPU and nothing else.Everything else on the card, such as discrete components in display output area, is muchbetter working at ambient temperatures. And for many years extreme overclockers wereusing heatguns to keep that area warm, as there are no parts which dissipate muchpower and without external heating front area of PCB get cold really quick. Warm PCBkeep the GPU signaling correct and reduce icing on critical areas.
So is there a solution without external heatgun? It’s possible with 980 Ti KINGPIN cardsto use dedicated design feature that keeps PCB layers always above negativetemperatures. It also keeps the memory IC’s from bugging out due to cold. WhileSamsung is the least buggy of GDDR5, it still runs best when it is not frozen solid. ThisPCB heating feature is needed only for hard-core LN2 overclocking, so we fullyde-activated it by default in stock condition.
It’s a hardware-based solution, which means it will be automatically on when activated. Toenable the KP PCB heating element, you will need to put 5 shorting points at top PCBsurface as marked and shown on photo below:

That’s it. Now card will automatically pre-heat PCB when GPU reach a specifictemperature. You don’t need to do anything else, it is a “smart” heater :). The heat loadwill be adjusted automatically depending on your GPU load, PCB temperature, ambienttemperature, and PWM power loading. All you need to worry about is to have enoughsupply on PSU side.PCB Heater may take up to 150W. A fully overclocked 2GHz card with -120 °C usually willdraw around 1000W power from +12V, so if you use heater make sure your PCB is atleast 1200-1300W to have some safe margin.
That’s for single-card power ONLY. This doesn’t account for CPU, peripherals, anyhigh-speed high-power fans, etc.
Integrated monitoring
This feature can be used by connecting any popular TTL UART to USB converter to serialport on card. Server crowd sure knows about serial consoles, as these used widely toremotely control rack mount hardware. This is a new thing on gaming VGA cardshowever. If you don’t have serial dongle, you can get all-ready-to-go solution here or littleDIY module here . Both are pretty cheap, and likely to be less than 5$ at sites such asebay. Pay close attention that you need UART-USB adapter, not RS232-USB (RS232 issame protocol, but much higher voltage).
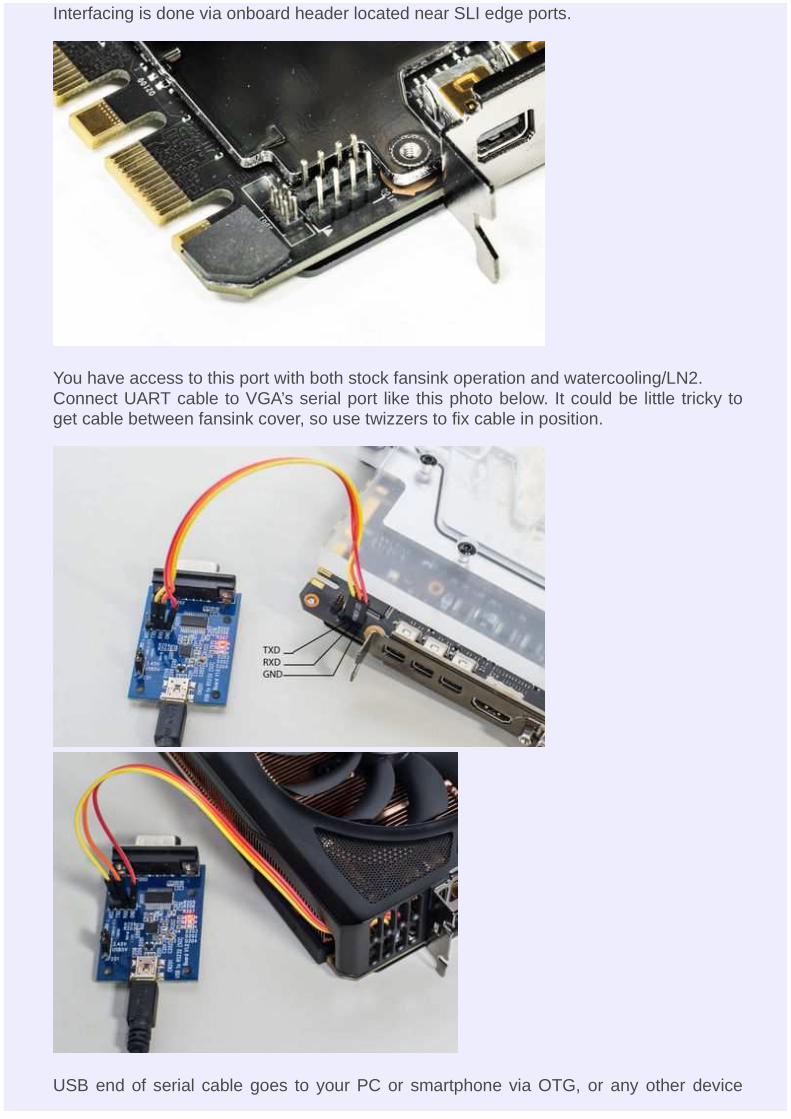
Interfacing is done via onboard header located near SLI edge ports.
You have access to this port with both stock fansink operation and watercooling/LN2.Connect UART cable to VGA’s serial port like this photo below. It could be little tricky toget cable between fansink cover, so use twizzers to fix cable in position.
USB end of serial cable goes to your PC or smartphone via OTG, or any other device

able to capture serial stream at 115200 8N1 speed.We use the popular putty , and if everything is connected properly, you should see this :
Useful menu items function are as below:
4. Set RGB data, which will let you configure LED RGB setting, just like Precision X does.7. Monitors key voltages8. Monitors GPU and PCB temperatures every second. Both GPU and PCB temperaturecan be measured in range from -64°C to +100°C. Works until any key press received9. Monitors voltages, temperatures, and status 5 times a second, until any key pressreceived10. Self-explanatory setting, just like EVBOT, can be used to change GPU voltage.Entering value 0 will switch back to automatic control, 1-799 will return to menu without

reverting to automatic control.11-12. Power and heat monitoring15. Activate or deactivate LN2 XOC heater coils. (works only if enabled by PCB mod)
Power tuning and controlsVRM on 980 Ti KPE take its roots from predecessor, 980 KPE, featuring next domains:
NVVDD, GPU Voltage – IR3595A digital controller with 14-phases using latestgeneration IR3575M PowerIRStageFBVDD, Memory voltage – IR3570B digital controller with 3-phases using latestgeneration IR3575M PowerIRStagePEXVDD, Digital-controlled IR 10A SupIRBuck1VPVDD, Digital-controlled IR 10A SupIRBuck
Each phase with IR3575M can deliver ~45 Amps of current with operation temperature+80 °C. And it’s unlikely to get so hot, as loading is spread across all phases. Thanks toexposed metal top of IR3575M, thermal heat is dissipated not just thru PCB copper, butalso directly to VRM heatsink plate. It helps to keep VRM cool, and loss less power, sothat improve margin on power target limit used by NVIDIA Boost function.

For voltage monitoring purposes EVGA GEFORCE GTX 980 Ti KINGPIN have 10-pin2mm pitch PH-type connector near top PCB edge.Pin definition as below:
Pin 1 GPU voltage
Pin 2 Ground
Pin 3 MEM voltage
Pin 4 Ground
Pin 5 PLL voltage
Pin 6 Ground
Pin 7 Onboard +3.3V power voltage
Pin 8 Ground
Pin 9 Onboard +12V PCIe power voltage
Pin 10 Ground
This pinout is same since GTX 680 era, so you still can use your ProbeIt setup if you hadit done before. Also helpful labels are located on bottom side of PCB, near eachconnector pin to aid connection:

You can use bundled ProbeIt adapter to your usual multimeter probes, or in case youwant to have custom cable connection to your specific meter, you can grab connectorseparately, for example here from Digikey.com . You will also need these contacts. If youwant less pins (for example only 4 to monitor GPU and MEM voltage) you can get neededhousings right here .
In addition to monitoring, this time around KPE card provides also extra hardware-basedcontrols:
V-Tune switches

Top switch near ProbeIt port dedicated to LN2 operation, to eliminate possibility of voltageshutdown when benching with GPU temperatures below -100 °C. First switch positiondisable thermal protection for memory VRM, and second switch position does same forGPU voltage VRM.
Another switch on bottom lower side, can be used to boost GPU voltage +25 or +50mVabove current setting. It’s different to software or EVBOT override control, as offset will beapplied any time, even if GPU uses stock mechanism to control voltage. It could be usefulif you wanted little bit extra voltage for everyday gaming, without any use of EVBOT orother voltage override methods. Each switch position at ON will add +25mV, so both willgive +50.
Two switches near bottom corner dedicated for Vdroop fine tune. It’s can be used inADDITION to EVBOT’s Vdroop enable/disable control, giving you at least 8 differentVdroop settings for GPU Voltage and three Vdroop settings for memory voltage.

EVBOT way
For lucky people who still have EVBOT controller, there is P55 EVBOT Firmware forEVGA GeForce GTX 980 Ti KPEYou can update your BOT with EVBOT Flash tool supporting Kepler & Maxwell GPU
This firmware allows you to control next settings:
NVVDD GPU Voltage, range is from 800 to 1850 mV
NVVDDVdroop can be enabled or disabled
NVOCP OCP protection for LN2 benching, can be enabled or disabled
NVOC ModeShould be set Extreme for LN2 benching, can be Normal orExtreme
NVPWM Sets PWM frequency for GPU VRM, from 750kHz to 1333kHz
FBVDD Memory voltage, from 1500 to 2100mV. Best for LN2 around1850-1900mV
PEXVDD PCIe PLL voltage, from 1045mV to 1400mV
1VPVDD GPU PLL voltage, from 1065mV to 1300mV
VIDVDD Clock PLL voltage, from 1045mV to 1500mV
This is it, these settings and ranges are more than enough to max out GM200 GPU, evenon LN2 cooling.
DIY way
Same as 980KPE, there are pads for commonly used 3296W-type trimpots.

To activate this mod, put two shorts in area marked on photo below.

Shorted pads in cyan box enable memory voltage trimmer, while red pads short enableGPU voltage trimmer.
Do not short red to cyan, as these pads drive differentsignals.
Now you can add trimmers, like on photo example:

For GPU (top) should use 100 ohm resistance , like 3296W-1-101ALF.Top trimpot (closer to 6-pin power plug) is for increasing GPU voltage (lower resistanceincreses voltage).

For Memory (bottom) should use 1 kOhm resistance, like 3296W-1-102LF.Bottom trimpot is for increasing MEM voltage (lower resistance increases voltage).
Adjusting resistance down to 550 ohm will increase memory voltage to ~1.7V.
Software way
FTW12345’s little tool 2.1.2 also working on 980 Ti KPE.
There is one drawback for software, as settings can be adjusted any time, and will keepbut will be reset on power cycle (card power turn off/turn on).So if your system shutdown, then all voltages and OCP/Vdroop setting will be reset todefault.
That’s one of reasons why other ways, like EVBOT/RPI or hardware mod are prefferablefor hardcore LN2 benching.
Raspberry Pi way

You can use widely available RPI to set voltage via EVBOT port on the card. To do so youwill need connect three wires from Raspberry Pi to VGA’s EVBOT connector.
Raspberry Pi signal name Raspberry Pi Pin EVBOT Port pin
Ground Pin 9 on header P1 Pin 6 on header J15
SDA Pin 3 on header P1 Pin 5 on header J15
SCL Pin 5 on header P1 Pin 3 on header J15
EVBOT Pinout is next (looking at connector’s face):
Pin 1
Pin 3 SCL Pin 4
Pin 5 SDA Pin 6 GND
After connection, check that all pins are correct and try to detect card on RPI.
root@raspberry-pi:~# i2cdetect -y 1 0 1 2 3 4 5 6 7 8 9 a b c d e f00: -- -- -- -- -- 08 -- 0a -- -- -- -- --10: -- -- -- -- -- -- -- -- -- -- -- -- -- -- -- --20: -- -- -- -- -- -- -- -- -- -- -- -- -- -- -- --30: -- 31 -- -- 34 -- -- -- -- -- -- -- -- -- -- --40: -- -- -- -- -- -- -- -- -- 49 -- -- -- -- -- --50: -- -- -- -- -- -- -- -- -- -- -- -- -- -- -- --60: -- -- -- -- -- -- -- -- -- -- -- -- -- -- -- --70: -- -- 72 -- -- -- -- --

Correct output is shown on terminal capture above.Now, you can run download tool here to your Pi and run it to set GPU voltage.
root@raspberry-pi:/home# ./tikpe_vcore/******** Manual VID setting tool :) **********/Voltage monitored = 1000 mV Enter voltage, in millivolts (800...1850): 1000Voltage monitored = 1000 mV Enter voltage, in millivolts (800...1850): 1100Voltage monitored = 1100 mV Enter voltage, in millivolts (800...1850): 1200Voltage monitored = 1197 mV Enter voltage, in millivolts (800...1850): 1300Voltage monitored = 1293 mV Enter voltage, in millivolts (800...1850): 1400Voltage monitored = 1388 mV Enter voltage, in millivolts (800...1850): 0Incorrect voltage input!
Here voltages in 100mV steps were entered, and actual readout values for input, outputvoltage after each change also reported back.
DIY RGB lights for waterblock setup (BP) or casemoddingBitspower waterblock have spots for 5mm LEDs on bottom edge, so it’s a perfectcandidate for these RGB LEDs , for casemodding and custom chassis systems.
To connect LEDs, we use same connector type as ProbeIt , but with 4-pins only.
Following simple schematics as shown, connect your custom RGB LEDs with 20-47 Ohmresistor in series. I had no 5mm RGB LEDs, so used 5050 SMD ones instead.

Now you can use Precision X to adjust LED settings. As example, to set rainbow effect,cycling all colors, use Demo2 setting:
Result could be similar to photo below:

You can connect each LED to separate port (connectors J17,J18,J19) to control LEDsindividually. Only your imagination is a limit for color scheme.Here’s prompt YouTube video on click showing completed mod with three RGB LEDsfixed on BP block and controlled by RGB connector on PCB.
© Vince “K|NGP|N” Lucido & Illya “TiN” Tsemenko
Feel free to share link to this guide, but keep linksand references intact, as guide might be updated infuture.This PDF is generated from http://xdevs.com/guide/maxwell_big_oc/ page
References
Uncorking reference EVGA GeForce GTX 980 for overclocking1. P55 EVBOT Firmware for EVGA GeForce GTX 980 Ti KPE2. Override NV Power limit by hardware3. EVGA Precision X OC toolkit4. EVGA GeForce GTX 980Ti KINGPIN Pics5. EVBOT Flash tool supporting Kepler & Maxwell GPU6. Guide for GTX 980 XOC modifications7. Adjusting voltage on EVGA EPOWER Classified module8. PuTTy terminal9. KPC forum : [Uncork] EVGA GeForce GTX 980 Ti K|NGP|N10.