Embed Size (px)
Citation preview

Waterproofing of New Roofs and Terraces[Excerpts from Dr. Fixit Healthy Construction Booklet “Construct Your Ideas”, 2012, pp.17-19, 24-27 & 46, Continuation of Rebuild Vol. 7 No. 2, pp.15]
7.6 EPDM Preformed Membrane Installation Method
EPDM (Ethylene Polypropylene Diene Monomer) is a synthetic rubber material that can be formulated with extensive flexibility for use as membrane sheet roofing. Chemically, EPDM is an elastomeric compound synthesized from ethylene, propylene and a relatively small amount of diene monomer. When ethylene propylene, which is derived from oil and natural gas, are combined with diene, a flexible rubber matrix is formed. EPDM generally is manufactured as a vulcanized (cured) membrane sheet but also can be formulated and produced in a nonvulcanized (uncured) state, which usually is used as membrane flashing material for detailing. EPDM membranes exhibit good resistance to ozone, ultraviolet (UV) rays, weathering and abrasion. EPDM also has good low-temperature flexibility. EPDM is resistant to some acids; alkalis; and oxygenated solvents, such as ketones, esters and alcohols. On the other hand, exposure to aromatic, halogenated and aliphatic solvents, as well as animal and vegetable oils and petroleum-based products, should be avoided to prevent membrane swelling and distortion.
EPDM sheets used for roofing applications are usually black in colour and range in thickness from 1.2 mm to 3 mm.The reinforcement used in reinforced EPDM sheets is typically a polyester scrim or fabric that is positioned during manufacturing near the middle of the finished thickness of the EPDM sheet. Some EPDM sheets are also manufactured with nonwoven polyester fleece backing adhered to the underside of the sheet. Fabric-backed EPDM sheets are typically manufactured using non-reinforced EPDM sheet. Fabric backed EPDM may facilitate adhesion to a substrate and/or serve as a separator from the substrate.
EPDM is a rubber based prefabricated membrane which is most durable membrane having highest service life of 15 to 20 years. The thickness of such preformed membrane available in the market varies between 1.2 mm to 1.5 mm having roll width of 1.2 m wide and length 20 m. The width of roll goes up to 3 m and roll length of 20 m which can be used for larger roofs. It can be used for large commercial roofs of concrete, wood, asbestos and metal sheets. It exhibits a high degree of resistance to water, ozone, UV, weathering, abrasion, extreme temperatures, acids, alkalis and oxygenated solvents. It can be laid quickly and easily, without any maintenance requirement.
3
7.6.1 Installation of EPDM on Large RCC Roof Slab
7.6.1.1 Surface Preparation
Prior to installing any membrane system, it is essential that the substrate to which it is being applied to is appropriately prepared. The substrate needs to be sound, smooth, dry and free of sharp edges, loose or foreign materials, oil, grease and laitance, etc. This can be achieved by rubbing the surface with a wire brush (Fig. 16a) so that all the loose particles comes out from the surface by vacuum sucked as shown in Fig. 16b. The mechanical surface preparation methods are strongly suggested to ensure proper adhesion of the membrane. The concrete or metallic substrate must be completely dry before taking up the application. If some moisture exists, it must be expelled with a blow torch or a flame torch. The moisture content of the substrate should be less than 4% and can be easily measured by a moisture meter if available otherwise the simplest way of checking the moisture content of the substrate is by enclosing a small unit area with a polythene sheet and edges wrapped with masking tape for a period of 16 hour and then inspection to be made for the presence of moisture or a dark colour of the substrate. Since the roofing is very large in case of EPDM membrane application, the expansion joints need to be properly attended prior to fixing of the membrane.
7.6.1.2 Installation
The application must start from the outlet, going towards the centre of the roof area. The step-by-step application method is described below and shown in Fig. 16.
• Before laying the sheets, mark out datum lines with chalk,
Fig. 16a: Rubbing the surface by wire brush for surface preparation
Fig. 16b: Mechanical cleaning of the surface

4
etc., so that the membranes can be arranged properly and parallelly with reference to the edges of the roof area.
• Then first arrange to lay the membrane according to datum line from one side of the roof, and fold back to half its length.
• The bonding adhesive should be a synthetic rubber based solvent containing contact adhesive specially designed for fixing EPDM of either single-component adhesive for membrane to substrate and membrane bonding or two-component adhesive for membrane to membrane bonding.
• The bonding adhesive should be applied on to the clean and prepared substrate (Fig. 16d). Before applying bonding adhesive, the materials must be stirred in the container to achieve a uniform mix with no sediment at the bottom.
• Adhesive must be then trowel applied in a thin even coat on membrane and the substrate. An excess of adhesive will prolong the drying time.
• Care must be taken not to apply bonding adhesive over an area that is to be cleaned later and overlapped to the adjacent membrane (from its underside). This is to be done also at the peripheries of the membranes or their termination (from the underside). Use a chalk line mark or a masking tape on the area to be overlapped (splicing area) and the ends of the membrane (for 50-70 mm) that has to remain clean.
• The porous substrates may require a second coat, which can be applied after 5 to 10 minutes of first coat. Let the solvent evaporate naturally until the adhesive attains a tacky condition. Drying time will defer depending upon the climatic conditions and coverage rate. Never use a hot air dryer to accelerate the process. The substrate should be in tacky condition after 15 to 20 minutes in normal room temperature. If the temperature of the substrate is between 30 to 35°C, then drying time may be approximately 5 to 10 minutes.
• The substrates bonded after prolonged open-time and in the absence of tack may result in inferior coalescence and bond strength.
• The membrane should be opened from sealed cover (Fig.16e) and the bonding adhesive should also be applied on to the back of the membrane that has been folded.
• The first half of the EPDM membrane should be unfolded back carefully to ensure that there are no wrinkles during the sticking process. The sticking process can be done with a roller. While laying and installing the membrane (Fig. 16f); the parallel position should be maintained with reference to the datum lines, spread and sticking, is very important.
• The bonding procedure for other half of EPDM membrane should be repeated. This procedure for every roll to complete the laying of EPDM membrane should be repeated for the entire area.
• The bonding adhesive should be allowed to dry completely for two days to avoid any joint failures before taking up slicing of the joints.
• An overlap of 50-70 mm along the length or as specified is a must. A masking tape must be first stuck to the laid membrane.
• Splice adhesive should be used to adhere to the overlapped membrane portions.
• Now, from the underside, the masking tape should be removed. Thereafter, two coats of splice adhesive wet on wet on the underside of the first membrane should be applied and a similar procedure is to be followed on the topside of the adjacent overlapping membrane. Overlapping portions must be abraded with an emery paper thoroughly and wiped / cleaned properly with a dry cloth. The overlapping in case of EPDM application is done by tucking it below the earlier membrane.
Fig. 16e: Opening the membrane from sealed cover
Fig. 16f: Aligning and laying the membrane over primed surface
Fig. 16c: Checking the moisture content of the substrate by enclosing with polythene sheet
Fig. 16d: Application of bonding adhesive

5
• Thoroughly roll on the overlapped area with a 50-70 mm wide metallic roller.
• The membrane must go over the angle fillet at the parapet junctions and all angles and abutments upstands at parapet for which cut piece members may be needed. This can be made by taking the measurement exactly as per the requirement of the cut piece (Fig.16g) and cutting into smaller pieces of the membrane (Fig.16h)
• The bonding adhesive is to be applied on the substrate and on the back side of the cut piece member and aligned and laid over the primed surface (Fig. 16i) and the fixing of the cut piece members should be made at the termination end (Fig. 16j)
• At the corner junction the marking should be made on the membrane for splicing of the cut piece (Fig. 16k) and the bonding adhesive should be applied for fixing the cut piece membrane (Fig. 16l). Thereafter the bonding adhesive should be applied on the back of the splice membrane(Fig.16m) and the splice membrane should be fixed (Fig. 16n) at the corner junction.
By following this step-by-step method one can easily do the waterproofing of roof by EPDM membrane.
Fig. 16g: Taking the measurement for a cut piece member
Fig. 16i: Aligning and laying the cut piece membrane
Fig. 16j: Fixing the cut piece at termination end
Fig. 16k: Marking on the membrane for splicing of cut piece at the corner junction
Fig. 16l: Applying the bonding adhesive for fixing the cut piece membrane
Fig. 16m: Applying the bonding adhesive on back of splice membrane
Fig. 16h: Cutting into smaller piece of the membrane
Fig. 16n: Fixing the cut piece membrane at the corner junction
Fig. 16: Step-by-step method of installation of EPDM membrane
6
7.6.2 Installation of EPDM on Profiled Metal Sheet
7.6.2.1 Surface Preparation
Check to ensure that metal roof is properly fitted with screws and fasteners. Replace all of the vents on the roof; never leave anything on the roof that could cause a problem. Gaps, if any, between the sheets shall be filled using a PU Sealant. Clean the surface well to remove dirt, dust, grease, etc.
7.6.2.2 Installation
Whenever EPDM membrane is being installed on the metal roof surface, it is highly recommended that the membrane shall be laid at the position and allowed to relax for at least 45 minutes. This will help releasing the tension in the membrane. Install insulation boards over the entire roof; to attain a smooth surface to lay the membrane roofing on metal roof. The insulation is fastened with epoxy-coated screws and insulation fastening plates; the plates give more surface area to the screw head and securely fasten the insulation to the roof deck. The membrane is secured with the same epoxy-coated screws and smaller seam fastening plates. Each successive course of membrane overlaps an area about 150 mm where the fasteners hold the membrane in place. Handheld hot air welding machine is used to safely heat the membrane to bond all of the seams and flashings. The welds are as strong as the material itself and they require no adhesive or maintenance. The seam in the membrane is also welded. The membrane is fastened at the walls with the same seam plates and screws. The membrane must be secured with screws and plates at any angle change or transition. The screws and plates at the wall are covered with another layer of membrane. This flashing covers the parapet dividing wall and waterproofs the perimeter of the roof. The membrane wall flashing is then welded to the roof deck membrane.
8.0 Criteria for evaluation of Lowslopped Roof Membranes
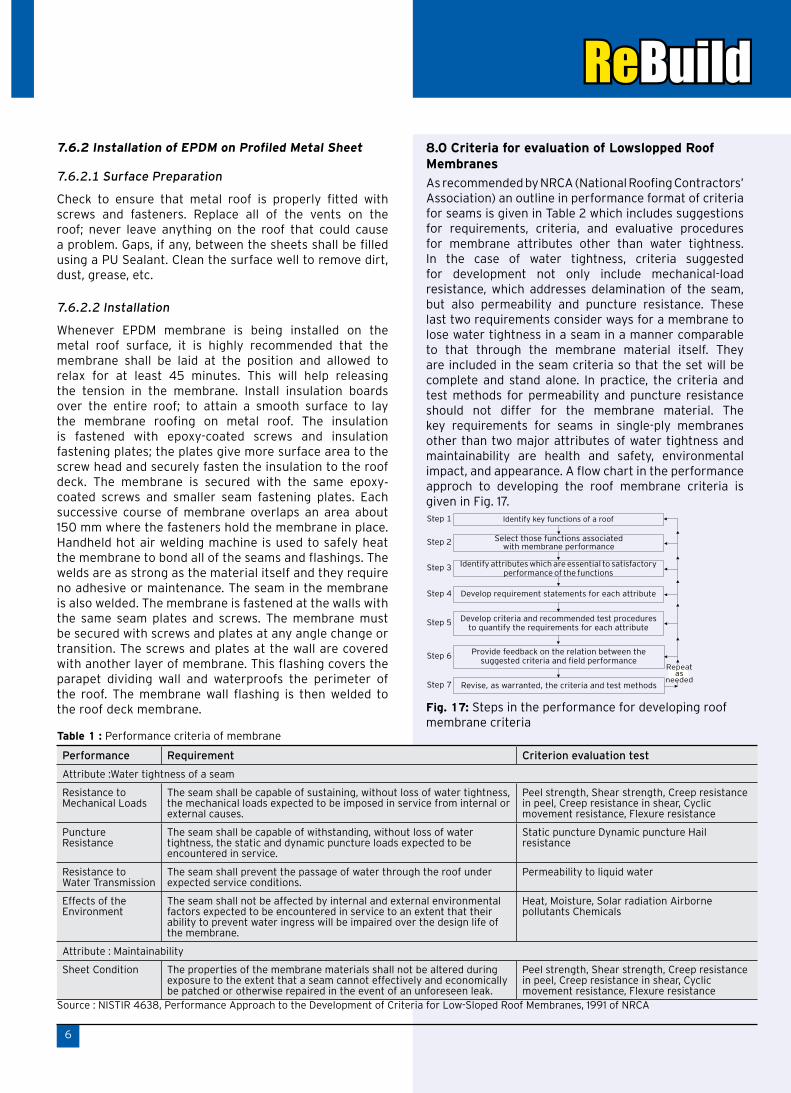
As recommended by NRCA (National Roofing Contractors’ Association) an outline in performance format of criteria for seams is given in Table 2 which includes suggestions for requirements, criteria, and evaluative procedures for membrane attributes other than water tightness. In the case of water tightness, criteria suggested for development not only include mechanical-load resistance, which addresses delamination of the seam, but also permeability and puncture resistance. These last two requirements consider ways for a membrane to lose water tightness in a seam in a manner comparable to that through the membrane material itself. They are included in the seam criteria so that the set will be complete and stand alone. In practice, the criteria and test methods for permeability and puncture resistance should not differ for the membrane material. The key requirements for seams in single-ply membranes other than two major attributes of water tightness and maintainability are health and safety, environmental impact, and appearance. A flow chart in the performance approch to developing the roof membrane criteria is given in Fig. 17.
Table 1 : Performance criteria of membrane
Performance Requirement Criterion evaluation test
Attribute :Water tightness of a seam
Resistance to Mechanical Loads
The seam shall be capable of sustaining, without loss of water tightness, the mechanical loads expected to be imposed in service from internal or external causes.
Peel strength, Shear strength, Creep resistance in peel, Creep resistance in shear, Cyclic movement resistance, Flexure resistance
Puncture Resistance
The seam shall be capable of withstanding, without loss of water tightness, the static and dynamic puncture loads expected to be encountered in service.
Static puncture Dynamic puncture Hail resistance
Resistance to Water Transmission
The seam shall prevent the passage of water through the roof under expected service conditions.
Permeability to liquid water
Effects of the Environment
The seam shall not be affected by internal and external environmental factors expected to be encountered in service to an extent that their ability to prevent water ingress will be impaired over the design life of the membrane.
Heat, Moisture, Solar radiation Airborne pollutants Chemicals
Attribute : Maintainability
Sheet Condition The properties of the membrane materials shall not be altered during exposure to the extent that a seam cannot effectively and economically be patched or otherwise repaired in the event of an unforeseen leak.
Peel strength, Shear strength, Creep resistance in peel, Creep resistance in shear, Cyclic movement resistance, Flexure resistance
Source : NISTIR 4638, Performance Approach to the Development of Criteria for Low-Sloped Roof Membranes, 1991 of NRCA
Fig. 17: Steps in the performance for developing roof membrane criteria

9.0 Performance and Testing of Waterproofing System
After the installation of the waterproofing system, the water ponding test should be carried out at the site for a depth of 50 mm for 24 hour to check any seepage or dampness on the roof ceiling surface below the roof slab. The test should be conducted after closing all the openings. If the dampness and seepages are observed after the ponding test, the remedial measures are to be taken. However, the performance of the coating depends on satisfying some of the important properties which affects long-term durability. The tests that need to be performed for this are tensile strength (Does the membrane fracture when stretched?), flexibility, fatigue fracture and water transmission and water vapour transmission. Waterproofing membranes can be subjected to movements caused by thermal or moisture content changes in the surfacing or substrate materials. This form of movement is considered slow and over time, such strain may induce plastic and permanent deformation rather than purely elastic response. This repeated slow cycling may cause the membrane to eventually rupture. Materials used should be waterproofed or water-resistant for their intended service life and shall maintain their integrity in their intended use.
10.0 Maintenance and Costing of the System
10.1 Maintenance of Coating
The service life of the coating depends upon the application, quality of material, physical and environmental conditions. While the application is the most important factor for any failure of coating system, it also depends on proper surface preparation, proper installation method as recommended by the manufacturer and proper curing of the coating system. The application failure constitutes almost 60-70% of total coating failure before its anticipated service life. If the extreme weathering conditions and corresponding desired properties with the selected coating system is not available, the failure takes place which constitutes between 20-30% of total coating failure. There may be failure of material itself which may be 10%. But to achieve the desired service life of the system, periodical maintenance of the coating needs to carried out by inspection for any colour fading, adhesion, development of any coating defects and cracks in the substrate and opening of the joints in case of preformed membrane. All loose and peeling coating should be removed and adjacent areas should be roughened upto 50 mm beyond the repaired surface area. The remedial measures to be taken here are cleaning the surface, spot repair by priming and top coat only with a brush or laying and installing a cut piece membrane as required. But if extensive repair is required, then coating should be removed and recoated or membrane needs to be reinstalled once again.
10.2 Life Cycle Cost Analysis There is a wrong perception that chemical waterproofing system is costlier than the traditional waterproofing system. This may be true while comparing with initial costs only but when one analyses the life cycle cost, then the chemical waterproofing system would be cheaper. The life cycle cost analysis of roof with traditional Brickbat Coba plus China Mosaic and with a heavy-duty reinforced acrylic coating has been taken for a comparison. The five-year roof coating cycle for both the systems has been taken. The cost involved for repair and maintenance after 5 years of Brickbat Coba plus China Mosaic system is plotted in the graph as Series1 whereas the periodical maintenance cost of heavy-duty reinforced acrylic throughout the life span is plotted in the graph as Series 2 in Fig. 18. As seen from the graph, after 20 years, the total cost of Brickbat Coba plus China Mosaic system becomes higher than the heavy-duty reinforced acrylic coating system. The life cycle has been analysed for cost only without taking environmental impact and other factors into consideration.
11.0 Conclusion
The liquid applied coating system is easier for application whereas the preformed membrane needs skilled manpower and equipment for installation. The waterproofing is a specialised job for which applicators or contactors and their entire team needs to be trained properly.
Though the modern chemical waterproofing has been widely used by construction industries, acceptance in Government sectors is not encouraging because of non-availability of any codes of practices or standards from the Bureau of Indian Standard. In that case, it is only approved specifications of the concerned organisation for acceptance of these modern chemical waterproofing systems. So, there is a need of urgent code of practices in waterproofing covering all the modern waterproofing practices which will be helpful for durable structures.
7
Fig. 18: 5-years roof coating life cycle cost analysis

8
Remedial Waterproofing of Roofs and Terraces
1.0 Introduction
The failure of waterproofing system in roofs and terraces is very common in tropical climates leading to distress and damage of the structures. Though there are many remedial waterproofing systems, only a few of them are in practice due to lack of awareness and skilled manpower. When existing roof waterproofing system can no longer be repaired or maintained to satisfy its’ functional requirement of preventing leakage or extending a roof system’s useful service life, then a decision has to be taken to either do a removal or a remedial treatment over the existing system. It should also be considered in other situations, like when:
• Repair expenditures become excessive.
• Leakage becomes intolerable.
• Damage is occurring to structural components.
• Damage is occurring to building contents.
The first decision that needs to be made is whether the existing roof system can be re-covered or whether removal and replacement is necessary. This determination needs to be made on a case-by-case basis and is best made after a thorough evaluation of the existing roof system.
2.0 Causes of Failures
Roof systems can deteriorate from normal wear, severe weather conditions (e.g., wind and snow loads); building movement (e.g., settlement, material contraction/ expansion); and improper design, construction and maintenance. Any roof repairs not dealt with after the first signs of failure can result in increased damage to the building envelope and interior finishes, and loss of occupant productivity, if damage causes interruption in client services and program delivery. Failure of structural integrity can endanger occupant safety. The reasons of failure of systems are many; it could be wrong system application or the behaviour and limitations of the material itself in terms of adhesion or UV stability, etc. Over a period of time, excellent development for different types of waterproofing materials and systems have been taking place, keeping in mind the criteria or requirements for a good engineered and reliable roof waterproofing.
Rigid waterproofing barriers have shown limitations or failures when subjected to certain aggressive conditions or structural movements during its life span. Bituminous / Cementitious polymer modified / EPDM membranes / HDPE based systems do enable elongations but have limiting success, application difficulties and deteriorate with time in the limited life span of application.
Membrane-type waterproofing systems may not remain effective over prolonged periods of time on roofs or other structural elements which may have projections or other construction features. Usually the membrane slips down from vertical faces because it is difficult to fix the edges by properly matching the contour of the drain mouths. The joints of laminates are always vulnerable and moisture entrapped underneath the membrane causes problems frequently. Similarly the adhesive for laminates may be sensitive to moisture in the substrate, thereby precluding the application of laminates during the rainy season. Since these laminates are bitumen based, they absorb a great deal of solar heat.
NRCA’s (National Roofing Contractors’ Association) Project Pinpoint provides information on performance problems and membrane deficiencies from the data base in 1990 which is given in Table 1. The five most common problems for the types of membrane roofing such as elastomeric, thermoplastic, modified bitumen, and bituminous built-up are seam defects, puncture/test, shrinkage, wind related and blistering. As is evident, seam defects in elastomeric and modified bitumen membranes occur more frequently than other problems for these types of membranes. Moreover, even in the case of thermoplastic membranes where unsatisfactory seam performance is generally not considered to be a problem, it has been reported that the seam defects are among the five most common problems. In the case of built-up membranes, blistering and splitting are reported as the two main problems. This is not unexpected as blistering and splitting has long been reported as two of the major problems recurring with BUR membranes.
Table 1: The most common problems for each of the main types of roof membranes*
Membrane Type
Elasto-meric
Modified Bitumen
Thermo-plastic
Built-Up
Type of Failures Percentage failures
Seam Defects 50 36 9
Puncture/Tear 21 17
Shrinkage 13 11 42
Wind Related 10 2 3 3
Blistering 5 10 29 24
Embrittlement 8
Splitting 22
Slippage 6
Ridging 18
Others 1 33 27
*Source: Cullen, William c., “Project Pinpoint’s Database continues
to Grow,” Professional Roofing (April 1990), .pp. 28-31.

9
3.0 Condition Assessment
The serviceability of the existing waterproofing system depends on the repair and maintenance of the system. A proactive periodical maintenance will increase the service life of the existing system. Regular inspection of building roof waterproofing systems will lead to early detection of roof problems. The objective of roof inspection should be as follows:
• To determine if the roof waterproofing system is performing according to its intended function
• To identify signs of weakness, deterioration or hazard
• To identify needed repairs
While inspecting, the general roof conditions need to be ascertained such as debris on roof, drainage, physical damage, structural deformation, if any. The waterproofing system needs to be checked for condition of the coating/membrane, granular loss, punctures, cracks/alligatoring, blisters/fish mouths, water ponding or any other defects. In addition to that, the various roof features such as fascia, soffit, flashing gutters/drains, skylights, chimneys/vents, drains, etc. needs to be checked for their performances. Similarly, the ceiling surface underneath the terrace roof needs to be checked for cracks, water staining, water leaks, etc. But in spite of all these, the failure of waterproofing system takes place for which remedial waterproofing needs to be carried out.
4.0 Remedial Treatment
4.1 Preparation of Existing Roof Surfaces
The following guidelines are specific to the preparation of existing built-up, polymer-modified bitumen and single-ply membranes prior to the installation of a re-cover roof system.
• Loose aggregate-surfacing, large buildups of bituminous coatings, and large buckles or blisters should be removed; any deficiency that prevents a proper installation of the re-cover roof system should be repaired.
• Areas of wet and deteriorated insulation to match the height of the existing system should be removed and replaced.
• Loose, damaged or otherwise incompatible existing base flashings should be removed.
If the existing uninsulated roof membrane is to be used as a vapor retarder, the flashings should remain in place and the existing membrane and flashings should be repaired sufficiently to perform as a vapor retarder. Only insulation boards should be used as separation layers over aggregate-surfaced built-up roof systems. Insulation boards, non-woven mats, mineral boards or base sheets are used as separation layers for granule-surfaced or smooth surfaced built-up or polymer-modified membranes. Existing single-ply membranes should be cut to relieve existing stress within the membrane. It is suggested to refer to the
manufacturer of the re-cover membrane or system to determine whether the existing membrane is required to be cut or sliced.
4.2 Guidelines for Membrane Roof Systems
The general recommendations for recovering over an existing roof system with a new built-up, polymer-modified bitumen, single-ply or liquid-applied membrane roof system as follows:
• The existing roof system and new re-cover roof system must be compatible or appropriately separated.
• The roof deck should be secured to the structure of the building, support the design live load and dead load required for the building, and provide the necessary pullout resistance for fasteners used with a new mechanically attached re-cover roof system.
• If the new roof system is fully adhered to the existing roof system, the existing roof membrane and insulation, if any, should be secured to the roof deck according to appropriate wind uplift resistance requirements. The surface of the existing roof system may require preparation and/or may need to be primed with a compatible primer to enhance adhesion before application of the new adhered roof system.
• The existing roof system should be inspected and tested, if necessary, to determine whether excess moisture is present within the roof assembly. Wet insulation must be removed and replaced with compatible materials.
• The existing roof system should be inspected for shrinkage, ridging, splitting and cracking and then repaired appropriately. Portions that may present problems should be secured or removed.
4.3 Waterproofing System Configurations
Though there may be many configurations on the existing system, the most important factor that needs to be considered is the compatibility between the two systems. The designers can specify membrane roof systems in roof re-covering situations and can develop their own drawings and specifications for specific projects. Some of the most commonly systems being used are given as follows:
• Torch-applied APP/SBS polymer-modified bitumen roof system over existing bituminous roof system
• Adhered EPDM roof system over existing roof system
• Liquid-applied roof system over existing roof system
While selecting preformed membrane system for very old surfaces, the APP membrane can be suitable, provided there are no projections or upstands and in such cases, a heavy-duty microfiber reinforced acrylic based flexible terrace waterproofing coating would be more suitable. For longer durable service life, one can choose an EPDM type of membrane. The cost also factor needs to be analysed for each system.

10
4.4 Repair of Existing Roof System
Proper maintenance and repair of roofing system always prolongs and enhances the roof’s service life. Any defects or problems in the roofing system should be rectified or tackled considering the age, condition and the maintenance history of the existing roof system. The levels of repair broadly can be divided into three categories: spot patching, general repairs, and major repairs and maintenance.
4.4.1 Spot Patching of Isolated Locations
Installation of isolated patches to repair deficient or degraded locations in the membrane comes under spot patching category. Spot patching might be applicable in the given scenario.
If the membrane is relatively new and in good condition with a few isolated sections that need to be repaired, upgrade & reinforce to improve the performance of the roof. This is mainly in case of deficient application.
If the membrane life is not so long but due to some unavoidable reasons, it can’t be replaced, spot patching can help to repair specific leakages.
4.4.2 General Repairs
This category is more comprehensive than spot patching. It deals in numerous deficiencies throughout the field, including various details and flashings of a roof system.
4.4.3 Major Repair and Maintenance
This category includes a repair regime for preventive maintenance. For example, a smooth surfaced modified bitumen roof system may need maintenance for a long service life, along with an application of the correct reflective coating. Some common problems for specific membrane type and its repair approach are discussed below:
4.4.4 Built-up Roof Membrane (BUR)
Built-up roof membranes are mainly composed of bitumen, glass fiber, polyester or organic reinforcing felts and commonly surfaced with aggregate, mineral granular or liquid applied coatings. For repair work, it should be ensured that repaired material must be compatible with the membrane being repaired. Blistering and splits are common problems faced in built-up roof type membrane system.
Blisters: This type of problem can be repaired by either cutting and removing or patching over to reinforce, based on situation or judgment. Surface of the membrane should be free from debris, contamination and loose particles. The area for repair should be extended up to 460 mm beyond the defect, to provide sufficient area for proper patch bonding. Carefully cut and remove the blistered materials until good adhesion of the membrane is reached. If water infiltration is
suspected, inspect the deck for damage and repair the same with polymer modified mortar. Prime the surface of the membrane to enhance adhesion and allow it to dry. Install the same number of piles as were removed. Any liquid applied membrane should be installed as per the manufacturer’s instructions, which may include the waiting time between the coatings for different coats.
Splits: The following procedure does not include the repair of splits caused by structural movement or other forces placed on the membrane. Preparation of surface by ensuring removal of debris, contaminants, aggregate of loose surface of the membrane. The repair area should be extended enough, approximately 610 mm on each side of the split and 915 mm beyond the end of the split to provide ample clean work area. Cut or remove loose felt from the split area. If water infiltration is suspected, inspect the deck for damage and repair the same with polymer modified mortar. At each end of the split, extend the split approximately 305 mm further in length by cutting through the membrane. At this new end of the split, make a T-cut approximately 150-200 mm on both sides. Prime the surface of the membrane. After the primer has dried, apply a piece of granular surfaced sheet approximately 230 mm wide and of sufficient length to cover the split from end to end. Install the same number of piles as in the original roof.
4.4.5 Modified Bitumen Membrane
Polymer modified bitumen membranes are mainly asphalt based membranes. The following procedures are the generic repair procedures.
Membrane Patch Repairs: Patch repair procedure for pre-formed membrane has to be started from surface preparation, deck repair (if required), and then priming the surface of the membrane. Patch must be cut in greater size, almost 203 mm larger in all dimensions than the defect to be repaired. Corner must be rounded to a 76 mm radius. Install the patch in hot asphalt, cold adhesive or by heat welding in accordance with the patch material manufacturer’s recommendation over the repair area, extending 203 mm in all directions from any part of defects. Apply moderate pressure to the patch to insure proper adhesion to the existing membrane.
Blisters: Remove the blistered membrane until good adhesion is reached. If water infiltration is suspected, inspect the deck for damage and repair the same with polymer modified mortar. Preparation of surface is one of the most important factors for good repair work. It must be ensuring removal of debris, contaminants, aggregate of loose surface of the membrane. Clean the surface of the membrane as well. Prime the surface with the asphalt primer and allow it to dry. The patch must be larger by 203 mm in all dimensions than the defects to be repaired.

11
Install the patch. Installation must be done as per the manufacturer’s guidelines. Apply moderate pressure to the patch to insure proper adhesion to the existing membrane.
4.4.6 Thermoset Membranes
This is a rubber-like membrane. Application defects are the main problem faced in thermoset membranes.
Membrane Patch Procedure (Repair with adhesive): In the very first step of the repair procedure, surface preparation is required by removing debris, contaminants and ballast or removing the surface coating. Wash the area using a mild soap. Dust must be removed from the area. The cleaned area must be extended by a minimum of 152 mm beyond the defect area. Rinse thoroughly with clean water and allow the membrane to dry. Cut a piece of like membrane large enough to extend 103 mm beyond any part of the defects. Round corners of the patch to prevent peeling of the square corners. Apply appropriate manufacturer-recommended primer to both surfaces to be mated, and allow drying. Apply proper adhesive to the membrane and the patch as per instructions given by the adhesive manufacturers. Allow time for the adhesive to dry. When the adhesive is ready, mate the two surfaces and smooth out with pressure from a gloved hand.
4.4.7 Thermoplastic Membrane
This is mainly composed of polymers which soften when heated and harden when cooled.
Membrane Patch Procedure: The surface of the membrane should be free from debris, contamination and loose particles. Wash the area using a mild soap and ensure that dust is removed from the area. Rinse thoroughly with clean water and allow the membrane to dry. Cut a piece of like membrane large enough to extend 103 mm beyond any part of the defects. Round corners of the patch to prevent peeling of the square corners. Allow the surface of the membrane and patch to air-dry. Weld the patch in place. After the welded area has cooled, check application for voids with a round tip probe such as a screwdriver. Where patches are made with reinforcement membrane materials, application seals the outer perimeter with sealant compatible with the membrane.
5.0 Conclusion
The roof and terrace waterproofing is the most crucial for durability in case of the ‘building envelope’ concept of the waterproofing system. No single material or system seems to be ideal for all the different cases of remedial waterproofing. It is easier to design and achieve the desired service life of any new waterproofing system if all the detailing is made properly. But while designing any remedial waterproofing system, the success depends on the exact condition assessment of the existing roof substrate and selection of a more compatible new system with proper adhesion to the old system.
Case Studies of Remedial Waterproofing1.0 Remedial Waterproofing with APP Torchshield Membrane
Durgapur Chemical Limited has more than 400 residential accommodations in their township. Majority of the roofs in the townships quarters have suffered water seepage in roof and parapet walls. For waterproofing initially PVC membrane was applied in roof, which was found in a brittle and water-soaked condition during the site investigation.
It was decided to do re-roofing for which the entire PVC membrane was removed from the roof surface. The proper gradient of the roof slab was made after repairing cracks and damages patched with polymer modified mortar followed by curing of the surface. After surface preparation, priming was done and torch-on application of APP preformed membrane of 3 mm thick on the roof was done after terminating it up to 300 mm on the parapet wall: (Source: Archives of doctor-fixit)
2.0 Remedial Waterproofing with Heavy-Duty Microfiber Reinforced Acrylic Based Liquid Applied Coating
2.1 Commercial Building of MAGENCO, Chandrapur
The present case study of MAGENCO at Chandrapur in Maharastra covers remedial waterproofing with liquid waterproofing coating. The structure has been started with construction since the year 2001 and completed in 2006. This 8–storey building is used as a commercial call centre. This site has a huge terrace of approximately 12000 m2. The large terrace of this building is occupied with big chillers and A/C, pipes, water tank, etc and below this terrace there were well-furnished international call centre which was taken on rent. During monsoons, there were heavy leakages from all the sides of terrace and because of all this, the call centre unit was affected. Due to heavy chillers and A/C pipes on the terrace, it was difficult to do any kind of waterproofing treatment. During site visit, it was observed that the surface is uneven, surface cracks were observed in all parts of the terrace, due to heavy chillers and large obstacles. A heavy-duty microfiber reinforced acrylic based flexible terrace waterproofing coating was applied after proper surface preparation. (Source: Archives of doctor-fixit)
2.2 Canteen Building of an Engineering College
Bhagavan Mahaveer Jain College of Engineering under Jain Deemed University in Karnataka located at Bangalore Kanakapura Highway has leakage problem from the tiled roof, made out of Mangalore tile in their
12
to brush applied polymer coating to bituminous felts. The water-tightness of the roof could not be achieved to satisfaction and with time and exposure to the elements, it resulted in leakages and seepage of water into the RCC roof slab. This seepage of water has added to the corrosion into the slab and the concrete was spalling and had become week. A system was looked into that could assure water-tightness to the roof and also one does not have to disturb the existing surface of the slab, to prevent damage to the structure. A 1.2 mm thick TPO membrane was selected which was polyester reinforced manufactured by the latest tri-extrusion process. Considering the situation of doing the treatment over the prevailing surface, the membrane was loosely laid over the roof with mechanical fixing at the end, terminations using fasteners with certain customised detailing. (Source:
NBMCW April 2009.
5.0 Remedial Terrace Waterproofing of Dabar India Limited at Ghaziabad with Polymer Modified Bituminous Coating
5.1 Background
Dabur India Limited, Ghaziabad plant and the old Dabur Research Foundation Laboratories (previously known as FKOL Building) at Sahibabad in Uttar Pradesh were facing severe water leakage problems in their roof terrace. The area of the terrace was very large and approximately 24,000 m2. After the site visit, it was found that the main cause of terrace leakage is the failure of existing waterproofing barrier of tar felt layer. The tar felt becomes brittle after exposure to the sun, and cracks formed in the layer providing passage for water ingress into the concrete structure. The present case study discusses the application of a polymer modified bituminous emulsion coating system which was applied on an old roof terrace in year 2010.
5.2 Condition Survey
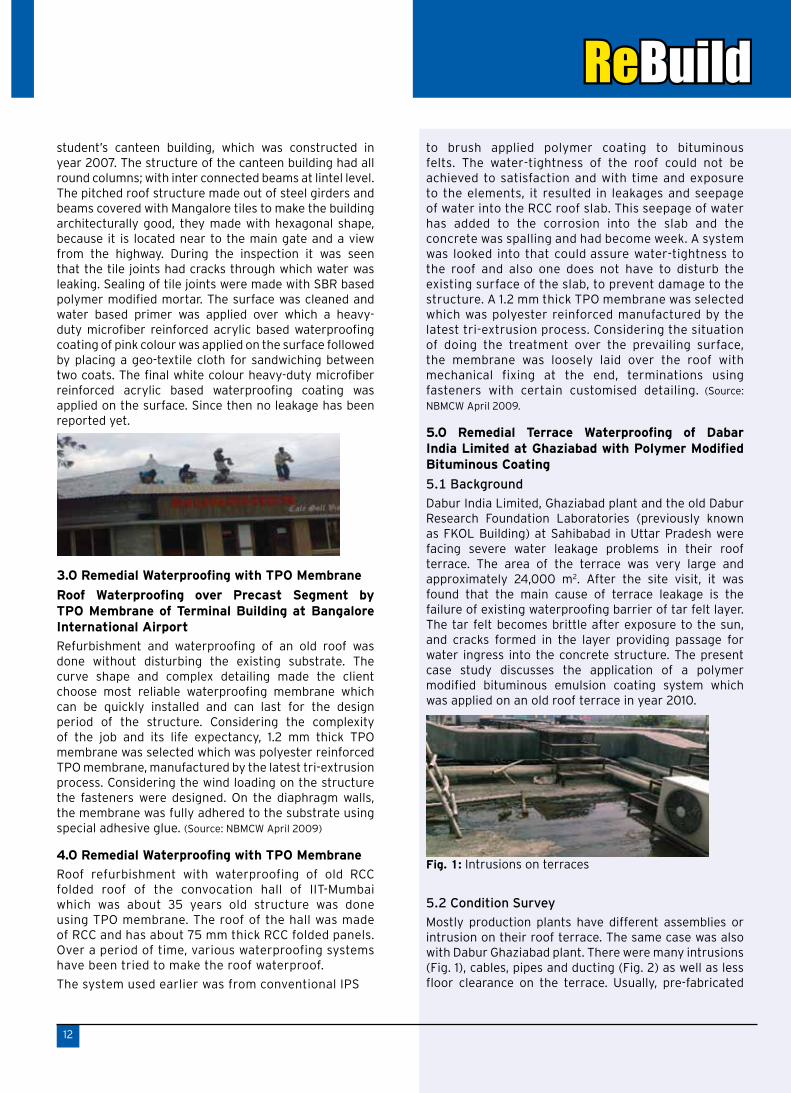
Mostly production plants have different assemblies or intrusion on their roof terrace. The same case was also with Dabur Ghaziabad plant. There were many intrusions (Fig. 1), cables, pipes and ducting (Fig. 2) as well as less floor clearance on the terrace. Usually, pre-fabricated
Fig. 1: Intrusions on terraces
student’s canteen building, which was constructed in year 2007. The structure of the canteen building had all round columns; with inter connected beams at lintel level. The pitched roof structure made out of steel girders and beams covered with Mangalore tiles to make the building architecturally good, they made with hexagonal shape, because it is located near to the main gate and a view from the highway. During the inspection it was seen that the tile joints had cracks through which water was leaking. Sealing of tile joints were made with SBR based polymer modified mortar. The surface was cleaned and water based primer was applied over which a heavy-duty microfiber reinforced acrylic based waterproofing coating of pink colour was applied on the surface followed by placing a geo-textile cloth for sandwiching between two coats. The final white colour heavy-duty microfiber reinforced acrylic based waterproofing coating was applied on the surface. Since then no leakage has been reported yet.
3.0 Remedial Waterproofing with TPO Membrane
Roof Waterproofing over Precast Segment by TPO Membrane of Terminal Building at Bangalore International Airport
Refurbishment and waterproofing of an old roof was done without disturbing the existing substrate. The curve shape and complex detailing made the client choose most reliable waterproofing membrane which can be quickly installed and can last for the design period of the structure. Considering the complexity of the job and its life expectancy, 1.2 mm thick TPO membrane was selected which was polyester reinforced TPO membrane, manufactured by the latest tri-extrusion process. Considering the wind loading on the structure the fasteners were designed. On the diaphragm walls, the membrane was fully adhered to the substrate using special adhesive glue. (Source: NBMCW April 2009)
4.0 Remedial Waterproofing with TPO Membrane
Roof refurbishment with waterproofing of old RCC folded roof of the convocation hall of IIT-Mumbai which was about 35 years old structure was done using TPO membrane. The roof of the hall was made of RCC and has about 75 mm thick RCC folded panels. Over a period of time, various waterproofing systems have been tried to make the roof waterproof.
The system used earlier was from conventional IPS

13
membrane is not recommended for waterproofing in such conditions, since intrusions make hindrance in placing the membrane and less clearance makes working very difficult. Due to the limitation of pre-fabricated membrane, it was recommended for polymer modified bituminous emulsion liquid applied waterproofing coating.
5.3 Remedial Treatment
There were many areas in the terrace where the existing waterproofing layer had torn out (Fig. 3). The cooling tower area over the administrative block was one of the worst damaged areas where even existing treatment was torn out badly.
Before application of any other waterproofing coating in this scenario, one is required to take out existing waterproofing layer totally till the mother slab. In this case, the damaged tar layer was removed manually (Fig. 4).
This would ensure the proper bonding of new coating with the parent slab. After removal of the tar layer, the minor hairline cracks and wider cracks (Fig. 5) at some location were seen on the mother slab. Unsound patches and cracks
Fig. 3: Damaged existing tar layer
Fig. 4: Removal of existing waterproofing layer in progress
on the parent slab must be treated properly for good performance of any coating. In this case, there were many cracks and unsound patches which were treated well with polymeric crack filling material and SBR based polymer modified mortar before priming the surface.
All the tar felting layers from the parapet wall were also chipped off (Fig. 6). In case of parapet walls, where plaster was badly damaged, re-plastering was required. The mortar used for re-plastering contained an integral waterproofing admixture. On the finished plaster, a waterproofing coating was applied. Watta (Fig. 7) of same cement mortar was prepared and placed at the junction of roof and parapet wall and other places wherever required.
After patch repairs, the entire area had to be cleaned properly ensuring no dust particles and undulations remained on the surface. A good surface preparation is one of the key factors for effective performance of any coating system. After surface preparation, priming was
Fig. 7: After surface preparation and making watta at junction
Fig. 2: Cables, ducting & pipes on terraces Fig. 5: Wider cracks on parent slab
Fig. 6: Tar felting layer chipping off from parapet wall
14
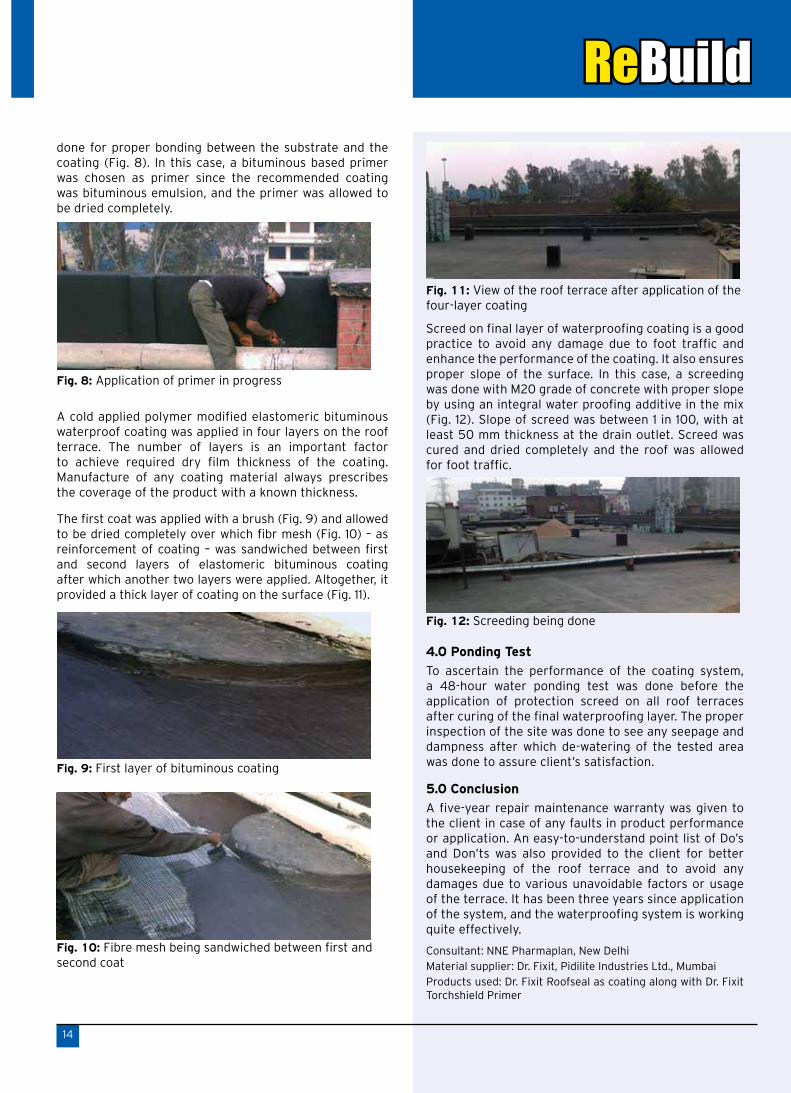
Screed on final layer of waterproofing coating is a good practice to avoid any damage due to foot traffic and enhance the performance of the coating. It also ensures proper slope of the surface. In this case, a screeding was done with M20 grade of concrete with proper slope by using an integral water proofing additive in the mix (Fig. 12). Slope of screed was between 1 in 100, with at least 50 mm thickness at the drain outlet. Screed was cured and dried completely and the roof was allowed for foot traffic.
4.0 Ponding Test
To ascertain the performance of the coating system, a 48-hour water ponding test was done before the application of protection screed on all roof terraces after curing of the final waterproofing layer. The proper inspection of the site was done to see any seepage and dampness after which de-watering of the tested area was done to assure client’s satisfaction.
5.0 Conclusion
A five-year repair maintenance warranty was given to the client in case of any faults in product performance or application. An easy-to-understand point list of Do’s and Don’ts was also provided to the client for better housekeeping of the roof terrace and to avoid any damages due to various unavoidable factors or usage of the terrace. It has been three years since application of the system, and the waterproofing system is working quite effectively.
Consultant: NNE Pharmaplan, New DelhiMaterial supplier: Dr. Fixit, Pidilite Industries Ltd., MumbaiProducts used: Dr. Fixit Roofseal as coating along with Dr. Fixit Torchshield Primer
Fig. 11: View of the roof terrace after application of the four-layer coating
done for proper bonding between the substrate and the coating (Fig. 8). In this case, a bituminous based primer was chosen as primer since the recommended coating was bituminous emulsion, and the primer was allowed to be dried completely.
A cold applied polymer modified elastomeric bituminous waterproof coating was applied in four layers on the roof terrace. The number of layers is an important factor to achieve required dry film thickness of the coating. Manufacture of any coating material always prescribes the coverage of the product with a known thickness.
The first coat was applied with a brush (Fig. 9) and allowed to be dried completely over which fibr mesh (Fig. 10) – as reinforcement of coating – was sandwiched between first and second layers of elastomeric bituminous coating after which another two layers were applied. Altogether, it provided a thick layer of coating on the surface (Fig. 11).
Fig. 9: First layer of bituminous coating
Fig. 10: Fibre mesh being sandwiched between first and second coat
Fig. 8: Application of primer in progress
Fig. 12: Screeding being done

15
Water Proofing of Slopped and Curved Roofs[Excerpts from Dr. Fixit Healthy Construction Booklet “Construct Your Ideas”, 2012, pp.17 and 27]
1.0 Introduction
The satisfactory performance of roof deck mainly depends upon the waterproofing system of the deck slab by considering proper roof covering materials, water proofing systems, flashing, fittings and other accessories that may be required depending on the profile of the roof.
2.0 For Pitched Tiled (With Battens) Roofs
2.1 Surface PreparationThe surface shall be cleaned thoroughly of all contaminants like dust, traces of curing compound, oil and grease. All surface imperfections, protrusions, structurally unsound and loose concrete must be removed and repaired with of SBR latex based polymer modified mortar. A schematic diagram of this coating system is shown in Fig. 1.
2.2 Priming
Apply a primer to a clean, smooth and dry surface by a brush or a roller. Allow the primer to dry prior to the application of coating. During the application of primer always maintain the surface in SSD (saturated surface dry) condition.
2.3 Application
Apply 1st coat of heavy duty, fibre reinforced elastomeric acrylic waterproofing coating system and while it is still in wet condition, lay an ‘open-woven’ 2.5 x 2.5 mm glass fibre
mesh and allow it to soak completely. Immediately apply 2nd coat to embed the mesh in coating. Allow it to dry completely. Fix the wooden battens by drilling and using steel screws for fixing to avoid rusting. After drilling holes and before fixing the screws fix leak proof sealing tape on bottom as well as top side of the batten. This will ensure a perfect seal around the screwed area. The battens must have enough number of grooves depending upon the length of the roof, for efficient drainage of water in case there is breakage of tiles.
Apply 3rd coat all over the area covering the wooden batten. Carefully fix tiles on the batten. Take care so that rupture of the coating is avoided while fixing the tiles. Never fix the batten by hammering nails in concrete. It will damage the roof. Always use a drill machine to fix the screws.
3.0 For Profiled Metal Sheet Roofs
3.1 Surface Preparation
Check to ensure that the metal roof is properly fitted with screws and fasteners. Replace all the vents on the roof; never leave anything on the roof that could cause a problem. Gaps if any between the sheets shall be filled using one part non-sag polyurethane PU sealant. Clean the surface well to remove dirt, dust, grease etc. Whenever flexible EPDM membrane is being installed it is highly recommended that the membrane shall be laid at the position and allowed to relax for at least 45 minutes. This will help releasing the tensions in the membrane. Install insulation boards over the entire roof; to attain a smooth surface to lay EPDM membrane roofing on metal roof.
3.2 Installation
The insulation is fastened with epoxy coated screws and insulation fastening plates; the plates give more surface area to the screw head and securely fasten the insulation to the roof deck. EPDM membrane is secured with the same epoxy coated screws and smaller seam fastening plates. Each successive course of preformed membrane overlaps area about 150 mm where the fasteners hold the membrane in place. Hand held hot air welding machine is used to safely heat the membrane to bond all of the seams and flashings. The welds are as strong as the material itself and they require no adhesive or maintenance. The seam in the EPDM roof membrane is also welded. The membrane is fastened at the walls with the same seam plates and screws. It must be secured with screws and plates at any angle change or transition. The screws and plates at the wall are covered with another layer of membrane; this flashing covers the parapet dividing wall and waterproofs the perimeter of the roof. EPDM wall flashing is then welded to the roof deck membrane. One can get a service life of 15 years with this system of waterproofing.
Fig. 1: Waterproofing system of pitched tile roofs
1 Concrete Roof 2 Dr. Fixit Primer
3 (1st Coat) 4 Glass Fibre Mesh
5 (2nd Coat) 6 (3rd Coat)
7 Wooden Battens 8 Roof Tiles
9 Stainless Steel Screw