Embed Size (px)
Citation preview

Middle Skills Manufacturing Initiative
TABLE OF CONTENTS
Project List...............................................................................................................................................2
Project #1: Shoulder Turning (8.5 hrs.)........................................................................................3
Project #2: Threading Practice Piece (7.5 hrs.).........................................................................5
Project #3: Hand Tapping Exercise (8 hrs.).................................................................................7
Project #4: Manual Mill/Bore Practice (8.5 hrs)..........................................................................9
Project #5: CNC Mill (15 hrs.).........................................................................................................11
Project #6: CNC Lathe with Threading (15.5 hrs.)..................................................................13
Project #7: CNC Mill (CAD/CAM/Make) (10 hrs.)......................................................................15
Project #8: CNC Lathe (CAD/CAM/Make) (10 hrs.)..................................................................17
Project #9: CNC Mill with MasterCAM (11 hrs.)........................................................................19
Project #10: CNC Lathe with MasterCAM (9 hrs.)....................................................................21
Exercise 1. G and M Code Exercise (13 hrs.)............................................................................23
Course Descriptions and Curriculums..........................................................................................24
Blueprint: MSMI Project 1: Shoulder Turning.............................................................................30
Blueprint: MSMI Project 2: Thread Practice..............................................................................................30
Blueprint: MSMI Project 3: Hand Tapping Exercise...................................................................................32
Blueprint: MSMI Project 4: Manual Mill Bore............................................................................................33
Blueprint: MSMI Project 5: Mill Bore with Angle.......................................................................................34
Blueprint: MSMI Project 6: Manual Double Thread...................................................................................35
Blueprint: MSMI Project 7 & 9: 4 Hole Step Plate......................................................................................36
Applied Manufacturing Technology Certification Pathway...................................................38
Appendix................................................................................................................................................39
This work is licensed under a Creative Commons Attribution 3.0 Unported License [http://creativecommons.org/licenses/by/3.0]9/8/14 1
Franklin County
Technical School

Project List Project # Project Title Main goal
1 Shoulder Turning(2) Manual Lathe and (6) TL-1 lathes run manually
2 Threading Practice PieceManual Lathe with thread and TL-1 lathes run manually
3 Manual Mill/Bore Practice Manual Mill with bore
4 Hand Tapping Exercise Manual mill with tapping
5 CNC MillCNC mill (operation) (4) VF-2. (2) TM1-P
6 CNC Lathe with threadingCNC lathe with thread (operation) (6) TL-1 (4) ST10
7 CNC Mill (CAD/CAM/Make) CNC Mill
8 CNC Lathe (CAD/CAM/Make) CNC Lathe
9 CNC Mill with MasterCAM CNC Mill with MasterCAM
10 CNC Lathe with MasterCAM CNC Lathe with MasterCAM
All projects are aligned with MA Department of Elementary & Secondary Education Career/Vocational Technical Education Framework for Machine Tool Technology.
Learning objectives and student outcomes for each project will be provided and students will demonstrate mastery of topics through completion of projects, class assessments and through an additional 68 hours of self-paced online instruction.
At the end of the training, students will be able to demonstrate: Knowledge of the basic parts and functions of manual and CNC lathes and milling
machines Ability to describe and perform the set-up and operation of engine lathe and milling
machines Ability to describe and perform the set-up and operation of CNC lathe and CNC milling
machine Ability to identify quality assurance of finished parts (acceptable and not acceptable
deburring and finishing) Ability to accurately measure finished parts and compare to print Learn proper machine maintenance on each machine Ability to describe and perform the shop floor program editing of CNC machines G&M programming – what it is and most important codes Concepts and practices to prepare CNC machine programs for both mills and lathes
This work is licensed under a Creative Commons Attribution 3.0 Unported License [http://creativecommons.org/licenses/by/3.0]9/8/14 2

This work is licensed under a Creative Commons Attribution 3.0 Unported License [http://creativecommons.org/licenses/by/3.0]9/8/14 3
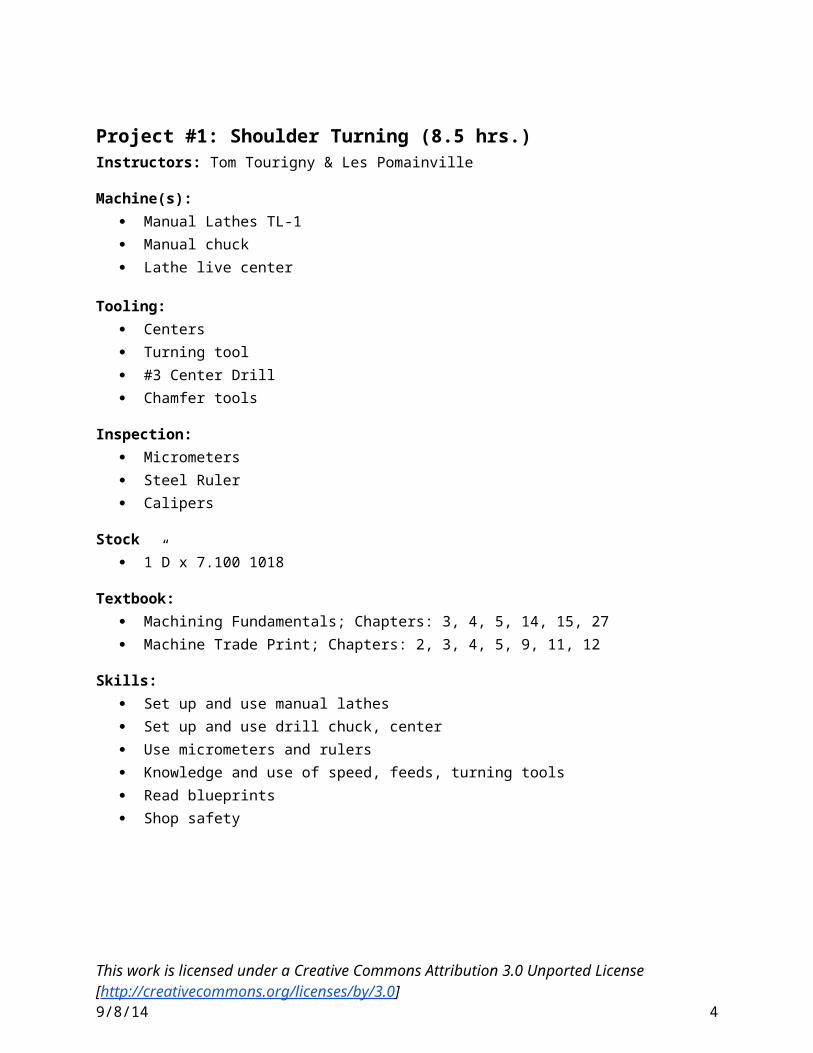
Project #1: Shoulder Turning (8.5 hrs.) Instructors: Tom Tourigny & Les Pomainville
Machine(s): Manual Lathes TL-1 Manual chuck Lathe live center
Tooling: Centers Turning tool #3 Center Drill Chamfer tools
Inspection: Micrometers Steel Ruler Calipers
Stock 1”D x 7.100 1018
Textbook: Machining Fundamentals; Chapters: 3, 4, 5, 14, 15, 27 Machine Trade Print; Chapters: 2, 3, 4, 5, 9, 11, 12
Skills: Set up and use manual lathes Set up and use drill chuck, center Use micrometers and rulers Knowledge and use of speed, feeds, turning tools Read blueprints Shop safety
This work is licensed under a Creative Commons Attribution 3.0 Unported License [http://creativecommons.org/licenses/by/3.0]9/8/14 4

Project #1: Shoulder Turning (8.5 hrs.)
Topics Learning Expectations Tooling U ModulesBlueprint(3 hrs)
Jeff
Types of projections and views Read the title block and get key
information about the blueprint Find and determine key features
and dimensions of the blueprint Define and interpret tolerances on
the blueprint Use the correct way of scaling a
drawing to make the part the correct size
Students will build and assemble products according to detailed drawings and annotated hand sketches. This will include the interpretation of prints with geometric dimensioning and tolerance symbols that meet ANSI and ISO specifications.
None required (yet)
Metrology(4 hrs)
Tom T.
Demonstrate the ability to distinguish among the appropriate precision measuring tools according to allowable tolerances on a given design. Using appropriate measuring tools and a print with specifications, the student will measure and document all dimensions to determine if a product passes inspection.
Understand the use of precision measurement – scaled measurement tools (rulers etc.), micrometers, height gauges, Vernier and dial calipers, and gauges in the quality inspection process (mechanical, electrical, and depth)
Successfully perform basic inspection of raw/incoming material/stock using appropriate measuring instruments
Successfully perform basic inspection of first piece parts using
Inspection-Basic Measurements 110
Linear Instrument Characteristics 115
Surface Measurement 140
This work is licensed under a Creative Commons Attribution 3.0 Unported License [http://creativecommons.org/licenses/by/3.0]9/8/14 5

appropriate precision instruments (external, ID bore, thread, depth readings)
Intro to CNC (5 hrs)
Tom T
Understand the basic parts and functions of manual lathes
Set-up and Operation – engine lathe
Manual Machining-Basics of the Engine Lathe 115
Manual Machining-Overview of Engine Lathe Setup 205
Benchwork and Layout Operations 210
This work is licensed under a Creative Commons Attribution 3.0 Unported License [http://creativecommons.org/licenses/by/3.0]9/8/14 6

Project #2: Threading Practice Piece (7.5 hrs.)Instructors: Tom Tourigny & Joe Adams
Machine(s): Manual Lathes TL-1 Manual chuck
Tooling: Centers Turning tool Grooving/Cut off Tool Threading tools Chamfer tool
Inspection: Micrometers Steel Ruler Calipers Three wire method/ thread gage
Stock 1”D x 5.100 1018
Textbooks: Machining Fundamentals; Chapters: 3, 4, 5, 14, 15, 16, 27 Machine Trades Print Reading; Chapters: 2, 3, 4, 5, 7, 11, 12
Skills: Read blueprints How to set up and run manual lathe Knowledge and use of turning tools Knowledge and use of speeds and feeds Set up and use drill cuck, center Shop safety
This work is licensed under a Creative Commons Attribution 3.0 Unported License [http://creativecommons.org/licenses/by/3.0]9/8/14 7

Project #2: Threading Practice Piece (7.5 hrs.)
Topics Learning Expectations Tooling U ModulesBlueprint(3 hrs)
Jeff
Read the title block and get key information about the blueprint
Determine the differences between various types of holes
Read a thread callout on the blueprint to create a thread
Students will build and assemble products according to detailed drawings and annotated hand sketches. This will include the interpretation of prints with geometric dimensioning and tolerance symbols that meet ANSI and ISO specifications.
None required (yet)
Metrology(4 hrs)
Joe
Reinforced by Caitlin and Jeff
Successfully perform basic inspection of first piece parts using appropriate precision instruments (external, ID bore, thread, depth readings)
Correctly record inspection readings in quality inspection log and attach log to process/operations sheet
Demonstrate the ability to distinguish among the appropriate precision measuring tools according to allowable tolerances on a given design. Using appropriate measuring tools and a print with specifications, the student will measure and document all dimensions to determine if a product passes inspection.
Inspection-Overview of Threads 150
Intro to GD&T 205 Inspection- Thread
Inspection 250
Intro to CNC (9 hrs)
Joe
Set-up and Operation – engine lathe
Learn proper machine maintenance of manual lathe
Manual Machining-Engine Lathe Operation 225
Manual Machining-Threading on the Engine Lathe 235
This work is licensed under a Creative Commons Attribution 3.0 Unported License [http://creativecommons.org/licenses/by/3.0]9/8/14 8

This work is licensed under a Creative Commons Attribution 3.0 Unported License [http://creativecommons.org/licenses/by/3.0]9/8/14 9

Project #3: Hand Tapping Exercise (8 hrs.) Instructor: Tom Tourigny & Joe Adams
Machine(s): Bridgeport Manual Mill Vise
Tools Edge finder Indicator Tramming Arm Parallels
Tooling: #3 Center Drills Drill 5/16, 27/64, “F” Reamers ½ End mills Taps 3/8 – 16, ½ - 13, 5/16 – 18 Spot Drill 90º Boring head
Inspection: Micrometers Calipers Gage pins Thread gage
Stock 5/8 x 3” x 7.100 1018
Textbooks: Machining Fundamentals; Chapters: 3, 4, 5, 12, 18, 19, 27 Machine Trades Print Reading; Chapters: 2, 3, 4, 5, 6, 7, 11, 12
Skills: Blueprint reading Set up and use manual mills Set up and use drills, taps, boring head, reamers, and end mills Knowledge of speeds and speeds for various cutting tools Knowledge and use of metrology equipment Shop safety
This work is licensed under a Creative Commons Attribution 3.0 Unported License [http://creativecommons.org/licenses/by/3.0]9/8/14 10

Project #3: Hand Tapping Exercise (8 hrs.)
Topics Learning Expectations Tooling U ModulesBlueprint(3 hrs)
Jeff
Read the title block and get key information about the blueprint
Successfully read and interpret basic detail/assembly drawing in preparation for setting-up and operating production equipment
Students will build and assemble products according to detailed drawings and annotated hand sketches. This will include the interpretation of prints with geometric dimensioning and tolerance symbols that meet ANSI and ISO specifications.
Shop Essentials-Blueprint Reading 130
Metrology(4 hrs)
Tom T.
Reinforced by Caitlin and Jeff
Successfully perform basic inspection of first piece parts using appropriate precision instruments (external, ID bore, thread, depth readings)
Follow procedures to measure inside diameter using a telescope gauge and micrometer to a tolerance of at least +/- .005
Demonstrate the ability to distinguish among the appropriate precision measuring tools according to allowable tolerances on a given design. Using appropriate measuring tools and a print with specifications, the student will measure and document all dimensions to determine if a product passes inspection.
Optional
Intro to CNC (8 hrs)
Tom T.
Understand the basic parts and functions of manual mills
Set-up and Operation – manual mill 2.I.01 Demonstrate General
Machining Operations. 2.I.01.01 Drill a hole to the
designated size and in the predetermined location.
2.I.01.02 Counter sink a hole to
Abrasives-Grinding Processes 120
Manual Machining-Basics of the Manual Mill 110
Manual Machining-Overview of Manual Mill Setup 200
Manual Machining-
This work is licensed under a Creative Commons Attribution 3.0 Unported License [http://creativecommons.org/licenses/by/3.0]9/8/14 11

depth and diameter specified by blueprint and or standard.
2.I.01.03 Ream a hole to a specified tolerance of +/- .001.
2.I.01.05 Counter bore a hole to the specified diameter and/or depth according to the blue print.
Manual Mill Operations 220
CAD/CAM(2 hrs)Mike
Intro to CAD/CAM Optional
This work is licensed under a Creative Commons Attribution 3.0 Unported License [http://creativecommons.org/licenses/by/3.0]9/8/14 12

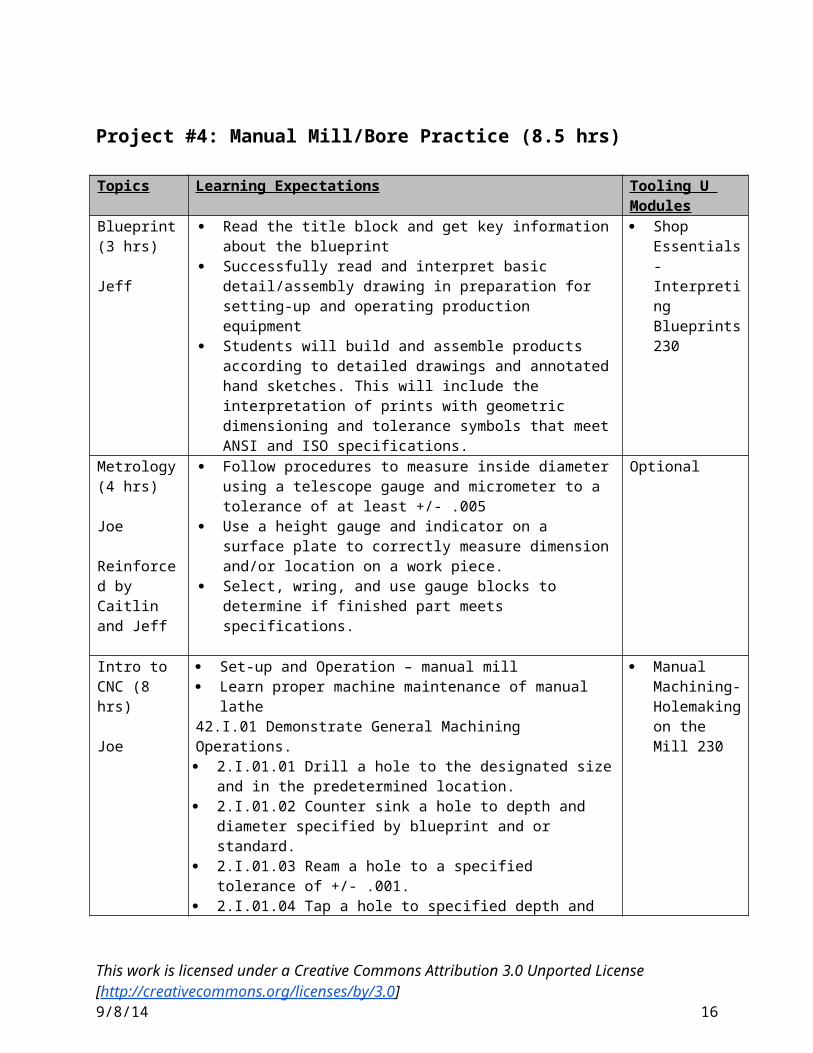
Project #4: Manual Mill/Bore Practice (8.5 hrs)Instructor: Tom Tourigny & Joe Adams
Machine(s):
Bridgeport Manual Mills Vise
Tools Edge finder Parallels
Tooling: ½ End Mills Mill Bore Head Drills .340, .300, “F” 0.313 Reamer Taps 5/16 -18
Inspection Micrometer Calipers Thread Gage
Stock ¾ x 3 ¼ x 7.100 1018
Textbooks: Machining fundamentals; Chapters: 3, 4, 5, 12, 18, 19, 27 Machine Trade Print Reading; Chapters: 2, 3, 4, 5, 6, 7, 11, 12
Skills: Shop safety Blueprint reading Set up and use a manual mill Knowledge and use of various cutting tools Knowledge and use of speeds and feeds Knowledge and use of metrology equipment
This work is licensed under a Creative Commons Attribution 3.0 Unported License [http://creativecommons.org/licenses/by/3.0]9/8/14 13

Project #4: Manual Mill/Bore Practice (8.5 hrs)
Topics Learning Expectations Tooling U Modules
Blueprint(3 hrs)
Jeff
Read the title block and get key information about the blueprint
Successfully read and interpret basic detail/assembly drawing in preparation for setting-up and operating production equipment
Students will build and assemble products according to detailed drawings and annotated hand sketches. This will include the interpretation of prints with geometric dimensioning and tolerance symbols that meet ANSI and ISO specifications.
Shop Essentials-Interpreting Blueprints 230
Metrology (4 hrs)
Joe
Reinforced by Caitlin and Jeff
Follow procedures to measure inside diameter using a telescope gauge and micrometer to a tolerance of at least +/- .005
Use a height gauge and indicator on a surface plate to correctly measure dimension and/or location on a work piece.
Select, wring, and use gauge blocks to determine if finished part meets specifications.
Optional
Intro to CNC (8 hrs)
Joe
Set-up and Operation – manual mill Learn proper machine maintenance of manual lathe42.I.01 Demonstrate General Machining Operations. 2.I.01.01 Drill a hole to the designated size and in the
predetermined location. 2.I.01.02 Counter sink a hole to depth and diameter
specified by blueprint and or standard. 2.I.01.03 Ream a hole to a specified tolerance of
+/- .001. 2.I.01.04 Tap a hole to specified depth and thread
size. 2.I.01.05 Counter bore a hole to the specified
diameter and/or depth according to the blue print. 2.I.01.06 Calculate speeds and feeds for given tooling
and material.
Manual Machining-Holemaking on the Mill 230
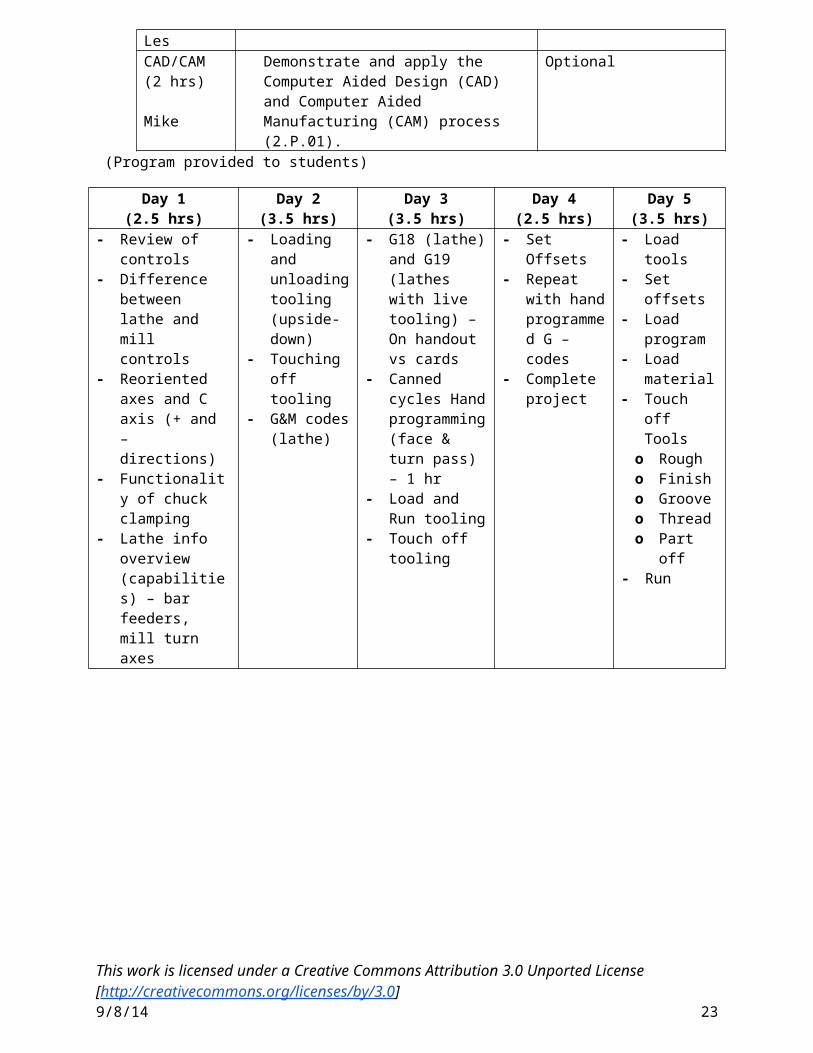
CAD/CAM(2 hrs)
Mike T.
Introduction to CADOptional
Operations CNC-Basics
of the CNC
This work is licensed under a Creative Commons Attribution 3.0 Unported License [http://creativecommons.org/licenses/by/3.0]9/8/14 14

& Programming
Joe
Machining Center 130
CNC-CNC Coordinates 140
CNC- CNC Offsets 210
This work is licensed under a Creative Commons Attribution 3.0 Unported License [http://creativecommons.org/licenses/by/3.0]9/8/14 15
Project #5: CNC Mill (15 hrs.)Instructor: Les Pomainville and Chris Whitaker
Machines: HAAS Vertical CNC milling machine TM1-1 Vise
Tools Edge finder Parallels
Tooling: 1” Face Mills End mills
o Two ¼o Two 3/8o ½o ½ 45º spoto 3/8 x .03 Rad Bull mill
Inspection Micrometer Calipers Pin Gages
Stock ¾ x 3 ¼ x 7.100 1018
Skills: Shop safety Blueprint reading Set up and use a CNC vertical mill Knowledge and use of various cutting tools Knowledge and set up of tool holder for CNC mills Knowledge and use of speed and feeds Knowledge and use of metrology equipment Knowledge and use G and M codes
This work is licensed under a Creative Commons Attribution 3.0 Unported License [http://creativecommons.org/licenses/by/3.0]9/8/14 16

Project #5: CNC Mill (15 hrs.)
Topics Learning Expectations Tooling U ModulesBlueprint(1hrs)
Jeff
Read the title block and get key information about the blueprint
Successfully read and interpret basic detail/assembly drawing in preparation for setting-up and operating production equipment
Students will build and assemble products according to detailed drawings and annotated hand sketches. This will include the interpretation of prints with geometric dimensioning and tolerance symbols that meet ANSI and ISO specifications.
Optional
Metrology(2hrs)
Jeff andLes/Chris WReinforced
Successfully perform basic inspection of first piece parts using appropriate precision instruments (external, ID bore, thread, depth readings)
Optional
Intro to CNC (6 hrs)
Les/Chris W.
Understand the basic parts and functions of CNCmills
Set-up and Operation – CNC mill Demonstrate the operations of
offhand grinding for the completion of a product and sharpening of tools associated with the trade.
Quality-Troubleshooting: Identifying Problems 180
Operations & Programming(6 hrs)Les/Chris W
G&M programming – what it is and most important codes
Concepts and practices to prepare CNC machine programs for both mills and lathes
CNC-CNC Manual Operations 200
CNC-CNC Specs for the Mill 220
CAD/CAM(2 hrs)
Mike
Demonstrate and apply the Computer Aided Design (CAD) and Computer Aided Manufacturing (CAM) process (2.P.01).
CNC-CAD/CAM Overview 160
(Program provided to students)
Day 1 (3.5 hrs)
Day 2(3.5 hrs)
Day 3(3.5 hrs)
Day 4(4.5 hrs)
- Intros - Work offsets - Tool Setting - Omit 2-3 tools
This work is licensed under a Creative Commons Attribution 3.0 Unported License [http://creativecommons.org/licenses/by/3.0]9/8/14 17

- Controls on Machines
- Hand functions- Axes of
machines- Work offsets
- Overview of G-codes
- Setting a work offset
- Offset Pathways
- Program Loading (from provided program)
to add tools by students
- Pick up work offset in machine
This work is licensed under a Creative Commons Attribution 3.0 Unported License [http://creativecommons.org/licenses/by/3.0]9/8/14 18

Project #6: CNC Lathe with Threading (15.5 hrs.)Instructor: Tom Vassallo and Les Pomainville
Machine(s): HAAS ST-10 CNC Lathe
Tooling: Lathe turning Grooving Threading tools
Tools
Inspection Micrometer Ruler
Stock
Textbooks: Machining Fundamentals; Chapters: 2, 3, 4, 22, 23, 25, 27 Machine Trades Print Reading; Chapters: 2, 3, 4, 5, 7, 10, 11, 12
Skills: Shop safety Blueprint reading Set up and use of lathe tooling Knowledge and use of G and M codes Knowledge and use of metrology equipment Knowledge and use of speed and feeds
This work is licensed under a Creative Commons Attribution 3.0 Unported License [http://creativecommons.org/licenses/by/3.0]9/8/14 19

Project #6: CNC Lathe with Threading (15.5 hrs.)
Topics Learning Expectations Tooling U ModulesBlueprint(1hrs)
Jeff
Successfully read and interpret basic detail/assembly drawing in preparation for setting-up and operating production equipment
Students will build and assemble products according to detailed drawings and annotated hand sketches. This will include the interpretation of prints with geometric dimensioning and tolerance symbols that meet ANSI and ISO specifications.
Optional
Metrology(2hrs)
Jeff and reinforced by Tom V/ Les
Successfully perform basic inspection of first piece parts using appropriate precision instruments (external, ID bore, thread, depth readings)
Optional
Intro to CNC (4 hrs)
Tom V & Les
Understand the basic parts and functions of CNC Lathes
Set-up and Operation – CNC lathe Demonstrate precision grinding
operations using the tools associated with the production of square and cylindrical finished products.
Quality-Troubleshooting: Understanding Causes & Effects 182
Operations & Programming(10 hrs)
Tom V & Les
G&M programming – what it is and most important codes
Concepts and practices to prepare CNC machine programs for both mills and lathes
CNC-Basics of the CNC Turning Center 120
CNC-Part Program 150
CNC-CNC Specs for the Lathe 225
CAD/CAM(2 hrs)
Mike
Demonstrate and apply the Computer Aided Design (CAD) and Computer Aided Manufacturing (CAM) process (2.P.01).
Optional
(Program provided to students)
Day 1(2.5 hrs)
Day 2(3.5 hrs)
Day 3(3.5 hrs)
Day 4(2.5 hrs)
Day 5(3.5 hrs)
- Review of controls- Difference
between lathe and mill controls
- Loading and unloading tooling (upside-
- G18 (lathe) and G19 (lathes with live tooling) – On handout vs
- Set Offsets- Repeat with
hand programmed
- Load tools- Set offsets- Load
program
This work is licensed under a Creative Commons Attribution 3.0 Unported License [http://creativecommons.org/licenses/by/3.0]9/8/14 20

- Reoriented axes and C axis (+ and – directions)
- Functionality of chuck clamping
- Lathe info overview (capabilities) – bar feeders, mill turn axes
down)- Touching off
tooling- G&M codes
(lathe)
cards- Canned cycles
Hand programming (face & turn pass) – 1 hr
- Load and Run tooling
- Touch off tooling
G – codes- Complete
project
- Load material
- Touch off Tools
o Rougho Finisho Grooveo Threado Part off
- Run
This work is licensed under a Creative Commons Attribution 3.0 Unported License [http://creativecommons.org/licenses/by/3.0]9/8/14 21

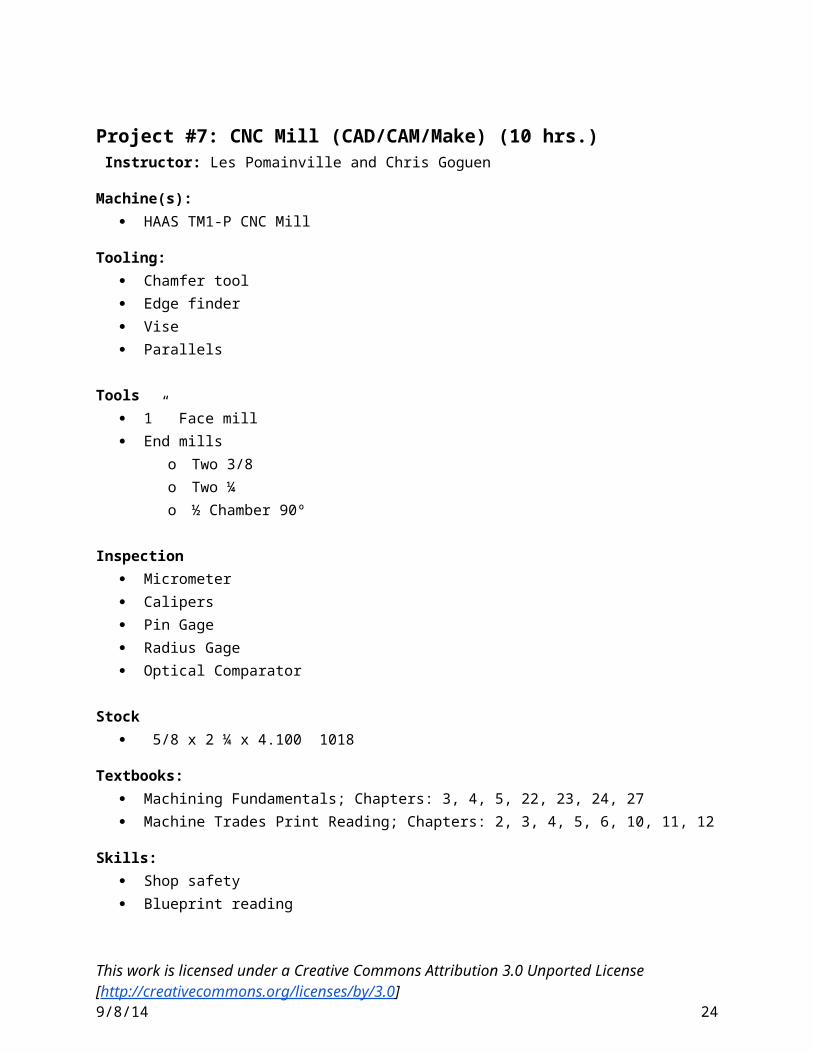
Project #7: CNC Mill (CAD/CAM/Make) (10 hrs.) Instructor: Les Pomainville and Chris Goguen
Machine(s): HAAS TM1-P CNC Mill
Tooling: Chamfer tool Edge finder Vise Parallels
Tools 1” Face mill End mills
o Two 3/8o Two ¼o ½ Chamber 90º
Inspection Micrometer Calipers Pin Gage Radius Gage Optical Comparator
Stock 5/8 x 2 ¼ x 4.100 1018
Textbooks: Machining Fundamentals; Chapters: 3, 4, 5, 22, 23, 24, 27 Machine Trades Print Reading; Chapters: 2, 3, 4, 5, 6, 10, 11, 12
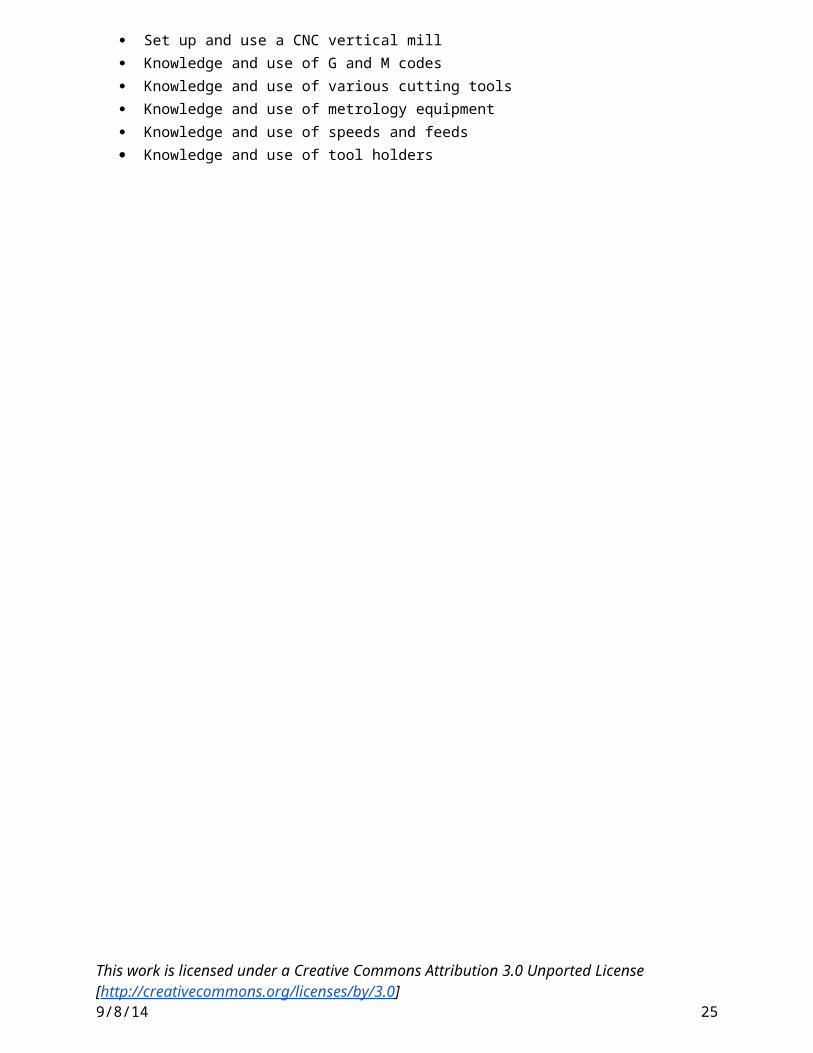
Skills: Shop safety Blueprint reading Set up and use a CNC vertical mill Knowledge and use of G and M codes Knowledge and use of various cutting tools Knowledge and use of metrology equipment Knowledge and use of speeds and feeds Knowledge and use of tool holders
This work is licensed under a Creative Commons Attribution 3.0 Unported License [http://creativecommons.org/licenses/by/3.0]9/8/14 22
Project #7: CNC Mill (CAD/CAM/Make) (10 hrs.)Topics Learning Expectations Tooling U ModulesBlueprint(1hrs)
Jeff
Successfully read and interpret basic detail/assembly drawing in preparation for setting-up and operating production equipment
Students will build and assemble products according to detailed drawings and annotated hand sketches. This will include the interpretation of prints with geometric dimensioning and tolerance symbols that meet ANSI and ISO specifications.
Optional
Intro to CNC (1 hr)
Les & Chris G
Set-up and Operation – CNC lathe Learn proper machine
maintenance of CNC lathe Proper use of surface profiler
Calibration Fundamentals 210
SPC Overview 210
Operations & Programming(9 hrs)
Les & Chris G
G&M programming – what it is and most important codes
Concepts and practices to prepare CNC machine programs for both mills and lathes
Computer-based simulation and hands-on demonstration of posting the program code
CNC-Milling Calculations 295
CAD/CAM(13 hrs)
Mike with reinforcement by Les & Chris G
Demonstrate basic CAD operations using current industry standard software. Use computer aided manufacturing (CAM) software to apply machining processes to design (e.g., speeds, feeds, cutter compensation, etc.) (2.P.01.01).
Post process program and transfer to and from CNC machine (2.P.01.02).
Computer-based simulation and hands-on demonstration of surface/solid modeling, wireframe creation, toolpath generation, 2D & 3D functionality, and tool selection.
Haas-Haas Mill: Control Panel Overview 250
Haas-Haas Mill: Entering Offsets 260
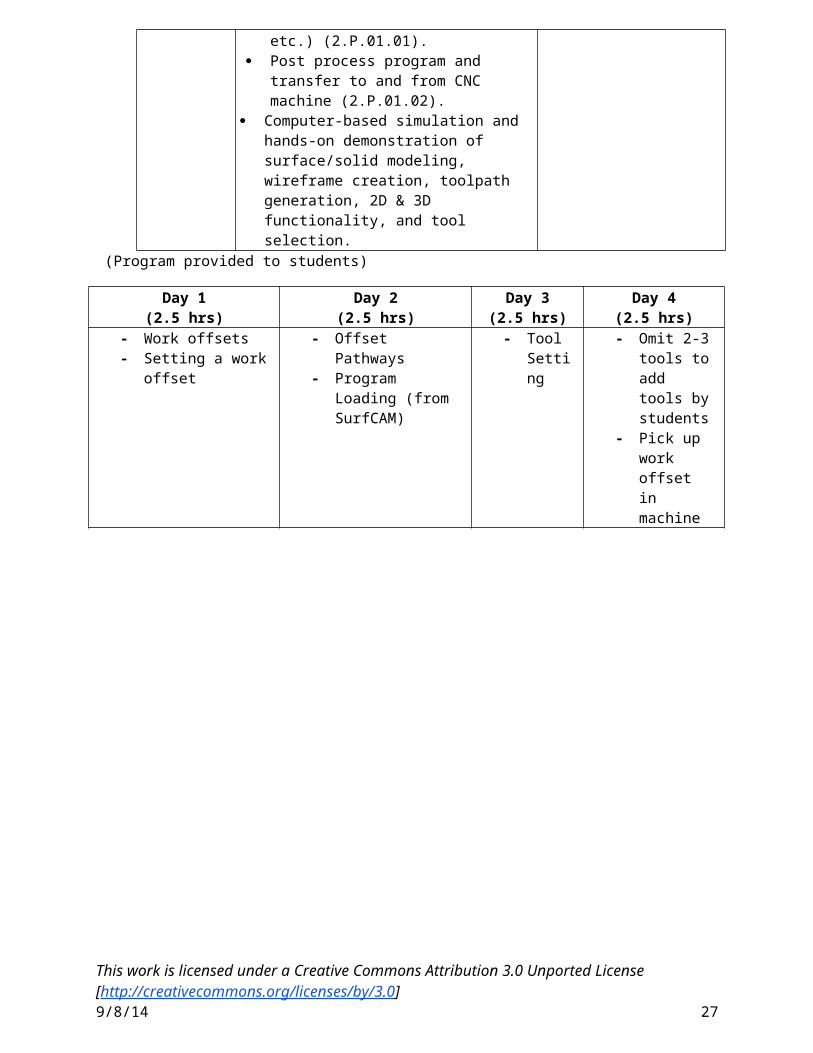
(Program provided to students)
Day 1(2.5 hrs)
Day 2(2.5 hrs)
Day 3(2.5 hrs)
Day 4(2.5 hrs)
- Work offsets - Offset Pathways - Tool - Omit 2-3
This work is licensed under a Creative Commons Attribution 3.0 Unported License [http://creativecommons.org/licenses/by/3.0]9/8/14 23
- Setting a work offset - Program Loading (from SurfCAM)
Setting tools to add tools by students
- Pick up work offset in machine
This work is licensed under a Creative Commons Attribution 3.0 Unported License [http://creativecommons.org/licenses/by/3.0]9/8/14 24
Project #8: CNC Lathe (CAD/CAM/Make) (10 hrs.)Instructor: Tom Vassallo and Les Pomainville
Machine(s): HAAS ST-10 CNC Lathe
Tooling: Turn Tool Groove tool ½ Drill 5/8D 90º Spot drill 3/8 Bore bar
Tools Indicator
Inspection Optical Comparator Micrometer Calipers Plug gage Bore gage Gage pins Steel Ruler
Stock 1.500 x 4.00 6061 aluminum
Textbooks: Machining Fundamentals; Chapters: 3, 4, 5, 22, 23, 25, 27 Machine Trades Print Reading; Chapters: 2, 3, 4, 5, 6, 8, 11, 12
Skills: Shop safety Blueprint reading Set up and use a CNC lathe Knowledge and use of lathe tooling Knowledge and use of G and M code Knowledge and use of various metrology equipment Knowledge and use speeds and feeds Knowledge and use of tool holders
This work is licensed under a Creative Commons Attribution 3.0 Unported License [http://creativecommons.org/licenses/by/3.0]9/8/14 25

Project #8: CNC Lathe (CAD/CAM/Make) (10 hrs.)Topics Learning Expectations Tooling U ModulesBlueprint(1hr)
Tom V & Les
Successfully read and interpret basic detail/assembly drawing in preparation for setting-up and operating production equipment
Students will build and assemble products according to detailed drawings and annotated hand sketches. This will include the interpretation of prints with geometric dimensioning and tolerance symbols that meet ANSI and ISO specifications.
Optional
Intro to CNC (1 hr)
Tom V.& Les
Set-up and Operation – CNC lathe Learn proper machine
maintenance of CNClathe
Quality-Troubleshooting: Taking Corrective Actions 184
Operations & Programming(9 hrs)
Tom V. & Les
G&M programming – what it is and most important codes
Concepts and practices to prepare CNC machine programs for both mills and lathes
Computer-based simulation and hands-on demonstration of posting the program code
CNC-Turning Calculations 285
CAD/CAM(12 hrs)
Mike
Demonstrate basic CAD operations using current industry standard software. Use computer aided manufacturing (CAM) software to apply machining processes to design (e.g., speeds, feeds, cutter compensation, etc.) (2.P.01.01).
Post process program and transfer to and from CNC machine (2.P.01.02).
Computer-based simulation and hands-on demonstration of surface/solid modeling, wireframe creation, toolpath generation, 2D & 3D functionality, and tool selection
Haas-Haas Lathe: Control Panel Overview 255
Haas-Haas Lathe: Entering Offsets 265
(Program provided to students.)
Day 1(2.5 hrs)
Day 2(2.5 hrs)
Day 3(2.5 hrs)
Day 4(2.5 hrs)
- Loading and - Canned cycles - Load tools - Touch off Tools
This work is licensed under a Creative Commons Attribution 3.0 Unported License [http://creativecommons.org/licenses/by/3.0]9/8/14 26
unloading tooling (upside-down)
- Touching off tooling
- Handout vs cards
- Load and Run tooling- Touch off tooling- Set Offsets
- Set offsets- Load program- Load material
o Rough; Finish; Groove; Drill
o Bore; Part off- Run- Finish project
This work is licensed under a Creative Commons Attribution 3.0 Unported License [http://creativecommons.org/licenses/by/3.0]9/8/14 27

Project #9: CNC Mill with MasterCAM (11 hrs.)Instructors: Les Pomainville
Machine(s): HAAS TM1-P Use of CAD/CAM software
Key Topic – CNC Mill with MasterCAM program created by students – Capstone Project
Tooling: Chamfer tool Edge finder Vise Parallels
Tools 1” Face mill End mills
o Two 3/8o Two ¼o ½ Chamber 90º
Inspection Micrometer Calipers Pin Gage Radius Gage Optical Comparator
Stock 5/8 x 2 ¼ x 4.100 1018
Textbooks: Machining Fundamentals; Chapters: 3, 4, 5, 22, 23, 24, 27 Machine Trades Print Reading; Chapters: 2, 3, 4, 5, 6, 10, 11, 12
Skills: Shop safety Blueprint reading Set up and use a CNC vertical mill Knowledge and use of G and M codes Knowledge and use of various cutting tools Knowledge and use of metrology equipment Knowledge and use of speeds and feeds
This work is licensed under a Creative Commons Attribution 3.0 Unported License [http://creativecommons.org/licenses/by/3.0]9/8/14 28

Knowledge and use of tool holders Knowledge and use of CAD/CAM Software
This work is licensed under a Creative Commons Attribution 3.0 Unported License [http://creativecommons.org/licenses/by/3.0]9/8/14 29

Project #9: CNC Mill with MasterCAM (11 hrs.)
Topics Learning Expectations Tooling U ModulesIntro to CNC (1 hr)
Les
Set-up and Operation – CNC mill Learn proper machine
maintenance of CNC mill
Optional
Operations & Programming(9 hrs)
Les
G&M programming – what it is and most important codes
Concepts and practices to prepare CNC machine programs for both mills and lathes
Haas-Haas Mill: Locating Program Zero 270
Haas-Haas Mill: Program Execution 280
Haas-Haas Mill: Program Storage 310
Haas-Haas Mill: First Part Runs 320
CAD/CAM(12 hrs)
Mike
Demonstrate basic CAD operations using current industry standard software. Use computer aided manufacturing (CAM) software to apply machining processes to design (e.g., speeds, feeds, cutter compensation, etc.) (2.P.01.01).
Post process program and transfer to and from CNC machine (2.P.01.02).
Computer-based simulation and hands-on demonstration of surface/solid modeling, wireframe creation, toolpath generation, 2D & 3D functionality, and tool selection
Optional
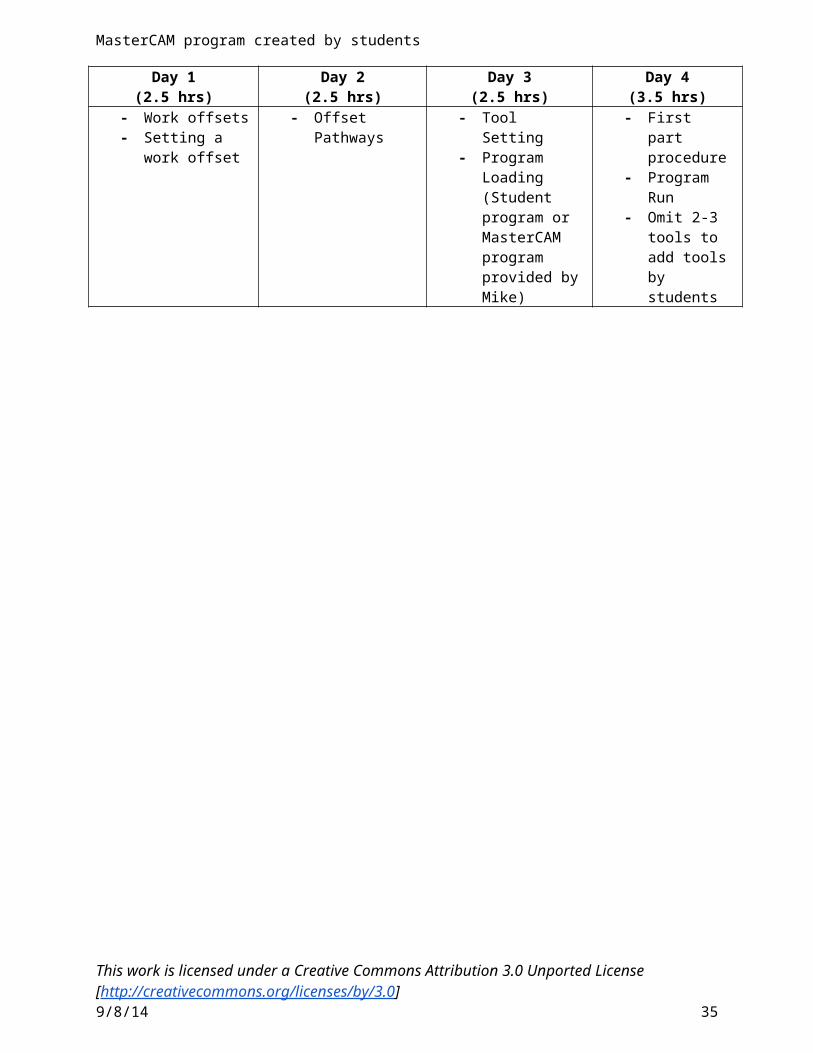
MasterCAM program created by students
Day 1(2.5 hrs)
Day 2(2.5 hrs)
Day 3(2.5 hrs)
Day 4(3.5 hrs)
- Work offsets- Setting a work
offset
- Offset Pathways - Tool Setting- Program Loading
(Student program or MasterCAM program provided by Mike)
- First part procedure
- Program Run- Omit 2-3 tools
to add tools by students
This work is licensed under a Creative Commons Attribution 3.0 Unported License [http://creativecommons.org/licenses/by/3.0]9/8/14 30

This work is licensed under a Creative Commons Attribution 3.0 Unported License [http://creativecommons.org/licenses/by/3.0]9/8/14 31

Project #10: CNC Lathe with MasterCAM (9 hrs.)Instructor: Tom Vassallo
Machine(s): HAAS ST-10 CNC Lathe
Key Topic – CNC Lathe with MasterCAM program created by students – Capstone Project
Tooling: Turn Tool Groove tool ½ Drill 5/8D 90º Spot drill 3/8 Bore bar
Tools Indicator
Inspection Optical Comparator Micrometer Calipers Plug gage Bore gage Gage pins Steel Ruler
Stock 1.500 x 4.00 6061 aluminum
Textbooks: Machining Fundamentals; Chapters: 3, 4, 5, 22, 23, 25, 27 Machine Trades Print Reading; Chapters: 2, 3, 4, 5, 6, 8, 11, 12
Skills: Shop safety Blueprint reading Set up and use a CNC lathe Knowledge and use of lathe tooling Knowledge and use of G and M code Knowledge and use of various metrology equipment Knowledge and use speeds and feeds
This work is licensed under a Creative Commons Attribution 3.0 Unported License [http://creativecommons.org/licenses/by/3.0]9/8/14 32

Knowledge and use of tool holders
This work is licensed under a Creative Commons Attribution 3.0 Unported License [http://creativecommons.org/licenses/by/3.0]9/8/14 33

Project #10: CNC Lathe with MasterCAM (9 hrs.)
Topics Learning Expectations Tooling U ModulesIntro to CNC (1 hr.)
Tom V.
Set-up and Operation – CNC lathe Learn proper machine
maintenance of CNClathe
Optional
Operations & Programming(9 hrs)
Tom V.
G&M programming – what it is and most important codes
Concepts and practices to prepare CNC machine programs for both mills and lathes
Computer-based simulation and hands-on demonstration of posting the program code
Haas-Haas Lathe: Locating Program Zero 275
Haas-Haas Lathe: Program Execution 285
Haas-Haas Lathe: Program Storage 315
Haas-Haas Lathe: First Part Runs 325
CAD/CAM(11 hrs)
Mike
Demonstrate basic CAD operations using current industry standard software. Use computer aided manufacturing (CAM) software to apply machining processes to design (e.g., speeds, feeds, cutter compensation, etc.) (2.P.01.01).
Post process program and transfer to and from CNC machine (2.P.01.02).
Computer-based simulation and hands-on demonstration of surface/solid modeling, wireframe creation, toolpath generation, 2D & 3D functionality, and tool selection
Optional
MasterCAM program created by students
Day 1(2.5 hrs.)
Day 2(2 hrs.)
Day 3(4.5 hrs.)
- Work offsets- Setting a work offset- Offset Pathways
- Program Loading (Student program or MasterCAM program provided by Mike)
- Tool Setting
- First part procedure
- Program Run- Omit 2-3 tools to
This work is licensed under a Creative Commons Attribution 3.0 Unported License [http://creativecommons.org/licenses/by/3.0]9/8/14 34
add tools by students
This work is licensed under a Creative Commons Attribution 3.0 Unported License [http://creativecommons.org/licenses/by/3.0]9/8/14 35

Exercise 1. G & M Code Exercises (13 hrs.)Instructor: Les Pomainville
Machine(s): HAAS Simulator
Textbooks: Machining Fundamentals
Skills: Operate CNC and Conversational Machines Construct a safe and effective part program using G&M codes Use Manual Data Input (M.D.I.) and control panel operations including simple
programming, tool changes and spindle speeds Demonstrate sequential start-up and shut down operations Set up datum point, tool length offsets and tool geometry offsets Set cutter compensation Load programs, dry run, edit, and execute program
This work is licensed under a Creative Commons Attribution 3.0 Unported License [http://creativecommons.org/licenses/by/3.0]9/8/14 36

Course Descriptions and Curriculums
Intro to Manufacturing Careers (4 hours) Instructor: Michael Baines
Instructional plan includes students’ participation in a MSMI Information session, interaction with instructors from industry, and participation in events that include representatives from partnering precision manufacturers.
Work Readiness/Job Search (4 hours) Instructor: Michael Baines
Instructional plan will include classroom portions and be supplemented by Career Center programs, with clear expectations, timelines, deliverables and graded assignments to prepare students for applying for a job. Assessment of each student’s completed resumes, cover letters and interview skills, an overall assessment of whether they are ready to apply for a job will be conducted by the Career and College Navigator and Project Manager and students will be to use additional counseling appointments if needed.
This work is licensed under a Creative Commons Attribution 3.0 Unported License [http://creativecommons.org/licenses/by/3.0]9/8/14 37

Manufacturing Math Curriculum (20 hours)–Instructor: Caitlin Sheriden
Basic math concepts and terms Identify place values of numbers Using math terms and symbols Basic arithmetic operations Order of operations Solve addition, subtraction,
multiplication, and division equations with whole numbers
Solve equations using the order of basic arithmetic operations
Solve fractions, decimals, percent's problems
Solve equations converting between fractions, decimals, and percent's
Solve equations involving like and dislike fractions
Reduce fractions to their lowest terms
Ruler Reading Cartesian Coordinates – X,Y axes and XYZ
and rotated XYZ planes Location in 3D space: identifying points and
moving between locations Machining Formulas – rearrange & solve
equations (surface speed, feed per tooth, spindle horsepower, feet per minute)
Circular measurements and angles – degrees and radians, zero location and positive and negative angles, 0, 90 and 180 degrees
Use calculators – identify and use the function of each calculator key
Solve averaging problems using a calculator
Solve square root problems Trigonometry concepts (right triangles,
ratios, properties of triangles)
Instructional plan will utilize projects as the foundation for students to apply their mathematics skills and will use Franklin County Technical School’s current textbooks (Practical Mathematics for Metalworking Trainees and Mathematics for the Trades), contextualized MCCWDTA curriculum for the Advanced Manufacturing Mathematics, and ToolingU modules for instructional materials and student assignments.
Learning Standards (CVTE Learning Standard Number and Domains)Reason quantitatively and use units to solve problems. Demonstrate problem solving abilities using units of measurement in
the development and implementation of a production process plan.
2.B, 2H;N-Q
Use facts about supplementary, complementary, vertical, & adjacent angles in a multi-step problem to write & solve simple equations for an unknown angle in a figure.
2.E, 2.N;7.G
Draw, construct, & describe geometrical figures & describe the relationships between them Identify and calculate for omitted angles and geometry in the
production of projects and tasks along with related theory components
2.G,2P;7.G
Apply and extend previous understandings of operations with fractions to add, subtract, multiply, and divide rational numbers Using foundational concepts of arithmetic students will calculate
missing dimensions in the creation of projects and tasks
2.G, 2.H;7.NS
Solve real-life & mathematical problems using numerical & algebraic expressions & equations. Calculate cutting speeds, feeds, and rpms using algebraic
expressions.
2.I;7.EE
This work is licensed under a Creative Commons Attribution 3.0 Unported License [http://creativecommons.org/licenses/by/3.0]9/8/14 38

Understand and apply the Pythagorean Theorem. Apply the Pythagorean Theorem to determine unknown side lengths in right triangles in real-world and mathematical problems in two and three dimensions; Apply the Pythagorean Theorem to find the distance between two points in a coordinate system.
2.L , 2.N, 2.O;8.G
Know the formulas for the area and circumference of a circle and use them to solve problems; give an informal derivation of the relationship between the circumference and area of a circle.
2.G, 2.M,2I;7.G, 8.G
Use volume formulas for cylinders, pyramids, cones, and spheres to solve problems. Use formulas and functions to calculate missing information for the
creation of projects and tasks with a related theory component.
2.P;G-GMD
o
This work is licensed under a Creative Commons Attribution 3.0 Unported License [http://creativecommons.org/licenses/by/3.0]9/8/14 39

Blueprint Reading (16 hours) - Jeff Krawczynski
Learning Standards (CVTE Learning Standard Number) 2.G.01 Read blueprints and create basic sketches.
o 2.G.01.01 Read and interpret detail drawings to meet American National Standards Institute (ANSI) and International Organization for Standards (ISO) standards.
o 2.G.01.02 Read and interpret assembly drawings.o 2.G.01.03 Design and sketch a basic work piece including
mathematical annotation. Types of projections and views Read the title block and get key information about the blueprint Find and determine key features and dimensions of the blueprint Define and interpret tolerances on the blueprint Use the correct way of scaling a drawing to make the part the correct size Determine the differences between various types of holes Read a thread callout on the blueprint to create a thread Successfully read and interpret basic detail/assembly drawing in preparation for
setting-up and operating production equipment
Instructional plan will utilize projects as the foundation for students to apply their knowledge of blueprint reading as part of each project and will use Franklin County Technical School’s current textbooks and ToolingU modules for instructional materials and student assignments.
This work is licensed under a Creative Commons Attribution 3.0 Unported License [http://creativecommons.org/licenses/by/3.0]9/8/14 40
Shop Safety (10 hrs)
Instructors: Barbara Williams (with FCTS Shop Safety support from Tom T and reinforced by all instructors)
OSHA-certified instructor will present OSHA materials and students will be issued their OSHA 10 General Industry card from the Department of Labor.
2 hour Intro to OSHA 1 hour Safety & Health Programs
1 hour Electrical 1 hour Hazard Communication
1 hour Walking & Working Surfaces
1 hour Blood Bourne Pathogens
1 hour Personal Protective Equipment
1 hour Machine Guarding
1 hour Emergency Exit Routes
Learning Standards (CVTE Learning Standard Number)
1.A Fundamentals of Health and Safety 1.A.01 Define health and safety regulations. 1.A.01.01 Identify and apply Occupational Safety and Health Administration
(OSHA) and other health and safety regulations that apply to specific tasks and jobs in the occupational area.
1.A.01.02 Identify and apply Environmental Protection Agency (EPA)and other environmental protection regulations that apply to specific tasks and jobs in the occupational area.
1.A.01.03 Identify and apply Right-To-Know (Hazard Communication Policy) and other communicative regulations that apply to specific tasks and jobs in the occupational area.
1.A.01.04 Explain procedures for documenting and reporting hazards to appropriate authorities.
1.A.01.05 List penalties for non-compliance with appropriate health and safety regulations.
1.A.01.06 Identify contact information for appropriate health and safety agencies and resources.
1.A.02 Demonstrate health and safety practices: 1.A.02.01 Identify, describe and demonstrate the effective use of Material Safety
Data Sheets (MSDS). 1.A.02.02 Read chemical, product, and equipment labels to determine
appropriate health and safety considerations. 1.A.02.03 Identify, describe and demonstrate personal, shop and job site safety
practices and procedures.
This work is licensed under a Creative Commons Attribution 3.0 Unported License [http://creativecommons.org/licenses/by/3.0]9/8/14 41

1.A.02.04 Demonstrate safe dress and use of relevant safety gear and personal protective equipment (PPE), including (where appropriate) wrist rests, adjustable workspaces and equipment, gloves, boots, earplugs, eye protection, and breathing apparatus.
1.A.02.05 Demonstrate appropriate safe body mechanics, including proper lifting techniques and ergonomics.
1.A.02.06 Locate emergency equipment in your lab, shop, and classroom, including (where appropriate) eyewash stations, shower facilities, sinks, fire extinguishers, fire blankets, telephone, master power switches, and emergency exits.
1.A.02.07 Demonstrate the safe use, storage, and maintenance of every piece of equipment in the lab, shop, and classroom.
1.A.02.08 Describe safety practices and procedures to be followed when working with and around electricity.
1.A.02.09 Properly handle, store, dispose of, and recycle hazardous, flammable, and combustible materials.
1.A.02.10 Demonstrate proper workspace cleaning procedures.
1.A.03 Demonstrate responses to situations that threaten health and safety. 1.A.03.01 Describe First Aid procedures for potential injuries and other health
concerns in the occupational area. 1.A.03.02 Describe the importance of emergency preparedness and an
emergency action plan. 1.A.03.03 Describe procedures used to handle emergency situations and
accidents, including identification, reporting, response, evacuation plans, and follow-up procedures.
1.A.03.04 Identify practices used to avoid accidents. 1.A.03.05 Identify and describe fire protection, precautions and response
procedures. 1.A.03.06 Discuss the role of the individual and the company/organization in
ensuring workplace safety. 1.A.03.07 Discuss ways to identify and prevent workplace/school violence.
2.A Fundamentals of Safety in Machine Tool Technology 2.A.01 Demonstrate Machine Tool safety. 2.A.01.01 Utilize Personal Protective Equipment, following OSHA regulations and
industry standards. 2.A.01.02 Explain and implement Machine Guarding. 2.A.01.03 Demonstrate safe operation
Instructional plan will include a safety overview on the first day of class, and reinforcement of safety topics on each machine (manual lathe, manual mill, CNC lathe, and CNC mill). FCTS safety test will be administered to demonstrate knowledge of safety concepts.
This work is licensed under a Creative Commons Attribution 3.0 Unported License [http://creativecommons.org/licenses/by/3.0]9/8/14 42

Metrology (20 hours) - Instructors: Jeff Krawczynski, Tom Tourigny and Industry Partners
Learning Standards (CVTE Learning Standard Number)
2.D Quality Control 2.D.01 Review inspection procedures. 2.D.01.01 Measure work piece with a scale within a tolerance of +/- 1/64. 2.D.01.02 Measure work piece outside diameter, inside diameter and depth
with the precision instrument to a tolerance of +/- .001”. 2.D.01.03 Measure work piece with a precision caliper within a tolerance of
+/- .005. 2.D.01.04 Measure radius on a work piece using a radius gauge. 2.D.01.05 Use a protractor to measure the angle(s). 2.D.01.06 Measure location and diameter of a feature to a tolerance of at
least +/- .001. 2.D.01.07 Identify a thread and measure outside and pitch diameter to a
tolerance of at least +/- .002. 2.D.01.08 Compare surface finish quality of a part using surface finish
comparator/gauge to print specification. 2.D.01.09 Define attributes, units, and systems of measurement used in
quality control. Understand the use of precision measurement – scaled measurement tools
(rulers etc.), micrometers, height gauges, Vernier and dial calipers, and gauges in the quality inspection process (mechanical, electrical, and depth)
Successfully perform basic inspection of raw/incoming material/stock using appropriate measuring instruments
Successfully perform basic inspection of first piece parts using appropriate precision instruments (external, ID bore, thread, depth readings)
Correctly record inspection readings in quality inspection log and attach log to process/operations sheet
Follow procedures to measure inside diameter using a telescope gauge and micrometer to a tolerance of at least +/- .005
Use a height gauge and indicator on a surface plate to correctly measure dimension and/or location on a work piece.
Select, wring, and use gauge blocks to determine if finished part meets specifications.
Proper use of surface profiler
Instructional plan will classroom portions and utilization of skills during project s and lab activities. Projects and Tooling U online modules will be administered to demonstrate mastery of metrology concepts.
This work is licensed under a Creative Commons Attribution 3.0 Unported License [http://creativecommons.org/licenses/by/3.0]9/8/14 43

Introduction to CNC (44 hours) - Instructors: Tom Tourigny and Industry Partners Understand the basic parts and functions of manual and CNC lathes and
milling machines Set-up and Operation – engine lathe (Tom) Set-up and Operation –milling machine (Tom) Set-up and Operation – CNC lathe Set-up and Operation –CNC milling machine Ability to identify quality assurance of finished parts (acceptable and not
acceptable deburring and finishing) Ability to accurately measure finished parts and compare to print
2.I.01 Demonstrate General Machining Operations. 2.I.01.01 Drill a hole to the designated size and in the predetermined
location. 2.I.01.02 Counter sink a hole to depth and diameter specified by blueprint
and or standard. 2.I.01.03 Ream a hole to a specified tolerance of +/- .001. 2.I.01.04 Tap a hole to specified depth and thread size. 2.I.01.05 Counter bore a hole to the specified diameter and/or depth
according to the blue print. 2.I.01.06 Calculate speeds and feeds for given tooling and material.
2.N.01 Use Precision Milling. 2.N.01.01 Indicate vise within a tolerance of .001 over a 6” span. 2.N.01.02 Tram milling head within a tolerance of .001 over a 6” diameter
sweep. 2.N.01.03 Locate a datum feature using an edge finder. 2.N.01.04 Locate and indicate holes and pins. 2.N.01.05 Mill a flat surface within a specified surface finish using a variety of
tooling. 2.N.01.06 Mill a variety of angles within a specified tolerance. 2.N.01.07 Square a work piece within a specified tolerance. 2.N.01.08 Demonstrate climb and conventional milling. 2.N.01.09 Mill a shoulder, slots and pockets within a specified tolerance. 2.N.01.10 Demonstrate setup and operation of a boring head. 2.N.01.11 Bore a hole to size and location within a tolerance of +/- .005. 2.N.01.12 Mill keyways and keyseats to specifications.
MasterCam, sec g-code programming (23 hours MasterCam: 13 hours G & M code Exercises) - Instructors: Mike Therrien, Les Pomainville and Industry Partners
Concepts and practices to prepare CNC machine programs for both mills and lathes
This work is licensed under a Creative Commons Attribution 3.0 Unported License [http://creativecommons.org/licenses/by/3.0]9/8/14 44

G&M programming – what it is and most important codes Construct a safe and effective part program using G&M codes Use Manual Data Input (M.D.I.) and control panel operations including simple
programming, tool changes and spindle speeds. Demonstrate sequential start-up and shut down operations. Set up datum point, tool length offsets and tool geometry offsets. Load programs, dry run, edit, and execute program. Computer-based simulation and hands-on demonstration of posting the
program code
Textbook: Machining Fundamentals
Machine(s): HAAS Simulator
2.O CNC Programming 2.O.01 Operate CNC and Conversational Machines. 2.O.01.01 Construct a safe and effective part program using G&M codes. 2.O.01.02 Use Manual Data Input (M.D.I.) and control panel operations
including simple programming, tool changes and spindle speeds. 2.O.01.03 Demonstrate sequential start-up and shut down operations. 2.O.01.04 Set up datum point, tool length offsets and tool geometry offsets. 2.O.01.05 Set cutter compensation. 2.O.01.06 Load programs, dry run, edit, and execute program.
CAD/CAM Lab (56 hours) Instructors: Mike Therrien and Industry Partners
Students will use MasterCAM and Inventor
Demonstrate and apply the Computer Aided Design (CAD) and Computer Aided Manufacturing (CAM) process (2.P.01).
o Demonstrate part already completedo Use blueprint drawing and Inventor to demonstrate CAD/CAM concepts
Demonstrate basic CAD operations using current industry standard software. Use computer aided manufacturing (CAM) software to apply machining processes to design (e.g., speeds, feeds, cutter compensation, etc.) (2.P.01.01).
Post process program and transfer to and from CNC machine (2.P.01.02). Computer-based simulation and hands-on demonstration of surface/solid
modeling, wireframe creation, toolpath generation, 2D & 3D functionality, and tool selection
This work is licensed under a Creative Commons Attribution 3.0 Unported License [http://creativecommons.org/licenses/by/3.0]9/8/14 45

BLUEPRINTSMSMI Project #1: Shoulder Turning Blueprint
This work is licensed under a Creative Commons Attribution 3.0 Unported License [http://creativecommons.org/licenses/by/3.0]9/8/14 46

MSMI Project #2: Thread Practice
Blueprint
This work is licensed under a Creative Commons Attribution 3.0 Unported License [http://creativecommons.org/licenses/by/3.0]9/8/14 47

This work is licensed under a Creative Commons Attribution 3.0 Unported License [http://creativecommons.org/licenses/by/3.0]9/8/14 48
MSMI Project #3: Hand Tapping Exercise Blueprint
This work is licensed under a Creative Commons Attribution 3.0 Unported License [http://creativecommons.org/licenses/by/3.0]9/8/14 49

This work is licensed under a Creative Commons Attribution 3.0 Unported License [http://creativecommons.org/licenses/by/3.0]9/8/14 50

MSMI Project #4: Manual Mill Bore Blueprint
This work is licensed under a Creative Commons Attribution 3.0 Unported License [http://creativecommons.org/licenses/by/3.0]9/8/14 51

MSMI Project #5: Mill Bore with Angle Blueprint
This work is licensed under a Creative Commons Attribution 3.0 Unported License [http://creativecommons.org/licenses/by/3.0]9/8/14 52

This work is licensed under a Creative Commons Attribution 3.0 Unported License [http://creativecommons.org/licenses/by/3.0]9/8/14 53

MSMI Project #6: Manual Double Thread Blueprint
This work is licensed under a Creative Commons Attribution 3.0 Unported License [http://creativecommons.org/licenses/by/3.0]9/8/14 54

MSMI Project #7 & #9: 4 Hole Step Plate Blueprint
This work is licensed under a Creative Commons Attribution 3.0 Unported License [http://creativecommons.org/licenses/by/3.0]9/8/14 55

This work is licensed under a Creative Commons Attribution 3.0 Unported License [http://creativecommons.org/licenses/by/3.0]9/8/14 56

MSMI Project #8 & #10: Turn Groove and Bore Blueprint
This work is licensed under a Creative Commons Attribution 3.0 Unported License [http://creativecommons.org/licenses/by/3.0]9/8/14 57

Applied Manufacturing Technology Certification Pathway
Add MACWIC Pyramid (pdf import as snip it tool ?? Karen???
With MSMI between level and 2 and 3 text box as comment
Standards as Appendix
This work is licensed under a Creative Commons Attribution 3.0 Unported License [http://creativecommons.org/licenses/by/3.0]9/8/14 58
The Applied Manufacturing Technology Certification Pathway has been incorporated into the Vocational Technical Education Frameworks and adopted by the Massachusetts Community Colleges and Workforce Development Transformation Agenda (MCCWDTA).
FMI
MSMI

Appendix: MA Machine Technology Frameworks
Strand Description 1 2 3 4 5 6 7 8 9 10
2.A Fundamentals of Safety in Machine Tool Technology2.A.01 Machine Tool safety.2.A.01.01 Personal Protective Equipment x x x x x x x x x x2.A.01.02 Explain and implement Machine Guarding x x x x x x x x x x2.A.01.03 Demonstrate safe operation of equipment x x x x x x x x x x
2.B Problem Solving2.B.01 Demonstrate skills in problem solving.2.B.01.01 Identify the problem or source of the problem. x x x x x x x x x x2.B.01.02
Predict solutions using a structured problem solving process. x x x x x x x x x x
2.B.01.03Apply designated strategies to remedy the given problem. x x x x x x x x x x
2.C Machine Maintenance2.C.01 Manage equipment and machinery.2.C.01.01 Identify appropriate person(s) for maintenance and
repair of equipment. x x x x x x x x x x2.C.01.02 Review and state equipment indicators to insure that
equipment is operating according to manufacturer's specifications.
x x x x x x x x x x2.C.01.03 Demonstrate ability to maintain equipment. x x x x x x x x x x2.C.01.04 Report and maintain a written log for service and
repair of equipment. x x x x x x x x x x2.D Quality Control
2.D.01 Review inspection procedures.
2.D.01.01Measure work piece with a scale within a tolerance of +/- 1/64. x x x
2.D.01.02
Measure work piece outside diameter, inside diameter and depth with the precision instrument to a tolerance of +/- .001".
2.D.01.03Measure work piece with a precision caliper within a tolerance of +/- .005. x x x x x x x
2.D.01.04Measure radius on a work piece using a radius gauge. x x
2.D.01.05 Use a protractor to measure the angle(s). x x2.D.01.06
Measure location and diameter of a feature to a tolerance of at least +/- .001. x x
2.D.01.07Identify a thread and measure outside and pitch diameter to a tolerance of at least +/- .002.
2.D.01.08
Compare surface finish quality of a part using surface finish comparator/gauge to print specification.
x x x2.D.01.09 Define attributes, units, and systems of
measurement used in quality control. x x x x x x x x x x2.E Material Preparation
2.E.01 Produce General Bench Work Processes.2.E.01.01 Layout flat and/or round stock.
2.E.01.02Cut material using hacksaw to specified length and size.
2.E.01.03 File and blend angles and radii on work piece.2.E.01.04 Mark work piece with identification information.2.E.01.05 Describe the operation of keys and keyways.
This work is licensed under a Creative Commons Attribution 3.0 Unported License [http://creativecommons.org/licenses/by/3.0]9/8/14 59

2.F Material Sciences2.F.01 Describe material properties.2.F.01.01 Identify types of metals and related materials. x x x x x x x x x x2.F.01.02 List properties that affect machinability.
2.F.01.03Describe heat treatment processes: harden, temper, anneal, normalize, and case harden.
This work is licensed under a Creative Commons Attribution 3.0 Unported License [http://creativecommons.org/licenses/by/3.0]9/8/14 60

Strand Description 1 2 3 4 5 6 7 8 9 10
2.G Blueprints2.G.01 Read blueprints and create basic sketches.
2.G.01.01
Read and interpret detail drawings to meet American National Standards Institute (ANSI) and International Organization for Standards (ISO) standards.
x x x x x x x x x x2.G.01.02 Read and interpret assembly drawings.
2.G.01.03Design and sketch a basic work piece including mathematical annotation.
2.H Process Planning2.H.01 Plan production process.
2.H.01.01Determine and select appropriate material, size and quantity needed to complete specified product(s).
2.H.01.02Formulate an order of operations, proper tooling and work holding devices.
2.I Machining Operations2.I.01 Demonstrate General Machining Operations.
2.I.01.01Drill a hole to the designated size and in the predetermined location. x x x x x
2.I.01.02Counter sink a hole to depth and diameter specified by blueprint and or standard.
2.I.01.03 Ream a hole to a specified tolerance of +/- .001. x x2.I.01.04 Tap a hole to specified depth and thread size. x x x2.I.01.05
Counter bore a hole to the specified diameter and/or depth according to the blue print. x x x
2.I.01.06Calculate speeds and feeds for given tooling and material.
2.J Power Saw Processes2.J.01 Operate a power saw.2.J.01.01 Choose the appropriate blade for specified task.2.J.01.02 Cut material using horizontal saw to specified length.2.J.01.03 Use a vertical band saw to cut along layout lines.
2.K Finishing Processes2.K.01 Demonstrate Offhand Grinding and Finishing
Operations.2.K.01.01 Explain the selection and process of finishing
techniques.2.K.01.02 Dress wheel, set tool rest and spark guard to proper
height and clearance.2.K.01.03 Deburr work piece.2.K.01.04 Explain and demonstrate the grinding of tools for
specific application and use.2.L Grinding Processes
2.L.01 Practice Precision Grinding.2.L.01.01 Demonstrate mounting of a grinding wheel according
to industry standards.2.L.01.02 Demonstrate precision grinding operations.
2.M Lathe Processes2.M.01 Practice Precision Turning.
2.M.01.01Identify and setup workholding devices including universal and independent chucks and collets. x x x x x
2.M.01.02
Demonstrate outside turning procedures, including facing, grooving, turning diameters to a shoulder, and tapering to a specified tolerance.
x x x x x
2.M.01.03
Demonstrate inside turning procedures, including boring, grooving and tapering to a specified tolerance.
x x
2.M.01.04Demonstrate single-point threading to a specified tolerance. x x
This work is licensed under a Creative Commons Attribution 3.0 Unported License [http://creativecommons.org/licenses/by/3.0]9/8/14 61

2.M.01.05 Demonstrate cut-off techniques. x x x2.M.01.06 Machine a form into the work piece. x x2.M.01.07 Knurl a piece to design specifications from blue print.2.M.01.08 File and polish a work piece.
This work is licensed under a Creative Commons Attribution 3.0 Unported License [http://creativecommons.org/licenses/by/3.0]9/8/14 62

Strand Description 1 2 3 4 5 6 7 8 9 10
2.N Milling Processes2.N.01 Use Precision Milling.
2.N.01.01Indicate vise within a tolerance of .001 over a 6" span. x x x
2.N.01.02Tram milling head within a tolerance of .001 over a 6" diameter sweep.
2.N.01.03 Locate a datum feature using an edge finder. x x x x x2.N.01.04 Locate and indicate holes and pins.
2.N.01.05Mill a flat surface within a specified surface finish using a variety of tooling. x x x
2.N.01.06 Mill a variety of angles within a specified tolerance. x x2.N.01.07 Square a work piece within a specified tolerance. x x2.N.01.08 Demonstrate climb and conventional milling. x2.N.01.09
Mill a shoulder, slots and pockets within a specified tolerance. x x x
2.N.01.10 Demonstrate setup and operation of a boring head. x2.N.01.11
Bore a hole to size and location within a tolerance of +/- .005. x x x
2.N.01.12 Mill keyways and keyseats to specifications.2.O CNC Programming
2.O.01 Operate CNC and Conversational Machines.
2.O.01.01Construct a safe and effective part program using G&M codes. x x
2.O.01.02
Use Manual Data Input (M.D.I.) and control panel operations including simple programming, tool changes and spindle speeds.
x x x x x
2.O.01.03Demonstrate sequential start-up and shut down operations. x x x x x x
2.O.01.04Set up datum point, tool length offsets and tool geometry offsets. x x x x x x
2.O.01.05 Set cutter compensation. x x x x x x2.O.01.06 Load programs, dry run, edit, and execute program. x x x x x x
2.P CNC Operations
2.P.01
Demonstrate and apply the Computer Aided Design (CAD) and Computer Aided Manufacturing (CAM) process.
2.P.01.01
Demonstrate basic CAD operations using current industry standard software. Use computer aided manufacturing (CAM) software to apply machining processes to design (e.g., speeds, feeds, cutter compensation, etc.).
x x
2.P.01.02Post process program and transfer to and from CNC machine. x x
Manufacturing MathIntro to Manufacturing CareersWork Readiness/Job SearchAdult Education Totals
This work is licensed under a Creative Commons Attribution 3.0 Unported License [http://creativecommons.org/licenses/by/3.0]9/8/14 63

This work is licensed under a Creative Commons 3.0 License
http://creativecommons.org/licenses/by/3.0
This workforce solution is 100% funded by a grant awarded by the U.S. Department of Labor, Employment and Training Administration, TAACCCT grant agreement # TC-22505-11-60-A-25.The solution was created by the grantee and does not necessarily reflect the official position of the U.S. Department of Labor. The Department of Labor makes no guarantees, warranties, or assurances of any kind, express or implied, with respect to such information, including any information on linked sites and including, but not limited to, accuracy of the information or its completeness, timeliness, usefulness, adequacy, continued availability, or ownership. Massachusetts Community Colleges are equal opportunity employers. Adaptive equipment available upon request for persons with disabilities.
This work is licensed under a Creative Commons Attribution 3.0 Unported License [http://creativecommons.org/licenses/by/3.0]9/8/14 64