Embed Size (px)
Citation preview

Environmental and Social Management Plan for
“Mapping coral population connectivity and ocean currents to inform management & policy of the coral reef system in Seychelles”
1. Project Description (location, specific activities)Briefly list the planned activities. Clearly identify the issues to be addressed in terms of potential E&S impacts and the proposed solution (to be retrieved from the concept note and/or full proposal - 500 words max).
In this project we will map connectivity among major reefs across Seychelles, using genetic and oceanographic modelling, and use this map to determine keystone reefs – defined as highly connected sites that potentially supply larvae to many other reefs in the region.
Coral population connectivity1.1 DNA extraction from existing samples then quality testing1.2 Additional fieldwork1.3 Sequencing of DNA1.4 Bioinformatics & data interpretation1.5 Publication & media1.6 Workshop & data dissemination
In terms of E&S Impacts the main environmental impacts is the removal of fragments of coral, however the coral fragments are small and will not impact the health of the overall colony. In addition, the impact of divers on coral reef can sometimes be damaging but all divers involved in collection will be highly trained to ensure good buoyancy control and no impact to the coral reef. The lab work component introduces the threat of spills of ethanol from sample tubes and cuts whilst extracting the DNA with scalpels but a laboratory health and safety training course has been completed and first aid training was provided.
Current Mapping2.1 Review and study design, site choice2.2 Carry out numerical model simulations and Lagrangian analyses 2.3 Comparison of genetic vs simulated coral larval dispersal2.4 Publication & Media2.5 Workshop & data dissemination
The current mapping component has no obvious risks involved as it is entirely computational. Reef management tool development
3.1 Research tech & existing tool3.2 Brainstorm tool requirements 3.3 Design and implement tool
The final component of the project will include a workshop and therefore we will need to ensure there is a good communication and that no-one feels left-out or un-notified. Additionally, the workshop venue would need to be somewhere accessible. The tool development will be largely computational but will be field tested and therefore safe fieldwork procedure will be in place as per section one.

2. Risks, mitigation measures and monitoringIdentify and list potential environmental and social risks associated to the project. For each of the identified risks proposed mitigation
measures to mitigate these risks and develop indicators to monitor the implementation of the proposed mitigation measures.
Potential risks Mitigation measures Indicators to monitor implementation of mitigation measuresEnvironmental risksCoral reef/colony damage Diver trained to Dive Master or Rescue Diver
with previous experience in scientific diving Diver organise equipment logistics and set-up
to ensure no dragging equipment or littering (e.g sample bags contained within BCD pocket then stored in mesh bag.)
Diving certificates
Pre-dive checks on dive equipment
Post dive log of incidents of mal practice/damage.
Small fragment taken using appropriate tool NOT using hands
Training on sampling practice prior to fieldwork Follow the coral sampling fieldwork protocol
Photographs taken of colony immediately after sampling showing the area sampled to ensure no more than a small area of the colony is affected. Some of these colonies to be revisited after one year to re-assess recovery/damage.
Social risksOccupational health and safety
Use of ethanol, a highly flammable substance.
Follow lab safety protocol & use of PPE; For operating machinery:
H&S training and use of PPE
Training certificates acquired
Work procedural checks completed daily and logged.

Faulty / Damage to Dive Equipment
Follow the Coral Sampling Field Work Protocol
Proper diving training and rigorous, systematic equipment check before use
A dive equipment check-log, plus air pressure, time-in etc will be collected prior to every dive.
A log of all equipment related issues will be recorded.
Buddy Separation / Lost Diver
Follow the Coral Sampling Field Work Protocol
Complete and log the buddy separation protocol briefing prior to each dive.
Drowning Follow the Coral Sampling Field Work Protocol
A pre-dive check will be completed, each diver will acknowledge the conditions and agree/disagree they are safe to dive. Each diver will state whether they feel well and fit enough to dive. This will be recorded in the dive log.
Blocked Sinuses Follow the Coral Sampling Field Work Protocol
The pre-dive check will be conducted and logged to eliminate the chance of a diver descending with blocked sinuses though all trained divers are aware they cannot dive under such circumstances.
Collision with Boat / Propeller
Follow the Coral Sampling Field Work Protocol
Pre-dive training for Surface marker buoys use and boat procedures will be given and logged plus pre-dive checks to ensure SMB is attached to diver equipment.
Decompression Sickness/ Injury
Follow the Coral Sampling Field Work Protocol
Pre-dive checks and log completed and a detailed dive plan, along with high-level dive training (Rescue diver or above).
Aquatic life Injury Follow the Coral Sampling Field Work Protocol
Training on potentially dangerous aquatic animals and alleviation procedures is provided and a log recorded of training.
Checks that appropriate first aid equipment is present should be conducted prior to departure in boat.

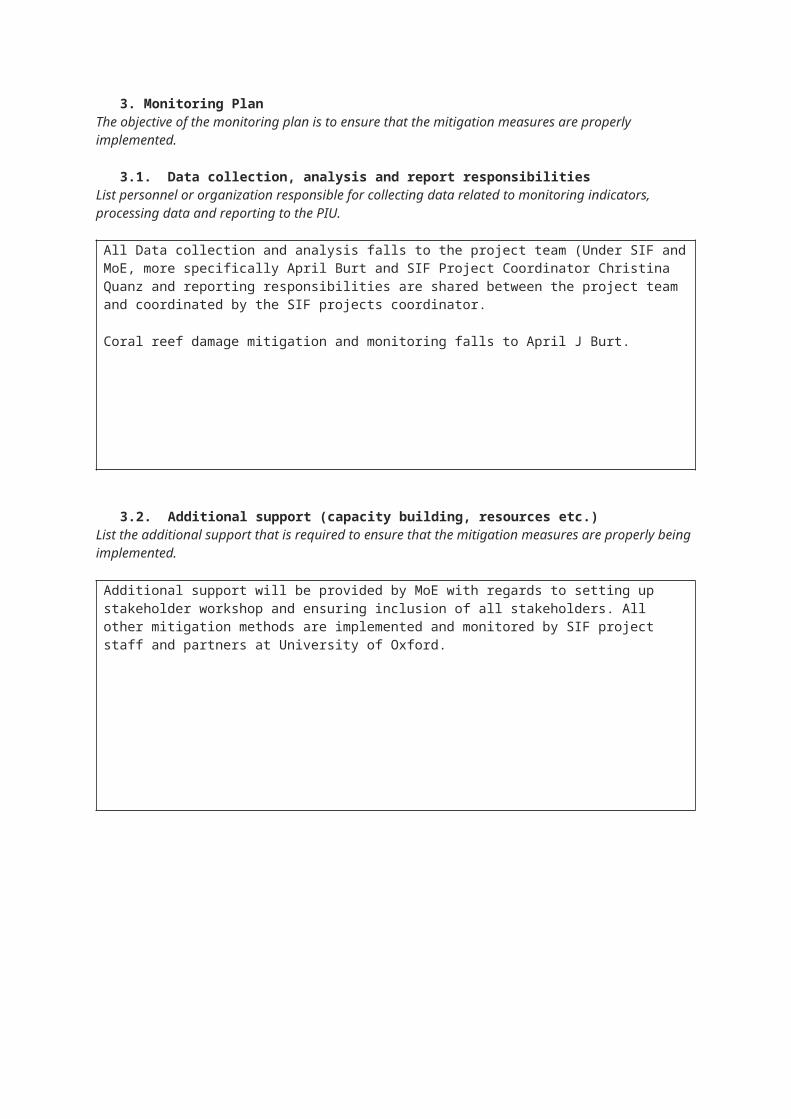
3. Monitoring Plan The objective of the monitoring plan is to ensure that the mitigation measures are properly implemented.
3.1. Data collection, analysis and report responsibilitiesList personnel or organization responsible for collecting data related to monitoring indicators, processing data and reporting to the PIU.
All Data collection and analysis falls to the project team (Under SIF and MoE, more specifically April Burt and SIF Project Coordinator Christina Quanz and reporting responsibilities are shared between the project team and coordinated by the SIF projects coordinator.
Coral reef damage mitigation and monitoring falls to April J Burt.
3.2. Additional support (capacity building, resources etc.)List the additional support that is required to ensure that the mitigation measures are properly being implemented.
Additional support will be provided by MoE with regards to setting up stakeholder workshop and ensuring inclusion of all stakeholders. All other mitigation methods are implemented and monitored by SIF project staff and partners at University of Oxford.

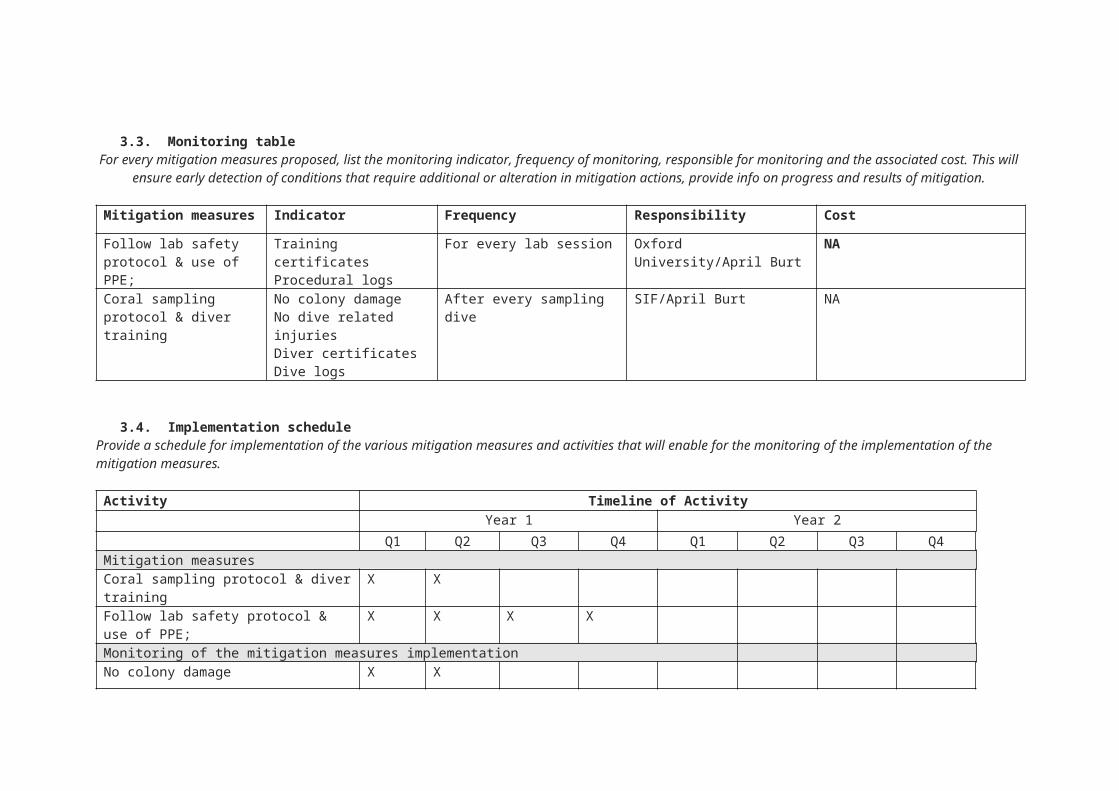
3.3. Monitoring tableFor every mitigation measures proposed, list the monitoring indicator, frequency of monitoring, responsible for monitoring and the
associated cost. This will ensure early detection of conditions that require additional or alteration in mitigation actions, provide info on progress and results of mitigation.
Mitigation measures Indicator Frequency Responsibility Cost
Follow lab safety protocol & use of PPE;
Training certificatesProcedural logs
For every lab session Oxford University/April Burt
NA
Coral sampling protocol & diver training
No colony damageNo dive related injuriesDiver certificatesDive logs
After every sampling dive SIF/April Burt NA
3.4. Implementation schedule Provide a schedule for implementation of the various mitigation measures and activities that will enable for the monitoring of the implementation of the mitigation measures.
Activity Timeline of ActivityYear 1 Year 2
Q1 Q2 Q3 Q4 Q1 Q2 Q3 Q4Mitigation measuresCoral sampling protocol & diver training
X X
Follow lab safety protocol & use of PPE;
X X X X
Monitoring of the mitigation measures implementationNo colony damage X XWork logs completed and training certificates stored
X X X X
Dive logs, protocols, training certificates.
X X X X
4. Grievance Redress Mechanism
In line with the World Bank safeguards policies, the SWIOFish3 project has developed a Grievance Redress Mechanism (GRM) to receive, process and respond to complaints from any person or group of people related to the project or is affected by its activities. The GRM is a system designed to answer questions, clarify doubts and resolve implementation problems and complaints of individuals or groups affected by SWIOFish3 project activities. GRMs are intended to be accessible, collaborative, efficient, and effective in resolving concerns through dialogue, joint fact-finding, negotiation, and problem solving. Grievances can surface at different stages of the project cycle. Some grievances may arise during the project design and planning stage, while others may come up during project implementation. In general, grievances that may be encountered in the implementation of the SWIOFish3 project can be grouped into three categories:
Grievances related to the changes in access to resources through management plans
Grievances related to proponents and beneficiaries of the Blue Grants Fund (BGF) and Blue Investment Fund (BIF)
Grievances related to issues encountered by local communities where project activities are occurring
Individuals or groups affected by the SWIOFish3 subproject can complete a “complaint form” which will be made available to the public to
formulate their suggestions or complaints. These forms can be withdrawn at the PIU office or download from the project website. Once completed, these forms can be deposited in complaint boxes.
A line of communication will be made for the public so that they can transmit suggestions and complaints through a call or an SMS;
Formal letters, emails can also be sent to the PIU; Suggestions or complaints can also be formulated during consultation meetings.
Annex 1: Lab Safety Protocol
Personal and General laboratory safety
1. Never eat, drink, or smoke while working in the laboratory.
2. Read labels carefully.
3. Do not use any equipment unless you are trained and approved as a user by your instructor.
4. Wear safety glasses or face shields when working with hazardous materials and/or equipment.
5. Wear gloves when using any hazardous or toxic agent.
6. Clothing: When handling dangerous substances, wear gloves, laboratory coats, and safety shield or glasses.
7. If you have long hair or loose clothes, make sure it is tied back or confined.
8. Keep the work area clear of all materials except those needed for your work.

9. Coats and bags should be stowed outside the lab space to keep all isles and walkways free of obstruction.
10. Disposal - You are responsible for the proper disposal of used material if any in appropriate containers.
11. Equipment Failure - If a piece of equipment fails while being used, report it immediately to your lab instructor of TA. Never try to fix the problem yourself because you could harm yourself and others.
12. Clean up your work area before leaving. 13. Wash hands before leaving the lab or elsewhere before eating.
Chemical safety
1. Treat every chemical as if it were hazardous.
2. Make sure all chemicals are clearly and currently labeled with the substance name, if you find any substance in the lab not labeled, notify the lab instructor immediately.
3. Never return chemicals to reagent bottles. If excess can not be used, dispose of it in a properly designated manner.
4. Comply with fire regulations concerning storage quantities, types of approved containers and cabinets, proper labeling, etc. If uncertain about regulations, contact the building coordinator.
5. Use volatile and flammable compounds only in a fume hood. Procedures that produce aerosols should be performed in a hood to prevent inhalation of hazardous material.
6. Never allow a solvent to come in contact with your skin. Use gloves when needed.
7. Never "smell" a solvent!! Read the label on the solvent bottle to identify its contents.
8. Dispose of all chemical waste in proper containers. Never pour anything down the sink without first obtaining clearance.
9. Inform other lab workers of, and clean up spills immediately.
10. Do not bring food into the laboratory.
Additional Safety Guidelines
1. Never do unauthorized experiments.
2. Never work alone in laboratory.
3. Keep your lab space clean and organized.
4. Do not leave an on-going experiment unattended.

5. Never use open flames in laboratory.
6. Maintain unobstructed access to all exits, fire extinguishers, electrical panels, emergency showers, and eye washes.
7. A reminder: Clean your lab bench and area and equipment before leaving.
Emergency Response
1. It is your responsibility to read safety and fire alarm posters and follow the instructions during an emergency.
2. Know the location of the fire extinguisher, eye wash, and safety shower in your lab and know how to use them.
3. Notify your instructor immediately after any injury, fire, explosion, spill or breakage.
4. Know the building evacuation procedures.
Annex 2: DNA extraction Protocol
Manufacturer’s protocol
1. Spin the PowerBead Pro Tube briefly to ensure that the beads have settled at the bottom.2. Add up to 250 mg of soil and 800 µl of Solution CD1. Vortex briefly to mix.3. Secure the PowerBead Pro Tube horizontally on a Vortex Adapter for 1.5– 2 ml tubes (cat.
no. 13000-V1-24). Vortex at maximum speed for 10 min.4. Note: If using the Vortex Adapter for more than 12 preps simultaneously, increase the
vortexing time by 5–10 min.5. Centrifuge the PowerBead Pro Tube at 15,000 x g for 1 min.6. Transfer the supernatant to a clean 2 ml Microcentrifuge Tube. Note: Expect 500–600 µl.
The supernatant may still contain some soil particles.7. Add 200 µl of Solution CD2 and vortex for 5 s.8. Centrifuge at 15,000 x g for 1 min at room temperature. Avoiding the pellet, transfer up to
700 µl of supernatant to a clean 2 ml Microcentrifuge Tube. Note: Expect 500–600 µl.9. Add 600 µl of Solution CD3 and vortex for 5 s.10. Load 650 µl of the lysate onto an MB Spin Column and centrifuge at 15,000 x g for 1 min.11. Discard the flow-through and repeat step 8 to ensure that all of the lysate has passed
through the MB Spin Column.12. Carefully place the MB Spin Column into a clean 2 ml Collection Tube. Avoid splashing any
flow-through onto the MB Spin Column.13. Add 500 µl of Solution EA to the MB Spin Column. Centrifuge at 15,000 x g for 1 min.14. Discard the flow-through and place the MB Spin Column back into the same 2 ml Collection
Tube.15. Add 500 µl of Solution C5 to the MB Spin Column. Centrifuge at 15,000 x g for 1 min.16. Discard the flow-through and place the MB Spin Column into a new 2 ml Collection17. Centrifuge at up to 16,000 x g for 2 min. Carefully place the MB Spin Column into a new 1.5
ml Elution Tube.

18. Add 50–100 µl of Solution C6 to the center of the white filter membrane.19. Centrifuge at 15,000 x g for 1 min. Discard the MB Spin Column. The DNA is now ready for
downstream applications.
Modified protocol – substituting step 1 to 7 of the original Manufacturer’s protocol.
1. Gently crush a small piece of coral in a mortar and pestle (~100mg, in order not to overload1. the column though). And transfer in a PowerBead Pro Tube (or 2 ml Microcentrifuge).2. Add 800 µl of buffer CD1 and vortex briefly.3. Add 83 µl Proteinase K (e.g. from Qiagen Blood & Tissue Kit) and vortex briefly.4. Incubate at 56 degrees for 60 minutes. Vortex for 10 seconds every 15 minutes, and at end5. of incubation. (Ideally, do this on a shaking heat block, with shaking on full).6. Add 200ul buffer CD2 and vortex for 5 seconds.7. Microfuge at full for 1 minute (at room temperature).8. Transfer supernatant to new tube (Max 700 µl).9. Add 600 µl of buffer CD3, vortex for 5 seconds and proceed with manufacturer’s protocol.10. Step 8 manufacturer’s protocol.
Annex 3: DNA Preservation Protocol
1. Obtain 97%+ concentrated ethanol2. Use high quality sample tubes with tight lids3. Upon retrieving coral samples either transfer them directly into tubes with ethanol already
decanted, ensuring ethanol fills the tubes OR put the coral sample bags into a iced cooler for transportation. The sample bags should have seawater in from the dive, if any don’t then fill these up prior to transportation.
4. Within an hour of collection samples should be transferred from cool box to ethanol.5. Once samples are in ethanol filled tubes, store in refrigerator or more ideally in freezer until
extraction.

Annex 4:
Coral Sampling Field Work Protocol
For Coral Connectivity studyBy April J Burt
Project PartnersSeychelles Islands Foundation (Main partner)
Island Conservation Society Seychelles (Collaborator)
Seychelles National Parks Authority (Collaborator)
Seychelles Fishing Authority (Collaborator)
Global Vision International (Collaborator)
Cousine Island Private (Collaborator)
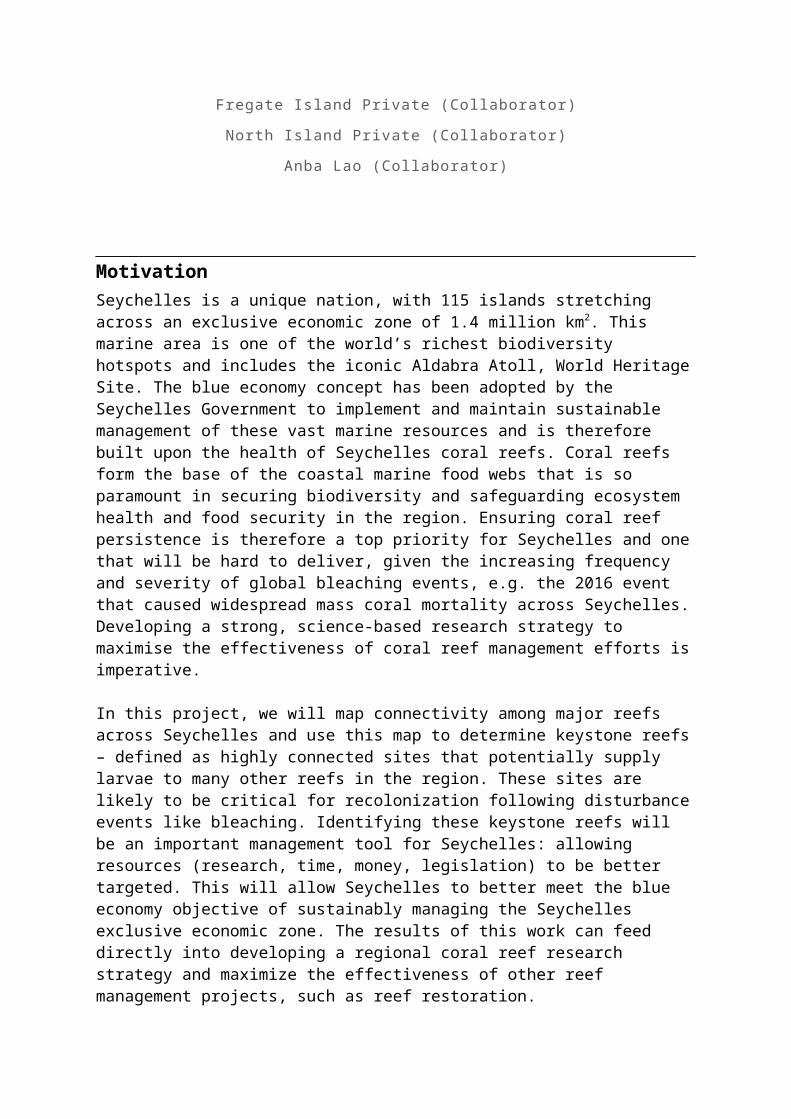
Fregate Island Private (Collaborator)
North Island Private (Collaborator)
Anba Lao (Collaborator)

MotivationSeychelles is a unique nation, with 115 islands stretching across an exclusive economic zone of 1.4 million km2. This marine area is one of the world’s richest biodiversity hotspots and includes the iconic Aldabra Atoll, World Heritage Site. The blue economy concept has been adopted by the Seychelles Government to implement and maintain sustainable management of these vast marine resources and is therefore built upon the health of Seychelles coral reefs. Coral reefs form the base of the coastal marine food webs that is so paramount in securing biodiversity and safeguarding ecosystem health and food security in the region. Ensuring coral reef persistence is therefore a top priority for Seychelles and one that will be hard to deliver, given the increasing frequency and severity of global bleaching events, e.g. the 2016 event that caused widespread mass coral mortality across Seychelles. Developing a strong, science-based research strategy to maximise the effectiveness of coral reef management efforts is imperative.
In this project, we will map connectivity among major reefs across Seychelles and use this map to determine keystone reefs – defined as highly connected sites that potentially supply larvae to many other reefs in the region. These sites are likely to be critical for recolonization following disturbance events like bleaching. Identifying these keystone reefs will be an important management tool for Seychelles: allowing resources (research, time, money, legislation) to be better targeted. This will allow Seychelles to better meet the blue economy objective of sustainably managing the Seychelles exclusive economic zone. The results of this work can feed directly into developing a regional coral reef research strategy and maximize the effectiveness of other reef management projects, such as reef restoration.
We will use state-of-the-art genetic techniques to investigate coral connectivity at two levels: (1) the site-specific connectivity around Aldabra Atoll; and (2) the first study of coral population connectivity across the whole Seychelles archipelago, stretching from the southern outer islands all the way up to the northern granitic islands. This will mean sampling 10-20 small coral fragments from 2-3 coral species at reefs across the archipelago, including the Aldabra group, the Amirantes and the inner granitic islands. The fragments are easy to remove and their removal has no negative consequences for the rest of the colony.
This project will be the first to address coral population connectivity and identify important sources of colonists in Seychelles. We will form a multi-organisation collaboration to target an essential gap in current knowledge required for effective marine spatial planning in Seychelles. The results will not just be of benefit to a single island or organization but will be a national level project, which already has the support of a number of organizations, as it aligns with their own management objectives (SIF, ICS, SNPA, SFA, GVI, Cousine Island Private and Fregate Island Private).
Maximizing the effective management of marine ecosystems is arguably the most important tool that Seychelles has against climate-driven disturbance events. This project is specifically designed to ensure evidence-based decision-making for effective management of marine ecosystems at the local, community and governmental level.
Objectives1. Determine the connectivity of coral populations across Seychelles
Use genetic techniques to determine site level differences & similarities among coral populations by sampling up to 24 reef sites across Seychelles. This will reveal patterns of coral dispersal across Seychelles.
Compare two/three different species of coral to determine whether connectivity patterns are likely to differ depending on their dispersal mechanism (broadcasters vs brooders).
Identify keystone reefs that show high levels of connectivity. Identify significant barriers to dispersal within Seychelles.
2. Determine the degree of genetic differentiation in coral populations around Aldabra Atoll. Use genetic techniques to determine the level of genetic differentiation between
lagoon reefs and outer fringing reefs and whether this depends on coral species. Determine whether lagoon corals contain different symbionts (potentially more
resilient) to corals in the outer reef.
3. Develop a Coral Reef Research Strategy for better management of Seychelles Hold a workshop with all stakeholders to present results, outline coral reef
management objectives and together, develop a strategy to achieve these.
Basic species informationThree species have been selected, all of which have been recorded at Aldabra and in the broader Seychelles region (Sheppard and Obura, 2005; Pristine Seas, 2015). They are all reasonably common and include two closely-related broadcast spawners: Acropora cytheria and Acropora tenuis; and a brooding spawner; Porites lutea. These species were also collected recently in Chagos as part of a coral connectivity study and will therefore enable a wider understanding of connectivity across the region.
Note: This sampling will cause minimal damage to the reef and will have no long-lasting effects for the individual coral colonies. The sampling will not be noticeable (to divers) or effect in anyway long-term monitoring programmes at the sites because the sampling is simply not enough to have an impact on coral cover. The fragments that I remove will take approximately 6-12 months to be re-grown.
Figure 1:Acropora tenuisColonies of this species form corymbose clumps, usually with neat evenly-spaced, delicate branchlets, but branchlets may be irregular and prostrate. Axial corallites are

long and tubular. Radial corallites are arranged in a neat rosette and have slightly flaring lips .
Colour: Yellow, cream, green or blue. Colours may be bright with distinctively coloured corallite lips.
Figure 2: Acropora cytheriaColonies are wide flat tables which are usually thin and finely structured. May become thick and robust in turbulent environments. Fine upward projecting branchlets have exsert axial corallites. Radial corallites are short, with open calices. Tentacles are frequently extended during the day.
Colour: Uniform pale cream, brown or blue.
Figure 3: Porites luteaColonies are hemispherical or helmet-shaped and may be over 4 metres across. They usually form microatolls in intertidal habitats. The surface is usually smooth.
Colour: Usually cream or yellow but may show bright colours in shallow water.
Sampling Sites & TimetableThe ideal sampling design is shown below. Each site will require 1-2 dives to complete sample collection.
Area Site NameSouthern Seychelles Aldabra Atoll lagoon West (ARM9)
Aldabra Atoll lagoon East (ARM11/10)Aldabra Atoll outer reef North (ARM6&5)
Aldabra Atoll outer reef South (ARM12&8)Assumption IslandCosmoledo AtollAstove AtollFarquhar Atoll
Mid Seychelles Platte IslandCoetivy IslandDarros IslandSt Joseph AtollDesrochesPoivre
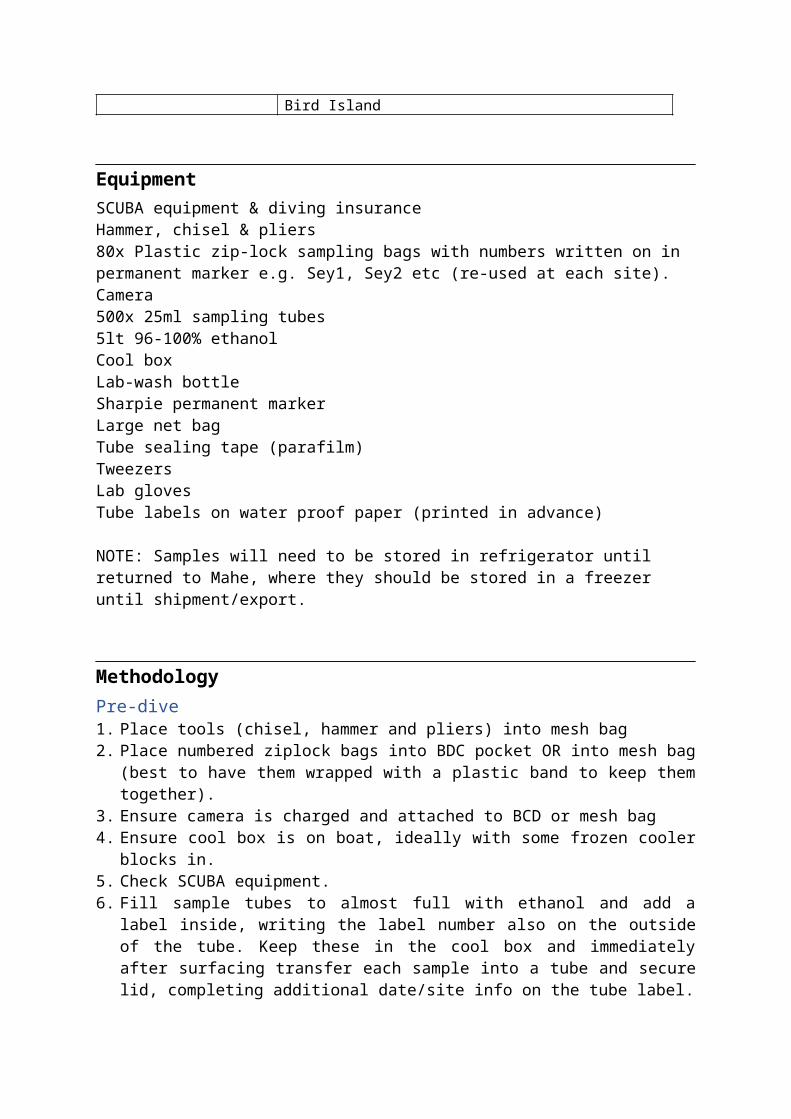
Northern Seychelles Mahé/Baie TernayMahé/St AnneNorth IslandFregate IslandSilhouette IslandCocos IslandCousine IslandPraslin/ Anse Petit CoursCurieuse islandAride islandLa DigueDenis islandBird Island
EquipmentSCUBA equipment & diving insuranceHammer, chisel & pliers80x Plastic zip-lock sampling bags with numbers written on in permanent marker e.g. Sey1, Sey2 etc (re-used at each site).Camera500x 25ml sampling tubes5lt 96-100% ethanolCool boxLab-wash bottleSharpie permanent markerLarge net bagTube sealing tape (parafilm)TweezersLab glovesTube labels on water proof paper (printed in advance)
NOTE: Samples will need to be stored in refrigerator until returned to Mahe, where they should be stored in a freezer until shipment/export.

MethodologyPre-dive1. Place tools (chisel, hammer and pliers) into mesh bag2. Place numbered ziplock bags into BDC pocket OR into mesh bag (best to have them
wrapped with a plastic band to keep them together).3. Ensure camera is charged and attached to BCD or mesh bag4. Ensure cool box is on boat, ideally with some frozen cooler blocks in.5. Check SCUBA equipment.6. Fill sample tubes to almost full with ethanol and add a label inside, writing the label
number also on the outside of the tube. Keep these in the cool box and immediately after surfacing transfer each sample into a tube and secure lid, completing additional date/site info on the tube label.
During dive1. Requires two trained divers. Both should work on collecting a single species to ensure
that the same colony is not sampled twice, and that species are not over-sampled. Close co-ordination is needed between the two divers, who should agree who is doing what prior to the dive.
2. While underwater, look around to see where the coral is densest and agree with your buddy to move in that direction. If there is a current then swim against the current, it will be easier to collect and you will not get swept far from the boat.
3. Begin sampling coral in the 3 to 15 meter depth range, working your way along the reef.4. To sample a coral, take out a ziplock bag and use the pliers to carefully clip a small
fragment of the branching acropora (same for both species) and place in the bag, being careful to close the bag (the bag needs to have some water in it so don’t squeeze the water out before closing). Once closed, hold the bag, showing the bag code (e.g. Sey1) over the coral colony and take a picture of the colony. Generally best to take two, one close-up and one of the overall colony. The coral sample bag can then go into the mesh bag and move onto the next colony. Ideally the colonies you sample from should be 5+ meters apart to ensure that it is not just a single fragmented colony.
5. For the Porites species, you will need to use the chisel and hammer, placing the chisel at about a 45 degree angle (or lower) and then applying just enough force with the hammer to get a scrape off the top of the colony. Repeat the bagging and photographing process described in point 4.
6. It can be quite difficult to manage holding all this equipment underwater so plan to make it as easy as possible, for example, by ensuring that the camera is attached to you and easily accessible, attaching the mesh bag to your BCD, having the tools either in a BCD pocket or in the mesh bag. This will prevent you loosing anything, which is very easily done underwater.
7. Be sure to stay within close proximity of your dive buddy and keep an eye on air, time and depth. Finish the time with a three minute safety stop at 5 m depth and surface next to SMB.
8. Hand the mesh bag onto the boat and ask the surface cover to place it straight into the cool box.

Post-dive1. The following process is best performed in laboratory-like conditions but may be
necessary to do on the boat, depending on how long you will be out. If returning directly to land, then keep the samples in the cool box. If not, then you will need to do the transfer to ethanol on the boat. If you will be on the boat for a long time then take some pre-filled sample tubes with you and transfer the coral asap after the dive. It is really important to get them in ethanol as soon as possible to ensure the DNA doesn’t degrade.
2. Put on some gloves and prepare the equipment; fill the lab-wash bottle with ethanol, cut the sample labels (these should be printed from excel on a grid with grid borders), swipe the tweezers in ethanol and have a sharpie pen to hand.
3. One bag at a time, take the coral fragment out using tweezers and place it in the appropriately sized sample tube, place a paper label into the tube and cover the sample/fill the tube with ethanol and ensure lid is firmly on.
4. On the outside of the tube, write the site name, the date, the species code, the bag number that the sample came from (e.g Sey1) and the paper sample number (e.g AB1). Repeat for all samples. Store in a refrigerator.
5. At the end of the sampling day, download all photos and rename each photo with the paper code (e.g AB1). Separate them into a folder with the date and then folders for each site. Also complete an excel spreadsheet (provided by A.Burt) with the following columns; Date, site, paper sample number, photo bag code and species. This will enable us to link each sample to the photos later if needed to verify.
6. Before export all samples will have ethanol refreshed (emptied and new ethanol) and then each sample tube will be wrapped in parafilm. Once done, samples can be stored in fridge/freezer until export.
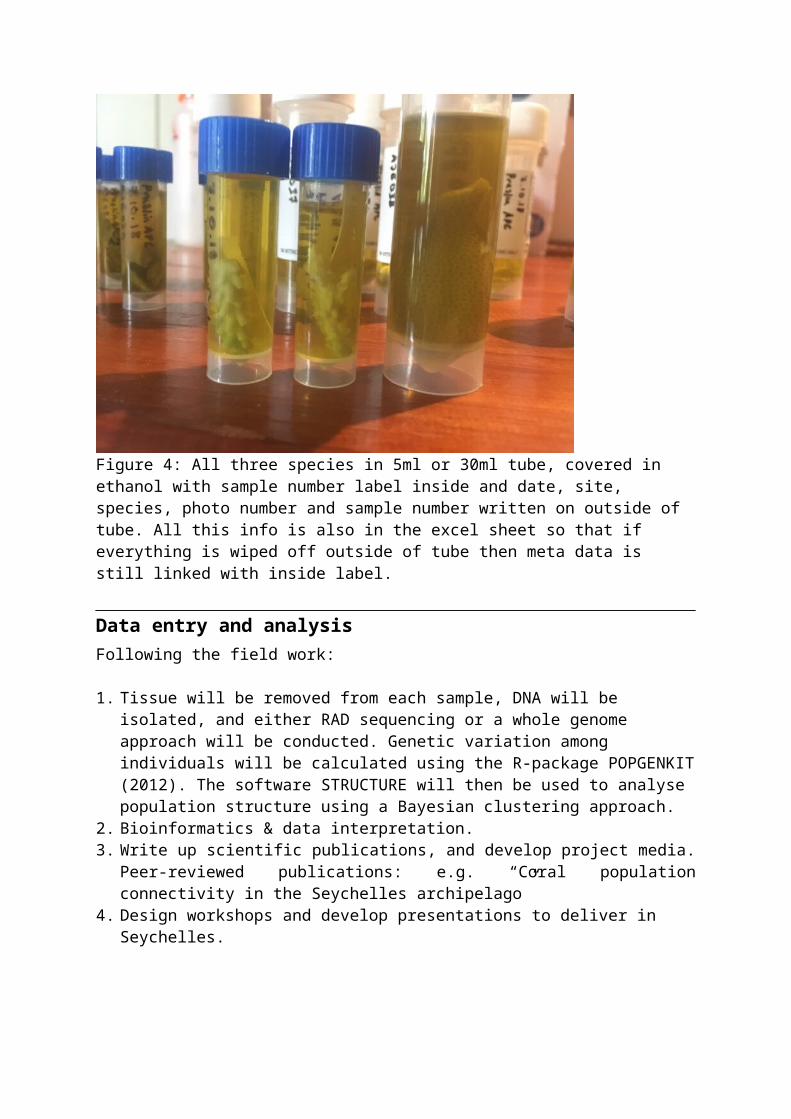
Figure 4: All three species in 5ml or 30ml tube, covered in ethanol with sample number label inside and date, site, species, photo number and sample number written on outside of tube. All this info is also in the excel sheet so that if everything is wiped off outside of tube then meta data is still linked with inside label.

Data entry and analysisFollowing the field work:
1. Tissue will be removed from each sample, DNA will be isolated, and either RAD sequencing or a whole genome approach will be conducted. Genetic variation among individuals will be calculated using the R-package POPGENKIT (2012). The software STRUCTURE will then be used to analyse population structure using a Bayesian clustering approach.
2. Bioinformatics & data interpretation.3. Write up scientific publications, and develop project media. Peer-reviewed publications:
e.g. “Coral population connectivity in the Seychelles archipelago” 4. Design workshops and develop presentations to deliver in Seychelles.
Dive Risk AssessmentRef. No.
Activity Potential Hazard Control / Mitigation Measure
1 Diving Faulty / Damage to Equipment
All personnel are responsible for pre-dive checking their own equipment. Dive equipment is a life support unit and should be properly stored and maintained. Faulty or damaged equipment should be isolated and clearly identified so as not to be used by divers before repairs.
2 Diving Buddy Separation / Lost Diver
Strictly no solo diving, always dive in buddy pair, stay within a maximum distance of ten metres but reduce if diving in bad visibility or strong current. This is for your safety and that of your buddy. All dive groups should also stay together maintaining visual contact. When diving: If separated search for no more than 1 minute underwater, before surfacing if you do not find your buddy/group. Ascend without a safety stop if within dive profiles. All dive buddy pairs/groups must carry one deployed permanent SMB in addition all divers must carry one DSMB if not carrying the permanent SMB. Separated divers/groups should deploy the DSMB before surfacing. If separated from the boat, swim towards shore, stay as a group and if possible exit the water.
3 Diving Drowning Strictly no solo diving, always dive in buddy pair, divers should monitor their air throughout the dive and inform dive buddy when they reach 100 Bar and end the dive once the first diver reaches 50 Bar ascending to the surface under procedures stated in the dive protocol, during the pre-dive buddy check divers should identify to their buddy their alternate air source and how to retrieve it.
4 Diving Nitrogen Narcosis Avoid deep dives, maximum dive depth whilst diving at Aldabra is 30m for PADI Advanced Open Water Divers (or equivalent) or above, 18 m for Open Water Divers (or equivalent). Be aware of the symptoms of nitrogen narcosis, monitor and slowly decrease depth if suspected.

5 Diving Blocked Sinuses Never dive with blocked sinuses. Never use temporary clearing medication. This can result in ear drum perforations, burst ear drum on descent or ascent (reverse squeeze).
6 Diving Collision with Boat / Propeller
Never dive without SMB. On ascent from dives ensure that you are looking to the surface for overhead boat traffic and listening for the noise of boat engines, if noise is heard descend down to below 5m and wait until noise has gone to continue ascent. Do not approach boat until told to do so by skipper and ensure engines are in neutral before leaving or approaching the boat.
7 Diving Decompression Sickness/ Injury
Stay within max dive times and depths. All dives are planned with the eRDPML and are conducted as no-decompression dives. Never dive beyond the limits of your training and never beyond 30m. Always ascend from dives at a rate of no greater than 18m per minute. Never hold your breath whilst diving. Check your time, depth and air regularly. When diving with dive computers divers are not permitted to go below 5 mins before NDL time.
8 Diving Aquatic life Injury Do not approach or aggravate potentially dangerous marine life. Inform other divers if you encounter a dangerous marine animal. If the animal appears aggressive divers sound alarm to other divers then group together closely and ascend to the surface. Jewellery can attract biting fish. Shiny jewellery should be removed or covered whilst in the sea. Avoid contact with coral. Coral cuts are slow to heal and can become infected easily. Fire coral can cause a burning skin irritation. Take care around sea urchins to avoid injuries from spines. Flower urchins have toxic spines which can lead to death. Use good buoyancy control is essential. Do not handle shells or other aquatic life forms as this can lead to injury or even death. Wear appropriate protection, i.e. wetsuit, rash vest, to protect against jellyfish. Look upwards whilst ascending to avoid aggregations of jellyfish. Treat with vinegar and hot water if stung.
9 Diving Miscommunication underwater leading to accident
Divers maybe changing buddy's regularly through the survey dives, Divers must go through all common hand signals with dive buddy pre-dive to insure all signals will be understood underwater
Annex 1: Example sample size
Annex 2: Image of data entry sheet

Annex 3: Additional species photos
A.Cytheria taken at St Anne, notice the thin and upwards reaching inner branches.
There are two very similar species in this region; P.lutea and P.lobata and I have been told by taxonomists that it is impossible to tell them apart by looking at corralite shape in-situ. I

therefore aim for the same shape of colony. There are lots of porites massive everywhere. Aim for the classic massive colony, notice the ridged/bumped surface, often the large old colonies are helmit shaped like in the picture in this protocol. Try and avoid the small colonies. This is an example of the picture you take for each sample, so the bag id can clearly be seen.
A. tenuis picture from Aldabra. These colonies form clumps not tables as you get close to the corallites you will see the slightly flared edges.