Embed Size (px)
Citation preview

Un po’ di ricette scovate in INTERNET.
Si tratta di piatti che mangiavamo sicuramente durante la nostra infanzia e adolescenza.
Alcuni sono riuscito a riprodurli anche se ho penato un po’ per trovare le materie prime ma la pazienza è stata premiata.
Spero che scorrendo queste pagine possiate fare affiorare dalla vostra mente i ricordi dei colori, odori e sapori che ci accoglievano quando tornavamo a casa da scuola o quando ci trovavamo ad attraversare i mercatini e i ristorantini dai quali si levavano profumi e odori (alcuni appetitosi altri un po’ meno).
Se non l’avete mai fatto potrà essere un occasione per fare assaggiare ai vostri cari o agli amici queste deliziose e ipercaloriche pietanze!!
Un abbraccio affettuoso a tutti
Silvio
P.S.
Per chi non avesse dimestichezza con le temperature di cottura, in prima pagina ho messo una tabella di conversione da gradi Celsius a Fahrenheit e viceversa.

TABELLA CONVERSIONE TEMPERATURE
da Gradi Centigradi
a Gradi Fahrenheit
da Gradi Fahrenheit
a Gradi Centigradi
°C °F °F °C
50 122 120 4860 140 140 6070 158 160 7180 176 180 8290 194 200 93
100 212 220 104110 230 240 115120 248 260 126130 266 280 137140 284 300 148150 302 320 160160 320 340 171170 338 360 182180 356 380 193190 374 400 204200 392 420 215210 410 440 226220 428 460 237230 446 480 248240 464 500 260250 482 520 271260 500 540 282270 518 560 293280 536 580 304290 554 600 315300 572 620 326

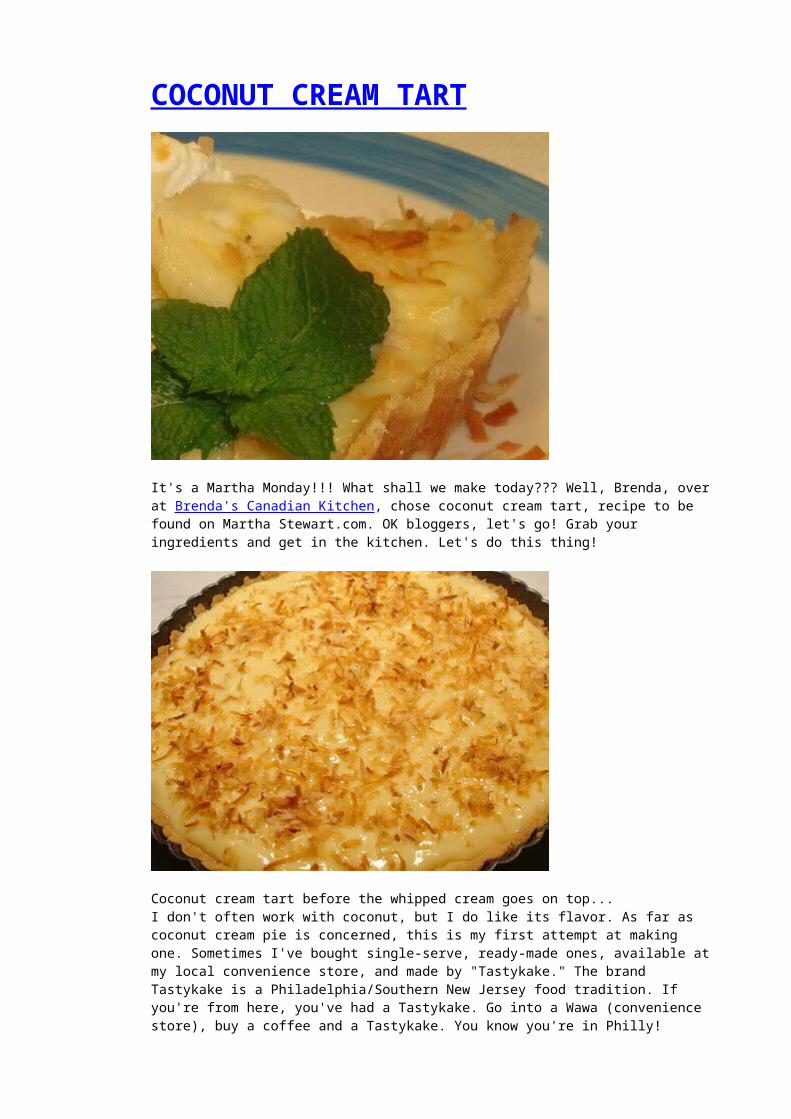
COCONUT CREAM TART
It's a Martha Monday!!! What shall we make today??? Well, Brenda, over at Brenda's Canadian Kitchen, chose coconut cream tart, recipe to be found on Martha Stewart.com. OK bloggers, let's go! Grab your ingredients and get in the kitchen. Let's do this thing!
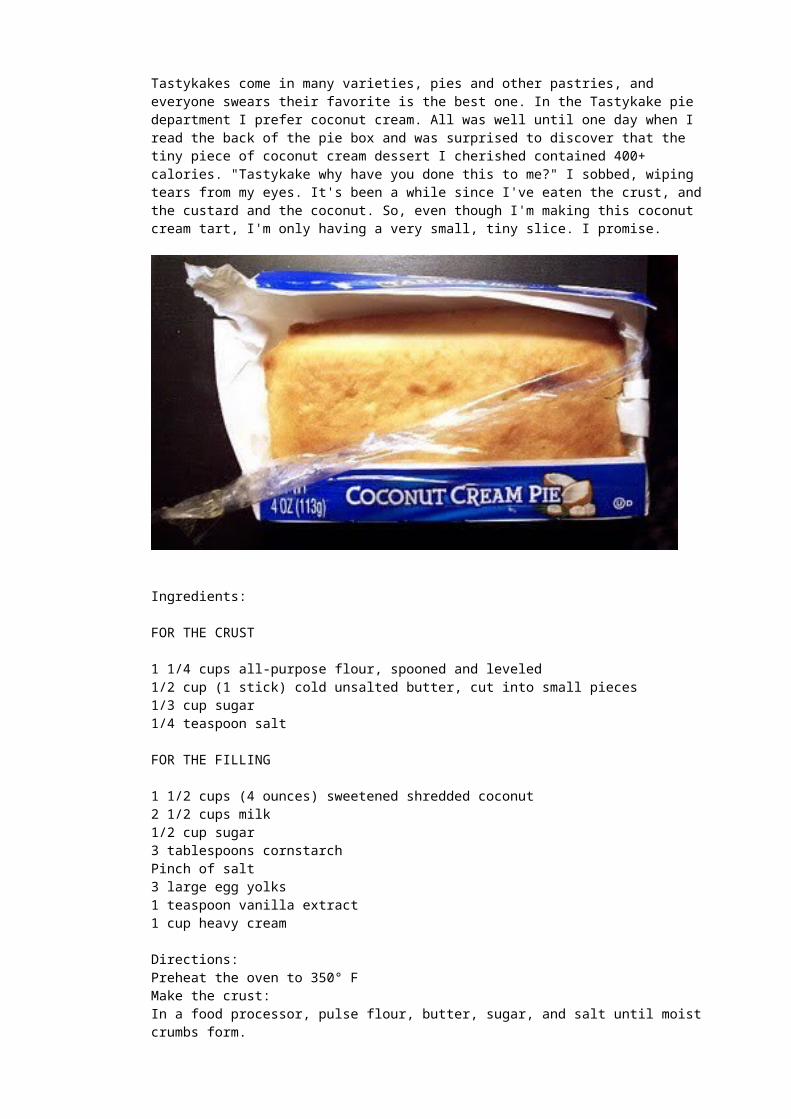
Coconut cream tart before the whipped cream goes on top...I don't often work with coconut, but I do like its flavor. As far as coconut cream pie is concerned, this is my first attempt at making one. Sometimes I've bought single-serve, ready-made ones, available at my local convenience store, and made by "Tastykake." The brand Tastykake is a Philadelphia/Southern New Jersey food tradition. If you're from here, you've had a Tastykake. Go into a Wawa (convenience store), buy a coffee and a Tastykake. You know you're in Philly! Tastykakes come in many varieties, pies and other pastries, and everyone swears their favorite is the best one. In the Tastykake pie department I prefer coconut cream. All was well until one day when I read the back of the pie box and was surprised to discover that the tiny piece of coconut cream dessert I cherished contained 400+ calories. "Tastykake why have you done this to me?" I sobbed, wiping tears from my eyes. It's been a while since I've eaten the crust, and the custard and the coconut. So, even though I'm making this coconut cream tart, I'm only having a very small, tiny slice. I promise.
Ingredients:
FOR THE CRUST
1 1/4 cups all-purpose flour, spooned and leveled 1/2 cup (1 stick) cold unsalted butter, cut into small pieces 1/3 cup sugar 1/4 teaspoon salt
FOR THE FILLING
1 1/2 cups (4 ounces) sweetened shredded coconut 2 1/2 cups milk 1/2 cup sugar 3 tablespoons cornstarch Pinch of salt 3 large egg yolks 1 teaspoon vanilla extract 1 cup heavy cream
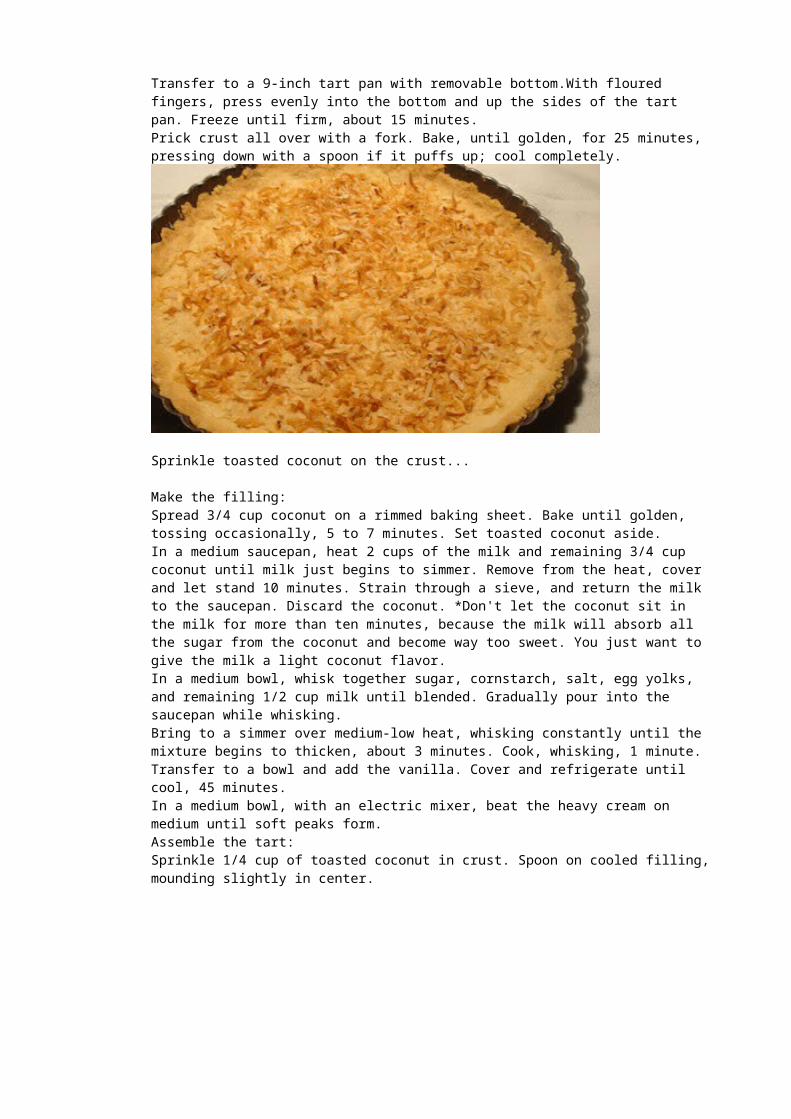
Directions:Preheat the oven to 350° FMake the crust: In a food processor, pulse flour, butter, sugar, and salt until moist crumbs form. Transfer to a 9-inch tart pan with removable bottom.With floured fingers, press evenly into the bottom and up the sides of the tart pan. Freeze until firm, about 15 minutes. Prick crust all over with a fork. Bake, until golden, for 25 minutes, pressing down with a spoon if it puffs up; cool completely.
Sprinkle toasted coconut on the crust...
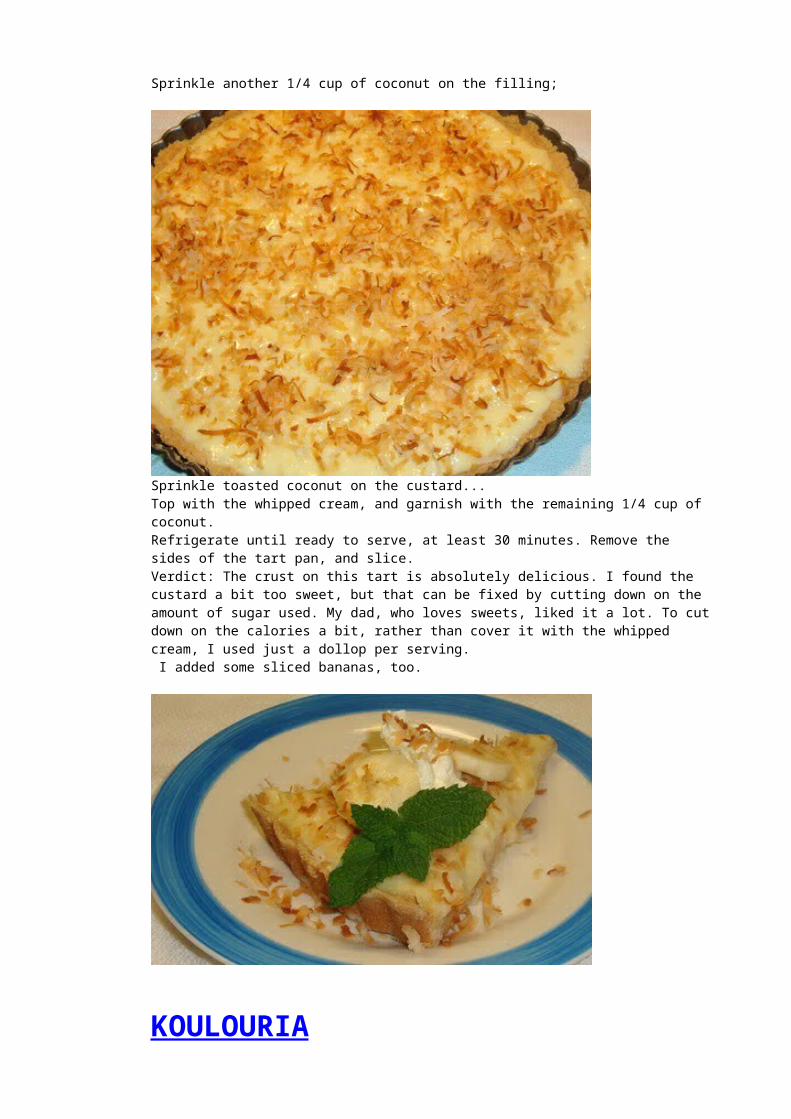
Make the filling: Spread 3/4 cup coconut on a rimmed baking sheet. Bake until golden, tossing occasionally, 5 to 7 minutes. Set toasted coconut aside.In a medium saucepan, heat 2 cups of the milk and remaining 3/4 cup coconut until milk just begins to simmer. Remove from the heat, cover and let stand 10 minutes. Strain through a sieve, and return the milk to the saucepan. Discard the coconut. *Don't let the coconut sit in the milk for more than ten minutes, because the milk will absorb all the sugar from the coconut and become way too sweet. You just want to give the milk a light coconut flavor. In a medium bowl, whisk together sugar, cornstarch, salt, egg yolks, and remaining 1/2 cup milk until blended. Gradually pour into the saucepan while whisking. Bring to a simmer over medium-low heat, whisking constantly until the mixture begins to thicken, about 3 minutes. Cook, whisking, 1 minute.Transfer to a bowl and add the vanilla. Cover and refrigerate until cool, 45 minutes. In a medium bowl, with an electric mixer, beat the heavy cream on medium until soft peaks form.Assemble the tart: Sprinkle 1/4 cup of toasted coconut in crust. Spoon on cooled filling, mounding slightly in center. Sprinkle another 1/4 cup of coconut on the filling;
Sprinkle toasted coconut on the custard... Top with the whipped cream, and garnish with the remaining 1/4 cup of coconut. Refrigerate until ready to serve, at least 30 minutes. Remove the sides of the tart pan, and slice. Verdict: The crust on this tart is absolutely delicious. I found the custard a bit too sweet, but that can be fixed by cutting down on the amount of sugar used. My dad, who loves sweets, liked it a lot. To cut down on the calories a bit, rather than cover it with the whipped cream, I used just a dollop per serving. I added some sliced bananas, too.
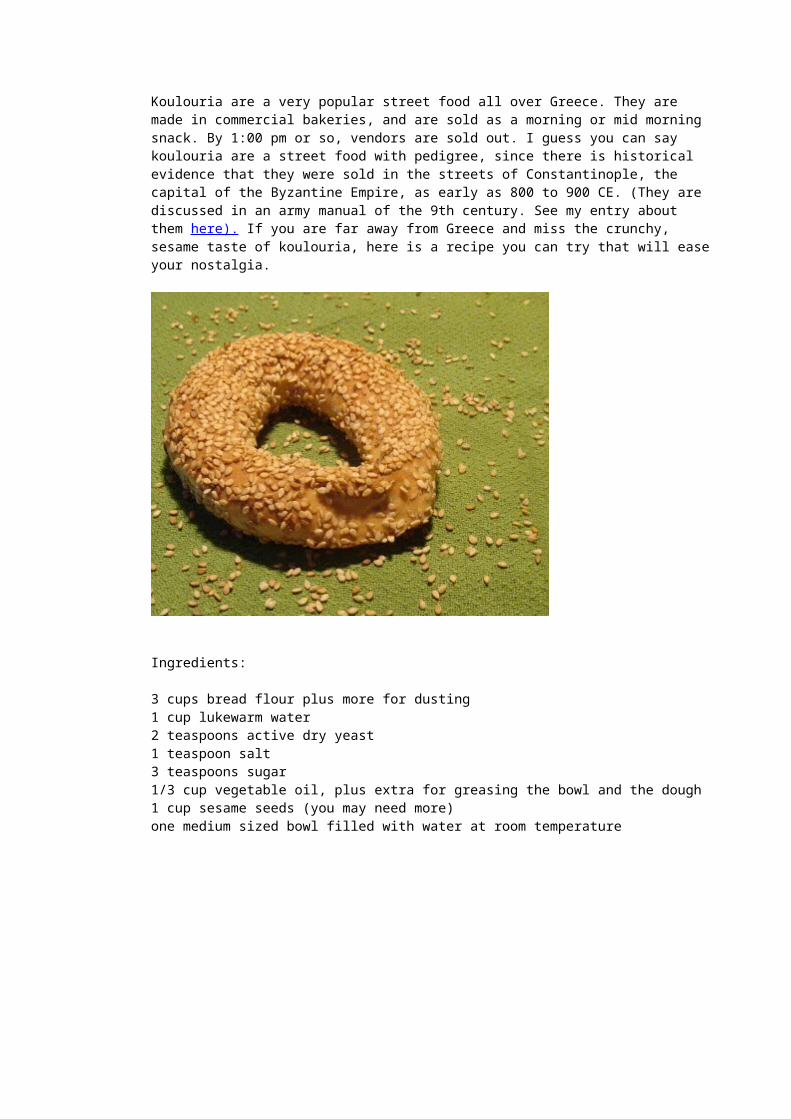
KOULOURIA Koulouria are a very popular street food all over Greece. They are made in commercial bakeries, and are sold as a morning or mid morning snack. By 1:00 pm or so, vendors are sold out. I guess you can say koulouria are a street food with pedigree, since there is historical evidence that they were sold in the streets of Constantinople, the capital of the Byzantine Empire, as early as 800 to 900 CE. (They are discussed in an army manual of the 9th century. See my entry about them here). If you are far away from Greece and miss the crunchy, sesame taste of koulouria, here is a recipe you can try that will ease your nostalgia.
Ingredients:
3 cups bread flour plus more for dusting1 cup lukewarm water2 teaspoons active dry yeast1 teaspoon salt3 teaspoons sugar1/3 cup vegetable oil, plus extra for greasing the bowl and the dough1 cup sesame seeds (you may need more)one medium sized bowl filled with water at room temperature
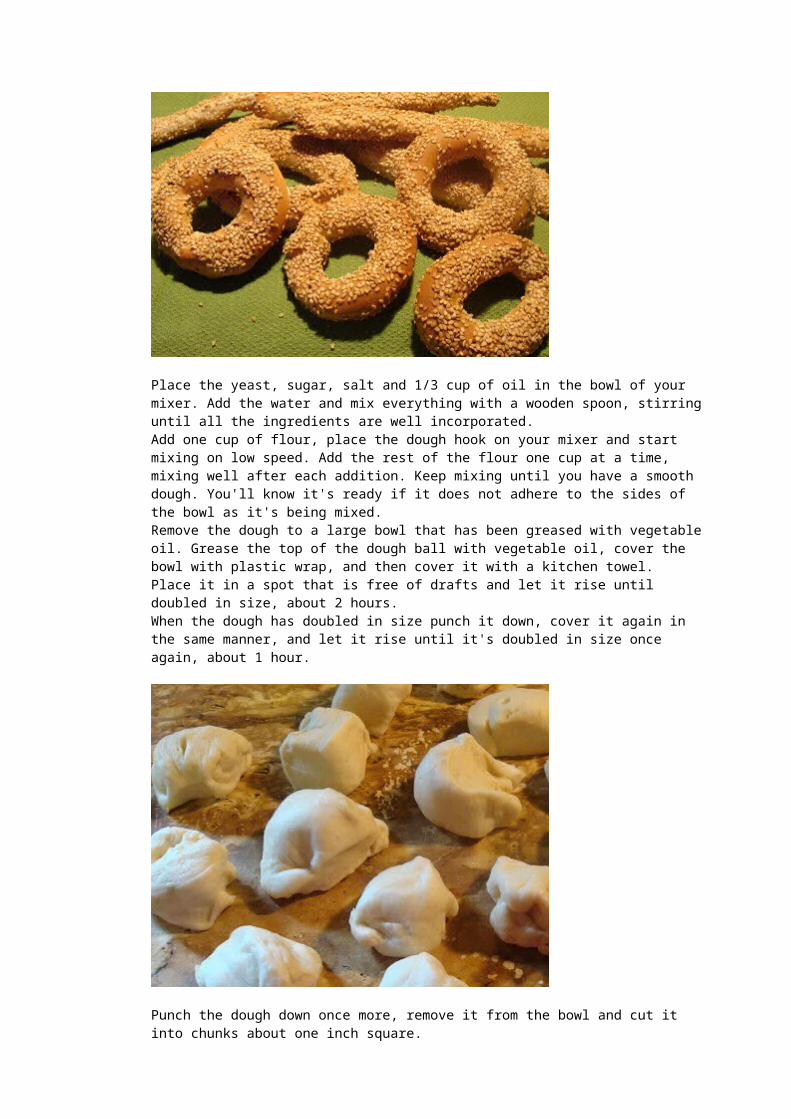
Place the yeast, sugar, salt and 1/3 cup of oil in the bowl of your mixer. Add the water and mix everything with a wooden spoon, stirring until all the ingredients are well incorporated. Add one cup of flour, place the dough hook on your mixer and start mixing on low speed. Add the rest of the flour one cup at a time, mixing well after each addition. Keep mixing until you have a smooth dough. You'll know it's ready if it does not adhere to the sides of the bowl as it's being mixed. Remove the dough to a large bowl that has been greased with vegetable oil. Grease the top of the dough ball with vegetable oil, cover the bowl with plastic wrap, and then cover it with a kitchen towel. Place it in a spot that is free of drafts and let it rise until doubled in size, about 2 hours. When the dough has doubled in size punch it down, cover it again in the same manner, and let it rise until it's doubled in size once again, about 1 hour.
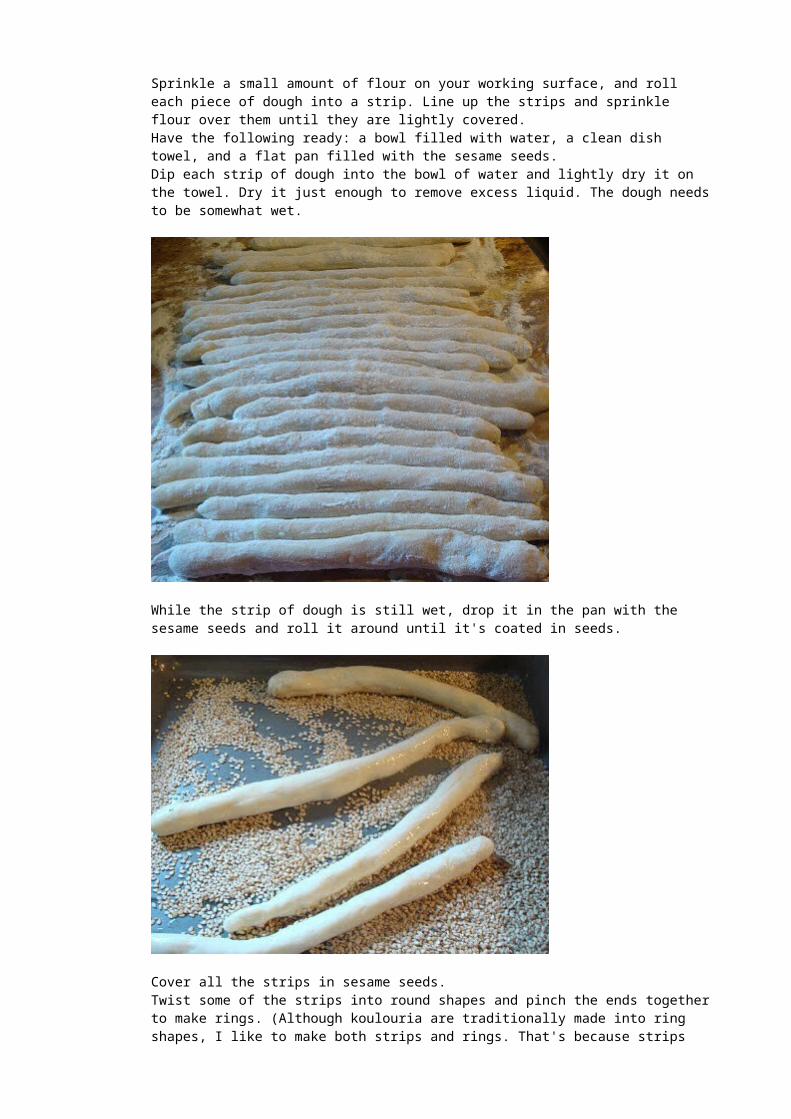
Punch the dough down once more, remove it from the bowl and cut it into chunks about one inch square. Sprinkle a small amount of flour on your working surface, and roll each piece of dough into a strip. Line up the strips and sprinkle flour over them until they are lightly covered. Have the following ready: a bowl filled with water, a clean dish towel, and a flat pan filled with the sesame seeds. Dip each strip of dough into the bowl of water and lightly dry it on the towel. Dry it just enough to remove excess liquid. The dough needs to be somewhat wet.
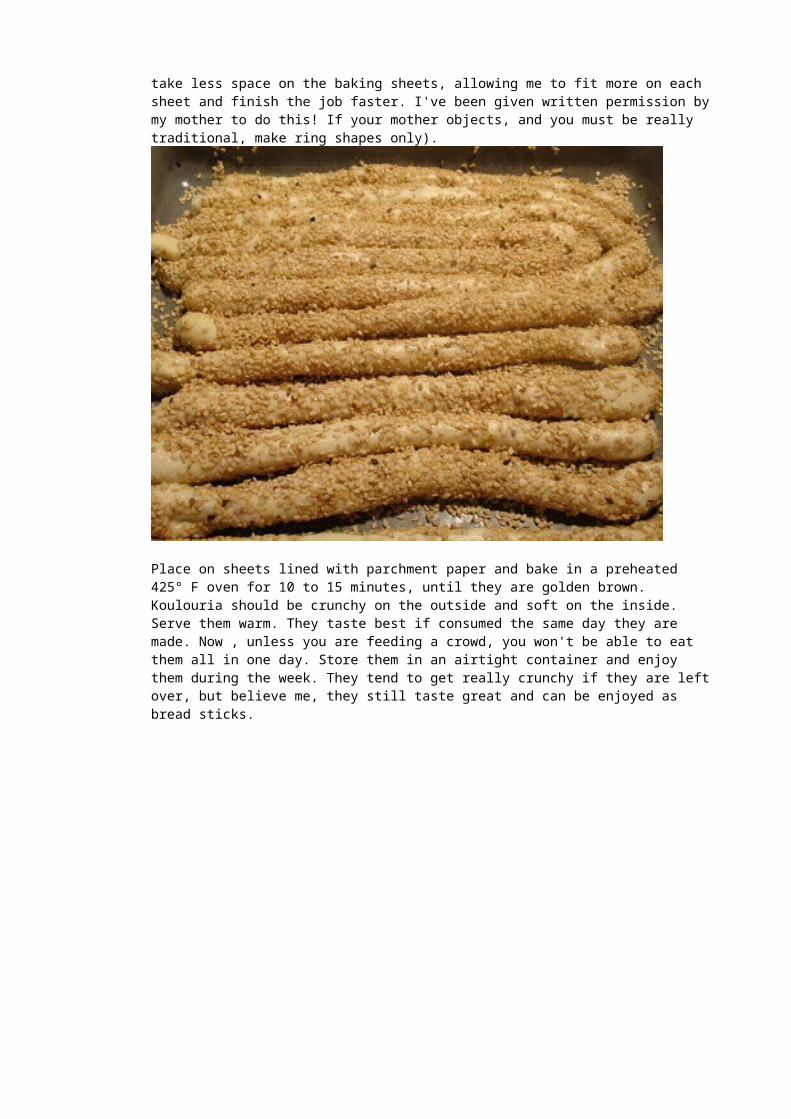
While the strip of dough is still wet, drop it in the pan with the sesame seeds and roll it around until it's coated in seeds.
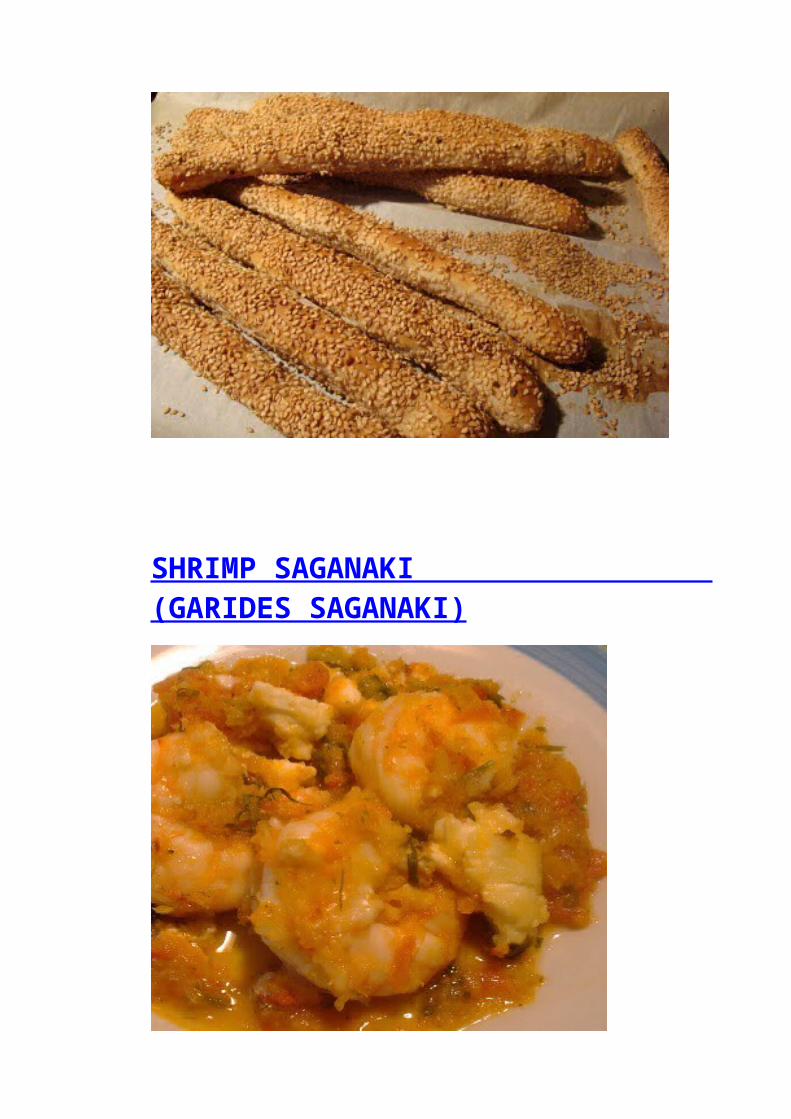
Cover all the strips in sesame seeds. Twist some of the strips into round shapes and pinch the ends together to make rings. (Although koulouria are traditionally made into ring shapes, I like to make both strips and rings. That's because strips take less space on the baking sheets, allowing me to fit more on each sheet and finish the job faster. I've been given written permission by my mother to do this! If your mother objects, and you must be really traditional, make ring shapes only).
Place on sheets lined with parchment paper and bake in a preheated 425° F oven for 10 to 15 minutes, until they are golden brown. Koulouria should be crunchy on the outside and soft on the inside. Serve them warm. They taste best if consumed the same day they are made. Now , unless you are feeding a crowd, you won't be able to eat them all in one day. Store them in an airtight container and enjoy them during the week. They tend to get really crunchy if they are left over, but believe me, they still taste great and can be enjoyed as bread sticks.
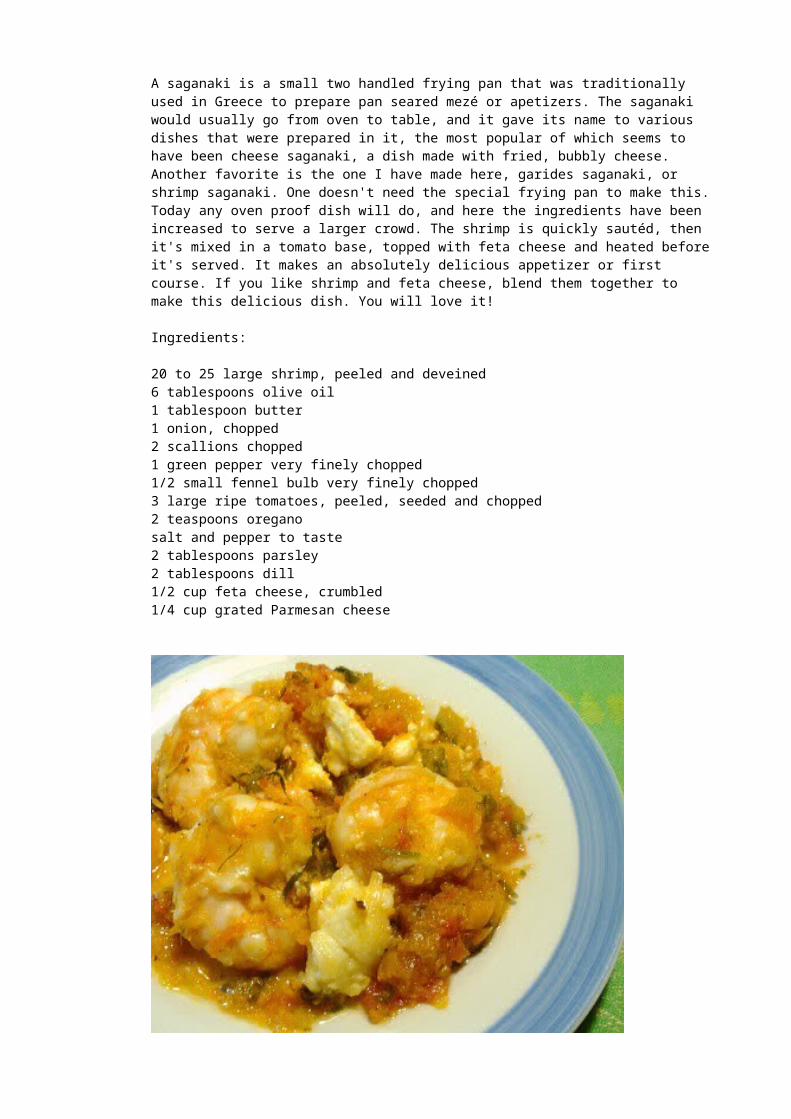
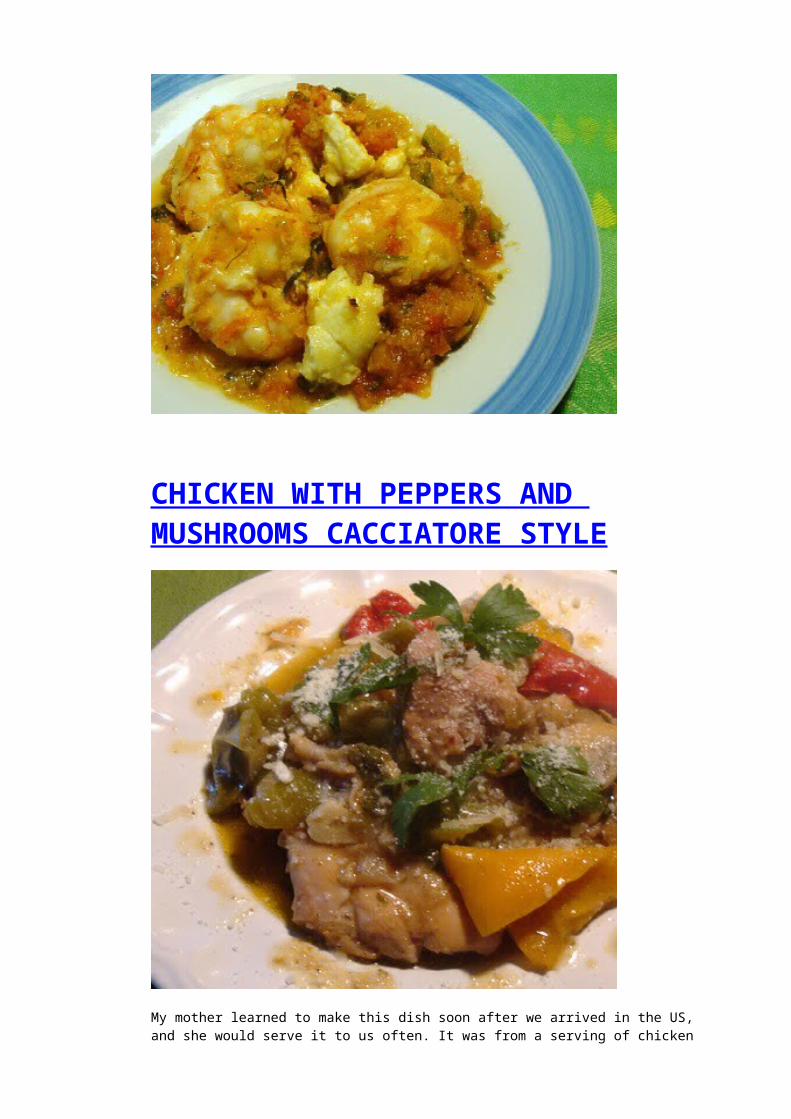
SHRIMP SAGANAKI (GARIDES SAGANAKI)
A saganaki is a small two handled frying pan that was traditionally used in Greece to prepare pan seared mezé or apetizers. The saganaki would usually go from oven to table, and it gave its name to various dishes that were prepared in it, the most popular of which seems to have been cheese saganaki, a dish made with fried, bubbly cheese. Another favorite is the one I have made here, garides saganaki, or shrimp saganaki. One doesn't need the special frying pan to make this. Today any oven proof dish will do, and here the ingredients have been increased to serve a larger crowd. The shrimp is quickly sautéd, then it's mixed in a tomato base, topped with feta cheese and heated before it's served. It makes an absolutely delicious appetizer or first course. If you like shrimp and feta cheese, blend them together to make this delicious dish. You will love it!
Ingredients:
20 to 25 large shrimp, peeled and deveined6 tablespoons olive oil1 tablespoon butter1 onion, chopped2 scallions chopped1 green pepper very finely chopped1/2 small fennel bulb very finely chopped3 large ripe tomatoes, peeled, seeded and chopped2 teaspoons oreganosalt and pepper to taste2 tablespoons parsley2 tablespoons dill1/2 cup feta cheese, crumbled1/4 cup grated Parmesan cheese
Directions:
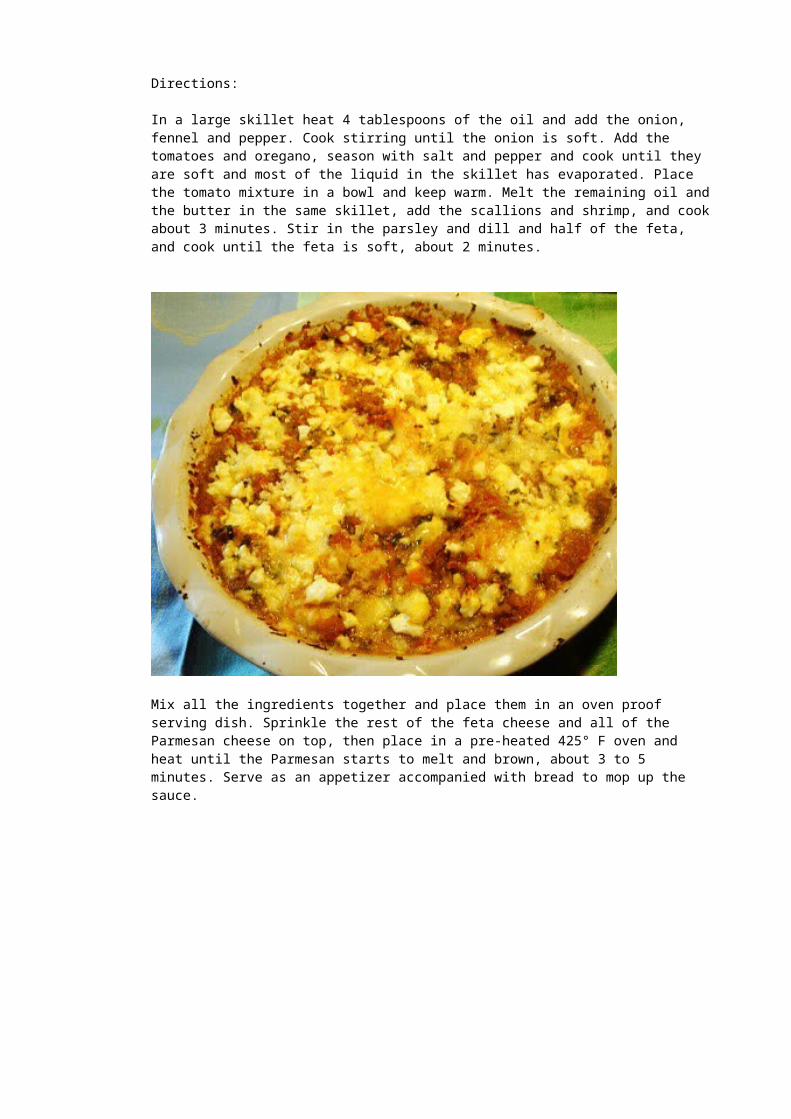
In a large skillet heat 4 tablespoons of the oil and add the onion, fennel and pepper. Cook stirring until the onion is soft. Add the tomatoes and oregano, season with salt and pepper and cook until they are soft and most of the liquid in the skillet has evaporated. Place the tomato mixture in a bowl and keep warm. Melt the remaining oil and the butter in the same skillet, add the scallions and shrimp, and cook about 3 minutes. Stir in the parsley and dill and half of the feta, and cook until the feta is soft, about 2 minutes.
Mix all the ingredients together and place them in an oven proof serving dish. Sprinkle the rest
of the feta cheese and all of the Parmesan cheese on top, then place in a pre-heated 425° F oven and heat until the Parmesan starts to melt and brown, about 3 to 5 minutes. Serve as an appetizer accompanied with bread to mop up the sauce.
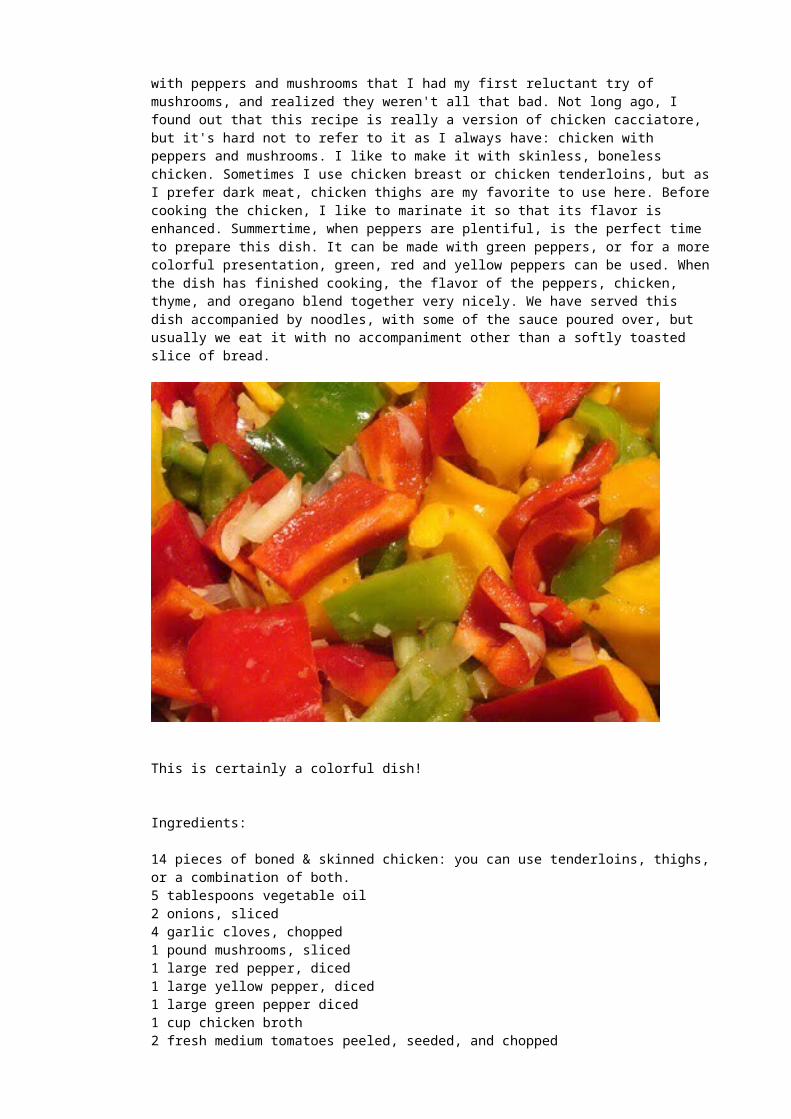
CHICKEN WITH PEPPERS AND MUSHROOMS CACCIATORE STYLE
My mother learned to make this dish soon after we arrived in the US, and she would serve it to us often. It was from a serving of chicken with peppers and mushrooms that I had my first reluctant try of mushrooms, and realized they weren't all that bad. Not long ago, I found out that this recipe is really a version of chicken cacciatore, but it's hard not to refer to it as I always have: chicken with peppers and mushrooms. I like to make it with skinless, boneless chicken. Sometimes I use chicken breast or chicken tenderloins, but as I prefer dark meat, chicken thighs are my favorite to use here. Before cooking the chicken, I like to marinate it so that its flavor is enhanced. Summertime, when peppers are plentiful, is the perfect time to prepare this dish. It can be made with green peppers, or for a more colorful presentation, green, red and yellow peppers can be used. When the dish has finished cooking, the flavor of the peppers, chicken, thyme, and oregano blend together very nicely. We have served this dish accompanied by noodles, with some of the sauce poured over, but usually we eat it with no accompaniment other than a softly toasted slice of bread.
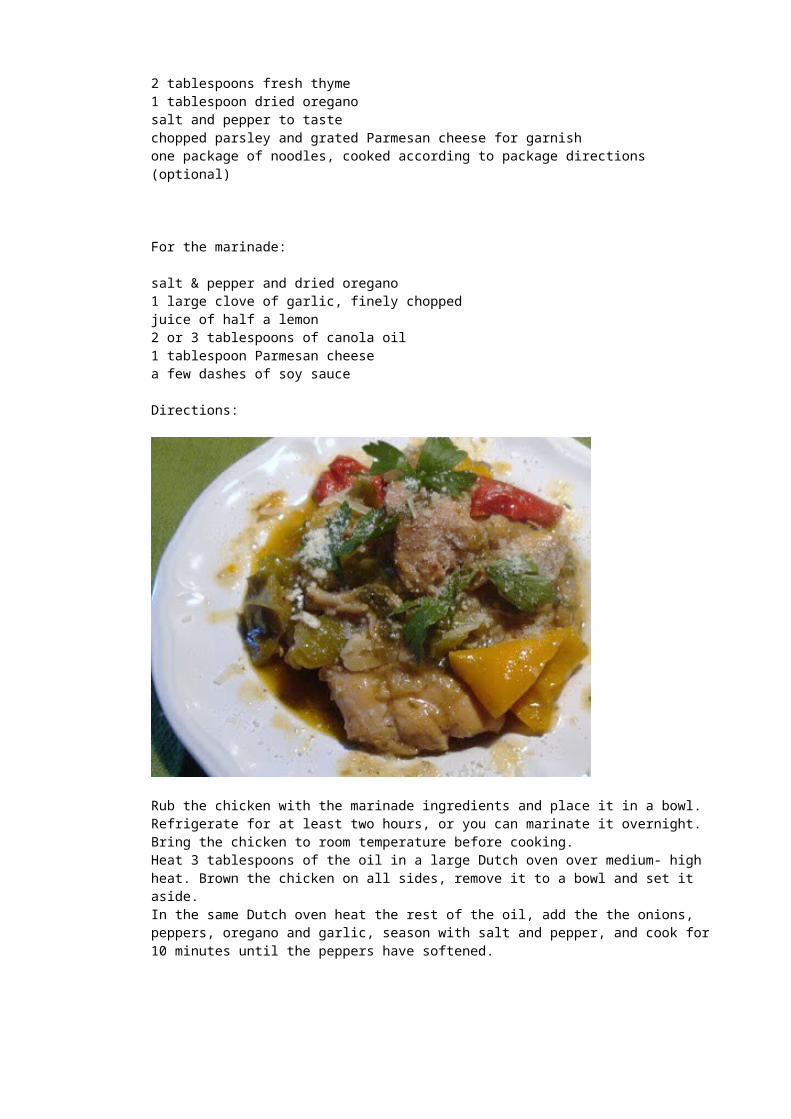
This is certainly a colorful dish!
Ingredients:
14 pieces of boned & skinned chicken: you can use tenderloins, thighs, or a combination of both. 5 tablespoons vegetable oil 2 onions, sliced 4 garlic cloves, chopped 1 pound mushrooms, sliced 1 large red pepper, diced 1 large yellow pepper, diced 1 large green pepper diced 1 cup chicken broth 2 fresh medium tomatoes peeled, seeded, and chopped 2 tablespoons fresh thyme 1 tablespoon dried oregano salt and pepper to taste chopped parsley and grated Parmesan cheese for garnishone package of noodles, cooked according to package directions (optional)
For the marinade:
salt & pepper and dried oregano1 large clove of garlic, finely choppedjuice of half a lemon2 or 3 tablespoons of canola oil1 tablespoon Parmesan cheesea few dashes of soy sauce
Directions:
Rub the chicken with the marinade ingredients and place it in a bowl. Refrigerate for at least two hours, or you can marinate it overnight. Bring the chicken to room temperature before cooking. Heat 3 tablespoons of the oil in a large Dutch oven over medium- high heat. Brown the chicken on all sides, remove it to a bowl and set it aside. In the same Dutch oven heat the rest of the oil, add the the onions, peppers, oregano and garlic, season with salt and pepper, and cook for 10 minutes until the peppers have softened.
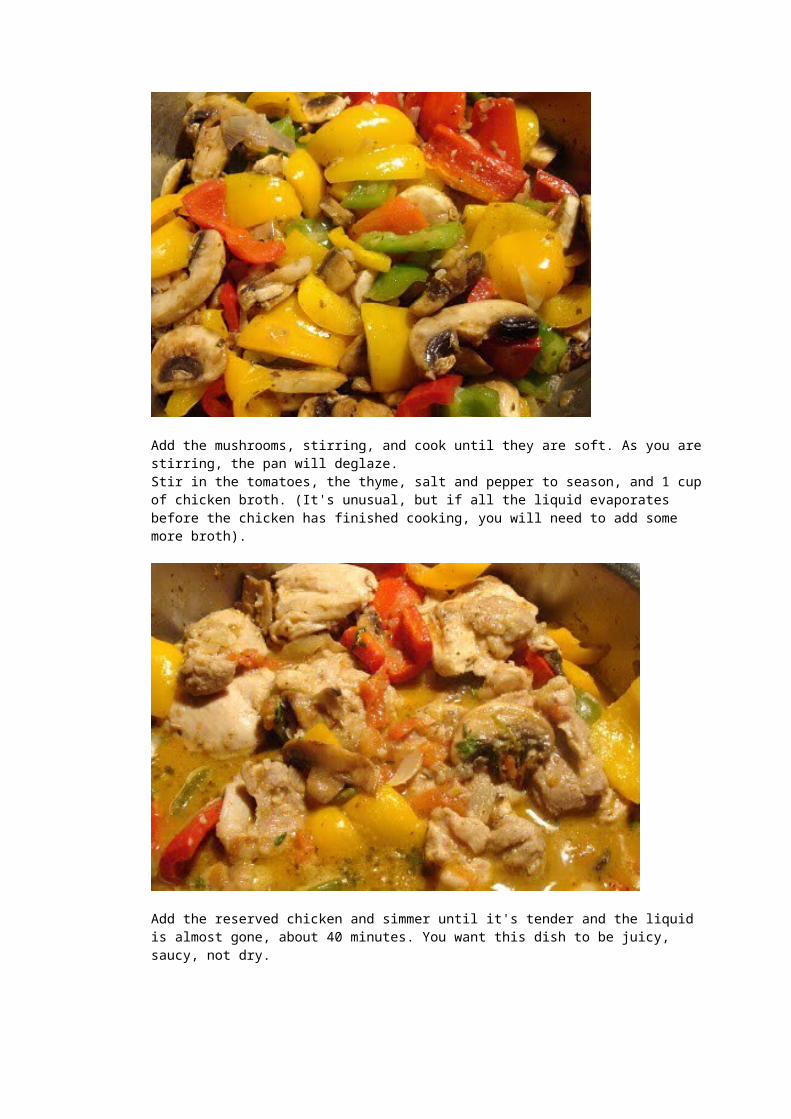
Add the mushrooms, stirring, and cook until they are soft. As you are stirring, the pan will deglaze. Stir in the tomatoes, the thyme, salt and pepper to season, and 1 cup of chicken broth. (It's unusual, but if all the liquid evaporates before the chicken has finished cooking, you will need to add some more broth).
Add the reserved chicken and simmer until it's tender and the liquid is almost gone, about 40 minutes. You want this dish to be juicy, saucy, not dry.
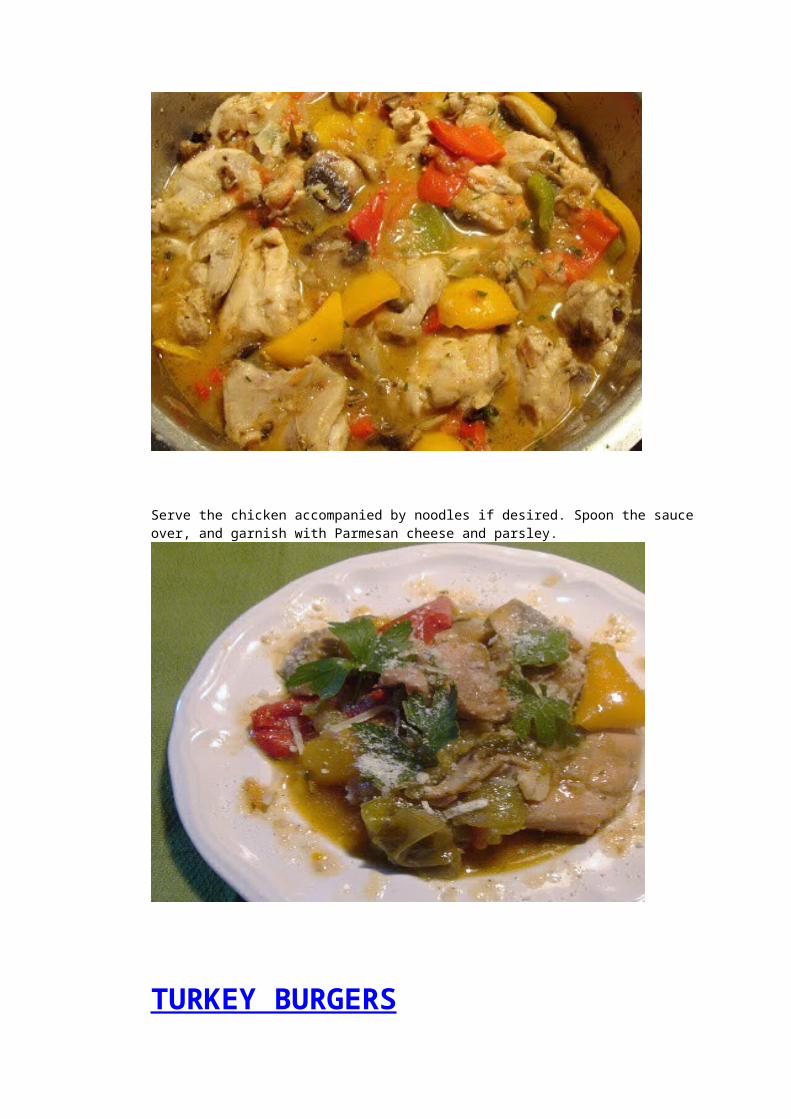
Serve the chicken accompanied by noodles if desired. Spoon the sauce over, and garnish with Parmesan cheese and parsley.
TURKEY BURGERS
Ingredients:
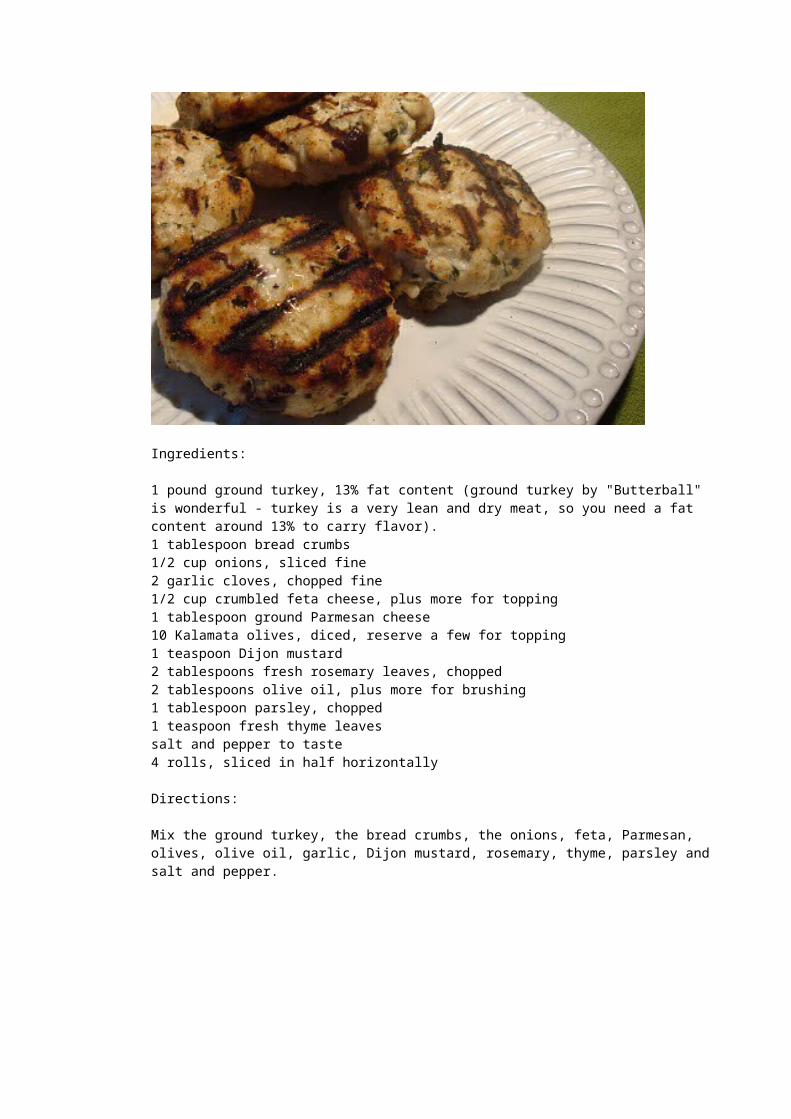
1 pound ground turkey, 13% fat content (ground turkey by "Butterball" is wonderful - turkey is a very lean and dry meat, so you need a fat content around 13% to carry flavor). 1 tablespoon bread crumbs 1/2 cup onions, sliced fine 2 garlic cloves, chopped fine 1/2 cup crumbled feta cheese, plus more for topping 1 tablespoon ground Parmesan cheese
10 Kalamata olives, diced, reserve a few for topping 1 teaspoon Dijon mustard 2 tablespoons fresh rosemary leaves, chopped 2 tablespoons olive oil, plus more for brushing 1 tablespoon parsley, chopped 1 teaspoon fresh thyme leaves salt and pepper to taste 4 rolls, sliced in half horizontally
Directions:
Mix the ground turkey, the bread crumbs, the onions, feta, Parmesan, olives, olive oil, garlic, Dijon mustard, rosemary, thyme, parsley and salt and pepper.
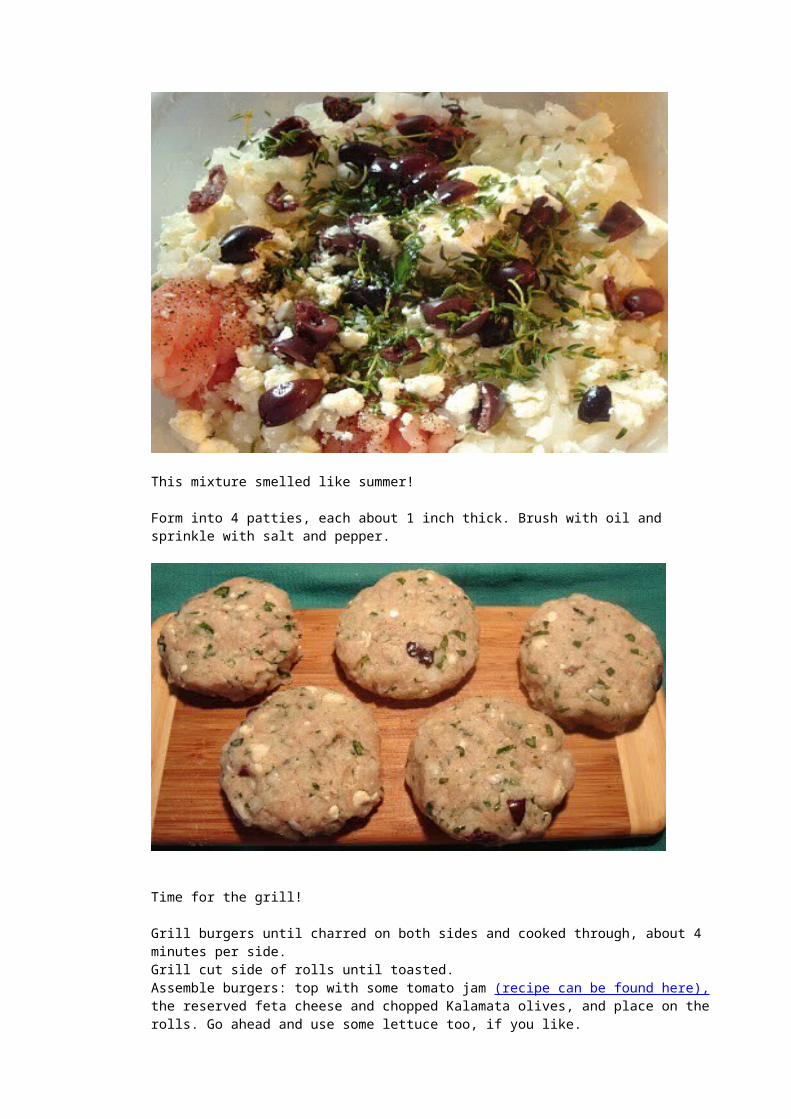
This mixture smelled like summer!
Form into 4 patties, each about 1 inch thick. Brush with oil and sprinkle with salt and pepper.
Time for the grill!
Grill burgers until charred on both sides and cooked through, about 4 minutes per side. Grill cut side of rolls until toasted. Assemble burgers: top with some tomato jam (recipe can be found here), the reserved feta cheese and chopped Kalamata olives, and place on the rolls. Go ahead and use some lettuce too, if you like.
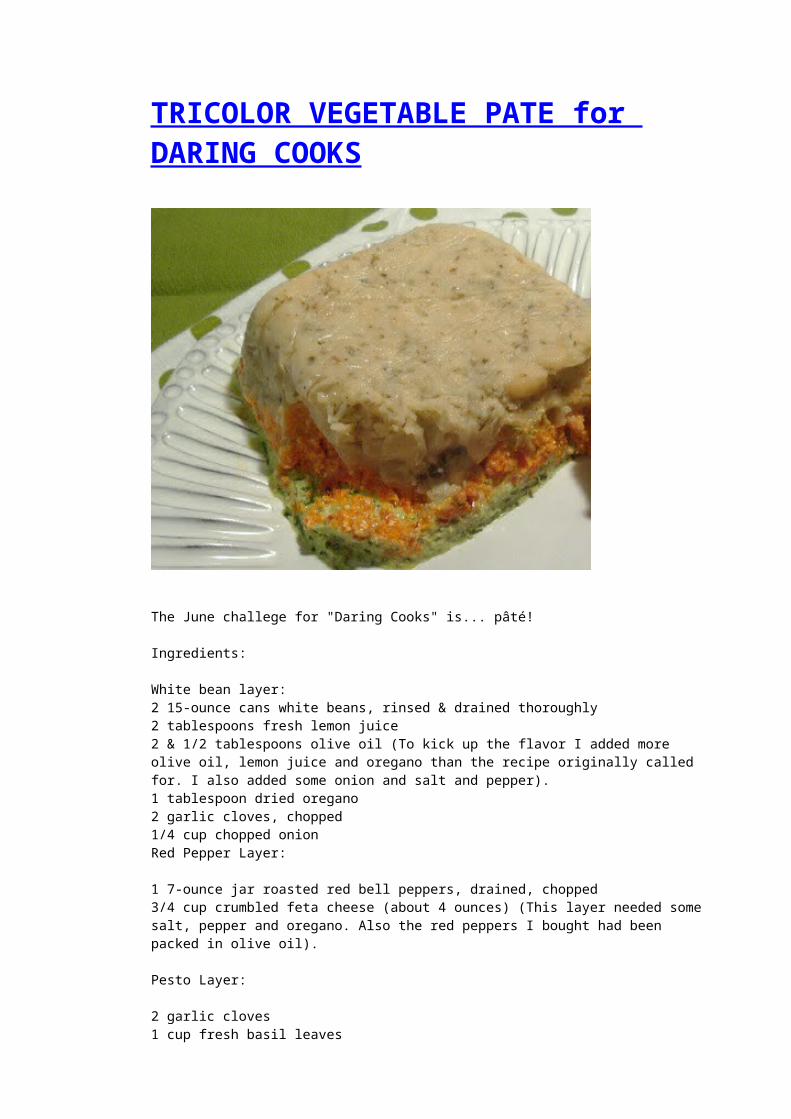
TRICOLOR VEGETABLE PATE for DARING COOKS
The June challege for "Daring Cooks" is... pâté!
Ingredients:
White bean layer:2 15-ounce cans white beans, rinsed & drained thoroughly2 tablespoons fresh lemon juice2 & 1/2 tablespoons olive oil (To kick up the flavor I added more olive oil, lemon juice and oregano than the recipe originally called for. I also added some onion and salt and pepper). 1 tablespoon dried oregano2 garlic cloves, chopped1/4 cup chopped onion Red Pepper Layer:
1 7-ounce jar roasted red bell peppers, drained, chopped3/4 cup crumbled feta cheese (about 4 ounces) (This layer needed some salt, pepper and oregano. Also the red peppers I bought had been packed in olive oil).
Pesto Layer:
2 garlic cloves1 cup fresh basil leaves
1 cup fresh Italian parsley leaves1/4 cup toasted pine nuts3 tablespoons olive oil1/2 cup low-fat ricotta cheese *This layer was perfect as is, it was absolutely delicious!Fresh herb sprigs for decoration, Bread slices
Directions:
Line a 8 1/2x4 1/2-inch loaf pan with plastic wrap, overlapping sides. (you can also line with parchment paper)
For the Bean Layer:
Place the beans in the food processor. Add lemon juice, olive oil, oregano, onions and garlic and blend until smooth. Season to taste with salt and pepper. Spread bean mixture evenly on bottom of the prepared loaf pan.
Before going in the food processor the pepper layer got a sprinking of salt, pepper and oregano
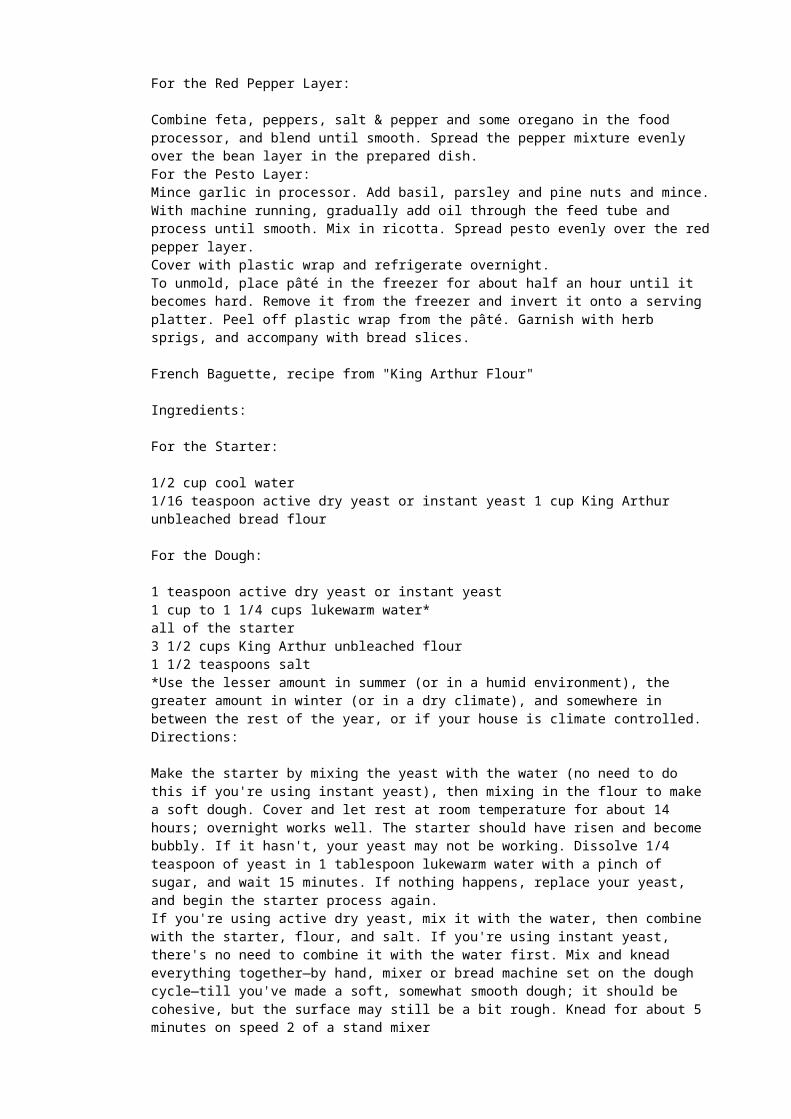
For the Red Pepper Layer:
Combine feta, peppers, salt & pepper and some oregano in the food processor, and blend until smooth. Spread the pepper mixture evenly over the bean layer in the prepared dish.For the Pesto Layer:Mince garlic in processor. Add basil, parsley and pine nuts and mince. With machine running, gradually add oil through the feed tube and process until smooth. Mix in ricotta. Spread pesto evenly over the red pepper layer.
Cover with plastic wrap and refrigerate overnight.To unmold, place pâté in the freezer for about half an hour until it becomes hard. Remove it from the freezer and invert it onto a serving platter. Peel off plastic wrap from the pâté. Garnish with herb sprigs, and accompany with bread slices.
French Baguette, recipe from "King Arthur Flour"
Ingredients:
For the Starter:
1/2 cup cool water1/16 teaspoon active dry yeast or instant yeast 1 cup King Arthur unbleached bread flour
For the Dough:
1 teaspoon active dry yeast or instant yeast1 cup to 1 1/4 cups lukewarm water*all of the starter3 1/2 cups King Arthur unbleached flour1 1/2 teaspoons salt*Use the lesser amount in summer (or in a humid environment), the greater amount in winter (or in a dry climate), and somewhere in between the rest of the year, or if your house is climate controlled.Directions:
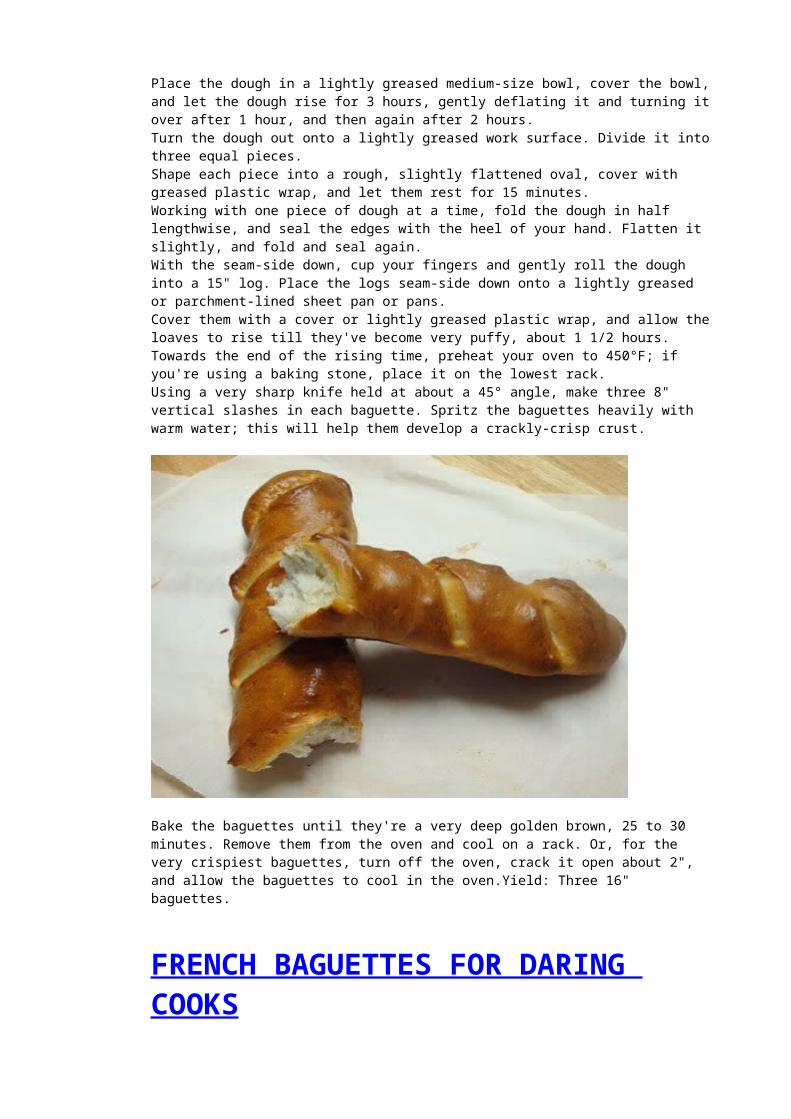
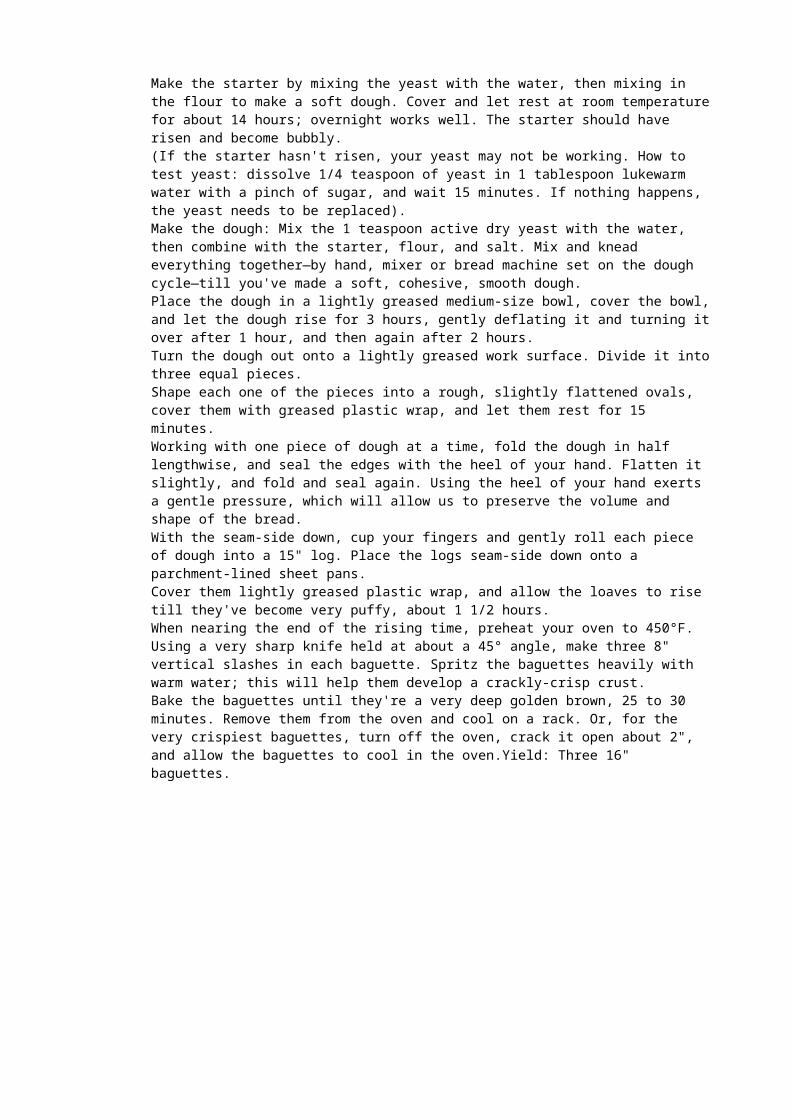
Make the starter by mixing the yeast with the water (no need to do this if you're using instant yeast), then mixing in the flour to make a soft dough. Cover and let rest at room temperature for about 14 hours; overnight works well. The starter should have risen and become bubbly. If it hasn't, your yeast may not be working. Dissolve 1/4 teaspoon of yeast in 1 tablespoon lukewarm water with a pinch of sugar, and wait 15 minutes. If nothing happens, replace your yeast, and begin the starter process again.If you're using active dry yeast, mix it with the water, then combine with the starter, flour, and salt. If you're using instant yeast, there's no need to combine it with the water first. Mix and knead everything together—by hand, mixer or bread machine set on the dough cycle—till you've made a soft, somewhat smooth dough; it should be cohesive, but the surface may still be a bit rough. Knead for about 5 minutes on speed 2 of a stand mixer Place the dough in a lightly greased medium-size bowl, cover the bowl, and let the dough rise for 3 hours, gently deflating it and turning it over after 1 hour, and then again after 2 hours.Turn the dough out onto a lightly greased work surface. Divide it into three equal pieces.Shape each piece into a rough, slightly flattened oval, cover with greased plastic wrap, and let them rest for 15 minutes. Working with one piece of dough at a time, fold the dough in half lengthwise, and seal the edges with the heel of your hand. Flatten it slightly, and fold and seal again. With the seam-side down, cup your fingers and gently roll the dough into a 15" log. Place the logs seam-side down onto a lightly greased or parchment-lined sheet pan or pans.Cover them with a cover or lightly greased plastic wrap, and allow the loaves to rise till they've become very puffy, about 1 1/2 hours.Towards the end of the rising time, preheat your oven to 450°F; if you're using a baking stone, place it on the lowest rack.Using a very sharp knife held at about a 45° angle, make three 8" vertical slashes in each baguette. Spritz the baguettes heavily with warm water; this will help them develop a crackly-crisp crust.
Bake the baguettes until they're a very deep golden brown, 25 to 30 minutes. Remove them from the oven and cool on a rack. Or, for the very crispiest baguettes, turn off the oven, crack it open about 2", and allow the baguettes to cool in the oven.Yield: Three 16" baguettes.
FRENCH BAGUETTES FOR DARING COOKS On the first day of my first visit to Paris I went for a long walk. It was a Sunday in early June, and the weather had not yet turned hot. There was a lovely breeze and I was enjoying its cooling effect on my skin. In the lull of the Sunday afternoon I strolled the tree lined Avenue Victor Hugo, looking into shop windows, having a great time. There was a beautiful scent in the air, "it must be coming from the trees," I thought, but soon I discerned that this aromatic scent was the fresh, earthy smell that foretells the coming of a rain storm. Science tells us that the smell of rain being nearby, is caused by the effect of humidity on bacteria which lives in the soil, and by trees and plants releasing aromatic gases when there is a spike in humidity.
It's good to know this, but scientific facts aside, I will always remember the scent of that afternoon as the fragrance of lovely Paris when it rains! Yes, Paris smells beautiful when it rains! However, there I was, soon caught in a downpour, without an umbrella, and with an immediate need for cover. I was lucky to find a patisserie which had tables on the sidewalk, set up underneath a sheltering awning. I sat at one of the tables and ordered a café au lait and an éclair à la pistache (pistachio éclair, yum!). I took leisurely sips of my coffee while waiting for the rain to stop. Every now and then someone would run inside the patisserie and then reemerge carrying one or two baguettes. When the rain stopped a steady stream of people came to buy their baguettes. I especially remember a hurried young boy who was wearing shorts, a shirt with horizontal brown stripes, and an annoyed expression. It seemed to me this lad was non too happy to be running the baguette errand for his family. Still, off he went, home for dinner, carrying his two baguettes. I truly enjoyed my brief glimpse into the everyday life of that Parisian neighborhood. So now, as I attempt to make my own baguettes for the first time, I reminisce of the fragrant rainy afternoon when I sipped coffee at a patisserie and watched the Parisian folk rush to buy their baguettes for Sunday dinner. Ingredients:
Starter1/2 cup cool water1/16 teaspoon active dry yeast
1 cup King Arthur unbleached flour
Dough1 teaspoon active dry yeast 1 cup to 1 1/4 cups lukewarm water*all of the starter3 1/2 cups King Arthur unbleached flour1 1/2 teaspoons salt*Use the lesser amount in summer (or in a humid environment), the greater amount in winter (or in a dry climate), and somewhere in between the rest of the year, or if your house is climate controlled.
Directions:
Make the starter by mixing the yeast with the water, then mixing in the flour to make a soft dough. Cover and let rest at room temperature for about 14 hours; overnight works well. The starter should have risen and become bubbly. (If the starter hasn't risen, your yeast may not be working. How to test yeast: dissolve 1/4 teaspoon of yeast in 1 tablespoon lukewarm water with a pinch of sugar, and wait 15 minutes. If nothing happens, the yeast needs to be replaced). Make the dough: Mix the 1 teaspoon active dry yeast with the water, then combine with the starter, flour, and salt. Mix and knead everything together—by hand, mixer or bread machine set on the dough cycle—till you've made a soft, cohesive, smooth dough.Place the dough in a lightly greased medium-size bowl, cover the bowl, and let the dough rise for 3 hours, gently deflating it and turning it over after 1 hour, and then again after 2 hours.Turn the dough out onto a lightly greased work surface. Divide it into three equal pieces.Shape each one of the pieces into a rough, slightly flattened ovals, cover them with greased plastic wrap, and let them rest for 15 minutes.Working with one piece of dough at a time, fold the dough in half lengthwise, and seal the edges with the heel of your hand. Flatten it slightly, and fold and seal again. Using the heel of your hand exerts a gentle pressure, which will allow us to preserve the volume and shape of the bread. With the seam-side down, cup your fingers and gently roll each piece of dough into a 15" log. Place the logs seam-side down onto a parchment-lined sheet pans.Cover them lightly greased plastic wrap, and allow the loaves to rise till they've become very puffy, about 1 1/2 hours.When nearing the end of the rising time, preheat your oven to 450°F.Using a very sharp knife held at about a 45° angle, make three 8" vertical slashes in each baguette. Spritz the baguettes heavily with warm water; this will help them develop a crackly-crisp crust. Bake the baguettes until they're a very deep golden brown, 25 to 30 minutes. Remove them from the oven and cool on a rack. Or, for the very crispiest baguettes, turn off the oven, crack it open about 2", and allow the baguettes to cool in the oven.Yield: Three 16" baguettes.

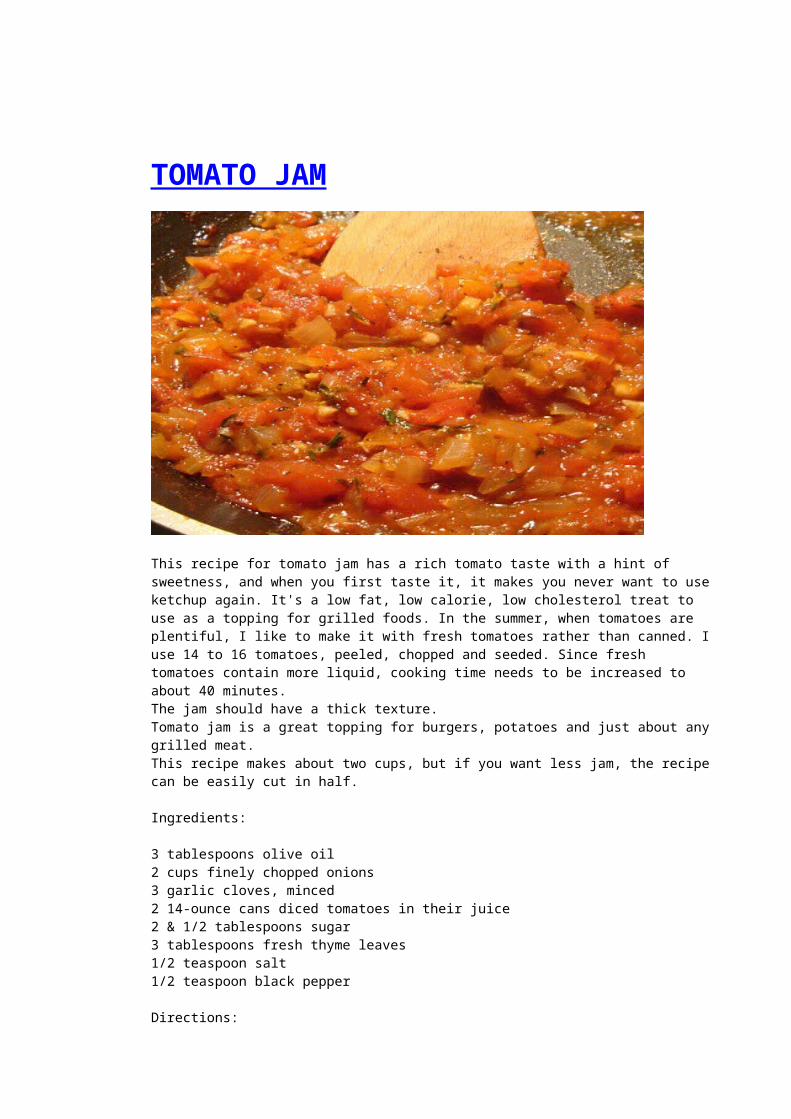
TOMATO JAM
This recipe for tomato jam has a rich tomato taste with a hint of sweetness, and when you first taste it, it makes you never want to use ketchup again. It's a low fat, low calorie, low cholesterol treat to use as a topping for grilled foods. In the summer, when tomatoes are plentiful, I like to make it with fresh tomatoes rather than canned. I use 14 to 16 tomatoes, peeled, chopped and seeded. Since fresh tomatoes contain more liquid, cooking time needs to be increased to about 40 minutes. The jam should have a thick texture. Tomato jam is a great topping for burgers, potatoes and just about any grilled meat. This recipe makes about two cups, but if you want less jam, the recipe can be easily cut in half.
Ingredients:
3 tablespoons olive oil2 cups finely chopped onions3 garlic cloves, minced2 14-ounce cans diced tomatoes in their juice2 & 1/2 tablespoons sugar3 tablespoons fresh thyme leaves1/2 teaspoon salt1/2 teaspoon black pepper
Directions:
Heat the oil in a saucepan over medium heat. Add the onion and garlic, and cook until the onion is very soft and translucent, stirring often, about 8 to 10 minutes. Add the tomatoes with their juice, the sugar, thyme, salt, and black pepper. Cook over medium heat stirring occasionally, until most of the liquid has evaporated. This should take about 25 minutes. Cool and refrigerate.
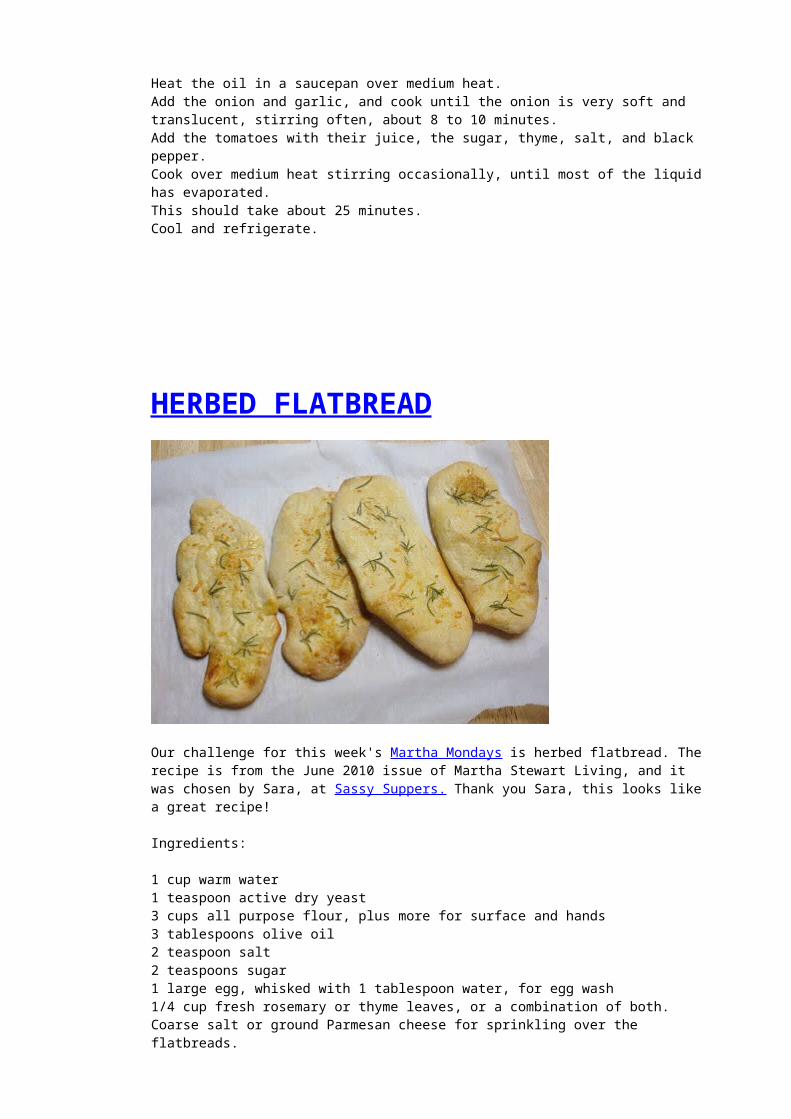
HERBED FLATBREAD
Our challenge for this week's Martha Mondays is herbed flatbread. The recipe is from the June 2010 issue of Martha Stewart Living, and it was chosen by Sara, at Sassy Suppers. Thank you Sara, this looks like a great recipe!
Ingredients:
1 cup warm water1 teaspoon active dry yeast3 cups all purpose flour, plus more for surface and hands3 tablespoons olive oil2 teaspoon salt2 teaspoons sugar1 large egg, whisked with 1 tablespoon water, for egg wash1/4 cup fresh rosemary or thyme leaves, or a combination of both.Coarse salt or ground Parmesan cheese for sprinkling over the flatbreads.
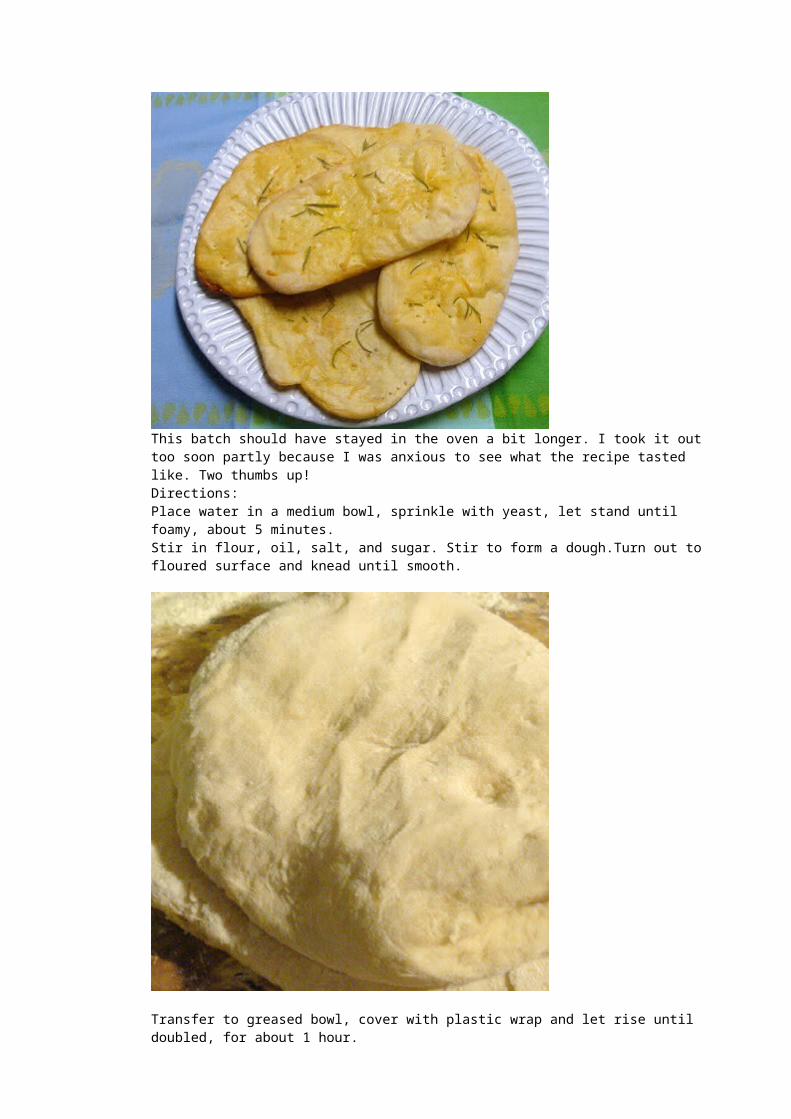
This batch should have stayed in the oven a bit longer. I took it out too soon partly because I was anxious to see what the recipe tasted like. Two thumbs up! Directions:
Place water in a medium bowl, sprinkle with yeast, let stand until foamy, about 5 minutes.Stir in flour, oil, salt, and sugar. Stir to form a dough.Turn out to floured surface and knead until smooth.
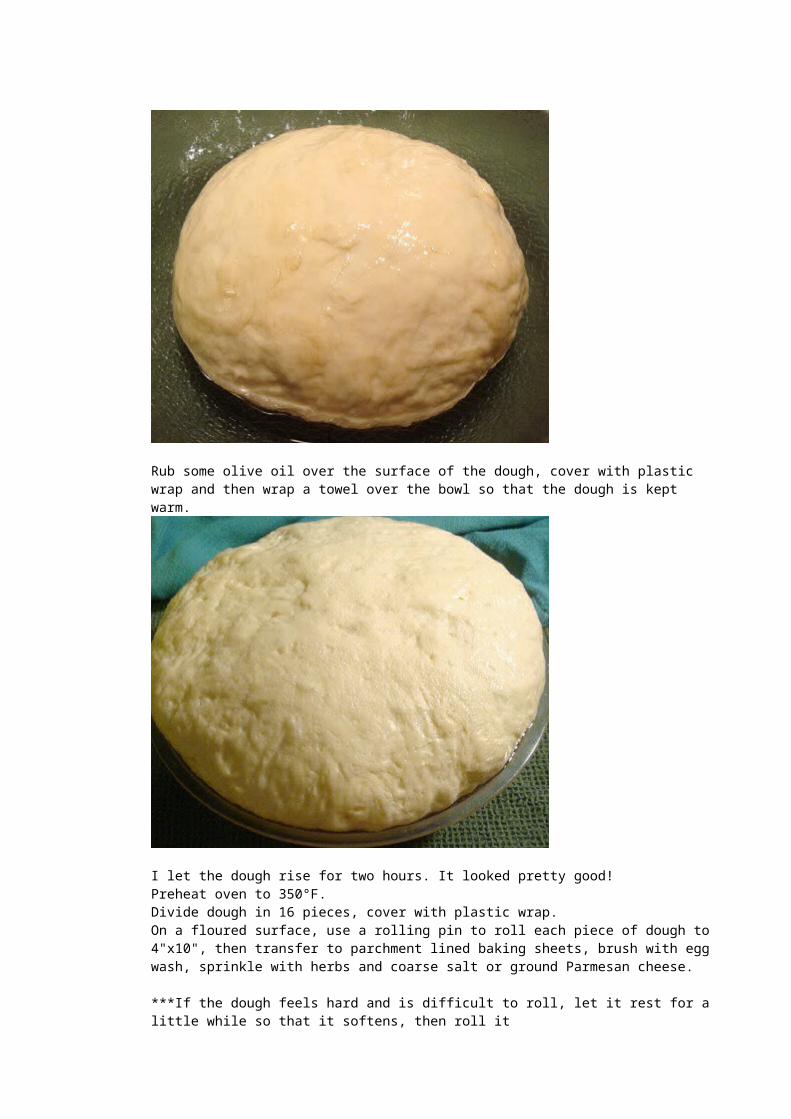
Transfer to greased bowl, cover with plastic wrap and let rise until doubled, for about 1 hour.
Rub some olive oil over the surface of the dough, cover with plastic wrap and then wrap a towel over the bowl so that the dough is kept warm.
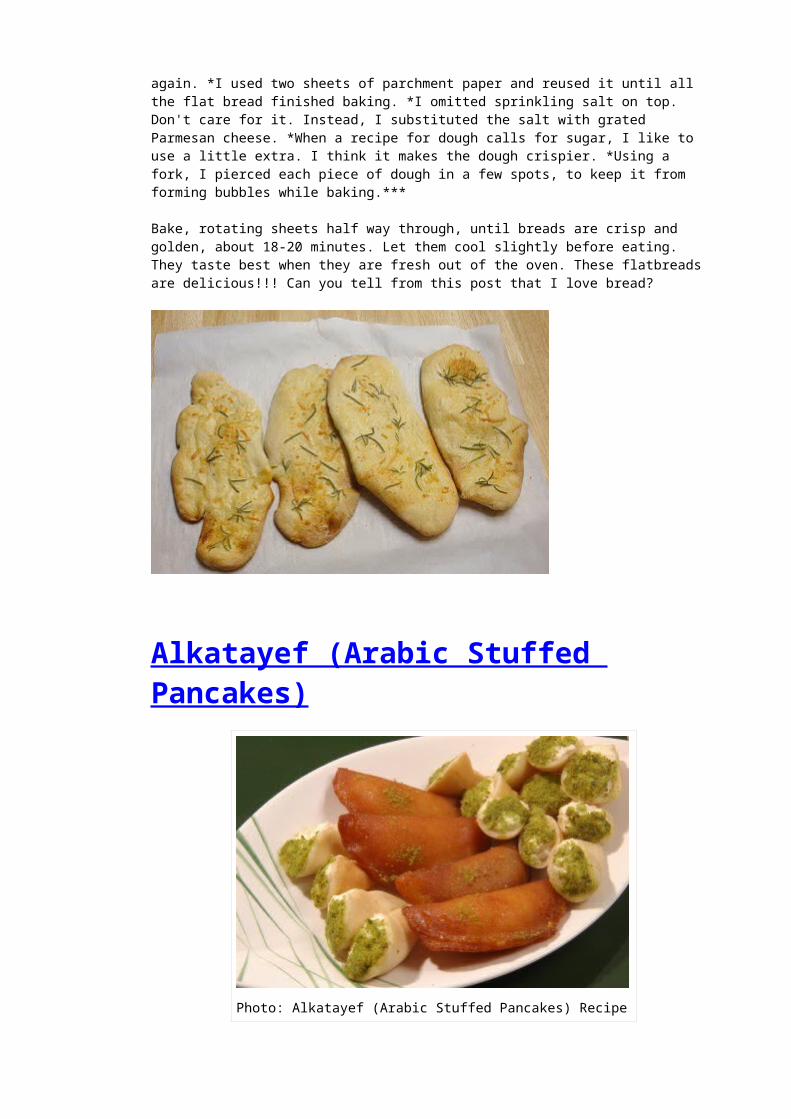
I let the dough rise for two hours. It looked pretty good!Preheat oven to 350°F. Divide dough in 16 pieces, cover with plastic wrap. On a floured surface, use a rolling pin to roll each piece of dough to 4"x10", then transfer to parchment lined baking sheets, brush with egg wash, sprinkle with herbs and coarse salt or ground Parmesan cheese.
***If the dough feels hard and is difficult to roll, let it rest for a little while so that it softens, then roll it again. *I used two sheets of parchment paper and reused it until all the flat bread finished baking. *I omitted sprinkling salt on top. Don't care for it. Instead, I substituted the salt with grated Parmesan cheese. *When a recipe for dough calls for sugar, I like to use a little extra. I think it makes the dough crispier. *Using a fork, I pierced each piece of dough in a few spots, to keep it from forming bubbles while baking.***
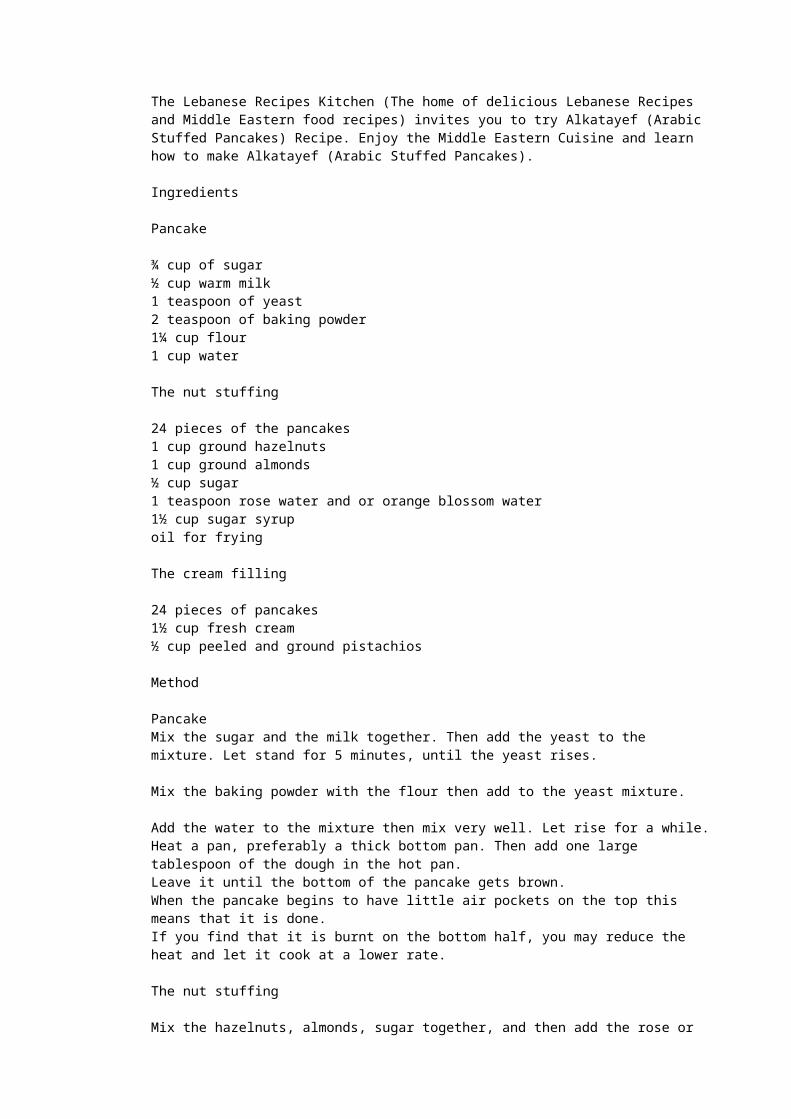
Bake, rotating sheets half way through, until breads are crisp and golden, about 18-20 minutes. Let them cool slightly before eating. They taste best when they are fresh out of the oven. These flatbreads are delicious!!! Can you tell from this post that I love bread?
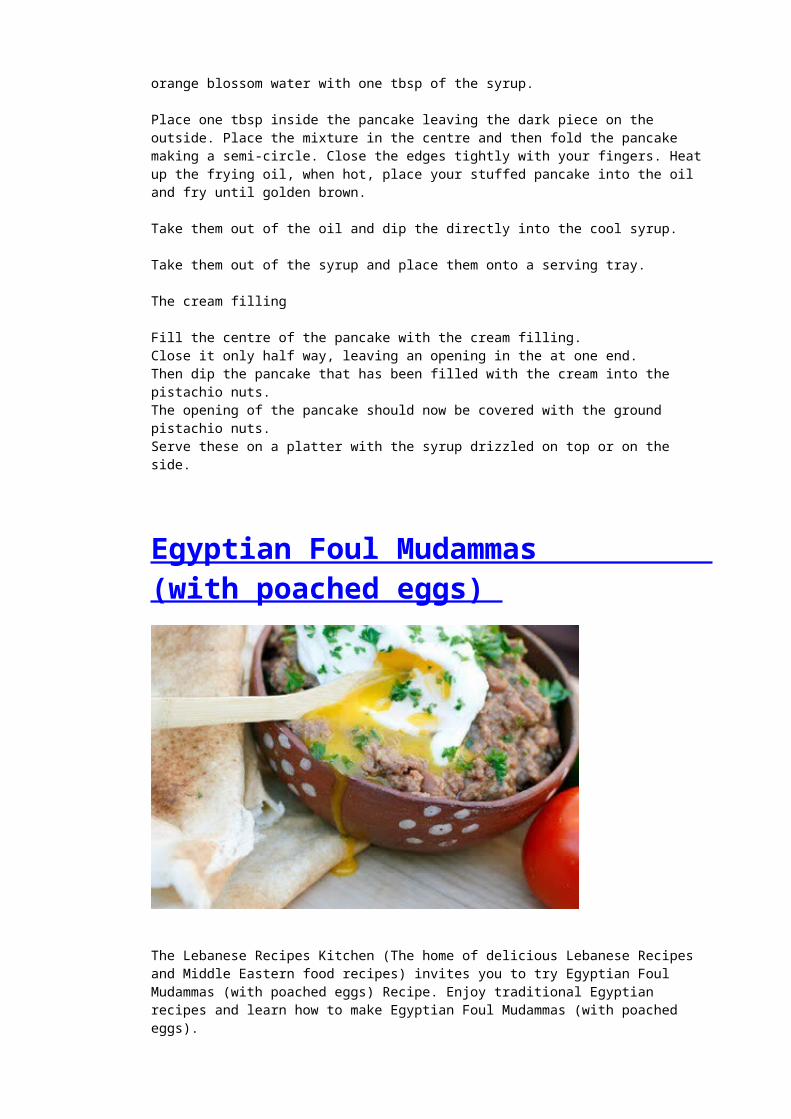
Alkatayef (Arabic Stuffed Pancakes)
Photo: Alkatayef (Arabic Stuffed Pancakes) Recipe
The Lebanese Recipes Kitchen (The home of delicious Lebanese Recipes and Middle Eastern food recipes) invites you to try Alkatayef (Arabic Stuffed Pancakes) Recipe. Enjoy the Middle Eastern Cuisine and learn how to make Alkatayef (Arabic Stuffed Pancakes).
Ingredients
Pancake
¾ cup of sugar½ cup warm milk1 teaspoon of yeast2 teaspoon of baking powder1¼ cup flour1 cup water
The nut stuffing
24 pieces of the pancakes1 cup ground hazelnuts1 cup ground almonds½ cup sugar1 teaspoon rose water and or orange blossom water1½ cup sugar syrupoil for frying
The cream filling
24 pieces of pancakes1½ cup fresh cream½ cup peeled and ground pistachios
Method
Pancake Mix the sugar and the milk together. Then add the yeast to the mixture. Let stand for 5 minutes, until the yeast rises.
Mix the baking powder with the flour then add to the yeast mixture.
Add the water to the mixture then mix very well. Let rise for a while.Heat a pan, preferably a thick bottom pan. Then add one large tablespoon of the dough in the hot pan. Leave it until the bottom of the pancake gets brown.When the pancake begins to have little air pockets on the top this means that it is done.If you find that it is burnt on the bottom half, you may reduce the heat and let it cook at a lower rate.
The nut stuffing
Mix the hazelnuts, almonds, sugar together, and then add the rose or orange blossom water with one tbsp of the syrup. Place one tbsp inside the pancake leaving the dark piece on the outside. Place the mixture in the centre and then fold the pancake making a semi-circle. Close the edges tightly with your fingers. Heat up the frying oil, when hot, place your stuffed pancake into the oil and fry until golden brown. Take them out of the oil and dip the directly into the cool syrup. Take them out of the syrup and place them onto a serving tray.
The cream filling
Fill the centre of the pancake with the cream filling.Close it only half way, leaving an opening in the at one end.Then dip the pancake that has been filled with the cream into the pistachio nuts.The opening of the pancake should now be covered with the ground pistachio nuts.Serve these on a platter with the syrup drizzled on top or on the side.
Egyptian Foul Mudammas (with poached eggs)
The Lebanese Recipes Kitchen (The home of delicious Lebanese Recipes and Middle Eastern food recipes) invites you to try Egyptian Foul Mudammas (with poached eggs) Recipe. Enjoy traditional Egyptian recipes and learn how to make Egyptian Foul Mudammas (with poached eggs).
Ingredients
2 cans of foul mudammas4 eggs2 teaspoons of mashed garlic (mash in a mortar with a pinch of salt)juice of 1 large lemon1/4 cup of extra-virgin olive oilground cumin, to taste4 tablespoons of finely chopped parsleygarnish: (optional) sliced radishes, tomatoes, diced jalapeño peppers, pita bread
Method
Open cans of foul medammas and pour into a sieve; rinse well and place in a saucepan. Add the volume of the cans in fresh tap water and place over medium heat. Cook for at least thirty minutes and preferably one hour or longer over slow heat.
If you wish, you can poach the eggs in the pot with the foul or poach them in a saucepan filled with 2 inches of simmering salted water and a few droplets of vinegar. Drop the eggs one by one and as soon as the whites are cooked, remove the eggs and set aside; if you are cooking them with the foul, let them cook at the same time and when ready, turn off the heat and season the foul. Remove the eggs temporarily while you season and taste the fava beans.
Mash the foul with an immersion blender, a meat mallet, or whatever tool you have at hand. Add to the pot the mashed garlic, lemon juice, olive oil, a pinch of black pepper (optional), parsley, and serve with a garnish of radishes, sliced tomatoes, pita bread and (or) a salad.
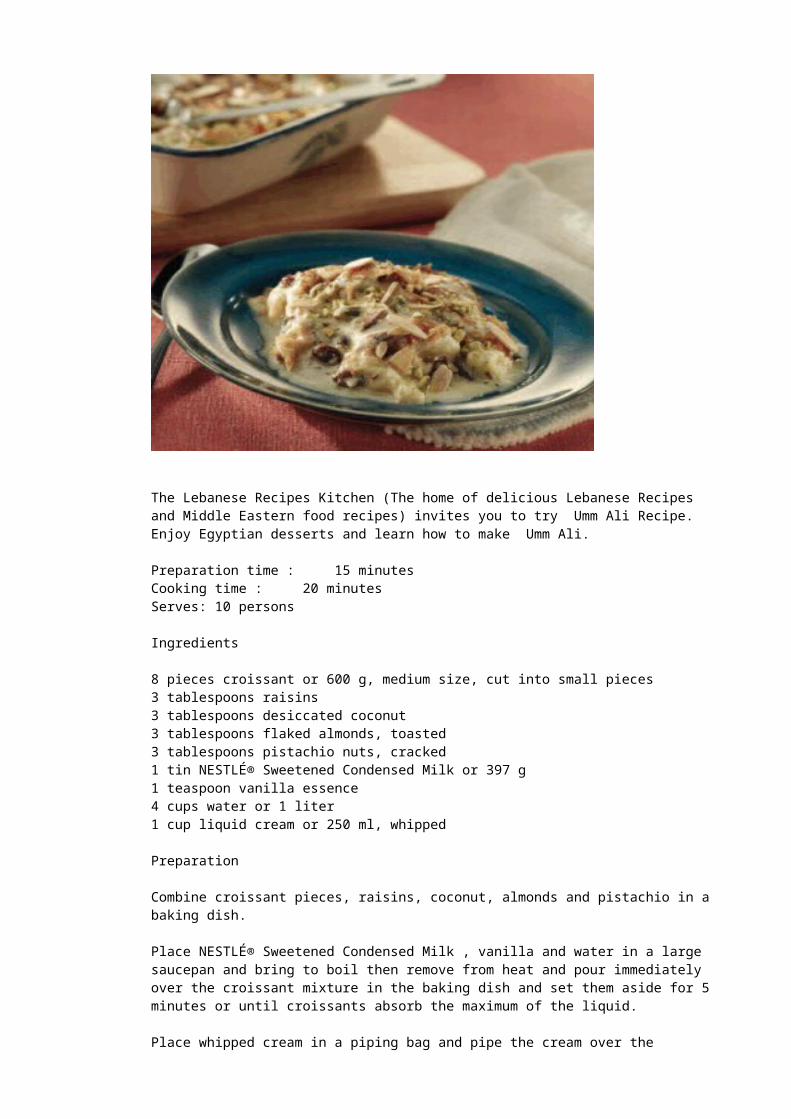
Umm Ali - How to Make Umm Ali
The Lebanese Recipes Kitchen (The home of delicious Lebanese Recipes and Middle Eastern food recipes) invites you to try Umm Ali Recipe. Enjoy Egyptian desserts and learn how to make Umm Ali. Preparation time : 15 minutesCooking time : 20 minutesServes: 10 persons
Ingredients
8 pieces croissant or 600 g, medium size, cut into small pieces3 tablespoons raisins3 tablespoons desiccated coconut3 tablespoons flaked almonds, toasted3 tablespoons pistachio nuts, cracked1 tin NESTLÉ® Sweetened Condensed Milk or 397 g1 teaspoon vanilla essence4 cups water or 1 liter1 cup liquid cream or 250 ml, whipped
Preparation
Combine croissant pieces, raisins, coconut, almonds and pistachio in a baking dish.
Place NESTLÉ® Sweetened Condensed Milk , vanilla and water in a large saucepan and bring to boil then remove from heat and pour immediately over the croissant mixture in the baking dish and set them aside for 5 minutes or until croissants absorb the maximum of the liquid.
Place whipped cream in a piping bag and pipe the cream over the prepared mixture in the baking dish.
Place the baking dish in a preheated oven at 200°C using the grill part of the oven and grill for 5 minutes or until the cream topping is golden color. Serve it immediately.
Mango Mahalabeya
The Lebanese Recipes Kitchen (The home of delicious Lebanese Recipes and Middle Eastern food recipes) invites you to try Mango Mahalabeya recipe. Enjoy tasty Egyptian dessserts and learn how to make Mango Mahalabeya. Mango custard topped with dried fruit & nuts.
Ingredients:
4 cups milk1 cup sugar4 tablespoons corn flour1 cup mango juice1/2 cup water1/2 teaspoon vanilla essencedried fruits and nuts to garnishmango slices (optional)
Directions:
Mix sugar with 3 cups of the milk, heat until boiling. Mix corn flour with remaining cup of milk.
Then add it slowly to sugar-milk mixture while stirring quickly until it re-boils. It is very important to stir quickly.
Add mango juice to the mixture and stir quickly. Turn heat down to low. Cook for 5 minutes.
Add water and vanilla essence to the mixture and stir for 3 more minutes.
Remove mixture from heat and wait until it cools down a little. Pour into round individual dessert dishes.
Top with dried fruit, mixed nuts or small slices of fresh mango. Serve warm or chilled.
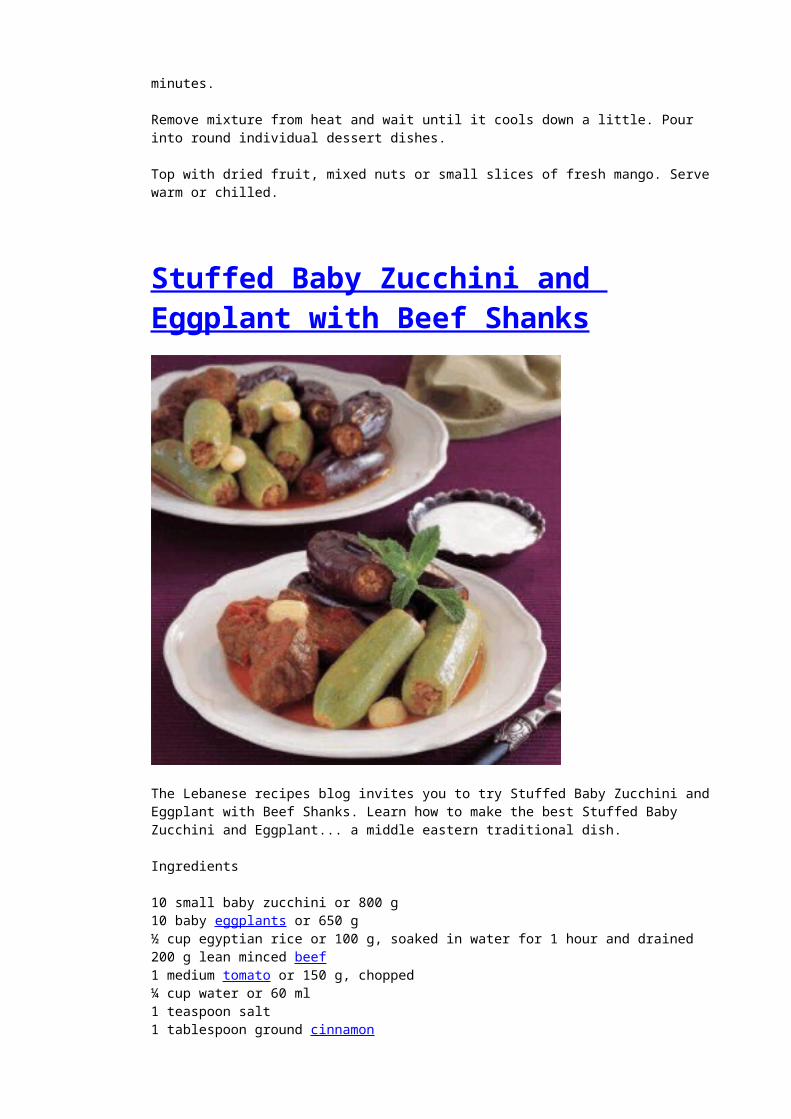
Stuffed Baby Zucchini and Eggplant with Beef Shanks
The Lebanese recipes blog invites you to try Stuffed Baby Zucchini and Eggplant with Beef Shanks. Learn how to make the best Stuffed Baby Zucchini and Eggplant... a middle eastern traditional dish.
Ingredients
10 small baby zucchini or 800 g10 baby eggplants or 650 g½ cup egyptian rice or 100 g, soaked in water for 1 hour and drained200 g lean minced beef1 medium tomato or 150 g, chopped¼ cup water or 60 ml
1 teaspoon salt1 tablespoon ground cinnamon½ teaspoon ground black pepper1 tablespoon seven spices, groundPinch of ground nutmeg1 tablespoon vegetable oil500 g lean beef shanks, cut into big chunks2 cubes MAGGI® Flavored Mutton Bouillon, crumbled8 cloves garlic, peeled9 cups water or 2250 ml, additional quantity5 tablespoons tomato paste
Preparation
Hollow baby zucchinis and eggplants. Wash both well, drain and set them aside.In a bowl, combine and mix rice, meat, tomato, water, salt and spices and set aside.Stuff baby zucchinis and eggplants with this mixture and keep 1cm empty from the top and set aside.Heat the oil in large pot and fry beef shanks for 5 minutes or until brown in color. Remove pot from heat. Add the whole peeled garlic and the crumbled MAGGI® Flavored Mutton Bouillon cubes.Place stuffed eggplants and the baby zucchinis over the shanks side by side. Secure the top with a plate.Combine and mix well the water and tomato paste together. Pour over the prepared pot. Place over medium heat and bring to boil (add salt to your taste) then simmer on low heat for 2 hours or until eggplants and baby zucchinis are well cooked. Remove from heat and serve.
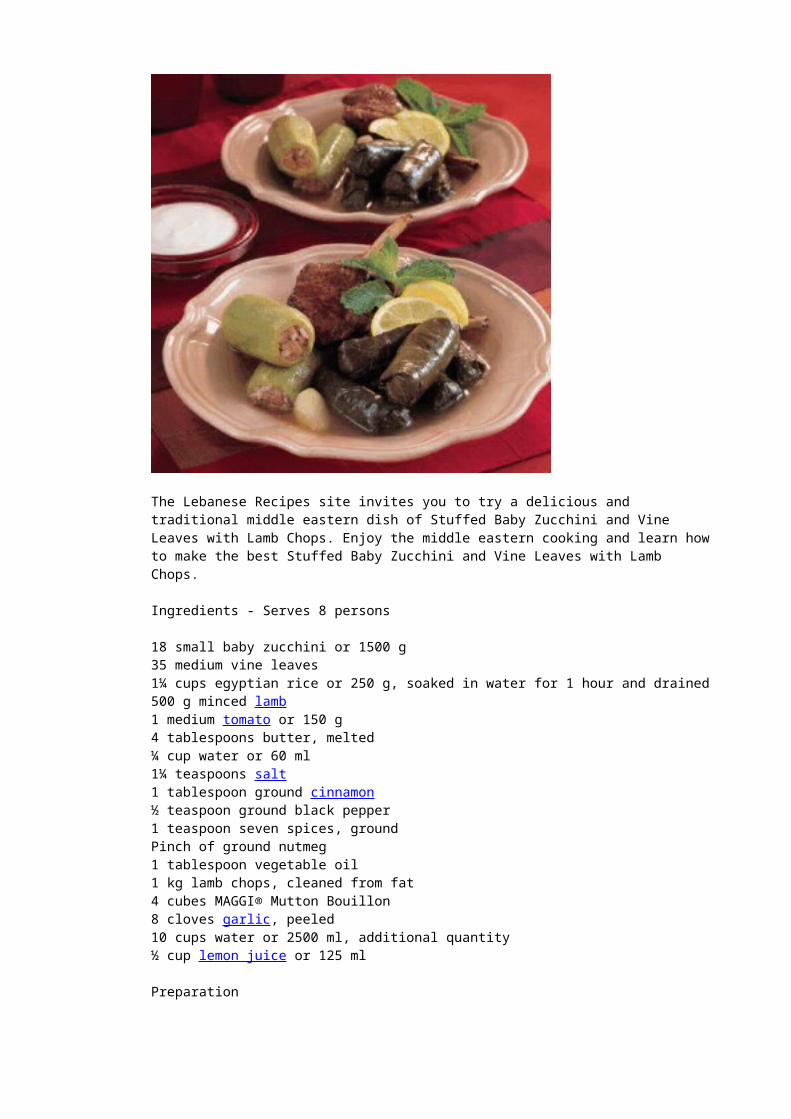
Stuffed Baby Zucchini and Vine Leaves with Lamb Chops
The Lebanese Recipes site invites you to try a delicious and traditional middle eastern dish of Stuffed Baby Zucchini and Vine Leaves with Lamb Chops. Enjoy the middle eastern cooking and learn how to make the best Stuffed Baby Zucchini and Vine Leaves with Lamb Chops.
Ingredients - Serves 8 persons
18 small baby zucchini or 1500 g35 medium vine leaves1¼ cups egyptian rice or 250 g, soaked in water for 1 hour and drained500 g minced lamb1 medium tomato or 150 g4 tablespoons butter, melted¼ cup water or 60 ml1¼ teaspoons salt1 tablespoon ground cinnamon½ teaspoon ground black pepper1 teaspoon seven spices, groundPinch of ground nutmeg1 tablespoon vegetable oil1 kg lamb chops, cleaned from fat4 cubes MAGGI® Mutton Bouillon8 cloves garlic, peeled10 cups water or 2500 ml, additional quantity½ cup lemon juice or 125 ml
Preparation
Hollow baby zucchini and then remove extra stems from the vine leaves. Wash both well, drain and set them aside.In a bowl, combine and mix rice, minced lamb, tomato, butter, water, salt and spices and set in fridge for ½ hour.
Stuff baby zucchini with this mixture and keep 1cm empty from the top and set aside.
To stuff a vine leaves; place it on a working board with the dull side and the stem facing up. Place a teaspoon of the stuffing on the lower part of the leaves, fold the outside edges towards the center and roll tightly into the shape of a finger.Heat the oil in large pot and fry lamb chops for 5 minutes or until brown in color. Remove pot from heat. Arrange lamb chops evenly then add the whole peeled garlic, crumble MAGGI® Mutton Bouillon cubes over the lamb chops.
Lines with 1 layer of unstuffed leaves over the lamb chops then place the rolled stuffed leaves above them alternating the direction of each layer.
Place stuffed baby zucchini over the stuffed vine leaves side by side. Secure zucchinis with a plate on top.
Add water and bring to boil (add salt to your taste) then simmer on low heat for 2 hours or until baby zucchini is well cooked. Add lemon juice and remove from heat.
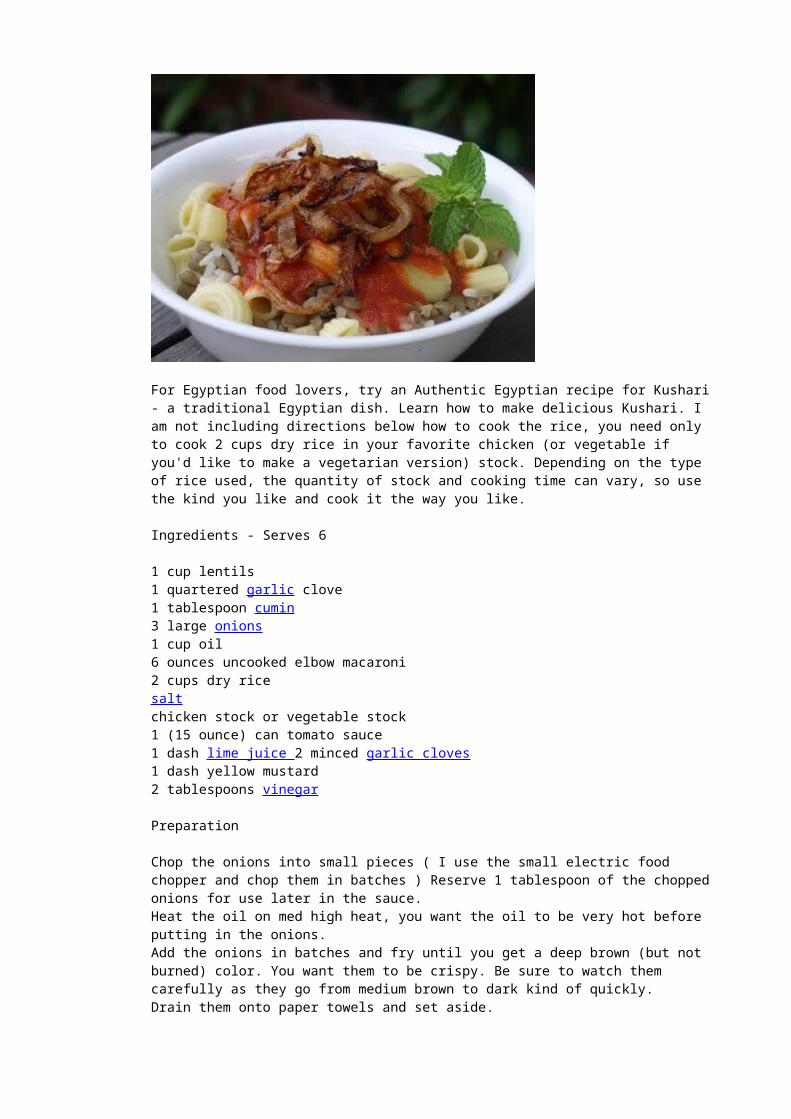
Kushari Recipe - Egyptian Kushari Recipe
For Egyptian food lovers, try an Authentic Egyptian recipe for Kushari - a traditional Egyptian dish. Learn how to make delicious Kushari. I am not including directions below how to cook the rice, you need only to cook 2 cups dry rice in your favorite chicken (or vegetable if you'd like to make a vegetarian version) stock. Depending on the type of rice used, the quantity of stock and cooking time can vary, so use the kind you like and cook it the way you like.
Ingredients - Serves 6
1 cup lentils1 quartered garlic clove1 tablespoon cumin3 large onions1 cup oil6 ounces uncooked elbow macaroni2 cups dry ricesaltchicken stock or vegetable stock1 (15 ounce) can tomato sauce1 dash lime juice 2 minced garlic cloves1 dash yellow mustard2 tablespoons vinegar
Preparation
Chop the onions into small pieces ( I use the small electric food chopper and chop them in batches ) Reserve 1 tablespoon of the chopped onions for use later in the sauce.Heat the oil on med high heat, you want the oil to be very hot before putting in the onions.Add the onions in batches and fry until you get a deep brown (but not burned) color. You want them to be crispy. Be sure to watch them carefully as they go from medium brown to dark kind of quickly.Drain them onto paper towels and set aside.Boil lentils in water (about 4 cups) along with 1 clove garlic cut into quarters, and 1 tablespoon cumin until cooked, drain and set aside. MEANWHILE:.Boil the macaroni until done (about 10 min).Cook the rice in the chicken stock add salt if the broth is unsalted.Put them all together in the same pot and mix well.Make the sauce.
In 1 tablespoon oil heated over medium heat add 2 cloves minced garlic, 1 tablespoon chopped onions that you reserved from before, and a dash of salt, stir and fry about 2 minute.Add 1 and ½ teaspoon sugar to the onion garlic mixture and mix well.Next, add one can 15 oz can tomato sauce.Now add 2 tablepoons vinegar, a small squirt yellow mustard and a dash of lime juice. You can adjust the amounts according to your personal taste but it should have kind of a slight puckery bite.To serve, put the kusherie onto a plate and add a SMALL amount of sauce to the top. (A little goes a long way, and you can always add more according to taste) Sprinkle the whole thing liberally with the fried onions. Mix together and enjoy!
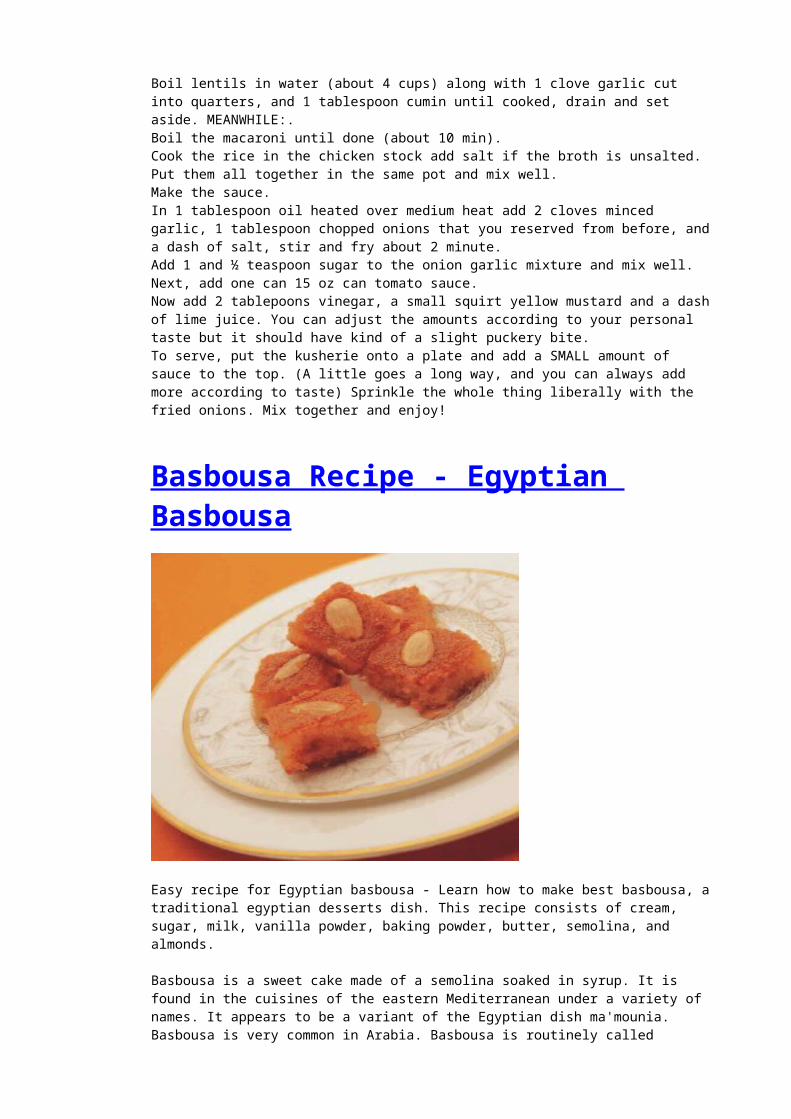
Basbousa Recipe - Egyptian Basbousa
Easy recipe for Egyptian basbousa - Learn how to make best basbousa, a traditional egyptian desserts dish. This recipe consists of cream, sugar, milk, vanilla powder, baking powder, butter, semolina, and almonds.
Basbousa is a sweet cake made of a semolina soaked in syrup. It is found in the cuisines of the eastern Mediterranean under a variety of names. It appears to be a variant of the Egyptian dish ma'mounia. Basbousa is very common in Arabia. Basbousa is routinely called "Hareesa" in Arabic countries.
Preparation time : 20 minutesCooking time : 40 minutes
Ingredients1 tin NESTLÉ® Cream or 170 g1 cup sugar or 200 g2¾ cups milk or 690 ml2 teaspoons vanilla powder2 teaspoons baking powder¾ cup butter or 150 g, melted5 cups semolina or 800 g½ cup almonds or 70 g, halved
For the syrup:1¾ cups water or 440 ml2½ cups sugar or 500 g2 tablespoons rose water
Preparation
Combine NESTLÉ® Cream , sugar, milk, vanilla powder, baking powder and butter. Stir until sugar dissolves.Add semolina to the milk cream mixture and stir until well combined.Grease a 35cm x 28cm oven tray with butter. Pour semolina mixture in and arrange the surface at one level then decorate with almond halves.Bake in 175°C preheated oven for 35-40 minutes or until the top is golden brown.Remove from oven and pour the syrup equally.Set aside to cool, use a sharp knife to cut in square or diamond patterns and serve.To prepare the syrup:
Boil water and sugar for 5-6 minutes, remove from heat, stir with rose water and allow cooling to room temperature.
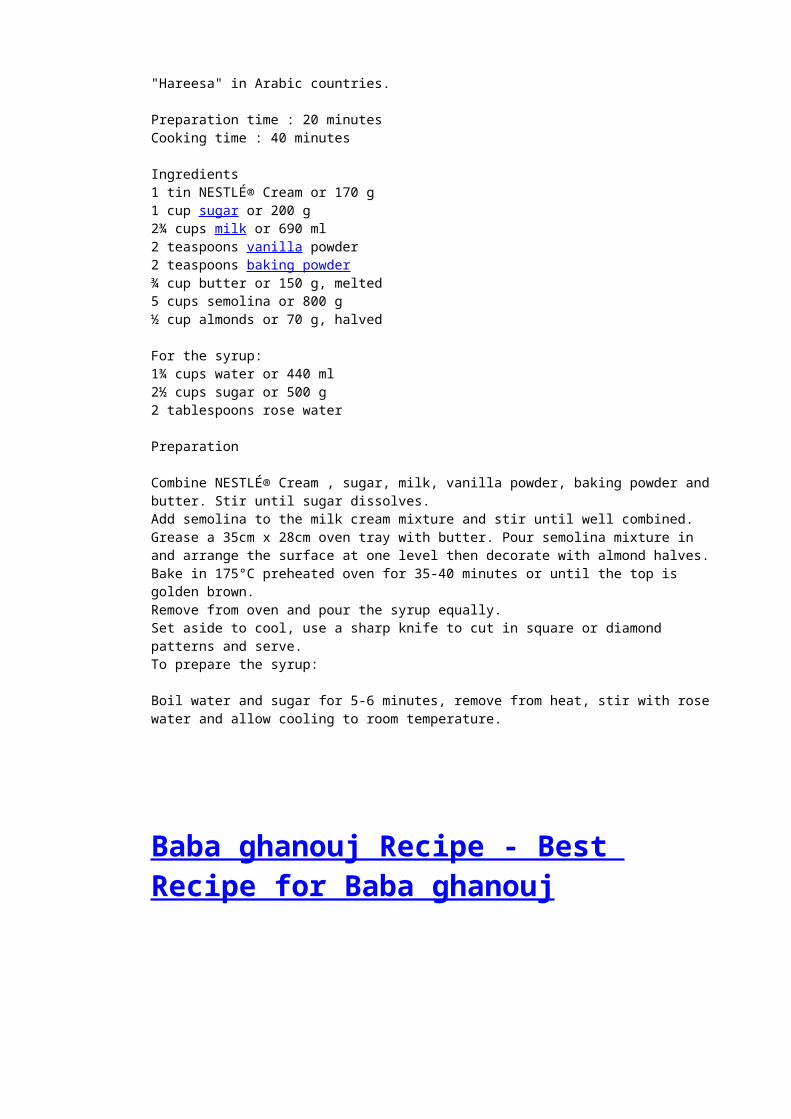
Baba ghanouj Recipe - Best Recipe for Baba ghanouj
Learn how to make the best recipe for Baba ghanouj or some times spelled Baba Ghannouj or Baba Ghannoug. It is a Middle Eastern dish of eggplant mashed and mixed with various seasonings. Frequently the eggplant is baked in the oven or broiled over an open flame before peeling, so that the pulp is soft and has a smoky taste. It is eaten with pita bread. It is usually of an earthy light brown color some times little off white, depending if you like to have more Tahini. It is popular in the Levant and Egypt.
Cooking time: 20 minutes
Ingredients2 large eggplants3 garlic cloves minced1/3 cup tahini sauce1/2 teaspoon salt1/4 cup lemon juice

Preparation
Heat the oven to 400 degrees F. Make a few 1’’ slits all around each eggplant. Wrap the eggplants in a aluminum foil. Roast it for 40 minutes, or until soft. Let it cool for 10 minutes.Mash garlic with little salt, mash it really good to paste consistency.Peel the eggplants.In a food processor, mix the eggplants, garlic, tahini, salt and lemon juice until just combined.Drizzle with olive oil. Serve with pita bread.
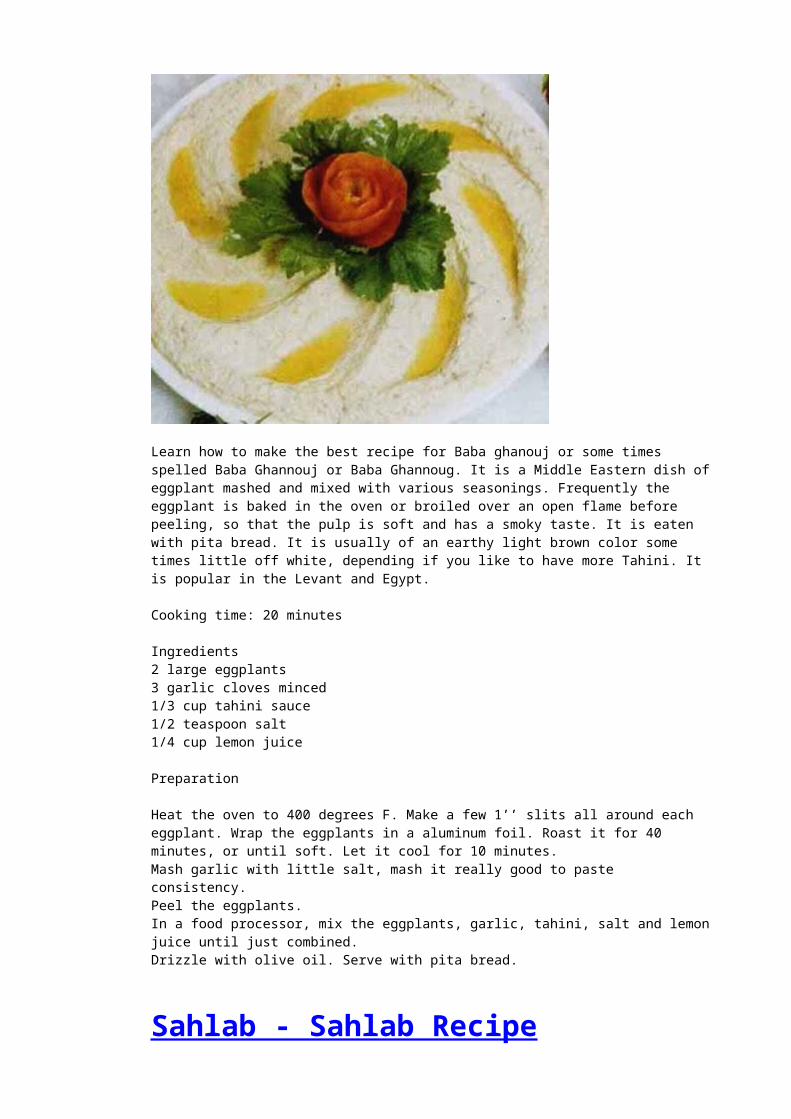
Sahlab - Sahlab Recipe
Quick and easy to prepare Sahlab Recipe. Sahlab is traditionally prepared at homealthough there are boxed versions of this pudding. You can add more or less cornstarch to this recipe if preferred.
Sahlab Ingredients - Serves 3 -5 4 cups milk1/2 cup cornstarch1 teaspoon vanillaSugar (to taste)
Toppingsground cinnamon (to taste)unsweetened dried shredded coconut (to taste)chopped pistachios (to taste)
Preparation
Combine cornstarch and water in a small cup and stir well.Add milk to a soup pan or dutch oven pot.Stir in cornstarch mixture in milk before it gets warm.Add in vanilla and sugar.Must stir constantly until it comes to a boil.
Let boil for 2 minutes, meanwhile still stirring.Serve in dessert bowls.Top with cinnamon and coconut or just chopped pistachios.It's traditionally eaten hot, but I like it cold too, once it cooled off and firmed up.Enjoy!
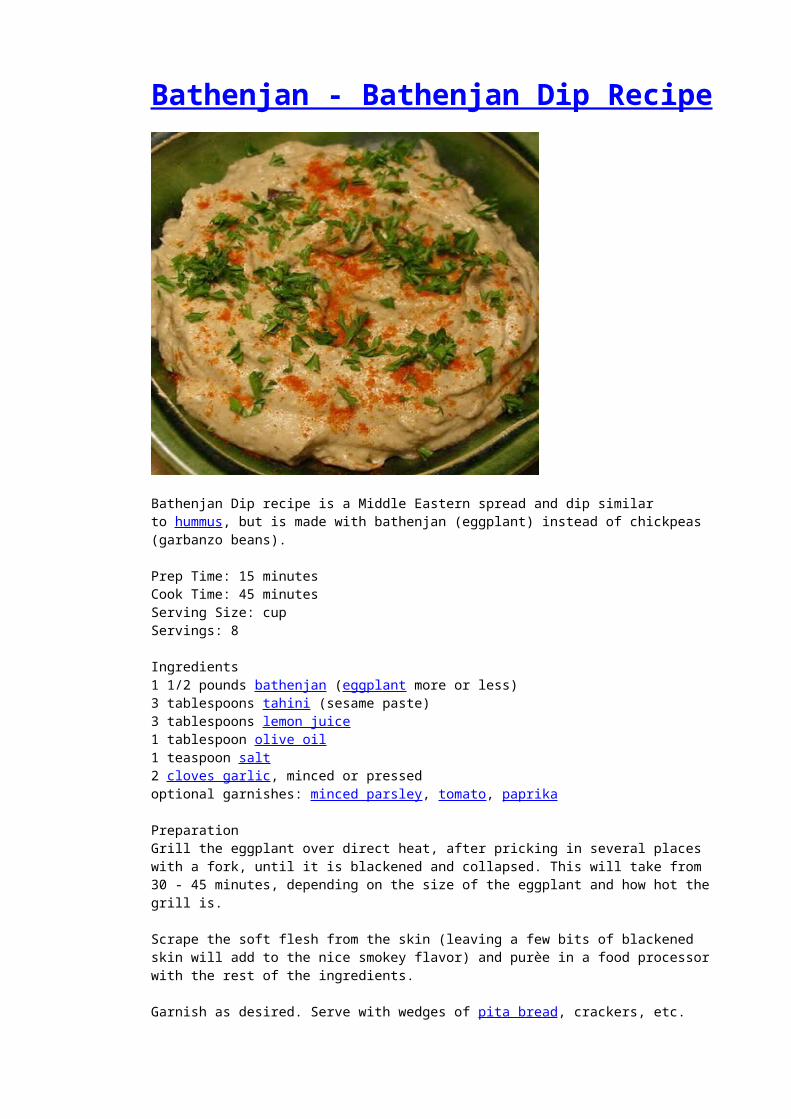
Bathenjan - Bathenjan Dip Recipe
Bathenjan Dip recipe is a Middle Eastern spread and dip similar to hummus, but is made with bathenjan (eggplant) instead of chickpeas (garbanzo beans).
Prep Time: 15 minutesCook Time: 45 minutesServing Size: cupServings: 8
Ingredients1 1/2 pounds bathenjan (eggplant more or less)3 tablespoons tahini (sesame paste)3 tablespoons lemon juice1 tablespoon olive oil1 teaspoon salt2 cloves garlic, minced or pressedoptional garnishes: minced parsley, tomato, paprika
PreparationGrill the eggplant over direct heat, after pricking in several places with a fork, until it is blackened and collapsed. This will take from 30 - 45 minutes, depending on the size of the eggplant and how hot the grill is.
Scrape the soft flesh from the skin (leaving a few bits of blackened skin will add to the nice smokey flavor) and purèe in a food processor with the rest of the ingredients.
Garnish as desired. Serve with wedges of pita bread, crackers, etc.
TIP: Eggplants can also be oven-roasted at 400°F for 30 - 45 minutes, or until soft and collapsed.
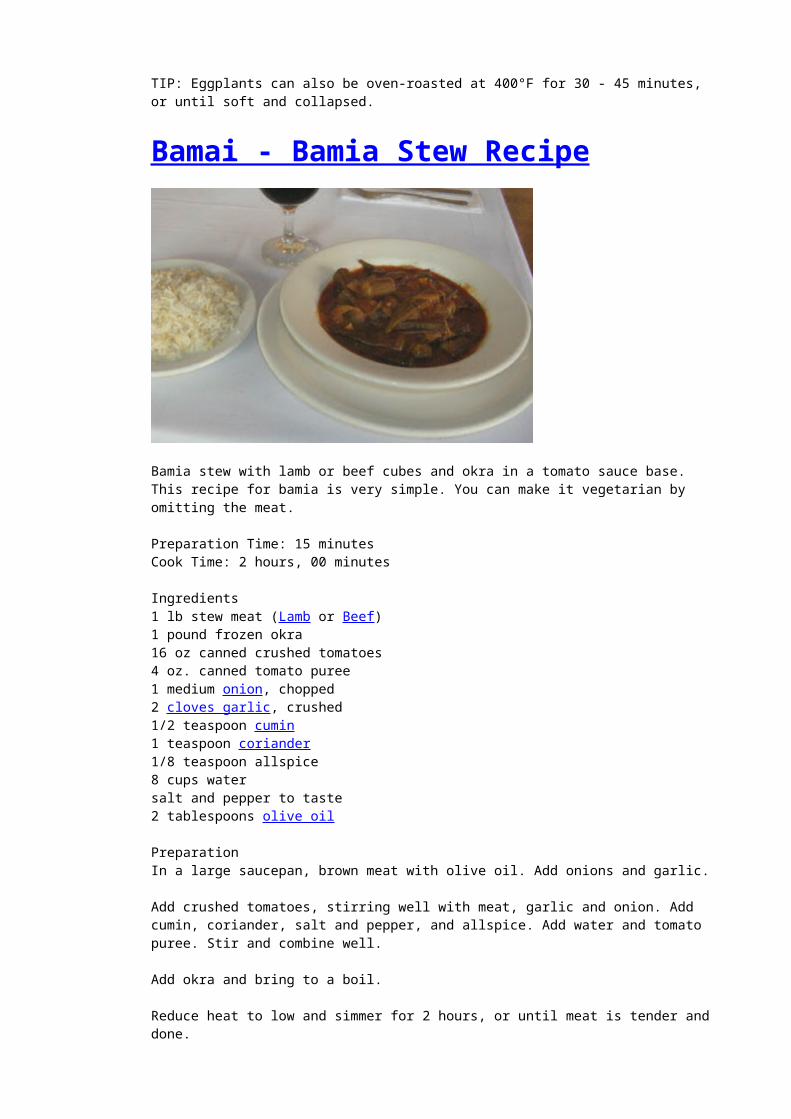
Bamai - Bamia Stew Recipe
Bamia stew with lamb or beef cubes and okra in a tomato sauce base. This recipe for bamia is very simple. You can make it vegetarian by omitting the meat.
Preparation Time: 15 minutesCook Time: 2 hours, 00 minutes
Ingredients1 lb stew meat (Lamb or Beef)1 pound frozen okra16 oz canned crushed tomatoes4 oz. canned tomato puree1 medium onion, chopped2 cloves garlic, crushed1/2 teaspoon cumin1 teaspoon coriander1/8 teaspoon allspice8 cups watersalt and pepper to taste2 tablespoons olive oil
PreparationIn a large saucepan, brown meat with olive oil. Add onions and garlic.
Add crushed tomatoes, stirring well with meat, garlic and onion. Add cumin, coriander, salt and pepper, and allspice. Add water and tomato puree. Stir and combine well.
Add okra and bring to a boil.
Reduce heat to low and simmer for 2 hours, or until meat is tender and done.
The sauce should thicken as it cooks. If it does not, add 1/2 cup all purpose flour.
Serve bamia with white rice.
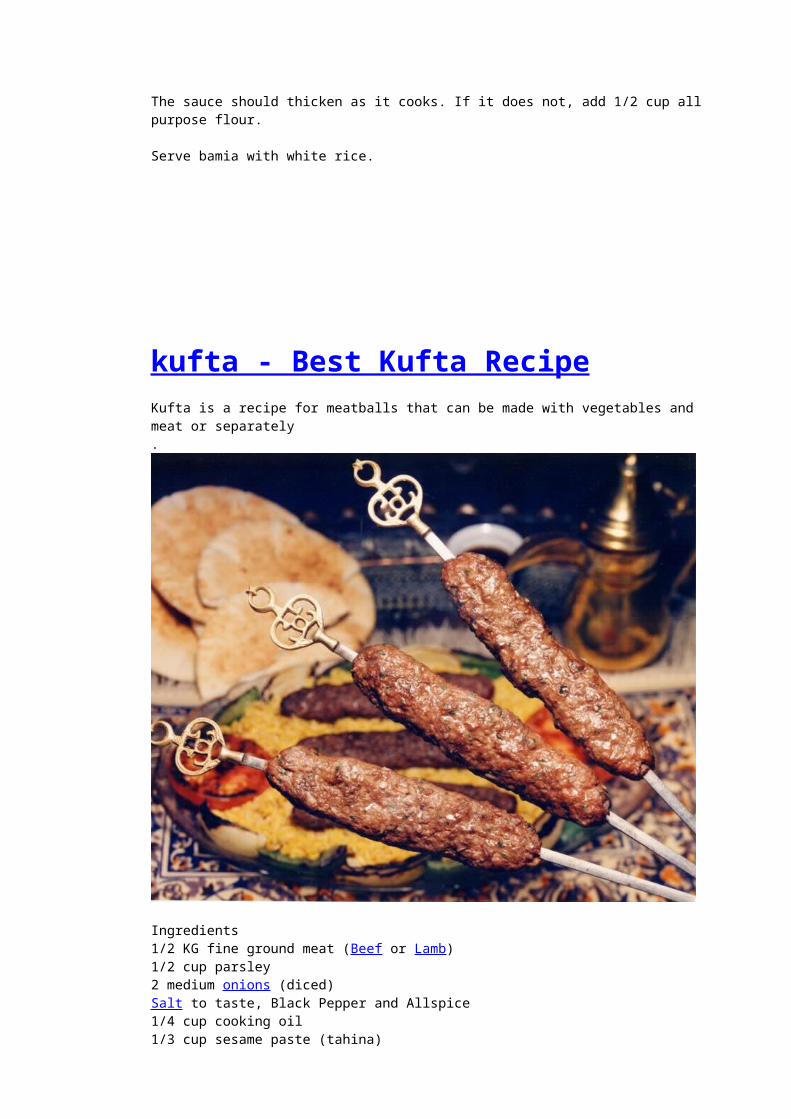
kufta - Best Kufta RecipeKufta is a recipe for meatballs that can be made with vegetables and meat or separately.
Ingredients1/2 KG fine ground meat (Beef or Lamb)1/2 cup parsley2 medium onions (diced)Salt to taste, Black Pepper and Allspice1/4 cup cooking oil1/3 cup sesame paste (tahina)1/3 cup lemon juice1/3 cup water
Preparation
Mix the meat with fine cut parsley and diced onions.Add your seasoning- Salt, Black pepper and Allspice.Shape into Kababs, (the size of a small egg) and place into a large pan.Add cooking oil and lightly fry the Kufta on the stove top to hold its shape.
Preparing the Tahini sauce:
Mix tahina and lemon juice together well until it forms a smooth paste.Slowly add the water while stirring to keep the mixture smooth.Pour sauce over kofta.Cook on the stove top covered at a low-medium heat until the water has boiled away to form a semi-thick sauce in the bottom of the pan (about 30 Minutes).Brown the top under the broiler.Serve with Pita bread or white rice on the side.
Falafel RecipeFalafel also known in Egypt and Sudan as ta'meya, Arabic , is a fried ball or patty made from spiced fava beans and/or chickpeas. It is a popular form of fast food in the Middle East, where it is also served as a mezze (snack or tapas). The word "falafel" is the plural of the Arabic word .meaning pepper. Variant spellings in English include felafel and filafil ,(filfil) فلفل
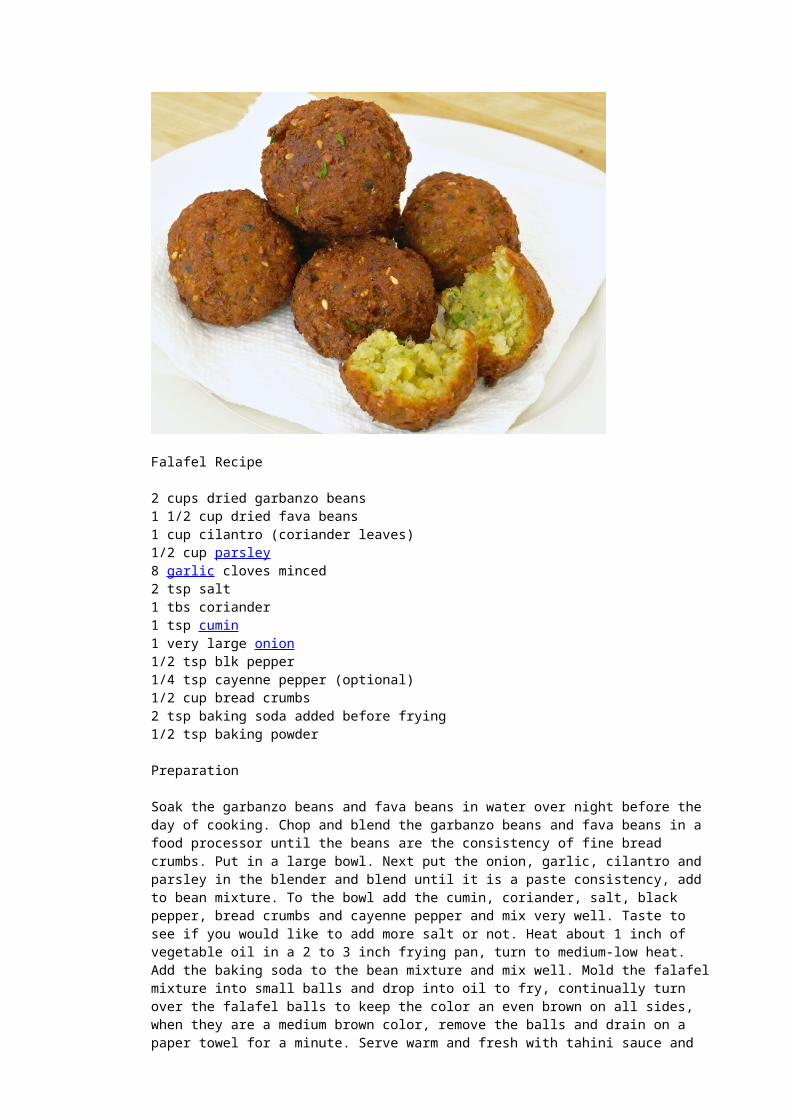
Falafel Recipe
2 cups dried garbanzo beans1 1/2 cup dried fava beans1 cup cilantro (coriander leaves)1/2 cup parsley8 garlic cloves minced2 tsp salt1 tbs coriander1 tsp cumin1 very large onion1/2 tsp blk pepper1/4 tsp cayenne pepper (optional)1/2 cup bread crumbs2 tsp baking soda added before frying1/2 tsp baking powder
Preparation
Soak the garbanzo beans and fava beans in water over night before the day of cooking. Chop and blend the garbanzo beans and fava beans in a food processor until the beans are the consistency of fine bread crumbs. Put in a large bowl. Next put the onion, garlic, cilantro and parsley in the blender and blend until it is a paste consistency, add to bean mixture. To the bowl add the cumin, coriander, salt, black pepper, bread crumbs and cayenne pepper and mix very well. Taste to see if you would like to add more salt or not. Heat about 1 inch of vegetable oil in a 2 to 3 inch frying pan, turn to medium-low heat. Add the baking soda to the bean mixture and mix well. Mold the falafel mixture into small balls and drop into oil to fry, continually turn over the falafel balls to keep the color an even brown on all sides, when they are a medium brown color, remove the balls and drain on a paper towel for a minute. Serve warm and fresh with tahini sauce and vegetables.
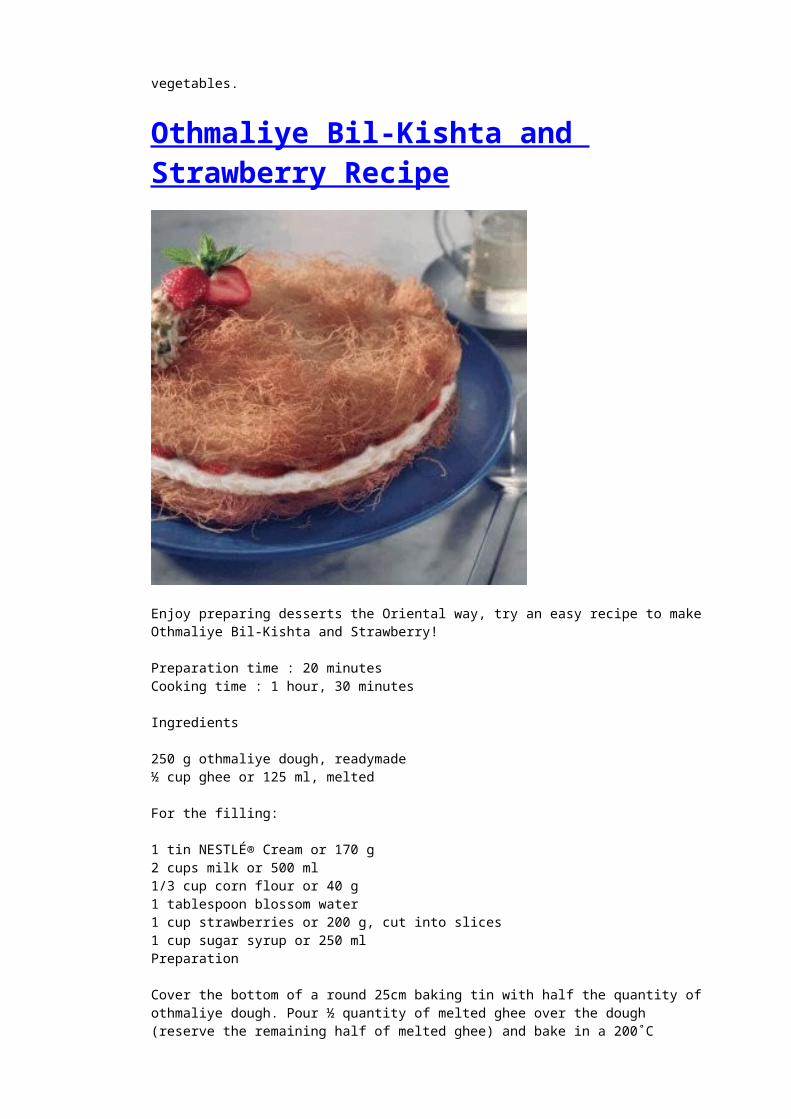
Othmaliye Bil-Kishta and Strawberry Recipe
Enjoy preparing desserts the Oriental way, try an easy recipe to make Othmaliye Bil-Kishta and Strawberry!
Preparation time : 20 minutesCooking time : 1 hour, 30 minutes
Ingredients
250 g othmaliye dough, readymade½ cup ghee or 125 ml, melted
For the filling:
1 tin NESTLÉ® Cream or 170 g2 cups milk or 500 ml1/3 cup corn flour or 40 g1 tablespoon blossom water1 cup strawberries or 200 g, cut into slices1 cup sugar syrup or 250 mlPreparation
Cover the bottom of a round 25cm baking tin with half the quantity of othmaliye dough. Pour ½ quantity of melted ghee over the dough (reserve the remaining half of melted ghee) and bake in a 200˚C preheated oven for 35-40 minutes or until dough is golden brown in color. Remove from the oven and carefully take the crusted dough out and place it on a flat platter.In the same baking tin, cover the bottom with the rest of the dough and pour the remaining melted ghee and bake again in the oven in the same way. Remove and place on a separate flat platter.Meanwhile, add NESTLÉ® Cream , milk and corn flour to a large saucepan, bring to boil with constant stirring then simmer for 1-2 minutes or until sauce thickens. Remove from heat and stir with orange blossom water. Allow to cool at room temperature. (Cover with cling film to avoid the top drying up).
Stir the cooled cream well until very smooth. Spread the cream mixture over the first part of the baked dough. Arrange sliced strawberries on top of the cream then place the second part of the baked dough on top.Slice and serve with the sugar syrup.
Serving tips : Decorate the top with clicks of whipped cream, crushed pistachio and strawberries.
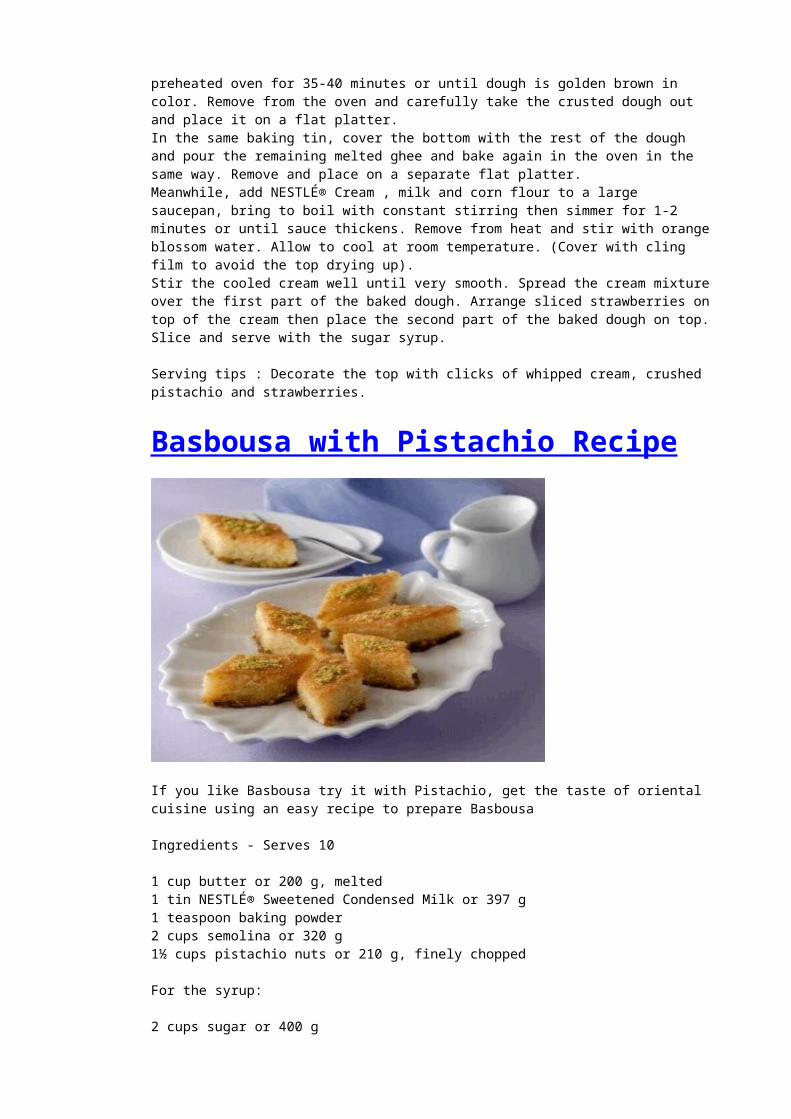
Basbousa with Pistachio Recipe
If you like Basbousa try it with Pistachio, get the taste of oriental cuisine using an easy recipe to prepare Basbousa
Ingredients - Serves 10
1 cup butter or 200 g, melted1 tin NESTLÉ® Sweetened Condensed Milk or 397 g1 teaspoon baking powder2 cups semolina or 320 g1½ cups pistachio nuts or 210 g, finely chopped
For the syrup:
2 cups sugar or 400 g1½ cups water or 375 ml1 teaspoon lemon juice1 tablespoon rose water
Preparation
In a bowl, combine butter, NESTLÉ® Sweetened Condensed Milk and baking powder and stir well. Add semolina and mix until well-combined.Sprinkle chopped pistachio evenly in a 28cm x 24cm baking tin. Pour semolina mixture over the pistachio and level it.Bake in a 190°C preheated oven for 35 minutes or until top is golden.Remove from oven and pour cooled syrup on top. Place in fridge to completely cool then cut into diamond shapes and serve.
To prepare the syrup:
Place sugar and water in a saucepan, bring to boil and simmer for 6-8 minutes, then remove from heat and stir in lemon juice and rosewater.
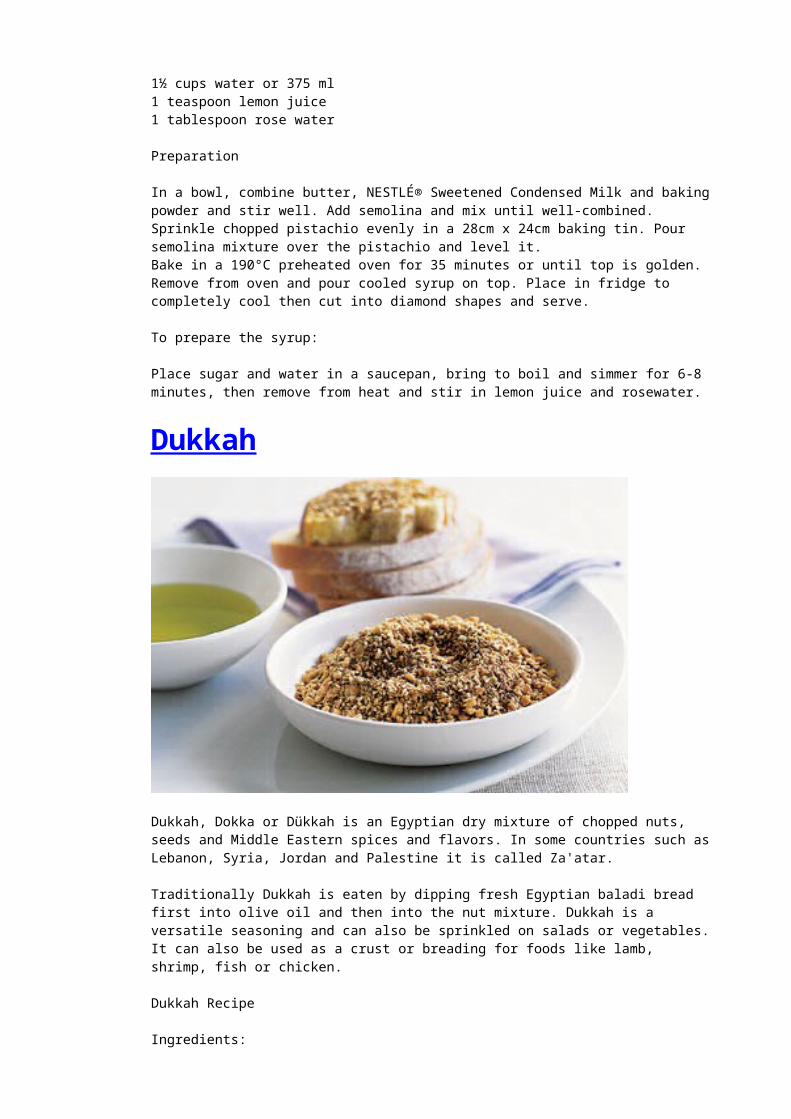
Dukkah
Dukkah, Dokka or Dükkah is an Egyptian dry mixture of chopped nuts, seeds and Middle Eastern spices and flavors. In some countries such as Lebanon, Syria, Jordan and Palestine it is called Za'atar.
Traditionally Dukkah is eaten by dipping fresh Egyptian baladi bread first into olive oil and then into the nut mixture. Dukkah is a versatile seasoning and can also be sprinkled on salads or vegetables. It can also be used as a crust or breading for foods like lamb, shrimp, fish or chicken.
Dukkah Recipe
Ingredients:
¾ cup sesame seeds½ cup pine nuts½ cup coriander seeds½ tsp ground cumin½ tsp salt½ tsp chilli powder½ tsp baharat (white and black pepper, cinnamon, cloves and nutmeg)
Preparation:
In a large frying pan combine pine nuts and coriander seeds over medium-high heat. When the mix has started to colour, add the sesame seeds and continue to toast until golden brown.Pour the mixture into a food processor. Add cumin, baharat mix, chilli powder and salt. Blend together.Use as seasoning in cooking or serve as an accompaniment with bread and olive oil.
Chicken Liver with Pomegranate Molasses
Easy and tasty appetizer dish of Chicken Liver with Pomegranate Molasses.
Ingredients:
1 Kg (2.2 lb) chicken liver1 large onion, finley chopped1/2 teaspoon red pepper1 teaspoon salt1/4 teaspoon black pepper1 teaspoon cumin1/4 cup cooking oil or olive oil1 or 2 tablespoons Pomegranate Molasses
Preparation:
Heat oil in frying pan on high heat.add onion and stir until onions are golden brown. Add chicken liver until it's color change and bubbles appear in the oil or until done according to desire.add cumin, salt, red pepper, black pepper and mix well.Add Pomegranate Molasses and mix well, leave over fire for 2 minutes.Serve hot with pita bread as an appetizer.
karkadeh Tea - karkadeh Tea Recipe
Karkadeh, carkade or karkady teay is served hot or chilled with ice. It is very popular in some parts of the Middle East, and especially in North Africa. KarkadehHibiscus tea is the infusion made from the calyces (sepals) of the Hibiscus sabdariffa flower.
Serves 4 persons
Ingredients:
1 cup Karkadeh (Hibiscus) flowers4 cups water1 cup sugar
Preparation:
Wash Karkadeh flowers well, then place in a pot with 4 cups of water over medium heat.Let boil for 5 minutes then let soak overnight.Strain the Karkadeh flowers and pour the juice in a glass pitcher. Add sugar.Stir well until all sugar dissolves.Let cool in the fridge and serve chilled.
karkadeh (Hibiscus Dried flowers)
Sayadieh
Sayadieh (Fish with Rice) is a delicious and robust lebanese, Syrian, Egyptian, Palestinian, and Jordanian style fish dish. Any firm, white fish, such as haddock or cod, can be used in this recipe.
Ingredients:
2 tbsp. oil, for deep-frying2 tbsp. pine nuts3 onions, sliced2 cups American rice, rinsed1/2 tsp. turmeric1/4 tsp. mixed spicesSalt and pepper to taste2 MAGGI Chicken Stock cubes(dissolved in 3 cups of hot water)4 white fish fillets (Cod or Haddock)3 tbsp. seasoned flour to coat the fish
Preparation:
Heat the oil in a deep pan and fry the pine nuts till brown. Remove nuts from the oil and keep aside.Add the onions to the same pan and fry till brown.Add the rice, turmeric, spices, salt and pepper and stir till the rice is well-coated with oil.Add the MAGGI Chicken Stock, boil and then lower the heat. Cover the pan and simmer for 20 minutes.Meanwhile, coat the fish with the seasoned flour and deep fry.When the rice is cooked, add the pine nuts and stir gently.Empty the rice in a flat dish, and arrange the fish on top. Serve with mixed salad and Tarator (Tahini sauce).
Molokheya with chicken Molokheya is a popular national dish in Egypt.
Servings : 4
Preparation Time : 1 hour
Ingredients :
1 chicken.1 pack molokheya.1 1/2 tablespoon garlic , crushed.1 1/2 tablespoon coriander , ground3 tablespoons margarine or butter.Salt.
Cooking Instructions :: Wash chicken well then boil until tender.Strain and reserve 3-4 cups of chicken soup.Cut chicken into 4 pieces.In a skillet add 2 tablespoons margarine or butter.Fry chicken pieces until golden brown.In a deep pan heat reserved soup and bring to boil over high heat.Add 1 teaspoon coriander and 1/2 tablespoon garlic.Reduce heat and add molokheya and leave to boil once, uncovered.While molokhia is boiling, in a small skillet heat 1 tablespoon margarine or butter then add 1 teaspoon coriander, 1 tablespoon garlic and stir until golden brown.Immediately pour components of skillet onto molokheya in pan. Don't stir.Stir molokhia just before serving.Serve in a bowl with chicken and rice on the side.
WARAH ENAB - STUFFED GRAPE LEAVES
(Makes about 40 leaves)
1 cup uncooked basmati brown or traditional white rice(traditionally prepared with white)2 large tomatoes, chopped1 medium onion, chopped1/4 cup chopped parsley1 Tablespoon vegetable oilJuice of 1 lemon1/2 teaspoon salt1/4 teaspoon pepper1/4 teaspoon allspiceOne 16 oz jar of grape leaves1 cup tomato sauce2 cups waterRound sliced carrots, frozen or fresh (enough to cover the bottom of a 3 quart pot,approximately 15 carrot slices, depending on their size)
Mix all ingredients except grape leaves, tomato sauce, water, and carrots in a bowl. Remove grape leaves from jar, unfold, and rinse with water. Place grape leaves with the rough side up, one at a time, on a large, flat plate.Be sure that the pointy parts of the leaf are directed away from you and the flatter edges and stem are towards you. Place one teaspoon of the mixture on the bottom of the leaf, near the stem, and arrange it lengthwise using your fingers. First roll the flat edges near the stem upwards and tuck them slightly under the filling. Then applying pressure to keep the leaves rolled tightly, tuck one side at a time of the two parts of the leaf pointing outwards. Now, roll the rest of the way upwards still applying pressure to keep the leaf tight.Cook sliced carrots in water until tender. Cover the bottom layer of a large pot with these carrots.Begin layering the stuffed leaves above the carrots and be sure that they are packed tightly together; otherwise they may fall apart during cooking. Each layer of leaves should be in varying directions across the pot. Pour the tomato sauce and water over the leaves and bring the sauce to a boil.
Reduce heat to medium, and place a flat plate (glass or stoneware) upside down over the top layer of leaves, and press down as hard as you can. Leave the plate in place during cooking. Cover the pot with its cover as well, and cook for 40-45 minutes. Check one leaf to see if rice has cooked fully. Serve warm.
BAMYA (MEAT AND OKRA STEW)
2 lbs. stewing lamb or beef, cut into one-inch cubes.2 onion(s), finely chopped2 cloves garlic, finely minced1 teaspoon(s) ground cumin1 teaspoon(s) ground coriander1 cup(s) peeled, seeded and chopped tomatoes3 tablespoon(s) tomato paste1 cup(s) stock (beef) or water, or as needed2 tablespoons chopped fresh mint (optional)salt and freshly ground pepper1 1/2 lbs. okrajuice of 1 lemon Preparation :
Note Okra must be cooked so that its slimy texture is eliminated. The Greeks have the best technique for achieving this. Trim the conical tops with a sharp knife, then soak the okra in red wine-vinegar (Khall) for 30 minutes, allowing 1/2 cup vinegar per pound. Drain, rinse and dry the okra and proceed with the recipe. This dish is popular throughout the Middle East and can be prepared with lamb or beef. Serve with rice. Method :
Preheat an oven to 325 F (165 C)In a large frying pan over medium-high heat, warm 1 tablespoon of the butter or oil per serving.Working in batches, add the meat and fry, turning, until browned on all sides, about 10 minutes.
Using a slotted spoon transfer to a baking dish or stew pot.Add the onions to the fat remaining in the frying pan and saute over medium heat until tender and translucent, 8-10 mins.Add the garlic, cumin, coriander, tomatoes, tomato paste, the 1 cup stock and mint (if using). Stir well. Pour over the meat and season to taste with salt and pepper.Cover and bake until all the liquid is absorbed, about 1 1/2 Hrs. Taste and adjust the seasonings.Meanwhile, prepare the okra as directed in the note above.In a saute pan over medium heat, warm the remaining 1/2 tablespoon (per serving) of butter or oil Add the okra and saute for 3 mins, stirring gently.Remove the stew from the oven and arrange the okra on top in a spoke pattern. Sprinkle the lemon juice evenly over the surface. Re-cover the dish and return it to the oven.Bake for 35 minutes longer. Add stock or water if the mixture seems too dry.
HOMEMADE PITA BREAD
Ingredients: 1 envelope dry yeast2 teaspoons salt1 tablespoon sugar4 cups white all-purpose flour1 1/2 cups water1 tablespoon olive oil
Instructions: Combine the yeast and sugar in a small bowl, add 1/2 cup of the warm water and let it stand for 10 minutes to proof and ferment it.Dissolve the salt in the remaining warm water.Put the flour in a large mixing bowl, making a well in the middle and put the dissolved yeast and salt water into it.With your hands, blend it into a dough.You may need a bit more or less water depending on your flour.Knead the dough in the bowl with your fists for 10-15 minutes or until it is smooth.Pour the oil over the dough and knead it again until the oil is absorbed.
Cover the dough in the bowl with a towel and set it in a draft free area to rise to double it's bulk (1-2 hours), then punch it down and knead it again for a few minutes.Preheat your oven to 350°F.Cut pieces of dough, egg size or larger, depending on the size of the pita desired, shape them into balls with your hands and roll them out over a lightly floured board or pastry cloth to 1/4 inch thickness.Set 2 or 3 pitas on a lightly oiled cookies sheet and bake them on the lower rack 2 to 3 minutes each side.Pitas should be white and soft.Wrap the baked pitas in a clean towel until they are cool, then store them in plastic bags to prevent them from drying out.When you are ready to use them, heat a bit of oil in a shallow skillet and fry them a minute or so on each side, or until golden brown.Use them immediately, because they get hard when they dry out.
KAHK
2 cup(s) samn balady.1 cup(s) milk.4 1/2 cup(s) flour, all purpose.2 tablespoons baking powder.1 teaspoon(s) instant yeas.1 teaspoon(s) ground cinnamon.1 teaspoon(s) ground cloves.1 teaspoon(s) ground ginger. sesame seeds.
Method:
Heat the samn balady until almost boiling.Add the baking powder and the spices to the flour.Carefully add the flour to the hot samn balady and stir with a wooden spoon.Keep stirring and stirring and stirring.When you get tired (honestly this is part of the recipe as given to me by my friend's mother in law, ... tired = your arms are ready to fall off) then you can stop stirring. Her recipe said not to use a wooden spoon but to knead the flour into the hot samna, but I do not do that part. I have not tried using a food processor.When the mixture cools down a little, but is still warm, (ie you can knead it with your hands without causing permanent damage), add the instant yeast to the milk with a teaspoon of sugar, then stir gently into the dough.
Knead it for a short while, cover and let it rest. (Officially you should shape the kahk now and let it rest later).After an hour or so you can start shapping the dough with your hands into little balls and then flatten them.You can add nuts, agwa or other filling when you are making it into balls.Put them in a cookie tray and let them rest for a little.Then put them in a preheated oven (170 °C) and watch them. Usually 15 minutes is enough.Take them out, wait until they cool and sprinkle with powdered sugar just before eating.
ROS BEL LABAN
Ros Bel Laban is a sweet dish that can be served as desert. In the Egyptian dialect “Ros” means rice and “Laban” means milk. The dish is easy to prepare and is very tasty. Ros Bel Laban is a traditional desert that has undergone very little modifications in preparation. It dates back to the time of historic Cairo. Ingredients (serves Four)
* 2 ½ cups of short rice* 1 liter milk* ½ cup of sugar* 1 table spoon of starch dissolved in ¼ cup of water* 1 teaspoon vanilla
Method
Wash the rice thoroughly, then let it settle in water for about 15 minutes. Sieve the rice and place in a pot. Top the rice with water and place on a medium flame. Let the rice boil for five minutes. Do not let the water dry up. The rice is supposed to be soggy! Sieve the partially boiled rice again.In a separate container add mix the sugar to the milk and stir until the sugar is completely dissolved.Add the sweetened milk to the rice and stir slowly for a minute. Place the mixture of rice milk and sugar on low flame and let it boil for 20 minutes.Dissolve the starch in some water and add to boiling rice. Stir slowly until the mixture thickens.Remove from heat. Let it cool for five minutes before you add the vanilla.Pour into smaller bowls and chill in the fridge.
The above recipe is the original recipe for Ros Bel Laban. However, the toppings may vary. You can be creative. Try unsalted nuts, for example, pistachio and/or hazelnut. Shredded dried coconut will add a special taste to the desert.You can even carry the topping to a further extent and add ice cream as on top of the bowl of Ros.
GHREYBA – Butter cookies
Ingredients : * 1 cup warm "samn" (veg. Oil or melted butter)* 1/2 cup powdered sugar* 3-4 cups of flour
Instructions: * Mix "samn" and sugar well.* Add flour gradually and mix.* Shape into little balls and press down gently to flatten into shape.* Garnish with an almond.* Bake in a preheated oven at 400 ƒF (200 ƒC) for 10 to 15 minutes
Nota di Silvio : Io ci metto sopra (incastrato) un pinolo
Buon appetito !!!!!