Embed Size (px)
Citation preview

Image: University of Roehampton
ConnectaLEARNING PACK 6 | EDITING
Contents 1. What is video editing? 1
2. Editing software 1
3. Lightworks tutorial - Creating a new project 1-2
Interface and log tab 3
Importing media 3-5
The edit tab 5-6
The project contents bin 6
The timeline 6-7
Creating clips 7-8
Tracks 8-10
Undo/redo 11
Timeline clipping 11-12
Trimming 13-15
Duration 15-16
Cutting 16-18
4. Glossary 18-19
5. Self-assessment 19
6. References 19-20


1. What is video editing?
Video editing is the process of changing, altering and rearranging your video into a final
structure that will be presented to an audience. The purpose of editing is to produce a
finished film that flows and presents a coherent story that the audience can understand.
The best place to start, is to rearrange the footage so it matches your screenplay and
storyboard. Sometimes a film can change dramatically at this stage because viewing what
you have recorded may be different to what you had in your mind. Video editing is achieved
by using editing software.
2. Editing software
There are many free and accessible editing tools available to use such as iMovie on Mac and
Windows Movie Maker on Windows. There are other free editing programmes available
online such as: Filmora, Open Source and Lumen5. For the purposes of this project we have
chosen to use Lightworks as it can be used on Mac, Windows and Linux and it is free and
easy to use.
You can access Lightworks via this link https://www.lwks.com/ . From here, you can
download the programme and register for it. In the next section we have included a step by
step guide to using certain features of Lightworks. Please note that this guide is
accompanied by a video tutorial, which explains the process in more detail.
3. Lightworks Tutorial
Here we have compiled a short guide to import, rearrange and cut your video clips and
images on the editing software Lightworks.
1

Creating a new project
Once you have downloaded the editing program via this link: https://www.lwks.com/ .
and have opened the programme, you will see this screen.
Here you will find your project/s. As this is your first time using this software, all the
squares will be empty.
Click on ‘create project’ (you will be prompted to name your project)
Select the frame rate that your film was shot at (this should be 24 fps)
Interface and Log tab
InterfaceThe editing programme splits the project into four tabs; ‘log’, ‘edit’, ‘vfx’ and ‘audio’. Your
2

screen will automatically show the ‘log’ tab.
Log Tab
The log tab features a project contents bin on the left half of the window. This is where
you can import and store various media files, including video, audio, and still images.
Importing media
Before you can start editing, you need to import some media.
Go to the menu that sits at the top of the log, then click ‘local Files’ (it will show
you all the various media files you have stored on your computer)
You can also click on ‘Places’, just under the log menu.
Once you find a file you want to use in your video, double click on the file
thumbnail.
Tip: we recommend that you store all files for your film into one folder to save searching
through all of your documents.
3

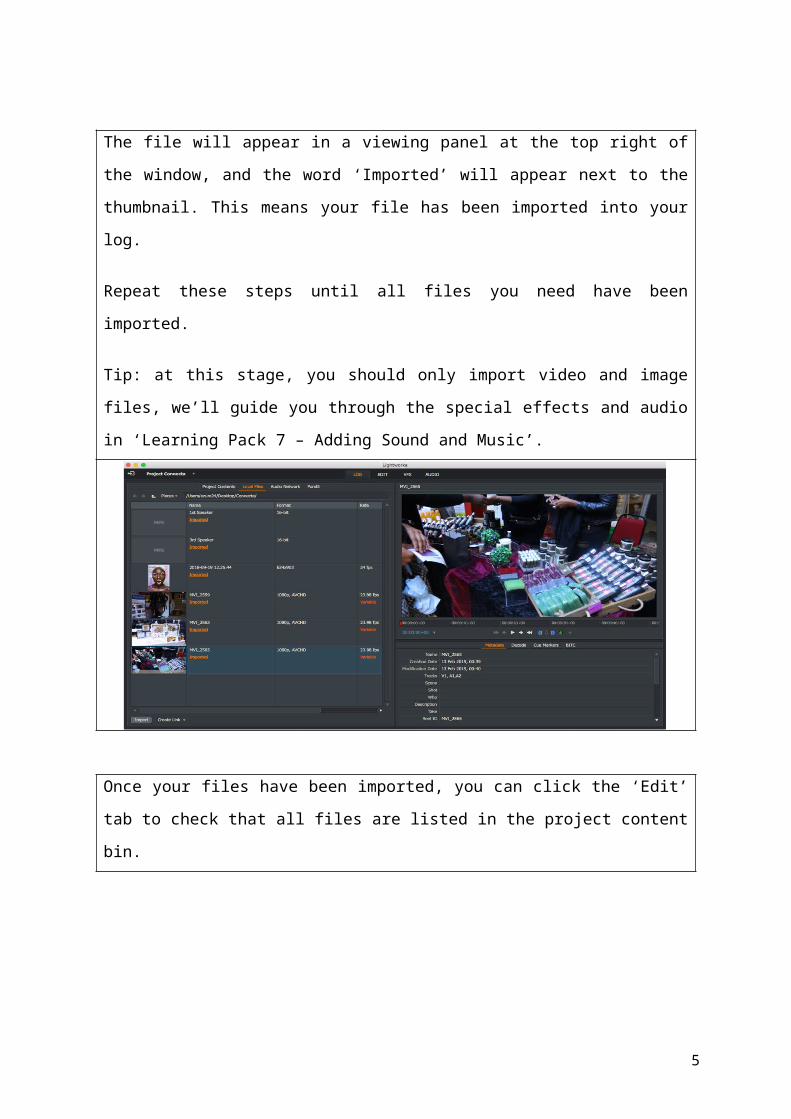
The file will appear in a viewing panel at the top right of the window, and the word
‘Imported’ will appear next to the thumbnail. This means your file has been imported into
your log.
Repeat these steps until all files you need have been imported.
Tip: at this stage, you should only import video and image files, we’ll guide you through
the special effects and audio in ‘Learning Pack 7 – Adding Sound and Music’.
Once your files have been imported, you can click the ‘Edit’ tab to check that all files are
listed in the project content bin.
4
The edit tab
Edit tab
The editing tab is where you can mix your video, image and audio files to create a finished
video.
Familiarise yourself with the three main features of this window:
The project contents bin in the top left, which contains all your imported files.
The timeline media viewer in the top right, where you can view all the media in
the timeline.
The timeline at the bottom, which is where you can arrange all media files in a
chronological sequence.
The project contents bin
5

Project contents bin
If you double click on one of the files in the project contents bin, a second window will
appear in between the project contents bin and the timeline media viewer (top-middle)
which we will refer to as the source media viewer. This is where you can view and edit
your media from the project contents bin before you add them into the timeline.
The timeline
The timeline
The timeline is your workspace.
To add a file from the project contents bin into the timeline, click on the file you
want and drag it into the timeline.
If you click on the file you’ve added to the timeline it will appear in the timeline
media viewer on the top-right.
If you click and hold the vertical red line you can move it back and forth. You will
notice the file in the timeline media viewer will also move to where the red line is
on the timeline.
6

Tracks
‘V1’, ‘A1’, ‘A2’, ‘A3’ and ‘A4’ are called tracks. The ‘V’ stands for video and the ‘A’
stands for audio.
The numbers that follow either ‘V’ or ‘A’ correspond to the number of tracks there
are for video or audio.
By default, video has one track and audio has four tracks, but we will show you
how to add more on this later.
Creating clips
Creating clips
As an example, I have long a clip of beauty products being displayed in an exhibition on
my project contents bin. Let’s say I wanted to use only 15 seconds of this clip in the
timeline:
By viewing the clip in the source media viewer, I can place the red cursor to the
position where I want the 15 second clip to begin and press ‘i’ on my keyboard (or
this symbol just below the source media viewer), this marks the ‘in’ point
(where the clip begins).
I play the clip from this point for 15 seconds, after 15 seconds I stop the clip and
7

then press ‘o’ on my keyboard (or this symbol just below the source media
viewer), this marks the ‘out’ point (where the clip ends).
To add this short clip into the timeline, I click on this symbol, just below the
source media viewer and the clip will be inserted into the timeline.
Tracks
Tracks
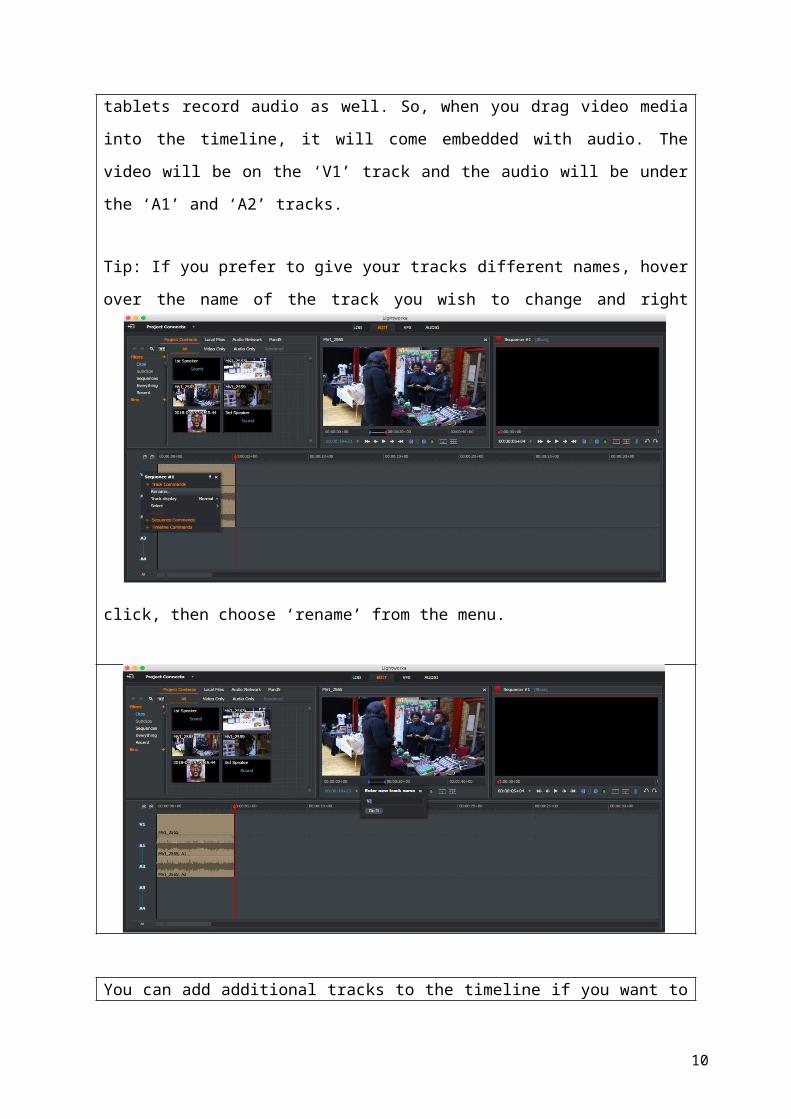
Most cameras that record video, including smartphones and tablets record audio as well.
So, when you drag video media into the timeline, it will come embedded with audio. The
video will be on the ‘V1’ track and the audio will be under the ‘A1’ and ‘A2’ tracks.
Tip: If you prefer to give your tracks different names, hover over the name of the track
you wish to change and right click, then choose ‘rename’ from the menu.
8

You can add additional tracks to the timeline if you want to create space for more clips:
Right click where the tracks are named and select ‘sequence commands’ from the
menu, then select ‘tracks’ and select ‘add video’ or ‘add audio’.
Tip: Lightworks also allows you to lock tracks. This is particularly useful if you 1) want to
unlink video from the audio, or 2) don’t want to accidently move a clip out of place. To do
this, just click on the name of the track. For example, if you want to lock track ‘V1’, click
on ‘V1’ and the track will visually grey out.
9
Now that the video on the ‘V1’ track is locked, you can move its audio around to a
different spot by dragging it or delete the audio by right clicking on it and selecting
‘delete’. This is useful if you want different sounds to go with a particular video or if you
want the audio of a clip to be played elsewhere on the timeline.
Undo/redo
Undo/redo
If you accidently delete or remove something, hold down the command button (⌘) on
your keyboard and press Z (if using a Mac) or hold control (Ctrl) and press Z (if using
Windows).
Alternatively, at the bottom of the timeline media viewer, on the far right there will be
two symbols. Click to undo and to redo. Undo, undoes an action by one move
and redo, redoes an action by one move.
IMPORTANT: when moving clips in the timeline, if you drag one clip over another, it will
delete information from the clip underneath.
For example, perhaps you want to add some sound to a video clip, but you accidentally
dragged it onto the video clip itself rather than to the clip above. When you drag the
audio clip back again, you’ll see that a chunk of the bottom video clip is now missing.
Don’t worry, just press Command > Z (or Control > Z) to restore the data.
10

Timeline clipping
Timeline clipping
So, you have created a clip using the source media viewer? Well, there is another way to
cut sections out of video and audio clips in the timeline.
First, move the vertical red line in the timeline across a clip until it reaches the
beginning of the section you want to cut. You can do this by clicking play on the
timeline media viewer, or by simply dragging the red vertical line on the timeline.
Once you have the vertical red line at the beginning point, click the Blue ‘in’
control at the bottom of the timeline media viewer to mark that point, just
like you did in the source media viewer earlier.
Now click play again or drag the red vertical line to the end point of the section
and click the blue ‘out’ control to mark that point.
If you’d like to delete the section you just selected, you can click on the ‘remove’
tool in the timeline media viewer controls .
When you click ‘remove’, it will delete that section and leave a gap in your clip
down in the Timeline.
11

If you do not want a gap, and prefer to have the remaining segments of the clip joined
together, simply click the ‘delete’ control in the timeline media viewer controls .
Trimming
Trimming
If you move your mouse cursor over the edges of a clip in the timeline, white
brackets will appear. Depending on where you move the cursor, you may see the
brackets appear inside the clip or outside.
To trim a clip, you need to use the inside brackets.
Click on the white brackets and they should turn yellow.
12

The yellow brackets allow you to trim information away from either end of a clip.
Once you have trimmed the clip, click outside the clip and the yellow brackets will
turn white or disappear.
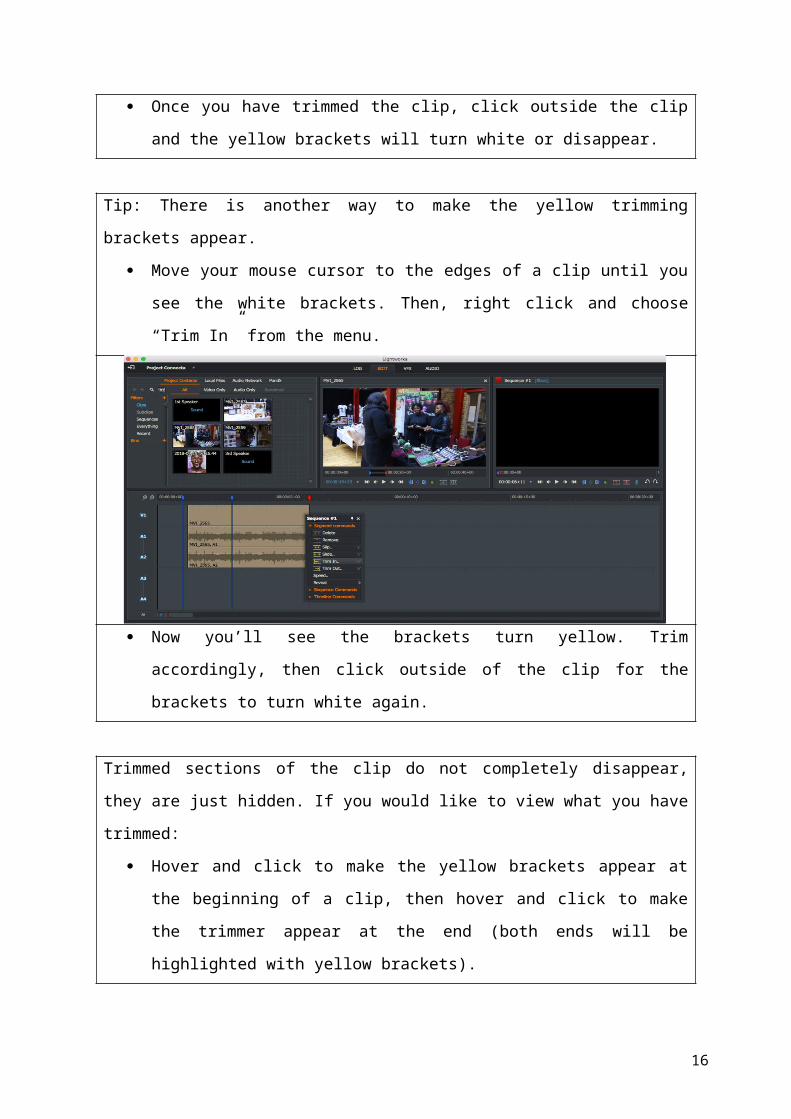
Tip: There is another way to make the yellow trimming brackets appear.
Move your mouse cursor to the edges of a clip until you see the white brackets.
Then, right click and choose “Trim In” from the menu.
13

Now you’ll see the brackets turn yellow. Trim accordingly, then click outside of the
clip for the brackets to turn white again.
Trimmed sections of the clip do not completely disappear, they are just hidden. If you
would like to view what you have trimmed:
Hover and click to make the yellow brackets appear at the beginning of a clip, then
hover and click to make the trimmer appear at the end (both ends will be
highlighted with yellow brackets).
Drag the clip left and right to view the trimmed parts.
As you drag the clip left and right, you’ll see the action moving back and forth in
the timeline media viewer.
Tip: putting the yellow brackets at both ends of a clip is a simple way to select the precise
section of a clip that you need.
Duration
Duration
Perhaps you have a video clip that you would love to use, but it is too long. Maybe it is a
30 second opening sequence but you only have room for 15 seconds.
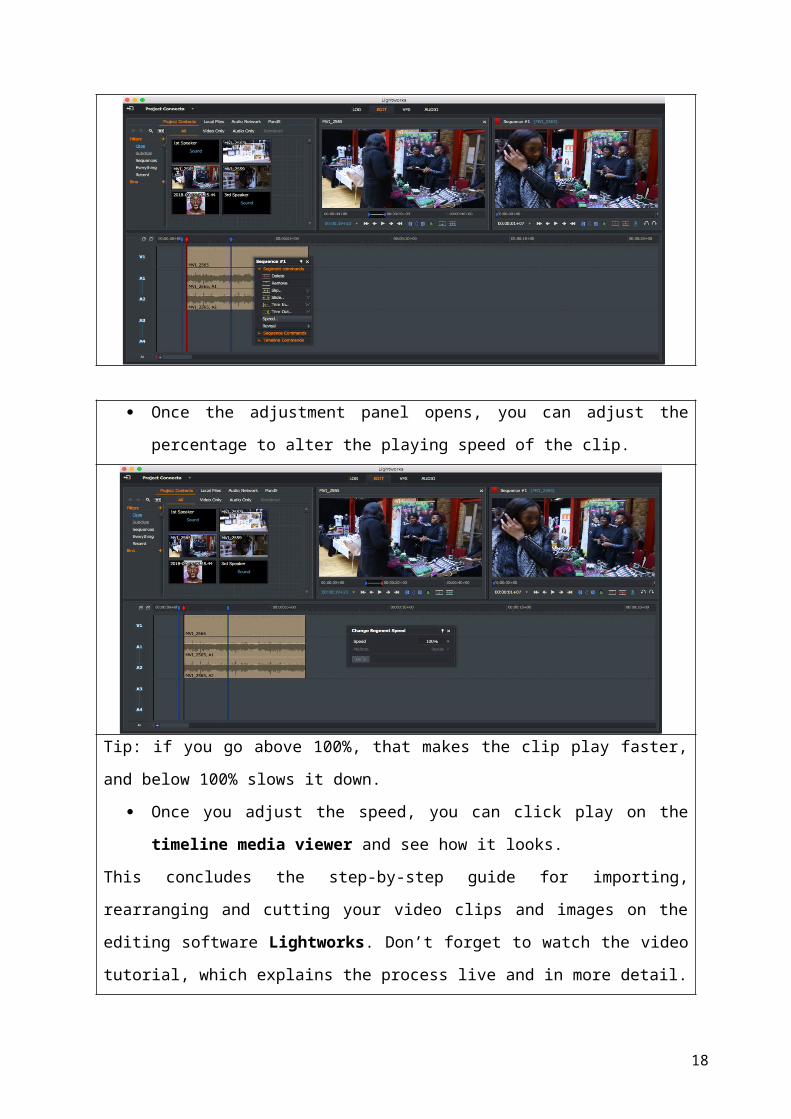
To speed up or slow down a clip, simply right-click on that clip in the timeline, then
choose ‘speed’ from the menu.
14

Once the adjustment panel opens, you can adjust the percentage to alter the
playing speed of the clip.
Tip: if you go above 100%, that makes the clip play faster, and below 100% slows it down.
Once you adjust the speed, you can click play on the timeline media viewer and
see how it looks.
This concludes the step-by-step guide for importing, rearranging and cutting your video
clips and images on the editing software Lightworks. Don’t forget to watch the video
tutorial, which explains the process live and in more detail.
4. Cutting
15
Cutting is the name given when a video clip changes from one clip to another clip. The term
refers to the time when actual film rolls were cut, rearranged and then put back together. It
is said among video editors that the best cuts are the ones that are ‘invisible’, in other
words, cuts that the audience doesn’t notice. To perform ‘invisible’ cuts, there are several
things you can do:
1. Cut to match action
Cutting to match the action means changing a shot when a character is moving. In this
example above, the shot on the left, which is a long shot transitions into a medium long
shot. Notice how the man motions to hand the woman a piece of paper on the left and
the shot on the right continues the same action. If done correctly, the audience wouldn’t
notice the shot change from a long to a medium long shot.
2. Shot reverse shot
The shot reverse shot is used when people are having a conversation (this can be more
than two people). Switching shots between people speaking isn’t noticeable because the
camera and the audience is following the sound. However, switching to whoever is
speaking can become too predictable and boring, occasionally it’s good practice to switch
to characters after they have started speaking so the camera follows the speaker and not
16

the other way around.
3. Cut to match camera movement
In this particular shot, the camera tilts upwards as the bone in the image on the left is
thrown into the air. As it falls, the camera follows it downwards. As the bone continues to
fall, the film cuts to a spaceship in space. The movement of the camera and the similar
shape of the objects allow for a smooth cut.
4. Cut to match visuals
Both of the shots above feature an adult hugging a child in matching compositions. Also
notice how the colours are similar, with the warm yellows of the incandescent bulbs in
the lampshades on the picture on the left and the car headlights in the picture on the
right. As the two shots are similar, the cut is less noticeable.
4. Glossary
English Español Français Deutsch
Video editing Montaje / Edición Le montage vidéo die Videobearbeitung
17
Editing software Programa de edición Logiciel de montage die Videobearbeitungssoftware
Camera movement Movimiento de cámara
Mouvement de camera
die Kamerabewegung
To change Cambiar Changer ändern/ tauschen
To alter Alterar Modifier ändern
To rearrange Reorganizar Réarranger neu anordnen
To edit Editar / Montar Faire le montage bearbeiten
Timeline Cronología Timeline die Zeitleiste
Audio Audio Audio der Ton
Track Pista Piste die Spur
Trim Recorte / Recortar Découper das Kürzen/Zuschneiden
Cut Corte / Cortar Couper der Schnitt
Clip Clip Clip der Clip
Footage Metraje Séquence Filmmaterial
5. Self-assessment
After editing your film, tick the column that best represents how you feel about the following
statements:
Not at all
confident
Nearly
there
Very
confident
1 I understand what the term video editing means and when it
occurs in the filmmaking process.
18

2 I understand why a video must be edited to create a film.
3 I know what video editing software is for and which one to
use.
4 I understand how to import, rearrange and cut video files with
the video editing software Lightworks.
5 I am aware of how to achieve ‘invisible cuts’.
6. References
- Keet, J. (2018). How to Use Lightworks 14 for Beginner Video Editors. [online]
TEACHER'S TECH. Available at: http://teachers.tech/ [Accessed 16 Feb. 2019].
- Lightworks. (2018). EditShare LLC.
- North by Northwest. (1959). [film] Directed by A. Hitchcock. Hollywood: Metro-
Goldwyn-Mayer.
- Stranger Things. (2016). [DVD] Created by M. Duffer and R. Duffer. Hollywood:
Netflix.
- 2001: A Space Odyssey. (1968). [film] Directed by S. Kubrick. Hollywood: Metro-
Goldwyn-Mayer.
19
![Lot N° 33 / 34816 piezas · 305 111043[1] thumbnail 20200 406 093916[1] thumbnail 20200 306 163106[1] thumbnail 20200 406 110021[1] thumbnail 20200 310 093707[1] thumbnail 20200](https://img.pdfslide.net/doc/110x75/60b49dcc34471c67ab0cc0ed/lot-n-33-34816-piezas-305-1110431-thumbnail-20200-406-0939161-thumbnail.jpg)