Embed Size (px)
Citation preview
Web 2.0 Solutions with Oracle WebCenter 11g
Plinio Arbizu
Amit Gupta
Ashok Aggarwal
Sukanta Hazra
Chapter No. 6
"Portlets"
For More Information: www.packtpub.com/web-2-0-solutions-with-oracle-webcenter-11g/book
In this package, you will find: A Biography of the authors of the book
A preview chapter from the book, Chapter NO.6 "Portlets"
A synopsis of the book’s content
Information on where to buy this book
About the Authors Plinio Arbizu is member of Oracle ACE Director Program, sponsored by otn.oracle.com, which selects professionals in the world who have a strong technical level and commitment to Oracle technology diffusion. He has more than ten years of IT experience in projects using Oracle Technology, for commercial, pharmaceutical, and finance areas in companies like Bristol Myers Squibb Peru and Consite.
Currently, he lives in Mexico and serves as a Senior Consultant in Deloitte Consulting. Also, he is an Official Oracle University Instructor in courses like JEE and Oracle WebCenter. Additionally, he has participated as a speaker and organizer of Oracle technology events in Colombia, Chile, Argentina, and Peru
Plinio is a graduate of computer engineering at the Pontificia Universidad Catolica del Peru. You can follow him through his blog: http://plinioa.blogspot.com.

For More Information: www.packtpub.com/web-2-0-solutions-with-oracle-webcenter-11g/book
I begin by thanking James Lumsden, for the opportunity to write this book. His encouragement, support, and commitment were vital to complete this project.
This book could never have happened without the guidance of our editor, Rakesh Shejwal, who has always been looking after our deliveries. Thanks for your coordination and collaboration in the technical reviews of each chapter.
I would also like to acknowledge the Oracle WebCenter team; Vince Casarez and George Maggessy. They provided invaluable contributions with knowledge and tools.
Special thanks to Leena Purkait, who from the beginning was following the development of each chapter. Her persistence and dedication was instrumental in completing the book.
Finally, my gratitude to the whole team at Packt Publishing. Thanks for your effort and support in the publication of the book.
Ashok Aggarwal has been delivering web-based collaboration, document management, content management, and workflow solutions using Oracle's products since before they were named Enterprise 2.0. As Oracle's offerings have matured and the market has grown, so has Ashok's involvement in the Oracle Fusion Middleware technology stack, leading to early adoption of Oracle WebCenter Suite 10g and 11g. Since 2002, Ashok has delivered robust solutions by leading a highly talented implementation organization, M&S Consulting. Prior to co-founding M&S, Ashok focused on delivery of enterprise applications and integration solutions at Accenture in a variety of industry verticals. Ashok has led innovative business transformation initiatives leveraging SOA, BPM, BI, Identity Management, and Enterprise 2.0 technologies as he works to solve today's most challenging business problems. He is a regular instructor and speaker at private and public events. Along with white papers and trade journal publications on Fusion Middleware, Ashok is co-authoring an Oracle SOA book and sponsoring technology and process publications for others on his team at M&S Consulting. Ashok holds a B.S. in Biomedical Engineering and a Minor in Computer Science from The Johns Hopkins University.
To the talented and tireless M&S team, our wonderful customers, the Oracle E2.0 team, Packt Publishing, and, most importantly, my family and friends. All have supported me greatly in this process.
For More Information: www.packtpub.com/web-2-0-solutions-with-oracle-webcenter-11g/book
Amit Gupta has spent most of his career in high technology, media, and infrastructure. He currently leads the Enteprise 2.0 infrastructure and development team at M&S Consulting.
Amit co-founded Affle Limited, which is a mobile media company with extensive operations in the Asia-Pacific region. While there, he helped to drive new product initiatives and helped to complete Microsoft's strategic investment in Affle. Prior to Affle, Amit worked at Bloomberg New York, and subsequently at Bloomberg London, helping to plan and implement major new projects such as "Bloomberg Anywhere" that helped to drive $500M+ in new revenues annually. While there, he also designed and implemented highly scalable system architectures that were used to support millions of users. Systems integration is his specialty.
He is a technology enthusiast and likes to get his hands dirty with new projects. He has also spent time at various high-technology companies, developing and applying virtual reality applications, medical imaging algorithms, neural networks, and financial trading systems. Amit holds a B.S. in Computer Science (Honors) from The Johns Hopkins University (USA).
To my supportive family, the Oracle Team, and Packt Publishing. This would not have been possible without you.
Sukanta K. Hazra has a passion for technology and constant desire to try out new areas. This has taken him through academic research on wireless networks and networking protocols, mobile software development, mobile advertisement platforms, and enterprise software and architecture. His experience in various fields has given him a unique perspective on software development and the evolution of software and systems in the evolving technology landscape.
Sukanta was one of the founding members of Affle Limited, which is a mobile media company with extensive operations in the Asia-Pacific region. At Affle, Sukanta led the development of their mobile software products, working on several mobile platforms. He also designed and led the implementation of Affle's mobile advertisement platform. Prior to Affle, he worked as a researcher in the field of wireless networks at the Institute for Infocomm Research, Singapore.

For More Information: www.packtpub.com/web-2-0-solutions-with-oracle-webcenter-11g/book
He has contributed several papers to IEEE conferences and journals. Sukanta considers himself to be a 'geek' and both enjoys tinkering with the guts of the system and is equally comfortable dealing with the high-level architectural view of the system. His current passion is Service-Oriented Architecture and the use of use of open standards and their consequent impact on the enterprise.
Sukanta holds both a Masters degree in Engineering and a Bachelors degree (Honors) in Engineering from National University of Singapore.
To the thousands of software engineers out there who are making it a better world for all of us. To my colleagues at M&S Consulting for their encouragement and helpful advice, and to Packt Publishing for their suggestions and patience. Thank you for making this possible.
For More Information: www.packtpub.com/web-2-0-solutions-with-oracle-webcenter-11g/book
Web 2.0 Solutions with Oracle WebCenter 11g Oracle WebCenter Suite is the industry's most comprehensive enterprise portal platform designed for business users, unified with business applications, Enterprise 2.0 services, and social communities. It incorporates Web 2.0 content, collaboration, and communication services. However, without proper guidance on developing performance-critical enterprise applications, it is easy to make the wrong design and technology decisions.
Packed with screenshots, this book offers you in-depth knowledge of developing custom WebCenter applications for your various enterprise requirements. Integrate various web services to make development simpler and faster. Build fast, reliable, and robust Web 2.0 applications with this hands-on practical tutorial.
Oracle WebCenter Suite is a stack of products that helps implement Web 2.0 solutions in organizations. This book enables developers to learn the important concepts. It shows several scenarios where Oracle WebCenter 11g technology can be used to improve the productivity of your organization. Each chapter provides a practical application of the technology. It will guide you through many web-building features such as pages and portlets.
Finally, the book describes complete solutions, such as Oracle WebCenter Spaces, and ready-to-use collaborative environments.
What This Book Covers Chapter 1, What is Oracle WebCenter?, summarizes the features of Oracle WebCenter and shows the business needs that this technology solves.
Chapter 2, WebCenter Installation and Configuration, provides the necessary instructions to install WEB Center Suite successfully in an environment standard of development.
Chapter 3, Setting up the Development Environment, helps us to prepare the development environments and the application server, in order to support our WebCenter applications.
Chapter 4, Getting Started with WebCenter Development: Hello World(s), helps us create a HelloWorld web service. We also accomplish a verification of our development environment and gain confidence in being able to build the foundational components and skills needed for WebCenter development.
For More Information: www.packtpub.com/web-2-0-solutions-with-oracle-webcenter-11g/book
Chapter 5, Design and Personalization, explains how to develop templates and add data access features to our WebCenter applications.
Chapter 6, Portlets, explains how to implement features using portlets in our applications, as component reuse is one of principal goals of our applications.
Chapter 7, Discussions, Wiki, and Blog Services, demonstrates simple ways to incorporate the Wiki and Blog Services into your custom WebCenter applications.
Chapter 8, Search Service, explores the WebCenter Search Service, Tags, Links, and RSS. By creating a sample application, it explains how to integrate WebCenter Search Service into your custom WebCenter application.
Chapter 9, Personalization with Oracle Composer, works with Oracle WebCenter in two parts. In the first part, as developers, we prepare the environment for end users. Then, we assume the role of end user to personalize the page defined in the previous step.
Chapter 10, Oracle WebCenter Spaces Overview, shows how to configure and customize Oracle WebCenter Spaces.
For More Information: www.packtpub.com/web-2-0-solutions-with-oracle-webcenter-11g/book
PortletsIn the previous chapter, we looked at how to build a page containing information on our example company's requirements, and the offers made by its suppliers. Now, we are interested in adding a chart to that page that graphically shows the status of requirements pending and closed, as a percentage. However, this graph will not only be required on this page but in many others. Therefore, it is necessary build this chart as a reusable component. In this kind of scenario, the technology of portlets can help us.
A portlet is a component of software that can be part of a page. In consequence, a page can be enriched by many portlets allowing us to grab the contents of various sources of data. This chapter will help us to understand the concept associated with this technology and how it can apply to our projects with Oracle WebCenter.
During this chapter, you will learn the following:
• JSF specifi cation concepts• The types of portlets you can build with WebCenter• Developing a portlet using ADF• Integrating portlets with custom Applications
For More Information: www.packtpub.com/web-2-0-solutions-with-oracle-webcenter-11g/book
Portlets
[ 128 ]
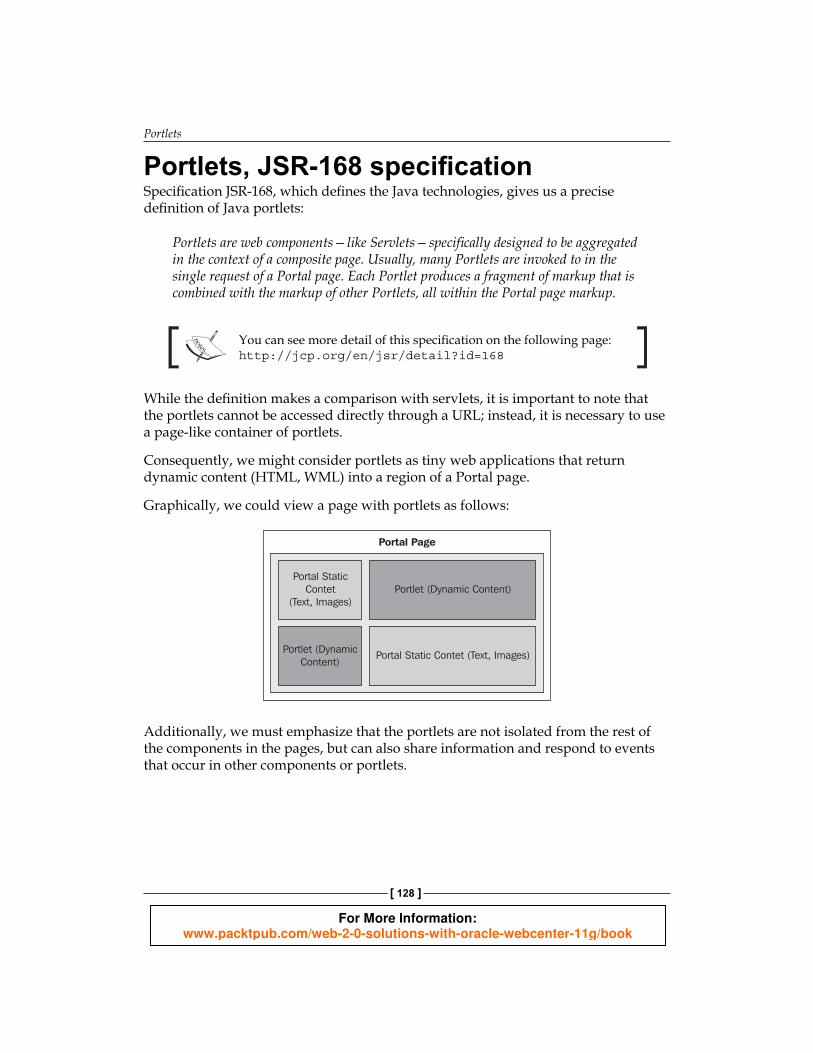
Portlets, JSR-168 specifi cation Specifi cation JSR-168, which defi nes the Java technologies, gives us a precise defi nition of Java portlets:
Portlets are web components—like Servlets—specifi cally designed to be aggregated in the context of a composite page. Usually, many Portlets are invoked to in the single request of a Portal page. Each Portlet produces a fragment of markup that is combined with the markup of other Portlets, all within the Portal page markup.
You can see more detail of this specifi cation on the following page:http://jcp.org/en/jsr/detail?id=168
While the defi nition makes a comparison with servlets, it is important to note that the portlets cannot be accessed directly through a URL; instead, it is necessary to use a page-like container of portlets.
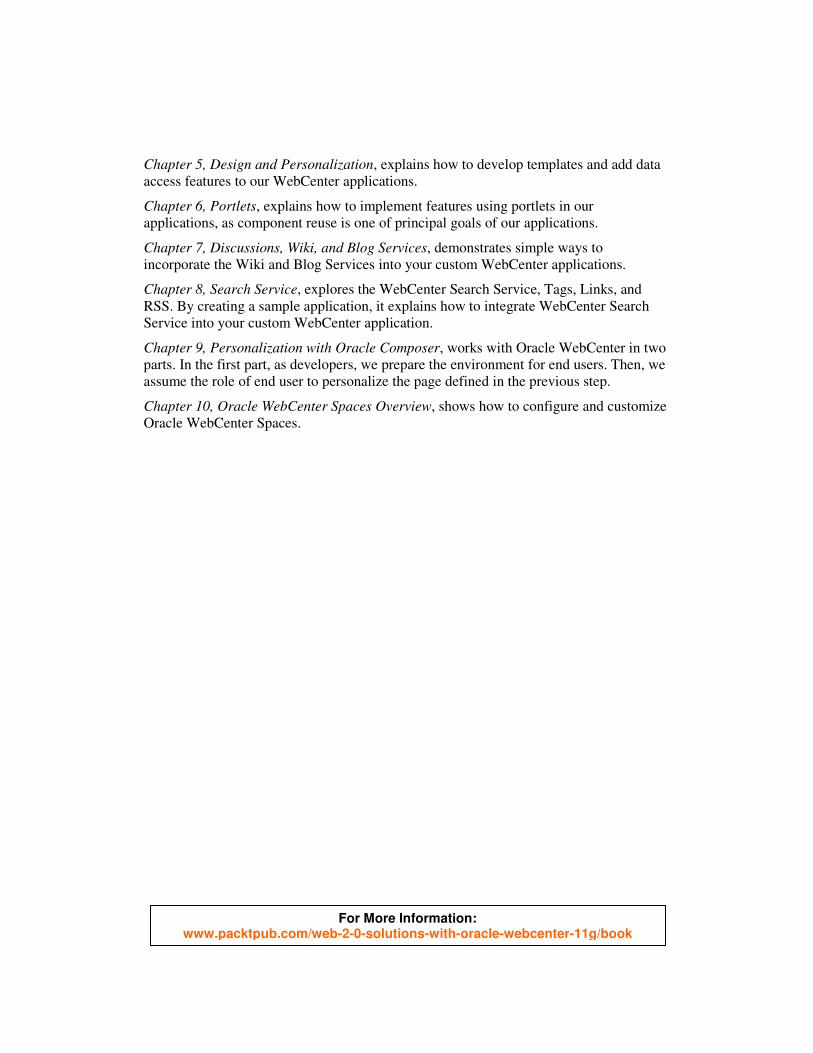
Consequently, we might consider portlets as tiny web applications that return dynamic content (HTML, WML) into a region of a Portal page.
Graphically, we could view a page with portlets as follows:
Additionally, we must emphasize that the portlets are not isolated from the rest of the components in the pages, but can also share information and respond to events that occur in other components or portlets.
For More Information: www.packtpub.com/web-2-0-solutions-with-oracle-webcenter-11g/book
Chapter 6
[ 129 ]
WSRP specifi cation The WSRP specifi cation allows exposing portlets as Web services. For this purpose, clients access portlets through an interface (*. wsdl) and get graphic content associated. Optionally, the portlet might be able to interact directly with the user through events ocurring on them.
This way of invoking offers the following advantages:
• The portals that share a portlet centralize their support in a single point.• The portlet integration with the portal is simple and requires
no programming.• The use of portlets, hosted on different sites, helps to reduce the load
on servers.
WebCenter portlets Portlets can be built in different ways, and the applications developed with Oracle WebCenter can consume any of these types of portlets.
• JSF Portlets : This type of portlet is based on a JSF application, which is used to create a portlet using a JSF Portlet Bridge.
For More Information: www.packtpub.com/web-2-0-solutions-with-oracle-webcenter-11g/book
Portlets
[ 130 ]
• Web Clipping : Using this tool, we can build portlets declaratively using only a browser. These portlets show content from other sites.
• OmniPortlet : These portlets can retrieve information from different types of data sources (XML, CSV, database, and so on) to expose different ways of presenting things, such as tables, forms, charts, and so on.
• Content Presenter : This allows you to drop content from UCM on the page and display this content in any way you like or using a template.
• Ensemble : This is a way to "mashup" or produce portlets or "pagelets" of information that can be displayed on the page.
• Programmatic Portlets: Obviously, in addition to the previous technologies that facilitate the construction of portlets, it is also possible to build in a programmatic way. When we build in this way, we reach a high degree of personalization and control. However, we need specialized Java knowledge in order to program in this way.
As we can see, there are several ways in which we can build a portlet; however, in order to use the rich components that the ADF Faces framework offers, we will focus on JSF Portlets.
Developing a portlet using ADF The portlet that we will build will have a chart, which shows the status of the company's requests. To do this, we must create a model layer that represents our business logic and exposes this information in a page.
Therefore, we are going to do the following steps:
1. Create an ADF application. 2. Develop business components.3. Create a chart page.4. Generate a portlet using the page.5. Deploy the portlet.
In this example, we use a page for the construction of a portlet; however, ADF also offers the ability to create portlets based on a fl ow of pages through the use of ADF TaskFlows. You can fi nd more information on the following link: http://download.oracle.com/docs/cd/E15523_01/web.1111/b31974/taskflows.htm#BABDJEDD
For More Information: www.packtpub.com/web-2-0-solutions-with-oracle-webcenter-11g/book
Chapter 6
[ 131 ]
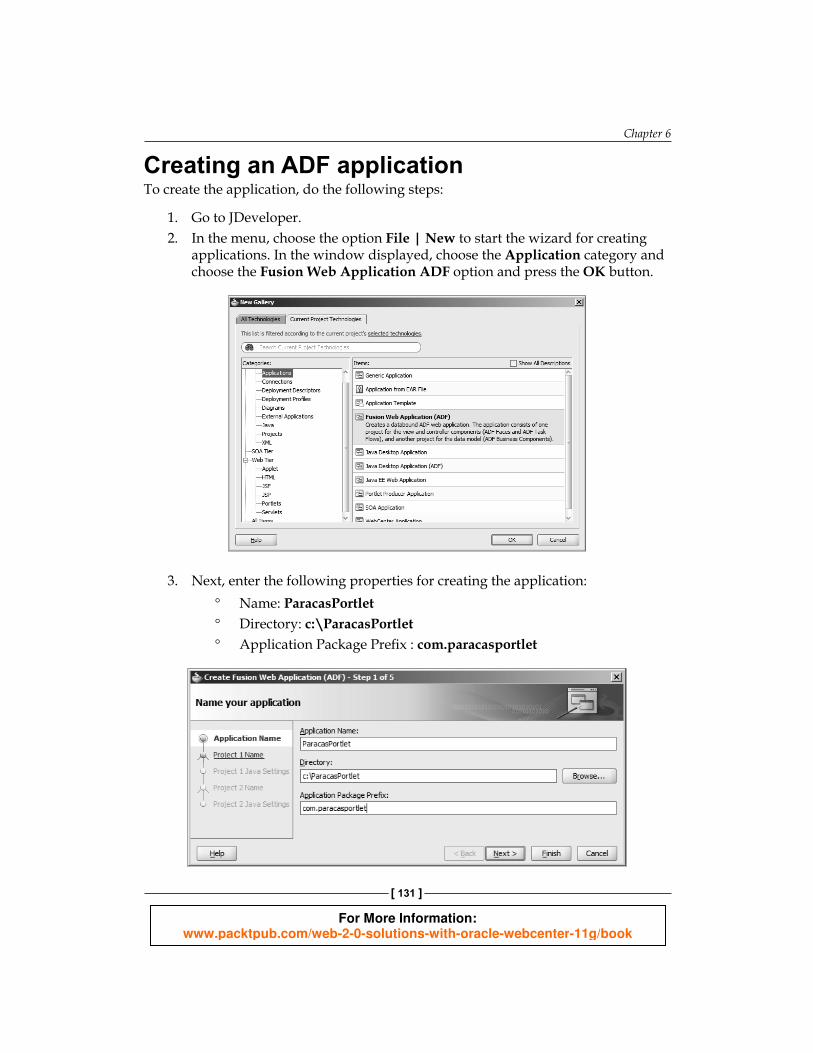
Creating an ADF applicationTo create the application, do the following steps:
1. Go to JDeveloper.2. In the menu, choose the option File | New to start the wizard for creating
applications. In the window displayed, choose the Application category and choose the Fusion Web Application ADF option and press the OK button.
3. Next, enter the following properties for creating the application: ° Name: ParacasPortlet ° Directory: c:\ParacasPortlet ° Application Package Prefi x : com.paracasportlet
For More Information: www.packtpub.com/web-2-0-solutions-with-oracle-webcenter-11g/book
Portlets
[ 132 ]
4. Click Finish to create the application.
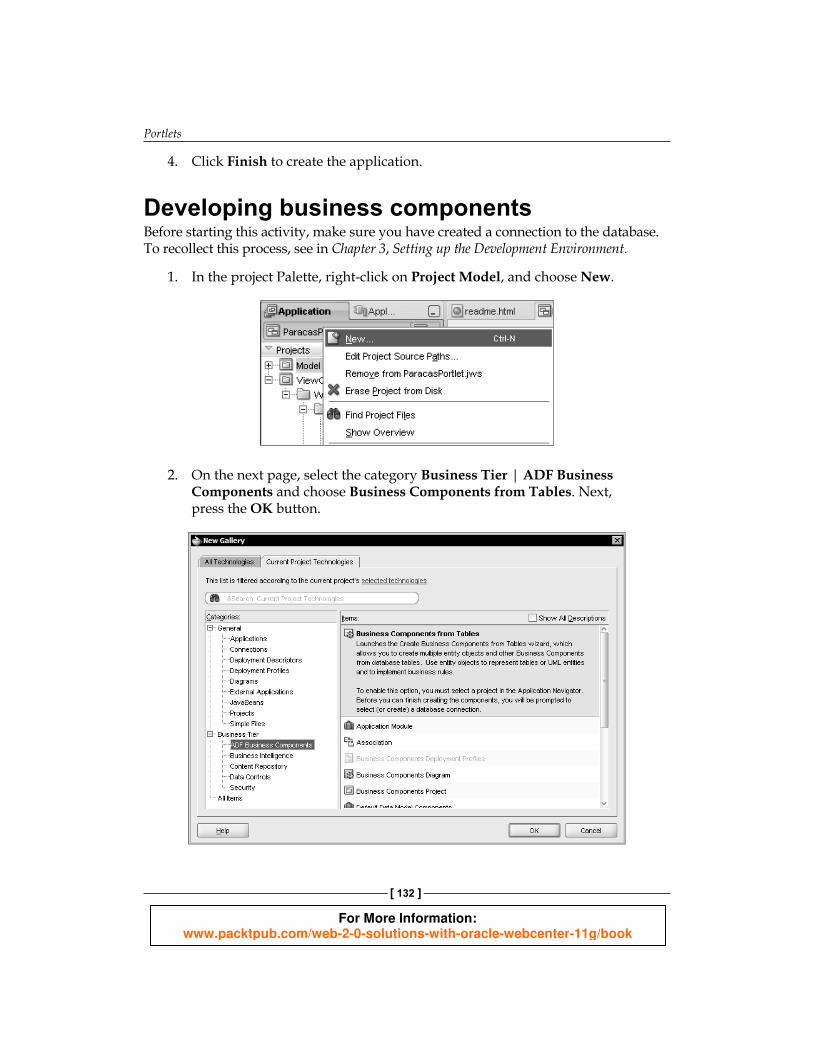
Developing business componentsBefore starting this activity, make sure you have created a connection to the database. To recollect this process, see in Chapter 3, Setting up the Development Environment.
1. In the project Palette, right-click on Project Model, and choose New.
2. On the next page, select the category Business Tier | ADF Business Components and choose Business Components from Tables. Next, press the OK button.
For More Information: www.packtpub.com/web-2-0-solutions-with-oracle-webcenter-11g/book
Chapter 6
[ 133 ]
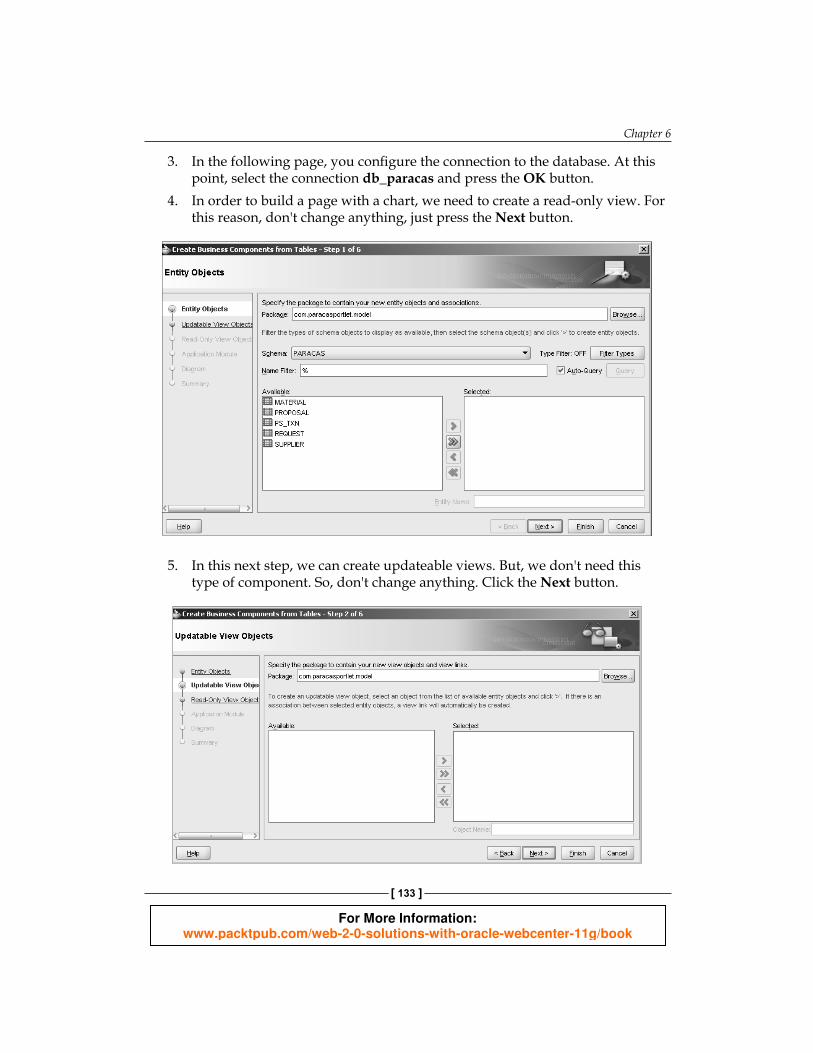
3. In the following page, you confi gure the connection to the database. At this point, select the connection db_paracas and press the OK button.
4. In order to build a page with a chart, we need to create a read-only view. For this reason, don't change anything, just press the Next button.
5. In this next step, we can create updateable views. But, we don't need this type of component. So, don't change anything. Click the Next button.
For More Information: www.packtpub.com/web-2-0-solutions-with-oracle-webcenter-11g/book
Portlets
[ 134 ]
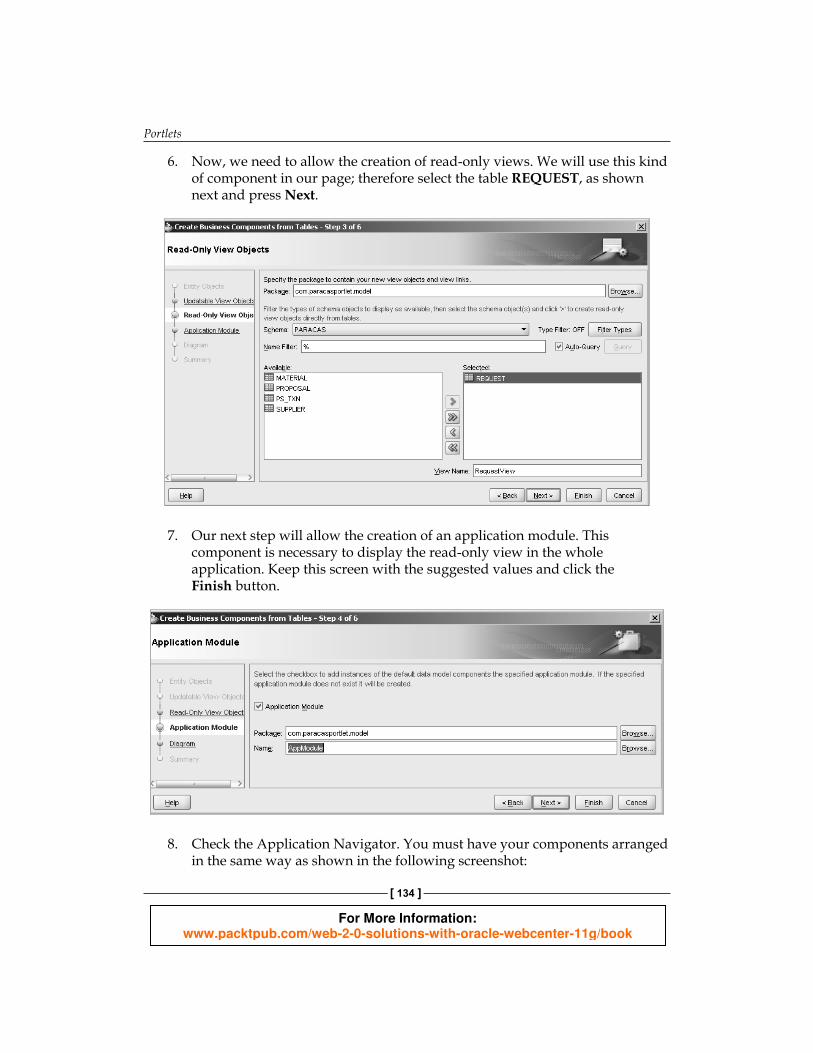
6. Now, we need to allow the creation of read-only views. We will use this kind of component in our page; therefore select the table REQUEST, as shown next and press Next.
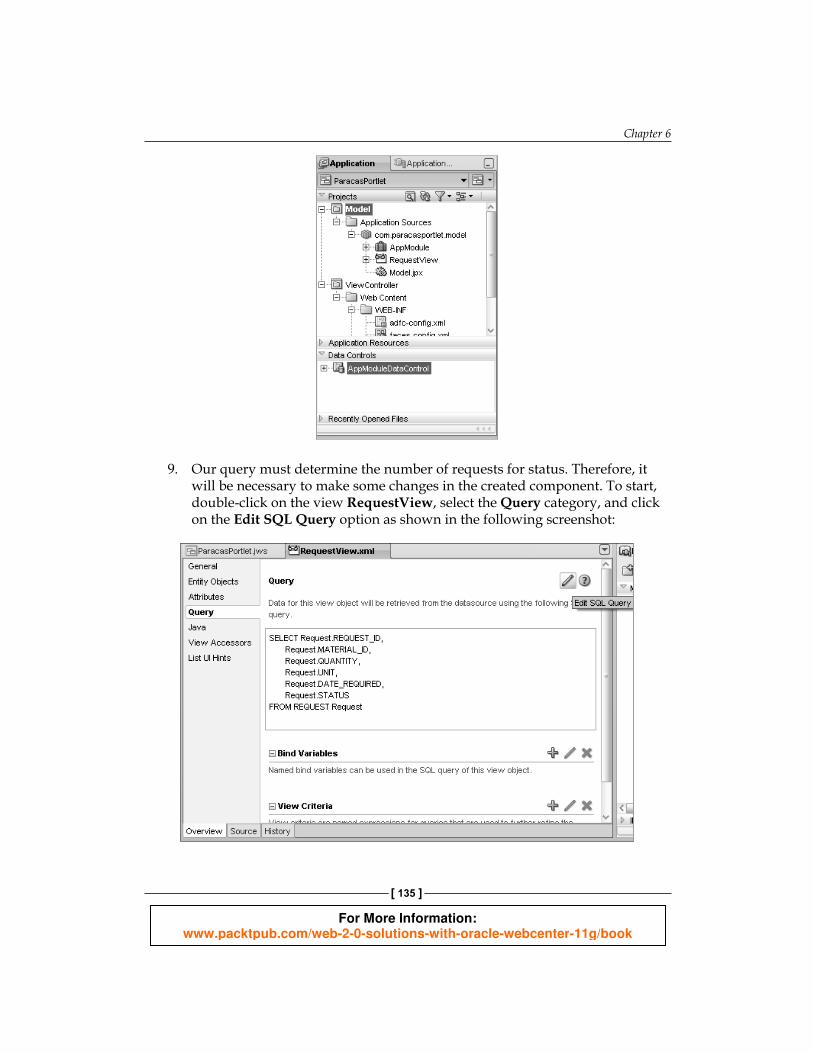
7. Our next step will allow the creation of an application module. This component is necessary to display the read-only view in the whole application. Keep this screen with the suggested values and click the Finish button.
8. Check the Application Navigator. You must have your components arranged in the same way as shown in the following screenshot:
For More Information: www.packtpub.com/web-2-0-solutions-with-oracle-webcenter-11g/book
Chapter 6
[ 135 ]
9. Our query must determine the number of requests for status. Therefore, it will be necessary to make some changes in the created component. To start, double-click on the view RequestView, select the Query category, and click on the Edit SQL Query option as shown in the following screenshot:
For More Information: www.packtpub.com/web-2-0-solutions-with-oracle-webcenter-11g/book
Portlets
[ 136 ]
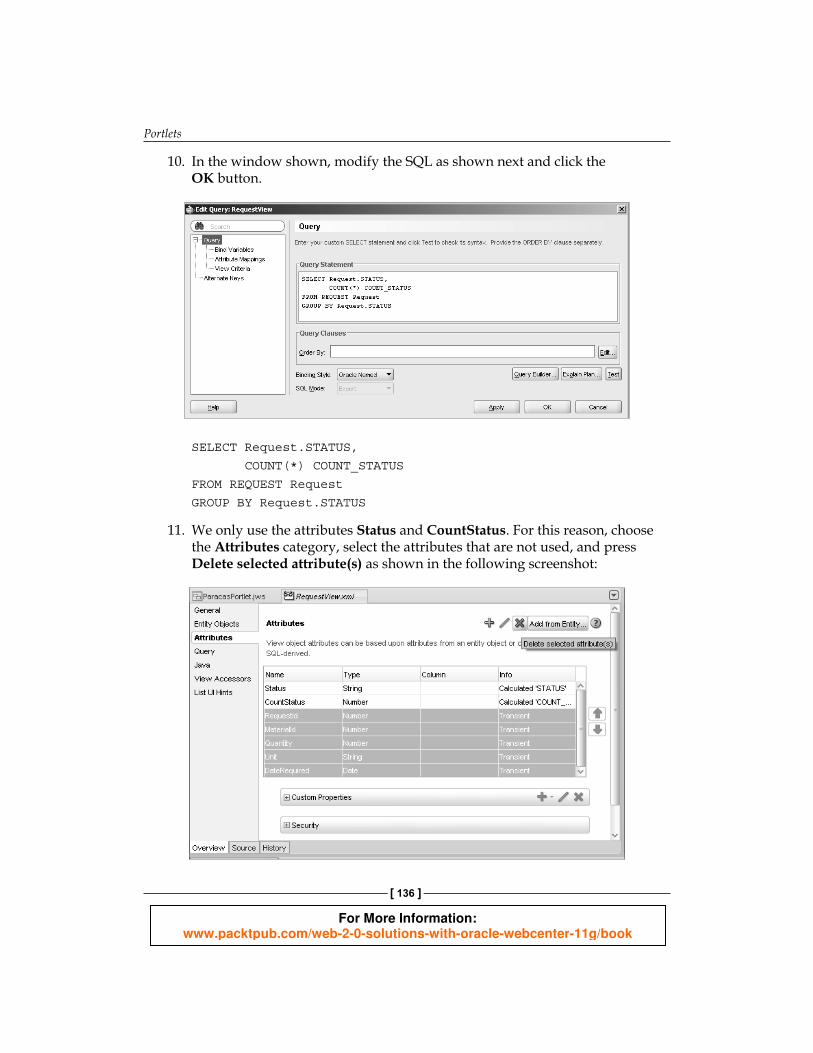
10. In the window shown, modify the SQL as shown next and click the OK button.
SELECT Request.STATUS,
COUNT(*) COUNT_STATUS
FROM REQUEST Request
GROUP BY Request.STATUS
11. We only use the attributes Status and CountStatus. For this reason, choose the Attributes category, select the attributes that are not used, and press Delete selected attribute(s) as shown in the following screenshot:

For More Information: www.packtpub.com/web-2-0-solutions-with-oracle-webcenter-11g/book
Chapter 6
[ 137 ]
12. Save all changes and verify that the view is similar to that shown next:
Creating a chart page Once we have completed the stage of building the model, we will create the page that hosts our chart.
1. In Application Navigator, right-click on the project ViewController, then choose New.
For More Information: www.packtpub.com/web-2-0-solutions-with-oracle-webcenter-11g/book
Portlets
[ 138 ]
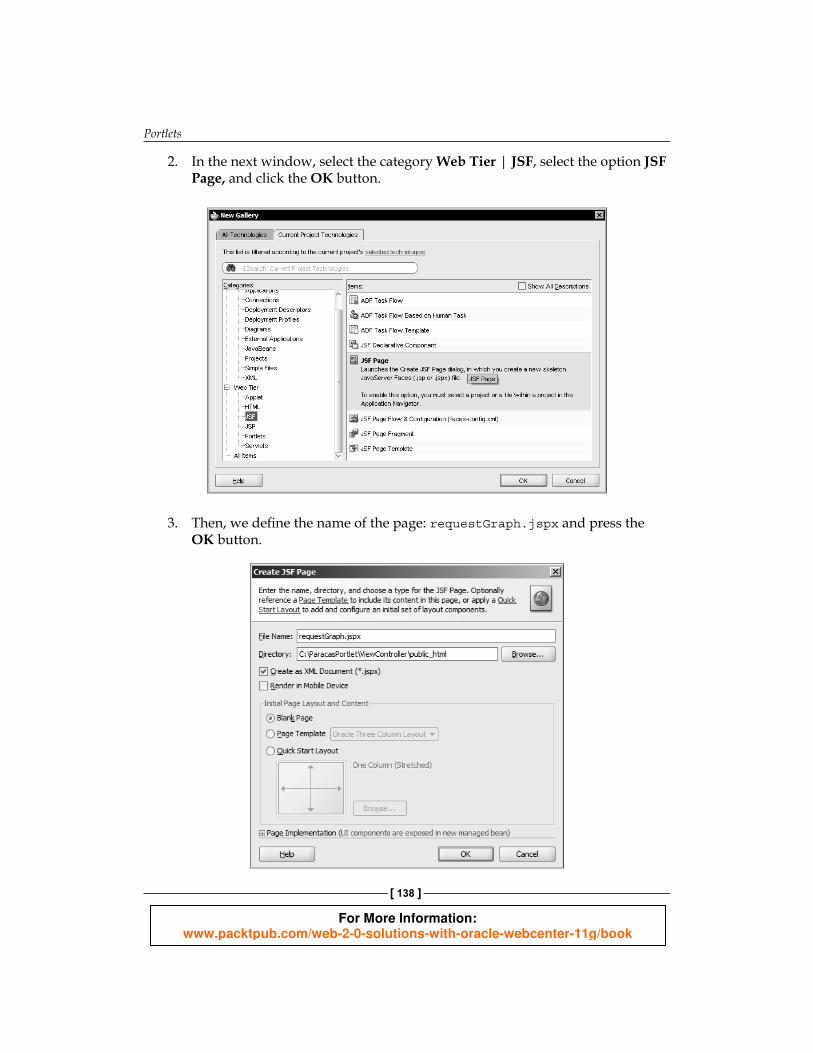
2. In the next window, select the category Web Tier | JSF, select the option JSF Page, and click the OK button.
3. Then, we defi ne the name of the page: requestGraph.jspx and press the OK button.

For More Information: www.packtpub.com/web-2-0-solutions-with-oracle-webcenter-11g/book
Chapter 6
[ 139 ]
4. Now, locate the Data Controls palette and drag the view RequestView1 to the page. Then choose, from the context menu, the option Graphs in the same way as shown in the following screenshot:
5. Next, choose the Pie category and Pie type item, as shown next:
For More Information: www.packtpub.com/web-2-0-solutions-with-oracle-webcenter-11g/book
Portlets
[ 140 ]
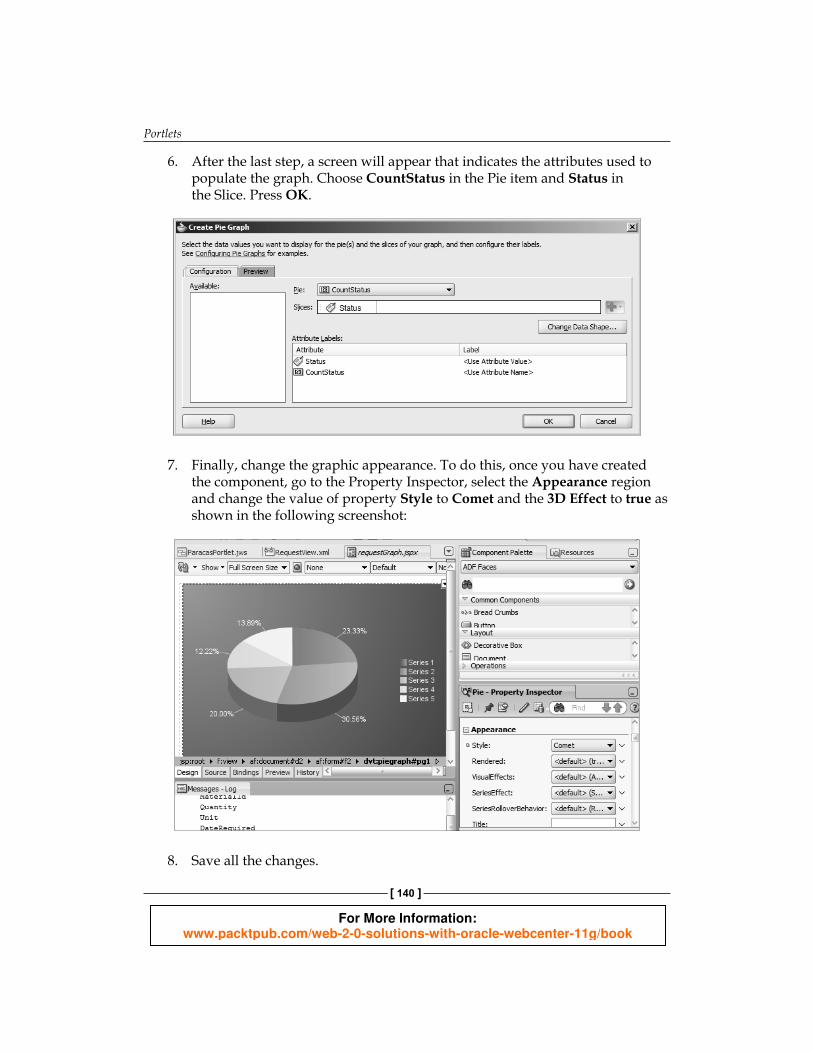
6. After the last step, a screen will appear that indicates the attributes used to populate the graph. Choose CountStatus in the Pie item and Status in the Slice. Press OK.
7. Finally, change the graphic appearance. To do this, once you have created the component, go to the Property Inspector, select the Appearance region and change the value of property Style to Comet and the 3D Effect to true as shown in the following screenshot:
8. Save all the changes.
For More Information: www.packtpub.com/web-2-0-solutions-with-oracle-webcenter-11g/book
Chapter 6
[ 141 ]
Creating a Portlet using the pageNow that we have our page, we will use it.
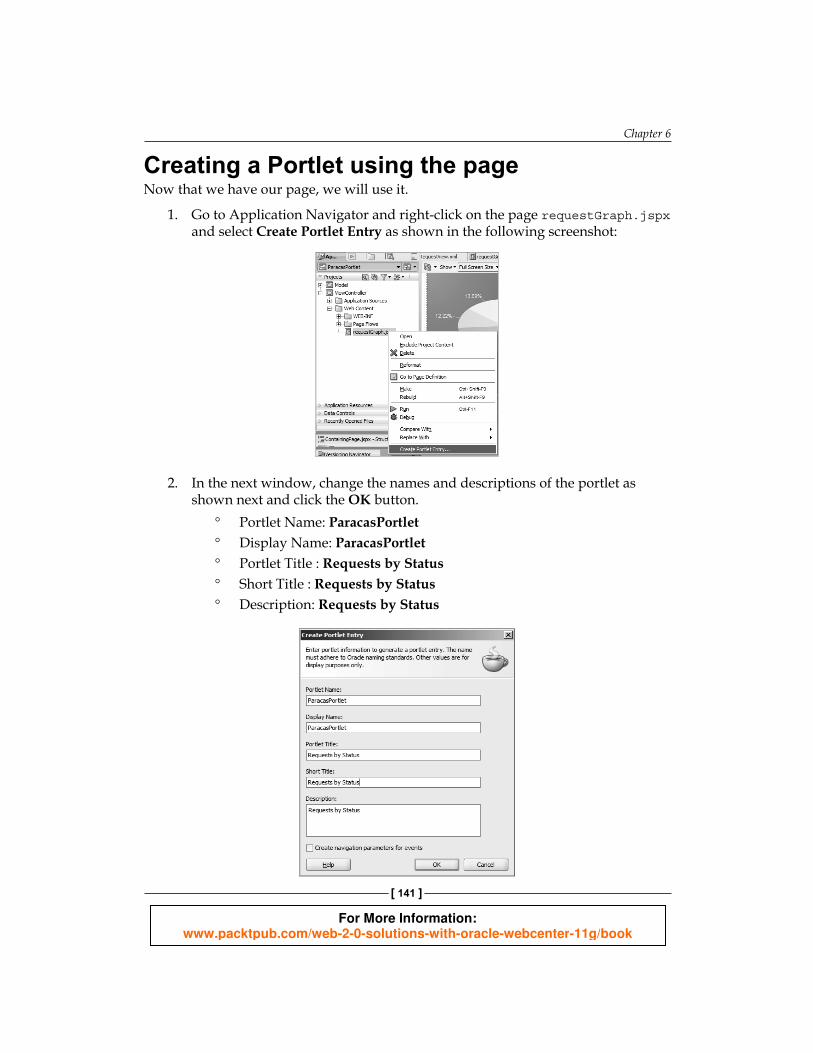
1. Go to Application Navigator and right-click on the page requestGraph.jspx and select Create Portlet Entry as shown in the following screenshot:
2. In the next window, change the names and descriptions of the portlet as shown next and click the OK button.
° Portlet Name: ParacasPortlet ° Display Name: ParacasPortlet ° Portlet Title : Requests by Status ° Short Title : Requests by Status ° Description: Requests by Status
For More Information: www.packtpub.com/web-2-0-solutions-with-oracle-webcenter-11g/book
Portlets
[ 142 ]
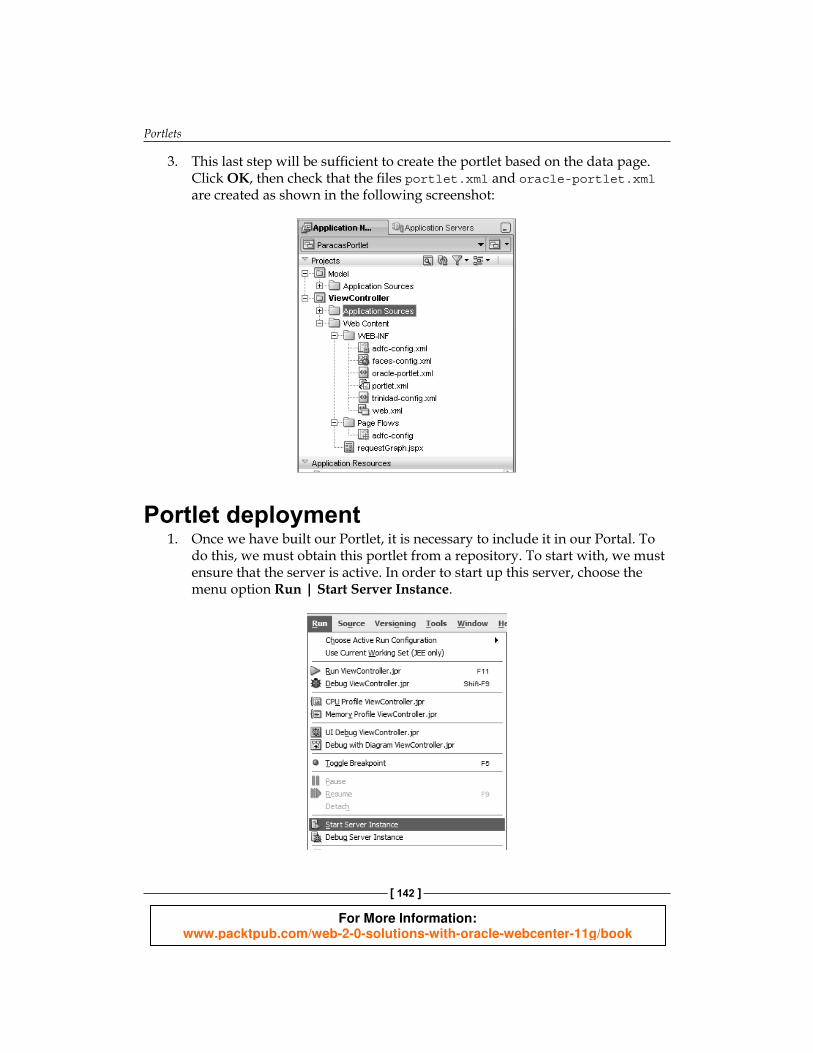
3. This last step will be suffi cient to create the portlet based on the data page. Click OK, then check that the fi les portlet.xml and oracle-portlet.xml are created as shown in the following screenshot:
Portlet deployment1. Once we have built our Portlet, it is necessary to include it in our Portal. To
do this, we must obtain this portlet from a repository. To start with, we must ensure that the server is active. In order to start up this server, choose the menu option Run | Start Server Instance.

For More Information: www.packtpub.com/web-2-0-solutions-with-oracle-webcenter-11g/book
Chapter 6
[ 143 ]
2. The following message at the Console confi rms that the server is initialized:DefaultServer started.
3. Right-click on the ParacasPortlet application and choose Deploy | ParacasPortlet_application1 | to | IntegratedWLSConnection, in the same way as shown next:
4. In the next window, click the button OK to complete the process.
For More Information: www.packtpub.com/web-2-0-solutions-with-oracle-webcenter-11g/book
Portlets
[ 144 ]
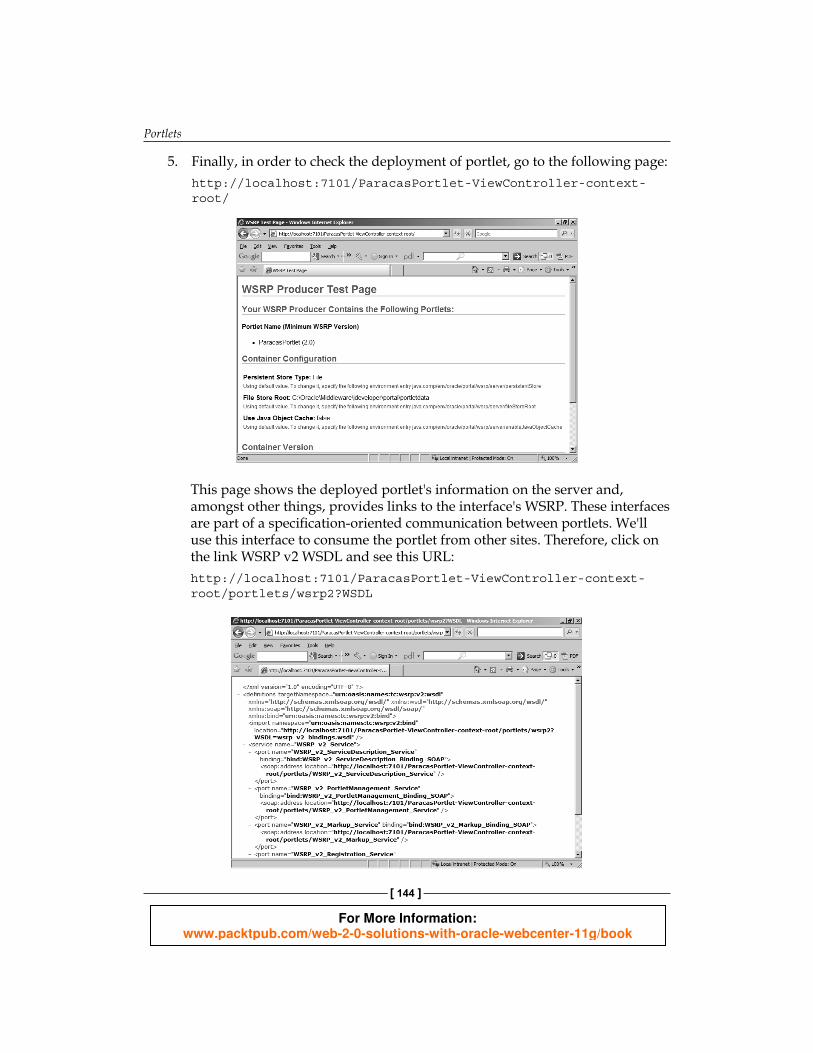
5. Finally, in order to check the deployment of portlet, go to the following page:http://localhost:7101/ParacasPortlet-ViewController-context-root/
This page shows the deployed portlet's information on the server and, amongst other things, provides links to the interface's WSRP. These interfaces are part of a specifi cation-oriented communication between portlets. We'll use this interface to consume the portlet from other sites. Therefore, click on the link WSRP v2 WSDL and see this URL: http://localhost:7101/ParacasPortlet-ViewController-context-root/portlets/wsrp2?WSDL
For More Information: www.packtpub.com/web-2-0-solutions-with-oracle-webcenter-11g/book
Chapter 6
[ 145 ]
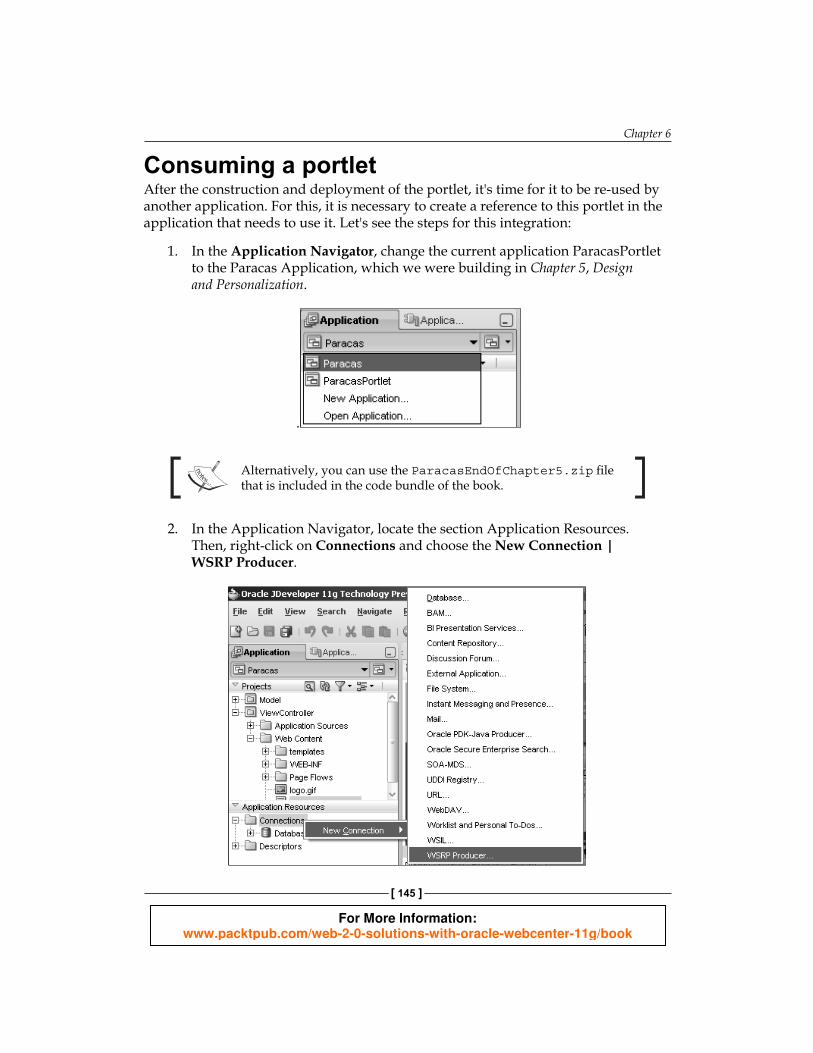
Consuming a portlet After the construction and deployment of the portlet, it's time for it to be re-used by another application. For this, it is necessary to create a reference to this portlet in the application that needs to use it. Let's see the steps for this integration:
1. In the Application Navigator, change the current application ParacasPortlet to the Paracas Application, which we were building in Chapter 5, Design and Personalization.
.
Alternatively, you can use the ParacasEndOfChapter5.zip fi le that is included in the code bundle of the book.
2. In the Application Navigator, locate the section Application Resources. Then, right-click on Connections and choose the New Connection | WSRP Producer.

For More Information: www.packtpub.com/web-2-0-solutions-with-oracle-webcenter-11g/book
Portlets
[ 146 ]
3. In the next window, rename the registration of the portlet to WsrpPortletParacas and click Next.
4. In the URL for the endpoint, type the URL associated with the previously deployed portlet and press Next. http://localhost:7101/ParacasPortlet-ViewController-context-root/portlets/wsrp2?WSDL
5. Now, click the Finish button to complete the establishment of the connection to the portlet.
For More Information: www.packtpub.com/web-2-0-solutions-with-oracle-webcenter-11g/book
Chapter 6
[ 147 ]
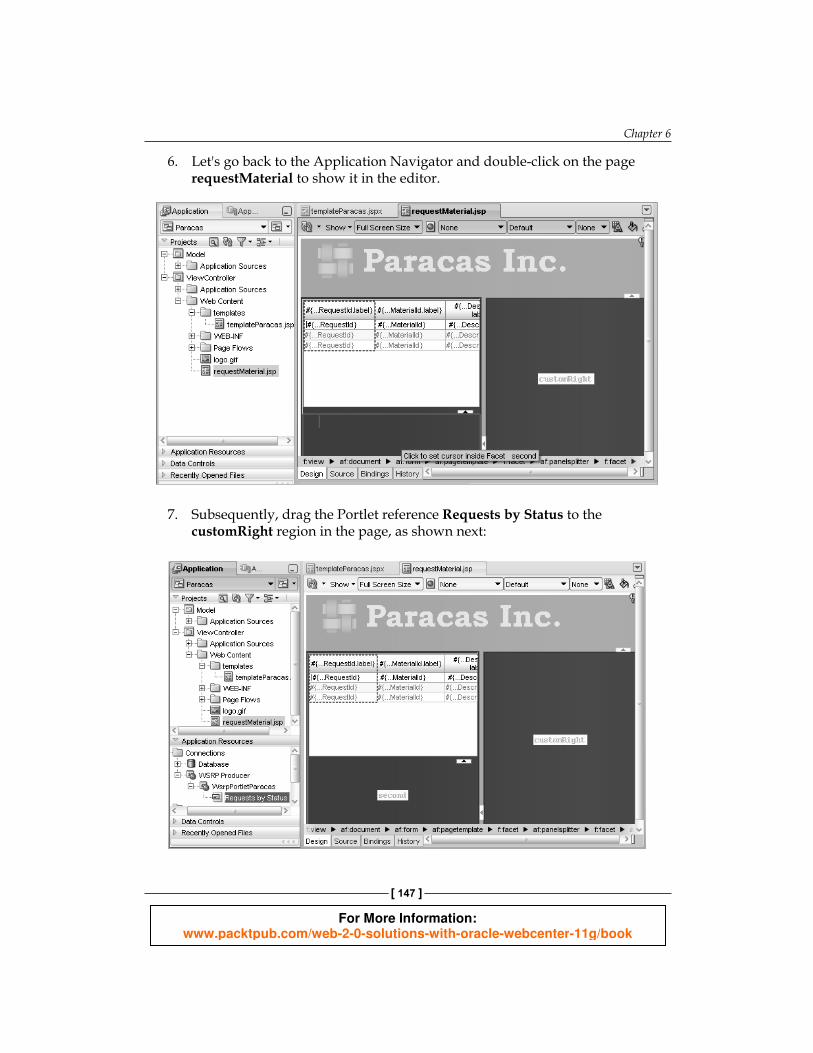
6. Let's go back to the Application Navigator and double-click on the page requestMaterial to show it in the editor.
7. Subsequently, drag the Portlet reference Requests by Status to the customRight region in the page, as shown next:
For More Information: www.packtpub.com/web-2-0-solutions-with-oracle-webcenter-11g/book
Portlets
[ 148 ]
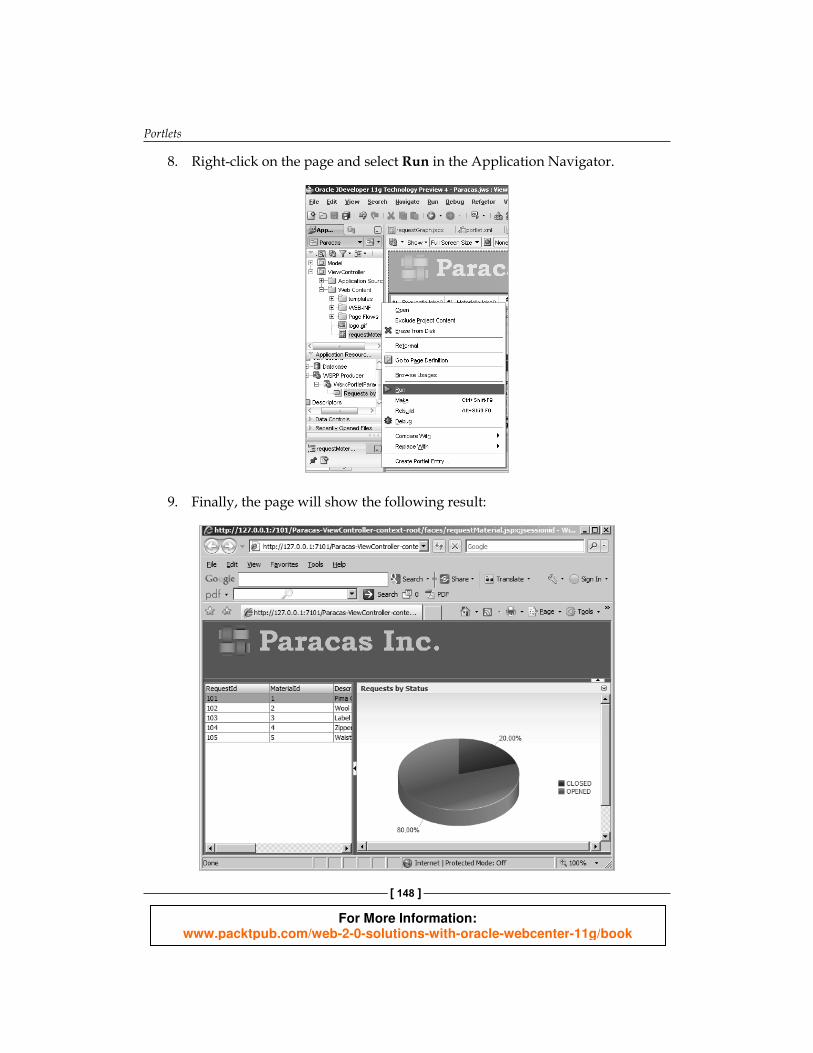
8. Right-click on the page and select Run in the Application Navigator.
9. Finally, the page will show the following result:
For More Information: www.packtpub.com/web-2-0-solutions-with-oracle-webcenter-11g/book
Chapter 6
[ 149 ]
SummaryThis chapter has shown us the power of portlets, a mechanism that can be reused between pages. In this case, we have taken advantage of the JSF and wizards offered by JDeveloper to quickly build graphical components.
In this chapter, we discovered the features offered by portlets as a technique of component reuse. Also, we applied this technology to build a portlet using JDeveloper. Next, we hosted the said component in a repository offered by Oracle WebCenter. Finally, we consumed this portlet through our Paracas portal, which we built earlier in this book.

For More Information: www.packtpub.com/web-2-0-solutions-with-oracle-webcenter-11g/book
Where to buy this book You can buy Web 2.0 Solutions with Oracle WebCenter 11g from the Packt Publishing
website: https://www.packtpub.com/web-2-0-solutions-with-oracle-webcenter-11g/book
Free shipping to the US, UK, Europe and selected Asian countries. For more information, please read our shipping policy.
Alternatively, you can buy the book from Amazon, BN.com, Computer Manuals and most internet book retailers.
www.PacktPub.com
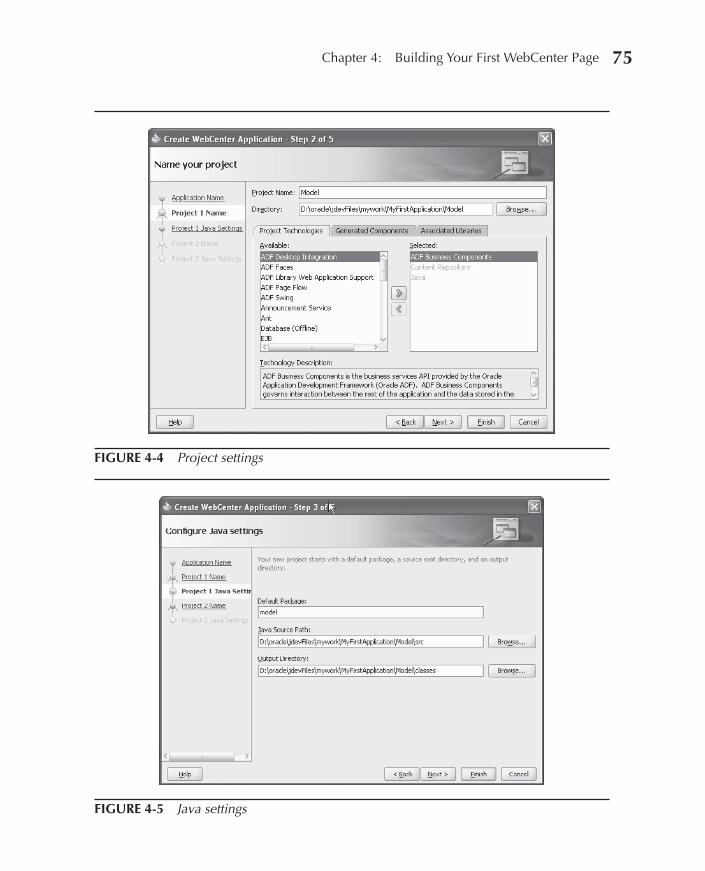
Chapter 4: Building Your First WebCenter Page 75
FIGURE 4-4 Project settings
FIGURE 4-5 Java settings
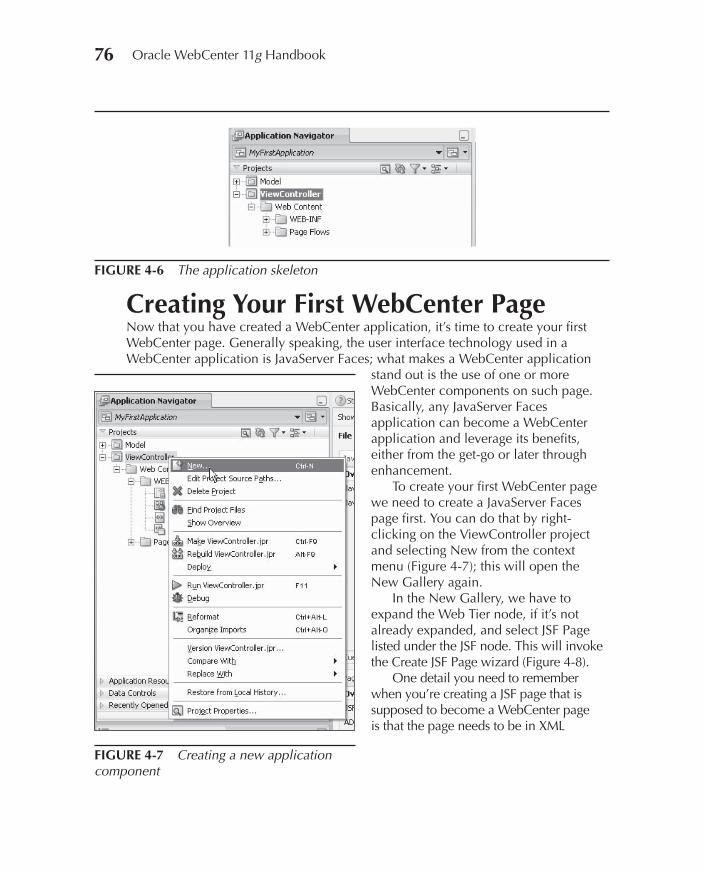
76 Oracle WebCenter 11g Handbook
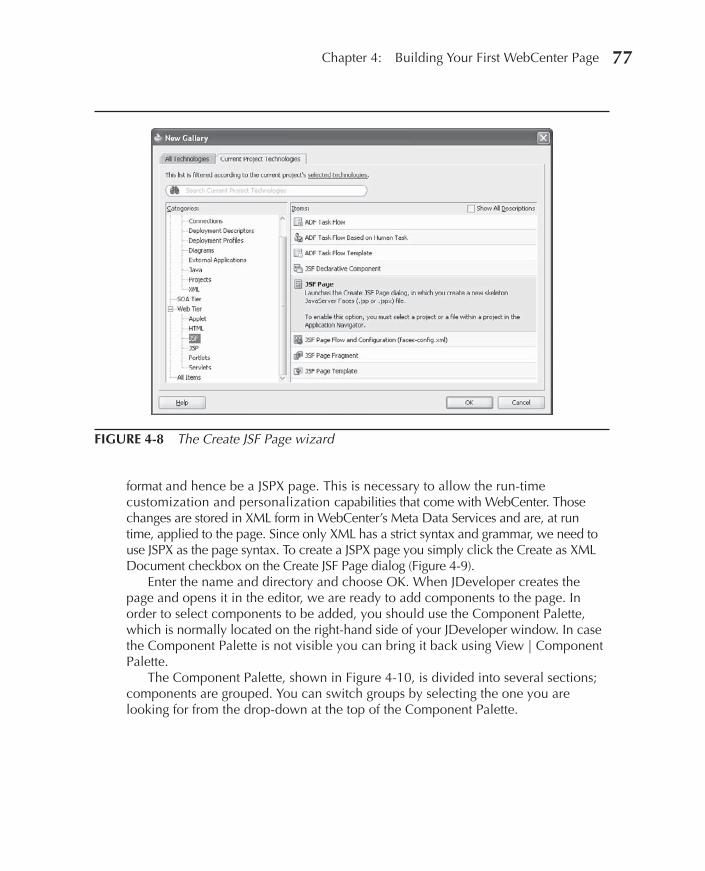
Creating Your First WebCenter PageNow that you have created a WebCenter application, it’s time to create your first WebCenter page. Generally speaking, the user interface technology used in a WebCenter application is JavaServer Faces; what makes a WebCenter application
stand out is the use of one or more WebCenter components on such page. Basically, any JavaServer Faces application can become a WebCenter application and leverage its benefits, either from the get-go or later through enhancement.
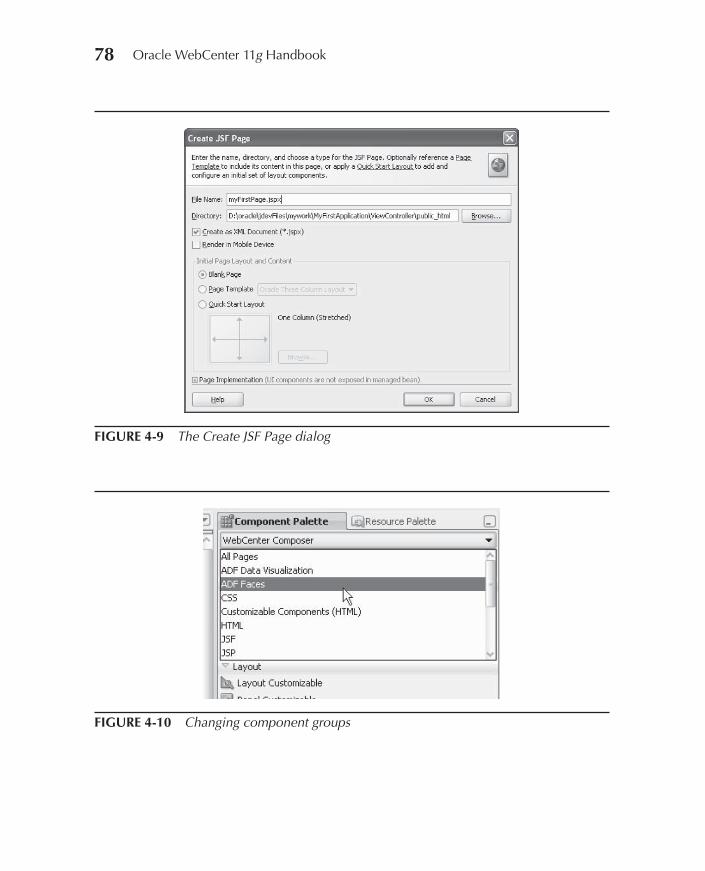
To create your first WebCenter page we need to create a JavaServer Faces page first. You can do that by right-clicking on the ViewController project and selecting New from the context menu (Figure 4-7); this will open the New Gallery again.
In the New Gallery, we have to expand the Web Tier node, if it’s not already expanded, and select JSF Page listed under the JSF node. This will invoke the Create JSF Page wizard (Figure 4-8).
One detail you need to remember when you’re creating a JSF page that is supposed to become a WebCenter page is that the page needs to be in XML
FIGURE 4-6 The application skeleton
FIGURE 4-7 Creating a new application component
Chapter 4: Building Your First WebCenter Page 77
format and hence be a JSPX page. This is necessary to allow the run-time customization and personalization capabilities that come with WebCenter. Those changes are stored in XML form in WebCenter’s Meta Data Services and are, at run time, applied to the page. Since only XML has a strict syntax and grammar, we need to use JSPX as the page syntax. To create a JSPX page you simply click the Create as XML Document checkbox on the Create JSF Page dialog (Figure 4-9).
Enter the name and directory and choose OK. When JDeveloper creates the page and opens it in the editor, we are ready to add components to the page. In order to select components to be added, you should use the Component Palette, which is normally located on the right-hand side of your JDeveloper window. In case the Component Palette is not visible you can bring it back using View | Component Palette.
The Component Palette, shown in Figure 4-10, is divided into several sections; components are grouped. You can switch groups by selecting the one you are looking for from the drop-down at the top of the Component Palette.
FIGURE 4-8 The Create JSF Page wizard
78 Oracle WebCenter 11g Handbook
FIGURE 4-9 The Create JSF Page dialog
FIGURE 4-10 Changing component groups
Chapter 4: Building Your First WebCenter Page 79
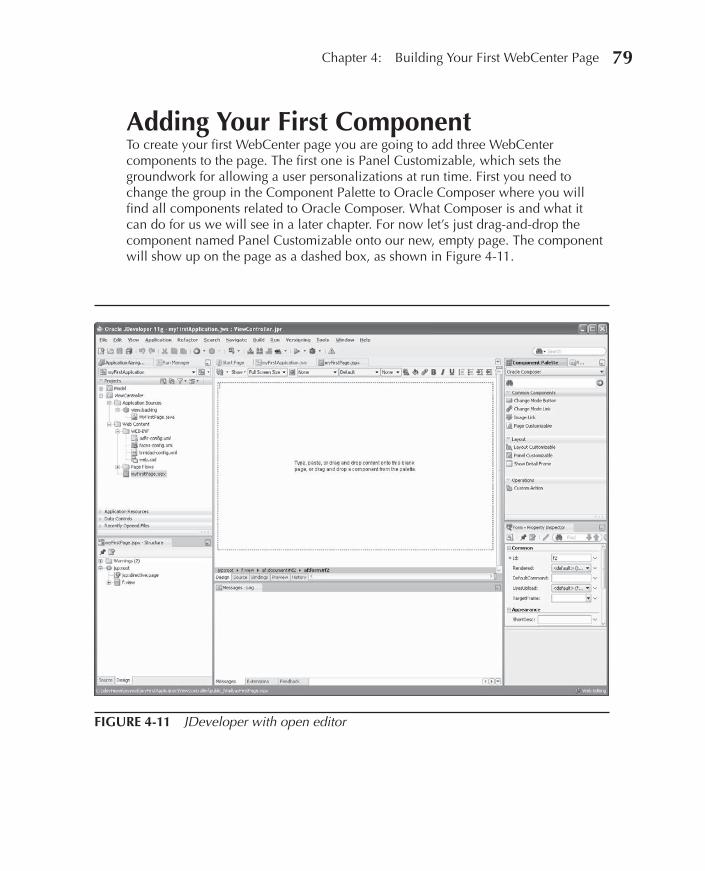
Adding Your First ComponentTo create your first WebCenter page you are going to add three WebCenter components to the page. The first one is Panel Customizable, which sets the groundwork for allowing a user personalizations at run time. First you need to change the group in the Component Palette to Oracle Composer where you will find all components related to Oracle Composer. What Composer is and what it can do for us we will see in a later chapter. For now let’s just drag-and-drop the component named Panel Customizable onto our new, empty page. The component will show up on the page as a dashed box, as shown in Figure 4-11.
FIGURE 4-11 JDeveloper with open editor
80 Oracle WebCenter 11g Handbook
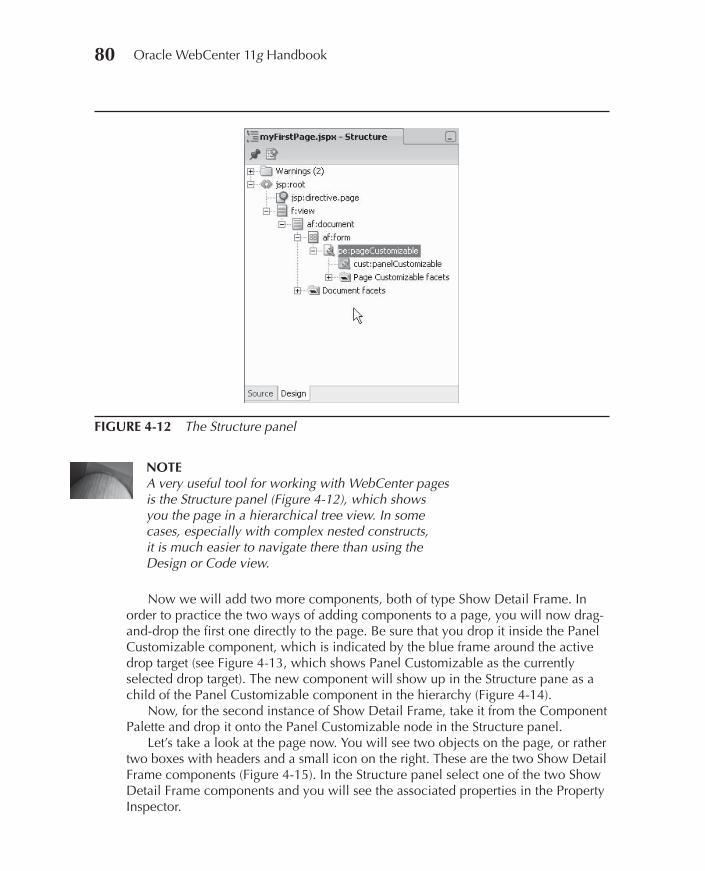
NOTEA very useful tool for working with WebCenter pages is the Structure panel (Figure 4-12), which shows you the page in a hierarchical tree view. In some cases, especially with complex nested constructs, it is much easier to navigate there than using the Design or Code view.
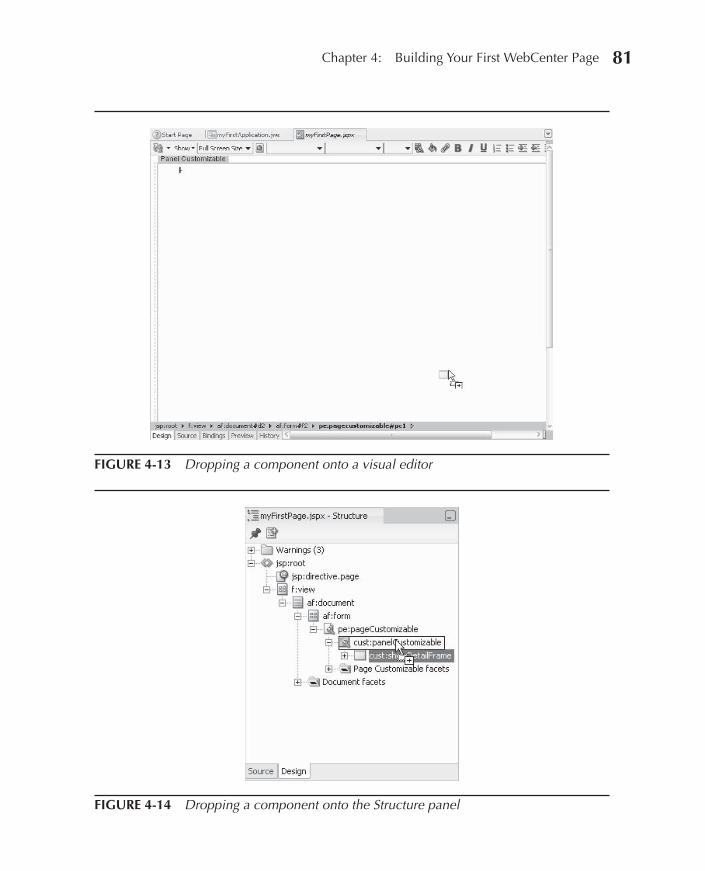
Now we will add two more components, both of type Show Detail Frame. In order to practice the two ways of adding components to a page, you will now drag-and-drop the first one directly to the page. Be sure that you drop it inside the Panel Customizable component, which is indicated by the blue frame around the active drop target (see Figure 4-13, which shows Panel Customizable as the currently selected drop target). The new component will show up in the Structure pane as a child of the Panel Customizable component in the hierarchy (Figure 4-14).
Now, for the second instance of Show Detail Frame, take it from the Component Palette and drop it onto the Panel Customizable node in the Structure panel.
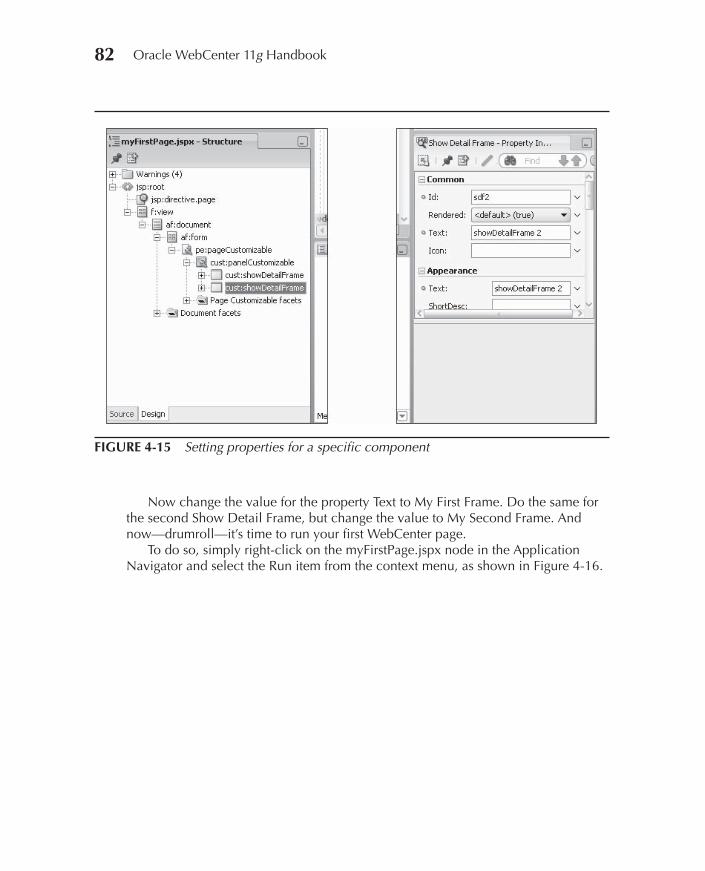
Let’s take a look at the page now. You will see two objects on the page, or rather two boxes with headers and a small icon on the right. These are the two Show Detail Frame components (Figure 4-15). In the Structure panel select one of the two Show Detail Frame components and you will see the associated properties in the Property Inspector.
FIGURE 4-12 The Structure panel
Chapter 4: Building Your First WebCenter Page 81
FIGURE 4-13 Dropping a component onto a visual editor
FIGURE 4-14 Dropping a component onto the Structure panel
82 Oracle WebCenter 11g Handbook
Now change the value for the property Text to My First Frame. Do the same for the second Show Detail Frame, but change the value to My Second Frame. And now—drumroll—it’s time to run your first WebCenter page.
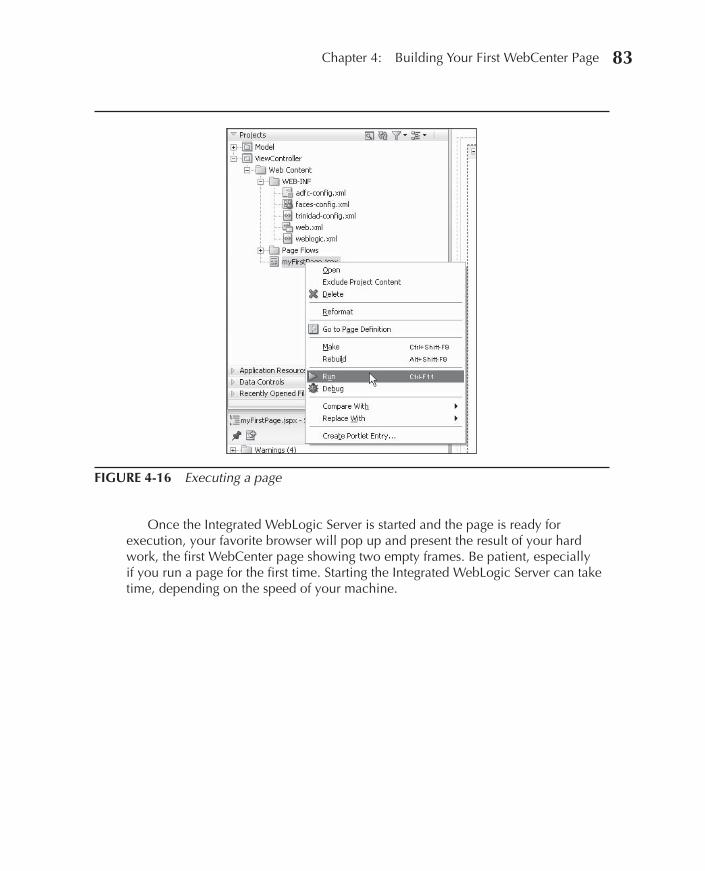
To do so, simply right-click on the myFirstPage.jspx node in the Application Navigator and select the Run item from the context menu, as shown in Figure 4-16.
FIGURE 4-15 Setting properties for a specific component
Chapter 4: Building Your First WebCenter Page 83
Once the Integrated WebLogic Server is started and the page is ready for execution, your favorite browser will pop up and present the result of your hard work, the first WebCenter page showing two empty frames. Be patient, especially if you run a page for the first time. Starting the Integrated WebLogic Server can take time, depending on the speed of your machine.
FIGURE 4-16 Executing a page

84 Oracle WebCenter 11g Handbook
Let’s examine the rendered page a bit closer (Figure 4-17). You will find each frame to have
A header with expand icon, title, and a menu on the right.
A resize indicator in the lower-right corner.
Without any further coding you can now
Expand/contract the region using the icon left of the title text.
Reorder frames using the menu items of the menu behind the icon on the right.
Reorder through drag-and-drop by grabbing the frame at the header.
All those changes are being persisted in MDS and will be preserved even if you restart the application. This behavior is the basis for creating more complex scenarios where you can then add new components at run time or dynamically change the page layout without having to touch the underlying application code.
■
■
■
■
■
FIGURE 4-17 The running page
Chapter 4: Building Your First WebCenter Page 85
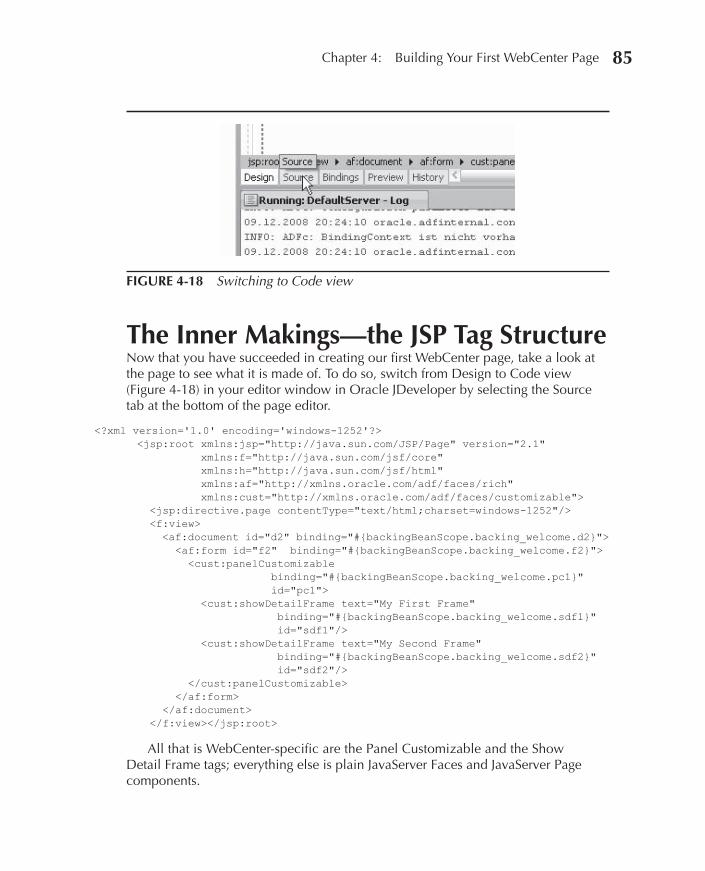
The Inner Makings—the JSP Tag StructureNow that you have succeeded in creating our first WebCenter page, take a look at the page to see what it is made of. To do so, switch from Design to Code view (Figure 4-18) in your editor window in Oracle JDeveloper by selecting the Source tab at the bottom of the page editor.
<?xml version='1.0' encoding='windows-1252'?><jsp:root xmlns:jsp="http://java.sun.com/JSP/Page" version="2.1" xmlns:f="http://java.sun.com/jsf/core" xmlns:h="http://java.sun.com/jsf/html" xmlns:af="http://xmlns.oracle.com/adf/faces/rich" xmlns:cust="http://xmlns.oracle.com/adf/faces/customizable"> <jsp:directive.page contentType="text/html;charset=windows-1252"/> <f:view> <af:document id="d2" binding="#{backingBeanScope.backing_welcome.d2}"> <af:form id="f2" binding="#{backingBeanScope.backing_welcome.f2}"> <cust:panelCustomizable binding="#{backingBeanScope.backing_welcome.pc1}" id="pc1"> <cust:showDetailFrame text="My First Frame" binding="#{backingBeanScope.backing_welcome.sdf1}" id="sdf1"/> <cust:showDetailFrame text="My Second Frame" binding="#{backingBeanScope.backing_welcome.sdf2}" id="sdf2"/> </cust:panelCustomizable> </af:form> </af:document> </f:view></jsp:root>
All that is WebCenter-specific are the Panel Customizable and the Show Detail Frame tags; everything else is plain JavaServer Faces and JavaServer Page components.
FIGURE 4-18 Switching to Code view

This page intentionally left blank

CHAPTER5
Consuming and Building Portlets
87
88 Oracle WebCenter 11g Handbook
ortlets are the key building blocks of portals; they are reusable web components or page fragments that you can plug in to your pages. Examples of portlets are a report of top sales by region, an order entry form, or a threaded discussion forum. Portlets are frequently used by Enterprise Resource Planning (ERP), Customer Relationship
Management (CRM), or systems to publish well-defined, often self-contained business facts. In this chapter you will learn what portlets are, what it takes to build portlets, and how to consume them in your WebCenter applications.
We cannot go into great detail about portlet development, but fortunately there is a lot of information available about portlet development online. First and foremost, you can refer to the Java Portlet Specification (JPS), http://jcp.org/en/jsr/detail?id=168 and http://jcp.org/en/jsr/detail?id=286. Secondly, you can look up the official Oracle documentation, the Oracle WebCenter Developer’s Guide that contains plenty of details about portlet development. And last but not least, Stefan Hepper, the specification lead for JSR 168 and 286, co-authored a book, Portlets and Apache Portals. The book, containing a wealth of information, has not been published, but the manuscript is freely available from the publisher’s web site on http://www.manning.com.
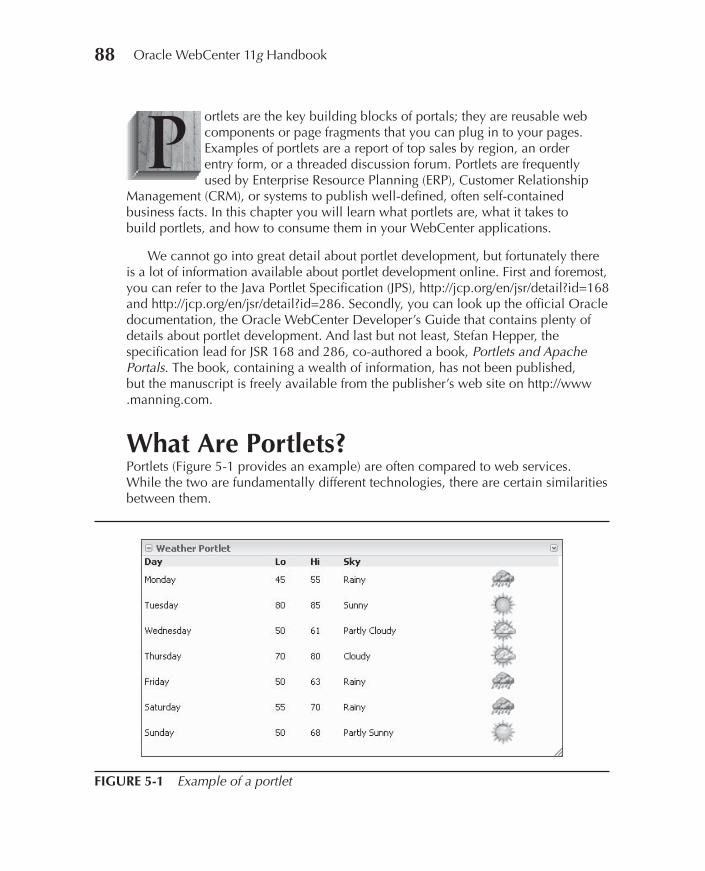
What Are Portlets?Portlets (Figure 5-1 provides an example) are often compared to web services. While the two are fundamentally different technologies, there are certain similarities between them.
P
FIGURE 5-1 Example of a portlet

Chapter 5: Consuming and Building Portlets 89
Both portlets and web services provide well-defined functionality and are invoked by consumer applications. While the information coming from web services is meant to be processed by the consuming application, portlets themselves are the consumed entities. For example, a weather or stock quote web service returns data based on the ZIP code or stock ticker information. On the other hand, portlets also provide the user interface on top of their data, so the application developer consuming the portlet doesn’t have to build a UI. Web services, as their name suggests, are accessible through the Web, typically over HTTP. The user interface for web services is mostly defined on the consumer end. The most common markup types that portlets generate are HTML and XML. Portlets can be accessed both locally (deployed along with the consumer application or portal) and remotely.
NOTETo accommodate the scalability and flexibility requirements of large-scale enterprise deployments, Oracle has a history of supporting remote portlet technologies. In the 11g release, Oracle WebCenter supports remote portlets only. WebLogic Portal supports local portlets as well. Oracle WebCenter was architected so that local portlet support can be added easily in future releases.
Another core functionality of portlets is that they provide customization and personalization capabilities. Administrators, for example, may set the default stock ticker for the stock quote portlet, which end users can override by personalizing the portlet.
Portlet Standards: Java Portlet Specification and WSRPThere are widely used open industry standards for portals and portlets, which ensure that portlets built and deployed on one vendor’s platform work well when deployed to or consumed by another company’s infrastructure.
The Java Portlet Specification defines the API to build standards-based portlets. The initial 1.0 version of the Java Portlet Specification,1 often referred to as JSR 168, addresses the basic portlet functionality, such as the portlet life cycle, portlet request and response, portlet context, and portlet display modes. The Java Portlet Specification 2.0 (JSR 286) elevated the portlet standards to the next level by adding key functionalities, such as inter-portlet communication and event support.
1 While in development, the Java Portlet Specification 1.0 was managed under Java Specification Request (JSR) 168. Java Portlet Specification 2.0 was developed by the JSR 286 Expert Group.
90 Oracle WebCenter 11g Handbook
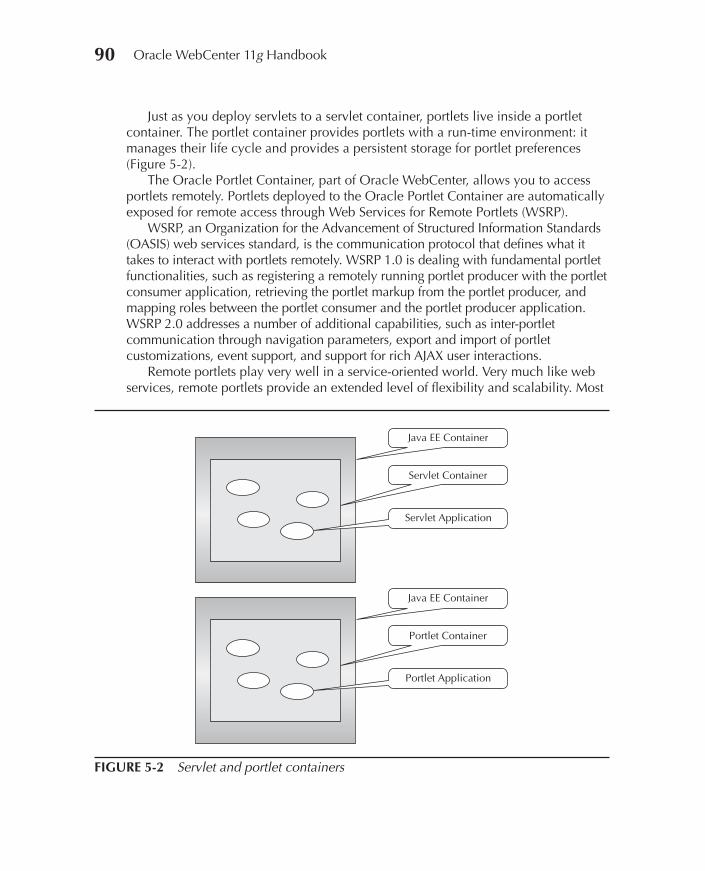
Just as you deploy servlets to a servlet container, portlets live inside a portlet container. The portlet container provides portlets with a run-time environment: it manages their life cycle and provides a persistent storage for portlet preferences (Figure 5-2).
The Oracle Portlet Container, part of Oracle WebCenter, allows you to access portlets remotely. Portlets deployed to the Oracle Portlet Container are automatically exposed for remote access through Web Services for Remote Portlets (WSRP).
WSRP, an Organization for the Advancement of Structured Information Standards (OASIS) web services standard, is the communication protocol that defines what it takes to interact with portlets remotely. WSRP 1.0 is dealing with fundamental portlet functionalities, such as registering a remotely running portlet producer with the portlet consumer application, retrieving the portlet markup from the portlet producer, and mapping roles between the portlet consumer and the portlet producer application. WSRP 2.0 addresses a number of additional capabilities, such as inter-portlet communication through navigation parameters, export and import of portlet customizations, event support, and support for rich AJAX user interactions.
Remote portlets play very well in a service-oriented world. Very much like web services, remote portlets provide an extended level of flexibility and scalability. Most
FIGURE 5-2 Servlet and portlet containers
Chapter 5: Consuming and Building Portlets 91
important, WSRP supports federated deployments, allowing you to consume remotely running portlets in multiple portlet consumers. WSRP is often used when interoperability is crucial between portals of different vendors. For example, through WSRP, Oracle WebCenter can easily consume the standards-based portlets deployed to Oracle Portal or WebLogic Portal. At the same time, Oracle WebCenter and WebLogic Portal portlets are available to Oracle Portal or any other third-party portlet consumer with WSRP support.
What makes WSRP especially powerful is that it’s a communication protocol and therefore is independent of the underlying language used to build the portlet. There are WSRP portlet containers and bridges available for different programming languages, including Java, PHP, and .NET.
Although WSRP is language-independent, WSRP 1.0 was designed to work well with JSR 168 while WSRP 2.0 goes hand in hand with JSR 286.
For a long time, standards-based portlets were inferior to vendor-specific portlets. Fortunately, this has changed with JSR 286 and WSRP 2.0. In this section we primarily focus on standards-based portlets. If you are interested in building and consuming Oracle-specific PDK-Java portlets, the product documentation provides plenty of information about it.
NOTEBe warned that by using PDK-Java, you are tied to the Oracle Portal offerings: Oracle Portal and Oracle WebCenter. Given that PDK-Java doesn’t offer significant advantages over standards-based portlets, our recommendation is to go with standards-based portlets. An even better reason to walk the standards-based path: Oracle invests most of its development effort into standards-based portlets. While WSRP 2.0 portlets are pretty much first-class citizens in the WebCenter world, PDK-Java portlets have various limitations, including lack of support for events and limited partial page refresh support.
WSRP 2.0 provides functionalities that JSR 168 does not support. To be able to build feature-rich WSRP 2.0 portlets with capabilities such as parameters and support for export and import of portlet customizations, Oracle extended the portlet container to provide these features using WSRP 2.0. While JSR 168 portlets can be deployed to any vendor’s portlet container, JSR 168 portlets using the Oracle extensions to support WSRP 2.0 must be deployed to the Oracle Portlet Container. If deployed to a third-party JSR 168 container, the Oracle specific extensions will be ignored.
92 Oracle WebCenter 11g Handbook
NOTEOracle WebCenter 11gR1 supports JSR 168, WSRP 1.0, and WSRP 2.0. JSR 286 support is planned for a future release.
Consuming Portlets in JDeveloperWebCenter allows you to consume portlets at design time in JDeveloper, or run time in your WebCenter application. There are some differences between the exact steps of consuming portlets at design time versus run time, but the concepts are the same for the two approaches. First, let’s focus on how to consume portlets in the design-time environment.
You need to follow four easy steps when consuming portlets in your WebCenter applications:
1. Register portlet producer The first step before adding portlets to your applications is the portlet producer registration. You have to point your WebCenter application to the portlet producer endpoint: the WSDL URL in the case of WSRP, or the producer test page URL in the case of PDK-Java portlets.
2. Drop portlet onto the page The newly registered portlet producer shows up under your connections, and you can drop the portlet onto the page.
3. Specify portlet view tag attributes The portlet view tag allows you to control behavior like rendering or hiding the portlet header, which portlet modes the portlet should expose, or whether the portlet should be rendered in an inline frame (iframe).
4. Wire portlet parameters and events If the portlet supports navigational parameters in the case of WSRP 2.0 portlets or public portlet parameters in the case of PDK-Java portlets, you can wire them up with other components on the page. You can also specify partial page refresh behavior.
Now let’s take a closer look at these steps.
Chapter 5: Consuming and Building Portlets 93
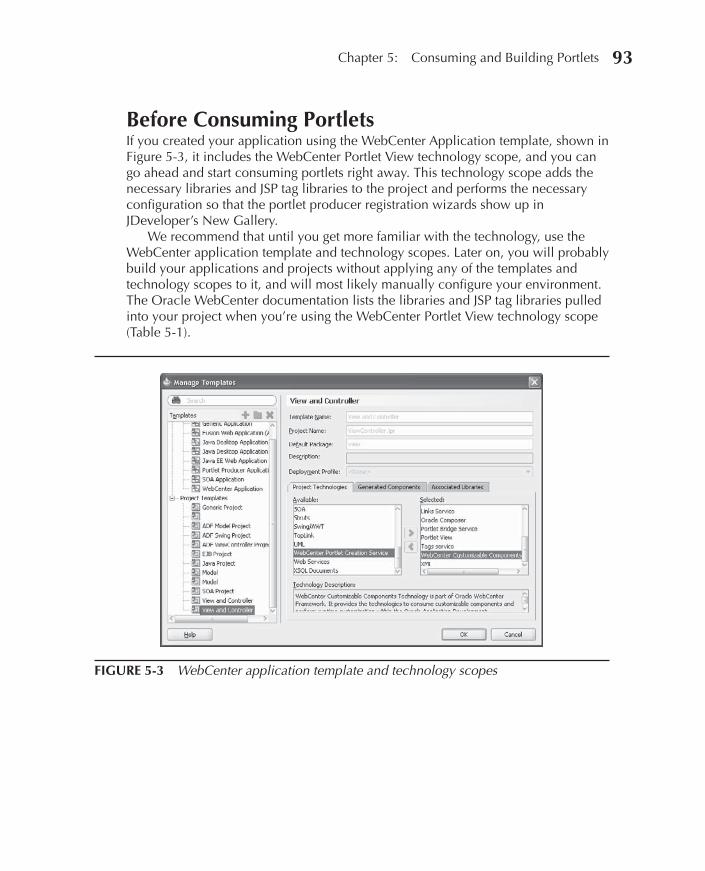
Before Consuming PortletsIf you created your application using the WebCenter Application template, shown in Figure 5-3, it includes the WebCenter Portlet View technology scope, and you can go ahead and start consuming portlets right away. This technology scope adds the necessary libraries and JSP tag libraries to the project and performs the necessary configuration so that the portlet producer registration wizards show up in JDeveloper’s New Gallery.
We recommend that until you get more familiar with the technology, use the WebCenter application template and technology scopes. Later on, you will probably build your applications and projects without applying any of the templates and technology scopes to it, and will most likely manually configure your environment. The Oracle WebCenter documentation lists the libraries and JSP tag libraries pulled into your project when you’re using the WebCenter Portlet View technology scope (Table 5-1).
FIGURE 5-3 WebCenter application template and technology scopes
94 Oracle WebCenter 11g Handbook
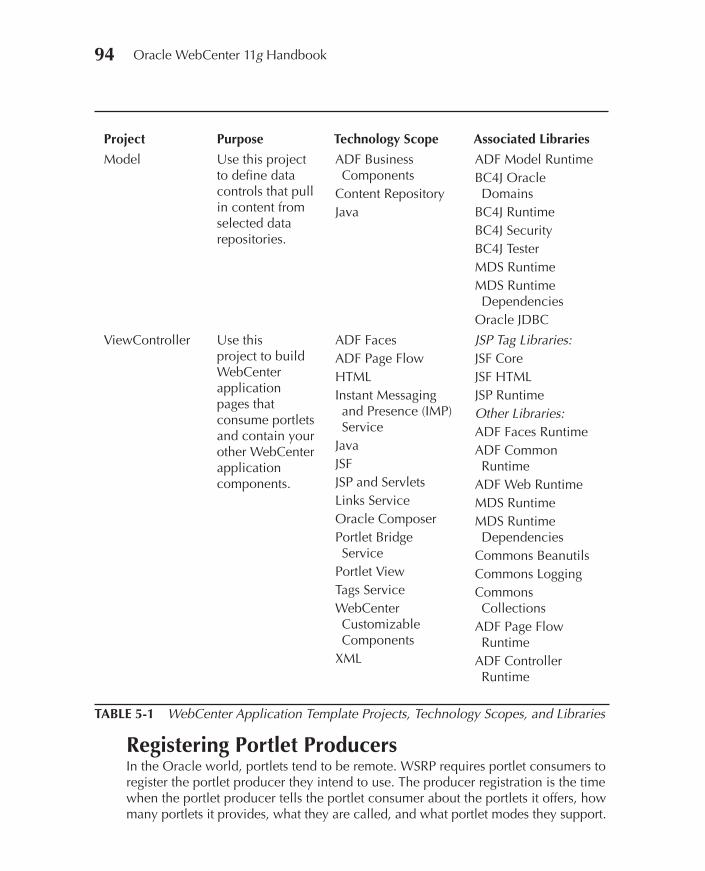
Project Purpose Technology Scope Associated Libraries
Model Use this project to define data controls that pull in content from selected data repositories.
ADF BusinessComponents
Content RepositoryJava
ADF Model RuntimeBC4J Oracle Domains
BC4J RuntimeBC4J SecurityBC4J TesterMDS RuntimeMDS Runtime Dependencies
Oracle JDBC
ViewController Use this project to build WebCenter applicationpages that consume portlets and contain your other WebCenter applicationcomponents.
ADF FacesADF Page FlowHTMLInstant Messaging and Presence (IMP) Service
JavaJSFJSP and ServletsLinks ServiceOracle ComposerPortlet BridgeService
Portlet ViewTags ServiceWebCenter CustomizableComponents
XML
JSP Tag Libraries:JSF CoreJSF HTMLJSP RuntimeOther Libraries:ADF Faces RuntimeADF Common Runtime
ADF Web RuntimeMDS RuntimeMDS Runtime Dependencies
Commons BeanutilsCommons LoggingCommonsCollections
ADF Page Flow Runtime
ADF Controller Runtime
TABLE 5-1 WebCenter Application Template Projects, Technology Scopes, and Libraries
Registering Portlet ProducersIn the Oracle world, portlets tend to be remote. WSRP requires portlet consumers to register the portlet producer they intend to use. The producer registration is the time when the portlet producer tells the portlet consumer about the portlets it offers, how many portlets it provides, what they are called, and what portlet modes they support.
Chapter 5: Consuming and Building Portlets 95
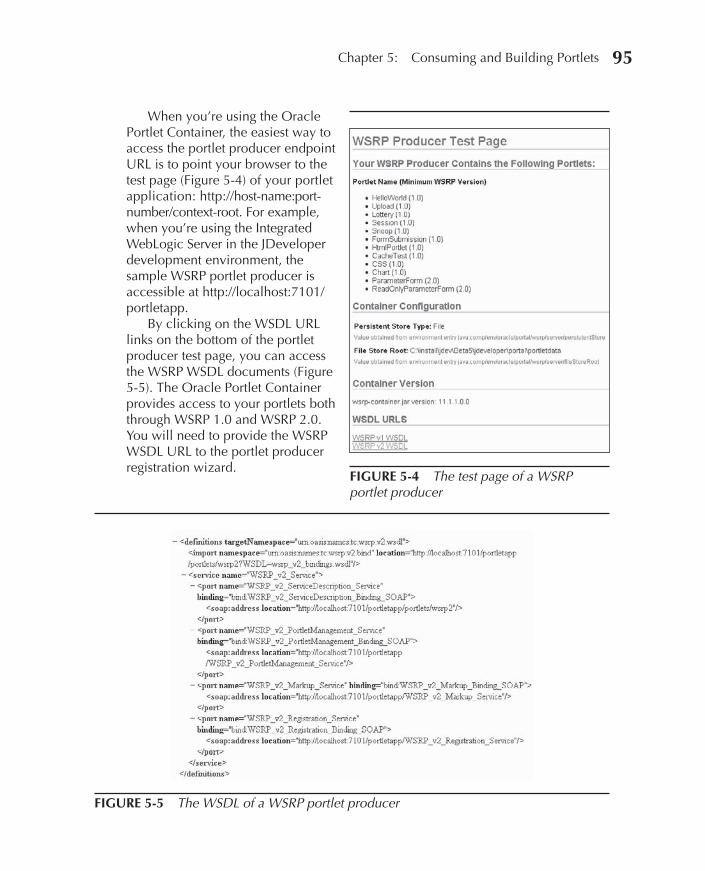
When you’re using the Oracle Portlet Container, the easiest way to access the portlet producer endpoint URL is to point your browser to the test page (Figure 5-4) of your portlet application: http://host-name:port-number/context-root. For example, when you’re using the Integrated WebLogic Server in the JDeveloperdevelopment environment, the sample WSRP portlet producer is accessible at http://localhost:7101/ portletapp.
By clicking on the WSDL URL links on the bottom of the portlet producer test page, you can access the WSRP WSDL documents (Figure 5-5). The Oracle Portlet Container provides access to your portlets both through WSRP 1.0 and WSRP 2.0. You will need to provide the WSRP WSDL URL to the portlet producer registration wizard.
FIGURE 5-4 The test page of a WSRP portlet producer
FIGURE 5-5 The WSDL of a WSRP portlet producer

96 Oracle WebCenter 11g Handbook
After having successfully accessed the WSDL document, copy the WSDL URL to the clipboard and invoke the producer registration wizard.
When it comes to producer registration, you can decide if you want to register the producer with your application or with your IDE. You should register the producer with your IDE if you expect to use the portlet producer repeatedly in other consumer applications. If you are new to WebCenter, we recommend that you register the WSRP Sample Portlet Producer with JDeveloper through the Resource Palette (Figure 5-6). This will allow you to reuse the portlet producer across your applications by simply dropping a portlet from the Resource Palette onto your page or by dropping the portlet producer connection onto the Application Resources section in the Application Navigator without going through the producer registration process over again.
NOTEThe producer registration wizard allows you to specify whether your producer will be registered for your application or your IDE.
FIGURE 5-6 Registering a portlet producer against the Resource Palette
Chapter 5: Consuming and Building Portlets 97
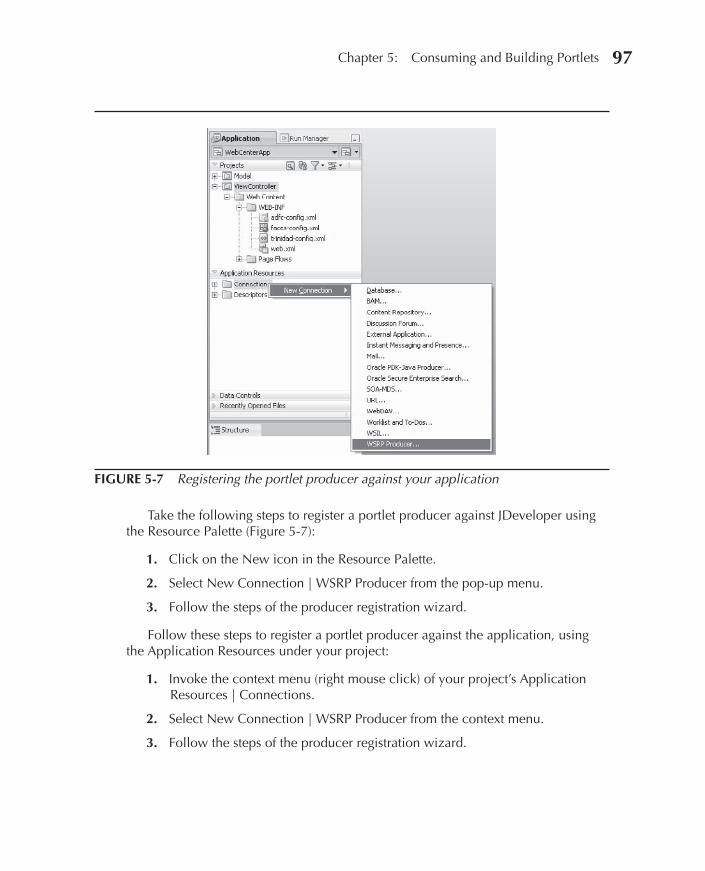
Take the following steps to register a portlet producer against JDeveloper using the Resource Palette (Figure 5-7):
1. Click on the New icon in the Resource Palette.
2. Select New Connection | WSRP Producer from the pop-up menu.
3. Follow the steps of the producer registration wizard.
Follow these steps to register a portlet producer against the application, using the Application Resources under your project:
1. Invoke the context menu (right mouse click) of your project’s Application Resources | Connections.
2. Select New Connection | WSRP Producer from the context menu.
3. Follow the steps of the producer registration wizard.
FIGURE 5-7 Registering the portlet producer against your application
98 Oracle WebCenter 11g Handbook
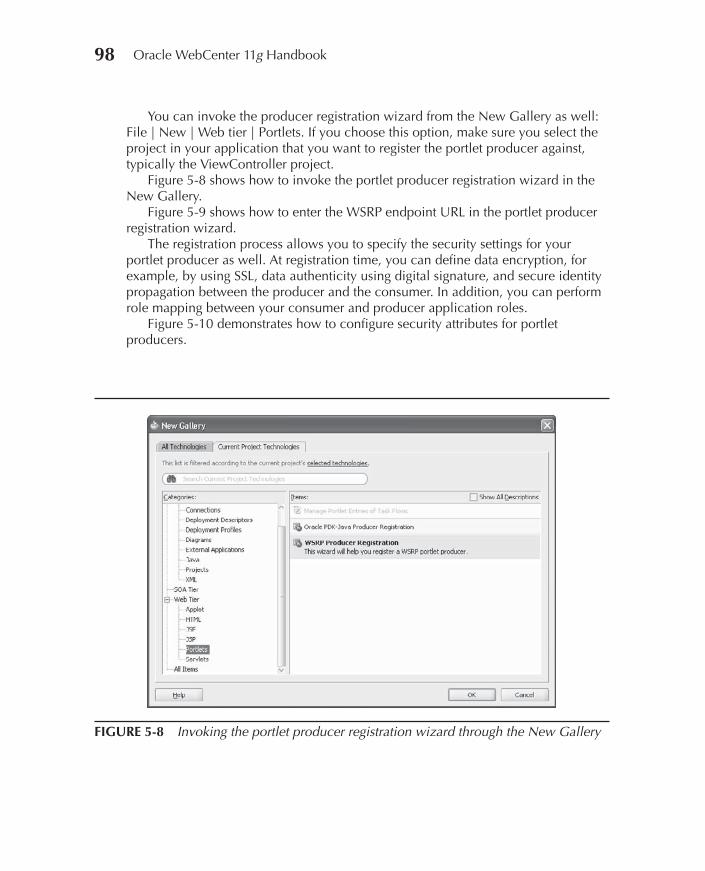
You can invoke the producer registration wizard from the New Gallery as well: File | New | Web tier | Portlets. If you choose this option, make sure you select the project in your application that you want to register the portlet producer against, typically the ViewController project.
Figure 5-8 shows how to invoke the portlet producer registration wizard in the New Gallery.
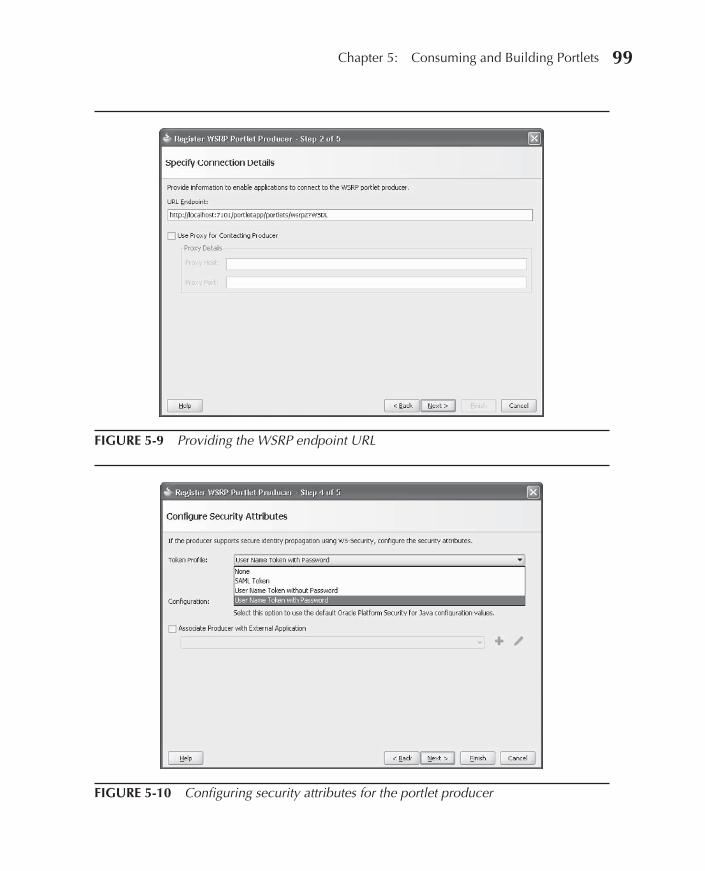
Figure 5-9 shows how to enter the WSRP endpoint URL in the portlet producer registration wizard.
The registration process allows you to specify the security settings for your portlet producer as well. At registration time, you can define data encryption, for example, by using SSL, data authenticity using digital signature, and secure identity propagation between the producer and the consumer. In addition, you can perform role mapping between your consumer and producer application roles.
Figure 5-10 demonstrates how to configure security attributes for portlet producers.
FIGURE 5-8 Invoking the portlet producer registration wizard through the New Gallery
Chapter 5: Consuming and Building Portlets 99
FIGURE 5-9 Providing the WSRP endpoint URL
FIGURE 5-10 Configuring security attributes for the portlet producer
100 Oracle WebCenter 11g Handbook
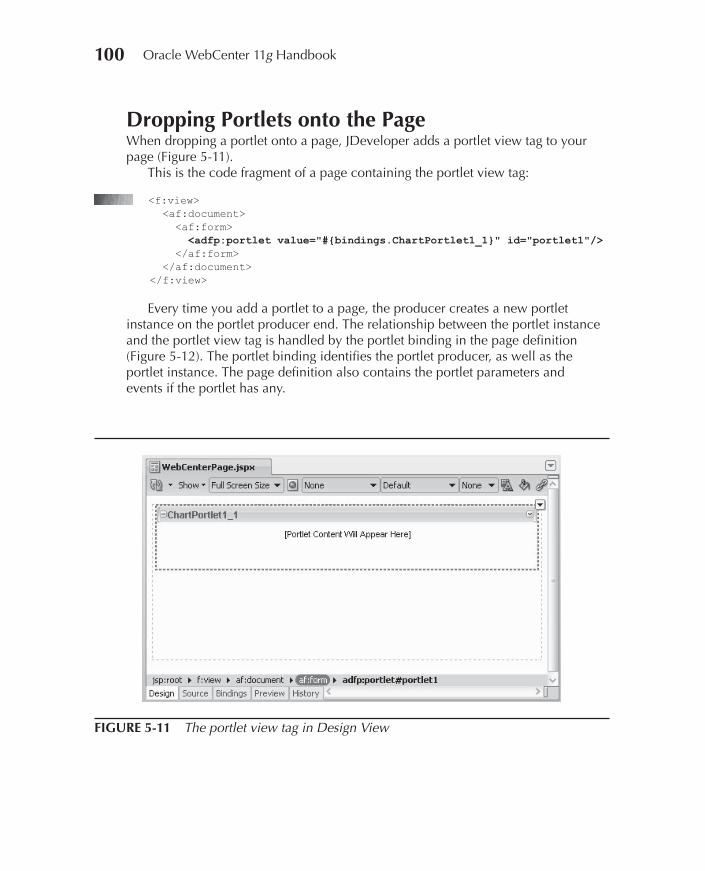
Dropping Portlets onto the PageWhen dropping a portlet onto a page, JDeveloper adds a portlet view tag to your page (Figure 5-11).
This is the code fragment of a page containing the portlet view tag:
<f:view> <af:document> <af:form> <adfp:portlet value="#{bindings.ChartPortlet1_1}" id="portlet1"/> </af:form> </af:document> </f:view>
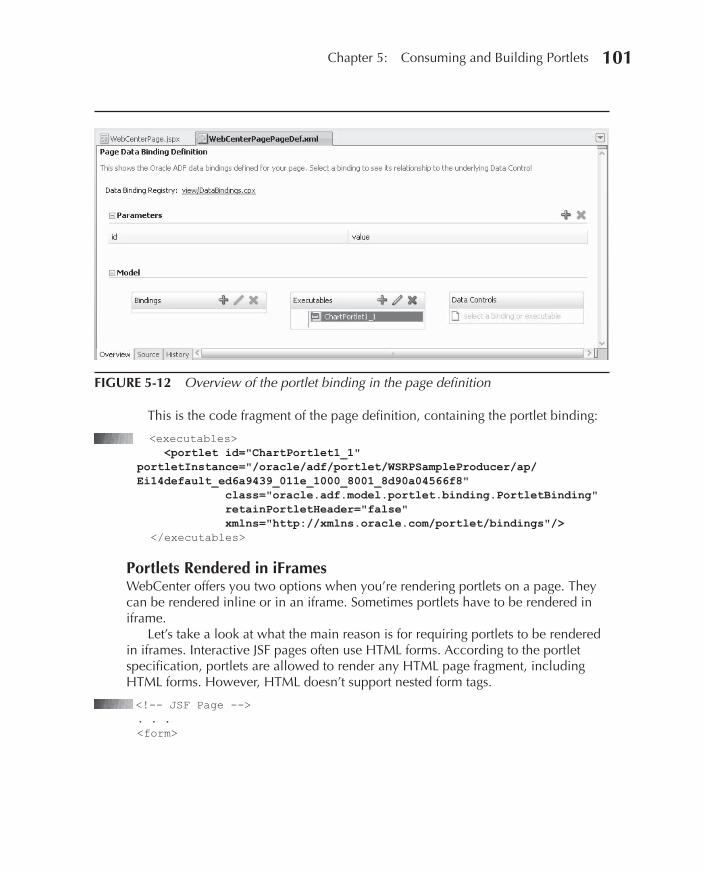
Every time you add a portlet to a page, the producer creates a new portlet instance on the portlet producer end. The relationship between the portlet instance and the portlet view tag is handled by the portlet binding in the page definition (Figure 5-12). The portlet binding identifies the portlet producer, as well as the portlet instance. The page definition also contains the portlet parameters and events if the portlet has any.
FIGURE 5-11 The portlet view tag in Design View
Chapter 5: Consuming and Building Portlets 101
This is the code fragment of the page definition, containing the portlet binding:
<executables> <portlet id="ChartPortlet1_1"portletInstance="/oracle/adf/portlet/WSRPSampleProducer/ap/Ei14default_ed6a9439_011e_1000_8001_8d90a04566f8" class="oracle.adf.model.portlet.binding.PortletBinding" retainPortletHeader="false" xmlns="http://xmlns.oracle.com/portlet/bindings"/> </executables>
Portlets Rendered in iFramesWebCenter offers you two options when you’re rendering portlets on a page. They can be rendered inline or in an iframe. Sometimes portlets have to be rendered in iframe.
Let’s take a look at what the main reason is for requiring portlets to be rendered in iframes. Interactive JSF pages often use HTML forms. According to the portlet specification, portlets are allowed to render any HTML page fragment, including HTML forms. However, HTML doesn’t support nested form tags.
<!-- JSF Page -->. . .<form>
FIGURE 5-12 Overview of the portlet binding in the page definition
102 Oracle WebCenter 11g Handbook
<!-- Portlet starts here -->. . .<form>. . .</form>. . .<!-- Portlet ends here --></form>
There are multiple ways to avoid nested HTML form tags. The first and desired approach is having the WebCenter Framework parse the markup that the portlet returns and replacing the form, form field, and form submit tags with meaningful JavaScript code. This allows the browser to render the portlet in the page, without nested HTML form tags. When the portlet’s form is submitted, the JavaScript code kicks in and submits the form on behalf of the portlet.
This approach works well for simple portlets. However, there are portlets that use complex JavaScript libraries, which makes it virtually impossible to parse the portlet markup in a reliable and flawless manner. When parsing of the portlet markup fails, the framework falls back to using an iframe.
WebCenter offers a certain level of control for you to specify how the portlet should be rendered on the page. The portlet view tag has a renderPortletInIFrameattribute allowing you to specify if the portlet should be rendered inline (renderPortletInIFrame=false) or in an iframe (renderPortletInIFrame=true). The third option is setting the renderPortletInIFrame attribute to auto, which causes the WebCenter Framework to render the portlet in an iframe if any of the following conditions are true:
The portlet is built using the JSF Portlet Bridge. When you add a JSF portlet to your page, renderPortletInIFrame is set to true by default as JSF pages within portlets are too complex to render inline.
The portlet contains a file upload element.
The parser is not able to parse the markup.
If you, as a portlet developer, want to ensure that your portlet is always included in an iframe, you can declare it in the oracle-portlet.xml file by setting the <prefer-iframe> element to true in the <portlet> section.
The code below shows the contents of the oracle-portlet.xml file:
<?xml version="1.0" encoding="UTF-8" standalone="yes"?><portlet-app-extension xmlns= "http://xmlns.oracle.com/portlet/oracle-portlet-app"> <portlet-extension> <portlet-name>CalendarPortlet</portlet-name> <portlet-id>1244584713031</portlet-id> <allow-export>true</allow-export>
■
■
■
Chapter 5: Consuming and Building Portlets 103
<allow-import>true</allow-import> <require-iframe>true</require-iframe> </portlet-extension> <allow-export>true</allow-export> <allow-import>true</allow-import></portlet-app-extension>
Specifying Portlet View Tag and Binding AttributesThe portlet view tag attributes control the visual appearance and behavior of the portlet on a page. Just like for any other tag attribute, you can either hard code these values or use an expression language to evaluate them at run time. Table 5-2 describes the portlet view tag attributes.
Attribute Description
Common
Id The identifier of the portlet view tag; it has to be unique on the page.id="p1"
Text The portlet title displayed in the portlet header.If the portlet view tag text value is not defined, it is defined by the portlet response.If the portlet response doesn’t define the text attribute, it is defined by the portlet definition: portlet.xml.text="Weather Information"
Width The width of the area to allow for portlet display.If the actual portlet width is larger than the width value entered here, a scroll bar appears, provided the displayScrollBar attribute is set to auto or true. If displayScrollBar is set to false, and the actual portlet width exceeds the value expressed for the width attribute, the width attribute value is considered and the portlet content is truncated.
Height The height of the area to allow for portlet display.If the actual portlet height is larger than the height value entered here, a scroll bar appears, provided displayScrollBar is set to auto or true. If displayScrollBar is set to false, and the actual portlet height exceeds the value expressed for the height attribute, the heightattribute value is considered and the portlet content is truncated.
Icon A URI specifying the location of an image to use as an icon, displayed to the left of the portlet title in the portlet header. This can be used to indicate the portlet’s purpose, to reinforce branding, as a content indicator, or for some other reason.
PartialTriggers The IDs of the components that trigger a partial update of the portlet. The portlet listens on the specified trigger components. If one of the trigger components receives a trigger event that causes it to update in some way, this portlet also requests to be updated.
TABLE 5-2 The Portlet View Tag Attributes
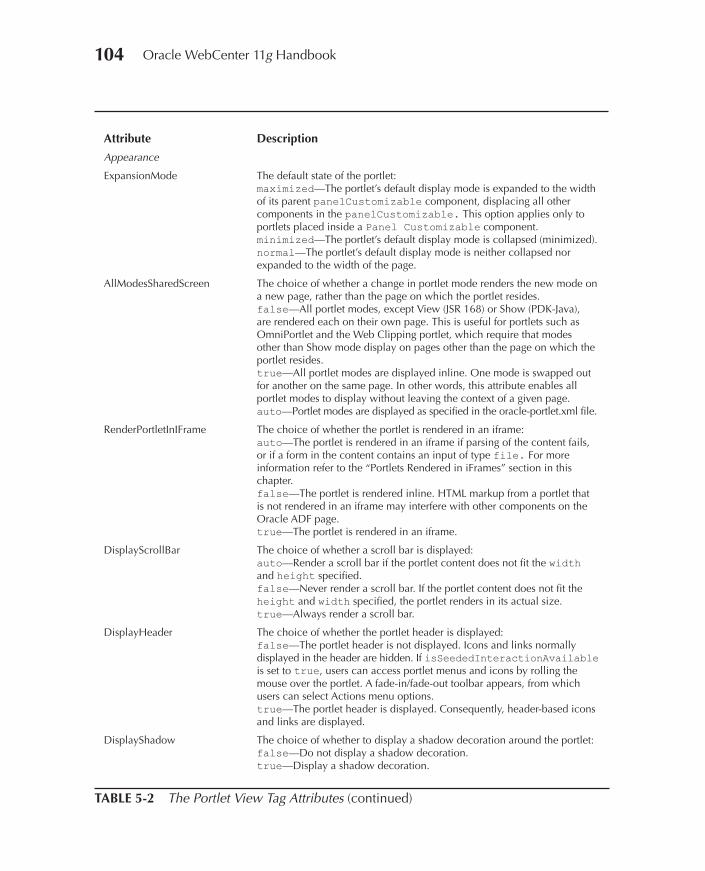
104 Oracle WebCenter 11g Handbook
Attribute Description
Appearance
ExpansionMode The default state of the portlet:maximized—The portlet’s default display mode is expanded to the width of its parent panelCustomizable component, displacing all other components in the panelCustomizable. This option applies only to portlets placed inside a Panel Customizable component.minimized—The portlet’s default display mode is collapsed (minimized).normal—The portlet’s default display mode is neither collapsed nor expanded to the width of the page.
AllModesSharedScreen The choice of whether a change in portlet mode renders the new mode on a new page, rather than the page on which the portlet resides.false—All portlet modes, except View (JSR 168) or Show (PDK-Java), are rendered each on their own page. This is useful for portlets such as OmniPortlet and the Web Clipping portlet, which require that modes other than Show mode display on pages other than the page on which the portlet resides.true—All portlet modes are displayed inline. One mode is swapped out for another on the same page. In other words, this attribute enables all portlet modes to display without leaving the context of a given page.auto—Portlet modes are displayed as specified in the oracle-portlet.xml file.
RenderPortletInIFrame The choice of whether the portlet is rendered in an iframe:auto—The portlet is rendered in an iframe if parsing of the content fails, or if a form in the content contains an input of type file. For more information refer to the “Portlets Rendered in iFrames” section in this chapter.false—The portlet is rendered inline. HTML markup from a portlet that is not rendered in an iframe may interfere with other components on the Oracle ADF page.true—The portlet is rendered in an iframe.
DisplayScrollBar The choice of whether a scroll bar is displayed:auto—Render a scroll bar if the portlet content does not fit the widthand height specified.false—Never render a scroll bar. If the portlet content does not fit the height and width specified, the portlet renders in its actual size.true—Always render a scroll bar.
DisplayHeader The choice of whether the portlet header is displayed:false—The portlet header is not displayed. Icons and links normally displayed in the header are hidden. If isSeededInteractionAvailableis set to true, users can access portlet menus and icons by rolling the mouse over the portlet. A fade-in/fade-out toolbar appears, from which users can select Actions menu options.true—The portlet header is displayed. Consequently, header-based icons and links are displayed.
DisplayShadow The choice of whether to display a shadow decoration around the portlet:false—Do not display a shadow decoration.true—Display a shadow decoration.
TABLE 5-2 The Portlet View Tag Attributes (continued)
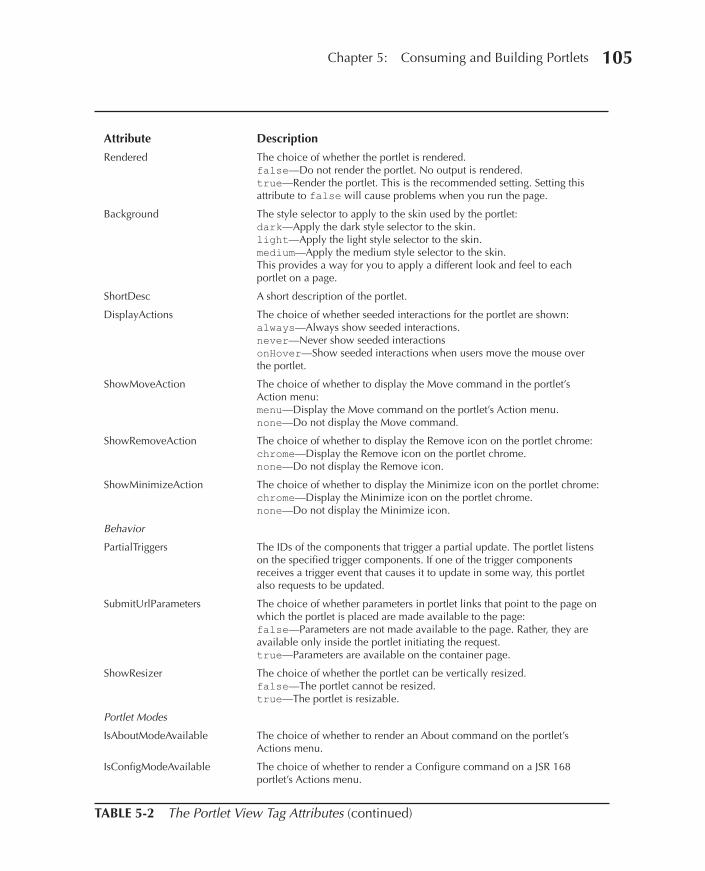
Chapter 5: Consuming and Building Portlets 105
Attribute Description
Rendered The choice of whether the portlet is rendered.false—Do not render the portlet. No output is rendered.true—Render the portlet. This is the recommended setting. Setting this attribute to false will cause problems when you run the page.
Background The style selector to apply to the skin used by the portlet:dark—Apply the dark style selector to the skin.light—Apply the light style selector to the skin.medium—Apply the medium style selector to the skin.This provides a way for you to apply a different look and feel to each portlet on a page.
ShortDesc A short description of the portlet.
DisplayActions The choice of whether seeded interactions for the portlet are shown:always—Always show seeded interactions.never—Never show seeded interactionsonHover—Show seeded interactions when users move the mouse over the portlet.
ShowMoveAction The choice of whether to display the Move command in the portlet’s Action menu:menu—Display the Move command on the portlet’s Action menu.none—Do not display the Move command.
ShowRemoveAction The choice of whether to display the Remove icon on the portlet chrome:chrome—Display the Remove icon on the portlet chrome.none—Do not display the Remove icon.
ShowMinimizeAction The choice of whether to display the Minimize icon on the portlet chrome:chrome—Display the Minimize icon on the portlet chrome.none—Do not display the Minimize icon.
Behavior
PartialTriggers The IDs of the components that trigger a partial update. The portlet listens on the specified trigger components. If one of the trigger components receives a trigger event that causes it to update in some way, this portlet also requests to be updated.
SubmitUrlParameters The choice of whether parameters in portlet links that point to the page on which the portlet is placed are made available to the page:false—Parameters are not made available to the page. Rather, they are available only inside the portlet initiating the request.true—Parameters are available on the container page.
ShowResizer The choice of whether the portlet can be vertically resized.false—The portlet cannot be resized.true—The portlet is resizable.
Portlet Modes
IsAboutModeAvailable The choice of whether to render an About command on the portlet’s Actions menu.
IsConfigModeAvailable The choice of whether to render a Configure command on a JSR 168 portlet’s Actions menu.
TABLE 5-2 The Portlet View Tag Attributes (continued)
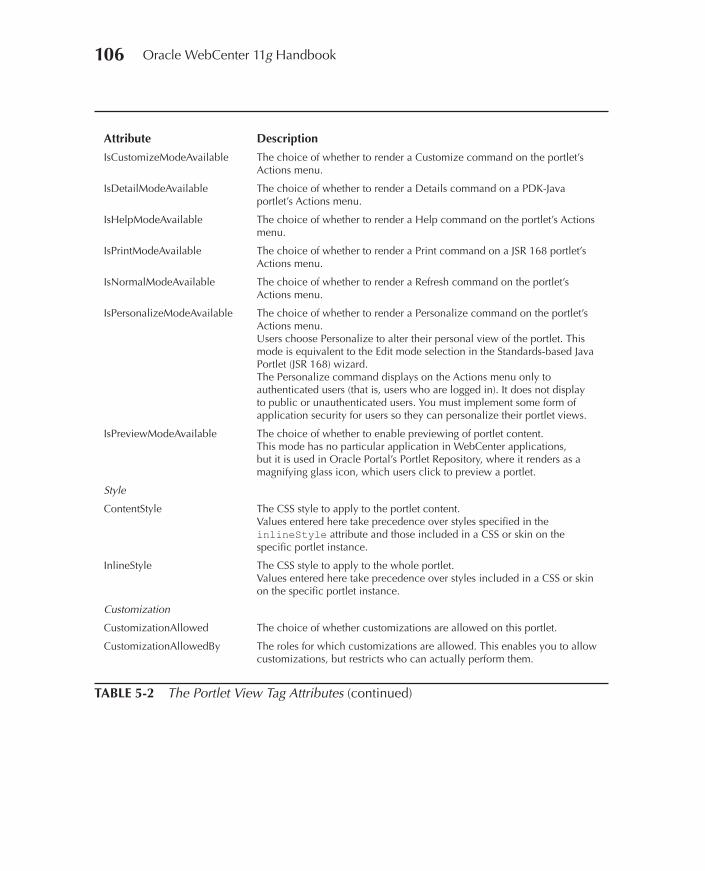
106 Oracle WebCenter 11g Handbook
Attribute Description
IsCustomizeModeAvailable The choice of whether to render a Customize command on the portlet’s Actions menu.
IsDetailModeAvailable The choice of whether to render a Details command on a PDK-Java portlet’s Actions menu.
IsHelpModeAvailable The choice of whether to render a Help command on the portlet’s Actions menu.
IsPrintModeAvailable The choice of whether to render a Print command on a JSR 168 portlet’s Actions menu.
IsNormalModeAvailable The choice of whether to render a Refresh command on the portlet’s Actions menu.
IsPersonalizeModeAvailable The choice of whether to render a Personalize command on the portlet’s Actions menu.Users choose Personalize to alter their personal view of the portlet. This mode is equivalent to the Edit mode selection in the Standards-based Java Portlet (JSR 168) wizard.The Personalize command displays on the Actions menu only to authenticated users (that is, users who are logged in). It does not display to public or unauthenticated users. You must implement some form of application security for users so they can personalize their portlet views.
IsPreviewModeAvailable The choice of whether to enable previewing of portlet content.This mode has no particular application in WebCenter applications, but it is used in Oracle Portal’s Portlet Repository, where it renders as a magnifying glass icon, which users click to preview a portlet.
Style
ContentStyle The CSS style to apply to the portlet content.Values entered here take precedence over styles specified in the inlineStyle attribute and those included in a CSS or skin on the specific portlet instance.
InlineStyle The CSS style to apply to the whole portlet.Values entered here take precedence over styles included in a CSS or skin on the specific portlet instance.
Customization
CustomizationAllowed The choice of whether customizations are allowed on this portlet.
CustomizationAllowedBy The roles for which customizations are allowed. This enables you to allow customizations, but restricts who can actually perform them.
TABLE 5-2 The Portlet View Tag Attributes (continued)
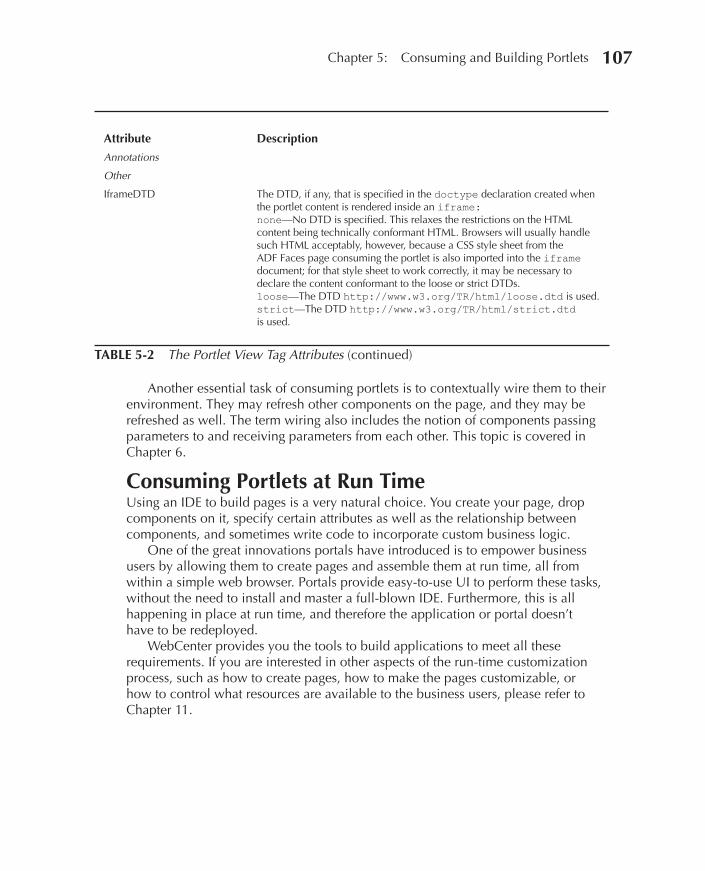
Chapter 5: Consuming and Building Portlets 107
Attribute Description
Annotations
Other
IframeDTD The DTD, if any, that is specified in the doctype declaration created when the portlet content is rendered inside an iframe:none—No DTD is specified. This relaxes the restrictions on the HTML content being technically conformant HTML. Browsers will usually handle such HTML acceptably, however, because a CSS style sheet from the ADF Faces page consuming the portlet is also imported into the iframedocument; for that style sheet to work correctly, it may be necessary to declare the content conformant to the loose or strict DTDs.loose—The DTD http://www.w3.org/TR/html/loose.dtd is used.strict—The DTD http://www.w3.org/TR/html/strict.dtdis used.
TABLE 5-2 The Portlet View Tag Attributes (continued)
Another essential task of consuming portlets is to contextually wire them to their environment. They may refresh other components on the page, and they may be refreshed as well. The term wiring also includes the notion of components passing parameters to and receiving parameters from each other. This topic is covered in Chapter 6.
Consuming Portlets at Run TimeUsing an IDE to build pages is a very natural choice. You create your page, drop components on it, specify certain attributes as well as the relationship between components, and sometimes write code to incorporate custom business logic.
One of the great innovations portals have introduced is to empower business users by allowing them to create pages and assemble them at run time, all from within a simple web browser. Portals provide easy-to-use UI to perform these tasks, without the need to install and master a full-blown IDE. Furthermore, this is all happening in place at run time, and therefore the application or portal doesn’t have to be redeployed.
WebCenter provides you the tools to build applications to meet all these requirements. If you are interested in other aspects of the run-time customization process, such as how to create pages, how to make the pages customizable, or how to control what resources are available to the business users, please refer to Chapter 11.
108 Oracle WebCenter 11g Handbook
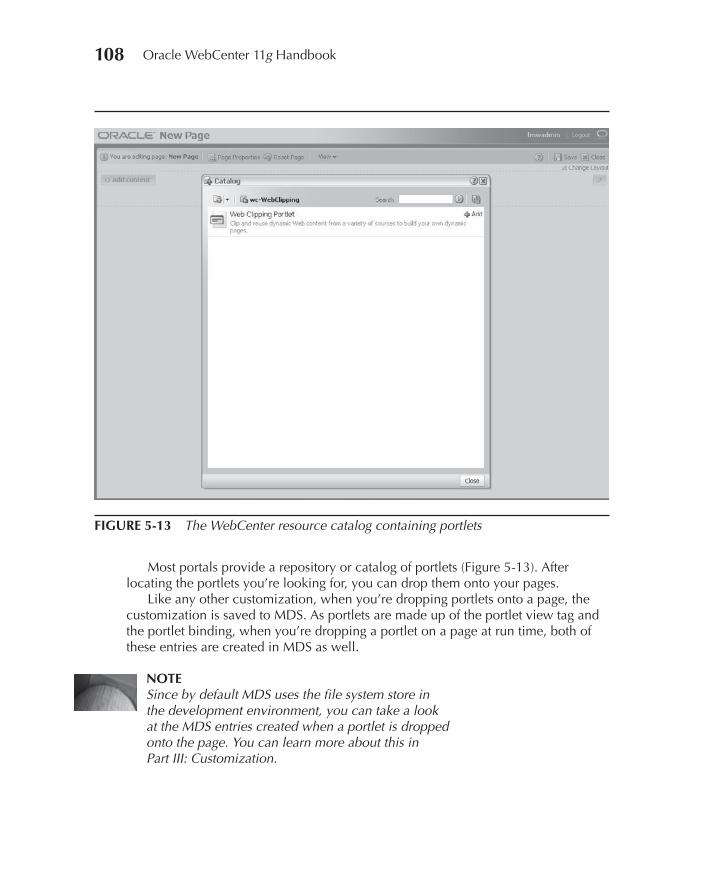
Most portals provide a repository or catalog of portlets (Figure 5-13). After locating the portlets you’re looking for, you can drop them onto your pages.
Like any other customization, when you’re dropping portlets onto a page, the customization is saved to MDS. As portlets are made up of the portlet view tag and the portlet binding, when you’re dropping a portlet on a page at run time, both of these entries are created in MDS as well.
NOTESince by default MDS uses the file system store in the development environment, you can take a look at the MDS entries created when a portlet is dropped onto the page. You can learn more about this in Part III: Customization.
FIGURE 5-13 The WebCenter resource catalog containing portlets
Chapter 5: Consuming and Building Portlets 109
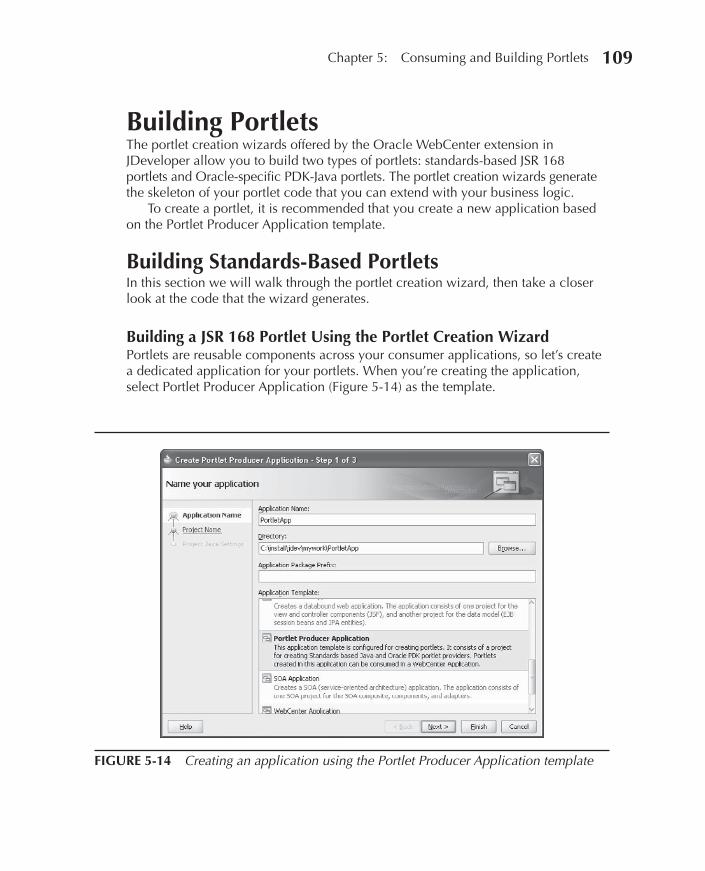
Building PortletsThe portlet creation wizards offered by the Oracle WebCenter extension in JDeveloper allow you to build two types of portlets: standards-based JSR 168 portlets and Oracle-specific PDK-Java portlets. The portlet creation wizards generate the skeleton of your portlet code that you can extend with your business logic.
To create a portlet, it is recommended that you create a new application based on the Portlet Producer Application template.
Building Standards-Based PortletsIn this section we will walk through the portlet creation wizard, then take a closer look at the code that the wizard generates.
Building a JSR 168 Portlet Using the Portlet Creation WizardPortlets are reusable components across your consumer applications, so let’s create a dedicated application for your portlets. When you’re creating the application, select Portlet Producer Application (Figure 5-14) as the template.
FIGURE 5-14 Creating an application using the Portlet Producer Application template

110 Oracle WebCenter 11g Handbook
Your application contains one project, Portlets. Invoke the New Gallery (Portlets context menu | New… or File | New…) and select Web Tier | Portlets (Figure 5-15).
The following steps walk you through the task of creating a simple portlet using JDeveloper’s portlet creation wizard.
1. Create web application The first step of the portlet creation wizard is a generic web application–specific question: What version servlet and JSP version do you want to use? If you are using the 11g version of WebCenter, you should choose the default and most recent Servlet 2.5/JSP 2.1 (Java EE 1.5) option.
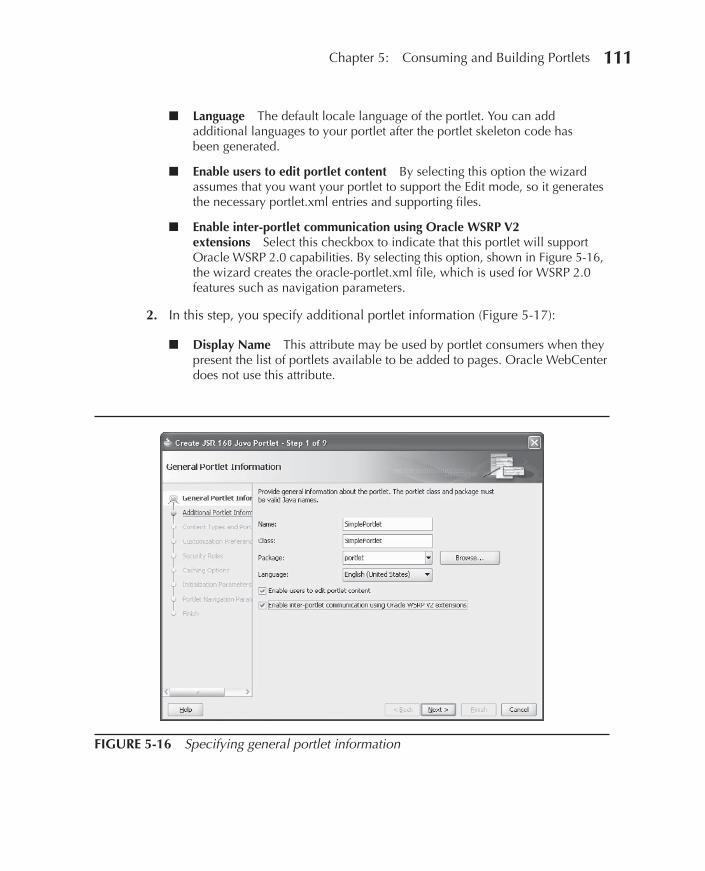
In this step you specify several generic portlet properties:
Name The display name of your portlet that shows up in JDeveloper, as well as in Composer at run time.
Class The name of the portlet Java class generated by the wizard.
Package The package created for the portlet Java class.
■
■
■
FIGURE 5-15 Portlet creation wizards in the New Gallery
Chapter 5: Consuming and Building Portlets 111
Language The default locale language of the portlet. You can add additional languages to your portlet after the portlet skeleton code has been generated.
Enable users to edit portlet content By selecting this option the wizard assumes that you want your portlet to support the Edit mode, so it generates the necessary portlet.xml entries and supporting files.
Enable inter-portlet communication using Oracle WSRP V2 extensions Select this checkbox to indicate that this portlet will support Oracle WSRP 2.0 capabilities. By selecting this option, shown in Figure 5-16, the wizard creates the oracle-portlet.xml file, which is used for WSRP 2.0 features such as navigation parameters.
2. In this step, you specify additional portlet information (Figure 5-17):
Display Name This attribute may be used by portlet consumers when they present the list of portlets available to be added to pages. Oracle WebCenter does not use this attribute.
■
■
■
■
FIGURE 5-16 Specifying general portlet information

112 Oracle WebCenter 11g Handbook
Portlet Title The portlet title is displayed in the portlet’s header.
Short Title The portlet consumer may opt to display a different portlet title on mobile devices: the Short Title.
Description This portlet attribute allows portlet consumers to display detailed information about the portlet, in addition to the portlet title. The description is not used by Oracle WebCenter. In Oracle Portal the description displays beneath the portlet in the portlet repository.
Keywords This attribute stores search keywords, separated by commas. This portlet attribute is not used when the portlet is consumed by Oracle WebCenter.
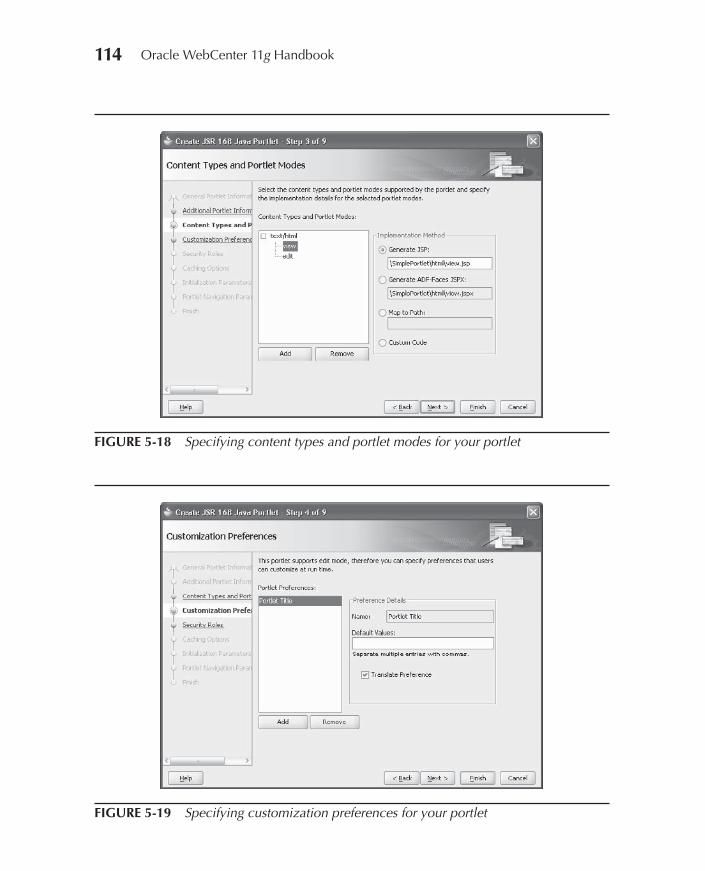
3. Select content types and portlet modes Content types: Select the text/html node under Content Types and Portlet Modes, and click the Add button (Figure 5-18). In the dialog you can specify which content types you want your portlet to support. Also, if you need to specify a content type not available in the list, you can do so by clicking the New button.
■
■
■
■
FIGURE 5-17 Specifying additional portlet information
Chapter 5: Consuming and Building Portlets 113
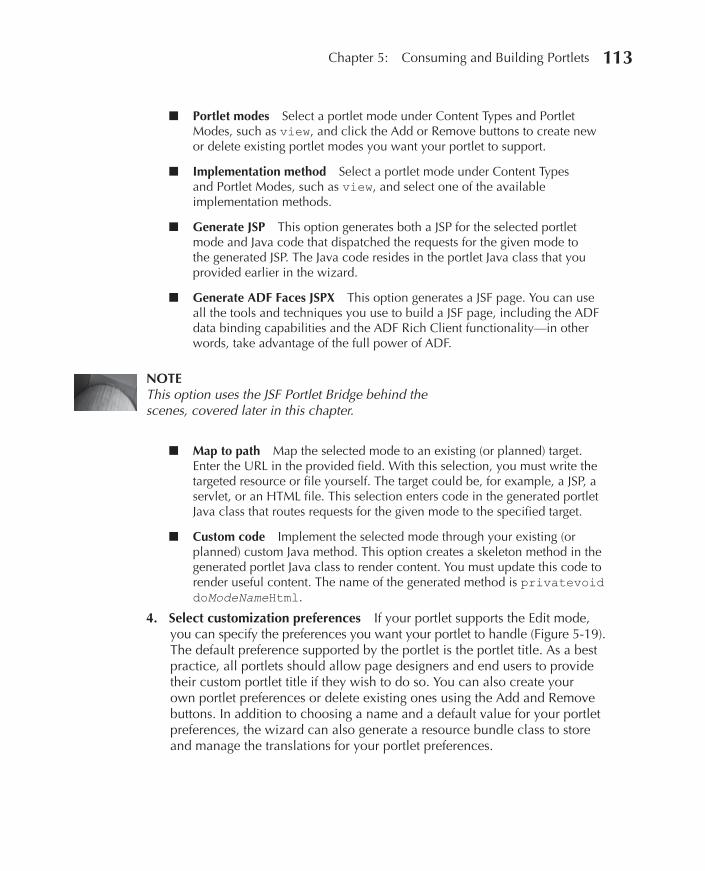
Portlet modes Select a portlet mode under Content Types and Portlet Modes, such as view, and click the Add or Remove buttons to create new or delete existing portlet modes you want your portlet to support.
Implementation method Select a portlet mode under Content Types and Portlet Modes, such as view, and select one of the available implementation methods.
Generate JSP This option generates both a JSP for the selected portlet mode and Java code that dispatched the requests for the given mode to the generated JSP. The Java code resides in the portlet Java class that you provided earlier in the wizard.
Generate ADF Faces JSPX This option generates a JSF page. You can use all the tools and techniques you use to build a JSF page, including the ADF data binding capabilities and the ADF Rich Client functionality—in other words, take advantage of the full power of ADF.
NOTEThis option uses the JSF Portlet Bridge behind the scenes, covered later in this chapter.
Map to path Map the selected mode to an existing (or planned) target. Enter the URL in the provided field. With this selection, you must write the targeted resource or file yourself. The target could be, for example, a JSP, a servlet, or an HTML file. This selection enters code in the generated portlet Java class that routes requests for the given mode to the specified target.
Custom code Implement the selected mode through your existing (or planned) custom Java method. This option creates a skeleton method in the generated portlet Java class to render content. You must update this code to render useful content. The name of the generated method is privatevoiddoModeNameHtml.
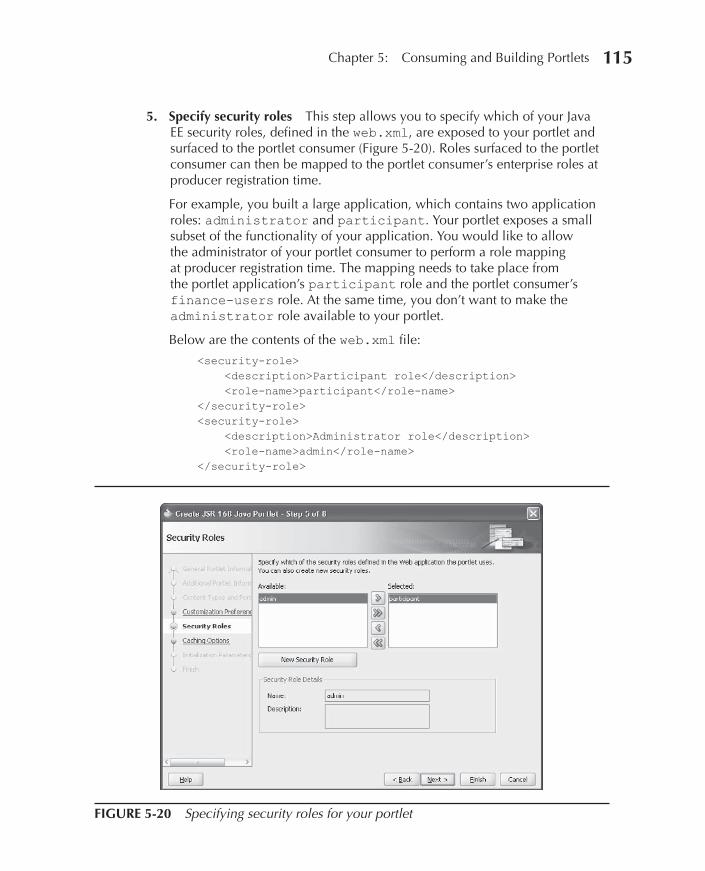
4. Select customization preferences If your portlet supports the Edit mode, you can specify the preferences you want your portlet to handle (Figure 5-19). The default preference supported by the portlet is the portlet title. As a best practice, all portlets should allow page designers and end users to provide their custom portlet title if they wish to do so. You can also create your own portlet preferences or delete existing ones using the Add and Remove buttons. In addition to choosing a name and a default value for your portlet preferences, the wizard can also generate a resource bundle class to store and manage the translations for your portlet preferences.
■
■
■
■
■
■
114 Oracle WebCenter 11g Handbook
FIGURE 5-18 Specifying content types and portlet modes for your portlet
FIGURE 5-19 Specifying customization preferences for your portlet
Chapter 5: Consuming and Building Portlets 115
5. Specify security roles This step allows you to specify which of your Java EE security roles, defined in the web.xml, are exposed to your portlet and surfaced to the portlet consumer (Figure 5-20). Roles surfaced to the portlet consumer can then be mapped to the portlet consumer’s enterprise roles at producer registration time.
For example, you built a large application, which contains two application roles: administrator and participant. Your portlet exposes a small subset of the functionality of your application. You would like to allow the administrator of your portlet consumer to perform a role mapping at producer registration time. The mapping needs to take place from the portlet application’s participant role and the portlet consumer’s finance-users role. At the same time, you don’t want to make the administrator role available to your portlet.
Below are the contents of the web.xml file:
<security-role> <description>Participant role</description> <role-name>participant</role-name> </security-role> <security-role> <description>Administrator role</description> <role-name>admin</role-name> </security-role>
FIGURE 5-20 Specifying security roles for your portlet
116 Oracle WebCenter 11g Handbook
The contents of the portlet.xml file follow: <security-role-ref> <role-name>participant</role-name> </security-role-ref>
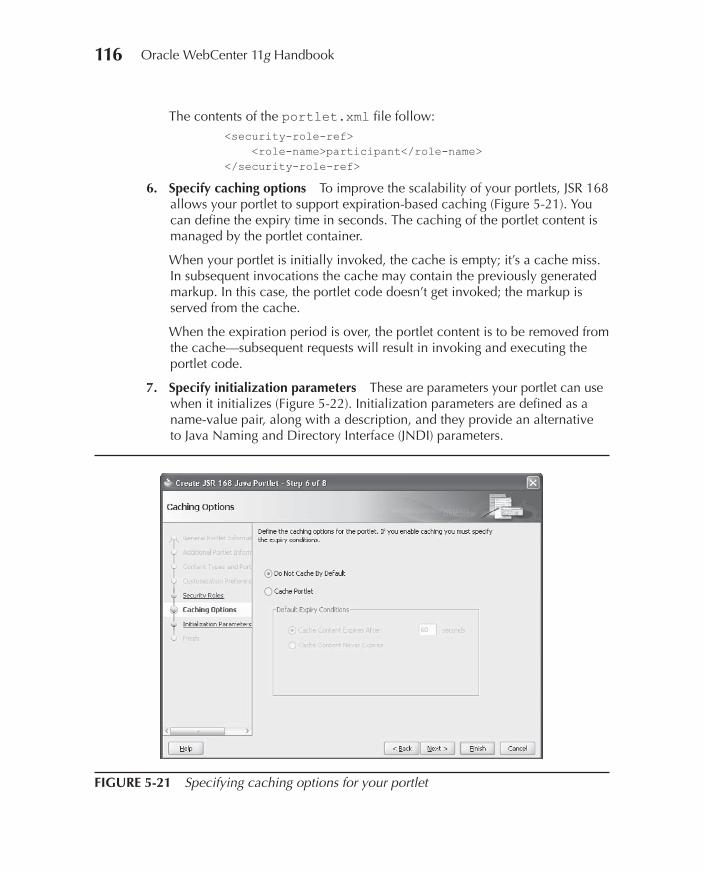
6. Specify caching options To improve the scalability of your portlets, JSR 168 allows your portlet to support expiration-based caching (Figure 5-21). You can define the expiry time in seconds. The caching of the portlet content is managed by the portlet container.
When your portlet is initially invoked, the cache is empty; it’s a cache miss. In subsequent invocations the cache may contain the previously generated markup. In this case, the portlet code doesn’t get invoked; the markup is served from the cache.
When the expiration period is over, the portlet content is to be removed from the cache—subsequent requests will result in invoking and executing the portlet code.
7. Specify initialization parameters These are parameters your portlet can use when it initializes (Figure 5-22). Initialization parameters are defined as a name-value pair, along with a description, and they provide an alternative to Java Naming and Directory Interface (JNDI) parameters.
FIGURE 5-21 Specifying caching options for your portlet

Chapter 5: Consuming and Building Portlets 117
FIGURE 5-22 Specifying initialization parameters for your portlet
8. Specify portlet navigation parameters WSRP 2.0 portlets use navigation parameters for inter-portlet communication. As shown in Figure 5-23, you can define the navigation parameters for your portlet by providing a parameter name, a label, and a translatable hint text.
NOTEThis option is available only if you have selected the Enable Inter-portlet Communication Using Oracle WSRP V2 Extensions checkbox in the General Portlet Information wizard step, shown in Figure 5-16.
Understanding the Generated Portlet Skeleton CodeFigure 5-24 shows all the files that the portlet creation wizard generated for us. In this section we explain the generated files:
portlet.xml The portlet deployment descriptor file is the most important of all the generated files in a portlet application. It contains information about the portlets and their attributes that the application contains. Attributes
■
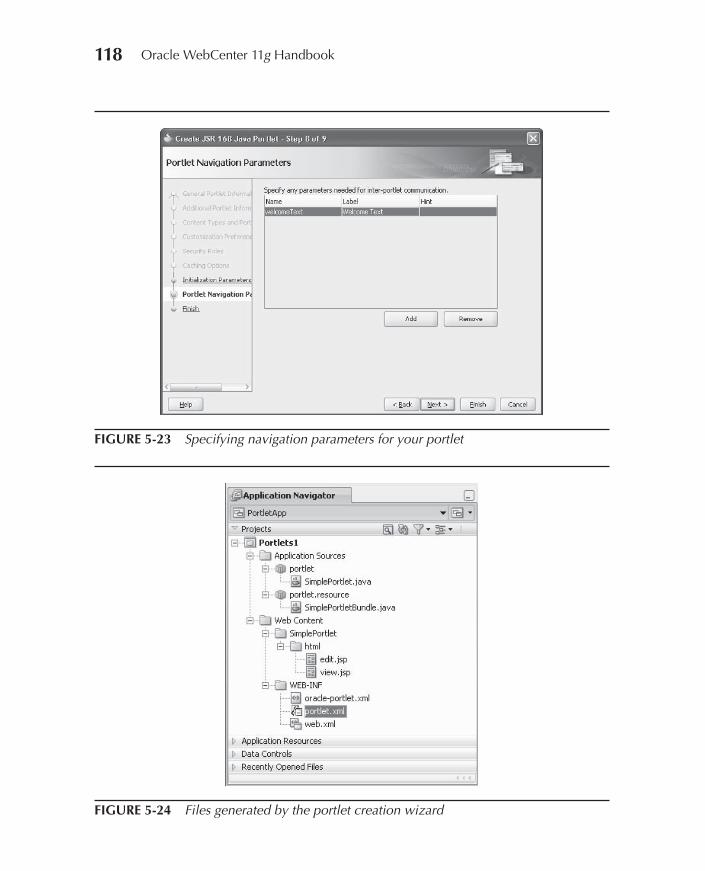
118 Oracle WebCenter 11g Handbook
FIGURE 5-23 Specifying navigation parameters for your portlet
FIGURE 5-24 Files generated by the portlet creation wizard

Chapter 5: Consuming and Building Portlets 119
include the portlet’s unique ID, the portlet name, and display name, as well as the display modes that the portlet supports.
<?xml version="1.0" encoding="UTF-8" standalone="yes"?><portlet-app version="1.0"xsi:schemaLocation="http://java.sun.com/xml/ns/portlet/portlet-app_1_0.xsdhttp://java.sun.com/xml/ns/portlet/portlet-app_1_0.xsd"xmlns="http://java.sun.com/xml/ns/portlet/portlet-app_1_0.xsd"xmlns:xsi="http://www.w3.org/2001/XMLSchema-instance"> <portlet id="1232667183625"> <portlet-name>SimplePortlet</portlet-name> <display-name xml:lang="en-US">Simple Portlet</display-name> <display-name xml:lang="en">English Display Name</display-name> <portlet-class>portlet.SimplePortlet</portlet-class> <expiration-cache>0</expiration-cache> <supports> <mime-type>text/html</mime-type> <portlet-mode>edit</portlet-mode> </supports> <supported-locale>en-US</supported-locale> <resource-bundle>portlet.resource.SimplePortletBundle </resource-bundle> <portlet-info> <title>Welcome to the Simple Portlet</title> <short-title>SimplePortlet</short-title> <keywords/> </portlet-info> <portlet-preferences> <preference> <name>portletTitle</name> </preference> </portlet-preferences> </portlet> <custom-portlet-mode> <portlet-mode>about</portlet-mode> </custom-portlet-mode> <custom-portlet-mode> <portlet-mode>config</portlet-mode> </custom-portlet-mode> <custom-portlet-mode> <portlet-mode>edit_defaults</portlet-mode> </custom-portlet-mode> <custom-portlet-mode> <portlet-mode>preview</portlet-mode> </custom-portlet-mode> <custom-portlet-mode> <portlet-mode>print</portlet-mode> </custom-portlet-mode></portlet-app>
oracle-portlet.xml This file contains Oracle-specific deployment information about the portlet. Since WSRP 2.0 features are implemented as extensions on top of JSR 168, this file is generated when you select the Enable Inter-portlet Communication Using Oracle WSRP V2 Extensions checkbox, as shown in Figure 5-16. In addition to defining navigation
■
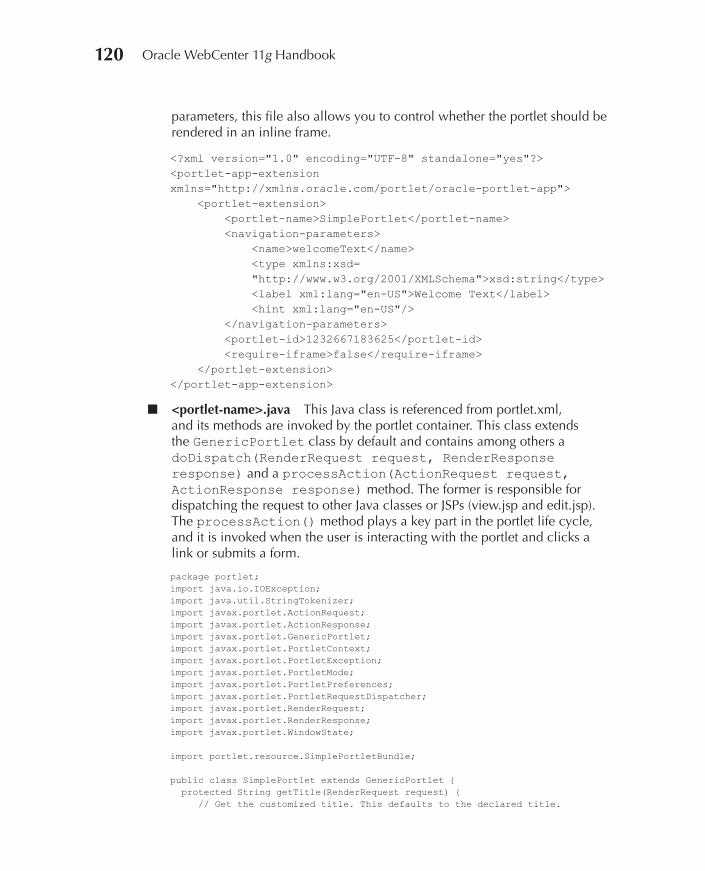
120 Oracle WebCenter 11g Handbook
parameters, this file also allows you to control whether the portlet should be rendered in an inline frame.
<?xml version="1.0" encoding="UTF-8" standalone="yes"?><portlet-app-extensionxmlns="http://xmlns.oracle.com/portlet/oracle-portlet-app"> <portlet-extension> <portlet-name>SimplePortlet</portlet-name> <navigation-parameters> <name>welcomeText</name> <type xmlns:xsd= "http://www.w3.org/2001/XMLSchema">xsd:string</type> <label xml:lang="en-US">Welcome Text</label> <hint xml:lang="en-US"/> </navigation-parameters> <portlet-id>1232667183625</portlet-id> <require-iframe>false</require-iframe> </portlet-extension></portlet-app-extension>
<portlet-name>.java This Java class is referenced from portlet.xml, and its methods are invoked by the portlet container. This class extends the GenericPortlet class by default and contains among others a doDispatch(RenderRequest request, RenderResponse response) and a processAction(ActionRequest request, ActionResponse response) method. The former is responsible for dispatching the request to other Java classes or JSPs (view.jsp and edit.jsp). The processAction() method plays a key part in the portlet life cycle, and it is invoked when the user is interacting with the portlet and clicks a link or submits a form.
package portlet; import java.io.IOException;import java.util.StringTokenizer;import javax.portlet.ActionRequest;import javax.portlet.ActionResponse;import javax.portlet.GenericPortlet;import javax.portlet.PortletContext;import javax.portlet.PortletException;import javax.portlet.PortletMode;import javax.portlet.PortletPreferences;import javax.portlet.PortletRequestDispatcher;import javax.portlet.RenderRequest;import javax.portlet.RenderResponse;import javax.portlet.WindowState;
import portlet.resource.SimplePortletBundle;
public class SimplePortlet extends GenericPortlet { protected String getTitle(RenderRequest request) { // Get the customized title. This defaults to the declared title.
■
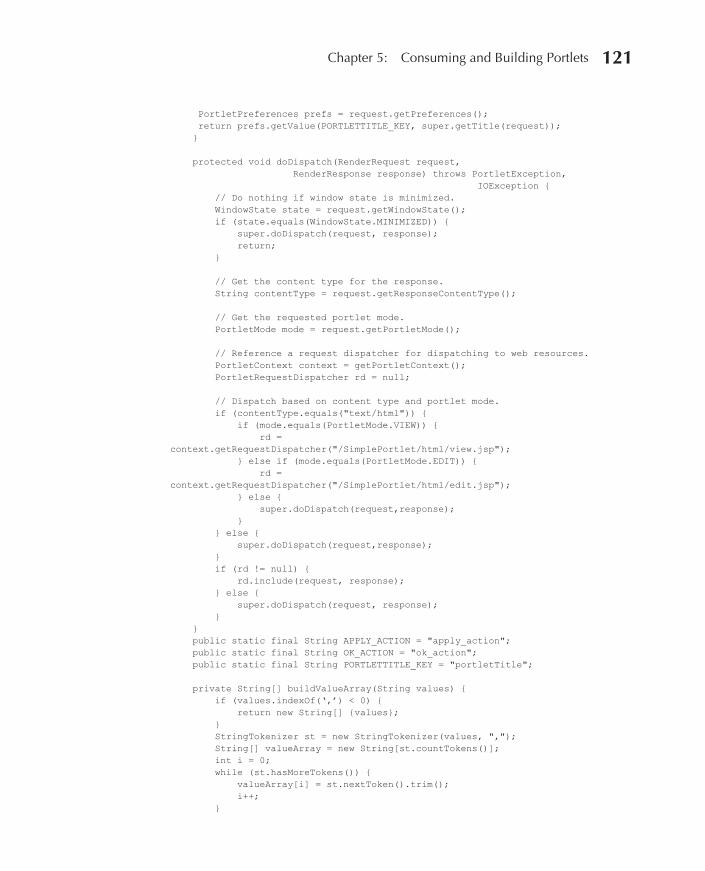
Chapter 5: Consuming and Building Portlets 121
PortletPreferences prefs = request.getPreferences(); return prefs.getValue(PORTLETTITLE_KEY, super.getTitle(request)); }
protected void doDispatch(RenderRequest request, RenderResponse response) throws PortletException, IOException { // Do nothing if window state is minimized. WindowState state = request.getWindowState(); if (state.equals(WindowState.MINIMIZED)) { super.doDispatch(request, response); return; }
// Get the content type for the response. String contentType = request.getResponseContentType();
// Get the requested portlet mode. PortletMode mode = request.getPortletMode();
// Reference a request dispatcher for dispatching to web resources. PortletContext context = getPortletContext(); PortletRequestDispatcher rd = null;
// Dispatch based on content type and portlet mode. if (contentType.equals("text/html")) { if (mode.equals(PortletMode.VIEW)) { rd = context.getRequestDispatcher("/SimplePortlet/html/view.jsp"); } else if (mode.equals(PortletMode.EDIT)) { rd = context.getRequestDispatcher("/SimplePortlet/html/edit.jsp"); } else { super.doDispatch(request,response); } } else { super.doDispatch(request,response); } if (rd != null) { rd.include(request, response); } else { super.doDispatch(request, response); } } public static final String APPLY_ACTION = "apply_action"; public static final String OK_ACTION = "ok_action"; public static final String PORTLETTITLE_KEY = "portletTitle";
private String[] buildValueArray(String values) { if (values.indexOf(‘,’) < 0) { return new String[] {values}; } StringTokenizer st = new StringTokenizer(values, ","); String[] valueArray = new String[st.countTokens()]; int i = 0; while (st.hasMoreTokens()) { valueArray[i] = st.nextToken().trim(); i++; }
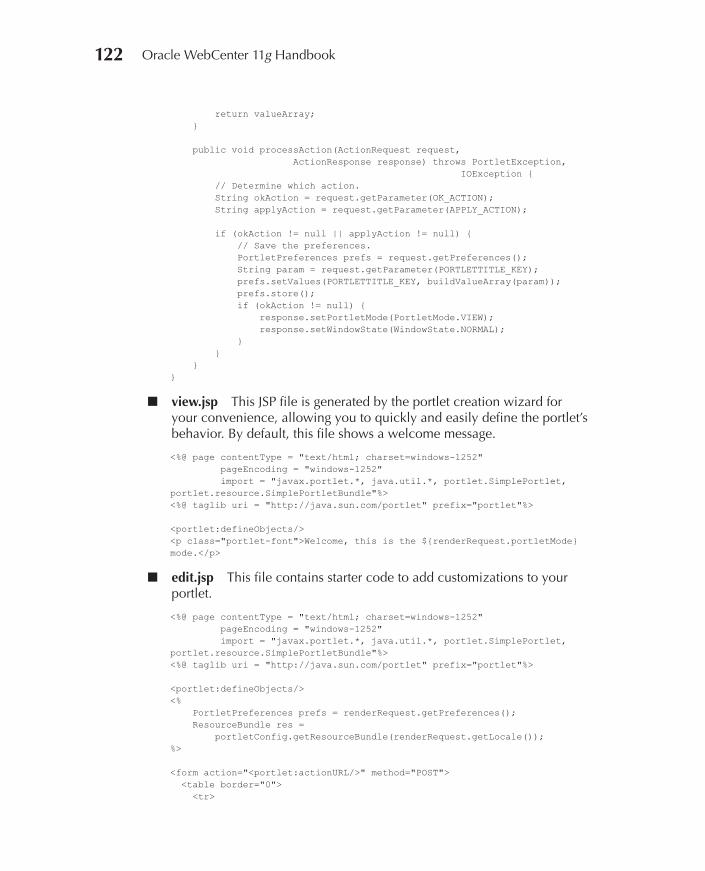
122 Oracle WebCenter 11g Handbook
return valueArray; }
public void processAction(ActionRequest request, ActionResponse response) throws PortletException, IOException { // Determine which action. String okAction = request.getParameter(OK_ACTION); String applyAction = request.getParameter(APPLY_ACTION);
if (okAction != null || applyAction != null) { // Save the preferences. PortletPreferences prefs = request.getPreferences(); String param = request.getParameter(PORTLETTITLE_KEY); prefs.setValues(PORTLETTITLE_KEY, buildValueArray(param)); prefs.store(); if (okAction != null) { response.setPortletMode(PortletMode.VIEW); response.setWindowState(WindowState.NORMAL); } } }}
view.jsp This JSP file is generated by the portlet creation wizard for your convenience, allowing you to quickly and easily define the portlet’s behavior. By default, this file shows a welcome message.
<%@ page contentType = "text/html; charset=windows-1252" pageEncoding = "windows-1252" import = "javax.portlet.*, java.util.*, portlet.SimplePortlet, portlet.resource.SimplePortletBundle"%><%@ taglib uri = "http://java.sun.com/portlet" prefix="portlet"%>
<portlet:defineObjects/><p class="portlet-font">Welcome, this is the ${renderRequest.portletMode} mode.</p>
edit.jsp This file contains starter code to add customizations to your portlet.
<%@ page contentType = "text/html; charset=windows-1252" pageEncoding = "windows-1252" import = "javax.portlet.*, java.util.*, portlet.SimplePortlet, portlet.resource.SimplePortletBundle"%><%@ taglib uri = "http://java.sun.com/portlet" prefix="portlet"%>
<portlet:defineObjects/><% PortletPreferences prefs = renderRequest.getPreferences(); ResourceBundle res = portletConfig.getResourceBundle(renderRequest.getLocale());%>
<form action="<portlet:actionURL/>" method="POST"> <table border="0"> <tr>
■
■
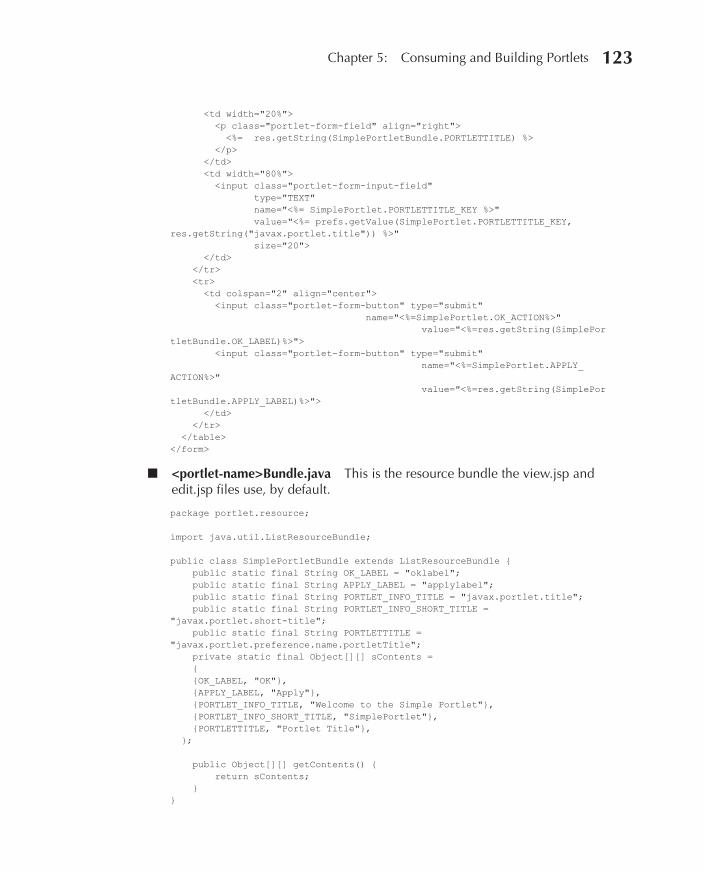
Chapter 5: Consuming and Building Portlets 123
<td width="20%"> <p class="portlet-form-field" align="right"> <%= res.getString(SimplePortletBundle.PORTLETTITLE) %> </p> </td> <td width="80%"> <input class="portlet-form-input-field" type="TEXT" name="<%= SimplePortlet.PORTLETTITLE_KEY %>" value="<%= prefs.getValue(SimplePortlet.PORTLETTITLE_KEY, res.getString("javax.portlet.title")) %>" size="20"> </td> </tr> <tr> <td colspan="2" align="center"> <input class="portlet-form-button" type="submit" name="<%=SimplePortlet.OK_ACTION%>" value="<%=res.getString(SimplePortletBundle.OK_LABEL)%>"> <input class="portlet-form-button" type="submit" name="<%=SimplePortlet.APPLY_ACTION%>" value="<%=res.getString(SimplePortletBundle.APPLY_LABEL)%>"> </td> </tr> </table></form>
<portlet-name>Bundle.java This is the resource bundle the view.jsp and edit.jsp files use, by default.
package portlet.resource;
import java.util.ListResourceBundle;
public class SimplePortletBundle extends ListResourceBundle { public static final String OK_LABEL = "oklabel"; public static final String APPLY_LABEL = "applylabel"; public static final String PORTLET_INFO_TITLE = "javax.portlet.title"; public static final String PORTLET_INFO_SHORT_TITLE = "javax.portlet.short-title"; public static final String PORTLETTITLE = "javax.portlet.preference.name.portletTitle"; private static final Object[][] sContents = { {OK_LABEL, "OK"}, {APPLY_LABEL, "Apply"}, {PORTLET_INFO_TITLE, "Welcome to the Simple Portlet"}, {PORTLET_INFO_SHORT_TITLE, "SimplePortlet"}, {PORTLETTITLE, "Portlet Title"}, };
public Object[][] getContents() { return sContents; }}
■
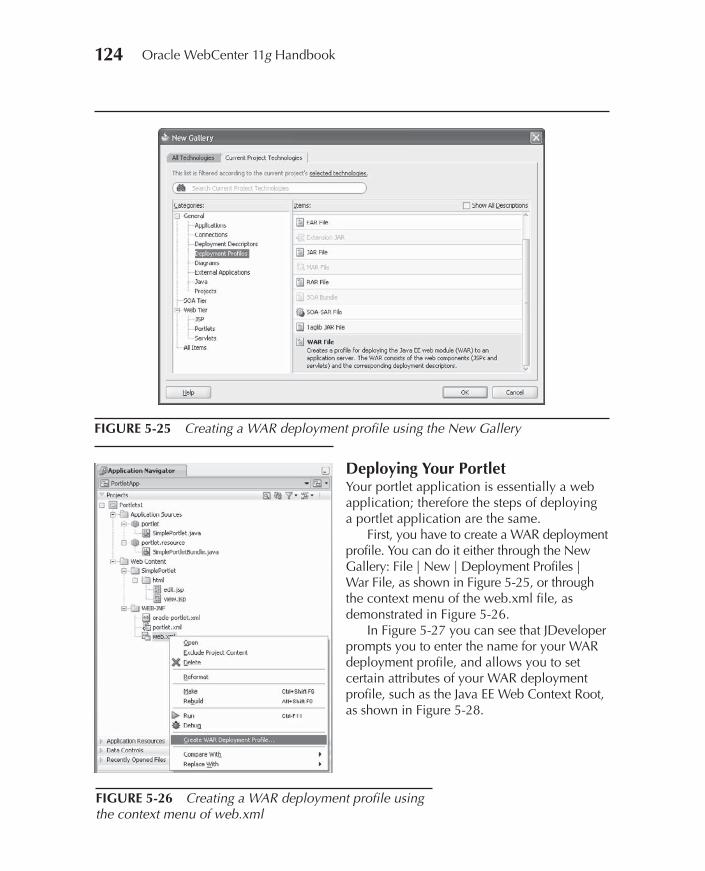
124 Oracle WebCenter 11g Handbook
FIGURE 5-25 Creating a WAR deployment profile using the New Gallery
Deploying Your PortletYour portlet application is essentially a web application; therefore the steps of deploying a portlet application are the same.
First, you have to create a WAR deployment profile. You can do it either through the New Gallery: File | New | Deployment Profiles | War File, as shown in Figure 5-25, or through the context menu of the web.xml file, as demonstrated in Figure 5-26.
In Figure 5-27 you can see that JDeveloper prompts you to enter the name for your WAR deployment profile, and allows you to set certain attributes of your WAR deployment profile, such as the Java EE Web Context Root, as shown in Figure 5-28.
FIGURE 5-26 Creating a WAR deployment profile using the context menu of web.xml
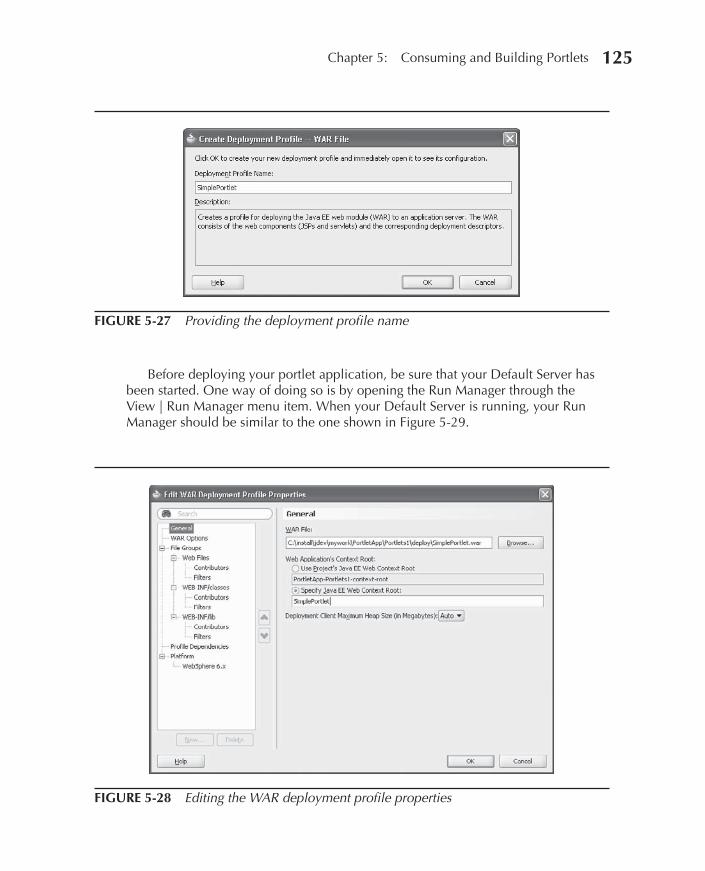
Chapter 5: Consuming and Building Portlets 125
Before deploying your portlet application, be sure that your Default Server has been started. One way of doing so is by opening the Run Manager through the View | Run Manager menu item. When your Default Server is running, your Run Manager should be similar to the one shown in Figure 5-29.
FIGURE 5-27 Providing the deployment profile name
FIGURE 5-28 Editing the WAR deployment profile properties
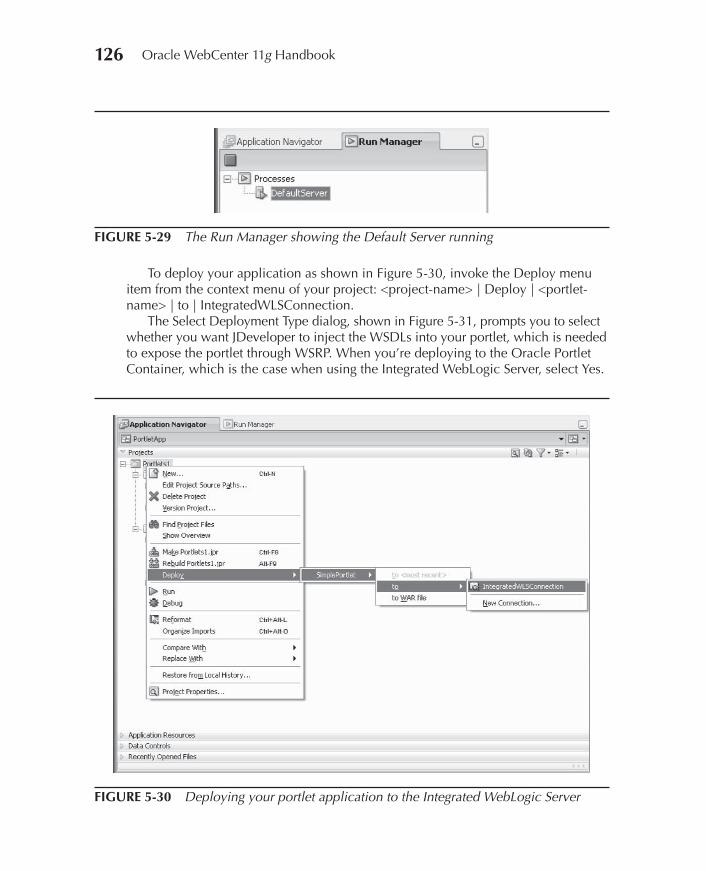
126 Oracle WebCenter 11g Handbook
To deploy your application as shown in Figure 5-30, invoke the Deploy menu item from the context menu of your project: <project-name> | Deploy | <portlet-name> | to | IntegratedWLSConnection.
The Select Deployment Type dialog, shown in Figure 5-31, prompts you to select whether you want JDeveloper to inject the WSDLs into your portlet, which is needed to expose the portlet through WSRP. When you’re deploying to the Oracle Portlet Container, which is the case when using the Integrated WebLogic Server, select Yes.
FIGURE 5-29 The Run Manager showing the Default Server running
FIGURE 5-30 Deploying your portlet application to the Integrated WebLogic Server
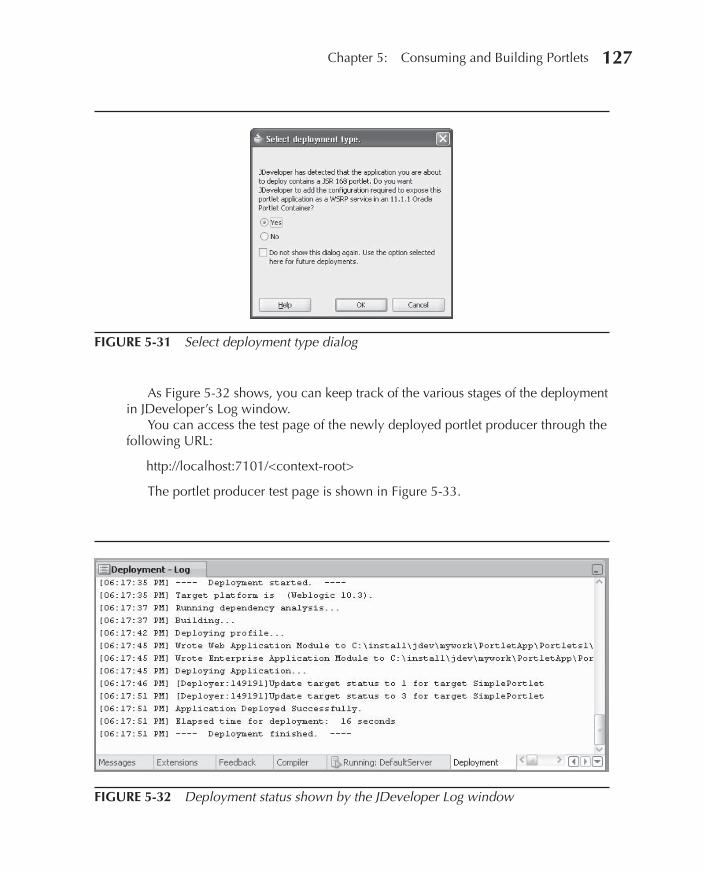
Chapter 5: Consuming and Building Portlets 127
As Figure 5-32 shows, you can keep track of the various stages of the deployment in JDeveloper’s Log window.
You can access the test page of the newly deployed portlet producer through the following URL:
http://localhost:7101/<context-root>
The portlet producer test page is shown in Figure 5-33.
FIGURE 5-31 Select deployment type dialog
FIGURE 5-32 Deployment status shown by the JDeveloper Log window
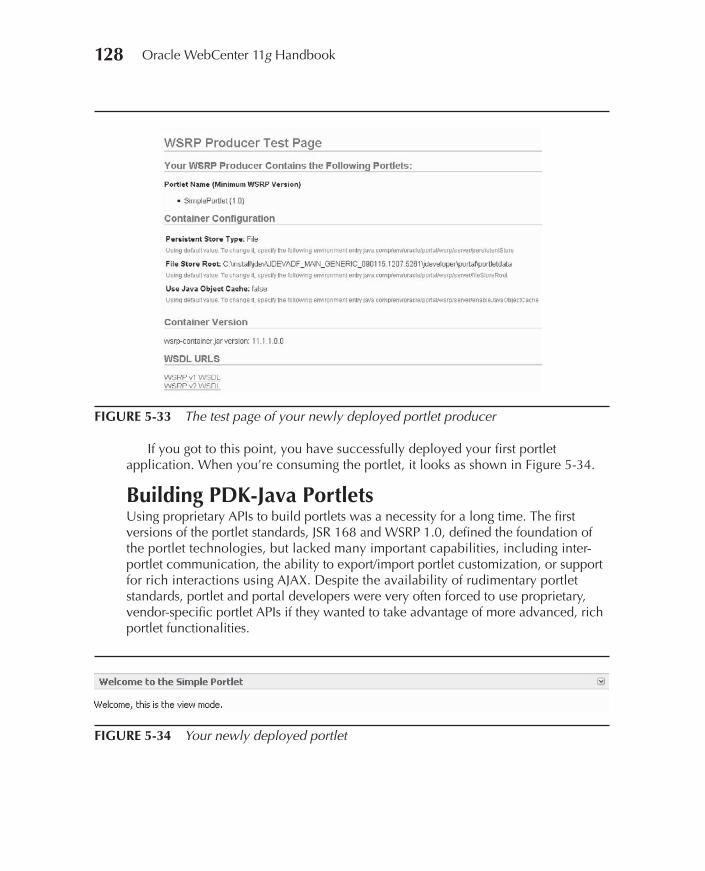
128 Oracle WebCenter 11g Handbook
If you got to this point, you have successfully deployed your first portlet application. When you’re consuming the portlet, it looks as shown in Figure 5-34.
Building PDK-Java PortletsUsing proprietary APIs to build portlets was a necessity for a long time. The first versions of the portlet standards, JSR 168 and WSRP 1.0, defined the foundation of the portlet technologies, but lacked many important capabilities, including inter-portlet communication, the ability to export/import portlet customization, or support for rich interactions using AJAX. Despite the availability of rudimentary portlet standards, portlet and portal developers were very often forced to use proprietary, vendor-specific portlet APIs if they wanted to take advantage of more advanced, rich portlet functionalities.
FIGURE 5-33 The test page of your newly deployed portlet producer
FIGURE 5-34 Your newly deployed portlet

Chapter 5: Consuming and Building Portlets 129
Oracle PDK-Java was born long before the inception of the portlet standards. In fact, the remote nature of PDK-Java portlets served as an inspiration for WSRP.
The second-generation portlet standards, JSR 286 and WSRP 2.0, fill most of the gaps of JSR 168 and WSRP 1.0. Therefore, in almost every case you will be building standards-based portlets. To save space for more important and exciting topics, we cover only the first steps of creating PDK-Java portlets. If for some reason you are required to build portlets using PDK-Java, the Oracle WebCenter documentation contains a lot of useful information and examples.
As in the JSR 168 portlet creation wizard, you can create a new PDK-Java portlet by creating a dedicated application based on the Portlet Producer Application template, as shown in Figure 5-35.
In Figure 5-36 you can see that right next to the JSR 168 portlet creation wizard, the New Gallery contains a dedicated PDK-Java portlet wizard that will generate the skeleton code for your portlet application.
For more information on PDK-Java portlets, please refer to the Oracle WebCenter Developer’s Guide.
FIGURE 5-35 Creating an application using the Portlet Producer Application template
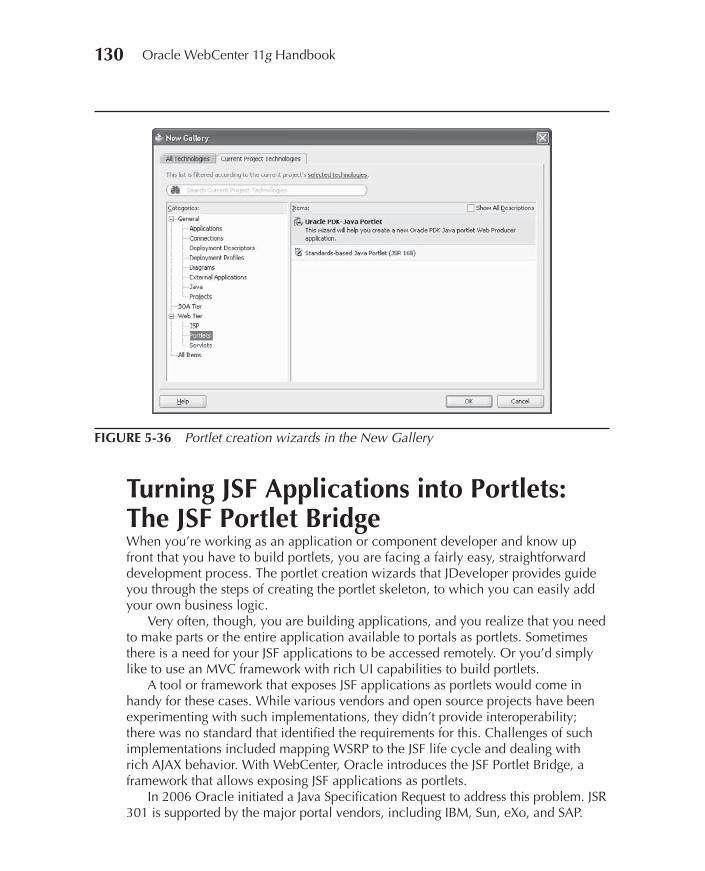
130 Oracle WebCenter 11g Handbook
Turning JSF Applications into Portlets: The JSF Portlet BridgeWhen you’re working as an application or component developer and know up front that you have to build portlets, you are facing a fairly easy, straightforward development process. The portlet creation wizards that JDeveloper provides guide you through the steps of creating the portlet skeleton, to which you can easily add your own business logic.
Very often, though, you are building applications, and you realize that you need to make parts or the entire application available to portals as portlets. Sometimes there is a need for your JSF applications to be accessed remotely. Or you’d simply like to use an MVC framework with rich UI capabilities to build portlets.
A tool or framework that exposes JSF applications as portlets would come in handy for these cases. While various vendors and open source projects have been experimenting with such implementations, they didn’t provide interoperability; there was no standard that identified the requirements for this. Challenges of such implementations included mapping WSRP to the JSF life cycle and dealing with rich AJAX behavior. With WebCenter, Oracle introduces the JSF Portlet Bridge, a framework that allows exposing JSF applications as portlets.
In 2006 Oracle initiated a Java Specification Request to address this problem. JSR 301 is supported by the major portal vendors, including IBM, Sun, eXo, and SAP.
FIGURE 5-36 Portlet creation wizards in the New Gallery

Chapter 5: Consuming and Building Portlets 131
NOTEThe JSR 168 portlet creation wizard offers various technologies to build portlets, one of them being JSF. When you choose JSF as the implementation style, it is the portlet bridge that’s used under the covers.
How Do You Do It?JDeveloper provides very simple and powerful design-time support for exposing JSF applications as portlets. You can simply invoke the Create Portlet Entry action from the context menu of any Faces page in your application. This is often referred to as the JSF Portlet Bridge design-time experience (Figure 5-37).
TerminologyThe task of turning applications into portlets is sometimes referred to as “portletizing” the application. While this is not a commonly accepted term, and obviously you don’t find it in English dictionaries, it is being used quite widely. An even more unusual and unfortunate terminology you may see in this context is “portalizing” the application. This doesn’t even express the task we’re performing (we are not turning an application into a portal, but into a portlet). Despite the spread of these terms, we try to stay away from them, but at the same time we find it important to clarify that they tend to mean the same thing.
FIGURE 5-37 JSF Portlet Bridge design-time experience
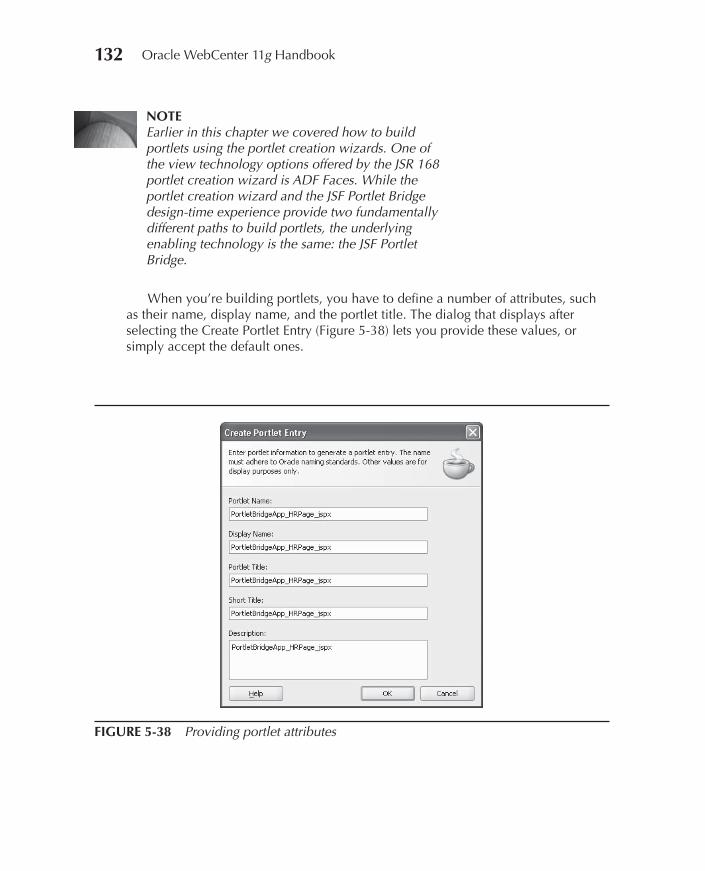
132 Oracle WebCenter 11g Handbook
NOTEEarlier in this chapter we covered how to build portlets using the portlet creation wizards. One of the view technology options offered by the JSR 168 portlet creation wizard is ADF Faces. While the portlet creation wizard and the JSF Portlet Bridge design-time experience provide two fundamentally different paths to build portlets, the underlying enabling technology is the same: the JSF Portlet Bridge.
When you’re building portlets, you have to define a number of attributes, such as their name, display name, and the portlet title. The dialog that displays after selecting the Create Portlet Entry (Figure 5-38) lets you provide these values, or simply accept the default ones.
FIGURE 5-38 Providing portlet attributes

Chapter 5: Consuming and Building Portlets 133
As a result of invoking the Create Portlet Entry action from the context menu, several files are created in your project. The two most important ones are:
portlet.xml This is the standard portlet deployment descriptor file that has to be present in every JSR 168 portlet application. The portlet.xmlidentifies the portlet class that will be used: ADFBridgePortlet, as well as the JSF page that serves as the entry point to the portlet: /POSubmit.jspx.
The following is a relevant code fragment of the generated portlet.xml file: <portlet-class> oracle.portlet.bridge.adf.application.ADFBridgePortlet </portlet-class> <init-param> <name>javax.portlet.faces.defaultViewId.view</name> <value>/POSubmit.jspx</value> </init-param>
oracle-portlet.xml This is the Oracle-specific descriptor file that contains the extensions required to expose JSR 168 portlets through WSRP 2.0; it allows the portlet to leverage some of the WSRP 2.0 capabilities that JSR 168 doesn’t provide.
As a consequence of using the JSF Portlet Bridge, the ADF Portlet Bridge library has been added to your project if it wasn’t part of it before.
As applications vary in complexity, the number of portlets you create for them can change too. Remember that when you create a portlet, you specify the JSF page that serves as the entry point to the portlet. Users are free to navigate in the portlet, just like they would do it in the native application. For example, if you have an application consisting of three JSF pages, you may choose to provide only one portlet for the application and have the user navigate between the pages (Figure 5-39). An alternative is to provide a portlet for each JSF page, giving the portlet consumer more options to choose from. Both approaches can be valid depending on the nature of your JSF application.
■
■
FIGURE 5-39 JSF application composed of three JSF pages
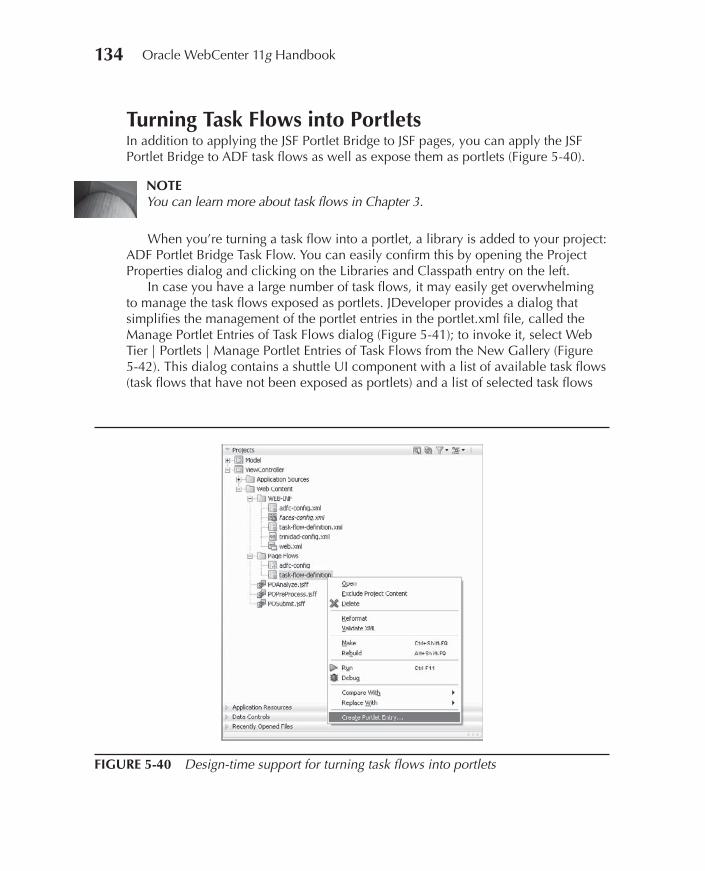
134 Oracle WebCenter 11g Handbook
Turning Task Flows into PortletsIn addition to applying the JSF Portlet Bridge to JSF pages, you can apply the JSF Portlet Bridge to ADF task flows as well as expose them as portlets (Figure 5-40).
NOTEYou can learn more about task flows in Chapter 3.
When you’re turning a task flow into a portlet, a library is added to your project: ADF Portlet Bridge Task Flow. You can easily confirm this by opening the Project Properties dialog and clicking on the Libraries and Classpath entry on the left.
In case you have a large number of task flows, it may easily get overwhelming to manage the task flows exposed as portlets. JDeveloper provides a dialog that simplifies the management of the portlet entries in the portlet.xml file, called the Manage Portlet Entries of Task Flows dialog (Figure 5-41); to invoke it, select Web Tier | Portlets | Manage Portlet Entries of Task Flows from the New Gallery (Figure 5-42). This dialog contains a shuttle UI component with a list of available task flows (task flows that have not been exposed as portlets) and a list of selected task flows
FIGURE 5-40 Design-time support for turning task flows into portlets

Chapter 5: Consuming and Building Portlets 135
(task flows that have been made available as portlets). Moving a task flow from left to right is equivalent to selecting the Create Portlet Entry option from the context menu of the task flow. Moving a task flow from right to left has the same effect as removing the task flow’s portlet entry from the portlet.xml.
FIGURE 5-41 Invoking the Manage Portlet Entries of Task Flows dialog
FIGURE 5-42 The Manage Portlet Entries of Task Flows dialog
136 Oracle WebCenter 11g Handbook
After deploying your “portletized” application, you can access it via the traditional servlet entry point, as well as the portlet entry point, provided by the JSF Portlet Bridge.
The default servlet entry point follows this pattern:
http://<host-name>:<port-number>/<context-root>/faces/<page-name>
For example:
http://localhost:7101/MyApplication /faces/simplePage.jspx
The default portlet producer test page follows this pattern:
http://<host-name>:<port-number>/<context-root>
For example:
http://localhost:7101/MyApplication
The WSRP WSDL can be accessed by clicking on the WSRP link on the bottom of the portlet producer test page.

CHAPTER6
Inter-component Communication
137

138 Oracle WebCenter 11g Handbook
omposite applications and portals share a common root in many aspects. In this chapter we focus on the aspect that they both promote the building of a site or application on top of existing functions and services; they often do so by leveraging reusable components. When you are implementing such solutions, it is imperative that the building
blocks are able to communicate with each other so they can be synchronized in the page.
Let’s take a simple example. The user of an enterprise application is interacting with orders: the user can see the order date, the status of the order, as well as the items that make up the order. This functionality may be implemented as one single component, or alternatively as two: a master (orders) and a detail (items). The expected behavior is that orders and items are synchronized.
As the user is stepping through the orders, another component in the page displays detailed information about the customer who placed the order. The orders component drives the customer details component—in other words, orders and customer details components are in sync, they share the context, they are contextually wired.
In general, we can say that two components are contextually wired if the following conditions are satisfied:
Parameters are passed from one component to another.
The target component is refreshed as a result of a partial page refresh (PPR) event.
In this chapter we will demonstrate the options available to you and give recommendations for when to use which.
Which Technique Is for Me?ADF and the WebCenter Framework provide several component types, including JSF view components, task flows, and portlets that can be wired in a number of different ways. As a rule of thumb, you should always use the simplest approach that fits your use case and requirements.
The first and simplest scenario that we will discuss is when your data resides in one data source, for example a database, and the native ADF data controls can handle the actual wiring for you, without performing the wiring task explicitly.
■
■
C
Chapter 6: Inter-component Communication 139
Another straightforward wiring option is when you want to use a JSF view component, for example a drop-down list, to drive another component, such as a table, on the page. This can be achieved in two simple steps: you have to pass the information from one component to the other, and you have to make sure that the driven component is repainted with partial page refresh. In this section you will see an example of how a portlet can be driven by a JSF view component as well.
In the context of portals, most of the time, inter-component communication translates to inter-portlet communication. In this chapter you will also learn how two portlets can communicate with each other using navigational parameters, a feature of WSRP 2.0.
Moving to somewhat more complex cases, you can make task flows communicate with each other, using the ADF model layer (ADFm) contextual events. This is a very powerful way of linking ADF task flows that were built independently. In addition to ADF task flows, portlets can expose contextual events, providing an extra level of flexibility when it comes to wiring them.
Contextual Wiring with ADF Data ControlsIn enterprise applications, your data often resides in a database and you use ADF data controls to access it. The relational data model inherently supports the notion of relationships between entities.
When you’re choosing ADF Business Components or TopLink to access your database, ADF’s data controls provide you with easy ways to ensure that the relationship in the data model is reflected in the UI of the application you are building. While it’s beyond the scope of this book to go into great detail on how you can use data controls to build master-detail or more complex relationships, we’ll take a quick look at what you can achieve in a simple example.
When you want to display a set of master rows, and for each master row a set of coordinated detail rows, then in your application module you can create view links to define how you want the master and detail view objects to relate. You can do this explicitly, or if the primary key–foreign key relationship is defined in your database schema, JDeveloper can do this automatically for you.
In Figure 6-1 you see how a primary key–foreign key database relationship is visualized in the data control panel as a master-detail hierarchy. The OrdersView (called OrdersView1 in the figure) and OrderItemsView (highlighted and called OrderItemsView2 in the figure) are both exposed as data collections. Notice that
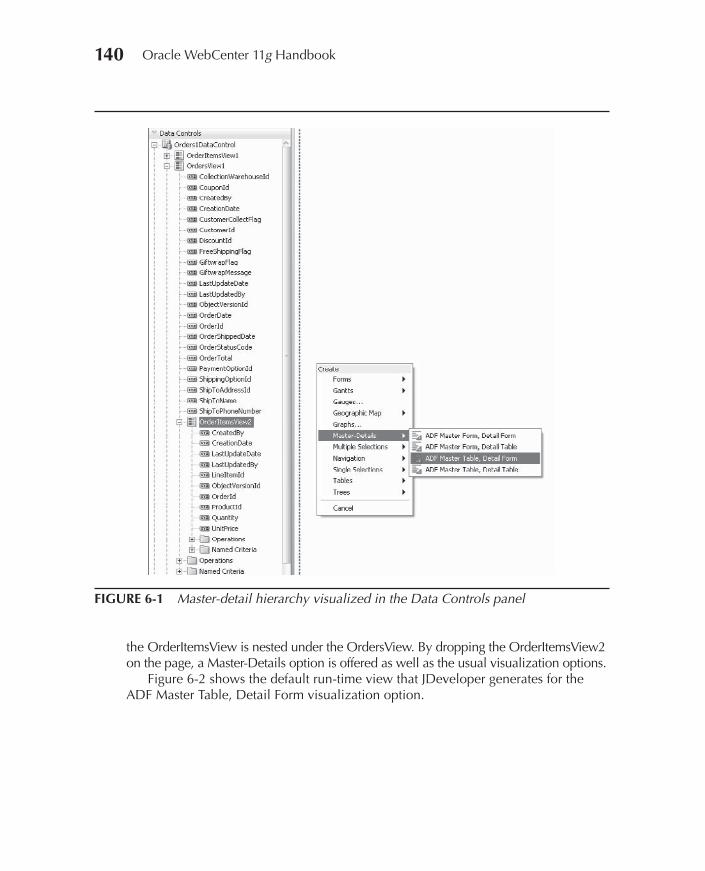
140 Oracle WebCenter 11g Handbook
the OrderItemsView is nested under the OrdersView. By dropping the OrderItemsView2 on the page, a Master-Details option is offered as well as the usual visualization options.
Figure 6-2 shows the default run-time view that JDeveloper generates for the ADF Master Table, Detail Form visualization option.
FIGURE 6-1 Master-detail hierarchy visualized in the Data Controls panel
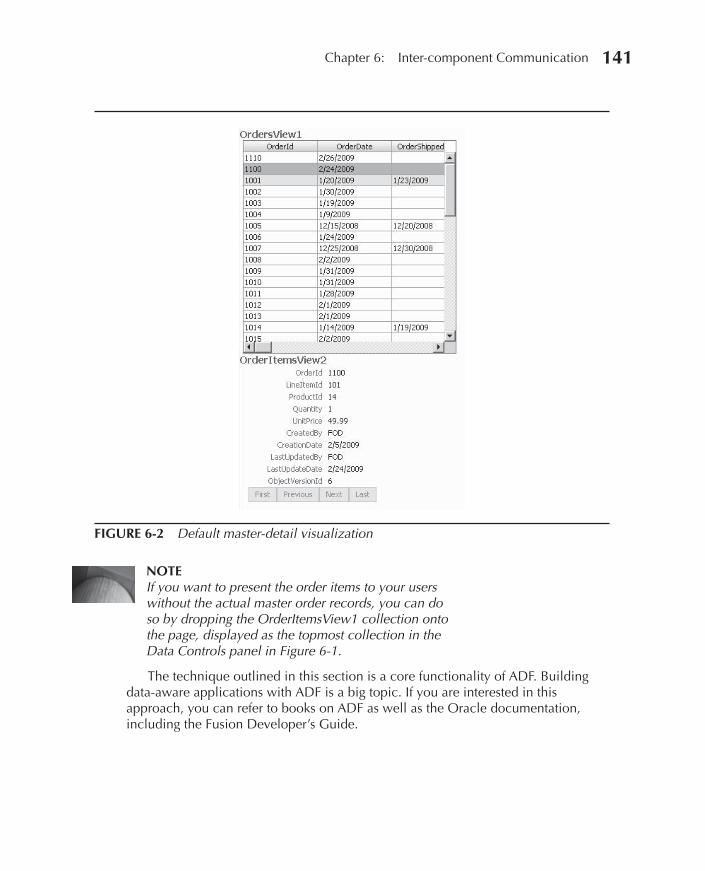
Chapter 6: Inter-component Communication 141
NOTEIf you want to present the order items to your users without the actual master order records, you can do so by dropping the OrderItemsView1 collection onto the page, displayed as the topmost collection in the Data Controls panel in Figure 6-1.
The technique outlined in this section is a core functionality of ADF. Building data-aware applications with ADF is a big topic. If you are interested in this approach, you can refer to books on ADF as well as the Oracle documentation, including the Fusion Developer’s Guide.
FIGURE 6-2 Default master-detail visualization
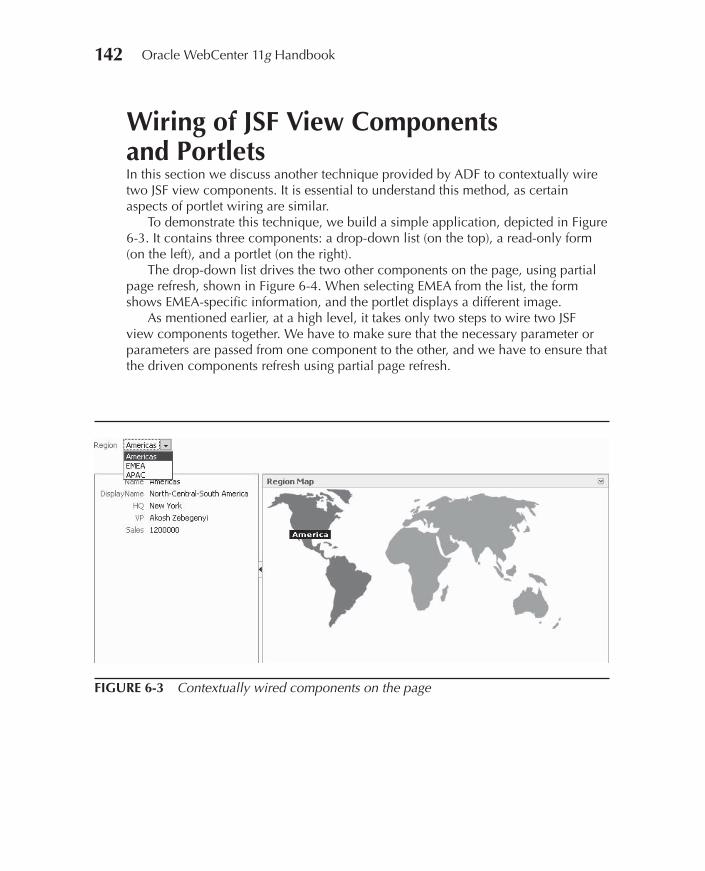
142 Oracle WebCenter 11g Handbook
Wiring of JSF View Components and PortletsIn this section we discuss another technique provided by ADF to contextually wire two JSF view components. It is essential to understand this method, as certain aspects of portlet wiring are similar.
To demonstrate this technique, we build a simple application, depicted in Figure 6-3. It contains three components: a drop-down list (on the top), a read-only form (on the left), and a portlet (on the right).
The drop-down list drives the two other components on the page, using partial page refresh, shown in Figure 6-4. When selecting EMEA from the list, the form shows EMEA-specific information, and the portlet displays a different image.
As mentioned earlier, at a high level, it takes only two steps to wire two JSF view components together. We have to make sure that the necessary parameter or parameters are passed from one component to the other, and we have to ensure that the driven components refresh using partial page refresh.
FIGURE 6-3 Contextually wired components on the page
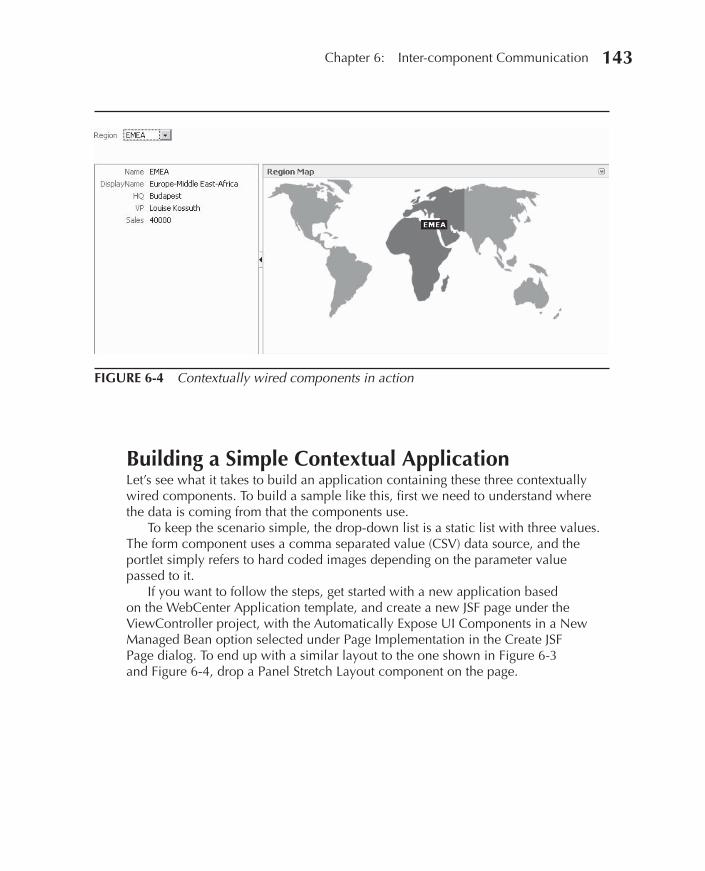
Chapter 6: Inter-component Communication 143
Building a Simple Contextual ApplicationLet’s see what it takes to build an application containing these three contextually wired components. To build a sample like this, first we need to understand where the data is coming from that the components use.
To keep the scenario simple, the drop-down list is a static list with three values. The form component uses a comma separated value (CSV) data source, and the portlet simply refers to hard coded images depending on the parameter value passed to it.
If you want to follow the steps, get started with a new application based on the WebCenter Application template, and create a new JSF page under the ViewController project, with the Automatically Expose UI Components in a New Managed Bean option selected under Page Implementation in the Create JSF Page dialog. To end up with a similar layout to the one shown in Figure 6-3 and Figure 6-4, drop a Panel Stretch Layout component on the page.
FIGURE 6-4 Contextually wired components in action
144 Oracle WebCenter 11g Handbook
Creating the Drop-down ListDrop a Select One Choice component in the “top” facet of the Panel Stretch Layout, and define a static list by selecting the Create List option. Provide values for the list: Americas, EMEA, APAC. You can use the same values for Item Label and Item Value, as shown in Figure 6-5. To achieve the desired behavior, we’ll change a few simple attributes:
1. Under Common Properties, change the Label to Region and set the Value attribute to Americas. This latter setting will ensure that there is always a value rendered in the drop-down list; no empty entry is offered.
2. To notify other components on the page when you select a new region from the drop-down list, set the Auto Submit property to true under Behavior.
Here is the source code of your drop-down list so far:
<af:selectOneChoice label="Region" binding="#{backingBeanScope.backing_pg1.selectOneChoice1}" id="selectOneChoice1" value="Americas" autoSubmit="true"> <af:selectItem label="Americas" value="Americas" binding="#{backingBeanScope.backing_pg1.selectItem1}" id="selectItem1"/> <af:selectItem label="EMEA" value="EMEA" binding="#{backingBeanScope.backing_pg1.selectItem2}" id="selectItem2"/> <af:selectItem label="APAC" value="APAC" binding="#{backingBeanScope.backing_pg1.selectItem3}" id="selectItem3"/> </af:selectOneChoice>
Creating and Wiring the Form ComponentBefore creating the form component, let’s drop a Panel Splitter component into the center facet of the Panel Stretch Layout. This layout component allows us to specify at run time how much horizontal space our components require.
To create the form component, we will use a CSV data source that returns its results based on the parameter passed to it. For example, the regionDetails.jsp?region=Americas request returns this CSV:
Name, DisplayName, HQ, VP, SalesAmericas, North-Central-South America, New York, Akosh Zebegenyi, 1200000
How the parameterized CSV is generated is not really relevant from this chapter’s perspective. However, for the sake of completeness, here is the source of the above-mentioned regionDetails.jsp file. If you make it part of your application, it
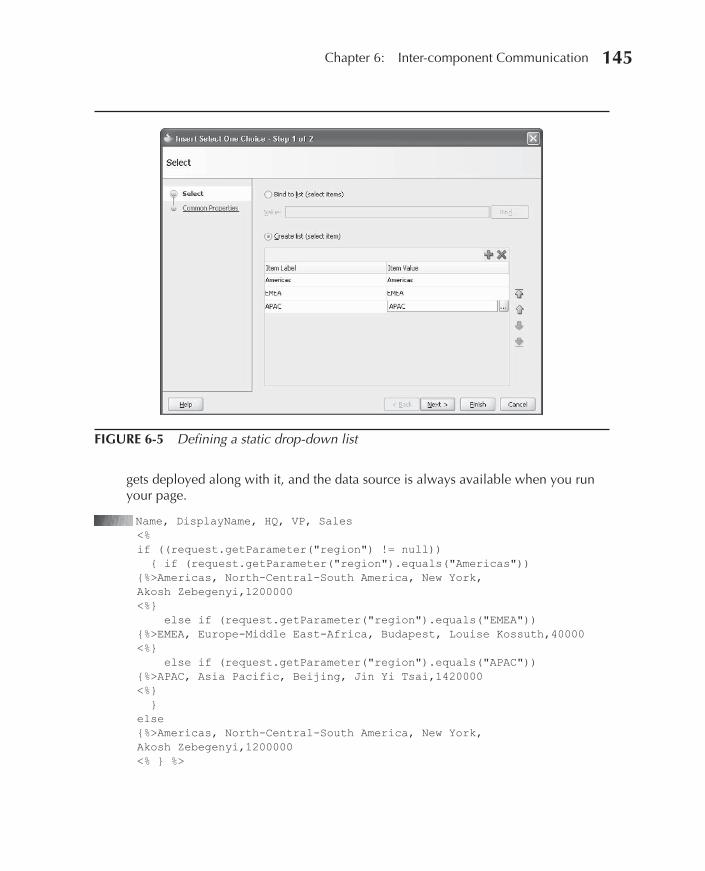
Chapter 6: Inter-component Communication 145
gets deployed along with it, and the data source is always available when you run your page.
Name, DisplayName, HQ, VP, Sales<%if ((request.getParameter("region") != null)) { if (request.getParameter("region").equals("Americas")) {%>Americas, North-Central-South America, New York, Akosh Zebegenyi,1200000<%} else if (request.getParameter("region").equals("EMEA")) {%>EMEA, Europe-Middle East-Africa, Budapest, Louise Kossuth,40000<%} else if (request.getParameter("region").equals("APAC")) {%>APAC, Asia Pacific, Beijing, Jin Yi Tsai,1420000<%} }else{%>Americas, North-Central-South America, New York, Akosh Zebegenyi,1200000<% } %>
FIGURE 6-5 Defining a static drop-down list
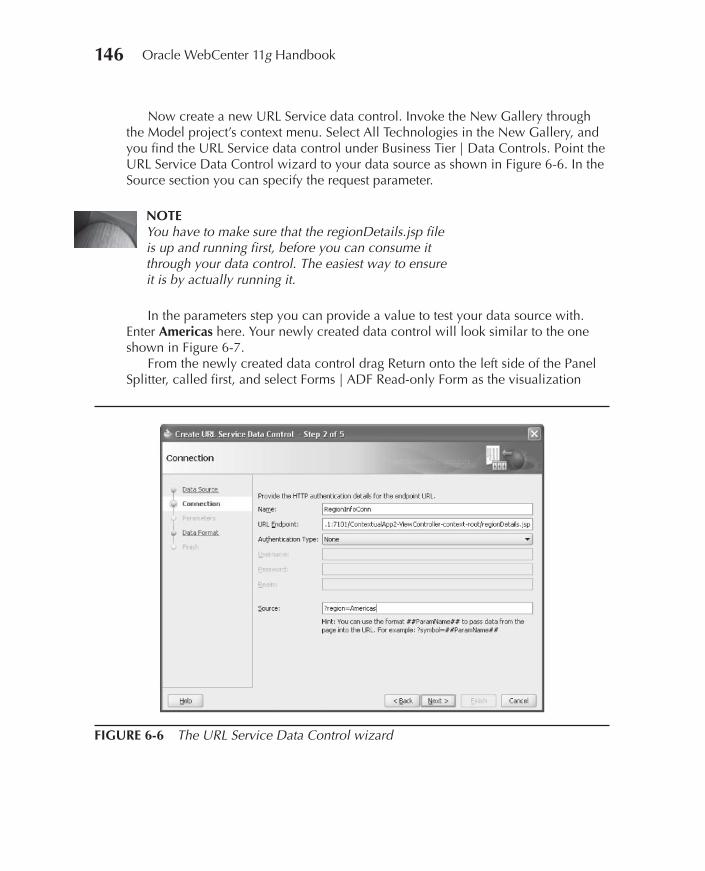
146 Oracle WebCenter 11g Handbook
Now create a new URL Service data control. Invoke the New Gallery through the Model project’s context menu. Select All Technologies in the New Gallery, and you find the URL Service data control under Business Tier | Data Controls. Point the URL Service Data Control wizard to your data source as shown in Figure 6-6. In the Source section you can specify the request parameter.
NOTEYou have to make sure that the regionDetails.jsp file is up and running first, before you can consume it through your data control. The easiest way to ensure it is by actually running it.
In the parameters step you can provide a value to test your data source with. Enter Americas here. Your newly created data control will look similar to the one shown in Figure 6-7.
From the newly created data control drag Return onto the left side of the Panel Splitter, called first, and select Forms | ADF Read-only Form as the visualization
FIGURE 6-6 The URL Service Data Control wizard
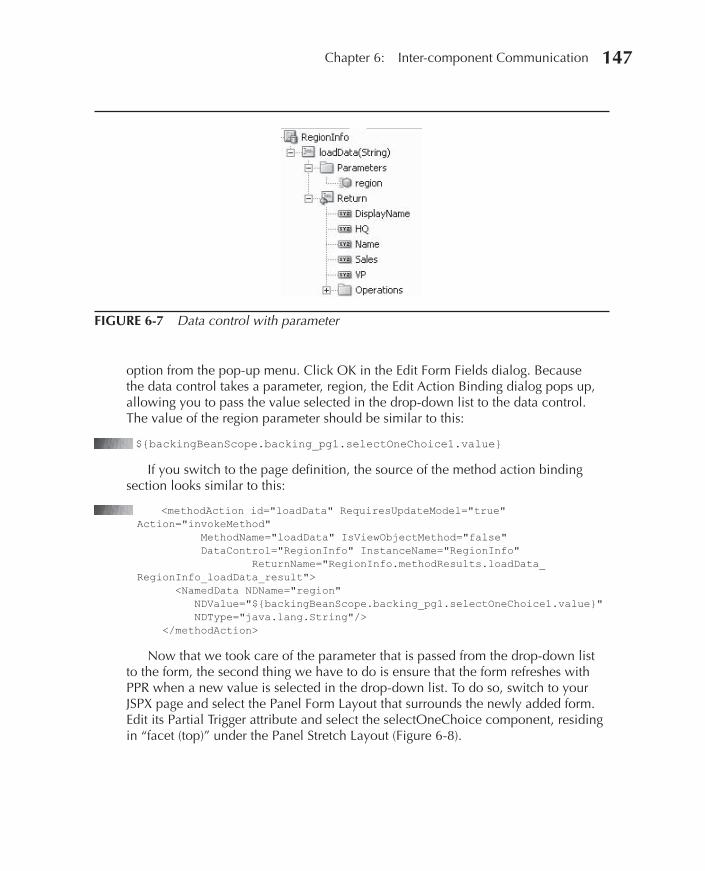
Chapter 6: Inter-component Communication 147
option from the pop-up menu. Click OK in the Edit Form Fields dialog. Because the data control takes a parameter, region, the Edit Action Binding dialog pops up, allowing you to pass the value selected in the drop-down list to the data control. The value of the region parameter should be similar to this:
${backingBeanScope.backing_pg1.selectOneChoice1.value}
If you switch to the page definition, the source of the method action binding section looks similar to this:
<methodAction id="loadData" RequiresUpdateModel="true" Action="invokeMethod" MethodName="loadData" IsViewObjectMethod="false" DataControl="RegionInfo" InstanceName="RegionInfo" ReturnName="RegionInfo.methodResults.loadData_RegionInfo_loadData_result"> <NamedData NDName="region" NDValue="${backingBeanScope.backing_pg1.selectOneChoice1.value}" NDType="java.lang.String"/> </methodAction>
Now that we took care of the parameter that is passed from the drop-down list to the form, the second thing we have to do is ensure that the form refreshes with PPR when a new value is selected in the drop-down list. To do so, switch to your JSPX page and select the Panel Form Layout that surrounds the newly added form. Edit its Partial Trigger attribute and select the selectOneChoice component, residing in “facet (top)” under the Panel Stretch Layout (Figure 6-8).
FIGURE 6-7 Data control with parameter
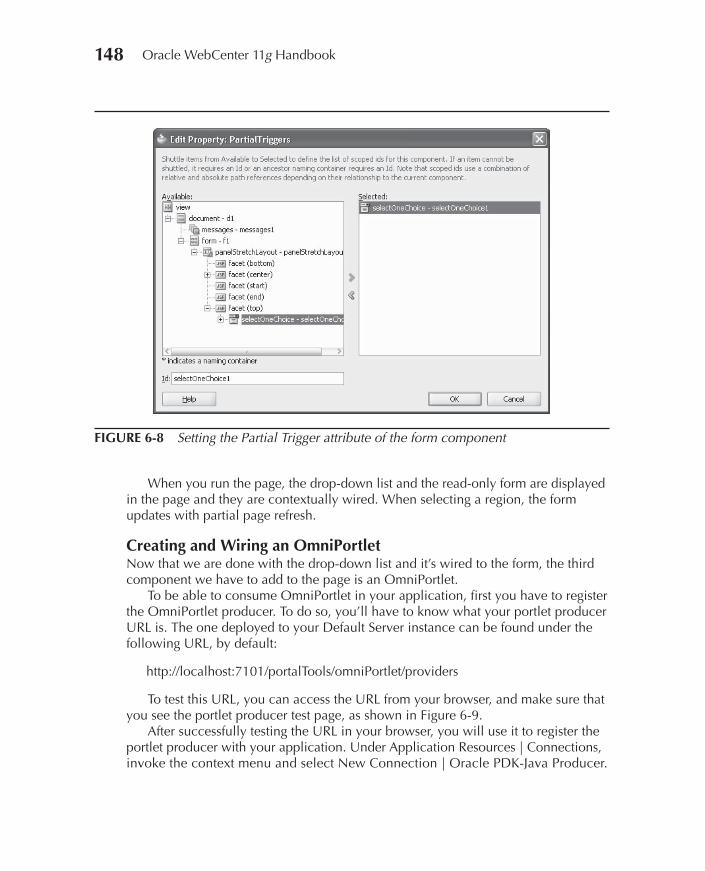
148 Oracle WebCenter 11g Handbook
When you run the page, the drop-down list and the read-only form are displayed in the page and they are contextually wired. When selecting a region, the form updates with partial page refresh.
Creating and Wiring an OmniPortletNow that we are done with the drop-down list and it’s wired to the form, the third component we have to add to the page is an OmniPortlet.
To be able to consume OmniPortlet in your application, first you have to register the OmniPortlet producer. To do so, you’ll have to know what your portlet producer URL is. The one deployed to your Default Server instance can be found under the following URL, by default:
http://localhost:7101/portalTools/omniPortlet/providers
To test this URL, you can access the URL from your browser, and make sure that you see the portlet producer test page, as shown in Figure 6-9.
After successfully testing the URL in your browser, you will use it to register the portlet producer with your application. Under Application Resources | Connections, invoke the context menu and select New Connection | Oracle PDK-Java Producer.
FIGURE 6-8 Setting the Partial Trigger attribute of the form component
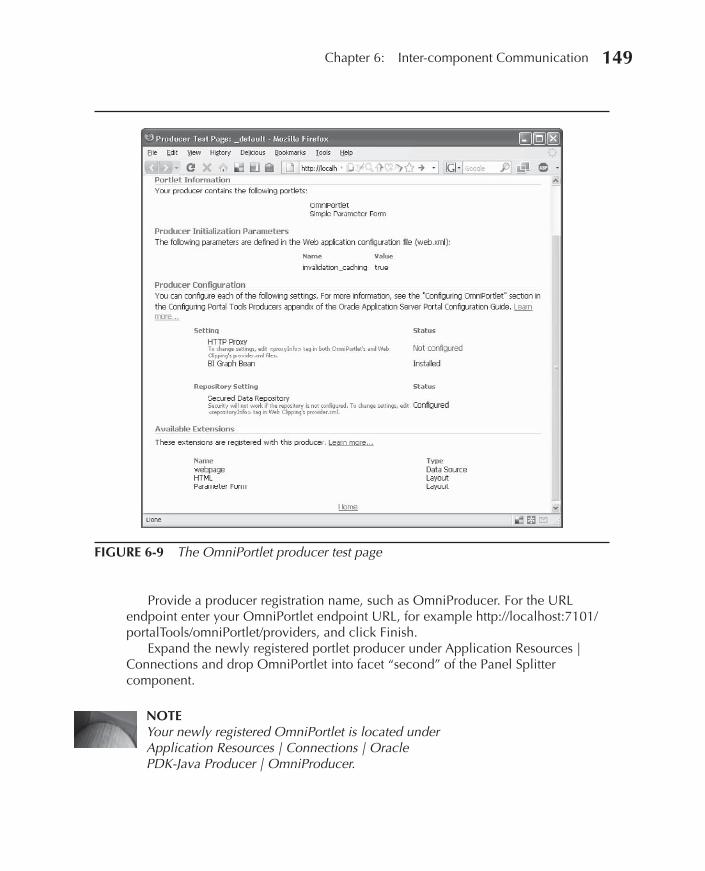
Chapter 6: Inter-component Communication 149
Provide a producer registration name, such as OmniProducer. For the URL endpoint enter your OmniPortlet endpoint URL, for example http://localhost:7101/portalTools/omniPortlet/providers, and click Finish.
Expand the newly registered portlet producer under Application Resources | Connections and drop OmniPortlet into facet “second” of the Panel Splitter component.
NOTEYour newly registered OmniPortlet is located under Application Resources | Connections | Oracle PDK-Java Producer | OmniProducer.
FIGURE 6-9 The OmniPortlet producer test page
150 Oracle WebCenter 11g Handbook
To wire OmniPortlet to the drop-down list, switch to the page definition file by invoking the context menu of the JSPX page and selecting Go to Page Definition.
When a PDK-Java portlet with public portlet parameters is dropped onto a page, the public portlet parameters are exposed in the page definition file, under the portlet tag. Every portlet parameter is mapped to an automatically created page variable in the page definition file. Param1 portlet parameter is mapped to the OmniPortlet1_1_Param1 page variable, Param2 is mapped to OmniPortlet1_1_Param2, and so on. Because OmniPortlet supports five public portlet parameters, you see five of these parameters in the page definition file. It’s very important to know that you can manipulate the value of the portlet parameter, through the page variable, but you cannot do so by assigning values to the portlet parameter directly. When you’re assigning a value to the page variable, the parameter value is automatically picked up by the portlet parameter during the ADF life cycle.
As unusual as it may sound, the page variable attribute used to specify the value for the portlet parameter is called Default Value. The name of the property should not mislead you, as the value isn’t used exclusively for defaults; it is used to assign new values to the portlet parameter while the application is running.
The easiest way to assign a value to the page variable is using an expression language (EL). Select the parameter you want to deal with in the Structure pane (in our case, let’s select OmniPortlet1_1_Param1) and select Edit next to the Default Value attribute. The same expression editor dialog pops up that we used earlier to select the currently selected value of the selectOneChoice component through its backing bean. We’ll do the same thing and specify the following value:
#{backingBeanScope.backing_pg1.selectOneChoice1.value}
Now that we took care of the parameter wiring, the last thing we have to do is set the Partial Trigger attribute of the portlet to ensure that it gets refreshed when a new value is selected in the selectOneChoice drop-down list component. Switch back to your JSPX file, select OmniPortlet in the page, and set the Partial Trigger attribute to SelectOneChoice1. Again, remember that you find it under the “top” facet of the Panel Splitter (in case you use the partial trigger editor dialog), shown in Figure 6-8.
When you re-run the page, your OmniPortlet is undefined. You can customize the portlet and walk through a five-step wizard to define its contents. In our simple sample, we use JavaScript to render an image conditionally, depending on the parameter that is passed to the portlet.
From the action menu of the portlet select Customize. In the first screen of the wizard, don’t change anything and click Next. In the Source screen specify a default value for the first parameter, Param1: Americas. Don’t change anything in the Filter screen. In the View screen change the portlet title to Region Map and the Layout Style to HTML. In the Layout screen clear all the fields by selecting Clear Fields from

Chapter 6: Inter-component Communication 151
Quick Start and clicking the Apply button. In the Non-Repeating Heading Section enter your code. Here is some sample code that you can use as a starting point:
<script type="text/javascript">if ("##Param1##" == "Americas") { document.write ("<img src=http://127.0.0.1:7101/WCHBChapter15Sample1/images/map_america.gif>");}else if ("##Param1##" == "EMEA") { document.write ("<img src=http://127.0.0.1:7101/WCHBChapter15Sample1/images/map_emea.gif>");}else document.write ("<img src=http://127.0.0.1:7101/WCHBChapter15Sample1/images/map_apac.gif>");</script>
As you return to the page, OmniPortlet displays an image, specific to the Americas region. As you select another region from the drop-down list, both the form and portlet components refresh with partial page refresh and render their new content, relevant to the region selected.
Inter-portlet Communication: Wiring PortletsBecause WebCenter applications are built on the foundation of JSF and ADF, most of the time you are required to wire portlets with other JSF view components. However, wiring two portlets on a page remains a key functionality, and the WebCenter Framework gives you full power to leverage it.
We will start off with an application that was created based on the WebCenter Template containing two WSRP 2.0 portlets: the Parameter Form and Parameter Display portlets. These two portlets are very useful when you want to learn and experiment with portlet wiring: the Parameter Form portlet can drive the Parameter Display portlet.
To register the portlet producer containing these two portlets, point your browser to your producer’s test page, for example http://localhost:7101/portletapp/info. Confirm that you see the ParameterForm (2.0) and ReadOnlyParameterForm (2.0) portlets in the list. Copy the WSRP 2.0 WSDL URL to your clipboard, and use it to register the WSRP portlet producer with your application. After a successful registration you can drop the Parameter Form and Parameter Display portlets onto the page.
Open the page definition file by invoking the context menu of the JSPX page and selecting Go To Page Definition from the menu. In the Structure panel shown in Figure 6-10, you can see the two portlets: ParameterFormPortlet1_1 and ParameterDisplayPortlet1_1, each featuring three parameters, called ora_wsrp_navigparam_Parameter< >. Navigational parameters serve both as input and output parameters.
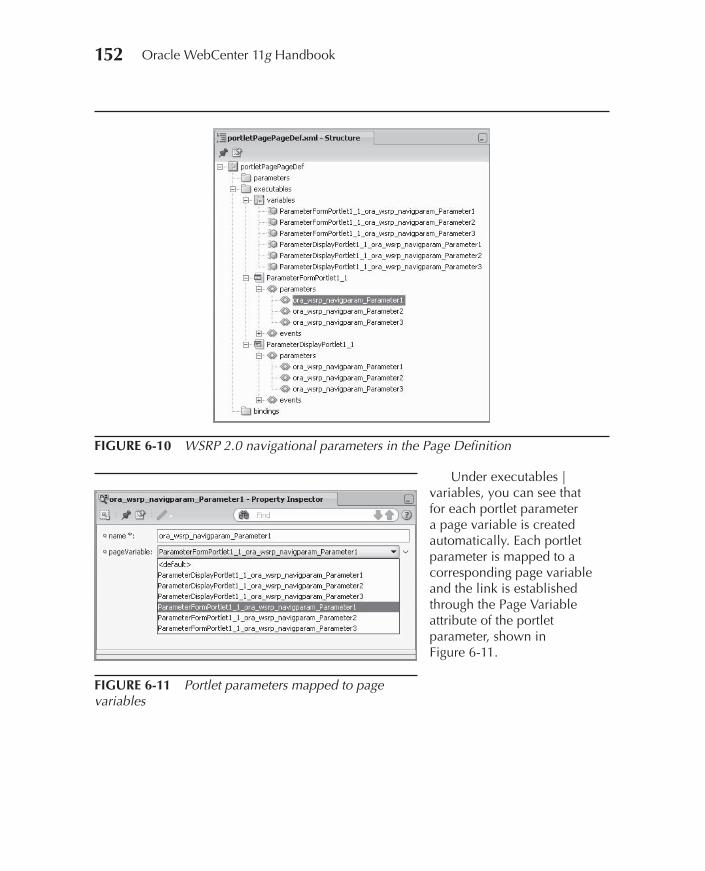
152 Oracle WebCenter 11g Handbook
Under executables | variables, you can see that for each portlet parameter a page variable is created automatically. Each portlet parameter is mapped to a corresponding page variable and the link is established through the Page Variable attribute of the portlet parameter, shown in Figure 6-11.
FIGURE 6-10 WSRP 2.0 navigational parameters in the Page Definition
FIGURE 6-11 Portlet parameters mapped to page variables
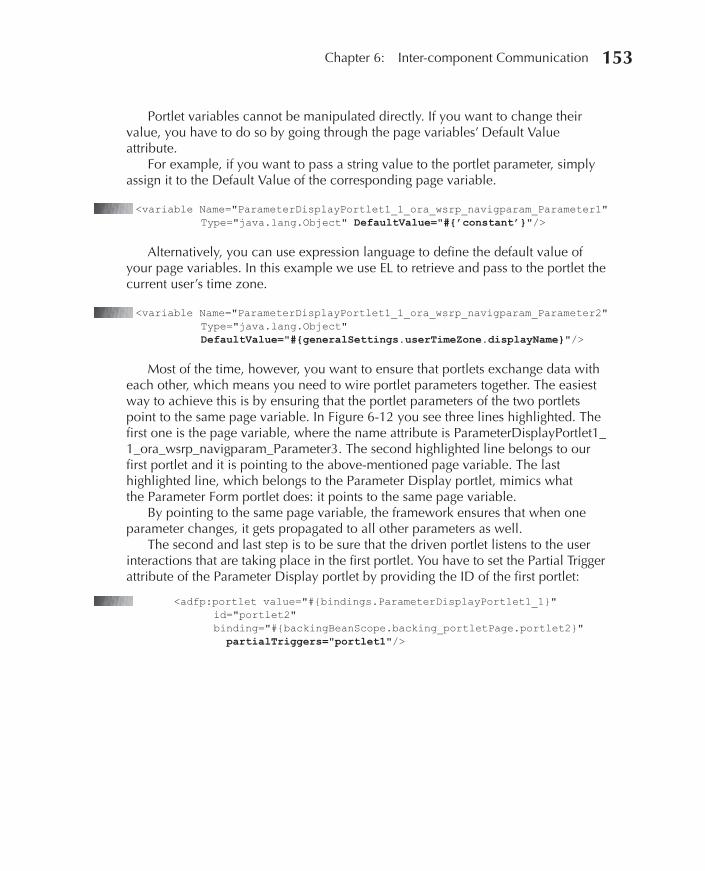
Chapter 6: Inter-component Communication 153
Portlet variables cannot be manipulated directly. If you want to change their value, you have to do so by going through the page variables’ Default Value attribute.
For example, if you want to pass a string value to the portlet parameter, simply assign it to the Default Value of the corresponding page variable.
<variable Name="ParameterDisplayPortlet1_1_ora_wsrp_navigparam_Parameter1" Type="java.lang.Object" DefaultValue="#{’constant’}"/>
Alternatively, you can use expression language to define the default value of your page variables. In this example we use EL to retrieve and pass to the portlet the current user’s time zone.
<variable Name="ParameterDisplayPortlet1_1_ora_wsrp_navigparam_Parameter2" Type="java.lang.Object"
DefaultValue="#{generalSettings.userTimeZone.displayName}"/>
Most of the time, however, you want to ensure that portlets exchange data with each other, which means you need to wire portlet parameters together. The easiest way to achieve this is by ensuring that the portlet parameters of the two portlets point to the same page variable. In Figure 6-12 you see three lines highlighted. The first one is the page variable, where the name attribute is ParameterDisplayPortlet1_1_ora_wsrp_navigparam_Parameter3. The second highlighted line belongs to our first portlet and it is pointing to the above-mentioned page variable. The last highlighted line, which belongs to the Parameter Display portlet, mimics what the Parameter Form portlet does: it points to the same page variable.
By pointing to the same page variable, the framework ensures that when one parameter changes, it gets propagated to all other parameters as well.
The second and last step is to be sure that the driven portlet listens to the user interactions that are taking place in the first portlet. You have to set the Partial Trigger attribute of the Parameter Display portlet by providing the ID of the first portlet:
<adfp:portlet value="#{bindings.ParameterDisplayPortlet1_1}" id="portlet2" binding="#{backingBeanScope.backing_portletPage.portlet2}"
partialTriggers="portlet1"/>
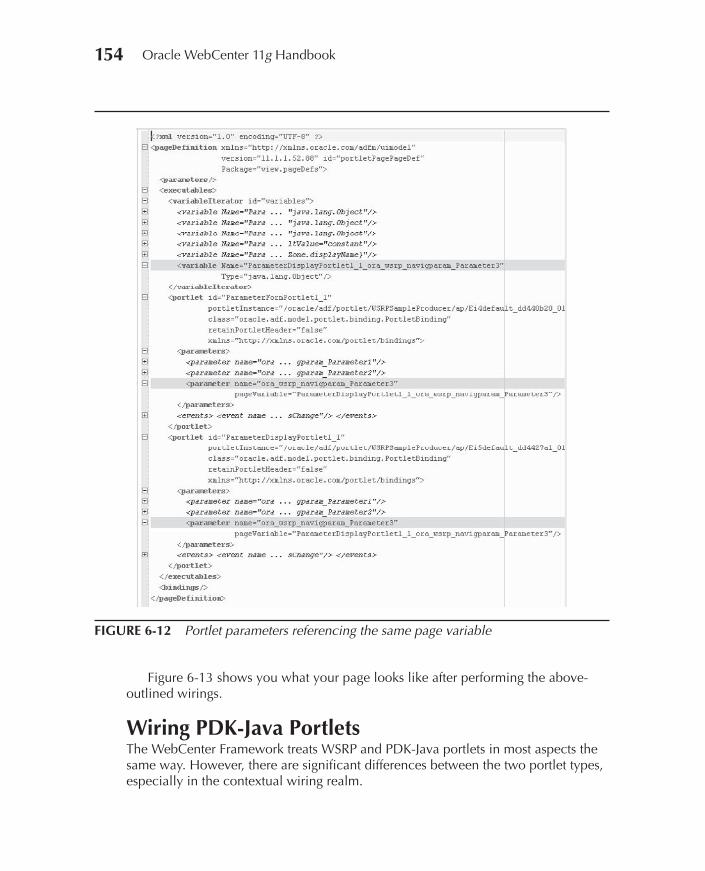
154 Oracle WebCenter 11g Handbook
Figure 6-13 shows you what your page looks like after performing the above- outlined wirings.
Wiring PDK-Java PortletsThe WebCenter Framework treats WSRP and PDK-Java portlets in most aspects the same way. However, there are significant differences between the two portlet types, especially in the contextual wiring realm.
FIGURE 6-12 Portlet parameters referencing the same page variable

Chapter 6: Inter-component Communication 155
When looking at the consumer side of portlet wiring, the same wiring techniques apply to PDK-Java portlets as to WSRP 2.0 portlets. The public portlet parameters of PDK-Java portlets, conceptually similar to the WSRP 2.0 navigational parameters, are automatically wired to page variables. As shown earlier in this chapter, through the automatically linked page variables, PDK-Java portlets can be driven by other components or portlets in the page.
Workaround for PDK-Java Portlets to Drive Other Components on the PageA significant limitation of PDK-Java portlets is that they cannot drive other portlets or components in the page. If this is a requirement, you should seriously consider using different view technologies to build your components, such as task flows or WSRP 2.0 portlets.
If for some reason you don’t have a choice and you have to use PDK-Java portlets, you can use a simple workaround. Since the portlet cannot drive other components on the page, the only way to pass information to other components on the page is by rendering HTML links and/or forms in your portlet that point back to your page. When users click on the link or submit the form, the entire page refreshes, and the link or form parameters are passed to the page. At that point, the request parameters can be wired to any other component on the page.
By default, parameters submitted to the same page are not made available to portlets on the page. To make them available, you have to set the master or driver PDK-Java portlet view tag’s Submit URL Parameters attribute to true.
Mind you, the above-outlined technique has to be treated as a workaround and is not a recommended technique to be used in large-scale production deployments. It performs a full page refresh, and therefore you lose your Faces context on your page and it will render as if it was rendering for the first time.
FIGURE 6-13 Two contextually wired WSRP 2.0 portlets
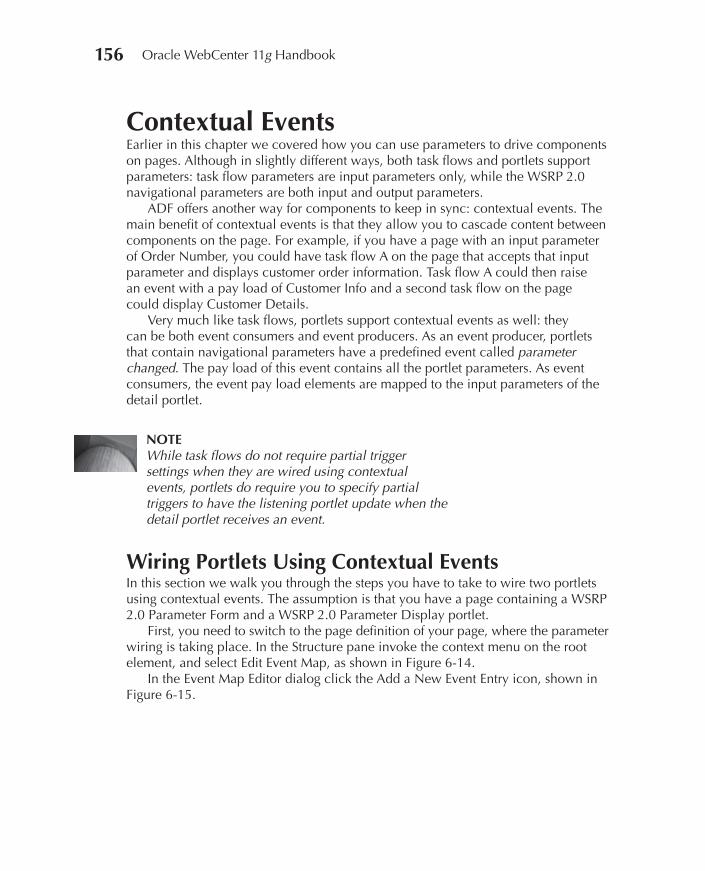
156 Oracle WebCenter 11g Handbook
Contextual EventsEarlier in this chapter we covered how you can use parameters to drive components on pages. Although in slightly different ways, both task flows and portlets support parameters: task flow parameters are input parameters only, while the WSRP 2.0 navigational parameters are both input and output parameters.
ADF offers another way for components to keep in sync: contextual events. The main benefit of contextual events is that they allow you to cascade content between components on the page. For example, if you have a page with an input parameter of Order Number, you could have task flow A on the page that accepts that input parameter and displays customer order information. Task flow A could then raise an event with a pay load of Customer Info and a second task flow on the page could display Customer Details.
Very much like task flows, portlets support contextual events as well: they can be both event consumers and event producers. As an event producer, portlets that contain navigational parameters have a predefined event called parameterchanged. The pay load of this event contains all the portlet parameters. As event consumers, the event pay load elements are mapped to the input parameters of the detail portlet.
NOTEWhile task flows do not require partial trigger settings when they are wired using contextual events, portlets do require you to specify partial triggers to have the listening portlet update when the detail portlet receives an event.
Wiring Portlets Using Contextual EventsIn this section we walk you through the steps you have to take to wire two portlets using contextual events. The assumption is that you have a page containing a WSRP 2.0 Parameter Form and a WSRP 2.0 Parameter Display portlet.
First, you need to switch to the page definition of your page, where the parameter wiring is taking place. In the Structure pane invoke the context menu on the root element, and select Edit Event Map, as shown in Figure 6-14.
In the Event Map Editor dialog click the Add a New Event Entry icon, shown in Figure 6-15.
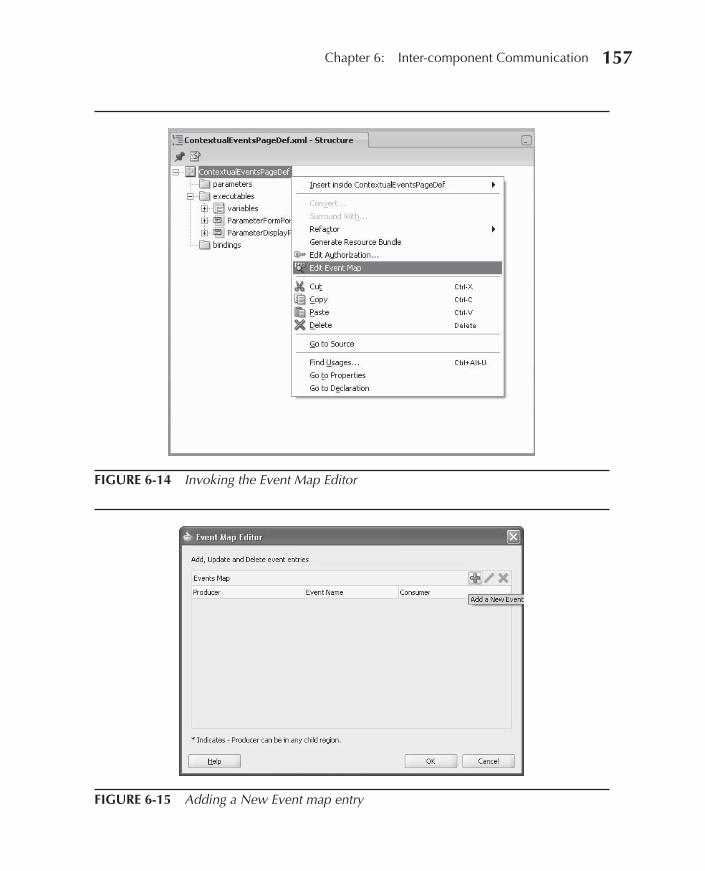
Chapter 6: Inter-component Communication 157
FIGURE 6-14 Invoking the Event Map Editor
FIGURE 6-15 Adding a New Event map entry
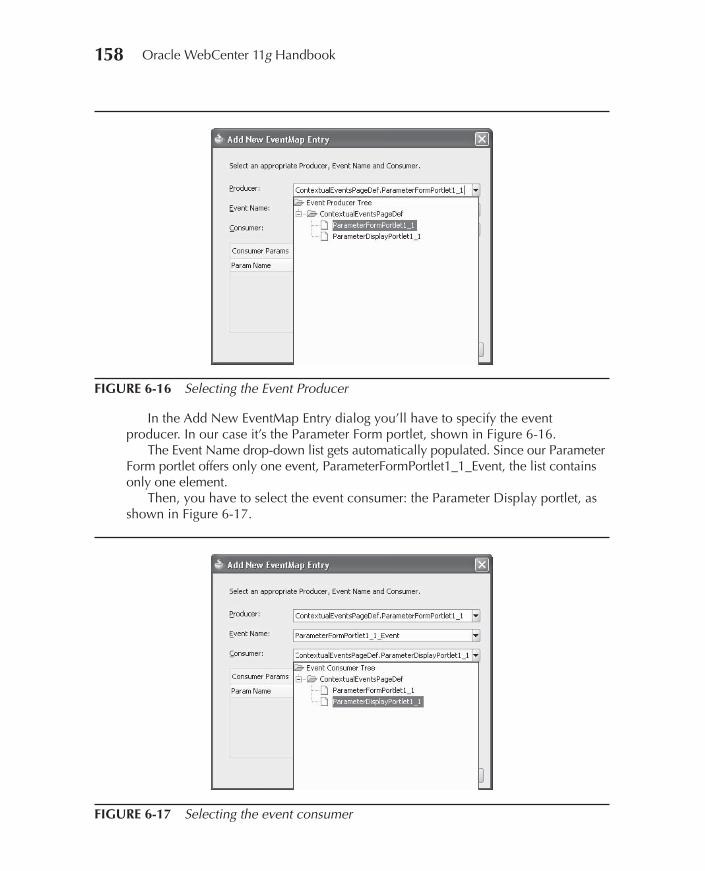
158 Oracle WebCenter 11g Handbook
In the Add New EventMap Entry dialog you’ll have to specify the event producer. In our case it’s the Parameter Form portlet, shown in Figure 6-16.
The Event Name drop-down list gets automatically populated. Since our Parameter Form portlet offers only one event, ParameterFormPortlet1_1_Event, the list contains only one element.
Then, you have to select the event consumer: the Parameter Display portlet, as shown in Figure 6-17.
FIGURE 6-16 Selecting the Event Producer
FIGURE 6-17 Selecting the event consumer
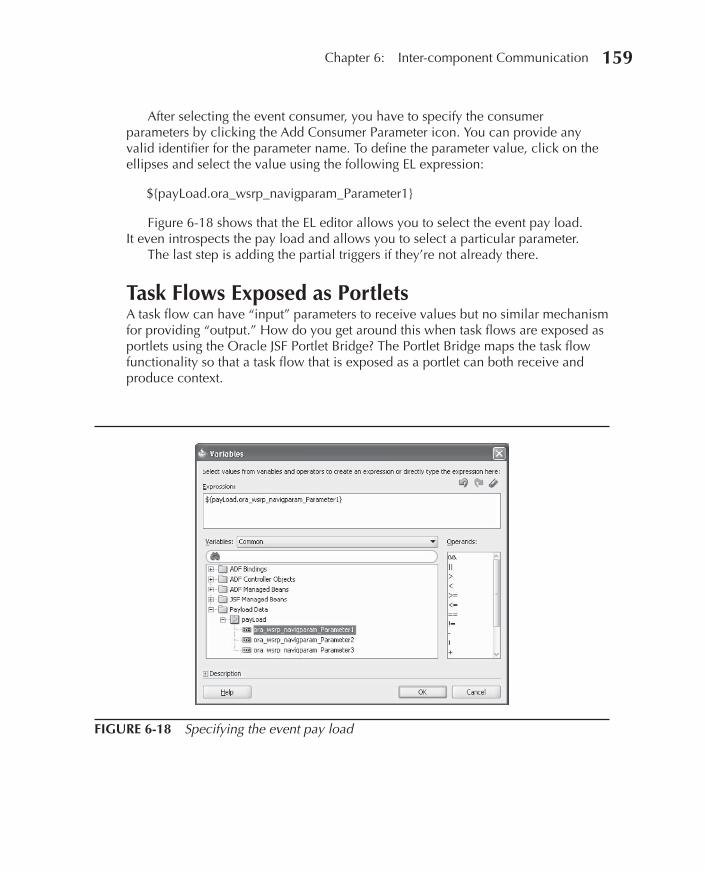
Chapter 6: Inter-component Communication 159
After selecting the event consumer, you have to specify the consumer parameters by clicking the Add Consumer Parameter icon. You can provide any valid identifier for the parameter name. To define the parameter value, click on the ellipses and select the value using the following EL expression:
${payLoad.ora_wsrp_navigparam_Parameter1}
Figure 6-18 shows that the EL editor allows you to select the event pay load. It even introspects the pay load and allows you to select a particular parameter.
The last step is adding the partial triggers if they’re not already there.
Task Flows Exposed as PortletsA task flow can have “input” parameters to receive values but no similar mechanism for providing “output.” How do you get around this when task flows are exposed as portlets using the Oracle JSF Portlet Bridge? The Portlet Bridge maps the task flow functionality so that a task flow that is exposed as a portlet can both receive and produce context.
FIGURE 6-18 Specifying the event pay load
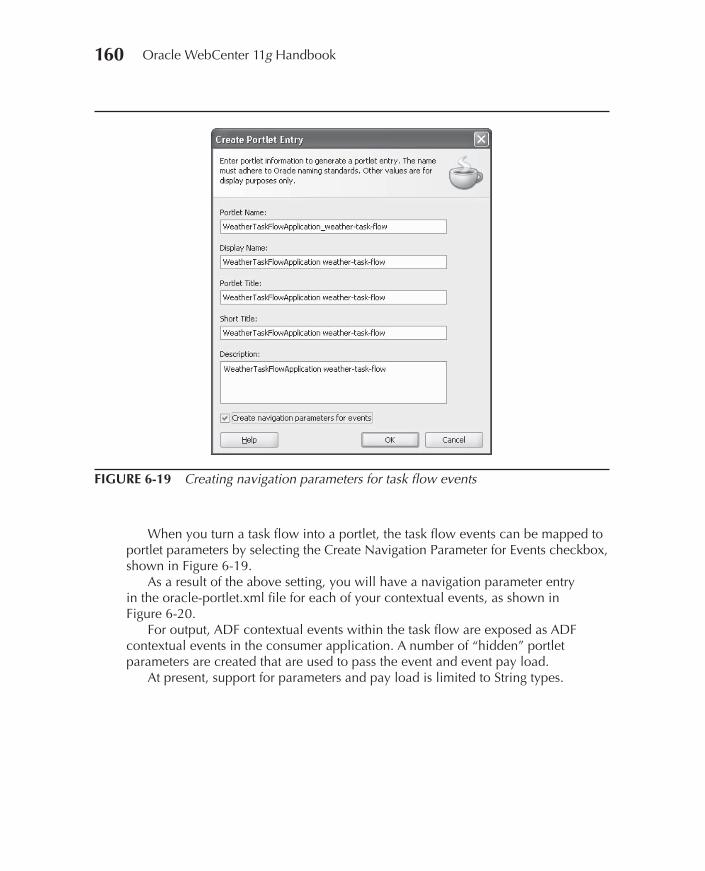
160 Oracle WebCenter 11g Handbook
When you turn a task flow into a portlet, the task flow events can be mapped to portlet parameters by selecting the Create Navigation Parameter for Events checkbox, shown in Figure 6-19.
As a result of the above setting, you will have a navigation parameter entry in the oracle-portlet.xml file for each of your contextual events, as shown in Figure 6-20.
For output, ADF contextual events within the task flow are exposed as ADF contextual events in the consumer application. A number of “hidden” portlet parameters are created that are used to pass the event and event pay load.
At present, support for parameters and pay load is limited to String types.
FIGURE 6-19 Creating navigation parameters for task flow events
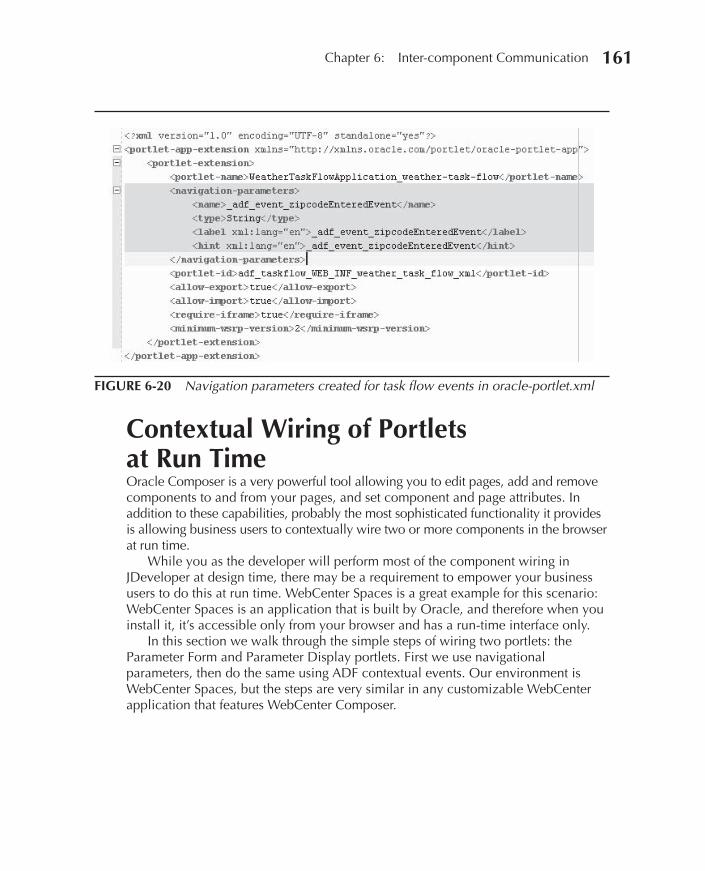
Chapter 6: Inter-component Communication 161
Contextual Wiring of Portlets at Run TimeOracle Composer is a very powerful tool allowing you to edit pages, add and remove components to and from your pages, and set component and page attributes. In addition to these capabilities, probably the most sophisticated functionality it provides is allowing business users to contextually wire two or more components in the browser at run time.
While you as the developer will perform most of the component wiring in JDeveloper at design time, there may be a requirement to empower your business users to do this at run time. WebCenter Spaces is a great example for this scenario: WebCenter Spaces is an application that is built by Oracle, and therefore when you install it, it’s accessible only from your browser and has a run-time interface only.
In this section we walk through the simple steps of wiring two portlets: the Parameter Form and Parameter Display portlets. First we use navigational parameters, then do the same using ADF contextual events. Our environment is WebCenter Spaces, but the steps are very similar in any customizable WebCenter application that features WebCenter Composer.
FIGURE 6-20 Navigation parameters created for task flow events in oracle-portlet.xml
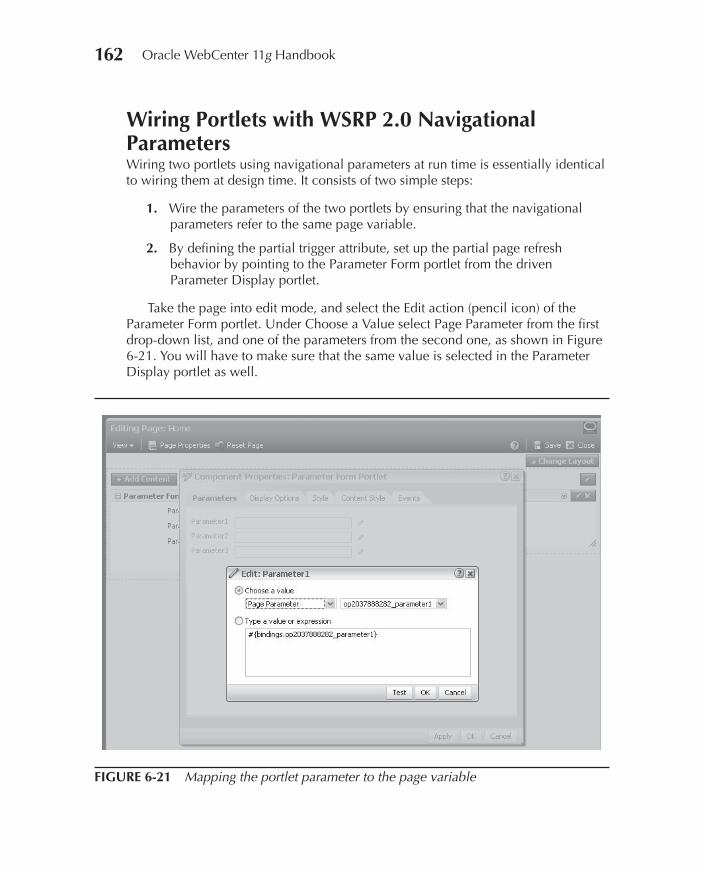
162 Oracle WebCenter 11g Handbook
Wiring Portlets with WSRP 2.0 Navigational ParametersWiring two portlets using navigational parameters at run time is essentially identical to wiring them at design time. It consists of two simple steps:
1. Wire the parameters of the two portlets by ensuring that the navigational parameters refer to the same page variable.
2. By defining the partial trigger attribute, set up the partial page refresh behavior by pointing to the Parameter Form portlet from the driven Parameter Display portlet.
Take the page into edit mode, and select the Edit action (pencil icon) of the Parameter Form portlet. Under Choose a Value select Page Parameter from the first drop-down list, and one of the parameters from the second one, as shown in Figure 6-21. You will have to make sure that the same value is selected in the Parameter Display portlet as well.
FIGURE 6-21 Mapping the portlet parameter to the page variable

Chapter 6: Inter-component Communication 163
We are not quite done with step 1, as we will have to wire the Parameter Display portlet’s navigational parameter to the same page variable. But while we are here, let’s take this opportunity to copy the system-generated ID of the first portlet to the clipboard. This ID will be needed for step 2: setting up the Partial Trigger attribute for the Parameter Display portlet, shown in Figure 6-22.
Let’s close the Component Properties dialog and edit the properties of our Parameter Display portlet. On the Parameters tab point Parameter1 to the same page variable as shown in Figure 6-21.
And finally, switch to the Display Options tab and paste in the Parameter Form portlet’s ID in the Partial Triggers field, as shown in Figure 6-23.
FIGURE 6-22 Copying the ID of the Parameter Form portlet to the clipboard
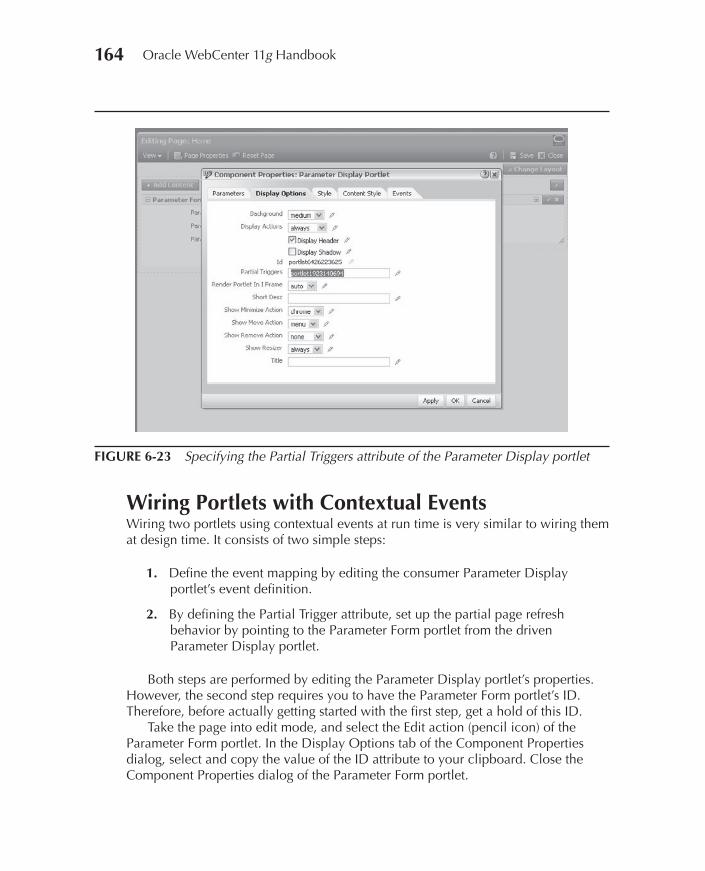
164 Oracle WebCenter 11g Handbook
Wiring Portlets with Contextual EventsWiring two portlets using contextual events at run time is very similar to wiring them at design time. It consists of two simple steps:
1. Define the event mapping by editing the consumer Parameter Display portlet’s event definition.
2. By defining the Partial Trigger attribute, set up the partial page refresh behavior by pointing to the Parameter Form portlet from the driven Parameter Display portlet.
Both steps are performed by editing the Parameter Display portlet’s properties. However, the second step requires you to have the Parameter Form portlet’s ID. Therefore, before actually getting started with the first step, get a hold of this ID.
Take the page into edit mode, and select the Edit action (pencil icon) of the Parameter Form portlet. In the Display Options tab of the Component Properties dialog, select and copy the value of the ID attribute to your clipboard. Close the Component Properties dialog of the Parameter Form portlet.
FIGURE 6-23 Specifying the Partial Triggers attribute of the Parameter Display portlet
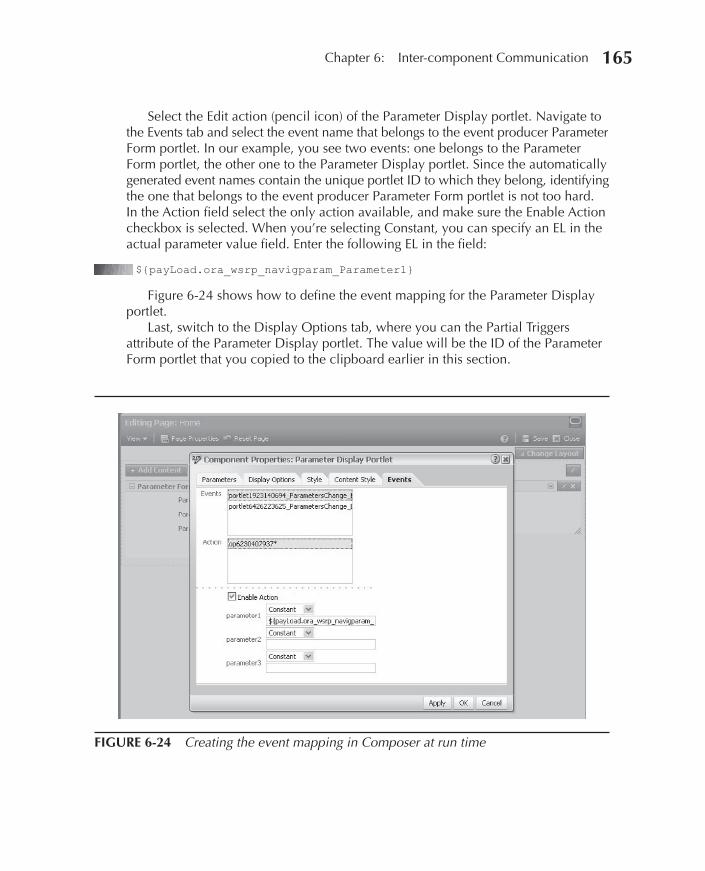
Chapter 6: Inter-component Communication 165
Select the Edit action (pencil icon) of the Parameter Display portlet. Navigate to the Events tab and select the event name that belongs to the event producer Parameter Form portlet. In our example, you see two events: one belongs to the Parameter Form portlet, the other one to the Parameter Display portlet. Since the automatically generated event names contain the unique portlet ID to which they belong, identifying the one that belongs to the event producer Parameter Form portlet is not too hard. In the Action field select the only action available, and make sure the Enable Action checkbox is selected. When you’re selecting Constant, you can specify an EL in the actual parameter value field. Enter the following EL in the field:
${payLoad.ora_wsrp_navigparam_Parameter1}
Figure 6-24 shows how to define the event mapping for the Parameter Display portlet.
Last, switch to the Display Options tab, where you can the Partial Triggers attribute of the Parameter Display portlet. The value will be the ID of the Parameter Form portlet that you copied to the clipboard earlier in this section.
FIGURE 6-24 Creating the event mapping in Composer at run time

This page intentionally left blank
CHAPTER7
Integrating Content Systems
167

168 Oracle WebCenter 11g Handbook
n essential part of any application is content. Content can be various things, the most obvious one being pictures of some kind (product pictures, personnel pictures, etc.), but it can also be document-style content. If you are using a project management application, you might want to manage structured data about the project, like open tasks,
through the application. Projects usually also include unstructured information in the form of documents such as reports and meeting minutes; this information needs managing and, ideally, should be managed and accessible through the same application as the structured information about the project.
Oracle WebCenter provides mechanisms that allow you to manage unstructured content in a professional content management system and expose that content in your WebCenter application. In addition, you can expose content from third-party content management systems through the use of adapters adhering to the Java Content Repository (JCR) standard.
NOTEThe Java Content Repository standard (JCR, aka JSR 170 and JSR 283) describes the access to content stored in a content management system through Java APIs as well as a common object model representing the content itself. The idea behind JCR is similar to the idea behind Java Database Connectivity (JDBC): to provide a common interface to access information from a Java application regardless of the type of repository (or storage mechanism) used. In order to do so, a group of industry experts created an API definition and object model that provided a base set of capabilities in read, query, write, and search. This initial release was JCR 1.0, also known as JSR 170. JCR works by way of adapters, similar to JDBC, that represent the interface between native repository APIs and the standard-defined JCR APIs.
Oracle WebCenter provides a set of JCR adapters (File System, Oracle Portal, and Oracle Universal Content Management) out of the box and ones (e.g., Microsoft SharePoint, EMC Documentum, and Lotus Domino) that can be licensed separately.
Because the JCR standard is quite complex and hard to get used to, Oracle WebCenter includes a Data Control to simplify the interaction with JCR within a WebCenter application. In this chapter we will discuss the mechanisms you can choose from to integrate content into your application.
There are two main mechanisms to choose from:
A
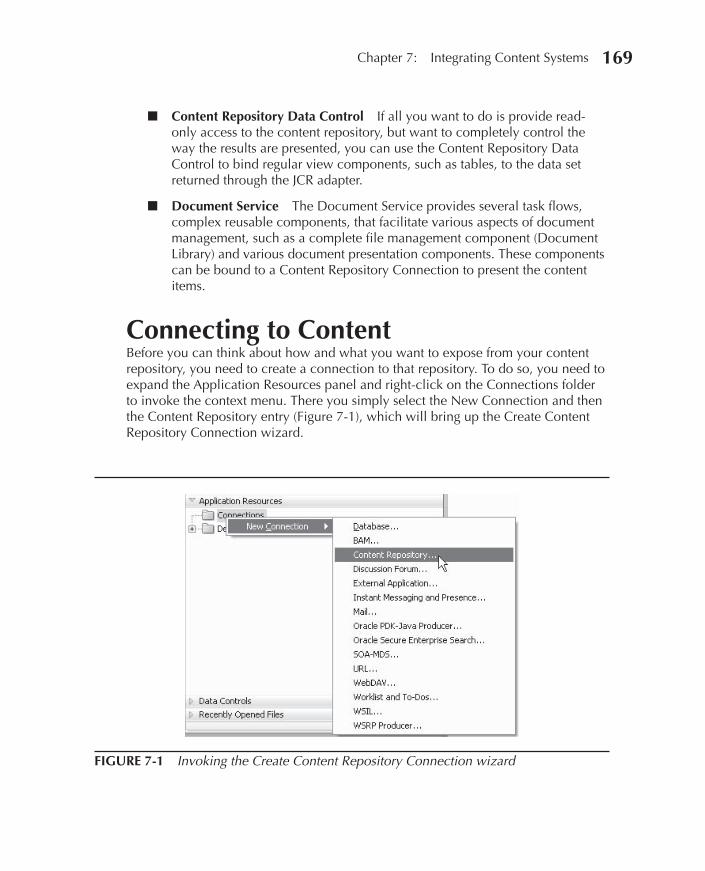
Chapter 7: Integrating Content Systems 169
Content Repository Data Control If all you want to do is provide read-only access to the content repository, but want to completely control the way the results are presented, you can use the Content Repository Data Control to bind regular view components, such as tables, to the data set returned through the JCR adapter.
Document Service The Document Service provides several task flows, complex reusable components, that facilitate various aspects of document management, such as a complete file management component (Document Library) and various document presentation components. These components can be bound to a Content Repository Connection to present the content items.
Connecting to ContentBefore you can think about how and what you want to expose from your content repository, you need to create a connection to that repository. To do so, you need to expand the Application Resources panel and right-click on the Connections folder to invoke the context menu. There you simply select the New Connection and then the Content Repository entry (Figure 7-1), which will bring up the Create Content Repository Connection wizard.
■
■
FIGURE 7-1 Invoking the Create Content Repository Connection wizard
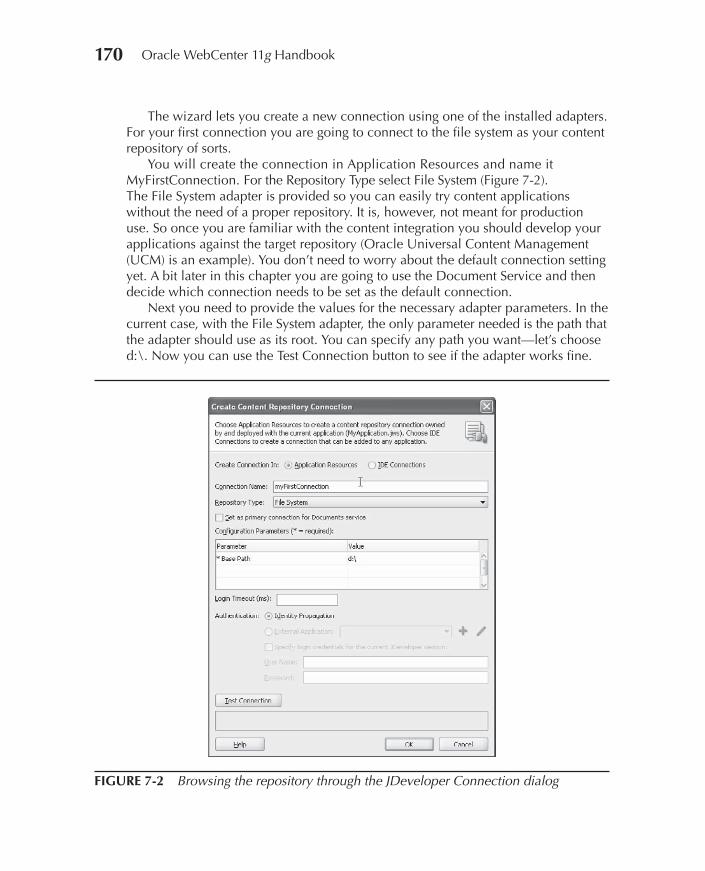
170 Oracle WebCenter 11g Handbook
The wizard lets you create a new connection using one of the installed adapters. For your first connection you are going to connect to the file system as your content repository of sorts.
You will create the connection in Application Resources and name it MyFirstConnection. For the Repository Type select File System (Figure 7-2). The File System adapter is provided so you can easily try content applications without the need of a proper repository. It is, however, not meant for production use. So once you are familiar with the content integration you should develop your applications against the target repository (Oracle Universal Content Management (UCM) is an example). You don’t need to worry about the default connection setting yet. A bit later in this chapter you are going to use the Document Service and then decide which connection needs to be set as the default connection.
Next you need to provide the values for the necessary adapter parameters. In the current case, with the File System adapter, the only parameter needed is the path that the adapter should use as its root. You can specify any path you want—let’s choose d:\. Now you can use the Test Connection button to see if the adapter works fine.
FIGURE 7-2 Browsing the repository through the JDeveloper Connection dialog
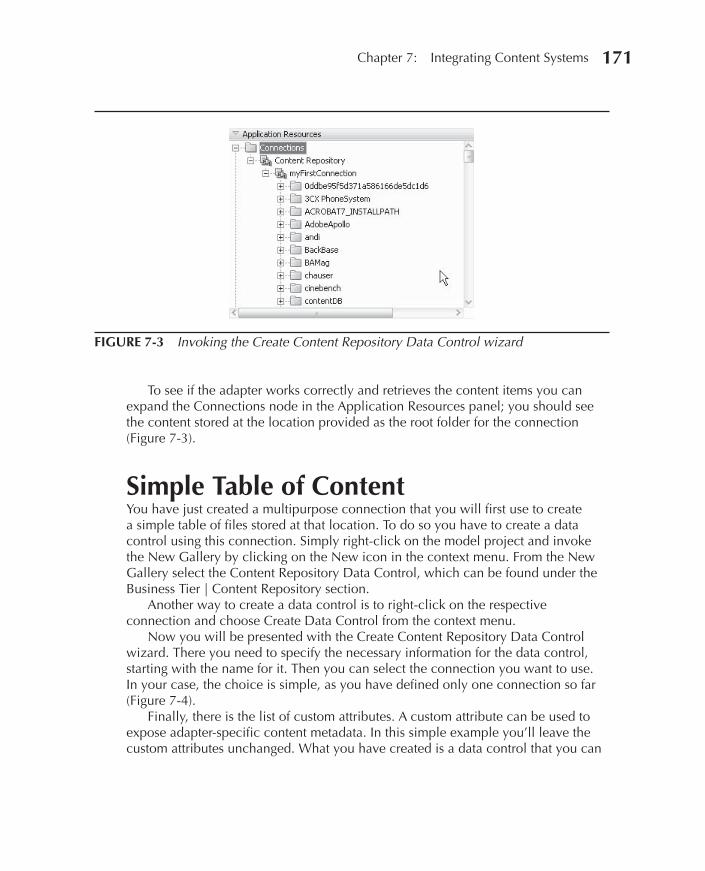
Chapter 7: Integrating Content Systems 171
To see if the adapter works correctly and retrieves the content items you can expand the Connections node in the Application Resources panel; you should see the content stored at the location provided as the root folder for the connection (Figure 7-3).
Simple Table of ContentYou have just created a multipurpose connection that you will first use to create a simple table of files stored at that location. To do so you have to create a data control using this connection. Simply right-click on the model project and invoke the New Gallery by clicking on the New icon in the context menu. From the New Gallery select the Content Repository Data Control, which can be found under the Business Tier | Content Repository section.
Another way to create a data control is to right-click on the respective connection and choose Create Data Control from the context menu.
Now you will be presented with the Create Content Repository Data Control wizard. There you need to specify the necessary information for the data control, starting with the name for it. Then you can select the connection you want to use. In your case, the choice is simple, as you have defined only one connection so far (Figure 7-4).
Finally, there is the list of custom attributes. A custom attribute can be used to expose adapter-specific content metadata. In this simple example you’ll leave the custom attributes unchanged. What you have created is a data control that you can
FIGURE 7-3 Invoking the Create Content Repository Data Control wizard
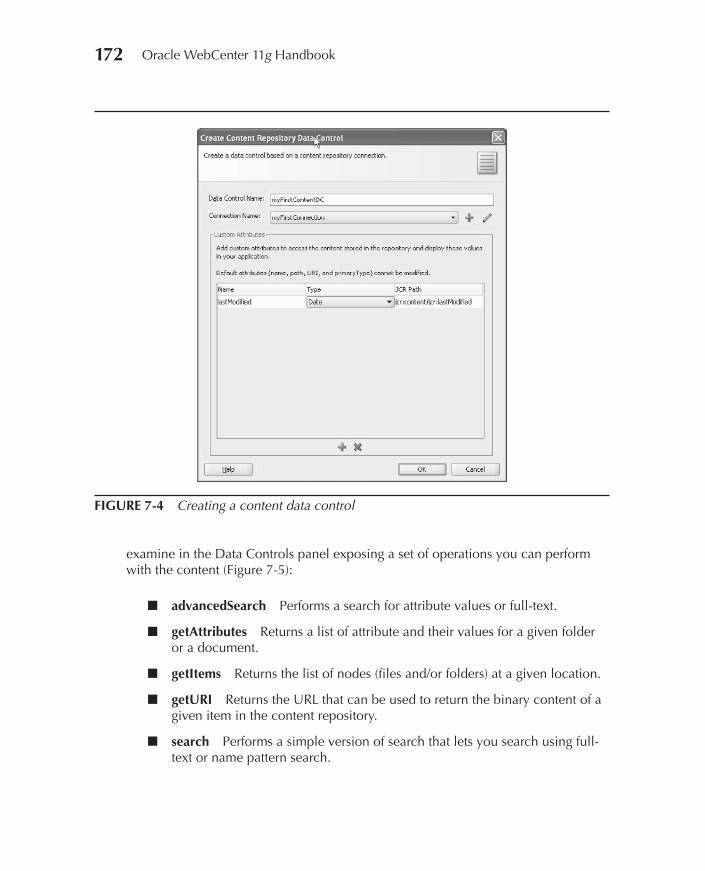
172 Oracle WebCenter 11g Handbook
examine in the Data Controls panel exposing a set of operations you can perform with the content (Figure 7-5):
advancedSearch Performs a search for attribute values or full-text.
getAttributes Returns a list of attribute and their values for a given folder or a document.
getItems Returns the list of nodes (files and/or folders) at a given location.
getURI Returns the URL that can be used to return the binary content of a given item in the content repository.
search Performs a simple version of search that lets you search using full-text or name pattern search.
■
■
■
■
■
FIGURE 7-4 Creating a content data control
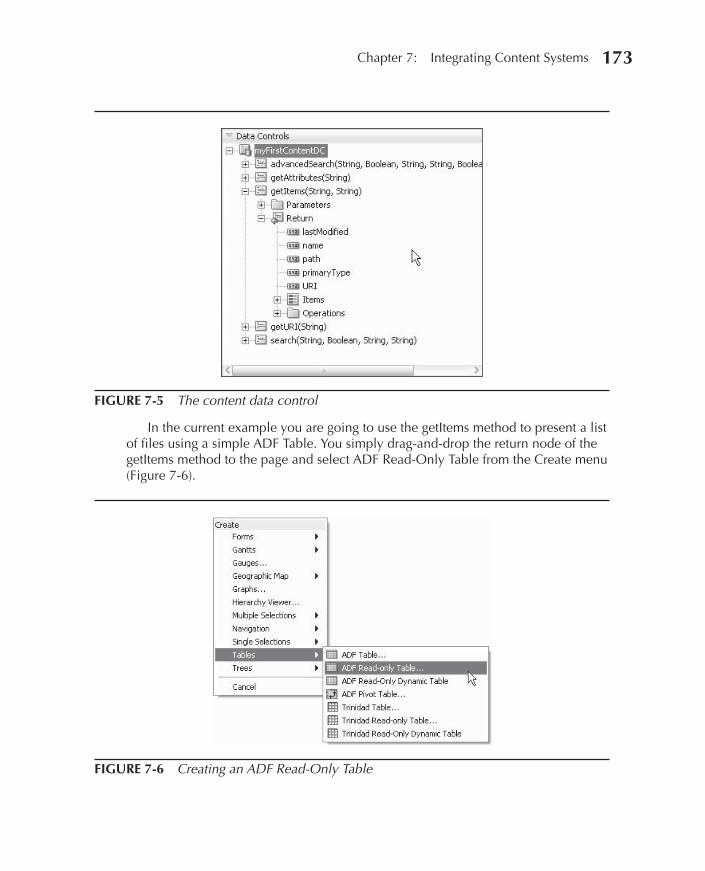
Chapter 7: Integrating Content Systems 173
In the current example you are going to use the getItems method to present a list of files using a simple ADF Table. You simply drag-and-drop the return node of the getItems method to the page and select ADF Read-Only Table from the Create menu (Figure 7-6).
FIGURE 7-5 The content data control
FIGURE 7-6 Creating an ADF Read-Only Table
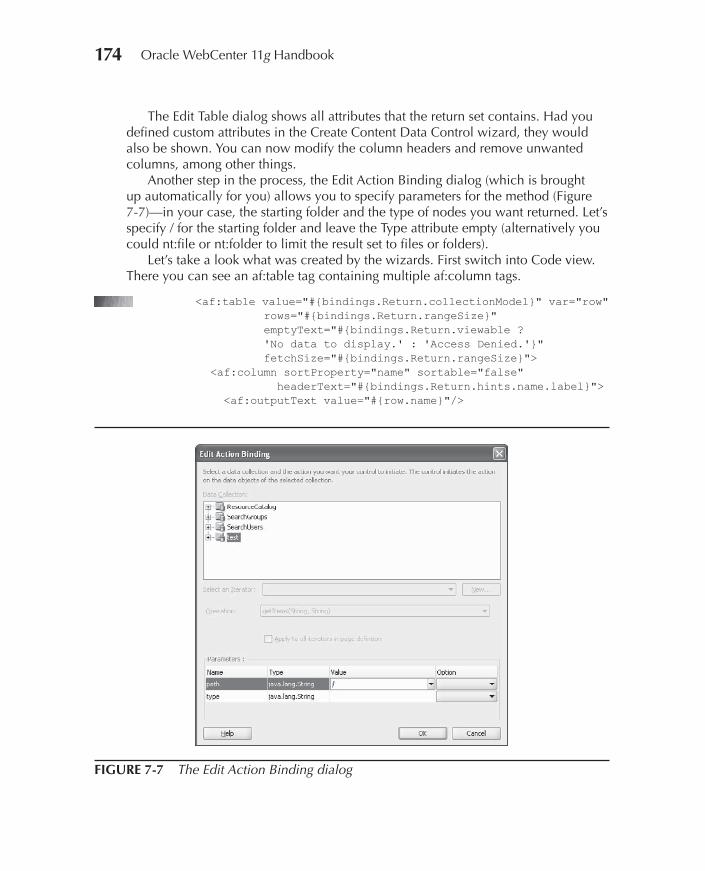
174 Oracle WebCenter 11g Handbook
The Edit Table dialog shows all attributes that the return set contains. Had you defined custom attributes in the Create Content Data Control wizard, they would also be shown. You can now modify the column headers and remove unwanted columns, among other things.
Another step in the process, the Edit Action Binding dialog (which is brought up automatically for you) allows you to specify parameters for the method (Figure 7-7)—in your case, the starting folder and the type of nodes you want returned. Let’s specify / for the starting folder and leave the Type attribute empty (alternatively you could nt:file or nt:folder to limit the result set to files or folders).
Let’s take a look what was created by the wizards. First switch into Code view. There you can see an af:table tag containing multiple af:column tags.
<af:table value="#{bindings.Return.collectionModel}" var="row" rows="#{bindings.Return.rangeSize}" emptyText="#{bindings.Return.viewable ? 'No data to display.' : 'Access Denied.'}" fetchSize="#{bindings.Return.rangeSize}"> <af:column sortProperty="name" sortable="false" headerText="#{bindings.Return.hints.name.label}"> <af:outputText value="#{row.name}"/>
FIGURE 7-7 The Edit Action Binding dialog
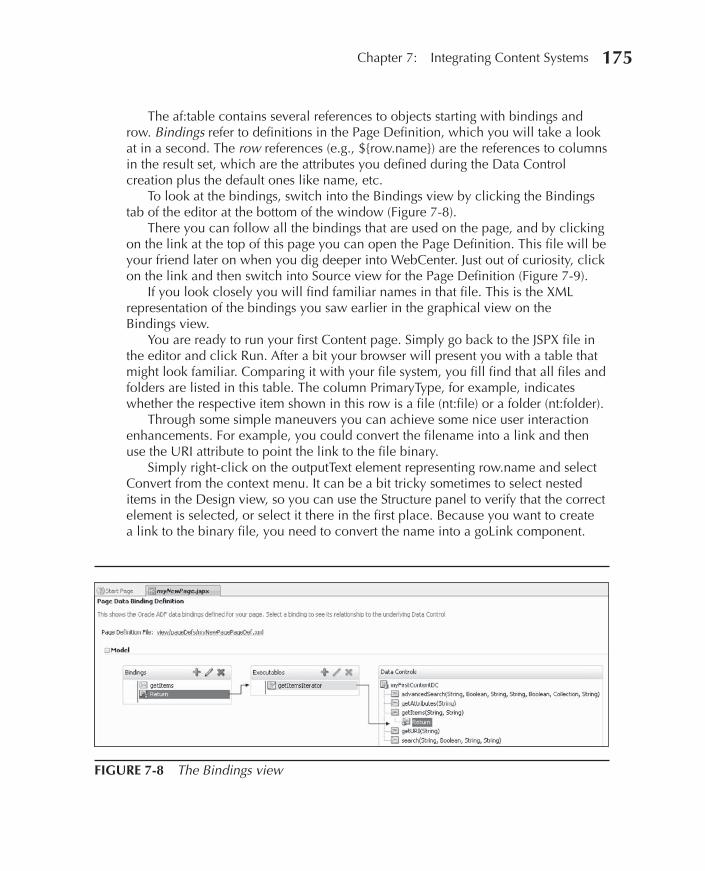
Chapter 7: Integrating Content Systems 175
The af:table contains several references to objects starting with bindings and row. Bindings refer to definitions in the Page Definition, which you will take a look at in a second. The row references (e.g., ${row.name}) are the references to columns in the result set, which are the attributes you defined during the Data Control creation plus the default ones like name, etc.
To look at the bindings, switch into the Bindings view by clicking the Bindings tab of the editor at the bottom of the window (Figure 7-8).
There you can follow all the bindings that are used on the page, and by clicking on the link at the top of this page you can open the Page Definition. This file will be your friend later on when you dig deeper into WebCenter. Just out of curiosity, click on the link and then switch into Source view for the Page Definition (Figure 7-9).
If you look closely you will find familiar names in that file. This is the XML representation of the bindings you saw earlier in the graphical view on the Bindings view.
You are ready to run your first Content page. Simply go back to the JSPX file in the editor and click Run. After a bit your browser will present you with a table that might look familiar. Comparing it with your file system, you fill find that all files and folders are listed in this table. The column PrimaryType, for example, indicates whether the respective item shown in this row is a file (nt:file) or a folder (nt:folder).
Through some simple maneuvers you can achieve some nice user interaction enhancements. For example, you could convert the filename into a link and then use the URI attribute to point the link to the file binary.
Simply right-click on the outputText element representing row.name and select Convert from the context menu. It can be a bit tricky sometimes to select nested items in the Design view, so you can use the Structure panel to verify that the correct element is selected, or select it there in the first place. Because you want to create a link to the binary file, you need to convert the name into a goLink component.
FIGURE 7-8 The Bindings view
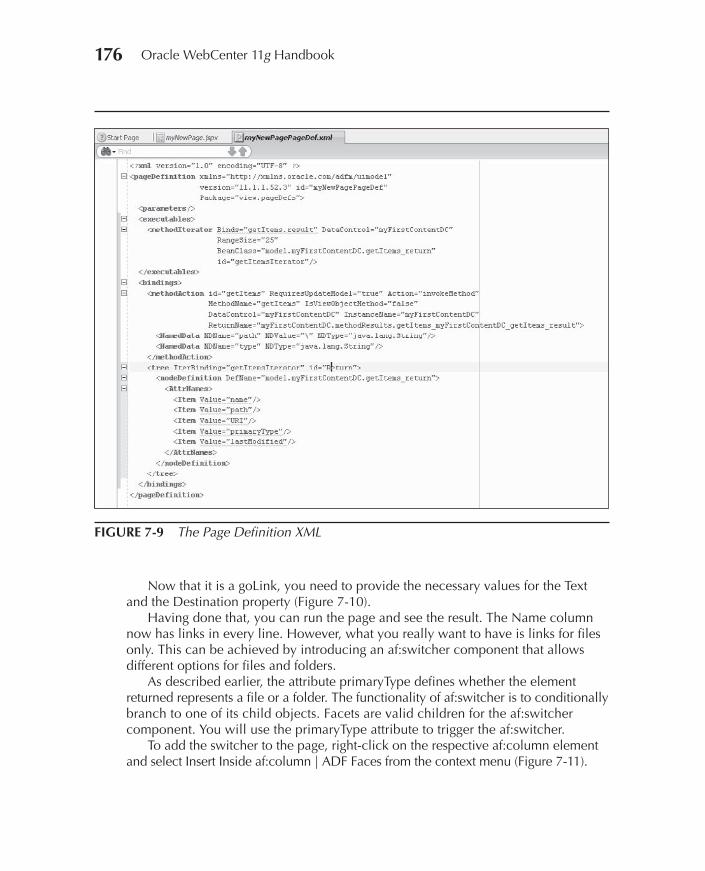
176 Oracle WebCenter 11g Handbook
Now that it is a goLink, you need to provide the necessary values for the Text and the Destination property (Figure 7-10).
Having done that, you can run the page and see the result. The Name column now has links in every line. However, what you really want to have is links for files only. This can be achieved by introducing an af:switcher component that allows different options for files and folders.
As described earlier, the attribute primaryType defines whether the element returned represents a file or a folder. The functionality of af:switcher is to conditionally branch to one of its child objects. Facets are valid children for the af:switcher component. You will use the primaryType attribute to trigger the af:switcher.
To add the switcher to the page, right-click on the respective af:column element and select Insert Inside af:column | ADF Faces from the context menu (Figure 7-11).
FIGURE 7-9 The Page Definition XML
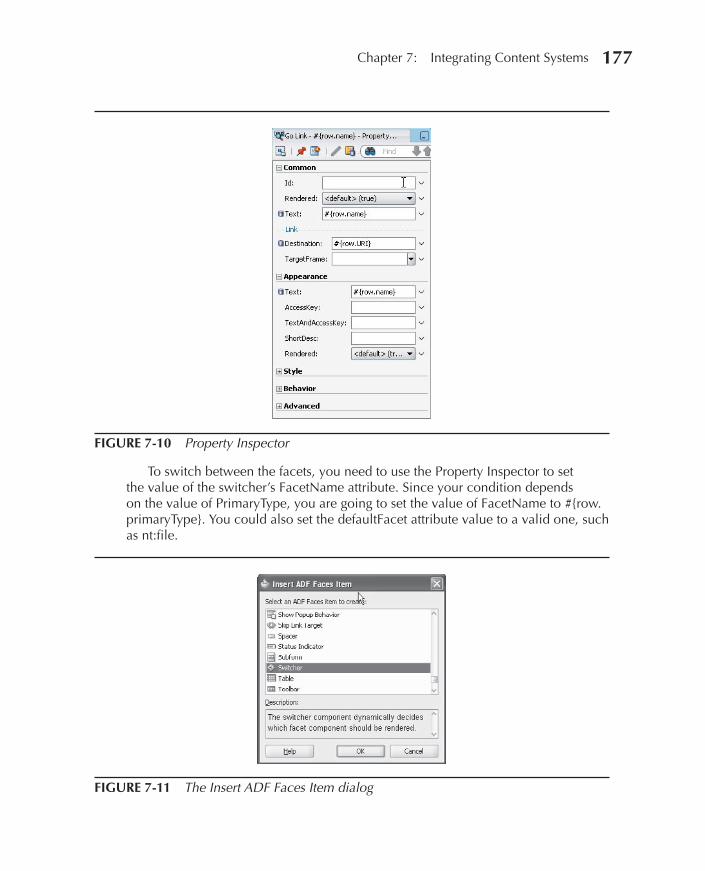
Chapter 7: Integrating Content Systems 177
To switch between the facets, you need to use the Property Inspector to set the value of the switcher’s FacetName attribute. Since your condition depends on the value of PrimaryType, you are going to set the value of FacetName to #{row.primaryType}. You could also set the defaultFacet attribute value to a valid one, such as nt:file.
FIGURE 7-10 Property Inspector
FIGURE 7-11 The Insert ADF Faces Item dialog
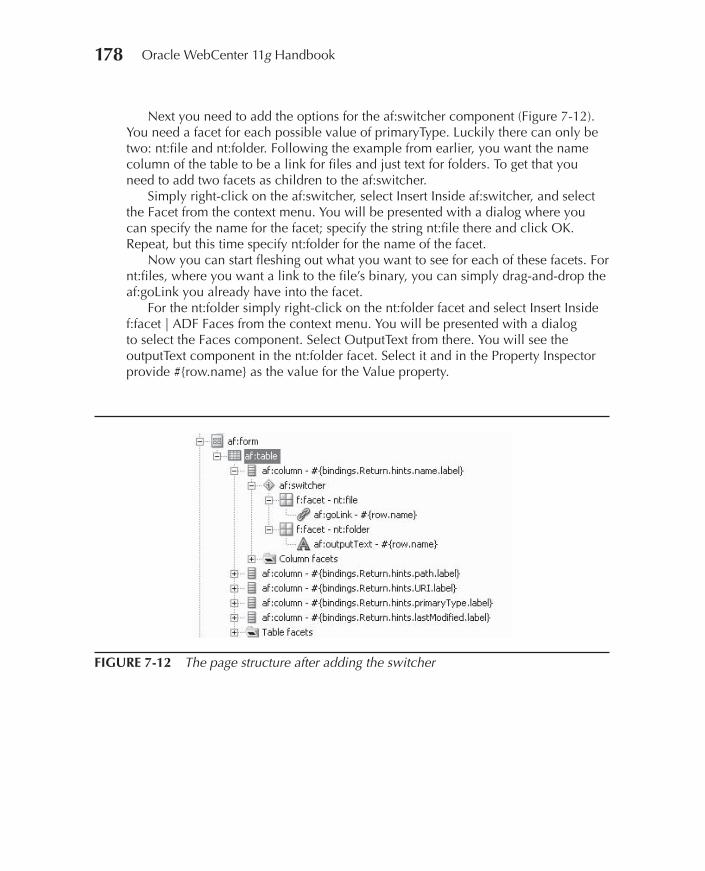
178 Oracle WebCenter 11g Handbook
Next you need to add the options for the af:switcher component (Figure 7-12). You need a facet for each possible value of primaryType. Luckily there can only be two: nt:file and nt:folder. Following the example from earlier, you want the name column of the table to be a link for files and just text for folders. To get that you need to add two facets as children to the af:switcher.
Simply right-click on the af:switcher, select Insert Inside af:switcher, and select the Facet from the context menu. You will be presented with a dialog where you can specify the name for the facet; specify the string nt:file there and click OK. Repeat, but this time specify nt:folder for the name of the facet.
Now you can start fleshing out what you want to see for each of these facets. For nt:files, where you want a link to the file’s binary, you can simply drag-and-drop the af:goLink you already have into the facet.
For the nt:folder simply right-click on the nt:folder facet and select Insert Inside f:facet | ADF Faces from the context menu. You will be presented with a dialog to select the Faces component. Select OutputText from there. You will see the outputText component in the nt:folder facet. Select it and in the Property Inspector provide #{row.name} as the value for the Value property.
FIGURE 7-12 The page structure after adding the switcher
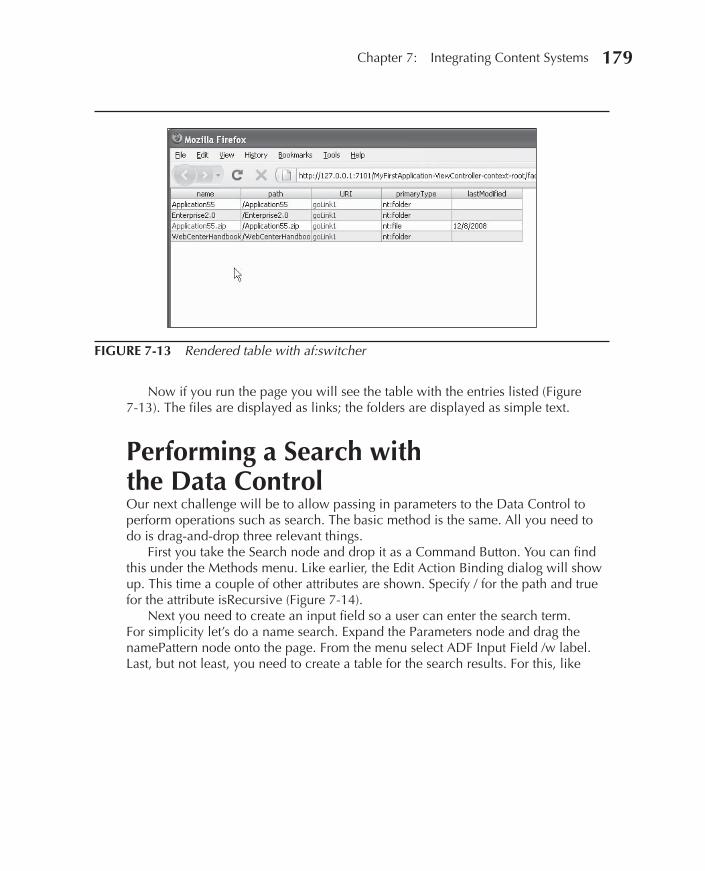
Chapter 7: Integrating Content Systems 179
Now if you run the page you will see the table with the entries listed (Figure 7-13). The files are displayed as links; the folders are displayed as simple text.
Performing a Search with the Data ControlOur next challenge will be to allow passing in parameters to the Data Control to perform operations such as search. The basic method is the same. All you need to do is drag-and-drop three relevant things.
First you take the Search node and drop it as a Command Button. You can find this under the Methods menu. Like earlier, the Edit Action Binding dialog will show up. This time a couple of other attributes are shown. Specify / for the path and true for the attribute isRecursive (Figure 7-14).
Next you need to create an input field so a user can enter the search term. For simplicity let’s do a name search. Expand the Parameters node and drag the namePattern node onto the page. From the menu select ADF Input Field /w label. Last, but not least, you need to create a table for the search results. For this, like
FIGURE 7-13 Rendered table with af:switcher