Embed Size (px)
Citation preview
Fifth Light
www.eaton.com/lightingsystems 24-May-16 ii
Table of Contents
1.1 – Key Terms................................................................................................................................................................ 3 1.2 – Related Fifth Light Documentation .......................................................................................................................... 3
2.1 – Standalone and Centralized Systems ..................................................................................................................... 4
2.1.1 – Standalone Systems .................................................................................................................................... 4 2.1.2 – Centralized Systems .................................................................................................................................... 4
3.1 – The Webmin Interface ............................................................................................................................................. 5 3.2 – Logging in to Webmin ............................................................................................................................................. 5 3.3 – Setting up Local Controllers .................................................................................................................................... 6
3.3.1 – Installing and Initializing the Replication Manager ...................................................................................... 6 3.3.2 – Adding Local Controllers ............................................................................................................................. 7 3.3.3 – Viewing the Added Local Controllers .......................................................................................................... 8 3.3.4 – Configuring Cross-Panel Communication ................................................................................................... 8 3.3.5 – Adding a Local Controller to the Replication Manager ............................................................................... 9 3.3.6 – Removing a Local Controller from the Replication Manager ...................................................................... 9 3.3.7 – Updating the Zone Controller .................................................................................................................... 10
3.4 – Backing up and Restoring the Database .............................................................................................................. 10 3.4.1 – Backing up the Database .......................................................................................................................... 10 3.4.2 – Restoring a Central Manager Database .................................................................................................... 11 3.4.3 – Restoring a Standalone Server Database ................................................................................................. 11
3.5 – System Maintenance Tasks .................................................................................................................................. 13 3.5.1 – Setting the Database Time Zone ............................................................................................................... 13 3.5.2 – Setting the System Date and Time ............................................................................................................ 13 3.5.3 – Configuring an External Time Server ......................................................................................................... 13 3.5.4 – Changing the IP Address .......................................................................................................................... 14 3.5.5 – Setting up Remote Access (Hamachi) ...................................................................................................... 15
4.1.1 – Common Problems ................................................................................................................................... 16 4.1.2 – Retrieving Zone Controller Log Files ......................................................................................................... 16 4.1.3 – Wiping the Replication Manager Configuration ......................................................................................... 16 4.1.4 – Using Ping to Test a Network Connection ................................................................................................ 17
24-May-16 www.eaton.com/lightingsystems
3
1 – About This Document
This document describes how to use the Fifth Light
Webmin application for low-level configuration of the
Fifth Light Local Controller and Central Manager
operating systems and applications.
The material in this document assumes you are familiar
with the Fifth Light Lighting Management Software as
described in the LMS User Manual and the Fifth Light
Planning and Installation Guide.
1.1 – Key Terms
The terms listed below are used in this document.
Lighting Control System (LCS) – A computer-based
control system installed in a building to control and
monitor the lighting equipment. An LCS consists of
hardware and software.
Master Control Application (MCA) – A Fifth Light
software application that allows users to configure and
manage the system via a Web-based user interface.
Digital Addressable Lighting Interface (DALI) – An
International Electrotechnical Commission (IEC)
standard for network-based systems that control
lighting in building automation. A DALI system can
include control gear, control devices and bus power
supplies from any manufacturer that supports DALI.
DALI Bus – A cable over which DALI communication
can connect up to 63 DALI devices – such as
dimmable ballasts, sensors and keypads – to the LCS.
Local Controller – A computer that hosts the Zone
Controller application and typically resides in an
electrical room of a building.
Zone Controller Application – A Fifth Light software
application that issues lighting commands according to
the system configuration and information received from
DALI Bus devices such as motion sensors, daylight
sensors and wall stations.
DALI Bus Chassis (DBC) – A hardware interface for up
to 8 DALI buses. Each Local Controller can support up
to 4 USB-connected DBCs.
Lighting Control Panel (LCP) – An enclosure that
houses the Local Controller, DBCs and any supporting
hardware.
Replication Manager – An application used in a
centrally-managed system to synchronize the database
across multiple Local Controllers.
1.2 – Related Fifth Light
Documentation
Document Description
Fifth Light Planning and
Installation Guide
This guide covers the
planning, design, set up
and configuration of a
Fifth Light System.
Fifth Light Lighting
Management Software
User Manual
This manual covers the
use of the Fifth Light
Lighting Management
Software to manage the
lighting system.
www.eaton.com/lightingsystems 24-May-16 4
2 – Webmin System Overview
Webmin is a graphical user interface that eliminates the
need to perform configuration tasks with a Linux
command line interface. Some of the key tasks you can
perform with Webmin include the following:
System maintenance tasks, such as changing the
time and retrieving log files
Backing up and restoring the system configuration
databases
Centralizing multiple Local Controller computers
into a single Central Manager database
2.1 – Standalone and Centralized
Systems
There are two ways a Fifth Light system can be set up,
standalone and centralized.
In a standalone system, there is one MCA (Master
Control Application) on each Local Controller. To
change how the lighting is controlled in a particular part
of a building, you must know which Local Controller is
responsible for that area and change the configuration
on that MCA.
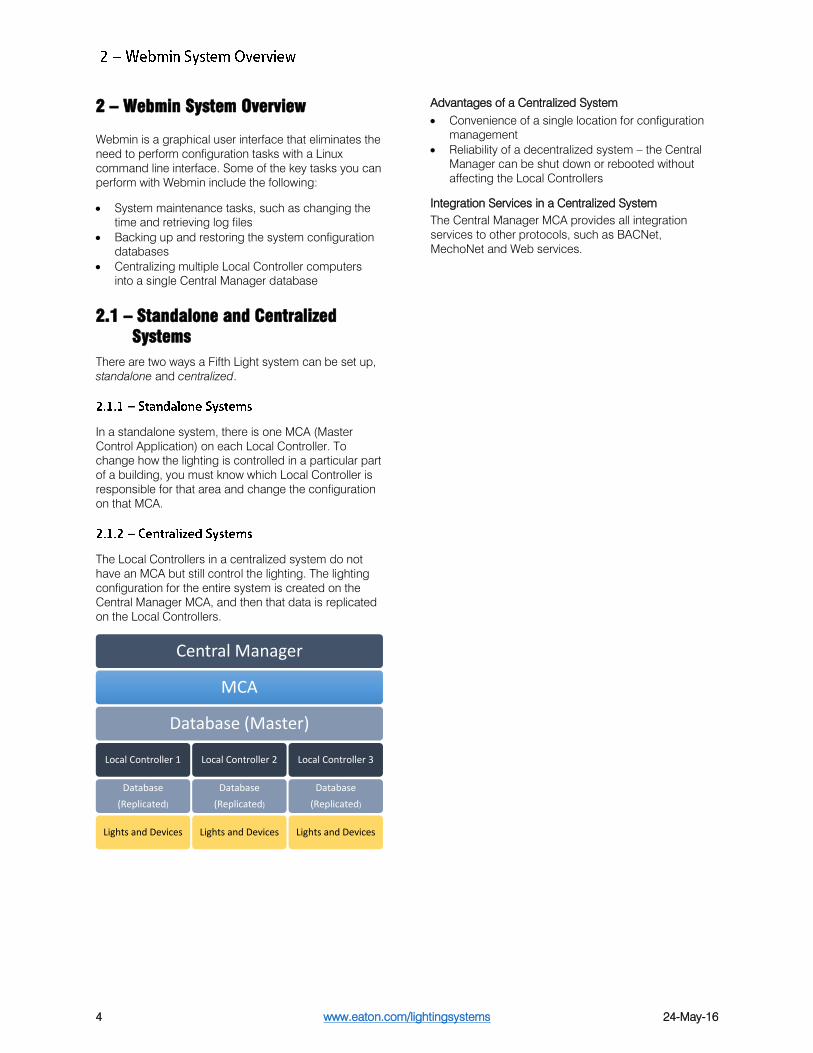
The Local Controllers in a centralized system do not
have an MCA but still control the lighting. The lighting
configuration for the entire system is created on the
Central Manager MCA, and then that data is replicated
on the Local Controllers.
Advantages of a Centralized System
Convenience of a single location for configuration
management
Reliability of a decentralized system – the Central
Manager can be shut down or rebooted without
affecting the Local Controllers
Integration Services in a Centralized System
The Central Manager MCA provides all integration
services to other protocols, such as BACNet,
MechoNet and Web services.
Central Manager
MCA
Database (Master)
Local Controller 1
Database
(Replicated)
Lights and Devices
Local Controller 2
Database
(Replicated)
Lights and Devices
Local Controller 3
Database
(Replicated)
Lights and Devices
24-May-16 www.eaton.com/lightingsystems
5
3 – Using Webmin
This section describes how to log in to Webmin, configure the Local Controllers and the Central Manager, centralize the
system by enabling the Replication Manager, backup and restore the Central Manager database, and perform general
tasks such as setting the time zone and changing the IP address on each Local Controller.
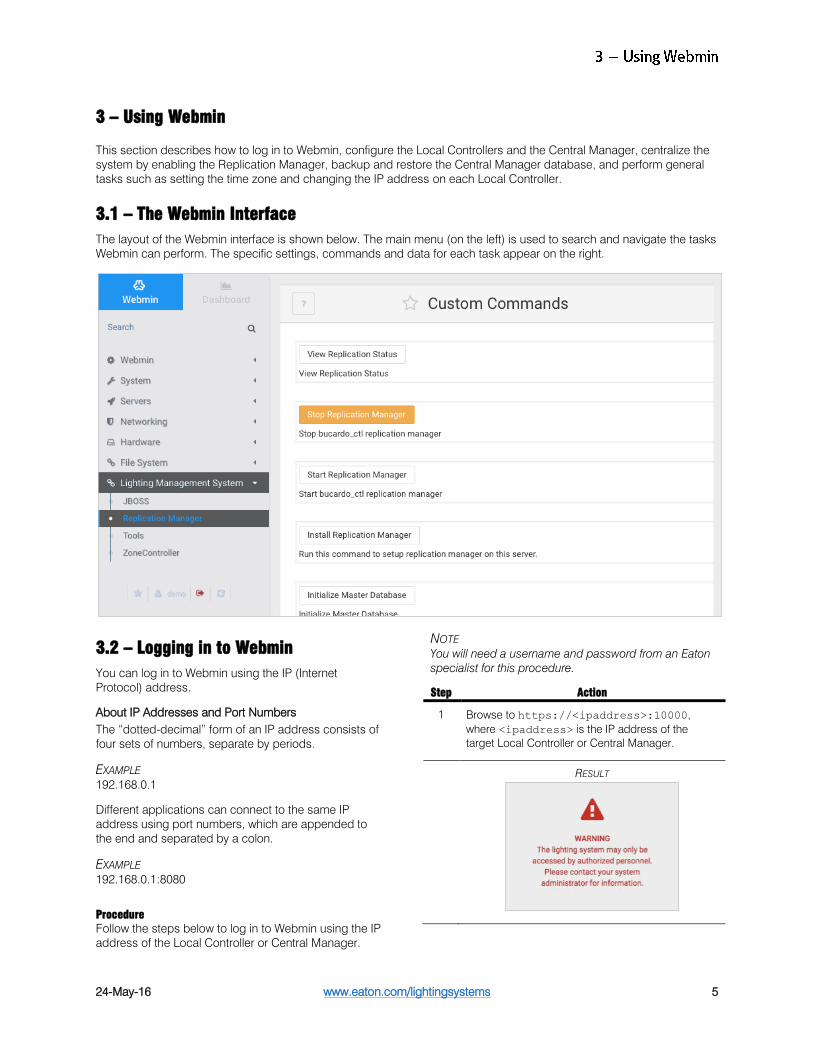
3.1 – The Webmin Interface
The layout of the Webmin interface is shown below. The main menu (on the left) is used to search and navigate the tasks
Webmin can perform. The specific settings, commands and data for each task appear on the right.
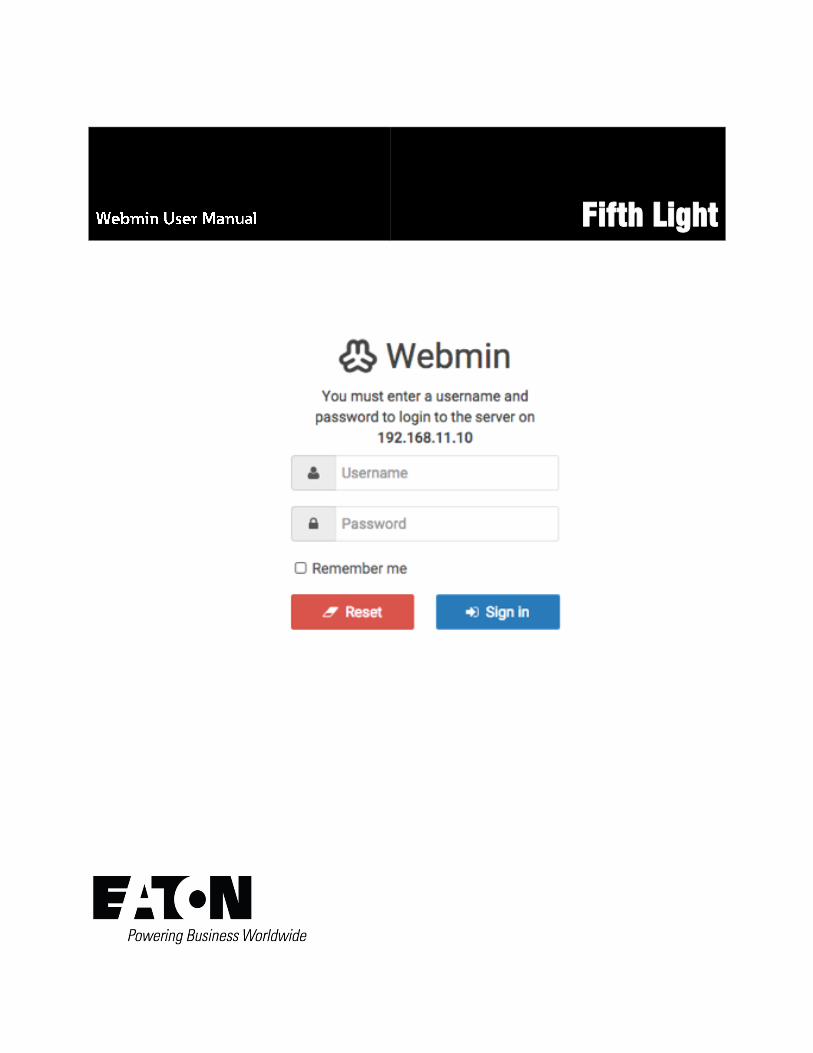
3.2 – Logging in to Webmin
You can log in to Webmin using the IP (Internet
Protocol) address.
About IP Addresses and Port Numbers
The “dotted-decimal” form of an IP address consists of
four sets of numbers, separate by periods.
EXAMPLE
192.168.0.1
Different applications can connect to the same IP
address using port numbers, which are appended to
the end and separated by a colon.
EXAMPLE
192.168.0.1:8080
Procedure
Follow the steps below to log in to Webmin using the IP
address of the Local Controller or Central Manager.
NOTE
You will need a username and password from an Eaton
specialist for this procedure.
Step Action
1 Browse to https://<ipaddress>:10000,
where <ipaddress> is the IP address of the
target Local Controller or Central Manager.
RESULT

www.eaton.com/lightingsystems 24-May-16 6
Step Action
2 Refresh the page to clear the warning and display
the Webmin login page.
RESULT
3 Enter your Username and Password, and then click
Sign in.
RESULT
NOTE
To log out, click the button below the Main
menu.
3.3 – Setting up Local Controllers
The following procedures describe how to configure a
Central Manager and multiple Local Controllers as a
centralized system
IMPORTANT
If your system software is older than LMS 4.11.5, contact
Eaton technical support at
[email protected] prior to centralizing.
Before you can add the first Local Controller to a
system, the Replication Manager must be installed on
the Central Manager and initialized. This process is only
required once per site. If this has already been done,
skip to “Adding Local Controllers” on page 7.
Confirming Database Access
The Central Manager IP address must have permission
to access its own database as well as those on every
Local Controller. Because that IP address may have
been changed to work with the local site network, you
must confirm this access.
Step Action
1 Click Servers in the Main menu, then click
PostgreSQL Database Server.
RESULT
2 Click Allowed Hosts.
RESULT
3 Is the Central Manager IP address listed?
If yes, stop here.
If no, go to Step 4.
4 Click Create a new allowed host.
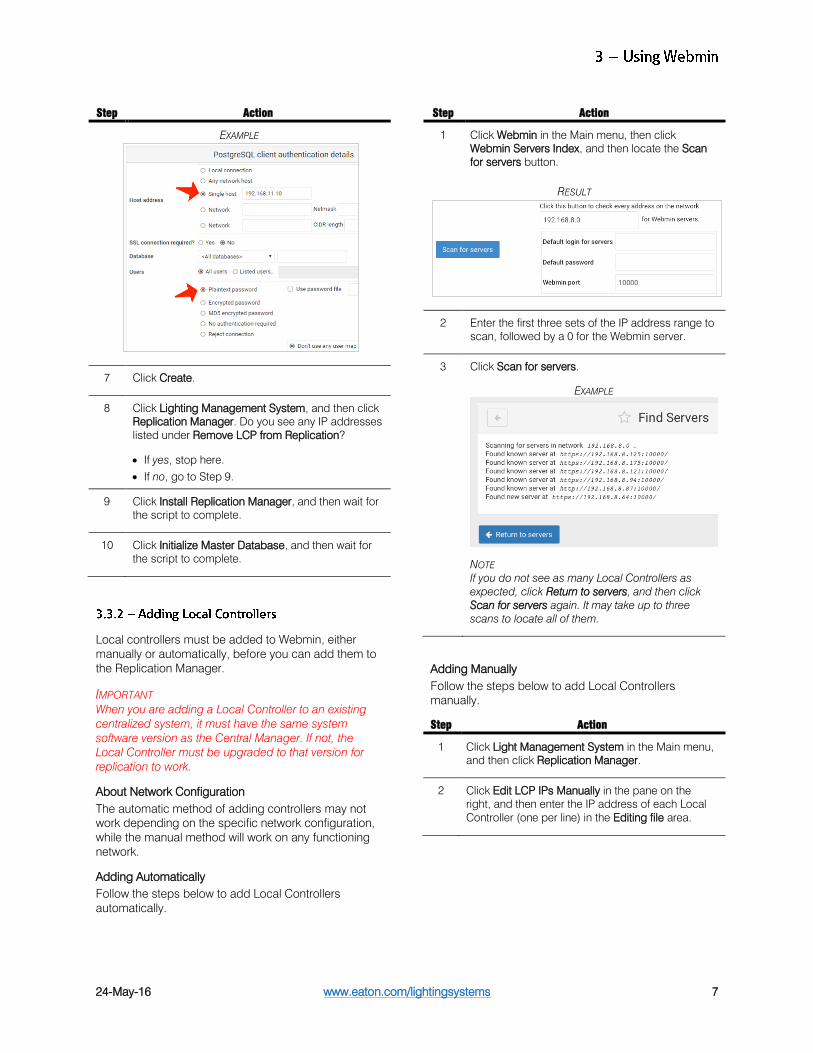
5 Click Single host, and then enter the IP address of
the Central Manager.
6 Click Plaintext password, and leave all of the other
settings at their default values.
24-May-16 www.eaton.com/lightingsystems
7
Step Action
EXAMPLE
7 Click Create.
8 Click Lighting Management System, and then click
Replication Manager. Do you see any IP addresses
listed under Remove LCP from Replication?
If yes, stop here.
If no, go to Step 9.
9 Click Install Replication Manager, and then wait for
the script to complete.
10 Click Initialize Master Database, and then wait for
the script to complete.
Local controllers must be added to Webmin, either
manually or automatically, before you can add them to
the Replication Manager.
IMPORTANT
When you are adding a Local Controller to an existing
centralized system, it must have the same system
software version as the Central Manager. If not, the
Local Controller must be upgraded to that version for
replication to work.
About Network Configuration
The automatic method of adding controllers may not
work depending on the specific network configuration,
while the manual method will work on any functioning
network.
Adding Automatically
Follow the steps below to add Local Controllers
automatically.
Step Action
1 Click Webmin in the Main menu, then click
Webmin Servers Index, and then locate the Scan
for servers button.
RESULT
2 Enter the first three sets of the IP address range to
scan, followed by a 0 for the Webmin server.
3 Click Scan for servers.
EXAMPLE
NOTE
If you do not see as many Local Controllers as
expected, click Return to servers, and then click
Scan for servers again. It may take up to three
scans to locate all of them.
Adding Manually
Follow the steps below to add Local Controllers
manually.
Step Action
1 Click Light Management System in the Main menu,
and then click Replication Manager.
2 Click Edit LCP IPs Manually in the pane on the
right, and then enter the IP address of each Local
Controller (one per line) in the Editing file area.
www.eaton.com/lightingsystems 24-May-16 8
Step Action
RESULT
3 Click Save.
Follow the steps below on the Central Manager to view
the Local Controllers that have been added to a
system.
Step Action
1 Click Lighting Management System in the Main
menu, and then click Replication Manager.
2 Click View LCP Information to display all known IP
addresses.
EXAMPLE
3 Click View Online/Offline Status. Does the Online
LCP list show all the expected IP addresses?
If yes, stop here.
If no, go to Step 4.
4 See “Using Ping to Test a Network Connection”
on page 17 for details on testing an IP address
connection using Webmin. If the ping test fails,
contact the facility IT team responsible for the
network.
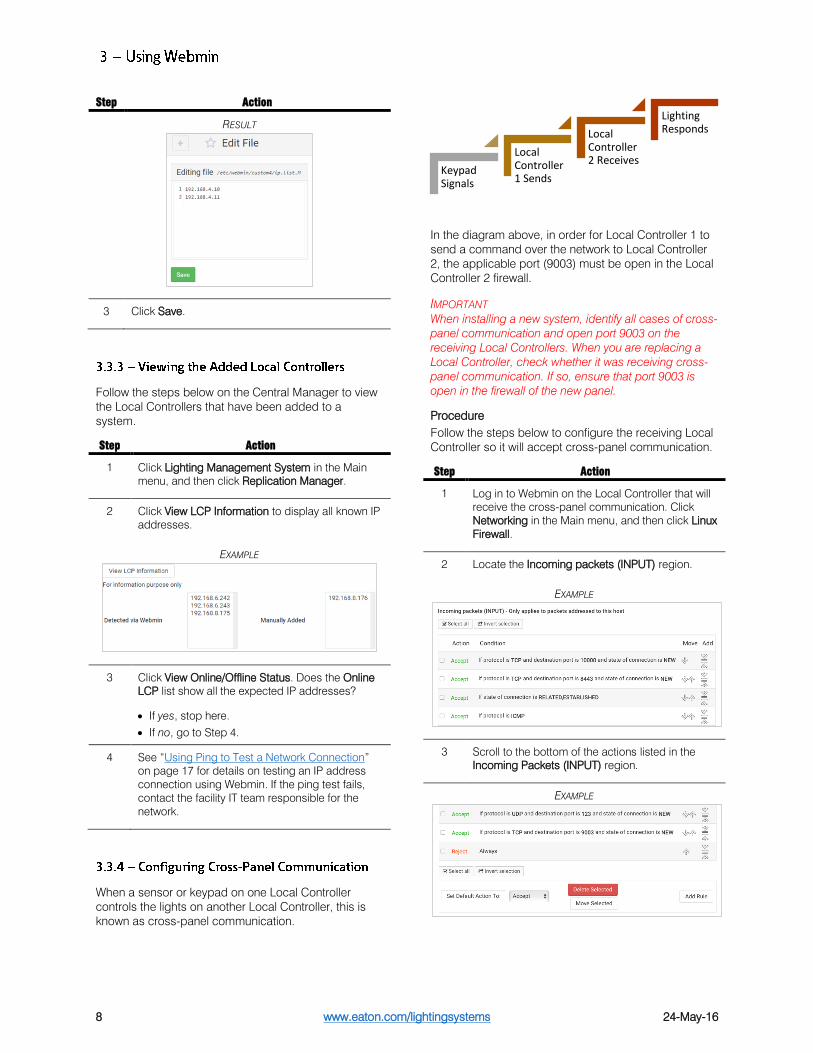
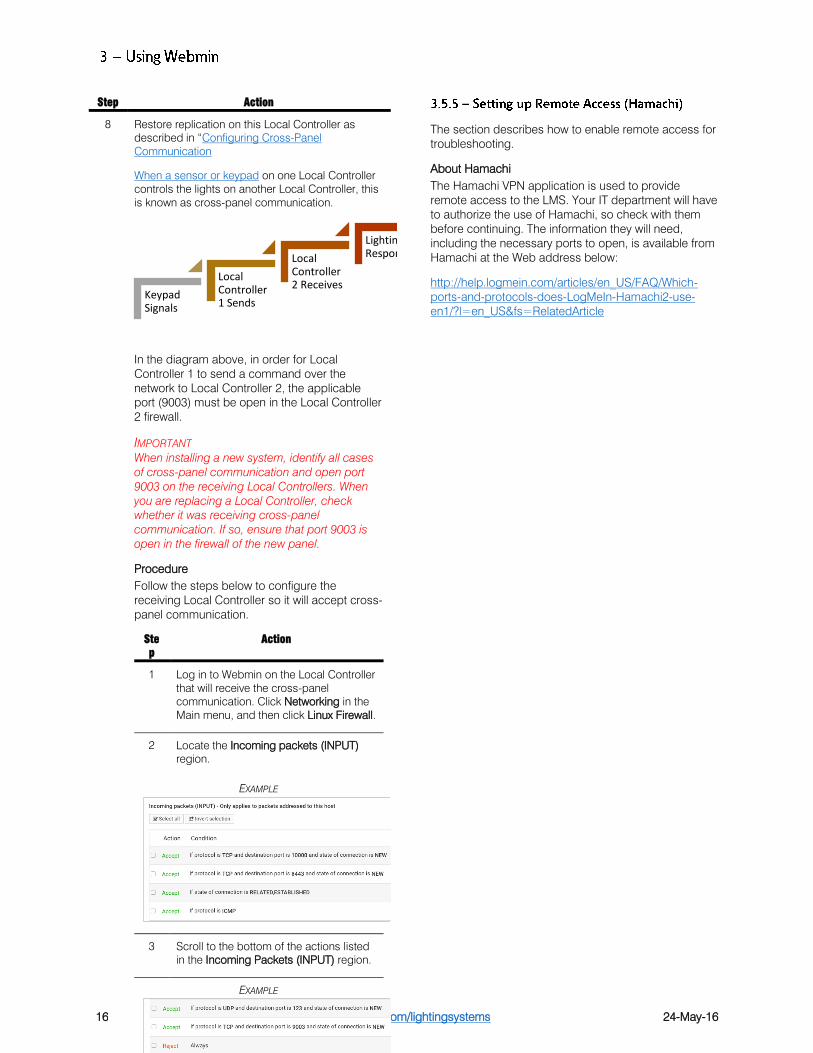
When a sensor or keypad on one Local Controller
controls the lights on another Local Controller, this is
known as cross-panel communication.
In the diagram above, in order for Local Controller 1 to
send a command over the network to Local Controller
2, the applicable port (9003) must be open in the Local
Controller 2 firewall.
IMPORTANT
When installing a new system, identify all cases of cross-
panel communication and open port 9003 on the
receiving Local Controllers. When you are replacing a
Local Controller, check whether it was receiving cross-
panel communication. If so, ensure that port 9003 is
open in the firewall of the new panel.
Procedure
Follow the steps below to configure the receiving Local
Controller so it will accept cross-panel communication.
Step Action
1 Log in to Webmin on the Local Controller that will
receive the cross-panel communication. Click
Networking in the Main menu, and then click Linux
Firewall.
2 Locate the Incoming packets (INPUT) region.
EXAMPLE
3 Scroll to the bottom of the actions listed in the
Incoming Packets (INPUT) region.
EXAMPLE
Keypad Signals
Local Controller 1 Sends
Local Controller 2 Receives
Lighting Responds
24-May-16 www.eaton.com/lightingsystems
9
Step Action
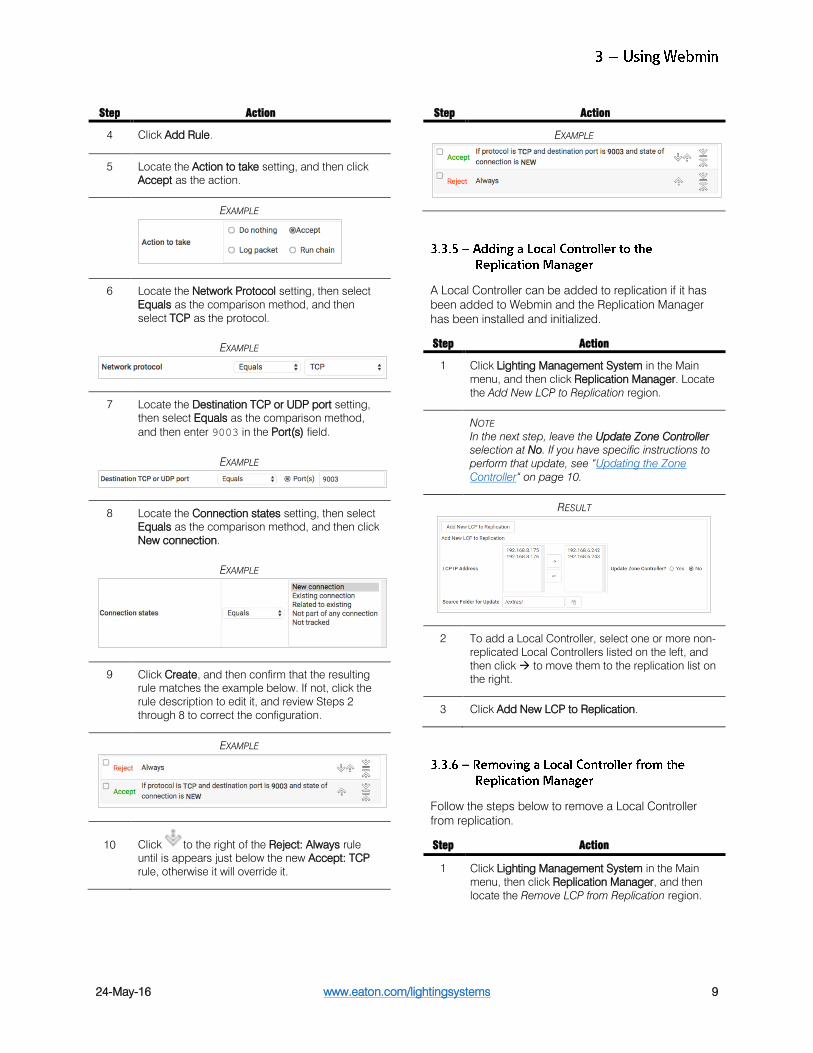
4 Click Add Rule.
5 Locate the Action to take setting, and then click
Accept as the action.
EXAMPLE
6 Locate the Network Protocol setting, then select
Equals as the comparison method, and then
select TCP as the protocol.
EXAMPLE
7 Locate the Destination TCP or UDP port setting,
then select Equals as the comparison method,
and then enter 9003 in the Port(s) field.
EXAMPLE
8 Locate the Connection states setting, then select
Equals as the comparison method, and then click
New connection.
EXAMPLE
9 Click Create, and then confirm that the resulting
rule matches the example below. If not, click the
rule description to edit it, and review Steps 2
through 8 to correct the configuration.
EXAMPLE
10 Click to the right of the Reject: Always rule
until is appears just below the new Accept: TCP
rule, otherwise it will override it.
Step Action
EXAMPLE
A Local Controller can be added to replication if it has
been added to Webmin and the Replication Manager
has been installed and initialized.
Step Action
1 Click Lighting Management System in the Main
menu, and then click Replication Manager. Locate
the Add New LCP to Replication region.
NOTE
In the next step, leave the Update Zone Controller
selection at No. If you have specific instructions to
perform that update, see “Updating the Zone
Controller“ on page 10.
RESULT
2 To add a Local Controller, select one or more non-
replicated Local Controllers listed on the left, and
then click to move them to the replication list on
the right.
3 Click Add New LCP to Replication.
Follow the steps below to remove a Local Controller
from replication.
Step Action
1 Click Lighting Management System in the Main
menu, then click Replication Manager, and then
locate the Remove LCP from Replication region.
www.eaton.com/lightingsystems 24-May-16 10
Step Action
RESULT
2 Select one or more Local Controllers in the
replication list on the left, and then click to move
them to the non-replicated list on the right.
3 Click Remove LCP from Replication.
The Zone Controller may need to be updated to take
advantage of new features or resolve an issue. Updates
are normally applied to the entire system, not to
individual panels.
Procedure
Follow the steps below to update the Zone Controller.
NOTE
One or more Local Controllers must be added during
this procedure for it to complete successfully.
Step Action
1 Click Lighting Management System in the Main
menu, then click Replication Manager, and then
locate the Add New LCP to Replication region.
RESULT
2 Select Yes beside Update Zone Controller, and
then click to locate the install directory.
NOTE
The selected install directory should contain a “zc”
subdirectory that has a file named
“ZoneController.zip” in it.
Step Action
EXAMPLE
3 Click OK to select the install directory.
4 Click Add New LCP to Replication, and then wait
for the script to complete with an “END OF
SCRIPT” message.
3.4 – Backing up and Restoring the
Database
This section describes the procedures for backing up
and restoring a Central Manager or Local Controller
database.
A backup may be taken when a technician has made
changes on site, or if the facility owner requires
assistance from Eaton that involves the database.
Procedure
Follow the steps below to back up the database on a
Central Manager or Local Controller.
Step Action
1 Click Servers in the Main menu, and then click
PostgreSQL Database Server.
2 Click flt_v4, and then click Backup.
24-May-16 www.eaton.com/lightingsystems
11
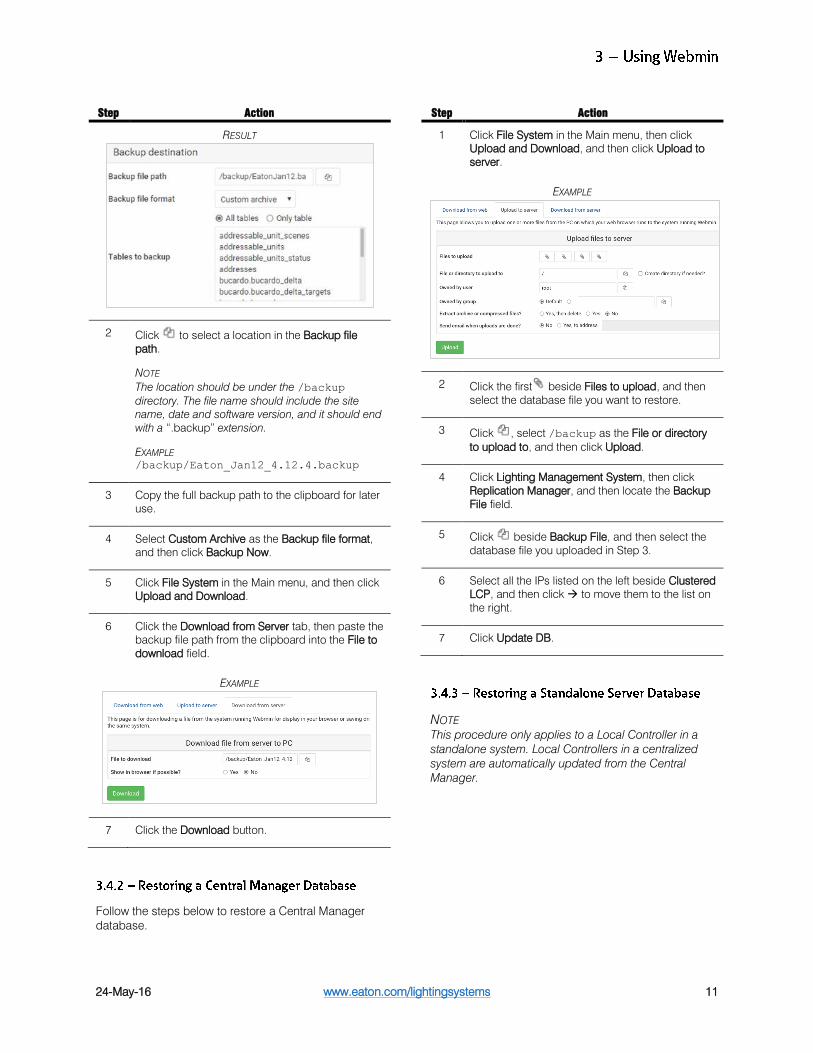
Step Action
RESULT
2 Click to select a location in the Backup file
path.
NOTE
The location should be under the /backup
directory. The file name should include the site
name, date and software version, and it should end
with a “.backup” extension.
EXAMPLE
/backup/Eaton_Jan12_4.12.4.backup
3 Copy the full backup path to the clipboard for later
use.
4 Select Custom Archive as the Backup file format,
and then click Backup Now.
5 Click File System in the Main menu, and then click
Upload and Download.
6 Click the Download from Server tab, then paste the
backup file path from the clipboard into the File to
download field.
EXAMPLE
7 Click the Download button.
Follow the steps below to restore a Central Manager
database.
Step Action
1 Click File System in the Main menu, then click
Upload and Download, and then click Upload to
server.
EXAMPLE
2 Click the first beside Files to upload, and then
select the database file you want to restore.
3 Click , select /backup as the File or directory
to upload to, and then click Upload.
4 Click Lighting Management System, then click
Replication Manager, and then locate the Backup
File field.
5 Click beside Backup File, and then select the
database file you uploaded in Step 3.
6 Select all the IPs listed on the left beside Clustered
LCP, and then click to move them to the list on
the right.
7 Click Update DB.
NOTE
This procedure only applies to a Local Controller in a
standalone system. Local Controllers in a centralized
system are automatically updated from the Central
Manager.
www.eaton.com/lightingsystems 24-May-16 12
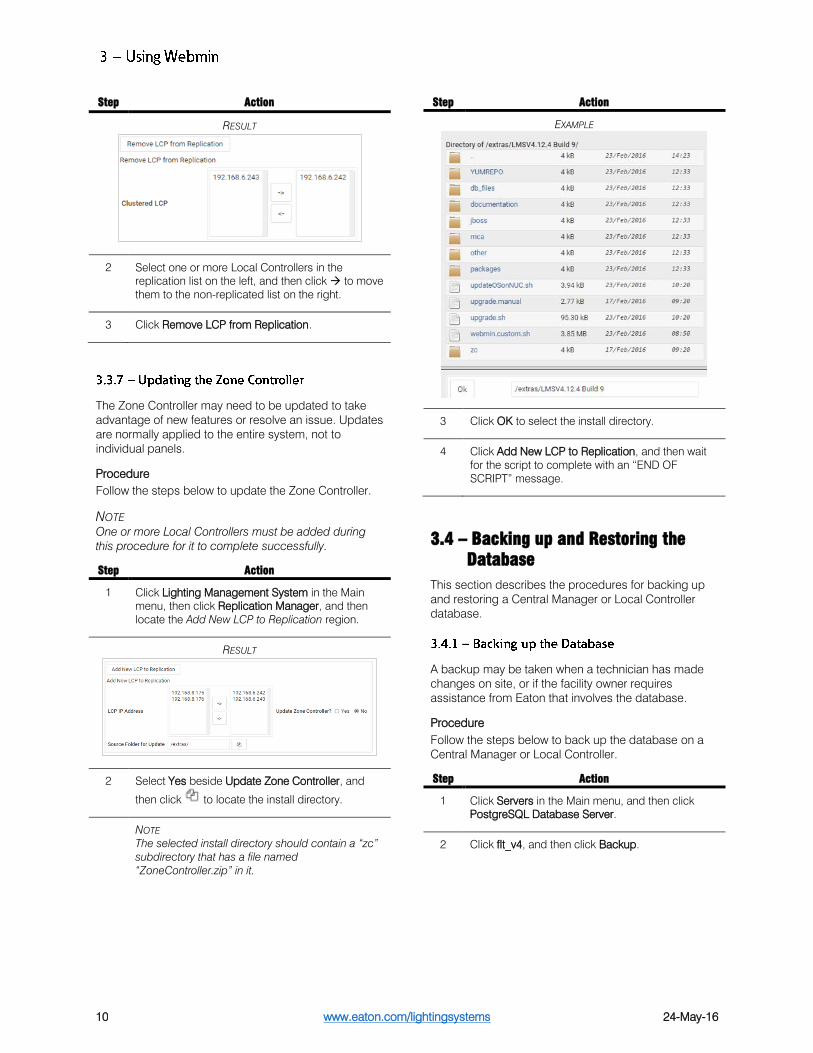
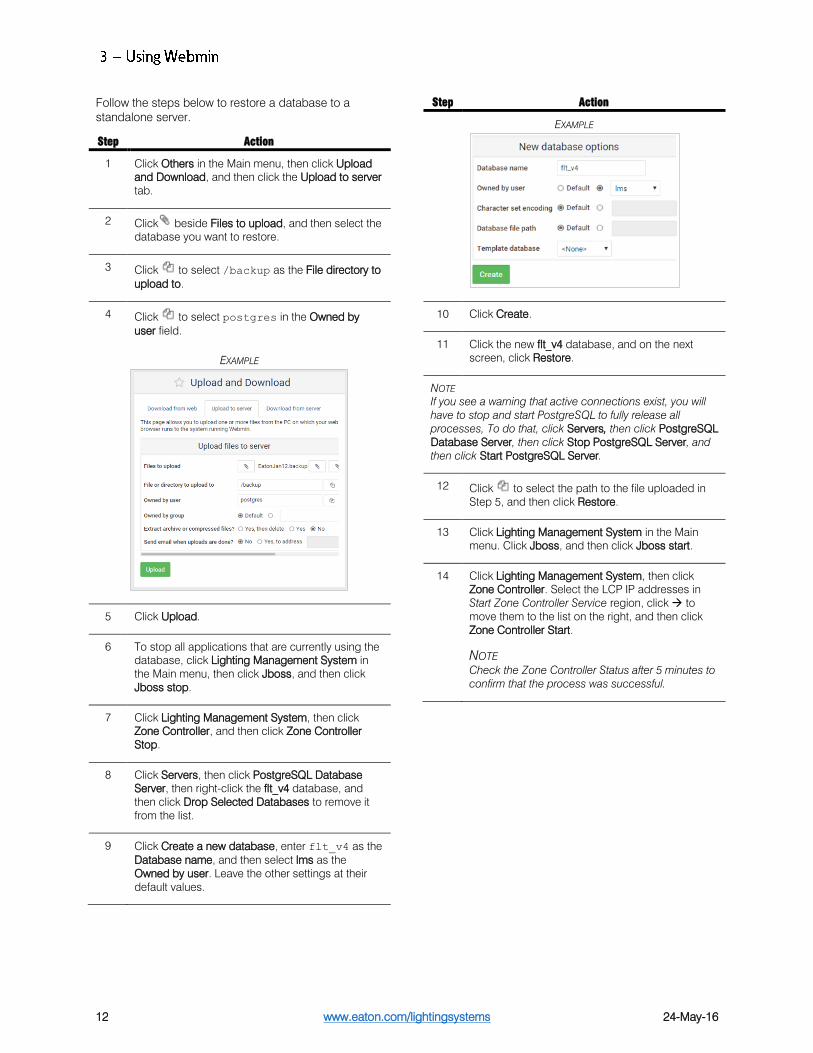
Follow the steps below to restore a database to a
standalone server.
Step Action
1 Click Others in the Main menu, then click Upload
and Download, and then click the Upload to server
tab.
2 Click beside Files to upload, and then select the
database you want to restore.
3 Click to select /backup as the File directory to
upload to.
4 Click to select postgres in the Owned by
user field.
EXAMPLE
5 Click Upload.
6 To stop all applications that are currently using the
database, click Lighting Management System in
the Main menu, then click Jboss, and then click
Jboss stop.
7 Click Lighting Management System, then click
Zone Controller, and then click Zone Controller
Stop.
8 Click Servers, then click PostgreSQL Database
Server, then right-click the flt_v4 database, and
then click Drop Selected Databases to remove it
from the list.
9 Click Create a new database, enter flt_v4 as the
Database name, and then select lms as the
Owned by user. Leave the other settings at their
default values.
Step Action
EXAMPLE
10 Click Create.
11 Click the new flt_v4 database, and on the next
screen, click Restore.
NOTE
If you see a warning that active connections exist, you will
have to stop and start PostgreSQL to fully release all
processes, To do that, click Servers, then click PostgreSQL
Database Server, then click Stop PostgreSQL Server, and
then click Start PostgreSQL Server.
12 Click to select the path to the file uploaded in
Step 5, and then click Restore.
13 Click Lighting Management System in the Main
menu. Click Jboss, and then click Jboss start.
14 Click Lighting Management System, then click
Zone Controller. Select the LCP IP addresses in
Start Zone Controller Service region, click to
move them to the list on the right, and then click
Zone Controller Start.
NOTE
Check the Zone Controller Status after 5 minutes to
confirm that the process was successful.
24-May-16 www.eaton.com/lightingsystems
13
3.5 – System Maintenance Tasks
This section contains procedures for various tasks that
may be needed to maintain the system.
Follow the applicable procedure below to set the
database time zone on a PostgreSQL Server or a Local
Controller.
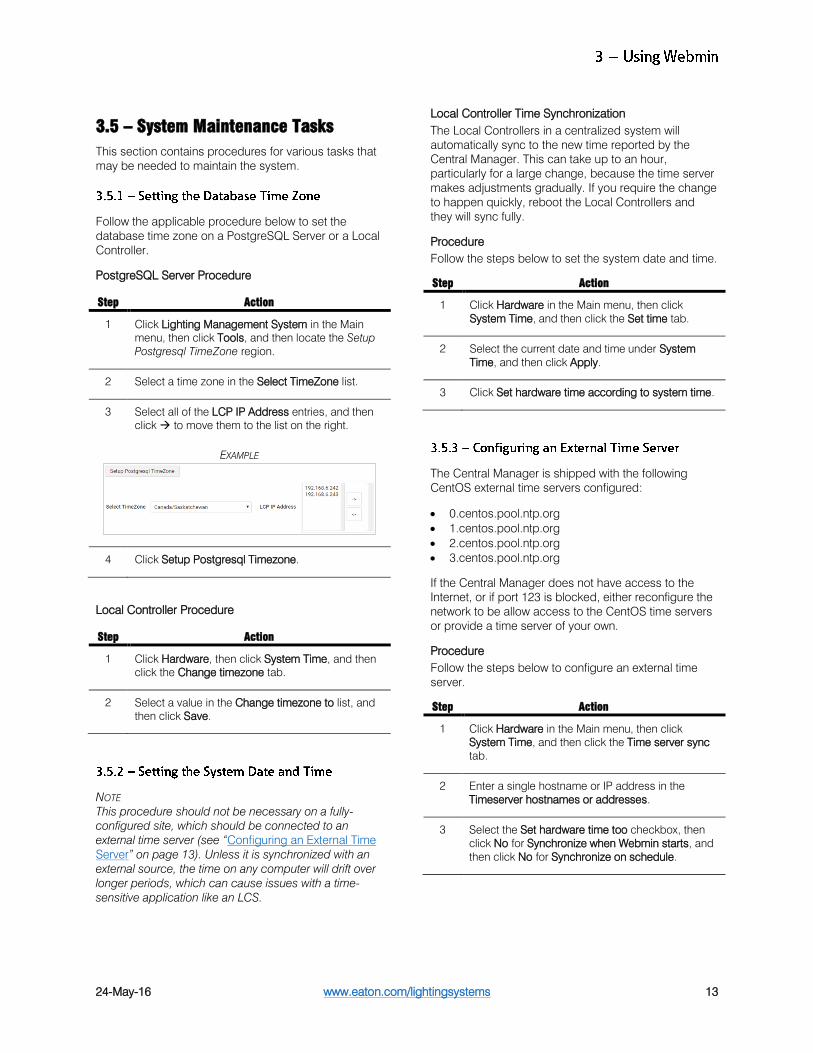
PostgreSQL Server Procedure
Step Action
1 Click Lighting Management System in the Main
menu, then click Tools, and then locate the Setup
Postgresql TimeZone region.
2 Select a time zone in the Select TimeZone list.
3 Select all of the LCP IP Address entries, and then
click to move them to the list on the right.
EXAMPLE
4 Click Setup Postgresql Timezone.
Local Controller Procedure
Step Action
1 Click Hardware, then click System Time, and then
click the Change timezone tab.
2 Select a value in the Change timezone to list, and
then click Save.
NOTE
This procedure should not be necessary on a fully-
configured site, which should be connected to an
external time server (see “Configuring an External Time
Server” on page 13). Unless it is synchronized with an
external source, the time on any computer will drift over
longer periods, which can cause issues with a time-
sensitive application like an LCS.
Local Controller Time Synchronization
The Local Controllers in a centralized system will
automatically sync to the new time reported by the
Central Manager. This can take up to an hour,
particularly for a large change, because the time server
makes adjustments gradually. If you require the change
to happen quickly, reboot the Local Controllers and
they will sync fully.
Procedure
Follow the steps below to set the system date and time.
Step Action
1 Click Hardware in the Main menu, then click
System Time, and then click the Set time tab.
2 Select the current date and time under System
Time, and then click Apply.
3 Click Set hardware time according to system time.
The Central Manager is shipped with the following
CentOS external time servers configured:
0.centos.pool.ntp.org
1.centos.pool.ntp.org
2.centos.pool.ntp.org
3.centos.pool.ntp.org
If the Central Manager does not have access to the
Internet, or if port 123 is blocked, either reconfigure the
network to be allow access to the CentOS time servers
or provide a time server of your own.
Procedure
Follow the steps below to configure an external time
server.
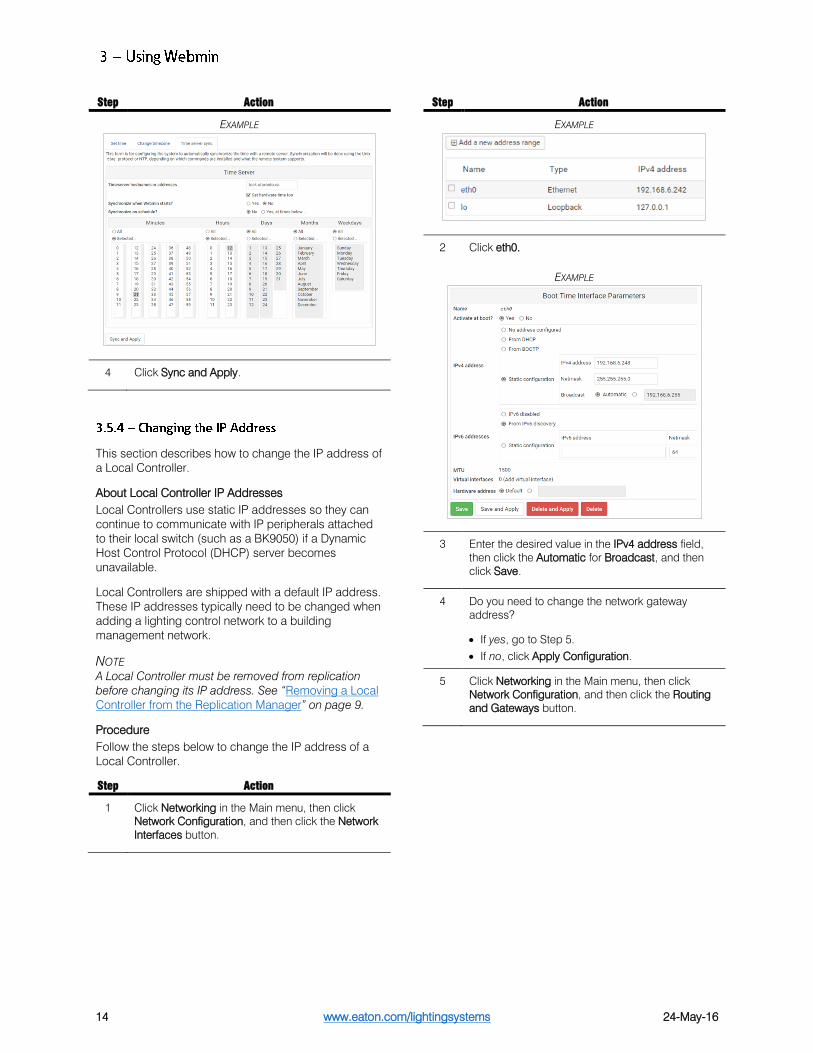
Step Action
1 Click Hardware in the Main menu, then click
System Time, and then click the Time server sync
tab.
2 Enter a single hostname or IP address in the
Timeserver hostnames or addresses.
3 Select the Set hardware time too checkbox, then
click No for Synchronize when Webmin starts, and
then click No for Synchronize on schedule.
www.eaton.com/lightingsystems 24-May-16 14
Step Action
EXAMPLE
4 Click Sync and Apply.
This section describes how to change the IP address of
a Local Controller.
About Local Controller IP Addresses
Local Controllers use static IP addresses so they can
continue to communicate with IP peripherals attached
to their local switch (such as a BK9050) if a Dynamic
Host Control Protocol (DHCP) server becomes
unavailable.
Local Controllers are shipped with a default IP address.
These IP addresses typically need to be changed when
adding a lighting control network to a building
management network.
NOTE
A Local Controller must be removed from replication
before changing its IP address. See “Removing a Local
Controller from the Replication Manager” on page 9.
Procedure
Follow the steps below to change the IP address of a
Local Controller.
Step Action
1 Click Networking in the Main menu, then click
Network Configuration, and then click the Network
Interfaces button.
Step Action
EXAMPLE
2 Click eth0.
EXAMPLE
3 Enter the desired value in the IPv4 address field,
then click the Automatic for Broadcast, and then
click Save.
4 Do you need to change the network gateway
address?
If yes, go to Step 5.
If no, click Apply Configuration.
5 Click Networking in the Main menu, then click
Network Configuration, and then click the Routing
and Gateways button.
24-May-16 www.eaton.com/lightingsystems
15
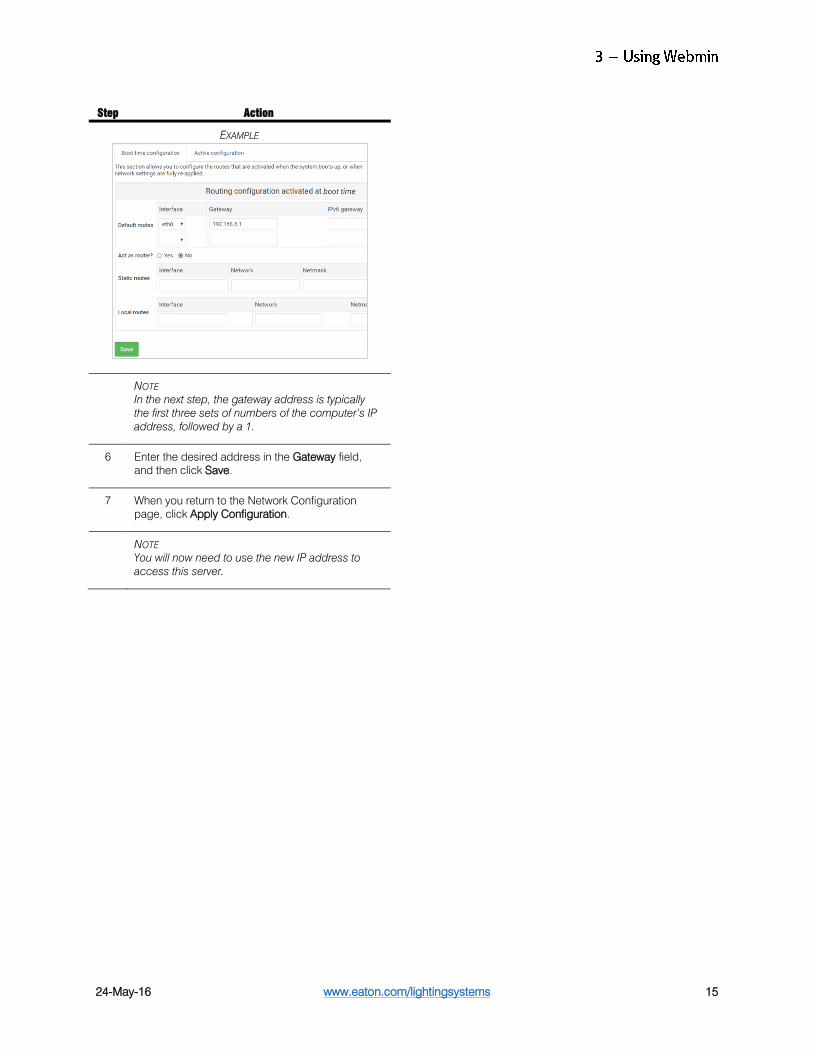
Step Action
EXAMPLE
NOTE
In the next step, the gateway address is typically
the first three sets of numbers of the computer’s IP
address, followed by a 1.
6 Enter the desired address in the Gateway field,
and then click Save.
7 When you return to the Network Configuration
page, click Apply Configuration.
NOTE
You will now need to use the new IP address to
access this server.
www.eaton.com/lightingsystems 24-May-16 16
Step Action
8 Restore replication on this Local Controller as
described in “Configuring Cross-Panel
Communication
When a sensor or keypad on one Local Controller
controls the lights on another Local Controller, this
is known as cross-panel communication.
In the diagram above, in order for Local
Controller 1 to send a command over the
network to Local Controller 2, the applicable
port (9003) must be open in the Local Controller
2 firewall.
IMPORTANT
When installing a new system, identify all cases
of cross-panel communication and open port
9003 on the receiving Local Controllers. When
you are replacing a Local Controller, check
whether it was receiving cross-panel
communication. If so, ensure that port 9003 is
open in the firewall of the new panel.
Procedure
Follow the steps below to configure the
receiving Local Controller so it will accept cross-
panel communication.
Ste
p
Action
1 Log in to Webmin on the Local Controller
that will receive the cross-panel
communication. Click Networking in the
Main menu, and then click Linux Firewall.
2 Locate the Incoming packets (INPUT)
region.
EXAMPLE
3 Scroll to the bottom of the actions listed
in the Incoming Packets (INPUT) region.
EXAMPLE
The section describes how to enable remote access for
troubleshooting.
About Hamachi
The Hamachi VPN application is used to provide
remote access to the LMS. Your IT department will have
to authorize the use of Hamachi, so check with them
before continuing. The information they will need,
including the necessary ports to open, is available from
Hamachi at the Web address below:
http://help.logmein.com/articles/en_US/FAQ/Which-
ports-and-protocols-does-LogMeIn-Hamachi2-use-
en1/?l=en_US&fs=RelatedArticle
Keypad Signals
Local Controller 1 Sends
Local Controller 2 Receives
Lighting Responds
24-May-16 www.eaton.com/lightingsystems
17
Procedure
Follow the steps below to enable Hamachi remote
access.
Step Action
1 Click Lighting Management System in the Main
menu, and then click Tools.
NOTE
In the next step, the default email is the head of
Fifth Light IT. This should be used unless specified
otherwise.
2 Click the Install Hamachi button, and confirm the
message that the server was successfully attached
to the Hamachi network.
www.eaton.com/lightingsystems 24-May-16 18
4 – Troubleshooting
This section contains procedures and information to
help resolve LMS issues that may arise.
This topic lists some common symptoms, identifies
causes and suggests possible solutions.
Symptom Possible Causes
Changes
are not
synced to
Local
Controllers
In the Replication Manager, under
View LCP Information, check that the
Local Controller IP address appears
under SSH Trusted IP and Clustered
IP. If not, uninstall and reinstall this
Local Controller
If you changed the IP address of the
Central Manager or Local Controller
after adding the Local Controller to
replication, you must uninstall and
reinstall the Local Controller.
Check that the new IP has access to
PostgreSQL as described in
“Installing and Initializing the
Replication Manager” on page 6.
In the Replication Manager, click View
Replication Status. If you see “No
syncs have been created”, the
replication was not configured
correctly.
See “Wiping the Replication Manager
Configuration” on page 16 for
instructions on clearing the existing
configuration so you can set it up
again from a known state.
Cannot
control
lights but
Zone
Controller is
running
The Local Controller has the wrong IP
address. The Local Controller knows
what floor it is on by matching its IP
address to the IP address
programmed in the system for a given
floor.
The USB mapping for the DMM is
wrong in the MCA. If the DBC USB
plug has been shifted to another port,
it might no longer be accurate.
The status of the lights shown under
View Details in the MCA shows
System Failure. Check that all of the
sensors attached to these lights are
functioning. If the system cannot see
all the lights, verify the two preceding
bullet points, and confirm that the
lights are correctly addressed.
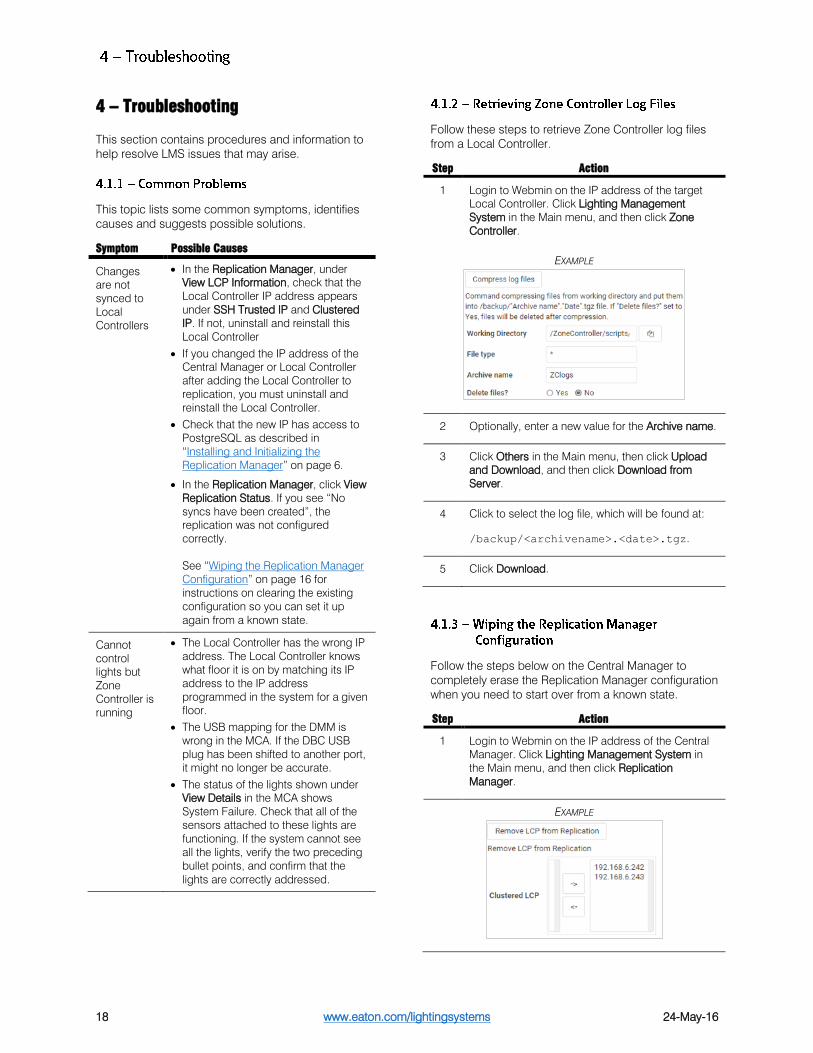
Follow these steps to retrieve Zone Controller log files
from a Local Controller.
Step Action
1 Login to Webmin on the IP address of the target
Local Controller. Click Lighting Management
System in the Main menu, and then click Zone
Controller.
EXAMPLE
2 Optionally, enter a new value for the Archive name.
3 Click Others in the Main menu, then click Upload
and Download, and then click Download from
Server.
4 Click to select the log file, which will be found at:
/backup/<archivename>.<date>.tgz.
5 Click Download.
Follow the steps below on the Central Manager to
completely erase the Replication Manager configuration
when you need to start over from a known state.
Step Action
1 Login to Webmin on the IP address of the Central
Manager. Click Lighting Management System in
the Main menu, and then click Replication
Manager.
EXAMPLE
24-May-16 www.eaton.com/lightingsystems
19
Step Action
2 Select all of the IP addresses listed on the left, and
then click to move them to the list on the right.
3 Click Remove LCP from Replication, and then
confirm that the script completes with an “END OF
SCRIPT” message.
4 Click Stop Replication Manager.
NOTE
The purpose of the next step is to remove any
existing connections to the PostgreSQL Server.
5 Click Servers in the Main menu, then click
PostgreSQL Database Server, and then click Stop
PostgreSQL Server. When the PostgreSQL Server
has stopped, click Start PostgreSQL Server.
6 Right-click on bucardo to highlight it, then click
Drop Selected Databases, and then confirm that
the bucardo database is no longer listed.
7 Click Lighting Management System in the Main
menu, then click Tools, and then click Edit
/root/servers.list.
EXAMPLE
8 Delete all text below the CSIPA declaration, as
highlighted in the example. If the Central Manager
IP address is being changed, delete all of the lines.
9 Click Save.
10 Set up the Replication Manager as described in
“Installing and Initializing the Replication Manager”
on page 6.
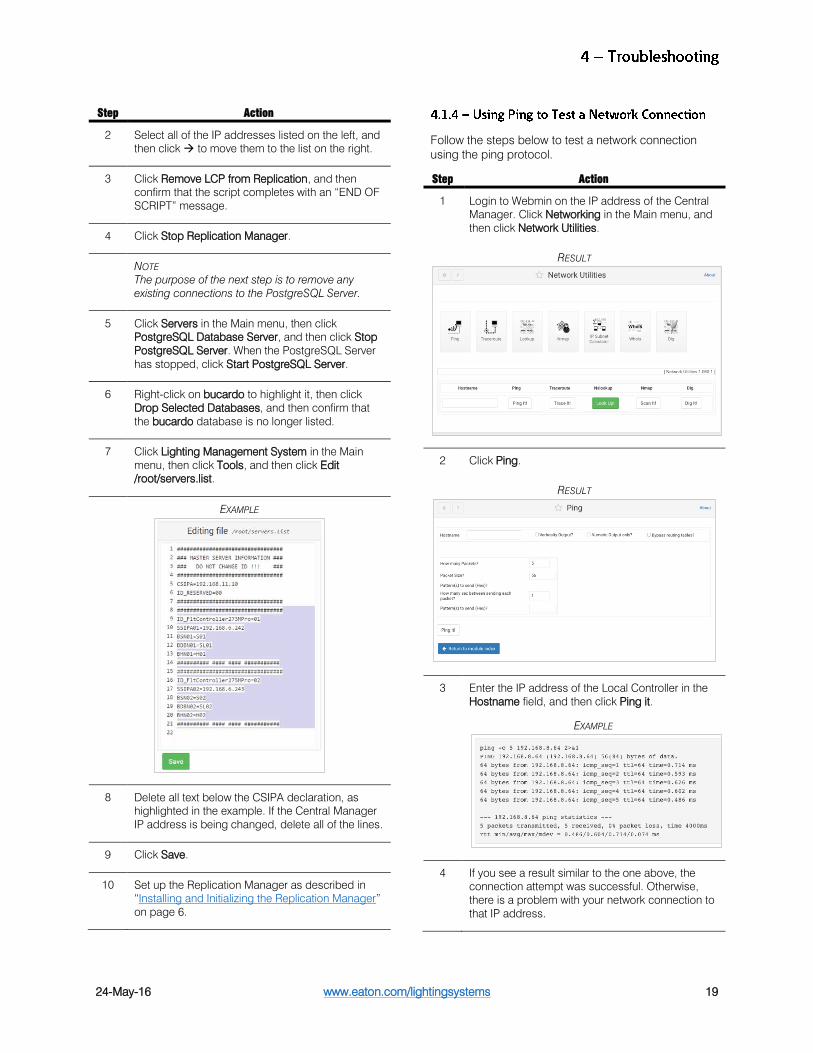
Follow the steps below to test a network connection
using the ping protocol.
Step Action
1 Login to Webmin on the IP address of the Central
Manager. Click Networking in the Main menu, and
then click Network Utilities.
RESULT
2 Click Ping.
RESULT
3 Enter the IP address of the Local Controller in the
Hostname field, and then click Ping it.
EXAMPLE
4 If you see a result similar to the one above, the
connection attempt was successful. Otherwise,
there is a problem with your network connection to
that IP address.

Eaton
1000 Eaton Boulevard
Cleveland, OH 44122
United States
Eaton.com
EatonLighting solutions
203 Cooper Circle
Peachtree City, GA 30269
www.eaton.com/lightingsystems
© 2016 Eaton
All Rights Reserved
Printed in USA
Publication No. WM052016EN
24-May-16
Eaton is a registered
trademark.
All trademarks are property of
their respective owners.