Embed Size (px)
Citation preview

v1.1
Websense V10000 Console HelpWebsense® V10000 Appl iance

©1996–2009, Websense Inc.All rights reserved.10240 Sorrento Valley Rd., San Diego, CA 92121, USAPublished 2009Printed in the United States and IrelandThe products and/or methods of use described in this document are covered by U.S. Patent Numbers 5,983,270; 6,606,659; 6,947,985; 7,185,015; 7,194,464 and RE40,187 and other patents pending.This document may not, in whole or in part, be copied, photocopied, reproduced, translated, or reduced to any electronic medium or machine-readable form without prior consent in writing from Websense Inc.Every effort has been made to ensure the accuracy of this manual. However, Websense Inc., makes no warranties with respect to this documentation and disclaims any implied warranties of merchantability and fitness for a particular purpose. Websense Inc., shall not be liable for any error or for incidental or consequential damages in connection with the furnishing, performance, or use of this manual or the examples herein. The information in this documentation is subject to change without notice.
TrademarksWebsense is a registered trademark of Websense, Inc., in the United States and certain international markets. Websense has numerous other unregistered trademarks in the United States and internationally. All other trademarks are the property of their respective owners.Microsoft, Windows, Windows NT, Windows Server, and Active Directory are either registered trademarks or trademarks of Microsoft Corporation in the United States and/or other countries.Sun, Sun Java System, and all Sun Java System based trademarks and logos are trademarks or registered trademarks of Sun Microsystems, Inc., in the United States and other countries.Mozilla and Firefox are registered trademarks of the Mozilla Foundation in the United States and/or other countries.eDirectory and Novell Directory Services are a registered trademarks of Novell, Inc., in the U.S and other countries.Adobe, Acrobat, and Acrobat Reader are either registered trademarks or trademarks of Adobe Systems Incorporated in the United States and/or other countries.Pentium is a registered trademark of Intel Corporation.Red Hat is a registered trademark of Red Hat, Inc., in the United States and other countries. Linux is a trademark of Linus Torvalds, in the United States and other countries.This product includes software distributed by the Apache Software Foundation (http://www.apache.org).Copyright (c) 2000. The Apache Software Foundation. All rights reserved.Other product names mentioned in this manual may be trademarks or registered trademarks of their respective companies and are the sole property of their respective manufacturers.

1
Overview
The Websense® V10000™ appliance secures Web traffic effectively while providing high throughput, consolidating software components, and simplifying security upgrades.
Introduction
The V10000 analyzes Web traffic in real-time, instantly categorizing new sites and dynamic content, proactively discovering security risks, and blocking dangerous malware.
The V10000 provides advanced analytics—including rules, signatures, heuristics, and application behaviors—to detect and block proxy avoidance, hacking sites, adult content, botnets, keyloggers, phishing attacks, spyware, and many other types of unsafe content.
The V10000 also closes a common security gap: decrypting and scanning SSL traffic before it enters the network.
Websense integrates these real-time capabilities on the V10000 appliance with its industry-leading Web security software to provide Web filtering with over 90 URL categories, Web reputation, management of 120 network and application protocols, instant messaging attachments, and Websense Web Protection Services.
Security best practices
Lock the V10000 in an IT closet and enable a BIOS password. Physical access to the appliance can be a security risk for your network.Ensure that root permissions are restricted to a select few persons. This helps preclude unauthorized access to the system.Lock down unused ports on the appliance.Enable troubleshooting ports and remote access only when requested to do so by Websense Technical Support. Return these settings to the disabled state immediately after the Websense specialist logs off.
Websense V10000 Console Help 1
Overview
V10000 Console
The management console for the V10000 is a graphical interface for configuring the appliance itself, checking the status of the software modules, updating passwords, troubleshooting, and applying software patches.
The V10000 console provides status information about each module running on the appliance and enables you to establish assignments and routes for the appliance’s network interfaces.
Management consoles for Websense software modules
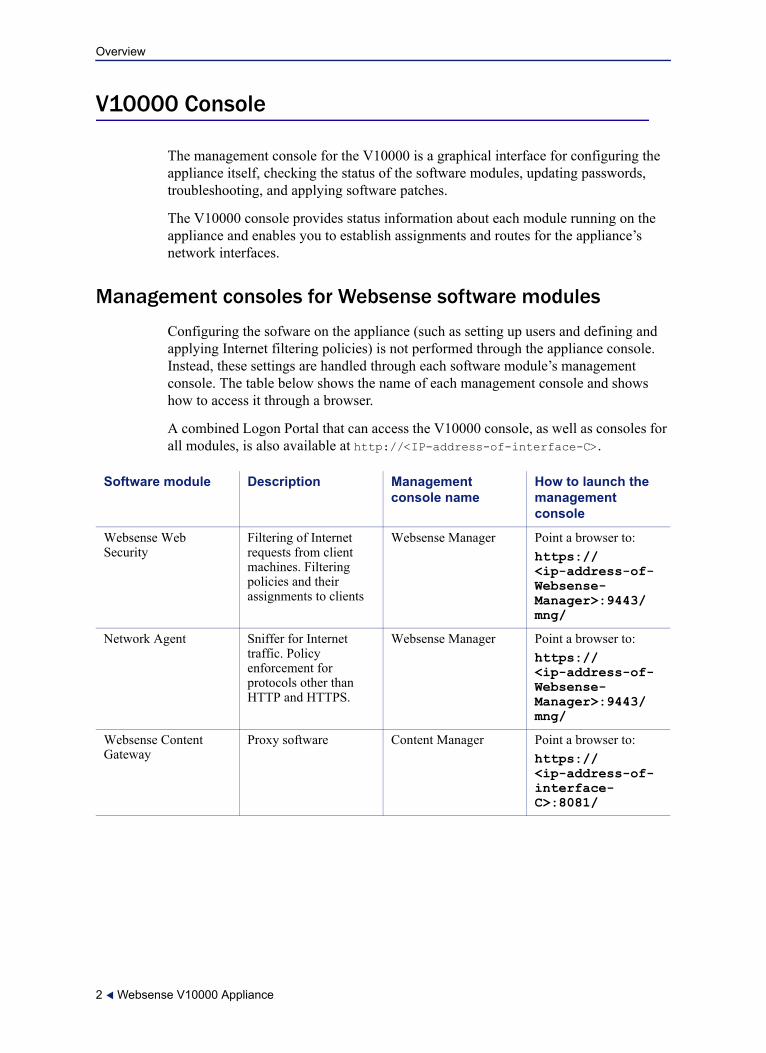
Configuring the sofware on the appliance (such as setting up users and defining and applying Internet filtering policies) is not performed through the appliance console. Instead, these settings are handled through each software module’s management console. The table below shows the name of each management console and shows how to access it through a browser.
A combined Logon Portal that can access the V10000 console, as well as consoles for all modules, is also available at http://<IP-address-of-interface-C>.
Software module Description Management console name
How to launch the management console
Websense Web Security
Filtering of Internet requests from client machines. Filtering policies and their assignments to clients
Websense Manager Point a browser to:https://<ip-address-of-Websense-Manager>:9443/mng/
Network Agent Sniffer for Internet traffic. Policy enforcement for protocols other than HTTP and HTTPS.
Websense Manager Point a browser to:https://<ip-address-of-Websense-Manager>:9443/mng/
Websense Content Gateway
Proxy software Content Manager Point a browser to:https://<ip-address-of-interface-C>:8081/
2 Websense V10000 Appliance

Overview
Additional online Help
Help is embedded in each management console and is also available online in the Websense Knowledge Base at www.websense.com/support/.
Reporting
Software on the V10000 generates detailed reporting records (log records) of Web usage and Web security actions.
Management reports from these logs are provided through software modules (Websense Manager and Websense Log Server) that are:
downloaded from www.websense.cominstalled on a Windows server
with access to Microsoft SQL Servernetworked to the V10000 appliance
The following reports produced in Websense Manager help you evaluate the effectiveness of your security policies.
The Today page appears first when you open Websense Manager in a browser. It shows the operating status of Websense software, and can display charts of filtering activities in the network since midnight.The History page shows charts of filtering activities in the network for up to 30 days.Presentation reports and Investigative reports are extensive reporting tools that give you options for generating, customizing, and scheduling Internet usage reports.
Presentation reports
Presentation reports offer a list of report definitions. Some are tabular, some combine a bar chart and a table. To generate a presentation report, open Websense Manager in a browser and choose Presentation Reports from the navigation bar at the left.
In addition to generating predefined charts, you can copy them and apply a customized report filter that identifies specific clients, categories, protocols, or actions to include. Mark report definitions that you use frequently as Favorites to make them easier to find.
You can schedule any presentation report to run at a particular time or on a repeating cycle.
Investigative reports
Investigative reports let you browse through reporting log data interactively. The main page shows a summary-level bar chart of activity. Click the different elements on the page to update the chart or get a different view of the data.
Websense V10000 Console Help 3

Overview
Databases
Websense software filters Internet activity based on your active policy and information stored in databases.
Master Database
The Master Database is downloaded daily from a Websense server.
The Websense Master Database houses the category and protocol definitions that provide the basis for filtering Internet content.A limited version of the filtering database is pre-installed on the appliance. Download the full Master Database as soon as possible to enable comprehensive Internet filtering capabilities. See the V10000 Getting Started Guide after you complete initial setup of the appliance.After the first Master Database download, Websense software downloads database changes on a schedule that you establish. Because the Master Database is updated frequently, by default database downloads are scheduled to occur daily.If the Master Database on your appliance is more than 14 days old, Websense software does not filter Internet requests.
Real-time database updates
In addition to scheduled downloads, Websense software performs emergency updates to the Master Database as needed. A real-time update might be used, for example, to recategorize a site that was temporarily miscategorized. These updates ensure that sites and protocols are filtered appropriately.
Websense software checks for real-time database updates every hour.
Real-Time Security Updates™
In addition to receiving the standard real-time database updates, users of Websense Web Security can enable Real-Time Security Updates in Websense Manager to receive security-related updates to the Master Database as soon as they are published by Websense, Inc.
Real-Time Security Updates provide an added layer of protection against Internet-based security threats. Installing these updates as soon as they are published reduces vulnerability to new phishing scams (identify fraud), rogue applications, and malicious code infecting mainstream Web sites or applications.
Websense Filtering Service checks for security updates every 5 minutes. Because updates are sent only when security threats occur, actual changes are occasional, and tend not to disrupt normal network activity.
In-line categorization and content scanning
Software on the V10000 can also analyze Web site and file content in real time, at the time when the content is requested by a user on your network.
4 Websense V10000 Appliance

Overview
The real-time options rely on small databases installed with Websense software.The software checks for updates to these small databases at a regular interval. Updates to these databases occur independently of all Master Database updates (including real-time database updates and Real-Time Security Updates).Every time you restart the V10000 or the Websense Content Gateway module, a database download is initiated. If the download fails, a new download is attempted every 15 minutes until a successful download occurs.
Logging on to the V10000
Log on to the V10000 console by pointing a browser to either of these URLs:
(Logon Portal) http://<IP-address-of-interface-C> (Console only) https://<IP-address-of-interface-C>:9447/appmng/
The user name is: admin.
The password was set on your appliance when firstboot was run.
To change the console password, see Account management.
Navigation pane
At the left side of the V10000 console is the navigation pane. Use this pane to select the console screen you want to view.
Status
ModulesCPU and memory statusDisk usageNetwork bandwidth
Configuration
General configurationNetwork interfacesRoutingPolicy source
Administration
Patch managementBackup utility for policiesLogsSupport toolsAccount management
Websense V10000 Console Help 5

Overview
Modules
The Status > Modules page appears first after you log on to the Websense V10000 appliance. It presents the current status of each software module on the appliance.
Use this screen to stop or start software services, restart or disable an entire software module, and gauge resource usage per module.
Modules on the V10000 may include:
The V10000 Controller software manages appliance configuration, downloads and applies patches, accesses the backup utility, requests module restarts, initiates shutdowns, and handles other appliance management tasks.Websense Content Gateway contains the Websense proxy software and Web content scanning and analysis. Several services (daemons) comprise this software.Network Agent monitors Internet traffic and filters non-HTTP protocols such as instant messaging.Websense Web Security is the software that handles Web filtering. Several services (daemons) comprise this software.
The table below describes the action of each button on the Status > Modules screen.
ImportantFor security purposes, a V10000 console session ends after 30 minutes of inactivity. You can choose to monitor the status pages even after the 30-minute timeout is reached.
To do this, mark the box labeled Monitor status of modules . . . without timing out on this page.
Information on all Status pages then continues to update normally until you close the browser or navigate away from the Status pages. Be sure to Save all changes; these are lost if not saved before 30 minutes of inactivity.
Button Description
Restart V10000 Causes this V10000 appliance to be rebooted. All modules are stopped. Modules that are flagged as Enabled are then restarted. Modules that are flagged as Disabled are not restarted.
Shutdown V10000 Causes this V10000 appliance and all software modules to be shut down gracefully.
Stop (Websense Content Gateway)
Causes all proxy services and content scanning on this appliance to be stopped.
6 Websense V10000 Appliance

Overview
IP address and port for Websense Manager
Fields entered on this page can instead be entered in the Logon Portal, at your option.
To store information that the Logon Portal uses to connect to Websense Manager, provide the IP address and port number for Websense Manager.
The IP address is the network interface for the Windows server where Websense Manager is installed in your network.The default port is displayed.
Restart (Websense Content Gateway)
Causes the Websense Content Gateway proxy module on this appliance (all of its services) to be stopped and then restarted.
Disable (Websense Content Gateway)
Sets a flag to indicate that the proxy module and content scanning on this appliance should be shut down and not restarted the next time the V10000 is restarted (rebooted). No action occurs when this button is selected, except the setting of the flag.
Configure (Websense Content Gateway)
Links you to the Content Manager console interface for the proxy software.
Stop (Network Agent) Causes the Network Agent service on this appliance to be stopped.
Restart (Network Agent)
Causes the Network Agent service on this appliance to be stopped and then restarted.
Disable (Network Agent)
Sets a flag to indicate that the Network Agent software on this appliance should be shut down and not restarted the next time the V10000 is restarted (rebooted). No action occurs when this button is selected, except the setting of the flag.
Stop (Websense Web Security)
Causes all Websense Web Security services running on this appliance to be stopped. Note that only Filtering Service would have been running if this appliance is not the designated policy source for your network.
Restart (Websense Web Security)
Causes the Websense Web Security module on this appliance (all services in use) to be stopped and then restarted. Note that only Filtering Service would have been in use if this appliance is not the designated policy source for your network.
Disable (Websense Web Security)
Sets a flag to indicate that the Websense Web Security module on this appliance should be shut down and not restarted the next time the V10000 is restarted (rebooted). No action occurs when this button is selected, except the setting of the flag.
Enter IP Address for Websense Manager
At the bottom of this page, you can click a link to bring up a page for entering the IP address where Websense Manager is installed. The Logon Portal uses this information to connect you to Websense Manager.
Button Description
Websense V10000 Console Help 7

Overview
Save your entries.
The Logon Portal prompts you for this information if it is not entered and saved here. One entry is sufficient.
CPU and memory status
The Status > CPU and Memory page provides information about CPU and memory usage for each software module running on this appliance, for the previous 60 seconds.
CPU Usage displays the percentage of the CPU in use by each module during the previous 60 seconds.Memory Usage displays:
the percentage of available memory used by the module during the previous 60 secondsthe actual memory used by the module during the previous 60 seconds, in megabytesthe total memory available to this module during the previous seconds, in megabytes
Disk usage
The Status > Disk Usage page provides a summary of system disk and cache disk usage on this appliance, during the previous 60 seconds.
System Disk is used to store all Websense services and the files used by Websense services.Cache Disk is used to store the proxy cache.
The cache consists of a high-speed object database called the object store. The object store indexes objects according to URLs and associated headers, enabling Websense Content Gateway to store, retrieve, and serve Web pages, and also parts of Web pages, providing optimum bandwidth savings. Using object management, the object store can cache alternate versions of the same object, varying on language or encoding type, and can store small and large documents, minimizing wasted space. When the cache is full, Websense Content Gateway removes stale data.If the cache disk fails, Websense Content Gateway goes into proxy-only mode (no caching).
8 Websense V10000 Appliance

Overview
Network bandwidth
The Status > Network Bandwidth screen provides information about throughput on the V10000 network interfaces listed here:
V10000 Controller Interface (C)Websense Content Gateway Interface (P1)Websense Content Gateway Interface (P2)Network Agent Interface (N)
For each interface, the following information is displayed for the previous 60 seconds:
current megabits per second, inbound and outbound, on the interfacetotal megabits of data received and senttotal number of packets received and sentpackets dropped, inbound and outboundtotal errors, inbound and outbound ()rate in megabits per second, inbound and outbound ()
Websense V10000 Console Help 9

Overview
10 Websense V10000 Appliance
2
Configuration
The V10000 console accepts general appliance values such as date and time, and enables you to define each network interface (C, P1, P2, N).
Overview of configuration options
Use the Configuration screens on the Websense V10000 console to set the time and date; define the network interfaces for the appliance; specify static routes if desired for the proxy module; and identify which computer is hosting the filtering policies for the network.
Configuration options
General configurationNetwork interfacesRoutingPolicy source
General configuration
Use the Configuration > General page to:
View basic appliance informationView a list of the software modules installed on the appliance and their version numbersSet the system Time and DateSet the Hostname
In each pane:
Save applies and saves new values in the pane.Cancel discards all changes entered since the last Save and restores entry fields in the pane to their current settings.
Websense V10000 Console Help 11
Configuration
Time and Date
Time zone: (displays the current setting)
From the drop-down list, select the time zone to be used on this system.
GMT (Greenwich Mean Time) is also known as UTC (Universal Time, Coordinated). Other time zones are calculated by adding or subtracting from GMT. GMT is sometimes chosen to provide a common time stamp for geographically distributed systems.
Click Save to save and apply the change.
Time and date: (displays their current values)
Set the time and date manually, or synchronize the system clock with an Internet Network Time Protocol (NTP) server (the default).
If you synchronize the system clock :.
Time is set and displayed in 24-hour notation.
Click Save to apply and save the changes.
B ImportantNTP protocol packets and their response packets must be allowed on any firewall or NAT device between the V10000 and the NTP server. Ensure that you have outbound connectivity to the NTP server(s). Add a firewall rule that allows outbound traffic to UDP port 123 on the NTP server. If the firewall does not have stateful logic for UDP, also add a run that allows inbound traffic for port 5678 on the V10000.
Automatic synchronization
To synchronize with an Internet Network Time Protocol (NTP) server, select the Automatically sychronize option and enter the address of a primary NTP server. The secondary and tertiary fields are optional.For more information about NTP servers, go to www.ntp.org.
Manual settings Select Manually set time and date and change the values in the Time and Date fields. Use the format indicated adjacent to the entry field.
12 Websense V10000 Appliance

Configuration
Hostname
Hostname is the system name of the V10000.
Hostname can be 1 to 32 characters. The first character must be a letter. Other characters can be letters or numbers.
Click Save to apply and save the change.
Network interfaces
Use the Configuration > Network Interfaces screen to specify the IP address, subnet mask, default gateway, and DNS addresses for each network interface on the V10000.
V10000 Controller Interface (C)Websense Content Gateway Interface (P1 and P2)Network Agent Interface (N)
In each panel:
Save applies and saves new values in the pane.Cancel discards all changes entered since the last Save and restores entry fields in the pane to their current settings.
Websense V10000 Console Help 13

Configuration
V10000 Controller Interface (C)
The V10000 Controller interface (C) handles communication with all Websense management interfaces; provides inter-appliance communication; transports non-HTTP and non-HTTPS protocol enforcement; and handles Websense Master Database downloads via the Internet. Initial configuration of the C interface is completed when the V10000 is first powered on. A script called firstboot prompts you for the values needed to configure interface C.
Guidelines for configuring network interface C
IP address (C interface)
Required. This interface requires continual access to the Internet.If you change the IP address for the C interface, the update process may require about 10 minutes. The IP is changed, and then you are redirected to a Web logon page. Enter your user name and password. Notice on the Status > Modules page that the services are starting up. Allow for all services to start.
Subnet mask (C) Required.
Default gateway (C)
Required. IP address of the router that allows traffic to be routed outside of the subnet.
Primary DNS (C) Required. IP address of the domain name server.
Secondary DNS (C)
Optional. Serves as a backup in case the primary DNS is unavailable (failover).
Tertiary DNS (C) Optional. Serves as a backup in case the primary and secondary DNSs are unavailable (failover).
14 Websense V10000 Appliance

Configuration
Websense Content Gateway Interface (P1 and P2)
The Websense Content Gateway proxy interfaces (P1 and P2) handle traffic directed to and from the Websense Content Gateway proxy module.
Both the P1 and P2 proxy interfaces can be used to accept users’ Internet requests (inbound traffic) and communicate with Web servers (outbound traffic). In other words, both interfaces can be configured to handle traffic into and out of the proxy module.A typical configuration is to use P1 for both inbound and outbound traffic, and not use P2.Another option is to configure P1 to accept users’ Internet requests (inbound only). In this case, P2 is configured to communicate with Web servers (outbound).
IMPORTANT
If you use the P2 interface, the P1 interface is bound to eth0, and the P2 interface is bound to eth1. Keep this in mind when you configure Websense Content Gateway.For example, suppose you are using transparent proxy, and the P1 interface is connected to a WCCP router. In this case, you must configure Websense Content Gateway to use eth0 for WCCP communications (in Content Manager, see Configure > Networking > WCCP, WCCP version tab).
Guidelines for configuring network interfaces P1 and P2
IP address (P1 or P2 interface)
Required.
Subnet mask Required.
Default gateway Required.The gateway must be in the same subnet as the IP address of the interface (P1 or P2) used for communicating with the Internet (outbound traffic).
Primary DNS Required.IP address of the domain name server.
Secondary DNS Optional.Serves as a backup in case the primary DNS is unavailable (failover).
Tertiary DNS Optional. Serves as a backup in case the primary and secondary DNSs are unavailable (failover).
Websense V10000 Console Help 15

Configuration
Network Agent Interface (N)
Network Agent is a software component used to filter protocols other than HTTP and HTTPS. It provides bandwidth optimization data and enhanced logging detail.
Network Agent continually monitors overall network usage, including bytes transferred over the network. The agent sends usage summaries to other Websense software at predefined intervals.
Network Agent is typically configured to see both inbound and outbound traffic in your network. The agent distinguishes between:
Requests sent from internal machines to internal machines (hits to an intranet server, for example)Requests sent from internal machines to external machines such as Web servers (user Internet requests, for example)
Guidelines for configuring network interface N on the V10000.
Network Agent can instead be installed on a different server in the network. See the Getting Started guide for the V10000 for requirements.
Check the box only if network interface N is connected to a bidirectional span port, and you want to use N to transport blocking information for protocols other than HTTP and HTTPS.
If interface N is connected to a bidirectional span port, then you can use it to transport blocking information for protocols other than HTTP and HTTPS. To set this up, you must check the box near the top of this pane. Interface N is then used to transport blocking information for protocols other than HTTP and HTTPS. Complete all required fields, as described below.If the box is not checked, then network interface C (not interface N) is used to transport blocking information for non-HTTP and non-HTTPS protocols.Settings for the Network Interface blocking NIC in Websense Manager do not override the settings you enter in this pane. The settings here take precedence.
IP address (N interface)
Required.Network Agent should be able to see the outbound and inbound traffic in your network Network Agent ignores ports 80 and 443.
Subnet mask Required.
Default gateway Required if the box above is checked. Otherwise, entry field is disabled.
Primary DNS Required.IP address of the domain name server.
Secondary DNS Optional.Serves as a backup in case the primary DNS is unavailable (failover).
Tertiary DNS Optional.Serves as a backup in case the primary and secondary DNSs are unavailable (failover).
16 Websense V10000 Appliance

Configuration
Routing
Optionally, use the Configuration > Routing screen to specify customized, static routes from client computers to the Websense Content Gateway software module.
Data entered in each field of the static routing table is validated by the V10000, and an error message is displayed if there is an inconsistency in the route.
To add a static route, click Add Route.To modify a static route, first click the entry in the list, and then click Edit.To remove a static route, first click the entry in the list, and then click Delete.
Guidelines for configuring static routes to the proxy software
Route name Required.Unique route name, up to 15 characters long .
Destination Network
Required.The network identifier for the network where the clients reside (such as 192.168.0.0)
Netmask Required.The subnet mask for the network where the clients reside (such as 255.255.0.0)
Gateway Required. IP address providing access from the proxy subnet to the client subnet. This address must be on the same subnet as the V10000 appliance.
Websense V10000 Console Help 17

Configuration
Policy source
Use the Configuration > Policy Source screen to specify where the V10000 gets Internet filtering policy information. See Redundancy for more information about load balancing options.
All V10000 appliances in the network share filtering policy components installed on the primary appliance (or other designated policy source).
Thus, you manage one set of policies for all appliances in the network and can add appliances quickly as your network expands.
Single V10000 deployment: In a single-appliance deployment, the policy information is typically located on the V10000 appliance.Multiple V10000 deployment: In a multiple-appliance deployment in which multiple appliances filter behind a common load balancer, one V10000 appliance is typically designated the host of the policy information, and other appliances go to that host for policy updates.
If the appliance being configured is to be the policy information host, select This V10000 Appliance.If the appliance being configured is to get policy information from another V10000, select Another V10000 appliance or server on your network. In the entry field, enter the IP address of the V10000 Controller Interface (C) of the policy information host appliance.If the policy information for your network is hosted on a server that is not a V10000, select Another V10000 appliance or server on your network. In the entry field, enter the IP address of the policy information server.This third option is used when you upgrade from version 6.x of Websense Web filtering software. First, upgrade all machines running Websense filtering software to version 7. Then, designate the server running Policy Broker as the primary policy source for this V10000. See the Websense Knowledge Base for upgrade details.
When a V10000 is not designated as the primary appliance (the policy source), then several Websense Web Security services are disabled on that appliance. These include:
Policy BrokerPolicy DatabasePolicy ServerUsage MonitorUser Service
18 Websense V10000 Appliance

Configuration
Redundancy
Internet usage filtering requires interaction between several Websense software components:
User requests for Internet access are monitored by Network Agent.The requests are sent to Websense Filtering Service for processing.Filtering Service communicates with Policy Server and Policy Broker to apply the appropriate policy in response to the request.
In some networks, additional machines may be used to deploy additional instances of Network Agent or other components. For example, in a large, segmented network, you may need a separate Network Agent for each segment. Or, you might deploy the Remote Filtering Server on a separate computer, to enable filtering of laptops and other computers that are outside the organization’s network.
If you install one or more instances of Network Agent on separate, non-appliance machines, you must install a separate Filtering Service, too. Keep in mind that multiple Network Agents can communicate with the same Filtering Service. Both Network Agent and Filtering Service on non-appliance machines can use Policy Broker and Policy Server on the V10000 appliance.
Be sure to configure each separate Network Agent to communicate with the separate Filtering Service on the Settings > Network Agent > Local Settings page in Websense Manager. See Websense Manager Help for additional information.
Check the Websense Deployment Guide and associated Deployment Guide Supplements for component distribution options. Contact your Websense Sales Engineer, or your authorized Websense reseller, for assistance in planning a more complex deployment.
When you are ready to install individual components, refer to the Websense Installation Guide for instructions.
Websense V10000 Console Help 19

Configuration
20 Websense V10000 Appliance

3
Administration
Use the Administration screens to apply patches to the appliance software, update passwords, and assist with the resolution of error messages.
Support and maintenance overview
Websense, Inc., maintains a customer portal at www.mywebsense.com where you can access product updates, patches, product news, and technical support resources for your Websense software and appliance.
When you create a MyWebsense account, you are prompted to enter all Websense subscription keys. This helps to ensure ready access to information, alerts, and patches relevant to your Websense products and versions.
The best practice is to create your MyWebsense account when you first set up the V10000 appliance, so that access is readily available whenever you need support or updates.
Online support
Technical information about all Websense products is available online 24 hours a day, including:
latest release informationsearchable Websense Knowledge Base Support ForumsSupport WebinarsTop Customer Issuesanswers to frequently asked questionsproduct documentsbest practicesin-depth technical papers
Access support on the Web site at:
www.websense.com/support/
Websense V10000 Console Help 21

Administration
Administration options
Administration screens enable you to change passwords, access system logs, prepare and restore backups of your Policy Database, and install software patches.
Patch managementBackup utility for policiesLogsSupport toolsAccount management
Patch management
Use the Administration > Patch Management screen to upload and install software patches and review patch history. Keep all V10000 appliances on your network at the same version, and install software patches as soon as they become available.
The Websense® V10000™ supports manual upload and installation of patch files. First, you must download the new patch with your MyWebsense account.
Create a MyWebsense account at www.mywebsense.com.Check your MyWebsense account regularly for updates and news about Websense releases and patches. Download V10000 patches to a folder on your network as they become available.Use the Administration > Patch Management screen to upload and install each patch on the appliance, during a low usage period on your network. Patches must be installed in consecutive sequence. For example, patch 1.1.3 will not install if patch 1.1.2 is not already installed.The appliance as a whole has one version number. This is the number of the latest patch installed.Be sure that all Websense modules running off the appliance (such as Websense Manager and Log Server) are upgraded to the approriate level, each time you patch the appliance.Online Knowledge Base article 4069 (V10000 Compatibility Matrix) shows a table of the Websense software module versions that are compatible with each V10000 version.Multiple V10000 appliances may be installed in your network. However, they must all be running the same version of Websense software modules. Websense, Inc., does not support running different versions of the software on different appliances on one network. Filtering results are not expected to be consistent in that scenario.
22 Websense V10000 Appliance

Administration
Available patch update options
Patch History
The Patch History pane displays all patches installed on this appliance. For each patch, you see:
version numberdate and time of patch installationconfirmation of successful installationlink to patch log file showing patch details
Backup utility for policies
The primary V10000 appliance on your network (policy source) can back up the Policy Database. The backup option must be triggered by you; it is not automatic.
Upload patch Click Browse to navigate to the folder containing a downloaded patch.Then click Upload to upload the patch to this appliance. Caution: Do not navigate away during the upload process. This can cause the patch upload to fail.After a successful upload, the patch is listed in the patch window on the console, and the Status column indicates that the patch is Ready to install.
Install Click the Install button in the Action column to the right of the patch. The Status column shows the progress of the installation in a progress bar. You are notified if a restart is required after installation. After you restart, the patch is removed from the patch queue and logged in Patch History. The version number of the appliance (shown in the patch pane) is updated.If a previous patch is not installed on the appliance, you receive a message in the Status column indicating which earlier patch is required, and the Install button is disabled. Install the previous patch first.
Delete Click the Delete button in the Action column to the right of a patch you want to delete.If a patch installation fails, any installed files from that patch are immediately uninstalled. You receive a message indicating that the patch installation failed. You can try installing it again. If that fails, delete the patch, then re-upload it, and then start the installation again.
Websense V10000 Console Help 23

Administration
The Backup Utility saves all configuration information, including client and policy data, stored in the Policy Database.
Data saved by the backup can be used to import Websense policy information in the event of a power failure, equipment malfunction, or equipment replacement.
Backup process
Initiate an immediate backup by selecting Backup on the Administration > Backup Utility screen.
Highlight the software module under Select Module.
Choose Websense Web Security to back up the Policy Database.
Backup operations for Websense Content Gateway are managed through the Websense Content Manager (proxy user interface).
The Backup Utility checks all Websense components on the machine, collects the data eligible for backup, and creates an archive file. The file name includes a time and date stamp.
Up to 5 backup files can be stored on the V10000. If you request a sixth backup file, then the oldest one is automatically deleted when the new one is created.Backup files are stored on the appliance in an internal directory. This directory cannot be moved or renamed.
You can download backup files from the V10000 to another location on your network.This enables you to:
Store Websense Policy Database backup files in a safe and secure location. These files should be part of your organization’s regular backup procedures.Move a backup file to another appliance if you need to designate that appliance as the policy source.
You can also delete old backup files.
Restoring a backup file
To revert to an earlier Policy Database , select Restore on the Administration > Backup Utility screen.
Highlight the software module under Select Module.
Choose Websense Web Security to restore the Policy Database.
For the Policy Database, choose one:
Restore from a backup stored on the V10000Restore from a backup stored elsewhere
Select the file from which you want to restore the Policy Database. Then, click Restore Policy.
24 Websense V10000 Appliance

Administration
Logs
Websense Technical Support may request log files to assist you with troubleshooting. This screen provides access to these log files for viewing and download.
Select the module for which you want to view logs:
Websense Web SecurityWebsense Content GatewayNetwork AgentV10000 Controller
Then select either:
View linesIndicate how many lines of the log you want to see in a pop-up window:
last 50 lineslast 100 lineslast 500 lines
Download entire log file
Click Submit to begin the process of gathering the requested log file.
If you are downloading the entire log file, use the File Download dialog box to navigate to the folder where you want to save it.
Support tools
Use the Administration > Support Tools screen to assist with troubleshooting.
Troubleshooting ports
Websense Web Security provides the option to open troubleshooting ports, so that various troubleshooting tests can be run. Use this tool only when directed to do so by Websense Technical Support.
Check Enable troubleshooting ports, and then click Save to cause the special ports to be enabled.
B ImportantBe sure to clear the check box and click Save to disable the ports when Technical Support is done using them. Do not leave these ports open and unattended.
Websense V10000 Console Help 25

Administration
V10000 Configuration summary
The configuration summary tool gathers data from the V10000 and generates an archive file that can be sent to Websense Technical Support for analysis and debugging. The process takes about 5 minutes.
When Websense Technical Support requests this file:
Click Generate File. When the file is ready, a message appears at the top of the screen: Configuration summary has been successfully collected. Click the link in the message to download the archive file to your desktop.You can then open the file or save it.Your technician will provide an FTP site for secure file transfer to Websense Technical Support.
Remote access
Enable remote access only at the request of Websense Technical Support.
When you check Enable Remote Access and then click Save, a passcode is generated and displayed on screen.Provide the passcode to your Websense Technical Support technician.This enables SSH, so that the technician can log on to your appliance.Each time you allow remote access to the V10000 and a Websense technician logs on, a record is added to the Remote access login history at the bottom of the Support Tools screen.When the technician is done, be sure to click Disable remote access and click Save to disable the access.
Account management
Use the Administration > Account Management page to change the password for the appliance console, or to reset the password for Websense Manager.
V10000 Console password
1. Enter the current V10000 console password.2. Enter the new console password.3. Confirm the new password.
Save applies and saves new values in the pane.
Cancel discards all changes entered since the last Save and restores entry fields in the pane to the last saved values.
26 Websense V10000 Appliance

Administration
Websense Manager password reset
1. Log on to your MyWebsense account.2. Select Password Reset.3. If you have more than one Websense product installed, make sure that the
correct Websense product is displayed.4. Copy and paste the subscription key shown on the V10000 screen into the text
box on the myWebsense screen (below the prompt: Enter Key Here).5. Click the Copy button to copy the long, encrypted password string shown on
myWebsense.6. Return to the V10000 Console and paste the encrypted password string into
the text box (Enter security string).7. Click Submit to reset your Websense Manager password. 8. The new password appears at the bottom of the screen. Write it down.9. Use this password to log on to Websense Manager and change your
password. 10. As soon as you navigate away from the Account Management screen on the
V10000 Console, your reset password is no longer displayed.
Websense Content Manager password reset
1. Click Reset Password to reset your proxy password.2. Your new password is generated automatically and displayed on the V10000
screen. Write it down.3. As soon as you navigate away from the Account Management screen on the
V10000 Console, your reset password is no longer displayed.4. Log on to Websense Content Manager with the new password.5. Go to Configure > My Proxy > UI Setup > Login to change the new
password to the desired string.
Websense V10000 Console Help 27

Administration
28 Websense V10000 Appliance