Embed Size (px)
Citation preview


1
Bag mask with oxygen
EmErgEncy OxygEn (OptiOnal cErtificatiOn)
Oxygen is a basic need for survival. The air we breathe contains about 21% oxygen. Certain medical conditions may cause the body to breathe in less oxygen, or deliver less oxygen to the organs and tissues. During an emergency, providing sup-plemental oxygen at a higher concentration than room air may allow more oxygen to be absorbed into the bloodstream and delay damage to vital organs.
Emergency oxygen is used primarily to correct mild to moderate hypoxia (insufficient oxygen delivered to the organs and tissues) and reduce the work of the heart. Guidelines for the treatment of hypoxia may differ between first aid provid-ers and professional rescuers. Follow your local EMS authority or Medical Director’s guidelines if they differ from this training. Always use standard or universal precautions, according to your workplace and OSHA guidelines, to protect your-self from exposure to infectious diseases when giving care to a patient.
Only use emergency oxygen:• After EMS has been activated.• When additional trained rescuers are available who
are not assigned other critical tasks (e.g. performing CPR, controlling severe bleeding).
Never delay critical patient care in order to prepare and administer emergency oxygen.
What is Emergency Oxygen?
Never Delay Critical Care
The use of supplemental oxygen may delay damage to vital organs, stabilize the heart, and even save a life!
An Organization’s Medical Director should review and approve emergency oxygen use and training. TipTip
Oxygen is considered a drug, and is regulated by the FDA. Rescuers must be trained in its use and storage. 100% pure oxygen is stored in cylinders as a highly compressed gas. When supplemental oxygen is given to a patient, it is con-sidered either medical oxygen or emergency oxygen, de-pending on how it is used. Oxygen flow is measured in liters per minute (LPM).
Medical oxygen requires a prescription for use. The deliv-ery rate is less than 6 LPM or the duration is less than 15 minutes.
Emergency Oxygen:• Does not require a prescription• Has a delivery rate of at least 6 LPM for 15 min. or
longer• Must be clearly labeled as Emergency Oxygen
Emergency oxygen is delivered from a cylinder, through a pressure regulator and oxygen tubing, and into a delivery device such as a mask, cannula or bag mask. Emergency oxygen

2
guidElinEs fOr EmErgEncy OxygEn usE
Use emergency oxygen to treat breathing difficulty based on the patient’s condition, work of breathing and respiratory rate. Consider using emergency oxygen for:
• Respiratory rates that are too fast or too slow ◦ Adult < 12 or > 20 breaths per minute ◦ Child < 15 or > 30 breaths per minute ◦ Infant < 25 or > 50 breaths per minute
• No breathing• Cyanosis (bluish color in skin, lips and fingernail beds)• Diving decompression injuries
The emergency oxygen cylinder, also known as a ‘tank’ or a ‘bottle,’ is typically green or has green markings. It should be labeled “U.S.P.” and marked with a yellow diamond and the statement, “For emergency use only.” Cylinders are made of metal and have a built-in valve at the top. An oxy-gen wrench, which should be stored with the cylinder, is used to open the valve. An o-ring (gasket used to create a seal) usually accompanies a newly-filled cylinder.
Oxygen cylinders come in different sizes, and hold differ-ent amounts of oxygen (measured in liters). Emergency oxygen that is brought to the scene is usually stored in a D (425L), Jumbo D (640L), or E (680L) cylinder. It must be small enough to be carried by one person and secured on a cot, stretcher or gurney with the patient during transport.
Patient Assessment
Oxygen Equipment
Oxygen cylinders
Guidelines for the use of emergency oxygen may differ at the State and local levels. Contact your local medical control or EMS agency to identify any local practices or guidelines that may differ from this training.Tip
Oxygen Cylinders
Professional rescuers and healthcare providers may provide emergency oxygen based on additional signs and symptoms or if certain conditions are suspected. In addition to the guidelines previously stated, consider using emer-gency oxygen for:
• Heart attack/suspected ACS• Stroke• Severe asthma• Pulmonary embolism• Shock• Drowning• Pregnancy-related emergency• Exacerbated COPD• Hypothermia (use warmed oxygen)
Always follow state and local protocols.
Before deciding to use emergency oxygen to treat difficulty breathing, assess the patient’s effort to breathe.Signs of difficulty breathing can include:
• Labored breathing: using accessory muscles in the neck and back, heaving chest, speaking in broken sentences
• Noisy breathing: coughing, wheezing• Tripod position: sitting up position supported on arms• Cyanosis
To calculate the RPM (respirations per minute):• Use a stopwatch, second hand or other timer.• Watch the patient’s chest for 15 seconds.• Multiply the number of breaths in 15 seconds x 4.• e.g. 5 breaths in 15 seconds = 20 RPM, an accept-
able rate for adults.

3
OxygEn EquipmEnt
Once the pressure regulator is fitted to the cylinder, oxygen tubing connects the regulator to the oxygen delivery device.
1. Remove the protective seal over the cylinder valve, and ensure the valve is dry and clean. Slowly open and close the valve to expel particles.
2. Inspect the o-ring in the pressure regulator, and replace it if missing or worn.3. Line up the pins on the regulator with the holes on the cylinder valve, and slip the regulator over the valve. Secure in
place by turning the thumbscrew until hand tight.4. Turn the pressure gauge away from rescuers and bystanders and open the valve (counterclockwise) one full turn.5. Read the pressure gauge to determine the pressure in the cylinder.6. Listen for leaking air to ensure a tight seal between the regulator and the valve.
The pressure regulator, which connects the cylinder valve to the oxygen tubing, controls the rate of oxygen flow (LPM). There are two common types of regulators used for emer-gency oxygen:
• Dual Flow Regulator: Has only 2 settings- HIGH and LOW.
• Full Control Regulator: Can dial in the desired flow of oxygen from 2 – 25 LPM. Used primarily by profes-sional rescuers.
The pressure regulator has a gauge that displays the amount of pressure (psi) inside the cylinder. The pressure indicates the amount of oxygen in the cylinder.
• 2,000 psi = Full• 1,000 psi = Half Full• 500 psi = Time to refill
If the pressure is < 200 psi, do not use it.Pressure regulator
Connecting a Pressure Regulator
Replace the o-ring each time you refill and prepare a cylinder to maintain the best seal between the cylin-der valve and the pressure regulator.
TipOnly an authorized oxygen vendor or worksite with spe-cialized equipment and training should refill an oxygen cylinder.!
Pressure Regulator

4
OxygEn dElivEry dEvicEs
Use a non-rebreather mask or a nasal cannula to delivery emergency oxygen to a patient who is breathing.
The non-rebreather mask is the preferred device. It de-livers a high concentration of oxygen to a patient who is breathing. It consists of a clear mask, one-way valve, oxy-gen reservoir, and oxygen tubing. The non-rebreather mask is most effective with a flow rate of 15 LPM, and can deliver O2 concentration as high as 90%.
The nasal cannula is a low-flow oxygen device, provid-ing between 2 – 6 LPM, and a maximum O2 concentration of about 44%. It consists of a loop of oxygen tubing with 2 prongs that are inserted into a patient’s nostrils. Use the nasal cannula when a patient is non-critical or cannot toler-ate a non-rebreather mask. Set the liter flow for 6 LPM for emergency oxygen administration.
Using a nasal cannula:1. Confirm that rescue breathing is not required.2. Inform the patient that you are going to provide some
oxygen.3. Select the right size (adult, child, or infant).4. Connect the oxygen tubing to the emergency oxygen
source. Ensure the valve is open and adjust the flow to 6 LPM.
5. Listen for the sound of oxygen flowing from the prongs.
6. Slide the adjusting band away from the prongs to fully open the cannula loop. Hold the loop with your thumb and forefingers on either side of the prongs.
7. Explain the procedure to the patient. Explain that the prongs won’t hurt.
8. Carefully insert the prongs into the patient’s nostrils. While holding the prongs in position, slide your fin-gers along the loop and wrap each side around the patient’s ears.
9. Slide the adjusting band up towards the chin. Do not overtighten or pinch the skin.
10. Instruct the patient to breathe in through his or her nose.
Using a non-rebreather mask:1. Confirm that rescue breathing is not required.2. Inform the patient that you are going to provide some
oxygen.3. Select the right size mask (adult, child, or infant).4. Connect the oxygen tubing to the emergency oxygen
source. Ensure the valve is open and adjust the flow to 15 LPM.
5. Listen for the sound of oxygen flowing through the mask.
6. Place your thumb or finger over the one-way valve in-side the mask to speed up filling the oxygen reservoir.
7. Place the mask over the patient’s face, covering the mouth and nose. Secure in place with the elastic band.
8. Instruct the patient to breathe as normally as possi-ble.
Non-Rebreather Mask
Nasal Cannula
Non-rebreather mask
Nasal cannula
Some people cannot tolerate a non-rebreather mask, and may need reassurance that they are get-ting more oxygen than normal.
Tip Monitor the O2 reservoir in the non-rebreather mask to en-sure it does not completely deflate and has enough time to refill between breaths. Increase the liter flow if needed.!

5
OxygEn dElivEry dEvicEs
The bag mask and CPR face mask with oxygen inlet can be used to deliver emergency oxygen to a patient who is not breathing. During resuscitation, the bag mask and face mask may increase the amount of oxygen delivered with rescue breaths.
The bag mask consists of a rigid face mask and self-inflat-ing bag attached to an oxygen reservoir. Tubing connects the bag mask to the oxygen source. The bag mask requires training to be used effectively, and is generally used only by healthcare providers and professional rescuers.
The CPR face mask with oxygen inlet is used for rescue breathing.
Using a CPR face mask:1. Confirm the victim is not breathing. Follow the guide-
lines for CPR, AED use, and activating EMS.2. Select the appropriate size (adult, child or infant).3. Connect the oxygen tubing to the oxygen inlet on the
CPR face mask. Connect the other end of the tubing to the emergency oxygen source. Ensure the valve is open and adjust the flow to 15 LPM.
4. Use the face mask to give rescue breaths. Ensure there is a complete seal between the patient’s face and the mask. Watch for chest rise with each breath. Do not over-ventilate.
Using a bag mask:1. Confirm the victim is not breathing. Follow the guide-
lines for CPR, AED use, and activating EMS.2. Select the appropriate size (adult, child or infant) and
assemble the bag mask. 3. Connect the oxygen tubing to the emergency oxygen
source. Ensure the valve is open and adjust the flow to 15 LPM.
4. Use the bag mask to give rescue breaths. Ensure there is a complete seal between the patient’s face and the mask. Watch for chest rise with each breath. Do not over-ventilate.
Bag mask components
Using a bag mask
CPR face mask
A bag mask and CPR face mask with oxygen inlet can also be used for patients who are conscious and breathing. Instruct the patient to hold the device to his or her face. Use a flow rate of 15 LPM for a bag mask, and between 6-15 LPM for a CPR face mask.
Bag Mask
CPR Face Mask
Tip

6
mOnitOring OxygEn dElivEry
Risks of Oxygen Delivery
Monitor Oxygen Delivery
In general, the benefits of emergency oxygen administration outweigh the risks. Provide emergency oxygen when indicated by a patient’s signs and symptoms, and according to local and workplace guidelines. Some risks include the following:Oxygen Toxicity: Prolonged exposure to high concentrations of oxygen can result in too much oxygen in the blood. COPD: There is some concern that if a person with COPD is given oxygen, it will decrease the stimulus to breathe. In an emergency, the cause of difficulty breathing may be related to a condition other than COPD. Do not withhold emergency oxygen administration to a patient with a history of COPD if he or she has signs or symptoms that may benefit from it.
A pulse oximeter is a small, portable electronic device that monitors the blood-oxygen level, or oxygen saturation.Emergency oxygen administration should be based on target oxygen saturation levels, not fixed flow rates, to decrease the risks associated with oxygen delivery. A trained responder with a pulse oximeter should titrate the inspired oxygen to the lowest effective level, usually 94% to 99%, in a patient with circulation. If a patient’s O2 saturation level reaches 100%, follow local protocols regarding decreasing the flow rate or changing to a low-flow device.
To use a pulse oximeter:• Turn it on and connect the monitoring probe.• Attach the probe to the finger, earlobe, or foot per
manufacturer’s instructions.• Allow the pulse oximeter to register the O2 saturation
level and pulse rate.• Verify the pulse rate with the patient’s actual pulse
rate.• Monitor and record the O2 saturation levels while pro-
viding emergency oxygen.
Most non-medical settings do not have a pulse oximeter available when responding to an emergency. A first aid provider should give emergency oxygen when indicated. The monitoring of oxygen delivery and titration of inspired oxygen may need to wait until professional rescuers arrive or the patient is transported to the emergency department.
If an Organization has emergency oxygen onsite, at least one staff member certified in its use should be present at all times during business hours.
Monitor oxygen deliveryPulse oximeter
Using oxygen to treat ‘breathlessness’ rather than low oxygen saturation levels has not been shown to help the feeling of breathlessness.
If spontaneous circulation is restored in a patient af-ter cardiac arrest, titrate emergency oxygen to limit the risk of oxygen toxicity.
Tip Tip

7
OxygEn safEty
100% oxygen is highly reactive, and can cause other materials to catch on fire. It’s critical to keep oxygen cylinders and delivery devices away from heat sources and flammable items and products.
• Avoid alcohol, aerosol sprays, solvents, perfumes, oil, grease, gasoline and other petroleum products.• Never combine oxygen with an ignition source, such as a cigarette.
Alcohol: Do not use alcohol to dry a patient’s chest before applying AED pads.
Skin-to-Pad Contact: Space between an AED pad and the chest can create a pocket which could contain oxygen. Good skin-to-pad contact reduces the risk of AED use with oxygen present.
Oxygen Clear: When using an AED with oxygen present, move the mask at least 3 feet away from the victim and loudly state, “Oxygen clear!” before shocking.
Always treat oxygen cylinders as if they are full. Dropping or mishandling a cylinder can damage the valve, turning the cyl-inder into a potential missile as the compressed gas escapes and propels the cylinder at a high rate of speed.
Cylinder Storage:• Store cylinders upright, secured in a rack or by some
other method to prevent them from falling.• Avoid storing different types of compressed gasses in
the same area.• Store in a well-ventilated area.• Do not subject cylinders to temperatures greater
than 125°F, prolonged exposure to direct sunlight, or exposure to other heat sources (e.g. radiator, space heater).
Cylinder Maintenance:• Regularly inspect equipment and document inspec-
tions according to national and local guidelines and manufacturer specifications.
• Ensure labels and signs are in compliance with fed-
Oxygen clear!
When not in use or before removing the regulator, close the cylinder valve.
Only use equipment and parts that are specifically approved for oxygen service. Some materials are dangerous to use with pure oxygen at high pressure.
Tip Tip
Using Oxygen with a Defibrillator
Storage, Handling & Maintenance
eral OSHA, state and local regulations.• Do not use a cylinder that appears damaged.• Keep oxygen equipment clean. Dirt and debris can be
a fire hazard.• Use a pressure gauge to check contents; do not rely
solely on a tagging system (Full, In-Use, Empty). Cylinder Handling:
• Do not slide, drag or roll cylinders.• Do not use oil or grease on oxygen equipment.• When on scene, lay the cylinder on the floor so it does
not get knocked over accidentally.• If transporting the cylinder with the patient, secure it
to the cot, stretcher or gurney so that it does not slip or get knocked off.

8
advancEd EquipmEnt
When performing CPR, a team may be composed of rescuers with different levels of training. EMTs, paramedics, nurses and physicians may use equipment that is not part of a standard BLS course. Rescuers should become familiar with this equipment and understand how it is used.
Suction devices are designed to remove blood, secretions, or vomit from the victim’s airway. EMS personnel use both manual and battery-operated units. Either a rigid suction tip or a flexible suction catheter will be used with the device.
Prior to performing suctioning, measure the distance from the corner of the victim’s mouth to the ear lobe. This is the maximum distance the rigid or flexible catheter is inserted into the mouth. Inserting too deeply may stimulate the gag reflex, compromising the airway.
While a patient is being suctioned, remove the CPR mask from the victim’s face. Turn his or her head to the side and wipe out any large debris with a gloved hand. Insert the catheter, and observe for fluid traveling up the tube.
Suction Devices
Battery-operated suction device
Rigid suction tip
Flexible suction tip
If a rescuer must clear the mouth of large debris and cervical spine injury is suspected, carefully roll the victim to the side as a unit, sweep out the mouth, and roll back.
Use sterile water to cleanse the suction catheter if it becomes obstructed.Tip Tip
9
advancEd EquipmEnt
The terms simple airway and advanced airway describes devices used by EMS and healthcare personnel to establish or control the airway of a patient in distress. Simple airways (oral and nasal) may be inserted only by responders trained in their use. While rescuers trained at the BLS level will not use advanced airways, they may interact with and assist advanced medical providers who are using them. The course does not provide training in the placement of simple and ad-vanced airways.
Oral AirwaysThe oropharyngeal airway (OPA) is the most commonly used airway adjunct. It is placed along the roof of the mouth and rotated into position so that it rests at the back of the throat. The end of the airway rests on the lips and will be visible to the rescuer. The backbone of the OPA keeps the tongue off the back of the airway, allowing air exchange.
OPAs are used with unresponsive patients who do not have a gag reflex. They are available in adult, child, and infant sizes. Choose the correct size, because an airway that is too large may trigger a gag reflex and cause vomiting. If the OPA is too long or inserted incorrectly, the airway may become blocked.
Choose the correct size by measuring from the level of the front teeth to the angle of the jaw or the earlobe.
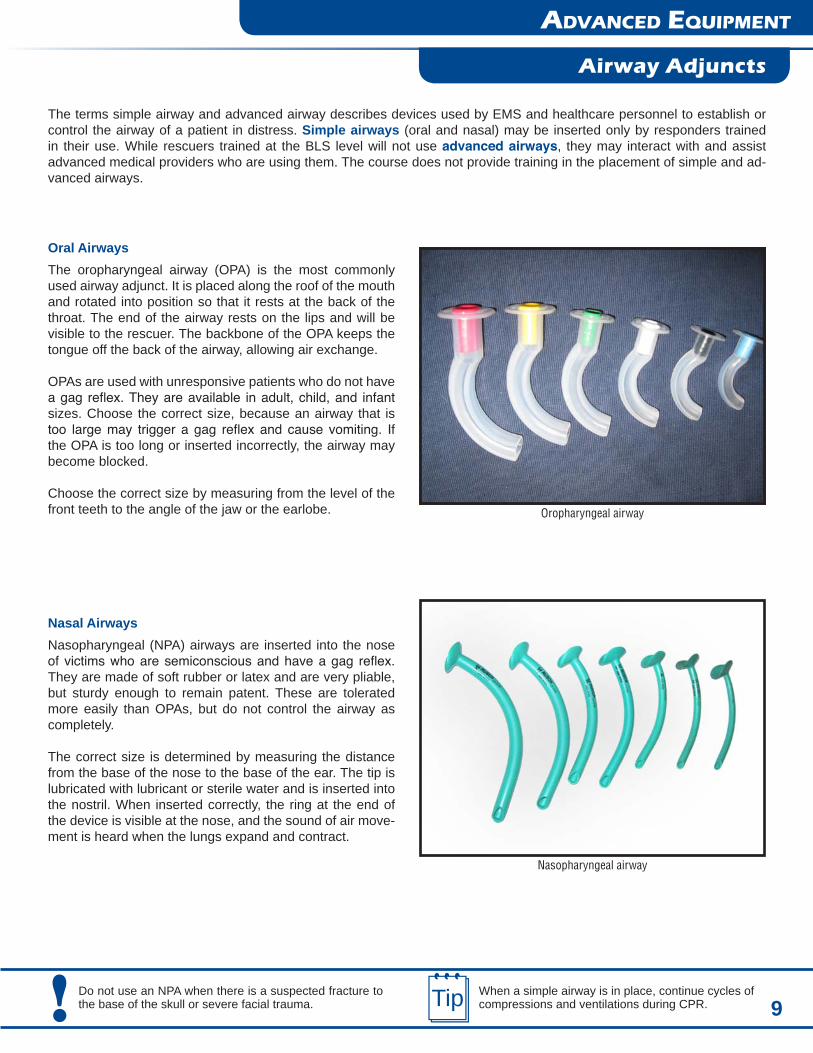
Nasopharyngeal airway
Oropharyngeal airway
Airway Adjuncts
When a simple airway is in place, continue cycles of compressions and ventilations during CPR.Tip
Nasal AirwaysNasopharyngeal (NPA) airways are inserted into the nose of victims who are semiconscious and have a gag reflex. They are made of soft rubber or latex and are very pliable, but sturdy enough to remain patent. These are tolerated more easily than OPAs, but do not control the airway as completely.
The correct size is determined by measuring the distance from the base of the nose to the base of the ear. The tip is lubricated with lubricant or sterile water and is inserted into the nostril. When inserted correctly, the ring at the end of the device is visible at the nose, and the sound of air move-ment is heard when the lungs expand and contract.
Do not use an NPA when there is a suspected fracture to the base of the skull or severe facial trauma.!

10
advancEd EquipmEnt
Advanced Airways
Positive pressure ventilation with an endotracheal tube
Although supplemental oxygen normally requires a prescription, the use of emergency oxygen does not. Do not delay starting CPR in order to set up oxygen.Tip !
Advanced airways are used by professionals trained in ACLS. Examples of advanced airways include the follow-ing: an endotracheal (ET) tube, laryngeal mask airway (LMA), Combitube, or supraglottic airway.
When an advanced airway is in place, rescuers no longer need to pause compressions while providing ventilations.
For victims of all ages provide:• 1 breath every 6 – 8 seconds (8 – 10 breaths/minute)• At least 100 compressions/minute without pauses for
breaths.