Embed Size (px)
Citation preview

What light color should a White-Light-Scanner use?
Bill Mongon, President, Accurex, USA
Jürgen Pfeifer, Business Field Manager Industry and Technology, Breuckmann GmbH, Germany
Erik Klaas, CTO, 8 Tree LLC, USA
Contact information for submitting Author:
Erik Klaas
Oberriederweg 14
88718 Daisendorf
+49 1516 1022488
Word Count (number of words in paper): 3611
Number of Figures Submitted: 11 (some consist of up to 4 images)

What light color should a White-Light-Scanner use?
1 Abstract This paper addresses some aspects of the question ‘Why and when should a fringe projection system
for 3d scanning use a particular color of light’, rather than white light which has been the standard
approach for the past decade.
In order to understand the impact of changing the color of the illumination source the working
principle of a state-of-the-art fringe projection system is explained, as well as the limitations of these
techniques when it comes to transparent, translucent or shiny objects.
The paper describes the pros and cons of white light illumination (the full spectrum) and contrasts it
with the use of selected component colors that comprise white light. The choice of illumination
colors (wavelengths), can range from infrared (IR) to ultra-violet (UV), including the visible ‘rainbow’
spectra. Different wavelength bands can uniquely benefit different application categories, e.g. the
use of IR is beneficial for cultural heritage and biometric scanning. Real world examples where
certain wavelengths make special sense (such as blue for skin scanning) are highlighted, in addition
to outlining the problem when it comes to objects with complementary colors of the projected color.
The impact of different colors on shiny object surfaces is also assessed. The main benefit of
monochromatic light is that it enables the use of filters in front of camera lenses to suppress ambient
light. Also the color of the ambient light (for example fluorescent light) plays an important role when
considering monochromatic light for scanning.
Last but not least the sensitivity of current camera technologies is highly dependent on different light
wavelengths.
As a result of all these factors, the answer to the title question rests on a series of complex
considerations.
We try to help by giving many examples to the issues above and suggest that a multi-color approach
including white light would provide the user with the flexible approach needed to address all the
issues above.
Keywords: white light scanning, structured light, 3D scanning, fringe projection, laser scanning, LED,
Laser, UV, Infrared, multi-color, ambient light, blue light, fluorescent light
2 Introduction White light scanning has become a well-established tool in the past decade for many different
applications such as 3d digitizing (turning real world objects into 3d models) and 3d inspection and
measuring (comparing scan data to CAD models). Fields of use are as versatile, including automotive,
aerospace, archaeology, cultural heritage, life-science and medical applications. This section outlines
the basic principle of operation, resulting output and associated limitations of white-light scanning.
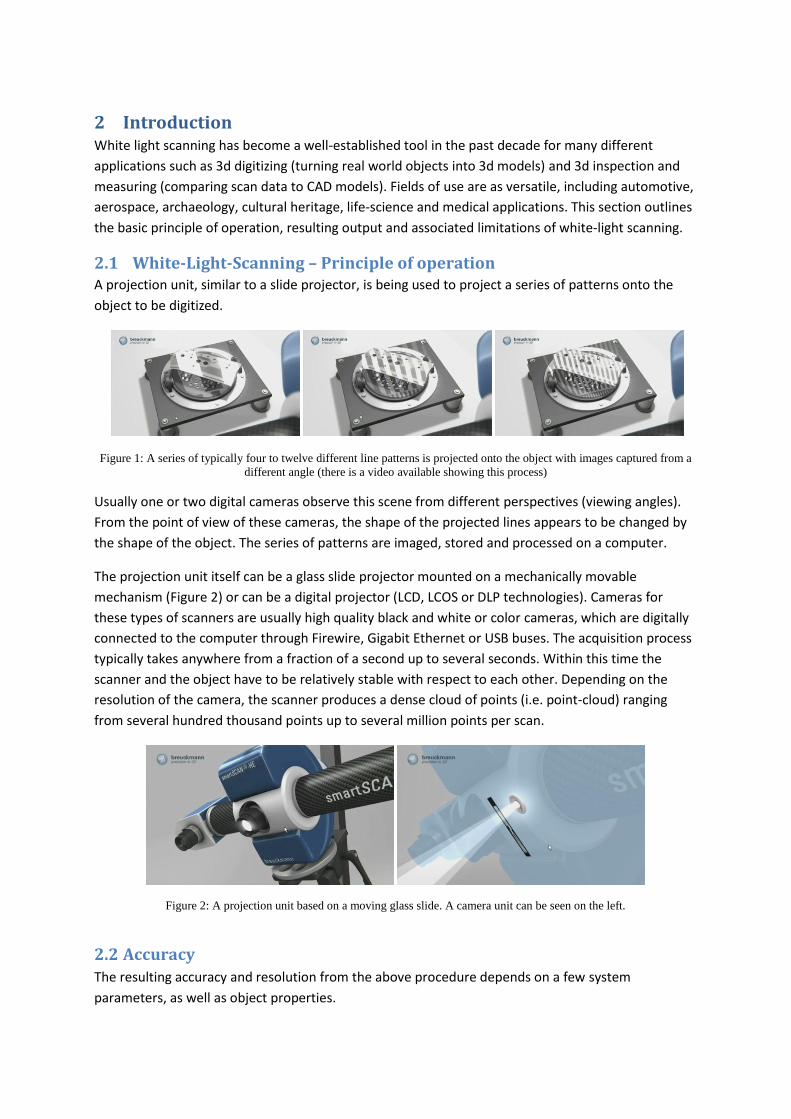
2.1 White-Light-Scanning – Principle of operation A projection unit, similar to a slide projector, is being used to project a series of patterns onto the
object to be digitized.
Figure 1: A series of typically four to twelve different line patterns is projected onto the object with images captured from a
different angle (there is a video available showing this process)
Usually one or two digital cameras observe this scene from different perspectives (viewing angles).
From the point of view of these cameras, the shape of the projected lines appears to be changed by
the shape of the object. The series of patterns are imaged, stored and processed on a computer.
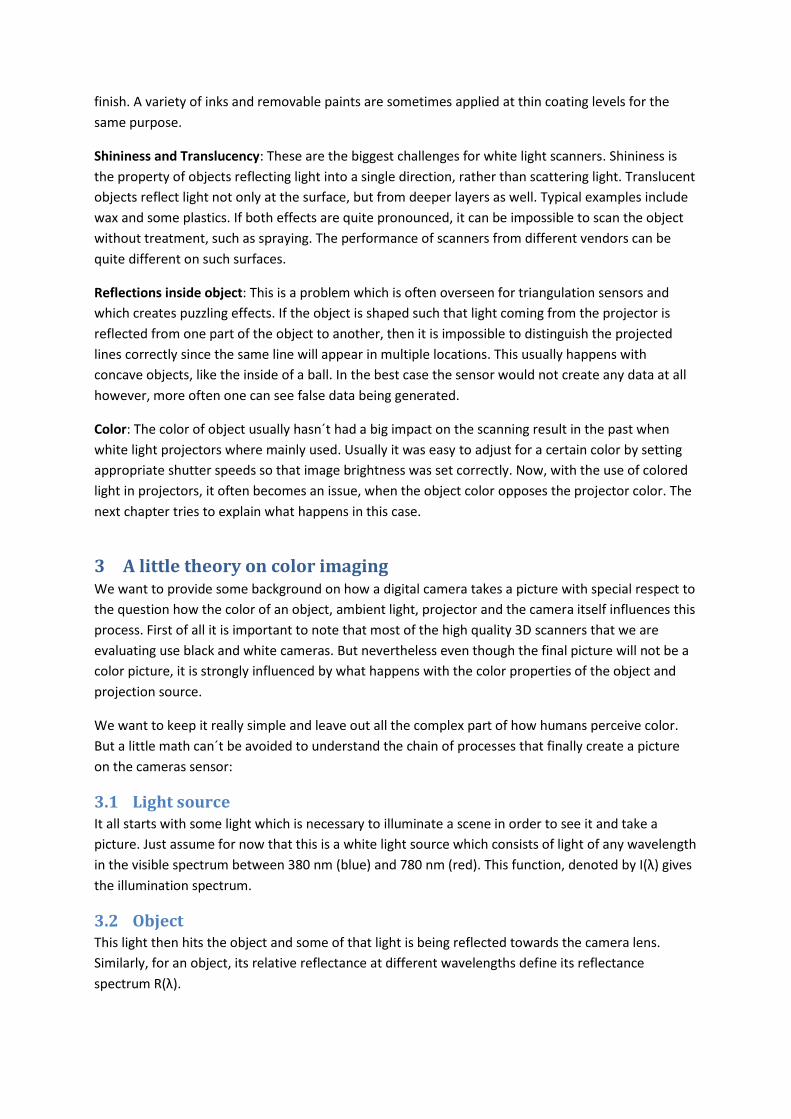
The projection unit itself can be a glass slide projector mounted on a mechanically movable
mechanism (Figure 2) or can be a digital projector (LCD, LCOS or DLP technologies). Cameras for
these types of scanners are usually high quality black and white or color cameras, which are digitally
connected to the computer through Firewire, Gigabit Ethernet or USB buses. The acquisition process
typically takes anywhere from a fraction of a second up to several seconds. Within this time the
scanner and the object have to be relatively stable with respect to each other. Depending on the
resolution of the camera, the scanner produces a dense cloud of points (i.e. point-cloud) ranging
from several hundred thousand points up to several million points per scan.
Figure 2: A projection unit based on a moving glass slide. A camera unit can be seen on the left.
2.2 Accuracy
The resulting accuracy and resolution from the above procedure depends on a few system
parameters, as well as object properties.

2.2.1 System parameters
The following system parameters will significantly influence the accuracy of 3d scan data with a white
light scanner:
Triangulation angle: This is the angle between the two cameras. It is the most important parameter
with respect to accuracy. The greater the angle, the better the accuracy. Unfortunately the tradeoff
associated with larger angles is the issue of shadowing, i.e. deeper holes or pockets become so called
“undercuts” and cannot be seen anymore. So a typical triangulation angle for many commercially
available scanners is around 30 degrees.
Camera resolution and noise: The camera is a key component in a 3d scanner and so its quality is
particularly important. The number of camera pixels is important for the number of 3d points that
the scanner can pick up in one scan. The downside of many pixels is that usually the pixel size on the
sensor decreases with more pixels on a single chip. This will increase the noise that this sensor will
add randomly to any picture. So again it is necessary to balance the number of pixels against the
noise. In many cases a lower resolution sensor will produce a better image because there is less
noise.
Lens quality: A good lens quality will have a big impact on the accuracy as well. It will be easier to
achieve a good calibration result, if distortions within the image are less pronounced. But there are
also proprietary calibration techniques which are able to map and minimize even higher order
remaining distortions.
2.3 Limitations
As explained above, white light scanning technology is suitable for many applications and different
surface types. But unlike touch probe instruments, there are limitations due to certain optical
properties of surfaces. In the following experimental results section we tried to simulate some of
these difficult surface properties to demonstrate the impact on the scanning result in combination
with different light colors.
Ambient light: As the scanner actively projects light onto a surface to gather information, any
ambient light source in that scene (e.g. daylight) acts as a source of noise. If this ambient light is too
strong, scanning can become impossible.
Line of sight: To be picked up, all points on a surface need to be “seen” from at least two different
perspectives -- that of the camera and of the projector, since the systems work on a triangulation
principle. This is a limitation that prevents scanning the bottom of deep holes or pockets.
Transparency, Shininess, Translucency: The scanning principle requires at least a small amount of
scattered light to be reflected in the direction of the camera. This might not be the case on highly
polished surfaces (“mirrors”), transparent surfaces (“glass”) and translucent surfaces (“wax”).
2.3.1 Object properties
The following properties of the object surface need to be considered for a good scan. The main
requirement is that the projected patterns can be clearly seen from the camera point of view. In
many cases spraying the object with a matte coating helps to overcome issues. A common example is
developer spray for dye penetrant crack detection. This can be carefully applied to obtain a uniform
finish. A variety of inks and removable paints are sometimes applied at thin coating levels for the
same purpose.
Shininess and Translucency: These are the biggest challenges for white light scanners. Shininess is
the property of objects reflecting light into a single direction, rather than scattering light. Translucent
objects reflect light not only at the surface, but from deeper layers as well. Typical examples include
wax and some plastics. If both effects are quite pronounced, it can be impossible to scan the object
without treatment, such as spraying. The performance of scanners from different vendors can be
quite different on such surfaces.
Reflections inside object: This is a problem which is often overseen for triangulation sensors and
which creates puzzling effects. If the object is shaped such that light coming from the projector is
reflected from one part of the object to another, then it is impossible to distinguish the projected
lines correctly since the same line will appear in multiple locations. This usually happens with
concave objects, like the inside of a ball. In the best case the sensor would not create any data at all
however, more often one can see false data being generated.
Color: The color of object usually hasn´t had a big impact on the scanning result in the past when
white light projectors where mainly used. Usually it was easy to adjust for a certain color by setting
appropriate shutter speeds so that image brightness was set correctly. Now, with the use of colored
light in projectors, it often becomes an issue, when the object color opposes the projector color. The
next chapter tries to explain what happens in this case.
3 A little theory on color imaging We want to provide some background on how a digital camera takes a picture with special respect to
the question how the color of an object, ambient light, projector and the camera itself influences this
process. First of all it is important to note that most of the high quality 3D scanners that we are
evaluating use black and white cameras. But nevertheless even though the final picture will not be a
color picture, it is strongly influenced by what happens with the color properties of the object and
projection source.
We want to keep it really simple and leave out all the complex part of how humans perceive color.
But a little math can´t be avoided to understand the chain of processes that finally create a picture
on the cameras sensor:
3.1 Light source It all starts with some light which is necessary to illuminate a scene in order to see it and take a
picture. Just assume for now that this is a white light source which consists of light of any wavelength
in the visible spectrum between 380 nm (blue) and 780 nm (red). This function, denoted by I(λ) gives
the illumination spectrum.
3.2 Object This light then hits the object and some of that light is being reflected towards the camera lens.
Similarly, for an object, its relative reflectance at different wavelengths define its reflectance
spectrum R(λ).

The amount of light that is reflected from that object at different wavelengths is given by the product
of I(λ) and R(λ). Since this is the spectrum that stimulates the vision, this is called the color stimuli,
denoted by C(λ). Thus, C(λ) = I(λ) * R(λ)
Figure 3: The product of the illumination and the reflectance generated the color stimuli.
3.3 Camera This color stimulus now passes the lens (we leave out the fact that the lens may also change it) and
hits the sensor and is being multiplied one more time with the camera spectral sensitivity function
S(λ). This creates the signal that finally enters the computer for further image processing.
Figure 4: Absolute Quantum Efficiency of the Kodak KAI 4022 for color cameras (left) and monochrome cameras (right)
which is similar to the sensitivity function S(λ). In our case we only used the monochrome camera (4).
From this math we see, that in order for a good signal we need non zero values in all chain links. So, if
we want to scan an object with blue color, we need some blue light in the projector’s spectrum as
well as some sensitivity in the blue range of the camera’s sensor.
As a second example you can assume a scanner with blue light wants to pick up a pure red surface,
than multiplying these two curves results in a poor signal even though the camera sensor may have a
good sensitivity for blue and red. This effect is visualized in the graphic below.
Figure 5: This sequence shows what happens if you illuminate the horizontal 8 color bars on the left with more and more
monochromatic light in 3 vertical bars with red, green and blue. The image on the right only shows those bars that reflect
some of this monochromatic light, all the others turn black. Interactive graphic can be found at (6)
3.4 Ambient Light The last factor we have to take into account is any ambient light that might be present in our
scanning scene. This light as well has a spectral curve which we can call A(λ). The only difference to
the other spectra we looked at is that we want that spectrum to be small in the relevant colors we
are looking at. One can think of the ambient light as being noise that disturbs the scanning process.
So whenever there is the possibility to choose the color of the light for a scanner, it should be
different than the constituent light wavelengths contained in ambient light.
4 Experiments and Results
4.1 Setup In order to compare the influence of colored light we set up 3 scanners with blue, green and white-
light and used them in 2 object settings. Colored objects were used in one setting and some of the so
called “un-cooperative” surfaces were used in the other setting. In addition we repeated all scans in
the dark (without ambient light) and in the presence of a significant amount of fluorescent ambient
light. All experiments used an off-the-shelf Breuckmann smartSCAN system that was equipped with
two black and white 4 Megapixel cameras. They use the Kodak KAI-4022 sensor, which is currently
one of the best quality Megapixel CCD Sensors, and it’s often used in high quality 3d systems. The so
called “Quantum Efficiency Curve” of this sensor has a maximum in the blue range, which is a
measure of the sensitivity for different wavelengths. In order to easily compare the results of scans
that use different colors of light, only the projector module was swapped out of the scanner and
replaced with another module. This way all the lens and camera settings as well as the geometrical
parameters where kept the same and should have no influence on the results.
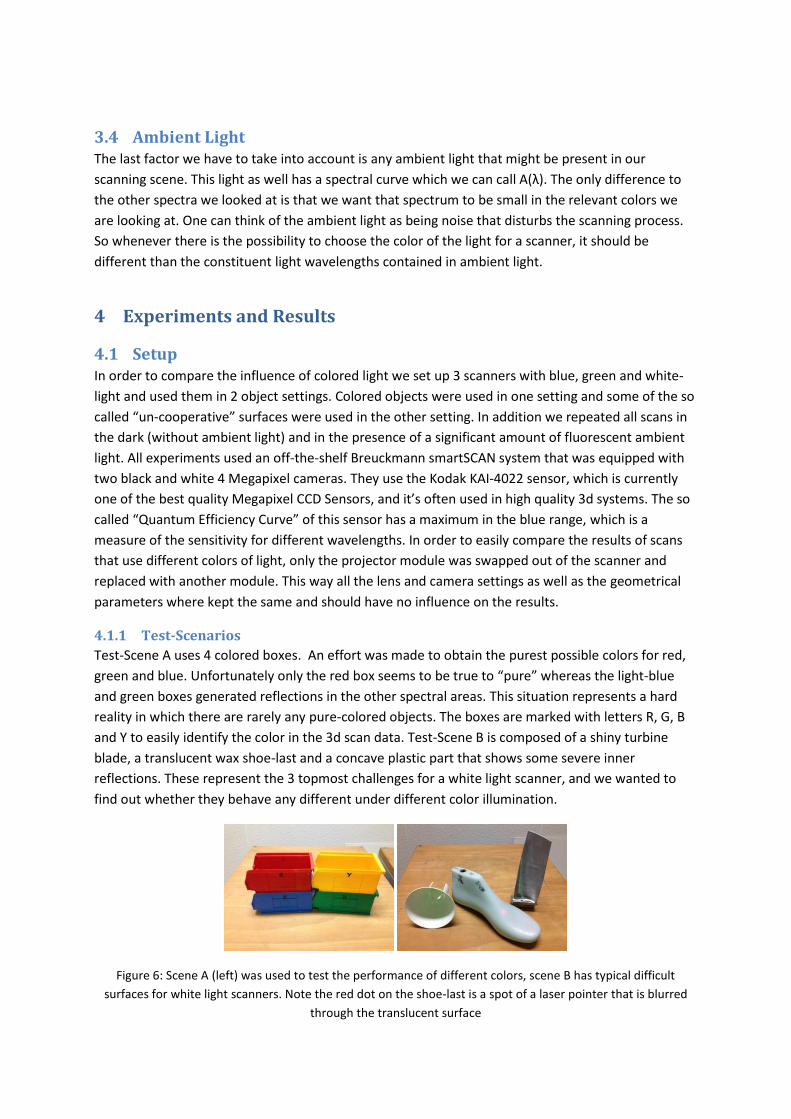
4.1.1 Test-Scenarios
Test-Scene A uses 4 colored boxes. An effort was made to obtain the purest possible colors for red,
green and blue. Unfortunately only the red box seems to be true to “pure” whereas the light-blue
and green boxes generated reflections in the other spectral areas. This situation represents a hard
reality in which there are rarely any pure-colored objects. The boxes are marked with letters R, G, B
and Y to easily identify the color in the 3d scan data. Test-Scene B is composed of a shiny turbine
blade, a translucent wax shoe-last and a concave plastic part that shows some severe inner
reflections. These represent the 3 topmost challenges for a white light scanner, and we wanted to
find out whether they behave any different under different color illumination.
Figure 6: Scene A (left) was used to test the performance of different colors, scene B has typical difficult
surfaces for white light scanners. Note the red dot on the shoe-last is a spot of a laser pointer that is blurred
through the translucent surface
4.2 Results
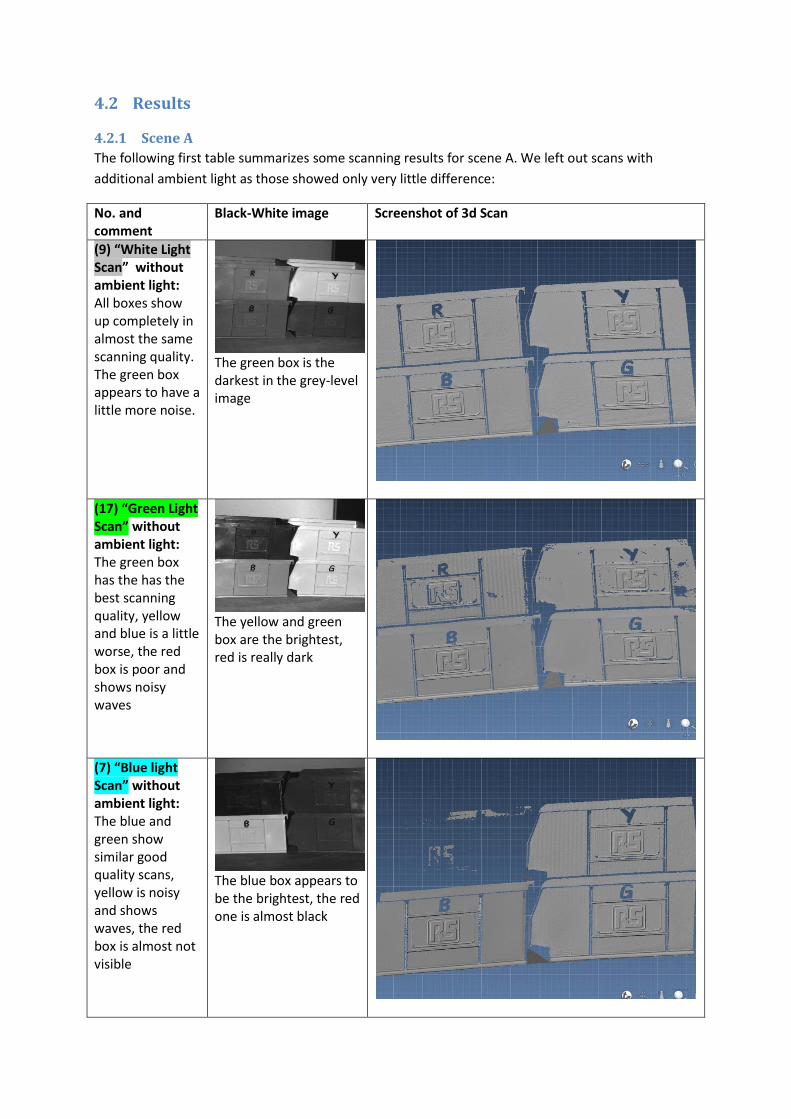
4.2.1 Scene A
The following first table summarizes some scanning results for scene A. We left out scans with
additional ambient light as those showed only very little difference:
No. and comment
Black-White image Screenshot of 3d Scan
(9) “White Light Scan” without ambient light: All boxes show up completely in almost the same scanning quality. The green box appears to have a little more noise.
The green box is the darkest in the grey-level image
(17) “Green Light Scan” without ambient light: The green box has the has the best scanning quality, yellow and blue is a little worse, the red box is poor and shows noisy waves
The yellow and green box are the brightest, red is really dark
(7) “Blue light Scan” without ambient light: The blue and green show similar good quality scans, yellow is noisy and shows waves, the red box is almost not visible
The blue box appears to be the brightest, the red one is almost black
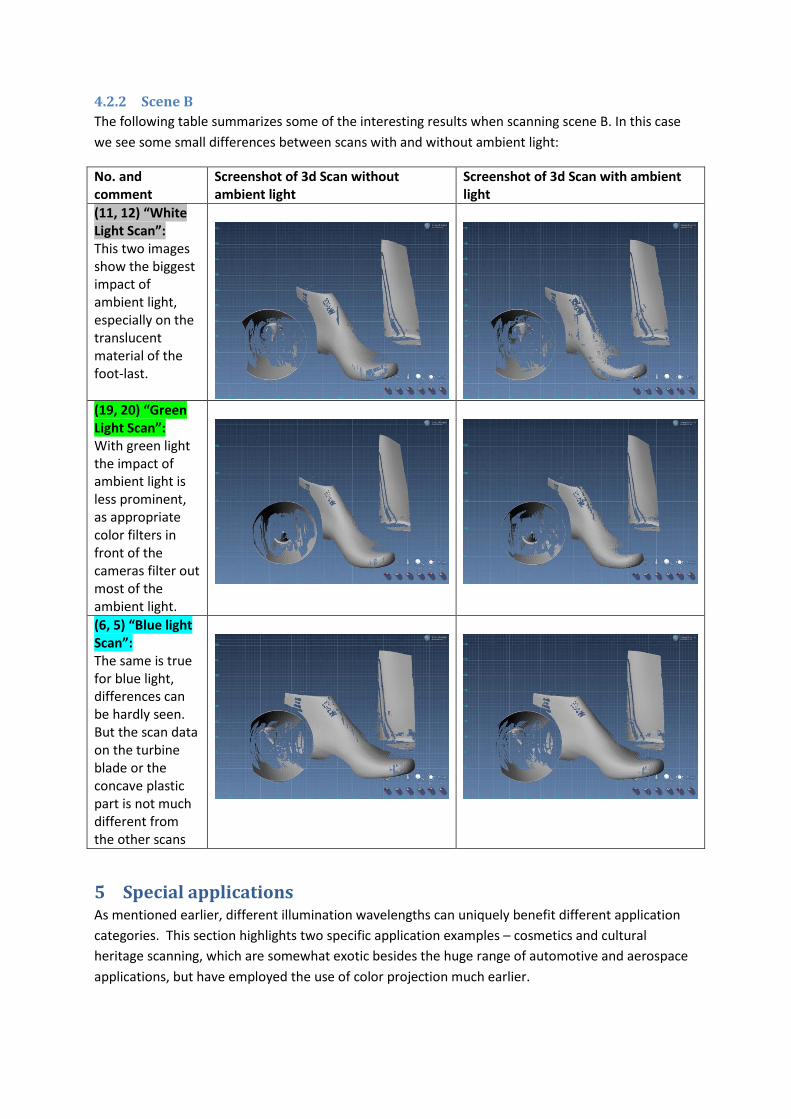
4.2.2 Scene B
The following table summarizes some of the interesting results when scanning scene B. In this case
we see some small differences between scans with and without ambient light:
No. and comment
Screenshot of 3d Scan without ambient light
Screenshot of 3d Scan with ambient light
(11, 12) “White Light Scan”: This two images show the biggest impact of ambient light, especially on the translucent material of the foot-last.
(19, 20) “Green Light Scan”: With green light the impact of ambient light is less prominent, as appropriate color filters in front of the cameras filter out most of the ambient light.
(6, 5) “Blue light Scan”: The same is true for blue light, differences can be hardly seen. But the scan data on the turbine blade or the concave plastic part is not much different from the other scans
5 Special applications As mentioned earlier, different illumination wavelengths can uniquely benefit different application
categories. This section highlights two specific application examples – cosmetics and cultural
heritage scanning, which are somewhat exotic besides the huge range of automotive and aerospace
applications, but have employed the use of color projection much earlier.
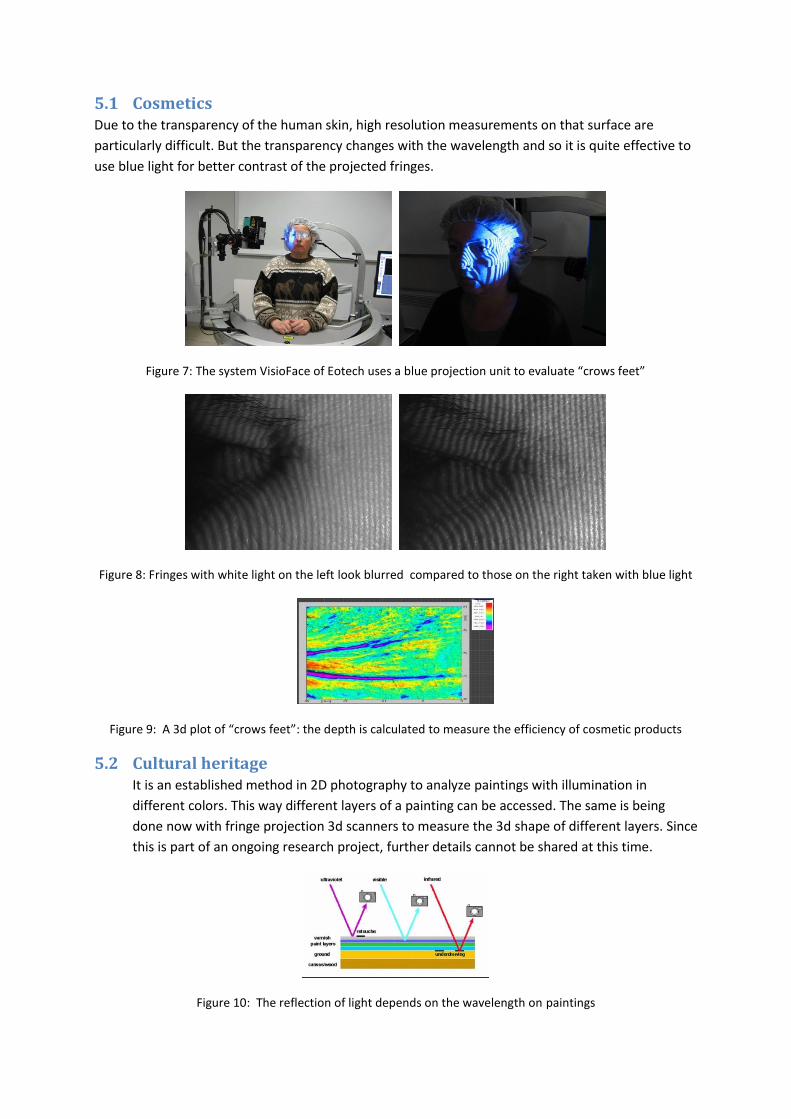
5.1 Cosmetics Due to the transparency of the human skin, high resolution measurements on that surface are
particularly difficult. But the transparency changes with the wavelength and so it is quite effective to
use blue light for better contrast of the projected fringes.
Figure 7: The system VisioFace of Eotech uses a blue projection unit to evaluate “crows feet”
Figure 8: Fringes with white light on the left look blurred compared to those on the right taken with blue light
Figure 9: A 3d plot of “crows feet”: the depth is calculated to measure the efficiency of cosmetic products
5.2 Cultural heritage It is an established method in 2D photography to analyze paintings with illumination in
different colors. This way different layers of a painting can be accessed. The same is being
done now with fringe projection 3d scanners to measure the 3d shape of different layers. Since
this is part of an ongoing research project, further details cannot be shared at this time.
Figure 10: The reflection of light depends on the wavelength on paintings

6 Summary - The impact of colored projected light Colored light works as well as white light on non-colored (black, grey, white) or matt metal
surfaces. Colored light also works as well as white light on objects which match the color of the projected light.
Ambient light doesn’t affect the scans as much when projecting colored light as with a white light scanner because filters with a small bandwidth can be used in front of the cameras. The colored projected light can pass through these filters but the ambient light is significantly suppressed as it has larger bandwidth.
As should be expected, our results are representative of any illumination color. While our tests were performed only with blue and green light, the same principle holds true for red, infrared or UV.
A benefit of using colored light on traditionally difficult surfaces could not be observed. Shiny surfaces, as well as translucent surfaces are still not easy to pick up for fringe projection scanners. Also the problem of light reflecting inside the object is not improved through colored light. The inner surfaces of our concave plastic could not be scanned completely in any setup.
The tradeoff of using colored light is that the quality of the scan data starts to depend on the object color itself, which is not the case with white light. Our analysis shoed that it becomes difficult to scan complementary colors with good quality. When these complementary object colors are pretty pure the scan data becomes noisy, wavy or it can be even impossible to get any scan data at all (see experiment no. 7 on the red box). This seems to be a significant disadvantage if users are looking for a general purpose scanner and can´t make any assumptions about colors of the objects they will be required to inspect.
A solution to this dilemma, apart from coating objects in white or appropriate colors, could be the following approach: the user should have the flexibility to adjust the scan light color according to his object color, or use even white light if the object consists of more than one color. This can be done by swapping out one light source and plug in a different module with a different color.
Figure 7: Summary of the different scenes A and B as well as the different light colors being used for scanning
7 References 1. Breuckmann, B., Halbauer, F., Klaas, E., Kube, M., "3D-metrologies for industrial applications" in Rapid
Prototyping and Flexible Manufacturing, edited by Rolf-Juergen Ahlers, Gunther Reinhart, Proceedings of SPIE
Vol. 3102 (SPIE, Bellingham, WA 1997) pp. 20-29.
2. Klaas, E., Kropp, J., Mongon, B.,”The impact of different alignment strategies on the overall performance of
a white light scanner according to sphere spacing error specified in VDI 2634 (2011 Proceedings Paper)”
3. Klaas, E.,Erben, K-P, Zinck, S., „Robotic Scanning Using a White Light Scanner”, CMSC conference 2009,
http://www.qualitydigest.com/inside/cmsc-article/robotic-scanning-using-white-light-scanner.html
4. Allied Vision Technologies Website: http://www.alliedvisiontec.com/de/produkte/kameras/firewire/pike/f-
421bc.html
5. Wikipedia: http://en.wikipedia.org/wiki/Structured-light_3D_scanner
6. “The Dimensions of Color”, David Briggs, http://www.huevaluechroma.com/104.php