Embed Size (px)
Citation preview

What’s NewPro Tools® HD 8.0

Legal Notices
This guide is copyrighted ©2008 by Digidesign, a division of Avid Technology, Inc. (hereafter “Digidesign”), with all rights reserved. Under copyright laws, this guide may not be duplicated in whole or in part without the written consent of Digidesign.
003, 003 Rack, 96 I/O, 96i I/O, 192 Digital I/O, 192 I/O, 888|24 I/O, 882|20 I/O, 1622 I/O, 24-Bit ADAT Bridge I/O, AudioSuite, Avid, Avid DNA, Avid Mojo, Avid Unity, Avid Unity ISIS, Avid Xpress, AVoption, Axiom, Beat Detective, Bomb Factory, Bruno, C|24, Command|8, Control|24, D-Command, D-Control, D-Fi, D-fx, D-Show, D-Verb, DAE, Digi 002, DigiBase, DigiDelivery, Digidesign, Digidesign Audio Engine, Digidesign Intelligent Noise Reduction, Digidesign TDM Bus, DigiDrive, DigiRack, DigiTest, DigiTranslator, DINR, D-Show, DV Toolkit, EditPack, Eleven, HD Core, HD Process, Hybrid, Impact, Interplay, LoFi, M-Audio, MachineControl, Maxim, Mbox, MediaComposer, MIDI I/O, MIX, MultiShell, Nitris, OMF, OMF Interchange, PRE, ProControl, Pro Tools M-Powered, Pro Tools, Pro Tools|HD, Pro Tools LE, QuickPunch, Recti-Fi, Reel Tape, Reso, Reverb One, ReVibe, RTAS, Sibelius, Smack!, SoundReplacer, Sound Designer II, Strike, Structure, SYNC HD, SYNC I/O, Synchronic, TL Aggro, TL AutoPan, TL Drum Rehab, TL Everyphase, TL Fauxlder, TL In Tune, TL MasterMeter, TL Metro, TL Space, TL Utilities, Transfuser, Trillium Lane Labs, Vari-Fi Velvet, X-Form, and XMON are trademarks or registered trademarks of Digidesign and/or Avid Technology, Inc. Xpand! is Registered in the U.S. Patent and Trademark Office. All other trademarks are the property of their respective owners.
Product features, specifications, system requirements, and availability are subject to change without notice.
Guide Part Number 9106-59101-00 REV A 11/08
Documentation Feedback
At Digidesign, we're always looking for ways to improve our documentation. If you have comments, corrections, or suggestions regarding our documentation, email us at [email protected].
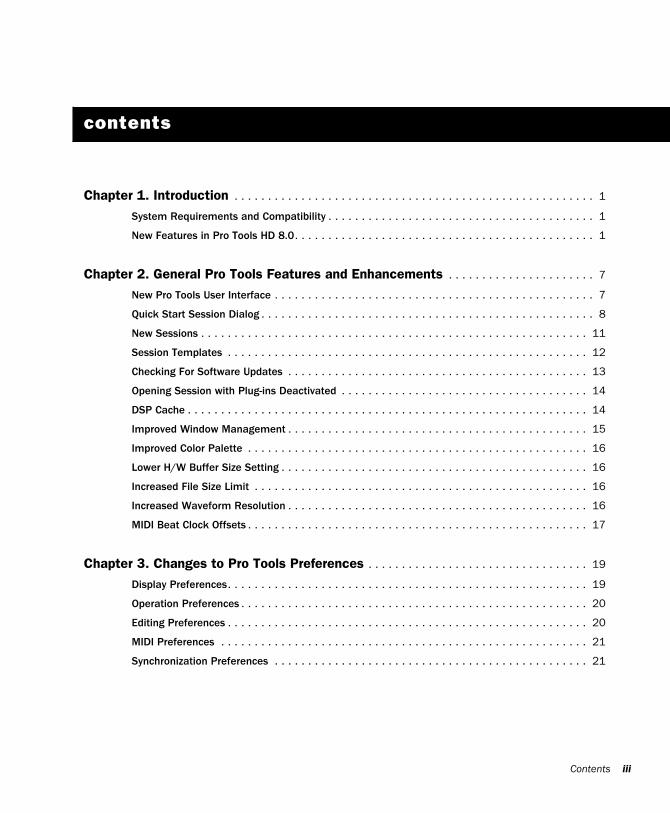
contents
Chapter 1. Introduction . . . . . . . . . . . . . . . . . . . . . . . . . . . . . . . . . . . . . . . . . . . . . . . . . . . . . . 1
System Requirements and Compatibility . . . . . . . . . . . . . . . . . . . . . . . . . . . . . . . . . . . . . . . . 1
New Features in Pro Tools HD 8.0. . . . . . . . . . . . . . . . . . . . . . . . . . . . . . . . . . . . . . . . . . . . . 1
Chapter 2. General Pro Tools Features and Enhancements . . . . . . . . . . . . . . . . . . . . . . 7
New Pro Tools User Interface . . . . . . . . . . . . . . . . . . . . . . . . . . . . . . . . . . . . . . . . . . . . . . . . 7
Quick Start Session Dialog . . . . . . . . . . . . . . . . . . . . . . . . . . . . . . . . . . . . . . . . . . . . . . . . . . 8
New Sessions . . . . . . . . . . . . . . . . . . . . . . . . . . . . . . . . . . . . . . . . . . . . . . . . . . . . . . . . . . 11
Session Templates . . . . . . . . . . . . . . . . . . . . . . . . . . . . . . . . . . . . . . . . . . . . . . . . . . . . . . 12
Checking For Software Updates . . . . . . . . . . . . . . . . . . . . . . . . . . . . . . . . . . . . . . . . . . . . . 13
Opening Session with Plug-ins Deactivated . . . . . . . . . . . . . . . . . . . . . . . . . . . . . . . . . . . . . 14
DSP Cache . . . . . . . . . . . . . . . . . . . . . . . . . . . . . . . . . . . . . . . . . . . . . . . . . . . . . . . . . . . . 14
Improved Window Management . . . . . . . . . . . . . . . . . . . . . . . . . . . . . . . . . . . . . . . . . . . . . 15
Improved Color Palette . . . . . . . . . . . . . . . . . . . . . . . . . . . . . . . . . . . . . . . . . . . . . . . . . . . 16
Lower H/W Buffer Size Setting . . . . . . . . . . . . . . . . . . . . . . . . . . . . . . . . . . . . . . . . . . . . . . 16
Increased File Size Limit . . . . . . . . . . . . . . . . . . . . . . . . . . . . . . . . . . . . . . . . . . . . . . . . . . 16
Increased Waveform Resolution . . . . . . . . . . . . . . . . . . . . . . . . . . . . . . . . . . . . . . . . . . . . . 16
MIDI Beat Clock Offsets . . . . . . . . . . . . . . . . . . . . . . . . . . . . . . . . . . . . . . . . . . . . . . . . . . . 17
Chapter 3. Changes to Pro Tools Preferences . . . . . . . . . . . . . . . . . . . . . . . . . . . . . . . . . 19
Display Preferences. . . . . . . . . . . . . . . . . . . . . . . . . . . . . . . . . . . . . . . . . . . . . . . . . . . . . . 19
Operation Preferences . . . . . . . . . . . . . . . . . . . . . . . . . . . . . . . . . . . . . . . . . . . . . . . . . . . . 20
Editing Preferences . . . . . . . . . . . . . . . . . . . . . . . . . . . . . . . . . . . . . . . . . . . . . . . . . . . . . . 20
MIDI Preferences . . . . . . . . . . . . . . . . . . . . . . . . . . . . . . . . . . . . . . . . . . . . . . . . . . . . . . . 21
Synchronization Preferences . . . . . . . . . . . . . . . . . . . . . . . . . . . . . . . . . . . . . . . . . . . . . . . 21
Contents iii

iv
Chapter 4. Editing Features and Enhancements . . . . . . . . . . . . . . . . . . . . . . . . . . . . . . . 23
Universe View . . . . . . . . . . . . . . . . . . . . . . . . . . . . . . . . . . . . . . . . . . . . . . . . . . . . . . . . . 23
New Waveform Views . . . . . . . . . . . . . . . . . . . . . . . . . . . . . . . . . . . . . . . . . . . . . . . . . . . . 26
MIDI Editor View. . . . . . . . . . . . . . . . . . . . . . . . . . . . . . . . . . . . . . . . . . . . . . . . . . . . . . . . 28
Customizable Toolbars . . . . . . . . . . . . . . . . . . . . . . . . . . . . . . . . . . . . . . . . . . . . . . . . . . . 29
New Look for the Smart Tool . . . . . . . . . . . . . . . . . . . . . . . . . . . . . . . . . . . . . . . . . . . . . . . 30
Commands Keyboard Focus . . . . . . . . . . . . . . . . . . . . . . . . . . . . . . . . . . . . . . . . . . . . . . . 30
Chords . . . . . . . . . . . . . . . . . . . . . . . . . . . . . . . . . . . . . . . . . . . . . . . . . . . . . . . . . . . . . . 31
Edit Window Indicators . . . . . . . . . . . . . . . . . . . . . . . . . . . . . . . . . . . . . . . . . . . . . . . . . . . 32
New Edit Window Option . . . . . . . . . . . . . . . . . . . . . . . . . . . . . . . . . . . . . . . . . . . . . . . . . . 33
Edit Window MIDI Editing Controls . . . . . . . . . . . . . . . . . . . . . . . . . . . . . . . . . . . . . . . . . . . 33
New Edit Window Zoom Buttons . . . . . . . . . . . . . . . . . . . . . . . . . . . . . . . . . . . . . . . . . . . . 34
Strip Silence Down to –96 dB . . . . . . . . . . . . . . . . . . . . . . . . . . . . . . . . . . . . . . . . . . . . . . 34
Snap To Grid . . . . . . . . . . . . . . . . . . . . . . . . . . . . . . . . . . . . . . . . . . . . . . . . . . . . . . . . . . 35
New Zoom Keyboard Shortcuts . . . . . . . . . . . . . . . . . . . . . . . . . . . . . . . . . . . . . . . . . . . . . 35
Edit Selection Enhancements and Key Commands . . . . . . . . . . . . . . . . . . . . . . . . . . . . . . . 36
New Record Enable, Input Enable, Solo, and Mute Key Commands . . . . . . . . . . . . . . . . . . . . 37
Locking Regions. . . . . . . . . . . . . . . . . . . . . . . . . . . . . . . . . . . . . . . . . . . . . . . . . . . . . . . . 37
Regions View for MIDI and Instrument Tracks . . . . . . . . . . . . . . . . . . . . . . . . . . . . . . . . . . . 38
Elastic Audio Region-Based Pitch Transposition . . . . . . . . . . . . . . . . . . . . . . . . . . . . . . . . . . 39
Improved Quantize Event Operation . . . . . . . . . . . . . . . . . . . . . . . . . . . . . . . . . . . . . . . . . . 41
Improvements for Field Recorder Files . . . . . . . . . . . . . . . . . . . . . . . . . . . . . . . . . . . . . . . . 41
Chapter 5. Track Compositing . . . . . . . . . . . . . . . . . . . . . . . . . . . . . . . . . . . . . . . . . . . . . . . 43
Example Track Compositing Workflow . . . . . . . . . . . . . . . . . . . . . . . . . . . . . . . . . . . . . . . . 43
Playlists Track View . . . . . . . . . . . . . . . . . . . . . . . . . . . . . . . . . . . . . . . . . . . . . . . . . . . . . 46
Rating Regions . . . . . . . . . . . . . . . . . . . . . . . . . . . . . . . . . . . . . . . . . . . . . . . . . . . . . . . . 51
Matching Alternate Regions . . . . . . . . . . . . . . . . . . . . . . . . . . . . . . . . . . . . . . . . . . . . . . . 52
Selecting Alternate Takes on Tracks. . . . . . . . . . . . . . . . . . . . . . . . . . . . . . . . . . . . . . . . . . 53
Automatically Create New Playlists When Loop Recording . . . . . . . . . . . . . . . . . . . . . . . . . . 55
Expanding Alternate Takes to New Playlists or Tracks . . . . . . . . . . . . . . . . . . . . . . . . . . . . . 55
Expanding Alternate Channels to New Playlists or Tracks . . . . . . . . . . . . . . . . . . . . . . . . . . . 56
Expanding Channels by Time Code Only . . . . . . . . . . . . . . . . . . . . . . . . . . . . . . . . . . . . . . . 57
What’s New in Pro Tools HD 8.0

Chapter 6. MIDI Editor Windows . . . . . . . . . . . . . . . . . . . . . . . . . . . . . . . . . . . . . . . . . . . . . 59
MIDI Editor Window Toolbar . . . . . . . . . . . . . . . . . . . . . . . . . . . . . . . . . . . . . . . . . . . . . . . . 61
Zoom Controls . . . . . . . . . . . . . . . . . . . . . . . . . . . . . . . . . . . . . . . . . . . . . . . . . . . . . . . . . 66
Track List . . . . . . . . . . . . . . . . . . . . . . . . . . . . . . . . . . . . . . . . . . . . . . . . . . . . . . . . . . . . . 66
Group List. . . . . . . . . . . . . . . . . . . . . . . . . . . . . . . . . . . . . . . . . . . . . . . . . . . . . . . . . . . . . 68
Timebase and Conductor Rulers . . . . . . . . . . . . . . . . . . . . . . . . . . . . . . . . . . . . . . . . . . . . . 69
Superimposed Notes View . . . . . . . . . . . . . . . . . . . . . . . . . . . . . . . . . . . . . . . . . . . . . . . . . 69
Notation View . . . . . . . . . . . . . . . . . . . . . . . . . . . . . . . . . . . . . . . . . . . . . . . . . . . . . . . . . . 74
Velocity, Controller, and Automation Lanes . . . . . . . . . . . . . . . . . . . . . . . . . . . . . . . . . . . . . 77
Additional MIDI Editing Commands and Enhancements . . . . . . . . . . . . . . . . . . . . . . . . . . . . 78
Chapter 7. Score Editor Window . . . . . . . . . . . . . . . . . . . . . . . . . . . . . . . . . . . . . . . . . . . . . 81
Notation Display Track Settings . . . . . . . . . . . . . . . . . . . . . . . . . . . . . . . . . . . . . . . . . . . . . 91
Score Setup . . . . . . . . . . . . . . . . . . . . . . . . . . . . . . . . . . . . . . . . . . . . . . . . . . . . . . . . . . . 93
Editing Notes . . . . . . . . . . . . . . . . . . . . . . . . . . . . . . . . . . . . . . . . . . . . . . . . . . . . . . . . . . 94
Score Editor Right-Click Menu. . . . . . . . . . . . . . . . . . . . . . . . . . . . . . . . . . . . . . . . . . . . . . . 97
Key Changes. . . . . . . . . . . . . . . . . . . . . . . . . . . . . . . . . . . . . . . . . . . . . . . . . . . . . . . . . . . 98
Meter Changes . . . . . . . . . . . . . . . . . . . . . . . . . . . . . . . . . . . . . . . . . . . . . . . . . . . . . . . . . 98
Chord Symbols and Diagrams . . . . . . . . . . . . . . . . . . . . . . . . . . . . . . . . . . . . . . . . . . . . . . 99
Exporting Scores . . . . . . . . . . . . . . . . . . . . . . . . . . . . . . . . . . . . . . . . . . . . . . . . . . . . . . . 101
Printing Scores . . . . . . . . . . . . . . . . . . . . . . . . . . . . . . . . . . . . . . . . . . . . . . . . . . . . . . . . 101
Chapter 8. Pro Tools Mixing and Automation Features and Enhancements . . . . . . 103
Automation and Controller Lanes . . . . . . . . . . . . . . . . . . . . . . . . . . . . . . . . . . . . . . . . . . . 103
Ten Inserts . . . . . . . . . . . . . . . . . . . . . . . . . . . . . . . . . . . . . . . . . . . . . . . . . . . . . . . . . . . 104
Improvements for Recording with Automatic Delay Compensation. . . . . . . . . . . . . . . . . . . . 105
Chapter 9. Plug-ins . . . . . . . . . . . . . . . . . . . . . . . . . . . . . . . . . . . . . . . . . . . . . . . . . . . . . . . . 107
Creative Collection Plug-ins . . . . . . . . . . . . . . . . . . . . . . . . . . . . . . . . . . . . . . . . . . . . . . . 107
Additional Plug-ins Included with Pro Tools . . . . . . . . . . . . . . . . . . . . . . . . . . . . . . . . . . . . 110
TL Utilities Included with Pro Tools . . . . . . . . . . . . . . . . . . . . . . . . . . . . . . . . . . . . . . . . . . 110
DigiRack Plug-in Improvements . . . . . . . . . . . . . . . . . . . . . . . . . . . . . . . . . . . . . . . . . . . . 111
Improved Drag and Drop to Plug-ins . . . . . . . . . . . . . . . . . . . . . . . . . . . . . . . . . . . . . . . . . 111
Plug-in Find and Relink . . . . . . . . . . . . . . . . . . . . . . . . . . . . . . . . . . . . . . . . . . . . . . . . . . 111
AudioSuite Preview Improvements . . . . . . . . . . . . . . . . . . . . . . . . . . . . . . . . . . . . . . . . . . 112
Contents v

vi
Chapter 10. Pro Tools Controller Features and Enhancements . . . . . . . . . . . . . . . . . 113
Accessing 10 Inserts. . . . . . . . . . . . . . . . . . . . . . . . . . . . . . . . . . . . . . . . . . . . . . . . . . . . 113
Plug-in Mapping . . . . . . . . . . . . . . . . . . . . . . . . . . . . . . . . . . . . . . . . . . . . . . . . . . . . . . . 115
ICON Enhancements . . . . . . . . . . . . . . . . . . . . . . . . . . . . . . . . . . . . . . . . . . . . . . . . . . . . 126
D-Control Enhancements. . . . . . . . . . . . . . . . . . . . . . . . . . . . . . . . . . . . . . . . . . . . . . . . . 133
D-Command Enhancements . . . . . . . . . . . . . . . . . . . . . . . . . . . . . . . . . . . . . . . . . . . . . . 135
Chapter 11. Pro Tools Satellite Link Software Option . . . . . . . . . . . . . . . . . . . . . . . . . 141
System Requirements. . . . . . . . . . . . . . . . . . . . . . . . . . . . . . . . . . . . . . . . . . . . . . . . . . . 141
System Connections . . . . . . . . . . . . . . . . . . . . . . . . . . . . . . . . . . . . . . . . . . . . . . . . . . . . 141
Configuring Satellite Link . . . . . . . . . . . . . . . . . . . . . . . . . . . . . . . . . . . . . . . . . . . . . . . . 142
Linking Satellite Systems . . . . . . . . . . . . . . . . . . . . . . . . . . . . . . . . . . . . . . . . . . . . . . . . 144
Using Satellite Link with MachineControl . . . . . . . . . . . . . . . . . . . . . . . . . . . . . . . . . . . . . 147
Control Surface Support for Satellite Link . . . . . . . . . . . . . . . . . . . . . . . . . . . . . . . . . . . . . 147
Chapter 12. Pro Tools Video and Avid Interoperability Improvements . . . . . . . . . . . 149
Support for QuickTime HD. . . . . . . . . . . . . . . . . . . . . . . . . . . . . . . . . . . . . . . . . . . . . . . . 149
AAF Pan Improvements with DigiTranslator 2.0. . . . . . . . . . . . . . . . . . . . . . . . . . . . . . . . . 150
Pro Tools Support for Avid Interplay on Windows Vista . . . . . . . . . . . . . . . . . . . . . . . . . . . . 150
Media Composer Video Satellite Software Option . . . . . . . . . . . . . . . . . . . . . . . . . . . . . . . 150
Video Satellite LE Software Option . . . . . . . . . . . . . . . . . . . . . . . . . . . . . . . . . . . . . . . . . . 151
What’s New in Pro Tools HD 8.0

chapter 1
Introduction
This chapter is an overview of new features in Pro Tools® HD 8.0 for Pro Tools|HD® systems on Digidesign®-qualified versions of Windows or Mac OS X.
System Requirements and CompatibilityDigidesign can only assure compatibility and provide support for hardware and software it has tested and approved.
For complete system requirements and a list of Digidesign-qualified computers, operating sys-tems, hard drives, and third-party devices, refer to the latest information on the Digidesign web-site:
www.digidesign.com/compatibility
New Features in Pro Tools HD 8.0Pro Tools HD 8.0 includes the following:
General Pro Tools Features and Enhancements
• Improved, modernized user interface
• Pro Tools Quick Start dialog for quickly and easily creating new sessions from templates, from scratch, or opening existing ones
• New Session Templates
• Auto-update Notification and Checking for Software Updates
• Open Session with Plug-ins Deactivated
• DSP Cache maintained for faster session open-ing and closing
• Improved window management:
• Tile windows
• Cascade windows
• Window Configurations with Score Editor window and targeted MIDI Editor window
• Improved Color Palette
• New RTAS Hardware Buffer Settings
• Increased Audio File Size Limit
• Increased Waveform Resolution
• MIDI Beat Clock Sample Offset on a port-by-port basis
Chapter 1: Introduction 1

2
Changes to Pro Tools Preferences
Display Preferences
• “MIDI Note Color Shows Velocity” option
Operation Preferences
• “Latch Forward/Rewind” option
• “Automatically Create New Playlists When Loop Recording” option
• “Show Quick Start Dialog when Pro Tools Starts” option
Editing Preferences
• Moved the following “Matching Start Time” Takes List options to the Match Criteria dia-log:
• “Includes Take Region Names That Match Track Names”
• “Includes Take Region Lengths That Match”
MIDI Preferences
• Moved the “Play MIDI Notes When Editing” option to the Edit, MIDI Editor, and Score Ed-itor windows
• “Remove Range Selection After Opening the MIDI/Score Editor” option
• Moved the “Default Note On Velocity” setting to the Edit, MIDI Editor, and Score Editor win-dows
• “Double-clicking a Region Opens…” options:
• MIDI Editor
• Score Editor
• MIDI Event List
• Name Dialog
• MIDI/Score Editor Display section:
• “Additional Empty Bars in the Score Edi-tor” setting
What’s New in Pro Tools HD 8.0
Synchronization Preferences
• Synchronization section:
• “Delay Before Locking to Longitudinal Time Code” setting
• “Delay Before Locking to Serial Time Code” setting
• Satellite Link section:
• Transmit Solos
• Receive Solos
• Solo Independent Of Linked State
• DAE Errors Stop All Linked Systems
• Transmit Play Selections
• Receive Play Selections
Editing Features and Enhancements
Edit Window Features
• New Universe View
• New MIDI Editor View
• New Waveform Views
• Customizable Toolbar
• Chord Symbol ruler
• Restore Last Selection
• Edit selection enhancements and key com-mands
• Region Edit and Time Locking
• MIDI and Instrument tracks now default to Regions view in the Edit window
• Timeline Insertion Follows Playback indi-cator
• Strip Silence to –96 dB
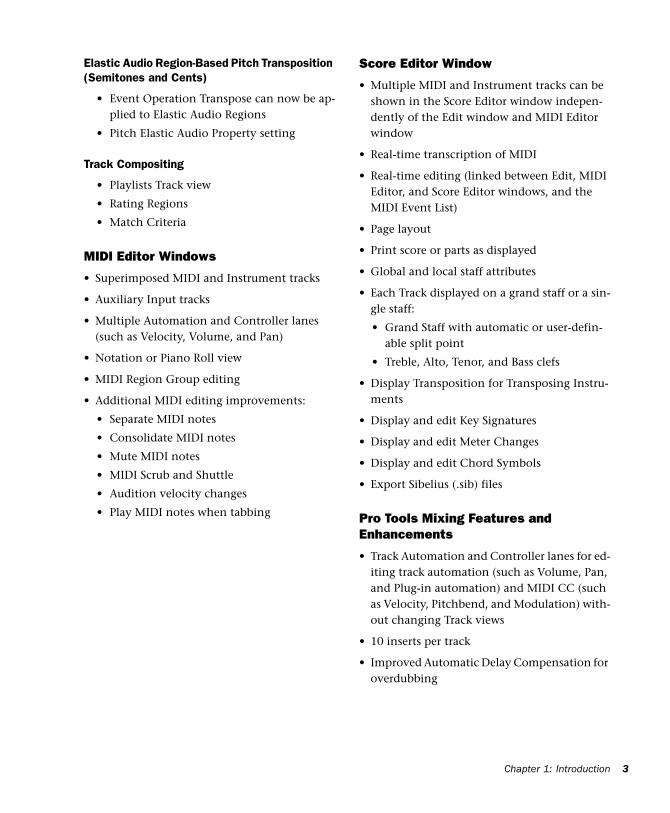
Elastic Audio Region-Based Pitch Transposition (Semitones and Cents)
• Event Operation Transpose can now be ap-plied to Elastic Audio Regions
• Pitch Elastic Audio Property setting
Track Compositing
• Playlists Track view
• Rating Regions
• Match Criteria
MIDI Editor Windows
• Superimposed MIDI and Instrument tracks
• Auxiliary Input tracks
• Multiple Automation and Controller lanes (such as Velocity, Volume, and Pan)
• Notation or Piano Roll view
• MIDI Region Group editing
• Additional MIDI editing improvements:
• Separate MIDI notes
• Consolidate MIDI notes
• Mute MIDI notes
• MIDI Scrub and Shuttle
• Audition velocity changes
• Play MIDI notes when tabbing
Score Editor Window
• Multiple MIDI and Instrument tracks can be shown in the Score Editor window indepen-dently of the Edit window and MIDI Editor window
• Real-time transcription of MIDI
• Real-time editing (linked between Edit, MIDI Editor, and Score Editor windows, and the MIDI Event List)
• Page layout
• Print score or parts as displayed
• Global and local staff attributes
• Each Track displayed on a grand staff or a sin-gle staff:
• Grand Staff with automatic or user-defin-able split point
• Treble, Alto, Tenor, and Bass clefs
• Display Transposition for Transposing Instru-ments
• Display and edit Key Signatures
• Display and edit Meter Changes
• Display and edit Chord Symbols
• Export Sibelius (.sib) files
Pro Tools Mixing Features and Enhancements
• Track Automation and Controller lanes for ed-iting track automation (such as Volume, Pan, and Plug-in automation) and MIDI CC (such as Velocity, Pitchbend, and Modulation) with-out changing Track views
• 10 inserts per track
• Improved Automatic Delay Compensation for overdubbing
Chapter 1: Introduction 3
4
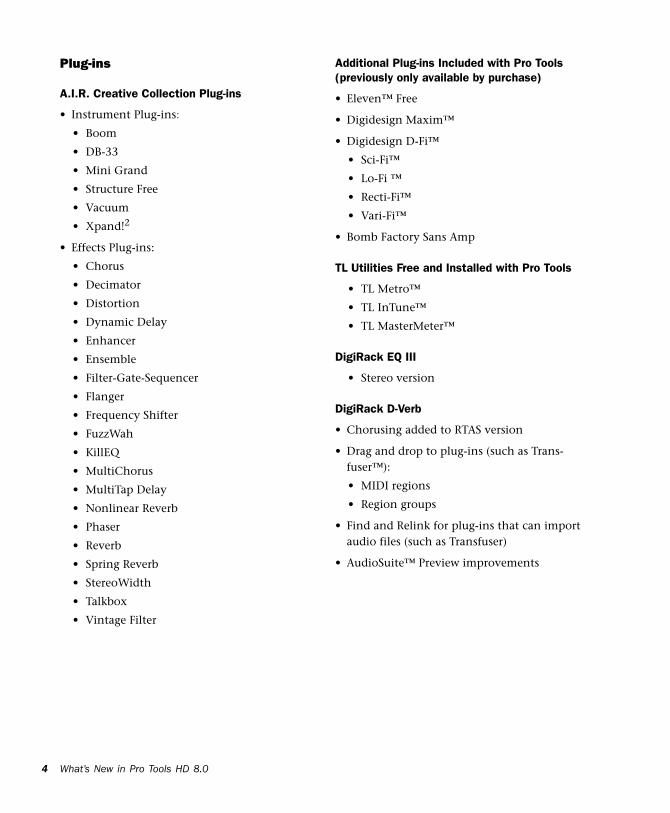
Plug-ins
A.I.R. Creative Collection Plug-ins
• Instrument Plug-ins:
• Boom
• DB-33
• Mini Grand
• Structure Free
• Vacuum
• Xpand!2
• Effects Plug-ins:
• Chorus
• Decimator
• Distortion
• Dynamic Delay
• Enhancer
• Ensemble
• Filter-Gate-Sequencer
• Flanger
• Frequency Shifter
• FuzzWah
• KillEQ
• MultiChorus
• MultiTap Delay
• Nonlinear Reverb
• Phaser
• Reverb
• Spring Reverb
• StereoWidth
• Talkbox
• Vintage Filter
What’s New in Pro Tools HD 8.0
Additional Plug-ins Included with Pro Tools (previously only available by purchase)
• Eleven™ Free
• Digidesign Maxim™
• Digidesign D-Fi™
• Sci-Fi™
• Lo-Fi ™
• Recti-Fi™
• Vari-Fi™
• Bomb Factory Sans Amp
TL Utilities Free and Installed with Pro Tools
• TL Metro™
• TL InTune™
• TL MasterMeter™
DigiRack EQ III
• Stereo version
DigiRack D-Verb
• Chorusing added to RTAS version
• Drag and drop to plug-ins (such as Trans-fuser™):
• MIDI regions
• Region groups
• Find and Relink for plug-ins that can import audio files (such as Transfuser)
• AudioSuite™ Preview improvements

Pro Tools Controller Features and Enhancements
• Accessing 10 inserts
• Plug-in mapping
• New Matrix Assign mode
• Interrogate I/O Settings on a per-track basis
• D-Command® Enhancements:
• Plug-in channel strip editing
• Change plug-in settings
• ICON Soft Keys Enhancements:
• New AutoWrite layout
• Support for Pro Tools Window Configura-tions
• Write Memory Locations
• Show MIDI Editor (toggle)
• Audio Files Softkey
• Modes Softkey
• Operations Softkeys for D-Command
• Softkeys with No Session Open
• Identify Empty Sends and Inserts
• No Group Members on VCA Master Encoders
• Removing Multiple Assignments from ICON
Pro Tools Video and Avid Interoperability
• Support for QuickTime HD playback using a Digidesign-qualified Blackmagic DeckLink video card (Mac Only)
• Windows Vista support for Interplay
Media Composer Video Satellite Software Option
• Support for Video Satellite with Pro Tools and Avid® Media Composer® 3.1 with Avid Mojo® DX and Nitris® DX peripherals
Video Satellite LE Software Option
(Mac Only)
• Lets you connect a Pro Tools LE® Mbox® 2 Mi-cro system to a Pro Tools HD system for use as a QuickTime HD video satellite
Satellite Link Software Option
• Support for linking Pro Tools transport with multiple Pro Tools|HD systems
Chapter 1: Introduction 5

6
What’s New in Pro Tools HD 8.0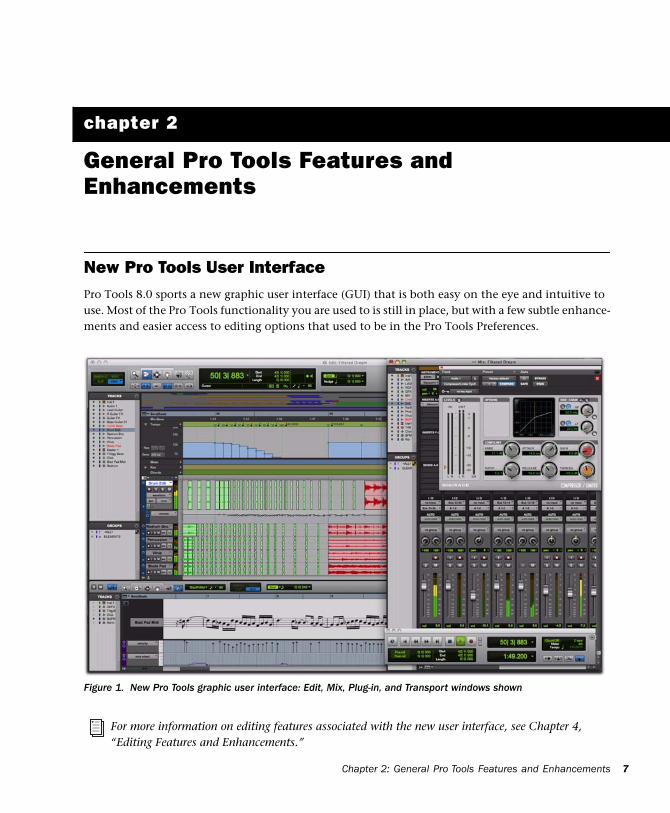
chapter 2
General Pro Tools Features and Enhancements
New Pro Tools User InterfacePro Tools 8.0 sports a new graphic user interface (GUI) that is both easy on the eye and intuitive to use. Most of the Pro Tools functionality you are used to is still in place, but with a few subtle enhance-ments and easier access to editing options that used to be in the Pro Tools Preferences.
C
Figure 1. New Pro Tools graphic user interface: Edit, Mix, Plug-in, and Transport windows shown
For more information on editing features associated with the new user interface, see Chapter 4, “Editing Features and Enhancements.”
hapter 2: General Pro Tools Features and Enhancements 7

8
Quick Start Session DialogPro Tools 8.0 provides a new Quick Start dialog on launch that lets you quickly and easily create a new session or open an existing one. You can choose to show or hide the Quick Start dialog on launch in the Pro Tools Operation Preferences.
When you first launch Pro Tools, you are prompted by the Quick Start dialog to do one of the following:
• Create a new session from a template.
• Create a new blank session.
• Open any of the last ten most recent ses-sions.
• Open any other session on your system.
Press Control+Up Arrow or Down Arrow (Windows) or Command+Up Arrow or Down Arrow (Mac) to select different Ses-sion Quick Start options. Also, you can use the up and down arrows to select different items in the Recent Sessions and Session Templates lists.
What’s New in Pro Tools HD 8.0
Creating a New Session from a Template
To create a new session from a template:
1 Select Create Session from Template.
2 From the Session Template pop-up menu, se-lect the category for the session templates you want.
3 Select the session template you want to use from the list (on the right).
Quick Start dialog
Session Parameters reveal button
Session Templatelist
Session Template pop-up menu

4 If you want to change any of the session pa-rameters, click the Session Parameters reveal button.
5 Configure any of the following session set-tings as necessary:
• Audio File Type
• Bit Depth
• Sample Rate
6 Click OK.
7 In the Save dialog, name the session, choose where you want to save the session, and click Save.
Quick Start dialog, Session Parameters revealed
C
Creating a New Blank Session
To create a new, blank session:
1 Select Create Blank Session.
2 If you want to change any of the session pa-rameters, click the Session Parameters reveal button.
3 Configure any of the following session param-eters as necessary:
• Audio File Type
• Bit Depth
• Sample Rate
• I/O Settings
4 Click OK.
5 In the Save dialog, name the session, choose where you want to save the session, and click Save.
Quick Start dialog, Create Blank Session
hapter 2: General Pro Tools Features and Enhancements 9

10
Opening a Recent Session
To open a recent session:
1 Select Open Recent Session.
2 Select any of the last ten recent sessions from the list (on the right).
3 Click OK.
The Open Recent Session option is not available the first time you launch Pro Tools (or if you have cleared the Recent Sessions list by choosing File > Open Recent > Clear).
Quick Start dialog, Open Recent Session
What’s New in Pro Tools HD 8.0
Opening Any Session
To open any session:
1 Select Open Session.
2 In the Choose a Session dialog, navigate to the location of the session file and select it.
3 Click Open.
Showing or Hiding the Quick Start Dialog on Launch
To not have the Quick Start dialog appear when Pro Tools launches:
Deselect the Show Quick Start Dialog when Pro Tools Starts option in either the Quick Start dialog or the Pro Tools Operation Preferences (Setup > Preferences).
To have the Quick Start dialog appear when Pro Tools launches:
1 Choose Setup > Preferences.
2 Click the Operation tab.
3 In the Miscellaneous section of the Operation Preferences page, select the Show Quick Start Dia-log when Pro Tools Starts option.
4 Click OK.
Show Quick Start Dialog when Pro Tools Starts option

New SessionsPro Tools 8.0 provides an improved New Session dialog that lets you create a new session from a template or create a new blank session (with no tracks or media).
To create a new session from a template:
1 Choose File > New.
2 In the New Session dialog, select Create Ses-sion from Template.
3 From the Session Template pop-up menu, se-lect the category for the session templates you want:
• Guitar
• Music Creation
• Record & Mix
4 Select the session template you want to use from the list (on the right).
5 Configure any of the following session set-tings as necessary:
• Audio File Type
• Bit Depth
• Sample Rate
6 Click OK.
New Session dialog, Create Session from Template
C
7 In the Save dialog, navigate to the location where you want to save the new session and click Save.
To create a new blank session:
1 Choose File > New.
2 In the New Session dialog, select Create Blank Session.
3 Configure any of the following session set-tings as necessary:
• Audio File Type
• Bit Depth
• Sample Rate
• I/O Settings
4 Click OK.
5 In the Save dialog, navigate to the location where you want to save the new session and click Save.
New Session dialog, Create Blank Session
hapter 2: General Pro Tools Features and Enhancements 11

12
Session TemplatesIn addition to the Session Templates provided in the Pro Tools Session Quick Start dialog, Pro Tools lets you create and share your own custom Session Templates. Pro Tools Session Template files use the suffix “.ptt” to differenti-ate them from regular Pro Tools session files (“.ptf”).
Creating and Saving Custom Templates
To create a custom Pro Tools Session Template:
1 Create a new Pro Tools session and configure it for the session template you want.
2 Choose File > Save As Template.
For example, if you are a songwriter you might simply want a session consisting of a stereo Instrument track with an instrument plug-in (such as Xpand! 2 with a piano pre-set), a mono audio track (for tracking vo-cals), a stereo Auxiliary Input track (for an effects bus), and a stereo Master Fader track. You can then use this template every time you sit down to work on a new song.
Save Session Template dialog
What’s New in Pro Tools HD 8.0
3 Configure the Save Session Template dialog as desired (see “Save Session Template Dialog” on page 12).
4 Select the Include Media option if there is any audio, MIDI, or video media in the session that you want included in the template.
5 Click OK.
If you selected the Install Template In System op-tion, your session template will be available in the Pro Tools Session Quick Start dialog.
If you selected the Select Location For Template option, you are prompted by the Save As Tem-plate dialog to save the file to another location on your system.
Save Session Template Dialog
The Save Template dialog provides the follow-ing options:
Install Template In System
Select this option to save the template file in the system folder referenced by the Pro Tools Ses-sion Quick Start dialog (the Session Templates in the Pro Tools application folder).
Category
The Category pop-up menu is only available if the Install Template In System option is enabled. The Category pop-up menu lets you select the subdirectory in which to save the template file. It also provides options for adding a category and revealing the Session Templates folder in Windows Explorer or the Mac Finder.
When the Include Media option is enabled, all media in the session is included in the template. If you want to include media in your session template, be sure that your ses-sion only contains the media you want.

Add Category Select this option from the Cate-gory pop-up menu to create a new subdirectory in the Session Templates folder.
Name
The Name setting is only available if the Install Template In System option is enabled. This lets you type a new name for the template file. From the Name pop-up menu (to the right of the Name field), you can select from a list of all of the templates available in the currently selected Category. Selecting one places that name in the Name field, letting you overwrite, or create a in-cremental version of, an existing template.
Select Location For Template
Select this option to save the template file to any directory location on your system. Note that the saved session template will not appear in the Pro Tools Session Quick Start dialog unless it is in a subdirectory (Category) in the Session Tem-plates folder in the Pro Tools application folder.
Include Media
Select this option to include any audio, MIDI, or video media in the session with the template.
Creating New Sessions from Templates
You can create new session from templates by opening a template. In addition to being able to open session templates from Pro Tools Session Quick Start dialog, you can simply open any Pro Tools Session Template file (.ptt) to start a new session based on that template.
For information on creating new sessions from templates using the Quick Start dialog, see “Creating a New Session from a Tem-plate” on page 8.
C
To open a Pro Tools Session Template and save it as a new session:
1 Choose File > Open, navigate to the Session Template file you want and open it.
2 In the New Session From dialog, select the Au-dio File Type, Sample Rate, and Bit Depth for the new session that will be created from the tem-plate.
3 Click OK.
4 In the Save New Session As dialog, navigate to the location where you want to save the new session and click Save.
Checking For Software UpdatesPro Tools can check for Pro Tools application and Digidesign plug-in updates, either automat-ically or manually. An internet connection is re-quired to be able to check for updates. Approxi-mately every two weeks, Pro Tools checks online for any available application and plug-in up-dates.
If updates are available for Pro Tools or any plug-ins, Pro Tools reports what updates (if any) are available and how important the updates are for your system. You can then visit the Digide-sign website to locate, download, and install the appropriate updates for your Pro Tools system.
New Session From dialog
hapter 2: General Pro Tools Features and Enhancements 13

14
To manually check for updates:
1 Ensure that your internet connection is func-tioning properly.
2 Launch Pro Tools.
3 Choose Help > Check For Updates, and a progress dialog appears.
4 Depending on whether or not any updates are available, do one of the following:
• If no updates are available, click OK.
– or –
• If updates are available, do one of the follow-ing:
• Click Details to launch your web browser and see what updates are available for download.
• Click Not Now if you do not want to review or download updates until later.
To disable checking for software updates automatically:
In the Software Update dialog, enable the Do Not Check For Updates Automatically option.
To enable checking for software updates automatically:
1 Check for updates manually (Help > Check For Updates).
2 In the Software Update dialog, disable the Do Not Check For Updates Automatically option.
Opening Session with Plug-ins DeactivatedPro Tools lets you open sessions with all of the session’s plug-ins set to inactive. Since sessions with a lot of plug-ins can take a long time to load, this lets you quickly open any session for
What’s New in Pro Tools HD 8.0
immediate visual inspection and audio playback (without plug-ins). If it is the session that you want to work with, you can easily reopen the session with plug-ins activated.
To open a Pro Tools session with all plug-ins set to inactive:
1 In Pro Tools, choose File > Open Session.
2 In the Open Session dialog, locate and select the session you want.
3 Shift-click Open.
To re-open the same session with all plug-ins set to active, do one of the following:
Choose File > Revert To Saved.
– or –
Choose File > Open Recent and select the most recent session in the submenu.
DSP CachePro Tools HD 8.0 now maintains a Plug-in and Mixer cache for allocated DSP when closing and opening sessions. While this does not change the time it takes to open the first session after you launch Pro Tools, it does result in being able to open and close all subsequent Pro Tools ses-sions much more quickly than before, especially when using the Revert To Saved command or when opening similarly configured sessions.
If you save your session after opening it with all plug-ins set to inactive, you will not be able to use Revert to Saved or Open Most Recent to re-activate all of the plug-ins in the session.
Press Control+Shift+O (Windows) or Com-mand+Shift+O (Mac) to open the most re-cent session.

In previous versions of Pro Tools, all DSPs were completely unloaded, or “purged,” when clos-ing a session, and they had to be completely re-loaded when opening the next session. Now, as long as Pro Tools is running, the DSPs will only be completely purged if you open a session with a different sample rate or one with different Playback Engine settings.
However, when using DSP caching, the System Usage window may not always accurately show the DSP resources your session is currently us-ing. For an accurate display of current DSP us-age, you can either disable DSP caching or purge the DSP cache.
To enable (or disable) DSP Caching:
1 Open the System Usage window (Windows > System Usage).
2 Click the DSP Cache pop-up menu and select (or deselect) Use DSP Cache.
To purge the DSP cache:
1 Open the System Usage window (Windows > System Usage).
System Usage window, DSP Cache pop-up menu
C
2 Click the DSP Cache pop-up menu and select (or deselect) Purge Cache. This refreshes the Sys-tem Usage display.
Improved Window Management
Arranging Windows
Pro Tools provides commands to tile or cascade all open windows. Floating windows (such as plug-in, output, and send windows) and the Transport window are not affected by these commands.
To arrange windows:
Select one of the following options from Win-dow > Arrange:
Tile Arranges all open windows in a tiled pattern on the screen.
Tile Horizontal Arranges all open windows in a horizontally-tiled pattern on the screen. This option is not available if there are too many windows open.
Tile Vertical Arranges all open windows in a ver-tically-tiled pattern, side by side, on the screen. This option is not available if there are too many windows open.
Cascade Arranges all open windows in a cascad-ing pattern on the screen.
Windows Configurations
Introduced in Pro Tools 7.3, Window Configu-rations have provided a powerful means of man-aging the configuration of windows in your Pro Tools sessions. Window Configurations now also include the Targeted MIDI Editor win-dow and Score Editor in the Window Layout
hapter 2: General Pro Tools Features and Enhancements 15

16
and Window Display Settings options. The Tar-geted MIDI Editor window and Score Editor can also be view filtered in the Window Configura-tions List.
Improved Color PaletteThe Color Palette lets you make color selections for tracks, regions, groups and markers. It also now lets you apply colors to channel strips in the Mix and Edit windows, and lets you adjust the color saturation and brightness for channel strips.
New Color Palette Controls
Apply To Channel Strip When Apply To Channel Strip is enabled, you can adjust the Saturation slider to change the color saturation of all chan-nel strips.
Saturation When Apply To Channel Strip is en-abled, you can adjust the Saturation slider to the color saturation for channel strips.
Brightness This control lets you adjust the Brightness for the channel strips.
For information about MIDI Editor win-dows, see Chapter 6, “MIDI Editor Win-dows.” For information about the Score Ed-itor window, see Chapter 7, “Score Editor Window.”
Color Palette window
Apply to Selected
Hold
DefaultNoneApply to Channel Strip
Saturation
Last assigned color
Brightness
What’s New in Pro Tools HD 8.0
Lower H/W Buffer Size SettingIn the Playback Engine dialog, Pro Tools HD now provides H/W Buffer Size settings down to 64 samples for the lowest possible monitoring latency. However, the 64 sample buffer size set-ting is only be available when the Number of Voices setting is set to 48 Voices (1 DSP) or 96 voices (2 DSP). The lowest available H/W Buffer Size setting will be 64, 128, or 256 Samples de-pending on the Number of Voices setting.
Increased File Size LimitPro Tools 8.0 supports file sizes up to 3.4 GB (the file size limit used to be 2 GB). This lets you have longer, single file recordings.
Increased Waveform ResolutionPro Tools 8.0 provides 16-bit waveform over-view calculation (it used to be 8-bit). This pro-vides better vertical resolution of the waveform when zoomed in for editing. This is especially true for recordings with low signal levels.
When opening a Pro Tools 8.0 session that references files larger than 2 GB in an ear-lier version of Pro Tools on Mac, regions that refer to those files appear offline. If you know you will be transferring your Pro Tools 8.0 session to an earlier version of Pro Tools, be sure to edit any regions that reference files larger than 2 GB and consol-idate them so that the session only refer-ences files less than 2 GB. You will then be able to open the session in an earlier version of Pro Tools with all of the region online.

MIDI Beat Clock OffsetsPro Tools can transmit MIDI Beat Clock to syn-chronize external MIDI devices that receive MIDI Beat Clock (such as drum machines) with the Pro Tools session tempo. Some instrument plug-ins also support MIDI Beat Clock for syn-chronizing to the Pro Tools tempo.
Pro Tools 8.0 now lets you set an offset for MIDI Beat Clock on a port-by-port basis with your MIDI interface and external MIDI devices. This lets you adjust the timing for each device where some devices sound late due to different, fixed latencies. Where appropriate, enter negative off-set values in samples for each port to correctly synchronize the audio signals from your exter-nal MIDI devices with Pro Tools playback.
Transmitting Beat Clock
To transmit MIDI Beat Clock:
1 Choose Setup > MIDI > MIDI Beat Clock.
2 In the MIDI Beat Clock dialog, select the En-able MIDI Beat Clock option.
MIDI Beat Clock dialog
C
3 Select the devices you want to receive MIDI Beat Clock. If your MIDI interface does not sup-port transmitting MIDI Beat Clock to separate ports, only the interface appears as a destina-tion.
4 Enter the correct negative offset values (such as “–200” samples) for each port that is enabled for transmitting MIDI Beat Clock (see “Measur-ing Beat Clock Latency” on page 17).
5 Click OK.
Measuring Beat Clock Latency
To determine the correct MIDI Beat Clock offset for an external MIDI device:
1 Ensure that your computer and external MIDI device are correctly connected and configured for MIDI, and that its audio output is correctly connected to audio inputs on your Pro Tools au-dio interface.
2 Ensure that your external MIDI device is con-figured to receive MIDI Beat Clock, and that it is correctly configured to play back a simple rhyth-mic pattern “on the beat.”
3 Create a new Pro Tools session.
4 In the MIDI Beat Clock dialog, ensure that MIDI Beat Clock is enabled and that the device is selected.
5 Set the Main Time Scale to Bars|Beats.
6 Create a new audio track and select the audio input channels for your external MIDI device.
7 Record enable the audio track and start record-ing. MIDI Beat Clock is sent to the external MIDI device, which starts playing back the pattern.
8 Stop recording after a few bars.
9 Enable both Grid mode and Show Grid.
hapter 2: General Pro Tools Features and Enhancements 17

18
10 With the Selector tool, place the edit cursor on the beat grid prior to a prominent transient in the waveform that is “on the beat.”
11 Enable Tab to Transients and Shift+Tab to the transient.
12 Switch the Main Time Scale to Samples. The length of the Edit selection (in samples) is the approximate MIDI Beat Clock latency for that device. See Figure 2 on page 18.
Since MIDI is not sample accurate, you may want to make several measurements at dif-ferent grid locations and average them to come up with the best value for the MIDI Beat Clock Offset.
What’s New in Pro Tools HD 8.0
13 In the MIDI Beat Clock dialog, enter the Sam-ple Offset value as a negative number.
MIDI Beat Clock Sample Offset
Once you have measured the latency for your MIDI Beat Clock–enabled devices, be sure to keep a record of these values in case you need to re-enter the MIDI Beat Clock Sample Offset in other sessions.
Figure 2. Measuring the offset for MIDI Beat Clock in samples
ApproximateSample Offset

chapter 3
Changes to Pro Tools Preferences
Display Preferences
Basics Section
The following preferences have been removed.
• Recompute Invalid Overviews (Pro Tools al-ways recalculates invalid or missing wave-form overviews)
• Draw Grids in Edit Window (this option is now available with the Grid Value selector in the Edit window)
• Draw Waveforms Rectified (this option has been moved to View > Waveforms > Recti-fied)
Color Coding
The following preference is new:
MIDI Note Color Shows Velocity When enabled, MIDI notes display varying shades of the as-signed track color in MIDI notes view in the Edit window and in MIDI Editor windows. Notes with high velocities are darker and notes with lower velocities are lighter.
Chapter 3: Changes to Pro Tools Preferences 19

20
Operation Preferences
Transport Section
The following preference is new:
Latch Forward/Rewind When selected, fast for-ward and rewind latch and continue until you start or stop playback. When disabled, the Fast Forward and Rewind only last as long as you hold down the mouse after clicking either but-ton on the Transport (or hold down the corre-sponding switch on a Control Surface).
Record Section
The following preference is new:
Automatically Create New Playlists when Loop Re-cording Copies loop recorded alternate takes to new playlists in the track. This is especially use-ful to prepare for track compositing in Playlist View after loop recording multiple alternate takes.
What’s New in Pro Tools HD 8.0
Misc (Miscellaneous) Section
The following preference is new:
Show Quick Start Dialog when Pro Tools Starts When selected, Pro Tools shows the Ses-sion Quick Start dialog on launch.
Editing Preferences
“Matching Start Time” Takes List
The following “Matching Start Time” Takes List have been removed and are now available through the Matching Criteria dialog:
• “Includes Take Region Names That Match Track Names”
• “Includes Take Region Lengths That Match”
For information on Matching Criteria op-tions, see “Matching Criteria” on page 52.

MIDI Preferences
The following MIDI Preferences have been re-moved and are now available in the Edit, MIDI Editor, and Score Editor windows:
• “Default Note On Velocity”
• “Play MIDI Notes When Editing”
Basics Section
The following preferences are new:
Remove Range Selection After Opening the MIDI/Score Editor When selected, the current Edit selection collapses into an insertion point after opening either a MIDI Editor window or the Score Editor window.
“Double-clicking a Region Opens…”
This option lets you specify what happens when you double-click MIDI regions with the Grabber tool on MIDI and Instrument tracks in the Edit window.
MIDI Editor Opens the MIDI region in a MIDI Editor window.
Score Editor Opens the MIDI region in the Score Editor window.
MIDI Event List Opens the MIDI region in the MIDI Event List.
Name Dialog Opens the Name dialog for the MIDI region.
MIDI/Score Editor Display
The following preference is new:
Additional Empty Bars in the Score Editor Lets you specify the default number of empty bars that appear in the Score Editor window after the end of the last MIDI region in the session.
Synchronization Preferences
Synchronization Section
The following preference has been removed:
Stable LTC Source When selected, this option suppresses the normal 1-second wait time before Pro Tools attempts to lock to incoming LTC.
Chapter 3: Changes to Pro Tools Preferences 21

22
The following preferences are new:
Delay Before Locking to Longitudinal Time Code Sets the amount of time (in frames) for Pro Tools to wait before attempting to lock to incoming LTC. Use this option when locking Pro Tools to a stable time code source (such as a non-linear tape machine or LTC generator) and not a linear tape machine.
Delay Before Locking to Serial Time Code (Pro Tools HD Only) Sets the amount of time (in frames) for Pro Tools to wait before attempting to lock to machines that issue servo lock mes-sages. This setting allows time for the servo mechanisms to achieve stable lock.
Satellite Link Section
The following preferences are new:
Transmit Solos Causes a linked Pro Tools system to transmit the solo status of its tracks to all other linked Pro Tools systems. On other linked systems that are set to receive solo status, tracks follow solo behavior as if the solo were on the local system. However, if the Solo Independent of Linked State option is enabled, Transmit Solos ap-plies to connected systems regardless of whether or not they are linked.
Receive Solos Causes a linked Pro Tools system to receive solo status from all other linked Pro Tools systems that are set to transmit solo status of their tracks. Tracks on the receiving sys-tem follow solo behavior as if the solos were on the local system. However, if the Solo Indepen-dent of Linked State option is enabled, Receive Solos applies to connected systems regardless of whether or not they are linked.
What’s New in Pro Tools HD 8.0
Solo Independent of Linked State Causes a Pro Tools system to send the solo status of its tracks to other connected satellite systems even when it is unlinked. This allows control of solo status across systems even when transport con-trol is not enabled.
DAE Errors Stop All Linked Systems Causes a DAE error on any linked Pro Tools system to stop the transport on all linked systems. When this option is not selected, linked systems will not stop if a DAE error occurs on one system.
Transmit Play Selections Causes a linked Pro Tools system to send the Edit window selec-tion to all other linked Pro Tools systems. On other linked systems that are set to receive play selections, the selection is mirrored in the Edit window.
Receive Play Selections Causes a linked Pro Tools system to receive Edit window selec-tions from all other linked Pro Tools systems that are set to transmit play selections.

chapter 4
Editing Features and Enhancements
Universe ViewIn Pro Tools 8.0, the Universe window has been replaced with the Universe view at the top of the Edit window. You can use the Universe view to quickly and easily navigate your Pro Tools ses-sion.
The Universe view displays an overview of the entire session (see Figure 1 on page 23). This view represents audio and MIDI material on all tracks that are not hidden (including tracks that are inactive, or that contain offline regions). The order in which material is displayed in the Uni-verse view corresponds to the track order in the Edit window.
Figure 1. Universe view at the top of the Edit window
Universe view
Chapter 4: Editing Features and Enhancements 23
24
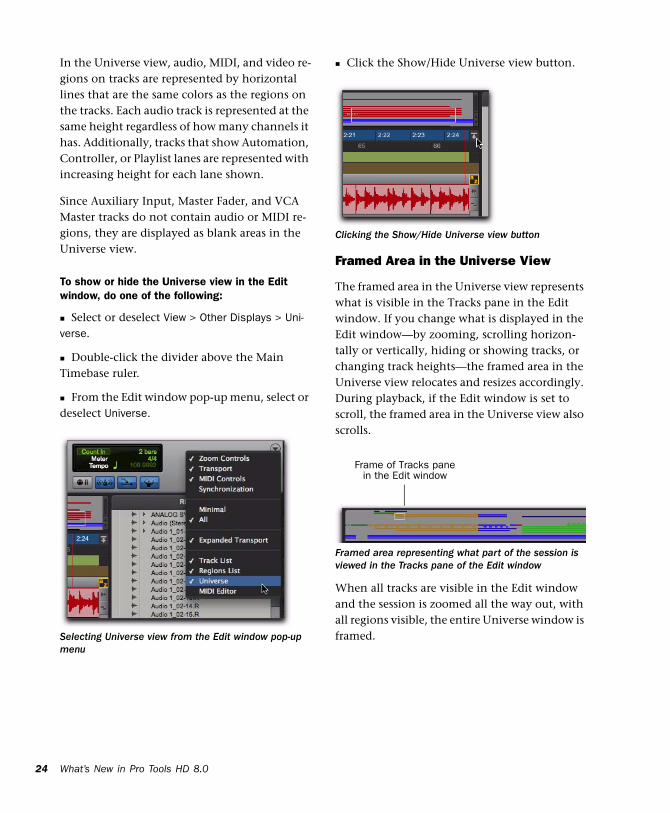
In the Universe view, audio, MIDI, and video re-gions on tracks are represented by horizontal lines that are the same colors as the regions on the tracks. Each audio track is represented at the same height regardless of how many channels it has. Additionally, tracks that show Automation, Controller, or Playlist lanes are represented with increasing height for each lane shown.
Since Auxiliary Input, Master Fader, and VCA Master tracks do not contain audio or MIDI re-gions, they are displayed as blank areas in the Universe view.
To show or hide the Universe view in the Edit window, do one of the following:
Select or deselect View > Other Displays > Uni-verse.
Double-click the divider above the Main Timebase ruler.
From the Edit window pop-up menu, select or deselect Universe.
Selecting Universe view from the Edit window pop-up menu
What’s New in Pro Tools HD 8.0
Click the Show/Hide Universe view button.
Framed Area in the Universe View
The framed area in the Universe view represents what is visible in the Tracks pane in the Edit window. If you change what is displayed in the Edit window—by zooming, scrolling horizon-tally or vertically, hiding or showing tracks, or changing track heights—the framed area in the Universe view relocates and resizes accordingly. During playback, if the Edit window is set to scroll, the framed area in the Universe view also scrolls.
When all tracks are visible in the Edit window and the session is zoomed all the way out, with all regions visible, the entire Universe window is framed.
Clicking the Show/Hide Universe view button
Framed area representing what part of the session is viewed in the Tracks pane of the Edit window
Frame of Tracks panein the Edit window
Navigating with the Universe View
By clicking in the Universe view, you can scroll the material displayed in the Edit window hori-zontally, vertically, or both. This provides a con-venient method of focusing the Edit window anywhere in the session.
To navigate the session using the Universe view:
1 Ensure that Universe view is shown (View > Other Displays > Universe).
2 Click anywhere in the Universe view to move the framed area and the Edit window updates accordingly.
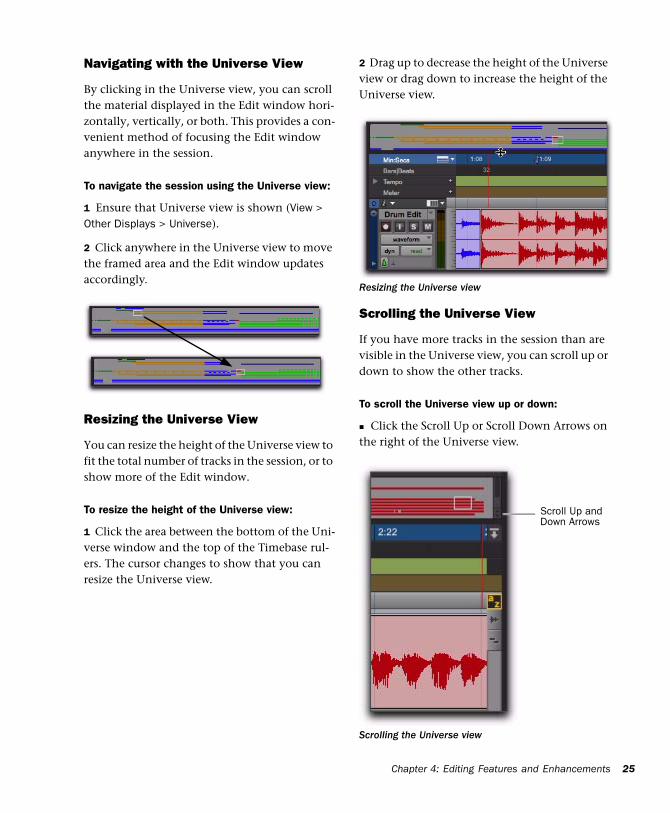
Resizing the Universe View
You can resize the height of the Universe view to fit the total number of tracks in the session, or to show more of the Edit window.
To resize the height of the Universe view:
1 Click the area between the bottom of the Uni-verse window and the top of the Timebase rul-ers. The cursor changes to show that you can resize the Universe view.
2 Drag up to decrease the height of the Universe view or drag down to increase the height of the Universe view.
Scrolling the Universe View
If you have more tracks in the session than are visible in the Universe view, you can scroll up or down to show the other tracks.
To scroll the Universe view up or down:
Click the Scroll Up or Scroll Down Arrows on the right of the Universe view.
Resizing the Universe view
Scrolling the Universe view
Scroll Up andDown Arrows
Chapter 4: Editing Features and Enhancements 25

26
Video Universe
The Video Universe window is now directly ac-cessible from the Window menu in Pro Tools. The Video Universe lets you view, navigate, zoom, and select video regions on the main video track. The Video Universe window dis-plays the center video frame of each video re-gion in the main video track. Video frames are ordered sequentially according to their order in the Timeline, and the colored strip under each frame represents the color coding for that re-gion.
To display the Video Universe window:
1 Make sure the Video Online button in the main video track is set to online status (blue).
2 Choose Window > Video Universe.
New Waveform ViewsPro Tools 8.0 provides several Waveform view options. As before, waveforms can be displayed in Peak view normally (as positive and negative shapes around the zero crossing) or rectified. They can now also be calculated as Power whether displayed normally or rectified. Addi-tionally, you can choose to display waveforms outlined or not.
To set the Waveform view:
1 Choose View > Waveforms and select Peak or Power.
2 Choose View > Waveforms and select or dese-lect Rectified.
3 Choose View > Waveforms and select or dese-lect Outlines.
When zoomed in to the sample level, Pro Tools always displays Peak view.
What’s New in Pro Tools HD 8.0
Peak When selected, the waveform display is calculated based on the sample-by-sample peak level. Peak view is traditionally how Pro Tools calculates the waveform overview and can be used for normal or rectified views. Peak view clearly displays any clipping in the waveform.
Power When selected, the wave form display is calculated according to the Root Mean Square (RMS). Power view can be used for normal or rectified views. Power view is useful for better seeing the characteristics of the audio in the waveform representation when zoomed out be-yond the sample level. For mastering applica-tions in particular, it can be more revealing of the sonic characteristics of the audio than Peak view.
Normal Peak Waveform view with Outlines
Normal Power Waveform view with Outlines
Peak view is always shown during record-ing. Power waveform view is calculated and shown only after you stop recording.
Power view is not available in Destructive Punch mode or when zoomed to the sample level.

Rectified When selected, audio waveforms are displayed so that their positive and negative waveform excursions (the portions that fall above and below the center line) are summed together and viewed as a single positive-value signal. This view lets you see more waveform de-tail in normal or reduced track height views. It can be particularly useful when editing volume automation data, since it depicts waveform lev-els as starting at the bottom of the track. Recti-fied Waveform view is an option that can be en-abled in Peak or Power views.
Rectified Peak Waveform view with Outlines
Rectified Power Waveform view with Outlines
Outlines When selected, audio waveforms are outlined. This helps provide more visual defini-tion of the waveform, especially when viewed from a distance. However, you may want to dis-able Outlines when you need to do precise, de-tailed editing in Peak waveform view. Outlines are not displayed when you are zoomed in to the sample level.
Peak Waveform view without Outlines
Power Waveform view without Outlines
Rectified Peak Waveform view without Outlines
Rectified Power Waveform view without Outlines
Chapter 4: Editing Features and Enhancements 27

28
MIDI Editor ViewPro Tools 8.0 introduces MIDI Editor windows for detailed MIDI editing. MIDI Editor windows can show MIDI data and automation data for Auxiliary Input, Instrument, and MIDI tracks. You can open any number of separate MIDI Ed-itor windows, each of which can provide a unique view of MIDI in your Pro Tools session. Like Plug-in, Output, and Send windows, a sin-gle MIDI Editor window can be “targeted.”
For detailed information on MIDI Editor windows, see Chapter 6, “MIDI Editor Windows.”
What’s New in Pro Tools HD 8.0
MIDI Editor in the Edit Window
You can also choose to show (or hide) a MIDI Editor pane at the bottom of the Edit window (below the Tracks pane).
To show (or hide) the MIDI Editor view in the Edit window, do one of the following:
Select (or deselect) View > Other Displays > MIDI Editor.
Click the MIDI Editor Show/Hide icon in the lower left corner of the Tracks pane in the Edit window.
Double-click the divider below the Tracks pane in the Edit window.
From the Edit Window menu, select (or dese-lect) MIDI Editor.
Figure 2. MIDI Editor view at the bottom of the Edit window

Customizable ToolbarsIn Pro Tools 8.0 you can customize the toolbar in the Edit, MIDI Editor, or Score Editor win-dows by re-arranging, showing, and hiding the available controls and displays.
Showing and Hiding Controls in the Edit Window
To show or hide controls in the Edit window toolbar:
1 Do one of the following:
• Click the Edit Window Toolbar menu (in the upper-right corner of the window).
• Right-click in the toolbar.
2 From the menu, select or deselect any of the following depending on which window you are configuring:
Zoom Controls When selected, the Zoom con-trols are displayed in the Edit window toolbar.
Edit Window Toolbar menu
Transport When selected, the Transport controls are displayed in the Edit window toolbar.
MIDI Controls When selected, the MIDI controls are displayed in the window toolbar.
Synchronization When selected, the Synchroni-zation controls are displayed in the Edit window toolbar.
Minimal When selected, the Zoom, Transport, MIDI, and Synchronization controls are not dis-played in the Edit window toolbar.
All When selected, the Zoom, Transport, MIDI, and Synchronization controls are all displayed in the Edit window toolbar.
Expanded Transport When selected, the Ex-panded Transport controls are displayed in the Edit window toolbar if Transport is also selected.
Track List When selected, the Track List is shown on the left of the Edit window.
Region List When selected, the Region List is shown on the right of the Edit window.
Chapter 4: Editing Features and Enhancements 29

30
Universe When selected, the Universe view is shown near the top of the Edit window.
MIDI Editor When selected, the MIDI Editor view is shown at the bottom of the Edit window.
Rearranging Controls and Displays
To rearrange controls and displays in the Edit, MIDI Editor, or Score Editor window toolbar:
Control-click (Windows) or Command-click (Mac) the controls or displays you want to move and drag them to the location in the toolbar you want.
For example, if you want the Counters and Edit Selection indicators to the right of the Transport controls in the toolbar, Control-click (Windows) or Command-click (Mac) and drag them to the right of the Transport controls.
Moving the Counters and Edit Selection indicators
What’s New in Pro Tools HD 8.0
New Look for the Smart ToolThe Smart Tool button has a new look and loca-tion in Pro Tools 8.0. It is now both over and bracketing the Trimmer, Selector, and Grabber tools.
Commands Keyboard FocusThe Commands Keyboard Focus button for the Edit window has been relocated to the upper-right corner of the tracks pane in the Edit win-dow. Commands Keyboard Focus is also avail-able in any MIDI Editor window. Only one win-dow can have Commands Keyboard Focus enabled at a time.
Edit window, Commands Keyboard Focus enabled
Smart Tool button
Commands KeyboardFocus enabled

ChordsThe Chords ruler lets you add chord symbols to Pro Tools sessions in the Edit window, in MIDI Editor windows, and in the Score Editor. Chord symbols in Pro Tools are simply markers that display chord symbols and diagrams (guitar tab-latures). Chord symbols have no effect on MIDI data.
Chords Ruler
In the Edit window and MIDI Editor windows, the Chords ruler lets you add, change, move, and delete chord symbols. You can use chord symbols to indicate the chord changes in your Pro Tools session.
To view the Chords ruler, do one of the following:
Select View > Rulers > Chords.
– or –
From the Ruler View selector in the Edit win-dow or in a MIDI Editor window, select Chords.
To add a chord symbol:
1 Place the cursor in the Timeline where you want to add a chord symbol.
For information on chord symbols in the Score Editor, see “Chord Symbols and Dia-grams” on page 99.
Chord Symbols ruler
Chords rulerAdd Chord Symbol
Chord Symbol markers
2 Do one of the following:
• Click the Plus (+) button in the Chords ruler.
– or –
• While pressing the Start key (Windows) or Control (Mac), move the cursor into the Chords ruler (where the cursor changes to the Grabber with a “+”) and click at the lo-cation where you want to place the chord symbol.
3 In the Chord Change dialog, select the name for the root of the chord, the chord quality, the bass note of the chord, and the desired chord di-agram (chord diagrams are only displayed in the Score Editor).
4 Click OK.
To change a chord symbol:
1 Double-click the Chord Symbol marker in the Chord Symbol ruler.
2 In the Chord Change dialog, make the desired changes.
3 Click OK.
To move a chord symbol:
Click and drag the Chord Symbol marker to a new time location.
To delete a chord symbol, do one of the following:
Alt-click (Windows) or Option-click (Mac) the Chord Symbol marker in the Chords ruler.
– or –
Make a selection in the Chords ruler that in-cludes the chord symbols you want to delete and choose Edit > Clear or press Delete.
Chapter 4: Editing Features and Enhancements 31

32
Chord Change Dialog
The Chord Change dialog lets you specify a commercial chord symbol and chord diagram (guitar tab) to place in the Chords ruler or on the score in the Score Editor. The Chord Change di-alog opens whenever you add or edit a Chord marker.
Chord Select the name for the root of the Chord (such as D).
Chord Quality Select the chord quality from the selector (such as major or minor).
Bass Select the bass note of the chord (such as B-flat for a G minor chord in first inversion).
Chord Change dialog
Chord selector Chord Qualityselector
Bass Note
Chord Diagrams
selector
What’s New in Pro Tools HD 8.0
Chord Diagram Select the chord diagram for gui-tar tablature. Chord diagrams only appear in the Score Editor.
Edit Window IndicatorsThe Timeline Data Online Status, Session Data Online Status, and Automatic Delay Compensa-tion indicators have a new look.
Timeline Data Online Status Indicator
The Timeline Data Online Status indicator is green when all files in use in track playlists are available for playback. If files are offline, being processed, or otherwise unavailable for play-back, this indicator is red.
Session Data Online Status Indicator
The Session Data Online Status indicator is green when all audio and fade files referenced by the session are available for playback. If files are offline, being processed, or otherwise unavail-able for playback, this indicator is red.
To show or hide chord symbols and dia-grams in the Score Editor, select or deselect the corresponding option in the Score Setup dialog.
Edit window indicators
Automatic Delay Compensation
Timeline Data Online StatusSession Data Online Status

Delay Compensation Status Indicator
(Pro Tools HD Only)
The Automatic Delay Compensation indicator is displayed when Delay Compensation is enabled (Options > Delay Compensation). When Delay Compensation is disabled, this indicator is not displayed.
New Edit Window OptionThe following Edit window option is new in Pro Tools 8.0.
Timeline Insertion/Play Start Marker Follows Playback Button
Pro Tools 8.0 provides a new Timeline Inser-tion/Play Start Marker Follows Playback button in the Edit window. This lets you enable or dis-able the Timeline Insertion/Play Start Marker Fol-lows Playback option and also provides a visual indication of whether or not this option is on. Previously, the option was only available in the Operation Preferences.
Edit window buttons
Press Start+N (Windows) or Control+N (Mac) to toggle the Timeline Insertion/Play Start Marker Follows Playback preference on and off.
Timeline Insertion/Play Start Marker Follows Playback
Edit Window MIDI Editing Controls Pro Tools provides a few options for determin-ing MIDI editing behavior. These options are available in the Edit window, MIDI Editor win-dows, and the Score Editor window. However, these options are only available if there is at least one MIDI or Instrument track in your Pro Tools session.
Play MIDI Notes When Editing
When enabled, the Play MIDI Notes When Edit-ing option causes MIDI notes to sound when ed-iting.
Default Note Duration
The Default Note Duration selector lets you de-fine the default note duration for manually in-serted notes. The Edit window, MIDI Editor win-dows, and Score Editor window can each have different Default Note Duration settings.
Default Note On Velocity
The Default Note On Velocity setting lets you define the default note on velocity for manually inserted notes. The Edit window, MIDI Editor windows, and Score Editor window can each have different Default Note On Velocity set-tings.
MIDI Editing Controls in the Edit window
Play MIDI Notes When Editing
Default Note Duration
Default Note On Velocity
Chapter 4: Editing Features and Enhancements 33

34
New Edit Window Zoom Buttons
Vertical and Horizontal Zoom In and Out Buttons
In addition to the Zoom controls in the Toolbar, Pro Tools 8.0 provides horizontal and vertical zoom buttons in the lower-right corner of the Edit window.
Vertical Zoom Buttons Zoom the track heights proportionally in the Edit window.
Horizontal Zoom Buttons Zoom the Timeline just like the Horizontal Zoom controls in the Edit window toolbar.
Vertical ZoomIn and Outbuttons
Horizontal ZoomIn and Outbuttons
What’s New in Pro Tools HD 8.0
Audio and MIDI Zoom In and Out Buttons
Pro Tools 8.0 also provides Audio and MIDI Zoom In and Out buttons in the upper-right cor-ner of the Edit window. These controls function the same as the Audio and MIDI Zoom controls in the Toolbar, and let you zoom in and out ver-tically on audio waveforms and MIDI notes re-spectively. Click the top part of the button to zoom in and the bottom part to zoom out.
Strip Silence Down to –96 dBIn Pro Tools 8.0, Strip Silence now lets you ad-just the Strip Threshold down to –96 dB (the lower limit used to be –48 dB). This increased dynamic range is especially useful when work-ing on recordings with low signal levels (such as ambient recordings) and recordings with a wide dynamic range (such as orchestral music).
MIDI Vertical Zoom only affects tracks in not in Regions view.
Strip Silence window
Audio ZoomIn and Outbuttons
MIDI ZoomIn and Outbuttons

Snap To GridTraditionally, the four Pro Tools Edit modes (Shuffle, Slip, Spot, and Grid) have been mutu-ally exclusive. Now, Pro Tools 8.0 also lets you enable Snap To Grid while in Shuffle, Slip, or Spot mode. When in any of these modes with Snap To Grid also enabled, placing the Edit cur-sor and making Edit selections is constrained by the Grid, but any region editing is also affected by the other selected Edit mode.
For example, in Shuffle mode, with Snap To Grid enabled, you can make a selection in a re-gion based on the Grid, cut the selection, and any regions to the right of the edit shuffle to the left.
To enable Snap To Grid while in another Edit mode:
Shift-click the Grid mode button.
To enable Shuffle, Slip, or Spot while in Grid mode:
Shift-click the Shuffle, Slip, or Spot mode but-ton.
Shuffle mode with Snap To Grid enabled
Press Shift+F4 to enable Snap To Grid while in another Edit mode.
Press F1+F4 to enable Snap To Grid and Shuffle mode; press F2+F4 to enable Snap To Grid and Slip mode; and press F3+F4 to enable Snap To Grid and Spot mode.
New Zoom Keyboard Shortcuts
To zoom horizontally to show the entire session without affecting vertical zoom or scrolling, do one of the following:
Press Alt+Start+A (Windows) or Option+Con-trol+A (Mac).
– or –
Press Control+Start+[ (Windows) or Com-mand+Control+[ (Mac).
To zoom in horizontally on a selection without affecting vertical zoom or scrolling, do one of the following:
Press Alt+Start+F (Windows) or Option+Con-trol+F (Mac).
– or –
Press Control+Start+] (Windows) or Com-mand+Control+] (Mac).
To zoom all audio vertically to show the default waveform height:
Press Control+Alt+Start+[ (Windows) or Com-mand+Option+Control+[ (Mac).
To zoom MIDI vertically to show all notes (lowest to highest) in MIDI and Instrument tracks:
Press Control+Start+Shift+[ (Windows) or Command+Control+Shift+[ (Mac).
Chapter 4: Editing Features and Enhancements 35

36
Edit Selection Enhancements and Key Commands
Restoring the Last Selection
There are times when editing that you can lose your selection. If you lose the current Edit (or Timeline) selection and want to restore it, use the Restore Last Selection command.
To restore the last selection:
Choose Edit > Restore Last Selection.
Moving the Insertion to the Beginning or End of the Selection
With the Transport stopped, you can use the Down and Up Arrows on your QWERTY key-board to place the Edit cursor at the beginning or end of the Edit (or Timeline) selection and collapse the selection.
To move the insertion to the beginning of the selection:
Press the Down Arrow.
To move the insertion to the end of the selection:
Press the Up Arrow.
Press Control+Alt+Z (Windows) or Com-mand+Option+Z (Mac) to restore the previ-ous selection.
What’s New in Pro Tools HD 8.0
Additional Keyboard Shortcuts for Changing the Edit Selection
Pro Tools provides several keyboard shortcuts for moving and extending or decreasing the range of an Edit (or Timeline) selection.
To move the selection forward by the selection amount:
Press Control+Alt+Start+’ (single quote) (Win-dows) or Command+Control+Option+’ (single quote) (Mac).
To move the selection backward by the selection amount:
Press Control+Alt+Start+L (Windows) or Command+Control+Option+L (Mac).
To double the length of the Edit selection:
Press Control+Alt+Start+Shift+’ (single quote) (Windows) or Command+Control+Op-tion+Shift+’ (single quote) (Mac).
To halve the length of the selection:
Press Control+Alt+Start+Shift+L (Windows) or Command+Control+Option+Shift+L (Mac).
Canceling Zoom Toggle
When Zoom Toggle is enabled, you can cancel it and remain at the same zoom level.
To cancel Zoom Toggle:
Press Alt+Shift+E (Windows) or Op-tion+Shift+E (Mac).

New Record Enable, Input Enable, Solo, and Mute Key CommandsPro Tools provides key commands for record en-abling, input enabling, soloing, and muting any tracks that contain the Edit cursor or an Edit se-lection. When you are navigating the session us-ing key commands, this lets you quickly enable or disable any of these options without having to use the mouse.
To record enable tracks that contain the Edit cursor or Edit selection:
Press Shift+R to toggle Record enable on or off.
To input enable tracks that contain the Edit cursor or Edit selection:
Press Shift+I to toggle Input enable on or off.
To solo tracks that contain the Edit cursor or Edit selection:
Press Shift+S to toggle solo on or off.
To mute tracks that contain the Edit cursor or Edit selection:
Press Shift+M to toggle mute on or off.
Locking RegionsIn many cases you may want to “lock” regions or region groups to a specific time location to keep them from being moved inadvertently. You may also want to protect them from being inadvertently edited. Pro Tools provides two dif-ferent types of region locking: Time-locking and Edit-locking.
Edit Locking Regions
If you have a region or group of regions that you want to protect from being inadvertently edited, you can Edit-lock them. Regions that are Edit-locked cannot be edited (such as cutting, delet-ing, separating, or trimming) or moved to a dif-ferent time location. Copied Edit-locked regions can be pasted to any track or time location, but the copy will also be Edit-locked at the new time location.
To Edit-lock (or unlock) a region:
1 With the Time Grabber, select the region or re-gions to Edit Lock (or unlock). The regions can reside on multiple tracks.
2 Choose Region > Edit Lock/Unlock.
When Edit-locked, a small Edit Lock icon ap-pears in the region and the region cannot be moved, deleted, or edited. If you attempt to per-form edits on a locked region, Pro Tools alerts you (see “Allowing Editing of Locked Regions” on page 38).
The Edit Lock command is the same as the Lock Regions command from previous ver-sions of Pro Tools.
Press Control+L (Windows) or Com-mand+L (Mac) to Edit lock or unlock the se-lected region.
Edit locked region
Edit Lock icon
Chapter 4: Editing Features and Enhancements 37
38
In Shuffle mode, Edit-locked regions, and all re-gions occurring after the locked region, are not displaced when other neighboring regions are moved.
On tick-based Elastic Audio–enabled tracks, Edit-locked regions conform to tempo changes, but no other Elastic Audio processing (such as Quantize or manual warping) can be applied.
Time Locking Regions
For regions that you want to lock to a particular location in a track (a beat, SMPTE frame, or sam-ple location), you can lock it in place so it can-not be moved accidentally. Time-locked regions cannot be moved. However, they can be edited in ways that do not move the region to a differ-ent time location (such as separating, trimming, AudioSuite processing, or even moving the re-gion to another track). Time-locked regions can also be deleted. When separating a Time-locked region, any new regions will also be locked to their time locations.
To Time-lock (or unlock) a region:
1 With the Time Grabber, select the region or re-gions to Time Lock (or unlock). The regions can reside on multiple tracks.
2 Choose Region > Time Lock/Unlock.
Press Shift+T to Time lock or unlock the se-lected region.
What’s New in Pro Tools HD 8.0
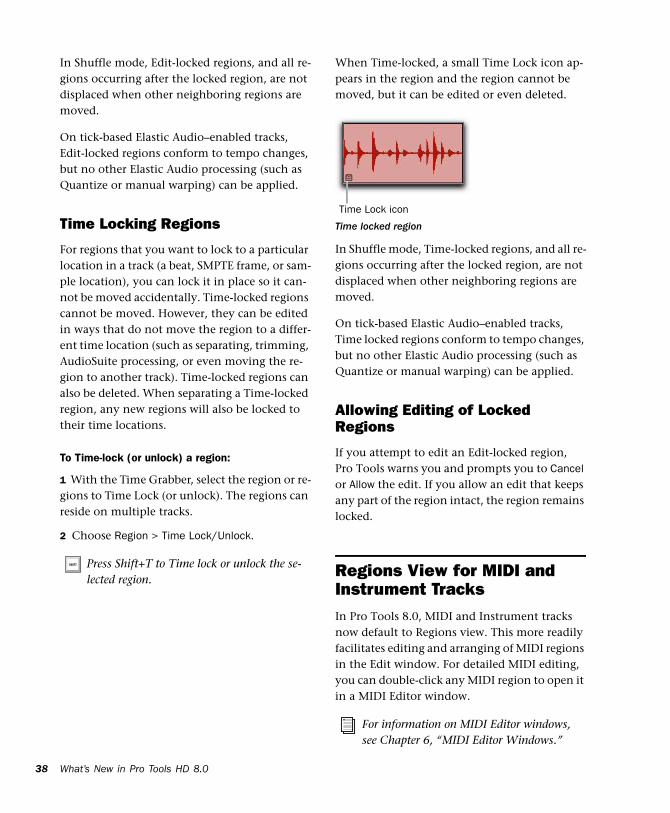
When Time-locked, a small Time Lock icon ap-pears in the region and the region cannot be moved, but it can be edited or even deleted.
In Shuffle mode, Time-locked regions, and all re-gions occurring after the locked region, are not displaced when other neighboring regions are moved.
On tick-based Elastic Audio–enabled tracks, Time locked regions conform to tempo changes, but no other Elastic Audio processing (such as Quantize or manual warping) can be applied.
Allowing Editing of Locked Regions
If you attempt to edit an Edit-locked region, Pro Tools warns you and prompts you to Cancel or Allow the edit. If you allow an edit that keeps any part of the region intact, the region remains locked.
Regions View for MIDI and Instrument TracksIn Pro Tools 8.0, MIDI and Instrument tracks now default to Regions view. This more readily facilitates editing and arranging of MIDI regions in the Edit window. For detailed MIDI editing, you can double-click any MIDI region to open it in a MIDI Editor window.
Time locked region
For information on MIDI Editor windows, see Chapter 6, “MIDI Editor Windows.”
Time Lock icon

Elastic Audio Region-Based Pitch Transposition(Polyphonic, Rhythmic, and X-Form Only)
In addition to Pro Tools Elastic Audio time com-pression and expansion capabilities, you can also change the pitch of whole audio regions in semitones and cents in the range of +/– 2 oc-taves.
Pitch transposition can be applied to Elastic Au-dio regions using either the Elastic Properties window or the Transpose window.
Elastic Audio pitch transposition is not sup-ported with the Monophonic algorithm.
To transpose the pitch of an audio region in the Elastic Properties window:
1 Make sure the region, or regions, you want to Transpose are on Elastic Audio–enabled tracks (using the Polyphonic, Rhythmic, or X-Form al-gorithm).
2 With the Grabber or Selector tool, select the audio region you want to transpose. Only re-gions that are completely selected will be af-fected.
3 Do one of the following to open the Elastic Properties window:
• Choose Region > Elastic Properties.
– or –
• Right-click the selected region and choose Elastic Properties.
4 Adjust the Pitch Shift settings by the desired amount in semitones and cents.
Press Alt+5 (Windows) or Option+5 (Mac) on the numeric keypad to open the Elastic Properties window.
Elastic Properties window
Chapter 4: Editing Features and Enhancements 39
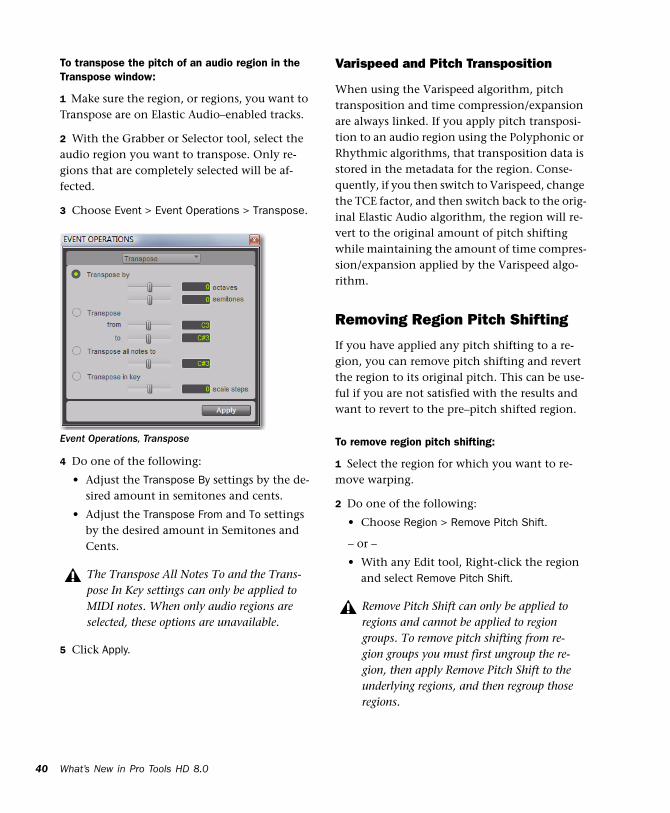
40
To transpose the pitch of an audio region in the Transpose window:
1 Make sure the region, or regions, you want to Transpose are on Elastic Audio–enabled tracks.
2 With the Grabber or Selector tool, select the audio region you want to transpose. Only re-gions that are completely selected will be af-fected.
3 Choose Event > Event Operations > Transpose.
4 Do one of the following:
• Adjust the Transpose By settings by the de-sired amount in semitones and cents.
• Adjust the Transpose From and To settings by the desired amount in Semitones and Cents.
5 Click Apply.
Event Operations, Transpose
The Transpose All Notes To and the Trans-pose In Key settings can only be applied to MIDI notes. When only audio regions are selected, these options are unavailable.
What’s New in Pro Tools HD 8.0
Varispeed and Pitch Transposition
When using the Varispeed algorithm, pitch transposition and time compression/expansion are always linked. If you apply pitch transposi-tion to an audio region using the Polyphonic or Rhythmic algorithms, that transposition data is stored in the metadata for the region. Conse-quently, if you then switch to Varispeed, change the TCE factor, and then switch back to the orig-inal Elastic Audio algorithm, the region will re-vert to the original amount of pitch shifting while maintaining the amount of time compres-sion/expansion applied by the Varispeed algo-rithm.
Removing Region Pitch Shifting
If you have applied any pitch shifting to a re-gion, you can remove pitch shifting and revert the region to its original pitch. This can be use-ful if you are not satisfied with the results and want to revert to the pre–pitch shifted region.
To remove region pitch shifting:
1 Select the region for which you want to re-move warping.
2 Do one of the following:
• Choose Region > Remove Pitch Shift.
– or –
• With any Edit tool, Right-click the region and select Remove Pitch Shift.
Remove Pitch Shift can only be applied to regions and cannot be applied to region groups. To remove pitch shifting from re-gion groups you must first ungroup the re-gion, then apply Remove Pitch Shift to the underlying regions, and then regroup those regions.

Improved Sound Quality with Elastic Audio
In Pro Tools 8.0, Digidesign has further im-proved the sound quality of the Polyphonic, Monophonic, and Rhythmic algorithms used for Elastic Audio processing.
Improved Quantize Event OperationQuantize always operates on the original event location (Elastic Audio and MIDI). This lets you apply new Quantize settings without having to first apply Restore Performance or undo the pre-vious Quantize pass.
When opening Pro Tools 7.4.x sessions that use Elastic Audio in Pro Tools 8.0, some Elastic Audio processing may be slightly al-tered due to the new and improved algo-rithms. Be sure to listen to the session in Pro Tools 8.0 with the new Elastic Audio processing algorithms and make any neces-sary adjustments (such as adjusting the De-cay Rate when using the Rhythmic Elastic Audio plug-in).
Improvements for Field Recorder FilesPro Tools 8.0 provides two improvements for managing the metadata associated with files im-ported from field recorders.
Shoot Date Metadata
Many field recorders do not populate the Shoot Date field, relying instead on the file’s Creation Date to indicate date of production. When Pro Tools imports a field recorder file, it now checks to see if the Shoot Date field is populated. If it is empty, Pro Tools copies the Creation Date of the original source file to the Shoot Date field of the new imported files.
Editing Channel Name Metadata
The Channel Name field in DigiBase displays the channel name, followed the by channel number in parentheses. It is now possible to edit the Channel name for mono BWF files. When editing the channel name, anything you enter in parentheses will be discarded. However, the channel number will always be preserved.
Chapter 4: Editing Features and Enhancements 41

42
What’s New in Pro Tools HD 8.0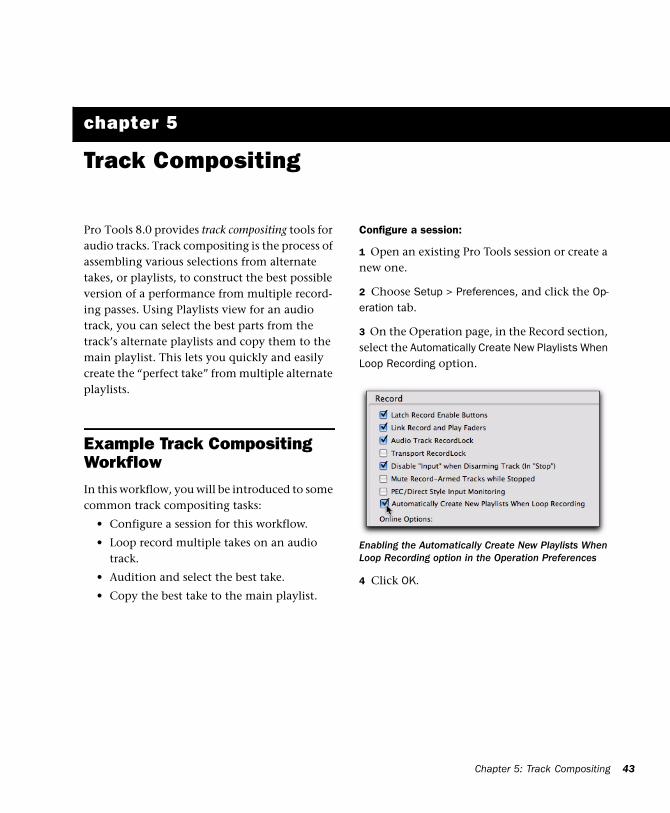
chapter 5
Track Compositing
Pro Tools 8.0 provides track compositing tools for audio tracks. Track compositing is the process of assembling various selections from alternate takes, or playlists, to construct the best possible version of a performance from multiple record-ing passes. Using Playlists view for an audio track, you can select the best parts from the track’s alternate playlists and copy them to the main playlist. This lets you quickly and easily create the “perfect take” from multiple alternate playlists.
Example Track Compositing WorkflowIn this workflow, you will be introduced to some common track compositing tasks:
• Configure a session for this workflow.
• Loop record multiple takes on an audio track.
• Audition and select the best take.
• Copy the best take to the main playlist.
Configure a session:
1 Open an existing Pro Tools session or create a new one.
2 Choose Setup > Preferences, and click the Op-eration tab.
3 On the Operation page, in the Record section, select the Automatically Create New Playlists When Loop Recording option.
4 Click OK.
Enabling the Automatically Create New Playlists When Loop Recording option in the Operation Preferences
Chapter 5: Track Compositing 43

44
Loop record several takes:
1 Create a new audio track (stereo or mono), or use an existing track.
2 Make sure the source you want to record is correctly connected and routed to the track in-put.
3 From the Track View selector, select Playlists.
4 To hear track material up to the start point of the loop, enable pre-roll and set the pre-roll time.
5 Enable Loop Recording by doing one of the following:
• Select Options > Loop Playback.
– or –
• Right-click the Play button in the Transport and select Loop.
6 Make sure that Options > Link Timeline and Edit Selection is selected.
7 With the Selector tool, select the loop range on the track.
8 Record enable the audio track by clicking its Record Enable button.
9 Click Record in the Transport to arm Pro Tools for recording.
10 Click Play to start recording.
11 When finished, click Stop to stop recording.
12 If you do not want to make another loop record pass, record disable the audio track.
What’s New in Pro Tools HD 8.0
After you have stopped loop recording, notice that all of the loop recording takes are revealed in Playlist lanes below the main playlist (includ-ing the whole audio file region of all of the loop record passes).
Playlists view showing multiple alternate playlists
If the Automatically Create New Playlists When Loop Recording option was disabled before you started loop recording, Right-click the region in the main playlist and choose Matches > Expand Alternates to New Playl-ists.
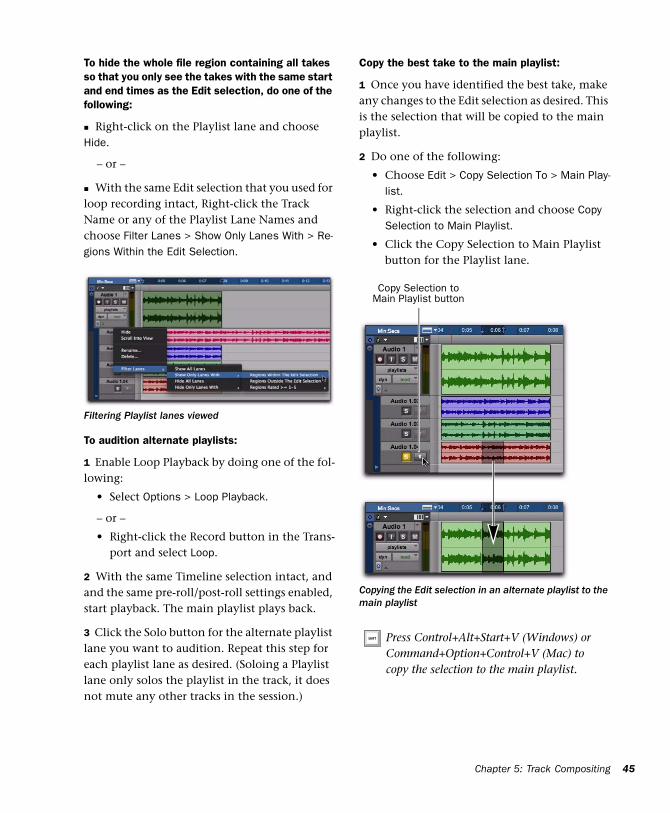
To hide the whole file region containing all takes so that you only see the takes with the same start and end times as the Edit selection, do one of the following:
Right-click on the Playlist lane and choose Hide.
– or –
With the same Edit selection that you used for loop recording intact, Right-click the Track Name or any of the Playlist Lane Names and choose Filter Lanes > Show Only Lanes With > Re-gions Within the Edit Selection.
To audition alternate playlists:
1 Enable Loop Playback by doing one of the fol-lowing:
• Select Options > Loop Playback.
– or –
• Right-click the Record button in the Trans-port and select Loop.
2 With the same Timeline selection intact, and and the same pre-roll/post-roll settings enabled, start playback. The main playlist plays back.
3 Click the Solo button for the alternate playlist lane you want to audition. Repeat this step for each playlist lane as desired. (Soloing a Playlist lane only solos the playlist in the track, it does not mute any other tracks in the session.)
Filtering Playlist lanes viewed
Copy the best take to the main playlist:
1 Once you have identified the best take, make any changes to the Edit selection as desired. This is the selection that will be copied to the main playlist.
2 Do one of the following:
• Choose Edit > Copy Selection To > Main Play-list.
• Right-click the selection and choose Copy Selection to Main Playlist.
• Click the Copy Selection to Main Playlist button for the Playlist lane.
Copying the Edit selection in an alternate playlist to the main playlist
Press Control+Alt+Start+V (Windows) or Command+Option+Control+V (Mac) to copy the selection to the main playlist.
Copy Selection toMain Playlist button
Chapter 5: Track Compositing 45

46
Playlists Track ViewPlaylists Track view lets you view the main play-list in the track, and also any alternate playlists associated with the track. Alternate playlists are displayed directly below the track in Playlist lanes.
You can edit alternate playlists in Playlist view just like the main playlist in Waveform view. In Playlists view, edits that are applied to range se-lections are applied to all shown alternate play-lists. Alternate playlists that are not shown are not affected.
To view the Playlist lanes for a track:
From the Track View selector, select Playlists.
\
Before starting work with Track Composit-ing, duplicate the track’s Main Playlist to keep it intact as a backup alternate playlist.
Region Groups are not supported in Playl-ists Track View.
Selecting Playlists Track view
You can also Control-Alt-click (Windows) or Command-Control-click (Mac) the Play-list selector to switch to Playlists view.
What’s New in Pro Tools HD 8.0
If the track does not contain any alternate play-lists in addition to the main playlist, only a sin-gle, empty Playlist lane is shown under the main playlist. You can drag and drop audio to this lane from the Region List, DigiBase Browsers, or other audio tracks to create an alternate playlist for the track in addition to the main playlist.
If the track contains one or more alternate play-lists in addition to the main playlist, they are displayed in lanes under the main playlist. Re-gardless, the bottom Playlist lane is always empty and can be used for adding regions to cre-ate new alternate playlists.
Dropping audio from Region List to create an alternate playlist
Track with alternate playlists in Playlists Track view

Auditioning Alternate Playlists
Only the main playlist plays back through the track audio output path. To hear an alternate playlist, you need to solo the Playlist lane. The soloed lane then plays through the track audio output path instead of the main playlist.
To audition an alternate playlist:
1 Click the Solo button for the Playlist lane you want to audition. (Soloing a Playlist lane only solos the playlist in the track, it does not mute any other tracks in the session.)
2 Start Pro Tools playback.
Soloing an alternate playlist
Press Shift+S to solo any one Playlist lane containing the Edit cursor. If more than one Playlist lane contains the Edit cursor, the topmost lane is soloed.
Use Start+P and Start+“;” (Windows) or Control+P and Control+“;” (Mac) to move the Edit cursor up and down through Playl-ist lanes.
Copying Alternate Playlists to the Main Playlist
Once you have found a selection in an alternate playlist that you want to use in the main playl-ist, copy and paste the selection to the main playlist. In this way you can construct the best combination of selections from alternate playl-ists.
In addition to manually copying and then past-ing to the main playlist, Pro Tools provides sev-eral commands for copying and pasting the se-lection to the main playlist:
Copy Selection To Main Playlist Copies and pastes the selection to the main playlist. Any material already on the main playlist at the same location is overwritten.
Copy Selection to New Playlist Creates a new, empty main playlist and copies and pastes the selection to the new main playlist
Copy Selection to Duplicate Playlist Duplicates the current main playlist and copies and pastes the selection to the duplicate of the main playl-ist. The previous main playlist moves to a new Playlist lane.
Chapter 5: Track Compositing 47
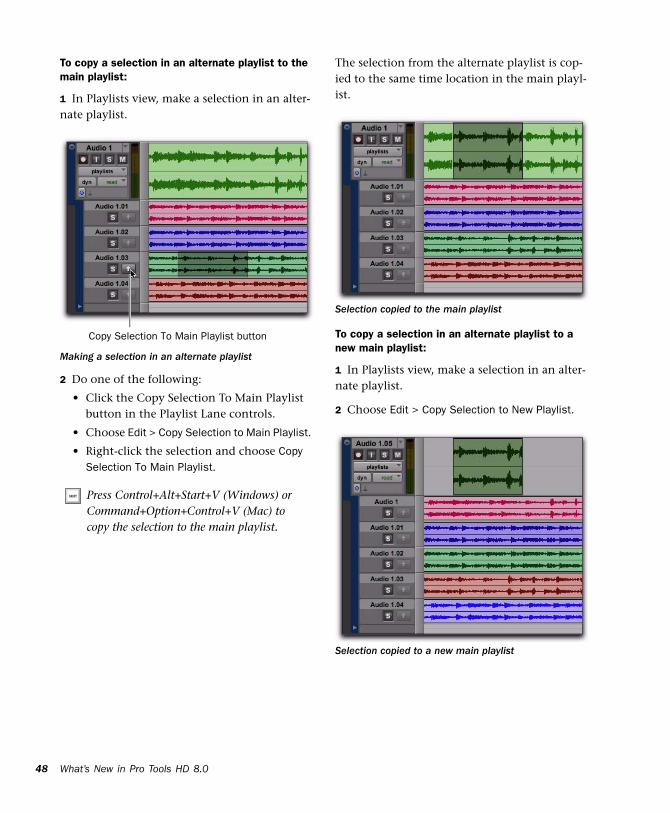
48
To copy a selection in an alternate playlist to the main playlist:
1 In Playlists view, make a selection in an alter-nate playlist.
2 Do one of the following:
• Click the Copy Selection To Main Playlist button in the Playlist Lane controls.
• Choose Edit > Copy Selection to Main Playlist.
• Right-click the selection and choose Copy Selection To Main Playlist.
Making a selection in an alternate playlist
Press Control+Alt+Start+V (Windows) or Command+Option+Control+V (Mac) to copy the selection to the main playlist.
Copy Selection To Main Playlist button
What’s New in Pro Tools HD 8.0
The selection from the alternate playlist is cop-ied to the same time location in the main playl-ist.
To copy a selection in an alternate playlist to a new main playlist:
1 In Playlists view, make a selection in an alter-nate playlist.
2 Choose Edit > Copy Selection to New Playlist.
Selection copied to the main playlist
Selection copied to a new main playlist

To copy a selection in an alternate playlist to a duplicate of the main playlist:
1 In Playlists view, make a selection in an alter-nate playlist.
2 Choose Edit > Copy Selection to Duplicate Playl-ist.
Dragging Regions to Playlists Lanes
You can drag and drop regions to any available Playlist lane on any track that has the same channel width. For example, you cannot drag and drop a stereo region to a mono track Playlist lane. Similarly, you can drag regions from any Playlist lane to any other track of the same chan-nel width.
Editing in Playlist Lanes
You can edit regions in Playlist lanes in the same way that you do in the main playlist. You can even move regions between different Playlist lanes (including the main playlist), between dif-ferent tracks, and to different points in time. However, you will not be able to hear your edits on Playlist lanes unless the lane you are editing is soloed (see “Auditioning Alternate Playlists” on page 47).
Selection copied to a duplicate of the main playlist
Reordering Playlist Lanes
You can reorder Playlist lanes the same way you reorder tracks.
To reorder Playlist lanes:
Click the name of the alternate playlist and drag it to the location you want.
Resizing Playlist Lanes
You can resize Playlist lanes the same way you resize tracks.
To resize the track and all Playlist lanes together, do one of the following:
Click the line in between lanes and drag up or down. The track and all Playlist lanes resize ac-cordingly.
– or –
Right-click the vertical scale between the play-list area and the Playlist Lane controls and select the lane size you want. The track and all Playlist lanes resize accordingly.
Reordering Playlist lanes
Press Start+Up/Down Arrow key (Win-dows) or Control+Up/Down Arrow key (Mac) to resize heights for tracks, playlists, and lanes containing the Edit cursor or Edit selection.
Chapter 5: Track Compositing 49
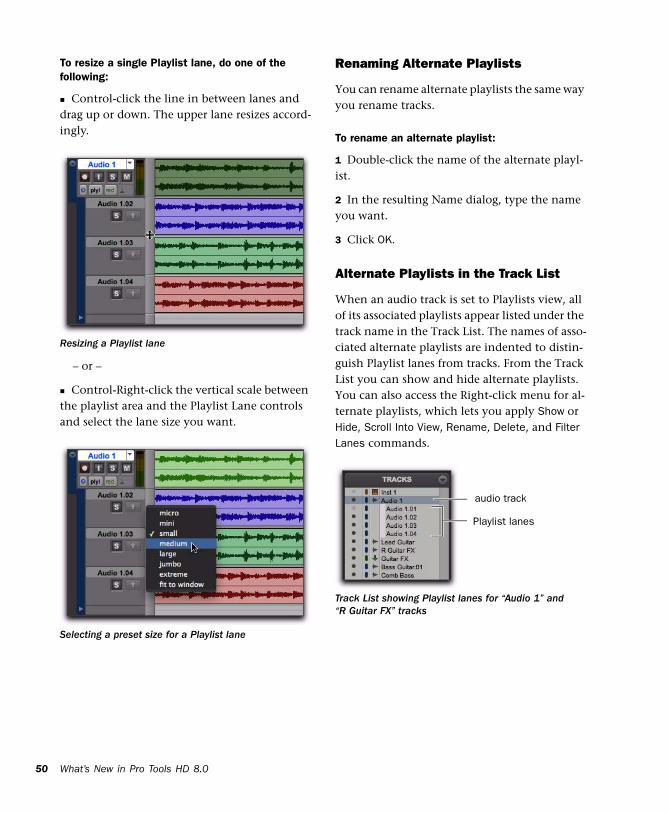
50
To resize a single Playlist lane, do one of the following:
Control-click the line in between lanes and drag up or down. The upper lane resizes accord-ingly.
– or –
Control-Right-click the vertical scale between the playlist area and the Playlist Lane controls and select the lane size you want.
Resizing a Playlist lane
Selecting a preset size for a Playlist lane
What’s New in Pro Tools HD 8.0
Renaming Alternate Playlists
You can rename alternate playlists the same way you rename tracks.
To rename an alternate playlist:
1 Double-click the name of the alternate playl-ist.
2 In the resulting Name dialog, type the name you want.
3 Click OK.
Alternate Playlists in the Track List
When an audio track is set to Playlists view, all of its associated playlists appear listed under the track name in the Track List. The names of asso-ciated alternate playlists are indented to distin-guish Playlist lanes from tracks. From the Track List you can show and hide alternate playlists. You can also access the Right-click menu for al-ternate playlists, which lets you apply Show or Hide, Scroll Into View, Rename, Delete, and Filter Lanes commands.
Track List showing Playlist lanes for “Audio 1” and “R Guitar FX” tracks
audio track
Playlist lanes

Filtering Lanes
You can filter Playlist lanes to show or hide them based on different criteria.
To filter Playlist lanes:
1 Right-click the Track Name or the Playlist Name.
2 From the Right-click menu, select one of the following:
• Show All Lanes
• Show Only Lanes With > Regions Within The Edit Selection
• Show Only Lanes With > Regions Outside The Edit Selection
• Show Only Lanes With > “Regions Rated >= 1–5”
• Hide All Lanes
• Hide Only Lanes With > Regions Within The Edit Selection
• Hide Only Lanes With > Regions Outside The Edit Selection
• Hide Only Lanes With > “Regions Rated >= 1–5”
Playlist lanes are shown and hidden accord-ingly.
Rating RegionsYou can rate different regions on a scale of 1 to 5, where 5 is the highest (or best) and 1 is the lowest (or worst). Region rating is useful for identifying which takes (regions) you like the most when compositing playlists. You can dis-play or hide the region rating in regions to facil-itate track compositing or regular editing. You can also show or hide Playlist lanes based on the ratings of regions in the playlist (see “Filtering Lanes” on page 51).
To rate a region:
1 Select the region.
2 Do one of the following:
• Choose Region > Rating, and select a rank-ing of 1 to 5.
– or –
• Right-click the region, choose Rate, and se-lect a ranking of 1 to 5.
To display ratings in regions:
Select View > Region > Rating.
To hide ratings in regions:
Deselect View > Region > Rating.
You can rate regions during playback and recording by pressing Control+Alt+Start (Windows) or Command+Option+Control (Mac) and then typing the rating number (1–5) on the numeric keypad.
Chapter 5: Track Compositing 51

52
Matching Alternate RegionsPro Tools lets you exchange regions in the main playlist on tracks with matching alternate re-gions from other playlists associated with the same track, from other tracks, or from the Re-gion List. Matching alternate regions are regions that meet certain criteria. For example, regions that have the same User Time Stamp match.
There are several ways to create matching alter-nate regions in Pro Tools:
• When punch recording (audio or MIDI), Pro Tools creates matching regions for the original region (if any) and the new punch re-corded region.
• When loop recording (audio or MIDI), Pro Tools creates multiple matching regions for each recording pass.
• When duplicating playlists (audio or MIDI), there will be matching alternate regions be-tween playlists.
• When importing multichannel audio from a field recorder, there will be matching alternate regions between channels.
Pro Tools also provides several ways to access and audition multiple matching alternate re-gions:
• Use the Region Right-click menu to select matching alternate regions according to cer-tain criteria.
• Use the Alternate Takes pop-up menu to select matching alternate regions.
• Use the Expand Alternates to New Tracks com-mand to copy matching alternate regions to new tracks.
What’s New in Pro Tools HD 8.0
• Use the Expand Alternates to New Playlists command to copy matching alternate regions to new alternate playlists on the same track. Then use Playlists view to access the alternate playlists.
Matching Criteria
The Matching Criteria window lets you select the criteria for matching alternate regions. This lets you refine the list of available matching re-gions in the Alternate Takes pop-up menu and Region Right-click Matches submenu.
To configure the Matching Criteria options for matching alternate regions:
1 Do one of the following:
• Right-click the region with the Selector or the Grabber tool and select Matches > Match Criteria.
– or –
• With the Selector tool, Control-click (Win-dows) or Command-click (Mac) at the pre-cise beginning of the loop or punch range and select Match Criteria.
Ratings displayed in regions
Matching Criteria affects MIDI as well as audio regions.

2 In the Matching Criteria window, select any combination of the following Alternates Match options:
• Track ID
• Track Name
• Region Rating
3 Select one of the following In Addition To op-tions:
• All
• Region Start
• Region Start and End
• Within Selection
• None
4 Leave the Matching Criteria window open to change the settings as appropriate while com-positing tracks. Close the Matching Criteria win-dow when you are done.
Alternates Match Options
The following Alternates Match options can be selected in any combination:
Track ID Any regions recorded to the same track are considered matching. Use this option for se-lecting alternate takes from loop or punch re-cording.
Track Name Any regions that share the same root name with the track/playlist are considered matching. For example, the Matches for a track named “Gtr.L” would show the regions “Gtr.L_01” and “Gtr.L_02-01,” but not “Gui-tar.L_01.”
Region Rating Any regions that have the same Rating are considered matching. Enable this op-tion if you have rated regions (see “Rating Re-gions” on page 51).
Matching Criteria settings are saved with your Pro Tools session.
In Addition To Match Options
The following In Addition To Match options are mutually exclusive.
All Any regions that include the time location of the Edit cursor; or any regions that are either partly or fully within the current time range of the Edit selection.
Region Start Any regions that have the same start time as the time location of the Edit cursor or Edit selection.
Region Start and End Any regions that have the same start and end times as the Edit selection.
Selection Range Any complete regions that are entirely within the Edit selection.
None No other criteria in addition to the se-lected Alternates Match options are used to filter matching alternate regions.
Selecting Alternate Takes on TracksEach region resulting from a punch or loop record pass has an identical start time (the User Time Stamp). You can select and audition alter-nate takes from the Right-click Matches sub-menu or the Alternate Takes pop-up menu—even during playback.
To select an alternate take:
1 Configure the Matching Criteria window if necessary (see “Matching Criteria” on page 52).
Chapter 5: Track Compositing 53

54
2 Do one of the following:
• Right-click the region with the Selector or the Grabber tool, and select a matching al-ternate take from the Matches submenu in the pop-up menu.
• If the take currently residing in the track is selected, Control-click (Windows) or Com-mand-click (Mac) anywhere on the selected take with the Selector tool, and select a dif-ferent take from the Alternate Takes pop-up menu.
• With the Selector tool, Control-click (Win-dows) or Command-click (Mac) at the pre-cise beginning of the loop or punch range and select a different take from the Alter-nate Takes pop-up menu.
The selected matching alternate region (take) re-places the region in the main playlist and snaps precisely to the correct location.
Right-click Matches submenu
Alternate Takes pop-up menu
What’s New in Pro Tools HD 8.0
One way to ensure that subsequent recording takes have the same User Time Stamp (and as such can be available as matching alternate re-gions) is to store punch and loop record selec-tions as Memory Locations. Then, if you later need to record additional takes, recall the corre-sponding Memory Location.
To change the User Time Stamp of other regions so that they can be available as alternate match-ing regions for a specific location, use the Time Stamp command in the Region List menu.
Matches and Multiple Tracks
If you have loop recorded on multiple tracks, and each track contains multiple takes with identical User Time Stamps, you can change all takes simultaneously.
To switch takes for multiple tracks:
1 Configure the Matching Criteria window (see “Matching Criteria” on page 52), so that the fol-lowing options are enabled:
• Track Name
– and –
• Selection Range
2 With the Selector tool, select the take range for each track you want to replace.
3 Do one of the following:
• Right-click the Edit selection and select a different matching alternate take from the Matches submenu.
– or –
• Control-click (Windows) or Command-click (Mac) the Edit selection and select a different take from the Alternates pop-up menu.

The selected take replaces the previous take and snaps precisely to the correct location on each track.
Automatically Create New Playlists When Loop RecordingWhen loop recording, Pro Tools creates a single file containing all recording passes where each recording pass is a region in the file. On the track, only the last recording pass is present as a region in the main playlist. All other regions (re-cording passes) are hidden, but can be recalled as matching alternate regions (takes).
When enabled, the new Automatically Create New Playlists When Loop Recording option in the Op-eration Preferences page automatically copies each region (take) to a new playlist in the track. This facilitates using Playlists view for audition-ing and selecting alternate takes.
To automatically create new playlists when loop recording:
1 Choose Setup > Preferences and click the Oper-ation tab.
2 In the Recording section, enable the Automati-cally Create New Playlists When Loop Recording op-tion.
3 Click OK.
Expanding Alternate Takes to New Playlists or TracksPro Tools lets you copy alternate takes and channels to new playlists or tracks. This is espe-cially useful for auditioning, editing, and mix-ing multiple alternate takes or channels. Alter-
nate takes are created when punch and loop recording. Alternate channels are included with files imported into Pro Tools from field record-ers.
Expanding Alternate Takes to New Playlists
Expanding alternate takes to new playlists readily facilitates track compositing. Once you have expanded alternate takes to new playlists on a track, you can audition and edit them in Playlists view to assemble the best takes in the main playlist.
To expand alternate takes to new playlists:
1 Identify the region on the main playlist with matching alternate regions (takes).
2 Do one of the following:
• Right-click the region and choose Matches > Expand Alternates To New Playlists.
• If the region is selected, with the Selector tool, Control-click (Windows) or Com-mand-click (Mac) anywhere on the selected region and choose Matches > Expand Alter-nates To New Playlists.
• If the region is not selected, with the Selec-tor tool, Control-click (Windows) or Com-mand-click (Mac) at the precise beginning of the loop or punch range and choose Matches > Expand Alternates To New Playl-ists.
All matching alternate regions are copied to new playlists on the track. To view all playlists for the track, select Playlists view. In any track view, you can also select any available alternate playl-ist as the main playlist from the Playlist selector.
Chapter 5: Track Compositing 55

56
Expand Alternate Takes to New Tracks
Expanding alternate takes to new tracks readily facilitates auditioning, editing, and mixing al-ternate takes, each on separate tracks.
To expand alternate takes to new tracks:
1 Identify the region on the main playlist with matching alternate regions (takes).
2 Do one of the following:
• Right-click the region and choose Matches > Expand Alternates To New Tracks.
• If the region is selected, with the Selector tool, Control-click (Windows) or Com-mand-click (Mac) anywhere on the selected region and choose Matches > Expand Alter-nates To New Tracks.
• If the region is not selected, with the Selec-tor tool, Control-click (Windows) or Com-mand-click (Mac) at the precise beginning of the loop or punch range and choose Matches > Expand Alternates To New Tracks.
3 Then choose one of the following from the Ex-pand Alternates To New Tracks sub-menu:
By Track Name Names all new tracks after the source track name.
By Region Name Names each new tracks after the corresponding original region names that you see in the Matches list.
By Track and Region Name Names all new tracks after the source track name, but with the corre-sponding original region names in parenthesis.
All matching alternate regions are copied to new tracks.
What’s New in Pro Tools HD 8.0
Expanding Alternate Channels to New Playlists or TracksWhen working with a mono region that is part of a multichannel recording imported from a field recorder, you can expand that region (or a selected portion of it) to new playlists that re-flect its matching alternate channels while pre-serving any edits or fades.
Expanding Channels to New Playlists
To expand alternate channels to new playlists:
1 In the Timeline, do one of the following:
• To expand only a portion of the regions on the track, make a selection that includes or overlaps any number of regions on a track, and Right-click (Windows or Mac) or Con-trol-click (Mac) the selection.
– or –
• To expand all of the regions on the track, Right-click (Windows or Mac) or Control-click (Mac) the track name.
2 Choose the Expand to New Playlists pop-up menu, and select one of the following methods by which to expand alternate channels for the selection to new tracks:
• By Channel Name
• By Channel Number
• By Channel Name and Number
• By Time Code Only
If alternate channels are available, Pro Tools ex-pands them to new playlists (including the channel represented in the original track) ac-cording to the selected option.

Expand Channels to New Tracks
To expand alternate channels to new tracks:
1 In the Timeline, do one of the following:
• To expand only a portion of the regions on the track, make a selection that includes or overlaps any number of regions on a track, and Right-click (Windows or Mac) or Con-trol-click (Mac) the selection.
– or –
• To expand all of the regions on the track, Right-click (Windows or Mac) or Control-click (Mac) the track name.
2 Choose the Expand to New Tracks pop-up menu, and select one of the following methods by which to expand alternate channels for the selection to new tracks:
• By Channel Name
• By Channel Number
• By Channel Name and Number
• By Time Code Only
If alternate channels are available, Pro Tools ex-pands them to new tracks (including the chan-nel represented in the original track) according to the chosen parameters.
For detailed information on how each of these options expand to new tracks, see the Field Recorder Workflow Guide.
It is not possible to rename files encoded with XML metadata. The file extension will always be .A1 and .A2 (even for stereo files). Also, it is not possible to rename files with a .L/.R suffix. As a result, Pro Tools does not always recognize these channels as a stereo pair.
Expanding Channels by Time Code OnlyThe new Expand To New Tracks By Time Code Only command lets you expand an entire track or only selected regions to new playlists on the same track or to new separate tracks, thus reveal-ing all other regions recorded at the same time code location, regardless of channel name or number. This is especially useful when expand-ing edited guide tracks to original source audio that was recorded while referenced to time code, but where channel names or numbers were not written to the audio files.
Example Workflow: Working with a Guide Track
For live concert videos, the video is captured separately while the audio is recorded in Pro Tools. The video editor will use a guide au-dio track that is edited along with the video in their video editing software (such as Avid Media Composer). The edited guide track is then re-turned to Pro Tools, but it needs to be expanded to the conformed original source tracks for mix-ing and mastering.
1 Multitrack audio is recorded in Pro Tools while chasing time code. A mono or stereo mix is recorded simultaneously as a guide track for the video editor.
2 The picture and audio guide tracks are edited in a video editing application (such as Avid Media Composer).
Chapter 5: Track Compositing 57
58
3 The edited audio guide tracks are exported from the video editor as an AAF (or OMF) se-quence, including handles of at least 2 frames.
4 The AAF (or OMF) sequence is imported into Pro Tools as a new session.
5 The original source audio files and unedited guide track are also imported into the session.
6 The original unedited guide track is relinked to the session (see “Relinking the Original Unedited Guide Track” on page 58).
7 The Pro Tools editor Right-clicks the name of the guide track and selects Expand to New Tracks > By Time Code Only. The original source tracks expand to new tracks with edits and fades that match the guide track.
Relinking the Original Unedited Guide Track
After importing the AAF (or OMF) sequence and original source audio files into the session, it is recommended that you relink the edited guide track to the original unedited source audio.
What’s New in Pro Tools HD 8.0
To relink the original unedited guide track:
1 Open the Project Browser for the session and open the Audio Files folder.
2 Right-click the edited guide track audio file in the browser and choose Relink Selected.
3 In the upper pane of the Relink window, nav-igate to the original unedited guide track audio file that was recorded in Pro Tools.
4 In the Select Files To Relink pane, select the edited guide track file.
5 Drag the original unedited guide track audio file into the Candidates pane. If a dialog appears stating that one or more files are shorter than the media file you are trying to relink, click Yes to select it for relinking anyway.
6 Check the box to the left of the file in the Can-didates pane so that the Link icon appears.
7 Click Commit Links at the top of the Relink window and then close the Relink window.
8 You can now Right-click the name of the guide and select Expand To New Tracks > By Time Code Only. All expanded tracks should be synchronous with the guide track.
If the original unedited file is not available, you can relink to any of the source audio files as long as they have the same start and end times as the guide track.

chapter 6
MIDI Editor Windows
Pro Tools 8.0 provides MIDI Editor windows for detailed MIDI editing.
Figure 1. MIDI Editor window
Solo
Zoom controls
Cursor locationTarget
Notation ViewMute
Link Timeline and Edit SelectionEdit Tools
Notation View
MIDI Editor menu
Default Note Duration
Play MIDI Notes While EditingDefault Note Velocity
Velocity, Controller and Superimposed MIDIand Instrument tracks
Track ListGroups List
Key Focus
Automation lanes
Edit modes
Mirrored MIDI Editing
Grid selector
Nudge selector
Track Edit selector
Chapter 6: MIDI Editor Windows 59

60
Superimposed MIDI and Instrument Tracks
MIDI Editor windows display and let you edit MIDI data (notes, velocities, and continuous controller data) for one or more MIDI or Instru-ment tracks. When displaying multiple tracks in a MIDI Editor window, MIDI notes from differ-ent tracks are superimposed. MIDI Editor win-dows can also show Auxiliary Input tracks.
Automation and Controller Lanes
Velocity, other continuous controller data (MIDI and Instrument tracks), and automation data (Instrument and Auxiliary Input tracks only), can be edited along with MIDI notes and appear in Controller lanes under the Notes pane. Velocities for MIDI notes on multiple tracks are also superimposed in the Velocity lane. How-ever, for all other automation and controller data, additional lanes are shown for each auto-mation or controller type for each track.
For example, if two Instrument tracks are shown in a MIDI Editor window, the MIDI notes for each track are superimposed in the Notes pane and the velocities for each track are superim-posed in the Velocity lane. However, you would see two Mod Wheel Controller lanes, one for each track; and you would see two Volume lanes, one for each track.
What’s New in Pro Tools HD 8.0
Opening a MIDI Editor Window
To open a MIDI Editor window, do one of the following:
Choose Window > MIDI Editor.
In the Edit window, Right-click a MIDI region on the track, or the track name in the track con-trols or in the Track List, and choose Open In MIDI Editor.
In the Score Editor window, Right-click any-where on the score, or a track name in the Track List, and choose Open In MIDI Editor.
To open additional MIDI Editor windows, do one of the following:
Deselect the Target button in the open MIDI Editor window and open another MIDI Editor window.
– or –
Right-click in the open MIDI Editor window and select Open in New MIDI Editor.
To bring an open MIDI Editor window to the front:
Choose Window > MIDI Editors and select the MIDI Editor window you want.
Press Start+“=” (Windows) or Control+“=” (Mac) to open a MIDI Editor window.
If the MIDI Editor option is selected as the “Double Clicking A MIDI Region Opens” setting in the Pro Tools MIDI Preferences, you can double-click a MIDI region to open it in a MIDI Editor.
To cycle through all open MIDI Editor win-dows, press Start+“=” (Windows) or Con-trol+“=” (Mac) repeatedly until the window you want is in the front.

MIDI Editor Window ToolbarThe MIDI Editor window toolbar is similar to the Edit window toolbar. Each MIDI Editor win-dow and the Edit window can be configured in-dependently of one another. For example, you can have Notation view enabled in one MIDI Editor window, but not another; or, you can have a MIDI Editor window set to Grid mode, but the Edit window set to Slip mode. You can also customize the toolbar in MIDI Editor win-dows.
Solo and Mute Buttons
In a MIDI Editor window, the Solo and Mute buttons affect tracks in all windows. They let you either audition the tracks shown in the cur-rent MIDI Editor window without the reset of the mix, or let you hear just the mix without the tracks shown in the MIDI Editor window.
Solo
The Solo button lets you solo all the tracks cur-rently displayed in the MIDI Editor window.
Mute
The Mute button lets you mute all the tracks currently displayed in the MIDI Editor window.
Mixed Mute and Solo States
The Solo and Mute buttons are global controls in that they affect all tracks shown in a MIDI Ed-itor window. If you independently solo or mute tracks in the Edit window that are also shown in the MIDI Editor window, the appearance of the Solo and Mute buttons updates to indicate mixed states. Mixed solo and mute states occur when one or more tracks shown in the MIDI Ed-itor window, but not all, are soloed or muted.
Notation View
The Notation View button lets you view MIDI notes in the MIDI Editor window as music nota-tion. In Notation view, MIDI and Instrument tracks are not superimposed, but are shown as staves just like in the Score Editor window.
Notation view enabled in a MIDI Editor window
You can access the Notation Display Track Settings in a MIDI Editor window when in Notation view. Select the Notation Display Track Settings option from the Track List menu or Right-click in the Notes pane and select the Notation Display Track Settings option from the Right-click menu. For more information, see “Notation Display Track Settings” on page 91.
Chapter 6: MIDI Editor Windows 61

62
Edit Modes
The Edit modes in MIDI Editor windows func-tion exactly the same way for MIDI data as in the Edit window. Edit mode settings are unique to each MIDI Editor window and are also set in-dependently of the Edit window.
Edit Tools
The Edit tools in MIDI Editor windows can be viewed as a single tool with a pop-up menu for selecting other tools, or as an expanded, com-plete row of Edit tool icons just like in the Edit window. The Edit tools in MIDI Editor windows function exactly the same way for MIDI data as in the Edit window. Edit tool settings can be set independently in each MIDI Editor window, and are independent of tool selection in the Edit window and Score Editor.
To view the Expanded Edit tools in a MIDI Editor window, do one of the following:
Click the MIDI Editor Window Toolbar menu and select Expanded Edit Tools.
– or –
Right-click in the toolbar and select Expanded Edit Tools.
Deselect Expanded Edit Tools to revert to the single Edit Tool icon with the Edit Tool pop-up menu.
What’s New in Pro Tools HD 8.0
MIDI Editing Controls
The MIDI Editing controls function exactly the same way in MIDI Editor windows as in the Edit window.
Track Edit Selector
If more than one MIDI or Instrument track is shown in the MIDI Editor window, the Track Edit selector lets you select which track is “pen-cil-enabled.” You can manually insert MIDI notes only in pencil-enabled tracks. You can also pencil-enable tracks in the Track List (see “Manually Inserting MIDI Notes” on page 72).
Default Note Duration
The Default Note Duration selector lets you de-fine the default note duration for manually in-serted notes.
Default Note On Velocity
The Default Note On Velocity setting lets you define the default note on velocity for manually inserted notes.
MIDI Editing controls
Play MIDI Notes When Editing, Link Time-line and Edit Selection, and Mirrored MIDI Editing are all global settings that are avail-able in the Edit window, MIDI Editor win-dows, and in the Score Editor window.
Link Timeline and
Default Note Duration
Play MIDI Notes While EditingDefault Note Velocity
Mirrored MIDI Editing
Track Edit selector
Edit Selection

Play MIDI Notes When Editing
When enabled, Play MIDI Notes When Editing causes MIDI notes to sound when you insert them with the Pencil tool, click them with the Grabber tool, Tab to them, or select them with the Note Selector tool.
Link Timeline and Edit Selection
When this button is enabled, the Timeline and Edit selections are linked. When it is disabled, you can make Timeline and Edit selections inde-pendently of one another.
Mirrored MIDI Editing
Mirrored MIDI Editing lets you edit MIDI re-gions and have your edits apply to every copy of the same MIDI region. This can be particularly useful when editing looped MIDI regions.
Cursor Location Display
The Cursor Location display in MIDI Editor win-dows functions exactly the same way in MIDI Editor windows as in the Edit window.
Edit Selection Display
The Edit Selection display in MIDI Editor win-dows functions exactly the same way for MIDI data in MIDI Editor windows as in the Edit win-dow. The Selection display can be shown or hid-den in the Toolbar by selecting or deselecting it in the MIDI Editor Window menu.
If Mirrored MIDI Editing mode is disabled, and you edit notes of looped regions in Notes view, the edit flattens the loop. Simi-larly editing region groups separates the re-gion groups.
Grid and Nudge Selectors
When the Expanded Grid/Nudge Display option is enabled in the MIDI Editor Window menu, the Grid and Nudge selectors in MIDI Editor win-dows function exactly the same way for MIDI data in MIDI Editor windows as in the Edit win-dow.
When the Expanded Grid/Nudge Display option is disabled in the MIDI Editor Window menu, you can toggle between Grid Display and Nudge Dis-play using the Grid/Nudge Display selector.
Target
Generally, the Target button for MIDI Editor windows functions just like the Target button for Plug-in, Output, and Send windows. Addi-tionally, the Target button in a MIDI Editor win-dow synchronizes its Timeline location view to the Timeline location view in the Edit window. Any changes to the Edit selection in the Edit window are reflected in the Targeted MIDI Edi-tor window. There can only be one targeted MIDI Editor window at a time. The targeted MIDI Editor window can also be stored in a Win-dow Configuration.
One or more untargeted MIDI Editor windows can remain open and available at the same time, just like untargeted Plug-in windows. Targeting an untargeted MIDI Editor window untargets any other targeted MIDI Editor window.
The front-most window, regardless of whether it is targeted, responds to Edit menu commands. receives Keyboard Command focus and control surface focus.
Grid/Nudge Display selector, selecting Nudge display
Chapter 6: MIDI Editor Windows 63

64
Unless it has Groups Focus (or no focus). It also responds to commands in the Edit menu.
To enable or disable the Target for a MIDI Editor window:
Click the Target button for the MIDI Editor window so that it is highlighted (targeted) or unhighlighted (untargeted).
MIDI Editor Window Menu
The MIDI Editor Window menu provides access to MIDI Editor Window Display options and Scrolling options.
Targeted MIDI Editor window
Untargeted MIDI Editor window
Target enabled
Target disabled
What’s New in Pro Tools HD 8.0
MIDI Editor Window Display Options
Expanded Edit Tools
When selected, the Expanded Edit Tools option displays all of the Edit Tools in the MIDI Editor window toolbar.
When this option is not selected, only the icon for the selected Edit tool is displayed. Any of the other Edit tools can be selected from the Edit Tool pop-up menu.
Expanded Grid/Nudge Display
When selected, the Expanded Grid/Nudge Display option displays the Nudge selector in addition to the Grid selector in the MIDI Editor window toolbar.
Expanded Edit tools displayed in a MIDI Editor window
Edit Tool pop-up menu
Grid and Nudge selectors

Selection Display
When selected, the Selection Display option shows the Edit Selection Display in the MIDI Ed-itor window toolbar.
Track List
When selected, the Track List option displays the Track List in the MIDI Editor window.
Scrolling
The Scrolling submenu lets you select the scroll-ing options for the MIDI Editor window inde-pendently of other MIDI Editor windows and the Edit window. The scrolling options include:
No Scrolling The MIDI Editor window does not scroll during or after playback. The playback cursor moves across the MIDI Editor window, indicating the playback location.
After Playback The playback cursor moves across the MIDI Editor window, indicating the playback location. When playback has stopped, the MIDI Editor window scrolls to the final play-back location.
Page The playback cursor moves across the MIDI Editor window, indicating the playback location. When the right edge of the MIDI Edi-tor window is reached, its entire contents are scrolled, and the playback cursor continues moving from the left edge of the window.
Selection display
Continuous (Pro Tools HD and Pro Tools LE with Complete Production Toolkit or DV Toolkit 2 Only) The MIDI Editor window scrolls continu-ously past the playback cursor, which remains in the center of the window. With this option, playback is always based on the Timeline selec-tion (unlike the Center Playhead Scrolling op-tion).
Center Playhead (Pro Tools HD Only) The MIDI Editor window scrolls continuously past the Playhead, which is represented as a blue line in the center of the window (or a red line when re-cording).
Follow Edit Window When selected, the MIDI Ed-itor window follows the scrolling option se-lected for the Edit window (Options > Edit Win-dow Scrolling).
Customizable Toolbar
You can customize the toolbar in MIDI Editor windows by rearranging, and showing and hid-ing the available controls and displays just like in the Edit window or the Score Editor window.
Toolbar Display Options
To change the toolbar display options in a MIDI Editor window toolbar:
1 Do one of the following:
• Click the MIDI Editor Window Toolbar menu.
– or –
• Right-click in the toolbar.
2 From the pop-up menu, select or deselect any of the following:
• Expanded Edit Tools
• Expanded Grid/Nudge Display
• Selection Display
Chapter 6: MIDI Editor Windows 65

66
Rearranging Controls and Displays
You can rearrange the controls and displays in the MIDI Editor window toolbar just like in the Edit window or the Score Editor window.
To rearrange controls and displays in a MIDI Editor window toolbar:
Control-click (Windows) or Command-click (Mac) the controls or displays you want to move and drag them to the location in the Toolbar you want.
Zoom Controls
Vertical and Horizontal Zoom In and Out Buttons
In addition to the Zoom controls in the Toolbar, Pro Tools provides horizontal and vertical zoom buttons in the lower-right corner of MIDI Editor windows.
Vertical Zoom Buttons Zoom the lane heights proportionally for Automation and Controller lanes.
Horizontal Zoom Buttons Zoom the Timeline just like the Horizontal Zoom controls in the MIDI Editor window toolbar.
Vertical ZoomIn and Outbuttons
Horizontal ZoomIn and Outbuttons
What’s New in Pro Tools HD 8.0
MIDI Zoom In and Out Buttons
Pro Tools provides MIDI Zoom In and Out but-tons in the upper-right corner of MIDI Editor windows. These controls function exactly the same as the MIDI Zoom controls in the toolbar, and let you zoom in and out vertically on MIDI notes.
Track ListThe Track List in MIDI Editor windows lets you show or hide MIDI, Instrument, and Auxiliary Input tracks in the MIDI Editor window. The Track List settings are unique to each MIDI Edi-tor window. However, the order of tracks in the Track List is global. Sorting or changing the or-der of tracks affects the Track List in every win-dow.
Track List
MIDI ZoomIn and Outbuttons
Track List menu
Track nameTrack Type icon
Track Color CodeTrack Show/Hide
Pencil Enable

Track List Columns
In MIDI Editor windows there are four columns for the Track List:
Show/Hide Indicates which tracks are shown or hidden in the MIDI Editor window.
Track Color Displays the track color for each track by type or by track.
Name Displays the name for each track.
Pencil Lets you enable a track for manually en-tering MIDI notes with the Pencil tool.
Track List Menu
The Track List menu lets you show and hide MIDI, Instrument, and Auxiliary Input tracks in the MIDI Editor window (see “Showing and Hid-ing Tracks” on page 67).
The Track List menu also lets you sort tracks in the Track List by Name, Type, Edit Group, Mix Group, or Voice (see “Sorting Tracks in the Track List” on page 68).
Showing and Hiding Tracks
To show MIDI, Instrument, and Auxiliary Input tracks in a MIDI Editor window:
Click the Show/Hide icon in the Track List for tracks you want to show in the MIDI Editor win-dow.
To show all MIDI, Instrument, and Auxiliary Input tracks in a MIDI Editor window:
From the Track List menu, select Show All Tracks.
To show only selected MIDI, Instrument, and Auxiliary Input tracks in a MIDI Editor window:
1 In the Track List, select the MIDI, Instrument, and Auxiliary Input tracks you want to show in the MIDI Editor window.
2 From the Track List menu, select Show Only Se-lected Tracks.
To show all tracks of a single type (MIDI, Instrument, or Auxiliary Input) in a MIDI Editor window:
From the Track List menu, choose Show Only, and select the track type you want.
To hide MIDI, Instrument, and Auxiliary Input tracks in a MIDI Editor window:
Click the Show/Hide icon in the Track List for tracks you want to hide in the MIDI Editor win-dow.
To hide all (but one) MIDI, Instrument, and Auxiliary Input tracks in a MIDI Editor window:
From the Track List menu, select Hide All Tracks.
All but the top MIDI or Instrument track in the Track List are hidden. MIDI Editor windows re-quire that at least one MIDI or Instrument track always be shown in the window.
To hide selected MIDI, Instrument, and Auxiliary Input tracks in a MIDI Editor window:
1 In the Track List, select the MIDI, Instrument, and Auxiliary Input tracks you want to hide.
2 From the Track List menu, select Hide Selected Tracks.
To hide all tracks of a single type (MIDI, Instrument, or Auxiliary Input):
From the Track List menu, choose Hide Only, and select the track type you want.
Chapter 6: MIDI Editor Windows 67
68
Sorting Tracks in the Track List
You can sort tracks in the Track List by the fol-lowing criteria:
Name Sorts the order of tracks in the Track List by Track Name.
Type Sorts the order of tracks in the Track List by Track Type.
Edit Group Sorts the order of tracks in the Track List by Edit Groups.
Mix Group Sorts the order of tracks in the Track List by Mix Groups.
Voice Sorts the order of tracks in the Track List by Voice allocations.
Track List Right-Click Menu
In addition to common track management com-mands, the Track List Right-click menu shares commands with both the Track List menu and the Notes Pane Right-click menu.
To access the MIDI Editor Track List Right-click menu:
Right-click on any Track Name in the Track List.
Track List Right-click Menu Options
The following options are available depending on the track type (Auxiliary Input, Instrument, or MIDI).
Hide Hides the selected track.
Hide and Make Inactive Hides the selected track and makes it inactive.
Make Inactive Makes the selected track inactive.
Export MIDI Exports the selected track as a MIDI file.
What’s New in Pro Tools HD 8.0
New Opens the New Track dialog.
Rename Renames the selected track.
Duplicate Duplicates the selected track.
Split into Mono Splits the selected stereo Instru-ment or Auxiliary Input track into two mono tracks.
Delete Deletes the selected track.
MIDI Real-Time Properties Opens the MIDI Real-Time Properties window for the selected track.
Open in New MIDI Editor Opens the tracks dis-played in the current MIDI Editor window in a new MIDI Editor window. The new MIDI Editor window will be untargeted.
Open in Score Editor Opens the shown tracks in the Score Editor window.
Open in MIDI Event List Opens the selected track in the MIDI Event List.
Notation Display Track Settings Opens the Nota-tion Display Track Settings window.
Group ListThe Group List in MIDI Editor windows pro-vides the same functionality as in the Edit win-dow. You can create, edit, and delete Edit Groups using the Group List in any MIDI Editor window. The Group List is linked between the Edit window and all MIDI Editor windows.
For information on grouping tracks in Pro Tools 8.0, refer to the Pro Tools Refer-ence Guide (Help > Pro Tools Reference Guide).

Timebase and Conductor RulersTimebase and Conductor rulers in MIDI Editor windows function exactly the same as in the Edit window. However, the Edit window and each MIDI Editor window can have a unique view of the Timeline in terms of which Time-base and Conductor rulers are shown, and in terms of zoom level and time location.
With Scrolling enabled, only the front-most window updates during playback. All other win-dows maintain their last Timeline view.
Also, the Edit window and each MIDI Editor window can display different combinations of Timebase and Conductor rulers independently of one another.
Superimposed Notes ViewThe Notes pane in MIDI Editor windows lets you view and edit MIDI notes superimposed from different MIDI and Instrument tracks such that you can easily edit multitrack arrangements in a single constellation of color-coded notes. The Notes pane lets you edit MIDI notes much the same way as in Notes view on MIDI and Instru-ment tracks in the Edit window, except you can edit MIDI notes on multiple MIDI and Instru-ment tracks at the same time.
You can also view and edit MIDI notes in Notation view in the Notes pane (see “Nota-tion View” on page 74).
Figure 2. MIDI Editor window, Notes pane with five superimposed Instrument tracks
Chapter 6: MIDI Editor Windows 69
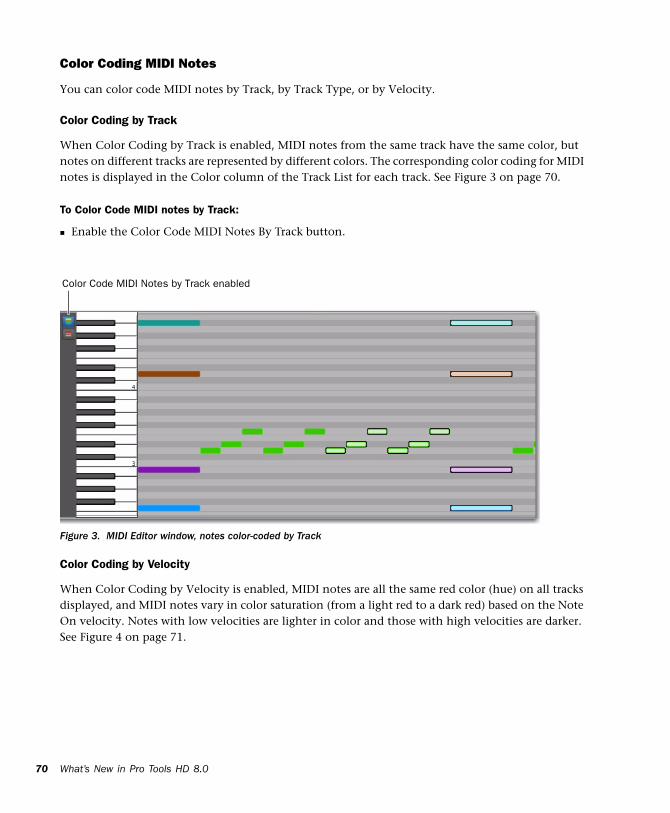
70
Color Coding MIDI Notes
You can color code MIDI notes by Track, by Track Type, or by Velocity.
Color Coding by Track
When Color Coding by Track is enabled, MIDI notes from the same track have the same color, but notes on different tracks are represented by different colors. The corresponding color coding for MIDI notes is displayed in the Color column of the Track List for each track. See Figure 3 on page 70.
To Color Code MIDI notes by Track:
Enable the Color Code MIDI Notes By Track button.
What’s New in Pro Tools HD 8.0
Figure 3. MIDI Editor window, notes color-coded by Track
Color Code MIDI Notes by Track enabled
Color Coding by Velocity
When Color Coding by Velocity is enabled, MIDI notes are all the same red color (hue) on all tracks displayed, and MIDI notes vary in color saturation (from a light red to a dark red) based on the Note On velocity. Notes with low velocities are lighter in color and those with high velocities are darker. See Figure 4 on page 71.
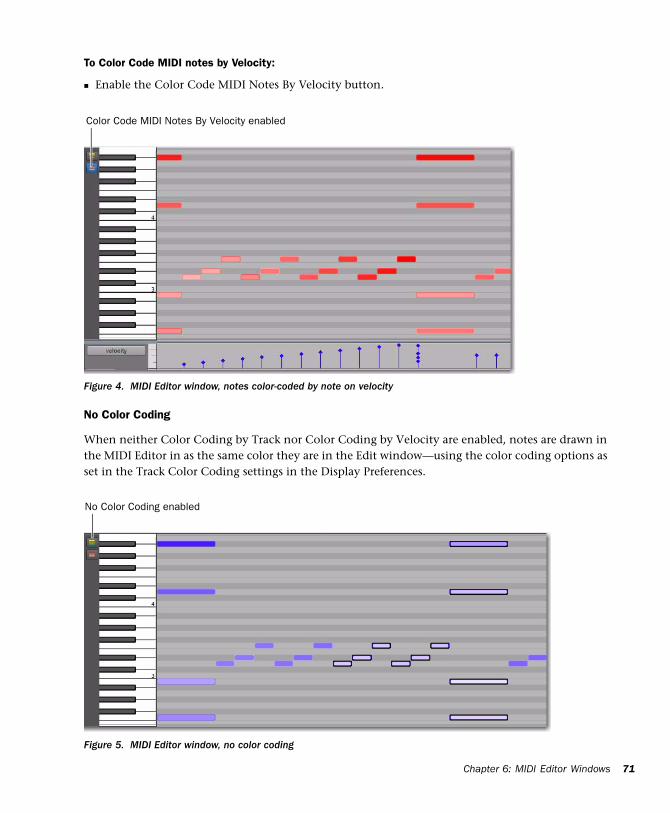
To Color Code MIDI notes by Velocity:
Enable the Color Code MIDI Notes By Velocity button.
Figure 4. MIDI Editor window, notes color-coded by note on velocity
Color Code MIDI Notes By Velocity enabled
No Color Coding
When neither Color Coding by Track nor Color Coding by Velocity are enabled, notes are drawn in the MIDI Editor in as the same color they are in the Edit window—using the color coding options as set in the Track Color Coding settings in the Display Preferences.
Figure 5. MIDI Editor window, no color coding
No Color Coding enabled
Chapter 6: MIDI Editor Windows 71

72
Editing MIDI Notes
You can edit any note on any track shown in the Notes pane. You edit MIDI notes in the Notes pane the same way as in Notes view for MIDI and Instrument tracks in the Edit window, ex-cept that notes from different tracks are super-imposed.
Manually Inserting MIDI Notes
Using the Pencil tool, you can manually insert MIDI notes to any pencil-enabled track shown in the Notes pane. If only one track is viewed in the MIDI Editor window, that track will auto-matically be pencil-enabled. If multiple super-imposed tracks are shown in the Notes pane, MIDI notes will be inserted on the pencil en-abled tracks only.
To insert MIDI notes on a specific track in the Notes pane:
1 Do one of the following:
• Select the track you want pencil-enabled from the Track Edit selector in the Toolbar.
– or –
• Click the Pencil column in the Track List to pencil-enable the track you want.
Selecting a track for editing
Only tracks that are currently shown in the MIDI Editor window are available in the Track Edit selector pop-up menu.
What’s New in Pro Tools HD 8.0
2 With the Pencil tool, click at the desired time and pitch location to insert a MIDI note on the pencil-enabled track with the default Note On velocity and the selected Default Note Duration.
“Blad Pad Midi” track pencil-enabled
Inserting a MIDI note on track “Inst 3”
To pencil-enable multiple contiguous tracks, Shift-click in the Pencil column of the range of tracks you want. To pencil-en-able multiple discontiguous tracks, Control-click (Windows) or Command-click (Mac) in the Pencil column of any additional tracks. Alt-click (windows) or Option-click (Mac) to pencil-enable all tracks. Manually inserted notes are written to all pencil-en-able tracks.
2 MIDI tracks and 1 Instrument track shown
pencil-enabled track

Notes Pane Right-Click Menu
The Notes Pane Right-click menu provides sev-eral useful commands for editing, exporting, and viewing MIDI data.
To access the MIDI Editor Right-click menu:
Right-click anywhere in the Notes pane.
Notes Pane Right-click Menu Options
Tools
The Tools submenu lets you select any Edit tools relevant to the Score Editor.
Zoomer Selects the Zoomer tool.
Trimmer Selects the Trimmer tool.
Selector Selects the Selector tool.
Grabber Selects the Grabber tool.
Scrubber Selects the Scrubber tool.
Pencil Selects the Pencil tool.
Smart Selects the Smart tool.
Zoomer Tools Lets you select Normal Zoom or Single Zoom.
Pencil Tools Lets you select any of the Pencil tools.
Insert
The Insert submenu lets you insert key changes, meter changes, and chord symbols at the loca-tion of the Edit cursor.
Key Inserts a key change.
Meter Inserts a meter change.
Chord Inserts a chord symbol.
Cut
The Cut command cuts the current Edit selec-tion.
Copy
The Copy command copies the current Edit se-lection.
Paste
The Paste command pastes the clipboard to the current Edit selection or at the current Edit cur-sor location. Any MIDI notes already present at the same location are overwritten.
Merge
The Merge command pastes the clipboard to the current Edit selection or at the current Edit cur-sor location and merges the pasted data with any MIDI notes already present at the same lo-cation.
Clear
The Clear command clears (deletes) the current Edit selection.
Separate
The Separate command lets you separate MIDI notes at the Edit cursor location.
Consolidate
The Consolidate command lets you consolidate selected multiple consecutive MIDI notes of the same pitch.
Mute Notes
The Mute Notes (or Unmute Notes) command lets you mute (or unmute) selected MIDI notes.
Chapter 6: MIDI Editor Windows 73
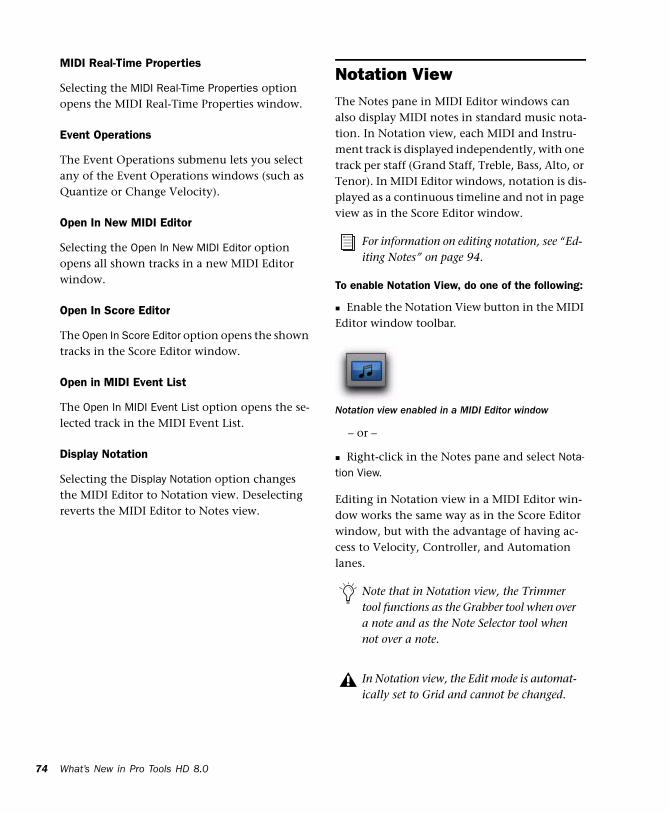
74
MIDI Real-Time Properties
Selecting the MIDI Real-Time Properties option opens the MIDI Real-Time Properties window.
Event Operations
The Event Operations submenu lets you select any of the Event Operations windows (such as Quantize or Change Velocity).
Open In New MIDI Editor
Selecting the Open In New MIDI Editor option opens all shown tracks in a new MIDI Editor window.
Open In Score Editor
The Open In Score Editor option opens the shown tracks in the Score Editor window.
Open in MIDI Event List
The Open In MIDI Event List option opens the se-lected track in the MIDI Event List.
Display Notation
Selecting the Display Notation option changes the MIDI Editor to Notation view. Deselecting reverts the MIDI Editor to Notes view.
What’s New in Pro Tools HD 8.0
Notation ViewThe Notes pane in MIDI Editor windows can also display MIDI notes in standard music nota-tion. In Notation view, each MIDI and Instru-ment track is displayed independently, with one track per staff (Grand Staff, Treble, Bass, Alto, or Tenor). In MIDI Editor windows, notation is dis-played as a continuous timeline and not in page view as in the Score Editor window.
To enable Notation View, do one of the following:
Enable the Notation View button in the MIDI Editor window toolbar.
– or –
Right-click in the Notes pane and select Nota-tion View.
Editing in Notation view in a MIDI Editor win-dow works the same way as in the Score Editor window, but with the advantage of having ac-cess to Velocity, Controller, and Automation lanes.
For information on editing notation, see “Ed-iting Notes” on page 94.
Notation view enabled in a MIDI Editor window
Note that in Notation view, the Trimmer tool functions as the Grabber tool when over a note and as the Note Selector tool when not over a note.
In Notation view, the Edit mode is automat-ically set to Grid and cannot be changed.

Figure 6. MIDI Editor window, Notes pane in Notation view
Chapter 6: MIDI Editor Windows 75

76
Double Bar
The Double Bar button is only available in Nota-tion view. When enabled, the Double Bar option shows the final double bar line in the MIDI Edi-tor window. The double bar line is located at the end of the last MIDI region or event in the ses-sion.
When the Double Bar option is disabled, there will be a number of empty bars at the end of the last event in the session. The number of empty bars is determined by the Additional Empty Bars In The Score Editor setting in the MIDI Preferences page (Setup > Preferences). Disable the Double Bar option to manually enter notes in the Score Editor after the last MIDI region or event in the session.
Double Bar enabled in a MIDI Editor window
Double Bar
What’s New in Pro Tools HD 8.0
Notation View Right-Click Menu
When in Notation view, the Notes Pane Right-click menu provides slightly different options than when in Superimposed Notes view.
In both views, the following options are avail-able:
• Tools
• Insert
• Cut
• Copy
• Paste
• Clear
• Separate
• Consolidate
• Mute
• MIDI Real-Time Properties
• Event Operations
• Open In New MIDI Editor
• Open In Score Editor
• Open In MIDI Event List.
• Display Notation
In Notation view, the additional Notation Display Track Settings option is available in the Right-click menu. Select this option to open the Nota-tion Display Track Settings dialog and configure the display settings for tracks in Notation view. For information on the Notation Display Track Settings dialog, see “Notation Display Track Set-tings” on page 91.

Velocity, Controller, and Automation LanesMIDI Editor windows let you edit velocities, MIDI controller data, and automation for all shown MIDI, Instrument, and Auxiliary Input tracks in lanes under the Notes pane. You can move and resize Automation and Controller lanes just like in the Edit window.
When viewing multiple MIDI and Instrument tracks, the velocities for notes on separate tracks are superimposed in a single lane, just like notes in the Notes pane. However, all other Controller lanes are grouped by automation and controller type, and provide individual lanes for each shown track.
To show or hide lanes under the Notes pane:
Click the Show/Hide Lanes button.
To add lanes:
Click the Add Lane button.
To remove lanes:
Click the Remove Lane button.
To change the Automation or Controller type for a lane:
Click the Automation or Controller Type se-lector and select the Automation or Controller type you want.
Figure 7. Velocity, Controller, and Automation lanes for two stereo Instrument tracks
Show/Hide lanes
Velocity lane(2 tracks superimposed)
Remove laneAdd lane
Controller/AutomationType selector
Paired Automation lanes for separatetracks
Chapter 6: MIDI Editor Windows 77

78
Additional MIDI Editing Commands and EnhancementsPro Tools 8.0 includes several new MIDI editing commands and enhancements. These com-mands and enhancements operate both in the in MIDI Editor windows and in the Edit window on MIDI and Instrument tracks in Notes and Re-gions views.
Separating MIDI Notes
The Separate command lets you separate MIDI notes at the Edit cursor location or at the bound-aries of the Edit selection. When in Notes view in the Edit window and in MIDI Editor win-dows, separating MIDI regions creates new MIDI notes but does not create new MIDI regions. However, when in Regions view in the Edit win-dow, separating MIDI regions only creates new MIDI regions. Also, if the Edit selection includes any audio tracks, the Separate command sepa-rates only regions on MIDI and Instrument tracks regardless of the Track View setting.
To separate MIDI notes at the Edit cursor location or at the boundaries of the Edit selection:
1 Make an Edit selection or place the Edit cursor at the location where you want to separate one or more MIDI notes.
2 Do one of the following:
• Choose Edit > Separate > At Selection.
– or –
• Right-click in the Notes pane and choose Separate.
Press Control+E (Windows) or Com-mand+E (Mac) to separate MIDI notes at the selection.
What’s New in Pro Tools HD 8.0
To separate MIDI notes on the grid:
1 Set the Grid as desired.
2 Make an Edit selection or a marque selection that includes the MIDI notes you want to sepa-rate.
3 Choose Edit > Separate > On Grid.
4 In the Pre-Separate Amount dialog, click OK.
Separate and Consolidate Tools for MIDI Notes
In Notes view in the Edit window and in MIDI Editor windows, both the Pencil and Grabber tools can be used to separate MIDI notes and to consolidate MIDI notes. The cursor updates to show a “knife” for the Separate tool and a “ban-dage” for the Consolidate tool.
To separate a MIDI note with the Separation tool:
With the Grabber or Pencil tool, Start-Shift-click (Windows) or Control-Shift-click (Mac) on the MIDI note at the location where you want the separation.
MIDI note separated into two using the Separate Tool
Separation tool

To consolidate MIDI notes with the Consolidate tool:
With the Grabber or Pencil tool, Start-Shift-click (Windows) or Control-Shift-click (Mac) be-tween the separated MIDI notes.
Consolidating MIDI Notes
The Consolidate command lets you combine two or more consecutive MIDI notes of the same pitch into a single MIDI note.
To consolidate MIDI notes:
1 Select the MIDI notes you want to consoli-date.
Consolidating MIDI notes into one using the Consolidate Tool
Consolidate tool
2 Do one of the following:
• Choose Edit > Consolidate.
– or –
• Right-click the selected notes and choose Consolidate.
Muting MIDI Notes
The Mute command lets you mute individual MIDI notes. If entire regions are selected, the Mute command prompts you to either mute re-gions or MIDI notes.
To mute one or more MIDI notes:
1 Select the MIDI notes you want to mute.
2 Do one of the following:
• Choose Edit > Mute Notes.
– or –
• Right-click the selected MIDI notes and choose Mute Notes.
To unmute one or more MIDI notes:
1 Select the MIDI notes you want to unmute.
2 Do one of the following:
• Choose Edit > Unmute Notes.
– or –
• Right-click the selected MIDI notes and choose Unmute Notes.
Press Alt+Shift+3 (Windows) or Op-tion+Shift+3 (Mac) to consolidate adjacent selected MIDI notes of the same pitch.
Press Control+M (Windows) or Com-mand+M (Mac) to mute and unmute se-lected MIDI notes.
Chapter 6: MIDI Editor Windows 79

80
Scrubbing and Shuttling MIDI
When scrubbing and shuttling through MIDI notes, they play back. A MIDI note will sound as long as the scrub or shuttle location is within the MIDI note on and MIDI note off boundaries. When scrubbing or shuttling backward, the MIDI note off location triggers playback of the MIDI note using the MIDI note on velocity.
Auditioning Velocity Changes
When editing velocities for MIDI notes with the Grabber tool, Pro Tools plays the note at the new velocity. This lets you hear when you have the velocity setting you want for a MIDI note.
Tabbing Plays MIDI Notes
When tabbing to MIDI notes, each MIDI note plays back if Play MIDI Notes While Editing mode is enabled.
Note Selector Tool
In Notes or Velocity view on MIDI and Instru-ment tracks in the Edit window, or in a MIDI Ed-itor window, the Selector tool makes a time range selection that includes all MIDI event types in addition to MIDI notes and velocities (such as program changes, and continuous con-troller data). The Note Selector tool can be used to select only MIDI notes and velocities in a time range selection.
What’s New in Pro Tools HD 8.0
To select only MIDI notes and velocities with the Note Selector tool:
1 Select the Selector tool.
2 On MIDI or Instrument tracks in the Edit win-dow in Notes or Velocity view, or in a MIDI Edi-tor window, Alt-click (Windows) or Option-click (Mac) and drag over the time range that includes the notes you want selected.
When using the Smart tool and pressing Alt (Windows) or Option (Mac), the Selector is available in the upper part of the Track and the Note Selector is available in the lower part of the track.
Also, the Smart tool now defaults to the Mar-quee tool when not over a note.
Selecting only MIDI notes using the Note Selector tool

chapter 7
Score Editor Window
The Score Editor window lets you view, edit, arrange, and print MIDI from your session as music no-tation. Whether you record, import, draw (with the Pencil tool), or Step Enter MIDI, the Score Editor transcribes MIDI notes in real-time.
Figure 8. Score Editor window
Edit tools
Default Note Duration
Track ListPage controls Zoom controls
Grid selectorCursor location Target
Play MIDI Notes While EditingMirrored MIDI Editing
Double Bar
Default Note Velocity
Score Editor menu
Selection
Link Edit and Timeline Selection
Chapter 7: Score Editor Window 81

82
Opening the Score Editor Window
To open the Score Editor window:
Choose Window > Score Editor.
To open the Score Editor window with a single MIDI or Instrument track shown:
1 Ensure that there is no Edit selection.
2 Right-click the Track name of an unselected track in the Edit or Mix window, or in the Track List of the Edit, Mix, or MIDI Editor window.
3 From the Right-click menu, choose Open In Score Editor.
To open the Score Editor window with the current Edit selection shown:
1 In the Edit window or in a MIDI Editor win-dow, make an Edit selection on one or more tracks that includes what you want shown in the Score Editor window.
2 Right-click the Edit selection and choose Open In Score Editor.
Press Alt+Start+“=” (Windows) or Op-tion+Control+“=” (Mac) to show the Score Editor window.
If the Score Editor option is selected as the “Double Clicking a MIDI Region Opens” setting in the MIDI Preferences page, you can double-click a MIDI region to open it in the Score Editor.
What’s New in Pro Tools HD 8.0
Edit Tools
The Edit tools in the Score Editor window func-tion much the same as in the Edit window, but with a few differences for editing music nota-tion.
Zoomer
Use the Zoomer tool to zoom in and out around a particular area in the score.
The Zoomer tool provides two modes:
Normal Zoom The Zoomer tool remains selected after zooming.
Single Zoom The previously selected Edit tool is automatically reselected after zooming.
Normal Zoom Mode
To zoom around a certain point in the score:
1 Click the Zoomer tool pop-up menu and select Normal Zoom mode.
2 Click once with the Zoomer tool at a location within the score. The score is zoomed in by one level and is centered around the zoomed loca-tion.
3 To zoom back to the previous level, Alt-click (Windows) or Option-click (Mac) with the Zoomer tool.
Press the F5 key to select the Zoomer tool and toggle between Normal and Single Zoom modes.
Also see “Zoom Controls” on page 90

To marque zoom to a particular area of the score:
1 Click the Zoomer tool pop-up menu and select Normal Zoom mode.
2 Click and drag in the score, making a marque selection of the area to which you want to zoom.
The zoomed area fills the entire Edit window.
Single Zoom Mode
Single Zoom mode returns you to the previously selected tool after a zoom has been performed.
For example, when using the Pencil tool you can select the Single Zoomer tool, and once the Zoom operation has been performed, Pro Tools automatically switches back to the Pencil tool.
Single Zoom is identified with an arrow to the right of the Zoomer icon. (Normal Zoom mode does not show the arrow.)
To use Single Zoom mode:
Click the Zoomer tool pop-up menu and se-lect Single Zoom mode.
Marque zooming with the Zoomer tool
Trimmer
The Trimmer tool lets you lengthen or shorten the duration of a note.
Note Selector
Use the Note Selector tool to select notes on one or more staves in the Score Editor window. Se-lected notes highlight blue. Selected notes can be deleted, moved, transposed, and processed (using Event Operations).
Grabber
Use the Grabber tool to select one or more notes. You can also use the Grabber tool to move single notes, or all selected notes, to a different pitch or time location.
Pencil
Use the Pencil tools to insert, select, move, or delete notes. The various Pencil tools differ in how they draw note durations, repeated notes, and velocities, but function in the same fashion as drawing notes on tracks in Notes view in the Edit window or in a MIDI Editor window.
Press the F6 key to select the Trimmer tool.
Press the F7 key to select the Note Selector tool.
The Note Selector tool makes a range selec-tion that only includes MIDI notes and ve-locities. It does not include any other MIDI data, such as program changes or continu-ous controller data.
Press the F8 key to select the Grabber tool.
Chapter 7: Score Editor Window 83

84
To select a Pencil tool:
Click the Pencil tool pop-up menu and select the Pencil tool you want.
The following Pencil tools are available in the Score Editor:
Free Hand
The Free Hand Pencil tool lets you draw single notes of varying duration.
Note velocities are determined by the Default Note Velocity setting (see “Default Note On Ve-locity” on page 85).
The minimum duration of the note is deter-mined by the selected Default Note Duration (see “Default Note Duration” on page 85).
Line
The Line Pencil tool lets you draw multiple notes of the same pitch and duration.
Note velocities are determined by the Default Note Velocity setting (see “Default Note On Ve-locity” on page 85).
The duration is determined by the selected De-fault Note Duration (see “Default Note Dura-tion” on page 85).
The start time for each note is determined by the selected Grid value (see “Grid” on page 86).
Press the F10 key to select the current Pencil tool. Press the F10 key repeatedly to cycle through the different Pencil tools.
What’s New in Pro Tools HD 8.0
Triangle
The Triangle Pencil tool lets you draw a series of MIDI notes on a single pitch whose velocities os-cillate between the defined Default Note Veloc-ity and 127 in a triangle pattern. The duration of each note is determined by the current Grid value.
The duration is determined by the selected De-fault Note Duration (see “Default Note Dura-tion” on page 85).
The start time for each note is determined by the selected Grid value (see “Grid” on page 86).
Square
The Square Pencil tool lets you draw a series of MIDI notes on a single pitch whose velocities al-ternate between the defined Default Note Veloc-ity and 127 in a square pattern. The duration of each note is determined by the current Grid value.
The duration is determined by the selected De-fault Note Duration (see “Default Note Dura-tion” on page 85).
The start time for each note is determined by the selected Grid value (see “Grid” on page 86).
Random
The Square Pencil tool lets you draw a series of MIDI notes on a single pitch whose velocities change randomly within the range between the defined Default Note Velocity and 127 in a square pattern. The duration of each note is de-termined by the current Grid value.
The duration is determined by the selected De-fault Note Duration (see “Default Note Dura-tion” on page 85).
The start time for each note is determined by the selected Grid value (see “Grid” on page 86).

Default Note Duration
The Default Note Duration selector lets you de-fine the default note duration for manually in-serted notes.
To define the Default Note Duration:
From the Default Note Duration selector, se-lect the desired note value. Select the Follow Grid option if you want the Default Note Dura-tion to use the selected Grid value.
If you want dotted note values, also select the Dotted option.
If you want triplet note values, also select the Triplet option.
Default Note On Velocity
The Default Note On Velocity setting lets you define the default note on velocity for manually inserted notes.
Play MIDI Notes When Editing
When enabled, the Play MIDI Notes When Edit-ing option causes MIDI notes to sound when you insert them with the Pencil tool or drag them with the Grabber tool.
Selecting the Default Note Duration
Play MIDI Notes When Editing enabled in the Score Editor window
Default Note Duration selector
Play MIDI Notes When Editing
Link Timeline and Edit Selection
When this button is enabled, the Timeline and Edit selections are linked. When it is disabled, you can make Timeline and Edit selections inde-pendently of one another.
Mirrored MIDI Editing
Mirrored MIDI Editing lets you edit MIDI re-gions and have your edits apply to every copy of the same MIDI region. This can be particularly useful when editing looped MIDI regions.
In Mirrored MIDI Editing mode, the Mirrored MIDI Editing button blinks Red once as an edit is made to alert you that your edit is being ap-plied to more than one region.
To enable Mirrored MIDI Editing, do one of the following:
Select Options > Mirror MIDI Editing.
– or –
Select the Mirrored MIDI Editing button in the Edit window, MIDI Editor window, or Score Editor window.
Link Timeline and Edit Selection enabled in the Score Editor window
Mirrored MIDI Editing disabled in the Score Editor window
Link Timeline and Edit Selection
Mirrored MIDI Editing
Chapter 7: Score Editor Window 85

86
To disable Mirrored MIDI Editing, do one of the following:
Deselect Options > Mirror MIDI Editing.
– or –
Disable the Mirrored MIDI Editing button in the Edit window, MIDI Editor window, or Score Editor window.
Double Bar
When enabled, the Double Bar option shows the final double bar line in the Score Editor win-dow. The double bar line is located at the end of the last MIDI region or event in the session. En-able the Double Bar option when you are ready to print the score.
When the Double Bar option is disabled, there will be a number of empty bars at the end of the last MIDI region in the session. The number of empty bars is determined by the Additional Empty Bars In The Score Editor setting in the Pro Tools MIDI Preferences (Setup > Preferences). Disable the Double Bar option to manually enter notes in the Score Editor after the last MIDI region.
If Mirrored MIDI Editing mode is disabled, and you edit notes of looped regions in Notes view, the edit flattens the loop. Simi-larly editing region groups separates the re-gion groups.
Double Bar enabled in the Score Editor window
Double Bar
What’s New in Pro Tools HD 8.0
Cursor Location
The Cursor Location display provides informa-tion about the current cursor location in Bars|Beats|Ticks and pitch.
Grid
The Grid selector lets you define the Grid value for MIDI notes inserted and displayed in the Score Editor window.
To set the Grid value for the Score Editor window:
From the Grid Value pop-up menu, select the desired note value.
If you want dotted note values, also select the Dotted option.
If you want triplet note values, also select the Triplet option.
Cursor Location indicator in the Score Editor window
Setting the Grid value
Cursor Location

Inserting Notes on the Grid
When inserting MIDI notes with the Pencil tool (using the Line, Triangle, Square, or Random shapes), the Grid value determines the note on location and the Default Note Duration value determines the note duration (see “Default Note Duration” on page 85).
For example, if the Default Note Duration is set to quarter notes and the Grid is set to half notes, drawing with the Line Pencil tool creates alter-nating quarter notes and quarter note rests.
However, if the selected Grid value is shorter than the Default Note Duration, the Grid value determines both the note on location and note duration for notes inserted with the Pencil tool. For example, if the Default Note Duration is set to quarter notes and the Grid is set to eighth notes, drawing with the Line Pencil tool creates a sequence of eighth notes.
Score Editor Window Target
When the Target is enabled for the Score Editor window, navigating the Edit window automati-cally navigates the Score Editor window as well. For example, if in the Edit window you navigate to bar 32, beat 3 in a MIDI track, when you view the Score Editor window it too will show the same location.
When the Target is disabled, Score Editor does not update to show the current Edit window se-lection or Edit cursor location.
Inserting notes on the Grid
Score Editor Window Menu
The Score Editor Window menu provides access to the Expanded Edit Tools, Selection Display, Track List, and Scrolling options.
Expanded Edit Tools
When selected, the Expanded Edit Tools option displays all of the relevant Edit Tools in the Score Editor window toolbar.
When this option is not selected, only the icon for the selected Edit tool is displayed. Any of the other Edit tools can be selected from the Edit Tool pop-up menu.
Selection Display
When selected, the Selection Display option shows the Edit Selection Display in the MIDI Ed-itor window toolbar.
Track List
When selected, the Track List option displays the Track List in the Score Editor window.
Scrolling
The Scrolling submenu lets you select the scroll-ing options for the Score Editor window inde-pendently of the Edit window and any MIDI Ed-itor windows. The scrolling options include:
No Scrolling The Score Editor window does not scroll during or after playback. The playback cursor moves across the Edit window, indicating the playback location.
After Playback The playback cursor moves across the Score Editor window, indicating the playback location. When playback has stopped, the Score Editor window scrolls to the final play-back location.
Chapter 7: Score Editor Window 87

88
Page The playback cursor moves across the Score Editor window, indicating the playback location. When the right edge of the current page shown in the Score Editor window is reached, it scrolls to the next page and the play-back cursor continues moving from the left edge of the window.
Follow Edit Window When selected, the Score Ed-itor window follows the scrolling option se-lected for the Edit window (Options > Edit Win-dow Scrolling).
Customizable Toolbar
You can customize the toolbar in the Score Edi-tor window by re-arranging, and showing or hiding the available controls and displays just like in the Edit window or MIDI Editor windows.
Toolbar Display Options
To change the toolbar display options in the Score Editor window toolbar:
1 Do one of the following:
• Click the Score Editor Window Toolbar menu.
– or –
• Right-click in the toolbar.
For Pro Tools|HD systems, the Continuous and Center Playhead scrolling options are not available in the Score Editor window. If the Score Editor window is set to the Follow Edit Window scrolling option and the Edit window is set to either the Continuous or Center Playhead scrolling options, the Score Editor window scrolls by page.
What’s New in Pro Tools HD 8.0
2 From the pop-up menu, select or deselect any of the following:
• Expanded Edit Tools
• Selection Display
Rearranging Controls and Displays
To rearrange controls and displays in a MIDI Editor window toolbar:
Control-click (Windows) or Command-click (Mac) the controls or displays you want to move and drag them to the location in the Toolbar you want.
Track List
The Track List lets you show and hide MIDI and Instrument tracks in the Score Editor. It also pro-vides access to the Notation Display Track Set-tings and Score Setup (see “Notation Display Track Settings” on page 91 and “Score Setup” on page 93).
To show or hide the Track List in the Score Editor window:
From the Score Editor Window menu, select or deselect Track List.

Showing and Hiding Tracks
Use the Track List to show and hide MIDI and Instrument tracks as staves in the score.
To show MIDI and Instrument tracks in the Score Editor:
Click the Show/Hide icon in the Track List for tracks you want to show in the score.
To show all MIDI and Instrument tracks in the Score Editor:
From the Track List menu, select Show All Tracks.
To show only selected MIDI and Instrument tracks in the Score Editor:
1 In the Track List, select the MIDI and Instru-ment tracks you want to show in the score.
2 From the Track List menu, select Show Only Se-lected Tracks.
To hide MIDI and Instrument tracks in the Score Editor:
Click the Show/Hide icon in the Track List for tracks you want to hide in the score.
Partial Score: Violin I and Violin II shown; all other tracks are hidden
To hide all MIDI and Instrument tracks in the Score Editor:
From the Track List menu, select Hide All Tracks.
To hide selected MIDI and Instrument tracks in the Score Editor:
1 In the Track List, select the MIDI and Instru-ment tracks you want to hide in the score.
2 From the Track List menu, select Hide Selected Tracks.
Page Controls
The Score Editor window provides controls for navigating forward and backward by page. The current page number is displayed in the lower-left corner of the window.
To display the next page of the score:
Click the Page Forward button.
To display the previous page of the score:
Click the Page Back button.
Score Editor Page controls
Page ForwardPage Back
Current Page Display
Chapter 7: Score Editor Window 89

90
To display any specific page of the score:
1 Click the Current Page display.
2 Type the page number for the page you want to view.
3 Press Enter (Windows) or Return (Mac).
Zoom Controls
In addition to the Zoomer tool, the Score Editor provides Zoom In and Out buttons in the lower right hand corner of the window. It also pro-vides a Zoom selector that lets you zoom to a preset percentage or page size. When using these Zoom controls, the Score Editor zooms around the current Edit selection.
To zoom in one level:
Click the Zoom In button.
To zoom out one level:
Click the Zoom Out button.
Score Editor Zoom controls
Zoom InZoom Out
Zoom selector
What’s New in Pro Tools HD 8.0
To zoom to a preset percentage:
1 Click the Zoom selector.
2 From the Zoom pop-up menu, select the de-sired zoom percentage.
To zoom to a page size:
1 Click the Zoom selector.
2 From the Zoom pop-up menu, select the de-sired page size.
Zoom to Page Sizes
The Zoom pop-up menu provides the following page sizes:
Fit Page Width Zooms so that the width of one page fits in the Score Editor window.
Fit Page Height Zooms so that the height of the page fits in the Score Editor window.
Fit Page Zooms so that an entire page fits in the Score Editor window.
Fit 2 Pages Zooms so that two pages fit horizon-tally in the Score Editor window.
Selecting a zoom percentage from the Zoom pop-up menu

Notation Display Track SettingsThe Notation Display Track settings determine how individual MIDI and Instrument tracks ap-pear in the Score Editor. You can set the Clef, Display Quantization, and whether or not to display the track at “concert pitch” or as a trans-posing instrument (such as a B-flat tenor sax).
To configure the Notation Display Track settings:
1 Do one of the following:
• From the Track menu in the Score Editor, select Notation Display Track Settings.
• Right-click in the Score Editor and select Notation Display Track Settings.
• Double-click a Clef on a Staff.
2 From the Track pop-up menu, select the MIDI or Instrument track whose Notation Display Set-tings you want to change.
3 Configure the Notation Display Track Settings as desired.
Notation Display Track Settings
4 Repeat the preceding steps for other MIDI and Instrument tracks as necessary.
Notation Display Track Settings Options
Track
From the Track pop-up menu, select the track you want to configure.
Clef
From the Clef pop-up menu, select the Clef you want for the selected track from the following options:
• Grand Staff
• Treble Clef
• Bass Clef
• Alto Clef
• Tenor Clef
Display Transposition
From the Key pop-up menu, select the key of Transposition for the track. For instruments that transpose from another octave, you can also ad-just the Octave slider. For example, for a Bass Clarinet track, select the Key of B-flat and set the Octave slider to +1. This way, when you print the Bass Clarinet part, the player will be able to read the part and concert pitch will sound cor-rectly a major ninth below where the part is written.
Chapter 7: Score Editor Window 91

92
Attributes
The Attributes tab lets you specify the notation display quantization settings for the selected track. If the Clef is set to Grand Staff, you can also set the Split Point to divide notes between the treble and bass clefs.
Follow Globals
When the Follow Globals option is selected, the track attributes use the global attributes settings (see “Globals” on page 92). This option is en-abled for all tracks by default.
Display Quantization
The Display Quantization setting lets you select the quantization grid for the display of MIDI notes in music notation. MIDI notes in Pro Tools still maintain their original start time and duration, but this setting affects what note values are displayed. The notation display is quantized to the nearest select note value.
Straighten Swing
When enabled, the Straighten Swing option causes “swung” notes to be displayed as straight notation. For example, a run of swung eighth notes will be displayed as straight eighth notes.
Notation Display Track Settings window, Attributes tab
What’s New in Pro Tools HD 8.0
Allow Note Overlap
Pro Tools only displays a single rhythmic line on a single staff. When two notes that start at dif-ferent times overlap, the first note will be trun-cated when the second note begins. If the Allow Note Overlap option is enabled, Pro Tools dis-plays the full length of overlapping notes using tied notes.
Split Point
When the Clef for the selected track is set to Grand Staff, the selected Split Point setting deter-mines at which pitch the notes are placed in ei-ther the upper or lower staff of the Grand Staff.
Automatic When selected, Pro Tools splits notes between the upper and lower staves of the Grand Staff based on logical note groupings.
Fixed When selected, you can specify a particu-lar pitch at which to split notes between the up-per and lower staves of the Grand Staff.
Globals
The Globals tab provides the same settings as the Attributes tab (see “Attributes” on page 92). You can select which tracks follow the settings in the Globals tab in the Attributes tab for each track.

Score SetupThe Score Setup window lets you set up the page layout and staff spacing. You can enter the Title and Composer for the score. You can also select what elements of the score to display. Changes to the Score Setup update instantly in the Score Editor.
To open the Score Setup, do one of the following:
Choose File > Score Setup.
From the Tracks menu in the Score Editor win-dow, select Score Setup.
Right-click in the Score Editor window and se-lect Score Setup.
Score Setup window
Score Setup Window Options
Information
Title Enter the Title for the score. This appears at the top of the first page.
Composer Enter the Composer for the score. This appears in the upper right-hand corner of the first page.
Display
The Display options determine which score ele-ments you want displayed in the score. Deselect the elements you do not want displayed in the score.
Title and Composer Select to display the Title and Composer on the score.
Page Numbers Select to display Page Numbers at the bottom of each page.
Bar Numbers Select to display Bar Numbers at the beginning of each system above the top staff.
Track Names Select to display Track Names for each staff at the beginning of the score.
Chord Symbols Select to display chord symbols in the score.
Chord Diagrams Select to display Chord Dia-grams to display guitar tablature in the score (see “Chord Symbols and Diagrams” on page 99).
Disable the Chord Diagrams option when printing charts and lead sheets where you just want to see chord symbols.
Chapter 7: Score Editor Window 93

94
Spacing
Between Staves Enter the spacing you want be-tween staves.
Between Systems Enter the spacing you want between systems.
Below Title and Composer Enter the spacing you want between the Title and Composer and the first staff of the score.
Below Chord Symbols and Diagrams Enter the spacing you want between Chord Symbols and Diagrams and the top stave of each system.
Layout
Page Size Select the page size (Letter, Legal, Tab-loid, or A4).
Portrait Select to set the page orientation to Por-trait.
Landscape Select to set the page orientation to Landscape.
Staff Size Enter the Staff Size.
Page Margins Enter the size for the top, bottom, left, and right page margins.
Inches Select to enter Stave Size and Page Mar-gins in inches.
Millimeters Select to enter Stave Size and Page Margins in millimeters.
On pages where the music is vertically jus-tified, the distance between staves and sys-tems will be larger than the numbers speci-fied.
What’s New in Pro Tools HD 8.0
Editing NotesMIDI note editing in the Edit window, MIDI Ed-itor windows, and the Score Editor window all affect the same MIDI data. When editing in one window, your edits are reflected in all other win-dow. The Score Editor provides simple score ed-iting tools for entering, moving, and transpos-ing MIDI notes as music notation:
• The Trimmer tool lets you lengthen or shorten the duration of notes.
• The Note Selector tool lets you make object se-lections of notes in the score.
• The Grabber tool lets you select and move notes to another time or pitch location on the same track.
• The Pencil tool lets you insert notes and move them to another time or pitch location on the same track.
Selecting Notes
You can use either the Note Selector tool or the Grabber tool to select notes on one or more staves.
To select notes on one or more staves with the Note Selector tool:
1 Click the Note Selector tool.
2 Click and drag on the score to highlight the notes you want selected.
Selecting notes with the Note Selector tool
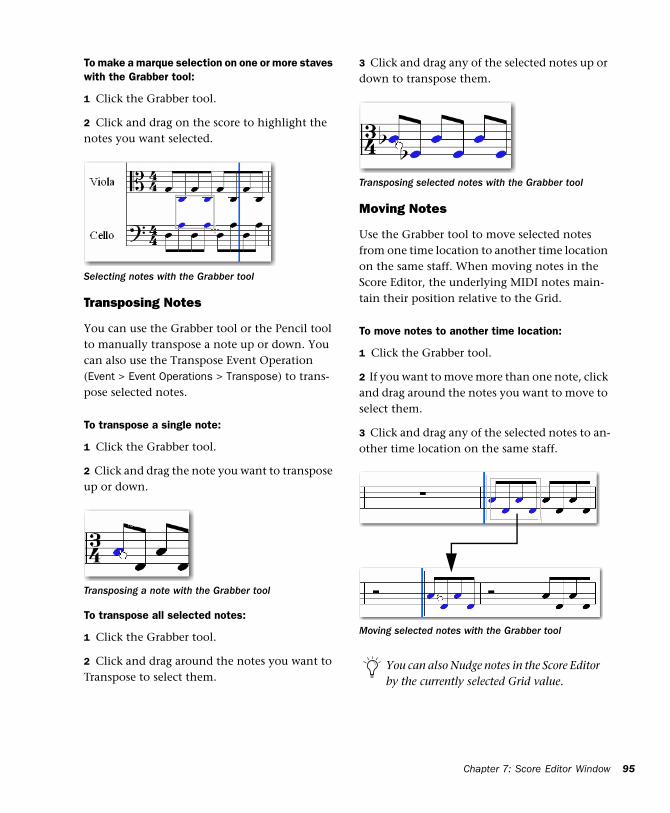
To make a marque selection on one or more staves with the Grabber tool:
1 Click the Grabber tool.
2 Click and drag on the score to highlight the notes you want selected.
Transposing Notes
You can use the Grabber tool or the Pencil tool to manually transpose a note up or down. You can also use the Transpose Event Operation (Event > Event Operations > Transpose) to trans-pose selected notes.
To transpose a single note:
1 Click the Grabber tool.
2 Click and drag the note you want to transpose up or down.
To transpose all selected notes:
1 Click the Grabber tool.
2 Click and drag around the notes you want to Transpose to select them.
Selecting notes with the Grabber tool
Transposing a note with the Grabber tool
3 Click and drag any of the selected notes up or down to transpose them.
Moving Notes
Use the Grabber tool to move selected notes from one time location to another time location on the same staff. When moving notes in the Score Editor, the underlying MIDI notes main-tain their position relative to the Grid.
To move notes to another time location:
1 Click the Grabber tool.
2 If you want to move more than one note, click and drag around the notes you want to move to select them.
3 Click and drag any of the selected notes to an-other time location on the same staff.
Transposing selected notes with the Grabber tool
Moving selected notes with the Grabber tool
You can also Nudge notes in the Score Editor by the currently selected Grid value.
Chapter 7: Score Editor Window 95

96
Inserting Notes
Use the Pencil tool to manually insert notes in the Score Editor. When you insert a note, the Score Editor automatically places it on the Grid and creates rests where appropriate.
To manually insert a note:
1 Select the Default Note Duration setting you want (see “Default Note Duration” on page 85).
2 Select the Grid setting you want (see “Grid” on page 86).
3 Select the Default Note On Velocity (see “De-fault Note On Velocity” on page 85).
4 Click the Pencil tool and select Free Hand.
5 With the Free Hand Pencil tool, do any of the following:
• Single-click at the time location and pitch you want to enter a single note of the se-lected Default Note Duration.
– or –
• Click at the time location and pitch you want and drag to the right to increase the duration of the note. Let go of the mouse when you have the duration you want.
You can also enter notes by recording MIDI, importing MIDI from a file, or using Step In-put (Event > Event Operations > Step Input).
Entering a single note with the Pencil tool
What’s New in Pro Tools HD 8.0
To manually insert multiple notes of the same pitch:
1 Select the Default Note Duration setting you want (see “Default Note Duration” on page 85).
2 Select the Grid setting you want (see “Grid” on page 86).
3 Select the Default Note On Velocity (see “De-fault Note On Velocity” on page 85).
4 Click the Pencil tool and select any of the fol-lowing shapes:
• Line
• Triangle
• Square
• Random
5 Click at the time location and pitch you want and drag to the right. Repeated notes of the se-lected Default Note Duration are entered on the selected Grid. The note on velocities for each note are determined in part by the Default Note On Velocity setting and the selected Pencil tool shape (see “Pencil” on page 83).
Entering a single longer note with the Pencil tool
Entering multiple note of the same pitch with the Line Pencil tool
Rests
The Score Editor automatically adds rests as nec-essary. Rests cannot be moved or inserted man-ually.
Score Editor Right-Click MenuThe Score Editor Right-click menu provides sev-eral useful commands for editing, exporting, and formatting the score and MIDI data.
To access the Score Editor Right-click menu:
Right-click anywhere on the score.
Tools
The Tools submenu lets you select any Edit tools relevant to the Score Editor.
Zoomer Selects the Zoomer tool.
Note Selector Selects the Note Selector tool.
Grabber Selects the Grabber tool.
Pencil Selects the Pencil tool.
Insert
The Insert submenu lets you insert key changes, meter changes, and chord symbols into the score at the location of the Edit cursor.
Key Inserts a key change.
Meter Inserts a meter change.
Chord Inserts a chord symbol.
Cut
The Cut command cuts the current Edit selec-tion.
Copy
The Copy command copies the current Edit se-lection.
Paste
The Paste command pastes the clipboard to the current Edit selection or at the current Edit cur-sor location. Any MIDI notes already present at the same location are overwritten.
Merge
The Merge command pastes the clipboard to the current Edit selection or at the current Edit cur-sor location and merges the pasted data with any MIDI notes already present at the same lo-cation.
Clear
The Clear command clears (deletes) the current Edit selection.
Event Operations
The Event Operations submenu lets you select any of the Event Operations windows (such as Quantize or Change Velocity).
Open in MIDI Editor
Choosing the Open in MIDI Editor option opens the tracks shown in the Score Editor in a MIDI Editor window.
Open in MIDI Event List
The Open In MIDI Event List option opens the se-lected track in the MIDI Event List.
Chapter 7: Score Editor Window 97

98
Notation Display Track Settings
Choosing the Notation Display Track Settings op-tion opens the Notation Display Track Settings dialog (see “Notation Display Track Settings” on page 91).
Score Setup
Choosing the Score Setup option opens the Score Setup dialog (see “Score Setup” on page 93).
Send to Sibelius
Choosing the Send to Sibelius command sends the score exactly as it appears in the Score Editor window to Sibelius notation software (see “Send To Sibelius Enhancements” on page 101).
Print Score
Choosing the Print Score command prints the score (see “Printing Scores” on page 101).
Key ChangesYou can add, edit, and delete Key Signatures in your score. Key Signatures affect the note spell-ing of MIDI notes in the score. For example, MIDI note number 58 (“B-flat 3”) is B-flat in F major, but it is A-sharp in B major.
You can also add and delete Key Signatures in the Key Signatures ruler in the Edit win-dow or in any MIDI Editor window.
What’s New in Pro Tools HD 8.0
To add a Key Signature:
1 With the Note Selector, Grabber, or Pencil tool, Right-click at the location in the score where you want to change key and select Insert > Key Change.
2 In the Key Change dialog, select the mode (major or minor), the key, its location and range, and how you want it to affect pitched tracks.
3 Click OK.
The selected Key Signature is displayed in the score and the note spellings for notes after the key change are updated accordingly.
To edit a Key Signature:
1 With the Grabber tool, double-click the Key Signature you want to edit.
2 In the Key Change dialog, make the desired changes and click OK.
To delete a Key Signature:
With the Grabber tool, Alt-click (Windows) or Option-click (Mac) the Key Signature you want to delete.
Meter ChangesYou can add, edit, and delete Meters in your score. Meter changes affect the number of bars in the score (and in your session). When chang-ing meter, notes are not moved, but the barlines will be redrawn.
You can also add and delete Meters in the Meter ruler in the Edit window and in MIDI Editor windows.

To add a Meter change:
1 Do one of the following:
• Choose Event > Time Operations > Change Meter.
– or –
• With the Note Selector, Grabber, or Pencil tool, Right-click at the location in the score where you want to change key and select In-sert > Meter Change.
2 In the Meter Change dialog, do the following:
• Enter the Location and Meter for the meter change.
– and –
• If you want the inserted meter event to fall cleanly on the first beat of the nearest mea-sure, select the Snap To Bar option.
3 Select a note value for the number of clicks to sound in each measure. For a dotted-note click value, select the dot (.) option in addition to the note value.
4 Click OK to insert the new meter.
Meter Change dialog
For some meters, it may be desirable to use a dotted value for the click. For instance, if using a meter of 6/8, a dotted quarter note click (yielding two clicks per measure) is generally more suitable than a straight eighth note click (six clicks per measure).
To edit a Meter change:
1 With the Grabber tool, double-click the Meter event you want to edit.
2 In the Meter Change dialog, make the desired changes and click OK.
To delete a Meter change:
With the Grabber tool, Alt-click (Windows) or Option-click (Mac) the Meter event you want to delete.
Chord Symbols and DiagramsYou can add, edit, and delete chord symbols and chord diagrams (guitar tablature) in your score. Chord symbols have no effect on MIDI data.
Chord symbols are not included when export-ing MIDI data from Pro Tools to a MIDI file, but they are included when exporting to a Sibelius file (.sib) or when using the Send to Sibelius command.
You can also add and delete chord symbols in the Chord Symbol ruler in the Edit win-dow and in MIDI Editor windows. However, Chord Diagrams (guitar tab) are only dis-played in the Score Editor window.
Chapter 7: Score Editor Window 99

100
To insert a chord symbol:
1 With the Note Selector, Grabber, or Pencil tool, Right-click at the location in the score where you want to add a chord symbol and se-lect Insert > Chord.
2 In the Chord Change dialog, select the name for the root of the Chord from the Chord selec-tor (such as D).
3 Select the quality from the Chord Quality se-lector (such as major or minor).
4 Select the bass note of the chord from the Bass selector (such as B-flat for an inverted G minor chord).
5 Select the desired Chord Diagram (guitar tab-lature) from the available options.
Chord Change dialog
Chord selectorChord Quality
selector Bass selector
Chord Diagrams
What’s New in Pro Tools HD 8.0
6 Click OK.
The selected chord symbol is placed above the top staff in the system.
To edit a chord symbol:
1 With the Grabber tool, double-click the chord symbol you want to edit.
2 In the Chord Change dialog, make the desired changes and click OK.
To move a chord symbol:
With the Grabber tool, click and drag the chord symbol to a new location.
To delete a chord symbol:
With the Grabber tool, Alt-click (Windows) or Option-click (Mac) the chord symbol you want to delete.
To display or hide chord symbols in the score:
In the Score Settings dialog (File > Score Setup), enable or disable the Chord Symbols op-tion.
To display or hide chord diagrams (guitar tab) in the score:
In the Score Settings dialog (File > Score Setup), enable or disable the Chord Diagrams op-tion.
Chord symbol in the score
chord symbol
Exporting ScoresPro Tools lets you export the score from your session as a Sibelius (.sib) file. You can then open your score in Sibelius as transcribed by Pro Tools, edit the notation in Sibelius as de-sired, and print the score and parts from Sibel-ius.
To export a score from Pro Tools:
1 Configure the score for your session in Score Editor window.
2 Choose File > Export > Sibelius.
3 Select a destination and click Save.
Send To Sibelius Enhancements
The Send to Sibelius command has been im-proved to export MIDI and Instrument tracks shown in the Score Editor to Sibelius notation software as a “.sib” file. If Sibelius is installed on your computer, the Send to Sibelius command launches Sibelius. You can then further edit the notation in Sibelius and print a score or parts.
To send the Score from your Pro Tools session to Sibelius, do one of the following:
1 Configure the score for your session in Score Editor window.
2 Do one of the following:
• Choose File > Send to Sibelius.
– or –
• Right-click in the Score Editor and choose Send to Sibelius.
Sibelius 5.x or higher is required to open .sib files exported from Pro Tools.
Pro Tools exports all Instrument and MIDI tracks shown in the Score Editor to Sibelius as a .sib file. You can then further edit the notation in Sibelius and print the score or parts from Si-belius.
Printing ScoresPro Tools lets you print the score from your Pro Tools session. The score will be printed ex-actly as it appears in the Score Editor window. Configure the Score Setup and show or hide any MIDI and Instrument tracks as desired. Only those tracks that are shown in the score will be printed.
To print the score from your Pro Tools session:
1 Open the Score Editor window and configure your score as desired.
2 Choose File > Print Score.
3 Configure the Print dialog as necessary and click OK (Windows) or Print (Mac)
Press Control+P (Windows) or Com-mand+P (Mac) to Print Score.
Chapter 7: Score Editor Window 101

102
What’s New in Pro Tools HD 8.0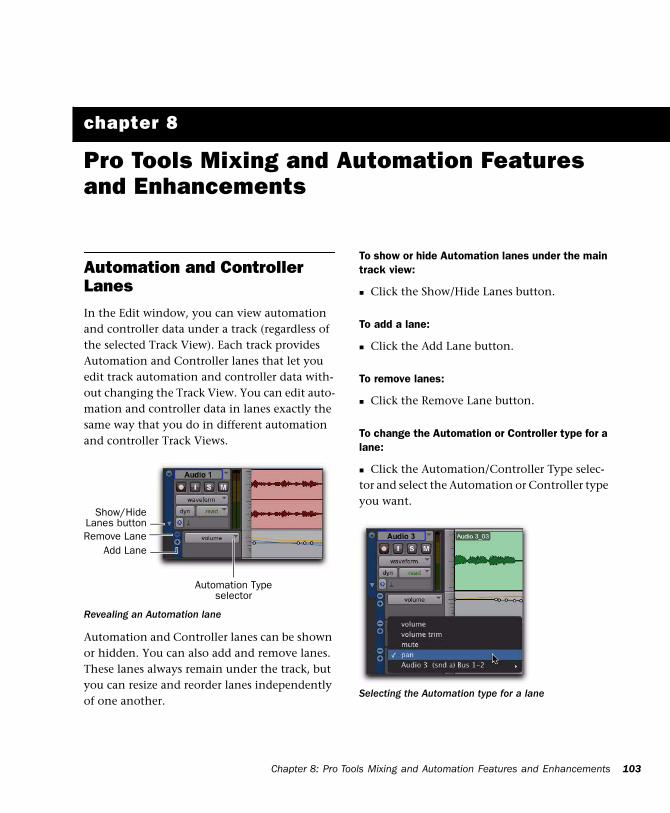
chapter 8
Pro Tools Mixing and Automation Features and Enhancements
Automation and Controller LanesIn the Edit window, you can view automation and controller data under a track (regardless of the selected Track View). Each track provides Automation and Controller lanes that let you edit track automation and controller data with-out changing the Track View. You can edit auto-mation and controller data in lanes exactly the same way that you do in different automation and controller Track Views.
Automation and Controller lanes can be shown or hidden. You can also add and remove lanes. These lanes always remain under the track, but you can resize and reorder lanes independently of one another.
Revealing an Automation lane
Automation Typeselector
Show/HideLanes buttonRemove Lane
Add Lane
Chapter 8: Pro To
To show or hide Automation lanes under the main track view:
Click the Show/Hide Lanes button.
To add a lane:
Click the Add Lane button.
To remove lanes:
Click the Remove Lane button.
To change the Automation or Controller type for a lane:
Click the Automation/Controller Type selec-tor and select the Automation or Controller type you want.
Selecting the Automation type for a lane
ols Mixing and Automation Features and Enhancements 103

104
To replace all Automation and Controller lanes under the track with a single lane of the specified automation or controller type:
1 Right-click the Show/Hide Lanes button.
2 Select the Automation or Controller type you want.
To resize the height of all Automation and Controller lanes for a track, do one of the following:
Right-click on the vertical zoom scale just to the right of the track controls and select the height from the pop-up menu.
– or –
Click and drag the bottom line of any given Lane Controls column up or down. The cursor changes to indicate that you can resize the lane.
To resize the height of a single Automation or Controller lane for a track:
Press Start (Windows) or Control (Mac) while selecting the Lane Height setting.
Right-click menu for selecting a single Automation or Controller lane
Press Start+Up/Down Arrow key (Win-dows) or Control+Up/Down Arrow key (Mac) to increase or decrease height of any lane that contains the Edit cursor or an Edit selection.
What’s New in Pro Tools HD 8.0
To reorder lanes:
To reorder lanes on-screen, drag the lane con-trol section to new positions in the Edit window.
Ten InsertsPro Tools 8.0 provides five additional inserts on audio, Auxiliary Input, Master Fader, and Instru-ment tracks for software plug-ins and hardware inserts. The audio signal flow is in series for all ten inserts on a track.
Configuring Inserts View in the Mix and Edit Windows
Audio tracks, Auxiliary Inputs, Master tracks, and Instrument tracks include two sets of inserts views: Inserts A–E (inserts 1–5) and Inserts F–J (inserts 6–10). The View menu provides separate options for viewing each set of inserts in the Mix and Edit windows.
To display inserts in the Edit window:
Select any of the following:
• View > Edit Window > Inserts A–E.
• View > Edit Window > Inserts F–J.
For information on accessing Inserts F–J from Pro Tools control surfaces, see “Ac-cessing 10 Inserts” on page 113.
Inserts A–E and F–J in the Edit window

To display inserts in the Mix window:
Select any of the following:
• View > Mix Window > Inserts A–E.
• View > Mix Window > Inserts F–J.
Inserts A–E and F–J in the Mix window
Chapter 8: Pro To
Improvements for Recording with Automatic Delay CompensationAutomatic Delay Compensation is now applied to Sends as well as Inserts to compensate for mixer delays inherent in bussing. In most cases, you can now record in Pro Tools with Delay Com-pensation enabled.
With Delay Compensation enabled, it is recommended that you do not use any in-serts on any Auxiliary Input or Master Fader tracks you may be using to control the cue mix volume. Also, you should avoid us-ing inserts on any record tracks. (Some low latency inserts may be acceptable depend-ing on the talent’s preference.)
ols Mixing and Automation Features and Enhancements 105

106
What’s New in Pro Tools HD 8.0
chapter 9
Plug-ins
Creative Collection Plug-ins(RTAS Only)
The new Pro Tools Creative Collection plug-ins include several RTAS virtual instrument and ef-fects plug-ins from Digidesign’s Advanced In-strument Research group.
Creative Collections Instruments
Boom
Boom is a drum instrument for Pro Tools, in-spired by classic drum machines. Featuring a drum machine-style pattern sequencer, Boom offers ten different electronic-oriented kits, with extensive sound-shaping capability.
For more information, see the Pro Tools Creative Collection Plug-ins Guide.
DB-33
DB-33 is a tonewheel organ instrument for Pro Tools with rotary speaker cabinet and tube preamp emulation. DB-33 provides full draw-bars, variable percussion, and several tonewheel models that provide a wide range of classic or-gan sounds.
Chapter 9: Plug-ins 107

108
Mini Grand
Mini Grand is a high-quality grand piano instru-ment for Pro Tools. Seven selectable piano mod-els, with eight velocity layers per key, can be cus-tomized with variable room simulation to fit your piano needs.
Structure Free
Structure® Free is a sample player for Pro Tools that provides some of the key features of the full-featured version of Structure. Structure Free lets you quickly and easily integrate a wide range of sampler performances in your Pro Tools sessions.
If the full version of Structure or Structure LE is already installed on your system, Structure Free will not be installed.
What’s New in Pro Tools HD 8.0
Vacuum
Vacuum is a unique analog synth for Pro Tools, employing Vacuum Tube Synthesis for rich leads, basses and special effects. With a dusty, distressed look to match its vintage-slanted sound, Vacuum offers extensive modulation ca-pabilities and a lot of sonic character.
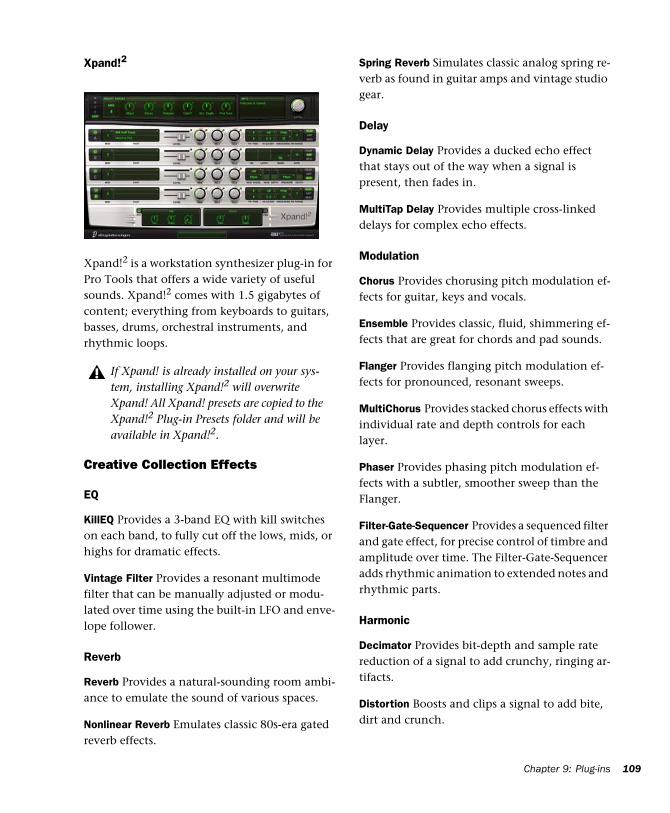
Xpand!2
Xpand!2 is a workstation synthesizer plug-in for Pro Tools that offers a wide variety of useful sounds. Xpand!2 comes with 1.5 gigabytes of content; everything from keyboards to guitars, basses, drums, orchestral instruments, and rhythmic loops.
Creative Collection Effects
EQ
KillEQ Provides a 3-band EQ with kill switches on each band, to fully cut off the lows, mids, or highs for dramatic effects.
Vintage Filter Provides a resonant multimode filter that can be manually adjusted or modu-lated over time using the built-in LFO and enve-lope follower.
Reverb
Reverb Provides a natural-sounding room ambi-ance to emulate the sound of various spaces.
Nonlinear Reverb Emulates classic 80s-era gated reverb effects.
If Xpand! is already installed on your sys-tem, installing Xpand!2 will overwrite Xpand! All Xpand! presets are copied to the Xpand!2 Plug-in Presets folder and will be available in Xpand!2.
Spring Reverb Simulates classic analog spring re-verb as found in guitar amps and vintage studio gear.
Delay
Dynamic Delay Provides a ducked echo effect that stays out of the way when a signal is present, then fades in.
MultiTap Delay Provides multiple cross-linked delays for complex echo effects.
Modulation
Chorus Provides chorusing pitch modulation ef-fects for guitar, keys and vocals.
Ensemble Provides classic, fluid, shimmering ef-fects that are great for chords and pad sounds.
Flanger Provides flanging pitch modulation ef-fects for pronounced, resonant sweeps.
MultiChorus Provides stacked chorus effects with individual rate and depth controls for each layer.
Phaser Provides phasing pitch modulation ef-fects with a subtler, smoother sweep than the Flanger.
Filter-Gate-Sequencer Provides a sequenced filter and gate effect, for precise control of timbre and amplitude over time. The Filter-Gate-Sequencer adds rhythmic animation to extended notes and rhythmic parts.
Harmonic
Decimator Provides bit-depth and sample rate reduction of a signal to add crunchy, ringing ar-tifacts.
Distortion Boosts and clips a signal to add bite, dirt and crunch.
Chapter 9: Plug-ins 109
110
Enhancer Synthesizes additional high-end to en-hance dull signals.
Freq Shifter Provides classic pitch shifting effects that are great for guitar and keyboard sounds.
FuzzWah Provides nasty distortion and sweeping wah effects that are perfect for guitar, electric pi-ano, and organ sounds.
Talkbox Emulates a mouth-controlled wah for vintage lead guitar effects.
Sound Field
StereoWidth Widens mono signals in the stereo field, and precisely controls width of stereo sig-nals.
Additional Plug-ins Included with Pro Tools(TDM, RTAS, and AudioSuite)
The following plug-ins, which used to be paid plug-in options, are now free and installed with Pro Tools:
• Digidesign Maxim
• Digidesign D-Fi
• Sci-Fi
• Lo-Fi
• Recti-Fi
• Vari-Fi
• Bomb Factory Sans Amp
For information on these plug-ins, and other plug-ins, see the Digidesign Plug-ins Guide and the Bomb Factory Plug-ins Guide.
What’s New in Pro Tools HD 8.0
Eleven Free
(RTAS Only)
The Eleven Free plug-in is installed with Pro Tools. Eleven Free gives you two custom gui-tar amplifiers and two cabinet models, selected from among the “best of the best” vintage and contemporary gear provided in the full version of Eleven.
TL Utilities Included with Pro Tools(TDM and RTAS)
The TL Utilities™ plug-ins, which used to be paid plug-in options, are now free and installed with Pro Tools.
TL Utilities includes the following plug-ins.
• TL Metro
• TL InTune
• TL MasterMeter
For more information, see the Eleven Free Guide.
For information on the TL Utilities plug-ins and other TL Labs plug-ins, see the TL Labs Plug-ins Guide.

DigiRack Plug-in Improvements
Stereo Version of DigiRack EQ III
The DigiRack™ EQ III plug-ins are now available as stereo as well as mono and multi-mono. Note that for the stereo version, the Input and Output meters display the sum of the left and right channels.
Improved RTAS DigiRack D-Verb
The RTAS version of DigiRack D-Verb™ now in-cludes a very subtle chorusing effect in the Church and Hall options. This “thickens” the re-verb sound, giving it a little more sense of a church or hall space.
The chorusing effect has always been present for the Church and Hall options in the AudioSuite and TDM versions, but was originally not in the RTAS version to help lessen the demands on host processing power.
Improved Drag and Drop to Plug-ins
MIDI Regions
Pro Tools now supports dragging and dropping MIDI regions from tracks, the Region List, or Di-giBase Browsers to certain instrument plug-ins. This is useful for some instrument plug-ins, such as Digidesign’s Transfuser, that provide MIDI se-quencers.
Region Groups
Pro Tools now supports dragging and dropping region groups from tracks, the Region List, or Di-giBase Browsers to certain instrument plug-ins. This is useful for instrument plug-ins like Digidesign’s Transfuser.
Plug-in Find and RelinkWhen opening a Pro Tools session with certain instrument plug-ins that can import and play back audio files (such as Digidesign’s Trans-fuser), the Find and Relink command is started automatically if the plug-in is missing any audio files.
Chapter 9: Plug-ins 111

112
AudioSuite Preview ImprovementsThe AudioSuite window now provides volume control and level meters for previewing Audio-Suite processing. AudioSuite previewing has also been improved in both the time it takes to start and stop preview, and in the responsiveness to moving plug-in controls during preview.
Preview Volume
The Preview Volume control lets you adjust the volume for previewing AudioSuite processing.
To adjust the volume for previewing AudioSuite processing:
1 Click the Preview Volume control.
2 In the resulting pop-up fader, drag up to in-crease the preview volume and drag down to de-crease the preview volume.
AudioSuite window, Invert plug-in shown
Adjust the volume for previewing AudioSuite processing
Preview Level metersPreview volume
What’s New in Pro Tools HD 8.0
Preview Volume Level Meters
The Preview Volume Level meters display the levels for previewed AudioSuite processing. This can help you watch for clipping in the processed signal.
AudioSuite Preview Audition Paths
(Pro Tools HD Only)
For Pro Tools|HD systems with more than one audio interface, AudioSuite preview can now be assigned to any audio output path on any inter-face in the system.
To configure an Audition Path:
1 Choose Setup > I/O and click the Output tab.
2 From the Audition Paths pop-up menu, select the audition path that you want.

chapter 10
Pro Tools Controller Features and Enhancements
Pro Tools 8.0 provides several new features and enhancements for Digidesign control surfaces and ICON work surfaces.
Accessing 10 Inserts
Accessing Inserts on D-Control
When you press the Inserts switch on a channel strip, plug-in names are shown in two groups of five (Inserts A–E or Inserts F–J) on the encoder displays.
You can use Flip mode to transfer controls for any insert (A–J) from the channel encoders to the Faders.
To toggle display of Inserts A–E and F–J on a channel strip:
1 Press the Inserts switch in the Channel Strip Mode controls section of the channel strip to show the top level Insert display.
2 Press the Page Up and Page Down switches to toggle the top level Insert display between the two sets of five Inserts (A–E and F–J).
Chap
To view the parameters for an individual plug-in:
Press the Select switch on the corresponding encoder.
To return to the top level display of plug-ins on the channel strip:
Press the Inserts switch.
Accessing Inserts on D-Command
When you press the Inserts switch, you enter In-serts mode, and the plug-in names for the first two plug-ins on that channel strip are displayed on the encoder displays. The 10 available inserts are displayed in five pairs (A–B, C–D, E–F, G–H, I–J).
To scroll display of Inserts A–J on a channel strip:
Press the Page Up and Page Down switches.
ter 10: Pro Tools Controller Features and Enhancements 113

114
Accessing Inserts on ProControl
With the DSP Edit/Assign section you can view and assign inserts in two groups of five (Inserts A–E and F–J) for any channel strip.
To view inserts in the DSP Edit/Assign section:
1 Press the INS/SEND switch on a channel to fo-cus it in the DSP Edit/Assign section.
2 Press the INSERT/PARAM switch in the DSP Edit/Assign section.
3 Press the PRE/POST switch at the bottom of the DSP Edit/Assign section to toggle display be-tween Insert A–E and F–J.
To view and toggle display of Inserts A–E and F–J in the DSP Edit/Assign section:
1 Press the INS/SEND switch on a channel to fo-cus it in the DSP Edit/Assign section.
2 Hold Shift and press the INSERT/PARAM switch in the DSP Edit/Assign section.
Accessing Inserts on C|24
When you press the Insert switch in a channel strip, C|24™ enters Insert Select view, which dis-plays the channel’s insert controls horizontally across the LCD displays.
To display the Inserts on a track:
1 Press the Insert switch in the track’s channel strip. The switch lights to indicate track focus.
The left side of the LCD display shows the track name in the top row and “Inserts” in the bottom row.
What’s New in Pro Tools HD 8.0
2 If necessary, press the Channel Bar Scroll switches to toggle display between Inserts A–E and F–J.
For each assigned Insert on the track, the LCD displays show Insert position and Insert name on the top row, “more” and Insert bypass state on the bottom row.
For each Insert position without an assignment, the LCD displays show “No Insert” on the top row, and “assign” on the bottom row.
Accessing Inserts on Control|24
When you press the Insert switch in a channel strip, Control|24™ enters Insert Select view, which displays the channel’s inserts horizon-tally across the scribble strip displays.
To display the Inserts on a track:
1 Press the Inserts switch in the track’s channel strip.
The track name is shown in the Channel Bar dis-play and the first five inserts are shown in the channel scribble strips.
2 If necessary, press the Channel Bar Scroll switches to toggle display between Inserts A–E and F–J.
For each assigned Insert on the track, the chan-nel scribble strips show the Insert name.
For each Insert position without an assignment, the channel scribble strips show “No Insert.”

Accessing Inserts on Command|8
Inserts in Console View
When Command|8 is in Console view, the dis-play shows the names of currently-assigned in-serts across all channel strips for a given insert position (Inserts A–J in Pro Tools).
To display the inserts on an Insert position across all tracks:
1 Press the Insert switch to the left of the rotary encoders to put Command|8 in Console view.
2 Do one of the following:
• To display an insert position A–E, press the corresponding A–E switch.
– or –
• To view any of the Inserts F–J, hold Shift/Add and press the corresponding switch (A=F, B=G, C=H, D=I, or E=J). The switches flash to indicate display of Inserts F–J.
Inserts in Channel View
When Command|8 is in Channel View, the dis-play shows the names of all the inserts on the se-lected track.
To view all inserts on a single track (Channel View):
1 Press the Insert switch in the Channel View row.
2 Press a lit Channel Select switch.
3 Do one of the following:
• To display Inserts A–E, press the Page Left switch.
– or –
• To display Inserts F–J, press the Page Right switch.
Chap
Plug-in MappingPro Tools lets you customize the arrangement of plug-in parameters on supported control sur-faces. You can save these customized plug-in maps as presets and export them for use across different sessions and systems.
Plug-in Learn Mode
Plug-ins can be put into Learn mode, from which any automatable plug-in parameter can be mapped to a channel strip encoder, switch, or (in Flip mode) fader on the control surface.
Plug-in Map Presets
A map for a plug-in can be saved and recalled for any plug-in of the same type.
You can save multiple map presets for a single plug-in, and switch between maps at any time during a session.
You can also use multiple map presets on differ-ent instances of a plug-in at the same time. This is useful for virtual instrument plug-ins with multiple configurations, or for multi-user work-flows on large systems.
You can set a custom plug-in map to be the de-fault map for a plug-in, so that the same map is used for all default instances of that plug-in.
Plug-in Map Files
Plug-in maps can be exported (as .pim files) for use in other sessions and on other systems with a similar type of control surface (8-fader surface, 24-fader surface, or ICON surface).
ter 10: Pro Tools Controller Features and Enhancements 115

116
Control Surface Mapping
When you create a custom plug-in map, its pa-rameters are arranged in pages that correspond to the controls on the control surface. The size of a page depends on the type of control surface. Each custom plug-in map allows up to 200 pages of mapped parameters.
Plug-in mapping is stored according to the fol-lowing types of control surfaces:
8-fader surfaces The following has a page size of 8 mappable encoders/switches:
• Command|8
24-fader surfaces The following have a page size of 24 mappable encoders/switches:
• C|24
• Control|24
ICON surfaces The following have a separately mappable encoders and switches with the fol-lowing page sizes:
• D-Control®
• Custom Faders display 6 rows (pages) of 8 encoders and switches at a time
• Channel strips display 1 column (page) of 6 encoders and switches at a time
• D-Command
• Custom Faders display 2 rows (pages) of 8 encoders and switches at a time
• Channel strips display 1 column (page) of 6 encoders and switches, 2 at a time
Plug-in Mapping is not supported with ProControl™.
If you import a plug-in map that was cre-ated on a different type of control surface, it will appear as an inactive choice in the Map Presets menu.
What’s New in Pro Tools HD 8.0
Plug-in Map Controls
When a supported control surface is declared in Pro Tools, Plug-in Map controls appear in the plug-in window.
Map Options Menu Lets you create, rename, save, delete, import, export, and set default plug-in maps.
Map Presets Menu Lets you choose from avail-able custom Plug-in Maps for the plug-in.
Learn Button Puts the plug-in in Learn mode, where you can map plug-in parameters to a con-trol surface.
Parameter Menu When in Learn mode, lets you select a parameter on the plug-in for mapping. If you click a parameter in the plug-in window while in Learn mode, this menu shows the name of the parameter.
Creating Plug-in Maps
This section covers creating plug-in maps on the following control surfaces:
• C|24
• Control|24
• Command|8
For details on plug-in mapping, see “Plug-in Mapping on D-Control” on page 121 and “Plug-in Mapping on D-Command” on page 124.
Plug-in Map controls in the plug-in window
Map Options menu
Map Presets menu
Learn button
Parameter menu

Putting a Plug-in into Learn Mode
When you first put a plug-in into Learn mode, a new plug-in map is created (with the default name “Custom Map”), and the plug-in is fo-cused on the control surface, but with a blank page of controls, ready for mapping.
Only one plug-in can be in Learn mode at a time.
To put a plug-in into Learn mode, do one of the following:
Click the Learn button in the plug-in window.
– or –
From the Map Options pop-up menu, choose New Map.
To take a plug-in out of Learn mode, do one of the following:
Click the active Learn button in the plug-in window.
Close the plug-in window.
Click the Learn button in a different plug-in window.
Plug-ins are automatically taken out of Learn mode when moved to a different insert position, made inactive, or converted between TDM and RTAS formats.
Chap
Creating and Editing Plug-in Maps
To create a custom map of plug-in parameters:
1 Open the plug-in whose mapping you want to customize.
2 Put the plug-in into Learn mode. The plug-in is focused on the control surface, but with a blank page of controls, ready for mapping.
3 In the plug-in window, click the plug-in pa-rameter you want to map. The parameter name appears in the Parameter menu.
4 On the control surface, do one of the follow-ing:
• Turn the encoder or press the channel Se-lect switch where you want to map the pa-rameter.
– or –
• If the control surface is in Flip mode, move the fader or press the channel Select switch where you want to map the parameter.
5 Repeat steps 3-4 for each parameter you want to map.
6 Take the plug-in out of Learn mode.
To change parameter mapping in a plug-in map:
1 Open the plug-in whose custom map you want to change.
2 Choose the map you want to change from the Map Preset pop-up menu.
3 Put the plug-in into Learn mode. The plug-in is focused on the control surface.
ter 10: Pro Tools Controller Features and Enhancements 117

118
4 Do the following for each parameter mapping you want to change:
• In the plug-in window, click the new plug-in parameter you want to map. The param-eter name appears in the Parameter menu.
– and –
• On the control surface, page to the encoder or switch where you want to change the mapping, and turn the encoder or press the switch.
5 Take the plug-in out of Learn mode.
To remove parameter mapping from a plug-in map:
1 Open the plug-in whose custom map you want to change.
2 Choose the map you want to change from the Map Preset pop-up menu.
3 Put the plug-in into Learn mode. The plug-in is focused on the control surface.
4 Do the following for each parameter mapping you want to remove:
• Make sure the Parameter menu displays No Control.
– and –
• On the control surface, page to the encoder or switch where you want to remove the mapping, and turn the encoder or press the switch.
5 Take the plug-in out of Learn mode.
Managing Plug-in Maps
You can save plug-in maps as presets for reuse on the same Pro Tools system, or export them for use on other Pro Tools systems with a similar control surface.
What’s New in Pro Tools HD 8.0
Saving Plug-in Maps
Plug-in maps are saved as global preferences on a Pro Tools system, so they are available to all sessions created on the system.
When you create a map for a plug-in, that map becomes available to all other plug-ins of the same type and channel format.
To save a copy of a custom plug-in map:
1 Open the plug-in whose map you want to copy.
2 Choose the map you want to copy from the Map Presets pop-up menu.
3 From the Map Options pop-up menu, choose Save Map As.
4 Enter a name for the plug-in map.
5 Click OK. The new copy becomes the active plug-in map.
To rename a custom plug-in map:
1 Open the plug-in whose map you want to re-name.
2 Choose the map you want to rename from the Map Presets pop-up menu.
3 From the Map Options pop-up menu, choose Rename Map.
4 Enter a new name for the plug-in map.
5 Click OK.
If you want to map the same plug-in in dif-ferent channel formats (such as mono, ste-reo and 5.1 surround) you need to create a separate plug-in map for each format.

Deleting Plug-in Maps
From the plug-in window, you can delete indi-vidual plug-in maps.
You can also delete all custom plug-in maps on the system, reverting all plug-ins to their Factory Default plug-in maps.
To delete a custom plug-in map:
1 Open the plug-in whose map you want to de-lete.
2 Choose the map you want to delete from the Map Presets pop-up menu.
3 From the Map Options pop-up menu, choose Delete Current Map.
4 Click Delete.
To delete all plug-in maps from the system:
1 Open any plug-in in the session.
2 From the Map Options pop-up menu, choose Delete All Maps.
3 Click Delete.
On D-Control and D-Command systems, when you delete all plug-in maps, you are also deleting all Custom Fader Plug-in mapping. For more information, see the D-Control Guide or D-Command Guide.
Chap
Setting a Custom Plug-in Map as the Default Map
You can set a custom plug-in map as the default map for a plug-in, instead of the Factory Default map.
When you set a custom plug-in map as the de-fault, it applies across the entire session. All in-stances of that plug-in that were set to the Fac-tory Default map, or to another custom default map, change to the new default.
If you change parameter mapping in the custom plug-in map that has been set as the default, the changes will propagate to all instances of the plug-in using that default.
How Default Plug-in Map Settings are Stored
Default map settings are stored as global (sys-tem-wide) Pro Tools preferences, so they are ap-plied to all sessions that you subsequently open or create on that system.
To set a custom plug-in map as the default map:
1 Open the plug-in whose default plug-in map you want to change.
2 Choose the map you want to use as the new default from the Map Presets pop-up menu.
3 From the Map Options pop-up menu, choose Set As Default.
When you export a plug-in map, the default map setting for that plug-in is also exported. When that map is imported, the default set-ting is also updated, and all instances of the plug-in change to the new default.
If you plan to work with the same plug-in mapping on multiple sessions, back up your settings by exporting all plug-in maps on a regular basis and saving the .pim file with your sessions.
ter 10: Pro Tools Controller Features and Enhancements 119

120
Hiding Default Plug-in Map Pages
When you create a custom plug-in map, its pa-rameters are arranged in pages that correspond to the groups of controls that appear on a con-trol surface.
When you page through the controls for a plug-in on a control surface, the pages for custom plug-in maps appear first, and the pages for the Factory Default map appear after the custom pages.
You can hide the Factory Default pages of a plug-in, so that only the custom pages appear on the control surface. This applies to all in-stances of the plug-in.
To hide the Factory Default pages of a plug-in map:
1 Open the plug-in whose default plug-in map pages you want to hide.
2 From the Map Options pop-up menu, choose Hide Factory Default Pages.
Exporting and Importing Plug-in Maps
Plug-in maps can be exported as .pim files for use on other Pro Tools systems.
When exporting plug-in maps, you can choose to save individual map files for each plug-in, or a single map file containing all the plug-in maps for the system.
On D-Control and D-Command systems, when you export all plug-in maps, you are also exporting Custom Fader Plug-in map-ping to the same file. For more information, see the D-Control Guide or D-Command Guide.
What’s New in Pro Tools HD 8.0
To export an individual plug-in map:
1 Open the plug-in whose map you want to ex-port.
2 Choose the map you want to export from the Map Presets pop-up menu.
3 From the Map Options pop-up menu, choose Export Current Plug-in Map.
4 Choose a location for the map file.
5 Click Save.
To export all plug-in maps in the system to a single map file:
1 Open any plug-in in the session.
2 From the Map Options pop-up menu, choose Export All Plug-in Maps.
3 Choose a location for the map file.
4 Click Save.
To import a map file:
1 Open the plug-in where you want to import a plug-in map.
2 From the Map Options pop-up menu, choose Import Plug-in Maps From File.
3 Locate the plug-in map (.pim) file you want to import.
4 Click Open.

Plug-in Mapping on D-Control
With D-Control, you can put a plug-in into Learn mode, select parameters for mapping, and independently map two sets of plug-in parame-ters to each encoder or its associated B/M/P switch, all directly from the control surface.
You can map parameters to encoders and B/M/P switches in both the Custom Faders and in channel strips.
When you put a plug-in into Learn mode, its track is focused in the Focus Channel strip and it is automatically put into Custom Fader Plug-in mode. In Learn mode, encoder displays for a fo-cused plug-in are blank, showing that it is ready for mapping of parameters to the encoders and B/M/P switches.
LrnTch (Learn Touch) Console Preference
The Learn Touch preference (in the Operation Soft Keys) determines whether controls are ac-tive when a plug-in is in Learn mode. When this preference is enabled, encoders and switches will not send commands to Pro Tools while in Learn mode, but will only allow Learn mode op-erations. This lets you select parameters for map-ping from the control surface.
Plug-in Mapping and Channel Strips
D-Control plug-in map parameters are arranged in Channel Strip pages of 6 separately mappable encoders and switches. These pages are dis-played one full page at a time on the 6 encoders in D-Control channel strips.
You cannot map controls to the EQ and Dynamics sections of D-Control.
Chap
Plug-in Mapping and Custom Fader Bank Size
D-Control plug-in map parameters are arranged in Custom Fader pages of 8 separately mappable encoders and switches.
When plug-in mapping is displayed in Plug-in Custom Fader banks, the arrangement of plug-in map pages follows the setting for Maximum Custom Fader Bank Size for Plug-ins (in the Op-eration Soft keys).
By default, the Left Custom Fader Bank is used, unless the Left Custom Fader Bank Size (LCF) is set to 0 or the Left Custom Faders are locked. In these cases, the Right Custom Fader Bank is used.
Putting a Plug-in into Learn Mode
You can put a plug-in into Learn mode directly from D-Control.
To put a plug-in into Learn mode from the control surface:
1 Focus the plug-in in Custom Fader mode.
2 Hold Start (Windows) or Control (Mac) and press the Map switch in the Custom Faders sec-tion.
When creating and recalling plug-in maps, it is important to use the same Custom Fader Bank Size setting, so that plug-in maps display consistently. The examples in this section are for a Custom Fader Bank Size of 8 channels.
ter 10: Pro Tools Controller Features and Enhancements 121

122
To take a plug-in out of Learn mode from the control surface, do one of the following:
Hold Start (Windows) or Control (Mac) and press the flashing Map switch in the Custom Faders section.
– or –
Press the Win switch in the Custom Faders section to close the plug-in window.
Creating and Editing Plug-in Maps
To create a custom map of plug-in parameters:
1 Make sure the LrnTch (Learn Touch) prefer-ence (in the Operation Soft Keys) is set to On.
2 Open the plug-in whose mapping you want to customize.
3 Put the plug-in into Learn mode. The plug-in is focused with blank encoders and switches, ready for mapping.
4 On the control surface, do one of the follow-ing:
• For an EQ or Dynamics plug-in, make sure a plug-in of the same type is displayed in the EQ or Dynamics section of the control surface.
– or –
• For all other plug-in types, display a differ-ent instance of the same plug-in type in a second location (for example, on a channel strip in Normal mode, or in another bank of Custom Faders).
5 Touch the encoder or press the switch for the parameter you want to map. The encoder’s auto LED or the switch’s Mute LED lights.
6 On the encoder where you want to map the parameter, press the encoder Select switch to toggle between the two available views on the control.
What’s New in Pro Tools HD 8.0
7 Map the parameter by doing one of the fol-lowing:
• Touch the encoder to map a continuous or a switched parameter, or press the B/M/P switch to map a switched parameter.
– or –
• If D-Control is in Flip mode, touch the fader to map a continuous or a switched pa-rameter, or press the channel Select switch to map a switched parameter.
8 Take the plug-in out of Learn mode.
To change parameter mapping in a plug-in map:
1 Make sure the LrnTch (Learn Touch) prefer-ence (in the Operation Soft Keys) is set to On.
2 Open the plug-in whose mapping you want to change.
3 Choose the map you want to change from the Map Preset pop-up menu.
4 Put the plug-in into Learn mode. The plug-in map is focused on the control surface.
5 On the control surface, do one of the follow-ing:
• For an EQ or Dynamics plug-in, make sure a plug-in of the same type is displayed in the EQ or Dynamics section of the control surface.
– or –
• For all other plug-in types, display a differ-ent instance of the same plug-in type in a second location (for example, on a channel strip in Normal mode, or in another bank of Custom Faders).
6 Touch the encoder or press the switch for the parameter you want to map. The encoder’s auto LED or the switch’s Mute LED lights.

7 Locate the encoder where you want to change the mapping, and if necessary, press the encoder Select switch to toggle between the two avail-able views on the control.
8 Touch the encoder or press the B/M/P switch to map the parameter.
9 Take the plug-in out of Learn mode.
To remove parameter mapping from a plug-in map:
1 Make sure the LrnTch (Learn Touch) prefer-ence (in the Operation Soft Keys) is set to On.
2 Open the plug-in whose mapping you want to change.
3 Choose the map you want to change from the Map Preset pop-up menu.
4 Put the plug-in into Learn mode. The plug-in map is focused on the control surface.
5 Locate the encoder where you want to change the mapping, and if necessary, press the encoder Select switch to toggle between the two avail-able views on the control.
6 Do one of following for each parameter map-ping you want to remove:
• If the Parameter menu shows No Control, touch the encoder or press the B/M/P switch to remove the parameter mapping.
– or –
• If the Parameter menu shows the name of a preset, hold Control (Windows) or Com-mand (Mac) and press the B/M/P switch to remove the parameter mapping.
7 Take the plug-in out of Learn mode.
Chap
Changing Plug-in Map Presets from D-Control
You can select the next or previous plug-in map for a plug-in directly from D-Control.
To enable the next or previous plug-in map from a channel strip:
1 Focus the plug-in in the channel strip so its controls are visible on the channel strip encod-ers.
2 Hold Start (Windows) or Control (Mac) and press the Page Up (Next) or Page Down (Previ-ous) switch in that channel strip’s Channel Strip Mode controls. The name of the plug-in map preset is shown momentarily in the bottom en-coder display.
To enable the next or previous plug-in map from the Custom Faders:
1 Focus the plug-in in the Custom Faders sec-tion.
2 Hold Start (Windows) or Control (Mac) and press the Page Up (Next) or Page Down (Previ-ous) switch in a Custom Fader channel. The name of the plug-in map preset is shown mo-mentarily in the Custom Fader channel dis-plays.
To select the next or previous plug-in map on multiple channels, use the Do To All and Do To Selected switches on D-Control.
ter 10: Pro Tools Controller Features and Enhancements 123

124
Plug-in Mapping on D-Command
With D-Command, you can put a plug-in into Learn mode, select parameters for mapping, and independently map two sets of plug-in parame-ters to each encoder or its associated B/M/P switch, all directly from the control surface.
You can map parameters to encoders and B/M/P switches in both the Custom Faders and in channel strips.
When you put a plug-in into Learn mode, its track is focused in the Focus Channel strip and it is automatically put into Custom Fader Plug-in mode. In Learn mode, encoder displays for a fo-cused plug-in are blank, showing that it is ready for mapping of parameters to the encoders and B/M/P switches.
LrnTch (Learn Touch) Console Preference
The Learn Touch preference (in the Operation Soft Keys) determines whether controls are ac-tive when a plug-in is in Learn mode. When this preference is enabled, encoders and switches will not send commands to Pro Tools while in Learn mode, but will only allow Learn mode op-erations. This lets you select parameters for map-ping from the control surface.
Plug-in Mapping and Channel Strips
D-Command plug-in map parameters are ar-ranged in Channel Strip pages of 6 separately mappable encoders and switches. These pages are displayed 2 encoders at a time on D-Com-mand channel strips.
You cannot map controls to the EQ and Dynamics sections of D-Command.
What’s New in Pro Tools HD 8.0
Plug-in Mapping and Custom Fader Bank Size
D-Command plug-in map parameters are ar-ranged in Custom Fader pages of 8 separately mappable encoders and switches.
When plug-in mapping is displayed in Plug-in Custom Fader banks, the arrangement of plug-in map pages follows the setting for Maximum Custom Fader Bank Size for Plug-ins (in the Op-eration Soft keys).
Putting a Plug-in into Learn Mode
You can put a plug-in into Learn mode directly from D-Command.
To put a plug-in into Learn mode from the control surface:
1 Focus the plug-in in Custom Fader mode.
2 Hold Start (Windows) or Control (Mac) and press the Map switch in the Custom Faders sec-tion.
To take a plug-in out of Learn mode from the control surface, do one of the following:
Hold Start (Windows) or Control (Mac) and press the flashing Map switch in the Custom Faders section.
– or –
Press the Win switch in the Custom Faders section to close the plug-in window.
When creating and recalling plug-in maps, it is important to use the same Custom Fader Bank Size setting, so that plug-in maps display consistently. The examples in this section are for a Custom Fader Bank Size of 8 channels.
Creating and Editing Plug-in Maps
To create a custom map of plug-in parameters:
1 Make the LrnTch (Learn Touch) preference (in the Operation Soft Keys) is set to On.
2 Open the plug-in whose mapping you want to customize.
3 Put the plug-in into Learn mode. The plug-in is focused with blank encoders and switches, ready for mapping.
4 On the control surface, do one of the follow-ing:
• For an EQ or Dynamics plug-in, make sure a plug-in of the same type is displayed in the EQ or Dynamics section of the control surface.
– or –
• For all other plug-in types, display a differ-ent instance of the same plug-in type in a second location (for example, on a channel strip in Normal mode, or in another bank of Custom Faders).
5 Touch the encoder or press the switch for the parameter you want to map. The encoder’s auto LED or the switch’s Mute LED lights.
6 On the encoder where you want to map the parameter, press the encoder Select switch to toggle between the two available views on the control.
7 Map the parameter by doing one of the fol-lowing:
• Touch the encoder to map a continuous or a switched parameter, or press the B/M/P switch to map a switched parameter.
– or –
• If D-Command is in Flip mode, touch the fader to map a continuous or a switched pa-rameter, or press the channel Select switch to map a switched parameter.
Chap
8 Take the plug-in out of Learn mode.
To change parameter mapping in a plug-in map:
1 Make the LrnTch (Learn Touch) preference (in the Operation Soft Keys) is set to On.
2 Open the plug-in whose mapping you want to change.
3 Choose the map you want to change from the Map Preset pop-up menu.
4 Put the plug-in into Learn mode. The plug-in map is focused on the control surface.
5 On the control surface, do one of the follow-ing:
• For an EQ or Dynamics plug-in, make sure a plug-in of the same type is displayed in the EQ or Dynamics section of the control surface.
– or –
• For all other plug-in types, display a differ-ent instance of the same plug-in type in a second location (for example, on a channel strip in Normal mode, or in another bank of Custom Faders).
6 Touch the encoder or press the switch for the parameter you want to map. The encoder’s auto LED or the switch’s Mute LED lights.
7 Locate the encoder where you want to change the mapping, and if necessary, press the encoder Select switch to toggle between the two avail-able views on the control.
8 Touch the encoder or press the B/M/P switch to map the parameter.
9 Take the plug-in out of Learn mode.
To remove parameter mapping from a plug-in map:
1 Make the LrnTch (Learn Touch) preference (in the Operation Soft Keys) is set to On.
ter 10: Pro Tools Controller Features and Enhancements 125

126
2 Open the plug-in whose custom map you want to change.
3 Choose the map you want to change from the Map Preset pop-up menu.
4 Put the plug-in into Learn mode. The plug-in map is focused on the control surface.
5 Locate the encoder where you want to change the mapping, and if necessary, press the encoder Select switch to toggle between the two avail-able views on the control.
6 Do one of following for each parameter map-ping you want to remove:
• If the Parameter menu shows No Control, touch the encoder or press the B/M/P switch to remove the parameter mapping.
– or –
• If the Parameter menu shows the name of a preset, hold Control (Windows) or Com-mand (Mac) and press the B/M/P switch to remove the parameter mapping.
7 Take the plug-in out of Learn mode.
Changing Plug-in Map Presets from D-Command
You can select the next or previous plug-in map for a plug-in directly from D-Command.
To enable the next or previous plug-in map from a channel strip:
1 Focus the plug-in in the channel strip so its controls are visible on the channel strip encod-ers.
2 Hold Start (Windows) or Control (Mac) and press the Page Up (Next) or Page Down (Previ-ous) switch in that channel strip’s Channel Strip Mode controls. The name of the plug-in map preset is shown momentarily in the bottom en-coder display.
What’s New in Pro Tools HD 8.0
To enable the next or previous plug-in map from the Custom Faders:
1 Focus the plug-in in the Custom Faders sec-tion.
2 Hold Start (Windows) or Control (Mac) and press the Page Up (Next) or Page Down (Previ-ous) switch in a Custom Fader channel. The name of the plug-in map preset is shown mo-mentarily in the Custom Fader channel dis-plays.
ICON Enhancements(All D-Control and D-Command Systems)
Display of Slave Tracks in VCA Master Tracks
You can turn off the display of slave track con-trols in the encoders of VCA Master tracks if you don’t want to view or adjust slave track controls from the VCA Master channel strip.
To toggle display of slave track controls in VCA Masters:
1 In the Console Prefs Soft Keys section, press the Operation switch repeatedly to display the page that includes the Encoder VCA display preference (“EncVCA”).
2 Press the Soft Key that corresponds to “EncVCA” to toggle the setting between “Yes” (display of slave track controls in encoders) and “No” (no display of slave track controls).
3 Hold Control (Windows) or Command (Mac) and press the Operations switch to exit.
To select the next or previous plug-in map on multiple channels, use the Do To All and Do To Selected switches on D-Command.

Removal of Output and Send Assignments
While in Assign mode (either normal or Assign Matrix), you can quickly remove output and send assignments from D-Control and D-Com-mand.
To remove an output or send assignment:
Hold Start (Windows) or Control (Mac) and press the Select switch for each output or send assignments you want to remove.
Display of I/O Assignments
On D-Control and D-Command, you can view the I/O assignments for individual channels in a new I/O view.
I/O assignments are displayed at the of bottom the channel’s encoders, according to track type. Assignments are displayed from top to bottom as follows:
• Audio and Auxiliary Input tracks
• Input
• Output
• Instrument tracks
• MIDI input
• MIDI output
• Aux input
• Aux output
• MIDI tracks
• MIDI input
• MIDI output
• Master Fader tracks
• Output
• VCA Master tracks
• Group assignment
Chap
To view the I/O assignments on a track:
Press and hold the Sends switch on the track. The Sends switch lights to indicate I/O view.
Display of Multiple Output Assignments (Audio or MIDI Tracks)
For audio or MIDI tracks that have multiple out-put assignments, a Plus (+) sign precedes the output name.
To view the names of multiple output assignments:
1 Press and hold the Sends switch on a track with multiple output assignments. The Sends switch lights to indicate I/O view.
2 Press the B/M/P switch under any output name preceded by a plus (+) sign. The names of output paths “spill” onto the track’s encoder dis-plays.
3 To exit output “spill” view, press any of the lit output path B/M/P switches.
To rename an I/O path on an audio track:
1 Press and hold the Sends switch on the track. The Sends switch lights to indicate display of I/O assignments.
2 If you have multiple I/O assignments on the track, press the B/M/P switch under any output name preceded by a plus (+) sign. The names of output paths “spill” onto the track’s encoder dis-plays.
3 Hold Start (Windows) or Control (Mac) and press the B/M/P switch under the I/O path you want to rename.
On D-Command, when an Instrument track’s I/O assignments are displayed, press the Page Up and Page Down switches to view additional assignments.
ter 10: Pro Tools Controller Features and Enhancements 127

128
4 Enter a new name for the path.
5 Click OK.
Display of Multiple Assignments (Sends)
For sends that have multiple assignments, a Plus (+) sign precedes the send name.
To view the names of multiple send assignments:
1 Press the Sends switch on a track with multi-ple send assignments.
2 Hold Control (Windows) or Command (Mac) and press the B/M/P switch under any Send name preceded by a plus (+) sign. The names of send paths “spill” onto the track’s encoder dis-plays.
3 To exit send “spill” view, press any of the lit send path B/M/P switches.
To rename a Send path:
1 Press the Sends switch on the track with the Send you want to rename.
2 If you have multiple sends on the track, hold Control (Windows) or Command (Mac) and press the B/M/P switch under any Send name preceded by a plus (+) sign,. The names of send paths “spill” onto the track’s encoder displays.
3 Hold Start (Windows) or Control (Mac) and press the B/M/P switch under the send path name.
4 Enter a new name for the path.
5 Click OK.
What’s New in Pro Tools HD 8.0
Interrogation of Bus and I/O Assignments
On D-Control and D-Command, you can quickly identify bus assignments and I/O assign-ments in a session.
Momentary and Latching Operation
When interrogating bus assignments or I/O as-signments, you can display them momentarily or latch them on. (See Interrogating Bus Assign-ments and Interrogating I/O Assignments, below.) Latching the display of assignments is useful when banking faders to locate off-bank indica-tions.
To display bus and I/O assignments momentarily:
Touch the encoder showing the assignment.
To latch display of bus and I/O assignments:
Double-tap the encoder showing the assign-ment.
To exit latched display of bus and I/O assignments:
Press the flashing Escape switch.
Off-Bank Indications
When interrogating bus assignments (in either momentary or latched display), any off-bank as-signment are indicated by flashing Bank/Nudge switches. Slow flashing indicates that an assign-ment is one button press away; Fast flashing in-dicates that an assignment is multiple presses away. Off-bank indications are shown as fol-lows:
D-Control When interrogating a bus or I/O as-signment, the Soft Key display shows “Nudge 1,” “Nudge 8” and “Bank.” The left and right Soft Keys flash to indicate the presence of off-bank assignments.

D-Command The Bank/Nudge switches flash to indicate the presence of off-bank assignments.
Interrogating Bus Assignments
D-Control and D-Command allow both forward interrogation of outputs to bus paths and reverse interrogation of inputs from bus paths on Audio tracks or Auxiliary Input tracks.
To interrogate a track output to a bus (forward bus interrogation):
1 Press and hold the Sends switch on a track that has the bus as an output assignment. The channel goes into I/O view, showing the input and output for the track in its channel strip en-coders.
2 Touch (or double-tap) the encoder showing the bus assignment on the output. The channel Select switch flashes on tracks with that bus as-signed as an input.
To interrogate a send to a bus (forward bus interrogation):
1 Press the Sends switch on a track that has the bus as a Send assignment.
2 Hold Control (Windows) or Command (Mac) and press the B/M/P switch under the send. All sends on the track spill to the track’s encoders.
3 Touch (or double-tap) the encoder showing the bus assignment on the send. The channel Se-lect switch flashes on tracks with that bus as-signed as an input.
Chap
To interrogate a track input from a bus (reverse bus interrogation):
1 Press and hold the Sends switch on a track that has the bus as an input assignment. The channel goes into I/O view, showing the input and output for the track in its channel strip en-coders.
2 Touch (or double-tap) the encoder showing the bus assignment on the input. The channel Select switch flashes on tracks with that bus as an output. Both the channel Select switch and the channel Send switch flash on tracks with that bus as a send assignment.
Interrogating I/O Assignments
D-Control and D-Command allow interrogation of matching input or output assignments (in-cluding interface, bus, or MIDI paths) on Audio, Auxiliary Input, MIDI, Instrument, or Master Fader tracks.
To interrogate a track input or output:
1 Press and hold the Sends switch on a track that has the input or output assignment. The channel goes into I/O view, showing the input and output for the track in its channel strip en-coders.
2 Hold Shift and touch (or double-tap) the en-coder showing the input or output assignment. The channel Select switch flashes on all tracks that have the same input or output.
For instructions on interrogating bus and I/O assignments in the Assign Matrix, see the D-Control Guide or D-Command Guide.
ter 10: Pro Tools Controller Features and Enhancements 129

130
Assign Matrix
D-Control and D-Command provide a means of quickly assigning plug-ins, sends, and I/O rout-ing to tracks in a session. Instead of making as-signment by drilling down multiple levels on a single encoder, the Assign Matrix feature tempo-rarily uses a 6 x 8 section of encoders (on D-Con-trol) and a 2 x 8 section of encoders (on D-Com-mand) to show multiple layers of navigation at one time.
Enabling Assign Matrix Operation
The AsnMtx (Assign Matrix) console preference (in the Operation Soft Keys) determines whether the control surface follows legacy Assign mode behavior or Assign Matrix operation. When this preference is enabled, Assign Matrix operation is used for assigning Inserts, Sends, or I/O routing on the control surface.
Insert Assign Matrix Mode
The Insert Assign Matrix shows insert positions (A-J), and information about the inserts, such as insert type (TDM, RTAS, HW), plug-in category (such as EQ or DYN), plug-in manufacturer, and plug-in name, in the Assign Matrix encoders.
To enter the Insert Assign Matrix:
1 Press the Inserts switch on the channel where you want to assign an insert.
For complete instructions on using Assign Matrix to assign inserts, sends, and I/O routing, see the D-Control Guide or D-Command Guide.
What’s New in Pro Tools HD 8.0
2 Do one of the following for the insert you want to assign:
• If no insert if present at the insert position, press the encoder Select switch.
– or –
• If an insert is already present, press and hold the encoder Select switch.
Send Assign Matrix Mode
The Send Assign matrix shows send positions (A-J) and information about the sends, such as send type (HW, Bus), and send name, in the As-sign Matrix encoders.
To enter the Send Assign Matrix:
1 Press the Sends switch on the channel where you want to assign a send.
2 Do one of the following for the send you want to assign:
• If no send if present at the send position, press the encoder Select switch.
– or –
• If a send is already present, press and hold the encoder Select switch.
I/O Assign Matrix Mode
Depending on the track type, the I/O Assign ma-trix shows audio or MIDI input and output, VCA group assignment, or Master Fader output in the Assign Matrix encoders.
To enter the I/O Assign Matrix:
1 Press and hold the Sends switch on the chan-nel where you want to assign I/O routing.
2 Press the encoder Select switch for the input, output, or group assignment you want to assign.

Changes to Soft Keys
Pro Tools 8.0 introduces the following changes to the Soft Key pages on D-Control and D-Com-mand.
Soft Keys When No Session is Open
When no Pro Tools session is open, D-Control and D-Command Soft Keys show the following commands:
Window Switch
Page 1
• Task Managr: Window > Task Manager
• Disk Space: Window > Disk Space
• System Usage: Window > System Usage
Page 2
• I/O Setup: Setup > I/O
• HW Setup: Setup > Hardware
• PB Engine: Setup > Playback Engine
• Preferences: Setup > Preferences
• Peripherals: Setup > Peripherals
Audio Files Switch
• Recent Sessions (up to 2 pages)
Soft Keys in Pro Tools
On D-Control and D-Command, the following Soft Keys pages have a new arrangement of com-mands.
Chap
Window Switch
The Window switch displays the following com-mands:
Page 4
• Window Confgs: Window > Configura-tions > Window Configuration List
• MIDI Editor: Window > MIDI Editor
• Score Editor: Window > Score Editor
Page 5
• Tile Windws: Window > Arrange > Tile
• Tile Hrzntl: Window > Arrange > Tile Hori-zontal
• Tile Vertcl: Window > Arrange > Tile Verti-cal
• Cascde Windws: Window > Arrange > Cas-cade
Audio Files Switch
The Audio Files switch displays the following commands:
Page 1
• New Sessn: File > New Session
• Open Sessn: File > Open Session
• Close Sessn: File > Close Session
• Revert Sessn: File > Revert to Saved
• Save As: File > Save As
• Save Copy In: File > Save Copy In
Page 2
• Import Audio: File > Import > Audio
• Import MIDI: File > Import > MIDI
• Import SesDat: File > Import > Session Data
• Import RgnGrp: File > Import > Region Groups
• Import Video: File > Import > Video
ter 10: Pro Tools Controller Features and Enhancements 131

132
Page 3
• Export Region: Region List Menu > Export Regions as Files
• Export MIDI: File > Export > MIDI
• Export OMFAAF: File > Export > Selected Tracks as New AAF/OMF
• Export Text: File > Export > Session Info As Text
Pages 4 and 5
• Recent Sessns: Open recent sessions (listed by name)
Edit Modes Switch
The Edit Modes switch displays the following commands:
Page 2
• Tab Trnsnt: Tab to Transients
• Dynamc Trnspt: Options > Dynamic Trans-port
• Loop Plybck: Options > Loop Playback
• Loop Record: Options > Loop Record
Window Configurations
You can view, create, and edit Window Config-urations from the Soft Keys.
To display Window Configurations in the Soft Keys:
1 Hold the Start key (Windows) or Control key (Mac) and press the Mem Loc switch in the Se-lect/MIDI Soft Keys section. The Mem Loc switch flashes to indicate Window Configura-tion display.
2 If there are more than six Window Configura-tions, press the Soft Keys that correspond to Page Up and Page Down to view additional con-figurations.
What’s New in Pro Tools HD 8.0
To recall a Window Configuration from the Soft Keys:
1 Hold the Start key (Windows) or Control key (Mac) and press the Mem Loc switch in the Se-lect/MIDI Soft Keys section.
2 Press the Soft Key that corresponds to the Window Configuration you want to recall.
To create a Window Configuration from the Soft Keys:
1 Hold the Start key (Windows) or Control key (Mac) and press the Mem Loc switch in the Se-lect/MIDI Soft Keys section.
2 Press any Soft Key that corresponds to a blank display.
3 Set the properties of the new Window Config-uration in the New Window Configuration dia-log.
4 Press the Soft Key that corresponds to Enter to save the Window Configuration.
To edit a Window Configuration from the Soft Keys:
1 Hold the Start key (Windows) or Control key (Mac) and press the Mem Loc switch in the Se-lect/MIDI Soft Keys section.
2 Hold the Start key (Windows) or Control key (Mac) and press the Soft Key that corresponds to the Window Configuration you want to edit.
3 Change the properties of the Window Config-uration in the Edit Window Configuration dia-log.
4 Press the Soft Key that corresponds to Enter to save the Window Configuration.
To delete a Window Configuration from the Soft Keys:
1 Hold the Start key (Windows) or Control key (Mac) and press the Mem Loc switch in the Se-lect/MIDI Soft Keys section.

2 Hold the Alt key (Windows) or Option key (Mac) and press the Soft Key that corresponds to the Window Configuration you want to delete.
Memory Locations
You can create new Memory Locations from the Soft Keys.
To create a new Memory Location from the Soft Keys:
1 Press the Mem Loc switch in the Select/MIDI Soft Keys section. The Mem Loc switch lights to indicate Memory Location display.
2 Press any Soft Key that corresponds to a blank display.
3 Set the properties of the new Memory Loca-tion in the New Memory Location dialog.
4 Press the Soft Key that corresponds to Enter to save the Memory Location.
To edit a Memory Location from the Soft Keys:
1 Press the Mem Loc switch in the Select/MIDI Soft Keys section. The Mem Loc switch lights to indicate Memory Location display.
2 If there are more than six Memory Locations, press the Soft Keys that correspond to Page Up and Page Down to view additional locations.
3 Hold the Start key (Windows) or Control key (Mac) and press the Soft Key that corresponds to the Memory Location you want to edit.
4 Change the properties of the Memory Loca-tion in the Edit Memory Location dialog.
5 Press the Soft Key that corresponds to Enter to save the Memory Location.
To delete a Memory Location from the Soft Keys:
1 Press the Mem Loc switch in the Select/MIDI Soft Keys section.
Chap
2 Hold the Alt key (Windows) or Option key (Mac) and press the Soft Key that corresponds to the Memory Location you want to delete.
D-Control EnhancementsThe following enhancements apply to D-Con-trol systems.
Display of Insert and Send Positions
You can set D-Control to display Send and Insert letters on send and insert positions with no as-signment.
To enable display of Insert and Send letters:
1 In the Console Prefs Soft Keys section, press the Operation switch repeatedly to display the page that includes Show Send/Insert Letters (“Lettrs”).
2 Press the Soft Key that corresponds to “Lettrs” to toggle the setting between “On” and “Off.”
3 Hold Control (Windows) or Command (Mac) and press the Operations switch to exit.
D-Control and D-Command encoder and chan-nel strip displays show Insert and Send informa-tion as follows:
• With the Show/Send Insert Letters prefer-ence enabled, inserts with no assignments show only uppercase letters (A–J) in the corresponding positions.
• With the Show/Send Insert Letters prefer-ence enabled, sends with no assignments show only lowercase letters (a–j) in the cor-responding positions.
• Inserts and Sends with assignments show the only the Insert or Send name and no letters.
ter 10: Pro Tools Controller Features and Enhancements 133

134
Focusing Plug-ins in Custom Fader Mode
You can set D-Control to focus plug-ins directly in Custom Faders instead of channel strips.
To enable focusing of plug-ins in Custom Faders on D-Control:
1 In the Console Prefs Soft Keys section, press the Operation switch repeatedly to display the page that includes Channel Editing for Plug-ins (“ChanPI”).
2 Press the Soft Key that corresponds to “ChanPI” to toggle the setting between “On” (to focus plug-ins on Custom Faders) and “Off” (to focus plug-ins in channel strips).
3 Hold Control (Windows) or Command (Mac) and press the Operations switch to exit.
To focus a plug-in directly in Custom Faders:
1 Press the Inserts switch for the channel to dis-play plug-in names on the channel’s encoders. Press the Page Up and Page Down switches on the channel to display additional plug-ins.
2 Press the encoder Select switch for the plug-in you want to focus.
The controls of the focused plug-in appear in Custom Fader Plug-in mode.
To focus a plug-in using the opposite mode from the current ChanPI setting:
Hold Control+Alt (Windows) or Com-mand+Option (Mac) when pressing the encoder Select switch for a plug-in.
What’s New in Pro Tools HD 8.0
Changes to Soft Keys
On D-Control, various Soft Key pages have new or rearranged commands.
Operation Switch
Page 6
AsnMtx (Assign Matrix Enable) Determines whether Assign Matrix or normal Assign mode operation is used for assigning inputs, outputs, inserts and sends.
MtxJst (Matrix Select Area Justification) Deter-mines whether Assign Matrix rows are arranged from Top to Bottom or Bottom to Top on the en-coders.
PIClmn (Plug-in Menu Column Width) Deter-mines the number of plug-in names displayed per row in the Assign Matrix
IOClmn (I/O Menu Column Width) Determines the number of I/O labels displayed per row in the Assign Matrix
MtxRws (Assign Matrix Rows) Determines the number of rows used to display elements in the Assign Matrix
MtxLck (Assign Matrix Lock) Determines whether the Assign Matrix is locked by default or needs to be put into lock mode manually.
Page 7
ChanPI (Channel Strip Editing for Plug-ins) Tog-gles the preference setting that enables display of plug-in parameters directly on D-Control channel encoders.
EncVCA (VCA Encoder Display) Determines whether VCA slave track controls are displayed in the encoders of VCA Master channels

LrnTch (Learn Touch) Determines whether D-Control encoders and switches are active when a plug-in is in Learn mode.
Lettrs (Show Send/Insert Letters) Determines whether D-Control displays Send and Insert let-ters on send and insert positions with no assign-ments
D-Command EnhancementsThe following enhancements apply to D-Com-mand systems.
Support for 40-Fader Configuration
Up to two Fader Modules can be added to a D-Command Main Unit for a total of 40 faders. The Main Unit and Fader Modules can be ar-ranged in any order from left to right.
Maximum Custom Fader Bank Size
The Maximum Custom Fader Bank Size prefer-ence determines the number of channels to be used when displaying channels in the Custom Fader modes.
You can choose settings for the 32-fader and 40-fader sizes (indicated by the prefix “Min”) that use the minimum number of channels neces-sary, so that the Custom Fader section dynami-cally resizes to match the number of channels in the group.
For a 40-fader D-Command system, Maximum Custom Fader Bank Size options include 4, 8, 16, 24, 32, Min32, 40 and Min40.
Chap
To set the maximum Custom Fader bank size:
1 In the Soft Keys section, press the Operation switch repeatedly to display the page that in-cludes the following Custom Fader Bank Size preferences:
CFPIug (CF Bank Size for Plug-ins) Determines the number of channels allocated for Custom Fader Plug-in mode.
CF Grp (CF Bank Size for Custom and Mix/Edit Groups) Determines the number of channels al-located for Custom Groups mode.
CFTyp (CF Bank Size for Track Type) Determines the number of channels allocated for Custom Fader Tracks mode.
2 Do one of the following:
• To increment the number of channel strips, press the Soft Key that corresponds to the preference setting you want to change.
– or –
• To decrement the number of channel strips, hold Shift and press the Soft Key that corresponds to the preference setting you want to change.
3 Hold Control (Windows) or Command (Mac) and press the Operation switch to exit.
New “Auto Write To” Switch Layout
On D-Command, the “Auto Write To” switches now invoke the manual “Write to Start/End/All/Punch/Next” commands and the automatic “Write to Start/End/All/Punch/Next on Stop” automation commands in Pro Tools.
The new switch mapping includes all of the Manual Write and Write on Stop commands available in the Pro Tools Automation window.
ter 10: Pro Tools Controller Features and Enhancements 135
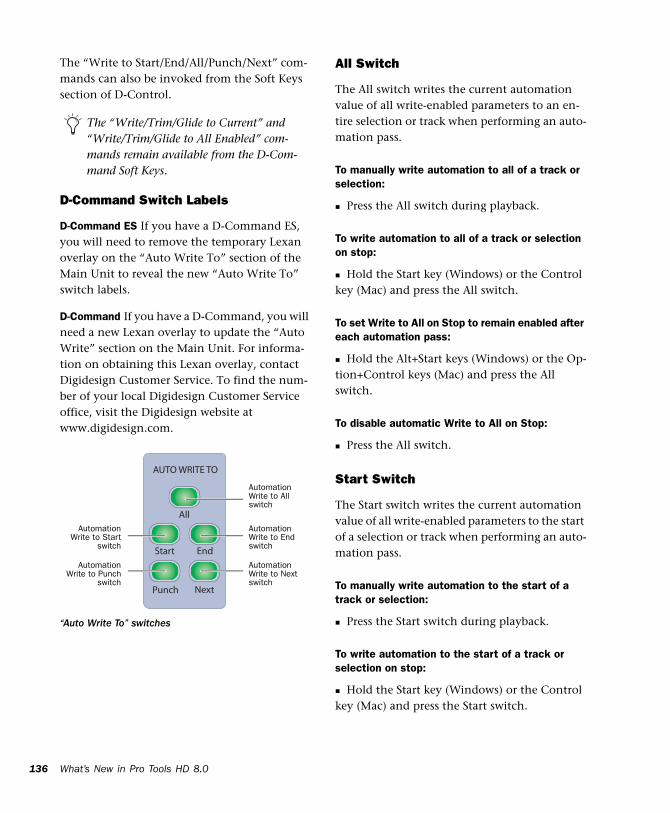
136
The “Write to Start/End/All/Punch/Next” com-mands can also be invoked from the Soft Keys section of D-Control.
D-Command Switch Labels
D-Command ES If you have a D-Command ES, you will need to remove the temporary Lexan overlay on the “Auto Write To” section of the Main Unit to reveal the new “Auto Write To” switch labels.
D-Command If you have a D-Command, you will need a new Lexan overlay to update the “Auto Write” section on the Main Unit. For informa-tion on obtaining this Lexan overlay, contact Digidesign Customer Service. To find the num-ber of your local Digidesign Customer Service office, visit the Digidesign website at www.digidesign.com.
The “Write/Trim/Glide to Current” and “Write/Trim/Glide to All Enabled” com-mands remain available from the D-Com-mand Soft Keys.
“Auto Write To” switches
AutomationWrite to All
AutomationWrite to End
AutomationWrite to Start
AutomationWrite to Punch
AutomationWrite to Next
switch
switch
switch
switch
switch
What’s New in Pro Tools HD 8.0
All Switch
The All switch writes the current automation value of all write-enabled parameters to an en-tire selection or track when performing an auto-mation pass.
To manually write automation to all of a track or selection:
Press the All switch during playback.
To write automation to all of a track or selection on stop:
Hold the Start key (Windows) or the Control key (Mac) and press the All switch.
To set Write to All on Stop to remain enabled after each automation pass:
Hold the Alt+Start keys (Windows) or the Op-tion+Control keys (Mac) and press the All switch.
To disable automatic Write to All on Stop:
Press the All switch.
Start Switch
The Start switch writes the current automation value of all write-enabled parameters to the start of a selection or track when performing an auto-mation pass.
To manually write automation to the start of a track or selection:
Press the Start switch during playback.
To write automation to the start of a track or selection on stop:
Hold the Start key (Windows) or the Control key (Mac) and press the Start switch.

To set Write to Start on Stop to remain enabled after each automation pass:
Hold the Alt+Start keys (Windows) or the Op-tion+Control keys (Mac) and press the Start switch.
To disable Write to Start on Stop:
Press the Start switch.
End Switch
The End switch writes the current automation value of all write-enabled parameters to the end of a selection or track when performing an auto-mation pass.
To manually write automation to the end of a track or selection:
Press the End switch during playback.
To write automation to the end of a track or selection on stop:
Hold the Start key (Windows) or the Control key (Mac) and press the End switch.
To set Write to End on Stop to remain enabled after each automation pass:
Hold the Alt+Start keys (Windows) or the Op-tion+Control keys (Mac) and press the End switch.
To disable automatic Write to End on Stop:
Press the End switch.
Punch Switch
The Punch switch writes the current automation value of all write-enabled parameters back to the punch point (the location in the track where the current automation pass started).
Chap
To manually write automation back to the punch point:
Press the Punch switch during playback.
To write automation back to the punch point on stop:
Hold the Start key (Windows) or the Control key (Mac) and press the Punch switch.
To set Write to Punch on Stop to remain enabled after each automation pass:
Hold the Alt+Start keys (Windows) or the Op-tion+Control keys (Mac) and press the Punch switch.
To disable automatic Write to Punch on Stop:
Press the Punch switch.
Next Switch
The Next switch writes the current automation value of all write-enabled parameters forward to the next automation breakpoint.
Unlike the other Write To commands, the Write to Next on Stop command always remains en-abled after each automation pass, until you dis-able it.
To manually write automation forward to the next breakpoint:
Press the Next switch during playback.
To set Write to Next on Stop to remain enabled after each automation pass:
Hold the Start key (Windows) or the Control key (Mac) and press the Next switch.
To disable automatic Write to Next on Stop:
Press the Next switch.
ter 10: Pro Tools Controller Features and Enhancements 137

138
Display of Insert and Send Positions
D-Command encoder and channel strip dis-plays show Insert and Send information as fol-lows:
• Inserts with no assignments show only up-percase letters (A–J) in the corresponding positions.
• Sends with no assignments show only low-ercase letters (a–j) in the corresponding po-sitions.
• Inserts and Sends with assignments show the only the Insert or Send name and no letters.
Focusing Plug-ins in Channel Strips
You can set D-Command to focus plug-ins di-rectly in channel strips instead of Custom Fad-ers, so that plug-in parameters can be edited and automated from the channel strip.
To enable focusing of plug-ins in D-Command channel strips:
1 In the Console Prefs Soft Keys section, press the Operation switch repeatedly to display the page that includes Channel Editing for Plug-ins (“ChanPI”).
2 Press the Soft Key that corresponds to “ChanPI” to toggle the setting between “On” (to focus plug-ins on channel strips) and “Off” (to focus plug-ins in Custom Faders).
3 Hold Control (Windows) or Command (Mac) and press the Operations switch to exit.
What’s New in Pro Tools HD 8.0
To focus a plug-in on a channel strip:
1 Press the Inserts switch for the channel to dis-play plug-in names on the channel’s encoders. Press the Page Up and Page Down switches on the channel to display additional plug-ins.
2 Press the encoder Select switch for the plug-in you want to focus.
The controls of the focused plug-in appear on the channel’s encoders. You can page through the plug-in’s controls by pressing the Page Up and Page Down switches on the channel.
To focus a plug-in using the opposite mode from the current ChanPI setting:
Hold Control+Alt (Windows) or Com-mand+Option (Mac) when pressing the encoder Select switch for a plug-in.
Changing Plug-in Presets from Channel Strips
You can activate the next or previous settings in the Plug-in Librarian menu directly from any channel strip or from the Custom Fader section.
To enable the next or previous plug-in setting from D-Command:
1 Do one of the following:
• Focus the plug-in in a channel strip so its controls are visible on the channel strip en-coders.
– or –
• Focus the plug-in in the Custom Faders sec-tion.
2 Hold Control (Windows) or Command (Mac) and press the Page Up (Next) or Page Down (Pre-vious) switch in the channel’s Channel Strip Mode controls.

Changes to Soft Keys
On D-Command, various Soft Key pages have new or rearranged commands.
Actions Switch
To more closely reflect the arrangement of the “Auto Write To” switches on the D-Command surface, the following Actions switch pages have a new arrangement of commands:
Page 2
Wrt To All (Write to All) Writes current automa-tion values to an entire selection or track while performing an automation pass.
Snap Back Causes all Latch or Write enabled tracks to exit their current automation pass and return instantly to the previously written auto-mation levels. During playback, this command stops writing of automation without applying any AutoMatch ramping.
Wrt To Start (Write To Start) Writes current au-tomation values from the insertion point back-ward to the beginning of a selection or track while performing an automation pass.
Wrt To End (Write to End) Writes current auto-mation values from the insertion point forward to the end of a selection or track while perform-ing an automation pass.
Wrt To Punch (Write To Punch Point) Writes cur-rent automation values back to the point where writing of automation began
Wrt To Next (Write to Next Breakpoint) Writes current automation values from the insertion point forward to the next automation break-point while performing an automation pass.
Chap
Automation Modes Switch
To more closely reflect the arrangement of the “Auto Write To” switches on the D-Command surface, the following Modes switch pages have a new arrangement of commands:
Page 1
AWrtTo All (Auto Write to All on Stop) Writes current automation values to an entire selection or track when the transport is stopped after an automation pass.
By default, Automatic Write to All on Stop mode is enabled for a single automation pass only. To configure the mode to remain enabled after an automation pass, hold Start+Alt(Windows) or Control+Option (Mac) while pressing the AWrtTo All switch.
AWrtTo Start (Auto Write to Start on Stop) Auto-matically writes current automation values from the insertion point backward to the beginning of a selection or track when the transport is stopped after an automation pass.
By default, Automatic Write to Start on Stop mode is enabled for a single automation pass only. To configure the mode to remain enabled after an automation pass, hold Start+Alt (Windows) or Control+Option (Mac) while pressing the AWrtTo Strt switch.
AWrtTo Punch (Auto Write to Punch Point on Stop) Writes current automation values back to where the current automation pass began.
By default, Automatic Write to Punch Point on Stop mode is enabled for a single automation pass only. To configure the mode to remain en-abled after an automation pass, hold Alt (Win-dows) or Option (Mac) while pressing the AWrtTo Punch switch.
ter 10: Pro Tools Controller Features and Enhancements 139

140
Auto Join Auto Join is used in Latch mode to au-tomatically resume writing of automation after the transport is stopped and started again dur-ing an automation pass.
AWrtTo End (Auto Write to End on Stop) Writes current automation values from the insertion point forward to the end of a selection or track when the transport is stopped after an automa-tion pass.
By default, Automatic Write to End on Stop mode is enabled for a single automation pass only. To configure the mode to remain enabled after an automation pass, hold Start+Alt(Windows) or Control+Option (Mac) while pressing the AWrtTo End switch.
AWrtTo Next (Auto Write to Next Breakpoint on Stop) Writes current automation values from the insertion point forward to the next automa-tion breakpoint when the transport is stopped after an automation pass.
Automatic Write to Next Breakpoint on Stop re-mains enabled after each automation pass, until you disable it by pressing the lit AWrtTo Next switch.
Operation Switch
Page 4
Import PIMaps (Import Plug-in Maps) Opens “Choose a mapping file” dialog in Pro Tools.
Export PIMaps (Export Plug-in Maps) Opens “Save Plug-in Mapping As” dialog in Pro Tools.
Faders (Faders On/Off) Turns off D-Command faders to prevent fader movement when moni-toring a mix.
What’s New in Pro Tools HD 8.0
FilBnk (Always Fill Channel Strips When Banking)
Toggles the preference setting that maximizes the number of channels displayed in Normal mode when banking. When selected, banking follows end stop behavior.
FillCF (Always Fill Custom Faders When Banking)
Toggles the preference setting that maximizes the number of channels displayed in Custom Faders when banking. When selected, banking follows end stop behavior.
ChanPI (Channel Strip Editing for Plug-ins) Tog-gles the preference setting that enables display of plug-in parameters directly on D-Command channel encoders.
Operation Switch
Page 5
AsnMtx (Assign Matrix Enable) Determines whether Assign Matrix or normal Assign mode operation is used for assigning inputs, outputs, inserts and sends.
MtxJst (Matrix Select Area Justification) Deter-mines whether Assign Matrix rows are arranged from Top to Bottom or Bottom to Top on the en-coders.
PIClmn (Plug-in Menu Column Width) Deter-mines the number of plug-in names displayed per row in the Assign Matrix
IOClmn (I/O Menu Column Width) Determines the number of I/O labels displayed per row in the Assign Matrix
MtxLck (Assign Matrix Lock) Determines whether the Assign Matrix is locked by default or needs to be put into lock mode manually.
EncVCA (VCA Encoder Display) Determines whether VCA slave track controls are displayed in the encoders of VCA Master channels

chapter 11
Pro Tools Satellite Link Software Option
The Digidesign Satellite Link option lets you link up to 5 Pro Tools systems (or up to 4 Pro Tools systems and an Avid Media Composer or Video Satellite LE system) over an Ethernet network. You can cue, play, and stop the trans-ports, make play selections, and solo tracks across any of the systems from any linked work-station.
From each linked Pro Tools system, Satellite Link lets you link and unlink networked systems and see the link status of other connected sys-tems.
By setting Satellite Link preferences, you can configure those Pro Tools systems for single- or multi-operator workflows
Satellite Link can be used simultaneously with MachineControl™. Satellite Link allows one linked Pro Tools system to go online and drive a 9-pin capable device.
On systems with a D-Control console, Satellite Link can work in conjunction with D-Control Multi-mode, allowing you to operate the trans-port of any of the networked Pro Tools systems from the D-Control Transport section.
Video Satellite LE provides limited Satellite Link features. For more information on using Satellite Link with Video Satellite LE, see the Video Satellite LE Guide.
System RequirementsSatellite Link requires a Digidesign-qualified Pro Tools|HD system running Pro Tools 8.0 or higher.
Each satellite Pro Tools system must have an iLok authorization for the Satellite Link option and have an Ethernet connection to a Local Area Network (LAN). The administrator Pro Tools system does not require an iLok authorization.
In addition, each Pro Tools system in a Satellite Link network must be resolved to a common video reference, or “house sync,” using a Digide-sign SYNC HD™ or SYNC I/O™.
To use Media Composer with Satellite Link, Me-dia Composer 3.1 with the Video Satellite op-tion is required.
System ConnectionsSatellite Link requires all linked systems to be connected to an Ethernet Local Area Network and to be synced to a common video reference using a Digidesign SYNC HD or SYNC I/O.
It is required that all systems be on the same subnet, and recommended that all systems be on the same Ethernet switch, in order to mini-mize response time over the network.
Chapter 11: Pro Tools Satellite Link Software Option 141

142
Configuring Satellite Link
Configuring Network Settings
Satellite Link systems communicate over an Ethernet LAN. You can configure the network settings on each Pro Tools system to build one or more Satellite Link networks on the same LAN.
Ethernet Interface
On computers with multiple Ethernet inter-faces, you can select the interface you want to use for Satellite Link communications.
To select the Ethernet interface for Satellite Link:
1 Choose Setup > Peripherals and click Satellites.
2 Under Advanced Network Settings, choose the Ethernet interface from the Interface pop-up menu.
3 Click OK.
TCP/UDP Port
Systems in a Satellite Link network need to use the same TCP/UDP port to communicate. Avail-able satellite systems will only appear on other satellite systems using the same port.
By default, Satellite Link uses TCP/UDP port 28282.
If the default port is already in use, or if you want to set up separate Satellite Link networks, you can select a different TCP/UDP port for Sat-ellite Link communication.
To select the TCP/UDP port for Satellite Link communication:
1 Choose Setup > Peripherals and click Satellites.
What’s New in Pro Tools HD 8.0
2 Under Advanced Network Settings, enter the TCP/UDP port number you want the system to use.
3 Click OK.
Configuring a Satellite Link Network
To set up Pro Tools systems or Video Satellite LE for Satellite Link operation, one Pro Tools sys-tem on the network must be designated as an administrator system.
Other systems on the network are set up as sat-ellite systems, then they are declared from the administrator system.
Configuring Satellite Systems
Do the following for each Pro Tools system you want to configure as a Satellite Link satellite:
1 Choose Setup > Peripherals and click Satellites.
2 In the System Name text box, enter a name for the system.
3 Under Mode, choose Satellite.
4 Click OK.
Configuring a satellite in the Satellites page of the Peripherals dialog

To configure a Media Composer system as a Video Satellite:
1 In Media Composer, choose Edit > Preferences.
2 In the Project window, click the Settings Tab and double-click Video Satellite.
3 In the Video Satellite Settings window, select Video Satellite Mode.
4 Click OK.
Configuring an Administrator System
If a Pro Tools system does not have the Satellite Link option installed, it can only operate as an administrator. You can, however, change a sat-ellite system to an administrator system.
To configure a Pro Tools system as a Satellite Link administrator:
1 Choose Setup > Peripherals and click Satellites.
2 In the System Name text box, enter a name for the system.
3 Under Mode, choose Administrator.
4 Under Administrator, choose the current sys-tem from the System 1 pop-up menu.
5 Click OK.
Configuring a satellite in the Satellites page of the Peripherals dialog
Declaring Satellites
When systems have been configured as satel-lites, they become available on the administra-tor system. The satellite systems are then de-clared to build the Satellite Link network.
To declare satellite systems:
1 On the administrator system, choose Setup > Peripherals and click Satellites.
2 Under Administrator, declare the systems you want to use as satellites from the System 2–5 pop-up menus.
3 Click OK.
Systems 1–5 appear, in order, from left to right, in the Synchronization section of the Transport window.
Declared satellites in the in the Satellites page of the Peripherals dialog
Declared satellites in the in the Synchronization section of the Transport window
Chapter 11: Pro Tools Satellite Link Software Option 143

144
Linking Satellite SystemsWhen a Pro Tools system has been declared as a satellite, it can then be placed in a linked state. When a system is linked, the following fea-tures/commands can be controlled across all linked systems:
• Linking and unlinking of the system
• Transport controls (Stop, Play, FF, Rew)
• Play selections
• Scrub/Shuttle location
• Channel solo (including Solo clear)
• Clearing system errors (such as DAE errors)
Satellite Link Controls
When a Pro Tools system has been declared as a satellite, the following Satellite Link controls ap-pear in the Transport window:
Link Button Controls the link status of the local system.
Satellite Link Buttons Control the link status of the other satellite systems. On every system, one of these buttons corresponds to that system’s main Link button.
Link buttons highlight to indicate linked status.
What’s New in Pro Tools HD 8.0
To display Satellite Link controls in the Transport window:
Choose View > Transport > Synchronization and View > Transport > Expanded.
To link or unlink the local Pro Tools system:
Click the Link button in the Transport win-dow.
To link or unlink other satellite systems:
Click the corresponding Satellite Link button in the Transport window.
To link or unlink all declared satellite systems:
Alt-click (Windows) or Option-click (Mac) the Link button or a Satellite Link button in the Transport window.
Linking Systems During Playback
You can link a system while it or any other linked system is playing back (“join in play”), and the transports will play in sync. In cases where both systems are playing back, the newly linked system will cue to the location of the sys-tem on which the link was initiated.
Satellite Link controls in the Transport window
Link button
Satellite Link buttons

Linking Play Selections
You can set linked Pro Tools systems to transmit and receive play selections from other satellite systems. This lets you configure your setup to se-lectively mirror Edit window selections between systems, or to have all systems mirror Edit win-dow selections on all other systems.
If you are working in a multi-user dub stage environment where dialog, FX, and music reside on different systems, it can be useful to set those systems to only transmit play selections, and set the recorder/video Pro Tools system to only re-ceive play selections.
If you are working in a single-user mix envi-ronment and are moving between systems, it can be useful to set all systems to transmit and receive play selections, so that you can work with the same selection on any system.
To set satellite Pro Tools systems to mirror play selections on other satellite systems
1 On the systems where you will be making play selections, do the following:
• Choose Setup > Preferences and click Syn-chronization.
– and –
• In the Satellites section of the Synchroniza-tion page, select the Transmit Play Selections option.
2 On the systems that you want to mirror the play selections, do the following:
• Choose Setup > Preferences and click Syn-chronization.
• In the Satellites section of the Synchroniza-tion page, select the Receive Play Selections option.
3 Make sure the systems are linked.
Solo Linking
You can set linked Pro Tools systems to transmit the solo status of their tracks and receive solo status information from other satellite systems.
If you are working in a multi-user dub stage environment where dialog, FX, and music reside on different systems, it can be useful to set those systems to send and receive solos, and set the re-corder/video Pro Tools system so that it does not transmit or receive solos.
If you are working in a single-user mix envi-ronment and are moving between systems, it might be useful to set all systems to transmit and receive solos, so that solos propagate across all systems.
When Solo Linking is enabled, tracks on all systems retain their Solo Safe status.
When Solo Linking is enabled, a Solo Clear operation (Option+Solo) clears all solos on sys-tems set to receive solos.
To set satellite Pro Tools systems to transmit or receive solo status:
1 On the systems that you want to solo tracks, do the following:
• Choose Setup > Preferences and click Syn-chronization.
– and –
• In the Satellites section of the Synchroniza-tion page, select the Transmit Solos option.
2 On the systems where you want tracks to fol-low solo behavior for solos on other systems, do the following:
• Choose Setup > Preferences and click Syn-chronization.
– and –
• In the Satellites section of the Synchroniza-tion page, select the Receive Solos option.
3 Make sure the systems are linked.
Chapter 11: Pro Tools Satellite Link Software Option 145

146
Using Solo Link without Linking Transport Controls
if you are synchronizing multiple Pro Tools sys-tems to an external synchronizer, you can still take advantage of the Solo Link feature.
You can set a satellite Pro Tools system to always send its solo status, whether linked or unlinked, so you can solo tracks across systems without linking transport controls.
To set a satellite Pro Tools system to always solo even when it is not linked:
1 Choose Setup > Preferences and click Synchro-nization.
2 In the Satellites section of the Synchroniza-tion page, select the Solo Independent of Linked State option.
Solo Link Behavior in the Solo Modes
Solo in Place With Solo Link, when using Solo In Place, the mode of solo operation is deter-mined by the system transmitting the solo.
If a linked system is in Solo Latch mode, solo-ing a track on that system adds to the number of tracks in solo, regardless of the solo mode of other systems set to receive solos.
If a linked system is in Solo X-OR mode, solo-ing a track on that system cancels all other sys-tem’s solos regardless of the solo mode of other systems set to receive solos.
AFL and PFL Modes With Solo Link, AFL and PFL solos on a linked system have no effect on other systems.
An AFL-soloed track on a linked system can be muted by a Solo In Place on another system. To avoid this, use PFL instead of AFL.
What’s New in Pro Tools HD 8.0
Satellite Link Operation
Clearing Errors on Linked Systems
By default, linked systems will continue to oper-ate if one of the systems experiences an error and its transport stops. Any error message on a linked system appears in the tool tip for the cor-responding Satellite Link button in the Trans-port window.
You can set each system to stop playback when it experiences an error.
To clear an error dialog on a linked system:
In the Transport window on another linked system, Shift-click the Satellite Link button for the affected system.
To set a linked system to stop the transport on all systems when an error occurs:
Make sure the DAE Errors Stop All Linked Sys-tems option is selected in the Synchronization Preferences.
To set all systems to stop the transport when an error occurs, make sure this option is selected on all linked systems.
Playback and Dialogs
Linked systems will stop playback (or prevent playback from starting) if a modal dialog (such as the I/O Setup, Hardware Setup, or Playback Engine dialog) is opened on any linked system.
To avoid interrupting playback on another system when opening a modal dialog, unlink the system before opening the dialog.

Using Satellite Link with MachineControlSatellite Link lets you use MachineControl on one linked Pro Tools system at a time.
When one linked Pro Tools system is already online and you go online with another linked Pro Tools system, Satellite Link will automati-cally take the first system off-line.
Any linked Pro Tools systems set to “Transport=Pro Tools” will follow Satellite Link transport commands.
Any linked Pro Tools systems set to “Trans-port=Machine” cannot transmit Satellite link transport commands, but will follow transport commands only if they are offline.
Control Surface Support for Satellite Link
Linking Satellite Systems(D-Control, D-Command, and C|24)
To link or unlink the local Pro Tools system:
Hold Control (Windows) or Command (Mac) and press the Online switch in the Transport section.
Satellite Link Soft Keys(D-Control and D-Command)
To link or unlink other satellite systems:
1 Hold Control (Windows) or Command (Mac) and press the Modes switch in the Automation Soft Keys section.
2 Press the Soft Key that corresponds to the name of the system that you want to link or un-link.
The Soft Key lights solid to indicate that the cor-responding system is linked, and flashed to indi-cate that the corresponding system is displaying an error.
To link or unlink all declared satellite systems:
Hold Alt+Control (Windows) or Op-tion+Command (Mac) and press the Online switch in the Transport section.
To set the local system to transmit solo:
To toggle the solo transmit status of the local Pro Tools system:
1 Hold Control (Windows) or Command (Mac) and press the Modes switch in the Automation Soft Keys section.
2 Press the Soft Key that corresponds to “Transmit Solo.”
The Soft Key lights solid to indicate that trans-mit solo is enabled.
Chapter 11: Pro Tools Satellite Link Software Option 147

148
What’s New in Pro Tools HD 8.0
chapter 12
Pro Tools Video and Avid Interoperability Improvements
Support for QuickTime HDPro Tools 8.0 offers professional quality support of most SD and HD Quicktime video formats, in-cluding 720p, 1080p, and 1080i at all standard frame rates.
Most common QuickTime codecs are now sup-ported, including HD codecs such as h.264, DVCPro 100, and HDV.
Monitoring QuickTime HD or SD Video Through a PCIe Video Card
(Mac Only)
With a Digidesign-qualified PCIe video card, Pro Tools can play and display QuickTime SD or QuickTime-based HD video files with frame edge-locked HD image output to a variety of professional HD monitors.
To Play QuickTime video through PCIe:
1 Import a QuickTime video file into a Pro Tools session.
2 Select Options > Video Out PCIe.
When this option is enabled, Pro Tools will play the video out the PCIe video card to the con-nected HD monitor.
Chapter 12
If the Video window is open while video plays out the PCIe video card, it displays text indicat-ing that video is playing out PCIe.
To toggle output of QuickTime video between the Video window and PCIe, do one of the following:
Select (or deselect) Options > Video Out PCIe.
– or –
Right-click, or Control-click, the Video win-dow, and select (or deselect) Video Out PCIe
Video Reference
Video output can be locked to external video reference, including Black Burst and Tri-Level Sync.
Supported QuickTime Codecs
Most common QuickTime codecs are supported, including HD codecs such as h.264, DVCPro 100, and HDV.
Pro Tools should be locked to a suitable clock reference, such as a Digidesign SYNC peripheral. If no external audio clock is ref-erenced, audio will not be frame-edge aligned and may drift.
: Pro Tools Video and Avid Interoperability Improvements 149

150
Supported Video Formats
* The video output format may be displayed on the external monitor.
Supported Video Formats using PCIe
Video Format*
Video Reference Rate
PT Frame Rate
Video Output Format*
23.976p NTSC
NTSC 23.976 NTSC
720p/ 23.976
720p/ 59.94 or NTSC
23.976 720p/59.94
1080p/ 23.976
1080psf/23.98
23.976 1080psf/23.98
24p NTSC NTSC 24 NTSC
24p PAL PAL 24 PAL
1080p/ 24
1080psf/24
24 1080psf/24
25p PAL PAL 25 PAL
25i PAL PAL 25 PAL
1080p/ 25
1080i/50 or PAL
25 1080i/50
30i NTSC NTSC 29.97 NTSC
720p/ 29.97 HDV
720p/ 59.94 or NTSC
29.97 720p/ 59.94
720p/50 720p/50 or PAL
25 720p/50
1080i/50 1080i/50 or PAL
25 1080i/50
720p/ 59.94
720p/ 59.94 or NTSC
29.97 720p/ 59.94
1080i/ 59.94
1080i/ 59.94 or NTSC
29.97 1080i/ 59.94
What’s New in Pro Tools HD 8.0
AAF Pan Improvements with DigiTranslator 2.0With DigiTranslator 2.0, Pro Tools 8.0 includes improvements for importing Avid generated AAF sequences with clip-based pan and support for automation (keyframe) pan.
Pro Tools Support for Avid Interplay on Windows VistaPro Tools HD systems running Windows Vista are now able to work with the Avid Interplay Media Management system.
Media Composer Video Satellite Software OptionBuilding on the success of the previous Media Station|PT-based Video Satellite Option, the new Media Composer Video Satellite Option in-cludes the following enhanced features:
HD Video Support
• Adds Avid HD video workflows to Pro Tools
• Provides professional-quality Avid HD video I/O using Mojo DX or Nitris DX
Increased Functionality
• Full-featured Media Composer software pro-vides extensive video workstation functional-ity
• Provides support for Windows Vista

Video Satellite LE Software OptionThe Video Satellite LE Software option enables a dedicated Pro Tools LE system for video play-back, synchronized to a main Pro Tools|HD sys-tem over ethernet. The main Pro Tools|HD sys-tem functions as the master transport. The satellite Pro Tools LE system with the Video Sat-ellite LE option provides high-quality Quick-Time HD and SD playback, or Avid SD video playback with Mojo SDI, to an external video monitor. This lets you place all of the video pro-cessing on a single dedicated Pro Tools LE sys-tem, freeing up the main Pro Tools|HD system for audio mixing and processing tasks.
The Video Satellite LE option is supported with a Digidesign-qualified Mac Pro computer, a Pro Tools LE system with Mbox 2 Micro, and a Digidesign-qualified Blackmagic video card or Avid Mojo SDI. The Pro Tools|HD system can be Mac or Windows.
For more information, see the Video Satel-lite LE Guide.
Chapter 12
: Pro Tools Video and Avid Interoperability Improvements 151
DIGIDESIGN2001 Junipero Serra Boulevard
Daly City, CA 94014-3886 USA
Tel: 650.731.6300
Fax: 650.731.6399
TECHNICAL SUPPORT (USA)Tel: 650.731.6100Fax: 650.731.6375
PRODUCT INFORMATION (USA)Tel: 800.333.2137
INTERNATIONAL OFFICESVisit the Digidesign websitefor contact information
www.digidesign.com