Embed Size (px)
Citation preview
What's New – Resource and Assignment Planning by Dale Howard and Gary Chefetz With this chapter, teach yourself how to use Microsoft Project
2010’s new manual scheduling feature. This self-paced study
guide includes hands-on lessons complete with practice files
that you can download to get you up to speed on the
revolutionary new scheduling features in Microsoft Project
2010.
The practice files needed in the hands-on exercises can
be downloaded from MS Project Experts.
This article is an excerpt from What’s New Study Guide Microsoft Project 2010, by
Dale Howard and Gary Chefetz.
You can buy their book at MS Project Experts.
This material is copyright © 2010 by Chefetz L.L.C. (dba MSProjectExperts) and is
used with permission.

123
Module 05
What’s New – Resource and Assignment Planning
Learning Objectives
After completing this module, you will be able to:
Insert a Work, Material, or Cost resource in the Resource Sheet
Assign resources to tasks using the Task Entry view and the Assign Resources dialog
Analyze resource allocation in the Team Planner view
Use the Team Planner view to locate and level resource overallocations
Move tasks in the Team Planner view
Customize the Team Planner view
Print the Team Planner view
Locate and resolve resource overallocations
Inside Module 05
Inserting New Resources in the Resource Sheet View ................................................................................................. 125
Assigning Resources to Tasks ........................................................................................................................................... 126
Using the Task Entry View .................................................................................................................................................................. 126
Using the Assign Resources Dialog ................................................................................................................................................... 127
Using the Team Planner View ........................................................................................................................................... 131
Leveling an Overallocated Resource in the Team Planner View ................................................................................................... 133
Dragging Tasks in the Team Planner View ....................................................................................................................................... 135
Changing Schedule Information in the Team Planner View .......................................................................................................... 137
Customizing the Team Planner View ................................................................................................................................................ 140
Printing the Team Planner View ........................................................................................................................................................ 144
Detecting and Resolving Resource Overallocations ..................................................................................................... 146

124
What’s New – Resource and Assignment Planning
125
Inserting New Resources in the Resource Sheet View
After you complete task planning, you are ready to begin resource planning. During the resource planning
process, you first build the team of resources to work on tasks in your project. Microsoft Project 2010, like its 2007
predecessor, offers Work, Material, and Cost resource types. A new feature in the software, the Add Resources
Picklist, allows you to insert a new resource in the Resource Sheet view, by selecting a resource Type. To insert a
new resource in your project, complete the following steps:
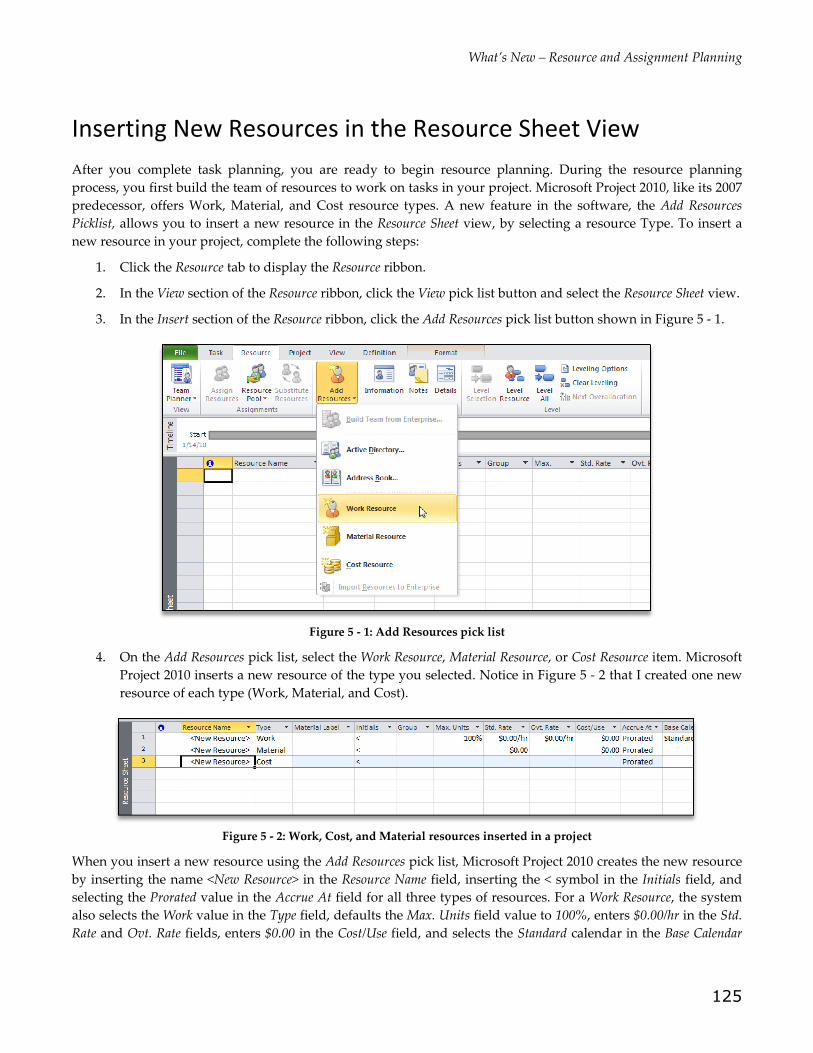
1. Click the Resource tab to display the Resource ribbon.
2. In the View section of the Resource ribbon, click the View pick list button and select the Resource Sheet view.
3. In the Insert section of the Resource ribbon, click the Add Resources pick list button shown in Figure 5 ‐ 1.
Figure 5 ‐ 1: Add Resources pick list
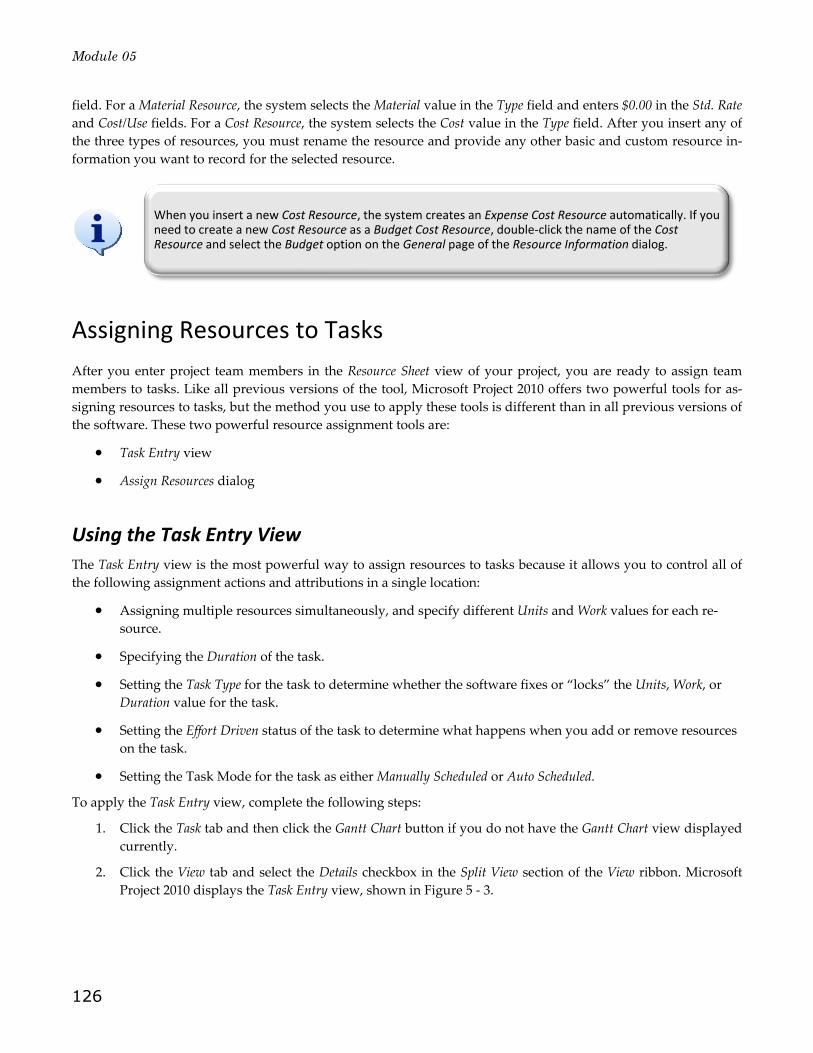
4. On the Add Resources pick list, select the Work Resource, Material Resource, or Cost Resource item. Microsoft
Project 2010 inserts a new resource of the type you selected. Notice in Figure 5 ‐ 2 that I created one new
resource of each type (Work, Material, and Cost).
Figure 5 ‐ 2: Work, Cost, and Material resources inserted in a project
When you insert a new resource using the Add Resources pick list, Microsoft Project 2010 creates the new resource
by inserting the name <New Resource> in the Resource Name field, inserting the < symbol in the Initials field, and
selecting the Prorated value in the Accrue At field for all three types of resources. For a Work Resource, the system
also selects the Work value in the Type field, defaults the Max. Units field value to 100%, enters $0.00/hr in the Std.
Rate and Ovt. Rate fields, enters $0.00 in the Cost/Use field, and selects the Standard calendar in the Base Calendar
Module 05
126
field. For a Material Resource, the system selects the Material value in the Type field and enters $0.00 in the Std. Rate
and Cost/Use fields. For a Cost Resource, the system selects the Cost value in the Type field. After you insert any of
the three types of resources, you must rename the resource and provide any other basic and custom resource in‐
formation you want to record for the selected resource.
Assigning Resources to Tasks
After you enter project team members in the Resource Sheet view of your project, you are ready to assign team
members to tasks. Like all previous versions of the tool, Microsoft Project 2010 offers two powerful tools for as‐
signing resources to tasks, but the method you use to apply these tools is different than in all previous versions of
the software. These two powerful resource assignment tools are:
Task Entry view
Assign Resources dialog
Using the Task Entry View
The Task Entry view is the most powerful way to assign resources to tasks because it allows you to control all of
the following assignment actions and attributions in a single location:
Assigning multiple resources simultaneously, and specify different Units and Work values for each re‐
source.
Specifying the Duration of the task.
Setting the Task Type for the task to determine whether the software fixes or “locks” the Units, Work, or
Duration value for the task.
Setting the Effort Driven status of the task to determine what happens when you add or remove resources
on the task.
Setting the Task Mode for the task as either Manually Scheduled or Auto Scheduled.
To apply the Task Entry view, complete the following steps:
1. Click the Task tab and then click the Gantt Chart button if you do not have the Gantt Chart view displayed
currently.
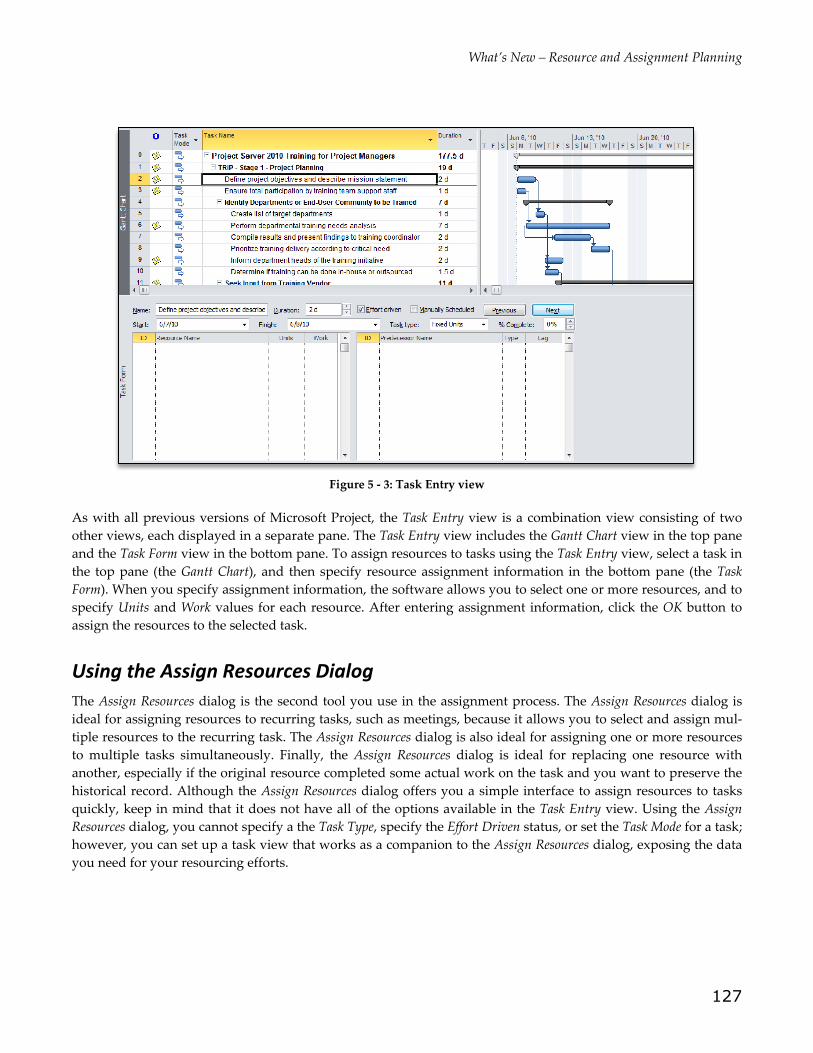
2. Click the View tab and select the Details checkbox in the Split View section of the View ribbon. Microsoft
Project 2010 displays the Task Entry view, shown in Figure 5 ‐ 3.
When you insert a new Cost Resource, the system creates an Expense Cost Resource automatically. If you need to create a new Cost Resource as a Budget Cost Resource, double‐click the name of the Cost Resource and select the Budget option on the General page of the Resource Information dialog.
What’s New – Resource and Assignment Planning
127
Figure 5 ‐ 3: Task Entry view
As with all previous versions of Microsoft Project, the Task Entry view is a combination view consisting of two
other views, each displayed in a separate pane. The Task Entry view includes the Gantt Chart view in the top pane
and the Task Form view in the bottom pane. To assign resources to tasks using the Task Entry view, select a task in
the top pane (the Gantt Chart), and then specify resource assignment information in the bottom pane (the Task
Form). When you specify assignment information, the software allows you to select one or more resources, and to
specify Units and Work values for each resource. After entering assignment information, click the OK button to
assign the resources to the selected task.
Using the Assign Resources Dialog
The Assign Resources dialog is the second tool you use in the assignment process. The Assign Resources dialog is
ideal for assigning resources to recurring tasks, such as meetings, because it allows you to select and assign mul‐
tiple resources to the recurring task. The Assign Resources dialog is also ideal for assigning one or more resources
to multiple tasks simultaneously. Finally, the Assign Resources dialog is ideal for replacing one resource with
another, especially if the original resource completed some actual work on the task and you want to preserve the
historical record. Although the Assign Resources dialog offers you a simple interface to assign resources to tasks
quickly, keep in mind that it does not have all of the options available in the Task Entry view. Using the Assign
Resources dialog, you cannot specify a the Task Type, specify the Effort Driven status, or set the Task Mode for a task;
however, you can set up a task view that works as a companion to the Assign Resources dialog, exposing the data
you need for your resourcing efforts.
Module 05
128
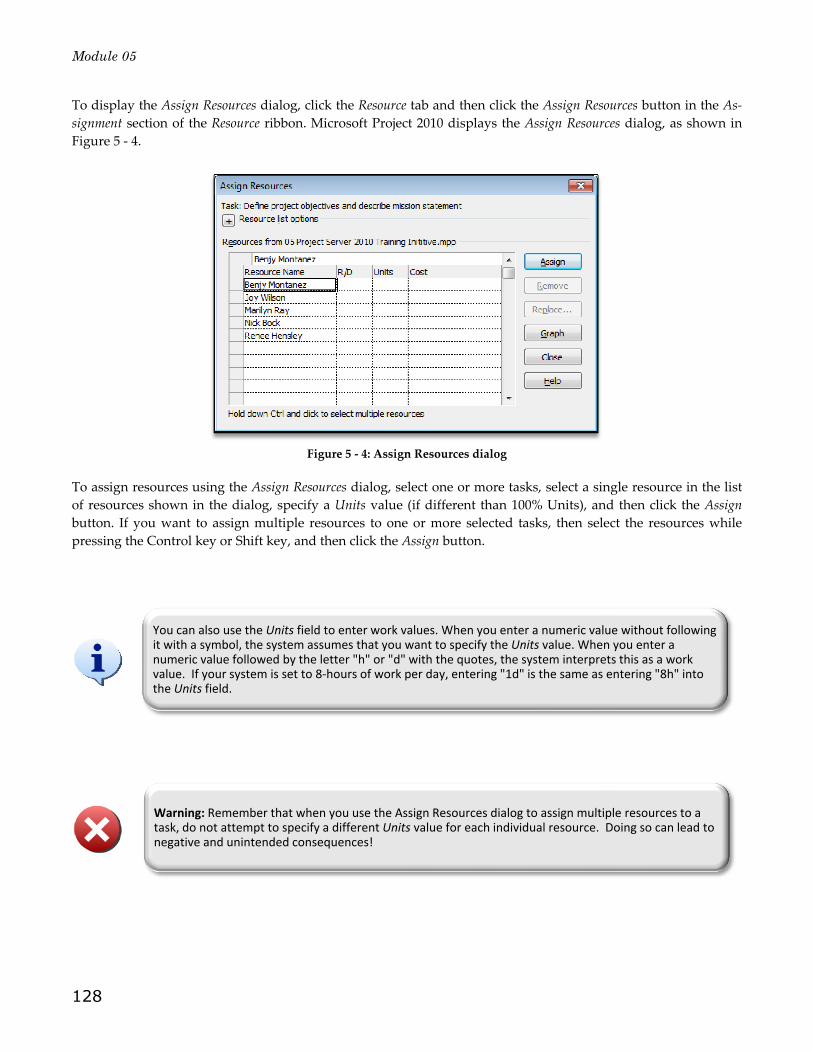
To display the Assign Resources dialog, click the Resource tab and then click the Assign Resources button in the As‐
signment section of the Resource ribbon. Microsoft Project 2010 displays the Assign Resources dialog, as shown in
Figure 5 ‐ 4.
Figure 5 ‐ 4: Assign Resources dialog
To assign resources using the Assign Resources dialog, select one or more tasks, select a single resource in the list
of resources shown in the dialog, specify a Units value (if different than 100% Units), and then click the Assign
button. If you want to assign multiple resources to one or more selected tasks, then select the resources while
pressing the Control key or Shift key, and then click the Assign button.
You can also use the Units field to enter work values. When you enter a numeric value without following it with a symbol, the system assumes that you want to specify the Units value. When you enter a numeric value followed by the letter "h" or "d" with the quotes, the system interprets this as a work value. If your system is set to 8‐hours of work per day, entering "1d" is the same as entering "8h" into the Units field.
Warning: Remember that when you use the Assign Resources dialog to assign multiple resources to a task, do not attempt to specify a different Units value for each individual resource. Doing so can lead to negative and unintended consequences!

What’s New – Resource and Assignment Planning
129
Exercise 5‐1
Insert new Work, Material, and Cost resources in a project.
1. Navigate to your student folder and open the Resource and Assignment Planning 1.mpp sample
file.
2. Click the View tab and then click the Resource Sheet button in the Resource Views section of the View
ribbon.
3. Click the Resource tab to display the Resource ribbon.
4. Select the first blank row after the resource named Terry Uland.
5. Click the Add Resources pick list button in the Insert section of the Resource ribbon and select the
Work Resource item on the list.
6. Change the name of the new Work resource to Vicky Joslyn, enter VJ in the Initials column, and en‐
ter Test in the Group field.
7. For Vicky Joslyn, enter $50/h in the Std. Rate column and $75/h in the Ovt. Rate column.
8. Select the first blank row after Vicky Joslyn.
9. Click the Add Resources pick list button in the Resource ribbon and select the Material Resource
item.
10. Change the name of the new Material resource to Training Supplies, enter Sets in the Material Label
column, and enter TS in the Initials column.
11. For the Training Supplies resource, enter Supplies in the Group column, and enter $50 in the Std.
Rate column.
12. Select the first blank row after the Training Supplies material resource.
13. Click the Add Resources pick list button in the Resource ribbon and select the Cost Resource item.
14. Change the name of the new Cost resource to Software Licenses, enter SL in the Initials column,
and enter Acct$ in the Group column.
15. Save but do not close your Resource and Assignment Planning 1.mpp sample file.
Exercise 5‐2
Assign resources to tasks using the Assign Resources dialog.
1. Return to your Resource and Assignment Planning 1.mpp sample file.
Module 05
130
2. In the View section of the Resource ribbon, click the Team Planner pick list button and select the
Gantt Chart item on the list.
3. Select task ID #4, the Load and Configure Software task, and then click the Assign Resources button in
the Resource ribbon.
4. In the Assign Resources dialog, select the Software Licenses resource and then click the Assign but‐
ton.
5. In the Assign Resources dialog, enter $15,000 in the Cost column for the Software Licenses resource
and then press the Enter key on your computer keyboard.
The $15,000 amount you just entered for the Software Licenses cost resource represents the planned cost
of the software licenses needed for this task.
6. Click outside of the Assign Resources dialog and select task IDs #15‐17 (the Create Training Module
01, Create Training Module 02, and Create Training Module 03 tasks).
7. In the Assign Resources dialog, select Ruth Andrews and click the Assign button.
Notice that Microsoft Project 2010 assigned Ruth Andrews at 100% Units to each of the three tasks. If you
do not supply a Units value when assigning a resource, the system defaults to the Max. Units value speci‐
fied for the resource in the Resource Sheet view of your project.
8. Click the Close button to close the Assign Resources dialog.
Exercise 5‐3
Assign resources to tasks using the Task Entry view.
1. Click the View tab and then select the Details checkbox in the Split View section of the View ribbon
to apply the Task Entry view.
2. In the top pane (Gantt Chart), scroll down and select task ID #19, the Conduct Skills Assessment
task.
3. In the bottom pane (Task Form), select Chuck Kirkpatrick and Kent Bergstrand, set the Units val‐
ue to 50% for each of them, enter 40h in the Work field for each of them, and then click the OK
button to complete the assignment.
Notice how Microsoft Project 2010 calculated the Duration value when you supplied the Units and Work
values. This is the default behavior for Fixed Units tasks.
4. In the Task Form, click the Next button to select the Create Training Schedule task.
5. In the Task Form, select Kent Bergstrand, enter 25% in the Units field, and then click the OK but‐
ton.
Notice how Microsoft Project 2010 calculated the Work value when you supplied the Units and Duration
values. Again, this is the default behavior for Fixed Units tasks.
6. In the Task Form, click the Next button to select the Provide Training task.
7. In the Task Form, select Kent Bergstrand, Chuck Kirkpatrick, and Ruth Andrews and then click
the OK button.
What’s New – Resource and Assignment Planning
131
8. Below the name of Ruth Andrews in the Task Form, select the Training Supplies material re‐
source, enter 36/d in the Units field, and then click the OK button.
9. Save and close the Resource and Assignment Planning 1.mpp sample file.
Using the Team Planner View
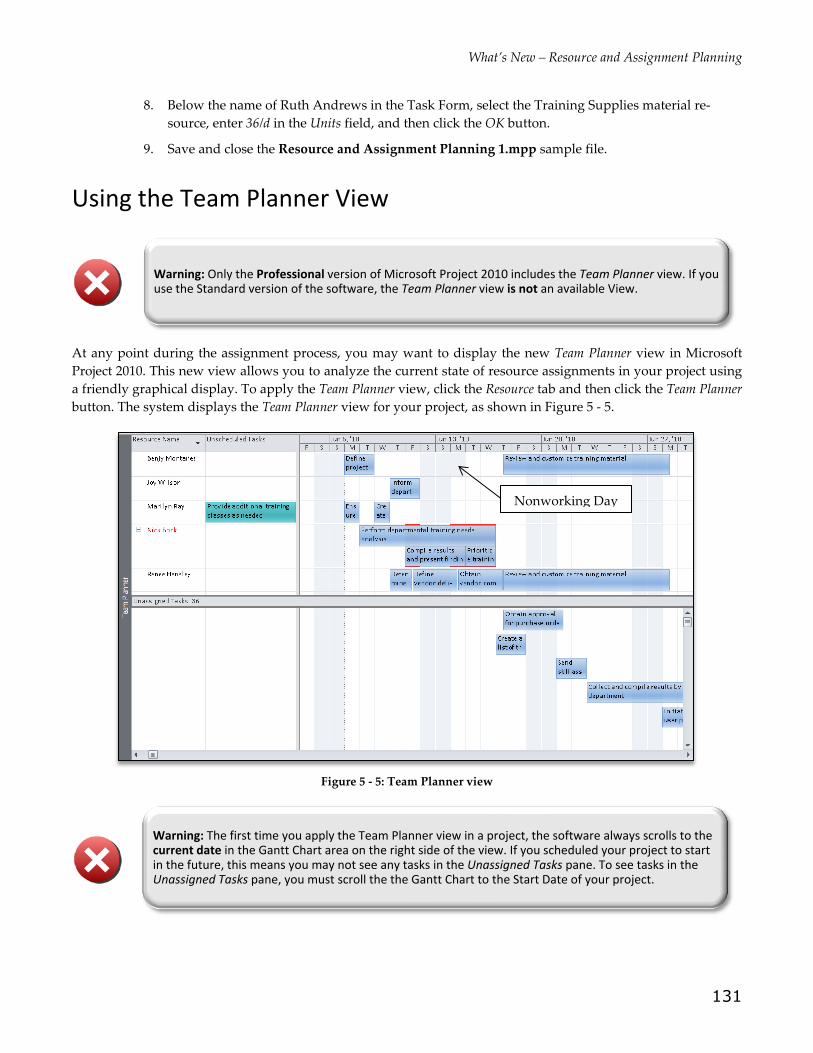
At any point during the assignment process, you may want to display the new Team Planner view in Microsoft
Project 2010. This new view allows you to analyze the current state of resource assignments in your project using
a friendly graphical display. To apply the Team Planner view, click the Resource tab and then click the Team Planner
button. The system displays the Team Planner view for your project, as shown in Figure 5 ‐ 5.
Figure 5 ‐ 5: Team Planner view
Warning: Only the Professional version of Microsoft Project 2010 includes the Team Planner view. If you use the Standard version of the software, the Team Planner view is not an available View.
Warning: The first time you apply the Team Planner view in a project, the software always scrolls to the current date in the Gantt Chart area on the right side of the view. If you scheduled your project to start in the future, this means you may not see any tasks in the Unassigned Tasks pane. To see tasks in the Unassigned Tasks pane, you must scroll the the Gantt Chart to the Start Date of your project.
Nonworking Day
Module 05
132
The Team Planner view consists of two viewing panes. The top pane is the Resource pane and shows resources
from the Resource Sheet view of your project, sorted by ID number. Assigned tasks appear in the Gantt Chart area
on the right side of the pane for each resource. Unlike the Gantt Chart view, the Team Planner view displays the
Gantt bars arranged horizontally on a single line for each resource. Unscheduled Tasks (Manually Scheduled tasks
with no Duration, Start, or Finish date) already assigned to a resource appear in the Unscheduled Tasks column to
the right of the resource name.
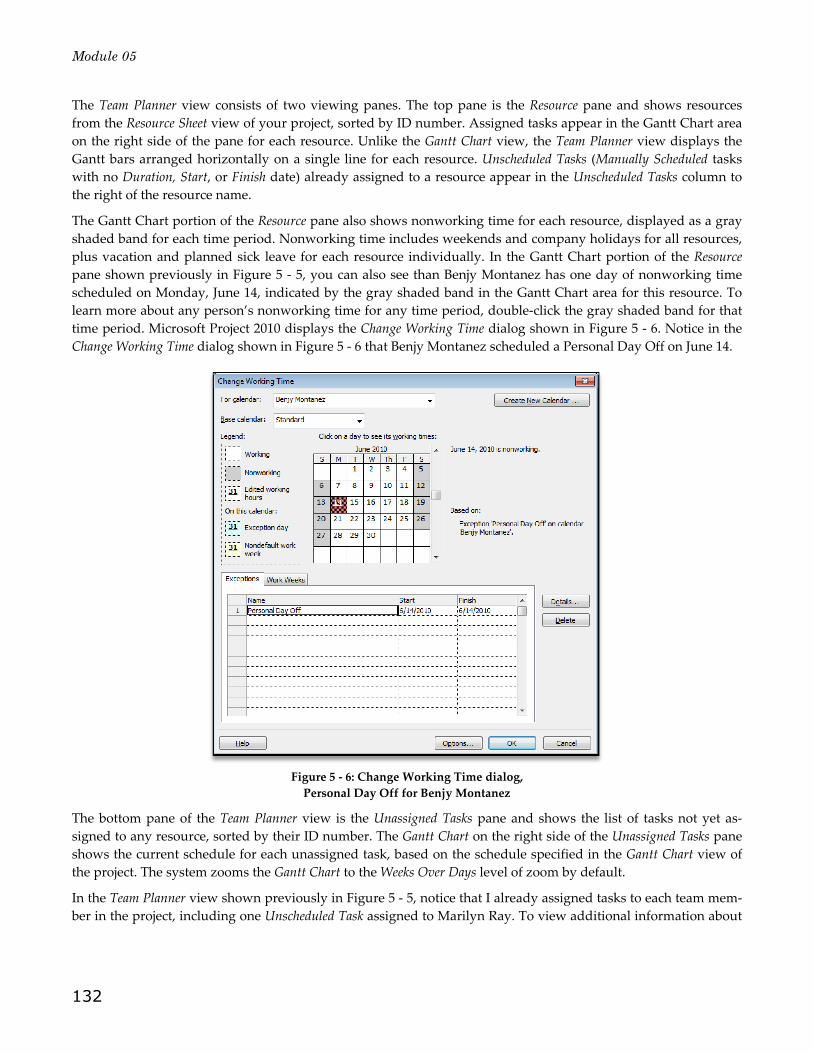
The Gantt Chart portion of the Resource pane also shows nonworking time for each resource, displayed as a gray
shaded band for each time period. Nonworking time includes weekends and company holidays for all resources,
plus vacation and planned sick leave for each resource individually. In the Gantt Chart portion of the Resource
pane shown previously in Figure 5 ‐ 5, you can also see than Benjy Montanez has one day of nonworking time
scheduled on Monday, June 14, indicated by the gray shaded band in the Gantt Chart area for this resource. To
learn more about any person’s nonworking time for any time period, double‐click the gray shaded band for that
time period. Microsoft Project 2010 displays the Change Working Time dialog shown in Figure 5 ‐ 6. Notice in the
Change Working Time dialog shown in Figure 5 ‐ 6 that Benjy Montanez scheduled a Personal Day Off on June 14.
Figure 5 ‐ 6: Change Working Time dialog,
Personal Day Off for Benjy Montanez
The bottom pane of the Team Planner view is the Unassigned Tasks pane and shows the list of tasks not yet as‐
signed to any resource, sorted by their ID number. The Gantt Chart on the right side of the Unassigned Tasks pane
shows the current schedule for each unassigned task, based on the schedule specified in the Gantt Chart view of
the project. The system zooms the Gantt Chart to the Weeks Over Days level of zoom by default.
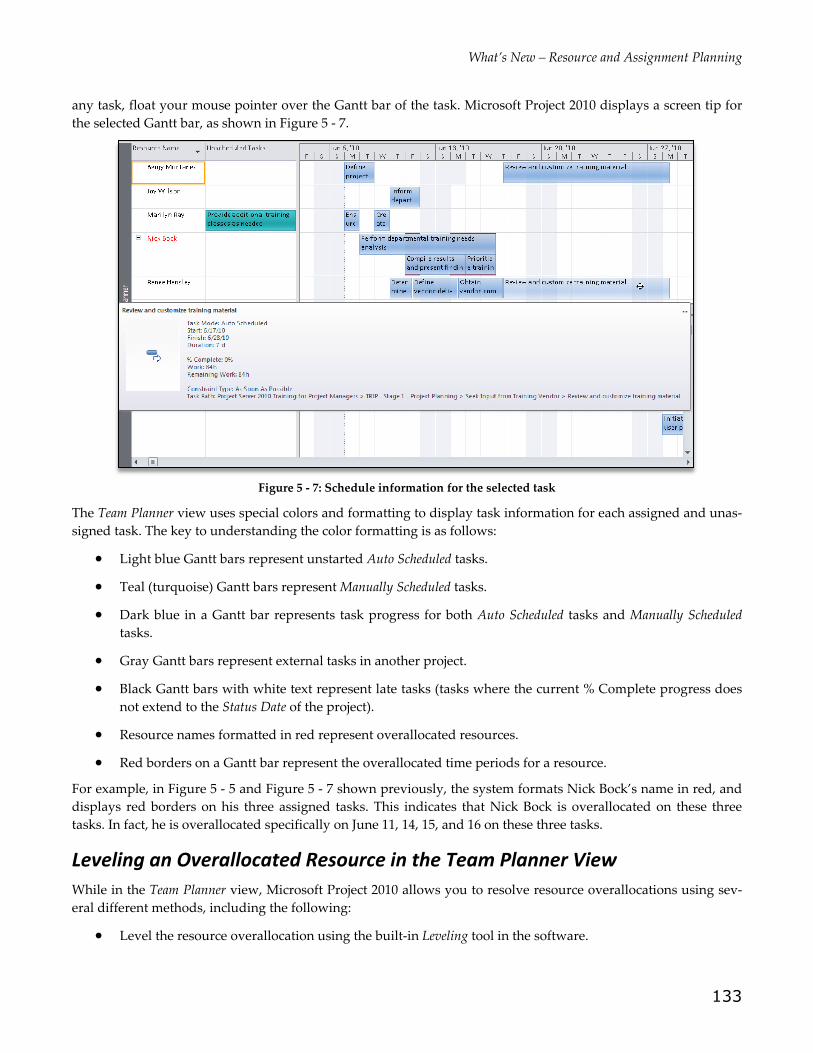
In the Team Planner view shown previously in Figure 5 ‐ 5, notice that I already assigned tasks to each team mem‐
ber in the project, including one Unscheduled Task assigned to Marilyn Ray. To view additional information about
What’s New – Resource and Assignment Planning
133
any task, float your mouse pointer over the Gantt bar of the task. Microsoft Project 2010 displays a screen tip for
the selected Gantt bar, as shown in Figure 5 ‐ 7.
Figure 5 ‐ 7: Schedule information for the selected task
The Team Planner view uses special colors and formatting to display task information for each assigned and unas‐
signed task. The key to understanding the color formatting is as follows:
Light blue Gantt bars represent unstarted Auto Scheduled tasks.
Teal (turquoise) Gantt bars represent Manually Scheduled tasks.
Dark blue in a Gantt bar represents task progress for both Auto Scheduled tasks and Manually Scheduled
tasks.
Gray Gantt bars represent external tasks in another project.
Black Gantt bars with white text represent late tasks (tasks where the current % Complete progress does
not extend to the Status Date of the project).
Resource names formatted in red represent overallocated resources.
Red borders on a Gantt bar represent the overallocated time periods for a resource.
For example, in Figure 5 ‐ 5 and Figure 5 ‐ 7 shown previously, the system formats Nick Bock’s name in red, and
displays red borders on his three assigned tasks. This indicates that Nick Bock is overallocated on these three
tasks. In fact, he is overallocated specifically on June 11, 14, 15, and 16 on these three tasks.
Leveling an Overallocated Resource in the Team Planner View
While in the Team Planner view, Microsoft Project 2010 allows you to resolve resource overallocations using sev‐
eral different methods, including the following:
Level the resource overallocation using the built‐in Leveling tool in the software.
Module 05
134
Reschedule a task that is causing an overallocation by dragging it to a different time period.
Reassign a task that is causing an overallocation by dragging the task to a different resource.
To level a resource overallocation using the built‐in Leveling tool in Microsoft Project 2010, complete the follow‐
ing steps:
1. Select the name of an overallocated resource in the Resource pane.
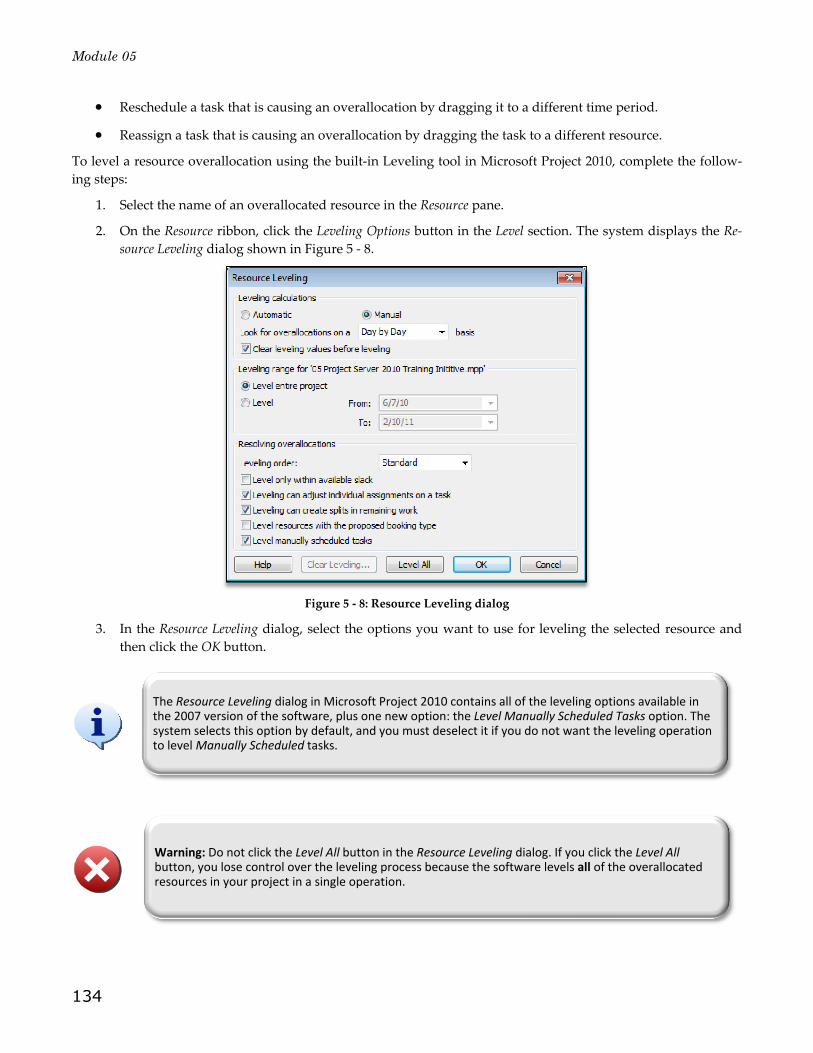
2. On the Resource ribbon, click the Leveling Options button in the Level section. The system displays the Re‐
source Leveling dialog shown in Figure 5 ‐ 8.
Figure 5 ‐ 8: Resource Leveling dialog
3. In the Resource Leveling dialog, select the options you want to use for leveling the selected resource and
then click the OK button.
The Resource Leveling dialog in Microsoft Project 2010 contains all of the leveling options available in the 2007 version of the software, plus one new option: the Level Manually Scheduled Tasks option. The system selects this option by default, and you must deselect it if you do not want the leveling operation to level Manually Scheduled tasks.
Warning: Do not click the Level All button in the Resource Leveling dialog. If you click the Level All button, you lose control over the leveling process because the software levels all of the overallocated resources in your project in a single operation.
What’s New – Resource and Assignment Planning
135
4. Click the Level Resource button in the Level section of the Resource ribbon.
When you use the built‐in leveling tool to level an overallocated resource, as with all previous versions of the
software, Microsoft Project 2010 resolves the overallocation using one or both of the following methods:
The software delays tasks or assignments.
The software splits tasks or assignments.
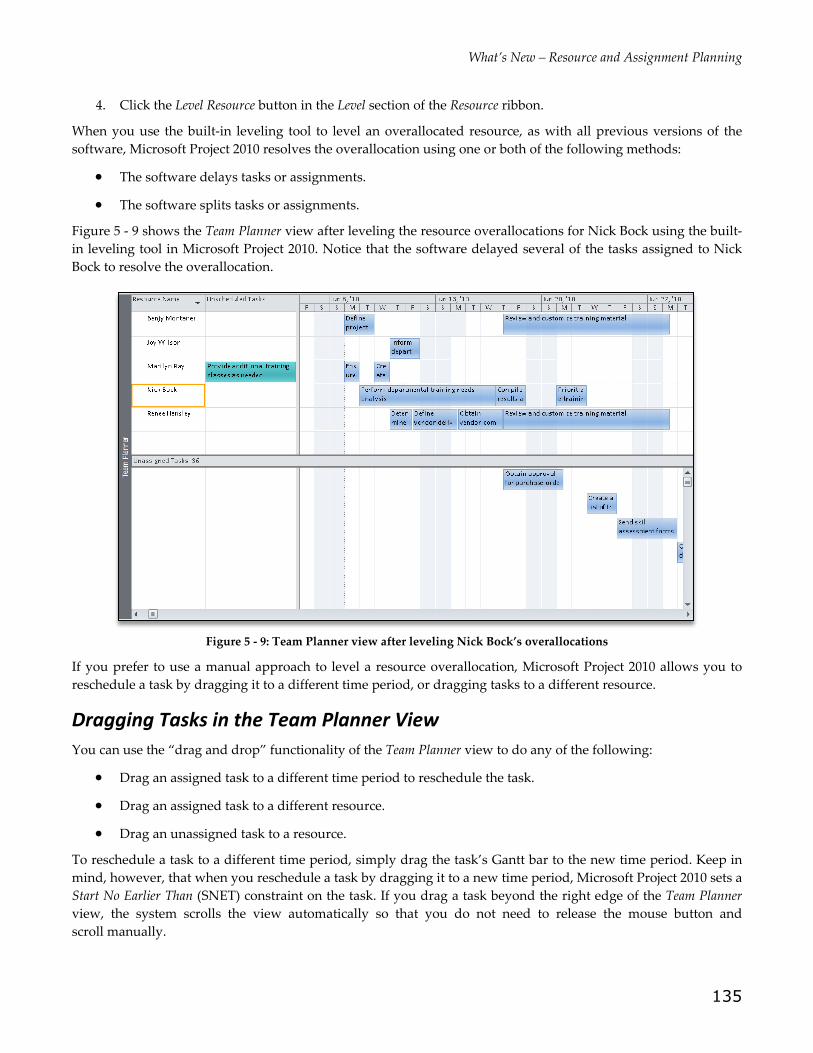
Figure 5 ‐ 9 shows the Team Planner view after leveling the resource overallocations for Nick Bock using the built‐
in leveling tool in Microsoft Project 2010. Notice that the software delayed several of the tasks assigned to Nick
Bock to resolve the overallocation.
Figure 5 ‐ 9: Team Planner view after leveling Nick Bock’s overallocations
If you prefer to use a manual approach to level a resource overallocation, Microsoft Project 2010 allows you to
reschedule a task by dragging it to a different time period, or dragging tasks to a different resource.
Dragging Tasks in the Team Planner View
You can use the “drag and drop” functionality of the Team Planner view to do any of the following:
Drag an assigned task to a different time period to reschedule the task.
Drag an assigned task to a different resource.
Drag an unassigned task to a resource.
To reschedule a task to a different time period, simply drag the task’s Gantt bar to the new time period. Keep in
mind, however, that when you reschedule a task by dragging it to a new time period, Microsoft Project 2010 sets a
Start No Earlier Than (SNET) constraint on the task. If you drag a task beyond the right edge of the Team Planner
view, the system scrolls the view automatically so that you do not need to release the mouse button and
scroll manually.

Module 05
136
To reassign a task to another resource, simply drag the task’s Gantt bar from the assigned resource to the new
resource and drop it on the desired time period. For example, Figure 5 ‐ 10 shows the Team Planner view after I
dragged two tasks assigned to Nick Bock and reassigned them to Marilyn Ray. These two tasks were the tasks
causing the resource overallocation for Nick Bock.
Figure 5 ‐ 10: Resolve a resource overallocation by dragging tasks to another resource
To assign an Unassigned Task to any resource using the Team Planner view, drag the task’s Gantt bar from the bot‐
tom pane to the top pane and drop it in the time period during which you want to schedule the task. Keep in
mind that when you assign a task to a resource using this method, Microsoft Project 2010 assigns the task to the
resource at 100% Units automatically, indicating full‐time work on the task.
Warning:Microsoft Project's use of SNET constraints in the Team Planner view may be contrary to the best interests of your schedule model if you want to maintain a fully dynamic model. These prevent a task from moving to an earlier start date if an earlier start became available. You can easily clear delays added by the built‐in leveling tool with a press of a button, while you must manually manage constraints added by the Team Planner.
You can also reassign a task to another resource by right‐clicking on the Gantt bar for the task, choosing the Reassign To item on the shortcut menu, and then selecting the name of the new resource.
To reassign or reschedule multiple tasks simultaneously, press and hold the Control key to select multiple tasks, and then drag and drop the block of selected tasks. Microsoft Project 2010 does not allow you to make multiple tasks assignments simultaneously in the Team Planner view.
What’s New – Resource and Assignment Planning
137
Changing Schedule Information in the Team Planner View
As you analyze assignment information in the Team Planner view, at some point you may need to revise schedule
information. Microsoft Project 2010 allows you to revise your project as follows in the Team Planner view:
You can change the Task Mode option for a task by right‐clicking on the Gantt bar for the task and choos‐
ing either the Auto Schedule or Manually Schedule item on the shortcut menu.
You can set a task to Inactive status by right‐clicking on the Gantt bar for the task and choosing the Inacti‐
vate Task item on the shortcut menu.
You can change information for any task (such as setting a constraint or applying a task calendar) by
double‐clicking the Gantt bar for the task and entering the information in the Task Information dialog. You
can also right‐click on the Gantt bar for the task and choose the Information item on the shortcut menu.
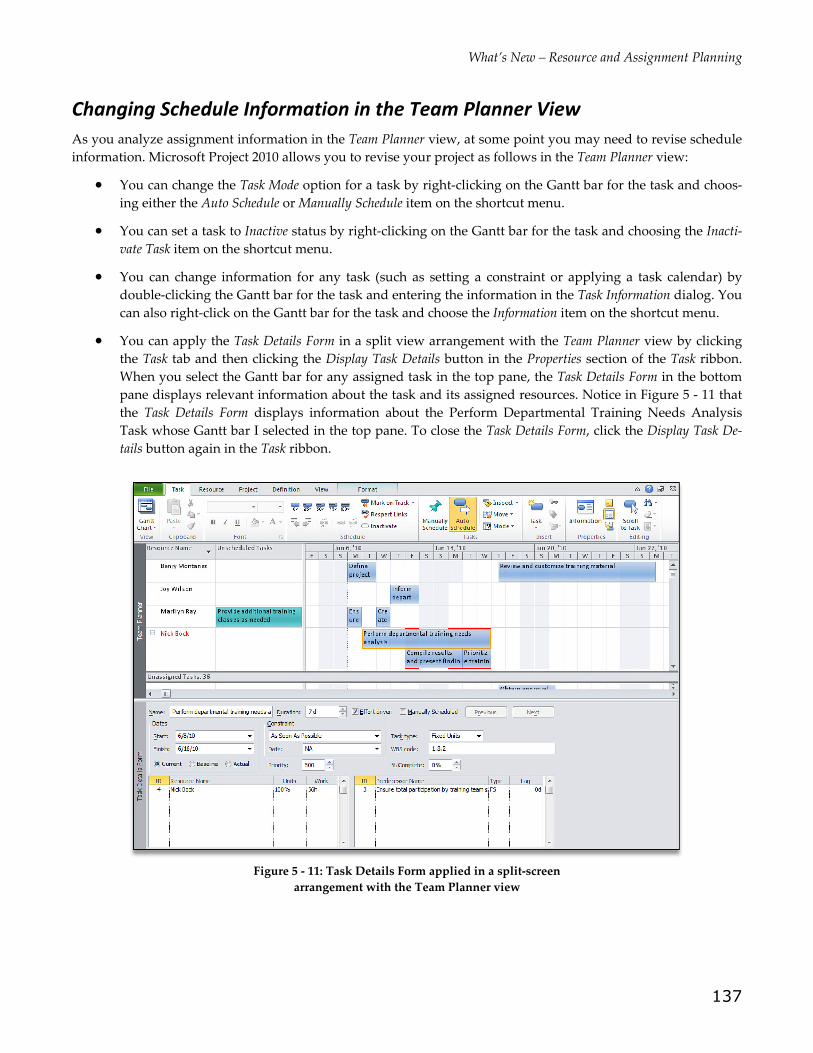
You can apply the Task Details Form in a split view arrangement with the Team Planner view by clicking
the Task tab and then clicking the Display Task Details button in the Properties section of the Task ribbon.
When you select the Gantt bar for any assigned task in the top pane, the Task Details Form in the bottom
pane displays relevant information about the task and its assigned resources. Notice in Figure 5 ‐ 11 that
the Task Details Form displays information about the Perform Departmental Training Needs Analysis
Task whose Gantt bar I selected in the top pane. To close the Task Details Form, click the Display Task De‐
tails button again in the Task ribbon.
Figure 5 ‐ 11: Task Details Form applied in a split‐screen
arrangement with the Team Planner view
Module 05
138
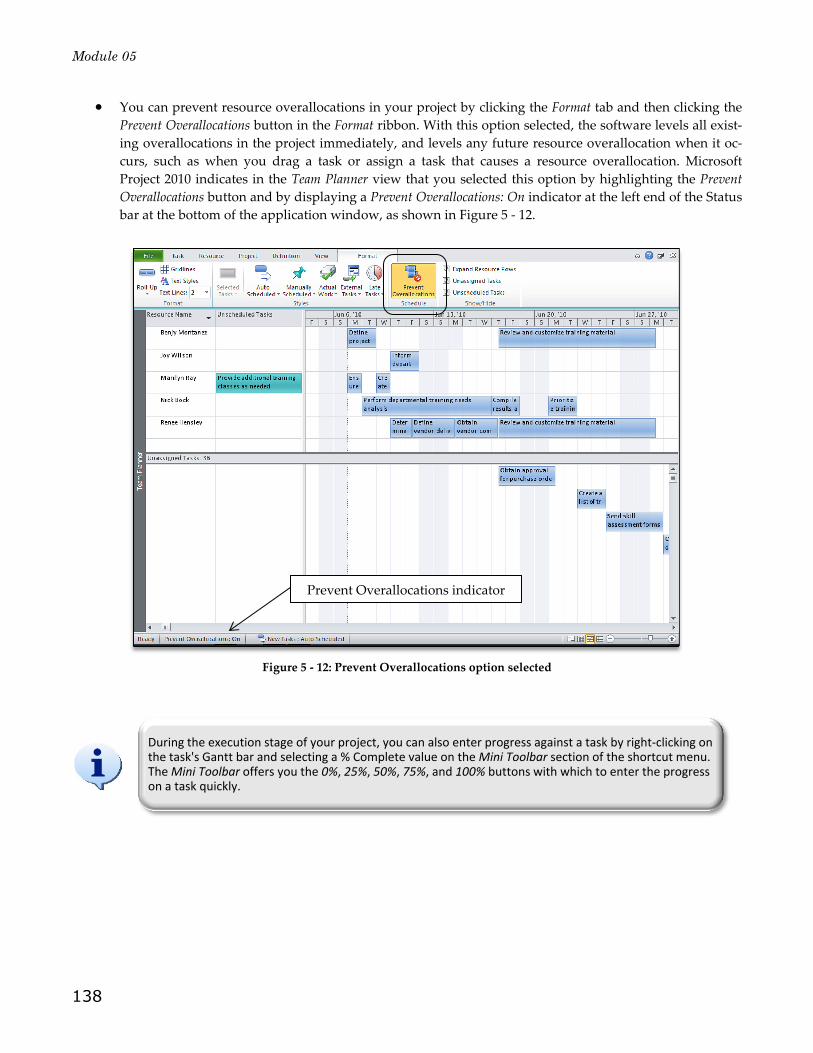
You can prevent resource overallocations in your project by clicking the Format tab and then clicking the
Prevent Overallocations button in the Format ribbon. With this option selected, the software levels all exist‐
ing overallocations in the project immediately, and levels any future resource overallocation when it oc‐
curs, such as when you drag a task or assign a task that causes a resource overallocation. Microsoft
Project 2010 indicates in the Team Planner view that you selected this option by highlighting the Prevent
Overallocations button and by displaying a Prevent Overallocations: On indicator at the left end of the Status
bar at the bottom of the application window, as shown in Figure 5 ‐ 12.
Figure 5 ‐ 12: Prevent Overallocations option selected
During the execution stage of your project, you can also enter progress against a task by right‐clicking on the task's Gantt bar and selecting a % Complete value on theMini Toolbar section of the shortcut menu. The Mini Toolbar offers you the 0%, 25%, 50%, 75%, and 100% buttons with which to enter the progress on a task quickly.
Prevent Overallocations indicator

What’s New – Resource and Assignment Planning
139
Exercise 5‐4
Use the Team Planner view to analyze resource assignments and to level resource overallocations.
1. Navigate to your student folder and open the Resource and Assignment Planning 2.mpp sample
file.
2. Click the Resource tab and then click the Team Planner button in the Resource ribbon.
3. Examine the tasks currently assigned to each resource. Note: Scroll to the right, as needed, to
view task assignments for each resource.
4. In the Resource pane, scroll to the week of September 23, 2013 for Dan Morton and look for the
week of nonworking time in the Gantt Chart (gray shaded cells).
5. Double‐click in the gray shaded cells during the week of nonworking time for Dan Morton to
display the Change Working Time dialog and reveal the reason for the nonworking time.
6. Click the OK button to close the Change Working Time dialog.
7. In the Level section of the Resource ribbon, click the Leveling Options button.
8. In the Resource Leveling dialog, click the Leveling Order pick list and select the Priority, Standard
order.
9. Click the OK button to close the Resource Leveling dialog.
10. Select the overallocated resource, Dan Morton, and then click the Level Resource button in the Re‐
source ribbon.
Notice that Microsoft Project 2010 delayed two of the tasks assigned to Dan Morton to resolve the
overallocation.
11. Select the overallocated resource, Marilyn Ray, and then scroll to the right to locate her resource
overallocation.
12. Drag the Gantt bar for the Initiate End‐User Placement Matrix task from Marilyn Ray to Cassie En‐
dicott. Note: Be sure to keep the same time schedule for the task when you drag the Gantt bar to
Cassie Endicott.
13. Select the overallocated resource, Renee Hensley, and then click the Level Resource button in the
Resource ribbon.
Notice that Microsoft Project 2010 delayed a task assigned to Renee Hensley to resolve the overallocation.
14. Save but do not close the Resource and Assignment Planning 2.mpp sample file.

Module 05
140
Customizing the Team Planner View
Microsoft Project 2010 allows you to customize the Team Planner view. To customize this view, click the Format
tab to display the Format ribbon, shown in Figure 5 ‐ 13.
Figure 5 ‐ 13: Format ribbon
Click the Roll‐Up pick list button and select the level of WBS information to display for each Gantt bar shown in
the Team Planner view. By default, the system selects the All Subtasks item on the Roll‐Up pick list. When I created
my project, I set it up so that summary tasks at Outline Level 1 represent phases and summary tasks at Outline Lev‐
el 2 represent deliverables. Figure 5 ‐ 14 shows the Team Planner view after selecting the Outline Level 1 item on the
Roll‐Up pick list. Notice that Microsoft Project 2010 displays the name of each Outline Level 1 summary task
(the Phases) as Gantt bars in the Team Planner view. Notice also that the software displays the selected Outline
Level for the Team Planner view with an indicator at the left end of the Status bar at the bottom of the
application window.
Figure 5 ‐ 14: Team Planner view showing Outline Level 1 task information
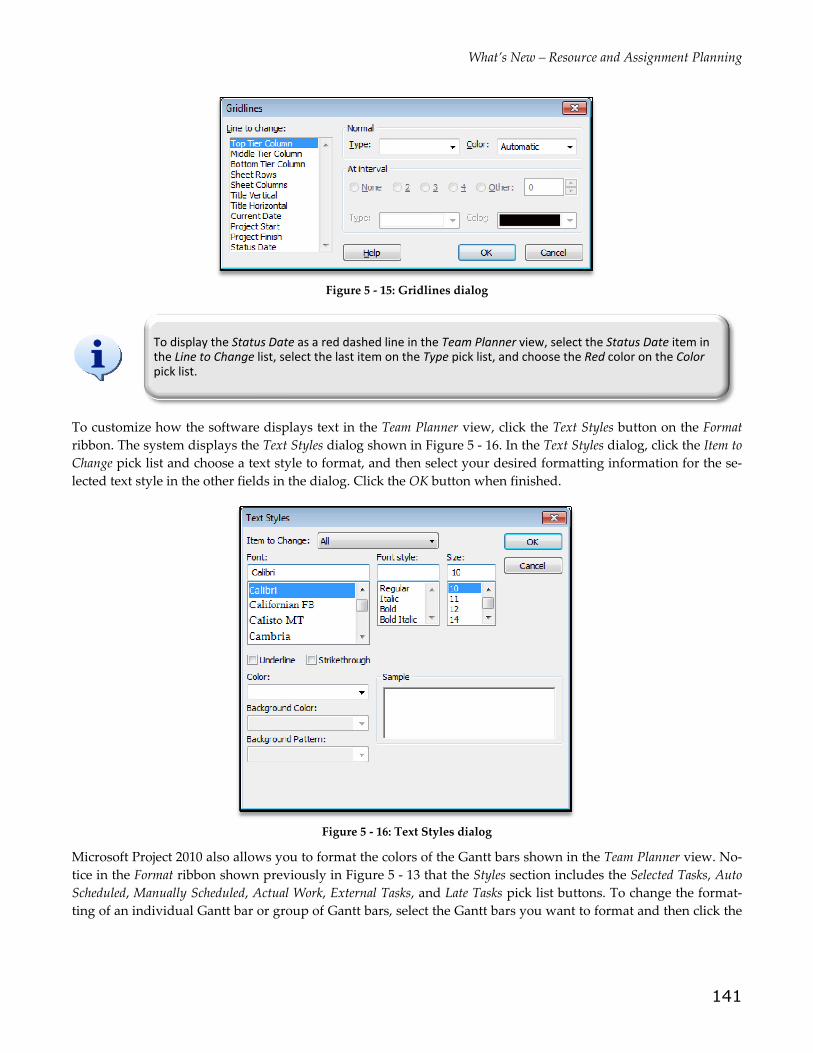
Microsoft Project 2010 allows you to customize the display of gridlines and text in the Team Planner view. To
change the gridline display, click the Gridlines button in the Format ribbon. The system displays the Gridlines di‐
alog shown in Figure 5 ‐ 15. In the Gridlines dialog, select an item in the Line to Change list and select the format‐
ting on the Type and Color pick lists. When finished, click the OK button to apply the gridline formatting.
Selected Outline Level indicator
What’s New – Resource and Assignment Planning
141
Figure 5 ‐ 15: Gridlines dialog
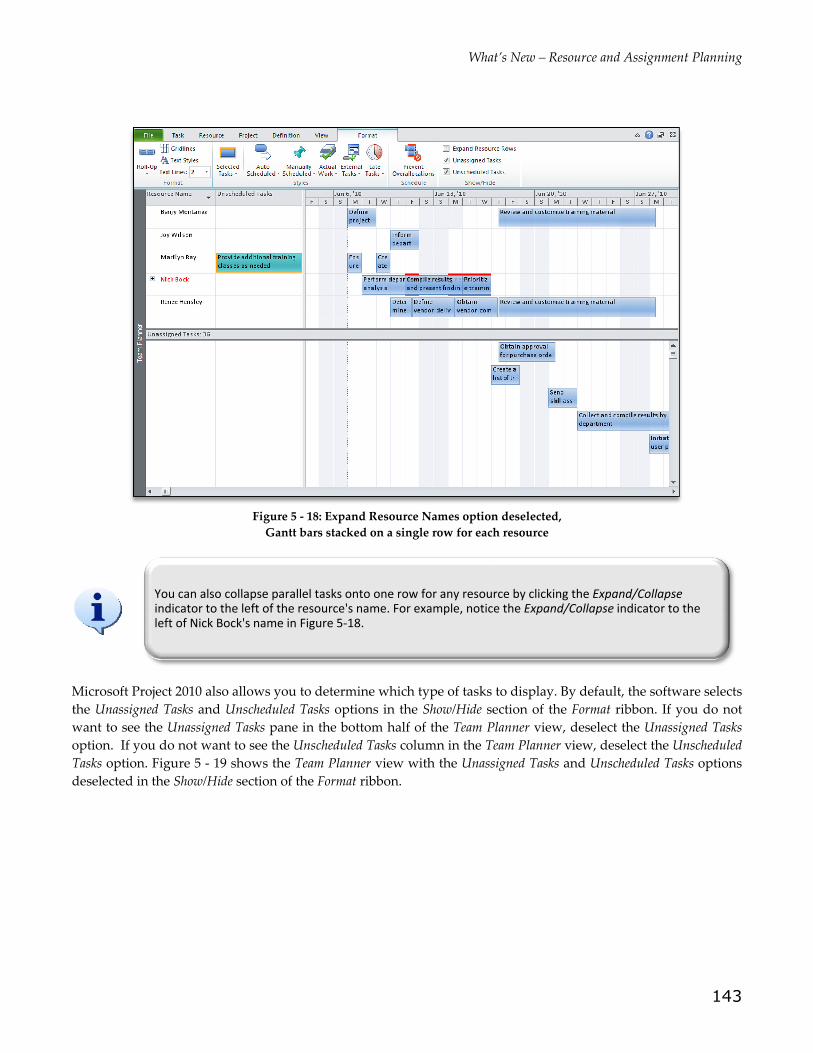
To customize how the software displays text in the Team Planner view, click the Text Styles button on the Format
ribbon. The system displays the Text Styles dialog shown in Figure 5 ‐ 16. In the Text Styles dialog, click the Item to
Change pick list and choose a text style to format, and then select your desired formatting information for the se‐
lected text style in the other fields in the dialog. Click the OK button when finished.
Figure 5 ‐ 16: Text Styles dialog
Microsoft Project 2010 also allows you to format the colors of the Gantt bars shown in the Team Planner view. No‐
tice in the Format ribbon shown previously in Figure 5 ‐ 13 that the Styles section includes the Selected Tasks, Auto
Scheduled, Manually Scheduled, Actual Work, External Tasks, and Late Tasks pick list buttons. To change the format‐
ting of an individual Gantt bar or group of Gantt bars, select the Gantt bars you want to format and then click the
To display the Status Date as a red dashed line in the Team Planner view, select the Status Date item in the Line to Change list, select the last item on the Type pick list, and choose the Red color on the Colorpick list.

Module 05
142
Selected Tasks pick list button. To change the Gantt bars for a particular type of tasks, such as Manually Scheduled
tasks, click the pick list button for the type of task whose Gantt bar you want to format. When you click the pick
list button, the system displays a pick list of available formatting items. Notice in Figure 5 ‐ 17, for example, that I
want to change the Fill Color value for all Manually Scheduled tasks.
Figure 5 ‐ 17: Format the Fill Color for Manually Scheduled tasks
To change the formatting for Gantt bars, the software allows you to specify both a Border Color value and a Fill
Color value from a palette of values. With the exception of the Selected Tasks pick list, all of the other pick lists in
the Styles section of the Format ribbon contain a Reset to Default item as well. If you change the color of any type of
Gantt bar, and want to restore the original default value, simply select the Reset to Default item on the appropriate
pick list.
As you format the Team Planner view for your project, Microsoft Project 2010 also allows you to determine which
items to display in this view. The Show/Hide section of the Format ribbon offers three option checkboxes that con‐
trol the items you see in the Team Planner view. By default, the software selects the Expand Resource Rows option
so that you see the Gantt bars for parallel tasks on separate rows for each resource. For example, in the Team Plan‐
ner view shown previously in Figure 5 ‐ 5, the system shows two rows of tasks for Nick Bock, indicating parallel
tasks occurring during the same time periods. If you deselect the Expand Resource Rows option, the system dis‐
plays all tasks on a single row for each resource, and “stacks” Gantt bars on top of each other, as shown in Figure
5 ‐ 18. Although deselecting this option may save vertical screen space, you may find it difficult to read the text
contained in Gantt bars stacked on top of each other.
What’s New – Resource and Assignment Planning
143
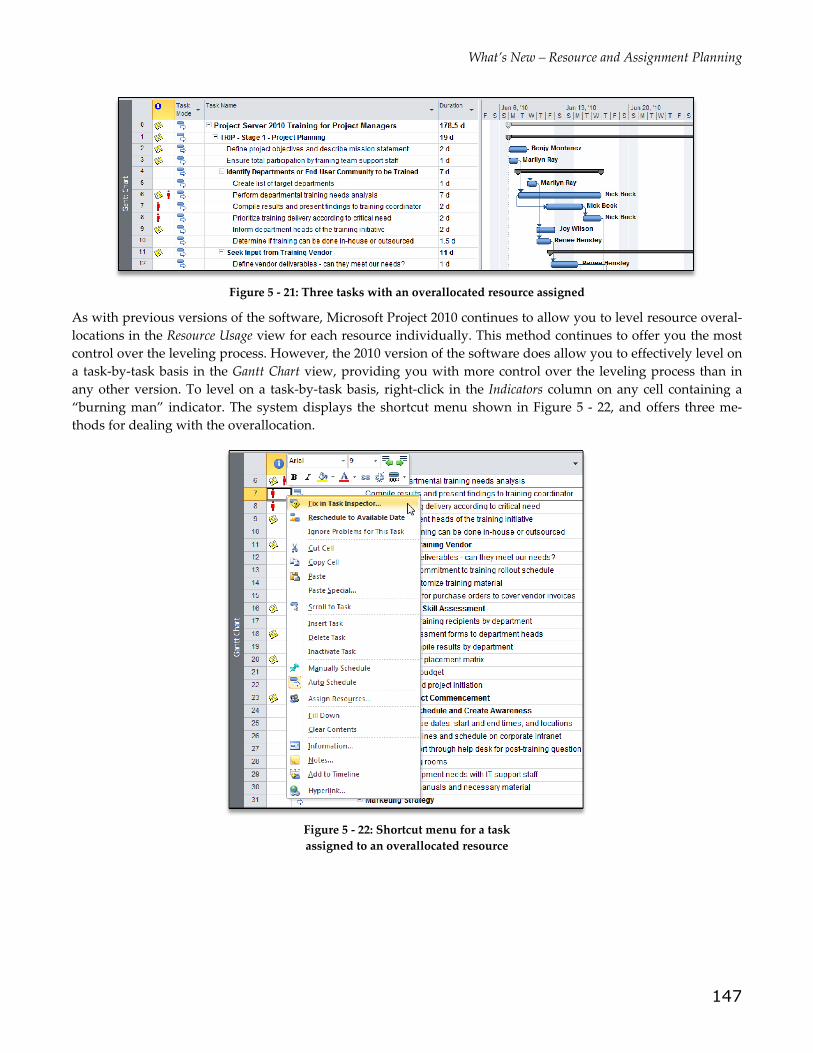
Figure 5 ‐ 18: Expand Resource Names option deselected,
Gantt bars stacked on a single row for each resource
Microsoft Project 2010 also allows you to determine which type of tasks to display. By default, the software selects
the Unassigned Tasks and Unscheduled Tasks options in the Show/Hide section of the Format ribbon. If you do not
want to see the Unassigned Tasks pane in the bottom half of the Team Planner view, deselect the Unassigned Tasks
option. If you do not want to see the Unscheduled Tasks column in the Team Planner view, deselect the Unscheduled
Tasks option. Figure 5 ‐ 19 shows the Team Planner view with the Unassigned Tasks and Unscheduled Tasks options
deselected in the Show/Hide section of the Format ribbon.
You can also collapse parallel tasks onto one row for any resource by clicking the Expand/Collapseindicator to the left of the resource's name. For example, notice the Expand/Collapse indicator to the left of Nick Bock's name in Figure 5‐18.

Module 05
144
Figure 5 ‐ 19: Team Planner view with
Unassigned Tasks and Unscheduled Tasks hidden
A final formatting option in the Team Planner view is not obvious: zooming the Timescale in the Gantt Chart por‐
tion of the view. As I stated earlier in this section, Microsoft Project 2010 zooms the Timescale to the Weeks Over
Days level of zoom. You can display any level of zoom you wish. If you added the Zoom In and Zoom Out buttons
to your Quick Access menu (as specified previously in Hands On Exercise 1‐4), you can use these buttons to zoom
the Timescale in the Team Planner view. Otherwise, click the View tab and then click the Zoom pick list button in
the Zoom section of the View ribbon to zoom in or zoom out as needed.
Printing the Team Planner View
You can print the Team Planner view by first formatting the Team Planner view to display according to your print‐
ing standards. Then click the File tab and click the Print tab in the Backstage. Microsoft Project 2010 displays the
Print page of the Backstage, as shown in Figure 5 ‐ 20. By default, the system sets the date in the Dates field to the
Start date of the project, and sets the date in the To field to the Finish date of the project. Because of this, printing
the Team Planner view can generate many pages in your printout. For example, notice in Figure 5 ‐ 20 that the sys‐
tem needs 24 pages of paper to print my entire Team Planner view. If you do not need to print the entire date
range of the project, change the dates in the Dates and To fields to reduce the page count. Otherwise, specify your
settings on the Print page of the Backstage and then click the Print button to print the Team Planner view.

What’s New – Resource and Assignment Planning
145
Figure 5 ‐ 20: Print page of the Backstage,
preparing to print the Team Planner view
Exercise 5‐5
Customize the Team Planner view.
1. Return to the Resource and Assignment Planning 2.mpp sample file.
2. While in the Team Planner view, click the Format tab to display the Format ribbon for the Team
Planner view.
3. In the Format section of the Format ribbon, click the Roll Up pick list and select the Outline Level 1
item on the list.
Notice how Microsoft Project 2010 displays the first‐level summary tasks (Phases) for each resource in the
Team Planner view.
4. Click the Roll Up pick list again and select the All Subtasks item on the list.

Module 05
146
5. In the Styles section of the Format ribbon, click the Manually Scheduled pick list, select the Fill Color
item, and then select a light green color on the color palette.
Notice how Microsoft Project 2010 changed the fill color for the Manually Scheduled task assigned to Ma‐
rilyn Ray.
6. Click the Manually Scheduled pick list again and select the Reset to Default item on the list.
7. In the Schedule section of the Format ribbon, click the Prevent Overallocations button.
8. In the Unassigned Tasks pane, scroll to the right to locate tasks not yet assigned to any resource in
this project.
9. Select the Determine Course Dates, Start and End Times, and Locations task, then drag and drop the
Gantt bar to George Stewart. Note: Be sure to keep the same time schedule for the task and drop
the Gantt bar on top of the Gantt bar of George Stewart’s existing task.
With the Prevent Overallocations button selected, notice how Microsoft Project 2010 immediately leveled
the new resource overallocation for George Stewart.
10. In the Show/Hide section of the Format ribbon, deselect the Unscheduled Tasks checkbox.
Notice that Microsoft Project 2010 hides the Unscheduled Tasks column in the Resources pane.
11. Save and close the Resource and Assignment Planning 2.mpp sample file.
Detecting and Resolving Resource Overallocations
Another powerful new feature in Microsoft Project 2010 helps you to detect and level resource overallocations on
a task‐by‐task basis in any task view, such as the Gantt Chart view. Previous versions of the software, did not al‐
low you to detect resource overallocations in a task view, displaying overallocation information and indicators
only in a resource view, such as the Resource Usage view. In all previous versions of the software, the system al‐
lowed you to level resource overallocations in a task view, but it leveled the overallocations for all resources and
all tasks simultaneously, which meant you lost control over the leveling process.
To detect a resource overallocation in a task view using Microsoft Project 2010, apply any task view, such as the
Gantt Chart view. Look in the Indicators column for any task with a “burning man” indicator, as this indicator
identifies the task as assigned to an overallocated resource. For example, Figure 5 ‐ 21 shows the Gantt Chart view
of my project. Notice the special indicator in the Indicators column for task IDs #6, #7, and #8, indicating that I
have an overallocated resource assigned to these three tasks. In this situation, the overallocated resource is Nick
Bock. The overallocation is a consequence of assigning Nick Bock at 100% Units on three tasks that run in parallel.
Because he cannot work full‐time on three tasks simultaneously, the system shows that Nick Bock is an overallo‐
cated resource on these three tasks.
What’s New – Resource and Assignment Planning
147
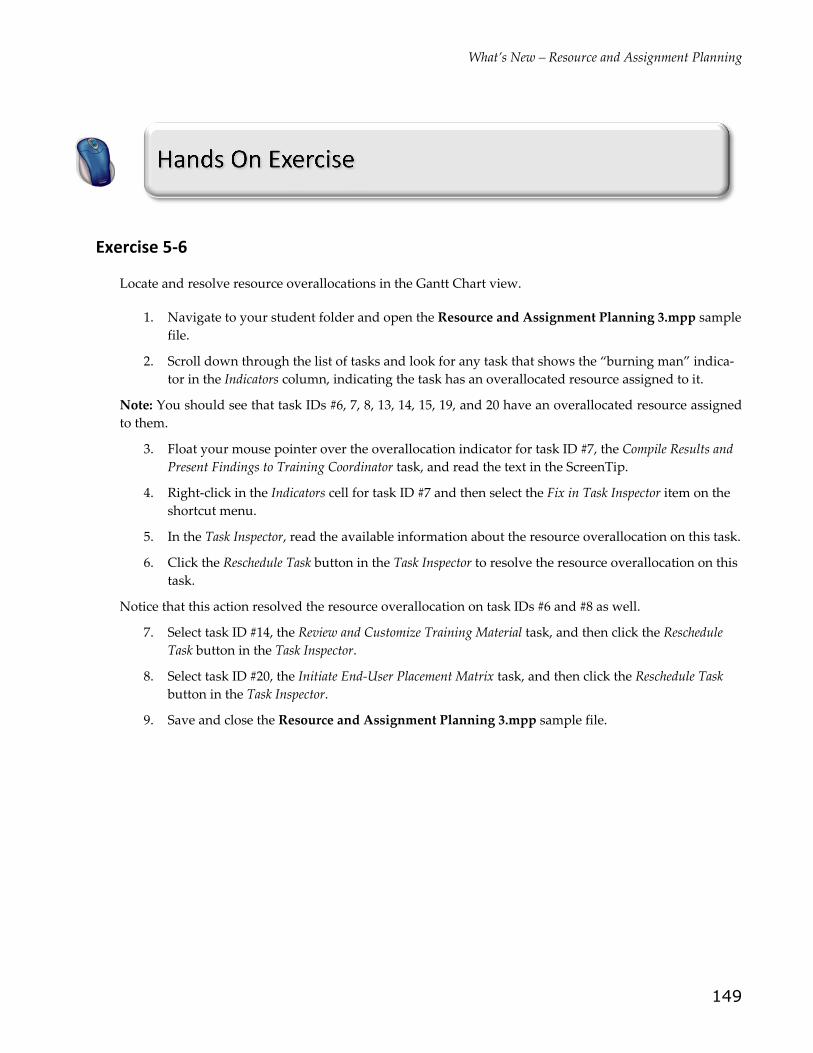
Figure 5 ‐ 21: Three tasks with an overallocated resource assigned
As with previous versions of the software, Microsoft Project 2010 continues to allow you to level resource overal‐
locations in the Resource Usage view for each resource individually. This method continues to offer you the most
control over the leveling process. However, the 2010 version of the software does allow you to effectively level on
a task‐by‐task basis in the Gantt Chart view, providing you with more control over the leveling process than in
any other version. To level on a task‐by‐task basis, right‐click in the Indicators column on any cell containing a
“burning man” indicator. The system displays the shortcut menu shown in Figure 5 ‐ 22, and offers three me‐
thods for dealing with the overallocation.
Figure 5 ‐ 22: Shortcut menu for a task
assigned to an overallocated resource

Module 05
148
The first option in the shortcut menu is the Fix in Task Inspector option. If you select this option, the system opens
the Task Inspector on the left side of the Gantt Chart view, as shown in Figure 5 ‐ 23.
Figure 5 ‐ 23: Task Inspector for a task assigned to an overallocated resource
The Task Inspector offers two options in the Repair Options section for resolving the resource overallocation. Click
the Reschedule Task button to delay the task to the first available time period that resolves the overallocation. Click
the Team Planner button to apply the Team Planner view, in which you can level the resource using any of the me‐
thods I discussed in the previous section of this module.
The second option in the shortcut menu is the Reschedule to Available Date option. If you select this option, Micro‐
soft Project 2010 delays the task to the first available time period that resolves the overallocation. Selecting this
option is the same as clicking the Reschedule button in the Task Inspector.
Lastly, you can use the third option on the shortcut menu, Ignore Problems for This Task. If you select this option,
the system hides the “burning man” indicator for that task in the Indicators column, but does nothing to resolve
the resource overallocation.
What’s New – Resource and Assignment Planning
149
Exercise 5‐6
Locate and resolve resource overallocations in the Gantt Chart view.
1. Navigate to your student folder and open the Resource and Assignment Planning 3.mpp sample
file.
2. Scroll down through the list of tasks and look for any task that shows the “burning man” indica‐
tor in the Indicators column, indicating the task has an overallocated resource assigned to it.
Note: You should see that task IDs #6, 7, 8, 13, 14, 15, 19, and 20 have an overallocated resource assigned
to them.
3. Float your mouse pointer over the overallocation indicator for task ID #7, the Compile Results and
Present Findings to Training Coordinator task, and read the text in the ScreenTip.
4. Right‐click in the Indicators cell for task ID #7 and then select the Fix in Task Inspector item on the
shortcut menu.
5. In the Task Inspector, read the available information about the resource overallocation on this task.
6. Click the Reschedule Task button in the Task Inspector to resolve the resource overallocation on this
task.
Notice that this action resolved the resource overallocation on task IDs #6 and #8 as well.
7. Select task ID #14, the Review and Customize Training Material task, and then click the Reschedule
Task button in the Task Inspector.
8. Select task ID #20, the Initiate End‐User Placement Matrix task, and then click the Reschedule Task
button in the Task Inspector.
9. Save and close the Resource and Assignment Planning 3.mpp sample file.

150