Embed Size (px)
Citation preview
AWR RACING’S MIATA WIDE BODY INSTALLATION INSTRUCTIONS WWW.AWRRACING.COM OR 760-598-9782
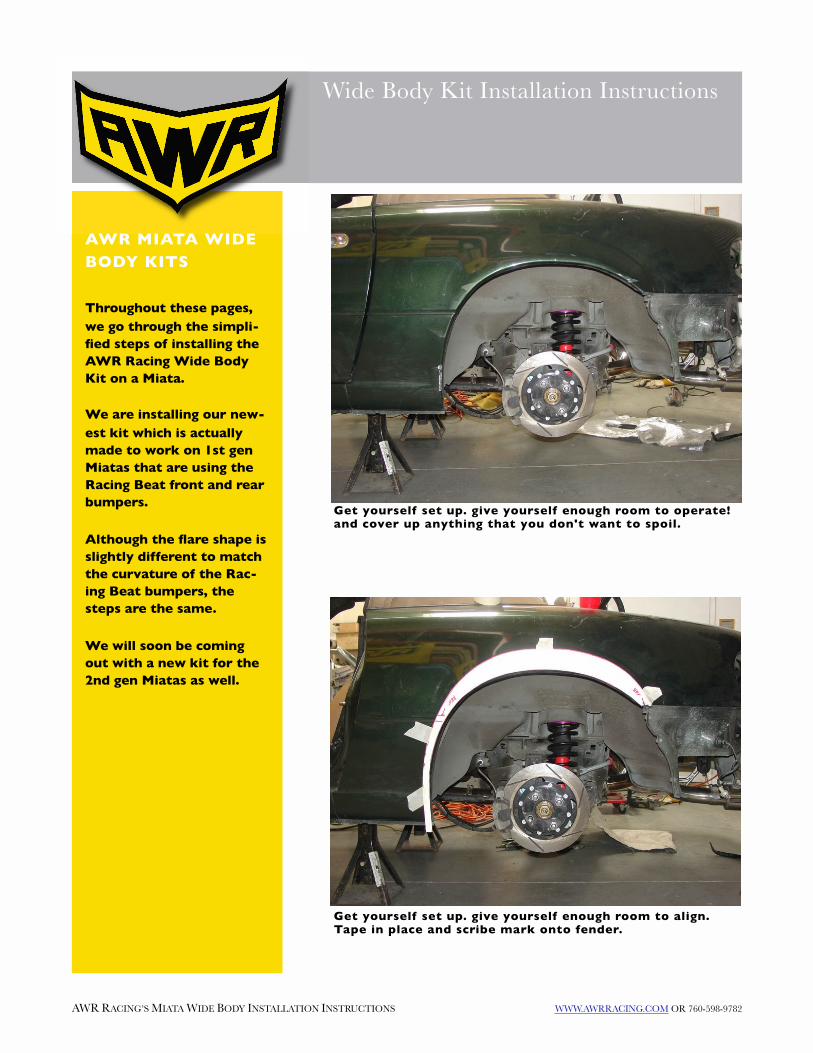
AWR MIATA WIDE BODY KITS
Throughout these pages, we go through the simpli-fied steps of installing the AWR Racing Wide Body Kit on a Miata.
We are installing our new-est kit which is actually made to work on 1st gen Miatas that are using the Racing Beat front and rear bumpers.
Although the flare shape is slightly different to match the curvature of the Rac-ing Beat bumpers, the steps are the same.
We will soon be coming out with a new kit for the 2nd gen Miatas as well.
Wide Body Kit Installation Instructions
Get yourself set up. give yourself enough room to operate! and cover up anything that you don't want to spoil.
Get yourself set up. give yourself enough room to align. Tape in place and scribe mark onto fender.

AWR RACING’S MIATA WIDE BODY INSTALLATION INSTRUCTIONS WWW.AWRRACING.COM OR 760-598-9782
SCRIBING AND CUTTING
Page 2
Wide Body Kit Installation Instructions
Photo shows scribe mark on fender. Now it's time to cut. use a cut off wheel or preferably a small plasma kit. re-member there is a fuel filler on this side of the car. take special precautions while doing this. do not catch the car on
This is Jeff operating the plasma cutter. An awesome tool for any shop or hobbiest! This is the fastest way to do this project by far. (OK, it’s a bit pricey for the hobbiest, but it’s a cool tool nonetheless!) Say Hi to Jeff!

AWR RACING’S MIATA WIDE BODY INSTALLATION INSTRUCTIONS WWW.AWRRACING.COM OR 760-598-9782
GRINDING AND SMOOTHING
Page 3
Wide Body Kit Installation Instructions
Jeff pauses to inspect the cut fender; ready for slight grind-ing to remove any burrs left behind. Next is to trim the re-maining inner fender.
A cutoff wheel is now used to remove the excess sheet metal left over. Do not remove too much as you will need to weld this inner skin to the new formed outer skin.

AWR RACING’S MIATA WIDE BODY INSTALLATION INSTRUCTIONS WWW.AWRRACING.COM OR 760-598-9782
ALIGNING AND TACK WELDING
PAGE 4
Wide Body Kit Installation Instructions
A hammer and dolly is used to bring the inner fender up to the outer skin. Be patient and the job will be less frustrat-ing and more rewarding. As you do this you may need to tack some points or remove more inner fender material.
Notice the tack welds to keep the raised material aligned and flowing smoothly. After all is tack welded, you will completely weld this fender up. Do it in short runs to help keep the fender as straight as possible. This will also add strength back to the structure!
AWR RACING’S MIATA WIDE BODY INSTALLATION INSTRUCTIONS WWW.AWRRACING.COM OR 760-598-9782
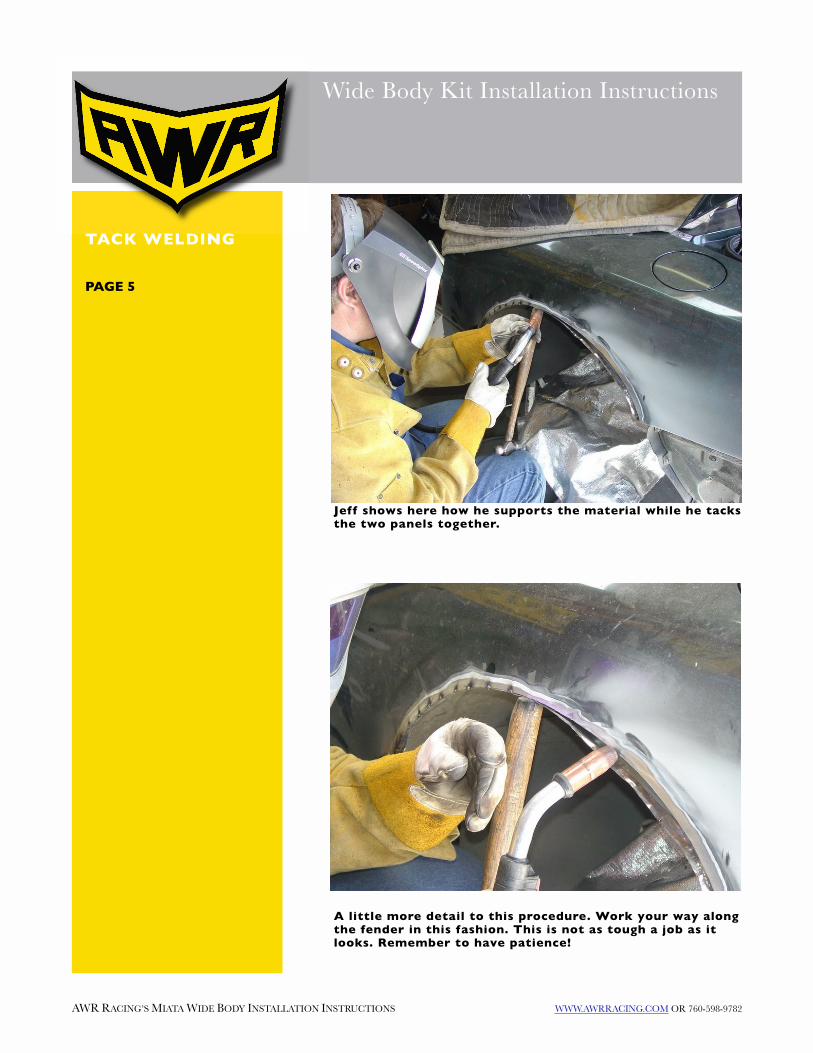
TACK WELDING
PAGE 5
Wide Body Kit Installation Instructions
Jeff shows here how he supports the material while he tacks the two panels together.
A little more detail to this procedure. Work your way along the fender in this fashion. This is not as tough a job as it looks. Remember to have patience!

AWR RACING’S MIATA WIDE BODY INSTALLATION INSTRUCTIONS WWW.AWRRACING.COM OR 760-598-9782
FINAL WELDING
Page 6
Wide Body Kit Installation Instructions
Fully tack welded fender section ready for final welding and grinding.
Jeff starts to finish off the sections of weld between the tacks. Again, take your time and allow the fender to cool between welds. Switch from front to back and side to side to help stop deformation on the panels.

AWR RACING’S MIATA WIDE BODY INSTALLATION INSTRUCTIONS WWW.AWRRACING.COM OR 760-598-9782
GRINDING THE
WELDS & TEST FITTING THE FENDER
Page 7
Wide Body Kit Installation Instructions
Final grinding of welds . Now we are ready to set up the flare and get ready to install an extra inner fender to take up the area between the old fender and new flare. This panel will also be welded in place. Again a little patience will go a long way.
Set fender in place and confirm space around the tire that you intend to run. It may make a difference in the end. There is a little bit of fudge factor here to allow the move-ment of the flare fore and aft! Tape the fender up and when you are happy with it drill some locating holes. We use a tool called a clecko, but you may use self tapping screws to temporarily secure the flare.

AWR RACING’S MIATA WIDE BODY INSTALLATION INSTRUCTIONS WWW.AWRRACING.COM OR 760-598-9782
INNER FENDER
Page 8
Wide Body Kit Installation Instructions
Jeff has cut a strip of .020 sheet metal to create a new inner fender. You will need to remove and install the flare a few times during this process to make sure that the inner fender is not interfering with the fit of the flare. Not only does it not want to hold the flare out but it does not want to be to far away also. This panel will be tacked as before and then final welded. This is installed to stop debris from getting inside the flare or damaging the flare.
Here is the new inner fender tacked in place and ready for final welding and grinding.

AWR RACING’S MIATA WIDE BODY INSTALLATION INSTRUCTIONS WWW.AWRRACING.COM OR 760-598-9782
PRIMER AND UN-DERCOATING
Page 9
Wide Body Kit Installation Instructions
After grinding is completed we washed the panel down and sprayed a zinc based primer. This is to protect it from the elements later down the road.
We then sprayed on a few layers of undercoating to seal it.

AWR RACING’S MIATA WIDE BODY INSTALLATION INSTRUCTIONS WWW.AWRRACING.COM OR 760-598-9782
PREPARING THE FIBERGLASS
Page 10
Wide Body Kit Installation Instructions
Before the flare was installed for the final time we added this gum or sealer strip which would close off the rest of the gap between the fender and the flare.
Before the fender is installed for the last time we grind away the outer edge that would interfere with us feathering in the flare after it is bonded in place.

AWR RACING’S MIATA WIDE BODY INSTALLATION INSTRUCTIONS WWW.AWRRACING.COM OR 760-598-9782
FINAL INSTALLA-TION
Page 11
Wide Body Kit Installation Instructions
Before you bond the flare in place grind the paint down to bare metal with a coarse grit disc to aid in adhesion of the bonding agent.
This is the fender bonded and then placed in position. Again this fender is held in place with cleckos but you can use self taping screws. Use enough points to keep the flare flat with the original fender. Any high points will cause a problem during feathering of the edge. take your time but be aware of the setting time of the bonding agent!

AWR RACING’S MIATA WIDE BODY INSTALLATION INSTRUCTIONS WWW.AWRRACING.COM OR 760-598-9782
FINISH WORK
As you can see, once the car is painted, it makes an absolutely gorgeous flare.
Be sure to take the time to do this right. It will take several days, but in the end will be worth it.
If you have any questions, you can always call us at AWR Racing.
Wide Body Kit Installation Instructions
Get a nice paint job! Your almost done!
Send the pictures to your friends. Now you’re done..