Embed Size (px)
Citation preview
Winch Launch Illustrated Training Guide
By Bill Daniels
January 20th, 2010 Revision
"There is nothing more frightful than ignorance in action."
Goethe
Special thanks to the following people for reviewing this guide and offering helpful suggestions.
Don Ingraham CFI-GCross Country SoaringFariboult, MN
George Moore BSEE, CFI-GSpokane, WA
Alfonso Ossorio CFI-G, DPE, Chief Instructor, Soaring Society of Boulder.Boulder, CO
Frank Whiteley, Winchmeister Extraodinaire Greeley, CO
Introduction
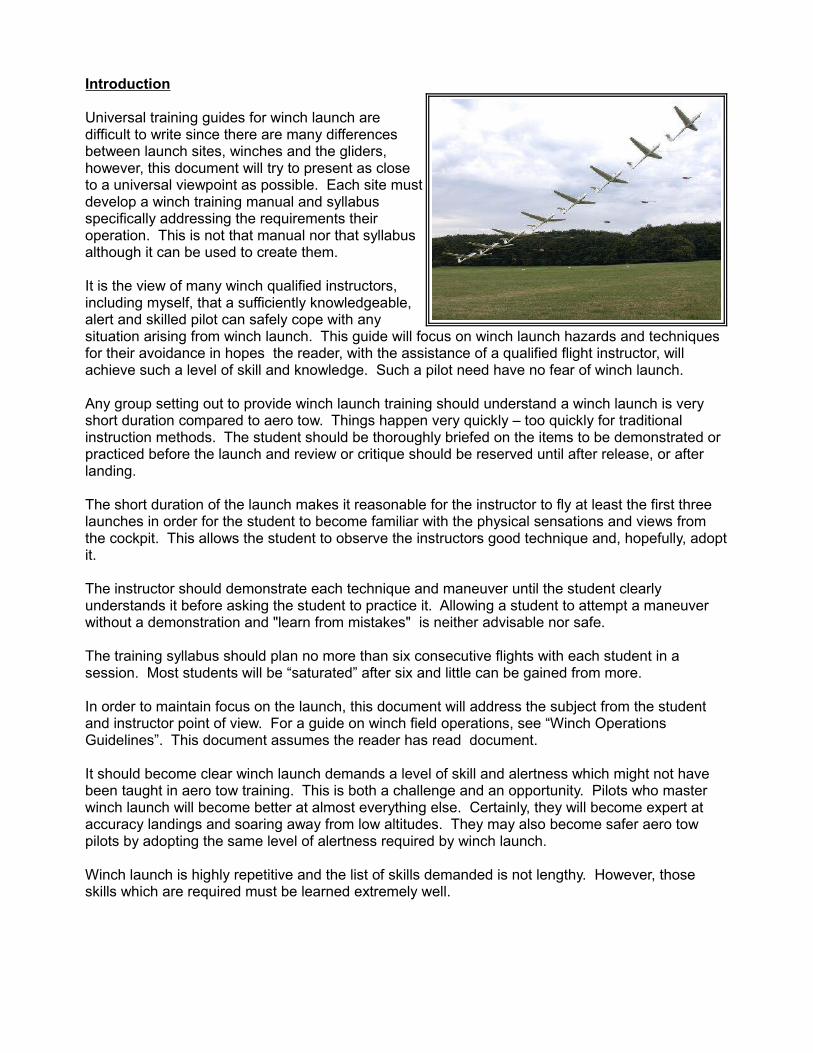
Universal training guides for winch launch are difficult to write since there are many differences between launch sites, winches and the gliders, however, this document will try to present as close to a universal viewpoint as possible. Each site must develop a winch training manual and syllabus specifically addressing the requirements their operation. This is not that manual nor that syllabus although it can be used to create them.
It is the view of many winch qualified instructors, including myself, that a sufficiently knowledgeable, alert and skilled pilot can safely cope with any situation arising from winch launch. This guide will focus on winch launch hazards and techniques for their avoidance in hopes the reader, with the assistance of a qualified flight instructor, will achieve such a level of skill and knowledge. Such a pilot need have no fear of winch launch.
Any group setting out to provide winch launch training should understand a winch launch is very short duration compared to aero tow. Things happen very quickly – too quickly for traditional instruction methods. The student should be thoroughly briefed on the items to be demonstrated or practiced before the launch and review or critique should be reserved until after release, or after landing.
The short duration of the launch makes it reasonable for the instructor to fly at least the first three launches in order for the student to become familiar with the physical sensations and views from the cockpit. This allows the student to observe the instructors good technique and, hopefully, adopt it.
The instructor should demonstrate each technique and maneuver until the student clearly understands it before asking the student to practice it. Allowing a student to attempt a maneuver without a demonstration and "learn from mistakes" is neither advisable nor safe.
The training syllabus should plan no more than six consecutive flights with each student in a session. Most students will be “saturated” after six and little can be gained from more.
In order to maintain focus on the launch, this document will address the subject from the student and instructor point of view. For a guide on winch field operations, see “Winch Operations Guidelines”. This document assumes the reader has read document.
It should become clear winch launch demands a level of skill and alertness which might not have been taught in aero tow training. This is both a challenge and an opportunity. Pilots who master winch launch will become better at almost everything else. Certainly, they will become expert at accuracy landings and soaring away from low altitudes. They may also become safer aero tow pilots by adopting the same level of alertness required by winch launch.
Winch launch is highly repetitive and the list of skills demanded is not lengthy. However, those skills which are required must be learned extremely well.
Human Factors
It almost goes without saying winch launch is not for everyone, but no healthy person willing to undertake a formal instruction program should have problems.
In addition to the usual soaring hazards of dehydration and fatigue, winch launch can put stress on a pilot in the form of mental anxiety. It is incumbent on instructors to keep a close watch on their students and call a break in flight instruction if a student seems stressed.
Instructors themselves are particularly vulnerable to dehydration and fatigue since they spend hours in the cockpit talking loudly exhaling moisture as well as helping students push gliders. Most glider trainers have little space in the cockpit for water containers so it is vital the ground crew take the initiative offering water to instructors at regular intervals. Ground crews would not be out of line to suggest an instructor take a break if he appears fatigued.
The average healthy human has a reaction time of 150 - 220 milliseconds to actuate a control like a rope release or initiate a pushover. This is more than quick enough to perform safely on winch launch. See: http://www.humanbenchmark.com/tests/reactiontime/index.php
If the instructor has any reason to suspect a student reacts too slowly, he should conduct a test with the above web site. While a student may react slowly simply because he lacks a clear understanding the action expected and is not yet reacting instinctively, slow reaction time can also be a symptom of medical problems which needs attention from a physician. The instructor should discuss the issue with the student and if understanding is not the problem, gently suggest the student take steps to deal with the issue before instruction continues.
There are individuals who complain loudly about the 'extreme' acceleration encountered in a winch launch. However, simple arithmetic will show the maximum possible acceleration is less than 1.5G with the limit being the weak link. While this is much greater than with aero tow, it is not "extreme" by any means. Navy carrier pilots encounter 6G on catapults. Race drivers routinely encounter more than 3G's. Laying flat on one's back generates 1G of "eyeballs in" acceleration which is typical for winch launch.
Complaints about acceleration may indicate a pilot is anxious about winch launch. Such anxiety is likely to reach a peak during the seconds before a launch begins manifested by physiological issues such as breath holding, hyperventilation and hypoxia (Google: "anxiety physiology"). If not reassured by a calm, confident instructor, the student may perform erratically. Many otherwise inexplicable accidents might be explained by pilots suffering anxiety induced hypoxia. The instructor should be constantly alert for anxiety and make every effort to reassure and calm students. Suggesting a student "relax, take a deep breath" just before each launch is an effective strategy.
Difficulty switching tasks quickly can also be a serious issue. (See Instructors Note 1) This can be difficulty switching from "sitting" to "flying" mode during the quick ground roll which can lead to a dropped wing and groundloop or when dealing with launch failures where the pilot must instantly switch from "launch mode" to "landing mode". It's possible task switching failures lies at the heart of many winch accidents. Fortunately, task switching skills improve with practice and the instructor should be alert to the need for additional training with Condor flight simulator.
The concept of a pilot being "behind the aircraft" is highly applicable to winch launch. A winch training program should emphasize getting "ahead" of events and controlling them for a safe outcome.
Equipment - Winches
Winches may be divided into two categories:
1. Speed Controlled (SC) with a strong throttle vs. rope speed relationship and/or a high level of load/engine speed "stiffness" which do not allow the glider to reduce airspeed by increasing pitch attitude and
2. Automatic Tension Controlled (ATC) winches which allow the pilot to control airspeed.
Classic SC winches tend to use automotive engines and transmissions which, in their original role, were designed to accelerate a heavy vehicle and, when cruising, resist slowing under increasing load if the throttle is held constant - i.e. torque increases with load. It it's new home, the power train tries to maintain drum RPM under increasing load even though rope speed must slow down with increasing climb angle to maintain a constant airspeed. The automatic transmission was highly tuned for the donor vehicle but is wildly mis-matched to launching gliders so the critical initial acceleration is very difficult for the winch operator to control accurately so the throttle must be advanced very slowly.
ATC winches use electric or hydrostatic Continuously Variable Transmissions (CVT), a tensiometer and a microcontroller or Process Logic Controller (PLC). The winch automatically controls rope tension as measured by the tensiometer and the pilot controls airspeed with elevator inputs just as in free flight; i.e. nose up reduces airspeed and nose down increases airspeed. No speed signals are needed between pilot and an ATC winch since the pilot controls airspeed. Unlike automotive drive trains, ATC winches tend to reduce torque with increasing load.
An ATC winch controls rope tension so it can never exceed weaklink strength effectively eliminating weaklink failures and greatly reducing rope breaks. It will automatically increase power if the glider encounters a downdraft and decrease power in updrafts easing the pilots workload while producing a higher launch.
With SC winches, the winch operator controls the glider airspeed with the winch throttle. If the pilot wishes to change airspeed, the pilot must signal the winch operator to increase or decrease speed/power. Although the winch operator charged with controlling the glider's airspeed, he has no airspeed instrument and must proceed on “feel” or signals from the pilot. The pilot can only control the steepness of the climb by changing angle of attack. If no angle of attack indicator is installed in the glider, the pilot is also relying on “feel”. As a result, no two launches will be alike. It's like a couple trying to dance with each listening to different music.
With some SC winches, changes in climb steepness can have an unpredictable effect on airspeed. If the winch is less powerful or not operating at peak power, increased climb steepness will load the engine and slow the winch resulting in decreasing airspeed. If the winch is exceptionally "stiff" or powerful, the additional pull of a steeply climbing glider will have little effect on rope speed in which case the glider airspeed must increase. SC winches may even present alternating speed and tension behaviors in the same launch. Pilots should expect unusual behaviors from SC winches.
Not surprisingly, pilot training is highly specific to a particular SC winch and it's characteristics. In the authors experience, no two SC winches are alike nor is the behavior a particular winch the same with different gliders or under different wind conditions.
Winch design is undergoing a slow shift from SC winches towards ATC which will allow standardization of winch behavior and therefore training They will make the whole winch training experience easier, safer and far more pleasant.
Equipment – Gliders
Modern glider trainers such as the Grob 103, ASK-21 or DG505 exhibit exemplary behavior during winch launch. These trainers have a CG release location and elevator authority balanced such little elevator input is needed to achieve an ideal launch profile. On some winches, they will fly a perfect launch hands off. These gliders make winch launch a joy.
However, certain older gliders can present problems. Those with only nose hooks will exhibit "proposing" behavior which make them totally unsuitable for winch launch. Gliders with deep fuselages, high wings and/or limited elevator authority can present special problems. If the CG is far above the hook, a strong nose up "Inertia coupling" is induced by the pull of the rope during acceleration. When combined with a small tail, the pilot may find it difficult to limit premature rotation if strong acceleration is used. Gliders with a 'compromise hook', neither at the nose or CG, will need full up elevator to climb and will experience a 10 - 15 degree nose "pop-up" if the rope breaks as discussed in the section on Launch Failure. These "Problem gliders", if launched at all, should be handled with care. When combined with classic SC winches, they make for a VERY POOR winch transition experience.
Equipment – Winch Rope
Traditionally, winches have used stranded steel cable or solid wire but Spectra/Dyneema UHMWPE rope is rapidly replacing it. It offers so many operational and safety advantages, there is no reason to use steel. This guide assumes the use of UHMWPE rope.
Pre-Launch Preparation
Before accepting the rope, the pilot must make certain both he and the glider are ready for launch. Extra care must be taken to insure there are no loose objects in the cockpit and any seat cushions are firm enough the pilot will not sink into them under the force of acceleration. Rudder pedals should be adjusted closer than normal. The pilot should push hard on the pedals to determine if he will slip aft under acceleration so critical controls become unreachable. Firmer back cushions may be needed.
Although it would seem utterly obvious, the glider must be staged pointing exactly at the winch. If this is not done, the lateral component of rope tension can cause a dangerously unstable transition into the rotation phase.
As with aero tow, care should be taken to insure air brakes and canopy are locked. Open spoilers shift spanwise lift distribution toward the tips which greatly increases the bending moment on the wing spar. The pilot must be certain the weak link specified in the glider's POH is used and the correct ring set is attached to the CG release - never the nose hook.
Pilots should take a moment to prepare themselves mentally for the launch. They should have a “target airspeed” specific for the glider type in mind and know its maximum winch launch airspeed. They should have selected a “critical altitude” below which there is sufficient runway to land straight ahead and above which there is enough altitude to circle back to the departure runway. The pilot must also have a plan for dealing with very low level launch failures. Many accident reports seem to suggest the pilot didn't actually start flying the glider until after it was airborne.
Finally, the pilot should place the left hand on the release knob, but not gripping it, so it can be pulled without delay should the pilot feel the ground roll is not precisely nominal. Controls should be in the neutral position. It's considered good form to advise passengers to stiffen their neck muscles just before the ground roll begins.
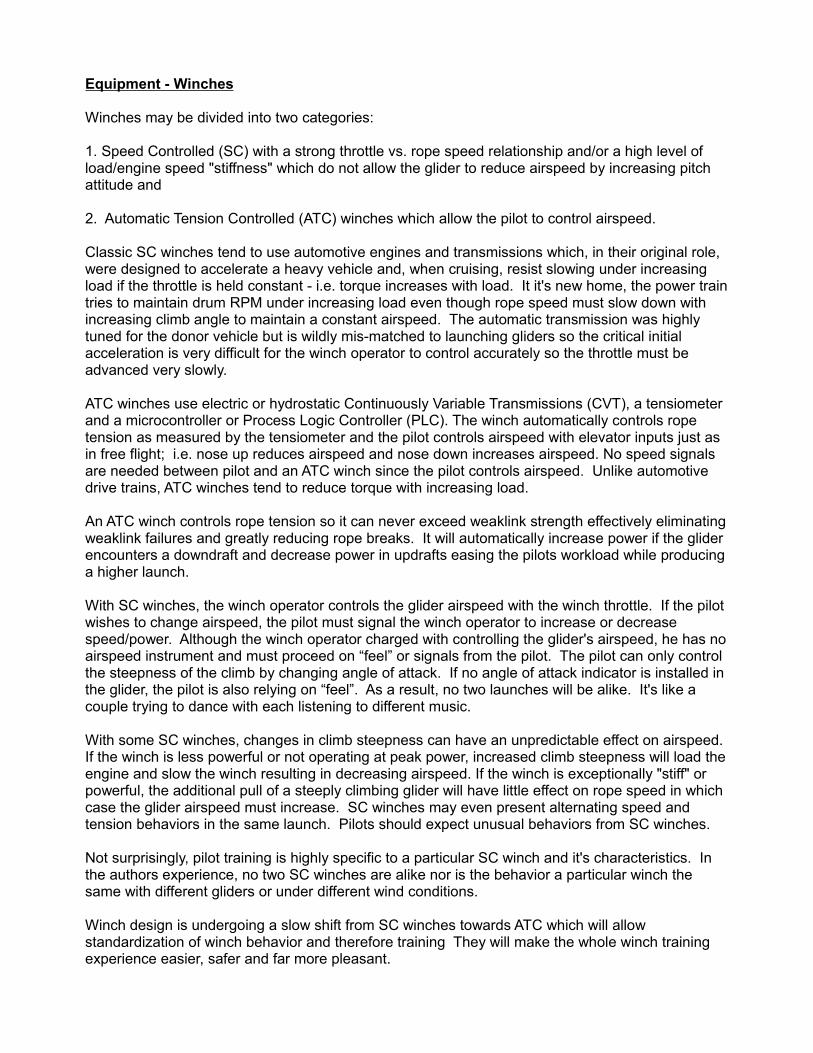
Figure 1: The Normal Launch
With an ATC rope winch and a modern trainer like an ASK-21, the launch will begin with an acceleration of one G or 32 feet per second per second. After one second, the glider will have traveled 16 feet and have reached a velocity of 19 knots. At this speed the pilot will have control authority. After 2 seconds, the glider will be at 38 knots and ready to leave the runway surface. At 3.5 seconds, the glider is airborne and smoothly rotating to capture the "Target Airspeed".
During the rotation phase, the pilot will be controlling the pitch rate with reference to the ASI such the glider will stabilize at the pre-selected "target airspeed" - the same technique as in high performance airplanes rotating into a climb at VY (Best rate-of-climb airspeed).
The initial acceleration tells the pilot what rotation rate will be required to "capture" the target airspeed - low acceleration = slow rotation, higher acceleration = faster rotation. The pilot may allow the airspeed to exceed the target during rotation to achieve a greater stall margin and bring it down once in the climb.
At no time during the rotation phase will the combination of Airspeed, Attitude and Altitude (AAA envelope) be such the pilot could not pitch over and land straight ahead with generous safety margins should a launch failure occur.
During the remainder of the launch, the pilot will make small adjustments to pitch attitude to maintain the target airspeed. With rope tension set to equal the glider's weight, (Tension Factor = 1) the climb angle will peak at 45 degrees. Lower tension results in shallow climbs - higher tension requires steeper climbs.
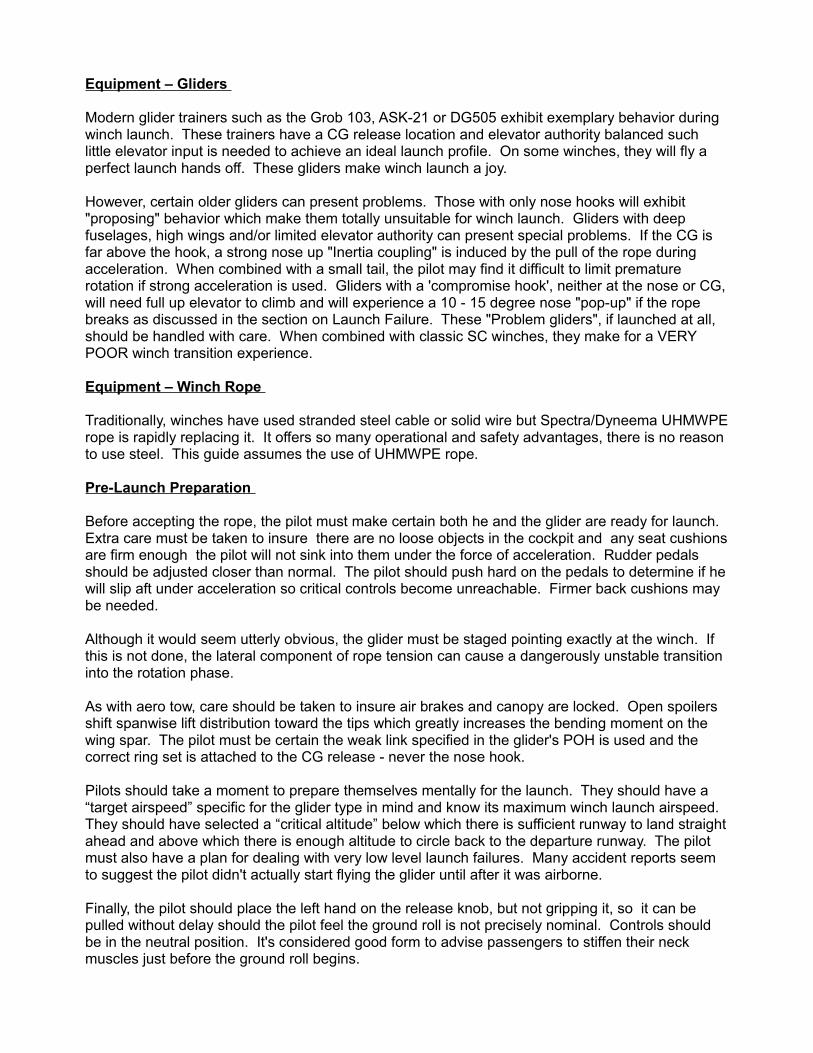
As the glider reaches the round over phase, the angle between the rope and the longitudinal axis of the glider will approach about 70 degrees. Tost CG releases are designed to automatically release (“Back-release”) the rope at this angle . Good winch operator technique is to cut power just before the automatic release occurs so there is little tension on the rope as the release occurs. Cutting power will increase the sag of the rope so an automatic release is triggered. The pilot will pull the release anyway to assure rope separation.
As the ring set leaves the release mechanism, the launch is over and free flight begins. The nose will be slightly high so the pilot must lower it to achieve a normal glide. The glider will be at a height above the runway equal to about half the length of the rope used. If launched into a headwind, the height will be greater. No "clearance" turn is required - the pilot may continue straight ahead or turn either way.
A launch to 2000' AGL will take about 40 seconds. Operation at large airfields have achieved 5400 feet AGL with the glider climbing for over two minutes. The height achieved depends mainly on the length of rope used and the headwind component.
Figure 2: Normal Launch
Ground Roll Technique & Hazards
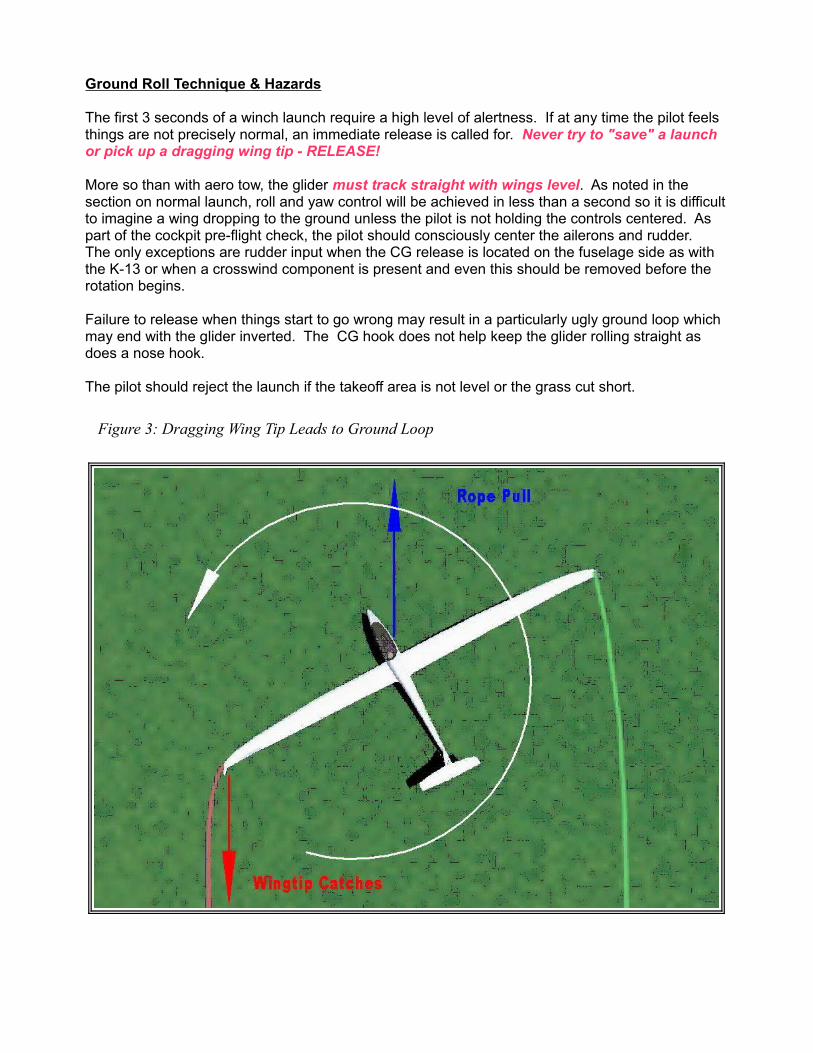
The first 3 seconds of a winch launch require a high level of alertness. If at any time the pilot feels things are not precisely normal, an immediate release is called for. Never try to "save" a launch or pick up a dragging wing tip - RELEASE!
More so than with aero tow, the glider must track straight with wings level. As noted in the section on normal launch, roll and yaw control will be achieved in less than a second so it is difficult to imagine a wing dropping to the ground unless the pilot is not holding the controls centered. As part of the cockpit pre-flight check, the pilot should consciously center the ailerons and rudder. The only exceptions are rudder input when the CG release is located on the fuselage side as with the K-13 or when a crosswind component is present and even this should be removed before the rotation begins.
Failure to release when things start to go wrong may result in a particularly ugly ground loop which may end with the glider inverted. The CG hook does not help keep the glider rolling straight as does a nose hook.
The pilot should reject the launch if the takeoff area is not level or the grass cut short.
Figure 3: Dragging Wing Tip Leads to Ground Loop
Liftoff and Rotation - Technique & Hazards
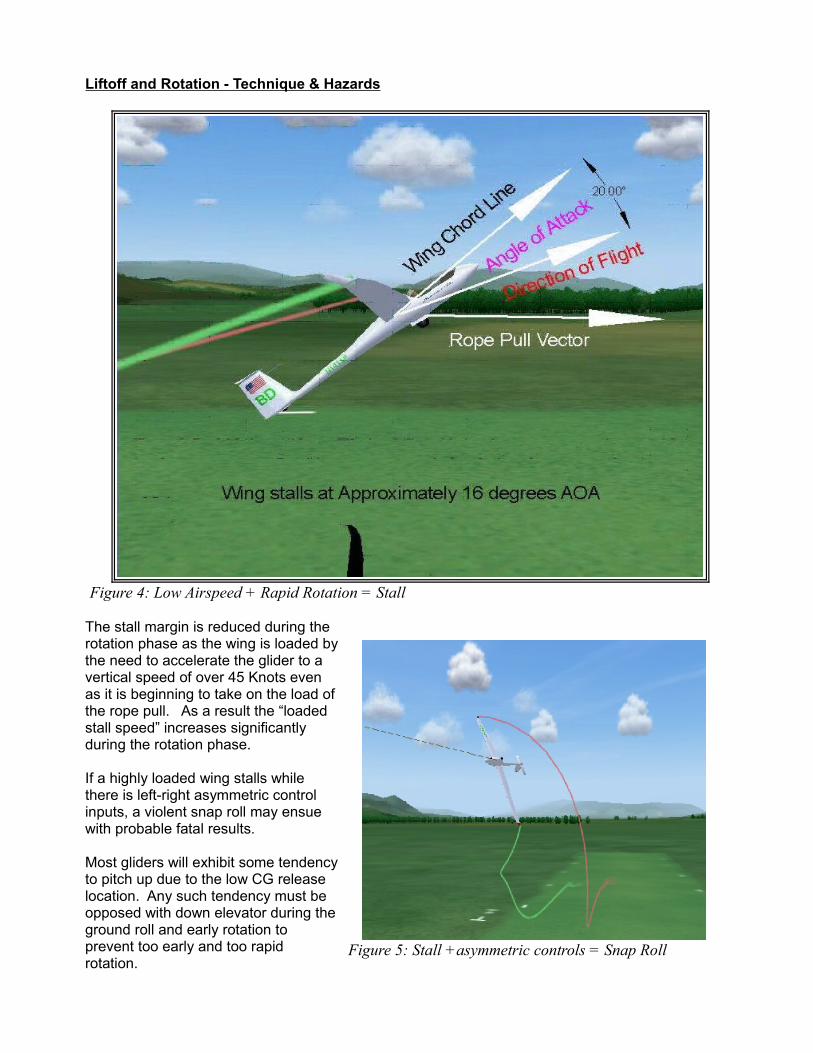
The stall margin is reduced during the rotation phase as the wing is loaded by the need to accelerate the glider to a vertical speed of over 45 Knots even as it is beginning to take on the load of the rope pull. As a result the “loaded stall speed” increases significantly during the rotation phase.
If a highly loaded wing stalls while there is left-right asymmetric control inputs, a violent snap roll may ensue with probable fatal results.
Most gliders will exhibit some tendency to pitch up due to the low CG release location. Any such tendency must be opposed with down elevator during the ground roll and early rotation to prevent too early and too rapid rotation.
Figure 4: Low Airspeed + Rapid Rotation = Stall
Figure 5: Stall +asymmetric controls = Snap Roll
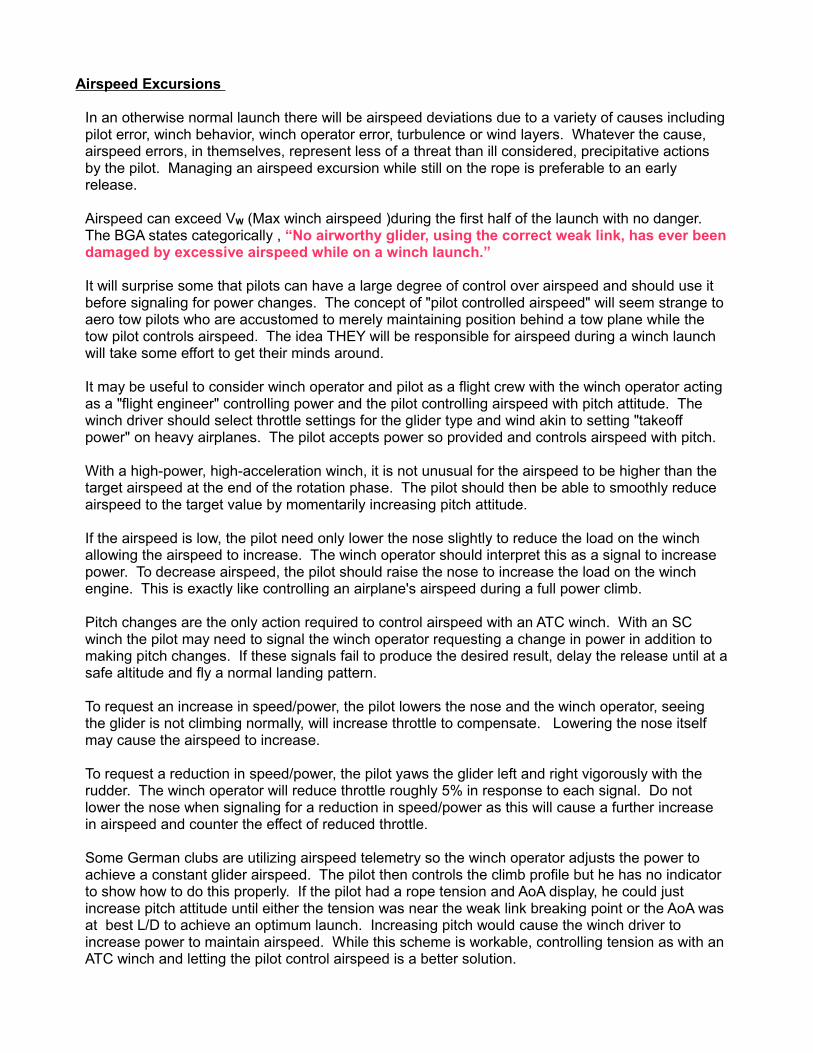
As the glider rotates into the climb, the rope pull vector will move closer to the CG so less down elevator is needed. In a steep climb, the pull vector may pass ahead of the CG so up elevator is needed. Some gliders require down elevator through much of the early launch.
If the pilot is controlling airspeed with pitch attitude, the pilot will cope with trim changes as a matter of course. Stall hazards may be avoided by carefully monitoring airspeed during the takeoff roll and rotation into the full climb while resisting any tendency to rotate into the climb prematurely. Airspeed may be permitted to exceed the target during the rotation phase for extra stall margin.
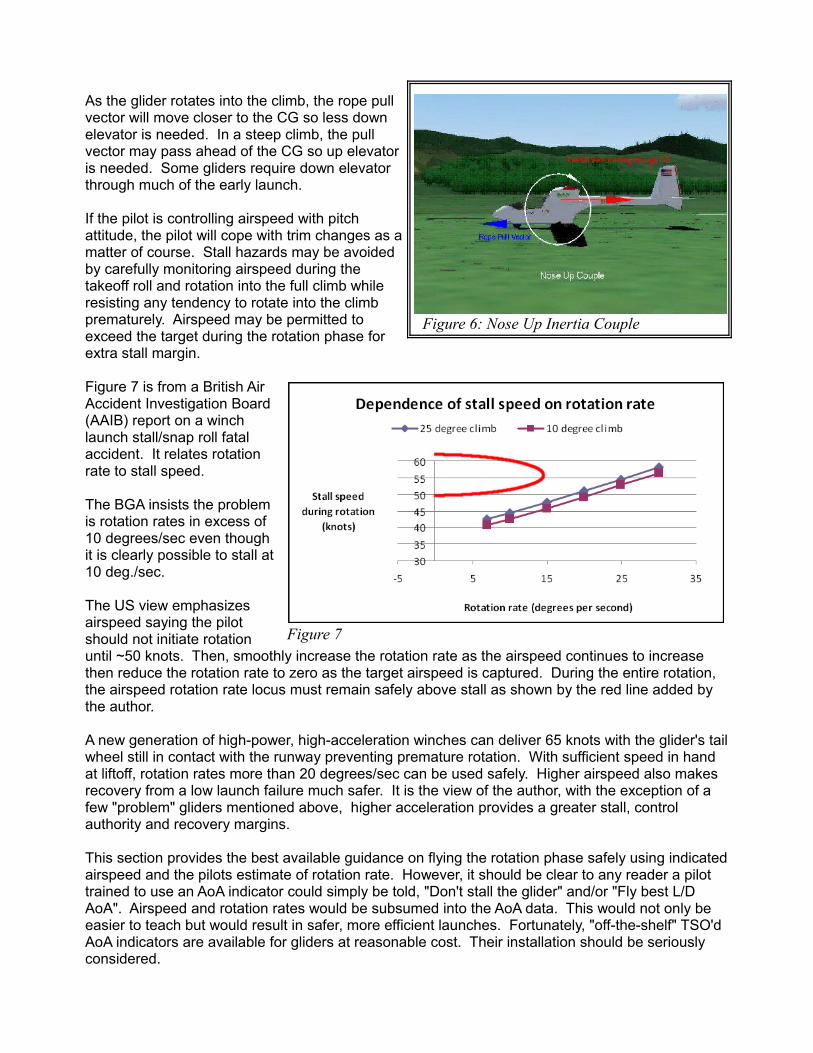
Figure 7 is from a British Air Accident Investigation Board (AAIB) report on a winch launch stall/snap roll fatal accident. It relates rotation rate to stall speed.
The BGA insists the problem is rotation rates in excess of 10 degrees/sec even though it is clearly possible to stall at 10 deg./sec.
The US view emphasizes airspeed saying the pilot should not initiate rotation until ~50 knots. Then, smoothly increase the rotation rate as the airspeed continues to increase then reduce the rotation rate to zero as the target airspeed is captured. During the entire rotation, the airspeed rotation rate locus must remain safely above stall as shown by the red line added by the author.
A new generation of high-power, high-acceleration winches can deliver 65 knots with the glider's tail wheel still in contact with the runway preventing premature rotation. With sufficient speed in hand at liftoff, rotation rates more than 20 degrees/sec can be used safely. Higher airspeed also makes recovery from a low launch failure much safer. It is the view of the author, with the exception of a few "problem" gliders mentioned above, higher acceleration provides a greater stall, control authority and recovery margins.
This section provides the best available guidance on flying the rotation phase safely using indicated airspeed and the pilots estimate of rotation rate. However, it should be clear to any reader a pilot trained to use an AoA indicator could simply be told, "Don't stall the glider" and/or "Fly best L/D AoA". Airspeed and rotation rates would be subsumed into the AoA data. This would not only be easier to teach but would result in safer, more efficient launches. Fortunately, "off-the-shelf" TSO'd AoA indicators are available for gliders at reasonable cost. Their installation should be seriously considered.
Figure 6: Nose Up Inertia Couple
Figure 7

Crosswind Technique
Gliders tend to 'weather vane' into a crosswind more easily with a CG hook than with a nose hook. For this reason, it is critical no winch launch should be attempted with a crosswind component greater than the demonstrated crosswind component listed in the glider's POH.
Aero tow pilots have been trained to hold the upwind wing low during the takeoff roll to help maintain position behind the tug. For winch launch, this technique introduces the possibility of dragging the upwind wing tip leading to a groundloop as addressed in the section on ground roll. Fortunately, winch ground roll is very short and there's no tug to follow so holding wings level and allowing the glider to drift a few feet downwind is usually of little consequence.
It is best to use only as much downwind rudder as needed to maintain a straight ground roll. All asymmetric control inputs must be removed during the rotation phase.
Winch pilots should always be aware of airfield surface conditions with particular attention to sloping ground in the takeoff area. High ground on the upwind side reduces wingtip clearance even without a bank into the wind. Banking into the wind almost guarantees wing tip contact.
Once into the main climb, lowering the upwind wing will cause the glider to track into a crosswind. "Crabbing" into a crosswind is completely ineffective. Checking the ground track is somewhat upwind of the runway at least once during the launch is advisable. The winch operator and rope retrieve crew will appreciate this as it makes the post-release rope recovery easier and safer.
Takeoff Roll and Rotation Summary
1. The glider must roll straight with wings level - otherwise RELEASE IMMEADIATELY.
2. The pilot's left hand should be on the release but not gripping it.
3. Pilots should expect gliders with a high CG and low hook to pitch up (Inertia Coupling)
4. Use down elevator to oppose inertia coupling and to prevent rotation until at least 50 Kts.
5. Rotate smoothly so airspeed continues to increase until it stabilizes at the "target airspeed" .
6. A stall during rotation is EXTREMELY DANGEROUS.
Airspeed Excursions
In an otherwise normal launch there will be airspeed deviations due to a variety of causes including pilot error, winch behavior, winch operator error, turbulence or wind layers. Whatever the cause, airspeed errors, in themselves, represent less of a threat than ill considered, precipitative actions by the pilot. Managing an airspeed excursion while still on the rope is preferable to an early release.
Airspeed can exceed VW (Max winch airspeed )during the first half of the launch with no danger. The BGA states categorically , “No airworthy glider, using the correct weak link, has ever been damaged by excessive airspeed while on a winch launch.”
It will surprise some that pilots can have a large degree of control over airspeed and should use it before signaling for power changes. The concept of "pilot controlled airspeed" will seem strange to aero tow pilots who are accustomed to merely maintaining position behind a tow plane while the tow pilot controls airspeed. The idea THEY will be responsible for airspeed during a winch launch will take some effort to get their minds around.
It may be useful to consider winch operator and pilot as a flight crew with the winch operator acting as a "flight engineer" controlling power and the pilot controlling airspeed with pitch attitude. The winch driver should select throttle settings for the glider type and wind akin to setting "takeoff power" on heavy airplanes. The pilot accepts power so provided and controls airspeed with pitch.
With a high-power, high-acceleration winch, it is not unusual for the airspeed to be higher than the target airspeed at the end of the rotation phase. The pilot should then be able to smoothly reduce airspeed to the target value by momentarily increasing pitch attitude.
If the airspeed is low, the pilot need only lower the nose slightly to reduce the load on the winch allowing the airspeed to increase. The winch operator should interpret this as a signal to increase power. To decrease airspeed, the pilot should raise the nose to increase the load on the winch engine. This is exactly like controlling an airplane's airspeed during a full power climb.
Pitch changes are the only action required to control airspeed with an ATC winch. With an SC winch the pilot may need to signal the winch operator requesting a change in power in addition to making pitch changes. If these signals fail to produce the desired result, delay the release until at a safe altitude and fly a normal landing pattern.
To request an increase in speed/power, the pilot lowers the nose and the winch operator, seeing the glider is not climbing normally, will increase throttle to compensate. Lowering the nose itself may cause the airspeed to increase.
To request a reduction in speed/power, the pilot yaws the glider left and right vigorously with the rudder. The winch operator will reduce throttle roughly 5% in response to each signal. Do not lower the nose when signaling for a reduction in speed/power as this will cause a further increase in airspeed and counter the effect of reduced throttle.
Some German clubs are utilizing airspeed telemetry so the winch operator adjusts the power to achieve a constant glider airspeed. The pilot then controls the climb profile but he has no indicator to show how to do this properly. If the pilot had a rope tension and AoA display, he could just increase pitch attitude until either the tension was near the weak link breaking point or the AoA was at best L/D to achieve an optimum launch. Increasing pitch would cause the winch driver to increase power to maintain airspeed. While this scheme is workable, controlling tension as with an ATC winch and letting the pilot control airspeed is a better solution.

Managing a Launch Failure
The term “Launch Failure” includes a variety of failure modes. Most commonly it is a rope break but may also include failure of the weak link or winch. It is the winch equivalent of PTT.
Whatever the reason for the failure, the pilot response is always the same - Unload the wing and Fly the Glider! Virtually all accidents from launch failure are pilots failing to fly the glider.
If the nose is up 45 degrees at the failure, the glider will be losing airspeed at about 12 knots per second so the pilot must react swiftly.
The correct action is to unload the wing by vigorously pushing over in a zero G ballistic trajectory. At zero G, "stall speed" has no meaning - airspeed can be, and often is, well below VS without stalling. At zero G the wing is producing no lift thus has no induced drag.
The Altitude, Attitude and Airspeed at failure must fall within an envelope (Figure 9: AAA Envelope) from which a safe recovery can be made. Outside of this envelope, at low altitude, low airspeed or high pitch angle, there will be insufficient height for a recovery. Like a CG envelope, the AAA Envelope will vary from glider to glider and, to a degree, on the experience of the pilot. A winch pilot should study Figure 9 to determine the AAA Envelope best suited for his experience and glider.
Instructors Note 1: "Task Switching Costs"Experiments show human subjects are slower and less accurate at performing a complex task immediately following another complex task especially if the rules for task 2 are different than for task 1. The same experiments show task switching is a teachable skill. (Google "Task switching costs" for more information.)
Instructors must be alert for students having difficulty switching from "Launch Mode" to "Landing Mode" and take steps to help them learn task switching skills. Condor flight simulator can be useful.
Figure 8: Flight path for 100 foot AGL rope break

Note the selection of 1.5 x VS as a recovery airspeed in Fig. 9 introduces an illogical artifact. One would not expect to lose 100+ feet with a failure at 50 knots and 10 degrees nose up. Actually, one would pitch to 10 deg. nose down, recover to ~ 1.2 VS with little height loss, then simply flair and land.
Note if a glider requires lots of up elevator in the climb, expect the nose to 'pop up' 10 - 15 degrees with a rope failure which may place the glider outside the AAA envelope - use higher airspeed and lower climb angle in these gliders.
The key determinant of height loss is the minimum airspeed at the top of the ballistic trajectory. A zero G, or even a slightly negative G pushover will minimize airspeed loss and therefore the height lost.
The 0G push over should continue until the nose is as far below the horizon as it was above it when the rope break occurred.
The words “as far below the horizon as it was above” have been carefully chosen to provide the maximum safety margin. If a rope break occurs at 20 feet with the nose up 10 degrees, the glider will strike the runway if the pilot attempts a 45 degree dive but at 500 feet with the nose 45 degrees above the horizon, lowering the nose only 10 degrees below the horizon will not result in safe airspeed recovery.
With the nose at the correct angle below the horizontal the pilot must wait for a safe airspeed (1.5 VS) before taking further action. It is critical no turn be initiated or spoilers opened until a safe airspeed is achieved.
If an AoA indicator is installed, the pilot can safely recover at a significantly greater height by smoothly reloading the wing starting at the top of the trajectory at an AoA corresponding to best L/D in level unaccelerated flight.
Once a safe airspeed is achieved, the pilot must decide whether to land ahead on the remaining runway or circle to land. When the option is available, pilots are expected to land ahead.
It's useful to divide launch failures into “high” and “low” where low failures end with a straight ahead landing on the runway and high failures require a circle to land. Each wind speed-runway-winch-glider combination will have a “Critical Altitude” below which a straight ahead landing can be made safely using spoiler and slip (Figure 11). Above the “Critical Altitude” the pilot can safely circle back to land into-the-wind on the departure runway(Figure 10). Under most conditions, the land ahead and circle back options overlap by several hundred feet making the choice obvious and relatively benign.
A circle to land from a "high" launch failure is done in phases. The first, as with a low failure, is a zero G pushover and safe airspeed recovery - only then enter a 45 degree bank, 180 degree turn to the downwind side of the runway if a crosswind component is present. The downwind turn direction is chosen so the bank angle will be decreasing as the glider performs the final 180 degree
Figure 9: Typical AAA Envelope in Red Box
turn to align with the runway. (Figure 11)
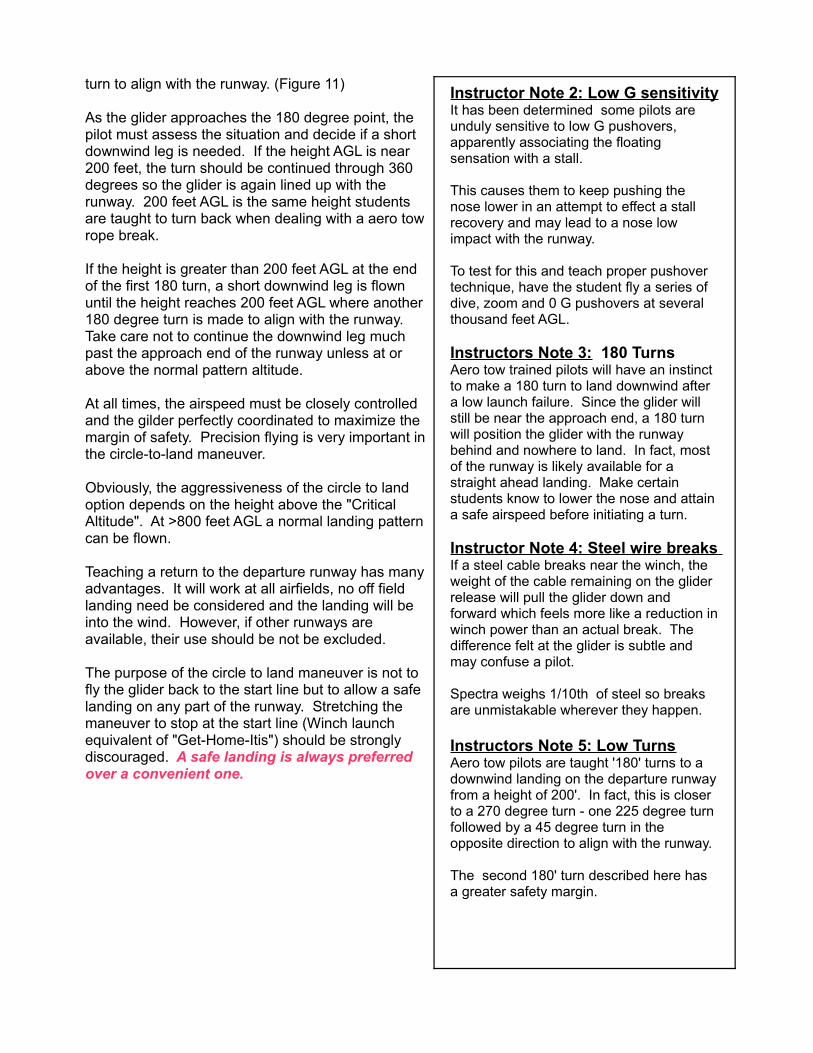
As the glider approaches the 180 degree point, the pilot must assess the situation and decide if a short downwind leg is needed. If the height AGL is near 200 feet, the turn should be continued through 360 degrees so the glider is again lined up with the runway. 200 feet AGL is the same height students are taught to turn back when dealing with a aero tow rope break.
If the height is greater than 200 feet AGL at the end of the first 180 turn, a short downwind leg is flown until the height reaches 200 feet AGL where another 180 degree turn is made to align with the runway. Take care not to continue the downwind leg much past the approach end of the runway unless at or above the normal pattern altitude.
At all times, the airspeed must be closely controlled and the gilder perfectly coordinated to maximize the margin of safety. Precision flying is very important in the circle-to-land maneuver.
Obviously, the aggressiveness of the circle to land option depends on the height above the "Critical Altitude". At >800 feet AGL a normal landing pattern can be flown.
Teaching a return to the departure runway has many advantages. It will work at all airfields, no off field landing need be considered and the landing will be into the wind. However, if other runways are available, their use should be not be excluded.
The purpose of the circle to land maneuver is not to fly the glider back to the start line but to allow a safe landing on any part of the runway. Stretching the maneuver to stop at the start line (Winch launch equivalent of "Get-Home-Itis") should be strongly discouraged. A safe landing is always preferred over a convenient one.
Instructor Note 2: Low G sensitivityIt has been determined some pilots are unduly sensitive to low G pushovers, apparently associating the floating sensation with a stall.
This causes them to keep pushing the nose lower in an attempt to effect a stall recovery and may lead to a nose low impact with the runway.
To test for this and teach proper pushover technique, have the student fly a series of dive, zoom and 0 G pushovers at several thousand feet AGL.
Instructors Note 3: 180 TurnsAero tow trained pilots will have an instinct to make a 180 turn to land downwind after a low launch failure. Since the glider will still be near the approach end, a 180 turn will position the glider with the runway behind and nowhere to land. In fact, most of the runway is likely available for a straight ahead landing. Make certain students know to lower the nose and attain a safe airspeed before initiating a turn.
Instructor Note 4: Steel wire breaks If a steel cable breaks near the winch, the weight of the cable remaining on the glider release will pull the glider down and forward which feels more like a reduction in winch power than an actual break. The difference felt at the glider is subtle and may confuse a pilot.
Spectra weighs 1/10th of steel so breaks are unmistakable wherever they happen.
Instructors Note 5: Low TurnsAero tow pilots are taught '180' turns to a downwind landing on the departure runway from a height of 200'. In fact, this is closer to a 270 degree turn - one 225 degree turn followed by a 45 degree turn in the opposite direction to align with the runway.
The second 180' turn described here has a greater safety margin.
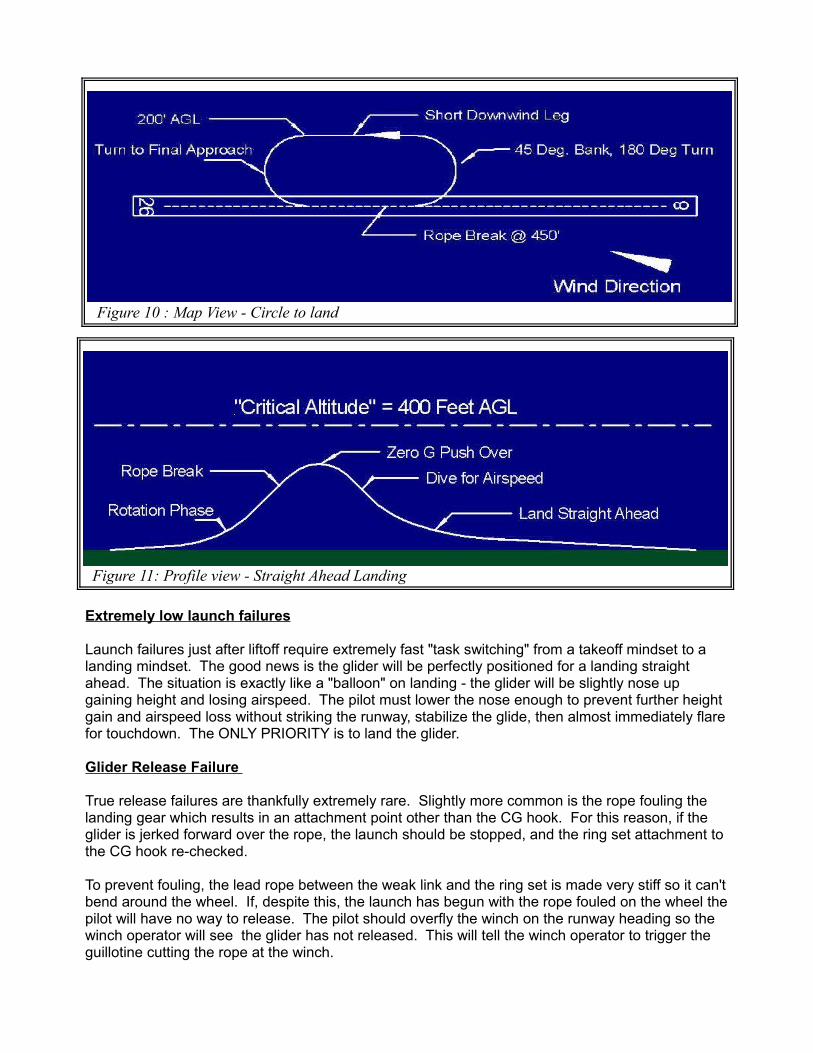
Extremely low launch failures
Launch failures just after liftoff require extremely fast "task switching" from a takeoff mindset to a landing mindset. The good news is the glider will be perfectly positioned for a landing straight ahead. The situation is exactly like a "balloon" on landing - the glider will be slightly nose up gaining height and losing airspeed. The pilot must lower the nose enough to prevent further height gain and airspeed loss without striking the runway, stabilize the glide, then almost immediately flare for touchdown. The ONLY PRIORITY is to land the glider.
Glider Release Failure
True release failures are thankfully extremely rare. Slightly more common is the rope fouling the landing gear which results in an attachment point other than the CG hook. For this reason, if the glider is jerked forward over the rope, the launch should be stopped, and the ring set attachment to the CG hook re-checked.
To prevent fouling, the lead rope between the weak link and the ring set is made very stiff so it can't bend around the wheel. If, despite this, the launch has begun with the rope fouled on the wheel the pilot will have no way to release. The pilot should overfly the winch on the runway heading so the winch operator will see the glider has not released. This will tell the winch operator to trigger the guillotine cutting the rope at the winch.
Figure 10 : Map View - Circle to land
Figure 11: Profile view - Straight Ahead Landing
With the rope cut, UHMWPE rope, unlike steel cable, will trail nearly horizontally behind the glider like thread of spider silk. The pilot should fly a high pattern and steep approach to the runway with touchdown planned as near the departure end as possible. This should prevent a trailing rope from fouling anything on the ground.
Winch Failures
Winches can have many failure modes. Unlike automobiles, a winch can't be driven to diagnose problems. For this reason, any odd behavior, no matter how slight, should be cause to discontinue launches until the issue can be identified and eliminated.
For the pilot, the main concern is the rapidity of failure. Instead of the sharp “thump” of a rope break, the rope tension may slowly fade away as the winch loses power. If the pilot is controlling airspeed, this will cause him to lower the nose as the power fades which is exactly the right response even if he doesn't recognize the winch failure. If the pilot is focused on attitude while the winch controls speed, he may allow the airspeed to decay until the glider stalls.
It's good form for the winch operator to transmit "Abort, Abort, Abort" as soon as a failure is detected.
The pilot should treat a suspected winch failure just like a rope break but should avoid landing on the rope if at all possible. If the glider lands on the rope, there is the possibility of the winch suddenly regaining power and pulling the rope parachute into the glider from behind.
Summary of Launch Failure Techniques
1. Expect every launch to fail - Fly the Glider!
2. Know the "Critical Altitude" for conditions. Plan landings accordingly before launch.
3. Always stay within a safe AAA Envelope.
4. React instantly to launch failure by pushing over at zero G - or even slightly negative G.a. Airspeed below unaccelerated Vs at top of trajectory is no problem at 0 G.
5. Height lost or gained is primarily determined by airspeed at the top of the ballistic trajectory.
6. Do not open spoilers or turn until level flight at a safe airspeed is achieved (1.5 x Vs).
7. Execute pre-planned landing straight ahead if below critical altitude or circle to land if above.
8. Pay extremely close attention to coordination and airspeed control when circling to land.
9. Don't worry about pulling the release until 1 - 6 are satisfied.
10. Concentrate on landing safely anywhere on the airfield - never try for a 'convenient' landing.
Instructors Note 6: Use of Condor Fight Simulator
This amazing PC program can simulate almost all the techniques and hazards to a quite realistic degree. Like any simulator, Condor allows exploration of dangerous situations without risk. On the "NOTAM" screen select "winch launch" then set wind and weather conditions. The instructor should spend considerable time learning to fly the simulator so maneuvers look realistic.
It helps the student visualize the aerodynamics if the “smoke” in on (“T” key toggle). The simulator can be paused with the “P” key and the F2, F3, and F4 keys show external views with the arrow keys on the number pad shifting the view and the + and - keys zooming in and out. The "S" key captures a screenshot as a JPEG image which can be incorporated into training manuals.
Unless a complete “cockpit” with accurate controls and 180 degree view is available, the best instructor technique is to use Condor as an “animated white board” were the instructor flies the simulator and the student watches. The goal is to help the student visualize a maneuver.
The simulated winch is an ATC winch with a tension factor of about 70% of the glider's weight. This allows the 'pilot' to control the glider airspeed with pitch as with an ATC winch.
Airspeed control: Demonstrate raising the nose will decrease airspeed and lowering it will increase it.
Tip drag leading to Ground loop: Bring a wing tip into contact with the ground just before the glider reaches flying speed. The glider will groundloop and, if the timing is just right, may flip and crash inverted.
Stall and snap roll: Use any 15m glider or the PW-5. Use full up elevator to rotate into the climb then apply rudder as the 'glider' stalls. This is very convincing.
Crosswinds: Set the “weather” for wind direction and speed.
Rope breaks: On the “NOTAM” screen, set the “rope failure probability” to >50% and the program will provide random breaks or set the release function to the keyboard and have someone else activate the release without warning the 'pilot'. Practicing rope breaks on Condor is great training for those wishing to improve their "Task Switching" abilities. An infinite variety of rope break situations can be simulated.
Condor Limitations:
1. The program does not support a "back release".
2. There are no "high density altitude airports" although users can create them.
3. Slow power loss cannot be simulated.
4. Rope tension is limited to 70% of the glider weight which is less than typical.
5. With only a single PC monitor, lateral vision lacking so holding the wings level at steep climb angles is difficult. It helps to set the "weather" so clouds are in the field of view.
Suggested Winch Launch Transition Syllabus: (27 – 36 launches)
Session one: Winch launch familiarization (Six launches)
Instructor flies three normal launches and the transition candidate observes. Then the candidate flies three normal launches under close observation by the instructor. If a launch failure occurs, the instructor will take the controls and fly the recovery. The instructor then debriefs the candidate on the ground offering critique with suggestions for the next session.
Session two: Further launch practice and zero G training. (One to six launches)
The candidate flies up to six launches under instructor observation and tries to contact lift. If lift is found, the student will gain sufficient altitude for zero G pushover practice. Pushover practice is diving the glider to approximately 90 knots and then zooming upward at 45 degrees. When the airspeed drops to 65 knots, the instructor will yell “Rope Break!” and the candidate will push over at zero G until the nose is 45 degrees below the horizon. This allows the candidate to experience zero G and learn the control inputs needed to achieve it. If no lift is available, it may be necessary to take an aero tow to gain enough height. The instructor will debrief the candidate offering critique.
Session three: High launch failure training. (Six launches)
The instructor will fly a launch to pattern altitude and pull the release simulating a rope break. He will demonstrate a recovery with zero G pushover and airspeed recovery. The candidate with then fly the next 5 launches with the instructor pulling the release without warning simulating a rope break at successively lower altitudes but always above the “Critical Altitude” ending with a tight, low altitude 360 pattern to an into-the-wind landing. The instructor will debrief the candidate and offer critique.
Session four: Low launch failure training. (Six launches)
The instructor will fly a launch to a height below the “Critical Altitude” and pull the release simulating a rope break. The instructor will fly a ballistic airspeed recovery and land straight ahead. The candidate will fly the next 5 launches with the instructor pulling the release without warning at progressively lower altitudes ending with a simulated break just after liftoff. The instructor will debrief the candidate and offer critique.
Session Five: Winch failure training. (Three to six launches)
The student will fly six launches with the winch operator simulating various winch failure modes. These should include overspeed, under speed, slow power loss, delayed power cut and unusual gear changes if the winch is equipped with a transmission. The instructor and winch operator will debrief the candidate together and offer critique.
Session Six: Crosswind training. (Two to six launches)
This session may be skipped if the preceding sessions encountered significant crosswinds. Otherwise, it should be delayed until crosswinds are available.
The instructor will demonstrate wings level takeoff roll with minimum rudder input and centering controls before rotation. The instructor will also demonstrate tracking to upwind so the rope falls on the runway. The student will practice under supervision.