Embed Size (px)
Citation preview
Copyright © 1994 - 2015 Computerworld, Inc. All rights reserved.
1
TECH PRIMER
Windows 10 cheat sheet
Get to know the new interface, features and shortcuts in Microsoft's latest
operating system.
Preston Gralla | December 15, 2015
Windows 10 is the best operating system that's come along from Microsoft in a long time. It's a
shape-shifter that changes its interface depending upon whether you're using a traditional
computer or a touch-based one. It undoes the damage wrought by Windows 8, including
eliminating the awkward Charms bar and bringing back the long-mourned Start menu. A lot more
has changed as well, with a new default browser called Edge and plenty more.
Whether you've upgraded to Windows 10 from Windows 8 or an earlier version of Windows, or if
you've got it on a new PC, this cheat sheet will get you up to speed on it. I'll cover everything you
Copyright © 1994 - 2015 Computerworld, Inc. All rights reserved.
2
need to know, and I've also provided quick-reference charts listing useful keyboard shortcuts,
touchscreen gestures and touchpad gestures.
Before we get started, a few words about some terminology you'll need to know. Microsoft has
sowed enormous confusion with a set of lightweight apps that were originally designed for the
Windows 8 touch-oriented Start screen interface. It first called them Metro apps, and then through
the years changed their names to Modern apps, Windows Store apps, and then Universal Windows
apps. Now it's settled simply on Windows apps, although at times the company also calls them
Universal Windows apps, to get across the point that they will run on all versions of Windows 10,
including for mobile phones. In this article, we'll refer to them as Windows apps.
What about apps designed for the desktop? Microsoft now calls them Windows desktop
applications. In this article we'll call them desktop applications, for simplicity's sake.
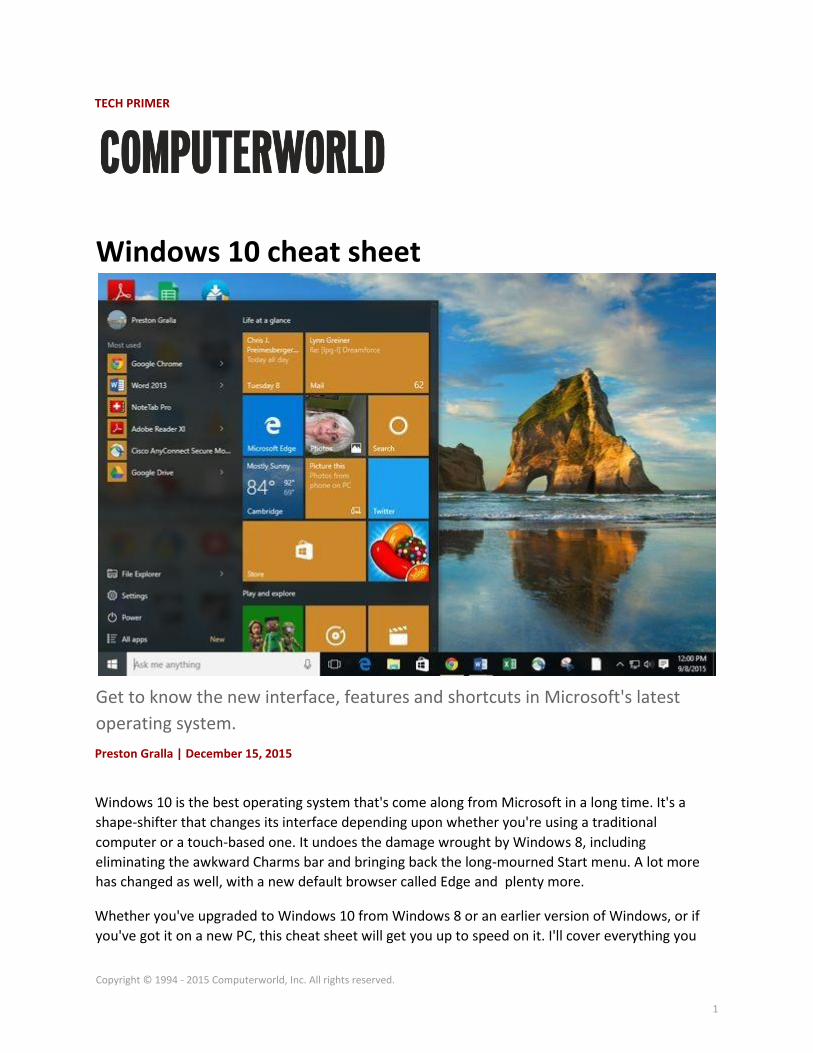
Get to know the new Start menu
The loudest complaint that desktop users had about Windows 8 was the death of the Start menu. In
Windows 10 it's back with a vengeance. When you use Windows 10 on a desktop or laptop, you
boot directly into the desktop. Click the Start button at the lower left of the desktop to bring up the
Start menu -- command central for traditional PC users. (Those who use Windows 10 on a tablet will
instead see a Start screen; more on that later.)
The Start menu is command central for Windows 10.
Copyright © 1994 - 2015 Computerworld, Inc. All rights reserved.
3
The menu is divided into two sections. Down its left side you'll find the following:
Account: Up at the top left you'll see an icon representing your user account. Click it to lock your PC,
sign out of Windows or change your account settings. When you choose to change your account
settings, you'll be sent to a screen that lets you change your account picture, your password, and a
variety of other settings.
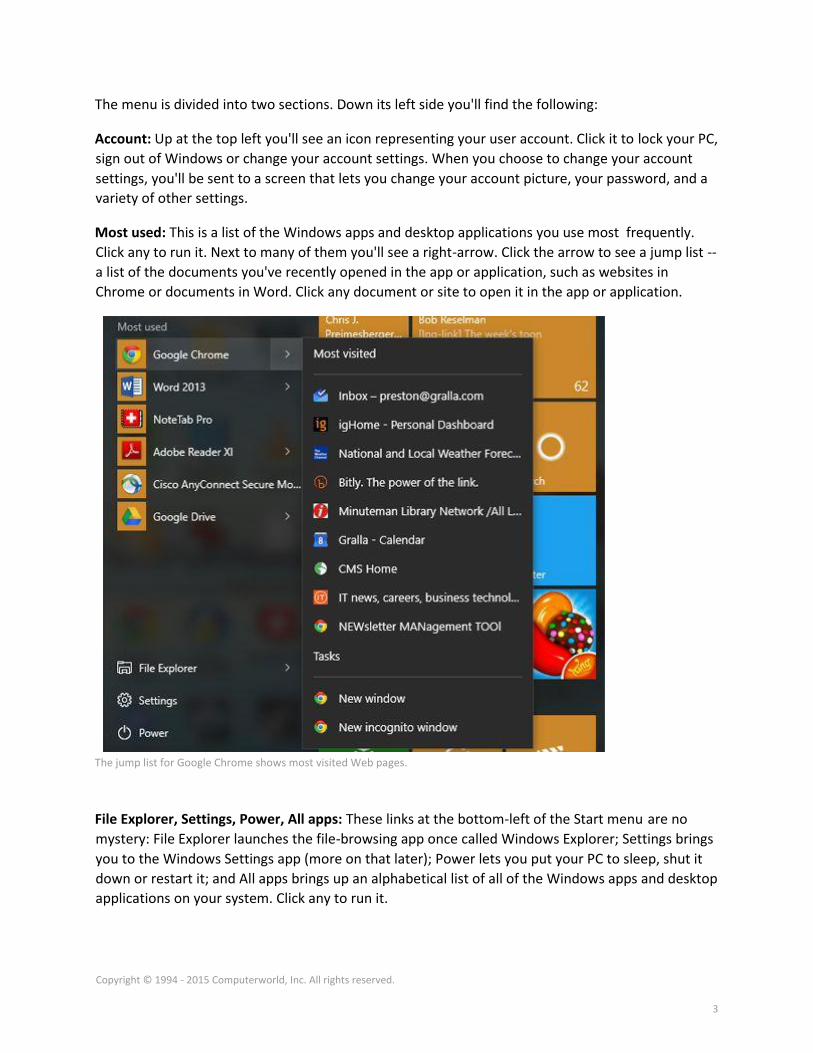
Most used: This is a list of the Windows apps and desktop applications you use most frequently.
Click any to run it. Next to many of them you'll see a right-arrow. Click the arrow to see a jump list --
a list of the documents you've recently opened in the app or application, such as websites in
Chrome or documents in Word. Click any document or site to open it in the app or application.
The jump list for Google Chrome shows most visited Web pages.
File Explorer, Settings, Power, All apps: These links at the bottom-left of the Start menu are no
mystery: File Explorer launches the file-browsing app once called Windows Explorer; Settings brings
you to the Windows Settings app (more on that later); Power lets you put your PC to sleep, shut it
down or restart it; and All apps brings up an alphabetical list of all of the Windows apps and desktop
applications on your system. Click any to run it.
Copyright © 1994 - 2015 Computerworld, Inc. All rights reserved.
4
The right side of the Start menu has tiles for Windows apps and desktop applications. They're
grouped into two Microsoft-created categories -- "Life at a glance" and "Play and explore" -- and
then, if you have more apps than fit in those two, grouped into unnamed categories below that.
New tiles will be added to the unnamed groups as you install new apps and desktop applications.
Click any tile to run the app associated with it.
Some tiles are "live" -- that is, real-time information gets piped into them. So the Mail tile, for
example, shows your latest email, the Weather shows the weather and so on. Only Windows apps
have live tiles. Desktop applications, such as Microsoft Office, don't. Each group of tiles is three
columns wide, with most tiles taking up one column by default.
The Start menu is highly customizable. To change its height, hover your cursor over its top edge
until a two-headed arrow appears, then drag it up or down to expand or shrink it. On some
Windows 10 installations you can do the same thing at the right edge of the menu to expand it to
the right or shrink it back again, although this doesn't work for everybody.
To rename a group of tiles, click the group name and type in a new name for it. You can also move
tiles around the Start menu by dragging them from one group to another, or, to create a new group,
drag tiles to a blank area on the menu. You can name any unnamed group by clicking on the blank
area above it and typing in a name.
You can also widen the groups in the Start menu so that tiles take up four columns rather than
three. To do it, from the Start menu select Settings --> Personalization --> Start and in the "Show
more tiles" setting, move the slider to On. The tiles will now take up four columns, but to take
advantage of the extra space you’ll have to manually drag tiles to the fourth column.
When you right-click a tile, a menu pops up. Here's where things get a bit confusing, because not
every Windows app and desktop application has the same pop-up menu, and depending on your
installation you might have to click "More" to see some of these options. Most have some
combination of these choices:
● Unpin from Start: Select this and the tile vanishes from the Start menu.
● Resize: As you would expect, this lets you resize the tile. You can choose Small,
Medium or Large, and some tiles also have a Wide choice that makes it span two columns in
its group.
● Turn live tile off: This stops real-time information from streaming into the tile. If it's already
off, you'll get a Turn live tile on choice.
● Pin to taskbar: As it says, this pins the app to the taskbar. If it's already pinned, you'll
get an Unpin from taskbar choice.
● Uninstall: This uninstalls the app. Some Windows apps created by Microsoft, such as Weather and Mail, can't be uninstalled.
Some Windows apps have other choices as well, depending on their purposes. For example, right-
click the This PC app and you get choices such as mapping or unmapping a network drive.
Copyright © 1994 - 2015 Computerworld, Inc. All rights reserved.
5
You can also right-click the icons for the "Most used" apps on the left side of the menu as well as
the File Explorer, Settings and Power icons underneath them. (If you right-click All Apps, no menu
appears.) Windows apps and desktop applications on the "Most used" app menu typically have
these choices (with some hidden under the "More" submenu):
● Pin to Start: This moves the app from the "Most used" list to the right side of the Start
menu.
● Pin to taskbar (or Unpin from taskbar if it's already pinned) ● Uninstall
● Run as a different user: This lets you run the app as someone other than the person
currently logged in.
● Run as an administrator: This lets you run the app or application as an administrator.
● Open file location: Opens File Explorer to the folder where the application lives.
● Don't show in this list: Takes the app off the "Most used" list.
What's new with Windows apps
In Windows 8, Windows apps and the desktop didn't get along. Windows apps could only be run
from the Start screen, not from the desktop. What's more, they didn't appear in traditional
application windows; you could only run them full-screen or side by side with another Windows app
(but not a desktop application) so the two apps filled the full screen. That meant you couldn't have
multiple Windows apps running in separate windows on the desktop alongside desktop
applications. It was just one more way in which Windows 8 felt like two separate operating systems.
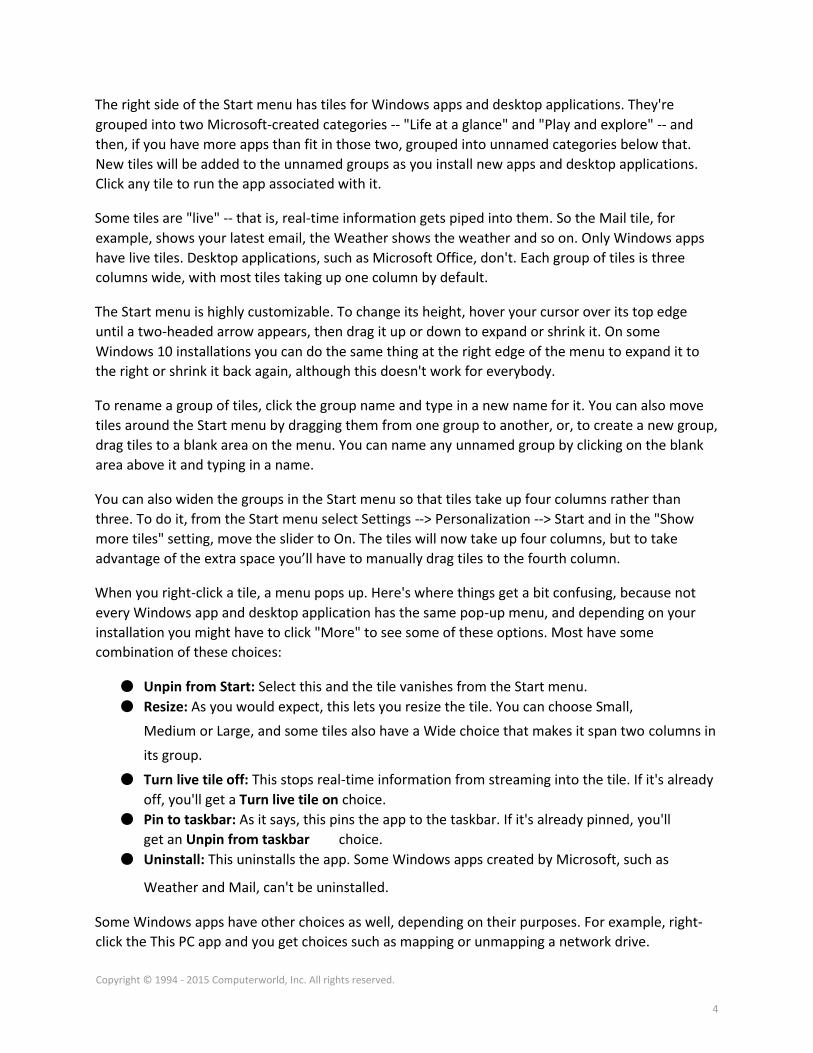
That's no longer the case in Windows 10. You can resize, minimize and close Windows apps in the
same familiar way as desktop applications. Drag the edges of a Windows app to resize it. Use the
familiar icons on the upper right of the app window for minimizing, maximizing and closing the app.
Copyright © 1994 - 2015 Computerworld, Inc. All rights reserved.
6
In Windows 10, Windows apps can be resized, minimized and closed in the same way as desktop apps.
Windows apps also get a better way to access all of their features. On the left side of the app
window you'll see a series of icons for the different features in the app. The icons change depending
on the app.
Using Windows 10 on a tablet or 2-in-1
One of Windows 8's biggest drawbacks was that it forced people with desktop computers to use an
interface designed for tablets. In Windows 10, Microsoft changes that with a feature called
Continuum that automatically senses the device you're using and switches Windows 10's interface
to match it -- the Windows 8-like Start screen for tablets, and the desktop and Start menu for
laptops and desktops.
Continuum works dynamically. If you're using a tablet with a keyboard attached, such as a Microsoft
Surface, it displays the desktop interface, but if you detach the keyboard, it asks if you want to
switch to tablet mode, which uses the Start screen interface. Tap "Yes" to switch to tablet mode.
Similarly, if you're using a tablet and attach a keyboard to it, a notification appears asking if you
want to switch out of tablet mode.
Copyright © 1994 - 2015 Computerworld, Inc. All rights reserved.
7
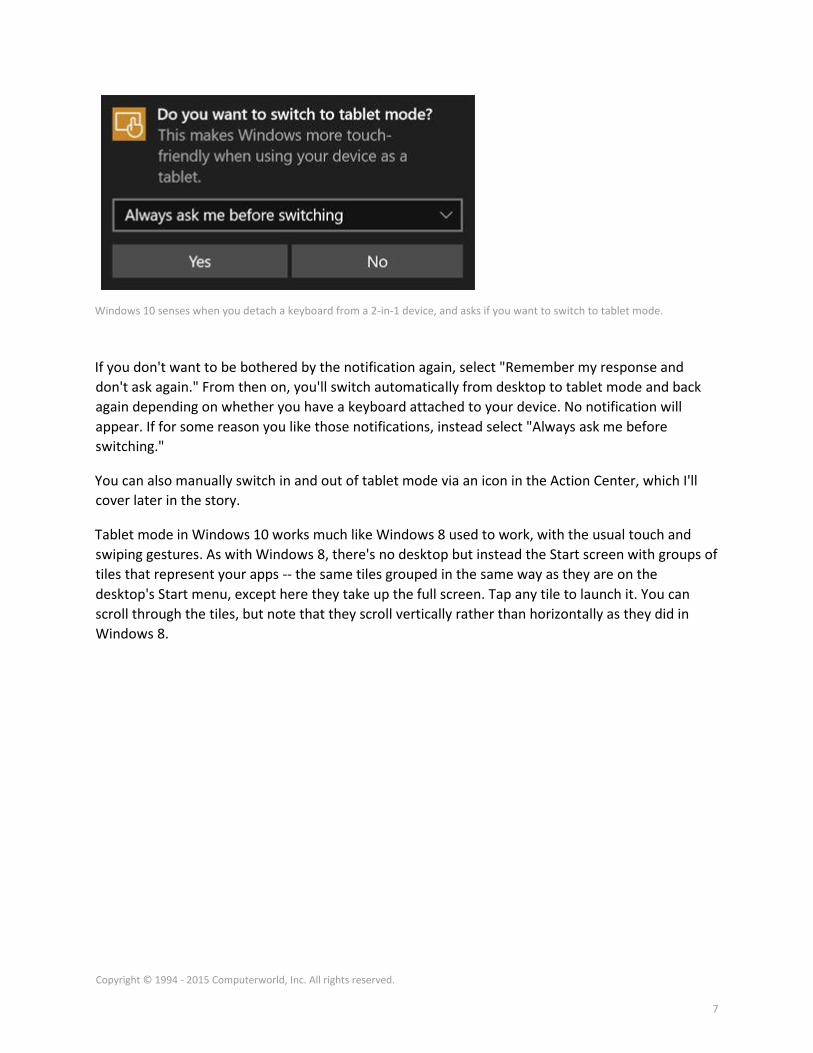
Windows 10 senses when you detach a keyboard from a 2-in-1 device, and asks if you want to switch to tablet mode.
If you don't want to be bothered by the notification again, select "Remember my response and
don't ask again." From then on, you'll switch automatically from desktop to tablet mode and back
again depending on whether you have a keyboard attached to your device. No notification will
appear. If for some reason you like those notifications, instead select "Always ask me before
switching."
You can also manually switch in and out of tablet mode via an icon in the Action Center, which I'll
cover later in the story.
Tablet mode in Windows 10 works much like Windows 8 used to work, with the usual touch and
swiping gestures. As with Windows 8, there's no desktop but instead the Start screen with groups of
tiles that represent your apps -- the same tiles grouped in the same way as they are on the
desktop's Start menu, except here they take up the full screen. Tap any tile to launch it. You can
scroll through the tiles, but note that they scroll vertically rather than horizontally as they did in
Windows 8.
Copyright © 1994 - 2015 Computerworld, Inc. All rights reserved.
8
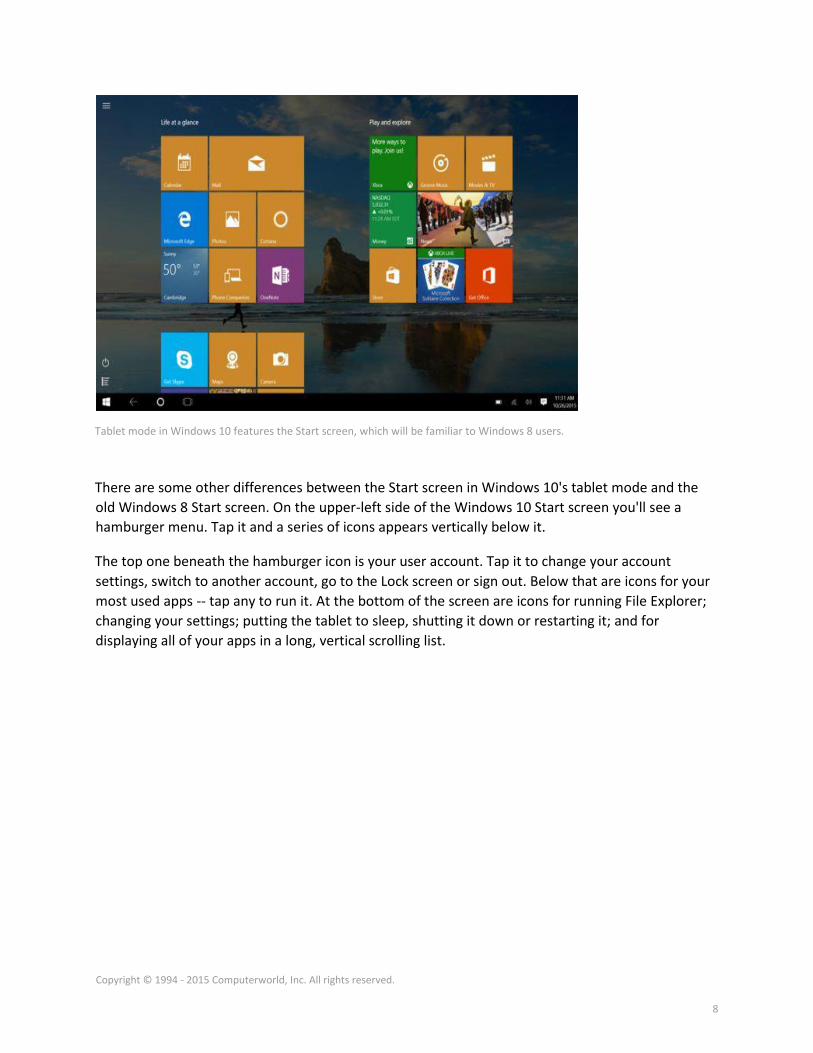
Tablet mode in Windows 10 features the Start screen, which will be familiar to Windows 8 users.
There are some other differences between the Start screen in Windows 10's tablet mode and the
old Windows 8 Start screen. On the upper-left side of the Windows 10 Start screen you'll see a
hamburger menu. Tap it and a series of icons appears vertically below it.
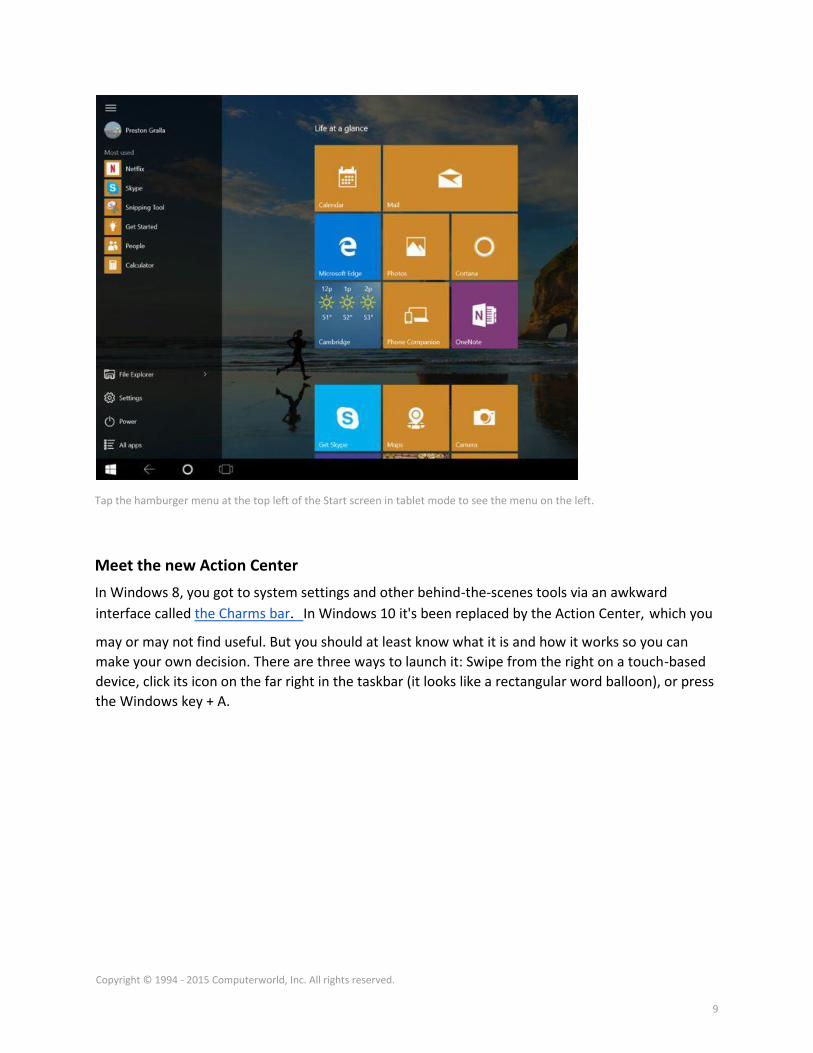
The top one beneath the hamburger icon is your user account. Tap it to change your account
settings, switch to another account, go to the Lock screen or sign out. Below that are icons for your
most used apps -- tap any to run it. At the bottom of the screen are icons for running File Explorer;
changing your settings; putting the tablet to sleep, shutting it down or restarting it; and for
displaying all of your apps in a long, vertical scrolling list.
Copyright © 1994 - 2015 Computerworld, Inc. All rights reserved.
9
Tap the hamburger menu at the top left of the Start screen in tablet mode to see the menu on the left.
Meet the new Action Center
In Windows 8, you got to system settings and other behind-the-scenes tools via an awkward
interface called the Charms bar. In Windows 10 it's been replaced by the Action Center, which you
may or may not find useful. But you should at least know what it is and how it works so you can
make your own decision. There are three ways to launch it: Swipe from the right on a touch-based
device, click its icon on the far right in the taskbar (it looks like a rectangular word balloon), or press
the Windows key + A.
Copyright © 1994 - 2015 Computerworld, Inc. All rights reserved.
10
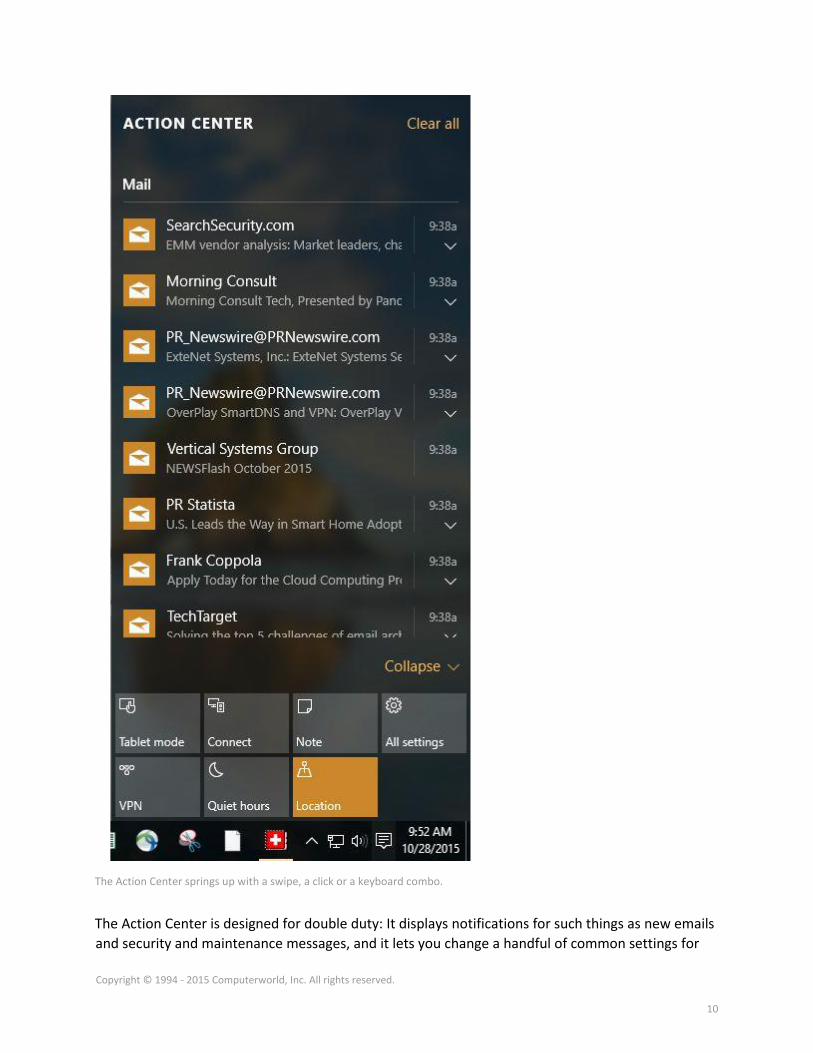
The Action Center springs up with a swipe, a click or a keyboard combo.
The Action Center is designed for double duty: It displays notifications for such things as new emails
and security and maintenance messages, and it lets you change a handful of common settings for
Copyright © 1994 - 2015 Computerworld, Inc. All rights reserved.
11
such tasks as connecting to Wi-Fi networks, switching to and from tablet mode, and changing
brightness settings.
Notifications first appear on their own on the lower right of the desktop and disappear after a few
seconds. You may or may not want to click them right away, which is where the Action Center
comes in. After they fade away on the desktop, they live on in the Action Center.
More useful are the icons for quick actions at the bottom of the Action Center. Just click the icon of
the action you want to perform. Most are self-explanatory, such as starting a new note or turning
Bluetooth on or off.
By default, four icons appear in the top row of the quick actions area. (The top row is the only one
you'll see when this section is collapsed.) To change which ones appear in this row, click the "All
settings" icon, then go to the System group, click "Notifications & actions" and find the area labeled
"Choose your quick actions" with the four icons from the action center showing. To make a
different icon appear in any of the four spots, just click the icon and select a different one from the
list that appears. The old icon goes away from the Action Center and a new one appears.
To show icons for all the quick actions available to you in the Action Center, click "Expand" just
above the row of quick action icons. All of the remaining quick action icons that aren't displayed in
that row of four icons will appear. The exact icons that appear depend upon the capabilities of the
computer that you're using. On a desktop PC, for example, you might only have eight or so quick
action icons, but on a laptop or tablet there will likely be more icons available for options like
battery saver, Bluetooth, Airplane mode and so on.
You can also change which notifications show up in the Action Center. Back on the
"Notifications & actions" screen, scroll down and select the kinds of notifications you want to see
and turn off the ones you don't want to see. You'll be able to choose or hide general types, such as
Windows tips or app notifications, or turn off and on notifications from individual apps, including
Mail. To do the latter, scroll to the "Show notifications from these apps" section and toggle them
On or Off.
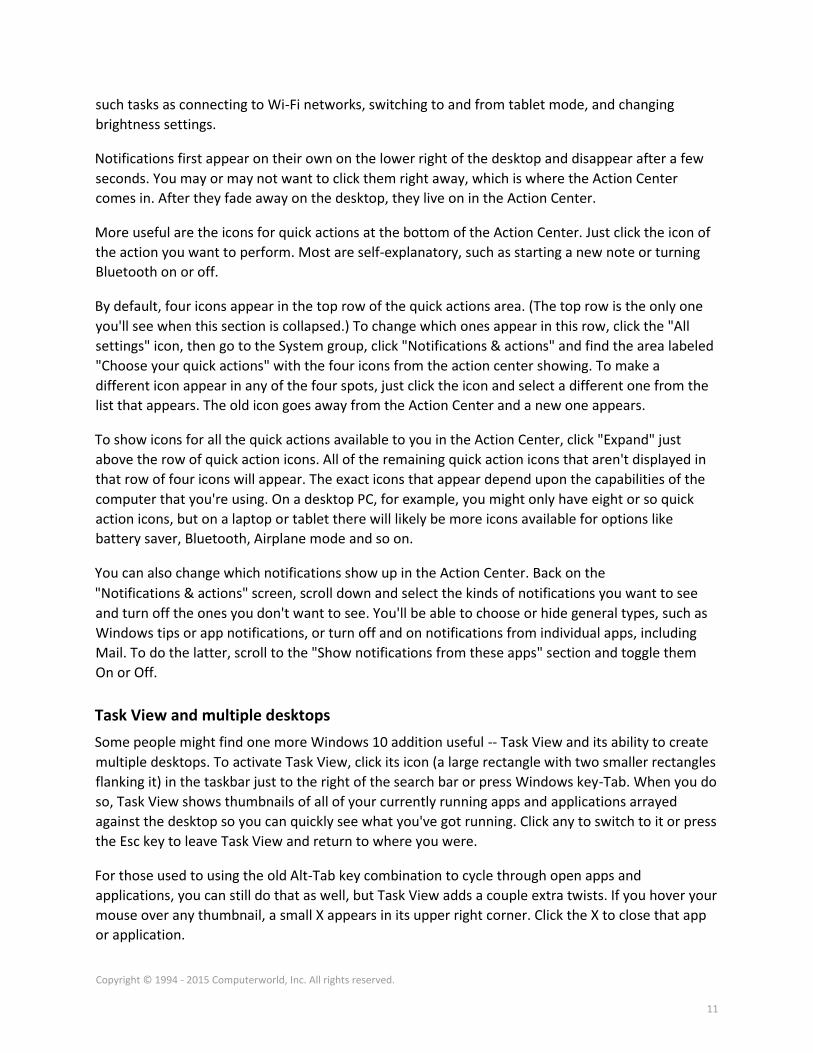
Task View and multiple desktops
Some people might find one more Windows 10 addition useful -- Task View and its ability to create
multiple desktops. To activate Task View, click its icon (a large rectangle with two smaller rectangles
flanking it) in the taskbar just to the right of the search bar or press Windows key-Tab. When you do
so, Task View shows thumbnails of all of your currently running apps and applications arrayed
against the desktop so you can quickly see what you've got running. Click any to switch to it or press
the Esc key to leave Task View and return to where you were.
For those used to using the old Alt-Tab key combination to cycle through open apps and
applications, you can still do that as well, but Task View adds a couple extra twists. If you hover your
mouse over any thumbnail, a small X appears in its upper right corner. Click the X to close that app
or application.
Copyright © 1994 - 2015 Computerworld, Inc. All rights reserved.
12
Task View also lets you create multiple virtual desktops, each with different Windows apps and
desktop applications running on them. To create a new desktop, activate Task View and click "New
desktop" at the lower right of the screen. You can run a different set of Windows apps and desktop
applications inside the new desktop -- for instance, you could dedicate one desktop to work-related
apps and applications, and another desktop to entertainment-related apps and applications.
To switch between desktops, click the Task View icon and click the desktop to which you want to
switch. You can keep creating new desktops this way and switch among them.
One odd thing to keep in mind about virtual desktops is that you can't run a Windows app in
multiple desktops simultaneously. If it's running in one desktop and you try to launch it in another,
you'll immediately zoom to the desktop in which you originally launched it. You can, however, run
desktop applications in multiple desktops.
The new Task View in action: Virtual desktops are shown across the bottom, and the apps running in the current desktop appear
up top.
Copyright © 1994 - 2015 Computerworld, Inc. All rights reserved.
13
Good-bye, Internet Explorer; hello, Edge
With Windows 10, Microsoft finally bids good-bye to Internet Explorer -- almost, that is. You'll still
find it, but it's no longer the default browser, and development work has essentially stopped on it.
The browser of today and tomorrow is Edge.
Edge is a considerable improvement over Internet Explorer. It's faster, cleaner-looking and
downright Chrome-like in its stripped-down design. It's generally intuitive to use. The upper left has
arrows for going forward, back and reloading a page. Type URLs in the address bar or use the
address bar as a search box by typing in search terms.
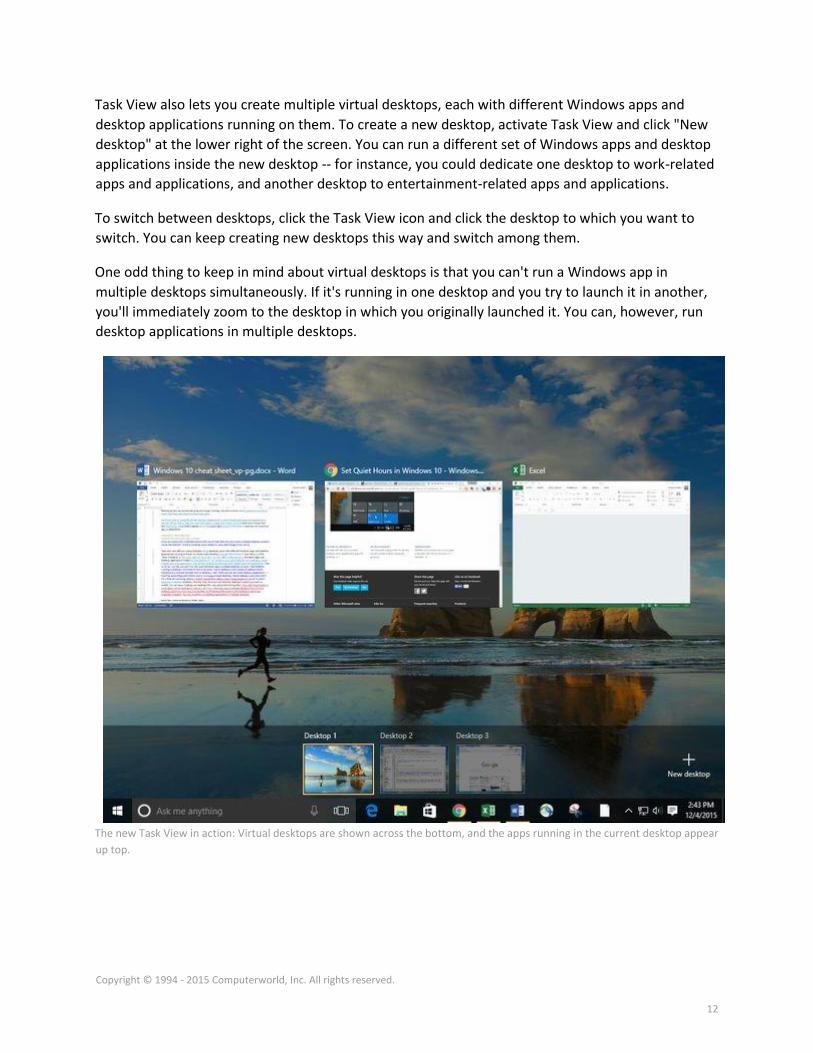
Directly to the right of the address bar you'll find an icon of a book, which launches one of Edge's
most useful features -- Reading View. Like similar features in Safari and Firefox, it strips out
everything extraneous to a page's content, including ads, navigation, sidebars and anything else
that diverts attention from the content. Text and graphics appear in a scrollable window. Its icon
will be grayed out if you're on a page that Reading View can't handle, such as a page that is
primarily used for navigation.
Left: Here's how an article looks in Edge normally. Right: Here's how it looks in Reading View.
Edge has another new feature that you may or may not find as helpful as Reading View -- the ability
to annotate and share Web pages. With it, you can mark up a page using highlighters and note-
creation tools, save the annotated page and share it as a JPG graphics file via email, OneNote or
Twitter.
Click the annotation icon to the right of the menu icon -- it looks like a pencil and paper -- and the
annotation tools appear. When you're done annotating, click the Share icon, just to the left of the
Exit button on the top right of the screen. Then select how you want to share the annotation, and
follow the instructions. When you want to exit annotation, press the Esc key or click Exit.
Copyright © 1994 - 2015 Computerworld, Inc. All rights reserved.
14
One of Edge's more useful features is its behind-the-scenes integration with Cortana. When you
browse to a page for which Cortana can offer help, a Cortana icon appears at the top of the page,
along with a note, such as "I've got directions, hours, and more" if you're on a restaurant page. Click
the icon and a sidebar appears on the right side of the page with additional information -- for
example, a map, address, phone number and reviews for a restaurant, in addition to links for
getting directions, viewing the menu and calling the restaurant.
Microsoft hasn't completely given up on Internet Explorer, because some enterprises have
standardized on it, and some enterprise apps require that browser to work properly. So there's a
way to launch Internet Explorer when you're visiting a Web page. Click the icon with three dots on
the upper right of the screen, and from the menu that appears, select "Open with Internet
Explorer." Internet Explorer will launch with the current page in it.
As for the rest of Edge, it's straightforward to use. To get to your history, favorites and downloads,
click the icon with three horizontal lines just to the left of the annotation icon. To share the current
page's URL, click the circular icon just to the right of the annotation icon. And for more menu
choices, including zooming in and out, finding text on a page, changing settings, and more, click the
three-dot icon.
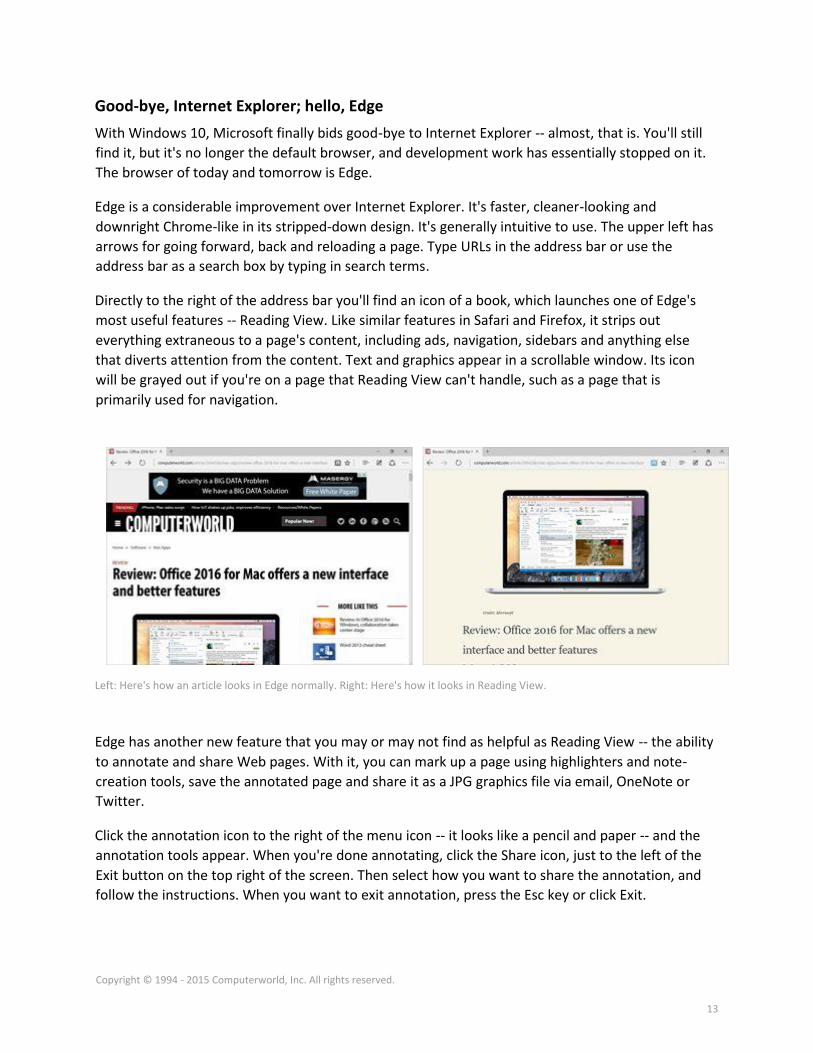
Changing your settings and preferences
In Windows 8, when you wanted to change your settings, you had to look in multiple places and
hope you found what you wanted. Windows 10 makes your life easier. Most settings, and
particularly the most important ones, are found in the Settings app.
Get to it by clicking the Start button, then clicking Settings. You can also get to it from the Action
Center by clicking the "All settings" quick-action icon.
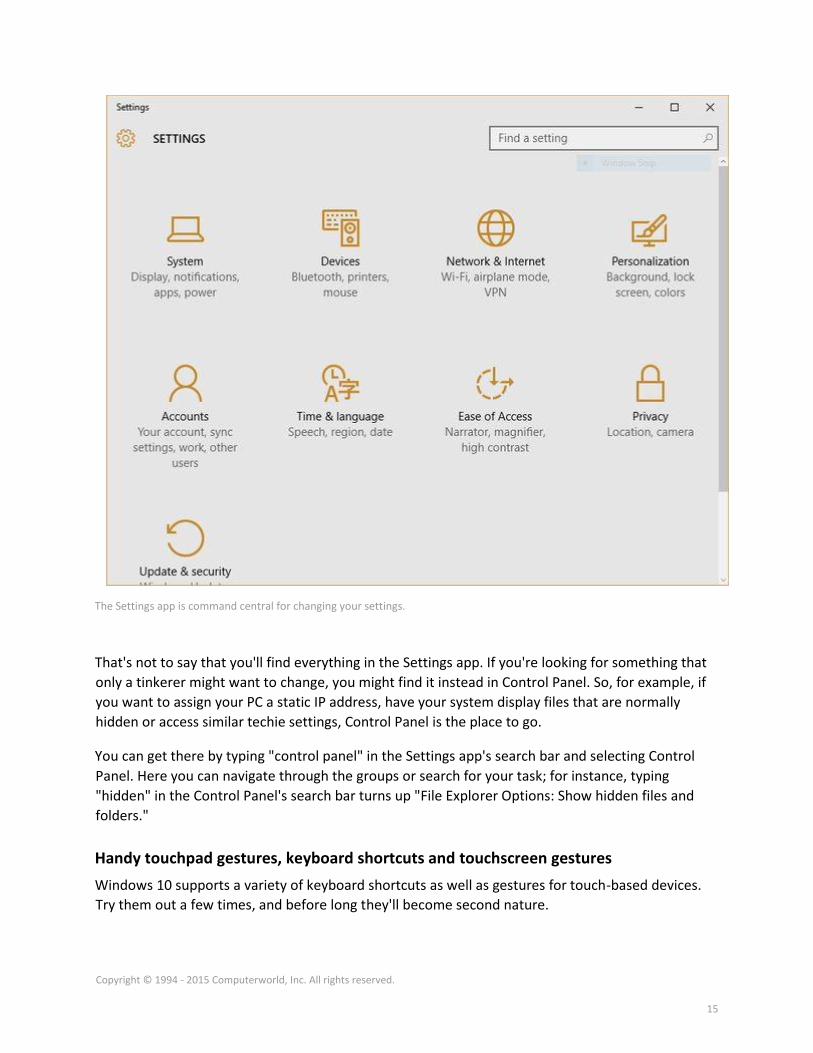
The Settings app has nine sections: System, Devices, Network & Internet, Personalization,
Accounts, Time & language, Ease of Access, Privacy and Update & security. It's straightforward to
use: Click on an icon and navigate to what you need. If you want to get to a specific setting fast,
type into the app's search bar, then click a setting that matches your search -- for instance, to turn
autocorrect off or on, you can type "autocorrect" in the search bar, select "Autocorrect misspelled
words" and drag the toggle switch to the setting you want.
Copyright © 1994 - 2015 Computerworld, Inc. All rights reserved.
15
The Settings app is command central for changing your settings.
That's not to say that you'll find everything in the Settings app. If you're looking for something that
only a tinkerer might want to change, you might find it instead in Control Panel. So, for example, if
you want to assign your PC a static IP address, have your system display files that are normally
hidden or access similar techie settings, Control Panel is the place to go.
You can get there by typing "control panel" in the Settings app's search bar and selecting Control
Panel. Here you can navigate through the groups or search for your task; for instance, typing
"hidden" in the Control Panel's search bar turns up "File Explorer Options: Show hidden files and
folders."
Handy touchpad gestures, keyboard shortcuts and touchscreen gestures
Windows 10 supports a variety of keyboard shortcuts as well as gestures for touch-based devices.
Try them out a few times, and before long they'll become second nature.
Copyright © 1994 - 2015 Computerworld, Inc. All rights reserved.
16
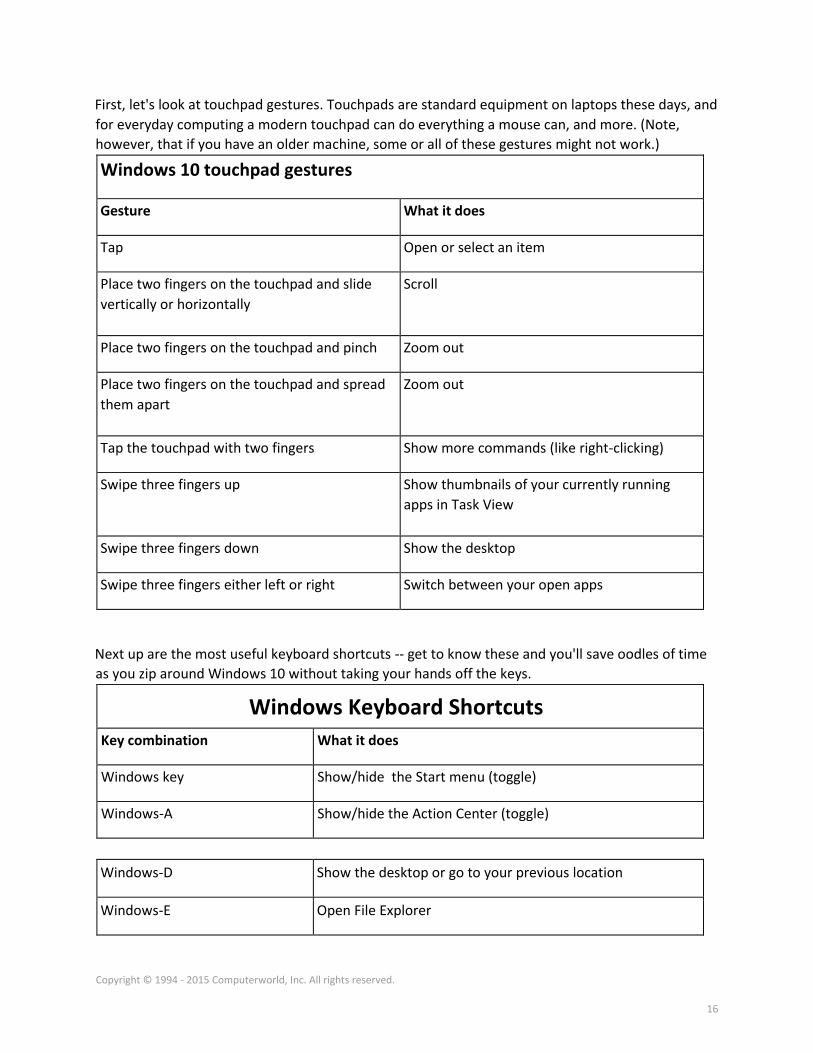
First, let's look at touchpad gestures. Touchpads are standard equipment on laptops these days, and
for everyday computing a modern touchpad can do everything a mouse can, and more. (Note,
however, that if you have an older machine, some or all of these gestures might not work.)
Windows 10 touchpad gestures
Gesture What it does
Tap Open or select an item
Place two fingers on the touchpad and slide
vertically or horizontally
Scroll
Place two fingers on the touchpad and pinch Zoom out
Place two fingers on the touchpad and spread
them apart
Zoom out
Tap the touchpad with two fingers Show more commands (like right-clicking)
Swipe three fingers up Show thumbnails of your currently running
apps in Task View
Swipe three fingers down Show the desktop
Swipe three fingers either left or right Switch between your open apps
Next up are the most useful keyboard shortcuts -- get to know these and you'll save oodles of time
as you zip around Windows 10 without taking your hands off the keys.
Windows Keyboard Shortcuts
Key combination What it does
Windows key Show/hide the Start menu (toggle)
Windows-A Show/hide the Action Center (toggle)
Windows-D Show the desktop or go to your previous location
Windows-E Open File Explorer
Copyright © 1994 - 2015 Computerworld, Inc. All rights reserved.
17
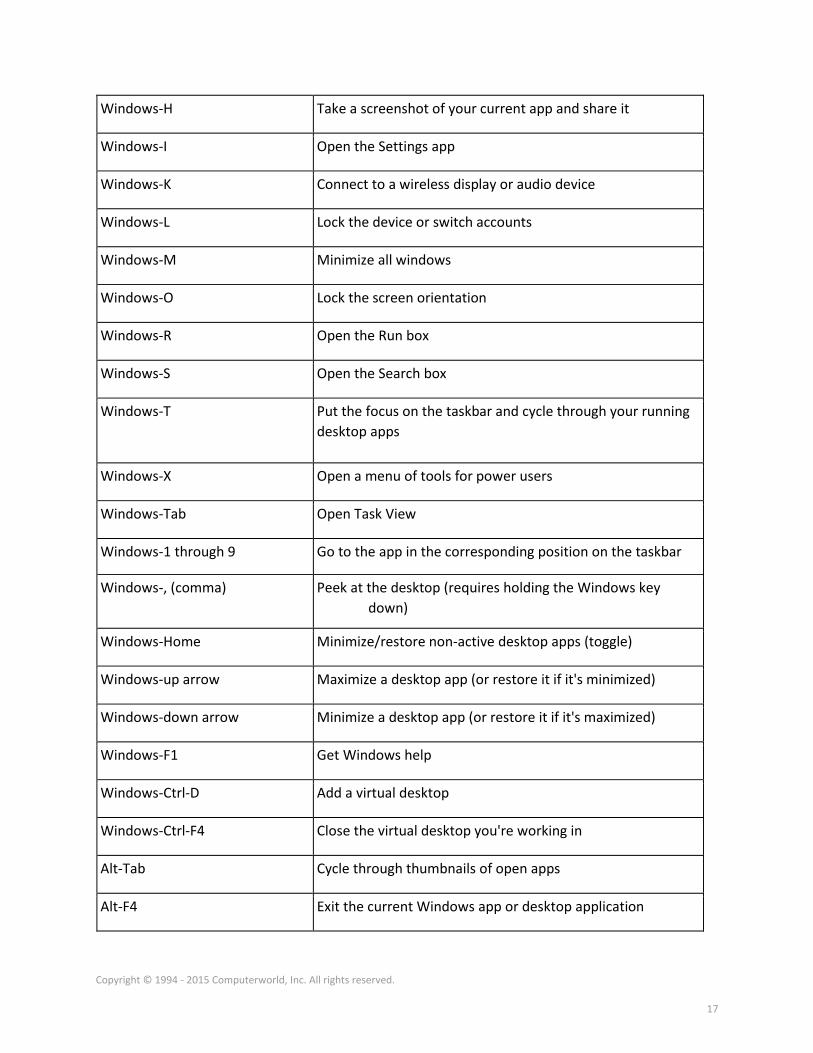
Windows-H Take a screenshot of your current app and share it
Windows-I Open the Settings app
Windows-K Connect to a wireless display or audio device
Windows-L Lock the device or switch accounts
Windows-M Minimize all windows
Windows-O Lock the screen orientation
Windows-R Open the Run box
Windows-S Open the Search box
Windows-T Put the focus on the taskbar and cycle through your running
desktop apps
Windows-X Open a menu of tools for power users
Windows-Tab Open Task View
Windows-1 through 9 Go to the app in the corresponding position on the taskbar
Windows-, (comma) Peek at the desktop (requires holding the Windows key
down)
Windows-Home Minimize/restore non-active desktop apps (toggle)
Windows-up arrow Maximize a desktop app (or restore it if it's minimized)
Windows-down arrow Minimize a desktop app (or restore it if it's maximized)
Windows-F1 Get Windows help
Windows-Ctrl-D Add a virtual desktop
Windows-Ctrl-F4 Close the virtual desktop you're working in
Alt-Tab Cycle through thumbnails of open apps
Alt-F4 Exit the current Windows app or desktop application
Copyright © 1994 - 2015 Computerworld, Inc. All rights reserved.
18
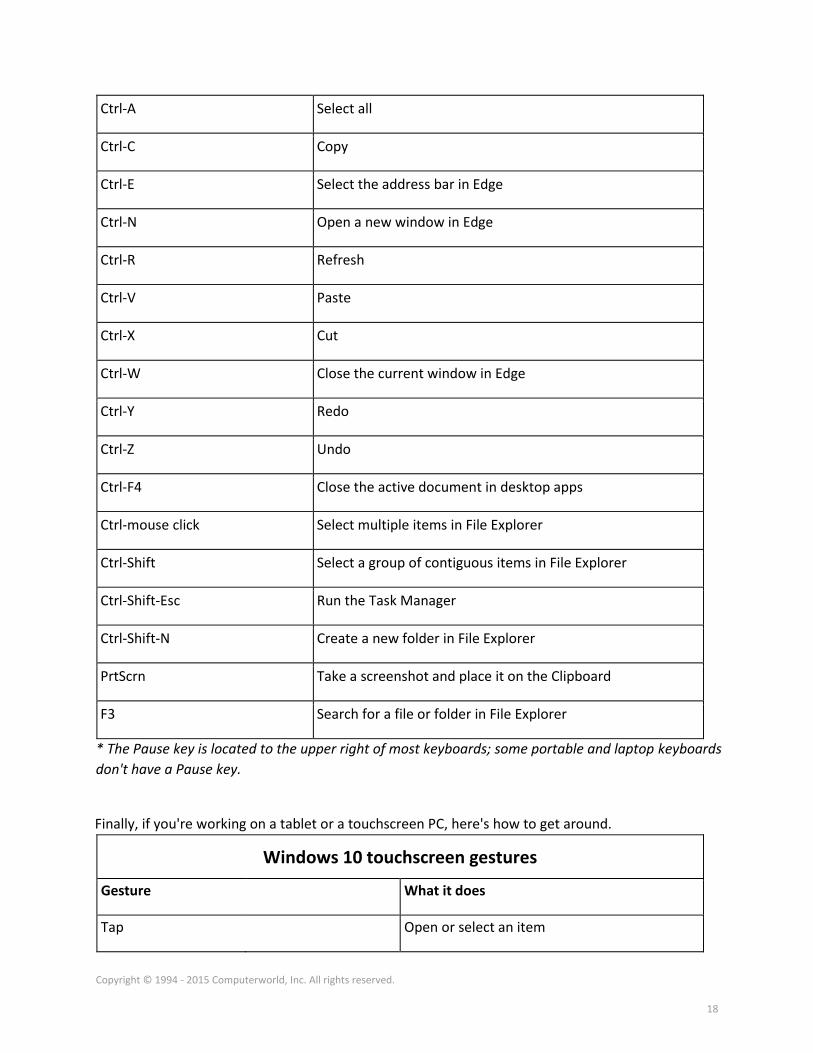
Ctrl-A Select all
Ctrl-C Copy
Ctrl-E Select the address bar in Edge
Ctrl-N Open a new window in Edge
Ctrl-R Refresh
Ctrl-V Paste
Ctrl-X Cut
Ctrl-W Close the current window in Edge
Ctrl-Y Redo
Ctrl-Z Undo
Ctrl-F4 Close the active document in desktop apps
Ctrl-mouse click Select multiple items in File Explorer
Ctrl-Shift Select a group of contiguous items in File Explorer
Ctrl-Shift-Esc Run the Task Manager
Ctrl-Shift-N Create a new folder in File Explorer
PrtScrn Take a screenshot and place it on the Clipboard
F3 Search for a file or folder in File Explorer
* The Pause key is located to the upper right of most keyboards; some portable and laptop keyboards
don't have a Pause key.
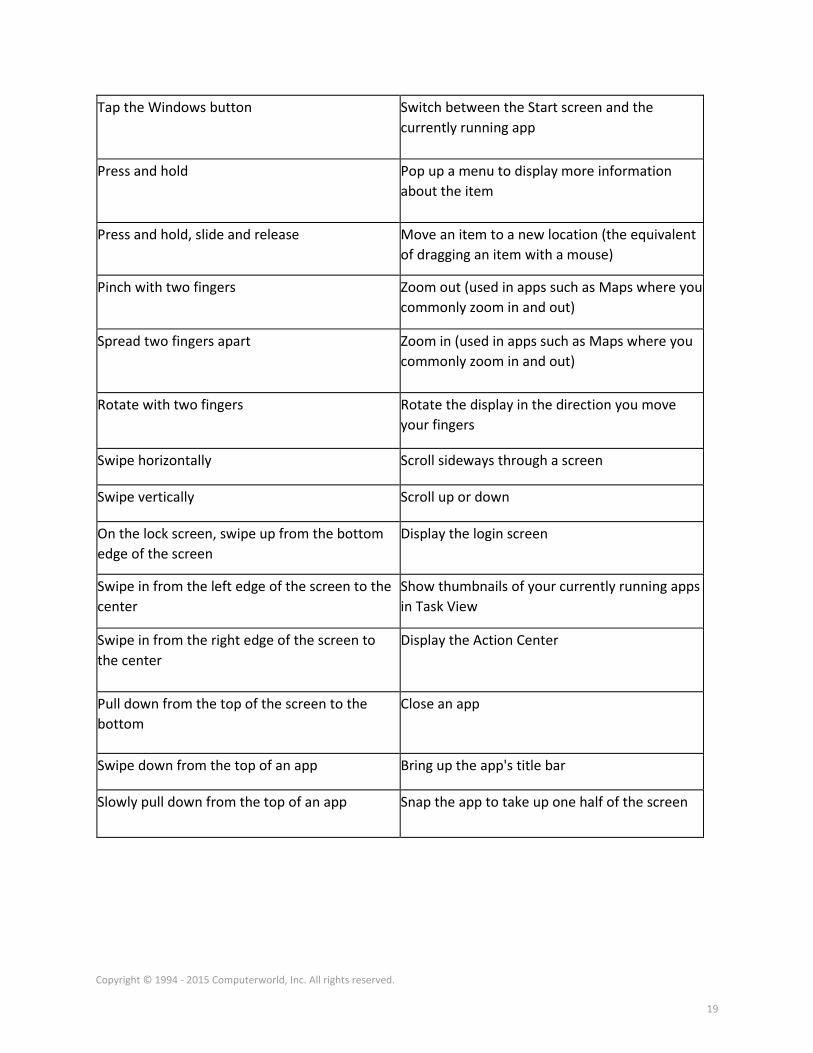
Finally, if you're working on a tablet or a touchscreen PC, here's how to get around.
Windows 10 touchscreen gestures
Gesture What it does
Tap Open or select an item
Copyright © 1994 - 2015 Computerworld, Inc. All rights reserved.
19
Tap the Windows button Switch between the Start screen and the
currently running app
Press and hold Pop up a menu to display more information
about the item
Press and hold, slide and release Move an item to a new location (the equivalent
of dragging an item with a mouse)
Pinch with two fingers Zoom out (used in apps such as Maps where you
commonly zoom in and out)
Spread two fingers apart Zoom in (used in apps such as Maps where you
commonly zoom in and out)
Rotate with two fingers Rotate the display in the direction you move
your fingers
Swipe horizontally Scroll sideways through a screen
Swipe vertically Scroll up or down
On the lock screen, swipe up from the bottom
edge of the screen
Display the login screen
Swipe in from the left edge of the screen to the
center
Show thumbnails of your currently running apps
in Task View
Swipe in from the right edge of the screen to
the center
Display the Action Center
Pull down from the top of the screen to the
bottom
Close an app
Swipe down from the top of an app Bring up the app's title bar
Slowly pull down from the top of an app Snap the app to take up one half of the screen


![Laravel Cheat Sheet - Kyle Huynh's blogkylehuynh.com/.../2014/09/Laravel-Cheat-Sheet.pdf · Laravel Cheat Sheet 9/15/2014 10:32:05 AM] // Displays help for a command php artisan help](https://img.pdfslide.net/doc/110x75/5aaac6457f8b9a90188e8e9c/laravel-cheat-sheet-kyle-huynhs-cheat-sheet-9152014-103205-am-displays.jpg)