Embed Size (px)
Citation preview
Understanding File ManagementTo work with the folders and files on your computer, you need to understand how your
computer stores them. You should also know how to organize them so you can always find
the information you need. These skills are called file management skills. When you cre-
ate a document and save it as a file, it is important that you save the file in a place where
you can find it later. To keep your computer files organized, you will need to copy, move,
and rename them. When you have files you don’t need any more, it’s a good idea to move
or delete them so your computer has only current files. Your supervisor, Evelyn
Swazey, asks you to learn how to manage your computer files so you can begin creating and
organizing documents for the upcoming Oceania tours.
UNIT
BWindows 7
No fi les needed.
Files You Will Need:
Understand folders and files
Create and save a file
Explore the files and folders on your computer
Change file and folder views
Open, edit, and save files
Copy files
Move and rename files
Search for files, folders, and programs
Delete and restore files
OBJECTIVES

UNIT
BWindows 7
Understanding File ManagementWindows 26
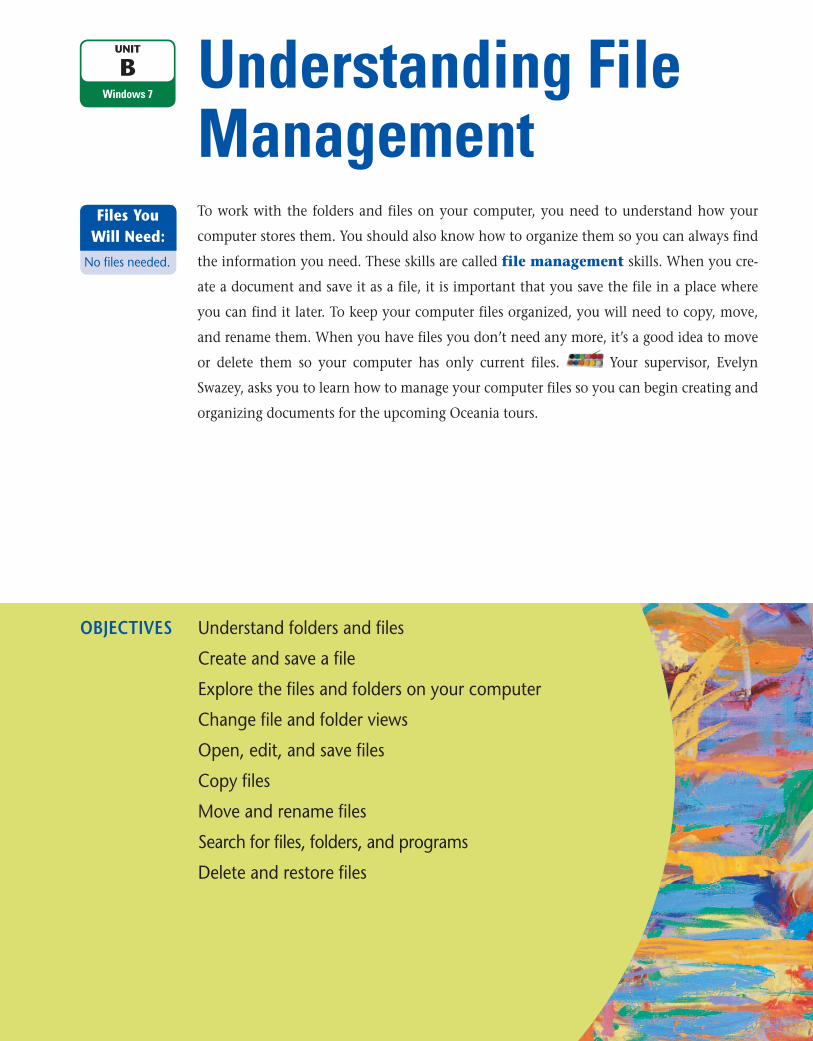
Understanding Folders and FilesAs you work with your computer programs, you create and save files, such as letters, drawings, or budgets. When you save files, you usually save them inside folders, which are storage areas on your computer. You use folders to group related files, as with paper folders in a file cabinet. The files and folders on your com-puter are organized in a fi le hierarchy, a system that arranges files and folders in different levels, like the branches of a tree. Figure B-1 shows a sample file hierarchy. Evelyn asks you to look at some impor-tant facts about files and folders to help you store your Oceania tour files.
Use the following guidelines as you organize files using your computer’s file hierarchy:
• Use folders and subfolders to organize filesAs you work with your computer, you can add folders to your hierarchy and rename them to help you orga-nize your work. You should give folders unique names that help you easily identify them. You can also create subfolders, which are folders that are inside of other folders. Windows comes with several existing folders, such as My Documents, My Music, and My Pictures, that you can use as a starting point.
• View files in windowsYou view your computer contents by opening a window, like the one in Figure B-2. A window is divided into sections. The Navigation pane on the left side of the window shows the folder structure on your com-puter. When you click a folder in the Navigation pane, you see its contents in the File list on the right side. The Details pane at the bottom of the window provides information about selected fi les in the File list. A window actually opens in an accessory program called Windows Explorer, although the program name does not appear on the window. You can open this program from the Start menu, or just double-click a folder to open its window and view its contents.
• Understand file addressesA window also contains an Address bar, an area just below the title bar that shows the location, or address, of the fi les that appear in the File list. An address is a sequence of folder names separated by the symbol that describes a fi le’s location in the fi le hierarchy. An address shows the folder with the highest hierarchy level on the left and steps through each hierarchy level toward the right, sometimes called a path. For example, the My Documents folder might contain a subfolder named Notes. In this case, the Address bar would show My Documents Notes. Each location between the symbols represents a level in the fi le hierarchy.
• Navigate upward and downward using the Address bar and File listYou can use the Address bar and the File list to move up or down in the hierarchy one or more levels at a time. To navigate upward in your computer’s hierarchy, you can click a folder or subfolder name in the Address bar. For example, in Figure B-2, you would move up in the hierarchy by clicking once on Users in the Address bar. Then the File list would show the subfolders and fi les inside the Users folder. To navigate downward in the hierarchy, double-click a subfolder in the File list. The path in the Address bar then shows the path to that subfolder.
• Navigate upward and downward using the Navigation paneYou can also use the Navigation pane to navigate among folders. Move the mouse pointer over the Naviga-tion pane, then click the small triangles or to the left of a folder name to show or hide the folder’s contents under the folder name. Subfolders appear indented under the folders that contain them, showing that they are inside that folder. Figure B-2 shows a folder named Users in the Navigation pane. The subfolders Katharine, Public, and Your User Name are inside the Users folder.
You can also start Windows Explorer by clicking the Windows Explorer button on the taskbar.
QUICK TIP
Remember that you single-click a folder or subfolder in the Address bar to show its contents. But in the File list, you double-click a sub-folder to open it.
QUICK TIP
DETAILS
Windows 27Understanding File Management
Window
s 7
Address shows
path to Your User
Name folder in
file hierarchy
Click Users to
move up one
level in
hierarchy
Users folder
Double-click any
folder to move one
level down in
hierarchy
Navigation pane
File list shows
contents of selected
Your User Name folde
Subfolders inside
the Your User Name
folderDetails pane
FIGURE B-2: Windows Explorer window
FIGURE B-1: Sample folder and file hierarchy
My
Documents
Tours Tour Guide
Bio.docx
Correspondence Quest Specialty
Travel
Tour Brochures Tour Calendars Tour Proposals
French Polynesia
Tour Brochure.docx
June Tour
Calendar.docx Tokelau Tour
Proposal.docx
Tuvalu Tour
Proposal.docx
Niue Tour
Proposal.docx
As you manage your files, you should plan how you want to organize them. First, identify the types of files you work with, such as images, music, and reports. Think about the content, such as personal, business, clients, or projects. Then think of a folder organization that will help you find them later. For example, use subfolders in the My Pictures folder to separate family photos from business photos or to
group them by year. In the My Documents folder, you might group personal files in one subfolder and business files in another subfolder. Then create additional subfolders to further separate sets of files. You can always move files among folders and rename folders. You should periodically reevaluate your folder structure to make sure that it contin-ues to meet your needs.
Plan your file organization
UNIT
BWindows 7
Understanding File ManagementWindows 28
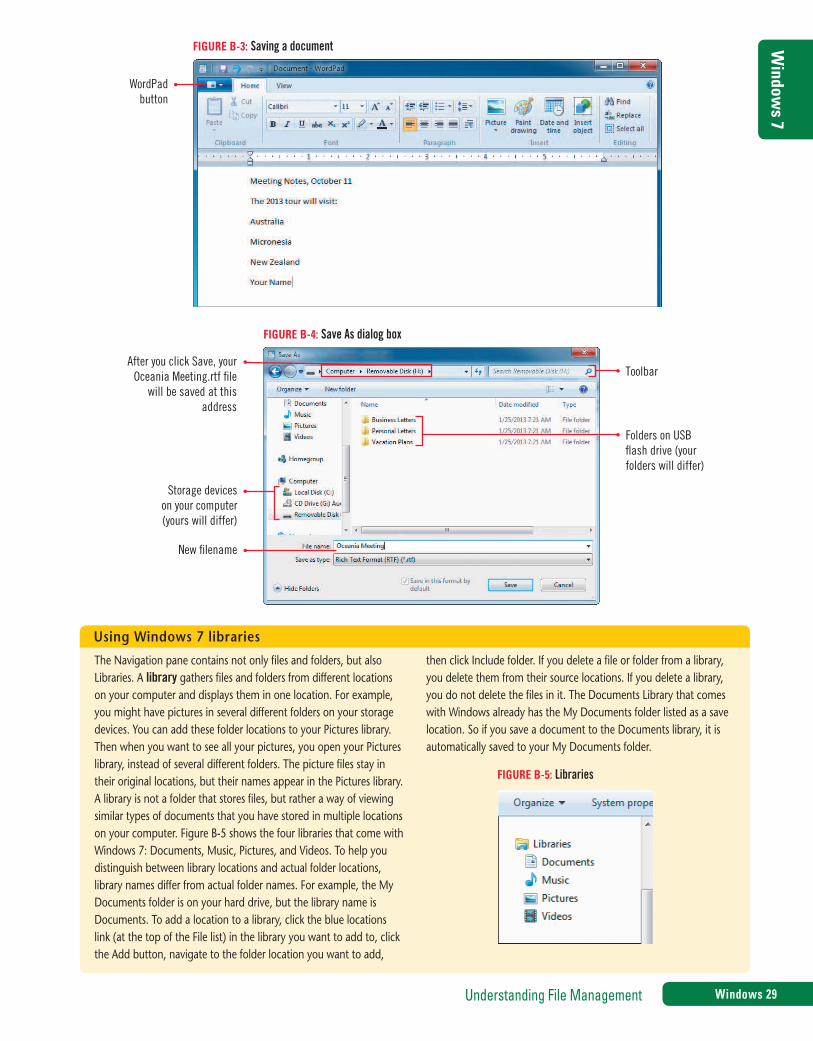
Creating and Saving a FileAfter you start a program and create a new file, the file exists only in your computer’s random access memory (RAM), which is a temporary storage location. RAM only contains information when your com-puter is on. When you turn off your computer, it automatically clears the contents of RAM. So you need to save a new file onto a storage device that permanently stores the file so that you can open, change, and use it later. One important storage device is your computer’s hard disk built into your computer. Another popular option is a USB fl ash drive, a small, portable storage device. Evelyn asks you to use the WordPad accessory program to create a short summary of an Oceania tour planning meeting and save it.
1. Start Windows if necessary, click the Start button on the taskbar, point to All Programs, click Accessories, then click WordPad The WordPad program opens. Near the top of the screen you see the Ribbon containing command buttons, similar to those you used in Paint in Unit A. The Home tab appears in front. A new, blank document appears in the document window. The blinking insertion point shows you where the next character you type will appear.
2. Type Meeting Notes, October 11, then press [Enter]WordPad inserts a new blank line and places the insertion point at the beginning of the next line.
3. Type The 2013 tour will visit:, press [Enter], type Australia, press [Enter], type Micronesia, press [Enter], type New Zealand, press [Enter], then type your name; see Figure B-3
4. Click the WordPad button on the upper-left side of the window below the title bar, then click Save on the WordPad menuThe fi rst time you save a fi le using the Save button, the Save As dialog box opens. Use this dialog box to name the document fi le and choose a storage location for it. The Save As dialog box has many of the same elements as a Windows Explorer window, including an Address bar, a Navigation pane, and a File list. Below the Address bar, the toolbar contains command buttons you can click to perform actions. In the Address bar, you can see that WordPad chose the Documents library (which includes the My Documents folder) as the storage location.
5. Plug your USB flash drive into a USB port on your computer, if necessaryOn a laptop computer, the USB port is on the left or right side of your computer. On a desktop computer, the USB port is on the front panel (you may need to open a small door to see it), or on the back panel.
6. In the Navigation pane scroll bar, click the Down scroll arrow as needed to see Computer and any storage devices listed under itUnder Computer, you see the storage locations available on your computer, such as Local Disk (C:) (your hard drive) and Removable Disk (H:) (your USB drive name and letter might differ). These storage locations act like folders because you can open them and store fi les in them.
7. Click the name for your USB flash driveThe fi les and folders on your USB drive, if any, appear in the File list. The Address bar shows the location where the fi le will be saved, which is now Computer > Removable Disk (H:) (or the name of your drive). You need to give your document a meaningful name so you can fi nd it later.
8. Click in the Filename text box to select the default name Document, type Oceania Meeting, compare your screen to Figure B-4, then click SaveThe document is saved as a fi le on your USB fl ash drive. The fi lename Oceania Meeting.rtf appears in the title bar at the top of the window. The “.rtf” at the end of the fi lename is the fi le extension. A file extension is a three- or four-letter sequence, preceded by a period, that identifi es the fi le as a particular type of document, in this case Rich Text Format, to your computer. The WordPad program creates fi les using the RTF format. Windows adds the .rtf fi le extension automatically after you click Save.
9. Click the Close button on the WordPad windowThe WordPad program closes. Your meeting minutes are now saved on your USB fl ash drive.
If you make a typing mistake, press [Backspace] to delete the character to the left of the insertion point.
TROUBLE
If you don’t have a USB fl ash drive, save the document in the My Documents folder instead.
TROUBLE
If your Save As dia-log box or title bar does not show the .rtf fi le extension, open any Windows Explorer window, click Organize in the toolbar, click Folder and search options, click the View tab, then under Files and Folders, click to remove the check mark from Hide extensions for known fi le types.
TROUBLE
STEPS
Windows 29Understanding File Management
Window
s 7
WordPad
button
FIGURE B-3: Saving a document
Storage devices
on your computer
(yours will differ)
After you click Save, your
Oceania Meeting.rtf file
will be saved at this
address
Folders on USB
flash drive (your
folders will differ)
Toolbar
New filename
FIGURE B-4: Save As dialog box
The Navigation pane contains not only files and folders, but also Libraries. A library gathers files and folders from different locations on your computer and displays them in one location. For example, you might have pictures in several different folders on your storage devices. You can add these folder locations to your Pictures library. Then when you want to see all your pictures, you open your Pictures library, instead of several different folders. The picture files stay in their original locations, but their names appear in the Pictures library. A library is not a folder that stores files, but rather a way of viewing similar types of documents that you have stored in multiple locations on your computer. Figure B-5 shows the four libraries that come with Windows 7: Documents, Music, Pictures, and Videos. To help you distinguish between library locations and actual folder locations, library names differ from actual folder names. For example, the My Documents folder is on your hard drive, but the library name is Documents. To add a location to a library, click the blue locations link (at the top of the File list) in the library you want to add to, click the Add button, navigate to the folder location you want to add,
then click Include folder. If you delete a file or folder from a library, you delete them from their source locations. If you delete a library, you do not delete the files in it. The Documents Library that comes with Windows already has the My Documents folder listed as a save location. So if you save a document to the Documents library, it is automatically saved to your My Documents folder.
Using Windows 7 libraries
FIGURE B-5: Libraries
UNIT
BWindows 7
Understanding File ManagementWindows 30
Exploring the Files and Folders on Your ComputerIn the last lesson, you navigated to your USB flash drive as you worked in the Save As dialog box. But even if you’re not saving a document, you will want to examine your computer and its existing folder and file structure. That way, you’ll know where to save files as you work with Windows application programs. In a Windows Explorer window, you can navigate through your computer contents using the File list, the Address bar, and the Navigation pane. As you prepare for the Oceania tours, you look at the files and folders on your computer.
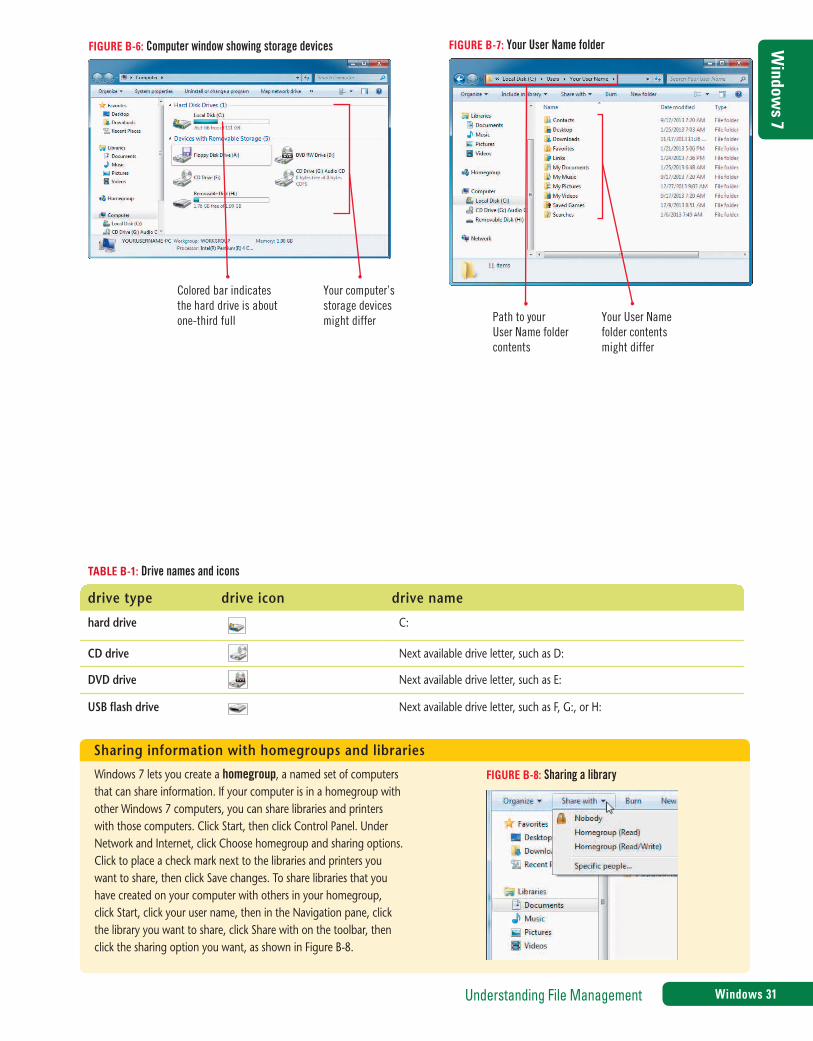
1. Click the Start button on the taskbar, then click ComputerYour computer’s storage devices appear in a window, as shown in Figure B-6, including hard drives; devices with removable storage, such as CD and DVD drives or USB fl ash drives; and portable devices such as per-sonal digital assistants (PDAs). Table B-1 lists examples of different drive types. A colored bar shows you how much space has been taken up on your hard drive. You decide to move down a level in your computer’s hierarchy and see what is on your USB fl ash drive.
2. In the File list, double-click Removable Disk (H:) (or the drive name and letter for your USB flash drive)You see the contents of your USB fl ash drive, including the Oceania Meeting.rtf fi le you saved in the last lesson. You decide to navigate one level up in the fi le hierarchy.
3. In the Address bar, click ComputerYou return to the Computer window showing your storage devices. You decide to look at the contents of your hard drive.
4. In the Navigation pane, click Local Disk (C:)The contents of your hard drive appear in the File list. The Users folder contains a subfolder for each user who has a user account on this computer. Recall that you double-click items in the File list to open them. In the Address bar and in the Navigation pane, you only need to single-click.
5. In the File list, double-click the Users folderYou see folders for each user registered on your computer. You might see a folder with your user account name on it. Each user’s folder contains that person’s documents. User folder names are the log-in names that were entered when your computer was set up. When a user logs in, the computer allows that user access to the folder with the same user name. If you are using a computer with more than one user, you might not have permission to view other users’ folders. There is also a Public folder that any user can open.
6. Double-click the folder with your user name on itDepending on how your computer is set up, this folder might be labeled with your name; however, if you are using a computer in a lab or a public location, your folder might be called Student or Computer User or something similar. You see a list of folders, such as My Documents, My Music, and others. See Figure B-7.
7. Double-click My DocumentsYou see the folders and documents you can open and work with. In the Address bar, the path to the My Documents folder is Computer Local Disk (C:) Users Your User Name My Documents. You decide to return to the Computer window.
8. In the Navigation pane, click ComputerYou moved up three levels in your hierarchy. You can also move one level up at a time in your fi le hierarchy by pressing the [Backspace] key on your keyboard. You once again see your computer’s storage devices.
If you don’t see the colored bar, click the More Options list arrow on the menu bar, then click Tiles.
TROUBLE
If you do not have a USB fl ash drive, click the Documents library in the Navi-gation pane instead.
TROUBLE
Click the Back but-ton, to the left of the Address bar, to return to the win-dow you last viewed. In the Address bar, click to the right of a folder name to see a list of the subfold-ers. If the folder is open, its name appears in bold.
QUICK TIP
STEPS
Windows 31Understanding File Management
Window
s 7FIGURE B-6: Computer window showing storage devices
Colored bar indicates
the hard drive is about
one-third full
Your computer’s
storage devices
might differ Path to your
User Name folder
contents
Your User Name
folder contents
might differ
FIGURE B-7: Your User Name folder
TABLE B-1: Drive names and icons
drive type drive icon drive name
hard drive C:
CD drive Next available drive letter, such as D:
DVD drive Next available drive letter, such as E:
USB fl ash drive Next available drive letter, such as F, G:, or H:
Windows 7 lets you create a homegroup, a named set of computers that can share information. If your computer is in a homegroup with other Windows 7 computers, you can share libraries and printers with those computers. Click Start, then click Control Panel. Under Network and Internet, click Choose homegroup and sharing options. Click to place a check mark next to the libraries and printers you want to share, then click Save changes. To share libraries that you have created on your computer with others in your homegroup, click Start, click your user name, then in the Navigation pane, click the library you want to share, click Share with on the toolbar, then click the sharing option you want, as shown in Figure B-8.
Sharing information with homegroups and libraries
FIGURE B-8: Sharing a library
UNIT
BWindows 7
Understanding File ManagementWindows 32
Changing File and Folder ViewsAs you view your folders and files, you might want to see as many items as possible in a window. At other times, you might want to see details about each item. Windows 7 lets you choose from eight different views, which are appearance choices for your folder contents. Each view provides different information about the files and folders in different ways. You can list your folders and files by using several different-sized icons or in lists. You can also sort them to change the order in which the folders and files are listed. If you want to see what a file looks like, but don’t want to open the file, you can see a preview of it in the window. As you plan the Oceania tour, you review picture files in various views.
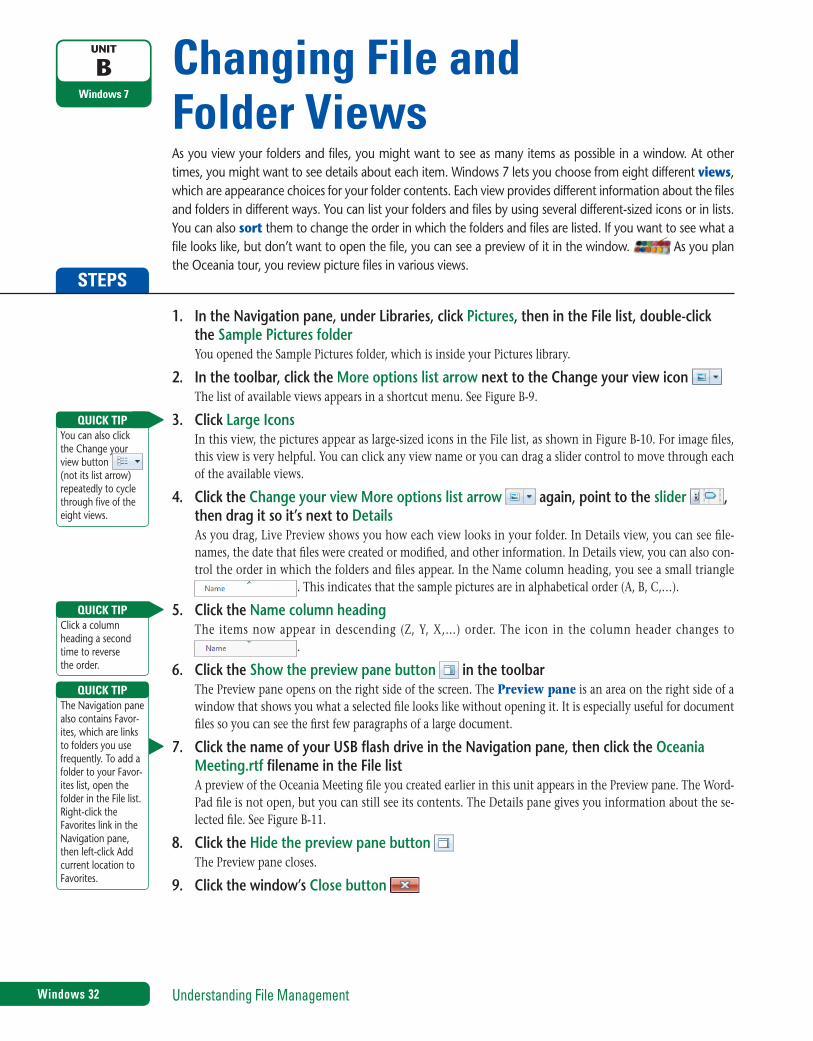
1. In the Navigation pane, under Libraries, click Pictures, then in the File list, double-click the Sample Pictures folderYou opened the Sample Pictures folder, which is inside your Pictures library.
2. In the toolbar, click the More options list arrow next to the Change your view icon The list of available views appears in a shortcut menu. See Figure B-9.
3. Click Large IconsIn this view, the pictures appear as large-sized icons in the File list, as shown in Figure B-10. For image fi les, this view is very helpful. You can click any view name or you can drag a slider control to move through each of the available views.
4. Click the Change your view More options list arrow again, point to the slider , then drag it so it’s next to Details As you drag, Live Preview shows you how each view looks in your folder. In Details view, you can see fi le-names, the date that fi les were created or modifi ed, and other information. In Details view, you can also con-trol the order in which the folders and fi les appear. In the Name column heading, you see a small triangle
. This indicates that the sample pictures are in alphabetical order (A, B, C,…).
5. Click the Name column headingThe items now appear in descending (Z, Y, X,…) order. The icon in the column header changes to
.
6. Click the Show the preview pane button in the toolbarThe Preview pane opens on the right side of the screen. The Preview pane is an area on the right side of a window that shows you what a selected fi le looks like without opening it. It is especially useful for document fi les so you can see the fi rst few paragraphs of a large document.
7. Click the name of your USB flash drive in the Navigation pane, then click the Oceania Meeting.rtf filename in the File listA preview of the Oceania Meeting fi le you created earlier in this unit appears in the Preview pane. The Word-Pad fi le is not open, but you can still see its contents. The Details pane gives you information about the se-lected fi le. See Figure B-11.
8. Click the Hide the preview pane button The Preview pane closes.
9. Click the window’s Close button
Click a column heading a second time to reverse the order.
QUICK TIP
The Navigation pane also contains Favor-ites, which are links to folders you use frequently. To add a folder to your Favor-ites list, open the folder in the File list. Right-click the Favorites link in the Navigation pane, then left-click Add current location to Favorites.
QUICK TIP
STEPS
You can also click the Change your view button (not its list arrow) repeatedly to cycle through fi ve of the eight views.
QUICK TIP

Windows 33Understanding File Management
Window
s 7FIGURE B-9: More options shortcut menu showing views
Slider
Your pictures
might differ
FIGURE B-10: Sample pictures library as large icons
Selected
document
USB flash
drive selected
Details pane
Preview pane
shows preview of
selected document
Show the preview
pane button
FIGURE B-11: Preview of selected Oceania Meeting.rtf file

UNIT
BWindows 7
Understanding File ManagementWindows 34
Opening, Editing, and Saving FilesOnce you have created a file and saved it with a name in a folder on a storage device, you can easily open it and edit (make changes to) it. For example, you might want to add or delete text to a document, or change the color in a drawing. Then you save the file again so that it contains your latest changes. Usually you save a file with the same filename and in the same location as the original, which replaces the existing file with the latest, updated version. When you save a file you have changed, you use the Save command. Evelyn asks you to complete the meeting notes.
1. Click the Start button on the taskbar, point to All Programs, click the Accessories folder, then click WordPadIf you use WordPad frequently, it’s name might appear on the left side of the Start menu. If it does, you can click it there to open it.
2. Click the WordPad button , then click Open The Open dialog box opens. It has the same sections as the Save As dialog box and the Windows Explorer windows you used earlier in this unit. You decide to navigate to the location where you saved your Oceania Meeting.rtf fi le so you can open it.
3. Scroll down in the Navigation pane if necessary until you see Computer, then click Removable Disk (H:) (or the drive name and letter for your USB flash drive)The contents of your USB fl ash drive appear in the File list, as shown in Figure B-12.
4. Click Oceania Meeting.rtf in the File list, then click OpenThe document you created earlier opens.
5. Click to the right of the “d” in New Zealand, press [Enter], then type Evelyn Swazey closed the meeting.The edited document includes the text you just typed. See Figure B-13.
6. Click the WordPad button , then click Save, as shown in Figure B-14WordPad saves the document with your most recent changes, using the fi lename and location you specifi ed when you saved it for the fi rst time. When you save an existing fi le, the Save As dialog box does not open.
7. Click , then click Exit
You can also double-click the fi lename in the File list to open the fi le.
QUICK TIP
Instead of using the WordPad menu and Save command to save a document, you can also click the Save button. in the Quick Access toolbar at the top of the WordPad window.
QUICK TIP
STEPS
The WordPad menu has two save command options—Save and Save As. When you first save a file, the Save As dialog box opens (whether you choose Save or Save As). Here you can select the drive and folder where you want to save the file and enter its filename. If you edit a previously saved file, you can save the file to the same location with the same filename using the Save command. The Save command
updates the stored file using the same location and filename without opening the Save As dialog box. In some situations, you might want to save another copy of the existing document using a different file-name or in a different storage location. To do this, open the docu-ment, use the Save As command, and then navigate to a different location, and/or edit the name of the file.
Comparing Save and Save As
If you are not using a USB fl ash drive, click an appropriate storage location in the Navigation pane.
TROUBLE

Windows 35Understanding File Management
Window
s 7
The folders on your
drive will differ
FIGURE B-12: Navigating in the Open dialog box
Added text
FIGURE B-13: Edited document
FIGURE B-14: Saving a revised document
UNIT
BWindows 7
Understanding File ManagementWindows 36
Copying FilesAs you have learned, saving a file in a location on your hard drive stores it so you can open it later. But some-times you will want to make a copy of a file. For example, you might want to put a copy on a USB flash drive so you can open the file on another machine or share a file with a friend or colleague. Or you might want to create a copy as a backup, or replacement, in case something happens to your original file. You copy files and folders using the Copy command and then place the copy in another location using the Paste com-mand. You cannot have two copies of a file with the same name in the same folder. If you attempt to do this, Windows 7 will ask you if you want to replace the first one then gives you a chance to give the second copy a different name. Evelyn asks you to create a backup copy of the meeting notes document you cre-ated and paste it in a new folder you create on your USB flash drive.
1. Click the Start button on the taskbar, then click Computer2. In the File list, double-click Removable Disk (H:) (or the drive name and letter for your
USB flash drive)First you create the new folder Evelyn needs.
3. In the toolbar, click the New folder buttonA new folder appears in the File list, with its name, New folder, selected. Because the folder name is selected, any text you type replaces the selected text as the folder name.
4. Type Meeting Notes, then press [Enter]You named the new folder Meeting Notes. Next, you copy your original Oceania Meeting.rtf fi le.
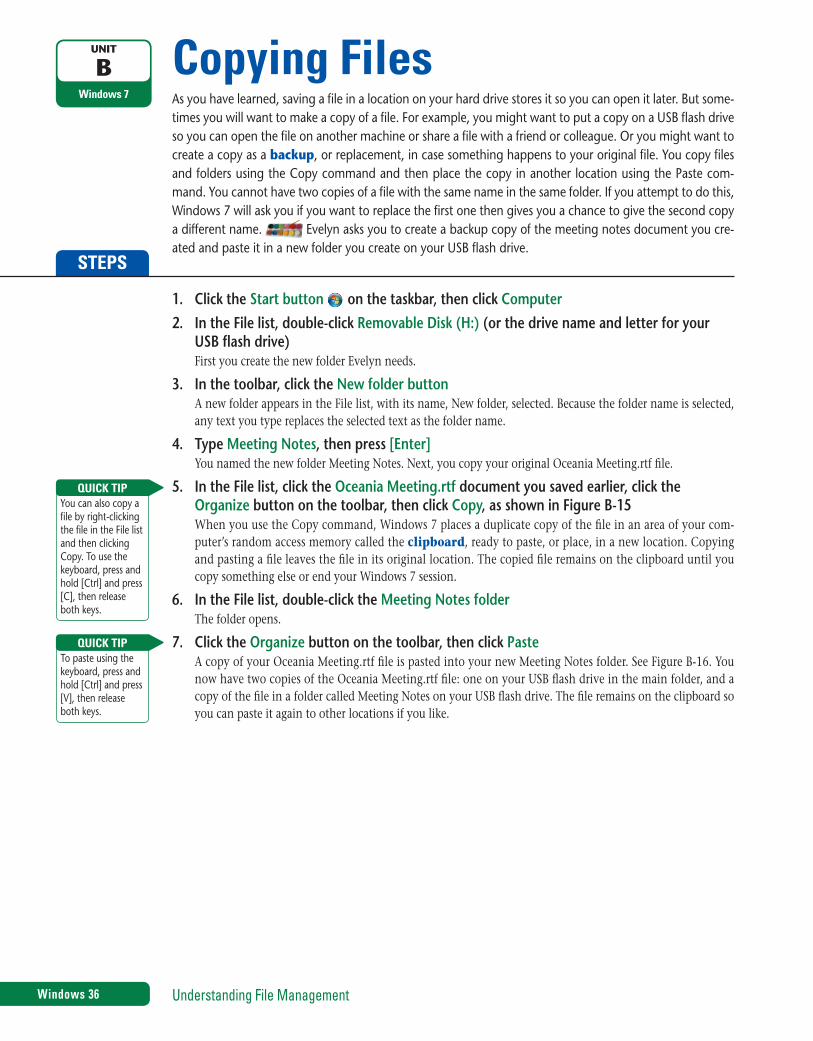
5. In the File list, click the Oceania Meeting.rtf document you saved earlier, click the Organize button on the toolbar, then click Copy, as shown in Figure B-15When you use the Copy command, Windows 7 places a duplicate copy of the fi le in an area of your com-puter’s random access memory called the clipboard, ready to paste, or place, in a new location. Copying and pasting a fi le leaves the fi le in its original location. The copied fi le remains on the clipboard until you copy something else or end your Windows 7 session.
6. In the File list, double-click the Meeting Notes folderThe folder opens.
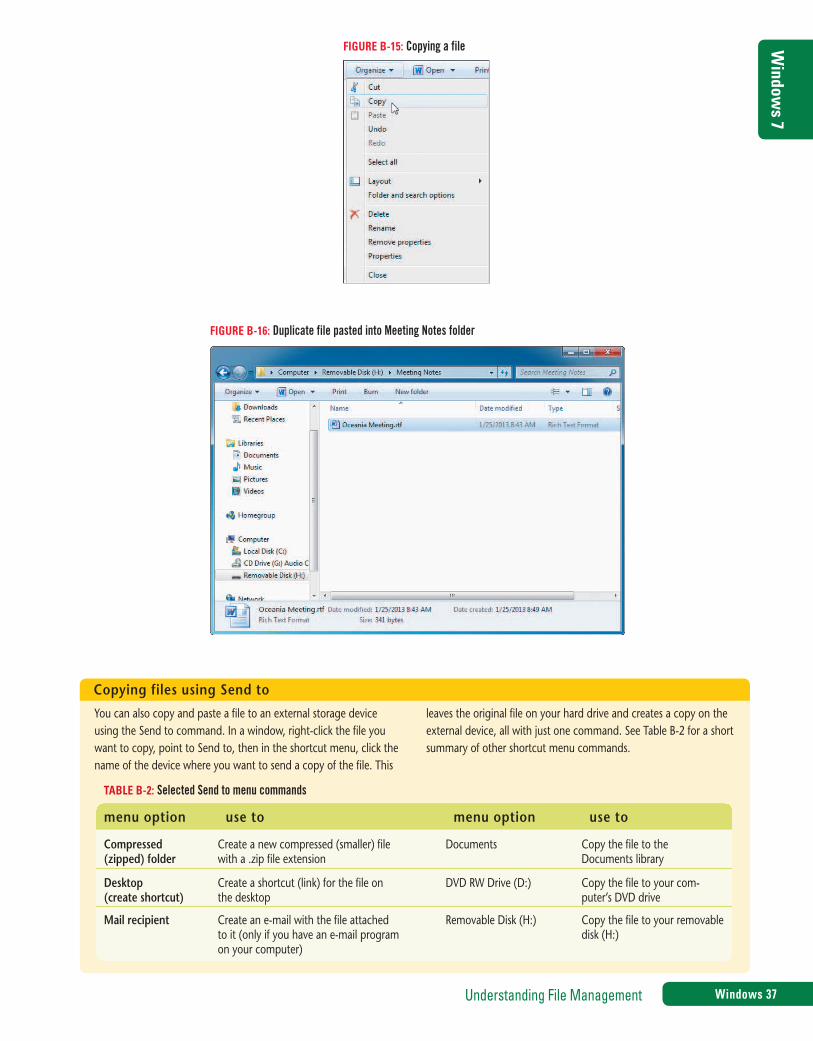
7. Click the Organize button on the toolbar, then click Paste A copy of your Oceania Meeting.rtf fi le is pasted into your new Meeting Notes folder. See Figure B-16. You now have two copies of the Oceania Meeting.rtf fi le: one on your USB fl ash drive in the main folder, and a copy of the fi le in a folder called Meeting Notes on your USB fl ash drive. The fi le remains on the clipboard so you can paste it again to other locations if you like.
You can also copy a fi le by right-clicking the fi le in the File list and then clicking Copy. To use the keyboard, press and hold [Ctrl] and press [C], then release both keys.
QUICK TIP
To paste using the keyboard, press and hold [Ctrl] and press [V], then release both keys.
QUICK TIP
STEPS
Windows 37Understanding File Management
Window
s 7FIGURE B-15: Copying a file
FIGURE B-16: Duplicate file pasted into Meeting Notes folder
You can also copy and paste a file to an external storage device using the Send to command. In a window, right-click the file you want to copy, point to Send to, then in the shortcut menu, click the name of the device where you want to send a copy of the file. This
leaves the original file on your hard drive and creates a copy on the external device, all with just one command. See Table B-2 for a short summary of other shortcut menu commands.
Copying files using Send to
TABLE B-2: Selected Send to menu commands
menu option use to menu option use to
Compressed (zipped) folder
Create a new compressed (smaller) file with a .zip file extension
Documents Copy the file to the Documents library
Desktop (create shortcut)
Create a shortcut (link) for the file on the desktop
DVD RW Drive (D:) Copy the file to your com-puter’s DVD drive
Mail recipient Create an e-mail with the file attached to it (only if you have an e-mail program on your computer)
Removable Disk (H:) Copy the file to your removable disk (H:)

UNIT
BWindows 7
Understanding File ManagementWindows 38
Moving and Renaming Files As you work with files, you might need to move files or folders to another location. You can move one or more files or folders. You might move them to a different folder on the same drive or a different drive. When you move a file, the file is transferred to the new location and no longer exists in its original loca-tion. You can move a file using the Cut and Paste commands. After you create a file, you might find that the original name you gave the file isn’t clear anymore, so you can rename it to make it more descriptive or accurate. You decide to move your original Oceania Meeting.rtf document to your Documents library. After you move it, you decide to edit the filename so it better describes the file contents.
1. In the Address bar, click Removable Disk (H:) (or the drive name and letter for your USB flash drive)
2. Click the Oceania Meeting.rtf document to select it3. Click the Organize button on the toolbar, then click Cut
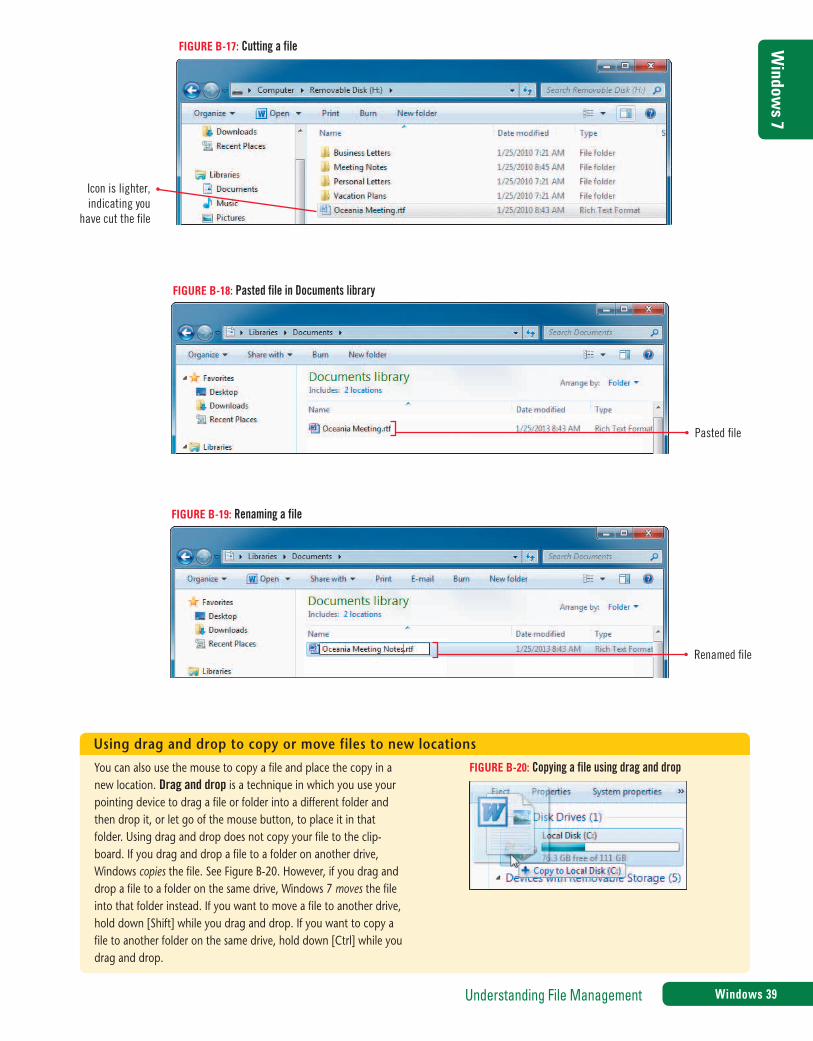
The icon representing the cut file becomes lighter in color, indicating you have cut it, as shown in Figure B-17. You navigate to your Documents library, in preparation for pasting the cut document there.
4. In the Navigation Pane, under Libraries, click Documents5. Click the Organize button on the toolbar, then click Paste
The Oceania Meeting.rtf document appears in your Documents library. See Figure B-18. The fi lename could be clearer, to help you remember that it contains notes from your meeting.
6. With the Oceania Meeting.rtf file selected, click the Organize button on the toolbar, then click RenameThe fi lename is highlighted. In a window, the fi le extension cannot change because it identifi es the fi le to WordPad. If you delete the fi le extension, the fi le cannot be opened. You could type a new name to replace the old one, but you decide to add the word “Notes” to the end of the fi lename instead.
7. Click the after the “g” in “Meeting”, press [Spacebar], then type Notes, as shown in Figure B-19, then press [Enter]You changed the name of the document copy in the Documents library. The fi lename now reads Oceania Meeting Notes.rtf.
8. Close the window
You can also cut a fi le by right-clicking the fi le in the File list and then clicking Cut. To use the key-board, press and hold [Ctrl] and press [X], then release both keys.
You can also paste a fi le by right-clicking an empty area in the File list and then clicking Paste. To use the keyboard, press and hold [Ctrl] and press [V], then release both keys.
QUICK TIP
QUICK TIP
STEPS
Windows 39Understanding File Management
Window
s 7
Icon is lighter,
indicating you
have cut the file
FIGURE B-17: Cutting a file
Pasted file
FIGURE B-18: Pasted file in Documents library
Renamed file
FIGURE B-19: Renaming a file
You can also use the mouse to copy a file and place the copy in a new location. Drag and drop is a technique in which you use your pointing device to drag a file or folder into a different folder and then drop it, or let go of the mouse button, to place it in that folder. Using drag and drop does not copy your file to the clip-board. If you drag and drop a file to a folder on another drive, Windows copies the file. See Figure B-20. However, if you drag and drop a file to a folder on the same drive, Windows 7 moves the file into that folder instead. If you want to move a file to another drive, hold down [Shift] while you drag and drop. If you want to copy a file to another folder on the same drive, hold down [Ctrl] while you drag and drop.
Using drag and drop to copy or move files to new locations
FIGURE B-20: Copying a file using drag and drop

UNIT
BWindows 7
Understanding File ManagementWindows 40
Searching for Files, Folders, and ProgramsAfter copying or moving folders and files, you might forget where you stored a particular folder or file, its name, or both. Or you might need help finding a program on your computer. Windows Search helps you quickly find any file, folder, or program. You must type one or more letter sequences or words that help Windows 7 identify the item you want. The search text you type is called your search criteria. Your search criteria can be a filename, part of a filename, or any other characters you choose. Windows 7 will find files with that information in its name or with that information inside the file. For example, if you type “word,” Windows 7 will find the program Microsoft Word, any documents with “word” in its title, or any document with “word” inside the file. To search your entire computer, including its attached drives, you can use the Search box on the Start menu. To search within a particular folder, you can use the Search box in a Windows Explorer window. You want to locate the copy of the Oceania Meeting Notes.rtf document so you can print it for a colleague.
1. Click the Start button on the taskbarThe Search programs and fi les box at the bottom of the Start menu already contains the insertion point, ready for you to type search criteria. You begin your search by typing a part of a word that is in the fi lename.
2. Type meEven before you fi nish typing the word “meeting”, the Start menu lists all programs, fi les, and Control Panel items that have the letters “me” in their title or somewhere inside the fi le or the fi le properties. See Figure B-21. Your search results will differ, depending on the programs and fi les on your computer. File properties are details that Windows stores about a fi le. Windows arranges the search results into categories.
3. Type eThe search results narrow to only the fi les that contain “mee”. The search results become more specifi c every time you add more text to your criteria fi nding the two versions of your meeting notes fi le. See Figure B-22.
4. Point to the Oceania Meeting.rtf filename under FilesThe ScreenTip shows the fi le location. This Oceania Meeting.rtf fi le is on the USB fl ash drive. The fi lenames are links to the document. You only need to single-click a fi le to open it.
5. Under Documents, click Oceania Meeting Notes.rtfThe fi le opens in WordPad.
6. Click the Close button in the program window’s title barYou can search in a folder or on a drive using the search box in any Windows Explorer window.
7. Click , click Computer, in the Navigation pane click Removable Disk (H:) (or the drive name and letter for your USB flash drive)
8. Click the Search Removable Disk (H:) text box, to the right of the Address bar9. Type mee to list all files and folders on your USB flash drive that contain “mee”
The search criterion, mee, is highlighted in the fi lenames. The results include the folder called Meeting Notes and the fi le named Oceania Meeting.rtf. Because you navigated to your USB fl ash drive, Windows only lists the document version that is on that drive. See Figure B-23.
10. Double-click Oceania Meeting.rtf in the File list to open the document file in WordPad, view the file, close WordPad, then close the Windows Explorer window
If you do not have a USB fl ash drive, click another storage location in the Navi-gation pane.
TROUBLE
Search text is not case sensitive. Typing lowercase “mee”, you will still fi nd items that start with “Mee” or “mee”.
QUICK TIP
Your fi le might open in another program on your computer that reads RTF fi les. You can continue with the lesson.
TROUBLE
STEPS

Windows 41Understanding File Management
Window
s 7
Search criterion in
Search Computer
text box
Search results
Search criterion
highlighted
FIGURE B-23: Searching using the Search Computer text box in folder window
Search results divided
into categories (your
search results will differ)
Search criterion
FIGURE B-21: Searching on criterion “me”
Search results narrow down
to fewer documents (your
search results will differ)
FIGURE B-22: Searching on criterion “mee”
To locate all files that have the same file extension (such as .rtf), type the file extension as your search criterion. If you want to locate files created by a certain person, use the first name, last name, or first and last name as your search criteria. If you want to locate files cre-ated on a certain date, type the date (for example, 7/9/2012) as
your search criterion. If you remember the title in a document, type the title as your search criterion. If you have created e-mail contacts in your Contacts folder, you can type the person’s name to find his or her e-mail address.
Performing more advanced searches
UNIT
BWindows 7
Understanding File ManagementWindows 42
Deleting and Restoring FilesIf you no longer need a folder or file, you can delete (or remove) it from the storage device. By regularly deleting files and folders you no longer need and emptying the Recycle Bin, you free up valuable storage space on your computer. This also keeps your computer uncluttered. Windows 7 places folders and files you delete from your hard drive in the Recycle Bin. If you delete a folder, Windows 7 removes the folder as well as all files and subfolders stored in it. If you later discover that you need a deleted file or folder, you can restore it to its original location, but only if you have not yet emptied the Recycle Bin. Emptying the Recycle Bin permanently removes the deleted folders and files from your computer. However, files and folders you delete from a removable drive, such as a USB flash drive, do not go to the Recycle Bin. They are immediately and permanently deleted and cannot be restored. You delete the meeting notes copy saved in the Documents library and then restore it.
1. Click the Start button on the taskbar, then click DocumentsYour Documents library opens.
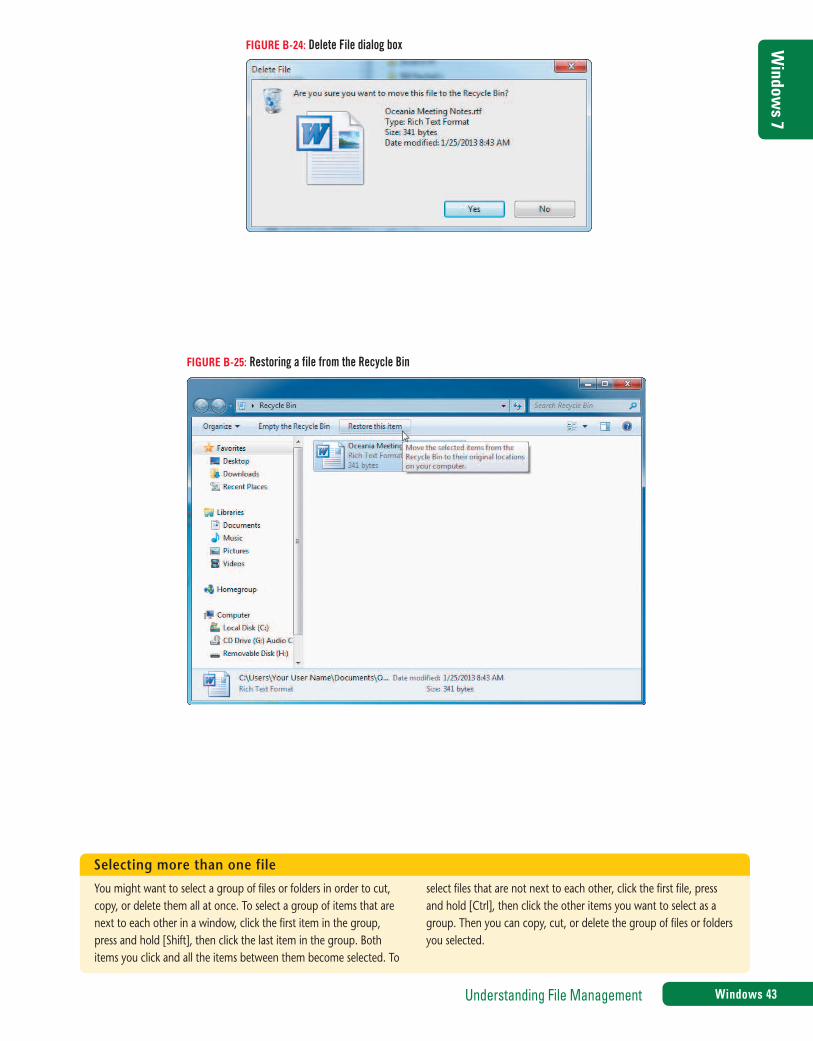
2. Click Oceania Meeting Notes.rtf to select it, click the Organize button on the toolbar, then click Delete The Delete File dialog box opens so you can confi rm the deletion, as shown in Figure B-24.
3. Click Yes You deleted the fi le from the Documents library. Windows moved it into the Recycle Bin.
4. Click the Minimize button on the window’s title bar and examine the Recycle Bin icon The Recycle Bin icon appears to contain crumpled paper. This tells you that the Recycle Bin contains deleted folders and fi les.
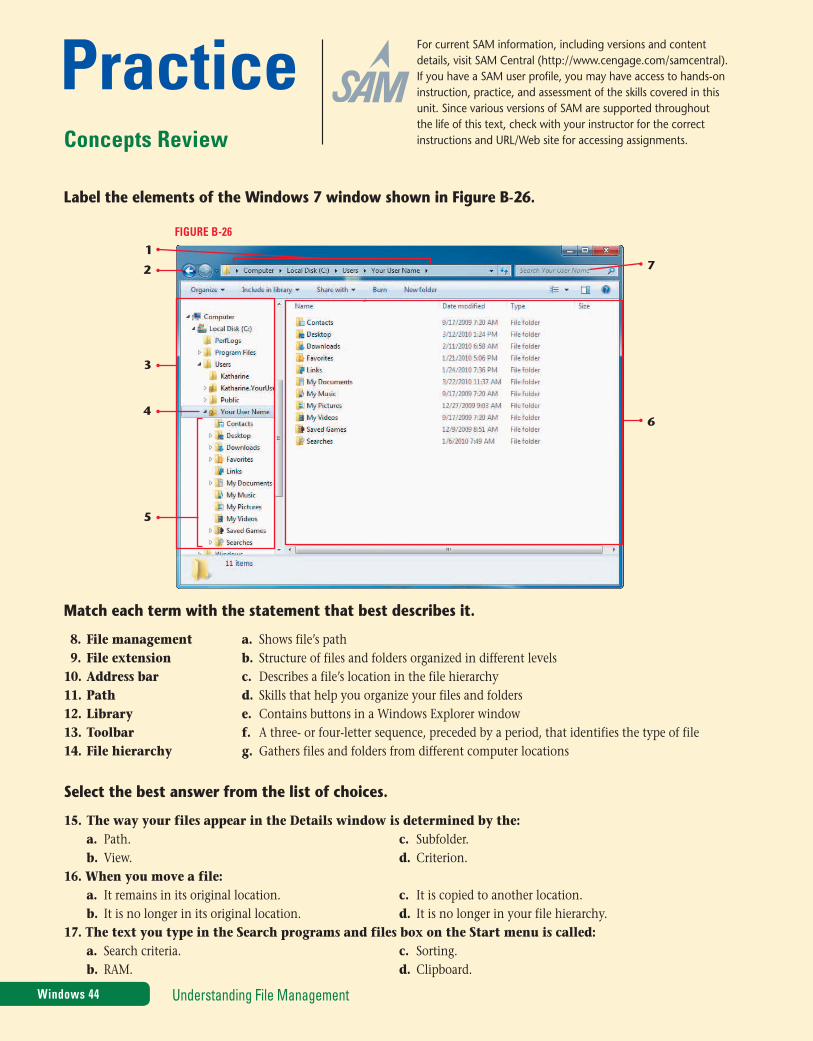
5. Double-click the Recycle Bin icon on the desktopThe Recycle Bin window opens and displays any previously deleted folders and fi les, including the Oceania Meeting Notes.rtf fi le.
6. Click the Oceania Meeting Notes.rtf file to select it, then click the Restore this item button on the Recycle Bin toolbar, as shown in Figure B-25The fi le returns to its original location and no longer appears in the Recycle Bin window.
7. In the Navigation pane, click the Documents libraryThe Documents library window contains the restored fi le. You decide to permanently delete this fi le.
8. Click the Oceania Meeting Notes.rtf file, press the [Delete] key on your keyboard, then click Yes in the Delete File dialog boxThe Oceania Meeting Notes.rtf fi le moves from the Documents library to the Recycle Bin. You decide to permanently delete all documents in the Recycle Bin.NOTE: If you are using a computer that belongs to someone else, or that is in a computer lab, make sure you have permission to empty the Recycle Bin before proceeding with the next step.
9. Minimize the window, double-click the Recycle Bin, click the Empty the Recycle Bin button on the toolbar, click Yes in the dialog box, then close all open windows
If the Recycle Bin icon does not con-tain crumpled paper, then it is empty.
QUICK TIP
To delete a fi le com-pletely in one action, click the fi le to select it, press and hold [Shift], then press [Delete]. A message will ask if you want to permanently delete the fi le. If you click Yes, Windows deletes the fi le with-out sending it to the Recycle Bin. Use caution, however, because you cannot restore the fi le.
QUICK TIP
STEPS
Windows 43Understanding File Management
Window
s 7FIGURE B-24: Delete File dialog box
FIGURE B-25: Restoring a file from the Recycle Bin
You might want to select a group of files or folders in order to cut, copy, or delete them all at once. To select a group of items that are next to each other in a window, click the first item in the group, press and hold [Shift], then click the last item in the group. Both items you click and all the items between them become selected. To
select files that are not next to each other, click the first file, press and hold [Ctrl], then click the other items you want to select as a group. Then you can copy, cut, or delete the group of files or folders you selected.
Selecting more than one file
UNIT
BWindows 7
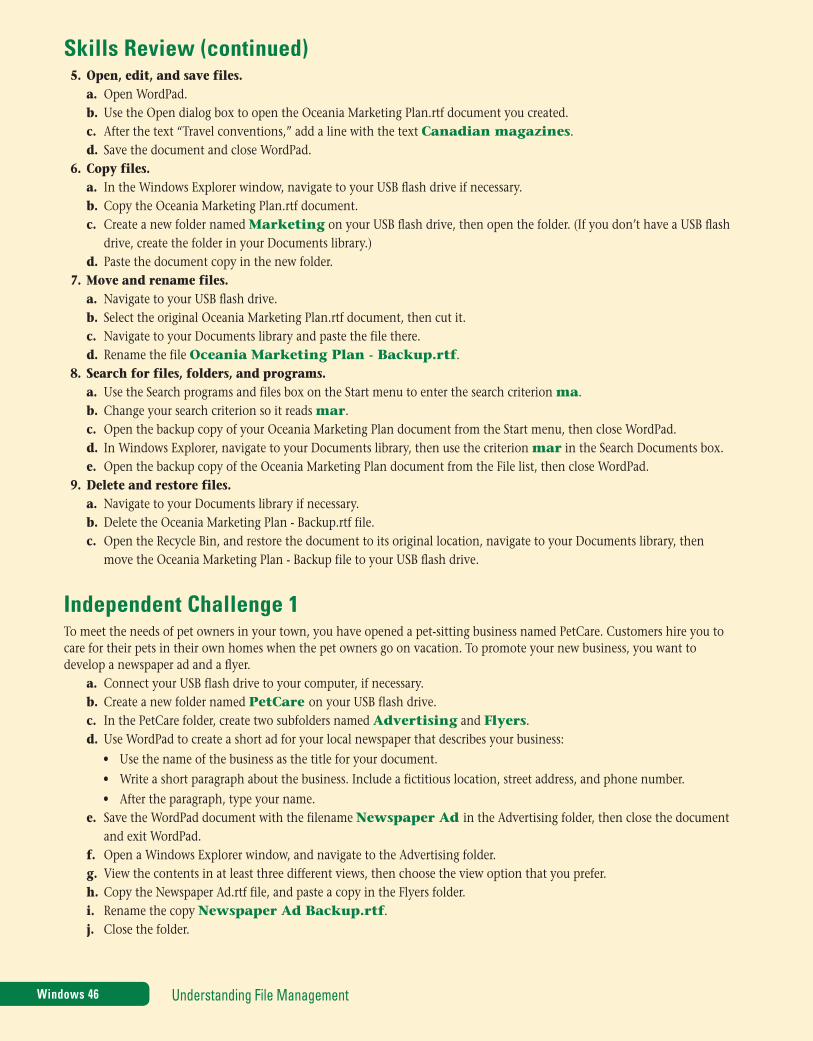
Label the elements of the Windows 7 window shown in Figure B-26.
Practice
Match each term with the statement that best describes it.
5
2
1
3
4
7
6
FIGURE B-26
8. File management 9. File extension 10. Address bar 11. Path 12. Library 13. Toolbar 14. File hierarchy
a. Shows file’s pathb. Structure of files and folders organized in different levelsc. Describes a file’s location in the file hierarchyd. Skills that help you organize your files and folderse. Contains buttons in a Windows Explorer windowf. A three- or four-letter sequence, preceded by a period, that identifies the type of fileg. Gathers files and folders from different computer locations
Select the best answer from the list of choices.
15. The way your files appear in the Details window is determined by the:a. Path. c. Subfolder.b. View. d. Criterion.
16. When you move a file:a. It remains in its original location. c. It is copied to another location.b. It is no longer in its original location. d. It is no longer in your file hierarchy.
17. The text you type in the Search programs and files box on the Start menu is called:a. Search criteria. c. Sorting.b. RAM. d. Clipboard.
Concepts Review
Understanding File ManagementWindows 44
For current SAM information, including versions and content details, visit SAM Central (http://www.cengage.com/samcentral). If you have a SAM user profile, you may have access to hands-on instruction, practice, and assessment of the skills covered in this unit. Since various versions of SAM are supported throughout the life of this text, check with your instructor for the correct instructions and URL/Web site for accessing assignments.

Windows 45Understanding File Management
Window
s 718. Which of the following is not a window section?
a. Address bar c. Navigation paneb. File list d. Clipboard
19. Which part of a window lets you see a file’s contents without opening the file?a. File list c. Navigation paneb. Preview pane d. Address bar
20. In a file hierarchy, a folder inside another folder is called a:a. Subfolder. c. Clipboard.b. Internal hard disk. d. Path.
21. After you delete a file from your hard disk, it is automatically placed in the:a. USB fl ash drive. c. Recycle bin.b. Clipboard. d. Search box.
22. When you copy a file, it is automatically placed on the:a. Preview pane. c. Hierarchy.b. My Documents folder. d. Clipboard.
Skills Review 1. Understand folders and files.
a. Assume that you sell books as a home business. How would you organize your folders and files using a file hierarchy? How would you use folders and subfolders? Draw a diagram and write a short paragraph explaining your answer.
2. Create and save a file.a. Connect your USB fl ash drive to a USB port on your computer, then open WordPad from the All Programs menu.b. Type Marketing Plan: Oceania Tours as the title, then start a new line.c. Type your name, then press [Enter] twice.d. Create the following list: Brochures Direct e-mail Web ads Travel conventionse. Save the WordPad file with the filename Oceania Marketing Plan.rtf on your USB fl ash drive.f. View the filename in the WordPad title bar, then close WordPad.
3. Explore the files and folders on your computer.a. Open a Windows Explorer window that shows the contents of your computer.b. Use the File list to navigate to your USB fl ash drive. (If you do not have a USB fl ash drive, navigate to your Documents
library using the Navigation pane.)c. Use the Address bar to navigate to Computer again.d. Use the Navigation pane to navigate to your hard drive.e. Use the File list to open the Users folder, and then open the folder that represents your user name.f. Open the My Documents folder. (Hint: The path is Local Disk (C:) Users [Your User Name] My Documents.)g. Use the Navigation pane to navigate back to your computer contents.
4. Change file and folder views.a. Navigate to your USB fl ash drive using the method of your choice.b. View its contents as large icons.c. Use the View slider to view the drive contents in all the other seven views.d. Use the Change your view button to cycle through the five available views.e. Open the Preview pane, then click a file and view its preview. Repeat with two more files.f. Close the Preview pane.
Windows 45Understanding File Management
Window
s 7
UNIT
BWindows 7
Understanding File ManagementWindows 46
Skills Review (continued) 5. Open, edit, and save files.
a. Open WordPad.b. Use the Open dialog box to open the Oceania Marketing Plan.rtf document you created.c. After the text “Travel conventions,” add a line with the text Canadian magazines.d. Save the document and close WordPad.
6. Copy files.a. In the Windows Explorer window, navigate to your USB fl ash drive if necessary.b. Copy the Oceania Marketing Plan.rtf document.c. Create a new folder named Marketing on your USB fl ash drive, then open the folder. (If you don’t have a USB fl ash
drive, create the folder in your Documents library.)d. Paste the document copy in the new folder.
7. Move and rename files. a. Navigate to your USB fl ash drive.b. Select the original Oceania Marketing Plan.rtf document, then cut it.c. Navigate to your Documents library and paste the file there.d. Rename the file Oceania Marketing Plan - Backup.rtf.
8. Search for files, folders, and programs.a. Use the Search programs and files box on the Start menu to enter the search criterion ma.b. Change your search criterion so it reads mar.c. Open the backup copy of your Oceania Marketing Plan document from the Start menu, then close WordPad.d. In Windows Explorer, navigate to your Documents library, then use the criterion mar in the Search Documents box.e. Open the backup copy of the Oceania Marketing Plan document from the File list, then close WordPad.
9. Delete and restore files.a. Navigate to your Documents library if necessary.b. Delete the Oceania Marketing Plan - Backup.rtf file.c. Open the Recycle Bin, and restore the document to its original location, navigate to your Documents library, then
move the Oceania Marketing Plan - Backup file to your USB fl ash drive.
Independent Challenge 1To meet the needs of pet owners in your town, you have opened a pet-sitting business named PetCare. Customers hire you to care for their pets in their own homes when the pet owners go on vacation. To promote your new business, you want to develop a newspaper ad and a fl yer.
a. Connect your USB flash drive to your computer, if necessary.b. Create a new folder named PetCare on your USB flash drive.c. In the PetCare folder, create two subfolders named Advertising and Flyers.d. Use WordPad to create a short ad for your local newspaper that describes your business:
• Use the name of the business as the title for your document.
• Write a short paragraph about the business. Include a fictitious location, street address, and phone number.
• After the paragraph, type your name. e. Save the WordPad document with the filename Newspaper Ad in the Advertising folder, then close the document
and exit WordPad.f. Open a Windows Explorer window, and navigate to the Advertising folder.g. View the contents in at least three different views, then choose the view option that you prefer.h. Copy the Newspaper Ad.rtf file, and paste a copy in the Flyers folder.i. Rename the copy Newspaper Ad Backup.rtf.j. Close the folder.
Understanding File ManagementWindows 46
Windows 47Understanding File Management
Window
s 7Independent Challenge 2 As a freelance editor for several national publishers, you depend on your computer to meet critical deadlines. Whenever you encounter a computer problem, you contact a computer consultant who helps you resolve the problem. This consultant asked you to document, or keep records of, your computer’s current settings.
a. Connect your USB flash drive to your computer, if necessary.b. Open the Computer window so that you can view information on your drives and other installed hardware. c. View the window contents using three different views, then choose the one you prefer.d. Open WordPad and create a document with the title My Hardware Documentation and your name on
separate lines.e. List the names of the hard drive (or drives), devices with removable storage, and any other hardware devices, installed on
the computer you are using. Also include the total size and amount of free space on your hard drive(s) and removable stor-age drive(s). (Hint: If you need to check the Computer window for this information, use the taskbar button for the Com-puter window to view your drives, then use the WordPad taskbar button to return to WordPad.)
Advanced Challenge Exercise ■ Navigate your computer’s file hierarchy, and determine its various levels. ■ On paper, draw a diagram showing your file hierarchy, starting with Computer at the top, and going down at least
four levels if available.
f. Save the WordPad document with the filename My Hardware Documentation on your USB flash drive.g. Preview your document, print your WordPad document, then close WordPad.
Independent Challenge 3You are an attorney at Lopez, Rickland, and Willgor, a large law firm. You participate in your firm’s community outreach pro-gram by speaking at career days in area high schools. You teach students about career opportunities available in the field of law. You want to create a folder structure on your USB fl ash drive to store the files for each session.
a. Connect your USB flash drive to your computer, then open the window for your USB flash drive.b. Create a folder named Career Days.c. In the Career Days folder, create a subfolder named Mather High.
Advanced Challenge Exercise ■ In the Mather High folder, create subfolders named Class Outline and Visual Aids. ■ Rename the Visual Aids folder Class Handouts. ■ Create a new folder named Interactive Presentations in the Class Handouts subfolder.
d. Close the Mather High window.e. Use WordPad to create a document with the title Career Areas and your name on separate lines, and the following
list of items: Current Opportunities: Attorney Corrections Officer Forensic Scientist Paralegal Judgef. Save the WordPad document with the filename Careers Listing.rtf in the Mather High folder. (Hint: After you
switch to your USB flash drive in the Save As dialog box, open the Career Days folder, then open the Mather High folder before saving the file.)
g. Close WordPad.
Windows 47Understanding File Management
Window
s 7
UNIT
BWindows 7
Understanding File ManagementWindows 48
Independent Challenge 3 (continued)h. Open WordPad and the Careers Listing document again, then add Court Reporter to the bottom of the list, then
save the file and close WordPad.i. Using pencil and paper, draw a diagram of your new folder structure. j. Use the Start menu to search your computer using the search criterion car. Locate the Careers Listing.rtf document in
the list, and use the link to open the file.k. Close the file.
Real Life Independent ChallengeThink of a hobby or volunteer activity that you do now, or one that you would like to do. You will use your computer to help you manage your plans or ideas for this activity.
a. Using paper and a pencil, sketch a folder structure using at least two subfolders that you could create on your USB flash drive to contain your documents for this activity.
b. Connect your USB flash drive to your computer, then open the window for your USB flash drive.c. Create the folder structure for your activity, using your sketch as a reference.d. Think of at least three tasks that you can do to further your work in your chosen activity. e. Open WordPad and create a document with the title Next Steps at the top of the page and your name on the
next line.f. List the three tasks, then save the file in one of the folders you created on your USB flash drive, using the title
To Do.rtf.g. Close WordPad, then open a Windows Explorer window for the folder where you stored the document.h. Create a copy of the file, give the copy a new name, then place a copy of the document in your Documents library.i. Delete the document copy from your Documents library.j. Open the Recycle Bin window, and restore the document to the Documents library.
Visual WorkshopYou are a technical support specialist at Emergency Services. The company supplies medical staff members to hospital emer-gency rooms in Los Angeles. You need to respond to your company’s employee questions quickly and thoroughly. You decide that it is time to evaluate and reorganize the folder structure on your computer. That way, you’ll be able to respond more quickly to staff requests. Create the folder structure shown in Figure B-27 on your USB fl ash drive. As you work, use WordPad to prepare a simple outline of the steps you follow to create the folder structure. Add your name to the document, and store it in an appropriate location.
Understanding File ManagementWindows 48
FIGURE B-27
Medical System
Scheduling Records Evaluation Contacts Backups
Active Archived
Admin System
Tech Support


![(b) (c) - TU Wien · [7 ] per-formed a purely quan titativ e comparison of elev en windo w ed sinc functions. They found the W elc h, Cosine, Lanczos and Kaiser windo ws yielding](https://img.pdfslide.net/doc/110x75/5eaa490542ae8941865a928e/b-c-tu-7-per-formed-a-purely-quan-titativ-e-comparison-of-elev-en-windo.jpg)


![Trucos de windo[1]](https://img.pdfslide.net/doc/110x75/55772d30d8b42a13308b510a/trucos-de-windo1-55849338cb566.jpg)