Embed Size (px)
Citation preview

EMC® VNX™ SeriesRelease 7.1
Using Windows Administrative Tools on VNX™P/N 300-013-821 Rev 01
EMC CorporationCorporate Headquarters:
Hopkinton, MA 01748-91031-508-435-1000
www.EMC.com

Copyright © 2005 -2012 EMC Corporation. All rights reserved.
Published July 2012
EMC believes the information in this publication is accurate as of its publication date. Theinformation is subject to change without notice.
THE INFORMATION IN THIS PUBLICATION IS PROVIDED "AS IS." EMC CORPORATIONMAKES NO REPRESENTATIONS OR WARRANTIES OF ANY KIND WITH RESPECT TOTHE INFORMATION IN THIS PUBLICATION, AND SPECIFICALLY DISCLAIMS IMPLIEDWARRANTIES OF MERCHANTABILITY OR FITNESS FOR A PARTICULAR PURPOSE.
Use, copying, and distribution of any EMC software described in this publication requires anapplicable software license.
For the most up-to-date regulatory document for your product line, go to the TechnicalDocumentation and Advisories section on EMC Powerlink.
For the most up-to-date listing of EMC product names, see EMC Corporation Trademarks onEMC.com.
All other trademarks used herein are the property of their respective owners.
Corporate Headquarters: Hopkinton, MA 01748-9103
2 Using Windows Administrative Tools on VNX 7.1
Contents
Preface.....................................................................................................5
Chapter 1: Introduction...........................................................................7System requirements...............................................................................................8Related information................................................................................................8
Chapter 2: Concepts...............................................................................9Local groups...........................................................................................................10User rights..............................................................................................................10Auditing..................................................................................................................11
Chapter 3: Managing the Windows Server.........................................15Open Computer Management MMC.................................................................16Create local groups on a CIFS server using MMC...........................................17Assign user rights using Unisphere ...................................................................21Create shares and set ACLs using MMC...........................................................24Monitor Data Mover connections and resource usage using MMC..............25
Monitor users on the Data Mover.............................................................26Monitor access to shares on the Data Mover...........................................27Monitor use of files on the Data Mover...................................................28
Audit CIFS users and objects using Unisphere ................................................29Specify the audit policy..............................................................................30Set the audit log parameters......................................................................32Change log file size.....................................................................................33View the audit events.................................................................................35
Disable auditing.....................................................................................................37Connect the MMC to a CIFS server....................................................................38
Using Windows Administrative Tools on VNX 7.1 3

Chapter 4: Troubleshooting..................................................................41EMC E-Lab Interoperability Navigator..............................................................42VNX user customized documentation...............................................................42EMC Training and Professional Services...........................................................42
Glossary..................................................................................................43
Index.......................................................................................................45
4 Using Windows Administrative Tools on VNX 7.1
Contents
Preface
As part of an effort to improve and enhance the performance and capabilities of its product lines,EMC periodically releases revisions of its hardware and software. Therefore, some functions describedin this document may not be supported by all versions of the software or hardware currently in use.For the most up-to-date information on product features, refer to your product release notes.
If a product does not function properly or does not function as described in this document, pleasecontact your EMC representative.
Using Windows Administrative Tools on VNX 7.1 5

Special notice conventions
EMC uses the following conventions for special notices:
Note: Emphasizes content that is of exceptional importance or interest but does not relate to personalinjury or business/data loss.
Identifies content that warns of potential business or data loss.
Indicates a hazardous situation which, if not avoided, could result in minor ormoderate injury.
Indicates a hazardous situation which, if not avoided, could result in death orserious injury.
Indicates a hazardous situation which, if not avoided, will result in death or seriousinjury.
Where to get help
EMC support, product, and licensing information can be obtained as follows:
Product information — For documentation, release notes, software updates, or forinformation about EMC products, licensing, and service, go to the EMC Online Supportwebsite (registration required) at http://Support.EMC.com.
Troubleshooting — Go to the EMC Online Support website. After logging in, locatethe applicable Support by Product page.
Technical support — For technical support and service requests, go to EMC CustomerService on the EMC Online Support website. After logging in, locate the applicableSupport by Product page, and choose either Live Chat or Create a service request. Toopen a service request through EMC Online Support, you must have a valid supportagreement. Contact your EMC sales representative for details about obtaining a validsupport agreement or with questions about your account.
Note: Do not request a specific support representative unless one has already been assigned toyour particular system problem.
Your comments
Your suggestions will help us continue to improve the accuracy, organization, and overallquality of the user publications.
Please send your opinion of this document to:
6 Using Windows Administrative Tools on VNX 7.1
Preface

1
Introduction
The EMC VNX supports the Common Internet File System (CIFS) protocolthat allows Windows clients to access files stored on the VNX. After youconfigure the VNX to support Windows clients on the network, useWindows tools to perform a variety of administrative tasks on the DataMover.
The Configuring and Managing CIFS on VNX provides more informationabout how to configure the VNX for CIFS support.
This document is part of the VNX documentation set and is intended forsystem administrators responsible for implementing the VNX in theirWindows network or for adding Windows clients to their existing UNIXnetwork.
Topics included are:◆ System requirements on page 8◆ Related information on page 8
Using Windows Administrative Tools on VNX 7.1 7

System requirements
Table 1 on page 8 describes the EMC® VNX™ software, hardware, network, and storageconfigurations.
Table 1. System requirements
VNX version 7.0.Software
No specific hardware requirements.Hardware
No specific network requirements.Network
No specific storage requirements.Storage
Related information
Specific information related to the features and functionality described in this document areincluded in:
◆ Configuring and Managing CIFS on VNX
◆ EMC VNX Command Line Interface Reference for File
◆ Managing a Multiprotocol Environment on VNX
◆ Using International Character Sets on VNX for File
◆ Using Wizards to Configure VNX for File
◆ Configuring VNX User Mapping
◆ Using NTMigrate with VNX
◆ VNX for File man pages
EMC VNX documentation on the EMC Online Support website
The complete set of EMC VNX series customer publications is available on the EMCOnline Support website. To search for technical documentation, go tohttp://Support.EMC.com. After logging in to the website, click the VNX Support byProduct page to locate information for the specific feature required.
VNX wizards
Unisphere software provides wizards for performing setup and configuration tasks. TheUnisphere online help provides more details on the wizards.
8 Using Windows Administrative Tools on VNX 7.1
Introduction

2
Concepts
The concepts to understand the administrative tools are:◆ Local groups on page 10◆ User rights on page 10◆ Auditing on page 11
Using Windows Administrative Tools on VNX 7.1 9

Local groups
When a new CIFS service is created on a Data Mover and it becomes a domain member,there are no local groups resident on the Data Mover. After you create a CIFS service on aData Mover and add the CIFS server to the domain, use Windows Computer ManagementMMC to create and manage local groups on the CIFS server.
A local group is granted permissions and rights from its own computer to only thoseresources on its own computer on which the group resides.
In the Windows Server native domain, local groups can contain user accounts, global groups,and domain local groups, but not other local groups.
VNX supports all types of Microsoft Windows Server user groups and nested groups. VNXalso supports local user accounts if they are set up. Configuring and Managing CIFS on VNXprovides more information about local groups.
In a Windows domain, local groups can contain user accounts and global groups, but notother local groups. VNX supports all types of Windows users groups.
Windows online help provides more information on creating and managing local groups.
User rights
You can use user rights assignments to manage which users and groups can log in to orexecute tasks on a Data Mover. User rights assignments are local policies that apply only tothe selected Data Mover.
Local groups, individual users, and global groups can be assigned privileges to:
◆ Access this computer from the network◆ Back up files and directories◆ Bypass traverse checking (improves performance)◆ Perform EMC Virus Checking◆ Generate security audits◆ Increase quotas◆ Log in as a batch job◆ Log in as a service◆ Log in locally◆ Manage auditing and security log◆ Restore files and directories◆ Set security audit (users with this privilege can manage audits on the server)◆ Take ownership of files or object (all administrators have this capability)
10 Using Windows Administrative Tools on VNX 7.1
Concepts

Note: This capability is not supported for Data Movers in the current release.
To set user rights for individual users and global groups on a Data Mover, use the VNXData Mover Security Management Console, which is an MMC snap-in to the Unisphere.
Installing Management Applications on VNX for File provides information about installing theUnisphere. The VNX Data Mover Security Management snap-in online help providesinformation about setting user rights.
Note: You cannot use Microsoft Windows Local Policy Setting tools to manage user rights assignmentson a Data Mover because in Windows Servers, these tools do not support managing user rights on aremote computer.
Auditing
To audit CIFS servers on a Data Mover, use the VNX Data Mover Security ManagementConsole, which is a MMC snap-in to the Unisphere.
By default, auditing is disabled for all Windows object classes. To enable auditing, you mustexplicitly turn it on for specific events on specific Data Movers. After it is enabled, auditingis initiated whenever the CIFS service on the relevant Data Mover is started, and terminatedwhenever the CIFS service is stopped.
Installing Management Applications on VNX for File contains information about installing theUnisphere. The VNX Data Mover Security Management snap-in online help providesinformation on setting audit policies.
If the Group Policy Object (GPO) is configured and enabled on the Data Mover, then theGPO configuration of the audit settings is used. Configuring and Managing CIFS on VNXprovides more information about configuring audit settings.
The log files (security.evt, application.evt, and system.evt) are typically stored in the rootfile system, which has a maximum capacity of 128 MB. If you expect to retain large EventViewer logs, you should select a different directory for storing these log files. To do so, editthe Registry residing on the Data Mover.
If you do not have experience editing the Registry, seek assistance.
You can use the Windows Event Viewer to audit Data Movers for certain events and activities.Many of the event types available for monitoring and auditing on a Windows Server canbe audited on a Data Mover.
Auditing is available on the object classes and events listed in Table 2 on page 12. Onlymembers of the Administrators local group can set auditing on a server.
Auditing 11
Concepts

Table 2. Auditing object classes
Audited forEventObject class
Success◆ CIFS user login
◆ CIFS guest login
Logon/logoff
Failure◆ Windows/UNIX mapping (user/domain combina-tion not found)
◆ Password authentication error returned by domaincontroller (DC)
◆ DC returned a nonprocessed error code
◆ No reply from DC (insufficient resources or badprotocol)
Success and FailureObject Open:
◆ File and directory access, if system access con-trol list (SACL) is set, for read, write, delete, exe-cute, set permissions, and take ownership
◆ Security Access Manager (SAM) local groupmodification
Close Handle:
◆ File and directory access (if SACL set) for read,write, delete, execute, set permissions, and takeownership
Object Open for Delete:
File and directory access (if SACL set)
Delete Object:
File and directory access (if SACL set)
File and object access
N/ANot supportedProcess tracking
SuccessRestart:
◆ CIFS service startup (includes DART releasenumber)
◆ CIFS service shutdown
◆ Audit log cleared
System restart/shutdown
12 Using Windows Administrative Tools on VNX 7.1
Concepts
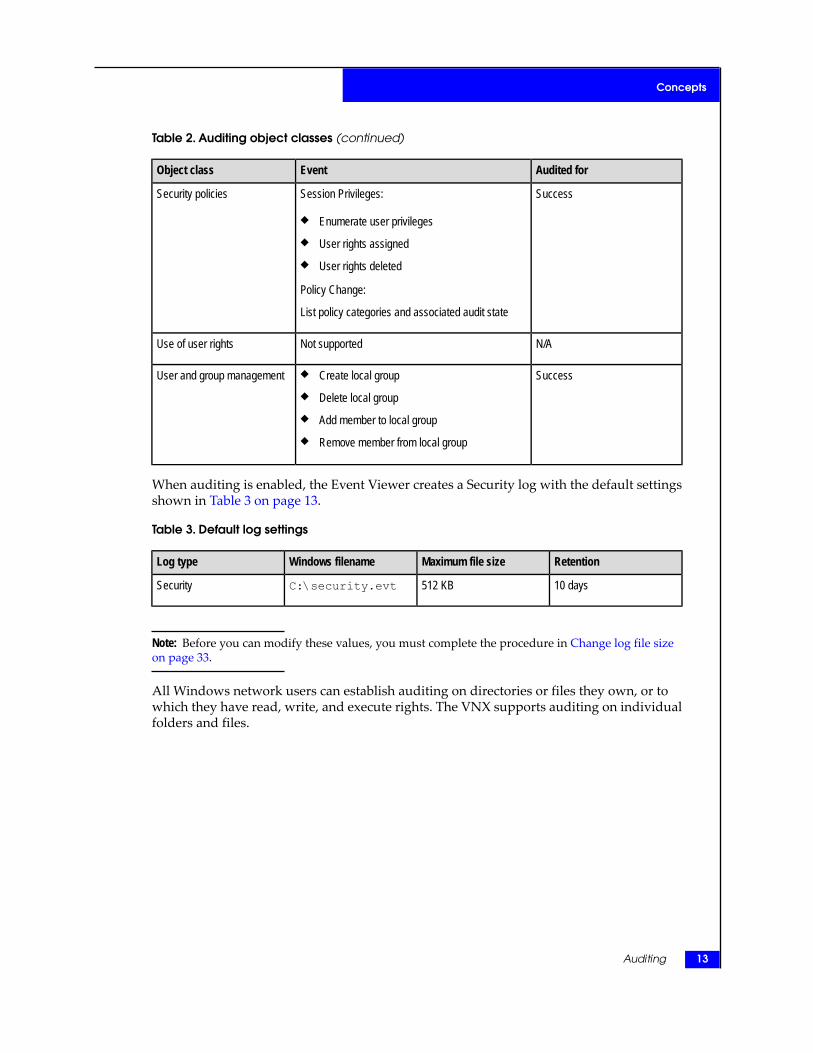
Table 2. Auditing object classes (continued)
Audited forEventObject class
SuccessSession Privileges:
◆ Enumerate user privileges
◆ User rights assigned
◆ User rights deleted
Policy Change:
List policy categories and associated audit state
Security policies
N/ANot supportedUse of user rights
Success◆ Create local group
◆ Delete local group
◆ Add member to local group
◆ Remove member from local group
User and group management
When auditing is enabled, the Event Viewer creates a Security log with the default settingsshown in Table 3 on page 13.
Table 3. Default log settings
RetentionMaximum file sizeWindows filenameLog type
10 days512 KBC:\security.evtSecurity
Note: Before you can modify these values, you must complete the procedure in Change log file sizeon page 33.
All Windows network users can establish auditing on directories or files they own, or towhich they have read, write, and execute rights. The VNX supports auditing on individualfolders and files.
Auditing 13
Concepts

14 Using Windows Administrative Tools on VNX 7.1
Concepts

3
Managing the WindowsServer
The administrative tasks to manage Windows on the CIFS server are:
Note: For purposes of illustrating management steps, Windows Server 2003 is usedin this document. Depending on your Windows version, the steps required toaccomplish these tasks may vary.
◆ Open Computer Management MMC on page 16◆ Create local groups on a CIFS server using MMC on page 17◆ Assign user rights using Unisphere on page 21◆ Create shares and set ACLs using MMC on page 24◆ Monitor Data Mover connections and resource usage using MMC on
page 25◆ Audit CIFS users and objects using Unisphere on page 29◆ Disable auditing on page 37◆ Connect the MMC to a CIFS server on page 38
Using Windows Administrative Tools on VNX 7.1 15
Open Computer Management MMC
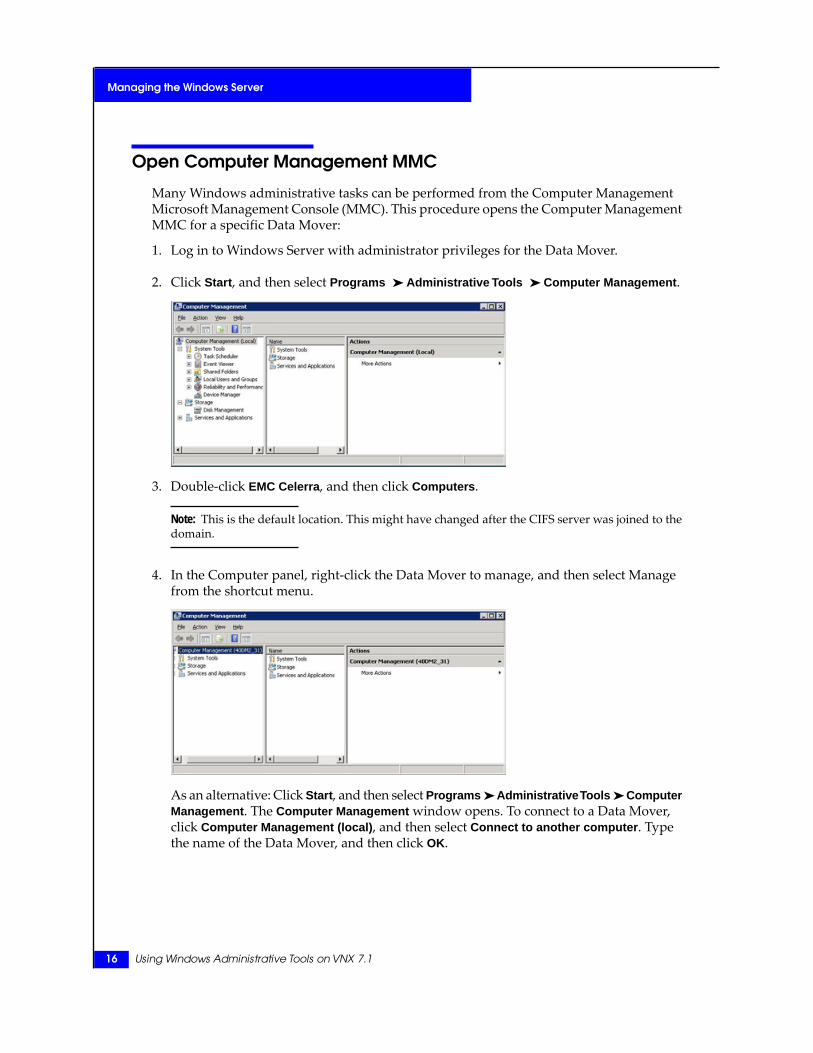
Many Windows administrative tasks can be performed from the Computer ManagementMicrosoft Management Console (MMC). This procedure opens the Computer ManagementMMC for a specific Data Mover:
1. Log in to Windows Server with administrator privileges for the Data Mover.
2. Click Start, and then select Programs ➤ Administrative Tools ➤ Computer Management.
3. Double-click EMC Celerra, and then click Computers.
Note: This is the default location. This might have changed after the CIFS server was joined to thedomain.
4. In the Computer panel, right-click the Data Mover to manage, and then select Managefrom the shortcut menu.
As an alternative: Click Start, and then select Programs ➤ Administrative Tools ➤ ComputerManagement. The Computer Management window opens. To connect to a Data Mover,click Computer Management (local), and then select Connect to another computer. Typethe name of the Data Mover, and then click OK.
16 Using Windows Administrative Tools on VNX 7.1
Managing the Windows Server

Create local groups on a CIFS server using MMC
Use this procedure to create local groups on a CIFS server:
Note: The task instructions shown are for Windows Server 2003. Depending on your Windows version,the steps required to accomplish these tasks may vary.
1. Open the Computer Management MMC for the Data Mover on which you want to createa local group.
Open Computer Management MMC on page 16 provides instructions.
2. Under System Tools, double-click Local Users and Groups.
3. Right-click Groups, then select New Group from the shortcut menu.
Create local groups on a CIFS server using MMC 17
Managing the Windows Server
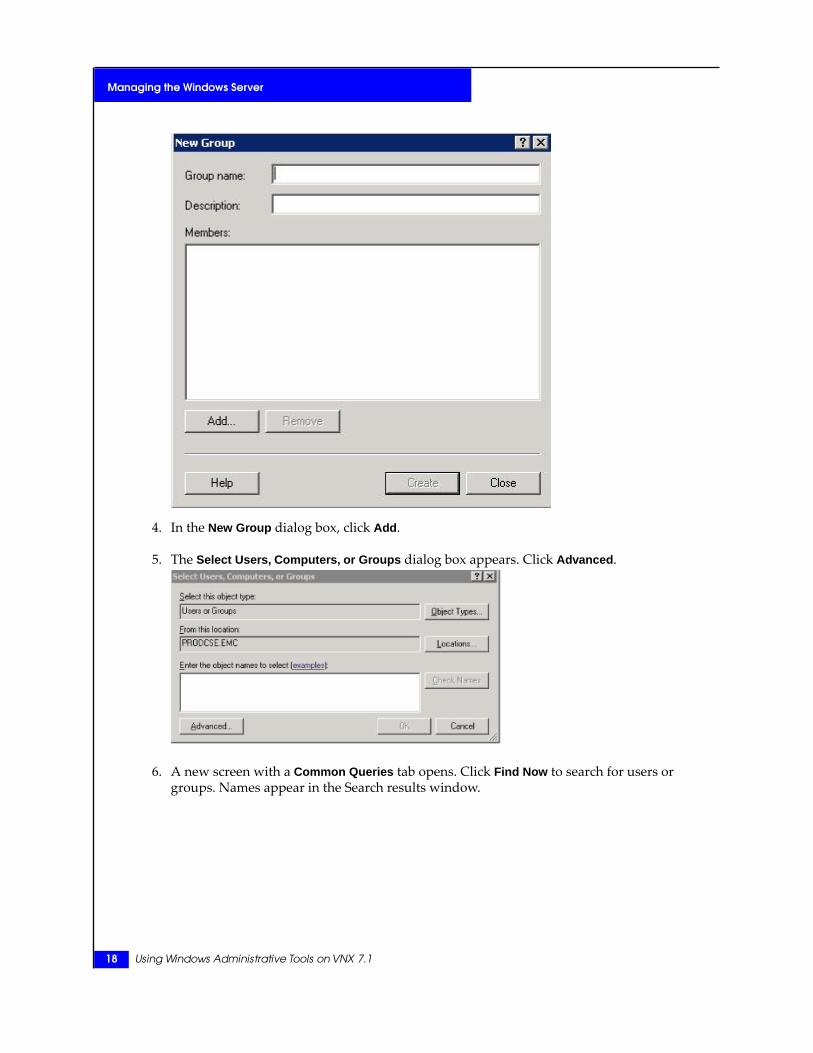
4. In the New Group dialog box, click Add.
5. The Select Users, Computers, or Groups dialog box appears. Click Advanced.
6. A new screen with a Common Queries tab opens. Click Find Now to search for users orgroups. Names appear in the Search results window.
18 Using Windows Administrative Tools on VNX 7.1
Managing the Windows Server
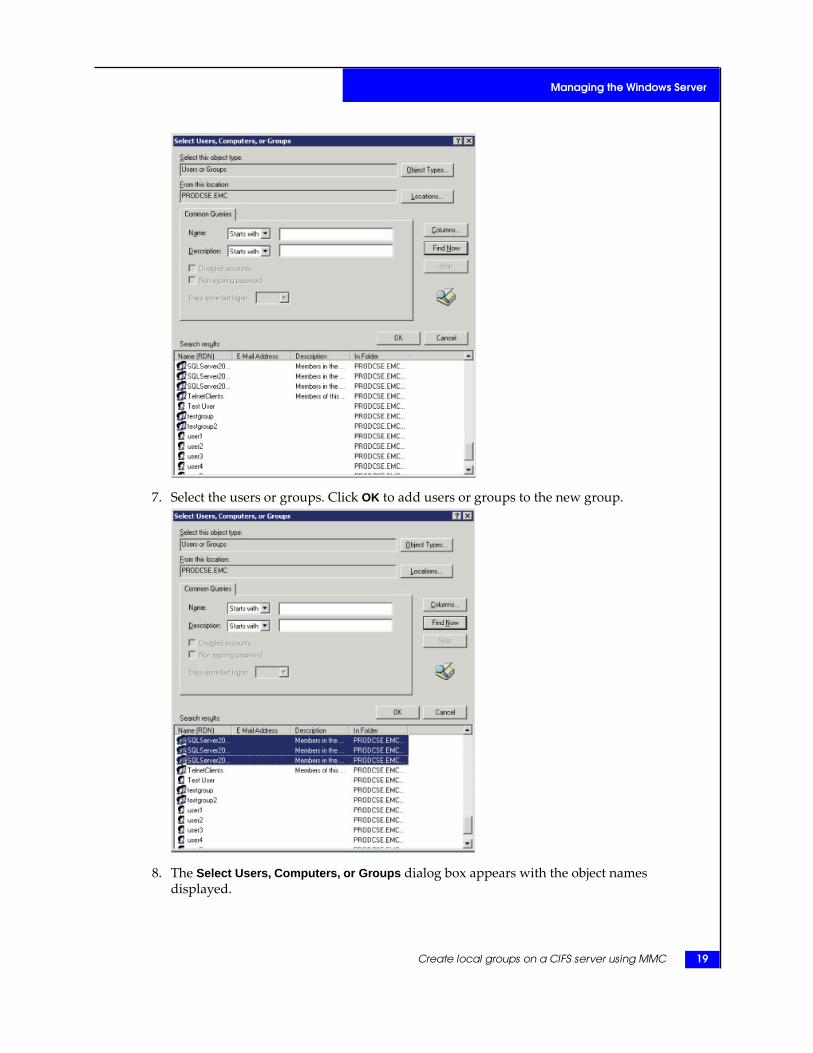
7. Select the users or groups. Click OK to add users or groups to the new group.
8. The Select Users, Computers, or Groups dialog box appears with the object namesdisplayed.
Create local groups on a CIFS server using MMC 19
Managing the Windows Server

9. Click OK.
10. The New Group dialog box opens and your selection appears in the Members window.Type a group name and description in the fields provided. Click Create and Close. Thenew group is created.
20 Using Windows Administrative Tools on VNX 7.1
Managing the Windows Server

Assign user rights using Unisphere
After the Unisphere is installed, use this procedure to access the Security Managementsnap-in:
1. Log in to a Windows Server with administrator privileges for the Data Mover.
2. Click Start and then select Programs ➤ Administrative Tools ➤ Celerra Management.
3. If a Data Mover name appears after Data Mover Management, go to step 4.
Otherwise:
a. Right-click Data Mover Management, and then select Connect to Data Mover from theshortcut menu.
b. In the Select Data Mover dialog box, select a Data Mover by using one of the followingmethods:
• In the Look in list, select the domain in which the Data Mover that you want tomanage is located, and then select the Data Mover from the list.
• In the Name field, type the computer name, IP address, or the NetBIOS name ofthe Data Mover.
4. Double-click Data Mover Management, and then double-click Data Mover Security Settings.
5. Select User Rights Assignment.
The assignable rights appear in the right panel.
Assign user rights using Unisphere 21
Managing the Windows Server

6. Double-click a user right to assign it to a particular group or user.
7. To add a group to a User Rights assignment, right-click User Rights Policy from the listin the right panel. Click Security. From the Security Policy Setting window, click Add.
22 Using Windows Administrative Tools on VNX 7.1
Managing the Windows Server
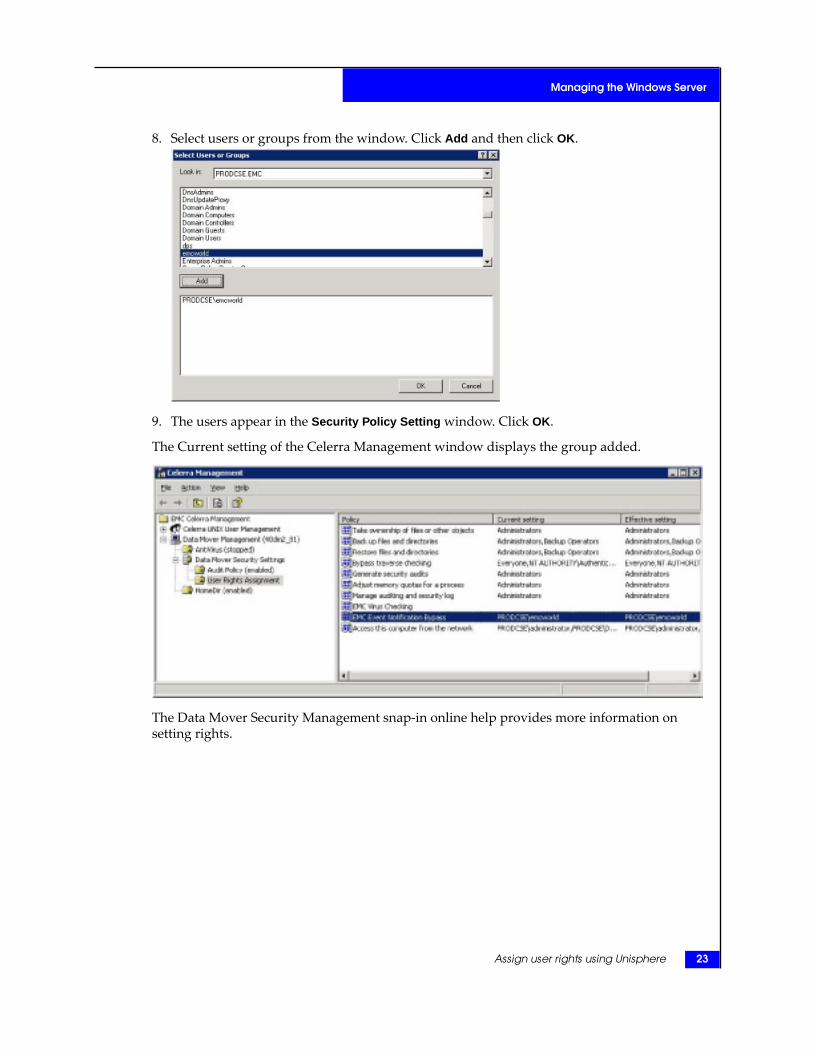
8. Select users or groups from the window. Click Add and then click OK.
9. The users appear in the Security Policy Setting window. Click OK.
The Current setting of the Celerra Management window displays the group added.
The Data Mover Security Management snap-in online help provides more information onsetting rights.
Assign user rights using Unisphere 23
Managing the Windows Server
Create shares and set ACLs using MMC
Before you begin
To create a share with MMC, you must:
◆ Have assigned UNIX UIDs and GIDs to CIFS users. Configuring and Managing CIFS onVNX and Configuring VNX User Mapping provide instructions for assigning UIDs.
◆ Have mounted the file system and created directories that you want to share.◆ Be a member of the local Administrators group on a Data Mover.
Procedure
Use the MMC to create shares and set ACLs on shares after you create a CIFS server on aData Mover, join it to the domain, and start the CIFS service.
Note: Shares created through Windows administrative tools are accessible only from the NetBIOSname used by the Windows client. If you want the share to be globally accessible by all NetBIOSnames, create a share with the VNX server_export command and omit the optionnetbios=<netbiosName>.
This procedure creates a share on a Data Mover for Windows Server:
1. Open the Computer Management MMC for the Data Mover.
Open Computer Management MMC on page 16 provides instructions.
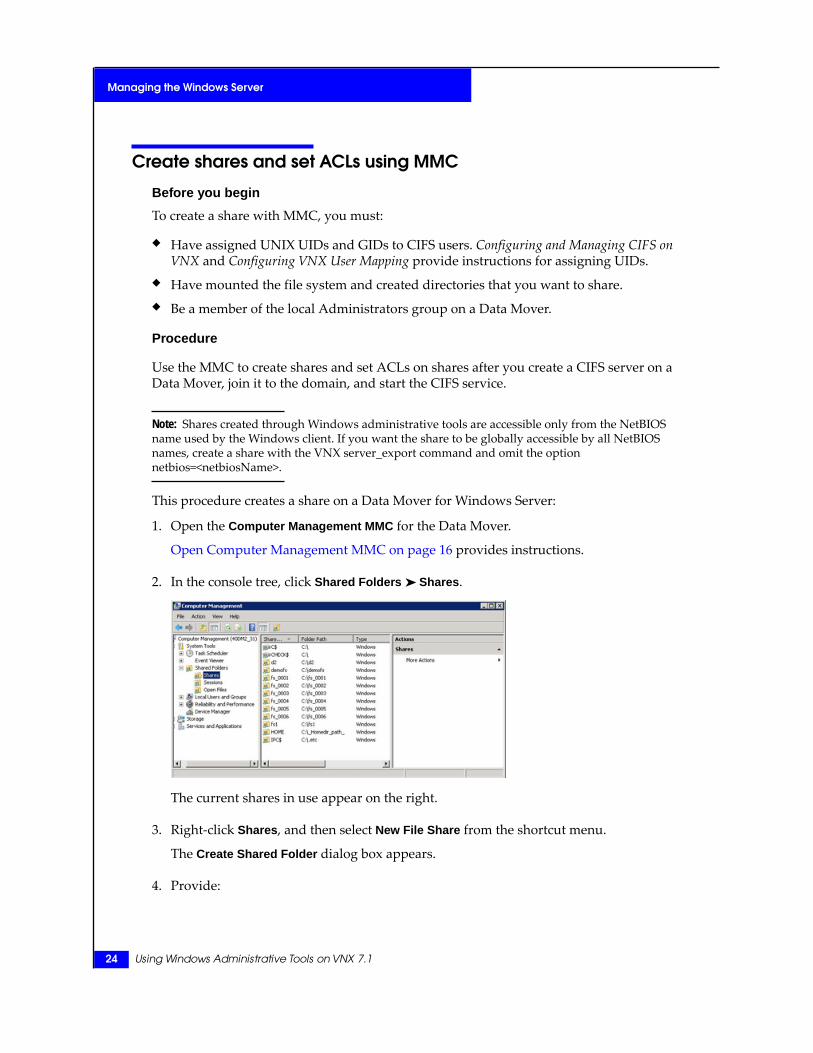
2. In the console tree, click Shared Folders ➤ Shares.
The current shares in use appear on the right.
3. Right-click Shares, and then select New File Share from the shortcut menu.
The Create Shared Folder dialog box appears.
4. Provide:
24 Using Windows Administrative Tools on VNX 7.1
Managing the Windows Server
• The name of the folder to share. Type the path of the folder, or click Browse and locatethe folder.
• The share name for the folder. You cannot create a NetBIOS share name with the samename as a global share. The VNX supports only ASCII share names. Share name lengthis limited to 12 ASCII characters unless Unicode support is enabled, in which casethe limit is 80 multibyte characters. Share names cannot include the followingcharacters: /, \, %, ", NUL (Null character), STX (start of header), SOT (start of text),and LF (line feed). Share names can contain spaces and other nonalphanumericcharacters, but must be enclosed by quotes if spaces are used. Share names cannotbegin with a - (hyphen). Share names are case-sentitive.
• A share description.
5. Click Next.
You are prompted for share permissions.
6. For Windows Server, set permissions by selecting one of the options. With the CustomizeShare and Folder Permissions option, you can assign permissions to individual groupsand users.
7. Click Finish.
Monitor Data Mover connections and resource usage using MMC
You can use Windows administrative tools to:
◆ Monitor users on the Data Mover on page 26◆ Monitor access to shares on the Data Mover on page 27◆ Monitor use of files on the Data Mover on page 28
Monitor Data Mover connections and resource usage using MMC 25
Managing the Windows Server
Monitor users on the Data Mover
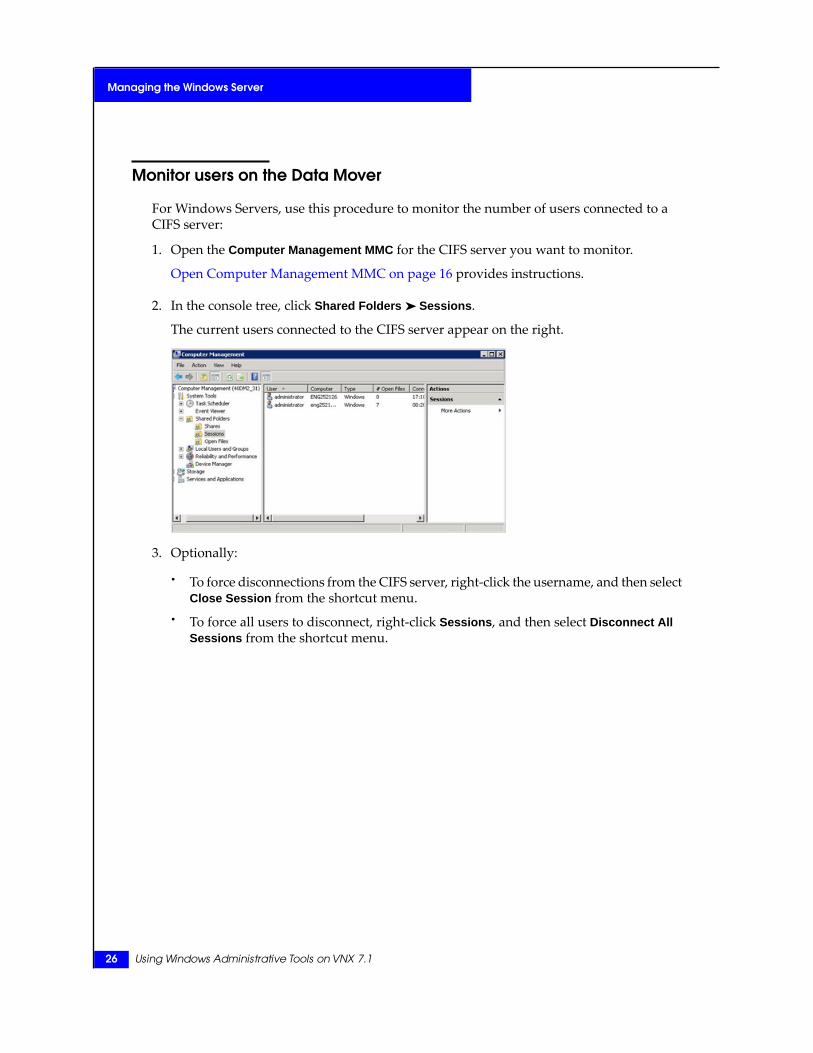
For Windows Servers, use this procedure to monitor the number of users connected to aCIFS server:
1. Open the Computer Management MMC for the CIFS server you want to monitor.
Open Computer Management MMC on page 16 provides instructions.
2. In the console tree, click Shared Folders ➤ Sessions.
The current users connected to the CIFS server appear on the right.
3. Optionally:
• To force disconnections from the CIFS server, right-click the username, and then selectClose Session from the shortcut menu.
• To force all users to disconnect, right-click Sessions, and then select Disconnect AllSessions from the shortcut menu.
26 Using Windows Administrative Tools on VNX 7.1
Managing the Windows Server
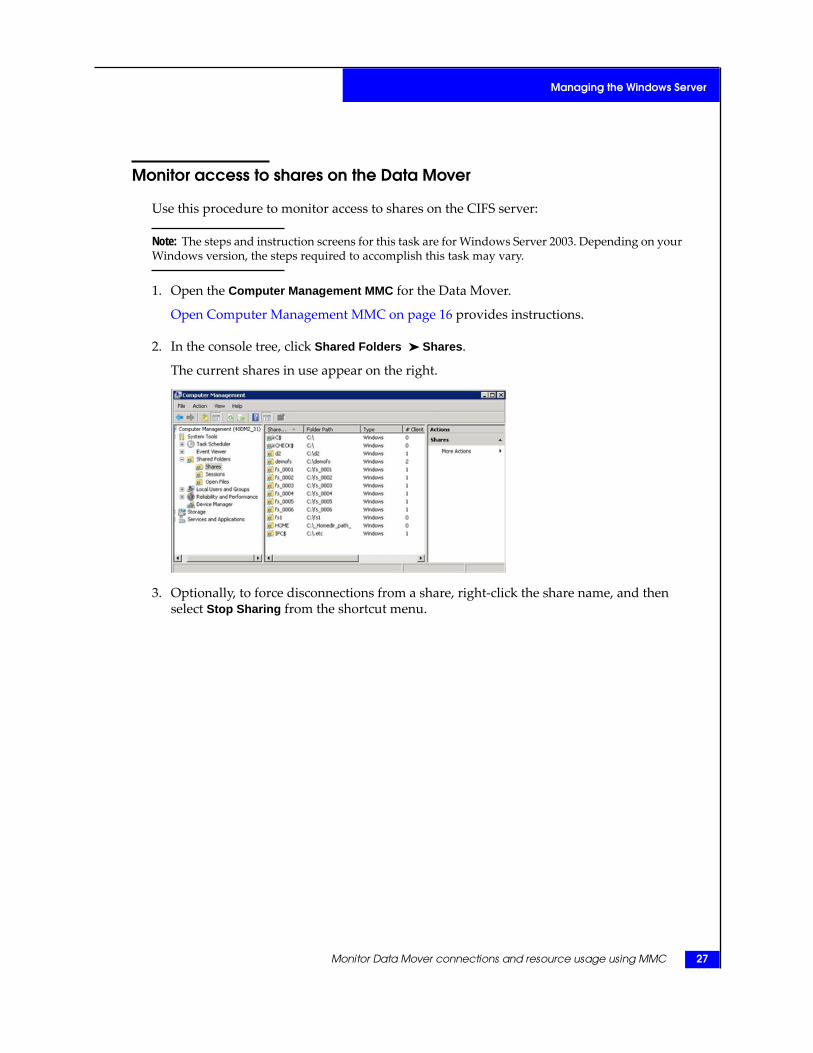
Monitor access to shares on the Data Mover
Use this procedure to monitor access to shares on the CIFS server:
Note: The steps and instruction screens for this task are for Windows Server 2003. Depending on yourWindows version, the steps required to accomplish this task may vary.
1. Open the Computer Management MMC for the Data Mover.
Open Computer Management MMC on page 16 provides instructions.
2. In the console tree, click Shared Folders ➤ Shares.
The current shares in use appear on the right.
3. Optionally, to force disconnections from a share, right-click the share name, and thenselect Stop Sharing from the shortcut menu.
Monitor Data Mover connections and resource usage using MMC 27
Managing the Windows Server

Monitor use of files on the Data Mover
For Windows Servers, use this procedure to monitor open files on the CIFS server:
1. Open the Computer Management MMC for the Data Mover.
Open Computer Management MMC on page 16 provides instructions.
2. In the console tree, click Shared Folders ➤ Open Files.
The files in use appear on the right.
3. Optionally, to close an open file, right-click the file, and then select Close Open File fromthe shortcut menu.
To close all open files, right-click the Open Files folder, and then select Disconnect AllOpen Files from the shortcut menu.
28 Using Windows Administrative Tools on VNX 7.1
Managing the Windows Server

Audit CIFS users and objects using Unisphere
Complete the following steps to enable auditing on a Data Mover:
◆ Specify the audit policy on page 30◆ Set the audit log parameters on page 32◆ Change log file size on page 33◆ View the audit events on page 35
Note: Ensure that the CIFS service is running on the Data Mover.
Audit CIFS users and objects using Unisphere 29
Managing the Windows Server
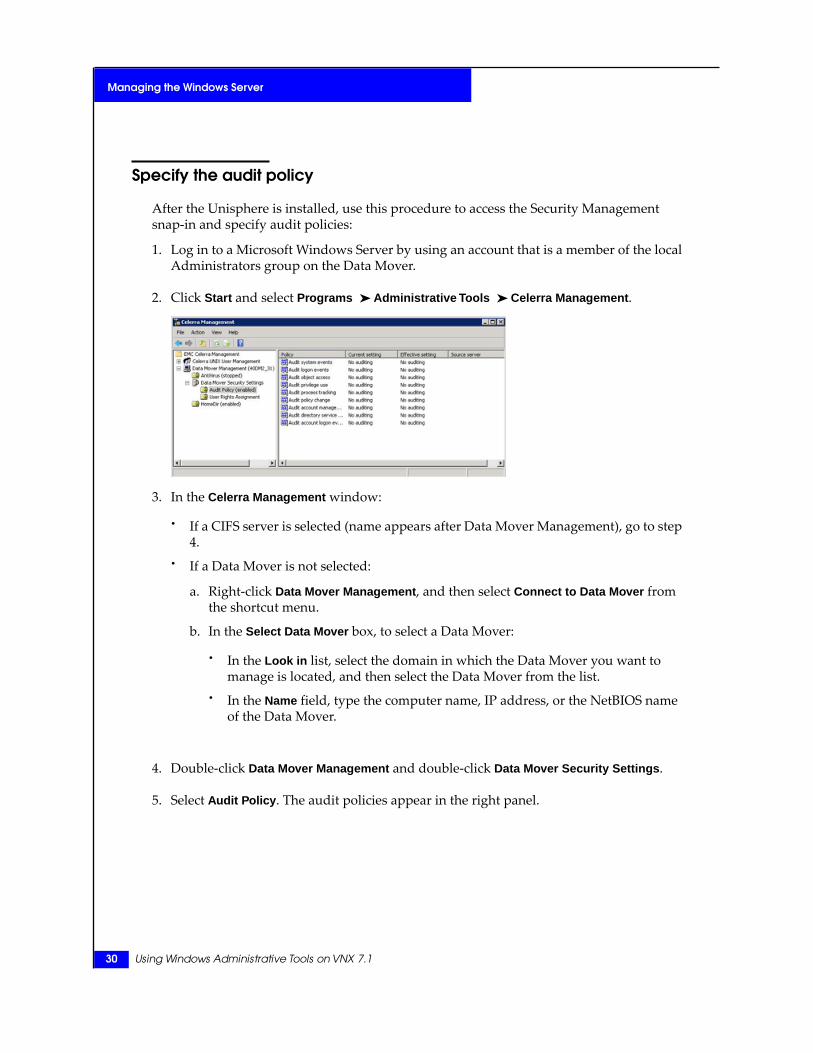
Specify the audit policy
After the Unisphere is installed, use this procedure to access the Security Managementsnap-in and specify audit policies:
1. Log in to a Microsoft Windows Server by using an account that is a member of the localAdministrators group on the Data Mover.
2. Click Start and select Programs ➤ Administrative Tools ➤ Celerra Management.
3. In the Celerra Management window:
• If a CIFS server is selected (name appears after Data Mover Management), go to step4.
• If a Data Mover is not selected:
a. Right-click Data Mover Management, and then select Connect to Data Mover fromthe shortcut menu.
b. In the Select Data Mover box, to select a Data Mover:
• In the Look in list, select the domain in which the Data Mover you want tomanage is located, and then select the Data Mover from the list.
• In the Name field, type the computer name, IP address, or the NetBIOS nameof the Data Mover.
4. Double-click Data Mover Management and double-click Data Mover Security Settings.
5. Select Audit Policy. The audit policies appear in the right panel.
30 Using Windows Administrative Tools on VNX 7.1
Managing the Windows Server

6. Right-click Audit Policy, and then select Enable Auditing from the shortcut menu.
7. Double-click an audit object in the right panel to define the audit policy for that object.The Data Mover Security Management snap-in online help provides more informationon audit policy.
Audit CIFS users and objects using Unisphere 31
Managing the Windows Server
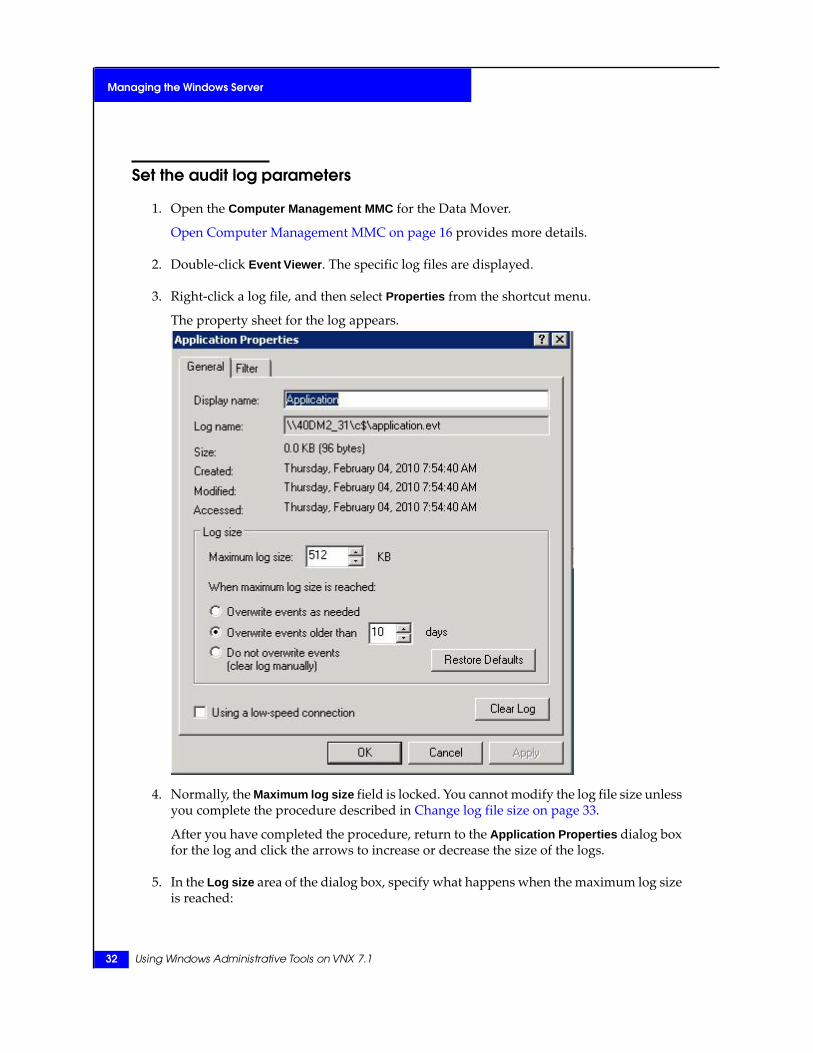
Set the audit log parameters
1. Open the Computer Management MMC for the Data Mover.
Open Computer Management MMC on page 16 provides more details.
2. Double-click Event Viewer. The specific log files are displayed.
3. Right-click a log file, and then select Properties from the shortcut menu.
The property sheet for the log appears.
4. Normally, the Maximum log size field is locked. You cannot modify the log file size unlessyou complete the procedure described in Change log file size on page 33.
After you have completed the procedure, return to the Application Properties dialog boxfor the log and click the arrows to increase or decrease the size of the logs.
5. In the Log size area of the dialog box, specify what happens when the maximum log sizeis reached:
32 Using Windows Administrative Tools on VNX 7.1
Managing the Windows Server

• Overwrite events as needed: Specifies whether all new events are written to the log,even if the log is full. When the log is full, each new event replaces the oldest event.
• Overwrite events older than ( <n> ) days: Overwrites events older than the numberof days specified. Use the arrows to specify the limit, or click the field to type a value.The file size specified in step 4 is not exceeded. New events will not be added if themaximum log size is reached and there are no events older than this period.
• Do not overwrite events: Fills the log up to the limit specified in step 4. When the logis full, no new events are written to it until you clear the log.
6. Click OK to save the settings.
Change log file size
Auditing must be enabled on the Data Mover for the log file size changes to take effect:
Note: The steps and instruction screens for this task are for Windows Server 2003. Depending on yourWindows version, the steps required to accomplish these tasks may vary.
1. On the Windows Server system used to manage the Data Movers, start the RegistryEditor as follows:
a. Select Start Run.
b. Type regedit.exe in the Open field.
c. Click OK.
The Registry Editor opens.
2. From the Registry menu, select Connect Network Registry. The Connect Network Registrydialog box appears.
Note: Depending on how the CIFS account is set up, you might receive an error message stating,"Unable to connect to all roots in the computer’s registry." Click OK to continue.
3. In the Computer name field, type the name of the CIFS server and click OK.
The Registry Editor is updated to display the Registry information for the CIFS server.
Audit CIFS users and objects using Unisphere 33
Managing the Windows Server

4. Navigate to the following Registry key on the CIFS server:
HKEY_LOCAL_MACHINE\System\CurrentControlSet\Services\Eventlog\Security
The settings for the Registry key appear in the right panel.
5. Right-click the File icon in the right panel, and then select Modify.
The Edit String dialog box appears.
6. In the Value data field, edit the path for the log file. For example:C:\<mtpnt>\<directory_name>\security.evt
where:
<mntpt>= mount point of the file system (not the root file system)
<directory_name> = name of the directory that contains the log file
Example:
C:\CIFS_FS_1\Win2KLog\security.evt
Do not change the name of the log file.
7. Click OK.
8. Close the Registry Editor. The changes take effect immediately.
34 Using Windows Administrative Tools on VNX 7.1
Managing the Windows Server

View the audit events
Use this procedure to view the audit events:
Note: The steps and instruction screens provided are for Windows Server 2003. Depending on yourWindows version, the steps required to accomplish these tasks may vary.
1. Click Start and select Programs ➤ Administrative Tools ➤ Event Viewer.
2. Right-click the Event Viewer icon in the right panel, and then select Connect to AnotherComputer from the shortcut menu.
The Select Computer dialog box appears.
3. Click Browse, select the name of the Data Mover to which you want to connect, and thenclick OK.
Click OK again to close the Select Computer dialog box.
4. Click the log. The log entries appear in the right panel.
5. Double-click the log entry to view the event detail.
The Sucess Audit Properties window opens.
Audit CIFS users and objects using Unisphere 35
Managing the Windows Server

36 Using Windows Administrative Tools on VNX 7.1
Managing the Windows Server
Disable auditing
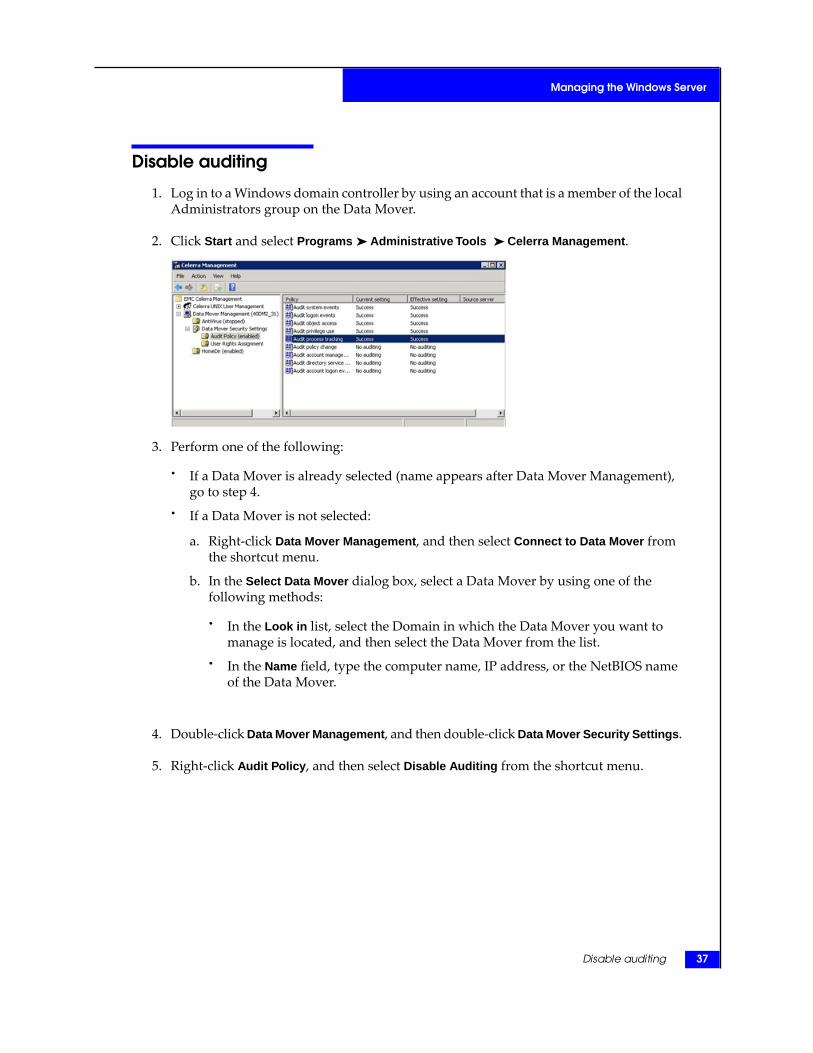
1. Log in to a Windows domain controller by using an account that is a member of the localAdministrators group on the Data Mover.
2. Click Start and select Programs ➤ Administrative Tools ➤ Celerra Management.
3. Perform one of the following:
• If a Data Mover is already selected (name appears after Data Mover Management),go to step 4.
• If a Data Mover is not selected:
a. Right-click Data Mover Management, and then select Connect to Data Mover fromthe shortcut menu.
b. In the Select Data Mover dialog box, select a Data Mover by using one of thefollowing methods:
• In the Look in list, select the Domain in which the Data Mover you want tomanage is located, and then select the Data Mover from the list.
• In the Name field, type the computer name, IP address, or the NetBIOS nameof the Data Mover.
4. Double-click Data Mover Management, and then double-click Data Mover Security Settings.
5. Right-click Audit Policy, and then select Disable Auditing from the shortcut menu.
Disable auditing 37
Managing the Windows Server

Connect the MMC to a CIFS server
Use this procedure to connect the MMC to the CIFS server:
1. To open the MMC, click Start and select Programs ➤ Administrative Tools ➤ ComputerManagement.
38 Using Windows Administrative Tools on VNX 7.1
Managing the Windows Server

2. In the MMC, right-click Computer Management (Local) and select Connect to anothercomputer…. The Select Computer dialog box appears.
3. In the Select Computer screen, select Another computer. Type the VNX CIFS serverhostname in the Another Computer field and click OK.
4. Once connected, click Classic Event Viewer ➤ Global Logs to manage the CIFS server.
Connect the MMC to a CIFS server 39
Managing the Windows Server

40 Using Windows Administrative Tools on VNX 7.1
Managing the Windows Server

4
Troubleshooting
As part of an effort to continuously improve and enhance the performanceand capabilities of its product lines, EMC periodically releases new versionsof its hardware and software. Therefore, some functions described in thisdocument may not be supported by all versions of the software orhardware currently in use. For the most up-to-date information on productfeatures, refer to your product release notes.
If a product does not function properly or does not function as describedin this document, please contact your EMC Customer SupportRepresentative.
Topics included are:◆ EMC E-Lab Interoperability Navigator on page 42◆ VNX user customized documentation on page 42◆ EMC Training and Professional Services on page 42
Using Windows Administrative Tools on VNX 7.1 41

EMC E-Lab Interoperability Navigator
The EMC E-Lab™ Interoperability Navigator is a searchable, web-based application thatprovides access to EMC interoperability support matrices. It is available on the EMC OnlineSupport website at http://Support.EMC.com. After logging in, locate the applicable Supportby Product page, find Tools, and click E-Lab Interoperability Navigator.
VNX user customized documentation
EMC provides the ability to create step-by-step planning, installation, and maintenanceinstructions tailored to your environment. To create VNX user customized documentation,go to: https://mydocs.emc.com/VNX.
EMC Training and Professional Services
EMC Customer Education courses help you learn how EMC storage products work togetherwithin your environment to maximize your entire infrastructure investment. EMC CustomerEducation features online and hands-on training in state-of-the-art labs conveniently locatedthroughout the world. EMC customer training courses are developed and delivered by EMCexperts. Go to the EMC Online Support website at http://Support.EMC.com for course andregistration information.
EMC Professional Services can help you implement your system efficiently. Consultantsevaluate your business, IT processes, and technology, and recommend ways that you canleverage your information for the most benefit. From business plan to implementation, youget the experience and expertise that you need without straining your IT staff or hiring andtraining new personnel. Contact your EMC Customer Support Representative for moreinformation.
42 Using Windows Administrative Tools on VNX 7.1
Troubleshooting
Glossary
C
CIFS serverLogical server that uses the CIFS protocol to transfer files. A Data Mover can host many instancesof a CIFS server. Each instance is referred to as a CIFS server.
CIFS serviceCIFS server process that is running on the Data Mover and presents shares on a network aswell as on Microsoft Windows-based computers.
Common Internet File System (CIFS)File-sharing protocol based on the Microsoft Server Message Block (SMB). It allows users toshare file systems over the Internet and intranets.
D
Data MoverIn VNX for file, a cabinet component that is running its own operating system that retrievesdata from a storage device and makes it available to a network client. This is also referred to asa blade.
F
file systemMethod of cataloging and managing the files and directories on a system.
N
network file system (NFS)Network file system (NFS) is a network file system protocol that allows a user on a clientcomputer to access files over a network as easily as if the network devices were attached to itslocal disks.
Using Windows Administrative Tools on VNX 7.1 43

Network Information Service (NIS)Distributed data lookup service that shares user and system information across a network,including usernames, passwords, home directories, groups, hostnames, IP addresses, andnetgroup definitions.
44 Using Windows Administrative Tools on VNX 7.1
Glossary
Index
Aaccess rights
Windows Server 21ACLs setting
for Windows Server 2003 groups 24auditing
changing log file size 33setting log parameters 32Windows Server
specifying policy 30Windows Server 2003
auditing 29CIFS users on Data Mover 35viewing audit events 35
Ccreating shares 24
Dediting Registry
for Windows Server 2003 33Windows 2003
monitoring user 26Windows Server 2003
monitoring shares 27disabling
user auditing for Windows Server 2003 37
EEMC E-Lab Navigator 42Event Viewer
Event Viewer (continued)Windows Server 2003 35
Ffiles, monitoring on Data Mover for Windows Server25
LWindows Server
setting user rights 17, 21log file, changing sizefor Windows Server 33
MMMC, opening 16monitoring
files on Data Mover 28shares on Data Mover 27shares on the Data Mover 27Windows 2003
users on Data Mover 26Windows Server
files on Data Mover 28
RRegistry, editing
Windows Server 33
Ssecurity log file, changing size
for Windows Server 33setting
ACLs on shares 24
Using Windows Administrative Tools on VNX 7.1 45

shares (continued)Windows Server 2003
setting ACLs 24specifying audit policy 30
Ttools
Event ViewerWindows Server 2003 35
MMC 11
UWindows Server 2003
disabling 37viewing events 35
auditing
users (continued)auditing (continued)
from Windows Server 2003 35
Wsetting
log parameters 32monitoring
users on the Data Mover 26Windows Server
changing log file size 33setting
user rights 21Windows Server 2000
MMC 16Windows Server 2003
creating 24disabling user auditing 37monitoring on Data Mover 27
46 Using Windows Administrative Tools on VNX 7.1
Index