Embed Size (px)
Citation preview
Road Condition Reporting System
Winter Manual Version 3.0
Telenium Inc.
Government of Saskatchewan
Ministry of Highways and Infrastructure
RCRS v3.0 SK Winter Manual Page 2
Table of Contents
Saskatchewan Highways and Infrastructure RCRS Links homepage ........................................ 3
Log in to the Telenium RCRS .................................................................................................... 4
Provincial Map ............................................................................................................................ 5
Area Map Overview .................................................................................................................... 6
Public Site Overview ................................................................................................................ 11
RCRS Reporting Area User Exercises ...................................................................................... 12
Exercise One ................................................................................................................... 12
Exercise Two .................................................................................................................. 15
Exercise Three ................................................................................................................ 16
Exercise Four – Closures ................................................................................................ 17
IABR ......................................................................................................................................... 18
Exercise One ................................................................................................................... 18
Removing Road Conditions ...................................................................................................... 21
Exercise One ................................................................................................................... 22
Ferries / Ice roads Overview ..................................................................................................... 23
Exercise One ................................................................................................................... 24
RCRS v3.0 SK Winter Manual Page 3
Saskatchewan RCRS Winter Manual
Saskatchewan Highways and Infrastructure RCRS Links homepage
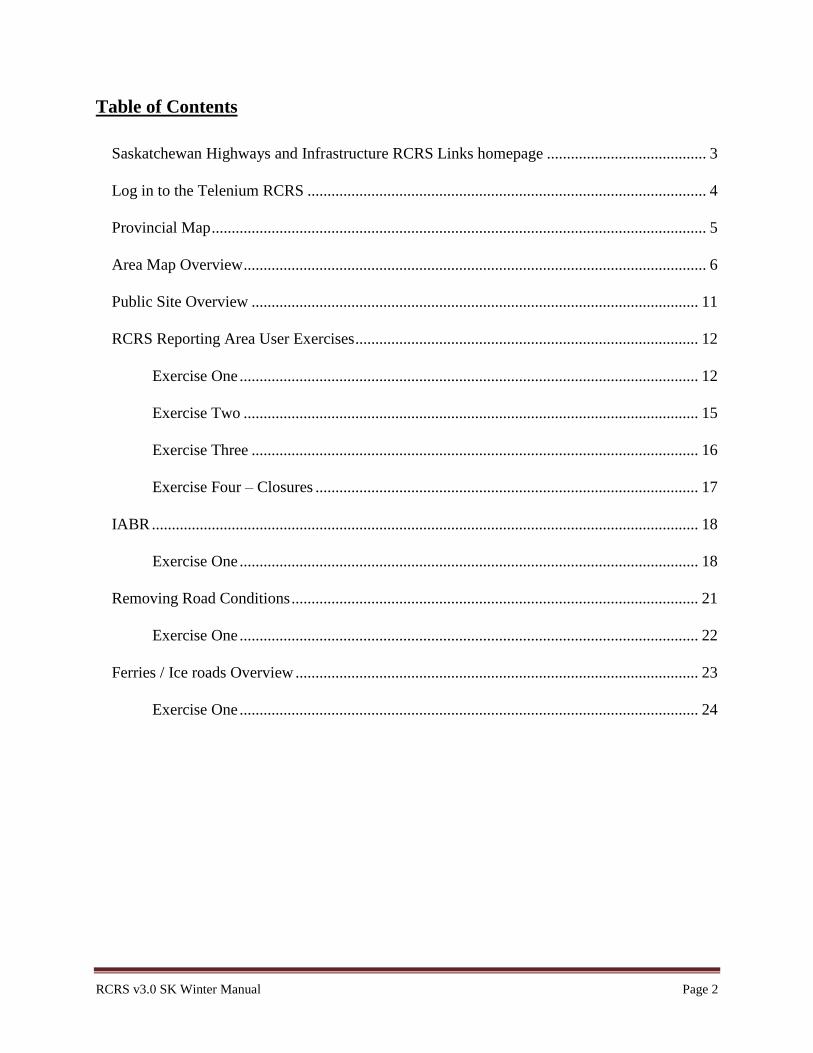
The RCRS Update Program may be accessed via the Highway RCRS Links homepage.
RCRS Links Homepage
“Demo version link” is located at the top of the Links homepage.
RCRS v3.0 SK Winter Manual Page 4
Road Condition Reporting System
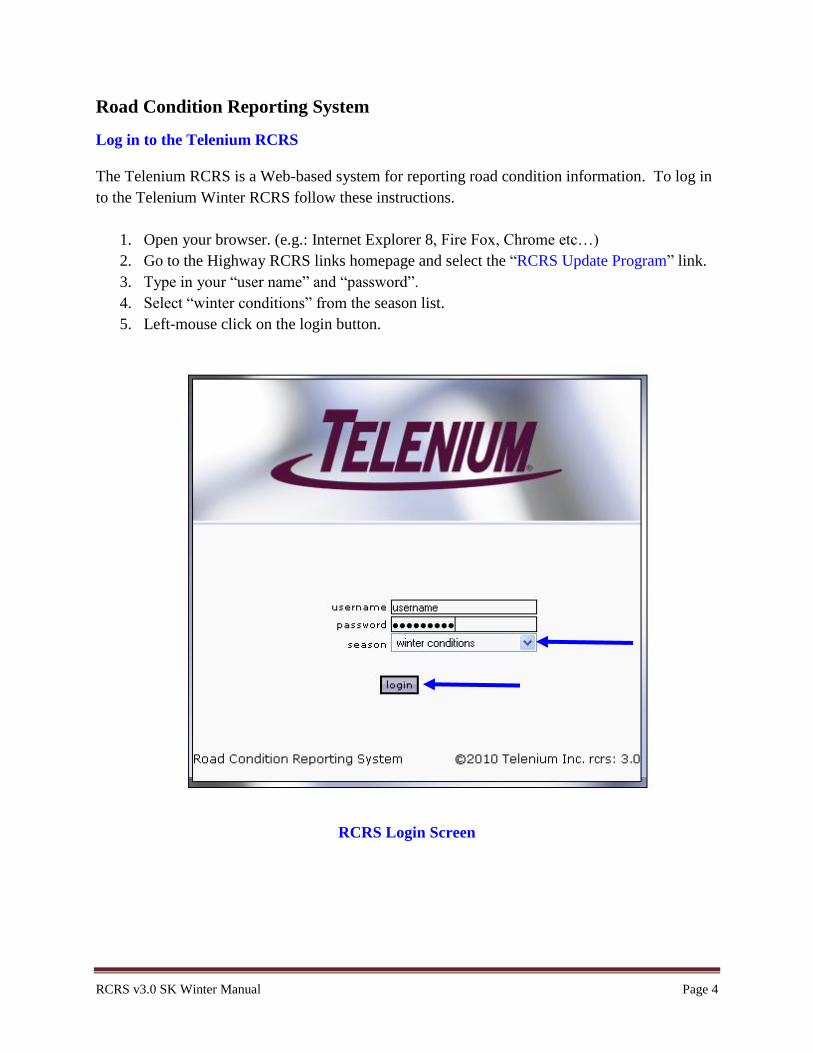
Log in to the Telenium RCRS
The Telenium RCRS is a Web-based system for reporting road condition information. To log in
to the Telenium Winter RCRS follow these instructions.
1. Open your browser. (e.g.: Internet Explorer 8, Fire Fox, Chrome etc…)
2. Go to the Highway RCRS links homepage and select the “RCRS Update Program” link.
3. Type in your “user name” and “password”.
4. Select “winter conditions” from the season list.
5. Left-mouse click on the login button.
RCRS Login Screen
RCRS v3.0 SK Winter Manual Page 5
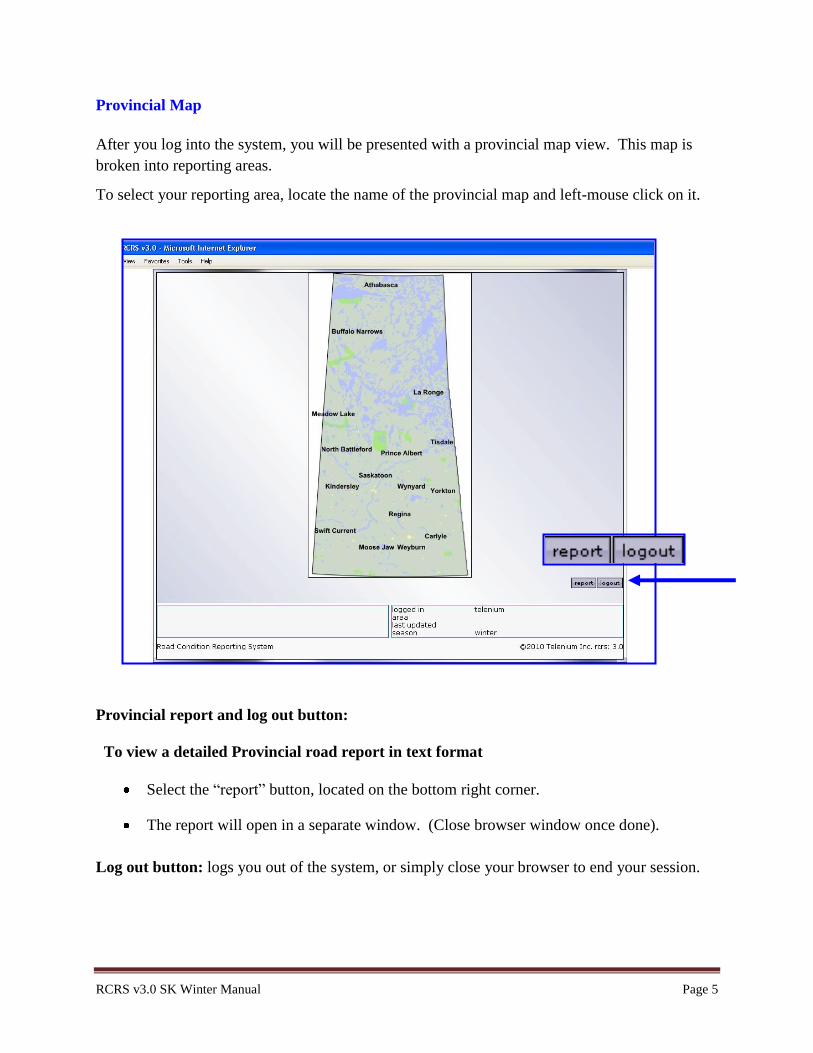
Provincial Map
After you log into the system, you will be presented with a provincial map view. This map is
broken into reporting areas.
To select your reporting area, locate the name of the provincial map and left-mouse click on it.
Provincial report and log out button:
To view a detailed Provincial road report in text format
Select the “report” button, located on the bottom right corner.
The report will open in a separate window. (Close browser window once done).
Log out button: logs you out of the system, or simply close your browser to end your session.
RCRS v3.0 SK Winter Manual Page 6
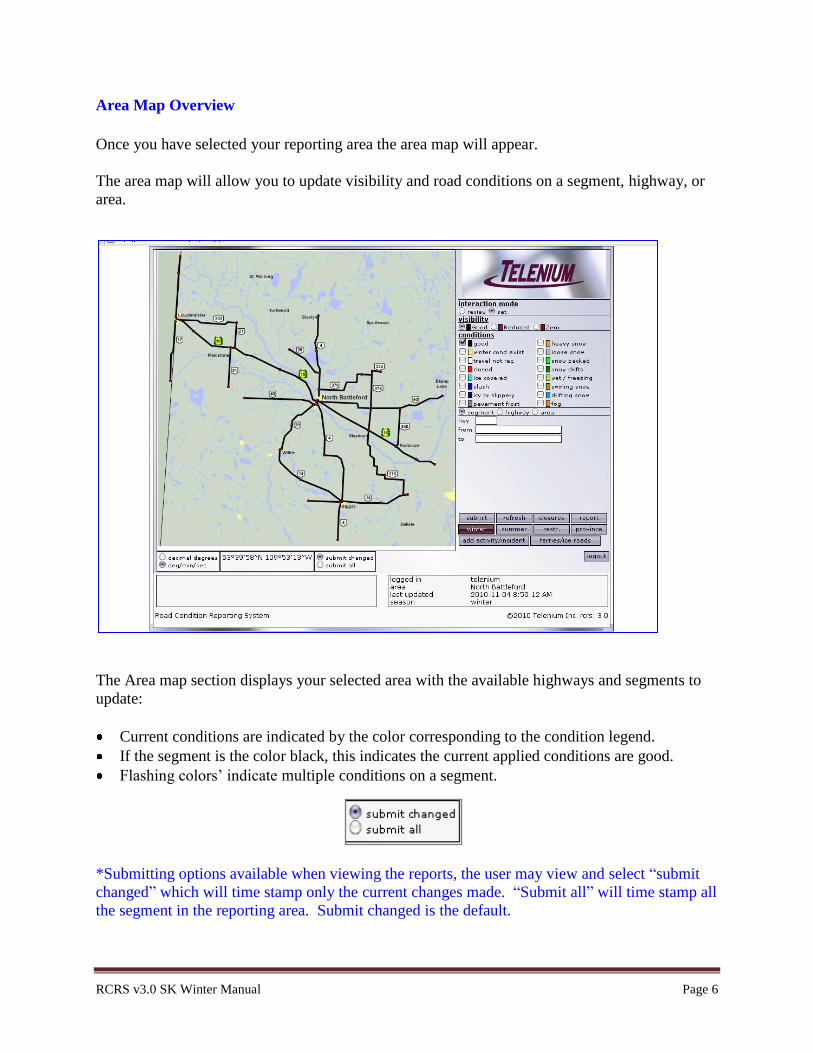
Area Map Overview
Once you have selected your reporting area the area map will appear.
The area map will allow you to update visibility and road conditions on a segment, highway, or
area.
The Area map section displays your selected area with the available highways and segments to
update:
Current conditions are indicated by the color corresponding to the condition legend.
If the segment is the color black, this indicates the current applied conditions are good.
Flashing colors‟ indicate multiple conditions on a segment.
*Submitting options available when viewing the reports, the user may view and select “submit
changed” which will time stamp only the current changes made. “Submit all” will time stamp all
the segment in the reporting area. Submit changed is the default.

RCRS v3.0 SK Winter Manual Page 7
Interaction mode:
review mode: this mode allows the user to
review the conditions already applied.
set mode: this mode allows the user to apply a selected condition(s). Set is the default.
Visibility
You have the option to apply;
Good, Reduced, or Zero visibility.
Good is the default.
Road Condition Legend
A list of pre-defined winter road conditions that can be applied;
Primary driving conditions are:
Good (is the default)
Winter conditions exist
Travel not recommended
Closed
Secondary descriptors include:
ice covered heavy snow wet / freezing
slush loose snow swirling snow
icy or slippery snow packed drifting snow
pavement frost snow drifts fog
Primary driving conditions: must be used independently from each other. „Good winter
driving‟ may not be used with a secondary descriptor.
Secondary descriptors: to be used in conjunction with a “Primary driving conditions” except
for “Good”.
*Note: If the user selects „Good‟ and then selects „Closed‟ the system will de-select „Good‟.
RCRS v3.0 SK Winter Manual Page 8
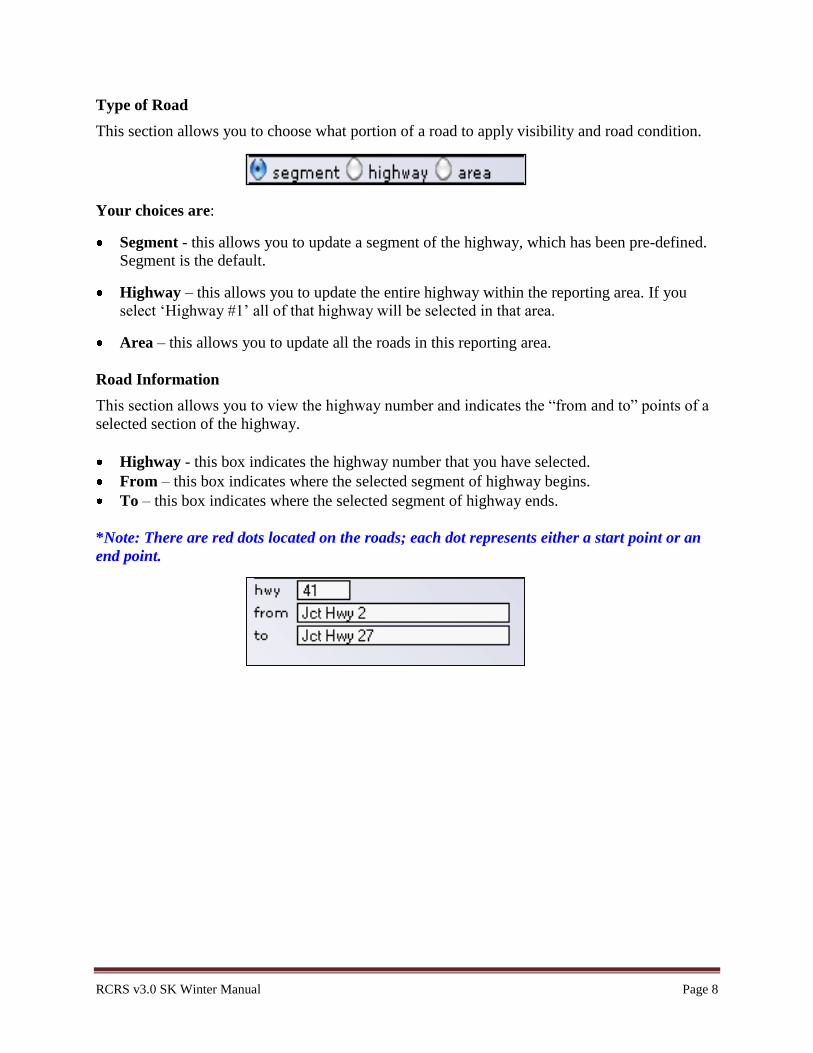
Type of Road
This section allows you to choose what portion of a road to apply visibility and road condition.
Your choices are:
Segment - this allows you to update a segment of the highway, which has been pre-defined.
Segment is the default.
Highway – this allows you to update the entire highway within the reporting area. If you
select „Highway #1‟ all of that highway will be selected in that area.
Area – this allows you to update all the roads in this reporting area.
Road Information
This section allows you to view the highway number and indicates the “from and to” points of a
selected section of the highway.
Highway - this box indicates the highway number that you have selected.
From – this box indicates where the selected segment of highway begins.
To – this box indicates where the selected segment of highway ends.
*Note: There are red dots located on the roads; each dot represents either a start point or an
end point.
RCRS v3.0 SK Winter Manual Page 9
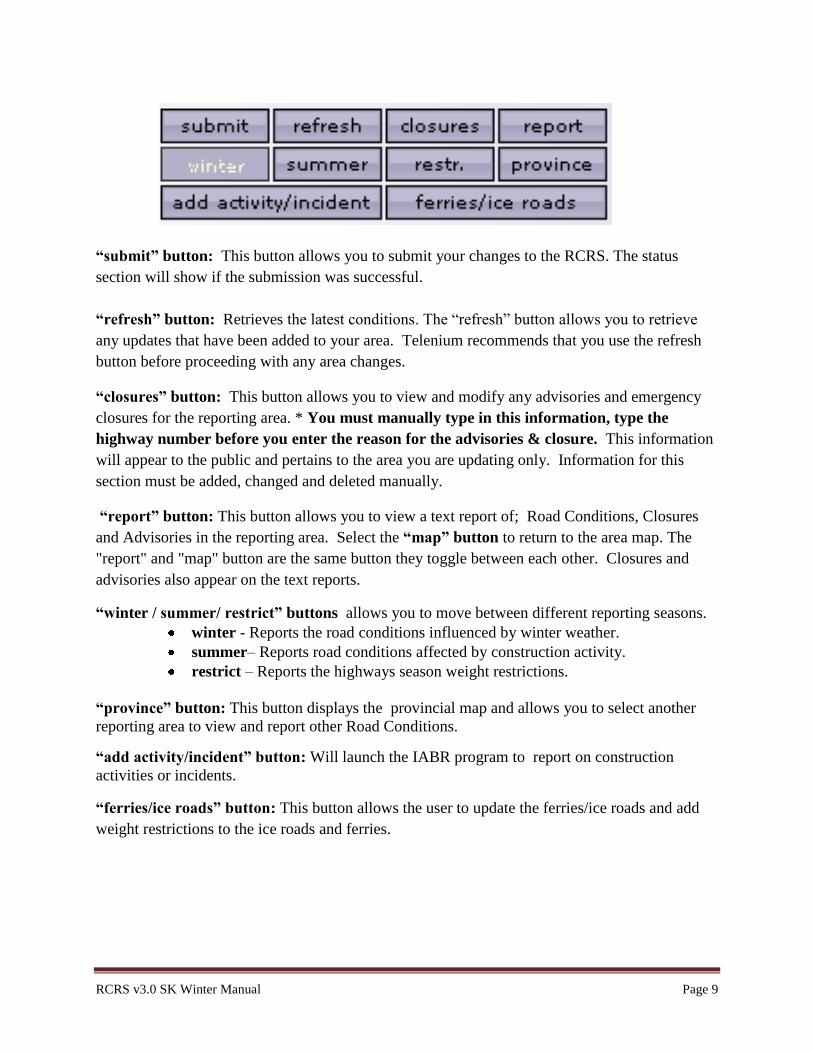
“submit” button: This button allows you to submit your changes to the RCRS. The status
section will show if the submission was successful.
“refresh” button: Retrieves the latest conditions. The “refresh” button allows you to retrieve
any updates that have been added to your area. Telenium recommends that you use the refresh
button before proceeding with any area changes.
“closures” button: This button allows you to view and modify any advisories and emergency
closures for the reporting area. * You must manually type in this information, type the
highway number before you enter the reason for the advisories & closure. This information
will appear to the public and pertains to the area you are updating only. Information for this
section must be added, changed and deleted manually.
“report” button: This button allows you to view a text report of; Road Conditions, Closures
and Advisories in the reporting area. Select the “map” button to return to the area map. The
"report" and "map" button are the same button they toggle between each other. Closures and
advisories also appear on the text reports.
“winter / summer/ restrict” buttons allows you to move between different reporting seasons.
winter - Reports the road conditions influenced by winter weather.
summer– Reports road conditions affected by construction activity.
restrict – Reports the highways season weight restrictions.
“province” button: This button displays the provincial map and allows you to select another
reporting area to view and report other Road Conditions.
“add activity/incident” button: Will launch the IABR program to report on construction
activities or incidents.
“ferries/ice roads” button: This button allows the user to update the ferries/ice roads and add
weight restrictions to the ice roads and ferries.
RCRS v3.0 SK Winter Manual Page 10
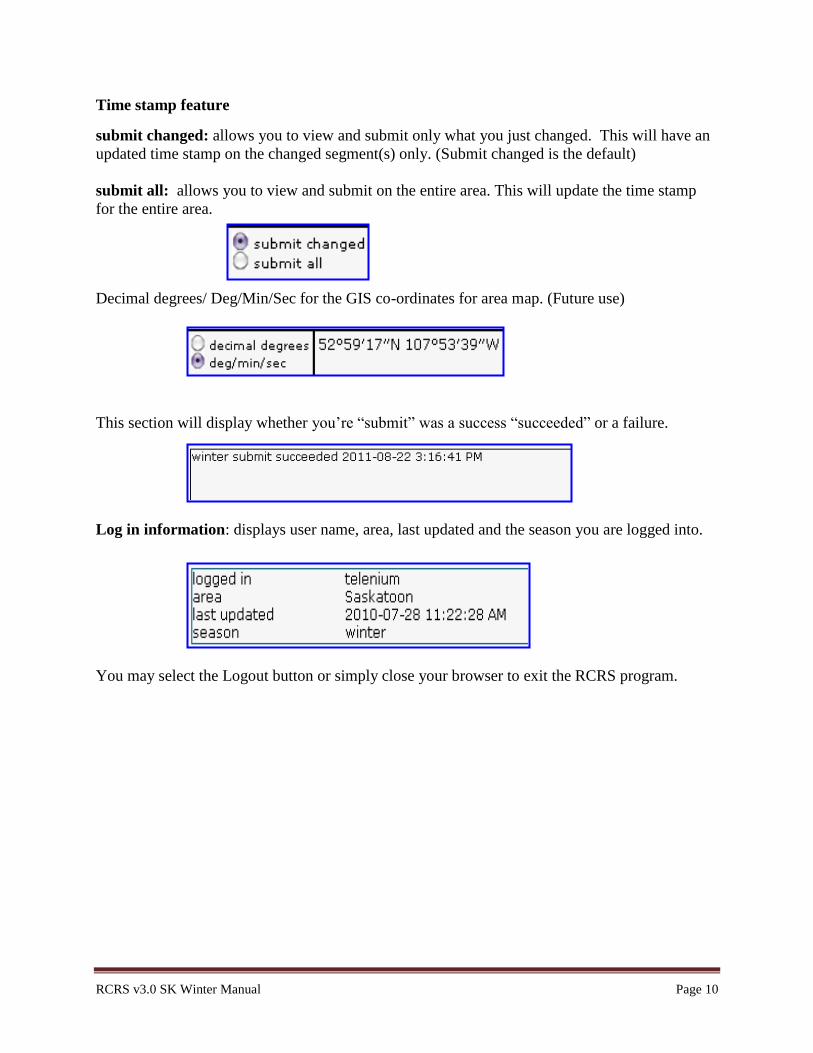
Time stamp feature
submit changed: allows you to view and submit only what you just changed. This will have an
updated time stamp on the changed segment(s) only. (Submit changed is the default)
submit all: allows you to view and submit on the entire area. This will update the time stamp
for the entire area.
Decimal degrees/ Deg/Min/Sec for the GIS co-ordinates for area map. (Future use)
This section will display whether you‟re “submit” was a success “succeeded” or a failure.
Log in information: displays user name, area, last updated and the season you are logged into.
You may select the Logout button or simply close your browser to exit the RCRS program.
RCRS v3.0 SK Winter Manual Page 11
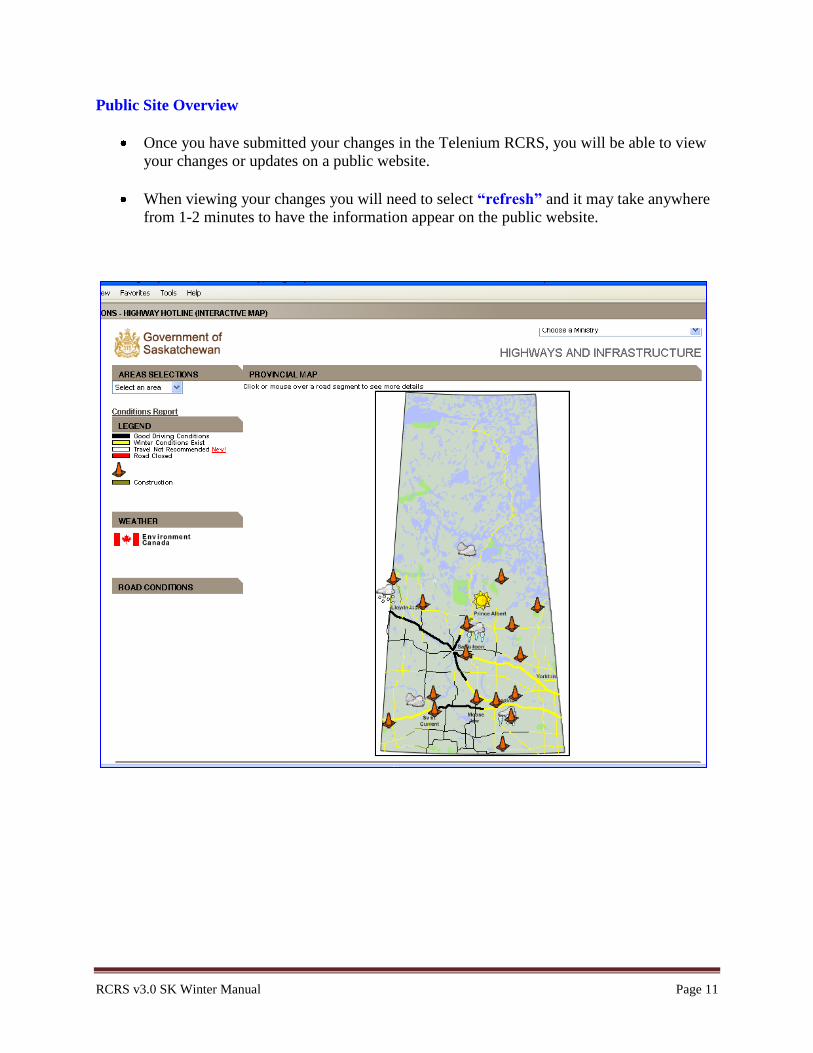
Public Site Overview
Once you have submitted your changes in the Telenium RCRS, you will be able to view
your changes or updates on a public website.
When viewing your changes you will need to select “refresh” and it may take anywhere
from 1-2 minutes to have the information appear on the public website.
RCRS v3.0 SK Winter Manual Page 12
RCRS Reporting Area User Exercises
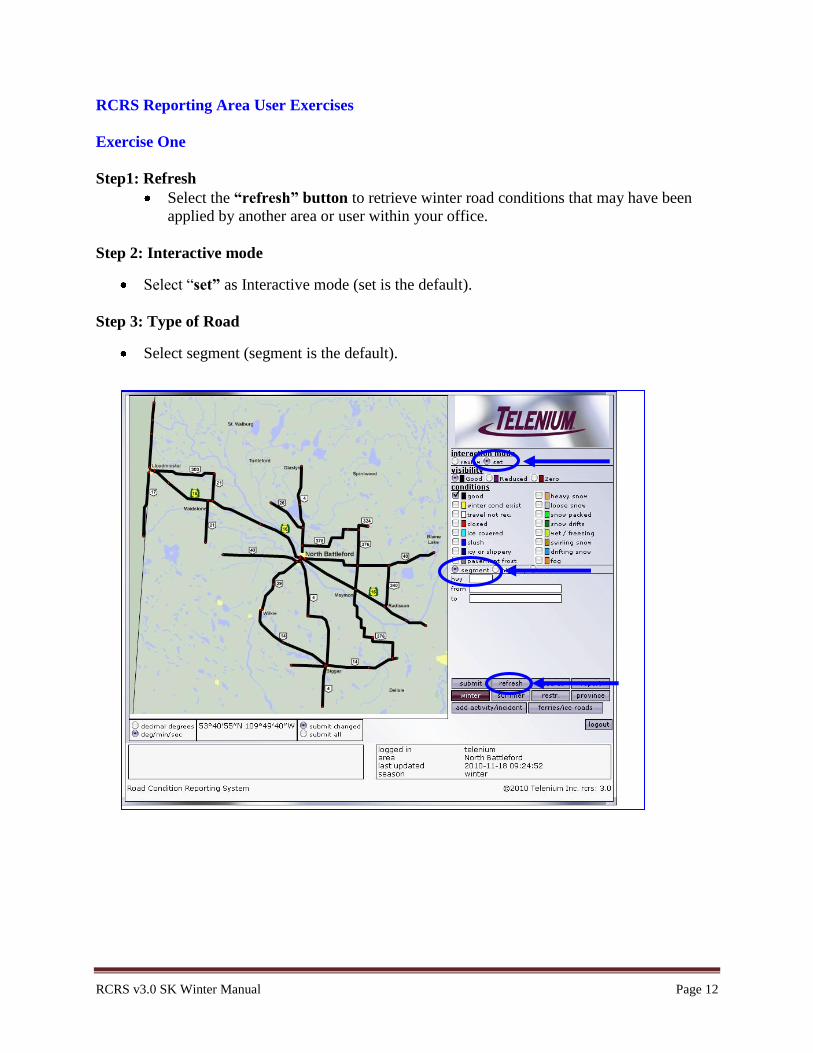
Exercise One
Step1: Refresh
Select the “refresh” button to retrieve winter road conditions that may have been
applied by another area or user within your office.
Step 2: Interactive mode
Select “set” as Interactive mode (set is the default).
Step 3: Type of Road
Select segment (segment is the default).
RCRS v3.0 SK Winter Manual Page 13
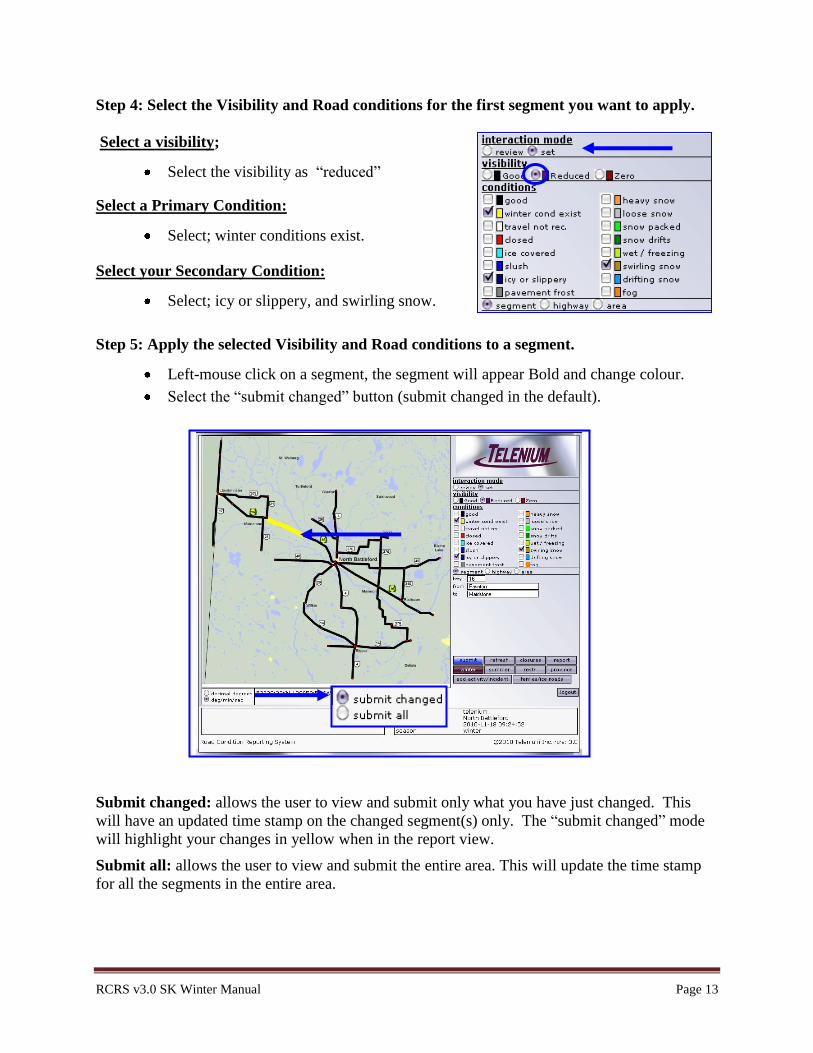
Step 4: Select the Visibility and Road conditions for the first segment you want to apply.
Select a visibility;
Select the visibility as “reduced”
Select a Primary Condition:
Select; winter conditions exist.
Select your Secondary Condition:
Select; icy or slippery, and swirling snow.
Step 5: Apply the selected Visibility and Road conditions to a segment.
Left-mouse click on a segment, the segment will appear Bold and change colour.
Select the “submit changed” button (submit changed in the default).
Submit changed: allows the user to view and submit only what you have just changed. This
will have an updated time stamp on the changed segment(s) only. The “submit changed” mode
will highlight your changes in yellow when in the report view.
Submit all: allows the user to view and submit the entire area. This will update the time stamp
for all the segments in the entire area.
RCRS v3.0 SK Winter Manual Page 14
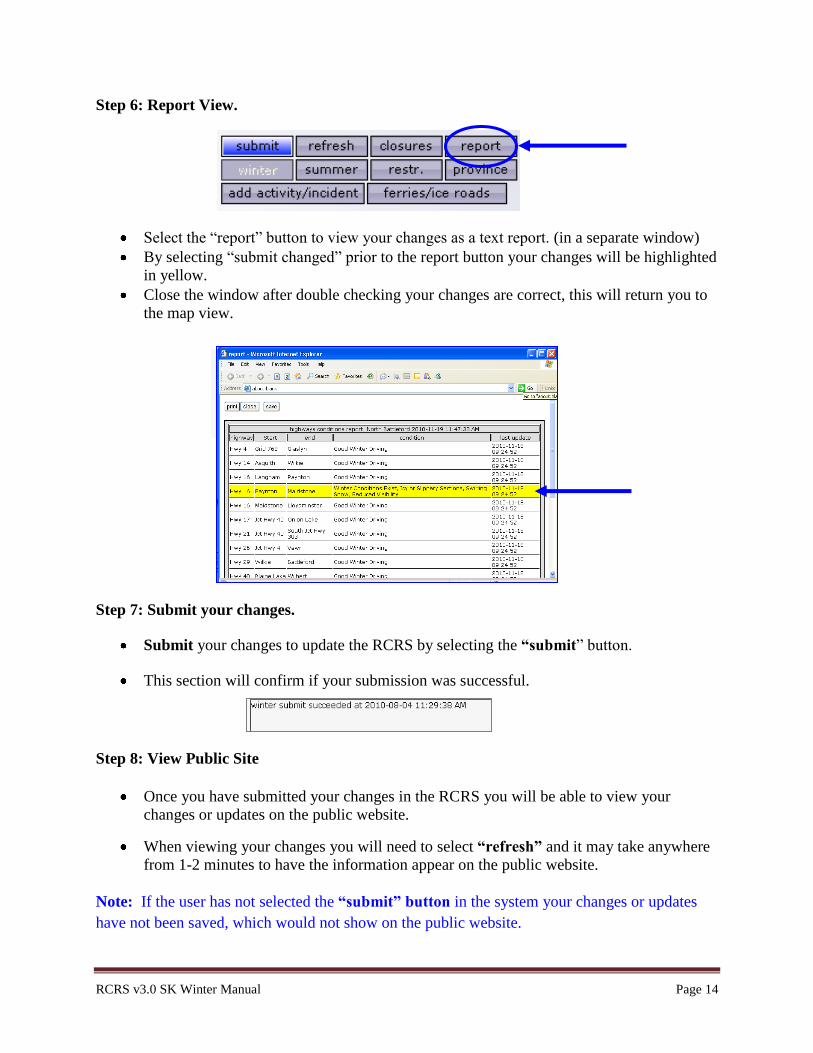
Step 6: Report View.
Select the “report” button to view your changes as a text report. (in a separate window)
By selecting “submit changed” prior to the report button your changes will be highlighted
in yellow.
Close the window after double checking your changes are correct, this will return you to
the map view.
Step 7: Submit your changes.
Submit your changes to update the RCRS by selecting the “submit” button.
This section will confirm if your submission was successful.
Step 8: View Public Site
Once you have submitted your changes in the RCRS you will be able to view your
changes or updates on the public website.
When viewing your changes you will need to select “refresh” and it may take anywhere
from 1-2 minutes to have the information appear on the public website.
Note: If the user has not selected the “submit” button in the system your changes or updates
have not been saved, which would not show on the public website.
RCRS v3.0 SK Winter Manual Page 15
Exercise Two
Step1: Refresh
Select the “refresh” button to retrieve winter road conditions that may have been
applied by another area or user within your office.
Step 2: Interactive mode
Select “set” as Interactive mode (set is the default).
Step 3: Type of Road
Select highway (segment is the default).
Step 4: Select the visibility and road conditions
Select the visibility as “Zero”
Select Primary conditions as; winter conditions exist.
Select Secondary road conditions as; icy or slippery, heavy snow, snow drifts.
Note: You need to ensure that the variations of conditions are compatible, for example “drifting
snow” and “icy or slippery” are possible conditions that may exist at the same time.
Step 5: Apply the visibility and the road conditions to the highway.
Left-mouse clicks on a highway to apply the visibility and selected conditions.
Step 6: Apply the same visibility and road conditions to another highway or segment.
Locate another highway on the area map that you would like to apply the same visibility
and road condition as the previous highway.
Left- mouse click on another highway to apply these same conditions. You may also
select a different road types to apply these same selected conditions to a segment.
Step 7: Select submit changed mode.
Select the “submit changed” option to view your changes.
Step 8: Report view.
Select the “report” button to review your changes as a text report. The “report” button
will detail all the highways in the area. Find the highway number that you updated and
review that the changes are correct.
Step 9: Submit
Submit your changes to update the RCRS by selecting the “submit” button.
RCRS v3.0 SK Winter Manual Page 16
Exercise Three
Step 1: Refresh
Select the “refresh” button to retrieve winter road conditions that may have been applied
by another area reporting or Saskatchewan head office.
Step 2: Copying one segments condition to another segment or highway.
Right-mouse click on the segment.
Note: The visibility and road conditions legend reflects the selected segments conditions.
Step 3: Apply the copied visibility and road conditions to another segment
Locate another segment to apply the copied visibility and road conditions.
Left-mouse click on it to apply the conditions.
Step 4: Report view
Select the “report” button to review your changes as a text report. The “report” button
will detail all of the highways in the area. Find the highway number you updated and
verify the changes are correct.
Step 5: Submit
Submit your changes to update the RCRS by selecting the “submit” button.
RCRS v3.0 SK Winter Manual Page 17
Exercise Four – Closures
Step 1: Refresh
Select the “refresh” button
Step 2: Select visibility and winter road conditions
Select “good” as the visibility and “good” as the road conditions.
Step 3: Add an Emergency Road closures or other advisories.
Select the “closures” button.
Type in the Hwy number and reference point or area where the closure has
occurred before the closure or advisories.
Type in the emergency and closure information.
Select the “map” button to return to the reporting area map
Emergency and closure information must be manually cleared from the system
when the activity or incident is concluded
Use the “clear” button at the top of the text report to delete the text information.
Step 4: Submit
Submit your changes to update the RCRS by selecting the “submit” button.
Public Website view of Emergency closures and advisories you have entered.
Examples of possible emergency closures/advisories:
Hazardous waste spill.
Vehicle accident, over turned semi.
Any unexpected emergency activities.
Urgent advisories in your reporting area.
RCRS v3.0 SK Winter Manual Page 18
IABR
Exercise One
How to Apply a Graphic. (example: cone)
Step1: Refresh.
Select the “refresh” button.
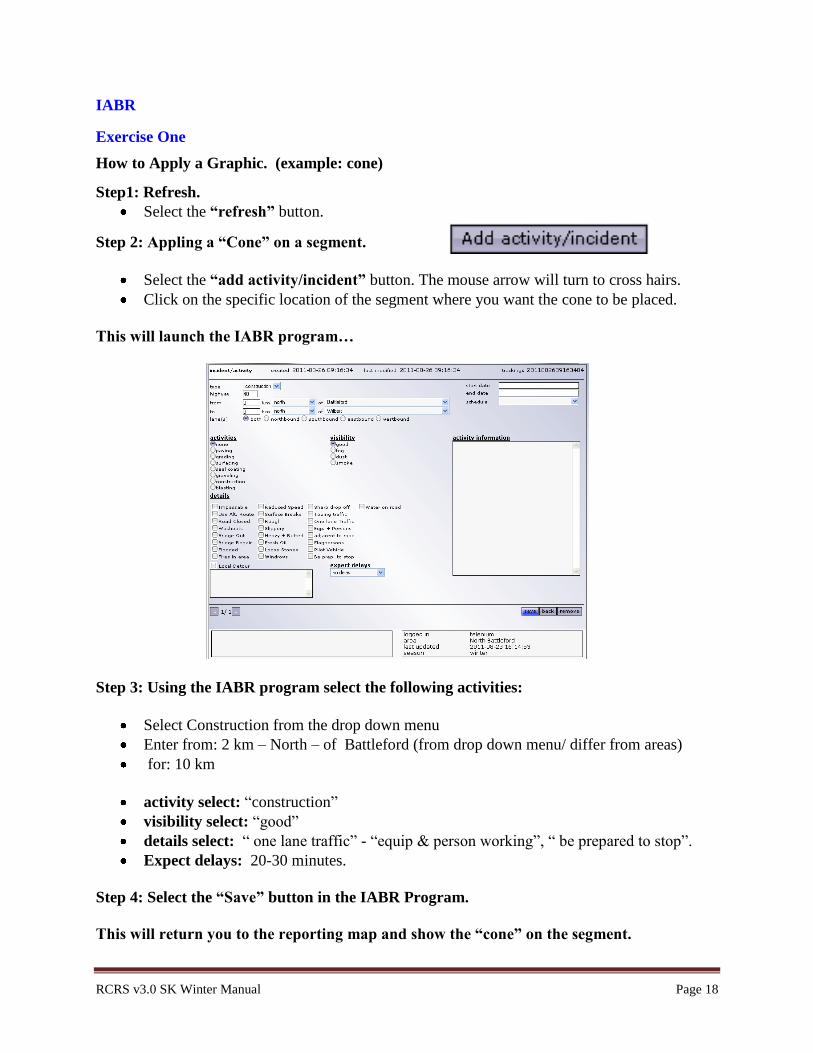
Step 2: Appling a “Cone” on a segment.
Select the “add activity/incident” button. The mouse arrow will turn to cross hairs.
Click on the specific location of the segment where you want the cone to be placed.
This will launch the IABR program…
Step 3: Using the IABR program select the following activities:
Select Construction from the drop down menu
Enter from: 2 km – North – of Battleford (from drop down menu/ differ from areas)
for: 10 km
activity select: “construction”
visibility select: “good”
details select: “ one lane traffic” - “equip & person working”, “ be prepared to stop”.
Expect delays: 20-30 minutes.
Step 4: Select the “Save” button in the IABR Program.
This will return you to the reporting map and show the “cone” on the segment.
RCRS v3.0 SK Winter Manual Page 19
Moving a Graphic: “Cone”
Step 5: Move a “cone” graphic along a segment.
Click and hold to move the cone.
*You can move a cone anywhere along the segment, if required; to properly place the graphic in
relation to the actual activity (see example above).
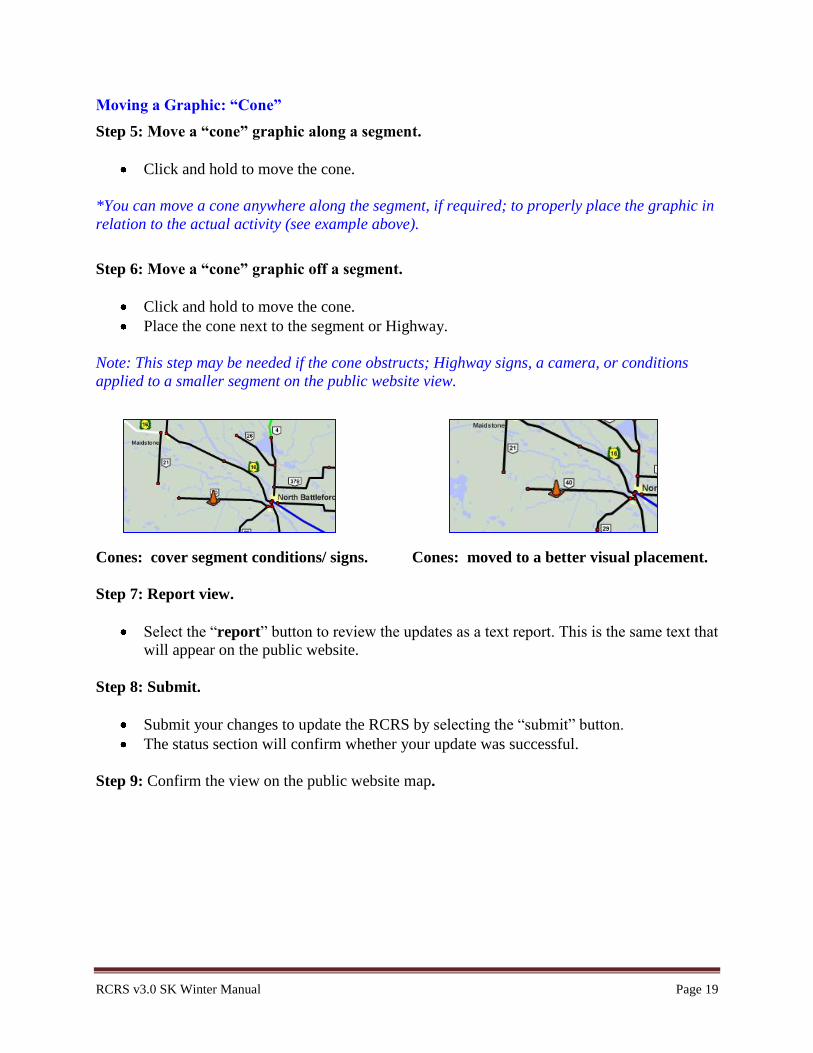
Step 6: Move a “cone” graphic off a segment.
Click and hold to move the cone.
Place the cone next to the segment or Highway.
Note: This step may be needed if the cone obstructs; Highway signs, a camera, or conditions
applied to a smaller segment on the public website view.
Cones: cover segment conditions/ signs. Cones: moved to a better visual placement.
Step 7: Report view.
Select the “report” button to review the updates as a text report. This is the same text that
will appear on the public website.
Step 8: Submit.
Submit your changes to update the RCRS by selecting the “submit” button.
The status section will confirm whether your update was successful.
Step 9: Confirm the view on the public website map.
RCRS v3.0 SK Winter Manual Page 20
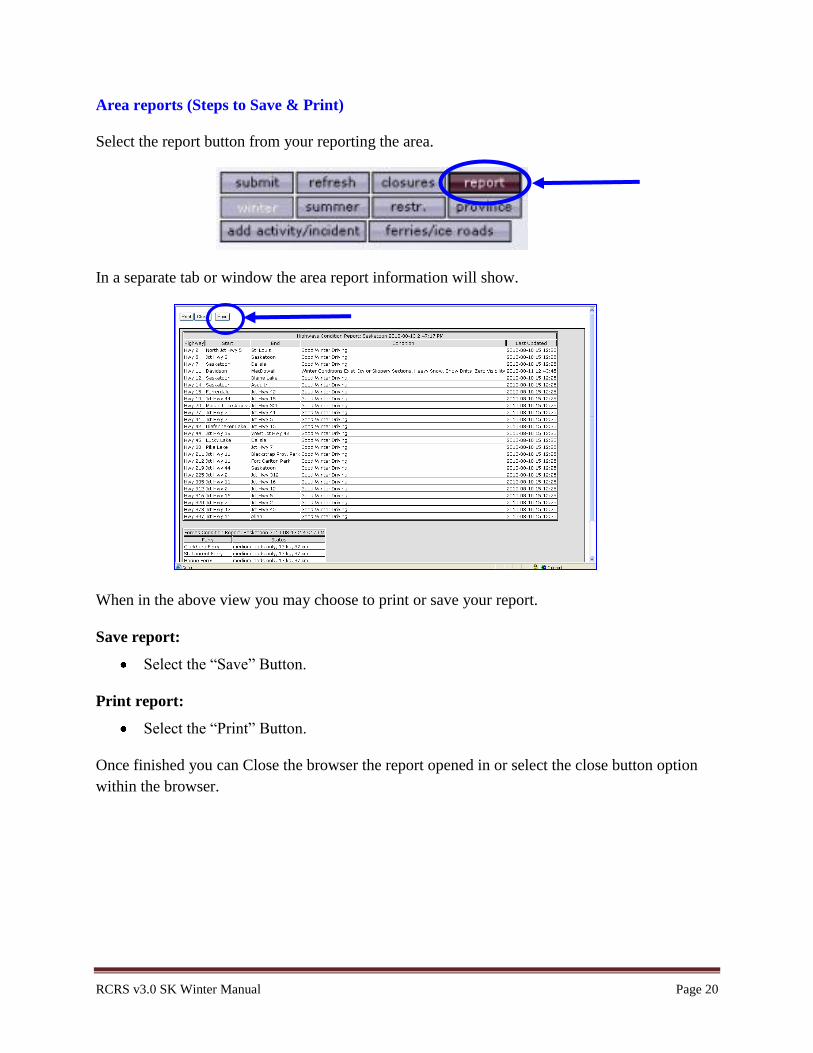
Area reports (Steps to Save & Print)
Select the report button from your reporting the area.
In a separate tab or window the area report information will show.
When in the above view you may choose to print or save your report.
Save report:
Select the “Save” Button.
Print report:
Select the “Print” Button.
Once finished you can Close the browser the report opened in or select the close button option
within the browser.
RCRS v3.0 SK Winter Manual Page 21
Removing Road Conditions
To clear the area map of visibility and road conditions in the winter system there are two
options:
Option 1: To remove conditions one “segment” or “highway” at a time.
Select the option “good” under “visibility”.
Select the option “good” under “road conditions”.
Choose the type of road: “segment” or “highway”
Left mouse click on any highway located on the area map.
Select the “submit” button to submit your changes, select “refresh”
The segment or highway you have just removed the condition on will stay locked. You
can update a new condition to that segment or highway or simply left mouse click on the
segment or highway you are updating next.
Option 2: To remove all conditions in the entire “area”.
Select the option “good” under “visibility”.
Select the option “good” under “road conditions”.
Choose the type of road: “area”
Left mouse click on any highway located on the area map.
Select the “submit” button to submit your changes, select “refresh”
If all the roads in the area are locked (all roads will appear bold) select the “refresh”
button to unlock the road segments and to view your changes.
Once you have completed these steps, all the highways will be “good” or “clear” visibility
“good” or “clear” road conditions.
Update the “area” with new conditions or select the “segment” or “highway” and the
“area” then proceed to update the new conditions as you require.
Note: This does not clear the “emergency closures and / or advisories” section.
To clear the “emergency closures and / or advisories”
Select the “closures” button.
Select the clear button at the top left of the screen.
Note: The map “clear all” button is only available in the summer RCRS update program.
RCRS v3.0 SK Winter Manual Page 22
Exercise One
Remove/Clear: Road conditions, emergency closures and IABR activities.
Step 1: Refresh
Select the “refresh” button
Step 2: Select visibility and winter road conditions
Select “good” as the visibility and “good” as the road conditions.
Step 3: Select the road type “area”
Select area as the road type
Left-mouse click the on any highway. The area will turn bold (locked)
This will clear any conditions applied in this area.
Step 4: Remove any emergency closures
Select the “closure” button
Delete any advisories or emergency closures by using the clear button.
Select the “map” button to return to the area map.
Step 5: Remove IABR construction activity.
Double click on the graphic “cone” to launch the IABR program
Select Remove- using your arrows to view other activities in that area.
Step 6: Report view
Step 7: Submit
Submit your changes to update the RCRS by selecting the “submit” button.
Logout of the system
The winter RCRS does not have a logout button.
Simply close your browser to leave the system.
Important Note:
If you close your browser without “submitting” the updates, the changes and updates will be
lost. You must log back into the RCRS and repeat your updates and select the “submit” button.

RCRS v3.0 SK Winter Manual Page 23
Ferries / Ice roads Overview
When in an area that has a ferry or ice road (example: North Battleford)
Select the “ferries/ice roads” button
This will launch the ferries/ice roads program, this next screen will appear:
Left-mouse click on the text of the Ferry or Ice road you are applying conditions to.
Select a ferries/ice road condition:
open daylight only
closed light loads
closed (season) medium loads
closed (repair)
Manually enter the weight (kg) & the thickness of the ice (cm).
Once you have selected your condition and entered weight or thickness:
Left-mouse click in the check box next to the text.
Select the “submit” button to save your changes.
RCRS v3.0 SK Winter Manual Page 24
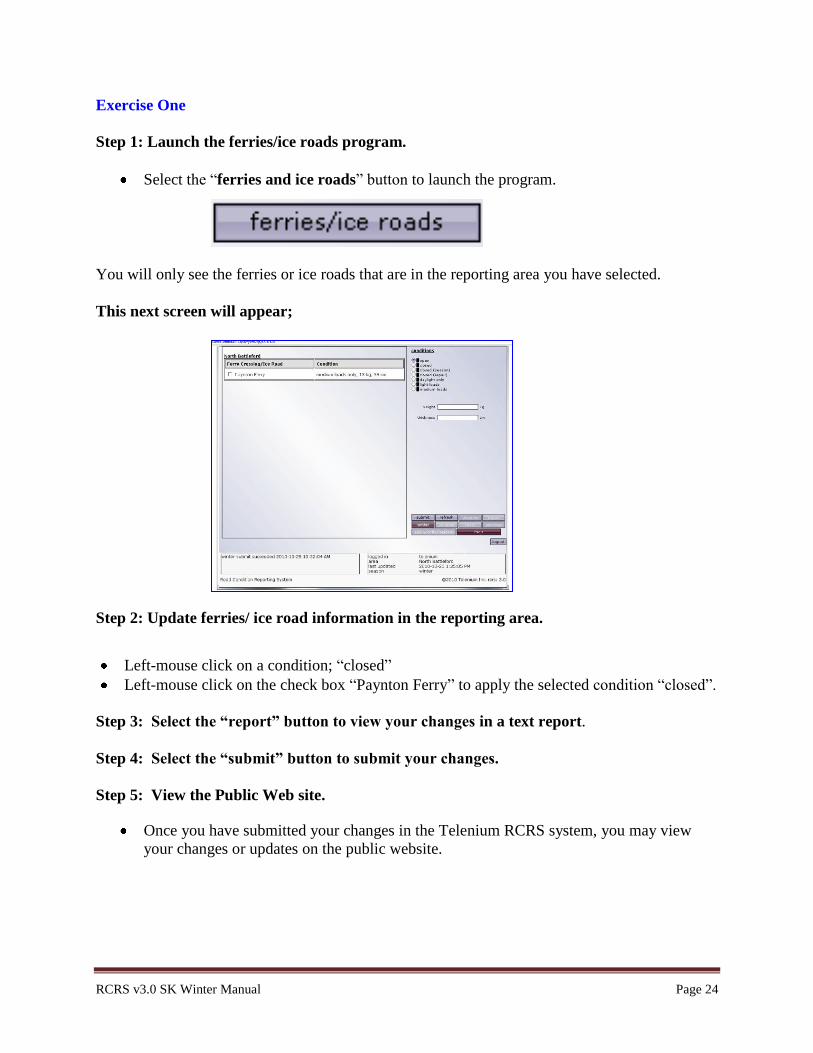
Exercise One
Step 1: Launch the ferries/ice roads program.
Select the “ferries and ice roads” button to launch the program.
You will only see the ferries or ice roads that are in the reporting area you have selected.
This next screen will appear;
Step 2: Update ferries/ ice road information in the reporting area.
Left-mouse click on a condition; “closed”
Left-mouse click on the check box “Paynton Ferry” to apply the selected condition “closed”.
Step 3: Select the “report” button to view your changes in a text report.
Step 4: Select the “submit” button to submit your changes.
Step 5: View the Public Web site.
Once you have submitted your changes in the Telenium RCRS system, you may view
your changes or updates on the public website.