Embed Size (px)
Citation preview

USSC Page 1851731
UNITED STATES STOVE COMPANY227 Industrial Park Road
P.O. Box 151South Pittsburg, TN 37380
All installations must be made in accordance with local and state codeswhich may differ from this manual.
Wood & Coal Burning FurnaceOwners Manual
Models: 24A, 30ATESTED TO UL 391
Page 2 USSC
CHIMNEY INSTALLATIONYour new furnace must be installed into a "Class A" Chimneyonly. This type of chimney consists of a flue lined brick chimney,or an approved "Class A" all fuel factory built (prefabricated)type. Any other installation guarantees an immediate fire haz-ard.
Do not install the furnace into the same chimney serving otherappliances.
When using 8" flue pipe, the chimney should have an 8" to 10"round flue liner or 9"x9" square liner.
The chimney should have a minimum height of 3' from the top ofthe chimney to the point at which it passes through the roof.
The top of the chimney must be at least 2' higher than the peakor the highest portion of the roof within 10' horizontally.
A chimney that rises within the house is better insulated than achimney that is located outside the house and exposed to theweather, the north side of the house is the worst position.
Check manual for proper installation of flue pipe into chimney.
FURNACE INSTALLATIONInstall your furnace as close to the chimney as possible with aminimum of elbows, no more than two and a flue pipe run of nomore than 6 feet horizontally. Also, the flue pipe should containa 1/2" rise per foot and NEVER be installed closer than 18" fromcombustibles.
WOOD BURNING: Install a manual flue pipe draft damper at asafe, convenient location between your furnace and chimney.
COAL BURNING: Install a barometric damper set at .05 WaterColumn.
AIR FLOW: Solid Fuel furnaces produce much hotter air than oilor gas fired appliances so all clearances are mandatory.
AIR DUCT INSTALLATION: This furnace provides a 12" round (113sq. in.) opening, because of efficiency and general conve-nience.
United States Stove Company recommends a Parallel FurnaceInstallation with direct (ducted) feed or return air to your fur-nace. NOTE: Cold air duct intake must be at least 25% largerthan hot air duct outlet.
FURNACE ASSEMBLYU.S. Stove provides easy step by step pictures, therefore, thefurnace assembly procedure should be understandable.
FIRING YOUR FURNACEStart on a conservative basis. Your new furnace, when properlyfired with hard dry wood will achieve approximately 6 to 8 hoursof burn time per load of wood, much longer with coal. If thefurnace is being fired hot constantly with full flames and onlyprovides a 3 hour burn cycle, the furnace is being overfired.Possibly your heating requirements are too much for the size offurnace purchased. Certainly allowing your existing furnace toassist in extremely cold weather is no crime. Remember, yourfurnace can be damaged if fired continually at extremely hightemperatures and this procedure will void your warranty.
CAUTION: OVERFIRING YOURFURNACE VOIDS WARRANTY.
OVER FIRINGThis generally occurs when the following procedures are notfollowed, ash door is open (even partially open), the feeddoor pressure relief flap is open, the feed door is open or themanual draft spinner is open. Open the ash and feed doorsonly when in attendance, never leave the furnace unattendedwhen doors are open. This furnace has an automatic draftfan so use the manual draft with a specific purpose. Also, anoverfilled ash drawer can cause grate warpage, keep ashdrawer clean. Don't use furnace if distribution fan isn't func-tioning properly, and keep air filter clean. Draft fan openingshould be set at 1/2" open as a point of start, depending oncondition of fuel.U. S. Stove recommends a very active fire at all times for maxi-mum results, but only as instructed.
SOME HELPFUL HINTS•Your furnace will hold logs approximately 2" shorter than the
length of the firebox. Don't force in oversized logs.
•Unsplit, dry logs will provide longer burn time than split logs.
•Don't ever try to burn trash or garbage.
•Keep flue pipe stack temperature between 300 and 400
degrees. This will reduce creosote build-up. A magnetic sur-
face thermometer can be obtained from your dealer.
•Weather is the most important determinant in how you oper-
ate your furnace (assuming you have dry wood).
•The colder it is the stronger the draft, warm weather reducesdraft. Set your draft fan rheostat and manual draft accord-ingly.•Open manual smoke damper only when starting the fire andwhen chimney draft is marginal.•Always place logs so air can flow between them.•Shake gently (up to 10 o'clock down to 8 o'clock) don't try toloose weight shaking down ashes!•Wood ash is useful as a fertilizer because it contains potas-sium, ashes also decrease the acidity of the soil. Coal ashes willprovide good traction on ice or snow, otherwise they are use-less.•Always store ashes in a metal container with a lid.•Ashes are a good thermal insulator and will keep enoughoxygen away so embers will not burn out.•Never, never let ashes accumulate up to grate level, this willgreatly reduce the life span of your grate.•Coal produces much more ash than wood.•Keep your chimney and flue pipe clean, check monthly.•Smoke detectors and fire extinguishers should always be apart of your equipment.•Never use chemicals or fluids such as gasoline, charcoal lighter,drain oil or kerosene to light a fire.•Oil the air fan motors yearly. They do not contain bearings,sleeves with felt. Therefore keeping fan air clean is more impor-tant than oiling.•Turn on your regular furnace once every month to keep ittuned up.•Always shut the furnace down gradually to prevent exces-sive stress on steel.WARPAGE OF STEEL IS COMMON, AGGRESSIVE BUT GENTLE FIR-ING CAN MINIMIZE WARPAGE.•There is no substitute for dry hard wood. Wood requires 6months to a year to air dry to 25% moisture content or less.•Don't throw heavy, wet wood into your Jensen, it could crackthe firebox and bricks.•Treat your furnace with the proper respect and it will rewardyou with much comfort, and a lifetime of central heat.
USSC Page 3
...to the world of solid fuel heating! Your new furnace has been designedand built with a high grade of materials and the strictest regard to quality.
Before you start installing your new furnace, take the time to read these instal-lation and operating instructions. We have prepared them for your benefit tosave time and provide some helpful knowledge on wood and coal burning.
Save the instructions for future use. It won't take long for you to realize thebenefit of solid fuel heating, however, maintenance is the key to a long last-ing relationship with your new furnace. These instructions can help you nowas well as in the future.
Note: This owners manual is provided for Forced Air add on furnaces. UnitedStates Stove Company is constantly developing and improving its productline, therefore, we reserve the right to change specifications without notice.
General Rules ............................................................................................................................................................4
How It Works ..............................................................................................................................................................5
Installation Instructions ...........................................................................................................................................6-9
Assembly ............................................................................................................................................................. 10-14
Control Box and Electrical Components .............................................................................................................15
Operation ........................................................................................................................................................... 15-19
Accessories ..............................................................................................................................................................19
Trouble Shooting ..................................................................................................................................................... 20
Parts List & Diagram ........................................................................................................................................... 21-22
Wiring Schematic ....................................................................................................................................................23
How To Order Repair Parts .....................................................................................................................................24
WELCOMEWELCOMEWELCOMEWELCOMEWELCOME
TTTTTABLE OF CONTENTSABLE OF CONTENTSABLE OF CONTENTSABLE OF CONTENTSABLE OF CONTENTS
Page 4 USSC
Rules for the Safe Installation and Operation of YourFurnace...
Check local codes, the installation must comply withstrict conformance in regard to clearances.
The Furnace must be installed on a noncombustiblefloor.
Connect the furnace to tile lined inside masonry chim-ney or approved insulated all fuel prefabricated chim-ney only.
Keep smoke pipe connection as short as possible,using a minimum 24 gauge pipe with a minimum 1/2"per foot rise from the flue collar to the chimney open-ing.
Be sure there is a sufficient supply of combustion airto the area where the furnace is to be located.
Do not over draft the furnace! It is designed to oper-ate at .04 to .06 inches of water column and must beset with a draft gauge to maintain a steady draft.
Do not use flammable liquids for starting a fire.
Do not store fuel or combustibles near the furnace.Some areas of the furnace are hot and could causean explosion and possible bodily or property dam-age.
Store all ashes in a metal container with a tight seal-ing lid and allow ashes to cool before disposing ofthem, possibly a week.
Familiarize yourself with the furnace's solid fuel burn-ing characteristics before leaving unit unattended forlong periods of time.
The loading door and ash door must be tightly closedduring furnace operation to insure safety and effi-ciency.
CAUTION -The furnace has hot surfaces. Keep Children Away.Do not touch during operation.
The furnace is designed to burn air dried wood andcoal at a predetermined firing rate. Over firing couldresult in damage to the heat exchanger and causedangerous operation. Over firing occurs when theash door is left open during operation or a highlyvolatile fuel, such as large amounts of small kindling,is used. Note: This action voids all warranty.
Follow a regular service and maintenance scheduleof the furnace and chimney for efficient and safe op-eration.
Do not leave the ash door open when the fire is burn-ing.
Do not let ashes build up closer than 2" to the grate.
With new steel, there is a small amount of oil or dirton the metal. You may smell an odor. This is normalduring the first operation. You should assemble thefurnace out of doors and build a small fire in it to"burn off" this dirt and oil before installing the unit.
During the first few fires, heat may slightly warp thefront and back panels. This is normal and will nothamper your unit's operation.
DO NOT CONNECT THIS UNIT TO A CHIMNEY FLUESERVING ANOTHER APPLIANCE.
BURN WOOD OR COAL ONLY THESE MODELS. DO NOTMIX OTHER THAN THE USE OF WOOD TO START A COALFIRE.
DANGER - Risk of Fire or Explosion: Do not burn gar-bage, gasoline, drain oil or other flammable liquids.
WARNING - Risk of Fire:
Do not operate with flue draft exceeding 6 inches wa-ter column.
Do not operate with fuel loading or ash removal doorsopen.
Do not store fuel or other combustible material withinmarked installation clearances.
Inspect and clean flues and chimney regularly.
In case of a power failure, remove the filter from thecold air return box if equipped. Do not expect tokeep your home at normal temperatures. Do notload fuel above the botom of the feed door.
In the event of a chimney fire call the fire depart-ment, then be sure the furnace doors are closedtightly and the power to the unit is turned off.
This Furnace Must Be Installed By A Qualified Installer.
GENERAL RULESGENERAL RULESGENERAL RULESGENERAL RULESGENERAL RULES
USSC Page 5
How Your New Furnace Works
Unlike conventional heating (gas, oil, electric), woodor coal heating requires more user attention. Yourfurnace, with its automatic combustion air blower,alleviates the constant need for adjusting the burn-ing rate common to other units on the market. Thefire, however, must be started and subsequent fueladded by the user.
Conventional heating system produce heat onlywhen the thermostat calls for heat. This way of heat-ing is inefficient and often leaves part of the homeeither too hot or too cold. Your furnace is designedto deliver heat as long as there is a fire in it. The fireintensity is regulated by the room thermostat, high orlow, the fire continues to produce heat. This heat iscontinuously distributed throughout the home by adistribution blower. This constant supply of heat isuniform and prevents drafts.
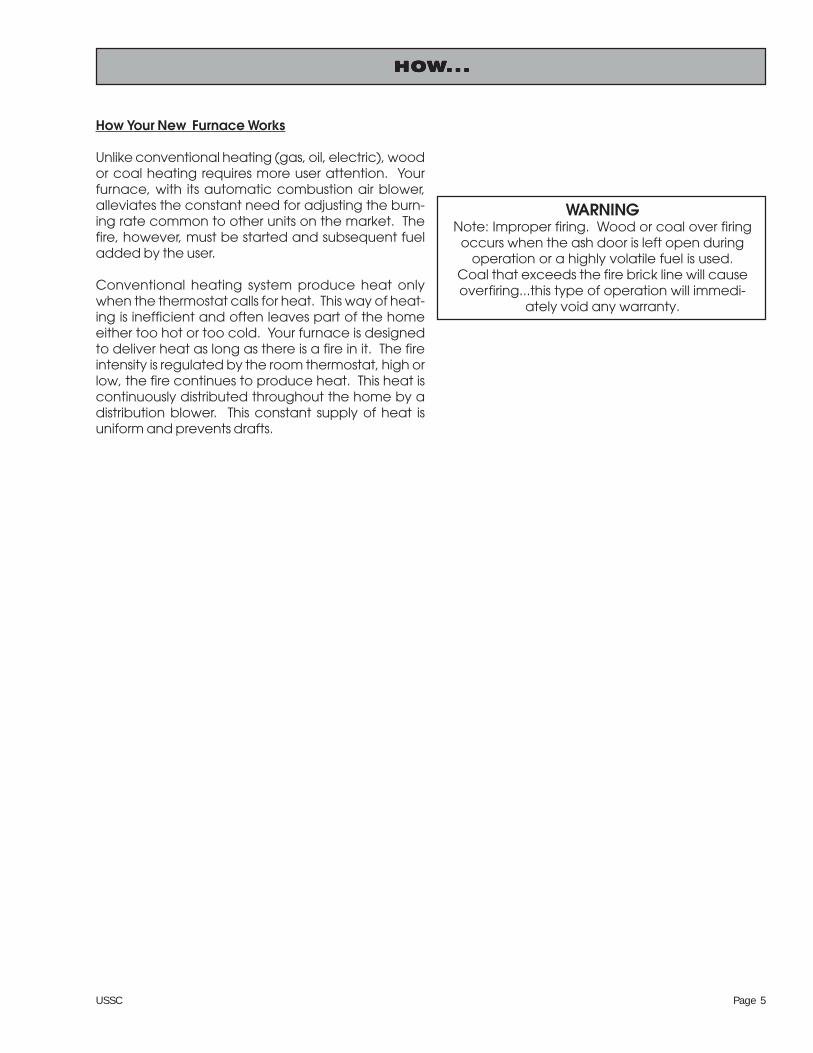
WARNINGNote: Improper firing. Wood or coal over firingoccurs when the ash door is left open during
operation or a highly volatile fuel is used.Coal that exceeds the fire brick line will causeoverfiring...this type of operation will immedi-
ately void any warranty.
HOWHOWHOWHOWHOW...............
Page 6 USSC
Furnace locationBefore you start!It is very important you check with your dealer, localfire department, or building inspector. They will beable to inform you of any state or local codes per-taining to the location and installation of your fur-nace.
The ideal location for your furnace is centrally locatedin the basement. This allows for an even heat distri-bution by having all the duct work approximately thesame length. Ideal locations cannot always be usedfor one reason or another, therefore, let's look at somealternatives.If your home does not have a basement, but a utilityroom or garage, make sure there is enough space tomaintain the required clearances stated on the labellocated on the furnace. Also, read about combus-tion air.
Chimney location is also critical. The furnace mustbe placed as close as possible to the chimney. Youwant the chimney connector (smoke pipe) to havea minimum of elbows, two (2) or less. Also, the chim-ney connector should not have to run more than six(6) feet to the chimney.
CAUTION: The warm-air supply outlet of the Furnaceshould not be connected to the cold-air return inletof the central furnace because a possibility exists ofcomponents of the central furnace overheating andcausing the central furnace to operate other than asintended.
After installation, be sure the measured external staticpressure of the central and Furnace is not greater thanthose marked on the nameplates.
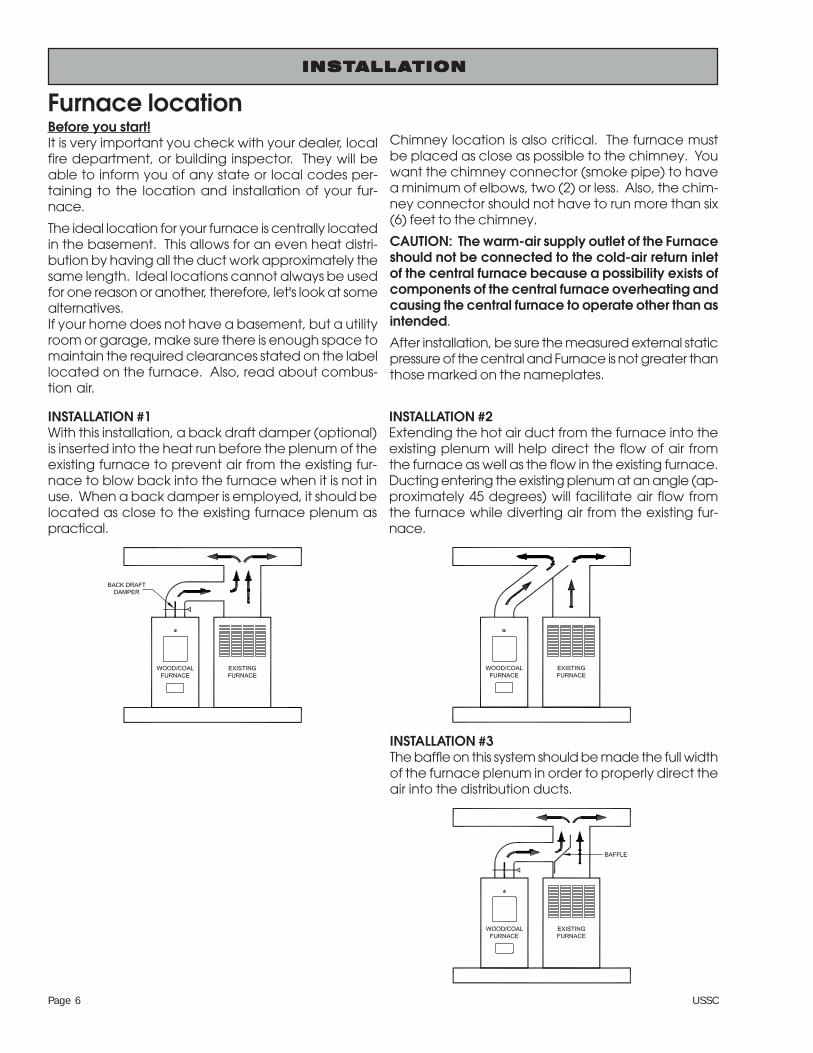
INSTALLATION #3The baffle on this system should be made the full widthof the furnace plenum in order to properly direct theair into the distribution ducts.
INSTALLATION #1With this installation, a back draft damper (optional)is inserted into the heat run before the plenum of theexisting furnace to prevent air from the existing fur-nace to blow back into the furnace when it is not inuse. When a back damper is employed, it should belocated as close to the existing furnace plenum aspractical.
INSTALLATION #2Extending the hot air duct from the furnace into theexisting plenum will help direct the flow of air fromthe furnace as well as the flow in the existing furnace.Ducting entering the existing plenum at an angle (ap-proximately 45 degrees) will facilitate air flow fromthe furnace while diverting air from the existing fur-nace.
INSTINSTINSTINSTINSTALLALLALLALLALLAAAAATIONTIONTIONTIONTION
USSC Page 7
INSTINSTINSTINSTINSTALLALLALLALLALLAAAAATIONTIONTIONTIONTION
Your furnace is designed to be added on to existingduct work and operate either with or without anotherheat source such as a gas furnace. The followingdiagrams illustrate acceptable ways of ducting yourfurnace.
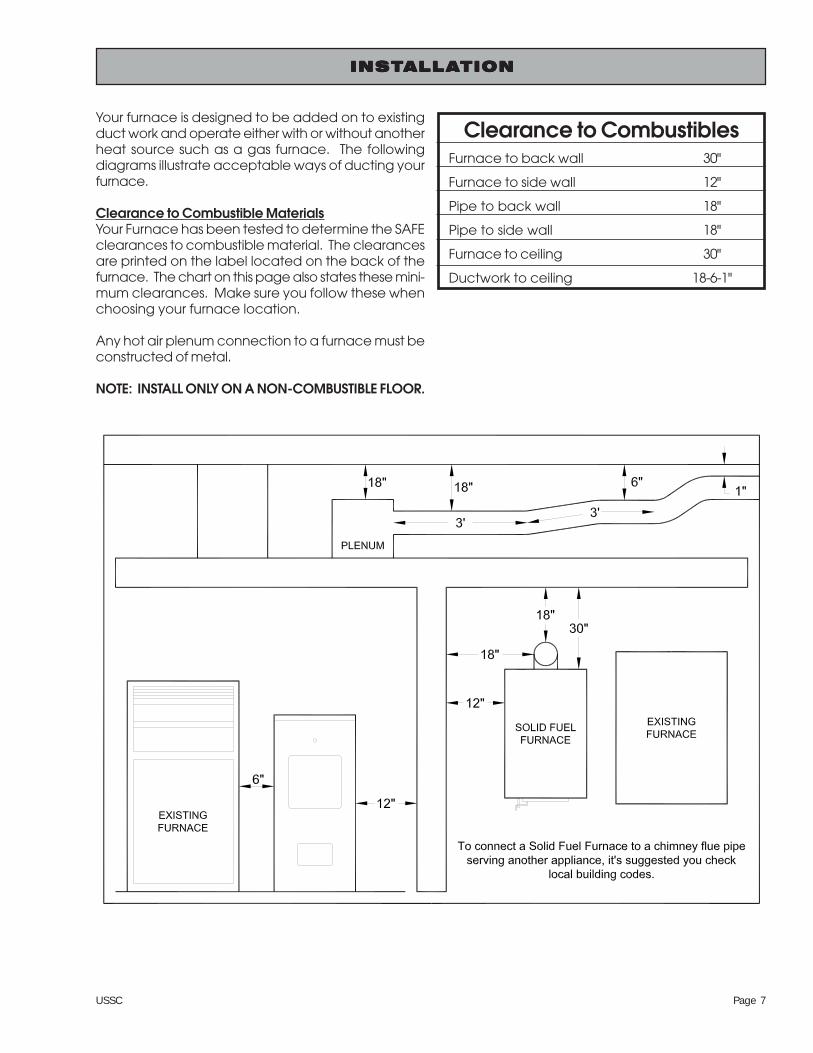
Clearance to Combustible MaterialsYour Furnace has been tested to determine the SAFEclearances to combustible material. The clearancesare printed on the label located on the back of thefurnace. The chart on this page also states these mini-mum clearances. Make sure you follow these whenchoosing your furnace location.
Any hot air plenum connection to a furnace must beconstructed of metal.
NOTE: INSTALL ONLY ON A NON-COMBUSTIBLE FLOOR.
Clearance to CombustiblesFurnace to back wall 30"
Furnace to side wall 12"
Pipe to back wall 18"
Pipe to side wall 18"
Furnace to ceiling 30"
Ductwork to ceiling 18-6-1"
Page 8 USSC
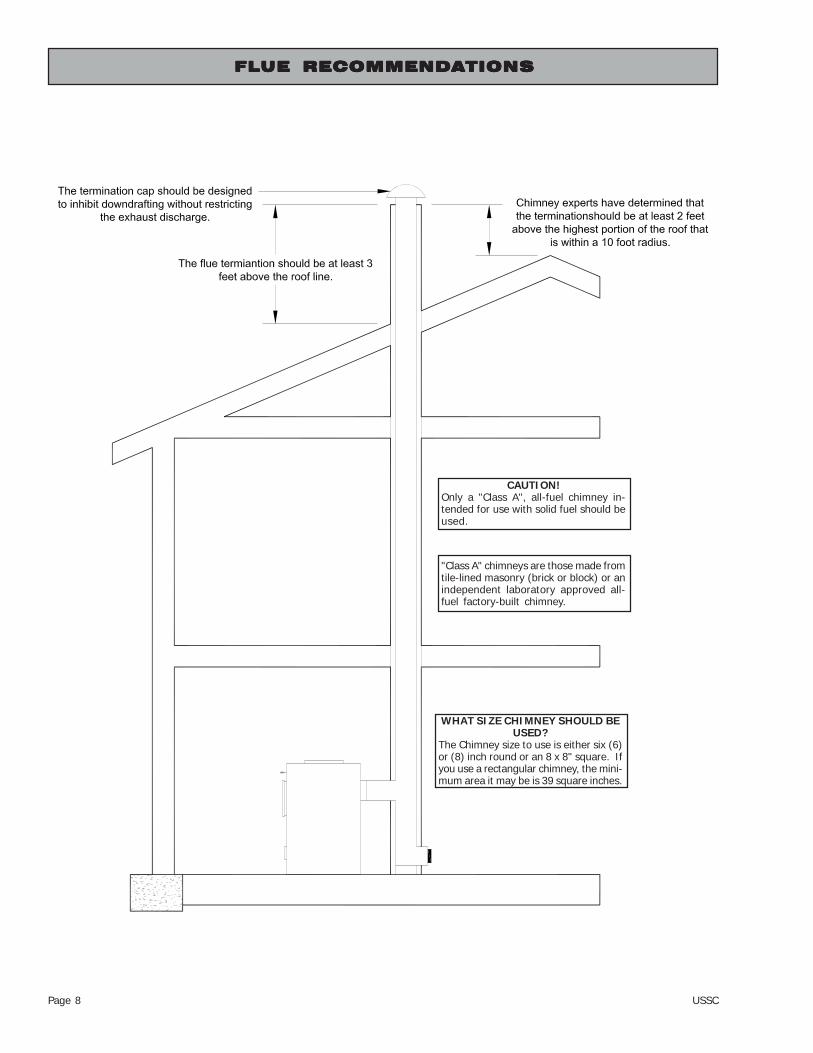
WHAT SIZE CHIMNEY SHOULD BEUSED?
The Chimney size to use is either six (6)or (8) inch round or an 8 x 8" square. Ifyou use a rectangular chimney, the mini-mum area it may be is 39 square inches.
"Class A" chimneys are those made fromtile-lined masonry (brick or block) or anindependent laboratory approved all-fuel factory-built chimney.
CAUTION!Only a "Class A", all-fuel chimney in-tended for use with solid fuel should beused.
FLFLFLFLFLUE RECOMMENDUE RECOMMENDUE RECOMMENDUE RECOMMENDUE RECOMMENDAAAAATIONSTIONSTIONSTIONSTIONS
USSC Page 9
FACTORY-BUILT OR METAL CHIMNEYSIf your home has an existing metal chimney, the same rulesapply as with masonry chimneys. One thing to be espe-cially aware of is that "Class B" chimneys are for gas appli-ances only, not solid fuel burners. If purchasing a new pack-age, consult with the dealer. He will provide the necessaryparts and instructions for installation.
INSTALLING A NEW CHIMNEYWhen installing a new chimney, whether it be masonry ormetal, if possible, it is recommended that it is placed withinthe house structure. These chimneys remain warmer and,in turn, radiate this warmth into the house. A chimney lo-cated outside the house is exposed to cold temperatureswhich encourages creosote build-up and poor chimneydraft.
CONNECTING STOVE PIPE TO A METALCHIMNEYWhen using a metal chimney, part of the installationpackage should include a stove pipe connector. Followthe instructions provided with the chimney and its parts.
CHIMNEY DRAFT REGULATORS(OPTIONAL) BAROMETRIC DAMPERThese devices are used to help maintain adequate chimneydraft automatically. They should be installed according totheir instructions and set at .04 to .06 inches of water column.
MANUAL DAMPER(RECOMMENDED FOR ADDED SAFETY)These are used to control chimney draft manually andshould be installed in a convenient place between furnaceand chimney. In the event of a chimney fire, it should beclosed reducing air to the chimney fire.
A combination of both barometric damper and manualdamper may be used. If this is the case, install the manualdamper between the barometric damper and thechimney.
VENTILATION FOR YOUR FURNACEThere are many appliances which require "make up" air tooperate. However, with a combustion air draft fan, "make-up" air is not usually necessary with your wood furnace.
If your home is sealed exceptionally well, use a 3" or 4"diameter duct vented to the outside and terminating in thevicinity of the combustion air draft fan. Also, it is possible foryour fans to draw in furnace smoke if there is only dead airin the area. Note: It's highly recommended that a cold airreturn system be utilized. Simply attach a 14" round to afilter box adapter and attach to cold air return. Also, acold air return increases motor life.
CHIMNEY INSTALLATIONWith the chimney being the most important part toyour installation, great care should be given to itsdesign.
MASONRY CHIMNEYSIf your intention is to use an existing masonry chim-ney, check first with your local building official to seeif this is acceptable.
An older chimney, in need of repair, is the GREATESTfire hazard in any installation.
STOVE PIPE (FLUE PIPE) CONNECTIONThe flue pipe you should use is 6" or 8" 24 gauge orheavier steel pipe.
When installing the flue pipe, make sure all joints aresecured with at least three (3) sheet metal screws. Thisincludes the connection to the flue collar of the fur-nace. For added protection, use some high tempera-ture furnace cement to seal each joint.
The stove pipe should slope upward to the chimneyat a rate of 1/2 inch per foot. Any horizontal runs ofstove pipe should not exceed six (6) feet and it shouldbe supported every four (4) feet. Note: Flue pipeshould be attached inside the flue pipe collar to pre-vent creosote from running down onto electricalmotors.
CONNECTION OF FLUE PIPE TO AMASONRY CHIMNEYWhen connecting flue pipe to a masonry chimney,there are two ways to go:
1. The flue pipe itself can be cemented into the chim-ney or;
2. A thimble can be used which is cemented into thechimney, and the flue pipe fits into the thimble.
In each case, care must be taken. The outer ma-sonry (brick or block) must be chipped away, andthe inner liner must be pierced. The flue pipe orthimble is then inserted flush to the inside face of thetile liner. NOT ANY FURTHER!
Use furnace cement or mortar to seal this connec-tion. When connecting the flue pipe, make sure theattachment is secure enough so down draft or "puffs"do not dislodge it.
FLFLFLFLFLUE RECOMMENDUE RECOMMENDUE RECOMMENDUE RECOMMENDUE RECOMMENDAAAAATIONSTIONSTIONSTIONSTIONS
Page 10 USSC
NOTE: Your furnace may come partially pre-assembled, but in the case that it is not, follow the instructionsbelow. Also use these instructions for future maintenance and disassembly. Drawings and photos are forillustration purposes only. Actual parts may differ.
Prior to assembling, place the unit in the general vicinity of the installation. This should help minimizehandling damage to the unit after assembly.
1. Unit side shrouds can be assemble by slipping theside shrouds into place from the top down. If theydon't slide easily, open up the lip of the sides witha large screw driver then add a little oil. Some-times a slight tapping with a block of wood andhammer may be required, but do not force. Whenproperly installed, the electrical knock-outs will beat the top left side. NOTE: Should you wish to in-stall a domestic hot water coil, it should be securedto the right side prior to assembly. Also, the rearcast iron baffle must be fastened prior to shroudinstallation.NOTE: The furnace is partially prewired all that isrequired is the wiring of the distribution fan (seewiring diagram, page 18) and the wiring to wallthe thermostat.
4. After mounting the three (3) fans proceed to thefan control center.NOTE: The best maintenance for fan motors is tokeep them clean (exceptionally clean). Oilingwith 20W N. detergent once a season will alsohelp, but cleanliness is what prolongs motors life.The distribution motors have sealed ball bearingmotors and should not need oiling. However, ifan oil tube is present, you should oil the motorsonce a season as mentioned.
Attaching the distribution fans. Using four(4) of thesupplied 1/4-20 self-tapping bolts, first install theblower motor on the right looking at the rear ofthe furnace. Then proceed to mount the left blower.Be sure to place the supplied gaskets between themotors and firebox back as shown.
Attach the draft fan to the back of the weld onthe throat (2" throat hole with 3 mounting holes).It's best to use the self tapping screws without thedraft fan to establish threads then mount blower.The electrical box on the blower should be fac-ing downward. Draft fan air intake cover shouldbe set at a 20% opening, about 1/2" opening.
3.
ASSEMBLASSEMBLASSEMBLASSEMBLASSEMBLY ILLY ILLY ILLY ILLY ILLUSTRAUSTRAUSTRAUSTRAUSTRATIONSTIONSTIONSTIONSTIONS
2.
USSC Page 11
6. Attach low voltage thermostat No. 18 up to 30 ft.run No. 16 to 15ft. Run (purchase locally) to ter-minal plate, screws identified with letters G & R.(Generally top row center, bottom row right).Snake wire through holes in top of box. Replaceouter covers & control knob. Under no circum-stances should you attempt to plug in main powercord until all wiring and covers are in place.NOTE: A ground power cord plug is provided;however, local codes may require fuse boxmounting.
8. Install top shroud (if removed) by simply placingshroud on to the top of unit, push down, checkeach corner for snug fit.
Attaching furnace control center box. To sepa-rate outer cover, remove two (2) side screws andpull off black rheostat knob. Attach box to leftside (facing feed door) with four (4) self-thread-ing screws. One screw in each corner. (NOTE:Furnace control center is designed for left sideattachment. Should space prohibit such, revers-ing shrouds for right side installation is possible,however, control wires from box will have to beextended.)Next, attach the 4x4 junction box below the con-trol center box, using (2) self-threading screws pro-vided in the parts bag. (Two starter holes areprovided.)
5a.
5b.
Wall thermostat should be mounted on an up-stairs inside wall (no outside facing wall) prefer-ably near your existing thermostat. For more spe-cific information, read the Honeywell instructionsheet provided with thermostat. Caution: discon-nect the power supply before installing. NOTE:Your wall thermostat and transfer relay are matedHoneywell products for trouble free installation.
7.
ASSEMBLASSEMBLASSEMBLASSEMBLASSEMBLY ILLY ILLY ILLY ILLY ILLUSTRAUSTRAUSTRAUSTRAUSTRATIONSTIONSTIONSTIONSTIONS
Page 12 USSC
10. Install grate frame (if not already installed): Laythe first grate frame on the side supports and slideto the back of the unit. Then install the secondgrate frame to the front as shown in the pictureabove. The smooth ends of the frames should betogether in the middle. For the model 30A, insertthe half grate frame in the middle of the front andrear frames.
12. Installing Firebrick: Place 5 bricks on each side(10 brick total). The bricks tuck under firebox seem.
For the 30A model, use six(6) full brick and 1 halfbrick per side. (12 full and 2 half brick total)
9. Installing collar to top: To install hot air attachingcollar, simply bend all tabs right angle undershroud. This may be possible with thumbs, if not,remove top and use small hammer.
CAUTION: Any hot air plenum connection to a fur-nace must be constructed of metal.
Installing Grates: Install grates together, slip shakerlug into hole and place grates into frame. Gratearch faces upward. Check out grate rotation byplacing shaker handle on grate lug (3/4"). Gratesshould rotate freely.NOTE: Grates are designed to withstand high tem-peratures, however, should you overfire the fur-nace you may fuse or melt grates. This happensif furnace receives too much air caused by leav-ing the ash and feed doors open, draft fan coverwide open, and hot coals or ashes are excessivein ash pan.
11.
ASSEMBLASSEMBLASSEMBLASSEMBLASSEMBLY ILLY ILLY ILLY ILLY ILLUSTRAUSTRAUSTRAUSTRAUSTRATIONSTIONSTIONSTIONSTIONS
USSC Page 13
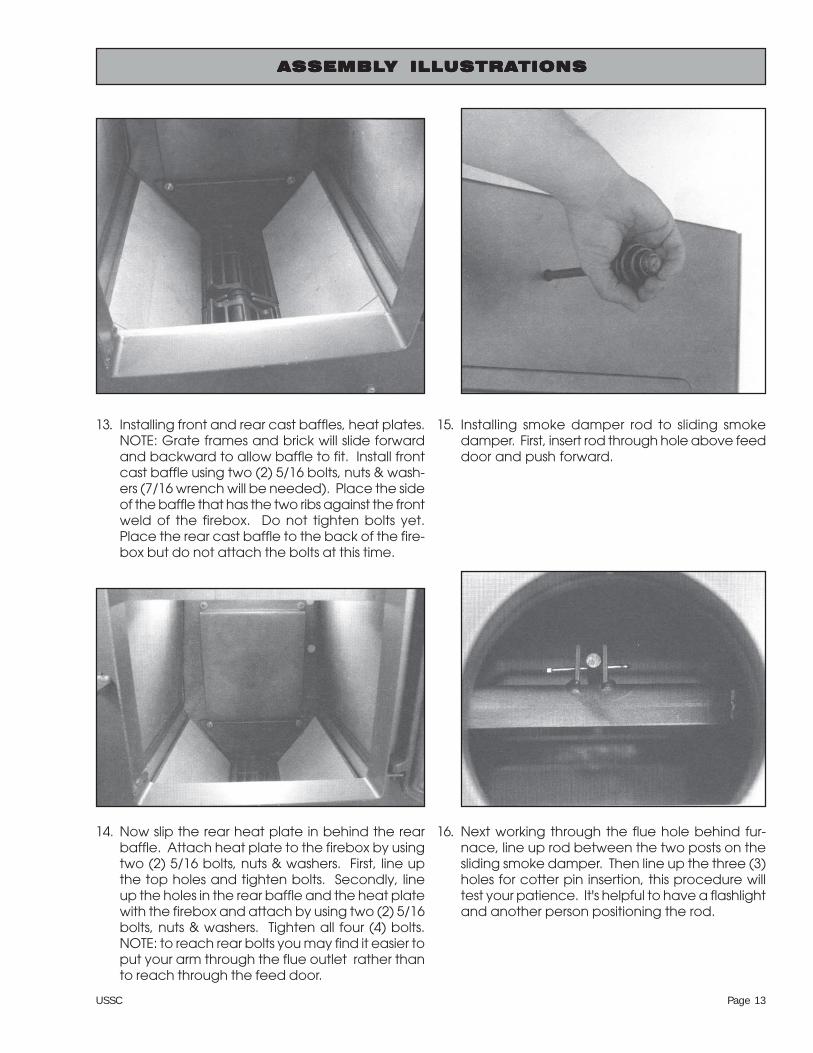
13. Installing front and rear cast baffles, heat plates.NOTE: Grate frames and brick will slide forwardand backward to allow baffle to fit. Install frontcast baffle using two (2) 5/16 bolts, nuts & wash-ers (7/16 wrench will be needed). Place the sideof the baffle that has the two ribs against the frontweld of the firebox. Do not tighten bolts yet.Place the rear cast baffle to the back of the fire-box but do not attach the bolts at this time.
14. Now slip the rear heat plate in behind the rearbaffle. Attach heat plate to the firebox by usingtwo (2) 5/16 bolts, nuts & washers. First, line upthe top holes and tighten bolts. Secondly, lineup the holes in the rear baffle and the heat platewith the firebox and attach by using two (2) 5/16bolts, nuts & washers. Tighten all four (4) bolts.NOTE: to reach rear bolts you may find it easier toput your arm through the flue outlet rather thanto reach through the feed door.
15. Installing smoke damper rod to sliding smokedamper. First, insert rod through hole above feeddoor and push forward.
16. Next working through the flue hole behind fur-nace, line up rod between the two posts on thesliding smoke damper. Then line up the three (3)holes for cotter pin insertion, this procedure willtest your patience. It's helpful to have a flashlightand another person positioning the rod.
ASSEMBLASSEMBLASSEMBLASSEMBLASSEMBLY ILLY ILLY ILLY ILLY ILLUSTRAUSTRAUSTRAUSTRAUSTRATIONSTIONSTIONSTIONSTIONS
Page 14 USSC
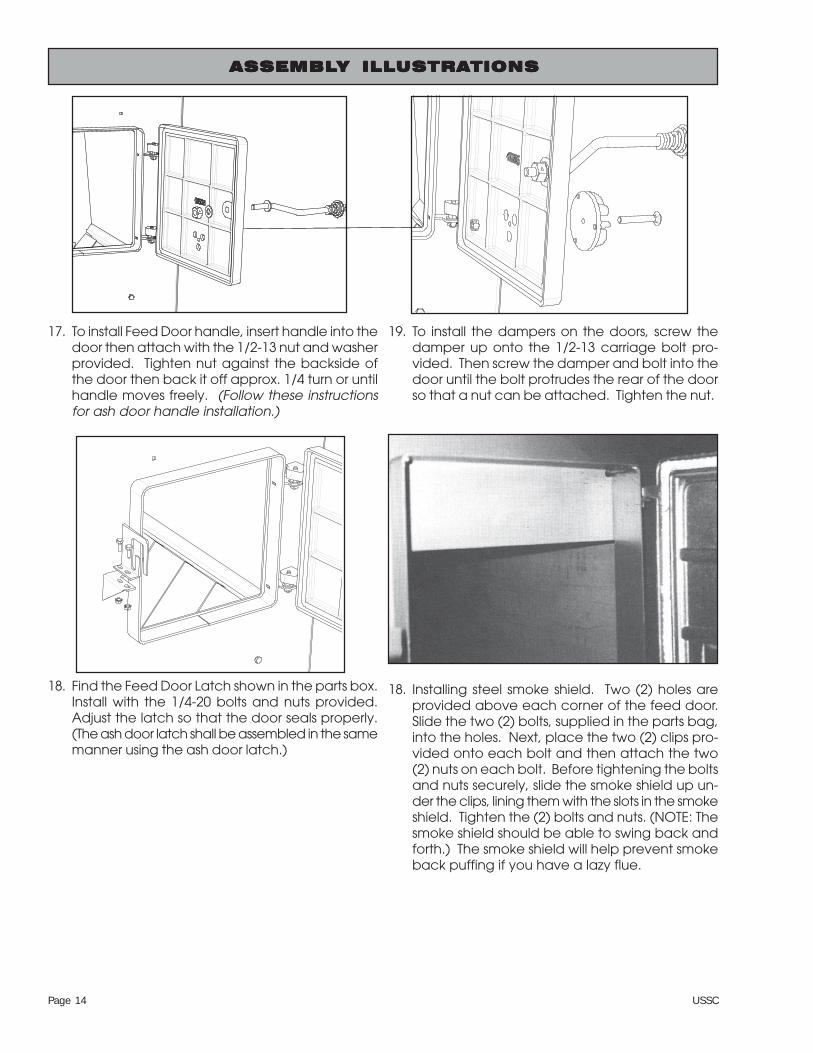
18. Installing steel smoke shield. Two (2) holes areprovided above each corner of the feed door.Slide the two (2) bolts, supplied in the parts bag,into the holes. Next, place the two (2) clips pro-vided onto each bolt and then attach the two(2) nuts on each bolt. Before tightening the boltsand nuts securely, slide the smoke shield up un-der the clips, lining them with the slots in the smokeshield. Tighten the (2) bolts and nuts. (NOTE: Thesmoke shield should be able to swing back andforth.) The smoke shield will help prevent smokeback puffing if you have a lazy flue.
17. To install Feed Door handle, insert handle into thedoor then attach with the 1/2-13 nut and washerprovided. Tighten nut against the backside ofthe door then back it off approx. 1/4 turn or untilhandle moves freely. (Follow these instructionsfor ash door handle installation.)
ASSEMBLASSEMBLASSEMBLASSEMBLASSEMBLY ILLY ILLY ILLY ILLY ILLUSTRAUSTRAUSTRAUSTRAUSTRATIONSTIONSTIONSTIONSTIONS
18. Find the Feed Door Latch shown in the parts box.Install with the 1/4-20 bolts and nuts provided.Adjust the latch so that the door seals properly.(The ash door latch shall be assembled in the samemanner using the ash door latch.)
19. To install the dampers on the doors, screw thedamper up onto the 1/2-13 carriage bolt pro-vided. Then screw the damper and bolt into thedoor until the bolt protrudes the rear of the doorso that a nut can be attached. Tighten the nut.
USSC Page 15
----
--
--
--
--
--
1.
2.
3.
4.
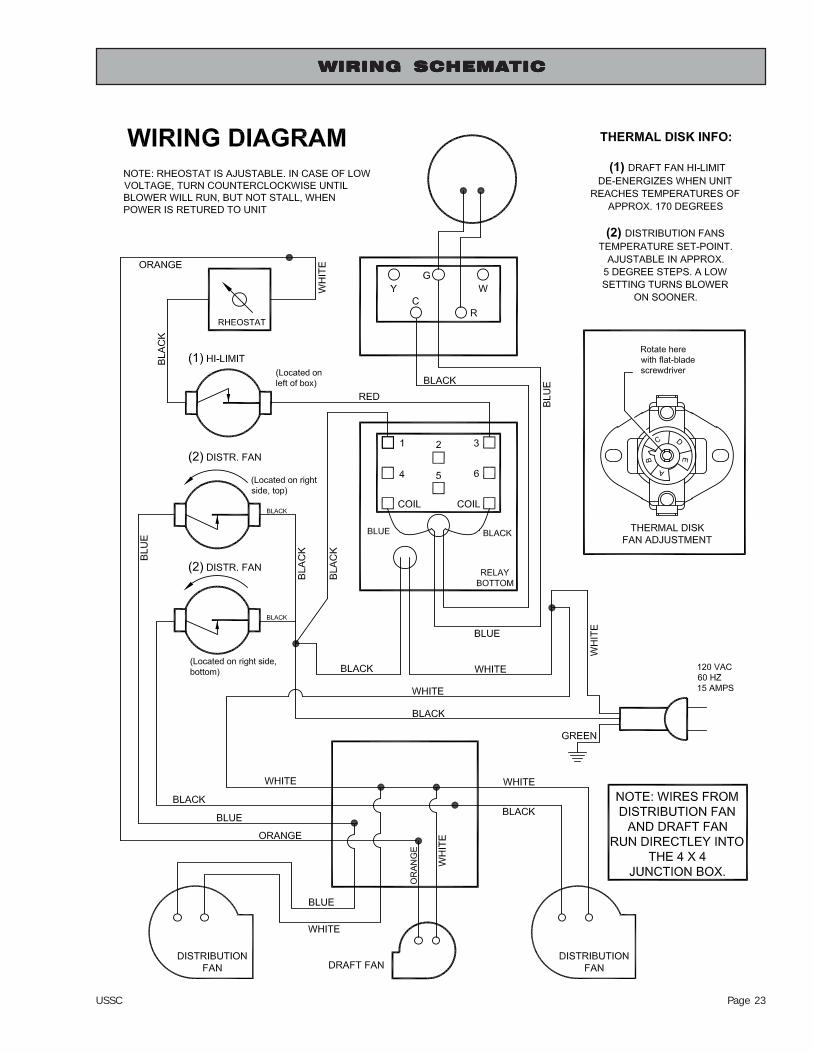
Relay...electrical switching device,Rheostat...current (voltage) reducer increases ordecreases draft fan R.P.M.Distribution Capacitor: Reduces amps requiredto activate distribution fan.Transformer: Reduces voltage 110 volts to 24 voltsfor thermostat usage. Generally hums a bit.170 degree limit disk...breaks off electrical currentto the draft fan at 170 degrees(2) adjustable140 degree limit disc...closes at settemperature to operate distribution blowers.Thermodisc’s range is 95-140. (see illustration forlocation)Draft fan...small fan that activates fire, increasingfire temperature.Wall mounted thermostat requests heat...electricalcontact occurs.Current is sent through relay, rheostat, 170 degreesthermo limit disk to activate draft fan.Upon firebox temperature rise due to air from draftfan, current passes thru the top/right thermodiscto activate the left distribution fan. The factoryseting is approximately 120 degrees air tempera-ture, 500 CFM of air at 120 degrees.Should firebox temperature air reach 140 degrees,current is directed thru the bottom/rightthermodisc to activate the second fan for 1,000CFM of air.Both blowers will continue to run until air tempera-ture drops approx. 20 degrees below the set pointon the thermodisc.
Your new furnace is now completely assembled andready to be installed. Make sure you followed thesections on installation in the front of this manual.
OPERATION OF YOUR NEW SOILDFUEL BURNING FURNACE.
Check that your draft blower is in working order be-fore lighting a fire (cover setting 20% open).
Do this by turning the room thermostat to a high tem-perature so that the draft blower turns on, then turnthe thermostat back to proper setting thus turning thedraft air blower off. Should draft blower not func-tion, check to see if rheostat setting is on.
NOW PROCEED WITH LIGHTINGA FIRE.
The above is somewhat basic, however, it's offeredso you can understand your furnaces electrical func-tions and enjoy it more.
CAUTION:Never use chemicals or fluids such as gasoline,charcoal lighter fluid, drain oil or kerosene tolight a fire in your furnace. This would be likechecking the level of gas in your car with a
lighted match.
10 BASIC FUNCTIONS OF ELECTRICAL SYSTEM
1.
2.
3.
4.
Pull bypass damper out (opens up flue hole).
Make sure your flue pipe damper is open. Placeseveral pieces of crumpled paper in the center ofyour firebox. In a crisscross pattern, place a coupleof handfuls of dry kindling wood, then several smalldry pieces of firewood.
Ignite the paper and close the door. Do not at-tempt to open the door immediately after ignit-ing the fire. There could be a flame flash out.
It will take a few minutes for the fire to establishitself. Once you have some good red hot burn-ing coals, add larger pieces of wood. All Chim-neys and hookups act differently. After a while,you will find out how your unit works best for start-ing.
CONTROL BOCONTROL BOCONTROL BOCONTROL BOCONTROL BOX & ELECTRICAL COMPONENTX & ELECTRICAL COMPONENTX & ELECTRICAL COMPONENTX & ELECTRICAL COMPONENTX & ELECTRICAL COMPONENT
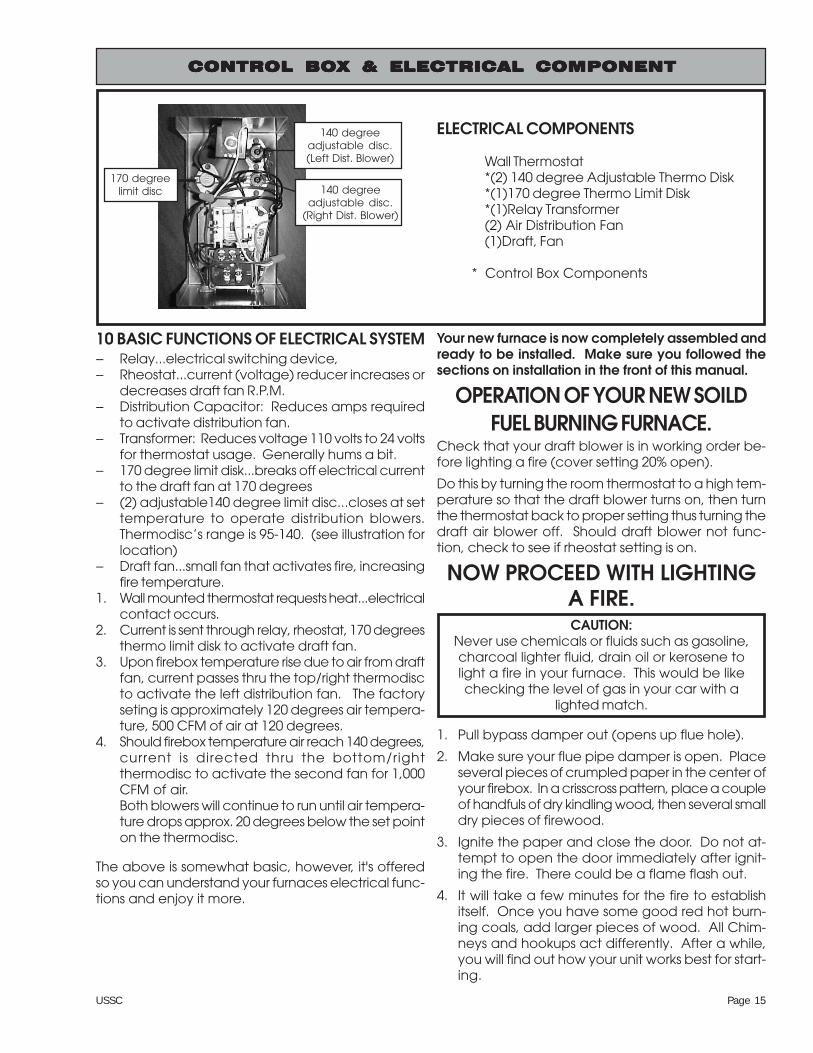
ELECTRICAL COMPONENTS
Wall Thermostat*(2) 140 degree Adjustable Thermo Disk*(1)170 degree Thermo Limit Disk*(1)Relay Transformer(2) Air Distribution Fan(1)Draft, Fan
* Control Box Components
170 degreelimit disc
140 degreeadjustable disc.(Left Dist. Blower)
140 degreeadjustable disc.
(Right Dist. Blower)
Page 16 USSC
5.
6.
7.
8.
9.
10.
Push in bypass damper after fire has progressed.
Your furnace is capable of putting out many BTU's,so don't fully load your furnace until you have be-come familiar with the operation of the furnace.Keep in mind, a full load will not always give youthe best results for your needs. Note: With newsteel, there is a small amount of oil or dirt on themetal. You may smell an odor. This is normal dur-ing the first operation. You may want to assemblethe furnace out of doors and build a small fire in itto "burn off" this dirt and oil before installing theunit.
When loading your furnace that has existing hotcoals, pull the bypass damper out and rake thered hot embers over grate evenly. Put a few smallerpieces of wood on the coals first, then load up tothe middle of the feed door.
Set rheostat setting for type and condition of coalor wood. Hard coal and wood requires moreforced air than soft, so experiment with dial set-ting. Start with a center dial setting. The draft fancover also requires experimenting with. Start witha 20% opening.
Set the furnace thermostat for comfort. Set the otherthermostat 10 degrees lower.
Use caution when opening loading door. Avoidopening loading door rapidly. This could causeflames to flash out the door. This occurs when thereis unburned fuel and a large amount of gases onthe top of the firebox. When the door is openedoxygen is combined with the gases and ignites.
ASH REMOVALEvery morning when there is just a bed of hot embers,shake the grate very, very lightly.
Once every week or two, depending on how muchfuel you burn, ashes should be removed. Note: A 2"to 3" bed of ashes will prolong wood burning andprotect grates.
To remove ash pan simply open ash door and pull outyour ash pan. But remember, the ash pan can getvery hot. Dump ashes in a metal container with a lidand place on a non-combustible surface.
CAUTIONNever let ashes build up to grate level. This will
reduce the life span of your grate, and void gratewarranty.
CAUTIONNever use anything but a metal container to put
your ashes in. Every year fires are caused by empty-ing ashes into cardboard boxes or paper bags.
MAINTENANCEKeep chimney and flue pipe clean by cleaning atleast twice during a heating season.
CREOSOTE- FORMATION ANDNEED FOR REMOVALWhen wood is burned slowly, it produces tar andother organic vapors which combine with expelledmoisture to form creosote. The creosote vapors con-dense in the relatively cool chimney flue of a slowburning fire. As a result, creosote residue accumu-lates on the flue lining. When ignited, this creosotemakes an extremely hot fire.
The chimney connector and chimney should be in-spected at least twice monthly during the heatingseason to determine if a creosote buildup has oc-curred.
If creosote has accumulated, it should be removedto reduce the risk of a chimney fire.
Keeping your chimney and stove pipe clean is thebest insurance against chimney fires. Note: Smokedetectors and fire extinguishers should always be apart of your equipment.
If you clean your own chimney and stove pipe, werecommended purchasing the equipment profession-als use. Wire brushes are available in enough sizesand shapes to be a snug fit inside any common flue.
Once a week let your furnace burn with ash dooropen for a maximum of fifteen minutes while in at-tendance. This will help minimize creosote buildup.Also placing a surface magnetic thermometer onflue pipe is helpful to keep temperatures at 300 to400 degrees. Duct temperatures should be 115 to125 degrees at 12" above furnace.
CAUTIONIf you have a chimney fire, we recommend thefollowing immediate actions:
1.
2.
3.
Alert everyone in the house.
Shut any furnace doors, disconnect power tothe unit, and close any dampers. This shouldtake no longer than a few seconds.
Call the fire department.
OPERAOPERAOPERAOPERAOPERATIONTIONTIONTIONTION
USSC Page 17
BURNING COALYour furnace is capable of burning both Bituminousand Anthracite coal. Anthracite is perhaps the bestcoal fuel because its long even burn time, high heatoutput, and cleanliness make it a good choice forthe home. However, keep in mind it is a much moredifficult fuel to use, requires more care and patience,is not so widely available, and is usually much moreexpensive than bituminous.
SIZE OF COAL: Most sizes of Bituminous Coal willwork in your New Furnace, for best results we recom-mend large nut coal to small egg coal (1-3/4" dia. to4" dia.). When burning Anthracite, use egg or bro-ken with sizes between 2-5/16" thru 4-3/8". Note that itis important to the long life of your furnace to buycoal which has been sized and cleaned. Cleaninginsures removal of rocks and other materials. Neveruse coal smaller than 1" or larger than 5" in diameter.Small sized coal will smother the fire. Too large a sizeof coal will not burn well.
STOVE OPERATION: All coal fires should be startedwith wood which will allow the fire to get hot enoughto ignite the coal. The best ignition fires utilize drypine or other resinous soft woods as kindling, withhard wood (oak, hickory, ash) added to increasethe heat prior to addition of the coal.
BURNING BITUMINOUS: Once your kindling andwood fire has produced a bed of well establishedcoals, start adding coal in layers allowing each toignite before adding more. Bituminous has a highvolatile content and, as a result, should be fired withthe "conical method" - with the highest portion of yourfirebed in the center of the firebox. The first flameswill be long and generally orange or yellow and pro-duce quite a bit of smoke. As the gases burn off theflames become shorter, change colorand produceless smoke. Once the fire is WELL ESTABLISHED addcoal to the center of the firebox forming the cone.Burning in this fashion allows heat to drive off the vola-tile gases, and turbulence created increases the burnefficiency. You will have to experiment with your par-ticular setup as no two chimney's or installations aregoing to be the same. Just remember to allowenough secondary air to enter the firebox and keepyour stove pipe damper open so that volatiles areproperly burned. Before refueling, take the time tobreak up the cone a little with a poker, especially if ithas caked over or formed a crust. But, be careful notto mix the coal as this increases the chances of form-ing clinkers. When shaking the grate(s) be gentle.Just a few short movements is better than a lot ofagitation. The objective is to remove a small amount
of the ashes without disturbing the fire. Stop whenyou see a glow in the ashes or the first red coals fallinto the ash pan. Excessive shaking wastes fuel andcan expose the grate(s) to very high temperatureswhich can cause warpage or burnout.
For overnight operation (long duration burn time)shake the fire and add coal, retaining your centercone. Once the volatiles are burned off, close thefeed door and adjust your stove pipe damper. Thenadjust your thermostat to the desired heat level.
You will have more MAINTENANCE with bituminousthan with anthracite coal as more soot will collect onheating surfaces and in pipes, requiring more frequentcleaning.
ANTHRACITE: Before starting the fire open - the stovepipe damper, open the ash pit door and feed door,place newspaper, finely split kindling on the grate,and light the paper. Add larger hard wood afterkindling is burning brightly. CAUTION: Never usegasoline, lantern fuel, kerosene, charcoal lighter fluid,or other flammable liquids to start or freshen up a firein this heater. Place the larger pieces of wood onthe fire so that they are slightly separated and form alevel for the addition of coal. It will take 10 to 20minutes before this wood is thoroughly ignited. Add-ing coal too soon will cut the air supply and smotherthe fire.
Add a thin layer of coal (preferably smaller chunks)to the wood fire, being careful not to disturb it toomuch or cut off the draft. Then, add a second heavierlayer after the coal is ignited and burning well. Ifnecessary, add a third layer to bring the coal up tothe top of the front liner (not above!). Be sure youhave closed your ash door.
Before adding further fuel, be sure you leave a redspot of glowing coals in the center of the firebox toinsure that you have not smothered the fire and tohelp ignite thegases given off by the new charge. Adeep charge will give a more even heat and a longerfire, but it may take one to two hours before the wholebed is fully ignited.
When the fire is well established and the room is be-coming warm, partially close the dampers. You willhave to experiment with your particular setting of thedamper and controls as your chimney provides thedraft necessary to not only exhaust the smoke, but topull combustion air into the heater as well - and notwo chimney's perform the same. Leave the ash pitdamper at least partially open to prevent the fire fromgoing out. Adjust the stove pipe damper to reducethe draft on the fire. With anthracite you will see shortblue flames above the coal, except when the fire isstarted or a new charge is added. If, however, there
OPERAOPERAOPERAOPERAOPERATIONTIONTIONTIONTION
Page 18 USSC
If, however, there is no flame then the fire needs moreair from the bottom (unless it is near the end of itsburn cycle and needs to be recharged).
Only when the coal is burned down to half its origi-nal depth is it time to add fresh coal. When doing so,open your stove pipe damper, which will allow thefire to burn off any accumulated gases. Open thefeed door, and with a small rake, hoe or hookedpoker pull the glowing coals to the front of the fire-box. Try not to disturb the fire too much. Next, add afresh charge to the back being careful not to seal offthe top. Close the feed door but leave the spindamper open for a few minutes until the volatile gaseshave burned off. It is not necessary to shake downthe ashes each time you refuel your furnace. Experi-ence will be your best teacher.
BANKING THE FIRE: For extended operation, suchas overnight, you will need to bank the fire. To do soheap coal up along the sides and back of the fire-box so that the fire gradually burns it over a longerperiod of time. You will also reduce the intensity ofthe fire without letting it go out. Follow the same pro-cedure as for refueling. If possible, avoid shaking, asa heavier layer of ash will help reduce the intensity ofthe fire during this time. After loading, let the fire es-tablish itself for about 30 minutes. Then close yourdamper to the point where the house does not be-come too cold. It is important that you begin bank-ing early enough before retiring or leaving that youcan make necessary adjustments after the fire is wellestablished.
To revive a coal fire that is almost out, you should (1)open the ash door and stove pipe damper to get agood draft through the grate. (2) place a thin layerof dry coal over the entire top of the fire. DO NOTPOKE OR SHAKE THE FIRE AT THIS TIME! (3) after thefresh coal has become well ignited shake the grate(just a little) and you will be ready to refuel.
DO NOT burn coke, charcoal, high volatile bitumi-nous coal, sub bituminous, lignite or cannel coal(sometimes called channel coal or candle coal).NEVER burn wax or chemically impregnated sawdustlogs - their intended use is for fireplaces only. NEVERfill your stove or furnace above the firebrick or casiron liner.
SHAKING: Shaking should be done only when thereis a hot fire.
The frequency of shaking will depend on the degreeof burning. Shaking should be done at least once aday and preferably twice a day.
Best results from shaking the rocker grates will occur ifshort "choppy" strokes are used rather than long, evenstrokes.
The amount of shaking is critical. Too little or toomuch of both can result in the extinguishing of a firedue to blocked air flow. The proper amount nor-mally occurs when red coals first start to drop throughonto the bed of ashes.
No furnace ever should be "poled" from the top. Thiscan lead to clinker formation and compacting ofthe coal and ashes, which results in clogged air pas-sages.
ASHES: Ashes never should be allowed to accumu-late in the ash pit so that they in any way impede theflow of combustion air to the fire. Excess ash accu-mulation can cause the fire to go out and also cancause severe damage to the grates because of theabsence of a cooling flow of air beneath them.
Ashes always should be emptied into a metal con-tainer. Coals can remain hot many hours after a fireis out. Coal ashes should not be put on gardens asthey do not contain beneficial minerals like woodashes, and may cause ground water pollution.
Coal produces considerably more ash than wood,so the intervals between emptying are much shorter.For equal heat output, coal will produce seven (7) toten (10) times more ash than wood.
CLINKERS: Clinkers can occur in any coal furnaceduring the process of burning. These are hard piecesof fused ash that form in the firebox. They can be-come hard and large in size and, therefore, cannotbe shaken through the grates in a coal stove. Whenthere is an appreciable accumulation, the fire will goout because insufficient air is allowed to pass throughthe clinkers to the burning coal.
Once large clinkers have formed, they can be re-moved only from above the grates. This usually meansthe fire must be allowed to go out before they canbe removed.
Clinkers formation can occur from a number of dif-ferent causes or a combination of causes. Some ofthese are:
• Poor quality coal-excess ash content and/or toolow a heat of fusion.
• Too hot a fire (too much draft).
• Too shallow a bed of coals.
• Too deep a bed of coals.
• Excessive Shaking.
• Poking the fire from the top.
• Too little air (draft) after a long, hot fire (caused byrapid adjustment of draft from a very high setting toa low setting).
OPERAOPERAOPERAOPERAOPERATIONTIONTIONTIONTION
USSC Page 19
Whenever the loading door is opened, it should be cracked slightly (for about ten (10) seconds) to allowoxygen to enter and burn any combustible gases that are present before fully opening. Failure to do thiscould result in sudden ignition of the unburned gases when the door is opened. This furnace is equippedwith a safety latch system to reduce the rsik of sucjh an ignition. Always wear a glove to protect you handfrom the heat.
With the exception of the start-up period, the ash pit door should never be left open. Serious damage to thestove can occur from overheating. In extreme cases, this overheating could be the cause of an "unfriendlyfire".
Coal furnaces are subject to the same installation clearance standards as wood furnaces. Never burn coalin any furnace that does not have an airtight, unified chimney system.
Coal furnaces should not be installed in any chimney that has had a history of back-drafting or flow rever-sal. Also, coal furnaces should not be installed in any chimney having an excessively large flue. Theseconditions can cause improper draft, resulting in carbon monoxide entering the house rather than beingdrawn up the chimney. Remember, coal gases are toxic.
Sulfur dioxide, sulfur trioxide and other ions released from coal burning may corrode stainless and masonrychimneys, and even terra cotta chimney liners and brick in nearby buildings. Coal with high sulfur contentwill destroy chimneys especially fast if soot sits in the flue for extended lengths of time. It is important to cleanchimneys regularly.
SAFETY - OPERASAFETY - OPERASAFETY - OPERASAFETY - OPERASAFETY - OPERATIONTIONTIONTIONTION
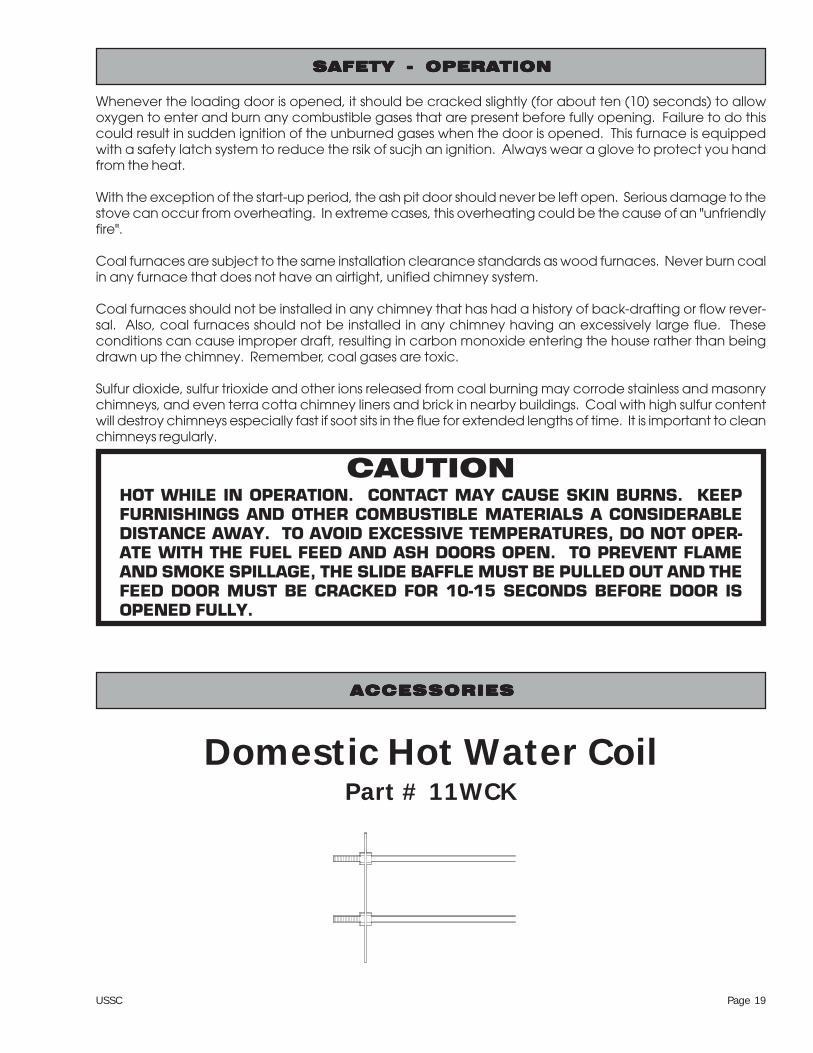
Domestic Hot Water CoilPart # 11WCK
ACCESSORIESACCESSORIESACCESSORIESACCESSORIESACCESSORIES
CAUTIONHOT WHILE IN OPERATION. CONTACT MAY CAUSE SKIN BURNS. KEEPFURNISHINGS AND OTHER COMBUSTIBLE MATERIALS A CONSIDERABLEDISTANCE AWAY. TO AVOID EXCESSIVE TEMPERATURES, DO NOT OPER-ATE WITH THE FUEL FEED AND ASH DOORS OPEN. TO PREVENT FLAMEAND SMOKE SPILLAGE, THE SLIDE BAFFLE MUST BE PULLED OUT AND THEFEED DOOR MUST BE CRACKED FOR 10-15 SECONDS BEFORE DOOR ISOPENED FULLY.
Page 20 USSC
TROUBLE-SHOOTING, PROBLEM SOLVING FOR YOUR FURNACE1.
2.
3.
Problem: Smoke puffs from furnace.Solution:
Check chimney draft. Check for blocked chim-ney or flue pipe. Use mirror to check chimneyclearance.Check ash pit - if too full, empty.Make sure furnace room is not too airtight.Make sure all chimney mortar connections areair tight.Check clean out door. Make sure it's airtight.Check chimney for possible down-draft causedby taller surrounding trees or objects. Correctwith proper chimney vent cap.Check the possibility of cold chimney forcingcool gas blockage. Remedy by properly insu-lating chimney with noncombustible liner andnon- combustible insulation.Fuel may be too wet.Make sure no other fuel burning devices areconnected to the chimney impairing the draft.
Problem: Inadequate heating being delivered toyour home.Solution:
Check home insulation - is it adequate?Check hookup to furnace - is it installed cor-rectly? (review manual)Cool air inlet may be inadequate or furnaceroom too airtight, 14" inlet for 12" outlet.Your wood fuel may be too low grade. Hardwoods are recommended.Make sure your hot air duct (and other ductwork) is airtight.If furnace room is warm but your home isn't,check back draft dampers.Is air inlet to the blower open? Check filters.Fuel may be too wet.Check draft blower cover, setting 1/2" open-ing.Rheostat setting is fully open.
Problem: Excess smoke or flames coming out doorwhen refueling.Solution:
Open bypass damper. Wait 15 seconds andopen door slowly - then refuel.Check length of flue pipe to chimney. Yourunit should be within six (6) feet of your chim-ney.Make sure chimney cap is not too close to thetop of the chimney.Check chimney draft-make sure chimney fluepipe is clean and chimney is of adequateheight.Make sure you're not suffocating the fire withexcess amounts of unburned fuel.
Problem: Distribution blower vibrating.Solution:
Tighten Allen Screw on squirrel cage.Check for bad fan bearings.Also oil 3-4 drops of 20w non detergent oil.
Problem: Distribution blower continues to run orwill not run.Solution:
Check to see if thermodisc 110 degrees (topright side) is faulty. Use match or lighter for clickor jumper wire.Check to see that blower is properly wired. (SeeWiring and Assembly Instructions).
Problem: Draft blower continues to run or will notrun.Solution:
Check rheostat switch for on position. Checkwiring.Check thermostat or thermostat wire for short.Make sure temperature is calling for or not call-ing for heat. Set thermostat at 80 degrees.Check to see if thermodisc 170 degrees (left side)is faulty. Use match or lighter for click or jumperwire.
Problem: Odor from first fire.Solution:
The odor remains, call your dealer immediately.A defective weld can cause a fume leak.
Problem: Excessive creosote.Solution:
Check the grade of wood you are burning. Make sure your unit is serviced by its own properchimney.Check length of flue pipe and its connections.Make sure you are burning the smallest, hottestfire to adequately heat your home.Also see Solutions to Problem 1.Use a magnetic surface thermometer on fluepipe and operate between 300 and 400 de-grees.
Problem: Poor seal around unit door.Solution:
Bend door latch in to tighten seals.
4.
5.
6.
7.
8.
9.
TROUBLE SHOOTINGTROUBLE SHOOTINGTROUBLE SHOOTINGTROUBLE SHOOTINGTROUBLE SHOOTING
A.B.C.
A.
B.
A.
B.
C.
A.
A.B.
C.D.
E.F.
A.
A.
B.C.D.
E.F.
G.
H.I.
A.B.
C.
D.
E.
F.G.H.
I.
A.
B.
C.
D.
E.
USSC Page 21
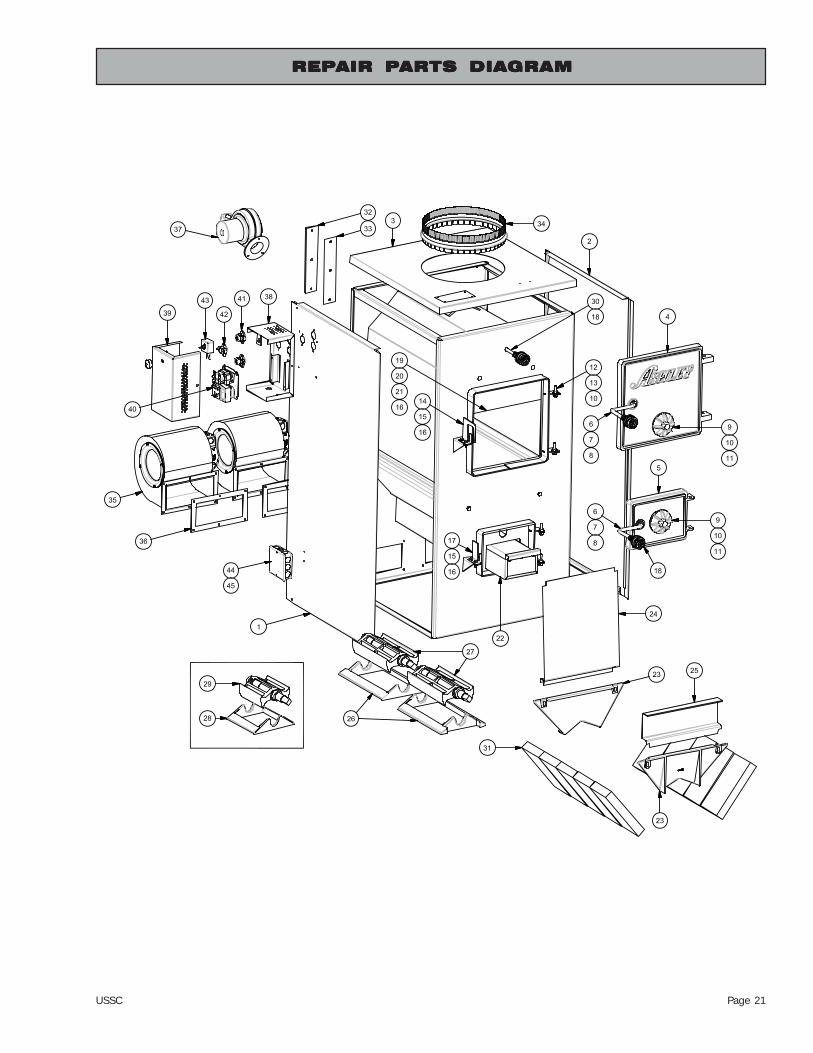
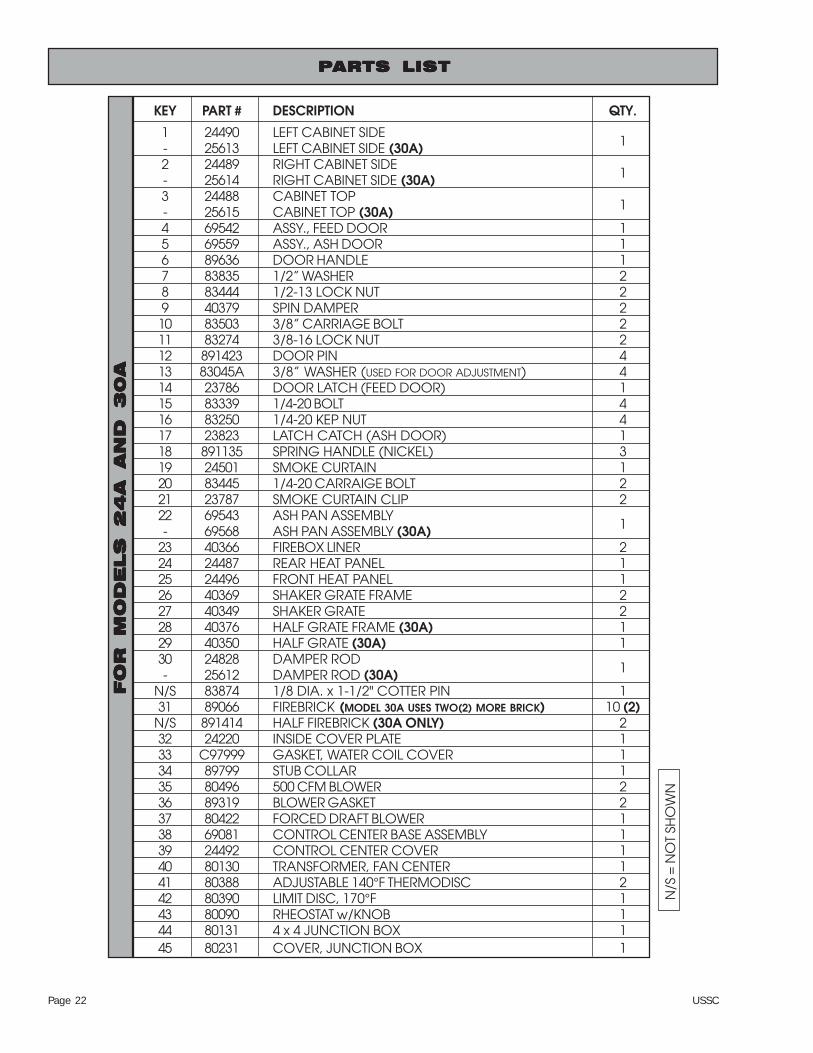
REPREPREPREPREPAIR PAIR PAIR PAIR PAIR PARTS DIAARTS DIAARTS DIAARTS DIAARTS DIAGRAMGRAMGRAMGRAMGRAM
Page 22 USSC
KEY PART # DESCRIPTION QTY.
1 24490 LEFT CABINET SIDE1- 25613 LEFT CABINET SIDE (30A)
2 24489 RIGHT CABINET SIDE1- 25614 RIGHT CABINET SIDE (30A)
3 24488 CABINET TOP1- 25615 CABINET TOP (30A)
4 69542 ASSY., FEED DOOR 15 69559 ASSY., ASH DOOR 16 89636 DOOR HANDLE 17 83835 1/2” WASHER 28 83444 1/2-13 LOCK NUT 29 40379 SPIN DAMPER 210 83503 3/8” CARRIAGE BOLT 211 83274 3/8-16 LOCK NUT 212 891423 DOOR PIN 413 83045A 3/8” WASHER (USED FOR DOOR ADJUSTMENT) 414 23786 DOOR LATCH (FEED DOOR) 115 83339 1/4-20 BOLT 416 83250 1/4-20 KEP NUT 417 23823 LATCH CATCH (ASH DOOR) 118 891135 SPRING HANDLE (NICKEL) 319 24501 SMOKE CURTAIN 120 83445 1/4-20 CARRAIGE BOLT 221 23787 SMOKE CURTAIN CLIP 222 69543 ASH PAN ASSEMBLY
1- 69568 ASH PAN ASSEMBLY (30A)23 40366 FIREBOX LINER 224 24487 REAR HEAT PANEL 125 24496 FRONT HEAT PANEL 126 40369 SHAKER GRATE FRAME 227 40349 SHAKER GRATE 228 40376 HALF GRATE FRAME (30A) 129 40350 HALF GRATE (30A) 130 24828 DAMPER ROD
1- 25612 DAMPER ROD (30A)N/S 83874 1/8 DIA. x 1-1/2" COTTER PIN 131 89066 FIREBRICK (MODEL 30A USES TWO(2) MORE BRICK) 10 (2)
N/S 891414 HALF FIREBRICK (30A ONLY) 232 24220 INSIDE COVER PLATE 133 C97999 GASKET, WATER COIL COVER 134 89799 STUB COLLAR 135 80496 500 CFM BLOWER 236 89319 BLOWER GASKET 237 80422 FORCED DRAFT BLOWER 138 69081 CONTROL CENTER BASE ASSEMBLY 139 24492 CONTROL CENTER COVER 140 80130 TRANSFORMER, FAN CENTER 141 80388 ADJUSTABLE 140°F THERMODISC 242 80390 LIMIT DISC, 170°F 143 80090 RHEOSTAT w/KNOB 144 80131 4 x 4 JUNCTION BOX 145 80231 COVER, JUNCTION BOX 1
N/S
= N
OT
SHO
WN
FO
R M
OD
ELS
2
4A AN
D 3
0A
FO
R M
OD
ELS
2
4A AN
D 3
0A
FO
R M
OD
ELS
2
4A AN
D 3
0A
FO
R M
OD
ELS
2
4A AN
D 3
0A
FO
R M
OD
ELS
2
4A AN
D 3
0A
PPPPPARTS LISTARTS LISTARTS LISTARTS LISTARTS LIST
USSC Page 23
WIRING SCHEMAWIRING SCHEMAWIRING SCHEMAWIRING SCHEMAWIRING SCHEMATICTICTICTICTIC
Page 24 USSC
HOW TO ORDER REPHOW TO ORDER REPHOW TO ORDER REPHOW TO ORDER REPHOW TO ORDER REPAIR PAIR PAIR PAIR PAIR PARTSARTSARTSARTSARTS
THIS MANUAL WILL HELP YOU OBTAIN EFFICIENT, DEPENDABLE SERVICE FROM YOURFURNACE, AND ENABLE YOU TO ORDER REPAIR PARTS CORRECTLY.
KEEP THIS MANUAL IN A SAFE PLACE FOR FUTURE REFERENCE.
WHEN WRITING, ALWAYS GIVE THE FULL MODEL NUMBER WHICH IS ON THE NAMEPLATEATTACHED TO THE HEATER.
WHEN ORDERING REPAIR PARTS, ALWAYS GIVE THE FOLLOWING INFOR-MATION AS SHOWN IN THIS LIST:
1. THE PART NUMBER
2. THE PART DESCRIPTION
3. THE MODEL NUMBER: 24A 30A
4. THE SERIAL NUMBER: ____________________ ____________________ ____________________ ____________________ ____________________
UNITED STATES STOVE COMPANY227 INDUSTRIAL PARK ROAD
PO BOX 151SOUTH PITTSBURG, TN 37380
(423) 837-2100www.USSTOVE.com